
XEVA205 - Energy meter HAGER - Free user manual and instructions
Find the device manual for free XEVA205 HAGER in PDF.
| Product type | TIC/CHP gateway card for charging stations |
| Brand | Hager |
| Model | XEVA205 |
| Category | Energy meter (data gateway) |
| Power supply | 5 V== and 12 V== supplied by the controller via flat cable |
| Power consumption | 100 mA max (5 V), 4 mA max (12 V) |
| Wired communication | TIC input from electronic meter (tele-report cable, max length 500 m) |
| Radio communication | KNX RF Secure (868-868.6 MHz, power 25 mW, range 100 m) |
| CHP input | 12 V== / 2.5 mA, logic input for local production |
| CHP output | Potential-free relay, 24 V max, 200 mA max / 100 mA min |
| Configuration | Quicklink (fct and cfg push buttons), compatible with TRPS120 |
| LED indicators | Status LED: green (operation), red (RF or TIC error), off (not powered) |
| Operating temperature | -25 °C to +70 °C |
| Storage temperature | -25 °C to +70 °C |
| Maximum altitude | 2000 m |
| Insulation class | 3 |
| Surge voltage | 4 kV |
| TIC connection cross-section | 0.2 to 2.5 mm² (stripping 10 mm) |
| CHP connection cross-section | 0.14 to 1.5 mm² (stripping 9 mm) |
| Compliance | Directive 2014/53/EU (radio equipment) |
| Installation | Only by qualified electrician, comply with SELV standards |
| Charging station compatibility | XEV1Kxxx range (single-phase or three-phase) |
Frequently Asked Questions - XEVA205 HAGER
User questions about XEVA205 HAGER
0 question about this device. Answer the ones you know or ask your own.
Ask a new question about this device
Download the instructions for your Energy meter in PDF format for free! Find your manual XEVA205 - HAGER and take your electronic device back in hand. On this page are published all the documents necessary for the use of your device. XEVA205 by HAGER.
USER MANUAL XEVA205 HAGER
natural_image
Pure electrical circuit lines without any symbols
Carte TIC/CHP

TIC/CHP card

CE KNX

nouvelle génération
XEVA205
natural_image
Diagram showing a circuit board and a device with a plus sign, no text or symbols present.1


natural_image
Technical diagram of an electronic circuit board with labeled components (no readable text or symbols)2


1
natural_image
Pure electrical circuit lines without any symbols2
natural_image
Pure electrical circuit lines without any symbolsFR Carte TIC/CHP
EN TIC/CHP card

CE KNX

nouvelle génération
XEVA205
Safety instructions
Electrical devices must only be installed and assembled by a qualified electrician. The accident prevention recommendations applicable in the country must be followed. Failure to follow the installation instructions may result in damage to the device, fire or other dangers. Please follow the recommendations and standards applicable for SELV electrical circuits during installation and when laying cables. Before any work on the device or the load, switch off the power to the installation. Do not forget all the circuit breakers that deliver voltages which are potentially dangerous to the device or the load. Risk of electric shock.

- The TIC/CHP card must be installed when the charging station is switched off.
- Please read the maintenance manual before servicing a charging station.
- The device must only be installed by an electrician, in accordance with the installation standards applicable in the country.
- Follow the SELV installation rules.

How to dispose of this product (electrical and electronic equipment waste). (Applicable in European Union countries and other European countries with selective waste collection
systems). This symbol on the product or its documentation indicates that it must not be disposed of with other household waste at the end of its life cycle. As disposing of waste inappropriately may harm the environment or human health, please separate it from other types of waste and recycle it responsibly. In this way you will contribute to the sustainable re-use of material resources. Individuals should contact the retailer who sold them the product or contact their local council to find out where and how they can dispose of this product for recycling in an environmentally friendly manner. Companies should contact their suppliers and read the terms of their sales contract. This product must not be disposed of with the other commercial waste.

TIC card installation precautions
Electronic components such as the TIC card may be damaged by electrostatic discharges (ESD) when they are removed from their packaging. To ensure you correctly install your TIC/CHP card, we recommend:
- Holding the edges of the card only, to avoid touching the sensitive components.
- Wearing an antistatic bracelet when handling the card to prevent any damage. If you do not have an antistatic bracelet, touch a metal object connected to the earth before handling the card to remove any static electricity from your body. Regularly touch the metallic object when handling the card.
- Until the TIC/CHP card is installed, store it in its packaging to protect it from electrostatic discharges, or on an antistatic support.
Presentation
The XEVA205 (TIC/CHP) card is a gateway that allows the exchange of meter data between an old or new generation of electronic energy meter and a Hager charging station. It offers the charging station the option of being informed in real time of electrical consumptions in order to manage the dynamic charge of the vehicle (adaptation of the vehicle charge depending on the dwelling's consumption). In conjunction with the Hager XEVA220 WiFi card, it monitors the dwelling and vehicle consumptions based on rates through an application on your mobile phone. The TIC/CHP card receives data from electronic meters or TIC XEV304 or XEV305 simulators and transmits them to the terminal controller.
- Your customer has a new generation energy meter:

It is possible to connect the meter and TIC card using a wire via a remote energy meter cable and radio via the Hager TRPS120 radio transmitter to be installed in the new generation meter.
- Your customer has a blank electronic energy meter (previous generation):

The meter and the TIC card can only be connected by a wire via a remote energy meter cable.
- Your customer has a Ferraris electromechanical meter (without TIC):

To obtain a TIC, you can create a wired connection using a remote energy meter cable between the TIC XEV304 (for single-phase network) or XEV305 simulator (for three-phase network) and the TIC card. Refer to the XEV304 and XEV305 product manual.

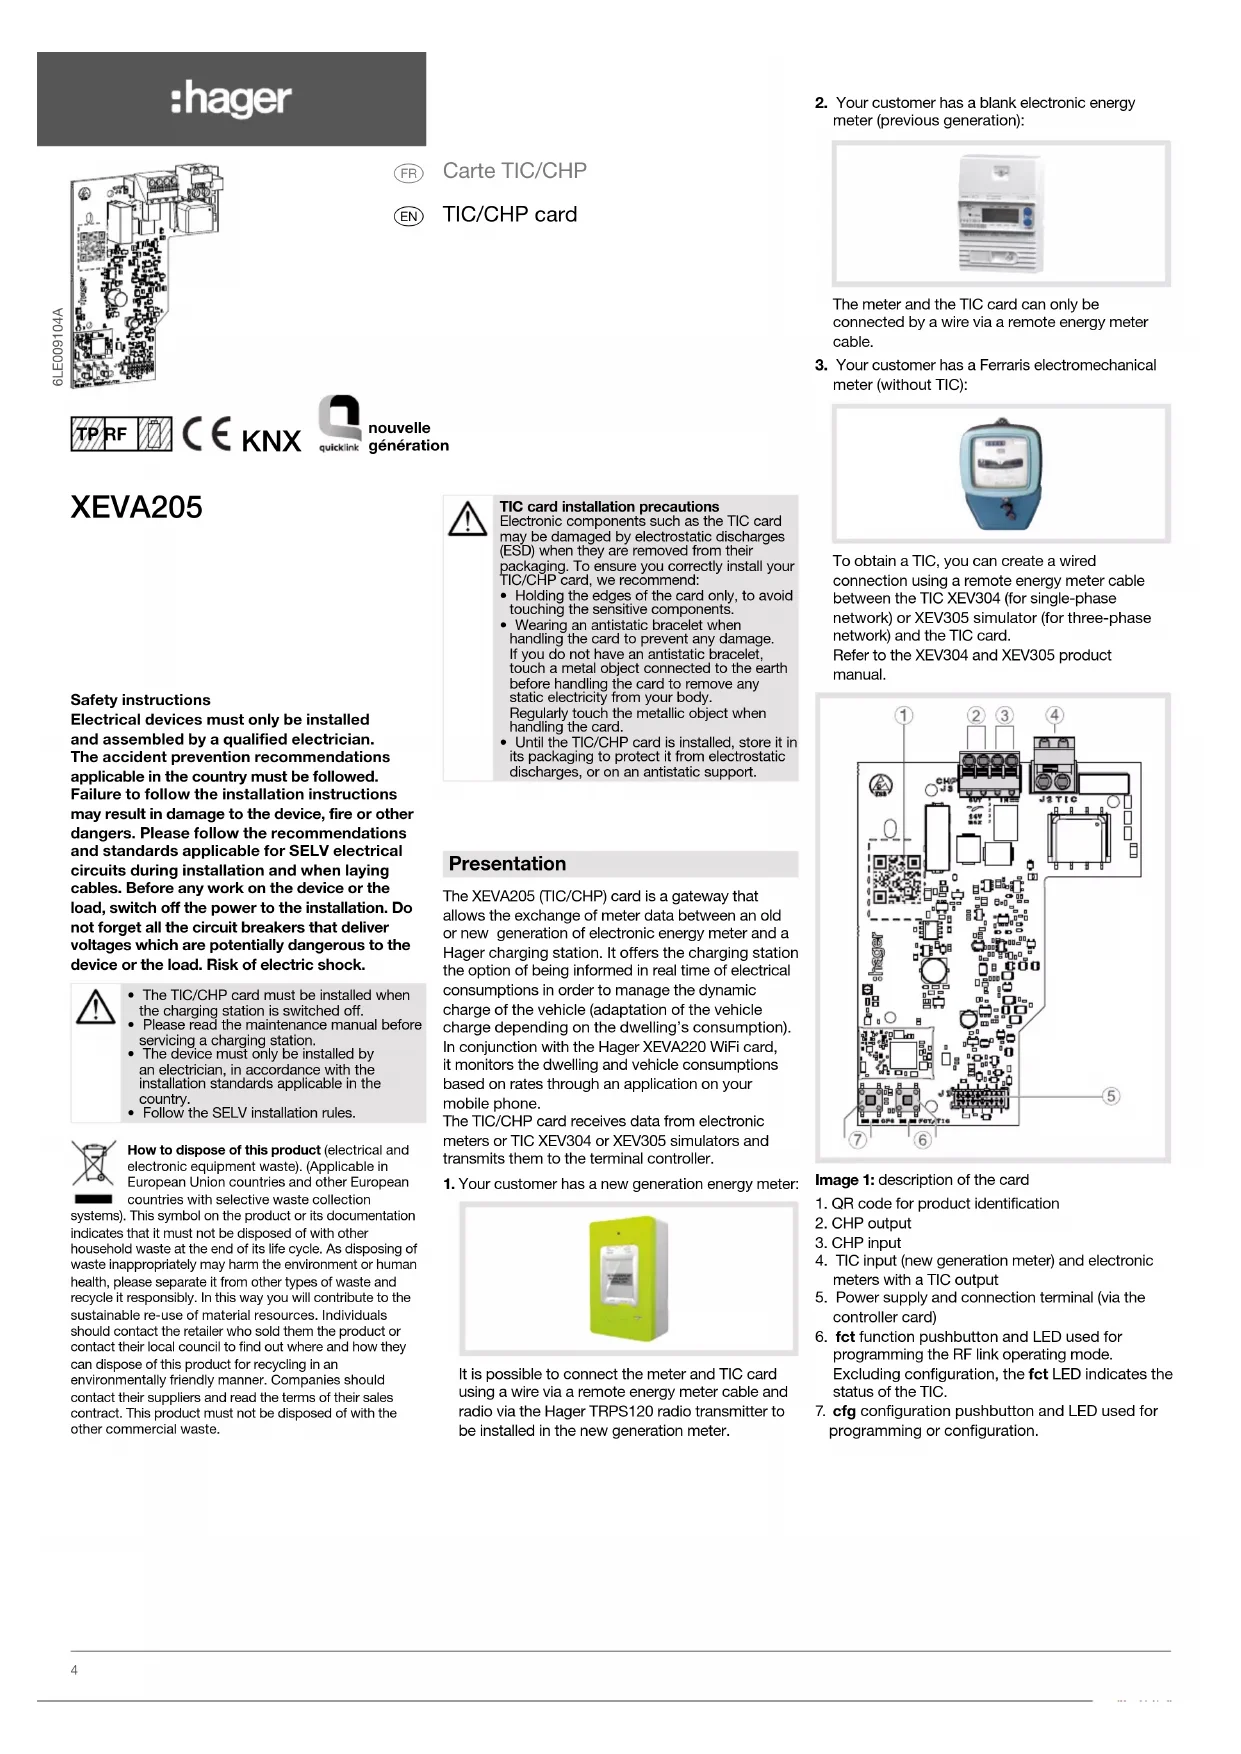
Image 1: description of the card
- QR code for product identification
- CHP output
- CHP input
- TIC input (new generation meter) and electronic meters with a TIC output
- Power supply and connection terminal (via the controller card)
- fct function pushbutton and LED used for programming the RF link operating mode. Excluding configuration, the fct LED indicates the status of the TIC.
- cfg configuration pushbutton and LED used for programming or configuration.
Function
System information
Detailed, specialised knowledge obtained from Hager through specific KNX training courses is required for full understanding of the system. These training courses are not necessary for this installation.
"Quicklink" configuration
The TIC XEVA205 card is compatible with the Hager TRPS120 radio transmitter, to be integrated into the new generation meter.
Typical scenario
- Integration into a charging station for an XEV1Kxxx electric vehicle.
- Communication with the new generation meter and electronic meters with a TIC output via the wired connection.
- Communication with the new generation meter via the KNX RF connection (TRPS120 module).

If the 2 methods of communication (wire and RF) are used, the wired communication always takes priority.
Product compatibility
- Compatible with the XEV1Kxxx three-phase or single-phase electric vehicle charging station range.
- This TIC card does not require setting:
- with a previous generation TIC card from French electronic energy meters,
- with a standard TIC from the new generation French energy meter.
Meaning of the card status LED
Once the product is set up and configured via the Quicklink method, the status LED ⑥ indicates:
| LED 6 | LED status | Meaning |
| Off | OFF: LED deactivated/TIC off | |
| Green | ON: LED activated/TIC on | |
| TIC in standby: the TIC is present but it is not activated by the energy supplier. It only transmits the identification number of the energy meter. The customer must request TIC activation from its energy supplier. | ||
| Red | no link with the TRPS120 module: the LED flashes red if the wired TIC is not used and if no radio link has been configured between the TIC card and the TRPS120 module. | |
| no RF reception with the TRPS120 module: the LED flashes red if the wired TIC is not used and the scope between the TRPS120 radio transmitter and the TIC card is insufficient. | ||
| no TIC communication at the TRPS120 module input: the TRPS120 module is incorrectly or insufficiently plugged in or the TIC output of the new generation meter is not working. | ||
| error in the TIC data transmission frame |
function (fct) pushbutton ⑥
In Quicklink mode, press the pushbutton to select the function during the configuration phase (refer to the TRPS120 module instructions).
Installing the TIC card

natural_image
Diagram showing a circuit board and a device casing with a plus sign, no text or symbols present.1


natural_image
Technical diagram of an electronic circuit board with labeled components and close-up insets (no readable text or symbols)2


natural_image
Technical line drawing of an electronic circuit board with screw and indicator lights (no readable text or symbols)Connecting the TIC card

1
1 Connecting the TIC card to the controller: use the flat cable (2 x 10 pins) supplied and connect the J1 connector of the TIC/CHP card to the J2 connector of the Controller card.

natural_image
Pure electrical circuit lines without any symbols2
Connecting the TIC card to the electronic meter
If you use wired connectivity to transmit information, the plug-in J2 quick connect terminal of the TIC/CHP card connects to the I1 and I2 terminals of the electronic meters.

It is preferable to use a remote energy meter cable or, failing that, a telephone-type twisted cable. An R02V cable should not be used.

3 The TIC cable should be fastened using the 3 cable clamps provided on the socket support side.

4 Installing the TRPS120 module and configuring the radio with the TIC card.


To install the TRPS120 module and configure the RF with the TIC/CHP, refer to the instructions provided in the TRPS120 module.
5 Connection with TIC XEV304 (for single-phase network) or XEV305 simulator (for three-phase network)
When an electronic meter is not available, Hager offers a TIC simulator that enables dynamic management of the vehicle charge and thus prevents accidental outages caused by an overload in the domestic electricity network. This simulator also enables interfacing of an installation equipped with a source of electricity production, such as a micro-cogeneration or a photovoltaic system, also called CHP (Combined Heat & Power).

It is preferable to use a remote energy meter cable or, failing that, a telephone-type twisted cable. An R02V cable should not be used.


To install the XEV304 or XEV305 simulator and configure the product, refer to the instructions provided with these products.
Connecting the CHP functions

The CHP input or CHP IN (Combined Heat & Power) is used in local electricity production by a cogeneration system or by photovoltaic panels. Once activated, it signals to the charging station controller that a (locally produced) energy is available to charge the vehicle.

flowchart
graph TD
    A["Energy (input)"] --> B["CHP"]
    B --> C["Heat (output)"]
    B --> D["Electricity (output)"]
    E["CHP (OUT) J3 connector (OUT 1 and 2)"] --> F["CHP (IN) J3 connector (IN 1 and 2)"]
    F --> G["Output"]
    style A fill:#f9f,stroke:#333
    style B fill:#ccf,stroke:#333
    style E fill:#cfc,stroke:#333
    style F fill:#fcc,stroke:#333
Image 2: connecting the CHP functions
The CHP output or CHP OUT is a low voltage (24 V—max) and low current (200 mA max / 100 mA min) potential-free relay output. This output is activated 30 seconds after the CHP IN is activated and (if required) authorises the cogeneration system to supply energy to the customer's internal network.
An EN145, ERD225SDC or ESD225S interfacing relay is recommended to manage the input of a cogeneration system. A TGF110 or TGA200 supply is recommended to power these control circuits, in line with the electrical diagram below:

Image 3: wiring diagram
Technical features
Configuration method: Quicklink
Communication media: by wiring through a twisted pair cable from an electronic meter fitted with a previous generation or standard TIC output and by radio (KNX RF Secure) via the TRPS120 radio transmitter module.
Electrical specifications
- Power supply voltage: 5 V== and 12 V== supplied by the controller via the flat cable
- Consumption: 100 mA max. for 5 V— and 4 mA max. for 12 V—
- CHP input (IN 1 and 2 of the CHP connector):
- Pin 1: 12 V== / 2.5 mA / Power output
- Pin 2: 12 V== / 2.5 mA / Logic input
- CHP output (OUT 1 and 2 of the CHP connector): relay output, SELV, Contact: 24 V=+10% max. / 200 mA max. and 100 mA min.
Functional specifications
• KNX radio frequency: 868 - 868.6 MHz
• Max. emission power: 25 mW
- Receiver category: 2
- Scope: 100 m in free field
Ambient conditions
- Operating temperature: -25 °C to +70 °C
• Storage temperature: -25 °C to +70 °C - Pollution level: 2
• Insulation class: 3
• Maximum operating altitude: 2000 m - Surge voltage: 4 kV
Connection
- TIC input: 0.2 to 2.5 ~mm^2 / Stripping: 10 mm / dual-insulated cable / length: 500 m max.
- CHP input and output: 0.14 to 1.5 ~mm^2 / Stripping: 9 mm / dual-insulated cable / length: 100 m max.
- TIC card and controller card: Micromatch 2x10-pin flat cable (supplied)
Simplified EU declaration of conformity:
Hereby, HagerEnergy GmbH declares that the radio equipment type XEVA205-TIC/CHP card is in compliance with Directive 2014/53/EU. The full text of the EU declaration of conformity is available at the following internet address www.hager.com
The declaration of conformity is only valid when the card is installed in the charging station, in accordance with the regulations and best practices set out in this document. Failure to comply with the installation or assembly instructions is prohibited and does not render Hager liable.
Can be used anywhere in Europe (€) and Switzerland


- XEVA205
- Safety instructions
- TIC card installation precautions
- Presentation
- Image 1: description of the card
- Function
- System information
- "Quicklink" configuration
- Typical scenario
- Product compatibility
- Meaning of the card status LED
- function (fct) pushbutton ⑥
- Installing the TIC card
- Connecting the TIC card
- Connecting the TIC card to the electronic meter
- Connection with TIC XEV304 (for single-phase network) or XEV305 simulator (for three-phase network)
- Connecting the CHP functions
- Technical features
- Configuration method: Quicklink
- Electrical specifications
- Functional specifications
- Ambient conditions
- Connection
- Simplified EU declaration of conformity:
Brand : HAGER
Model : XEVA205
Category : Energy meter