GuitarLink Wireless - Musical instrument ALESIS - Free user manual and instructions
Find the device manual for free GuitarLink Wireless ALESIS in PDF.
User questions about GuitarLink Wireless ALESIS
0 question about this device. Answer the ones you know or ask your own.
Ask a new question about this device
Download the instructions for your Musical instrument in PDF format for free! Find your manual GuitarLink Wireless - ALESIS and take your electronic device back in hand. On this page are published all the documents necessary for the use of your device. GuitarLink Wireless by ALESIS.
USER MANUAL GuitarLink Wireless ALESIS
User Guide (English)
- Make sure all items listed in the Box Contents are included.
- READ SAFETY INSTRUCTION BOOKLET BEFORE USING THE PRODUCT.
- Place the product in an appropriate location for operation.
BOX CONTENTS
- GuitarLink Wireless Transmitter
- GuitarLink Wireless Receiver
Power Adapter
2 AAA Batteries - User Guide
Safety & Warranty Manual
Support
For complete system requirements, compatibility information, and product registration, visit the Alesis website: alesis.com/guitarlink-wireless.
For additional product support, visit alesis.com/support.
Quick Setup
- Flip the power switch to the "On" position for the transmitter and receiver.
- Press the Pair Button on both the transmitter and the receiver. The Pair LED will be lit solid on the transmitter and receiver when they have successfully connected.
- Set the receiver antenna to a vertical position.
- Connect your guitar to the transmitter and adjust your guitar's output volume.
- Use a standard 1/4" cable (not included) to connect the receiver's Amp Output to your amplifier.
- Set the volume control on the receiver to the highest level possible without distorting or clipping the guitar signal. This level will vary with the settings of your guitar's volume and your guitar amplifier's gain and/or volume. Adjust your guitar amplifier's volume last.
Connection Diagram
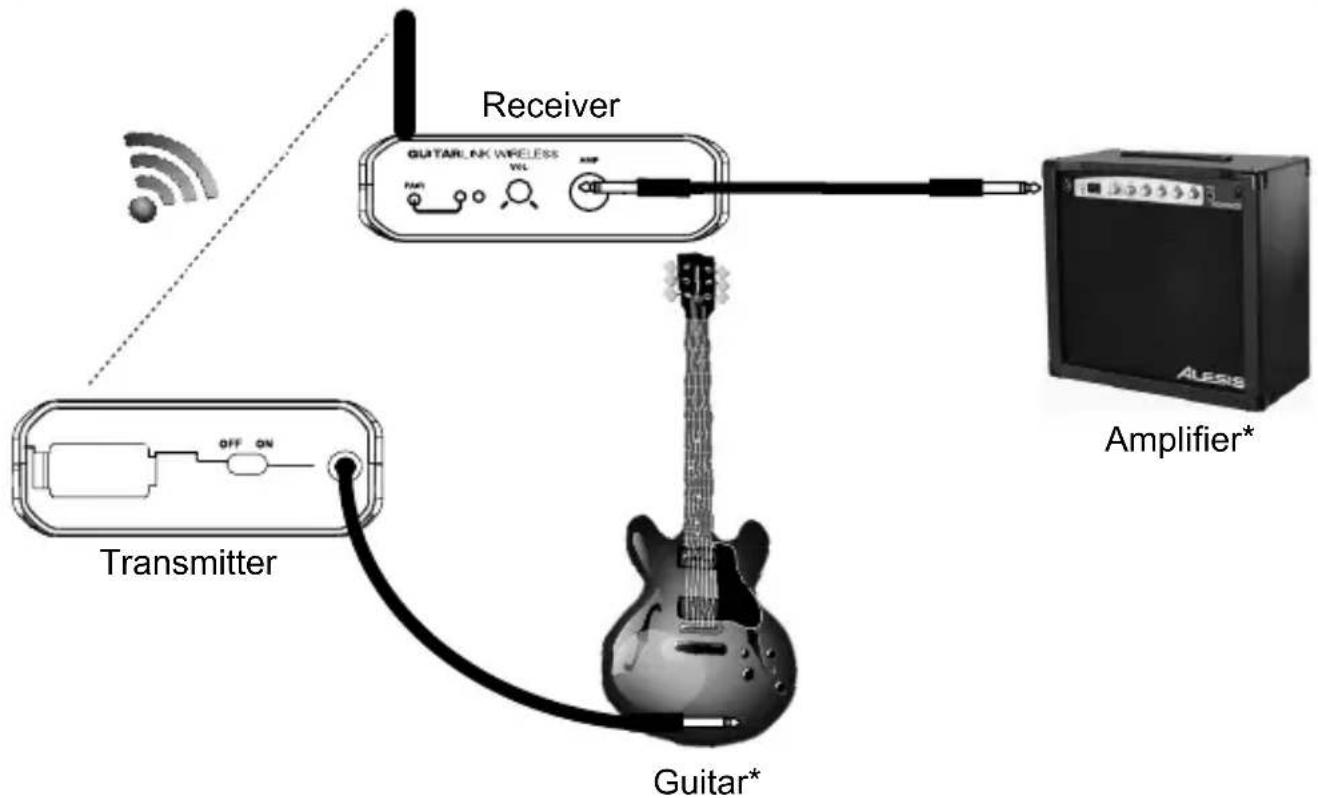
* Sold
separately
Transmitter Features
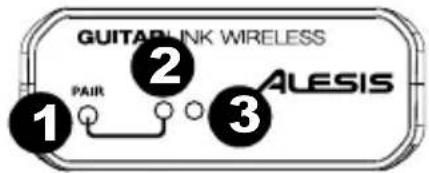
Front Panel
- Pair Button - Press this button to connect to the receiver. The Pair LED will illuminate when connected to the receiver.
- Pair LED - Illuminates when the transmitter is connected with the receiver.
- Power LED - Illuminates when the transmitter is powered on.
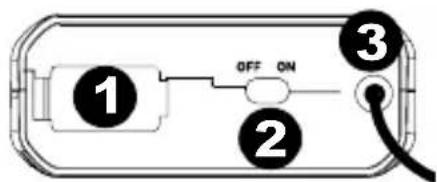
Rear Panel
- Battery Compartment - Insert 2 AAA batteries here to power the transmitter.
- On/Off Switch - Slide this switch to power the transmitter on.
- Guitar Cable - Connect the attached 1/4'' cable to your guitar's 1/4'' output.
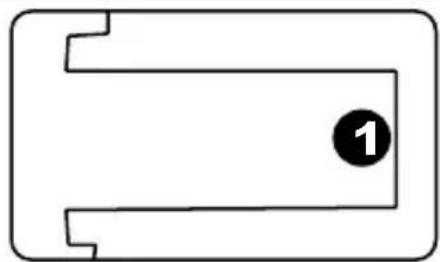
Bottom Panel
- Guitar Strap Clip - Use the attached clip to secure the GuitarLink Wireless transmitter to your guitar strap or to your pocket.
Receiver Features
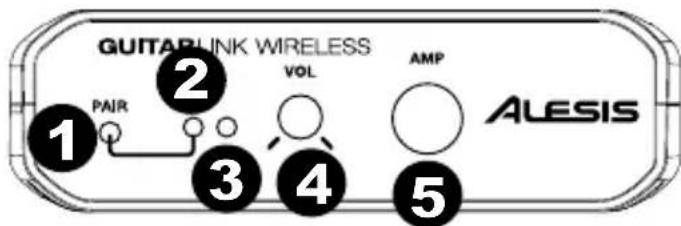
Front Panel
- Pair Button - Press this button to connect to the transmitter. The Pair LED will illuminate when connected to the transmitter.
- Pair LED - Illuminates when the receiver is connected with the transmitter.
- Power LED - Illuminates when the receiver is powered on.
- Volume - Adjusts the volume of the signal going to the Amp Output.
- Amp Output - Use a standard 1/4" cable (not included) to connect the GuitarLink Wireless receiver to your amplifier.
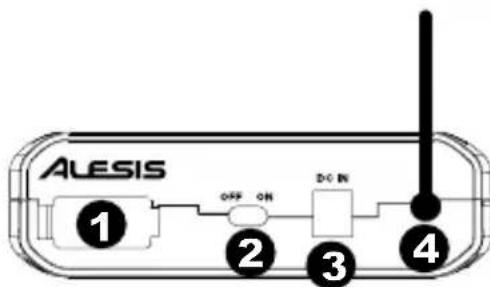
Rear Panel
- Battery Compartment - Insert 2 AAA batteries here to power the receiver.
- On/Off Switch - Slide this switch to power the receiver on.
- Power Input - Connect the included 5V 1A, Center-Pin Positive power adapter here.
- Antenna - Place the antenna in a vertical position for best results in transmitting the wireless signal. If the wireless signal quality is poor, change the position of the antenna.
ALESIS
Troubleshooting
No signal:
- Make sure both the transmitter and receiver are powered on.
Make sure you are within the 60-foot (20-meter) transmitting range. - Make sure the transmitter and receiver have been paired.
- Adjust the output volume on your guitar.
- Make sure the volume controls on your mixer and speakers are turned up.
- Check the power LEDs on both the receiver and transmitter. If one of them is off, check that the device is powered correctly:
o Install fresh AAA batteries in the transmitter.
Connect the power adapter to (or install fresh AAA batteries in) the receiver.
Weak signal:
- Adjust the output volume on your guitar.
Make sure there are no objects (computers, walls, furniture, etc.) between the transmitter and receiver.
Make sure you are within the 60-foot (20-meter) transmitting range.
If the transmitter or receiver is being powered from batteries, install fresh AAA batteries.
Poor signal quality:
- Keep any connected audio cables away from the receiver's antenna.
If the transmitter or receiver is being powered from batteries, install fresh AAA batteries.
Assistance technique
Dimensions (L x W x H):
Receiver: 3.5'' (6.5" with antenna extended) 4.5'' × 1.25'' ; 89 mm (165 mm with antenna extended) x 114 mm x 32 mm
Transmitter: 2.5'' × 9.2'' 0.75"; 64mm × 234mm × 19mm
Weight:
Receiver: 0.25 lbs (0.11 kg)
Transmitter: 0.25 lbs (0.11 kg)
Wireless Connection: 2.4 GHz wireless signal
Wireless Transmission Range: 60 feet (20 meters)
Receiver Power Adapter: 5V, 1A; Center-Pin Positive
alysis.com
Manual Version 1.0