
GP120CE - Air-conditioner LG - Free user manual and instructions
Find the device manual for free GP120CE LG in PDF.

| Product Type | Mobile air conditioner (monoblock) |
| Brand | LG (Goldstar) |
| Model | GP120CE |
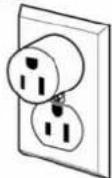
| Power Supply | 120 V, 60 Hz, 15 A (grounded plug) |
| Weight | Up to 50 kg |
| Operating Modes | Cooling (Cool), Dehumidification (Dry), Fan (Fan) |
| Temperature Range (Cool mode) | 17 °C to 30 °C |
| Fan Speed | Low, Mid, High |
| Timer | Programmable On/Off from 30 minutes to 24 hours |
| Louver Oscillation (Swing) | Remote control only |
| Remote Control | Infrared, AAA batteries (x2) |
| Air Filter | Washable, cleaning every 2 weeks recommended |
| Internal Water Tank | Capacity ~1 L (manual drain if full, code P2) |
| Water Drainage | Automatic via evaporation (Cool/Fan); hose required in Dry mode |
| Installation Type | Vertical or horizontal sliding window (width 457-914 mm) |
| Installation Kit Included | Vent panel, extension panels, foam seals, screws |
| Caster Wheels | Swiveling for mobility |
| Safety Device | Built-in circuit breaker on plug (Test/Reset buttons) |
| Warranty (parts) | 2 years (in-home) |
| Warranty (sealed system) | 5 years (in-home) |
Frequently Asked Questions - GP120CE LG
User questions about GP120CE LG
0 question about this device. Answer the ones you know or ask your own.
Ask a new question about this device
Download the instructions for your Air-conditioner in PDF format for free! Find your manual GP120CE - LG and take your electronic device back in hand. On this page are published all the documents necessary for the use of your device. GP120CE by LG.
USER MANUAL GP120CE LG
To contact Goldstar, 24 hours a day, 7 days a week:
1-800-243-0000 (US)
1-888-542-2623 (Canada)
Or visit us on the Web at:
www.goldstarappliances.com
www.goldstarappliances.com

INTRODUCTION
IMPORTANT SAFETY INSTRUCTIONS
Basic Safety Precautions 3,4
Electrical Safety. 4,5
PARTS AND FEATURES
Key Parts and Components 6
Control Panel and Remote 7
HOW TO USE
Before Using Your Air Conditioner 8,9
Using the Controls. 10
INSTALLATION INSTRUCTIONS
Preparing for Installation 11
Window Vent Panel and Extensions 12
Installation in Vertical Sliding Windows. 13, 14
Installation in Casement Windows 16, 17
CARE AND CLEANING
Cleaning the Case. 18
Cleaning the Air Filter 18
Water Drainage 20
Storing the Air Conditioner 21
Defrost Operation 21
TROUBLESHOOTING
Before Calling for Service. 22, 23
WARRANTY
Product Registration Information 24
THANK YOU!
Congratulations on your purchase and welcome to the Goldstar family.
Your new Goldstar Air Conditioner combines high-efficiency operation with portable convenience.
By following the operating and care instructions in this manual, your air conditioner will provide you with many years of reliable service.
READ ALL INSTRUCTIONS BEFORE USE
Your safety and the safety of others is very important.
We have provided many important safety messages in this manual and on your appliance. Always read and obey all safety messages.
This is the safety alert symbol. This symbol alerts you to potential hazards that can kill or hurt you and others.
All safety messages will follow the safety alert symbol and either the word "WARNING" or "CAUTION".
These words mean:
WARNING This symbol indicates the possibility of death or serious injury.
CAUTION This symbol indicates the possibility of injury or damage to property.
BASIC SAFETY PRECAUTIONS
WARNING
To reduce the risk of fire, electric shock, or injury
to persons when using this appliance, follow basic precautions, including the following:
- Do not attempt to repair or replace any part of your air conditioner unless it is specifically recommended in this manual. All other services should be referred to a qualified technician.
- If the power cord becomes worn or damaged, the cord should only be replaced by a qualified service technician using genuine replacement parts.
The air conditioner should be plugged into its own grounded 15A, 60Hz 120 VAC circuit. - Do not plug other appliances into the same outlet; it can overload the circuit and cause a fire or electric shock.
- Do not remove the round grounding prong from the plug. It can result in the risk of electric shock.
- This air conditioner is not designed for use by young children. Young children should be supervised to ensure that they do not play with or climb on the air conditioner.
- Be sure all packaging materials are removed from the air conditioner before use. It can result in personal injury.
- Do not disassemble or modify the air conditioner or the power cord. It can result in the risk of electric shock or fire.
- Do not place the power cord or air conditioner near a heater, radiator, or other heat source. It can result in the risk of electric shock or fire.
-
Do not use this or any appliance near flammable gases or liquids or other combustibles, such as gasoline, benzene, thinner, etc. It can result in the risk of electric shock or fire.
-
Make sure the power cord is plugged firmly and completely into the outlet. It can result in the risk of electric shock or fire.
- Do not start or stop operation by plugging in or unplugging the power cord. It can result in the risk of electric shock.
- If the air conditioner is making unusual sounds or is emitting smoke or an unusual odor, unplug it immediately. It can result in the risk of electric shock or fire.
- Do not use if the electrical socket is loose or damaged. It can result in the risk of electric shock or fire.
- Do not operate with wet hands or in a damp environment. It can result in the risk of electric shock.
- Do not use this or any electrical appliance if you smell gas. It can result in the risk of fire or explosion.
- Turn off and unplug the air conditioner before cleaning to avoid the risk of electric shock.
- Do not clean the unit with water. Water can enter the unit and damage the insulation, creating a shock hazard. If water enters the unit, unplug it immediately and contact Customer Service. It can result in the risk of electric shock.
- Use two or more people to lift and install the unit. Failure to do so can cause back injury or other injuries.
READ ALL INSTRUCTIONS BEFORE USE
BASIC SAFETY PRECAUTIONS

CAUTION
To reduce the risk of fire, electric shock, or injury to persons when
using this appliance, follow basic precautions, including the following:
- To avoid possible cuts, avoid contacting the metal parts of the air conditioner when removing or reinstalling the filter. It can result in the risk of personal injury.
- Do not block the air inlet or outlet of the air conditioner. Reduced air flow will result in poor performance and could damage the unit.
- Always grasp the plug when plugging in or unplugging the air conditioner. Never unplug by pulling on the cord. It can result in result in the risk of electrical shock and damage.
- Always turn off and unplug the air conditioner when it will not be used for extended period of time. This conserves energy and reduces the chance of accidents.
- Secure the wheels with blocks to prevent the air conditioner from rolling on smooth floors.
- Install the air conditioner on a sturdy, level floor capable of supporting up to 110 lbs (50 kg). Installation on a weak or unlevel floor can result in result in the risk of property damage and personal injury.
-
Make sure the air conditioner is the correct size for the area you wish to cool. Using an air conditioner that is the wrong size can waste energy and damage the air conditioner.
-
Close all doors and windows to the room for most efficient operation.
- To prevent damage to the surface finish, use only a soft cloth to clean the air conditioner. Do not use wax, thinner, or a strong detergent.
- To prevent spills and property damage, be sure to drain the air conditioner properly.
- To prevent the coils from freezing, do not operate the air conditioner if the room temperature is below 18^ (65^) .
- Do not position the air conditioner so that pets or house plants are exposed to the direct air flow. It can result in the risk of injury to pets or house plants.
- This air conditioner is designed for normal household use. Do not use for cooling pets, foods, precision machinery, or art objects.
- Do not drink the water from the drain pan. Dispos of it properly outdoors or down the drain.
- Do not operate air conditioner without the filter securely in place. Operation without the filter could damage the unit.
- Clean the filter every two weeks, or more often if needed.
ELECTRICAL SAFETY
WARNING
Electrical Shock Hazard
Failure to follow these instructions can result in death, fire, or electrical shock.
- This unit must be properly grounded.
- Do not, under any circumstances, cut or remove the ground prong.
-
If you do not have a properly grounded outlet, or if there is any doubt that the outlet is not properly grounded, a qualified electrician should check the outlet and circuit, and, if necessary, install a properly grounded outlet.
-
This air conditioner must be plugged into a grounded 60Hz , 120 VAC outlet protected by a 15 amp time delay fuse or circuit breaker.
- This air conditioner must be installed in accordance with national wiring codes.
- Do not alter or modify the plug or cord of this air conditioner. If the power cord becomes worn or damaged, the cord should only be replaced by a qualified service technician using genuine replacement parts.
- Do not use an extension cord.
IMPORTANT SAFETY INSTRUCTIONS
READ ALL INSTRUCTIONS BEFORE USE
ELECTRICAL SAFETY
INTEGRATED CIRCUIT BREAKER
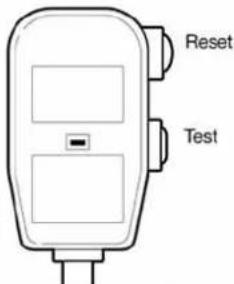
For additional safety, the power cord features an integrated circuit breaker. Test and reset buttons are provided on the plug case.
The circuit breaker should be tested periodically by pressing the TEST
button then the RESET button. If the TEST button does not cause the circuit breaker to trip, or if the RESET button will not stay engaged, unplug the air conditioner immediately and contact your Goldstar service technician.
PREFERRED GROUNDING METHOD
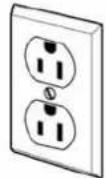
Ensure proper ground exists before use.
Due to potential safety hazards, the use of an adapter plug is strongly discouraged.
For temporary connections, use only a UL-listed adapter. Ensure that the large slot in the adapter is aligned with the large slot in the outlet.
To prevent damage to the adapter's ground terminal, hold the adapter in place while plugging in or unplugging the air conditioner.
- Attaching the adapter ground terminal to the wall receptacle cover screw does not ground the appliance unless the cover screw is metal and not insulated, and the wall receptacle is grounded through the house wiring.
TEMPORARY GROUNDING METHOD
(Use of adapter plugs not permitted in Canada)
Ensure proper ground exists before use.
- Frequent connection and disconnection can damage the ground terminal on the adapter. Never use a broken or damaged adapter.
SAVE THESE INSTRUCTIONS
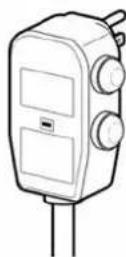
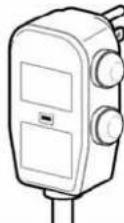
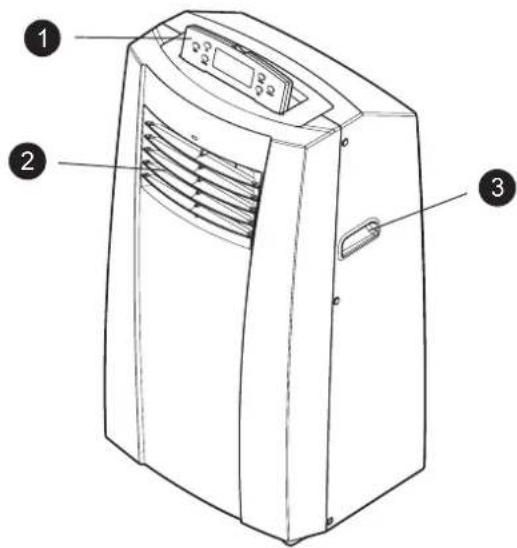
KEY PART AND COMPONENTS
CONTROL PANEL AND DISPLAY
Easy-to-read digital display shows the set temperature and indicator lights show the operating mode. Simple push buttons make changing settings quick and easy.
AIR DISCHARGE
Distribute air more evenly through the room.
3 INTEGRATED HANDLES
Integrated handles provide a convenient grip when lifting the air conditioner.
4 INFRARED REMOTE CONTROL
The remote control allows you to adjust the temperature and operate most functions of the air conditioner from across the room.
SWIVELING CASTERS
Swiveling casters allow you to move the air conditioner easily on most floor surfaces.
6 BOTTOM DRAIN PORT
Used when water is full or free of using long time.
Before moving the unit, drain the internal water collection tank completely by using bottom drain port.
7 FILTER
Filter cover clips in place for easy access to the air filter.
8 UPPER DRAIN PORT
Used when Continuous Drainage or in dry mode.
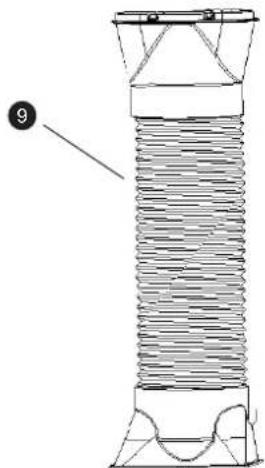
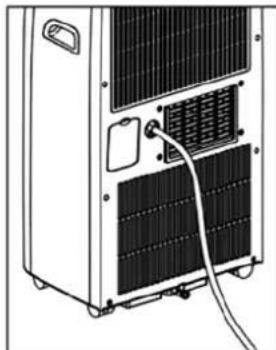
9 FLEXIBLE VENTING HOSE
Use the diffuser and hose to connect the air conditioner to the window installation kit to vent exhaust air outside.
Check all the accessories included in the package and please refer to the installation instructions for their usage.
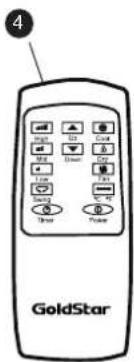

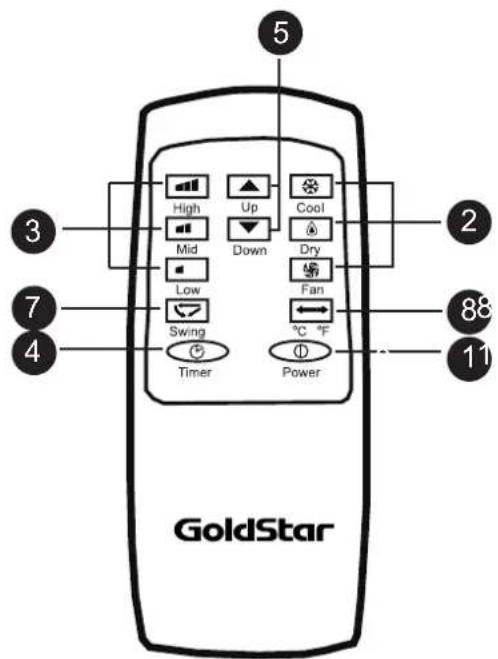
CONTROL PANEL AND REMOTE
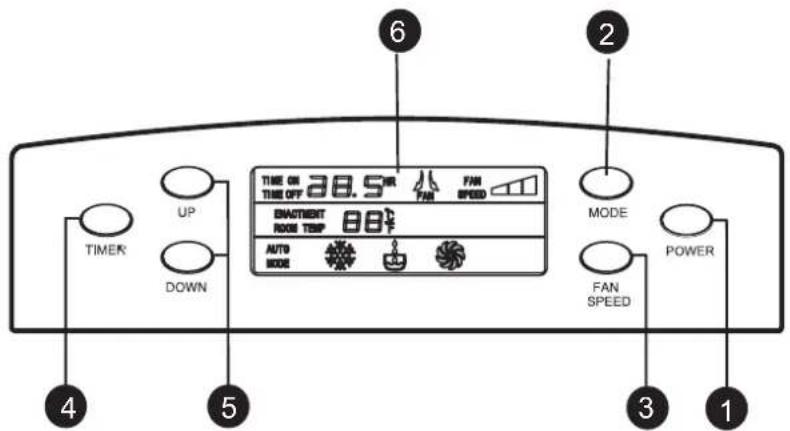
Operation of functions is the same when using the remote or the control panel, unless otherwise stated.
1 POWER
Operation begins when this button is pressed and stops when you press the button again
2 MODE
Press this button to select COOL, DRY, FAN mode
3 FAN SPEED
Adjusts the circulation fan speed between HIGH, MID, LOW fan speed.
4 TIMER
Press this button to set TIMER ON, TIMER OFF or NO TIME
UP & DOWN
Press these buttons to set room temperature or time when in Time On/Off mode.
LCD Display
Display different signals accordingly.
7 AUTO SWING
This button can automatically control the air flow direction
CELSIUS AND FAHRENHEIT EXCHANGE BUTTON
NOTE
To vary from Fahrenheit to Celsius, press both UP and DOWN button
BEFORE USING YOUR AIR CONDITIONER
PREPARING FOR OPERATION
Refer to the Installation Instructions included in this manual before using the air conditioner.
Once the air conditioner has been properly assembled and installed:
Plug the power corihtotows dcdicated propagated ineditoutlet.Do not plg atg o t her appliances into the same outlet; it could overload the outlet and create a fire hazard.
Make sure the air conditioner and cord is positioned where it does not create a tripping hazard and will receive adequate ventilation. Do not place it directly next to furniture or objects that could block the vent openings.
Make sure that any items that could be blown over or damaged by the airflow from the fan are out of the airflow path.
UNPACKING THE AIR CONDITIONER
Remove and store packing materials for reuse. Remove any shipping tape before using the air conditioner. If the tape leaves behind any adhesive, rub a small amount of liquid dish soap onto it and wipe with a damp cloth. Do NOT use sharp instruments, alcohol, thinners, or abrasive cleaners to remove adhesive. They could damage the finish.
IMPORTANT:
- Do not remain in the direct airflow from the air conditioner for extended periods of time.
- To prevent damage or injury to pets and plants, make sure they are not exposed to direct airflow from the air conditioner.
- When used at the same time as stoves, fireplaces, and other combustion devices, make sure there is a sufficient flow of fresh air into the room. Do not use in tightly enclosed spaces with these types of devices.
- This air conditioner is intended for household use as a consumer comfort appliance. Do not use it as a precision climate control system, or for purposes such as cooling precision equipment, food, pets, plants, artwork, etc. Such items could be damaged.
- Do not bend the hose downward when window installation kit is not applied. It may cause failure of air conditioner or performance deterioration.
BEFORE USING YOUR AIR CONDITIONER
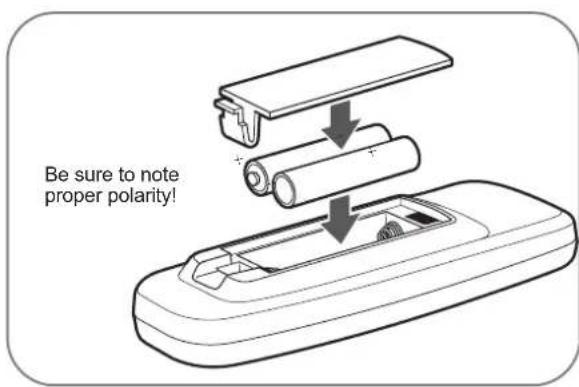
INSERTING BATTERIES IN THE REMOTE
Before using your remote, install the provided AAA batteies :
Press in the locking tab on the battery cover on the back of the remote and remove the cover
Insert two new alkaline AAA batteries into the battery compartment, being sure to note the proper polarity.
3 Reattach the battery cover, making sure the locking tab clicks into place.
NOTE:
- Use only alkaline batteries. Do not use rechargeable batteries.
- When replacing batteries, always replace both batteries with new batteries. Do not mix old and new batteries.
- If the air conditioner will not be used for an extended period of time, remove the batteries from the remote.
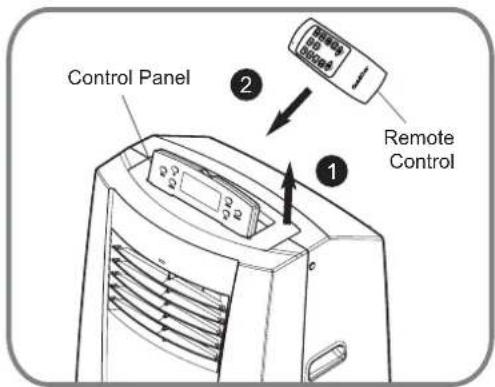
STORAGING REMOTE CONTROL
1 Lift up the Control Panel.
2 Slide the Remote into place for storage.
CAUTION
- If the liquid from the batteries gets onto your skin or clothes, wash it well with clean water. Do not use the remote if the batteries have leaked.
- If you eat the liquid from the batteries, brush your teeth and see doctor. The chemicals in batteries could cause burns or other health hazards.
USING THE CONTROLS
Control panel buttons shown. Operation using the remote control is the same, unless specifically noted.
1.COOL MODE
- Press MODE button (or Cool button) to choose Cool mode.
- Press UP or DOWN button to set room temperature between 17^ to 30^ .
- Press FAN SPEED button (or Low/Mid/High button) to select low, middle or high fan speed. The LCD will display , or accordingly.
- Press Swing button to make the lower swing (use remote control only). The LCD will display
2.DRY MODE
- Select Dry button for dehumidify Mode.
- In Dry mode fan speed is preset. Speed button is not available. The temperature can't be set either.
- Press Swing button to make the fins swing (use remote control only). The LCD will display
- Do not use air outlet duct.
- Dry mode can not be used to cool the room.
3. FAN MODE

- Press MODE button (or Fan button) to choose Fan mode.
- Select the fan speed by press FAN SPEED button or press High/Mid/Low button directly.
- Press Swing button to make the lower swing (use remote control only). The LCD will display
The temperature can not be set. - Do not use the air outlet duct.
4. TIMER-ON
- When the appliance is switch off, press Timer button to set timer-on. Press Up or Down button to adjust time from 30 minutes to 24 hours. The Time on light indicator will light.
5. TIMER-OFF
- When the appliance is operating, press Timer button to set timer-off. Press Up or Down button to adjust time from 30 minutes to 24 hours. The Time off light indicator will light.
CAUTION
DO NOT USE DRY MODE, WITHOUT INSTALLING DRAIN HOSE
NOTE
- All functions are available with the remote control and the control panel. The Swing function can only be operated by remote control.
- Always point the remote at the sensor. The remote may not work if the sensor is in bright light or if there is not a clear path between the remote and the sensor.
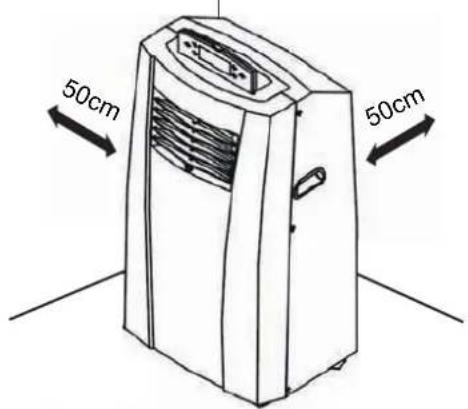
SELECTION OF INSTALLATION LOCATION
Install the unit on a flat and dry place.
For best performance, allow at least 50cm of air space on all sides of the unit for good air circulation.
WARNING
The length of the exhaust pipe is specially designed according to the specification of this product. Do not replace or prolong it with your own private hose as this could cause mal-function.
ATTACHING THE HOSE AND DIFFUSER
NOTE: The air conditioner is shipped with the hose. The hose may be removed for cleaning and storage, if necessary. Simply reverse the steps below to remove.
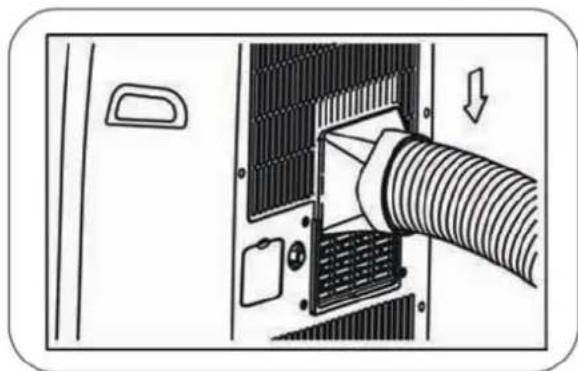
Insert the large adapter end of the hose into the slot on the back of the air conditioner.
PREPARED FOR INSTALLATION
WARNING The air conditioner is heavy! Use two or more people to lift and install the unit! Failure to do so could result in back injury or other injuries.
EXHAUST COMPONENTS
The following components are used for window venting. Not all components are used for every installation.
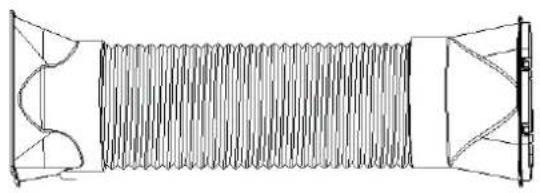
Flexible Venting Hose
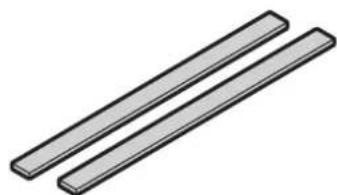
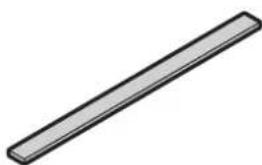
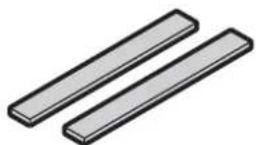
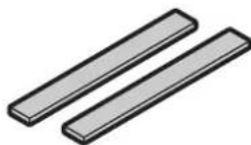
Window Installation Kit (includes 2 Window Vent Panel and 2 Extension Panels)
2 Type A Foam Seals (adhesive)
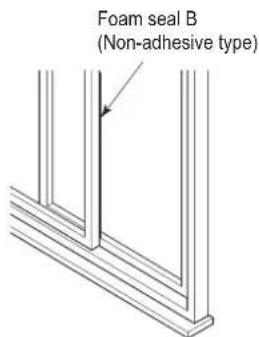
1 Type B Foam Seal (non-adhesive)
2 Type C Foam Seals (Adhesive type-Shorter)
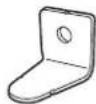
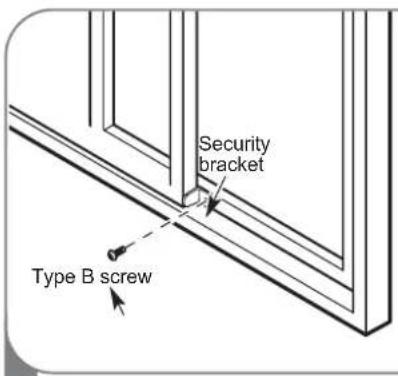
Security Bracket

4 Type A Screws
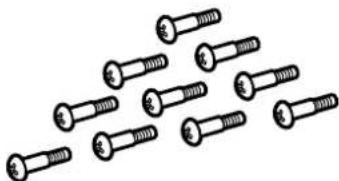
10 Type B Screws
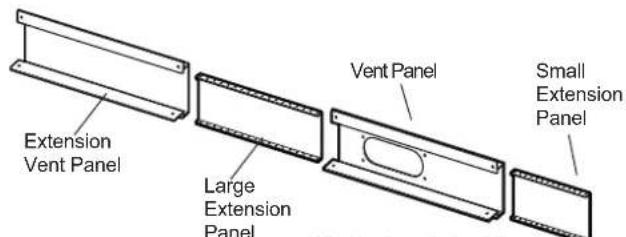
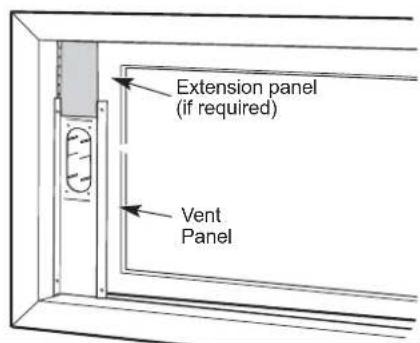
WINDOW VENT PANEL AND EXTENSIONS
The window installation kit allows you to install the air conditioner in most vertical-sliding windows 457mm to 1219mm wide, or casement-style windows from 457mm to 1219mm high.
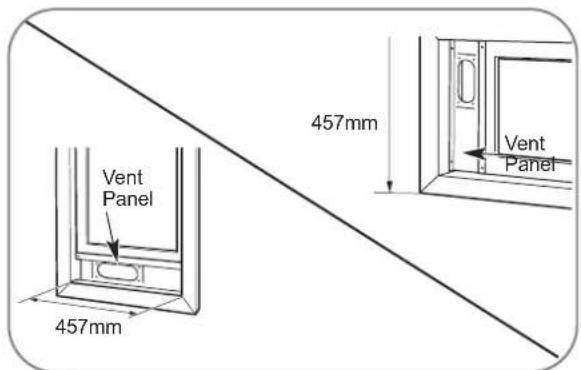
For an 457mm window opening, use the window vent panel by itself.
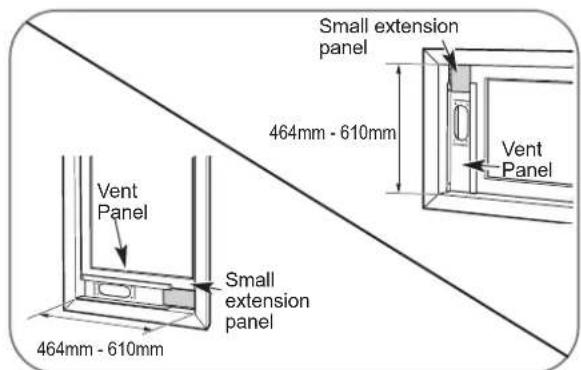
For window openings from 464mm to 610mm use the window vent panel and the small extension panel.
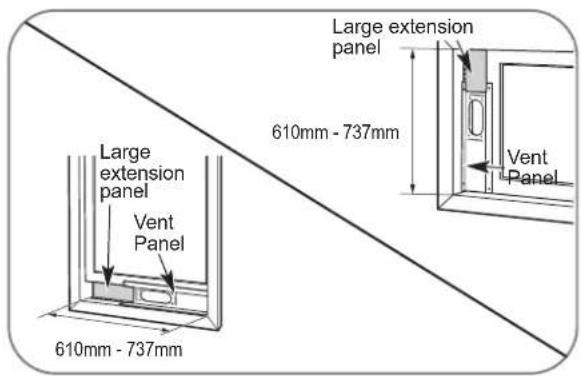
For window openings from 610mm to 737mm use the window vent panel and the large extension panel.
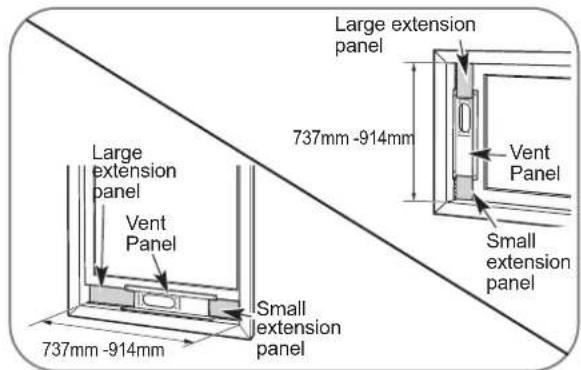
For window openings from 737mm to 914mm use the window vent panel and both extension panels.
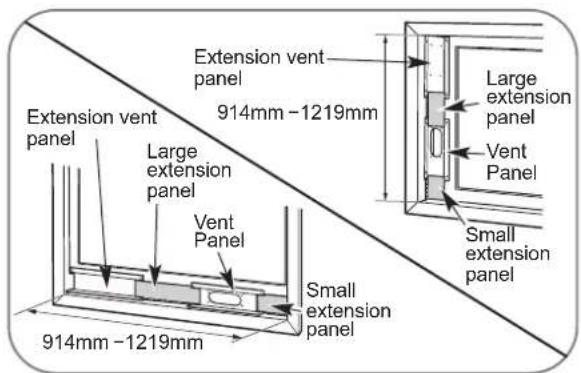
For window openings from 914mm to 1219mm use both vent panels and both extension panels.
INSTALLATION IN VERTICAL SLIDING WINDOWS
NOTE: The window installation kit can be used with vertical sliding windows between 457mm and 1219mmwide.
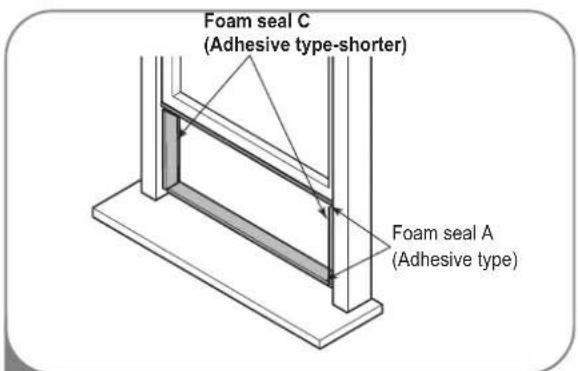
Cut the foam seal A(adhesive type) & C(adhesive type-shorter) to the proper length, and attach it to the window sash and frame.
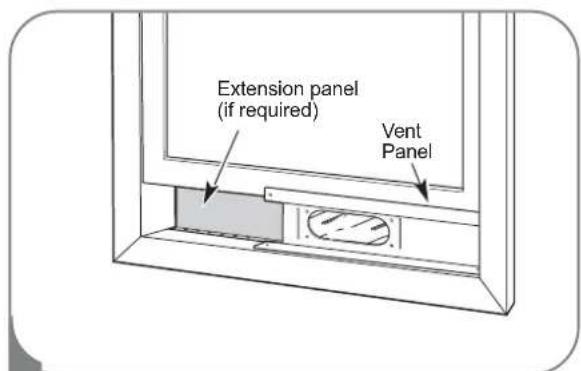
2 Insert the vent panel assembly, including extension panels, if needed, into the window opening. Extend the extension panels, if used.

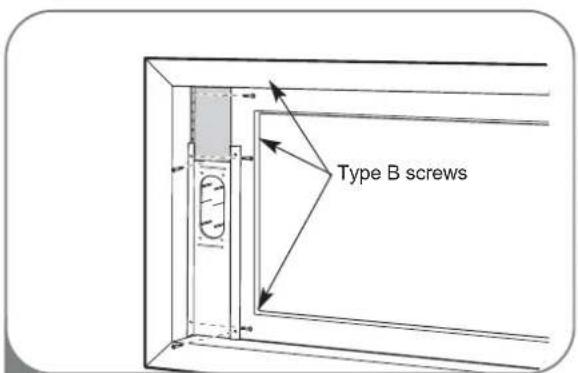
3 Carefully lower the window. Secure the vent panel in place with 4 type B screws, plus one screw for each extension: Vent panel only: 4 type B screws Vent panel and one extension: 5 type B screws Vent panel and two extensions: 6 type B screws Twovent panels and two extensions: 9 type B screws
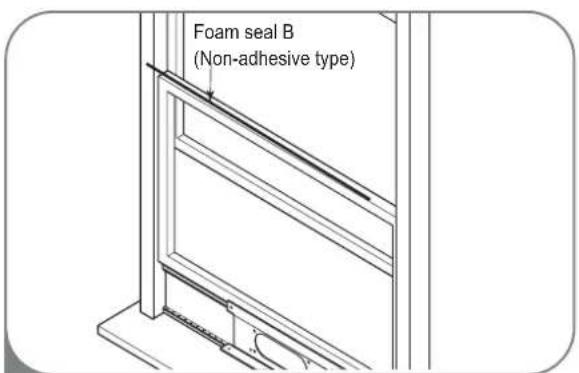
Cut the foam seal B(Non-adhesive type) to the window width. Stuff the foam seal B between the glass and the window to prevent air and insects from getting into the room.
INSTALLATION IN VERTICAL SLIDING WINDOWS
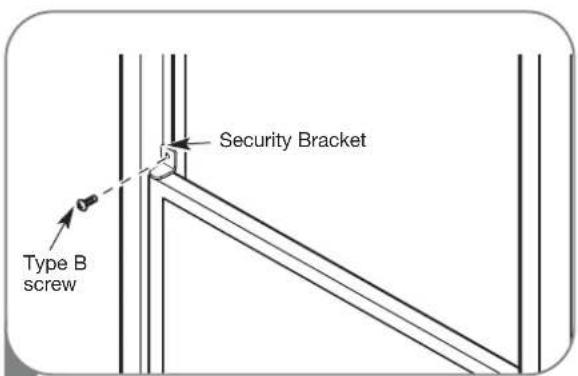
5 Install the security bracket with a type B screw, as shown.
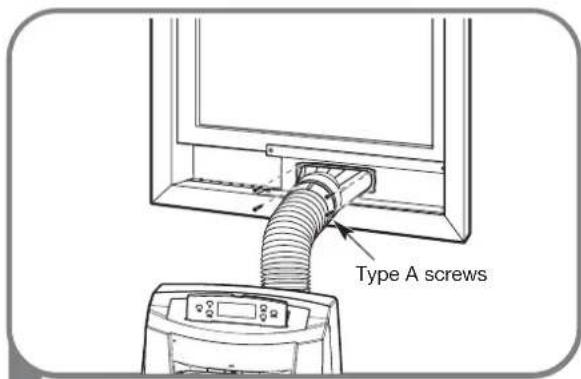
6 Insert the oval end of the diffuser into the window installation kit until the locking tabs engage. Secure in place with four Type A screws.
INSTALLATION IN CASEMENT STYLE WINDOWS
NOTE: The window installation kit can be used with casement windows between 457mm and 914mm tall.
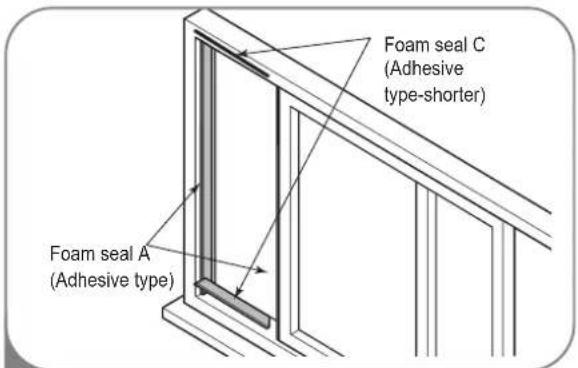
Cut the foam seal A(adhesive type) & C(adhesive type-shorter) to the proper length, and attach it to the window sash and frame.
2 Insert the vent panel assembly, including extension panels, if needed, into the window opening. Extend the extension panels, if used.
3 Carefully close the window. Secure the vent panel in place with 4 type B screws, plus one screw for each extension: Vent panel only: 4 type B screws Ventpaneland one extension: 5 type B screws Ventpaneland two extensions: 6 type B screws Twovent panels and two extensions: 9 type B screws
Cut the foam seal B(Non-adhesive type) to the window height. Stuff the foam seal B between the glass and the window to prevent air and insects from getting into the room.
INSTALLATION IN CASEMENT STYLE WINDOWS
5 Install the window security bracket with a type B screw, as shown.
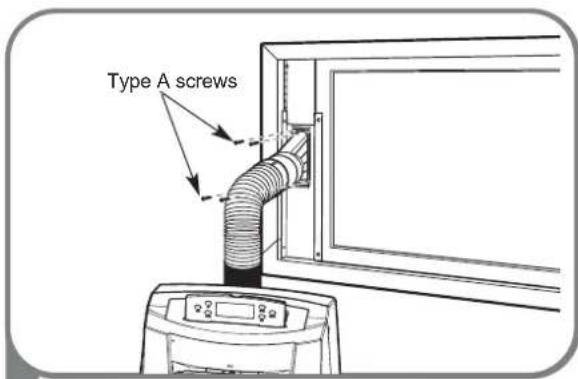
6 Insert the oval end of the diffuser into the window installation kit until the locking tabs engage. Secure in place with four of the included screws.
Your air conditioner is designed for year-round operation with only minimal ceaning and maintenance
From maximum efficiency, it is recommended that you have the cooling coils inspected and cleaned annually. Your local Goldstar Authorized Service Center can provide this inspection and cleaning service for a nominal fee

WARNING
- Unplug the air conditioner before cleaning or performing any maintenance or serviceing.
- Be careful when cleaning coils or removing or reinstalling the filter-the cooling fins are shrp!
Failure to follow the above precautions could result in electrical shock or personal injury
CLEANING THE CASE
Wipe the case with a slightly damp cloth, then wipe dry with a dry cloth or towel.
- To prevent damage to the finishi, do not use gasoline, benzene, thinner, etc., or any abrasive cleansers to clean the air conditioner; the may damage the finish.
- Never pour water onto or into the unit; it could damage internal components and create a shock and fire hazard
CLEANING THE AIR FILTER
The air filter should be cleaned every two weeks; depending on indoor air quality, more frequent cleaning may be needed. A dirty air filter will decrease airflow and reduce efficiency
Do not operate the air conditioner without the air filter in place
Use a vaccum cleaner to clean the filter. If the filter is heavily soiled, it can be washed in warm water using a mild detergent.
Do not use harsh cleaners or very hot water. Do not wash in a dishwasher.
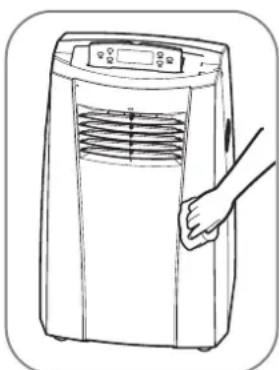
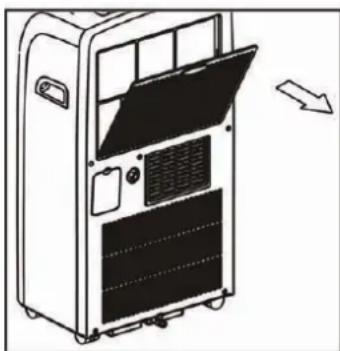
1 Open the air filter cover upward
Take out the air filter
4 Allow the filter to dry completely before reinstalling.
WATER DRAINAGE
Using the Upper Drain Port ( Dry Mode Only)
This product has a self-evaporative system. The condensing water will be recycled to cool the condenser. This can not only improve cooling efficiency, but also save energy for you.
- When need dehumidification in high humidity
- Under the Cool or Fan mode, there's no need of water drainage
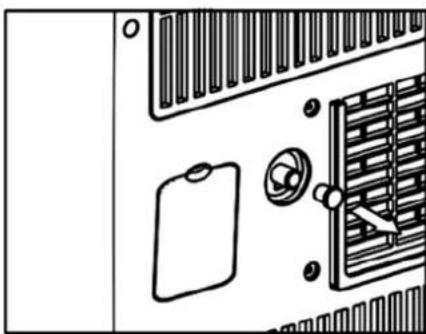
- During dehumidifying mode, remove the drain plug and the exhaust hose from the back of the unit.
- Install a drain hose (φ10mm inner dimension) and place the open end of the hose a suitable drain location or outdoors.
- If the internal water container is full, the LCD-display will flash "P2" and the unit will stop automatically.
Note: If the water full alarm is often on, there may be some malfunction about the unit. Contact the professional service for help.
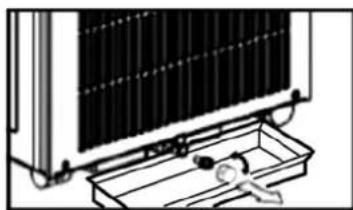
Using the Bottom Drain Port
When the internal water collection tank is full, the air conditioner will turn off until the tank is emptied.
- Unplug the air conditioner, disconnect the exhaust hose from the back, and move the air conditioner to a suitable drain location or outdoors. You may also place a pan under the drain that will hold up to 1 quart of water.
- Remove the drain cap from the drain outlet.
- Once the water collection tank is drained, reinstall the drain cap, making sure it is on securely.
- Place the air conditioner in the desired location, reconnect the exhaust hose, and plug in the air conditioner.
NOTICE P2 apperars in the display
The water collection tank is full, drain the tank and reset your setting.
STORING THE AIR CONDITIONER
If the air conditioner will not be used for an extended period of time :
1 Drain the water collection tank completely and leave the bottom drain cap off long enough to allow any residual water to drain out. Once the tank is completely drained and no more water flows out, reinstall the cap.
Remove and clean the filter, allow it to dry completely, then reinstall it.
3 Remove the batteries from the remote.
Store the air conditioner in a cool, dry location, away from direct sunlight, extreme temperatures, and excessive dust.
Before using the air conditioner again :
1 Make sure the filter and drain cap are in place
2 Check the cord to make sure it is in good condition, with no cracks or damage.
Place new batteries in the remote.
4 Install the air conditioner as described in the Installation Instructions.
Defrost Operation
- The air conditioner has a built-in defrost control senses frost built up on the evaporator coils. During defrost the compressor off, keeping the fan on to defrost the coils.
BEFORE CALLING FOR SERVICE
Before you call for service, review this list. It may save you time and expense. This list includes common occurrences that are not the result of a defect in workmanship or materials.
| Problem Possible Causes Solutions | ||
| Air conditioner will not start not completely inserted in live, properly grounded outlet. the electrical outlet. • The house fuse is blown or the • Replace circuit breaker has tripped. that there are power failure. • If a power failure occurs, • The integrated circuit breaker in the • Press the RESET button on the air conditioner plug. • P2 appears in the display. • Room temperature is less than the set temperature. | • The air conditioner plug is live, properly grounded outlet. the electrical outlet. • The house fuse is blown or the • Replace circuit breaker has tripped. that there are power failure. • If a power failure occurs, • The integrated circuit breaker in the • Press the RESET button on the air conditioner plug. • P2 appears in the display. • Room temperature is less than the set temperature. | • Make sure electrical plug is plugged completely into a the fuse or reset the circuit breaker. Make sure no other appliances on the same circuit. turn the power OFF. When power is restored, wait 3 minutes before restarting the air conditioner. • The water collection tank is full. Drain the tank and reset your settings. • This is normal. The air conditioner automatically shuts off when the room equals or is less than the set temperature. Adjust the temperature setting, if needed. |
| Air conditioner does not cool properly | • Airflow is restricted. • The air filter is dirty. • The room is very hot, or not enough time allowed for cooling. • Cold air is escaping. • Cooling coils have iced up. | • Make sure there is sufficient clearance around the air conditioner and that the air inlet and outlet are not blocked by furniture, curtains, etc. • Clean the air filter at least every two weeks. See the Care and Cleaning section. • When first turned on, allow the air conditioner sufficient time to cool the room. • Check for open furnace floor registers or cold air returns, or open windows or doors. • In especially hot, humid weather and when the air conditioner is running frequently or for extended periods, ice can form on the cooling coils, blocking air flow. Set the controls to High Fan or High Cool, and set to a warmer temperature. |
| Air conditioner runs too often or too long | • Area to be cooled is too large for the air conditioner. • Doors or windows are open. | • Consult your dealer for the air conditioner capacity necessary to cool the desired area. • Make sure doors and windows are closed. |
BEFORE CALLING FOR SERVICE
| Problem | Description |
| Code appears in the display. | |
| P2 | • Protection ( Water-full protection, to prevent spilling). |
| E1, E2 | • Sensor protection, to avoid occurrence of unit damage, auto-stop protection. |
| E3 | • Unit-abnormal protection, to avoid occurrence of unit damage. |
| E4 | • When coil sensor feels coil temperature is ≤2℃, the unit will stop and display E4 to defrost, and fan speed is low. • When coil temperature runs up to ≥8℃, the unit will re-cool. |
Cautions: Switch off the unit and unplug it immediately if anything abnormal happens. Then contact a qualified electrician.
LIMITED WARRANTY
Should your product prove to be defective in materials or workmanship under normal use during the warranty period listed below, which warranty period runs from the original date of purchase, GOLDSTAR will, at its option, repair or replace the product at no charge to you. The warranty is valid only to the original purchaser of the product, during the warranty period, as long as it is in Canada
WARRANTY PERIOD :
Product Part Labor
All Parts
2Years
2Years (In-Home Service)
Sealed system
5Years
5Years (In-Home Service)
No other warranty is applicable to this product. THE DURATION OF ANY IMPLIED WARRANTY, INCLUDING THE IMPLIED WARRANTY OF MERCHANTABILITY, IS LIMITED TO THE DURATION OF THE EXPRESS WARRANTY HEREIN.
GOLDSTAT SHALL NOT BE LIABLE FOR THE LOSS OF USE OF THE PRODUCT, INCONVENIENCE, LOSS OR ANY OTHER DAMAGES, DIRECT OR CONSEQUENTIAL, ARISING OUT OF THE USE OF OR INABILITY TO USE, THIS PRODUCT OR FOR ANY BREACH OF ANY EXPRESS OR IMPLIED WARRANTY, INCLUDING THE IMPLIED WARRANTY OF MERCHANTABILITY OR FITNESS FOR A PARTICULAR PURPOSE, APPLICABLE TO THIS PRODUCT.
Some Provinces or Territories do not allow for the exclusion or limitation of incidental or consequential damages of limitations on how long an implied warranty lasts; so these limitations or exclusions may not apply to you.
This warranty gives you, (the original purchaser) specific legal rights and you may also have other rights, which vary from province to province or territory to territory.
THE ABOVE WARRANTY DOES NOT APPLY TO:
- Service trips to your home to deliver and pickup, install, instruct or replace house fuses, or connect house wiring or plumbing, or correction of unauthorized repairs.
- Damage to the product caused by accident, pest, fire, floods or acts of God.
- Repairs when your GOLDSTAR product is used in other that normal, single-family household use or contrary to the instructions outlined in the product's owners manual.
- Damage resulting from accident, alteration, misuse, abuse, or improper installation or maintenance.
- Products with altered or removed serial numbers. If the product is installed outside the normal service area, any cost of transportation involved in the repair of the product, or the replacement of a defective part, shall be borne by you (the owner).
CUSTOMER ASSISTANCE INFORMATION:
To obtain Warranty Coverage:
Retain your Bill of Sale to prove the date of purchase.
A copy of your Sales Receipt must be submitted when warranty service is provided. This warranty is invalid if the factory applied serial number has been altered or removed from the product.
To obtain Product or Customer Service Assistance:
Call 1-888-LG-CANADA (542 2623)
Press the appropriate menu option, and have your product model and serial numbers and your postal code ready.
To obtain the nearest Authorized Service Center:
Access our web-site at: www.lge.ca (Service Option) or
Call 1-888-LG-CANADA (542 2623)
Press the appropriate menu option, have your product model & serial numbers & your postal code ready.
2cJointscencMoussecde TypeC (plusc ourtcdeptypecadhesif).
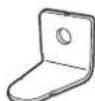
Support de sécurité
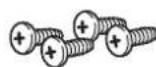
4 vis de type A
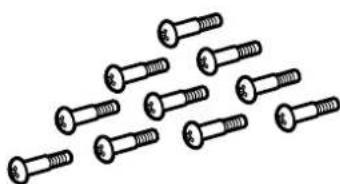
10 vis de type B