HDI 3T623PWDF - Dishwasher HOOVER - Free user manual and instructions
Find the device manual for free HDI 3T623PWDF HOOVER in PDF.
Questions des utilisateurs sur HDI 3T623PWDF HOOVER
0 question sur cet appareil. Repondez a celles que vous connaissez ou posez la votre.
Poser une nouvelle question sur cet appareil
Download the instructions for your Dishwasher in PDF format for free! Find your manual HDI 3T623PWDF - HOOVER and take your electronic device back in hand. On this page are published all the documents necessary for the use of your device. HDI 3T623PWDF by HOOVER.
USER MANUAL HDI 3T623PWDF HOOVER
9 persons Min. 0,08 - Max. 0,8 See rating plate Power consumption of the off-mode and of the left-on mode: 0,45 W / 0,45 W *Values are measured in a laboratory according to European Standard EN 50242 (consumption may vary according to conditions of usage). 2,07 1,46 0,77 0,59
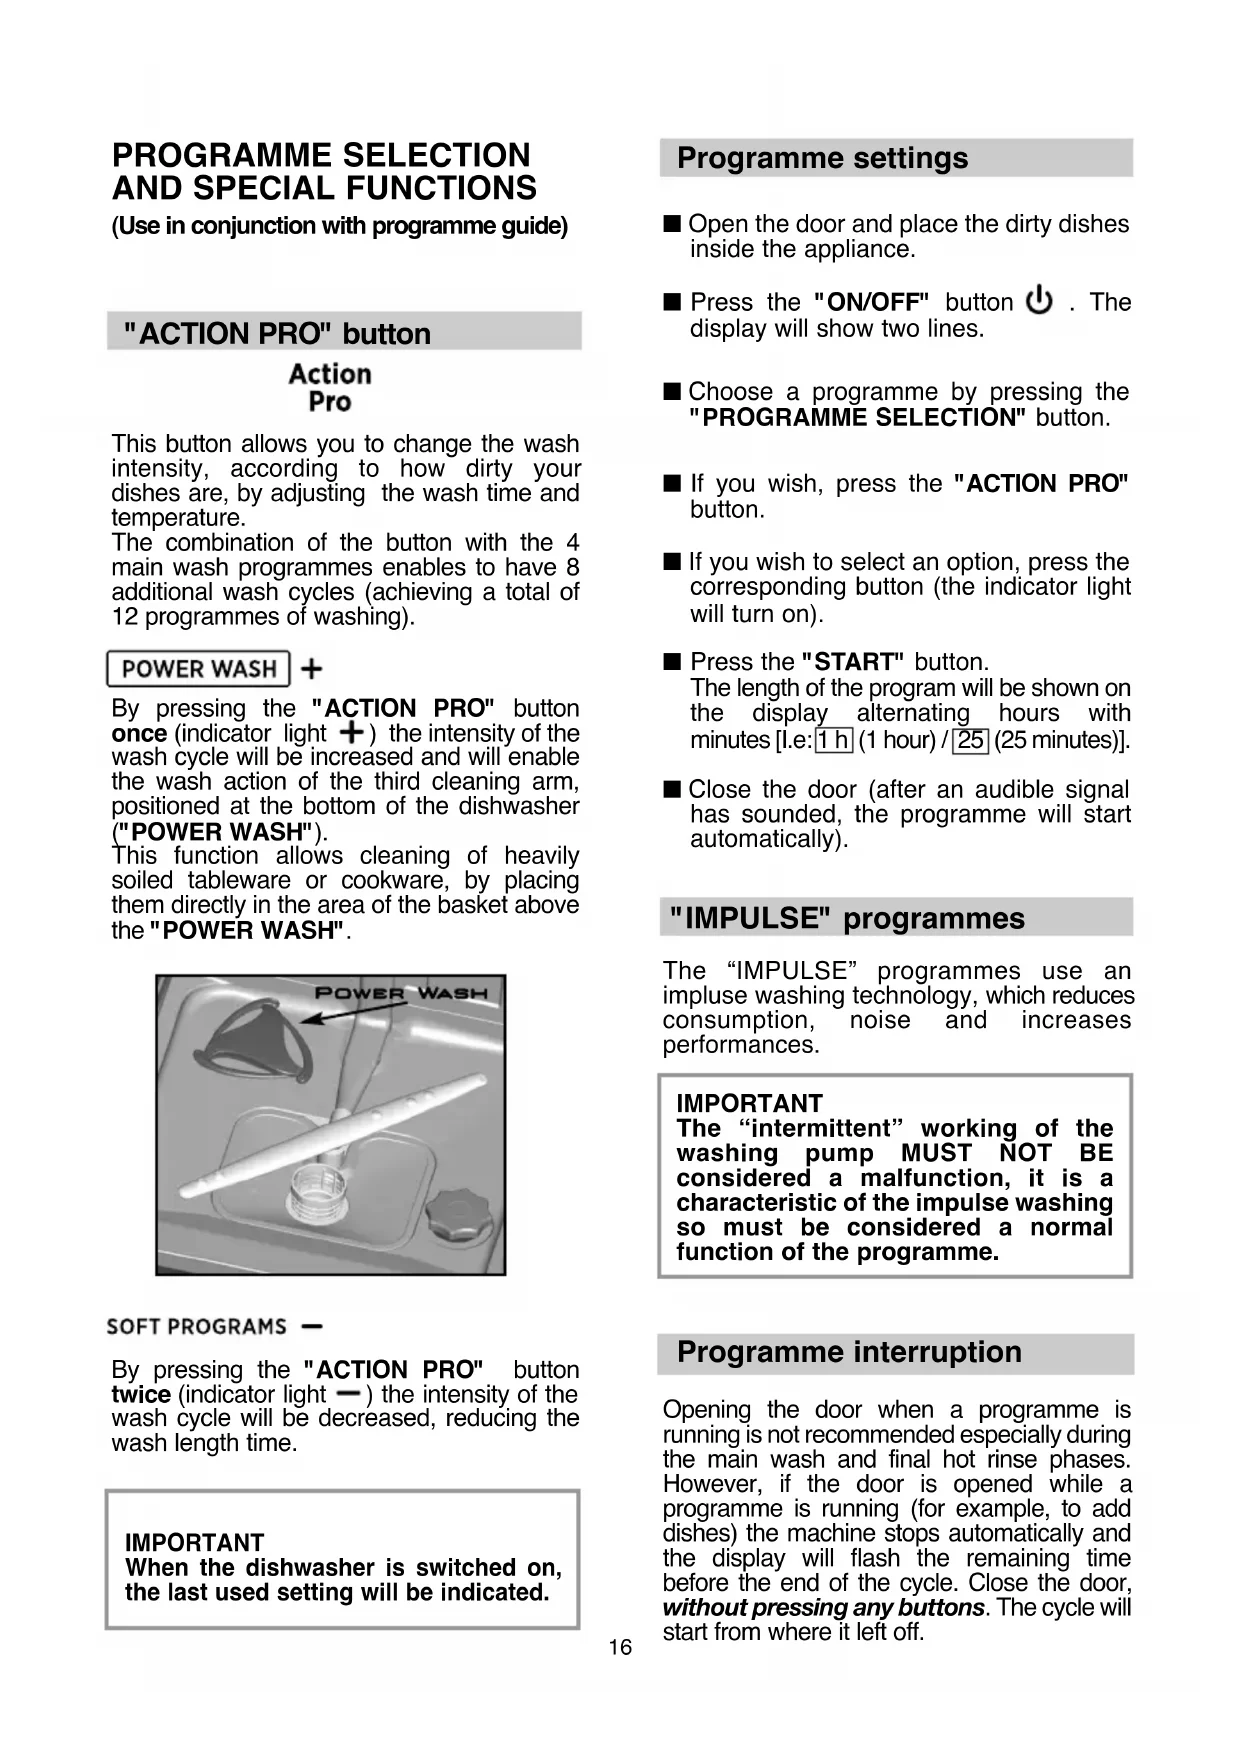
(Use in conjunction with programme guide) "ACTION PRO" button This button allows you to change the wash intensity, according to how dirty your dishes are, by adjusting the wash time and temperature. The combination of the button with the 4 main wash programmes enables to have 8 additional wash cycles (achieving a total of 12 programmes of washing). By pressing the "ACTION PRO" button once (indicator light ) the intensity of the wash cycle will be increased and will enable the wash action of the third cleaning arm, positioned at the bottom of the dishwasher ("POWER WASH"). This function allows cleaning of heavily soiled tableware or cookware, by placing them directly in the area of the basket above the "POWER WASH". By pressing the "ACTION PRO" button twice (indicator light ) the intensity of the wash cycle will be decreased, reducing the wash length time. IMPORTANT When the dishwasher is switched on, the last used setting will be indicated. Programme settings ■ Open the door and place the dirty dishes inside the appliance. ■ Press the "ON/OFF" button . The display will show two lines. ■ Choose a programme by pressing the "PROGRAMME SELECTION" button. ■ If you wish, press the "ACTION PRO" button. ■ If you wish to select an option, press the corresponding button (the indicator light will turn on). ■ Press the "START" button. The length of the program will be shown on the display alternating hours with minutes [I.e: 1 h (1 hour) / 25 (25 minutes)]. ■ Close the door (after an audible signal has sounded, the programme will start automatically). "IMPULSE" programmes The “IMPULSE” programmes use an impluse washing technology, which reduces consumption, noise and increases performances. IMPORTANT The “intermittent” working of the washing pump MUST NOT BE considered a malfunction, it is a characteristic of the impulse washing so must be considered a normal function of the programme. Programme interruption Opening the door when a programme is running is not recommended especially during the main wash and final hot rinse phases. However, if the door is opened while a programme is running (for example, to add dishes) the machine stops automatically and the display will flash the remaining time before the end of the cycle. Close the door, without pressing any buttons. The cycle will start from where it left off.17 WARNING! If you open the door during the drying cycle, an audible audio signal advises you that the drying cycle has not yet finished. Changing a running programme Proceed as follows to change or cancel a running program: ■ Hold the "RESET" button down for at least 5 seconds. "00" will appear on the display and some audible signals will sound. ■ The running programme will be cancelled. The display will show two lines. ■ At this point a new programme can be set. WARNING! Before starting a new programme, you should check that there is still detergent in the dispenser. If necessary, top up the dispenser. If there is any break in the power supply while the dishwasher is operating, a special memory stores the selected programme and, when the power is restored, it continues where it left off. Programme end A 5 second alarm will sound (if not muted) 3 times at 30 second intervals to signal that the programme has ended. IMPORTANT If the "OPEN DOOR" function is acti- vated, during the drying phase the door will open automatically and you will have to wait until the indication of the end of cycle before removing the dishes. Option buttons "OPEN DOOR" button (AUTOMATIC OPEN DOOR) This option activiates a special device that opens the door a few centimeters during or at the end of the drying cycle (depending on the programme). This ensures the natural and efficient drying of dishes. The duration of the selected cycle will automatically change to allow an optimiazation of temperatures used during the rinse phase, this allows a significant reduction of energy consumption. The automatic door opening in the last phase of drying enables the air to circulate, removing the risk of bad odours. IMPORTANT This option is automatically activated on the "ECO" programme, it is however possible to disable it. The function "OPEN DOOR" is not available in the programme "RAPID 24'" and "PRE-WASH". ATTENTION With this option selected, you must not in any way prevent the door from opening or force it shut, as this will damage the mechanism. Ensure that there is free space in front of the door and before closing wait for the return opening device.18 "ALL IN 1" button This option optimises the use of "ALL in 1" ("3 in 1"/"4 in 1"/"5 in 1", ecc.) combined detergents. By pressing this button, the selected washing programme is modified to get best performance from combined detergents (furthermore, the salt and rinse aid shortage lights are de-activated). WARNING! Once selected, this option keeps being on (light on) also for next washing cycles and it can be de-activate (light off) only by pressing the button once again. IMPORTANT This option is recommended when using the RAPID 24' program, the duration of which will be extended for about 15 minutes, allowing the detergent tablets to achieve a better performance. "DELAY START" button Dishwasher start time can be set with this button, delaying start from 1 to 23 hours. Proceed as follows to set a delayed start: ■ Press the "DELAY START" button ("00" will appear on the display). ■ Press the button again to increase the delay in hours (each time the button is pressed the delay is increased by 1 hour to a maximum of 23). ■ To start the countdown, press the "START" button. At the end of the countdown, the programme will automatically start. If you wish to see which programme has been selected, press the "PROGRAMME SELECTION" button. Proceed as follows to cancel a delayed start: ■ Hold the "RESET" button down for at least 5 seconds. "00" will appear on the display and some audible signals will sound. ■ The delayed start and the selected programme will be cancelled. The display will show two lines. ■ At this point, a new programme and option buttons must be set to start a new programme as indicated in the "PROGRAMME SETTINGS" section. Alarm mute for the PROGRAMME END The alarm for the programme end may be muted as follows: IMPORTANT The dishwasher must ALWAYS be off before start of this procedure.
1. Hold down the "PROGRAMME
SELECTION" button and at the same time switch on the dishwasher by pressing the "ON/OFF" button (a brief audible signal will sound).
2. Keep the "PROGRAMME SELECTION"
button pressed for at least 15 seconds (during this time 2 audible signals will sound).3. Release the button when the THIRD audible signal sounds ("A0 " will appear on the display to indicate that the memorization is off).
4. Press the same button again ("A1" will
appear on the display to indicate that the memorization is on).
5. Turn off the dishwasher by pressing the
"ON/OFF" button to confirm the new setting. To disable the memorization, follow the same procedure. IMPORTANT This dishwasher is equipped with an anti-overflow safety device which will automatically discharge any excess water should a problem occur. WARNING! To ensure the correct operation of the anti-overflow safety device, we recommend that the dishwasher is not moved or tilted during operation. If however it is necessary to tilt or move the dishwasher, please ensure that the washing cycle is complete and that there is no remaining water inside the dishwasher.
3. Release the button when the second
audible signal sounds ("b1" will appear on the display to indicate that the alarm is on).
4. Press the same button again ("b0" will
appear on the display to indicate that the alarm is off).
5. Turn off the dishwasher by pressing the
"ON/OFF" button to confirm the new setting. To turn the alarm on again, follow the same procedure. Memorization of the last programme used The last programme used can be memorized by following the below: IMPORTANT The dishwasher must ALWAYS be off before start of this procedure.
1. Hold down the "PROGRAMME
SELECTION" button and at the same time switch on the dishwasher by pressing the "ON/OFF" button (a brief audible signal will sound).
2. Keep the "PROGRAMME SELECTION"
button pressed for at least 30 seconds (during this time, 3 audible signals will sound).
Turn off the dishwasher, open the inlet hose and reset the cycle. Check if the drain tube is bent or if the siphon or filters are clogged. If the problem persists, contact Customer Service. Check if the drain tube is bent or if the siphon or filters are clogged. If the problem persists, contact Customer Service. Contact Customer Service. Clean the filter plate. If the problem persists, contact Customer Service.
FAULTS CAUSE SOLUTION
E2 appears on the display and the alarm sounds. E3 appears on the display and the alarm sounds. E4 appears on the display and the alarm sounds. E5,E6,E7,Ef or EL appears on the display and the alarm sounds. E8 or Ei appear on the display and the alarm sounds. No water (inlet hose closed). The machine cannot drain water. Water leak Electronic control fault. The water heating element is not working correctly or the filter plate is clogged. The dishwasher is able to signal a series of faults in the display.21 ONE Fi This appliance is equipped with ONE Fi technology that allows you to control it remotely via App, thanks to Wi-Fi function. Machine enrollment (on App) ■ Download the Hoover Wizard App on your device. The Hoover Wizard App is available for devices running both Android and iOS, both for tablets and for smartphones. Get all the details of the ONE Fi functions by browsing the App in DEMO mode. ■ Open the App, create the user profile and enroll the appliance following the instructions on the device display or the "Quick Guide" attached on the machine. Enable remote control (via App) ■ After the machine enrollment, every time you want to manage it remotely through the App, firstly you have to load dishes and detergent. Switch the appliance on, select the "P0" programme, press the START/RESET button and close the door; from that moment on you can manage it through the App commands. WIRELESS PARAMETERS With this the Candy Hoover Group Srl, declares that this appliance marked with complies with the essential requirements of the Directive 2014/53/EU. To receive a copy of the declaration of conformity, please contact the manufacturer at: www.candy-group.com Parameter Wireless Standard Frequency range Max Trasmit Power Minimum Receiving Sensitivity Specifications
2,412 GHz. - 2,484 GHz. 802.11b (11Mbps) +18,5 ± 2 dBm 802.11g (54Mbps) +16 ± 2 dBm 802.11n (HT20, MCS7) +14 ± 2 dBm 802.11b (11Mbps) -93 dBm 802.11g (54Mbps) -85 dBm 802.11n (HT20, MCS7) -82 dBm22 PROGRAMME GUIDE Wash with prewash For wash programmes with prewash, it is advisable to add a second dose of detergent (max. 10 g) directly in the machine. Cycle with alternated action of water jets and steam. Effective in softening and removing dried up soil and bacteria, with no need to pre-wash pots and dishes. Hygiene+ 75°C Suitable for normally soiled items that are to be washed straight after a meal (Max 8 place load). Quick wash for dishes which are to be washed immediately after the meal. Wash load of 4/6 persons. Suitable for delicate crockery and glassware. Also for less soiled items excluding pans. Short cold pre-wash for items that are stored in the dishwasher until you are ready to wash a full load. Once a day - for normal soiled pans and any other items that have been left all day for washing. Programme for normally soiled tableware (the most efficient in terms of its combined energy and water consumption for that type of tableware). Programme standardised to EN 50242. STEAM 75°C Chef 65°C Family 70°C UNIVERSAL 60°C Daily 55°C ECO 45°C Cristal 45°C A Wash 59’ 65°C RAPID 24' 50°C Pre-wash An antibacterial cycle, intended for washing and sterilising dishes (even heavily stained ones) babies’ bottles etc. Intended for rapid washing of very dirty dishes. Intended for everyday dishwashing. Two final rinses ensure a high level of hygiene and cleanliness. Fast cycle, for “normally” dirty dishes - intended for frequent washes and normal loads. = is the program which allows you to access the ONE FI functions Eco Plus 55°C A medium temperature programme, intended for washing pans and dishes that are “normally” dirty, using detergents which contain enzymes. Programme Description23 Check list Avaragedurationin minutes Special function buttons available Detergent for soaking(Prewash)Detergent for washingClean filterCheck rinse aid dispenserCheck salt containerHot pre-washCold pre-washMain washFirst cold rinseSecond cold rinseHot rinse with rinse aidWith cold water (15°C) -Tolerance ± 10%-"DELAY START" button"OPEN DOOR" button"ALL IN 1" button Programme contents
N/A = OPTION NOT AVAILABLE
= "IMPULSE" programmes
70°C 60°C 55°C24 The water-stop device protects against water damages caused by leaks on the fill hose which could develop due to natural ageing of the hose. In the water-stop system the leaking water fills the corrugated hose and activates a stop valve which cuts off the water supply to the machine. This fault is shown by a red sector on the window . Would this occur, please refer to your Service Agent. If the hose is not long enough for correct connection, it must be replaced with a longer one. The hose can be obtained from your Service Agent. Safety antitwist device (press and twist to remove the washer). AQUASTOP-SYSTEM25
- The softener unit is set in the factory at level 4 (d4) as this satisfies the requirements of the majority of users. Regulate the setting of your water softener unit according to the degree of hardness of your water as follows: IMPORTANT The dishwasher must ALWAYS be off before start of this procedure.
1. Hold down the "PROGRAMME
SELECTION" button and at the same time switch on the dishwasher by pressing the "ON/OFF" button (a brief audible signal will sound).
2. Keep the "PROGRAMME SELECTION"
button pressed for at least 5 seconds, UNTIL a brief audible signal sounds. The current water softener setting level will be shown on the display.
3. Press the same button again to select
the required water softener level: each time the button is pressed, the setting will increase by one level. When you have reached "d7", the display will go back to "d0".
4. Turn off the dishwasher by pressing the
"ON/OFF" button to confirm the new setting. WARNING! If any problem occurs, turn the dishwasher off by pressing the "ON/OFF" button and start the procedure again from the beginning (STEP 1).
Depending on the source of the supply, water contains varying amounts of limestone and minerals which are deposited on the dishes leaving whitish stains and marks. The higher the level of these minerals present in the water, the harder the water is. The dishwasher is fitted with a water softener unit which, through the use of special regenerating salt, supplies softened water for washing the dishes. The degree of hardness of your water can be obtained from your water supply company. Regulating the water softener The water softener can treat water with a hardness level of up to 90°fH (French grading) or 50°dH (German grading) through 8 settings. The settings are listed in the table below:
Water hardness Water softener setting Use of regenerating salt Salt loading indicator This model is provided with an indicator light on the control panel which will light up when it is necessary to reload the salt container. IMPORTANT The appearance of white stains on dishes is generally an important sign that the salt container needs filling.2627