
DCR-TRV530E - Camcorder SONY - Free user manual and instructions
Find the device manual for free DCR-TRV530E SONY in PDF.

| Product Type | Digital8 Camcorder |
| Brand | Sony |
| Model | DCR-TRV530E |
| Recording System | Digital8 |
| Recording Media | Hi8/Digital8 tape (mini-DV not compatible) |
| LCD Screen | 8.8 cm (3.5 inches) color, rotating |
| Viewfinder | Electronic black and white, adjustable |
| Optical Zoom | 25x |
| Digital Zoom | Up to 700x (adjustable) |
| Image Stabilizer | SteadyShot (electronic) |
| Exposure Modes | PROGRAM AE (multiple modes), manual exposure |
| Shooting Functions | NightShot, Super NightShot, Back Light, Fader, picture effects, digital effects, Memory Mix |
| Battery | InfoLITHIUM series M (NP-FM30 supplied, approx. 30 min capacity) |
| Power Supply | AC power adapter AC-L10A/L10B/L10C (supplied), 100-240 V |
| Weight (approx.) | Approx. 750 g (with battery and tape) |
| Dimensions (approx.) | 89 x 114 x 215 mm (W x H x D) without protrusions |
| Connectors | A/V (output), S-Video (output), DV (i.LINK) output, USB, microphone, headphone, LANC |
| Advanced Features | Memory Stick (photo recording and playback), digital editing, signal convert |
| Operating Temperature | 0°C to 40°C, 20% to 80% humidity |
Frequently Asked Questions - DCR-TRV530E SONY
User questions about DCR-TRV530E SONY
0 question about this device. Answer the ones you know or ask your own.
Ask a new question about this device
Download the instructions for your Camcorder in PDF format for free! Find your manual DCR-TRV530E - SONY and take your electronic device back in hand. On this page are published all the documents necessary for the use of your device. DCR-TRV530E by SONY.
USER MANUAL DCR-TRV530E SONY
Digital Video Camera Recorder B
Operating Instructions
Before operating the unit, please read this manual thoroughly, and retain it for future reference.
HCTPYKUNI NO 3KCNLYATALIN
Ipeed 3Kcnpnyatauien annapaTa BnHmATEbHO npOHTte, noXaJyncTa, daHHoe pyKOBOdTBO n COxpaHnTe erO dJaJIbHeMIX CNpABOK.
Digital Handycam

InfoLITHIUM
TM

SERIES

MEMORY STICK TM

Digital8
DCR- TRV230E/TRV235E/TRV325E/
TRV330E/TRV430E/TRV530E
English
Welcome!
Congratulations on your purchase of this Sony Digital Handycam camcorder. With your Digital Handycam, you can capture life's precious moments with superior picture and sound quality.
Your Digital Handycam is loaded with advanced features, but at the same time it is very easy to use. You will soon be producing home video that you can enjoy for years to come.
WARNING
To prevent fire or shock hazard, do not expose the unit to rain or moisture.
To avoid electrical shock, do not open the cabinet.
Refer servicing to qualified personnel only.
NOTICE ON THE SUPPLIED AC POWER ADAPTOR FOR CUSTOMERS IN THE UNITED KINGDOM
A moulded plug complying with BS1363 is fitted to this equipment for your safety and convenience.
Should the fuse in the plug supplied need to be replaced, a 5 AMP fuse approved by ASTA or BSI to BS1362 (i.e., marked with or mark) must be used.
If the plug supplied with this equipment has a detachable fuse cover, be sure to attach the fuse cover after you change the fuse. Never use the plug without the fuse cover. If you should lose the fuse cover, please contact your nearest Sony service station.
For the customers in Europe ATTENTION
The electromagnetic fields at the specific frequencies may influence the picture and sound of this digital camcorder.
This product has been tested and found compliant with the limits set out in the EMC Directive for using connection cables shorter than 3 meters. (9.8 feet)
For the customers in Germany Directive:EMC Directive 89/336/EEC. 92/31/EEC
This equipment complies with the EMC regulations when used under the following circumstances:
Residential area
Business district
Light-industry district
(This equipment complies with the EMC standard regulations EN55022 Class B.)
Pysckn
Добpo пожаловать!
I03dpaBnaem BAc C npno6peTeHnEm daHHoB BuDeokamepb Digital Handycam qnpMb1 Sony. C NOMOsbHO Baew BIndeokamepb Digital Handycam Bbl CMOXeTe 3aneaTneB doporeNe Bam MRHOBeHNJ KU3HN C npeBOxCoNDbIM KaueCTBOM N3O6paXeHNi N 3ByKa. BaWa BuDeokamepa Digital Handycam OchaSeHa YCOBepseHCTBOBaHHbIMN fynKuYMI, HO B TO Xe BpEM ee OChb JERKO uCNoIb3OBA Tb. BCKope Bbl 6yDete Co3daBa Tb CeMeHbIe BuDeonpOrpAmMbI, KOtopbIMN MoKeTe HacnJaKaDaTbc PocJeDuOuIe rOdbI.
PNEyPPEXDEHNE
IpypeDToBpaueHnBa0ropaHnIyIOnaChOCTn 3NeKtpuYeCKoR O yapa He BbICTaBnIte annapaT Ha DoJb IIN Bnary.
Bo n36eKaHne nopaxKeHn 3JIeKtpnuecknM TOKOM He OTKpbBaIte Kopnyc.
3a obcnykubahnem obaaTaBcTolbko K KBaInΦuIpuOBaHOMy obcnykubIoUeMy nepcohany.
Make sure that the following accessories are supplied with your camcorder.
Y6eIntecb, cyTo cneIyUOuIe npHaIaNExKHOCTn npIraIaIOTcK BaSei BIndeokampe.
| 1 | 2 | 3 |
| 4 | 5 | 6 |
| 8 | 9 | 10 |
1 Wireless Remote Commander (1) (p. 210)
2 AC-L10A/L10B/L10C AC power adaptor (1), Mains lead (1) (p. 16)
3 NP-FM30 battery pack (1) (p. 15, 16) DCR-TRV230E/TRV325E/TRV330E/ TRV530E NP-FM50 battery pack (1) (p. 15, 16) DCR-TRV235E/TRV430E
R6 (size AA) battery for Remote Commander (2) (p. 211)
5 A/V connecting cable (1) (p. 44)
6 Shoulder strap (1) (p. 205)
Lens cap (1) (p. 26)
USB cable (1)* (p. 151)
[9] "Memory Stick" (1) (p. 124)
10 CD-ROM (SPVD-004 USB Driver) (1) (p. 151)
11 21-pin adaptor (1) (p. 45)
- DCR-TRV325E/TRV330E/TRV430E/TRV530E only
Contents of the recording cannot be compensated if recording or playback is not made due to a malfunction of the camcorder, storage media, etc.
1 BeçnpoBóHbI pyJbT dNCTaHcNoHHO ynpaBJIeHn (1) (ctp. 210)
2 CeTeBoi aIaIaTep npeMeHnHO ToKa AC-L10A/L10B/L10C (1) (ctp. 16)
3БатAPEHbI 6LOK NP-FM30 (1) (cTp.15,16) DCR-TRV230E/TRV325E/TRV330E/TRV530E BaTapeHbI 6LOK NP-FM50 (1) (cTp.15,16) DCR-TRV235E/TRV430E
4БатAPEka R6 (pa3mepa AA)ДЯ nylbta DnCTaHcUOnHOrO ynpaBLeHnA (2)(ctp. 211)
5 CoeHnHTeHbHbI Ka6JIb ayNo/BnDeo (1) (cTp. 44)
6Плесьов ремь (1) (cTp.205)
7 Kpblika oBbeKTHBa (1) (cTp. 26)
8 Ka6eIb USB (1)* (ctp. 151)
[9] "Memory Stick" (1) (ctp. 124)
10 CD-ROM (ДраиВер USB SPVD-004) (1) (ст. 151)
11 21-wtbtpboBb aadantep (1) (ctp. 45)
*ToIbKO moIeIIN DCR-TRV325E/TRV330E/ TRV430E/TRV530E
Copepkahne 3aIncn He MoXeT 6bItb KOMpeHcIpOBAHO B Cnyuae,ecnn 3aIncb NIN BOCpON3BeDeHne He BblIOJIHeHb I3-3a HEnCpPaBHOCTN BInEoKaMepbl, BInEoJeHTbl n T.I.
Taking moving or still images, and playing them back
- Recording a picture (p. 26)
- Recording a still image on a tape (p. 48)
- Playing back a tape (p. 39)
- Recording still images on "Memory Stick" (p. 129) (DCR-TRV325E/TRV330E/TRV430E/TRV530E only)
- Viewing a still image recorded on "Memory Stick" (p. 146) (DCR-TRV325E/TRV330E/TRV430E/ TRV530E only)
Capturing images on your computer
- Using with analog video unit and your computer (p. 98) (DCR-TRV330E only)
- Viewing images recorded on "Memory Stick" using USB cable (p. 150) (DCR-TRV325E/TRV330E/ TRV430E/TRV530E only)

Other uses
Functions to adjust exposure in the recording mode
Back light (p. 32)
NightShot/Super NightShot (p. 33)
PROGRAM AE (p.61)
- Adjusting the exposure manually (p. 64)
Functions to give images more impact
Digital program editing (p. 86)
Fader (p. 53)
- Picture effect (p. 56)
Digital effect (p. 58)
- Title (p. 67, 69)
- MEMORY MIX (p. 135) (DCR-TRV325E/TRV330E/TRV430E/TRV530E only)
Functions to give a natural appearance to your recordings
END SEARCH/EDITSEARCH/Rec Review (p. 37)
- Manual focus (p. 65)
- Digital zoom MENU (p. 107) The default setting is set to OFF. (To zoom greater than 25 × , select the digital zoom power in D ZOOM in the menu settings.)
Functions to use after recording
Zero set memory (p. 77)
HiFi SOUND MENU (p. 107)
- SUPER LASER LINK (p. 46)
- Tape PB ZOOM (p. 75)/Memory PB ZOOM (p. 157) (DCR-TRV325E/TRV330E/TRV430E/TRV530E only)
CbeMa DnKxuXcxn Hn Hn HeoBnKhblx n3OpaXeHn nX BocpnU3BeDeHne
3aɪnɪc bɪnɪðpɑːkæŋnɪ (CTp. 26)
3aIncb HnOoBnKHO rO 3IO6paXeHna JHeTy (CTp.48)
Bocnpon3BeJeHneJeHTbI (CTp. 39)
- 3aɪnscb HeɪnoDVBIXhBix nɪðþaʊxeHŋ Ha "Memory Stick" (cTp. 129) (Toɪbko moJelɪn DCR-TRV325E/ TRV330E/TRV430E/TRV530E)
- Плосмотр Нетодьхноги Изображени, заиманоги на "Memory Stick" (стр. 146) (Толъков модали DCR-TRV325E/TRV330E/TRV430E/TRV530E)
3aHnCb n3o6paXeHn Ha BaWem KOMnbITope
Checking supplied accessories 3
Main Features 4
Quick Start Guide 8
Getting started
Using this manual 12
Step 1 Preparing the power supply 15
Installing the battery pack 15
Charging the battery pack. 16
Connecting to a wall socket 21
Step 2 Setting the date and time 22
Step 3 Inserting a cassette 24
Recording - Basics
Recording a picture 26
Shooting backlit subjects
- BACK LIGHT 32
Shooting in the dark
- NightShot/Super NightShot 33
Self-timer recording (DCR-TRV325E/
TRV330E/TRV430E/TRV530E only)
35
Checking the recording - END SEARCH/
EDITSEARCH/Rec Review 37
Playback - Basics
Playing back a tape 39
Viewing the recording on TV 44
Advanced Recording Operations
Recording a still image on a tape
-Tape Photo recording 48
Using the wide mode 52
Using the fader function 53
Using special effects - Picture effect 56
Using special effects - Digital effect 58
Using the PROGRAM AE function 61
Adjusting the exposure manually 64
Focusing manually 65
Superimposing a title 67
Making your own titles 69
Inserting a scene 71
AdvancedPlaybackOperations
Playing back a tape with picture effects 72
Playing back a tape with digital effects 73
Enlarging recorded images - Tape PB ZOOM 75
Quickly locating a scene using the zero set memory function 77
Searching a recording by date
-Date search 78
Searching for a photo
- Photo search/Photo scan. 80
Editing
Dubbing a tape 82
Dubbing only desired scenes
Digital program editing 86
Using with analog video unit and your
Computer - Signal convert function (DCR-
TRV330E only) 98
Recording video or TV programmes (DCR
TRV330E only) 100
Inserting a scene from a VCR
- Insert Editing (DCR-TRV330E only) ... 104
Customizing Your Camcorder
Changing the menu settings. 107
"Memory Stick" operations
(DCR-TRV325E/TRV330E/TRV430E/TRV530E only)
Using "Memory Stick"-introduction 124
Recording still images on "Memory Stick"
-Memory Photo recording 129
Superimposing a still image in the "Memory
"Stick" on an image
-MEMORYMIX. 135
Recording an image from a tape as a still image
141
Copying still images from a tape
- Photo save 144
Viewing a still image
- Memory Photo playback 146
Viewing images using your computer 150
Copying the image recorded on "Memory
"Stick" to tapes (DCR-TRV330E only) 155
Enlarging still images recorded on "Memory
"Stick"s - Memory PB ZOOM 157
Playing back images in a continuous loop
SLIDE SHOW 159
Preventing accidental erasure
Image protection 161
Deleting images
ing a print mark - PRINT MARK 166
Using the printer (optional) 168
Troubleshooting
Types of trouble and their solutions 169
Self-diagnosis display 174
Warning indicators and messages. 175
Additional Information
Digital8 system, recording and playback
185
About the "InfoLITHIUM" battery pack..... 188
About i.LINK 190
Using your camcorder abroad 192
Maintenance information and precautions
193
Specifications 199
Quick Reference
Identifying the parts and controls 203
Index 214
PpOBeRpa npIraeMbIX npHnAdIeXHoCTe 3 OChOBhIe cyHKUIN 5
PykoBoCTBO no 6bICTpOmy 3anyCky.....10
IyHKT 1 IoIroTOBka NCTOHTHnKa NITAHNIA 15
UcTaHOBKa 6aTapeiHoro 6Ioka 15
3apKa 6aTapeHoro 6Joka. 16
PoiDcoEHHHeHc K cTeBoB po3eTke 21
IyHKT 2 UcTaHOBka DaTbI IN BpeMeHn 22
IyHKT 3 YcTaHOBKa Kaccetbl 24
3aHcB - OCHOBHbIe NOLOXeHnA
3aIncB n3o6paXeHH 26
CbeMa 06bEeKToB C 3aHHe NOpCBeTKoI
- BACK LIGHT 32
Cbemka B TEMHOTe-Houhy cbemka/Houhy cynepcbemka...33
3aIncb no TaMepy caMo3anycKa (ToIbko
Moenel DCR-TRV325E/TRV330E/ TRV430E/TRV530E) 35
BCTabKa 3nIImOda c KBM -MoTaNk BCTABOK (ToNbko MoJeb DCR-TRV330E) 104
BbINOJIHHeHne mHdINBnDyaJbHbIX yctaHOBOK Ha BnDeOKaMepe
U3MeHeHne yCTaHOBOK MeHIO 107
Onepaunc "Memory Stick" (ToIbko MoJeN DCR-TRV325E/TRV330E/ TRV430E/TRV530E)
IcnoIb3ObaHne "Memory Stick"-BVeJeHne .... 124
3aɪnçb HænoɒdBʌnKhɒbɪx nɪðþaʊkæHŋ ha “Memory Stick” -ФOTOCbEмKa c COxpaHEnHem BnamrTɪ . 129
HanoKHeHne HenoDnBnKHO n3o6paXeHn 13 "Memory Stick" Ha noDnBnKHO n3o6paXeHne -MEMORY MIX .135
3aIncbNIO6paeKHeN CJIeHTb KaK HenoDnBHXHOrIO 03o6paKeHEn 141
KoInpOBaHHe HEnOdBxHbIX N3OpBXeHm CJeHTbl-CoxpaHHeHne FOToCHMKBOB B nAMrTn 144
PrcMOrH HeNOBdIXHO r3O6paXeHnI BocnpoBBeDeHne FOToCHMkoB I3 narnT 146
PcOcMoTp nI3o6pAeHKeH cINONb3oBaHnEM nepCohaHbHoro KOMbnHOpTepa... 150
KoI\PaOBaHnE n3O6pAxeHn, 3aIcAChhBix Ha "Memory Stick", HcIeHTbT (ToIbko moIebl DCr-TRV330E) .155
YBeIeHHeHneODbXhBx3aIINCAHNbIX nIO6paKeHH Ha "Memory Stick" -PamrTB PB ZOOM 157
Bocnpn3BeHneI n3o6paxeHn B HnpepbIBHnIOncEdoBaTeNbHOCTN IO 3aMKHYTOmy UKlny-SLIDE SHOW...159
PpeoTbpaueHne clyaHoro CTpaHnna -3aunTa n3o6paXeHnna 161
UdaJIeHHe n3o6paXKeHn 163
3a n c b neu aThbIX 3HaKOB - PRINT MARK ......... 166
NcnoIb3OBAHneMpInHTepa (npno6peTaetcra 0TdEnbHO) 168
Ponck u yctpaenhe HncnpabHocte
Pa3HOBnIOHcTn HEnCnPabHOCTeN CnOcObInx yCTpaHEHn 177
HnDnKaun CaOmaIaHOctu 182
PpeynpEJaIOuIe INHmKaTOpBi noo6ueHHn. 183
DOnOpHnTeIbHa NΦopMaζη
LcpoBaa CnCTeMa Digital8F,3anucbN BocnpOn3BeDeHne 185
O 6aTapeiHOM 6JIOke "InfoLITHIUM" 188
OTHOcHTeNbHO i.LINK 190
This chapter introduces you to the basic features of your camcorder. See the page in parentheses "() for more information.

Connecting the mains lead (p. 21)
Use the battery pack when using your camcorder outdoors (p. 15)

Inserting a cassette (p. 24)
1 Slide OPEN/EJECT in the direction of the arrow and open the lid.
Insert the cassette in a straight line deeply into the cassette compartment with the window facing out. Push the middle portion of the back of the cassette to insert.
3 Close the cassette compartment by pressing the PUSH mark on the cassette compartment. After the cassette compartment goes down completely, close the lid until it clicks.
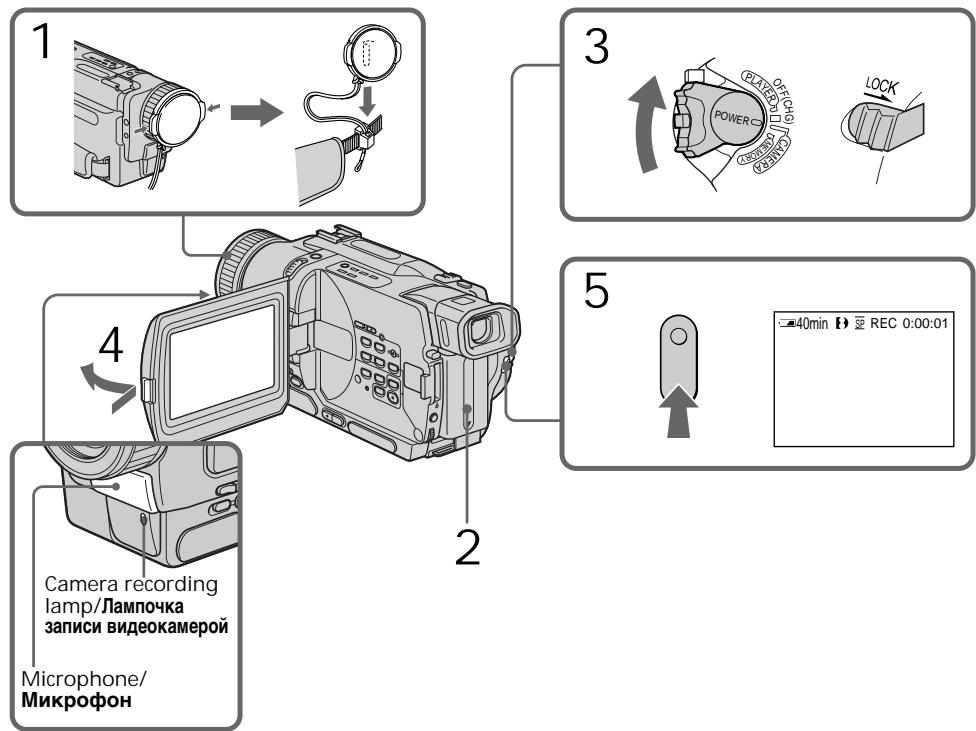
1 Remove the lens cap.
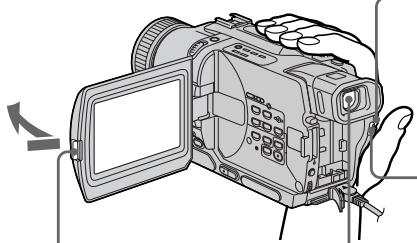
3 Open the LCD panel while pressing OPEN. The picture appears on the LCD screen.
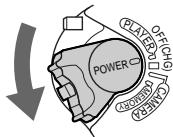
2 Set the POWER switch to CAMERA while pressing the small green button.
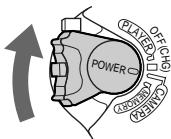
4 Press START/STOP. Your camcorder starts recording. To stop recording, press START/STOP button again.

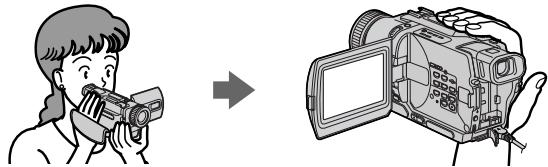
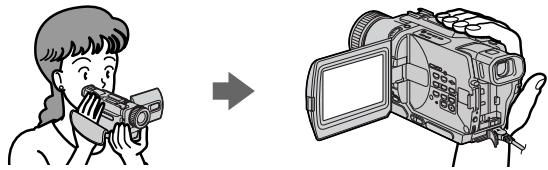
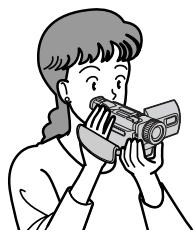
Viewfinder
When the LCD panel is closed, use the viewfinder placing your eye against its eyecup.
The picture in the viewfinder is black and white.
When you purchase your camcorder, the clock setting is set to off. If you want to record the date and time for a picture, set the clock setting before recording (p. 22).
4
Monitoring the playback picture on the LCD screen (p. 39)
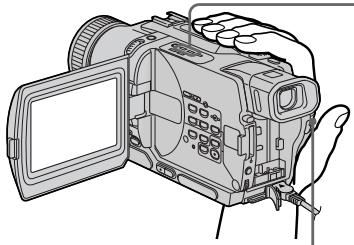
Press to rewind the tape.

Press to start playback.

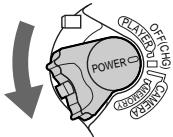
1 Set the POWER switch to PLAYER or VCR (DCR-TRV330E only) while pressing the small green button.
Note
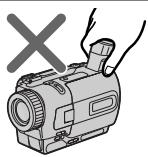
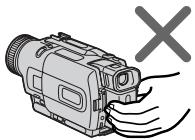
Do not pick up your camcorder by holding the viewfinder, the LCD panel, or the battery pack.

PykoBoIcTBo IIO 6bICTpOmy 3aIpycky
B daHnoI rnaBe npBbeHeIbO cHOBhIe cyHKnMn Bauei BndeOkamepbI. IOpRo6HbIe CBeDeHn npBbeHeI Ha cTpaHnue B KpyrblxCKo6kax“()”.
3 HaxmTe KhoIky I BOCpOn3BeDeHnI
W
PLAY

1 Haxab ManeHbkyo
3eIeHyIO KHOIpKy, yCTaHOBnTe nepeKJIouaTeIb POWER B nIoJoxHeIe PLAYER uIN VCR (TolbKO moJeB DCR-TRV330E).
Примейане
He noHnMaTe BnDeOkAmepy, B3A8Bmncb 3a BnDOuCKaTeNb, NaHeIb KKd nnn 6aTaapeiHbN 6JOK.

Using this manual
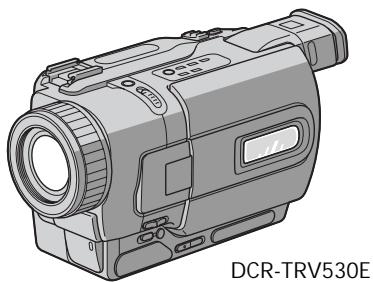
The instructions in this manual are for the six models listed in the table below. Before you start reading this manual and operating your camcorder, check the model number by looking at the bottom of your camcorder. The DCR-TRV530E is the model used for illustration purposes. Otherwise, the model name is indicated in the illustrations. Any differences in operation are clearly indicated in the text, for example, "DCR-TRV530E only."
As you read through this manual, buttons and settings on your camcorder are shown in capital letters.
e.g. Set the POWER switch to CAMERA.
When you carry out an operation, you can hear a beep sound to indicate that the operation is being carried out.
Type of difference/Tnblpa3nny
| DCR- | TRV230E | TRV235E | TRV325E | TRV330E | TRV430E | TRV530E |
| MEMORY mark*(on the POWER switch)/MeTka MEMORY*(na nepekliouatele POWER) | — | — | ● | ● | ● | ● |
| VCR mark**(on the POWER switch)/MeTka VCR**(na nepekliouatele POWER) | — | — | — | ● | — | — |
| Self-timer/Taïmep camo3anypska | — | — | ● | ● | ● | ● |
| Ψ (USB) jack/Γηεδο Ψ (USB) | — | — | ● | ● | ● | ● |
| LCD screen/Ξκραπ加热KD | 6.2 cm (2.5 type)/(2,5 πίουмα πο ένηρολή) | 6.2 cm (2.5 type)/(2,5 πίουmα πο ένηρολή) | 6.2 cm (2.5 type)/(2,5 πίουmα πο ένηρολή) | 6.2 cm (2.5 type)/(2,5 πίουmα πο ένηρολή) | 7.5 cm (3 type)/(3 πίουmα πο ένηρολή) | 8.8 cm (3.5 type)/(3,5 πίουmα πο ένηρολή) |
| Digital zoom/Lιφροών Bαρμοσθέκτιν | 700× | 800× | 700× | 700× | 800× | 700× |
Provided/PrunlaraeTcA
Not provided/He npnilaraetca
- The models with MEMORY marked on the POWER switch is provided with memory functions. See page 124 for details.
** The models with VCR marked on the POWER switch can record pictures from other equipment such as VCR. The other models have PLAYER mark on the POWER switch.
Before using your camcorder
With your digital camcorder, you can use Hi8 Hi3/Digital8 [ ] video cassettes. Your camcorder records and plays back pictures in the Digital8 [ ] system. Also, your camcorder plays back tapes recorded in the Hi8 Hi3/standard 8 [ ] (analog) system. You, however, cannot use the functions in "Advanced Playback Operations" on page 72 to 81 for playback in the Hi8 Hi3/standard 8 [ ] system. To enable smooth transition, we recommend that you do not mix pictures recorded in the Hi8 Hi3/standard 8 [ ] with the Digital8 [ ] system on a tape.
Note on TV colour systems
TV colour systems differ from country to country. To view your recordings on a TV, you need a PAL system-based TV.
Copyright precautions
Television programmes, films, video tapes, and other materials may be copyrighted.
Unauthorized recording of such materials may be contrary to the provision of the copyright laws.
IcnoJb3OBAHne daHHoro pyKOBoIDCTBa
- MoDéJIи C MeTKoI MEMORY Ha
nepeKJIQUaTeIe POWER oCHaIeHbI
ФунКцИЯМи ПамТи. CM.стp. 124 ДЯ
ПOLУЧЕНЯ 6ОЛEE NOДрбИХ CBeDEHnI.
** MoDéni c MeTKoVCR Ha nepeKnHouaTeNe POWER mOryT 3aIncbIBaTB n3o6paXeHNc dpyro anInpaTpybl, taKo, kaK KBM. B OcTaJIbHbIX MoDeJIx Ha nepeKnHouaTeNe POWER haxOДNTcMeTKa PLAYER.
IpeepHaayalom 3KcnpyaTaucn BawaenBvdeokamepbbl
Дя Baшенцфровидевокамерь Вь loMeTe nCNoIb3OBAtВnDEOKacceTbHi8 Hi8 Digital8).BaаВdEVOKaMepa 3aIncbIbAetИ BOCPON3BOJNT N3O6paXeHnB ZUΦpOBoB cnCTeMe Digital8. TaKxe, BaаВdEVOKaMepa BOCPON3BOJNT JIeHTbI, 3aIncaHHbIe B CNTeMe Hi8 H3/ctaHdpTHOu CNTeMe 8 8 (aHaIorOBO). Ondako, BbI He MoXeTe nCNoIb3OBAtФyHKcNnB pa3JeIe "YCOBepueHCTBOBaHHbIe Opeaunn BOCPON3BeDeHn" Ha cTpaHncax c 72 no 81 Дя BOCPON3BeDeHnB CNTeMe Hi8 H3/ ctanDapTHOu CNTeMe 8 8.ДЯ obecneYeHn IJIaBHOrO nepexOda peKOMeHdyETcH He CMEWIBaTB NaJeHTE N3O6paXeHn, 3aIncaHHbIe CNTeMe 8 8, c N3O6paXeHnMn, 3aIncaHHbIMn B zuΦpOBo CNTeMe Digital8.
Приимechаши по системам CBETHORO TeJIeBnIeHnI
CnCTeMbI ZBETHORo TEBUNDEHIN OTNIuHaOTcB 3aBNCIMOCTN OT CTpaHbI.ДЯ npocMToPa Baunx 3aNInCe Hn EKpaHe TENEBU3Opa Bam HeoXoDnMo NcNoJIb3OBaTb TELEBn3Op, OCHOBAHbI Ha CnCTeMe PAL.
Пре dioctepexeHne o6 aBTopcKOM npaBe
TeIeBn3NoHHbIe npOrpaMMbI, KINHOJIbMbI, BnDEoJIeHTbI n DpyrHe MaTePnaJIb MoYr 6bITb 3aUuIeHbI aBTOpCKM npaBOM. HeNtEh3npoBaHNa 3aNcB TaKx MaTePnaJIOB MOKeT pOToNbOpEuyntb NIOXKeHnAm 3aKOHa o6 aBTOpCKOM npaBe.
Precautions on camcorder care
Lens and LCD screen/finder (on mounted models only)
- The LCD screen and the finder are manufactured using extremely high-precision technology so over 99.99% of the pixels are operational for effective use. However, there may be some tiny black points and/or bright points (white, red, blue or green in colour) that constantly appear on the LCD screen and the finder. These points are normal in the manufacturing process and do not affect the recording in any way.
- Do not let your camcorder get wet. Keep your camcorder away from rain and sea water. Letting your camcorder get wet may cause your camcorder to malfunction. Sometimes this malfunction cannot be repaired a.
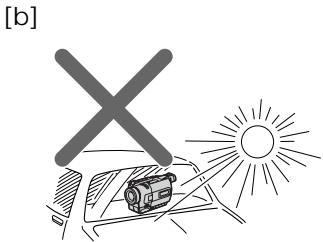
- Never leave your camcorder exposed to temperatures above 60^ (140^) , such as in a car parked in the sun or under direct sunlight [b].
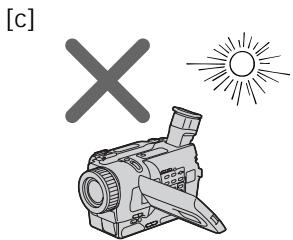
- Be careful when placing the camera near a window or outdoors. Exposing the LCD screen, the finder or the lens to direct sunlight for long periods may cause malfunctions [c].
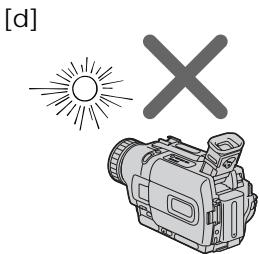
- Do not directly shoot the sun. Doing so might cause your camcorder to malfunction. Take pictures of the sun in low light conditions such as dusk [d].

MepblnpedocTopoKHOCTn npnyxoJe 3a BndeokamepoJ
06beKTHB n 3KpaH KKДВИДОИСКаTeIb (TOJIbKO HA CMOHTnPOBaHHbIX MODEJIaX)
3KpaH KKD u BvDOnCKaTeIb N3rTOBJIeHbI C NOMOuBb YoBcOKOpneu3HOHNoT ETHoNOrn, TaK TTO CbIwe 99,99% 3JeMeHTOB N3o6paXeHnI PpeHa3HaYeHbI DnA 3ΦΦeKTHBHorO McNoIb3OBAHn. OdHaKO Ha 3KpaHe KKД u B vDOnCKaTeIe MOyT NOCToRHHo NORBJIaTBcR MeJKNe YepHbIe H/nnI npKHe UcBeTHbIe TOUKn (6Eblc, KpaChbIe, CnHne NnIe 3JeHbIe. PovBLeHne 3Txx ToeK BnOLHe HopMaIbHo Dn IPOUeCCA CbEMKn H NIKONM O6pa3OM He BInaET Ha 3aINCbIBaEMoe N3o6paXeHne.
He donyckaite, yTo6bI BnDeokamepa cTaHOBnlaCb BnaXHoN. IpeOxpaHraIte BnDEokamepy OT DOxJa N MOpCKoB BObl. Ecnn Bbl HAmOHTe BnDeokamepy, To 3TO MoKET npNBecTN K HeNCpabHocTn annapata, KOtopar He BcERda MoKet 6bITb YcTpaHeHa a.
Hnkorga He octabJnIe BnJeokamepy B Mece T TempepatyoB bIe 60°C (140°F), KaK, HApIMep, B aBTOMoBne, OCTabJeHHOM Ha COJIHHe IIN NOI pRmblcOJIHeHbIM CBETOM [b].
- ByIbTe BHNMaTeJIbHbI, KOrJa NOMEuaeTe KaMepy OkONo OKHa IINN BHe NOMEueHn. Bo3dEiCTBVe Ha 3KpaH KKД, BUnOnCKaTeIb IINN O6BeKTHN pIamoro CoJneHORO CBeTa B TeUeHn EINTEJBHO BRpeMeH MoKet npNBecTn K HEnCnpaBHOCTAm [C].
He HanpaBnIte KaMepy npMaHa coNHe. 3TO MoKET npNBecT N K HcNpBaHocTn. IpoBOaNTe CbEMKn CoNHa B YcNobNx Hs3KO oCBeSeHHoCTn, TaKx, KaK cyMePKn [d].
Step 1 Preparing the power supply
Пункт 1 Побтовka nctочнka ппаня
Installing the battery pack
We recommend using the battery pack when you use your camcorder outdoors.
(1) Lift up the viewfinder.
(2) Slide the battery pack down until it clicks.
UcTaHOBka 6aTapeHoro 6Joka
PekomEnyTeTcYcTaHOBnTB 6aTapeHbIb 6NoK, ecnn Bby nCnoJIb3yeTe BaUy BIneOkaMepy BHe nOmeuEHH.
To remove the battery pack
(1) Lift up the viewfinder.
(2) Slide the battery pack out in the direction of the arrow while pressing BATT (battery) release lever down.
If you install the large capacity battery pack If you install the NP-FM70/FM90/FM91 battery pack on your camcorder, extend its viewfinder.
EcIn Bby yctaHOBNJ 6aTapeHbI 6LoK 60JIbwoj EMKoCTn
Ecni Bby yctaHOBnHa Bauy BnuDeokamepy 6aTapeHbI bLOK NP-FM70/FM90/FM91, BBiDnHbTe BNDOCKaTeJIb.
Charging the battery pack
Use the battery pack after charging it for your camcorder.
Your camcorder operates only with the "InfoLITHIUM" battery pack (M series).
See page 188 for details of "InfoLITHIUM" battery pack.
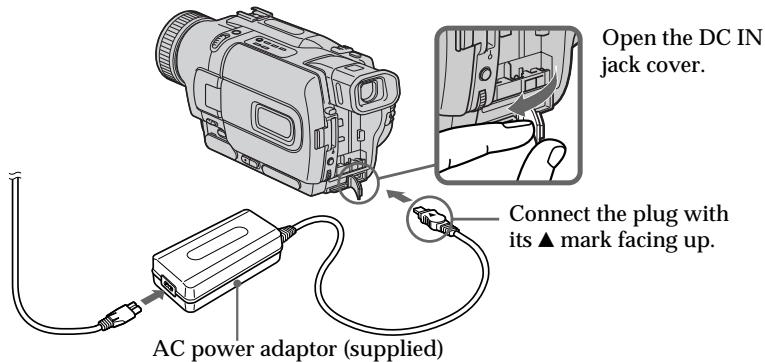
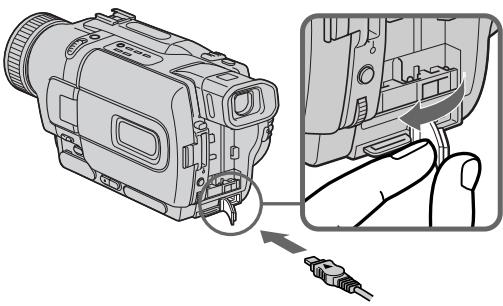
(1) Open the DC IN jack cover and connect the AC power adaptor supplied with your camcorder to the DC IN jack with the plug's mark facing up.
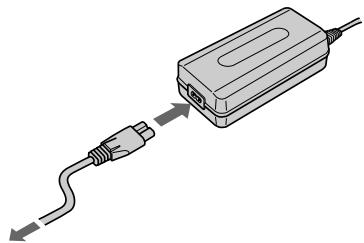
(2) Connect the mains lead to the AC power adaptor.
(3) Connect the mains lead to a wall socket.
(4) Set the POWER switch to OFF (CHG). Charging begins. The remaining battery time is indicated in minutes on the display window.
When the remaining battery indicator changes to normal charge is completed. To fully charge the battery (full charge), leave the battery pack attached after normal charge is completed until FULL appears on the display window. Fully charging the battery allows you to use the battery longer than usual.
3apka 6aTaapeHoro 6loKa
IcnoIb3yIte 6aTapeHbI 6Iok IJBaWei BuaeOkaMepbl nocle erO 3apRdk. BaWbIeOkaMepa paObaTe TolbKO C 6aTapeHbIM 6IokOM "InfoLITHIUM" (cepN M). Cm. cTp. 188 IJnIPOJyEHbOJee IOpDIOBbIX cBeJeHn O 6aTapeHOM 6Ioke "InfoLITHIUM".
(1)OTKpoITe KpbIuKy rHe3da DC IN n noDcoeDNHnTE cTeBOi aadantep nepemEHoro ToKa, npInaraembK BaWei BnDEOKaMepe, K rHe3dy DC IN, taK YTo6bl WTeKepe ▲bIHNapBaBneN BBePx.
(2)ПоДсоeДиНITE npOBOD JIeKTpOПТаHЯ K cTeBOMy aДaNTepу NepeMeHOrO TOKa.
(3)ПодсоeДинHTe npOBOD эЛeКТрОпТаHЯ K ceteBOI pO3eTke.
(4)Установпейсянчateль POWERВ поожене OFF (CHG).Начеся зараздka.В okшке dinспелбудет отображatable врем octabшeroюзарда в мину tax.
Ecnn INDnKaTOp ocTaBWeOcR 3apJa
H3MeHNTCa Ha ,3TO 3HaUHT, YTO
HOPMaJIbNar 3apJDKa 3abepSeHa.ДЯ NOIHOI
3apJDKn 6batapeHoro 6NoKa (NOHAR
3apJDKa) OCTaBbTe 6batapeHbIb 6NoK
PnIKpeINHeHHM Ha MeCTe NocLe 3aBepSeHHA
HOPMaJIbHOH 3apJDKn Do TEs nop, NOKa B
OKoUkHe DInCpIe He NOBtCn INDnKAuIa
FULL. POnHAR 3apJDKa 6batapeHrO 6NoKa
no3BOJraET Bam nCnOLb3ObaTb 6batapeHbI
6NoKdoJIbWe cEm O6bIuHo.
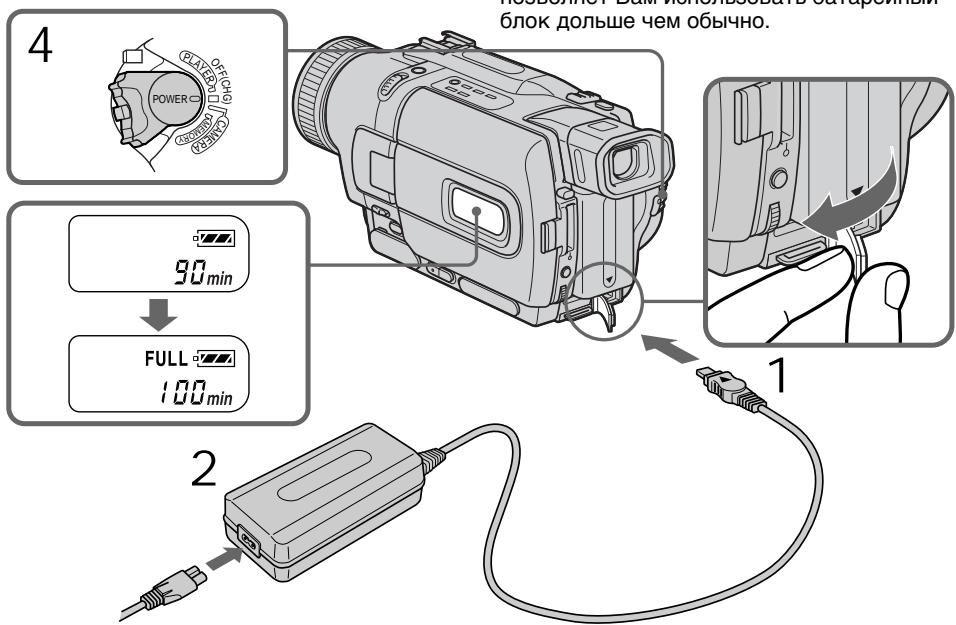
The number in the illustration of the display window may differ from that on your camcorder.
LncpbHa npcunHKe okouka dincnpeMoryT otnuaTbcaOn cPpHa Baew Bndeokamepe.
After charging the battery pack Disconnect the AC power adaptor from the DC IN jack on your camcorder.
Notes
- Prevent metallic objects from coming into contact with the metal parts of the DC plug of the AC power adaptor. This may cause a short-circuit, damaging the AC power adaptor.
- Keep the battery pack dry.
- When the battery pack is not to be used for a long time, charge the battery pack fully, and then use it until it fully discharges again. Do this once a year. Keep the battery pack in a cool place.
When the battery pack is charged fully The LCD backlight of the display window is turned off.
Remaining battery time indicator The remaining battery time indicator in the display window roughly indicates the recording time with the viewfinder.
Until your camcorder calculates the actual remaining battery time "---min" appears in the display window.
While charging the battery pack, no indicator appears or the indicator flashes in the display window in the following cases:
-
The battery pack is not installed correctly.
-
Something is wrong with the battery pack.
If the power may go off although the battery remaining indicator indicates that the battery pack has enough power to operate
Charge the battery pack fully again so that the indication on the battery remaining indicator is correct.
When you use the AC power adaptor Place the AC power adaptor near a wall socket. If any trouble occurs with this unit, disconnect the plug from a wall socket as soon as possible to cut off the power.
Iocne 3apdKn 6aTapeHoro 6loka
OTcoeDnHnTe cTeBoa aanTep nepemEnHoTo kota O rHe3da DC IN ha Bauei BnDeokampe.
Примеане
HeOnyckaIte KOHTaKta MeTaNJIuYeCKNX npEIMTeOB CMeTaNJIuYeCKMM YAcCTAMU TEKepa NOCToHHoro TOKA CeTeBORO aADANTepa.3To MOKeT IpiNbEcTn K KOPOTKOMy 3AmbKaHIO N NobpeXdEHNO BaWero ceTeBOrO aADANTepa.
- Coidepknte 6aTapeHbI 6nOK BCyXOM COCTOHN.
- EcIn 6aTapeiHbI 6bok npeIOnlaeTcH He IcNpOJIb3OBA TbДЛteJIbHoe BpeM, 3apJInTe erO NIOHOCtBIO, a 3aTeM IcNpOIb3yIe To TEX nop, noka OH ChOBa NIOHOCtBIO He pa3PdNTcH. BblONHJIte 3To pa3 B rOd. XpaHITe 6aTapeiHbI 6bok B npoxlaHOM MeCTe.
EcJn 6aTapeHbI 6JOK 3apXeH noJIHOCTbIO 3aJHЯ nOcBETka KKД bOkOwke ducnpe BblKJIOUHTcI.
What is "InfoLITHIUM"?
The "InfoLITHIUM" is a lithium ion battery pack which can exchange data such as battery consumption with compatible electronic equipment. This unit is compatible with the "InfoLITHIUM" battery pack (M series). Your camcorder operates only with the "InfoLITHIUM" battery. "InfoLITHIUM" M series battery packs have the 10000000000000000000000000000000000000000000000000000000000000000000000000000000000000000000000000000
Charging time/Bpem3aprakn
| Battery pack/Батуейний 6лok | Full charge (Normal charge)/Полная заюда (нормальnahя заюда) |
| NP-FM301) | 145 (85) |
| NP-FM502) | 150 (90) |
| NP-FM70 | 240 (180) |
| NP-FM90 | 330 (270) |
| NP-FM91 | 360 (300) |
Approximate number of minutes to charge an empty battery pack at 25^ (77^)
Supplied with DCR-TRV230E/TRV325E/ TRV330E/TRV530E
Supplied with DCR-TRV235E/TRV430E
ПриблизИтельhoeВремВ MInHyTaxДЯЗДКИ ПОЛHOCТБЮ pa3ржЕнHorO 6aTapeиного 6лOKа пи TemпepаType 25°C (77°F)
1)Пилагаетск DCR-TRV230E/TRV325E/ TRV330E/TRV530E
2)Пилагаетск DCR-TRV235E/TRV430E
Recording time/Bpema 3aIncn
DCR-TRV230E/TRV235E/TRV325E/TRV330E
| Battery pack/Батарейний 6лok | Recording with the viewfinder/Запись с помоцью видаочкателя | Recording with the LCD screen/Запись с помоцью зкрана XXКД | ||
| Continuouse3/Henррывнай 3) | Typical4)/Тушичай 4) | Continuouse3/Henррывнай 3) | Typical4)/Тушичай 4) | |
| NP-FM30 1) | 100 | 55 | 75 | 40 |
| NP-FM50 2) | 165 | 95 | 125 | 70 |
| NP-FM70 | 345 | 200 | 265 | 150 |
| NP-FM90 | 520 | 300 | 400 | 230 |
| NP-FM91 | 605 | 350 | 465 | 265 |
DCR-TRV430E
| Battery pack/Батугий b 6лok | Recording with the viewfinder/Запись с помоцью видаочкателя | Recording with the LCD screen/Запись с помоцью зкрана XXКД | ||
| Continuouss3)/Нерръвнай 3) | Typical4)/Тличнай 4) | Continuouss3)/Нерръвнай 3) | Typical4)/Тличнай 4) | |
| NP-FM30 1) | 100 | 55 | 70 | 40 |
| NP-FM50 2) | 165 | 95 | 115 | 65 |
| NP-FM70 | 345 | 200 | 245 | 140 |
| NP-FM90 | 520 | 300 | 370 | 215 |
| NP-FM91 | 605 | 350 | 430 | 250 |
DCR-TRV530E
| Battery pack/Батугийский 6лok | Recording with the viewfinder/Запись с помоцью Ви这样做kanею | Recording with the LCD screen/Запись с помоцью陈某рана陈某 | ||
| Continuouss3)/Нерревая 3) | Typical4)/Т��очая 4) | Continuouss3)/Нерревая 3) | Typical4)/Т��очая 4) | |
| NP-FM301) | 100 | 60 | 70 | 40 |
| NP-FM502) | 165 | 105 | 115 | 65 |
| NP-FM70 | 345 | 220 | 245 | 140 |
| NP-FM90 | 520 | 335 | 370 | 210 |
| NP-FM91 | 605 | 390 | 430 | 245 |
Approximate number of minutes when you use a fully charged battery
Supplied with DCR-TRV230E/TRV325E/ TRV330E/TRV530E
Supplied with DCR-TRV235E/TRV430E
3) Approximate continuous recording time at 25^ (77^) . The battery life will be shorter if you use your camcorder in a cold environment.
4) Approximate number of minutes when recording while you repeat recording start/stop, zooming and turning the power on/off. The actual battery life may be shorter.
PnIbI3ntJIbHOe BpeMaB MInHyTax PnI NCIOb3OBAHmN IOJIHOCTbIO 3apJKeHHOrO 6aTaPeHOrO 6loKa
1)Пилагаетск DCR-TRV230E/TRV325E/TRV330E/TRV530E
2)Пилагаетск DCR-TRV235E/TRV430E
3)ПиблзnteьhoeВрмннeppebHOBn 3aHNCI npT TempepaType 25 ^ C (77 ^ F) .Пи nCNoB3OBAHN BIndeOKaMepbl BXIoJNbIX yCNoBnX cPOK cnYk6bl 6bTaapeHOro 6lOk a 6yDet KopoYe.
4)ПиблзnteьhoeВремВMinHytaxпри 3aINCSн HeOДнOKpaTHbIM ПYCKOM/OCTaHOBKO 3aINCSn,Hae3DOM BInDeOKaMepbl IN BKIQUeHMe/BbIKJIQUeHMeПNTaHnI. ΦakTtueckm cpoK cnJxkbI 3apraJa 6aTaapeHOrO bloka moKeT 6bITb KopoYe.
Playing time/BpemBocnpom3BedeHDCR-TRV230E/TRV235E/TRV325E/TRV330E
| Battery pack/Батуарейний 6лok | Playing time on LCD screen/Вразma Восчрпзveдени на закра themselves | Playing time with LCD closed/ Вразma Восчрпзveдени при закрав� themselves |
| NP-FM301) | 75 | 100 |
| NP-FM502) | 125 | 165 |
| NP-FM70 | 265 | 345 |
| NP-FM90 | 400 | 520 |
| NP-FM91 | 465 | 605 |
DCR-TRV430E/TRV530E
| Battery pack/Батуейний 6лok | Playing time on LCD screen/Вразma Восюпзveдени на захрае ХКД | Playing time with LCD closed/Вразma Восюпзveдени при зakрытом ХКД |
| NP-FM301) | 70 | 100 |
| NP-FM502) | 115 | 165 |
| NP-FM70 | 245 | 345 |
| NP-FM90 | 370 | 520 |
| NP-FM91 | 430 | 605 |
Approximate number of minutes when you use a fully charged battery
Supplied with DCR-TRV230E/TRV325E/ TRV330E/TRV530E
2) Supplied with DCR-TRV235E/TRV430E
Approximate continuous playing time at 25^ (77^) . The battery life will be shorter if you use your camcorder in a cold environment.
The recording and playing times of a normally charged battery are about 90% of those of a fully charged battery.
Note
The table shows the playing time for tapes recorded in the Digital8 system. The playing time of tapes recorded in the Hi8/standard 8 system is reduced by about 20% .
PnI6JIIN3NTeJIbHOE BpEmB MmHyTax PnI nCIOJIb3OBAHm NOnHOCTbIO 3apJKeHHORo 6aTapeHOrO 6noka
1)Пилараетск DCR-TRV230E/TRV325E/TRV330E/TRV530E
2)Пилагаетск DCR-TRV235E/TRV430E
PnIbI3nteHbHOe BpeM HeIpepbIBHoro BOCpON3BEdENHnn PnTEmpepaType 25^ (77^) .PnI nCIOJIb3OBAHN BnDEOKaMEpbI B XOJIoNbIbIX yCNOBIAx cPoK cIyKbI bAtapeHoro 6Ioka b6Iyt KOpOe.
Bpem 3aIncn I Bocpon3BeDenHn HOpMaJIbHOI 3apJxehHOrO 6aTapeHOrO 6JOKa COCTABNIeT OKoJIO 90% BpemHn PONHOCTbU 3apJxehHOrO 6JOKa.
PpmeaHne
Tabnica noka3bIaET BpEMBocPON3BeHnna JENTb, 3ancaHOB B CNTeMe Digital8 H. BpEMBocPON3BeHnna JENTb, 3ancaHHOB CNTeMe Hi8/CTanapTHoN CNTeMe 8, COkpaTntcHa 20%
Connecting to a wall socket
When you use your camcorder for a long time, we recommend that you power it from a wall socket using the AC power adaptor.
(1) Open the DC IN jack cover, and connect the AC power adaptor to the DC IN jack on your camcorder with the plug's mark facing up.
(2) Connect the mains lead to the AC power adaptor.
(3) Connect the mains lead to a wall socket.
PoiocoeiHHeNeK CeTeBoi po3eTKe
EcIn Bbl cObnpaTeCb nCnOJIb3OBaTb BnDEOkamepy dIINTEJbHoe BpeM, peKOMeHNdyETcN cNPOJIb3OBaTb NITaHne OT cTeBOI p03eTK C NOMOUsbO cTeBOro aDAnTepa nepemehHoro TOka.
(1)ОткpoиTe KpbIshky rHe3da DC IN n noДcoeDHHTe cTeBOAaIaNTep nepemEnHOro TOKa K rHe3dy DC IN Ha BaSei BnIeOkamepy, TaK YTo6bl 3HaK ▲Ha WTeKepe 6bl Obaaueh BBepx.
(2)ПодсоeДинHTe npOBOD эЛeКТрОпТанИΚ ceTeBOMy aДaNTepу nEpemEHORTo TOKa.
(3)ПодсоeДинHTe npOBOD эЛeКТрОпТаHЯ K ceteBOI pO3eTke.
1
2,3
PRECAUTION
The set is not disconnected from the AC power source (the mains) as long as it is connected to a wall socket, even if the set itself has been turned off.
Notes
- The AC power adaptor can supply power even if the battery pack is attached to your camcorder.
- The DC IN jack has "source priority". This means that the battery pack cannot supply any power if the mains lead is connected to the DC IN jack, even when the mains lead is not plugged into a wall socket.
Using a car battery
Use Sony DC Adaptor/Charger (optional).
PNEIOCTEPEXEHNE
Annapata He OTKJIOUaETcA OT NCTOCHNka nepemehoro ToKa (3JIeKTPnuecko Cetu) Do tex nop, IOKa OH NIOCDoeINHeH K CeTeBOI po3eTke, daXe ECNI CAM annpaAT N BbIKHOueH.
PpimueaHn
-Питане OT ceteBOrO aanTepa nepemehnHoro TOka MoKet nOdaBaTcR daxe B cIyae,ecn6batapeiHb6Jok npikpenlen K BaSei BIndeokamepe.
ΓHe3do DC IN nIeET "PnOpntet nCTOuHnka". 3To 3NaHT, YTO nTahne OT 6aTapeHoro 6Loka He MoKTe IIOdaBaTcBcR, ecIn npBOoD 3NeKTPoNtAHn IIOcoEiHNHe K rHe3dy DC IN, daXe ecIn npBOoD 3NeKTPoNtAHn I He nOIOCoEiHNH K cTeBoi po3eTke.
UcnoJb3ObaHne aBTOMo6nJbHOro aKkyMylrTopa
IcnoJIb3yIte aIaNTep/3apIdHoe yCTpoIcTBO nocToAHnHO ToKa qIpMbI Sony (npNo6peTaetcR OTdIbHo).
Step 2 Setting the date and time
Set the date and time settings when you use your camcorder for the first time.
"CLOCK SET" will be displayed each time that you set the POWER switch to CAMERA or MEMORY (DCR-TRV325E/TRV330E/TRV430E/ TRV530E only) unless you set the date and time settings.
If you do not use your camcorder for about half a year, the date and time settings may be released (bars may appear) because the built-in rechargeable battery will have been discharged (p. 195).
First, set the year, then the month, the day, the hour and then the minute.
(1) Set the POWER switch to CAMERA or MEMORY (DCR-TRV325E/TRV330E/ TRV430E/TRV530E only), and then press MENU to display the menu settings.
(2) Turn the SEL/PUSH EXEC dial to select, then press the dial.
(3) Turn the SEL/PUSH EXEC dial to select CLOCK SET, then press the dial.
(4) Turn the SEL/PUSH EXEC dial to adjust the desired year, then press the dial.
(5) Set the month, day and hour by turning the SEL/PUSH EXEC dial and pressing the dial.
(6) Set the minute by turning the SEL/PUSH EXEC dial and pressing the dial by the time signal. The clock starts to move.
(7) Press MENU to make the menu settings disappear.
Пункт 2 Установka затуни Врemeи
BbINOJIHInTe yCTaHOBky DaTbI IN BpeMeHN, KOrDa BblncnOJIb3yete BaUy BnDeOkamepy B nepBbI pa3.
The year changes as follows:
Tod n3mehreTc CneIyIoUIM o6pa30M:

If you do not set the date and time ``` "--------" "----:---:" is recorded on the tape and the "Memory Stick". (DCR-TRV325E/TRV330E/ TRV430E/TRV530E only)
Note on the time indicator The internal clock of your camcorder operates on a 24-hour cycle.
EcIn Bbl He yctaHOBnI daTy uBpeMa
Ha JeHTy n "Memory Stick" 6byet
3aINCbIbA TbCB NIDnKaUra "--- --"
"--- --". (Tolbko MoJeN DCR-TRV325E/ TRV330E/TRV430E/TRV530E)
PpmeaHne no HndkaTOpy BpeMeHN BcTroeHHbIe YacBi BaSei BnDeokamepbl pa60taIOT B 24-ycobom pexime.
Step 3 Inserting a cassette
Пун=kТ 3 yctahOBka KaCCeTbl
We recommend using Hi8 Hi8/Digital8 [ ] video cassettes.
(1) Prepare the power supply (p. 15).
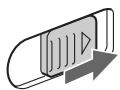
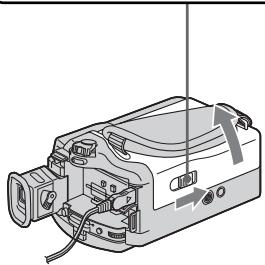
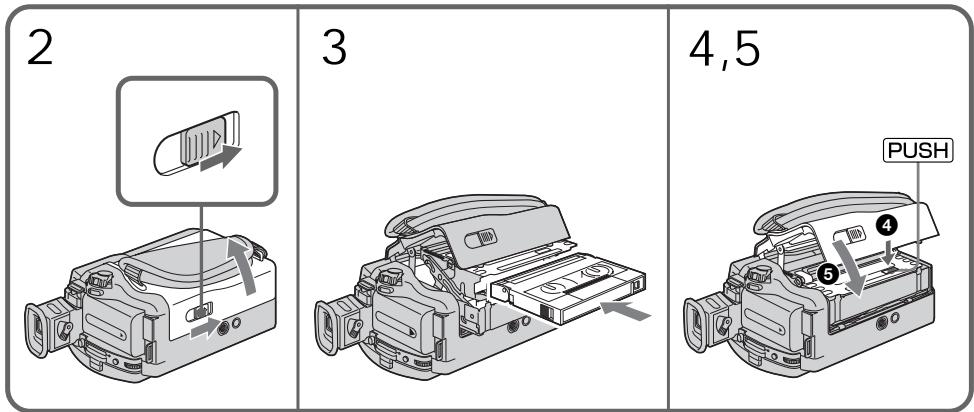
(2) Slide OPEN/EJECT in the direction of the arrow and open the lid. The cassette compartment automatically lifts up and opens.
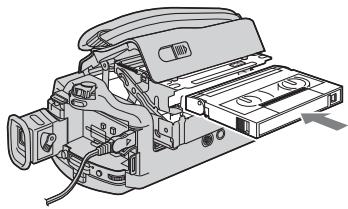
(3) Insert the cassette in a straight line deeply into the cassette compartment with the window facing out. Push the middle portion of the back of the cassette to insert.
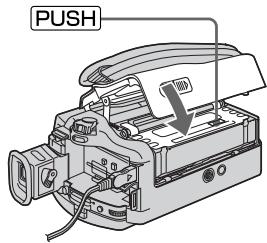
(4) Close the cassette compartment by pressing the mark on the cassette compartment. The cassette compartment automatically goes down.
(5) After the cassette compartment going down completely, close the lid until it clicks.
PekomEnyETcNcNoIb3ObTaB BnDeOkacCeTbI Tnla Hi8 Hig/Digital8
(1)ПоДг罗TOBteИСТОчнКПИТанЯ(стр. 15).
(2)CdbnHbTe KhoNky OPEN/EJECT B HappaBHeHm, yka3aHHom CtpeIkoi, n OTKpoTKe KpbIuKy. KaCCeTHbIOTcEK aBTOMaTHueckn NOdHMaeTcR N OTKpoETcR
(3) YctaHOBtTe Kaccety No npAMoIINHnI rny60K B KaccETbI OTCeK TaK, YTO6bl OkOuKo 6bIIO o6paueHo HapyKy. HaxMnte Ha cepenHy TbIbHoi CTOpHbI Kaccetbl IyraTaHOBKn.
(4)3aKpOte KaccetHbI OTCeK, HaxaB MeTky PUSH) Ha OTCeKe. KaccetHbI OTCeK aBTOMaTHueCKn 3aKpOeTcR.
(5)Посlete toro, кak kaccethtbI OTCek nonHocTbIO ONyCTITcR, 3aKpoITe KpbIshKy, YTO6bl OHa UeJIKHynla.
To eject a cassette
Follow the procedure above, and eject the cassette in step 3.
ДяиЗВLEЧЕнЯ KACCEТы
BbIIOJIHnTe npINBeDHNHyO BblIe npOeDpy N BbITOKHnTe KACCety BnyHKTe 3.
Notes
- Do not press the cassette compartment down. Doing so may cause malfunction.
- Your camcorder records pictures in the Digital8 system.
- The recording time when you use your camcorder is 2/3 of indicated time on Hi8 Hi8 tape. If you select the LP mode in the menu settings, the recording time is indicated time on Hi8 Hi8 tape.
- If you use standard 8 tape, be sure to play back the tape on this camcorder. Mosaic pattern noise may appear when you play back standard 8 tape on other camcorders (including other DCR-TRV230E/TRV235E/TRV325E/TRV330E/TRV430E/TRV530E).
- The cassette compartment may not be closed when you press any part of the lid other than the PUSH mark.
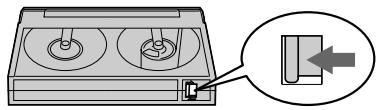
To prevent accidental erasure
Slide the write-protect tab on the cassette to expose the red mark.
Примеанья
- He HaxkmaIte BnI3 KaccTeHbI OToCek. 3To MoKet IpiBecTn K HeNCpabHOCTn.
Baisha BndeOkamepa BbIOnHReT 3aINCb n3o6paXeHn B CnCTeme Digital8 H.
Bpem3aHcnpnncnoB3ObaHnBauei nDpboBNuDEOKaMepbIcoCTabJIeT 2/3 BpemH, yKa3aHHoro HaJeHTe Hi8 HlE. Ecnn Bbl BbIbepnte peKIM LPByctahOBkax MeHIO, TO Bpem3aHcN6yJdT paBHO BpemH, yKa3aHHoro HaJeHTe Hi8 HlE. - EcIn BblncNoIb3yeTe cTaNdapThHyIO JeHTy 8,To ee peKOMeHdyETcB OBCnpoIN3BOIDtB Ha 3TOJ Xe BVNeOkaMepe.3aNncaHHBe C nOmoBIO BaWei BVNeOkaMepbl,Ha BaWei Xe BVNeOkaMepe.B Cnyae BCnpoIN3BEdenr CTaHdApTHbIX JENT TnA 8 Hn DpynX BVNeOkaMepax,MOYT NOBITcN NOMEXn MO3aunHO TnA (BKnUoyA dpynE BVNeOkaMepbl DCR-TRV230E/TRV235E/ TRV325E/TRV330E/TRV430E/TRV530E).
KaccTeHbIOTcEKMOKeTHe3aKpbITbcra,ecnBbHaXMeTeHaKaKoe-Im6oDpyroEmeToHaKpbIiKe,aHeHaMeTkYPUSH.
ДлпpenotbpaueHnCnyaHOrO CTnpaHn
IpeBnHbTe IeneCTOK 3aunTb 3anCn Ha KaccTe, TaK YTO6bI NpBnlaCb KpaChar MeTka.
Recording a picture
Your camcorder automatically focuses for you.
(1) Remove the lens cap by pressing both knobs on its sides and attach the lens cap to the grip strap.
(2) Install the power source and insert a cassette. See "Step 1" to "Step 3" for more information (p. 15 to 25).
(3) Set the POWER switch to CAMERA while pressing the small green button. Your camcorder is set to the standby mode.
(4) Open the LCD panel while pressing OPEN. The viewfinder automatically turns off.
(5) Press START/STOP. Your camcorder starts recording. The REC indicator appears on the screen. The camera recording lamp located on the front of your camcorder lights up. To stop recording, press START/STOP again. The recording lamp lights up in the viewfinder when you record with the viewfinder.
3a\Pncb n3o6paXeHnY
BaSha BnDeOkamepa aBTOMaTnueckN BbIIOJIHReT φokcnpOBky 3a Bac.
(1) CHIMNTE KpbIuKy oBbEaKTnBa, HaxKaB OBe KhoIKN Ha ee KpOMKe, N pRnIKpeNITe KpbIuKy oBbEaKTnBa K pemHIO dJa 3axBaTa.
(2)YcTaHOBnTe NCTOCHNK NITaHnI N BCTaBbTe KaccTeY. CM.“PlyhKT 1”-“PlyhKT 3"ДЯ NOJUyehn8 6oJIe noJpO6bIX CBeDeHn (Ctp.15-21).
(3)Haxab MaIeHbKyIO 3eIeHyIO KHOINky, yctaHOBtpe nepeKlnOuataJIb POWER B noLOXKeHne CAMERA. BaIa BnDeOkamepa nepeKlnOuHTcraB pexIM OxNdaHna.
(4)HaxaB KhoNky OPEN,otKpoIte naHeIb XKJ.BuOnCKaTeIb BvIKJIouHTcA bBTOMaTnueCKN.
(5)HaKmTe KhONky START/STOP.Ba7a BnDeOkaMepa HaChet 3anncb.Ha 3kpaHneBnTcN HndnKaTOp REC.BbCBeNTcTaKKe JAMNOUcKa 3annci,paCNoJooXeHHaHa nepeDHe NpHeJI N BuDeOkaMepbl.ДЯ octaHObKn 3annci HaKMTe KhONky START/ STOP eue pa3. Ppi 3aIncs c N oMOuBIO BnDOINCKaTeJI, BHyTPn Hero BbCBeNTcN JaMOnCu Ka 3annci.
Notes
- Fasten the grip strap firmly.
- Do not touch the built-in microphone during recording.
Note on Recording mode
Your camcorder records and plays back in the SP (standard play) mode and in the LP (long play) mode. Select SP or LP in the menu settings (p. 107). In the LP mode, you can record 1.5 times as long as in the SP mode. When you record a tape in the LP mode on your camcorder, we recommend that you play back the tape on your camcorder.
Note on LOCK (DCR-TRV325E/TRV330E/ TRV430E/TRV530E only)
When you slide LOCK to the right, the POWER switch can no longer be set to MEMORY accidentally. The LOCK is released as a default setting.
To enable smooth transition
You can make the transition between the last scene you recorded and the next scene smooth as long as you do not eject the cassette if you turn off your camcorder. When you change the battery pack, set the POWER switch to OFF (CHG).
If you leave your camcorder in the standby mode for 3 minutes
Your camcorder automatically turns off. This is to save battery power and to prevent battery and tape wear. To resume the standby mode, set the POWER switch to OFF (CHG) once, then turn it to CAMERA again.
When you record in the SP and LP modes on one tape or you record some scenes in the LP mode
The playback picture may be distorted or the time code may not be written properly between scenes.
Примеанья
ПлOTнО пиСТЕгНITE рЕмЕнь ДЯЗхВATERBИДЕОКамерbl.
- He npikacaiTecb K BCtpoeHHOMy MmKpOPOHy BO Bpemr 3aHcN.
PpimueaHne no pexkmy 3anncn
BaSHA BnDEOKaMepa BbINOJHReT 3aIncs b BOCPON3BVeDHeNc B pexmE SP (ctaHapThoe BOCPON3BVeDHeNc) n B pexmE LP (dOJIrOraPoUeE BOCPON3BVeDHeNc). BbIbepnte KOMaHdy SP nIu LP yCTaHOBkax MeHIO (CTp. 107). B pexmE LP Bbl MoKeTe BbINOJHATb 3aIncs b 1,5 pa3a dOnbIe No BpeMeHn, Yem B pexmE SP. PnB bINOJHEnHn Ha BaWei BnDEOKaMepe 3aIncs Ha JIeHTy B pexmE LP peKOMeHnyETcB OBCPON3BOIDITb 3Tu JIeHTy TaKke Ha BaWei BnDEOKaMepe.
Приимechани по рек immу LOCK (Toлько модени DCR-TRV325E/TRV330E/TRV430E/ TRV530E)
EcIn Bbl nepeDbHnHe te nepeKniOuataIb LOCK BnpaBo, nepeKniOuataIb POWER yxe He MoXKeT 6blcnyaHNO yCTaHOBnE H nIoXeHne MEMORY. Pexm LOCK 6ydet yCTaHaBnBaTbcraNo yMOJUaHnIO.
Adjusting the LCD screen
The LCD panel moves about 90 degrees to the viewfinder side and about 180 degrees to the lens side.
If you turn the LCD panel over so that it faces the other way, the indicator appears on the LCD screen and in the viewfinder (Mirror mode).
PerynipoBka 3KpaHa KKД
PanaJIb KKД MoXeT nepeBnIgA TbCЯ npImepHO Ha 90 rpaIycOB B CTOpOHy BINOOnCKaTeJЯ npImepHOHa 180 rpaIycOB BCTOpOHy oBeKtNbA. EcIn Bbl NOBepHe T anaJIb KKД TAK, YTO OHa 6yIet HnPaBnEHa B dpyrIy CToPOHy, Ha 3kpaHc KKД nOraBITcN INdNKaTOp (3epKaIbHbI pexM).
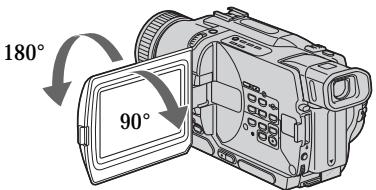
When closing the LCD panel, set it vertically until it clicks, and swing it into the camcorder body.
Note
When using the LCD screen except in the mirror mode, the viewfinder automatically turns off.
When you use the LCD screen outdoors in direct sunlight
The LCD screen may be difficult to see. If this happens, we recommend that you use the viewfinder.
When you adjust angles of the LCD panel Make sure if the LCD panel is opened up to 90 degrees.
Picture in the mirror mode
The picture on the LCD is a mirror-image.
However, the picture will be normal when recorded.
During recording in the mirror mode
You cannot operate the ZERO SET MEMORY on the Remote Commander.
Indicators in the mirror mode
The STBY indicator appears as 11 and REC as
- Some of other indicators appear mirror-reversed and others are not displayed.
When recording with the LCD panel opened Recording time becomes shorter a little compared with when recording with the LCD panel closed.
Pn3akpbbAHn naneHJXKd yctahOBnTe ee BepTtKaJIbHO, nOKa Hpea3daCTcIeJIyok, a3aTEM npncOeDHHTe ee K Kopnyuc BVideOkamepbl.
Ppmeuahne
BbI He MoXeTe onepuPoBaTb KhoNkoZERO SET MEMORY Ha npJIte DnCTaHcNoHOro ynpaBHeHn.
HdkaTOpblB3epKaIbHOMpeXmme
HnDnKaTOp STBY noBntcB BnIe IIO, a HnDnKaTOp REC B BnIe . HeKOTOpbIe npYrne HnDnKaTOpbl NOBRTcB 3epKaJIbHO OTo6paJKeHHOM BnIe, a HeKOTOpbIe n3 HnX He 6ydyT OTo6paJkaTbcra COBCem.
Pn3aTnc C OTKpbIToN naHeIbIO KKd
Bpme 3aIncn npn OTkpblto naneHn JKKHeCKoJIbKO yMeHbJaaetCn o CpabHeHIO C3aIncbIo npn 3akpbIToN naneHn JKK.
Brightness of the LCD screen
You can adjust the brightness of the LCD screen. Select LCD B.L. or LCD BRIGHT in the menu settings (p. 107). Even if you adjust the LCD B.L. or LCD BRIGHT, the recorded picture will not be affected.
After recording
(1) Set the POWER switch to OFF (CHG).
(2) Close the LCD panel.
(3) Eject the cassette.
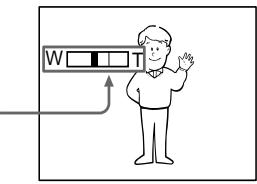
Using the zoom feature
Move the power zoom lever a little for a slower zoom. Move it further for a faster zoom. Using the zoom function sparingly results in better-looking recordings.
"T" side: for telephoto (subject appears closer)
"W" side: for wide-angle (subject appears farther away)
Apkoctb 3kpaHa KKJ
Bb MoXeTe OTperyIinpoBaT pyKoCTb 3KpaHa KKД. Bb6epnTe nYhKT LCD B.L. nIuLCD BRIGHT B yctahOBkax MeHIO (cTp.107).Да Ze cIe Bb OTperyIinpyeTe nYhKT LCD B.L. nIuLCD BRIGHT, 3TO He NOblnreT Ha 3aIncaHHe n3ObpaxeHne.
Pocje 3aIncn
(1) YctaHOBInTe npeKJIouaTeIb POWER B noJIOKeHne OFF (CHG).
(2)3aKpoIe nAneJb KKД.
(3)ИзВлескпту Касу.
IcnoJIb3OBAHneФyHKcHn Hae3da BnDEOKaMepbl
PepeBnHbTe pblur npBODHO
Bapnoo6bEeKTNBa cIeRka dIy OTHOCINbHO
MeIeHHoro Hae3da BnDeOKaMepbl.
PepeBnHbTe erO CInbHee Iy yckOpEHORo
Hae3da BnDeOKaMepbl.
IcnoB3OBAHnE cyHKuHn Hae3da BnDeOkamepbl B He6oJbWOM KOJIuYeCTBe OBeCneUBaET HanLyUHnpe3yJbTaTbI.
CTopoHa "T":ДЯ TepefoTo (Obeekt npu6JInxKaeTcA)
Zoom greater than 25× is performed digitally. To activate digital zoom, select the digital zoom power in D ZOOM in the menu settings. (p. 107) The picture quality deteriorates as the picture is processed digitally.
Hae3d BnDEOKaMepb60nee 25X BbINOJHReTcA ΣΦpOBbIM MeToDOM.ДЯ npBVeDeHINB B DeIcTBVe ΣΦpOBoBO BapNoO6bEKTNbBA BbIePnte npBbOHN ΣΦpOBoB BapNoO6bEKTNb D ZOOM B yCTaHOBkax MeHIO (ctp.107).
IopckoIbky o6pa6OtKa n3o6paXeHnBblIOJIHHETcA uΦpOBbIM cNoC06OM, KaYeCTBOn3o6paXeHn HeCKoJIbKO yxDiHTcN.
The right side of the bar shows the digital zooming zone. The digital zooming zone appears when you select the digital zoom power in D ZOOM in the menu settings./ Iprabaa CTOPoHa nOLOcbi Ha 3KpaHe nOKa3bIbAeT 3OnHy cHpOBoT TpaHCpOKaUm.
EcIn BbI bIbePte npBIOdHOn UcnpboBoB Bapnoo6BeKtNB D ZOOM B yctaHObKaX MeHIO, NOBNTc3 OHa UcnpboB TpaHcfoKaun.
Notes on digital zoom
- Digital zoom starts to function when zoom exceeds 25 × .
- The picture quality deteriorates as you go toward the "T" side.
When you shoot close to a subject
If you cannot get a sharp focus, move the power zoom lever to the "W" side until the focus is sharp. You can shoot a subject that is at least about 80~cm (about 2 feet 5/8 inch) away from the lens surface in the telephoto position, or about 1cm (about 1 / 2 inch) away in the wide-angle position.
PpmeaHnK Hae3ny BndeOKamepbI UcfoBbIM MetoDM
LippboB Bapnoo6bekTnB HauHnaeCpa6aTaBaTb B Cnyae,ecnHae3D BIndeOKamepbl PpeBbIaet 25x.
KaueCTBO n3o6paXeHn yxuiaaTcno Mepe np6nXeHn K cToPOHe "T".
Ppncbemke o6bekTa c 6Jn3Koro noJIOXeHnA
EcIn Bb He MoKTe POnyUHTb YeTkoi
fokycnOBKn,pepeBunHbTe pblur npBNOHO
BapnoooBeKTbA CTOpOHy W"do NpOyuHENIA
yeTkoi fokycnOBKn. Bbl MoKTe BblNoJHrTa
cbEmky o6BeKTa B NoIooKeHN TeJeΦoTO,
KOTobY OCTOIT NO KpaJHeMpe Ha
pacctOTHm 80 CM OT nobepxHocTN o6BeKTbNA
uIN Jxe OKOJ 1 CM B NoIooKeHN
UnPOKoyrohBO Horu Dna.
To record pictures with the viewfinder - adjusting the viewfinder
If you record pictures with the LCD panel closed, check the picture with the viewfinder. Adjust the viewfinder lens to your eyesight so that the indicators in the viewfinder come into sharp focus.
Lift up the viewfinder and move the viewfinder lens adjustment lever.
Viewfinder backlight
You can change the brightness of the backlight.
Select VF B.L. in the menu settings. (p. 107)
3aHnnoDcBtKa BUNoNcKaTeJIa
BbMOKeTe N3MeHArTpApKoCTb 3aDHei NOcBETKn. BbI6epnte KOMaHdy VF B.L. ByctaHOBkax MeHIO (CTp.107).
Indicators displayed in the recording mode
The indicators are not recorded on tape.
Инданахета He 3anncbaiotca Ha leHTy.
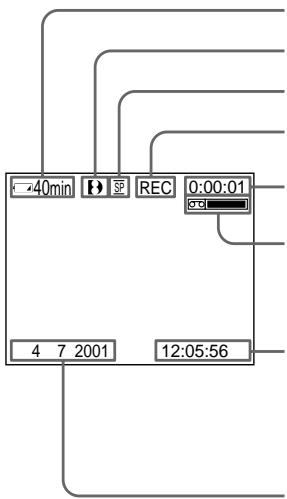
Remaining battery time indicator/ндкатор Врemeи octabweo8a7paTeHOrO 6Joka
Format indicator/ндкатор Формata
Recording mode indicator/ндикатор рекima заимсс
STBY/REC indicator/ндкатop STBY/REC
Time code/Tape counter indicator/KoI BpeMeHn/UnnkaTOp CHTNKAJIENTbl
Remaining tape indicator/ндкakot octabweeя lehtbI This appears after the POWER switch is set to CAMERA for a while./ 3ta ndkacnna noBntcnoCteToro, kakpeknouateJIb POWER 6ydt yctahOBlenHa KaKoe-TO BpemBa N poloxene CAMERA.
Time indicator/ндкатовсмп
This is displayed for five seconds after the POWER switch is set to CAMERA or MEMORY (DCR-TRV325E/TRV330E/TRV430E/TRV530E only)./Oh oTo6paJaaTeC OKIoNo pIaTn cSeKHy nOcNe TOro, KaK nepeKJIouaTeIb POWER yCTaHOBHeB N POnOKeHne CAMERA uNIMEMORY(ToIbko MoJeN DCR-TRV325E/TRV330E/TRV430E/TRV530E).
Date indicator/IMHdNKaTOp daTbI
This is displayed for five seconds after the POWER switch is set to CAMERA or MEMORY (DCR-TRV325E/TRV330E/TRV430E/TRV530E only)./Oh otobpaxaetc oKOLO nTn cekynI nocne TOrO, kak nepekniouateJIb POWER yctanOBIeN B noJoxeHne CAMERA iIIMEMORY (ToIbko moJeI DCR-TRV325E/TRV330E/TRV430E/ TRV530E).
Remaining battery time indicator
The remaining battery time indicator roughly indicates the recording time. The indicator may not be correct, depending on the conditions in which you are recording. When you close the LCD panel and open it again, it takes about one minute for the correct remaining battery time in minutes to be displayed.
Time code (for tapes recorded in the Digital8 system only)
The time code indicates the recording or playback time, "0:00:00" (hours:minutes: seconds) in CAMERA mode and "0:00:00:00" (hours:minutes:seconds:frames) in PLAYER or VCR (DCR-TRV330E only) mode. You cannot rewrite only the time code.
When you play back tapes recorded in the Hi8/ standard 8 system, the tape counter appears on the screen.
You cannot reset the time code or the tape counter.
Инданахтор Врemeи OCTaBшeroСяразда 6атAPEйHorO 6лoka
Инданкатор Времени OCTabшeroCЗapяда 6атAPEйНогО 6лOKа npиблииТеьно yka3ыВаET OCTabшeесс Врем 3aПИСN. Инданкатор может 6blТ HeTOчБIM B 3aВИСMоCTn OT yCLOВи,В кOTOBxВbl npOnIbOДпTe 3aПИСь.КогДа Бы 3akpbIbAteTe nAnel JBKKДи OTKpbIbAteTe eE ChOba, Tpe6yeTc OKIoO OdHoi MInHyТы ДЯnpaВИнбагОTOбрахенЯ OCTabшeroCЗВремни pa6obTy bАтAPEйНогО 6лOKа B MInHyTax.
KoB BpeMeHn (ToIbKO DJIaJeHT, 3aIncAHbIX B uΦpOBoB cNCTeMe Digital8 [3)
KoIbVpeMeHn yka3bIbAeT BpeMra 3aIncn IJIbBocPpON3BeDeHnra,“0:00:00”(uaCbI:MHNyTbI:bcekyndb)BpeXmmeCAMERA n“0:00:00:00"(uaCbI:MHNyTbI:bcekyndb):KaIpbI)BpeXmPePLAYERIuNVCrTOJbKO MoJeNb DCR-TRV330E).BbI He MoKeTe nepe3aIncatbToJbKO KoD BpeMeHn.
Korda Bbl Bocnpo3BODnTE JeHTbl, 3aHncaHHbIe B CnCTeme Hi8/ctaHapTHOu CnCTeMe 8, Ha 3kpaHe NOBlaTeCryTcNk JENTbl.
BbI He MoXKeTe nepeyCTaHOBuTb KoD BpEmHnJIN ChETUKN JeHTbl.
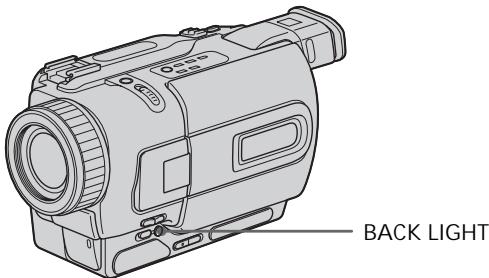
Shooting backlit subjects - BACK LIGHT
When you shoot a subject with the light source behind the subject or a subject with a light background, use the backlight function.
Press BACK LIGHT in CAMERA or MEMORY (DCR-TRV325E/TRV330E/TRV430E/TRV530E only) mode.
The indicator appears on the screen. To cancel, press BACK LIGHT again.
CbeMa o6BeKToB c 3aHnei noCDBeTkoI - BACK LIGHT
EcIn BbBbIOJIHReTe CbEMKy o6BeKTa c nCTOCHNKOM CBeTA N03aI IN Hero IIN JKe o6BeKTA CO CBETNbIM fOHOM, IcNIOJb3yIte fYHKUIO 3aDHe NIOCBETKN.
Haxmte KhoNky BACK LIGHT B pexime CAMERA nn MEMORY (ToIbko moJeB DCR-TRV325E/TRV330E/TRV430E/TRV530E only).
Ha 3KpaHe IIOBHTcH INIINKaTOp.
IIra OTMeHbI HaxMnte KhoNky BACK LIGHT
eue pa3.
If you press EXPOSURE when shooting backlit subjects
The backlight function will be canceled.
EcIn Bbl HaxMeTe KhoNky EXPOSURE npn BblONJIHeHm CbeMkn OBeKToB C 3aDHe NoDCBETKoI
Функцязднй посветкбудETOTMeheHa.
Shooting in the dark - NightShot/Super NightShot
The NightShot function enables you to shoot a subject in a dark place. For example, you can satisfactorily record the environment of nocturnal animals for observation when you use this function.
While your camcorder is in CAMERA or
MEMORY (DCR-TRV325E/TRV330E/TRV430E/
TRV530E only) mode, slide NIGHTSHOT to ON.
and "NIGHTSHOT" indicators flash on the
screen.
To cancel the NightShot function, slide
NIGHTSHOT to OFF.
Cbemka B TemHote - Houhna cbemka/Houhna cynepcbemka
Функци_Hочнoi CьeMkn no3BONЯт Bam BblONJIrTB Cbemky ObeKToB B TemhIx MecTax. HanpIMep, Bbl CMOxTe C yCnexOM BblONJIrTB Cbemky HOUHbIX XJIBOTbIX DnI Ha6JIIODeHn npi NcNoJIb3OBAHN DaHHOfФункци.
B To Bpem, KOrda BnDeOkaMepa HaxoDntcB
peKmme CAMERA nIM MEMORY (ToIbko
MoJeN DCR-TRV325E/TRV330E/TRV430E/ TRV530E), nepeDbHbTe nepeKlHuataTeIb
NIGHTSHOT B noJIoKeHne ON.
HnIqKaTopbI ① "NIGHTSHOT" NaHyT
MraTb Ha ekpaHe.
ДЯ OTMeHbФyHKUmH NoHcHOb cBeMKn
pepeDbHbTe nepeKluOuaTeIb NIGHTSHOT B noJIoKeHnn OFF.
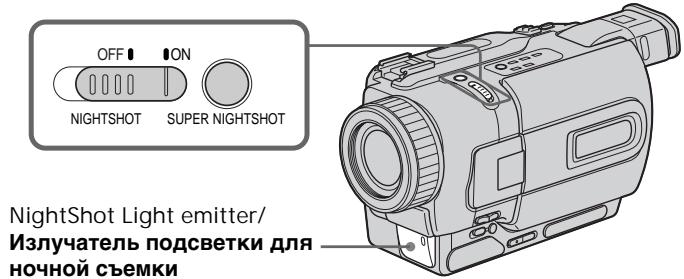
The Super NightShot mode makes subjects up to 16 times brighter than those recorded in the NightShot mode.
(1) Slide NIGHTSHOT to ON in CAMERA mode. and "NIGHTSHOT" indicators flash on the screen.
(2) Press SUPER NIGHTSHOT. S and "SUPER NIGHTSHOT" indicators flash on the screen. To cancel the Super NightShot mode, press SUPER NIGHTSHOT again.
Using the NightShot Light
The picture will be clearer with the NightShot Light on. To enable NightShot Light, set N.S.LIGHT to ON in the menu settings (p. 107).
- Do not use the NightShot function in bright places (ex. outdoors in the daytime). This may cause your camcorder to malfunction.
- When you keep NIGHTSHOT set to ON in normal recording, the picture may be recorded in incorrect or unnatural colours.
- If focusing is difficult with the autofocus mode when using the NightShot function, focus manually.
While using the NightShot function, you can not use the following functions:
- Exposure
- PROGRAM AE
While using the Super NightShot function, you can not use the following functions:
-Fader
- Digital effect
- Exposure
- PROGRAM AE
Shutter speed in the Super NightShot mode The shutter speed will be automatically changed depending on the brightness of the background. The motion of the picture will be slow.
In MEMORY mode (DCR-TRV325E/TRV330E/ TRV430E/TRV530E only)
You cannot use the Super NightShot function.
NightShot Light
NightShot Light rays are infrared and so are invisible. The maximum shooting distance using the NightShot Light is about 3m (10 feet).
Приимейсаня
He nCnoJIb3yIte cyHKUIO HOcHOr CbEMKn BApKnx MeCTax (HaNPIMep, Ha yNlCe B DHeBHOeBpem). 3TO MOKeT pINBecTn K HeNCnpaBHOCTn BaWe BNDeOKaMepbl.
-Пи удержани установки NIGHTSHOTВ положени ON пи Нормальон 3аписи зображени может 6ыт 3апсано В He npавиьньхИЛ Ин HeeCTeCTBeHHbIX ζBetax.
Ecnfokycnpobka 3aTpydHehaB abTomatueckom peXmme npn nCIOJIb3OBaHn fYHKcH NHOHcBEMKn, BblONJIHNTe fokycnpobky BpyHyIO.
PnHcNoIb3OBAHnn FyHKCmN HocHoB cBeMKn Bbl He MoKeTe NcNoJIb3OBA Tb cJeDyUoJne FyHKCmN:
-3Kcno3nua
-PROGRAM AE
PnncnoIb3OBAHnn FyHKmN HcnpcBemKn BbHe moKTe nCnoIb3OBaTb cJeDyUoJne FyHKmN:
-Φeɪdεp
-LnDpOBoN 3ΦΦeKT
-3Kcno3nua
- PROGRAM AE
Ckopooc3aTbopaBpeXmHeHouHo cynepcbeMkn
CkopocTb 3aTbopa 6yDet aBTOMaTuYeCKn
m3MeHrTbcR B 3aBcIMoCTn OT rPkOCTn fOHa.
BocPon3BeDeHne n3oBpaXeHn6yDet
3aMeDJIeHHbIM.
B pexime MEMORY (ToIbko moIeI N DCR-TRV325E/TRV330E/TRV430E/TRV530E)
BbHe MoKxTe NcNoJIb3ObaTb cyHKcIIO HocHOn CynepcbemKn.
Iopcbetka dna HOHOn CbeMkn
JyHnIOCBETKNIJIHOUHOHBEMKINBJIOTC INΦpakpaChbIMNIO3TOMYHEBUNMbIMN.
MaKcImaJIbHoe paCCTOarHne IJIr CbeMkn npI NCIOJIb3OBAHmI IOCDBeTKI IJIr HOUHOJ CbeMkn paBHO pIIMeRHo 3 M.
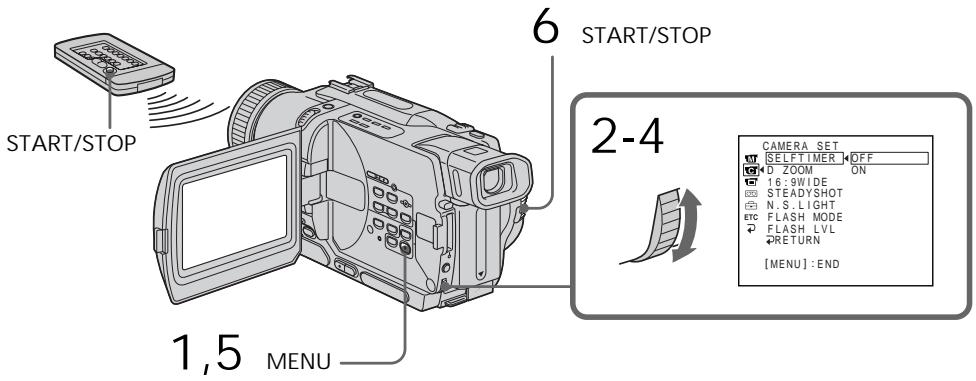
Self-timer recording
- DCR-TRV325E/TRV330E/TRV430E/ TRV530E only
Recording with the self-timer starts in 10 seconds automatically. You can also use the Remote Commander for this operation.
(1) Press MENU to display the menu settings in the standby mode.
(2) Turn the SEL/PUSH EXEC dial to select , then press the dial.
(3)Turn the SEL/PUSH EXEC dial to select SELFTIMER, then press the dial.
(4) Turn the SEL/PUSH EXEC dial to select ON, then press the dial.
(5) Press MENU to make the menu settings disappear.
(6) Press START/STOP.
Self-timer starts counting down from 10 with a beep sound. In the last two seconds of the countdown, the beep sound gets faster, then recording starts automatically. To stop recording, press START/STOP again.
3aInc b no TaMepy camo3anycka
-Только модали DCR-TRV325E/TRV330E/TRV430E/TRV530E
3aIINc b c nOMOuBt TaMepa cAmO3aNyCKa NaHHeTcra Ypee3 10 cekyHd aBTOMaTHueckn. IInr 3Toi onepaunm Bbl MoXte TaKke INCNoIb3OBaTB NylbT dNCTaHcUHOHHoro ynpabLeHnR.
(1)HaxmTe KhONky MENU nIa OTO6paXeHHy yCTaHOBOK MeHIO BpeKIMe OxNdaHHa.
(2)ПовернITE ДИСК SEL/PUSH EXEC ДЯ Выбopa установки ,Затем нахмITE на ДИСК.
(3)ПовернITE ДИСК SEL/PUSH EXEC ДИВЮбopa установки SELFTIMER,Затем нажмITE на ДИСК.
(4)ПовернITE ДИСК SEL/PUSHEXECДЯ ВИБОраустановки ON,Затем НжмITE на ДИСК.
(5)Haxmte KhoNky MENUДЯИСЧЕЗHOBEHЯ YCTaHOBOK MEHIO.
(6)Haxmte KhoNky START/STOP. TaMep cAmo3anycka hauHet o6paTHbI OTCHTOT 10c3yMMepHBIM CnHaIOM.B nocLeDnHe DBe CeKHyDbI O6paTHoro OTCeTa 3yMMepHbI CnHaNbI ByDeT 3ByuTaB YaSe, a 3aTe m ABTOMaTHueCKn HauHETc 3aInCb. IJra OCTaHOBVKn 3aINcN CHOBa Haxmte KhoNky START/STOP.
To stop the countdown Press START/STOP. To restart the countdown, press START/STOP again.
To record still images using the self-timer
Press PHOTO in step 6. (p. 50)
To cancel self-timer recording Set SELFTIMER to OFF in the menu settings in the standby mode.
Note
The self-timer recording mode is automatically cancelled when:
- Self-timer recording is finished.
- The POWER switch is set to OFF (CHG), PLAYER or VCR (DCR-TRV330E only).
Self-timer memory photo recording (DCRTRV325E/TRV330E/TRV430E/TRV530E only) You can also record still images on "Memory Stick"s with the self-timer (p. 133).
3aHncb n3o6paXeHnA
ДлЯ OCTaHOBKn O6paTHOrO OTCheTa
Haxmnte KhONky START/STOP.
You can use these buttons to check the recorded picture or shoot so that the transition between the last recorded scene and the next scene you record is smooth.
Bb moKeTe nCNoIb3ObaT bT N KHOJIg IJIpy npOBepK 3aNcAHHORo I3o6paXeHnI ININ CbeMkn, TaK YTo6blpePexOJ MekJy PocJeHNM 3aNcAHHbIM 3nI3Odom I CJIeDyIOUIM 3aNcBbAebMbIM 3nI3Odom 6blI PnAbHbIM.
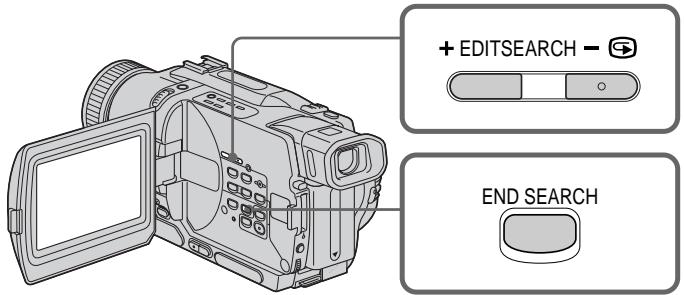
END SEARCH
You can go to the end of the recorded section after you record.
Press END SEARCH in the standby mode.
The last 5 seconds of the recorded section are played back and returns to the standby mode.
You can monitor the sound from the speaker or headphones.
EDITSEARCH
You can search for the next recording start point.
Hold down the + / - (⑤) side of EDITSEARCH in the standby mode. The recorded section is played back.
+: to go forward
:to go backward
Release EDITSEARCH to stop playback. If you press START/STOP, re-recording begins from the point you released EDITSEARCH. You cannot monitor the sound.
END SEARCH
BbMOxKTe DoTn Do KOHcza 3aINcaHHo YacTn JeHTbI NocLe BbINONHeHr 3aNci.
HaKmTe KhONky END SEARCH B pexnme OxndaHn. BydyT BocnpOn3BeDeHbI NocJeDnHe 5 cekyH, nocne Yero BIndeOkamepa BepHetcB PexnM OxndaHn. Bbl MoKeTe KOHTpOIpObaT bByk Chepe3 DnHaMnK nnn rOJOBHbI TeNeΦoHbl.
EDITSEARCH
BbMOKTe BbINONHATb NOnCK MeCTa HaHaIa CneDyUoSe 3aNcN.
Дерхи te haxkaToI CTOpOHy +/-() KhoNkN EDITSEARCH B pexime oXuJaHn. Bydet BocnpOn3BeDeHa 3aIncaHHa YacTb.
+:ДлгпpoДиЖeнгВпeрeД
-:ДЯпpoДиженяHa3aД
OTnyctnte KhoNky EDITSEARCH nIra octaHOBKn BocnpOn3BeDeHn. EcIn Bbl naKMeTe KhoNky START/STOP,naHHeTcna nepe3anCb TOro MeCTa, rDe Bbl OTnyctnIkn KhoNky EDITSEARCH. Bbl He MoXkeTe KOHTpOJInpOBAt b 3Byk.
Rec Review
You can check the section which you have stopped most recently.
Press the - (S) side of EDITSEARCH momentarily in the standby mode.
The section you have stopped most recently will be played back for a few seconds, and then your camcorder will return to the standby mode. You can monitor the sound from the speaker or headphones.
Notes
- END SEARCH, EDITSEARCH and Rec Review work only for tapes recorded in the Digital8 system.
- If you start recording after using the end search function, occasionally, the transition between the last scene you recorded and the next scene may not be smooth.
- Once you eject the cassette after you have recorded on the tape, the end search function does not work.
If a tape has a blank portion in the recorded portions
The end search function may not work correctly.
Ppocmptzanns
BbMOxKeTnpOBepnTb nocJeHIO 3aIncAHHyU qACTb.
HaXMMTe KpaTkoBpeMeHNO CTOpOHy-(@) KhoNkI EDITSEARCH B peXmme OxuJaHn. ByUyt BocPOn3BeDeHb IocJeHne HeCKoJIbKO cKeYHd 3aINcAHHO uactN. Bbl MoKTe KOHTpOJIrpoBaT bYk chePe3 aKycTNeCeKyIO CnCTeMy INI rOLOBhIE TeNeΦoHbI.
Приимейань.
ΦyHKcHm END SEARCH,EDITSEARCH n npocMToPa 3aIncn pa6oTaHOT TOnbKO dJIeHT,3aIncaHHbIX B cIuΦpOBoN CnCTeme Digital8 H.
- Ecni BblcnyaHno Haayan 3aNcB nocle
ncnObl3OBAHnH ΦyHKUIM NOnCKa KOHua
3aNcN, TO nepexoM MeJy NocLeiHM
3aNcCaHHbIM 3PiN3Odom N CneIyIOuIM
3aNcBbIAeMbIM 3PiN3Odom MOKeT He 6bITb
PJIaBHbIM.
- Ecnn Bbl BbltonkHnTe Kaccety nocIe TOro, KaK 6ydt BblonHeHa 3aInc b Ha JeHTe, fYHKnna noncka KOHa 3aInc H e 6ydt pa60TaTb.
EcIn Ha JeHTe MExkDy 3aNcAHHbIMn YactTAMN NMeETCA He3aNcAHHbYyactOK ФункцЯ ПОИСКа может He pa6OtaTb.
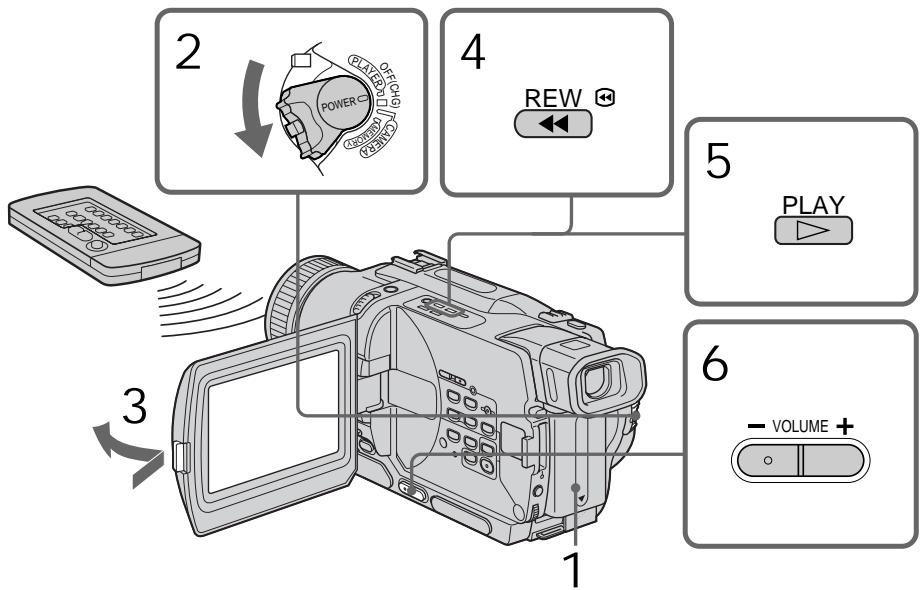
Playing back a tape
You can monitor the playback picture on the LCD screen. If you close the LCD panel, you can monitor the playback picture in the viewfinder. You can control playback using the Remote Commander supplied with your camcorder.
(1) Install the power source and insert the recorded tape.
(2) Set the POWER switch to PLAYER or VCR (DCR-TRV330E only) while pressing the small green button.
(3) Open the LCD panel while pressing OPEN.
(4) Press to rewind the tape.
(5) Press to start playback.
(6) To adjust the volume, press either of the two buttons on VOLUME. The speaker on your camcorder is silent when the LCD panel is closed.
Bocnpon3BeDeHne JeHTbI
BbMOKTe KOHTpOINPOBaTb BOCpON3BOdIMoE
n3O6paXeHHe Ha 3kpaHe KKД. EcIn Bbl
3aKpoTe NaHeJIb KKD, Bbl MoXeTe
KOHTpOINPOBaTb BOCpON3BOdIMoE
n3O6paXeHHe B BVIOUckaTeJIe. Bbl MOxTe
KOHTpOINPOBaTb BOCpON3BeJeHHe C NOMOu bIO
nyNbTa DnCTaHcNHOHor OYnpaBLeHnI,
PpNJlraEmoro K BaWe BNDeOkamepe.
(1)YCTaHOBNTe NCTOUYHK NITaHnI N BCTaBBTe 3aNtcaHHyIOJIeHTy.
(2) HaxkaB MaJIeHbKyI O 3eJIeHyI KHOJKy, yCTaHOBnTe NepeKJIIOUaTeIb POWER B nOToXKeHne PLAYER nII VCR (TOJIbKO mOdEnb DCR-TRV330E).
(3)Haxab KhoNky OPEN, oTKpoIte naHeJIb XXKJ.
(4)HaxKMnte KHOKNkyДЯ yCKopeHHoN nepeMOTKn IeHTbI Ha3a.d.
(5)HaXMMTe KHOIIKy ▲ДЯВКЛIOUeHINBAOCnpoN3BeDEHIN.
(6)Дпяретулорвкnpromkoctnнackима Te OdHy n3 DByX KHOJOK VOLUME. EcIn naHelb XXKД Ha BaSeB Bndeokampe 3aKpbI Ta, DnHaMnK He 6yTe Pa6OtaTb.
To stop playback
Press ■.
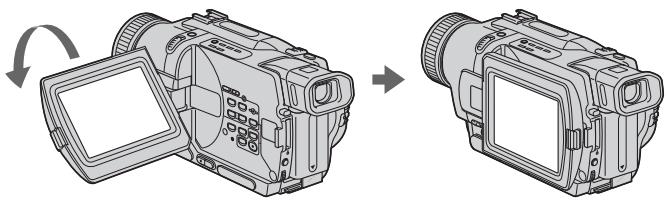
When monitoring on the LCD screen You can turn the LCD panel over and move it back to the camcorder body with the LCD screen facing out.
Bo Bpem KOnTpOJa Ha 3KpaHe XXd
Bb moXeTe noBepHyT naHJIynpaBHeHnI npuDInHyT b ee o6paTHo Ha MeTO K KopnyCy BnDeokamepbl, TaK UTo 3KpaH JKKd 6yJeT o6paUen HapxJy.
To display the screen indicators
- Display function
Press DISPLAY on your camcorder or the Remote Commander supplied with your camcorder.
The indicators appear on the screen.
To make the indicators disappear, press
DISPLAY again.
Your camcorder automatically records not only images on the tape but also the recording data (date/time or various settings when recorded) (Data code). Use the Remote Commander for this operation.
Press DATA CODE on the Remote Commander in the playback mode.
The display changes as follows:
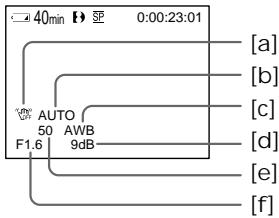
date/time various settings (SteadyShot, exposure AUTO/MANUAL, white balance, gas shutter speed, aperture value) no indicator
IcnoIb3OBAHne yHKcuN KoDa daTbI
Bawa Bndeokamepa ABTomatueckn 3anncbIbaeT He TOLbKO n3o6paXeHnHa JeHTy, HO TaKxne I daHhble 3anCn (daTy/BpeMn nn pa3hble yCTaHOBKn PnI 3anCn).
(KoJaTaBtI).NcNoJIb3yIteNyIbT InCTaHcUHOHorO ynpaBHeHЯДЯЗToI OpeaHn.
HaxmTe KhONky DATA CODE Ha nyIbTe DnCTaHcUHOHHoro ynpabLeHnB pexKIme BOCPpOu3BeDeHn.
INDnkaun6yJeT n3MeHrTaCnEduoUIM 06pa3om:
daTa/Bpemr pa3HbIe yCTaHOBKn (ycTouHBaBcBemKa, 3KcNo3nua AUTO/MANUAL, 6aHaHC6eIoro, ycInHeHne, ckOpocTb 3aTbopa, BeINuHaDnaPpaMbl) 6e3 INdNkaun
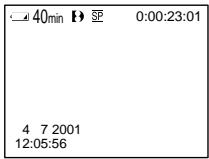
Date/time/ Data/Bpema
a SteadyShot off indicator
[b] Exposure mode indicator
[c] White balance indicator
[d] Gain indicator
[e] Shutter speed indicator
[f] Aperture value
Not to display various settings
Set DATA CODE to DATE in the menu settings (p. 107).
The display changes as follows: date/time no indicator
Notes on the data code function
- The data code function works only for tapes recorded in the Digital8 system.
- Various settings of the recording data are not recorded when recording images on "Memory Stick" (DCR-TRV325E/TRV330E/TRV430E/TRV530E only).
Recording data
Recording data is your camcorder's information when you have recorded. In the recording mode, the recording data will not be displayed.
When you use data code function, bars ( ) and appear if:
- A blank section of the tape is being played back.
- The tape is unreadable due to tape damage or noise.
- The tape was recorded by a camcorder without the date and time set.
Data code
When you connect your camcorder to the TV, the data code appears on the TV screen.
Various settings/
Pa3JIUmHbIe yCTaHOBKn
a INHnKATOp BbIKNHOeHHOyCTOuINBOcBEmKn
[b] INHДИКaTOp pexKIma 3KcNo3nUmN
[c]ИнданkaTopбаланcaбелого
[d] INHdNkaTop yCnJIeHnI
[e]Индikatop ckopooctn 3aTbopa
[f]BemnHa anepTypbI
ДяТOrO,ЧTo6bl He OTO6paKaTb pa3JIuHbIe yCTaHOBKn
YcTaHOBnTe KOMaHny DATA CODE B NOJoxeHne DATE B yCTaHOBkax MeHIO (Ctp. 107).
INHnkaun6yJeT n3MeHaTbCnEnyoUIM 06pa30m:
JaTa/BpeMa 6e3 INHdNkaCnN
PpIMeuaHn no fYHKcN KOA daHHbIX
-Функця КODа Данньх pa60taeТ TOЛьКОДЛЯНТ,ЗагпсанhhbIXВцифровсИСТЕмDigital8【.
Pa3HbIe yCTaHOBKn DaHHbIX 3aIncn He 3aIncbIbAIOTC npn 3aIncn nI3OpaXeHn Ha "Memory Stick" (ToIbKO moJeN DCR-TRV325E/TRV330E/TRV430E/TRV530E).
3aHncaHHbIe daHHbIe
3aHcHbIe DaHbIe HecyT INOpMaIIO O 3aHcN, BbINOJIeHHo BaIe BnDeOKaMepoB. B peXIMe 3aHcN daHbIe oTo6paKaTaBc He 6byT.
EcIn Bbl nCnOJIb3yeTe yHKcIIO KOA daHHbIX, To noBraTc nnocbl (--- -- -- nn --: --: --), ecIn:
- Bocnpon3boDntcra He3aIncahHbI yuactok HaJIeHTe.
-JIeHTa YBnIeTcH He YHTaEMoN 13-3a NOBpeKJeHnI NIN NOMex.
-3aIncb Ha JeHTy 6bIJa BbIIOJIHeHa BVJeOKamepoB63 yCTaHOBKn DaTbI IN BpeMeHn.
KoДаHHbIX
Ecni Bby noDcoeDHHnTe Bauy BuDeokamepy K TeNeBn3Opy,Ha 3Kpahe NoaBntcKa DAnHbIX.
Remaining battery time indicator during playback
The indicator indicates the approximate continuous playback time. The indicator may not be correct, depending on the conditions in which you are recording. When you close the LCD panel and open it again, it takes about 1 minute for the correct remaining battery time to be displayed.
Various playback modes
To operate video control buttons, set the POWER switch to PLAYER or VCR (DCRTRV330E only).
To view a still image (playback pause)
Press I during playback. To resume playback, press I or
To advance the tape
Press in the stop mode. To resume normal playback, press .
To rewind the tape
Press in the stop mode. To resume normal playback, press .
To change the playback direction Press < on the Remote Commander during playback to reverse the playback direction. To resume normal playback, press
To locate a scene monitoring the picture (picture search)
Keep pressing or during playback. To resume normal playback, release the button.
To monitor the high-speed picture while advancing or rewinding the tape (skip scan)
Keep pressing while rewinding or while advancing the tape. To resume rewinding or advancing, release the button.
Bocnpoun3BeDeHne JeHTbI
HdkaTop ocTabeOcBpeMeH 6aTape BO BpeMBOCpOn3BeDeHnA
HnDnkaTop noka3bIbAeT npi6IIN3nteJIbHOB Bpem HnpepbIBHOBOCIpOIN3BeDeHIN.
Индана можетьтб HeToCHOB,ВЗвсмocTN
OT ycNoB,В KOTOpbIX Bbl npOBOdnte 3aInCb.
Korda Bbl 3akpbIbaTe naHelen JKKДи
OTKpbIbaTe e chObA,Tpe6yTeCOKO OdHOn
MnHyTbI dЯnpaBnIbHorO OTO6paxHeNIA
OCTabWseGcBpeMeH pa60tbl 6aTapeHoro
6Ioka B MmHYtax.
IpepeMeHHbIepeXIMbIBOcPpOn3BeDeHnA
ДлЯ IncnoJIb3OBAHЯ KHOJOK ynpaBJIeHЯ BnIeO yctaHOBInTe nepeKIIuOaTeNь POWERВ nIoJxHeNE PLAYER nIIN VCR (ToIbKO moIeNь DCR-TRV330E).
IaH3MeHeHHHaPaBHeHH BocPOn3BeDeHH
HaxmTe KhoNkY <Ha npIbTe DnCTaHIOHOHorO ynpaBHeHr BO BpEm BOCPOn3BeDeHr DnI N3MeHeHr HApPaBHeHr BOCPOn3BeDeHr.
ДЯ BO306HOBJIeHЯ O6bIyHOrO
BOcnpoN3BeDeHnIa,OTnyCTnTE KHOKNy
ДЯОТБИCKAнHЯЗПИЗOSTOДАВВБЕМА KOHTPОЛЯ N3OBpAXKeHЯ(NONCKN3OBpAXKeHЯ)
ДерхитЕ нахаToH KONky 一 一 ИИ 一 一 BOВ ВрмЯ BOCnpon3BeDEH.NIЯ BOCCTaHOBJIeHnO OБьИнО BOCnpOn3BeDEHnO OTnyCTnTe KONky.
Дя KoHTpOJI N3o6paXeHЯ Ha BbICOKO CKOpOCTN BO BpeM YcKOpEHHO nepemOTKN JeHtbl Bnpepd IIN Ha3aI (NONCK MeTOJOM nporoHa)
Держпге Нжатои KONКу BO Время YСКОРЕнOH КЕМOTКЛ ДНТБИЗАД NIIKONKу BO Врем.YСКОРЕнOH КЕМOTКЛ ДНТБI BNEpeД,ДЯВОЗбOBHNeHЯ OБИЧОн КЕМOTKЛ JENEltB BNEpeД NIIH Na3aD OTNCTNTe KONKY.
To view the picture at slow speed (slow playback)
Press on the Remote Commander during playback. For slow playback in the reverse direction, press < , then press on the Remote Commander. To resume normal playback, press
To view the picture at double speed Press × 2 on the Remote Commander during playback. For double speed playback in the reverse direction, press < , then press × 2 on the Remote Commander. To resume normal playback, press .
To view the picture frame-by-frame Press on the Remote Commander in the playback pause mode. For frame-by-frame playback in the reverse direction, press . To resume normal playback, press
To search the last scene recorded (END SEARCH)
Press END SEARCH in the stop mode. The last 5 seconds of the recorded section plays back and stops.
In the various playback modes
- Noise may appear when your camcorder plays back tapes recorded in the Hi8/standard 8 system.
Sound is muted. - The previous recording may appear as a mosaic image when playing back in the Digital8 system.
Notes on the playback pause mode
- When the playback pause mode lasts for 3 minutes, your camcorder automatically enters the stop mode. To resume playback, press .
- The previous recording may appear.
Slow playback for tapes recorded in the Digital8 system
The slow playback can be performed smoothly on your camcorder; however, this function does not work for an output signal from the DV OUT or DV IN/OUT jack.
When you play back a tape in reverse
Horizontal noise may appear at the center or top and bottom of the screen. This is not a malfunction.
Bocnpoun3BeDeHne JeHTbI
Длгпрсмтра BOCпpon3Bedeни n3бразжени Ha 3amEdlenHHoN Ckopoctn (3amEdlenHoe BOCрpon3BedeHne)
HaxMITE BO BpEMBAocPON3BeDeEHN KHOIky HnPyNbTe DnCTaHcNOHORO ynpabNeHHA 3ameDnEHHO BCoPON3BeDEEHN B O6paTHOM HApabNeHHn HaxMITE KHOIKY <, a3aTEM HaxMITE KHOKNy HA npbTe DnCTaHcNOHORO ynpabNeHH. IaB03o6HOBnEHN ObbHORO BOCPON3BeDEEHN HaxMITE KHOKNy
Длгпрсмтра BOCПОИЗБЕДENH N3O6paXeHЯ Ha yDBoEHHо CKOpOCTN
HaxMMTe KHOKNy × 2 Ha nyIbTe DnCTaHcNHOHOro YnpaBNeHn BO BpEm BA BOCpOm3BeDeHn.ДЯ BOCpON3BeDEHnHa yDBoEHHO CKOpOCTn B O6paTHOM HApBaPbEHn HAXMMTe KHOKNy < , a 3aTEM KHOKNy × 2 Ha NyIbTe DnCTaHcNHOHOro YnpaBNeHn.ДЯ BO3O6HOBNeHn O6bYHORO BOCpON3BeDEHn HaxMMTe KHOKNy
Для покадрово npocmoТра BOCПОНЗВЕДENИ N3OБРAXКЕНЯ
HaxmTe KONkY II Ha NyIbTe DnCTaHcNHOHOrO ynpabNeHnB PexnMe Naay3bl BOCpOn3BeDeHn. IINI NOKApBOrO HOcPOn3BeDeHnB O6paTHOM HapabNeHn HaxmTe KONkY II. IINB036HOBHeHn O6bUHORO BOCpOn3BeDeHn HaxmTe KONkY
PnB BocnpOn3BeDeHnn JeHTbI B 6paTHOM HaprabJeHHN
Ha 3kpahe MOrTy NOrBnTbC rOpN3OHTaJIbHbIe nOMexn No ceHTpy nn JxK E BBePxy N Bn3y 3kpaHa. 3TO He ABnErc HEnCnpaBHOCTbIO.
Viewing the recording on TV
Connect your camcorder to your TV with the A/V connecting cable supplied with your camcorder to watch the playback picture on the TV screen. You can operate the playback control buttons in the same way as when you monitor playback pictures on the LCD screen. When monitoring the playback picture on the TV screen, we recommend that you power your camcorder from a wall socket using the AC power adaptor (p. 21). Refer to the operating instructions of your TV.
Open the jack cover. Connect your camcorder to the TV using the A/V connecting cable. Then, set the TV/VCR selector on the TV to VCR.
If your TV is already connected to a VCR
Connect your camcorder to the LINE IN input on the VCR by using the A/V connecting cable supplied with your camcorder. Set the input selector on the VCR to LINE.
EcnBawTeIeBn3Op yXe npDoceHHeN K KBM
IopoceDHHTe Bauy Bndeokamepy K BxoHOMy rhe3dy LINE IN ha KBMC nOmozbuO coeHNHTeJbHoro Ka6eJra aydno/Bndeo, KOtOpB npnilaraetcK Baueh Bndeokamepe. YctaHOBeCeJeKTOp BxOnHOro CnHaHa Ha KBM B noLoXeHne LINE.
If your TV or VCR is a monaural type
Connect the yellow plug of the A/V connecting cable to the video input jack and the white or the red plug to the audio input jack on the VCR or the TV. If you connect the white plug, the sound is L (left) signal. If you connect the red plug, the sound is R (right) signal.
EcnBaw TeIeBn3Op nJN KBM MOHOΦOHueCKOro Tnna
IopdoeHHTe JeHbI shTekep coeHNHTeBHO Ka6eJy ayDIO/BnDeO K BXoHDOMy rHe3dy BnDeocnHa n 6bIy IIN kpaChbI wTekeK BxOHDOMy rHe3dy ayNoCnHaHa Na KBM nI TeBeN3ope. EcIn Bbl noCoEOHNTE 6bIy wTekep, TO 6byet 3ByK L (neBbl) KaHAn. EcIn Bbl noCoEOHNTe KpaChbI wTekep, TO 6byet 3ByK R (npabbl) KaHAn.
If your TV/VCR has a 21-pin connector (EUROCONNECTOR)
Use the 21-pin adaptor supplied with your camcorder.
EcnB Baawem TeleBn3ope/KBM mMeetc 21-tpbkoBbpa3beM (EUROCONNECTOR)
IcnoIb3yIte 21-7tBpBkoBbI aIaNTep, npnlaeraembl K Baewe BnDeokamepe.
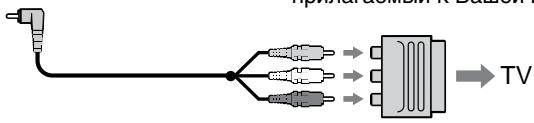
If your TV or VCR has an S video jack Connect using an S video cable (optional) to obtain high-quality pictures.
With this connection, you do not need to connect the yellow (video) plug of the A/V connecting cable.
Connect an S video cable (optional) to the S video jacks on both your camcorder and the TV or the VCR.
To display the screen indicators on TV Set DISPLAY to V-OUT/LCD in the menu settings (p. 107).
Then press DISPLAY on your camcorder. To turn off the screen indicators, press DISPLAY on your camcorder again.
EcnB Bawaem TeleBn3ope NMeetcra rHe3do S Bndeo
BbINOJIHInTe coeINHeHnE c nOmoIIO Ka6eJr S BnIeO (npio6peTaTcR OToIeNbHO) dIra IOnlyeHnRA BblCOKOKaYeCTBeHHbIX N3o6paKeHn.
Ppi DaHHom coeHHeHn Bam He hyXHo
noDCoeHNHTb XeIbIy wTeKepe (BvJeO)
coEHNHTeNbHoro Ka6eY aUdNo/BvJeO.
PiDCoeHNHTe Ka6eNb S BvJeO
( npio6petaeTcR oTdeNbHO) K rHe3dAm S BvJeO
ha Baawe BvJeOkamepe n Baewem TeVeBn3ope
nJi KBM.
Using the AV cordless IR receiver
Once you connect the AV cordless IR receiver (optional) to your TV or VCR, you can easily view the picture on your TV. For details, refer to the operating instructions of the AV cordless IR receiver.
IcnoJb3OBAHne 6ecnpoBOdHorO NKayuOBnDeOpnpemHnka
IocJe noCoeDInHeHn 6ecnpoBOnHoro IK ayuINOBnDeOpnEmHnKa K BaWemy TeLeBn3Opy (PnpO6peTaETcR OTeJIbHo) Bbl MoKTe IerKo hAbIOaTb N3O6paXeHne Ha 3KpaHe BaWero TeLeBn3Opa. POnpO6HbIe CBeDeHn CoepKacTB INCTpyKcIMn PO 3KcNlyaTaUm 6ecnpoBOnHoro IK ayuINOBnDeOpnEmHnKa.
SUPER LASER LINK/ SUPER LASER LINK toets
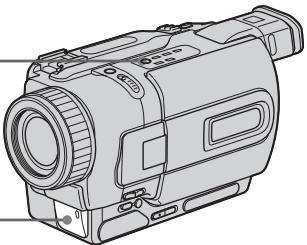
Attach the power supply such as the AC power adaptor to your camcorder, and insert the recorded tape.
(1) After connecting your TV and AV cordless IR receiver, set the POWER switch on the AV cordless IR receiver to ON.
(2) Turn the TV on and set the TV/VCR selector on the TV to VCR.
(3) Set the POWER switch on your camcorder to PLAYER or VCR (DCR-TRV330E only).
(4) Press SUPER LASER LINK. The lamp of SUPER LASER LINK lights up.
(5) Press on your camcorder to start playback.
(6) Point the super laser link emitter at the AV cordless IR receiver. Adjust the position of your camcorder and the AV cordless IR receiver to obtain clear playback pictures.
Ipeed 3kcnnyataaunei
PπpKpeNTe NCTOHTNK PINTaHn,HapPmEp,ceTeBoi aanTep nepemEHnHO ToKa,K BaSei BnDeokampe,N BCTaBtE 3aIncAHHyJeHTy.
(1)После полбоевинец К Baшему Teileвзору 6ecпобODногу UK aydnoBnDEopnpemHnka yctahOBnTe nepeKlnuOyatelb POWER Ha 6ecпобODногу UK aydnoBnDEopnpemHnke B noJoxeHne ON.
(2)ВключITE Telebeи3Op n yctaHOBInTe ceIeKTop TV/VCR ha TelebeN3Op e B noLoXeHne VCR.
(3)Установпей поелов POWER на Baшей вдешке рьюжени PLAYERил VCR (Толъко морель DCR-TRV330E).
(4)HaxmTe KhoNky SUPER LASER LINK. BbICBeTnTCa JAMNoUka SUPER LASER LINK.
(5)HaKMMTe KHOIIKy ▶ Ha BaSei BnDEOkampe Ia NaHauJa BkJIIOUeHnBOCPpOIN3BeDeHnA.
(6) HanpaBte n3nyaTeIb na3epHoro cynepkahana Ha 6ecnpoBOndnIK ayDnOpiemMnK. OTpErpynpyTe noLoXeHne BaSei BnDeokamepbI n 6ecnpoBOndoro IK ayDnOBnDeOpnEemMnKa dIra noLuyenr YETKOrO BOCpON3BOIDmORo I306paXeHnR.

To cancel the super laser link function
Press SUPER LASER LINK. The lamp on the SUPER LASER LINK button goes out.
If you turn the power off
Super laser link function turns off automatically.
When super laser link is activated (the SUPER LASER LINK button is lit)
Your camcorder consumes power. Press SUPER LASER LINK to turn off the super laser link function when it is not needed.
is a trademark of Sony Corporation.
Recording a still image on a tape – Tape Photo recording
You can record a still image like a photograph. This mode is useful when you want to record an image such as a photograph or when you print a picture using a video printer (optional). You can record about 510 images in the SP mode and about 765 images in the LP mode on a tape which can record for 60 minutes in the SP mode. Besides the operation described here, your camcorder can record still images on "Memory Stick"s (p. 129) (DCR-TRV325E/TRV330E/ TRV430E/TRV530E only).
(1) In the standby mode, keep pressing PHOTO lightly until a still image appears. The CAPTURE indicator appears on the screen. Recording does not start yet. To change the still image, release PHOTO, select a still image again, and then press and hold PHOTO lightly.
(2) Press PHOTO deeper.
The still image on the screen is recorded for about seven seconds. The sound during those seven seconds is also recorded. The still image is displayed until recording is completed.
3aIncb HeNoDBrXHOro N3O6paXeHnHa JIeHTy - FOToCbEmKa Ha JIeHTy
BbMoKTe 3aNcBtBHeNoDbXHoe
n3o6paXeHne nOo6Ho foToRpaHm.3TOT
peXIM RbIaTeCn POJe3HbIM,ecn Bb XOTNe
3aNcTaB n3o6paXeHne, TaKoe KaK
foToRpaHn,nn eCnB bXoNTe paCneHaTaB
n3o6paXeHne C NOMOuBn BVdeOpnPHTepa
( npno6peTaetc oTJeBHO).
Bb MoKTe 3aNcTaB OKIo 510 n3o6paXeHn
B peXime SP n OkIo 765 n3o6paXeHn B
peXime LP JeHte, KOTopar no3BoJraE
BbIOJIHaTb 3aNcB B TeueHne 60 MNHT B
peXime SP.KpOME onNCaHNO 3deCb
onepaun, BaSha BVdeOkAmepa MoKTe
BbIOJInTb 3aNcB HeNoDVBxHbIX n3o6paXeHn
Ha "Memory Stick" (ctp. 129) (ToIbKO moDeTI
DCR-TRV325E/TRV330E/TRV430E/TRV530E).
(1)BpeximeOxuDAnHnIepXnTe cnerKa haxaToi KhoNkY PHOTO do Tex nop, noka He NoarBtCHeNoDbuxKHOe N3oBpaXeHne. NOBITc HnDnKAtOp CAPTURE Ha 3kpaHe. 3aInCb NOKa eue He Nauchanacb. IINaN3meHEnHa HeNoDBNXHoro N3oBpaXeHnO tOnyCTnTe KhoNkY PHOTO, Bbl6epnte HenoDbNxHoe N3oBpaXeHne CHOBa, a 3aTEM HaxMnTe n epXnTe cnerKa haxaToi KhoNkY PHOTO.
(2)Haxmte KhoNky PHOTO cnilbhee. HeoDbnKHOe n3obpaXeHne Ha 3kpane 6yDet 3aIncbIBaTbCn OKOIO ceMn cekynD.B TeueHne 3TNX cEMn cekynD 6yDet 3aIncbIBaTcN n 3ByK. HeoDbnKHOe n3obpaXeHne 6yDet oTo6paXaTbcN Tex nop, noka 3aIncbHe 6yDet 3aBepseHa.
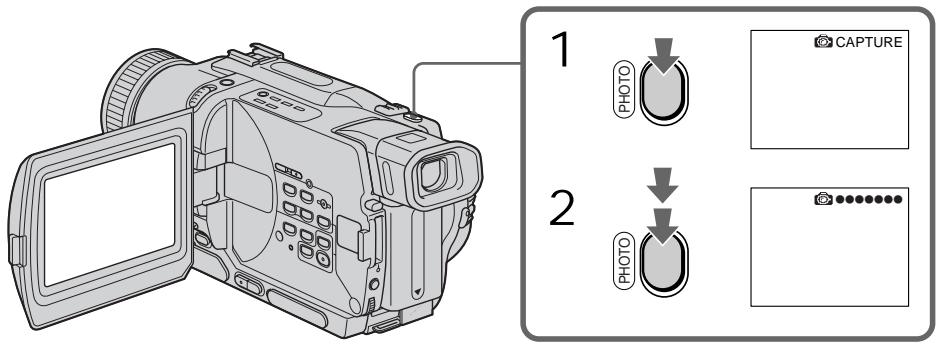
Notes
- During the tape photo recording, you cannot change the mode or setting.
- The PHOTO button does not work:
- while the digital effect function is set or in use.
- while the fader function is in use.
- When recording a still image, do not shake your camcorder. Mosaic-pattern noise may appear on the image.
To use tape photo recording function using the Remote Commander Press PHOTO in the Remote Commander. Your camcorder records an image on the screen immediately.
When you use the tape photo recording function during normal CAMERA recording You cannot check an image on the screen by pressing PHOTO lightly. Press PHOTO deeper. The still image is then recorded for about seven seconds, and your camcorder returns to the standby mode.
To record clear and less fluctuated still images (DCR-TRV325E/TRV330E/TRV430E/TRV530E only) We recommend that you record on "Memory Stick"s.
Примеанья
- Bo BpemФOTOCbEMKn HaJeHTy Bbl He MoXKeTe N3MeHrTb peXmN IJN ycTaHOBky.
Khonka PHOTO He pa6oTaet: -ecn yctaHOBHeHa nIeN cNoJIb3yeTcra fynKcua uOfpoBOrO 3oFeKa. -ecn nCnoJIb3yeTcra fynKcua feNepa.
-ПиЗЗИСН HeNoDVBnXHOrO n3O6paXeHЯ He TpIcNte BaUy BIndeOkamepu.Инчe Ha n3O6paXeHЯ mOryT nOraBnTbCЯ nOMexn Mo3aunHOrO tnpa.
ДлИ NCNoIb3OBAHnI ΦyHKUmΦOTocbEmKnHaJIeHTyC NOMOuBIO NyIbTaДиCTaHcUHOHOrO ynpabJeHnI
HaxmTe KhoNky PHOTO Ha nyIbTe InCTaHcUOHoro ynpabLeHnra. Bawa BInDeOKaMepa TOTcAc JHe NaHcT 3aINCb N3O6paXeHnHa 3KpaHe.
PnncnoB3OBAHnnyHKunnfoTOcBEmKn HaJeHTy BO BpeMa 06bIuHOJ 3aIncn CAMERA
BbI He MoXeTe npOBepuTb 3o6paXeHne Ha 3KpaHe, cIerKa haxKaB KhoNkY PHOTO. HaxMnTe KhoNkY PHOTO cnIbHee. HenOdBxKHOe 3o6paXeHne 6yJeT 3aINCbIbTaCB OKOIO CeM CEkyHd, a 3aTEM BInDeOKaMePa BepHcTB PexIM OxNiDaHnA.
ДЯТOrO,ЧTOБИЗОБРажЕнЯбИп ЧЕТКИМИ И He TAK ДЮЖАЛ (ТOLьКО МОДЕЛ DCR-TRV325E/TRV330E/TRV430E/TRV530E) РекOMeHДуETСЯ BыПОЛЯТь 3aПиСь на "Memory Sticks".
Self-timer recording
- DCR-TRV325E/TRV330E/TRV430E/ TRV530E only
You can record still images on tapes with the self-timer. You can also use the Remote Commander for this operation.
(1) In the standby mode, press MENU to display the menu settings.
(2) Turn the SEL/PUSH EXEC dial to select then press the dial.
(3) Turn the SEL/PUSH EXEC dial to select SELFTIMER, then press the dial.
(4) Turn the SEL/PUSH EXEC dial to select ON, then press the dial.
(5) Press MENU to make the menu settings disappear.
(6) Press PHOTO deeper. Self-timer starts counting down from 10 with a beep sound. In the last two seconds of the countdown, the beep sound gets faster, then recording starts automatically.
CbeMaHaJIeHTycNOMOuBTOaMepa cAmo3anycka
-ToIbKO MoJeN DCR-TRV325E/ TRV330E/TRV430E/TRV530E
BbMOxKeTe 3aIINcBbA Tb HeNoDnBXHbIe
N3O6paXeHnHa IeHTb C NOMOuTo TaMepa
camo3aNycka.ДЯ TToI OePaUNBbTaKx
MOxKeTe NcIOJIb3ObA Tb PJIbT DInCTaHcUHOHOrO
ynpabLeHn.
(1)ДЯ OTOбрахеня yctaHOBOK MeHIO B peKIMe OXnDaHnHaXmTe KhoNky MENU.
(2)ПовернITEДСКSEL/PUSH EXECДЯВБОрауCTаНовки ,Затем НжмITE HaДИСК.
(3)ПовернITE диСК SEL/PUSH EXEC дя Выбopa усановки SELFTIMER, затем нажмITE на диСК.
(4)ПовернITEДСК SEL/PUSH EXEC ДЯ Вьбogaустанови ON,Затем НжмITE на дис.
(5)HaxMMTe KhoNkY MENUДЯИСЧЕЗHOBEHIN YCTaHOBOK MEHIO.
(6)HaKmTe KONky PHOTO cnIbHo. TaMep cAmO3aNycka NaHcHT o6paTHbI OTCuET BpeMeHN OT 10 c 3yMMepHbIM CnHApOM. B nocJeDnHe DBe CeKyHDbI O6paTHOrO OTCuETa BpeMeHN, YaCTota 3yMMepHOrO CnHana 6yJed T6bICTpee, a 3aTEM HaHcTcA 3aINCb.
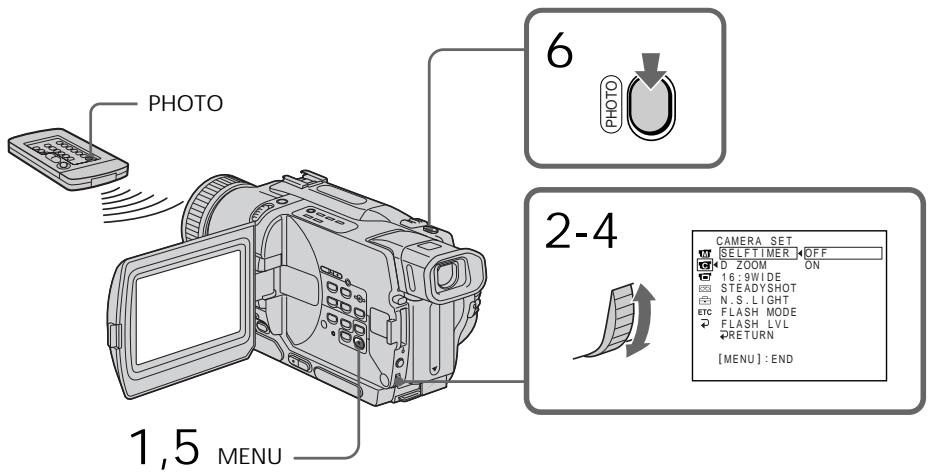
To cancel self-timer recording
Set SELFTIMER to OFF in the menu settings in the standby mode.
You cannot cancel the self-timer recording using the Remote Commander.
Длг OTMeHbI 3aIncn no TaImepy camo3anycka
YcTaHOBnTe pyHKT SELFTIMER By cTaHOBkax MeHIO B NOJoxeHNN OFF.
BbHe MoKTe OTMeHnTb 3aIINcB NO TaIepe caMo3aNyCka, IcNoJIb3yI NyIbT
ДиСТаHCUOHHOROУправлеснЯ.
Note
The self-timer recording mode is automatically cancelled when:
- Self-timer recording is finished.
- The POWER switch is set to OFF (CHG), PLAYER or VCR (DCR-TRV330E only).
Printing the still image
You can print a still image by using the video printer (optional). Connect the video printer using the A/V connecting cable supplied with your camcorder.
Connect the A/V connecting cable to the A/V OUT or AUDIO/VIDEO jack and connect the yellow plug of the cable to the video input of the video printer. Refer to the operating instructions of the video printer as well.
PpimcuaHne
Pekim 3aIncn IIO TaImepy 6ydet aBTOMaTnueckn OTMeHEn,ecJIN:
-3aHnCb nTo TaMepy cAmO3aNycka 3aKOHHTcA.
-Пepeклочаел b POWER yctaHOBnB nnoJoxHeNE OFF (CHG),PLAYER nIIN VCR (ToIbko moJeIb DCR-TRV330E).
If the video printer is equipped with S video input
Use the S video connecting cable (optional).
Connect it to the SVIDEO OUT or SVIDEO jack and the S video input of the video printer.
EcIn B BnDeOpnPnHTepe NmEeTcBxOJHoe THe3Do S BnDeo
IcnoJIb3yIte coeHInTeIbHbI Ka6eJIb S BnIeO (npno6peTaetcA OTeJIbHo). POncoeHInTe ero K rHe3d - S VIDEO OUT nnn - S VIDEO n Ko BXoJHOMy rHe3dy S BnIeHO Ha BnDeOpnPHTepe.
Using the wide mode
You can record a 16:9 wide picture to watch on the 16:9 wide-screen TV (16:9WIDE).
Black bands appear on the LCD screen or in the viewfinder during recording in 16:9 WIDE mode a. The picture during playing back on a normal TV [b] or a wide-screen TV [c] are compressed in the widthwise direction. If you set the screen mode of the wide-screen TV to the full mode, you can watch pictures of normal images [d].
BbMOxTe 3aINcBtBbIuPOKoOpMaTHoe
n3o6paXeHne16:9 dIa npocMToPa Ha
IuPOKO3KpaHOM TeIeBn3ope fOpMaTa16:9
(16:9WIDE).
Bo Bpem 3aIncn B pexmme 16:9 WIDE Ha
3kpaHe KKД nI IN B BuOnckaTeNe NOBATcN
eepHbIe nOocbl a. N3o6paXeHne BO Bpem
BOcPON3BeDEnr B BuOnCKaTeNe,Ha
06bUHOM TeneBn3OpE [b] nIIN H
7IpOKo3KpaHHom TeneBn3OpE [c] 6yDet Cxkato
no 7uPInHe. Ecnn Bby yCTaHOBtpe pexm
3KpaHa 7IpOKo3KpaHHoro TeneBn3OpA B
NoIHO3KpaHHbI peXmB, Bby cMOXeTe
Ha6IIIOaTb 06bUHbIe N3o6paXeHn86e3
nCKaXeHn [d].
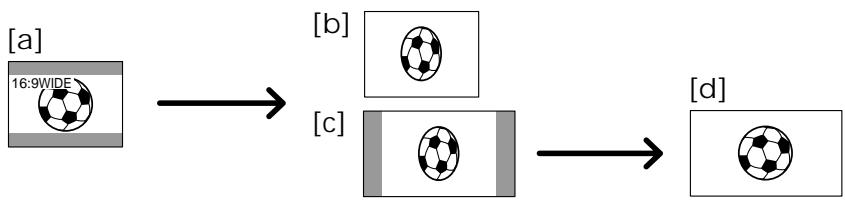
In the standby mode, set 16:9WIDE to ON in the menu settings (p. 107).
B pexime oxndaHn yctaHOBnte KOMaHny 16:9WIDE B noLoXeHne ON B ycTaHOBkax MeHIO (cTp. 107).
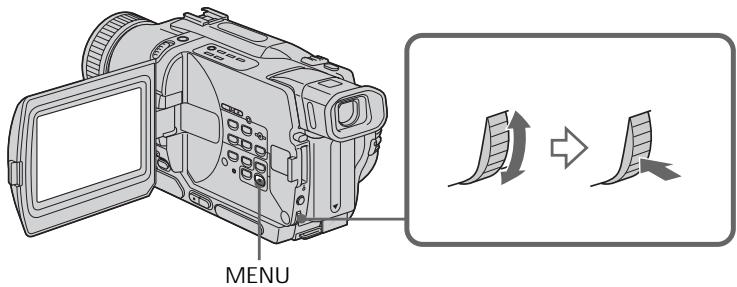
To cancel the wide mode
Set 16:9WIDE to OFF in the menu settings.
Длг OTMeHbI ShpOKo3KpaHOrO pexHMa
YcTaHOBnTe KOMaHny 16:9WIDE B noJIOKeHne OFF By cTaHOBkax MeHIO.
In the wide mode, you cannot select the following functions:
Old movie
- Bounce
During recording
You cannot select or cancel the wide mode. When you cancel the wide mode, set your camcorder to the standby mode and then set 16:9WIDE to OFF in the menu setting.
B shpoko3kpaHHom pexHme Bbl He moKTe BblnpaTb cneDyUOune fynKcnn:
-CTapHHoe KINHO
-ПepeckaиВанe
BoBpem3aHncn
BbHe moXeTe BbI6paT bNn OTMeHntb ⅢpOKo3KpaHbH pexm. EcIn BbO tMeHnte ⅢpOKo3KpaHbH pexm, yCTaHObTe BaSy BuDeokamepy BpeXM OxuDaHnA, a3aTEMycTaHObTe KOMaHdy 16:9WIDE B noJIOKeHne OFF.
Using the fader function
IcnoJb3OBaHne cyHKunn feydepa
You can fade the picture in or out to give your recording a professional appearance.
BbMOKeTe BbIOJNHTb PnABHO BBeDeHne N BbIEDeHne 3O6paXeHNA, YTO6bI PnJaTb BaewcBemKe npoceccnHaJIbHbI BnD.
STBY
REC
FADER
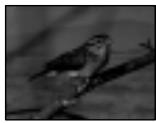
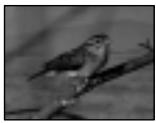
M.FADER (mosaic)/(mo3aikka)


BOUNCE ^(1)2)


OVERLAP2)


WIPE2)

DOT2) (ramdom dot)/ (PpOIN3BOJbHbIe ToUKN)
[b]
STBY
REC
MONOTONE
When fading in, the picture gradually changes from black-and-white to colour.
When fading out the picture gradually changes from colour to black-and-white.
1) You can use this function when D ZOOM is set to OFF in the menu settings.
2) Fade in only
MONOTONE
Pn BBeDeHn N3O6paXeHne 6yDet nocTeenHNO n3MeHrTbCn OT UepHO-6eNo DO uBcETHO. Pn BBeDeHn N3O6paXeHne 6yDet nocTeenHNO n3MeHrTbCn OT UcBcTHOro Do UepHO-6eNo.
1) Bb moKeTe nCnOlb3ObaTb 3Ty cyHKnIO, ecnn onu D ZOOM yCTaHOBJeHa B noLoXeHne OFF B yCTaHOBkax MeHIO.
2)ToIbKO BVeJeHne I3O6paXeHnI
(1) When fading in a
In the standby mode, press FADER until the desired fader indicator flashes.
When fading out [b]
In the recording mode, press FADER until the desired fader indicator flashes.
The indicator changes as follows:
FADER M.FADER BOUNCE
MONOTONE OVERLAP
WIPE DOT
The last selected fader mode is indicated first of all.
(2) Press START/STOP. The fader indicator stops flashing.
After the fade in/out is carried out, your camcorder automatically returns to the normal mode.
(1)При ВБеDEDи n30обрахень a
B pexme oXndaHn, haxmMaTe KHOIky FADER do tex np, noka He naHet Mnrat Hxkhb nnDkaTOp fepa.
PnBbIBeHeHHn 306paXeHn [b]
Bpekime 3aHncn, HaxkmaTe KhoNky
FADER IO Tex nop, noka He haayet Mrgatb HxkHb mdkaTop feiepa.
HnDnKaTOp 6yDeT N3MeHrTbCra CNeDuOuIM 06pa3oM:
FADER M.FADER BOUNCE
MONOTONE OVERLAP WIPE DOT
IocneHn n3 BbIbpaHHbIX pexmOB 贝depaOTobpaXaETcNepBbIM.
(2)HaxmTe KhoNky START/STOP.ИнdkaTOp ΦeIdepa nepeCTaHET MngraTb.
IocneToro,KaK BbInOnHeNoBVeDeHne/ BbBeDeHne n3O6paXeHn, BaWa
BIDeOKaMepa aBTOMaTnueCKN BepHeTcB O6bUHbI peKIM.
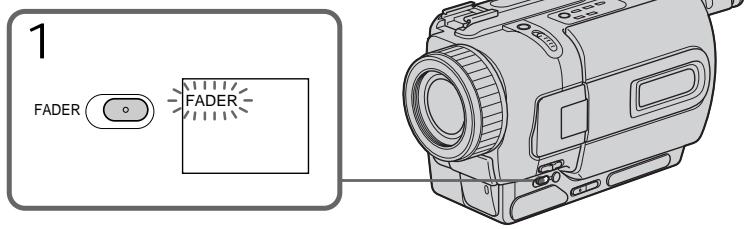
To cancel the fader function
Before pressing START/STOP, press FADER
until the indicator disappears.
Notes
- The overlap, wipe and dot functions work only for tapes recorded in the Digital8 system.
- You cannot use the following functions while using the fader function. Also, you cannot use the fader function while using the following functions:
- Digital effect
- Low lux mode of PROGRAM AE (Overlap, wipe, or dot function only)
Super NightShot
-Tape photo recording
Длг OTMeHbI Функци ФeДера
IpeπTeM, KaK hαKaTb KhONky START/STOP, hαKImaJIte KhONky FADER do tex nop, noka He uCye3HeT INdɪkaTOp.
Примеань.
-Функин haIoxeHn I3O6paXeHn pa60aet TOnbKOДЯЛeHT,3aIncaHHbIX BcIcfoBOcNCTeme Digital8
- BbI He MoXeTe IcNoJIb3OBA Tb CneIyUoIue IcYHKuIM BO BpEMr IcNoJIb3OBAHr IcYHKUIM FeIepa. TaKxe, Bbl He MoXeTe IcNoJIb3OBA Tb CyHKUIO QeIepa BO BpEmr IcNoJIb3OBAHr CneIyUoIx CyHKUIM:
-LnΦpOBoNΦΦeK
-PeKIM Hn3KoO cBSeUeHHocTn PROGRAM AE (ToIbKO fYHKuNHaLoXeHnBa, BbITEcHnA WTOpKo NIN ToUeHOro n3o6paJxHnA)
-Houha cynepcbemka
-ΦOTOCbEMKa
Before operating the overlap, wipe, or dot function
Your camcorder stores the image on the tape. As the image is being stored, the indicator flashes quickly, and the image you are shooting disappears from the screen. Depending on the tape condition, the image may not be recorded clearly.
While using the bounce function, you cannot use the following functions:
-Focus
-Zoom
- Picture effect
Note on the bounce function
The BOUNCE indicator does not appear in the following mode or functions:
-D ZOOM is activated in the menu settings
- Wide mode
- Picture effect
- PROGRAM AE
EcIn Bbl He 3aNcBbAln Hnryo nepei BKJIOueHnem yHKunn HaNOxHeHn n3O6paKeHn
BaSHA BnDEOKaMepaXpaHNT n3o6paXeHne HaJeHTe.BoBpEM coxpaHEnn n3o6paXeHn INDkaTOp Mnaet 6bICTpo,a n3o6paXeHne, KOtOpoe BbI cHmaeTe,NCue3HeT c 3kpaHa.B 3aBncMocTn OT COCTOHNJIeHTbl, n3o6paXeHne MoKET 6bITb 3aNcHo HeeTko.
Bo BpemnncnoB3OBaHnnyHKcnnnepeckaunBaHnBbHe MoKTeNCnoB3OBaTb cJeDyUOuNe cyHKcnn:
-ФokycnpOBka
-TpaHcΦokaun
-3ΦΦeKrN3o6paXeHnA
PpimueaHne no fynkun npeckaKaBaHnA
Hdkatop BOUNCE He noBnEeTcB CNeDyUOxnpexKmMax nIIN npu NcNoIb3OBaHnCneDyUOxN cyHKcN:
-Komahda D ZOOM npBBeHa B DeIcTBne ByCTaHOBkax MeHIO
-ШрокоэКраHHь ржим
-ФФфekt n306paKeHnA
- PROGRAM AE
Using special effects
- Picture effect
You can digitally process images to obtain special effects like those in films or on the TV.
NEG. ART a: The colour and brightness of the image is reversed.
SEPIA: The image is sepia.
B&W: The image is monochrome (black-and-white).
SOLARIZE [b]: The light intensity is clearer, and the picture looks like an illustration.
SLIM [c]: The image expands vertically.
STRETCH [d]: The image expands horizontally.
PASTEL [e]: The contrast of the image is emphasized, and the image looks like an animated cartoon.
MOSAIC [f]: The image is mosaic.
IcnoJb3OBaHne cpeunabHbIX 3ΦΦeKTOB - ΘΦΦeKT n3o6paXeHnA
BbMOxTe BblONHrTb 6pbOToKy
13o6paXeHnI cIpPoBBIM MeTOOM dI
10nyehn CneuaJIbHbIX 3cEKeKTOB, KaB
KNHOINbMax INI Ha 3kpaHax TeNeBu3OpOB.
NEG. ART a: LcBET NЯРKOCt b N3O6paXeHb 6yDyT HeTaTNBbIMN.
SEPIA: 1306paXeHne 6yJeT B CBeTe cENIN.
B&W: 136paKeHne 6yJeT MOHOxPOMaTHueCKIM (YepeHo- 6eIbIM).
(1) Press MENU to display the menu settings in CAMERA mode.
(2) Turn SEL/PUSH EXEC dial to select , then press the dial.
(3) Turn SEL/PUSH EXEC dial to select P EFFECT, then press the dial.
(4) Turn the SEL/PUSH EXEC dial to select the desired picture effect mode, then press the dial.
(1)HaxmTe KhoNky MENUДЯ OTObpaXeHn yCTaHOBOK MeHIO BpeKmE CAMERA.
(2)ПовернITE ДИСК SEL/PUSH EXEC ДЯ Выбopa установки W,затем нахмITE на ДИСК.
(3)ПовернITE ДИСК SEL/PUSH EXEC ДИВЮбopa установки P EFFECT, за тем нажмITE на ДИСК.
(4)ПовернITE диСEL/PUSH EXEC дяБыбopa ржима hyжного зфөгтaitи36рхен, 3aTeM habKMnTe Ha диСК.
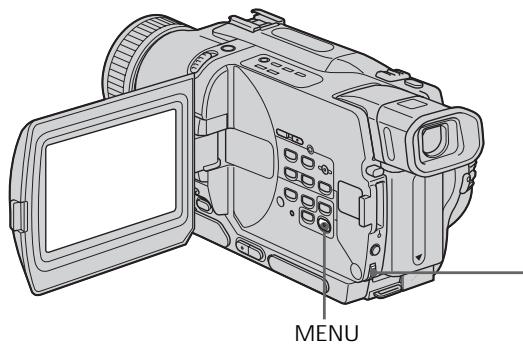
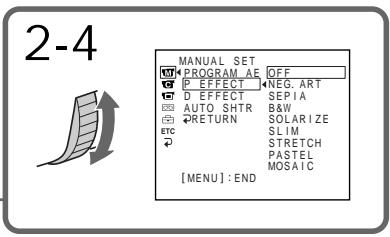
To turn the picture effect function off
Set P EFFECT to OFF in the menu settings.
While using the picture effect function
You cannot select OLD MOVIE with the digital effect function.
When you turn the power off
The picture effect is automatically canceled.
Using special effects - Digital effect
You can add special effects to recorded image using the various digital functions. The sound is recorded normally.
STILL
You can record a still image so that it is superimposed on a moving image.
FLASH (FLASH MOTION)
You can record still images successively at constant intervals.
LUMI. (LUMINANCEKEY)
You can swap a brighter area in a still image with a moving image.
TRAIL
You can record the image so that an incidental image like a trail is left.
SLOW SHTR (SLOW SHUTTER)
You can slow down the shutter speed. The slow shutter mode is good for recording dark images more brightly.
OLD MOVIE
You can add an old movie type atmosphere to images. Your camcorder automatically sets the wide mode to ON, picture effect to SEPIA, and the appropriate shutter speed.
IcnoJb3OBaHne CpeunalbHbIX 3ΦΦeKTOB -CnΦpOBoN 3ΦΦeKT
BbMOxKeTe Do6aBnTb CneuaJIbHbIe 3ΦΦeKtbl K 3aINCbIbAeMOMy N3O6paXeHNI C NOMOuBo pa3HbIX cUΦpOBbIX cyHKm. 3aINCbIbAeMbIM 3Byk 6yDet O6bIHybIM.
STILL
BbMOKTe 3aIINcMbA Tb HEnoDBNIXHOe n3O6paXeHne, KOtOpoe MOxHo HanaRaTb Ha nOdBnIXHO n3O6paXeHne.
FLASH (FLASH MOTION)
Bb moKTe 3aIncbIbTaB HeNoDVBHXHbIe
n3o6paXeHnB IVocNeIOBaTeJIbHOCTN Upe3
onPeJeIeHNbIe INHTepBaIbI.
LUMI. (LUMINANCEKEY)
Bb moKTe n3MeHArI pKHe MeCtHa HnOoBnXHOM N3o6paXeHn Ha NoDnXHbIe N3o6paXeHn.
TRAIL
BbMOKeTe 3aINcMbTaB IN3O6paXeHne C 3ΦΦeKToM 3aNa3DbBaHn.
SLOW SHTR (SLOW SHUTTER)
BbMOKeTe 3aMeDnITb CKOpOCTb 3aTbopa.
PexMM MeIeHHoro 3aTbopa RaJIHeTcnaDxOJHnM dIra 3aIINC TeMHbIX N3o6paXeHnB 60lee npKOM CBeTe.
OLD MOVIE
BbMOKeTe npNBHOCnTb aTMoccpepy
CTapHHoro KInHO B n3o6paXeHn. Ba7a
BnDEOKaMepa 6ydt ABTomATnueckn
yCTaHaBnBaTb WnPOKo3KpaHbNpEKM B
IIOJoxeHne ON, 3ΦΦeKT n3o6paXeHn B
IIOJoxeHne SEPIA, IN BbICTabJIaTb
COOTBeTCTByIOUyIOCKOpOCTb 3aTBopa.
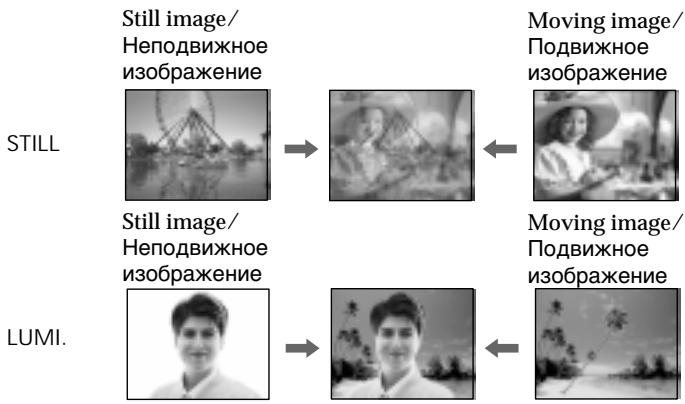
(1) Press MENU to display the menu settings in CAMERA mode.
(2) Turn SEL/PUSH EXEC dial to select , then press the dial.
(3) Turn SEL/PUSH EXEC dial to select D EFFECT, then press the dial.
(4) Turn the SEL/PUSH EXEC dial to select the desired digital effect mode.
(5) Press the SEL/PUSH EXEC dial. The bars appear on the screen. In the STILL and LUMI modes, the still image is stored in memory.
(6) Turn the SEL/PUSH EXEC dial to adjust the effect as follows:
STILL - The rate of the still image you want to superimpose on the moving image
FLASH - The interval of flash motion
LUMI. - The colour scheme of the area in the still image which is to be swapped with a moving image
TRAIL - The vanishing time of the incidental image
SLOW SHTR - Shutter speed. The larger the shutter speed number, the slower the shutter speed.
OLD MOVIE - No adjustment necessary
The more bars there are on the screen, the stronger the digital effect. The bars appear in the following modes: STILL, FLASH, LUMI and TRAIL.
To cancel the digital effect
Set D EFFECT to OFF in the menu settings.
Notes
- The following functions do not work during digital effect:
-Fader - Low lux mode of PROGRAM AE
-Tape photo recording
Super NightShot - The following function does not work in the slow shutter mode:
- PROGRAM AE
- The following functions do not work in the old movie mode:
- Wide mode
- Picture effect
- PROGRAM AE
When you turn the power off
The digital effect is automatically canceled.
When recording in the slow shutter mode
Auto focus may not be effective. Focus manually using a tripod.
Shutter speed
| Shutter speed number | Shutter speed |
| SLOW SHTR 1 | 1/25 |
| SLOW SHTR 2 | 1/12 |
| SLOW SHTR 3 | 1/6 |
| SLOW SHTR 4 | 1/3 |
IcnoJb3OBAHHe cneuaJIbHbIX 3ΦΦeKTOB -LHΦpOBoI 3ΦΦeKT
ДЯ OTMeHbI UΦpOBOrO 3ΦΦeKtA
YcTaHOBInTe OOnuIO D EFFECT B nOJIoxeHne OFF By cTaHOBkax MeHIO.
Примеань.
CneIyUoJIe cyHKnUHe pa6OaIOT npn IcNoJIb3OBAHm UcΦpOBOrO 3ΦΦeKTA:
-Φeɪdεp
-PexkIM Hn3KoO ocBeueHocTn PROGRAM AE
-ΦOTOCbEMKaHaJIeHTy
-Houha cynepcbemka
CneIyUOUIeФyHKuIN He pa6oTaIOBpeKIMMeMEnHHO3aTBopa:
-PROGRAM AE
CneyuohueyHKnHepa6oTaIOTBpeXnMe CTapHHORKINHO:
-山npoko3KpaHbIpeXIM
-3ΦΦeKt n306paXeHn
-PROGRAM AE
PnBbIKJIIOHeHNIITaHNA
LcfoboB OeFekT 6yET aBTOMaTneCKN OTMeHEN.
Pn3aIncBpeKmmeMeJIeHnHO 3aTbopa
ABTOMATUeCKaФOKcnpOBKa MoKET 6bITb He 3ΦΦeKTnBHO. BbIIOJIHInTeФOKcnpOBky BpyHyIO, IcNoJIb3yI TpeHORY.
CKopoctb 3aTBopa
You can select PROGRAM AE (Auto Exposure) mode to suit your specific shooting requirements.
Spotlight
This mode prevents people's faces, for example, from appearing excessively white when shooting subjects lit by strong light in the theatre.
Soft portrait
This mode brings out the subject while creating a soft background for subjects such as people or flowers.
Sports lesson
This mode minimizes shake on fast-moving subjects such as in tennis or golf.
Beach & ski
This mode prevents people's faces from appearing dark in strong light or reflected light, such as at a beach in midsummer or on a ski slope.
Sunset & moon
This mode allows you to maintain atmosphere when you are recording sunsets, general night views, fireworks displays and neon signs.
Landscape
This mode is for when you are recording distant subjects such as mountains and prevents your camcorder from focusing on glass or metal mesh in windows when you are recording a subject behind glass or a screen.
Low lux
This mode makes subjects brighter in insufficient light.
Bb moXeTe Bb6paTb peXm PROGRAM AE (aBTOMaTHueckKa CbEMka) B COOTBeTCTBnC oCneUΦnueckMn TpeOBAHnA M K CbEMKe.
PpOxKeTOpHoe OcBeeHne
(1) Press MENU to display menu settings in CAMERA or MEMORY (DCR-TRV325E/ TRV330E/TRV430E/TRV530E only) mode.
(2) Turn SEL/PUSH EXEC dial to select , then press the dial.
(3) Turn SEL/PUSH EXEC dial to select PROGRAM AE, then press the dial.
(4) Turn the SEL/PUSH EXEC dial to select the desired mode.
(1)Hakmnte KhoNkUy MENUВ рекиme CAMERA uIN MEMORY (ToIbko moJeIN DCR- TRV325E/TRV330E/TRV430E/TRV530E).
(2)ПовернITE ДИСК SEL/PUSH EXEC ДИВыбopa установки ,Затем нахмпесу ДИСК.
(3)ПовернITE ДИСК SEL/PUSH EXEC ДЯ
Выбopa установки PROGRAM AE, за tem
нажмITE на ДИСК.
(4)ПовернITE дисK SEL/PUSH EXEC Ддьбора hyxhoro pekma.
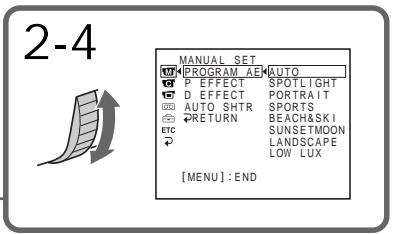
To turn the PROGRAM AE function off
Set PROGRAM AE to AUTO in the menu settings.
Notes
- In the spotlight, sports lesson and beach & ski modes, you cannot take close-ups. This is because your camcorder is set to focus only on subjects in the middle to far distance.
- In the sunset & moon and landscape modes, your camcorder is set to focus only on distant subjects.
-
The following functions do not work in the PROGRAM AE mode:
-
Slow shutter
Old movie
-Bounce -
The following functions do not work in the low lux mode:
-
Digital effect
- Overlap
-Wipe -
Dot
-
While setting the NIGHTSHOT to ON, the PROGRAM AE function does not work. (The indicator flashes.)
- While shooting in MEMORY mode, the low lux mode does not work. (The indicator flashes.) (DCR-TRV325E/TRV330E/TRV430E/TRV530E only)
If you are recording under a discharge tube such as a fluorescent lamp, sodium lamp or mercury lamp
Flickering or changes in colour may occur in the following modes. If this happens, turn the PROGRAM AE function off.
- Soft portrait mode
- Sports lesson mode
EcIn BbI BbINOpHReTe 3aINcB npn
NCIOJIb3OBAHm Ra3Opa3PdHOn JAMNbI,
HaTpNEBOJ LAMNbI IN pTyTHoJ LAMNbI
B CneDyUOxN pexIMax MoKet BO3HKnHyTb
MePcaHHe IN HeYCTOuINBVe IPOceCCbl. EcIn
3To Ipon30JeT, BbIKLIOHTe FyHKUIO
PROGRAM AE.
Adjusting the exposure manually
You can manually adjust and set the exposure. Adjust the exposure manually in the following cases:
- The subject is backlit
- Bright subject and dark background
- To record dark pictures (e.g. night scenes) faithfully
(1) Press EXPOSURE in CAMERA or MEMORY (DCR-TRV325E/TRV330E/TRV430E/ TRV530E only) mode. The exposure indicator appears on the screen.
(2) Turn the SEL/PUSH EXEC dial to adjust the brightness.
PerynpoBka 3Kcno3nN BpyHyO
BbMOxTe OTperyIuropoBaTb uYCTaHOBnTb 3KcNo3nUIO BpyHyIO.
Otpereynpyte3Kcno3nIO BpyHyIO BCJeDyUOxClyuAx:
-Obekt Ha ohe 3aDnei noCBETK
-Ярkin obbeKT Ha temHom fohe
ДяЗаис TeMHbIX n3O6paXeHn(Ha npimep, HOnHbIX cUeH)C 60JIbWoi DoCTOBePBOcTbIO
(1)Haxmte KhoNky EXPOSURE B peximeCAMERA nIM MEMORY (ToIbKO moJeiDCR-TRV325E/TRV330E/TRV430E/TRV530E).Ha ekpahe XKД nIM BVIOUNCKaTeJI NOBNTcI INHdIKaTOP 3KcNo3nI.
(2)ПовернITE диСК SEL/PUSH EXEC дяперулровки ярков.
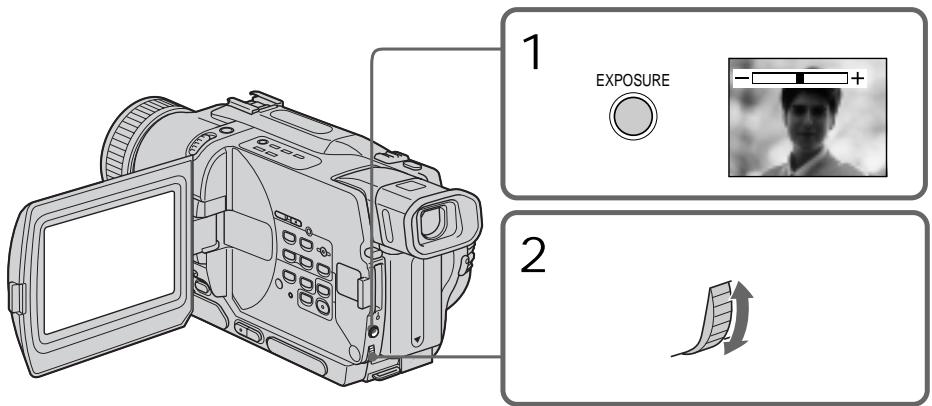
To return to the automatic exposure mode
Press EXPOSURE.
Note
When you adjust the exposure manually, the backlight function does not work in CAMERA or MEMORY (DCR-TRV325E/TRV330E/TRV430E/TRV530E only) mode.
Your camcorder automatically returns to the automatic mode:
-if you change the PROGRAM AE mode
-if you slide NIGHTSHOT to ON
Дя BO3Bpata B peKIM aBTOMaTnuecko 3KcNo3nCm
HaxmTe KhoNky EXPOSURE.
PpimueaHn
EcIn Bb OtpreIpyeTe 3KcNo3nIO BpyHyIO,
fynKuJy 3aDHeN PoCBeTKn He 6yDet pa6oTaB
BpeXime CAMERA nIN MEMORY (ToIbKO
moJeIN DCR-TRV325E/TRV330E/TRV430E/ TRV530E).
Bawa bVideokamape aBTOMaTnueckn BepHETcB pEXM aBTOMaTnuecko 3Kcno3n:
-ecnBbIu3meHntepexIMPROGRAMAE
-ecn Bbl nepeBnHeTe nepeKIOuAteJIb NIGHTSHOT B noJooKeHne ON
You can gain better results by manually adjusting the focus in the following cases:
-
The autofocus mode is not effective when shooting:
-
subjects through glass coated with water droplets.
horizontal stripes. - subjects with little contrast with backgrounds such as walls and sky.
- When you want to change the focus from a subject in the foreground to a subject in the background.
- Shooting a stationary subject when using a tripod.
Bb mojke Te noluyntb lyuine pe3ynbTaTb nytem perynipOBKn BpynuHyo B cneDyUOxN CnyaX:
- Pexm aTOMaTnuecko fokycnpOBKn ABJIeTC He3fkeKTHBbIM npi BblONHeHn CbeMKN:
-06bekTOB Chepe3 NOKpbIToe KaJIaMn CTeKIO.
-Topn3OHTaJIbHbIX NOIoc.
-06bekTOB C MaJIoN KOHTpaCTHO TaKOM fOHe, KAK CTeHa Nn He6o.
- EcIn Bbl XOTnTe BbINOJIHnTb N3MeHeHne
ФOKcynOpBkn C obKeT ha nepeHem ПlaHep
Ha obKeT Ha 3aDhem ПlaHep.
-Пи BыллнHeHn CbemKn CTaNoHapbIx 06beKToB C ИСпОЛьЗOBаHnEМ TpeHOrn.


(1) Set FOCUS to MANUAL in CAMERA or MEMORY (DCR-TRV325E/TRV330E/ TRV430E/TRV530E only) mode. The ⑤ indicator appears on the screen.
(2) Turn the focus ring to sharpen focus.
To return to the autofocus mode Set FOCUS to AUTO.
ДЯВОЗВРашЕнВрекиФокс neuropOKN
YcTaHOBInTe nepeKIOuHaTeIb FOCUS B noJIOxHeHrAUTO.
To focus precisely
Adjust the zoom by first focusing at the "T" (telephoto) position and then shooting at the "W" (wide-angle) position. This makes focusing easier.
When you shoot close to the subject
Focus at the end of the "W" (wide-angle) position.

changes to the following indicators:

when recording a distant subject.

when the subject is too close to focus on.
ДЯTOUHONΦOKYCUPOBKN
OtpereynpyTe o6bekTnB, cHaayla BbvIOnHNB
fokycinpOBky BVIOJoxeHN "T" (Telecpoto), a 3aTEM BbvIOnHNB CbEMKY BVIOJoxeHN "W" (IInpOKoro yrna Oxbata). 3To ynpocntt fokycinpOBky.
Pn BbINOJIHeHn CbeMKn B6IIm3n 06BeKta
BbIOnHInTeΦOKyCnPOBky B KOHcpe NIOJoxeHHN "W" (Umpokoro yrna oxbaTa).
HdNkaun

N3MeHNTcHa CJIeDyIOUne
INHdNkATobpbl:

Superimposing a title
HanoxeHne TnTpa
You can select one of eight preset titles and two custom titles (p. 69). You can also select the language, colour, size and position of titles.
BbMoKTe BbIbPaTb OINH N3 BOCbMn
npedBaPnteJIbHO yCTaHOBJIeHHbIX TITPOB IN DByX
cO6CTBeHHbIX TITPOB (CTp. 69). BbMoKTe TaKKe
BbIbPaTb RaBk, ZBET, pa3Mep INoLoXeHne
TITPOB.

(1) Press TITLE to display the title menu in the standby mode. The title menu display appears on the screen.
(2) Turn the SEL/PUSH EXEC dial to select , then press the dial.
(3) Turn the SEL/PUSH EXEC dial to select the desired title, then press the dial. The titles are displayed in the language you selected.
(4) Change the colour, size, or position, if necessary.
① Turn the SEL/PUSH EXEC dial to select the colour, size, or position, then press the dial. The item appears on the screen.
② Turn the SEL/PUSH EXEC dial to select the desired item, then press the dial.
③ Repeat steps ① and ② until the title is laid out as desired.
(5) Press the SEL/PUSH EXEC dial again to complete the setting.
(6) Press START/STOP to start recording.
(7) When you want to stop recording the title, press TITLE.
(1)HaKMMTe KHOIpKy TITLEДЯ OTo6paJxHЯ MeHIO TnTPOB B pexMme OxNJaHЯ. Ha 3KpaHe NpOBITcN HINdkaUraMeHIO TnTPOB.
(2)ПовернITE ДИСК SEL/PUSH EXEC ДЛЯ
Быбopa установки,а 3aTeM нахмITE ДИСК.
(3)Повернite диck SEL/PUSH EXEC дяВыбopa Нхнoro TИТра,а 3aTeM haxmTeДпС.ТИТрbl 6ут OTOБразКТсЯНВыбopaHHom BamЯ 3bIke.
(4)Измени Teцет,размер Или полженье TИТра, eclin Нухно.
①Повернite ДИСК SEL/PUSH EXEC ДИВыбopaцBEta,размера UNIN NOLOженТИТра,a 3aTeM HaxmITEДИСК.ΗЗКране ПОВИТСАТOT ПУНКТ.
② ПовернITE диck SEL/PUSH EXEC Дпь Выбoga hyжно пункta, a 3aTeMHаЖмITE диck.
③ Повторгейtenунковы ①и ②do tex nop, noka TnTp He 6ydt pacnoIooKeH TaK, KaK HxKHO.
HaxmTe DNCK SEL/PUSH EXEC nla 3aBepSeHn yCTaHOBKn.
(6)Hakmnte KhoNky START/STOP nHaJnla 3aIncn.
(7)Ecln Bbl 3axoTne octaHOBntb 3aInCb TnTp,a Haxmnte KhONky TITLE.

To superimpose the title while you are recording
Press TITLE while you are recording, and carry out steps 2 to 5. When you press the SEL/PUSH EXEC dial at step 5, the title is recorded.
To select the language of a preset title
If you want to change the language, select before step 2. Then select the desired language and return to step 2.
If you display the menu while superimposing a title
The title is not recorded while the menu is displayed.
To use the custom title
If you want to use the custom title, select l in step 2.
Title setting
- The title colour changes as follows:
$$ \mathrm {W H I T E} \leftrightarrow \mathrm {Y E L L O W} \leftrightarrow \mathrm {V I O L E T} \leftrightarrow \mathrm {R E D} \leftrightarrow $$
$$ \mathrm {C Y A N} \leftrightarrow \mathrm {G R E E N} \leftrightarrow \mathrm {B L U E} $$
- The title size changes as follows:
$$ \text {S M A L L} \leftrightarrow \text {L A R G E} $$
You cannot input more than 12 characters in LARGE size.
- The title position changes as follows:
$$ 1 \longleftrightarrow 2 \longleftrightarrow 3 \longleftrightarrow 4 \longleftrightarrow 5 \longleftrightarrow 6 \longleftrightarrow 7 \longleftrightarrow 8 \longleftrightarrow 9 $$
The larger the position number, the lower the title is positioned.
When you select the title size LARGE, you cannot choose position 9.
When you are selecting and setting the title
You cannot record the title displayed on the screen.
When you superimpose a title while you are recording
The beep does not sound.
While you are playing back
You can superimpose a title. However, the title is not recorded on tape.
You can record a title when you dub a tape connecting your camcorder to the VCR with the A/V connecting cable. If you use the i.LINK cable instead of the A/V connecting cable, you cannot record the title.
Длн HaLOXKeHn THTpa BO BpeM 3aIncn
HaKmTe KhoNky TITLE BO BpeM 3aIncn I BbIOnHte DeiCTBnI NyHKTOB 2-5. EcIn Bbl HaKMeTe DnCK SEL/PUSH EXEC B nyHKTe 5, TITp 6byET 3aIncan.
Дя ВьбopaЯЗыka npedBapuTeNbHo yctaHOBJeHHOROTntpa
EcIN BbXOTNE m3MeHnTH b3bIK, BbI6epNTe INdkaunIO npeJ nyHKToM 2. 3aTeM BbI6epNTe HxKbIn Ra3bIK N BepHntEcB K NyHKTy 2.
B clyuae oTo6paXeHMeHIO BO BpeMn HALOXeHn Tttpa
Tntp He 6ydt 3aIINCbIbTaBcra BO BpeMa OTo6paXeHn MeHIO.
IINCNOB3OBAHNA CO6CTBEHHOROTHTP
EcIn BbXOTnTe NcNoJIb3OBAt b Co6CTBeHHbI TnTp, Bbl6epnte yctaHOBky B nYHKte 2.
YctaHObKa THTpa
LcBET THTpa N3MeHReTcR CNeDyUOuIM 06pa3OM:
$$ W H I T E (6 e n b i \text {i}) \leftrightarrow Y E L L O W (x e n t b i \text {i}) \leftrightarrow $$
$$ V I O L E T (\Phi \cap \text {I e t o b b i n}) \leftrightarrow R E D (K p a c h b i n) $$
$$ \leftrightarrow \text {C Y A N} (\text {r o n y b o i}) \leftrightarrow \text {G R E E N} (\text {3 e l e n b i}) $$
$$ \leftrightarrow \text {B L U E} (\text {C H N I}) $$
- Pa3Mep TITpa I3MeHReTcCneIyUOuIM 06pa3OM:
$$ S M A L L \left(M a l e n h b k m\right) \leftrightarrow L A R G E (6 o l b w o i) $$
BbI He MoKeTe BBeCTn 6oJIee 12 CmBOJIOB dIaP3Mepa TITpa LARGE.
Ecnn BbI Bb6epnte pa3mep TnTpa LARGE, Bbl He cMOxKeTe BbI6paTb nOIOxKeHne 9.
PnBbIbOpe n yctaHOBKe TnTpa
BbI He MoKeTe 3aIncatb TnTp, OTo6paXaEmbI Ha 3KpaHe.
Pn HanoXeHm TnTpa BO BpeM 3aInc
3ymmepnbI cHnHaJI He 6yTeT 3ByuAtb.
BoBpemBaocpon3BeDeHnA
BbMOKeTe HaIOXHTb TnTp. OHaKO TnTp He 6yDet 3aIncan Ha JeHtY.
Bb MojkeTe 3aIncatb TnTp npnpe3aIncn
JIeHTbI, NIOcOeIMNIB BaUy BUnEoKaMepy K
KBMc nOMoUbIO coeINHtBnHorO ka6enr
ayDIO/BuJeO. Ecnn Bb IcNoJIb3yYeTe Ka6enb
i.LINK BmecTO coeINHtBnHorO ka6enr ayDIO/
BnDeO, Bb He MojkeTe 3aIncatb TnTpbl.
You can make up to two titles and store them in your camcorder. Each title can have up to 20 characters.
(1) Press TITLE in the standby, PLAYER or VCR (DCR-TRV330E only) mode.
(2) Turn the SEL/PUSH EXEC dial to select , then press the dial.
(3) Turn the SEL/PUSH EXEC dial to select CUSTOM1 SET or CUSTOM2 SET, then press the dial.
(4) Turn the SEL/PUSH EXEC dial to select the column of the desired character, then press the dial.
(5) Turn the SEL/PUSH EXEC dial to select the desired character, then press the dial.
(6) Repeat steps 4 and 5 until you have selected all characters and completed the title.
(7) To finish making your own titles, turn the SEL/PUSH EXEC dial to select [SET], then press the dial. The title is stored in memory.
(8) Press TITLE to make the title menu disappear.
BbMOxETe COCTaNTb DO bByx TnTPOB n CoXpaHHTb IN B NaMrtn BaSei BnDeokamepbI. KaKdbl TnTp MOxET coepKaTaB Do 20 CmBOJOB.
(1)HaKmTe KhoNky TITLE BpeXmE OxuDaHnBpeXmPE PLAYER uIn VCR (DCR-TRV330E).
(2)ПовернITE ДСК SEL/PUSH EXEC ДЯ
Быбoga установский ,а заlem нахмпerte ДСК.
(3)ПовернITE ДИСК SEL/PUSH EXEC ДИВьбopa onци Custom1 SET ИN CUSTOM2 SET, a 3aTeM нажмITE ДИСК.
(4)ПовернITE ДИСК SEL/PUSH EXEC ДИВьбopa КОЛОНС HУЖНБIM CИМBOЛOM, a 3aTeM НAZMITEДИСК.
(5)ПовернITE ДИСК SEL/PUSH EXEC ДИЯ ВИБОпа
НУЖНОТСИМВОЛА, a 3aTeM наЖМИТЕ ДИСК.
(6)Повторгийпунковы 4и5do tex nop,пoka Bы He BBберпte BCE CIMBOлы И NOПНOCьH He COCTaBITe TnTp.
(7)ДЯЗавершени COCTABЛЕNHЯ CBOIX CO6CTBHeHHbIX TITPOB NOBepHnTe ДИСК SEL/ PUSH EXEC ДЯ BBi6opa KImaHaNDbI [SET], a 3aTeM NaXmTe ДИСК. TITp 6ydt COxpaHEn B ПAMrTи.
(8)HaKMMTe KHOIIky TITLE, UTo6bl Ncye3No MeHIO TnTPOB.
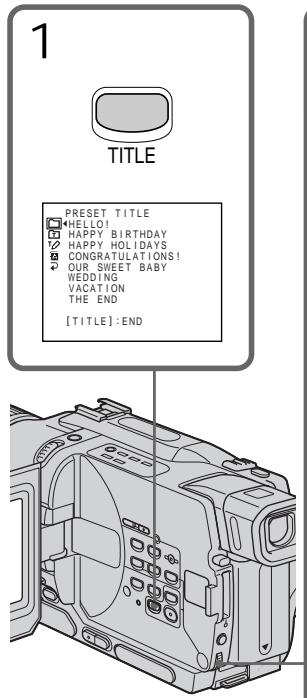
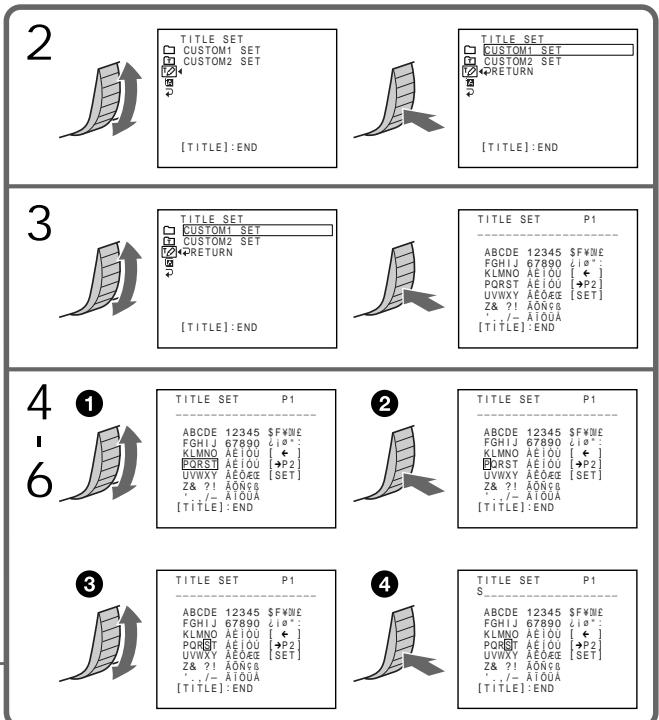
To change a title you have stored In step 3, select CUSTOM1 SET or CUSTOM2 SET, depending on which title you want to change, then press the SEL/PUSH EXEC dial. Turn the SEL/PUSH EXEC dial to select [] , then press the dial to delete the title. The last character is erased. Enter the new title as desired.
If you take 3 minutes or longer to enter characters in the standby mode while a cassette is in your camcorder The power automatically goes off. The characters you have entered remain stored in memory. Set the POWER switch to OFF (CHG) once, and turn it to CAMERA again, then proceed from step 1. We recommend setting the POWER switch to PLAYER or VCR (DCR-TRV330E only) or removing the cassette so that your camcorder does not automatically turn off while you are entering title characters.
If you select [ P2] The menu for selecting alphabet and Russian characters appear. Select [ P1] to return to the previous screen.
To erase a character Select [ ] . The last character is erased.
To enter a space Select [Z& ?!], then select the blank part.
Co3dHne Baunx co6CTBeHHbIX TnTPOB
ДлЯ ИЗмени COхраенногВ namATN TnTpA
B nyHKte 3 BbI6epnte yCTaHOBky CUSTOM1 SET nIN CUSTOM2 SET, B 3aBnCmOcTn OT TnTpA, KOTOpB bBy XOTnTe N3MeHnTb, a 3aTeM hXMMTE nCK SEL/PUSH EXEC. NObepnTe nCK SEL/PUSH EXEC nBbI6opa yCTaHOBKn [<], a 3aTEM hXMMTe nCK nDn yJaJIeHn TnTpA. IocJIeHN mCMBOJ 6yJeT cTept. BBeIeNTe HOBbI HxKbI TnTp.
EcIn BbI BBOINTE CUMBOJI 3 MNHyTBI INI 6OJIeB PexmE OxuDAnH B TO Bpem, KOrda Kacceta HaxoDITcB BaWe BnDeokamepe
Питainede ВьклioчNTcAВТOMaTNUcheKn.
СИМВОЛы, КOTорbie Bы ВБЕп, COXpaHЯТСВа
namrTn BvdeOkamepbI. YCTaHOBInTe ChauJaIa
nepeKIOUoateNB POWER B noLoXeHne OFF
(CHG), a 3aTeM cHOba B noLoXeHne CAMERA,
a 3aTeM hauHnTe cpyHKTa 1. PeKOMeHdyTeC
yCTaHOBInTpeKIOUoateNB POWER B
noLoXeHne PLAYER Иln VCR (ToIbKO moJelen
DCR-TRV330E) Ии BvHnyt kAcceTy, YTObSI
BaGa bVIeOKaMepa abTOMaTNUeCKN He
BvIKIOUaJIacBo BvPemBA BBOda CmIBOJOB
TITpa.
Ecnn BbI Bbl6paann yctaHOBky [P2]
IorBnTcMeHIOIy BbIbopa aIpaBNTa I pyCCKNX CmBBOIOB.ДЯ BO3BpTa K npexHemy 3KpaHy BbIbepnte yCTAHOBKy [→P1].
Дудаленгтра
Bb6epnte yctahOBky [].IocneHn CmBON 6ydt ctept.
ДлвВБОДиHTePbana
BbI6epNTe 3nak [Z& ?!, a 3aTeM BbI6epNTe nyctyIO ryeiKy.
You can insert a scene in the middle of a recorded tape by setting the start and end points. The previously recorded frames between these start and end points will be erased. Use the Remote Commander for this operation.
BbMOxTe BCTaBnTb 3IN3oD BcepeDInHe
3aNcAHHo JIeHTb IyTEM yCTaHOBKn TOeK
NaHa n OKOHuaHn. Ppebldyuine
3aNcAHHbIe KaIpbI MeJMy 3TmM ToykAmn
HaHa n OKOHuaHn 6yUyT Cteptb. BbMOxTe
BbIOHNb 3TO, INCNoB3y NylbT
INCTaHcUNHOHorO ynpabJeHn.
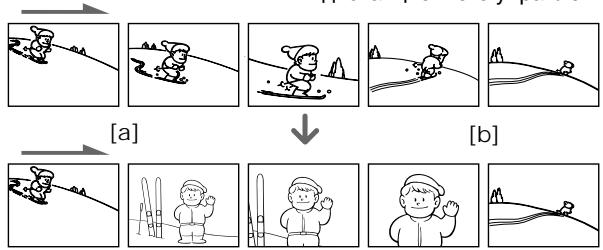
(1) While your camcorder is in the standby mode, keep pressing EDITSEARCH, and release the button at the insert end point [b].
(2) Press ZERO SET MEMORY. The ZERO SET MEMORY indicator flashes and the counter resets to zero.
(3) Keep pressing the - side of EDITSEARCH and release the button at the insert start point a.
(4) Press START/STOP to start recording. The scene is inserted. Recording stops automatically near the counter zero point. Your camcorder returns to the standby mode.
(1)В рекиемохиданьидeoКаМеры, deprжптунакотй конку EDITSEARCHи OTnyстпг КнокуВ точke OkOHuaHЯнэпзда [b].
(2)HaxmTe KhoNky ZERO SET MEMORY. HaHnET MrraTb HnDnKaTOp ZERO SET MEMORY, a ChEtTuK JeHTb 6yDet yCTaHOBJIeB HHyJeBOE NOJIOKeHne.
(3)Дерхитейнжатоистору - ΕΚΗΝΚΙΝΕDITSEARCH и OTпстιтей кΗΝΚΥВ Точке начала знистая a.
(4)Haxmnte KhoNky START/STOP nHaayana 3aIncn. 3nI3oD BCTaBJIeH. 3aIncb OCTaHOBNTcA BtOMaTNUeCKn B HynEBoi TOUKe CHTuKa. Ba7a BnDEOKaMepa BepHeTcR BpeXIM OxNuDAHHJ.
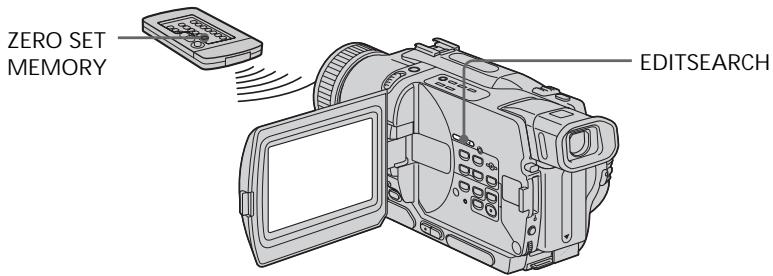
Notes
- The zero set memory function works only for tapes recorded in the Digital8 system.
- The picture and the sound may be distorted at the end of the inserted section when it is played back.
If a tape has a blank portion in the recorded portions
The zero set memory function may not work correctly.
PpIMeuaHnA
-ФункципamгнHyн He pa6oTaetДЯлent, 3aHncaHHbIX B zincpOboB cnCTeMe Digital8 H.
- 1306paXeHne n 3ByK MOrTy 6bIb NCKaXeHbl B KOHcE BCTaBJIeHHORO 3nN3oJa PnB BOCpON3BeDeHIn.
EcIn Ha JeIte IMeETc H3aIncaHbI yAcTOK
Функци памгтни hyн может He pa60taTb Надлесхшим образим.
Playing back a tape with picture effects
During playback, you can process a scene using the picture effect functions: NEG.ART, SEPIA, B&W and SOLARIZE.
(1) Press MENU to display the menu settings in the playback or playback pause mode.
(2) Turn SEL/PUSH EXEC dial to select , then press the dial.
(3) Turn SEL/PUSH EXEC dial to select P EFFECT, then press the dial.
(4) Turn the SEL/PUSH EXEC dial to select the desired picture effect mode, then press the dial.
For details of each picture effect function, see page 56.
To cancel the picture effect function Set P EFFECT to OFF in the menu settings.
Notes
- The picture effect function works only for tapes recorded in the Digital8 system.
- You cannot process externally input scenes using the picture effect function.
- You cannot record pictures that you have processed using the picture effect function with this camcorder. To record pictures that you have processed using the picture effect function, record the pictures on the VCR using your camcorder as a player.
Pictures processed by the picture effect function
Pictures processed by the picture effect function are not output through the DV OUT or DV IN/OUT jack.
When you set the POWER switch to OFF (CHG) or stop playing back
The picture effect function is automatically canceled.
BocnpOn3BeDeHne JeHTbIC 3ΦΦeKtAmn n3o6paXkeHn
Bo BpemBocpnoun3BeJeHnBbMOKeTe BUNoIN3MeHATb N3O6paXeHne C NOMOuBu OfynKcN:NEG.ART,SEPIA,B&W u SOLARIZE.
(1)HaxmTe KhoNky MENU dЯ OTo6paXeHn yCTaHOBOK MEHIO B pexIMe BOCpON3BeDeEHn IINI nay3bl BOCpON3BeDEEHn.
(2)ПовернiteДСКSEL/PUSHEXECДЯВбopaуCTaHOBKN,3aTeMHaXMITEHaДСК.
(3)ПовернITE ДИСК SEL/PUSH EXEC ДЯ
БИбopa установки P EFFECT, заlem
НХKMп� НДИСК.
(4)ПовернITE ДСК SEL/PUSH EXEC ДЯ
Выбoga рекиma hyхно оффөкта
Избржэн, a 3aTeM haxmite Ha ДИСК.
ДЯ пolyченя生态保护лдрбьх севеди
о кади ИЗ Функлund 3фсөктэ
Избржэн CM.ст. 56.
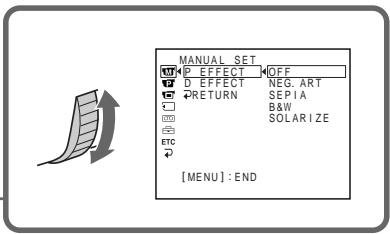
IITRAOTMeHbIΦyHKcNmCnΦpOBbIX 3ΦΦeKTOB
YcTaHOBnTe nyHKT P EFFECT B ycTaHOBkax MEHIO B nOJKeHne OFF.
Примеань.
ФУнкиялзфсгКТОВИЗбрахжЕнЯ pa6obaET TOLьКОДЛЯНТ,ЗАпcaHнБИВцИФрOBОС NСТЕМЕ Digitai8 [].
BbI He MOXETe BUNOM3MHeTb N3O6paXeHnI KBTM NIN TEBeN3Opa C NMOUbO yHKuN 30pEKTOB N3o6paXeHnI
BbI He MoKeTe 3aNcBiBaTb Obpa6oTaHbIe n3ObpaXeHnC NMOUbO fYHKuIN 3ΦΦeKTOB n3OpaXeHnHa daHHoB BnuEOKaMepe.ДЯЗaNcN n3OpaXeHnC nCpONJIb3OBaHnEM 3ΦΦeKTOB n3OpaXeHnA 3aNsiWte n3OpaXeHnHa KBM, nCpONJIb3yR BaWy BnuEOKaMepy B kaueCTbe PneJepa.
N3o6paXeHn, o6pa6oTaHHbIe C NOMOuBIO fYHKUIN 3ΦΦeKTOB N3o6paXeHn
I306paXeHn, 6pb6oTaHHbIe C nOMOuBIO yHNKnn 3cFKeTOB I306paXeHn, He nepeaIoTcA YpeE3 rHe3do DV OUTnN DV IN/ OUT.
EcIbYcTaHOBnI nepeKluOaTeIb POWER B noJIoKeHne OFF (CHG) nIe octaHOBnI BOCpOn3BEdHeN
Функцялфсгковибрхьуbet ABTomatueckn OTmeHeHa.
Playing back a tape with digital effects
Bocnpo3BeDeHne JeHTbI c uΦpObblm 3ΦΦeKtAmN
During playback, you can process a scene using the digital effect functions: STILL, FLASH, LUMI and TRAIL.
(1) Press MENU to display the menu settings in the playback mode.
(2) Turn SEL/PUSH EXEC dial to select , then press the dial.
(3) Turn SEL/PUSH EXEC dial to select D EFFECT, then press the dial.
(4) Turn SEL/PUSH EXEC dial to select the desired digital effect mode, then press the dial. The bars appear on the screen. In the STILL or LUMI mode, the image where you press the SEL/PUSH EXEC dial is stored in memory as a still image.
(5) Turn the SEL/PUSH EXEC dial to adjust the effect. For details of each digital effect function, see page 58.
Bo Bpemra BoCnpon3BeDHeHn, Bb MoKeTe BuOn3MeHrTb N3O6paXeHne C NOMOuBIO fynKcN: STILL, FLASH, LUMI. n TRAIL.
To cancel the digital effect function Set D EFFECT to OFF in the menu settings.
IITRAOTMeHbIΦyHKcUNuΦpOBbIX 3ΦΦeKTOB
YcTaHOBnTe nyHKT D EFFECT B yCtHaOBkax MEHIO B NpOJKeHne OFF.
Notes
- The digital effect function works only for tapes recorded in the Digital8 system.
- You cannot process externally input scenes using the digital effect function.
- You cannot record images that you have processed using the digital effect function with this camcorder. To record images that you have processed using the digital effect function, record the images on the VCR using your camcorder as a player.
Pictures processed by the digital effect function
Pictures processed by the digital effect function are not output through the DV OUT or DV IN/OUT jack.
When you set the POWER switch to OFF (CHG) or stop playing back
The digital effect function is automatically canceled.
Приимейсан<|im_start|>
-Функицфровьхлфсектob pa6oTaETToIbKOДЯЛeHT,3aIncaHHbIX BцфрбоBcncTeMe Digital8
- BbI He MoXeTe BUNOIN3MeHbTb N3o6paKeHnA ot KBM INI TelenBn3Opa C NOMOuBo FOyHKUIN UnpobBix 3ppeKToB.
BbI He MoKeTe 3aIINcBiBaTb O6pa6OtaHHbIe I3o6paKeHnC NOMOJIbIO cyHKUIM UΦpOBbIX 3ΦΦeKToB Ha DaHHo BUNDeOKaMepe.ДЯ 3aIINcI 3o6paKeHnC C UΦpOBbIMN 3ΦΦeKtAmI, 3aIIuInTe I3o6paKeHnHa KBM, INOpJIb3yR BaSy BUNDeOKaMepy B KaueCTBe IIeJepa.
N3o6paXeHn, o6pa6OtaHHbIe c nOmoUbO fYHKmN uΦpOBbIX 3ΦΦeKTOB
You can enlarge moving and still images recorded on tapes. You can also dub the enlarged images to tapes or copy to "Memory Stick"s (DCR-TRV325E/TRV330E/TRV430E/TRV530E only).
Besides the operation described here, your camcorder can enlarge still images recorded on "Memory Stick"s (DCR-TRV325E/TRV330E/ TRV430E/TRV530E only).
(1) Press PB ZOOM on your camcorder in the playback or playback pause mode. The image is enlarged, and indicators which showing the direction to move the image appear on the screen.
(2)Turn SEL/PUSH EXEC dial to move the enlarged image, then press the dial.
: The image moves downwards.
:The image moves upwards.
becomes available.
(3) Turn SEL/PUSH EXEC dial to move the enlarged image, then press the dial.
: The image moves rightward (Turn the dial downwards.)
: The image moves leftward (Turn the dial upwards.)
Bbl Moxete yBelenuNbAte DBNKUneecn HnenoDbNkHbIe n3o6paXeHnra, 3aIncaHbIe Ha IeHTbI. Bbl Moxete TaKxepepe3aIncBtBvBelenuHbIe n3o6paXeHnra Ha IeHTbI INn KOnipOBaTb Ha "Memory Stick" (ToIbKO moJeIN DCR-TRV325E/TRV330E/TRV430E/TRV530E). POMMnO Onpaun, oNncaHbIX B daHHom pykoDBCTBe, Baaa BndeOkamepa No3BolnaT EyBelenuNbAte HnOdbNkHbIX m3o6paXeHnra, 3aIncaHbIe Ha "Memory Stick" (ToIbKO moJeIN DCR-TRV325E/TRV330E/TRV430E/TRV530E).
(1)В ржиме BOCрпои3БeДЕня Илп пay3ы BOCрпои3БeДЕня нажмITE KНОКУ PB ZOOM Ha Baшй Видаokedape.
I306paXeHne yBEnuHTcA, a Ha 3KpaH eNORBA Tc INHnIKaTOpbI , NOKa3bIBaIOUme HapBaJIeHne dIy IpeHocA I306paXeHna.
(2)ПовернITE ДИСК SEL/PUSH EXEC ДЯпегемшени велочenvorO n3обрахеня,а зatem нахмITE ДИСК.
↑:ИЗобрахенья посямцаetсь Bнз.
↓:Изобрахенье поемаaeТСВБЕХ.
←→NORBNTCAHaDnCnnee.
(3)ПовернITE ДИСК SEL/PUSH EXEC ДЯпегемшия увелочenv Horo n3обрахеня,а зтЕм наЖмITE ДИСК.
←:ИЗобрахениперемается
BnpaBO (NoBepHnTe NnCK Bn3.)
:ИЗбрахене перемаetсь Влево (Повернite ДИСК ВВЕХ.)
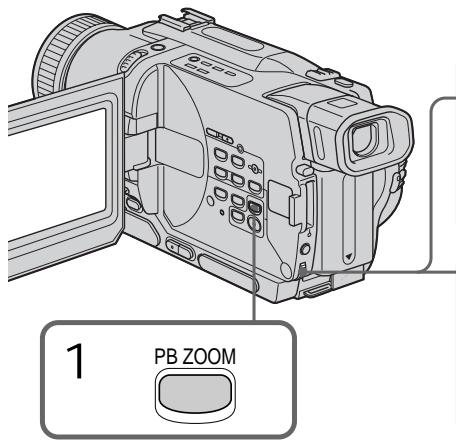
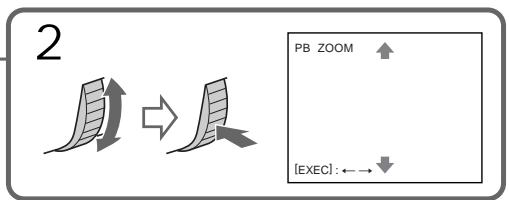
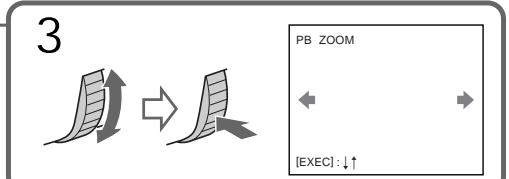
Notes
PB ZOOM works only for tapes recorded in the Digital8 system.
- You cannot process externally input scenes using PB ZOOM function.
- You cannot record pictures that you have processed using PB ZOOM function with this camcorder. To record pictures that you have processed using PB ZOOM function, record the pictures on the VCR using your camcorder as a player.
Pictures processed by PB ZOOM function
Pictures processed by PB ZOOM function are not
output through the DV OUT or DV IN/OUT
jack.
PB ZOOM function is automatically canceled when:
- the POWER switch is set to OFF (CHG)
- you stop playing back
- you press MENU
- you press TITLE
PpimueaHn
-Функця PB ZOOM pa6oTaet TOnbko ДЯлent,ЗаиcaHHbIX BcNCTeMe Digital8 [].
- BbI He MoXKeTe 6Obpa6aTbIBaTb BBeDeHHbIe C BHeUHei anIIapatypbI n3O6paXKeHnC nOMoUbIO yHKnPn PB ZOOM.
- Bы He MoxKeTe 3aIncbIbTaBt N3o6paJceHn, o6pa6oTaHHbIe C nOmoIbI OyHKcIIN PB ZOOM, Ha daHNoB BVJeOkaMepe.ДЯЗaIncu N3o6paJceHn, o6pa6oTaHHbIX C nOmoIbIO fYHKcIIN PB ZOOM, 3aIInIte N3o6paJceHn Ha KBM c nOmoIbIO BVJeOkaMepebl, IcIOnb3yra ee B KaYeTe PJIeepa.
N3o6paXeHn, o6pa6oTaHHbIe C IOMOuBIO fYHKUIM PB ZOOM
I3o6paXeHnI, 6pa6oTaHHbIe C nOmoUbIO
Функции PB ZOOM, He nepedaIoTca uepes
rhe3do DV OUT nJn DV IN/OUT.
Quickly locating a scene using the zero set memory function
БыICTpoe OTbICKaHne 3ПИЗODa C NOMOUsbO Функци ПamrTu HUJIeBOI OTMeTKn
Your camcorder goes forward or backward to automatically stop at a desired scene having a counter value of "0:00:00".
Use the Remote Commander for this operation.
Use this function, for example, to view a desired scene later on during playback.
(1) In the playback mode, press DISPLAY.
(2) Press ZERO SET MEMORY at the point you want to locate later. The counter shows "0:00:00" and the ZERO SET MEMORY indicator flashes on the screen.
(3) Press when you want to stop playback.
(4) Press to rewind the tape to the counter's zero point. The tape stops automatically when the counter reaches approximately zero. The ZERO SET MEMORY indicator disappears and the time code appears.
(5) Press . Playback starts from the counter's zero point.
BaSha BnDeOkamepa BbInOpHnErT npOdBnKeHne Bnpei nn HaaC aBTOMaTnueckoN OCTaHOBkoB HnyKHom 3n3Oe, rIe NOKa3aHne CteTHKa paBHo "0:00:00".
BbMOKTe BbINONHATb 3TO C NOMOcIbIO NyIbTa dNCTAHUHOHHOro ynpabNeHnA.
IcnoIb3yIte 3Tu cyHKUHO,HaPIMeP,IJI npOCMOTpa HJxHOrO 3Nn3Oda I03Ke BO BpEMBBOcnpON3BeDeHnI.
(1)В ржиме Воспpon3БeDEня нажмITE kHonky DISPLAY.
(2)HaKmTe KhONky ZERO SET MEMORY B MeCTe, KOtOpoe BbI 3axoTne HaNTn PO3Ke. Ioka3aHHe CHTuKa CTAHe TpaBbIM "0:00:00", n HaHTet MInaTb INdNkATOp ZERO SET MEMORY Ha 3KpaHe.
(3)HaxMnte KhoNky ,ecnBb 3axOTnte octaHOBNTB BOCnPOn3BeDeHne.
(4)HaxmTe KhoNky Для уckopehnoi nepemOTkn JENTbI Ha3aI K HynBoTo TOUKe CteTnKa. JIeHTaOCTaHOBtCra aBTOMaTnueCKn,ecJI NcETuK NOCTnHET HnyeBoI OTMetKn.IHdIkatOp ZERO SET MEMORY uCye3HeT,II NOBtCkoD BpeMeHi.
(5)HaKMMTe KHOIIKy BocpOn3BeDeHne HaUHeTc HHyIeBOO OTMeTK CteTuKa.

Notes
- The zero set memory function works only for tapes recorded in the Digital8 system.
- When you press ZERO SET MEMORY before rewinding the tape, the zero set memory function is canceled.
- There may be a discrepancy of several seconds from the time code.
If a tape has a blank portion in the recorded portions
The zero set memory function may not work correctly.
Приимechаня
Функшияпамати hyneвоу OTMeTK pa6oTaETToIbkoДЯ_LEHT,ЗИССАнБИХВУИФРОВСИСТЕМ DigitaI8
- Ecni Bbl haxMeTe KhoNkY ZERO SET MEMORY Do hauJa oBpaTHoI nepEMOTkn JeHTb, To fynKUma nAmrTu HnyeBoi OTmETKn Bydet OTMeHeHa.
MoxetBbTbPacXOXJdHHeB HcckOJIbKO CekyH MEXy KOJOM BpEmEH N DeiCTBNTIbHbIM BpeMeH.
EcnHaJeHTe HMeETcH He3aHncaHHbIyUyactOK MExdy 3aHncaHHbIMN 306paXeHnA M
Функци пamrtи hyneBOI OTMeTkn MOxET He pa6oTaTb HAnEkaUIM O6pa30M.
Searching a recording by date – Date search
You can automatically search for the point where the recording date changes and start playback from that point (Date search). Use the Remote Commander for this operation.
Use this function to check where recording dates change or to edit the tape at each recording date.
(1) Set the POWER switch to PLAYER or VCR (DCR-TRV330E only).
(2) Press SEARCH MODE on the Remote Commander repeatedly, until the date search indicator appears on the screen.
The indicator changes as follows:

(3) When the current position is [b], press to search towards a or press to search towards [c]. Your camcorder automatically starts playback at the point where the date changes.
Each time you press or , the camcorder searches for the previous or next date.
(1)Установпейсякючateь POWER в положене PLAYER улін VCR (Толъков модали DCR-TRV330E).
(2)HaximaiTe NoBToPHo KhoNky SEARCH MODE Ha npIbTe DuctaHIOHHO ynpaBHeHnO Tex NOp,poKa He NoBHTcH uHdkaTOp NOncKa DaTbHa 3KpaHe. VHdkaTOp 6ydt HmEHaTbC cJeDuOIm 06pa3oM:

(3)Ecni TeKyuiee noIooXeHne COOTBeTCTByeT BapnAHTy [b], HaxMNTe KhONkY dIaB bInOJHHeHn NOMcKa B HApPaBLeHn a IINn HaxMNTe KhONkY dIaB bInOJHHeHn IOncKa B HApPaBLeHn [c].BaSha BVNeOKaMepa ABToMaTUnCeckn HauchET BOCpOn3BeDeHne B MeCTe, rIe N3MeHReTcTa DaTa.
BcKn pa3 npn HaxKaTm KHOJKn I nnI ▷I, BInDeOkaMepa 6yDet BbINOJIHATb NOnCK npdebldyuee nnCneDyUoSe DaTbI.
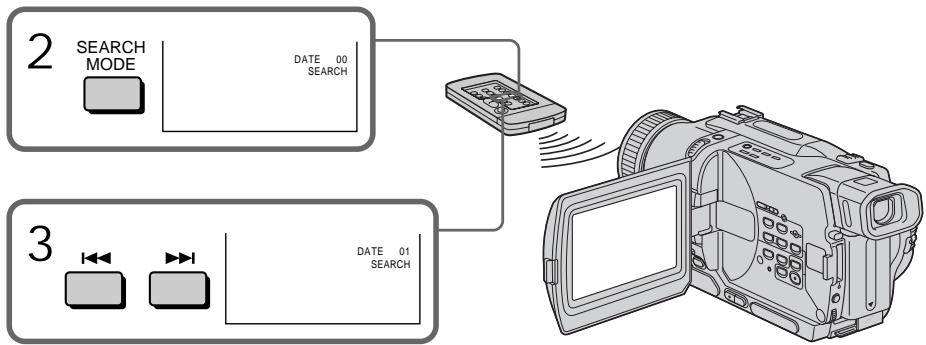
To stop searching
Press ■.
ДЯ OCTaHOBKи NONcKa
HaxmTe KhoNky
Notes
- The date search works only for tapes recorded in the Digital8 system.
- If one day's recording is less than two minutes, your camcorder may not accurately find the point where the recording date changes.
If a tape has a blank portion in the recorded portions
The date search function may not work correctly.
Примейань
- Pexim noncka daTbI cyHKUHOHpye TOLbKO dIaJIeHT, 3aIINcaHHbIX BcUΦpOBoN CnCTeme Digital8#.
- EcInB KaKoI-Ni6o n3 dHei Ba7a 3aIncb npOdoXkanaCb MeHee OndHmHyTbI, Ba7a BnDeOKaMepa MoKeT ToH0 He HaHTn MecTo, rDe n3MeHHeTcR dAta 3aIncn.
EcJn Ha 3aIncaHHoJIeHTe IMeIoTcH He3aIncaHHbIe YUactKu
Функци поcka дыбудет pa60taTb Hnравиьн.
Searching for a photo - Photo search/Photoscan
You can search for the recorded still image recorded on tape (photo search).
You can also search for still images one after another and display each image for five seconds automatically (photo scan). Use the Remote Commander for these operations.
Searching for a photo
(1) Set the POWER switch to PLAYER or VCR (DCR-TRV330E only).
(2) Press SEARCH MODE on the Remote Commander repeatedly, until the photo search indicator appears on the screen. The indicator changes as follows:

(3) Press 1 or 2 to select the photo for playback. Each time you press 1 or 2 , the camcorder searches for the previous or next photo. Your camcorder automatically starts playback from the photo.
(1) Set the POWER switch to PLAYER or VCR (DCR-TRV330E only).
(2) Press SEARCH MODE on the Remote Commander repeatedly, until the photo scan indicator appears on the screen.
The indicator changes as follows:

(3) Press or .
Each photo is played back for about 5 seconds automatically.
Сканироваиме Фото
(1)Установпейсякючateь POWER в положене PLAYER уліи VCR (Толъково модали DCR-TRV330E).
(2)HaximaiTe NOBTOPO Ha npIbTe DnCTaHIOHOrO ynpaBHeHNA KHOkY SEARCH MODE do Tex nop, noka He noRBrTcN HdIKaTOP FOToCKaHIpOBaHNA. INdIKaTOP 6yDet N3MeHrTBcA CNeDyUoMm o6pa30M: DATE SEARCH PHOTO SEARCH (6e3 INdIKaTopa)←PHOTO SCAN
(3)HaXMMTe KHNKy I nnI. KaJdoe fOTo 6yJeT aBtOMaTHueCkn oTo6paKaTaCbra pImepHo 5 cKeYnD.
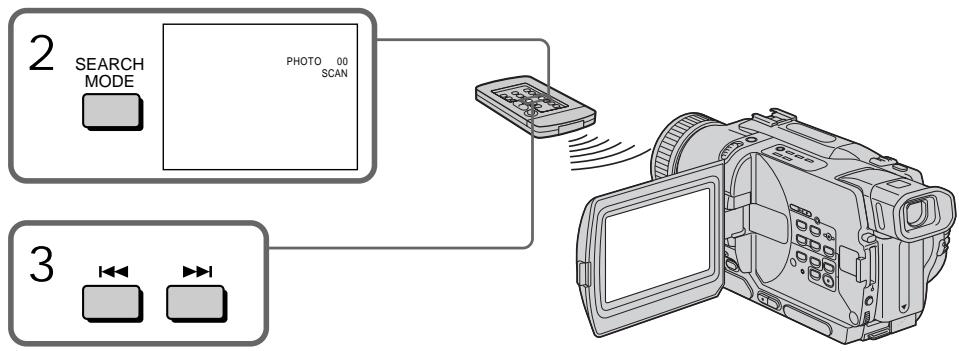
To stop scanning Press
Note
The photo search and photo scan work only for tapes recorded in the Digital8 system.
If a tape has a blank portion in the recorded portions
The photo search and photo scan functions may not work correctly.
ДлЯ OCTaHOВКи CkaHnpoBaHnHa HaxmTe KhoNky ■.
PpimeyaHne
ΦOTONOUCN ΦOTOCKaHINPOBaHne ФункцИОнHyIOT TOnIbKO IЯJI NeHT, 3aПИСаHHbIX ВЦИФРОВССТЕМe Digital8 B.
EcIn Ha 3aIncahHNo JeHTe NMeKOTc He3aIncahHbIe yUacTKn
Функця спOTOnOnckaифOTOCKaHIpOBaHnMOKeT pa60TaTb HeIpabuNbHO.
Using the A/V connecting cable
You can dub or edit on the VCR connected to your camcorder using your camcorder as a player.
Connect your camcorder to the VCR using the A/V connecting cable supplied with your camcorder.
Before operation
- Set DISPLAY to LCD in the menu settings. (The default setting is LCD.)
- Press the following buttons to make the indicators disappear so that they will not be superimposed on the edited tape:
DISPLAY on your camcorder - DATA CODE on the Remote Commander
- SEARCH MODE on the Remote Commander
(1) Insert a blank tape (or a tape you want to record over) into the VCR, and insert the recorded tape into your camcorder.
(2)Set the input selector on the VCR to LINE. Refer to the operating instructions of your VCR for more information.
(3)Set the POWER switch to PLAYER or VCR (DCR-TRV330E only).
(4) Play back the recorded tape on your camcorder.
(5)Start recording on the VCR. Refer to the operating instructions of your VCR for more information.
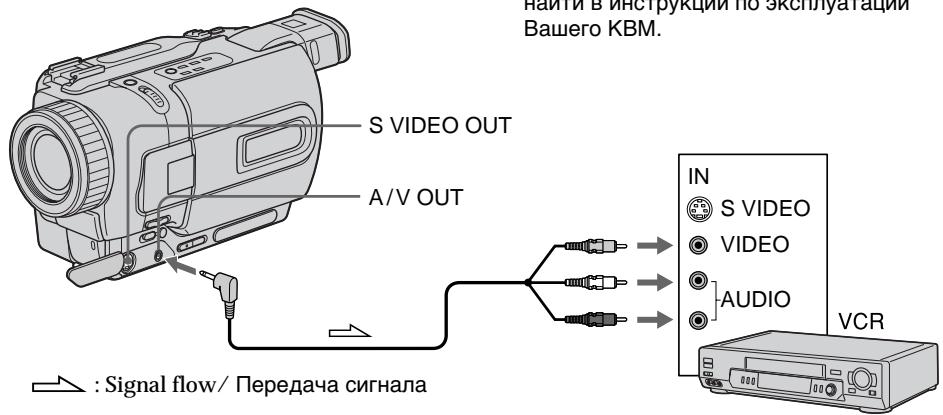
UcnOJIb3OBAHnE CoeHNHTeJIbHOrO Ka6eJIa yIuNo/BuJeO
BbMOxTe BbIOINHrTb Nepe3aINCb NIM MoHTax Ha KBM, nOcEOdInHeHHOM K BaSei BnDeOkampe, nCNoIb3yR BAny BnDeOkamepy KaK npOnrpbIbAteJIb.
IoioceiHnHTe Bauy BIndeokamepy K KBMc nOMOuBIO coeHNHTeJbHOro Kaebna ayDno/ BIndeo, KOtOpBn npinaraetc Ka Bauei BIndeokamepe.
Ipeed 3Kcnnyataauei
-
YctahOBHT nyHKT DISPLAY B yctahOBkax MEHIO B noJoxeHne LCD. (No ymoJIyauHIO yctahOBJIeHO noJoxeHne LCD.)
HaxMMTe CJIeDyIOUne KHOJKN IINcHe3HOBeHnI INdIKaTOPOB, YTObBI OHN He6blIN HAnOKeHbI HA MoHTIpyeMMyI JeHTy: -
Khońky DISPLAY Ha Bašew Bvnéokampe
- KhoNky DATA CODE Ha nyIbTe DnCTaHcNoHOrO ynpabNeHH
KhoNky SEARCH MODE Ha npIbTe DnCTaHcNoHHoro ynpaBHeHnA
(1)BcTaBbTe He3aIncaHHyIO JeHTy (IIINJeHTy, Na KOTopyIO Bbl XOTnte BblNOJHNTb 3aNtCb) B KBM IN BcTaBbTe 3aIncaHHyIO JeHTy B BaUy BnDeOkamepy.
(2)YcTaHOBInTe CeIeKTop BxoDHoro Ha KBM B noLoXKeHne LINE. BoJe e noIrpO6HbIe CBeDeHnBaCMOxTe HaHTn B INCTpyKuIN no 3KcNpyatauIN BaWero KBM.
(3)Установпейсякючать POWER в поожене PLAYER ул ВСR (Толъково дел DCR-TRV330E).
(4)HaunHe BocnpOn3BeJeHne 3aIncAHNoJIeHTbI Ha BaSei BnDeOkaMepe.
(5)HaunTe 3aHnCb Ha BaueM KBM. BoJe e npOboBHe CBeDeHnBaIcMOKeTe HauTn B INCTpyKuN N O KcPnyatauN BaUero KBM.
When you have finished dubbing a tape
Press on both your camcorder and the VCR.
You can edit on VCRs that support the following systems:
8 8 mm, HiHi8, VHS VHS, SVS S-VHS, VHSVHSC, SVS S-VHSC, Betamax, Mini DV,DV or Digital8
If your VCR is a monaural type
Connect the yellow plug of the A/V connecting cable to the video input jack and the white or the red plug to the audio input jack on the VCR or the TV. When the white plug is connected, the left channel audio is output, and the red plug is connected, the right channel audio is output.
If your VCR has an S video jack
Connect using an S video cable (optional) to obtain high-quality pictures.
With this connection, you do not need to connect the yellow (video) plug of the A/V connecting cable.
Connect an S video cable (optional) to the S video jacks of both your camcorder and the VCR.
Ipezeanncb IeHTbl
Ecnn Bbl 3aKOHnJI nepe3annCb JeHTbI Haxmnte KhoNky KaK Ha BIndeokampe, TaK n ha KBM.
BbMOxTe BbINoHnTb MOtax Ha KBM, KOtOpbIe NODepXnBaIOT CneDyUOuNe CnCTeMbI:
8 MM, Hi8 Hi8, VHS VHS, SVHS S-VHS, VHSC, SVHSC S-VHSC, Betamax, Mini DMNHDV, DV Digital8
Ecnn BaW KBM MOHOOHNueCKOROTnla
IoiDCoeHNHtTe XeNtBIO uTeKepe COeHNHTbHO Ka6eJIa ayDnO/BuDeo K BXoHDOMy BUnDeoRHe3dy, a 6BeIy IINK pAcHbI uTeKeP K BXoHDOMy ayDnORe3dy Ha KBM IIN TeneBn3Op. EcNI PoDcoEiHEn 6BeIy uTeKeP, TO BbIXoHDIM CInHaIOM 6yDeT 3ByK JLeBOrO KaHAla, a ecNI PoDcoEiHEn KpaCHbI uTeKeP, TO BbIXoHDIM CInHaIOM 6yDeT 3ByK npaboro KaHaJa.
EcIn B BaWeM KBM Imeetc rHe3do S BnDeo BbIIOJIHnTe noIDcoEINHEHeNc c NOMOu bko Ka6en S BnDeo (Ppno6peTaecr OTeNbHO) dnn POnJyEHnB BblCOKOKaYeCTBeHHbIX n306paXKeHn.
PnTakOM PNOCDoeHNHeHn Bam He HUxHo
NoDcoeHNrTb JeIeTbI (BnDeo) uTekep
CoEHNHTeBHorO Ka6eY ayuNIO/BnDeo.
PiDCoeHNHTe Ka6eB S BnDeo
( npio6peTaETcN OTdEhHO) K rHe3dAm S BnDeo
Ha BaWei BnDeokampe n KBM.
Using the i.LINK cable (DV connecting cable)
Simply connect the i.LINK cable (DV connecting cable) (optional) to DV OUT or DV IN/OUT and to DV IN/OUT of the DV products. With digital-to-digital connection, video and audio signals are transmitted in digital form for high-quality editing. You cannot dub the screen indicators.
(1)Insert a blank tape (or a tape you want to record over) into the VCR, and insert the recorded tape into your camcorder.
(2)Set the input selector on the VCR to DV IN if it is available. Refer to the operating instructions of your VCR for more information.
(3)Set the POWER switch to PLAYER or VCR (DCR-TRV330E only).
(4) Play back the recorded tape on your camcorder.
(5)Start recording on the VCR. Refer to the operating instructions of your VCR for more information.
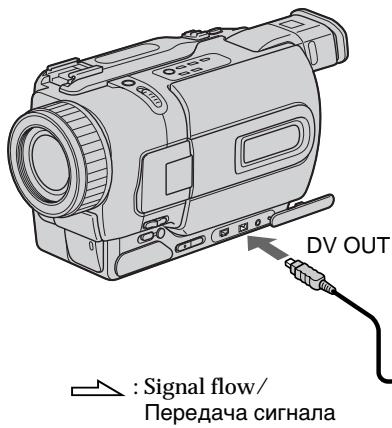
When you have finished dubbing a tape
Press on both your camcorder and the VCR.
IcnoJIb3OBAHne Ka6eJIa.i.LINK (coeHNHTeJIbHOrKa6eJIa cIΦpOBOro BnDeocuHaJa DV)
ПрocTo noCoeHnHTe Ka6eJIb i.LINK (coeHnTeJIbHbI Ka6eJIb zuΦpOBOrO BInDeocRHaHa DV) (prno6peTaetc rOTdJIbHO) K rHe3dy DV OUT nIV DV IN/OUT nK rHe3dy DV IN/OUT zuΦpObBix BInDeo3deJIn. Ppi zuΦpo-uzΦpOBom CoeHHeHN BInDeo- ayDnOCnHaJIbI nepeaIoTcB zuΦpOBoi φOpme ДЯ NOcNe dyUoJero BblCOKokaueCTBeHOrO MOnTaJa. Bbl He MoXeTe BblNoHHTb nepe3aNcB 3KpaHbIX mHnIKaTopOB.
(1)BcTaBbTe He3aIncAHHyIO JeHTy (IINI JeHTy, HApKOTopyIO XOTITE BbIIOJIHNITb 3aIncb) B KBM IN BcTaBbTe 3aIncAHHyIO JeHTy B BaIy BuJeOKaMEpy.
(2)YcTaHOBInTe CeIeKTop BXoHOrO CmHaJa Ha KBMBnoLoXeHHe DV IN,ecnIOHO ImeTcB HAnu. BoJe eNoPbO6HbIE CBeDeHnI pINBeDeHbIB HnCTpyKUnnIO EKnCpNyaTaUaBauero KBM.
(3)Установпейсякючateь POWER в положене PLAYER ил VCR (Толков модали DCR-TRV330E).
(4)HaunHe BoCpOn3BeJeHne 3aIncaHNoJenTbI Ha BaSei BnDeokampe.
(5)HaunTe 3aHcB Ha KBM. BoJe e noDpo6bIe CBeDeHn npuVeHb B HnCTpyKuIN no 3KnplyaTaun BaWero KBM.
Signal flow/ Peredau cunhana
Note on tapes that are not recorded in the Digital8 system The picture may fluctuate. This is not a malfunction.
During playback of tapes recorded in the Hi8/ standard 8 system Digital signals are output as the image signals from the DV OUT or DV IN/OUT jack.
You can connect one VCR only using the i.LINK cable (DV connecting cable). See page 190 for more information about i.LINK.
The following functions do not work during digital editing:
- Picture effect
- Digital effect
- PB ZOOM
If you record playback pause picture via the DV OUT or DV IN/OUT jack
The recorded picture becomes rough. Also, when you play back the recorded pictures on other video equipment, the picture may jitter.
Ipezeanncb IeHTbl
Ппмechаиме OTHOCHTeьно Лent, KOTopbie 6bln 3aIncahbI He B cHpOBoN CnCTeme Digital8
Bo3MOxHNO pIpaIbAHne I3O6paXeHn. 3To He ABJIETcH HNCIIpaBHOCTbIO.
Bo BpemBocPon3BeHnJIeHT, 3aIncAHbIX B CnCTeme Hi8/ctaHdapTHoI cnCTeme 8
LcnpobBie CnHaNbI BbIOJATCBA KaueCTBe CnHaNOB n3o6paXeHnI rHe3do DV OUT nnnrHe3do DV IN/OUT.
BbMOxTe NODcoeHNHTb TOJIbKO OINH KBM c nOmoosbu Ka6eIa.LINK (coeHNHTeJbHOro Ka6eIaNΦpOBoro BnDeocnHaHa DV).
Bolue noDpO6HbIe CBeDeHn OTHoCtJIbHO i.LINK npUBeDeHbHa cTp.190.
Cneyuouine yHKun He pa6oTaOT BO Bpemu npOBOrMOHTaxa:
-ФФфekt n306paXeHnA
-LuΦpOBoN 3ΦΦeK
-PB ZOOM
Pn3aIncn Ha nay3e BocnpOn3BODmOro n36paXeHn Ype3 rHe3do DV OUT nIN DV IN/OUT
3aIncaHHe 13o6paXeHne 6yDet NCKaXeHHbIM. TaKxpe, pI IN BOCpON3BeDeHn 3aIncaHHbIX 13o6paXeHn Ha DpyroB BuDeOaannapatype, 13o6paXeHne MoKeT POparNBaTb.
Dubbing only desired scenes - Digital program editing
You can duplicate selected scenes (programmes) for editing onto a tape without operating the VCR.
Scenes can be selected by frame. You can set up to 20 programmes.
Ipee3aHnscb TOnbKO HuxHbIX 3nn3oIOB - uΦpOBOI MOHTaX IporpaMMbl
BbMOKeTe KOINPOBaTb HxKHbIe 3n3OdbI (PporpaMMbI) dJI MOHTaKa Ha JeHTy 6e3 BKJIOUeHn KBM.
3nIObMoXHO BbIbupaTb NOKaIpOBo. Bbl MoXeTe yCTaHOBuTb do 20 nporpaMm.
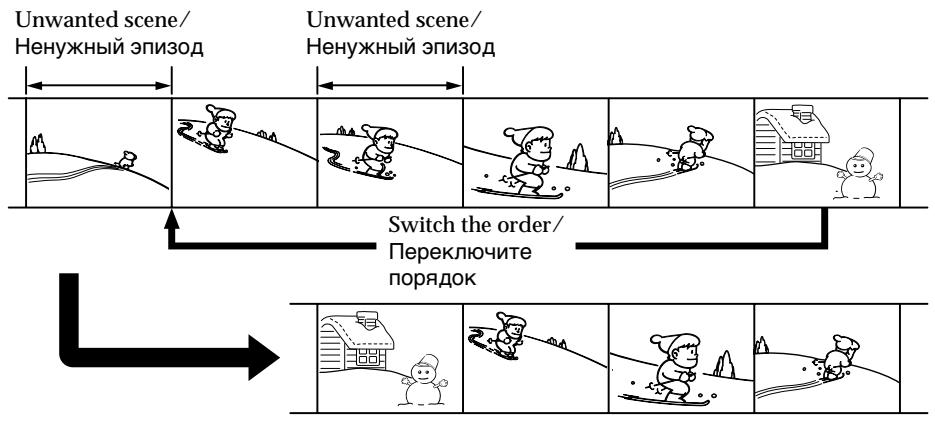
Before operating the Digital program editing function
Step 1 Connecting the VCR (p. 87).
Step 2 Setting the VCR for operation (p. 87, 92).
Step 3 Adjusting the synchronicity of the VCR (p.93).
When you dub using the same VCR again, you can skip steps 2 and 3.
Using the Digital program editing function
Operation 1 Making the programme (p. 95).
Operation 2 Performing Digital program editing (dubbing a tape) (p. 97).
Notes
- The Digital program editing works only for tapes recorded in the Digital8 system.
- You cannot dub titles or display indicators.
- When you connect with an i.LINK cable (DV connecting cable), you may not be able to operate the dubbing function correctly, depending on the VCR.
Set CONTROL to IR in the menu settings of your camcorder.
- When editing digital video, the operation signals cannot be sent with LANC .
Ipeed npimHeHnem yHKcnn cnpoBoro MOHTaxa nporpaMMbl
IyHKr1 PoDCoeDHHTe KBM (cTp. 87)
IpynKT 2 IIOJrTOOBbTe KBM K pa6Ote (ctp. 87, 92)
Пункт 3Отergyнеру Te cHxpoHn3aunIO KBM (Стр.93)
Korda BbI nepe3aInbcBaeTe, nCOnb3yra CHOba TOT JKe KBM, Bbl MoKeTe npOnyCTnTb nyHKtbl 2 n3.
IcnoJIb3OBAHnE cyHKuIN cNΦpOBOro MOHTaKa IporpaMMbl
ДeИства 1Создане nporpammbi (cTp.95).
Step 1: Connecting the VCR
You can connect both an A/V connecting cable and an i.LINK cable (DV connecting cable). When you use the A/V connecting cable, connect the devices as illustrated in page 82. When you use an i.LINK cable (DV connecting cable), connect the devices as illustrated in page 84.
If you connect using an i.LINK cable (DV connecting cable)
With a digital-to-digital connection, video and audio signals are transmitted in digital format for high-quality editing.
Step 2: Setting the VCR to operate with the A/V connecting cable
To edit using the VCR, send the control signal by infrared ray to the remote sensor on the VCR. When you connect using an A/V connecting cable, follow the procedure below, (1) to (4), to send the control signal correctly.
(1) Set the IR SETUP code
① Set the POWER switch to PLAYER or VCR (DCR-TRV330E only) on your camcorder.
② Turn the power of the connected VCR on, then set the input selector to LINE. When you connect a video camera recorder, set its power switch to VCR/VTR.
③ Press MENU to display the menu.
④ Turn the SEL/PUSH EXEC dial to select ETC, then press the dial.
⑤ Turn the SEL/PUSH EXEC dial to select EDIT SET, then press the dial.
⑥ Turn the SEL/PUSH EXEC dial to select CONTROL, then press the dial.
⑦ Turn the SEL/PUSH EXEC dial to select IR, then press the dial.
⑧ Turn the SEL/PUSH EXEC dial to select IR SETUP, then press the dial.
⑨ Turn the SEL/PUSH EXEC dial to select the IR SETUP code number of your VCR, then press the dial.
Check the code in "About the IR SETUP code." (p. 89)
(1) YctaHOBka Koga IR SETUP
① YctaHOBITE nepeKJIIOUaTeIb POWER Ha Bauei BnEeOKaMepe B noLoKeHne PAYER Inu VCR (ToJIbKO moJeB DCR-TRV330E).
② BkJIIOUHTe\PITaHne NOIDCOEIMHeHHORO KBM UyCTaHOBtE CeIeKTop BXoDOb B noJIoXeHne LINE.
Ecnn Bbl noDcoeINHReTe 3aNcBbAIOUyIO BVIDeOKamepy,yCTAHOBInTe ee nepeKlIOuateIb NITAHBy BNOJKeHEn VCR/VTR.
③ HαχΜιTe KΗΝΚγ MΕΝΥ, ζΤΟδβι ΟΤΟδραδηΤβ MEΗΙΟ.
④ПовернITEДИСК SEL/PUSH EXEC,ЧТобblыбраьпункTETC,Затем нажмпTe ДИСК.
⑤ ПовернITE ДИСК SEL/PUSH EXEC, УТобь ВБбразы NGK TEDIT SET, заlem нажмITE ДИСК.
⑥ ПовернITE ДИСК SEL/PUSH EXEC, УТОБы ВИбраь NYHKT CONTROL, заTem нажмITE ДИСК.
⑦ Повернite ДИСК SEL/PUSH EXEC, УTOБы ВьЮразы NGHKT IR, 3aTeM нажмITE ДИСК.
⑧ NOBEPHNTe DnCK SEL/PUSH EXEC, YTO6bI Bb6paTb NyHKT IR SETUP, 3aTeM HaXmHTe DnCK.
⑨ プービ�ル フリド SEL/PUSH EXEC, ヤフローロ バリバpace JBOK IR SETUP Baawero KBM, 3aTeM HAXMITE フリCK.
Поберъ Кд В понкт "О код IR SETUP" (ст. 89).
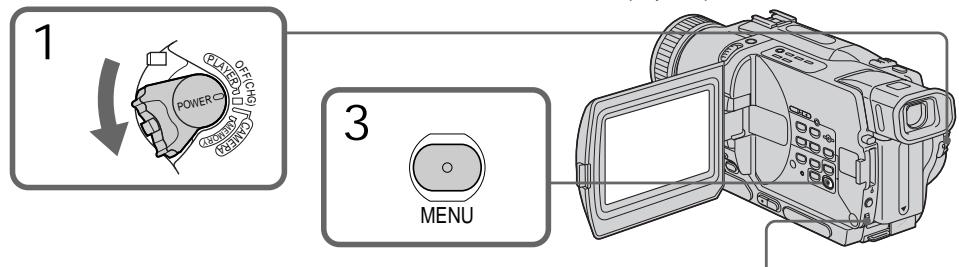
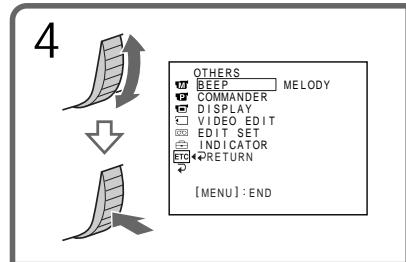
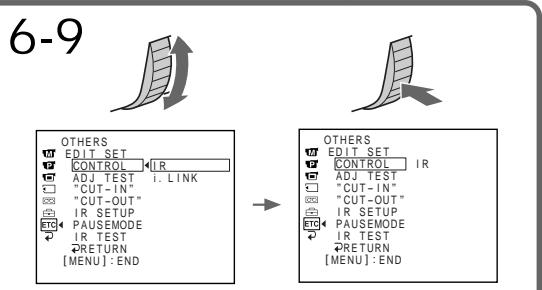
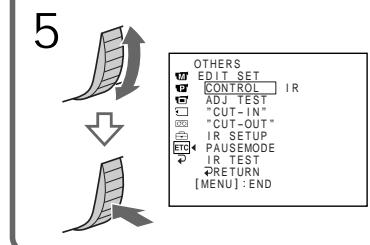
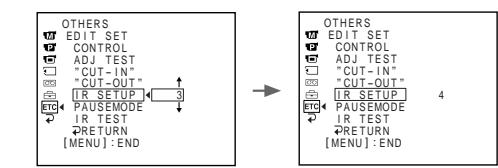
About the IR SETUP code
The IR SETUP code is stored in the memory of your camcorder. Be sure to set the correct code depending on your VCR. Default setting is code number 3.
| Brand/Mapka | IR SETUP code/KoД IR SETUP |
| Sony | 1, 2, 3, 4, 5, 6 |
| Aiwa | 47, 53, 54 |
| Akai | 62, 50, 74 |
| Alba | 73 |
| Aristona | 84 |
| Baird | 36, 30 |
| Blaupunkt | 83, 78 |
| Bush | 74 |
| Canon | 97 |
| CGM | 47, 83, 36 |
| Clatronic | 73 |
| Daewoo | 26 |
| Ferguson | 76 |
| Fisher | 73 |
| Funai | 80 |
| Goldstar | 47 |
| Goodmans | 26, 84 |
| Grundig | 83, 9 |
| Hitachi | 42, 56 |
| ITT/Nokia Instant | 36 |
| JVC | 12, 21, 15, 11 |
| Kendo | 47 |
| Loewe | 16, 47, 84 |
| Luxor | 89 |
| Mark | 26* |
| Matui | 47, 60, 58* |
| Mitsubishi | 28, 29 |
- TV/VCR component/
KOMnoHeNT TeIeBn3opa
Note on IR SETUP code
Digital program editing is not possible if the VCR
does not support IR SETUP codes.
O Koje IR SETUP
KoI IR SETUP xpaHntcB namATn BaSei BnDeokamepbI. Y6eInTeScb, yTO Bbl Bbl6pAln npaBnBHykO B 3aBNCIMocTOn OT BaWero KBM. IyoymoluaHnIO yCTaHOBNeHO 3haueHne KoJa, paBHOe 3.
| Brand/Mapka | IR SETUP code/KoД IR SETUP |
| Nokia | 89, 36 |
| Nokia Oceanic | 89 |
| Nordmende | 76 |
| Okano | 60, 62, 63 |
| Orion | 70, 58* |
| Panasonic | 16, 78, 96 |
| Philips | 83, 84, 86 |
| Phonola | 83, 84 |
| Roadstar | 47 |
| SABA | 76, 21 |
| Samsung | 93, 94, 52, 22 |
| Sanyo | 36 |
| Schneider | 84, 10 |
| SEG | 73 |
| Seleco | 47, 74 |
| Sharp | 89 |
| Siemens | 10, 36 |
| Tandberg | 26 |
| Telefunken | 91, 92 |
| Tensai | 73 |
| Thomson | 76, 100 |
| Thorn | 36, 47 |
| Toshiba | 40 |
| Universum | 92, 70, 47 |
| W.W.House | 47 |
| Watoson | 83, 58 |
Примочанne o koide IR SETUP
LcnpoBoMOnTAX npOrpamMbI HeB03MoKeH, ecn KBM He noDdePxxNbae KoOB IR SETUP.
(2) Setting the modes to cancel recording pause on the VCR
① Turn the SEL/PUSH EXEC dial to select PAUSEMODE, then press the dial.
② Turn the SEL/PUSH EXEC dial to select the mode to cancel recording pause on the VCR, then press the dial.
(2) YctaHOBka pexmOB dIg OTMeHbI nay3bl 3aIncn Ha KBM
①ПовернITE ДИСК SEL/PUSH EXEC,ЧТобы ВьбраТ nbYнкТ PAUSEMODE,ЗаTem наЖмпTe ДИСК.
②ПовернITE ДИСК SEL/PUSH EXEC,ЧТобы ВьбраТь рекIM OTМeHы пayзы 3аисн Ha KBM,Затм НжмITE ДИСК.
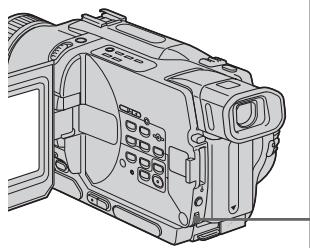
1 原 原

2 味 味
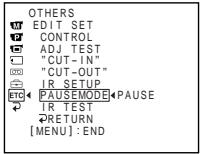
Buttons for canceling recording pause on the VCR
The buttons vary depending on your VCR. To cancel recording pause:
- Select PAUSE if the button to cancel recording pause is I.
- Select REC if the button to cancel recording pause is .
- Select PB if the button to cancel recording pause is
(3) Setting your camcorder and the VCR to face each other
Locate the infrared rays emitter of your camcorder and face it towards the remote sensor of the VCR.
Set the devices about 30~cm (11 7/8 in.) apart,
and remove any obstacles between the devices.
KhONKn dIy OTMeHbI nay3bI 3aIncn Ha KBM
KhONKn MOryT OTnUaTbCra, B 3aBnCmOCTn OT BaWero KBM. YTo6bl OTMeHnTb nay3y 3annc:
- BbI6epnte KhoNky PAUSE,ecnI dIra OTMeHbI nay3bl 3aIncn cnyKNT KhoNka II.
-BbIbePnte KhoNky REC,ecnI dIra OTMeHbI nay3bl 3aIncn CnyKNT KhoNka - Bb6epnte KhoNky PB,ecnДЯ OTMeHbI nay3bl 3aIncn CnyKt KhoNka
(3) YcTaHOBKa BaSei BnDeOKaMepbl KBM dpyr HapPoTnB dpyra
OnpeDenIte, rnde HaxoDITcN 3nYuataIb nHpaKpaChbIX nyuei Ha BaWei BnDeokampe, nHaPabBte ero ha ydaJIeHHbI daTnK Ha KBM.
YcTaHOBInTe yCTpoIcTBA Ha pacCToHnN OkONo 30 cm dpyr ot npya n ydaJIne BCE
PpEaTCTBmMeXdYHIMN.

(4) Confirming VCR operation
① Insert a recordable tape into the VCR, then set to recording pause.
② Turn the SEL/PUSH EXEC dial to select IR TEST, then press the dial.
③ Turn the SEL/PUSH EXEC dial to select EXECUTE, then press the dial.
If the VCR starts recording, the setting is correct.
When finished, the indicator on the screen changes to COMPLETE.
(4)Подтверхдени.Deиctвя KBM
① YcTaHOBInTe 3aIncbIbAeMyIO KaccTeY B KBM UycTaHOBInTe erO Ha nay3y 3aIncN.
②ПовернITE ДИСК SEL/PUSH EXEC,ЧТобы ВьIBLEпункт IR TEST,Затем нажмITE ДИСК.
③ ПовернITE ДИСК SEL/PUSH EXEC, РTOБы Вьбразы ПУНКТ EXECUTE, заTem нажмITE ДИСК.
EcIIN KBM Naayal 3aIncb, HacTpoKa BblOJIHeHa npabUNbHO.
When the VCR does not operate correctly
- After checking the code in "About the IR SETUP code", set the IR SETUP or the PAUSEMODE again.
- Place your camcorder at least 30cm (11 7/8 in.) away from the VCR.
Refer to the operating instructions of your VCR.
EcIn KBM He pa6oTaet NaIeXaIIM o6pa30M
Step 2: Setting the VCR to operate with the i.LINK cable (DV connecting cable)
When you connect using an i.LINK cable (DV connecting cable) (optional), follow the procedure below.
(1) Set the POWER switch to PLAYER or VCR (DCR-TRV330E only) on your camcorder.
(2) Turn the power of the connected VCR on, then set the input selector to DV input. When you connect a digital video camera recorder, set its power switch to VCR/VTR.
(3) Press MENU to display the menu.
(4) Turn the SEL/PUSH EXEC dial to select ETC, then press the dial.
(5) Turn the SEL/PUSH EXEC dial to select EDIT SET, then press the dial.
(6) Turn the SEL/PUSH EXEC dial to select CONTROL, then press the dial.
(7) Turn the SEL/PUSH EXEC dial to select i.LINK, then press the dial.
Пункт 2: Habсторka KBM дя pa6obtы с ka6elem i.LINK (coeudнiteьнblm ka6elem zuфpoBOrO bndeocHraJa DV)
EcnBbI BbIOJIHReTe NOcOeIINHeHcNcNoIb3OBaHNem Ka6eI i.LINK
(coeHnTeJIbHOrO Ka6JIa ZIcIpPoBOro BInDeocirHana DV) (He npuIaraeTc), cJeNyTe ONiCaHHbIM HNKe IpOueDypam.
OTHERS
BEEP MELODY
COMMANDER
DISPLAY
VIDEOEDIT
EDIT SET
INDICATOR
RETURN
.


OTHERS
EDIT SET
CONTROL IR
ADJ TEST
"CUT-IN"
"CUT-OUT"
IR SETUP
- PAUSEMODE
IR TEST
RETURN
6,7


OTHERS
WEDITS
CONTER
ADJ TEST
CUT-1N
“CUT-OUT”
图 IR SETUP
ETC PAUSEMODE
IR TEST
RETURN
【MENU】:END
OTHERS
EDIT SET
CONTROL
ADJ TEST i.LINK
"CUT-1N"
"CUT-OUT"
IR SETUP
PAUSEMODE
IR TEST
RETURN
MENJ:END
→
→
OTHERS
WEDITSET
P CONTROL i. I NK
ADJ TEST
"CUT-1N”
四“CUT-OUT”
□001011.
FTE4 RAUSEMODE
PAUSEMO IR TEST
QRETURN
[MEU]:END
Step 3: Adjusting the synchronicity of the VCR
You can adjust the synchronicity of your camcorder and the VCR. Have a pen and paper ready for notes. Before operation, eject the cassette from your camcorder.
(1) Set the POWER swtch to PLAYER or VCR (DCR-TRV330E only) on your camcorder.
(2) Insert a blank tape (or a tape you want to record over) into the VCR, then set to recording pause. When you select i.LINK in CONTROL, you do not need to set to recording pause.
(3) Turn the SEL/PUSH EXEC dial to select ADJ TEST, then press the dial.
(4) Turn the SEL/PUSH EXEC dial to select EXECUTE, then press the dial. IN and OUT are recorded on an image for 5 times each to calculate the numerical values for adjusting the synchronicity. The EXECUTING indicator flashes on the screen. When finished, the indicator changes to COMPLETE.
(5) Rewind the tape in the VCR, then start slow playback. Take a note of the opening numerical value for each IN and the closing numerical value for each OUT.
(6) Calculate the average of all the opening numerical values for each IN, and the average of all the closing numerical values for each OUT.
(7) Turn the SEL/PUSH EXEC dial to select "CUT-IN", then press the dial.
(8) Turn the SEL/PUSH EXEC dial to select the average numerical value of IN, then press the dial. The calculated start position for recording is set.
(9) Turn the SEL/PUSH EXEC dial to select "CUT-OUT", then press the dial.
(10) Turn the SEL/PUSH EXEC dial to select the average numerical value of OUT, then press the dial. The calculated stop position for recording is set.
(11) Turn the SEL/PUSH EXEC dial to select RETURN, then press the dial.
Пункт 3: Perуларовka cnHxpoHn3aци KBM
Bb moKTe OtperynipoBaTc HxpoH3aCuIO Bawae BInDeokamepbl n KBM. PpiroToBbTe pyky n 6byary Iany 3anice. Ipeed hauanom BbInOpHeHnO npEaunu N3BnKeNte Kaccety n3 Bawae BInDeokamepbl.
(1) YctaHOBiTepeKJIIOHaTeIbPOWERHa BaSei BnDEoKaMepeB nOIOxHeIe PLAYERI IN VCR (ToJIbKO MoJeIb DCR-TRV330E).
(2) YcTaHOBnTe YnCTyIO JeHTy (NII NHeTHy, Ha KOTOpYbI XOTITe 3aNtCaTb) B KBM yCtAHOBnTe ERO Ha Na3y 3aNtCu. EcIN BnyKTe MeHIO CONTROL Bbl BbIepeTe npHKT i.LINK, Bam He HuykHo ycTaHaBnBaTb Ha na3y 3aNtCu.
(3) ПовернITE диСK SEL/PUSH EXEC,чTo6bl Bbl6paTb nyHKT ADJ TEST,ЗаTeM HaxKMTE dIck.
(4)ПовернITEДСКSEL/PUSHEXEC,чTo6bI Bbl6paTbПинкТ EXECUTE,3aTeM HaxMnTeДСС. Ha n3o6paxKeHm 6byT 3aIncaHbI CnHnAblIN OUTno5pa3KaJdbI, ChTo6bI BbluNCnTb YncNoBbIe 3HaueHnIДЯ PeryUnIpOBKn CnHxPoHn3aUIM. INDkaTOp EXECUTING Mmraet Ha 3KpaHe JKKДИIIN BvIDOnCKaTeNe. ПО OOKHcAHn INDkaTOp N3MeHNTcHa COMPLETE.
(5)перемотайенту в KBМ назади
нанчNTe 3amdeлнhoe BOCPOn3BedeHne.
ЗаиштЕ начальhoe YUCJIeHNOE
Зачehne ДЯ КжdORO сгнANA INи
Конechhoe YUCJIeHNOE 3aueHne Дя
КжdORO сгнANA OUT.
(6) PóndcHTaɪTe cpeHHee dIЯ BCex HaayalbHbIX YCKeJIeHHbIX 3Haayehn KαKdOrO CInrHana IN i CpeHHee dIЯ BCex KOeHbIX YCKeJIeHHbIX 3Haayehn KαKdOrO CInrHana OUT.
(7) Повернite ДИСК SEL/PUSH EXEC, утобы ВьбраТь пункT“CUT-IN”, затем нахмITE ДИСК.
(8) ПовернITE днСK SEL/PUSH EXEC,чTOбbl BыбрathсдпггчИСLEHHOe 3нaЧЕнБЕЛПИНь IN,ЗАtem HaЖмТe ДИСК.УCTAHOBITcR BbIчИСLEHнЯ ПОЗИЗNTаРТа 3ANICN.
(9) ПовернITE ДИСК SEL/PUSH EXEC, чтобы Вьбразы пункT“CUT-OUT”,затем НжмITE ДИСК.
(10)Повернite ДИСК SEL/PUSH EXEC,ЧТобblыбратсpeДпгчИСLEнhoe3наЧЕпЕВELINHb OUT,ЗАtemнжMЛТЕДИС.УCTAHOBITcRБИЧИСLEнHAЯ ПОЗИЯNOCTAHOBKN 3ANICN.
(11) ПовернITE ДИСК SEL/PUSH EXEC, утобblыбразы NGHKT RETURN, затемнжмITE DИСК.
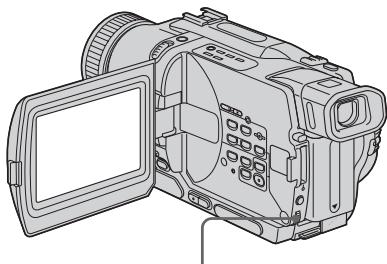
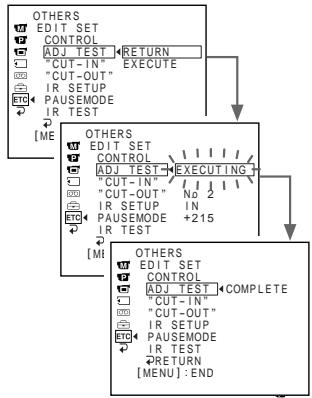
3,4

7


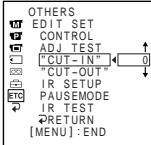

9
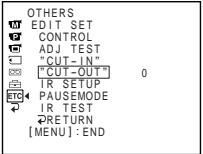

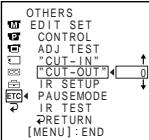
Notes
- When you complete step 3, the image to adjust the synchronicity is recorded for about 50 seconds.
- If you start recording from the very beginning of the tape, the first few seconds of the tape may not record properly. Be sure to allow about 10 seconds' of lead before starting the recording.
- When you connect using an i.LINK cable (DV connecting cable) you may not be able to operate the dubbing function correctly, depending on the VCR.
- Keep the i.LINK connection, and set CONTROL to IR in the menu settings. (p. 107)
- Video and audio signals are transmitted in digital format.
Примеанья
Korda BbI BbIOnHInTe 3, n3o6paXeHne dIa peryIuropBkn CnHxpoHn3aun 6yJeT 3aIncbIbTaBcA OKJ05 cekyHd.
- Ecnn BbI haHneTe 3aIncb c camoro hauana IeHTbl, nepBbIe HeCKOJIbKO CeKHyD IeHTbl MOrTy 3aIncatbCra HeKaueCTBeHNO. Y6eIInTeCb, yTO BbI ocTabINn PycToi yAcToK Okono 10 ceKHyd nepei Haanom 3aIncn.
- Ecni Bbl BbIOnHReTe NoCoEduHHe nCnOJIb3OBAHNem Ka6eJI i.LINK (coeDHHTeJIbHO K6eJIa CUnpOBOrB BInDeOcINrHaJa DV), Bbl MoKTe He cyMeTb npAByIbHO BblONHHTb cyHKUIO nepe3aInci, B 3aBNCIMoCTn OT KBM.
Iopndepkmbte coednHeHne i.LINK u yctaHOBNTe npHKT CONTROL B yctaHOBkax meHIO B noLoXeHne IR. (cTp. 107) BuDeo- n ayDnOscnHaNbI nepeDaIoTcB U ndpboBoNΦOpme.
Operation 1: Making the programme
(1) Insert the tape for playback into your camcorder, and insert a tape for recording into the VCR.
(2) Press MENU to display the menu.
(3) Turn the SEL/PUSH EXEC dial to select ETC, then press the dial.
(4) Turn the SEL/PUSH EXEC dial to select VIDEO EDIT, then press the dial.
(5) Search for the beginning of the first scene you want to insert using the video operation buttons, then pause playback.
(6) Press the SEL/PUSH EXEC dial. The IN point of the first programme is set, and the top part of the programme mark changes to light blue.
(7) Search for the end of the first scene you want to insert using the video operation buttons, then pause playback.
(8) Press the SEL/PUSH EXEC dial. The OUT point of the first programme is set, then the bottom part of the programme mark changes to light blue.
(9) Set the programme by repeating steps 5 to 8. When the programme is set, the programme mark changes to light blue.
You can set a maximum of 20 programmes.
Дениства 1:Созданныnpограмь!
(1)YcTaHOBnTeJeHTyIJIbBOCpOn3BeJeHnBaWByBnDeOkAmepy,a3aTeMycTaHOBnTeJeHTyIJIa3aNcB KBM.
(2)HaKmTe KhOpKy MENU nIa oTo6paXeHnMaMeHIO.
(3)Повернite ДИСК SEL/PUSH EXEC,ЧТобblыбраь ПУНК ETC,Затем нахмITEДИСК.
(4)ПовернITE ДИСК SEL/PUSH EXEC,Чтобы ВьбраТь пунк.T VIDEO EDIT,Затем НжмITE ДИСК.
(5) BbINOJIHnTe NOIcK NaIa NepBOrO 3N3Oda, KOToPbI BBy XOTnTE BCTaBnTb, IcNoB3yK KONKn YUnpaBLeHn BIDeO, N IOCTaBbTe BOCpOn43BeDEHeHr Ha NaY3y.
(6)HaxMMTe DnCK SEL/PUSH EXEC. Tocka IN nepBoN nporpAmMbI yctaHOBneHa, NCBETBepXHeN qACTmMeTKn pOprpAmMbI n3MeHETCn HA CBETNo-roYboN.
(7) BbIIOJIHnTe nonck KOHca nepBOrO 3nn3oJa, KOTOpB bBi XOTNIte BCTaBntB, nCNOJb3yR KHONK yUnpaBJeHnBa NDeO, n NOCTaBbTe BOCnPOM3BeDEHeHne Ha nay3Y.
(8)HaxMMTe DnCK SEL/PUSH EXEC. Tocka OUT nepboN nporpaMmbYcTaHOBJIeHa,NuBET HNXKHe Yactn MeTKn nporpaMMb N3MEHReTc Ha CBeTNo-TOJyBooI.
(9)YcTaHOBnTe npOrpAMMy, NOBTOpRynyHKtbl 5-8.KorJa npOrpAMMa yCTaHOBJIeHa, CBETMeTKn npOrpAMMbI n3MeHHeTcHa CBETIO-ROJy6oB. BbMoKeTe yCTaHOBnTb, camoe 6OJIbJee, 20 npOrpAMM.
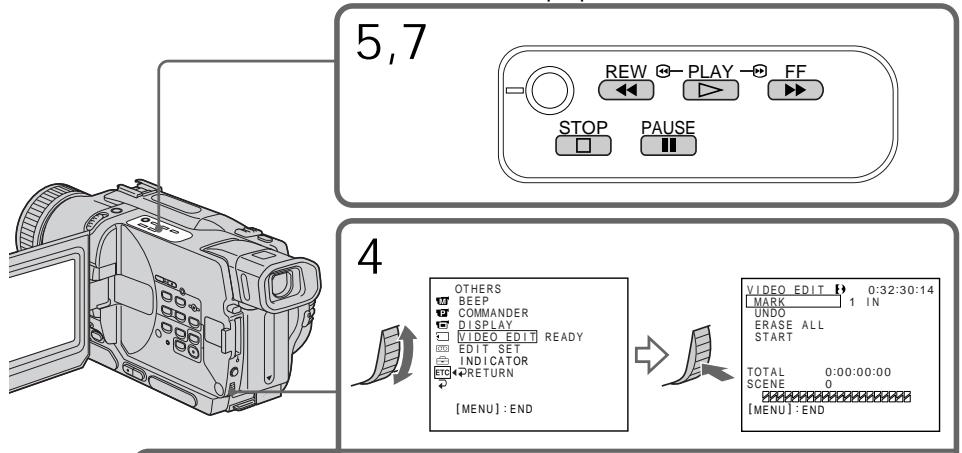
6,8,9

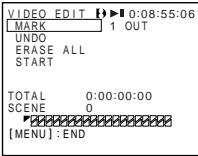

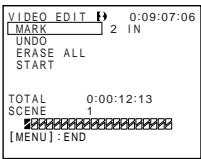


Erasing the programme you have set Erase OUT first and then IN from the last set programme.
(1) Turn the SEL/PUSH EXEC dial to select UNDO, then press the dial.
(2) Turn the SEL/PUSH EXEC dial to select EXECUTE, then press the dial. The last set programme mark flashes, then the setting is canceled.
To cancel erasing
Select RETURN in step 2.
Erasing all programmes
(1) Select VIDEO EDIT in the menu settings. Turn the SEL/PUSH EXEC dial to select ERASE ALL, then press the dial.
(2) Turn the SEL/PUSH EXEC dial to select EXECUTE, then press the dial. All the programme marks flash, then the settings are canceled.
To cancel erasing all programmes
Select RETURN in step 2.
To cancel a programme you have set Press MENU.
The programme is stored in memory until the tape is ejected.
Notes
- The Digital program editing does not work when PB MODE is set to H18/3 in the menu settings.
- You cannot operate recording during Digital program editing.
You cannot set IN or OUT to the following portions of the tape:
-a blank portion of the tape
- a portion recorded in a system other than Digital8
The total time code may not be displayed correctly in the following cases:
- there is a blank portion between IN and OUT on the tape
- the tape is not recorded in the Digital8 system.
Erasing the programme you have set CtrpanHe nporpaMMbl, kOTopyb Bby yCTaHOBnII NepBoy ydaJIte ToCKY OUT, a 3aTEM ToCKY IN nocJeDHe nporpaMMbl.
MeTKn Bcex ycTaHOBJIeHHbIX npOrpAMM MmraHOT, 3aTeM ycTaHOBKN OTMeHJrOITCA.
ДЯ OTMeHbI CTuPaHnB BCex nporpaMM
BbIbepuTe nyHKT RETURN B nyHKTe 2.
Дя OTMeHbI nporpaMMbl, KOTopyBbl yctaHOBNI
HaxmTe KhoNky MENU.
Iporpamma coxpaHHeTcB IamaTn Do Tex np, noka leHTa He 6ydeT n3BLeueHa.
Примеань.
LpboM MoTax nporpaMbI He pa6oTaET, cHn nyKt PB MODE B yctaHOBkax MeIO yCTaHOBJIe H noJooKeHne H3/8.
- BbI He MoXeTe BbIIOJIHrTb 3aIINcB BO BpeM rIcppOBOr MOHTaxa nporpaMMbl.
BbI He MoXeTe yCTaHaBJIbBaTb TOUKN IN OUT Ha cIeDyIOxN yAcTkax JeHTbl:
- Ha He3aHcAHHOM yuactke JeHTbI
-Ha yuctke JeHtbl, 3aIncahHom B CnCTeMe, OTJNUHOIOT Digital8
Obui KOD BpemH MoXeT OTo6paXaTbcHnepaBnIbHO BcNeDyUoNx CnyuAx:
-ecn mekdy tokam IN n OUT ecb He3aIncahhb yactok JeHtbl
-JeHTa 3ancaHa He B CnCTeme Digital8
Operation 2: Performing Digital program editing (Dubbing a tape)
Make sure that your camcorder and VCR are connected, and that the VCR is set to recording pause. This procedure is not necessary when you use an i.LINK cable (DV connecting cable).
When you use a digital video camera recorder, set its power switch to VCR/VTR.
(1) Select VIDEO EDIT. Turn the SEL/PUSH EXEC dial to select START, then press the dial.
(2) Turn the SEL/PUSH EXEC dial to select EXECUTE, then press the dial.
Search for the beginning of the first programme, then start dubbing.
The programme mark flashes.
The SEARCH indicator appears during a search, and the EDIT indicator appears during editing on the screen.
The programme mark changes to light blue after dubbing is complete.
When dubbing ends, your camcorder and the VCR automatically stop.
To stop dubbing during editing
Press on your camcorder.
To quit the Digital program editing function
Your camcorder stops when dubbing is complete. Then the display returns to VIDEO EDIT in the menu settings.
Press MENU to quit the Digital program editing function.
You cannot record on the VCR when:
- The tape has run out.
- The write-protect tab on the cassette is set to lock.
- The IR SETUP code is not correct. (when IR is selected)
- The button to cancel recording pause is not correct. (when IR is selected)
NOT READY appears on the screen when:
- The programme to operate Digital program editing has not yet been made.
-i.LINK is selected but an i.LINK cable (DV connecting cable) is not connected. - The power of the connected VCR is not turned on. (when you set i.LINK)
Using with analog video unit and your computer - Signal convert function
IcnoJb3OBAHne c aHaIOrOBbIM BnDeoanPapaTOM n NepcoHaJIbHbIM KOMNbIOTepOM -ФункцЯ npeo6pa3OBAHna CnHaJIOB
- DCR-TRV330E only
You can capture images and sound from an analog video unit connected to your computer which has the i.LINK (DV) jack to your camcorder.
Before operation
Set DISPLAY to LCD in the menu settings. (The default setting is LCD.)
(1) Set the POWER switch to VCR.
(2)Set A / V DV OUT in to ON in the menu settings. (P. 107)
(3) Start playback on the analog video unit.
(4)Start capturing procedures on your computer. The operation procedures depend on your computer and the software which you use. For details on how to capture images, refer to the instruction manual of your computer and software.
-ToJbKO DCR-TRV330E
BbMoKTe 3axBaTbBaTb N3O6paKeHn I 3ByK c aHaIorOBbIX BnDeoannapaTOB, npncOeAnHeHHbIX Chepe3 BaSy BnDeoKaMepy K nepcoHaJIbHOMy KOMNbIoTepy Co WTekepom i.LINK (uNpPoBOrO BnDeocnHana).
Ipeep npimmehenneem
YcTaHOBnTe nyHKT DISPLAY BY ycTaHOBkax MeHIO B noJoxKeHne LCD. (No ymoJIuaHIO BbI6paHNO noJoxKeHne LCD.)
(1)Установпейразковая Power в положене VCR.
(2) YctaHOBInTe OINIO A/V DV OUT B NOLOXKeHne ON yCTaHOBkax MeHIO (cTp. 107).
(3)HaunTe Bocnpoun3BeJeHne Ha aHaIorOBom BnDeoannapaTe.
(4)HaunHe npoedpy 3aHncn Ha Baem KOMnbItepe. 3tn pOueDpybl 3abncrt ot BaWero KOMNbIOTepa n porpaMMHOrO o6ecneehn, KOtopoe Bbl nCnoJIb3yeTe. PioIpO6HbIe CBeDeHn O 3aHncn I3O6paXeHn npVBedeHb I pyKOBoDCTBe nCNoIb3OBAHnO pOprpaMMHOrO o6ecneehn.
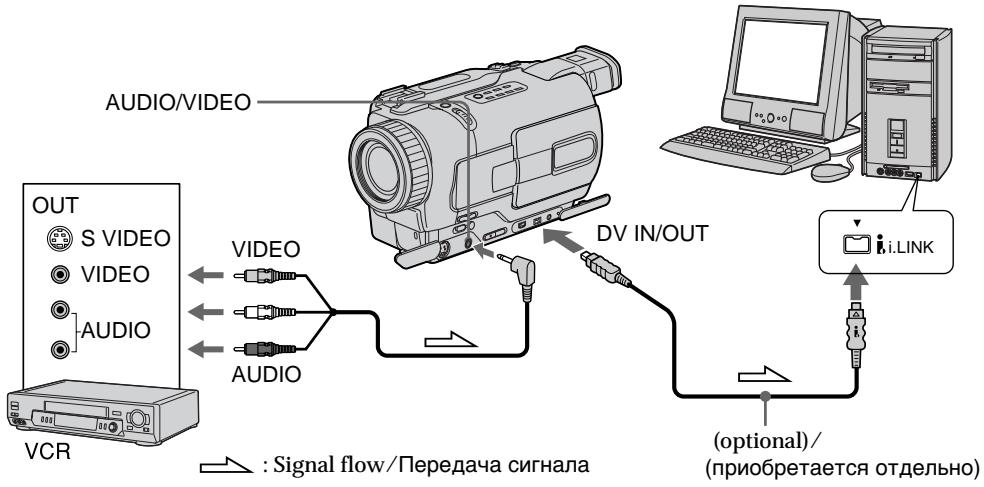
After capturing images and sound Stop capturing procedures on your computer, and stop the playback on the analog video unit.
Pocne 3aHncn H3o6paXeHn n 3Byka
OcTaHOBInTe IpoUeIpyu 3aIncn Ha BaWeM KOMbIOTepe N OCTaHOBInTe BOCpOn3BeJeHne Ha aHaJIoROBOM BUnDeoAnnapaTe.
Using with analog video unit and your computer - Signal convert function
IcnoB3OBAHnE c anaIorOBbIM BIndeoannapaTom I nepcoHaJIbHbIM KOMNbIOTePOM -ФункцЯ npeo6pa3OBAHnCnHaJIOB
Notes
- You need to install software which can exchange video signals.
Depending on the condition of the analog video signals, the computer may not be able to output the images correctly when you convert analog video signals into digital video signals via your camcorder. Depending on the analog video unit, the image may contain noise or incorrect colours. - You cannot record or capture the video output via your camcorder when the video tapes include copyright protection signals.
PpIMeuaHn
Bam Huxho yctahOBnTB nporpamMHO
06ecneueHHe, NO3BOJIOOe ee BbINoHrTb
06MeH BInDeocnHaNoB.
B 3aBNCIMOCTN OT COCTOHN HnAHAIOROBbIX BnDEOCIRHANOB, KOMNBIOTep MOXET He nepeDaBaTb N3o6paXeHn HAJIeKxAMM Oba30m PnI Pneo6pa3OBAHn aHaIARoBObIX BnDEOCIRHANOB B nCpOBbIe BnDEOCIRHbIc NOMOuBo BAWeJ BnDEOKaMEpbI. B 3aBNCIMOCTN OT aHaIARoBOrO BnDEoAnPaTa, N3o6paXeHne MoXeT CoDEPkaTb NOMEX NIN NCKaKeHHbIe CBETA.
- Bbl He MoXKeTe BblOnHrTb 3aNNcB NnN CbEmKy BblOxHbIX BnDEoCnHaNIOB C nMOuBb BaWei BnDeOkAmepbI,ecIN BnDeOkacCeTb COepeKxAT CNHaJIb3aUnTIb aBTopCKNX npab.
Recording video or TV programmes
- DCR-TRV330E only
Using the A/V connecting cable You can record a tape from another VCR or a TV programme from a TV that has video音频 outputs. Use your camcorder as a recorder.
Before operation Set DISPLAY to LCD in the menu settings. (The default setting is LCD.)
(1) Insert a blank tape (or a tape you want to record over) into your camcorder. If you are recording a tape from the VCR, insert a recorded tape into the VCR.
(2) Set the POWER switch to VCR.
(3) Press REC and the button on its right simultaneously on your camcorder, then immediately press on your camcorder.
(4) Press on the VCR to start playback if you are recording a tape from VCR. Select a TV programme if you are recording from TV. The picture from a TV or VCR appears on the screen of your camcorder.
(5) Press on your camcorder at the scene where you want to start recording from.
3a\Pncb BnDeO nIITeJIeBn3nOHhblx npoRpaMM
-ToJbKO DCR-TRV330E
IcnoJIb3OBAHHe COeINHITeNbHOKa6eJyDnO/BuDeo
Bb MoKTe 3aIncatb IeHTy C pyrTO KBM nnn TeJIeBn3IOHOH NpOgPaMMbl C TeJIeBn3Opa, B KOToPOM IMeOTcB bIXoDbI BVJeO/aYdNO. IVcNoJIb3yUte BaWy BuJeOkaMepy B kaueCTBe MarHnTocOHa.
Ipeed 3knnyataunei
YcTaHOBnTe OIunIO DISPLAY B noJoxKeHne LCD B yCTaHOBkax MeHIO. (YcTaHOBKe nO yMOnuHaHIO COOTBeTCTByeT LCD.)
(1)BCTaBbTe He3aIncaHHyo JeHTy (uJI NLeHTy, HaN KOTOpYBO bIXOITNE BbINONHtB nepe3aIncb) BBaSy BnDeOkAmepy. EcNb BbI 3aIncbBaTeJeHTy c KBM, BCTaBbTe 3aIncaHHyo JeHTy B KBM.
(2)Установпейрееклочатуль POWER в положене VCR.
(3)HaxmTe KhoNky REC u KhoNky cnpabaOT Hee OndHOBpeMeHHo Ha BaWei BnDeOkamepe, a 3aTEM TOtHaC Xe HaxmTe KhoNky HA BaWei BnDeOkamepe.
(4)HaxMMTe KhoNkky Ha KBM dIaHaayana Bocnpo3BeDnIe,ecnBbI 3aIncsbIbaeTe IeHTy c KBM. BbI6epTe TeBEN3IOHNHyo nporpaMMy,ecnBbI 3aIncsbIbaeTe nporpaMMy c TeBEN3Opa. Ha 3KpaHe BaSei BuDeOkAmepbI nOraBtca N3O6paxKeHne OT TeBEN3Opa nn KBM.
(5)HaxmTe KhoNkY Ha BaSei BnDeokampeB TOM MeCTe, Ie BbXOTNe Hauatb 3aIncb.
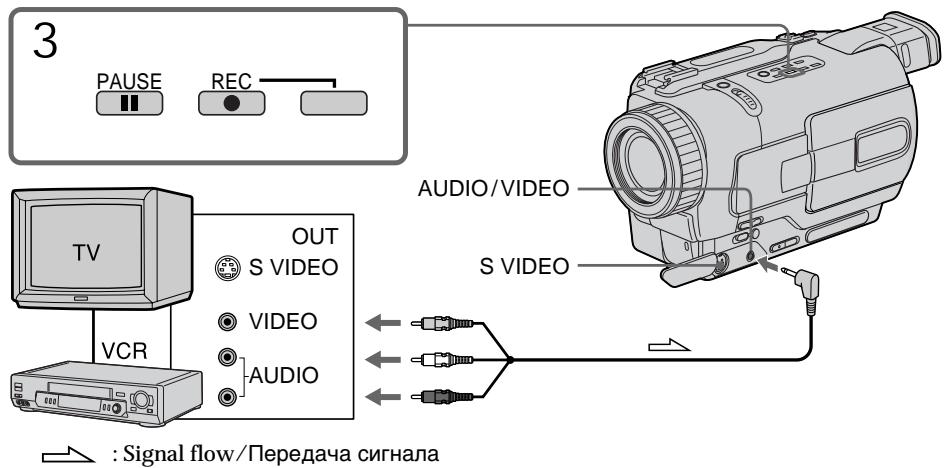
When you have finished dubbing a tape
Press on both your camcorder and the VCR.
Notes
- To enable smooth transition, we recommend that you do not mix pictures recorded in the Hi8/standard 8 with the Digital8 system on a tape.
- If you fast-forward or slow-playback on the other equipment, the image being recorded may fluctuate. When recording from other equipment, be sure to play back the original tape at normal speed.
If your VCR is a monaural type
Connect the yellow plug of the A/V connecting cable to the video output jack and the white or the red plug to the audio output jack on the VCR or the TV. When the white plug is connected, the left channel audio is output, and the red plug is connected, the right channel audio is output.
If your TV or VCR has an S video jack
Connect using an S video cable (optional) to obtain high-quality pictures.
With this connection, you do not need to connect the yellow (video) plug of the A/V connecting cable.
Connect an S video cable (optional) to the S video jacks of both your camcorder and the TV or VCR.
3aIncb Bndeo IJN TeJeBn3NoHHbIX nporpaMM
EcnBb3aKoHnI nepe3anncbHa JeHTy
HaxmTe KhONky Ha BnDeokamepe nHa KBM.
PpimueaHn
Дя obecneueHnIaBHorO nepexoJa peKOMeHdyETcH He CMeUWBaTb N3o6paKeHn, 3aIncAHbIe B CnCTeMe Hi8/CTaHdapTHoN CnCTeMe 8 cIuΦpOBoi CnCTeMoI Digital8 H aJeHTy.
Bcnyae yckopenHoro nIN 3aMeIeHoro Bocpon3BeDenHa npyrom annapate 3anncahHOe n3o6paxeHne MOKeT noDparnBaTb. PIn 3annc c dpyrOro annapata Bam cJeMyet BOCpon3BOIDtOpnHaJIbHyIO 3anncb Ha HopMaJIbHoN CKOpOCTN.
EcnBaw KBM MOHOPOHueCKOro Tnna
ПодсоeДиНTe JжелТьштЕр COeДиНTeьногО KaБЕЯ ayДиO/BuДeоК bByIoxDHomу BnDEoRHe3dу, a 6БЛь ИП KpaСньштЕр К bByxOДHomу ayDINOrHe3dYHa KBM ИЛ TseLBeN3Ope. EcNs noДсоeДиHc 6БЛьштЕр,TO bByxOДнOH cSrHaN 6yDeT pepeDaBaTbCS YpeE3 JleBb KaHaN,aEcn IpoДсоeДиHc PacHbI WtTeKep,TO bByxOДнOH cSrHaN 6yDeT pepeDaBaTbCS YpeE3 npaBb KaHaN.
EcIn B BaWem TeJIeBn3ope nI IN KBM IMeetc rHe3do S bVdeo
BbIOpHInTeNoIDcoEINHeHnCnOMOuKa6JIa S BnDeo (Ppno6peTaetcOtDnelHo) dnn POnlyeHnBaICOKOKaEcTBHeHHbIX n306paXKeHn.
Ppi DaHHom PoiCoeHNHeHn BAm He HuyxHo PoiCoEINHATb KeIbTbB (BnDeo) wTeKepe CoeINHTelbHorO KaBEn ayDnO/BnDeo.
ПодсоeДинITE Ka6eBJ S BnIeO (прибретаetcT OТдьHo) K rHe3dAm S BnIeO ha BnIeOKaMepen TeleBn3ope nIi KBM.
Using the i.LINK cable (DV connecting cable)
Simply connect the i.LINK cable (DV connecting cable) (optional) to DV IN/OUT and to DV IN/OUT of the DV products. With digital-to-digital connection, video and audio signals are transmitted in digital form for high-quality editing.
Before operation
Set DISPLAY to LCD in the menu settings. (The default setting is LCD.)
(1) Insert a blank tape (or a tape you want to record over) into your camcorder, and insert the recorded tape into the VCR.
(2) Set the POWER switch to VCR.
(3) Press REC and the button on its right simultaneously on your camcorder, then immediately press on your camcorder.
(4) Press on the VCR to start playback. The picture from a TV or VCR appears on the screen of your camcorder.
(5) Press on your camcorder at the scene where you want to start recording from.
IcnoJb3ObaHne Ka6eJa
IcnoJIb3OBAHne Ka6eIa.i.LINK (coeHNHTeJIbHOrKa6eIa cIΦpOBOro BnDeocuHaJa DV)
ПрocTo noDCoeDInHnTe Ka6eIi.LINK (coeDInHnTeBnBn Ka6eN zuΦpOBOr BnDeoCnHaJa DV) (npno6peTaetc OTrdENoHO) K rHe3dy DV IN/OUT nIN DV IN/OUT nK rHe3dy DV IN/OUT zuΦpOBbIx BnDeoN3deJin. Ppi zuΦpo-ZuΦpOBom NOcOeDInHn BnDeo-ny aynocOHaJIbI nepeDaIOCT B zuΦpOBoI φOpMe DnB BvICOKKaueCTBeHHOro MOHTaJa.
Ipeed 3knnyataunei
YctaHOBnTe OIzHIO DISPLAY B nOJoxKeHne LCD B yCTaHOBkAX MEHIO. (YCTaHOBKe NO yMOnUHaHIO COOTBeTCTByeT LCD.)
(1)BcTaBbTe He3aIncaHHyIO JeHTy (IINIJeHTy, Ha KOTopyBO Bbl XOTITe BblONIHNTb nepe3anCb) B BaUy BuDeOkamepu IN BcTaBbTe JENTy dIJI 3aIncn B KBM.
(2)Установпейpeклоча teь POWER в положене VCR.
(3)HaxmTe KhoNky REC u KhoNky cnpabaOT Hee OndHOBpeMeHHo Ha BaWei BnDeOkamepe, a 3aTEM TOTuac Xe HaxmTe KhoNky II Ha BaWei BnDeOkamepe.
(4)HaxMMTe KhoNk Ky ▶ Ha KBM dIa Na HauAna BOCpOn3BeDeHnI. Ⅲo6paXeHne OTeJeBn3Opa IIN KBM noBnTcRa Ha 3KpaHe.
(5)HaxmTe KhONky Ha BaWeu BnDeokampeB TOM MeCTe, rIe Bbl XOTnte HaaTb 3aINCb.
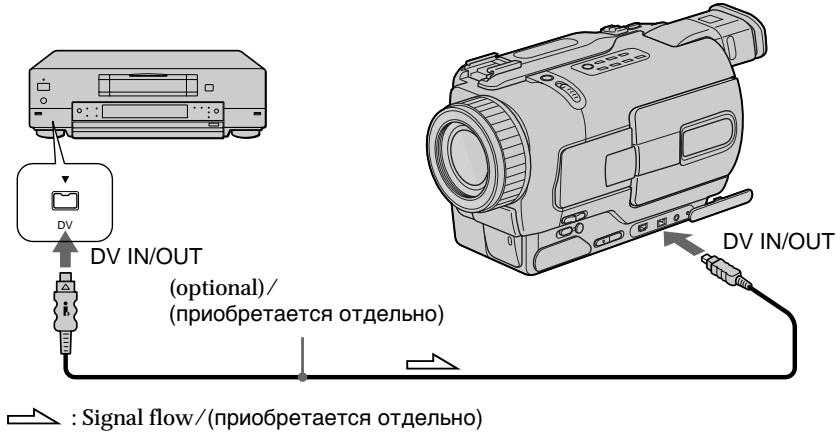
When you have finished dubbing a tape
Press on both your camcorder and the VCR.
EcnBb3aKoHnI INpe3anncbHa JeHTy
HaxmTe KhoNkny Na BnDeokampe n Ha KBM.
You can connect one VCR only using the i.LINK cable (DV connecting cable).
During digital editing
The colour of the display may be uneven.
However this does not affect the dubbed picture.
If you record playback pause picture with the DV IN/OUT jack
The recorded picture becomes rough. And when you play back the picture using your camcorder, the picture may jitter.
Before recording
Make sure if the DV IN indicator appears on the screen of your camcorder by pressing DISPLAY.
The DV IN indicator may appear on both equipment.
3aIncb Bndeo IJI N TeJeBn3NoHHbIX nporpaMM
BbMOxTe NOcOeINHt b OINH KBM ToIbKO c NOMoUbIO Ka6eJI i.LINK (coeINHTeJIbHbI K6eJIb DV).
Bo Bpemu npoBOr moTaXa
LBeT DnCnneM MoKeT 6blb HepaBHomepHbIM.
Ondako 3To He BInaReT Ha nepe3aIncBbAeMOe n3o6paXeHne.
Pn 3aIncn 3o6paXeHnB peKmne npay3bl Bocpon3BeHnuepe3 rHe3do DV IN/OUT
3aIncaHnOe n3o6paXeHne cTaHET NCKaXeHHbIM.AecIn Bbl BocnpOn3BOJnte n3o6paXeHne c nOMoUBo BaWei BnDeOkamepbl, n3o6paXeHne moKeT noDparuBaTb.
Ipeed 3aHcBIO
Y6eIntecb, noBnTcJn INHdkaTOp DV IN Ha 3kpaHe BaWeB BnDeokamepbl, nyTeM hKaTnKhONKn DISPLAY. INHdkaTOp DV IN MoXet nOBnTBcRaHa obox annapatax.
Inserting a scene from a VCR – Insert Editing
You can insert a new scene from a VCR onto your originally recorded tape by specifying the insert start and end points.
Use the Remote Commander for this operation.
Connections are the same as in "Recording video or TV programmes" on page 100, 102. Insert a cassette containing the desired scene to insert into the VCR.
-ToJbKO DCR-TRV330E
Bb moKTe BCTaBnTb HObI 3nn3oD c KBMaBaUy nepBOHauJIbHO 3aIIncAHHyIO JeHTy, yKa3aB TOcN HaJala N KOHcA BCTaBOK. IaI aTOI onepaunm nCnoJIb3yIe pIbT dIcTaHUNHO UnpabJeHna.
IopocHeHnHaBbIOTcTaKmNJKe,KaK N Bpa3dene "3aIncBnDeo nTneBn3OnHHbx nporpaMM"Ha cTp.100,102.BCTabTe kaccety, Ha KOTopoR coepkntcHyXhBn 3n3Od dJI R BCTaBKn B KBM.
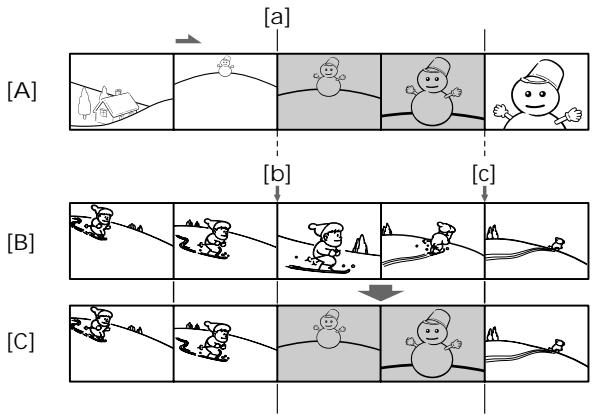
A: A tape that contains the scene to be superimposed
[B]: A tape before editing
[C]: A tape after editing
[B]:ЛeHTaперд мотатжEM
[C]:Лента поlete монтука
(1) Set the POWER switch to VCR.
(2) On the VCR, locate just before the insert start point a, then press to set the VCR to the playback pause mode.
(3)On your camcorder, locate the insert end point [c] by pressing or . Then press I to set it to the playback pause mode.
(4) Press ZERO SET MEMORY on the Remote Commander. The ZERO SET MEMORY indicator flashes and the end point of the insert is stored in memory.
(5) On your camcorder, locate the insert start point [b] by pressing , then press REC and the button on its right simultaneously to set your camcorder to the recording pause mode.
(6) First press on the VCR, and after a few seconds press on your camcorder to start inserting the new scene. Inserting automatically stops near the zero point on the counter. Your camcorder automatically stops. The end point [c] of the insert stored in memory is canceled.
(1) YctaHOBInTe npeKJIouaTeIb POWER B noJIOKeHne VCR.
(2)Ha KBM, haДиTe MeCTo KaK pa3 nepeT OTuKoHauJaBa BCTaBKn a, 3aTeM haxMtE KhoNky I Dnla yctaHOBKn KBM bpeKm nay3bI BOCnpOn3BeDeHnY.
(3)Ha BaWei BnIeOkaMepe,HaIInTe ToKy KOHua BCTaBKN[C],Haxab KHOJNkY 3aTeM HaxmTKe KHONky IINr yTaHOBKn BnIEoKaMepbI B pexm nay3bl BOCnpOn3BedeHn.
(4)HaXmnte KhoNky ZERO SET MEMORY Ha nyIbTe DnCTaHNoHHOrO ynpabJeHn. HauHeT MrraTb INDnKaTOp ZERO SET MEMORY, A toUka KOuHa BCTaBKn 6yDet coXpaHeHa B nAmrTn.
(5)Ha Baue BnDeokampe, HauDnte Toky Naaya BCTaBKn [b], Haxab KhoNkY 3aTeM OndHOBPemHNO HaxMNTe KhoNkY REC n KhoNkCy npaba dny CtaHOBKn Baue BnDeokamepbl B pexm npay3aNNcN.
(6)Сачала нахмITE кногИК ha KBM, a
ЧepeЗ HeCKOBko CeKYнД нахмITE KногИK
II Ha Baшев Вдебокамер Дяна?
BCTabKN HOBOrO 3nN3Oda.
BCTabKa abTomatUcheckи OCTaHOBITcR BO3Ne
HynEBoY ToTOKn Ha CTeuKne. BaSHA
Вдебокамер abTomatUcheckи OCTaHOBITcR.
ToUka KOHua BCTabKN [c], COxpaHeHHa R
NamrTn, BydT aHHyInpObaHa.
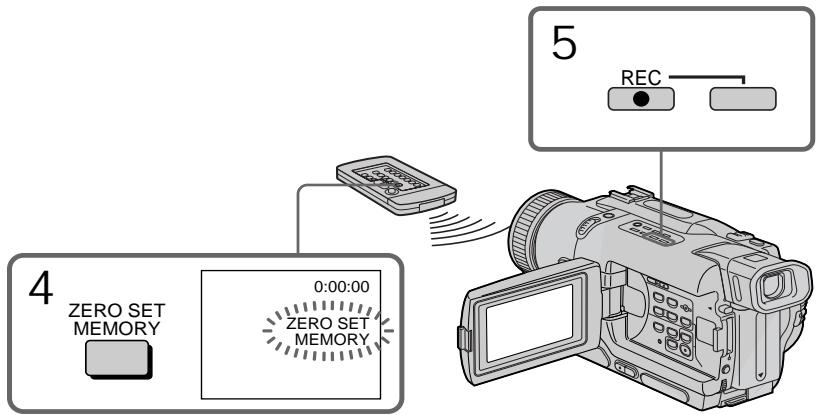
Inserting a scene from a VCR - Insert Editing
To change the insert end point Press ZERO SET MEMORY again after step 5 to erase the ZERO SET MEMORY indicator and begin from step 3.
Notes
- The zero set memory function works only for tapes recorded in the Digital8 system.
- The picture and sound recorded on the section between the insert start and end points will be erased when you insert the new scene.
When the inserted picture is played back The picture may be distorted at the end of the inserted section. This is not a malfunction.
To insert a scene without setting the insert end point
Skip step 3 and 4. Press when you want to stop inserting.
BCTaBka 3nH3OJa c KBM - MoHTaK BCTaBOK
ДлЯ ИЗМЕHENHЯ TOUKN KOHcA BCTaBKn Hakmnte KhoNky ZERO SET MEMORY eе pa3 nocle nyHKta 5 ДдудALEHINHdNKaTopa ZERO SET MEMORY n HauHnTe c DeiCTbNpyHKTa 3.
Приимейсаня
ΦYHKUINaMHTN yCTaHOBKN Hynpa6oTaET TObKO INIJIeHT,3aINcaHHbIX B cInΦpOBoCnCTeme Digital8【].
ИЗбрахени n 3Byk,Заиcaньhe Na yuactke Мжdy TOnkamn Haayala N KOHca BCTaBKn, 6ydyT CTeptbl,ecn Bbl BCTaBnte HOBbI 3ПИЗOD.
PnBocnpOn3BeDeHne BCTaJIeHHOro n3O6paXeHnI
Changing the menu settings
To change the mode settings in the menu settings, select the menu items with the SEL/PUSH EXEC dial. The default settings can be partially changed. First, select the icon, then the menu item and then the mode.
(1) In CAMERA, PLAYER, VCR (DCR-TRV330E only) or MEMORY (DCR-TRV325E/ TRV330E/TRV430E/TRV530E only) mode, press MENU.
(2) Turn the SEL/PUSH EXEC dial to select the desired icon, then press the dial to set.
(3)Turn the SEL/PUSH EXEC dial to select the desired item, then press the dial to set.
(4) Turn the SEL/PUSH EXEC dial to select the desired mode, and press the dial to set.
(5) If you want to change other items, select RETURN and press the dial, then repeat steps from 2 to 4.
For details, see "Selecting the mode setting of each item" (p. 108).
-BbInOpHeHne HnDnBnDyaIbHbIX yctaHOBOK Ha BnDeOKaMepe -
N3MeHeHne yCTaHOBOK MeHIO
ДлгиИЗмЕнIHуCTaHOBOK pexIMa B yctaHOBkax MEHIO BbIeBpITe ПYHKTbI MeHIO C NOMOtsI DnCKA SEL/PUSH EXEC. YcTaHOBKn NO yMOJIaHnIO MOxHO qactmIo H3MeHtB. Chayana BblpeBpITe NIKTORpAMMy, 3aTeMpyHKT MeHIO, a 3aTeM pexIM.
(1)В рекиme CAMERA,PLAYER,VCR(Tolьков
moель DCR-TRV330E)пл рекиme
MEMORY(Tолько моели DCR-TRV325E/
TRV330E/TRV430E/TRV530E),нajхмite
К honку MENU.
(2)Поверн'teДИСК SEL/PUSH EXEC ДИА Вьбора НУХКOH ПИКТORрмMbI,аЗТЕМ HAXMЛТЕДИСКДДыВиJOЛНЕНЯ YCTAHOBKM.
(3)Поверн'te ДСК SELPUSH EXEC ДЯ
Выбopa НУЖСОД ПИКТORPGAMPAHа, a 3aTeM
HAXMMTE ДССД КЕ ВьЮЛНЕНИ YCTAHOBKM.
(4)ПовернейдаиCK SEL/PUSH EXECдЯьбора hyхкйи ККТогрмы, a 3aTeMaHЖМКЕДИСДКД YБИЛПЕНHA yCTaHOBK.
(5) Ecni Bbl XOTnTe N3MeHnTb DpyrNe nyHKtBblB6epnTe KOMaHNy RETURN, a 3aTeMaHXMnTe DNCK, NOcne Yero NOBTOpTe DeiCtBNI NYKTOB 2-4.
Menu items are displayed as the following icons:

MANUAL SET

CAMERA SET

PLAYER SET (DCR-TRV230E/
TRV235E/TRV325E/TRV430E/ TRV530E)

VCR SET (DCR-TRV330E)

LCD/VF SET

MEMORY SET (DCR-TRV325E/
TRV330E/TRV430E/TRV530E only)

PRINT SET (DCR-TRV325E/
TRV330E/TRV430E/TRV530E only)

TAPE SET

SETUP MENU

OTHERS
U3MeHeHne yCTaHOBOK MeHIO
PLAYER SET (DCR-TRV230E/
TRV235E/TRV325E/TRV430E/ TRV530E)

VCR SET (DCR-TRV330E)

LCD/VF SET

MEMORY SET (MOdJIb
DCR-TRV325E/TRV330E/TRV430E/ TRV530E)

PRINT SET (MOdJIb DCR-TRV325E/ TRV330E/TRV430E/TRV530E)

TAPE SET

SETUP MENU

OTHERS
English
Selecting the mode setting of each item is the default setting.
Menu items differ according to the position of the POWER switch. The screen shows only the items you can operate at the moment.
| Icon/item | Mode | Meaning | POWER switch |
| PROGRAM AE | — | To suit your specific shooting requirement (p. 61) | CAMERA MEMORY |
| P EFFECT | — | To add special effects like those in films or on the TV to images (p. 56) | CAMERA PLAYER/VCR |
| D EFFECT | — | To add special effects using the various digital functions (p. 58) | CAMERA PLAYER/VCR |
| AUTO SHTR | ●ON | To automatically activate the electronic shutter when shooting in bright conditions | CAMERA MEMORY |
| OFF | To not automatically activate the electronic shutter even shooting in bright conditions | ||
| SELFTIMER1) | ● OFF | Not to use the self-timer function | CAMERA MEMORY |
| ON | To use the self-timer function | ||
| D ZOOM | ● OFF | To deactivate digital zoom. Up to 25× zoom is carried out. | CAMERA MEMORY |
| 50× | To activate digital zoom. More than 25× to 50× zoom is performed digitally. (p. 29) | ||
| 700×2) | To activate digital zoom. More than 25× to 700× zoom is performed digitally. (p. 29) | ||
| 16:9WIDE | ● OFF | — | CAMERA |
| ON | To record a 16:9 wide picture (p. 52) | ||
| STEADYSHOT | ● ON | To compensate for camera-shake | CAMERA MEMORY |
| OFF | To cancel the SteadyShot function. Natural pictures are produced when shooting a stationary object with a tripod. | ||
| N.S. LIGHT | ● ON | To use the NightShot Light function (p. 33) | CAMERA MEMORY |
| OFF | To cancel the NightShot Light function | ||
| FLASH MODE | ● ON | To fire the flash (optional) regardless of the brightness of the surroundings | CAMERA MEMORY |
| AUTO | The flash fires automatically | ||
| AUTO ● | To fire the flash before recording to reduce the red-eye phenomenon | ||
| FLASH LVL | HIGH | Makes the flash level higher than normal | CAMERA MEMORY |
| ● NORMAL | Normal setting | ||
| LOW | Makes the flash level lower than normal |
1) DCR-TRV325E/TRV330E/TRV430E/TRV530E only
2) 800 × (DCR-TRV235E/TRV430E only)
Notes on the SteadyShot function
- The SteadyShot function will not correct excessive camera-shake.
- Attachment of a conversion lens (optional) may influence the SteadyShot function.
If you cancel the SteadyShot function
The SteadyShot off indicator appears on the screen. Your camcorder prevents excessive compensation for camera-shake.
Notes on FLASH MODE and FLASH LVL
- You cannot adjust FLASH MODE or FLASH LVL if the flash (optional) is not compatible with FLASH MODE or FLASH LVL.
- FLASH MODE and FLASH LVL are displayed only when an external flash (optional) is connected to the intelligent accessory shoe.
| Icon/item | Mode | Meaning | POWER switch |
| HiFi SOUND | ●STEREO | To play back a stereo tape or dual sound track tape with main and sub sound | PLAYER/VCR |
| 1 | To play back a stereo tape with the left sound or a dual sound track tape with main sound | ||
| 2 | To play back a stereo tape with the right sound or a dual sound track tape with sub sound | ||
| TBC* | ●ON | To correct jitter | PLAYER/VCR |
| OFF | To not correct jitter. Set TBC to OFF when playing back a tape on which you have dubbed over and recorded the signal of a TV game or similar machine. | ||
| TBC stands for “Time Base Corrector”. | |||
| DNR* | ●ON | To reduce picture noise | PLAYER/VCR |
| OFF | To reduce a conspicuous afterimage when the picture has a lot of movement | ||
| DNR stands for “Digital Noise Reduction”. | |||
| AUDIO MIX | — | To adjust the balance between the stereo 1 and stereo 2 | PLAYER/VCR |
| ST1 ▲ ST2 | |||
| NTSC PB | ●ON PAL TV | To palyback a tape recorded on your camcorder on a PAL system TV | PLAYER/VCR |
| NTSC 4.43 | To palyback a tape recorded in the NTSC colour system on a TV with the NTSC 4.43 mode | ||
| PB MODE | ●AUTO | To automatically select the system (Hi8/ standard 8 or Digital8) that was used to record on the tape, and play back the tape | PLAYER/VCR |
| Hi8/8 | To play back a tape that was recorded in the Hi8/standard 8 system when your camcorder does not automatically distinguish the recording system | ||
| A/V→DV OUT (DCR- TRV330E only) | ●OFF | To convert digital video signals into analog video signals via your camcorder. | VCR |
| ON | To convert analog video signals into digital video siginals via your camcorder. | ||
- When you play back tapes recorded in the Hi8/standard 8 system only.
Notes on AUDIO MIX
- When playing back a tape recorded in the 16-bit mode, you cannot adjust the balance.
- You can adjust the balance only for tapes recorded in the Digital8 B system.
Notes on NTSC PB
When you play back a tape on a Multi System TV, select the best mode while viewing the picture on the TV.
Note on PB MODE
The mode will return to the default setting when:
- you remove the battery pack or power source.
- you turn the POWER switch.
| Icon/item | Mode | Meaning | POWER switch |
| LCD BRIGHT | — | To adjust the brightness on the LCD screen with the SEL/PUSH EXEC dial. | CAMERA PLAYER/VCR MEMORY |
| To darken → To lighten | |||
| LCD B. L. | ●BRT NORMAL | To set the brightness on the LCD screen backlight normal | CAMERA PLAYER/VCR MEMORY |
| BRIGHT | To brighten the LCD screen backlight | ||
| LCD COLOUR | — | To adjust the colour on the LCD screen, turning the SEL/PUSH EXEC dial to adjust the following bar | CAMERA PLAYER/VCR MEMORY |
| To reduce intensity To increase intensity | |||
| VF B.L. | ●BRT NORMAL | To set the brightness in the viewfinder normal | CAMERA PLAYER/VCR MEMORY |
| BRIGHT | To brighten the viewfinder | ||
| * STILL SET | |||
| PIC MODE | ●SINGLE | Not to record continuously | MEMORY |
| MULTI SCRN | To record 9 images continuously (p. 130) | ||
| QUALITY | ●FINE | To record still images in the fine image quality mode | PLAYER/VCR MEMORY |
| STANDARD | To record still images in the standard image quality mode (p. 127) | ||
| FLD/FRAME | ●FIELD | To record moving subjects correcting jitter | MEMORY |
| FRAME | To record stopping subjects in high quality | ||
| PRINT MARK | ON | To write a print mark on the recorded still images you want to print out later (p. 166) | PLAYER/VCR MEMORY |
| ●OFF | To cancel print marks on still images | ||
| PROTECT | ON | To protect selected still images against accidental erasure (p. 161) | PLAYER/VCR MEMORY |
| ●OFF | Not to protect still images | ||
- DCR-TRV325E/TRV330E/TRV430E/TRV530E only
Notes on LCD B.L. and VF B.L. - When you select BRIGHT, battery life is reduced by about 10 percent during recording.
- When you use power sources other than the battery pack, BRIGHT is automatically selected.
| Icon/item | Mode | Meaning | POWER switch |
| *SLIDE SHOW | — | To play back images in a continuous loop (p. 159) | MEMORY |
| DELETE ALL | — | To delete all the images (p. 163) | MEMORY |
| FORMAT | ●RETURN | To cancel formatting | MEMORY |
| OK | To format an inserted “Memory Stick.” 1. Select FORMAT with the SEL/PUSH EXEC dial, then press the dial. 2. Turn the SEL/PUSH EXEC dial to select OK, then press the dial. 3. After EXECUTE appears, press the SEL/PUSH EXEC dial. FORMATTING appears during formatting. COMPLETE appears when formatting is finished. | ||
| PHOTO SAVE | — | To duplicate still images in the tape to “Memory Stick” (p. 144) | PLAYER/VCR |
| *9PIC PRINT | ●RETURN | To cancel prints of split screen | MEMORY |
| SAME | To make prints of same split screen (p. 168) | ||
| MULTI | To make prints of different split screen | ||
| MARKED | To make prints of images with print marks in recording order | ||
| DATE/TIME | ●OFF | To make prints without the recording date and time | MEMORY |
| DATE | To make prints with the recording date | ||
| DAY&TIME | To make prints with the recording date and time (p. 168) |
Notes on formatting*
- Supplied or optional "Memory Stick"s have been formatted at factory. Formatting with this camcorder is not required.
- Do not turn the POWER switch or press any button while the display shows "FORMATTING".
- You cannot format the "Memory Stick" if the write-protect tab on the "Memory Stick" is set to LOCK.
- Format the "Memory Stick" if "格式化" FFORMAT ERROR" appears.
Formatting erases all information on the "Memory Stick"
Check the contents of the "Memory Stick" before formatting.
- Formatting erases sample images on the "Memory Stick."
- Formatting erases the protected image data on the "Memory Stick."
Note on PRINT SET*
9PIC PRINT and DATE/TIME are displayed only when an external printer (optional) is connected to the intelligent accessory shoe.
- DCR-TRV325E/TRV330E/TRV430E/TRV530E only
| Icon/item | Mode | Meaning | POWER switch |
| REC MODE | ●SP | To record in the SP (Standard Play) mode | CAMERA PLAYER/VCR |
| LP | To increase the recording time to 1.5 times the SP mode | ||
| AUDIO MODE | ●12BIT | To record or play back in the 12-bit mode (two stereo sounds) | CAMERA PLAYER/VCR* |
| 16BIT | To record or play back in the 16-bit mode (the one stereo sound with high quality) | ||
| ○ REMAIN | ● AUTO | To display the remaining tape bar: • for about 8 seconds after your camcorder is turned on and calculates the remaining amount of tape • for about 8 seconds after a cassette is inserted and your camcorder calculates the remaining amount of tape • for about 8 seconds after ▲ is pressed in PLAYER or VCR mode • for about 8 seconds after DISPLAY is pressed to display the screen indicators • for the period of tape rewinding, forwarding or picture search in the PLAYER or VCR mode | CAMERA PLAYER/VCR |
| ON | To always display the remaining tape bar | ||
| DATA CODE | ● DATE/CAM | To display date, time and recording data during playback | PLAYER/VCR |
| DATE | To display date and time during playback |
Note on REC MODE
When you record on the standard 83 tape, your camcorder records in the SP mode even you select the LP mode in the menu settings. In this case, the indicator "8mm TAPE SP REC, Hi8 TAPE LP/SP REC" appears on the screen. Use the Hi8 Hi8 tapes for the LP mode.
Notes on the LP mode
- When you record a tape in the LP mode on your camcorder, we recommend playing the tape on your camcorder. When you play back the tape on other camcorders or VCRs, noise may occur in images or sound.
- When you record in the SP and LP modes on one tape or you record some scenes in the LP mode, the playback image may be distorted or the time code may not be written properly between scenes.
Note on AUDIO MODE
When playing back a tape recorded in the 16-bit mode, you cannot adjust the balance in AUDIO MIX.
*To dub a tape to another VCR
You cannot select AUDIO MODE for tapes recorded in the Digital8 system. You, however, can select AUDIO MODE when you dub tapes recorded in the Hi8/standard 8 system to another VCR using the i.LINK cable.
| Icon/item | Mode | Meaning | POWER switch |
| CLOCK SET | — | To set the date or time (p. 22) | CAMERA MEMORY |
| LTR SIZE | ●NORMAL | To display selected menu items in normal size | CAMERA PLAYER/VCR MEMORY |
| 2× | To display selected menu items at twice the normal size | ||
| DEMO MODE | ●ON | To make the demonstration appear | CAMERA |
| OFF | To cancel the demonstration mode |
Notes on DEMO MODE
- You cannot select DEMO MODE when a cassette is inserted in your camcorder.
- DEMO MODE is set to STBY (Standby) at the factory and the demonstration starts about 10 minutes after you have set the POWER switch to CAMERA without a cassette inserted. To cancel the demonstration, insert a cassette, set the POWER switch to other than CAMERA, or set DEMO MODE to OFF.
- When NIGHTSHOT is set to ON, the "NIGHTSHOT" indicator appears on the screen and you cannot select DEMO MODE in the menu settings.
| Icon/item | Mode | Meaning | POWER switch |
| ETC WORLD TIME | — | To set the clock to the local time. Turn the SEL/PUSH EXEC dial to set a time difference. The clock changes by the time difference you set here. If you set the time difference to 0, the clock returns to the originally set time. | CAMERA MEMORY |
| BEEP | ●MELODY | To output the melody when you start/stop recording or when an unusual condition occurs on your camcorder | CAMERA PLAYER/VCR MEMORY |
| NORMAL | To output the beep instead of the melody | ||
| OFF | To cancel all sound including shutter sound | ||
| COMMANDER | ●ON | To activate the Remote Commander supplied with your camcorder | CAMERA PLAYER/VCR MEMORY |
| OFF | To deactivate the Remote Commander to avoid remote control misoperation caused by other VCR's remote control | ||
| DISPLAY | ●LCD | To show the display on the LCD screen and in the viewfinder | CAMERA PLAYER/VCR MEMORY |
| V-OUT/LCD | To show the display on the TV screen, LCD screen and in the viewfinder | ||
| REC LAMP | ●ON | To light up the camera recording lamp at the front of your camcorder | CAMERA MEMORY |
| OFF | To turn the camera recording lamp off so that the subject is not aware of the recording | ||
| VIDEO EDIT | — | To make programme and perform video editing (p. 86) | PLAYER/VCR |
| EDIT SET | — | To adjust and set the synchronicity of your camcorder and a VCR for dubbing in edit set mode (p. 86) | PLAYER/VCR |
| INDICATOR | ●BL OFF | To turn off the backlight on display window | CAMERA PLAYER/VCR MEMORY |
| BL ON | To turn on the backlight |
Note
If you press DISPLAY with DISPLAY set to V-OUT/LCD in the menu settings, the picture from a TV or VCR will not appear on the screen even when your camcorder is connected to outputs on the TV or VCR. (Except when your camcorder is connected with the i.LINK cable)
In more than 5 minutes after removing the power source
The AUDIO MIX, FLASH LVL, COMMANDER and HiFi SOUND items are returned to their default settings.
The other menu items are held in memory even when the battery is removed.
Notes on INDICATOR
- When you select BL ON, battery life is reduced by about 10 percent during recording.
- When you use power sources other than the battery pack, BL ON is automatically selected.
Pysckn
Bb6op yctaHOBOK peKIma no KaXdOmy NyHKTy
yctaHOBka nO yMOnUaHHIO.
Using "Memory Stick" - introduction
- DCR-TRV325E/TRV330E/TRV430E/ TRV530E only
You can record and play back still images on the "Memory Stick" supplied with your camcorder. You can easily play back, record or delete still images. You can exchange image data with other equipment such as your computer etc., using the USB cable for "Memory Stick" supplied with your camcorder.
On file format (JPEG)
Your camcorder compresses image data in JPEG format (extension.jpg).
Typical image data file name
100-0001: This file name appears on the screen of your camcorder.
Dsc00001.jpg: This file name appears on the display of your computer.
Before using "Memory Stick"
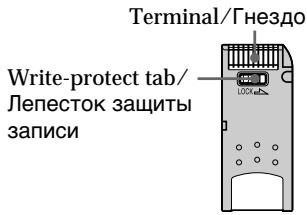
- You cannot record or erase still images when the write-protect tab on the "Memory Stick" is set to LOCK.
Depending on the model, the position and shape of the switch may be different. - We recommend backing up important data.
-
Image data may be damaged in the following cases:
-
If you remove the "Memory Stick", turn the power off, or detach the battery for replacement when the access lamp is flashing
- If you use "Memory Stick"s near static electricity or magnetic fields.
- Prevent metallic objects or your finger from coming into contact with the metal parts of the connecting section.
- Stick its label on the labelling position.
- Do not bend, drop or apply strong shock to "Memory Stick"s.
- Do not disassemble or modify "Memory Stick"s.
ИспOLTьзоване“Memory Stick”-ВveDEXHne
-ToIbKO MoDeJI NDCR-TRV325E/ TRV330E/TRV430E/TRV530E
BbMOxTe 3aINcBbTaB N BOCnPOn3BODnTb HEnoDBNXHbIe I3O6paXeHnHa "Memory Stick", npuIraeMoi K Bauei BnDeokampe. Bbl MOxTe JERKo BbIOJNHTb BOCnPO3BeDEHne, npe3anCb iIN ydaJIeHne HenoDBNXbIX I3O6paXeHn. Bbl MOxTe BbIOJNHTb OMeH daHHbIMN I3O6paXeHn C dpyroI annapaTypoI, TAKOI, KaK BaU nepcoHaIbHi KOMlbOTep IN.T.I., IcNoJIb3yI Ka6eIb USB DnA "Memory Stick", npuIraeMbi K Bauei BnDeokampe.
OΦopMaTe ΦaɪJIOB (JPEG)
Baa7a BnIeOKaMepa CxNMaet DaHhble
m3o6paXeHnBΦOpMaT JPEG (c paCUnpeHnem
.jpg).
TunuHoe mma faJna daHHbIX n3o6paXeHHa
100-0001: IIMr 3Toro foaiIa IOBNTcHa 3KpaHe
Dsc00001.jpg: IIMr 3tOrO foAIIa IIOBHTcHa IINCnIe BaUero KOMNbIoTepa.
-EcIn BblncnoIb3yete "Memory Stick" Bo3ne MaHHTOB uIN MaHHTbIX NOJIeN.
- He pinnacaiTecb metaJIInuYeCKnIM qaCTaMn IIN BaunmN nabIcK M metaJIInuYeCKnM qACTaM CoeDInHtEnbHbX CekLNI.
- HakneiTe 3TuKeTky B No3nCm MapKnpoBkn.
- He crn6aITe, He poHaiTe u CnIbHo He TpAcuTe "Memory Stick".
-
He pa3bnpaIte n He moIuPnIpyuTe "Memory Stick".
-
Do not let "Memory Stick"s get wet.
-
Do not use or keep "Memory Stick"s in locations that are:
-
Extremely hot such as in a car parked in the sun or under the scorching sun
-Under direct sunlight - Very humid or subject to corrosive gases
- When you carry or store a "Memory Stick", put it in its case.
"Memory Stick"s formatted by a computer
"Memory Stick"s formatted by Windows OS or Macintosh computers do not have a guaranteed compatibility with this camcorder.
Notes on image data compatibility
- Image data files recorded on "Memory Stick"s by your camcorder conform with the Design Rules for Camera File Systems universal standard established by the JEITA (Japan Electronics and Information Technology Industries Association). You cannot play back on your camcorder still images recorded on other equipment (DCR-TRV890E/TRV900/TRV900E or DSC-D700/D770) that does not conform with this universal standard. (These models are not sold in some areas.)
- If you cannot use the "Memory Stick" that has been used on other equipment, format the "Memory Stick" on your camcorder following the steps on page 112. Note that all images on the "Memory Stick" will be deleted if you format it.
"Memory Stick" and Sony Corporation.

MEMORY STICK TM
are trademarks of
- Microsoft® and Windows® are either registered trademarks or trademarks of Microsoft Corporation in the United States and/or other countries.
- Macintosh and Mac OS are trademarks of Apple Computer, Inc.
- All other product names mentioned herein may be the trademarks or registered trademarks of their respective companies.
Furthermore, "TM" and "®" are not mentioned in each case in this manual.
Иснольбоваиме "Memory Stick"
-Вваенье
- He donyckaIte, yTo6bl "Memory Stick" CTaHOBUNCb BIAJXHbIMN.
- He IncnoIb3yIte n He xpaHnTe "Memory Stick" B MeCTax:
-Préz3mepHO JxapKnx, HApnMpE, B npinapKoBaHNoH pOcNHeA bTOMo6nIe IINIOI pAnJyIMC oNHiEe.
-ПОДпразмьIMCOЛHEЧнБIMCBETOM
-B MeCTax OueHb BnAaKhbIX INI COepeXaUHX Koppo3IOHHble ra3bl
-Пи переноске Ипхраheneni "Memory Stick" nopoхи-te eeВфутлг.
"Memory Stick", oTΦopMaTHpOBaHHaHa KaOMNbItepe
"Memory Stick", oTφopmatupobAHna B onepaunHOHoi CIsCTMe Windows nIi Macintosh, MoXet OKa3aTbcr He COBmecTUMoC DaHHoB BInDeOKaMepoI.
Примочаим IO COBmecTUMOCTn ДанhhIx n306paKeHn
-Фаилддннбхизбржгь,3aNicaHbIe Ha "Memory Stick"c nOmoшьdoHaHNoB BnDEOKAMepbl,OTBeayoTnpoEKTHbIM Tpe6obAHmIДЯунВерсалhORoCTaHdapTa FaaiIOBbIX CNTeM BnDEOKAMepbl, pa3pa6OtaHnHO JEITA (AnOHCKoA cccoumauei 3JIeKtpOHHO pPOMbiUHeHHOCTn I nHfOpMaunOHHO texHoJOrm).BbI He MoKete BocpOnzBoDInt ha BaWei BnDEOKAMepe HEnoDbMxKHbIe 3OBpaXeHn, 3aNicaHbIe Ha dpyro annapaType (DCR-TRV890E/TRV900/TRV900E IN DCs-D700/ D770),KOTOpbe He COOTBeTCTByOT 3Tomy yHnBepCaIbHOMy CTaHdapTy. (3TN moJeIne H npOdaIOTCB HEKOToPbIX pernoHax.)
- Ecnn Bbl He MoXeTe NcNoJIb3OBAtB "Memory Stick", KOTOPaNcNoJIb3OBAIaNb Ha dpyroI annapaType, OToΦopMaTnpUyTe "Memory Stick" Ha BaIeBnBeOekampe, CneIyHnCTpyKuINn Ha ctp. 120. IMeIe T BnuDy, YTO BCE n3o6paxKeHHa "Memory Stick" 6dy ydaIeHbI, ecnn Bbl OToΦopMaTnpye ee.
"Memory Stick" IN MEMORY STICK ABJIAOTCA ФИМЕнHBIMN 3HakamN Sony Corporation.
- Microsoft® Windows® RNAIHO TCR OPhiuaJIbHO 3aperncTprnpoBAHbIMn MapkamN ININ φπρmehhBIMn 3HaKaAMn Microsoft Corporation B CoeDInHeHHbIX LToTaX n/Inn Dpynx CtpaHax.
Macintosh Mac OS ABJHOTcФИРМEHbIM3HaKaMn Apple Computer, Inc.
Bce npyrnHe Ha3BaHnI N3deIi, yNOMHyTbIe B daHHOM pyKOBoIDCTBE, MOrY T 6blTb CpIMeHHbIM3HaKaMn IIN OΦnuaJIbHO 3apeHNTpnpOBaHHbIM TopRObBlm MapKaMn COOTBTCTBYUOxH KOMNaHNI.
BДаьншem,Знakn“TM"и“@”He 6удуТ yka3bIbAысяКakдый pa3В данHOMpykoBOdCTBe.
Inserting "Memory Stick"
Insert a "Memory Stick" in the "Memory Stick" slot as far as it can go with the mark facing toward the "Memory Stick" slot as illustrated below.
YcTaHOBka "Memory Stick"
BctaBbTe "Memory Stick" B oTcE K dIa "Memory Stick" do ynpa, TaK uTo6bI 3HaK ▲ 6bln o6paueH K oTcEky "Memory Stick", KaK nokaaso H a pucyHke.
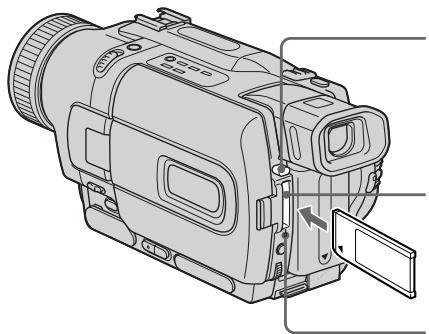
"Memory Stick" eject button/ KhONka BbITaJIKNBaHn "Memory Stick
"Memory Stick" slot/ Otcek "Memory Stick"
Access lamp/
Ламmarочka дocтуна
To eject the "Memory Stick"
Press the "Memory Stick" eject button. The "Memory Stick" pops up.
When the access lamp is lit or flashing Do not shake or strike your camcorder because your camcorder is reading the data from the "Memory Stick" or recording the data on the "Memory Stick". Do not turn the power off, eject the "Memory Stick" or remove the battery pack. Otherwise, the image data breakdown may occur.
If "MEMORY STICK ERROR" is displayed The "Memory Stick" may be corrupted. If this occurs, use another "Memory Stick."
Selecting image quality mode
You can select image quality mode in still image recording. The default setting is FINE.
(1) Set the POWER switch to PLAYER, VCR (DCR-TRV330E only) or MEMORY. Make sure that the LOCK is set to the left (unlock) position.
(2) Press MENU to make the menu display appear.
(3) Turn the SEL/PUSH EXEC dial to select , then press the dial.
(4) Turn the SEL/PUSH EXEC dial to select STILL SET, then press the dial.
(5) Turn the SEL/PUSH EXEC dial to select QUALITY, then press the dial.
(6) Turn the SEL/PUSH EXEC dial to select the desired image quality, then press the dial.
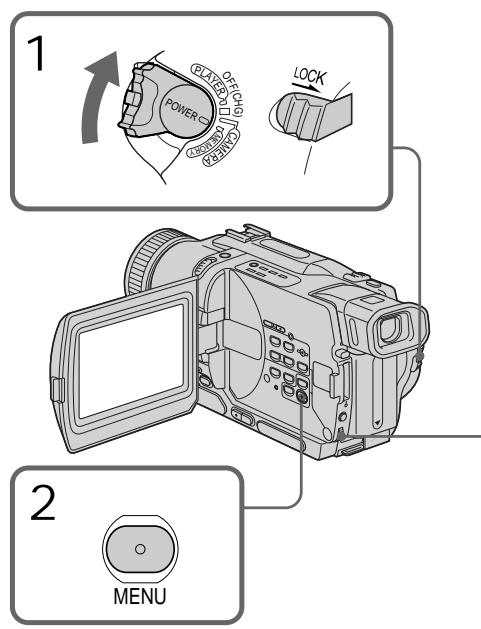
Bb6oppeKImaKaueCTBa n3o6paXeHn
BbMOxTe Bb6paTb peXIM KaecCTBa n3o6paXeHnI npI 3aIncn HEnoDbXHoro n3o6paXeHnI.
YcTaHOBKOI NO yMOJIaHnIO ABNaETCFA FINE.
In some cases, changing the image quality mode may not affect the image quality, depending on the types of images you are shooting.
Image quality settings
| Setting | Meaning |
| FINE (FINE) | Use this mode when you want to record high quality images. The image is compressed to about 1/6. |
| STANDARD (STD) | This is the standard image quality. The image is compressed to about 1/10. |
Differences in image quality mode
Recorded images are compressed in JPEG format before being stored into memory. The memory capacity allotted to each image varies depending on the selected image quality mode. Details are shown in the table below. (The number of pixels is 640 × 480 , regardless of image quality mode. The data size before compression is about 600 KB.)
| Image quality mode | Memory capacity |
| FINE | About 100 KB |
| STANDARD | About 60 KB |
Approximate number of images you can record on a "Memory Stick"
The approximate number of images you can record on a "Memory Stick" formatted using this camcorder varies depending on which image quality mode you select and the complexity of the subject.
Исплььзоваиме "Memory Stick" -В蜱есншe
Ppmeuahne
B HeKOTopbIX cnyaJx, n3MeHeHne peJXmHa KaueCTBa N3o6paXeHn MOKeT Otpa3HTbCn Ha KaueCTBe N3o6paXeHn, B 3aBcNcMOnCTN OT TINOB N3o6paXeHn, KOTOpBie Bbl CHMaete.
YctaHOBKn KaueCTBa 306paXeHnA
Maximum number of images you can record on a "Memory Stick"/
MaKcMaIbHoe KOJIneCtBO H3O6paXeHn, KOTOpoe BbIMoKeTe 3aIncatb Ha "Memory Stick"
| Setting/ Установka | 4MB (supplied)/ (приобраветаэр OTдельно) | 8MB | 16MB | 32MB | 64MB | 128MB |
| FINE | 40 | 81 | 164 | 329 | 659 | 1319 |
| STANDARD | 60 | 122 | 246 | 494 | 988 | 1978 |
Note on the image quality mode indicator
This is only displayed during recording.
Recording still images on "Memory Stick" - Memory Photo recording
- DCR-TRV325E/TRV330E/TRV430E/ TRV530E only
You can select the FIELD or FRAME mode in still image recording. Your camcorder compensates for camera-shake when recording moving subjects in the FIELD mode. Your camcorder records still images in high quality in the FRAME mode. Select the FIELD or FRAME in the menu settings (p. 107).
Before operation
Insert a "Memory Stick" into your camcorder.
(1) Set the POWER switch to MEMORY. Make sure that the LOCK is set to the left (unlock) position.
(2) Keep pressing PHOTO lightly. The green mark stops flashing, then lights up. The brightness of the image and focus are adjusted, being targeted for the middle of the image and are fixed. Recording does not start yet.
(3) Press PHOTO deeper. The image displayed on the screen will be recorded on the "Memory Stick". Recording is complete when the bar scroll indicator disappears.
3aIncb HeNoDBrXhBIX N3O6paXeHn Ha "Memory Stick" -ФOTOCbEmKa c COxpaHeHem B namrTn
-ToIbKO MoJeN DCR-TRV325E/ TRV330E/TRV430E/TRV530E
BbMoKeTe Bb6paTb peKIM FIELD nIn FRAME npn 3aNcN HeNoDVBnKhbix n3o6paXeHn. Baasa BVJeOkaMepa KOMNeHCnpyET NpOpaRnBaHnI npn 3aNcN DnBxUyncxC oBeKToB BpeKImE FIELD. Baasa BVJeOkaMepa 3aNcSbBaet HeNoDVBnKhbie n3o6paXeHn C BbICOKIM KaueCTBOM BpeKImE FRAME. Bb6epnte OunIO FIELDS nIn FRAME B yctaHOBkax MeHIO (CTp.107).
Ipeed nayanom pa60tbI
BcTaBbTe "Memory Stick" B BaUy BnIeokamepy.
(1)YcTaHOBnTe NepeKJIouaTeIb POWER B noIOJKeHne MEMORY. Y6eJIntEc, yTO fNkCaTOp LOCK yCTaHOBJnB IeBOM (He3aΦNKcICPOBaHOM) NOJIOXeHIM.
(2)Держпге сlerка нажатои кногу PHOTO. 3elenьзнak ● прекрази MTraTи 6удт BысевчВатсЯ NOCTOrHNo.яркови ИЗБрахени и Фокуншо расToHne 6byt OTpergynIpOBaHbl npn habOdke Ha cepeДИнHy ИЗБрахени 和 6byt 3aФИКСИРОВАнblnpn 3Tom.
(3)HaxMnTe KhONky PHOTO cnIbHee. N3O6paxeHne, OTo6paxaemoe Ha 3KpaHe, 6yDet 3aIncaHoHa "Memory Stick". 3aIncb CHTaTcTc 3aBepHeHNo, ecN IcYe3HeT nepMeUauOniCn pIoocTaB i HnDnKaTOP.
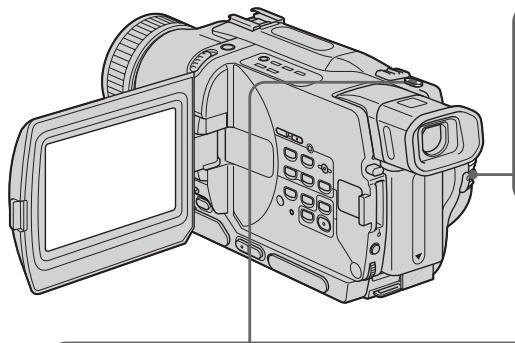
1
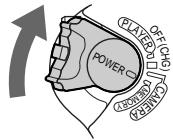
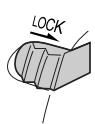
2

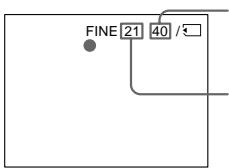
Number of images can be recorded on the "Memory Stick"/Kolmuechtbo n3o6paXeHn, KOTOpbIe moXHO 3aIncatb Ha "Memory Stick"
Number of recorded images/ KolnuectBO 3ancaHHbIX n3o6paXeHn
3

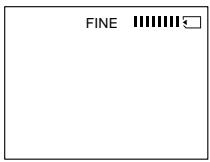
Notes
- When recording fast-moving subjects in the FRAME mode, the recorded image blurry.
- When recording in the FRAME mode, your camcorder may not correct camera-shake. We recommend that you shoot objects with a tripod.
- When recording still images at step 2 with PHOTO pressed lightly, the image momentarily flickers. This is not a malfunction.
When the POWER switch is set to MEMORY
The following functions do not work:
- wide mode
- picture effect
-digital effect
title - low lux mode of PROGRAM AE.
When you are recording a still image
You can neither turn off the power nor press PHOTO.
When you press PHOTO on the Remote
Commander
Your camcorder immediately records the image that is on the screen when you press the button.
Recording images continuously
You can record still images continuously.
Multi screen mode
You can record 9 still images continuously on a single page.
PpimueaHn
(1) Set the POWER switch to MEMORY. Make sure that the LOCK is set to the left (unlock) position.
(2) Press MENU to make the menu display appear.
(3) Turn the SEL/PUSH EXEC dial to select , then press the dial.
(4) Turn the SEL/PUSH EXEC dial to select STILL SET, then press the dial.
(5)Turn the SEL/PUSH EXEC dial to select PIC MODE, then press the dial.
(6) Turn the SEL/PUSH EXEC dial to select the desired setting, then press the dial.
(7) Press MENU to erase the menu display.
(8) Press PHOTO deeper.
(1) YcTaHOBInTe nepeKlnHouaTeJIb POWER B noLoXeHne MEMORY. Y6eDiNTEcb, yTo nepeKlnHouaTeJIb LOCK ycTaHOBInB JIeBOe (He3aФИКСИРОВАнhoe noLoXeHne).
(2)HaxmTe KhoNky MENU, YTo6bHa Na IIncPiee NOBnlaScb INDnKaIaM MeHIO.
(3)ПовернITE ДИСК SEL/PUSH EXEC ДЯ
Выбoga установки , a за tem нажмITE
ДИСК.
(4)ПовернITE диСК SEL/PUSH EXEC дя Выбopa установки STILL SET, a 3aTeM нажмITE диСК.
(5)ПовернITE ДИСК SEL/PUSH EXEC ДЯ
Быбopa установки PIC MODE, a за tem
нав KMЛТЕ ДИСК.
(6)ПовернITE ДИСК SEL/PUSH EXEC ДИВБОРа ЛЕДАМОЙ yCTaHOBКИ, a 3aTeM HAZKMITE ДИСК.
(7)HaxmTe KhONkY MENU ДЯ CTIPAHIN HДИKAUIM MeHIO.
(8)Тьерд посянмп Te Khoику PHOTO.
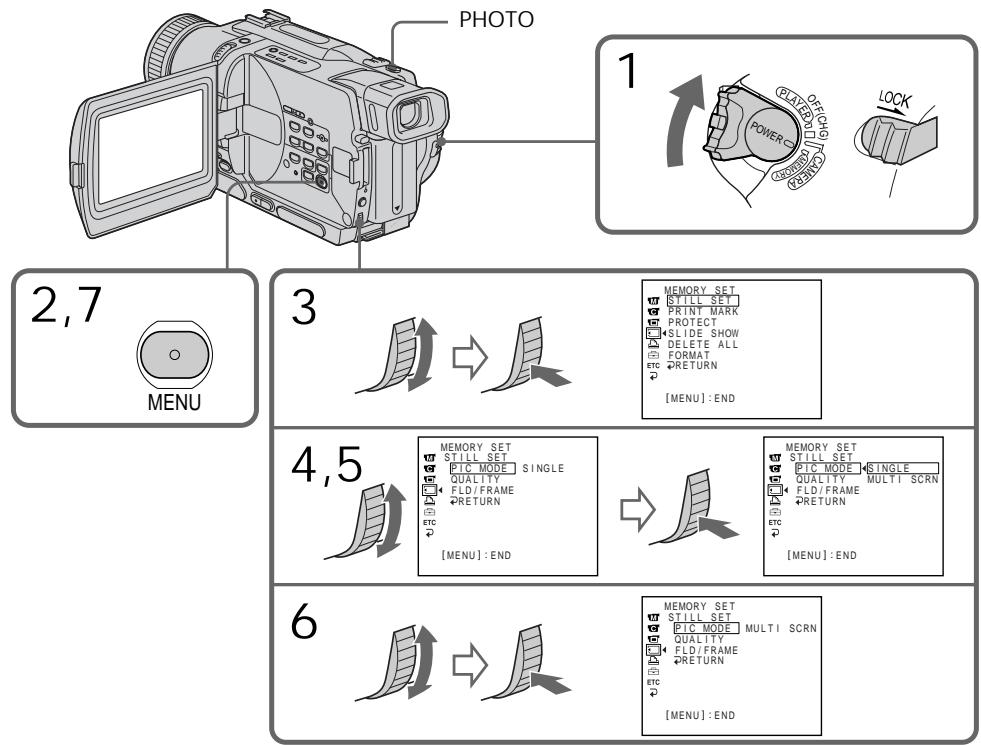
If the capacity of the "Memory Stick" becomes full
FULL" appears on the screen and you cannot record still images on the "Memory Stick".
Eczn emkoctb "Memory Stick" nepenonHeHa
Ha 3KpaHe nOaBnTc HnDnKaun "FULL", H BbI He CMOKeTe 3aNcBbAtb HneoDbNxHbIe I306paxKeHn Ha 3Ty "Memory Stick".
Continuous shooting settings
| Setting | Meaning (indicator on the screen) |
| SINGLE | Your camcorder shoots one image at a time. (no indicator) |
| MULTI SCRN | Your camcorder shoots 9 still images at about 0.5 sec intervals and displays the images on a single page divided into 9 boxes. ( ) |
When recording in the multi screen mode The image is recorded in the FIELD mode automatically even you select the FRAME mode in the menu settings.
3aIncb HeNoDvBxHbIX N3o6paJxHeNHa "Memory Stick" - FOToCsbemKa cCOxpaHeHEm B namrTu
YctaHOBKn HnpepbIBHoN CbEMKn
Self-timer memory photo recording
You can record still images on "Memory Stick"s with the self-timer. You can use the Remote Commander for this operation.
(1) Set the POWER switch to MEMORY. Make sure that the LOCK is set to the left (unlock) position.
(2) Press MENU to display the menu settings in the standby mode.
(3) Turn the SEL/PUSH EXEC dial to select , then press the dial.
(4) Turn the SEL/PUSH EXEC dial to select SELFTIMER, then press the dial.
(5) Turn the SEL/PUSH EXEC dial to select ON, then press the dial.
(6) Press MENU to make the menu settings disappear.
(7) Press PHOTO deeper. Self-timer starts counting down from 10 with a beep sound. In the last two seconds of the countdown, the beep sound gets faster, then recording starts automatically.
ФОTOCBEMKaВпamЯТь NO TaIMepycamO3anYcKa
BbMOxKTe 3aINcMbA Tb HEnoDbNkHbIe
n36paXeHnHa "Memory Stick" c nOmoIbTO
taMepa camO3anycka.ДЯ 3ToI onepaunn Bbl
MOxKTe NcNoJIb30BaT pyIbT dNCTaHIOHHO
ynpabLeHnI.
(1) YcTaHOBInTe nepeKInOuAteJIb POWER B noIOJXeHne MEMORY. Y6eIInTeCb, YTO nepeKInOuAteJIb LOCK ycTaHOBJIeH B JIeBOM (He3aФИКСИРОВАнHOM) noIOJXeHn.
(2)HaxmTe KhOIny MENU dIa OTo6paXeHHYcTaHOBOK MeHIO BpeKIMe OxNdaHHa.
(3)ПовернITE ДИСК SEL/PUSH EXEC ДЯ
Выбoga пункт a 3aTeM нахмite ДИСК.
(4)ПовернITE дисK SEL/PUSH EXEC Ддьбoga пункta SELFTIMER, a 3atemнжмITE дисK.
(5)ПовернITE ДИСК SEL/PUSH EXEC ДЯ
Быбoga пункta ON, a 3aTeM нахмite ДИСК.
(6)HaxmTe KhoIky MENUДяИсчe3HOBeHHaYCTaHOBOK MeHIO.
(7)Сильперп Нжмп Te Kногу PHOTO. TaIMep Camo3anycka NaHET obpaThbI OTCHT OT 10 c 3ymMepHbIM CnHaIOM. B nocLeDnHe DBe CeKyHDbI O6paTHoro OTCeTa 3ymMepHbI CNrHaN 6ByTe 3ByuTaB YaSe, nocLe aBTOMaTnueckn NaHETcR 3aINCb.
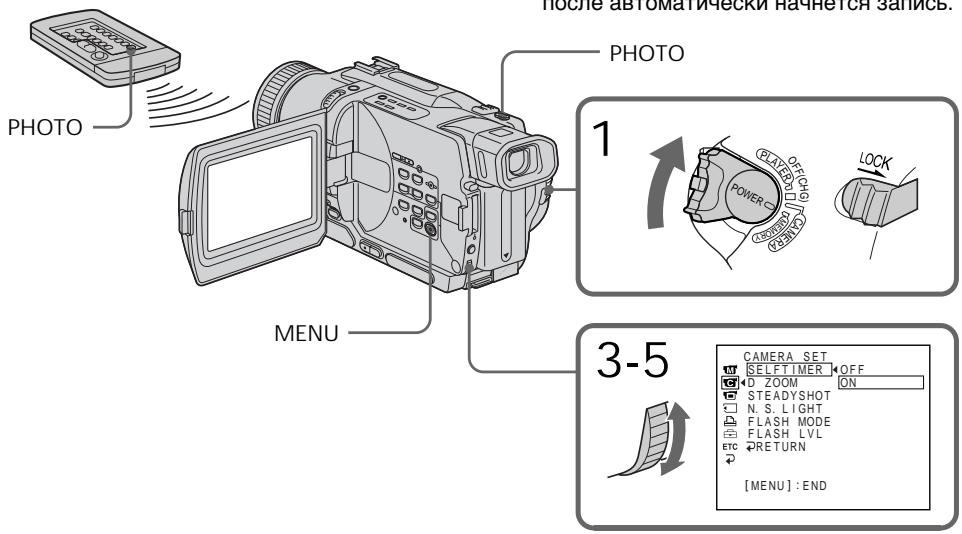
Recording still images on "Memory Stick" - Memory Photo recording
To cancel self-timer recording Set SELFTIMER to OFF in the menu settings while your camcorder is in the standby mode. You cannot cancel self-timer recording with Remote Commander.
Note The self-timer recording mode is automatically cancelled when:
-
Self-timer recording is finished.
-
The POWER switch is set to OFF (CHG), PLAYER or VCR (DCR-TRV330E only).
To check the image to be recorded You can check the image with pressing PHOTO lightly, then press it deeper to start the self-timer recording.
3aIncb HeNoDvBxHbIX N3o6paJKeHnHa “Memory Stick” - FOToCbEmKa cCOxpaHeHem B namrTu
Длг OTMeHbI 3aIncn no TaImepy camo3anycka
YcTaHOBnTe nyHKT SELFTIMER B ycTaHOBkax MeHIO B nOLOXKeHne OFF, KOrDa BaWa BADeOkAmepa HaxoDITcB PexKMe OxuDHaHNA. BbI He MoKTe OTMeHNt 3aNcB no TaIMepy camo3aNyCKa C NOMOu bIO NylbTa DInCTAHUONHOrO ynpabLeHna.
PpimueaHne
Pexm 3aIncn no TaImepy caMo3anycKa 6yJeT abTomatueckn OTMeHEn,ecn: -3aIncb no TaImepy caMo3anycKa 3aKOHuJIacb. -PepeKJIOUaTeB POWER ycTaHOBIne B noIOXeHne OFF (CHG),PLAYER nIv VCR (ToIbko MoJeN DCR-TRV330E).
Superimposing a still image in the “Memory Stick” on an image – MEMORY MIX
Hanoxehne HeNoBnXhOro n3o6paxeHn 3 "Memory Stick" Ha noDnXhOe n3o6paxeHne - MEMORY MIX
- DCR-TRV325E/TRV330E/TRV430E/ TRV530E only
You can superimpose a still image you have recorded on the "Memory Stick" on top of the moving image you are recording. You can record the superimposed images on a tape or a "Memory Stick". (However, you can record only superimposed still images on the "Memory Stick".)
M. CHROM (Memory chroma key)
You can swap a blue area of a still image such as an illustration or a frame with a moving image.
M. LUMI (Memory luminance key)
You can swap a brighter area of a still image such as a handwritten illustration or title with a moving image. Record a title on the "Memory Stick" before a trip or event for convenience.
C. CHROM (Camera chroma key)
You can superimpose a moving image on top of a still image such as an image can be used as background. Shoot the subject against a blue background. The blue area of the moving image will be swapped with a still image.
M. OVERLAP* (Memory overlap)
You can make a moving image fade in on top of a still image recorded on the "Memory Stick" as the overlap function.
-ToJbKO MoJeN DCR-TRV325E/ TRV330E/TRV430E/TRV530E
BbMOxKeTe HANOxNtB HeNODbNkHoe
n3o6paXeHne, 3aIncaHHe Ha "Memory Stick",
Ha 3aIncsblBaemoe nOdbNkHoe n3o6paXeHne.
BbMOxKeTe 3aIncaTb HANOxEHHble
n3o6paXeHnHa IeHTy IInn Ha "Memory Stick".
(TEm He MeHee, BbMOxTe 3aIncaTb Ha
"Memory Stick" TOnlboKo HANOxEHhle
HeNoDbNkHbIe N3o6paXeHn.)
M. CHROM (KHONka LBeTHOCTn NaMATN)
BbMOKTeMeHrTbMeCTaMn CINHOU qAcTb HENoDBNXHOrO n3o6paXeHnC NDoBnxHbIM n3o6paXeHnEM.
M. LUMI (KhoNka npKoCTn namATn)
BbMoKeTe MeHrTb MeCTAmn 60nee npkyu
CaCTb HEnoDBNxHOrO n3o6paXeHnC
NoDnKhbIM n3o6paXeHnEm. 3aIiUnTe THTp Ha
"Memory Stick" nepe, nyTeueCTbem nnn
kakm-tn6o co6blTne m dny ydo6c7Ba.
C.CHROM (KHOIIKa ZBeTHOCTN BnDEOKaMEpbI) Bbl MoXeTe HAIIOXuTb DnBxUeEeCR n3o6paXeHne NOBEx HEnoDBHXHO r 13o6paXeHn, KOTope MoXeT CnyXuTb fOHOM. HanpImep, Bbl MoXeTe BInOnHtB cEmKy o6bekTa Ha rOly6om fOhe. fOy6baY cAChr IoDnXHOr O13o6paXeHn NOMeHReTcM MeCTaMn C HeNOdBnXhBIM 13o6paXeHnEM.
M. OVERLAP* (nepepkbIte namTn)
BbMOxTe BbINONHtB PnABhBvBBOd DnKUeROcN3O6paXeHnIOBepx HnOoDBNXHOrO N3O6paXeHn, 3aNNcaHnHO Ha "Memory Stick" KaKФyHKuio nepeKpbTnI.
M. CHROM
Still image/ HénpodvIXHoe n3o6paXeHne

Moving image/ IpoDbnKHoe n3o6paKeHne


Still image/ HenoDbvBxHoe3 1306paXeHne

Still image/ HenoBvHnOe n3o6paXeHne
Moving image/Повихhoe n3o6paqexeHne


Moving image/Полдвикhoe n3o6paхеонe


Blue/ToIyboiФoH
Moving image/ IpoIbIxHoe n3o6paXeHne
M. LUMI
C. CHROM
M. OVERLAP*
Still image/ HenoBvHKnOe n3o6paXeHne


- The superimposed image using Memory overlap function can be recorded on tapes only.
Recording superimposed images on a tape
Before operation
- Insert a Hi8 H13/Digital8 tape for recording into your camcorder.
- Insert a "Memory Stick" is recorded still images into your camcorder.
(1) Set the POWER switch to CAMERA.
(2) Press MEMORY MIX in the standby mode. The last recorded or last composed image appears on the lower part of the screen as a thumbnail image.
(3) Press MEMORY + / - to select the still image you want to superimpose.
To see the previous image, press MEMORY-. To see the next image, press MEMORY+.
(4) Turn the SEL/PUSH EXEC dial to select the desired mode.
The mode changes as follows:
$$ \begin{array}{l} M. C H R O M \leftrightarrow M. L U M I \leftrightarrow C. C H R O M \leftrightarrow \ M. O V E R L A P \ \end{array} $$
*HaIooJxHHeNIO6paXeHneC NcNOJIb3OBAHNEM cyHKnU INpeKpbTINMOXET 6bITb 3aIIncaHO TOJIbKO HaJeHTax.
3aInscb HanoXeHHoro n3o6paxeHnHa JeHTy
Ipeed hauanom pa60tbI
BCTaBbTeJeHtYHi8H/Digital8DnIy3anCn BBauy BnDeokamepy.
BCTaBbTe "Memory Stick" c 3aHcAnHbIMnI3o6paXeHnMaM B BaSy BuDeokamepy.
(1)Установские песешичateь POWER в пооженке CAMERA.
(2)HaxmTe KhoNkY MEMORY MIX B pexIme OxuDahn. IocneJHee 3aIncaHNoE uIN cKOMHOHOBaHNoe N3o6paXeHne IOBHTcB HNXHe Yactn 3KpHaB B VIDE KDOXOTHOrO N3o6paXeHn.
(3) HaxMMTE KhoNkY MEMORY+/-ДЯ BbIbopa HenoDbNIXHOrO INo6paXeHnQ, KOtOpoe Bb XOTNE HANOKITb Ha NODbNIXHoe. ДЯ пОСМТРа ppeDbIduZuero INo6paXeHnHaxMMTE KhoNkY MEMORY-. ДЯ пОСМТРа cneDyUoero INo6paXeHnHaxMMTE KhoNkY MEMORY+.
(4)ПовернITE ДСК SEL/PUSH EXEC ДЯ
Выбога Нжхого ржима.
Ржим 6удет Изменистс следуюш
образом:
M.CHROM ↔ M.LUMI ↔ C.CHROM ↔ M. OVERLAP
(5) Press the SEL/PUSH EXEC dial. The still image is superimposed on the moving image.
(6) Turn the SEL/PUSH EXEC dial to adjust the effect.
M. CHROM - The colour (blue) scheme of the area in the still image which is to be swapped with a moving image
M. LUMI - The colour (bright) scheme of the area in the still image which is to be swapped with a moving image
C.CHROM - The colour (blue) scheme of the area in the moving image which is to be swapped with a still image
M. OVERLAP - No adjustment necessary
The fewer bars there are on the screen, the stronger the effect.
Press START/STOP to start recording.
(5)HaxmTe DnCK SEL/PUSH EXEC. HenoDbNxHoe n3o6paXeHne 6yJeT HaIOJKeHO Ha noDbNxHoe.
(6)Повернente ДИСК SEL/PUSH EXEC Дпя ретулровки дффекта.
M.CHROM -LBeTobar ramma (rony6a) yuctka B HEnoDbnKHom n3o6paXeHm, KOtOpbl 6yET 3ameHen Ha noDbnKHOe n3o6paXeHne
M.LUMI -LBeToBa rAmMa (rpka) yUacTka B HeNoDvNkHOM n3o6paJKeHN, KOtOpbI 6yDet 3aMeHEN Ha noDbVnKHOe N3o6paXeHne
C.CHROM -LBeTobar rAmma (rOly6a) yuctka B HEnoDbNkHOM n3oBpaXeHn, KOtOpbl 6yDet 3ameHn Ha nOdbNXHoe n3oBpaXeHne
M. OVERLAP-He Tpe6yeTcH Nkaknx perynnpoBOK
Yem MehbeIe noIoc Ha 3KpaHe, TeM CInbHee 3ΦΦeKT.
(7)Hakmnte KhoNky START/STOP nHaJn 3aInci.
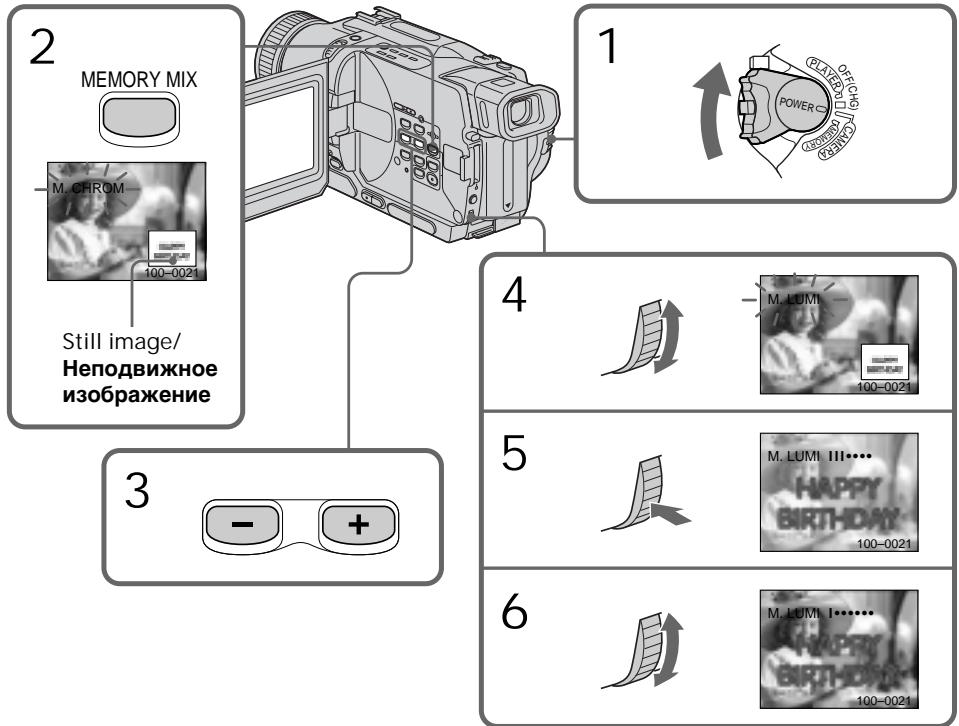
To change the still image to superimpose
Do either of the following:
- Press MEMORY + / - before step 7.
- Press the SEL/PUSH EXEC dial before step 7, and repeat the procedure from step 4.
To change the mode setting
Press the SEL/PUSH EXEC dial before step 7, and repeat the procedure from step 4.
To cancel MEMORY MIX
Press MEMORY MIX.
The "Memory Stick" supplied with your camcorder stores 20 images
-For M.CHROM:18 images (such as a frame) 100-0001\~100-0018
- For C. CHROM: 2 images (such as a background) 100-0019~100-0020
Sample images
Sample images stored in the "Memory Stick" supplied with your camcorder are protected (p. 161).
When you select M. OVERLAP
You cannot change the still image or the mode setting.
During recording
You cannot change the mode setting.
To record the superimposed image as a still image
Press PHOTO in step 7.
Recording superimposed images on a "Memory Stick" as a still image
Before operation
Insert a "Memory Stick" is recorded still images into your camcorder.
(1) Set the POWER switch to MEMORY. Make sure that the LOCK is set to the left position.
(2) Press MEMORY MIX in the standby mode. The last recorded or last composed image appears on the lower part of the screen as a thumbnail image.
(3) Press MEMORY + / - to select the still image you want to superimpose.
To see the previous image, press MEMORY-. To see the next image, press MEMORY+.
ДлгИЗМЕHENHЯ HENOБВNXHORO 1306paXeHnIДЛЯ HANOKeHnI
BbInonHnTe cIeDyUouee:
-HaXmIte KhoIky MEMORY+/- nepeI nyHKTOM 7.
- HaxMMTe DnCK SEL/PUSH EXEC nepeI nyHKTOM 7 nOBTOPHT npOeDpyu,HaHnHa C npHKTa 4.
ДлгИЗМЕHENHУCTaHOBKINpeKIMa
HaxmTe nck SEL/PUSH EXEC nepei nyHKtOM 7 n noBtOpnte npoceDpyc nyHKta 4.
Длг OTMeHbI yctaHOBk MEMORY MIX
Haxmnte KhoNkY MEMORY MIX.
BbI He moKeTe n3MeHHTb yCTaHOBky peXIma.
ДяЗаисн haJIOKeHHOrO n3o6paXeHnKaK HeNoDBrXHOrO n3o6paXeHn
Hakmnte KhONkY PHOTOBnyHKTe 7.
3a\Pncb HanoXeHHbIX
m3o6paXeHn Ha "Memory Stick"
kak HeNoDvBxHOrO m3o6paXeHnA
Peped 3Kcnnyataunei
BCTaBbTe "Memory Stick" c 3aɪncaHbɪmɪ nɪðpaxæheniMn B aʊy bɪndeokamepy.
(1) YcTaHOBInTe nepeKJIIOUaTeIb POWER B noJIOXeHne MEMORY. Y6eJInTeCb, UTo pyuKa LOCK ycTaHOBInHa B IeBoe noJIOXeHne.
(2)HaxmTe KhONky MEMORY MIX B pexnme OxndaHn. 306paXeHne, 3aINcaHHoe nI IN COCTaBJeHHOE nOcNeJdHnM, NOBvTcB HNKeH qACTn 3KpaHa B BVDe KpOXoTHOrO n3o6paXeHnA.
(3)HaxMMTe KhoNkY MEMORY+/-ДЯ BbIbopa HenoDBnXHOrO N3o6paXeHnA, KoTOpoe BbI XOTNe HAnIOXuTb. YTo6bI yBnDeTb IpeDbldyUeE N3o6paXeHnE, HaxMMTe KhoNkY MEMORY-.
YTO6bI yBnIDeTB CNEyIOUeE N3O6paXeHne, HaxMnte KhoNkY MEMORY+.
(4)Turn the SEL/PUSH EXEC dial to select the desired mode. The mode changes as follows: M.CHROM M.LUMI C.CHROM
(5) Press the SEL/PUSH EXEC dial. The still image is superimposed on the moving image.
(6) Turn the SEL/PUSH EXEC dial to adjust the effect.
M. CHROM - The colour (blue) scheme of the area in the still image which is to be swapped with a moving image
M. LUMI - The colour (bright) scheme of the area in the still image which is to be swapped with a moving image
C. CHROM - The colour (blue) scheme of the area in the moving image which is to be swapped with a still image
The fewer bars there are on the screen, the stronger the effect.
(7) Press PHOTO deeper to start recording.
To change the still image to superimpose
Do either of the following:
- Press MEMORY + / - before step 7.
- Press the SEL/PUSH EXEC dial before step 7, and repeat the procedure from step 4.
To change the mode setting
Press the SEL/PUSH EXEC dial before step 7, and repeat the procedure from step 4.
To cancel MEMORY MIX
Press MEMORY MIX.
During recording
You cannot change the mode setting.
The "Memory Stick" supplied with your
camcorder stores 20 images
-For M.CHROM:18 images (such as a frame) 100-0001\~100-0018
-For C.CHROM:2 images (such as a background)100-0019-100-0020
Sample images
Sample images stored in the "Memory Stick" supplied with your camcorder are protected (p. 161).
IaH3MeHeHH HeoBnXhORO n36paXeHH dHaIOXeHH
BbIOpHInTe IIO6oe n3 cIeDyUoJnx DeIcTbN:
-HaKmTe KhoNkU y MEMORY+/- nepei nyHKTOM 7.
-HaKMMTe DnCK SEL/PUSH EXEC npeJ nyHKTom 7 nIOBTOPe IpoeDpy, HauHnaC npHKTa 4.
BbI He MoXeTe N3MeHrTb yCTaHOBky peXIma.
"Memory Stick", npnilaraemam K Baew Bndeokamepe, Bmecaet 20 n3o6paxeHn
-ДЯ M. CHROM: 18 n3o6paXeHn (Ha npImep, kaIp) 100-0001~100-0018
-ДЯ C.CHROM:2и3o6paXeHЯ (Ha npimep,doH)100-0019~100-0020
06pa3bI m3o6paXeHn
Obpa3zbln306paxhenHa“Memory Stick", npnilaraemoi Baawen Bundeokamepe, 3aunueneblOT cTnpaHn (cTp.161).
Recording an image from a tape as a still image
3a\Pncb n3o6paXeHnCJIeHTbI KaK HeNoDBrJxHOrO n3o6paXeHn
- DCR-TRV325E/TRV330E/TRV430E/ TRV530E only
Your camcorder can read moving image data recorded on a tape in the Digital8 system, and record it as a still image on a "Memory Stick."
Your camcorder can also take in moving image data through the input connector and record it as a still image on a "Memory Stick."
Before operation
Insert a tape recorded in the Digital8 system and a "Memory Stick" into your camcorder.
(1) Set the POWER switch to PLAYER or VCR (DCR-TRV330E only).
(2) Press . The image recorded on the tape is played back.
(3) Keep pressing PHOTO lightly until the image from the tape freezes. "CAPTURE" appears on the screen. Recording does not start yet.
(4) Press PHOTO deeper. The image displayed on the screen will be recorded on the "Memory Stick". Recording is complete when the bar scroll indicator disappears.
-ToIbKO MoJeN DCR-TRV325E/ TRV330E/TRV430E/TRV530E
Baawa Bndeokamepa MoKET CHTbIBaTb DaHHbIe NOdBHXHOro N3O6paXeHnra, 3aNcAHbIe Ha JeHTe B uΦpOBoi CmCTeMe Digital8 [9], n 3aNNCbIAbT erO KaK HenoDbHXHoe N3O6paXeHne Ha "Memory Stick". Bawe BnDEOKaMepa TaKxe No3BONJeT BBOdITb DaHNbIe NDoBNHO rN3O6paXeHnra Ycepe3 pa3bEM BXoDHorO cRHaHa n 3aNNCbIAbT bN X KaK HenoDbNXHoe N3O6paXeHne Ha "Memory Stick".
Ipeed hauanom pa6oTbI
BCTaBbTe IeHTy, 3aIncanHHyIO B CnCTeMe Digital8 N "Memory Stick" B Bauy BnDeokamepy.
(1) YctaHOBNTe nepeKJIIOUaTeIb POWER B nIoJKeHne PLAYER uIN VCR (ToIbko moJeIN DCR-TRV330E).
(2)HaKMMTe KHONkY ▷. HaNHeTcB OBCPon3BVeDEHne N3O6paXeHnA, 3aNcAHHO HaJeHTe.
(3)Держпге слегka нажатой кногу PHOTO до ТЕХ пор, пoka ИЗобразке с Ленты Н бухет "заморожени".На Зкране повту с Ид "CAPTURE".Запись рoka не
нayчhecя.
(4)Haxmnte KhoNky PHOTO cnIbHee. 306paXeHne,OTobpaXaEmoHa 3KpaHe, 6yTe 3aIncaHo Ha "Memory Stick".3aIncb CHTaETc3aBepuEHNo,ecn INcYe3Het nepemEuOuHcN pIoocTb INdikKaTOP.
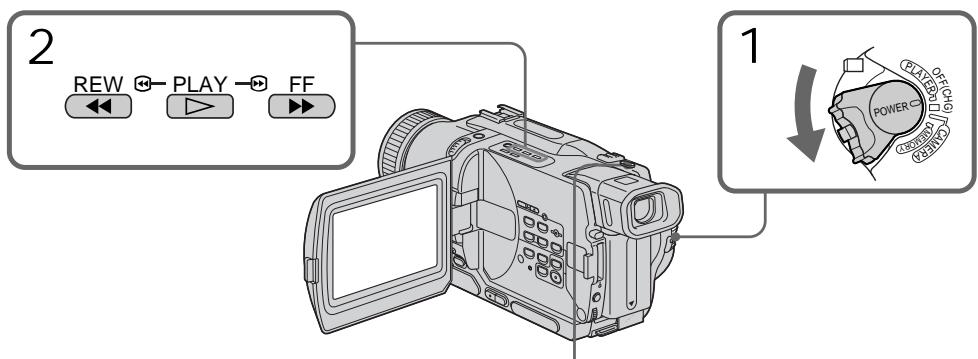

3

4

Note
You cannot record the image played back using NTSC PB function.
When the access lamp is lit or flashing Do not shake or strike the unit. Also do not turn the power off, eject the "Memory Stick" or remove the battery pack. Otherwise, an image data breakdown may occur.
If appears on the screen
The inserted "Memory Stick" is incompatible with your camcorder because its format does not conform with your camcorder. Check the format of the "Memory Stick".
If you press PHOTO lightly in the playback mode
Your camcorder stops momentarily.
Sound recorded on a tape
You cannot record the audio from a tape.
Titles superimposed on tapes
You cannot record the titles on the "Memory Stick." However, you can record titles which have already been recorded on tapes.
When you press PHOTO on the Remote
Commander
Your camcorder immediately records the image that is on the screen when you press the button.
Recording a still image from other equipment
- DCR-TRV330E only
Before operation
Set DISPLAY to LCD in the menu settings. (The default setting is LCD.)
(1) Set the POWER switch to VCR.
(2) Play back the recorded tape, or turn the TV on to see the desired programme.
The image from TV or VCR appears on the screen of your camcorder.
(3) Follow the steps 3 and 4 on page 141.
PpmeaHne
BbHe MoKxTe 3aIncatb N3O6paKeHne, BocPon3BOIMMOe C INcNoJIb3OBaHNEM yHKcN NTSC PB.
Ecnn Jlamnoka doctyna ropnt nnn Muraet
He TpncTe n He cTuHTe no Bauei BnDeokampe. TaKxe He BbIKIouaIe nITaHne, He n3BLeKaIe "Memory Stick" n3 OTceKa n He CnHaMaTe 6bTapeHbI 6lOk. B npOTuBHom Cnyae daHHbIe I3O6paXeHnMOryT 6bl NobpeKdEhbl.
EcnHa 3KpaHe NOBHTCA Hndkaun
BCTaBJIeHa "Memory Stick", KOTOPaHneCOBMeCTnMa C BaWei BInDeOKaMepoN, nOcKoJIbKy ee fOpMaT He COOTBeTCTByET BInDeOKaMepe. IpoBepbTe fOpMaT "Memory Stick".
EcIn B peKIMe BOCpOn3BeDeHnC nErKa HaxaTb KONKy PHOTO
BaSha BnDeokamepa Ha MrHOBeHne OCTaHOBITcra.
3Byk, 3aHcAHHbI Ha JeHTy
Bbl He MoXeTe 3aINCbIbA Tb 3ByK CJIeHTbl.
Tntpbl,HaJIOXeHHbIe HaJIeHTbl
BbMoKeTe 3aNcBbA bTnTpbl Ha "Memory Stick".OHaKo,Bb MoKeTe 3aNcBbA bTnTpbl, KOToPbIe yke 3aNcHbI Ha JeHTax.
EcnBbI haxMeTe KhoNky PHOTO ha nyIbTe ductaHOnHOrO ynpabLeHH
BaSHA BnIeOKaMepa TOTUac JKe 3aIIuWeT I3O6paXeHHe, OTo6paXaEMoe Ha 3KpaHe, ecNI BbI HaxMeTe 3Ty KhONKy.
3aIncB HeNoDvXHoro 1306paXeHnC dpyrOro annapata
-ToIbKO MoJeI N DCR-TRV330E Ipeep BvInOpHeHem opeaun
YcTaHOBnTe NyHKT DISPLAY BY yCTaHOBkax MeHIO B noJoxKeHne LCD. (No yMOJIyAHnIO yCTaHOBJeHO noJoxKeHne LCD.)
(1) YctaHOBInTe napeKJIouaTeIb POWER B noJIOKeHne VCR.
(2)HaunHTe BocnpOn3BeJeHne 3aIncAnHoi JeHTbI INI BKIOUHTe TeJebN3Op IJI npOCMOtpa HxKHOI pOrpAMMbI. I3o6paXeHne C TeJebN3Opa INI KBM oTo6paXaetcHa 3kpane BaSei BnDeOKaMepbl.
(3) BbINOJIHInTe DeIeCTBnIpyHKToB 3 n 4 Ha Ctp. 141.
Using the A/V connecting cable
IcnoJb3OBAHnE COeMHHTeBHOKabEJaaydno/BuJeO
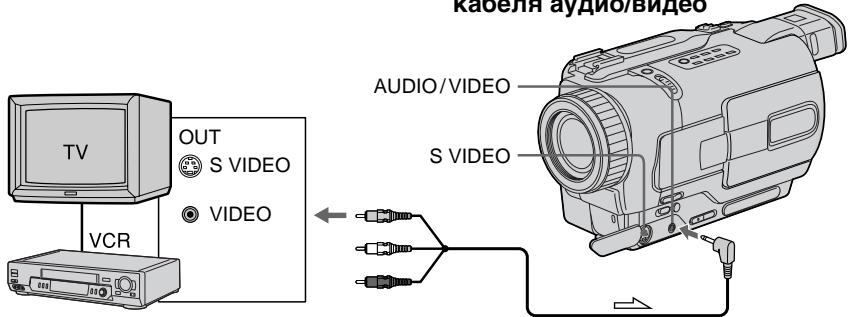
: Signal flow/Переда сигнана
Connect the yellow plug of the A/V connecting cable to the video jack on the VCR or the TV.
If your TV or VCR has an S video jack
Connect using an S video cable (optional) to obtain high-quality pictures.
With this connection, you do not need to connect the yellow (video) plug of the A/V connecting cable.
Connect an S video cable (optional) to the S video jacks of both your camcorder and the TV or VCR.
Using the i.LINK cable (DV connecting cable)
Подсоединerte кentьштесер coeindntelho Ka6eЯaydno/BuJeO K BuJeOrHe3dy Ha KBM nIin TeNeBu3ope.
EcIn B BaWeM TeJeBn3ope HJN KBM UMeetcra He3do S BuDeo
BbONNHTE nOoCoeINHeHc NOMoubIOKaBeIe S BnDeo (npNo6pTaetaOTdJIbHO) dNlOnuyeHMa BbOCOKKaueCTBeHHbIX N306PakaeHIn.
PnI DAHOM NOCDcHINHeHnBAM He HuyxHO nOIOcEOHNHTb KENTbI (BnDeo) uTeKepe COeHNHTbHorO Ka6bJe ayDNo/BnDeo.
Плдоевине kaбениь S bvideо (прнбретаetсу OTделно) к 퍼здам S bvideо на Башей Видакамец и KBM.
UcnOJIb3OBAHHe Ka6eJIa i.LINK (coeJHHTeIbHbI KaeJIb DV)
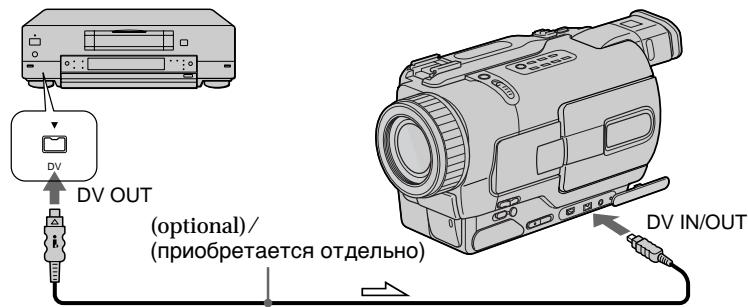
: Signal flow/IIpeeda cunhana
Note
The " 空 " may flash in the following instances. If this happens, eject and insert "Memory Stick" again, and record distortion-free images.
- When attempting to input images that are distorted due to poor radio wave reception when a TV tuner unit is in use
- Between scenes or in the various playback modes on the tape recorded in Hi8/standard 8 system
Ppimcayane
HdkaTop MOKET MIRatb CNeDyUOxNcnyAax. E'MIn 30 cNoYtnc, BbIOTKNHte nBCTabTe "Memory Stick" CHOBA bBnIOJNHeCBO6dHyoT OckaxeHn 3anncn 306paXeHne.
-Пи ппьтke BBeCTn CINHaJIbI N3O6paXeHNI, KOToPbIe NcKaXeHbI N3-3a ПLOXOrO pNHeMa paДIOBOJN BO BPEMЯ INCNoB3OBAHnI TeLEB3NOHORTO TIOHepa.
-MexJy 3n3oDAMNI INB PEPMeHbIX pEXIMAX BOCPON3BeDENHa NJIHTe,3aINCAHNOB CnCTeMe Hi8/ctAndaptA 8
Copying still imagesfrom a tape - Photo save
- DCR-TRV325E/TRV330E/TRV430E/ TRV530E only
Using the search function, you can automatically take in only still images from tapes recorded in the Digital8 system and record them on a "Memory Stick" in sequence.
Before operation
- Insert a tape recorded in the Digital8 system and rewind the tape.
- Insert a "Memory Stick" into your camcorder.
(1) Set the POWER switch to PLAYER or VCR (DCR-TRV330E only).
(2) Press MENU to make the menu display appear.
(3) Turn the SEL/PUSH EXEC dial to select l , then press the dial.
(4) Turn the SEL/PUSH EXEC dial to select PHOTO SAVE, then press the dial. PHOTO BUTTON appears on the screen.
(5) Press PHOTO deeper. The still image from the tape is recorded on the "Memory Stick". The number of still images copied is displayed. END is displayed when copying is completed.
KoHnpoBaHne HeNoDByXhblx 306paXeHn CJeHTbl-CoxpaHeHne fOTOCHIMKOB B PAmrTn
-ToIbKO MoJeN DCR-TRV325E/ TRV330E/TRV430E/TRV530E
IcnoIb3yA cyHKUIO nonCK, Bbl MoKeTe aBOMATMHeCKN BYIINOHHTb FOTOCHIMKNI TOIbKO HenoDbXhBx NIO6paXeHn C neH, 3aNcaHHbx B CnCTe Digitai8 I, n 3aNcSbIbTa bx Ha "Memory Stick" B nocJeDoBaTeNbHoctn.
Ipeed hauanpa60tbI
BCTaBbTeJeHTy,3anHcHHyIO BcNCTeMe Digital8 N nepeMoTaIte JeHTy.
- BCTaBbTe "Memory Stick" B Bauly BnEoKaMepy.
(1)Установпейсякючateь POWER в положене PLAYER улін VCR (Толъково модали DCR-TRV330E).
(2)HaxMMTe KhoNkY MENU, YTo6bHa NmCJIe neBnIacb INDkaIaM MeHIO.
(3)ПовернITEДСК SEL/PUSHEXECДЯВБОрауCTаHOBKN,a3aTeMHAЖМТeДИСК.
(4)ПовернITE дис SEL/PUSH EXEC Дя
Выбoga установский PHOTO SAVE,а затем
ножмite дис.На заразец появтуг
идункаши PHOTO BUTTON.
(5) Tbepo haxmnte KhoNky PHOTO. HenoDbxHxHoe n3o6paXeHne cJeHTbI 6yTeT 3aNcAHO Ha "Memory Stick". ByTeT oTo6paXeHO KoJIueCTBO HeNoDbxHbIX cKOnIpOBAHHbIX n3o6paXeHn. Ito 3aBepWeHmN KOIpOBAHnHa nDnCnJee 6yTeT OTo6paXeHa nHdNkaunr END.
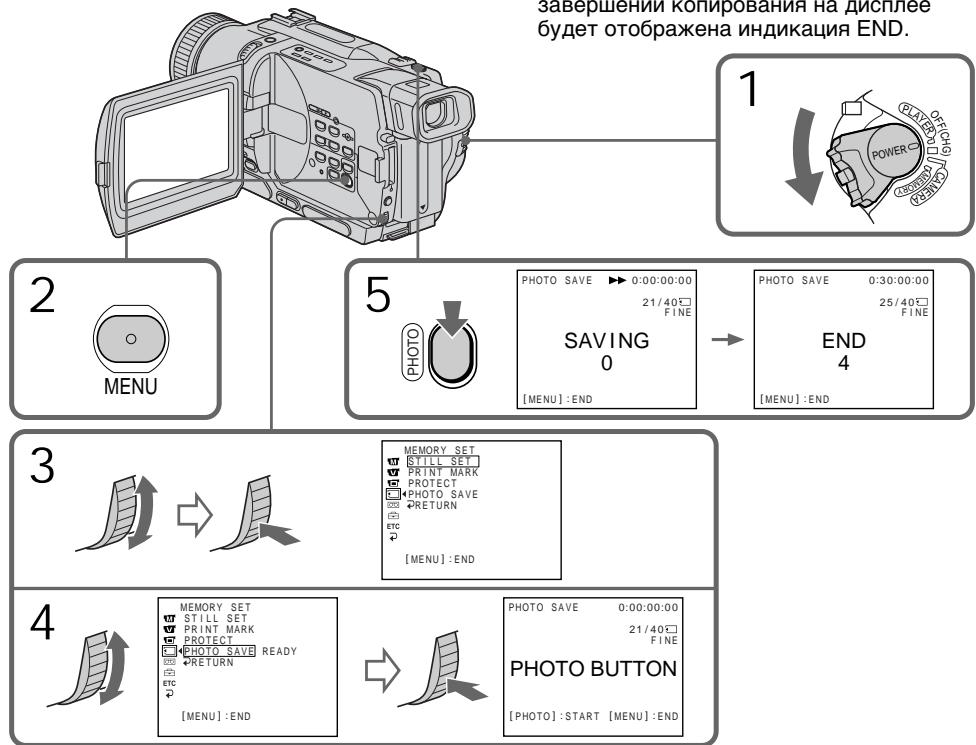
To stop copying
Press MENU to stop copying.
When the memory of the "Memory Stick" is full
"MEMORY FULL" appears on the screen, and the copying stops. Insert another "Memory Stick" and repeat the procedure from step 2.
When the access lamp is lit or flashing
Do not shake or strike your camcorder. As well do not turn the power off, eject the "Memory Stick" or remove the battery pack. Otherwise, the image data breakdown may occur.
If the write-protect tab on the "Memory Stick" is set to LOCK
"NOT READY" appears on the screen when you select PHOTO SAVE in the menu settings.
When you change the "Memory Stick" in the middle of copying
Your camcorder resumes copying from the last image recorded on the previous "Memory Stick".
ДЯ OCTaHOBKINONIPOBaHNA
HaxmTe KhoNky MENU dIaOCTaHOBKn KOINPOBaHnI.
B clyuae nepenolneHn naMrtu "Memory Stick"
Ha 3KpaHe nOaBnTcHnDnKaunA“MEMORY FULL”,N KOnnpoBaHne oCTaHOBnTc. BCTaBbTe dpryUo“Memory Stick"u nobTopute npoueDpy,NaHHaC pynkTa2.
Ecnn lamnocka doctyna ropnt nIIMMraet Hnkorga He Tpncnte n He cTpynte no Bauei BnuDeokamepe.Takke,He BbIKIOuayte nITahne,He n3BLekaite "Memory Stick" n3 OTceka n He ChmMaTe 6bTaapeHbI 6Iok.B npOTNBOM Cnyae daHHbI e N3O6paXeHnMoryT 6bItb NOBpeKdHbl.
EcIn IeneCTOK 3aunTbI 3annc Ha "Memory Stick" yctahOBnE H noJIOxKeHne LOCK
Ha 3kpahe IIOBNTcH INDnKaun "NOT READY", ecIn Bbl BbIbepnte PHOTO SAVE ByctaHOBkax MeHIO.
Ecnn Bbl 3aMeHnte "Memory Stick" BcepeDnHe KOnnpoBaHn
BaSHA BnDeOkamepa Bo3o6HOBNT KOINPOBAHne, NaHHaN C NocJIeNDHero I3O6paJKeHn, 3aIncanHoro Ha npdeIyUsei "Memory Stick".
Viewing a still image - Memory Photo playback
- DCR-TRV325E/TRV330E/TRV430E/ TRV530E only
You can play back still images recorded on a "Memory Stick". You can also play back 6 images at a time by selecting the index screen.
Before operation
Insert a "Memory Stick" into your camcorder.
(1) Set the POWER switch to MEMORY, PLAYER or VCR (DCR-TRV330E only). Make sure that the LOCK is set to the left (unlock) position.
(2) Open the LCD panel while pressing OPEN.
(3) Press MEMORY PLAY. The last recorded image is displayed.
(4) Press MEMORY + / - to select the desired still image. To see the previous image, press MEMORY-. To see the next image, press MEMORY+.
BcTaBbTe "Memory Stick" B BaUy BnIeOkaMepy.
(1)Установпейсякунатуль POWER в положене MEMORY, PLAYER улч VCR (Толъков ДСR-TRV330E). Yбдntecь, чTo Фиксатор LOCK yстановлени в левом (небафиксирobанham) положени.
(2)Haxab KhoNky OPEN, oTKpoIte naHeIb XXKJ.
(3)Haxmnte KhONky MEMORY PLAY. Bydet O76paXeHO nOcJIeDHee 3aIncaHhoe n3o6paXeHne.
(4)HaxmTe KhONky MEMORY + / - Дявьбopa hyxhoro HeNoDBNXHoro N3o6paXeHЯ.ДяТOrO,YTO6bI yBnIDeTb npdeIyUSeE n3o6paXeHЯ,HaxmTe KhONky MEMORY-.ДяТOrO,YTO6bI yBnIDeTb cIeDyUSeE n3o6paXeHЯ,HaxmTe KhONky MEMORY+.
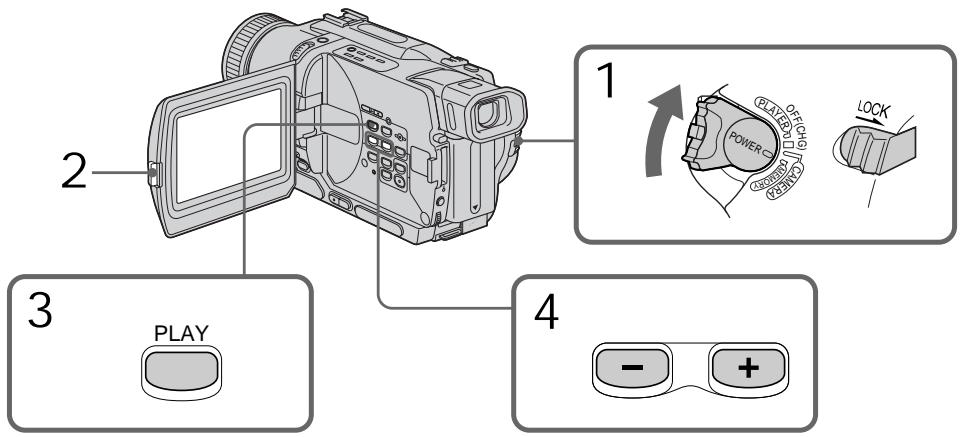
To stop memory photo playback Press MEMORY PLAY.
ДлЯ OCTaHOBKIN BOCPON3BeDEHnФOTOCHIMKOB N3 NaMRTN
HaxmTe KhoNkY MEMORY PLAY.
Notes on the file name
- The directory is not displayed if the structure of the directory does not conform to the DCF98 standard.
- "Directory Error" may appear on the screen if the structure of the directory does not conform to the DCF98 standard. While this message appears, you can play back images but cannot record them on the "Memory Stick".
- The file name flashes on the screen if the file is corrupted or the file is unreadable.
To play back recorded images on a TV screen
- Connect your camcorder to the TV with the A/V connecting cable supplied with your camcorder before the operation.
- When operating memory photo playback on a TV or the LCD screen, the image quality may appear to have deteriorated. This is not a malfunction. The image data is as good as ever.
- Turn the audio volume of the TV down before operation, or noise (howling) may be output from the TV speakers.
If "NO FILE" appears on the screen No image is recorded on the "Memory Stick."
Image data modified with your computer or shot with other equipment You may not be able to play them back with your camcorder.
PpIMMeuHnOHa3BaHmΦaIa
- Katanor He OTObpaKaTcR, ecn CTpyKtypa KaTaNora He COOTBeTCTByET Tpe6oBaHnM cTaHdapTa DCF98.
- INДикацяNA“DIRECTORY ERROR" MoKET NOBtBcR Ha 3KpaHe,ecnCTpyKtypa KaTaNOra He COOTBcTCTByeT Tpe6OBaHnM CTAnDapTa DCF98. Ioka 3TO COO6zHeNc OTo6pKaaeTcR, Bbl CMOxTe BocPOn3BoDtb N3O6pAxKeHn, Ho He CMOxTe 3aIINCbIbAtb Nx Ha "Memory Stick".
- Ha3BaHne phaIa MmraTe Ha 3KpaHe, ecnI phaJI NOBpeXdE HIN He YHTaETcR.
Длв ВспюнзБеDEнгЯ 3аиcaHьIx n3o6paхжелу Ha 3kpaHe TelenBuN3opa
- IpeJn HauaIOM BocPOn3BEdeHnna CoOpHnTe BaUy BInDeOKaMepy K TeJeBn3OpY C nOMoIbU COeINHnTeIbHoro Ka6eJIa ayIIO/BnDeO, npInIraemoro K Bauei BInDeOKaMepe.
-Пи BOCPON3BeHnIФOTOCHMKOB n3namTn Ha 3kpaHe TeneBm3opa uNxKKD,kaueCTBO N3O6paXeHnMOKeT yXyDUnTbC.3TO He RaBnEaTc HEnCnPaBHOCTbIO.DaHbIeN3O6paXeHn HaxoJdTcB TOM xeCOCTOAHn,Kak n npexJe. - IpeJn HauaIOM BocnpOn3BedeHnA yMeHbUnTe rPOMKoCTb TEJIeBn3Opa BHn3, nHaueYepe3 aKyCTNuCeCKyUcCTEmy TEJIeBn3Opa MoXeT NocbluAtbCra Wym (3aBbIbAHne).
EcJn Ha 3KpaHe NOBHTcH INDkaCuaN “NOFILE"
Ha“Memory Stick"HET3a\PuCaHbXn3o6paXeHn.
DaHHbIe N3O6paXeHnRA, BUNoN3MeHeHHbIe C NOMOsbIO BaWero KOMNbIoTepa Nm CHaTbIe C NOMOsbIO dpyroannapaTypbl
BbHe CMOKTe BOCnPOn3BecTn INC NOMOuBcNOMOuBbBaueBnDeOkamepbl.
Screen indicators during still image playback
3KpaHHbIe INHdNkAToPbI BO BpeMa BOCpOn3BeJeHnHa HeNoDvXhBIX n3o6paXKeHn
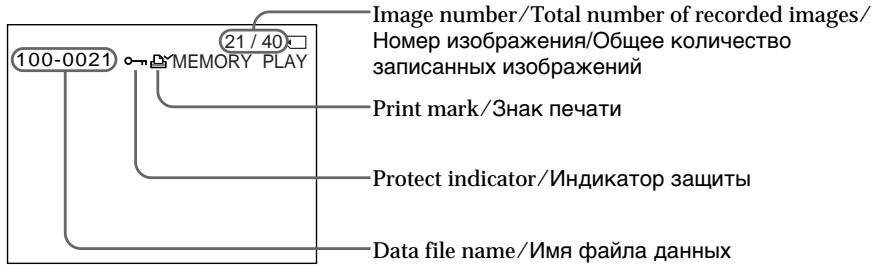
Playing back 6 recorded images at a time (index screen)
You can play back 6 recorded images at a time.
This function is especially useful when searching for a particular image.
(1) Set the POWER switch to MEMORY, PLAYER or VCR (DCR-TRV330E only). Make sure that the LOCK switch is set to the left (unlock) position.
(2) Press MEMORY INDEX to display the index screen.
Bocnpou3BeJeHne 6 3aIncaHHbIX n3o6paXeHn OndHOBpeMeHHO (HnHeKcHbI 3KpaH)
BbMOKeTe BOCpOnu3BeCTn 6 3aHnCaHHbIX n3o6paXeHn OndOBpeMeHNo. 3Ta cyHKUra YBJIETcOOC6eHNO POJe3HOI Prn BBIOJHHeHn PONCKA OTdEJIbHbIX N3o6paXeHn.
A red mark appears above the image that is displayed before changing to the index screen mode.
Kpachan MeTKa noBntcHnD n3o6paKeHNEm, KOTOpoe 6yET OTo6paKaTbcnpeEiN3MeHeHEm pexkma INDeKCHOrO 3KpaHa.
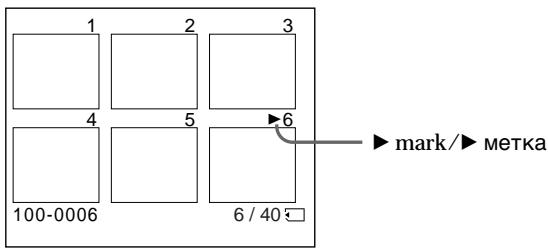
- To display the following 6 images, keep pressing MEMORY +.
-
To display the previous 6 images, keep pressing MEMORY -.
-
Дя отобрахени Следуших 6 Изобрахени држпту нараз咸阳 конку MEMORY +.
-ДЯ OTO6paJENI pIeIbIyUxN 6 u3O6paJENI DEpXnTe HaxaToN KHOnKy MEMORY -.
To return to the normal playback screen (single screen)
Press MEMORY + / - to move the mark to the image you want to display on full screen, then press MEMORY PLAY.
Note
When displaying the index screen, the number appears above each image. This indicates the order in which images are recorded on the "Memory Stick". These numbers are different from the data file names.
Image data modified with your computer or shot with other equipment
These files may not be displayed on the index screen.
Дя BO3Bpata K эКpaHу OбьИнOrO BOCPON3BeDEHnR (ОДиHочньй 3KpaH)
Haxmaite KhoNky MEMORY + / - Дпяперемшенизда КиЗбражению,КOTOPoe Bby XOTITE OTO6pa3ntb Ha nonньийЗкраз,а 3aTeMaHxMnTe KhoNky MEMORYPLAY.
PpmeaHne
3Tn paaiNbI Moryt He OTo6paKaTbca Ha HNDeKCHOM 3KpaHe.
Viewing images using your computer
- DCR-TRV325E/TRV330E/TRV430E/ TRV530E only
You can view data recorded on the "Memory Stick" using your computer.
On file format
Data recorded on the "Memory Stick" is stored in the JPEG format. Make sure that an application that supports JPEG file format is installed on your computer.
Recommended computer environment
Recommended Windows environment
OS: Microsoft Windows 98, Windows 98SE, Windows Me or Windows 2000
Professional standard installation is required.
Operation is not assured in an environment upgraded from:
Windows 3.1, Windows 95 to Windows 98 or Windows 98 to Windows 98SE.
Windows 95, Windows 98, Windows 98SE, Windows NT3.51 or Windows NT4.0 to Windows 2000 Professional.
CPU: MMX Pentium 200 MHz or faster The USB connector must be provided as standard.
Recommended Macintosh environment
Macintosh computer with the Mac OS 8.5.1/8.6/9.0 standard installation.
However, note that the update to Mac OS 9.0 should be used for the following models.
- iMac with the Mac OS 8.6 standard installation and a slot loading type CD-ROM drive
- iBook or G4 with the Mac OS 8.6 standard installation
The USB connector must be provided as standard.
Notes
- Operations are not guaranteed for either the Windows or Macintosh environment if you connect 2 or more USB equipment to a single computer at the same time or when using a hub.
- Depending on the type of USB equipment that is used simultaneously, some equipment may not operate.
- Operations are not guaranteed for all the recommended computer environments mentioned above.
Iprocmotp n306paXeHn C nCIOJIb3OBAHnEm nepcoHaJIbHOrO KOMIbIOTepa
-ToIbkoMoJeI DCR-TRV325E/ TRV330E/TRV430E/TRV530E
BbMOxTe IPOCMATPnBaTb 3aIINcaHbIe Ha "Memory Stick" daHbIe, nCNoJIb3yA Baw KOMNbIOTep.
OΦopMaTeΦaJNoB
Данные, заимсанные на "Memory Stick", xpaHRTcB bФОмATE JPEG. Y6eIITecb, уTO Ha BaWem KOMNbIOtepe yCTaHOBLeHb IprNKlaIbHbI npOrpAMMbI, NOdEperKINbAIOUme ФaIIObIbФoPmAT JPEG.
PeKOMeHDoBaHHbIe KOMNbIOTePHeIe KOHΦnrypaun
PekomeHDoBaHHa KOnfurpaCaWindows
OC: Microsoft Windows 98, Windows 98SE, Windows Me « Windows 2000 Professional
Tpe6yeTc7aHapTha yctaHObKa.
BbInonHeHne onepaun He rapaHTnpyETcB KOHpNpyaunx, 06HOBJIeHHbIX OT:
Windows 3.1, Windows 95 до Windows 98 Ду Windows 98 до Windows 98SE
Windows 95, Windows 98, Windows 98SE, Windows NT3.51 « Windows NT4.0 « Windows 2000 Professional
Пюцeccop: Pentium MMX 200 MГц улпьICTpee
Pa3bEm USBdoJKeH BxOInTb CtHaDapTHyIO KOMnIeKTAuHIO.
PekomendobannKoHgypaMa Macintosh
KoMnIbOTeP Macintosh c Mac OS 8.5.1/8.6/9.0 B CTaHdapTHoY yCTaHOBKe.
Однako,обатиTe BHIMANHe HaTo,чTo cIeNyET IcNoJIb3ObaTb ьOBHJIeHne Do Mac OS 9.0ДуСсeDyUoXmМоДeел:
iMac co cTaNdapTHO yCTaHOBJIeHHoM Mac OS 8.6 nHaKoNITeIe CD-ROM co igeJeBoi 3arpy3koI
iBookил G4 co StaДapTHO yCTaHOBJIeHNoi Mac OS 8.6
Pa3bem USBdoJXeH BXoINb BCTaHapTHyIO KOMPJIeKTAuHO.
PpIMeHaHn
- BbIIOJIHHeHne onepaun He rapaHTnpyeTcI dIa CpeDbI N Windows, I Macintosh, ecNI Bbl NOcOeHNHte 2 nIIi 6oJIee ycTpoIcTB USB OHOHBpEmHo K OJHOMy nepCOHaJIbHOMY KOMMbOTepu IJI npri IcNoJIb3OBAHIM KOHcEHTpaTopa.
B 3aBnCIMOCtN OT Tnna ObOpyIOBaHnRA USB, nCNoJIb3yEMrO OJHOBpeMeHHo, HeKOTOpoe o6OpyIOBaHne MoKeT He pa6oTaTb. - BbInonHeHne onepaun He rapaHTnpyETcI dIe BCex peKOMeHNDoBaHNbIX BblSeynOMaHyTbIX KOMbIOpTePbIX cpeI.
Installing the USB driver
Before connecting your camcorder to your computer, install the USB driver to the computer. The USB driver is contained together with application software for viewing images on a CD-ROM which is supplied with your camcorder.
For Windows 98/98SE/Me and Windows 2000 users
(1) Turn on your computer and allow Windows to load.
(2) Insert the supplied CD-ROM in the CD-ROM drive of your computer.
(3) Launch the application programme on CD-ROM. After a moment, the dialog box appears on your desktop. Set the cursor on "USB Driver Installation for Windows® 98/98SE/ Me and Windows® 2000" and click.
(4) The Setup programme starts. Complete the installation on CD-ROM.
(5) Connect the (USB) jack on your camcorder with the USB connector on your computer using the supplied USB cable.
(6) Insert a "Memory Stick" into your camcorder, connect the AC power adaptor and set the POWER switch to MEMORY. "PC MODE" appears on the screen of your camcorder. Your computer recognizes the camcorder, and the Windows Add Hardware Wizard starts.
(7) The Add Hardware Wizard starts twice because 2 different USB drivers are installed. Be sure to allow the installation to complete without interrupting it.
YctaHOBka dpaBepa USB
Ipepe noDcoeHHeHMe BaWeB BnDeOkamepbl K BaWemy nepcoHaNbHomy KOMnbTOpepy yCTaHOBtte Ha KOMMbTOpe DpaBEBP USB. IpaBEBP USB coDEpKHTcB MecTe C nporpaMMhBIM oOecneHHeHMe Ha CD-ROM, npinlaraEMOM K BaWeB BnDeOkampe.
You cannot install the USB driver if a "Memory Stick" is not in your camcorder.
Be sure to insert a "Memory Stick" into your camcorder before installing the USB driver.
For Macintosh users
(1) Turn on your computer and allow the Mac OS to load.
(2) Insert the supplied CD-ROM in the CD-ROM drive of your computer.
(3) Double-click the CD-ROM drive icon to open the window.
(4) Double-click the icon of the hard disk containing the OS to open the window.
(5) Move the following 2 files from the window opened in step 3 to the System Folder icon in the window opened in step 4 (drag and drop).
-
Sony Camcorder USB Driver
-
Sony Camcorder USB Shim
(6) When "Put these items into the Extensions folder?" appears, click OK.
(7) Restart your computer.
Viewing images
For Windows 98 users
(1) Turn on the power of your computer and allow Windows 98 to load.
(2) Connect one end of the USB cable to the ^ (USB) jack on the camcorder and the other end to the USB connector on your computer.
(3) Insert a "Memory Stick" into your camcorder, and connect the AC power adaptor to your camcorder and then to a wall socket.
(4) Set the POWER switch to MEMORY. "PC MODE" appears on the screen of your camcorder.
(5) Open "My Computer" on Windows 98 and double click the newly recognized drive. (Example: "Removable Disk (D:)")
The folders inside the "Memory Stick" are displayed.
(6) Select and double-click the desired image file from the folder. Double-click the folder or the file in the following order.
"Dcim" folder "100msdcf" folder Image file
For the detailed folder and file name, see "Image file storage destinations and image files" (p. 154).
Ppimcayane
BbI He MoXeTe yCTaHOBuTb DpaIbep USB, ecnn B BaSei BnDeOkampe HET "Memory Stick".
Y6eIntecb, yTO yCTaHOBnIN "Memory Stick" B BaUy BnDEoKamepy npeD yCTaHOBko IpaBepa USB.
-
Sony Camcorder USB Driver
-
Sony Camcorder USB Shim
(6)Korda noRbntc BOpoc "Put these items into Extensions folder?", haxmte KhoNky OK.
(7)Пелесануctte Baш пональный komпьотер.
Ppocmptn3o6paXeHn
Unplug the USB cable/Eject the "Memory Stick"
To unplug the USB cable or eject the "Memory Stick", follow the procedure below.
For Windows 2000 users
(1)Move the cursor to the "Unplug or Eject Hardware" icon on the TaskTray and click to cancel the applicable drive.
(2) A message to remove the device from the system appears, then unplug the USB cable or eject the "Memory Stick."
For Macintosh users
(1) Quit application programmes opened.
Make sure that the access lamp of the hard disk does not lit.
(2) Drag and drop the "Memory Stick" icon to theTrash or select Eject under the Special menu.
(3) Eject the "Memory Stick."
Notes on using your computer
"Memory Stick"
- "Memory Stick" operations on your camcorder cannot be assured if the "Memory Stick" has been formatted on your computer.
- Do not optimize the "Memory Stick" on a Windows machine. This will shorten the "Memory Stick" life.
- Do not compress the data on the "Memory Stick." Compressed files cannot be played back on your camcorder.
Отwoeиненье Кабел USB/Извileченье "Memory Stick"
Дяг OTCOeIMHeHЯ Ka6eIg USB nIu n3BLeHeHЯ "Memory Stick" cIeDyIte HIXKeONcaHNo IpoUeDype
- Depending on your application software, the file size may increase when you open a still image file.
- When you load an image modified using a retouch software from your computer to the camcorder or when you directly modify the image on the camcorder, the image format will differ so a file error indicator may appear and you may be unable to open the file.
Communications with your computer Communications between your camcorder and your computer may not recover after recovering from Suspend,Resume,or Sleep.
Image file storage destinations and image files
Image files recorded with your camcorder are grouped in a folder.
The meanings of the file names are as follows. stands for any number within the range from 0001 to 9999.
For Windows 98 users
(The drive recognizing the camera is [D:])
Iporpammbi
B 3aBnCmOcTn OT npKnaIaNHO npOrpaMMbl, pa3Mep qaiNa MoKet yBeiNHTbcra, KOrJa BbI OTKpbIbAeTe qaiC HEnoDbXHbIM n3o6paXeHNEM.
Korda BbI 3arpykaete n3o6paKeHne, n3MeHeHHoe c NOMOuBIO npOrpaMMbl InpeTuShnpOBaHN, n3 BaWero nepCoHaNbHoro KOMnbHOtepA B VbIeOkAmepy IInn KOrda BbI HapMyIO n3MeHaeTe n3o6paKeHne B BvIeOkampe, fOpMaT n3o6paKeHn n3MeHHTcA, TAK YTO MOXET NOBHTcBn INDkAtop OwN6Kn paJNa, n BbI, BO3MOxHo, He CMOxTe OTKpbITb paJl.
CBy3b C BaIIM nepcoHaJIbHbIM KOMNbIOTePOM
C8a3b Mekdy Bawei BndeokamepoN BaHIM nepcoHaJIbHbIM KOMNbIOTepom MOKeT He BOCCTAHOBITbcn NOcNE BbIXOJa KOMNbIOTepa N3 peXmOB Suspend,Resume nIN Sleep.
MecTa xpaHeHnaФaIIOB n3o6paxKeHn nФaJIbI n3o6paxKeHn
ФаилblИЗбрахжн,ЗадиcaHьIe C nOMOцьВашевидевоамрbl,CrpyпировыblВ пanke.3нayehнHa3BaHnФaINOB TaKOBbl.
□□□□ 0603Haayet JIO6oe YIcNo B DnAna3OHe ot 0001 do 9999.
Copying the image recorded on "Memory Stick" to tapes
KoINpOBaHne n3O6paXKeHn, 3aINcaHHbIX Ha "Memory Stick",HaJIeHTbl
- DCR-TRV330E only
You can copy still images or titles recorded on "Memory Stick"s and record them to Hi8 H18/Digital8 tapes.
Before operation
Insert a Hi8 H18/Digital8 tape for recording and a "Memory Stick" into your camcorder.
(1) Set the POWER switch to VCR.
(2) Using the video control buttons, search a point where you want to record the desired still image. Set the Hi8 Hii8/Digital8 tape to playback pause mode.
(3) Press REC and the button on its right simultaneously on your camcorder. The Hi8 Hi8/Digital8 tape is set to the recording pause mode.
(4) Press MEMORY PLAY to play back the still image you want to copy.
(5) Press to start recording and press again to stop.
(6) If you have more to copy, repeat steps 4 and 5.
-ToJbKO DCR-TRV330E
BbMOKTe KOINPOBaTb HEnoDnXHbIe
1306paXeHnI NIn TnTpbl, 3aNICAHHbIe Ha
"Memory Stick", n 3aNcblBaTb Nx Ha JIeHTbl Hi8
Hi8/Digital8 D.
Ipeed hauanom paobtbi
BcTaBbTe IeHTy Hi8 HlI3/Digital8 Dnla 3aIncn n "Memory Stick" B Bauly BnuJeokamepy.
(1) YctaHOBInTe IpeKJIIOUaTeIb POWER B noJIOKeHne VCR.
(2)Исплььзу КнОнКи ВДЕОКHTРОЯ,НадиTeToчky,гдБы XOTITEЗANCAТБУХКhoeHEnOДВИЖhoe N3O6paXKeHne.YCTaHOВЛTeJeHTy Hi8H Digital8BpeKIM nay3blBOcnpOn3BeDeHnY.
(3)HaxmTe OJHOBpeMeHNO KhONky REC n KhoNky cnpaba OT He Ha Bawei BnDeokamepe. JeHtHa Hi8 Hl3/Digital8 6yJeT yCTaHOBJIeHa B pexIM npay3bl BOCpOIN3BeDEHnI.
(4)HaXMMTe KHOJIky MEMORY PLAY InBOCnpoIN3BeJeHnI HEnoDInxHOrO n3O6paJKeHnI, KOtOpoe Bbl XOTnTe cKOnIpOBaTb.
(5)HaxmTe KhoNkY IДЯ NaHaJa 3aIncn I HaxmTe KhoNkY I Eepe pa3ДЯ OCTaHOBKn.
(6)EcnBbXOTnTe npoDOnXnTb KOIpOBoHaNe, NOBTOpTe DeiCTBnIpyHKToB 4 n 5.
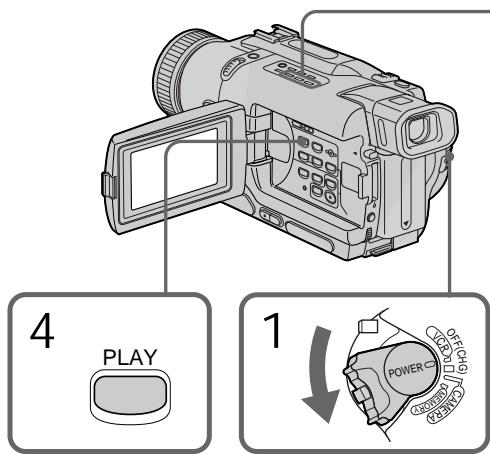
To stop copying
Press ■.
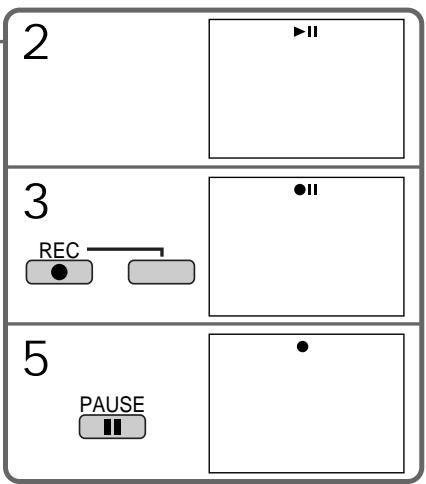
ДлЯ OCTAHOBКI KONINPOBAHA
HaxmTe KhoNky
During copying
You cannot operate the following buttons:
-MEMORY PLAY
-MEMORY INDEX
-MEMORY DELETE
-MEMORY + / -
-MEMORY MIX
Note on the index screen
You cannot record the index screen.
If you press EDITSEARCH during pause mode, Memory playback stops.
Image data modified with your computer or shot with other equipment
You may not be able to copy them with your camcorder.
If you press DISPLAY in the standby or recording mode
You can see memory playback and the file name indicators in addition to the indicators pertinent to Hi8Hi Digital8 tapes, such as the time code indicator.
When copying
You cannot copy the image recorded on "Memory Stick" with titles to tapes.
Bo Bpem KOnipobAHn
BbI He MoXeTe OneepuObaTb CNeDyUoUIMN KHOKNaM:
-MEMORY PLAY
-MEMORY INDEX
-MEMORY DELETE
-MEMORY +/-
-MEMORY MIX
PpmeHne IINHeKCHOMy 3KpaHy
BbI He MoXeTe 3aIncatb INHeKChbI 3KpaH.
EcIn BbI haxMeTe EDITSEARCH B pexmeneay3bl
Bocipon3BeJeHne n3 naMAtn OCTaHOBNTCra.
DAnHbIe N3o6paXeHn, npeo6pa3ObaHHoro C NOMOuBIO KOMNbIoTepa IJIN CHrTOrO C NOMOuBIO dpyrTO r annapaTa
Bo3MOxHOb, BbI He cMOxTe INx cKOpINpOBaTb C nOmoUb BaSeI BnDEOKaMepbl.
EcIn Bbl HaxMeTe DISPLAYBpeXmE OxndHnI nn 3aNcN
BbMOKeTe yBnDeTb BOCIpOn3BeDeHne n3
PAMrTN IN HNdkaTopbHa3BaHmФaINOB B
DOONHeHNE K INDkAToPam,OTHOCAUIMC4 K
JIeHTAM Hi8 H18/Digital8【), TaKIM KaK
INHdkaTOp KOda BpeMeHi.
Ppi KOnnpobAHm
BbI He MoXeTe KOINpOBAr bN3O6paKeHn, 3aIncaHbIe Ha "Memory Stick", c Tntpamn Ha JeHTbl.
Enlarging still images recorded on "Memory Stick"s - Memory PB ZOOM
- DCR-TRV325E/TRV330E/TRV430E/ TRV530E only
You can enlarge still images recorded on a "Memory Stick."
Before operation
Insert a "Memory Stick" into your camcorder.
(1) Set the POWER switch to MEMORY, PLAYER or VCR (DCR-TRV330E only). Make sure that the LOCK is set to the left (unlock) position.
(2) Press PB ZOOM on your camcorder while you are playing back images recorded on "Memory Stick." The still image is enlarged, and indicators showing the direction to move the image appear on the screen.
(3) Turn SEL/PUSH EXEC dial to move the enlarged image, then press the dial.
: The image moves downwards.
:The image moves upwards.
becomes available.
(4) Turn SEL/PUSH EXEC dial to move the enlarged image, then press the dial.
: The image moves rightward (Turn the dial downwards.)
: The image moves leftward (Turn the dial upwards.)
YBeJIuHHe HeNoDBrXHbIX 3aIncHbIX I3O6paXeHn Ha "Memory Stick" - PAmrPB ZOOM
-ToIbKO MoJeN DCR-TRV325E/ TRV330E/TRV430E/TRV530E
BbIMoKeTe yBeNnUBaTb N3O6paKeHna, 3aNNcaHbIe Ha "Memory Stick".
Peped onepaunei
BcTaBbTe "Memory Stick" B Bauy BnDeokamepy.
(1)Установские поеклочаень POWER в поожене MEMORY, PLAYER улп VCR (Только модали DCR-TRV330E).
Y6eIntecb, YTO IpeKIOUOATEJIb LOCK yCTaHOBJIEN BJeBOM (He3aФИКСИРОВАHOM nOJOXEHNI).
(2)HaxmTe KhONky PB ZOOM Ha BaSei BnDEOKaMEpe BO BpEmr BOCpn3BeHeHHn3OpaXeHH, 3aIncAHbIX Ha "Memory Stick". HeNoBnKHOe n3OpaXeHHe yBelenuTcN, nHa 3KpaHe KKД nII nB BnOIOCKaTeJI NOBRTcN INdNKaTOpbI ↑↓, nOKa3bIbAOUHe HaprabLeHne DnBXeHHn3OpaXeHH.
(3)ПовернITE ДИСК SEL/PUSH EXEC ДЯпегемшени увелучен Horo ИЗобрахенья,а зatem нахмITE ДИСК.
Enlarging still images recorded on "Memory Stick"s - Memory PB ZOOM
To cancel memory PB ZOOM function Press PB ZOOM.
Note
You cannot record the images enlarged by the PB ZOOM mode on "Memory Stick"s.
In the PB ZOOM mode
The digital effect function does not work.
The PB ZOOM function is cancelled when the following buttons are pressed:
-MENU
-MEMORY PLAY
-MEMORY INDEX
-MEMORY + / -
Pictures in the PB ZOOM mode
Pictures in the PB ZOOM mode are not output through the DV OUT or DV IN/OUT jack when the POWER switch is set to MEMORY.
YBeJIuYeHne HeNoDBrXhBIX 3aIncaHHbIX N3O6paXeHn Ha "Memory Stick" - PAmrTb PB ZOOM
ДлгOTMeHbIФункци PB ZOOM
Haxmnte KhoNky PB ZOOM.
Приимеанne
BbI He MoXKeTe 3aIncsblBaTb N3o6paXeHnIyBeJIuHeHbIe BpeXmE PB ZOOM,Ha "MemoryStick".
BpexmePB ZOOM
Функцицпфобого зфсекта He pa6oTaet.
Функця PB ZOOM OTmehreTc npn HaxkataH Na cIeDyUOuNE KHOKN:
-MENU
-MEMORY PLAY
-MEMORY INDEX
-MEMORY + / -
I3o6paXeHnBpeXmpe PB ZOOM
Избражень в рекиme PB ZOOM He nepepaioTcay chee3 rhe3do DV OUT nIn DV IN/ OUT, ecnne peeknochaTeIb POWER yctahOBJIeB nIoJKeHne MEMORY.
Playing back images in a continuous loop - SLIDE SHOW
Bocnpon3BeJeHne n3o6paXeHn BHeIpepbIBHOI PocLeIOBaTeJIbHOCTNpo 3aMKHyTOMy zIKJy - SLIDE SHOW
- DCR-TRV325E/TRV330E/TRV430E/ TRV530E only
You can automatically play back images in sequence. This function is useful especially when checking recorded images or during a presentation.
Before operation
Insert a "Memory Stick" into your camcorder.
(1) Set the POWER switch to MEMORY. Make sure that the LOCK is set to the left (unlock) position.
(2) Press MENU to make the menu display appear.
(3) Turn the SEL/PUSH EXEC dial to select , then press the dial.
(4) Turn the SEL/PUSH EXEC dial to select SLIDE SHOW, then press the dial.
(5) Press MEMORY PLAY. Your camcorder plays back the images recorded on the "Memory Stick" in sequence.
-ToIbKO MoJeN DCR-TRV325E/ TRV330E/TRV430E/TRV530E
BbMOKTeaABOMaTnueeCKN BOCPPOIN3BOoNTb
H3O6paXeHnB HHepepBIBHOI
IOcNEoBaTeJeBHOCTN.3TaФyHKuY RAJIReTCa
Pioe3HO OOC6eHNO ppi npOBepKe 3aIncaHHbIX
H3O6paXeHn IJIN BO BPemr Ippe3eHTaUIN.
Ipeed nayanom pa60tbi
BcTaBbTe "Memory Stick" B BaUy BnIeokamepy.
(1) YcTaHOBInTe IpeKJIIOUaTeIb POWER B noJIOXeHne MEMORY. Y6eIInTeCb, yTO fIKcaTop LOCK ycTaHOBJeH B IeBOM (He3aФИКсINPOBaHHom) NOLOXeHm.
(2)HaxMMTe KhoNky MENU, YTO6bI Ha NucnJIee NOBUNaCb INDnKaUma MEHIO.
(3)ПовернITE ДИСК SEL/PUSH EXEC ДЯ
Выбopa установки , a за tem нажмITE
ДИСК.
(4)ПовернITE ДИСК SEL/PUSH EXEC ДЯ Выбoga установkin SLIDE SHOW, a 3aTeM НжмITE ДИСК.
(5)HaxmTe KhONky MEMORY PLAY. BawaBnDEOKaMepa 6yJeT BOCpOn3BOoNtBn3ObpaKeHn, 3aIncaHhbHe Ha "Memory Stick", B HEnpepbHBNoIocNeDoBaTeNbHOCTn.
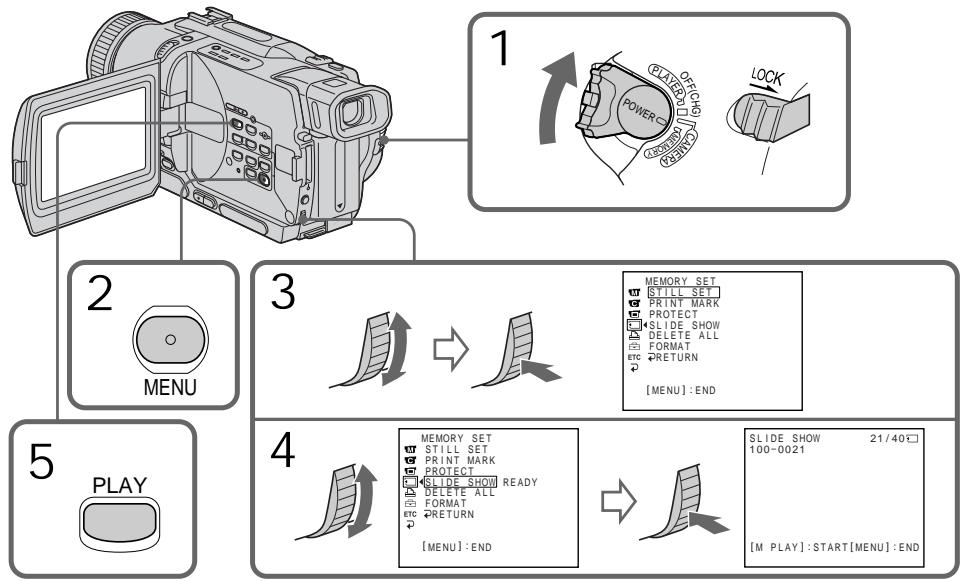
To stop the slide show Press MENU.
To pause during a slide show Press MEMORY PLAY.
To start the slide show from a particular image
Select the desired image using MEMORY + / - buttons before step 2.
To view the recorded images on TV
Connect your camcorder to a TV with the A/V connecting cable supplied with your camcorder before operation.
If you change the "Memory Stick" during operation
The slide show does not operate. If you change the "Memory Stick", be sure to follow the steps again from the beginning.
Дя OCTaHOBKи noka3 cnaIdoB
HaxmTe KhONkY MENU.
Дл na'ay3bl BO BpeM noka3a cJaIOB
Hakmnte KhoNky MEMORY PLAY.
Дян haуала noka3a сайдов c onpedeleHHoro n3o6paXeHn
BbIeTe HxHHe n3o6paxHeMe c NOMOu bIO KHOIOK MEMORY +/- nepei nyHKToM 2.
To prevent accidental erasure of important images, you can protect selected images.
Before operation
Insert a "Memory Stick" into your camcorder.
(1) Set the POWER switch to MEMORY, PLAYER or VCR (DCR-TRV330E only). Make sure that the LOCK is set to the left (unlock) position.
(2) Play back the image you want to protect.
(3) Press MENU to make the menu display appear.
(4) Turn the SEL/PUSH EXEC dial to select , then press the dial.
(5) Turn the SEL/PUSH EXEC dial to select PROTECT, then press the dial.
(6) Turn the SEL/PUSH EXEC dial to select ON, then press the dial.
(7) Press MENU to erase the menu display. The o-n mark is displayed beside the data file name of the protected image.
-ToIbKO MoJeN DCR-TRV325E/ TRV330E/TRV430E/TRV530E
ДлпnpedOTbpaSeHnCnyaHOrO CTupaHnBaxhblx n3o6paXeHn Bbl moKTe 3aunTntbBblpaHhIe n3o6paXeHn.
Ipeed hauanom pa6oTbi
BcTabbTe "Memory Stick" B Bauly Bndeokamepy.
To cancel image protection Select OFF in step 6, then press the SEL/PUSH EXEC dial.
Note
Formatting erases all information on the "Memory Stick", including the protected image data. Check the contents of the "Memory Stick" before formatting.
If the write-protect tab on the "Memory Stick" is set to LOCK
You cannot carry out image protection.
Длг OTMeHbI 3aunTbI N306paXeHnA
BbIbePte yctaHOBky OFF bIyHKTe 6, a 3aTeM haxmTe DCCK SEL/PUSH EXEC.
Ppmeuahne
ΦopMaTnOBAHHe CTnPaET BCIO INΦopMaZnHO Ha "Memory Stick", BKIoUaH JaHHbIe 3aunuEHHoro I3o6paXKeHn. PpOBepbTe coOpJxAHne "Memory Stick" nepeD φopMaTnOBAHHeM.
EcJn IeNecToK 3aunTbI 3anmH Na "Memory Stick" yctahOBHeB B noJIOXeHne LOCK
BbI He cMOXKeTe BbIIOJIHITb 3aIHTy n3o6paXeHnI.
- DCR-TRV325E/TRV330E/TRV430E/ TRV530E only
You can delete images stored in a "Memory Stick."
Before operation
Insert a "Memory Stick" into your camcorder.
Deleting selected images
(1) Set the POWER switch to MEMORY, PLAYER or VCR (DCR-TRV330E only). Make sure that the LOCK is set to the left (unlock) position.
(2) Play back the image you want to delete.
(3) Press MEMORY DELETE. "DELETE?" appears on the screen.
(4) Press MEMORY DELETE again. The selected image is deleted.
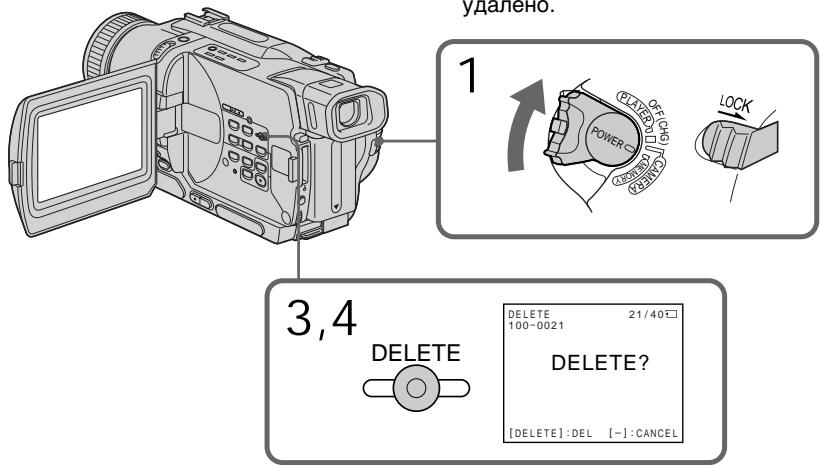
To cancel deleting an image Press MEMORY - in step 4.
To delete an image displayed on the index screen
Press MEMORY + / - to move the indicator to the desired image and follow steps 3 and 4.
Notes
- To delete a protected image, first cancel image protection.
- Once you delete an image, you cannot restore it. Check the images to delete carefully before deleting them.
YdaJIeHne n3o6paXeHn
- TOlbko Mojeeli DCR-TRV325E/ TRV330E/TRV430E/TRV530E
Bb mojkeTe ydaJIntb n3O6paXeHnA, xpaHmblie Ha "Memory Stick".
Ipeed hauanom pa60tbI
BcTaBbTe "Memory Stick" B Bauy BnIeOkamepy.
YdaenHe BbI6paHHbIX N3o6paXeHn
(1)Установпейсякючateь POWERВ
нолжени MEMORY, PLAYER Или VCR
(Tолъков мodyел DCR-TRV330E).
Чебець, что Фикусатор LOCK
Установпей в Левом (небафигсеровим)
нолжени.
(2) Bocnpoun3BveiTe n3o6paXeHne, KOtOpoe BbIXOTnTe ydaJIHTb.
(3)Haxmnte KhONky MEMORY DELETE. Ha 3kpAne NOBtCn INDnKauZna "DELETE?"
(4)Haxmnte KhoNky MEMORY DELETE eue pa3. BbI6paHnoe n3o6paXeHne 6ydet ydaJeHo.
Длг OTMeHbI ydaJIeHnI n3O6paXeHnI
Haxmnte KhoNkY MEMORY -B nyHKTe 4.
Длг OTMeHbI n3O6paXeHnI, OTO6paXaemoroHa ИнDEkCHOM 3KpaHe
HakmTe KhoNky MEMORY + / - nIa
napeMeueHnIuNkATopa K HuyxHOMy
I3ObpaXeHIO I BblONHte DeiCTBnI PyHKTOB
3I 4.
PpIMeuaHnA
Deleting all the images
You can delete all the unprotected images in the "Memory Stick".
(1) Set the POWER switch to MEMORY. Make sure that the LOCK is set to the left (unlock) position.
(2) Press MENU to make the menu display appear.
(3) Turn the SEL/PUSH EXEC dial to select , then press the dial.
(4) Turn the SEL/PUSH EXEC dial to select DELETE ALL, then press the dial.
(5) Turn the SEL/PUSH EXEC dial to select OK, then press the dial. OK changes to EXECUTE.
(6) Turn the SEL/PUSH EXEC dial to select EXECUTE, then press the dial. DELETING appears on the screen. When all the unprotected images are deleted, COMPLETE is displayed.
YdaJIeHne Bcex n3o6paXKeHn
BbMOKTeYdAaNTb BCE He3aunuHHeHbIe n3o6paXeHnHa "Memory Stick".
To cancel deleting all the images in the "Memory Stick"
Select RETURN in step 5, then press the SEL/PUSH EXEC.
While DELETING appears Do not turn the POWER switch or press any buttons.
If the write-protect tab on the "Memory Stick" is set to LOCK
You cannot delete images.
Дя OTMeHbI ydaJIeHnB BcEx n3O6paXKeHn Ha "Memory Stick"
BbIepeTe yctaHOBky RETURN B nyHKte 5, a 3aTe m HaxMnte KhONky SEL/PUSH EXEC
Bo Bpemr OTo6paKeHn HndkaCn DELETING
He n3meHnIte noIoxKeHne nepeKJIIOuChaTeNn POWER n He naXImaIte KaKx-1n6o KhoNok.
EcInI IeneCTOK 3aunTbI 3annc Ha "Memory Stick" yctahOBlen B noJIOxKeHne LOCK BbI He moKTe ydaJIb TnO6paXeHnI.
- DCR-TRV325E/TRV330E/TRV430E/
TRV530E only
You can specify the recorded still image to print out. This function is useful for printing out still images later.
Your camcorder conforms with the DPOF
(Digital Print Order Format) standard for specifying the still images to print out.
Before operation
Insert a "Memory Stick" into your camcorder.
(1) Set the POWER switch to MEMORY, PLAYER or VCR (DCR-TRV330E only). Make sure that the LOCK is set to the left (unlock) position.
(2) Play back the image you want to write a print mark.
(3) Press MENU to display the menu.
(4) Turn the SEL/PUSH EXEC dial to select , then press the dial.
(5) Turn the SEL/PUSH EXEC dial to select PRINT MARK, then press the dial.
(6) Turn the SEL/PUSH EXEC dial to select ON, then press the dial.
(7) Press MENU to erase the menu display. The mark is displayed beside the data file name of the image with a print mark.
-ToJbKO MoJeN DCR-TRV325E/ TRV330E/TRV430E/TRV530E
Bb mokeTe yka3aTb 3aIncanHbIe n3o6paXeHnI dIra paCneYaTkN. 3Ta cyHKUIN RAJIeTCR nOJIe3HOJ dIra paCneYaTkN HeIOJDbHXbIX n3o6paXeHn I03xe.
BaaBaIeOkamepa COOTBeTCTBye TcAHaapTy
DPOF (UnpbooB cnlye6hbl pfOpMaT paCneaTkN) dny kya3aHn HenoDbXbXbIX n3o6paXeHn dny paCneaTkN.
Ipeed hauanom pa60tbI
BcTaBbTe "Memory Stick" B BaUy BnDeokamepy.
(1)YcTaHOBInTe NepeKInOuChaTeNb POWER B noLoXeHne MEMORY,PLAYER nIIN VCR (ToIbKO moJeIN DCR-TRV330E).Y6eIInTeCb, yTOΦnKCaTOP LOCK YcTaHOBEn B JEBOM (He3aФнКСИРОВAHOM) noLoXeHnN.
(2) Bocnpon3BvTe n3o6paXeHne, Ha KOTOpOM Bby XOTITE 3aIncatb neaTHbI 3HaK.
(3)HaKMMTe KHONKy MENU, YTO6bI Ha DmCnJIeep NOBUNOCb MeHIO.
(4)Повернite ДСК SEL/PUSH EXEC ДЯ
Вьбopa установки ,а заTem нажмпerte ДСК.
(5)ПовернITE диС K SEL/PUSH EXEC дяьБбopa установки PRINT MARK,a 3aTeMHakmte dИСК.
(6)ПовернITEДСК SEL/PUSHEXECДЯВБОраустанови ON,аЗатем нажмптдИСК.
(7)HaxMNTe KhoNkY MENUДЯ CTnpaHnI INdNkaIIM MeHIo. Ha DiacnIeNoBnTcR 3HaK PryDom C ha3BaHnem faJaIa DaHHbIX N3O6paKeHnC peuAThbIM 3HaKOM.
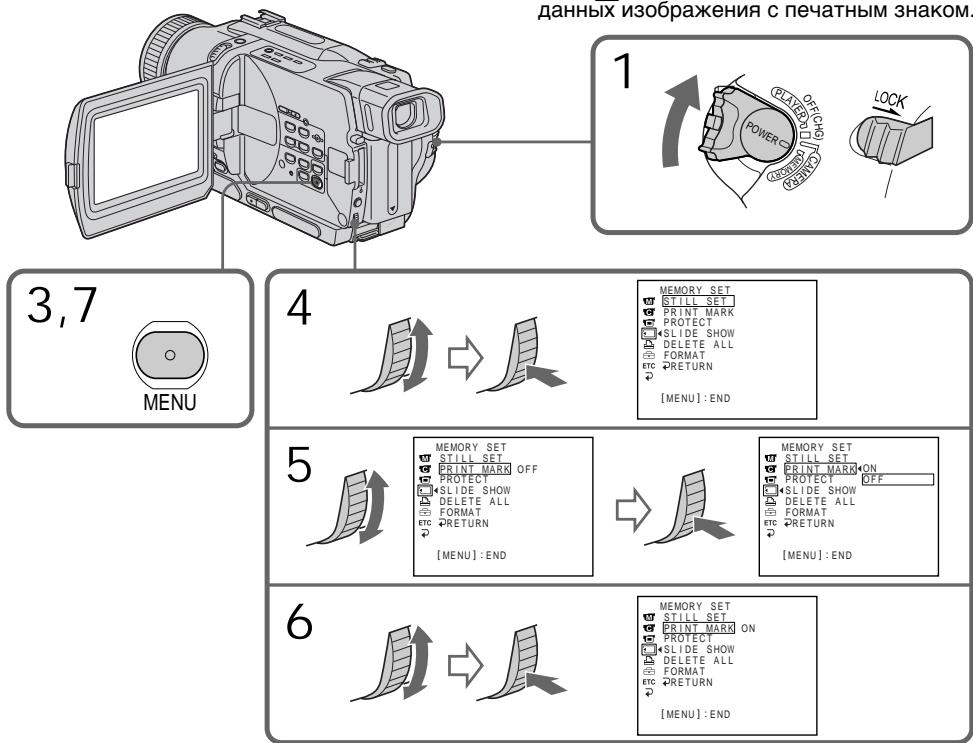
To cancel writing print marks
Select OFF in step 6, then press the SEL/PUSH EXEC dial.
If the write-protect tab on the "Memory Stick" is set to LOCK
You cannot write print marks on still images.
ДЯ OTMeHbI 3aHcN NeayathbIX 3HaKOB
BbIbePte yctaHOBky OFF bIyHKTe 6, a 3aTeM haxmTe dNCK SEL/PUSH EXEC.
EcInI IeneCTOK 3aunTbI 3annc Ha "Memory Stick" yctahOBlenB noJIOxKeHne LOCK
BbI He MoKTe 3aIINCaTb NeaTHbIe 3HaKn Ha HEnoDbXkHbIe N3O6paXeHn.
- DCR-TRV325E/TRV330E/TRV430E/ TRV530E only
You can use the printer (optional) on your camcorder to print images on the print paper.
For details, refer to the operating instructions of the printer.
There are various ways of printing still images.
The following, however, describes how to print by selecting in the menu on your camcorder. (p. 107)
Before operation
- Insert a recorded "Memory Stick" into your camcorder.
- Connect the printer to your camcorder as illustrated.
- Tôлько модали DCR-TRV325E/TRV330E/TRV430E/TRV530E
Bb moKTe nCnoJIb3OBAt b npInTep (npno6peTaetc OTdIeIbHo) c Bauei BnDEOKaMePO DnI neuATn I3o6paKeHn Ha 6ymare dIg ONeTuATkOB. DnI NOyUeHn BOJee NoDpO6Hn INHΦOpMaUM CM. pyKOBoDCTBO NO 3KcIIpyataum npInTepa.
CyueCTbuyot pa3nHbIe cnoocbI neaHTn HeoDBNkHbIX n6OpaXeHNI. CneyIOUnn cNoC0, Te Me HeMeHe, ONcBIBaET, KaK BbIOJIHNITb NeaTb IYTEM BbIOpa NHyKHtA n3 MeHIO BaSeI BnDeokamepbl. (ctp. 107)
Ipeed npimHeHHem
BCTaBbTe 3ancaHnyo "Memory Stick" B Bauy Bndeokamepy.
ПодсоевинтприntеркВашенидокаме,кakпokазанупсунke.
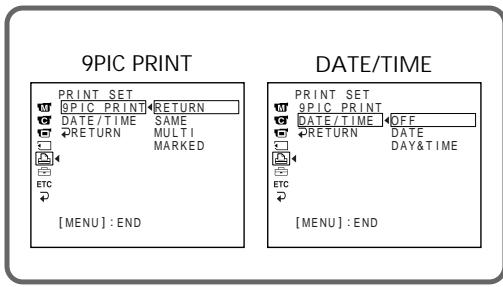
Printer/Приптер
You can print 9 still images on the 9 split print paper. Select the desired mode in the menu settings.
SAME PICS/
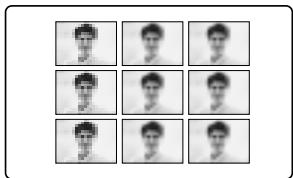
- 9 still images with print marks are printed together.
You can make prints with the recording date and/or recording time. Select the desired mode in the menu settings. DATE
DATE
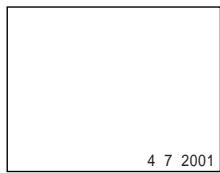

BbMOxTe HaneyataTb 9 HeNoDbNkHbIX n3o6paxEHn Ha 9 CoCTaHBx JInCTax 6yMaRn dIra OTneATKOB. Bb6epnte HxKhbl peKmB yCTaHOBkAX MEHIO.
MULTI PICS or MARKED PICS/Рекиль MULTI PICS и MARKED PICS
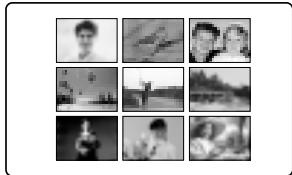
*9 HeNoDnBxKhBix N3O6paXeHm C MeTKaMn NeayTu NeyTaIOTcB MecTe.
BbI MoXeTe DeNaTb OTNeTuATKn C DaToi 3aNcN c/n/nn BpeMeHem 3aNcNc. BbIbePuTe HxKhbl peKIM B yCTAHOBKaX MeHO.
DAY & TIME

English
Types of trouble and their solutions
If you run into any problem using your camcorder, use the following table to troubleshoot the problem. If the problem persists, disconnect the power source and contact your Sony dealer or local authorized Sony service facility. If "C:□□:□□" appears on the screen or the display window, the self-diagnosis display function has worked. See page 174.
In the recording mode
| Symptom | Cause and/or Corrective Actions |
| START/STOP does not operate. | ·The POWER switch is not set to CAMERA. →Set it to CAMERA. (p. 26) ·The tape has run out. →Rewind the tape or insert a new one. (p. 24, 39) ·The write-protect tab is set to expose the red mark. →Use a new tape or slide the tab. (p. 24, 25) ·The tape is stuck to the drum (moisture condensation). →Remove the cassette and leave your camcorder for at least 1 hour to acclimate. (p. 193) |
| The power goes off. | ·While being operated in CAMERA mode, your camcorder has been in the standby mode for more than 3 minutes. →Set the POWER switch to OFF (CHG) and then to CAMERA again. (p. 26) ·The battery pack is dead or nearly dead. →Install a fully charged battery pack. (p. 15, 16) |
| The image on the viewfinder screen is not clear. | ·The viewfinder lens is not adjusted. →Adjust the viewfinder lens. (p. 30) |
| The SteadyShot function does not work. | ·STEADYSHOT is set to OFF in the menu settings. →Set it to ON. (p. 107) |
| The autofocusing function does not work. | ·FOCUS is set to MANUAL. →Set it to AUTO. (p. 65) ·Shooting conditions are not suitable for autofocus. →Set FOCUS to MANUAL to focus manually. (p. 65) |
| The picture does not appear in the viewfinder. | ·The LCD panel is open. →Close the LCD panel. (p. 28) |
| You cannot record in the LP mode. | ·The tape is the standard 8 tape. →Use Hi8 Hi8/Digital8 tapes. (p. 113) |
| A vertical band appears when you shoot a subject such as lights or a candle flame against a dark background. | ·The contrast between the subject and background is too high. This is not a malfunction. |
| A vertical band appears when you shoot a very bright subject. | ·This is not a malfunction. |
| Some tiny white spots appear on the screen. | ·Slow shutter, low lux or Super NightShot mode is activated. This is not a malfunction. |
| An unknown picture is displayed on the screen. | If 10 minutes elapse after you set the POWER switch to CAMERA or DEMO MODE is set to ON in the menu settings without a cassette inserted, your camcorder automatically starts the demonstration. → Insert a cassette and the demonstration stops. You can also cancel DEMO MODE. (p. 107) |
| The picture is recorded in incorrect or unnatural colours. | ·NIGHTSHOT is set to ON. → Set it to OFF. (p. 33) |
| Picture appears too bright, and the subject does not appear on the screen. | ·NIGHTSHOT is set to ON in a bright place. → Set it to OFF. (p. 33) ·The backlight function is active. → Set it off. (p. 32) |
| The click of the shutter does not sound. | ·BEEP is set to OFF in the menu settings. → Set it to MELODY or NORMAL. (p. 107) |
| A horizontal black band appears when shooting a TV screen or computer screen. | ·Set STEADYSHOT to OFF in the menu setting. (P. 107) |
| An external flash (optional) does not work. | ·The power of the external flash (optional) is off or the power source does not installed. → Turn on the external flash or install the power source. ·Two or more external flashes (optional) are attached. → Only one external flash (optional) can be attached. ·AUTO is selected in FLASH MODE in the menu settings while recording in a bright place. → Set it to ON. (p. 107) |
In the playback mode
| Symptom | Cause and/or Corrective Actions |
| The tape does not move when a video control button is pressed. | · The POWER switch is not set to PLAYER or VCR (DCR-TRV330E only). → Set it to PLAYER or VCR (DCR-TRV330E only). (p. 39) |
| The playback button does not work. | · The tape has run out. → Rewind the tape. (p. 39) |
| There are horizontal lines on the picture or the playback picture is not clear or does not appear. | · The video head may be dirty. → Clean the heads using the Sony V8-25CLD cleaning cassette (optional). (p. 194) |
| No sound or only a low sound is heard when playing back a tape. | · The stereo tape is played back with HiFi SOUND set to 2 in the menu settings. → Set it to STEREO. (p. 107) · The volume is turned to minimum. → Press VOLUME+. (p. 39) · AUDIO MIX is set to ST2 side in the menu settings. → Adjust AUDIO MIX. (p. 107) |
| The date search does not work correctly. | · The tape has a blank portion in the recorded portion. (p. 78) |
| The picture which is recorded in the Digital8 system is not played back. | · PB MODE is set to Hi8/8 in the menu settings. → Set it to AUTO. (p. 107) |
| The tape which is recorded in the Hi8 /standard 8 system is not played back correctly. | · Set PB MODE to Hi8/8 in the menu settings. (p. 107) |
In the recording and playback modes
| Symptom | Cause and/or Corrective Actions |
| The power does not turn on. | · The battery pack is not installed, or is dead or nearly dead. → Install a charged battery pack. (p. 15, 16) · The AC power adaptor is not connected to a wall socket. → Connect the AC power adaptor to a wall socket. (p. 21) |
| The end search function does not work. | · The tape was ejected after recording. · You have not recorded on the new cassette yet. |
| The end search function does not work correctly. | · The tape has a blank portion in the beginning or middle. |
| The battery pack is quickly discharged. | · The operating temperature is too low. · The battery pack is not fully charged. → Charge the battery pack fully again. (p. 16) · The battery pack is completely dead, and cannot be recharged. → Replace with a new battery pack. (p. 15) |
| The battery remaining indicator does not indicate the correct time. | · You have used the battery pack in an extremely hot or cold environment for a long time. · The battery pack is completely dead, and cannot be recharged. → Replace with a new battery pack. (p. 15) · The battery is dead. → Use a fully charged battery pack. (p. 15, 16) · A deviation has occurred in the remaining battery time. → Charge the battery fully. (p. 16) |
| The power goes off although the battery remaining indicator indicates that the battery pack has enough power to operate. | · A deviation has occurred in the remaining battery time. → Charge the battery fully so that the battery remaining indicator indicates correct time. (p. 16) |
| The cassette cannot be removed from the holder. | · The power source is disconnected. → Connect it firmly. (p. 15, 21) · The battery is dead. → Use a charged battery pack. (p. 15, 16) |
| The □ and ▲ indicators flash and no functions except for cassette ejection work. | · Moisture condensation has occurred. → Remove the cassette and leave your camcorder for at least 1 hour to acclimate. (p. 193) |
When operating using the "Memory Stick"
- DCR-TRV325E/TRV330E/TRV430E/TRV530E only
| Symptom | Cause and/or Corrective Actions |
| The “Memory Stick” does not function. | · The POWER switch is not set to MEMORY. → Set it to MEMORY. (p. 129) · The “Memory Stick” is not inserted. → Insert a “Memory Stick”. (p. 126) |
| Recording does not function. | · The “Memory Stick” has already been recorded to its full capacity. → Delete unnecessary images and record again. (p. 129, 163) · The “Memory Stick” formatted incorrectly is inserted. → Format the “Memory Stick” on your camcorder or use another “Memory Stick.” (p. 112) · The write-protect tab on the “Memory Stick” is set to LOCK. → Release the lock. (p. 124) |
| The image cannot be deleted. | · The write-protect tab on the “Memory Stick” is set to LOCK. → Release the lock. (p. 124) · The image is protected. → Cancel image protection. (p. 161) |
| You cannot format the “Memory Stick”. | · The write-protect tab on the “Memory Stick” is set to LOCK. → Release the lock. (p. 124) |
| Deleting all the images cannot be carried out. | · The write-protect tab on the “Memory Stick” is set to LOCK. → Release the lock. (p. 124) |
| You cannot protect the image. | · The write-protect tab on the “Memory Stick” is set to LOCK. → Release the lock. (p. 124) · The image to protect is not played back. → Press MEMORY PLAY to play back the image. (p. 146) |
| You cannot write a print mark on the still image. | · The write-protect tab on the “Memory Stick” is set to LOCK. → Release the lock. (p. 124) · The image to write a print mark is not played back. → Press MEMORY PLAY to play back the image. (p. 146) · The “Memory Stick” has been recorded to its full capacity. → Delete unnecessary images and write a print mark again. (p. 163, 166) |
| The photo save function does not work. | · The write-protect tab on the “Memory Stick” is set to LOCK. → Release the lock. (p. 124) |
Others
| Symptom | Cause and/or Corrective Actions |
| Digital program editing does not function. | ·The input selector on the VCR is not set correctly. →Check the connection and set the input selector on the VCR again. (p. 87) ·The camcorder is connected to DV equipment of other than Sony. →Set it to IR. (p. 88) ·Setting programme on a blank portion of the tape is attempted. →Set the programme again on a recorded portion. (p. 95) ·The camcorder and the VCR are not synchronized. →Adjust the synchronicity. (p. 93) |
| The Remote Commander supplied with your camcorder does not work. | ·COMMANDER is set to OFF in the menu settings. →Set it to ON. (p. 107) ·Something is blocking the infrared rays. →Remove the obstacle. ·The batteries are inserted in the battery holder with the + - polarities incorrectly matching the + - marks. →Insert the batteries with the correct polarity. (p. 211) ·The batteries are dead. →Insert new ones. (p. 211) |
| The picture from a TV or VCR does not appear even when your camcorder is connected to outputs on the TV or VCR. | ·DISPLAY is set to V-OUT/LCD in the menu settings. →Set it to LCD. (p. 107) |
| The melody or beep sounds for 5 seconds. | ·Moisture condensation has occurred. →Remove the cassette and leave your camcorder for at least 1 hour to acclimate. (p. 193) ·Some troubles has occurred in your camcorder. →Remove the cassette and insert it again, then operate your camcorder. |
| You cannot charge the battery pack. | ·The POWER switch is not set to OFF (CHG). →Set it to OFF (CHG). |
| While charging the battery pack, the backlight of the display window does not light. | ·Charging the battery pack is completed. ·The AC power adaptor is disconnected. →Connect it firmly. (p. 21) |
| While charging the battery pack, the remaining battery time indicator flashes. | ·The battery pack is not properly installed. →Install it properly. ·Something is wrong with the battery pack. →Contact your Sony dealer or local authorized Sony service facility. |
| No function works though the power is on. | ·Disconnect the power cord of the AC power adaptor or remove the battery, then reconnect it in about one minute. Turn the power on. If the functions still do not work, open the LCD panel and press the RESET button under DISPLAY button using a sharp-pointed object. (If you press the RESET button, all the settings including the date and time return to the default.) (p. 205) |
Your camcorder has a self-diagnosis display function.
This function displays the current condition of your camcorder as a 5-digit code (a combination of a letter and figures) on the screen or in the display window.
If a 5-digit code is displayed, check the following code chart. The last two digits (indicated by ) will differ depending on the state of your camcorder.
LCD screen, viewfinder or display window
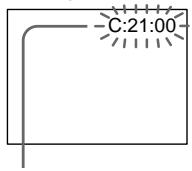
Self-diagnosis display
C:□□:□□
You can service your camcorder yourself.
· E :□□:□□
Contact your Sony dealer or local authorized Sony facility.
| Five-digit display | Cause and/or Corrective Actions |
| C:04:☐☐ | • You are using a battery pack that is not an “InfoLITHIUM” battery pack. → Use an “InfoLITHIUM” battery pack. (p. 188) |
| C:21:☐☐ | • Moisture condensation has occurred. → Remove the cassette and leave your camcorder for at least 1 hour to acclimateze. (p. 193) |
| C:22:☐☐ | • The video heads are dirty. → Clean the heads using the Sony V8-25CLD cleaning cassette (optional). (p. 194) |
| C:31:☐☐ | • A malfunction other than the above that you can service has occurred. |
| C:32:☐☐ | • Remove the cassette and insert it again, then operate your camcorder. → Disconnect the power cord of the AC power adaptor or remove the battery pack. After reconnecting the power source, operate your camcorder. |
| E:61:☐☐ | • A malfunction that you cannot service has occurred. |
| E:62:☐☐ | • Contact your Sony dealer or local authorized Sony service facility and inform them of the 5-digit code. (example: E:61:10) |
If you are unable to rectify the problem even if you try corrective actions a few times, contact your Sony dealer or local authorized Sony service facility.
Warning indicators and messages
If indicators and messages appear on the screen or in the display window, check the following. See the page in parentheses "() for more information.
Warning indicators

100-0001 Warning indicator as to file Slow flashing:
The file is corrupted.
- The file is unreadable.
C:21:00 Self-diagnosis display (p. 174)
The battery is dead or nearly dead Slow flashing:
- The battery is nearly dead.
The indicator sometimes blinks even if the remaining battery time is about five to ten minutes depending on the operating conditions, environment and battery condition.
Fast flashing:
The battery is dead.
Moisture condensation has occurred*
Fast flashing:
- Eject the cassette, turn off your camcorder, and leave it for about 1 hour with the cassette compartment open (p. 193).
Warning indicator as to "Memory Stick"* (DCR-TRV325E/TRV330E/TRV430E TRV530E only)
Slow flashing:
- No "Memory Stick" is inserted.
Fast flashing:
- The "Memory Stick" is not readable with your camcorder (p. 124).
Warning indicator as to "Memory Stick" formatting (DCR-TRV325E/TRV330E/ TRV430E/TRV530E only)
Fast flashing:
- "Memory Stick" is not formatted correctly (p. 112).
- The "Memory Stick" data is corrupted.*
Warning indicator as to tape
Slow flashing:
The tape is near the end.
- No tape is inserted.
- The write-protect tab on the cassette is out (red) (p. 25).
Fast flashing:
- The tape has run out.*
You need to eject the cassette*
Slow flashing:
- The write-protect tab on the cassette is out (red) (p. 25).
Fast flashing:
- Moisture condensation has occurred (p. 193).
The tape has run out. - The self-diagnosis display function is activated (p. 174).
The still image is protected * (DCRTRV325E/TRV330E/TRV430E/TRV530E only)
Slow flashing:
- The still image is protected (p. 161).
Warning indicator as to the flash (optional)
Fast flashing:
-
There is something wrong with the external flash (optional).
-
You hear the melody or beep sound.
Warning messages
CLOCK SET
Set the date and time. (p. 22)
FOR "InfoLITHIUM" BATTERY ONLY
Use an "InfoLITHIUM" battery pack. (p. 188)
- 8mm TAPE SP REC Hi8 TAPE LP/SP REC
Use Hi8 H18/Digital8 tapes when you record in the LP mode.* (p. 113)
TAPE END
The tape has run out.*
NO TAPE
Insert a cassette tape.*
CLEANING CASSETTE**
The video heads are dirty. (p. 194)
- COPY INHIBIT
You tried to record a picture that has a copyright control signal.* (p. 186)
FULL
The "Memory Stick" is full.* (p. 131)
(DCR-TRV325E/TRV330E/TRV430E/TRV530E only)
·
The write-protect tab on the "Memory Stick" is set to LOCK.* (p. 124) (DCR-TRV325E/TRV330E/ TRV430E/TRV530E only)
NOFILE
No still image is recorded on the "Memory Stick".* (p. 147) (DCR-TRV325E/TRV330E/TRV430E/ TRV530E only)
NO MEMORY STICK
No "Memory Stick" is inserted.* (DCR-TRV325E/ TRV330E/TRV430E/TRV530E only)
- MEMORY STICK ERROR
The "Memory Stick" data is corrupted.* (p. 126)
(DCR-TRV325E/TRV330E/TRV430E/TRV530E only)
- FORMAT ERROR
Check the type of formatting.* (p. 112) (DCR-TRV325E/TRV330E/TRV430E/TRV530E only)
- DIRECTIONAL ERROR
The "Memory Stick" has more than one directory such as 100msdfc.* (p. 147) (DCR-TRV325E/TRV330E/TRV430E/TRV530E only)
- You hear the melody or beep sound.
** The indicator and “CLEANING CASSETTE” message appear one after another on the screen.
Pysckn
Pa3HOvndHocTn HeucnpaBHOCTeN cNoCo6bI INx yCTpaHeHn
EcIn y Bac Bo3Nkla kakaJ-Im6 npo6Iema npin nCnOJIb3OBAHm BnDEOKaMepbl, BOCNoJIb3yTeCb cJeDyUoSei Ta6nuei dny OtBcKAnH N yCTpaHEnH npo6IeMb. EcIn npo6IeMa He yCTpaHAreTcA, TO cJeDyET OTcoEHNHT bNCTOCHNK nITaHn H o6PaNTbC B CepBNCbI yENTp SONY iIN B MeCTHOe yONlHomOeHHoe ppeIpnrTne no 06CnJxJbAHnIO3dJIeNl Sony. EcIn Ha 3KpaHe, B vIDOnckaTeNe iIN B OKoIke DnCIIeIe NOBHTcN INHdNkaZnR "C:□□:□□", 3TO 3NaHT, YTO cpa6ToJ fYHKuIra CamODnArHocTNI. CM. cTp. 182.
B pexkme 3ainnc
"Memory Stick" He yctaHOBJeHa.
Быстpoe мьагнел:
"Memory Stick" He uHTaETcBaue BIndeOKamepo (CTp. 124).
Ппсдурждаюши Инданкатор OTHOCNTIELьно Форматеровая “Memory Stick” (Толъков мосян DCR-TRV325E/ TRV330E/TRV430E/TRV530E)
BbICTpoe MmraHne:
"Memory Stick" OToΦopMaTIpOBaHa HEnpaBnJIbHo (cTp. 120).
Данные "Memory Stick" noBpeKdHebl.*
Предунрекдаюши ИнданkaTop OTHOCNTelbHO Лentbl
MeDJIeHHoe MmraHne:
- JeHTa noOTn DOCTnRJa KOHca.
- He BCTaBJIeHa KaccetCa JIeHTOn.
JIeNEcTOK 3aunITbI OT 3aINcH Na JeHTe OTCyTCTByET (KpaChbI) (CTp.25).*
Быст Poe маганe:
-ЛeHTa 3aKoHUnlaCb.*
Bam Huxho n3Bneb kaccety*
MeJenneHoe MURaHne:
JIeNEcTOK 3aunITbI OT 3aNNcH Na JeHTe OTCyTCTByeT (KpaChbI) (CTp.25).
Быст Poe маганe:
-Пюизошлaja KOнд echcaиь Влаги (ст. 193).
-JIeHTa 3aKoHnJlaCb.
Cpa6oTanaФyHKUHINDnKaUcIcamOHaNarHOCTnK(ctp.182).
HeNoBnKHOe 3o6paKeHne 3aunuEHO\* (TolbKO moJeN DCR- TRV325E/TRV330E/TRV430E/TRV530E)
MeJenneHoe MURaHne:
- HenoDBnKHOe n3o6paXeHne 3aunuEHO (cTp.161).
4 PpeynpeKdaiouim HndkaTop OTHOCHTeBHO BCbIaKN (npno6peTaetcra OTdelenbHO)
Быст Poe маганe:
- Bo3nKJa HeNoJaKa Co BCtPoEHNOB BCblIKo HnN BHeUHRe BCblIKoN (npno6peTaetcO TdJeHo).
*BbI yCJIbIuTe MeIoNDIO UIN 3yMMepHbI CnHaJ.
Ppeynpexkaioune coo6eHnA
- CLOCK SET
UctaHOBtE DaTy N BpEmr. (CTp. 22)
FOR "InfoLITHIUM" BATTERY ONLY
IcnoIb3yIte 6aTapeHbI 6Jok "InfoLITHIUM". (ctp. 188)
- 8mm TAPE SP REC Hi8 TAPE LP/SP REC
IcnoJIb3yIeJIeHTbI Hi8 H Digital8 B pexnme LP.* (CTp. 121)
TAPE END
JIeHTa3aKOHuInacb.
NO TAPE
Bctabte kaccety CJeHToN.*
CLEANING CASSETTE**
3aŋpə3nɪnbcBnuéorOJIOBKn.(CTp.194)
- COPY INHIBIT
BbI nbITaanCb 3aIncatb N3O6paXeHne, copeKaaUee cInHaI 3aunTbI aBTOpCKoro npaba.* (cTp.186)
FULL
Emkoctb "Memory Stick" 3aNoJIHeHa.* (CTp. 131) (ToIbKO moJeN DCR-TRV325E/TRV330E/TRV430E/TRV530E)
He BCTaBJIeHa "Memory Stick".* (ToIbKO moIeJI DCR-TRV325E/TRV330E/TRV430E/TRV530E)
- MEMORY STICK ERROR
Digital8 system, recording and playback
What is the "Digital8 system"?
This video system has been developed to enable digital recording to Hi8 Hi8/Digital8 video cassette.
Usable cassette tapes
We recommend using Hi8 Hii3/Digital8 video cassette.*
The recording time when you use your Digital8
system camcorder on Hi8 H1i3/standard 8 tape is 2/3 the recording time when using the conventional Hi8 H1i3/standard 8 system camcorder. (90 minutes of recording time becomes 60 minutes in the SP mode.)
- If you use standard 8 3 tape, be sure to play back the tape on this camcorder. Mosaic pattern noise may appear when you play back standard 8 3 tape on other VCRs (including other DCR-TRV230E/TRV235E/TRV325E/TRV330E/TRV430E/TRV530E).
Note
Tapes recorded in the Digital8 system cannot be played back on Hi8 Hi3/standard 8 (analog) system machine.
±b is a trademark.
Hi 3 is a trademark.
D is a trademark.
Playback system
The Digital8 system or Hi8 Hi3/standard 8 system is automatically detected before the tape is played back.
During playback of tapes recorded in the Hi8 Hi8/standard 8 system, digital signals are output as the image signals from the DV OUT or DV IN/OUT jack.
Display during automatic detection of system The Digital8 system or Hi8 Hi/standard 8 system is automatically detected, and the playback system is automatically switched to. During switching of systems, the screen turns blue, and the following displays appear on the screen. A hissing noise also sometimes can be heard.
H HiB / B During switching from Digital8 to Hi8 H18/standard 8 B
Hi8/3→: During switching from Hi8 Hi8/ standard 8 to Digital8
CnФрова систema Digital8 3aIncB N BOCpOu3VeDEHne
TTO takoE "Lcnpobar cnctema Digital8 E)?
3Ta BnDEOncntema 6bIa pa3pa6oTaHa nIb
0eBcepeHnI cIpPoBOI 3anIc Hb
BnDEoKaccTebl Hi8 Hi8/Digital8#.
Ucnonb3yemble kaccetbl
PeKOMeHnyeTcNcNoJIb3OBAbTB BnIeOKacCeTbI Hi8 Hl8/Digital8 D.*
Bpme 3aHcnpnncnoJb3ObaHn Baue BIndeokamepbl CNTembl Digital8 HnJeHTe Hi8
Hi 8/ctaHapThoI JeHTe 8 8 coCTaBJIeT 2/3 BpEMHI 3aIMnI pni MCNoIb3OBAHm O6bIHy OBIeOKaMepbI Hi8 Hi8/BuDEOKaMepbI cTaHapThoI CNTeMbI 8. (90 MmHT BpEMEH 3aIMCn CTaHOBATcpaBbIMN 60 MmHTam B pexmE SP).
*PnIN cNpONb3OBAHm CtAnDapTHoJ IeHTbI 8 3, ee CLeDyET BOCpOn3BOJNTb Ha 3ToJ Ke BUnDeOkaMepe. PnIN BOCpOn3BeJeHN mCTaHdAPTHoJ IeHTbI 8 3 Ha dpyTnx KBM (BKNIOUcA npYrme aannapaTb DCR-TRV230E/ TRV235E/TRV325E/TRV330E/TRV430E/ TRV530E) MOrT NOBnTc nOMexn Tnpa Mo3aIKN.
Ppimechane
JIeHTbl, 3aIINcaHbIe BcIΦpOBoN cNCTEme Digital8 I), He MoryT 6blb BocPOn3BeDeHb Ha annapatye CnCTEmbl Hi8 HII CTaHdpTHoH cnCTEmbl 8 8 (ahalorOboN).
8 ABJRAETCRФнрмEHbIM 3HaKOM.
H18 ABJARETCdmpMeHHbIM 3HaKOM.
ABJRAETCQHmpeHHbIM3HaKOM.
CnCTema BOCPON3BeDeHna
LcnpoBa CnCTema Digital8 HHi8 H13/ CTaHapTha CnCTema 8 ABTomatueckn deTeKtpyETcpeB OBCpOu3BeDEHem JeHTbI. Bo BpEmA BOCpOm3BeDEHnJ LEHT, 3aNcaHHbIX B CnCTeMe Hi8 H3/CtHaapTHoN CnCTema 8 LcnpoBle CnHaJIb BBIOJaTcB KaueCTBe CnHaJOB n3o6paXeHnJ cpe3 rHe3do DV OUT nJi DV IN/OUT.
Индикади BO Врема abTomatчecкого DeTeKTIpoBaHЯ CNTeMbI
LHpOBaCnCTema Digital8 HHi3/ CTaHapTHa CnCTema 8 ABTomaTneCKn DETeKTIPyETcA, a CnCTema BOCPOn3BEdEHn ABTomaTneCKn BKIOuaeTc. Bo BpeMBAIKIOueHHn CNTEM, 3KpaH cTAHOBNTcRrOlybIM IIORBIAIOTcCJEDYUOHe INDINKAaUNHn HA3KpaHe. MoXeT bItb TaKxE cblIeH CBNCTaUNI shm.
H→Hi8/8:BoBpeMa nepeKIOUeHnC cnCTembl Digital8 Ha cnCTemy Hi8
H18/CTaHdapTHyU CnCTemy 8 8
H8/3→E:BoBpMaIpeKIOueHnIc cnCTembl Hi8 H8IaHdapTHoH cnCTembl 8 8Ha UcDPOBvIO
CnCTemy Digital 8
When you play back
Playing back an NTSC-recorded tape You can play back tapes recorded in the NTSC video system on the LCD screen, if the tape is recorded in the SP mode.
Copyright signal
When you play back
Using any other video camera recorder, you cannot record on a tape that has recorded copyright control signals for copyright protection of software which is played back on your camcorder.
When you record (DCR-TRV330E only) You cannot record software on your camcorder that contains copyright control signals for copyright protection of software.
COPY INHIBIT appears on the LCD screen, in the viewfinder or on the TV screen if you try to record such software. Your camcorder does not record copyright control signals on the tape when it records.
When you playback a dual sound track tape
When you use tapes recorded in the Digital8 system
When you play back a Digital8 system tape which is dubbed from a dual sound track tape recorded in the DV system, set HiFi SOUND to the desired mode in the menu settings (p. 107).
Sound from speaker
| HiFi Sound Mode | Playing back a stereo tape | Playing back a dual sound track tape |
| STEREO | Stereo | Main sound and sub sound |
| 1 | Lch | Main sound |
| 2 | Rch | Sub sound |
PnBocnpOn3VeJeHn
Bocnpon3BeJeHne JeHT, 3aIncaHHbIX BCnCTeme NTSC
BbMOKeTe BOCIpON3BOIDtIeHTbl, 3aIncahHbE B VInDeOcNCTeMe NTSC,Ha 3KpaHe KKd,ecnIeHTa 3aIncaHa BpeXmEp SP.
CunhaJnabTOpckoro npaba
PnB Bocnpon3BeDeHH
PnncnoB3OBAHn KaKo-JIb6DpyroB BuDeokampeBbHe MoXeTe BByINONHtB 3aNcBHaJeHTy,HaKOToPOB 3aNcAHB KoTHpOJbHbIE CnHbJIa ABTOPCKOro npaba dIa 3aUHTbI aBTOPCKnx npab IporpaMM, KOToPbIE BOCpOn3BOJATcHa BaWei BuDeokamepe.
Пи запис (Toько морел DCR-TRV330E)
BbI He MoXKeTe 3aInCbIBaTb Ha BaSei BnDeOkAmepe npOrpaMMbI, coDePxaUne KOHTpONbHbIe CmHaJIb I ABTOpcKOro npaba dJa 3aUITbI abTOptckNx npab nporpaMM. EcNI Bbl NOnbTaTeTcB 3aINCaTb TaKyIO npORpaMMy, Ha 3kpaHe KKD, B BnDOncKaTeNe IINHa 3kpaHe TeLEBeN3Opa NoBtCra INdIkauaCPOY INHIBIT. Ppi 3aIncB Ba7a BnDeOkAmera He 6yDet 3aInCbIBaTb KOHTpONbHbIe CmHaJIbI aTOptckKOro npaba.
PnBocnpOn3BeJeHm JeHTbIC DBOHOH 3ByKOBOI DOPOXKOJ
PnncnoJIb3OBAHmJIeHT,3aIIncAHhBIX BcnpoBOBcnCTeme Digital8
ПиВОСТРОИЗBEДЕНМЛЕNTБI B ZUФрOBоN CИСТЕ DigitaI8,Ha KOTOpYu BbINONHeHa nepe3aINcIeHTbC DBOHOn 3ByKOBOI DOPOKKoI,ZaINscaHNoB UzPpOBoI BnDeOCInCTeMe DV,yCTaHOBInTe KOMaHny“HiFi SOUND"B HUxHbI pExm B yCTaHOBkax MeHIO (cTp.107).
3Byk OT DnHaMnka
| Рек imm 3Byuahnia HiFi | Восpreneurбраздени стесофонческо лentesь | Восpreneurбраздени лentesь с двогно 3Bykoов дорожков |
| STEREO | Стесофразнческ 3Byk | Осныно 3Byk и BCNOMORAтелов 3Byk |
| 1 | Левий канал | Осныно 3Byk |
| 2 | Правий канал | Вспомогателов 3Byk |
Digital8 system, recording and playback
When you use a tape recorded in the Hi8/standard 8 system
When you play back a dual sound track tape recorded in an AFM HiFi stereo system, set HiFi SOUND to the desired mode in the menu settings (p. 107).
Sound from speaker
| HiFi Sound Mode | Playing back a stereo tape | Playing back a dual sound track tape |
| STEREO | Stereo | Main sound and sub sound |
| 1 | Monaural | Main sound |
| 2 | Unnatural Sound | Sub sound |
You cannot record dual sound programmes on your camcorder.
UncpoBaa CnCTema Digital8 B, 3aIncb N BocnpOn3BeDeHne
PnncnoJIb3OBAHnJeHT,3aIncAHbIX B CnCTeMe Hi8/CTaHdapTHoN CnCTeMe 8
ПиВВOCПОИЗBEДЕнHЛЕНТБICДВОИHOB 3BYKOBOДОРОЖКО,3aINSCAHHOВ CtepeoФончecкоссTeMe AFM HiFi, yCTaHOBtE KOMaHdY“HiFi SOUND" B Huxhbl peXIM B YcTaHOBkax MeHIO (cTp.107).
3Byk OT DnHaMnka
About the " InfoLITHIUM" battery pack
What is the "InfoLITHIUM" battery pack?
The "InfoLITHIUM" battery pack is a lithium-ion battery pack that has functions for communicating information related to operating conditions between your camcorder and an AC power adaptor.
The "InfoLITHIUM" battery pack calculates the power consumption according to the operating conditions of your camcorder, and displays the remaining battery time in minutes.
Charging the battery pack
- Be sure to charge the battery pack before you start using your camcorder.
- We recommend charging the battery pack in an ambient temperature of between 10^ to 30^ (50^ to 86^) until the backlight of the display window goes out, indicating that the battery pack is fully charged. If you charge the battery pack outside of this temperature range, you may not be able to efficiently charge the battery pack.
- After charging is completed, either disconnect the cable from the DC IN jack on your camcorder or remove the battery pack.
Effective use of the battery pack
-
Battery performance decreases in low-temperature surroundings. So, the time that the battery pack can be used is shorter in cold places. We recommend the following to use the battery pack longer:
-
Put the battery pack in a pocket close to your body to warm it up, and insert it in your camcorder immediately before you start taking shots.
- Use the large capacity battery pack (NPFM70/FM90/FM91, optional).
- Frequently using the LCD panel or frequently operating playback, fast forward or rewind wears out the battery pack faster. We recommend using the large capacity battery pack (NP-FM70/FM90/FM91, optional).
- Be certain to turn the POWER switch to OFF (CHG) when not taking shots or playing back on your camcorder. The battery pack is also consumed when your camcorder is in the standby mode or playback is paused.
- Have spare battery packs handy for two or three times the expected recording time, and make a trial recording before the actual recording.
- Do not expose the battery pack to water. The battery pack is not water resistant.
О затыpéйhom блODE "InfoLITHIUM"
Remaining battery time indicator
- If the power may go off although the remaining battery time indicator indicates that the battery pack has enough power to operate, charge the battery pack fully again so that the indication on the remaining battery time indicator is correct. Note, however, that the correct battery indication sometimes will not be restored if it is used in high temperatures for a long time or left in a fully charged state, or the battery pack is frequently used. Regard the remaining battery time indication as the approximate shooting time.
- The 心 mark indicating there is little remaining battery time sometimes flashes depending on the operating conditions or ambient temperature and environment even if the remaining battery time is about five to ten minutes.
How to store the battery pack
- Even if the battery pack is not used for a long time, store it in a dry, cool place after fully charging it once per year and then using the battery pack up on your camcorder. This is to maintain the battery pack's functions.
- To use the battery pack up on your camcorder, leave your camcorder in the shooting mode until the power goes off without a cassette inserted.
Battery life
- The battery life is limited. Battery capacity drops little by little as you use it more and more, and as time passes. When the available battery time is shortened considerably, a probable cause is that the battery pack has reached the end of its life. Please buy a new battery pack.
- The battery life varies according to how it is stored and operating conditions and environment for each battery pack.
HdkaTop BpeMeHH octabweoc3apra 6aTaepnHoro 6loka
- Ecnn nntaHne MoKcET BbIKNoHTbcra HecMOtpr Ha To, YTO INDkaTOp BpeMeHn OCTabWeroCz 3apJa 6batapeHoro 6Ioka. Yka3bBaet Ha To, YTO 6batapeHnB 6Iok DOCTaTOHO 3apJxKeH IJIa FyHKUOnHPOBaHn BInDeOkAmebpI, CHOBA 6aTApTe 6batapeHbI 6IOK NIOHOCTbU, TAK YTO6bl INDkaCnR BpeMeHn OCTabWeroCz 3apJa 6batapeHoro 6Ioka 6blna npaBnBHOJ. 3amTe, TeM He MeHee, YTO TOuHaer INDkaCnR BpeMeHn 3apJa 6batapeHoro 6Ioka INHOrDa He 6yDet BOCCTaHaBnBaTbcra, ECNI OH DInTeJBHOE BpeMn NCNOBJ3OBaLCN Prn BBICOKX TemNepaTypax INIbIN OCTaBJeH B NOHOCTbU 3apJxKeHHOM COCToHnn, INI npqactom INCNOBJ3OBaHN 6batapeHoro 6Ioka.CHTaIte INDkaCnIO OCTabWeroCz BpeMeHn 3apJa 6batapeHoro 6Ioka Pn6blN3NTebhIM BpeMeHem CbEMKn.
- INHOrda MeTka 日 yKa3bIbAIOUaHa Ha To, YTO BpEmHeN 3apraDa 6bTaapeHoro 6boka OCTaIocb MaIIO, MmraET B 3abNCIMOCTn OT ycNoBn OkpyKaHOSe TeMnpaTpybI n CpeDbI, Daxe ecIn 3apraDa ocTaIocb Ha 5-10 MNHyT.
Kak xpaHbTb 6aTapeeHbI bJOK
JaXe ecn6batapeHb6loK He nCNoIb3yeTcA DInTeJIbHOe BpeM, XpaHnte erO BCYXOM, PPOXlaNDHom MecTe, POJHOCTbIO 3apXkAero OOnH pa3B roD, a 3aTeM nCNoIb3y6batapeHb6loK Ha BaWei BnDEOKamepe. 3To Heo6xOIMo dny PoNDepKAnHnФyHKUHOHnpOBAHn6batapeHnoro 6loka.
-ДЯТOrO,YTO6bI NOHOCbIO pa3PraNTb 6aTapeiHbI bLOK Ha BaUeB VbDEOKaMepe, OCTaBtBe BaUy BvDEOKaMepy B pexnme CbeMkn 6e3 BCTaBLeHHoN KacCtbl, NOKa He BBkIOuHTcR NITaHne 6e3 BCTaBLeHHoN KACcTebl.
Cpok cnjx6bl 6atapeHoro 6noka
Cpok cnyk6bl 6batapeHoro 6boka orpaHueH. EmKocTb 6batapeHoro 6boka mano-nomany nadaet, no Mepe toro, kak Bbc TeueHnem BpeMeHN iNoNb3yeTe erO BCE 6bIbe N 6bIbe. Korda Doctynhoe Bpem 3aepda 6batapeHoro 6boka 3naHTeJIbHO COKpaTNTcA, BO3MOxHoi pnuHNO JBnEeTCa TO, UTO Cpok cnyk6bl 6batapeHoro 6boka 3aKOHnCL. PnpO6pTaaiTe, NOXaYnCTa HOBbl 6batapeHbI b6loK.
Cpok cnyk6bl 6batapeHoro 6noka pa3nnaeTcB COOTBEcTBUN C TEM, KaK OH xpaHnCSA, a TAKKE B 3aBNCIMOCTN OT yCNOBn NCNoJIb3oBAHnI N OKpyKaIOSe CpeDbI DЯ KaxDOrO 6batapeHoro 6noka.
The DV jack on this unit is an i.LINK-compliant DV input/output jack. This section describes the i.LINK standard and its features.
What is "i.LINK"?
i.LINK is a digital serial interface for handling digital video, digital audio and other data in two directions between equipment having the i.LINK jack, and for controlling other equipment.
i.LINK-compatible equipment can be connected by a single i.LINK cable. Possible applications are operations and data transactions with various digital AV equipment.
When two or more i.LINK-compatible equipment are connected to this unit in a daisy chain, operations and data transactions are possible with not only the equipment that this unit is connected to but also with other devices via the directly connected equipment.
Note, however, that the method of operation sometimes varies according to the characteristics and specifications of the equipment to be connected, and that operations and data transactions are sometimes not possible on some connected equipment.
Note
Normally, only one piece of equipment can be connected to this unit by the i.LINK cable (DV cable). When connecting this unit to i.LINK-compatible equipment having two or more i.LINK jacks (DV jacks), refer to the instruction manual of the equipment to be connected.
About the Name "i.LINK"
i.LINK is a more familiar term for IEEE 1394 data transport bus proposed by SONY, and is a trademark approved by many corporations. IEEE 1394 is an international standard standardized by the Institute of Electrical and Electronic Engineers.
OTHOCNTeJIbHO i.LINK
LHΦPBOe rHe3dO DV ha daHHOM annapate yDIOBJIETBOPaET cTaNapTy i.LINK n ABnIeTcOBMECTMlbIM C BXOJHbIM/BbIXOHNbIM rHe3DOM ζΦPobBXuDeocnHaNoB DV. B 3tOM pa3dene OINcaH cTAHApT i.LINK n ero ochOBhie OC6EHHOCTN.
YTo Takoe "i.LINK"?
i.LINK ABJIeTcA UΦpOBbIM nocJeBOBaTeJbHbIM INHTepFeIcOM dIa YnpabJIeHnUΦpOBbIMn BVJeOCrHaNAMn, UΦpOBbIMn ayDInOCrHaNAMn I DpyrIMN daHHbIMN B DBx HApRaBJIeHnIX MExJd y annapaTaMn, IMeIoUmM rHe3da i.LINK, a TaKxe dIa YnpabJIeHnI DpyrIMN annapaTaMn. i.LINK-COBMeCTMbI annapaT MoXHO noCoEINHTb C NOMOuBIO OJHO KAbEY I.LINK. Bo3MoXHbIe npImeHEnH 3ToI cyHKcIMn OXBaTBiBAIoT OpeaUMn I nepeaUN DaHHbIX C pa3HbIMN UΦpOBbIMn ayDInOBnDeoAnnapaTaMn. Ecn K DaHHOMy annapaTy NOcoEINHeHbI Dba IIn SoJonei i.LINK-COBMeCTMbI annapaT B noCleJoBaTeJbHoI cEN, TO Bo3MoXHbI opeaUMn I nepeaUN DaHHbIX He ToJbKO c NoDCoEINHeHbIM annapaTOM, HO I C DpyrIMN annapaTaMn Yepe3 HEnocPeDCTBeHHO noCoEINHeHbI annapaT.
Ondako mMeIe B BVdy, yTo MeToI ynpaBleHn IHOrJa OTIIuYaeTcB 3aBVCIMoCTn OT XapaKTePncTkn N TexHnYeCKnx DaHbIX NOcOeINHHeMOrO annapaTa C DBymN IJI 60lee rHe3dAmi i.LINK (rHe3da DV), n YTO onepaunn I nepeaun daHHbIX INOHra HeBO3MOxHbI Ha HEKOtOpbIX NOcOeINHHeMbIX annapaTaX.
Птумецни
O6bIHyO,ToIbKO OINH annapaT MOxHO
NoCDoeDHNITb K DaHOMy annapaTy C NOMOsbIO
Ka6eJIa.i.LINK (uΦpOboR o Ka6eJIa DV).Pn
NoCDoeDHNHeHHn DaHORo annapaTa K DByM INN
60nee i.LINK-COBMeCTNbMbIM annapaTaM n3yUHTe
pyKOBODCTBO NO 3KcNlyaTaun
COOTBETCTBYUoCErno NoCDoeDHNHEmoro annapaTa.
OTHOCINTeJbHo Ha3BaHnI “i.LINK”
i.LINK ABIETc6 60lee npBbIHybIM TepMHOM dIy IINHbI nepeaun DaHHbx IEEE 1394, npedIOxehHOf pnpMoY SONY, n OH ABIeTc fIpMHeHbIM 3HaKOM, yTBepXJeHHbIM MHOrnMI KOpnpaUNAMN.
IEEE 1394 ABJETCA MExdyHapOdHbIM CTaHapTOM, yTBepXdeHHbIM INCTHTyTOM INHexepeOB NO 3JEKtpOTexHnke IN 3JEKtpOHKe.
i.LINK Baud rate
i.LINK's maximum baud rate varies according to the equipment. Three maximum baud rates are defined:
S100 (approx. 100Mbps*)
S200 (approx. 200Mbps)
S400 (approx. 400Mbps)
The baud rate is listed under "Specifications" in the instruction manual of each equipment. It is also indicated near the i.LINK jack on some equipment.
The maximum baud rate of equipment on which it is not indicated such as this unit is "S100".
When units are unit is connected to equipment having a different maximum baud rate, the baud rate sometimes differs from the indicated baud rate.
- What is "Mbps"?
Mbps stands for megabits per second, or the amount of data that can be sent or received in one second. For example, a baud rate of 100Mbps means that 100 megabits of data can be sent in one second.
i.LINK Functions on this unit
For details on how to dub when this unit is connected to other video equipment having DV jacks, see page 84.
This unit can also be connected to other i.LINK (DV) compatible equipment made by SONY (e.g. VAIO series personal computer) other than video equipment.
Before connecting this unit to a personal computer, make sure that application software supported by this unit is already installed on the personal computer.
For details on precautions when connecting this unit, also refer to the instruction manuals for the equipment to be connected.
Required i.LINK Cable
Use the Sony i.LINK 4-pin-to-4-pin cable (during DV dubbing).
i.LINK and are trademarks.
Ckopooctb nepeaun i.LINK
MaKcImaJIbHaI cKOpocTb nepeDaHn i.LINK n3MeHЯTeC B 3aBcImOCTn OT annapaTa. ImeOTc Tpr MaKcImaJIbHbIe cKOpocTn nepeDaHn:
S100 (npu6n3. 100 M6nT/c*)
S200 (npn6Jn3. 200 M6nT/c)
Using your camcorder abroad
You can use your camcorder in any country or area with the AC power adaptor supplied with your camcorder within 100V to 240V AC, 50/60 Hz.
Your camcorder is a PAL system based camcorder. If you want to view the playback picture on a TV, it must be a PAL system based TV with VIDEO/AUDIO input jack. The following shows TV colour systems used overseas.
PAL system
Australia, Austria, Belgium, China, Czech Republic, Denmark, Finland, Germany, Great Britain, Holland, Hong Kong, Italy, Kuwait, Malaysia, New Zealand, Norway, Portugal, Singapore, Slovak Republic, Spain, Sweden, Switzerland, Thailand, etc.
PAL-M system Brazil
PAL-N system
Argentina, Paraguay, Uruguay
NTSC system
Bahama Islands, Bolivia, Canada, Central America, Chile, Colombia, Ecuador, Jamaica, Japan, Korea, Mexico, Peru, Surinam, Taiwan, the Philippines, the U.S.A., Venezuela, etc.
SECAM system
Bulgaria, France, Guyana, Hungary, Iran, Iraq, Monaco, Poland, Russia, Ukraine, etc.
Simple setting of clock by time difference
You can easily set the clock to the local time by setting a time difference. Select WORLD TIME in the menu settings. See page 107 for more information.
Moisture condensation
If your camcorder is brought directly from a cold place to a warm place, moisture may condense inside your camcorder, on the surface of the tape, or on the lens. In this condition, the tape may stick to the head drum and be damaged or your camcorder may not operate correctly. If there is moisture inside your camcorder, the beep sounds and the indicator flashes. When the indicator flashes at the same time, the cassette is inserted in your camcorder. If moisture condenses on the lens, the indicator will not appear.
If moisture condensation occurred None of the functions except cassette ejection will work. Eject the cassette, turn off your camcorder, and leave it for about 1 hour with the cassette compartment open. Your camcorder can be used again if the indicator does not appear when the power is turned on again.
Note on moisture condensation Moisture may condense when you bring your camcorder from a cold place into a warm place (or vice versa) or when you use your camcorder in a hot place as follows:
- You bring your camcorder from a ski slope into a place warmed up by a heating device.
- You bring your camcorder from an air-conditioned car or room into a hot place outside.
- You use your camcorder after a squall or a shower.
- You use your camcorder in a high temperature and humidity place.
How to prevent moisture condensation When you bring your camcorder from a cold place into a warm place, put your camcorder in a plastic bag and tightly seal it. Remove the bag when the air temperature inside the plastic bag has reached the surrounding temperature (after about 1 hour).
KoHdeHcaZnBlaRn
EcIn BnDeOkamepa npHnecHa npAMo n3 XOJNOHO MeCTa B TeNIOe,TO BHyTpN BnDeOkamepbI,Ha NOBepxHOCTn LEHTb I IIN Ha 06BeKtTBE MOKeT IpOn3OITN KOHeCnAChUBAIgB. BTAOK COCTOHN INHTa MOKeT npuINHcyB K bapabayHy rOLOBKN i BydET NOBpeXJDeHa IIN JVE BnDEOkamepa He CMOKeT paBoTaTb HAnLexaUM mbpa3OM. EcIn BNYtpN BnDeOkamepbI pOn3OIM NaOHDeHCaUNBlaRn, TO pOn3ByuHT 3yMMepbI CNrHaN, a HA 3KnpaHe 6yEdT MraTb INDkaTOP .EcnB To JxE cAmoe BvEmB 6yEdT MrrA Tb INDkaTop ,3TO 3NaHT, YTO BnDeOkamepy BCTABNeHa Kacceta. EcIn Bnara CKOHDeHCnpOBaNacb Ha 06BeKtTBe, INDkaTOP NOBnA TBCn HE 6yEdT.
Ecn npon3oJna KOHdeHcaJn BlaJn
Hn Onda H3 cyHKcN, KpOme BbItaKNBaHnKacCtBt, He 6ydt pa6oTaB. N3BNeKeNTe KaCCTe, BbIKJIOUHTe BNDeOKaMEpy N OCTaBBte ee np6JIIN3HTeNbHO Ha 1 qac COTkpBTbIM KaccEThBM OTceKOM. EcIn npNoBTOPHOM BKJIOUChEN INTAHNA INDkATOp HE NOBUTCAHa DnCJIpeE, Bbl MoXeTe CHOba NOnb3ObaTbcBnDEOKaMEpoi.
PpimcHne no KOHdeHcaunn BlaHn
Bnara moKeT o6pa3oBaTbCra, ecIn Bbl npHecete BaSy BuDeokamepy nX xOIoNHoro MeCTa B TeIIOe (nnn Hao6OpOT) nnKorDa Bbl nCnoIb3yTe BaSy BuDeokamepy B kApkOM MeCTe B cJeDyUOuX clyuaX:
-BbI npHecn BaUy BInDeokamepy c IbIXHOcKIOHa B NOMeueHne, rIe cyHKUOHNpyeT 06OrpeBaTeIb.
-BbI npHecnB Bauy BnuDeokamepu n3 aBTOMO6nJI NnN I3 KOMHaTbI C Bo3dUHbIM KOHNIOHOPOBaHHeM B XapKoe MeCTo Ha yInCe.
-BbI nCnOJIb3yeTe BnDEoKamepy nocIe rpo3bl IJIN DoXJa.
-BbI nCnoJIb3yTe BaUy BnDeOkaMepy B OueHb JapKOM N BlaJxHOM MecTe.
Kak npedotBpataNb KOHcauNIO BlaH
EcIn BnDeOKaMepa npHecHa n3 XoJOnHOrO MeCTa B TeJIIOE,TO NIOXKeTBe BNDeOKaMepy B NOnIaTmJIeHObB I NaKeT I NIOToHO 3aKJeIeTe erO. BbIbTe BnDeOKaMepy n3 NOnIaTmJIeHOBO rNaKeTa, KOrJa TEmNepaTypa BO3dYxa BHyTpni NaKeTa DOCTnIRHTemNepaTypbI OkpyKaIoUeRo BO3dYxa (PpIb6Ibn3nteJIbHo uepe3 1 qac).
Maintenance information
Cleaning the video head
To ensure normal recording and clear pictures, clean the video heads.
When you playback/record in the Digital8 system
The video head may be dirty when:
- mosaic-pattern noise appears on the playback picture.
- playback pictures do not move.
- playback pictures do not appear.
- the × indicator and “CLEANING
CASSETTE" message appear one after another during recording.
If the video head gets dirtier, the entire screen becomes blue.
HΦopMaζη no yxody
UcTka BundeOrONoBOK
When you play back in the Hi8/Standard 8 (analog) system
The video head may be dirty when:
- playback pictures contain noise.
- playback pictures are hardly visible.
- playback pictures do not appear.

or/nn
PnB BocnpOn3BeDeHnn B CnCTeMe Hi8/ CTaHApTHOI CNCTeMe 8 (aHaJorOBoi)
BudoeorOJOBKn BO3MOXHO 3aPr3HeHbI,ecN:
-Bocnpo3B0dImoe n3o6paXeHne coepxnt nomexn.
- Bocnpon3Bovnmoe n3o6paXeHne c Tpydom pa3nVIMO.
-Bocnpoan3B0DnMoe n3O6paXeHne He nO8BnreTcHa 3KpAhe.

If the above problem occurs, clean the video heads with the Sony V8-25CLD cleaning cassette (optional). Check the picture and if the above problem persists, repeat cleaning.
Cleaning the LCD screen
If fingerprints or dust make the LCD screen dirty, we recommend using a LCD Cleaning Kit (optional) to clean the LCD screen.
B cnyaee Bo3nKHOBeHn yKa3aHHbIX Bblwe npo6lne, noCHNTe BVDeOOrOBKn C NOMOuBcO ouCTnteBnOH KaccetbI Sony V8-25CLD (npno6peTaTcN OTeJbHo).PpOBepbTe n3o6paXeHne n,ecnn OOnCAnHbE BIIwe npo6lneMbHe YcTpaHnInCb, nobTOPnte YnCTKy.
UncTkA 3KpaHa KKd
EcnHa 3KpaHe XXKD nOBArTcO TneuATkn naIbueB nnI nbJIb, peKOMeH dyETcB BOCnOl3OBaTbCOnCTnTeNbHbIM Ha6Opom dJa XXKD (npno6peTaetcOnDeNbHO) dJa YnCTKn XXKD.
Charging the built-in rechargeable battery
Your camcorder is supplied with a built-in rechargeable battery so as to retain the date and time, etc., regardless of the setting of the POWER switch. The built-in rechargeable battery is always charged as long as you are using your camcorder. The battery, however, will get discharged gradually if you do not use your camcorder. It will be completely discharged in about half a year if you do not use your camcorder at all. Even if the built-in rechargeable battery is not charged, it will not affect the camcorder operation. To retain the date and time, etc., charge the battery if the battery is discharged.
Charging the built-in rechargeable battery:
- Connect your camcorder to a wall socket using the AC power adaptor supplied with your camcorder, and leave your camcorder with the POWER switch turned off for more than 24 hours.
- Or install the fully charged battery pack in your camcorder, and leave your camcorder with the POWER switch turned off for more than 24 hours.
Precautions
Camcorder operation
- Operate your camcorder on 7.2V (battery pack) or 8.4V (AC power adaptor).
- For DC or AC operation, use the accessories recommended in this operating instructions.
- If any solid object or liquid get inside the casing, unplug your camcorder and have it checked by a Sony dealer before operating it any further.
- Avoid rough handling or mechanical shock. Be particularly careful of the lens.
- Keep the POWER switch set to OFF (CHG) when you are not using your camcorder.
- Do not wrap your camcorder with a towel, for example, and operate it. Doing so might cause heat to build up inside.
3apKa BCTpoEHNo aKKyMylTOpHoi 6aTapeiKn
Baasa Bndeokamepa ochaeta BcTpoeHHoakymyIaTOPHO6batapeiKOdI TOrO,HTo6bIPOndepxNBAbTaDy, Bpemr nT.D.,BHe3aBNCIMOCNTOYCTaHOBKnepeKJIOnaTePAIPOWER.BCTpoEHNAAKyMylAToPbHa6batapeiKaBcerDa3apJXaeTcR,koJaBbIncNoJIb3yeTe Bauy BnDeokamepy.Ondako,6batapeiKaNoCTeNEHNOpa3prAnTcR,ecmBblHe 6byTe NcNoJIb3ObaTbBaCyu BnDeokamepy.Oba6ydtNeNoHocTbOpa3prKeHa npimepHouepe3 NoIroda,ecmBblBoo6Se He 6byTeNoJIb3ObaTbcBaWe BnDeokamepoJ.DaxeecnBCTpoEHNAAKyMylAToPbHa6batapeiKaHe 3apJXeHa,Oha He NoBNIaET Ha pa60TuBnDeokamepb.YtO6bINoDepxNBAbTaDtHy bPemr,3apJInTe 6batapeiKy,ecmOnaHpazprAnlacb.
3apRka BCTpoEHNo aKKymyIaTOPHO 6aTapeiKn:
Под_COетине Baшу Bиdeokamepy K CTehnoi po3eTke, Испόньзуа addanTpEri nITaHЯ nepeMeHHoro TOKA,ПрINaRaembI K BaшeI Bиdeokampe,ИocTaBte BaShy Bиdeokamepy CBblKIIIOUeHbIM nepeKJIIOUaTeIeM POWER 60JIeue YeM Ha 24 yaca.
- Iи npikpeiTe nonHocTbIO 3apRjxEHHbI bTaapeHbI 6bok K Bauei BnDeoKaMepe n ocTabBe TaSy BuDeoKaMepy C bIKluoyeHHbIM nepeKlouaTeJeM POWER 60nee Yem Ha 24 yaca.
MepblnpedoctopoXHoctn
3KcnIyataunBndeokamepbI
- 3KcπnyaTupyIte BndeOkaMepy ot 7,2 B (6aTaapeHbI b6I0K) nI N 8,4 B (ceTeBOJ aDAnTEp IpeMeHnHO TOKa)
- YTO KACAETCA 3KCNLYaTauIN BUNDEOKaMepeB1 OT NOCTOAHHORIO INPEMEHHO TOKA,NCNObyTuPe HnAJIEXHXOCT, PEKOMEHyEMbIe B DaHHOn IHCTpyKUHN NO 3KCNLYaTaUIN.
Ecni KaKoi-Ni6yDb TBeRbI npEIMETnJIN XIKIOCTb NOpAII BNHTb KOpNya, BbIKJIouHrTe BUNeOKeAMepy I npOBePbTe ee y dIJIpeLa Sony neped daIbHeuWee ee 3KcPiyaTaunie.
-Избегаитгрубогообрашенивидекамеровлм Мexанчecкх ударов.Будьтесobенho OCTOPOXнblсObbeektibOM. -
EcNn BvIeOkaMepa He NcNoIb3yeTCH, yctAHOBInTe BblKnIOuAteJIb POWER B noJIoXeHm Off (CHG).
He 3abopauBaIte BaUy BnDeokamepy, HapmMep, B noLoteHue, n He 3KcPnyATnpyTe ee B TAKOM COCTOHN. B npOTNBOM Cnyae MOXET npON30ITN NOBIIeHne TEMnepaTpybl BHYTPN BNDeokamepbI. -
Keep your camcorder away from strong magnetic fields or mechanical vibration. Noise may appear on the image.
- Do not touch the LCD screen with your fingers or a sharp-pointed object.
- If your camcorder is used in a cold place, a residual image may appear on the screen. This is not a malfunction.
- While using your camcorder, the back of the LCD screen may heat up. This is not a malfunction.
On handling tapes
- Do not insert anything into the small holes on the rear of the cassette. These holes are used to sense the type and thickness of the tape and if the recording tab is in or out.
- Do not open the tape protect cover or touch the tape.
Camcorder care
- Remove the tape, and periodically turn on the power, operate the CAMERA and PLAYER or VCR (DCR-TRV330E only) sections and play back a tape for about 3 minutes when your camcorder is not to be used for a long time.
- Clean the lens with a soft brush to remove dust. If there are fingerprints on the lens, remove them with a soft cloth.
- Clean the camcorder body with a dry soft cloth, or a soft cloth lightly moistened with a mild detergent solution. Do not use any type of solvent which may damage the finish.
- Do not let sand get into your camcorder. When you use your camcorder on a sandy beach or in a dusty place, protect it from the sand or dust. Sand or dust may cause your camcorder to malfunction, and sometimes this malfunction cannot be repaired.
Connection to your computer
- When recording with i.LINK cable the image processed or edited by your computer, use a new Hi8 H18/Digital8 tape.
- When inputting the image recorded by Hi8/ standard 8 (analog) system into your computer, dub the image into a Digital8 or DV tape first, and then input it into your computer.
When inputting the image recorded by Hi8/ standard 8 system into Sony VAIO
The Program Capture function of DVgate motion doesn't work. To use this function, dub the image into a Digital8 or DV tape first, and then input it into your Sony VAIO.
HΦopMaζη no yxOу 3a annapaTOM n Mepbl ppeoctOpoxKHOCTn
-ДерхиTe BaSu Bndeokamepy noJaIbIe OTO nBbIX MaHHTbIX pIoJIe mIJIm MEXaHueCKO bIbpaIu. Ha n3obpaXeHn MOrYT nOraBtbc nOMexN.
He npikacaitcEckpnyHKD cboaMn panbcaum INH octPbIMn pRdEMTAMi.
-ПиЗКСРЛУаТaцИNВашЕВИДeOKaМерБВxOJOHOMMeCTHe,НэКрАнЖКДМожET NOВЯлбСОCTaTOUHoeИЗOBpaXeHne.ЗTo He RAJIHTcR HeINCPaBHOCTbI.O.
-Пи зкплуатам Baawe Bndeokamepbl,Здяг STOPOHAЗККДМоketHArpeBaTbC.3TO He ABJIeTcH HEnCnpabBOCTbI0.
06paueHne c JeHTamn
He BCTABJIrTe HNcero B MaNEHbKMe OTBepCTnHa 3aHdNe CTOpOHe KaccTebl. 3TN OTBepCTNuNCoJIb3yOTCn DnI ONpeDEneHn Tnna INToLIINbI JIeHTbl, a TAKKe DnI ONpeDEneHn HAJIuHn IIN OTCYCTBn IeNecTka 3aunTbI 3aNNc HJNeHTe.
He OTKpbIbAaTe 3aunTHyU KpbIshky JIeHTbI Hne npKacaiTeCb KJeHte.
Yxo3a Bndeokamepo
-Пелюдческы Виимау Касету и ВКлочауптане, осяруне устоястамСАРЕWAИ VCR (Toько модаль DCRTRV330E)и BCOPno3BODNTe LENTY NOPIKDA 3-x MInHt, ecn BaWa BИDEOKampe He 6byTeNCNOLBJ3OBAtBcДиТeTbHObE BPEM.
- UnCTNTe OBeKTNB C NOMOuBIO MRAKo KNUCTOuKNI DnyUaJIENH NbIIN. ECNI NImEIOCTO NTNeTuKNI NaJIbueB Ha OBeKtNBe, YdaJInte INx C NOMOuBIO MRAKo TKAHN.
JcHrTKe KOpNyc BuDeOKaMepbI c NMOUbCyxOJ MrgKoTKaHN JIN MrgKo TKaHN, CJeRKa CMOUHeHOr pactBOPOM YMepeHHOrO MOUeOer CpeDCTBa. He IcNoJIb3yIte KaNX-Jn6o TInOB pactBopnteIe, KOtOpBe MOnYr NObpeDITb OTdNkY.
He donyckaTe nonadaHnna necka B
BHeDekampey. EcnBbHmNcNoIb3yeTe
BHeDekampey HNaCeuaHnPAnKe IINu B KaKOM
JIIn60 NblbHom MeCTe, npEdoxpaHnTe annapaT OT
necka IINu PbJIn. TecOK IINu PbJb MoryT
pInBBeCTn K HEnCnpBaHnCTn AnnapaTa, KOtOpar
HOrDa MoKet 6bITb HEmCnpBaHMoN.
IopKJIIOHeHc K BaWEmy KOMNbIoTepy
-ПиЗздпссс nnomоьюшура i.LINK, n360paackeHne MOnHO 6OBpaBaTBiBaTbI nepeДakTnIOpoBAТи BaWaem KOMNbIOTepe, nCNoJIb3yIte ПиЗТOM HOBuY NeHTy Hi8 Hi3/ uNФрОвУ NeHTy NeHTy Digital8 [].
Пи ВВОДе n360paЖЕнma,ЗАпСанHOrO B CnCTeMe Hi8/CTaHdAPTHoN CnCTeMe 8 (aHaIorOBoi),B BaI KOMpbIoTeP,ChaJaIa CdenaiTe KOINIO n360paЖЕнma HuaΦpOByIO leHTy Digital8 I mN DV,a 3aTeM BBeДnte erO B KOMpbIoTeP.
При ВьODEиЗБОБРАЖЕнИ,ЗАпсанHOrOВСЧТЕМ经Hi8/CTaнДAPТНОИССТЕМ经8,Bnporpammy Sony VAIO
Функша зхвета ИЗБрахенИ DVgate motion He pa60tae.TЯн MСПОЛьЗОВАнЯ 3Тои Функшп chана скониpyе ИЗБрахенпе на UNФову loHenty Digital8I INM DV, a 3aTeM BBeДпte erO B Baуnporpammy Sony VAIO.
AC power adaptor
- Unplug the unit from a wall socket when you are not using the unit for a long time. To disconnect the mains lead, pull it out by the plug. Never pull the mains lead itself.
- Do not operate the unit with a damaged cord or if the unit has been dropped or damaged.
- Do not bend the mains lead forcibly, or place a heavy object on it. This will damage the cord and may cause fire or electrical shock.
- Prevent metallic objects from coming into contact with the metal parts of the connecting section. If this happens, a short may occur and the unit may be damaged.
- Always keep metal contacts clean.
- Do not disassemble the unit.
- Do not apply mechanical shock or drop the unit.
- While the unit is in use, particularly during charging, keep it away from AM receivers and video equipment. AM receivers and video equipment disturb AM reception and video operation.
- The unit becomes warm during use. This is not a malfunction.
-
Do not place the unit in locations that are:
-
Extremely hot or cold
- Dusty or dirty
- Very humid
-Vibrating
About care and storage of the lens
- Wipe the surface of the lens clean with a soft cloth in the following instances:
- When there are fingerprints on the lens surface
-In hot or humid locations - When the lens is used in environments susceptible to salt such as the seaside
- Store the lens in a well-ventilated location subject to little dirt or dust.
To prevent mold from occurring, periodically perform the above.
We recommend turning on and operating the video camera recorder about once per month to keep the video camera recorder in an optimum state for a long time.
Cetebo aadantep nepemehhoro ToKa
- OTCOeINHnTe annapat OT cTehHOI po3ETKn, ecn OH He nCNObl3yeTCa DInHTeNbHoe BpEMA.ДЯ OTCOeINHeHnCeTeBOrO shHypa NotAHnTe ero 3a pa3bEm. HnkOrda He TAnHnTe 3a cam shHyp.
He 3KcnpyataHpyTe annapat C noBpeXdEHbIM UHypom IIN Jx B cnyae, ecnn annapat Ynai nIN 6bl nobpeXdeH.
He crnbaiTe ceTeBOI npoBOd cInIoN i He CTaBBTE Ha Hero TReXeJIbIe ppeDMeTbI.3TO NOBpeiNT npoBOd mMOKeT npuBeCTn K NoxapuynnopaxKeHIO 3NeKtpueckm TOKOM. - ByIbTe OCETOPOXKnbl, YTO6bl HNKaKne MeTaNINHECKNe IpeDMeTbI He COpNIkACAJNcB CMeTaNINHECKKNMI KOHTaKTAMn COEINHITeJIbHOI PNaCTINbI. EcIn 3TO CNYUHTC, TO MOKeT PpOIN3OHTN KOpOTKoe 3AmbKaHMe, n AnnpaT MoKeT 6bITb NOBpeXDeH.
CJIeITe 3a TEM, YTO6bI MetaJIInuYeCKne KOHTaKTbI 6blIN UcTbIMN. - He pa3bpaai Te annapat.
- He noДвергайte annapaT mexaHueckoBn6paunu n He poHaiTe erO.
- Пи Исплььовани anecdapata, особен BO B Врмя Зардки, deprжITE erо поалбwe ot Рпемнков AM-paДИОВЕSHAANИ видаоап.apaТуbl. ПпемнкIM Am-PaДИОВЕSHAANИ видаоап.apaТура hapшадOT AM-paДИОПРeM и paBoTy BnDEOAPaTpybl.
B npoucece 3Kcnpnyataun annapat HarppeBaetc. TOBnAeTcBnOJIHe HOpMaJIbHbIM. - He pa3meaunTe annapat B Mectax: -Yepe3mepHo kapKx uIN XOJIOHbIX
-ПыньHbIX ИИnpRЯ3HbIX
-OueHbBnaXhblIX
-ПОДВЕРЖЕНБИ ВИБРАЦN
06 yxode 3a o6bekTNBOM n ero xpaheHn
-П ropntpaaiTe NOBepxHocTb ObeKtNBa CyXOuNCTOITKaHbIO B CJIeDyUOxN CJIyuaX:
-ECnHaNoBepxHOCtNIMH3blOCTaJIINCbOTneuATKn NaJIbueB
-BXkapKnxnnBnAkhbIXMeCTax
- Ecnn oBekTNB nCnObn3yETcB COneHON cpe, HApnpMep, Na nobepexBe MopA
XpaHnTe ObBeKtNB B XopoIo BeHTnIpyEMOM MeCTe, HeOCTynHom IJr IblJN IN rpa3N.
- Use only the specified charger or video equipment with the charging function.
- To prevent accident from a short circuit, do not allow metal objects to come into contact with the battery terminals.
- Keep the battery pack away from fire.
- Never expose the battery pack to temperatures above 60^ (140^) , such as in a car parked in the sun or under direct sunlight.
- Keep the battery pack dry.
- Do not expose the battery pack to any mechanical shock.
- Do not disassemble nor modify the battery pack.
- Attach the battery pack to the video equipment securely.
- Charging while some capacity remains does not affect the original battery capacity.
Note on dry batteries
To avoid possible damage from battery leakage or corrosion, observe the following:
- Be sure to insert the batteries with the + - polarities matched to the + - marks.
- Dry batteries are not rechargeable.
- Do not use a combination of new and old batteries.
- Do not use different types of batteries.
- Current flows from batteries when you are not using them for a long time.
- Do not use leaking batteries.
If batteries are leaking
- Wipe off the liquid in the battery compartment carefully before replacing the batteries.
- If you touch the liquid, wash it off with water.
- If the liquid get into your eyes, wash your eyes with a lot of water and then consult a doctor.
If any problem occurs, unplug your camcorder and contact your nearest Sony dealer.
BaTapeHbIb6Jok
- IcnoIb3yIte ToIbKO peKoMeHdyEmoe 3apJHOe yCTPOIcTBO INI BnDeoanpaTpy C 3apJHOHФyHKUeN.
ДлгпрдOTьрашенн HeсчacTHOrO cIyчан n3-3a KOPOTKOrO 3aMbICnH He ДОпуСкайTe KOHTaKToMaTeJIИЧeCKNx PpeMTeOB C noJIOCAMbSaTepHOrO bIoka. - He pacnojaraite 6atapeHbI 6JIOK B6JIu3n orHJ.
He npBepraTe 6aTapeHbI bIOK BO3dEICTBnIO TEMpepaTycBbIe 60°C, HAnpIMeR, B npNapKOBaHHOM IOI COJIHcEM aBTOMObIe NII NIOI pPmbl COMOLHeYbIM CBEtOM.
CneDnte 3a Tem, YTo6bI 6aTapeHbI 6JOK 6bl CyxIM. - He noDBeprAte 6aTapeHbI 6LoK BO3DeIcTBnIO KaKnx-Jn6o MExaHnuecknx yIapOB.
- He pa3bnpaTne n He BnDOn3MeHnTe 6aTapeHbI 6NoK.
- Пгкрплгп Te 6atapeинь 6лok K BndeoannapaType nIOTHO.
- 3apЯДа в сlyае оstabш�ся EMKOCТи 3apЯДа He OtpaЖаETСЯ ha EMKOCТи првончального зapяДа.
PpimcuaHne K cyxM 6aTapeiKaM
Bo n36eKahne Bo3MOxHOro noBpeXdEHHBnDEOKaMepbI BCNeDCTBnE yTeuKN BHyTpeHHeRoBeueCTBa 6aTaapeek nn Kopp03nn Co6JIoudaJTeCneDyUoee:
-При установке батуарек соблюдайправильнуюлярноctь + -В COOTBETCTBИС MEТКAMN + -.
-Cyxne 6atapeeKn Helb3n nepe3apKaTb.
-He nCnoJIb3yIte HOBIIe 6aTapeKn BmecTe CO CTapblM.
-He nCnoJb3yIte 6aTapeKn pa3Horo Tuna.
-EcIn 6aTapeKHe nCIOJb3yIOTc dNITeJIbHoe Bpemr, OHn IOCTeNEHNO pa3PJAOTcA.
-He nCnoIb3yIe 6aTapeuKn, KOTOpblne NOTeKJI.
EcIn npOn3oUla yTeuKa BHyTpEnHero BeuecTb6aTaapeek
-Перед Tem,Кak 3amehntb 6aTapeeKn, TuaTeIbHNO pOtpnTe OCTaTKN KUdkoCTN B OTCeKe DnA 6aTapeeK.
Bcnyae npaandaHnJkuKoCTn Ha Koxy, npOMTe JnuKoCTb BOOn.
Bcnyae nonaadaHЯ JxdkocTn B rla3a, npomTe CBOI rla3a 60JIbUIMK OJIuYeCTBOM BObl, nOcne Yero o6paTntecb K BpaYu.
B clyaee Bo3HKnHOBeHn KaKnx-Jn6o np6Jem, OTKIIOHTe BaUy BnDeOkaMepy OT nCTOHNKa IITaHnI N o6paTntEcB B 6nXkAunn cepBnCHbI ueTp Sony.
Video camera recorder
System
Video recording system
2 rotary heads
Helical scanning system
Audio recording system
Rotary heads, PCM system
Quantization: 12 bits (Fs 32kHz
stereo 1, stereo 2), 16 bits
(Fs 48 kHz, stereo)
Video signal
PAL colour, CCIR standards
Recommended cassette
Hi8/Digital8 video cassette
Recording/playback time (using
90 min. Hi8 video cassette)
SP mode: 1 hour
LP mode: 1 hour and 30 minutes
Fastforward/rewind time (using
90 min. Hi8 video cassette)
Approx. 5 min.
Viewfinder
Electric Viewfinder, Monochrome
Image device
3 mm (1/6 type CCD)
(Charge Coupled Device)
Approx. 800 000 pixels
(Effective: Approx. 400 000 pixels)
Lens
Combined power zoom lens
Filter diameter 37mm (1 1/2 in.)
25× (Optical), 700×^* (Digital)
*800× (DCR-TRV235E/TRV430E)
Focal length
2.4 - 60 mm (1/8 - 2 3/8 in.)
When converted to a 35mm still
camera
46 - 1 150 mm (1 13/16 - 45 3/8 in.)
Colour temperature
Auto
Minimum illumination
6 lx (lux) (F 1.6)
0 lx (lux) (in the NightShot mode)*
- Objects unable to be seen due to the dark can be shot with infrared lighting.
Input/output connectors
S video input/output
4-pin mini DIN
Luminance signal: 1 Vp-p,
75 Ω (ohms), unbalanced
Chrominance signal: 0.3Vp - p 75
(ohms), unbalanced
Audio/Video input/output
AV MINIJACK, 1 Vp-p, 75 Ω
(ohms), unbalanced, sync negative
327mV (at output impedance more than 47k (kilohms))
Output impedance with less than
2.2 kΩ (kilohms)/Stereo minijack
(0 3.5 mm)
Input impedance more than 47k (kilohms)
Headphone jack
Stereo minijack ( 3.5mm)
USB jack (DCR-TRV325E/TRV330E/
TRV430E/TRV530E)
mini-B
LANC jack
Stereo mini-minijack ( 2.5mm)
MIC jack
Stereo minijack (0 3.5 mm)
DV input/output
4-pin connector
LCD screen
Picture
DCR-TRV230E/TRV235E/
TRV325E/TRV330E:
6.2 cm (2.5 type)
50.3 × 37.4 ~mm (2 × 11 / 2 in)
DCR-TRV430E:
7.5cm (3 type)
61.0 × 43.8 ~mm (21 / 2 × 13 / 4 in)
DCR-TRV530E:
8.8 cm (3.5 type)
72.2 × 50.4 ~mm (2 7 / 8 × 2 in.)
Total dot number
123 200 (560× 220)
General
Power requirements
7.2 V (battery pack)
8.4 V (AC power adaptor)
Average power consumption
(when using the battery pack)
During camera recording using
LCD
DCR-TRV230E/TRV235E/
TRV325E/TRV330E: 3.9 W
DCR-TRV430E/TRV530E:4.2W
Viewfinder
3.0 W
Operating temperature
0^ to 40^ (32^ to 104^)
Recommended charging
temperature
10^ to 30^ (50^ to 86^)
Storage temperature
-20^ to +60^ (-4^ to +140^)
Dimensions (Approx.)
85× 102× 205.5mm
(3 3 / 8× 41 / 8× 81 / 8 in.) (w / h / d)
Mass (approx.)
DCR-TRV230E/TRV235E:
880 g (1 lb 15 oz)
DCR-TRV325E/TRV330E:
900 g (1 lb 15 oz)
DCR-TRV430E/TRV530E:
930 g (2 lb 0 oz)
excluding the battery pack, cassette and shoulder strap
DCR-TRV230E:
1020g(2lb3oz)
DCR-TRV235E/TRV325E/
TRV330E:
1040g(2lb4oz)
DCR-TRV430E:
1090g(2lb6oz)
DCR-TRV530E:
1070 g (2 lb 5 oz)
including the supplied battery pack
(NP-FM30 or NP-FM50), 90min. Hi8
cassette, and shoulder strap
Supplied accessories
See page 3.
AC power adaptor
Power requirements
100-240VAC,50/60Hz
Power consumption
23 W
Output voltage
DC OUT: 8.4V 1.5 A in the
operating mode
Operating temperature
0^ to 40^ (32°F to 104°F)
Storage temperature
-20^ to +60^ (-4^ to +140^)
Dimensions (approx.)
125× 39× 62mm
(5× 19 / 16× 21 / 2 in.) (w / h / d)
excluding projecting parts
Mass (approx.)
280 g (9.8 oz)
excluding the mains lead
Battery pack
Maximun output voltage
DC 8.4 V
Mean output voltage
DC 7.2 V
Capacity
NP-FM30:
5.0 Wh (700 mAh)
NP-FM50:
8.5 Wh (1 180 mAh)
Operating temperatur
0^ to 40^ (32^ to 104^)
Dimensions (approx.)
38.2 × 20.5 × 55.6 ~mm
(19 / 16 × 13 / 16 × 21 / 4 in.)
(w/h/d)
Mass (approx.)
NP-FM30:
65 g (2.3 oz)
NP-FM50:
76 g (2.7 oz)
Type
Lithium ion
"Memory Stick"
(DCR-TRV325E/TRV330E/ TRV430E/TRV530E only)
Memory
Flash memory
4MB: MSA-4A
Operating voltage
2.7 - 3.6 V
Power consumption
Approx. 45mA in the operating mode
Approx. 130~ A in the standby mode
Dimensions (approx.)
50× 2.8× 21.5mm
(2× 1 / 8× 7 / 8 in.) (w / h / d)
Mass (approx.)
4 g (0.14 oz)
Design and specifications are subject to change without notice.
TexHnueckne XapaKTepeNCTnKN
Bvdeokamepa
CnCTema
CnCTema BnDeo3aHncn
2Bpaaioiuecra roIobkn
CnCTema HaKJIOHHOI
MexaHnuecko pa3BepTKN
CnCTemaaydno3aunnc
LBeTobO BcHnPal, cTaHdpT MKKP
PekomeHnyeMbIe Kaccetbl
Bndeokacctb Hi8/Digital8
Bpem3aHncw/
Bocnpon3BeDeHn(npn
NcnoJIb3OBAHmN 90-MnH. Kaccetbl Hi8)
PekmSP:1ac
Pexim LP: 1 cac 30 mHnyT
Bpem yckopenhno nepoMToKn Bpeed/Ha3ad (pnn nCNoJIb3OBAHN 90-MMH. KacceTbI Hi8)
Pn6m3.5MH
BudonckateIb
3JeKTPOMATNCHECK
ΦopMnpoBaTeIb 306paXeHnA
25-kaTbIy (onTnueckm),
BbIXoD/ByixoD CnHana S BnDeo
4-山bIpbkoBoe MHH-rHe3do DIN CnHAn npKoCTn:pa3Max 1 B, 75Ω (OM), HcNMMETpHuHbI CnHAn UBeTHOCTn:pa3Max 0.3 B 75Ω (OM), HcNMMETpHuHbI
Bxod/BbixoD cnHana ayduo/ Bndeo
AV MINJACK, pa3max 1 B, 75 Ω (OM), HeNMMETPNHbIy, 327 Mb c OTPnCuATEbHOB CNHXPOH3aUeIe (PnB bIXoDMOHNoHOMC conpOTnVBLeHm 47 kΩ (kOM)) POnHoe conpOTnVBLeHme Mehee 2,2 kΩ (kOM)/CTpeofoHueCeKoe MmHn-THe3do (0 3,5 mm (MM)) POnHoe BXoHObe coPOTnVBLeHne 6BoJe 47 kΩ (kOM)
THe3do roJIOBbIX TeJefoHOB
CtepeofoHmueckoe MHN-He3do (3,5mm(MM))
THe3o USB (ToIbko MoJeI N DCR-TRV325E/TRV330E/ TRV430E/TRV530E)
MnHn-B
THe3do LANC
CtepeofoHnueckoe MNHN-He3do (2,5mm (MM))
THe3do MIC
CtepeofoHnueckoe MNHN-He3do (3,5mm(MM))
DV BxOJ/BbIXoUΦpOBOBnDeOcHnHaJa
4-ItbipbKOBblpa3bem
3KpaH KKD
U306paXeHne
Moel DCR-TRV230E/TRV235E/
TRV325E/TRV330E:
6,2cm(2,5IOHMa)
50,3 x 37,4 mm (MM)
Mодень DCR-TRV430E:
7,5cm(3IOHMa)
61,0 x 43,8 mm (MM)
Moelb DCR-TRV530E:
8,8cm(3,5IOHMa)
72,2x50,4mm (MM)
06uee KOJINUcTBO 3JEMeHToB
n306paXeHHa
123 200 (560 x 220)
06uee
Tpe6obAHnK nntaHnIO
7,2B(6aTapeHbIb 6JIOK)
8,4 B (ceTeBoi aanTep npeMeHHoro Toka)
CpeHnH noTpe6JemaMa
MoOHTCbT (PnI NcNOLb3OBaHm 6BaTaepHOro 6IoKa)
BovBpeMa3nCkAmepeBp npnNCN0JIb3OBAHmKJKD
Moeln DCR-TRV230E/TRV235E/
TRV325E/TRV330E:3,9BT
Moienb DCR-TRV430E/TRV530E: 4,2 B
BudonckataTeIb
3.0 Bt
Pa6oay TemnepaTypa
OT0°Cdo40°C
Pekomendyemam TemnepaTpa 3apdK
Or 10^ do 30^
TemnepaTypa xpaheHH
OT-20°C 10 +60°C
Pa3mepbl (npn6bn3.)
85× 102× 205,5mm (MM) ( / / )
Bec (npn6Jn3.)
Mодел DCR-TRV230E/TRV235E: 880 g(r)
Mодел DNCR-TRV325E/TRV330E: 900 g(r)
Moelb DCR-TRV430E/TRV530E: 930 g(r)
NCKJIIOUaBaTapeHbIb6IbOK, KACCETy INIeYeBOB peMeHb
Moel DCR-TRV230E:
1020 g(r)
Moelen DCR-TRV235E/TRV325E/ TRV330E:
1 040 g(r)
MoeB DCR-TRV430E:
1090 g(r)
Moelb DCR-TRV530E: 1070 g(r)
BKLIOUaI npJlaraembI
6aTapeiHbI 6JIOK (NP-FM30 nII
NP-FM50), 90-MnHyTHyIO Kaccety
Hi-8 n pIeueBoy peMeHb
PpIaeraemble npHaadJIeXHocTn CM. cTp. 3.
CetéBoi aDantep nepemehhoro TOka
Tpe6obAHnK nntaHnIO
100-240B nepemehoro Toka,50/60T
Iotpe6JIeMaMoUHocTb 23BT
BbIXoHoe HappXeHne
DC OUT: 8,4 B; 1,5 A B pa6oHem
pekime
Paboya tempepatya
OT0°Cdo40°C
TemnepaTypa xpaheHn
OT-20°C d0 +60°C
Pa3mepb (npn6nn3.)
125× 39× 62mm (MM) ( / / )
He BKIIOUaY BbICTypaIOuIe YaCTN
Bec (npn6n3.)
280 g(r)
He BkIIOUaY npoBOd
3JIeKtpONnTaHnA
BaTapeiHbI 6JIOK
MaKcImaJIbHOe BbIXOJHoe
HannpaxeHne
8,4 B NOCTOHHORO TOKa
CpeHee BbIXoHoe HapXeHne
7,2 B NOCTOARHHORO TOKA
EMKOCTb
NP-FM30:
5,0 Bt-4 (700 MAh)
NP-FM50:
8,5BT-(1180mAh)
Pa6o7a TemnepaTpa
0^ - 40^
Pa3mepb (npn6nn3.)
38.2× 20.5× 55.6mm (MM) ( / / )
Bec (npn6n3.)
NP-FM30:
65 g(r)
NP-FM50:
76 g(r)
TNO
JIITNHEBO-NOHHbI
"Memory Stick"
(Tobko Moaden DCR-TRV325E/TRV330E/TRV430E/TRV530E)
NamrTa
Φn3u-naMTb
4 M6: MSA-4A
Pa6ooye HappexHne
2.7-3.6B
Notpe6JREMaMoHocTb
Ppim6Jn3.45MABpa6oem
pekime
Ppns3.130 mKa B pexime
OxndaHnA
Pa3mepbl (npn6n3.)
50× 2,8× 21,5mm (MM) ( / / )
Bec (npn6n3.)
4g (r)
KOHCTPYKUNI IN TEXUHECKNE xapaKTepNCINMOYt BbIt6mHeHBe 63E yBEODMNEHnI.
Identifying the parts and controls
Lens cap (p. 26)
LCD screen (p. 26)
3 OPEN button (p. 26)
4VOLUME buttons (p. 39)
5 Battery pack (p. 15)
6 BATT (battery) release lever (p. 15)
7 POWER switch (p. 26)
8 START/STOP button (p. 26)
[9] Hooks for shoulder strap (p. 205)
DC IN jack (p. 16)

This mark indicates that this product is a genuine accessory for Sony video products. When purchasing Sony video products, Sony recommends that you purchase accessories with this "Genuine VIDEO ACCESSORIES" mark.
1 Kpbiika o6bekTnBa (ctp. 26)
2 3KpaH KKn (cTp. 26)
3 Khonka OPEN (cTp. 26)
4 Khonk VOLUME (cTp. 39)
5 BaTapeHbIy 6JIOK (cTp.15)
6ΦuKcatop BATT (6aTape) (cTp.15)
7IpepeKJIIOuATeINbPOwER(cTp.26)
8 Khonka START/STOP (ctp. 26)
9 KpOuKn dIJI pIeYeBOrOp eMHa (cTp. 205)
10 THe3do DC IN (ctp. 16)

What is SUPER LASER LINK?
The super laser link system sends and receives pictures and sound between video equipment having the super laser link mark by using infrared rays.
11 Khonkn BndeokoHTpOJa (ctp. 39, 42)
STOP (ocTaHOBka)
REW (yckopeHHa nepemOTka Ha3a)
PLAY (Bocnpo3VeJeHne
FF (yckopeHHa nepemOTka Bnpei)
PAUSE (nay3a)
REC (3aɪncb) (Tɔŋbko DCR-TRV330E)
12 Khonka SUPER LASER LINK (cTp. 46)
13 Khonka SUPER NIGHTSHOT (ctp. 33)
14 KoIbIcOΦokycnpoBKn (ctp. 65)
15 06bektnb
16 Minkpofoh
17 Namma 3aHncn BIndeokamepbI (cTp.26)
18 N3nyaTeIb IHHΦpaKpaChbIX Lyuei (cTp. 33, 46)
19 NipekeJIOUateJIb NIGHTSHOT (cTp. 33)
20 Okowko dncnJe (cTp. 212)
[21] PēpekJIIOUaTeJIb FOCUS (cTp. 65)
22 Khonka BACK LIGHT (cTp. 32)
23 Khonka FADER (cTp. 53)
[24] DaTnK dNCTaHcNoHOrO ynpabJIeHn
4To Takoe SUPER LASER LINK?
CnCTema Ia3epHoro cynepkahana nepedaun CnHAnOB NocbIJaet IN pNHNMaET n3O6paJxehn IN 3BYK MExdy BnDeoanPapaTypoj , IMeIoUeIN 3NAk Ia3epHoro cynepkahana nepeDaun CnHAnOB, C NOMOJIbHO IHΦpaKpachIx Lyuei.
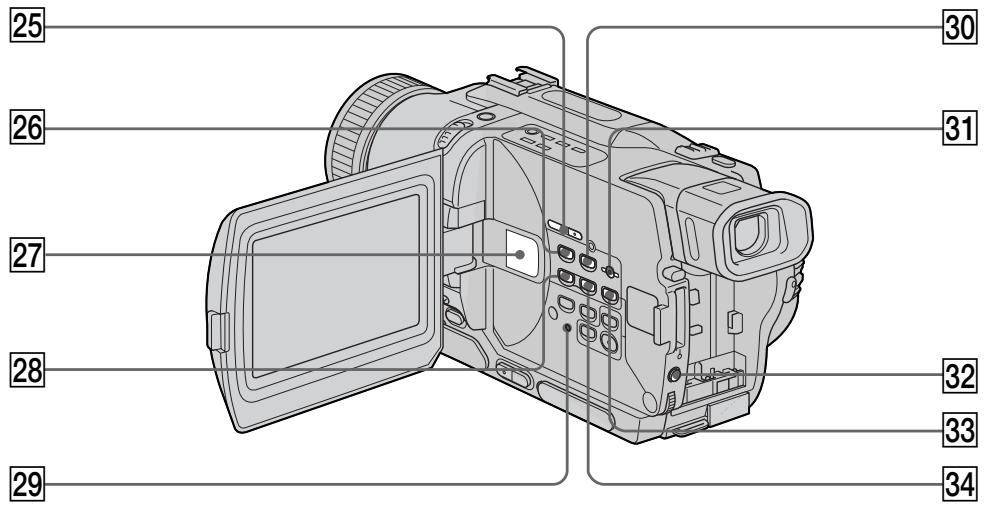
25 EDITSEARCH buttons (p. 37)
26 MEMORY PLAY button (p. 146)
27 Speaker
28 MEMORY - button (p. 137, 146)
29 RESET button (p. 173)
30 MEMORY INDEX button (p. 148)
31 MEMORY DELETE button (p. 163)
EXPOSURE button (p. 64)
33 MEMORY MIX button (p. 137)
34 MEMORY + button (p. 137, 146)
- DCR-TRV325E/TRV330E/TRV430E/TRV530E only
Attaching the shoulder strap
Attach the shoulder strap supplied with your camcorder to the hooks for the shoulder strap.
25 Khonka EDITSEARCH (cTp. 37)
26 Khonka MEMORY PLAY (ctp. 146)
[27]ДиHamNK
28 Khonka MEMORY -* (ctp. 137, 146)
29 Khonka RESET (ctp. 181)
30 Khonka MEMORY INDEX (ctp. 148)
31 Khonka MEMORY DELETE (ctp. 163)
32 Khonka EXPOSURE (cTp. 64)
33 Khonka MEMORY MIX (ctp. 137)
34 Khonka MEMORY ^+ (ctp. 137, 146)
- Tôлько модени DCR-TRV325E/TRV330E/ TRV430E/TRV530E
PpKpeIeHne PteEbopeMn
PpKpeIte PteEbopeMeHb, pnilaraembl K
Baew BnDeokamepe, K KpUckam dna
PteEbopeMn.
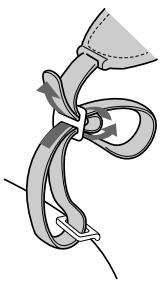
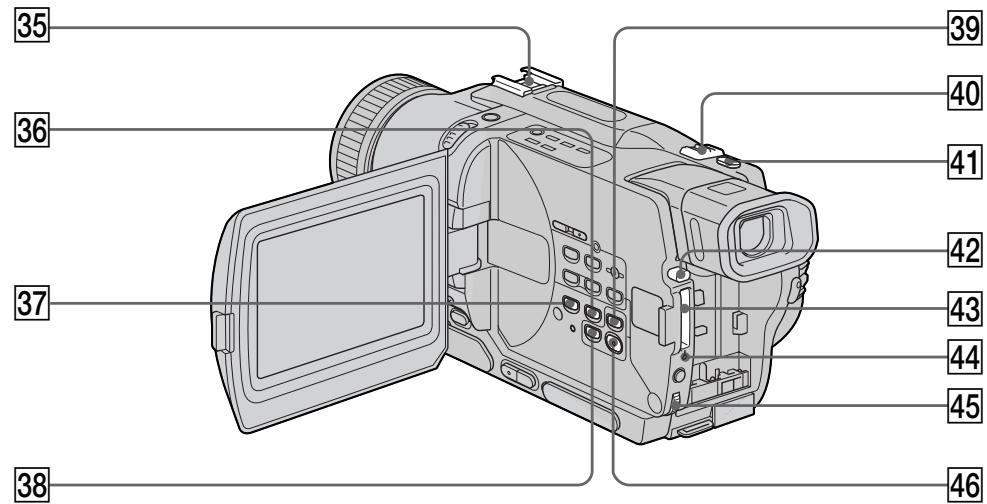
35 Intelligent accessory shoe
36 END SEARCH button (p. 37)
37 DISPLAY button (p. 40)
38 TITLE button (p. 67)
39 PB ZOOM button (p. 75, 157)
40 Power zoom lever (p. 29)
41 PHOTO button (p. 48, 129)
42 "Memory Stick" eject button (p. 126)
43 "Memory Stick" slot (p. 126)
44 Access lamp* (p. 126)
45 SEL/PUSH EXEC dial (p. 107)
46 MENU button (p. 107)
- DCR-TRV325E/TRV330E/TRV430E/TRV530E only
35ДерхаTeь ДЯ усТаHOBк npинаджХоcteи
36 Khonka END SEARCH (ctp. 37)
37 Khonka DISPLAY (cTp. 40)
38 Khonka TITLE (cTp. 67)
39 Khonka PB ZOOM (cTp. 75, 157)
40 Pbyar npBODHO Bapnoo6bekTnBa (cTp. 29)
41KhoNka PHOTO (cTp. 48, 129)
42 Khonka n3BneHnra "Memory Stick" (cTp. 126)
43 Otcek "Memory Stick" (ctp. 126)
44 JIaMnoUka Doctyna* (cTp. 126)
45Диck SEL/PUSH EXEC (ctp. 107)
46 Khonka MENU (ctp. 107)
- Tôлько модени DCR-TRV325E/TRV330E/ TRV430E/TRV530E
Attaching the lens cap
Attach the lens cap to the grip strap as illustrated.
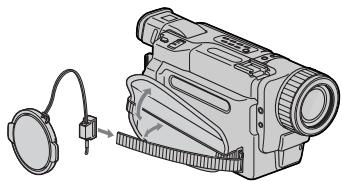
PpNkpeJIeHne KpbIiKu oBekTnBa
Connect an external microphone (optional). This jack also accepts a "plug-in-power" microphone.
47 BvnOnckatEnb (ctp. 30)
48 PyuKa LOCK (cTp. 26)
(Tonboko moJeN DCR-TRV325E/TRV330E/ TRV430E/TRV530E)
49 PemeNb dIa 3axBaTa
50 THe3do (roJIOBhIe TeIeΦoHbI)
51 THe3do MIC (PLUG IN POWER)
Fastening the grip strap
PpncTeRnBaHne pEmHaI 3aXbata
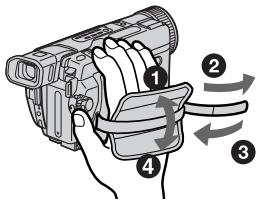
Fasten the grip strap firmly.
ПпстertepemenьдязхыtabanIOTHO.
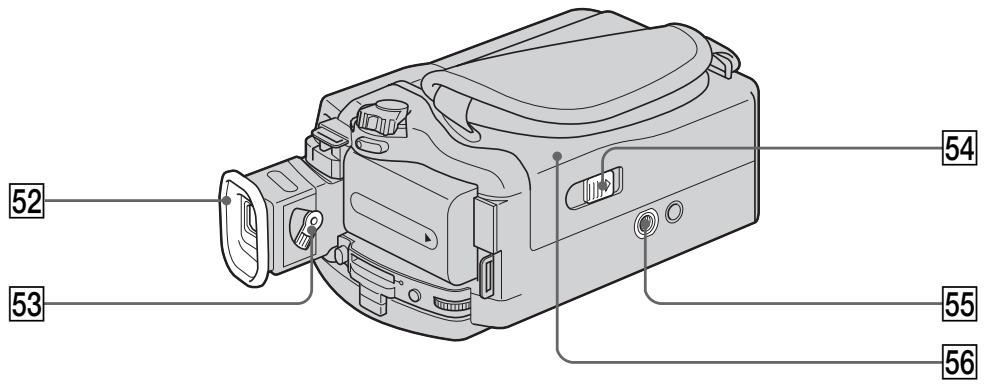
52 Eyecup
53 Viewfinder lens adjustment lever (p. 30)
54 OPEN/EJECT switch (p. 24)
55 Tripod receptacle (base) Make sure that the length of the tripod screw is less than 6.5mm 9/32 inch).Otherwise, you cannot attach the tripod securely and the screw may damage your camcorder.
56 Cassette compartment (p. 24)

Intelligent
Accessory Shoe
Notes on the intelligent accessory shoe
- The intelligent accessory shoe supplies power to optional accessories such as a video light, microphone or printer (DCR-TRV325E/ TRV330E/TRV430E/TRV530E only).
- The intelligent accessory shoe is linked to the POWER switch, allowing you to turn the power supplied by the shoe on and off. Refer to the operating instructions of the accessory for further information.
- The intelligent accessory shoe has a safety device for fixing the installed accessory securely. To connect an accessory, press down and push it to the end, and then tighten the screw.
- To remove an accessory, loosen the screw, and then press down and pull out the accessory.
52 OkyIap
53 Pbyhar perylnpoBkn o6beKtNbBa BvdoonckaTeIa (cTp. 30)
54 IpepeKJIIOuATEIb OPEN/EJECT (cTp. 24)
55 THe3do DnA TpeHOrn (OCHOBAHne) Y6eDntecb, yTO dINHa BnHTa TpeHOrn MeHee 6,5 MM. B npOTuBHom cIyae BbI He cMOxTe HaJeXHO pNkPeNtB TpeHOry, a BnHT MoKeT NOBpeDntb BaUy BnDeOkamepy.
56 KaccetHbIOTceK (cTp.24)
Intelliec Acces
PpmeaHnO depkateJe dnyyctahOBKn BCNOMOraTeJIbHbIX pInHaJdIeXHOCTe
The DV OUT or DV IN/OUT jack is i.LINK compatible.
60 LANC jack
LANC stands for Local Application Control Bus System. The LANC control jack is used for controlling the tape transport of video equipment and other peripherals connected to the video equipment. This jack has the same function as the jack indicated as CONTROL L or REMOTE.
61 (USB) jack (p. 151)
(DCR-TRV325E/TRV330E/TRV430E/
TRV530E only)
57IHe3doA/VOUT(cTp.44,82)
(DCR-TRV230E/TRV235E/TRV325E/
TRV430E/TRV530E)
THe3do AUDIO/VIDEO (ctp. 44, 82, 143)
DCR-TRV330E)
58 THe3do SVIDEO OUT (cTp. 44)
(DCR-TRV230E/TRV235E/TRV325E/
TRV430E/TRV530E)
THe3do S BnIeO (cTp. 44)
(DCR-TRV330E)
59 THe3do DV OUT (cTp. 84)
(DCR-TRV230E/TRV235E/TRV325E/
TRV430E/TRV530E)
THe3do DV IN/OUT (cTp. 84, 143)
(DCR-TRV330E)
THe3do DV OUT nJIn DV IN/OUT ABnAETCA
COBmecTnMbIM C KaHaIOM i.LINK.
60 The3do LANC
LANC O3Haayet CNTEmy HnHbI
ynpabJIeHnI MeCTbIM npJIOXeHnEM.
Гнзду упраьени LANC nсрьзуетс
JI KOTPOJIA 3a IepeMeueHnem JeHTbI
BIDeOaannapaTpybI npytnx
nepnnepeinhblx yctpoiCTB,
IOKJIIOUeHHbIX K Hemy. JaHHOe rHe3do
IMeet TakyIO Je cyHKUHO, KaN I rHe3do,
0603haeHHoe kaK CONTROL Lnn
REMOTE.
61 Tne3do (USB) (ctp. 151)
(Tolbko mojeeli DCR-TRV325E/TRV330E/
TRV430E/TRV530E)
Remote Commander
The buttons that have the same name on the Remote Commander as on your camcorder function identically to the buttons on your camcorder.
NylbT dntaHcnoHHoro ynpabHeHn
KhoNknybTa DnCTaHcNoHOrO ynpaBLeHnna KOTOpbIe IMeHOT OINHaKOBbIe HAMMeHOBaHNc KhoNkamn Ha BIndeOkampe, fYHKcNoHpyHOT nDEHTNUHO.
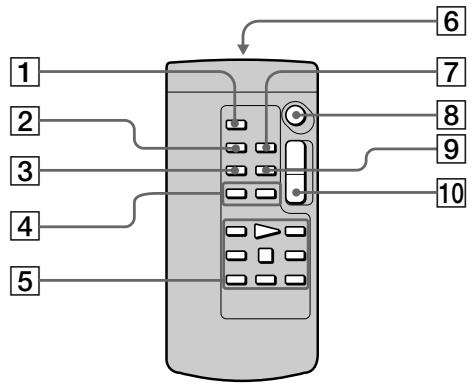
1 PHOTO button (p. 48, 129)
2 DISPLAY button (p. 40)
3 SEARCH MODE button (p. 78, 80)
4 1/▶按钮 (p. 78, 80)
5 Tape transport buttons (p. 42)
6 Transmitter Point toward the remote sensor to control the camcorder after turning on the camcorder.
ZERO SET MEMORY button (p. 71, 77)
8 START/STOP button (p. 26)
9 DATA CODE button (p. 41)
10 Power zoom button (p. 29)
1 Khonka PHOTO (ctp. 48, 129)
2 Khonka DISPLAY (cTp. 40)
3 Khonka SEARCH MODE (ctp. 78, 80)
4 KhoIknK (ctp. 78, 80)
5 Khonkn nepemeeHHa JeHTbI (ctp. 42)
6 NpepaTnuK
HanpaBbTe Ha daTnK dIy npaBneHn BInDeOKaMepo nocIe BKIOueHn BInDeOKaMepbl.
7 Khonka ZERO SET MEMORY (ctp. 71, 77)
8 Khonka START/STOP (cTp. 26)
9 Khonka DATA CODE (ctp. 41)
10 Khonka npuBODHOro BapnoooBeKtNbA (cTp. 29)
To prepare the Remote Commander Insert 2 R6 (size AA) batteries by matching the + and - polarities on the batteries to the + marks inside the battery compartment.
ДлnoiodrotOBKn nyIbTa ДиctahUHOHHorO ynpaBNeHn
BcTaBbTe DBe 6aTapeKn R6 (pa3Mepa AA), co6IIOJaH aIeKaUyO nIpyHocTb + I - Ha 6aTapeKax CO 3HaKaAM + - BHyTpN OTCeKa dIa 6aTapeek.
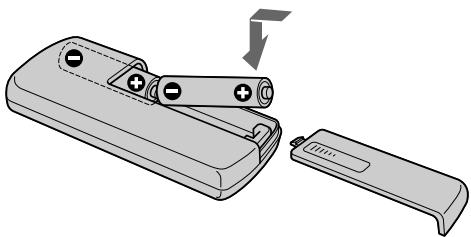
Notes on the Remote Commander
- Point the remote sensor away from strong light sources such as direct sunlight or overhead lighting. Otherwise, the Remote Commander may not function properly.
- Your camcorder works in the Commander mode VTR 2. Commander modes 1, 2 and 3 are used to distinguish your camcorder from other Sony VCRs to avoid remote control misoperation. If you use another Sony VCR in the Commander mode VTR 2, we recommend changing the Commander mode or covering the sensor of the VCR with black paper.
PpmeaHnK npylbTy ductaHcnoHoro ynpabJeHH
Operation indicators
1 Recording mode indicator (p. 26) /Mirror mode indicator (p. 28)
Format indicator (p. 185) [3], [H] or [B] indicator appears.
Remaining battery time indicator (p. 16, 31, 41)
4 Zoom indicator (p. 29)/Exposure indicator (p. 64)
Fader indicator (p. 54)/Digital effect indicator (p. 58, 73)
6 Wide mode indicator (p. 52)/FRAME indicator* (p. 129)
Picture effect indicator (p. 56, 72)
Volume indicator (p. 39)/Data code indicator (p. 41)
9 PROGRAM AE indicator (p. 61)
Backlight indicator (p. 32)
11 SteadyShot off indicator (p. 109)
12 Manual focusing indicator (p. 65)
13 Self-timer indicator* (p. 35, 50, 133)
- DCR-TRV325E/TRV330E/TRV430E/TRV530E only
1Индикатop рекима запис (ctp. 26)/Индикатop зеркально рекима (ctp. 28)
2 INHdNKaTOpΦopMaTa (CTp.185) ΠoAByNTcH INHdNKaTOp [3], H18 nIu 8.
3 INHdNKATOp BpeMeHOn OCTaBWeOcR 3apYda 6batapeHoro 6Ioka (ctp.16,31,41)
4 INHdNkATOp Bapnoo6bKeKTnBa (ctp. 29)/ INHdNkATOp 3KcNo3nnn (ctp. 64)
5 INHdNKaTOP feiDepa (cTp. 54)/INHdNKaTop cnΦpOBoRo 0ΦΦeKTa (cTp. 58, 73)
6 INHdNkATOp ⅢpOKoΦopMaTHORo peKIma (ctp.52)/INHdNkATOp FRAME* (ctp.129)
7 INHdNkaTOp əΦΦeKta N3o6paXkeHnA (cTp.56,72)
8 INHdNkATOp rPOMKoCTn (ctp. 39)/ INHdNkATOp KODa daHHbIX (ctp. 41)
9 INHdNKaTOp PROGRAM AE (cTp. 61)
10 INHdNkAToP 3aDHei noCDBcETKn (ctp. 32)
11 INHДИКaTOP BbIKIQUeHHOФункциУctочИвОВсБeМКИ (cTp. 117)
12 INHdkaToppyHoHΦokucpoBkn (ctp.65)
13 Инданкатор Таймера самоанусяк*
(ст. 35, 50, 133)
- Toлько модали DCR-TRV325E/TRV330E/ TRV430E/TRV530E
STBY/REC indicator (p. 26)/Video control mode (p. 42)
15 Tape counter indicator (p. 31)/Time code indicator (p. 31)/Self-diagnosis display indicator (p. 174)/Tape photo recording indicator (p. 48)
16 Remaining tape indicator (p. 31)
ZERO SET MEMORY indicator (p. 71, 77, 105)
Search mode indicator (p. 37, 78, 80)
19 NIGHTSHOT indicator (p. 33)
20 A/V DV indicator (p. 98)/DV IN indicator (p. 103)
21 Audio mode indicator (p. 113)
22 Warning indicators (p. 175)
23 Recording lamp (p. 26) This indicator appears in the viewfinder.
Video flash ready indicator (p. 109) This indicator appears when you use the video flash light (optional).
Video flash mode indicator (p. 109) This indicator appears when you use the video flash light (optional).
26 Tape counter indicator (p. 31)/Time code indicator (p. 31)/Self-diagnosis display indicator (p. 174)
27 FULL charge indicator (p. 16)
14 INdInKaTOp STBY/REC (cTp. 26)/peXnM BnDeOkoHTpOJa (cTp. 42)
15 INHdkaTOP ChETnka JIeHTbI (ctp. 31)/ INHdkaTOP KOJa BpeMeHN (ctp. 31)/ INHdkaTOP FyHKcIMn CaMOHaRGHOCTnKn (ctp.182)/INHdkaTOP FOToCbeMkn HaJeHTy (ctp.48)
16 INHnKATOp OCTaBWeCJHeHTbI (cTp. 31)
17Индikatop ZERO SET MEMORY (cTp. 71, 77, 105)
18 ИнданkaTop ржима посяк
(ст. 37, 78, 80)
19Индкатop NIGHTSHOT (cтр.33)
20ИнданkaTop A/V DV (cTp. 98)/инданkaTop DV IN (cTp. 103)
[21]Инданкаторaydnopexиma(cTp.121)
22 Pnpdynpexkaioune HndnKaTOpbl (ctp. 183)
23 JAmnoUka 3aHmch (cTp.26) 3TOT INdNkaTOp NORBnaTeCn B BuDOnCKaTeNe.
24 INHdNKaTOP TOTOBHOCTN BIDeOBCnbIJKK (ctp.117) 3TOT INHdNKaTOP NOBnETCr npi NCIOJIb3OBAHm BNDEOBCNbIK (He npINlaRaETc).
25 INHdikatop pexima BndeOBcnbIiKu (ctp.117) 3TOT INHdkatop nOBnIeTCn npn IcNoJIb3OBAHN BnDeOBcnblkN (He npnilaraetca).
26Индикатор счетшика Ленты (стр. 31)/
Индикатор Кда Врemeи (стр. 31)/
Индикатор Функуни самодангосток
(cтр. 182)
[27]Инданкатор зараздкfu FULL (ctp.16)
A, B
AC power adaptor 16
Adjusting viewfinder 30
AFM HiFi Sound 186
AUDIO MIX 110
AUDIO MODE 113
A/V connecting cable 44,82,143
BACK LIGHT 32
Battery pack. 15
BEEP 115
BOUNCE 53
C, D
Camera chroma key 135
Charging battery 16
Charging built-in rechargeable battery 195
Clock set 22
Data code 41
Date search 78
DEMO 114
DIGITAL EFFECT 58,73
Digital8 system 185
Digital program editing 86
DISPLAY 40
DOT 53
Dual sound track tape 186
DV connecting cable 84, 143
E
EDITSEARCH 37
END SEARCH 37,43
Exposure 64
F, G, H
FADER 53
Fade in/out 53
FLASH MOTION 58
FOCUS. 65
Format 112
Full charge 16
Grip strap 207
Headphone jack 207
Heads 194
HiFi SOUND 110
I, J, K, L
i.LINK. 84,190
Image protection 161
Image quality mode 127
Index screen 148
"InfoLITHIUM" battery 188
Infrared rays emitter 33, 46
JPEG 124
LANC jack 209
LUMINANCEKEY 58
M, N
Main sound 110
Manual focus 65
Memory chroma key 135
Memory luminance key 135
MEMORY MIX 135
Memory overlap 135
Memory PB ZOOM 157
Memory photo recording 129
"Memory Stick" 124
Menu settings 107
Mirror mode 28
Moisture condensation 193
Monaural 45
MONOTONE 53
Mosaic fader 53
NIGHTSHOT 33
O, P, Q
OLD MOVIE 58
Operation indicators 212
OVERLAP 53
PAL system 192
Photo scan 81
Photo search 80
PICTURE EFFECT 56,72
Picture search 42
Playback pause 42
Printmark. 166
PROGRAM AE 61
R
Recording time 18
RESET button 173
Rec Review 38
Remaining battery time indicator 31,42
Remaining tape indicator 31
Remote Commander 210
Remote control jack (LANC) 209
Remote sensor 204
S
Self-diagnosis display 174
Self-timer 35, 50, 133
Shoulder strap 205
Signal convert function 98
Skip scan 42
Slide show 159
Slow playback 43
SLOW SHUTTER 58
STEADYSHOT 109
Stereotape 186
STILL 58
Sub sound 110
SUPER LASER LINK 46
SUPER NIGHTSHOT 33
SVIDEO jack 44
SVIDEO OUT jack 44
T, U, V
Tape counter 31
Tape PB ZOOM 75
Tape photo recording 48
Telephoto 29
Time code 31
Title 67
TRAIL 58
Transition 27
TV colour systems 192
(USB) jack 151
W,X,Y,Z
Warning indicators 175
Wide-angle 29
Wide mode 52
WIPE 53
WORLD TIME 115
Write-protect tab 25
Zero set memory 71, 77, 105
Zoom 29
AnΦaВnThbI yKa3aTeIb
A, B, Γ
BaTapeHbIb 6Jok 15
БатAPEйьблоб
"InfoLITHIUM" 188
Bapnoo6bekTnB 29
BVeDeHnE/BbVeBeHnE n3o6paXeHnA 53
Bpema 3aPiuCi 18
BcnoMoraTeJIbHbI 3ByK ....118
Tolobkn 194
Гездо Головьх Телегонов 207
THe3I0DInCTaHcHOnHOynpaBHeHn(LANC) 209
Tne3do LANC 209
Tne3do SVIDEO 44
ГнздО SVIDEO OUT 44
Tne3do (USB) 151
A,E,X,3
Датукдистанционноуправлени.. 204
3aemeHHeBocpOu3BeDeHne 43
3apka 6aTaapeHoro 6loka ....16
3aRdaKbBCTPOeHHoJ aKKyMylTOpHoi 6atapeKei. 195
3aunTa n3o6paXeHnI 161
3Byk AFM HiFi 186
3epKaIbHbI pexIM 28
3nak neuatai 166
N, K, N, M
I3nyaTeIb nHΦpaKaPaChbIX nyeu ... 33,46
HnDekChbI 3KpaH 148
INHAKATOPBBEMEHNOCTABWIEOCA3apda6batapeHOro 6bnoka.....31,42
INHdkaTop ocTabweeJLeNTbI 31
INHdkauncaMoDnaHOctkn 182
KHOIIKa ZBETHOCTN BnDeOKaMEpbI 135
KhoNka ZbETHOCTn NaMRTn ..135
KhoNka npKOCTn nAMrTn 135
KhoNka RESET 181
KoI BpemeHn 31
KoI daHHbIX 44
KoHdEHaCaunBlaRn 193
JIeHTa C DBOHHO 3ByKOBOI dOPOXKoI 186
Jelenctok 3aunntb1 3anncn ....25
Mo3aunHbI Φeɪdep 53
MoHooHueckn 3Byk 45
H, O
OCHOBHoi 3Byk 118
P
PamrB HnyeBoO OTMeTkn 71,77,105
PamrPB ZOOM 157
Paly3a Bocnpon3BedeHnna 42
IpeekpbTne naMaTn 135
PepexoI 27
Плесевошемь … 205
Ponck DaTbI 78
Ponck n3o6paXeHnA 42
Ponck MeToDom nporoHa 42
Poka3 cnaIOB 159
Ponha3apka 16
Ipeynpexkaioome INDnKaTOpbl 183
PpocMoTp 3aHnCn 38
- Digital Video Camera Recorder B
- Digital8
- English
- Welcome!
- WARNING
- NOTICE ON THE SUPPLIED AC POWER ADAPTOR FOR CUSTOMERS IN THE UNITED KINGDOM
- For the customers in Europe ATTENTION
- Pysckn
- Добpo пожаловать!
- PNEyPPEXDEHNE
- Other uses
- CbeMa DnKxuXcxn Hn Hn HeoBnKhblx n3OpaXeHn nX BocpnU3BeDeHne
- 3aHnCb n3o6paXeHn Ha BaWem KOMnbITope
- Getting started
- Recording - Basics
- Playback - Basics
- Advanced Recording Operations
- AdvancedPlaybackOperations
- Editing
- Customizing Your Camcorder
- "Memory Stick" operations
- Troubleshooting
- Additional Information
- Quick Reference
- 3aHcB - OCHOBHbIe NOLOXeHnA
- BbINOJIHHeHne mHdINBnDyaJbHbIX yctaHOBOK Ha BnDeOKaMepe
- Onepaunc "Memory Stick" (ToIbko MoJeN DCR-TRV325E/TRV330E/ TRV430E/TRV530E)
- Ponck u yctpaenhe HncnpabHocte
- DOnOpHnTeIbHa NΦopMaζη
- Connecting the mains lead (p. 21)
- Inserting a cassette (p. 24)
- Remove the lens cap.
- 4
- Monitoring the playback picture on the LCD screen (p. 39)
- PykoBoIcTBo IIO 6bICTpOmy 3aIpycky
- Примейане
- Using this manual
- Before using your camcorder
- Note on TV colour systems
- Copyright precautions
- IcnoJb3OBAHne daHHoro pyKOBoIDCTBa
- IpeepHaayalom 3KcnpyaTaucn BawaenBvdeokamepbbl
- Приимechаши по системам CBETHORO TeJIeBnIeHnI
- Пре dioctepexeHne o6 aBTopcKOM npaBe
- Precautions on camcorder care
- Lens and LCD screen/finder (on mounted models only)
- MepblnpedocTopoKHOCTn npnyxoJe 3a BndeokamepoJ
- 06beKTHB n 3KpaH KKДВИДОИСКаTeIb (TOJIbKO HA CMOHTnPOBaHHbIX MODEJIaX)
- Step 1 Preparing the power supply
- Пункт 1 Побтовka nctочнka ппаня
- Installing the battery pack
- UcTaHOBka 6aTapeHoro 6Joka
- Charging the battery pack
- 3apka 6aTaapeHoro 6loKa
- Notes
- Iocne 3apdKn 6aTapeHoro 6loka
- Примеане
- Note
- PpmeaHne
- Connecting to a wall socket
- PoiocoeiHHeNeK CeTeBoi po3eTKe
- PRECAUTION
- PNEIOCTEPEXEHNE
- PpimueaHn
- UcnoJb3ObaHne aBTOMo6nJbHOro aKkyMylrTopa
- Step 2 Setting the date and time
- Пункт 2 Установka затуни Врemeи
- Step 3 Inserting a cassette
- Пун=kТ 3 yctahOBka KaCCeTbl
- Примеанья
- Recording a picture
- 3a\Pncb n3o6paXeHnY
- Note on Recording mode
- Note on LOCK (DCR-TRV325E/TRV330E/ TRV430E/TRV530E only)
- To enable smooth transition
- PpimueaHne no pexkmy 3anncn
- Приимechани по рек immу LOCK (Toлько модени DCR-TRV325E/TRV330E/TRV430E/ TRV530E)
- Adjusting the LCD screen
- PerynipoBka 3KpaHa KKД
- Ppmeuahne
- After recording
- Using the zoom feature
- Apkoctb 3kpaHa KKJ
- Pocje 3aIncn
- IcnoJIb3OBAHneФyHKcHn Hae3da BnDEOKaMepbl
- Notes on digital zoom
- When you shoot close to a subject
- PpmeaHnK Hae3ny BndeOKamepbI UcfoBbIM MetoDM
- Ppncbemke o6bekTa c 6Jn3Koro noJIOXeHnA
- To record pictures with the viewfinder - adjusting the viewfinder
- Viewfinder backlight
- 3aHnnoDcBtKa BUNoNcKaTeJIa
- Indicators displayed in the recording mode
- Инданахтор Врemeи OCTaBшeroСяразда 6атAPEйHorO 6лoka
- KoB BpeMeHn (ToIbKO DJIaJeHT, 3aIncAHbIX B uΦpOBoB cNCTeMe Digital8 [3)
- Shooting backlit subjects - BACK LIGHT
- CbeMa o6BeKToB c 3aHnei noCDBeTkoI - BACK LIGHT
- Shooting in the dark - NightShot/Super NightShot
- Cbemka B TemHote - Houhna cbemka/Houhna cynepcbemka
- Using the NightShot Light
- Приимейсаня
- Self-timer recording
- - DCR-TRV325E/TRV330E/TRV430E/ TRV530E only
- 3aInc b no TaMepy camo3anycka
- -Только модали DCR-TRV325E/TRV330E/TRV430E/TRV530E
- 3aHncb n3o6paXeHnA
- ДлЯ OCTaHOBKn O6paTHOrO OTCheTa
- END SEARCH
- EDITSEARCH
- Rec Review
- Ppocmptzanns
- Приимейань.
- Playing back a tape
- Bocnpon3BeDeHne JeHTbI
- Bo Bpem KOnTpOJa Ha 3KpaHe XXd
- To display the screen indicators
- IcnoIb3OBAHne yHKcuN KoDa daTbI
- HaxmTe KhONky DATA CODE Ha nyIbTe DnCTaHcUHOHHoro ynpabLeHnB pexKIme BOCPpOu3BeDeHn.
- 3aHncaHHbIe daHHbIe
- KoДаHHbIX
- Various playback modes
- Bocnpoun3BeDeHne JeHTbI
- HdkaTop ocTabeOcBpeMeH 6aTape BO BpeMBOCpOn3BeDeHnA
- IpepeMeHHbIepeXIMbIBOcPpOn3BeDeHnA
- IaH3MeHeHHHaPaBHeHH BocPOn3BeDeHH
- ДЯОТБИCKAнHЯЗПИЗOSTOДАВВБЕМА KOHTPОЛЯ N3OBpAXKeHЯ(NONCKN3OBpAXKeHЯ)
- Дя KoHTpOJI N3o6paXeHЯ Ha BbICOKO CKOpOCTN BO BpeM YcKOpEHHO nepemOTKN JeHtbl Bnpepd IIN Ha3aI (NONCK MeTOJOM nporoHa)
- Длгпрсмтра BOCпpon3Bedeни n3бразжени Ha 3amEdlenHHoN Ckopoctn (3amEdlenHoe BOCрpon3BedeHne)
- Длгпрсмтра BOCПОИЗБЕДENH N3O6paXeHЯ Ha yDBoEHHо CKOpOCTN
- Для покадрово npocmoТра BOCПОНЗВЕДENИ N3OБРAXКЕНЯ
- Viewing the recording on TV
- If your TV is already connected to a VCR
- EcnBawTeIeBn3Op yXe npDoceHHeN K KBM
- If your TV or VCR is a monaural type
- EcnBaw TeIeBn3Op nJN KBM MOHOΦOHueCKOro Tnna
- If your TV/VCR has a 21-pin connector (EUROCONNECTOR)
- EcnB Baawem TeleBn3ope/KBM mMeetc 21-tpbkoBbpa3beM (EUROCONNECTOR)
- EcnB Bawaem TeleBn3ope NMeetcra rHe3do S Bndeo
- Using the AV cordless IR receiver
- IcnoJb3OBAHne 6ecnpoBOdHorO NKayuOBnDeOpnpemHnka
- Ipeed 3kcnnyataaunei
- Recording a still image on a tape – Tape Photo recording
- 3aIncb HeNoDBrXHOro N3O6paXeHnHa JIeHTy - FOToCbEmKa Ha JIeHTy
- ДлИ NCNoIb3OBAHnI ΦyHKUmΦOTocbEmKnHaJIeHTyC NOMOuBIO NyIbTaДиCTaHcUHOHOrO ynpabJeHnI
- PnncnoB3OBAHnnyHKunnfoTOcBEmKn HaJeHTy BO BpeMa 06bIuHOJ 3aIncn CAMERA
- CbeMaHaJIeHTycNOMOuBTOaMepa cAmo3anycka
- -ToIbKO MoJeN DCR-TRV325E/ TRV330E/TRV430E/TRV530E
- To cancel self-timer recording
- Длг OTMeHbI 3aIncn no TaImepy camo3anycka
- Printing the still image
- PpimcuaHne
- EcIn B BnDeOpnPnHTepe NmEeTcBxOJHoe THe3Do S BnDeo
- Using the wide mode
- Using the fader function
- IcnoJb3OBaHne cyHKunn feydepa
- MONOTONE
- Длг OTMeHbI Функци ФeДера
- Примеань.
- Using special effects
- - Picture effect
- IcnoJb3OBaHne cpeunabHbIX 3ΦΦeKTOB - ΘΦΦeKT n3o6paXeHnA
- Using special effects - Digital effect
- STILL
- FLASH (FLASH MOTION)
- LUMI. (LUMINANCEKEY)
- TRAIL
- SLOW SHTR (SLOW SHUTTER)
- OLD MOVIE
- IcnoJb3OBaHne CpeunalbHbIX 3ΦΦeKTOB -CnΦpOBoN 3ΦΦeKT
- To cancel the digital effect
- IcnoJb3OBAHHe cneuaJIbHbIX 3ΦΦeKTOB -LHΦpOBoI 3ΦΦeKT
- ДЯ OTMeHbI UΦpOBOrO 3ΦΦeKtA
- PnBbIKJIIOHeHNIITaHNA
- Pn3aIncBpeKmmeMeJIeHnHO 3aTbopa
- Spotlight
- Soft portrait
- Sports lesson
- Beach & ski
- Sunset & moon
- Landscape
- Low lux
- PpOxKeTOpHoe OcBeeHne
- Adjusting the exposure manually
- PerynpoBka 3Kcno3nN BpyHyO
- ДЯTOUHONΦOKYCUPOBKN
- Pn BbINOJIHeHn CbeMKn B6IIm3n 06BeKta
- HdNkaun
- N3MeHNTcHa CJIeDyIOUne
- INHdNkATobpbl:
- Superimposing a title
- HanoxeHne TnTpa
- Длн HaLOXKeHn THTpa BO BpeM 3aIncn
- Дя ВьбopaЯЗыka npedBapuTeNbHo yctaHOBJeHHOROTntpa
- B clyuae oTo6paXeHMeHIO BO BpeMn HALOXeHn Tttpa
- IINCNOB3OBAHNA CO6CTBEHHOROTHTP
- YctaHObKa THTpa
- PnBbIbOpe n yctaHOBKe TnTpa
- Pn HanoXeHm TnTpa BO BpeM 3aInc
- BoBpemBaocpon3BeDeHnA
- Co3dHne Baunx co6CTBeHHbIX TnTPOB
- ДлЯ ИЗмени COхраенногВ namATN TnTpA
- EcIn BbI BBOINTE CUMBOJI 3 MNHyTBI INI 6OJIeB PexmE OxuDAnH B TO Bpem, KOrda Kacceta HaxoDITcB BaWe BnDeokamepe
- Ecnn BbI Bbl6paann yctaHOBky [P2]
- Дудаленгтра
- ДлвВБОДиHTePbana
- PpIMeuaHnA
- EcIn Ha JeIte IMeETc H3aIncaHbI yAcTOK
- Playing back a tape with picture effects
- BocnpOn3BeDeHne JeHTbIC 3ΦΦeKtAmn n3o6paXkeHn
- IITRAOTMeHbIΦyHKcNmCnΦpOBbIX 3ΦΦeKTOB
- N3o6paXeHn, o6pa6oTaHHbIe C NOMOuBIO fYHKUIN 3ΦΦeKTOB N3o6paXeHn
- EcIbYcTaHOBnI nepeKluOaTeIb POWER B noJIoKeHne OFF (CHG) nIe octaHOBnI BOCpOn3BEdHeN
- Playing back a tape with digital effects
- Bocnpo3BeDeHne JeHTbI c uΦpObblm 3ΦΦeKtAmN
- IITRAOTMeHbIΦyHKcUNuΦpOBbIX 3ΦΦeKTOB
- Приимейсан<|im_start|>
- N3o6paXeHn, o6pa6oTaHHbIe C IOMOuBIO fYHKUIM PB ZOOM
- Quickly locating a scene using the zero set memory function
- БыICTpoe OTbICKaHne 3ПИЗODa C NOMOUsbO Функци ПamrTu HUJIeBOI OTMeTKn
- Приимechаня
- Searching a recording by date – Date search
- To stop searching
- ДЯ OCTaHOBKи NONcKa
- Примейань
- EcJn Ha 3aIncaHHoJIeHTe IMeIoTcH He3aIncaHHbIe YUactKu
- Searching for a photo - Photo search/Photoscan
- Searching for a photo
- Сканироваиме Фото
- PpimeyaHne
- EcIn Ha 3aIncahHNo JeHTe NMeKOTc He3aIncahHbIe yUacTKn
- Before operation
- UcnOJIb3OBAHnE CoeHNHTeJIbHOrO Ka6eJIa yIuNo/BuJeO
- Ipeed 3Kcnnyataauei
- Ipezeanncb IeHTbl
- IcnoJIb3OBAHne Ka6eJIa.i.LINK (coeHNHTeJIbHOrKa6eJIa cIΦpOBOro BnDeocuHaJa DV)
- Dubbing only desired scenes - Digital program editing
- Ipee3aHnscb TOnbKO HuxHbIX 3nn3oIOB - uΦpOBOI MOHTaX IporpaMMbl
- Step 1: Connecting the VCR
- Step 2: Setting the VCR to operate with the A/V connecting cable
- 原 → 原
- 味 → 味
- EcIn KBM He pa6oTaet NaIeXaIIM o6pa30M
- Step 2: Setting the VCR to operate with the i.LINK cable (DV connecting cable)
- Пункт 2: Habсторka KBM дя pa6obtы с ka6elem i.LINK (coeudнiteьнblm ka6elem zuфpoBOrO bndeocHraJa DV)
- Step 3: Adjusting the synchronicity of the VCR
- Пункт 3: Perуларовka cnHxpoHn3aци KBM
- Operation 1: Making the programme
- Дениства 1:Созданныnpограмь!
- 6,8,9
- Operation 2: Performing Digital program editing (Dubbing a tape)
- Using with analog video unit and your computer - Signal convert function
- IcnoJb3OBAHne c aHaIOrOBbIM BnDeoanPapaTOM n NepcoHaJIbHbIM KOMNbIOTepOM -ФункцЯ npeo6pa3OBAHna CnHaJIOB
- - DCR-TRV330E only
- -ToJbKO DCR-TRV330E
- Ipeep npimmehenneem
- Pocne 3aHncn H3o6paXeHn n 3Byka
- IcnoB3OBAHnE c anaIorOBbIM BIndeoannapaTom I nepcoHaJIbHbIM KOMNbIOTePOM -ФункцЯ npeo6pa3OBAHnCnHaJIOB
- PpIMeuaHn
- Recording video or TV programmes
- 3a\Pncb BnDeO nIITeJIeBn3nOHhblx npoRpaMM
- IcnoJIb3OBAHHe COeINHITeNbHOKa6eJyDnO/BuDeo
- Ipeed 3knnyataunei
- When you have finished dubbing a tape
- If your VCR is a monaural type
- 3aIncb Bndeo IJN TeJeBn3NoHHbIX nporpaMM
- EcnBb3aKoHnI nepe3anncbHa JeHTy
- EcnBaw KBM MOHOPOHueCKOro Tnna
- EcIn B BaWem TeJIeBn3ope nI IN KBM IMeetc rHe3do S bVdeo
- 3aIncb Bndeo IJI N TeJeBn3NoHHbIX nporpaMM
- Inserting a scene from a VCR – Insert Editing
- Inserting a scene from a VCR - Insert Editing
- BCTaBka 3nH3OJa c KBM - MoHTaK BCTaBOK
- PnBocnpOn3BeDeHne BCTaJIeHHOro n3O6paXeHnI
- Changing the menu settings
- -BbInOpHeHne HnDnBnDyaIbHbIX yctaHOBOK Ha BnDeOKaMepe -
- N3MeHeHne yCTaHOBOK MeHIO
- U3MeHeHne yCTaHOBOK MeHIO
- Notes on formatting*
- Note on PRINT SET*
- Note on REC MODE
- Notes on the LP mode
- Note on AUDIO MODE
- *To dub a tape to another VCR
- Notes on DEMO MODE
- Bb6op yctaHOBOK peKIma no KaXdOmy NyHKTy
- Using "Memory Stick" - introduction
- On file format (JPEG)
- Typical image data file name
- Before using "Memory Stick"
- ИспOLTьзоване“Memory Stick”-ВveDEXHne
- -ToIbKO MoDeJI NDCR-TRV325E/ TRV330E/TRV430E/TRV530E
- OΦopMaTe ΦaɪJIOB (JPEG)
- TunuHoe mma faJna daHHbIX n3o6paXeHHa
- "Memory Stick"s formatted by a computer
- Notes on image data compatibility
- Иснольбоваиме "Memory Stick"
- -Вваенье
- "Memory Stick", oTΦopMaTHpOBaHHaHa KaOMNbItepe
- Примочаим IO COBmecTUMOCTn ДанhhIx n306paKeHn
- Inserting "Memory Stick"
- YcTaHOBka "Memory Stick"
- To eject the "Memory Stick"
- Selecting image quality mode
- Bb6oppeKImaKaueCTBa n3o6paXeHn
- Differences in image quality mode
- Исплььзоваиме "Memory Stick" -В蜱есншe
- Recording still images on "Memory Stick" - Memory Photo recording
- 3aIncb HeNoDBrXhBIX N3O6paXeHn Ha "Memory Stick" -ФOTOCbEmKa c COxpaHeHem B namrTn
- Ipeed nayanom pa60tbI
- Recording images continuously
- 3aIncb HeNoDvBxHbIX N3o6paJxHeNHa "Memory Stick" - FOToCsbemKa cCOxpaHeHEm B namrTu
- Self-timer memory photo recording
- ФОTOCBEMKaВпamЯТь NO TaIMepycamO3anYcKa
- PpimueaHne
- Superimposing a still image in the “Memory Stick” on an image – MEMORY MIX
- Hanoxehne HeNoBnXhOro n3o6paxeHn 3 "Memory Stick" Ha noDnXhOe n3o6paxeHne - MEMORY MIX
- CHROM (Memory chroma key)
- LUMI (Memory luminance key)
- CHROM (Camera chroma key)
- OVERLAP* (Memory overlap)
- -ToJbKO MoJeN DCR-TRV325E/ TRV330E/TRV430E/TRV530E
- CHROM (KHONka LBeTHOCTn NaMATN)
- LUMI (KhoNka npKoCTn namATn)
- OVERLAP* (nepepkbIte namTn)
- Recording superimposed images on a tape
- 3aInscb HanoXeHHoro n3o6paxeHnHa JeHTy
- ДлгИЗМЕHENHЯ HENOБВNXHORO 1306paXeHnIДЛЯ HANOKeHnI
- To change the still image to superimpose
- To change the mode setting
- To cancel MEMORY MIX
- During recording
- IaH3MeHeHH HeoBnXhORO n36paXeHH dHaIOXeHH
- "Memory Stick", npnilaraemam K Baew Bndeokamepe, Bmecaet 20 n3o6paxeHn
- 06pa3bI m3o6paXeHn
- Recording an image from a tape as a still image
- 3a\Pncb n3o6paXeHnCJIeHTbI KaK HeNoDBrJxHOrO n3o6paXeHn
- If S appears on the screen
- If you press PHOTO lightly in the playback mode
- Sound recorded on a tape
- Titles superimposed on tapes
- When you press PHOTO on the Remote
- Commander
- Recording a still image from other equipment
- Ecnn Jlamnoka doctyna ropnt nnn Muraet
- EcnHa 3KpaHe NOBHTCA Hndkaun
- EcIn B peKIMe BOCpOn3BeDeHnC nErKa HaxaTb KONKy PHOTO
- 3Byk, 3aHcAHHbI Ha JeHTy
- Tntpbl,HaJIOXeHHbIe HaJIeHTbl
- EcnBbI haxMeTe KhoNky PHOTO ha nyIbTe ductaHOnHOrO ynpabLeHH
- 3aIncB HeNoDvXHoro 1306paXeHnC dpyrOro annapata
- -ToIbKO MoJeI N DCR-TRV330E Ipeep BvInOpHeHem opeaun
- Ppimcayane
- Copying still imagesfrom a tape - Photo save
- KoHnpoBaHne HeNoDByXhblx 306paXeHn CJeHTbl-CoxpaHeHne fOTOCHIMKOB B PAmrTn
- To stop copying
- ДЯ OCTaHOBKINONIPOBaHNA
- B clyuae nepenolneHn naMrtu "Memory Stick"
- EcIn IeneCTOK 3aunTbI 3annc Ha "Memory Stick" yctahOBnE H noJIOxKeHne LOCK
- Ecnn Bbl 3aMeHnte "Memory Stick" BcepeDnHe KOnnpoBaHn
- Viewing a still image - Memory Photo playback
- Notes on the file name
- PpIMMeuHnOHa3BaHmΦaIa
- Длв ВспюнзБеDEнгЯ 3аиcaHьIx n3o6paхжелу Ha 3kpaHe TelenBuN3opa
- EcJn Ha 3KpaHe NOBHTcH INDkaCuaN “NOFILE"
- DaHHbIe N3O6paXeHnRA, BUNoN3MeHeHHbIe C NOMOsbIO BaWero KOMNbIoTepa Nm CHaTbIe C NOMOsbIO dpyroannapaTypbl
- Playing back 6 recorded images at a time (index screen)
- Bocnpou3BeJeHne 6 3aIncaHHbIX n3o6paXeHn OndHOBpeMeHHO (HnHeKcHbI 3KpaH)
- Viewing images using your computer
- Iprocmotp n306paXeHn C nCIOJIb3OBAHnEm nepcoHaJIbHOrO KOMIbIOTepa
- -ToIbkoMoJeI DCR-TRV325E/ TRV330E/TRV430E/TRV530E
- PeKOMeHDoBaHHbIe KOMNbIOTePHeIe KOHΦnrypaun
- PpIMeHaHn
- Installing the USB driver
- YctaHOBka dpaBepa USB
- For Macintosh users
- Viewing images
- For Windows 98 users
- Ppocmptn3o6paXeHn
- Unplug the USB cable/Eject the "Memory Stick"
- For Windows 2000 users
- Notes on using your computer
- "Memory Stick"
- Отwoeиненье Кабел USB/Извileченье "Memory Stick"
- Image file storage destinations and image files
- Iporpammbi
- CBy3b C BaIIM nepcoHaJIbHbIM KOMNbIOTePOM
- MecTa xpaHeHnaФaIIOB n3o6paxKeHn nФaJIbI n3o6paxKeHn
- Copying the image recorded on "Memory Stick" to tapes
- KoINpOBaHne n3O6paXKeHn, 3aINcaHHbIX Ha "Memory Stick",HaJIeHTbl
- Enlarging still images recorded on "Memory Stick"s - Memory PB ZOOM
- YBeJIuHHe HeNoDBrXHbIX 3aIncHbIX I3O6paXeHn Ha "Memory Stick" - PAmrPB ZOOM
- Playing back images in a continuous loop - SLIDE SHOW
- Bocnpon3BeJeHne n3o6paXeHn BHeIpepbIBHOI PocLeIOBaTeJIbHOCTNpo 3aMKHyTOMy zIKJy - SLIDE SHOW
- Длг OTMeHbI 3aunTbI N306paXeHnA
- EcJn IeNecToK 3aunTbI 3anmH Na "Memory Stick" yctahOBHeB B noJIOXeHne LOCK
- Deleting selected images
- YdaJIeHne n3o6paXeHn
- - TOlbko Mojeeli DCR-TRV325E/ TRV330E/TRV430E/TRV530E
- Ipeed hauanom pa60tbI
- YdaenHe BbI6paHHbIX N3o6paXeHn
- Длг OTMeHbI ydaJIeHnI n3O6paXeHnI
- Длг OTMeHbI n3O6paXeHnI, OTO6paXaemoroHa ИнDEkCHOM 3KpaHe
- Deleting all the images
- YdaJIeHne Bcex n3o6paXKeHn
- - DCR-TRV325E/TRV330E/TRV430E/
- TRV530E only
- - Tôлько модали DCR-TRV325E/TRV330E/TRV430E/TRV530E
- Ipeed npimHeHHem
- Types of trouble and their solutions
- When operating using the "Memory Stick"
- Warning indicators and messages
- Warning messages
- Pa3HOvndHocTn HeucnpaBHOCTeN cNoCo6bI INx yCTpaHeHn
- B pexkme 3ainnc
- Ппсдурждаюши Инданкатор OTHOCNTIELьно Форматеровая “Memory Stick” (Толъков мосян DCR-TRV325E/ TRV330E/TRV430E/TRV530E)
- Предунрекдаюши ИнданkaTop OTHOCNTelbHO Лentbl
- Bam Huxho n3Bneb kaccety*
- HeNoBnKHOe 3o6paKeHne 3aunuEHO\* (TolbKO moJeN DCR- TRV325E/TRV330E/TRV430E/TRV530E)
- PpeynpeKdaiouim HndkaTop OTHOCHTeBHO BCbIaKN (npno6peTaetcra OTdelenbHO)
- Ppeynpexkaioune coo6eHnA
- Digital8 system, recording and playback
- Playback system
- CnФрова систema Digital8 3aIncB N BOCpOu3VeDEHne
- CnCTema BOCPON3BeDeHna
- When you play back
- Copyright signal
- When you playback a dual sound track tape
- PnBocnpOn3VeJeHn
- Bocnpon3BeJeHne JeHT, 3aIncaHHbIX BCnCTeme NTSC
- CunhaJnabTOpckoro npaba
- PnB Bocnpon3BeDeHH
- Пи запис (Toько морел DCR-TRV330E)
- PnBocnpOn3BeJeHm JeHTbIC DBOHOH 3ByKOBOI DOPOXKOJ
- PnncnoJIb3OBAHmJIeHT,3aIIncAHhBIX BcnpoBOBcnCTeme Digital8
- When you use a tape recorded in the Hi8/standard 8 system
- UncpoBaa CnCTema Digital8 B, 3aIncb N BocnpOn3BeDeHne
- PnncnoJIb3OBAHnJeHT,3aIncAHbIX B CnCTeMe Hi8/CTaHdapTHoN CnCTeMe 8
- About the " InfoLITHIUM" battery pack
- О затыpéйhom блODE "InfoLITHIUM"
- HdkaTop BpeMeHH octabweoc3apra 6aTaepnHoro 6loka
- Kak xpaHbTb 6aTapeeHbI bJOK
- Cpok cnjx6bl 6atapeHoro 6noka
- About the Name "i.LINK"
- OTHOCNTeJIbHO i.LINK
- YTo Takoe "i.LINK"?
- Птумецни
- OTHOCINTeJbHo Ha3BaHnI “i.LINK”
- i.LINK Baud rate
- i.LINK Functions on this unit
- Required i.LINK Cable
- Ckopooctb nepeaun i.LINK
- Using your camcorder abroad
- Simple setting of clock by time difference
- Moisture condensation
- KoHdeHcaZnBlaRn
- Ecn npon3oJna KOHdeHcaJn BlaJn
- PpimcHne no KOHdeHcaunn BlaHn
- Kak npedotBpataNb KOHcauNIO BlaH
- Maintenance information
- Cleaning the video head
- HΦopMaζη no yxody
- UcTka BundeOrONoBOK
- PnB BocnpOn3BeDeHnn B CnCTeMe Hi8/ CTaHApTHOI CNCTeMe 8 (aHaJorOBoi)
- Cleaning the LCD screen
- UncTkA 3KpaHa KKd
- Charging the built-in rechargeable battery
- Precautions
- Camcorder operation
- 3apKa BCTpoEHNo aKKyMylTOpHoi 6aTapeiKn
- 3apRka BCTpoEHNo aKKymyIaTOPHO 6aTapeiKn:
- MepblnpedoctopoXHoctn
- 3KcnIyataunBndeokamepbI
- On handling tapes
- Camcorder care
- Connection to your computer
- HΦopMaζη no yxOу 3a annapaTOM n Mepbl ppeoctOpoxKHOCTn
- 06paueHne c JeHTamn
- Yxo3a Bndeokamepo
- IopKJIIOHeHc K BaWEmy KOMNbIoTepy
- При ВьODEиЗБОБРАЖЕнИ,ЗАпсанHOrOВСЧТЕМ经Hi8/CTaнДAPТНОИССТЕМ经8,Bnporpammy Sony VAIO
- AC power adaptor
- About care and storage of the lens
- To prevent mold from occurring, periodically perform the above.
- Cetebo aadantep nepemehhoro ToKa
- yxode 3a o6bekTNBOM n ero xpaheHn
- Note on dry batteries
- If batteries are leaking
- BaTapeHbIb6Jok
- PpimcuaHne K cyxM 6aTapeiKaM
- EcIn npOn3oUla yTeuKa BHyTpEnHero BeuecTb6aTaapeek
- Video camera recorder
- System
- Input/output connectors
- LCD screen
- General
- Battery pack
- TexHnueckne XapaKTepeNCTnKN
- Bvdeokamepa
- CnCTema
- 3KpaH KKD
- 06uee
- CetéBoi aDantep nepemehhoro TOka
- Tpe6obAHnK nntaHnIO
- BbIXoHoe HappXeHne
- Paboya tempepatya
- TemnepaTypa xpaheHn
- Pa3mepb (npn6nn3.)
- Bec (npn6n3.)
- BaTapeiHbI 6JIOK
- MaKcImaJIbHOe BbIXOJHoe
- HannpaxeHne
- CpeHee BbIXoHoe HapXeHne
- EMKOCTb
- Pa6o7a TemnepaTpa
- TNO
- (Tobko Moaden DCR-TRV325E/TRV330E/TRV430E/TRV530E)
- NamrTa
- Pa6ooye HappexHne
- Notpe6JREMaMoHocTb
- Pa3mepbl (npn6n3.)
- Identifying the parts and controls
- PpmeaHnO depkateJe dnyyctahOBKn BCNOMOraTeJIbHbIX pInHaJdIeXHOCTe
- Remote Commander
- NylbT dntaHcnoHHoro ynpabHeHn
- ДлnoiodrotOBKn nyIbTa ДиctahUHOHHorO ynpaBNeHn
- PpmeaHnK npylbTy ductaHcnoHoro ynpabJeHH
- Operation indicators
- A, B
- C, D
- E
- F, G, H
- I, J, K, L
- M, N
- O, P, Q
- R
- S
- T, U, V
- W,X,Y,Z
- AnΦaВnThbI yKa3aTeIb
- A, B, Γ
- A,E,X,3
- N, K, N, M
- H, O
- P
Brand : SONY
Model : DCR-TRV530E
Category : Camcorder