
PU F38PQ 011 - Floor cleaner HOOVER - Free user manual and instructions
Find the device manual for free PU F38PQ 011 HOOVER in PDF.
| Product Type | Vacuum floor polisher for hard floors |
| Brand | Hoover |
| Model | PU F38PQ 011 |
| Power Supply | Electric, 230 V - 240 V (compatible with 220 V) |
| Insulation Type | Double insulation (does not require grounding) |
| Main Functions | Waxing and polishing hard floors with dust vacuuming |
| Compatible Floors | Hardwood floors, marble, tiles and other hard surfaces |
| Rotation Speed | Adjustable (2 positions via foot switch): low speed for wax application, high speed for polishing |
| Indicator Lights | Green (power on), red (bag full), orange (motor speed: 1 or 2 lights) |
| Collection Type | Outer fabric bag + paper dust bag (depending on model) |
| Included Accessories | Yellow brushes (stiff bristles), black brushes (soft bristles), gray polishing pads, white natural pads (wool) – depending on model |
| Brush Maintenance | Clean with warm water and mild detergent |
| Pad Maintenance | Light rubbing with soapy water, dry flat |
| Bag Maintenance | Fabric bag hand washable (warm water, mild detergent); paper bag to be replaced regularly |
| Fill Indicator | Red light turns on when the paper bag needs to be replaced |
| Safety | Stop and unplug before changing brushes or maintenance; do not use on wet surfaces or outdoors |
| Available Spare Parts | Brushes, pads, paper dust bag (code H29, art. 09178369) |
| Warranty | According to retailer's terms (purchase receipt required) |
| Environmental Standards | Compliant with WEEE directive 2002/96/EC – do not dispose of with household waste |
Frequently Asked Questions - PU F38PQ 011 HOOVER
User questions about PU F38PQ 011 HOOVER
0 question about this device. Answer the ones you know or ask your own.
Ask a new question about this device
Download the instructions for your Floor cleaner in PDF format for free! Find your manual PU F38PQ 011 - HOOVER and take your electronic device back in hand. On this page are published all the documents necessary for the use of your device. PU F38PQ 011 by HOOVER.
USER MANUAL PU F38PQ 011 HOOVER
natural_image
Exterior view of a modern vacuum cleaner (no signage or text visible on body)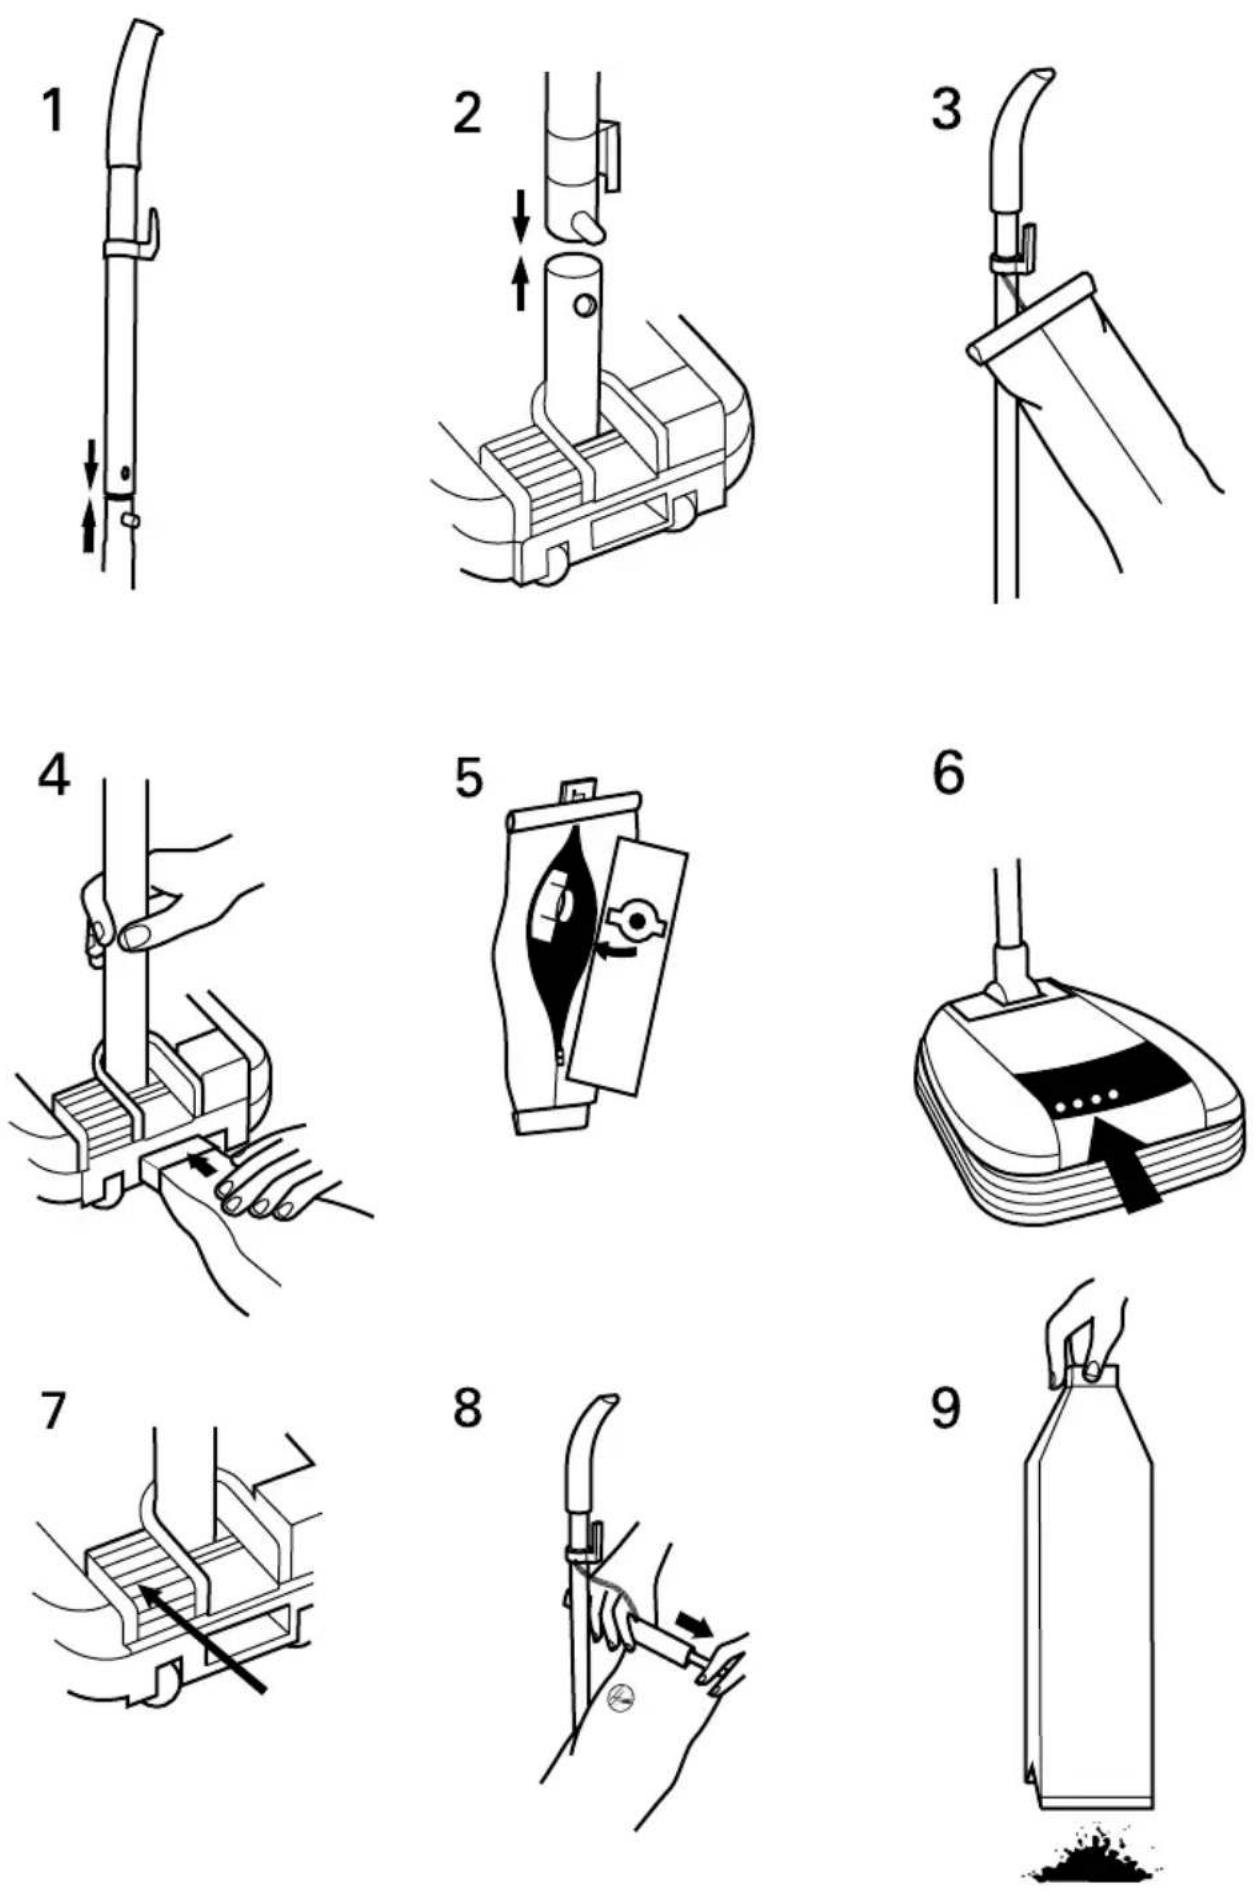
IMPORTANT SAFETY REMINDERS
This appliance is not intended for use by persons (including children) with reduced physical, sensory or mental impairments unless they have been judged as capable of using the product and given instruction concerning the use of appliance by a person responsible for their safety.
Children should be supervised to ensure that they do not play with the appliance.
This polisher should only be used for domestic polishing of hard floor surfaces as described in these instructions. Please ensure that these are fully understood before operating this appliance.
This polisher must not be used for floor washing.
This Hoover suction polisher must be connected to an electricity supply at the voltage shown on the rating plate, found on the underside of the polisher.
Appliances showing a rating plate voltage of 230V-240V can be connected to electrical sources of 220V.
This product is double insulated and must not be earthed.
IMPORTANT: The wires in the power cord are coloured in accordance with the following code:
Blue - Neutral Brown - Live
13 Amp fused plug on UK versions only.
GETTING STARTED
By following this step-by-step guide your new Hoover polisher will be ready for use:
Remove polisher and accessories from packaging. Please dispose of the packaging in a safe and environmentally conscientious way.
HANDLE ASSEMBLY
Join together the 2 handle sections ensuring that the stud locates in the hole (Fig.1).
Fit the handle into the socket at the rear of the hood and push until it locates in the hole (indicated by a "click") (Fig. 2).
OUTER BAG ASSEMBLY
Attach bag support to the hook positioned under the hand grip (Fig. 3).
Once the bag support is attached, insert plastic flange at the bottom of bag into the opening located at the rear of the hood (Fig. 4).
FITTING THE PAPER DUST BAG
(Depending on model)
Refer to the following instructions for models equipped with paper dust bag:
1) Open fastener on outer bag to the fullest extent to expose the air-duct.
2) Fit paper dust bag by pushing the cardboard collar on the air-duct (Fig. 5).
3) Tuck paper dust bag into the outer bag and fully close the zip fastener.
FITTING BRUSHES
SAFETY WARNING: The polisher must be switched off and the plug disconnected from the electrical supply before fitting or changing the brushes.
Turn the polisher upside down. Place each brush or pad on its axle and press until a click indicates that it is the correct position. To remove brushes or pads, grasp them and pull towards you.
Your polisher is now ready for use.
SWITCHING THE POLISHER ON
Ensure the handle is in the upright position before inserting the plug into the electricity supply.
To start the polisher push the handle down then lower it into the working position.
To stop the polisher simply return handle to the upright position.
SAFETY WARNING: Do not run over main leads to avoid damage to the electrical insulation.
INDICATOR LIGHTS (FIG. 6)
(Depending on model)
Some polishers will have 4 indicator lights on the front panel:
Green light on: the appliance is connected to the electricity supply
Red light on: paper dust bag needs changing
1 orange light on: motor running at low speed
2 orange lights on: motor running at normal speed
ADJUSTING BRUSH SPEED (FIGS 6 & 7)
(Depending on model)
Models equipped with 4 indicator lights on panel (Fig. 6), are supplied with a 2 - position foot switch (Fig. 7). During the wax-spreading phase with the Yellow or Black brushes, press the foot switch to reduce brush rotation speed, reduce noise level and save energy.
When the rotation speed is low one Orange light is illuminated. When the wax-spreading operation is finished, press the foot switch (Fig. 7) to return to high speed and start the polishing phase.
When the rotation speed is high two Orange lights are illuminated SAFETY WARNING: The polisher must be switched off and the plug disconnected from the electrical supply before fitting or changing the brushes.
ACCESSORIES
Hoover polishers are equipped with spring loaded brushes and pads in order to obtain the best results on floors with uneven surface.
For this reason, the small narrow brush positioned on the front of the hood is also spring loaded.
Three kits of brushes and pads are supplied with the polisher:
Yellow Hard Bristle Brushes (Depending on model)
To be used to remove the old polish then to spread the new wax evenly on the floor. Particularly suitable for marble and tiles.
Black Soft Bristle Brushes
Must be used to complete the first polishing phase. Suitable for all hard floors.
Grey Buffing Pads
To be used during the final polishing phase for producing a high gloss.
They can be used on all hard surfaces, but are especially suitable for marble and tiles.
Natural White Pads (Depending on model)
These natural white pads, made mainly of wool, have been especially designed to polish wooden floors. They should be used after the Black soft bristle brushes.
TO WAX AND POLISH THE FLOORS
TO WAX THE FLOORS
Before applying polish, ensure that the surface is clean. Remove any greasy stains using a damp cloth.
To apply the polish, follow the instructions supplied with the polish.
Use a good quality polish, spreading it evenly. After the polish has dried, polish the floor with the yellow hard texture brushes or the softer black brushes.
TO POLISH THE FLOORS
For producing a high gloss, use the natural white pads for wooden floors or grey buffing pads for all other hard surfaces.
To obtain better results, always move the polisher in straight lines rather than in circles.
Buffing pads should only be used after the whole surface has first been polished with brushes.
EMPTYING OUTER BAG / PAPER DUST BAG
The suction polisher collects dust in the bag. To maintain the efficiency of your polisher check the dust level and empty the cloth bag or replace the paper dust bag frequently.
MODELS EQUIPPED WITH PAPER DUST BAG:
Fully open zip fastener and remove paper dust bag by pulling the cardboard collar from the air duct (Fig. 5).
Fit new paper dust bag as described in paragraph "Fitting the paper dust bag".
MODELS EQUIPPED WITH BAG CHECK INDICATOR:
On these models the red light will switch on when paper dust bag needs to be replaced.
MODELS EQUIPPED WITH CLOTH BAG (WITHOUT
PAPER DUST BAG):
Remove the cloth bag from upper plastic clip (Fig. 8) and disconnect bottom plastic flange from hood pressing lightly on the indent on the flange.
Turn cloth bag upside down and shake gently (Fig. 9).
The cloth bag can be washed. We suggest hand washing it in warm water with a mild detergent.
CLEANING BRUSHES AND PADS
Brushes may be washed in warm water with a mild detergent.
Pads may be gently brushed with soapy water and wiped with a damp cloth. Do not immerse the pads in the soapy water.
Allow the pads to dry thoroughly before use, keeping them flat.
TRANSPORT, MAINTENANCE AND STORAGE
Move the polisher by means of the rear wheels.
Wind supply cord around the 2 clips on the handle tube.
To maintain brushes in good condition, always remove them before storing the polisher.
SIMPLE USER CHECK LIST BEFORE CALLING FORSERVICE
1) Is there a working electricity supply to the polisher? Check with another appliance.
2) Is a restriction causing the bag check indicator to be activated in use?
If yes: Is the dust bag full? Please refer to chapter "Fitting the Paper Dust Bag".
Please remember: A service charge will be made if the polisher is examined and found to be in working order, has not been assembled in accordance with these instructions, or has been misused.
DODO
Call your nearest Hoover Service Centre in the event of dissatisfaction
Ensure that all service and repairs are carried out by an authorised Hoover Service Engineer.
Only use genuine Hoover parts.
Replace the paper dust bag as soon as the bag check indicator activates.
Always switch off and remove the power plug from the electricity supply after use and before cleaning the appliance or attempting user maintenance as described in these instructions.
Remember: Electricity can be dangerous.
DO NOT
Use your polisher out of doors, on wet surfaces or for wet pick up.
Pick up matches, hot ashes, cigarette ends or anything that may damage the product.
Spray with or pick up flammable liquids, cleaning fluids, aerosols or their vapours as this may cause risk of fire/explosion.
Run over, stand on, or wrap the power cord around arms or legs when using your cleaner
Remove the plug by pulling on the power cord.
Continue to use your polisher if it or the plug/power cord appears to be faulty or damaged. To avoid safety hazards the polisher must only be repaired by an authorised Hoover Service Engineer.
TECHNICAL ASSISTANCE SERVICE
Please contact the nearest Hoover Spare Parts Point for any information and for the supply of spare parts.
Ensure that all the repairs are carried out by Hoover authorised personnel only.
Before cleaning and maintenance by the owner, remember to switch off the appliance and pull out the plug.
SPARE PARTS
Use only original Hoover spare parts.
Natural white pads (Kit 3 pieces).
Grey buffing pads (Kit 3 pieces).
Black Soft Bristle Brushes (Kit 3 pieces).
Yellow Hard Bristle Brushes (Kit 3 pieces).
Paper Dust Bag
Code H29 (Art. 09178369)
GUARANTEE STATEMENT
The guarantee conditions for this appliance are as defined by our representative in the country in which it is sold. Details regarding these conditions can be obtained from the dealer from whom the appliance was purchased. The bill of sale or receipt must be produced when making any claim under the terms of this guarantee.
Subject to change without notice.
This appliance is marked according to the European directive 2002/96/EC on Waste Electrical and Electronic Equipment (WEEE). By ensuring this product is disposed of correctly, you will help prevent potential negative consequences for the environment and human health, which could otherwise be caused by inappropriate waste handling of this product. The symbol on the product indicates that this product may not be treated as household waste. Instead it shall be handed over to the applicable collection point for the recycling of electrical and electronic equipment. Disposal must be carried out
in accordance with local environmental regulations for waste disposal. For more detailed information about treatment, recovery and recycling of this product, please contact your local city office, your household waste disposal service or the shop where you purchased the product.
IMPORTANTI CONSIGLI DI SICUREZZA
BROSSES (FIG. 6 ET 7)
(Selon modèle)