
DCR-TRV11E - Camcorder SONY - Free user manual and instructions
Find the device manual for free DCR-TRV11E SONY in PDF.

| Product Type | Mini DV Digital Camcorder |
| Brand and Model | Sony DCR-TRV11E |
| Recording Format | Mini DV (SP/LP modes) |
| Sensor | CCD with Carl Zeiss lens |
| LCD Screen | Swivel color LCD screen, adjustable backlight |
| Viewfinder | Electronic viewfinder with diopter adjustment |
| Power Source | InfoLITHIUM M series battery (NP-FM50 supplied) or AC adapter AC-L10A/B/C |
| Battery Life (NP-FM50) | Approx. 195 min (viewfinder) / 140 min (LCD) continuous |
| Optical Zoom | 10x (digital zoom up to 120x) |
| Special Features | NightShot, Super NightShot, Back Light, Fader, Picture Effect, Digital Effect, PROGRAM AE |
| Removable Memory | Memory Stick (for photos and memory mix) |
| Connectivity | i.LINK (DV), S-Video, Composite Audio/Video, LANC |
| Supplied Accessories | Remote control (RMT-811), AC adapter, AV cable, NP-FM50 battery, hand strap, Memory Stick, PC cable, PictureGear CD-ROM |
| Dimensions (approx.) | 74 x 90 x 170 mm (without protrusions) |
| Weight (approx.) | 590 g (with battery and cassette) |
| Power Consumption | Approx. 3.6W (viewfinder) / 4.2W (LCD) |
| Operating Temperature | 0°C to 40°C |
| Cleaning and Maintenance | Clean the exterior with a soft, dry cloth. Protect from moisture and extreme temperatures. |
| Safety | Do not expose to rain or moisture. Do not open the casing. Have repairs done by qualified personnel. |
Frequently Asked Questions - DCR-TRV11E SONY
User questions about DCR-TRV11E SONY
0 question about this device. Answer the ones you know or ask your own.
Ask a new question about this device
Download the instructions for your Camcorder in PDF format for free! Find your manual DCR-TRV11E - SONY and take your electronic device back in hand. On this page are published all the documents necessary for the use of your device. DCR-TRV11E by SONY.
USER MANUAL DCR-TRV11E SONY
Digital Video Camera Recorder Mini DV Digital Video Cassette
Operating Instructions
Before operating the unit, please read this manual thoroughly, and retain it for future reference.
natural_image
Line drawing of a video camera with lens and external frame (no text or symbols)DCR-TRV20E
Digital Handycam

InfoLITHIUM

SERIES

Cassette
Memory


MEMORY STICK TM
DCR-TRV6E/TRV11E/TRV20E
English
Welcome!
Congratulations on your purchase of this Sony Digital Handycam camcorder. With your Digital Handycam, you can capture life's precious moments with superior picture and sound quality.
Your Digital Handycam is loaded with advanced features, but at the same time it is very easy to use. You will soon be producing home video that you can enjoy for years to come.
WARNING
To prevent fire or shock hazard, do not expose the unit to rain or moisture.
To avoid electrical shock, do not open the cabinet.
Refer servicing to qualified personnel only.
ATTENTION
The electromagnetic fields at the specific frequencies may influence the picture and sound of this digital camcorder.
Memory Stick

N50
Русский
Добро пожаловать!
Step 1 Preparing the power supply ...... 13
Installing the battery pack 13
Charging the battery pack 14
Connecting to the mains 19
Step 2 Inserting a cassette .... 20
Recording - Basics
Recording a picture 21
Shooting backlit subjects (BACK LIGHT) ... 30
Shooting in the dark (NightShot/Super NightShot) 31
Checking the recording - END SEARCH /
EDITSEARCH / Rec Review 34
Playback - Basics
Playing back a tape 36
Viewing the recording on TV 41
Advanced Recording Operations
Recording a still image on a tape – Tape Photo recording 45
Adjusting the white balance manually 49
Using the wide mode 51
Using the fader function 53
Using special effects - Picture effect 56
Using special effects - Digital effect 58
Using the PROGRAM AE function 61
Adjusting the exposure manually 64
Focusing manually 65
Advanced Playback Operations
Playing back a tape with picture effects 67
Playing back a tape with digital effects 68
Enlarging images recorded on tapes - PB ZOOM.... 70
Quickly locating a scene using the zero set memory function 72
Searching the boundaries of recorded tape by title – Title search .... 73
Searching a recording by date - Date search ..... 75
Searching for a photo - Photo search/Photo scan .... 77
Editing
Dubbing a tape 80
Dubbing only desired scenes - Digital program editing .... 84
Using with analog video unit and PC - Signal convert function .... 96
Recording video or TV programmes 97
Inserting a scene a from VCR - Insert editing .... 101
Audio dubbing 104
Superimposing a title 108
Making your own titles.... 112
Labelling a cassette 114
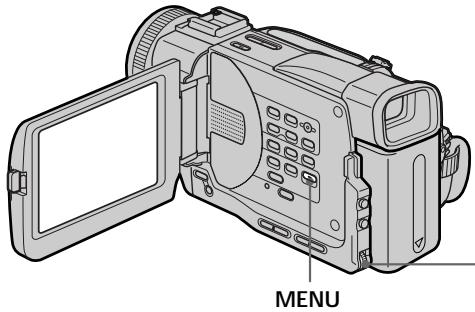
Customizing Your Camcorder
Changing the menu settings 116
Resetting the date and time 129
"Memory Stick" operation
(DCR-TRV11E/TRV20E only) Using a “Memory Stick”–introduction ..... 131
Recording still images on “Memory Stick”s - Memory Photo recording .... 138
Superimposing a still picture in a "Memory Stick" on a moving picture - MEMORY MIX 144
Recording an image from a mini DV tape as a still image 149
Copying still images from a mini DV tape - Photo save 152
Viewing a still picture - Memory photo playback.... 154
Copying the image recorded on "Memory Stick"s to mini DV tapes .... 158
Enlarging still images recorded on "Memory Stick"s - Memory PB ZOOM ...... 160
Playing back images in a continuous loop - SLIDE SHOW 162
Preventing accidental erasure - Image protection .... 164
Deleting images 166
Writing a print mark - PRINT MARK ...... 169
Additional Information
Usable cassettes 171
About i.LINK 174
Troubleshooting 176
Self-diagnosis display 182
Warning indicators and messages 183
Using your camcorder abroad 194
Maintenance information and precautions..... 195
Specifications 200
Quick Reference
Identifying the parts and controls 204
Quick Function Guide 216
Index 218
Checking supplied accessories
Make sure that the following accessories are supplied with your camcorder.
1 Wireless Remote Commander (1) (p. 212)
RMT-808: DCR-TRV6E
RMT-811: DCR-TRV11E/TRV20E
② AC-L10A/L10B/L10C AC power adaptor (1), Mains lead (1) (p. 14)
3 R6 (size AA) battery for Remote Commander (2) (p. 213)
4 NP-FM50 battery pack (1) (p. 13, 14)
5 A/V connecting cable (1) (p. 41, 80)
6 Shoulder strap (1) (p. 208)
7 Lens cap (1) (p. 21)
8 PC serial cable (1) (p. 157)
DCR-TRV11E/TRV20E only
⑨ "Memory Stick" (1) (p. 131)
DCR-TRV11E/TRV20E only
10 Application software: PictureGear 4.1Lite (CD ROM) (1) (p. 157)
DCR-TRV11E/TRV20E only
11 Lens hood (1) (p. 26)
DCR-TRV20E only
natural_image
Illustration of a person holding a digital camera (no text or symbols visible)This chapter introduces you to the basic features of your camcorder. See the page in parentheses “( )” for more information.
1 Connecting the mains lead (p. 19)
Use the battery pack when using your camcorder outdoors (p. 13).
text_image
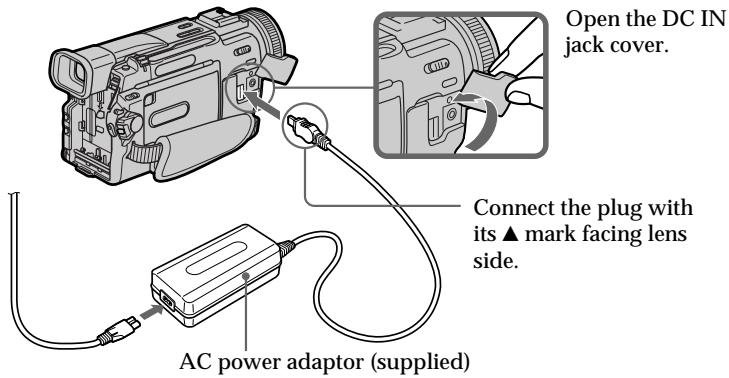
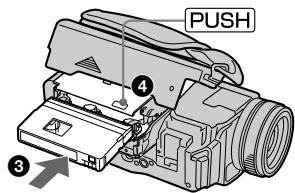
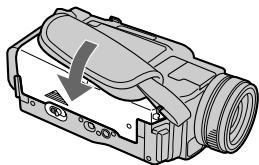
Open the DC IN jack cover. Connect the plug with its ▲ mark facing lens side. AC power adaptor (supplied)2 Inserting a cassette (p. 20)
1 Slide OPEN/EJECT in the direction of the arrow and open the lid.

2 Push the middle portion of the back of the cassette to insert.
3 Close the cassette compartment by pressing the PUSH mark on the cassette compartment.
4 After the cassette compartment going down completely, close the lid until it clicks.
natural_image
Diagram of a camera module with no visible text or symbols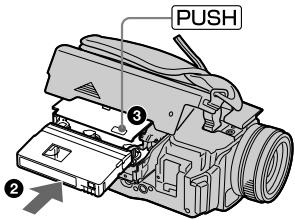
text_image
PUSH ③ ②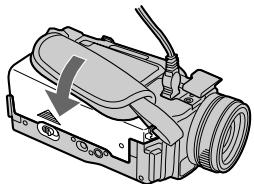
natural_image
Mechanical device with a downward arrow indicating a component (no text or symbols visible)3
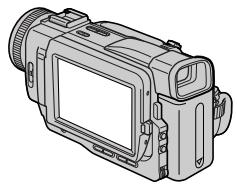
Recording a picture (p. 21)
1 Remove the lens cap.
natural_image
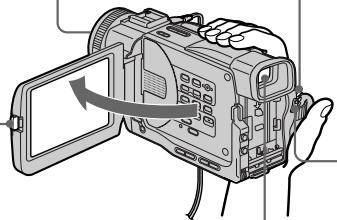
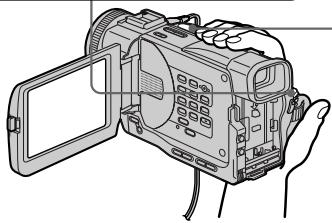
Line drawing of a handheld digital camera with an open screen and hand gesture (no text or symbols)3 To open the LCD panel, press OPEN. The picture appears on the LCD screen.
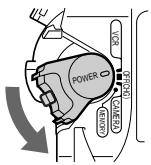
2 Set the POWER switch to CAMERA while pressing the small green button.
text_image
POWER OFF/CHD CAMERA KEYR4 Press START/STOP. Your camcorder starts recording. To stop recording, press START/STOP again.

Viewfinder
When the LCD panel is closed, use the viewfinder placing your eye against its eyecup.
4
Monitoring the playback picture on the LCD screen (p. 36)
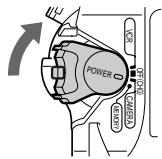
1 Set the POWER switch to VCR
while pressing the small green button.
text_image
POWER VCR OFF/ROHSI CAMERA KEYUOY2 Press ◀◀ to rewind the tape.
REW

③ Press ▶ to start playback.
PLAY

natural_image
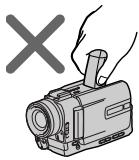
Line drawing of a handheld video camera with open lid and handle (no text or symbols)NOTE
Do not pick up your camcorder by holding the viewfinder or the LCD panel.
natural_image
Illustration of a hand holding a video camera with a 'X' symbol above it (no text or symbols on the device itself)
natural_image
Illustration of a hand holding a camera with a 'X' symbol above, no text or symbols presentnatural_image
Illustration of a person holding a video camera (no text or symbols present)natural_image
Technical diagram of a mechanical device with no visible text or symbols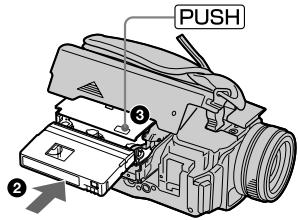
text_image
PUSH ③ ②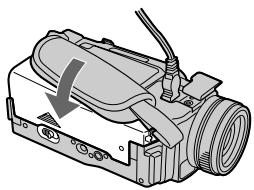
natural_image
Mechanical device with a circular component and cable, showing no visible text or symbolsnatural_image
Line drawing of a handheld digital camera with an open screen and hand gesture (no text or symbols)natural_image
Line drawing of a handheld video camera with open lid and hand holding case (no text or symbols)ПРИМЕЧАНИЕ
natural_image
Illustration of a hand holding a video camera with a 'X' symbol above it (no text or symbols on the device itself)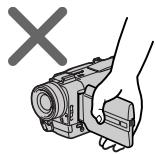
natural_image
Illustration of a hand holding a camera module with a 'X' symbol above (no text or labels on the device itself)Using this manual
The instructions in this manual are for the three models listed in the table below. Before you start reading this manual and operating your camcorder, check the model number by looking at the bottom of your camcorder. The DCR-TRV20E is the model used for illustration purposes. Otherwise, the model name is indicated in the illustrations. Any differences in operation are clearly indicated in the text, for example, “DCR-TRV20E only”.
As you read through this manual, buttons and settings on your camcorder are shown in capital letters.
e.g. Set the POWER switch to CAMERA.
When you carry out an operation, you can hear a beep sound to indicate that the operation is being carried out.
* The model with MEMORY marked on the POWER switch is provided with memory functions. See page 131 for details.
● Имеется
— Отсутствует
Note on Cassette Memory
Your camcorder is based on the DV format. You can only use mini DV cassettes with your camcorder. We recommend you to use a tape with cassette memory CIII.
The functions which depend on whether the tape has the cassette memory or not are:
• End search (p. 34, 40)
- Searching a recording by date – date search (p. 75)
• Photo search (p. 77)
The functions you can operate only with the cassette memory are:
- Searching the boundaries of recorded tape by title – title search (p. 73)
• Superimposing a title (p. 108)
- Making your own titles (p. 112)
• Labelling a cassette (p. 114)
For details, see page 171.
CM only
You see this mark in the introduction of the features that operate only with cassette memory.
Tapes with cassette memory are marked by (C) (Cassette Memory).
Note on TV colour systems
TV colour systems differ from country to country. To view your recordings on a TV, you need a PAL system-based TV.
Copyright precautions
Television programmes, films, video tapes, and other materials may be copyrighted. Unauthorized recording of such materials may be contrary to the provision of the copyright laws.
Precautions on camcorder care
- The LCD screen and the viewfinder are manufactured using high-precision technology. However, there may be some tiny black points and/or bright points (red, blue, green, or white) that constantly appear on the LCD screen and in the viewfinder. These points occur normally in the manufacturing process and do not affect the recorded picture in any way. Effective ratio of pixels and/or screen are 99.99% or more.
- Do not let your camcorder get wet. Keep your camcorder away from rain and sea water. Letting your camcorder get wet may cause your camcorder to malfunction. Sometimes this malfunction cannot be repaired [a].
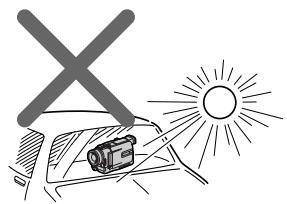
- Never leave your camcorder exposed to temperatures above 60^ (140°F), such as in a car parked in the sun or under direct sunlight [b].
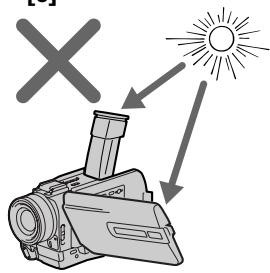
- Do not place your camcorder so as to point the viewfinder or the LCD screen toward the sun. The inside of the viewfinder or LCD screen may be damaged [c].
natural_image
Illustration of a person operating a radio with a large 'X' symbol above, surrounded by waves (no text or symbols present)[b]
natural_image
Simple line drawing of a sun and a camera on a surface, no text or symbols present[c]
text_image
Diagram showing a video camera with a sun icon and a cross symbol, illustrating the concept of light or brightness.Contents of the recording cannot be compensated if recording or playback is not made due to a malfunction of the camcorder, video tape, etc.
Step 1 Preparing the power supply
Installing the battery pack
Install the battery pack to use your camcorder outdoors.
(1) Lift up the viewfinder.
(2) Slide the battery pack down until it clicks.
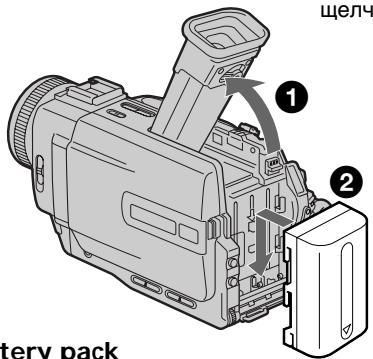
text_image
① ② щелч tery packTo remove the battery pack
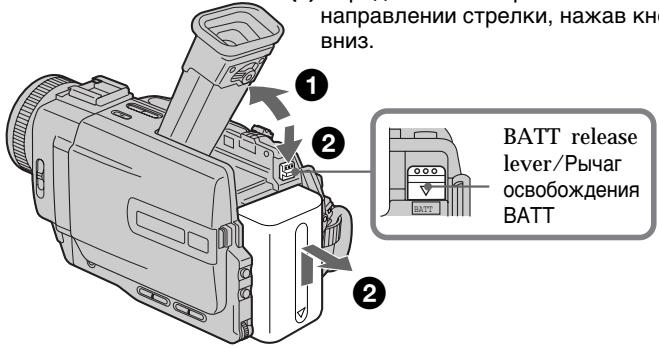
(1) Lift up the viewfinder.
(2) Slide the battery pack out in the direction of the arrow while pressing BATT down.
After installing the battery pack
Do not carry your camcorder by holding the battery pack. If you do so, the battery pack may slide off your camcorder unintentionally, damaging your camcorder.
If you use the large capacity battery pack If you install the NP-FM70/FM90/FM91 battery pack on your camcorder, extend its viewfinder. Take care not to pinch your finger when lifting the viewfinder up and down.
natural_image
Line drawing of a video camera with no visible text or symbolsCharging the battery pack
Use the battery pack after charging it for your camcorder.
Your camcorder operates only with the "InfoLITHIUM" battery pack (M series).
(1) Open the DC IN jack cover, pulling the cover out a little and rotating. Connect the AC power adaptor supplied with your camcorder to the DC IN jack on your camcorder with the plug's ▲ mark facing the lens side.
(2) Connect the mains lead to the AC power adaptor.
(3) Connect the mains lead to the mains.
(4) Set the POWER switch to OFF (CHG). Charging begins. The remaining battery time is indicated in minutes on the display window.
When the remaining battery indicator changes to 174 , normal charge is completed. To fully charge the battery (full charge), leave the battery pack attached for about one hour after normal charge is completed until FULL appears in the display window. Fully charging the battery allows you to use the battery longer than usual.
Step 1 Preparing the power supply
After charging the battery pack
Disconnect the AC power adaptor from the DC IN jack on your camcorder.
Notes
- Prevent metallic objects from coming into contact with the metal parts of the DC plug of the AC power adaptor. This may cause a short-circuit, damaging the AC power adaptor.
- Keep the battery pack dry.
- When the battery pack is not to be used for a long time, charge the battery pack once fully and then use it until it fully discharges again. Keep the battery pack in a cool place.
Remaining battery time indicator
The remaining battery time you record with the viewfinder is displayed.
The remaining battery time indicator in the display window roughly indicates the recording time with the viewfinder.
Until your camcorder calculates the actual remaining battery time
“-- - min” appears in the display window.
While charging the battery pack, no indicator appears or the indicator flashes in the display window in the following cases:
- The battery pack is not installed correctly.
- The AC power adaptor is disconnected.
- Something is wrong with the battery pack.
Battery pack
The battery pack is charged a little before it leaves the factory.
Approximate number of minutes to charge an empty battery pack
Step 1 Preparing the power supply
Approximate number of minutes when you use a fully charged battery
Numbers in parentheses “( )” indicate the time using a normally charged battery.
* Approximate continuous recording time at 25^ C ( 77^ F). The battery life will be shorter if you use your camcorder in a cold environment.
** Approximate number of minutes when recording while you repeat recording start/stop, zooming and turning the power on/off. The actual battery life may be shorter.
Approximate number of minutes when you use a fully charged battery
Numbers in parentheses “( )” indicate the time using a normally charged battery. The battery life will be shorter if you use your camcorder in a cold environment.
What is "InfoLITHIUM"?
The “InfoLITHIUM” is a lithium ion battery pack which can exchange data such as battery consumption with compatible electronic equipment. This unit is compatible with the “InfoLITHIUM” battery pack (M series). Your camcorder operates only with the “InfoLITHIUM” battery. “InfoLITHIUM” M series battery packs have the InfoLITHIUM ^TM MARK. “InfoLITHIUM” is a trademark of Sony Corporation.
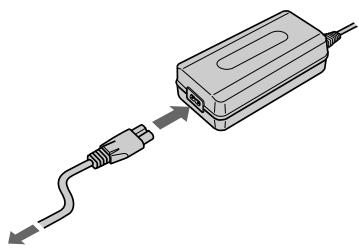
Connecting to the mains
When you use your camcorder for a long time, we recommend that you power it from the mains using the AC power adaptor.
(1) Open the DC IN jack cover, pulling the cover out a little and rotating it. Connect the AC power adaptor supplied with your camcorder to the DC IN jack on your camcorder with the plug's ▲ mark facing the lens side.
(2) Connect the mains lead to the AC power adaptor.
(3) Connect the mains lead to the mains.
natural_image
Line drawing of a video camera with attached cable, showing internal components and a close-up view of the cable (no text or symbols present)2, 3
natural_image
Diagram of a USB cable being inserted into an electronic device (no text or symbols present)PRECAUTION
The set is not disconnected from the AC power source (the mains) as long as it is connected to the mains, even if the set itself has been turned off.
Notes
- The AC power adaptor can supply power even if the battery pack is attached to your camcorder.
- The DC IN jack has “source priority”. This means that the battery pack cannot supply any power if the mains lead is connected to the DC IN jack, even when the mains lead is not plugged into the mains.
Using a car battery
Use Sony DC Adaptor/Charger (not supplied).
ПРЕДОСТЕРЕЖЕНИЕ
(1) Install the power source.
(2) Slide OPEN/EJECT in the direction of the arrow and open the lid. The cassette compartment automatically lifts up and opens.
(3) Push the middle portion of the back of the cassette to insert. Insert the cassette in a straight line deeply into the cassette compartment with the window facing out.
(4) Close the cassette compartment by pressing the PUSH mark on the cassette compartment. The cassette compartment automatically goes down.
(5) After the cassette compartment going down completely, close the lid until it clicks.
text_image
OPEN/EJECT3, 4
text_image
PUSH ④ ③5
natural_image
Technical illustration of a camera module with a downward arrow indicating motion (no text or symbols present)To eject a cassette
Follow the procedure above and in step 3, take out the cassette.
Notes
- Do not press the cassette compartment down. Doing so may cause malfunction.
- The cassette compartment may not be closed when you press any part of the lid other than the PUSH mark.
When you use mini DV cassette with cassette memory
Read the instruction about cassette memory to use this function properly (p. 171).
To prevent accidental erasure
Slide the write-protect tab on the cassette to expose the red mark.
natural_image
Diagram of a device with an arrow pointing to a component, no text or symbols presentRecording a picture
Your camcorder automatically focuses for you.
(1) Remove the lens cap by pressing both knobs on its sides and attach the lens cap to the grip strap.
(2) Install the power source and insert a cassette. See “Step 1” and “Step 2” for more information (p. 13 to p. 20).
(3) Set the POWER switch to CAMERA while pressing the small green button. Your camcorder is set to the standby mode.
(4) To open the LCD panel, press OPEN. The viewfinder automatically turns off.
(5) Press START/STOP. Your camcorder starts recording. The “REC” indicator appears. The camera recording lamp located on the front of your camcorder lights up. To stop recording, press START/STOP again.
Запись изображения
Fasten the grip strap firmly.
Note on recording mode
Your camcorder records and plays back in the SP (standard play) mode and in the LP (long play) mode. Select SP or LP in the menu settings. In the LP mode, you can record 1.5 times as long as in the SP mode.
When you record a tape in the LP mode on your camcorder, we recommend playing the tape on your camcorder.
Note on the LOCK switch (DCR-TRV11E/TRV20E only)
When you slide LOCK to the right, the POWER switch can no longer be set to MEMORY accidentally. LOCK is set to the left before your camcorder leaves the factory.
To enable smooth transition
Transition between the last scene you recorded and the next scene is smooth as long as you do not eject the cassette even if you turn off your camcorder.
However, check the following:
- Do not mix recordings in the SP mode and ones in the LP mode on one tape.
- When you change the battery pack, set the POWER switch to OFF (CHG).
When you use a tape with cassette memory, however, you can make the transition smooth even after ejecting the cassette if you use the END SEARCH function (p. 34).
If you leave your camcorder in the standby mode for five minutes while the cassette is inserted
Your camcorder automatically turns off. This is to save battery power and to prevent battery and tape wear. To resume the standby mode, set the POWER switch to OFF (CHG), and to CAMERA again.
Примечание
When you record in the SP and LP modes on one tape or you record some scenes in the LP mode
The playback picture may be distorted or the time code may not be written properly between scenes.
Adjusting the LCD screen
The LCD panel moves about 90 degrees to the viewfinder side and about 180 degrees to the lens side.
If you turn the LCD panel over so that it faces the other way, the ⚙ indicator appears in the viewfinder and on the LCD screen (Mirror mode).
Запись изображения
When closing the LCD panel, set it vertically until it clicks, and swing it into the camcorder body.
Note
When using the LCD screen except in the mirror mode, the viewfinder automatically turns off.
When you use the LCD screen outdoors in direct sunlight
The LCD screen may be difficult to see. If this happens, we recommend that you use the viewfinder.
Picture in the mirror mode
The picture on the LCD is a mirror-image. However, the picture will be normal when recorded.
During recording in the mirror mode ZERO SET MEMORY on the Remote Commander does not work.
Indicators in the mirror mode
The STBY indicator appears as II and REC as . Some of the other indicators appear mirror-reversed and others are not displayed.
Adjusting the brightness of the LCD screen
To adjust the brightness of the LCD screen, press either of the two buttons on LCD BRIGHT.
LCD screen backlight
You can change the brightness of the backlight. Select LCD B.L. in the menu settings.(p.116)
Even if you adjust the LCD screen backlight or brightness of the LCD screen
The recorded picture will not be affected.
After recording
(1) Set the POWER switch to OFF (CHG).
(2) Close the LCD panel.
(3) Eject the cassette.
Adjusting the viewfinder
If you record pictures with the LCD panel closed, check the picture with the viewfinder. Adjust the viewfinder lens to your eyesight so that the indicators in the viewfinder come into sharp focus.
Lift up the viewfinder and move the viewfinder lens adjustment lever.
natural_image
Diagram of a digital camera with an inset showing the internal components (no text or symbols present)Viewfinder backlight
You can change the brightness of the backlight.
Select VF B.L. in the menu settings. (p.116)
Attaching the supplied lens hood (DCR-TRV20E only)
To record fine pictures under strong light, we recommend attaching the lens hood. Also the lens cap can be attached even with the lens hood on.
natural_image
Line drawing of a video camera with a coiled cable and rotational arrow (no text or symbols)Notes
- When you use the Remote Commander and the lens hood, the Remote Commander may not function properly because the lens hood blocks the infrared rays from the Remote Commander. In such case, remove the lens hood from your camcorder.
- You cannot attach filters or other objects onto the lens hood.
When you use the filter (not supplied)
The shadow of the lens hood may appear in the corners of LCD screen or viewfinder.
Примечания
Using the zoom feature
Move the power zoom lever a little for a slower zoom. Move it further for a faster zoom.
Using the zoom function sparingly results in better-looking recordings.
“T” side: for telephoto (subject appears closer)
“W” side: for wide-angle (subject appears farther away)
text_image
Diagram showing a video camera with labeled screen orientation and directional arrows, including a person holding a 'W' button.To use zoom greater than 10×
Zoom greater than 10× is performed digitally, if you set D ZOOM to 20× or 120× in the menu settings. The digital zoom function is set to OFF at the factory. (p. 116)
The right side of the bar shows the digital zooming zone.
The digital zooming zone appears when you set D ZOOM to 20× or 120×./
When you shoot close to a subject If you cannot get a sharp focus, move the power zoom lever to the “W” side until the focus is sharp. You can shoot a subject that is at least about 80 cm (about 2 feet 5/8 inch) away from the lens surface in the telephoto position, or about 1 cm (about 1/2 inch) away in the wide-angle position.
Notes on digital zoom
- Digital zoom starts to function when zoom exceeds 10 × .
- The picture quality deteriorates as you move the power zoom lever toward the “T” side.
- You cannot use the digital zoom when the POWER switch is set to MEMORY (DCR-TRV11E/TRV20E only).
Indicators displayed in the recording mode
The indicators are not recorded on tapes.
[a] Remaining battery time indicator
[b] Cassette memory indicator
This appears when using a tape with cassette memory.
[c] Recording mode indicator
[d] STBY/REC indicator
[e] Time code/Tape counter
[f] Remaining tape indicator
[g] Time indicator
The time is displayed about five seconds after the power is turned on.
[h] Date indicator
The date is displayed about five seconds after the power is turned on.
The time code indicates the recording or playback time, “0:00:00” (hours : minutes : seconds) in CAMERA mode and “0:00:00:00” (hours : minutes : seconds : frames) in VCR mode. You cannot rewrite only the time code.
Remaining tape indicator
The indicator may not be displayed accurately depending on the tape.
Recording date and time
The recording date and time are not displayed while recording. However, they are recorded automatically onto the tape. To display the recording date and time, press DATE CODE during playback.
Код времени
When you shoot a subject with the light source behind the subject or a subject with a light background, use the backlight function.
In the standby, recording or memory mode, press BACK LIGHT.
The ☑ indicator appears in the viewfinder or on the LCD screen.
To cancel, press BACK LIGHT again.
natural_image
Line drawing of a video camera with lens and external ports (no text or symbols)BACK LIGHT
If you press EXPOSURE when shooting backlit subjects
The backlight function will be cancelled.
Shooting in the dark (NightShot/Super NightShot)
The NightShot function enables you to shoot a subject in a dark place. For example, you can satisfactorily record the environment of nocturnal animals for observation when you use this function.
In the standby, recording or memory mode, slide NIGHTSHOT to ON. and "NIGHTSHOT" indicators flash on the LCD screen or in the viewfinder. To cancel the NightShot function, slide NIGHTSHOT to OFF.
The Super NightShot mode makes subjects more than 16 times brighter than those recorded in the NightShot mode.
(1) In the standby or recording mode, slide NIGHTSHOT to ON. ◎ indicator appears on the LCD screen or in the viewfinder.
(2) Press SUPER NIGHTSHOT. The □ indicator and “SUPER NIGHTSHOT” appear. To cancel the Super NightShot mode, press SUPER NIGHTSHOT.
Using the NightShot Light
The picture will be clearer with the NightShot Light on. To enable NightShot Light, set N.S.LIGHT to ON in the menu settings (p. 116).
- Do not use the NightShot function in bright places (ex. outdoors in the daytime). This may cause your camcorder to malfunction.
- When you keep NIGHTSHOT set to ON in normal recording, the picture may be recorded in incorrect or unnatural colours.
- If focusing is difficult with the autofocus mode when using the NightShot function, focus manually.
While using the NightShot function, you cannot use the following functions:
- Exposure
- PROGRAM AE
- White balance
While using the Super NightShot Function The shutter speed is automatically adjusted depending on the brightness. At that time, the moving picture may be slow down.
While using the Super NightShot function, you cannot use the following functions:
- Exposure
- PROGRAM AE
- Fader
- Digital effect
- Memory mode (DCR-TRV11E/TRV20E only)
NightShot Light
NightShot Light rays are infrared and so are invisible. The maximum shooting distance using the NightShot Light is about three m (10 feet).
Примечания
Self-timer recording
You can make a recording with the self-timer. This mode is useful when you want to record yourself.
(1) Press SELFTIMER in the standby mode. The ⭕ (self-timer) indicator appears on the LCD screen or in the viewfinder.
(2) Press START/STOP.
Self-timer starts counting down from 10 with a beep sound. In the last two seconds of the countdown, the beep sound gets faster, then recording starts automatically.
To stop the self-timer during recording
Press START/STOP.
Use the Remote Commander for convenience.
To record still pictures using the self-timer
Press PHOTO in step 2 (p. 47).
To record still pictures on "Memory Stick"s
Press SELFTIMER, then press PHOTO in the memory mode (p. 143).
To cancel self-timer recording
Press SELFTIMER so that the Ⓧ indicator disappears from on the LCD screen or in the viewfinder while your camcorder is in the standby mode.
Note
The self-timer recording mode is automatically cancelled when:
– Self-timer recording is finished.
- The POWER switch is set to OFF (CHG) or VCR.
Checking the recording
- END SEARCH / EDITSEARCH / Rec Review
You can use these buttons to check the recorded picture or shoot so that the transition between the last recorded scene and the next scene you record is smooth.
Проверка записи
- END SEARCH/EDITSEARCH/
Просмотр записи
You can go to the end of the recorded section after you record.
Press END SEARCH in the standby mode. The last five seconds of the recorded section are played back and playback stops. You can monitor the sound from the speaker or headphones.
EDITSEARCH
You can search for the next recording start point.
Hold down the + / - → side of EDITSEARCH in the standby mode. The recorded section is played back.
- : to go forward
- →: to go backward
Release EDITSEARCH to stop playback. If you press START/STOP, re-recording begins from the point you released EDITSEARCH. You cannot monitor the sound.
END SEARCH
Checking the recording - END SEARCH / EDITSEARCH / Rec Review
Rec Review
You can check the last recorded section.
Press the - Ⓗ side of EDITSEARCH momentarily in the standby mode.
The last few seconds of the selected section are played back. You can monitor the sound from the speaker or headphones.
End search function
When you use a tape without cassette memory, the end search function does not work once you eject the cassette after you have recorded on the tape. If you use a tape with cassette memory, the end search function works even once you eject the cassette.
If there is a blank portion in the recorded portion, the end search function may not work correctly (p. 171).
You can monitor the playback picture on the LCD screen. If you close the LCD panel, you can monitor the playback picture in the viewfinder. You can control playback using the Remote Commander supplied with your camcorder.
(1) Install the power source and insert the recorded tape.
(2) Set the POWER switch to VCR while pressing the small green button. The video control buttons light up.
(3) To open the LCD panel, press OPEN.
(4) Press ◀◀ to rewind the tape.
(5) Press ▶ to start playback.
(6) To adjust the volume, press either of the two buttons on VOLUME. The speaker on your camcorder is silent when the LCD panel is closed.
When monitoring on the LCD screen
You can turn the LCD panel over and move it back to the camcorder body with the LCD screen facing out.
natural_image
Line drawing of a digital camera with an open screen and scroll, showing no text or symbols.
natural_image
Line drawing of a digital camera with front and back panels (no text or symbols)To display the screen indicators - Display function
Press DISPLAY on your camcorder or the Remote Commander supplied with your camcorder.
The indicators appear on the LCD screen. To make the indicators disappear, press DISPLAY again.
Your camcorder automatically records not only images on the tape but also the recording data (date/time or various settings when recorded) (Data code).
Press DATA CODE on your camcorder or the Remote Commander in the playback mode.
The display changes as follows: date/time → various settings (SteadyShot, white balance, gain, shutter speed, aperture value) → no indicator
[a] SteadyShot OFF indicator
[b] Exposure mode indicator
[c] White balance
[d] Gain indicator
[e] Sutter speed indicator
[f] Aperture value
Not to display various settings
Set DATA CODE to DATE in the menu settings (p. 116).
The display changes as follows:
date/time → no indicator
Recording data
Recording data is your camcorder's information when you have recorded. In the recording mode, the recording data will not be displayed.
When you use data code function, bars (-- -- --) appear if:
- A blank section of the tape is being played back.
- The tape is unreadable due to tape damage or noise.
- The tape was recorded by a camcorder without the date and time set.
Data code
The data code is displayed on the TV screen if you connect your camcorder to the TV (p. 37).
Various playback modes
To operate control buttons, set the POWER switch to VCR.
To view a still picture ( playback pause)
Press || during playback. To resume playback, press || or ▶.
To advance the tape
Press ▶▶ in the stop mode. To resume normal playback, press ▶.
To rewind the tape
Press ◀◀ in the stop mode. To resume normal playback, press ▶.
To change the playback direction
Press < on the Remote Commander during playback to reverse the playback direction. To resume normal playback, press ▶.
To locate a scene monitoring the picture (picture search)
Keep pressing ◀◀ or ▶▶ during playback. To resume normal playback, release the button.
To monitor the high-speed picture while advancing or rewinding the tape (skip scan)
Keep pressing ◀◀ while rewinding or ▶▶ while advancing the tape. To resume rewinding or advancing, release the button.
To view the picture at slow speed (slow playback)
Press ▶ on the Remote Commander during playback. For slow playback in the reverse direction, press <, then press ▶ on the Remote Commander. To resume normal playback, press ▶.
To view the picture at double speed
Press ×2 on the Remote Commander during playback. For double speed playback in the reverse direction, press <, then press ×2 on the Remote Commander. To resume normal playback, press ▶.
To view the picture frame-by-frame
Press ▶ on the Remote Commander in the playback pause mode. For frame-by-frame playback in the reverse direction, press ◀. To resume normal playback, press ▶.
To search the last scene recorded (END SEARCH)
Press END SEARCH in the stop mode. The last five seconds of the recorded section are played back and stops.
End Search function
When you use a tape without cassette memory, the end search function does not work once you eject the cassette after you have recorded on the tape. If you use a tape with cassette memory, the end search function works even once you eject the cassette.
In the various playback modes
- Sound is muted.
- The previous picture may remain as a mosaic image during playback.
When the playback pause mode lasts for five minutes
Your camcorder automatically enters the stop mode. To resume playback, press ▶.
Slow playback
The slow playback can be performed smoothly on your camcorder; however, this function does not work for an output signal from the i, DV IN/OUT jack.
When you play back a tape in reverse
Horizontal noise appears at the centre or top and bottom of the screen. This is not a malfunction.
Viewing the recording on TV
Connect your camcorder to your TV or VCR with the A/V connecting cable supplied with your camcorder to watch the playback picture on the TV screen. You can operate the playback control buttons in the same way as when you monitor playback pictures on the LCD screen. When monitoring the playback picture on the TV screen, we recommend that you power your camcorder from the mains using the AC power adaptor (p. 19). Refer to the operating instructions of your TV or VCR.
Open the jack cover. Connect your camcorder to the TV using the A/V connecting cable. Then, set the TV/VCR selector on the TV to VCR.
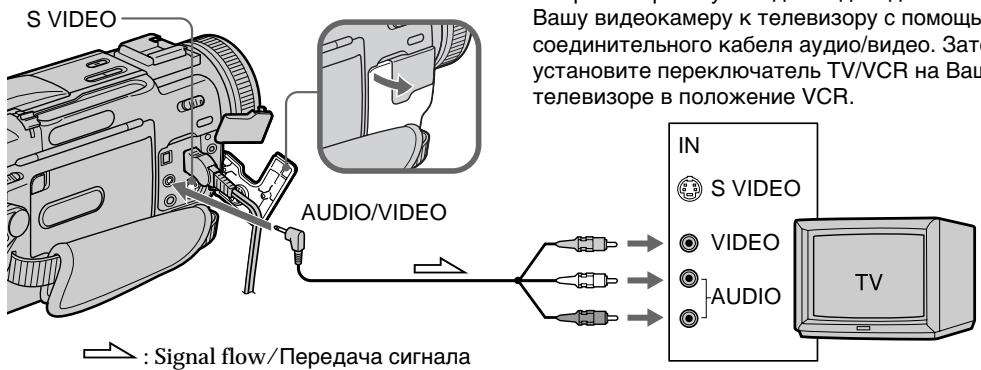
If your TV is already connected to a VCR
Connect your camcorder to the LINE IN input on the VCR by using the A/V connecting cable supplied with your camcorder. Set the input selector on the VCR to LINE.
If your TV or VCR is a monaural type
Connect the yellow plug of the A/V connecting cable to the video input jack and the white or the red plug to the audio input jack on the VCR or the TV. If you connect the white plug, the sound is L (left) signal. If you connect the red plug, the sound is R (right) signal.
If your TV or VCR has an S video jack
Connect using an S video cable (not supplied) to obtain high-quality pictures. With this connection, you do not need to connect the yellow (video) plug of the A/V connecting cable.
Connect the S video cable (not supplied) to the S video jacks on both your camcorder and the TV or the VCR.
This connection produces higher quality DV format pictures.
Using the AV cordless IR receiver
Once you connect the AV cordless IR receiver (not supplied) to your TV or VCR, you can easily view the picture on your TV. For details, refer to the operating instructions of the AV cordless IR receiver.
natural_image
Line drawing of a video camera with lens and control buttons (no text or symbols)Insert a tape into your camcorder
(1) After connecting your TV and AV cordless IR receiver, set the POWER switch on the AV cordless IR receiver to ON.
(2) Set the POWER switch to VCR.
(3) Turn the TV on and set the TV/VCR selector on the TV to VCR.
(4) Press SUPER LASER LINK. The lamp of SUPER LASER LINK lights up.
(5) Press ▶ on your camcorder to start playback.
(6) Point the super laser link emitter at the AV cordless IR receiver. Adjust the position of your camcorder and the AV cordless IR receiver to obtain clear playback pictures.
natural_image
Diagram of a device connected to a TV showing cable or cable attachment (no text or symbols present)To cancel the super laser link function
Press SUPER LASER LINK again. The lamp on the SUPER LASER LINK button goes out.
If you turn the power off
The super laser link function turns off automatically.
If you use a Sony TV
- You can turn on the TV automatically when you press SUPER LASER LINK. To do so, make sure you:
- Turn the TV's main switch on.
- Set AUTO TV ON to ON in the menu settings.
- Point the super laser link emitter at the TV's remote sensor.
- You can switch the video input of the TV automatically to the one which the AV cordless IR receiver is connected. To do so, set AUTO TV ON to ON and TV INPUT to the same video input (1, 2, 3) in the menu settings. With some models, however, the picture and sound may be disconnected momentarily when the video input is switched.
- The above feature may not work on some TV models.
When the super laser link is activated (the SUPER LASER LINK button is lit)
Your camcorder consumes power. Press SUPER LASER LINK to turn off the laser link function when it is not needed.

SUPER LASERLINK
is a trademark of Sony Corporation.
— Advanced Recording Operations — Recording a still image on a tape - Tape Photo recording
You can record a still picture, for example, a photograph or drawing. This mode is useful when you want to print a picture using a video printer (not supplied).
You can record about 510 pictures in the SP mode and about 765 pictures in the LP mode on a 60-minute tape.
Besides the operation described here, your camcorder can record still pictures on “Memory Stick” s (p. 138) (DCR-TRV11E/TRV20E only).
(1) Set the POWER switch to CAMERA.
(2) In the standby mode, keep pressing PHOTO lightly until a still picture appears.
The CAPTURE indicator appears. Recording does not start yet.
To change the still picture, release PHOTO, select a still picture again, and then press and hold PHOTO lightly.
(3) Press PHOTO deeper.
The still picture on the LCD screen or in the viewfinder is recorded for about seven seconds. The sound during those seven seconds is also recorded.
The still image is displayed on the LCD screen or in the viewfinder until recording is completed.
Recording a still image on a tape - Tape Photo recording
Notes
- During tape photo recording, you cannot change the mode or setting.
- When recording a still picture, do not shake your camcorder. The picture may fluctuate.
• The PHOTO button does not work: - while the fader function is set or in use
- while the digital effect function is set or in use
If you record a moving subject with tape photo recording function
When you play back the still picture on other equipment, the picture may fluctuate.
To use the tape photo recording function using the Remote Commander
Press PHOTO on the Remote Commander. Your camcorder records a picture on the LCD screen or in the viewfinder immediately.
To use the tape photo recording function during normal CAMERA recording
Press PHOTO deeper. The still picture is then recorded for about seven seconds and your camcorder returns to the standby mode. You cannot select another still picture.
To record clear and less fluctuated still pictures
We recommend that you record on “Memory Stick”s. (DCR-TRV11E/TRV20E only)
Recording a still image on a tape - Tape Photo recording
Self-timer tape photo recording
You can make a tape photo recording with the self-timer. This mode is useful when you want to record yourself.
(1) Set the POWER switch to CAMERA.
(2) Press SELFTIMER. The ⭕ (self-timer) indicator appears on the LCD screen or in the viewfinder.
(3) Press PHOTO deeper.
Self-timer starts counting down from 10 with a beep sound. In the last two seconds of the countdown, the beep sound gets faster, then recording starts automatically.
To cancel self-timer tape photo recording
Press SELFTIMER so that the Ⓧ indicator disappears from on the LCD screen or in the viewfinder while your camcorder is in the standby mode. You cannot cancel the self-timer tape photo recording using the Remote Commander.
Note
The self-timer tape photo recording mode is automatically cancelled when:
- Self-timer tape photo recording is finished.
- The POWER switch is set to OFF (CHG) or VCR.
Recording a still image on a tape - Tape Photo recording
Printing the still picture
You can print a still picture by using the video printer (not supplied). Connect the video printer using the A/V connecting cable supplied with your camcorder.
Connect it to the AUDIO/VIDEO jack and connect the yellow plug of the cable to the video input of the video printer. Refer to the operating instructions of the video printer as well.
If the video printer is equipped with S video input
Use the S video connecting cable (not supplied). Connect it to the S VIDEO jack and the S video input of the video printer.
Adjusting the white balance manually
You can manually adjust and set the white balance. This adjustment makes white subjects look white and allows more natural colour balance. Normally white balance is automatically adjusted.
In the standby, recording or memory mode (DCR-TRV11E/TRV20E only), select a desired white balance mode in ☐ in the menu settings. (p. 116)
(INDOOR):
• Lighting condition changes quickly
- Too bright place such as photography studios
- Under sodium lamps or mercury lamps
- Recording a sunset/sunrise, just after sunset, just before sunrise, neon signs, or fireworks
• Under a colour matching fluorescent lamp HOLD:
(OUTDOOR):
Recording a single-coloured subject or background
To return to the automatic white balance mode
Set WHT BAL to AUTO in the menu settings.
Adjusting the white balance manually
If the picture is being taken in a studio lit by TV lighting
We recommend you to record in the 🌿 indoor mode.
When you record under fluorescent lighting Use the automatic white balance or hold mode. Your camcorder may not adjust the white balance correctly in the indoor mode.
In the automatic white balance mode
Point your camcorder at a white subject for about 10 seconds after setting the POWER switch to CAMERA to get a better adjustment when:
- You detach the battery for replacement.
- You bring your camcorder to the outdoors from the interior of a house, or vice versa.
In the hold white balance mode
Set the white balance to AUTO and reset to HOLD after a few seconds when:
- You change the PROGRAM AE mode.
- You bring your camcorder to the outdoors from the interior of a house, or vice versa.
You can record a 16:9 wide picture to watch on the 16:9 wide-screen TV (16:9WIDE). Black bands appear on the screen during recording in 16:9WIDE mode [a]. The picture during playing back on a normal TV [b] or a wide -screen TV [c] are compressed in the widthwise direction. If you set the screen mode of the wide-screen TV to the full mode, you can watch pictures of normal images [d].
In the standby mode, set 16:9WIDE in ☐ to ON in the menu settings (p. 116).
To cancel the wide mode
Set 16:9WIDE to OFF in the menu settings.
In the wide mode, you cannot select the following functions:
- Old movie
- Bounce (DCR-TRV6E/TRV11E only)
During recording
You cannot select or cancel the wide mode. When you cancel the wide mode, set your camcorder to the standby mode and then set 16:9WIDE to OFF in the menu settings.
You can fade in or out to give your recording a professional appearance.
When fading in, the picture gradually changes from black-and-white to colour. When fading out the picture gradually changes from colour to black-and-white.
*1) DCR-TRV6E/TRV11E only
^2) You can use this function only when D ZOOM is set to OFF in the menu settings.
^3) The sound does not wipe away.
MONOTONE
(1) When fading in [a]
In the standby mode, press FADER until the desired fader indicator flashes.
When fading out [b]
In the recording mode, press FADER until the desired fader indicator flashes.
The indicator changes as follows:
FADER → M.FADER* → BOUNCE* →
MONOTONE → OVERLAP → WIPE →
DOT → no indicator
The last selected fader mode is indicated first of all.
(2) Press START/STOP. The fader indicator stops flashing.
* DCR-TRV6E/TRV11E only
MONOTONE → OVERLAP → WIPE →
DOT → без индикации
After the fade in/out is carried out: Your camcorder automatically returns to the normal mode.
Before the fade in/out is carried out: Before pressing START/STOP, press FADER until the indicator disappears.
You cannot use the following functions while using the fader function. Also, you cannot use the fader function while using the following functions:
- Digital effect
- Low lux mode of PROGRAM AE (Overlap, Wipe, or Random Dot function only)
- Super NightShot
- Tape Photo recording
When the OVERLAP, WIPE, or RANDOM DOT indicator appear in the standby mode
Your camcorder automatically stores the image recorded on a tape. As the image is being stored, the indicators flash fast, and the playback picture disappears. At this stage, the picture may not be recorded clearly, depending on the tape condition.
While using the bounce function, you cannot use the following functions (DCR-TRV6E/TRV11E only):
- Exposure
- Focus
- Zoom
- Picture effect
Note on the bounce function (DCR-TRV6E/TRV11E only)
The BOUNCE indicator does not appear in the following mode or functions:
- D ZOOM is activated in the menu settings
- 16:9 wide
- Picture effect
- PROGRAM AE
While in memory mode (DCR-TRV11E/TRV20E only)
You cannot use the fader function.
Примечание
Using special effects - Picture effect
You can digitally process images to obtain special effects like those in films or on the TV.
NEG. ART [a]: The colour and brightness of the picture is reversed.
SEPIA : The picture is sepia.
B&W : The picture is monochrome (black-and-white).
SOLARIZE [b]: The light intensity is clearer, and the picture looks like an illustration.
SLIM [c]: The picture expands vertically.
STRETCH [d]: The picture expands horizontally.
PASTEL [e] : The contrast of the picture is emphasized, and the picture looks like an animated cartoon.
MOSAIC [f]: The picture is mosaic.
Using special effects - Picture effect
(1) In the standby or recording mode, select P EFFECT in ☐ in the menu settings. (p. 116)
(2) Select the desired picture effect mode in the menu settings.
text_image
MENUTo cancel the picture effect function
Set P EFFECT to OFF in the menu settings.
While using the picture effect function You cannot select the old movie mode with DIGITAL EFFECT.
When you turn the power off Your camcorder automatically returns to the normal mode.
Using special effects - Digital effect
You can add special effects to recorded pictures using the various digital functions. The sound is recorded normally.
STILL
You can record a still picture so that it is superimposed on a moving picture.
FLASH (FLASH MOTION)
You can record still pictures successively at constant intervals.
LUMI. (LUMINANCEKEY)
You can swap a brighter area in a still picture with a moving picture.
TRAIL
You can record the picture so that an incidental image like a trail is left.
SLOW SHTR (SLOW SHUTTER)
You can slow down the shutter speed. The slow shutter mode is good for recording dark pictures more brightly. However, the picture may be less clear.
OLD MOVIE
You can add an old movie type atmosphere to pictures. Your camcorder automatically sets the wide mode to ON, picture effect to SEPIA, and the appropriate shutter speed.
flowchart
graph LR
    A["Still picture/Hepodwijknoe isображение"] --> B["Still picture/Indoor photo"]
    B --> C["Moving picture/Indoor photo"]
    C --> D["Moving picture/Indoor photo"]
    E["Still picture/Hepodwijknoe isображение"] --> F["Still picture/Indoor photo"]
    F --> G["Moving picture/Indoor photo"]
    G --> H["Moving picture/Indoor photo"]
    I["LUMI."] --> J["Still picture/Indoor photo"]
    J --> K["Moving picture/Indoor photo"]
    K --> L["Moving picture/Indoor photo"]
(1) In the standby or recording mode, press DIGITAL EFFECT. The digital effect indicator appears.
(2) Turn the SEL/PUSH EXEC dial to select the desired digital effect mode.
The indicator changes as follows:
$$ \begin{array}{l} \text { STILL } \leftrightarrow \text { FLASH } \leftrightarrow \text { LUMI. } \leftrightarrow \text { TRAIL } \leftrightarrow \ \text { SLOW SHTR } \leftrightarrow \text { OLD MOVIE } \end{array} $$
(3) Press the SEL/PUSH EXEC dial. The indicator lights up and the bars appear. In the STILL and LUMI. modes, the still picture is stored in memory.
(4) Turn the SEL/PUSH EXEC dial to adjust the effect.
Items to adjust
| STILL | The rate of the still picture you want to superimpose on the moving picture |
| FLASH | The interval of flash motion |
| LUMI. | The colour scheme of the area in the still picture which is to be swapped with a moving picture |
| TRAIL | The vanishing time of the incidental image |
| SLOW SHTR | Shutter speed. The larger the shutter speed number, the slower the shutter speed. |
| OLD MOVIE | No adjustment necessary |
The more bars there are on screen, the stronger the digital effect. The bars appear in the following modes: STILL, FLASH, LUMI. and TRAIL.
Press DIGITAL EFFECT again.
Notes
- The following functions do not work during digital effect mode:
- Fader
- Low lux mode of PROGRAM AE
- Tape Photo recording
- Super NightShot
- The following function does not work in the slow shutter mode:
- PROGRAM AE
- The following functions do not work in the old movie mode:
- 16:9 wide
- Picture effect
- PROGRAM AE
When you turn the power off
The digital effect will be automatically cancelled.
When recording in the slow shutter mode
Auto focus may not be effective. Focus manually using a tripod.
Shutter speed
| Shutter speed number | Shutter speed |
| SLOW SHTR 1 | 1/25 |
| SLOW SHTR 2 | 1/12 |
| SLOW SHTR 3 | 1/6 |
| SLOW SHTR 4 | 1/3 |
You can select PROGRAM AE (Auto Exposure) mode to suit your specific shooting requirements.
Spotlight mode
This mode prevents people's faces, for example, from appearing excessively white when shooting subjects lit by strong light in the theatre.
Soft portrait mode
This mode brings out the subject while creating a soft background for subjects such as people or flowers.
Sports lesson mode
This mode minimizes shake on fast-moving subjects such as in tennis or golf.
Beach & ski mode
This mode prevents people's faces from appearing dark in strong light or reflected light, such as at a beach in midsummer or on a ski slope.
Sunset & moon mode
This mode allows you to maintain atmosphere when you are recording sunsets, general night views, fireworks displays, and neon signs.
Landscape mode
This mode is for when you are recording distant subjects such as mountains and prevents your camcorder from focusing on glass or metal mesh in windows when you are recording a subject behind glass or a screen.
Low lux mode
This mode makes subjects brighter in insufficient light.
natural_image
Black-and-white photo of a woman in a floral dress, holding flowers, with a small icon in the corner (no text or symbols on the main subject)
natural_image
Portrait of a smiling person with a small icon in the corner (no text or symbols on the person or background)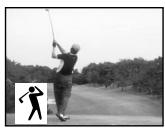
natural_image
Black-and-white photo of a golfer mid-swing on a dirt path, with trees and a small inset showing a stick figure (no text or symbols)
natural_image
Black-and-white beach scene with palm trees and a small island, featuring a silhouette of a palm tree (no text or symbols)
natural_image
Black-and-white beach scene with palm trees and a crescent moon symbol (no text or symbols)
natural_image
Black-and-white photo of a tropical beach with palm trees, an arched bridge, and a distant tower (no visible text or symbols)
natural_image
Black and white photo of a birthday cake with three candles on top, no visible text or symbolsUsing the PROGRAM AE function
(1) In the standby or memory mode, press PROGRAM AE. The PROGRAM AE indicator appears.
(2) Turn the SEL/PUSH EXEC dial to select the desired PROGRAM AE mode.
The indicator changes as follows:

To cancel the PROGRAM AE function Press PROGRAM AE again.
- In the spotlight, sports lesson, and beach & ski modes, you cannot take close-ups. This is because your camcorder is set to focus only on subjects in the middle to far distance.
- In the sunset & moon and landscape modes, your camcorder is set to focus only on distant subjects.
- The following functions do not work in the PROGRAM AE mode:
- Slow shutter
- Old movie
- Bounce (DCR-TRV6E/TRV11E only)
- The following functions do not work in the low lux mode:
- Digital effect
- Overlap
- Wipe
- Random dot
- While setting the NIGHTSHOT to ON, the PROGRAM AE function does not work. (The indicator flashes.)
- While shooting in memory mode, the low lux and sports lesson modes do not work. (The indicator flashes.)
While WHT BAL is set to AUTO in the menu settings
The white balance is adjusted even if the PROGRAM AE function is selected.
Even if the PROGRAM AE function is selected You can adjust the exposure.
If you are recording under a discharge tube such as a fluorescent lamp, sodium lamp or mercury lamp
Flickering or changes in colour may occur in the following modes. If this happens, turn the PROGRAM AE function off.
- Soft portrait mode
- Sports lesson mode
Adjusting the exposure manually
You can manually adjust and set the exposure. Adjust the exposure manually in the following cases:
• The subject is backlit
• Bright subject and dark background
• To record dark pictures (e.g. night scenes) faithfully
(1) In the standby, recording or memory mode, press EXPOSURE. The exposure indicator appears.
(2) Turn the SEL/PUSH EXEC dial to adjust the brightness.
To return to the automatic exposure mode
Press EXPOSURE again.
Note
When you adjust the exposure manually, the backlight function does not work.
If you change the PROGRAM AE mode or slide NIGHTSHOT to ON
Your camcorder automatically returns to the automatic exposure mode.
You can gain better results by manually adjusting the focus in the following cases:
- The autofocus mode is not effective when shooting
– subjects through glass coated with water droplets - horizontal stripes
– subjects with little contrast with backgrounds such as walls and sky
- When you want to change the focus from a subject in the foreground to a subject in the background
- Shooting a stationary subject when using a tripod
Фокусировка вручную
natural_image
Black-and-white photo sequence showing a woman holding white tulips, with two arrows pointing to the left (no text or symbols)(1) In the standby, recording or memory mode, set FOCUS to MAN. The 📄 indicator appears.
(2) Turn the focus ring to sharpen focus.
To return to the autofocus mode
Set FOCUS to AUTO.
To record distant subjects
When you press FOCUS down to INFINITY, the lens focuses on and ▲ indicator appears. When you release FOCUS, your camcorder returns to the manual focus mode. Use this mode when your camcorder focuses on near objects even though you are trying to shoot a distant object.
To focus precisely
It is easier to focus on the subject if you adjust the zoom to shoot at the “W” (wide-angle) after focusing at the “T” (telephoto) position.
When you shoot close to the subject
Focus at the end of the “W” (wide-angle) position.
The following indicators may appear:
When recording a distant subject.
When the subject is too close to focus on.
Фокусировка вручную
— Advanced Playback Operations — Playing back a tape with picture effects
During playback, you can process a scene using the picture effect functions: NEG.ART, SEPIA, B&W, and SOLARIZE.
In the playback or playback pause mode, select the desired picture effect mode in ☐ in the menu settings. (p. 116)
For details of each picture effect function, see page 56.
text_image
MANUAL SET P EFFECT OFF RETURN NEG ART SEP1A B&W SOLAR I ZE ETC [MENU] : ENDTo cancel the picture effect function
Set P EFFECT to OFF in the menu settings.
Notes
- You cannot process externally input scenes using the picture effect function.
- To record pictures that you have processed using the picture effect function, record the pictures on the VCR using your camcorder as a player.
Pictures processed by the picture effect function
Pictures processed by the picture effect function are not output through the i DV IN/OUT jack.
When you set the POWER switch to OFF (CHG) or stop playing back
The picture effect function is automatically cancelled.
Playing back a tape with digital effects
During playback, you can process a scene using the digital effect functions: STILL, FLASH, LUMI., and TRAIL.
(1) In the playback or playback pause mode, press DIGITAL EFFECT and turn the SEL/PUSH EXEC dial until the desired digital effect indicator (STILL, FLASH, LUMI., or TRAIL) flashes.
(2) Press the SEL/PUSH EXEC dial. The digital effect indicator lights up and the bars appear. In the STILL or LUMI. mode, the picture where you press the SEL/PUSH EXEC dial is stored in memory as a still picture.
(3) Turn the SEL/PUSH EXEC dial to adjust the effect. For details of each digital effect function, see page 58.
Press DIGITAL EFFECT again.
Playing back a tape with digital effects
Notes
- You cannot process externally input scenes using the digital effect function.
- To record pictures that you have processed using the digital effect function, record the pictures on the VCR using your camcorder as a player.
Pictures processed by the digital effect function
Pictures processed by the digital effect function are not output through the i DV IN/OUT jack.
When you set the POWER switch to OFF (CHG) or stop playing back
The digital effect function is automatically cancelled.
Enlarging images recorded on tapes - PB ZOOM
You can enlarge still and moving playback pictures.
You can also dub the enlarged pictures to tapes or copy to “Memory Stick”s.
(1) In the playback or playback pause mode, press PB ZOOM on your camcorder. The image is enlarged, and appears on the LCD screen or in the viewfinder.
(2) Turn SEL/PUSH EXEC dial to move the enlarged image, then press the dial.
↑: The image moves downward ↓: The image moves upward
(3) Turn SEL/PUSH EXEC dial to move the enlarged image, then press the dial.
→ : The image moves leftward (Turn the dial to upward.)
← : The image moves rightward (Turn the dial to downward.)
Press PB ZOOM again.
Enlarging images recorded on tapes - PB ZOOM
Note
You cannot process externally input scenes using the PB ZOOM function with your camcorder.
The following functions do not work in the PB ZOOM function:
- Digital effect
While displaying the menu settings or title The PB ZOOM function does not work.
The PB ZOOM function is automatically cancelled when you operate the following functions:
- Set the POWER switch to OFF (CHG)
- Stop playback
- Display the menu settings
- Display the title
Pictures in the PB ZOOM
Pictures in the PB ZOOM mode are not output through the i DV IN/OUT jack.
Quickly locating a scene using the zero set memory function
Your camcorder goes forward or backward to automatically stop at a desired scene having a tape counter value of “0:00:00”. You can do this with the Remote Commander.
(1) In the playback mode, press DISPLAY.
(2) Press ZERO SET MEMORY at the point you want to locate later. The tape counter shows "0:00:00" and the ZERO SET MEMORY indicator flashes.
(3) Press ■ when you want to stop playback.
(4) Press ◀◀ to rewind the tape to the tape counter's zero point. The tape stops automatically when the tape counter reaches approximately zero. The ZERO SET MEMORY indicator disappears and the time code appears.
(5) Press ▶. Playback starts.
text_image
ZERO SET MEMORY DISPLAYNotes
- When you press ZERO SET MEMORY before rewinding the tape, the zero set memory function will be cancelled.
- There may be a discrepancy of several seconds from the time code.
- The zero set memory function may not work when there is a blank portion between pictures on a tape.
The zero set memory functions also in the recording standby mode
When you insert a scene in the middle of a recorded tape, press ZERO SET MEMORY at the point you want to end the insertion. Rewind the tape to the insert start point, and start recording. Recording stops automatically at the tape counter zero point. Your camcorder returns to the standby mode.
Примечания
Searching the boundaries of recorded tape by title - Title search
CM only
If you use a tape with cassette memory, you can search for the boundaries of recorded tape by title (Title search). Use the Remote Commander for this operation.
(1) Set the POWER switch to VCR.
(2) Set CM SEARCH in ☐ to ON in the menu settings (p. 116). Factory setting is ON.
(3) Press SEARCH MODE on the Remote Commander repeatedly, until the TITLE SEARCH indicator appears.
The indicator changes as follows:
TITLE SEARCH → DATE SEARCH →
PHOTO SEARCH → PHOTO SCAN →
no indicator
(4) Press ◀◀◀ or ▶▶◀ on the Remote Commander to select the title for playback.
Your camcorder automatically starts playback of the scene having the title that you selected.
Searching the boundaries of recorded tape by title - Title search
If you use a tape without cassette memory You cannot search or superimpose a title.
In the 00 mark
- The bar in the mark indicates the present point on the tape.
- The × mark in the indicates the actual point you are trying to search.
If a tape has a blank portion between recorded portions
The title search function may not work correctly.
To superimpose a title See page 108.
Searching a recording by date - Date search
You can automatically search for the point where the recording date changes and start playback from that point (Date search). Use a tape with cassette memory for convenience. Use the Remote Commander for this operation. Use this function to check where recording dates change or to edit the tape at each recording date.
Searching for the date by using cassette memory
You can use this function only when playing back a tape with cassette memory (p. 171).
(1) Set the POWER switch to VCR.
(2) Set CM SEARCH in ☐ to ON in the menu settings (p. 116). Factory setting is ON.
(3) Press SEARCH MODE on the Remote Commander repeatedly, until the DATE SEARCH indicator appears.
The indicator changes as follows:
TITLE SEARCH → DATE SEARCH →
PHOTO SEARCH → PHOTO SCAN → no
indicator
(4) Press ◀◀◀ or ▶▶◀ on the Remote Commander to select the date for playback. Your camcorder automatically starts playback at the beginning of the selected date.
Searching a recording by date - Date search
To stop searching
Press ■.
Note
If one day's recording is less than two minutes, your camcorder may not accurately find the point where the recording date changes.
In the 00 mark
- The bar in the ○○ mark indicates the present point on the tape.
- The × mark in the indicates the actual point you are trying to search.
If a tape has a blank portion between recorded portions
The date search function may not work correctly.
Cassette memory
The tape cassette memory can hold six recording date data. If you search the date among seven or more data, see “Searching for the date without using cassette memory” below.
Searching for the date without using cassette memory
(1) Set the POWER switch to VCR.
(2) Set CM SEARCH in ☐ to OFF in the menu settings (p. 116).
(3) Press SEARCH MODE on the Remote Commander repeatedly, until the DATE SEARCH indicator appears.
The indicator changes as follows:
DATE SEARCH → PHOTO SEARCH →
PHOTO SCAN → no indicator
(4) Press ◀◀◀ on the Remote Commander to search for the previous date or press ▶▶▶ on the Remote Commander to search for the next date. Your camcorder automatically starts playback at the point where the date changes. Each time you press ◀◀◀ or ▶▶▶, your camcorder searches for the previous or next date.
To stop searching
Press ■.
Searching for a photo - Photo search/Photo scan
You can search for a still picture you have recorded on a mini DV tape (photo search). You can also search for still pictures one after another and display each picture for five seconds automatically regardless of cassette memory (photo scan). Use the Remote Commander for these operations. Use this function to check or edit still pictures.
Searching for a photo by using cassette memory
You can use this function only when playing back a tape with cassette memory (p. 171).
(1) Set the POWER switch to VCR.
(2) Set CM SEARCH in ☐ to ON in the menu settings (p. 116). Factory setting is ON.
(3) Press SEARCH MODE on the Remote Commander repeatedly, until the PHOTO SEARCH indicator appears.
The indicator changes as follows:
TITLE SEARCH → DATE SEARCH →
PHOTO SEARCH → PHOTO SCAN →
no indicator
(4) Press ◀◀◀ or ▶▶◀ on the Remote Commander to select the date for playback. Your camcorder automatically starts playback of the photo having the date that you selected.
Searching for a photo - Photo search/Photo scan
In the 00 mark
- The bar in the mark indicates the present point on the tape.
- The × mark in the indicates the actual point you are trying to search.
If a tape has a blank portion between recorded portions
The photo search function may not work correctly.
The available number of photos that can be searched using the cassette memory
The available number is up to 12 photos. However, you can search 13 photos or more using the scanning photo function.
Searching for a photo without using cassette memory
(1) Set the POWER switch to VCR.
(2) Set CM SEARCH in ☐ to OFF in the menu settings (p. 116).
(3) Press SEARCH MODE on the Remote Commander repeatedly, until the PHOTO SEARCH indicator appears.
The indicator changes as follows:
DATE SEARCH → PHOTO SEARCH →
PHOTO SCAN → no indicator
(4) Press ◀◀◀ or ▶▶◀ on the Remote Commander to select the photo for playback. Each time you press ◀◀◀ or ▶▶◀, your camcorder searches for the previous or next photo. Your camcorder automatically starts playback of the photo.
To stop searching
Press ■.
(1) Set the POWER switch to VCR.
(2) Press SEARCH MODE on the Remote Commander repeatedly, until the PHOTO SCAN indicator appears.
(3) Press ◀◀◀ or ▶▶◀ on the Remote Commander.
Each photo is played back for about five seconds automatically.
Сканирование фото
Using the A/V connecting cable
Connect your camcorder to the VCR using the A/V connecting cable supplied with your camcorder.
Set the input selector on the VCR to LINE, if available.
(1) Insert a blank tape (or a tape you want to record over) into the VCR, and insert the recorded tape into your camcorder.
(2) Prepare the VCR for recording, then set the input selector to LINE.
Refer to the operating instructions of the VCR.
(3) Set the POWER switch to VCR.
(4) Play back the recorded tape on your camcorder.
(5) Start recording on the VCR.
Refer to the operating instructions of your VCR.
Перезапись ленты
When you have finished dubbing a tape
Press ■ on both your camcorder and the VCR.
Set DISPLAY to LCD in the menu settings.
(Default setting is LCD.)
Be sure to clear the indicators from the screen. If they are displayed, press the following buttons not to record the indicators on the dubbed tape:
• The DISPLAY button
• The DATA CODE button
- The SEARCH MODE button on the Remote Commander
You can edit on VCRs that support the following systems
8 8 mm, Hi8 Hi8, VHS VHS, SVHS S-VHS, VHSC
VHSC, SVHSC S-VHSC, β Betamax, ED Beta ED
Betamax, Mini DV mini DV, DV DV, or D Digital8
If your VCR is a monaural type
Connect the yellow plug of the A/V connecting cable to the video input jack and the white or the red plug to the audio input jack on the VCR or the TV. When the white plug is connected, the left channel audio is output, and the red plug is connected, the right channel audio is output.
Connect using an S video cable (not supplied) to obtain high-quality pictures
With this connection, you do not need to connect the yellow (video) plug of the A/V connecting cable.
Connect an S video cable (not supplied) to the S video jacks of both your camcorder and the VCR. This connection produces higher quality DV format pictures.
Перед перезаписью
Using the i.LINK cable (DV connecting cable)
Simply connect the i.LINK cable (DV connecting cable) (not supplied) to DV IN/OUT and to DV IN of the DV products. With digital-to-digital connection, video and audio signals are transmitted in digital form for high-quality editing. You cannot dub the titles, display indicators or the contents of cassette memory. Set the input selector on the VCR to the DV input position if the VCR is equipped with the input selector.
(1) Insert a blank tape (or a tape you want to record over) into the VCR, and insert the recorded tape into your camcorder.
(2) Prepare the VCR for recording.
Set the input selector to LINE. Refer to the operating instructions of the VCR.
(3) Set the POWER switch to VCR.
(4) Play back the recorded tape on your camcorder.
(5) Start recording on the VCR.
When you have finished dubbing a tape
Press ■ on both your camcorder and the connected DV product.
You can connect one VCR only using the i.LINK cable (DV connecting cable).
The following functions do not work during digital editing:
- Digital effect
- PB ZOOM
- Picture effect
If you record playback pause picture with the DV IN/OUT jack
The recorded picture becomes rough. And when you play back the picture using the other video equipment, the picture may jitter.
Dubbing only desired scenes – Digital program editing
You can duplicate selected scenes (programmes) for editing onto a tape without operating the VCR.
Scenes can be selected by frame.
Before operating the Digital program editing
Step 1 Connecting the VCR. (p. 80, 82)
Step 2 Setting the VCR for operation. (p. 85, 89)
Step 3 Adjusting the synchronicity of the VCR. (p. 90)
When you dub using the same VCR again, you can skip steps 2 and 3.
Using the Digital program editing function
Operation 1 Making the programme. (p. 93)
Operation 2 Performing a Digital program editing (Dubbing a tape). (p. 95)
Step 1: Connecting the VCR
Connect your camcorder and the VCR as shown on pages 80, 82.
You can connect both an AV cable and an i.LINK cable (DV connecting cable).
Step 2: Setting the VCR for operation - Using the infrared rays emitter
To edit using the VCR, send the control signal by infrared ray to the remote sensor on the VCR. When you connect using an AV connecting cable, follow the procedures below.
Set the IR SETUP code
(1) Set the POWER switch to VCR on your camcorder.
(2) Turn the power of the connected VCR on, then set the input selector to LINE. When you connect a video camera recorder, set its POWER switch to VCR/VTR.
(3) Press MENU to display the menu.
(4) Turn the SEL/PUSH EXEC dial to select ETC, then press the dial.
(5) Turn the SEL/PUSH EXEC dial to select EDIT SET, then press the dial.
(6) Turn the SEL/PUSH EXEC dial to select CONTROL, then press the dial.
(7) Turn the SEL/PUSH EXEC dial to select IR, then press the dial.
(8) Turn the SEL/PUSH EXEC dial to select IR SETUP, then press the dial.
(9) Turn the SEL/PUSH EXEC dial to select the IR SETUP code of your VCR (p. 86), then press the dial.
natural_image
Line drawing of a digital camera with open lid and screen (no text or symbols)3 MENU
4

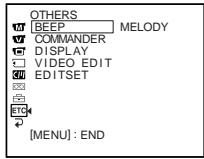
text_image
OTHERS MELODY BEEP COMMANDER DISPLAY VIDEO EDIT EDITSET [MENU] : END5

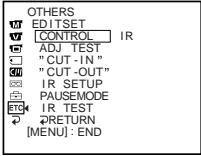
text_image
OTHERS EDITSET CONTROL IR ADJ TEST "CUT-IN" "CUT-OUT" IR SETUP PAUSEMODE ETQ IR TEST RETURN [MENU]: END6-9


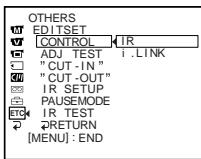
text_image
OTHERS EDITSET CONTROL IR ADJ TEST 1. LINK " CUT -IN " " CUT -OUT " IR SETUP PAUSEMODE ETC IR TEST RETURN [MENU] : END→
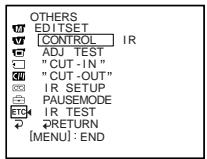
text_image
OTHERS M EDITSET V CONTROL IR ADJ TEST " CUT -IN " CU " CUT -OUT" IR SETUP PAUSEMODE ETC IR TEST RETURN [MENU] : END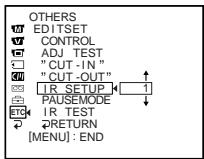
text_image
OTHERS EDITSET CONTROL ADJ TEST "CUT-IN" "CUT-OUT" IR SETUP 1 PAUSEMODE IR TEST RETURN [MENU] : END→
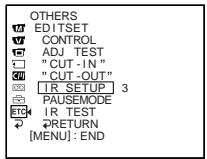
text_image
OTHERS W EDITSET V CONTROL □ ADJ TEST ■ " CUT -IN " □ " CUT -OUT " □ IR SETUP 3 □ PAUSEMODE ETC IR TEST ● RETURN [MENU] : ENDDubbing only desired scenes - Digital program editing
About the IR SETUP code
The IR SETUP code is stored in the memory of your camcorder. Be sure to set the correct code, depending on your VCR. Code number 1 is preset at the factory.
| BrandФирма-изготовитель | Remote control modeРежим пультадистанционногоуправления |
| Sony | 1, 2, 3, 4, 5, 6 |
| Aiwa | 47, 53, 54 |
| Akai | 62, 50, 74 |
| Alba | 73 |
| Aristona | 84 |
| Baird | 36, 30 |
| Blaupunkt | 83, 78 |
| Bush | 74 |
| Canon | 97 |
| CGM | 47, 83, 36 |
| Clatronic | 73 |
| Daewoo | 26 |
| Ferguson | 76 |
| Fisher | 73 |
| Funai | 80 |
| Goldstar | 47 |
| Goodmans | 26, 84 |
| Grundig | 83, 09 |
| Hitachi | 42, 56 |
| ITT/Nokia Instant | 36 |
| JVC | 12, 21, 15, 11, 14 |
| Kendo | 47 |
| Loewe | 16, 47, 84 |
| Luxor | 89 |
| Mark | 26* |
| Matsui | 47,60, 58* |
| Mitsubishi | 28, 29 |
* TV/VCR component
Note on remote control mode
You cannot do the assemble editing with some VCRs (for recording) if the remote control mode does not correspond to this VCR (for playing).
Setting the modes to cancel the recording pause on the VCR
(1) Turn the SEL/PUSH EXEC dial to select PAUSEMODE, then press the dial.
(2) Turn the SEL/PUSH EXEC dial to select the mode to cancel recording pause on the VCR, then press the dial.
The correct button depends on your VCR. Refer to the operating instructions of your VCR.
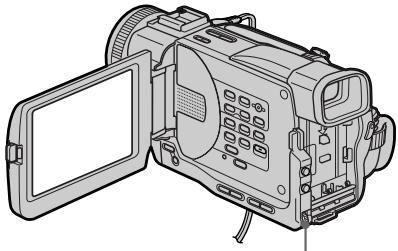
natural_image
Line drawing of a digital camera with open lid and control panel (no text or symbols)text_image
OTHERS EDITSET CONTROL ADJ TEST "CUT-IN" "CUT-OUT" IR SETUP PAUSEMODE PAUSE IR TEST REC RETURN PB [MENU] : END2

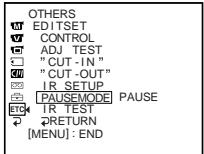
text_image
OTHERS AD EDITSET CONTROL ADJ TEST "CUT-IN" CUT" CUT -OUT" IR SETUP PAUSEMODE PAUSE IR TEST RETURN [MENU] : ENDThe buttons to cancel recording pause on the VCR
The buttons vary depending on your VCR. To cancel recording pause:
- Select playback pause if the button to cancel recording pause is .
- Select recording if the button to cancel recording pause is ●.
- Select playback if the button to cancel recording pause is ▶.
Setting your camcorder and the VCR to face each other
Locate the infrared ray emitter of your camcorder and face it towards the remote sensor of the VCR. Set the devices about 30 cm (117/8 in.) apart, and remove any obstacles between the devices.
Dubbing only desired scenes - Digital program editing
Confirming the VCR operation
(1) Insert a recordable tape into the VCR, then set to recording pause.
(2) Turn the SEL/PUSH EXEC dial to select IR TEST, then press the dial.
(3) Turn the SEL/PUSH EXEC dial to select EXECUTE, then press the dial. If the VCR starts recording, the setting is correct.
When finished, the indicator changes to COMPLETE.
natural_image
Line drawing of a digital camera with open lid and external buttons (no text or symbols)2

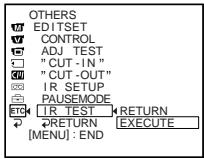
text_image
OTHERS M EDITSET V CONTROL ADJ TEST " CUT -IN " CU " CUT -OUT " DR IR SETUP PAUSEMODE ETC IR TEST RETURN RETURN EXECUTE [MENU] : END3

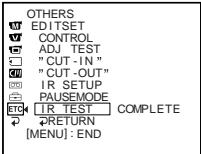
text_image
OTHERS W EDITSET V CONTROL □ ADJ TEST ■ " CUT -IN " □ " CUT -OUT " □ IR SETUP □ PAUSEMODE ETC IR TEST COMPLETE ↓ RETURN [MENU] : ENDWhen the VCR does not operate correctly
- After checking the code in “About the IR SETUP code” set the “IR SETUP” or the “PAUSEMODE” again.
- Place your camcorder at least 30 cm (11 7/8 in.) away from the VCR.
Step 2: Setting the VCR for operation - Using the i.LINK cable (DV connecting cable)
When you connect using i.LINK cable (DV connecting cable) (not supplied), follow the procedures below.
(1) Set the POWER switch to VCR on your camcorder.
(2) Turn the power of the connected VCR on, then set the input selector to DV input. When you connect a digital video camera recorder, set its POWER switch to VCR/VTR.
(3) Press MENU to display the menu.
(4) Turn the SEL/PUSH EXEC dial to select ETC, then press the dial.
(5) Turn the SEL/PUSH EXEC dial to select EDIT SET, then press the dial.
(6) Turn the SEL/PUSH EXEC dial to select CONTROL, then press the dial.
(7) Turn the SEL/PUSH EXEC dial to select i.LINK, then press the dial.
natural_image
Line drawing of a digital camera with open lid and screen (no text or symbols)3 MENU
5


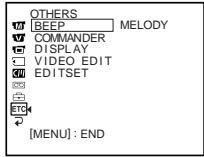
text_image
OTHERS MELODY BEEP COMMANDER DISPLAY VIDEO EDIT EDITSET [MENU]: END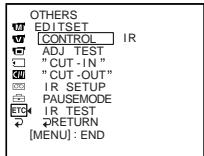
text_image
OTHERS EDITSET CONTROL IR ADJ TEST " CUT -IN " " CUT -OUT" IR SETUP PAUSEMODE IR TEST RETURN [MENU] : END6,7


text_image
OTHERS M EDITSET V CONTROL IR ADJ TEST " CUT -IN " CM " CUT -OUT" IR SETUP PAUSEMODE ETC IR TEST RETURN [MENU] : END
text_image
OTHERS EDITSET CONTROL IR ADJ TEST i. LINK " CUT -IN " " CUT -OUT" IR SETUP PAUSEMODE IR TEST RETURN [MENU] : END
text_image
OTHERS EDITSET CONTROL IR ADJ TEST I .LINK " CUT -IN " " CUT -OUT" IR SETUP PAUSEMODE ETC IR TEST RETURN [MENU] : END
text_image
OTHERS EDITSET CONTROL i .LINK ADJ TEST "CUT -IN " "CUT -OUT" IR SETUP PAUSEMODE IR TEST RETURN [MENU] : ENDStep 3: Adjusting the synchronicity of the VCR
You can adjust the synchronicity of your camcorder and the VCR.
Have a pen and paper ready for notes.
(1) Set the POWER swtich to VCR on your camcorder.
(2) Insert a blank tape (or a tape you want to record over) into the VCR, then set to recording pause.
When you select i.LINK in CONTROL, the above procedure is not necessary.
(3) Turn the SEL/PUSH EXEC dial to select ADJ TEST, then press the dial.
(4) Turn the SEL/PUSH EXEC dial to select EXECUTE, then press the dial.
IN and OUT are recorded on an image for five times each to calculate the numerical values for adjusting the synchronicity. The EXECUTING indicator flashes on the LCD screen or in the viewfinder. When finished, the indicator changes to COMPLETE.
(5) Rewind the tape in the VCR, then start slow playback. Take a note of the opening numerical value of each IN and the closing numerical value of each OUT.
(6) Calculate the average of all the opening numerical values of each IN, and the average of all the closing numerical values of each OUT.
Dubbing only desired scenes - Digital program editing
(7) Turn the SEL/PUSH EXEC dial to select "CUT-IN", then press the dial.
(8) Turn the SEL/PUSH EXEC dial to select the average numerical value of IN, then press the dial.
The calculated start position for recording is set.
(9) Turn the SEL/PUSH EXEC dial to select "CUT-OUT", then press the dial.
(10) Turn the SEL/PUSH EXEC dial to select the average numerical value of OUT, then press the dial.
The calculated stop position for recording is set.
(11) Turn the SEL/PUSH EXEC dial to select RETURN, then press the dial.
natural_image
Line drawing of a video camera with open lid and control panel (no text or symbols)3,4
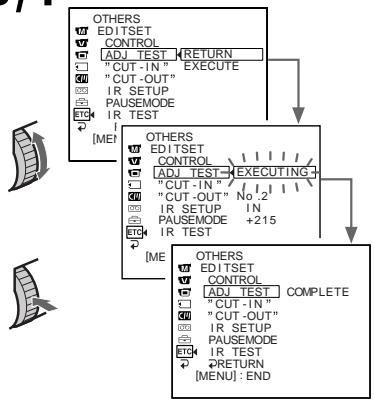
flowchart
graph TD
    A["OTHERS EDITSET CONTROL"] --> B["ADJ_TEST RETURN"]
    B --> C[""CUT-IN" EXECUTE"]
    B --> D["CUT-OUT"]
    B --> E["IR SETUP"]
    B --> F["PAUSEMODE"]
    B --> G["IR TEST"]
    H["OTHERS EDITSET CONTROL"] --> I["ADJ_TEST EXECUTING"]
    I --> J["CUT-IN"]
    I --> K["CUT-OUT"]
    I --> L["IR SETUP"]
    I --> M["PAUSEMODE +215"]
    M --> N["IR TEST"]
    O["OTHERS EDITSET CONTROL"] --> P["ADJ_TEST COMPLETE"]
    P --> Q["CUT-IN"]
    P --> R["CUT-OUT"]
    P --> S["IR SETUP"]
    P --> T["PAUSEMODE"]
    T --> U["IR TEST"]
    V["RETURN [MENU"]: END]
text_image
OTHERS EDITSET CONTROL ADJ TEST " "CUT-IN " 0 "CUT-OUT" IR SETUP PAUSEMODE ETG IR TEST RETURN [MENU]: END OTHERS EDITSET CONTROL ADJ TEST " "CUT-IN " 0 "CUT-OUT" IR SETUP PAUSEMODE ETG IR TEST RETURN [MENU]: END9


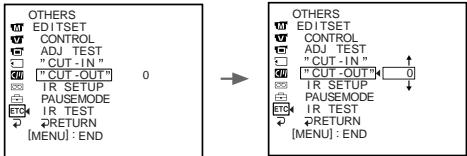
text_image
OTHERS EDITSET CONTROL ADJ TEST "CUT-IN" "CUT-OUT" 0 IR SETUP PAUSEMODE IR TEST RETURN [MENU] : END OTHERS EDITSET CONTROL ADJ TEST "CUT-IN" ↑ "CUT-OUT" 0 IR SETUP PAUSEMODE IR TEST RETURN [MENU] : ENDDubbing only desired scenes - Digital program editing
Notes
- If you start recording from the very beginning of the tape, the first few seconds of the tape may not record properly. Be sure to allow about 10 seconds' lead before starting the recording.
- You cannot dub the titles, display indicators, or the contents of cassette memory.
- When you connect with an i.LINK cable (DV connecting cable), you may not be able to operate the dubbing function correctly, depending on the VCR.
Set CONTROL to IR in the menu settings of your camcorder. - When editing digital video, the operation signals cannot be sent with DIGITAL I/O/ (LANC).
If you connect using an i.LINK cable (DV connecting cable)
With digital-to-digital connection, video and audio signals are transmitted in digital form for high-quality editing.
When the operations of the VCR do not work with an i.LINK cable (DV connecting cable) Keep the i.LINK connection, and select IR.
Operation 1: Making the Programme
(1) Insert the tape for playback into your camcorder, and insert a tape for recording into the VCR.
(2) Press MENU to display the menu.
(3) Turn the SEL/PUSH EXEC dial to select ETC, then press the dial.
(4) Turn the SEL/PUSH EXEC dial to select VIDEO EDIT, then press the dial.
(5) Search for the beginning of the first scene you want to insert using the video operation buttons, then pause playback (p. 39).
(6) Press MARK on the Remote Commander (DCR-TRV11E/TRV20E only), or the SEL/PUSH EXEC dial.
The IN point of the first programme is set, and the top part of the programme mark changes to light blue.
(7) Search for the end of the first scene you want to insert using the video operation buttons, then pause playback.
(8) Press MARK on the Remote Commander (DCR-TRV11E/TRV20E only), or the SEL/PUSH EXEC dial.
The OUT point of the first programme is set, then the bottom part of the programme mark changes to light blue.
(9) Repeat steps 5 to 8, then set PROGRAM.
When the programme is set, the programme mark changes to light blue.
You can set maximum of 20 programmes.
5,7

natural_image
Line drawing of a digital video camera with open lid and control panel (no text or symbols)4

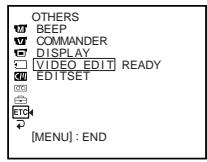
text_image
OTHERS BEEP COMMANDER DISPLAY VIDEO EDIT READY EDITSET [MENU] : END

text_image
VIDEO EDIT MARK 1 IN UNDO ERASE ALL START TOTAL 0:00:00:00 SCENE 0 [MENU] : END6,8,9


text_image
VIDEO EDIT 0:08:55:06 MARK 1 OUT UNDO ERASE ALL START TOTAL 0:00:00:00 SCENE 0 [MENU]: END
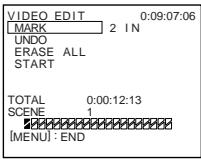
text_image
VIDEO EDIT MARK 2 IN UNDO ERASE ALL START TOTAL 0:00:12:13 SCENE 1 [MENU] : END
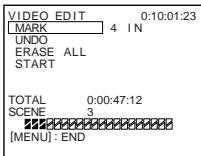
text_image
VIDEO EDIT MARK 4 IN UNDO ERASE ALL START TOTAL 0:00:47:12 SCENE 3 [MENU] : ENDDubbing only desired scenes - Digital program editing
Erasing the programme you have set
Erase OUT first and then IN from of the last programme.
(1) Turn the SEL/PUSH EXEC dial to select UNDO, then press the dial.
(2) Turn the SEL/PUSH EXEC dial to select EXECUTE, then press the dial. The last set programme mark flashes, then the setting is cancelled.
To cancel erasing
Select RETURN in step 2, then press the dial.
Erasing all programmes
(1) Select VIDEO EDIT in the menu settings. Turn the SEL/PUSH EXEC dial to select ERASE ALL, then press the dial.
(2) Turn the SEL/PUSH EXEC dial to select EXECUTE, then press the dial. All the programme marks flash, then the settings are cancelled.
To cancel erasing all programmes
Select RETURN in step 2, then press the dial.
To cancel a programme you have set Press MENU.
The programme is stored in memory until the tape is ejected.
On a blank portion of the tape
You cannot set IN or OUT on a blank portion of the tape.
If there is a blank portion between IN and OUT on the tape
The total time code may not be displayed correctly.
Operation 2: Performing a Digital program editing (Dubbing a tape)
Make sure your camcorder and VCR are connected, and that the VCR is set to recording pause. When you use an i.LINK cable (DV connecting cable) the following procedure is not necessary. When you use a digital video camera recorder, set its POWER switch to VCR.
(1) Select VIDEO EDIT. Turn the SEL/PUSH EXEC dial to select START, then press the dial.
(2) Turn the SEL/PUSH EXEC dial to select EXECUTE, then press the dial.
Search for the beginning of the first programme, then start dubbing.
The programme mark indicator flashes.
The SEARCH indicator appears during search, and the EDIT indicator appears during edit on the LCD screen or in the viewfinder.
The PROGRAM indicator changes to light blue after dubbing is complete.
When the dubbing ends, your camcorder and the VCR automatically stop.
To stop dubbing
Press ■ using the video operation buttons.
To end the programme editing function Your camcorder stops when the dubbing is complete. Then the display returns to VIDEO EDIT in the menu settings.
Press MENU to end the programme editing function.
You cannot record on the VCR when:
• The cassette is not inserted.
• The tape has run out.
- The write-protect tab is set to expose the red mark.
- The IR SETUP code is not correct. (When IR is selected.)
- The button to cancel recording pause is not correct (When IR is selected.) (see page 87).
NOT READY appears on the LCD screen when:
- The programme to operate the Digital program editing has not made.
- i.LINK is selected but an i.LINK cable (DV connecting cable) is not connected.
- The power of the connected VCR is not turned on. (when you set i.LINK).
Using with analog video unit and PC - Signal convert function
You can convert analog video signals into digital video signals via your camcorder connected to a PC and analog video unit.
Analog video signals → Digital video signals You can capture images and sound from an analog video unit connecting a PC which has the i.LINK (DV) jack to your camcorder.
(1) Set the POWER switch to VCR.
(2) Set DISPLAY in ETC to LCD in the menu settings.
(3) Set A/V → DV OUT in ☐ to ON in the menu settings.
(4) Start playback on the analog video unit slightly ahead of the point from which you want to start capturing images.
(5) Start capturing procedures on your PC. The operation procedures depend on your PC and the software which you use.
For details on how to capture images, refer to the instruction manual of PC and software.
After capturing images and sound
Stop capturing procedures on your PC, and stop the playback on the analog video unit.
Notes
- You need to install software which can exchange video signals.
- Depending on the condition of the analog video signals, the PC may not be able to output the images correctly when you convert analog video signals into digital video signals via your camcorder. Depending on the analog video unit, the image may contain noise or incorrect colours.
Recording video or TV programmes
Using the A/V connecting cable
You can record a tape from another VCR or a TV programme from a TV that has video/audio outputs. Use your camcorder as a recorder.
(1) Insert a blank tape (or a tape you want to record over) into your camcorder. If you are recording a tape from the VCR, insert a recorded tape into the connected VCR.
(2) Set the POWER switch to VCR on your camcorder.
(3) Set DISPLAY in ETC to LCD in the menu settings.
(4) Press ● REC and the button on its right simultaneously on your camcorder, then immediately press ■ on your camcorder.
(5) Press ▶ on the connected VCR to start playback if you record a tape from a VCR. Select a TV programme if you record from a TV. The picture from a TV or VCR appears on the LCD screen or in the viewfinder.
(6) Press Ⅱ on your camcorder at the scene where you want to start from.
Recording video or TV programmes
When you have finished dubbing a tape
Press ■ on both your camcorder and the VCR.
Using the Remote Commander (DCR-TRV11E/TRV20E only)
In step 4, press ● REC and MARK simultaneously, then immediately press ■. And in step 6, press ■ at the scene where you want to start recording from.
Note
When the picture from the VCR or TV does not appear on the LCD screen or in the viewfinder, check if the A/V connecting cable is connected to the output jack for playback.
If your VCR is a monaural type
Connect the yellow plug of the A/V connecting cable to the video output jack and the white or the red plug to the audio output jack on the VCR or the TV. When the white plug is connected, the left channel audio is output, and the red plug is connected, the right channel audio is output.
Connect using an S vido cable (not supplied) to obtain high-quality pictures
With this connection, you do not need to connect the yellow (video) plug of the A/V connecting cable.
Connect an S video cable (not supplied) to the S (S1) video jacks of both your camcorder and the VCR.
This connection produces higher quality DV format pictures.
Using the i.LINK cable (DV connecting cable)
Simply connect the i.LINK cable (DV connecting cable) (not supplied) to i, DV IN/OUT and to DV IN/OUT of the DV products. With digital-to-digital connection, video and audio signals are transmitted in digital form for high-quality editing.
(1) Insert a blank tape (or a tape you want to record over) into your camcorder, and insert the recorded tape into the connected VCR.
(2) Set the POWER switch to VCR on your camcorder.
(3) Set DISPLAY in ETC to LCD in the menu settings.
(4) Press ● REC and the button on its right simultaneously on your camcorder, then immediately press ■ on your camcorder.
(5) Press ▶ on the connected VCR to start playback. The picture to be recorded appears on the LCD screen or in the viewfinder.
(6) Press ■ on your camcorder at the scene where you want to start from.
Recording video or TV programmes
When you have finished dubbing a tape
Press ■ on both your camcorder and the VCR.
Using the Remote Commander (DCR-TRV11E/TRV20E only)
In step 4, press ● REC and MARK simultaneously, then immediately press ■. And in step 6, press ■ at the scene where you want to start recording from.
You can connect one VCR only using the i.LINK cable (DV connecting cable).
When you dub a picture in digital form The colour of the display may be uneven. However this does not affect the dubbed picture.
If you record playback pause picture with the DV IN/OUT jack
The recorded picture becomes rough. And when you play back the picture using your camcorder, the picture may jitter.
Before recording
Make sure if the DV IN indicator appears on the LCD screen or in the viewfinder. The DV IN indicator may appear on both equipment.
Inserting a scene a from VCR - Insert editing
You can insert a new scene from a VCR onto your originally recorded tape by specifying the insert start and end points. Use the Remote Commander for this operation. Connections are the same as on page 97 or 99. Insert a cassette containing the desired scene to insert into the VCR.
flowchart
graph TD
    A1["House with hills"] --> A2["Sun with snowman"]
    A3["Snowman in hat"] --> A4["Sun in snowy landscape"]
    B1["Mountain figure"] --> B2["Mountain figure in snowy landscape"]
    C1["Mountain figure in snowy landscape"] --> C2["Mountain figure in snowy landscape"]
    style A1 fill:#f9f,stroke:#333
    style A2 fill:#f9f,stroke:#333
    style A3 fill:#f9f,stroke:#333
    style B1 fill:#ccf,stroke:#333
    style B2 fill:#ccf,stroke:#333
    style C1 fill:#ccf,stroke:#333
    style C2 fill:#ccf,stroke:#333
[A]: A tape that contains the scene to be superimposed
[B]: A tape before editing
[C]: A tape after editing
Inserting a scene a from VCR - Insert editing
(1) Set the POWER switch to VCR on your camcorder.
(2) On the connected VCR, locate just before the insert start point [a], then press II to set the VCR to the playback pause mode.
(3) On your camcorder, locate the insert end point [c] by pressing ◀◀ or ▶▶. Then press ■ to set it to the playback pause mode.
(4) Press ZERO SET MEMORY on the Remote Commander. The ZERO SET MEMORY indicator flashes and the end point of the insert is stored in memory. The tape counter shows "0:00:00."
(5) On your camcorder, locate the insert start point [b] by pressing ◀◀, then press ● REC and the button on its right simultaneously.
(6) First press ■ on the connected VCR, and after a few seconds press ■ on your camcorder to start inserting new scene.
Inserting automatically stops near the zero point on the tape counter. Your camcorder automatically returns to the recording pause mode.
flowchart
graph TD
    A["4 ZERO SET MEMORY"] --> B["0:00:00 ZERO SET MEMORY"]
    B --> C["5 REC"]
To change the insert end point
Press ZERO SET MEMORY again after step 5 to erase the ZERO SET MEMORY indicator and begin from step 3.
Inserting a scene a from VCR - Insert editing
Using the Remote Commander (DCR-TRV11E/TRV20E only)
In step 5, press ● REC and MARK simultaneously, then immediately press ■. And in step 6, press ■ at the scene where you want to start recording from.
Note
The picture and sound recorded on the portion between the insert start and end points will be erased when you insert the new scene.
If you insert scenes on the tape recorded with other camcorder (including other DCR-TRV6E/TRV11E/TRV20E)
The picture and sound may be distorted. We recommend that you insert scenes on a tape recorded with your camcorder.
When the inserted picture is played back
The picture and sound may be distorted at the end of the inserted portion. This is not a malfunction.
The picture and sound at the start point and the end point may be distorted in the LP mode.
To insert a scene without setting the insert end point
Skip steps 3 and 4. Press ■ when you want to stop inserting.
You can record an audio sound to add to the original sound on a tape by connecting audio equipment or a microphone. If you connect the audio equipment, you can add sound to your recorded tape by specifying starting and ending points. The original sound will not be erased. Use the Remote Commander for this operation.
Connecting the microphone with the MIC jack
Аудиоперезапись
You can check the recorded picture and sound by connecting the AUDIO/VIDEO jack to a TV. The recorded sound is not output from a speaker. Check the sound by using the TV or headphones.
Connecting the microphone with the intelligent accessory shoe
Dubbing with the AUDIO/VIDEO jack
Dubbing with the built-in microphones
No connection is necessary.
Notes
- While audio dubbing, the sound does not output from the speaker. Check the sound by using headphones.
- When dubbing with the built-in microphone, the recorded picture is not output from the AUDIO/VIDEO and S VIDEO jacks. Check the pictures on the LCD screen or in the viewfinder.
- When dubbing with the AUDIO/VIDEO jack, the recorded picture is not output from the AUDIO/VIDEO and S VIDEO jacks. Check the recorded pictures on the LCD screen or in the viewfinder.
Adding an audio sound on a recorded tape
(1) Insert your recorded tape into your camcorder.
(2) Set the POWER switch to VCR on your camcorder.
(3) Locate the recording start point by pressing ▶. Then press ▪ at the point where you want to start recording to set your camcorder to playback pause mode.
(4) Press AUDIO DUB on the Remote Commander.
The green ◆ II indicator appears on the LCD screen or in the viewfinder.
(5) Press ■ on the Remote Commander or on your camcorder, and at the same time, start playing back the audio you want to record. The new sound is recorded in stereo 2 (ST2) during playback.
(6) Press ■ on the Remote Commander at the point where you want to stop recording.
Monitoring the new recorded sound
To play back the sound
Adjust the balance between the original sound (ST1) and the new sound (ST2) by selecting AUDIO MIX in the menu settings (p. 116).
Five minutes after when you disconnect the power source or remove the battery pack, the setting of AUDIO MIX returns to the original sound (ST1) only. The factory setting is original sound only.
Notes
- New sound cannot be recorded on a tape already recorded in the 16-bit mode (32 kHz, 44.1 kHz or 48 kHz) (p. 120).
- New sound cannot be recorded on a tape already recorded in the LP mode.
- You cannot add audio with the i, DV IN/OUT jack.
If you make all the connections
The audio input to be recorded will take precedence over others in the following order.
• MIC (PLUG IN POWER) jack
- Intelligent accessory shoe
• AUDIO/VIDEO jack
• Built-in microphone
If i.LINK cable (DV connecting cable) (not supplied) is connected to your camcorder. You cannot add a sound to a recorded tape.
To add new sound more precisely
Press ZERO SET MEMORY on the Remote Commander at the point where you want to stop recording later in the playback mode.
Carry out steps 3 to 5. Recording automatically stops at the point where ZERO SET MEMORY was pressed.
We recommend you to add new sound on a tape recorded with your camcorder
If you add new sound on a tape recorded with another camcorder (including DCR-TRV6E/TRV11E/TRV20E), the sound quality may become worse.
If you set the write-protect tab of the tape to lock
You cannot use the audio dubbing function. Slide the write-protect tab to release the write protection.
On blank portions
You cannot add an audio.
Аудиоперезапись
Superimposing a title
CM only
If you use a tape with cassette memory, you can superimpose the title while recording or after recording. When you play back the tape, the title is displayed for five seconds from the point where you superimposed it.
You can select one of eight preset titles and two custom titles (p. 112). You can also select the colour, size and position of titles.
Наложение титра
CM only
(1) In the standby, recording, playback or playback pause mode, press TITLE to display the title menu.
(2) Turn the SEL/PUSH EXEC dial to select ☐, then press the dial.
(3) Turn the SEL/PUSH EXEC dial to select the desired title, then press the dial. The title is flashing.
(4) Change the colour, size, or position, if necessary.
① Turn the SEL/PUSH EXEC dial to select the COLOUR, SIZE or POSITION, then press the dial. The item appears.
② Turn the SEL/PUSH EXEC dial to select the desired item, then press the dial.
③ Repeat steps ① and ② until the title is laid out as desired.
(5) Press the SEL/PUSH EXEC dial again to complete the setting.
In the recording, playback or playback pause mode:
The “TITLE SAVE” indicator appears on the screen for five seconds and the title is set.
In the standby mode:
The “TITLE” indicator appears. And when you press START/STOP to start recording, “TITLE SAVE” appears on the screen for five seconds and the title is set.
If you set the write-protect tab of the tape to lock
You cannot superimpose or erase the title. Slide the write-protect tab to release the write protection.
To use the custom title
If you want to use the custom title, select ☐ in step 2.
If the tape has a blank portion
You cannot superimpose a title on the portion.
If the tape has a blank portion in the middle of the recorded parts
The title may not be displayed correctly.
The titles superimposed with your camcorder
- They are displayed by only the DV ^Mini DV format video equipment with index title function.
- The point you superimposed the title may be detected as an index signal when searching a recording with other video equipment.
If the tape has too many index signals
You may not be able to superimpose a title because the memory is full. In this case, delete data you do not need.
Not to display titles
Set TITLE DSPL to OFF in the menu settings (p. 116).
Title setting
• The title colour changes as follows :
• The title size changes as follows :
You cannot input 13 characters or more for a LARGE size.
• The title position changes as follows :
If you select the title size “SMALL,” you have nine choices for the title position.
If you select the title size “LARGE,” you have eight choices for the title position.
$$ \begin{array}{l} \text {WHITE} \leftrightarrow \text {YELLOW} \leftrightarrow \text {VIOLET} \leftrightarrow \text {RED} \leftrightarrow \ \text {CYAN} \leftrightarrow \text {GREEN} \leftrightarrow \text {BLUE} \end{array} $$
$$ \text { SMALL } \leftrightarrow \text { LARGE } $$
One cassette can have up to about 20 titles, if one title consists of 5 characters
However, if the cassette memory is full with date, photo and cassette label data, one cassette can have only up to about 11 titles with 5 characters each.
Cassette memory capacity is as follows:
- 6 date data (maximum)
• 12 photo data (maximum)
• 1 cassette label (maximum)
If the "C" FULL" mark appears
The cassette memory is full. If you erase the title in the cassette, you can label it.
(1) Set the POWER switch to VCR.
(2) Press MENU to display the menu.
(3) Turn the SEL/PUSH EXEC dial to select ☐, then press the dial.
(4) Turn the SEL/PUSH EXEC dial to select TITLEERASE, then press the dial. Title erase display appears.
(5) Turn the SEL/PUSH EXEC dial to select the title you want to erase, then press the dial. "ERASE OK?" indicator appears.
(6) Make sure the title is the one you want to erase, and turn the SEL/PUSH EXEC dial to select ERASE, then press the dial.
Стирание титра
To cancel erasing a title
Select RETURN in step 6.
Making your own titles
CM only
You can make up to two titles and store them in the cassette memory. Each title can have up to 20 characters.
(1) Press TITLE in the standby or VCR mode.
(2) Turn the SEL/PUSH EXEC dial to select ☐, then press the dial.
(3) Turn the SEL/PUSH EXEC dial to select the first line (CUSTOM1) or second line (CUSTOM2), then press the dial.
(4) Turn the SEL/PUSH EXEC dial to select the column of the desired character, then press the dial.
(5) Turn the SEL/PUSH EXEC dial to select the desired character, then press the dial.
(6) Repeat steps 4 and 5 until you have selected all characters and completed the title.
(7) To finish making your own titles, turn the SEL/PUSH EXEC dial to select [SET], then press the dial. The title is stored in memory.
(8) Press TITLE to make the title menu disappear.
text_image
TITLE SET CUSTOM1 CUSTOM2 [TITLE] : END
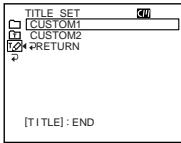
text_image
TITLE SET CUSTOM1 CUSTOM2 RETURN [TITLE] : END3

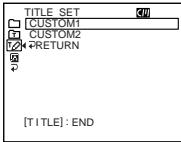
text_image
TITLE SET CUSTOM1 CUSTOM2 RETURN [TITLE]: END
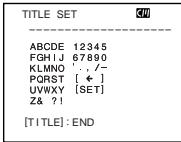
text_image
TITLE SET ABCDE 12345 FGHIJ 67890 KLMNO ', . , /- PQRST [ ← ] UVWXY [SET] Z& ?! [TITLE]: END4
1

TITLE SET

CIV
2

TITLE SET

CIII

TITLE SET

CIV

CIV
END
[Non-Text]
natural_image
Line drawing of a digital video camera module (no text or symbols)3

TITLE SET

CIV

To change a title you have stored
In step 3, select CUSTOM1 or CUSTOM2, depending on which title you want to change, then press the SEL/PUSH EXEC dial. Turn the SEL/PUSH EXEC dial to select [←], then press the dial to delete the title. The last character is erased. Enter the new title as desired.
If you take five minutes or longer to enter characters in the standby mode while a cassette is in your camcorder
The power automatically goes off. The characters you have entered remain stored in memory. Set the POWER switch to OFF (CHG) once and then to CAMERA again, then proceed from step 1. We recommend setting the POWER switch to VCR or removing the cassette so that your camcorder does not automatically turn off while you are entering title characters.
To delete the title
Select [←]. The last character is erased.
To enter a space
Select [Z& ? !], then select the blank part.
If you use a tape with cassette memory, you can label a cassette. The label can consist of up to 10 characters and is stored in cassette memory. When you insert the labelled cassette and turn the power on, the label is displayed for about five seconds.
(1) Insert the cassette you want to label.
(2) Set the POWER switch to VCR.
(3) Press MENU to display the menu.
(4) Turn the SEL/PUSH EXEC dial to select ☐, then press the dial.
(5) Turn the SEL/PUSH EXEC dial to select TAPE TITLE, then press the dial. Tape title display appears.
(6) Turn the SEL/PUSH EXEC dial to select the column of the desired character, then press the dial.
(7) Turn the SEL/PUSH EXEC dial to select the desired character, then press the dial.
(8) Repeat steps 6 and 7 until you finish the label.
(9) Turn the SEL/PUSH EXEC dial to select [SET], then press the dial.
The label is stored in memory.
natural_image
Line drawing of a digital camera with open screen and control panel (no text or symbols)4,5


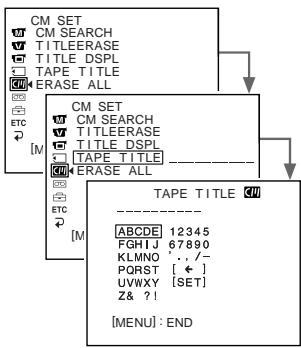
text_image
CM SET CM SEARCH TITLEERASE TITLE DSPL TAPE TITLE ERASE ALL [ M ] [ M ] CM SET CM SEARCH TITLEERASE TITLE DSPL [ TAPE TITLE ] [ TAPE TITLE ] [ ETRASE ALL ] [ ETC ] [ M ] [ ABCDE ] 12345 FGIHJ 67890 KLMNO ' . . /- PQRST [ ← ] UVWXY [SET] Z& ?! [MENU] : ENDМаркировка кассеты
CM only
natural_image
Diagram showing two curved arrows pointing to a segmented circular shape, one with an arrow indicating direction (no text or symbols)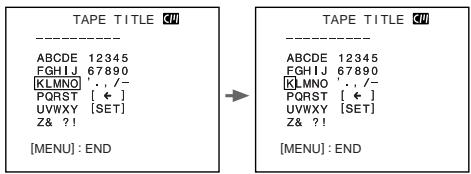
text_image
TAPE TITLE ---- ABCDE 12345 FGHIJ 67890 KLMO ' ', /- PQRST [ ← ] UVWXY [SET] Z& ?! [MENU] : END TAPE TITLE ---- ABCDE 12345 FGHIJ 67890 KLMO ' ', /- PQRST [ ← ] UVWXY [SET] Z& ?! [MENU] : END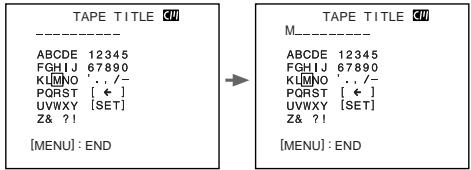
text_image
TAPE TITLE [C] ---- ABCDE 12345 FGHIJ 67890 KLINO ', /- PQRST [← ] UVWXY [SET] Z& ?! [MENU] : END TAPE TITLE [C] M---- ABCDE 12345 FGHIJ 67890 KLINO ', /- PQRST [← ] UVWXY [SET] Z& ?! [MENU] : ENDTo erase a character
In step 6 turn the SEL/PUSH EXEC dial to select [←], then press the dial. The last character is erased.
To change the label you have made
Insert the cassette to change the label, and operate in the same way to make a new label.
If you set the write-protect tab of the tape to lock
You cannot label it. Slide the write-protect tab to release the write protection.
If the ⬇ mark appears in step 5
The cassette memory is full. If you erase the title in the cassette, you can label it.
If you have superimposed titles in the cassette When the label is displayed, up to 4 titles also appear.
When the “----” indicator has fewer than 10 spaces
The cassette memory is full.
The “----” indicates the number of characters you can select for the label.
To enter a space
Select [Z& ? !], then select the blank part.
Changing the menu settings
To change the mode settings in the menu settings, select the menu items with the SEL/PUSH EXEC dial. The factory settings can be partially changed. First, select the icon, then the menu item and then the mode.
(1) In the standby, memory (DCR-TRV11E/TRV20E only) or VCR mode, press MENU.
(2) Turn the SEL/PUSH EXEC dial to select the desired icon, then press the dial to set.
(3) Turn the SEL/PUSH EXEC dial to select the desired item, then press the dial to set.
(4) Turn the SEL/PUSH EXEC dial to select the desired mode, and press the dial to set.
(5) If you want to change other items, select ➕ RETURN and press the dial, then repeat steps from 2 to 4.
For details, see “Selecting the mode setting of each item” (p. 117).
Changing the menu settings
To make the menu display disappear Press MENU.
Menu items are displayed as the following icons:
TM MANUAL SET
CAMERA SET
VCR SET
LCD/VF SET
MEMORY SET (DCR-TRV11E/TRV20E only)
CM SET
TAPE SET
SETUP MENU
ETC OTHERS
English
Selecting the mode setting of each item ● is the factory setting.
Menu items differ depending on the position of the POWER switch.
| Icon/item | Mode | Meaning | POWER switch |
| M P EFFECT | To add special effects like those in films or on the TV to images (p. 56). | CAMERA VCR | |
| WHT BAL | To adjust the white balance (p. 49). | CAMERA MEMORY | |
| AUTO SHTR | ● ON | To automatically activate the electronic shutter when shooting in bright conditions. | CAMERA |
| OFF | To not automatically activate the electronic shutter even when shooting in bright conditions. | ||
| C D ZOOM | ● OFF | To deactivate the digital zoom. Up to 10× zoom is carried out. | CAMERA |
| 20× | To activate the digital zoom. More than 10× to 20× zoom is performed digitally (p. 27). | ||
| 120× | To activate the digital zoom. More than 10× to 120× zoom is performed digitally (p. 27). | ||
| 16:9WIDE | ● OFF | — | CAMERA |
| ON | To record a 16:9 wide picture (p. 51). | ||
| STEADYSHOT | ● ON | To compensate for camera-shake. | CAMERA |
| OFF | To cancel the SteadyShot function. Natural pictures are produced when shooting a stationary object with a tripod. | ||
| N.S. LIGHT | ● ON | To use the NightShot Light function (p. 31). | CAMERA MEMORY |
| OFF | To cancel the NightShot Light function. |
Notes on the SteadyShot function
- The SteadyShot function will not correct excessive camera-shake.
- Attachment of a conversion lens (not supplied) may influence the SteadyShot function.
If you cancel the SteadyShot function
The SteadyShot off indicator “ _off ” appears. Your camcorder prevents excessive compensation for camera-shake.
| Icon/item | Mode | Meaning | POWER switch |
| HiFi SOUND | ● STEREO | To play back a stereo tape or dual sound track tape with main and sub sound (p. 172). | VCR |
| 1 | To play back a stereo tape with the left sound or a dual sound tape with main sound. | ||
| 2 | To play back a stereo tape with the right sound or a dual sound track tape with sub sound. | ||
| AUDIO MIX | To adjust the balance between the stereo 1 and stereo 2 (p. 106). | VCR | |
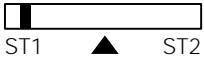 | |||
| A/V→DV OUT | ● OFF | To output digital images and sound in analog format using your camcorder. | VCR |
| ON | To output analog images and sound in digital format using your camcorder. | ||
| NTSC PB | ● ON PAL TV | To play back a tape recorded in the NTSC colour system on a PAL system TV. | VCR |
| NTSC 4.43 | To play back a tape recorded in the NTSC colour system on a TV with the NTSC 4.43 mode. | ||
| LCD B. L. | ● BRT NORMAL | To set the brightness on the LCD screen normal. | VCRCAMERAMEMORY |
| BRIGHT | To brighten the LCD screen. | ||
| LCD COLOUR | To adjust the colour on the LCD screen, turn and press the SEL/PUSH EXEC dial.To get low-intensity □ □ □ ▲ ▲ ▲ ▲ ▲ ▲ ▲ ▲ ▲ ▲ ▲ ▲ ▲ ▲ ▲ ▲ ▲ ▲ ▲ ▲ ▲ ▲ ▲ ▲ ▲ ▲ ▲ ▲ ▲ ▲ ▲ ▲ ▲ ▲ ▲ ▲ ▲ ▲ ▲ ▲ ▲ ▲ ▲ ▲ ▲ ▲ ▲ ▲ ▲ ▲ △ △ △ △ △ △ △ △ △ △ △ △ △ △ △ △ △ △ △ △ △ △ △ △ △ △ △ △ △ △ △ △ △ △ △ △ △ △ △ △ △ △ △ △ △ △ △ △ △ △ ▲ ▲ ▲ ▲ ▲ ▲ ▲ ▲ ▲ ▲ ▲ ▲ ▲ ▲ ▲ ▲ ▲ ▲ ▲ ▲ ▲ ▲ ▲ ▲ ▲ ▲ ▲ ▲ ▲ ▲ ▲ ▲ ▲ ▲ ▲ ▲ ▲ ▲ ▲ ▲ ▲ ▲ ▲ ▲ ▲ ▲ ▲ ▲ ▲ ▼ ▼ ▼ ▼ ▼ ▼ ▼ ▼ ▼ ▼ ▼ ▼ ▼ ▼ ▼ ▼ ▼ ▼ ▼ ▼ ▼ ▼ ▼ ▼ ▼ ▼ ▼ ▼ ▼ ▼ ▼ ▼ ▼ ▼ ▼ ▼ ▼ ▼ ▼ ▼ ▼ ▼ ▼ ▼ ▼ ▼ ▼ ▼ ▼ ▼ ▽ ▽ ▽ ▽ ▽ ▽ ▽ ▽ ▽ ▽ ▽ ▽ ▽ ▽ ▽ ▽ ▽ ▽ ▽ ▽ ▽ ▽ ▽ ▽ ▽ ▽ ▽ ▽ ▽ ▽ ▽ ▽ ▽ ▽ ▽ ▽ ▽ ▽ ▽ ▽ ▽ ▽ ▽ ▽ ▽ ▽ ▽ ▽ ▽ ▽ ▼ ▼ ▼ ▼ ▼ ▼ ▼ ▼ ▼ ▼ ▼ ▼ ▼ ▼ ▼ ▼ ▼ ▼ ▼ ▼ ▼ ▼ ▼ ▼ ▼ ▼ ▼ ▼ ▼ ▼ ▼ ▼ ▼ ▼ ▼ ▼ ▼ ▼ ▼ ▼ ▼ ▼ ▼ ▼ ▼ ▼ ▼ ▼ ▼ ▶ ▶ ▶ ▶ ▶ ▶ ▶ ▶ ▶ ▶ ▶ ▶ ▶ ▶ ▶ ▶ ▶ ▶ ▶ ▶ ▶ ▶ ▶ ▶ ▶ ▶ ▶ ▶ ▶ ▶ ▶ ▶ ▶ ▶ ▶ ▶ ▶ ▶ ▶ ▶ ▶ ▶ ▶ ▶ ▶ ▶ ▶ ▶ ▶ ▶ ▷ ▶ ▶ ▶ ▶ ▶ ▶ ▶ ▶ ▶ ▶ ▶ ▶ ▶ ▶ ▶ ▶ ▶ ▶ ▶ ▶ ▶ ▶ ▶ ▶ ▶ ▶ ▶ ▶ ▶ ▶ ▶ ▶ ▶ ▶ ▶ ▶ ▶ ▶ ▶ ▶ ▶ ▶ ▶ ▶ ▶ ▶ ▶ ▶ ▶ △ △ △ △ △ △ △ △ △ △ △ △ △ △ △ △ △ △ △ △ △ △ △ △ △ △ △ △ △ △ △ △ △ △ △ △ △ △ △ △ △ △ △ △ △ △ △ △ △ ▶ ▶ ▶ ▶ ▶ ▶ ▶ ▶ ▶ ▶ ▶ ▶ ▶ ▶ ▶ ▶ ▶ ▶ ▶ ▶ ▶ ▶ ▶ ▶ ▶ ▶ ▶ ▶ ▶ ▶ ▶ ▶ ▶ ▶ ▶ ▶ ▶ ▶ ▶ ▶ ▶ ▶ ▶ ▶ ▶ ▶ ▶ ▶ ▶ ▸ ▸ ▸ ▸ ▸ ▸ ▸ ▸ ▸ ▸ ▸ ▸ ▸ ▸ ▸ ▸ ▸ ▸ ▸ ▸ ▸ ▸ ▸ ▸ ▸ ▸ ▸ ▸ ▸ ▸ ▸ ▸ ▸ ▸ ▸ ▸ ▸ ▸ ▸ ▸ ▸ ▸ ▸ ▸ ▸ ▸ ▸ ▸ ▸ ▸ ▪ ▪ ▪ ▪ ▪ ▪ ▪ ▪ ▪ ▪ ▪ ▪ ▪ ▪ ▪ ▪ ▪ ▪ ▪ ▪ ▪ ▪ ▪ ▪ ▪ ▪ ▪ ▪ ▪ ▪ ▪ ▪ ▪ ▪ ▪ ▪ ▪ ▪ ▪ ▪ ▪ ▪ ▪ ▪ ▪ ▪ ▪ ▪ ▪ ▪ ▫ ▫ ▫ ▫ ▫ ▫ ▫ ▫ ▫ ▫ ▫ ▫ ▫ ▫ ▫ ▫ ▫ ▫ ▫ ▫ ▫ ▫ ▫ ▫ ▫ ▫ ▫ ▫ ▫ ▫ ▫ ▫ ▫ ▫ ▫ ▫ ▫ ▫ ▫ ▫ ▫ ▫ ▫ ▫ ▫ ▫ ▫ ▫ ▫ ▫ ▪ ▪ ▪ ▪ ▪ ▪ ▪ ▪ ▪ ▪ ▪ ▪ ▪ ▪ ▪ ▪ ▪ ▪ ▪ ▪ ▪ ▪ ▪ ▪ ▪ ▪ ▪ ▪ ▪ ▪ ▪ ▪ ▪ ▪ ▪ ▪ ▪ ▪ ▪ ▪ ▪ ▪ ▪ ▪ ▪ ▪ ▪ ▪ ▪ ▩ ▩ ▩ ▩ ▩ ▩ ▩ ▩ ▩ ▩ ▩ ▩ ▩ ▩ ▩ ▩ ▩ ▩ ▩ ▩ ▩ ▩ ▩ ▩ ▩ ▩ ▩ ▩ ▩ ▩ ▩ ▩ ▩ ▩ ▩ ▩ ▩ ▩ ▩ ▩ ▩ ▩ ▩ ▩ ▩ ▩ ▩ ▩ ▩ ▩ ▢ ▢ ▢ ▢ ▢ ▢ ▢ ▢ ▢ ▢ ▢ ▢ ▢ ▢ ▢ ▢ ▢ ▢ ▢ ▢ ▢ ▢ ▢ ▢ ▢ ▢ ▢ ▢ ▢ ▢ ▢ ▢ ▢ ▢ ▢ ▢ ▢ ▢ ▢ ▢ ▢ ▢ ▢ ▢ ▢ ▢ ▢ ▢ ▢ ▢ □ ▢ ▢ ▢ ▢ ▢ ▢ ▢ ▢ ▢ ▢ ▢ ▢ ▢ ▢ ▢ ▢ ▢ ▢ ▢ ▢ ▢ ▢ ▢ ▢ ▢ ▢ ▢ ▢ ▢ ▢ ▢ ▢ ▢ ▢ ▢ ▢ ▢ ▢ ▢ ▢ ▢ ▢ ▢ ▢ ▢ ▢ ▢ ▢ ▢ ▣ ▢ ▢ ▢ ▢ ▢ ▢ ▢ ▢ ▢ ▢ ▢ ▢ ▢ ▢ ▢ ▢ ▢ ▢ ▢ ▢ ▢ ▢ ▢ ▢ ▢ ▢ ▢ ▢ ▢ ▢ ▢ ▢ ▢ ▢ ▢ ▢ ▢ ▢ ▢ ▢ ▢ ▢ ▢ ▢ ▢ ▢ ▢ ▢ ▢ △ ▢ ▢ ▢ ▢ ▢ ▢ ▢ ▢ ▢ ▢ ▢ ▢ ▢ ▢ ▢ ▢ ▢ ▢ ▢ ▢ ▢ ▢ ▢ ▢ ▢ ▢ ▢ ▢ ▢ ▢ ▢ ▢ ▢ ▢ ▢ ▢ ▢ ▢ ▢ ▢ ▢ ▢ ▢ ▢ ▢ ▢ ▢ ▢ ▢ ▩ ▢ ▢ ▢ ▢ ▢ ▢ ▢ ▢ ▢ ▢ ▢ ▢ ▢ ▢ ▢ ▢ ▢ ▢ ▢ ▢ ▢ ▢ ▢ ▢ ▢ ▢ ▢ ▢ ▢ ▢ ▢ ▢ ▢ ▢ ▢ ▢ ▢ ▢ ▢ ▢ ▢ ▢ ▢ ▢ ▢ ▢ ▢ ▢ □ □ □ □ □ □ □ □ □ □ □ □ □ □ □ □ □ □ □ □ □ □ □ □ □ □ □ □ □ □ □ □ □ □ □ □ □ □ □ □ □ □ □ □ □ □ □ □ □ □ ▢ ▢ ▢ ▢ ▢ ▢ ▢ ▢ ▢ ▢ ▢ ▢ ▢ ▢ ▢ ▢ ▢ ▢ ▢ ▢ ▢ ▢ ▢ ▢ ▢ ▢ ▢ ▢ ▢ ▢ ▢ ▢ ▢ ▢ ▢ ▢ ▢ ▢ ▢ ▢ ▢ ▢ ▢ ▢ ▢ ▢ ▢ ▢ □ ▓ ▓ ▓ ▓ ▓ ▓ ▓ ▓ ▓ ▓ ▓ ▓ ▓ ▓ ▓ ▓ ▓ ▓ ▓ ▓ ▓ ▓ ▓ ▓ ▓ ▓ ▓ ▓ ▓ ▓ ▓ ▓ ▓ ▓ ▓ ▓ ▓ ▓ ▓ ▓ ▓ ▓ ▓ ▓ ▓ ▓ ▓ ▓ ▓ ▓ □△ □△ □△ □△ □△ □△ □△ □△ □△ □△ □△ □△ □△ □△ □△ □△ □△ □△ □△ □△ □△ □△ □△ □△ □△ □△ □△ □△ □△ □△ □△ □△ □△ □△□△□△□△□△□△□△□△□△□△□△□△□△□△□△□△□△□△□△□△□△□△□△□△□△□△□△□△□△□△□△□△□△□△□△□△□△□△□△□△□△□△□△□△□△□△□△□△□△□△□△○△○△○△○△○△○△○△○△○△○△○△○△○△○△○△○△○△○△○△○△○△○△○△○△○△○△○△○△○△○△○△○△○△○△○△○△○△○△○△○△○△○△○△○△○△○△○△○△○△○△△○△○△○△○△○△○△○△○△○△○△○△○△○△○△○△○△○△○△○△○△○△○△○△○△○△○△○△○△○△○△○△○△○△○△○△○△○△○△○△○△○△○△○△○△○△○△○△○△○△ ○△○△○△○△○△○△○△○△○△○△○△○△○△○△○△○△○△○△○△○△○△○△○△○△○△○△○△○△○△○△○△○△○△○△○△○△○△○△○△○△○△○△○△○△○△○△○△○△○△○△圆△○△○△○△○△○△○△○△○△○△○△○△○△○△○△○△○△○△○△○△○△○△○△○△○△○△○△○△○△○△○△○△○△○△○△○△○△○△○△○△○△○△○△○△○△○△○△○△○△○△O△○△○△○△○△○△○△○△○△○△○△○△○△○△○△○△○△○△○△○△○△○△○△○△○△○△○△○△○△○△○△○△○△○△○△○△○△○△○△○△○△○△○△○△○△○△○△○△○△○△ | ||
Note on the playback of the NTSC tapes
When you play back a tape on a Multi System TV, select the best mode while viewing the picture on the TV.
Notes on LCD B.L.
- When you select “BRIGHT”, battery life is reduced by about 10 percent during recording.
- When you use power sources other than the battery pack, “BRIGHT” is automatically selected.
Note on VF B.L.
When you select “BRIGHT”, battery life is reduced by about 10 percent during recording.
| Icon/item | Mode | Meaning | POWER switch |
| ^*1) CONTINUOUS | ● OFF | Not to record continuously. | MEMORY |
| ON ^2) | To record pictures continuously (p. 140). | ||
| MULTI SCRN | To record nine still picures continuously (p. 140). | ||
| QUALITY | ● SUPER FINE ^2) | To record still pictures in the super fine image quality mode, using the “Memory Stick” (p. 134). | VCR MEMORY |
| FINE | To record still pictures in the fine image quality mode, using the “Memory Stick” (p. 134). | ||
| STANDARD | To record still pictures in the standard image quality mode, using the “Memory Stick” (p. 134). | ||
| IMAGE SIZE ^2) | ● 1152×864 | To record still pictures with 1152×864 size (p. 136). | MEMORY |
| 640×480 | To record still pictures with 640×480 size (p. 136). | ||
| PRINT MARK | ON | To write a print mark on the recorded still images you want to print out later. | VCR MEMORY |
| ● OFF | To erase print marks on still pictures. | ||
| PROTECT | ON | To protect selected still pictures against accidental erasure (p. 164). | VCR MEMORY |
| ● OFF | Not to protect still pictures. | ||
| SLIDE SHOW | To play back images in a continuous loop (p. 162). | MEMORY | |
| DELETE ALL | To delete all the unprotected images (p. 167). | MEMORY | |
| FORMAT | ● RETURN | To cancel formatting. | MEMORY |
| OK | To format an inserted “Memory Stick.” 1. Select FORMAT with the SEL/PUSH EXEC dial, then press the dial. 2. Turn the SEL/PUSH EXEC dial to select OK, then press the dial. 3. After “EXECUTE” appears, press the SEL/PUSH EXEC dial. “FORMATTING” flashes during formatting. “COMPLETE” appears when formatting is finished. | ||
| PHOTO SAVE | To duplicate mini DV still pictures on “Memory Stick”s (p. 152). | VCR |
^1) DCR-TRV11E/TRV20E only
^2) DCR-TRV20E only
Note on IMAGE SIZE (DCR-TRV20E only):
When you set CONTINUOUS to MULTI SCRN or you set the POWER switch to VCR, IMAGE SIZE is automatically set to 640 × 480 .
Notes on formatting
- Supplied “Memory Stick”s have been formatted at factory. Formatting with this camcorder is not required.
- Do not turn the POWER switch or press any button while the display shows “FORMATTING.”
- You cannot format the “Memory Stick” if the write-protect tab on the “Memory Stick” is set to LOCK.
- Format again if the message “◀” appears.
Formatting erases all information on the "Memory Stick"
Check the contents of the “Memory Stick” before formatting.
- Formatting erases sample images on the “Memory Stick.
- Formatting erases the protected image data on the “Memory Stick.”
| Icon/item | Mode | Meaning | POWER switch |
| CM SEARCH | ● ON | To search using cassette memory (p. 73). | VCR |
| OFF | To search without using cassette memory. | ||
| TITLEERASE | To erase the title you have superimposed (p. 111). | VCR CAMERA | |
| TITLE DSPL | ● ON | To display the title you have superimposed. | VCR |
| OFF | Not to display the title. | ||
| TAPE TITLE | To label a cassette (p. 114). | VCR CAMERA | |
| ERASE ALL | To erase all the data in cassette memory. | VCR CAMERA | |
| REC MODE | ● SP | To record in the SP (Standard Play) mode. | VCR CAMERA |
| LP | To increase the recording time to 1.5 times the SP mode. | ||
| AUDIO MODE | ● 12BIT | To record in the 12-bit mode (two stereo sounds). | VCR CAMERA |
| 16BIT | To record in the 16-bit mode (the one stereo sound with high quality). |
Notes on the LP mode
- When you record a tape in the LP mode on your camcorder, we recommend playing the tape on your camcorder. When you play back the tape on other camcorders or VCRs, noise may occur in pictures or sound.
- When you record in the LP mode, we recommend using a Sony Excellence/Master mini DV cassette so that you can get the most out of your camcorder.
- You cannot make audio dubbing on a tape recorded in the LP mode. Use the SP mode for the tape to be audio dubbed.
- When you record in the SP and LP modes on one tape or you record some scenes in the LP mode, the playback picture may be distorted or the time code may not be written properly between scenes.
Notes on AUDIO MODE
- You cannot dub audio sound on a tape recorded in the 16-bit mode.
- When playing back a tape recorded in the 16-bit mode, you cannot adjust the balance in AUDIO MIX.
| Icon/item | Mode | Meaning | POWERSwitch |
| REMAIN | ● AUTO | To display the remaining tape bar:for about 8 seconds after your camcorder is turned on and calculates the remaining amount of tape.for about 8 seconds after a cassette is inserted and your camcorder calculates the remaining amount of tape.for about 8 seconds after ▶ is pressed in VCR mode.for about 8 seconds after DISPLAY is pressed to display the screen indicators.for the period of tape rewinding, forwarding or picture search in the VCR mode. | VCRCAMERA |
| ON | To always display the remaining tape indicator. | ||
| DATA CODE | ● DATE/CAM | To display date, time and various settings during playback. | VCR |
| DATE | To display date and time during playback. | ||
| CLOCK SET | To reset the date or time (p. 129). | CAMERAMEMORY | |
| AUTO TV ON | ● OFF | — | VCRCAMERAMEMORY |
| ON | To automatically turn on a Sony TV when using the laser link function (P. 43). | ||
| TV INPUT | ● VIDEO1VIDEO2VIDEO3 | To switch the video input on a Sony TV when using the laser function (P. 43). | VCRCAMERAMEMORY |
| OFF | — | ||
| LTR SIZE | ● NORMAL | To display selected menu items in normal size. | VCRCAMERAMEMORY |
| 2× | To display selected menu items at twice the normal size. | ||
| DEMO MODE | ● ON | To make the demonstration appear. | CAMERA |
| OFF | To cancel the demonstration mode. |
Notes on DEMO MODE
- You cannot select DEMO MODE when a cassette is inserted in your camcorder.
- DEMO MODE is set to STBY (Standby) at the factory and the demonstration starts about 10 minutes after you have set the POWER switch to CAMERA without a cassette inserted.
Note that you cannot select STBY of DEMO MODE in the menu settings. - When NIGHTSHOT is set to ON, the NIGHTSHOT indicator appears on the LCD screen or in the viewfinder and you cannot select DEMO MODE in the menu settings.
| Icon/item | Mode | Meaning | POWER switch |
| ETC WORLD TIME | To set the clock to the local time. Turn the SEL/PUSH EXEC dial to set a time difference. The clock changes by the time difference you set here. If you set the time difference to 0, the clock returns to the originally set time. | CAMERA MEMORY | |
| BEEP | ● MELODY | To output the melody when you start/stop recording or when an unusual condition occurs on your camcorder. | VCR CAMERA MEMORY |
| NORMAL | To output the beep instead of the melody. | ||
| OFF | To cancel the melody and beep sound. | ||
| COMMANDER | ● ON | To activate the Remote Commander supplied with your camcorder. | VCR CAMERA MEMORY |
| OFF | To deactivate the Remote Commander to avoid remote control misoperation caused by other VCR's remote control. | ||
| DISPLAY | ● LCD | To show the display on the LCD screen and in the viewfinder. | VCR CAMERA MEMORY |
| V-OUT/LCD | To show the display on the TV screen, LCD screen and in the viewfinder. | ||
| REC LAMP | ● ON | To light up the camera recording lamp at the front of your camcorder. | CAMERA MEMORY |
| OFF | To turn the camera recording lamp off so that the person is not aware of the recording. | ||
| VIDEO EDIT | To make programmes and perform video editing (p. 93). | VCR | |
| EDIT SET | To adjust and set the synchronicity of your camcorder and a VCR for dubbing in edit set mode. | VCR |
Note
If you press DISPLAY with DISPLAY set to V-OUT/LCD in the menu settings, the picture from a TV or VCR will not appear on the LCD screen even when your camcorder is connected to outputs on the TV or VCR.
When recording a close subject
When REC LAMP is set to ON, the red camera recording lamp on the front of the camcorder may reflect on the subject if it is close. In this case, we recommend you set REC LAMP to OFF.
In more than five minutes after removing the power source
The “AUDIO MIX”, “COMMANDER”, “HiFi SOUND”, and “WHT BAL” items are returned to their factory settings.
The other menu items are held in memory even when the battery is removed.
Русский
Resetting the date and time
The clock is set at the factory to Sydney time for Australia and New Zealand models, to Tokyo time for the models sold in Japan, and to Hong Kong time for other models.
If you do not use your camcorder for about four months, the date and time settings may be released (bars may appear) because the vanadium-lithium battery installed in your camcorder will have been discharged (p. 196). First, set the year, then the month, the day, the hour and then the minute.
(1) In the standby mode, press MENU to display the menu.
(2) Turn the SEL/PUSH EXEC dial to select ☐, then press the dial.
(3) Turn the SEL/PUSH EXEC dial to select CLOCK SET, then press the dial.
(4) Turn the SEL/PUSH EXEC dial to adjust the desired year, then press the dial.
(5) Set the month, day and hour by turning the SEL/PUSH EXEC dial and pressing the dial.
(6) Set the minute by turning the SEL/PUSH EXEC dial and pressing the dial by the time signal. The clock starts to move.
(7) Press MENU to make the menu disappear.
The year changes as follows:
If you do not set the date and time “--:--:-” is recorded on the data code of the tape and the “Memory Stick” (DCR-TRV11E/TRV20E only.)
Note on the time indicator The internal clock of your camcorder operates on a 24-hour cycle.
You can record and play back still images on a “Memory Stick” supplied with your camcorder. You can easily play back, record or delete still images. You can exchange image data with other equipment such as a personal computer etc., using the PC serial cable for “Memory Stick” supplied with your camcorder or PC card adaptor for “Memory Stick” (not supplied).
On file format (JPEG)
Your camcorder compresses image data in JPEG format (extension .jpg).
Typical image data file name
100-0001: This file name appears on the LCD screen or in the viewfinder of your camcorder. DSC00001.jpg: This file name appears on the display of your personal computer.
Using a "Memory Stick"
Using a "Memory Stick" -introduction
- Do not let "Memory Stick" s get wet.
- Do not use or keep “Memory Stick”s in locations that are:
- Extremely hot such as in a car parked in the sun or under the scorching sun.
- Under direct sunlight.
- Very humid or subject to corrosive gases.
- When you carry or store a “Memory Stick”, put it in its case.
Formatting the supplied "Memory Stick"
Formatting with this camcorder is not required. The “Memory Stick” has been formatted in the FAT-format at factory.
"Memory Stick" supplied with your camcorder
- Sample images are recorded in the “Memory Stick” (p. 148). Note that these images will be deleted if you format the “Memory Stick”.
- Stick the supplied label on the labelling position to prevent the accidental erasure. As for the labelling position, see the illustration on the previous page.
"Memory Stick"s formatted by a computer
"Memory Stick" s formatted by Windows OS or Macintosh computers do not have a guaranteed compatibility with this camcorder.
Notes on image data compatibility
- Image data files recorded on “Memory Stick”s by your camcorder conform with the Design Rules for Camera File Systems universal standard established by the JEIDA (Japan Electronic Industry Development Association). You cannot play back on your camcorder still images recorded on other equipment (DCR-TRV890E/TRV900/TRV900E or DSC-D700/D770) that does not conform with this universal standard. (These models are not sold in some areas.)
- If you cannot use the “Memory Stick” that is used with other equipment, format it with this camcorder (p. 119). However, formatting erases all information on the “Memory Stick”.
"Memory Stick" and are trademarks of Sony Corporation.
- Windows is registered trademark licensed to Microsoft Corporation, registered in the U.S.A. and other countries.
- All other product names mentioned herein may be the trademarks or registered trademarks of their respective companies.
Furthermore, “TM” and “®” are not mentioned in each case in this manual.
Inserting a "Memory Stick"
(1) Slide MEMORY OPEN in the direction of the arrow. The “Memory Stick” compartment opens.
(2) Insert a “Memory Stick” in as far as it can go with its rounded corner facing up.
Then, close the “Memory Stick” compartment.
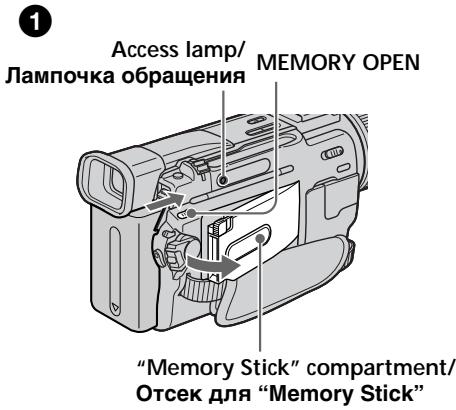
text_image
Access lamp/ Лампочка обращения MEMORY OPEN "Memory Stick" compartment/ Отсек для "Memory Stick"Ejecting a "Memory Stick"
Open the “Memory Stick” compartment in step 1, press MEMORY RELEASE. The “Memory Stick” comes out.
natural_image
Diagram of a video camera showing internal components and motion arrows (no text or symbols)Извлечение "Memory Stick"
natural_image
Technical line drawing of a video camera module with no visible text or symbolsMEMORY RELEASE
When the access lamp is lit or flashing Never shake or strike your camcorder. Do not turn the power off, eject a "Memory Stick" or remove the battery pack. Otherwise, the image data breakdown may occur.
Selecting image quality mode
You can select image quality mode in still picture recording. Image quality is set to SUPER FINE mode at the factory.
(1) Set the POWER switch to MEMORY or VCR. Make sure that the LOCK switch is set to the left (unlock) position.
(2) Press MENU to display the menu.
(3) Turn the SEL/PUSH EXEC dial to select ☐, then press the dial.
(4) Turn the SEL/PUSH EXEC dial to select QUALITY, then press the dial.
(5) Turn the SEL/PUSH EXEC dial to select the desired image quality, then press the dial.
In some cases, changing the image quality mode may not affect the image quality, depending on the types of images you are shooting.
3

natural_image
Diagram showing a transformation of a striped object into a simplified version (no text or symbols)
text_image
MEMORY SET CONTINUOUS OFF QUALITY IMAGE SIZE PRINT MARK PROTECT ETC SLIDE SHOW DELETE ALL FORMAT RETURN [MENU]: END4

text_image
MEMORY SET CONTINUOUS QUALITY SUPER FINE IMAGE SIZE PRINT MARK PROTECT ETC SLIDE SHOW DELETE ALL FORMAT RETURN [MENU]: END5


text_image
MEMORY SET STD CONTINUOUS QUALITY SUPER FINE IMAGE SIZE FINE PRINT MARK STANDARD PROTECT ETC SLIDE SHOW DELETE ALL FORMAT RETURN [MENU]: ENDПримечание
| Setting | Meaning |
| SUPER FINE (SFN) (DCR-TRV20E only) | This is the highest image quality in your camcorder. The number of still images you can record is less than that in FINE mode. The image is compressed to about 1/3. SFN appears on the screen. |
| FINE (FINE) | Use this mode when you want to record high quality images. The image is compressed to about 1/6. FINE appears on the screen. |
| STANDARD (STD) | This is the standard image quality. The image is compressed to about 1/10. STD appears on the screen. |
Differences in image quality mode Recorded images are compressed in JPEG format before being stored in memory. The memory capacity allotted to each image varies depending on the selected image quality mode and image size. Details are shown in the table below. (You can select 1152×864 or 640×480 image size in the menu settings.)
1152×864 image size (DCR-TRV20E only)
| Image quality mode | Memory capacity |
| SUPER FINE | About 600 KB |
| FINE | About 300 KB |
| STANDARD | About 200 KB |
| 640×480 image size | |
| Image quality mode | Memory capacity |
| SUPER FINE(DCR-TRV20E only) | About 190 KB |
| FINE | About 100 KB |
| STANDARD | About 60 KB |
Image quality mode indicator The image quality mode indicator is not displayed during playback.
Selecting image size
- DCR-TRV20E only
You can select either one of two image sizes: 1152 × 864 or 640 × 480 . (In VCR mode, you can select only 640 × 480 .)
(1) Set the POWER switch to MEMORY. Make sure that the LOCK switch is set to the left (unlock) position.
(2) Press MENU to display the menu.
(3)Turn the SEL/PUSH EXEC dial to select ☐, then press the dial.
(4)Turn the SEL/PUSH EXEC dial to select IMAGE SIZE, then press the dial.
(5)Turn the SEL/PUSH EXEC dial to select the desired image size, then press the dial. The indicator changes as follows;

When images recorded on a camcorder in 1152 × 864 size are played back on a unit that does not support that size, the full image may not appear.
Approximate number of images you can record on a "Memory Stick"
The number of images you can record varies depending on which image quality mode and image size you select and the complexity of the subject.
1152×864 image size and SUPER FINE are selected with DCR-TRV20E only.
Примечание
Recording still images on "Memory Stick"s - Memory Photo recording
- DCR-TRV11E/TRV20E only
You can record still pictures on "Memory Stick"s.
Before operation
Insert a "Memory Stick" into your camcorder.
(1) Set the POWER switch to MEMORY. Make sure that the LOCK switch is set to the left (unlock) position.
(2) Keep pressing PHOTO lightly until the desired still picture appears. The green ● mark stops flashing, then lights up. The brightness of the picture and focus are adjusted, being targeted for the middle of the picture and are fixed. Recording does not start yet.
(3) Press PHOTO deeper. The image displayed on the screen will be recorded on a “Memory Stick”. Recording is complete when the bar scroll indicator disappears.
text_image
1 POWER 2 PHOTO 1/100 CAPTURE [a] (b] 3 PHOTO[a] Number of images can be recorded on the "Memory Stick"
[b] Number of recorded images
Recording still images on "Memory Stick"s - Memory Photo recording
When the POWER switch is set to MEMORY The following functions do not work:
- Wide TV mode
- Digital zoom
- SteadyShot function
- SUPER NIGHTSHOT
- Fader
- Picture effect
- Digital effect
- Title
- Low lux mode (The indicator flashes.)
- Sports lesson mode (The indicator flashes.)
When you are recording a still image You can neither turn off the power nor press PHOTO.
When you press PHOTO on the Remote Commander
Your camcorder immediately records the image that is on the screen when you press the button.
Note
When recording still images at step 2 with the PHOTO button pressed lightly, the image momentarily flickers. This is not a malfunction.
When recording in memory mode
The angle of view is a little increased than one in CAMERA mode.
Recording images continuously
You can record still pictures continuously. Select one of the two modes described below before recording.
Continuous mode [a] (DCR-TRV20E only)
When the image size is set to 1152 × 864 , you can record up to four pictures continuously. When the image size is set to 640 × 480 , you can record up to 16 pictures continuously. The number of recorded photos in continuous mode depends on the capacity of the “Memory Stick”.
Multi screen mode [b] (Recording image size is 640×480)
You can record nine still pictures continuously on a single page.
[a]
![SONY DCR-TRV11E - Multi screen mode [b] (Recording image size is 640×480) - 1](/content/2019/11/48726/images/48985039df96cf8eab165fe98ebeb8e150cc953f2bc4108842b08e5f64755d83.jpg)
natural_image
Three identical grayscale images of a person with facial features, labeled 'SONY' in the top two (no additional text or symbols)While pressing down PHOTO, your camcorder continuously record maximum number of still pictures depending on the image size.
When you stop pressing, the recording stops.
Recording still images on "Memory Stick"s - Memory Photo recording
(1) Set the POWER switch to MEMORY. Make sure that the LOCK switch is set to the left (unlock) position.
(2) Press MENU to display the menu.
(3)Turn the SEL/PUSH EXEC dial to select ☐, then press the dial.
(4)Turn the SEL/PUSH EXEC dial to select CONTINUOUS, then press the dial.
(5)Turn the SEL/PUSH EXEC dial to select the desired setting, then press the dial.
flowchart
graph TD
    A["1: Display"] --> B["2: Menu"]
    B --> C["3: Memory SET ON CONTINUOUS OFF"]
    C --> D["4: Memory SET CONTINUOUS OFF"]
    D --> E["5: Memory SET CONTINUOUS ON QUALITY"]
    E --> F["End"]
If the capacity of the "Memory Stick" becomes full
“☑ FULL” appears on the LCD screen or in the viewfinder, and you cannot record still pictures on this “Memory Stick”.
Recording still images on "Memory Stick"s - Memory Photo recording
Continuous shooting settings
| Setting | Meaning (indicator on the screen) |
| OFF | Your camcorder shoots one image at a time. (no indicator) |
| ON (DCR-TRV20E only) | Your camcorder shoots up to 16 still images at about 0.5 sec intervals. (☑) |
| MULTI SCRN | Your camcorder shoots nine still images at about 0.5 sec intervals and displays the images on a single page divided into nine boxes. Still images are recorded in 640×480 size. (☐☐) |
The number of images in continuous shooting The number of images you can shoot continuously varies depending on the image size and the capacity of the "Memory Stick".
| Image size | The number of images |
| 640×480 | Up to 16 images |
| 1152×864 | Up to 4 images |
Note on using the video flash light (not supplied)
The video flash light does not work in the continuous or multi screen mode if you install it to the intelligent accessory shoe.
Self-timer memory photo recording
You can make a memory photo recording with the self-timer. This mode is useful when you want to record yourself.
(1) Set the POWER switch to MEMORY. Make sure that the LOCK switch is set to the left (unlock) position.
(2) Press SELFTIMER in the standby mode. The ⏻ (self-timer) indicator appears on the LCD screen or in the viewfinder.
(3) Press PHOTO.
Self-timer starts counting down from 10 with a beep sound. In the last two seconds of the countdown, the beep sound gets faster, then recording starts automatically.
To cancel self-timer recording
Press SELFTIMER so that the ⭕ (self-timer) indicator disappears from on the LCD screen or in the viewfinder. You cannot cancel the self-timer recording using the Remote Commander.
Note
The self-timer recording mode is automatically cancelled when:
– Self-timer recording is finished.
- The POWER switch is set to OFF (CHG) or VCR.
To check the picture to be recorded
You can check the picture with pressing the PHOTO button lightly, then press it deeper to capture.
Superimposing a still picture in a "Memory Stick" on a moving picture - MEMORY MIX
- DCR-TRV11E/TRV20E only
You can superimpose a still picture you have recorded on a “Memory Stick” on the top of the moving picture you are recording.
M. CHROM (Memory chromakey)
You can swap a blue area of a still picture such as an illustration or a frame with a moving picture.
M. LUMI (Memory luminancekey)
You can swap a brighter area of a still picture such as a handwritten illustration or title with a moving picture. Record a title on a “Memory Stick” before a trip or event for convenience.
C. CHROM (Camera chromakey)
You can superimpose a moving picture on the top of a still picture such as a picture can be used as background. Shoot the subject against a blue background. The blue area of the moving picture will be swapped with a still picture.
M. OVERLAP (Memory overlap)
You can make a moving image fade in on top of a still image.
Superimposing a still picture in a "Memory Stick" on a moving picture - MEMORY MIX
- Insert a mini DV tape for recording into your camcorder.
- Insert a recorded “Memory Stick” into your camcorder.
Superimposing a still picture in a "Memory Stick" on a moving picture - MEMORY MIX
(1) Set the POWER switch to CAMERA.
(2) Press MEMORY MIX in the standby mode. The last recorded or last composed image appears on the lower part of the screen as a thumbnail image.
(3) Press MEMORY+/- to select the still picture you want to superimpose. To see the previous image, press MEMORY - To see the next image, press MEMORY+.
(4) Turn the SEL/PUSH EXEC dial to select the desired mode.
The mode changes as follows:
M.CHROM → M.LUMI → C.CHROM →
M.OVERLAP
(5) Press the SEL/PUSH EXEC dial. The still picture is superimposed on the moving picture. Your camcorder automatically returns to the standby mode.
(6) Turn the SEL/PUSH EXEC dial to adjust the effect.
When M.OVERLAP is selected, no adjustment is necessary.
(7) Press START/STOP to start recording.
Superimposing a still picture in a "Memory Stick" on a moving picture - MEMORY MIX
Items to adjust
| M. CHROM | The colour (blue) scheme of the area in the still picture which is to be swapped with a moving picture |
| M. LUMI | The colour (bright) scheme of the area in the still picture which is to be swapped with a moving picture |
| C. CHROM | The colour (blue) scheme of the area in the moving picture which is to be swapped with a still picture |
| M. OVERLAP | No adjustment necessary |
The fewer bars there are on the screen, the stronger the effect.
To change the still picture to be superimposed
Do either of the following:
- Press MEMORY+/- before step 6.
- Press the SEL/PUSH EXEC dial before step 6, and repeat the procedure form step 4.
To change the mode setting
Press the SEL/PUSH EXEC dial before step 6, and repeat the procedure from step 4.
To cancel M. CHROM/M. LUMI/C. CHROM/M. OVERLAP
Press MEMORY MIX again.
Superimposing a still picture in a "Memory Stick" on a moving picture - MEMORY MIX
During recording
You cannot change the mode setting.
The "Memory Stick" supplied with your camcorder has stored 20 images
- For M.CHROM : 18 images (such as a frame) 100-0001 \~ 100-0018
- For C.CHROM : 2 images (such as a background) 100-0019 \~ 100-0020
Sample images
Sample images stored in the “Memory Stick” supplied with your camcorder are protected (p. 164).
If a still picture to be superimposed has lots of white areas
The thumbnail image may not be displayed clearly.
Image data modified with personal computers or shot with other equipment
You may not be able to play them back with your camcorder.
Note
When the overlapping still picture has a large amount of white, the thumbnail image of the picture may not be clear.
Recording an image from a mini DV tape as a still image
- DCR-TRV11E/TRV20E only
Your camcorder can read moving picture data recorded on a mini DV tape and record it as a still image on a “Memory Stick”.
Before operation
- Insert a recorded mini DV tape into your camcorder.
- Insert a “Memory Stick” into your camcorder.
(1) Set the POWER switch to VCR.
(2) Press ▶. The picture recorded on the mini DV tape is played back.
(3) Keep pressing PHOTO lightly until the picture from the mini DV tape freezes. "CAPTURE" appears on the LCD screen or in the viewfinder. Recording does not start yet.
(4) Press PHOTO deeper. The image displayed on the screen will be recorded on a “Memory Stick”. Recording is complete when the bar scroll indicator disappears.
Recording an image from a mini DV tape as a still image
Image size of still pictures
Image size is automatically set to 640 × 480 .
When the access lamp is lit or flashing
Never shake or strike the unit. As well do not turn the power off, eject a "Memory Stick" or remove the battery pack. Otherwise, the image data breakdown may occur.
If “◀” appears on the LCD screen or in the viewfinder
The inserted “Memory Stick” is incompatible with your camcorder because its format does not conform with your camcorder. Check the format of the “Memory Stick”.
If you press PHOTO lightly in the playback mode
Your camcorder stops momentarily.
Sound recorded on a mini DV tape
You cannot record the audio from a mini DV tape.
Titles have already recorded on mini DV tapes. You cannot record the titles on “Memory Stick”s. The title does not appear while you are recording a still picture with PHOTO.
When you press PHOTO on the Remote Commander
Your camcorder immediately records the image that is on the screen when you press the button.
Recording an image from a mini DV tape as a still image
Recording a still image from other equipment
(1) Set the POWER switch to VCR and set DISPLAY in ETC to LCD in the menu settings. Set A/V → DV OUT in V to OFF in the menu settings.
(2) Play back the recorded tape, or turn the TV on to see the desired programme. The image of the other equipment is displayed on the LCD screen or in the viewfinder.
(3) Follow the steps 3 and 4 on page 149.
When recording the image through the AUDIO/VIDEO jack
Connect the yellow plug of the A/V connecting cable to the video jack on the VCR or the TV.
When recording the image through the i DV IN/OUT jack
Connect using an S video cable (not supplied) to obtain high-quality pictures
With this connection, you do not need to connect the yellow (video) plug of the A/V connecting cable.
Connect an S video cable (not supplied) to the S video jacks of both your camcorder and the VCR. This connection produces higher quality DV format pictures.
Using the search function, you can automatically take in only still images from mini DV tapes and record them on a “Memory Stick” in sequence.
Before operation
- Insert a recorded mini DV tape into your camcorder and rewind the tape.
- Insert a “Memory Stick” into your camcorder.
(1) Set the POWER switch to VCR.
(2) Press MENU to display the menu.
(3) Turn the SEL/PUSH EXEC dial to select , then press the dial.
(4) Turn the SEL/PUSH EXEC dial to select PHOTO SAVE, then press the dial. "PHOTO BUTTON" appears on the LCD screen or in the viewfinder.
(5) Press PHOTO deeper. The still image from the mini DV tape is recorded on a “Memory Stick”. The number of still images copied is displayed. “END” is displayed when copying is completed.
When the memory of the "Memory Stick" is full
“MEMORY FULL” appears on the LCD screen or in the viewfinder, and the copying stops. Insert another “Memory Stick” and repeat the procedure from step 2.
Image size of still pictures
Image size is automatically set to 640 × 480.
When the access lamp is lit or flashing
Never shake or strike your camcorder. As well do not turn the power off, eject a “Memory Stick” or remove the battery pack. Otherwise, the image data breakdown may occur.
To record all the images recorded on the mini DV tape
Rewind the tape all the way back and start copying.
If the write-protect tab on the "Memory Stick" is set to LOCK
“NOT READY” appears when you select the item in the menu settings.
When you change "Memory Stick"s in the middle of copying
Your comcorder resumes copying from the last image recorded on the previous “Memory Stick”.
Viewing a still picture - Memory photo playback
- DCR-TRV11E/TRV20E only
You can play back still images recorded on a "Memory Stick". You can also play back six images at a time by selecting the index screen.
Before operation
Insert a “Memory Stick” into your camcorder.
(1) Set the POWER switch to MEMORY or VCR. Make sure that the LOCK switch is set to the left (unlock) position.
(2) Press MEMORY PLAY. The last recorded image is displayed.
(3) Press MEMORY +/- to select the desired still image. To see the previous image, press MEMORY -. To see the next image, press MEMORY +.
To stop memory photo playback
Press MEMORY PLAY again.
To play back recorded images on a TV screen
- Connect your camcorder to the TV with the A/V connecting cable supplied with your camcorder before the operation.
- When operating memory photo playback on a TV or on the LCD screen, the image quality may appear to have deteriorated. This is not a malfunction. The image data is as good as ever.
- Turn the audio volume of the TV down before operation, or noise (howling) may be output from the TV speakers.
- The message “☑ NO FILE” appears when no image is recorded on the “Memory Stick”.
Recording date
When you press DATA CODE, you can see the date of the recording.
Image data modified with personal computers or shot with other equipment
You may not be able to play them back with your camcorder.
Screen indicators during still image playback
[a] Image size
[b] Image number
[c] Total number of recorded images
[d] Print mark
[e] Protect indicator
[f] Data Directory Number, File Number
Playing back six recorded images at a time (index screen)
You can play back six recorded images at a time. This function is especially useful when searching for a particular image.
(1) Set the POWER switch to MEMORY or VCR. Make sure that the LOCK switch is set to the left (unlock) position.
(2) Press MEMORY INDEX.
text_image
2 INDEX 1A red ▶ mark appears above the image that is displayed before changing to the index screen mode.
MEMORY -: to display the previous six images MEMORY +: to display the following six images
To return to the normal playback screen (single screen)
Press MEMORY +/- to move the ▶ mark to the image you want to display on full screen, then press MEMORY PLAY.
Viewing a still picture - Memory photo playback
Note
When displaying the index screen, the number appears above each image. This indicates the order in which images are recorded on the "Memory Stick". These numbers are different from the data file names.
Files modified with personal computers
These files may not be displayed on the index screen. Image files shot with other equipment may not be displayed on the index screen either.
To make the display disappear Press DISPLAY.
Viewing the recorded images using a personal computer
The image data recorded with your camcorder is compressed in the JPEG format. If you use the application software, "PictureGear 4.1Lite" supplied with your camcorder, you can see images recorded on the "Memory Stick" on a computer screen. Use the PC serial cable supplied with your camcorder for this operation. You can playback the images on the "Memory Stick"s on the computer screen only in the memory mode.
Copying the image recorded on "Memory Stick"s to mini DV tapes
- DCR-TRV11E/TRV20E only
You can copy still images or titles recorded on "Memory Stick" and record them to a mini DV tape.
Before operation
- Insert mini DV tape for recording into your camcorder.
- Insert a “Memory Stick” into your camcorder.
(1) Set the POWER switch to VCR.
(2) Using the video control buttons, search a point where you want to record the desired still image. Set the mini DV tape to playback pause mode.
(3) Press ● REC and the button on its right simultaneously on your camcorder. The mini DV tape is set to the recording pause mode.
(4) Press MEMORY PLAY to play back the still image you want to copy.
(5) Press Ⅱ to start recording and press Ⅲ again to stop.
(6) If you have more to copy, repeat steps 4 and 5.
Copying the image recorded on "Memory Stick"s to mini DV tapes
During copying
You cannot operate the following buttons: MEMORY PLAY, MEMORY INDEX, MEMORY DELETE, MEMORY +, MEMORY -, and MEMORY MIX.
Note on the index screen
You cannot record the index screen.
If you press EDITSEARCH during pause mode Memory playback stops.
Image data modified with personal computers or shot with other equipment
You may not be able to copy them with your camcorder.
If you press DISPLAY in the standby or recording mode
You can see memory playback and the file name indicators in addition to the indicators pertinent to mini DV tape, such as the time code indicator.
Enlarging still images recorded on "Memory Stick"s - Memory PB ZOOM
- DCR-TRV11E/TRV20E only
You can enlarge still images recorded on a
"Memory Stick".
Before operation
Insert a "Memory Stick" into your camcorder.
(1) In the memory playback mode, press PB ZOOM on your camcorder. The still image is enlarged, and appears on the LCD screen or in the viewfinder.
(2) Turn SEL/PUSH EXEC dial to move the enlarged image, then press the dial.
↑: The image moves downwards ↓: The image moves upwards
(3) Turn SEL/PUSH EXEC dial to move the enlarged image, then press the dial. →: The image moves leftward (Turn the dial to upwards.) ←: The image moves rightward (Turn the dial to downwards.)
text_image
1 PB ZOOM 2 PB ZOOM [EXEC] ← 3 PB ZOOM [EXEC] ↙To cancel the play zoom function
Press PB ZOOM again.
Enlarging still images recorded on "Memory Stick"s- Memory PB ZOOM
Note
You cannot record the images enlarged by the PB ZOOM mode on “Memory Stick”s.
The PB ZOOM function is cancelled when the following buttons are pressed:
- MENU
- MEMORY PLAY
- MEMORY INDEX
- MEMORY +/-
In the PB ZOOM mode
The digital effect function does not work.
Pictures in the PB ZOOM mode
Pictures in the PB ZOOM mode are not output through the DV IN/OUT jack.
Playing back images in a continuous loop - SLIDE SHOW
- DCR-TRV11E/TRV20E only
You can automatically play back images in sequence. This function is useful especially when checking recorded images or during a presentation.
Before operation
Insert a "Memory Stick" into your camcorder.
(1) Set the POWER switch to MEMORY. Make sure that the LOCK switch is set to the left (unlock) position.
(2) Press MENU to display the menu.
(3) Turn the SEL/PUSH EXEC dial to select ☐, then press the dial.
(4) Turn the SEL/PUSH EXEC dial to select SLIDE SHOW, then press the dial.
(5) Press MEMORY PLAY. Your camcorder plays back the images recorded on a “Memory Stick” in sequence.
natural_image
Diagram showing a transformation of a striped object into a simplified version, with no text or symbols present.
1
text_image
POWER OFFRAG CAMERA SECTOR
4

MEMORY SET
CONTINUOUS
QUALITY
IMAGE SIZE
PRINT MARK
PROTECT
ETC SLIDE SHOW READY
DELETE ALL
FORMAT
RETURN
MENU : END
MEMORY SET
CONTINUOUS OFF
QUALITY
IMAGE SIZE
PRINT MARK
PROTECT
ETC SLIDE SHOW
DELETE ALL
FORMAT
SLIDE SHOW 640 1 / 100
100-0001
[M PLAY]: START MENU: END
Playing back images in a continuous loop - SLIDE SHOW
To stop or end the slide show
Press MENU.
To pause during a slide show
Press MEMORY PLAY.
To start the slide show from a particular image
Select the desired image using MEMORY +/- buttons before step 2.
To view the recorded images on TV
Connect your camcorder to a TV with the A/V connecting cable supplied with your camcorder before operation.
If you change the "Memory Stick" during operation
The slide show does not operate. If you change the “Memory Stick”, be sure to follow the steps again from the beginning.
To prevent accidental erasure of important images, you can protect selected images.
Before operation
Insert a “Memory Stick” into your camcorder.
(1) Set the POWER switch to MEMORY or VCR. Make sure that the LOCK switch is set to the left (unlock) position.
(2) Play back the image you want to protect.
(3) Press MENU to display the menu.
(4) Turn the SEL/PUSH EXEC dial to select ☐, then press the dial.
(5) Turn the SEL/PUSH EXEC dial to select PROTECT, then press the dial.
(6) Turn the SEL/PUSH EXEC dial to select ON, then press the dial.
(7) Press MENU to make the menu display disappear. The “○—” mark is displayed beside the data file name of the protected image.
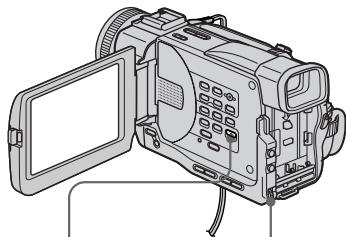
natural_image
Line drawing of a video camera with open lid and external screen (no text or symbols)3,7

4

natural_image
Diagram showing a transformation of a striped object into a simplified version (no text or symbols)MEMORY SET
M CONTINUOUS OFF
QUALITY
IMAGE SIZE
PRINT MARK
PRINT M PROTECT
PROTECT
ETC SLIDE SHOW
DELETE ALL
FORMAT
→RETURN
MENU : END
5

text_image
MEMORY SET 10 / 12 CONTINUOUS QUALITY IMAGE SIZE PRINT MARK PROTECT OFF ETC SLIDE SHOW DELETE ALL FORMAT RETURN [MENU]: END

text_image
MEMORY SET 10 / 12 CONTINUOUS QUALITY IMAGE SIZE PRINT MARK PROTECT ON ETC SLIDE SHOW OFF DELETE ALL FORMAT RETURN [MENU] : END6

natural_image
Diagram showing a transformation of a striped object into a simplified version, with no text or symbols present.
text_image
MEMORY SET 10 / 12 CONTINUOUS QUALITY IMAGE SIZE PRINT MARK PROTECT ON ETC SLIDE SHOW DELETE ALL FORMAT RETURN [MENU]: ENDTo cancel image protection
Select OFF in step 6, then press the SEL/PUSH EXEC dial.
Note
Formatting erases all information on the “Memory Stick”, including the protected image data. Check the contents of the “Memory Stick” before formatting.
If the write-protect tab on the "Memory Stick" is set to LOCK
You cannot carry out image protection.
Deleting selected images
Before operation
Insert a “Memory Stick” into your camcorder.
(1) Set the POWER switch to MEMORY or VCR. Make sure that the LOCK switch is set to the left (unlock) position.
(2) Play back the image you want to delete (p. 154).
(3) Press MEMORY DELETE with a sharp-pointed object. "DELETE?" appears on the LCD screen or in the viewfinder.
(4) Press MEMORY DELETE again. The selected image is deleted.
To cancel deleting an image
Press MEMORY - in step 4.
To delete an image displayed on the index screen
Press MEMORY +/- to move the ▶ indicator to the desired image and follow steps 3 and 4.
Notes
- To delete a protected image, first cancel image protection.
- Once you delete an image, you cannot restore it. Check the images to delete carefully before deleting them.
- You cannot delete images if the write-protect tab on a “Memory Stick” is set to LOCK.
Deleting all the images
You can delete all the unprotected images in a "Memory Stick".
Before operation
Insert a "Memory Stick" into your camcorder.
(1) Set the POWER switch to MEMORY. Make sure that the LOCK switch is set to the left (unlock) position.
(2) Press MENU to display the menu.
(3) Turn the SEL/PUSH EXEC dial to select ☐, then press the dial.
(4) Turn the SEL/PUSH EXEC dial to select DELETE ALL, then press the dial.
(5) Turn the SEL/PUSH EXEC dial to select OK, then press the dial. "OK" changes to "EXECUTE."
(6) Turn the SEL/PUSH EXEC dial to select EXECUTE, then press the dial. "DELETING" appears on the LCD screen or in the viewfinder. When all the unprotected images are deleted, "COMPLETE" is displayed.
natural_image
Line drawing of a digital camera with display screen and control buttons (no text or symbols)2

4

text_image
MEMORY SET CONTINUOUS QUALITY IMAGE SIZE PRINT MARK PROTECT ETC SLIDE_SHOW DELETE ALL READY FORMAT RETURN [MENU]: END
text_image
MEMORY SET CONTINUOUS OFF QUALITY IMAGE SIZE PRINT MARK PROTECT ETC SLIDE SHOW DELETE ALL FORMAT RETURN [MENU]: END
text_image
MEMORY SET CONTINUOUS QUALITY IMAGE SIZE PRINT MARK PROTECT ETC SLIDE SHOW DELETE ALL RETURN FORMAT OK RETURN [MENU] : END5

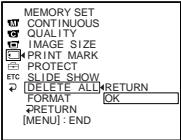
text_image
MEMORY SET CONTINUOUS QUALITY IMAGE SIZE PRINT MARK PROTECT ETC SLIDE_SHOW DELETE ALL RETURN FORMAT OK RETURN [MENU] : END
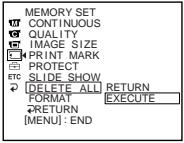
text_image
MEMORY SET CONTINUOUS QUALITY IMAGE SIZE PRINT MARK PROTECT ETC SLIDE_SHOW [DELETE_ALL] RETURN FORMAT EXECUTE RETURN [MENU]: END6

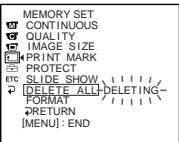
text_image
MEMORY SET CONTINUOUS QUALITY IMAGE SIZE PRINT MARK PROTECT ETC SLIDE_SHOW DELETE_ALL-DELETING- FORMAT RETURN [MENU]: END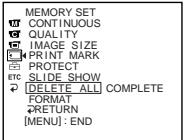
text_image
MEMORY SET CONTINUOUS QUALITY IMAGE SIZE PRINT MARK PROTECT ETC SLIDE_SHOW DELETE_ALL COMPLETE FORMAT RETURN [MENU]: ENDDeleting images
To cancel deleting all the images in the "Memory Stick"
Select ➕ RETURN in step 5, then press the SEL/PUSH EXEC dial.
While "DELETING" appears
Do not turn the POWER switch or press any buttons.
You can specify the recorded still image to print out. This function is useful for printing out still images later.
Your camcorder conforms with the DPOF (Digital Print Order Format) standard for specifying the still images to print out.
Before operation
Insert a “Memory Stick” into your camcorder.
(1) Set the POWER switch to MEMORY or VCR. Make sure that the LOCK switch is set to the left (unlock) position.
(2) Play back the image to be printed out.
(3) Press MENU to display the menu.
(4) Turn the SEL/PUSH EXEC dial to select ☐, then press the dial.
(5) Turn the SEL/PUSH EXEC dial to select PRINT MARK, then press the dial.
(6) Turn the SEL/PUSH EXEC dial to select ON, then press the dial.
(7) Press MENU to make the menu display disappear. The “☐” mark is displayed beside the data file name of the image with a print mark.
natural_image
Line drawing of a digital camera with open lid and screen (no text or symbols)3,7

4

natural_image
Diagram showing a transformation of a striped object into a simplified version (no text or symbols)
text_image
MEMORY SET CONTINUOUS OFF QUALITY IMAGE SIZE PRINT MARK PROTECT ETC SLIDE SHOW DELETE ALL FORMAT RETURN [MENU]: END5

text_image
MEMORY SET 10 / 12 CONTINUOUS QUALITY IMAGE SIZE PRINT MARK OFF PROTECT ETC SLIDE SHOW DELETE ALL FORMAT RETURN [MENU] : END

text_image
MEMORY SET 10 / 12 CONTINUOUS QUALITY IMAGE SIZE PRINT MARK ON PROTECT OFF ETC SLIDE SHOW DELETE ALL FORMAT RETURN [MENU] : END6

natural_image
Diagram showing a transformation of a striped object into a simplified version (no text or symbols)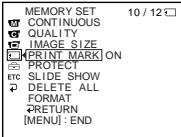
text_image
MEMORY SET 10 / 12 CONTINUOUS QUALITY IMAGE SIZE [PRINT MARK] ON PROTECT ETC SLIDE SHOW DELETE ALL FORMAT RETURN [MENU] : ENDWriting a print mark - PRINT MARK
To cancel writing print marks
Select OFF in step 6, then press the SEL/PUSH EXEC dial.
If the write-protect tab on the "Memory Stick" is set to LOCK
You cannot write print marks on still images.
Selecting cassette types
You can use the ^Mini DV mini DV cassette only*. You cannot use any other 8 mm, Hi 8 Hi8, Digital8, VHS VHS, VHSC VHSC, SVHS S-VHS, SVHSC S-VHSC, Betamax, ED Beta ED Betamax or DV DV cassette.
* There are two types of mini DV cassettes: with cassette memory and without cassette memory. Tapes with cassette memory have CIII (Cassette Memory) mark. We recommend you to use the tape with cassette memory.
The IC memory is mounted on this type of mini DV cassette. Your camcorder can read and write data such as dates of recording or titles, etc. to this memory.
The functions using the cassette memory require successive signals recorded on the tape. If the tape has a blank portion in the beginning or between the recorded portions, a title may not be displayed properly or the search functions may not work properly. Not to make any blank portion on the tape, operate the followings. Press END SEARCH to go to the end of the recorded portion before you begin the next recording if you operate the followings:
- you have ejected the cassette while recording. - you have played back the tape in the VCR. - you have used the edit search function. If there is a blank portion or discontinuous signal on your tape, re-record from the beginning to the end of the tape concerning above.
The same result may occur when you record using a digital video camera recorder without a cassette memory function on a tape recorded by one with the cassette memory function.
CIII4K mark on the cassette The memory capacity of tapes marked with CIII4K is 4KB. Your camcorder can accommodate tapes having a memory capacity of up to 16KB. 16KB tape is marked with CIII16K.
Mini DV Digital Video Cassette This is the Mini DV mark.
Circuit Cassette Memory This is the Cassette Memory mark.
These are trademarks.
Using any other video camera recorder, you cannot record on tape that has recorded a copyright control signals for copyright protection of software which is played back on your camcorder.
When you record
You cannot record software on your camcorder that contains copyright control signals for copyright protection of software.
“COPY INHIBIT” appears on the LCD screen, in the viewfinder or on the TV screen if you try to record such software.
Your camcorder does not record copyright control signals on the tape when it records.
Audio mode
12-bit mode: The original sound can be recorded in stereo 1, and the new sound in stereo 2 in 32 kHz. The balance between stereo 1 and stereo 2 can be adjusted by selecting AUDIO MIX in the menu settings during playback. Both sounds can be played back.
16-bit mode: A new sound cannot be recorded but the original sound can be recorded in high quality. Moreover, it can also play back sound recorded in 32 kHz, 44.1 kHz or 48 kHz. When playing back a tape recorded in the 16-bit mode, 16BIT indicator appears on the LCD screen or in the viewfinder.
When you play back a dual sound track tape
When you play back a dual sound track tape recorded in a stereo system, set “HiFi SOUND” to the desired mode in the menu settings (p. 116).
Sound from speaker
| HiFi Sound Mode | Playing back a stereo tape | Playing back a dual sound track tape |
| STEREO | Stereo | Main sound and sub sound |
| 1 | Left sound | Main sound |
| 2 | Right sound | Sub sound |
You cannot record dual sound programmes on your camcorder.
При воспроизведении
Be sure to affix a label only on the locations as illustrated below [a] so as not to cause malfunction of your camcorder.
Rewind the tape to the beginning, put the cassette in its case, and store it in an upright position.
When the cassette memory function does not work
Reinsert a cassette. The gold-plated connector of mini DV cassettes may be dirty or dusty.
Cleaning gold-plated connector
If the gold-plated connector of mini DV cassettes is dirty or dusty, you may not operate the function using cassette memory. Clean up the gold-plated connector with cotton-wool swab, about every 10 times ejection of a cassette. [b]
The DV jack on this unit is an i.LINK-compliant DV input/output jack. This section describes the i.LINK standard and its features.
What is i.LINK?
i.LINK is a digital serial interface for handling digital video, digital audio and other data in two directions between equipment having the i.LINK jack, and for controlling other equipment. i.LINK-compatible equipment can be connected by a single i.LINK cable. Possible applications are operations and data transactions with various digital AV equipment. When two or more i.LINK-compatible equipment are connected to this unit in a daisy chain, operations and data transactions are possible with not only the equipment that this unit is connected to but also with other devices via the directly connected equipment.
Note, however, that the method of operation sometimes varies according to the characteristics and specifications of the equipment to be connected, and that operations and data transactions are sometimes not possible on some connected equipment.
Note
Normally, only one piece of equipment can be connected to this unit by the i.LINK cable (DV cable). When connecting this unit to i.LINK-compatible equipment having two or more i.LINK jacks (DV jacks), refer to the instruction manual of the equipment to be connected.
About the Name "i.LINK"
i.LINK is a more familiar term for IEEE 1394 data transport bus proposed by SONY, and is a trademark approved by many corporations. IEEE 1394 is an international standard standardized by the Institute of Electrical and Electronic Engineers.
О кабеле i.LINK
i.LINK's maximum baud rate varies according to the equipment. Three maximum baud rates are defined:
S100 (approx. 100Mbps*)
S200 (approx. 200Mbps)
S400 (approx. 400Mbps)
The baud rate is listed under “Specifications” in the instruction manual of each equipment. It is also indicated near the i.LINK jack on some equipment.
The maximum baud rate of equipment on which it is not indicated such as this unit is “S100”.
When units are connected to equipment having a different maximum baud rate, the baud rate sometimes differs from the indicated baud rate.
*What is Mbps?
Mbps stands for megabits per second, or the amount of data that can be sent or received in one second. For example, a baud rate of 100Mbps means that 100 megabits of data can be sent in one second.
i.LINK functions on this unit
For details on how to dub when this unit is connected to other video equipment having DV jacks, see page 82, 99.
This unit can also be connected to other i.LINK (DV) compatible equipment made by SONY (e.g. VAIO series personal computer) other than video equipment.
Before connecting this unit to a personal computer, make sure that application software supported by this unit is already installed on the personal computer.
For details on precautions when connecting this unit, also refer to the instruction manuals for the equipment to be connected.
Required i.LINK Cable
Use the Sony i.LINK 4-pin-to-4-pin cable (during DV dubbing).
i.LINK and i are trademarks.
If you run into any problem using your camcorder, use the following table to troubleshoot the problem. If the problem persists, disconnect the power source and contact your Sony dealer or local authorized Sony service facility. If “C:□□:□□” appears on the LCD screen or in the viewfinder, the self-diagnosis display function has worked. See page 182.
In the recording mode
| Symptom | Cause and/or Corrective Actions |
| START/STOP does not operate. | The POWER switch is not set to CAMERA. Set it to CAMERA. (p. 21)The tape has run out. Rewind the tape or insert a new one. (p. 20, 39)The write-protect tab is set to expose the red mark. Use a new tape or slide the tab. (p. 20)The tape is stuck to the drum (moisture condensation). Remove the cassette and leave your camcorder for at least one hour to acclimatize. (p. 195) |
| The power goes off. | While being operated in CAMERA mode, your camcorder has been in the standby mode for more than five minutes. Set the POWER switch to OFF (CHG) and then to CAMERA again. (p. 22) |
| The image on the viewfinder screen is not clear. | The viewfinder lens is not adjusted. Adjust the viewfinder lens. (p. 25) |
| The SteadyShot function does not work. | STEADYSHOT is set to OFF in the menu settings. Set it to ON. (p. 116) |
| The autofocusing function does not work. | FOCUS is set to MAN. Set it to AUTO. (p. 65)Shooting conditions are not suitable for autofocus. Adjust to focus manually. (p. 65) |
| The fader function does not work. | The digital effect function is working. Cancel it. (p. 60) |
| The picture does not appear in the viewfinder. | The LCD panel is open. Close the LCD panel. (p. 23) |
| A vertical band appears when you shoot a subject such as lights or a candle flame against a dark background. | The contrast between the subject and background is too high.Your camcorder is not a malfunction. |
| A vertical band appears when you shoot a very bright subject. | Your camcorder is not a malfunction. |
| Some tiny white spots appear on the LCD screen or in the viewfinder. | Slow shutter, low lux or Super NightShot mode is activated.This is not a malfunction. |
| An unknown picture is displayed on the LCD screen or in the viewfinder. | If 10 minutes elapse after you set the POWER switch to CAMERA or DEMO MODE is set to ON in the menu settings without a cassette inserted, your camcorder automatically starts the demonstration. Insert a cassette and the demonstration stops.You can also cancel DEMO MODE. (p. 121) |
| The picture is recorded in incorrect or unnatural colours. | • NIGHTSHOT is set to ON.→ Set it to OFF. (p. 31) |
| Picture appears too bright, and the subject does not appear on the LCD screen or in the viewfinder. | • NIGHTSHOT is set to ON in a bright place.→ Set it to OFF, or use the NightShot function in a dark place. (p. 31) |
| The click of the shutter does not sound. | • BEEP is set to OFF in the menu settings.→ Set it to MELODY or NORMAL. (p. 116) |
| Black bands appear when you record TV or computer screen. | → Set the STEADYSHOT in the menu settings to OFF. (p. 116) |
In the playback mode
| Symptom | Cause and/or Corrective Actions |
| The tape does not move when a video control button is pressed. | The POWER switch is not set to VCR.→ Set it to VCR. (p. 36) |
| The playback button does not work. | The tape has run out.→ Rewind the tape. (p. 39) |
| The playback picture is not clear or does not appear. | The television's video channel is not adjusted correctly.→ Adjust it. (p. 41) |
| There are horizontal lines on the picture or the playback picture is not clear or does not appear. | The video head may be dirty.→ Clean the heads using the cleaning cassette (not supplied). (p. 196) |
| No sound or only a low sound is heard when playing back a tape. | The volume is turned to minimum.→ Turn up the volume. (p. 36)AUDIO MIX is set to ST2 in the menu settings.→ Adjust AUDIO MIX. (p. 116) |
| Displaying the recorded date, date search function does not work. | The tape has no cassette memory.→ Use a tape with cassette memory. (p. 75, 171)CM SEARCH is set to OFF in the menu settings.→ Set it to ON. (p. 116)The tape has a blank portion in the recorded portion. (p. 76) |
| The title search function does not work. | The tape has no cassette memory.→ Use a tape with cassette memory. (p. 73, 171)CM SEARCH is set to OFF in the menu settings.→ Set it to ON. (p. 116)There is no title in the tape.→ Superimpose the titles. (p. 108)The tape has a blank portion in the recorded portion. (p. 74) |
| The new sound added to the recorded tape is not heard. | AUDIO MIX is set to ST1 side in the menu settings.→ Adjust AUDIO MIX. (p. 116) |
| The title is not displayed. | TITLE DSPL is set to OFF in the menu settings.→ Set it to ON. (p. 116) |
In the recording and playback modes
| Symptom | Cause and/or Corrective Actions |
| The power does not turn on. | The battery pack is not installed, or is dead or nearly dead.→ Install a charged battery pack. (p. 13, 14)The AC power adaptor is not connected to the mains.→ Connect the AC power adaptor to the mains. (p. 19) |
| The end search function does not work. | The tape was ejected after recording when using a tape without cassette memory. (p. 34, 40)You have not recorded on the new cassette yet. (p. 34, 40) |
| The end search function does not work correctly. | The tape has a blank portion in the beginning or middle. |
| The battery pack is quickly discharged. | The operating temperature is too low.The battery pack is not fully charged.→ Charge the battery pack again. (p. 14)The battery pack is completely dead, and cannot be recharged.→ Replace with a new battery pack. (p. 13) |
| The battery remaining indicator does not indicate the correct time. | You have used the battey pack in an extremely hot or cold environment for a long time.The battery pack is completely dead, and cannot be recharged.→ Replace with a new battery pack. (p. 13)The battery is dead.→ Use a charged battery pack. (p. 13, 14) |
| The power goes off although the battery remaining indicator indicates that the battery pack has enough power to operate. | → Charge the battery pack fully again so that the indication on the battery remaining indicator is correct. |
| The cassette cannot be removed from the holder. | The power source is disconnected.→ Connect it firmly. (p. 13, 19)The battery is dead.→ Use a charged battery pack. (p. 13, 14) |
| The □ and ▲ indicators flash and no functions except for cassette ejection work. | Moisture condensation has occurred.→ Remove the cassette and leave your camcorder for at least one hour to acclimatize. (p. 195) |
| CIII indicator does not appear when using a tape with cassette memory. | The gold-plated connector of the tape is dirty or dusty.→ Clean the gold-plated connector. (p. 173) |
| Remaining tape indicator is not displayed. | The REMAIN is set to AUTO in the menu settings.→ Set it to ON to always display the remaining tape indicator. (p. 116) |
When operating using the "Memory Stick"
- DCR-TRV11E/TRV20E only
| Symptom | Cause and/or Corrective Actions |
| The “Memory Stick” does not function. | The POWER switch is not set to MEMORY. Set it to MEMORY. (p. 138) |
| Recording does not function. | The “Memory Stick” has already been recorded to its full capacity. Erase unnecessary images and record again. (p. 166)The “Memory Stick” is not inserted. Insert a “Memory Stick”. (p. 133)The “Memory Stick” formatted incorrectly is inserted. Format the “Memory Stick” or use another “Memory Stick.” (p. 119)The write-protect tab on the “Memory Stick” is set to LOCK. Set the tab to write. (p. 131) |
| The image cannot be deleted. | The image is protected. Cancel image protection. (p. 164)The write-protect tab on the “Memory Stick” is set to LOCK. Set the tab to write. (p. 131) |
| You cannot format the “Memory Stick”. | The write-protect tab on the “Memory Stick” is set to LOCK. Set the tab to write. (p. 131) |
| Deleting all the images cannot be carried out. | The write-protect tab on the “Memory Stick” is set to LOCK. Set the tab to write. (p. 131) |
| You cannot protect the image. | The write-protect tab on the “Memory Stick” is set to LOCK. Set the tab to write. (p. 131)The image to protect is not be played back. Press MEMORY PLAY to play back the image. (p. 154) |
| You cannot write a print mark on the still image. | The write-protect tab on the “Memory Stick” is set to LOCK. Set the tab to write. (p. 131)The image to write a print mark is not be played back. Press MEMORY PLAY to play back the image. (p. 154) |
| The photo save function does not work. | The write-protect tab on the “Memory Stick” is set to LOCK. Set the tab to write. (p. 131)The battery pack is dead. Install a charged battery pack or use the AC power adaptor |
Others
| Symptom | Cause and/or Corrective Actions |
| The title is not recorded. | The tape has no cassette memory.→ Use a tape with cassette memory. (p. 108, 171)The cassette memory is full.→ Erase another title. (p. 111)The tape is set to prevent accidental erasure.→ Slide the write-protect tab so that red portion is not visible. (p. 20)Nothing is recorded in that position on the tape.→ Superimpose the title to the recorded position. (p. 108) |
| The cassette label is not recorded. | The tape has no cassette memory.→ Use a tape with cassette memory. (p. 114, 171)The cassette memory is full.→ Erase some titles. (p. 115)The tape is set to prevent accidental erasure.→ Slide the write-protect tab so that red portion is not visible. (p. 20) |
| While editing using the i.LINK cable (DV connecting cable), recording picture cannot be monitored. | Remove the i.LINK cable (DV connecting cable), and connect it again. |
| Digital program editing does not function. | The input selector on the VCR is not set correctly.→ Check the connection and set the input selector on the VCR again. (p. 84)The camcorder is connected to DV equipment of other than Sony.→ Set it to IR. (p. 85)Setting programme on a blank portion of the tape is attempted.→ Set the PROGRAM again on a recorded portion. (p. 93)The camcorder and the VCR are not synchronized.→ Adjust the synchronicity. (p. 90) |
| The Remote Commander supplied with your camcorder does not work. | COMMANDER is set to OFF in the menu settings.→ Set it to ON. (p. 116)Something is blocking the infrared rays.→ Remove the obstacle.The batteries are inserted in the battery holder with the + - polarities incorrectly matching the + - marks.→ Insert the batteries with the correct polarity. (p. 213)The batteries are dead.→ Insert new ones. (p. 213) |
| The picture from a TV or VCR does not appear even when your camcorder is connected to output on the TV or VCR. | Display is set to V-OUT/LCD in the menu settings.→ Set it to LCD. (p. 116) |
| You cannot charge the battery pack. | The POWER switch is not set to OFF (CHG).→ Set it to OFF (CHG). |
| The melody or beep sounds for 5 seconds. | Moisture condensation has occurred.Remove the cassette and leave your camcorder for at least 1 hour to acclimatize. (p. 195)Some troubles has occurred in your camcorder.Remove the cassette and insert it again, then operate your camcorder. |
| While charging the battery pack, no indicator appears or the indicator flashes in the display window. | The AC power adaptor is disconnected bi Connect it firmly. (p. 19)The battery pack is not properly installed.Install it properly.Something is wrong with the battery pack.Contact your Sony dealer or local authorized Sony service facility. |
| No function works though the power is on. | Disconnect the mains lead of the AC power adaptor or remove the battery, then reconnect it in about one minute. Turn the power on. If the functions still do not work, open the LCD panel and press the RESET button beside the SELFTIMER button using a sharp-pointed object. (If you press the RESET button, all the settings including the date and time return to the default.) (p. 207) |
| When you set the POWER switch to VCR or OFF (CHG), if you move your camcorder, you may hear a clatter sound from inside your camcorder. | Your camcorder is not a malfunction. |
Self-diagnosis display
Your camcorder has a self-diagnosis display function.
This function displays the current condition of your camcorder as a 5-digit code (a combination of a letter and figures) in the viewfinder, on the LCD screen or in the display window. If a 5-digit code is displayed, check the following code chart. The last two digits (indicated by □□) will differ depending on the state of your camcorder.
LCD screen (or Viewfinder)
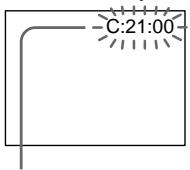
text_image
-C:21:00Self-diagnosis display
• C: □□: □□
You can service your camcorder yourself.
• E: □□: □□
Contact your Sony dealer or local authorized Sony facility.
| Five-digit display | Cause and/or Corrective Actions |
| C:04:□□ | You are using a battery pack that is not an “InfoLITHIUM” battery pack.→ Use an “InfoLITHIUM” battery pack. (p. 14) |
| C:21:□□ | Moisture condensation has occurred.Remove the cassette and leave your camcorder for at least one hour to acclimatize. (p. 195) |
| C:22:□□ | The video heads are dirty.→ Clean the heads using the cleaning cassette (not supplied). (p. 196) |
| C:31:□□ | A malfunction other than the above that you can service has occurred.→ Remove the cassette and insert it again, then operate your camcorder.→ Disconnect the mains lead of the AC power adaptor or remove the battery pack. After reconnecting the power source, operate your camcorder. |
| E:61:□□ | A malfunction that you cannot service has occurred.→ Contact your Sony dealer or local authorized Sony service facility and inform them of the 5-digit code.(example: E:61:10) |
| E:62:□□ |
If you are unable to rectify the problem even if you try corrective actions a few times, contact your Sony dealer or local authorized Sony service facility.
Warning indicators and messages
If indicators and messages appear in the viewfinder, on the LCD screen or in the display window, check the following:
See the page in parentheses “( )” for more information.
The indicators and messages are displayed in yellow.
Warning indicators
The video heads are dirty
Slow flashing:
- You need to clean the heads using the Sony DVM-12CLD cleaning cassette (not supplied) (p. 196).
The battery is dead or nearly dead
Slow flashing:
- The battery is nearly dead. Depending on conditions, the 📄 indicator may flash, even if there are five to 10 minutes remaining.
Fast flashing:
• The battery is dead (p. 14).
Warning indicator as to tape Slow flashing:
• The tape is near the end.
- No tape is inserted (p. 20).*
- The write-protect tab on the cassette is out (red) (p. 20).*
Fast flashing:
• The tape has run out (p. 20, 39).*
You need to eject the cassette
Slow flashing:
- The write-protect tab on the cassette is out (red) (p. 20).*
Fast flashing:
- Moisture condensation has occurred (p. 195).*
• The tape has run out (p. 20, 36).*
- The self-diagnosis display function is activated (p. 182).*
The still image is protected (DCR-TRV11E/TRV20E only)
Slow flashing:
- The still image is protected (p. 164).*
Moisture condensation has occurred\* Fast flashing:
- Eject the cassette, turn off your camcorder, and leave it for about 1 hour with the cassette compartment open (p. 195).
Warning indicator as to cassette memory Slow flashing:
- No tape with cassette memory is inserted (p. 171).*
Self-diagnosis display (p. 182).
Warning indicator as to "Memory Stick" (DCR-TRV11E/TRV20E only) Slow flashing:
- No “Memory Stick” is inserted (p. 133).*
Fast flashing:
- The “Memory Stick” is not readable with your camcorder (p. 131).*
Warning indicator as to "Memory Stick" (DCR-TRV11E/TRV20E only) Fast flashing:
- “Memory Stick” is not formatted correctly (p. 119).
- The “Memory Stick” data is corrupted.*
- Different size of “Memory Stick” is inserted.
Warning indicator as to file Slow flashing:
• The file is corrupted.
• The file is unreadable.
Warning messages
| • CLOCK SET | Reset the date and time (p. 129). |
| • FOR “InfoLITHIUM” BATTERY ONLY | Use an “InfoLITHIUM” battery pack (p. 14). |
| • CLEANING CASSETTEThe video heads are dirty (p. 196). | |
| • FULL | The tape cassette memory is full. |
| • 16BIT | AUDIO MODE is set to 16BIT (p. 116).* You cannot dub new sound. |
| • REC MODE | REC MODE is set to LP (p. 116).* You cannot dub new sound. |
| • TAPE | There is no recorded portion on the tape. You cannot dub new sound. |
| • “i.LINK” CABLE | i.LINK cable is connected (p. 107).* You cannot dub new sound. |
| • FULL | The “Memory Stick“ is full.* (DCR-TRV11E/TRV20E only) |
| • ○— | The write-protect tab on the “Memory Stick“ is set to LOCK (p. 131).* (DCR-TRV11E/TRV20E only) |
| • NO FILE | No still image is recorded on the “Memory Stick“ (p. 155).* (DCR-TRV11E/TRV20E only) |
| • NO MEMORY STICKNo “Memory Stick“ is inserted (p. 133). (DCR-TRV11E/TRV20E only) | |
| • MEMORY STICK ERRORThe “Memory Stick“ data is corrupted.(DCR-TRV11E/TRV20E only) | |
| • FORMAT ERROR | The “Memory Stick” is not recognized. Check the format (p. 132). (DCR-TRV11E/TRV20E only) |
| • DIRECTORY ERRORThere is more than two same directories. | |
| • COPY INHIBIT | The tape contains copyright control signals for copyright protection of software (p. 172).* |
| • TAPE END | The tape has reached the end of the tape (p.40).* |
| • NO TAPE | Insert a cassette tape (p. 20).* |
* You hear the melody or beep sound.
Using your camcorder abroad
Using your camcorder abroad
You can use your camcorder in any country or area with the AC power adaptor supplied with your camcorder within 100 V to 240 V AC, 50/60 Hz.
Your camcorder is a PAL system based camcorder. If you want to view the playback picture on a TV, it must be a PAL system based TV with AUDIO/VIDEO input jack.
The following shows TV colour systems used overseas.
PAL system
Australia, Austria, Belgium, China, Czech Republic, Denmark, Finland, Germany, Great Britain, Holland, Hong Kong, Italy, Kuwait, Malaysia, New Zealand, Norway, Portugal, Singapore, Slovak Republic, Spain, Sweden, Switzerland, Thailand, etc.
PAL-M system
Brazil
PAL-N system
Argentina, Paraguay, Uruguay
NTSC system
Bahama Islands, Bolivia, Canada, Central America, Chile, Colombia, Ecuador, Jamaica, Japan, Korea, Mexico, Peru, Surinam, Taiwan, the Philippines, the U.S.A., Venezuela, etc.
SECAM system
Bulgaria, France, Guyana, Hungary, Iran, Iraq, Monaco, Poland, Russia, Ukraine, etc.
Simple setting of clock by time difference
You can easily set the clock to the local time by setting a time difference. Select WORLD TIME in the menu settings. See page 122 for more information.
Maintenance information and precautions
Moisture condensation
If your camcorder is brought directly from a cold place to a warm place, moisture may condense inside your camcorder, on the surface of the tape, or on the lens. In this condition, the tape may stick to the head drum and be damaged or your camcorder may not operate correctly. If there is moisture inside your camcorder, the beep sounds and the ▶ indicator flashes. When the ▲ indicator flashes at the same time, the cassette is inserted in your camcorder. If moisture condenses on the lens, the indicator will not appear.
If moisture condensation occurred
None of the functions except cassette ejection will work. Eject the cassette, turn off your camcorder, and leave it for about one hour with the cassette compartment open. Your camcorder can be used again if the ⏻ indicator does not appear when the power is turned on again.
Note on moisture condensation
Moisture may condense when you bring your camcorder from a cold place into a warm place (or vice versa) or when you use your camcorder in a hot place as follows:
- You bring your camcorder from a ski slope into a place warmed up by a heating device
- You bring your camcorder from an air-conditioned car or room into a hot place outside
- You use your camcorder after a squall or a shower
- You use your camcorder in a high temperature and humidity place
How to prevent moisture condensation
When you bring your camcorder from a cold place into a warm place, put your camcorder in a plastic bag and tightly seal it. Remove the bag when the air temperature inside the plastic bag has reached the surrounding temperature (after about one hour).
Cleaning the video head
To ensure normal recording and clear pictures, clean the video heads. The video head may be dirty when:
- mosaic-pattern noise appears on the playback picture.
- playback pictures do not move.
- playback pictures do not appear.
- the ✕ indicator and “♣ CLEANING
CASSETTE" message appear one after another or the ✕ indicator flashes on the LCD screen or in the viewfinder.
If the above problem, [a] or [b] occurs, clean the video heads for 10 seconds with the Sony DVM-12CLD cleaning cassette (not supplied). Check the picture and if the above problem persists, repeat cleaning.
Cleaning the LCD screen
If fingerprints or dust make the LCD screen dirty, we recommend using a LCD Cleaning Kit (not supplied) to clean the LCD screen.
Charging the vanadium-lithium battery in your camcorder
Your camcorder is supplied with a vanadium-lithium battery installed so as to retain the date and time, etc., regardless of the setting of the POWER switch. The vanadium-lithium battery is always charged as long as you are using your camcorder. The battery, however, will get discharged gradually if you do not use your camcorder. It will be completely discharged in about four months if you do not use your camcorder at all. Even if the vanadium-lithium battery is not charged, it will not affect the camcorder operation. To retain the date and time, etc., charge the battery if the battery is discharged.
Charging the vanadium-lithium battery:
- Connect your camcorder to house current using the AC power adaptor supplied with your camcorder, and leave your camcorder with the POWER switch turned off for more than 24 hours.
- Or install the fully charged battery pack in your camcorder, and leave your camcorder with the POWER switch turned off for more than 24 hours.
Чистка экрана ЖКД
- Operate your camcorder on 7.2 V (battery pack) or 8.4 V (AC power adaptor).
- For DC or AC operation, use the accessories recommended in this operating instructions.
- If any solid object or liquid get inside the casing, unplug your camcorder and have it checked by a Sony dealer before operating it any further.
- Avoid rough handling or mechanical shock. Be particularly careful of the lens.
- Keep the POWER switch set to OFF (CHG) when you are not using your camcorder.
- Do not wrap your camcorder with a towel, for example, and operate it. Doing so might cause heat to build up inside.
- Keep your camcorder away from strong magnetic fields or mechanical vibration.
- Do not touch the LCD screen with your fingers or a sharp-pointed object.
- If your camcorder is used in a cold place, a residual image may appear on the LCD screen. This is not a malfunction.
- While using your camcorder, the back of the LCD screen may heat up. This is not a malfunction.
On handling tapes
- Do not insert anything into the small holes on the rear of the cassette. These holes are used to sense the type and thickness of the tape and if the recording tab is in or out.
- Do not open the tape protect cover or touch the tape.
- Avoid touching or damaging the terminals. To remove dust, clean the terminals with a soft cloth.
Camcorder care
- Remove the tape, and periodically turn on the power, operate the CAMERA and VCR sections and play back a tape for about three minutes when your camcorder is not to be used for a long time.
- Clean the lens with a soft brush to remove dust. If there are fingerprints on the lens, remove them with a soft cloth.
- Clean the camcorder body with a dry soft cloth, or a soft cloth lightly moistened with a mild detergent solution. Do not use any type of solvent which may damage the finish.
- Do not let sand get into your camcorder. When you use your camcorder on a sandy beach or in a dusty place, protect it from the sand or dust. Sand or dust may cause your camcorder to malfunction, and sometimes this malfunction cannot be repaired.
Maintenance information and precautions
AC power adaptor
- Unplug the unit from the mains when you are not using the unit for a long time. To disconnect the mains lead, pull it out by the plug. Never pull the mains lead itself.
- Do not operate the unit with a damaged cord or if the unit has been dropped or damaged.
- Do not bend the mains lead forcibly, or place a heavy object on it. This will damage the cord and may cause fire or electrical shock.
- Prevent metallic objects from coming into contact with the metal parts of the connecting section. If this happens, a short may occur and the unit may be damaged.
- Always keep metal contacts clean.
- Do not disassemble the unit.
- Do not apply mechanical shock or drop the unit.
- While the unit is in use, particularly during charging, keep it away from AM receivers and video equipment. AM receivers and video equipment disturb AM reception and video operation.
- The unit becomes warm during use. This is not a malfunction.
- Do not place the unit in locations that are:
- Extremely hot or cold
- Dusty or dirty
- Very humid
- Vibrating
Battery pack
- Use only the specified charger or video equipment with the charging function.
- To prevent accident from a short circuit, do not allow metal objects to come into contact with the battery terminals.
- Keep the battery pack away from fire.
- Never expose the battery pack to temperatures above 60^ (140°F), such as in a car parked in the sun or under direct sunlight.
- Keep the battery pack dry.
- Do not expose the battery pack to any mechanical shock.
- Do not disassemble nor modify the battery pack.
- Attach the battery pack to the video equipment securely.
- The battery pack is not resistant to water. Do not wet the battery pack.
- Unless you use the battery pack for a long period, store the battery pack after you charge it fully and use it completely once a year.
- Store the battery pack in a cool, dry place.
Maintenance information and precautions
Notes on dry batteries
To avoid possible damage from battery leakage or corrosion, observe the following:
- Be sure to insert the batteries with the + - polarities matched to the + - marks.
- Dry batteries are not rechargeable.
- Do not use a combination of new and old batteries.
- Do not use different types of batteries.
- Current flows from batteries when you are not using them for a long time.
- Do not use leaking batteries.
If batteries are leaking
- Wipe off the liquid in the battery compartment carefully before replacing the batteries.
- If you touch the liquid, wash it off with water.
- If the liquid get into your eyes, wash your eyes with a lot of water and then consult a doctor.
If any problem occurs, unplug your camcorder and contact your nearest Sony dealer.
Video camera recorder
System
Video recording system
2 rotary heads
Helical scanning system
Audio recording system
Rotary heads, PCM system
Quantization: 12 bits (Fs 32 kHz,
stereo 1, stereo 2), 16 bits
(Fs 48 kHz, stereo)
Video signal
PAL colour, CCIR standards
Usable cassette
Mini DV cassette with the MiniDV
mark printed
Tape speed
SP: Approx. 18.81 mm/s
LP: Approx. 12.56 mm/s
Recording/playback time (using cassette DVM60)
SP: 1 hour
LP: 1.5 hours
Fastforward/rewind time (using cassette DVM60)
Approx. 2 min. and 30 seconds
Viewfinder
Electric viewfinder (colour)
Image device
1/4 type CCD (Charge Coupled
Device)
DCR-TRV6E/TRV11E:
Approx. 800,000 pixels
(Effective: Approx. 400,000 pixels)
DCR-TRV20E:
Approx. 1,070,000 pixels
(Effective (still): 1,000,000 pixels)
(Effective (moving): 690,000 pixels)
Lens
Carl Zeiss
Combined power zoom lens
Filter diameter
DCR-TRV6E/TRV11E: 30 mm
(1 3/16 in.)
DCR-TRV20E: 37 mm (1 1/2 in.)
10× (Optical), 120× (Digital)
Focal length
DCR-TRV6E/TRV11E:
3.3 - 33 mm (5/32 - 1 5/16 in.)
DCR-TRV20E:
4.2 - 42 mm (3/16 - 1 11/16 in.)
When converted to a 35 mm still camera
DCR-TRV6E/TRV11E:
Camera/Memory mode:
42 - 420 mm (1 11/16 - 16 5/8 in.)
DCR-TRV20E:
Camera mode:
48 - 480 mm (1 15/16 - 19 in.)
Memory mode:
40 - 400 mm (1 5/8 - 15 3/4 in.)
Colour temperature
Auto, HOLD (Hold), 🌐Indoor
(3200K), ⚙ Outdoor (5800K)
Minimum illumination
DCR-TRV6E/TRV11E: 5 lux (F 1.7)
DCR-TRV20E: 7 lux (F 1.8)
0 lux (in the NightShot mode)*
* Objects unable to be seen due to the dark can be shot with infrared lighting.
Input/Output connectors
S video input/output
4-pin mini DIN
Luminance signal: 1 Vp-p, 75 ohms, unbalanced
Chrominance signal: 0.3 Vp-p,
75 ohms, unbalanced
Audio/Video input/output
AV MINI JACK, 1 Vp-p, 75 ohms,
unbalanced, sync negative
327 mV, (at output impedance
more than 47 kilohms)
Output impedance with less than
2.2 kilohms/Stereo minijack
(ø 3.5mm)
Input impedance more than 47
kilohms
DV input/output
4-pin connector
Headphone jack
Stereo minijack (ø 3.5 mm)
(LANC) jack (DCR-TRV6E)
DIGITAL I/O/ (LANC) jack (DCR-TRV11E/TRV20E)
Special Mini-minijack (ø 2.5 mm)
MIC jack
Minijack, 0.388 mV low impedance with 2.5 to 3.0 V DC, output
impedance 6.8 kilohms (ø 3.5 mm)
Stereo type
LCD screen
Picture
DCR-TRV6E:
2.5 type
50.3× 37.4mm(2× 11 / 2in.)
DCR-TRV11E/TRV20E:
3.5 type
72.4× 50.4mm (27 / 8× 2 in.)
Total dot number
DCR-TRV6E: 200,640 (880 × 228)
DCR-TRV11E: 184,800 (840 × 220)
DCR-TRV20E: 246,400 (1120 × 220)
General
Power requirements
7.2 V (battery pack)
8.4 V (AC power adaptor)
Average power consumption
(when using the battery pack)
During camera recording using LCD
DCR-TRV6E: 3.4 W
DCR-TRV11E: 3.5 W
DCR-TRV20E: 4.4 W
Viewfinder
DCR-TRV6E: 2.5 W
DCR-TRV11E: 2.6 W
DCR-TRV20E: 3.6 W
Operating temperature
0^ to 40^ (32 °F to 104 °F)
Storage temperature
-20^ to +60^ (-4^ to +140^)
Dimensions (Approx.)
DCR-TRV6E/TRV11E:
71× 93× 163mm
(2 7/8 × 3 3/4 × 6 1/2 in.) (w/h/d)
DCR-TRV20E:
71× 93× 170mm
(2 7/8 × 3 3/4 × 6 3/4 in.) (w/h/d)
Mass (approx.)
DCR-TRV6E: 580 g (1 lb 4 oz)
DCR-TRV11E: 620 g (1 lb 5 oz)
DCR-TRV20E: 680 g (1 lb 7 oz)
main unit only
DCR-TRV6E: 680 g (1 lb 7 oz)
DCR-TRV11E: 720 g (1 lb 9 oz)
DCR-TRV20E: 780 g (1lb 11 oz)
including the battery pack,
NP-FM50, cassette DVM60, lens cap and shoulder strap
Supplied accessories
See page 5.
AC power adaptor
Power requirements
100 - 240 V AC, 50/60 Hz
Power consumption
23 W
Output voltage
DC OUT: 8.4 V, 1.5 A in the
operating mode
Operating temperature
0^ to 40^ (32°F to 104°F)
Storage temperature
-20^ to +60^ (-4^ to +140^)
Dimensions (approx.)
125 × 39 × 62 ~mm
(5× 19 / 16× 21 / 2 in.) (w / h / d)
excluding projecting parts
Mass (approx.)
280 g (9.8 oz)
excluding mains lead
Cord length (approx.)
Mains lead: 2 m (6.6 feet)
Connecting cord: 1.6 m (5.2 feet)
"Memory Stick" (DCR-TRV11E/TRV20E only)
Memory
Flash memory
4MB: MSA-4A
Operating voltage
2.7-3.6V
Power consumption
Approx. 45mA in the operating
mode
Approx. 130μA in the standby
mode
Dimensions (approx.)
50 × 2.8 × 21.5 ~mm
(2 × 1/8 × 7/8 in.) (w/h/d)
Mass (approx.)
4 g (0.14 oz)
Design and specifications are
subject to change without notice.
Battery pack
Output voltage
DC 7.2 V
Capacity
8.5 Wh (1180m Ah)
Dimensions (approx.)
38.2 × 20.5 × 55.6 ~mm
(1 9/16 × 13/16 × 2 1/4 in.)
(w/h/d)
Mass (approx.)
76 g (2.7 oz)
Type
Lithium ion
DCR-TRV6E: 200,640 (880 × 228)
DCR-TRV11E: 184,800 (840 × 220)
DCR-TRV20E: 246,400 (1120 × 220)
Identifying the parts and controls
text_image
Labeled diagram of a digital camera with numbered parts for identification1 Viewfinder lens adjustment lever (p. 25)
② Display window (p. 214)
③ OPEN button (p. 21)
4 PROGRAM AE button (p. 61)
5 EXPOSURE button (p. 64)
⑥ SEL/PUSH EXEC dial (p. 49, 116)
This mark indicates that this product is a genuine accessory for Sony video products.
When purchasing Sony video products, Sony recommends that you purchase accessories with this "GENUINE VIDEO
ACCESSORIES" mark.

21 MEMORY PLAY button
(DCR-TRV11E/TRV20E only) (p. 154)
22 MEMORY +/- buttons
(DCR-TRV11E/TRV20E only) (p. 146, 154)
23 LCD screen (p. 23)
24 Speaker
25 MEMORY INDEX button (DCR-TRV11E/TRV20E only) (p. 156)
26 MEMORY DELETE button (DCR-TRV11E/TRV20E only) (p. 166)
27 MEMORY MIX button
(DCR-TRV11E/TRV20E only) (p.144)
37 PHOTO button (p. 45, 138)
38 BATT release button (p. 13)
39 Hooks for shoulder strap
40 Power zoom lever (p. 27)
41 NIGHTSHOT switch (p. 31)
42 SUPER NIGHTSHOT button (p. 31)
43 MEMORY RELEASE button (DCR-TRV11E/TRV20E only) (p. 133)
Attaching the shoulder strap
Attach the shoulder strap supplied with your camcorder to the hooks for the shoulder strap.
natural_image
Diagram of a rope knot with a loop, showing rope routing and clamping mechanism (no text or symbols)Identifying the parts and controls
44 Access lamp (DCR-TRV11E/TRV20E only) (p. 133)
45 MEMORY OPEN button
(DCR-TRV11E/TRV20E only) (p. 133)
46 LOCK switch (DCR-TRV11E/TRV20E only) (p. 21)
47 START/STOP button (p. 21)
48 POWER switch (p. 21)
49 Video control buttons (p. 36)
■ STOP (stop)
◀◀ REW (rewind)
▶ PLAY ( playback)
▶▶ FF (fastforward)
■ PAUSE (pause)
● REC (record)
The control buttons light up when you set the POWER switch to VCR.
50 Lens Cap (p. 21)
51 Grip strap
Fastening the grip strap
text_image
Diagram showing a hand holding a digital camera with numbered parts and directional arrows indicating motion or operation.Fasten the grip strap firmly.
52 AUDIO/VIDEO jack (p. 41, 80, 97)
53 Ⓞ (headphones) jack
When you use headphones, the speaker on your camcorder is silent.
54 OPEN/EJECT lever (p. 20)
55 Tripod receptacle
Make sure that the length of the tripod screw is less than 6.5 mm (9/32 inch). Otherwise, you cannot attach the tripod securely and the screw may damage your camcorder.
56 i. DV IN/OUT jack (p. 82, 96, 99)
This “i.LINK” mark is a trademark of Sony Corporation and indicates that this product is in agreement with IEEE 1394-1995 specifications and their revisions.
The i DV IN/OUT jack is i.LINK compatible.
57 DC IN jack (p. 14)
58 DIGITAL I/O/ (LANC) control jack (DCR-TRV11E/TRV20E only) (p. 157) (LANC) control jack (DCR-TRV6E only) LANC stands for Local Application Control Bus System. The control jack is used for controlling the tape transport of video equipment and other peripherals connected to the video equipment. This jack has the same function as the jack indicated as CONTROL L or REMOTE.
59 MIC jack (PLUG IN POWER)
Connect an external microphone (not supplied). This jack also accepts a “plug-in-power” microphone.
60 S VIDEO jack (p. 41, 80, 97)
Note on the Carl Zeiss lens
Your camcorder is equipped with a Carl Zeiss lens which can reproduce a fine image. The lens for your camcorder was developed jointly by Carl Zeiss, in Germany, and Sony Corporation. It adopts the MTF* measurement system for video camera and offers a quality as the Carl Zeiss lens.
* MTF is an abbreviation of Modulation Transfer Function/Factor. The value number indicates the amount of light of a subject penetrating into the lens.

Intelligent
Accessory Shoe
Notes on the intelligent accessory shoe
- The intelligent accessory shoe supplies power to optional accessories such as a video light or microphone.
- The intelligent accessory shoe is linked to the POWER switch, allowing you to turn the power supplied by the shoe on and off. Refer to the operating instructions of the accessory for further information.
- The intelligent accessory shoe has a safety device for fixing the installed accessory securely. To connect an accessory, press down and push it to the end, and then tighten the screw.
- To remove an accessory, loosen the screw, and then press down and pull out the accessory.
Intelligent Accessory Shoe
The buttons that have the same name on the Remote Commander as on your camcorder function identically to the buttons on your camcorder.
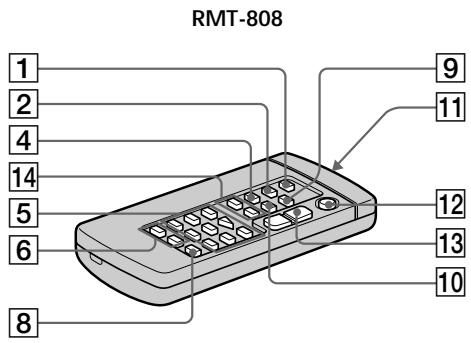
text_image
RMT-808 1 2 4 14 5 6 8 9 11 12 13 101 PHOTO button (p. 45, 138)
② DISPLAY button (p. 37)
③ Memory control buttons
PLAY/INDEX/ +/- button (p. 146, 154)
4 SEARCH MODE button (p. 73, 75, 77)
5 Video control buttons (p. 36)
6 REC button (p. 98, 100, 103)
7 MARK button (DCR-TRV11E/TRV20E only) (p. 93, 98, 100, 103)
8 AUDIO DUB button (p. 106)
9 ZERO SET MEMORY button (p. 72)
10 DATA CODE button (p. 37)
11 Transmitter
Point toward the remote sensor to control your camcorder after turning on your camcorder.
12 START/STOP button (p. 21)
13 Power zoom button (p. 27)
14 ◀◀◀ /▶▶▶ buttons (p. 73, 75, 77)
Identifying the parts and controls
To prepare the Remote Commander
Insert 2 R6 (Size AA) batteries by matching the + and - polarities on the batteries to the + - marks inside the battery compartment.
natural_image
Illustration of a handheld device with battery and switch, showing internal components (no text or symbols)Notes on the Remote Commander
- Point the remote sensor away from strong light sources such as direct sunlight or overhead lighting. Otherwise, the Remote Commander may not function properly.
- Your camcorder works in the commander mode VTR 2. Commander modes 1, 2 and 3 are used to distinguish your camcorder from other Sony VCRs to avoid remote control misoperation. If you use another Sony VCR in the Commander mode VTR 2, we recommend changing the commander mode or covering the sensor of the VCR with black paper.
Operation indicators
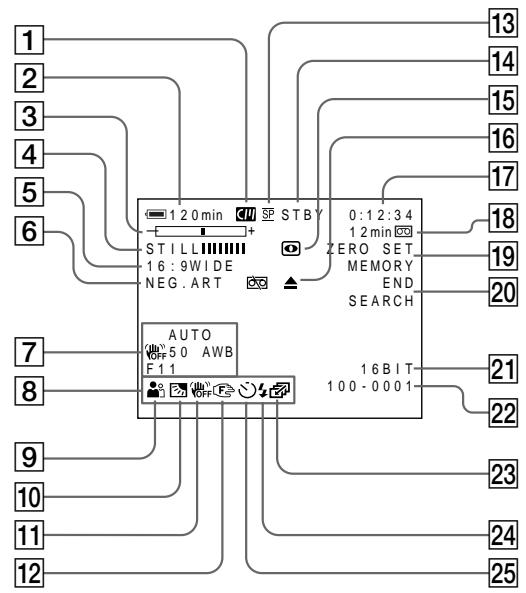
flowchart
graph TD
    A["1 20 min"] --> B["STBY"]
    B --> C["0:1:2:34"]
    C --> D["12 min"]
    D --> E["ZERO SET"]
    E --> F["MEMORY"]
    F --> G["END"]
    G --> H["SEARCH"]
    I["16:9WIDE"] --> J["NEG. ART"]
    K["AUTO"] --> L["F11"]
    M["16BIT"] --> N["100-0001"]
    O["13"] --> P["14"]
    Q["15"] --> R["16"]
    S["17"] --> T["18"]
    U["19"] --> V["20"]
    W["21"] --> X["22"]
    Y["23"] --> Z["24"]
    AA["24"] --> AB["25"]
Рабочие индикаторы
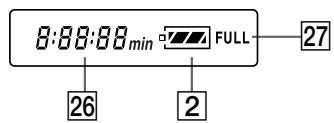
text_image
8:88:88 min FULL 27 26 21 Cassette memory indicator (p. 29, 171)
② Remaining battery time indicator (p. 29)
③ Zoom indicator (p. 27) /Exposure indicator (p. 64) /Data file name indicator (DCR-TRV11E/TRV20E only) (p. 131)
4 Digital effect indicator (p. 58) /MEMORY MIX indicator (DCR-TRV11E/TRV20E only) (p. 144)/FADER indicator (p. 53)
5 16:9WIDE indicator (p. 51)
6 Picture effect indicator (p. 56)
7 Data code indicator (p. 37)
⑧ LCD bright indicator (p. 24)/Volume indicator (p. 36)/Date indicator (p. 29)
9 PROGRAM AE indicator (p. 61)
10 Backlight indicator (p. 30)
11 SteadyShot off indicator (p. 117)
12 Manual focus/Infinity indicator (p. 65)
13 Recording mode indicator (p. 29)
14 STBY/REC indicator (p. 21)/Video control mode indicator (p. 36)/Image size indicator (DCR-TRV20E only) (p. 136)/Image quality mode indicator (DCR-TRV11E/TRV20E only)
(p. 134)
Identifying the parts and controls
15 NIGHTSHOT indicator (p. 31)
16 Warning indicators (p. 183)
17 Tape counter indicator (p. 72)/Time code indicator (p. 29)/Self-diagnosis indicator (p. 182)/Tape photo indicator (p. 45)/Memory photo indicator (DCR-TRV11E/TRV20E only) (P. 138)/Image number indicator (DCR-TRV11E/TRV20E only) (p. 155)
18 Remaining tape indicator (p. 29)/Memory playback indicator (DCR-TRV11E/TRV20E only) (p. 154)
19 ZERO SET MEMORY indicator (p. 72)
20 END SEARCH indicator (p. 34)
21 Audio mode indicator (p. 120)
22 Data file name indicator (DCR-TRV11E/TRV20E only)(p. 144) This indicator appears when the MEMORY MIX functions work./Time indicator (p. 29)
23 Continuous mode indicator (DCR-TRV11E/TRV20E only) (p. 140)
24 Video flash ready indicator
This indicator appears when you use the video flash light (not supplied).
25 Self-timer indicator (p. 33)
26 Remaining battery time indicator (p. 14)/Tape counter (p. 22)/Memory counter (DCR-TRV11E/TRV20E only)/Time code indicator (p. 29)
27 FULL charge indicator (p. 14)
Functions to adjust exposure (in the recording mode)
| • In a dark place | NIGHTSHOT (p. 31) |
| • In insufficient light | Low lux mode (p. 61) |
| • In dark environments such as sunset, fireworks, or general night views | Sunset & moon mode (p. 61) |
| • Shooting backlit subjects | BACK LIGHT (p. 30) |
| • In spotlight, such as at the theatre or a formal event | Spotlight mode (p. 61) |
| • In strong light or reflected light, such as at a beach in midsummer or on a ski slope | Beach & ski mode (p. 61) |
Functions to give images more impact (in the recording mode)
| • Smooth transition between scenes | FADER (p. 53) |
| • Taking a still picture | TAPE PHOTO (p. 45)/MEMORY PHOTO (DCR-TRV11E/TRV20E only) (p. 138) |
| • Digital processing of images | PICTURE EFFECT (p. 56)/DIGITAL EFFECT (p. 58) |
| • Creating a soft background for subjects | Soft portrait mode (p. 61) |
| • Superimposing a title | TITLE (p. 108) |
Functions to give a natural appearance to your recordings (in the recording mode)
| • Preventing deterioration of picture quality in digital zoom | D ZOOM [MENU] (p. 116) |
| • Focusing manually | Manual focus (p. 65) |
| • Shooting distant subjects | Landscape mode (p. 61) |
| • Recording fast-moving subjects | Sports lesson mode (p. 61) |
Functions to use in editing (in the recording mode)
| • Watching the picture on a wide-screen TV | Wide mode (p. 51) |
| • Viewing images using a personal computer (DCR-TRV11E/TRV20E only) | “Memory Stick” (p. 131) |
Functions to use after recording (in the playback mode)
| •Digital processing of recorded images | PICTURE EFFECT (p. 67)/DIGITAL EFFECT (p. 68) |
| •Displaying the date/time or various settings when you recorded | Data code (p. 37) |
| •Quickly locating a desired scene | Zero set memory (p. 72) |
| •Searching for scenes having a title | Title search (p. 73) |
| •Searching for scenes recorded in the photo mode | Photo search (p. 77) |
| •Scanning scenes recorded in the photo mode | Photo scan (p. 79) |
| •Playing back on monaural sound or sub sound | HiFi SOUND [MENU] (p. 116) |
| •Playing back the picture on a TV without connecting a cord | SUPER LASER LINK (p. 43) |
| •Enlarging still images | PB ZOOM (p. 70)/Memory PB ZOOM (DCR-TRV11E/TRV20E only) (p. 160) |
Camera chromakey 144
Cassette memory ...... 11, 171
Charging battery 14
Charging vanadium-lithium battery 196
Clock set 129
Connection
(viewing on TV) .... 41
(dubbing a tape) ..... 80, 97, 151
Continuous 140
Data code 37
Date search 75
DEMO 121
DIGITAL EFFECT 58, 68
DIGITAL I/O/ (LANC) ..... 157
Digital program editing .... 84
DISPLAY .... 37
Dual sound track tape ...... 172
Dubbing a tape 80
DV connecting cable .... 82, 99, 151
E
EDITSEARCH 34
END SEARCH 34, 40
Exposure 65
External microphone (not supplied) 210
F, G, H
FADER 53
Fade in/out 53
FLASH MOTION 58
FOCUS 65
Format 119
Full charge 14
Grip strap 209
Heads 195
Headphone jack 208
HiFi SOUND 118
I, J, K, L
i.LINK 174
Image protection 164
Image quality mode ...... 134
INDEX (Multiple) display ..... 140
"InfoLITHIUM" battery ...... 18
Infrared rays emitter ..... 31, 43, 48
Insert editing 101
Intelligent accessory shoe ..... 211
JPEG 131
Labelling a cassette .... 114
LANC 210
LCD screen 23
LUMINANCEKEY 58
M, N
Main sound 172
Manual focus 65
Memory chromakey ...... 144
Memory luminancekey ...... 144
Memory Stick 131
Menu settings ...... 116
Memory overlap 144
Memory PB ZOOM ...... 160
M.FADER 53
Mirror mode 23
Moisture condensation ..... 195
MONOTONE 53
Mosaic fader 53
NIGHTSHOT 31
Normal charge ...... 14
O, P, Q
OLD MOVIE 58
Operation indicators ...... 214
OVERLAP 53,114
PAL system 194
PB ZOOM 70
Photo scan 79
Photo search 77
Photo recording 45
PICTURE EFFECT ...... 56
Picture search 39
Playback pause 39
Power sources
(the mains) 19
(car battery) 19
(battery pack) 13
Power zoom 27
Print mark 169
PROGRAM AE 61
R
RANDOM DOT 53
Rec review 35
Recording time 16
Remaining battery time indicator 29
Remaining tape indicator ..... 29
Remote commander ...... 212
Remote control jack (LANC) 210
Remote sensor 203
RESET 180
S
S video jack 41, 48, 80
Self-diagnosis display ...... 182
Self-timer recording 33
SEL/PUSH EXEC dial ...... 116
Serial port adaptor 157
Shoulder strap 207
Signal convert function ...... 96
Skip scan 39
Slide show 162
Slow playback 39
SLOW SHUTTER 58
STEADYSHOT 117
Stereo tape 172
STILL 58
Sub sound 172
SUPER LASER LINK 43
SUPER NIGHTSHOT ...... 31
T, U, V
Tape counter 29,72
Telephoto 27
Time code 29
Title 108, 112
Title search 73
TRAIL 58
Transition 22
TV colour systems .... 194
W, X, Y, Z
Warning indicators .... 183
White balance 49
Wide-angle 27
Wide mode 51
WIPE 53
WORLD TIME......122
Write-protect tab 20
Zero set memory 72
Zoom 27