
DCR-TRV10E - Camcorder SONY - Free user manual and instructions
Find the device manual for free DCR-TRV10E SONY in PDF.

| Product type | Mini DV digital camcorder |
| Brand | Sony |
| Model | DCR-TRV10E |
| Power supply | InfoLITHIUM M series battery (NP-FM50) or AC adapter AC-L10A/L10B/L10C |
| Recording format | Mini DV, SP (standard) and LP (long play) modes |
| Lens | Carl Zeiss, 10x optical zoom, selectable digital zoom (D ZOOM) |
| LCD screen | Adjustable LCD screen (up to 90° toward viewfinder, 180° toward lens) |
| Viewfinder | Color electronic viewfinder, diopter adjustment |
| Special functions | NightShot, Backlight, Fader, Picture Effect, Digital Effect, Program AE, manual white balance, Anti Ground Shooting |
| Photo recording | Yes, up to approx. 510 photos in SP mode on a 60-minute tape |
| Memory Stick | Yes, enables recording and playback of photos (DCR-TRV10E model only) |
| Connectivity | Audio/video jack, S-Video, DV (i.LINK), headphone, external microphone |
| Included accessories | Remote control, AC adapter, NP-FM50 battery, AV cable, 21-pin adapter, wrist strap, lens cap, PC serial cable (DCR-TRV10E), Memory Stick (DCR-TRV10E) |
| Maintenance | Clean with a soft cloth, avoid moisture and condensation, do not expose to temperatures above 60°C |
| Safety | Do not expose to rain, do not open the casing, entrust repairs to qualified personnel |
| Repairability | Entrust to an authorized Sony service center for any repairs |
| Demo mode | Available (can be activated in the menu) |
| General | Manual in French downloadable as PDF on notice-facile.com |
Frequently Asked Questions - DCR-TRV10E SONY
User questions about DCR-TRV10E SONY
0 question about this device. Answer the ones you know or ask your own.
Ask a new question about this device
Download the instructions for your Camcorder in PDF format for free! Find your manual DCR-TRV10E - SONY and take your electronic device back in hand. On this page are published all the documents necessary for the use of your device. DCR-TRV10E by SONY.
USER MANUAL DCR-TRV10E SONY
Digital Video Camera Recorder Mini DV Cass
Operating Instructions
Before operating the unit, please read this manual thoroughly, and retain it for future reference.
HCTPYKUNI NO 3KCNLYATALIN
Ipeed 3Kcnpnyatauene annapaTa BnHmATEbHO npOHTne, noXaJyncTa, daHHoe pyKOBOdTBO n COxpaHnTe erO dJaIbHeMIX CNpABOK.
Digital Handycam

InfoLITHIUM


Cassette
Memory


MEMORY STICK
DCR-TRV8E/TRV10E
Welcome!
Congratulations on your purchase of this Sony Digital Handycam camcorder. With your Digital Handycam, you can capture life's precious moments with superior picture and sound quality.
Your Digital Handycam is loaded with advanced features, but at the same time it is very easy to use. You will soon be producing home video that you can enjoy for years to come.
WARNING
To prevent fire or shock hazard, do not expose the unit to rain or moisture.
To avoid electrical shock, do not open the cabinet.
Refer servicing to qualified personnel only.
NOTICE ON THE SUPPLIED AC POWER ADAPTOR FOR CUSTOMERS IN THE UNITED KINGDOM
A moulded plug complying with BS1363 is fitted to this equipment for your safety and convenience.
Should the fuse in the plug supplied need to be replaced, a 5 AMP fuse approved by ASTA or BSI to BS1362 (i.e., marked with 艹 or mark) must be used.
If the plug supplied with this equipment has a detachable fuse cover, be sure to attach the fuse cover after you change the fuse. Never use the plug without the fuse cover. If you should lose the fuse cover, please contact your nearest Sony service station.
ATTENTION
The electromagnetic fields at the specific frequencies may influence the picture and sound of this digital camcorder.
For the customers in Germany
Directive: EMC Directive 89/336/EEC. 92/31/EEC
This equipment complies with the EMC regulations when used under the following circumstances:
Residential area
Business district
- Light-industry district (This equipment complies with the EMC standard regulations EN55022 Class B.)
Добpo пожаловать!
I03dpaBnem BAc C npio6peTeHnEm daHHoB
BnDeokamepbl Digital Handycam pmpbSony.
C nOmoosbBoaew BnDeokamepbl Digital
Handycam Bb CMoxeTe 3aneuatnetb doporne
Bam MRHOBeHNJ Xn3HN C npEBOCXODhbIM
KaueCTBOM N3obpaxeHNJ N 3Byka.
BaAa BnDeokamepa Digital Handycam
OchaSeHa YCOBepseHCTBOBaHHbIMN
fynKUyMn, HO B TO Xe BpEme ee OChb JERKO
ncNoB3OBaTb.BCKope Bb 6yDete CO3daBaTb
CEMeHbIe BnDeOpnpaMMbI, KOToPbIMN
MOKeTe HacnaKDaTbc PocNe dyIOune rOdbI.
PNEyPPEKDEHNE
Длп п dedOTbpaSeHnBa 630ropaHnI INI ONaCHOCTN 3JIeKTPuYeCKOrO ydapa He BbICTaBnIte annapaT Ha DoJkb IINI Bnary.
Bo n36eKaHne nopaxeHn 3JIeKtpnuecknM TOKOM He OTKpbBaIte Kopnyc.
3a obcnyxnbAHnem o6paTaBcTolbKO K KBaINΦuIpuOBaHOMy obcnyxNBauOeMy nepcoHaNo.
BHIMAHNE
3JIeKtpomarHHTbIe NOIHa ONpeJeHbIX YacTOaX MOrYT BnIaTb Ha N3O6paXeHne I 3ByK,BOcPpON3B0DnMoE daHHo CnΦpOBoB BVNeOeKaMepbl.

A946
Table of contents
Checking supplied accessories 5
Quick Start Guide 6
Getting started
Using this manual. 10
Step 1 Preparing the power supply 12
Installing the battery pack 12
Charging the battery pack 13
Connecting to the mains 18
Step 2 Inserting a cassette. 19
Recording - Basics
Recording a picture 20
Shooting backlit subjects (BACK LIGHT) 27
Shooting in the dark (NightShot) 28
Checking the recording - END SEARCH / EDITSEARCH / Rec Review 31
Playback - Basics
Playing back a tape 33
Viewing the recording on TV 38
Advanced Recording Operations
Photo recording 41
Using the wide mode 44
Using the fader function 46
Using special effects -Picture effect 49
Using special effects - Digital effect 51
Adjusting the white balance manually. 54
Using the PROGRAM AE function 56
Adjusting the exposure manually 59
Focusing manually 60
AdvancedPlaybackOperations
Playing back a tape with picture effects 62
Playing back a tape with digital effects 63
Quickly locating a scene using the zero set memory function 65
Searching a recording by date - Date search..... 66
Searching the boundaries of recorded tape by title - Title search 68
Searching for a photo - Photo search/Photo scan 69
Editing
Dubbing a tape 71
Editing partially on a DV tape - DV synchro-editing (DCR-TRV10E only) 74
Audio dubbing 76
Superimposing a title 79
Making your own titles. 83
Labeling a cassette 85
Customizing Your Camcorder
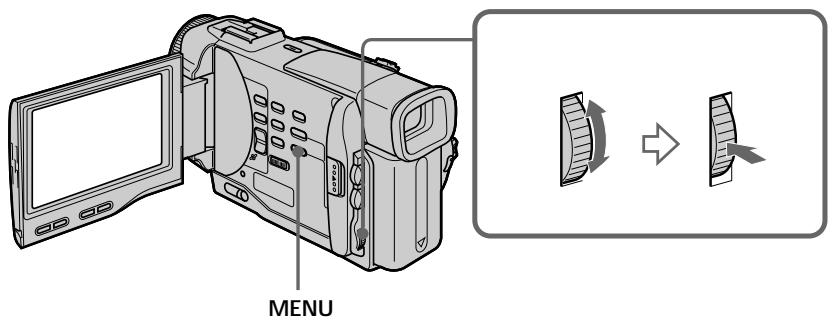
Changing the MENU settings 87
Resetting the date and time 98
Memory Stick operations (DCR-TRV10E only)
Using a Memory Stick-introduction 100
Recording still images on Memory Sticks - Memory photo recording 106
Recording an image from a mini DV tape as a still image 110
Copying still images from a mini DV tape
- Photo save 112
Viewing a still picture - Memory photo playback 114
Superimposing a still picture in a Memory Stick on a moving picture - M. CHROM/M. LUMI/ C. CHROM 118
Preventing accidental erasure - Image protection 121
Writing a print mark - PRINT MARK 123
Deleting images 124
Playing back images in a continuous loop -SLIDE SHOW 127
Additional Information
Usable cassettes 129
Troubleshooting 132
Self-diagnosis display 137
Warning indicators and messages 138
Using your camcorder abroad 148
Maintenance information and precautions..... 149
Specifications 154
Quick Reference
Identifying the parts and controls. 156
Quick Function Guide 168
Index 170
-
Windows is registered trademarks licensed to Microsoft Corporation, registered in the U.S.A. and other countries.
-
All other product names mentioned herein may be the trademarks or registered trademarks of their respective companies.
Furthermore, "TM" and "®" are not mentioned in each case in this manual.
PpOBepKa npuIarapaembIX npHuaIeXHoCTeI.... 5
PykoBoIcTBo no 6bICTpomy 3anycky. 8
Iodrotobka K 3Kcnnyatauun
IcnoJIb3OBAHnE daHHoro pyKOBoDCTBa 10
IyHKT 1 IoJrTOBka NCTOuHnKa nITaHnJa. 12
UctaHOBka 6aTapeiHorO 6Ioka 12
3apka 6aTapeHoro 6loka 13
IpoDcoeINHeHne K cTeBoi po3eTke 18
IyHKT 2 YcTaHOBKa KacCEtbl 19
3aHcB - OCHOBHbIe NOLOXeHn
3aIncB n3o6paXeHnA 20
CbeMa o6BeKToB c 3aDHeI IOcBtKoI (BACK LIGHT) 27
CbeMka B TeMHoTe (HouHaar CbeMka) 28
Ponck n yctpaHene HencnpaBHOCTeI 140
HnDnKaun CaMoDaIaHOctu 145
PpeDynpexkdaHoune INHnKaTOpbln COO6eHnI 146
IcnoIb3OBAHne BaSei BnDeokamepbl 3a rpaHnuei 148
HnΦopMaζηno yxOy 3a annapaTOM m MepblnpoTOPOXHOCTN 149
Texnueckne xapaKTepcntuKn 155
OnepaTHBbI CNpaBOUHnK
Obo3haeHne yacTe n peryIaTOpOB 156
PykoBOCTBO NO 6bICTpbIM yHKnram 169
AilpaBHTbIy yKa3aTeIb 171
-
Windows RNAIaeTc3aerncTpnpoBaHHoT ToproBOMapKo, npHaJnEkaeienΦnpMe Microsoft Corporation, 3aperncTpnpoBaHHoB CUSA ndpyrnx ctpaHax.
-
Bce Ha3BaHnIu 3dEJIy, yNOMaHyTbIe B daHHHom pyKOBoDcTBe, MOrYT 6bITb TopROBbIMu MapKaMn IIN 3apeRInCTpnpoBaHbIMU TopROBbIMu MapKaMn COOTBeTCTByIOxN KOMNaHm.
K TOMy Jze, 3NaKn "TM" N "®" He yNOMnHaIOTcB KaKdOM CnyHae B DaHHOM pyKOBOdCTBe.
Make sure that the following accessories are supplied with your camcorder.
Y6eIntecb, cyTo cneIyUOuIe npHnAdIeKHOCTn npInaraiOTc K BaSei BnDeokampe.
| 1 RMT-812 or/unni RMT-809 | 2 RMT-809 | ||
| 3 | 4 | 5 | 6 |
| 7 | 8 | 9 | 10 |
| 11 | 12 | 13 | 14 |
1 Wireless Remote Commander (1) (p. 164)
RMT-812: DCR-TRV10E
RMT-809: DCR-TRV8E
2 AC-L10A/L10B/L10C AC power adaptor (1),
Mains lead (1) (p. 13)
NP-FM50 battery pack (1) (p. 12, 13)
4 R6 (size AA) battery for Remote
Commander (2) (p. 165)
Serial port adaptor for Memory Stick (1),
PC serial cable (1), AC power adaptor for
Serial port adaptor (1) (p. 117)
DCR-TRV10E only
6 Memory Stick (1) (p. 100)
DCR-TRV10E only
7 A/V connecting cable (1) (p. 38, 71)
Shoulder strap (1) (p. 160)
Lens cap (1) (p. 20)
10 21-pin adaptor (1) (p. 39)
Application software: PictureGear 3.2Lite (CD ROM) (1) (p. 117)
DCR-TRV10E only
1 BeçnpoBóHbI pyJbT dNCTaHcNoHHOуnpaBJIeHn (1) (cTp. 164)
RMT-812: DCR-TRV10E
RMT-809: DCR-TRV8E
2 CeTeBoi aIaIeP IepemEnHoro ToKa AC-
L10A/L10B/L10C(1),npoBOD
3JIeKTpOuNTaHnA (1) (cTp. 13)
3 BaTapeHbIe 6Jok NP-FM50 (1)
(ctp. 12, 13)
4 BaTapeiKa R6 (pa3Mepa AA) dIyIyIbTa
Tonbko moJeB DCR-TRV10E
7 CoeHnHTeHbHbI Ka6eIb ayDnO/BnDeo (1) (ctp. 38, 71)
This chapter introduces you to the basic features of your camcorder. See the page in parentheses "() for more information.
1 Connecting the mains lead (p. 18)
Use the battery pack when using your camcorder outdoors (p. 12).
2 Inserting a cassette (p. 19)
Slide OPEN/EJECT in the direction of the arrow and open the lid.

Push the middle portion of the back of the cassette to insert.
3 Close the cassette compartment by pressing the mark on the cassette compartment.
After the cassette compartment going down completely, close the lid until it clicks.
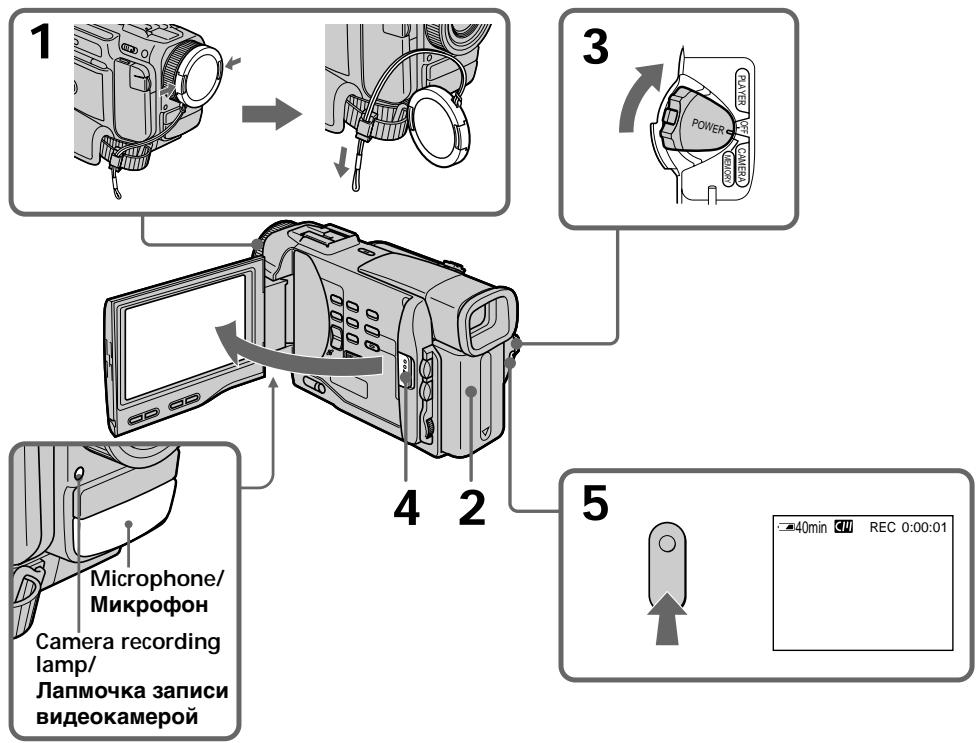
1 Remove the lens cap.
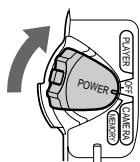
Set the POWER switch to CAMERA while pressing the small green button.The picture appears on the LCD screen.
4 Press START/STOP. Your camcorder starts recording. To stop recording, press START/STOP again.

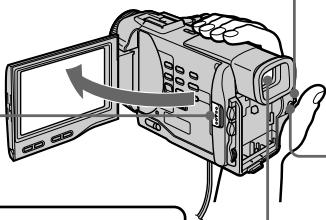
Slide OPEN in the direction of the mark. Then, open the LCD panel.
Viewfinder
When the LCD panel is closed, use the viewfinder placing your eye against its eyecup.
4
Monitoring the playback picture on the LCD screen (p. 33)
1 Set the POWER switch to
PLAYER while pressing the small green button.

Press to rewind the tape.
REW

Press to start playback.
PLAY


NOTE
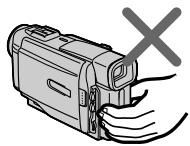
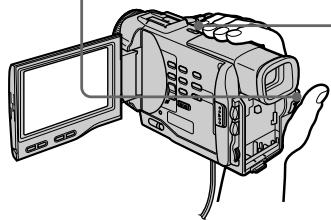
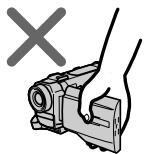
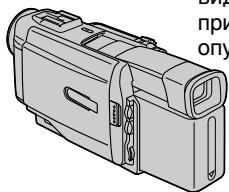
Do not pick up your camcorder by holding the viewfinder, the LCD panel or the battery pack.


PykoBoDCTBO IO 6bICTpOmy 3aIpycky

B daHno rIaBe npBedeHbIO cHOBHbIe cyHKcIMn BaSei BIndeokamepbI. PoIOpbHbIe CBeDeHNr npBedeHbI Ha cTpaHnue B KpyrlbIX cKo6KaX "( ).
3 HaxmTe KhoNky 1nHaayana BOCpOn3BeDeHna.
PLAY
ПОНМЕЧАНЕ
He npHIMMaIte BnDeOkaMepy, B3BbWcB 3a BnDOuCKaTeIb nn NaHeIb KKd.


Using this manual
The instructions in this manual are for the two models listed in the table below. Before you start reading this manual and operating your camcorder, check the model number by looking at the bottom of your camcorder. The DCR-TRV10E is the model used for illustration purposes. Otherwise, the model name is indicated in the illustrations. Any differences in operation are clearly indicated in the text, for example, "DCR-TRV10E only."
As you read through this manual, buttons and settings on your camcorder are shown in capital letters.
e.g. Set the POWER switch to CAMERA.
When you carry out an operation, you can hear a beep sound to indicate that the operation is being carried out.
Types of differences
| DCR- | TRV8E | TRV10E |
| DV synchro-editing | — | ● |
| MEMORY mark* (on the POWER switch) | — | ● |
Provided
Not provided
- The model with MEMORY marked on the POWER switch is provided with memory functions. See page 100 for details.
Note on Cassette Memory
Your camcorder is based on the DV format. You can only use mini DV cassettes with your camcorder. We recommend you to use a tape with cassette memory [11].
The functions which depend on whether the tape has the cassette memory or not are:
End search (p. 31, 37)
- Searching a recording by date - date search (p. 66)
- Photo search (p. 69).
The functions you can operate only with the cassette memory are:
- Searching the boundaries of recorded tape by title - title search (p. 68)
Superimposing a title (p. 79) - Making your own titles (p. 83)
- Labeling a cassette (p. 85).
For details, see page 129.

You see this mark in the introduction of the features that operate only with cassette memory.
Tapes with cassette memory are marked by C (Cassette Memory).
IcnoIb3OBAHne daHHoro pyKOBoDCTBa
IHCtpyKcHn B daHHom pyKObOdCTBe
npedHa3HaueHbI dJa DBx MoedeJe,
nepeuCleHbIX B Ta6Piue HHe. IpeeTEm,
kak npOceTb DaHHOe pyKObDToB No HaaTaB
3KcPnyatau BaWei BvdeOkAmeBbl,
npOBepbTe HOMep MoEJI Na HHXNe CTOpOHe
BaWei BvdeOkAmeBbl.B KaYeCTBe
IIJIOCTpaTHbIX cJeIe NcNoJIb3yETcR MoJeB
DCR-TRV10E.B DpyrHu CnyaHx HOpem MoEJIyKa3AHn pucyHKax.KacKe-Jn6o pacXoJxDeHn
B 3KcPnyatau YeTko Yka3aHbI B TeKCTe,
hAnpMeep, "ToJIbKO MoEJI B DCR-TRV10E."
Ppi UTeHm DnHORO pyKObOdCTBa
yUHTbBAaTE, YTO KhoNk U yCTaHOBVn Ha
BvdeOkAmepe NOKa3aHbI 3aJIaHBIMn 6yKBAmn.
Ppim.YcTAHOBITE BbIKIOuateJIb POWER B
noJIoXeHn CAMERA.
Ppi BblONHeHn Opeaun Ha BVdeOkAmepe
BblCMoXeTe ycblMaTb 3yMMepHbI CnHAp,
noITBepKDaOnu BblONHeHne Opeaun.
Tunbi pa3nnyi
| DCR- | TRV8E | TRV10E |
| Синхонnéй мо ntай DV | — | ● |
| 3нak MEMORY* (на пеклочатèle POWER) | — | ● |
Meetc
- OTCyTCTByET
* B MOpEnIx co 3HaKoM MEMORY Ha nepeKnIOuATEne POWER nmeIoTc yHKnCn nnamr. Iopro6bIe cBeDeHn npBVeDeHbHa CTp.100.
PpmeHne no KaccetHO namrTn
BaWb BnDeOkamepa ochoHa Ha foOpMaTe DV. Bbl MoKeTe nCnOlb3ObaT bIra BaWei BnDEOkamepbToJbKO KAcTeBmHn DV. PeKoMeHdyTe cNcOlb3ObaT JeHTy C KAcTeTHOn NaMrtBIO III.
HnHex pnpBdeHb cyHKm, KOTopbIe 3aBcIAT OT TOI, IMeETCAJ HA JIHTe KAcCETHa nAMrTb NNI HET:
ПОИСК KOHA (cTp. 31, 37)
-ПоискЗаинnoдатe -Поискдatabi (ctp.66)
-ΦOTONOικ (cTp.69).
Функши,КOTOpbIMN BblMOKeTe ynpabnTb TOIbKO C NOMOu KACCETHOI nAMrTi, CNeDyUOuHie:
-ПоИСК Граиц 3аписи На Лeнт e no TnTpу -ПоИСК ТИТра (Стр.68)
- HanoXeHne TnTpa (ctp. 79)
- Co3dahne BaIINX CO6CTBHeHbIX TITPOB (cTp. 83)
MapKupOBKa Kaccetbl (ctp. 85).
Iopob6hie CBeHnH npBHeHbHa cTp.129.

BbMOKTeYBnDeTb3TOT 3HaK pN INOcAHNIФHKn, KOTOpBIMN MOXHO ynpaBnTb TOnbKO c NOMoUbIO KAccETHO nAMrTI.
JIeHTbIC KAcCEThOH nAmrTbIO MapKnpyOTcC nOMOuBIO 3HaKa CII (KacCeTHaI NaMaTb).
Note on TV colour systems
TV colour systems differ from country to country. To view your recordings on a TV, you need a PAL system-based TV.
Copyright precautions
Television programmes, films, video tapes, and other materials may be copyrighted. Unauthorized recording of such materials may be contrary to the provision of the copyright laws.
Precautions on camcorder care
- The LCD screen and/or the colour viewfinder are manufactured using high-precision technology. However, there may be some tiny black spots and/or bright spots (red, blue or green in colour) that constantly appear on the LCD screen and/or in the colour viewfinder. These spots occur normally in the manufacturing process and do not affect the recorded picture in any way. Effective number of pixels is 99.99% or more.
- Do not let your camcorder get wet. Keep your camcorder away from rain and sea water. Letting your camcorder get wet may cause your camcorder to malfunction. Sometimes this malfunction cannot be repaired [a].
- Never leave your camcorder exposed to temperatures above 60^ (140^) , such as in a car parked in the sun or under direct sunlight [b].
- Do not place your camcorder so as to point the viewfinder or the LCD screen toward the sun. The inside of the viewfinder or LCD screen may be damaged [c].
Contents of the recording cannot be compensated if recording or playback is not made due to a malfunction of the camcorder, video tape, etc.
Copepkahne 3aIncn He MoKeT 6bITb KOMpeHcnpoBaHO B Cnyae,ecJI N3aINCb IIN BOCpOIN3BeJeHne He BbIOJIHeHb I3-3a HEnCpAxBHOCTN BuDEOKAmepbl,BuDEOEHTbl T.II.
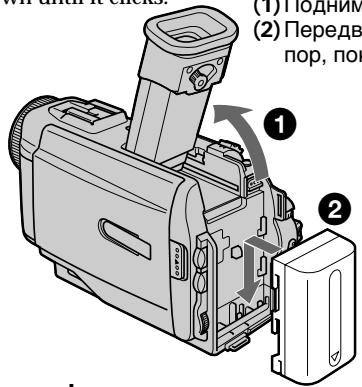
Installing the battery pack
Install the battery pack to use your camcorder outdoors.
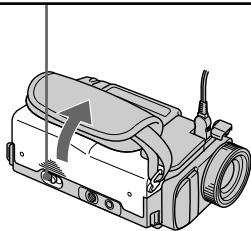
(1) Lift up the viewfinder.
(2) Slide the battery pack down until it clicks.
To remove the battery pack
Lift up the viewfinder.
Slide the battery pack out in the direction of the arrow while pressing BATT down.
YctaHOBka 6aTapeHoro 6Joka
YctaHOBInTe 6bapeHbI 6JOK IJrTO, YTO6bl NCNoJIb3OBA Tb BaSy BnDeokamepy BHe NOMeueHn.
After installing the battery pack
Do not carry your camcorder by holding the battery pack. If you do so, the battery pack may slide off your camcorder unintentionally, damaging your camcorder.
If you use the large capacity battery pack
If you install the NP-FM70/FM90 battery pack on your camcorder, extend its viewfinder. Take care not to pinch your finger when lifting the viewfinder up and down.
Iocne yctaHOBKn 6aTapeHoro 6Joka
He nepenocnte cboIO BnDeokamepy, B3RBunCb 3a6atapeHbIb 6nOK.EcNt BbTak cdenaeTe, 6baTeHbIb 6nOK moKet HnpOn3BOJbHO COCKoJIb3HytbcBaWeBnDeokamepbIn nobpeDntb ee.
PpHnCnOJIb3OBAHn6aTapeHOro 6Joka 6OJIbUoI EMKOCtN
Pn yctaHOBke 6batapeHoro 6Noka NP-FM70/ FM90 Ha BaUy BUndeokamepy NODHMnTe BUNONCKaTeJIb. ByIbTe OCTOpOxHbI, YTObI He npuSeMeNTb BaU paneu npn NOdHMmaHN n ONyCKaHN BUNONCKaTeJIa.
Charging the battery pack
Use the battery pack after charging it for your camcorder.
Your camcorder operates only with the "InfoLITHIUM" battery pack (M series).
"InfoLITHIUM" is a trademark of Sony Corporation.
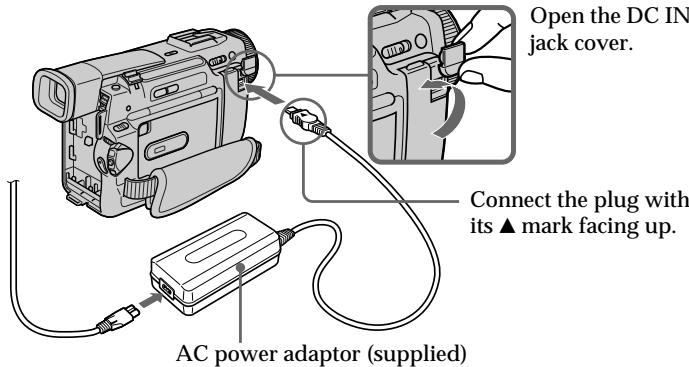
(1) Open the DC IN jack cover and connect the AC power adaptor supplied with your camcorder to the DC IN jack with the plug's mark facing up.
(2) Connect the mains lead to the AC power adaptor.
(3) Connect the mains lead to the mains.
(4) Set the POWER switch to OFF. Charging begins. The remaining battery time is indicated in minutes on the display window. When the remaining battery indicator changes to normal charge is completed. To fully charge the battery (full charge), leave the battery pack attached for about 1 hour after normal charge is completed until FULL appears in the display window. Fully charging the battery allows you to use the battery longer than usual.
3apka 6aTapeHoro 6loKa
IcnoIb3yIte 6aTapeHbI bLOK dIra BaSei BnDEOKaMepbl nOce ero 3aprKn. Ba7a BnDEOKaMepa pa60TaET TOnbKO C 6aTapeHbIM 6lOkOM "InfoLITHIUM" (cepN M).
"InfoLITHIUM" Альперся Торов Марков Корпорачи Sony.
(1)OTKpoITe KpbIshky rHe3da DC IN n noDcoeDNHnTE cTeBOJ aanTep nepemEHOro TOka, npInaraembIK BaueB WBeOkAmepe, K rHe3dy DC IN, TaK TTo6bl WTeKeP ▲6bl HnpaBAnEh BBepx.
(2)ПодсоeДинITE npOBOD АЛЕКТрОпТАнИΚ cTeBOMy aДaNTepу nepemeHOrO TOKa.
(3)ПодсоeДинITE npOBOD эЛeКТрОпИТаHЯ K ceteBOI po3eTke.
(4)UcTaHOBInTe nepeKJIOuCaTeNb POWER B noLoXeHne OFF. NaHHeTc3apRJa. B OOKoUke dinCnJIeB 6yIeT OTo6paXaTbCBA BpEMr OCTaBWeOcR 3apRABa MmHyTax. EcIn nHnDKaTOP ocTaBWeOcR 3apRda N3MeHITcRa H,3TO 3NaHT, YTO HOpMaJIbHaN 3apRJa 3aBePseHa.ДЯ NOIHOH 3apRdKn 6bATapeHnOro 6bLOKa (NoHnA 3apRJa) OCTaBtBe 6bATEHnBb6loK npIKpeINeHHbIM Ha MeCTe pNbIIN3ntEhBOHa Ho OINH qac NoCte 3aBepSeHn HOpMaJIbHOI 3apRdKn DoTexnop, POKa B OKoUko DnCpIeNe He NoBNTcN INDkaunr FULL. PoHnAra 3apRdKn 6bATapeHnOro 6bLOKa No3BoJIeT Bam IcNoIb3ObAtb 6bATapeHnBb 6bOk dOnIbe YeM O6bHuO.
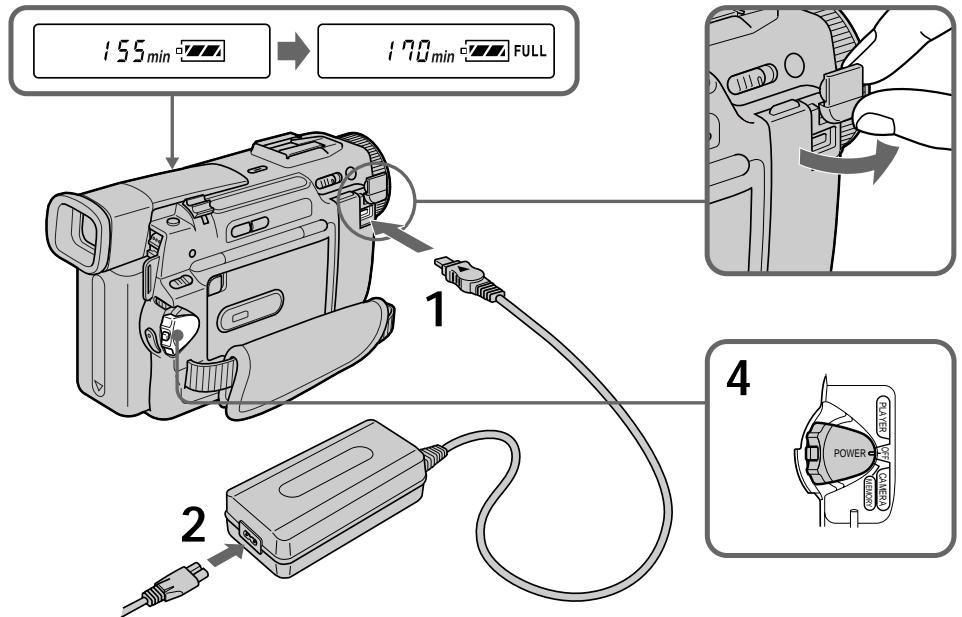
Step 1 Preparing the power supply
Note
Prevent metallic objects from coming into contact with the metal parts of the DC plug of the AC power adaptor. This may cause a short-circuit, damaging the AC power adaptor.
Remaining battery time indicator
The remaining battery time indicator in the display window roughly indicates the recording time.
Until your camcorder calculates the actual remaining battery time
“--min” appears in the display window.
If there is a slight difference in shape between the plug of mains lead and the terminal of AC power adaptor
It is ignorable for their mutual connection and power supply.
Plug the mains lead deeply
Be sure to plug the mains lead deeply into the terminal of AC power adaptor so that it is firmly locked. If there is a gap between the plug of mains lead and the terminal of AC power adaptor, it does not affect the efficiency of the AC power adaptor.
While charging the battery pack, no indicator appears or the indicator flashes in the display window in the following cases
- The battery pack is not installed correctly.
- The AC power adaptor is disconnected.
- Something is wrong with the battery pack.
Approximate number of minutes to charge an empty battery pack
Approximate number of minutes when you use a fully charged battery
Numbers in parentheses () indicate the time using a normally charged battery.
- Approximate continuous recording time at 25^ C( 77^ F) . The battery life will be shorter if you use your camcorder in a cold environment.
** Approximate number of minutes when recording while you repeat recording start/stop, zooming and turning the power on/off. The actual battery life may be shorter.
Pπi6n3nteHbHOe BpemaB MmHytax npnNCNoIb3OBAHmN NOHOCbIO 3apJxKeHHoro 6aTapeHoro 6noka
Yncna BCKo6kax()yka3bIBaHTBpEm npnNCNoIb3OBAHm 6aTapeiHoro 6Ioka C HopMaIbHOJ 3apJIKoJ.
* Pn6Ibn3ntelbHoe Bpemr HnpepebIBHO 3aIncn npn TemnepaType 25^ (77^) .Pnp NcIOJIb3OBaHNBnBNeOkaMepbI B XoIoNDbIX ycIOBnX cpoK cnJx6bl 6aTapeiHorO 6Ioka 6ydet Kopoye.
**Pn6Bn3nteIbHoe BpeM B MInHyTaX npi 3aIncn C HeoJHOKpaTHbIM NyCKOM/ OCTaHOBKO 3aIncn, Hae3dOM BnDeOkampebl N BKJIIOHeHem/BbIKJIIOHeHem PNTaHn. PaKTtueckn cPoK cnyk6bl 3apJa 6aTapeHOrO 6lOKa MoKet 6bTb KopoYe.
Playing time/BpemBocnpon3Beeden
DCR-TRV8E
| Battery pack/БатAPEйньий 6лok | Playing time on LCD screen/B越来越大 BOCPON3BVEDEHINHA зкра themselves | Playing time with LCD closed/B越来越大 BOCPON3BVEDEHINApri зakрытом XXKД |
| NP-FM50 (supplied)/ (прILAЯТСА) | 140 (125) | 180 (160) |
| NP-FM70 | 295 (265) | 370 (330) |
| NP-FM90 | 450 (400) | 560 (505) |
DCR-TRV10E
| Battery pack/Батуарейный城乡居民 | Playing time on LCD screen/B越来越大 B越来越大 | Playing time with LCD closed/B越来越大 B越来越大 |
| Вразуwoхш�д и захше XXД | Протяларетсу пгларытOM XXД | |
| NP-FM50 (supplied)/ (прилараяец) | 135 (120) | 180 (160) |
| NP-FM70 | 285 (255) | 370 (330) |
| NP-FM90 | 435 (390) | 560 (505) |
Approximate number of minutes when you use a fully charged battery
Numbers in parentheses " ( ) " indicate the time using a normally charged battery. The battery life will be shorter if you use your camcorder in a cold environment.
PnIbI3ntJIbHOe BpemB MmHyTax PnINcNoJIb3OBAHIM NIOHOCtBu 3apJxHeHHOro 6aTapeHoro 6noka
LcΦpB B cKo6kax (“) yKa3bIbAOT BpeM npi nCNoIb3OBAHn 6aTapeHOrO 6JOKa C HopMaJIbHOH 3apHKnO. Ppi nCNoIb3OBAHn BnDeOkamepbB XoJIoNbHbIX ycIOBnX CpOK cnJyK6bI 6aTapeHOrO 6JOKa 6yDet KOpOe.
After charging the battery pack Disconnect the AC power adaptor from the DC IN jack on your camcorder.
Note on the remaining battery time indicator during recording
The indicator may not be correct, depending on the conditions in which you are recording. When you close the LCD panel and open it again, it takes about 1 minute for the correct remaining battery time to be displayed.
What is "InfoLITHIUM"?
The "InfoLITHIUM" is a lithium ion battery pack which can exchange data such as battery consumption with compatible video equipment.
This unit is compatible with the "InfoLITHIUM" battery pack (M series). Your camcorder operates only with the "InfoLITHIUM" battery.
"InfoLITHIUM" M series battery packs have the InfoLITHIUM mark.
"InfoLITHIUM" is a trademark of Sony Corporation.
IocJe 3apRKn 6aTapeHoro 6noka OToeHNHe cTeBoi aanTpep nepMeHHoro ToKa ot rHe3da DC IN ha Bauei Bndeokamepe.
Connecting to the mains
When you use your camcorder for a long time, we recommend that you power it from the mains using the AC power adaptor.
(1) Open the DC IN jack cover, pulling the cover out a little and rotating it. Connect the AC power adaptor to the DC IN jack on your camcorder with the plug's mark facing up.
(2) Connect the mains lead to the AC power adaptor.
(3) Connect the mains lead to the mains.
The mains lead must only be changed at a qualified service shop.
PRECAUTION
The set is not disconnected from the AC power source (the mains) as long as it is connected to the mains, even if the set itself has been turned off.
Notes
- The AC power adaptor can supply power even if the battery pack is attached to your camcorder.
- The DC IN jack has "source priority". This means that the battery pack cannot supply any power if the mains lead is connected to the DC IN jack, even when the mains lead is not plugged into the mains.
- Keep the AC power adaptor away from your camcorder if the picture is disturbed.
Using a car battery
Use Sony DC Adaptor/Charger (not supplied).
BHIMAHNE
Повобд ЗЕКТРОПАТИЗ CLEДУЕТ 3aMEHЯТБ TOЛБКВ МбтэрсКОй KBALINФИЦЮРБАнНΟΥ OБслжИВИАНО.
IPEIOCTEPEXEHNE
Annapata He OTKIIOUaTeC T O NCTOuHnKa nepemEHORo TOKA Do TEX NOp, NOKa OH NOCDoeMHN K 3JIeKTPnuecckOn cETN, DaJce ECnn CAM annapaT N BbIKJUoyeH.
PpimueaHn
-Питане OT cTeBOrO aanTepa nepemehHoro ToKa mokTe nOabatbCn daxe Bcnyae,ecn6batapeHnb 6Iok npKpEnnE K BaSei BvdeOkamepe.
- Πhe3do DC IN IMeET "PnOpntET nCToYnka". 3To 3NaHT, YTO nITaHne OT bTaapeHORO 6boka He MOKeT NOdaBaTcBc, eCIN nPoBOd 3NeKtpONNTAHN IOCDoeHNHe K rHe3dy DC IN, dAxe cEIN pOBoD 3NeKtpONNTAHN H nePODcoeHNHe K CTeBOH POeTke.
Eeinn3o6paXeHne nCKaXeHc,OTOdBnHbTe CTeBcOy aanTp nepemEnHOrO ToKa NoaIbSe ONTBeOKaMepb.
UcnoJb3ObaHne aBTOMo6nJbHOro aKKyMylrTopa
IcnoIb3yIte aIaITeP/3apIHoe yCTpoIcTBO nocToHHoro ToKa Sony (he npunaraetca).
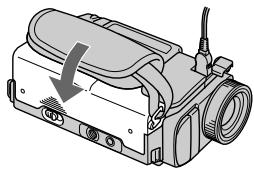
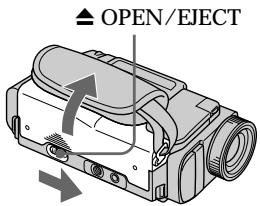
Step 2 Inserting a cassette
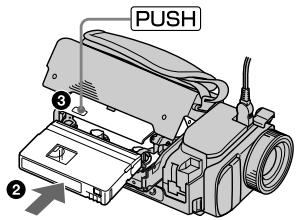
(1) Slide OPEN/EJECT in the direction of the arrow and open the lid. The cassette compartment automatically lifts up and opens.
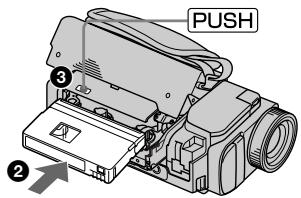
(2)Push the middle portion of the back of the cassette to insert. Insert the cassette in a straight line deeply into the cassette compartment with the window facing out.
(3) Close the cassette compartment by pressing the PUSH mark on the cassette compartment. The cassette compartment automatically goes down.
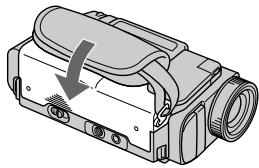
(4) After the cassette compartment going down completely, close the lid until it clicks.
Пун=kT2 YctaHOBKa KaCCetbl
(1)ПepeДиНьт epeKIOUaTeIb OPEN/ EJECT B HappaBJIeHm CTpeJIkn. KacceTHbI OTcEK aBTOMaTHyeCKn POnHIMeTCa BBepx n OTkpoETcR.
(2)HaxmTe nocpeDnHe 3aDHei CTOpOHbI KaccTeB, YTObI BCTaBtB ee. BcTaBbTe Kaccety no npMOn B KaccTeHbI OTcEk Do yNopa, TaK YTObI OKOuKy 6blO obpaueHo hapyKy.
(3)3aKpOte KaccetHbI OTCeK, HaxkAB MeTKy PUSH HaOTcKe. KaccetHbI OTcKe aBTOMaTnHeCKn ONyCTNTcB Hn3.
(4)Посл.TORO,КakKacceTHbОТсЕК onyctntcra ПОЛHOCtBIO BHN3,ЗakpoTKe KpbIshky TaK,чTOбla OHa 3auneKnHynacb.
1
2,3
4
To eject a cassette
Follow the procedure above and in step 2, take out the cassette.
Notes
- Do not press the cassette compartment down. Doing so may cause malfunction.
- The cassette compartment may not be closed when you press any part of the lid other than the PUSH mark.
When you use mini DV cassette with cassette memory
Read the instruction about cassette memory to use this function properly (p. 129).
To prevent misoperation of your camcorder Set the POWER switch to OFF when you insert and eject a cassette.
To prevent accidental erasure
Slide the write-protect tab on the cassette to expose the red mark.
IIN3BLeueHnKaCCeTbI
BbIIOJIHnTE npINBeENHyIO BblSe npOeDpy B nyHKTe 2, BblbTe Kaccety.
PpIMeuaHnA
- He haxkmaite BnH3 kaccetbIOTcEK. 3To MoKET npBecTN K HEnCnpaBHOCTN.
KaccTeHbIOTcEKMOKeTHe3aKpbITbC8eCNBbHaXMeTeKaKyIO-Ni6oDpyrYIOuactbHaKpbIiKe,aHEMeTKyPUSH.
PnncnoB3OBAHmKaccTeblMHN DV C KaccTeHOI NaMTbIO
Your camcorder automatically focuses for you.
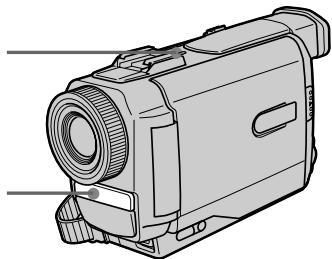
(1) Remove the lens cap by pressing both knobs on its sides and attach the lens cap to the grip strap.
(2) Install the power source and insert a cassette. See "Step 1" and "Step 2" for more information (p. 12 to p. 19).
(3) Set the POWER switch to CAMERA while pressing the small green button. Your camcorder is set to the standby mode.
(4) Slide OPEN in the direction of the mark. Then, open the LCD panel. The viewfinder automatically turns off.
(5) Press START/STOP. Your camcorder starts recording. The "REC" indicator appears. The camera recording lamp located on the front of your camcorder lights up. To stop recording, press START/STOP again.
3a\Pncb n3o6paXeHnA
BaSha BnDeOkamepa aBTOMaTHeCKN BbINOJIHReT fokcnpOBky 3a Bac.
(1)CHIMNEKpbIuKyObeKTnBa,HaxabObe KhoIKnHa ee KpOMKe,NpiKpEnTe KpbIuKyObeKTnBaKpeMHIOДЯ3axBaTa.
(2)YCTaHOBInTe NCTOCHNK IITaHIN IN BCTaBBte KACCEty. IOpIObHbIe CBeDeHNr PnIBeHeHbI B“PnyKHTe 1”N“PnyHKTe 2" (Ctp.12-19).
(3)Haxab MaIeHbKyIO 3eIeHyIO KHOINky, yCTaHOBInTe nepeKNIouaTeInb POWER B nOLOXeHne CAMERA. BaIa BnDeoKaMepa 6yDet yCTaHOBJIeHa B peJIM OxUdAHNIA.
(4)Передвиные КНОКУ OPEN B HanpaВлЕн И MeTKN 3aTeM OТКpoIte NaHEnb XXKД. BИДОССКATERNBblKIIHOHTCа ABTOMaTnueeCKN.
(5)Haxmnte KhoNky START/STOP.Bawa BnDeOkamepa NaHcT 3aInCb. IoBvITc HnDnKaTOp "REC". BbICBeTITc TaKke lamNoUka 3aInCn, paCnoIooKeHHa Ha nepeDne nAHei N BuDeOkamepbl.ДЯ ocTaHOBKn 3aInCn HaxmTe KhoNky START/ STOP eue pa3. B BnDoINckaTele BbICBeTITc NaMNoUka 3aInCn.
Note
Fasten the grip strap firmly. Do not touch the built-in microphone during recording.
Note on Recording mode
Your camcorder records and plays back in the SP (standard play) mode and in the LP (long play) mode. Select SP or LP in the MENU settings. In the LP mode, you can record 1.5 times as long as in the SP mode.
When you record a tape in the LP mode on your camcorder, we recommend playing the tape on your camcorder.
Note on the lock (DCR-TRV10E only)
When you slide the lock to the right, the POWER switch can no longer be set to MEMORY accidentally. The lock is set to the left before your camcorder leaves the factory.
To enable smooth transition
Transition between the last scene you recorded and the next scene is smooth as long as you do not eject the cassette even if you turn off your camcorder. When you change the battery pack, set the POWER switch to OFF. When you use a tape with cassette memory, however, you can make the transition smooth even after ejecting the cassette if you use the END SEARCH function (p. 31).
If you leave your camcorder in the standby mode for 5 minutes while the cassette is inserted
Your camcorder automatically turns off. This is to save battery power and to prevent battery and tape wear. To resume the standby mode, set the POWER switch to OFF, and to CAMERA again.
When you record in the SP and LP modes on one tape or you record some scenes in the LP mode
The playback picture may be distorted or the time code may not be written properly between scenes.
PpIMeuaHnA
ПлOTH npICTeRHTe peMeHbДЯ 3axBaTa BnDEOKaMepbl. He pIrkacaiTecb K BCTPOEHOMy MKNpOFOHy BO BpeM 3annci.
PpmeaHne no pexmy 3aHncn
Baawa BnndeKaMepa BbINOJHReT 3aNcB IN BOCpOIN3BeDeHne B pexmme SP (CTaHdapTHoe BOCpOIN3BeDeHne) IN B pexmme LP (DIOIOnrpaOoUee BOCpOIN3BeDeHne). Bb6epnte KOMaHdy SP nLI NP LBy cTaHOBkax MENU. B pexmme LP Bbl MoKeTe BbINOJIHrTB 3aNcB 1,5 pa3a DOnJIbSe IIOBpeMeHN, Yem B pexmme SP. Ppi BbINOJIHEnHn 3aNcN ha JIHTy B pexmme LP Ha BaWei BnDEOkamepe peKOMeHdyETcB OBCpOIN3BOJInT bTy JIHTy TaXke Ha BaWei BnDEOkampe.
Adjusting the LCD screen
To adjust the brightness of the LCD screen, press either of the two buttons on LCD BRIGHT. The LCD panel moves about 90 degrees to the viewfinder side and about 180 degrees to the lens side.
If you turn the LCD panel over so that it faces the other way, the indicator appears in the viewfinder and on the LCD screen (Mirror mode).
PerynipoBka 3KpaHa KKД
Дярergyнорвк npKoctn 3kaHa JKKJ
HaxMMTE Ody IN KhoNOK Ha LCD BRIGHT.
Пань JKKД мokET pepeBnIraTcЯпIMepHO
Ha 90 rpaIycOB B cTOpOHy BIDOMckATEY I
npMepHOHa 180 rpaIycOB B cTOpOHy obEketna.
EcIn BlNoBepHete NaHJIb XKKd TAK, YTO
6ydet HanpabIeHa B dpyrIy cToPOHy, B
BIDONCKaTeJe N Ha 3KpaHe JXKD NOBHTC
INHdkaTop (3epKaIbHbI pexm).
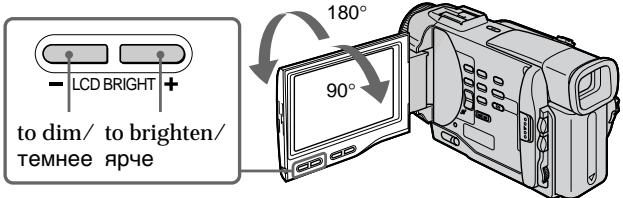
When closing the LCD panel, set it vertically until it clicks, and swing it into the camcorder body.
Note
When using the LCD screen except in the mirror mode, the viewfinder automatically turns off.
When you use the LCD screen outdoors in direct sunlight
The LCD screen may be difficult to see. If this happens, we recommend that you use the viewfinder.
LCD screen backlight
You can change the brightness of the backlight.
Select LCD B.L. in the MENU settings.
Even if you adjust the LCD screen backlight or brightness of the LCD screen
The recorded picture will not be affected.
Picture in the mirror mode
The picture on the LCD is a mirror-image.
However, the picture will be normal when recorded.
During recording in the mirror mode
ZERO SET MEMORY on the Remote
Commander does not work.
Indicators in the mirror mode
The STBY indicator appears as 11 and REC as
- Some of the other indicators appear mirror-reversed and others are not displayed.
After recording
(1) Set the POWER switch to OFF.
(2) Close the LCD panel.
(3) Eject the cassette.
To record pictures with the viewfinder - adjusting the viewfinder
If you record pictures with the LCD panel closed, check the picture with the viewfinder. Adjust the viewfinder lens to your eyesight so that the indicators in the viewfinder come into sharp focus.
Lift up the viewfinder and move the viewfinder lens adjustment lever.
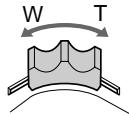
Using the zoom feature
Move the power zoom lever a little for a slower zoom. Move it further for a faster zoom.
Using the zoom function sparingly results in better-looking recordings.
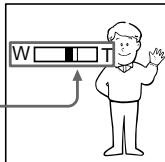
"T" side: for telephoto (subject appears closer)
"W" side: for wide-angle (subject appears farther away)

Zoom greater than 10× is performed digitally, if you set D ZOOM to ON in the MENU settings. The digital zoom function is set to OFF at the factory. (p. 87)
The right side of the bar shows the digital zooming zone.
When you shoot close to a subject
If you cannot get a sharp focus, move the power zoom lever to the "W" side until the focus is sharp. You can shoot a subject that is at least about 80~cm (about 2 feet 5/8 inch) away from the lens surface in the telephoto position, or about 1cm (about 1 / 2 inch) away in the wide-angle position.
Notes on digital zoom
- Digital zoom starts to function when zoom exceeds 10 × .
- The picture quality deteriorates as you go toward the "T" side. Set D ZOOM to OFF in the MENU settings. Otherwise the digital zoom activates without notice (p. 87).
IcnoJIb3OBAHneФyHKcHn Hae3da BnDEOKaMepbl
IpeeBnHbTe pbuHr npuBOdHoro
Bapnoo6bekTbBa CnErgKa DnIg OTHOCHTeJIbHO MeDIIeHHOro Hae3Da BnDEOKaMepbl.
IpeeBnHbTe ero CnilbHee dIa yckOpEHnOr Hae3da BnDeOkamepbl.
UcnoJb3OBAHne yHKnUHae3Da BuDeOkamepBb B He6oJbIOM KOJIeCTBe oBeceNeuBaet HauNHyUe pe3YNbTaTbI.
CTopoha "T":ДЯ TelepeToO (ObbeKT np6JInxKaetcra
CTopoha "W":ДлЯшпорokoyroЛьногоВида (объekt ydaJIЯTeCЯ)


Hae3d BnDeokamepb60nee 10x BbIOnHReTcnaPpOBbIM MeToDom,ecnBbYcTaHOBnTeKOMaHyD ZOOM B nIoJoxHeNe ON B yCTaHOBkAXMENU.Ha npEanPnTm-N3rOToBnTeIe FyHKuNzIcFpOBBo TpaHcCfoKaUm yCTaHOBJIeHa BnIoJoxHe N OFF (ctp.87).
Pn cbeMe oBeKta c 6JIn3KOro noLoXeHn
EcIn BbI He moXeTe nOlyuHTb YetKoI ΦOKyCINOBKN, nepeBnHbTe pBuar nPnBOHORO BApNoOOBJekTnBA CTOpOHY W" Do nOlyuHEN YeKToB φOKycnOBKn. BbI MoXeTe BByIOONHrTb CbEMky O6BekTA B N0LOKeHN TEleFOTO, KOTobpIOTcNOT NO kpaIHe MpeHa paCtOHN 80 cm OT nobEpxHOCTNs obKeTnBa IIN Jx Ke OKO1 1 CM B nOLOKeHN mIpOKoYOrJbHO BnDA.
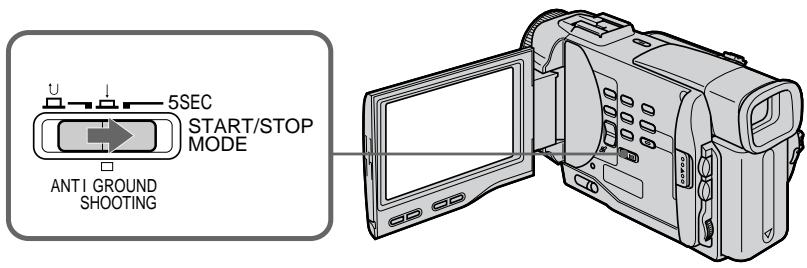
: Recording starts when you press START/ STOP, and stops when you press it again (factory setting).
ANTI GROUND SHOOTING Your camcorder records only while you press START/STOP. Use this mode to avoid recording unnecessary scenes.
5SEC: When you press use this mode to START/ STOP, your camcorder records for 5 seconds and then stops automatically.
YcTaHOBka START/STOP MODE
:ПинжатиКнОКИ START/STOP NaHHeTc8 3aNc6b,a npi noBToPHom Haxatm 3TOI KHOKN 3aNc6b OCTaHOBITc8 (3aBOJCKa YCTaHOBka).
ANTI GROUND SHOOTING Baisha Bndeokamepa 6ydtBbINOJIHrTb 3aINc bToJbKO npi HaxKaTIH KHOJKN START/STOP. IVcNoJIb3yIte 3OT pexIM dIra n36eXaHnI 3aIncN HeXeJaTeJbHbIX 3NI3OIOB.
5SEC: EcJn Bbl haKmTe KhoNky START/ STOP, BnIeokamepa 6yIET BblonHrTb 3aINcB TeHeHne 5 CeKyHd, a 3aTEM aBTOMaTHueCKn OCTaHOBNTcR.
Notes
- You cannot use the fader function in the 5SEC or mode.
- The time code does not appear in the 5SEC mode.
To extend the recording time in the 5SEC mode
Five dots ( ) appear, and then disappear at a rate of one per second. To extend the recording time, press START/STOP again before all the dots disappear. Recording continues for about 5 seconds from the moment you press START/STOP.
PpIMeuaHn
- BbI He MoXeTe IcNoJIb3OBA Tb cyHKuIO 1peiepaB pexKmE 5SEC nIIN peKmE
BpeKIMe 5SEC chetnK JIeHTbI He IORBJIeTcI.
Indicators displayed in the recording mode
The indicators are not recorded on tape.
The time code indicates the recording or playback time, "0:00:00" (hours : minutes : seconds) in CAMERA mode and "0:00:00:00" (hours : minutes : seconds : frames) in PLAYER mode. You cannot rewrite only the time code.
Remaining tape indicator
The indicator may not be displayed accurately depending on the tape.
KoB BpeMeHn
KoI BpeMeHn yka3bIbaeT BpeM 3aInc nIIN Bocnpou3BeDeHnra,“0:00:00”(yacbl,MNHyTbI, cekyHdbI)BpeXIMe CAMERA n“0:00:00" (yacbl,MNHyTbI,cekyHdbI:KaIpbI)BpeXIMe PLAYER.Bbl He MoxKeTe nepe3aIncatb ToIbKO KoI BpeMeHn.
HnDKaTOpOCTaBWeCnJeHTbI
INHnKaTOp MoKcTe TOnHO He OTo6paXaTbCBA3aBnCmOCTN OTJeHTbl.
Shooting backlit subjects (BACK LIGHT)
When you shoot a subject with the light source behind the subject or a subject with a light background, use the backlight function.
Press BACK LIGHT in the recording or standby mode.
The indicator appears in the viewfinder or on the LCD screen.
To cancel, press BACK LIGHT again.
CbeMa o6BeKToB c 3aHnei noCBeTkoi (BACK LIGHT)
EcIn BbBbIOJIHReTe CbEMKy o6BeKTa c nCTOHHKOM CBeTA N03aI IN Hero IIN JKe o6BeKTA CO CBETNbIM fOHOM, IcNoIb3yIte fYHKUIO 3aDHe NIOCBETKN.
Haxmte KhoNky BACK LIGHT B peXnme 3aIncn nnpeXnme oKnDaHn.
B BnDOnCKaTeIe IIn Ha 3KpaHe KKД nOraBtcaHnDnKaTOp
Дя OTmeны НжмITE KhoIGNky BACK LIGHT eue pa3.
BACK LIGHT
If you press EXPOSURE when shooting backlit subjects
The backlight function will be canceled.
EcIn Bbl HaxMeTe KhoNky EXPOSURE npBbIOnJIHeHm CbeMkn OBeKToB c 3aDHeNoDCBETKoI
ФункцяЗаднй посветкбудETOTMeHeHa.
Shooting in the dark (NightShot)
The NightShot function enables you to shoot a subject in a dark place. For example, you can satisfactorily record the environment of nocturnal animals for observation when you use this function.
(1) While your camcorder is in the standby mode, slide NIGHTSHOT to ON.
(2) Press START/STOP to start recording. and "NIGHTSHOT" indicators flash on the LCD screen or in the viewfinder. To cancel the NightShot function, slide NIGHTSHOT to OFF.
Cbemka B TEMHOTE (Houhna cbemka)
Функци_Hочнoi CьeMkn no3BOLЯТБam BbIIOJIHЯТсьсeMky OобЕКТОВ B Temhblx MecTax. Hanpimep, BblcmoKTe CycNEXomBbIOJIHЯТсьeMky HOUHbIX XINBOTbДЯ Na6JIHOdEHHI npn IcNoJIb3OBAHN DaHHOJФункци.
(1)BTOBpEMKoTgdaBUNDeOkaMepaHaxoDITcBpeXIMeOxNDAHn,nepeDBINbTe nepeKIOUpaTeIb NIGHTSHOT BnoIOxKeHne ON.
(2)HaKMTe KhoNky START/STOP nIa haJa 3aInci.
Инданахрьи "NIGHTSHOT" HaunhyT MngarbHa 3Kpahe XXKD nIN B BINOINCKaTeIe.ДЯ OTMeHbФyHKuIN NocHoH CbEMKn NepeBnHbTe nepeKJIIOUaTeIb NIGHTSHOT B noLoXeHN OFF.
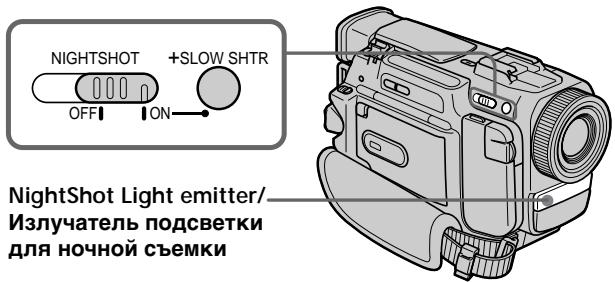
Using ^+ SLOW SHTR
The NightShot +Slow shutter mode makes subjects more than four times brighter than those recorded in the NightShot mode.
(1) Slide NIGHTSHOT to ON in the standby or recording mode. indicator appears.
(2) Press +SLOW SHTR until the desired NIGHTSHOT indicator flashes.
The indicator changes as follows:
(NIGHTSHOT) 1 (NIGHTSHOT1)
2 (NIGHTSHOT2) (NIGHTSHOT)
To cancel the NightShot +Slow shutter mode, slide NIGHTSHOT to OFF.
Using the NightShot Light
The picture will be clearer with the NightShot Light on. To enable NightShot Light, set N.S.LIGHT to ON in the MENU settings (p. 87).
IcnoJIb3OBAHne pexIma ^+ SLOW SHTR
PexkIM HcHNO CbEMKn +MeIeHHoro 3aTbopa no3BONJIET CdJIaTb OBeKbTI bOJee Yem B ueTbIpe pa3a IApYe, Yem B cIyueae, ecNI Bbl 6yIeTe BbIIOJIHNb TcEMky B TEMHOte c NMOUBO fYHKUNn HOHNO CbEMKn.
(1)ПepeДинБтЕпeрклуатель NIGHTSHOT B poloxhenue ONВ ржIMе OxuДаня Ип ржIMe 3aIncn. ПОВИТсЯнДИКATOP .
(2)HaximMaIte KhoNky +SLOW SHTR do Tex nop, noka He haNuHT MraTaB HxKhbln HndIkAToP NIGHTSHOT.
INHdkatop6ydtN3MeHrTbCnEduOuIM 06pa30M:
(NIGHTSHOT) (NIGHTSHOT1) (NIGHTSHOT2) (NIGHTSHOT)
Длг OTмны ржима HOчнов CBemkn +MeДлгEHORO 3aTbopa NepeДиньTeперклочаел NIGHTSHOT B noLoхене OFF.
IcnoJb3OBAHne IoDCBETKn DnA HOUHOI CbEMKn
- Do not use the NightShot function in bright places (ex. outdoors in the daytime). This may cause your camcorder to malfunction.
- When you keep NIGHTSHOT set to ON in normal recording, the picture may be recorded in incorrect or unnatural colours.
- If focusing is difficult with the autofocus mode when using the NightShot function, focus manually.
While using the NightShot function, you cannot use the following functions:
- Exposure
-
PROGRAM AE
-White balance
-Fader*
-Digital effect* -
You cannot use these functions only in the NightShot +Slow shutter mode.
Shutter speed in the NightShot +Slow shutter mode
| Indicator | Shutter speed |
| 1 (NIGHTSHOT1) | 1/12 |
| 2 (NIGHTSHOT2) | 1/3 |
The +SLOW SHTR button does not work:
- while the fader function is set or in use
- while the digital effect function is in use
- when NIGHTSHOT is set to OFF
- in the MEMORY mode (DCR-TRV10E only)
NightShot Light
NightShot Light rays are infrared and so are invisible. The maximum shooting distance using the NightShot Light is about 3m (10 feet). The shooting distance will be twice or more in the NightShot +Slow shutter mode.
Приимechanicals
He nCnoJIb3yIte cyHKUIO HOcHOr CbEMKn BApKnx MeCTax (HaNPIMep, Ha yNlCe B DHeBHOeBpeM). 3TO MOKeT pINBecTn K HeNCpabHocTn BaWe BNDeOKaMepbl.
-Пи удержани установки NIGHTSHOTВ положени ON пи Нормальон 3аписи зображени может 6ыт 3апсано В Нелразиьньх Или HeeCTeCTBeHHbIX CBetax.
- EcnnФokycnpoBka 3aTpydHeHa B aBTOMaTHueCKOM pexKmpe INCNOJIb3OBaHIN cyHKcIMN HCHOH CbEMKN, BblIOJIHInTe φokycnpOBky BpyHyIO.
PnncnoIb3OBAHnnyHKcnn HocHoN CbeMkn Bbl He moKeTe nCnoJIb3OBaTb cJeDyUoJne yHKn:
-3Kcno3nua
-PROGRAM AE
-Бааннсбелю
-Φeɪnεp
-LuΦpOBoN 3ΦΦeKt
BbI He MoXeTe IcNoJIb3OBAr 3TN ΦyHKcIM TOnbKO B pexKmE HOHOr CbeMKn +MeDJIeHHoro 3aTbopa.
CkopocTb 3aTbopa B pexmHe HooHcBemKu +MeIeHHoro 3aTbopa
| Индikatop | Сkopocь 3аТвора |
| 1 (NIGHTSHOT1) | 1/12 |
| 2 (NIGHTSHOT2) | 1/3 |
Khonka +SLOW SHTR He pa60taeT:
-eCnI yCTaHOBNeHa nIIN IcNoJIb3YeTcH φyHKUgΦeɪdepa
-eCINI NCIOJIb3yETcH cyHKUa IuΦpOBOrO 3ΦΦeKtA
-ecnnepekekIIOUaTeIb NIGHTSHOT yCTaHOBnEH B nOJoxHeNe OFF
-B pexkme MEMORY (ToIbko moJeB DCRTRV10E)
Iopcbetka dna HOHOn CbeMkn
JyHnIOcBETKn IJIa HOuHOcBEmKn AIBIOTc HnOpaKpaChbIMN INoTOMy HeBUNMbIMN. MakcmaJIbHOe paCCToAHHe dJIa CbEMKn pIn NCNoJIb3OBAHmN IOCDBeTKn IJIa HOuHOcBEmKn paBHO npImepHo 3 M. BpeXmme HOUHO cynepcBEmKn +MeDJIeHHoro 3aTBopa paCCToAHHe dJIa CbEMKn 6yDet B Dba INI 60Jee pa3 60JIbSe.
Self-timer recording
You can make a recording with the self-timer. This mode is useful when you want to record yourself.
(1) Press SELFTIMER in the standby mode. The (self-timer) indicator appears on the LCD screen or in the viewfinder.
(2) Press START/STOP. Self-timer starts counting down from 10 with a beep sound. In the last two seconds of the countdown, the beep sound gets faster, then recording starts automatically.
3aInc b no TaMepy camo3anycka
BbMOxTe BbINOJIHHTb 3aINCb NO TaIMepy camo3anycka.
3TOT pexkIM ABLAETCn POJIe3HbIM B TOM Cnyae, ecIn Bbl XOTNTe BblONHITb 3aNNc b camoro ce6ra.
(1) HaxmTe KhoIky SELFTIMER B peXmE OxndaHn. Ha 3kpaHe XKД nIiB BUNOINCKaTeIe NOBNTcR INHdNKaTOP (Taimep camo3anycka).
(2) Haxmnte kHonky START/STOP. TaMep camo3anycka haHHeT o6paTHbI OTCuET ot 10c 3yMMephBIM cHraJOM. B NocleHne DBe cekyHdbI o6paTHoro oTCuTea 3yMMepHbI CnHaN 6yJeT 3ByuTa b YaSe, a 3aTEM aBTomatUHeCKn HaHHeTc 3aINCb.
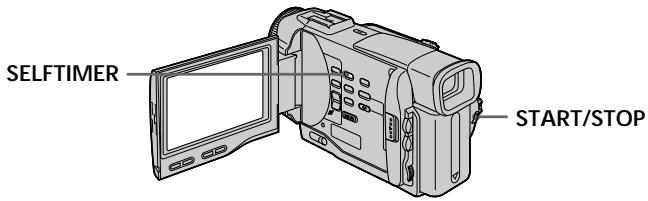
To stop the self-timer during recording
Press START/STOP.
Use the Remote Commander for convenience.
To record still pictures using the self-timer
Press PHOTO in step 2.
To cancel self-timer recording
Press SELFTIMER so that the indicator disappears from the LCD or viewfinder screen while your camcorder is in the standby mode.
Note
The self-timer recording mode is automatically cancelled when
- Self-timer recording is finished.
- The POWER switch is set to OFF or PLAYER.
Checking the recording
- END SEARCH / EDITSEARCH / Rec Review
You can use these buttons to check the recorded picture or shoot so that the transition between the last recorded scene and the next scene you record is smooth.
Поберka 3апссn
- END SEARCH/EDITSEARCH/
Ppocmotp 3annc
BbMOKeTe NcNOJIb3OBAbT 3TN KHOKN JnI npOBepKu 3aINcaHNOrO N3o6paXeHn IIN CbEMKn, TAK YTO6bI nepExoM MekDy NocJeDNHM 3aINcaHHbIM 3NIn3Odom N CNeDuOUIM 3aINCbIBaEBbIM 3NIn3Odom 6blI PJIaBHbIM.
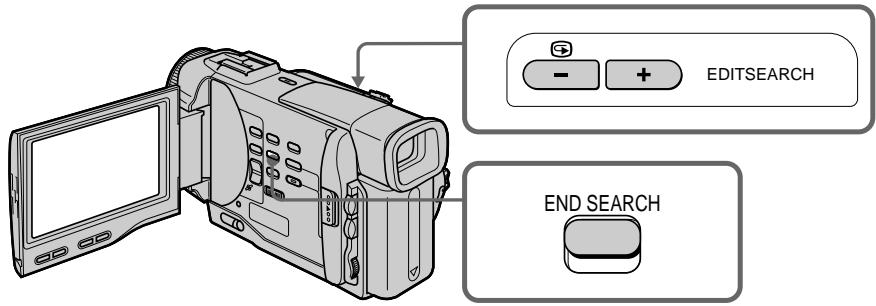
END SEARCH
You can go to the end of the recorded section after you record.
Press END SEARCH in the standby mode. The last 5 seconds of the recorded section are played back and playback stops. You can monitor the sound from the speaker or headphones.
EDITSEARCH
You can search for the next recording start point.
Hold down the + / - side of EDITSEARCH in the standby mode. The recorded section is played back.
- :to go forward
- : to go backward
Release EDITSEARCH to stop playback. If you press START/STOP, re-recording begins from the point you released EDITSEARCH. You cannot monitor the sound.
END SEARCH
BbMOxKTe DoITn DO KOHcA 3aNcAHHOuCTn JeHTbIOcNe BbINONHeHr 3aNcN.
HaxmTe KhoNky END SEARCH B peKmE OxuDAnH. ByUyt BocpnOn3BeDeHbI NocJeDHe 5 cekyHd 3aIncaHHo YacTn, n BOCpOn3BeDeHne OctaHOBHTcR. Bbl MoKeTe KOHTpOJIropOBaTb 3Byk Yepe3 aKyCTNuCeKYIO CNTeMy IIN rJOLOBHble TeNefoHbl.
EDITSEARCH
BbMOKeTe BbIIOJIHrTb NOnCK MeCTa HaHaJa cNeDuOSeI 3aIncn.
Дерхи te haxkaToI CTOpOHy +/- KHONKN EDITSEARCH B pexmE oXnlaHna. Bydet BOCpOn3BeDeHa 3aIncaHna YacTb.
+:ДлгпpoДиЖеньнepeД
-ДЯ npOДВИЖЕн Ha3aД
OTnyCTnTE KhoNky EDITSEARCH nIra octaHObKN BocnpOn3BeDeHn. EcIn Bbl haxMeTe KhoNky START/STOP, hauHeTcna nepe3anncb c TOro MeCt a, rDe Bbl OTnyCTnNI KhoNky EDITSEARCH. Bbl He MoXeTe KOHTpOJIuPoBaTb 3ByK.
Checking the recording - END SEARCH / EDITSEARCH / Rec Review
Rec Review
You can check the last recorded section.
Press the - side of EDITSEARCH momentarily in the standby mode.
The last few seconds of the recorded section are played back. You can monitor the sound from the speaker or headphones.
End search function
When you use a tape without cassette memory, the end search function does not work once you eject the cassette after you have recorded on the tape. If you use a tape with cassette memory, the end search function works even once you eject the cassette.
If there is a blank portion in the recorded portion, the end search function may not work correctly. (p. 129)
You can monitor the playback picture on the LCD screen. If you close the LCD panel, you can monitor the playback picture in the viewfinder. You can control playback using the Remote Commander supplied with your camcorder.
(1) Install the power source and insert the recorded tape.
(2) Set the POWER switch to PLAYER while pressing the small green button. The video control buttons light up.
(3) Slide OPEN. Then, open the LCD panel.
(4) Press to rewind the tape.
(5) Press to start playback.
(6) To adjust the volume, press either of the two buttons on VOLUME. The speaker on your camcorder is silent when the LCD panel is closed.
Bocnpon3BeDeHne JeHTbI
BbMOXeTe KOHtPOINPOBaTb BOCpON3BOJIMOe
IO60paXeHne Ha 3KpaHe KKd. Ecnn Bb 3aKpoTe
NaHEnb KJKD, Bb CMoXeTe KOHtPOINPOBaTb
BOcPON3BOJIMOE IO60paXeHne B BuONCKaTeNe.
BbMOxTe KOHtPOINPOBaTb BOCpON3BEdHeMe C
nOMoIbIO NylTa DnCTAHIOHOrO ynpabLeHnra,
pnInaraeMoro K Bauei BnuDeokamepe.
(1) YCTAHOBITE NCTOHHK NITAHNAI BCTABBTe 3ANICAHYIO JENTHY.
(2) Haxkab MaIeHbkyo 3eJeHyo KhoNky, yCTAHOBITE nepeKJIouaTeB POWER B nIoJoxHe ME PLAYER. POrBnTcR INDkaCuaH KHONoK ynpaBHeHn BUDeOu3o6paXeHMeM.
(3)пгелдьиьткноку OPEN.Затem OTКроштЯненжКД.
Hakmte KONKy dny yckopHHoN nepemotkn JeHTbI HAZd.
(5) HaxmITE KONKY DnB BKJIOUeHnBOCPON3BeDEHn.
(6)Длгэрелровки رомковши Нжима调解 OнHy n3 DByx KhoNOK VOLUME. Ecnn NaHelen JXKД на Вашеви Вideokampe ZeKpbIta, ДИнамк He BydET pa607aTb.
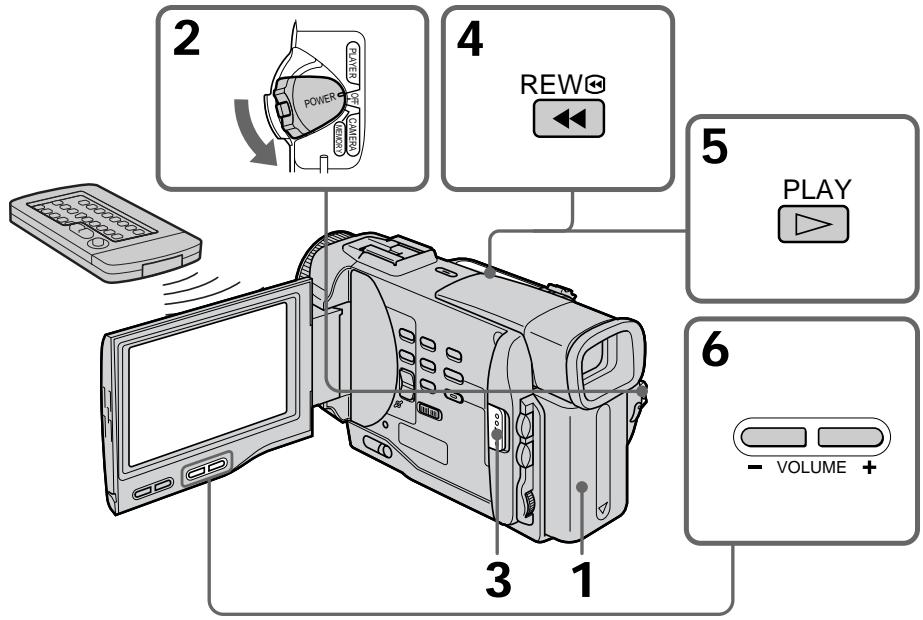
To stop playback
Press ■.
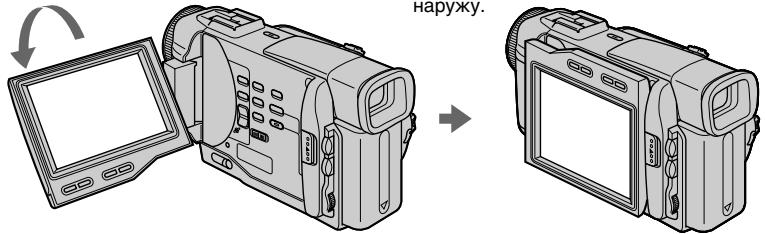
When monitoring on the LCD screen
You can turn the LCD panel over and move it back to the camcorder body with the LCD screen facing out.
Дя OCTaHOBKIN BOCPON3BeDEHNA
HaxmTe KhoIky
BoBpemKoHTpoHa3KpaHeKKD
BbMOKeTe NOBepHyTb NaHEnb ynpaBHeHn I npDBeHNyTb ee 6oPaTHO Ha MeCTo K KopnyCy BInDeOkamebpI, TaK UTo 3kpan KKd 6ydt ObpaueH HApYk.
To display the screen indicators - Display function
Press DISPLAY on your camcorder or the Remote Commander supplied with your camcorder.
The indicators appear on the LCD screen.
To make the indicators disappear, press
DISPLAY again.
Your camcorder automatically records not only images on the tape but also the recording data (date/time or various settings when recorded)
(Data code). Data code is not displayed during recording. You can only operate with the Remote Commander.
Press DATA CODE on the Remote Commander in the playback mode.
The display changes as follows:
date/time various settings (SteadyShot, white balance, gain, shutter speed, aperture value) no indicator

Not to display various settings
Set DATA CODE to DATE in the MENU settings (p. 87).
The display changes as follows:
date/time no indicator
IcnoJb3OBaHne cyHKcN KoJa DaTbI
BaSha Bndeokamepa aBTOMatNueckn
3aINcIbAeT He TOnbKO I3O6paXeHnHa JIeHTy, HO TaKKe I DaHNbIe 3aINcN (DaTy/BpeM INI pa3HbIe yCTaHOBKn PnI 3aINcN) (KoD dAtbl).
KoI daTbI He OTo6paKaaETcB BO BpeM 3aHmCn.
BbMOKeTe NcNoIb3ObA Tb 3Tу fYHKUHToJIbKO C NOMOUsIO NyIbTa DnCTaHnOHHO ynpabLeHn.
Haxmte KhONky DATA CODE Ha nyIbTe DnCTaHUNOHOrO ynpabLeHnB pexIme BOCpOn3BeDeHnA.
INDnkaun6yJeT n3MeHrTaCnEduoUIM 06pa3om:
daTa/Bpem → pa3HbIe yCTaHOBKN (yCTOmYnBaJ CbEmKa, 6aJIaHC 6eIOrO, yCINJIeHne, cKOpocTb 3aTBopa, BELNCHHa dnaΦpaarmbl) → 6e3 INHdNKaUH
AUTO 50 AWB F1.7 9db
ДЯТOrO,ЧTO6bI He OTO6paKaJINc b pa3JIuHbIe YCTaHOBKn
YcTaHOBnTe KOMaHny DATA CODE B noIoxKeHne DATE B yCtHaOBkax MENU (ctp. 87).
INDnkaa 6yTeT n3MeHrTbCnEduOuM 06pa3oM:
JaTa/BpeMa 6e3 INHnIkaCmN
Note
The pictures taken on the Memory Stick are not recorded with various settings.
Recording data
Recording data is your camcorder's information when you have recorded. In the recording mode, the recording data will not be displayed.
When you use data code function, bars (-- - - - ) appear if:
- A blank section of the tape is being played back.
- The tape is unreadable due to tape damage or noise.
- The tape was recorded by a camcorder without the date and time set.
Data code
The data code is displayed on the TV screen if you connect your camcorder to the TV (p. 38).
PpimechaHne
Ha n3o6paxKeHnx, 3aIncaHHbIX Ha Memory Stick, pa3nUHbIe ycTaHOBKn He 3aIncbIBaHTcA.
3aHncaHHbIe daHHbIe
3aHnHbIe DaHHbIe HecyT INHOpMaUH O 3aHNC, BblONJIeHNHO BaSei BNDeOKaMepo. BpeKIme 3aHNC daHHbIe OTobpaKaTbcN He 6yDyT.
EcnBbIncnoJIb3yeTe yHKcNIO KOda
Various playback modes
To operate control buttons, set the POWER switch to PLAYER.
To view a still picture (playback pause)
Press I during playback. To resume playback, press I or
To advance the tape
Press in the stop mode. To resume normal playback, press .
To rewind the tape
Press in the stop mode. To resume normal playback, press .
To change the playback direction
Press < on the Remote Commander during playback to reverse the playback direction. To resume normal playback, press .
To locate a scene monitoring the picture (picture search)
Keep pressing or during playback. To resume normal playback, release the button.
To monitor the high-speed picture while advancing or rewinding the tape (skip scan)
Keep pressing while rewinding or while advancing the tape. To resume rewinding or advancing, release the button.
To view the picture at slow speed (slow playback)
Press on the Remote Commander during playback. For slow playback in the reverse direction, press < , then press on the Remote Commander. To resume normal playback, press
IpepeMeHHbIe peXmMbI BOCnpOn3BeDeHn
Дяьылонпени уралнени KMONКAMY yctанови-tepeknioчateь POWER B noJoxeHne PLAYER.
ДлгпрсмOTpa HeNodBnKHO rO n3o6paXeHnra (nay3a BocnpOn3BeDeHnra)
HaxMnTe BO BpEMB BOCPOn3BeDeHnR KhONKy II. INRA BO3O6HOBJeHnO ObBuHOrO BOCPOn3BeDeHnR HaxMnTe KHONKy IINKONKY
Дя уckopehno nepemOTkn JentbI BnepeD
HaxMMTE B pEXMNE OCTAHOBKN KHNKY ▷.ДЯ BO3O6BONJIENNA O6bIYHOBOCNPOM3BeDEHNA HAXMMTE KHNKY
ДлусокорноpeмOTКЛeHTыHA3aД НахKMITEВ ржиме отоановки KMONKY Дл罗BO6OBHOBJIENHЯ OБьИного ВОсрпОНЗЕDEнHЯхKMITE KONKY
ДлИЗМЕнEHHAmpaBNeHNA BOCPON3BeDEHNA
HaKMTe KhoNky <Ha npIbTe DnCTaHmOHHoY npaBHeHn BO BpeM RAocpOn3BeDeHn Iyra N3MeHeHn HApaBHeHn BocpOn3BeDeHn. Iyra BO306HOBJEHn O6bUHOro BOCpON3BeDeHn, OTNyCTte KhoNky
To view the picture at double speed Press × 2 on the Remote Commander during playback. For double speed playback in the reverse direction, press < , then press × 2 on the Remote Commander. To resume normal playback, press .
To view the picture frame-by-frame Press II on the Remote Commander in the playback pause mode. For frame-by-frame playback in the reverse direction, press . To resume normal playback, press
To search the last scene recorded (END SEARCH)
Press END SEARCH in the stop mode. The last 5 seconds of the recorded section plays back and stops.
End Search
When you use a tape without cassette memory, the end search function does not work once you eject the cassette after you have recorded on the tape.
When you use a tape with cassette memory, the end search function works even once you eject the cassette.
In the various playback modes Sound is muted.
When the playback pause mode lasts for 5 minutes
Your camcorder automatically enters the stop mode. To resume playback, press
Slow playback
The slow playback can be performed smoothly on your camcorder; however, this function does not work for an output signal from the DV OUT jack.
When you play back a tape in reverse Horizontal noise appears at the centre or top and bottom of the screen. This is not a malfunction.
Bocnpon3BeDenHe JeHtbl
Для посмотра BOCPON3BedeHn n3o6paXeHn Ha yDBoEHNo ckopoCTn
HaXMMTe KHOHKy × 2 Ha npIbTe DnCTaHcHNOHHOr ynpaBLeHn BO BpeM BOCpON3BeDeHn.ДЯ BOCpON3BeDEHn Ha yDBoEHHo CKOpOCTn B o6paTHOM HApapBHeHn HaxMMTe KHOHky < , a 3aTEM KHOHKy × 2 Ha npIbTe DnCTaHcHNOHHOr ynpaBHeHn.ДЯ BO3O6HOBeHn OblyHORO BOCpON3BeDEHn HaXMMTe KHOHky
Для пokaцрово npocmoТра BOCPON3BedeHnI N3O6paXeHnI
HaxmTe KhONkY II>Ha npIbTe
DnCTaHIOHOrO UnpaBLeHnB PexKMe nay3bl BocpOn3BeDeHn.ДЯ NOKApOBoro
BOcPOn3BeDeHnB O6paTHOM HapBaJIeHn
HaxmTe KhONkY II.ДЯ BO3o6HOBJIeHn
06bUHOro BOCpOn3BeDeHn HaxmTe KhONkY
ДлиносякносядимeroЗапсан Horo 3nnoda (END SEARCH)
HaxmTe KhoNky END SEARCH B pexnme ocTaHOBKn. ByuT BocnpOn3BeDeHb IocneHne 5 cekyIaIncaHnro yuaCTka Ha IeHTe, nocne Yero BocnpOn3BeDeHne ocTaHOBITcH.
Понск Конца
EcIn BbI nCnOJIb3yeTe JeHTy 6e3 KaccTeHoi
nAMrTn, fYHKUIN NOcKa KOHua He 6yDeT
paBOTaTB NocLe N3BLeueHnKacCEtbl, HaJeHTy
KOTOpOI 6blA BbINOLHeHa 3aNNb.
EcIn BbI nCnOJIb3yeTe JeHTy C KaccTeHoi
nAMrTbIO, fYHKUIN NOcKa KOHua 6yDeT
paBOTaTB DaJKe NocLe N3BLeueHnKacCEtbl.
B nepemHeHbIX pexImax BocpOn3BeDeHn 3Byk 6ydet nprrnyuhen.
EcnI pexn may3bl Bocnpon3BedeHn npoDnTc4 5 MNyT
BaSha BnDeOkamepa aBtOMaTnueckn BoiDet BpeKIM ocTaHOBKn.ДЯ BO3O6HOBNeHNA BOCpON3BeDHeHNA HAXMITE KHOKNY
3aMeIeHHoe BocnpOn3BedeHne
3aMeIeHHoe BocPOn3BeHHe MoKeT BbIIOHHTbcra Ha BaWe BnDeOkAmepe 6e3 NOMex; OHaKo 3Ta cyHKunr He pa6oTaet Chepe3 BbIXoHDn CnHnI n3 rHe3da DV OUT.
При Воспpon3ВedeHи ЛeHTыВ образногнанравлеси <|im_start|>assistant
Ha 3kpahe MOryT NOBNTbcr RopnOHTaJIbHbIe NOMEXN IO CEHTpy INJX JKe BBepxu INBn3y 3KpaHa. 3TO He ABnErcr HEnCnPaBHOCTbIO.
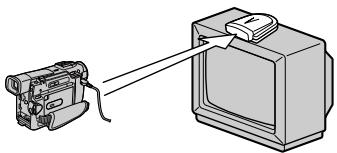
Viewing the recording on TV
Connect your camcorder to your TV or VCR with the A/V connecting cable supplied with your camcorder to watch the playback picture on the TV screen. You can operate the playback control buttons in the same way as when you monitor playback pictures on the LCD screen. When monitoring the playback picture on the TV screen, we recommend that you power your camcorder from the mains using the AC power adaptor (p. 18). Refer to the operating instructions of your TV or VCR.
Open the jack cover. Connect your camcorder to the TV using the A/V connecting cable. Then, set the TV/VCR selector on the TV to VCR.
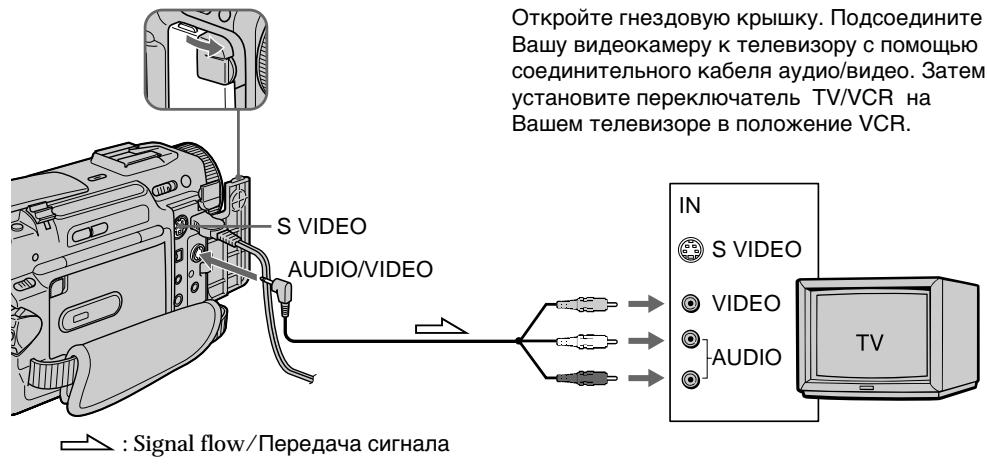
If your TV is already connected to a VCR
Connect your camcorder to the LINE IN input on the VCR by using the A/V connecting cable supplied with your camcorder. Set the input selector on the VCR to LINE.
Пресмтг заимсниэкpaneх телевизopa
IoiocoeiHInTe Bauy BnDeokamepy K BaueMy TeLeBn3Opy nIIN KBM c nomoubIO coeHNHTelbHoro Ka6eJy ayDIO/BnDEo, KOtOpby npnilaraetcR K Bauey BnDeokampe dI pyncMOrpa BOCnpOn3BODMORO n3o6paxHHe Ha 3KpaHe TELeBn3Opa. Bbl MOxTe OEPnpOBaTb KHONkAMN ynpABLeHnRA BOCpOn3BeDEHem TaKIM Xe CIOcO6M, KaK npu ynpAbeHn BOCnpOn3BODMbIM n3o6paxHHe Hn 3KpaHe JKKD. Ppi ynpAbeHn BOCnpOn3BODMbIM n3o6paxHHe Hn 3KpaHe TELeBn3Opa peKOMeHdyETcnojKnOuTHb NITaHne K Bauey BnDeokampe ot ceTeBOy po3eTKc n NOMOuBu cTeBTO r aanTepa nepemEHoro ToKa (CTp.18).Cm. IHCTpyKzIO NO 3KcPJIyaTaucn Baawero TeLeBn3Opa nIIN KBM.
OTkpOte THe3D0BvO KpbIuKy. NOpCoEInHnTe BaUy BnDeOkamepy K TeLeBn3OpY C NOMoUbO CoeHNHTeBHorO Ka6eY ayDIO/BnDeO. 3aTeM, yCTaHOBe TnepeKJIouHaTeNb TV/VCR Ha BaWem TeLeBn3Op E NpOnJxHne VCR.
EcIn BaW TeJIeBn3Op yXe npDCoeDInHeN K KBM
IopDCoeDHHnTe BaSy BnDEOKaMepy K BxOJHOMy rHe3dy LINE IN Ha KBM c nOmoBHO coEHNHTeJIbHoro Ka6eJa aydno/BnDeo, KOtOpBn npInaraeTc KaBaSe BnDEOKaMepe. YcTaHOBnTe CeNEKTop BxOJHOro CnHaHa Na KBM B noLoXKeHne LINE.
If your TV or VCR is a monaural type
Connect the yellow plug of the A/V connecting cable to the video input jack and the white or the red plug to the audio input jack on the VCR or the TV. If you connect the white plug, the sound is L (left) signal. If you connect the red plug, the sound is R (right) signal.
If your TV/VCR has a 21-pin connector (EUROCONNECTOR)
Use the 21-pin adaptor supplied with your camcorder.
EcnBaw TeIeBn3Op nJN KBM MOHOΦOHNueCKOro Tnna
IoioceHInHe JeTbI WTeKepe CoeHNHTeBHoro Ka6enA ayDnO/BnDeO K BxODHomy THe3dy BNDeOCnHa, a 6BeIy Inn KpaChbI WTeKepe K BxODHomy THe3dy ayDnOCnHaHa Na KBM nIu TeLeBn3ope. EcnB Bi noCoeHInTe 6BeIy WTeKepe, To Bbl nonyHte CnHaN kAna L (neBoro). A ecn Bbl noCoeHInTe KpaChbI WTeKepe, To Bbl nonyHte CnHaN kAna R (npaBoro).
EcniB Baawem TeleBn3ope/KBM mMeetc 21-7bIpbkoBbI pa3beM (EUROCONNECTOR)
IcnoIb3yIte 21-ItbIpbKOBbl aIaTep, npnlaeraMbl K BaWe BInDeokamepe.
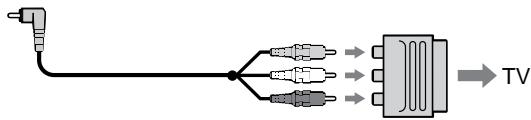
If your TV or VCR has an S video jack Connect using an S video cable (not supplied) to obtain high-quality pictures. With this connection, you do not need to connect the yellow (video) plug of the A/V connecting cable. Connect the S video cable (not supplied) to the S video jacks on both your camcorder and the TV or the VCR. Refer to the operating instructions of your TV. This connection produces higher quality DV format pictures.
EcIn B BaWem TeJIeBn3ope nI KBM IMeeTc rHe3do S bVdeo.
BbIIOJIHnTe CoeINHeHne c nOmoUbIO Ka6eJIa S BnDeo (He npInlaeraTcA) dNl nOlyueHnra BBICOKOKaueCTBeHHoro N3o6paXeHn. PnI daHHOM CoeINHeHn Bam He HuxHo NOcOeINHrTB XeNTbI WTeKeP (BnDeo) COeINHnTeJIbHOro Ka6eJIa ayDnO/BnDeo. IOncOeINHnTe Ka6eJIb S BnDeo (He npInlaraeTcA) K rHe3dAm S BnDeo Ha BaSei BnDEOkampe n BaWem TeLeBn3ope nII KBM. O6patntecb K INCTpyKcIMn PO 3KcNpYatauim Baawero TeneBn3opa. 3To IOcOeINHeHne n03BOJnAE TNOyUHTb BlicOKOKaueCTBeHHoe n3o6paXeHne fOpMaTa DV.
Using the AV cordless IR receiver
Once you connect the AV cordless IR receiver (not supplied) to your TV or VCR, you can easily view the picture on your TV. For details, refer to the operating instructions of the AV cordless IR receiver.
IcnoJb3OBAHne 6ecnpoBOdHorO IK aydnOBnDeOpnpemHnka
Iocne noDCoeHHeHn 6ecnpoBODHoro IK ayDNOBnDeOpnpnEMnHa Ka BaWemy TeNeBn3opy (He pnnaraeTc) Bbl MoKTe JERKO HabNDoTa b3o6paXHeH Na 3kPaH eBaWero TeteBn3opa. POndpoBHe CbeDeHn CoepKaTcB INHCTpyKmNo IOKnPyAtaTuM 6ecnpoBODHOrO IK ayDNOBnDeOpnpnEMnHa.
LASER LINK
LASER LINK emitter/Излуател LASER LINK
(1) After connecting your TV and AV cordless IR receiver, set the POWER switch on the AV cordless IR receiver to ON.
(2) Turn the TV on and set the TV/VCR selector on the TV to VCR.
(3) Press LASER LINK. The lamp of LASER LINK lights up.
(4) Press on your camcorder to start playback.
(5) Point the LASER LINK emitter at the AV cordless IR receiver. Adjust the position of your camcorder and the AV cordless IR receiver to obtain clear playback pictures.
(1)Послne посоeДинEHЯ K BaшeMy TeLEBn3opy BeCnpoBOdHOrO IK ayDNOBuDeOpnEhMnHa yCTaHOBHTe peKeILOuChaTeIb POWER HA beCnpoBOdHOM IK ayDNOBuDeOpnEhMnHe B noJoxeHne ON.
(2)ВключITE TeleBn3Op uYcTaHOBuTe CeJIeKTop TV/VCR Ha TeleBn3Ope B noJoxKeHne VCR.
(3)HaxMMTe KhoNky LASER LINK. BbICBeTnTcR JAMnOuKa LASER LINK.
(4)HaxKMnte KHOIpKy ▶Ha BaIeien BUNeOKaMepe DnA NaHaJIa BKJIIOUeHINBOCNPOM3BeDEHIN.
(5) HanpaBbTe n3nyuataIb LASER LINK Ha 6ecnpoBoDhbI NK aydnoBvJeOpnEmHnK. Otperyu npyIte noIooJHne BaIeN BnuDeokampebl 6ecnpoBOHorO NK aydnoBvJeOpnEmHnKa IJrNoIyueHnY qETKOrO BOCpOn3BODmORO n306paXeHnA.
To cancel the laser link function
Press LASER LINK. The lamp on the LASER LINK button goes out.
If you turn the power off
Laser link turns off automatically.
Note
When laser link is activated (the LASER LINK button is lit), your camcorder consumes power. Press LASER LINK to turn off the laser link function when it is not needed.
Длг OTMeHbI Φункци ЛаЗepHOrO KaHaJa NepeDaHu CnRHaJIOB
HajmTe KhoNky LASER LINK. JAmnoUka Ha KhoNke LASER LINK norachet.
EcN BbI BbIKIOUHTe NHTaHne
Ja3epHbKaHaJIpeeaCnHaIIOB BbIKJIOUHTcA BtOMaTInCeKn.
PpmeuHne
Прв BKЛIOUeHOM La3ePOM KaHaJIe nepeДaчИ СИгнALOB (Прв 3ТOM BbICBEHbAeTcR KHOПКа LASER LINK) BaSA BnDEOKAMepa notpe6JIeT питанIE. HabKmTe KhoNkY LASER LINK ДЯ БИКЛIOUeHЯФуHKIMI Na3ePHorO KaHApA nepeДaчИ сИгнALOB,ЕСЛОА Ие Тpe6ByeTcR.
Photo recording
You can record a still picture like a photograph. This mode is useful when you want to record a picture such as a photograph or when you print a picture using a video printer (not supplied).
You can record about 510 pictures in the SP mode and about 765 pictures in the LP mode on a 60-minute tape.
Besides the operation described here, your camcorder can record still pictures on Memory Sticks (p. 106) (DCR-TRV10E only).
(1) Set the POWER switch to CAMERA.
(2) In the standby mode, keep pressing PHOTO lightly until a still picture appears. The CAPTURE indicator appears. Recording does not start yet.
To change the still picture, release PHOTO, select a still picture again, and then press and hold PHOTO lightly.
(3) Press PHOTO deeper.
The still picture in the viewfinder or on the LCD screen is recorded for about seven seconds. The sound during those seven seconds is also recorded.
During recording, the still image you are shooting appears in the viewfinder or on the LCD screen.
ΦOTOCbEMKa
BbMOKeTe 3aINcBbATb HEnoDbNxHoe n06paXeHne pOIO6Ho FOToTpArpn.
Даньий реким полесен, ecIn Bbl xotinte 3aINcBbA Tb N3O6paXeHne B VnDE φOTOCHMka INJI Xe pIn BblONJIHnN OTNeYaTKOB C nOMOsbIO BVIDeONpIHTepa (He npinaraetc).
BbMOxKeTe 3aIncatb Okono 510 n3o6paXeHn BpeXmE SP u OKONo 765 n3o6paXeHn B peXmE LP Ha 60-MnHyThoJ neHTe.
Kpome npBBeHNoB BbIe onepaun, Ba7a BnDEOKaMepa MOxET BbIOJIHNtB 3aINCb HnOoBNXhBIX N3o6paJxHn Ha Memory Stick (cTp.106) (ToIbKO MoJeNb DCR-TRV10E).
(1)Установпейреклочаель POWER в положене CAMERA.
(2)В рекиме окданаши дрхи te cnerka hajkaToI KhoNkpy PHOTO do tex nop, noka He noRbTcH HeNoDbWxHoe u3o6paXeHne. IohBtCn HnDnKaTop CAPTURE. 3aInCb noka eSe He NaJaIacb.
ДяиИЗменин HeNodBnKHOro
I3O6paXeHЯ OTnyCTHTe KhONkY PHOTO,
BbIbepInTe HeNodBnKHOe I3O6paXeHne
CHOBA,a 3aTeM hAXMnte I depXnTe cIerKa
haxaToI KhoNkY PHOTO.
(3)HaxmTe KhoNky PHOTO cnIbHee. HeoDbnKHOe n3O6paKeHne B BuOnckaTeNe nHa n3KpaHe KKd 6yDet 3aINCbIBaTbCra OKJIO cEmn cKynD.B TeueHne 3TuX cEmn cKynD 6yDet 3aINCbIBaTbCra N3BYK.
Bo Bpem 3aIncn, n3o6paXeHne, KOtOpoe Bbl ChmMaTe, IONBNTcB BVIOOnCKaTeNe nnHa 3KpaHe KKd.


PHOTO
2
CAPTURE

PHOTO
3
Notes
- During photo recording, you cannot change the mode or setting.
- During photo recording, you cannot turn your camcorder off or press the PHOTO button.
- When recording a still picture, do not shake your camcorder. The picture may fluctuate.
- The photo recording function does not work: - while the fader function is set or in use - while the digital effect function is set or in use
- When ±b flashes, the appropriate brightness may not be obtained.
- When you start photo recording, from normal CAMERA recording, the video flash light (not supplied) does not work ( ±b does not appear).
If you record a moving subject with photo recording function
When you play back the still picture on other equipment, the picture may fluctuate.
To use the photo recording function using the Remote Commander
Press PHOTO on the Remote Commander. Your camcorder records a picture on the LCD screen or in the viewfinder immediately.
To use the photo recording function during normal CAMERA recording
Press PHOTO deeper. The still picture is then recorded for about seven seconds and your camcorder returns to the standby mode. You cannot select another still picture.
Приимechanicals
-BoBpemФOToCbEmKnBbIHeMOKeTe N3MeHrTbpeKIMUNYCTaHOBky.
- Bo BpemФOToCbEmKn Bbl He MoKeTe BbIKIIOuTaB BaUy BNdeOkaMepy NIn HaxkMaTb KhONKy PHOTO.
-ПиЗЗпICИн HeNoДВИЖНО ИЗБрахжЕнЯ HeТРсITE BaMu BInDeOKamepy.ИЗБрахжЕнe MоКeт 6bItb HeYCTOЛHnBbIM.
-ФункцифOTOCbEMKn He pa6OtaeT: -BTOBpEMK, KOrJa yCTaHOBJIeHa NIN INCNoJIb3yETcRФункцифEДepa.
BTO Bpemr, KOrda yCTaHOBJeHa NIN NCNoJIb3yETcFpyHKUuIuPPOBbIX 3ΦΦeKTOB
BoBpemMnraHnIhDnkaTopaHaIeJXaaJrpkOCTbN3o6paKeHnMOKet6bItb6bItbHeNoJIyHeHa.
- EcnBbHaHnHeTe foToCbeMky n3 noJIOXeHHnOBbUHOH 3aIncn CAMERA, naMaBaBNeOBCnbIbIKn (He npnilaraetc) He 6ydetpa6oTaTb (INHdkaTop 4 He NOBHTc).
EcIn Bbl BbInonHaeTe 3aNcB DnKyUeOc0 obBeKta c NOMoMbIO fYHKunf oTOocBemKn
PnBBOcnpOn3BeDeHn HHeoDbNxHoro n306paXeHnHaDpyroAnnapaType n306paXeHne MoKeT 6bItb HeYcToMnHBIM.
ДлИ NCПОЛБ3OBAHINФУнкIMФOTOCБEMКС NOMOUIIpyIbTa DnCTaHUNHOYOrуnpabJIeHIN
HaxmTe KhoNky PHOTO Ha nyIbTe DnCTaHcUOnHOrO ynpaBLeHnA. Ba7a BnDEOkamepa TOTtac Xe 3aNiWeT N3o6paKeHnHa 3KpaHe KKД nIn B BnDOnCKaTeNe.
ДлЯ Исторьоградункции ФотOCБЕМКИ BO Вразma 06byHOn 3aPnCn CAMERA
Haxmnte KhoNky PHOTO noCinbHee.
HenoDbnKHOe 306paXeHne 6ydt 3aNcBbTaBcOKOIO CeM cKeYHd, a 3aTeM BInDeOKaMePaBepHeTcBpeKIM OxuHaHna.
BbI He CMOXKeTe npn 3TOM Bbl6paTb Dpyroe HENoDBrNkHoe N3O6paXeHne.
Printing the still picture
You can print a still picture by using the video printer (not supplied). Connect the video printer using the A/V connecting cable supplied with your camcorder.
Connect it to the AUDIO/VIDEO jack and connect the yellow plug of the cable to the video input of the video printer. Refer to the operating instructions of the video printer as well.
If the video printer is equipped with S video input
Use the S video connecting cable (not supplied).
Connect it to the SVIDEO jack and the S video input of the video printer.
EcIn B BnDeOpnpHTepe NMeeTcBxOaHoe rHe3do S BnDeo
NcnoIb3yIte coeHNHtIbHbI Ka6eIb Ka6eIb S BnDeo (He npnilaeraTcra). POnCoeHNHTe erO K rHe3dy S VIDEO n Ko BXoHOMy rHe3dy S BnDeo ha BnDeOpnHTepe.
Using the wide mode
You can record a 16:9 wide picture to watch on the 16:9 wide-screen TV (16:9WIDE). Black bands appear on the screen during recording in 16:9WIDE mode [a]. The picture during playing back on a normal TV [b] or a wide-screen TV [c] are compressed in the widthwise direction. If you set the screen mode of the wide-screen TV to the full mode, you can watch pictures of normal images [d].
In the standby mode, set 16:9WIDE to ON in the MENU settings (p. 87).
B pexime oKuJaHnY yCTaHOBtE KOMaHny 16:9WIDE B noJooKeHne ON B yCTaHOBkax MENU (ctp. 87).
To cancel the wide mode Set 16:9WIDE to OFF in the MENU settings.
You cannot select the old movie function with DIGITAL EFFECT and the bounce function with FADER.
During recording
You cannot select or cancel the wide mode.
When you cancel the wide mode, set your camcorder to the standby mode and then set 16:9WIDE to OFF.
IcnoJb3OBAHne uHPOKO3KpaHHoro peKIma
B shpoko3kpaHHom peknme
BbI He MoKeTe BbI6paTb fynKcNIO CTapINHOro KnHO C nOMOuBIO fynKcNIM DIGITAL EFFECT IN fynKcNIO nepeCKaKNBaHN C nOMOuBIO fynKcNIM FADER.
BoBpeMa 3aIncn
BbHe MoXKeTe N3MeHnTb INJN OTMeHnTb 1IpOKo3KpaHHbIpeXIM.
EcIn Bb OTMeHnTe ⅢnpOKo3KpaHHbpeKIM, yCTaHOBnTe BaSy BuDeokamepy B peKIM OxndaHnA, a 3aTeM yCTaHOBnTe peKIM 16:9WIDE B noJIoKeHne OFF.
You can fade in or out to give your recording a professional appearance.
BbMOKeTe BbIOJNHTb PnABHO BBeDeHne N BbIEDeHne N3O6paXeHNA, YTO6bI PnJaTb BaWei CbeMke IpoQeCCNoHaJIbHbI BnD.
[a]
STBY
REC
FADER

M.FADER (mosaic)/(m03aɪka)


BOUNC*
(Fade in only)/
(Tolbko BVeDeneHne n3o6paXeHn)

OVERLAP
(Fade in only)/
(Tolbko BVeDeneHne n3o6paXeHnA)
[b]
STBY
REC
MONOTONE
When fading in, the picture gradually changes from black-and-white to colour.
When fading out the picture gradually changes from colour to black-and-white.
- You cannot use this function when D ZOOM is set to ON in the MENU settings.
MONOTONE
При ВБЕДECHИ N3OБРAXКЕпE 6уDET NOCTENEHNO N3MehaTbca OT YePHO-6eNOro Do ZBeTHoro.
(1) When fading in [a]
In the standby mode, press FADER until the desired fader indicator flashes.
When fading out [b]
In the recording mode, press FADER until the desired fader indicator flashes.
The indicator changes as follows:
FADER M.FADER BOUNCE
MONOTONE OVERLAP
no indicator
The last selected fader mode is indicated first of all.
(2) Press START/STOP. The fader indicator stops flashing.
After the fade in/out is carried out: Your camcorder automatically returns to the normal mode.
Before the fade in/out is carried out: Before pressing START/STOP, press FADER until the indicator disappears.
Длг OTMeHbI Функци Фeндара
Iocne toro, KaB BInOnHeO BVeDeHnE/ BBBeHnE N36paKeHnR: Ba7a BInDeOkAmpa aBTOMaTnueckn BepHeTcB O6bUHyb peXm. PpeJ Te, KaB BInOnHnTb BVeDeHnE/ BBBeHnE N36paKeHnR: PpeJ Te, KaH naKaTb KNoNkY START/STOP, NaXmaiTe KNoNky FADER Do Tex nop, noka He nCye3het INDnKaTOp.
Note
You cannot use the following functions while using the fader function. Also, you cannot use the fader function while using the following functions.
- Digital effect
- Low lux mode of PROGRAM AE (Overlap function only)
- NightShot +Slow shutter
- Photo recording
When the OVERLAP indicator appears
Your camcorder automatically stores the image recorded on a tape. As the image is being stored, the OVERLAP indicator flashes fast, and the playback picture is displayed. At this stage, the picture may not be recorded clearly, depending on the tape condition.
When START/STOP MODE is set to or 5SEC You cannot use the fader function.
While using the bounce function, you cannot use the following functions:
- Exposure
-Focus
-Zoom - Picture effect
Note on the bounce function
The BOUNCE indicator does not appear in the following mode or functions:
-D ZOOM is set to ON in the MENU settings
- Wide mode
- Picture effect
- PROGRAM AE
PpimeyaHne
BbHe MoKTe NcNoIb3OBA Tb CJeDyIoUne
fYHKuIN BO BpEmr NcNoJIb3OBAHn r CyHKuIN
peJepa.TakKe,BbHe MoKTe NcNoJIb3OBA Tb
fYHKuINo fpeJepa BO BpEmr NcNoJIb3OBAHn
CJeDyIoUnx FyHKuIN.
-LinФpoBoI ΘΦΦeKT
-PexKIM Hn3KoO OCBeUeHNoCTN PROGRAM AE (ToJbKO fYHKsna HaLoKeHna)
-Houha CbemKa +MeJlENHbI 3aTBop
-ΦOTOCbEMKa
EcJIN NOBNTcHnDnKaTOp OVERLAP
Baisha Bnideokamepa aBTOMaTNUeCKn COxpaHNT n3o6paxeHne HaJeHTe.BoBpeMraCOxpaHeHn n3o6paxeHn HnDnKaTOp OVERLAP 6ydet 6bICTPO MIRATb N 6yDet OTO6paxKaTcBocPOn3BODnMoE n3o6paxeHne. Ha 3tOM 3TaIe N3o6paxeHne MOKeT 6bITb 3aIncAoH neYeTKO B 3aBNCIMOCtN OT OCCTOHN JIeHTbl.
EcIn KOMaHa START/STOP MODE yCTaHOBJIeHa B noJIOXeHne I JnI 5SEC:
BbI He MoXeTe IcNoJIb3ObaTb cyHKUHO feiepa.
Bo BpemnncnoB3OBaHHyHKcnn nepeckaknBaHH BbI He moKeTe nCNOB3OBAt cJeDyUoNe cyHKcnn:
-3Kcno3nua
-ФokycnpOBka
-TpaHcΦokaun
-3cpfeKTn3o6paXeHn
PpmeaHne no yHKnnepeckaBbHa
HdkaTop BOUNCE He noBnEeTcB CLeDyUoXx peKImax nIIN npu nCIOb3OBAHn CLeDyUOxN cyHKcN:
-Komahda D ZOOM yctahOBnHa B nIOJKeHne ON bYcTaHOBkax MENU
-Шпрокозкразнный реким
-3ΦΦeKt n306paKeHnA
-PROGRAM AE
Using special effects - Picture effect
You can digitally process images to obtain special effects like those in films or on the TV.
NEG. ART [a]: The colour and brightness of the picture is reversed.
SEPIA : The picture is sepia.
B&W: The picture is monochrome (black-and-white).
SOLARIZE [b]: The light intensity is clearer, and the picture looks like an illustration.
SLIM [c]: The picture expands vertically.
STRETCH [d]: The picture expands horizontally.
PASTEL [e]: The contrast of the picture is emphasized, and the picture looks like an animated cartoon.
MOSAIC [f]: The picture is mosaic.

[a]
[b]
[c]
IcnoJb3OBAHne CneuJaNbHbIX 3ΦΦeKToB - ΘΦΦeK Tn3o6paXeHnA
BbMOKTe BblONHrTb 6pa6Otky
13o6paXeHnI cIpPoBBIM MeToOM dJI
10nyEnn CneuaJIbHbIX 3cEKeTob, KaB
KNHOJIbMax IIN Ha 3KpaHax TeNeBu3OpOB.
Select the desired picture effect mode in the MENU settings (p. 87).
BbI6epNTe JxenaemblpeKIM3ΦΦeKTa n3o6paXeHnB yCTaHOBkax MENU (cTp. 87).
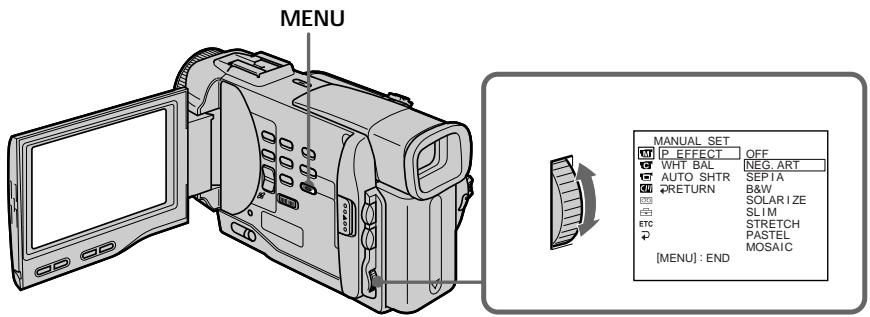
To turn the picture effect function off
Set P EFFECT to OFF in the MENU settings.
During playback, you can process a scene using the picture effect function
The available picture effects are NEG. ART, SOLARIZE, SEPIA and B&W.
While using the picture effect function
You cannot select the old movie mode with DIGITAL EFFECT.
When you turn the power off
Your camcorder automatically returns to the normal mode.
If you select the picture effect mode in the recording mode
Pictures processed by the picture effect function will be recorded.
When the POWER switch is set to PLAYER
The SLIM, STRETCH, PASTEL and MOSAIC
indicators do not appear in the MENU settings.
ДЯ BBKJIIOUeHЯ ФунКцин эффeKta n3o6paXeHЯ
YcTaHOBnTe KOMaHny P EFFECT B noIooKeHne OFF BycTaHOBkax MENU.
Bo BpemBocnpn3BeHnBb MoKeTe BbINoJHrTb 6pa6OtKy 3N3Oda C NOMOu bU yHKun 3ΦΦeKta n3o6paXeHn
Фф�ektamn n3obpaxeHЯвлгOTcN NEG. ART, SOLARIZE, SEPIA n B&W.
PnncnoB3OBaHm FyHKcH NΦΦekTa n3o6paXeHn
BbI He MoXKeTe BbI6paTb peKIM cTaPunHoro KIno C nOMOuBHO yHKnN DIGITAL EFFECT.
Ecnn BbI BbIKIOHTe NtTaHne
BaSHA BnDEOKaMepa aBTOMaTNUeCKN BepHeTCB O6bIHyI pEXIM.
EcIn BbI BbIbepnTepeKIM 3ΦΦeKtAn306paXeHnBpeKmE3aINc
N3o6paKeHn, BUNOIN3MeHHeHbIe C NOMOuB OfynKcun 3oΦeKTOB N3o6paKeHn, 6yDyT 3aIncahbl.
EcnI nepeKlnuOaTeIb POWER yCTaHOBJIeH B noJoxKeHne PLAYER
Индикаторы SLIM, STRECH, PASTEL m MOSAIC He noBbTcB yctaHOBkax MENU.
Using special effects - Digital effect
You can add special effects to recorded pictures using the various digital functions. The sound is recorded normally.
STILL
You can record a still picture so that it is superimposed on a moving picture.
FLASH (FLASH MOTION)
You can record still pictures successively at constant intervals.
LUMI. (LUMINANCEKEY)
You can swap a brighter area in a still picture with a moving picture.
TRAIL
You can record the picture so that an incidental image like a trail is left.
SLOW SHTR (SLOW SHUTTER)
You can slow down the shutter speed. The slow shutter mode is good for recording dark pictures more brightly. However, the picture may be less clear.
OLD MOVIE
You can add an old movie type atmosphere to pictures. Your camcorder automatically sets the wide mode to ON, picture effect to SEPIA, and the appropriate shutter speed.
IcnoJb3ObaHne cNeuaJIbHbIX 3ΦΦeKToB - LInΦpOBoN 3ΦΦeKT
BbMOxTe Do6aJIbTb CneUaJIbHbIe 3ΦΦeKtB K 3aINCbIbAeMOMy N3O6paXeHNIO C NOMOuH O pa3HbIX UcΦpOBbIX ΦyHKU. 3aINCbIAeMbI 3Byk 6ByET ObiUHbIM.
STILL
BbMOKTe 3aIINcIbA Tb HeNoDBHXHOe n3o6paXeHne, KOtOpoe MOxHO HanaRaTb Ha nOdBnXHoe n3o6paXeHne.
FLASH (FLASH MOTION)
BbMOKeTe 3aINcBbAtb HEnoDnXHbIe
H3O6paXeHnB INocJeIOBaTeJIbHOCTN Upe3
ONpeJenEHhBe INHTepBaJIbI.
LUMI. (LUMINANCEKEY)
BbMOKeTe N3MeHrTbApKHe MeCtHa HEnoDBNIXHOM N3O6paXeHn Ha NDoBnXhIe N3O6paXeHn.
TRAIL
BbMOxKeTe 3aINcMbA Tb IN3O6paXeHne C 3ΦΦEKTOM 3ana3DbBaHnI.
SLOW SHTR (SLOW SHUTTER)
BbMOxKeTe 3aMeIINITb CKOpOCTb 3aTbopa. PExKIM MeIeHHOrO 3aTbopa RbIeTcN IOXoJnIM DnIg 3aInc TEmhIx N3O6paXeHn B6Oee npKOM CBte. OdHaKO, I3O6paXeHne MOxKET NOJyUHTbc MEHee YetKIM.
OLD MOVIE
BbMOxKeTe npINBHOCnTb aTMoccpepy CTapHHNHO KIno B N3O6paXeHn. Ba7a BnDEOKamepa 6yDet ABTomatueckn yCTaHaBnBaTb 1IpiPOkO3KpaHnBpeKIM B nIOJoxHe ON, 3ΦΦeKT N3O6paXeHn B nIOJoxHe SEPIA, IN BbICTabnTb COOTBeTCTByIOUyIO CKOpOcTb 3aTBopa.
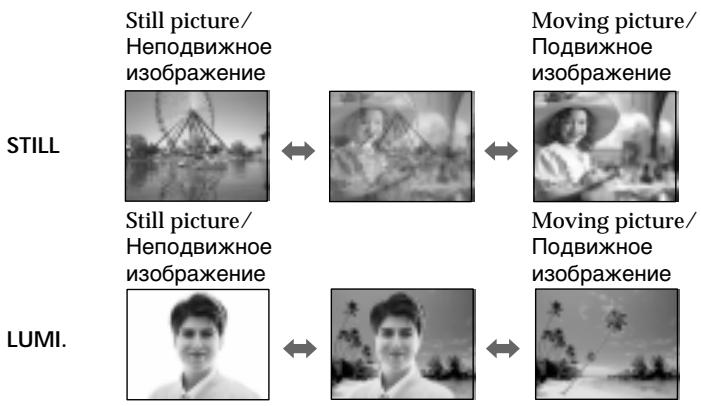
(1) While your camcorder is in the standby or recording mode, press DIGITAL EFFECT. The digital effect indicator appears.
(2)Turn the SEL/PUSH EXEC dial to select the desired digital effect mode. The indicator changes as follows: STILL FLASH LUMI. TRAIL SLOW SHTR OLD MOVIE
(3) Press the SEL/PUSH EXEC dial. The indicator lights up and the bars appear. In the STILL and LUMI modes, the still picture is stored in memory.
(4) Turn the SEL/PUSH EXEC dial to adjust the effect.
Items to adjust
| STILL | The rate of the still picture you want to superimpose on the moving picture |
| FLASH | The interval of flash motion |
| LUMI. | The colour scheme of the area in the still picture which is to be swapped with a moving picture |
| TRAIL | The vanishing time of the incidental image |
| SLOW SHTR | Shutter speed. The larger the shutter speed number, the slower the shutter speed. |
| OLD MOVIE | No adjustment necessary |
The more bars there are on screen, the stronger the digital effect. The bars appear in the following modes: STILL, FLASH, LUMI, and TRAIL.
(1)BTOBpemKoIaBaAuaBndeokamepa haoDNTcBpeXmE OxuDaHnN npexkme 3aIncn,HaXMnte KHOkny DIGITAL EFFECT.PoBbTcHnDnKaTop uDpOBOrO 3d6ekTa.
(2)ПовернITE диСК SEL/PUSH EXEC Дпь Вьбopa ржима Нжного сфрворо офдект. Инданкетop 6удET Измehаьс РдуюшIM o6pa3om: STILL FLASH LUMI. TRAIL SLOW SHTR OLD MOVIE
(3)HaKmTe nck SEL/PUSH EXEC. BbICBeTnTcN INHdkaTOp nIOBRTcN NOIocbl B peximax STll LUMl. HenoDbXhHoe nO6paXeHne 6ydt CoXPaHEno B naMTe.
(4)ПовернITE ДИСК SEL/PUSH EXEC Дпя ретулровки зафөгкта.
IyHKtbI dIa peYnnpOBKn
To cancel the digital effect
Press DIGITAL EFFECT. The digital effect indicator disappears.
Notes
- The following functions do not work during digital effect:
-Fader - Low lux mode of PROGRAM AE
- Photo recording
- NightShot +Slow shutter
- The following function does not work in the slow shutter mode:
- PROGRAM AE
- The following functions do not work in the old movie mode:
- Wide mode
- Picture effect
- PROGRAM AE
When you turn the power off
The digital effect will be automatically canceled.
When recording in the slow shutter mode
Auto focus may not be effective. Focus manually using a tripod.
Shutter speed
| Shutter speed number | Shutter speed |
| SLOW SHTR 1 | 1/25 |
| SLOW SHTR 2 | 1/12 |
| SLOW SHTR 3 | 1/6 |
| SLOW SHTR 4 | 1/3 |
ДЯ OTMeHbI UΦpOBOrO 3ΦΦeKtA
HaxmTe KhoIky DIGITAL EFFECT. INHdkaTop zuΦpOBOrO əΦΦeKta nCue3HeT.
Приимechanicals
CJeIyUOJIeФyHKcIIH He pa6oTaIOT npnIcNoJIb3OBAHN UcΦpOBOrO əΦΦeKtA:
-Φeɪdεp
-PexkIM Hn3KoO OcBeueHocTn PROGRAM AE
-ΦOTOCbEMKa
-HoHOn CbemKa +MeJleHHbI 3aTBOp
CJIeIyUOuaH cyHKuIN He pa6oTaET BpeKIme MeIeHHOrO 3aTBopa:
-PROGRAM AE
CLeNyUOuNEyHKuINHe pa6oTaIoT BpeXnMeCTapuHHoro KInHO:
-山npoko3KpaHbIpeXIM
-3ΦΦeKt n306paXeHn
-PROGRAM AE
PnBbIKJIIOHeHNIITaHNA
LcfoboB OeFekT 6yET aBTOMaTneCKN OTMeHEN.
Pn3aHncBpeXmmeMeJleHoro 3aTBopa
ABTOMaTnueckaФOKcnpOBKa MoKET 6bITb He 3ΦeKTnBHO. BbINOHteФOKcnpOBky BpyHyIO, NcNoJIb3yI TpeHory.
CKopoctb 3aTbopa
| Величина скорoctи 3аТьopa | Скорочь 3аТьopa |
| SLOW SHTR 1 | 1/25 |
| SLOW SHTR 2 | 1/12 |
| SLOW SHTR 3 | 1/6 |
| SLOW SHTR 4 | 1/3 |
Adjusting the white balance manually
You can manually adjust and set the white balance. This adjustment makes white subjects look white and allows more natural colour balance. Normally white balance is automatically adjusted.
In the standby or recording mode, select the desired white balance mode in the MENU settings. (p. 87)
The selected white balance indicator appears.
AUTO (Automatic white balance mode): no indication
HOLD (Hold mode): HOLD
OUTDOOR (Outdoor mode):
INDOOR (Indoor mode):
PeruInpoBka 6aHaHca 6eIoro BpyHyU
Bb moxete oTperynpoBaT b yctaHOBT bByuhyo 6aIaHc 6eIoro. 3Ta perylnpOBka nO3BOJAE TnpIaTb 6eblm 06BeKTam NCTHHO 6eIbI cBT n PO3BOJAE TdoBtbc 6oJee eCTeTBENHO UBeTOBOrO 6aIaHca.
BpeKIMe OxkUdaHnI INIpeKIMe 3aIncu BbIbepInTe HxKbIy peKIM 6aIahCa 6eIoro BVcTaHOBkax MENU (ctp.87)
HOLD (pexim 6loKnpovKn): HOLD
OUTDOOR (pexim "Ha ynue):
To return to the automatic white balance mode
Set WHT BAL to AUTO in the MENU settings.
Cases that you can obtain better results by adjusting the white balance manually
| Examples of picture-taking conditions | White balance indicator |
| ·If the lighting conditions, like those at a party, are changing. | |
| ·If the picture is being taken in a studio lit by TV lighting. | |
| ·If the subject is being lit by sodium- or mercury-vapor lamps. | |
| ·At night-time with neon or fireworks in the picture | |
| ·At sunrise or sunset | HOLD |
| ·Under daytime-fluorescent light | |
| ·If the subject or background is all the same colour. |
ДлЯ BOЗВРашени К abTOMaTHueCKOMy peЖIMу 6baHca 6eNoRo
YcTaHOBnTe KOMaHny WHT BAL B noJIOxHeHNE AUTO B yCtHaOBkax MENU.
Cnyu, Korga Bbl Moxete noJyntb lyuune pe3yIbTaI bNyTe mpeyInpOBKn 6aIahca 6eIoro BpyHyIO.
If the picture is being taken in a studio lit by TV lighting
We recommend you to record in the indoor mode.
When you record under fluorescent lighting Use the automatic white balance or hold mode. Your camcorder may not adjust the white balance correctly in the indoor mode.
To record when lighting conditions change
- When you move from indoors to outdoors, or vice versa, or detach the battery for replacement while recording in the automatic white balance mode, point your camcorder at a white subject for about 10 seconds after setting the POWER switch to CAMERA.
- When you move from indoors to outdoors, or vice versa, or change the PROGRAM AE mode while recording in the hold mode, set the white balance to AUTO and reset to HOLD after few seconds.
B clyuae foToIrpapnIpoBaHnI n3o6paXeHnI B CtynI pI TeJeBn3NoHHOM OcBeueHnI.
PekomehdyetcNcNoIb3ObaTbДJIa3aINcN peKIM“B NOMeUeHIN”.
B clyuae 3aHnC npn ocBeueHnn lamPamn DHeBHoro CBeta
UcnoIb3yIte aBtOMaTHueckn pexm 6aIahca 6eIoro nn pezm 6IOKIpOBKn.
BaSHA BnIeOKaMepa MoKET He OTpErpyIuPobA Tb NaIeXaIIM o6pa3OM 6aIaHc 6eIoro B peXJMe "B I NOMeUeHIn".
ДлгздпспprmMeHЯюшхсуcNoBnXOCBeueHn
- Ecni Bbl 3aunn C yunuB I nomueHne nnn HaoobopOT, N6o OTcoeHNnINn 6bTapeHnbI 6bOK dIy 3aMeHbI BO Bpem 3aIncn B aBTOMaTUnyeCKOM peKmE 6baHaNca 6beLoRo, HnPaPbTe BaUy BInDeokamepy Ha 6beln 06BeKT NocLe yCTaHOBKN PepeKnIOuChaTeIa POWER B noJoxKeHne CAMERA INoDepXnTe B TAKOM noJoxKeHn OKOLO 10 cekyHd.
- Ecni Bbl 3aunn C yunuB I nomeueHne nna Hao6oPoT, nIbO nImeHnI pexm PROGRAM AE BO BpeM 3aInCn B pexmme 6IoKupOBKn, ycTaHOBnTe 6BaHaNc 6BeJoro B noIOxKeHne AUTO n Choba BepHnTe B noIOxKeHne HOLD uepe3 HeckOJIbKO CeKyHd.
Using the PROGRAM AE function
You can select PROGRAM AE (Auto Exposure) mode to suit your specific shooting requirements.
Spotlight mode
This mode prevents people's faces, for example, from appearing excessively white when shooting subjects lit by strong light at weddings or in the theatre.
Soft portrait mode
This mode brings out the subject while creating a soft background for subjects such as people or flowers, and faithfully reproduces skin colour.
Sports lesson mode
This mode minimizes shake on fast-moving subjects such as in tennis or golf.
Beach & ski mode
This mode prevents people's faces from appearing dark in strong light or reflected light, such as at a beach in midsummer or on a ski slope.
Sunset & moon mode
This mode allows you to maintain atmosphere when you are recording sunsets, general night views, fireworks displays and neon signs.
Landscape mode
This mode is for when you are recording distant subjects such as mountains and prevents your camcorder from focusing on glass or metal mesh in windows when you are recording a subject behind glass or a screen.
Low lux mode
This mode makes subjects brighter in insufficient light.
Исpenьзованецфункциng PROGRAM AE
BbMOxTe Bb6paTb pexm PROGRAM AE (aBTOMaTHuecka3KcN03nua) B COOTBeCTBm CO CneuHuecknM Tpe6oBaHnMa N CcbemKe.
PexkIM npoxKeTOpHOrO ocBeueHnA
PexkIM cNoptNBbIx COCTa3AHN
3ToT peKIM N03BOLJIeT MHNHMn3IPOBaTb IdoXaHHe npi CbeMKe 6bICTpO DnBXKyUxxCr IpEaMeTOB, HApPImep, npi Irpe B TeHHc nIIN roIbФ.
TIIaXHbI n IbIXHbI peXHM
3TOT peKIM ppeIOTbpaaaet NOBLeHne TEMhBX IINI JIODeB B 3OHe CNJbHOrO CBeta INI OTPaKeHHOro CBeta, HApPImep, HaJIJaKe B pa3rap JeTa INI HA CHEXHOM CKJIOHe.
Pexim 3axoDa coJIHua n lyHbI
3TOT pEXKIM N03BOJAREB TOUHOCTN OTPaKaTb 6OCTaHOBKy PIPN CBeMKE 3axoDOB COHua, 06uX HOUHbIX BnIOB, FneepBepKOB IN HEOHOBbIX peKlAm.
LanDhaΦTbIypeXIM
3TOT pexmI NO3BONAE T BYIOJNHTb CbEmKy OTdAneHbIX O6BeKTOB, TaKNX KaK rOpbl, HAnpIMep, IN PpeODTbPaaaet FOKyCINPOBky BnDEOkAmepbHa CTekNo IIN MeTaJIuYeCKyO peWtKY Ha OKhax, KOrDa BbI BbIOJHReTe 3aNNc b6BeKToB N03aDn CTekNa IIN peWtKn.
Pexm Hn3KoO OCeEHHOCTN
3TOT pexnM denaet Obeekbl npHneIOCTaTOCHOMOCBeseHN.


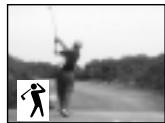
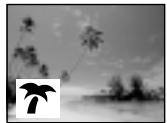


(1) Press PROGRAM AE in the standby mode. The PROGRAM AE indicator appears.
(2)Turn the SEL/PUSH EXEC dial to select the desired PROGRAM AE mode.
The indicator changes as follows:

IcnoJb3ObaHneФyHKcHn PROGRAM AE
- In the spotlight, sports lesson and beach & ski modes, you cannot take close-ups. This is because your camcorder is set to focus only on subjects in the middle to far distance.
- In the sunset & moon and landscape modes, your camcorder is set to focus only on distant subjects.
-
The following functions do not work in the PROGRAM AE mode:
-
Slow shutter
Old movie -
Bounce
-
The following functions do not work in the low lux mode:
-
Digital effect
-Overlap -
If you press PROGRAM AE when using the NightShot function, the PROGRAM AE indicator flashes and the PROGRAM AE function does not work.
While WHT BAL is set to AUTO in the MENU settings
The white balance is adjusted even if the
PROGRAM AE function is selected.
Even if the PROGRAM AE function is selected You can adjust the exposure.
If you are recording under a discharge tube such as a fluorescent lamp, sodium lamp or mercury lamp
Flickering or changes in colour may occur in the following modes. If this happens, turn the PROGRAM AE function off.
- Soft portrait mode
- Sports lesson mode
Приимechanicals
BpeKIMax npOKeKToPHorO oCBeUeHnA, cOpTnBbIx CoCTraaHn, a TaKxE B PJIaXHOM nJIbIXHM peXIME Bbl MoKeTe BblOnJIHTb CbEMky KpyINbIM PIIaHOM. 3To O6brcHeTcR TeM, yTO Ba7a BnDeoKaMepa HacTpoHa dIy FOKycNPOBKn TOnkHo Ha ObBeKtbl, HaxOJaIeCeHa cpeHem N daJIbHem paccToHnX.
Bpekime 3axoDa coJHua n Lyhbl, a TaKke B IaHdIaΦTHOM pexime BaIa BnDEOKamepa HacTpoHa Ha QokucpOBky TOnbKO Ha daIbHne oBeKtbl.
Cneyuouune cyuHKnH He pa6oTaIOr BpeXnME PROGRAM AE:
-MeJenneHbI 3aTBoP
-CTapHHoe KINHO
-ПepeckaKaиBaHne
CJIeIyUOUIneФyHKUHnHEpa6oTaIOBpeKIme Hn3KOJOCBeUeHHOCTN:
-LinФpoBoB 3ΦΦeKTe
- HaioxkeHne n3o6paXeHHa
- EÇınl Bbl hʌɡmTe KHOŋkny PROGRAM AE BO BpεmЯ nCNoJIb3OBAHnA ΦyHKιm HocHoN CbEMKn, NaHET MɪræT bɪNДɪKɑTOp
PROGRAM AE,иФункцЯ PROGRAM AE He 6byet pa6oTaTb.
EcIn KOMaHda WHT BAL yctaHoBneHa B noJoxKeHme AUTO b yctaHoBkax MENU
BaIaHc 6eIoro 6yIeT OTepyIuropoBaH, daxe ecnBbIbpaHaФyHKUЯ PROGRAM AE
EcIn BbI6paHaФyHKcINI PROGRAM AE
BbIMoXeTe BbIbpaTb 3KcNo3nHIO.
EcIn BbI BbINOJIHReTe 3aINcB npn IcNoJIb3OBAHm ra3Opa3PdHOJ lambl, HATpneBOJ lamblI nn pTyTHoJ lamblI
B cIeIyIOxN pexIMax MOXET BO3HKnHyTb MepaHne IIN HeYcToHnVBle npOceCbI. Ecnn 3TO npOn3oIDTe, BbIKIOuHTe cyHKUIO
PROGRAM AE.
-MaRkn noptpeThbmypeXIM
-PexkM CnOpTnBbIX COCTaHNI
Adjusting the exposure manually
You can manually adjust and set the exposure. Adjust the exposure manually in the following cases:
The subject is backlit
- Bright subject and dark background
- To record dark pictures (e.g. night scenes) faithfully
(1) Press EXPOSURE in the standby or recording mode. The exposure indicator appears.
(2) Turn the SEL/PUSH EXEC dial to adjust the brightness.
PerynipoBka 3Kcno3nCnBpyHyU
BbMOxTe OTpEryIuPoBaTb uYCTaHOBnTb 3KcNo3NtUo BpyHyIO. OTpEryIuPyIte 3KcNo3NtUo BpyHyIO B cJeDyOuX ClyuaX:
-ObbeKT Ha foHe 3aJHeN IODCBETK
Apkn ObeKT Ha TEMHOM oOHe
ДлгЗдзпс TeMHbIX N3Oбхжн (HAnpIMep, HOnHbIX CцeH) C 60Льшо ДocTObeRhoCTbIO
(1)HaKmTe KhoNky EXPOSURE B pexIme OxuDaHnI uIN 3aInCn.
IOrBNTcHnDnKaTOp 3KcNo3nU.
(2)Повернente ДИСК SEL/PUSH EXEC Дпя ретулровки яркови.
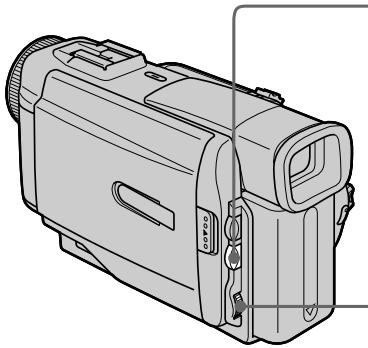
1

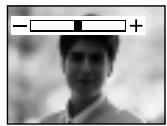
2

To return to the automatic exposure mode
Press EXPOSURE again.
Note
When you adjust the exposure manually, the backlight function does not work.
If you change the PROGRAM AE mode or slide NIGHTSHOT to ON
Your camcorder automatically returns to the automatic exposure mode.
Дя BO3Bpata B peKIM aBTOMaTnuecko 3KcNo3nCm
HaxmTe KhoNky EXPOSURE eue pa3.
PpmeaHne
PnBbINOHNHeHnpeyNIpOBKn BpyHyIO fynKzna 3aDne NpOcBETKn He pa6oTaet.
EcIn BbI n3MeHnTe peKmM PROGRAM AE nJIN nepeDbnHeTe nepeKIOuTaTeNb NIGHTSHOT B noJIoXeHne ON
Baasa Bndeokamepa aBTomatueeKn BepHeTcB pexm aBTomatueeKo 3Kcno3u.
Focusing manually
You can gain better results by manually adjusting the focus in the following cases:
- The autofocus mode is not effective when shooting
-subjects through glass coated with water droplets
horizontal stripes
- subjects with little contrast with backgrounds such as walls and sky
- When you want to change the focus from a subject in the foreground to a subject in the background
- Shooting a stationary subject when using a tripod
ФokycnopoBka BpyHyIO
Bb moxete noIyntb Iyuime pe3yIbTaTbI nyTem peryIinpOBKn BpyHyIO B cIeIyUOux CnyuaX:
- Pexim aBTomatuecko fokycinpobkn YBJIeTcH He3fKeKTHBbIM pN BbIOJIHeHH CbeMKI
-06bekTOB Ypee3 NOKpbIToe KaJIaMn CTekIIO -Trop3OHTaJIbHbIX NOLOC
-06bekTOB C MaJIoN KOHTpaCTHO TaKOM 00He, KaC CTeHa NIn He6o - Ecni Bby XOTnTE BbIIOJIHnTb N3MeHeHne
ФOKycuPOBKc C obBeKt Ha nepeJdHem ПlaHa
Ha obBeKt Ha 3aJdHem ПlaHa
Пи ВьлОнHeHи CBeMKn CTaUNOHapHbIX 06beKToB C nCIOJIb3OBAHnEM TpeHOrn

(1) Set FOCUS to MANUAL in the standby or recording mode. The indicator appears.
(2) Turn the focus ring to sharpen focus.
(1)YcTaHOBInTe NpeKJIIOUaTeIb FOCUS B noJIOKeHne MANUAL B pEXnme OxuJaHn IIN peXnme 3aIncI. IoRbNTcN HndnKaTOp F
(2)ПовернITE кольцо Фокс neuropВКДЯ
пolyченя чеков Фокс neuropВК.
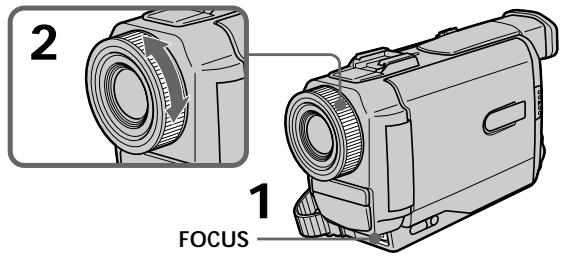
To return to the autofocus mode Set FOCUS to AUTO.
To record distant subjects
When you press FOCUS down to INFINITY. The lens focuses on and indicator appears. When you release FOCUS, your camcorder returns to the manual focus mode. Use this mode when your camcorder focuses on near objects even though you are trying to shoot a distant object.
Not to make subjects out of focus when using zoom function
Focus after forcing at the "T" (telephoto) position.
It will be harder to focus on when using digital zoom function.
Shooting in relatively dark places or shooting fast-moving subjects in relatively bright places Shoot at the "W" (wide-angle) position after focusing at the "T" (telephoto) position.
When you shoot close to the subject Focus at the end of the "W" (wide-angle) position.
The following indicators may appear
when recording a distant subject.
when the subject is too close to focus on.
ΦokycnpOBKa BpyHyIO
Дя BOЗВрашени B ржим abTomatн ueckо Фокс neuropOKN
YctaHOBInTe nepeKIOuHaTeIb FOCUS B noJoxKeHne AUTO.
Playing back a tape with picture effects
During playback, you can process a scene using the picture effect functions: NEG.ART, SOLARIZE, SEPIA and B&W.
During playback, select the desired picture effect mode in the MENU settings (p. 87). For details of each picture effect function, see page 49.
- ycoBepueHCTBOBaHHbIe onepaun BOCpOn3BeDeHnA
Bocnpo3BeDeHne JeHTbIC 3ΦΦeKtAmn n3o6paXKeHn
Bo BpemBocnpo3BeDeHnBbMOKeTe BUNOIN3MeHrTb N3O6paXeHne C NOMOuB0 fynKcN:NEG.ART,SOLARIZE,SEPIA n B&W.
Bo BpemBocpnOn3BeDeHnBb6epnte Hxhbl 306paXeHnBycTaHOBkax MENU (ctp.87).
Iopobhie CbeHnno KaKdof yHKmU nOeBbIX 3oFekTOB npBeHeHa cTp.49.
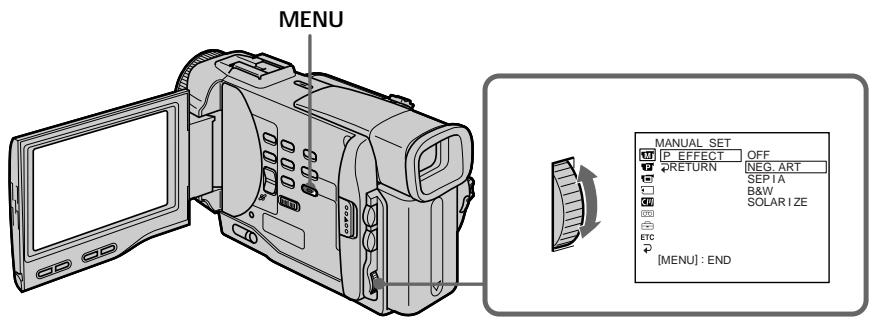
To cancel the picture effect function Set P EFFECT to OFF in the MENU settings.
Notes
- You cannot process externally input scenes using the picture effect function.
- To record pictures that you have processed using the picture effect function, record the pictures on the VCR using your camcorder as a player.
Pictures processed by the picture effect function
Pictures processed by the picture effect function are not output through the DV OUT jack.
When you set the POWER switch to OFF or stop playing back
The picture effect function is automatically canceled.
Длг OTMeHbI Φункци 3ффektob n3o6paXeHn
YcTaHOBInTe KOMaHny P EFFECT B noJIoKeHne OFF BycTaHOBkax MENU.
PpimueaHn
BbI He MoXeTe BUNOIN3MeHrTb BBeDeHHbIe N3 BHeUHrero NCTOCHNka N3o6paXeHnC NOMOuBHOyHKuIN 3cpeKToB N3o6paXeHn.
-ДяЗаисизображени,KOTOBIE BbyBnOIM3MeHINC NOMOUIBOФyHKUIN3ΦΦeKTOB 3aNiUnTeI3OBpaJENHa KBM,NcNoJIb3yBaUByBnDeOkamepyB KaueCTBeПлeepa.
N3o6paXeHn, BnDOn3MeHeHHbIe C nOmoUbIO fYHKmN 3ΦΦeKToB N3o6paXeHn
I3o6paKeHn, BUNOIN3MeHHeHbIe C NOMOuB O fynKun 3ofoKTOB I3o6paKeHn, He nepeaIOrTauee3 BbIXoINHOe rHe3do Dv OUT.
EcIn Bby ycTaHOBnI nepeKJIouaTeIb POWERBnoJIOxHeNc OFF nIIO octaHOBNI BOCPpon3BeDeHne
Функциэфсөговизбрахеняыдет abTOMATUcheCKN OTMeHeHa.
Playing back a tape with digital effects
During playback, you can process a scene using the digital effect functions: STILL, FLASH, LUMI and TRAIL.
(1) During playback, press DIGITAL EFFECT and turn the SEL/PUSH EXEC dial until the desired digital effect indicator (STILL, FLASH, LUMI or TRAIL) flashes.
(2) Press the SEL/PUSH EXEC dial. The digital effect indicator lights up and the bars appear. In the STILL or LUMI mode, the picture where you press the SEL/PUSH EXEC dial is stored in memory as a still picture.
(3) Turn the SEL/PUSH EXEC dial to adjust the effect. For details of each digital effect function, see page 51.
Bocnpo3BeDeHne JeHTbI c uΦpObblm 3ΦΦeKtAmN
Bo BpemBocnpon3BeDeHnB, BbMoXeTe BUnOn3MeHnTb N3O6paXeHne C NOMOuBu OfynKcN: STILL, FLASH, LUMI. n TRAIL.
(1)BoBpMaBOcnpOn3BeDeHn,HaXmnte KhONKy DIGITAL EFFECT n nobopauBaIte DnCK SEL/PUSH EXEC Do tex nop, noka He NaHuHT MInTaT b INdNkAtOp HxKHoTo cnpoBoro 3ΦΦekTa (STILL, FLASH, LUMI. nlin TRAIL).
(2)HaXmTeIINCKSEL/PUSH EXEC. BbICBETNTcHINDnKATOpUcΦpOBOrO 3ΦΦeKTaIIOBBAITcNOLocI.BpeXmE STILLIIN LUMI.N3o6paXeHne,HaKOTopOM Bbl HaXMeTe KHOkNy IINCKSEL/PUSH EXEC, 6yDet3aHeCtEOBnAMrTbKaKHeIOdBnXHoe n3o6paXeHne.
(3)ПовернITE ДИСК SEL/PUSH EXEC Дпя ретулровки зфөкта ИЗбрахеня. Пдробны сөсөдэнгий по калдүлүйсүлүровых зфөктов пивeteнь на CTР. 51.
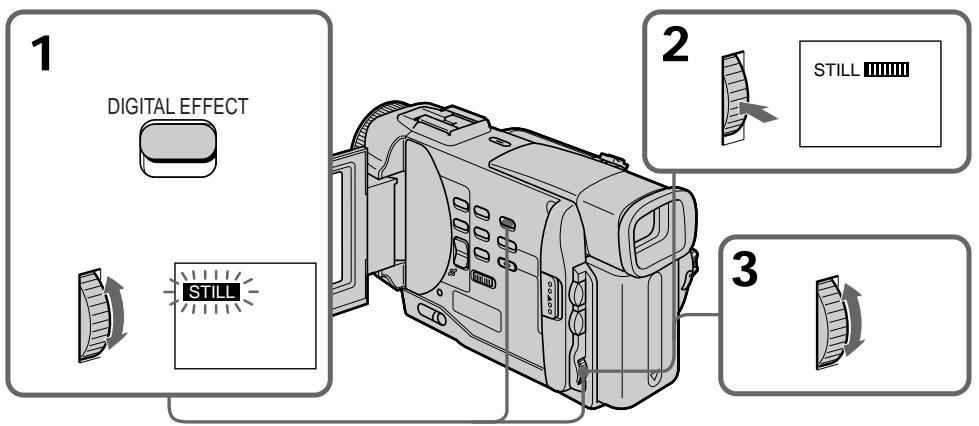
To cancel the digital effect function Press DIGITAL EFFECT.
IITMHeB1yHKcHnCnΦpOBbIX 3ΦΦeKTOB
Hakmte KhoNky DIGITAL EFFECT.
Notes
- You cannot process externally input scenes using the digital effect function.
- To record pictures that you have processed using the digital effect, record the pictures on the VCR using your camcorder as a player.
Pictures processed by the digital effect function
Pictures processed by the digital effect function are not output through the DV OUT jack.
When you set the POWER switch to OFF or stop playing back
The digital effect function is automatically canceled.
PpmeaHn
BbI He MoXeTe BUNOIN3MeHrTb BBeDeHHbIe N3 BHeUHrero NcTOUYHnKa N3o6paXeHnC nOMOuBIO cyHKun cNpOBoBix 30fekTOB.
-ДяЗаисиИЗображени,КOTObIe BblBIDOn3MeHnC NOMOuBуФyHKUIN3ΦΦeKToB ИЗображени,ЗЯIMiTeIиЗображени Ha KBM,ИспOlb3уВaшуВиDeOkamepyВ KaueCTBe Плелepa.
N3o6paXeHn, BnOu3MeHeHHbIe C NOMOaBIO cyHKmU nOpOBbIX 00
I3o6paKeHnBUNOIN3MeHHeHbIE C NOMOuBo OyHKUIN 3oFKeKTOB I3o6paKeHn, He nepeaIOrcape3 BbIXoINHO rHe3do Dv OUT.
EcIn Bby ycTaHOBnI nepeKJIouaTeIb POWERBIOJoxeHne OFF nIO ocTaHOBnI BOCpON3BeDeHne
Функцицрьхь6фпektob6удет abTomatueckn OTmeHeHa.
Quickly locating a scene using the zero set memory function
Your camcorder goes forward or backward to automatically stop at a desired scene having a tape counter value of "0:00:00". You can do this with the Remote Commander. Use this function, for example, to view a desired scene later on during playback.
(1) In the playback mode, press DISPLAY.
(2) Press ZERO SET MEMORY at the point you want to locate later. The tape counter shows "0:00:00" and the ZERO SET MEMORY indicator flashes.
(3) Press when you want to stop playback.
(4) Press to rewind the tape to the tape counter's zero point. The tape stops automatically when the tape counter reaches approximately zero. The ZERO SET MEMORY indicator disappears and the time code appears.
(5) Press . Playback starts.
БыICTpoe OTbICKaHne 3ПИЗODa C NOMOUsbIO Функципamrtu HUJIeBOI OTMeTKN
BaWbIeOkaMepa BbIOnHReT npoDBNKeHne Bnpei H3aD C ABTOMaTIueCKoI OCTaHOBkoB H yHKOM 3IN3Ode, Ige NOKa3aHne CcHTeYJIeTHbI paBHO "0:00:00". Bbl MoKTe BblONHrTa 3TO C NOMOuBIO NJbTa DInCTaHcNOHHOr OynpAabHeHry. UcNoIb3yUte 3Ty yFHKUIO, HnPImep, IJr pOCMOptRa HxHOrO 3IN3Oda nO3Ke BO BpEMr BOCNPQo3BeDEHnR.
(1)В ржиме BOCIPON3BedeHЯнхмITE KhoIGNy DISPLAY.
(2)HaxmTe KhoIky ZERO SET MEMORY B MeTe, KOtOpoe Bby 3aXOTnTe NaITn PO3Ke. Ioka3aHHe CHTuKa CTAHet paBbIM "0:00:00", n HauHET MraTb INdNkATOP ZERO SET MEMORY.
(3)HaxmTe KhONky ■,ecnBb 3axOTte HaxKaTb OCTaHOBtB BOCIpOUN3BeDeHne.
(4)HaxmTe KhoNky dIy yckOpEHNOI nepeMOTKn IeHTbI Ha3aD K HynEBoT ToUKe CteTnKa IeHTbI. JeHTa OCTaHOBNTcA aBTOMaTtueCeKn, eCNI ChETuK DoCTnHET HnyEBoI OTMeTK. INdkaTop ZERO SET MEMORY uChue3HeT, nNoBtca KoD BpeMeHn.
(5)HaxMMTe KHOJIky ▲. HauHETcB BOCnPOn3BeDeHHe.
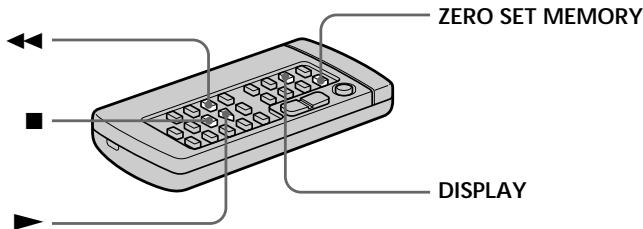
Notes
- When you press ZERO SET MEMORY before rewinding the tape, the zero set memory function will be canceled.
- There may be a discrepancy of several seconds from the time code.
- The zero set memory function may not work when there is a blank portion between pictures on a tape.
ZERO SET MEMORY functions also in the recording standby mode
When you insert a scene in the middle of a recorded tape, press ZERO SET MEMORY at the point you want to end the insertion. Rewind the tape to the insert start point, and start recording. Recording stops automatically at the tape counter zero point. Your camcorder returns to the standby mode.
PpimueaHn
- EcnBbI haxMeTe KhoNky ZERO SET MEMORY DO nauJa obpaTHOI nepeMoTkn JeHTbl,TO cyHKpIa NAMrTH HynBeOYOTmTK 6byET OTMeHena.
Moxet 6bIb pacOXJ.deHne B HecKoJIbKO CekyHd MEXdKOJOMBpEMeHn I DeIeCTBnTehBm BpeMeHem.
ΦyHKZnI NAMrTn HJyBeO IOTMeTK MoKET He pa6oTAtb B CJyae,ecJN IMeTcR He3aIMCaHHbYuACTOK Mekdy n3o6paxKeHnMn Ha JeHe.
ФункцЯ ZERO SET MEMORY pa6oTaet TaKxE B pexmme roTOBHOCTn 3aHNCN
Ecnn Bbl BCTaBnTe 3n3oD B cepenHe 3anicaHNOJIeHTbI, HaxmTe KhONky ZERO SET MEMORY BY Tom MecTe, Ige Bbl XoTne 3aKOnHTb BCTaBkY 3n3Oda. NpeMOTaHTe JENTy K MeCTy HauJana BCTaBKn 3n3Oda n HauHNTe 3aNcB. 3aNcB octaHOBTcA bTOMATueCKn B MeCTe HUJEBOI OTMeTKu CchETtHu. BaJa BuDEOKaMepa BepHETcB peXIM OxNDAHn.
Searching a recording by date - Date search
You can automatically search for the point where the recording date changes and start playback from that point (Date search). Use a tape with cassette memory for convenience. You can do this with the Remote Commander.
Use this function to check where recording dates change or to edit the tape at each recording date.
Searching for the date by using cassette memory
You can use this function only when playing back a tape with cassette memory (p. 129).
(1) Set the POWER switch to PLAYER.
(2) Set CM SEARCH in to ON in the MENU settings (p. 87). Factory setting is ON.
(3) Press SEARCH MODE repeatedly, until the date search indicator appears. The indicator changes as follows: TITLE SEARCH DATE SEARCH PHOTO SEARCH PHOTO SCAN no indicator
(4) Press or to select the date for playback. Your camcorder automatically starts playback at the beginning of the selected date.
Searching for the date without using cassette memory
(1) Set the POWER switch to PLAYER.
(2) Set CM SEARCH in to OFF in the MENU settings (p. 87).
(3) Press SEARCH MODE repeatedly, until the date search indicator appears.
The indicator changes as follows:
DATE SEARCH PHOTO SEARCH PHOTO SCAN no indicator
(4) Press to search for the previous date or press to search for the next date. Your camcorder automatically starts playback at the point where the date changes. Each time you press or your camcorder searches for the previous or next date.
To stop searching
Press ■.
Notes
- If one day's recording is less than two minutes, your camcorder may not accurately find the point where the recording date changes.
- The cursor in the 00 mark indicates the present point on the tape.
If a tape has a blank portion between
recorded portions
The date search function may not work correctly.
Cassette memory
The tape cassette memory can hold six recording date data.
Ponck 3aIncn no daTe
ДлЯ OCTaHOBKII NOUcKa
HaxmTe KhoNky
Ponck 3aIncn IIO daTe 6e3 nCNoJIb3OBAHnKacCeTHoI naMrtN
(1)Установпейсяклочаель POWER в поожене PLAYER.
(2) YcTaHOBInTe KOMaHdY CM SEARCH B CmB noJoxeHne OFF B ycTaHOBkax MENU (cTp. 87).
(3)HaximMaTe NOBtOpHo KhoNky SEARCH MODE Ha npIbTe DnCTaHcNoHnHO ynpaBHeHnDo TEx Nop, noka He NoRbHT HndKATOP NOnCKa DaTbl.
Инд 6удET ИЗмЕТьСА СLEДУЮшМ 06pa3OM:
DATE SEARCH PHOTO SEARCH PHOTO SCAN 6e3 uHdikKaTopa
(4)HaxmTe KhoNkU dIy nonka npdeI dyuei DaTbI IIN Jx He HaxmMaTe KhoNkU dIy noncka cIeDyIOeJ DaTbI. BaIe BnDeOKaMepa aBTOMaTNUeCKn HaCyHT BocPOn3BVeDEHne B MeCe, rIe N3MeHReTcI daTa.BcKn pa3 npn HaxKatNI KhoNkI dIy BaIa BnDeOKaMepa BblONHRe TNONCK npdeI dyuei IIN CNeDyIOeJ DaTbI.
Длг octahOBkn NOUCKa
HaxmTe KhONKy
PpIMeuaHn
- EcnI npOdoJnxNteBbocTb 3aHcN OndHOrO dHa MeHee DByx MInHyT, Ba7a BnDeOkamepa MoKcET He TOUHO NaTe MeCTO, rDe N3MeHReTcR DaTa.
KypcopBINHnKaTope yKa3bIbaETekyuee MeCTO HaJeHTe.
EcIn Ha 3aIncahHoi JeHte NMeIOTc H3aIncAHbIe YUacTkn
KaccetHaI NaMAtb Ha JeHTe N03BOJIaRET BMECTHT Do UeCTn DaT 3aINcN.
Searching the boundaries of recorded tape by title - Title search
CM only
If you use a tape with cassette memory, you can search for the boundaries of recorded tape by title (Title search). Use the Remote Commander for this operation.
(1) Set the POWER switch to PLAYER.
(2) Set CM SEARCH in to ON in the MENU settings (p. 87). Factory setting is ON.
(3) Press SEARCH MODE repeatedly, until the title search indicator appears.
(4) Press 1 or 2 to select the title for playback.
Your camcorder automatically starts playback of the scene having the title that you selected.
If you use a tape without cassette memory. You cannot superimpose or search a title.
To superimpose a title
See page 79.
If a tape has a blank portion between recorded portions
The title search function may not work correctly.
ДлЯ OCTaHOBKn NONCKa
HaxmTe KhOnKy ■
EcIn BblncnoIb3yTe JeHtyc KaCCeTHoI nAMrTbIO
BbI He MoXeTe BblIOJIHrTb HANOKeHne nn nnONCK TnTa.
ДЯHAJOLOXKeHnTHTpa
CM. cTp. 79.
EcJnHaJIeHTe NmEeTcH He3aIncaHHbI yuactOK MeKdy 3aIncaHHbIMu YactAMN FyHKsI IONCKa TITpa MoKet He pa6oTaTb HaJIeXaUIM O6pa3OM.
Searching for a photo - Photo search/Photo scan
You can search for a still picture you have recorded on a mini DV tape (photo search). You can also search for still pictures one after another and display each picture for five seconds automatically regardless of cassette memory (photo scan). Use the Remote Commander for these operations. Use this function to check or edit still pictures.
Searching for a photo by using cassette memory
You can use this function only when playing back a tape with cassette memory (p. 129).
(1) Set the POWER switch to PLAYER.
(2) Set CM SEARCH in to ON in the MENU settings (p. 87). Factory setting is ON.
(3) Press SEARCH MODE repeatedly, until the photo search indicator appears. The indicator changes as follows: TITLE SEARCH DATE SEARCH PHOTO SEARCH PHOTO SCAN no indicator
(4) Press or to select the date for playback. Your camcorder automatically starts playback of the photo having the date that you selected.
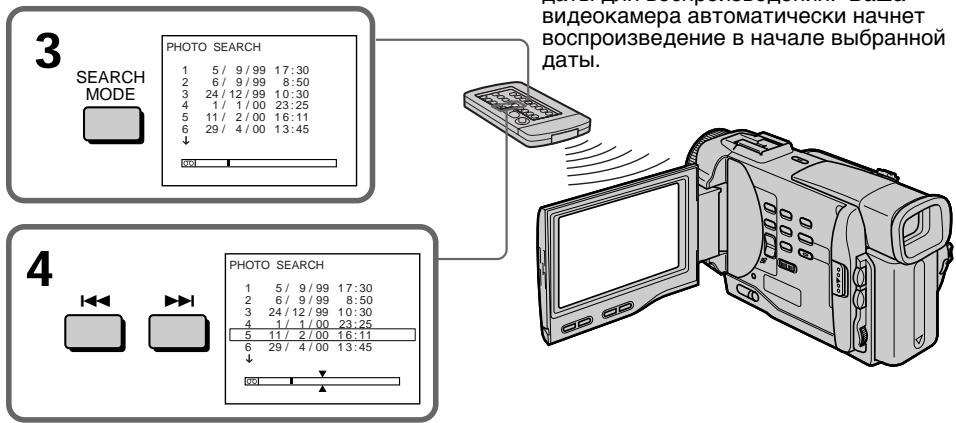
ДЯ OCTaHOBKn NOUcKa Haxmite KhONky ■.
To stop searching Press
If a tape has a blank portion between recorded portions The photo search function may not work correctly.
EcIn Ha JeHTe NMeeTc Hes3aNcaHHbIyUyactOK MExdy 3aNcaHHbIMu YacTAMnФyHKsIg FOToONUCKa MoKET He pa6oTaTbHaJdJIeKaUIM O6pa3OM.
Searching for a photo without using cassette memory
(1) Set the POWER switch to PLAYER.
(2) Set CM SEARCH in to OFF in the MENU settings (p. 87).
(3) Press SEARCH MODE repeatedly, until the photo search indicator appears.
(4) Press or to select the photo for playback. Each time you press or your camcorder searches for the previous or next photo.
Your camcorder automatically starts playback of the photo.
To stop searching
Press ■.
Scanning photo
(1) Set the POWER switch to PLAYER.
(2) Press SEARCH MODE repeatedly, until the photo scan indicator appears.
(3)Pressor
Each photo is played back for about 5 seconds automatically.
PonckΦOTO 6e3 nCnoJb3OBaHnKaCCETHOI pAMrTIN
(1)Установпейpeклочаель POWER в положене PLAYER.
(2) YcTaHOBnTe KOMaHny CM SEARCH B CnIOJoxeHne OFF B ycTaHOBkax MENU (cTp. 87).
(3)HaximaiTe NOBTOPO KHOKky SEARCH MODEHa npIbTe DnCTaHcIOHnHO ynpaBHeHnDoTexnop,NOKa He NoBHTca HNDNKaTOPΦOTONOICKa.
(4)Haxmte KhoNky I nnI □I BbIbopa foTo dIy BocnpOn3BeDeHn. BcKni pa3 npn Haxatnn KhoNkn I nnI Ba7a BIneOKamepa BblONHReT nonck npdeBlyuero nIi CneDyUoJero foTO. Ba7a BIneOKamepa aBTOMaTHueCKn HaHTet BOCnpOn3BeDeHne foTO.
ДлгocтабкнпОпска
HaxmTe KhOpKy ■
Сkaнрованые φοTO
(1)Установпейреклочаель POWER в положене PLAYER.
(2)HaximmaTe NOBtOHO KhoNky SEARCH MODE do Tex np, noka He noBntc HnDnKaTOp fOToCKaHIpOBaHn.
(3)HaxmTe KhoNky I nnI Kaxdoe foTo 6yDet aBtOMaTnueckn OTo6paXaTbc npImepHo 5 cKyHd.
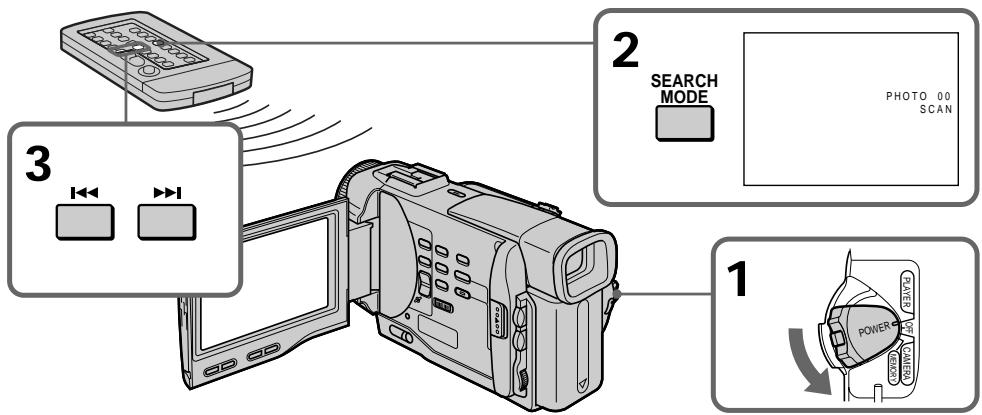
To stop scanning
Press ■.
ДлЯ OCTaHOBKn CkaHIpObaHnA
HaxmTe KhoNky
Dubbing a tape
Using the A/V connecting cable
Connect your camcorder to the VCR using the A/V connecting cable supplied with your camcorder.
Set the input selector on the VCR to LINE, if available.
(1)Insert a blank tape (or a tape you want to record over) into the VCR, and insert the recorded tape into your camcorder.
(2)Set the POWER switch to PLAYER.
(3) Play back the recorded tape on your camcorder.
(4)Start recording on the VCR.
Парапсь Ленты
UcnOJIb3OBAHnE CoeINHITeIbHOro Ka6eJyauDIO/BuDeO
IoioceiHnTe Bauy BIndeokamepy K KBM c nOmoaBIO coeHNHTelbHoro Kaebna aydno/ BIndeo, KOtOpBn npinaraetc K Bauei BIndeokamepe.
YcTaHOBtCeJIeKToPbI NepeKJIuOaTeIb BxOJHOro CnHaHa Na KBM B nIoXeHne LINE, ecNn TaKOBoe IMeETc.
(1)BcTaBbTe He3aIncaHHyIo JeHTy (IINI JeHTy, Ha KOTopyIO Bbl XOTnte BblONHnTb 3aIncb) B KBM u BcTaBbTe 3aIncaHHyio JeHTy B BaUy BuJeOKaMepy.
(2)Установпейразець POWER в положене PLAYER.
(3)HaunHe BocnpOn3BeJeHne 3aIncaHnoJIeHTbI Ha BaSei BnDeokampe.
(4)HaunHe 3aIncB Ha BaWeKM.

When you have finished dubbing a tape
Press on both your camcorder and the VCR.
Ecnn Bbl 3aKOHnJI npe3anCb JeHTbI
HaxmTe KhoNky KaK Ha BnDeokamepe, TaK nHa KBM.
If you have displayed the screen indicators on the TV
Make the indicators disappear by pressing SEARCH MODE or DATA CODE on the Remote Commander or DISPLAY so that they will not be superimposed on the edited tape.
You can edit on VCRs that support the following systems
8 8 mm, HiHi Hi8, Digital8, VHS VHS, SVHS S-VHS, VHSC VHSC, SVHSC S-VHSC, Betamax, Mini DV or DV
If your VCR is a monaural type
Connect the yellow plug of the A/V connecting cable to the video input jack and the white or the red plug to the audio input jack on the VCR or the TV. When the white plug is connected, the left channel audio is output, and the red plug is connected, the right channel audio is output.
Connect using an S video cable (not supplied) to obtain high-quality pictures
With this connection, you do not need to connect the yellow (video) plug of the A/V connecting cable.
Connect an S video cable (not supplied) to the S video jacks of both your camcorder and the VCR. This connection produces higher quality DV format pictures.
При OTОбрахени 3краньх ИнданkaTopoB На 3кразе Телевизopa
Добerteсьтого,чTOбыИнДикаторьИсчezин,нжимаяКнONКY SEARCH MODE Ил_DATA CODEHa nIbTeДиCTaHионHorOупавлени Ил кНОКу DISPLAY,TakчTOбыОн HeБыИн HANOKeHыHaMOHTaЖHyЛeHTy.
BbMOxTe BbIOnHrMbontax Ha KBM, KOtOpbIe NODepKINBaIOT cIeDyUoune CnCTembl
8 MM, Hi8 Hi8, Digital8, VHS VHS, SVHS S-VHS, VHSC VHSC, SWSC S-VHSC, Betamax, MHN DV Mini Dn Dv D
EcnBaw KBM MOHOpOHneckoro Tnna
IoiDCoeHInHe JxenTbI uTekep coeHNHTelbHOro Ka6eRa ayDnO/BnDeo K BXoDHOMy rHe3dy BuJeocnHana, a 6eBtI nII KpaCHN bUTekep K BXoDHOMy rHe3dy ayDnOCnHana Ha KBM nIu TeneBu3ope. EcNI noDCoeHIneH 6eBtUeKeP, To 3ByK 6yDet pa3DaBaTbcra C neBoro KaHana, a ecNI noDCoeHIneH KpaChN bTekeP, To 3ByK 6yDet pa3DaBaTbcra C npaBOrO KaHaJa.
BbINOJIHnTe NIOcOeINHeHne c NOMOuIko Ka6eJ S BnDeo (He npNJraTaTc) dNpONyueHn BBICOKOKaYeCTBeHHbIXn306paKeHn
PnTakOM PNOCDOeINHEnn Bam He HUxHo
NoDCOEINHbTB JKeIbY (BnDeo) uTekep
COeINHITBeHbHO Ka6eJe aUYIO/BuDeo.
PiDCOEINHTE Ka6eJb S BuDeo (He
PnInaeraTc) K IHe3dAm S BuDeo Ha BaSei
BuDEOKaMepe n KBM.
PnDAnHOM PNOCDOeINHEnn Bbl CMOXeTe
noLyHTb BblCOKKaueCTBeHNbIe N306paKehn
fOpMaTa DV.
Using the i.LINK cable (DV connecting cable)
Simply connect the VMC-IL4435/2DV/4DV i.LINK cable (DV connecting cable) (not supplied) to DV OUT and to DV IN of the DV products. With digital-to-digital connection, video and audio signals are transmitted in digital form for high-quality editing. You cannot dub the titles, display indicators or the contents of cassette memory.
(1)Insert a blank tape (or a tape you want to record over) into the VCR, and insert the recorded tape into your camcorder.
(2)Set the POWER switch to PLAYER.
(3) Play back the recorded tape on your camcorder.
(4)Start recording on the VCR.
IcnoJIb3OBAHnE Ka6eIaLINK (coeHNHTeBHyI Ka6eIb DV)
ПрocTo noДcoeДинTe Ka6ь VMC-IL4435/ 2DV/4DV i.LINK (CoeДинТeьнБиКа6ь DV) (He npilaraetc) K rHes3d y DV OUT n rHes3dy DV IN uФровь BvDoeon3delen. C nOmoшьo coeДинЕнЯ uФровьМ k6beIem BvDoe- aydInocrHaNbl NepeDAIOCTB uФрobOу ФорMe ДЯ NOCEdYUOJIeBO BbICOKOKaueCTBEHHORO MONTaKa. BBy He MoKeTe nepe3aINCbBaT bTNtPb, INdNKaTopb Na DCnPIee NII cOdePkahne KACCETHOI pAMrTn.
(1)BCTaBbTe He3aIncAHHyIO JeHTy (IINI JeHTy, Na KOTOpYIO XOTnTE BblIOJIHnTb 3aIncB) B KBM IN BcTaBTe 3aIncAHHyIO JeHTy B BuJeOKaMepy.
(2)Установпейразковая对外开放 POWER B NOJOKEHNE PLAYER.
(3)HaunHe BoCnpOn3BeJeHne 3aIncaHnoJIeHTbI Ha BaWei BnDeOkaMepe.
(4)HaunHe 3aIncHb Ka KBM.
When you have finished dubbing a tape
Press (STOP) on both your camcorder and the VCR.
You can connect one VCR only using the i.LINK cable (DV connecting cable).
During digital editing
You cannot use DIGITAL EFFECT button functions.
If you record playback pause picture with the DV OUT jack
The recorded picture becomes rough. And when you play back the picture using the other video equipment, the picture may jitter.
To perform a more precise editing (DCR-TRV10E only)
Use DV synchro-editing function (p. 74).
EcnBb3aKOHnJIpe3aIncbJeHTbI HaxmTe KhoNky (STOP) ka Ka Ha BaWei
Bndeokamepe, TaK n Ha KBM.
Bb moXeTe NOdcoEduHHTb OINH TOIbKO KBM c nOmoosbu Ka6eIa.LINK (coeDnHtJIbHbI KAbDV).
BoBpemr znpboBOrMOHTaxa
BbI He MoXeTe IcNoJIb3OBA Tb cyHKUIN KHOJOK DIGITAL EFFECT.
EcIn BbI BbINOHNn 3aNNc bN3o6paXeHnuepe3 rHe3do DV OUT
3aIncaHHe n3o6paXeHne cTaHET rpybIM.A ecnBbl 6ydeTe BocnpOn3BOJNb n3o6paXeHne ha dpyroBnDeOaannapatype,TO n3o6paXeHne 6byedNoDparuBaTb.
ДЯ ВылОнHeHЯ 60Jee ToCHOrO MOHTaJa (ToIbKO MoeJIb DCR-TRV10E)
IcnoIb3yIe cyHKuHcNHXPOHHOro MoHTaKa DV (ctp. 74)
Editing partially on a DV tape - DV synchro-editing (DCR-TRV10E only)
By simply selecting the scenes to edit, you can duplicate the desired portion on a tape, using other equipment connected with an i.LINK cable (DV connecting cable). The scenes can be selected by frame. Since your camcorder exchanges digital signals, you can edit with little audio and video deterioration.
You cannot duplicate titles, display indicators, or the contents of cassette memory.
The connection is the same as on page 73.
(1) Insert a recorded tape into your camcorder and insert a blank tape (or a tape you want to record over) into the DV product.
(2) Set the POWER switch of your camcorder to PLAYER.
(3) Set the input selector to DV input on the DV product. If the DV product is another DV camcorder, set its POWER switch to VTR.
(4) Press MENU to display the menu.
(5) Turn the SEL/PUSH EXEC dial to select ETC, then press the dial.
(6) Turn the SEL/PUSH EXEC dial to select DV EDITING, then press the dial.
(7) Using the video control buttons, locate the point where you want to start editing, then press to set your camcorder in the playback pause mode (p. 161).
(8) Press the SEL/PUSH EXEC dial or MARK on the Remote Commander to set DV EDITING IN.
(9) Using the video control buttons, locate the point where you want to end editing, then press to set your camcorder in the playback pause mode.
(10)Press the SEL/PUSH EXEC dial or MARK on the Remote Commander to set DV EDITING OUT. The editing process starts. When the process ends, your camcorder and the DV product automatically set to pause mode.
MoHTaX NO qaCTaM Ha JeHtY DV - CnHxPoHHbI MOHTaX DV (ToJIbKO MoJeJIb DCR-TRV10E)
BbIbIpa3nI3OdbI dIy moHTaKa, Bbl MoXeTe BbIbONHbTbpe3aINcBHyKhbix yuactKOB Ha IeHTy, nCpOJIb3yI dpyrIyO annapaTypy, noCooeiInHeHHyIO cNoMOUbIO Ka6eJIa I.LINK (coEHNITbHbIKa6eJIb DV). 3nI3Odb MoXHO BbIbPaTB NO kaJdPam. NocKoJIbKy BaHa b BuDeOKaMepa BblbONHReT oMeH uΦpoBbIX CnHAlOB, BblMoXeTe BblONHbTb MoTAtk LIIbC He3NaHTeJIbHbIM yUdWeHmE 3Byka n BuDeOn3O6paXeHNI.
BbHe MoXeTe Nepe3aNcBtBaT TnTpbl, HnDnKaTopbl Ha DnCnPee Nn CoepXaHne KACCETHOI nAMrTu.
Данhoe coeДиЕнHe IeBnIeTcTaKIM JKe, KaK NHa cTp. 73.
(1) BCTaBbTe 3aIncaHHyIO JeHTy B BaUy BnDEOKaMepy I BcTaBbTe He3aIncaHHyIO JeHTy (JINI JeHTy, Ha KOTOpO BbXOTnte BblONHnTb Nepe3aIncb) B annapaT DV.
(2)Установские посяклоуатель POWER на Baший Видаокаме Рожонке PLAYER.
(3) YctaHOBIne BXoJHOI cJIeKTop B noLoXeHne BXoJHOrO CnHana DV ha annapate DV. EcII annapat DV rBnEeTcA npRoB BuJeOKaMepo DV, yCTaHOBIne nepeKnIOuATeIb POWER B noLoXeHne VTR.
(4) HaxmTe KhoNky MENU ДЯ OTo6paXeHnMaMeHIO.
(5)ПовернITE диСК SEL/PUSH EXEC Дпь Выбoga установки ETC,затем нахмпес.
(6)ПовернITE ДИСК SEL/PUSH EXEC ДЯ
Быбopa установки DV EDITING, за tem
НашмITE ДИСК.
(7) VcnoIb3yK KHONKn BnDEoKOHTpONa, HauDiTe MeCTO, rge Bb XOTNe Haayatb MOHTaX, 3aTeM hAXmTe KHOKNy I dny yctahOBKn BaSeu BnDEoKaMeBb I pexNM nay3bI BocnpOn3BeDeHnA (CTp. 161).
(8) Haxmnte dnck SEL/PUSH EXEC nnn KhoNky MARK Ha nyIbTe dncTaHcNoHHoro ynpaBJIeHnI dIy BblOJIHeHnY cTahOBKn DV EDITING IN.
(9) IVcnoIb3yK KHONKn BIndeOeKOHTpOJIa, HauDte MeCTo, Ige Bbl XOTNe 3aKOHuTbMOHTaX, 3aTeM hAekMNTe KHNKy II JIbIbIOJHHeN yctaHOBKn Bauei BInDEOKaMEpbI BpeXm npay3blBOcnpOn3BeDeHn.
(10)Haxmnte nck SEL/PUSH EXEC nnn KhoNky MARKHa npIbte dntaHnOHoro ynpaBHeHHdIy yCTaHOBKn DV EDITING IN. HauHetc npOeCC moTaxa. Korda moHTax 3aKoHnTcH, Ba7a BnDeokamepa n annapat DV abTomatUneckn 6dyt yCTaHOBJIeHb I peXIM nay3bl.

Notes
- If you use other than Sony equipment with the DV jack, you cannot perform DV synchro-editing.
- If a tape has a blank portion between recorded portions, DV synchro-editing may not work correctly.
Errors in duplicating
If you connect your camcorder to Sony equipment with DV jack, the range of errors is within + / - 5 frames. The range may become wider in the following conditions.
- The interval between DV EDITING IN and OUT is less than five seconds.
- DV EDITING IN or OUT is set at the beginning of the tape.
If you do not make connections with i.LINK cable (DV connecting cable)
The screen shows NOT READY, and you cannot select DV EDITING.
On a blank portion of the tape
You cannot set DV EDITING IN or OUT.
PpimueaHn
- Ecnn Bbl nCnNoB3yeTe annapatypy c rHe3dOm D, He oTHocRyOcK rN3deJIaMФIpMbI Sony, Bbl He CMOxEte BblONHrTb CNHXPOHHbIM MOHTaX DV.
- Ecnn Ha JeHTe NMeETcH He3aNtcaHHbI yAchTOK MeJxD 3aNtcaHHbIM YactrMn, CnHXPOHHbI MOHTaK DV MOKeT He pa6oTaTb HAnLeXaUIM 06pa3OM.
Own6kn npn nepe3anncn
Ecnn Bby noDcoeHnHnBawy BNdeokamepy K annapaTy Sony C rHe3dOm DV,TO dnaana3oH oW6OK bYedT B npeJenax + / - KaIPOB. Dnaana3OH MoKet 6bITb WInpe B cIeNyUOxNcLyuJaX.
- INTePbAm MeJxNy yCTaHOBkAmn DV EDITING IN N OUT MeHee pTn cekyHd.
- YctaHOBka DV EDITING IN uIN OUT BbIOnHeHa B CaMOM HaJaNe JeHTbl.
EcIn BbI He BblIOJIHReTe NoDcoEINHeHm C nOmoUbIo Ka6eJI i.LINK (coEINHTeBbHbI Ka6eB DV)
Ha 3kpAHe IIOBNTcH INIINKaUNA NOT READY, n Bbl He CMOXeTe BbIbpaTb yCTaHOBky DV EDITING.
Ha He3anHcHOM yactke Jehtbi
BbI He MoXeTe BbIIOJIHHTb yCTaHOBky DV EDITING IN uNn OUT.
You can record an audio sound to add to the original sound on a tape by connecting audio equipment or a microphone. If you connect the audio equipment, you can add sound to your recorded tape by specifying starting and ending points. The original sound will not be erased. Use the Remote Commander for this operation.
Aydnopepe3a\Pncb
BbMOxTe 3aHcBt ayDnOcnHnB DOnONHeHne K nepBOHaJbHOMy 3ByKy Ha JeHTe, POnCoEHNHB ayDnOaHnapat NmMKnPOcoH. EcN Bb IOnCoeDnHte ayDnOaHnapat, Bb MOxTe Do6aBnTB 3ByK Ha BaUy 3aIncanHyIO leHTy nyTe yKa3aHnToueK hauana n OKoHuaHn. PerBoHaJbHbI 3ByK He 6yDet CTeP rnp 3Tom. IcNoJIb3yIte npIbT dNCTaHcNOHHOrO yIpaBLeHnДЯ 3ToI onepaunn.
Connecting the microphone with the MIC jack
You can check the recorded picture and sound by connecting the AUDIO/VIDEO jack to a TV. The recorded sound is not output from a speaker. Check the sound by using the TV or headphones.
BbMOxKeTe npOBepntb 3aHncaHHoe
H3o6paXeHne H3ByK, POnDCOEaHnHB THe3do
AUDIO/VIDEO K TeLEBn3opy.
3aHncaHbIy 3ByK He pa3daetcyepe3
akCyCTuYeCKyo CnCTemy. PpOBepbTe 3ByK c
POMOuBIO TeLEBn30paA INI rONOBhIX TeLeFOHOB.
Connecting the microphone with the intelligent accessory shoe
Dubbing with the built-in microphones
No connection is necessary.
Note
The picture is not output from the AUDIO/VIDEO jack. Check the recorded picture on the LCD screen or in the viewfinder, as well as check the recorded sound by using a speaker or headphones.
Adding an audio sound on a recorded tape
(1) Insert your recorded tape into your camcorder.
(2) Set the POWER switch of your camcorder to PLAYER.
(3)Locate the recording start point by pressing. . Then press 1 at the point where you want to start recording to set your camcorder to playback pause mode.
(4) Press AUDIO DUB on the Remote Commander.
(5) Press on the Remote Commander and at the same time start playing back the audio you want to record. The new sound is recorded in stereo 2 (ST2) during playback.
(6) Press on the Remote Commander at the point where you want to stop recording.
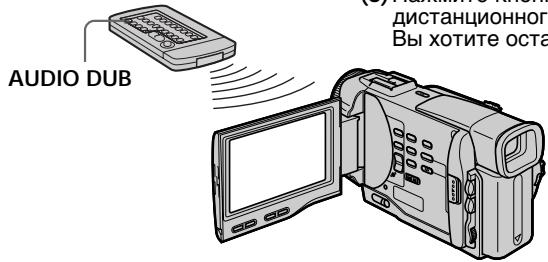
Monitoring the new recorded sound
To play back the sound
Adjust the balance between the original sound (ST1) and the new sound (ST2) by selecting AUDIO MIX in the MENU settings (p. 87).
Aydnope3anncb
Ipepe3aHcB c NOMOsbU BCTpoEHHO MKNpOfoHa
Hikakne noDCoeDHeHHn He Tpe6yOTcA.
PpimeyaHne
CirHnAbI N3o6paXeHn He 6yUyt NOCTynaTb OT rHe3da AUDIO/VIDEO. IpOBePraTe 3aINCbIAEMo N3o6paXeHne Ha 3KpaHe JKKd INI B BNDOCKaTEle, a 3aINCbIAeMbn 3Byk InpOBePraTe CnOJIb3OBAHNm DInHaMNka INI rONOBHX TeLEFOHOB.
KoHTpoJIb HOBOrO 3aIncaHHoro 3ByKa
Длвьоспpon3BeDEнгЯ 3Byka
Отergyларуге баланс мекду нрьогаальбим 3ыков (ST1) и Новим 3ыков (ST2), Вьбав Команду AUDIO MIXВ усанвкax MENU (ctp. 87).
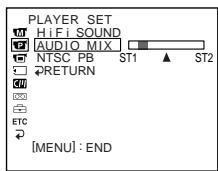
Five minutes after when you disconnect the power source or remove the battery pack, the setting of AUDIO MIX returns to the original sound (ST1) only. The factory setting is original sound only.
Notes
- New sound cannot be recorded on a tape already recorded in the 16-bit mode (32 kHz, 44.1 kHz or 48 kHz) (p. 91).
- When an external microphone is not connected, the recording will be made through the built-in microphone of your camcorder.
- New sound cannot be recorded on a tape already recorded in the LP mode.
- You cannot add audio with the AV OUT nor DV OUT jack.
If you make all the connections
The audio input to be recorded will take precedence over others in the following order.
- MIC (PLUG IN POWER) jack
- Intelligent accessory shoe
Built-in microphone
If the A/V connecting cable or i.LINK cable (DV connecting cable) is connected to your camcorder
You cannot add a sound to a recorded tape.
To add new sound more precisely
Press ZERO SET MEMORY at the point where you want to stop recording later in the playback mode.
Carry out steps 3 to 5. Recording automatically stops at the point where ZERO SET MEMORY was pressed.
We recommend you to add new sound on a tape recorded with your camcorder
If you add new sound on a tape recorded with another camcorder (including DCR-TRV8E/
TRV10E), the sound quality may become worse.
Aydnopepe3anncb
Yepe3 nIaTb MmHyT nOcNe OTCoeDInHeHn INCTOChnKa PNTAHnY mIN CHaTHnB 6aTaapeHOrO 6JOKa yCTaHOBKa AUDIO MIX BepHeTcK K nepBOHaauhOMy 3BykU (ST1).3aBoDcKO YCTaHOBKO RAJIeTcTOJIbKO nepBOHaauhBbHbM 3ByK.
PpimueaHn
- HOBBI 3ByK He MoKeT 6bIb 3aIncan Ha IeHTy, yXe 3aIncanHHyB V 16-6ntOBom peXmE (32 KΓU, 44,1 KΓU nIIIN 48 KΓU) (cTp. 96).
- Ecnn BHeHnMnKpOPOH He NoDCoEINHeN, 3aIncb 6yTeBbInOnHeHa Uepe3 BCtPoEHbIn MnkpoP0He BaWeBnDeOkamepbl.
- HOBBI 3BYK He MoXeT 6bITb 3aIncAH haJeHTy, yXe 3aIncAHHyO B pexkme LP.
- Bы He можete Быногнть наложене 3Byka, Испальзуг rHe3do AV OUT nIи rHe3do DV OUT.
EcnBbCpeJannBce noDcoeHHeHn
BxOJHON 3ByK dIy 3aIncn 6yJeT IMeTb npInopNTeT HaI dpyrMn 3Bykamn B CNeDyUoSei nocJeDoBaTeJIbHOCTN.
Bbl He cMOxKeTe IobaBnTb 3ByK Ha 3ancaHHyIO JENTy.
Дяболг TeUHorO IO6aBNeHЯ HOBOrO 3Byka
HajmTe KhoNky ZERO SET MEMORY B MeCTe, rIe Bbl xoTne 3aInc b no3xe B peXnme BocpOn3BeDeHn.
BbINOHNTE nyHKtbi c 3 no 5.3anncb abTomatueckn octaHOBNTc B MeTe, rde 6blna Hxkata Khonka ZERO SET MEMORY.
PekomeHnyeTcdo6abTb HOBbI 3ByK HaJeHTy,3aIncaHHyo c nOmoBIO BaWei BnDeOKaMepbl
Ecni Bby IobabNTe 3Byk Ha IneHTy, 3aIncanHyIO C NOMOJIbO DpyrO BnDEOkamepbl (BKNIOUaY DCR-TRV8E/TRV10E), KaueCTBO 3Byka MoXeT 6bITb xxke.
Superimposing a title
CM only
If you use a tape with cassette memory, you can superimpose the title while recording or after recording. When you play back the tape, the title is displayed for five seconds from the point where you superimposed it.
You can select one of eight preset titles and two custom titles (p. 83). You can also select the colour, size and position of titles.
HanoxeHne TnTpa
CM only
EcIn BbI nCnOJb3yeTeJeHTy c KACCtHoi nAmrTbHO, Bbl MoKeTe BblIOJIHb HAnOxHeHne TITpa BO BpeMa 3aIncn nnnoce 3aIncn. EcIn Bbl BOCpOn3BOoNte JeHTy, TITp 6yDet OTo6paXaTbcR B TeueHne nTn CeKHyD C TORo MeCTa, rDe Bbl HAnOxnn erO.
BbMOxKeTe Bb6paTb OINH N3 BOcBMn
IpeBaPnteJIbHO yCTaHOBJIeHHbIX TITPOB IN
DbYX Co6CTBeHHbIX TITPOB (Ctp. 83). Bbl MOxKeTe TaKke Bbl6paTb CbET, pa3Mep IN
NoJIOXeHne TITPOB.

(1) Press TITLE to display the title menu.
(2) Turn the SEL/PUSH EXEC dial to select , then press the dial.
(3) Turn the SEL/PUSH EXEC dial to select the desired title, then press the dial. The title is flashing.
(4) Change the colour, size, or position, if necessary.
① Turn the SEL/PUSH EXEC dial to select the colour, size, or position, then press the dial. The item appears.
② Turn the SEL/PUSH EXEC dial to select the desired item, then press the dial.
③ Repeat steps ① and ② until the title is laid out as desired.
(5) Press the SEL/PUSH EXEC dial again to complete the setting.
In the playback, playback pause or recording mode:
The "TITLE SAVE" indicator appears on the screen for 5 seconds and the title is set.
In the standby mode:
The "TITLE" indicator appears. And when you press START/STOP to start recording, "TITLE SAVE" appears on the screen for 5 seconds and the title is set.
(1)HaKmTe KhoNky TITLE dIra OTo6paXeHn MEHIO TITPOB.
(2)Повернite ДИСК SEL/PUSH EXEC ДЛЯ Вьбopa установский, a 3aTeM нахмITE ДИСК.
(3)ПовернITE днСEL/PUSH EXEC дЯ
Быбopa hyжно TИТра,а 3aTeM haЖмпЕ
dнСК.ТИТр haЧНТ MИrTaTb.
(4)Измени TeцBet, pa3mepил пооженп.TnTpа, ecInн hyxHo.
① ПовернITE ДИСК SEL/PUSH EXEC ДИВыбopa цьета, размера плноюжени.TИТра, a 3aTeM НAZMITE ДИСК.
② ПовернITE диck SEL/PUSH EXEC дя Выбoga hyжно пункta, a 3aTeM НжмITE диck.
③ Повторгейtenунковы ①и ② do tex nop, noka TnTp He bydET paCnoIOnKeH TaK, KaK HUxKHO.
(5)HaxmTeДиСKSEL/PUSH EXECДЯ 3aBepSeHnYcTaHOBKn.
B pexime Bocnpo3BeDeHn, nay3bl Bocnpo3BeDeHn nIIN 3aInci: Ha 3kpahe IIOBNTcN INIINkaTOp "TITLE SAVE" Na IANTb cekyHd, n ycTaHOBKa TITPa 6yDet 3aBepseHa.
B pexime oXnidaHn: IoAHTcI INndkaTOp "TITLE".Aecn Bbl NaJMeTe KhoNky START/STOP nHaayala 3aIncn,Ha 3KpaHe NOBHTcI INndkaTOp "TITLE SAVE" Ha nptb cekyHn, n yctaHOBka TITpTa 6ydet 3aBepSeHa.
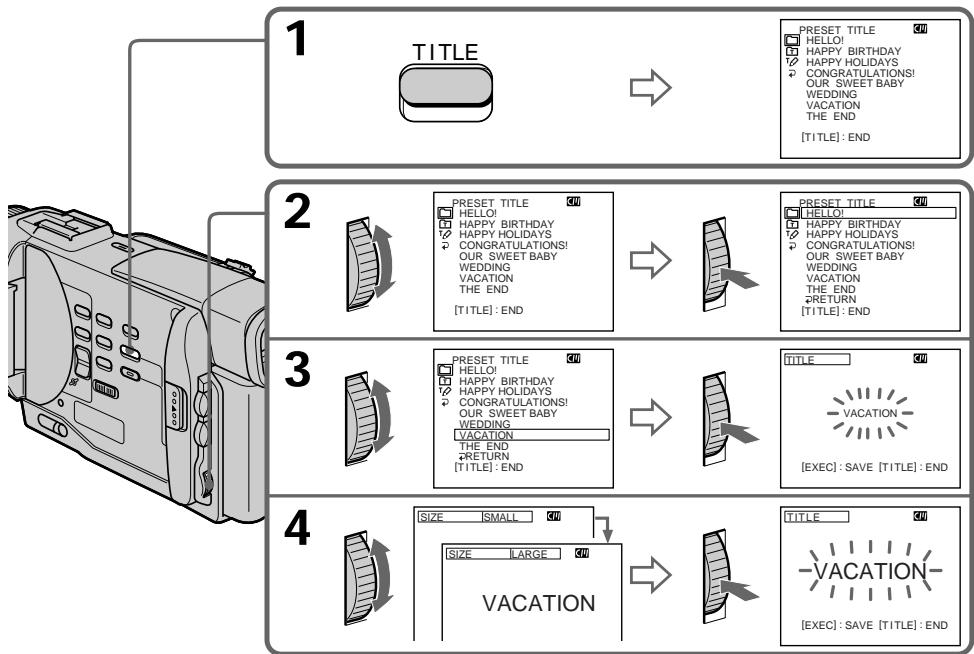
If you use a cassette set to prevent accidental erasure
You cannot superimpose or erase the title. Slide the write-protect tab so that the red portion is not visible.
To use the custom title
If you want to use the custom title, select in step 2.
If you have not made any custom title,
"---..." appears on the display.
Title setting
- The title colour changes as follows: WHITE YELLOW VIOLET RED CYAN GREEN BLUE
- The title size changes as follows :
SMALL LARGE
If you input 13 characters or more for a LARGE title, the title is automatically reduced in size after its position is set.
- The title position changes as follows :
1 2 3 4 5 6 7 8 9
The larger the position number, the lower the title is positioned.
When you select the title size "LARGE", you cannot choose position 9.
One cassette can have up to about 26 titles, if one title consists of 5 characters
However, if the cassette memory is full with date, photo and cassette label data, one cassette can have only up to about 15 titles with 5 characters each.
Cassette memory capacity is as follows:
- 6 date data (maximum)
- 12 photo data (maximum)
- 1 cassette label (maximum)
PnncnoIb3OBAHnn KaccetbI C yctaHOBkoJ DnI npedotBpaueHH CNyauHoro CTupaHH
BbI He CMOXeTe BbINONHtB HaIOXeHne IIN CTnpaHne TnTpa. IpeEaBHte JeNecTOK dIpyeOeTbPaueHn E CtnpaHn 3aNNc, TaK YTObI He bblna BnDa KaPachn YaCTb.
IINCNOB3OBAHNA CO6CTBEHNHO TNTpa
EcnBbXOTNE NcIOJIb3OBAb Tbco6CTBeHHbI TnTp, Bbl6epNTe yCTaHOBky B nyHKte 2.
EcnBbHe cdeIaHnHKaKOro co6CTBeHHoro TnTpA,Ha dncJIee NOBbTc HdNKaIy
“- - - - ...”
YctaHOBka TnTpa
LBeT TnTpA n3MeHReTcA CNeDyUOuIM 06pa3OM:
WHITE (6eBbI) YELLOW (XeNTbI)
VIOLET (ΦnOJIeTOBbI) ↔ RED (KpaChbI)
(1) Set the POWER switch to PLAYER.
(2) Press MENU to display the menu.
(3) Turn the SEL/PUSH EXEC dial to select, then press the dial.
(4) Turn the SEL/PUSH EXEC dial to select TITLEERASE, then press the dial. Title erase display appears.
(5) Turn the SEL/PUSH EXEC dial to select the title you want to erase, then press the dial. "ERASE OK?" indicator appears.
(6) Make sure the title is the one you want to erase, and turn the SEL/PUSH EXEC dial to select ERASE, then press the dial.
CTnpaHne TnTpa
(1)Установпейразковая对外开放 POWER в положене PLAYER.
(2)HaKmTe KhoNky MENU nIa oTo6paKeHn MeHIO.
(3)ПовернITE ДИСК SEL/PUSH EXEC ДИВБОGA yCTaHOBK n, a 3aTeM haxmITEДИСК.
(4)ПовернITE ДИСК SEL/PUSH EXEC ДЯ
Быбopa установки TITLE ERASE, a 3aTeM
НжмITE ДИСК.
IIOBNTcHnDnKaunCTnpaHnTtPa.
You can make up to two titles and store them in the cassette memory. Each title can have up to 20 characters.
(1) Press TITLE in the standby or PLAYER mode.
(2) Turn the SEL/PUSH EXEC dial to select then press the dial.
(3) Turn the SEL/PUSH EXEC dial to select the first line (CUSTOM1) or second line (CUSTOM2), then press the dial.
(4) Turn the SEL/PUSH EXEC dial to select the column of the desired character, then press the dial.
(5) Turn the SEL/PUSH EXEC dial to select the desired character, then press the dial.
(6) Repeat steps 4 and 5 until you have selected all characters and completed the title.
(7) To finish making your own titles, turn the SEL/PUSH EXEC dial to select [SET], then press the dial. The title is stored in memory.
(8) Press TITLE to make the title menu disappear.
CM only
BbMOKTe COCTaBHT Do DByx TnTPOB IN COXPAHHT Nx B KACCETHOI NaMRTN. KaKdYbTnTp MOKET CoepKaTaB Do 20 CmBOJOB.
(1)HaxmTe KhONkY TITLE B pexnme Oxndanu nn pexnme PLAYER.
(2)ПовернITE ДИСК SEL/PUSH EXEC ДИР
Быбopa усановский, a за tem нажмпес.
(3)ПовернITE ДИСК SEL/PUSH EXEC ДЛЯ Вьбор петовский CUSTOM1) Или Втору строчи(CUSTOM2),а за тем HAXKMTE DMCK.
(4)Поверн'te ДИС KELPUSH EXEC ДЯ
БИБОРа КОЛОнКИС HУЖБИМ CIMMOBJOM, a
3aTeM HAKMTE ДИСК.
(5)ПовернITE ДИСК SEL/PUSH EXEC ДИВьбора HYЖНО ВИМБOLA, a 3aTeM HAZKMITEДИСК.
(6) NOBTOPAITyeNYHKTbI 4N5doTexnop, NOKA BBy He BbIeBepNTBe CmMBOJIbI IN NOJHOCTbIO HE COCTABITNE THTp.
(7)ДЯЗавершени COCTaBNeHnA CBOUX co6CTBeHHbIX TnTPOB NOBepHNTe DnCK SEL/ PUSH EXEC ДЯ Bblbopa KOMaHdBi [SET], a 3aTeM haxmite DnCK. TnTp 6yDet CoXpaHe H nAMrTu.
(8)HaxMnte KhoNky TITLE, YTo6bI Ncye3JIO MEHIO TnTPOB.
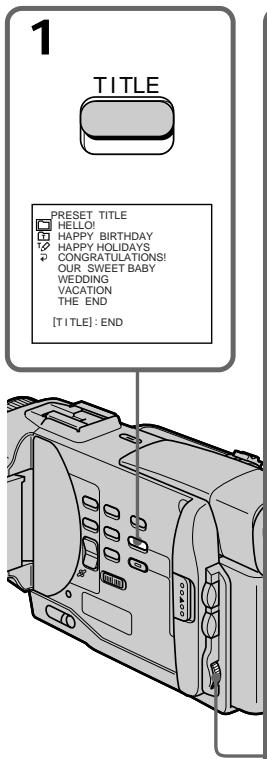
2

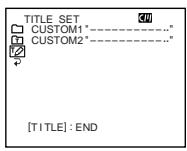

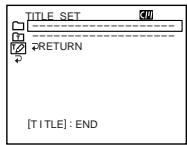
3

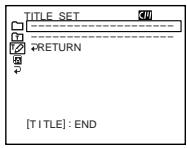

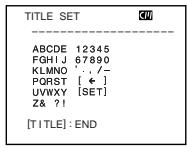
4 6
1

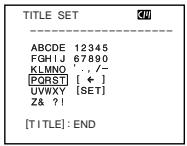
2

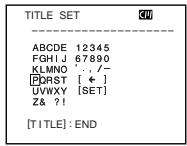
3

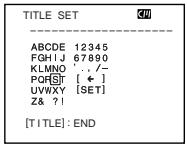
4

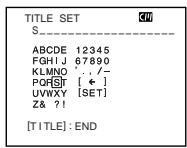
To change a title you have stored
In step 3, select CUSTOM1 or CUSTOM2, depending on which title you want to change, then press the SEL/PUSH EXEC dial. Turn the SEL/PUSH EXEC dial to select [<], then press the dial to delete the title. The last character is erased. Enter the new title as desired.
If you take 5 minutes or longer to enter characters in the standby mode while a cassette is in your camcorder
The power automatically goes off. The characters you have entered remain stored in memory. Set the POWER switch to OFF once and then to CAMERA again, then proceed from step 1. We recommend setting the POWER switch to PLAYER or removing the cassette so that your camcorder does not automatically turn off while you are entering title characters.
To delete the title
Select [ · ] . The last character is erased.
IIN3MeHeHH COxpaHeHHoro B nAMrTn TnTp a
B nyHKe 3 BbI6epnte yctaHOBky CUSTOM1 nIN CUSTOM2, B 3aBnCIMoCTn OT TnTpa, KOtOpbl Bby XOTnTe N3MeHNb, a 3aTeM haxmTe DnCK SEL/PUSH EXEC. IOBepHnTe DnCK SEL/PUSH EXEC dNBAbOpa yCTaHOBKn [<], a 3aTeM haxmTe DnCK dNlaJeHnA TnTpa. PocneHn CMBOJ 6ydt CTepT. BBeDnTe HOBb HxKbH TnTp.
EcIn Bbl BBOUNTE CNMBONJI 5 MNHT NNI 6OJIeBpeKIMe OXnDaHnB TO BpEmr, KOrda kacceta HaxoNTcB BaWei BNDeOKaMepe
Питainede ВьклочиаabTomatuchekn.CmBoNbl, KOTopbIe Bbl BBelen, coxpaHrTcBnamTn Bvdeokamepbl.YCTaHOBInTe Chauana nepeKlnoaTeJIb POWERB nOLOXeHne OFF,a 3aTeM CHOBA bNoLOXeHne CAMERA,a 3aTeM NaHHNTc CnyHKTa1.PekOMeHdyeTcYcTaHOBt nepeKlnoaTeJIb POWER B noLOXeHne PLAYER mINn BvHyTB kaccety, YTO6bl Ba7a Bvdeokamepa ABTomatucheKn He BvIKLIOUaJacb BO Bpemra BBOda CmBOJOB TITpa.
Дя удалини титра
Bb6epnte yctahOBky [].IocneHn CmBON 6ydet ctept.
CM only
If you use a tape with cassette memory, you can label a cassette. The label can consist of up to 10 characters and is stored in cassette memory. When you insert the labeled cassette and turn the power on, the label is displayed on the LCD screen, in the viewfinder, or on the TV screen.
(1) Insert the cassette you want to label.
(2) Set the POWER switch to PLAYER.
(3) Press MENU to make the menu display appear.
(4) Turn the SEL/PUSH EXEC dial to select 30 , then press the dial.
(5) Turn the SEL/PUSH EXEC dial to select TAPE TITLE, then press the dial.
(6) Turn the SEL/PUSH EXEC dial to select the column of the desired character, then press the dial.
(7) Turn the SEL/PUSH EXEC dial to select the desired character, then press the dial.
(8) Repeat steps 6 and 7 until you finish the label.
(9) Turn the SEL/PUSH EXEC dial to select [SET], then press the dial.
The label is stored in memory.
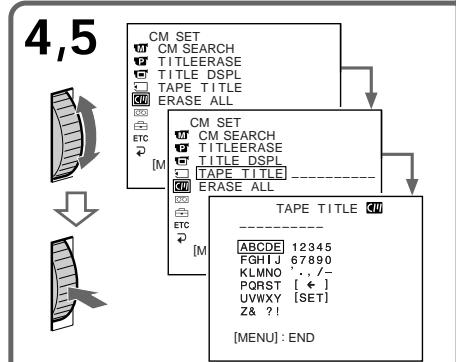
Mapknipobka kaccetbl
CM only
Ecnn Bblncnlo3yeTeJeHTy c
kaccetHOI nAMrTbIO,BblMOXeTe
BblIOHNHTb MapKINPOBY KACCETbI.
MapKINPOBka MOxET COCToRb 13 10
CmBOJIOB IN XpaHNTcB N pAmrTn
kaccetbl.EcnBblBCTaBtNE KACCETy C
MapKINPOBko IN BKIOUHTe NTaHHe,TO
MapKINPOBka 6yDet OTo6paxKeHa Ha
3KpaHe JKKD,B BVIOuCKaTeNe IIn Ha
3KpaHe TJIeBUN3Opa.
To erase a character
In step 6 turn the SEL/PUSH EXEC dial to select [ ] , then press the dial. The last character is erased.
To change the label you have made
Insert the cassette to change the label, and operate in the same way to make a new label.
If you use a cassette set to prevent accidental erasure
You cannot label it. Slide the write-protect tab so that the red portion is not visible.
If the ^H mark appears in step 5
The cassette memory is full. If you erase the title in the cassette, you can label it.
If you have superimposed titles in the cassette When the label is displayed, up to 4 titles also appear.
When the "-----" indicator has fewer than 10 spaces
The cassette memory is full.
The "-----" indicates the number of characters you can select for the label.
Длг STираннсмьола
BnyHKTe 6NoBepHnTe DNCK SEL/PUSH EXECДЯ BbIbOpa yCTaHOBKn [←], a3aTeM haxMnTeДИСК. Пocnédнi CmBBoN 6byet CTePT.
EcIn BbI nCnoJIb3yTe KaccTeY c yCTaHOBko 3aunTbI OT CnyauHoro CTnpaHn
BbI He cMOXeTe BbIOnHnTb MapKnipOBKy KaccTebl. IpeEaBnHbTe JIeNecTOK 3aunTbI 3aINcI, TaK YTObI Kpachna YacTb erO bbla He BnDHa.
EcInBnyHKTe 5 noBNTca 3nak
KacceTha namTb nepenOnHeHa. EcnBbl cOTpeTe TnTp Ha KaccTe, Bbl MoKeTe BblONHtB MapKnIpOBky KaccTebl.
EcIn Bbl BbIOpHnI HAnOKeHne TITPOB Ha Kaccete
Korda noBnTcMapKnipOBka, noBbTcTaKKe do 4 TnTPOB.
EcInnHdNkaTop "----" MeeTe MeHee 10 npo6eIOB
Kaccetna namrTb nepenolHeHa.
ИндикатOP----"уka3bIBAeT KOJIuYeCTBO CmBOnOB, KOTOpoe Bbl MoXeTe Bbl6paTbДлмарКИрВКИ.
- Customizing Your Camcorder - Changing the MENU settings
To change the mode settings in the MENU settings, select the menu items with the SEL/PUSH EXEC dial. The factory settings can be partially changed. First, select the icon, then the menu item and then the mode.
(1) In the standby or PLAYER mode, press MENU.
(2)Turn the SEL/PUSH EXEC dial to select the desired icon, then press the dial to set.
(3) Turn the SEL/PUSH EXEC dial to select the desired item, then press the dial to set.
(4) Turn the SEL/PUSH EXEC dial to select the desired mode, and press the dial to set.
(5) If you want to change other items, select RRETURN and press the dial, then repeat steps from 2 to 4.
For details, see "Selecting the mode setting of each item" (p. 88).
- BbInonJIHeHne HnDnBnDyaIbHbIX yCTaHOBOK Ha BnDEoKamepe -
Menu items are displayed as the following icons:
MANUAL SET
CAMERA SET
PLAYER SET
LCD/VF SET
MEMORY SET (DCR-TRV10E only)
CM SET
TAPE SET
SETUP MENU
ETC OTHERS
M MANUAL SET
CAMERA SET
PLAYER SET
LCD/VF SET
MEMORY SET (Tolbko mojeNB DCR-TRV10E)
CM SET
TAPE SET
SETUP MENU
ETC OTHERS
English
Selecting the mode setting of each item is the factory setting.
Menu items differ depending on the position of the POWER switch.
| Icon/item | Mode | Meaning | POWER switch |
| P EFFECT | To add special effects like those in films or on the TV to images (p. 49) | CAMERA PLAYER | |
| WHT BAL | To adjust the white balance (p. 54) | CAMERA MEMORY | |
| AUTO SHTR | ● ON | To automatically activate the electronic shutter when shooting in bright conditions | CAMERA MEMORY |
| OFF | To not automatically activate the electronic shutter even when shooting in bright conditions | ||
| D ZOOM | ON | To activate digital zoom. More than 10× to 40× zoom is performed digitally (p. 24) | CAMERA MEMORY |
| ● OFF | To deactivate digital zoom. Up to 10× zoom is carried out. | ||
| 16:9WIDE | ● OFF | — | CAMERA |
| ON | To record a 16:9 wide picture (p. 44) | ||
| STEADYSHOT | ● ON | To compensate for camera-shake | CAMERA MEMORY |
| OFF | To cancel the SteadyShot function. Natural pictures are produced when shooting a stationary object with a tripod. | ||
| N.S. LIGHT | ● ON | To use the NightShot Light function (p. 28) | CAMERA MEMORY |
| OFF | To cancel the NightShot Light function |
Notes on the SteadyShot function
- The SteadyShot function will not correct excessive camera-shake.
- Attachment of a conversion lens (not supplied) may influence the SteadyShot function.
If you cancel the SteadyShot function
The SteadyShot off indicator "W" appears. Your camcorder prevents excessive compensation for camera-shake.
| Icon/item | Mode | Meaning | POWER switch |
| HiFi SOUND | ●STEREO | To play back a stereo tape or dual sound track tape with main and sub sound | PLAYER |
| 1 | To play back a stereo tape with the left sound or a dual sound tape with main sound | ||
| 2 | To play back a stereo tape with the right sound or a dual sound track tape with sub sound | ||
| AUDIO MIX | To adjust the balance between the stereo 1 and stereo 2 (p. 77) | PLAYER | |
| ST1 ST2 | |||
| NTSC PB | ●ON PAL TV | To playback a tape recorded on your camcorder on a PAL system TV | PLAYER |
| NTSC 4.43 | To playback a tape recorded in the NTSC colour system on a TV with the NTSC 4.43 mode | ||
| LCD B. L. | ●BRT NORMAL | To set the brightness on the LCD screen normal | PLAYER |
| BRIGHT | To brighten the LCD screen | CAMERA MEMORY | |
| LCD COLOUR | To adjust the colour on the LCD screen, turn and press the SEL/PUSH EXEC dial | PLAYER | |
| To lighten To darken | CAMERA MEMORY | ||
| VF BRIGHT | To adjust the brightness on the viewfinder screen, turn and press the SEL/PUSH EXEC dial | PLAYER | |
| To darken To lighten | CAMERA MEMORY |
Note on AUDIO MIX
When playing back a tape recorded in the 16-bit mode, you cannot adjust the balance.
Note on the playback of the NTSC tapes
When you play back a tape on a Multi System TV, select the best mode while viewing the picture on the TV.
Notes on LCD B.L.
- When you select "BRIGHT", battery life is reduced by about 10 percent during recording.
- When you use power sources other than the battery pack, "BRIGHT" is automatically selected.
| Icon/item | Mode | Meaning | POWER switch |
| CONTINUOUS (DCR-TRV10E only) | ● OFF | Not to record continuously | MEMORY |
| ON | To record 3 or 4 pictures continuously (p. 107) | ||
| MULTI SCRN | To record 9 picutures continuously (p. 107) | ||
| QUALITY (DCR-TRV10E only) | ● FINE | To record still pictures in the fine image quality mode, using the Memory Stick | PLAYER MEMORY |
| STANDARD | To record still pictures in the standard image quality mode, using the Memory Stick | ||
| FLD./FRAME (DCR-TRV10E only) | ● FIELD | To record moving subjects | MEMORY |
| FRAME | To record stopping subjects in high quality | ||
| PRINT MARK (DCR-TRV10E only) | ON | To write a print mark on the recorded still images you want to print out later | PLAYER MEMORY |
| ● OFF | Not to write print marks on still pictures | ||
| PROTECT (DCR-TRV10E only) | ON | To protect selected still pictures against accidental erasure (p. 121) | PLAYER MEMORY |
| ● OFF | Not to protect still pictures | ||
| SLIDE SHOW (DCR-TRV10E only) | To play back images in a continuous loop (p. 127) | MEMORY | |
| DELETE ALL (DCR-TRV10E only) | To delete all the images (p. 124) | MEMORY | |
| FORMAT (DCR-TRV10E only) | To format Memory Sticks | MEMORY | |
| PHOTO SAVE (DCR-TRV10E only) | To duplicate still pictures (p. 112) | PLAYER | |
| CM SEARCH | ● ON | To search using cassette memory (p. 66) | PLAYER |
| OFF | To search without using cassette memory | ||
| TITLEERASE | To erase the title you have superimposed (p. 82) | PLAYER CAMERA | |
| TITLE DSPL | ● ON | To display the title you have superimposed | PLAYER |
| OFF | Not to display the title | ||
| TAPE TITLE | To label a cassette (p. 85) | PLAYER CAMERA | |
| ERASE ALL | To erase all the data in cassette memory | PLAYER CAMERA | |
| REC MODE | ●SP | To record in the SP (Standard Play) mode | CAMERA |
| LP | To increase the recording time to 1.5 times the SP mode | ||
| AUDIO MODE | ●12BIT | To record in the 12-bit mode (two stereo sounds) | PLAYER CAMERA |
| 16BIT | To record in the 16-bit mode (the one stereo sound with high quality) | ||
| REMAIN | ●AUTO | To display the remaining tape bar: •for about 8 seconds after your camcorder is turned on and calculates the remaining amount of tape •for about 8 seconds after a cassette is inserted and your camcorder calculates the remaining amount of tape •for about 8 seconds after ▲ is pressed in PLAYER mode •for about 8 seconds after DISPLAY is pressed to display the screen indicators •for the period of tape rewinding, forwarding or picture search in the PLAYER mode | PLAYER CAMERA |
| ON | To always display the remaining tape indicator | ||
| DATA CODE | ●DATE/CAM | To display date, time and various settings during playback | PLAYER |
| DATE | To display date and time during playback |
Notes on the LP mode
- When you record a tape in the LP mode on your camcorder, we recommend playing the tape on your camcorder. When you play back the tape on other camcorders or VCRs, noise may occur in pictures or sound.
- When you record in the LP mode, we recommend using a Sony Excellence/Master mini DV cassette so that you can get the most out of your camcorder.
- You cannot make audio dubbing on a tape recorded in the LP mode. Use the SP mode for the tape to be audio dubbed.
- When you record in the SP and LP modes on one tape or you record some scenes in the LP mode, the playback picture may be distorted or the time code may not be written properly between scenes.
Notes on AUDIO MODE
- You cannot dub audio sound on a tape recorded in the 16BIT mode.
- When playing back a tape recorded in the 16-bit mode, you cannot adjust the balance in AUDIO MIX.
| Icon/item | Mode | Meaning | POWER switch |
| CLOCK SET | To reset the date or time (p. 98) | CAMERA MEMORY | |
| LTR SIZE | ●NORMAL | To display selected menu items in normal size | PLAYER CAMERA MEMORY |
| 2× | To display selected menu items at twice the normal size | ||
| DEMO MODE | ●ON | To make the demonstration appear | CAMERA |
| OFF | To cancel the demonstration mode | ||
| ETC WORLD TIME | To set the clock to the local time. Turn the SEL/PUSH EXEC dial to set a time difference. The clock changes by the time difference you set here. If you set the time difference to 0, the clock returns to the originally set time. | CAMERA MEMORY | |
| BEEP | ●MELODY | To output the melody when you start/stop recording or when an unusual condition occurs on your camcorder | PLAYER CAMERA MEMORY |
| NORMAL | To output the beep instead of the melody | ||
| OFF | To cancel the melody and beep sound | ||
| COMMANDER | ●ON | To activate the Remote Commander supplied with your camcorder | PLAYER CAMERA MEMORY |
| OFF | To deactivate the Remote Commander to avoid remote control misoperation caused by other VCR's remote control | ||
| DISPLAY | ●LCD | To show the display on the LCD screen and viewfinder | PLAYER CAMERA MEMORY |
| V-OUT/LCD | To show the display on the TV screen, LCD screen and viewfinder | ||
| REC LAMP | ●ON | To light up the camera recording lamp at the front of your camcorder | CAMERA MEMORY |
| OFF | To turn the camera recording lamp off so that the subject is not aware of the recording | ||
| DV EDITING (DCR-TRV10E only) | To duplicate the desired portion on a tape by simply selecting the scenes to edit, using other equipment connected with an i.LINK cable (DV connecting cable) (p. 74) | PLAYER |
Notes on DEMO MODE
- You cannot select DEMO MODE when a cassette is inserted in your camcorder.
- DEMO MODE is set to STBY (Standby) at the factory and the demonstration starts about 10 minutes after you have set the POWER switch to CAMERA without a cassette inserted.
Note that you cannot select STBY of DEMO MODE in the MENU settings.
- When NIGHTSHOT is set to ON, the NIGHTSHOT indicator appears in the viewfinder or on the LCD screen and you cannot select DEMO MODE in the MENU settings.
In more than 5 minutes after removing the power source
The "AUDIO MIX", "COMMANDER" and "HiFi SOUND" items are returned to their factory settings.
The other menu items are held in memory even when the battery is removed.
Pysckn
Bb6op yctaHOBOK peXIMa no KaXdOMy NyHKTy 3aBOcKaYcTaHOBka.
IyHKtbl MeHIO OTJNUaOTcB 3aBnCmOCTN OT nIoXeHn IpeKJIouaTeTn POWER.
Resetting the date and time
IpeyeCTaHOBKa DaTbI N BpemeHn
The clock is set at the factory to London time for United Kingdom to Paris time for the other European countries.
If you do not use your camcorder for about a half year, the date and time settings may be released (bars may appear) because the vanadium-lithium battery installed in your camcorder will have been discharged.
First, set the year, then the month, the day, the hour and then the minute.
(1) While your camcorder is in the standby mode, press MENU to display the MENU settings.
(2) Turn the SEL/PUSH EXEC dial to select 一 then press the dial.
(3) Turn the SEL/PUSH EXEC dial to select CLOCK SET, then press the dial.
(4) Turn the SEL/PUSH EXEC dial to adjust the desired year, then press the dial.
(5) Set the month, day and hour by turning the SEL/PUSH EXEC dial and pressing the dial.
(6) Set the minute by turning the SEL/PUSH EXEC dial and pressing the dial by the time signal. The clock starts to move.
(7) Press MENU to make the MENU settings disappear.
YacbI yCTaHOBJIeHbI Ha IpeInpTmN-
n3ROTOBHTeNe Ha BpemI LoHDoHa dIy MoDeJeI
CoeHNHeHOrO KoponeBcTBa I Ha BpemI
PapNka dIydpurnx Ebponecknx MoDeJeI.
Ecni BbI He Icnpolb30BaIIi BaUy BInDeokamepy OKOJI NOIpyoJa, YCTaHOBKn DaTbI N BpeMeHn MOrYt NCHe3HyTb (NORBAITcR cepTOckn), NocKoiBky BaHaJneBO-NItNeBaa 6aTaapeKa, ycTaHOBJIeHHa B BaWei BInDeokamepe, pa3pIaNTcra.
Chauana yctaHOBNTe rO, 3aTeM MeCra, DeHb, Yac n MNHyTy.
(1)В рекиme Oжндань ВдоКамеры
ножмITE Кногку MENU до отбрахену
установК MENU.
(2)ПовернITE ДИСК SEL/PUSH EXEC ДЯ
Выбoga ИнДИКаци n, a 3aTeM нажмITE
ДИСК.
(3)ПовернITE диСК SEL/PUSH EXEC дя Вьбopa команды CLOCK SET, a 3aTeM нажмпг диСК.
(4)ПовернITE ДИСК SEL/PUSH EXEC ДИВБОпа НЖНО ГДа, a 3aTeM наЖМЛТЕ ДИСК.
(5)Установские месу,.Deнь уас пуtem Врашени диска SEL/PUSH EXECи Нжимани дисka.
(6)YCTaHOBtE MmHyTu Nytem BpaSeHnA DnCKa SEL/PUSH EXEC u HaxkImaHn DnCKa B MOMeHT npeJaHu CnHnA ToHOrO BpEmEH.NacbHaHcyf yHKsIOHnIPoBaTb.
(7)Haxmte KhoNky MENUДЯТOrO,УTO6blncye3n yCTaHOBKn MENU.
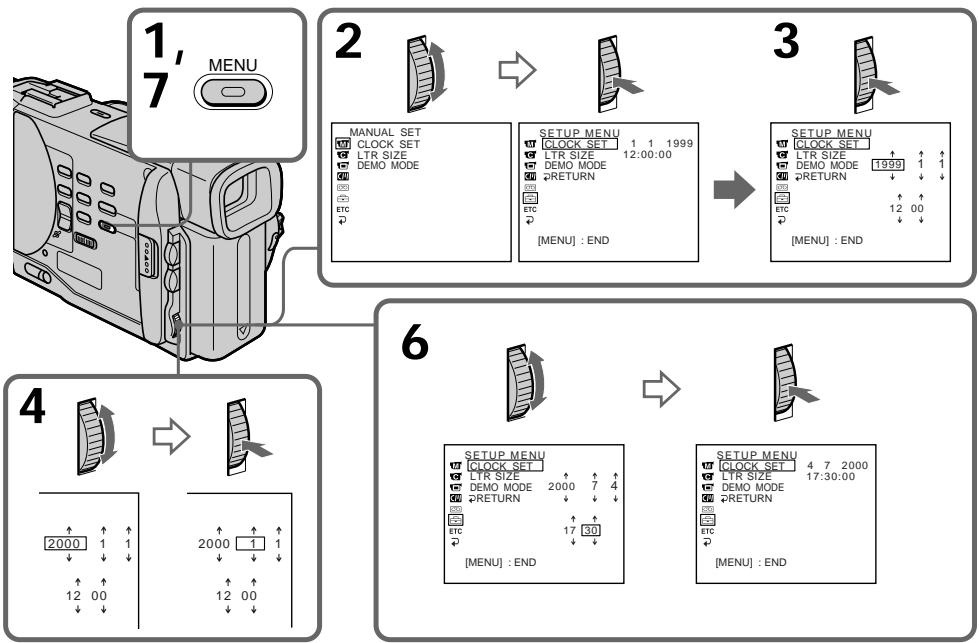
The year changes as follows:
Iod n3mehreTc cIeDyUoHm 6bpa30m:

If you do not set the date and time
“--:---” is recorded on the tape and the
Memory Stick (DCR-TRV10E only).
Note on the time indicator
The internal clock of your camcorder operates on a 24-hour cycle.
Ecnn BbI He yctaHOBnTe DaTy N BpeMa
Ha IeHTe nI pIaTe IamrTm Memory Stick
(ToIbKO MoIeJI BDCR-TRV10E) 6yIeT 3aIncaHa
HnDnKaun“------”
PpIMeuaHne no HnDkaTOpy BpeMeHn
BcTpoEHHbIe YacBi BaIeI BnDeOkamepbl pa6oTaIO T 24-YacOBOM pexKIme.
- Memory Stick operations - Using a Memory Stick-introduction
- DCR-TRV10E only
You can record and play back still images on a Memory Stick supplied with your camcorder. You can easily play back, re-record or delete still images. You can also record images from a mini DV tape on a Memory Stick or vice versa. You can exchange image data with other equipment such as a personal computer etc., using the Serial port adaptor for Memory Stick supplied with your camcorder or MSAC-PC1 PC card adaptor for Memory Stick (not supplied).
Still images
Record the still image on a Memory Stick. Play back the picture with your PC. See page 117 for details.
Using a Memory Stick
When you use a Memory Stick
-Операци c Memory Stick -Исpenьзоване Memory Stick -Вve徳нe
-ToIbKO MoIeJIb DCR-TRV10E
BbMOxKeTe 3aINcBbATb N BOCPOn3BOIDnTb HneOpDVBXKHeIe M3O6paxEHHa MEmory Stick, npnlaeraMoi K BaWei BnDeOkampe. Bbl JERKO MOxKeTe BbIOJHArTb BOCPOn3BeDEHne, nepe3aINCb INn ydaJIeHne HeNoDVBXKbIX n3O6paxEHH.
Kpome 3tix onepaun, Bby TaKke MoKeTe 3aHcBbTaB n3o6paXeHne CJeHTb MmH DV Ha Memory Stick nHn Hao6oPoT. Bby MoKeTe BByIOJIHTb O6MeH DaHHbIX n3o6paXeHne CdpYro annapaTpyo, Tako KaK nepcoHaJIbHbIK KOMNbIOTep I T.n., NcNoJIb3y aDAnTep nocSeIOBaTeJbHO rOpTa dJaMemory Stick, npInaRaem K Baue BnDeokampe nIn npAdanTep PC-Kaprbl MSAC-PC1 dJaMemory Stick (He npInaRaTeC).
HenoDbxKbIe n3o6paKeHHa
3aHnHtE HnoDnBxKHoe n3o6paXeHne Ha
Memory Stck. Bocnpn3BeNte n3o6paXeHne c
nomoUb BaUero nepcoHaBhoro KOMNbTopeA.
IopOboHbIe CBeDeHn npInBeHeHb Ha cTp. 117.
Icnojb3ObaHne Memory Stick EcIn Bbl ncnojb3yete Memory Stick
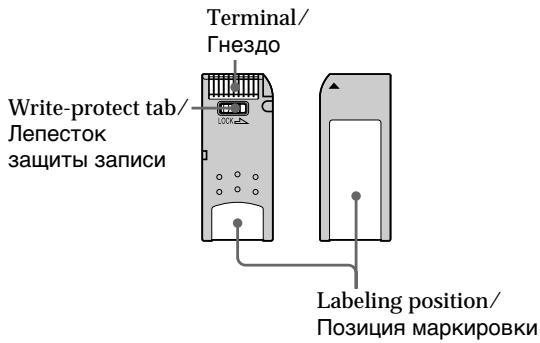
- You cannot record or erase still images when the write-protect tab on the Memory Stick is set to LOCK.
- You can format Memory Sticks. You can also protect still images and write print marks on still images in Memory Sticks.
- We recommend backing up important data.
- When the ACCESS lamp is flashing, never remove the Memory Stick.
-
Image data may be damaged in the following cases:
-
If you remove the Memory Stick or turn the power off when the ACCESS lamp is flashing
-
If you use Memory Sticks near magnets or magnet fields such as those of speakers and televisions.
-
Bы He можete 3аисьВаТь ИИ CTираТь ненДВМЖНБе 3ОБРХЕнИ, ecIN JENIECTOK Зашть 3лпСин Нa Memory Stick yctановпeн В полжениlock.
- Bby MoXeTe OTfOpMaTnIpOBaTb Memory Sticks. Bby TaKxe MoXeTe 3aunTnTb HEnoDBNXHbIe N3OBpaXeHnI N3aNcTaB 3HaKn IpeaTN Ha HEnoDBNXHbIX N3OBpaXeHnIX C nOMouCbIO Memory Sticks.
- PeKOMeHdyETcB BInONHrTb KOnN BaxHbIX daHHbIX.
-
Ecni Mmraet lammoqka ACCESS, HNKoRda He BbHMaTe Memory Stick B 3Ty Bpemr.
JaHHbIe N3O6paXeHnMOryT 6bITb NOBpeXdHeBb CNeDyUOxN CUYaX: -
EcIbn BblBHynn Memory Stick nnn BbIKJIOUHN NITAHNE B TO BpeM, KOrJa MMraet JAmnoUOKA ACCESS.
-
Ecyn Biu nCnoBn3yeTe Memory Sticks Bo3ne NcTOUHNIKOB MaHNIThbIX NOJIe, TaIKX KaK aKyCTUHeCKNe CnCTeMbI u TEJIeBn3Opbl.
On file format (JPEG)
Your camcorder compresses image data in JPEG format (extension .jpg).
Typical image data file name DSC00001.jpg.
Notes
- Prevent metallic objects or your finger from coming into contact with the metal parts of the connecting section.
- Stick its label on the labeling position.
- Do not bend, drop or apply strong shock to Memory Sticks.
- Do not disassemble or modify Memory Sticks.
- Do not let Memory Sticks get wet.
-
Do not use or keep Memory Sticks in locations that are:
-
Extremely hot such as in a car parked in the sun or under the scorching sun
-Under direct sunlight - Very humid or subject to corrosive gases
- When you carry or store a Memory Stick, put it in its case.
You do not need to format the Memory Stick supplied with your camcorder
The Memory Stick supplied with your camcorder is already formatted in FAT format. FAT format is the standard format for Memory Sticks and is supported by your camcorder.
Note
Sample images are already recorded on the Memory Stick supplied with your camcorder. All of these sample images will be deleted if you format the Memory Stick.
Memory Sticks formatted on a personal computer
Memory Stick operations on your camcorder cannot be assured if the Memory Stick is formatted on a Windows machine or Macintosh.
Notes on image data compatibility
- Image data files recorded on Memory Sticks by your camcorder conform with the Design Rules for Camera File Systems universal standard established by the JEIDA (Japan Electronic Industry Development Association).
You cannot play back on your camcorder still images recorded on other equipment (DCRTRV890E/TRV900E, DSC-D700) that does not conform with this universal standard. (These models are not sold in some areas.) - If you cannot use a Memory Stick that has been used on other equipment, format the Memory Stick on your camcorder following the steps on page 105. Note that all images on the Memory Stick will be deleted if you format it.
Memory Stick is a trademark of Sony Corporation.
O φopmaTe ΦaJIIOB (JPEG)
BaWa BnDeOkamepa CxImMaet DaHbIe N3o6paXeHnB B foPmT JPEG (c paCUnpeHnem .jpg).
TnHnHoe nMRAaIa DaHHbIX n3o6paXeHnR DSC00001.jpg.
PpmeHn
He pinnacaiitecb MeTJIiueeCKIMN YactAMM INI BaaMM NpIbIaMn K MEtJIiueeCKIM NactAM CoedINHITEnbHbIX CekKNI.
3TNIKETKY cIeIyET pIKNKPeIJIaTb B NO3NIMM MapKnPOBKn.
- He cπuδaβTe, He pοηαιTe u CπiMbHo He TpαCηTe Memory Sticks.
- He pa36paai Te i Ne BnDOn3MeHnTe Memory Sticks.
He DonlyckaIte, YTo6b Myl e StcHOBINIMb BLnAkhIMN.
- He ncpolb3yute n he xpaanite Memory Sticks B mectax:
- Upe3MepHO JxapKHX, HnnpIMep, B npiIapKOBaHHOM NOI cOJIHcEM ABTOMO6HJe, OCO6eHNo IOnIaIcIM COIIHcEM
-ПОД ПРЯМВIM COЛHEЧHBIM CBETOM
B-MeCTax OeHb BnAaKbIbx IINy CoOpEgXauInx Koppo3noHNbIe ra3I
Pnpehocke nIx xpaHem Memory Stick noIOXHTe ee B cyTnp.
Bam He hyxho fopmatnpoBaTb Memory Stick, npnilaraemyu K Baew Bndeokamepe
Memory Stick, npnilaraemKa BaweBnBeokampe, yke OtFopmatnpobawa B fOpMaTe FAT. FAT nBnAETcSTaHdAPThbM fOpMaTOM dNl Memory Sticks n noDepXkBAeTcB AweBnBeokampeoR.
PpimueaHne
Ha npinlaraeMoM K BaSeB BnDeokamepe Memory Stick yxe 3ancaHbI oBa3uI n3o6paxehn. BCE 3TN oBa3auI n3o6paxehn bdyT cTeptbl, eCIN Bbl oTfOpMaTInpye tMemory Stick.
Memory Sticks otΦopMaTnpoBaHbI Ha nepcoHaJIbHOM KOMNbIoTepe
Bce onepaunm c Memory Stick ha Baawe Bndeokamepe He MoryT 6bIb rapaHTnpoBaHb, eCNI Memory Stick otfopmatnpoBaHa ha MaShHe Windows nMacintosh.
Приимеаная К COBMecTUMOCTN ДаHHbIX n3o6paKeHn
-Фаилданньix,зарпсаньie HaMemory Sticks Baшеви Вдоекамеро,удоветоротnpавилamproeКТрOBaHINHAYHIBERCaIbHORO STAHdapTaФанOBБСNTeMДЯ ВдоekAMepbl,yctahOBJIeHOrO JEIDA(Янонckоаccoumaue耶paBHTM3NeKTPROHHО npOMbIuJIeHHOCTN).Вы He moKteTe BOCpON3BODHTBaHae WBIdeOKaMepe HenoDbNKHbIe N306bpKeHnA,3aHiccaHьie Ha dpyroH annapaType (DCR-TRV890E/TRV90OE,DSC-D700),KOTopar He yduBETbOPrET3OMy YHINBecalbHOMy CTaHdApTy.(STmMoJelenHe npdoAOTcBA H KEOtOpbIX obnaCTrx.)
- EcnBbI He MoKeTte IcNoIb3ObaTb My eMemory Stick, KOTOPa b6JIa IcNoIb3oBaHa Na dpyroI annapaType, OTOfPMAITpyTe MEmory Stck Ha Bauei BIDeOKaMepe, CNEyI pyNkTAM Ha cTaPaHnCe 105. POMHnTE, YTO npI fOpMaTIpOBaHN BCE n3O6paBeHHa H Memory Stck 6byDt cTeptbI.
Memory Stick RNAE TOPROB MApKo KOpnpaunn Sony.
Inserting a Memory Stick
(1) Slide MEMORY OPEN in the direction of the arrow. The Memory Stick compartment opens.
(2) Insert a Memory Stick in as far as it can go with its rounded corner facing up. Then, close the Memory Stick compartment.
YcTaHOBka Memory Stick
(1)Пелевиньт Кноку MEMORY OPEN B
Нарравли стрелк.Откpoeсг отсек
Для Memory Stick.
(2)BcTaBbTeMemoryStickdoynopa,TakTTo6bICKpyrHnHbIyrol6blnobpaueHBBepx.3aTeMzakpoTeOTceKdNMaMemoryStick.
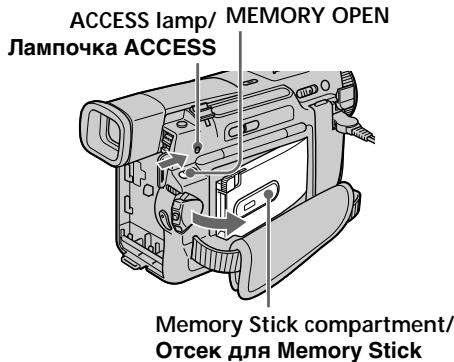
1
To eject a Memory Stick
Open the Memory Stick compartment in step 1, press MEMORY RELEASE. The Memory Stick comes out.
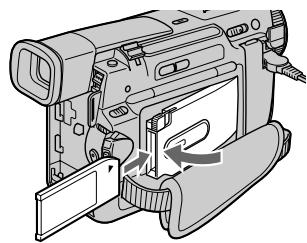
2
ДлгиИЗВLEЧЕНИЯ Memory Stick
OTkpOte OTCek dIa Memory Stick B nyHKeT 1, HaxMnte KHOkky MEMORY RELEEase. Memory Stick BbIJeT n3 OTcKa.
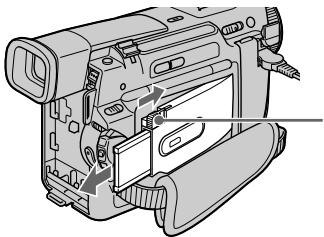
MEMORY RELEASE
When the ACCESS lamp is lit or flashing Never shake or strike your camcorder. Do not turn the power off, eject a Memory Stick or remove the battery pack. Otherwise, the image data breakdown may occur.
Ecnn Jlamnoka ACCESS ropnt nnn Mmraet
HnKoIa He TpncTe n He CtyuIte No BaWei BnDeokampe. He BbIKUoyaTe NITaHne, He n3BLeKaaiTe Memory Stick n3 OTceKa n He cHmaiTe 6aTapeHbI 6lOk. B npOTNBHom cLyuae DaHHbIe I3O6paXeHnMaOryT 6bITb NOBpeKdHebl.
Selecting image quality mode
You can select image quality mode in still picture recording. If you do not make any selection, the unit automatically records in FINE mode.
(1) Set the POWER switch to MEMORY. Make sure that the lock is set to the left (unlock) position.
(2) Press MENU to make the MENU display appear.
(3)Turn the SEL/PUSH EXEC dial to select then press the dial.
(4) Turn the SEL/PUSH EXEC dial to select QUALITY, then press the dial.
(5) Turn the SEL/PUSH EXEC dial to select the desired image quality, then press the dial.
(6) Press MENU to erase the menu display.
Bb6oppeKImaKaueCTBa n3o6paXeHn
BbMOxTe Bb6paTb pexIM KaYeCTBa
n3o6paXeHnI npn 3aIncN HEnoDbNkHoRo
n3o6paXeHnI. EcnBb He cDeJaTe HnKaKOrO
Bb6opa, annapat 6yDet ABToMaTneckn
BbIOINrTa 3aInCb B pexmE FINE.
(1)YcTaHOBInTe nepeKInouaTeIb POWER B nOIOXeHne MEMORY. Y6eINTEcb, YTO fNKcaTop yCTaHOBIne yCTaHOBIne B IeBOM (He3aФИКСИРОВAHOM) nOIOXeHnI.
(2)HaxMMTe KhoNky MENU,уTObby HaДиСплee nOBuJaIc bИнДИКaцИЯ MENU.
(3)ПовернITE ДИСК SEL/PUSH EXEC ДЯ
Быбopa установки , a 3aTeM нажмITE
ДИСК.
(4)ПовернITE ДИСК SEL/PUSH EXEC Ддьбopa установки QUALITY,а затемнite ДИСК.
(5)ПовернITE ДСК SEL/PUSH EXEC ДЯ
Выбoga КЕЛаEMOTO КаЧЕТBA ИЗБрахеня,
a 3aTeM НЖМITE ДСК.
(6)HaxmTe KhoNkY MEnU dIa CtnpaHnI INDnKaun MeHIO.

Image quality settings
| Setting | Meaning |
| FINE (FINE) | Use this mode when you want to record high quality images. The image is compressed to about 1/6. |
| STANDARD (STD) | This is the standard image quality. The image is compressed to about 1/10. |
Differences in image quality mode
Recorded images are compressed in JPEG format before being stored into memory. The memory capacity allotted to each image varies depending on the selected image quality mode. Details are shown in the table below. (The number of pixels is 640 × 480 , regardless of image quality mode. The data size before compression is about 600~KB .)
| Image quality mode | Memory capacity |
| FINE | About 100 KB |
| STANDARD | About 60 KB |
Approximate number of images you can record on a Memory Stick
The number of images you can record varies depending on which image quality mode you select and the complexity of the subject.
4MB type:
FINE (FINE) 40 images (maximum)
STANDARD (STD) 60 images (maximum)
8MB type:
FINE (FINE) 81 images (maximum)
STANDARD (STD) 122 images (maximum)
16MB type:
FINE (FINE) 164 images (maximum)
STANDARD (STD) 246 images (maximum)
Note
In some cases, changing the image quality mode may not affect the image quality, depending on the types of images you are shooting.
YctaHOBKn KaueCTBa n3O6paXeHn
| Установka | ЗнUCHЕНИе |
| FINE (FINE) | Искользейутоот реким, ecли ВыхOTITE заNICATБ ВыICOKOKачECTВЕНБIE ИЗБРAXECHИЯ. ИЗБРAXECHИЕ сЖИМАЕТСЕnpIMерно до 1/6. |
| STANDARD (STD) | ЭTO COOTВETСВЕТСТАДAPTHOMY КЧЕСТВИ ИЗБРAXECHИЯ. ИЗБРAXECHИЕ сЖИМАЕТСЕnpIMерно до 1/10. |
OTNIUBApeKIMeKaueCTBaN3o6paKeHNA
3aIncahHbIe 13o6paXeHHc CXmAlOTcB B pOpmAT JPEG nepeD coXpAHeHHc MnAHTn. EMcKoCTb nAmTn, BblJeLHeHHa DnJI KAKDOrO 13o6paXeHHc, INMehAETCBA 3aBNCIMOCTN OT Bbl6paHHoro peXkMa KaeeCTBa 13o6paXeHHc. IOpDro6HOCTn CoepXaTcB NpINBeDeHHo HnHexe TabNIue. (KOniYeCTBO 3neMeHTOB 13o6paXeHHc paBHO 640 x480, HeaBACmIO OT OT peXkMa KaeeCTBa 13o6paXeHHc. Pa3Mep nepeD cKaatmE moCocTabniet OKJIO 600 K6.)
Your camcorder can format (initialize) a Memory Stick. If you format a Memory Stick, all data stored in the Memory Stick will be deleted. This function is convenient when you want to delete all data including protected images. New Memory Sticks are already formatted so that formatting is not required for them. Sample images are stored in the supplied Memory Stick. Note that these sample images will be deleted if you format the Memory Stick.
Formatting (initializing) a Memory Stick
(1) Insert a Memory Stick into your camcorder.
(2) Set the POWER switch to MEMORY. Make sure that the lock is set to the left (unlock) position.
(3) Press MENU to make the MENU display appear.
(4) Turn the SEL/PUSH EXEC dial to select , then press the dial.
(5) Turn the SEL/PUSH EXEC dial to select FORMAT, then press the dial.
(6) Turn the SEL/PUSH EXEC dial again to select OK, then press the dial. The display shows "EXECUTE."
(7) Press the SEL/PUSH EXEC dial. The display shows "FORMATTING," and formatting procedure begins. When formatting is finished, the display shows "COMPLETE."
Check the contents of the "Memory Stick" before formatting
Note that all data in the "Memory Stick" including protected images will be deleted.
While "FORMATTING" is displayed
Do not turn the POWER switch nor press any button.
Note
You cannot format the "Memory Stick" if the write-protect tab on the "Memory Stick" is set to LOCK.
Исpenьзоване Memory Stick -Вve徳hoe
Baawa Bndeokamepa no3boJHET oTfOpMaTnpoBaTb (pOINHmuaJI3npoBaTb)
Memory Stick. Ipn fOpMaTnpoBAHm Memory
Stick BCE daHhIbe, xpaHmIbe B Memory Stick,
6bytCTeptb. 3Ta cyHKUra RBnAetc
ydo6Ho, ecn BxOTHTe CTepTe BCE daHHBe,
BKNIOaJ 3auuueHHe N3o6paxKeHn.
Hobie Memory Stick yke OTfOpMaTnpoBAHbI,
no3ToMycfOpMaTnpoBAHne dJa Hnx He
Tpe6yEtc.
O6pa3zbln3o6paXeHn xpaHrTcB npinlaraeMm Memory Stick. PmHnIte, yTO 3tN o6pa3zbln3o6paXeHn 6byT cTeptbI, eCIn Bbl oTfOpMaTnpyTe Memory Stick.
He nobopauBaBte BbIKHouateBb SWITCH n He haxmuTe KaKx-JIn60 KhONOK.
PpimueaHn
BbI He CMOXeTe OToFopMaTnpoBaTbMemory Stick,ecINJeNEcTOK3aunTb3aUNCnHa Memory Stick yCTaHOBJIEN BnoLoXeHne LOCK.
Recording still images on Memory Sticks - Memory photo recording
- DCR-TRV10E only
You can select the FIELD or FRAME mode in still picture recording. Your camcorder compensates for camera-shake when recording moving subjects in the FIELD mode. Your camcorder records still images in high quality in the FRAME mode. Select the FIELD or FRAME in the MENU settings (p. 87).
Before operation
Insert a Memory Stick into your camcorder.
(1) Set the POWER switch to MEMORY. Make sure that the lock is set to the left (unlock) position.
(2) Keep pressing PHOTO lightly. The picture freezes and "CAPTURE" appears on the LCD screen or in the viewfinder. Recording does not start yet.
(3) Press PHOTO deeper. The image displayed on the screen will be recorded on a Memory Stick. Recording is complete when the bar scroll indicator disappears.
3aHcB HeIOBbXbIX N3O6paXeHn Ha Memory Stick - FOTo3aHcB c COxpaHeHem B PAMrTn
-ToIbKO moIeJIb DCR-TRV10E
BbMoKeTe Bb6paTb peKmFIELD nn FRAME npn 3aIncn HneoDbNxHoro
306paXeHn. Ba7a BnDeOkaMePa KOMpeHcnpyET
noPpArBaHn.npn 3aIncn NDoBnxHbX O6beKTOB B pexMfEILD.Ba7a BnDeOkaMePa
3aIncsblBaet HeNoDVBxHbIe 3o6paXeHn C
BbICOKM KaueCTBOM B peXmME FRAME.
Bb6epnte npHKT FIELD nn FRAME B ycTaHOBkax MENU (ctp.87).
Ipeed hauanom pa6oTbI
BcTaBbTe Memory Stick B BaUy BnDeokamepy.
(1)YcTaHOBInTe NepeKJIIOUaTeJIb POWER B noJIOXeHne MEMORY. Y6eIINTEcb, yTO 2nKcaTOp yCTaHOBJIeB JLeBOM (He3aФNkCINPOBaHHOM) NOJIOXeHm.
(2)ДерхитЕ сlerka нажатой кногку PHOTO.Изобрахене 6bydET "Заморожени", И наэкране XXД nIиВиюнckeTeNe NOЯВNTсУндикага "CAPTURE".Заньпoka He NaЧется.
(3)Haxmnte KhoNky PHOTO cunbhee. H26paKaeHne, OTO6paKaemoe Ha 3KpaHe, 6ydet 3aHnCaHO Ha Memory Stick. 3aHnCb CHTaTe 3aBepseHHoE, eCIn NcYe3Het nepemeuaOuMnC nloCaTbI INDnKaTOP.
1

2
PHOTO
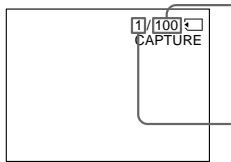
Number of images can be recorded on the Memory Stick/KoJIueCTBO n3O6paXeHn, KoTOpbIe MoXHo 3aIncatb Ha Memory Stick
Number of recorded images/
KoIInueCTBO 3aIncahhbyix n3obpaXeHn

3
PHOTO

Recording still images on Memory Sticks - Memory photo recording
Notes
- When recording fast-moving subjects in the FRAME mode, the recorded image blurry.
- When recording in the FRAME mode, your camcorder may not correct camera-shake. We recommend that you shoot objects with a tripod.
When the POWER switch is set to MEMORY The following functions do not work: wide TV mode, digital effect, picture effect, title.
When you are recording a still image You can neither turn off the power nor press PHOTO.
When you press the PHOTO button on the Remote Commander Your camcorder immediately records the image that is on the screen when you press the button.
Recording images continuously
You can record still pictures continuously. Select one of the two modes described below before recording.
Continuous mode [a]
You can record 3 or 4 pictures continuously.
Multi screen mode [b]
You can record 9 still pictures continuously on a single page.

[a]
3aNcB HeNoDvXhBix N3o6paKeHn Ha Memory Stick - FOTo3aNcB c COxpaHeHem B namrTu
Примейань
- Пи записьICTpo DBNЖушихСОБъektOBВ ржиме FRAME,ИЗобразенье 6удET pa3MbITbIM.
-ПиЗлпсВржIMe FRAMEФункцИКOMпЕнcaци ПОдparINbAHЯ BaшЕBnDEOKaMEpbI MoKET pa60TaTb HENpaBnMbHO.PekOMeHДуETcBAblONHATb CbeMky OБьEKTOBC NOMOuTO TpeHOrN.
EcJn NepeKJIIOUaTeIb POWER ycTaHOBNeH B noJIOXeHne MEMORY.
Cneyuouane yhkuHn He pa6oTaIoT: uPOKO3KpaHHb TeNEBUNHHb peXuM, uPpOBoN 3ΦΦeKT, 3ΦΦeKT n3OpaXeHn, TtTp.
EcIn Bbl 3ainncbiBaete HeNoDBHXHoe n3o6paKeHne
BbI He MoXKeTe HN BbIKNoHTb NITaHHe, HN hKaTb KhONKy PHOTO.
EcnBbI haxMeTe PHOTO ha nyIbTe dNCTaHcOnHOro ynpabJIeHHa
Baa Bndeokamepa TOTcAc Ze 3aNIMeT n3o6paXeHne, KOtOpoe 6yDet Ha 3KpaHe npi HaxaTNI KHOKN.
3aHcB n3o6paXeHn HnpepbIBHO
BbIMoKeTe 3aINCbIbTa bN3O6paXeHnA HnepepbIBHO. BbIbepnte OdIn N3 DByxpeXHMOB, ONiCAHHbIX HNXe, nepeD 3aINCbIO.
HenpepbIBHbI pexnM [a]
BbMOxKeTe 3aINcBtB 3 nIN 4 n3OpaXeHn HnpepbIBHO
Mhoro3KpaHHbIpeXIM[b]
BbMOKeTe 3aINcBbAtb 9 HeNoDBNkHbIX n06paXeHn HnpepbIBHO Ha OdHo CTpaHnIe.
![SONY DCR-TRV10E - Mhoro3KpaHHbIpeXIM[b] - 1](/content/2020/04/48720/images/2a3b72763c33c0ca24b95f408835e57bb2b6917e70bdb3387e6001edbc15b25e.jpg)
[b]
Recording still images on Memory Sticks - Memory photo recording
(1) Set the POWER switch to MEMORY. Make sure that the lock is set to the left (unlock) position.
(2) Press MENU to make the MENU display appear.
(3)Turn the SEL/PUSH EXEC dial to select then press the dial.
(4) Turn the SEL/PUSH EXEC dial to select CONTINUOUS, then press the dial.
(5) Turn the SEL/PUSH EXEC dial to select the desired setting, then press the dial.
(6) Press MENU to erase the menu display.
3aHcB HeNoDvXhBix N3o6paJxHnHaMemoryStick-ΦoTo3aHcBcCOxpaHeHEmBnAMrTu
(1)YcTaHOBInTe nepeKJIIOUaTeIb POWER B NOJIOKeHne MEMORY. Y6eJNTecb, yTO 0nKcaTOp yCtAHOBJIeH B JEBOM (He3aФИКСИРОВАHOM) NOJIOKeHm.
(2)HaxMMTe KhoNkY MENU, YTo6bHa HnCnIe neBnlaScbHnDkaunr MENU.
(3)Повернite ДИСК SEL/PUSH EXEC ДЯп Вьбopa установки , a 3aTeM нажмITE ДИСК.
(4)Повернite ДИСК SEL/PUSH EXEC ДИВьбopa установки CONTINUOUS, a 3aTeMHAKMITE DИСК.
(5)ПовернITE ДИСК SEL/PUSH EXEC ДИВьбopa кению установки,а затемпсун.
<|im_start|>assistant
(6)ДИСК.
(6)HaxmTe KhONkY MENU Дд CTирань ИнданкauNi MeHIO.
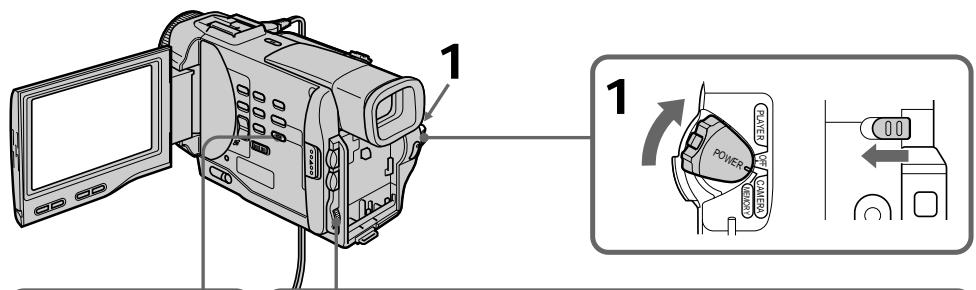
2,6

3

MEMORY SET
CONTINUOUS
QUALITY
FID/FRAME
PRINTMARK
PROTECT
PROTECT STC.SLIDE.SHOW
SELECT SHOW 2 DELETE ALL
DELETE ALC
( x - 2x) t - xy^2 = ( x - 2x) f^ t
MEMORY
CONTIN
MEMORY SET
CONTINUOL
QUALITY
C
F
D
P
F
S
D
FORMAT
FORMAT
RETUR
IMENU:END
4
MEMORY SET
CONTINUOUS OFF
QALI TY
QUATIY
FLD./FRAME
PRINT MARK
PROTECT
ETC SLIDE SHOW
P DELETE ALL
FORMAT
FORMAL
RETN


CONT1
QUALITY
FLD.LI
PROTE
PROTE
ETCSLIDE
DELET
FORMA
FORMA 205TUL
RETURN
5


MEMORY SET
CONTINUOUS ON
QUALITY
QUALITY
FLD./FR
PRINT M
PROTECT
FTSLIDE
DELATE
DELETE
FORMAT
RETURN
[MANUAL:END]
Recording still images on Memory Sticks - Memory photo recording
| Continuous shooting settings | |
| Setting | Meaning (indicator on the screen) |
| OFF | Your camcorder shoots one image at a time. (no indicator) |
| ON | Your camcorder shoots 3 or 4 still images at about 0.8 sec intervals. ( ) |
| MULTI SCRN | Your camcorder shoots 9 still images at about 0.3 sec intervals and displays the images on a single page divided into 9 boxes. ( ) |
Number of images in continuous shooting The number of images you can shoot continuously varies depending on the image quality mode.
FINE: 3 images
STANDARD: 4 images
Note on using the video flash light (not supplied)
The video flash light does not work in the continuous or multi screen mode if you install it to the accessory shoe.
3aIncb HeNoDvNkHbIX N3o6paKeHn HaMemoryStick-ΦoTo3aIncb c coXpaHeHemB namrTu
Recording an image from a mini DV tape as a still image
- DCR-TRV10E only
Your camcorder can read moving picture data recorded on a mini DV tape and record it as a still image on a Memory Stick.
Before operation
Insert a recorded mini DV tape and a Memory Stick into your camcorder.
(1) Set the POWER switch to PLAYER.
(2) Press. The picture recorded on the mini DV tape is played back.
(3) Keep pressing PHOTO lightly until the picture from the mini DV tape freezes. "CAPTURE" appears on the LCD screen or in the viewfinder. Recording does not start yet.
(4) Press PHOTO deeper. The image displayed on the screen will be recorded on a Memory Stick. Recording is complete when the bar scroll indicator disappears.
3aHnCb n3o6paXeHnCJIeHTbIMHN DV kaKHeNoDBrXhOrO n3o6paXeHn
-ToIbKO MoIeJIb DCR-TRV10E
BaSHA BnDeOKaMepa MoKet CUnTbIbTaB DaHHbIE NOdBnXHOrO n3o6paXeHnA, 3aNcCaHbIe Ha JeHTe MmH N D V, n 3aNcBbIaB b erO KaK HenoDnXHoe n3o6paXeHne Ha Memory Stick.
Перед наалом pa60ть
BcTaBbTe 3aIncanHyIO JeHtY MmHi DV i Memory Stick B BaUy BuJeokamepy.
(1)Установпейреклочаель POWER в положене PLAYER.
(2)HaXMMTe KHOHKnky ▷. HaYHeTcBBOCpOnI3BeDeHne I3O6paXeHnA, 3aNcAHOrO HaJeHTe MHN DV.
(3)Держпге сlerka нажатой кноку PHOTOdo Text nop, noka n3o6paхене с lentblMnD VNe 6ydeT "zamopoxeHo".HaЗкранЕЖКДИВиBиДОИСКаTeIe NOЯВITcHnДИКaця"CAPTURE".3aIncь nOKa He NaЧNETс.
(4)Haxmnte KhoNky PHOTO cnIbHee. 3o6paKeHne, OTo6paKaemoe Ha 3kpaHe, 6yTe 3aIncAHO Ha Memory Stick. 3aIncB cHTaETc3aBepSeHHo, ecIn NcE3HET nepemeuaOuMnCnPONoCaTbI INDnKaTOp.
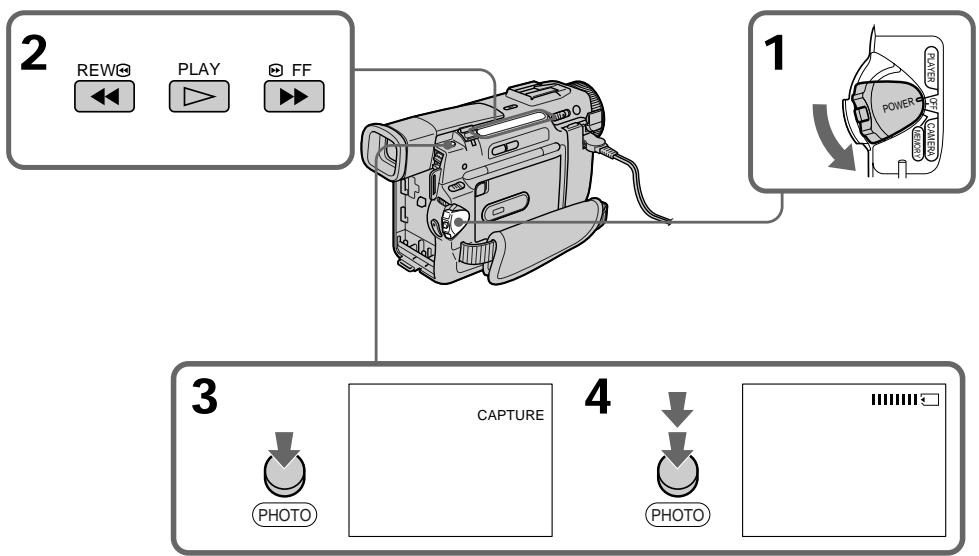
Recording an image from a mini DV tape as a still image
When the ACCESS lamp is lit or flashing Never shake or strike the unit. As well do not turn the power off, eject a Memory Stick or remove the battery pack. Otherwise, the image data breakdown may occur.
If " 日 " appears on the LCD screen or in the viewfinder
An incompatible Memory Stick is inserted. Be sure to use proper Memory Stick.
If you press PHOTO lightly in the playback mode
Your camcorder stops momentarily.
Sound recorded on a mini DV tape
You cannot record the audio from a mini DV tape.
Titles have already recorded on mini DV tapes You cannot record the titles on Memory Sticks. The title does not appear while you are recording a still picture with PHOTO.
3aIncb n3o6paXeHnC JeHTbl MNH DV KAK HenoDbHXHorO n3o6paXeHn
EcInI JAMnOuKa ACCESS ropnt nIIM Muraet HIKoRda He TprcnTe n He cTuynte no Bauei BnDeokampe. TaKke, He BbIKIOUaHte nITaHne, He n3BLekaTe Memory Stick n3 OTceKa n He ChImaTe 6bTaapeHbI 6lOk.B IpOTINBHOM Cnyae daHHbIe N3OBpaXeHnMOryt 6bItb NOBpeXdeHbl.
EcHnHa3KpaHe KKD nIN B VbDOnckaTeNe NOBHTcH INdNkaun "
BCTaBHeHa HeCOBMeCTnMaJMemory Stick.
Y6eIInTeCb, YTO6bI NcNoJIb3ObaIacb
HaIInEkaaJMemory Stick.
EcIn B peKIMe BOCpON3BedeHnCnerKa HaxaTb KhoNkY PHOTO
Baisha Bndeokamepa Ha mHOBeHne OCTaHOBITcR.
3Byk, 3aHcAHHbI Ha JeHTy MmH N DV
BbI He MoXeTe 3aINcBtB 3ByK CJIeHTbl MNH DV
Tntpbl, yxe 3auncaHbIe Ha JeHTbl MMH DV
BbHe MoKxTe 3aNcBbA bTbTtpbHaMemory Sticks.TtTp He NoaBntCBA Bo BpeMraNc HnOaBnXhoro N3o6paXeHn C nmoou KhoNk PHOTO.
Copying still images from a mini DV tape - Photo save
- DCR-TRV10E only
Using the search function, you can automatically take in only still images from mini DV tapes and record them on a Memory Stick in sequence.
Before operation
- Insert a recorded mini DV tape and rewind the tape.
- Insert a Memory Stick into your camcorder.
(1) Set the POWER switch to PLAYER.
(2) Press MENU to make the MENU display appear.
(3)Turn the SEL/PUSH EXEC dial to select then press the dial.
(4)Turn the SEL/PUSH EXEC dial to select PHOTO SAVE, then press the dial. "PHOTO BUTTON" appears on the LCD screen or in the viewfinder.
(5) Press PHOTO deeper. The still image from the mini DV tape is recorded on a Memory Stick. The number of still images copied is displayed. "END" is displayed when copying is completed.
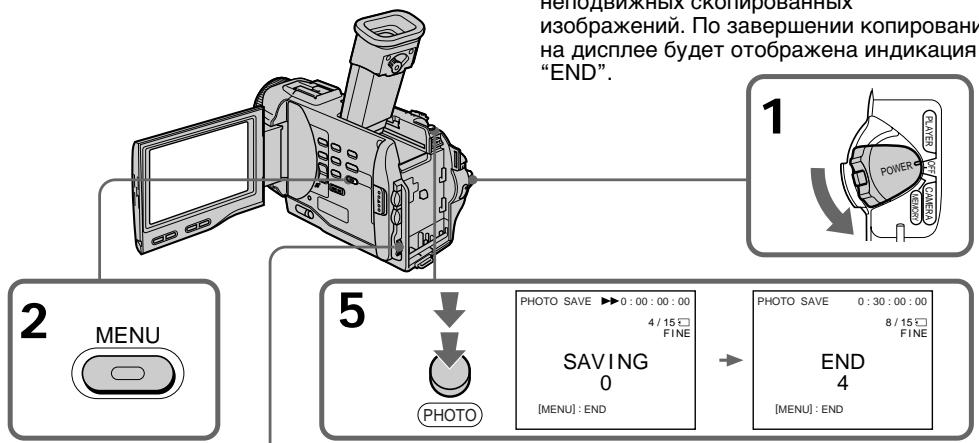
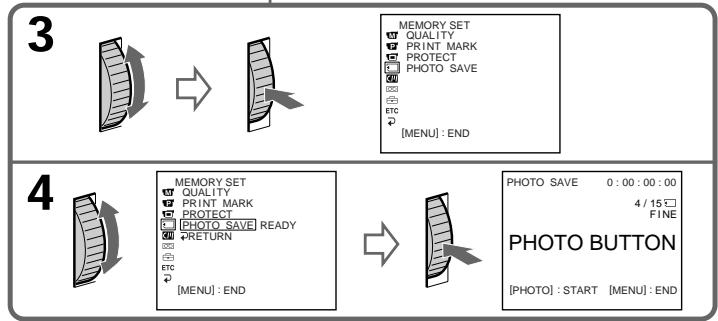
KoHIpOBaHHe HeNoDBrXhblIX 306paXeHn C JeHTbI MHN DV - CoXpaHeHne B PAMrTn fOToCHmKOB
-ToIbKO MoIeJIb DCR-TRV10E
NcnoIb3yI cyHKnIO nOncKa, Bbl MoKeTe ABOTOMaTIChECKu BBIIOJHrTb FOToCHIMKn TOJIbKO HEnoDBNXHbIX N3O6paXeHm C JeHT MMHN DV n 3aIINCbIBaTb Nx Ha Memory Stick B nocneIOBaTeJIbHOCTN.
Ipeed hauanom pa60tbi
BCTaBbTe 3anncahnyJeHTy MmH DV npeMeToaTe JeHTy.
BcTaBbTe Memory Stick B BaWy BnDeokamepy.
(1)YctaHOBInTe IpeKJIIOUaTeIb POWER B NOJIOKeHne PLAYER.
(2)HaxMMTe KhoNkY MENU, YTo6bHa HnCnIe neBnlaScbHnDkaunr MENU.
(3)ПовернITE ДИСК SEL/PUSH EXEC ДИЗ ВИБОа установки , a 3aTeM нажмITE ДИСК.
(4)ПовернITE дисK SEL/PUSH EXEC дяВыбoga установки PHOTO SAVE,а затемнITE дис.На ЗкpaneЕЖДилВВдоюпсале повитсгИнданkaцуЯ"PHOTO BUTTON".
(5)HaXMMTe KhoNkY PHOTO cnIbHee. HeoDbnKHoe n3obpaXeHne CJeHTbl MHN DV 6yDet 3aIncAHO HaMemory Stick. ByDet OTobpaXeHO KOINueCTBO HeoDbnKHBix cKoInpOBAHHbIX n3obpaXeHNI. IIO 3aBepWeHNI KOINpOBAHNI Ha DInCnJIeE 6yDet OTobpaXeHNI HdNkaUaN "END".
Copying still images from a mini DV tape - Photo save
To stop copying
Press MENU to stop copying.
When the memory of the Memory Stick is full
"MEMORY FULL" appears on the LCD screen, and the copying stops. Insert another Memory Stick and repeat the procedure from step 2.
When the ACCESS lamp is lit or flashing
Never shake or strike your camcorder. As well do not turn the power off, eject a Memory Stick or remove the battery pack. Otherwise, the image data breakdown may occur.
To record all the images recorded on the mini DV tape
Rewind the tape all the way back and start copying.
If the write-protect tab on the Memory Stick is set to LOCK
"NOT READY" appears when you select the item in the MENU settings.
When you change Memory Sticks in the middle of copying
Your comcorder resumes copying from the last image recorded on the previous Memory Stick.
KoHpOBaHne HnOJDbNkHbIX N3o6paXeHn C JIeHTbl MmH DV - CoXpaHHe B nAmrTn foTOChMkoB
Дл OCTaHOBKи KOnIpyOBaHn
HaxmTe KhoNkY MENU dIaOCTaHOBKn KOINPOBaHn.
B clyuae nepenolneHn Memory Stick
Ha 3KpaHe JKKD noBnTc nHnIkaun "MEMORY FULL", n KOnipOBaHne oCTaHOBnTc. BCTaBbTe dpyrmy Memory Stick n nobTOPnPte npoceDpyc c nyHKta 2.
Ecnn Jiamnoka ACCESS ropnt nnn Mmraet
HnKoIa He TpRcIne n CtUHHe n BaSei BnDeokamepe. TaKke, He BbIKIOuHaTe nITaHne, He BbIHMaIte Memory Stick n3 OTcKa n He ChIMaIte 6bTaapeHbI 6NoK. B npOTnBHom clyae daHHbI e N3O6paXKeHnMOryT 6bItb NOBpeXJeHbl.
ДяЗаин BCex ИЗОБрахжи,ЗИSCaHHbIX NaJIeHTe MInH DV
IpepeMoTaTe IeHTy Do KOHua NaHa3aN HauchnTe KOnPiPoBaHne.
EcIn IeNecToK 3aunTbI 3aHncn HaMemory Stick yctaHOBJIeB bNoLoXeHne LOCK
Viewing a still picture - Memory photo playback
- DCR-TRV10E only
You can play back still images recorded on a Memory Stick. You can also play back 6 images at a time by selecting the index screen.
Before operation
Insert a Memory Stick into your camcorder.
(1) Set the POWER switch to MEMORY or PLAYER. Make sure that the lock is set to the left (unlock) position.
(2) Slide OPEN in the direction of the mark. Then, open the LCD panel.
(3) Press MEMORY PLAY. The last recorded image is displayed.
(4) Press MEMORY + / - to select the desired still image. To see the previous image, press MEMORY-. To see the next image, press MEMORY+.
BcTaBbTe Memory Stick B BaUy BnDeokamepy.
(1)YcTaHOBInTe NepeKJIIOUaTeIb POWER B noJoxeHne MEMORY nIIN PLAYER. Y6eIInTeCb, yTO cIKCaTOP ycTaHOBJeH B JEBOM (He3aФNKCuPOBaHHOM) noJoxeHn.
(2)Перединьт Кноку OPEN в НаразовниMeTKI 3aTeM OTkpOte paHel JKKI.
(3)Haxmnte KhoNkY MEMORY PLAY. Bydet o76paxeHo nocJeDHee 3aIncanHoe n3o6paxeHne.
(4)HaxmTe KhONky MEMORY + / - Дя Bb6opa hyxHOro HEnOdBxHOrO n3o6paXeHn.ДЯ TORO,уTO6by yBnDeTb npEdyUSee n3o6paXeHne,HaxmTe KhONky MEMORY-.ДЯ TORO,yTO6by yBnDeTb cIeDyUSee n3o6paXeHne,HaxmTe KhONky MEMORY+.

To stop memory photo playback
Press MEMORY PLAY again.
Дл оctahOBKN BOCINpON3BeDEHNA
ΦOTOCHUMKOB 3 NAMRTN
HaxmTe KhoIky MEMORY PLAY eue pa3.
To play back recorded images on a TV screen
- Connect your camcorder to the TV with the A/V connecting cable supplied with your camcorder before the operation.
- When operating memory photo playback on a TV or the LCD screen, the image quality may appear to have deteriorated. This is not a malfunction. The image data is as good as ever.
- Turn the audio volume of the TV down before operation, or noise (howling) may be output from the TV speakers.
Image data modified with personal computers or shot with other equipment
You may not be able to play them back with your camcorder.
Дяв Восчpen3BveDEHЯ 3aINcAHbIX n3o6paXeHn Ha 3kpaHe TelenBn3opa
Ipeed Naalam Bocnpon3BeDnna POnCoeHNHTe Baui BIneOKeMaepy K TeNeBn3opy C NOMoBbIO CoeHNHTeBnHOrO KaEbeAayIO/ BInDeO, pinnaraemoro K Bauei BIndeOKeMape.
- Пи ВOCПОЗИЗБЕДЕНМФОТСИМКOB ИЗ пamRTN
нэ Ккале Телевзора ИИЖД КачсТВО
ИЗбражehн можетхудштб. 3TO He
ВЯЛВETСРЕСПAPBAHOCKТЮ. ДАньгile
ИЗбражehн HAXOДТСВ В TOM УС COCTОHRHIM,
ΚΑΚΙΝΥΕДZE.
- Пекд Налов ВорсpondЗбения NOВернite
peryIЯтгт ромковостп ТелевизORA BHN3, Инчe
Чере з Akуctи checkyo CnCTemy MoKeT
Nocblшаысь УМ (3aBbBAHne).
DAnHbIe M3O6paXeHnI, BUNOn3MeHeHbIe C NOMOsbIc nepCOHaJIbHOro KOMNbIbTepa IIN CHaTbIe C NOMOsbIO DpyrO annPapatypbI
BbI He CMOXKeTe BOCnPoN3BeCTn INC NOMOuBbBaSei Bvndeokamepbl.
Screen indicators during still image playback
3KpaHbIe HnDnKaTOpbl Bo BpeMBOcnpOn3BeDeHnHeNoDnBxhXnO6paXeHn
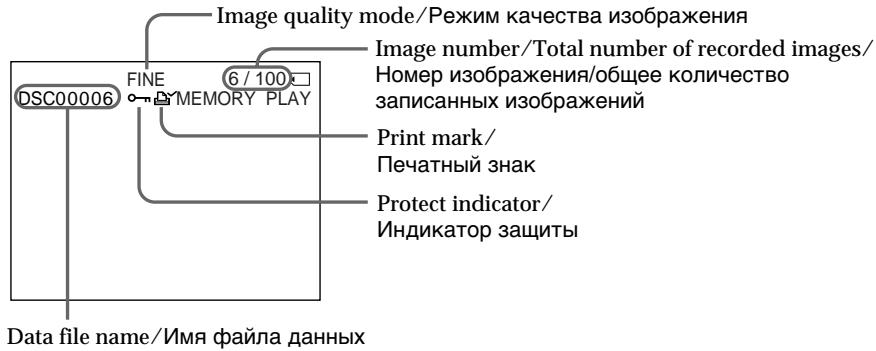
Playing back 6 recorded images at a time (index screen)
You can play back 6 recorded images at a time.
This function is especially useful when searching for the highest order
for a particular image.

Bocnpoun3BeHeHne 6 3aIINcaHHbIX N3o6paKeHn OndHOBpeMeHNo (HNeDEKCHbY 3KpaH)
BbMOxTe BOCPON3BcETN 6 3aINcaHHbIX N3O6paXKeHn OJHOBpeMeHNO.
3Ta yHKZIyBnEeTc Oo6eHNO IOne3HO np BbIIOHNHeHNI NONCKa OTDeJIbHbIX I3O6paXeHNI.
MEMORY INDEX
Press MEMORY INDEX.
A red mark appears above the image that is displayed before changing to the index screen mode.
Haxmnte KhoNkY MEMORY INDEX.
Kpachar MTeKa NpOBITcH NaI 3O6paXeHHeM, KOTOpoe 6byet OTo6paXaTbCnpeE IN3MeHeHEm pexMinaNDeKCHOrO 3KpaHa.

- To display the following 6 images, keep pressing MEMORY +.
- To display the previous 6 images, keep pressing MEMORY -.
To return to the normal playback screen (single screen)
Press MEMORY + / - to move the mark to the image you want to display on full screen, then press MEMORY PLAY.
Note
When displaying the index screen, the number appears above each image. This indicates the order in which images are recorded on the Memory Stick. These numbers are different from the data file names.
The image quality mode indicator
The indicator may show a mode different to the one in which you recorded. This is not a malfunction. The indicator shows the size of the data file. For instance, if the size of FINE image is small enough, it may be displayed as STD. Or if the size of image is large enough, it may be displayed as SFN.
Files modified with personal computers
These files may not be displayed on the index screen. Image files shot with other equipment may not be displayed on the index screen either.
Viewing the recorded images using a personal computer
The image data recorded with your camcorder is compressed in the JPEG format. If you use the application software, "PictureGear 3.2Lite" supplied with your camcorder, you can see images recorded on a Memory Stick on a computer screen. Use the serial port adaptor for Memory Stick supplied with your camcorder, the MSAKIT-PC4A Memory Stick/PC card kit or MSAC-PC1 card adaptor for Memory Stick (not supplied) for this operation. For detailed instructions on operation, refer to the operating instructions of the serial port adaptor, Memory Stick/PC card kit or PC card adaptor and application software.
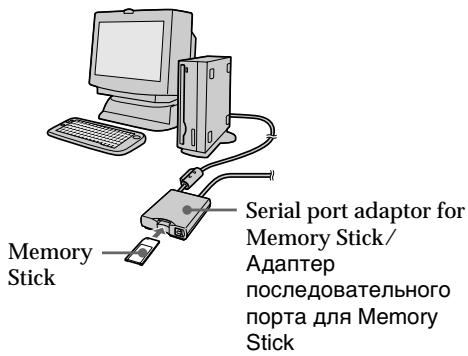
PC card adaptor (not supplied)/AДanTeP PC-KapТы (He пилагаert)
Memory Stick
PpocmToT 3aHncaHbIX n3o6paXeHn C NOMOuIOp nepcoHaJIbHOrO KOMNbIOTepa
Superimposing a still picture in a Memory Stick on a moving picture - M. CHROM/M. LUMI/C. CHROM
Haioxehne HenoBnxHoro n3o6paXehnna3 Memory Stick Ha noDbHXHoe n3o6paXehne - M.CHROM/M.LUMI/C.CHROM
- DCR-TRV10E only
You can superimpose a still picture you have recorded on a Memory Stick on top of the moving picture you are recording.
M. CHROM (Memory chroma key)
You can swap a blue area of a still picture such as an illustration or a frame with a moving picture.
M. LUMI (Memory luminance key)
You can swap a brighter area of a still picture such as a handwritten illustration or title with a moving picture. Record a title on a Memory Stick before a trip or event for convenience.
C. CHROM (Camera chroma key)
You can superimpose a moving picture on top of a still picture such as a picture can be used as background. Shoot the subject against a blue background. The blue area of the moving picture will be swapped with a still picture.
-ToIbKO moIeJIb DCR-TRV10E
BbMOKeTe HaIOKuTb HnOdBnXHoe n3o6paXeHne, 3aIncAHoe Ha Memory Stick, Ha 3aIncBaemoe IOdBnXHoe n3o6paXeHne.
M. CHROM (KHONka LBeTHOCTn NaMATN)
BbMOKeTe MeHrTb MeCTaMn CnHIOU qAcTb HnOdBnXhORo N3O6paXeHnra, TaKOrO KaK pNcYHOK INI KApD, C NOdBnXhblm N3O6paXeHnem.
M. LUMI (KhoNka npKocTn namATn)
BbMOKeTe MeHrTb MeCTAmN 60nee npkyuactb HnOdBnXHO r3o6paXeHn, TaKOrO KaPcCyHOK NIN TnTp, C NOdBnXhBMn3o6paXeHnEM. 3aNiUnTe TnTp HaMemory Stick nepeD Te, KAK OTnpabUTbc BnyteSeCTBne, INI Xe DnY yDo6CTBa.
C. CHROM (KHOIIKA ZBETHOCTN BIVDEOKAMepbl)
BbMOxTe HANOxNtB N0DnXHNOE
N3O6paXeHne Ha BepxHIOU YAcTb
HeNoDBNXHOrO N3O6paXeHNe, HApnPmep
PcCynKa, NcNoIb3yEmoR O KaueCTBe P0Ha.
ChIMnTE o6bekt Ha rOly6om P0He. TOny6a
YacTb NODnXHOrO N3O6paXeHNe 6yDet
3aMeHeHa Ha HeNoDnXHoe N3O6paXeHne.
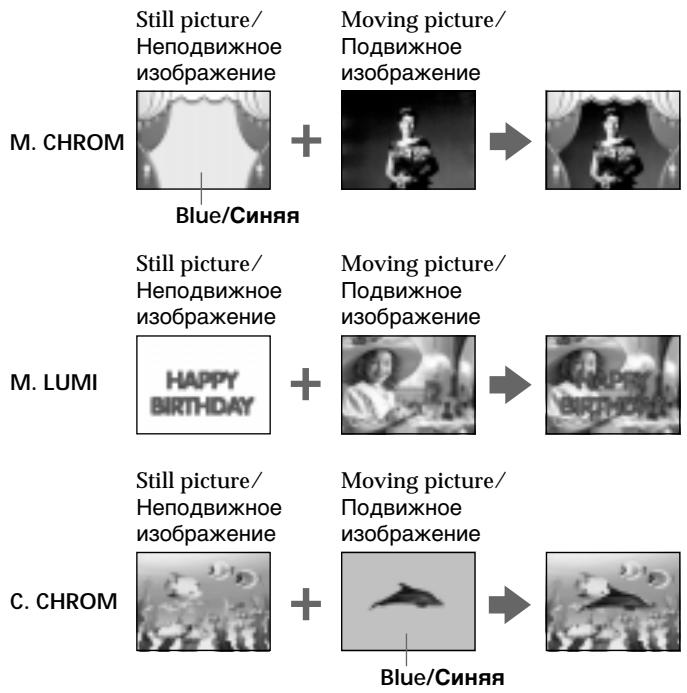
Superimposing a still picture in a Memory Stick on a moving picture - M. CHROM/M. LUMI/C. CHROM
HaIIOXeHne HEnoDnBxHOrO I3o6paXeHn I3 Memory Stick Ha noDnBxHoe I3o6paXeHne - M.CHROM/M.LUMI/C.CHROM
Before operation
Insert a recorded Memory Stick on your camcorder.
(1) Set the POWER switch to CAMERA.
(2) Press MEMORY PLAY in the standby mode. The last recorded or last composed image appears on the lower part of the screen as a thumbnail image.
(3)Turn the SEL/PUSH EXEC dial to select the desired mode, then press the dial to set. The mode changes as follows: M.CHROM M.LUMI C.CHROM
(4) Press the SEL/PUSH EXEC dial. The still picture is superimposed on the moving picture.
(5) Press MEMORY + / - to select the still picture you want to superimpose. To see the previous image, press MEMORY-. To see the next image, press MEMORY+.
(6) Turn the SEL/PUSH EXEC dial to adjust the effect.
(7) Press START/STOP to start recording.
IpeedHaayanpa60TbI
BcTaBbTeMemoryStickc3aNcBbBaUy BnDeokamepy.
(1)YCTaHOBInTe NepeKJIIOuChaTeIb POWER B noJoxKeHne CAMERA.
(2)HaxmTe KhONky MEMORY PLAY BpeKIme OxuaHn. IocJeHHe 3aIncahHoe nnn CKMOHOBAHHoe 3O6paJxehne IOBNTcB HxKHe Yactn 3KpaHa B BIne KpoxOTHOrO N3O6paXeHNy.
(3)ПовернITE ДСК SEL/PUSH EXEC ДЯ
Быбoga hyхно ржима, a 3aTeM haЖмпЕ
ДСК ДЯ BыЮЛОННО YCTAHOBК.
Ржим БудET ИЗМенТьс СLEДУЮШМ
образом:
M.CHROM → M.LUMI → C.CHROM
(4)HAnKMnTe DnCK SEL/PUSH EXEC. HenoDbNkHoe N3o6paXeHne 6yDeT HANOJoxEHO NaODbNkHoe.
(5)Haxmnte KhONky MEMORY+/-ДЯ BbI6opa HEnoDbNxHOrO n3ObpaXeHnRA, KOtOpoe BbXOTNe HAnOxNtB Na NOBnXHoe. ДЯПрOCMToPa npeDbIyUcero n3ObpaXeHnRAxMNTe KhONky MEMORY-. ДЯПрOCMToPa cIedIyUcero n3ObpaXeHnRAxMNTe KhONky MEMORY+.
(6)ПовернITE диСК SEL/PUSH EXEC дяпулmpовки зфразкета.
(7)HaxmTe KhoNky START/STOP nHaayana 3aPiNCi.
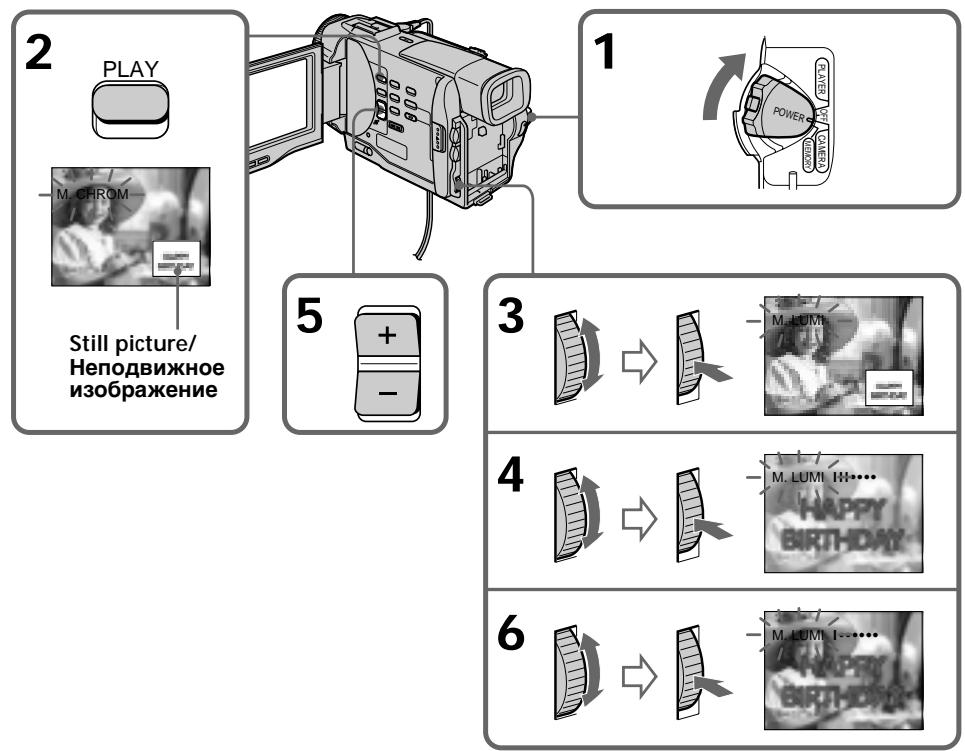
Superimposing a still picture in a Memory Stick on a moving picture - M. CHROM/M. LUMI/C. CHROM
Items to adjust
| M. CHROM | The colour (blue) scheme of the area in the still picture which is to be swapped with a moving picture |
| M. LUMI | The colour (bright) scheme of the area in the still picture which is to be swapped with a moving picture |
| C. CHROM | The colour (blue) scheme of the area in the moving picture which is to be swapped with a still picture |
The fewer bars there are on the screen, the stronger the effect.
To change the still picture to superimpose
Do either of the following:
- Press MEMORY+/-- before step 7.
- Press the SEL/PUSH EXEC dial before step 7, and repeat the procedure form step 3.
To change the mode setting
Press the SEL/PUSH EXEC dial before step 7, and repeat the procedure from step 3.
To cancel M. CHROM/M. LUMI/C. CHROM
Press MEMORY PLAY.
The Memory Stick supplied with your camcorder stores 30 images
-For M.CHROM:26 images (such as a frame) DSC00001\~DSC00026
-For C.CHROM:4 images (such as a background)
DSC00027\~DSC00030
Sample images stored before leaving the factory
Sample images are protected (p. 121).
If you format the Memory Stick
Sample images will be deleted.
During recording
You cannot change the mode setting.
HaIooKeHne HenoDbNxHoro I3o6paXeHn I3 Memory Stick Ha IIOBxHoe I3o6paXeHne - M.CHROM/M.LUMI/C.CHROM
IyHKtbI dJIpeRyIpOBKn
IaH3MeHeHH HeNoBuxxHoro 1306paXeHH JaHaIOXeHH
BbInonHnTe Ondo n3 CJeDyUOux DeNCTBn.
-HaKmTe KhONkY MEMORY+/- nepei nyHKTOM 7.
-HaKMTe DNCK SEL/PUSH EXEC nepeI nyHKToM 7 nIOBTopTe npOceDpy c NyHKTa 3.
BbI He MoXKeTe N3MeHrTaYcTaHOBky peKIma.
Preventing accidental erasure - Image protection
- DCR-TRV10E only
To prevent accidental erasure of important images, you can protect selected images.
Before operation
Insert a Memory Stick into your camcorder.
(1) Play back the image you want to protect.
(2) Press MENU to make the MENU display appear.
(3)Turn the SEL/PUSH EXEC dial to select then press the dial.
(4) Turn the SEL/PUSH EXEC dial to select PROTECT, then press the dial.
(5) Turn the SEL/PUSH EXEC dial to select ON, then press the dial.
(6) Press MENU to erase the menu display. The "o-n" mark is displayed beside the data file name of the protected image.
Пре dioTbpaaeeHne clyuaHoro CTnpaHn - 3aunTa n3o6paXeHn
-ToIbKO moIeJIb DCR-TRV10E
ДпnpedotBpaueHnCnyaHOrO CTupaHnBaxhblx n3o6paKeHn Bbl moKeTe 3aunTntbBblpaHHbe n3o6paKeHn
Ipeed hauanom pa60tbi
BcTaBbTeMemoryStickB Bauy BnDeokamepy.
(1) Bocnpoun3BeDnTe n3o6paXeHne, KOTOpoe Bbl XOTnTe 3aunTnTb.
(2)HaxMMTe KhoNky MENU,Чтоби на диспee nOBuIacb ИДИКaцЯ MENU.
(3)Повернite ДИСК SEL/PUSH EXEC ДЯ
Быбopa установки , a 3aTeM нахмITE
ДИСК.
(4)ПовернITE диСК SEL/PUSH EXEC дя Выбoga установки PROTECT, a 3aTeM нажмITE диСК.
(5)ПовернITE ДИСК SEL/PUSH EXEC ДИВБОGA yCTaHOBKN ON, a 3aTeM haxmnte DИСК.
(6)HaxMMTe KhoIky MENU dIry cTnpaHnIHdNkaCmMeHIO.Ha IncPnee NOBNTc3HaK“O-praDM C ha3BaHneM paJIlaDaHHbIX 3aUuIeHHoro N3o6paXeHnI.
2,6

3


MEMORY SET
CONTINUOUS
G QUALITY 152415
FLD.7/FRAME PRINT MARK
PRINTMARK
PROTECT SLIDE SHOW
2 DELETE ALL
FORMAT
4

EMORY SET:
CONTINU
QUALITY
FLD.7F
PRINT MARK
PROTE1 OFF 71
SLIDE SHOW
DELETE ALL
FORMAT 205TURNA
RETN MENU:END


MEMORY SET
CONTINUOUS
QUALITY
FLD./FRAME
PRINT MARK
PROTECT
E
DELETEALL
FORMAT
RETURN [MENUL]END
m - 1 0 ;
1
1
10/12□
5


MEMORY SET
CONTINUOUS
QUALITY
FLD./FRAME
PRINTMARK
PROTECT ON
ETC SLIDE SHOW
DELETE ALL
FORMAT
RETURI
Preventing accidental erasure - Image protection
To cancel image protection
Select OFF in step 5, then press the SEL/PUSH EXEC dial.
Note
Formatting erases all information on the Memory Stick, including the protected image data. Check the contents of the Memory Stick before formatting.
If the write-protect tab on the Memory Stick is set to LOCK
You cannot carry out image protection.
BbI He cMOXKeTe BbIIOJIHITb 3aUHTy n3O6paJxehnI.
Writing a print mark - PRINT MARK
3a\Pncb neyaTHbIX 3HaKOB - PRINT MARK
- DCR-TRV10E only
You can specify the recorded still image to print out. This function is useful for printing out still images later.
Your camcorder conforms with the DPOF
(Digital Print Order Format) standard for specifying the still images to print out.
Before operation
Insert a Memory Stick into your camcorder.
(1) Play back the image you want to write a print mark.
(2) Press MENU to display the menu.
(3)Turn the SEL/PUSH EXEC dial to select , then press the dial.
(4) Turn the SEL/PUSH EXEC dial to select PRINT MARK, then press the dial.
(5) Turn the SEL/PUSH EXEC dial to select ON, then press the dial.
(6) Press MENU to erase the menu display. The " " mark is displayed beside the data file name of the image with a print mark.

2,6
3

MEMORYSET
CONTINUOUS
QUALITY
FLD./FRAME
PRINTMARK
PROTECT
ETC SLIDE SHOW
DELETE ALL
EORTM

4
MEMORY SET
CONTINUOUS QUALITY
QALI TY
FLD./FRAME
PRINT MARK
PROTECT
ETC SLIDE SHOW
DELETE ALL
FORMAT
RETURN


MEMORY SET 10/12
CONTINUOUS
QUALITY
EID/FRAME
[PRINT MARK]ON
PROTECT MARKS ON
PROTECT
- DESELECT ALL
DELETES
FORMAT
RETURN

5
MEMORY SET
CONTINUOUS
QUALITY
FID/FRAME
PDB:7AHPAME 1 PRINT MARK ON
PROTECT
PROTECT TO G156
E
DELETE ALL
FORMAT
RETURN
To cancel writing print marks
Select OFF in step 5, then press the SEL/PUSH EXEC dial.
If the write-protect tab on the Memory Stick is set to LOCK
You cannot write print marks on still images.
Длг OTMeHbI 3aINcN NeayTHbIX 3HaKOB
BbIbePeTe yCTaHOBky OFF B nyHKTe 5, a 3aTeM haxmTe DNCK SEL/PUSH EXEC.
EcIn IeNecToK 3aunTbI 3aHnCn Ha Memory Stick yctaHOBJIEN B nOLOXeHne LOCK
BbI He CMOXeTe 3aIncatb neaThbte 3HaKn Ha HENoDBrXhBix N3O6paXeHnIX.
- DCR-TRV10E only
Deleting selected images
Before operation
Insert a Memory Stick into your camcorder.
(1) Play back the image you want to delete.
(2) Press MEMORY DELETE with a sharppointed object. "DELETE?" appears on the LCD screen.
(3) Press MEMORY DELETE again. The selected image is deleted.
-Тольковедель DCR-TRV10E
YdaJIeHne BbIbpaHHbIX n3o6paxKeHn
Ipeed hauanom pa6oTbi
BcTaBbTe Memory Stick B Bauy BnDeokamepy.
(1)Bocnpoun3BeDnTe n3o6paXeHne, KOTOpoe BbIXOHTe ydaIITb.
(2)Haxmnte KhONky MEMORY DELETE c nOMOuIbIO 3aocTpEHHOro IpeMeta.Ha 3KpaHe KKД NOBtCn INdNkauN "DELETE?"
(3)HaKMMTe KHOKNy MEMORY DELETE eue pa3. BbI6paHHe n3O6paXeHne 6yJeT ydaJIeHo.
To cancel deleting an image
Press MEMORY - in step 3.
To delete an image displayed on the index screen
Press MEMORY + / - to move the indicator to the desired image and follow steps 2 and 3.
Notes
- To delete a protected image, first cancel image protection.
- Once you delete an image, you cannot restore it. Check the images to delete carefully before deleting them.
Deleting all the images
You can delete all the unprotected images in a Memory Stick.
Длг OTMeHbI ydaJIeHnI N3O6paXeHnI
HaxmTe KhoNky MEMORY-B nyHKe 3.
Insert a Memory Stick into your camcorder.
(1) Set the POWER switch to MEMORY. Make sure that the lock is set to the left (unlock) position.
(2) Press MENU to make the MENU display appear.
(3)Turn the SEL/PUSH EXEC dial to select then press the dial.
(4) Turn the SEL/PUSH EXEC dial to select DELETE ALL, then press the dial.
(5) Turn the SEL/PUSH EXEC dial to select OK, then press the dial. "OK" changes to "EXECUTE."
(6) Turn the SEL/PUSH EXEC dial to select EXECUTE, then press the dial. "DELETING" appears on the LCD screen. When all the unprotected images are deleted, "COMPLETE" is displayed.
Ipeed nauaIom pa6oTbi
BcTaBbTe Memory Stick B Bauy BnuDeokamepy.
(1)YcTaHOBInTe nepeKJIIOuHaTeIb POWER B noJIOXeHnE MEMORY. Y6eJINTeCb, yTO qKCaTOp yCTaHOBJIeN B JEBOM (He3aФИKICIPOBaHHOM) NOJIOXeHm.
(2)HaxMMTe KhoNky MENU, YTO6bI Ha DnCJIe e nOBuJaCb INDnKaUaIa MENU.
(3)ПовернITEДСКSEL/PUSHEXECДЯBBбopaуCTaHOBKN,a3aTeMнанKMITEДСК.
(4)ПовернITE DMCK SEL/PUSH EXEC ДЯ
Быбopa установки DELETE ALL, a 3aTeM
НжмкпЕ DMCK.
(5)ПовернITE ДСК SEL/PUSH EXEC ДЯ
БИБОGA усыановки OK,а затем нахмтЕ
ДСК.Индикагя“OK”изменчсни
Индикагио“EXECUTE”.
(6)ПовернITE дисK SEL/PUSH EXEC дя
Быбoga установки EXECUTE,а затем
нхмтete дис.На ЗкраежКД повстс
индикал"DELETING".Кordа Вс
неба Heaшишении n3обрахеня 6удт
удалны,ндилгпee повстс Индикал"
"COMPLETE".
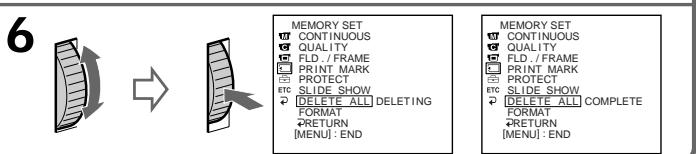
To cancel deleting all the images in the Memory Stick
Select RETURN in step 4, then press the SEL/PUSH EXEC.
While "DELETING" appears
Do not turn the POWER switch or press any buttons.
If the write-protect tab on the Memory Stick is set to LOCK
You cannot delete images.
Длг OTMeHbI ydaJIeHnBCEx n3o6paxeHn Ha Memory Stick
BbIbePte yCTaHOBky RETURN B nyHKTe 4, a 3aTEM haxMnte KhONKy SEL/PUSH EXEC
Bo Bpem OTo6paXeHn HndkaCn "DELETING"
He n3meHnIte noIOxKeHne nepeKJIIOuHaTeJIa POWER n He naKImaIte KaKnx-JIn6o KhoNOK.
EcIn IeNecToK 3aunTbI 3anncn HaMemory Stick yctahOBJIeB bnoJoxeHne LOCK
BbI He cMOKeTe ydaJIInTb n3O6paXeHnA.
Playing back images in a continuous loop - SLIDE SHOW
- DCR-TRV10E only
You can automatically play back images in sequence. This function is useful especially when checking recorded images or during a presentation.
Before operation
Insert a Memory Stick into your camcorder.
(1) Set the POWER switch to MEMORY. Make sure that the lock is set to the left (unlock) position.
(2) Press MENU to make the MENU display appear.
(3) Turn the SEL/PUSH EXEC dial to select , then press the dial.
(4) Turn the SEL/PUSH EXEC dial to select SLIDE SHOW, then press the dial.
(5) Press MEMORY PLAY. Your camcorder plays back the images recorded on a Memory Stick in sequence.
Bocnpon3BeJeHne n3o6paXeHn BHeIpepbIBHOI NOcIeIOBaTeJIbHOCTNIO 3aMKHyTOMy cIKJy - SLIDE SHOW
-ToIbKO moIeJIb DCR-TRV10E
BbMOxTe aBTOMaTnueeCKN BOCPON3BOoNTb
H3O6paXeHNr B HEnpepBIBHOI
IOcNEIOBaTeJIbHOCTN. 3Ta yHKnUy ABJReTc
PiOne3HO OOC6eHNo Ppi npOBepKe 3aIncaHHbIX
H3O6paXeHN uIN BO BVpEMr Ipe3eHTaUN.
Паран налом pa60ть
BcTabbTe Memory Stick B Bauly Bndeokamepy.
(1)YcTaHOBInTe NepeKJIIOUaTeIb POWER B noJIOXeHne MEMORY. Y6eJntEcb, yTO 2nKcaTOp yCtAHOBJIeH B JEBOM (He3aФNkCINPOBaHHOM) NOJIOXeHm.
(2)HaxMMTe KhoNky MENU, YTo6bHa NInCJIeepoBnIacb INDkaIaIaIcIaIe MENU.
(3)ПовернITE ДИСК SEL/PUSH EXEC ДЯ
Быбopa установки , a 3aTeM нажмITE
ДИСК.
(4)ПовернITE ДИСК SEL/PUSH EXEC ДЯ
Быбopa установки SLIDE SHOW, a 3atem
навKMЛТЕ ДИСК.
(5)HaxmTe KhoNky MEMORY PLAY. BawaBnDeOkamepa BocPon3BeDet n3o6paXeHna,3aIncAHbIe HaMemory Stick,BHepepbHbON nocJeDoBaTeJbHoCTn.
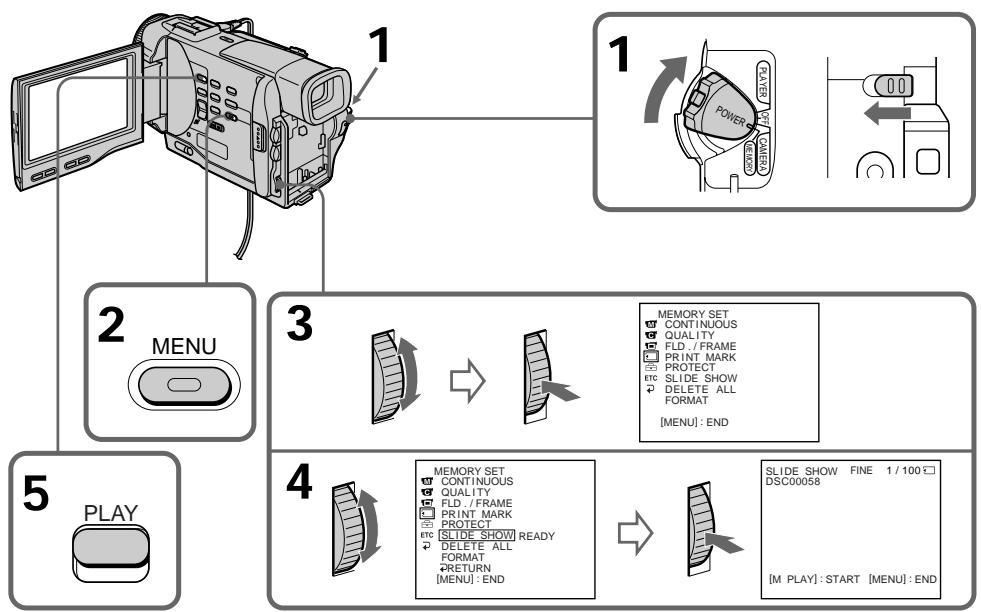
To stop the slide show
Press MENU.
To pause during a slide show
Press MEMORY PLAY.
To start the slide show from a particular image
Select the desired image using MEMORY + / - buttons before step 2.
To view the recorded images on TV
Connect your camcorder to a TV with the A/V connecting cable supplied with your camcorder before operation.
If you change the Memory Stick during operation
The slide show does not operate. If you change the Memory Stick, be sure to follow the steps again from the beginning.
ДлЯ OCTaHOBKN DeMOHCTpaCIN cIaNIOB
HaxmTe KhONKy MENU.
Iy3bI BO BpemA DEMOHCTpaCn CnaIOB
HaxmTe KhoNky MEMORY PLAY.
Дян haуала nokaza сайдов с onpeendeHHoro n3o6paKeHHa
BbIbePeTe HxHHe N3O6paXeHne C nOMoCbIO KhoNOK MEMORY +/- nepeJ nyHKTom 2.
Selecting cassette types
You can use the Mini DV cassette only*. You cannot use any other 8 mm, HiHi8,
Digital8,VHS VHS,VHSC VHSC,SVHS S-VHS, VSCHS-VHSC,B Betamax or DV cassette.
- There are two types of mini DV cassettes: with cassette memory and without cassette memory. We recommend you to use the tape with cassette memory.
The IC memory is mounted on this type of mini DV cassette. Your camcorder can read and write data such as dates of recording or titles, etc. to this memory.
The functions using the cassette memory require successive signals recorded on the tape. If the tape has a blank portion in the beginning or between the recorded portions, a title may not be displayed properly or the search functions may not work properly. Not to make any blank portion on the tape, operate the followings. Press END SEARCH to go to the end of the recorded portion before you begin the next recording if you operate the followings:
- you have ejected the cassette while recording.
- you have played back the tape in the PLAYER.
- you have used the edit search function.
If there is a blank portion or discontinuous signal on your tape, re-record from the beginning to the end of the tape concerning above.
The same result may occur when you record using a digital video camera recorder without a cassette memory function on a tape recorded by one with the cassette memory function.
Tapes with cassette memory have CIII (Cassette Memory) mark. Sony recommends that you use a tape having CIII mark to enjoy your camcorder fully.
CII4K mark on the cassette
The memory capacity of tapes marked with CII4K is 4KB. Your camcorder can accommodate tapes having a memory capacity of up to 16KB. 16KB tape is marked with CII16K.
Bb6op Tnna Kaccet
BbMoKeTe NcNoJIb3OBAbT ToJIbKO KaCCeTb MmH DV MinV. Bb He MoKeTe NcNoJIb3OBAbT KaKne-Jn6o DpyIe KacCetb TmNa 8 MM, HiB Hi8, Digital8,VHS VHS,VHSvHS S-VHS,SvHS S-VHS, Betamax nIu TmNa DV.
*IMeETcBbTnPaKacCTMmHNV:C KaccETHOI pAMrTBIO n6e3 KACCETHOI pAMrTI. PeKOMeHNyETcNcNOJIb3ObaTbJeHTbIC KaccETHOI pAMrTBIO.
Ha daHOM Tnne Kaccet MNH DV yctahOBneha
namrB B nide INTErpalbHO CXembl. Baia
BnDEOKaMepa MOKET CHTbBAbT N 3anncbBAbT
daHHbIE, TaKHe KAc DaTb 3aNcNn TTtpbl N
T.I. Ha daHNy IO NTerpaIbHyO CXemy.
FyHKuIN, IcNoJIb3yIOUe KACCtEHYIO nAMrTB,
Tpe6yIOT NocLeDoBATEbHbIe CNHAbI,
3aNcAnHbIe Ha JeNTy. EcNn HaJeHTe IMeETCn
He3aNcAnHbIy UCACTOK B HauJaIe NIn MekJy
3aNcAnHbIMn YAcTAMn, TO TnTp MoKET 6bITb He
OTobpaxen HaJnxKaUIM ObaZom NIn Xe
fynkui nnouCKa MoryT pa6oTaB He npabNbHO.
DnToro, YTObIe He DOnyckaTb He3aNcAnHbIX
yucTkoB HaJeHTe, BbIOJNHte CNe dyUoee.
HaxmTe KNOH Ky END SEARCH dnn nepexoda
K KOChy 3aNcAnHOrO yUacTKa nepeD Tem, KaK
BbHauchTe CNe dyUOyO 3aNcB, eCNn BblBOJINNI CNe dyUOee:
-BbI n3BnEkn KaccTey Bo BpeM 3aHcN.
-BbI Bocnpo3BeJI NHeTу BpeKIme PLAYER.
-BbI NCNoJIb3OBAaII ΦyHKUIO MOHTaXHOro NOUCKA.
EcniHa BaWei IeHTe IMeEeTc He3aPiNcaHHbI yuactOK uIN npepbBaIOUoiCnHaN, BbINOHNTEpe3aPiNcb CHaJaNo KOHua daHHoro yuactKa.
TaKoJ KZe pe3yIbTaT MoXeT NOLuYHtBcR npn BbIOnNHeHm 3aIcnC nOMOuBIO cIqDpBOB BnDEOKaMepBo 63ФyHKUIN KACCETHOI pAMrTn Ha IeHTy, 3aIncaHHyO KeM-ImoC O nOMOuBIO fФyHKUIN KACCETHOI pAMrTn.
JIeHTbI C KAcCtHoi NaMaTbIO NaMaTbIO IMeIOT 3HaK CII (KacceTHaN PAmTb).ΦIpMa Sony peKOMeHpyET NcONb3OBA TbJeHTy CO 3HaKOM CII IaI noHOro HacLaJdEHNBaWei BnDeOkamepoI.
Using any other video camera recorder, you cannot record on a tape that has recorded a copyright control signals for copyright protection of software which is played back on your camcorder.
Audio mode
12-bit mode: The original sound can be recorded in stereo 1, and the new sound in stereo 2 in 32 kHz. The balance between stereo 1 and stereo 2 can be adjusted by selecting AUDIO MIX in the MENU settings during playback. Both sounds can be played back.
16-bit mode: A new sound cannot be recorded but the original sound can be recorded in high quality. Moreover, it can also play back sound recorded in 32kHz , 44.1kHz or 48kHz . When playing back a tape recorded in the 16-bit mode, 16BIT indicator appears on the LCD screen or in the viewfinder.
When you play back a dual sound track tape
When you play back a dual sound track tape recorded in a stereo system, set "HiFi SOUND" to the desired mode in the MENU settings (p. 87).
Sound from speaker
| HiFi Sound Mode | Playing back a stereo tape | Playing back a dual sound track tape |
| STEREO | Stereo | Main sound and sub sound |
| 1 | Left sound | Main sound |
| 2 | Right sound | Sub sound |
You cannot record dual sound programmes on your camcorder.
PnBocnpOn3VeJeHn
CunHaI abTOPcKOro npaba Pn BocnpOn3VeDeHn
NcnoIb3yraKakyIO-Ni6o DpyryIO BnDEOKaMepy, BbI He MoKeTe BbIIOJIHNTb 3aNNCb HaJeHTy,Ha KOTOpO 3aIINCAHbCINHaJIb ABTOPCKORo npaba DnI 3aUHTb ABTOPCKNX pab INporpAMM, BOCnpOn3BOIDMbIX Ha BaWeBnDEOKaMepe.
Aydnopexum
12-6bTobbypeKIM:IepBOHaayBbHb3ByK MOKeT 6bITb 3aPcAn hA cTepeofoHnueckn KaHal 1,aHObYb3BYK-Ha cTepeofoHnueckn KaHal 2 B pexIMe 32 Kf, BaJAHc MExJy cTepeofoHnueckm KaHaiom 1 n cTepeofoHnueckm KaHaiom 2 MoXHo OTperyInpoBaTb PyTeM BbIbopa yCTaHOBKn AUDIO MIX B yCTaHOBkax MENU BO Bpemr BOCpOIm3BeDeHn. BblMoKTe BOCpOIm3BODnTb Oba 3ByKa.
16-6bTOBbI pEXIM: HObI 3ByK He MoXeT 6bITb 3aINcAH, Ondako nepBOHaJbHbI 3ByK MOxEe 6bITb 3aINcAH C BbICOKM KaYeCTBOM. KpOME TOrO, 3ByK MOxHO BOCPON3BOIDnB B peXImax 32 kTc, 44,1 kTc nIIN 48 kTc. PInB OBCPON3BeDeHNn IeHTbl, 3aINcAHHO B 16-6bTOBOM pEXIMe, Ha 3kpaHe KKД nIN B BVIOINCKaTeI NOBtca INDnKaTop 16BIT.
PnBocnpOn3BeJeHm JeHTbI C DBOHOH 3ByKOBOJ DOPOXKOJ
При ВOCирюзBEдени Лentы CДBOИнОВ 3БУКОВОД ДорожКо,ЗАпсанHоВ CBtepeофонческо ССТЕМ,уCTаHOBITe KOMaHДу "HiFi SOUND"В Нухньи ржIM B yctahOBkax MENU (cTp.87).
3Byk OTДиHamnka
| Рек imm 3Byuahnia HiFi | Восprоизve徴ие стrepoфонческо лeнтуbl | Восprоизve徴ие пeнтуbl с двоюно 3BykoBoД Dorpoхко |
| STEREO | Стrepo | Ос hoBон 3Byk И ВсПOMoRaTeЛьны 3ByK |
| 1 | 3Byk Левого Канала | Ос hoBон 3Byk |
| 2 | 3Byk павого Канала | Ос hoBон 3Byk |
BbHe MoKeTe 3aIINcIbA Tb npOrpaMMbIC DBoHbIM 3ByaHnEm Ha BaWei BnDeokaMepe.
Be sure to affix a label only on the locations as illustrated below [a] so as not to cause malfunction of your camcorder.
Rewind the tape to the beginning, put the cassette in its case, and store it in an upright position.
Cleaning gold-plated connector
If the gold-plated connector of mini DV cassettes is dirty or dusty, you may not operate the function using cassette memory. Clean up the gold-plated connector with cotton-wool swab, about every 10 times ejection of a cassette. [b]
PpmeaHn no KaccTe MmN DV
Pnp npnKpeHneHH 3TKeTKn Ha KaccTey MmH DV
CdeIte 3a Tem, TTo6bI 3TKeTkn
PnIKpeINJIINCb TOJbKO MeCTax, KaK NOKa3aHO
Ha pncyHKax HNXe [a], TaK TTo6bI He HApUHITb
HOpMaJIbHOe FyHKUHOHPOBaHHe
BUNDeOKaMEpbI.
Pocne nCnoJIb3OBAHnKacCeTbIMHH DV
Ipeemotai Te JnHTy K Naay, noJoxnte KaCCTe B cyTnp I xpaHnTe KACCteB BePTNKaJIbHOM nOLOXeHm.
Ouictka no30JoueHHoro pa3bema
Ecni no3o1ooyHbI pa3bEm KaccET MHN DV 3aqr3HeN IIN 3aBJIeN, Bbl He cMOxTe ynpabTb cyHKUeN C NOMOuH KaccetHOI namrIn. OunlaTe no3o1ooyHbI pa3bEm C nOMOuXnONuTaObyMaxJHO TaMNoHa npImepHo nocIe 10 pa3 nCnoJb3OBaHnKaccTebl. [b]
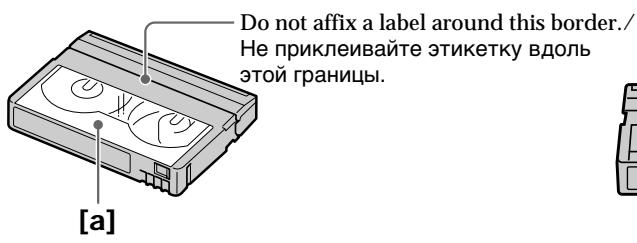
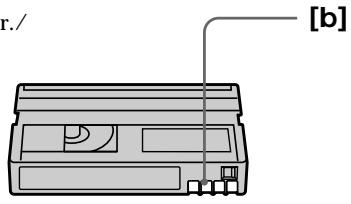
If you run into any problem using your camcorder, use the following table to troubleshoot the problem. If the problem persists, disconnect the power source and contact your Sony dealer or local authorized Sony service facility. If "C:□□:□□" appears on the LCD screen or in the viewfinder, the self-diagnosis display function has worked. See page 137.
In the recording mode
| Symptom | Cause and/or Corrective Actions |
| START/STOP does not operate. | ·The POWER switch is set to PLAYER. →Set it to CAMERA. (p. 20) ·The POWER switch is set to OFF. →Set the POWER switch to CAMERA. (p. 20) ·The tape has run out. →Rewind the tape or insert a new one. (p. 19, 33) ·The write-protect tab is set to expose the red mark. →Use a new tape or slide the tab. (p. 19) ·The tape is stuck to the drum (moisture condensation). →Remove the cassette and leave your camcorder for at least 1 hour to acclimatize. (p. 149) |
| Recording stops in a few seconds. | ·START/STOP MODE is set to 5SEC or ↓. →Set it to ↓. (p. 25) |
| The power goes off. | ·While being operated in the CAMERA mode, your camcorder has been in the standby mode for more than 5 minutes. →Set the POWER switch to OFF and then to CAMERA again. (p. 20) |
| The image on the viewfinder screen is not clear. | ·The viewfinder lens is not adjusted. →Adjust the viewfinder lens. (p. 23) |
| The SteadyShot function does not work. | ·STEADYSHOT is set to OFF in the MENU settings. →Set it to ON. (p. 87) |
| The autofocus function does not work. | ·FOCUS is set to MANUAL. →Set it to AUTO. (p. 60) ·Shooting conditions are not suitable for autofocus. →Set FOCUS to MANUAL to focus manually. (p. 60) |
| The fader function does not work. | ·START/STOP MODE is set to 5SEC or ↓. →Set it to ↓. (p. 25) ·The digital effect function is working. →Cancel it. (p. 53) |
| The indicator flashes in the viewfinder or on the LCD screen. | ·The video heads may be dirty. →Clean the heads using the Sony DVM12CL cleaning cassette (not supplied). (p. 150) |
| The picture does not appear in the viewfinder. | ·The LCD panel is open. →Close the LCD panel. (p. 22) |
| A vertical band appears when you shoot a subject such as lights or a candle flame against a dark background. | ·The contrast between the subject and background is too high. Your camcorder is not a malfunction. |
| A vertical band appears when you shoot a very bright subject. | ·Your camcorder is not a malfunction. |
| Some tiny white spots appear in the viewfinder or on the LCD screen. | ·Slow shutter, low lux or NightShot +Slow shutter mode is activated. This is not a malfunction. |
| An unknown picture is displayed in the viewfinder or on the LCD screen. | ·If 10 minutes elapse after you set the POWER switch to CAMERA or DEMO MODE is set to ON in the MENU settings without a cassette inserted, your camcorder automatically starts the demonstration. →Insert a cassette and the demonstration stops. You can also cancel DEMO MODE. (p. 92) |
| The picture is recorded in incorrect or unnatural colours. | ·NIGHTSHOT is set to ON. →Set it to OFF. (p. 28) |
| Picture appears too bright, and the subject does not appear in the viewfinder or on the LCD screen. | ·NIGHTSHOT is set to ON in a bright place. →Set it to OFF, or use the NightShot function in a dark place. (p. 28) |
| The click of the shutter does not sound. | ·BEEP is set to OFF in the MENU settings. →Set it to MELODY or NORMAL. (p. 87) |
In the playback mode
| Symptom | Cause and/or Corrective Actions |
| The tape does not move when a video control button is pressed. | ·The POWER switch is set to CAMERA or OFF. →Set it to PLAYER. (p. 33) ·The tape has run out. →Rewind the tape. (p. 33) |
| The playback picture is not clear or does not appear. | ·The television's video channel is not adjusted correctly. →Adjust it. (p. 38) |
| There are nine horizontal lines on the picture or the playback picture is not clear or does not appear. | ·The video head may be dirty. →Clean the heads using the Sony DVM12CL cleaning cassette (not supplied). (p. 150) |
| No sound or only a low sound is heard when playing back a tape. | ·The volume is turned to minimum. →Open the LCD panel and press VOLUME+. (p. 33) ·AUDIO MIX is set to ST2 in the MENU settings. →Adjust AUDIO MIX. (p. 87) |
| Displaying the recorded date, date search function does not work. | ·The tape has no cassette memory. →Use a tape with cassette memory. (p. 66, 129) ·CM SEARCH is set to OFF in the MENU settings. →Set it to ON. (p. 87) |
(continued on the following page)
| Symptom | Cause and/or Corrective Actions |
| The title search function does not work. | ·The tape has no cassette memory. →Use a tape with cassette memory. (p. 129) ·CM SEARCH is set to OFF in the MENU settings. →Set it to ON. (p. 87) ·There is no title in the tape. →Superimpose the titles. (p. 79) |
| The new sound added to the recorded tape is not heard. | ·AUDIO MIX is set to ST1 side in the MENU settings. →Adjust AUDIO MIX in the MENU settings. (p. 87) |
| The title is not displayed. | ·TITLE DSPL is set to OFF in the MENU settings. →Set it to ON in the MENU settings. (p. 87) |
| The date search or title search does not work correctly. | ·The tape has a blank portion in the recorded portion (p. 129) |
In the recording and playback modes
| Symptom | Cause and/or Corrective Actions |
| The power does not turn on. | · The battery pack is not installed, or is dead or nearly dead. → Install a charged battery pack. (p. 12, 13) · The AC power adaptor is not connected to the mains. → Connect the AC power adaptor to the mains. (p. 18) |
| The end search function does not work. | · The tape was ejected after recording when using a tape without cassette memory. · You have not recorded on the new cassette yet. |
| The end search function does not work correctly. | · The tape has a blank portion in the beginning or middle. |
| The battery pack is quickly discharged. | · The operating temperature is too low. · The battery pack is not fully charged. → Charge the battery pack again. (p. 13) · The battery pack is completely dead, and cannot be recharged. → Replace with a new battery pack. (p. 12) |
| The battery remaining indicator does not indicate the correct time. | · You have used the battery pack in an extremely hot or cold environment for a long time. · The battery pack is completely dead, and cannot be recharged. → Replace with a new battery pack. (p. 12) · The battery is dead. → Use a charged battery pack. (p. 12, 13) |
| The cassette cannot be removed from the holder. | · The power source is disconnected. → Connect it firmly. (p. 12, 18) · The battery is dead. → Use a charged battery pack or the AC power adaptor. (p. 12, 18) |
| The ☑ and ▲ indicators flash and no functions except for cassette ejection work. | · Moisture condensation has occurred. → Remove the cassette and leave your camcorder for at least 1 hour to acclimate. (p. 149) |
| CIII indicator does not appear when using a tape with cassette memory. | · The gold-plated connector of the tape is dirty or dusty. → Clean the gold-plated connector. (p. 131) |
| Remaining tape indicator is not displayed. | · The ☑ REMAIN is set to AUTO in the MENU settings. → Set it to ON to always display the remaining tape indicator. (p. 87) |
When operating using the Memory Stick
- DCR-TRV10E only
| Symptom | Cause and/or Corrective Actions |
| The Memory Stick does not function. | · The POWER switch is set to CAMERA. → Set it to MEMORY. (p. 103) |
| Recording does not function. | · The Memory Stick has already been recorded to its full capacity. → Erase unnecessary images and record again. (p. 124, 106) · The Memory Stick is not inserted. → Insert a Memory Stick. (p. 102) · Unformatted Memory Stick is inserted. → Format the Memory Stick. (p. 105) · The write-protect tab on the Memory Stick is set to LOCK. → Slide the tab to write. (p. 100) |
| The image cannot be deleted. | · The image is protected. → Cancel image protection. (p. 121) |
| You cannot format the Memory Stick. | · The write-protect tab on the Memory Stick is set to LOCK. → Set the tab to write. (p. 100) · Memory Stick is not inserted. → Insert a Memory Stick. (p. 102) |
| Deleting all the images cannot be carried out. | · The write-protect tab on the Memory Stick is set to LOCK. → Set the tab to write. (p. 100) · Memory Stick is not inserted. → Insert a Memory Stick. (p. 102) |
| You cannot protect the image. | · The write-protect tab on the Memory Stick is set to LOCK. → Set the tab to write. (p. 100) · The image to protect is not be played back. → Press MEMORY PLAY to play back the image. (p. 114) · Memory Stick is not inserted. → Insert a Memory Stick. (p. 102) |
| You cannot write a print mark on the still image. | · The write-protect tab on the Memory Stick is set to LOCK. → Set the tab to write. (p. 100) · The image to write a print mark is not be played back. → Press MEMORY PLAY to play back the image. (p. 114) · Memory Stick is not inserted. → Insert a Memory Stick. (p. 102) |
| The slide show function does not work. | · Memory Stick is not inserted. → Insert a Memory Stick. (p. 100) |
| The photo save function does not work. | · The write-protect tab on the Memory Stick is set to LOCK. → Set the tab to write. (p. 100) · Memory Stick is not inserted. → Insert a Memory Stick. (p. 102) |
(continued on the following page)
Others
| Symptom | Cause and/or Corrective Actions |
| The title is not recorded. | ·The tape has no cassette memory. →Use a tape with cassette memory. (p. 129) ·The cassette memory is full. →Erase another title. (p. 82) ·The tape is set to prevent accidental erasure. →Slide the write-protect tab so that red portion is not visible. (p. 19) ·Nothing is recorded in that position on the tape. →Superimpose the title to the recorded position. (p. 79) |
| The cassette label is not recorded. | ·The tape has no cassette memory. →Use a tape with cassette memory. (p. 129) ·The cassette memory is full. →Erase some titles. (p. 82) ·The tape is set to prevent accidental erasure. →Slide the write-protect tab so that red portion is not visible. (p. 19) |
| While editing using the i.LINK cable (DV connecting cable), recording picture cannot be monitored. | ·Remove the i.LINIK cable (DV connecting cable), and connect it again. |
| DV synchro-editing does not function. (DCR-TRV10E only) | ·The input selector on the VCR is not set correctly. →Set the selector to DV input position. If you use another DV camcorder, set the power switch to VTR. ·The camcorder is connected to DV equipment of other than Sony. →Operate normal editing. ·Setting programme on a blank portion of the tape is attempted. →Set the programme again on a recorded portion. |
| The Remote Commander supplied with your camcorder does not work. | ·COMMANDER is set to OFF in the MENU settings. →Set it to ON. (p. 87) ·Something is blocking the infrared rays. →Remove the obstacle. ·The batteries are inserted in the battery holder with the + - polarities incorrectly matching the + - marks. →Insert the batteries with the correct polarity. (p. 165) ·The batteries are dead. →Insert new ones. (p. 165) |
| The melody or beep sounds for 5 seconds. | ·Moisture condensation has occurred. →Remove the cassette and leave your camcorder for at least 1 hour to acclimate. (p. 149) ·Some troubles has occurred in your camcorder. →Remove the cassette and insert it again, then operate your camcorder. |
| While charging the battery pack, no indicator appears or the indicator flashes in the display window. | ·The AC power adaptor is disconnected. →Connect it firmly. (p. 18) ·Something is wrong with the battery pack. →Contact your Sony dealer or local authorized Sony service facility. |
| No function works though the power is on. | ·Disconnect the mains lead of the AC power adaptor or remove the battery, then reconnect it in about 1 minute. Turn the power on. If the functions still do not work, open the LCD panel and press the RESET button beside the speaker using a sharp-pointed object. (If you press the RESET button, all the settings including the date and time return to the default.) (p. 158) |
Your camcorder has a self-diagnosis display function.
This function displays the current condition of your camcorder as a 5-digit code (a combination of a letter and figures) in the viewfinder, on the LCD screen or in the display window. If a 5-digit code is displayed, check the following code chart. The last two digits (indicated by ) will differ depending on the state of your camcorder.
Viewfinder (or LCD screen)
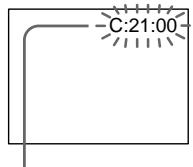
Self-diagnosis display
C:□□:□□
You can service your camcorder yourself.
-E:□□:□□
Contact your Sony dealer or local authorized Sony facility.
| Five-digit display | Cause and/or Corrective Actions |
| C:04:□□ | ·You are using a battery pack that is not an “InfoLITHIUM” battery pack. →Use an “InfoLITHIUM” battery pack. (p. 17) |
| C:21:□□ | ·Moisture condensation has occurred. →Remove the cassette and leave your camcorder for at least 1 hour to acclimate. (p. 149) |
| C:22:□□ | ·The video heads are dirty. →Clean the heads using the Sony DVM12CL cleaning cassette (not supplied). (p. 150) |
| C:31:□□ | ·A malfunction other than the above that you can service has occurred. |
| C:32:□□ | ·Remove the cassette and insert it again, then operate your camcorder. →Disconnect the mains lead of the AC power adaptor or remove the battery pack. After reconnecting the power source, operate your camcorder. |
| E:61:□□ | ·A malfunction that you cannot service has occurred. |
| E:62:□□ | →Contact your Sony dealer or local authorized Sony service facility and inform them of the 5-digit code. (example: E:61:10) |
If you are unable to rectify the problem even if you try corrective actions a few times, contact your Sony dealer or local authorized Sony service facility.
Warning indicators and messages
If indicators and messages appear in the viewfinder, on the LCD screen or in the display window, check the following:
See the page in parentheses “( )” for more information.
- The warning messages do not appear in the mirror mode.
- The indicators and messages are displayed in yellow.
Warning indicators
The video heads are dirty
Slow flashing:
- You need to clean the heads using the Sony DVM12CL cleaning cassette (not supplied) (p. 150).
The battery is dead or nearly dead
Slow flashing:
- The battery is nearly dead.
Fast flashing:
The battery is dead (p. 13).
Depending on conditions, the indicator may flash, even if there are 5 to 10 minutes remaining.
Warning indicator as to tape Slow flashing:
The tape is near the end.
- No tape is inserted (p. 19).*
Fast flashing:
The tape has run out (p. 19, 33).
- The write-protect tab on the cassette is out (red) (p. 19).
You need to eject the cassette Slow flashing:
- The write-protect tab on the cassette is out (red) (p. 19).*
Fast flashing:
- Moisture condensation has occurred (p. 149).
The tape has run out (p. 19, 33).* - The self-diagnosis display function is activated (p. 137).*
Moisture condensation has occurred* Fast flashing:
- Eject the cassette, turn off your camcorder, and leave it for about 1 hour with the cassette compartment open (p. 149).
Warning indicator as to cassette memory Slow flashing: - No tape with cassette memory is inserted (p. 19).*
C:21:00
Self-diagnosis display (p. 137)
Warning indicator as to Memory Stick (DCR-TRV10E only) Slow flashing:
- No Memory Stick is inserted (p. 102).*
Memory Stick is not formatted correctly (p. 105).
The still image is protected (DCR-TRV10E only)
Slow flashing:
- The still image is protected (p. 121).*
Warning messages
- CLOCK SET Reset the date and time (p. 98).
- For "InfoLITHIUM" Use an "InfoLIHIUM" battery pack (p. 17). BATTERY ONLY
CLEANING CASSETTE
The video heads are dirty (p. 150).
FULL The tape cassette memory is full.
16BIT AUDIO MODE is set to 16BIT (p. 87). You cannot dub new sound.
REC MODE REC MODE is set to LP (p. 87). You cannot dub new sound.
- TAPE There is no recorded portion on the tape. You cannot dub new sound.
- “i.LINK” CABLE i.LINK cable is connected (p. 73). You cannot dub new sound.
AV CABLE A/V connecting cable is connected (p. 38). You cannot dub new sound.
FULL The Memory Stick is full. (DCR-TRV10E only)
The write-protect tab on the Memory Stick is set to LOCK (p. 100). (DCR-TRV10E only)
No still image is recorded on the Memory Stick (p. 106).* (DCR-TRV10E only)
NO MEMORY STICK No Memory Stick is inserted (p. 102). (DCR-TRV10E only)
- You hear the melody or beep sound.
Понск и устараенье несправност
Ecni y Bac Bo3NKkna kakaJ-1n6 npo6Iema npi nCnoJIb3OBAHn BVideOKaMepbl, BOCnoJIb3yntec b cIeDyUoSeT TaBnueJ IJN O TBicKaHn I yCTpaHeHn I npo6IemaI. EcNI npo6Iema He ycTpAnHETcR, TO cIeDyET OTcoEHNHTb NtOuHKn IITaHnI N o6pATNTbC B CepBNCbH N CEHTp SONY IIIN B MeCTHOe yONHOMOeHHOE ppeInpraTne IO bcnyXnBaHnIO 3dJIeNl SNoy. EcNI Ha 3KpaHe XXKD IIIN B BVIOINCKaTeNe NOBNTcN INDkaZnN "C:□□:□□", 3TO 3NaHT, YTO cpa6OTana fYHKzN DmCInJe caMOdNarHocTNK. CM. cTp. 145.
B pexkme 3ainnc
- BbIToJKNHtE KACCETy, BblKIOUHTe BaUy BnDeOKaMepy N OCTaBbTe ee npIMepHo Ha 1 Yac C OTKpbITbIM OTCEKOM IJI KACCETbI (CTp. 149).
PpeDynpexkaIOUne INHnKaTOpbl KACCEbI C nAMrTbIO
MeJleHHeMurahHe:
- YctaHOBHeHa JeHTa 6e3 KaCCeTHoI nAMrTu (CTp. 19).*
C:21:00
Инданаши самоdnarHocTNK (cTp. 145).*
IpeDynpexkaUoJne HndIkAToPbI Memory Stick (ToIbKO MoJeB DCR-TRV10E)
MeJHeHHoe MItaHne:
- He yctaHOBJIeHa Memory Stick (cTp. 102).*
Memory Stick orΦopMaTIpOBaHa HnepaBnIbHo (ctp. 105).
3aunTa n3o6paXeHnA
(Tolbko MoJoelb DCR-TRV10E)
MeJHeHHe MURaHne:
He BCtabneHa Memory Stick (ctp. 102).* (ToIbko MoJeIb DCR-TRV10E)
*BbyycblbIHTeMeNoIOIOIIN3yMmepHbCnHaJ.
Using your camcorder abroad
Using your camcorder abroad
You can use your camcorder in any country or area with the AC power adaptor supplied with your camcorder within 100V to 240V AC, 50 / 60Hz .
Your camcorder is a PAL system based camcorder. If you want to view the playback picture on a TV, it must be a PAL system based TV with VIDEO/AUDIO input jack. The following shows TV colour systems used overseas.
PAL system Australia, Austria, Belgium, China, Czech Republic, Denmark, Finland, Germany, Great Britain, Holland, Hong Kong, Italy, Kuwait, Malaysia, New Zealand, Norway, Portugal, Singapore, Slovak Republic, Spain, Sweden, Switzerland, Thailand, etc.
PAL-M system Brazil
PAL-N system Argentina, Paraguay, Uruguay
NTSC system
Bahama Islands, Bolivia, Canada, Central America, Chile, Colombia, Ecuador, Jamaica, Japan, Korea, Mexico, Peru, Surinam, Taiwan, the Philippines, the U.S.A., Venezuela, etc.
SECAM system Bulgaria, France, Guyana, Hungary, Iran, Iraq, Monaco, Poland, Russia, Ukraine, etc.
Simple setting of clock by time difference
You can easily set the clock to the local time by setting a time difference. Select WORLD TIME in the MENU settings. See page 92 for more information.
Maintenance information and precautions
Moisture condensation
If your camcorder is brought directly from a cold place to a warm place, moisture may condense inside your camcorder, on the surface of the tape, or on the lens. In this condition, the tape may stick to the head drum and be damaged or your camcorder may not operate correctly. If there is moisture inside your camcorder, the beep sounds and the indicator flashes. When the indicator flashes at the same time, the cassette is inserted in your camcorder. If moisture condenses on the lens, the indicator will not appear.
If moisture condensation occurred
None of the functions except cassette ejection will work. Eject the cassette, turn off your camcorder, and leave it for about 1 hour with the cassette compartment open. Your camcorder can be used again if the indicator does not appear when the power is turned on again.
Note on moisture condensation
Moisture may condense when you bring your camcorder from a cold place into a warm place (or vice versa) or when you use your camcorder in a hot place as follows:
- You bring your camcorder from a ski slope into a place warmed up by a heating device
- You bring your camcorder from an air-conditioned car or room into a hot place outside
- You use your camcorder after a squall or a shower
- You use your camcorder in a high temperature and humidity place
How to prevent moisture condensation
When you bring your camcorder from a cold place into a warm place, put your camcorder in a plastic bag and tightly seal it. Remove the bag when the air temperature inside the plastic bag has reached the surrounding temperature (after about 1 hour).
Информацnia по ухODу 3a apnapaTom И МерыnpedoctopoxkHOCTN
KoHdEhCaunBlaIaI
EcIn BnDeOkamepa npHecena npramo n3 XOJOnHOrO MeCTa B TeJIIOe,TO BHyTpN BVNeOkAmepeI,Ha NOBepXHOCTn JENTbI IIN Ha 6ObKeTbE MoKET npON30tN KOHeHCAuN BlaRi. B TAKOM COCTOHN JENTa MoKET npININHTb K 6apabahy rONOBKn i 6yDet NOBpeXdHa NII Jne BnDEOkamepa He CMOKET pa6oTaB HAnEkaUm O6pa3Om. EcIn BNYtpN BVNeOkAmepb I pON30UHa KOHeHCAuN BlaRi, TO pON3ByuNT 3YMMepHBn CnHaN, a HA 3KpaHe KKJ 6yDet MmraTb INDkATop E.Cnn B To Jx e camoe BPemr 6yDet MmraTb INDkATop A,3TO 3NaHT, YTO B NDeOkAmepy BCTaBnHe kacceta.EcIn Bnara cKOHDeHCnpOBaLacb Ha 6ObKeTbE, INDkATOp NOABJIaTbc H6yDet.
Ecn npon3oJla KOHdEHCaIgBnaI
Hn Onda H3 cyHKcun, Kpome BbItaKbHaNn KaCCeTbI, He 6yDyT pa6OtaTb. N3BLeKeNte KacCteTy, BbIKJIOUHTe BnDEOKaMEpy N OCTaBbTe ee np6JIIN3NTeNbHO Ha 1 qac COTkpBTbIM OTCEKOM DnA KACcTeB. Ecnn Pnpi NOBTOPHOM BKJIIOUChENn INTaHn INdNKaTOP He NOBNTCA Ha DnCPIee, Bbl MoXeTe CHOba NOnb3ObaTbcBn DEOKaMEpoi.
PpimeyaHne no KOHeHcaun BlaRn
Bnara moKET o6pa3oBaTbC8, ecn BblnpHeceTe BaUy BnDeokamepy nX xOIoHOroMeCTa B TeNIOe (nn Hao6OpOT) nn KOrJa BblncNoIb3yTe BaUy BnDeokamepy B JkapKomMeCTe B cJeDyUOuX CnyaAx:
- Bby npinhecn Bauy Bndeokamepy c IbIXHOROCKHOHa B NOMeueHne, rIe yHKUOHpyeToborpBeTaTeB
BbI npHecn Bauy Bndeokamepy n3 aBTOMO6nI INI IN I3 KOMHaTbI C BO3dUHbIM KOHNIOHPOBaHnEM B JxapKoe MeCTo Ha yInuE
BbI nCnoJIb3ye Te BnDeOkaMepy nocne rpo3bl nn DoXd - Bby nCnoJb3yeTe BaUy BnDeokamepy B OueHb Kapkom n BnaxKHom MecTe.
Kak npedotBpaTntb KOHdeHcaHIO BnaI
EcIn BnDeOKaMepa npHecHa n3 XoNoHOrO MeCTa B TeNIOE,TO NIOXKeTbe BNDeOKaMepy B NIOIN3TNHeOBbI NaKeT I NIOToHO 3aKNeIeIero.BbInbTe BNDeOKaMepy n3 NIOIN3TNHeOBoro NaKeTa,KorTa TEMpeAtypa BO3dyxa BHyTpIn NaKeTa DOCTnIRHTempeAtypbI OKpyJaIOUero BO3dyxa (PpN6bn3nteJbHo uepe3 1 ac).
Maintenance information
Cleaning the video head
To ensure normal recording and clear pictures, clean the video heads. The video head may be dirty when:
- mosaic-pattern noise appears on the playback picture.
- playback pictures do not move.
- playback pictures do not appear.
- the indicator and "CLEANING CASSETTE" message appear one after another or the indicator flashes on the LCD screen or in the viewfinder.
If the above problem, [a] or [b] occurs, clean the video heads for 10 seconds with the Sony DVM12CL cleaning cassette (not supplied). Check the picture and if the above problem persists, repeat cleaning.
HΦopMaζη no yxody
Чистka вдебоголовк
Длбобсчесн_Hормально 3аиси n YETKOrO n3o6paxehnCneJyET nepNoDiuueckN YuCTNtB BIneorolOBKn. BIneorolOBKn BO3MoXH O3arP3HeHb, ecmI:
Ha BOCIPOM3BDOJIMOM N3O6paeKehnION8BJIOTCNAOMEXTNIAO3MAnK.
BOCPON3BOIDMOE N3O6paXeHne He DBNraTcA.
BOCPON3BOIDMOE N3O6paXeHHe NIOBJIaTeTcHa 3KpAHe.
- NaэкранеЖКДилВиДOMSCaTeNe NOВБЯHotc OдИNЗа ДугIM ИДДКATOP XИ COOБSEнe“CLEANING CASSETTE”илxe MnaeITHДNKATOp X
EcNn Bo3NHKHyT NOMEXI Tnna [a] nIIN [b], NOUcHtTe BnDEOrONBKN C NOMOJIbO ONUCTeINbHOJ KACCETbl Sony DVM12CL (He npriIaeraTcB) T byeHne 10 cekYHd. InpoBePte N3O6paXeHne H, ecNn OnuCAHnbYe BbIe npOBJembl He yctpaHmInCb, NOBTOpTE UcNTKy.
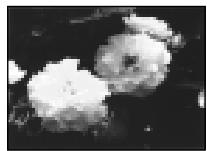

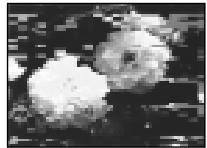
[a]
or/nn

[b]
Cleaning the LCD screen
If fingerprints or dust make the LCD screen dirty, we recommend using a LCD Cleaning Kit (not supplied) to clean the LCD screen.
Charging the vanadium-lithium battery in your camcorder
Your camcorder is supplied with a vanadium-lithium battery installed so as to retain the date and time, etc., regardless of the setting of the POWER switch. The vanadium-lithium battery is always charged as long as you are using your camcorder. The battery, however, will get discharged gradually if you do not use your camcorder. It will be completely discharged in about a half year if you do not use your camcorder at all. Even if the vanadium-lithium battery is not charged, it will not affect the camcorder operation. To retain the date and time, etc., charge the battery if the battery is discharged.
Charging the vanadium-lithium battery:
- Connect your camcorder to mains using the AC power adaptor supplied with your camcorder, and leave your camcorder with the POWER switch turned off for more than 24 hours.
- Or install the fully charged battery pack in your camcorder, and leave your camcorder with the POWER switch turned off for more than 24 hours.
Ynctka 3KpaHa KKd
Ecnna Ha 3Kpahe XKD nOBaTcO TneuATKn IIN PbInb, peKOMeHNyETcB OCN0JIb3OBAbTCn OHCTNTEnbHbIM naBOPm Dn JKKD (He npinlaraeTc) dnnuNTkn XKD.
3apKa BaHaDnEBO-JIHTneBOB 6aTapeKn B BaSei BnDeokampe
K Baωe BnDeokampe npinlaeraTcB aHaJneBOIHTNEBA batapeiKa, yctaHOBHeHcA TcEM, YTO6bl COxpaarBb NAMrN DaTy u BpEmu T.π. He3aBNCmO OY cTahOBKn nepeKnUoateHPOWER. BAnaDBeIOIHTNEBA batapeiKa 3apjXaeTcB CcerDa B To BpEmu KOrDa Bb IcNoIb3yeTe CBoO bIeDOKaMepy. OJaHao bAtapeiKa 6byet NoCTeNEHNO pa3PJAkTaC8,ecn Bb He IcNoIb3yeTe Bawy BnDeokampey. OHa npaKTNUeCKN pONHOCTb POa3PJIITcN pINMeMPHo Uepe3 nIoROda, eCNb Bi He 6bye Te IcNoIb3ObaTb Bawy BnDeokampey cOBsem. JaXe ecN BANaDBeIOIHTNEBA batapeiKa He 3apjXeHa, 3To He NOBImeT Ha pAOBy BnDeokampeBf. IJNa coxPAHeHry B nAMrTn DaTb I bPEMeHn CNeJyET 3apJNTb batapeiKy, ecn OHa pApRKeHa.
3apka BaHaDneBO-JInTHeBOB 6aTapeKn
ПодсоeДинiteБау WbIeOKeampey K cTeTc
помочь сеТбOrO aadantepa nepeMeHnOToKa,
прларaemoro K Baewi BbIeOKeampe,и OCTabTe
Вау WbIeOKeampeY C bblKIOUeHbIM noloxeHnEM
пeркliuOATEЯ NiTaHnA POWER 60JIee,Чм ha 24
чac.
-Иллжустановпгл�нocьюзаржehньбатаиньшквВаши ВдоекамеруиoctabteВаши ВдоекамерсБыкночесьmПОLOжehнempepekluohateяпintаня POWER60eee,чem ha 24yaac.
Precautions
Camcorder operation
- Operate your camcorder on 7.2V (battery pack) or 8.4V (AC power adaptor).
- For DC or AC operation, use the accessories recommended in this operating instructions.
- If any solid object or liquid get inside the casing, unplug your camcorder and have it checked by a Sony dealer before operating it any further.
- Avoid rough handling or mechanical shock. Be particularly careful of the lens.
- Keep the POWER switch set to OFF when you are not using your camcorder.
- Do not wrap your camcorder with a towel, for example, and operate it. Doing so might cause heat to build up inside.
- Keep your camcorder away from strong magnetic fields or mechanical vibration.
- Do not touch the LCD screen with your fingers or a sharp-pointed object.
- If your camcorder is used in a cold place, a residual image may appear on the LCD screen. This is not a malfunction.
- While using your camcorder, the back of the LCD screen may heat up. This is not a malfunction.
On handling tapes
- Do not insert anything into the small holes on the rear of the cassette. These holes are used to sense the type and thickness of the tape and if the recording tab is in or out.
- Do not open the tape protect cover or touch the tape.
- Avoid touching or damaging the terminals. To remove dust, clean the terminals with a soft cloth.
Camcorder care
- Remove the tape, and periodically turn on the power, operate the CAMERA and PLAYER sections and play back a tape for about 3 minutes when your camcorder is not to be used for a long time.
- Clean the lens with a soft brush to remove dust. If there are fingerprints on the lens, remove them with a soft cloth.
- Clean the camcorder body with a dry soft cloth, or a soft cloth lightly moistened with a mild detergent solution. Do not use any type of solvent which may damage the finish.
- Do not let sand get into your camcorder. When you use your camcorder on a sandy beach or in a dusty place, protect it from the sand or dust. Sand or dust may cause your camcorder to malfunction, and sometimes this malfunction cannot be repaired.
MepblnpedocTopoXHoctn
3KcnplyaatauBvdeokamepbl
3KcIpyaTHpye BnDeOkaMepy ot 7,2B (6aTaapeHnh6Iok) mI8,4B (ceTeBoaIaANTep nepemEmHOrTOKA)
- UTo Kacaetcra3KcPnlyaatauMn BInDeokamepbbl OT NOCTOARHORo INpeMeHHORo TOKa,NCpONlb3yIte PnpHaJlEeXHoCTn,peKOMHeYdEmbIe B DaHHOI NHCTpyKUIMNo 3KcPnlyaatauMn.
Ecnn KaKoH-NbDyB TBepdb npEmT nINXuDKoCTb nOanl BYHTb KOpNcA, TO BbIKNoUHTBeBnDEKaMepy nnpobepbTe ee y Dnepa Sonye nepedDaIbHeiwee e3Knpyatauei.
Избегаите рубого образецни с вдевожамери и менихов.
мениховски уларов.Будte осябенho
octopoхъсь с оьбектим�.
- ECnn BIDeokape Me hncnlo3yeTcA, depXkITE BbIKNOUATENB POWER B noIooXEHN OFF.
He 3abopauBaiTe BAsy BIndeokamepy, Hanpimep, B noToneHne, I He 3KnnyaupuYe ee B TakOM coToHHN. B pOtnBbOM cIyae MoKet npOn3oTu NBbIeHne TEMnepaTyb BYHTpy BIndeokamepey.
-ДеркптЕБауВидекамepyNoдальшOTСилььхМагнIHbIXПОелИлМexaанчecкоВибраци.
H NeprkaacTecB KxpaHy JXKД CBOHMn PAnbIaMn IINN OCTbIMn PnpdMeTAMn.
- Pπn 3κCπnyataaun BaωeBνDεOKaMepbI B XOJODHOM Mecte,Ha 3κρaHe KKД можET NOBλTbCObCTaTOOHoe N3OBpaXeHne.3To He RBAJAEcH HeMCnpabHOCTbO.
-ПиEkCNYatauM BauB NduEOKAMEbpI,3aJHRA cTOpOHa 3KpAa KKД moKeTHarpeBaTbC.3To He RAJIeTcH HcNpRaBHOCTbIO.
OTHOCHTeNbHO o6paueHncaJeHTaM
He BCTabnIe HnHero B MaIehbKne OTBepCTnHa 3aIeHcTcPOHe KAcCtB.3TN OTBepCTn IcONb3yIOCTaN OIpEneHn TnA n TOIunHb IeHTb, a TaKxE dJa ONpeJeHn HaJIuHn IIN OTCytCTBn JIeNecTKa 3aUITb 3aIcnCn HaJeHTe.
He OTKpbIbAte npeOdoxpaHntelHyo KpbIshky JeHTbln He pRnkacaiTeB KJIeThe.
ИЗбегаитke kacaHIN INI NOBpeKdHnR NOIIOcOB.ДуdaJIeHnI bIyI NcCTNTE NOIIOca C NOMOsbHO MRTKOJ TKAHI.
YxOД 3a BnDeOKamepoI
- Пелнодуншу Кьнимау Кассу и Вклочауп.TNTANHUE, onepupyte yctpoiCTBAMN CAMERA uPLAYERиВocpoin3BODnTe HeTynpaKa 3-xMnHyT,ecnBaSha BVDeokamepe He bDeTINCOJbOBAtBCrДInIteJbHoe BPem.
- UcHTNE ObekTNB C NOMOJIbHO MRAKOK KIOCTOCH DNJyADJIENH PJIJI. ECLNI IMEOTCR OTNEUATKN PJIJIbcEHa OObekTMB, TO ydJIaTIne INC NOMOJIbHO MRAKOKTKAHI.
YnCTNtE KOpNc BnDEOkAmePbI C NOMOsbCyXoB MTKoN TKAHN NIMMTRKoN TKAHN, CNErKa CMOeHNOI pACTBOPm UmepeHHoro MOHOero CpeDCTBa. He IcNoJIb3yTe KAKNX-NIOO TINOB pACTBOpNTeNei, KOTOpbl MOyT NOBpeDITb OTDeNKy.
He donyckaIte nonaDaHnna NceKa B VbIeOkaMepy. Ecnn BbI cNIOJIb3yeTe BVIEOkaMepy Ha NceCuHOM PIIJKe INB KAKOM-JINBO PbIbHOM MecTe, npdeoxpaHnte annpapat ot Necka IINI PbIIN. PecOK IIIN PbIb MOrT pNIBeCTN K HeINcPabHOCTn annapata, KOtOPaH INOrDa MoKeT 6bITb HEnCpAbIMoI.
AC power adaptor
- Unplug the unit from the mains when you are not using the unit for a long time. To disconnect the mains lead, pull it out by the plug. Never pull the mains lead itself.
- Do not operate the unit with a damaged cord or if the unit has been dropped or damaged.
- Do not bend the mains lead forcibly, or place a heavy object on it. This will damage the cord and may cause fire or electrical shock.
- Prevent metallic objects from coming into contact with the metal parts of the connecting section. If this happens, a short may occur and the unit may be damaged.
- Always keep metal contacts clean.
- Do not disassemble the unit.
- Do not apply mechanical shock or drop the unit.
- While the unit is in use, particularly during charging, keep it away from AM receivers and video equipment. AM receivers and video equipment disturb AM reception and video operation.
- The unit becomes warm during use. This is not a malfunction.
-
Do not place the unit in locations that are:
-
Extremely hot or cold
- Dusty or dirty
- Very humid
Vibrating
Battery pack
- Use only the specified charger or video equipment with the charging function.
- To prevent accident from a short circuit, do not allow metal objects to come into contact with the battery terminals.
- Keep the battery pack away from fire.
- Never expose the battery pack to temperatures above 60^ (140^) , such as in a car parked in the sun or under direct sunlight.
- Keep the battery pack dry.
- Do not expose the battery pack to any mechanical shock.
- Do not disassemble nor modify the battery pack.
- Attach the battery pack to the video equipment securely.
- Charging while some capacity remains does not affect the original battery capacity.
Cetebo aadanTp nepemehnHO Toka
- OTcoeHNHTe annapat OT 3neKtpnueckoC CETN, ECNI OH He NCIOBb3yeTcH DNIteBHOe BpEIM. IaO tcoeHNHEH CeteBOrO SHhpa NOTHeero 3a pa3bem.HIKORda He TAnHTE 3a cam WHyP.
He 3cknyatnpuyte annapat C noBpejXeHbIM shHypom nJn Jke B cnyae, ecnn annapat yanl nnIb 6bn nopEpxdeH.
He cnaBaiTe CeTeBOI npoBOID CINIOI He TaBbTe Ha Iore ToXeJIbe IpEaMeTbI. 3TO NOBpeNT pNOBOI N MoKET PnBvCeTN K Noxapy uNII NOpaxeHIO 3JIeKTPuYeCKIM TOKOM.
Будte octopokнbl,чтоби HNKakne MeTaNHueckNpeJMeTbI He COnpNKacanCb CMeTaNHueckNMI KOHTaKTAM CoeINHtJIbHOI NlaCTInbI. EcIN 3TO cNYuHcTc,TO MOKET PNO3OITNI KOPOTKoe 3aMbIKaHne, nannapAT MOXET6bITNbOBpejDeH.
Bcerda noidepKbAte MeaJIneckne KOHTaKTbI B UcTOTE. - He pa36upaTte annapaT.
- He noDBepraIte annapaT mexaHueckoBn6paunu HpeponyTe erO.
- Ppi nCnOJb3ObaHm annapaTa,OCo6eHNO BO BpeM 3apJdkn, DePxNITe erO NOdaJIbwe OT npIeMHNKOB AM-paIIOBeeUaHn BVdeOanpaTpybl. PpiMeHHKn AMpAIOBeeUaHn BVdeOanpaTpya HApUshaOT AM-paIIOnpHem npabOt BVdeOanpaTpybl.
B Pnoucece 3KcIpyataun annapat HarppeBaetca. 3TO RbIaTeCBA NOJIHe HOPMaJIbHbIM.
He pa3MeuzaIe annapaT B MeCtax: -Upe3MepHo XapKINx INI XOJIOHbIX -PiNbHbIX INI Ipr3HbIX -OChEBBnAxxHbIX
Батарейнь 6лok
IcnoIb3yIte TOIbKO peKOMeHdyEmoe 3apJdHOe yCTPOrCTBO IIN BUNdeOaPnapaTpy C 3apJdHOI FyHKUeIe.
ДлгпрдOTВрашенн HeсчacTHOrO cIyчанИЗ-3a KOPOTKOrO 3aMbICAHN He ДОпУСКАТe KOHTaTKaMe TaJIHnueCkMx ПрdMeTOb C NOПИСмИ bTaPeHrO 6bloka.
- HepacnoIaraiTe 6aTapeHbI 6Jok B6JIu3nOrHa.
He npDBepraTe 6aTapeHbI bLOK Bo3dJICTBnIO TEMpepaTyC bIIe 60°C, HApIMep, B npNapKOBaHHOM IOI COJIHcEM aBTOMOJIne IINI POI pRmbl COMOLHEyHbIM CBETOM.
-Поддерживаiteбатаразейньий блokВсухом Вида.
- He noDBepraIte 6aTapeiHbI 6Jok BO3DeIeCTBnIO KaKnx-JIbO MExaHnuecknx yIapOB.
- He pa36bpaTne n He BnDOn3MeHraTe 6aTapeiHbI 6Jok.
-Прикpenлгenteбатарейнь 6лok к BИдоаannapatypeплотно.
3aJaKa B Cnyaue octabuiecra EMKoCTn 3apJa He OtpaKaetcHa eMkoCTn nepBOHaaybHOrO 3apJa.
Notes on dry batteries
To avoid possible damage from battery leakage or corrosion, observe the following:
- Be sure to insert the batteries with the + - polarities matched to the + - marks.
- Dry batteries are not rechargeable.
- Do not use a combination of new and old batteries.
- Do not use different types of batteries.
- Current flows from batteries when you are not using them for a long time.
- Do not use leaking batteries.
If batteries are leaking
- Wipe off the liquid in the battery compartment carefully before replacing the batteries.
- If you touch the liquid, wash it off with water.
- If the liquid get into your eyes, wash your eyes with a lot of water and then consult a doctor.
If any problem occurs, unplug your camcorder and contact your nearest Sony dealer.
HΦopMaunno yxOdy 3a annapaTom mepbl npdeoctoPOKHOCTN
PpimechaHnK cyxM 6aTapeiKaM
Bo n36eKaHne Bo3MOxHOro noBpeXdEHHa BnDEOKaMepb BCNeDCTBnE yTeuKn BHyTpeHHeRo BeueCTBa 6aTaapeek nn Kopp03nn Co6JIoudaJTe CJeDuOSee:
- Пи установке батуарек собладитправлбую полярноctь + -В COOTBETCTBIMС MEТКAMN +-.
Cuyxie 6aTaepKn HnB3n nepe3apKaTb. - He nCnoJIb3yIte HOBIIe 6aTapeKn BmecTe coCTapblM.
- He ncpoJIb3yIte 6aTaapeKn pa3HOrO Tuna.
- Ecπn 6aTapeKn He nCnoJb3yIOTcAДПnteJbHoe Bpemr, OHI NOCTeNeHHo pa3PaxaIOTc.
- He ncpnoIb3yIe 6aTapeiKn, KOTOpBIE nOteKJIn.
EcIn npOn3oUna yTeUka BHyTpEnHero BeuecTb6aTaapeek
-Перед Tem,Кak 3amehntb 6aTapeeKn, TuaTeIbHNO pOtpNTe OCTaTKN KUdkoCTN B OTeKe DnA 6aTapeeK.
B cnyuae nonaadaHn JnkocTn Ha Koxy, npomTe JnkocTb BOdoi.
Bcnyae nonaadaHn Jnkocstn B rna3a, npomTe cBoi rna3a 60JIbIIM KOJIuYeCTBOM BObl, nOcne yero oBaPaNTEcb K BpaCy.
B clyae Bo3HKnHOBeHn KaKnx-JI6o np6Jem, OTKNoHTe BaUy BuDeOkaMepy O T nCTouHnKa IITaHnI N o6paTntEcB B 6LnXaIuN CepBnchbl ueHtp Sony.
Video camera recorder
System
Video recording system
2 rotary heads
Helical scanning system
Audio recording system
Rotary heads, PCM system
Quantization: 12 bits (Fs 32kHz
stereo 1, stereo 2), 16 bits
(Fs 48 kHz, stereo)
Video signal
PAL colour, CCIR standards
Usable cassette
Mini DV cassette with the Mini DV mark printed
Tape speed
SP: Approx. 18.81mm / s
LP: Approx. 12.56mm / s
Recording/playback time (using cassette DVM60)
SP: 1 hour
LP: 1.5 hours
Fastforward/rewind time (using cassette DVM60)
Approx. 1 min. and 45 seconds (AC power adaptor)
Approx. 2 min. and 30 seconds (battery pack)
Viewfinder
Electric viewfinder (colour)
Image device
1/4 inch CCD (Charge Coupled Device)
Approx. 800,000 pixels
(Effective: Approx. 400,000 pixels)
Lens
Combined power zoom lens
Filter diameter 30mm (1 3/16 in.)
10 × (Optical), 40 × (Digital)
Focal length
3.3 - 33 mm (5/32 - 1 5/16 in.)
When converted to a 35mm still camera
42 - 420 mm (1 11/16 - 16 5/8 in.)
Colour temperature
Auto, HOLD (Hold), Indoor (3200K), Outdoor (5800K)
Minimum illumination
5 lux (F 1.7)
0 lux (in the NightShot mode)**
**Objects unable to be seen due to the dark can be shot with infrared lighting.
Output connectors
S video output
4-pin mini DIN
Luminance signal: 1 Vp-p, 75 ohms, unbalanced
Chrominance signal: 0.3Vp - p
75 ohms, unbalanced
Audio/Video output
AV MINI JACK, 1 Vp-p, 75 ohms, unbalanced, sync negative
327mV (at output impedance
more than 47 kilohms)
Output impedance with less than
2.2 kilohms/Stereo minibjack (ø 3.5mm)
DV output
4-pin connector Headphone jac
Stereo minijack ( 3.5mm)
LANC control jack
Stereo mini-minijack ( 2.5mm)
MIC jack
Minijack, 0.388mV low impedance
with 2.5 to 3.0VDC output
impedance 6.8 kilohms (0 3.5 mm)
Stereo type
LCD screen
Picture
3.5 inches measured diagonally
72.4 × 50.4 ~mm (2 7 / 8 × 2 in.)
Total dot number
DCR-TRV8E: 105,380 (479× 220)
DCR-TRV10E: 184,580 (839× 220)
General
Power requirements
7.2 V (battery pack)
8.4 V (AC power adaptor)
Average power consumption
(when using the battery pack)
During camera recording using LCD
DCR-TRV8E: 3.6 W
DCR-TRV10E:3.7W
Viewfinder
2.9 W
Operating temperature
0^ to 40^ (32°F to 104°F)
Storage temperature
-20^ to +60^ (-4^ to +140^)
Dimensions (Approx.)
67.5× 89× 157.5mm
(23 / 4× 35 / 8× 61 / 4 in.) (w / h / d)
Mass (approx.)
DCR-TRV8E:
630 g (1 lb 6
DCR-TRV10E:
650 g (1 lb 6 oz)
excluding the battery pack, cassette
and shoulder strap
DCR-TRV8E:
730 g (1 lb 9 oz)
DCR-TRV10E:
750g (1 lb 10 oz)
including the battery pack,
NP-FM50, cassette DVM60, lens cap
and shoulder strap
Supplied accessories
See page 5.
AC power adaptor
Power requirements
100-240VAC,50/60Hz
Power consumption
23 W
Output voltage
DC OUT: 8.4 V, 1.5 A in the
operating mode
Operating temperature
0^ to 40^ (32^ to 104^)
Storage temperature
-20^ to +60^ (-4^ to +140^)
Dimensions (approx.)
125× 39× 62mm
(5× 19 / 16× 21 / 2 in.) (w / h / d)
excluding projecting parts
Mass (approx.)
280 g (9.8 oz)
excluding mains lead
Cord length (approx.)
Mains lead: 2m (6.6 feet)
Connecting cord: 1.6m (5.2 feet)
Battery pack
Output voltage
DC 7.2 V
Capacity
8.5 Wh
Dimensions (approx.)
38.2 × 20.5 × 55.6 ~mm
(19 / 16 × 13 / 16 × 21 / 4 in.)
(w/h/d)
Mass (approx.)
76 g (2.7 oz)
Type
Lithium ion
Memory Stick
(DCR-TRV10E only)
Memory
Flash memory
4MB: MSA-4A
Operating voltage
2.7-3.6V
Power consumption
Approx. 45mA in the operating mode
Approx. 130 A in the standby mode
Dimensions (approx.)
50× 2.8× 21.5mm
(2× 1 / 8× 7 / 8 in.) (w / h / d)
Mass (approx.)
4 g (0.14 oz)
Design and specifications are
subject to change without notice.
Texhnueckne xapaKtepncnkn
Bvdeokamepa
CnCTema
CnCTema BnDeo3annc
2BpauoouneecraTOLOBK
CnCTemaHaKIOHHO
mexaHnuecko pa3BepTKn
Cnctema aydn03annc
Bpaaioiuee rnoOBkn, cnCTema UKM
DnckpeTn3a:126ntOB
(CDnur qachto32 kFt, cTepeo 1, cTepeo 2). 16 bitob (CDnur
chaTObI 48 KfU, cTepeo)
BndeocnHa
LBeToBOb CnHAn PAL, cTaHapT MKKP
IcnoJb3yeMbIe KacceTbl
KACCETBIMNHDVcpeaTHbIM 3HAKOMMnD
CKopoctbJIeHTbl
SP: npn6n3. 18,81 MM/c
LP: npn6n3. 12,56 mm/c
ВерmaЗапис//Bocnpo3beDEHnA (PnH NcNoJIb3OBAHn Kaccetbl DVM60)
SP:14ac
LP: 1.5 yaca
Bpema yckopeneHHo nepeMOTkn BnpeH/na3a#
(pnncnoIb3OBAHmKaccTebl DVM60)
Пибнз.3.1 МИ. 45 СЕ. (сетевоаадтэнпег佩мен HorOToKa)
Pn6Iu3.2MmH.n 30 cek.
(6aTaepHbIb 6IOK)
BudonckateJIb
3NeKTPnueckCN BUNOONCKaTeNb (LBETHOH)
ΦopMnpoBaTeIb n3o6paXeHn
1/4-IOIMOBII3C(npM60c 3aPBOB8CB3bO)
Пибпз.800 000 ZIEMeHToB 1306paxehn
ABTOPERyJINPOBaHne,HOLD
(6JIOKINPOBka), B NOMEUeHn
(3200K), Ha ylne (5800K)
MIMIMAbhA OcbueeHHOCTb 5Jk (F1,7)
0 nK (B pexkme HocHOn cbeMKn)**
** Cbemky obeketOB, HEBNIMbIX B TEMHOTe, MOXHO BblNOJHRTb C NOMOsbIO NHppaKpachORO OCBEUHIN.
Pa3bEmbl BbIXOndhix CnHaJIOB
S Bndeo
4-UTbIPbKOBOe MHHI-Rhe3do DIN
CunHan npKoCTn: pa3Max 1 B, 75
OM, HecMMepnHybI
CnHAIJI ζβEHTOCTm:pa3max0,3B,75OM,HEcIIMMETNIHbI
BbIXoD cnHana ayuNo/BnDeo
AV MINI JACK, pa3max cunhana 1
B,7O M,HeCIMMpeHbIIN, CINXPOHN3IPOBAHHI
OTPiataTeBHyI NOJIoc 327 MB
(PnIPOJHOMBbIXOJHOM
cnpotnBneHm 6oJIe YEM 47 KJNOOM
Понhoe Вьхонhoe coprotublenhe MeHee 2,2KNooM/
CTpeoOHmueckoe MmH-rHe3do (0 3,5 MM
DV BBIXoD uΦpOBOrO
BndeocnHa
4-巾TbipbKOBBpa3bem
The3o roIobhIX TeIeOHOB
CTepeofoHnueckoe MmHn-rHe3do (0 3,5 MM)
THe3do ynpabLeHnA LANC
CtepeoΦoHueCKoe MmHn-Γhe3do
(0 2,5 MM)
THe3doMIC
MnHr3do,0,388 MB,Hn3Koe
noHoe conpoTnBHeNe O T 2,5 Do
3,O B noCToHHoro ToKa,BbIXoHDoe
noHoe coPOnTnBHeNe 6,8 KOM (
3,5 MM)
CtepeofoHueckn TIN
3KpaHKKd
N306paXeHne
3,5IOIma nO dnaorohann
72,4×50,4MM
O6Jee KOJIyueCTBO 3NeMeHToB N3o6paxKeHHa
DCR-TRV8E: 105380 (479× 220)
DCR-TRV10E: 184580 (839× 2)
06uee
Tpe6oBaHnK nHTaHmIO
7,2B (6aTapeHbI 6JIOK)
8,4 B (ceTeBOI aIaITeP
NepemehHoro TOka)
CpeHnA noptpe6IeMaM MOUHOCTb
(πρι ΚΝΟλβ3ΟΒαΗN)
6bataeHoro 6JIOka)
BoBpe3aepn BnDeoKamepoe C nOmoUbO XKJd
DCR-TRV8E:3.6BT
DCR-TRV10E:3.7BT
BudonckaTeNa
2,9 B
Pa6o7a TemnepaTpa
OT0°Cdo40°C
TemnepaotypxpaheHNA
OT-20°C dO +60°C
Pa3mepb(npn6n3.)
67.5× 89× 157.5MM (U/B/r)
Bec (npn6n3.)
DCR-TRV8E:
630
DCR-TRV10E:
650
HeBKIOUa6aTapeINb6IOK, KACcETyNpIeBvOpeMH
DCR-TRV8E:
730
DCR-TRV10E:
750
BKNIOUa 6aTapeHb 6nok NPFM50, kaccTeY DVM60 nIneYeOBpeMHb
Ppnilaraemble npHaJdxKHOCTN
CM. cTp. 5.
CteBoa aanTep nepemehHoro TOka
Tpe6oBaHnK nntaHnIO
100-240 B nepemehHoro Toka, 50/60 Γu
Notpe6JIaERMa MOUHOCTb 23BT
BbIXoHoe HapRjXeHne
DC OUT: 8.4 B; 1.5 A b pa6o7em pejimke
Pa6o7aT emnepatypa
OT 0^ do 40^
TemnepatypxaheHHa
OT-20°Cdo+60°C
Pa3mepbl (npn6Jn3.)
125× 39× 62MM (W/B/r)
He BKJIOUyA BbICTyNaIOUne YactN
Bec (npn6n3.)
280r
He BKJIIOUaCteBOI uHyp
Диннашура (приблз.)
Cetebo shyp: 2 M
CoeHHTeBHy:1,6M
BaTapeiHbI 6JIOK
BbIXoHoe HnpaXeHne
DC7,2B
EMKOCtB
8.5BT-4
Pa3mepbl (npn6n3.)
38,2× 20,5× 55,6 MM
Bec (npu6n3.)
76
Tun
JIITNUEBO-NOHHbI
Memory Stick (ToJbKo MoeJIb DCR-TRV10E)
NamATb
Miraioua naMATb
4 M6: MSA-4A
Pa6oyee HappxKeHne
2,7-3,6B
Notpe6JemaM MoUHOCTb
Пибш.45 mВ pa6ochem pexime
Viewfinder lens adjustment lever (p. 23)
2 OPEN button (p. 20)
3 SEL/PUSH EXEC dial (p. 44, 87)
4 PHOTO button (p. 41, 106)
5 BATT release lever (p. 12)
6 PROGRAM AE button (p. 57)
7 EXPOSURE button (p. 59)

This mark indicates that this product is a genuine accessory for Sony video products. When purchasing Sony video products, Sony recommends that you purchase accessories with this "GENUINEVIDEO ACCESSORIES"mark.
Mini Dv Digital Cassette
CITT Cassette Memory

InfoLITHIUM


MEMORY STICK
1 Pbyiar perylnpoBkn o6beKtNa BnOncKaTeJIa (cTp. 23)
2 Khonka OPEN (cTp. 20)
3ДиCKSEL/PUSH EXEC (ctp.44,87)
4 Khonka PHOTO (ctp. 41, 106)
5 Pbyar oCbo6oxJeHH BAATT (ctp. 12)
6 Khonka PROGRAM AE (cTp. 57)
7 Khonka EXPOSURE (cTp. 59)

Focus ring (p. 60)
9 Camera recording lamp (p. 20)
10 Infrared rays emitter (p. 28, 40)
11 Microphone
FOCUS switch (p. 60)
Viewfinder (p. 12, 23)
14 Display window (p. 167)
Remote sensor (p. 164)
16 BACK LIGHT button (p. 27)
17 FADER button (p. 47)
8 KoJIbIcOΦOKycuPObKn (ctp. 60)
9 Namna 3aHncn BIndeokamepb (ctp.20)
10 M3nyaTeIb uHΦpaKpaChbIX Lyuei (cTp. 28, 40)
11 Minkpofoh
12 NpekeKJIouaTeIbFOCUS(cTp.60)
13 BvOncKaTeJIb (CTp. 12, 23)
14 Okowko dncnner (ctp. 167)
15Дачник Дистанционногу упавлени (стр. 164)
16 Khonka BACK LIGHT (cTp. 27)
17 Khonka FADER (cTp. 47)
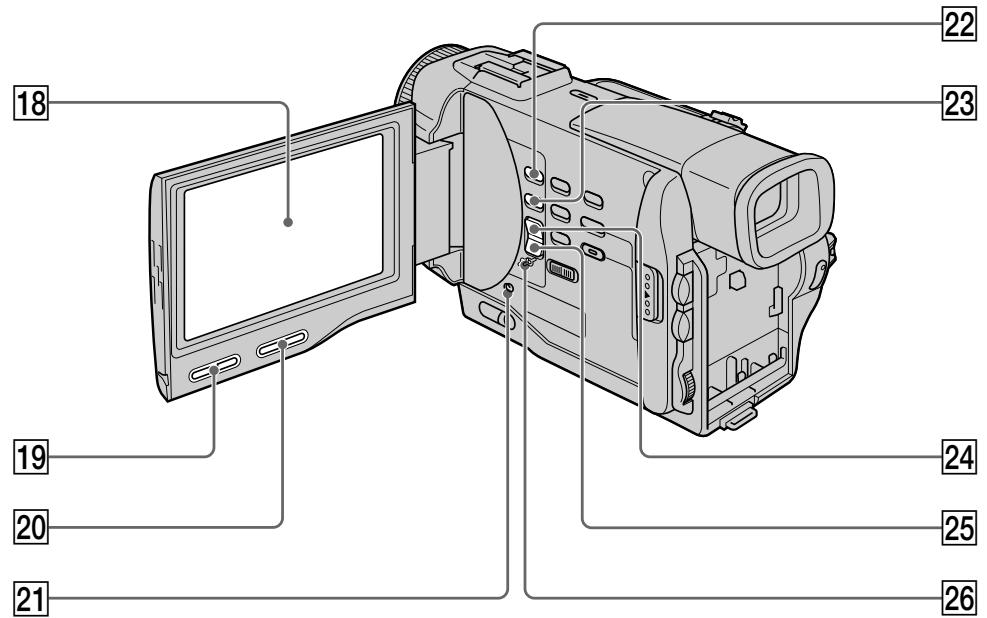
18 LCD screen (p. 22)
[19] LCD BRIGHT buttons (p. 22)
20 VOLUME buttons (p. 33)
21 RESET button (p. 136)
22 MEMORY PLAY button (p. 114, 119) (DCR-TRV10E only)
23 MEMORY INDEX button (DCR-TRV10E only) (p. 115)
24 MEMORY + button (DCR-TRV10E only) (p. 114, 119)
25 MEMORY - button (DCR-TRV10E only) (p. 114., 119)
26 MEMORY DELETE button (DCR-TRV10E only) (p. 124)
18 3KpaH KkD (ctp.22)
19 Khonk LCD BRIGHT (cTp. 22)
20 Khonkn VOLUME (cTp. 33)
[21] Khonka RESET (ctp. 136)
22 KhoNka MEMORY PLAY (TOnbKO MoJeJIb DCR-TRV10E) (cTp. 114, 119)
23 Khonka MEMORY INDEX (TOJIbKO MOJeJIb DCR-TRV10E) (ctp. 115)
24 Khonka MEMORY + (TOnbKO MoJeB DCRTRV10E) (ctp. 114, 119)
25 Khonka MEMORY - (ToIbKO MoIeJIb DCR-TRV10E) (cTp. 114, 119)
26 Khonka MEMORY DELETE (TOlbKO MOdeJIb DCR-TRV10E) (cTp. 124)
27 SELFTIMER button (p. 30)
28 END SEARCH button (p. 31)
29 DISPLAY button (p. 34)
30 START/STOP MODE switch (p. 25)
31 DIGITAL EFFECT button (p. 52, 63)
32 TITLE button (p. 80)
33 MENU button (p. 44, 87)
34 Speaker
[27] Khonka SELFTIMER (cTp. 30)
28 Khonka END SEARCH (ctp. 31)
29 Khonka DISPLAY (cTp. 34)
30 Пеклочаюb START/STOP MODE (ctp.25)
31 Khonka DIGITAL EFFECT (ctp. 52, 63)
32 Khonka TITLE (cTp. 80)
33 Khonka MENU (ctp. 44, 87)
34 DnHaMnK
35 Power zoom lever (p. 24)
36 ACCESS lamp (DCR-TRV10E only) (p. 102)
37 Hooks for shoulder strap
38 START/STOP button (p. 20)
39 LASER LINK button (p. 40)
40 EDITSEARCH buttons (p. 31)
Lock (DCR-TRV10E only) (p. 21)
42 POWER switch (p. 20)
35 Pbyar npBnBOJHO Bapnoo6bekTnBa (cTp.24)
36Ламноца ACCESS (ToIbKO moJeNb DCR-TRV10E) (cTp. 102)
37 KpOyOK nIpyIpeyeBOrOpemHn
38 Khonka START/STOP (cTp. 20)
39 Khonka LASER LINK (cTp. 40)
40 Khonkn EDITSEARCH (ctp. 31)
41ФИКСАТОР(TоЛько моДель DCR-TRV10E)(cтр.21)
42пеклоча无力 POWER (ctp. 20)
Attaching the shoulder strap
Attach the shoulder strap supplied with your camcorder to the hooks for the shoulder strap.
PpIKpenIeHne IJIeueBOro pemHa
PnKpeNITe PneueBoPemeHb, npIaRaembl K BaWeB BnDeOkaMepe, K KpUoykam DnI PneueBOr pemHa.
What is LASER LINK?
The LASER LINK system sends and receives pictures and sound between video equipment
having the 工 mark by using infrared rays.
4tro takoe LASER LINK?
CnCTema LASERLINKnocbjnaet npinHmaet cnHaJIbI n3o6paKeHnI 3Byka MeJky BIndeoannapaTpyoi, mHeIoUeI 3NaK , C nOmoBIO INHpaKpachBxIyuei.
43 Video control buttons (p. 36)
STOP (stop)
REW (rewind)
PLAY (playback)
FF (fastforward)
PAUSE (pause)
The control buttons light up when you set the POWER switch to PLAYER.
44 MEMORY OPEN button
(DCR-TRV10E only) (p. 102)
45 MEMORY RELEASE button
(DCR-TRV10E only) (p. 102)
46 Intelligent accessory shoe (p. 76, 163)
47 +SLOW SHTR button (p. 28)
48 NIGHTSHOT switch (p. 28)
49 Grip strap
43 KhONKN BnDEOKOHpOJIa (ctp. 36)
STOP (ocTaHOBka)
REW (yckopeHHa npeMoTka Ha3a,I)
PLAY (Bocnpon3BeJeHne)
FF (yckopeHHa nepemOTka Bnpei)
PAUSE (nay3a)
KhONk KOHTpOJIy BbICBeHnBaIOTc npi yCTaHOBKe nepeKJIouChaTeIa POWER B noLoXeHne PLAYER.
44 KHonka MEMORY OPEN
(TOJIbKO MOJeJIb DCR-TRV10E) (cTp. 102)
45 Khonka MEMORY RELEASE
(TOJIbKO MOdEJIb DCR-TRV10E) (cTp. 102)
46ДерхаTeьдЯ BCNOMORAteьHbIX
npuHaadJeKHoCTe (cTp.76,163)
47 Khonka +SLOW SHTR (CTp. 28)
48 NipeekJIIOHateJIb NIGHTSHOT (ctp. 28)
49 PemeNbДЯЗaXBaTa
Fastening the grip strap
PpNkpeHnTe peMeHb dIa 3aXbata.
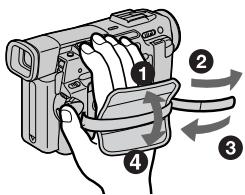
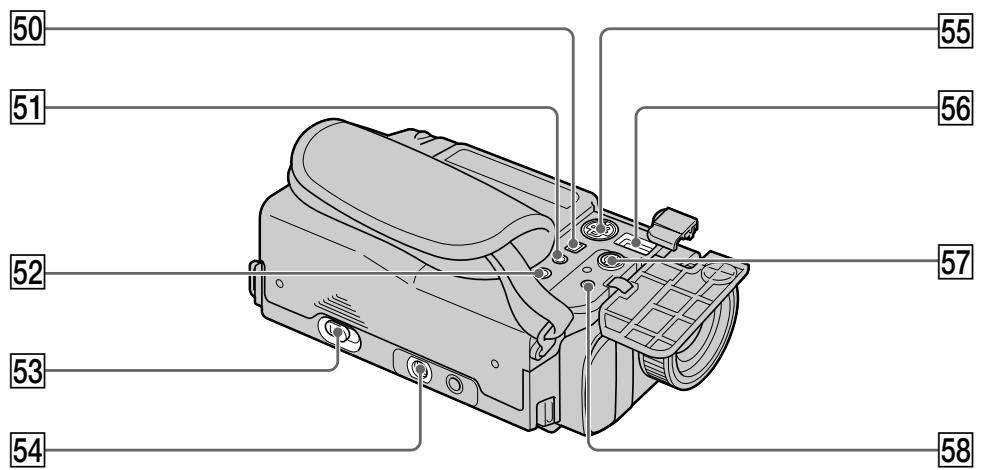
50 DV OUT jack (p. 73)
This "i.LINK" mark is a trademark of Sony Corporation and indicates that this product is in agreement with IEEE 1394-1995 specifications and their revisions.
The DV OUT jack is i.LINK compatible.
51 (headphones) jack
When you use headphones, the speaker on your camcorder is silent.
52 LANC control jack
LANC stands for Local Application Control Bus System. The control jack is used for controlling the tape transport of video equipment and other peripherals connected to the video equipment. This jack has the same function as the jack indicated as CONTROL L or REMOTE.
53 OPEN/EJECT lever (p. 19)
54 Tripod receptacle
Make sure that the length of the tripod screw is less than 6.5mm (9/32 inch). Otherwise, you cannot attach the tripod securely and the screw may damage your camcorder.
55 SVIDEO jack (p. 38, 71)
56 DC IN jack (p. 13)
57 AUDIO/VIDEO jack (p. 38, 71)
58 MIC jack (PLUG IN POWER)
Connect an external microphone (not supplied). This jack also accepts a "plug-in-power" microphone.
50 THe3do DV OUT (ctp. 73)
3нak "i.LINK"Явлиетсг Торбов Марков
Корпорашу Sony u yka3blBaet Ha To,ЧТо
Юразkyця COOTBETCTByeT TexHnueckm
Услобим EMLE 1394-1995и nx
ДОПОПЕНИМ.
Ihe3do DV OUT COBmecTnMo c KaHaJOM nepeaun ciHaJIOB iLINK.
51IHe3do(roJOBHbIeTeNeΦoHbI)
EcnBbIncNoJIb3yete rONoBHte TepeHbI, DnAMNK Ha BaWei BUneOkamepe OTKnIOuAeTcN.
52 Tne3do ynpablenLA nC
LANC 03haaet CnCTemy KaHaJa MeCTHOrO ynpableny. He3do ynpableny LNCJNtB3yeTcI JN KOTPOnla 3a nepMeueHHeM JeHTb BInDeoAnnapaTypbI INepiFepinhBxvctpoIcTB,IOKnJIuOeHHbIX K He.I DaHHOe THe3do IMeET TaKyo JKe fynKUIO, KaK i pa3bEmbl, O6o3NaueHbIe kak CONTROL L uIN REMOTE.
53 Pblar OPEN/EJECT (cTp. 19)
54 THe3doДЯТpeHOrn
Y6eINTeScb, YTO dInnHa BnHTa TpeHOrm MeHee 6,5 MM. B npOTuBOM cIyae Bbl He CMOKeTe HAdExHO pNkPepNTb TpeHory, a BnHT MoKet nobpeDntb BaUy BnDeokamepy.
55ГнeздоSVIDEO(cтр.38,71)
56 THe3do DC IN (ctp. 13)
57Гнeзда AUDIO/VIDEO (cTp.38,71)
58 THe3do MIC (PLUG IN POWER)
ДлгпоюсоевненяВьшонуМКррфога(He npinaraeTc).ТTo rH3doТakKe
No3BOJЯТ NOT NOkKЛЮчNTb MKNрФОH“C
BvIKJIQUaTeNeM NITAHNIA”.
Note on the Carl Zeiss lens
Your camcorder is equipped with a Carl Zeiss lens which can reproduce a fine image. The lens for your camcorder was developed jointly by Carl Zeiss, in Germany, and Sony Corporation. It adopts the MTF* measurement system for video camera and offers a quality as the Carl Zeiss lens.
- MTF is an abbreviation of Modulation Transfer Function/Factor.
The value number indicates the amount of light of a subject penetrating into the lens.
Примочаиме Клипзе Kapл Рецс
B BaweBnDoeOKaMepe BCtpoEHa JInh3a
Kapn Lec, KOTOPA NO3BOJAE TNOJUaTb
BbICOKOKAeCTBEHNBIE N3O6paxEHN.
JInh3a DnBaWe BnDEOKaMepbI 6bla
pa3pa6oTaHa COBMecTHO KOMnAHeN KePn
LcEic, TepMaHn I KopnpaueN Sony. OHa
OCHOBaHa Na CnCTEme N3MepHn MTF* dJa
BnDEOKaMepbI n OblaJaET KaYeCTBOM KaN
JInh3bl Kapn Lec.
- MTF 끼류ETС COKpaueHem OT Вырахеня ФункцИЯ/фakTOpпeдачИ MOduJIaIciN.
UcnIeHna BEnuHa YaKa3bIbaeT KOnIYeCTBO CBeta OObBeKTa, npOHkaIoOero Ype3 IInH3y.

Intelligent
Accessory Shoe
Notes on the intelligent accessory shoe
- The intelligent accessory shoe supplies power to optional accessories such as a video light or microphone.
- The intelligent accessory shoe is linked to the POWER switch, allowing you to turn the power supplied by the shoe on and off. Refer to the operating instructions of the accessory for further information.
- The intelligent accessory shoe has a safety device for fixing the installed accessory securely. To connect an accessory, press down and push it to the end, and then tighten the screw.
- To remove an accessory, loosen the screw, and then press down and pull out the accessory.

Intelligent
Accessory Shoe
PpIMeuaHnOTHocuTeNbHOepKaTeJIaN yCTaHOBKn pUHaadJeXHoCTeI
-Держателль дуястовки пинадлесхостей подаетпитане на BCNOMORAteьнbleппинадлесхости, takne KaBUNDEONODCBETka nlin MKNPOΦOH.
- DepeKataIb IyraHOBKn PnHaJdNexKHOCTeCB3aH cpeKmOM OxuHaHnaIpeKeKnIOUaTe nb POWER, no3B0JIa Bam BkJIIOaTb N BbKJIIOUaTb NOdaBaEMoe depeKaTeIem nITaHne. PoIIOb6Hbe CBeJeHn prINBeJeHb BV HCTpyKuIN NO EKcPJIyAtaUIM BCNOMORAteNbHbIX PnHaJdNexKHOCTe.
B DepeKaTeIe Iy yCTaHOBKn BCNOMOraTeIbHbIX npiHaJIeXHoCTeIMMeETcI npEoOxpaHITeIbHoe yCTpoIcTBO Iyra HaJeXHOΦKCaUINy yCTaHOBJIeHNHO npHaJIeXHoCTn. IyI IOJcoEIHeHnI npHaJIeXHoCTn HaKMITE ee BHN3 I HAKMITE Do yNopa, a 3aTEM 3aTAHNTe BHT.
-ДЯСНТЯнпинадлжноOCla6bTe BnHT, a 3aTEM HaxmTe пинадлжноBHuN3 n NOTAHITE ee.
Remote Commander
The buttons that have the same name on the Remote Commander as on your camcorder function identically to the buttons on your camcorder.
1 PHOTO button (p. 41, 106)
2 DISPLAY button (p. 34)
3 Memory control buttons (DCR-TRV10E only) (p. 114, 115, 119)
4 SEARCH MODE button (p. 66, 68, 69)
5 I /buttons (p. 66, 68, 69)
6 Video control buttons (p. 36)
7 MARK button (DCR-TRV10E only) (p. 75)
8 AUDIO DUB button (p. 77)
9 DATA CODE button (p. 34)
10 Power zoom button (p. 24)
11 START/STOP button (p. 20)
12 Transmitter Point toward the remote sensor to control your camcorder after turning on your camcorder.
13 ZERO SET MEMORY button (p. 65)
1 Khonka PHOTO (ctp. 41, 106)
2 Khonka DISPLAY (cTp. 34)
3 Khonknu npabNeHnna marnbTOJbKO moJeIb DCR-TRV10E) (ctp. 114, 115, 119)
4 Khonka SEARCH MODE (cTp. 66, 68, 69)
5 KhonknI▶/▶(ctp. 66, 68, 69)
6 KhoNKn BnDeoKoHtpOJa (ctp. 36)
7 KhoNka MARK (ToIbKO MoJeIb DCR-TRV10E) (cTp. 75)
8 Khonka AUDIO DUB (cTp. 77)
9 Khonka DATA CODE (ctp. 34)
10 KhoNka npuBODHOro BapnoooBeKtNbA (cTp. 24)
11 Khonka START/STOP (p. 20)
12 NpepaTuk
HanpaBbTe Ha daTnK dIy ynpaBneHnBnDEOKamepoN oCNe BkIIOHeHnBnDEOKamepbl.
13 Khonka ZERO SET MEMORY (cTp. 65)
To prepare the Remote Commander
Insert 2 R6 (Size AA) batteries by matching the + and - polarities on the batteries to the + - marks inside the battery compartment.
ДлnoiodroTOBKn nylbTa ДиctAHUHOHOrO ynpaBJIeHnA
BcTaBbTe DBe 6aTapeiKn R6 (pa3mepa AA), co6nOdaH aIeKaUyIO nIarPhocTB + I - Ha 6aTapeiKax CO 3HaKaMn + - BHyTpN OTCeKa dIra 6aTapeek.
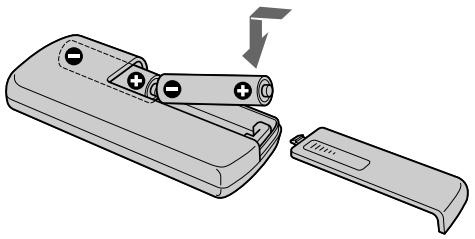
Notes on the Remote Commander
- Point the remote sensor away from strong light sources such as direct sunlight or overhead lighting. Otherwise, the Remote Commander may not function properly.
- Your camcorder works in the commander mode VTR 2. Commander modes 1, 2 and 3 are used to distinguish your camcorder from other Sony VCRs to avoid remote control misoperation. If you use another Sony VCR in the Commander mode VTR 2, we recommend changing the commander mode or covering the sensor of the VCR with black paper.
PpmeaHnK npIbTy dNCTaHcNoHHoro ynpabJIeHn
Operation indicators
Pa60yne HndnKaTOpbl
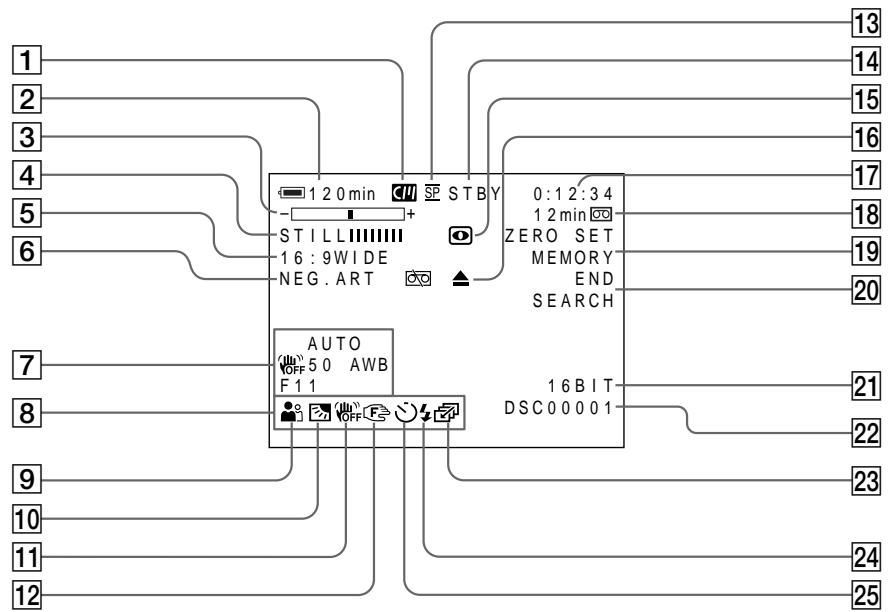
Cassette memory indicator (p. 129)
2 Remaining battery time indicator (p. 26)
3 Zoom indicator (p. 24) /Exposure indicator (p. 59) /Data file name indicator (DCR-TRV10E only) (p. 101)
4 Digital effect indicator (p. 52) /M.CHROM/ M.LUMI/C.CHROM indicator (DCR-TRV10E only) (p. 119)
FLD./FRAME indicator (DCR-TRV10E only) (p. 106)/16:9WIDE indicator (p. 44)/FAADER indicator (p. 47)
6 Picture effect indicator (p. 50)
7 Data code indicator (p. 34)
8 LCD bright indicator (p. 22)/Volume indicator (p. 33)
9 PROGRAM AE indicator (p. 56)
10 Backlight indicator (p. 27)
11 SteadyShot off indicator (p. 88)
12 Manual focus/Infinity indicator (p. 60)
13 Recording mode indicator (p. 91)
14 Standby/Recording indicator (p. 20) /Video control mode indicator (p. 36) /Image quality mode indicator (DCR-TRV10E only) (p. 103)
1 INHdNkatop KaccetHo nAMrTn (cTp. 129)
2 INHdNkaTOp OCTaBWeOcR BpeMeH 6bTaPeHnO 6Ioka (Ctp. 26)
3 INHДИКaTOP BapNoO6bKeTnBa (CTp. 24)/ INHДИKaTOP 3KcNo3nIuN (CTp. 59)/ INHДИKaTOP H3BaHЯ DAHHbIX (TOJIbKO MOneIb DCR-TRV10E) (CTp. 101)
4 INHnKaTOp UINΦpOBOrO 3ΦΦeKTa (cTp.52)/ INHnKaTOp M.CHROM/M.LUMI/C.CHROM (ToJIbKO MoJeB DCR-TRV10E) (cTp.119)
5 INHdNkaTop FLD./FRAME (TOJbKO MOJeNb DCR-TRV10E) (ctp. 106)/INHdNkaTop pexKMa 16:9WIDE (ctp. 44)/INHdNkaTop FADER (ctp. 47)
6 INHnkaTop 3ΦΦeKta n3o6paXeHnA (cTp.50)
7Индикадр Кда даньх (cTp. 34)
8 INHnKATOp npKocTn XXk (ctp. 22)/ INHnKATOp rpomKocTn (ctp. 33)
9Инданкатор PROGRAM AE (cTp. 56)
10 INHdkaTop 3aDHei noDCBETK (cTp.27)
11 INHdIkaTop BbIKNoeHHoYcToHBOB CbeMKn (CTp.93)
12 INHdNkATOp pyHNoI φOKyCnPOBKn/6eCKoHeuHocTn (ctp. 60)
13ИнданkaToppeхимаЗпсn(ctp.96)
14 INHnKATOP OXnDaHnra/ROTOBHOCTn (ctp. 20)/nHnKATOP pEXnMa BnDEOKOHtPOna (ctp.36)/nHnKATOP pEXnMa KaYeCTBa n3o6paKeHnra (TOnbKO MoJeNb DCR-TRV10E) (ctp.103)
15 NIGHTSHOT indicator (p. 28)
Warning indicators (p. 138)
17 Tape counter indicator (p. 65)/5SEC mode indicator (p. 25)/Time code indicator (p. 26) / Self-diagnosis indicator (p. 137)/Photo mode indicator (p. 41)/Image number indicator (DCR-TRV10E only) (p. 115)
Remaining tape indicator (p. 26) /Memory playback indicator (DCR-TRV10E only) (p. 114)
ZERO SET MEMORY indicator (p. 65)
20 END SEARCH indicator (p. 31)
21 Audio mode indicator (p. 91)
22 Data file name indicator (DCR-TRV10E only) This indicator appears when the M.CHROM/M.LUMI/C.CHROM functions work.
23 Continuous mode indicator (DCR-TRV10E only) (p. 107)
Video flash ready indicator (p. 42) This indicator appears when you use the video flash light (not supplied).
25 Self-timer indicator (p. 30)
15ИнданkaTop NIGHTSHOT (ctp. 28)
16 Pnepynpexkaioune HndkaTopbI (ctp. 146)
17 HndnkaTop cyeTnka JeHtbl (ctp. 65)/ HndnkaTop pexnma 5SEC (ctp. 25)/ HndnkaTop KOA BpeMeHH (ctp. 26)/ HndnkaTop fYHKmCamaOHaNcHocTNk (ctp. 145)/HndnkaTop FOptopExnma (ctp. 41)/HndnkaTop Homepa I3o6paXeHHa (TOJbKO MoJeNb DCR-TRV10E) (ctp. 115)
18 INHdNKaTOP OCTABWEcJIeHTbI (CTp. 26)/ INHdNKaTOP BOCPON3BeDEHnI NAMrTn (ToJIbKO MoJeJI DCR-TRV10E) (CTp. 114)
19ИндкатOP ZERO SET MEMORY (ctp.65)
20 INdikKaTop END SEARCH (cTp. 31)
21ИнданаTop abTomatnueckoro pexima (ctp.96)
22 INHdNkATOp Ha3BaHnA paJla daHHbIX (TOnbKO MoeJIb DCR-TRV10E) 3TOT INHdkaTOP NOBnAEcBO BpeMpa6oTbI cyHKnM.CHROM/M.LUMI/ C.CHROM.
23ИндикаTop HeNPepebIBHOro peXnMa
daHHbIX (TOJIbKO MoJeB DCR-TRV10E)
(cTp. 107)
24 INHdkaTOP FOTOBHOCTN BnDEOBcblIK (ctp. 42) 3TOT INHdkaTOP NOBJAETCR npn NCIOJIb3OBAHm BNDeOBcblIKN (He npnlaraeTc).
25 ИнданkaTop таимера самоанусяк (стр. 30)
Display window
Okowko dincpnjeA

Remaining battery time indicator (p. 13) / Tape counter (p. 65) / Memory counter (DCR-TRV10E only) (p. 115) /Time code indicator (p. 26)
2 FULL charge indicator (p. 13)
Remaining battery indicator (p. 13)
1 INHДИКATOP OCTaBweroC8 3apRda6bTapeHOrO 6JIOKa (ctp. 13)/cHTuKJIeHTbI (ctp. 65)/cHTuNK nAmrTu (TOnbKOmoJeNb DCR-TRV10E)(ctp. 115)/INHДИKATOpKoJaВPemHeN (ctp. 26)
2 INHmKAtop 3apAdkn FULL (cTp.13)
3Индикатор octabeiroc3apya 6aTapeHoro 6Ioka (ctp.13)
Functions to adjust exposure (in the recording mode)
In a dark place
NIGHTSHOT (p. 28)
- In insufficient light
Low lux mode (p. 56)
- In dark environments such as sunset, fireworks, or general night views
Sunset & moon mode (p. 56)
- Shooting backlit subjects
BACK LIGHT (p. 27)
- In spotlight, such as at the theatre or a formal event
Spotlight mode (p. 56)
- In strong light or reflected light, such as at a beach in midsummer or on a ski slope
Beach & ski mode (p. 56)
Functions to give images more impact (in the recording mode)
- Smooth transition between scenes
FADER (p. 46)
- Taking a still picture
PHOTO (p. 41)
Digital processing of images
PICTURE EFFECT (p. 49)/DIGITAL EFFECT (p. 51)
- Creating a soft background for subjects
Soft portrait mode (p. 56)
Superimposing a title
TITLE (p. 79)
Functions to give a natural appearance to your recordings (in the recording mode)
- Preventing deterioration of picture quality in digital zoom
D ZOOM MENU (p. 87)
- Focusing manually
Manual focus (p. 60)
- Shooting distant subjects
Landscape mode (p. 56)
- Recording fast-moving subjects
Sports lesson mode (p. 56)
Functions to use in editing (in the recording mode)
- Watching the picture on a wide-screen TV
Wide mode (p. 44)
Viewing images using a personal computer (DCR-TRV10E only)
Memory Stick (p. 117)
Functions to use after recording (in the playback mode)
- Digital processing of recorded images
PICTURE EFFECT (p. 62)/DIGITAL EFFECT (p. 63)
- Displaying the date/time or various settings when you recorded
Data code (p. 34)
- Quickly locating a desired scene
Zero set memory (p. 65)
- Searching for scenes having a title
Title search (p. 68)
- Searching for scenes recorded in the photo mode
Photo search (p. 69)
- Scanning scenes recorded in the photo mode
Photo scan (p. 70)
- Playing back on monaural sound or sub sound
HiFi SOUND MENU (p. 87)
- Playing back the picture on a TV without connecting a cord
LASER LINK (p. 40)
PykoBoCTBO IO 6bICTpbIM yHKcIaM
PyuHaФokycupOBka (CTp.60)
CbeMka ydaJIeHHbIX 06BeKToB
JanduaФтньim pexm (CTp. 56)
-3aIINcB 6bIcTpo DnNkUxxCsO6bekTOB
Pekim cnoptnbhix coct3aHn (ctp.56)
Camera chromakey 118
Cassette memory 10, 129
Charging battery 13
Charging vanadium-lithium battery 150
Clock set 98
Connection (viewing on TV) 38 (dubbing a tape) 71
Continuous 107
Data code 34
Date search 66
DEMO. 92
DIGITAL EFFECT 51
DISPLAY 34
Dual sound track tape 130
Dubbing a tape 71
DV connecting cable. 73
E
EDITSEARCH 31
END SEARCH 31, 37
Exposure 59
External microphone (not supplied) 162
F, G, H
FADER 46
Fade in/out. 46
FLASH MOTION 51
FOCUS. 60
Format 105
Full charge 13
Grip strap 161
Heads 150
Headphone jack 162
HiFi SOUND 89
I, J, K, L
i.LINK 73
Image protection 121
Image quality mode 103
INDEX (Multiple) display .... 115
"InfoLITHIUM" battery 17
Infrared rays emitter 28, 40
JPEG 101
Labeling a cassette 85
LANC 162
LASERLINK 40
LCD screen 22
LUMINANCEKEY 51
M, N
Main sound 89
Manual focus 60
Memory chromakey 118
Memory luminancekey 118
Memory Stick 100
Menu settings 87
Mirror mode 22
Moisture condensation 149
MONOTONE 46
Mosaic fader 46
NIGHTSHOT 28
NightShot +Slow shutter 28
Normal charge 13
O, P, Q
OLD MOVIE 51
Operation indicators 166
OVERLAP 46
PAL system 148
Photo scan 70
Photo search 69
Photo recording 41
PICTURE EFFECT 49
Picture search 36
Playback pause 36
Power sources
(the mains) 18
(car battery) 18
(battery pack) 12
Power zoom 24
Printmark. 123
PROGRAM AE 56
R
Rec review 32
Recording time 15
Remaining battery time indicator 26
Remaining tape indicator 26
Remote commander 164
Remote control jack (LANC) 162
Remote sensor 157
RESET 136
s
S video jack 38, 71
Self-diagnosis display 137
Self-timer recording 30
SEL/PUSH EXEC dial 156
Serial port adaptor 117
Shoulder strap 160
Skip scan 36
Slide show 127
Slow playback 36
SLOW SHUTTER 51
+SLOW SHTR 28
START/STOP MODE 25
STEADYSHOT 88
Stereo tape 130
STILL 51
Sub sound 89
T, U, V
Tape counter 26, 65
Telephoto 24
Time code 26
Title 79
Title search 68
TRAIL 51
Transition 21
TV colour systems 148
W,X,Y,Z
Warning indicators 138
Wide-angle 24
Wide mode 44
WORLD TIME 92
Write-protect tab 19
Zero set memory 65
Zoom 24
AлфаВиТьи yka3aTeЛb
A, B, Γ
AanTep noCneIOBaTeIbHoro npota 117
Aydnopepe3aHcB 76
Aydnopejkm 91
BaTapeiHbI 6Jok 12
BVeDeHnE/BbIBeDeHnE n3o6paXeHnA 46
BHeuHmMnKpOΦoH (He npUlaeTc) 162
Bpem3aHcN 15
BcnoMoraTeIbHbI 3ByK ....89
TolOBkn 150
THe3do roJOnOBhBx TeNeoHOB .. 162
THe3DoIInCTaHcUHOHHoR OynpaBLeHnA(LANC) 162
Tne3do S Bndeo 38,71
A,E,X,3
I3roTOBnteJIb: CoH KOpnpoeiHN
Ampec: 6-7-35 Kitaunharaba,
山HaraBa-Ky, Tokno 141-0001, JnOhna
CtpaHa-mpOn3BovnteJIb:JnoHnIa
- Digital Video Camera Recorder Mini DV Cass
- Operating Instructions
- HCTPYKUNI NO 3KCNLYATALIN
- Welcome!
- WARNING
- NOTICE ON THE SUPPLIED AC POWER ADAPTOR FOR CUSTOMERS IN THE UNITED KINGDOM
- ATTENTION
- For the customers in Germany
- Добpo пожаловать!
- PNEyPPEKDEHNE
- BHIMAHNE
- Table of contents
- Iodrotobka K 3Kcnnyatauun
- 3aHcB - OCHOBHbIe NOLOXeHn
- OnepaTHBbI CNpaBOUHnK
- Connecting the mains lead (p. 18)
- Inserting a cassette (p. 19)
- 4
- Monitoring the playback picture on the LCD screen (p. 33)
- NOTE
- PykoBoDCTBO IO 6bICTpOmy 3aIpycky
- ПОНМЕЧАНЕ
- Using this manual
- Note on Cassette Memory
- IcnoIb3OBAHne daHHoro pyKOBoDCTBa
- PpmeHne no KaccetHO namrTn
- Note on TV colour systems
- Copyright precautions
- Precautions on camcorder care
- Installing the battery pack
- To remove the battery pack
- YctaHOBka 6aTapeHoro 6Joka
- PpHnCnOJIb3OBAHn6aTapeHOro 6Joka 6OJIbUoI EMKOCtN
- Charging the battery pack
- 3apka 6aTapeHoro 6loKa
- Step 1 Preparing the power supply
- Remaining battery time indicator
- Until your camcorder calculates the actual remaining battery time
- If there is a slight difference in shape between the plug of mains lead and the terminal of AC power adaptor
- Plug the mains lead deeply
- While charging the battery pack, no indicator appears or the indicator flashes in the display window in the following cases
- Playing time/BpemBocnpon3Beeden
- Connecting to the mains
- PRECAUTION
- Notes
- Using a car battery
- IPEIOCTEPEXEHNE
- PpimueaHn
- UcnoJb3ObaHne aBTOMo6nJbHOro aKKyMylrTopa
- Step 2 Inserting a cassette
- Пун=kT2 YctaHOBKa KaCCetbl
- To eject a cassette
- IIN3BLeueHnKaCCeTbI
- PpIMeuaHnA
- PnncnoB3OBAHmKaccTeblMHN DV C KaccTeHOI NaMTbIO
- 3a\Pncb n3o6paXeHnA
- Note on Recording mode
- Note on the lock (DCR-TRV10E only)
- To enable smooth transition
- If you leave your camcorder in the standby mode for 5 minutes while the cassette is inserted
- When you record in the SP and LP modes on one tape or you record some scenes in the LP mode
- PpmeaHne no pexmy 3aHncn
- Adjusting the LCD screen
- PerynipoBka 3KpaHa KKД
- After recording
- To record pictures with the viewfinder - adjusting the viewfinder
- Using the zoom feature
- When you shoot close to a subject
- Notes on digital zoom
- IcnoJIb3OBAHneФyHKcHn Hae3da BnDEOKaMepbl
- Pn cbeMe oBeKta c 6JIn3KOro noLoXeHn
- YcTaHOBka START/STOP MODE
- To extend the recording time in the 5SEC mode
- PpIMeuaHn
- Indicators displayed in the recording mode
- Remaining tape indicator
- KoB BpeMeHn
- HnDKaTOpOCTaBWeCnJeHTbI
- Shooting backlit subjects (BACK LIGHT)
- CbeMa o6BeKToB c 3aHnei noCBeTkoi (BACK LIGHT)
- Shooting in the dark (NightShot)
- Cbemka B TEMHOTE (Houhna cbemka)
- Using + SLOW SHTR
- Using the NightShot Light
- IcnoJIb3OBAHne pexIma + SLOW SHTR
- IcnoJb3OBAHne IoDCBETKn DnA HOUHOI CbEMKn
- While using the NightShot function, you cannot use the following functions:
- Shutter speed in the NightShot +Slow shutter mode
- The +SLOW SHTR button does not work:
- NightShot Light
- Приимechanicals
- PnncnoIb3OBAHnnyHKcnn HocHoN CbeMkn Bbl He moKeTe nCnoJIb3OBaTb cJeDyUoJne yHKn:
- CkopocTb 3aTbopa B pexmHe HooHcBemKu +MeIeHHoro 3aTbopa
- Khonka +SLOW SHTR He pa60taeT:
- Iopcbetka dna HOHOn CbeMkn
- Self-timer recording
- 3aInc b no TaMepy camo3anycka
- To stop the self-timer during recording
- To record still pictures using the self-timer
- To cancel self-timer recording
- Checking the recording
- Поберka 3апссn
- END SEARCH
- EDITSEARCH
- Checking the recording - END SEARCH / EDITSEARCH / Rec Review
- Rec Review
- End search function
- Bocnpon3BeDeHne JeHTbI
- To stop playback
- When monitoring on the LCD screen
- Дя OCTaHOBKIN BOCPON3BeDEHNA
- BoBpemKoHTpoHa3KpaHeKKD
- To display the screen indicators - Display function
- Not to display various settings
- IcnoJb3OBaHne cyHKcN KoJa DaTbI
- ДЯТOrO,ЧTO6bI He OTO6paKaJINc b pa3JIuHbIe YCTaHOBKn
- Recording data
- Data code
- PpimechaHne
- 3aHncaHHbIe daHHbIe
- EcnBbIncnoJIb3yeTe yHKcNIO KOda
- Various playback modes
- To view a still picture (playback pause)
- To advance the tape
- To rewind the tape
- To change the playback direction
- To locate a scene monitoring the picture (picture search)
- To monitor the high-speed picture while advancing or rewinding the tape (skip scan)
- To view the picture at slow speed (slow playback)
- IpepeMeHHbIe peXmMbI BOCnpOn3BeDeHn
- ДлгпрсмOTpa HeNodBnKHO rO n3o6paXeHnra (nay3a BocnpOn3BeDeHnra)
- Дя уckopehno nepemOTkn JentbI BnepeD
- ДлИЗМЕнEHHAmpaBNeHNA BOCPON3BeDEHNA
- To search the last scene recorded (END SEARCH)
- When the playback pause mode lasts for 5 minutes
- Slow playback
- Bocnpon3BeDenHe JeHtbl
- Для посмотра BOCPON3BedeHn n3o6paXeHn Ha yDBoEHNo ckopoCTn
- Для пokaцрово npocmoТра BOCPON3BedeHnI N3O6paXeHnI
- ДлиносякносядимeroЗапсан Horo 3nnoda (END SEARCH)
- Понск Конца
- B nepemHeHbIX pexImax BocpOn3BeDeHn 3Byk 6ydet nprrnyuhen.
- EcnI pexn may3bl Bocnpon3BedeHn npoDnTc4 5 MNyT
- 3aMeIeHHoe BocnpOn3BedeHne
- При Воспpon3ВedeHи ЛeHTыВ образногнанравлеси <|im_start|>assistant
- Viewing the recording on TV
- If your TV is already connected to a VCR
- Пресмтг заимсниэкpaneх телевизopa
- EcIn BaW TeJIeBn3Op yXe npDCoeDInHeN K KBM
- If your TV or VCR is a monaural type
- If your TV/VCR has a 21-pin connector (EUROCONNECTOR)
- EcnBaw TeIeBn3Op nJN KBM MOHOΦOHNueCKOro Tnna
- EcniB Baawem TeleBn3ope/KBM mMeetc 21-7bIpbkoBbI pa3beM (EUROCONNECTOR)
- EcIn B BaWem TeJIeBn3ope nI KBM IMeeTc rHe3do S bVdeo.
- Using the AV cordless IR receiver
- IcnoJb3OBAHne 6ecnpoBOdHorO IK aydnOBnDeOpnpemHnka
- LASER LINK emitter/Излуател LASER LINK
- To cancel the laser link function
- If you turn the power off
- Длг OTMeHbI Φункци ЛаЗepHOrO KaHaJa NepeDaHu CnRHaJIOB
- EcN BbI BbIKIOUHTe NHTaHne
- PpmeuHne
- Photo recording
- ΦOTOCbEMKa
- If you record a moving subject with photo recording function
- To use the photo recording function using the Remote Commander
- To use the photo recording function during normal CAMERA recording
- EcIn Bbl BbInonHaeTe 3aNcB DnKyUeOc0 obBeKta c NOMoMbIO fYHKunf oTOocBemKn
- ДлИ NCПОЛБ3OBAHINФУнкIMФOTOCБEMКС NOMOUIIpyIbTa DnCTaHUNHOYOrуnpabJIeHIN
- ДлЯ Исторьоградункции ФотOCБЕМКИ BO Вразma 06byHOn 3aPnCn CAMERA
- Printing the still picture
- Using the wide mode
- IcnoJb3OBAHne uHPOKO3KpaHHoro peKIma
- MONOTONE
- Длг OTMeHbI Функци Фeндара
- When the OVERLAP indicator appears
- While using the bounce function, you cannot use the following functions:
- Note on the bounce function
- PpimeyaHne
- EcJIN NOBNTcHnDnKaTOp OVERLAP
- EcIn KOMaHa START/STOP MODE yCTaHOBJIeHa B noJIOXeHne I JnI 5SEC:
- Bo BpemnncnoB3OBaHHyHKcnn nepeckaknBaHH BbI He moKeTe nCNOB3OBAt cJeDyUoNe cyHKcnn:
- PpmeaHne no yHKnnepeckaBbHa
- Using special effects - Picture effect
- IcnoJb3OBAHne CneuJaNbHbIX 3ΦΦeKToB - ΘΦΦeK Tn3o6paXeHnA
- To turn the picture effect function off
- During playback, you can process a scene using the picture effect function
- ДЯ BBKJIIOUeHЯ ФунКцин эффeKta n3o6paXeHЯ
- Bo BpemBocnpn3BeHnBb MoKeTe BbINoJHrTb 6pa6OtKy 3N3Oda C NOMOu bU yHKun 3ΦΦeKta n3o6paXeHn
- PnncnoB3OBaHm FyHKcH NΦΦekTa n3o6paXeHn
- Ecnn BbI BbIKIOHTe NtTaHne
- EcIn BbI BbIbepnTepeKIM 3ΦΦeKtAn306paXeHnBpeKmE3aINc
- EcnI nepeKlnuOaTeIb POWER yCTaHOBJIeH B noJoxKeHne PLAYER
- Using special effects - Digital effect
- STILL
- FLASH (FLASH MOTION)
- LUMI. (LUMINANCEKEY)
- TRAIL
- SLOW SHTR (SLOW SHUTTER)
- OLD MOVIE
- IcnoJb3ObaHne cNeuaJIbHbIX 3ΦΦeKToB - LInΦpOBoN 3ΦΦeKT
- To cancel the digital effect
- When you turn the power off
- When recording in the slow shutter mode
- ДЯ OTMeHbI UΦpOBOrO 3ΦΦeKtA
- PnBbIKJIIOHeHNIITaHNA
- Pn3aHncBpeXmmeMeJleHoro 3aTBopa
- Adjusting the white balance manually
- PeruInpoBka 6aHaHca 6eIoro BpyHyU
- To return to the automatic white balance mode
- ДлЯ BOЗВРашени К abTOMaTHueCKOMy peЖIMу 6baHca 6eNoRo
- Using the PROGRAM AE function
- Spotlight mode
- Soft portrait mode
- Sports lesson mode
- Beach & ski mode
- Sunset & moon mode
- Landscape mode
- Low lux mode
- Исpenьзованецфункциng PROGRAM AE
- PexkIM npoxKeTOpHOrO ocBeueHnA
- PexkIM cNoptNBbIx COCTa3AHN
- TIIaXHbI n IbIXHbI peXHM
- Pexim 3axoDa coJIHua n lyHbI
- LanDhaΦTbIypeXIM
- Pexm Hn3KoO OCeEHHOCTN
- IcnoJb3ObaHneФyHKcHn PROGRAM AE
- While WHT BAL is set to AUTO in the MENU settings
- If you are recording under a discharge tube such as a fluorescent lamp, sodium lamp or mercury lamp
- EcIn KOMaHda WHT BAL yctaHoBneHa B noJoxKeHme AUTO b yctaHoBkax MENU
- EcIn BbI6paHaФyHKcINI PROGRAM AE
- EcIn BbI BbINOJIHReTe 3aINcB npn IcNoJIb3OBAHm ra3Opa3PdHOJ lambl, HATpneBOJ lamblI nn pTyTHoJ lamblI
- Adjusting the exposure manually
- PerynipoBka 3Kcno3nCnBpyHyU
- 1
- 2
- To return to the automatic exposure mode
- If you change the PROGRAM AE mode or slide NIGHTSHOT to ON
- Дя BO3Bpata B peKIM aBTOMaTnuecko 3KcNo3nCm
- PpmeaHne
- EcIn BbI n3MeHnTe peKmM PROGRAM AE nJIN nepeDbnHeTe nepeKIOuTaTeNb NIGHTSHOT B noJIoXeHne ON
- Focusing manually
- ФokycnopoBka BpyHyIO
- To return to the autofocus mode Set FOCUS to AUTO.
- To record distant subjects
- Not to make subjects out of focus when using zoom function
- ΦokycnpOBKa BpyHyIO
- Дя BOЗВрашени B ржим abTomatн ueckо Фокс neuropOKN
- Playing back a tape with picture effects
- Bocnpo3BeDeHne JeHTbIC 3ΦΦeKtAmn n3o6paXKeHn
- To cancel the picture effect function Set P EFFECT to OFF in the MENU settings.
- Pictures processed by the picture effect function
- When you set the POWER switch to OFF or stop playing back
- Длг OTMeHbI Φункци 3ффektob n3o6paXeHn
- N3o6paXeHn, BnDOn3MeHeHHbIe C nOmoUbIO fYHKmN 3ΦΦeKToB N3o6paXeHn
- EcIn Bby ycTaHOBnI nepeKJIouaTeIb POWERBnoJIOxHeNc OFF nIIO octaHOBNI BOCPpon3BeDeHne
- Playing back a tape with digital effects
- Bocnpo3BeDeHne JeHTbI c uΦpObblm 3ΦΦeKtAmN
- Pictures processed by the digital effect function
- PpmeaHn
- N3o6paXeHn, BnOu3MeHeHHbIe C NOMOaBIO cyHKmU nOpOBbIX 00
- EcIn Bby ycTaHOBnI nepeKJIouaTeIb POWERBIOJoxeHne OFF nIO ocTaHOBnI BOCpON3BeDeHne
- Quickly locating a scene using the zero set memory function
- БыICTpoe OTbICKaHne 3ПИЗODa C NOMOUsbIO Функципamrtu HUJIeBOI OTMeTKN
- ZERO SET MEMORY functions also in the recording standby mode
- ФункцЯ ZERO SET MEMORY pa6oTaet TaKxE B pexmme roTOBHOCTn 3aHNCN
- Searching a recording by date - Date search
- Searching for the date by using cassette memory
- Searching for the date without using cassette memory
- To stop searching
- If a tape has a blank portion between
- recorded portions
- Cassette memory
- Ponck 3aIncn no daTe
- ДлЯ OCTaHOBKII NOUcKa
- Ponck 3aIncn IIO daTe 6e3 nCNoJIb3OBAHnKacCeTHoI naMrtN
- Длг octahOBkn NOUCKa
- EcIn Ha 3aIncahHoi JeHte NMeIOTc H3aIncAHbIe YUacTkn
- Searching the boundaries of recorded tape by title - Title search
- CM only
- ДлЯ OCTaHOBKn NONCKa
- Searching for a photo - Photo search/Photo scan
- Searching for a photo by using cassette memory
- Searching for a photo without using cassette memory
- Scanning photo
- PonckΦOTO 6e3 nCnoJb3OBaHnKaCCETHOI pAMrTIN
- ДлгocтабкнпОпска
- Сkaнрованые φοTO
- To stop scanning
- ДлЯ OCTaHOBKn CkaHIpObaHnA
- Dubbing a tape
- Using the A/V connecting cable
- Парапсь Ленты
- UcnOJIb3OBAHnE CoeINHITeIbHOro Ka6eJyauDIO/BuDeO
- When you have finished dubbing a tape
- Ecnn Bbl 3aKOHnJI npe3anCb JeHTbI
- Using the i.LINK cable (DV connecting cable)
- IcnoJIb3OBAHnE Ka6eIaLINK (coeHNHTeBHyI Ka6eIb DV)
- During digital editing
- If you record playback pause picture with the DV OUT jack
- To perform a more precise editing (DCR-TRV10E only)
- EcnBb3aKOHnJIpe3aIncbJeHTbI HaxmTe KhoNky (STOP) ka Ka Ha BaWei
- Bb moXeTe NOdcoEduHHTb OINH TOIbKO KBM c nOmoosbu Ka6eIa.LINK (coeDnHtJIbHbI KAbDV).
- BoBpemr znpboBOrMOHTaxa
- EcIn BbI BbINOHNn 3aNNc bN3o6paXeHnuepe3 rHe3do DV OUT
- ДЯ ВылОнHeHЯ 60Jee ToCHOrO MOHTaJa (ToIbKO MoeJIb DCR-TRV10E)
- Editing partially on a DV tape - DV synchro-editing (DCR-TRV10E only)
- MoHTaX NO qaCTaM Ha JeHtY DV - CnHxPoHHbI MOHTaX DV (ToJIbKO MoJeJIb DCR-TRV10E)
- Errors in duplicating
- If you do not make connections with i.LINK cable (DV connecting cable)
- On a blank portion of the tape
- Own6kn npn nepe3anncn
- EcIn BbI He BblIOJIHReTe NoDcoEINHeHm C nOmoUbIo Ka6eJI i.LINK (coEINHTeBbHbI Ka6eB DV)
- Ha He3anHcHOM yactke Jehtbi
- Aydnopepe3a\Pncb
- Connecting the microphone with the MIC jack
- Connecting the microphone with the intelligent accessory shoe
- Dubbing with the built-in microphones
- Adding an audio sound on a recorded tape
- Monitoring the new recorded sound
- To play back the sound
- Aydnope3anncb
- Ipepe3aHcB c NOMOsbU BCTpoEHHO MKNpOfoHa
- KoHTpoJIb HOBOrO 3aIncaHHoro 3ByKa
- Длвьоспpon3BeDEнгЯ 3Byka
- If you make all the connections
- To add new sound more precisely
- Aydnopepe3anncb
- EcnBbCpeJannBce noDcoeHHeHn
- Дяболг TeUHorO IO6aBNeHЯ HOBOrO 3Byka
- PekomeHnyeTcdo6abTb HOBbI 3ByK HaJeHTy,3aIncaHHyo c nOmoBIO BaWei BnDeOKaMepbl
- Superimposing a title
- HanoxeHne TnTpa
- Title setting
- YctaHOBka TnTpa
- CTnpaHne TnTpa
- To change a title you have stored
- IIN3MeHeHH COxpaHeHHoro B nAMrTn TnTp a
- EcIn Bbl BBOUNTE CNMBONJI 5 MNHT NNI 6OJIeBpeKIMe OXnDaHnB TO BpEmr, KOrda kacceta HaxoNTcB BaWei BNDeOKaMepe
- Дя удалини титра
- Mapknipobka kaccetbl
- To erase a character
- To change the label you have made
- Длг STираннсмьола
- EcIn BbI nCnoJIb3yTe KaccTeY c yCTaHOBko 3aunTbI OT CnyauHoro CTnpaHn
- EcInBnyHKTe 5 noBNTca 3nak
- EcIn Bbl BbIOpHnI HAnOKeHne TITPOB Ha Kaccete
- EcInnHdNkaTop "----" MeeTe MeHee 10 npo6eIOB
- - Customizing Your Camcorder - Changing the MENU settings
- English
- Selecting the mode setting of each item is the factory setting.
- Notes on the SteadyShot function
- If you cancel the SteadyShot function
- Note on AUDIO MIX
- Note on the playback of the NTSC tapes
- Notes on LCD B.L.
- Notes on the LP mode
- Notes on AUDIO MODE
- Notes on DEMO MODE
- In more than 5 minutes after removing the power source
- Pysckn
- Bb6op yctaHOBOK peXIMa no KaXdOMy NyHKTy 3aBOcKaYcTaHOBka.
- Resetting the date and time
- IpeyeCTaHOBKa DaTbI N BpemeHn
- - Memory Stick operations - Using a Memory Stick-introduction
- - DCR-TRV10E only
- Still images
- Using a Memory Stick
- -Операци c Memory Stick -Исpenьзоване Memory Stick -Вve徳нe
- -ToIbKO MoIeJIb DCR-TRV10E
- HenoDbxKbIe n3o6paKeHHa
- Icnojb3ObaHne Memory Stick EcIn Bbl ncnojb3yete Memory Stick
- On file format (JPEG)
- You do not need to format the Memory Stick supplied with your camcorder
- Memory Sticks formatted on a personal computer
- Notes on image data compatibility
- O φopmaTe ΦaJIIOB (JPEG)
- TnHnHoe nMRAaIa DaHHbIX n3o6paXeHnR DSC00001.jpg.
- PpmeHn
- Bam He hyxho fopmatnpoBaTb Memory Stick, npnilaraemyu K Baew Bndeokamepe
- PpimueaHne
- Memory Sticks otΦopMaTnpoBaHbI Ha nepcoHaJIbHOM KOMNbIoTepe
- Приимеаная К COBMecTUMOCTN ДаHHbIX n3o6paKeHn
- Inserting a Memory Stick
- YcTaHOBka Memory Stick
- To eject a Memory Stick
- ДлгиИЗВLEЧЕНИЯ Memory Stick
- Ecnn Jlamnoka ACCESS ropnt nnn Mmraet
- Selecting image quality mode
- Bb6oppeKImaKaueCTBa n3o6paXeHn
- Differences in image quality mode
- Approximate number of images you can record on a Memory Stick
- OTNIUBApeKIMeKaueCTBaN3o6paKeHNA
- Formatting (initializing) a Memory Stick
- Исpenьзоване Memory Stick -Вve徳hoe
- Recording still images on Memory Sticks - Memory photo recording
- Before operation
- 3aHcB HeIOBbXbIX N3O6paXeHn Ha Memory Stick - FOTo3aHcB c COxpaHeHem B PAMrTn
- Ipeed hauanom pa6oTbI
- Recording images continuously
- 3aNcB HeNoDvXhBix N3o6paKeHn Ha Memory Stick - FOTo3aNcB c COxpaHeHem B namrTu
- Примейань
- EcJn NepeKJIIOUaTeIb POWER ycTaHOBNeH B noJIOXeHne MEMORY.
- EcIn Bbl 3ainncbiBaete HeNoDBHXHoe n3o6paKeHne
- EcnBbI haxMeTe PHOTO ha nyIbTe dNCTaHcOnHOro ynpabJIeHHa
- 3aHcB n3o6paXeHn HnpepbIBHO
- HenpepbIBHbI pexnM [a]
- Mhoro3KpaHHbIpeXIM[b]
- 3aHcB HeNoDvXhBix N3o6paJxHnHaMemoryStick-ΦoTo3aHcBcCOxpaHeHEmBnAMrTu
- 3aIncb HeNoDvNkHbIX N3o6paKeHn HaMemoryStick-ΦoTo3aIncb c coXpaHeHemB namrTu
- Recording an image from a mini DV tape as a still image
- 3aHnCb n3o6paXeHnCJIeHTbIMHN DV kaKHeNoDBrXhOrO n3o6paXeHn
- Перед наалом pa60ть
- 3aIncb n3o6paXeHnC JeHTbl MNH DV KAK HenoDbHXHorO n3o6paXeHn
- Copying still images from a mini DV tape - Photo save
- KoHIpOBaHHe HeNoDBrXhblIX 306paXeHn C JeHTbI MHN DV - CoXpaHeHne B PAMrTn fOToCHmKOB
- Ipeed hauanom pa60tbi
- To stop copying
- When the memory of the Memory Stick is full
- When the ACCESS lamp is lit or flashing
- To record all the images recorded on the mini DV tape
- If the write-protect tab on the Memory Stick is set to LOCK
- When you change Memory Sticks in the middle of copying
- Дл OCTaHOBKи KOnIpyOBaHn
- B clyuae nepenolneHn Memory Stick
- Ecnn Jiamnoka ACCESS ropnt nnn Mmraet
- ДяЗаин BCex ИЗОБрахжи,ЗИSCaHHbIX NaJIeHTe MInH DV
- EcIn IeNecToK 3aunTbI 3aHncn HaMemory Stick yctaHOBJIeB bNoLoXeHne LOCK
- Viewing a still picture - Memory photo playback
- To stop memory photo playback
- Дл оctahOBKN BOCINpON3BeDEHNA
- ΦOTOCHUMKOB 3 NAMRTN
- Image data modified with personal computers or shot with other equipment
- Дяв Восчpen3BveDEHЯ 3aINcAHbIX n3o6paXeHn Ha 3kpaHe TelenBn3opa
- DAnHbIe M3O6paXeHnI, BUNOn3MeHeHbIe C NOMOsbIc nepCOHaJIbHOro KOMNbIbTepa IIN CHaTbIe C NOMOsbIO DpyrO annPapatypbI
- Screen indicators during still image playback
- 3KpaHbIe HnDnKaTOpbl Bo BpeMBOcnpOn3BeDeHnHeNoDnBxhXnO6paXeHn
- Playing back 6 recorded images at a time (index screen)
- Bocnpoun3BeHeHne 6 3aIINcaHHbIX N3o6paKeHn OndHOBpeMeHNo (HNeDEKCHbY 3KpaH)
- MEMORY INDEX
- To return to the normal playback screen (single screen)
- The image quality mode indicator
- Files modified with personal computers
- Viewing the recorded images using a personal computer
- PpocmToT 3aHncaHbIX n3o6paXeHn C NOMOuIOp nepcoHaJIbHOrO KOMNbIOTepa
- Superimposing a still picture in a Memory Stick on a moving picture - M. CHROM/M. LUMI/C. CHROM
- Haioxehne HenoBnxHoro n3o6paXehnna3 Memory Stick Ha noDbHXHoe n3o6paXehne - M.CHROM/M.LUMI/C.CHROM
- CHROM (Memory chroma key)
- LUMI (Memory luminance key)
- CHROM (Camera chroma key)
- CHROM (KHONka LBeTHOCTn NaMATN)
- LUMI (KhoNka npKocTn namATn)
- CHROM (KHOIIKA ZBETHOCTN BIVDEOKAMepbl)
- HaIIOXeHne HEnoDnBxHOrO I3o6paXeHn I3 Memory Stick Ha noDnBxHoe I3o6paXeHne - M.CHROM/M.LUMI/C.CHROM
- IpeedHaayanpa60TbI
- To change the still picture to superimpose
- To change the mode setting
- To cancel M. CHROM/M. LUMI/C. CHROM
- HaIooKeHne HenoDbNxHoro I3o6paXeHn I3 Memory Stick Ha IIOBxHoe I3o6paXeHne - M.CHROM/M.LUMI/C.CHROM
- IaH3MeHeHH HeNoBuxxHoro 1306paXeHH JaHaIOXeHH
- Preventing accidental erasure - Image protection
- Пре dioTbpaaeeHne clyuaHoro CTnpaHn - 3aunTa n3o6paXeHn
- To cancel image protection
- Writing a print mark - PRINT MARK
- 3a\Pncb neyaTHbIX 3HaKOB - PRINT MARK
- To cancel writing print marks
- Длг OTMeHbI 3aINcN NeayTHbIX 3HaKOB
- Deleting selected images
- -Тольковедель DCR-TRV10E
- YdaJIeHne BbIbpaHHbIX n3o6paxKeHn
- To cancel deleting an image
- To delete an image displayed on the index screen
- Deleting all the images
- Длг OTMeHbI ydaJIeHnI N3O6paXeHnI
- Ipeed nauaIom pa6oTbi
- To cancel deleting all the images in the Memory Stick
- Длг OTMeHbI ydaJIeHnBCEx n3o6paxeHn Ha Memory Stick
- Bo Bpem OTo6paXeHn HndkaCn "DELETING"
- EcIn IeNecToK 3aunTbI 3anncn HaMemory Stick yctahOBJIeB bnoJoxeHne LOCK
- Playing back images in a continuous loop - SLIDE SHOW
- Bocnpon3BeJeHne n3o6paXeHn BHeIpepbIBHOI NOcIeIOBaTeJIbHOCTNIO 3aMKHyTOMy cIKJy - SLIDE SHOW
- Паран налом pa60ть
- To stop the slide show
- To pause during a slide show
- To start the slide show from a particular image
- ДлЯ OCTaHOBKN DeMOHCTpaCIN cIaNIOB
- Iy3bI BO BpemA DEMOHCTpaCn CnaIOB
- Дян haуала nokaza сайдов с onpeendeHHoro n3o6paKeHHa
- Selecting cassette types
- Bb6op Tnna Kaccet
- Audio mode
- When you play back a dual sound track tape
- PnBocnpOn3VeJeHn
- CunHaI abTOPcKOro npaba Pn BocnpOn3VeDeHn
- Aydnopexum
- PnBocnpOn3BeJeHm JeHTbI C DBOHOH 3ByKOBOJ DOPOXKOJ
- Cleaning gold-plated connector
- PpmeaHn no KaccTe MmN DV
- Pnp npnKpeHneHH 3TKeTKn Ha KaccTey MmH DV
- Pocne nCnoJIb3OBAHnKacCeTbIMHH DV
- Ouictka no30JoueHHoro pa3bema
- In the recording mode
- In the recording and playback modes
- When operating using the Memory Stick
- Others
- Warning indicators and messages
- Warning indicators
- Warning messages
- Понск и устараенье несправност
- B pexkme 3ainnc
- PpeDynpexkaIOUne INHnKaTOpbl KACCEbI C nAMrTbIO
- IpeDynpexkaUoJne HndIkAToPbI Memory Stick (ToIbKO MoJeB DCR-TRV10E)
- 3aunTa n3o6paXeHnA
- Using your camcorder abroad
- Simple setting of clock by time difference
- Maintenance information and precautions
- Moisture condensation
- If moisture condensation occurred
- Note on moisture condensation
- How to prevent moisture condensation
- Информацnia по ухODу 3a apnapaTom И МерыnpedoctopoxkHOCTN
- KoHdEhCaunBlaIaI
- Ecn npon3oJla KOHdEHCaIgBnaI
- PpimeyaHne no KOHeHcaun BlaRn
- Kak npedotBpaTntb KOHdeHcaHIO BnaI
- Maintenance information
- Cleaning the video head
- HΦopMaζη no yxody
- Чистka вдебоголовк
- Cleaning the LCD screen
- Charging the vanadium-lithium battery in your camcorder
- Charging the vanadium-lithium battery:
- Ynctka 3KpaHa KKd
- 3apKa BaHaDnEBO-JIHTneBOB 6aTapeKn B BaSei BnDeokampe
- 3apka BaHaDneBO-JInTHeBOB 6aTapeKn
- Precautions
- Camcorder operation
- On handling tapes
- Camcorder care
- MepblnpedocTopoXHoctn
- 3KcnplyaatauBvdeokamepbl
- OTHOCHTeNbHO o6paueHncaJeHTaM
- YxOД 3a BnDeOKamepoI
- AC power adaptor
- Battery pack
- Cetebo aadanTp nepemehnHO Toka
- Батарейнь 6лok
- Notes on dry batteries
- HΦopMaunno yxOdy 3a annapaTom mepbl npdeoctoPOKHOCTN
- PpimechaHnK cyxM 6aTapeiKaM
- EcIn npOn3oUna yTeUka BHyTpEnHero BeuecTb6aTaapeek
- Video camera recorder
- System
- Output connectors
- LCD screen
- General
- Memory Stick
- (DCR-TRV10E only)
- Texhnueckne xapaKtepncnkn
- Bvdeokamepa
- CnCTema
- CnCTema BnDeo3annc
- Pa3bEmbl BbIXOndhix CnHaJIOB
- 3KpaHKKd
- 06uee
- CteBoa aanTep nepemehHoro TOka
- BaTapeiHbI 6JIOK
- Memory Stick (ToJbKo MoeJIb DCR-TRV10E)
- Attaching the shoulder strap
- PpIKpenIeHne IJIeueBOro pemHa
- What is LASER LINK?
- 4tro takoe LASER LINK?
- Note on the Carl Zeiss lens
- Примочаиме Клипзе Kapл Рецс
- Notes on the intelligent accessory shoe
- PpIMeuaHnOTHocuTeNbHOepKaTeJIaN yCTaHOBKn pUHaadJeXHoCTeI
- Remote Commander
- To prepare the Remote Commander
- ДлnoiodroTOBKn nylbTa ДиctAHUHOHOrO ynpaBJIeHnA
- Notes on the Remote Commander
- PpmeaHnK npIbTy dNCTaHcNoHHoro ynpabJIeHn
- Operation indicators
- Pa60yne HndnKaTOpbl
- Display window
- Okowko dincpnjeA
- Functions to adjust exposure (in the recording mode)
- Functions to give images more impact (in the recording mode)
- Functions to give a natural appearance to your recordings (in the recording mode)
- Functions to use in editing (in the recording mode)
- Functions to use after recording (in the playback mode)
- PykoBoCTBO IO 6bICTpbIM yHKcIaM
- E
- F, G, H
- I, J, K, L
- M, N
- O, P, Q
- R
- s
- T, U, V
- W,X,Y,Z
- AлфаВиТьи yka3aTeЛb
- A, B, Γ
- A,E,X,3
Brand : SONY
Model : DCR-TRV10E
Category : Camcorder