DCR-PC2E - Camcorder SONY - Free user manual and instructions
Find the device manual for free DCR-PC2E SONY in PDF.

User questions about DCR-PC2E SONY
0 question about this device. Answer the ones you know or ask your own.
Ask a new question about this device
Download the instructions for your Camcorder in PDF format for free! Find your manual DCR-PC2E - SONY and take your electronic device back in hand. On this page are published all the documents necessary for the use of your device. DCR-PC2E by SONY.
USER MANUAL DCR-PC2E SONY
Digital Video Camera Recorder Mini DV Digital Video Cassette
Operating Instructions
Before operating the unit, please read this manual thoroughly, and retain it for future reference.
HCTPYKUNI NO 3KCNJYATAUIN
Ipeed 3kcnnyataune annapaata BHNMaTeJbHo npouTITe, noXanyCTa, daHHOe pyKOBOdCTBO n COxpaHnTe erO dJaIbHeiNX cnpaBOK.
Digital Handycam

Cassette Memory


DCR-PC2E/PC3E
Welcome!
Congratulations on your purchase of this Sony Digital Handycamcamcorder. With your Digital Handycam, you can capture life's precious moments with superior picture and sound quality.
Your Digital Handycam is loaded with advanced features, but at the same time it is very easy to use. You will soon be producing home video that you can enjoy for years to come.
WARNING
To prevent fire or shock hazard, do not expose the unit to rain or moisture.
To avoid electrical shock, do not open the cabinet.
Refer servicing to qualified personnel only.
NOTICE ON THE SUPPLIED AC POWER ADAPTOR FOR CUSTOMERS IN THE UNITED KINGDOM
A moulded plug complying with BS1363 is fitted to this equipment for your safety and convenience.
Should the fuse in the plug supplied need to be replaced, a 5 AMP fuse approved by ASTA or BSI to BS1362 (i.e., marked with or mark) must be used.
If the plug supplied with this equipment has a detachable fuse cover, be sure to attach the fuse cover after you change the fuse. Never use the plug without the fuse cover. If you should lose the fuse cover, please contact your nearest Sony service station.
ATTENTION
The electromagnetic fields at the specific frequencies may influence the picture and sound of this digital camcorder.
For the customers in Germany
Directive:EMC Directive 89/336/EEC. 92/31/EEC
This equipment complies with the EMC regulations when used under the following circumstances:
Residential area
Business district
- Light-industry district (This equipment complies with the EMC standard regulations EN55022 Class B.)
Добpo пожаловать!
I03dpaBnem BAc C npio6peTeHnEm daHHoB
BnDeokamepbl Digital Handycam pmpbSony.
C nOmoosbBoaew BnDeokamepbl Digital
Handycam Bb CMoxeTe 3aneuatnetb doporne
Bam MRHOBeHNJ Xn3HN C npEBOCXODhbIM
KaueCTBOM N3obpaxeHNJ N 3Byka.
BaAa BnDeokamepa Digital Handycam
OchaSeHa YCOBepseHCTBOBaHHbIMN
fynKUyMn, HO B TO Xe BpEme ee OChb JERKO
ncNoB3OBaTb.BCKope Bb 6yDete Co3daBaTb
CEMeHbIe BnDeOpnpaMMbI, KOTOpbIMN
MOKeTe HacnaKDaTbc PocNe dyIOune rOdbI.
PNEyPPEKDEHNE
Checking supplied accessories 5
Quick Start Guide. 6
Getting started
Using this manual. 10
Step 1 Preparing the power supply. 12
Charging the battery pack. 12
Installing the battery pack. 15
Connecting to the mains 16
Step 2 Inserting a cassette 17
Step 3 Using a touch panel 18
Recording - Basics
Recording a picture 20
Shooting backlit subjects (BACK LIGHT).... 27
Shooting in the dark (NightShot) 27
END SEARCH 29
Playback - Basics
Playing back a tape 30
Viewing the recording on TV. 35
Advanced Recording Operations
Photo recording 37
Using the wide mode 40
Using the fader function 41
Using special effects - Picture effect 44
Using special effects - Digital effect 45
Adjusting the white balance manually. 48
Using the PROGRAM AE function. 50
Adjusting the exposure manually. 52
Focusing manually. 53
AdvancedPlaybackOperations
Playing back a tape with picture effects. 55
Playing back a tape with digital effects. 56
Quickly locating a scene using the zero set memory function. 57
Searching a recording by date - Date search .... 58
Searching the boundaries of recorded tape by title - Title search. 60
Searching for a photo - Photo search/Photo scan 61
Editing
Dubbing a tape 64
Editing partially on a DV tape - DV synchro-editing (DCR-PC3E only) 66
Audio dubbing. 68
Superimposing a title. 71
Making your own titles. 74
Labelingacassette 76
Customizing Your Camcorder
Changing the menu settings 78
Resetting the date and time 89
"Memory Stick" operations
Using a "Memory Stick"-introduction. 91
Recording still images on "Memory Stick"s - Memory photo recording. 99
Superimposing a still picture in a "Memory Stick" on a moving picture - MEMORY MIX. 102
Recording an image from a mini DV tape as a still image 105
Copying still images from a mini DV tape - Photo save 107
Viewing a still picture - Memory photo playback. 109
Playing back images in a continuous loop -SLIDE SHOW 113
Preventing accidental erasure - Image protection. 115
Deleting images 116
Writing a print mark - PRINT MARK. 119
Additional Information
Using the viewfinder. 120
Usablecassettes 122
Troubleshooting 125
Self-diagnosis display 130
Warning indicators and messages 131
Using your camcorder abroad 141
Maintenance information and precautions.... 142
Specifications 148
Quick Reference
Identifying the parts and controls. 150
Quick Function Guide. 159
Index 161
-
Windows is registered trademarks licensed to Microsoft Corporation, registered in the U.S.A. and other countries.
-
All other product names mentioned herein may be the trademarks or registered trademarks of their respective companies.
Furthermore, "TM" and "®" are not mentioned in each case in this manual.
PpOBepKa npuIarapaembIX npHuaIeXHoCTeI.... 5
PykoBoIcTBo no 6bIcTpomy 3anycky. 8
IoproToBkaK3KcPnyatau
IcnoJIb3OBAHnE daHHoro pyKOBoDCTBa 10
IyHKT 1 NpOroTOBka nCTOHTHnKa nTahnra .... 12
3apKa 6aTapeHoro 6loKa 12
UcTaHOBKa 6aTapeiHoro 6noka 15
IopdoeHHHeHneKceBoBpo3eTke 16
IyHKT 2 YcTaHOBka KacCEtbl 17
IpyHKT 3 IcnoJIb3OBAHne ceHCOPHO paHeiI 18
3aHcB - OCHOBhble NOIOXKeHn
3aHnscb n3o6paXeHHa 20
CbeMa 06BeKToB C3aDHeI IOcBcTKoI (BACK LIGHT) 27
CbeMka B TeMHoTe (HouHaar CbeMka) 27
END SEARCH 29
Bocnpon3BeJeHne - OchOBhble IOJIOXeHHa
Bocnpon3BeDHeHneJeHTbl 30
IpocmoTp 3aHnHa 3KpaHe TeleBn3opa .... 35
YcoBepueHCTBOBaHHbIe Onpaunn CbeMKn
ΦOTOCbEMKa 37
IcnoJIb3OBAHne IupOKo3KpaHHoro peXIma..40
IcnoB3OBAHnE cyhKcun feiepa 41
IcnoIb3OBAHnE CneuIaIbHbIX OΦΦeKTOB -OΦΦeKr N3O6paXKeHnI 44
IcnoIb3OBAHnE CneuHaNbHbIX 3ΦΦeKToB -LncpOBoN 3ΦΦeKt. 45
PerynipoBka 6aHaHca 6eIoro BpyHyu ....48
IcnoB3OBAHnE cyhKcnn PROGRAM AE.....50
PerynpoBka 3Kcno3nH BpyHyu 52
ФokycinpOBka BpyHyU 53
YCOBEPHEHCTBOBAHHbIe ONEpaunn BOCPON3BVeHn
Make sure that the following accessories are supplied with your camcorder.
Y6eIntecb, cyTo CneIyIOuIne npHnAdIeKHOCTn npInaraiOTc K BaSei BnDeokampe.
| 1 RMT-812 or Mnn RMT-809 | 2 RMT-809 | 3 RMT-809 | |
| 4 | 5 | 6 | 7 |
| 8 | 9 | 10 | 11 |
| 12 | 13 | ||
1 Wireless Remote Commander (1) (p. 155)
RMT-812: DCR-PC3E
RMT-809: DCR-PC2E
2 AC-VF10 power adaptor (1), Mains lead (1) (p. 12)
3 NP-FS11 battery pack (1) (p. 12, 15)
4 R6 (Size AA) battery for Remote Commander (2) (p. 156).
Serial port adaptor for "Memory Stick" (1), PC serial cable (1), AC adaptor for Serial port adaptor (1) (p. 112) DCR-PC3E only
6 "Memory Stick" (1) (p. 91) DCR-PC3E only
7 A/V connecting cable (1) (p. 35)
Lens cap (1) (p. 20)
9 21-pin adaptor (1) (p. 36)
10 Application software: PictureGear 3.2Lite (CD ROM) (1) (p. 112) DCR-PC3E only
11 DK-115 Connecting cord (1) (p. 16)
12 Battery terminal cover (1) (p. 15)
13 Cleaning cloth (1) (p. 143)
1 RMT-811 BeecnpoBODHyIyIbT
ДистанционогуУпразьнеля (1) (cTp. 155)
RMT-812: DCR-PC3E
RMT-809: DCR-PC2E
2 CeTeBoJ aAnTep AC-VF10 (1), npoBoJ 3JIeKTPoPntaHnI (1) (cTp. 12)
3БатAPEHbIбБLOKNP-FS11(1)(cTp.12,15)
4 BaTapeIka R6 (pa3Mepa AA) dIyIyIbTa dIcTaNtUOHnHO ynpaBHeHn (2) (cTp. 156)
5 Aaantep nocJeobateHoro nopTa dny "Memory Stick" (1), PC-wnyp nocJeobatoHoro coeHneHn (1), aanTp nepemehnOto kna aanTepa cepHnOHO npTa (1) (ctp. 112) TOnbKO moJeb DCR-PC3E
6 "Memory Stick" (1) (ctp. 91) TOnbko MoJeJIb DCR-PC3E
7 CoeHnTeIbHbI Ka6JIb ayDIO/BnDeo (1) (CTp. 35)
8 KpbiIka o6beKtNbA (1) (cTp. 20)
[9] 21-штbpbKOBьй aanTeP (1) (cTp. 36)
10 PnKnlaHoe nporpamMHOe o6ecneueHHe: PictureGear 3.2Lite (Kd I3Y) (1) (ctp. 112) TOnbKO moJeB DCR-PC3E
11 CoeHNHTeNbHbI WHyp DK-115 (1) (cTp. 16)
12 KpbiIka 6aTapeiHbIX KOHTaKTOB (1) (CTp. 15)
13 OuHCTnTeJIbHaT KaHb (1) (cTp. 143)

This chapter introduces you to the basic features of your camcorder. See the page in parentheses "() for more information.
1 Connecting the mains lead (p. 16)
Use the battery pack when using your camcorder outdoors (p. 15).
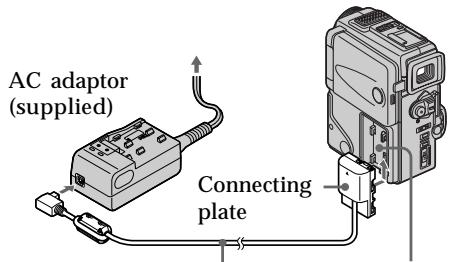
DK connecting cord (supplied)
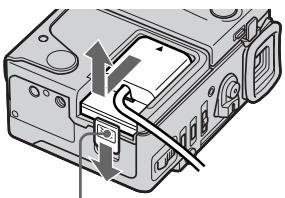
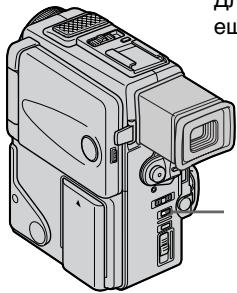
Slide the BATT RELEASE lever to remove the connecting plate from your camcorder.
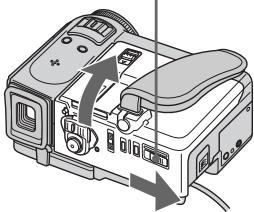
2 Inserting a cassette (p. 17)
1 Slide OPEN EJECT in the direction of the arrow and open the lid.

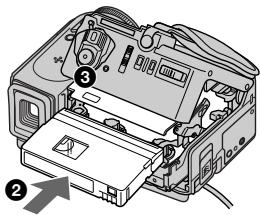
Push the middle portion of the back of the cassette to insert. Insert the cassette in a straight line deeply into the cassette compartment with the window facing out.
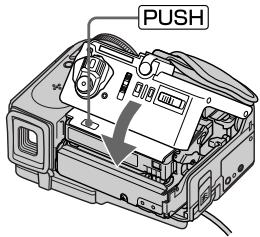
3 Close the cassette compartment by pressing the PUSH mark on the cassette compartment.
After the cassette compartment going down completely, close the lid until it clicks.
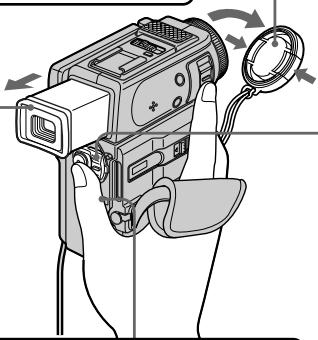
1 Remove the lens cap.
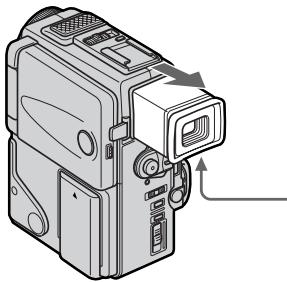
Viewfinder When the LCD panel is closed, pull out the viewfinder until it clicks. Use the viewfinder placing your eye against its eyecup.
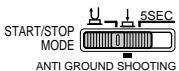
Set the START/STOP MODE switch to.
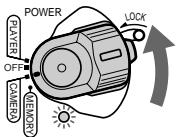
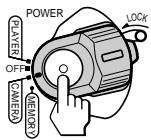
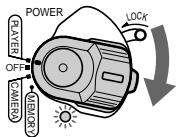
3 Set the POWER switch to CAMERA while pressing the small green button. The power lamp lights up.
4 Press START/STOP. Your camcorder starts recording. To stop recording, press START/STOP again.
4
Monitoring the playback picture on the LCD screen (p. 30)
1 Set the POWER switch to PLAYER while pressing the small green button.
Press of the touch panel to rewind the tape.

Press l of the touch panel to start playback.

NOTE
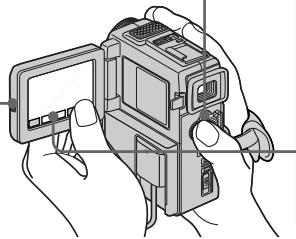
When using the touch panel, press operation buttons lightly with your thumb supporting the LCD screen from the backside of it. Do not press the LCD screen with sharp-pointed objects such as pens.
Press OPEN to open the LCD panel.
NOTE
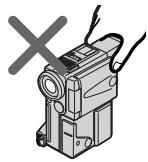
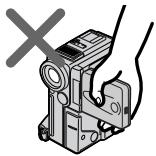
Do not pick up your camcorder by holding the viewfinder, the LCD panel or the battery pack.
PykoBoDCTBO IO 6bICTpOMy 3aIpyCKy

B daHno rIaBe npBedeHbIO cHOBHbIe cyHKcIMn BaSei BIndeokamepbI. PoIOpbHbIe CBeDeHNr npBedeHbI Ha cTpaHnue B KpyrlbIX cKo6KaX "( ).
Getting started Using this manual
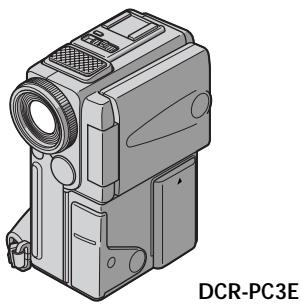
The instructions in this manual are for the two models listed in the table below. Before you start reading this manual and operating your camcorder, check the model number by looking at the bottom of your camcorder. The DCR-PC3E is the model used for illustration purposes. Otherwise, the model name is indicated in the illustrations. Any differences in operation are clearly indicated in the text, for example, "DCR-PC3E only."
As you read through this manual, buttons and settings on your camcorder are shown in capital letters.
e.g. Set the POWER switch to CAMERA.
When you carry out an operation, you can hear a beep sound to indicate that the operation is being carried out.
Types of differences
| DCR- | PC2E | PC3E |
| DV synchro-editing | — | ● |
| MEMORY mark* (on the POWER switch) | — | ● |
Provided
Not provided
- The model with MEMORY marked on the POWER switch is provided with memory functions. See page 91 for details.
Note on Cassette Memory
Your camcorder is based on the DV format. You can only use mini DV cassettes with your camcorder. We recommend that you use a tape with cassette memory CIII.
The functions which require different operations depending on whether the tape has the cassette memory or not are:
End search (p. 29, 34)
- Searching a recording by date - Date search (p. 58)
- Photo search (p. 61).
The functions you can operate only with the cassette memory are:
- Searching the boundaries of recorded tape by title - Title search (p. 60)
Superimposing a title (p. 71) - Making your own titles (p. 74)
- Labeling a cassette (p. 76).
For details, see page 122.
CM only
You see this mark in the introduction of the features that operate only with cassette memory.
Tapes with cassette memory are marked by C (Cassette Memory).
Note on TV colour systems
TV colour systems differ from country to country. To view your recordings on a TV, you need a PAL system-based TV.
Copyright precautions
Television programmes, films, video tapes, and other materials may be copyrighted.
Unauthorized recording of such materials may be contrary to the provision of the copyright laws.
Precautions on camcorder care
- The LCD screen and/or the colour viewfinder are manufactured using high-precision technology. However, there may be some tiny black spots and/or bright spots (red, blue or green in colour) that constantly appear on the LCD screen and/or in the colour viewfinder. These spots occur normally in the manufacturing process and do not affect the recorded picture in any way. Effective number of pixels is 99.99% or more.
- Do not let your camcorder get wet. Keep your camcorder away from rain and sea water. Letting your camcorder get wet may cause your camcorder to malfunction. Sometimes this malfunction cannot be repaired [a].
- Never leave your camcorder exposed to temperatures above 60^ (140^) , such as in a car parked in the sun or under direct sunlight [b].
- Do not place your camcorder so as to point the viewfinder or the LCD screen toward the sun. The inside of the viewfinder or LCD screen may be damaged [c].
Contents of the recording cannot be compensated if recording or playback is not made due to a malfunction of the camcorder, video tape, etc.
CoDepeJxHHe 3aIcN He MoXeT bItb KOMPENCHIOPOBAH B CnYae,ecIM 3aIcNcB INBOCpON3BVeHne H BeBInOJIHeHb N3-3a HEnCpABHOCTN BnDEOkAmePbl, BnDEOJIeHTb N.T.
Charging the battery pack
Use the battery pack after charging it for your camcorder.
Your camcorder operates only with the "InfoLITHIUM" battery pack (S series).
"InfoLITHIUM" is a trademark of Sony Corporation.
(1) Connect the mains lead to the AC adaptor.
(2) Align the hooks of the battery pack with the AC adaptor. Then fit the battery pack in the direction of the arrow.
(3) Connect the mains lead to mains. The CHARGE lamp (orange) lights up. Charging begins.
When the CHARGE lamp goes out, normal charge is completed. For full charge, which allows you to use the battery longer than usual, leave the battery pack in place for approximately one hour after the CHARGE lamp goes out.
3apka 6aTapeHoro 6loKa
IcnoIb3yIte 6aTapeHbI bIOK InBaIe BuaEeOKaMepbI nOcne erO 3apRKn.
BaSHA BnDeOKaMepa pa60TaET TOJIbKOc 6aTapeHbIM 6IOKOM "InfoLITHIUM" (cepN S).
Approximate number of minutes to charge an empty battery pack
PnIbI3nteIbHoe BpeM B MmHyTaX dIa 3apJIKN PONHOCTbHO pa3pJxKeHHoro 6aTapeHoro 6noka
Recording time / Bpemz
| Battery pack /БатAPEйный 6лok | Recording with the viewfinder /Запись с пomoцью видουнскатыль | Recording with the LCD screen /Запись с пomoцью заразаЖКД | ||
| Continuous*/Hерррывнай* | Typical** /Тличнай** | Continuous*/Hерррывнай* | Typical** /Тличнай** | |
| NP-FS11(supplied)/(приларетс) | 70 (60) | 35 (30) | 55 (50) | 30 (25) |
| NP-FS21 | 150 (135) | 85 (70) | 120 (110) | 60 (55) |
| NP-FS31 | 235 (210) | 120 (105) | 185 (170) | 95 (85) |
| NP-F10 | 60 (50) | 30 (25) | 45 (40) | 25 (20) |
| NP-F20 | 120 (105) | 65 (55) | 95 (85) | 50 (40) |
| NP-F30 | 175 (160) | 90 (80) | 140 (125) | 70 (60) |
Approximate number of minutes when you use a fully charged battery
Numbers in parentheses (·) indicate the time using a normally charged battery.
- Approximate continuous recording time at 25^ C( 77^ F) . The battery life will be shorter if you use your camcorder in a cold environment.
** Approximate number of minutes when recording while you repeat recording start/stop, zooming and turning the power on/off. The actual battery life may be shorter.
Playing time / BpemnBocnpn3BepeHn
| Battery pack /Батуейный 6лок | Playing time on LCD screen /Вразma Восюнзveдения на захра themselves | Playing time with LCD closed /Вразma Восюнзveдения до захлытом/XКД |
| NP-FS11(supplied) /(приларaelаця) | 60 (50) | 75 (70) |
| NP-FS21 | 130 (115) | 165 (145) |
| NP-FS31 | 200 (145) | 250 (235) |
| NP-F10 | 50 (45) | 60 (55) |
| NP-F20 | 100 (90) | 130 (115) |
| NP-F30 | 150 (135) | 190 (170) |
Approximate number of minutes when you use a fully charged battery
Numbers in parentheses (·) indicate the time using a normally charged battery.
The battery life will be shorter if you use your camcorder in a cold environment.
PnIbI3nteJIbHOe BpemB MInHyTaX npNcIb3OBAHm NIOHOCtBu 3apJxKeHHOro6aTapeHoro 6noka
Yncla BCKO6kax()yka3bBAHOBVPem npnNCpIb3OBAHm 6aTaepHOro 6Loka C HopMaJIbHOJ 3apJKOJ.
* PnIbIIN3IteIbHoe BpEM HnpepeBIBHOI 3aIINc Ipn TEmpepatyE 25^ (77^) .Pnp INoJIb3OBAHm BNDeOKaMepeBI XIOJNbIX ycNoBIAx cPoK cNjXbI bTaapeHOrO 6noka ByeT KOpOHe.
**Pn6bn3ntelbHoe BpeMBA MNHytax npn 3aINcN C HeoDnHOKpaTbIM NyckOM/ OCTaHOBKOI 3aINcN, Hae3dOM BInDeOKaMepbI INBkIOUeHNEM/BbIKIOUeHNEM NITaHNI. FAKTNIEcK cPoK cNyK6bl 3apJa 6bTaapeHoro 6Joka MoKeT 6bITb KOpOye.
PnIbIeBHO BpMaB MHyTax Pn IcNoIb3OBAHm NIOHOCTbHO 3apJKeHHoro 6aTaPeHOro 6loKa
LünФрbl BCKO6kax “()”yKa3bIBAIOT BpMa IprN cNoIb3OBAHmB 6aTaPeHOrO 6JOKa C HOPMaJIbHOH 3apHKnO.
PnI nCNoJIb3OBAHm BVNeOKeAMepbl B XoJIOnDhblX yCLOBnA cx cpoK cnJkb6 bTaapeHoro 6noka byedt Kopoue.
To remove the battery pack
Slide the battery pack in the direction of the arrow.
The battery life will be shorter when you carry out recording in a cold place or with the LCD panel opened. We recommend that you use the NP-FS21/FS31 large capacity battery pack (not supplied).
Plug the mains lead deeply
Be sure to plug the mains lead deeply into the terminal of AC power adaptor so that it is firmly locked. If there is a gap between the plug of mains lead and the terminal of AC power adaptor, it does not affect the efficiency of the AC power adaptor.
What is "InfoLITHIUM"?
The "InfoLITHIUM" is a lithium ion battery pack which can exchange data such as battery consumption with compatible video equipment. This unit is compatible with the "InfoLITHIUM" battery pack (S series). Your camcorder operates only with the "InfoLITHIUM" battery.
"InfoLITHIUM" S series battery packs have the InfoLITHIUM S mark.
"InfoLITHIUM" is a trademark of Sony Corporation.
Installing the battery pack
Install the battery pack to use your camcorder outdoors.
(1) While sliding BATT RELEASE in the direction of the arrow ①, slide the battery terminal cover in the direction of the arrow ②.
(2) Insert the battery pack in the direction of the arrow.
YcTaHOBka 6aTapeHoro 6Joka
UcTaHOBnte 6aTapeHbI 6Jok dJa TOrO, UTo6bl IcNoJIb3ObaTb BaSy BnDeOkamepy BHe NOMEueHna.
To remove the battery pack
The battery pack is removed in the same way as the battery terminal cover.
Note on the remaining battery time indicator The remaining battery time indicator on the LCD screen or in the viewfinder roughly indicates the recording time. The indicator may not be correct, depending on the conditions in which you recording. When you close the LCD panel and open it again, it takes about 1 minute for the correct remaining battery time to be displayed.
Note on battery terminal cover
To protect the battery terminals, install the battery terminal cover after the battery pack is removed.
Connecting to the mains
When you use your camcorder for a long time, we recommend that you power it from the mains using the AC adaptor.
(1) Connect the supplied connecting cord to the DC OUT jack on the AC adaptor.
(2) Slide the connecting plate in the direction of the arrow.
(3) Connect the mains lead to the AC adaptor.
(4) Connect the mains lead to the mains.
To remove the connecting plate
The connecting plate is removed in the same way as the battery pack.
WARNING
The mains lead must only be changed at a qualified service shop.
PRECAUTION
The set is not disconnected from the AC power source (the mains) as long as it is connected to the mains, even if the set itself has been turned off.
Note
Keep the AC adaptor away from your camcorder if the picture is disturbed.
Using a car battery
Use Sony DC Adaptor/Charger (not supplied).
ДЯ CHATNЯ COEINHHTeBHOJ ПlaCTNHbI
CoeHnTeBHa nlaCTnHa cHmaeTc TaKIM Kne 6pa3M KaN 6aTapeHb 6LoK.
BHIMAHNE
ПобODЗЛЕКТРОПТАнИСLEДУET3AmEHrTOЛБКВМасторсКО KBaINФицрOBaHHOrO6CnLYЖИBAHЯ.
IPEIOCTEPEXEHNE
Annapat He OTKJIIOUaETcA OT NCTOUYHnKa nepemehHoro TOKa (3NEKTPuYeCKoC CETn) Do Tex nop, nOKa OH NOCDoeINHeN K 3NeKTPuYeCKoC CETn, dJaKe ecIn cAm annapapat N BbIKNoUeH.
PpmeaHn
Ecni n3o6paXeHne nCKaXeHo, OToDbNbTe ceTeBOI aanTep nepemehnHO TOKa IOnaJIbSe OT BnDeOkAmepbl.
UcnoJb3ObaHne aBTOMo6nJbHOro aKKymyIaTopa
IcnoJIb3yIte aanTep/3apAnHoe yCTpoIcTBO nocToHHoro Toka Sony (He npnlaraeTc).
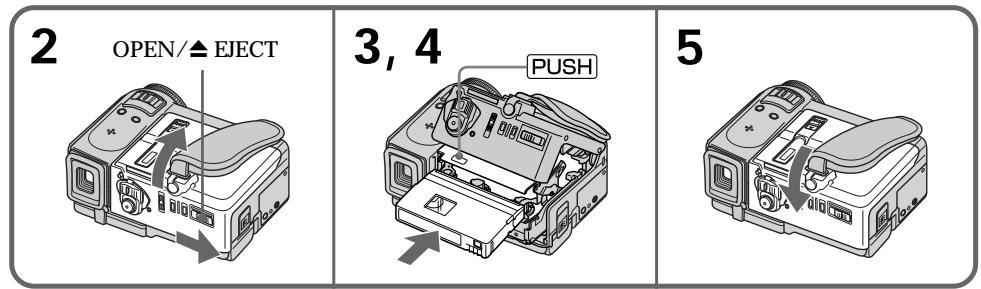
Step 2 Inserting a cassette
(1) Prepare the power supply (p.12).
(2) Slide OPEN/▲ EJECT in the direction of the arrow and open the lid. The cassette compartment automatically lifts up and opens.
(3) Push the middle portion of the back of the cassette to insert. Insert the cassette in a straight line deeply into the cassette compartment with the window facing out.
(4) Close the cassette compartment by pressing the PUSH mark on the cassette compartment. The cassette compartment automatically goes down.
(5) After the cassette compartment going down completely, close the lid until it clicks.
Пун=kT 2 YctaHOBKa KaCCETbl
(1)ПоДгOTOBbTe ИСТОчнК ПИТанЯ (Стр. 12).
(2)ПередиьтpeпеклочаелOBEN/ EJECTBнанравленистрелк.Касець OTCEK abTOMATUcheckn ПОДHIMETсВВерхИ OTKpoETcR.
(3)HaxmTe nocpeDnHe 3aDHei CTOpOhbl Kaccetbl, YTObI BCTaBNTb ee. BCTaBte Kaccety no npraMoB bKaccetHbI OTCek DO yOnpa,Tak YTObI OKoWky 6blNo 6bpaueHo HapyKy.
(4)3aKpOte KaccetHbI OTCeK,HaXaB MeTKy PUSHHaOTcKe.KaccetHbIOCTe ABTOMATUHeCKOnYCTNTCBHN3.
(5)Посл.TORO,КakKacceTHbОТсЕК onyCTNTcR NOJHOCTBIOBHN3,ЗakpoTKe KpbIshky TaK,чTOбla OHa 3aUeJIKNHyIaNbC.
To eject a cassette
Follow the procedure above, and take out the cassette in step 3.
Notes
- Do not press the cassette compartment down. Doing so may cause malfunction.
- The cassette compartment may not be closed when you press any part of the lid other than the PUSH mark.
When you use mini DV cassette with cassette memory
Read the instruction about cassette memory to use this function properly (p. 122).
To prevent misoperation of your camcorder Set the POWER switch to OFF when you insert and eject a cassette.
To prevent accidental erasure
Slide the write-protect tab on the cassette to expose the red mark.
ДлгИЗВLEЧЕНЯΚССТБI
CneyuTe BblweoncaHno npoceDype n BblbTe KacCeTy B nyHKTe 3.
PpimueaHn
- He HaxkmaIte BnI3 KaccTeHbI OToCek. 3To MoKcET pInBecTn K HEnCnpaBHOCTN.
- KaccTeHbIOTcK MoKeT He 3aKpbITbC8,ecn BbI HaxMeTe KaKyIO-Ni6o DpyrYIO YacTb Ha KpbIiKe,aHe MeTKy PUSH.
PnncnoIb3OBAHnn KacceTb mini DV C KACCETHOJ nAMrTbIO
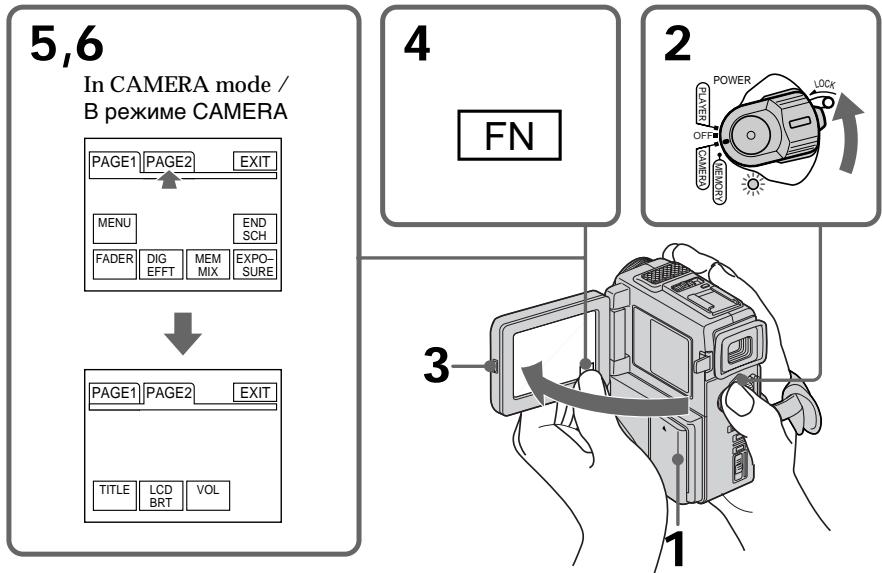
Step 3 Using a touch panel
Your camcorder has operation buttons on the LCD screen. Touch the LCD panel directly to operate each function.
In the recording/playback mode
(1) Prepare the power supply (p. 12).
(2) Set the POWER switch to CAMERA (in the recording mode)/PLAYER (in the playback mode) while pressing the small green button.
(3) Press OPEN to open the LCD panel.
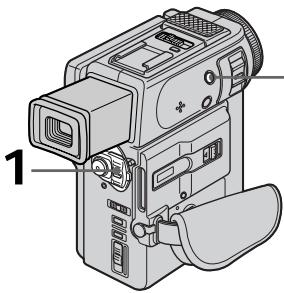
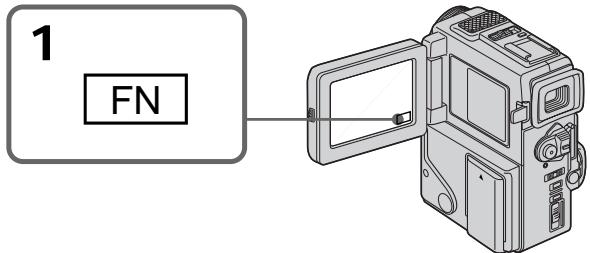
(4) Press FN. Operation buttons appear on the LCD screen.
(5) Press PAGE2 to go to PAGE2. Operation buttons appear on the LCD screen.
(6) Press a desired operation item. Refer to relevant pages for each function.
BaSHA BnDeokamepa Imeet KhoNk ynpabLeHnHa 3KpaHe KKД. TporaiTe HEnocpeIcTBeHNo naHelb XXД ДЯ уnpablenHa KaKdoiФyHKuEi.
B pexnme 3aHcN/BOcnpOn3BeDeHn
(1)Под�отовпей сточник петань (ст. 12).
(2)HaximamaIeHbkyIO 3eIeHyIO KHOIIKy, yctahOBInTe nepeKlIoUaTeIb POWER B noloxKeHne CAMERA (B pexIme 3aIncn)/ PLAYER (B pexIme BocpOIN3BeDHeHna).
(3)HaxMMTe KhoNkY OPEN nIa OTKpbBaHnnaHeJI XKД.
(4)HaxmTeFN.Ha3kpaHeXKДnoBbTcKaHONKynpabJeHn.
(5)HaXMMTe PAGE2ДЯп epexoJa K PAGE2. Ha 3KpaHe JKKД NOBByTcR KHONKn ynpaBHeHnA.
(6)HaKMTe Ha XeIaEmbI 3IeMeHT ynpabLeHn. O6paauTecb K COOTBeTCTByUoSei CTpaHnCe IJRA KaXdoI fYHKuIN.
To return to FN
Press EXIT.
To execute settings
Press EXEC or OK.
To cancel settings
Press OFF to return to PAGE1/PAGE2.
- When using the touch panel, press operation buttons with your thumb supporting the LCD screen from the back side of it or press those buttons lightly with your index finger. Do not press them with sharp-pointed objects such as pens.
- Do not touch the LCD screen with wet hands.
- If FN is not on the LCD screen, touch the LCD screen lightly to make it appear. You can control the display with DISPLAY/TOUCH PANEL on your camcorder.
- When operation buttons do not work even if you press them, an adjustment is required (CALIBRATION) (p. 145).
- When the LCD screen gets dirty, use the supplied cleaning cloth.
When executing each item
The green bar appears above the item.
If the items are not available
The colour of the items changes to grey.
Touch panel
You can operate with the touch panel using the viewfinder (p. 120).
Press FN to display the following buttons:
In CAMERA mode
| PAGE1 | MENU, END SEARCH, FADER, DIGITAL EFFECT, MEMORY MIX (DCR-PC3E only), EXPOSURE |
| PAGE2 | TITLE, LCD BRIGHT, VOLUME |
In PLAYER mode
| PAGE1 | MENU, LCD BRIGHT, VOLUME, END SEARCH |
| PAGE2 | TITLE, DIGITAL EFFECT |
See p. 91 for MEMORY mode.
Приимechanicals
-Пи ИСПОЛБЗOBAHМ сEHСOPHОи панели
нжимаTe KНОПКУ уральеня 6ОльшIM
пальем, подерхИВая зкран XXДс 3адней
сторны ил лergо нажимаTe 3ТИ KНОПК
ВашIM yka3aTeЛьнIM пальем. He
нжимаTe Иx 3aoCTpeHHbIM пeДметам,
тakими, кAKшAPIKOBble ручКI.
- He trpərənte əkpan JKKД mokpbIM pykam.
- Ecni KhoNkFN HET Ha 3KpaHe KKД, cnerka doTpoHbTeCbdo 3KpaHa KKД, YTObI OHa nOBnCra. Bbl MoXeTe ynpaBnTb DnCnPneem C nOMObIO DISPLAY/TOUCH PANEL Ha BaSei BnDeOkampe.
Korda kHONkyn ynpaBneHnHe pa6oTaIOT, daxe ecIn BbInx HaxmaeTe,To Tpe6yeTcBbINOHNtbperylnpOBky (CALIBRATION) (ctp.145).
Bcnyae 3aqr3HeHna 3KpaHa KKД, BocnoJb3yntecb npnlaeraMoTkaHbO dNry OYNCTk.
PnBbInOpHeHHKaKdOrO nyHKTa
3eHeH a nonoCA nOBJIaETCa HaD 3JeMeHToM.
Ecnn 3nementb6ydt Heoctynhbl
LBeT 3JemeHToB N3MeHHeTcHa cepbI.
Cehcopna naneIb
Bb moKeTe ynpaBnTb ceHCOPHO nHaHEnIbO cNcNoIb3OBAHnEM BnuOnCKaTeJIa (Ctp. 120).
Haxmte KhONky FN dIy oTo6paXeHHa CJeDyUoNx KHOK:
B pexkme CAMERA
| PAGE1 | MENU, END SEARCH, FADER, DIGITAL EFFECT, MEMORY MIX (Товко мodyель DCR-PC3E), EXPOSURE |
| PAGE2 | TITLE, LCD BRIGHT, VOLUME |
B pexnme PLAYER
| PAGE1 | MENU, LCD BRIGHT, VOLUME, END SEARCH |
| PAGE2 | TITLE, DIGITAL EFFECT |
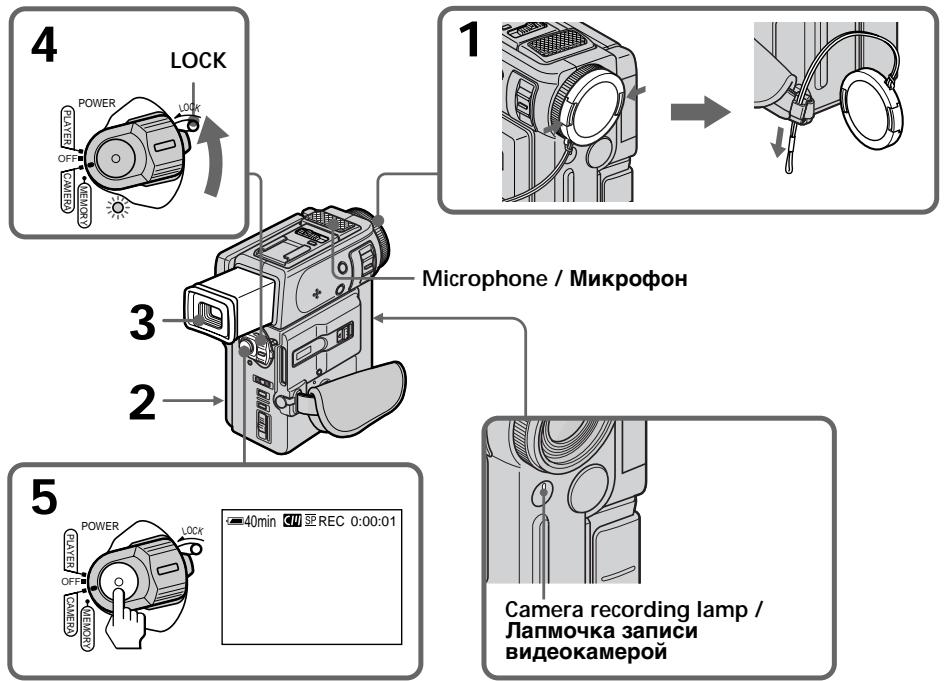
Your camcorder automatically focuses for you.
(1) Remove the lens cap and pull the lens cap string to fix it.
(2) Install the power source and insert a cassette. See "Step 1" and "Step 2" for more information (p. 12 to p. 17).
(3) Pull out the viewfinder until it clicks.
(4) Set the POWER switch to CAMERA while pressing the small green button. The power lamp under the POWER switch flashes, and then your camcorder is set to the standby mode. (It takes about five seconds.)
(5) Press START/STOP. Your camcorder starts recording. The "REC" indicator appears. The camera recording lamp located on the front of your camcorder lights up. To stop recording, press START/STOP again.
3a\Pncb n3o6paXeHnY
BaSha BnDeokamepa aBTOMaTnueckN BbINOJIHReT fOky 3a Bac.
(1)CHIMITE KpbIiHKy 06bEKTNBA N NOTAHINTHUHyp KpbIiHKN 06bEKTNBA, YTO6bl3aФИКСИРОВАТБе.
(2)YCTaHOBtE NCTOCHNK IITAHIN BCTaBBTe KACcTeTy. IOpIObHbIe CBeDEHnI pINBEHebl B“PHyKTe 1”“PHyKTe 2" (Ctp.12-17).
(3)BbItaunTe BnDOnckaTeJIb TaK, YTo6bl OH 3aUeJKNHynCra.
(4)Haxaba ManeBkyo 3eJeHyo KhoNky, yCTaHObITE nepeKIOUaTeIb POWER B noLoXeHne CAMERA. JAmnoUka nITaHn Ioi nepeKIOUaTeIem POWER 6ydet MIRaTb, a 3aTeM BaWa bIdeOkAmpa 6yDet yCTaHOBHeHa na pexIM rOTOBHocTn.(To 3aIMET OKOTO PAnu CeKYnd.)
(5)HaXMMTe KhONKy START/STOP.Ba7a BnDEOKaMepa HauHET 3aINcB. IOnBHTcN INDInKaTOp "REC". BbICBeNTTCaTKe NaMNoCHa 3aINcN, paCNOJIOKeHHa Ha nepeIeHne NAnHeN BnDEOKaMepbl.ДЯ OCTaHOBKn 3aINcN HaXMMTe KhONKy START/ STOP eue pa3.
After recording
(1) Set the POWER switch to OFF.
(2) Set the viewfinder back to the previous position.
(3) Eject the cassette.
(4) Remove the battery pack.
PocJIe 3aIncs
(1)YcTaHOBInTe NepeKJIIOUaTeIb POWER B noJIOKeHne OFF.
(2)BepHnTe BnOoNcKaTeJIb Ha3aD B npEckHee nOLOXKeHne.
(3) BbToJkHnTe kaccety.
(4) YdaJInte 6bTaapeHbI 6LoK
Notes
- Fasten the grip strap firmly. Do not touch the built-in microphone during recording.
- When the viewfinder is not pull out until it clicks, the picture does not appear in the viewfinder even if the LCD panel is closed.
Note on Recording mode
Your camcorder records and plays back in the SP (standard play) mode and in the LP (long play) mode. Select SP or LP in the menu settings (p.78). In the LP mode, you can record 1.5 times as long as in the SP mode. The picture is not distorted. When you record a tape in the LP mode on your camcorder, we recommend playing the tape on your camcorder.
While the power lamp is flashing
Images do not appear on the LCD screen or in the viewfinder.
Note on the LOCK (DCR-PC3E only)
When you slide the LOCK to the left, the POWER switch can no longer be set to MEMORY accidentally. The LOCK is set to the right as a default setting.
To enable smooth transition
Transition between the last scene you recorded and the next scene is smooth as long as you do not eject the cassette even if you turn off your camcorder. When you change the battery pack, set the POWER switch to OFF.
When you use a tape with cassette memory, however, you can make the transition smooth even after ejecting the cassette if you use the END SEARCH function (p. 29).
If you leave your camcorder in the standby mode for 5 minutes while the cassette is inserted
Your camcorder automatically turns off. This is to save battery power and to prevent battery and tape wear. To resume the standby mode, set the POWER switch to OFF, and to CAMERA again.
When you record in the SP and LP modes on one tape or you record in the LP mode
- The transition between scenes is not smooth.
- The playback picture may be distorted or the time code may not be written properly between scenes.
Примейань
Плотно пирстенite ремьд захва видахамь. He п riskац�тесь BCtpoEHOMMy Mнрфоу BO Врмг 3aпис.
KOrda BnDOnCKaTeIb He BblDlnHyT Do
N0nIMn 3aSeJIKNBaHnI, M3O6paXeHne He
N0RnBnETcR B BnDOnCKaTeIe, Daxe ecnI
NaHeIb XXkD 3akpyTa.
PpimmeaHne no pexkmy 3anncn
Baawa Bndekamepa BbIOnHReT 3aIncb N Bocpnon3BeDeHne B pexkme SP (cTaHdapThoe Bocpnon3BeDeHne) N B pexkme LP (DolonrnpaOoee Bocpnon3BeHne).Bb6epnte KOMaNDy SP nII LP B yCTaHOBkax MeHIO (CTp. 78).B pexkme LP Bbl MoKeTe BbIOnHtB 3aIncb B1,5 pa3a DOnbWe NO BpeMeH, Yem B pexkme SP. N3o6paXeHne He 6yJeT NCKAKeHo. Ppi BblONHHeHn 3aIncs Ha JeHTy B pexkme LP Ha Baawen BnDeOkamepe peKoMeHdyetcR Bocpnon3BOJNTb 3Ty JeHTy TaKxe Ha Baawen BnDeOkamepe.
BTOBpMaK, KOrDa MURaEt LAmNoUcKa NITAHnN 13O6paKeHNe NoRbIaHToC H Na 3KpaHe KKД nJIu BviDOnCKaTene.
Adjusting the viewfinder
If you record pictures with the LCD panel closed, check the picture with the viewfinder. Adjust the viewfinder lens to your eyesight so that the indicators in the viewfinder come into sharp focus.
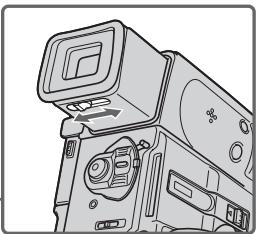
Pull out the viewfinder and move the viewfinder lens adjustment lever.
PerynipoBka BuidonckKaTeJIa
EcIn Bb6yTe 3aIncbIBaTb 3IO6paKeHn npi 3aKpbToI paHeI JKKD, npOBepbTe 3IO6paKeHne C NOMOcBIO BUNOnCKaTeJI. OTrpeYlnpyte ObEketNB BUNOnCKaTeJI B COOTBeTCTBm CO CBOIM 3peHnEM, TaK YTO6bl INHdkaTopbl B BNOnCKaTeJIe 6bln YeTKO cfoKycnpoBaHbl.
BbDnHbTe BnOuCKaTeJIb N NOBnRaIe pe bIyarpeRyInpOBKn O6BeKtNbA BnOuCKaTeJIa.
Note
When the viewfinder is not pull out until it clicks, the picture does not appear in the viewfinder.
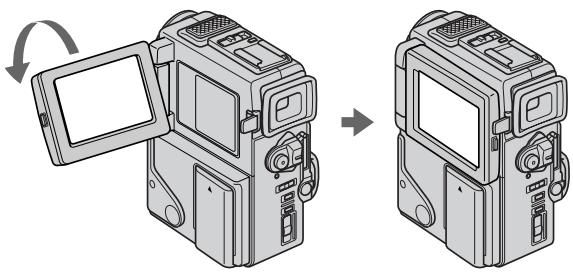
Shooting with the LCD screen
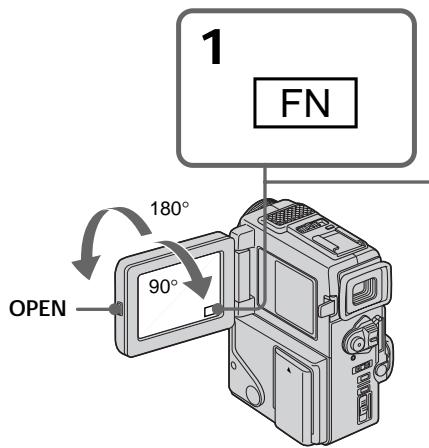
Press OPEN to open the LCD panel.
The LCD panel moves about 90 degrees to the viewfinder side and about 180 degrees to the lens side.
If you turn the LCD panel over so that it faces the other way, the indicator appears in the viewfinder and on the LCD screen (Mirror mode).
When closing the LCD panel, set it vertically until it clicks, and swing it into the camcorder body.
Note
Shooting with the LCD screen makes battery life shorter than using the viewfinder.
PpmeaHne
Korda BnDOnCKaTeJIb He BbIDBnHyT Do nO3nCIN 3aueJIknBaHnI, I3O6paXeHne He IIOBlaIeTcB B BnDOnCKaTeJIe.
CbeMka nOmoUbIO 3KpaHa KKd
HaxmTe KhoNky OPEN nIa OTKpbBaHnnaHeI XKJ.
PnaHJI KKJ MOKeT NepeBnRaTbCra PnIMepHO Ha 90 rpaDycOB B CTOPOHY BuOnckaTeI N npMepHOHa 180 rpaDycOB B CTOPOHY oBeKTbBa. EcII Bbl NOBepHe TnaHJI KKK TaK, YTO 6yDet HnPaBnEHa B DpyrIcTOPOHy, B BuOnckaTeIe N Ha 3kpaHe KKJ NoBHTcN INDkaTop (3epKaJIbHbI peXmM).
Pn3aKpbBaHnn naneJXKd yCTaHObnte ee BepTKaJIbHo, nOKa He pa3daCTcra 9eJIyOK, a 3aTe m npncOeDHHte ee K KopnyCy BnuDeOKaMepbl.
PpmeaHne
Cbemka cnnojIb3OBAHnem 3KpaHa KKД deJaET cpoK cnYk6bl 6aTapeHoro 3apraKoPoe, Yem npu nCNoIb3OBAHnBnDOnCKaTeJI.
Adjusting the brightness of the LCD screen
(1) In the standby/recording mode, press FN and select PAGE2 (p. 18).
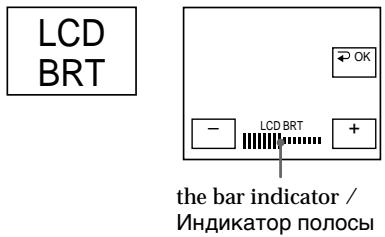
(2) Press LCD BRT. The screen to adjust the brightness of the LCD screen appears.
(3) Adjust the brightness of the LCD screen using - / +
- : to dim
+: to brighten
(4) Press OK to return to PAGE1/PAGE2.
PerynpoBka npKocTn 3KpaHa KKd
(1)B pexime roTOBHOCTN/3aIINcH aXmTe KhoNky FN u Bb6epuTe PAGE2 (ctp. 18).
(2)HaxmTe LCD BRT. IOnBnTc3KpaH dIpeRyInpOBKn npKoCTn 3KpaHa KKД.
(3)Отreyлару Teяркocт b ekpaHa JКД c nCNoJIb3OBAHnEM -/+
TEMHEE
+: Apye
(4)HaxmTe OKДЯ Bo3BpaTa K PAGE/1/ PAGE2.
2,3
To return to FN
Press EXIT.
Note
When using the LCD screen except in the mirror mode, the viewfinder automatically turns off.
When you use the LCD screen outdoors in direct sunlight
The LCD screen may be difficult to see. If this happens, we recommend that you use the viewfinder.
When you adjust angles of the LCD panel Make sure if the LCD panel is opened up to 90 degrees.
Picture in the mirror mode
The picture on the LCD is a mirror-image.
However, the picture will be normal when recorded.
During recording in the mirror mode ZERO SET MEMORY on the Remote
Commander does not work.
ДЯ BOЗБРАВ NOJIOЖЕНЕ FN
HaxmTe KhoNky EXIT.
PpimueaHne
KhoNka ZERO SET MEMORY Ha nyIbTe duCTaHIOHHO ynpabLeHn He pa6oTaet.
Indicators in the mirror mode
The STBY indicator appears as 11 and REC as
- Some of the other indicators appear mirror-reversed and others are not displayed.
When you press FN
The does not appear on the LCD screen or in the viewfinder.
LCD screen backlight
You can change the brightness of the backlight.
Select LCD B.L. in the menu settings (p. 78).
Even if you adjust the LCD screen backlight or brightness of the LCD screen
The recorded picture will not be affected.
Using the zoom feature
Move the power zoom lever a little for a slower zoom. Move it further for a faster zoom.
Using the zoom function sparingly results in better-looking recordings.
"T" side: for telephoto (subject appears closer)
"W" side: for wide-angle (subject appears farther away)
HndkaTopbI B 3epKaIbHOM peKIme
HnDnKaTOp STBY nOBnTcB BnDe IIO, a HnDnKaTOp REC BnDe .HeKoTOpBe npyrne HnDnKaTOpbl NOBbTcB 3epKaIbHo OTObpaKeEHOM BnDe, a HeKoTOpBle N3 HNX He 6ydyT OTobpaKaTaCBa COBCem.
Korda Bbl Haxnmaete KhoNky FN
He 6yTeT NOBbTbCn Ha 3KpaHe KKД nIi B BuONCKaTeNe.
3aHnI IOcBETka 3KpaHa KKd
BbMOKeTe N3MeHrTb RaKoCTb 3aDHei NOcBETKn. BbIePnte KOMaHdy LCD B.L. ByctaHOBkax MeHIO (Ctp.78).
Zoom greater than 10× is performed digitally, if you set D ZOOM to ON in the menu settings.
The digital zoom function is set to OFF as a default setting. (p. 78)

Hae3d BnDEOKaMepb60Jee 10x BbINHHeTcA uΦpOBbIM MeTOdOM,ecNl Bby UCTAHOBNTe KOMaHdy D ZOOMB nIOnoKeHne ON ByctahOBkax MEHO. YcTaHOBKa NO yMOJUaHNIO dJIyFHyKcIMn CΦpOBOrO BapNoOObEKeTKBa COOTBeTCTByET nIoJooKeHHIO OFF (ctp.78).
The right side of the bar shows the digital zooming zone.
The digital zooming zone appears when you set D ZOOM to ON. /
Правая Сторна пося на заразан.
NOKa3bIbaeT 3OHy LmfoBooT TpaHcfoKaun.
3OHa ZnФровТрансфokаци NOBvTcA,ecN Bby UCTaHOBITe KOMaHdY D ZOOMВ
noJoxKeHne ON.

When you shoot close to a subject
If you cannot get a sharp focus, move the power zoom lever to the "W" side until the focus is sharp. You can shoot a subject that is at least about 80~cm (about 2 feet 5/8 inch) away from the lens surface in the telephoto position, or about 1cm (about 1 / 2 inch) away in the wide-angle position.
Notes on digital zoom
- Digital zoom starts to function when zoom exceeds 10 × .
- The picture quality deteriorates as you go toward the "T" side. Set D ZOOM to OFF in the menu settings. Otherwise the digital zoom activates without notice (p. 78).
START/STOP MODE setting
: Recording starts when you press START/ STOP, and stops when you press it again (default setting).
ANTI GROUND SHOOTING Your camcorder records only while you press START/STOP. Use this mode to avoid recording unnecessary scenes.
5SEC: When you press use this mode to START/ STOP, your camcorder records for 5 seconds and then stops automatically.

PnCbemKe oBeKta c 6n3KOro noloxehn
EcJn BbI He MoKTe NOnyUHTb YcTKoI
fOkycnpoBKN, NepeDINHbTe PbYar nPBOJHO
BapNoO6BeKTbA CTOPHy W" Do NOnyEHN
YcTKoI fOkycnPOBKn. Bbl MoKTe BblONHrTb
CbEMky O6bEKA B NOnOxEHN TneF0TO,
KOTOpBb IOTcONt NO KpaHHeM Mepe Ha paccToaHm 80 CM OT NobepxHocTHn Ob6eKTHBa HnX Je
OKOJO 1 CM B NOnOxEHN ShIpOKoyroJbHO RbDa.
- You cannot use the fader function in the 5SEC or mode.
- The time code does not appear in the 5SEC mode.
To extend the recording time in the 5SEC mode Five dots ( ) appear, and then disappear at a rate of one per second. To extend the recording time, press START/STOP again before all the dots disappear. Recording continues for about 5 seconds from the moment you press START/STOP.
Примейань
- BbI He MoXeTe IcNoJIb3OBA Tb cyHKUIO feiepa B pexKmE 5SEC nIIN pexKmE
BpeKIme 5SEC cHTyK JIeHTbI He NOABJIaETcA.
Indicators displayed in the recording mode
HДиKaTOpbl, OTo6paXaEmbIe BpeXmte 3aIncN
The indicators are not recorded on tape.
Инданахь He 3аисьВаюТС на Лемпу.
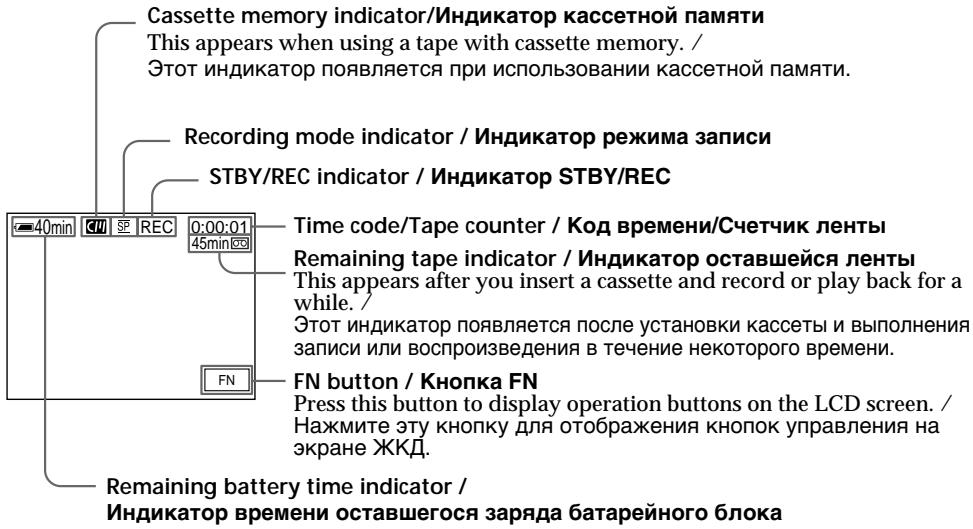
Time code
The time code indicates the recording or playback time, "0:00:00" (hours : minutes : seconds) in CAMERA mode and "0:00:00:00" (hours : minutes : seconds : frames) in PLAYER mode. You cannot rewrite only the time code.
Remaining tape indicator
The indicator may not be displayed accurately depending on the tape.
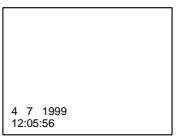
Recording date and time
Recording date and time will not be displayed on the LCD screen during recording. It is recorded on the tape automatically and displayed when you press the DATA CODE button on the remote commander during playing back.
KoDbpeMeHH
KoI BpemeH yka3bIbaeT Bpem 3aIncn IINBocnpOn3BeJeHnA,“0:00:00”(aCbI,MHyTbI,ceKyHdbI)BpeXIMe CAMERA n“0:00:00"(aCbI,MHyTbI,ceKyHdbI,KaIpbI)BpeXIMePLAYER.Bbl He moKeTe nepe3aIncatb ToIbkoKOd BpemeHn.
Hndkatop octabweeca JIeHTbI
INHnKaTOp MoKcTe TOnHO He OTo6paKaTbCBA3aBNCIMOCTN OTJeHTbl.
Data n Bpem 3anncn
When you shoot a subject with the light source behind the subject or a subject with a light background, use the backlight function.
Press BACK LIGHT in the recording or standby mode.
The indicator appears in the viewfinder or on the LCD screen.
To cancel, press BACK LIGHT again.
CbeMa o6BeKToB c 3aHnei noDCBeTKoI (BACK LIGHT)
EcIn BbI BbIOJIHReTe CbEMKy o6BeKta C nCTOCHNKOM CBETA NO3aDi Hero NnJx Ke o6BeKTA CO CBETNbIM FOHOM, INoNlb3yIte FyHKUIO 3aDHe NIOCBETKn.
HaxmTe KhONky BACK LIGHT BpeKIme 3aIncn nn peKIme OxuJaHn.
B BuOnckatene nn Ha 3KpaHe KKJ NoRbntc nHdkatop.
IIra OTMeHbI HaxmTe KhONky BACK LIGHT
eue pa3.
BACK LIGHT
If you press EXPOSURE and MANUAL when shooting backlit subjects
The backlight function will be canceled.
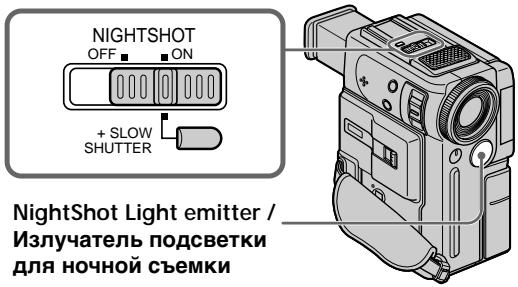
Shooting in the dark (NightShot)
The NightShot function enables you to shoot a subject in a dark place. For example, you can satisfactorily record the environment of nocturnal animals for observation when you use this function.
While your camcorder is in the standby mode, slide NIGHTSHOT to ON.
and "NIGHTSHOT" indicators flash on the LCD screen or in the viewfinder. To cancel the NightShot function, slide NIGHTSHOT to OFF.
EcInn Bbl NaXMeTe KHOJKN EXPOSURE mnnMANUAL npn BbIIOJIHeHn CbeEMKnOBBeKToB C 3aDHe NIOcBETKOIN
Функцязднй посветкбудт OTмehа.
CbemKa B TEMHOTe (Hoyna CbemKa)
Функци Ночис CBemkn no3BONeT Bam BblONJIrTB cbemky obkeTOB B Temhblx MecTaX. Hanpimep, Bbl cmoKTe C ycnexom BblONJIrTB cbemky HOUHbIX KINBOTbIX ДЯн Ha6JIIODeHn npi nCNoJIb3OBAHH DAHHOfФункци.
BTO BpemK, KOrda BnIeOkaMepa HaxoDITcBpeKIMe OxNDAHnI, nepeDbINbTepeKIOUOaTeIb NIGHTSHOT B noLoXeHne ON. INdAnkTopbl n "NIGHTSHOT" NaHyTmRaTb Ha 3KpaHe KKД nIiB V BnIoONcKaTeIe.ДЯOTMeHbФyHKsHn HOHoi CbEmKnpepeDbINbTe pepeKIOUOaTeIb NIGHTSHOT BnoLoXeHnOFF.
Using + SLOW SHUTTER
The NightShot +Slow shutter mode makes subjects more than four times brighter than those recorded in the NightShot mode.
(1) Slide NIGHTSHOT to ON in the standby mode. indicator appears in the viewfinder or on the LCD screen.
(2) Press +SLOW SHUTTER until the desired NIGHTSHOT indicator flashes. The indicator changes as follows: (NIGHTSHOT) (NIGHTSHOT1) (NIGHTSHOT2) (NIGHTSHOT) To cancel the NightShot +Slow shutter mode, slide NIGHTSHOT to OFF.
Using the NightShot Light
The picture will be clearer with the NightShot Light on. To enable NightShot Light, set N.S.LIGHT to ON in the menu settings (p. 78).
Notes
- Do not use the NightShot function in bright places (ex. outdoors in the daytime). This may cause your camcorder to malfunction.
- When you keep NIGHTSHOT set to ON in normal recording, the picture may be recorded in incorrect or unnatural colours.
- If focusing is difficult with the autofocus mode when using the NightShot function, focus manually.
- Do not cover the NightShot Light emitter when using the NightShot function.
While using the NightShot function, you cannot use the following functions:
- Exposure
- PROGRAM AE
-White balance
-Fader*
-Digital effect* - You cannot use these functions only in the NightShot +Slow shutter mode.
Shutter speed in the NightShot +Slow shutter mode
| Indicator | Shutter speed |
| 1 (NIGHTSHOT1) | 1/12 |
| 2 (NIGHTSHOT2) | 1/3 |
IcnoIb3ObaHnepexma+SLOWSHUTTER
PexIM HcHHO CbEMKn +MeIeHHoro 3aTbopa n03BOJIaET CJIeAaTB OBeKbTI 6OJIe YcEM B ueTbIpe paa3a Ipue, YcEM B cIyueae, ecNI Bbl 6ByTe BbIPOINHTB CbEMky B TEMHOTe C nOMOUIbO cyHKUIn HOcHOr cBEMKn.
(1)ПepeДВиньт eпeрклочател NIGHTSHOT B polnoхеонe ON B peshkime oxknadnna B BИоюckaтete nln Ha 3кpahe XXKД. ПогвNTсЯнДмКATOp
(2)Haxmaime KhoNky ^+ SLOW SHUTTER do tex nop, noka He hauheT MnaTaB hyxhbiu HnDkaTop NIGHTSHOT. UHdikatop 6ydt E3meHrtbcra CneDuOUM o6pa30M: () (NIGHTSHOT) () (NIGHTSHOT1) () (NIGHTSHOT) () (NIGHTSHOT) () OTMeHbI pexmHa HOcHOn CbEmKn +MeJHeHHoro 3aTBopa nepeDbHbTe pepeKJIouaTeB NIGHTSHOT B noLoXeHne OFF.
IcnoJb3OBAHne IoDCBETKn IJRA HOUHOI CbeMKN
Изобрахенистанов,在BNKIOHHTBФУнКИПОнNOДСВЕТК.ДЯВКIOHOUENIФункIMNHOHONIOCBETKNyCTAHOBNTepeNKIOHATNE.N.S.LIGHTBnoLOXKeHNeONBYCTAHOBkaxMeHNO(CTP.78).
Приимейсан<|im_start|>
He nCnoJb3yIte cyHKUIO HcHoi CBEMKn B RpKnx MecTax (HaNPIMep, Ha yInCe B DHeBHOe BpeMa). 3To MoKet pNbEcTn K HeNCnPabBHOCTu BaWei BInDeOKaMepbl.
- Pn ydepkaHn yctahOBKn NIGHTSHOT B nOJoxeHN ON nnp HOpMaBnHO 3aIncn N3o6paXeHMe OMeT 6bITb 3aIncAo HHePpAIBNbBHX INI HHeCTeCTBeHHbIX cBeTax.
EcnnФokycnpoBk3aTpudHeBa B abTOMaTnueckOMpeKIMeIpiNINcNOJb3OBaHmI pHyHKUINHOuHouCbEMKn,BbINOJIHnTe φokycnpOBkyBpyHuYNo.
He 3akpbBaIte KpbIshKOJI 3MINTTep IIOcBETKnДЯ HOCHOH CbEMKN PnI NcONb3OBAHINФYHKUNHOHCHO BcEMKN.
PnHNCNoB3OBAHnn FyHKuNN HooHOB cBeMKN BbI He MoKTe NcNoB3OBAt bCneDuOne FyHKUN:
-3Kcno3nna
- PROGRAM AE
-Балансбелого
-Φeɪdεp
-LnФpOBoBOn 3ΦΦeKTeT
*BbHe MoXeTe NcNoJIb3OBAbT b3TN yHKnUu TOnbKO BpeKIMe HocHou CbEMKN+ MeDJIeHHOrO 3aTBOpA.
CkopocTb 3aTbopa B pexmHe HooHOn CbeMKN +MeIeHHoro 3aTbopa
| Индikatop | Сkopocь 3атвора |
| 1 (NIGHTSHOT1) | 1/12 |
| 2 (NIGHTSHOT2) | 1/3 |
The +SLOW SHUTTER button does not work:
- while the fader function is set or in use
- while the digital effect function is in use
- when NIGHTSHOT is set to OFF
- in the MEMORY mode (DCR-PC3E only)
NightShot Light
NightShot Light rays are infrared and so are invisible. The maximum shooting distance using the NightShot Light is about 3m (10 feet). The shooting distance will be twice or more in the NightShot +Slow shutter mode.
When recording in the mirror mode using NP-F10/FS11 battery
NightShot Light does not work.
END SEARCH
You can go to the end of the recorded section after you record.
(1) In the standby mode, press FN to display PAGE1 (p. 18).
(2) Press END SCH.
The last 5 seconds of the recorded section are played back and playback stops. You can monitor the sound from the speaker or headphones.
To return to FN
Press EXIT.
To stop searching
Press END SCH again.
End search function
When you use a tape without cassette memory, the end search function does not work once you eject the cassette after you have recorded on the tape. If you use a tape with cassette memory, the end search function works even once you eject the cassette.
If there is a blank portion in the recorded portion, the end search function may not work correctly (p. 122).
3aHcB n3o6paXeHnA
Khonka+SLOW SHUTTER he pa6oTaet:
-eCnIyCTaHOBNeHa NII INcNoJIb3YeTcA ΦyHKZIgΦeIepa
-eCINNCNIOB3yeTcra yHKUNIuΦpOBOrO 3ΦΦeKTa
-ecnnnepekkiouateIb NIGHTSHOT yctaHOBHeB nnoJxHne OFF
-B pexkme MEMORY (ToIbko moJeIb DCR-PC3E)
Iopcbetka dna HOHcBemKu
JyH NIOCBETKN IJI H OCHHO CbEMK N BJIOTCn INΦpakpaChbIMN I N03TOMY HeBIMbIMN.
MaKcImaJIbHoe paCCTOarHne IJr CbeMkn npn
NCIOJIb3OBAHmI IOCDBeTKn IJr HOHOr CbeMkn
paBHO pIIMePHo 3 M. B pexmHe HocHo
cyNepCbeMkn +MeIJIeHHoro 3aTBopa
pacCTOarHne IJr CbeMkn 6yDeT B Dba nII
60nee pa3 60JIbWe.
You can monitor the playback picture on the LCD screen. You can control playback using the Remote Commander supplied with your camcorder.
(1) Install the power source and insert the recorded tape.
(2) Press OPEN to open the LCD panel.
(3) Set the POWER switch to PLAYER while pressing the small green button. The power lamp lights up.
(4) Press to rewind the tape.
(5) Press to start playback.
(6) Adjust the volume following the steps below.
① Press FN to make PAGE1 appear (p. 18).
② Press VOL. The screen to adjust volume appears.
③ Press -/+ to adjust the volume.
- : to make the volume down
to make the volume up
(7) Press OK to return to PAGE1/PAGE2.
Bocnpon3BeDeHne JeHTbI
BbMoKTe KOHTpOJIPOBaT BOCpPOn3BOdIMoe
H3o6paXeHne Ha 3kPaHe KKД. Bbl MoKTe
KOHTpOJIPOBaT BOCpPOn3BOdIMoe
H3o6paXeHne C NcNoJb3OBAHNEM NylTa
DICTaHcUHOHOrO ynpabJeHnI, pRnlaerMOrO K BaWei BNDeokamepe.
(1)YCTaHOBNTe NCTOUYHK PINTAHN IN BCTaBBTe 3aINCAHNyIOJeHTy.
(2)HaxMMTe KhoNkOy OPEN nIa OTKpbBaHHn naHeJI NKKJ.
(3)Haximma ManeBkyio 3eJeHyIO KhoIky, yctaHObITe nepeKniOuataTe bPOwER B noLoXeHne PLAYER. 3aRopNTcJ lamNoQka nTAtAHN.
(4)HaxmTe KhONky Dny yckopeHHo nepemOTkn JIeHTbHa3a.
(5)HaKMMTe KHOHKnKy IIДЯ BKJIIOueHnRA BOCpnpO3BeDeHnI.
(6)Отруглипун Te rpoMkoCTb, cneун HIXKePnBVeDeHHbIM NYHKTam.
① HaxmTe KhoNky FN, YTO6bI NOABnlaCb cTpaHnca PAGE1 (ctp. 18).
② HaxmTe VOL. ПОВИТСЕкран peуліровки ргомкови.
③ Haxmnte - / + pypepynilpoBkn rPOMKoCTn.
When monitoring on the LCD screen You can turn the LCD panel over and move it back to the camcorder body with the LCD screen facing out.
Bo Bpem KOnTpoJHa 3KpaHe KKDbMoKeTe NOBepHyT naHeJIy npaBLeHnI npiDnHyTb ee o6paTHo Ha MeTo K KopnyCy BnDeOkampebl, TaK TTO 3Kpan JKKd 6yJeT o6paueH hapxky.
If you leave the power on for a long time Your camcorder gets warm. This is not a malfunction.
When you open/close the LCD panel Open/close the LCD panel vertically.
When monitoring in the viewfinder Turn the LCD panel over and move it back to the camcorder body with the LCD screen facing out, and pull out the viewfinder until it clicks (p. 120). In this case, the picture is not displayed on the LCD screen.
EcIn octabntb nHTaHne BKJIIOueHHbIM Ha dINTeIbHOE Bpemr
Baa Bndeokamepa CtaHET TenIIO. 3TO He ABnErcn HcNpabHOCTbO.
Korda Bbl OTkpbIBaTe/3akpbIBaTe nHaHeJIb KkI
OTKpbIbAaTe/3aKpbIbAaTe naHelen JKKD B BePTIKaJIbHOM NIOLOXeHm.
Korda Bbl ocyuectBnheTe KOHTpOJIb c nOMOsbU BnDOnCKaTeJH
To control the display of the screen indicators
Press DISPLAY/TOUCH PANEL on your camcorder or DISPLAY on the Remote Commander supplied with your camcorder. The indicators disappear on the LCD screen. To make the indicators appear, press DISPLAY/TOUCH PANEL again.
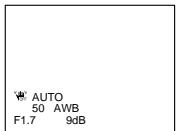
Your camcorder automatically records not only images on the tape but also the recording data (date/time or various settings when recorded) (Data code).
You can only operate with the Remote Commander.
Press DATA CODE on the Remote Commander in the playback mode.
The display changes as follows: date/time various settings (SteadyShot, exposure, white balance, gain, shutter speed, aperture value) no indicator
Not to display various settings Set DATA CODE to DATE in the menu settings (p. 78).
The display changes as follows: date/time no indicator
IcnoIb3OBAHne yHKcnn KoJa DaTbI
Ba7a BnDeokamepa ABTomatnueckn 3anncbIbaet He ToIbKO n3O6paKeHnHa JeHTy, HO TaKke I daHhble 3anCn (DaTy/BpeMnIIN pa3hle yCTaHOBKn npn 3anCn) (KoD DaTbI). Bbl MoKeTe NcNoJIb3ObTa 3Tu fYHKUIO TOnbKO c NOMOuIo NyIbTa DnCTaHNOHHoro ynpaBHeHn.
Haxmte KhoNky DATA CODE Ha nyIbTe DnCTaHUnOHOrO ynpabLeHnB PexKIme BOCpOn3BeDeHnA.
INDnkaun6ydetN3MeHrTbCnEduOuIM 06pa30m:
daTa/BpeMa pa3HbIe yCTaHOBKn (yCTOuYBaBcBeMka, 3KcNo3nUna, 6aJIaHC 6eJOrO, yCInJeHne,CKOpocTb 3aTBopa, BEnuHa dnaΦpaRmbI) 6e3 INHdNkauu
ДяТOrO,чTo6bI He OTo6paKaJIncb pa3JIuHbIe YcTaHOBKn
UcTaHOBnTe KOMaHny DATA CODE B noJIOKeHne DATE B yCTaHOBkax MeHIO (CTp. 78). INdIkaun6yJeT N3MeHArbCra CJeDyOuIm 06pa3oM:
DaTa/BpeMa 6e3 INHdNkaCmN
Note
The pictures taken on the "Memory Stick" are not recorded with various settings. (DCR-PC3E only)
Recording data
Recording data is your camcorder's information when you have recorded. In the recording mode, the recording data will not be displayed.
When you use data code function, bars (-- - - - ) appear if:
- A blank section of the tape is being played back.
- The tape is unreadable due to tape damage or noise.
- The tape was recorded by a camcorder without the date and time set.
Data code
When you connect your camcorder to the TV, the data code also appears on the TV screen (p. 35).
Various playback modes
To operate video control buttons, set the POWER switch to PLAYER.
To view a still picture (playback pause)
Press 11 /I during playback. To resume playback, press 11 /I again.
To advance the tape
Press >> / >> in the stop mode. To resume normal playback, press >>
To rewind the tape
Press 一 /in the stop mode. To resume normal playback, press 一
To change the playback direction
Press < on the Remote Commander during playback to reverse the playback direction. To resume normal playback, press .
To locate a scene monitoring the picture (picture search)
Keep pressing 440 /or 440 /during playback. To resume normal playback, release the button.
Ppimcayane
Ha ɪsəbpaXeHnʌx, 3aɪnɪcaHnɒhɪ Na "Memory Stick", paɪnɪchBle yCTaHOBn Ke 3aɪnɪcɪbɪaɪOτr. (Toŋbko Mɒeɪn b DECR-PC3E)
3aHcHbIe daHHbIe
3aIncaHbIe DaHbIe HecyT INHΦopMaζHIO 0 3aInc, BblONHeHNoB BaWe BnDeokamepoB. B peXIMe 3aInci DaHbIe OTo6paKaTaBc He 6yDyT.
EcIn BbI nCNoJIb3yTe ΦyHKuNIO KOA daHHbIX,TO NOBBArTcNOJOCbl(----),ecIN:
Bocnpo3BOOHTcH He3aIINcaHHbYuactOK HaJIeHTe.
- JeHt aBnIeTc H e YHTaEMo I3-3a IOBpeKdEHH NIN NOMex.
3aIncbHaJeHTy6bIaBbINOJIHeHa BnDeOkamepo6e3YCTaHOBKn DaTbI INBpeMeHN.
KoDaHHbIX
Korda Bbl noDcoeHHHe TaWy BuDeokamepy K TeLEBn3OpY, KOd DaHbIX TaKxE 6yTe NOBbTbcHa 3KpaHe TeLEBn3Opa (Ctp. 35).
IpepeMeHHbIe pexKmbI BOCnpOn3BeDeHn
Дяуnpавлика KMONКAMN BIVDEOKOHPTOЯ yctahobinte nepeKIOHATeB POWER B noJIoXeHne PLAYER.
To monitor the high-speed picture while advancing or rewinding the tape (skip scan)
Keep pressing 440 / while rewinding or 440 / while advancing the tape. To resume rewinding or advancing, release the button.
To view the picture at slow speed (slow playback)
Press on the Remote Commander during playback. For slow playback in the reverse direction, press < , then press on the Remote Commander. To resume normal playback, press
To view the picture at double speed Press × 2 on the Remote Commander during playback. For double speed playback in the reverse direction, press < , then press × 2 on the Remote Commander. To resume normal playback, press .
To view the picture frame-by-frame Press II on the Remote Commander in the playback pause mode. For frame-by-frame playback in the reverse direction, press To resume normal playback, press
To search the last scene recorded (END SEARCH)
Press END SEARCH in the stop mode. The last 5 seconds of the recorded section plays back and stops.
Video control buttons
Marks on your camcorder are different from those on the Remote Commander supplied with your camcorder.
Your camcorder :▶■,▶□,▶□
Remote Commander: , , ,
In the various playback modes
Sound is muted.
When the playback pause mode lasts for 5 minutes
Your camcorder automatically enters the stop mode. To resume playback, press /
Slow playback
The slow playback can be performed smoothly on your camcorder; however, this function does not work for an output signal from the DV OUT jack.
When you play back a tape in reverse
Horizontal noise appears at the center or top and bottom of the screen. This is not a malfunction.
Bocnpoun3BeDeHne JeHTbI
Дя KOHTPOnI N3O6paXeHnHa BbICOKo CKOpocTn BO BpeMa YcKOpEHHOIpemOTKn JHeTbI Bnepei IJI NaHa3aD (NONCK MeTOdOM IporoHa)
PnBocpOn3BeHnJeHTbIBo6paTHOM HnpaBHeHH
Ha 3KpaHe MoryT NOBuTbC ROPnSOHTaBhIe NOMEXN OENTchy NMe JBEBpXy N BHN3Y 3KaPaH. 3To He ABJRETC HeINCPaBHOCtBu.
Viewing the recording on TV
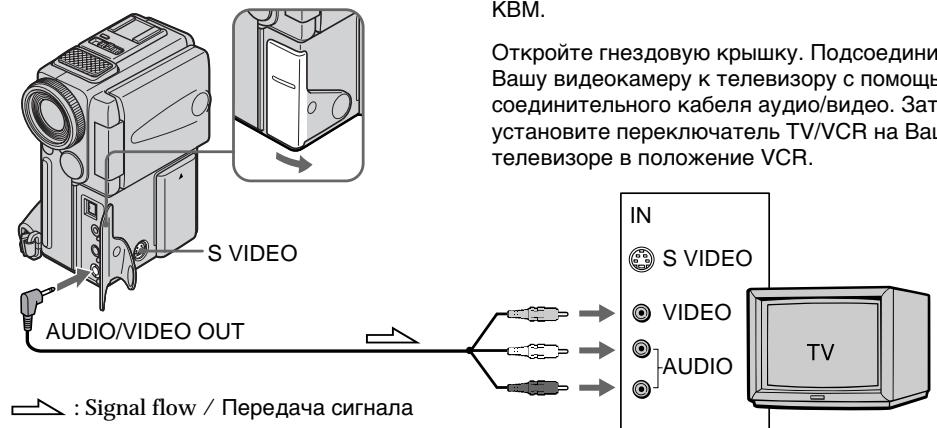
Connect your camcorder to your TV or VCR with the A/V connecting cable supplied with your camcorder to watch the playback picture on the TV screen. You can operate the playback control buttons in the same way as when you monitor playback pictures on the LCD screen. When monitoring the playback picture on the TV screen, we recommend that you power your camcorder from mains using the AC adaptor (p. 16). Refer to the operating instructions of your TV or VCR.
Open the jack cover. Connect your camcorder to the TV using the A/V connecting cable. Then, set the TV/VCR selector on the TV to VCR.
IoiocoeiHInTe Bauy BnDeokamepy K BaueMy TeLeBn3Opny nIN KBM c nomoubIO coeHNHTelbHorO ka6eJe aayIO/BnDeo, KOtOpby npnilaraetcK Bauey BnDeokamepe dIy IPOCSMOtpa BOCnpOn3BODMIMO r036paXeHnHa 3kPaHe TeneBn3Opa.Bbl MOxTe OnePupOBaTb KHOKNAMu ynpAbeHnB OBCpOn3BeDEHnEM TaKIM Xe CNOOCoM, KaK npuynpABNeHn BOCnpOn3BODMbIM I036paXeHnEM Ha 3kPaHe KKd.Ipn ynpAbeHn BOCnpOn3BODMbIM N3o6paXeHnEM Ha 3kPaHe TeneBn3Opa peKOMeHNdyETcN oDKNCHyTB nITaHne K Bauey BnDeokampe OT 3JIeKTPnueCKoT cTe c nOMouCbu aadntepa nepemehoro ToKa (CTp.16).CM.nHCTpyKzUIO no 3KcPnlyaataun Baewo TeneBn3Opa nIN KBM.
OTkpOte rHe3doBvU KoIbIku. IOncOeDInHnTe BaUy BnDeokamepy K TeNeBn3Opy C nOMoIbIcoEHNHTeIbHOrKa6eIayno/BnJeO. 3aTeM, yCTaHOBnTe nepeKnIOuATEb TV/VCR Ha BaWeM TeNeBn3OpE B nIoXKeHne VCR.
If your TV is already connected to a VCR
Connect your camcorder to the LINE IN input on the VCR by using the A/V connecting cable supplied with your camcorder. Set the input selector on the VCR to LINE.
If your TV or VCR is a monaural type
Connect the yellow plug of the A/V connecting cable to the video input jack and the white or the red plug to the audio input jack on the VCR or the TV. If you connect the white plug, the sound is L (left) signal. If you connect the red plug, the sound is R (right) signal.
EcIn BaW TeJIeBn3Op yKe IoIcoEiHHeN K KBM
IopdoeHnTe Bauy Bndeokamepy K BxoHomy rHe3dy LINE IN ha KBM c nOmoBIO coeHNHTeJbHoro Ka6eJra ayDIO/BnDeo, KOtOpB niPnlaerTc K Baueh BnDEOKamepe. YcTaHOBe TceNeKTop BxODHOro CnHaHa Ha KBM b noLoXeHne LINE.
Ecni BaW TeJIeBn3Op nJN KBM MOHOΦOHHueCKOro TUna
IoioceHInTe JKeIbIy IwTeKep coeHNHTeJIbHO Ra6eIa ayDIO/BuJeO K BxOJHOMy rHe3dy BnDeOcNHaJa, a 6eJIbI nn KpaChbI wTeKep K BxOJHOMy rHe3dy ayDIOcNHaJa Ha KBM nIITeBn3ope. EcIn Bbl noDCoeHNTe 6JIbI wTeKep, To Bbl noLyUte CnIHa KaHaJa L (JeBOr).A ecIn Bbl noDCoeHNTe KpacbI wTeKep, To Bbl noLyUte CnHaJa KaHaJa R (npaboro).
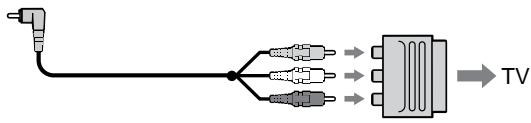
If your TV/VCR has a 21-pin connector (EUROCONNECTOR)
Use the 21-pin adaptor supplied with your camcorder.
EcInB BaWem TeJeBn3ope/KBM nMeetcra 21-7TbIpbKOBbl pa3beM (EUROCONNECTOR)
IcnoIb3yIte 21-7TbIpbKOBbl aIaNTep, npnlaeraMbl K BaWe BnDeokamepe.
If your TV or VCR has an S video jack Connect using an S video cable (not supplied) to obtain high-quality pictures. With this connection, you do not need to connect the yellow (video) plug of the A/V connecting cable. Connect the S video cable (not supplied) to the S video jacks on both your camcorder and the TV or the VCR. This connection produces higher quality DV format pictures.
To display the screen indicators on TV Set DISPLAY to V-OUT/LCD in the menu settings (p. 78). Then press DISPLAY/TOUCH PANEL on your camcorder. To turn off the screen indicators, press DISPLAY/TOUCH PANEL on your camcorder again.
EcIn B BaWem TeJIeBn3ope nI IN KBM IMeEeTc rHe3do S BvJeO.
BbIIOJIHnTe CoeINHeHne c nOmoUcbIO Ka6eJIa S BnDeo (He npInlaeraTcA) dNn NOyUeHnRA
BbICOKOKaueCTBeHHoro N3o6paXeHnra. Pn
DaHHOM CoeINHeHn Bam He HuxHo
NoCDoeINHrTB JeNTbI WTeKep (BnDeo)
CoEINHTeJIbHO rKa6eJIa ayDIO/BnDeo.
PiDCoeINHtKe6eJIb S BnDeo (He
npInaraeTcA) k rHe3dAm S BnDeo Ha BaSei
BnDEOkampe n Baem TeNEBn3ope nIi KBM.
To nDCoeINHeHne nO3BOJnET nOlyuHTb
BbICOKOKaueCTBeHHoe N3o6paXeHne fOpMaTa DV.
ДяоTO6paKeHЯИнДиKaTOpOBHa3KpaHe TeJIeBn3Opna
UcTaHOBnTe DISPLAY Ha V-OUT/LCD BVcTaHOBkax MeHIO (CTp.78). 3aTeM HaxMMTe DISPLAY/TOUCH PANEL Ha BaWei BnDeoKampe.ДЯВыКЛюЧЕнЯ 3KpaHbIX INdIkaTOpOB HaxMMTe DISPLAY/ TOUCH PANEL Ha BaWei BnDeoKampe chOba.
Photo recording
You can record a still picture like a photograph. This mode is useful when you want to record a picture such as a photograph or when you print a picture using a video printer (not supplied).
You can record about 510 pictures in the SP mode and about 765 pictures in the LP mode on a 60-minute tape.
Besides the operation described here, your camcorder can record still pictures on "Memory Stick"s (p. 99). (DCR-PC3E only)
(1) Set the POWER switch to CAMERA.
(2) In the standby mode, keep pressing PHOTO lightly until a still picture appears. The CAPTURE indicator appears. Recording does not start yet.
To change the still picture, release PHOTO, select a still picture again, and then press and hold PHOTO lightly.
(3) Press PHOTO deeper.
The still picture in the viewfinder or on the LCD screen is recorded for about seven seconds. The sound during those seven seconds is also recorded.
The still image is displayed in the viewfinder or on the LCD screen until recording is completed.
ΦOTOCbEMka
BbMOKeTe 3aINcBbTaB HEnoDnKHoe n06paXeHne pODo6HoΦOTorpaΦn.
JaHHbI pexHIM nOle3eH,ecnBbIXOTHe 3aINcblBaTb N3O6paXeHne B BVNeΦOTOCHMKa INJXKe IPN BbINOJIHEnN OITNeAeTKOB C NOMOsbIO BVDeONpINTepa (He npInnaeTcR).
BbMOxKeTe 3aIncatb Okono 510 n3o6paXeHn BpeXmE SP u OKoNo 765 n3o6paXeHn B peXmE LP Ha 60-MnHyThoi JeHTe.
Kpome npBBeHNoB BbIe Oepaun, Ba7a BnDeOKaMepa MOKeT BblOJIHNtB 3aINCb HnOJbNkHbIX n3o6paXeHn Ha "Memory Stick" (cTp.99). (ToJbKO moJeB DCR-PC3E)
(1)Установпейсяклочаель POWER в положене CAMERA.
(2)В ржиме окданаши држITE сlerka hajkaToи кноку PHOTO до tex nop, noka He nOBITcH HeNoDBrNkHoe n3o6paXeHne. ПогИТСЯ ИДИКaTOp CAPTURE. 3aIncb nOKa eSe He HauJaIacb.
ДяиИЗмeнEHNoIbNxHOrO
ИЗбрaxжЕнЯ OТусnte KhONky PHOTO,
ВьБepnTe HENoIbNxHoe I3ОБрaxжЕнe
CHOBA,a 3aTeM hAxMnTe n IdepXnTe cIerKa
HaxaToI KhONky PHOTO.
(3) Haxmnte KhoNky PHOTO cnJIbHee.
HEnoDBnXHoe n3O6paXeHne B
BnDOnCKaTeNe HnHa 3KpaHe KKd 6yDet
3aNcBbATbcr OkOIO cEMn cekyHd. B
TeYeHne 3Tnx CEMn cekyHd 6yDet
3aNcBbATbcr N 3ByK.
HenoDbnKHOe n3o6paXeHne 6ydet OTo6paKaTcB BnuOnCKaTeJe NIn Ha 3kpaHe KKD IO tex npa, noka He 6ydet 3aBepSeHa 3anCb.

2
CAPTURE

3
Notes
- During photo recording, you cannot change the mode or setting.
- During photo recording, you cannot turn your camcorder off or press the PHOTO button.
- When recording a still picture, do not shake your camcorder. The picture may fluctuate.
- The photo recording function does not work: - while the fader function is set or in use - while the digital effect function is set or in use
To use the photo recording function using the Remote Commander
Press PHOTO on the Remote Commander. Your camcorder records a picture on the LCD screen or in the viewfinder immediately.
To use the photo recording function during normal CAMERA recording
Press PHOTO deeper. The still picture is then recorded for about seven seconds and your camcorder returns to the standby mode. You cannot select another still picture.
If you record a moving subject with photo recording function
When you play back the still picture on other equipment, the picture may fluctuate.
When shooting in the dark
Attach the video flash (not supplied) to the accessory shoe.
PpimueaHn
- Bo BpemЯ ФпOTOCbEMKn Bbl He MoKeTe n3MeHrTb peXIM NJIY yCTaHOBKY.
- Bo BpemФOTOcBEmKbI He MoXeTe BbIKJIOuATb BaUy BnDEoKaMepy Nn HaxkMaTb KhONKy PHOTO.
-ПиЗЗИСН HeNoIbNIXHOrO I306paXeHnI He TpIcIte BaUy BInDeOkAmepy. I306paXeHnE MoKTe 6bITb HeyCTOnuHBbIM.
-ФункцифOTOCbEMKn He pa6OtaeT: -BTOBpemK,KOJa yCTaHOBJIeHa NIN NCNoIb3yETcFyHKZnFpeJepa.
-BTOBpMa,KOJa yCTaHOBHeHaNJIN NCNoJIb3yETcHФYHKUIMΦPOBbIX 3ΦΦEKTOB
ДлИ NCПОЛБЗОВАнгФУнкUMФOTOCБЕМКС NOMOUIIpyIbTaДиCTAHUNHOHOrOупавLEнг
HaKMMTe KhoNky PHOTO Ha nyIbTe
HnCTaHnOHHoro ynpabLeHn. Bawa
BnDeokamepa TOTcac Jke 3anuWet N3o6paXeHn
Ha 3kpane KKД nIn B BnDoNCkaTeNe.
ДлЯ Исторьоградункции ФотOCБЕМКИ BO Вразmaобчюн Запис CAMERA
HaKmTe KhONkY PHOTO nocJbHee. HenoDbVnxHoe n3o6paXeHne 6yDeT 3aINcBvBaTcB OKOLO cEMN cEkyH, a 3aTEM BnDEOKaMepa BepHeTcB PexIM OxuDaHn. BbI He CMOXeTe pIn 3tOM BbI6paTb dpyroe HenoDbVnxHoe n3o6paXeHne.
EcIn Bbl BbINONHReTe 3aNcB DBrKUeOc08 o6BeKtac NOMoUbO fYHKunf OTOCbeMKu
При ВOCПОНЗВЕДEHМ HeNoDВИЖНО и306рaxженя на дуroy annapaType и306рaxжене может 6ыт bHeYCTOМИБIM.
Pn CbemKe B TemHom MecTe
Printing the still picture
You can print a still picture by using the video printer (not supplied). Connect the video printer using the A/V connecting cable supplied with your camcorder.
Connect it to the AUDIO/VIDEO jack and connect the yellow plug of the cable to the video input of the video printer. Refer to the operating instructions of the video printer as well.
If the video printer is equipped with S video input
Use the S video connecting cable (not supplied).
Connect it to the SVIDEO jack and the S video input of the video printer.
EcIn B BnDeOpnpntepe NmEeTcBxOdHoe rHe3do S BnDeo
NcnoIb3yIte coeHNHTeHbI KabeJIb Ka6eJIb S BnDeo (He npinaraetc).PiOcEOHNITe erO K rHe3dy SVIDEO n KO BXoHOMy rHe3dy S BnDeo Ha BnDeOpnPHTepe.
Using the wide mode
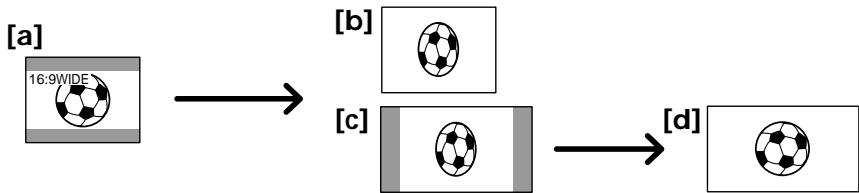
You can record a 16:9 wide picture to watch on the 16:9 wide-screen TV (16:9WIDE). Black bands appear on the screen during recording in 16:9WIDE mode [a]. The picture during playing back on a normal TV [b] or a wide-screen TV [c] are compressed in the widthwise direction. If you set the screen mode of the wide-screen TV to the full mode, you can watch pictures of normal images [d].
BbMOxKeTe 3aINcBtBbIPOKoΦopMaTHoe
n3O6paXeHne16:9 dIy npocMToPaHa
nIPOKO3KpAHOM TeLEBn3ope fOpMaTa16:9
(16:9WIDE).
Bo BpeMe 3aIncs B peXmE 16:9WIDE Ha
3KpaHe NOrBbTcY cepHbIe NOncBi [a].
N3O6paXeHne BO BpeM BAocPON3BeDeHnHa
HObUHOM TeLEBn3ope [b] IInn Ha
nIPOKO3KpAHOM TeLEBn3ope [c] 6yDet cKaTO
no OpiHne.EcNb By yCTaHObITe 3KpaHHbI
peXm MIPOKO 3KpaHORo TeLEBn3Opa B
NoHIOKpaHbI pexM, Bbl CMOxKeTe
Ha6NIODaTb N3O6paXeHn HOpMaJIbHorO
pa3Mepa [d].
(1) In the standby mode, press FN to display PAGE1 (p. 18).
(2) Press MENU, then set 16:9WIDE to ON in in the menu settings (p. 78).
(1)BpeXIME roTOBHOCTn HaxMnte KhoNky FN dIy OTo6paXeHnPAgE1 (ctp. 18).
(2)HaXMMTe KNONky MeHIO, a 3aTeM yCTaHOBNTe 16:9WIDE Ha ON b C B yCTaHOBkax MeHIO (cTp.78).
To return to FN
Press EXIT.
To cancel the wide mode
Set 16:9WIDE to OFF in the menu settings.
In the wide mode
You cannot select the old movie function with
DIG EFFT and the bounce function with FADER.
During recording
You cannot select or cancel the wide mode. When you cancel the wide mode, set your camcorder to the standby mode and then set 16:9WIDE to OFF.
Дя BOЗВраТВпОJOЖЕFN
HaxmTe KhoNky EXIT.
You can fade in or out to give your recording a professional appearance.
BbMOKeTe BbIOJNHTb PnABHO BBeDeHne N BbIEDeHne 3O6paXeHNA, YTO6bI PnJaTb BaewcBemKe npoceccnHaJIbHbI BnD.
[a]
REC
NORMAL FADER

M.FADER (mosaic) / (mo3aɪka)


BOUNCE* (Fade in only) / (ToIbKO nIaBHOe BBeJeHne I3O6paXeHHa)


OVERLAP (Fade in only) / (ToIbKO nIaBHOe BBeJeHne I3O6paXeHHa)


[b]
STBY
REC
MONOTONE
When fading in, the picture gradually changes from black-and-white to colour.
When fading out the picture gradually changes from colour to black-and-white.
- You cannot use this function when D ZOOM is set to ON in the menu settings.
MONOTONE
Pn BBeDeHn N3O6paXeHne 6yDet nocTeenHNO n3MeHrTbCn OT UePHo-6eNo DO uBcTHoro. Pn BBBeDeHn N3O6paXeHne 6yDet nocTeenHNO n3MeHrTbCn OT uBcTHoro Do UePho-6eNoRo.
*Bbl He MoXeTe NcNoJIb3OBAbTb 3Ty ΦyHKuHIO, ecn KOMaHdA D ZOOM yCTaHOBJIeHa B noIooKeHne ON B yCTaHOBkax MeHIO.
(1) When fading in [a]
In the standby mode, press FN to display PAGE1 (p. 18).
When fading out [b]
In the recording mode, press FN to display PAGE1 (p. 18).
(2) Press FADER. The screen to select the fader mode appears.
(3) Select a desired fader mode.
(4) Press OK to return to PAGE1/PAGE2, and press EXIT to return to FN.
(5) Press START/STOP. After the fade in/out is carried out, your camcorder automatically returns to the normal mode.
After the fade in/out is carried out: Your camcorder automatically returns to the normal mode.
Before the fade in/out is carried out: Before pressing START/STOP, press OFF to return to PAGE1/PAGE2, and press EXIT to return to FN.
IIT OTMHebl FyHKUHneIepa
Посл того, Ксвьионно Вьdeнe/ bivideнe n3o6paжehнa: Baа видокамера abTomatucheckn BepHTcR a obuHbI peJIM. ПepeД bivIOJIHeHem BvdeHnra/BvBideHnra n3o6paжehнa: Пepeн haxaTneM START/STOP haxmTe 一 O F F ДЯВОЗратa K PAGE1/ PAGE 2,ИнхмiteКONky EXIT ДЯВОЗратa B noLOXeHne FN.
Note
You cannot use the following functions while using the fader function. Also, you cannot use the fader function while using the following functions.
- Digital effect
- Low lux mode of PROGRAM AE (Overlap function only)
- NightShot +Slow shutter
- Photo recording
When the OVERLAP indicator appears
Your camcorder automatically stores the image recorded on a tape. As the image is being stored, the OVERLAP indicator flashes fast, and the playback picture is displayed. At this stage, the picture may not be recorded clearly, depending on the tape condition.
When START/STOP MODE is set to or 5SEC You cannot use the fader function.
While using the bounce function, you cannot use the following functions:
- Exposure
-Focus
-Zoom - Picture effect
Note on the bounce function
The BOUNCE indicator does not appear in the following mode or functions:
- D ZOOM is set to ON in the menu settings
- Wide mode
- Picture effect
- PROGRAM AE
PpmeaHne
BbHe MoKTe IcNoIb3OBA Tb CJeIyUoIe
fYHKuIN BO BpEma IcNoIb3OBAHnA fYHKuIN
peIepa.TakKe,BbHe MoKTe IcNoIb3OBA Tb
fYHKuIO fpeIepa BO BpEma IcNoIb3OBAHnA
CJeIyUoIx fYHKuIN.
-LnDpOBoN 3ΦΦeKT
-РекиннКОOBOCBESEHNOCTN PROGRAM AE (TOJbKOФункцнHaLoXeHnA)
-Houha CbemKa +MeIeHHbI 3aTBOP
-ΦOTOCbEMKa
EcJIN NOBNTcHnDnKaTOp OVERLAP
BaSHA BnDEOKaMepa aBtOMaTNUeCKn COxpaHNT n3O6paxeHne HaJeHTe. Bo Bpemr coxpaHeHn n3O6paxeHn INDnKaTOP OVERLAP 6yDet 6bICTPO MIRATb N 6yDet OTO6paxKaTcBocPON3BOdIMOE n3O6paxeHne. Ha 3OTOM 3TANE n3O6paxeHne MOXET 6bITb 3aNCAHO HcEeTKO B 3aBNCIMOCn OT OT COCTORHn JIeHTbl.
EcIn KOMaHda START/STOP MODE yctaHOBHeHa B noJoxKeHne 1 nn 5SEC
BbHe MoXeTe NcIOJIb3OBA Tb cyHKUIO feiepa.
Bo BpemnncnoB3OBaHnФyHKu npeckaunBaHn BbI He moKTe nCNoB3ObaTcJeDyUOpneФyHKm:
-3Kcno3nU
-ФokycnpOBka
-TpaHcΦokaun
-3cpfkeTn3o6paXeHn
PpimueaHne no fynkunn nepeckaBauHna
INHdkaTop BOUNCE He noBbIeTcB CNeDyIOxN pexmMax nIn npnNCNoIb3ObaHn CNeDyIOxN cyHKcN:
-KomahДa D ZOOM yctahOBJIeHa B NOJIOKeHne ON bYcTaHOBkax MeHIO
-Широкоэкразнный реким
-3ΦΦeKt n306paXeHn
-PROGRAM AE
Using special effects - Picture effect
You can digitally process images to obtain special effects like those in films or on the TV.
NEG. ART [a]: The colour and brightness of the picture is reversed.
SEPIA : The picture is sepia.
B&W: The picture is monochrome (black-and-white).
SOLARIZE [b]: The light intensity is clearer, and the picture looks like an illustration.
PASTEL [c]: The contrast of the picture is emphasized, and the picture looks like an animated cartoon.
MOSAIC [d]: The picture is mosaic.

[a]

[b]
(1) In the standby/recording mode, press FN to display PAGE1 (p. 18).
(2) Press MENU, then select P EFFECT in in the menu settings to select a desired picture effect mode (p. 78).
IcnoIb3OBaHne CpeuHaJIbHbIX 3ΦΦeKToB - 3ΦΦeKt n3o6paXeHnA
Bb MoKTe BblOnHrTb 6pb6Otky
N3o6pXeHHn UcPpOBvMm MeTODOM nJRA
N0yUeHn CneuHaJIbHbIX 3ΦeKToK, KaK b KInHOHnblMax NIN Ha 3KpaHax TeIeBn3OpOB.
To turn the picture effect function off
Select OFF in P EFFECT in the menu settings.
While using the picture effect function
You cannot select the old movie mode with DIG EFFT.
When you turn the power off
Your camcorder automatically returns to the normal mode.
If you select the picture effect mode in the recording mode
Pictures processed by the picture effect function will be recorded.
Using special effects - Digital effect
IcnoJb3OBaHne cNeuHaBbIX 3ΦΦeKToB - LnΦpBoB ΘΦΦeKT
You can add special effects to recorded pictures using the various digital functions. The sound is recorded normally.
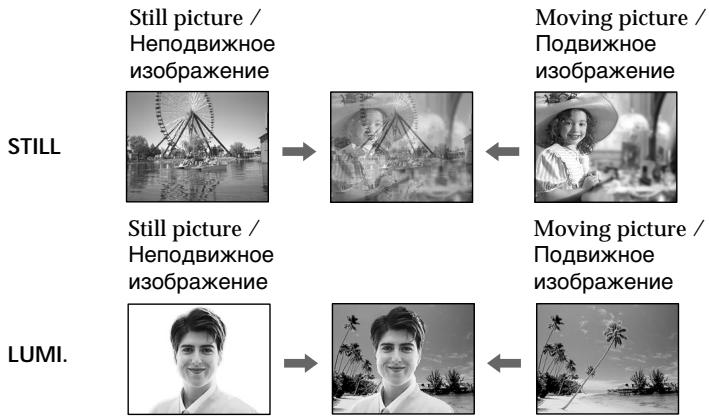
STILL
You can record a still picture so that it is superimposed on a moving picture.
FLASH (FLASH MOTION)
You can record still pictures successively at constant intervals.
LUMI. (LUMINANCEKEY)
You can swap a brighter area in a still picture with a moving picture.
TRAIL
You can record the picture so that an incidental image like a trail is left.
SLOW SHTR (SLOW SHUTTER)
You can slow down the shutter speed. The slow shutter mode is good for recording dark pictures more brightly.
OLD MOVIE
You can add an old movie type atmosphere to pictures. Your camcorder automatically sets the wide mode to ON and picture effect to SEPIA.
BbMOKeTe Do6abTb CneuaJIbHbIe 3ΦΦeKtbl K 3aINCbIbAeMOMy I3O6paKeHIO C NOMOcIbIO pa3HbIX cNfpoBbIX cyHKm. 3aINCbIbAeMbIM 3Byk 6yDet O6bUHbIM.
STILL
BbMOKTe 3aIINcIbA Tb HeNoDBHXHOe n3o6paXeHne, KOtOpoe MOxHO HaIarAtb Ha nOdBnXHoe n3o6paXeHne.
FLASH (FLASH MOTION)
BbMOxTe 3aINcBbAtb HEnoDbNxHbIe
n3O6paXeHnB INocJeIOBaTeJIbHOCTn Upe3
ONpeDeIeHNbIe INHTepBaJIbI.
LUMI. (LUMINANCEKEY)
BbMOKTe N3MeHrTbApKne MeCtHa HEnoDBNIXHOM N3O6paXeHn Ha NDoBnXhIe N3O6paXeHn.
TRAIL
BbMOxKeTe 3aIINcMbA Tb 3nO6paXeHne C 3ΦΦEKTOM 3aNa3DbBaHnI.
SLOW SHTR (SLOW SHUTTER)
Bb moKeTe 3aMeIINt b CKOpOCT b 3aTbopa. Pekm MeIeHHO r 3aTbopa RbIeTcnoDxOJIuM dIg 3aIINC TeMHbIX N3o6paXeHn B 60nee npKOM CBeTe.
OLD MOVIE
BbMOxKeTe npINBHOCnTb aTMocfepy
CTapHHNHO KIno B n3O6paXeHn. Ba7a
BnDEOKamepa 6yDeT ABTOMaTHueckn
yCTaHaBnBaTb WnP0KOaKpaHHbI pexmB
BnoJoxeHne ON n3ΦΦeKT n3O6paXeHn B
BnoJoxeHne SEPIA.
(1) In the standby mode, press FN to display PAGE1 (p. 18).
(2) Press DIG EFFT. The screen to select a desired digital effect mode.
(3) Select a desired digital effect mode.
(4) Press - / + to adjust the effect.
Items to adjust
| STILL | The rate of the still picture you want to superimpose on the moving picture |
| FLASH | The interval of flash motion |
| LUMI. | The colour scheme of the area in the still picture which is to be swapped with a moving picture |
| TRAIL | The vanishing time of the incidental image |
| SLOW SHTR | Shutter speed. The larger the shutter speed number, the slower the shutter speed. |
(5) Press OK to return to PAGE1/PAGE2.
IcnoJb3ObaHne cneuaJIbHbIX 3ΦΦeKTOB -LUnpOBoI 3ΦΦeKT
(1)BpeXIME roTOBHOCTn HaxMnte KhoNky FN dIy OTo6paXeHnPAgE1 (ctp. 18).
(2)HaxkMnte DIG EFFT. IorBntc3kpan nIy Bb6opa keJaemoro pexima uΦpOBOrO 3ΦΦeKtA.
(3)BbIbepeNTeKeJIaEMbIpeKIMcUΦpOBOrO 3ΦΦeKTA.
(4)HaxmTe-/+ДЯperyInpOBKn3ФфEkTa.
IyHKtbI dIa peYnnpOBKn
The bar appears when setting following digital effect modes: STILL, FLASH, LUMI., TRAIL. /
To cancel the digital effect
Press OFF to return to PAGE1/PAGE2.
- The following functions do not work during digital effect:
-Fader
- Low lux mode of PROGRAM AE
- Photo recording
- NightShot +Slow shutter
- The following function does not work in the slow shutter mode:
- PROGRAM AE
- The following functions do not work in the old movie mode:
- Wide mode
- Picture effect
-PROGRAM AE
When you turn the power off
The digital effect will be automatically canceled.
When recording in the slow shutter mode Auto focus may not be effective. Focus manually using a tripod.
Shutter speed
| Shutter speed number | Shutter speed |
| SLOW SHTR 1 | 1/25 |
| SLOW SHTR 2 | 1/12 |
| SLOW SHTR 3 | 1/6 |
| SLOW SHTR 4 | 1/3 |
Примеання
CJeIyUOJIe cyHKnUH He pa6oTaOT npn IcNoJIb3OBAHm UINpOBoRTO 3ΦeKTA:
-Φeɪdεp
-PexKIM Hn3KoO CbEeHHOCTN PROGRAM AE
-ΦOTOCbEMKa
-HoHOn CbemKa +MeJleHHbI 3aTBOp
CJeIyUOaJ cyHKuI He pa6oTaET BpeXnMe MeIeHHoro 3aTBopa:
-PROGRAM AE
CneIyHouIe cyHKuH He pa6oTaIOBpeXnMe CTAPHHORO KINHO:
-ШпрокоэКраHHь ржим
-3ΦΦeKt n306paXeHnA
-PROGRAM AE
PnBbIKIOueHm NITaHn
Lünpobov ΘΦΦekt 6ydet aBTOMaTneCKN OTMeHEN.
Pn3aIncBpeXmMe MeIeHHoro 3aTbopa
ABTOMaTnueckaФOKcnpOBKa MoKET 6bITb He 3ΦΦeKTnBHO. BbINoJIHnteФOKcnpOBky BpyHyIO, INCNoJIb3yI TpeHORY.
CKopoctb 3aTBopa
| Величина скорoctи за Това | Скорочь за Това |
| SLOW SHTR 1 | 1/25 |
| SLOW SHTR 2 | 1/12 |
| SLOW SHTR 3 | 1/6 |
| SLOW SHTR 4 | 1/3 |
Adjusting the white balance manually
You can manually adjust and set the white balance. This adjustment makes white subjects look white and allows more natural colour balance. Normally white balance is automatically adjusted.
(1) In the standby/recording mode, press FN to display PAGE1 (p. 18).
(2) Select WHT BAL in in the menu settings to select a desired white balance mode (p. 78).
(INDOOR):
- Lighting condition changes quickly
- Too bright place such as photography studios
- Under sodium lamps or mercury lamps (OUT DOOR):
- Recording a sunset/sunrise, just after sunset, just before sunrise, neon signs, or fireworks
- Under a colour matching fluorescent lamp
HOLD: Recording a single-coloured subject or background
PeruInpoBka 6aHaHca 6eIoro BpyHyU
Bb moxete otperynipobatn yctahOBNTb Bpyhyo 6aIaHc 6eIoro. 3Ta perynipOBka n03BOJAEt npIaTb 6eblm 6bEKTam nCTHHO 6eIbI cBTn n03BOJAEt 1oBuTBc8 6olee eCTeCTBeHHORO 6eTobORo 6aJAHca. O6bIHO 6aJIaHC 6eIoro perynipyETCA ABToMaTHueckn.
(1)В рекише roTOBHOCTn/3aIIncn HAXMITE KhoIky FN dIra oTo6paXeHnA PAGE1 (cTp. 18).
(2)Bb6epnte WHT BAL B BycTaHOBkax MeHIO DnIy Bb6opa JKeJaemoro pexKIma 6aJHaHa ca6enoro (Ctp.78).
(INDOOR):
- YCNOBNA OCBEULEHNA 6bICTPO IN3MeHAIOTCA
B cnIshKOM npKOM mecTe, KaK HapnIpMep, BΦOTOCTyDN
-Пов Натриевим Или ртугим ЛампамИ
OUTDOOR
3aInbc 3akaTAt/3axOda coJHua, cpa3a nocne 3axOda, HENOCpeDCTBeHNO nepeI paaccBcETOM, HeOHOBbIX peKJIam IINI feepBepKOB
Плп OСБЕSUЕн,在 COOTBETCTBYUIOEMЯМпamДневHORO CBeta
HOLD: 3a\Pncb oJHOuCBeTHOro obBeKt a nIi foHa.
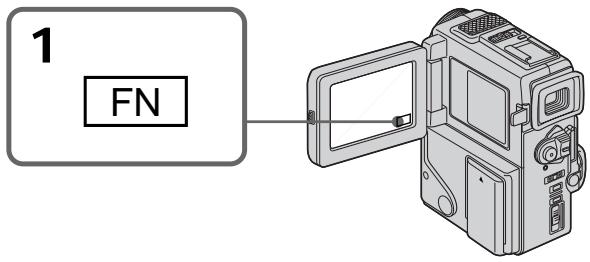
To return to FN
Press EXIT.
To return to the automatic white balance mode
Set WHT BAL to AUTO in the menu settings (p. 78).
Дя BO3Bpata B IOLOXeHne FN
HaxmTe KhONky EXIT.
ДлЯ BOЗВрашени К abTomatнчecKOMу peжиму баланca сelenоу
YcTaHOBnTe KOMaHny WHT BAL B noJoxeHne AUTO B ycTaHOBkax MeHIO (CTp. 78).
If the picture is being taken in a studio lit by TV lighting
We recommend that you record in the indoor mode.
When you record under fluorescent lighting Use the automatic white balance or hold mode. Your camcorder may not adjust the white balance correctly in the indoor mode.
In the automatic white balance mode
Point your camcorder at white subject for about 10 seconds after setting the POWER switch to CAMERA to get better adjustment when:
- You detach the battery for replacement.
- You bring your camcorder from indoors to outdoors and vice versa.
In the hold white balance mode
Set the white balance to AUTO and reset to HOLD after few seconds when:
- You change the PROGRAM AE mode.
- You bring your camcorder from indoors to outdoors and vice versa.
B clyuae foToIpaOpOBaHn H3O6paKeHn B Ctyn npTeNeBu3NoHHOM OcBeueHnn
PeKOMeHnyETcN IcNoJIb3OBAt bIaIINBpeXnme“B NOpMeUeHN".
B clyuae 3aHnC npn ocBeueHnn lamPamn DHeBHoro CBeta
IcnoIb3yIte aBtOMaTHueckn pexm 6anahca 6enoro nn pekm 6loknpobkn.
BaSHA BnIeOKaMepa MoKET He OTpErpyNIpOBA Tb NaJIeKaUIM o6pa3OM 6aIaHc 6eIoro B peXkIMe 一 "B NOMeIeHN".
B abTomatnucekom pexnme 6aanca 6eJorO
HaBeinte BIndeokamepy Ha 6bIy I obBeKT
npi6bn3ntelbNo Ha 10 cekynd nocne
ycTaHOBKn BblKnUoateJe r POWER B
noLoXeHne CAMERA dIra noluyehnna lyuwei
peRyIinpoBKN, kOrda:
- Bby OTOeDiHReTe 6aTapeiHbI 6nok dIra 3aMeHbI.
BbI BbIeCn BAsy BuJeOkamepu n3 nomeueHna yInuN hao6oPoT.
B pexkme 6lokpovbkn 6aanhca 6enoro
YctaHOBtBe 6aHaHc 6eIoro B noJoxeHne AUTO n CHOba yCTaHOBtBe B noJoxeHne HOLD uepe3 HeCKoJIbKO cekyHd: KOrJa:
- Bынзмениcopeхим PROGRAM AE
BbI BbIHeCn BaSu BnDeOkamepu n3 nOmeueHn Ha yInu N haobopot.
Using the PROGRAM AE function
You can select PROGRAM AE (Auto Exposure) mode to suit your specific shooting requirements.
Spotlight mode
This mode prevents people's faces, for example, from appearing excessively white when shooting subjects lit by strong light at weddings or in the theater.
Soft portrait mode
This mode brings out the subject while creating a soft background for subjects such as people or flowers.
Sports lesson mode
This mode minimizes shake on fast-moving subjects such as in tennis or golf.
Beach & ski mode
This mode prevents people's faces from appearing dark in strong light or reflected light, such as at a beach in midsummer or on a ski slope.
Sunset & moon mode
This mode allows you to maintain atmosphere when you are recording sunsets, general night views, fireworks displays and neon signs.
Landscape mode
This mode is for when you are recording distant subjects such as mountains and prevents your camcorder from focusing on glass or metal mesh in windows when you are recording a subject behind glass or a screen.
Low lux mode
This mode makes subjects brighter in insufficient light.
Исpenьзованецфункциng PROGRAM AE
BbMOxTe Bb6paTb pexm PROGRAM AE (aBTOMaTHuecka3KcN03nua) B COOTBeCTBm CO CneuHuecknM Tpe6oBaHnM N CcbemKe.
Pekim npoxektopHoro oCbeueHn
Select AUTO in PROGRAM AE in the menu settings.
Notes
- In the spotlight, sports lesson and beach & ski modes, you cannot take close-ups. This is because your camcorder is set to focus only on subjects in the middle to far distance.
- In the sunset & moon and landscape modes, your camcorder is set to focus only on distant subjects.
-
The following functions do not work in the PROGRAM AE mode:
-
Slow shutter
Old movie
-Bounce -
The following functions do not work in the low lux mode:
-
Digital effect
-
Overlap
-
If you press PROGRAM AE when using the NightShot function, the PROGRAM AE indicator flashes and the PROGRAM AE function does not work.
While WHT BAL is set to AUTO in the menu settings
The white balance is adjusted even if the PROGRAM AE function is selected.
Even if the PROGRAM AE function is selected You can adjust the exposure.
If you are recording under a discharge tube such as a fluorescent lamp, sodium lamp or mercury lamp
Flickering or changes in colour may occur in the following modes. If this happens, turn the PROGRAM AE function off.
- Soft portrait mode
- Sports lesson mode
Bb moXeTe Bb6paTb 3KcNo3nHIO.
EcNb BblBbIOJIHReTe 3aIbC pRn NCIONb3OBAHHa3Opa3PdHOJ LaMnbI, HaTpBeOB NaMbIy nIpyTHoJ LaMbIy
B CNeDyIOUxN pExmMax MoXeT BO3HKnHyTb MepaHne Nn HeycToOnuNBbIe npOceCbI. Ecnn 3TO IpnO3oJET, BbIKIOuHTe FyHKUHO PROGRAM AE.
-MaRkn npTpeThb peKmM
-PexIM CnOpTnBbIX COCTaHm
Adjusting the exposure manually
You can manually adjust and set the exposure. Adjust the exposure manually in the following cases:
The subject is backlit
- Bright subject and dark background
- To record dark pictures (e.g. night scenes) faithfully
(1) In the standby/recording/memory camera (DCR-PC3E only) mode, press FN to display PAGE1 (p. 18).
(2) Press EXPOSURE. The screen to adjust exposure appears.
(3) Press MANUAL, then adjust exposure using
(4) Press OK to return to PAGE1/PAGE2.
Perylnpobka 3Kcno3nN BpyHyO
BbMOxKeOTpeyIuPObaTb uYCTaHOBnTb 3KcNo3nUIO BpyHyIO.
Otperynpyte 3Kcno3nIO BpyHyIO BCJeDyUOx Clyuayx:
- OběkT ha fóhe 3a,dHei nOДCBETKn
Apkn oBeKT Ha TEMHom fOhe
-ДяЗаци TemHyix N3O6paxeHn(HaNPIMep, HocHybIX CueH)C60JIbSiOn DoCTOBePHOCTbIO
(1)В рекиеме ratoboctn/naamTn kamepbi/ 3a\Pnc (ToJbKO moJeNb DCR-PC3E) haxmTe KhoNky FN n Bbl6epnte PAGE1 (ctp.18).
(2)HaxmTe EXPOSURE. IoBntc3KpaH dIpeyInpOBKn 3KcNo3nMn.
(3)HaxmnteMANUAL,a3aTeMOTperynpyuTe 3Kcno3nIO C NcNoJIb3OBaHNEM-/+. -TeMHee +:Rpue
(4)HaxmTe OKДЯ Bo3bpaTa K PAGE1/PAGE2.
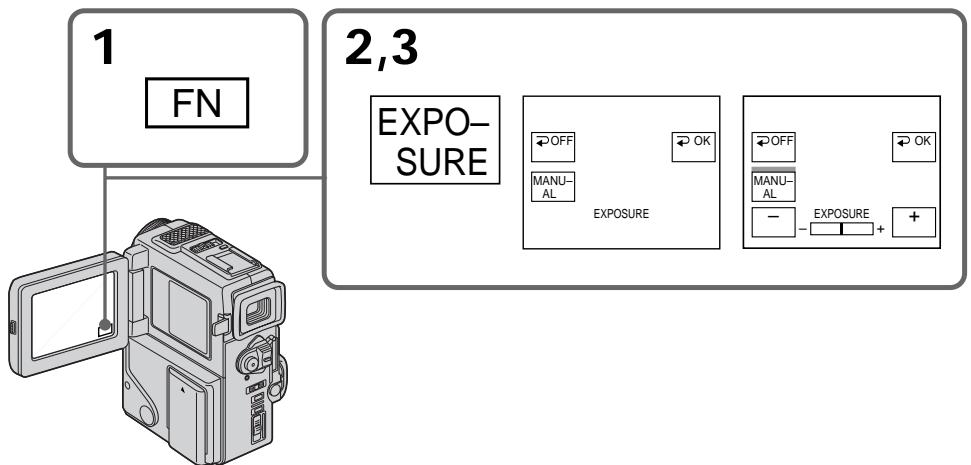
To return to FN
Press EXIT.
To return to the automatic exposure mode
Press OFF to return to PAGE1/PAGE2.
Note
When you adjust the exposure manually, the backlight function does not work.
If you change the PROGRAM AE mode or slide NIGHTSHOT to ON
Your camcorder automatically returns to the automatic exposure mode.
You can gain better results by manually adjusting the focus in the following cases:
-
The autofocus mode is not effective when shooting
-
subjects through glass coated with water droplets
horizontal stripes -
subjects with little contrast with backgrounds such as walls and sky
-
When you want to change the focus from a subject in the foreground to a subject in the background
- Shooting a stationary subject when using a tripod
BbMOxTe nOlyuHTbIyUwnepe3yNbTaTbI nyTem peRyIInpOBKn BpyHyIO B CNeDyIOux cLyuaX:
- Pexm aBtOMaTnuecko fokycnpOBKn YBJIeTcR He3fpeKTnBbIM npN BblNOJIHeHn CbEMKn
-ObbeKToB Upee3 NOKpbIToE KaIIaMn CTeKIO
-rotn30HTaJIbHbIX NOJOC
-06bekTOB C MaJIOI KOHTpactHcTbI Ho Ha TAKOM fOHe, KAK CTeHa NIN He6O - EcIn Bbl XOTnTe BblIOJIHnTb N3MeHeHne
ФOKycuPobKn C obBeKta Ha nepeIeHem ПlaHa
Ha obBeKt Ha 3aIdHem ПlaHa
Пи BыллнHeHn CbemKn CTaNoHapbIbX 06beKToB C NcNoJIb3ObAHnEM TpeHOrn


(1) Press FOCUS lightly in the standby/recording mode. The indicator appears on the LCD screen or in the viewfinder.
(2) Turn the focus ring to sharpen focus.
(1)Cnerka haxmTe FOCUS Bpexime roTOBHOCTn/3aINcN. INHdkatOp NOBNTcHa 3KpaHe KKД nIn BNDONCKaTeNe.
(2)ПовернITE кольцо Фокс neuropobkn Дпл польецни чеков Фокс neuropobkn.
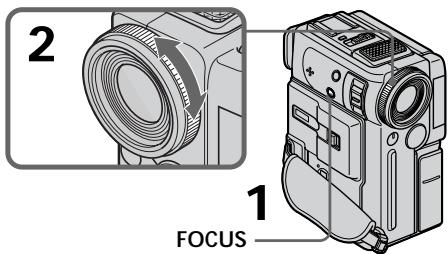
To return to the autofocus mode
Press FOCUS lightly to turn off _3 , or indicator.
To record distant subjects
When you press FOCUS down to INFINITY. The lens focuses on and indicator appears. When you release FOCUS, your camcorder returns to the manual focus mode. Use this mode when your camcorder focuses on near objects even though you are trying to shoot a distant object.
ДлвоьзврашениВ ржим abTomatн ueckо Фокс neuropobkn
Cnerka HaxmTe FOCUS IJIy BbIKIOueHnI INdIkTopa F, , nn
Not to make subjects out of focus when using zoom function
Focus after forcing at the "T" (telephoto) position. It will be harder to focus on when using digital zoom function.
Shooting in relatively dark places or shooting fast-moving subjects in relatively bright places Shoot at the "W" (wide-angle) position after focusing at the "T" (telephoto) position.
When you shoot close to the subject Focus at the end of the "W" (wide-angle) position.
changes as follows:
when recording a distant subject.
when the subject is too close to focus on.
ДЯТOrO,чTO6blOb6eKtblHeBbIaHnN3 30HbIФOKycaPpNNCNoJIb3OBaHmФyHKcHn Bapnoo6bEKeTnBa
BbIOnHnTeΦokcnpOBky TOnbko nocne ΦokcnpOBKn B noJoxKeHne “T” (TeJefoTo).
PnncnoJb3OBAHmФyHKmUcfoPoBOro Bapno06BeKTHBa BbIIOJIHrTb φokycnpOBky 6ydet TpydHee.
CbeMka B OTHOCHTeIbHO TEMhBIX MecTax NIM CbeMka 6bICTpo DnBxUxNcxO6BeKTOB B OTHOCHTeIbHO RPKNX MeCTAX
BbIIOJIHnTe CbEMcKy B nIoJoxKeHn "W" (IInpOkoYroIbHoe) nocLe fokycuPobKn B nIoJoxKeHn "T" (TepefoTo).
EcIn BblBbIOpHReTe CbeMky B6In3n 06bekTa
BbIOnHInTeΦOKyCnPOBky B KOHcpeNoJIOKeHHN "W" (UmpokoyroJIbHOe).
M3MeHReTcCJIeDyIOUmO6pa3OM:
Pn3aHncydaJIeHHoroObbekTa.
ecnObeKT haoiNTc CNIWKOM 6Nt3Ko, TTo6bl BbInONHHTb fokycnpOBky Ha Hero.
Playing back a tape with picture effects
During playback, you can process a scene using the picture effect functions: NEG.ART, SEPIA, B&W and SOLARIZE.
(1) In the playback mode or the playback pause mode, press FN to display PAGE1 (p. 18).
(2) Press MENU, then select P EFFECT in in the menu settings to select a desired picture effect mode (p. 78).
Refer to 44 page for details of each picture effect function.
BocnpOn3BeDeHne JeHtblc 3ΦΦeKtAmn n3o6paXKeHnA
Bo BpemBocnpoun3BeJeHnBbMOKeTe BUNON3MeHrTb N3O6paXeHne C NOMOuB0 cyHKui:NEG.ART,SEPIA,B&W u SOLARIZE.
(1)BpeXIMe BOCnpOu3BeDeHnI INI BpeXIMe nay3bl BOCpOu3BeDeHnHaXMITE KHOINy FN dIa OTo6paXeHnI PAGE1 (ctp. 18).
(2)HaKMnTe KHOIky MeHIO, a 3aTEM BbI6epNTe P EFFECTB WBycTaHOBkax MeHIO nIy BbI6opa XeJaEMoro pexmua 3ΦΦekTa n3o6paXeHnA (CTp.78).
Cm. ctp. 44 nnojueHn noJpO6HoTei OTHOCHTeJIbHO KaJdoI cyHKUIN 3ΦΦekTa n3o6paKeHn.
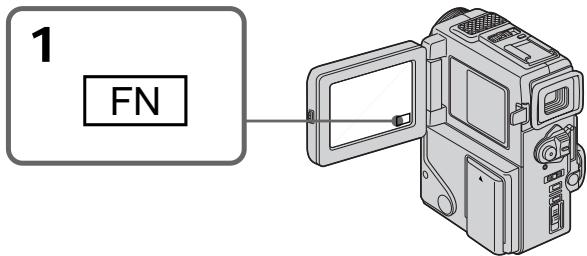
To return to FN
Press EXIT.
To cancel the picture effect function
Set P EFFECT to OFF in the menu settings.
Notes
- You cannot process externally input scenes using the picture effect function.
- To record pictures that you have processed using the picture effect function, record the pictures on the VCR using your camcorder as a player.
Pictures processed by the picture effect function
Pictures processed by the picture effect function are not output through the DV OUT jack.
When you set the POWER switch to OFF or stop playing back
The picture effect function is automatically canceled.
I3o6paKeHn, BUNOIN3MeHHeHbIe C NOMOcIbIO fynKuIN 3oPfKeTob I3o6paKeHn, He nepeaIoTcrape3 BbIXoINHOe rHe3do DV OUT.
EcIn Bby ycTaHOBnI nepeKJIoucTeIb POWERBnoJIOxHeNc OFF nIO ocTaHOBnI BocPon3BeDeHne
Playing back a tape with digital effects
During playback, you can process a scene using the digital effect functions: STILL, FLASH, LUMI and TRAIL.
(1) In the playback mode or the playback pause mode, press FN and select PAGE2 (p. 18).
(2) Press DIG EFFT. The screen to select a desired digital effect mode appears.
(3) Select a desired digital effect mode. In the STILL or LUMI mode, the picture where you select the mode is stored in memory as a still picture.
4) Press - / + to adjust the effect. Refer to page 45 for details.
(5) Press OK to return to PAGE1/PAGE2.
Bocnpo3BeJeHne JeHtblc uΦpObblm 0ΦΦeKtamn
Bo BpemBocnpon3BeJeHnB, BmOKeTe BUnOn3MeHbNtN06paXeHneC NOMOzbuO fynkui: STILL, FLASH, LUMI. n TRAIL.
(1)Вразиме roTOBHOCTn/3aHNCn HaXMITE KHOIIkyFNДЯ OTo6paXeHnPA GAGE2 (cTp.18).
(2)HaxxMnte DIG EFFT. IoBnTc3kpan dIbn Bb6opa JeJaemoro peXIma uΦpOBOrO 3ΦΦeKtA.
(3)Вьберп Te Jжелаьm peЖIM zuфpoBOrO əфскТа.ВpeЖIMe STILL nnn LUMI. n3o6paXeHne B TOM MeTe, rDe Bbl Bbl6pAni peKIM 3aONOMHaEcT B nAmrTn B KaueCTBe HENoDBMxHOrO n3o6paXeHneY.
(4)HaxmTe-+ДЯpeRyInpOBKn3ФФeKTa.CM. cTp. 45ДЯ y3HaBaHnnoDpo6HocTe.
(5) HaxmTe OKДЯ BO3BpaTa K PAGE1/PAGE2.
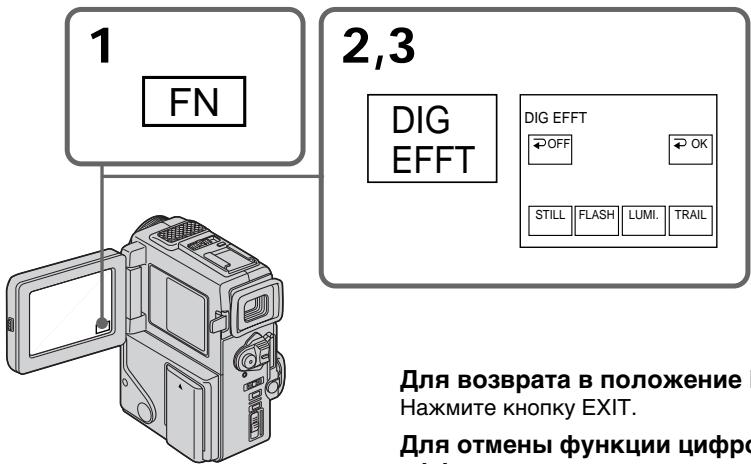
To return to FN
Press EXIT.
To cancel the digital effect function
Press OFF to return to PAGE1/PAGE2.
Notes
- You cannot process externally input scenes using the digital effect function.
- To record pictures that you have processed using the digital effect, record the pictures on the VCR using your camcorder as a player.
Pictures processed by the digital effect function
Pictures processed by the digital effect function are not output through the DV OUT jack.
When you set the POWER switch to OFF or stop playing back
The digital effect function is automatically canceled.
Quickly locating a scene using the zero set memory function
Your camcorder goes forward or backward to automatically stop at a desired scene having a tape counter value of "0:00:00". You can do this with the Remote Commander. Use this function, for example, to view a desired scene later on during playback.
(1) In the playback mode, press DISPLAY if the counter is not on the LCD screen or in the viewfinder.
(2) Press ZERO SET MEMORY at the point you want to locate later. The tape counter shows "0:00:00" and the ZERO SET MEMORY indicator flashes.
(3) Press when you want to stop playback.
(4) Press to rewind the tape to the tape counter's zero point. The tape stops automatically when the tape counter reaches approximately zero. The ZERO SET MEMORY indicator disappears and the time code appears.
(5) Press . Playback starts.
BaWbIeOkaMepa BbIOnHReT npoBnXeHne
BVepei HnHa3d C aBTOMATuYeCKoI
OCTaHOBKO B HyKHom 3NtIODe, Ige NOKa3aHHe
CChETKaJeHTb paBHO "0:00", Bbl MoKTe
BbIOnHrTa 3TO C NOMOUsy NjltbTa
DInCTAHUONHOrO ynpabNeHnA.
NcNoJIb3yIte 3Ty fYHKUIO, NaPpIMep, dIpy
PiocMOrTa HxHOrO 3NtIODa nO3Ke BO BpEm
BOcPOn3BeDEHnA.
(1)B pexime Bocnpon3BeDeHnHaXmnte KhONky DISPLAY eCIn CHTuNK He oTObpaXaetcna Ha 3KpaHe KKДиIb B BuONckATeNe.
(2)HaxMMTe KhoNky ZERO SET MEMORY B MeCTe, KOtOpoe Bbl 3aXOTnTe NaTn PO3Ke. Ioka3aHHe CHTuKa CTAHet paBbIM "0:00:00", N haHTet MngTaB INDnKaTOP ZERO SET MEMORY.
(3)HaxmTe KhONky ,ecnBb 3axOTte HaxKaTb OCTaHOBnTB BOCIpOUN3BeDeHne.
(4)HaxMMTe KhoNky dnyyckOpEHHO nepeMOTKn JHeTbHa3aAd K HnyeBOI TOKe CteuHKJeHTbJI HeTaOCTaHOBITcA ABtOMaTHueCKn,ecnCteuHK DoCTnHET HnyeBOI OTMeKn. UHnCkATOP ZERO SET MEMORY nChE3HET, INoRbNTcK KoD BpeMeHN.
(5)HaXMMTe KHOIIKy ▲. HaHHeTcR BOCnPOn3BeDeHne.
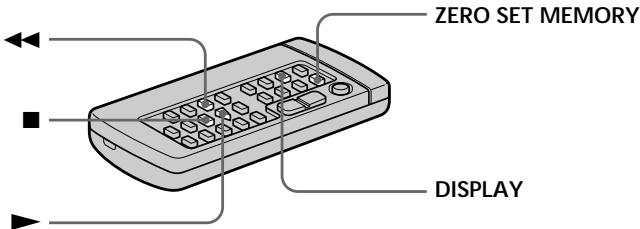
Notes
- When you press ZERO SET MEMORY before rewinding the tape, the zero set memory function will be canceled.
- There may be a discrepancy of several seconds from the time code.
- The zero set memory function may not work when there is a blank portion between pictures on a tape.
- The ZERO SET MEMORY indicator disappear when you press FN.
ZERO SET MEMORY functions also in the recording standby mode
When you insert a scene in the middle of a recorded tape, press ZERO SET MEMORY at the point you want to end the insertion. Rewind the tape to the insert start point, and start recording. Recording stops automatically at the tape counter zero point. Your camcorder returns to the standby mode.
Приимechаня
- Ecni Bbl HaXMeTe KhoNky ZERO SET MEMORY Do hauana o6paTHoI nepEMOTkn JeHTb, To fynKUmaPAMrHuJeBOI OTmETKn 6ydet OTMeHaHa.
MOKET 6bIb paCXOXJDEHNE B HECKoJIbKO CekyHd MEKJy KOJOM BpEmEH N DeIeCTBNTJIbHbIM BpEmEH.
ФУнклаяnamатиНунебоу OTMETКMOSET He paobTaTb B cIyuae,ЕсИМиЕТСЯ He3aПИСанHBH yuactOK MEXdY n3ObpaXeHnMn Ha JIHeT.
Korda Bby HaxMeTe KhoNky FN INdNkaTOp ZERO SET MEMORY uChes3het.
ФункцЯ ZERO SET MEMORY pa6oTaet TaKKe BpeXmE rTOBHOCTn 3aINcN
EcIn BbBCTaBnTE 3nIOB C cepEINHe
3AnuCAHNO JENTbI, HaxMnTE KhONky ZERO
SET MEMORY BY Tom MceTe, Ie Bb XoTnTe
3aKOnHTb BCTaBkY 3n3Oda. IpeMOTaHTe
JIeHTy K MeCTy HaCana BCTaBKn 3n3Oda N
HauchnTE 3aNcB. 3aNcB octaHOBTcA
ABTomAtueckn B MeCTe HynEOB OTMeTKn
CHTuKa. Baaa BuDEOKaMepa BepHETCB
peXIM OxNDAHN.
Searching a recording by date - Date search
You can automatically search for the point where the recording date changes and start playback from that point (Date search). Use a tape with cassette memory for convenience. Use the Remote Commander for this operation. Use this function to check where recording dates change or to edit the tape at each recording date.
Searching for the date by using cassette memory
You can use this function only when playing back a tape with cassette memory (p. 122).
(1) Set the POWER switch to PLAYER.
(2) Press FN to display PAGE1 (p. 18).
(3) Press MENU, then set CM SEARCH in to ON in the menu settings (p. 78). Default setting is ON.
(4) Press SEARCH MODE on the Remote Commander repeatedly, until the date search indicator appears. The indicator changes as follows: TITLE SEARCH DATE SEARCH PHOTO SEARCH PHOTO SCAN no indicator
(5) Press or on the Remote Commander to select the date for playback. Your camcorder automatically starts playback at the beginning of the selected date.
Press on the Remote Commander.
Searching for the date without using cassette memory
(1) Set the POWER switch to PLAYER.
(2) Press FN to display PAGE1 (p. 18).
(3) Press MENU, then set CM SEARCH in to OFF in the menu settings (p. 78). If using a tape without cassette memory, skip this step.
(4) Press SEARCH MODE on the Remote Commander repeatedly, until the date search indicator appears. The indicator changes as follows: TITLE SEARCH DATE SEARCH PHOTO SEARCH PHOTO SCAN no indicator
(5) Press on the Remote Commander to search for the previous date or press on the Remote Commander to search for the next date. Your camcorder automatically starts playback at the point where the date changes. Each time you press or , your camcorder searches for the previous or next date.
To stop searching
Press on the Remote Commander or on your camcorder.
Note
If one day's recording is less than two minutes, your camcorder may not accurately find the point where the recording date changes.
In the 00 mark
- The bar in the 00 mark indicates the present point on the tape.
- The x mark in the 00 indicates the actual point you are trying to search.
If a tape has a blank portion between recorded portions
The date search function may not work correctly.
Cassette memory
The tape cassette memory can hold six recording date data.
Ponck 3aIncn IIO daTe 6e3 NcNoJIb3OBAHnKacceTHoN nAMrTn
(1)YcTaHOBInTe NepeKJIIOUaTeIb POWER B noJIOKeHne PLAYER.
(2)HaXMMTe KNONky FN dIy OTo6paXeHnPAgE1 (ctp. 18).
(3) YctaHOBNTe KOMaHny CM SEARCH B C B NOJoxeHne OFF B yCTaHOBkax MeHIO (cTp. 78).Пи ИСЮЛБЗОВАнИ ЛENTы 6e3 KACCETHOД NAMATN ПОПУСТITE 3TOT NYHKT.
(4)HaximaiTeNoBTOPOKHOKNky SEARCH MODEHaIyIbTeDnCTaHIOHNOYOpBaPAnEHHdoTExNOP,IOKAHeIPOABNTcA INdIKaTOP NoCKa DaTbI. INdIKaTOP6yDeTIN3MeHATbCScJeDyUOIM 6pbazOM: TITLESEARCH DATE SEARCH PHOTO SEARCH PHOTO SCAN 6e3Indikatopa
(5)HaxmTe KhONkHa nylbTe DnCTaHcIOHHOrO UnpabLeHnA DnI NOnCKa npdeI dyuSei DaTbI nnJx He HaxmMaTe KhONkY I dNn oNcKa CneDyUoSei DaTbI. Baue BInDeOkamepa ABTomatueckn HaCyHTB OBCpnO3BeDeHnE B MceTe, rge N3MeHReTCa DaTa.BcKn p3 npn Haxkatnn KhONkI I nIi BaaBaInDeOkamepa BbINOpNHET nonck npdeI dyuSei nnCneDyUoSei DaTbI.
ДлЯ OCTaHOBKи NONCKa
HaxmTe KhoNky Ha npIbTe dncTaHcNoHHoro ynpaBHeHn Hn Ha BaWe BnDeokampe.
Ppimcayane
Ecni npoJOnKInTeIbHocTb 3aIncn Ondoro DnA MeHee DByx MmHyT, Ba7a BnDeokamepa MoKeT He ToUHO HaTe MeCTo, rDe n3MeHaerTa data.
B nHnKKaTope 00
Пола В Иndикatope 0уКа3ыBaet TEkyшee MeCTO Ha JIHTe.
3HaK B yKa3bIbAeT paKTneCKyTOUky, KOTOpYIO Bbl nbITaETcB HaHTN.
EcIn Ha 3aHncaHHoJIeHTe NMeIOTc H3aHncaHHbIe YUacTkn
Searching the boundaries of recorded tape by title - Title search

If you use a tape with cassette memory, you can search for the boundaries of recorded tape by title (Title search). Use the Remote Commander for this operation.
(1) Set the POWER switch to PLAYER.
(2) Press FN to display PAGE1 (p. 18).
(3) Press MENU, then set CM SEARCH in to ON in the menu settings (p. 78). Default setting is ON.
(4) Press SEARCH MODE on the Remote Commander repeatedly, until the title search indicator appears.
The indicator changes as follows:
TITLE SEARCH DATE SEARCH PHOTO SEARCH PHOTO SCAN no indicator
(5) Press or on the Remote Commander to select the title for playback.
Your camcorder automatically starts playback of the scene having the title that you selected.
Press on the Remote Commander.
If you use a tape without cassette memory. You cannot superimpose or search a title.
In the 00 mark
- The bar in the 00 mark indicates the present point on the tape.
- The x mark in the 00 indicates the actual point you are trying to search.
If a tape has a blank portion between recorded portions
The title search function may not work correctly.
To superimpose a title
See page 71.
ДлЯ OCTaHOBKINONCKA
HaKMTe KHONKy Ha NylbTe DnCTaHcNOHHOr OynpaBneHna.
EcIn Bblncnolb3yTe JIeHTy c KaCCsTHoN nAMrTbHO
BbI He MoKTe BblIOJIHrTb HAIIOXeHne IINI NONCK TnTpA.
B nHnKaTope 00
Плоса В yKazыBAET TOKY Ha JIHTE HAHACTOUIM MOMHT.
3HaK B yKa3bIbAeT paKTnueckyTohKy, KOTopyIO Bbl nbITaTeEc bHaTI.
EcIn Ha JeHTe MmEtTcH He3aHncaHHbI yAcTOK MExKd 3aHncaHHbIMu YactAMN
Searching for a photo
- Photo search/
Photo scan
You can search for a still picture you have recorded on a mini DV tape (photo search).
You can also search for still pictures one after another and display each picture for five seconds automatically regardless of cassette memory (photo scan). Use the Remote Commander for these operations.
Use this function to check or edit still pictures.
Searching for a photo by using cassette memory
You can use this function only when playing back a tape with cassette memory (p. 122).
(1) Set the POWER switch to PLAYER.
(2) Press FN to display PAGE1 (p. 18).
(3) Press MENU, then set CM SEARCH in to ON in the menu settings (p. 78). Default setting is ON.
(4) Press SEARCH MODE on the Remote Commander repeatedly, until the photo search indicator appears.
The indicator changes as follows: TITLE SEARCH DATE SEARCH PHOTO SEARCH PHOTO SCAN no indicator
(5) Press or on the Remote Commander to select the date for playback. Your camcorder automatically starts playback of the photo having the date that you selected.
ПоньфOTO
-ΦOTONONCK/
ΦOTOCKaHnpOBaHne
BblMOXkTe BblIOJIHrTb IONCK HEnOdBnIXHOrO n3o6paKeHnA,3aIncAHORo HaJeHTe mini DV (fotonouck).
BbTaKKe MoKTe BbIIOHnHbT NOnCK HNODBNkHbIX N3OpaXeHn ONDHO 3a DpyrIM N OTOpaXaKaTb KaJDoE N3OpaXeHne NpTb CEyHd ABTOMATNueckN H63aBNCM0 OT KACCtHOn NAMrTn (ΦOTOCKaHnpOBaHne).
IcnoJIb3yIte pIbI tIcTaHcUHOHOrO ynpaBHeHn dIa 3tNx Opeaun.
IcnoIb3yIte 3Ty cyHKcuIO dIra npOBepKn mMOHTaKa HEnoDBNXHbIX N3OpaXeHn.
PonckΦoToC nOmoaio
KACCETHOI NAMRTN
Bbl MOXeTe NcOJIb3OBAbTb 3Ty FyHKUHIO TOJIbKO npn BOCPOn3BeDEHm JIeHTbIC KACCETHOJ naMraTbIO (CTp.122).
(1)Установпейсяклочаель POWER в положене PLAYER.
(2)Haxmnte KhoNkFy FN dIpy OTo6paXeHnPAgPAGE1 (ctp. 18).
(3)HaxMMTE MENU, a 3aTEM yCTaHOBnTe KOMaHny CM SEARCH B [B] B noJIOxHeNc ON BYCTaHOBkAX MEHIO (CTp.78).YCTaHOBKa NO yOMONHIO COOTBeTCTByeT NOJIOxHeNc ON.
(4)HaximmaTe NOBTOPO KHOKNy SEARCH MODE Ha NylbTe DnCTaHmOHHoro ynpabHeHIO Do TEX NOP, NOKA He NORBtCn INDkAToP NOCKA FOTo.
INHnKaTOp 6yDet N3MeHrTbCnEynuIIM 06pa30M:
TITLE SEARCH DATE SEARCH
PHOTO SEARCH PHOTO SCAN 6e3 INdikatopa
(5)HaxmTe KhoNkU InnI HnnybTe DCTaHUnOHOrO ynpabJeHnI nnBb6opa DaTbI dNr BocPOn3BeHeN. Baasa BIDeOKaMepa ABtOMaTHueckn HaHTe BOCPOn3BeHeNbe H naAne Bb6paHHoJ DaTbI.
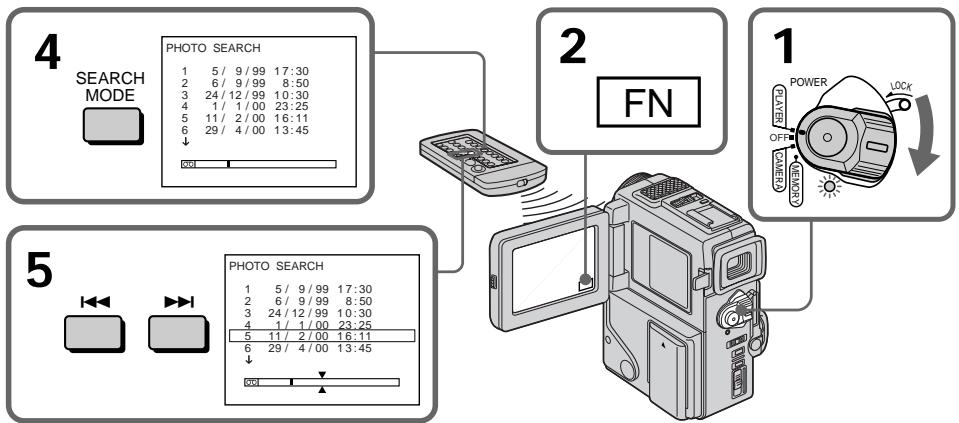
To stop searching
Press on the Remote Commander.
ДлЯ OCTaHOBKи NONcka
HaKMnTe KHOkky Ha NyIbTe DnCTaHcNoHHOrO ynpabLeHna.
In the 00 mark
- The bar in the 00 mark indicates the present point on the tape.
- The x mark in the 00 indicates the actual point you are trying to search.
If a tape has a blank portion between recorded portions
The photo search function may not work correctly.
The number of data to search displayed on the LCD screen
Up to 12 data can be displayed to search on the LCD screen. Use photo scan function to search the one among more than 12 photos.
Searching for a photo without using cassette memory
(1) Set the POWER switch to PLAYER.
(2) Press FN to display PAGE1 (p. 18).
(3) Press MENU, then set CM SEARCH in to OFF in the menu settings (p. 78).
(4) Press SEARCH MODE on the Remote Commander repeatedly, until the photo search indicator appears.
The indicator changes as follows:
TITLE SEARCH DATE SEARCH PHOTO SEARCH PHOTO SCAN no indicator
(5) Press or on the Remote Commander to select the photo for playback. Each time you press or , your camcorder searches for the previous or next photo.
Your camcorder automatically starts playback of the photo.
To stop searching
Press on the Remote Commander or on your camcorder.
BnHnKaTope 00
-Полаь yka3bIbae TOTky Ha JIeHTeHa HACTOJIUM MOMENT.
-3HaK B yKa3bIbAeT paKTneckyIO TOky, KOTopyBbl nbIaTeTcB haNTN.
EcnHaJeHTe NMeeTcHe3aNcaHHbIyUactOK MEXdy 3aNcaHHbIMu YacTAMnФyHKsIPOTOONCKa MoKET He pa6oTaBHaJIeKaUIM O6pa3OM.
Homep daHHbIX dIa noncKa oTo6paXaetca Ha 3KpaHe XXD
10 12 daHHbIX MoKet 6bITb OTo6paKeHo Ha 3KpaHe KKД. ИсплььзYte ФунКцИо ФOTOCKaHINPOBaHnЯ ДЯ ПОИСKa OdHOrO n3 6OJIe Yem 12 ФOTO.
Ponck foTo 6e3 nCnoJb3OBaHnKaCCTeHOI nAMrTn
(1)Установпейреклочаель POWER в положене PLAYER.
(2)HaxmTe KhoNkF NДЯ OTo6paXeHnPAgE1 (ctp.18).
(3)HaxmTe MeHIO,a 3aTEM yCTaHOBnTe KOMaHdY CM SEARCH B CmB nIoXeHne OFFBycTaHOBkaxMeHIO(cTp.78).
(4)HaximaiTe NoBToPHo KhoNky SEARCH MODEHa npIbTe DnCTaHIOHnHO ynpaBHeHdoTExnop,POKa HeNoBHTcA HndkaTOpΦoTOnOncKa.
INHdkatop6ydtN3MeHrTbCnEduOuIM 06pa30M:
TITLE SEARCH DATE SEARCH
PHOTO SEARCH PHOTO SCAN HET INHДИΚaTopa
(5)HaKmTe KhONkU Hn Hn lyIbTe DnCTaHnOHHOro UnpaBnEHHn DnBaBbOpa fTO dnn BocPon3BeDeHHn. BcKn n pa3 npn Haxatnn KhoNkn I nn Baasa BnDEOKaMepa BbINnHReT NOnCK npdebldyuero nIn cneDyUoero fTO.
Baa Bndeokamepa aBTOMaTneckn HaHnet BocpOun3BeDeHne fTO.
ДлгocтahOBknIOncka
HaxmTe KhoNky Ha npIbTe dncTaHcNoHHoro ynpaBHeHa Na BaWe BnDeokampe.
Scanning photo
(1) Set the POWER switch to PLAYER.
(2) Press SEARCH MODE on the Remote Commander repeatedly, until the photo scan indicator appears. The indicator changes as follows: TITLE SEARCH DATE SEARCH PHOTO SEARCH PHOTO SCAN no indicator
(3) Press or on the Remote Commander. Each photo is played back for about 5 seconds automatically.
Сканироваиме ФOTO
(1)YcTaHOBInTe NepeKJIIOUaTeIb POWER B noJIOKeHne PLAYER.
(2)HaxmajTe NOBtOHO KhoNky SEARCH MODEHaIyIbTe DInCTaHIOHnHO ynpaBHeHnI DoTex NOp,NOKa He NoBbTcH INdKATOP FOToCockAnPOBaHn. INdKATOp 6yJeT N3MeHArTbcr CneDyUoIM o6pa30M: TITLE SEARCH DATE SEARCH PHOTO SEARCH PHOTO SCAN HeT INdKATopa
(3)Haxmte KhoNkU HnIu HHa nIyIbTe DnCTaHcNoHHOro ynpaBHeHn. KaJdoe fOTo 6yJeT aBTOMaTHueckn OTo6paKaTaBC npImepHo 5 cekHyd.
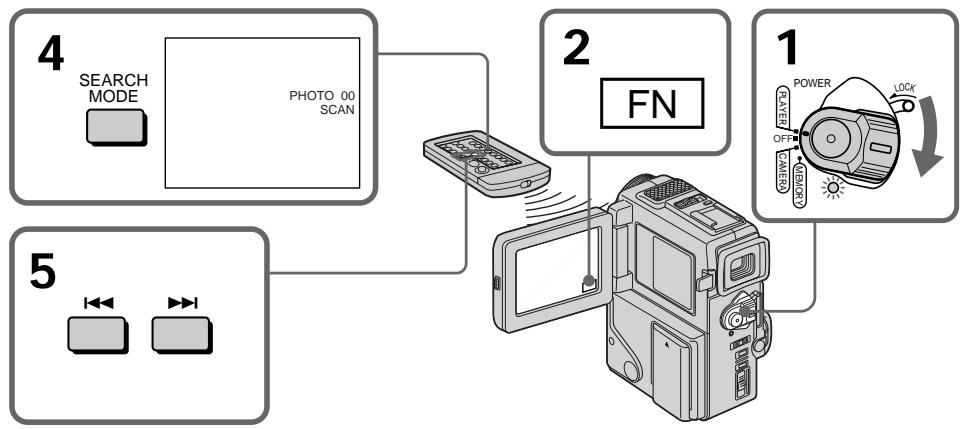
To stop scanning
Press on the Remote Commander or on the camcorder.
ДлЯ OCTаHOВКи CKaHирOBaHHA
HaxmTe KhoNky Ha npIbTe DnCtAnuOHOrO ynpaBHeHn Hn Ha BaSei BnDeokampe.
Using the A/V connecting cable
Connect your camcorder to the VCR using the A/V connecting cable supplied with your camcorder.
Set the input selector on the VCR to LINE, if available.
(1) Insert a blank tape (or a tape you want to record over) into the VCR, and insert the recorded tape into your camcorder.
(2) Set the POWER switch to PLAYER.
(3) Play back the recorded tape on your camcorder.
(4) Start recording on the VCR.
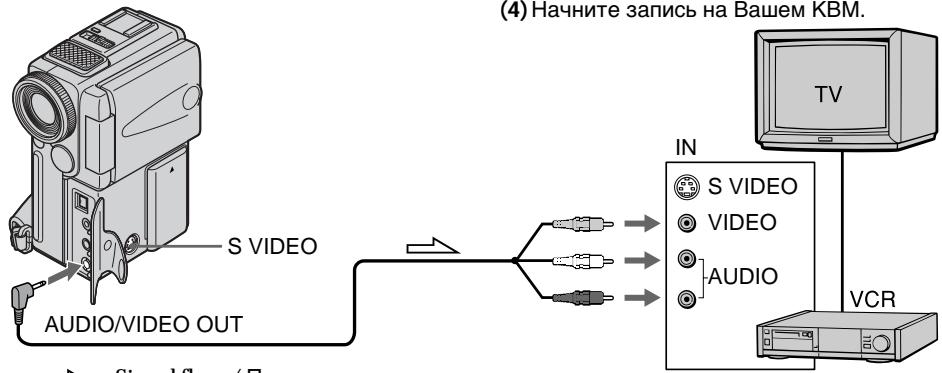
When you have finished dubbing a tape
Press on both your camcorder and the VCR.
When you dub a tape
Turn off indicators displayed on the LCD screen by pressing following buttons. Otherwise, those indicators will be also recorded.
On your camcorder:
DISPLAY/TOUCH PANEL
On the remote commander:
DISPLAY, DATA CODE, SEARCH
You can edit on VCRs that support the following systems
8 mm, Hi8 Hi8, Digital8, VHS VHS,
SVHS S-VHS, VHSVHSC, SVHS S-VHSC,
If your VCR is a monaural type
Connect the yellow plug of the A/V connecting cable to the video input jack and the white or the red plug to the audio input jack on the VCR or the TV. When the white plug is connected, the left channel audio is output, and the red plug is connected, the right channel audio is output.
IcnoJIb3OBAHnE CoeHNHTeNbHOKa6eJyauNo/BuDeo
HaxmTe KhoNky KaK Ha BnDeokamepe, TaK n Ha KBM.
Bo Bpemnpeepannc JIeHTbI
BbIKIOHHTe INdKaToPbI, OTObpaXaEmbI Ha 3KpaHe KKn, nyTEM haxaTnCneDyOuNX KHONok. B npoTbHMo Cnyae 3TN INdKaToPbI TaKke 6byT 3aNcA Hbl.
Ha Bašew BnDeokampe:
DISPLAY/TOUCH PANEL
Ha npJIbTe nDcTaHcUOnHOro ynpaBHeHnA:
DISPLAY, DATA CODE, SEARCH
BblMOXETe BblIOJIHrTb MOHTaX Ha KBM, KOTOpBIE NOdEPKINBAiOT cIeDyUoXiNE CNUCTEMbl
8 8 MM, Hi8 Hi8, Digital 8, VHS VHS, SVHS
S-VHS, VHSO VHSC, SVHSO S-VHSC, B
Betamax, MHHD VMinu DN
EcnBaw KBM mohofohueckoTnna
ПодсоeннTe Jкелтбишт ekep COeINHITbHOrO KaBEnAayDIOB/BNdeO K BXoDHOMY rHe3dY BnDEOCrHana, a 6Beln IInK pKaChbIshTKeP K BXoDHOMY rHe3dY ayDIOcRHaHa Na KBM nI IN TeBEN3ope. EcIn NOcEOiHNH 6Beln WtEkep, To 3Byk 6yDeT pa3DaBaTBcN C neBoro KaHana, a ecIn NOcEOiHNH KpaChbIsh TKeP, To 3Byk 6yDet pa3DaBaTBcN c npaBOrO KaHana.
Connect using an S video cable (not supplied) to obtain high-quality pictures
With this connection, you do not need to connect the yellow (video) plug of the A/V connecting cable.
Connect an S video cable (not supplied) to the S video jacks of both your camcorder and the VCR. This connection produces higher quality DV format pictures.
Using the i.LINK cable (DV connecting cable)
Simply connect the VMC-IL4435/2DV/4DV i.LINK cable (DV connecting cable) (not supplied) to DV OUT and to DV IN/OUT of the DV products. With digital-to-digital connection, video and audio signals are transmitted in digital form for high-quality editing. You cannot dub the titles, display indicators or the contents of cassette memory.
(1) Insert a blank tape (or a tape you want to record over) into the VCR, and insert the recorded tape into your camcorder.
(2) Set the POWER switch to PLAYER.
(3) Play back the recorded tape on your camcorder.
(4) Start recording on the VCR.
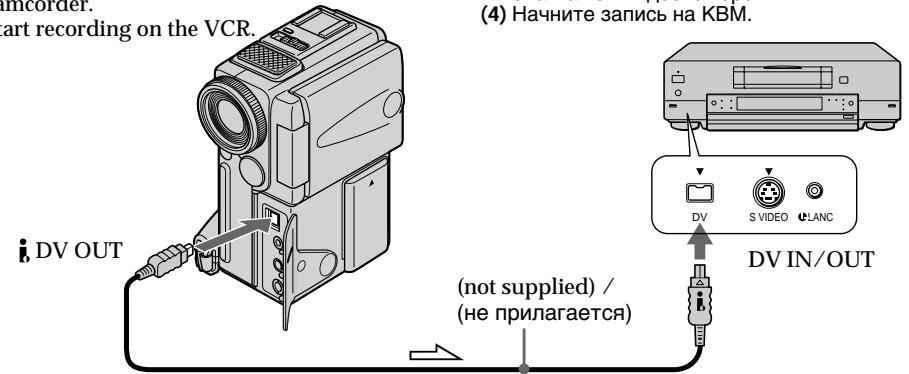
Signal flow / Πeρεδαγa cīrHana
When you have finished dubbing a tape
Press on both your camcorder and the VCR.
You can connect one VCR only using the i.LINK cable (DV connecting cable).
Pictures processed by the digital effect function
Pictures processed by the digital effect function are not output through the DV OUT jack.
Ipepe3anncb JeNTbl
BbINOHNTE NOcOeINHeHne C NOMoUbIO Ka6eN S BnDEO (He npuJIaRaTc)I dN oNtUeHn BbICOKOKaueCTBeHHbIX N3O6paXeHn
Пи ТAKOM ПОДСоЕДИНЕМВam He HUKHO
ПОДСоЕДИНТьЖЕЛТь (ВИДeo) wTekep
соEDINHITeBHorO Ka6eJIayuN0/BVdeO.
ПОДСоЕДИНTEКа6eJIb SV BDEo (He npInnaTaeTc) K
rHE3dAM S BIDeO Ha BaWei BIVdeOKaMepe n KBM.
Пи ДАнHOM ПОДСоЕДИНEHm Bbl cMOxete
ПОЛУЧТь BILCOKOKaYeCTBeHbIe N3O6paXeHnA
формanta DV.
IcnoJb3OBAHne Ka6eJIaLINK (coeHNHTeJIbHbI Ka6eJIb DV)
Ipocto noCoeHNHe Ka6bV MVC-IL4435/2DV/ 4DV i.LINK (coeHnHTenBHyk Ka6b DV) (He npinaarTcA)K rH3d yD, DV OUT n rHeDy DV IN/ OUT uHpO8bX BVJeOIm3dEm. C nomoUo coeJINHeHn UHpOBoBIM K6BeMe BnDeo- ayDuocnHaBn IpePaIoTcB uHpOBoW fOpme DnIPOncNduyoIeBO BICcOKKaeCTBeHHOrO MOHTaJa. Bb He MoKTepe3aInCbIbTa TtPbI, INDAKAtOpBHa NdcPiee nIi CoepjKaHne KACCETHO nAMrTI.
(1) BCTabTe He3aIcapAHy JOHtY (JINJ HENTY, HA KOTOpYxOHTe BbIOJIHnTb 3aIncs) B KBM 5BCTabTe 3aIcapAHy JOHtY B BuDEOKaMEpy.
(2)VctaHOBITE npeKJIHcATEb POWER B nIOJoxeHne PLAYER.
(3)HaunHte BocnpMo3BedeHeNe 3aImcaHHoJIeHTb5Ha Bauei BnDeokamepe.
(4)HaunTe 3anncb Ha KBM.
Ecnn Bbl 3aKOHuJIn nepe3annCb JeHTbl HaxMMte KhONkY ■ KaK Na BaSei BInDeokamepe, TAK n HA KBM.
Bb MoXeTe NOpCoeHNHt b OAnH ToIbKO KBM c nOmoCbKa6eJI a.LINK (coeHNHTeJIbHbI Ka6eJIb DV).
I3o6paXeHn, 6pa6oTaHHbIe C nOmoUbO cyHKuN uΦpOBBOrO 3ΦΦeKta
1306paxEHIN, 16pa6OtaHbIe C NOMOuBIO
fYHKUIM UcPOBOBFO 3dpeKTA, He NOCTyNaOT Ha
BbIXoJ Upe3 rHe3do DV OUT.
If you record playback pause picture with the DV OUT jack
The recorded picture becomes rough. And when you play back the picture using the other video equipment, the picture may jitter.
To perform a more precise editing (DCR-PC3E only)
Use DV synchro-editing function (p. 66).
Editing partially on a DV tape - DV synchro-editing (DCR-PC3E only)
By simply selecting the scenes to edit, you can duplicate the desired portion on a tape, using other equipment connected with an i.LINK cable (DV connecting cable). The scenes can be selected by frame. You can also use the Remote Commander for this operation. Since your camcorder exchanges digital signals, you can edit with little audio and video deterioration. You cannot duplicate titles, display indicators, or the contents of cassette memory. The connection is the same as on page 65.
(1) Insert a recorded tape into your camcorder and insert a blank tape (or a tape you want to record over) into the DV product.
(2) Connect your camcorder to the DV product with an i.LINK cable (DV connecting cable).
(3) Set the POWER switch on your camcorder to PLAYER.
(4) Set the input selector to DV input on the DV product. If the DV product is another DV camcorder, set its POWER switch to VTR.
(5) Press FN on your camcorder to display PAGE1 (p. 18).
(6) Press MENU, then select DV EDITING in ETC in the menu settings (p. 78).
(7) Using the video control buttons, locate the point where you want to start editing, then press l to set your camcorder in the playback pause mode.
(8) Press MARK on your camcorder or the Remote Commander to set DV EDITING IN.
n3o6paXeHnY uepe3 rHe3do Ipeep3aIncb JeHTbD, DV OUT
3aIncahHoe n3o6paXeHne cTaHET rpybIM.A ecn Bbl 6ydeTe BOCPON3BOIDnT b n3o6paXeHne h BaWeJ BnDEoKampe,TO n3o6paXeHne 6ydet NOpDarNBaTb.
ДЯ ВылОнHeHЯ 6ОЕТочHOrO MOHTaKa (ToьКо моДел BCR-PC3E)
NcnoJb3yIte cyHKUIO CnHXPOHHO MOHTaKa DV (ctp. 66)
MOHTaK NO qaCTaM Ha JeHtY DV-CnHxPoHHbI MoHTaK DV (ToIbKO moJeIb DCR-PC3E)
BbIbIpa3IN3OdbI dIa MoHTaxa, Bbl MoKeTe BbIbIbIbIbTbpeE3aNcBHyXhBXyAcTkoBHa naHTy, MCIOb3yraDpyrYIO annapatypy, NOcOeINHeHhyo C nOMoUbI kAbEi I.LINK (coeDNHITBeHbNk KabEbn DV). 3nIO3dbl MOxHO BbIbIpaTb IO KaDpAM. Bbl MoKeTe TaKxe NCIOb3OBAbT pNyBT DnCTaHcNOHHORO ynpaBVeHnRA JnBa BblONHeHnRA 3ToI Onepaun. IocKobky BaAa BnDeOkamepa BblONHReT o6MeH uΦPbOBx CnHaNob, Bbl MoKeTe BblIOJIbTHb MOHTaXJ NlMb C He3NaHTeNbHbIM yxUdSeHnEM 3Byka N BiDeOn3OpaXeHn. Bbl Me MoKeTe nepe3aNcSbIBaT bTtPbI, INdNKaTOpbI Ha dncnnee nn CoepXaHne KACCETHOI NaMATn. DaHnoe coeINHeHne RaJIeTcTaKIM Xe, KaK n Ha cTp. 65.
(1) BCTaBbTe 3aIncaHHyIO JeHTy B BauSy BnDEOkAmepy N BCTaBbTe He3aIncaHHyIO JeHTy (NIN NHeTMy, HAI KOToPoi Bbl XOTInTe BblOnJHbTb Nepe3aIncb) B annapat DV.
(2)ПодсоeДинITEБачуВиДeoКамерукannapaTy DV cnomoшьюKaбелЯI.LINK(coeДинITEьноKaбеляDV).
(3)Установпейсякючateль POWER на Baшен вideokampeь поожени PLAYER.
(4) UctaHOBInTe BxOJHOcEKeKTop B
PONOXeHMe BXoDHOrO CnHnAJa DV Ha
AnnapaTe DV. Ecnn AnnapaT DV nBnIeTcR
DpyroB BuDeOkAmePoR DV, yCTaHOBInTe
NepeKJIouCaTeNb POWER B noLoxeHne VTR.
(5) HaxmTe KhoNky FN ha Bauei BnDeokampe dIa oTo6paXeHnPA GAGE1 (cTp. 18).
(6) HaxmTe KhoNky MeHIO, a 3aTeM BbI6epnte DV EDITING B ETC B yCTaHOBkax MeHIO. (cTp.78)
(7)Исплььзу КНОКИ BИДЕОКHTРОЯ, НддTe MeCTO, Гд Бы XOTITE HaЧаТь MOТАЖ, 3aTem HжмITE KНОКИ [II]ДЯ YCTAHOBKи Baшew BИДЕОКМерБiВ ржIM nay3bI BOCIPON3BDEENH.
(8) HaxmTe KhoIky MARK Ha BaSei BInDeOkampe HnHa nIyIbTe INCTaHIOHHO ynpAbeHn Iyra YcTaHOBKn DV EDITING IN.
(9) Using the video control buttons, locate the point where you want to end editing, then press to set your camcorder in the playback pause mode.
(10)Press MARK on your camcorder or the Remote Commander to set DV EDITING OUT. The editing process starts. When the process ends, your camcorder and the DV product automatically set to pause mode.
(9) NcnoIb3yR KhoNkBnDeoKOHTpOJn, HauInTe MeCTo, rde Bby XOTNe 3aKOHHTb MOHTaX, 3aTeM HaxMITE KhoNky DJI BbINOHNHeY yCTaHOBKn BaWei BnDEOKaMEpbI B pexim Na3bl BOCNPON3BeDEHn.
(10) HaxmTe KhoNky MARK Ha BaSei BInDeOkampe NnHa NpIbTe NdCTaHIOHORO UnpabIeHnIA dYcTaHOBKn DV EDITING OUT. Ipocecc MoTaxa NauHaeTc. Korda npoecc 6ydet 3aKoHueh, BaSa BInDeOkamepa n annapat DV automatneckn nepeKluoyatcna Ha peXIM naY3bl.
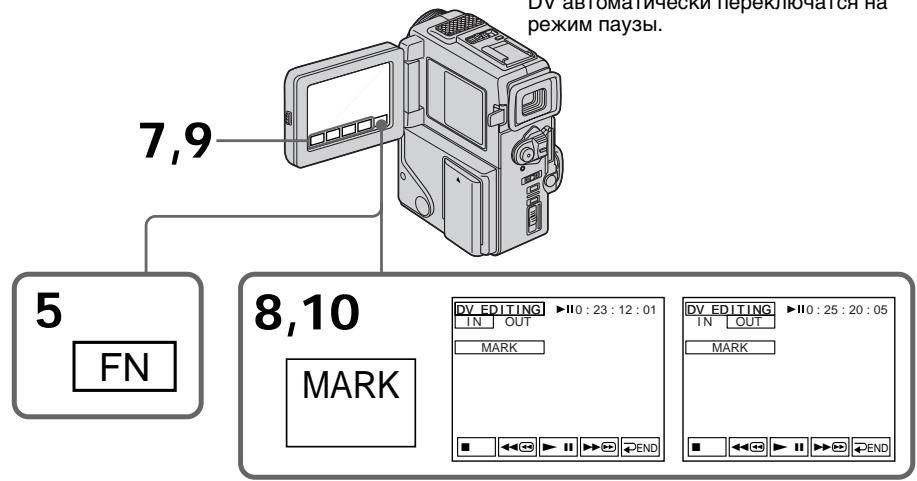
Notes
- If you use other than Sony equipment with the DV jack, you cannot perform DV synchro-editing.
- If a tape has a blank portion between recorded portions, DV synchro-editing may not work correctly.
Errors in duplicating
If you connect your camcorder to Sony equipment with DV jack, the range of errors is within + / - 5 frames.
The range may become wider in the following conditions.
- The interval between DV EDITING IN and OUT is less than five seconds.
- DV EDITING IN or OUT is set at the beginning of the tape.
If you do not make connections with i.LINK cable (DV connecting cable)
The screen shows NOT READY, and you cannot select DV EDITING.
PpIMeuaHnA
- Ecnn BbI nCnOJIb3yTe annpaTpy c rHe3dOm DV, He oTHoCAUHOC K n3dEINrM cInpMbly Sony, Bbl He CMOKeTe BblIOJNHTb CINxPOHbIM OMTaX DV.
- EcNi Ha JeHTe NMeETcH He3aPiNcaHHbY yAcTOK MExJy 3aPiNcaHHbIMu YacTBM, CNHxPoHHb MoTaxk DV MoKeT He paBoTaB NaIeXaUImo6pa3OM.
Own6kn npn nepe3annc
Ecnn Bbl noCoeDHHnB Bauy BnDeOkaMepy K annapaty Sony c rHezdom DV,To DNAna3OH Own60k 6byT B ppeJax ^+ -KaPob. Dna3oh MOKet 6b1b SiHpe B CneDuOnx CNyuJax.
- INтэрвал мени уустановами DV EDITING IN OUT Me Hee nTn ceKHyd.
YctahOBka DV EDITING IN nIN OUT BbIOnHeHa B CAMOM HauJaNe JeHTbl.
EcIi BbI He BbIIOJIHReTe IOcOeINHeHm C nOmoIbI KOa6eJIa I.LINK (coeAnHInTeIbHbI Ka6eIb DV)
Ha 3kpahe NoaBntcHnDnkaun NOT READY, n BbI He cMOxKeTe Bb6paTb yCTahOBky DV EDITING.
Ha He3aIncAHHom yUactKe JeHTbI
BbI He MoXeTe BbIIOJIHITb yCTaHOBky DV EDITING IN nnn OUT.
You can record an audio sound to add to the original sound on a tape by connecting a microphone. The original sound will not be erased. Use the Remote Commander for this operation.
Connecting the microphone with the MIC jack
Aydnopepe3a\Pncb
BbMOKTe 3aINcBtB 3Byk IJIaIO6aBHeHnK OpIMHaJIbHOMy 3Byky Ha IeHTe NytEm NOIcOeDInHeHnM NKpOfoHy. IepBOHaUaJIbHbI 3ByK He 6yDet CteP npI 3Tom. IcNoJIb3yIte NyIbT DnCTaHcNHO HOrO ynpAbeHnI dJIa 3ToI onepaun.
You can check the recorded picture and sound by connecting the AUDIO/VIDEO jack to a TV. The recorded sound is not output from a speaker. Check the sound by using the TV or headphones.
Dubbing with the built-in microphones
No connection is necessary.
Note
The picture is not output from the AUDIO/VIDEO jack. Check the recorded picture on the LCD screen or in the viewfinder, as well as check the recorded sound by using a speaker or headphones.
BbMOxKeI npOBepntb 3aIncahHoe
n3o6paXeHne n 3ByK, pOIOCoEIMHNIB rHe3do
AUDIO/VIDEO K TeJeBn3opy.
3aIncaHbI 3ByK He pa3daeTcYepe3 akyCTnueckyIO CnCTEmy. IPOBepbTe 3ByK c NOMOu bTO TeJeBn3Opa INI rOJOBhIx TeJefoHOB.
Ipee3aHnscb c nOmozbu BcTpoEHnOro MmKpOfoHa
HnkaKe nOIOcOeINHeHnE HTepe6yIOTca.
PpimueaHne
CnHnI n3o6paXeHnI He nepeJaetcYpe3 BbIXoHoe rHe3do AUDIO/VIDEO.IpoBepbTe 3aIncanHoe n3o6paXeHne Ha 3kpaHe KKД nII IN B VINOICKaTeJIe, a TaKKe IpoBepbTe 3aIncanbIy 3ByKpe3akycTnueckyIO CnCTEmy nIII rOJOBHbIe TeJeΦoHbl.
Adding an audio sound on a recorded tape
(1) Insert your recorded tape into your camcorder.
(2) Set the POWER switch to PLAYER.
(3)Locate the recording start point by pressing on the Remote Commander. Then press at the point where you want to start recording to set your camcorder to playback pause mode.
(4) Press AUDIO DUB on the Remote Commander. The green appears on the LCD screen.
(5) Press on your camcorder or on the Remote Commander and at the same time start playing back the audio you want to record. The new sound is recorded in stereo 2 (ST2) during playback. During recording new sound, the red appears on the LCD screen.
(6) Press on your camcorder or on the Remote Commander at the point where you want to stop recording.
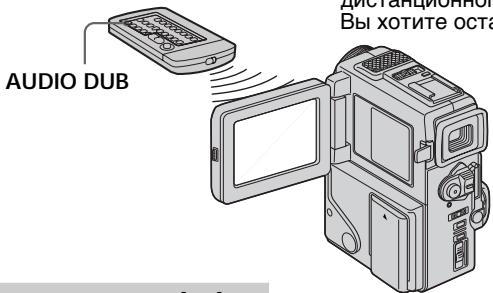
Monitoring the new recorded sound
To play back the sound
Adjust the balance between the original sound (ST1) and the new sound (ST2) by selecting AUDIO MIX in the menu settings (p. 78).
Aydnopepe3annscb
IobaBHeHne 3ByKOBOrO cnHaJaHa 3aNcAHHyo JeHTy
(1)BcTaBbTe BaUy 3aIncaHnyo JeHTy B BaUy BnDeOkamepy
(2)Установпейразковая对外开放 POWER B NOJOKEHNE PLAYER.
(3)HaIInTe MeTo HaaJa 3aHnCn,HaXnMaJ KHOINKy HApNbTe INCTaHcUOHHoro ynpaBHeN.3aTeM HAKmTe KHOINKy I B MeTe, rDe BbXoTne HauTa 3aNcB, dIy cTaHOBKn BaSeI BuaDeOkAmepbI bpeXnM npay3bI BOCnpOn3BeDeHnR.
(4)HaxMITE KHOIIky AUDIO DUB HA nyIbTe nCTaHIOHHOY npaBnHEHa.3eNHeB HnDKaTOP II NOBHTCa Ha 3KpaHe KKJ.
(5)HaXMMTe KHOKNy Ha Bauei BUNDEOKaMepe HINKHOKNY HA NpIbTe INCTAHUHNOHORO YnpaBHeNIA ONDOBPEMeHHO HauCHHTe BOCPnO3BeDeHne 3Byka, KOtOpbB Bb XOTNe 3aNcTaB. HoBbI 3Byk 6yDet 3aNcBbATbcB CtePeoOHmecKom pexMme 2 (ST2) BO BpEMr BOCPnO3BeDeHn.Bo BpEmr 3aNcH NHOBO 3Byka Ha 3KpaHe KKJn oRbNTcR KpaChb IHNdkaTop
(6)Haxmnte KhoNkIy Hā NybTe DnCTaHcNOHrO yOpaNBeHnB MeCte, rDe Bby XOTnTE OCTaHOBnTb 3aNtCb.
KoHTpoJIb HOBOrO 3aIncaHOrO 3ByKa
Длвьоспpon3BeGeHЯ 3Byka
Five minutes after when you disconnect the power source or remove the battery pack, the setting of AUDIO MIX returns to the original sound (ST1) only. The default setting is original sound only.
Yepe3 nIbMbMHyT nOcIe OTCoeHHeHn I NCTOCHNkA NITaHnI NII CNHTN BapTeHNO 6Ioka yCTaHOBka AUDIO MIX BepHeTcK NepBOHaJbHOMy 3ByKy (ST1).YCTaHOBka no YMOnuHaHIO COOTBeTCTByETOpINHaJIbeHOMy 3ByKY.
Notes
- New sound cannot be recorded on a tape already recorded in the 16-bit mode (32 kHz, 44.1 kHz or 48 kHz) (p. 82).
- New sound cannot be recorded on a tape already recorded in the LP mode.
- You cannot add audio with the AUDIO/VIDEO OUT nor DV OUT jack.
If you make all the connections
The audio input to be recorded will take precedence over others in the following order.
- MIC (PLUG IN POWER) jack
Built-in microphone
If the A/V connecting cable or i.LINK cable (DV connecting cable) is connected to your camcorder
You cannot add a sound to a recorded tape.
If you set the write-protect tab of the tape to lock
You cannot record on a tape. Slide the write-protect tab to release the write protection.
We recommend that you add new sound on a tape recorded with your camcorder
If you add new sound on a tape recorded with another camcorder (including other DCR-PC2E/PC3E), the sound quality may become worse.
To add new sound more precisely
Press ZERO SET MEMORY at the point where you want to stop recording later in the playback mode.
Carry out steps 3 to 5. Recording automatically stops at the point where ZERO SET MEMORY was pressed.
Приимецань
- HoBbI 3ByK He MoKeT 6bITb 3aIncAH HaJeHtY, yKe 3aIncAHHyO B 16-6uTOBmpeXmE (32 KfU, 44,1 KfU uIn 48 KfU) (ctp. 87).
- HoBbI 3ByK He MoXeT 6bITb 3aIncAH HaJeHTy, yJke 3aIncAHHyO B pexnme LP.
- Bbl He MoKTe BblonHtB HaIOKeHne 3ByKa, nCnoIb3yra rhe3do AUDIO/VIDEO OUT nnr rhe3do DV OUT.
Ecnn BbI cdeJannBce noDcoeHHeHH
BxOJHON 3ByK dIy 3aIINc 6yJeT NMeTb npInOpNTeT NaI DpyrIMN 3BykAMN B CNeDyUoSei nocneIOBaTeJIbHOCTn.
- MIC (PLUG IN POWER)
BcTpoeHHbIMNKpOΦOH
Ecnn K Baewe Bndeokamepe noocoeHHen coeHHntbHbI Ka6eB A/V nII i.LINK (coeHHtebHbI Ka6eB DV)
BbI He CMOXeTe IObaBnTb 3ByK Ha 3aIncaHHyIO JENTy.
EcIn Bbl yctaHOBtne JeneCTOK 3aunTbI 3anncn IeHTbI BNOLOXKeHne 6JIOKnpOBKn
BbI He CMOXKeTe BbIINHHTb 3aINCb Ha IeHTy.
PipeDbHbTe IeNecTOK 3aUHTb 3aINcN dJa
OCBO6OxKdEHHa 3aUHTb 3aINcN.
PeKOMeHnyeTcdo6abTbHObI3ByKHaJIeHTy,3aIncaHHyo c nOmoBbIO BaWei BnDeOKaMepbl
Ecni Bby IobabNTe 3Byk HaJIeHTy,3aIncanHHyIO C NOMOcIbO DpyroB BnDeOkamepbI (BKNIOUaI IN dpyrne DCR-PC2E/PC3E),KaueCTBO 3Byka MOKeT 6blxuyke.
Дпя 6олг eToUHOrO IO6aBJIeHnI HOBOrO 3Byka
HaxmTe KhONky ZERO SET MEMORY B MeCTe, rIe Bbl xoTne 3aINcB no3xe B peKIme BOCPon3BeDEnH.
BbINOHNTE nyHKtbc 3 no 5.3aNc bA BTOMATUeCKN OCTaHOBNTcB MeCTe, rJe 6bJa HxKaTa KhONKa ZERO SET MEMORY.
Superimposing a title
CM only
If you use a tape with cassette memory, you can superimpose the title while recording or after recording. When you play back the tape, the title is displayed for five seconds from the point where you superimposed it.
You can select one of eight preset titles and two custom titles (p. 74). You can also select the colour, size and position of titles.
HanoxeHne TnTpa
CM only
EcBn BblncnoIb3yeTe neHTy c KaccetHOI nAMrTbO, BblMOXeTe BblONHrtb HanoXeHne Ttnpa BO Bpem 3aNcH INI NocE 3aNcIe. EcBn BblBOcPOn3BODnte NeHTy, TtTp 6ydet OTObpaXaTbCBy TB TeUHeHne PAnTc KeYHc D TORE MeCTA, rDe Bbl HANOxHn erO.
BbMoKTe BbI6paTb OJIN H3 BOCbMn npeBaPteNbHO UCTaHOJIeHHbIX TNTPOB I DByX co6CTBeHHbIX TNTPOB (ctp.74). Bb MoKTe TaKxe BbI6paTb CBet, pa3MeP INoIOXeHne TNTPOB.

(1) In the standby/recording/playback/playback pause mode, press FN and select PAGE2 (p. 18).
(2) Press TITLE. The screen to select a title appears on the LCD screen.
(3) Select with / , and then press EXEC.
(4) Press to select a desired title, and then press EXEC. The title appears on the LCD screen.
(5) If necessary, change the colour, size, or position by pressing COLOUR, SIZE, POS or POS .
(6) Press 'TITLE OK.
(7) Press SAVE TITLE.
In the playback, playback pause or recording mode:
The "TITLE SAVE" indicator appears on the screen for 5 seconds and the title is set.
In the standby mode:
The "TITLE" indicator appears. And when you press START/STOP to start recording,
"TITLE SAVE" appears on the screen for 5 seconds and the title is set.
(1)BpeKIMe rTOBHOCTn/3aIncu/BOCpON3BeEHHa/ nay3bI BOCpON3BeEHHaHXMITE KHONKY FN n Bb6epNTe yCTaHOBY PAGE2 (cTp. 18).
(2)HaxMMTe KhoNkTy TITLE. 3KpaH dIy Bb6opa TnTpa NOBHTcH Na 3KpaHe KKd.
(3)BbIeepnte c nOmoaHIO , a 3aTeM haxmnte EXEC.
(4)HaKMITE IДЯВьБОаЖЕАмOROTNTPа, a3aTeMHaKMITE EXEC.TnTp noBnTc RA 3KpaHe JXKД.
(5)EcnI Tpe6yeTcA, I3MeHnTe UBeT, pa3Mep nnI noLoXeHne TnTpac NMOUbO COLOUR, SIZE, POS ↓ nnI POS ↑.
(6) Haxmnte KhONky TITLE OK.
(7)HaXMMTe KhoNkY SAVE TITLE. BpeXnme BocPOn3BEdENy,nay3bl BocPOn3BEdENH INI 3aINcN: Ha 3KpaHe NOBnTcN INIdkaTop "TITLE SAVE"Ha PJIb cekyHd, n YcTaHOBKa TITPa 6ydet 3aBepSeHa.
BpeXnme oXnDaHnA:
If you set the write-protect tab to lock You cannot superimpose or erase the title. Slide the write-protect tab to release the write protection.
To use the custom title If you want to use the custom title, select l in step 3.
If the tape has a blank portion
You cannot superimpose a title on the tape.
If the tape has a blank portion in the middle of the recorded parts The title may not be displayed correctly.
The titles superimposed with your camcorder
- They are displayed by only the DV Mini DV format video equipment with index titer function.
- The point you superimposed the title may be detected as an index signal when searching a recording with other video equipment.
If the tape has too many index signals You may not be able to superimpose a title because the memory is full. In this case, delete titles you do not need.
Not to display title
Set TITLE DISP to OFF in the menu settings.
Title setting
- The title colour changes as follows: WHITE YELLOW VIOLET RED CYAN GREEN BLUE
- The title size changes as follows:
SMALL LARGE
You cannot input more than 12 characters in LARGE size. - If you select the title size "SMALL", you have nine choices for the title position.
If you select the title size "LARGE", you have eight choices for the title position.
One cassette can have up to about 20 titles, if one title consists of 5 characters
However, if the cassette memory is full with date, photo and cassette label data, one cassette can have only up to about 11 titles with 5 characters each.
Cassette memory capacity is as follows:
- 6 date data (maximum)
- 12 photo data (maximum)
- 1 cassette label (maximum)
EcIn Bby yctaHOBNJI neeCTOK 3aunTbI 3aHNCB NOLOXKeHne 6JOKuPOBKn
BbI He CMOXeTe HAOXtB IIN CTepTb TnTP. PpeBnHbTe IneCTOK 3aunTb 3anncn DnA OCBOXOJeHHa 3aunTb 3anncN.
ДлЯ NCПОЛБ3OBAHNA CO6CTBEHHORO THTpa
EcIN Bbl XOTIte NCПОЛБ3OBaTb CO6CTBEHHbIM
THTp, Bbl6epITe yCTaHOBky BpyHKTe 3.
EcHnHaJeHTe HMeetc He3aHcHHa Yactb BbI He CMOKeTe HaIOXHTb TnTp HaJeHTy.
EcIHaJIeHTe IMEIOCTaH3ANCAHbIe 8aTHM MeKJy 3aNCAHbIMn 8aCTAMN THTp MoKET 6bITb OTo6paXeh HENpABInbHO.
Tntpbl,HaIOXKeHHbIe c nOmoBbBaSei BnDeOKaMepbl
OHTO6PaxaTcTbONKPOINNCNOB30BAHNUΦpOBoBNBDeoanapatypbIMNCHNEKCHOYHKnE6LOKA BBODa TNIPOB.
Mecto,HaKOTOpoe Bbl HaIOXmIIN TnTp, MOKeT 6bITb DeTeKTHPOBaHO B KaueCTBe INHeKCHOrO CmHnla Pn NiOnCKe 3aIncn Ha dpyroI BnDeoAnapatype.
EcIn Ha IeHTe NMeeTc CInuKOM MHOOr HnDeKChbIX CNrHaJIOB
BbMOKET 6bITb He CMOKTe HANOXHTb TnTp n3-3a nepenONHeHn NaMToN. B TakOM cnYae OTMeHNrte TnTpbl, KOTOpBle BA HenyXhbl.
YTO6bI THTp He OTO6paKaJcA
YcTaHOBnTe TITLE DISP Ha OFF B yCTaHOBkax MEHIO.
YctaHObKa TnTpa
- LBeT TnTpA n3MeHnEeTcA cJeDyIOUmO6pa3oM: WHITE (6eIbI) YELLOW (XeIeTbI) VIOLET (fnoJeToBbI) RED (KpaChbI) CYAN (rOly6oI) GREEN (3eJeHbI) BLUE (CInHnI)
- Pa3Mep TnTpa N3MeHЯETcR CNeIyUOUM o6pa3OM: SMALL (MaIeHbKm) LARGE (6oJIbIooi) Bbl He MoXeTe BBeCTn 60onee 12 3HaKOB dJa TnTpa LARGE.
- Ecni Bbl Bblbipape Ta3mep Tntpa "SMALL" To Bbl MojTe Bblbipatb n3 9 noLoxehn Tntpa. Korda Bbl Bblbipae Ta3mep Tntpa "LARGE", Bbl MojTe Bblbipatb n3 8 noLoxehn.
Ha OndHoi KaCCeTe MoKET BMeUaTbcSd 20 TnTPOB,ecmOIN TTnP COCTOnT n35 CUMBOJOB
Ondako, ecn ecn KaccetHa nAMrTb yke coepxnt dTaY, fOTO n daHHble KaccETHOI MapKnPOBKN, TO Ha OJHOn KaccTe MOKeT BMeaTbCn OKoJo 11 TITPoB c5 CmBolam KaKdBi.
EmKoCTb KACCETHOI nAMrN rBnAeTcR CJIeIOyUOeI:
-Данные 6 daT (MaKcIMyM)
-Данные 12фOTO (MaKcIMyM)
- 1 KacceTha MapKuropbKa (MaKcMym)
Erasing a title
(1) Set the POWER switch to PLAYER.
(2) Press to FN to display PAGE1 (p. 18).
(3) Press MENU to display the menu.
(4) Select _1 with / , and then EXEC.
(5) Select TITLEERASE with / , and then EXEC. The screen to erase a title appears.
(6) Select the title you want to erase with / , and then press EXEC.
"ERASE OK?" indicator appears.
(7) Make sure the title is the one you want to erase, and press OK.
CTupaHne TnTpa
(1)Установпейреклочаель POWER в положене PLAYER.
(2)HaxmTe KhoNkFy FN dIa OTo6paXeHnPAgE1 (ctp. 18).
(3)HaKMMTe KhoNky MENU ДЯ оTo6paJxehnmeHIO.
(4)Выберпгс сююьo↓↑,а затм нахштЕ EXEC.
(5) BыберпгТTLEERASE c nOMOьH O↓↑, a 3aTeM hAJKMnTe EXEC. ПОВИТСЯЗКран ДЛЯ CTIPaHIN TITPa.
(6) BbIbePte TnTp, KOtOpBb Bbl XOTnTe CtepeTb, C NOMOuBIO , a 3aTeM HaxMnTE EXEC. IoRbNTcH INDnKaTOP "ERASE OK?"
(7)Y6eIntecb,HTO TnTp NMeHHO TOT,KOTOpbB BblXoTnTe CtepeTB,NHaXKMnTe OK.
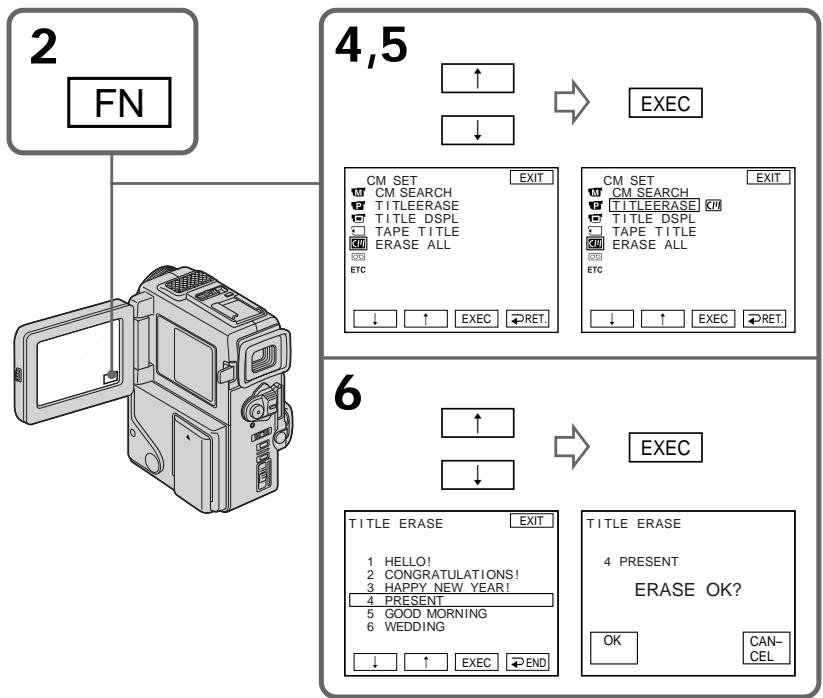
To return to FN
Press EXIT.
To cancel erasing
Press CANCEL in step 7.
You can make up to two titles and store them in Cassette Memory. Each title can have up to 20 characters.
(1) In the standby/playback/playback pause mode, press FN, and select PAGE2 (p. 18).
(2) Press TITLE.
(3) Select with / , and press EXEC.
(4) Select CUSTOM1 SET or CUSTOM2 SET with / , and press EXEC.
(5) Select the desired character. Repeat pressing a key to select the desired character on the key.
(6) Press to move the cursor for the next character. Repeat the same procedure as step 5 and 6 to complete your title.
(7) Press SET. The title is stored in memory.

BbMOKTe CoCTaBHT Do DByx TnTPOB u COXpaHNT bN B KACCETHOI nAMrTN. KaJdbI TnTp MoKet CoDEpXaTb Do 20 CmBOJOB.
(1)В ржиме roTOBHOCTn/3aIncu/ BOCnpOn3BeDEHn/naY3bI BOCnpOn3BeDEHn Haxmnte KhoNky FNи BB6epnTe yCTaHOBky PAGE2 (ctp. 18).
(2) HaxkMTe KhONky TITLE.
(3)Выберпг e c nomoьв ,a 3aTe m haxmte EXEC.
(4)ВьберпсCustom1 SETин Custom2 SET cnomoшь ,a 3aTeM HaXMMTE EXEC.
(5) BbIepeNTe JcJeaembI cMBOJI. IIOBTOPIte HaxKaTne KJIaBUNI dIJI BbIbopa JcJeaEMORO cMBOJa Ha KJIaBNIe.
(6)Haxmnte nI npememeHHn Kypcopa Ha cnEduoCnmbOJ. NOBTOpAte Ty Xe camyIO pOoCeDpy, YTO IN B nyHKtax 5 n 6 dIra 3aBepSeHHn BaWero TnTpa.
(7)Haxmnte KhoNky SET. TnTp 3anomnHaetcB nAMrTn.
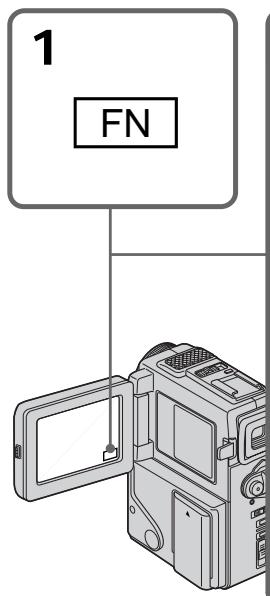
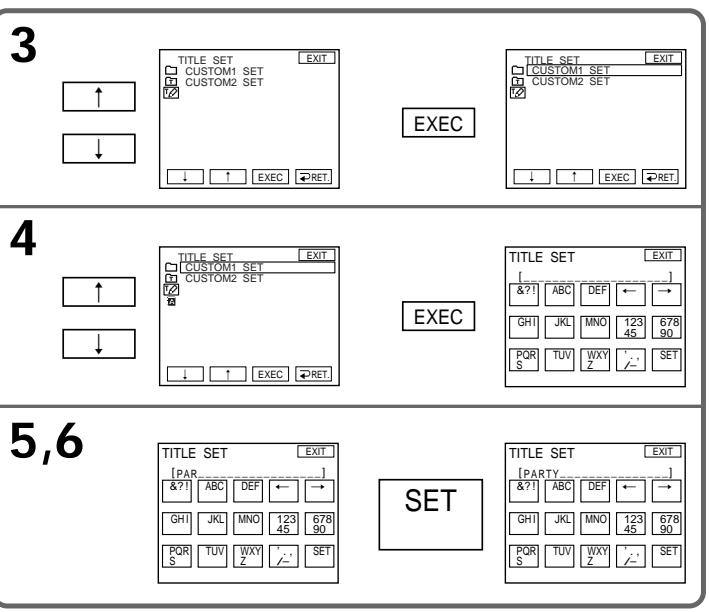
To return to FN
Press EXIT.
To change a title you have stored
In step 4, select CUSTOM1 SET or CUSTOM2 SET, depending on which title you want to change, then press EXEC and then enter the new title as desired.
If you take 5 minutes or longer to enter characters in the standby mode while a cassette is in your camcorder
The power automatically goes off. The characters you have entered remain stored in memory. Set the POWER switch to OFF once and then to CAMERA again, then complete your title. We recommend setting the playback or playback pause mode or removing the cassette so that your camcorder does not automatically turn off while you are entering title characters.
To erase the title
Press . The last character is erased.
To enter a space
Press
To enter the same character on the same button in succession
Press to move the cursor to the next position, and enter the character.
Co3dHnE Baunx Co6CTBeHHbIX TnTPOB
ДлвоьВраТВположенеFN
HaxMMTe KhONKy EXIT.
ДлЯИЗмeHeHnCOxpaHeHHOrOB namATn TnTp a
B nyhKe 4 BbIbepuTe CUSTOM1 SET nIN CUSTOM2 SET, B 3aBncmocTn OT TORO, KaKoI TnTp Bbl XOTNe I3MeHnTB, a 3aTeM HaxMnTE EXEC n noCne yero BBeDnTe HOBBI JeJIaEmbl TnTp.
EcIn Bbl BBOINTe CMBONbl 5 MmHyT nll 6oJIeeBpeXnmeOxNdaHnBTO BpEmr, KOrdaKacceta HaxODNTcB BaWei BnDeOkamepe
Питainede Вьклioчntc aВТOMaTичeckn. CmBbIb, KOTopbIe Bbl BBeJI, COxpaHЯТСВ b namrTn BVDeOKaMepbI. YCTaHObITe ChaJana nepeKlIOuataJIy POWER B NOLOXeHne OFF, a 3aTeM cHOba BNoLOXeHne CAMERA, a 3aTeM 3aBepuHTe BaW tNtp. Mbl peKOMeHnyem yCTaHObITb pexHM BOCpOIN3BdeHnI IINI nay3bl BOCpON3BdeHnI IINI xe BblHytB kacceTy, TAK YTo6bl Ba7a BVDeOKaMepa aBTOMaTичecKn He BvIKLIOUynIacb PnI BBODe CmBBOJOB TITpa.
ДлСТИРАПЕТРА
HaxmTe .IocneDnH CNMB06yDet Ctept.
Длвьда npoоба
HaKmTe
Длп посядова teльбог Вьда тakoro ке 3нakaToJжКногКо
HaxmTe nI npemMeueHHa Kypcopa Ha CneDyUOuIO N03uNIO BBeDnTE CnMBOJ.

If you use a tape with cassette memory, you can label a cassette. The label can consist of up to 10 characters and is stored in cassette memory. When you insert the labeled cassette and set the POWER switch to PLAYER, the label is displayed for about 5 seconds.
(1) Insert the cassette you want to label.
(2) Set the POWER switch to PLAYER.
(3) Press FN to display PAGE1 (p. 18).
(4) Press MENU to display the menu.
(5) Select with / , and then EXEC.
(6) Select TAPE TITLE, then press EXEC. The screen to enter the label appears.
(7) Select a desired character. Repeat pressing a key to select the desired character on the key.
(8) Press to move the cursor for the next character. Repeat the same procedure as step 7 and 8 to complete the label.
(9) Press SET. The label is stored in memory.
Mapknipobka kaccetbl

EcIn BblncnoIb3yTeJeHTy c
kaccetHOHnamrTbIO,BblMOKeTe
BblIOHNITbMapKnPOBky Kaccetbl.
MapKnPOBkaMOKETcoepXaTbIO10
3HaKOBnXpaHNTBCRbKACCETHOH
namrtn.EcIn BblBCTaBtne
npomapKnPOBaHHUo KaccetTy u
yctahOBtnepeKJIOnuAteNb POWER B
noJoxeHnePLAYER,MapKnPOBka6ydet
OTobpaKaTbCOrOKOLO5ceKyHd.
(1)BCTaBbTe Kaccety, KOtOpoyo Bby xOtnTe npomapKnpoBaTb.
(2)Установпейреклочаель POWER в положене PLAYER.
(3)HaxmTe KhoNkFy FNДЯ OTo6paXeHnPAgE1 (ctp.18).
(4)HaxmTe KhoNky MENU ДЯ OTo6paXeHnRA MEHIO.
(5)BbIbepeNTe c nOmoIbHO ,a 3aTeMaXmnte EXEC.
(6)Вьберп Te TAPE TITLE, a 3aTeM haxmite TE EXEC. ПОВИТсЯкpan Длг BBOda МарКИрOBК.
(7)BbIepeTe JKeJaEmbI CmBOJI. NIOBTOPIte HauKaTne KJIaBUNI INIy BbIbopa JKeJaEMORO CmBOJHa KJIaBUNe.
(8)HaxmTe nI npemMeuen Kypcopa Ha cnEduoui CNMBOI. NOBTOpe T yKe camyIO pOueDpy, UTo I B nyHKtax 7 n 8 dIra 3aBepWeHHn MapKnipOBKN.
(9)Haxmnte KhoNky SET. MapKnpobka 3aONMHaetcB namrtn.
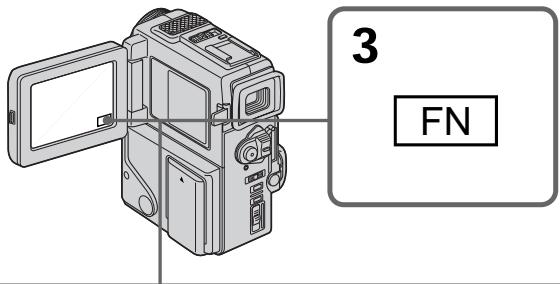

5,6


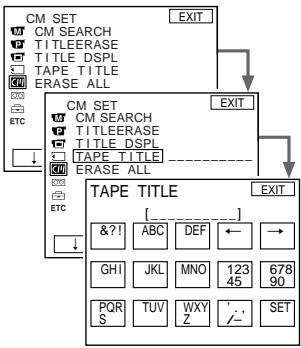
EXEC
7,8
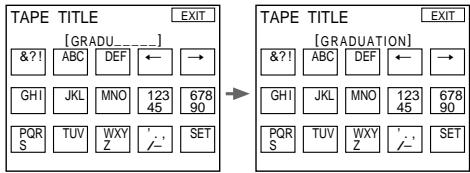
To return to FN
Press EXIT.
To erase a character
Select in step 6. The last character is erased.
To change the label you have made
Insert the cassette to change the label, and operate in the same way to make a new label.
If you set the write-protect tab of the tape to lock
You cannot label the tape. Slide the write-protect tab to release the write protection.
If the mark appears
The cassette memory is full. If you erase the title in the cassette, you can label it.
If you have superimposed titles in the cassette When the label is displayed, up to 4 titles also appear.
When you set the POWER switch to CAMERA
The label you have superimposed on is displayed for two seconds.
When the "-----" indicator has fewer than 10 spaces
The cassette memory is full.
The "----" indicates the number of characters you can select for the label.
To erase the title
Press . The last character is erased.
To enter a space
Press
To enter the same character on the same button in succession
Press to move the cursor to the next position, and enter the character.
MapKupobka KacceTbI
EcIn Bby ycTaHOBnI JeIeCTOK 3aunTbI 3annc JIeHTbI B NOLOXKeHne 6JOKnpOBKn
BbI He CMOKeTe BbIOnJIHnTb MapKnIpOBKy JeHTy. IpepeBnHbTe JIeNEcTOK 3aunTb 3anncn dIra OCBO6oxDeHHa3aunTb 3anncn.
EcIn NoABHTCA HnDnKaTOp
KacceTha namTb nepenonHeHa. Ecln Bbl cotpeTe TnTp Ha KaccTe, Bbl MoKeTe BblIOJIHHTb MapKnPOBky KaccTebl.
EcIn BblBbINHmHn HAnOKeHne THTpOB Ha Kaccete
KorДа NOBHTCn MapKINPOBka, NOBATcTaKKe Do 4 TITPOB.
EcIn Bby ycTaHOBnI nepeKJIouaTeIb POWERBnoJoxeHneCAMERA
B TeueHne DByx CekyHd 6yJeT OTo6paKaTbCn HanoJKeHHa MapKnupOBka.
EcInnHdNkaTop "----" mMeet MeHee 10 npo6eNoB
Kaccettha namrB nepenolheha.
ИндикатOP----"уka3bIBaET KONIYeCTBO CIMBOLOB, KOToPoe Bbl MoKTe Bbl6paTb ДЯ МарКИрOBК.
ДлСТИРАПЕТЯ
Haxmte .IocneDnHcMBOJ 6yTeTCTePT.
Длвьда npobena
HaKMnTe
Дпя посnéОВаTeььHOrO BBOJa TaKOrO JKe 3нАкa TOй JС KHONKоI
Haxmnte nI pynepeMeuen Kypcopa Ha cnEduouyIO No3uioN BBeDnTe CnMBOJ.
Changing the menu settings
To change the mode settings in the menu settings, select the menu items with / dial. The default settings can be partially changed. First, select the icon, then the menu item and then the mode.
(1) In the standby, PLAYER or MEMORY mode (DCR-PC3E only), press FN to display PAGE1 (p. 18).
(2) Press MENU to display the menu.
(3) Press / to select a desired icon, and press EXEC.
(4) Press / to select a desired item, and press EXEC.
(5) Press / to select a desired setting.
(6) Repeat steps from 3 to 5 if you want to change other items. Press RET. to return to step 3.
For details, see "Selecting the mode setting of each item" (p. 79).
Menu items are displayed as the following icons:
MANUAL SET
CAMERA SET
PLAYER SET
LCD/VF SET
MEMORY SET (DCR-PC3E only)
CM SET
TAPE SET
SETUP MENU
ETC OTHERS
M MANUAL SET
CAMERA SET
PLAYER SET
LCD/VF SET
MEMORY SET
(TonbKO moJenB DCR-PC3E)
CM SET
TAPE SET
SETUP MENU
ETC OTHERS
English
Selecting the mode setting of each item is the default setting.
Menu items differ depending on the position of the POWER switch. The LCD screen shows only the items you can operate at the moment.
| Icon/item | Mode | Meaning | POWER switch |
| PROGRAM AE | To suit your specific shooting requirement (p. 50) | CAMERA MEMORY | |
| P EFFECT | To add special effects like those in films or on the TV to images (p. 44) | CAMERA PLAYER | |
| WHT BAL | To adjust the white balance (p. 48) | CAMERA MEMORY | |
| AUTO SHTR | ● ON | To automatically activate the electronic shutter when shooting in bright conditions | CAMERA MEMORY |
| OFF | To not automatically activate the electronic shutter even when shooting in bright conditions | ||
| D ZOOM | ● OFF | To deactivate digital zoom. Up to 10× zoom is carried out. | CAMERA MEMORY |
| ON | To activate digital zoom. More than 10× to 40× zoom is performed digitally (p. 24) | ||
| 16:9WIDE | ● OFF | — | CAMERA |
| ON | To record a 16:9 wide picture (p. 40) | ||
| STEADYSHOT | ● ON | To compensate for camera-shake | CAMERA MEMORY |
| OFF | To cancel the SteadyShot function. Natural pictures are produced when shooting a stationary object with a tripod. | ||
| N.S. LIGHT | ● ON | To use the NightShot Light function (p. 28) | CAMERA MEMORY |
| OFF | To cancel the NightShot Light function | ||
Notes on the SteadyShot function
- The SteadyShot function will not correct excessive camera-shake.
- Attachment of a conversion lens (not supplied) may influence the SteadyShot function.
If you cancel the SteadyShot function
The SteadyShot off indicator "W" appears. Your camcorder prevents excessive compensation for camera-shake.
| Icon/item | Mode | Meaning | POWER switch |
| HiFi SOUND | STEREO | To play back a stereo tape or dual sound track tape with main and sub sound | PLAYER |
| 1 | To play back a stereo tape with the left sound or a dual sound tape with main sound | ||
| 2 | To play back a stereo tape with the right sound or a dual sound track tape with sub sound | ||
| AUDIO MIX | To adjust the balance between the stereo 1 and stereo 2 (p. 69) | PLAYER | |
| ST1 ST2 | |||
| NTSC PB | ON PAL TV | To playback a tape recorded on your camcorder on a PAL system TV | PLAYER |
| NTSC 4.43 | To playback a tape recorder in the NTSC colour system on a TV with the NTSC 4.43 mode | ||
| LCD B. L. | BRT NORMAL | To set the brightness on the LCD screen normal | PLAYER |
| BRIGHT | To brighten the LCD screen | CAMERA MEMORY | |
| LCD COLOUR | To adjust the colour on the LCD screen with -/+ To lighten To darken | PLAYER | |
| CAMERA MEMORY | |||
| VF BRIGHT | To adjust the brightness on the viewfinder screen with -/+ To lighten | PLAYER | |
| CAMERA MEMORY |
Note on NTSC PB
When you play back a tape on a Multi System TV, select the best mode while viewing the picture on the TV.
Notes on LCD B.L.
When you use power sources other than the battery pack, "BRIGHT" is automatically selected.
Note on NP-F10/FS11 battery pack
You cannot select BRIGHT in LCD B.L.
| Icon/item | Mode | Meaning | POWER switch |
| CONTINUOUS (DCR-PC3E only) | ● OFF | Not to record continuously | MEMORY |
| ON | To record 3 or 4 pictures continuously (p. 100) | ||
| MULTI SCRN | To record 9 picutures continuously (p. 100) | ||
| QUALITY (DCR-PC3E only) | ● FINE | To record still pictures in the fine image quality mode, using the “Memory Stick” | PLAYER MEMORY |
| STANDARD | To record still pictures in the standard image quality mode, using the “Memory Stick” | ||
| FLD./FRAME (DCR-PC3E only) | ● FIELD | To record moving subjects | MEMORY |
| FRAME | To record stopping subjects in high quality | ||
| SLIDE SHOW (DCR-PC3E only) | To play back images in a continuous loop (p. 113) | MEMORY | |
| DELETE ALL (DCR-PC3E only) | To delete all the images (p. 116) | MEMORY | |
| FORMAT (DCR-PC3E only) | To format “Memory Stick”s | MEMORY | |
| PHOTO SAVE (DCR-PC3E only) | To duplicate still pictures (p. 107) | PLAYER | |
| CM SEARCH | ● ON | To search using cassette memory (p. 58) | PLAYER |
| OFF | To search without using cassette memory | ||
| TITLEERASE | To erase the title you have superimposed (p. 73) | PLAYER CAMERA | |
| TITLE DSPL | ● ON | To display the title you have superimposed | PLAYER |
| OFF | Not to display the title | ||
| TAPE TITLE | To label a cassette (p. 76) | PLAYER CAMERA | |
| ERASE ALL | To erase all the data in cassette memory | PLAYER CAMERA | |
| REC MODE | ●SP | To record in the SP (Standard Play) mode | CAMERA |
| LP | To increase the recording time to 1.5 times the SP mode | ||
| AUDIO MODE | ●12BIT | To record in the 12-bit mode (two stereo sounds) | PLAYER CAMERA |
| 16BIT | To record in the 16-bit mode (the one stereo sound with high quality) | ||
| ○REMAIN | ●AUTO | To display the remaining tape bar: •for about 8 seconds after your camcorder is turned on and calculates the remaining amount of tape •for about 8 seconds after a cassette is inserted and your camcorder calculates the remaining amount of tape •for about 8 seconds after the playback button is pressed in PLAYER mode •for about 8 seconds after DISPLAY is pressed to display the screen indicators •for the period of tape rewinding, forwarding or picture search in the PLAYER mode | PLAYER CAMERA |
| ON | To always display the remaining tape indicator | ||
| DATA CODE | ●DATE/CAM | To display date, time and various settings during playback | PLAYER |
| DATE | To display date and time during playback |
Notes on the LP mode
- When you record a tape in the LP mode on your camcorder, we recommend playing the tape on your camcorder. When you play back the tape on other camcorders or VCRs, noise may occur in pictures or sound.
- When you record in the LP mode, we recommend using a Sony Excellence/Master mini DV cassette so that you can get the most out of your camcorder. Noise may occur in pictures and sound when you record image on other than a Sony Excellence/Master mini DV cassette.
- You cannot make audio dubbing on a tape recorded in the LP mode. Use the SP mode for the tape to be audio dubbed.
- When you record in the SP and LP modes on one tape or you record some scenes in the LP mode, the playback picture may be distorted or the time code may not be written properly between scenes.
Notes on AUDIO MODE
- You cannot dub audio sound on a tape recorded in the 16BIT mode.
- When playing back a tape recorded in the 16-bit mode, you cannot adjust the balance in AUDIO MIX.
| Icon/item | Mode | Meaning | POWER switch |
| CLOCK SET | To reset the date or time (p. 89) | CAMERA MEMORY | |
| DEMO MODE | ● ON | To make the demonstration appear | CAMERA |
| OFF | To cancel the demonstration mode | ||
| ETC WORLD TIME | To set the clock to the local time. Press ↓/↑ to set a time difference. The clock changes by the time difference you set here. If you set the time difference to 0, the clock returns to the originally set time. | CAMERA MEMORY | |
| BEEP | ● MELODY | To output the melody when you start/stop recording or when an unusual condition occurs on your camcorder | PLAYER CAMERA MEMORY |
| NORMAL | To output the beep instead of the melody | ||
| OFF | To cancel the melody and beep sound | ||
| COMMANDER | ● ON | To activate the Remote Commander supplied with your camcorder | PLAYER CAMERA MEMORY |
| OFF | To deactivate the Remote Commander to avoid remote control misoperation caused by other VCR's remote control | ||
| DISPLAY | ● LCD | To show the display on the LCD screen and viewfinder | PLAYER CAMERA MEMORY |
| V-OUT/LCD | To show the display on the TV screen, LCD screen and viewfinder | ||
| REC LAMP | ● ON | To light up the camera recording lamp at the front of your camcorder | CAMERA MEMORY |
| OFF | To turn the camera recording lamp off so that the subject is not aware of the recording | ||
| DV EDITING (DCR-PC3E only) | To duplicate the desired portion on a tape by simply selecting the scenes to edit, using other equipment connected with an i.LINK cable (DV connecting cable) (p. 66) | PLAYER |
Notes on DEMO MODE
- You cannot select DEMO MODE when a cassette is inserted in your camcorder.
- DEMO MODE is set to STBY (Standby) at the factory and the demonstration starts about 10 minutes after you have set the POWER switch to CAMERA without a cassette inserted.
To cancel the demonstration, insert a cassette, set the POWER switch to other than CAMERA, or set DEMO MODE to OFF.
- If you press the touch panel during the demonstration, the demonstration stops for a while, then it starts again after about 10 minutes.
- When NIGHTSHOT is set to ON, the NIGHTSHOT indicator appears in the viewfinder or on the LCD screen and you cannot select DEMO MODE in the menu settings.
Note
If you press DISPLAY/TOUCH PANEL with "DISPLAY" set to "V-OUT/LCD" in the menu settings, the picture from a TV or VCR will not appear on the LCD screen even when your camcorder is connected to outputs on the TV or VCR.
In more than 5 minutes after removing the power source
The "AUDIO MIX", "COMMANDER" and "HiFi SOUND" items are returned to their default settings.
The other menu items are held in memory even when the battery is removed.
When recording a close subject
When REC LAMP is set to ON, the red camera recording lamp on the front of the camcorder may reflect on the subject if it is close. In this case, we recommend you set REC LAMP to OFF.
Pycckn
Bb6op yctaHOBOK pexIma no KaXdOmy nyHkTy 8yCTaHOBka NO yMOJuaHIO.
IyHKtbl MeHIO OTNIuHaOTc B 3aBnCmOCTN OT NIOJKeHnNEpeKJIouTaTeA POWER.
3KpaH KKD nokaBbAeT ToJIbKO Te NyHKtbl, KOToPbIMn Bbl MoKeTe ynpaBJIrTa Ha daHHbI MOMeHT.
NHyTbI “AUDIO MIX”, “COMMANDER” and “HiFi SOUND” BepHyTCK yCTaHOBKM no YMOnJAHIO. Dpyrue yctaHOBKn MeHO 6byt OCT aTabcBn C nAMATN, daxe ecnn bByET bByHT bAtapeHNb 6IoK.
Pn 3a nCn 6Jn3Ko haxoJzeroCn oBekTa
ECINI cyHKnIe RLCAMYCTAHOHbHaON,TOKpaHAR lamIOuKa 3aHcNc KAMEPOH napeDHei NaHEnBUNEOkampeBMOKET OPAKaTbCOnoBekTA, KOJa OH HaxOOnTC6bn3KO. B TAKOM cnyaeMb peKOMeHdyEM, YTObB BcyCTAOHBOINREC LAMP HA OFF.
Resetting the date and time
The default clock setting is set to London time for United Kingdom to Paris time for the other European countries.
If you do not use your camcorder for about three months, the date and time settings may be released (bars may appear) because the vanadium-lithium battery installed in your camcorder will have been discharged.
First, set the year, then the month, the day, the hour and then the minute.
(1) In the standby mode, press FN to display PAGE1 (p. 18).
(2) Press MENU to display the menu.
(3) Select with / , and press EXEC.
(4) Select CLOCK SET with / , and press EXEC.
(5) Adjust the desired year, then press EXEC.
(6) Set the month, day and hour with the same procedure as step 5.
(7) Set the minute with / , and press EXEC by the time signal.
IpeyeCTaHOBKa DaTbI N BpemeHn
UcTaHOBka YacOB NO yMOnJuaHnIO BbIOnHeHa Ha BpeMa JIoHDoHa dJa CoeDiHeHHoro KoponeBCTBa n Ha BpeMa PApJxKa dJa dpyRnx eBpOneNcknx cTpaH.
Ecni BbI He nCnOJIb3OBAII Bauy BInDeokAmepy OKoIIO NOnIyroJa, ycTaHOBKn DaTb I INBpeMeHNI MOrYT NcYe3HyTb (NORBAITcY cepToUKN), NocKoJIbky BaHaDiNEBO-JNTneBaJ 6aTapeuKa, ycTaHOBJIeHHaB Baue BInDeokAmepe, pa3PraNTcR.
Chauana yctaHOBNTe rO, 3aTeM MeCAu, DeHb, Yac n MNHyTu.
(1)BpeXIME roTOBHOCTn HaxMnte KhoNkYFN dIa OTo6paXeHnA PAGE1 (ctp. 18).
(2)HaXmTe KhoNky MeHIO dIa OTo6paXeHHa MEHIO.
(3)BbI6epnte c nOmoIbHO ,a 3aTeM hAXMnTe EXEC.
(4) BbI6epnte CLOCK SET c nOmoaH o , a 3aTeM haxmnte EXEC.
(5)Отergyлару Te hyжны roД, a 3aTeMaHxMnTe EXEC.
(6) YctaHOBNTe Mecu, DeHb NcC NOMOUBTO TAKO JKe PPOUdpyb, KaK NpyHKTe 5.
(7) YctaHOBtMe MNHybI C NOMOuH o ↓↑, a 3aTEM haxmnte EXEC. no cnHaJy BpeMeHn.
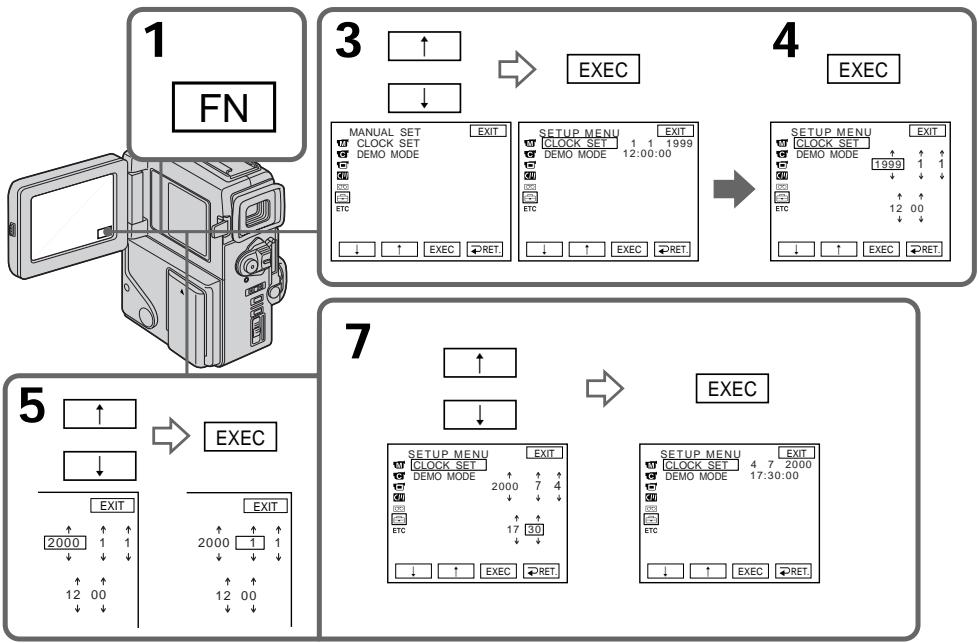
The year changes as follows:
Tog n3mehreTc cIeDyIOuM m6pa30m:

To return to FN
Press EXIT.
If you do not set the date and time
“- - - - - - - ” is recorded on the data code of the tape and the “Memory Stick” (DCR-PC3E only).
Note on the time indicator
The internal clock of your camcorder operates on a 24-hour cycle.
Ecnn BbI He yctaHOBnTe DaTy N BpeMa
Инданаши ——:-:-- -" 6удет заимсаны Вмсто Кда даньх на лenteи "Memory Stick" (Толъко модаль DCR-PC3E).
PpimmeaHne no HnDkaTopy BpeMeHH
BcTpoeHHbIe YacBi BaSeI BnDeokamepbl pa6oTaIO T 24-ycobom pexKIme.
- "Memory Stick" operations - Using a "Memory Stick"-introduction
- DCR-PC3E only
You can record and play back still images on a "Memory Stick" supplied with your camcorder. You can easily play back, record or delete still images. You can format "Memory Stick"s. You can also protect still images and write print marks on still images in "Memory Stick"s. You can exchange image data with other equipment such as a personal computer etc., using the Serial port adaptor for "Memory Stick" supplied with your camcorder or MSAC-PC1 PC card adaptor for "Memory Stick" (not supplied).
Using a "Memory Stick" When you use a "Memory Stick"
-Опацис“Memory Stick” -Исpoлььзоване“Memory Stick”-ВveDEDne
-ToIbKO MoIeJIb DCR-PC3E
Bbl MoxKeTe 3aIncbIbTaB n BOCnPoI3BOdntb HneOpDVBXhBte I3O6paXeHnHa "Memory Stick", npInlaeraemoi K BaWei BnDeoKampe. Bbl MoxTe IeKo BblIOJIHrT BocPOnI3BeDeHne, 3aIcNb nn ydaJIeHMe HneOpDVBXhBx I3O6paXeHn. Bbl MoxTe OTfOpMaTInpOBaT b "Memory Stick". Bbl TaKke MoXeTe 3aIuNTb HneOpDVBXhBte I3O6paXeHn N HaHeCTN peYaTHbIe 3NaKn Ha HneOpDVBXhBle I3O6paXeHn B "Memory Stick". Bbl MoxTe BblIOJIHrTb O6MeH dAnHbIX I3O6paXeHn C dpYro annapaTypoi, taKo KaN nepCoHaJIbHbIK KOMNbIOTep n T.., iCNoIb3y aadantep nocLeDoBaTeJbHoro nopTa dJa "Memory Stick", npInlaeraemoi K BaWei BnDeoKampe nn adanTep PC-KapTb MSAC-PC1 dJa "Memory Stick" (He npinlaraeTca).
- You cannot record or erase still images when the write-protect tab on the "Memory Stick" is set to LOCK.
- We recommend backing up important data.
- When the ACCESS lamp is flashing, never remove the "Memory Stick".
- Image data may be damaged in the following cases:
- If you remove the "Memory Stick", turn the power off, or detach the battery for replacement when the ACCESS lamp is flashing
- If you use "Memory Stick"s near magnets or magnet fields such as those of speakers and televisions.
On file format (JPEG)
Your camcorder compresses image data in JPEG format (extension .jpg).
- Bы He можete 3аисьlaBaT b Ил CTиpaTb нелдьнгьи IEОбхeнгИ, ecл ЛпectOK Зашпт b злпсн Ha "Memory Stick" усанов leн b поженьlock.
- PeKoMeHnyETcBbIIOJIHrTb KOnnBaXhblx DaHHblx.
-
Ecni MmraeT lammoqka ACCESS, HNKoIa He BbHIMaTe "Memory Stick" B 3Ty Bpemr.
-Данныеизобрахегп могутбыт nobрждныВ сеуцхссуяк: -
Ecni Bbl BbHyn "Memory Stick", BblKIOUHHNITAHNE IINOTCOEHNHNI 6aTapeHbIbIKoN dJr3aMeHbI BTOBpeM, KOrda Miraet lammoKcA ACCESS.
-EcIn Bblncnolb3yeTe "Memory Stick"s BO3JIe NCTOCHNIOB MaHHTbIX IOnJIe,TaKIN KAK aKyCTUHeCKNe CnCTeMbI IN TeLEBn3Opbl.
OΦopMaTeΦaIIOB(JPEG)
Baa7a BvIeOkaMepa CxNMaet DaHhble
n3o6paXeHnB fOpMaT JPEG (c pacuHpeHnem
.jpg).
Typical image data file name DSC00001.jpg.
Notes
- Prevent metallic objects or your finger from coming into contact with the metal parts of the connecting section.
- Stick its label on the labeling position.
- Do not bend, drop or apply strong shock to "Memory Stick" s.
- Do not disassemble or modify "Memory Stick"s.
- Do not let "Memory Stick"s get wet.
-
Do not use or keep "Memory Stick"s in locations that are:
-
Extremely hot such as in a car parked in the sun or under the scorching sun
-Under direct sunlight - Very humid or subject to corrosive gases
- When you carry or store a "Memory Stick", put it in its case.
You do not need to format the "Memory Stick" supplied with your camcorder
The "Memory Stick" supplied with your camcorder is already formatted in FAT format. FAT format is the standard format for "Memory Stick"s and is supported by your camcorder.
Note
Sample images are already recorded on the "Memory Stick" supplied with your camcorder. All of these sample images will be deleted if you format the "Memory Stick".
"Memory Stick"s formatted on a personal computer
"Memory Stick" operations on your camcorder cannot be assured if the "Memory Stick" is formatted on a Windows machine or Macintosh.
Note on image data compatibility
- Image data files recorded on "Memory Stick"s by your camcorder conform with the Design Rules for Camera File Systems universal standard established by the JEIDA (Japan Electronic Industry Development Association). You cannot play back on your camcorder still images recorded on other equipment (DCR-TRV890E/TRV900/TRV900E or DSC-D700) that does not conform with this universal standard. (These models are not sold in some areas.)
- If you cannot use a "Memory Stick" that has been used on other equipment, format the "Memory Stick" on your camcorder following the steps on page 98. Note that all images on the "Memory Stick" will be deleted if you format it.
"Memory Stick" is a trademark of Sony Corporation.
TinuHoe mMa faJa daHHbIX n3o6paXeHn DSC00001.jpg.
Приимейсаня
He npkaacTebc MeTJIHueCKMn YactmN HnBaIMn NaIbIaMn K MeTALIIeCKM qactm CoeJINHtBbHIX CekuN.
3TNIKETKY CNEyET PnIKpeINIbTB N03uIN MANKIOBKN.
He cru6aIte, he po7raIte n cIbHO He TpIcIte "Memory Stick"s.
- He pa3b6pa7e I ne BvDOn3MeHraIte "Memory Stick"s.
He NyocyaKeTte, YoToBb "Memory Stick's CTAHOBUNICB BAAxHBMi.
- He iconolb3yute n Hc xpaHnTe "Memory Stick"s B MECTax:
-Чрзмерно Харкх, HanpIMepB, Bплпаркованьн ДдСОЛЧЕМ abTOMOБиLE, OOCOBEHNO IDN PAJIUMM CONHJUE
-ПОДпразмьIMCOЛнHeчньIMCBETOM
B-MecTax OueHb BnaXhbl X INN COePkaux Koppo3OMOHHe rBa3i
- Пи переноске илханен "Memory Stick" поожитеше в углар.
Bam He Huyxho fOpMaTnpoBaTb "Memory Stick", npnlaraemyu K Baesh Bndeokamepe
"Memory Stick", npinaraemam K Baewi Bndekampe, yye otfopMaHPOBbA b fOpMaTe FAT. FAT nBnAeTcStaHdapThbIM fOpMaTOM dIa "Memory Stick"s n oDepxNBAeTcBaewi Bndekokamepoi.
PpimcyeaHne
Ha npinlaraemoi Baew Bndeokamepe "Memory Stick" yxe 3a1ncaHbI o6pa3u bN3o6paXeHNI. Bce 3tn O6pa3u bN3o6paXeHNI 6ydt CTePtbl, eCIN Bbl OTfOpMaTnpyeTe "Memory Stick".
"Memory Stick"s OTφopMaTHIpOBaHbI Ha nepcoHaJIbHOM KOMTbIbTepe
Bce onepaun c "Memory Stick" Ha Bauei BnuDeokampe He MoryT bItb rapaHTnroBaHbI,ecnn "Memory Stick" OtfopMaTnpoBaHa Ha MaunHe Windows nn Macintosh.
Приимechаши К COBmecTUMOCTN DaHHbIX n3o6paXeHn
-Фаилд даньх,залпсанье на "Memory Stick"s Bausew BiDoeKamepoY,уДовлтВоргот npавилам пpoeКТЮВОвANHунИВЕрсалНоCTанДага ФаиОвБxСИСТЕДУ BiDoeKaMepb,yctanOBHENHOrO JEIDA (Яноско accоцuaимey pa3BHTINJЯБКТЮнOHIpOMbiUHEnHOCtN). BBy He moЖte BoCnponIЗBOvNTa Hа Бausew BiDoeKaMepe HEOДВЖнEVиЗИЗМбOxРaxKeHnA, 3aПСаньHe Na dpyroI annapaType (DCRTRV890E/TRV900/TRV900E, DSC-D700), KTOparNe He yДobЛТВОРЯET OTMy yHINBepcaLbHOMy CTahdApTy. (OTmoМоDEЛи He npdoAOTcB H reKOTOpbX OOBaTnx.)
EcnBbHe MoKTe NcNoIb3OBaTb"Memory Stick”,KOTOPaBbJaNcNoIb3OBAHa Ha dpytoi annapatye,OTfOpMaTIpye"Memory Stick"Ha BaWei Bundeokamepe,Cneyra NyHKtam Ha cTpaHnue 98.PomHnte,YTO npi fopMaTIPoBAHm BCE n3O6paxKeHna Ha"Memory Stick"6byuT cTeptbl.
"Memory Stick" RNAE TCR TopROB M apKoI Kopnpaunn Sony.
Inserting a "Memory Stick"
Insert a "Memory Stick" in as far as it can go with the mark facing up.
YcTaHOBka "Memory Stick"
BcTaBbTe "Memory Stick" do ynpa, taK YTo6bl 3nak ▲ bIbn o6paueH Bvepx.
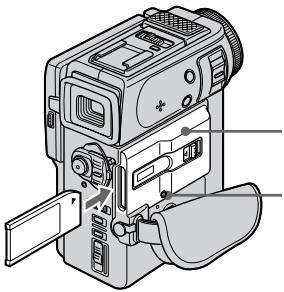
"Memory Stick" compartment / OTeček目前国内 "Memory Stick"
ACCESS lamp / JIamnoka ACCESS
To eject a "Memory Stick"
Slide MEMORY RELEASE in the direction of the arrow.
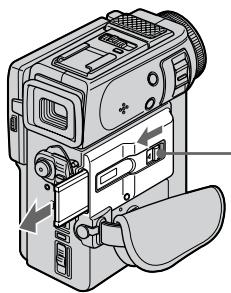
ДяиЗВлесеня“Memory Stick"
IpeBvHbTe MEMORY RELEASE B HappaBHeHn CTpeJIkn.
MEMORY RELEASE
When the ACCESS lamp is lit or flashing
Never shake or strike your camcorder. Do not turn the power off, eject a "Memory Stick" or remove the battery pack. Otherwise, the image data breakdown may occur.
EcnI JAmnoKAc ACCESS rOpnt nMn Mnraet
Hikorda He Tpncnte H He cTuynte No Bauei BnDeokamepe. He BbIKIOuAte NITAHne, He n3BLekaTe "Memory Stick" n3 OTcKa n He CnHMaTe 6aTapeHbI 6IOK. B IpOTNBOM Clyuae DaHHbIe I3O6paXeHnM OryT 6bITb NOBpeXdHebl.
Using a touch panel
Your camcorder has operation buttons on the LCD screen. Press the LCD panel directly to operate each function.
(1) Set the POWER switch to MEMORY while pressing the small green button. Make sure that the LOCK is set to the right (unlock) position.
(2) Press OPEN to open the LCD panel. Operation buttons appear on the LCD screen. You can switch the memory playback/the memory camera mode by pressing PLAY/ CAM. You can also use the Remote Commander for this operation.
(3) Press FN. Operation buttons appear on the LCD screen.
(4) Press PAGE2 to go to PAGE2. Operation buttons appear on the LCD screen.
(5) Press a desired operation item. Refer to relevant pages for each function.
Icnojlb3OBAHne ceHCOPHO naHeJI
Baissa Bndeokamepa NMeet KhONkynypaBLeHna Ha 3Kpae JKKD. DToTpaNbAaTecb HnOscpeDCTBeHHo Do naHenn XKd dny ynpaBLeHna KaXdof cyHKcnei.
(1)Haximma MaIeHbkyIO 3eIeHyIO KhoNky yCTaHOBInTe nepeKJIouHTeINb POwER B noJIOKeHne MEMORY. Y6eJIntecb, yTO fIKcaTOP LOCK yCTaHOBInE B npaboe noJIOKeHne (He3aΦNKcIMPOBaHHOE).
(2)HaXMMTe KhoNky OPENДЯ OTKpbIbAHnnaHEni XKД. KhoNkynpabNeHnnaOBJIaTOcHаЗкpaHe XKД. Bbl MoXeTeBKNIOHTpeXIMCBOPON3BeDeHEn/KamepbInyTe HnKaTnPLAY/CAM.BblMoXeTeTakKe IcNOJb3ObaTb NylbTДmCTaHUNHOyUnpaBJeHnДЯЗToIonepaUIN.
(3)HaxMMTeFN.KHOJKNyynpaBJeHHnO8BnHOTcHa3KpaHeKKD.
(4)Haxmnte PAGE2дя nepexoda κ PAGE2. Khonkn ynpaBneHЯ NOBJIHOrTcHa ḋkpaHe XXKД.
(5)HaxMMTE XeJMaEbM NYPHTYnpaBNeHnA.
O6paUaIeTcB K COOTBeTCTByIOuIMC
CTpaHnIaM OTHOCTJIbHO KAKdoI FyHKuIM.
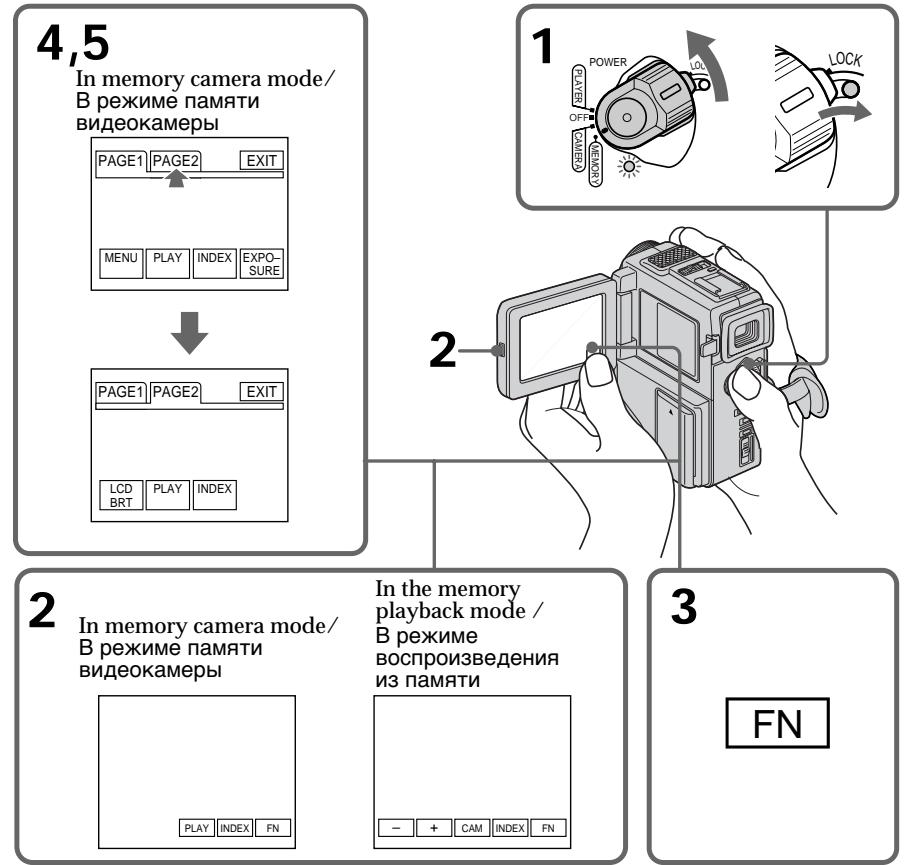
To execute settings
Press EXEC or OK.
To cancel settings
Press OFF to return to PAGE1/PAGE2.
To return to FN
Press EXIT.
Note
- When using the touch panel, press operation buttons with your thumb supporting the LCD screen from the back side of it or press those buttons lightly with your index finger. Do not press them with sharp objects such as pens.
- Do not touch the LCD screen with wet hands.
- If FN is not on the LCD screen, touch the LCD screen lightly to make it appear. You can control the display with DISPLAY/TOUCH PANEL on your camcorder.
- When operation buttons do not work even if you press them, an adjustment (CALIBRATION) is required (p. 145).
- When executing each item, the green bar appears above the item.
- The colour of the items changes to grey if they are not available.
- You can operate with the touch panel using the viewfinder (p. 120).
Press FN to display the following buttons:
In memory camera mode
| PAGE1 | MENU, PLAY, INDEX, EXPOSURE |
| PAGE2 | LCD BRIGHT, PLAY, INDEX |
In memory playback mode
| PAGE1 | MENU, CAM, INDEX, DELETE, +, - |
| PAGE2 | LCD BRIGHT, CAM, INDEX, +, - |
ДЯ Bыноленья yctahOBOK
Haxmnte EXEC nJn OK.
ДЯ OTMeHbI yCTaHOBOK
Haxmnte OFFДЯ Bo3BpaueHnK PAGE1/ PAGE2.
Selecting image quality mode
You can select image quality mode in still picture recording. If you do not make any selection, the unit automatically records in FINE mode.
(1) Set the POWER switch to MEMORY. Make sure that the LOCK is set to the right (unlock) position.
(2) Press FN to display PAGE1 (p. 94).
(3) Press MENU, then select QUALITY in l in the menu settings to select a desired image quality.
Bb6oppekima kaeeCTBa n3o6paXeHn
BbMOxTe Bb6paTb pexm KaYeCTBa
n3o6paXeHnI npn 3aIncN HEnoDbNkHo
n3o6paXeHn. EcnBb He cDeJaTe HnKaKoro
Bb6opa, annapat 6yDet ABToMaTuYeCKn
BbIOINrTa 3aIncB pexmE FINE.
(1)YcTaHOBInTe NepeKJIIOUaTeIb POWER B nIoJKeHne MEMORY. Y6eJntEcb, yTo fNKcaTop ycTaHOBJIeH B npaBOM (He3aФИКсИрOBaHHOM) NOLOXeHn.
(2)HaxmnteFNДЯOTobpaXeHnPAgE1 (cTp.94).
(3)HaxMMTe MENU, a 3aTeM bYb6epuTe QUALITY B y ycTaHOBkax MeHIO dIa BBb6opa KeJcAeMOrKaueCTBa N3O6paXeHnA.
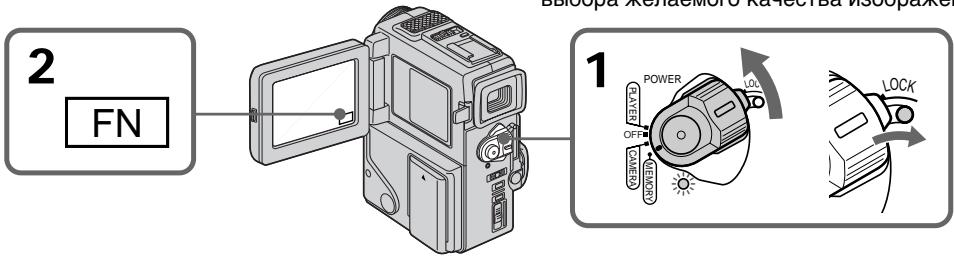
To return to FN
Press EXIT.
Note
In some cases, changing the image quality mode may not affect the image quality, depending on the types of images you are shooting.
Image quality settings
| Setting | Meaning |
| FINE (FINE) | Use this mode when you want to record high quality images. The image is compressed to about 1/6. FINE appears on the screen. |
| STANDARD (STD) | This is the standard image quality. The image is compressed to about 1/10. STD appears on the screen. |
Differences in image quality mode
Recorded images are compressed in JPEG format before being stored into memory. The memory capacity allotted to each image varies depending on the selected image quality mode. Details are shown in the table below. (The number of pixels is 640 × 480 , regardless of image quality mode. The data size before compression is about 600 KB.)
| Image quality mode | Memory capacity |
| FINE | About 100 KB |
| STANDARD | About 60 KB |
Approximate number of images you can record on a "Memory Stick"
The number of images you can record varies depending on which image quality mode you select and the complexity of the subject.
4MB type:
| FINE (FINE) | 40 images (maximum) |
| STANDARD (STD) | 60 images (maximum) |
8MB type:
| FINE (FINE) | 81 images (maximum) |
| STANDARD (STD) | 122 images (maximum) |
16MB type:
| FINE (FINE) | 164 images (maximum) |
| STANDARD (STD) | 246 images (maximum) |
OttinB Peknme KaecBa n3o6paKeHH
3aIncaHbIe I3o6paXeHHc CXIMaIOCTB B
fOpMaT JPEG nepeI coXpaHEnEM B nAmrTI.
EMKocTb nAmrTI, BiJeIeHNHaJ DJI KAcJDoTO
I3o6paXeHHn, I3MeHHeTcB 3aBNCmOcTNIOT
BbIbpaHOrO peXmu KaeeCTBa I3o6paXeHHa.
PiOp6HOCTN CoepXaTcB N pPbVeDeHHoH
HIXke Tablne. (KolnueCTBO 3IeMeHTOB
I3o6paXeHHa PabHO 640 × 480, He3aBcImo OT
OT peXmu KaeeCTBa I3o6paXeHHa. Pa3Mep
pePeI cXaTnem CoctTablaET OKIo 600 K6.)
| FINE (FINE) | 164 until now |
| STANDARD (STD) | 246 until now |
Formatting (initializing) a "Memory Stick"
Your camcorder can format (initialize) a "Memory Stick". If you format a "Memo
Stick", all data stored in the "Memory Stick" will be deleted. This function is convenient when you want to delete all data including protected images.
New "Memory Stick"s are already formatted so that formatting is not required for them.
Sample images are stored in the supplied "Memory Stick". Note that these images will be deleted if you format the "Memory Stick".
(1) Insert a "Memory Stick" into your camcorder.
(2) Set the POWER switch to MEMORY while pressing the small green button. Make sure that the LOCK is set to the right (unlock) position.
(3) Press FN to display PAGE1 (p. 94).
(4) Press MENU, then select FORMAT in l in the menu settings.
(5) Press / to select FORMAT on the right and then press EXEC. The display shows "OK."
(6) Press EXEC. again. The display shows "FORMATTING", and formatting procedure begins. When formatting is finished, the display shows "COMPLETE."
To return to FN
Press EXIT.
Check the contents of the "Memory Stick" before formatting
Note that all data in the "Memory Stick" including protected images will be deleted.
While "FORMATTING" is displayed
Do not turn the POWER switch nor press any button.
If " " is displayed during /after formatting
Format the "Memory Stick" again.
Note
You cannot format the "Memory Stick" if the write-protect tab on the "Memory Stick" is set to LOCK.
BbI He cMOXeTe OToDopMaTnPoBaTb "Memory
Stick", ecnlennectok 3auntb3anncn Ha "Memory
" Stick" yctahobJIeH b noJoxeHne LOCK.
Recording still images on "Memory Stick"s - Memory photo recording
3aɪncb HeɪnoDθɪxHbɪxɪn3o6paxeHnɪ Ha "Memory Stick"s - ΦOTo3aɪncb c coXpaHeHnEM B nʌmærɪ
- DCR-PC3E only
You can select the FIELD or FRAME mode in still picture recording. Your camcorder compensates for camera-shake when recording moving subjects in the FIELD mode. Your camcorder records still images in high quality in the FRAME mode. Select the FIELD or FRAME in the menu settings (p. 78).
Before operation
Insert a "Memory Stick" into your camcorder.
(1) Set the POWER switch to MEMORY while pressing the small green button. The power lamp lights up. Make sure that the LOCK is set to the right (unlock) position.
(2) Keep pressing PHOTO lightly. The picture freezes and "CAPTURE" appears on the LCD screen or in the viewfinder. Recording does not start yet.
(3) Press PHOTO deeper. The image displayed on the screen will be recorded on a "Memory Stick". Recording is complete when the bar scroll indicator disappears.
-ToIbKO moIeIb DCR-PC3E
BbMoKeTe BbIbPaTbpeKIM FIELD nnn FRAME npn 3aIncn HeNoDVBxHoro n3o6paXeHn. Baasa BvIeOKaMepa KOMNeHcNpyeT NOpaRnBaHn npn 3aIncn NoDVBxHbIX oBeKToB BpeKmE FIELD. Baasa BvIeOKaMepa 3aIncsBaAeT HeNoDVBxHbIe n3o6paXeHn C bVlCOKIM KaueCTBOM B peKmE FRAME. BbIbepIne NyHKT FIELD nnn FRAME B yCTaHOBkax MeHIO (CTp.78).
Ipeed hauajom pa60tbi
BcTaBbTe "Memory Stick" B BaUy BnDeokamepy.
(1)HaJIMMa MaJIeHbKyU 3eJIeHyIO KHOJky. YcTaHOBITE BblKIIOuATEIb POWER B noLOXeHne MEMORY, Haxab MaJIeHbKyU 3eJIeHyIO KHOJky. BbICBeNTcJaMNoUka nITaHnI. Y6eIITecb, yTO qIKCaTOP LOCK yCTaHOBJEN B npaBOM (He3aΦHKCpOBaHHOM) NOJoxeHN.
(2)Держinte сlerka нажато кногку PHOTO.Изобрахене 6удет "Заморожен", И наэн Кране XXД ил в Виюнскате поВпсгИнданця"CAPTURE".Зань пoka Heн haЧеТСЯ.
(3)Haxmnte KhONky PHOTO cnIbhee. 136pbaxeHne,OT6pbaxaemoe Ha 3kpahe, 6ydet 3aIncaHO ha"Memory Stick".3aIncb cHITaTcTc 3aBepweHnO,ecnI NCue3HeT nepemeuOuunCn noLoCaTbI INDnKaTOP.
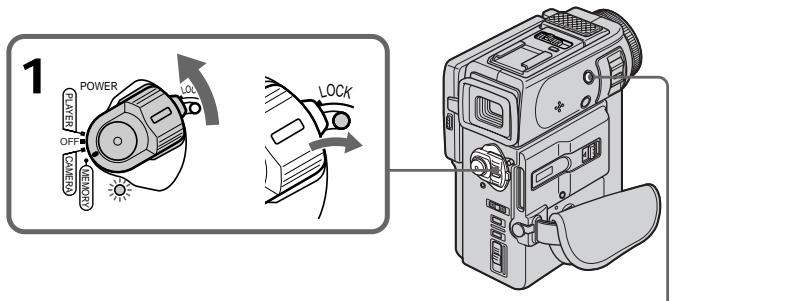
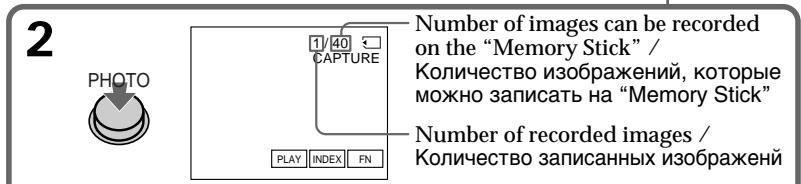

Notes
- When recording fast-moving subjects in the FRAME mode, the recorded image blurry.
- When recording in the FRAME mode, your camcorder may not correct camera-shake. We recommend that you shoot objects with a tripod.
When the POWER switch is set to MEMORY The following functions do not work: wide TV mode, digital effect, picture effect, title.
When you are recording a still image
You can neither turn off the power nor press PHOTO.
When you press the PHOTO button on the Remote Commander
Your camcorder immediately records the image that is on the screen when you press the button.
Recording images continuously
You can record still pictures continuously. Select one of the two modes described below before recording.
Continuous mode [a]
You can record 3 or 4 pictures continuously.
Multi screen mode [b]
You can record 9 still pictures continuously on a single page.
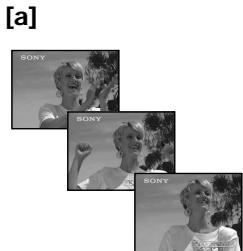
PpimueaHn
-ПиЗЗИСИЗБИСТРОДВИЖУЦИХСОББЕKTOBВ рекиme FRAME,ИЗбрахене 6удET pa3MbIТьМ.
-ПиЗлпсВ ржIMe FRAMEФункцИКOMпнcaипОдparINbAHЯBaшЕВиDEOKaMEpbI MoKET pa60TaTb HENpaBnIbHO.PekOMeHdyeTcBAIIPOHrAbCbeMkyObbEKTOBc NOMOuTO TpeHOrN.
EcnI nepeKlnOucaTeIb POWER yCTaHOBJIeH B noJoxKeHne MEMORY
CneyuoumeyHKmHHepa6oTaIoT: UnpOKo3KpaHHbI TeNEBn3IOHHbIpeKIM, UnppOBoBn3OΦeKT,3ΦΦeKTN3O6paXeHn,TtTp.
EcIn Bbl 3aHcBbAeTe HeNoDBHXHoe n3o6paKeHne
BbI He MOxKeTe HN BbIKNoHTb NtTaHHe, HN hKaTb KOnkY PHOTO.
EcnBbI haxMeTe PHOTO ha nyIbTe dNCTaHcOnHOro ynpabJIeHHa
BaSHA BnDeOKaMepa TOTcAc Ze 3aNIMeT n3o6paXeHne, KOtOpoe 6yJeT Ha 3KpaHe npi HaxaTNI KHOKN.
3aIncB n3o6paXeHn HnpepbIBHO
BbMOKeTe 3aINcBbATb N3O6paXeHn HnepepbIBHO. BbI6epNTe OINn I3 DByX peKIMOB, ONiCaHHbIX HIXe, PpeD 3aINCbIO.
HenpepbHbI pexm [a]
BbMOxKeTe 3aINcBtB 3nIN 4 n3OpaXeHn HnpepbIBHO
Mhoro3kpaHHbIpeXmB
BbMOKeTe 3aINcBbAtb 9 HeNoDBNXHbIX n3o6paXeHn HnpepbIBHO Ha OdHOI CTpaHnCe.
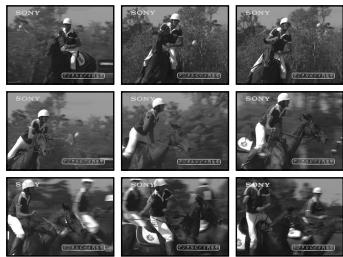
[b]
(1) Set the POWER switch to MEMORY while pressing the small green button. Make sure that the LOCK is set to the right (unlock) position.
(2) Press FN to display PAGE1 (p. 94).
(3) Press MENU, then set CONTINUOUS to ON in in the menu settings.
(1)Haximma ManeHyku 3eneHyIO KhoNky, yctahOBITE nepeKniOuataIb POWER B noLoXeHne MEMORY. Y6eIntecb, yTO fNKcaTop LOCK ycTaHOBJIen B npaBOM (He3aФнксИрOBaHHOM) noLoXeHn.
(2)HaxmTe KhoNkYFN dIa OTo6paXeHHaPAGE1 (ctp.94).
(3)HaxMMTe KhoNky MENU, a 3aTem yCTaHOBnTe CONTINUOUS Ha ON B B yCTaHOBkax MeHIO.
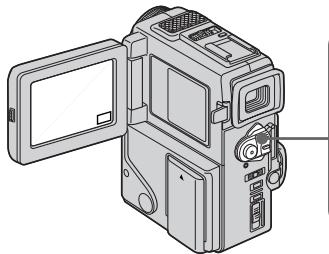
1
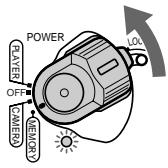
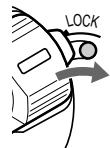
Continuous shooting settings
| Setting | Meaning (indicator on the screen) |
| OFF | Your camcorder shoots one image at a time. (no indicator) |
| ON | Your camcorder shoots 3 or 4 still images at about 0.8 sec intervals. ( ) |
| MULTI SCRN | Your camcorder shoots 9 still images at about 0.3 sec intervals and displays the images on a single page divided into 9 boxes. ( ) |
To return to FN
Press EXIT.
Number of images in continuous shooting The number of images you can shoot continuously varies depending on the image quality mode.
FINE: 3 images
STANDARD: 4 images
YcTaHOBKn HnpepbBHOcBEmKn
KolnueCTBO n3o6paXeHn Ipn HnpepbIBHOcBeMKe
KoIInueCTBO n3O6paXeHn, KOToPbIe BblMOKeTe CHIMaTb HEnpepbIBHO, N3MeHReTcB 3aBNCIMOCtN OT peXIMa KaYeCTBa n3O6paXeHn.
FINE: 3иЗображенья
STANDARD: 4 n3opaxeHnA
Superimposing a still picture in a "Memory Stick" on a moving picture - MEMORY MIX
HaLoXeHne HEnoBnXHoRo n3O6paXeHnI3“Memory Stick"Ha noDnXHoe n3O6paXeHne-MEMORY MIX
- DCR-PC3E only
You can superimpose a still picture you have recorded on a "Memory Stick" on top of the moving picture you are recording.
M. CHROM (Memory chromakey)
You can swap a blue area of a still picture such as an illustration or a frame with a moving picture.
M. LUMI (Memory luminancekey)
You can swap a brighter area of a still picture such as a handwritten illustration or title with a moving picture. Record a title on a "Memory Stick" before a trip or event for convenience.
C. CHROM (Camera chromakey)
You can superimpose a moving picture on top of a still picture such as a picture can be used as background. Shoot the subject against a blue background. The blue area of the moving picture will be swapped with a still picture.
-ToIbKO MoIeJIb DCR-PC3E
BbMOxKeTe HaLoXnTb HEnoDbNxHoe
n3O6paXeHne, 3aIncaHoe Ha "Memory Stick",
Ha 3aIncSbIbAeMoe nOdbNxHoe n3O6paXeHne.
(ФункцЯ MKNuPOBaHnno NaMaRTn)
M. CHROM (KHONka ZBETHOCTN nAMTn)
BbMOKeTe MeHrTb MeCTaMn CnHIOU YaCTb HnOoDBNXKHO rN3o6paXeHHa, TaKOrO KaK pNCyHOK NII KApD, C NOdBHXHBIM N3o6paXeHHem.
M. LUMI (KhoNka JpkOCTn NaMaTn)
BbMOxTe MeHrT MeCTaMn 6oJIe npKyo 占CTb HNoDBrXHOrO n3OpaXeHn, TaKOrO KaPcYHOK NIN TnTp, C NOdBxKhblm n3OpaXeHnEM. 3aNUnTe TnTp Ha "Memory Stick" nepeTem, KaK OTnpaBtbcB B nyTeWeCTBne, INI Xe DnY yDo6CTBa.
C.CHROM (KHONka ZBteTHOCTN BnDEOKaMepebl)
BbMOxKeTe HAnoxKtB IOnDbNkHoe
I3O6paXeHHe Na BepxHIOU YacTb
HeNoDBNXHOrO I3O6paXeHHe,HaPnIMep
pncyHka, IcNoJIb3yEmoR O KaueCTBe 0ha.
ChmMnte o6bekt Ha rOly6om 0he. TOny6aY
CaCTb IOnDbNkHOrO I3O6paXeHHe 6yDet
3aMeHeHa Ha HeNoDnBxHoe I3O6paXeHHe.
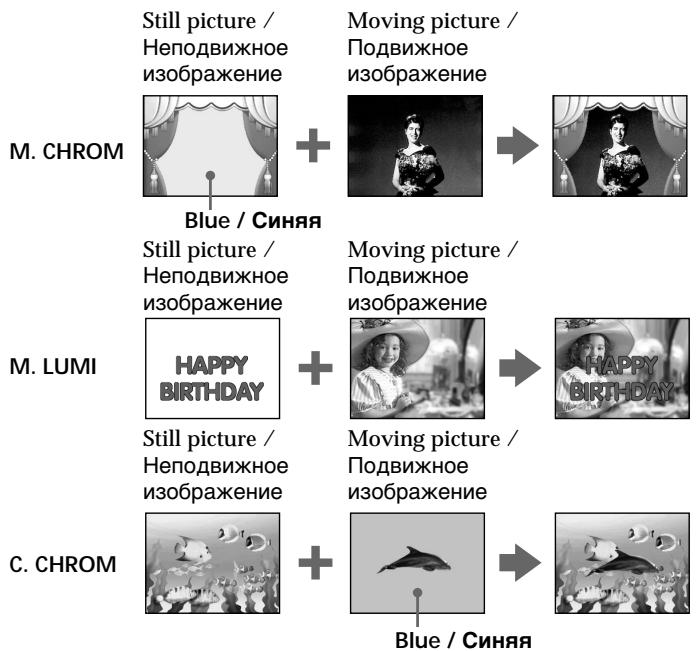
Superimposing a still picture in a "Memory Stick" on a moving picture - MEMORY MIX
HaIooXeHne HenoDbuXhOro n3o6paXeHn 13 "Memory Stick" Ha noDbuXhOe n3o6paXeHne - MEMORY MIX
Before operation
Insert a recorded "Memory Stick" on your camcorder.
(1) Set the POWER switch to CAMERA while pressing the small green button.
(2) In the standby mode, press FN to display PAGE1 (p. 18).
(3) Press MEM MIX. The last recorded or last composed image appears on the lower part of the screen as a thumbnail image.
4 Press - / + on the right lower corner of the screen or the Remote Commander to select the still picture which you want to superimpose. -to see the previous image ^+ : to see the next image
(5) Press a desired mode. The still picture is superimposed on the moving picture.
(6) Press - / + on the left lower corner of the screen to adjust the effect, then press OK to return to PAGE1.
(7) Press EXIT to return to FN.
(8) Press START/STOP to start recording.
Ipeed nauaIom pa6oTbi
BCTaBbTe "Memory Stick" c 3aIncbIO Bauy BnDeokamepy.
(1)Установские Великий Power B noLOJOKeHne CAMERA, нажав маленkyIO 3eJIeHyIO KHOJKy.
(2)HaxmTe KhoNkF NfДЯ OTo6paXeHnPAgE1 (cTp.18).
(3)HaxmTe MEM MIX. IocneJHee 3aIncahHoe nnIOcneJHee CKOMnHOBaHHOe 306paXeHHe NOBnTcB HIXKHeY qactN 3KpaHa B VIDE KPOXOTHOrO 306paXeHnY.
(4)HaKmTe-/+B npabOM HnXhEm yrIy 3KpaHa nn Ha nylbTe dNCTaHcUOHoro ynpabJeHHI DnBb6opa HeNoDBnXHO r3o6paXeHHa, KOtOpoe Bbl XOTnte HaIOXHTb.
::ДлпnpocmOTpaпpeыduyцero n3o6paXeHnI
+ДЯВБбopa cneDyUoIeO n3O6paJxHnA
(5)Bb6epnte jeknaembl pekum. HenoDbvXHoe n3o6paKeHne 6ydt HanoXeHo Ha dBxKyueeecn n3o6paKeHne.
(6)HaxMMTe - / + B JEBOM HNXXHem yTly 3KpaHa dIpyerynlpoBKn 3ΦΦeKTo, a 3aTEM haxMMTe OK dIy Bo3Bpata K PAGE1.
(7)HaxmTe KhONky EXIT IaI B03BpaTa B noIOXeHne FN.
(8)HaKMTe KHOIIky START/STOP nIaHaJa 3aInci.
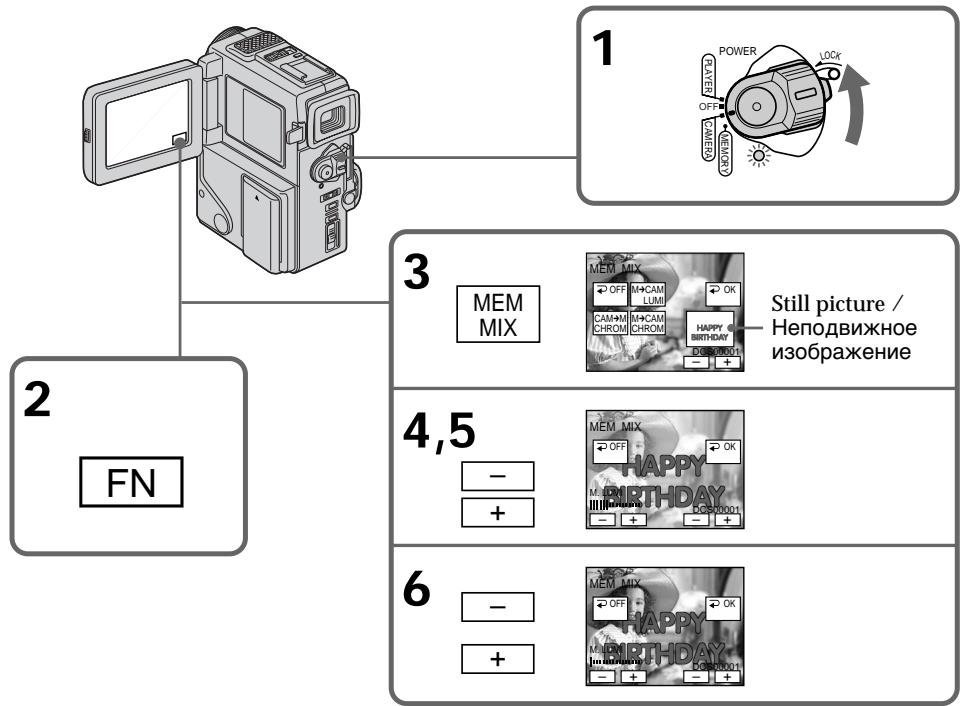
Superimposing a still picture in a "Memory Stick" on a moving picture - MEMORY MIX
Items to adjust
| M. CHROM | The colour (blue) scheme of the area in the still picture which is to be swapped with a moving picture |
| M. LUMI | The colour (bright) scheme of the area in the still picture which is to be swapped with a moving picture |
| C. CHROM | The colour (blue) scheme of the area in the moving picture which is to be swapped with a still picture |
The fewer bars there are on the screen, the stronger the effect.
To change the still picture to superimpose
Press - / + on the right lower corner before step 6.
To change the mode setting
Press OFF before step 7, and repeat the procedure from step 2.
To cancel M. CHROM/M. LUMI/C. CHROM
Press OFF to return to PAGE1/PAGE2.
During recording
You cannot change the mode setting.
The "Memory Stick" supplied with your camcorder stores 30 images
-For M.CHROM:26 images (such as a frame) DSC00001\~DSC00026
- For C. CHROM: 4 images (such as a background) DSC00027~DSC00030
Sample images
Sample images stored in the "Memory Stick" supplied with your camcorder are protected (p. 115).
If you format the "Memory Stick"
Sample images will be deleted.
To record a still picture which is added no effect on a mini DV tape
Press - / + on the left corner to increase the bars to maximum in the M. LUMI mode in step 6.
HaIoxeHne HnOaBnXHo rO n3o6paXeHn I3 "Memory Stick" Ha noDbxKHOe n3o6paXeHne - MEMORY MIX
IyHKtbI dIa peYnnpOBKn
IaH3MeHeHH HeNoBnXhOro H3o6paXeHH JIA HaIOXeHH
HaxmTe - / + B npaBOM HxKHe yIy nepei BbIOJIHeHem nyHKTa 6.
BbI He MoXKeTe N3MeHrTb yCTaHOBky pexIma.
"Memory Stick", npnilaraemar K Baweien Bndeokampe, Bmeaet 30 n3o6paxeHm.
-ДЯ M.CHROM:26изобрахенni(Tиna KaJaPa) DSC00001~DSC00026
-ДЯ C.CHROM:4и3o6paXeHnA(TuNaФоHa) DSC00027~DSC00030
06pa3cbi n3o6paxeHn
O6pa3bI n3o6paXeHn, xpaHmble Ha "Memory Stick", npuJaeraMoN K BaWei BnDeokamepe, 3aunueHb (cTp.115)
При Форматураими "Memory Stick"
06pa3bI n3o6paXeHn 6yDyT ydaJeHbI
Длгздн HeNoDnBxHOrO n3O6paXeHnA, 3aIncbIbaemoro Ha Jenty mini DV 6e3 kaKOro-Jn6o 3ФФeKta
Haxmaite KhoNky - / + BJeBOM yIy dIy yBeInuHnIaNoC Do MaKcImaJIbHOro KOJInueCTBa BV pexkme M.LUMI BV npHKte 6.
Recording an image from a mini DV tape as a still image
3a\Pncb n3o6paXeHnCJIeHTbI mini DV kaKHeNoDvXhOro n3o6paXeHn
- DCR-PC3E only
Your camcorder can read moving picture data recorded on a mini DV tape and record it as a still image on a "Memory Stick". Your camcorder can also take in moving picture data through the input connector and record it as a still image on a "Memory Stick".
Before operation
Insert a recorded mini DV tape and a "Memory Stick" into your camcorder.
(1) Set the POWER switch to PLAYER.
(2) Press The picture recorded on the mini DV tape is played back.
(3) Keep pressing PHOTO lightly until the picture from the mini DV tape freezes. "CAPTURE" appears on the LCD screen or in the viewfinder. Recording does not start yet.
(4) Press PHOTO deeper. The image displayed on the screen will be recorded on a "Memory Stick". Recording is complete when the bar scroll indicator disappears.
-ToIbKO moIeIb DCR-PC3E
Baasa BnideOKamepa MoKET CHTbIBaTb DaHHbIe IoDbNtHOrO N3OBpaXeHnra, 3aNNcaHHbIe Ha JeHTe mini DV, n 3aNNcBtBA Tb erO KaK HenoDbNtXHoe N3OBpaXeHne Ha "Memory Stick". Baasa BnideOKamepa MoKET TaKxe npuHmAtb CnHaNbIpoDbNtXbIX N3OBpaXeHn Ype3 BXoDHo pa3bEm N 3aNNcBtBA Tb IX KaK HenoDbNtXbIe N3OBpaXeHn Ha "Memory Stick".
Ipeed hauajom pa60tbI
BCTaBtTe 3aIncanHnyJeHTy mini DV n "Memory Stick" B BaUy BnDeokamepy.
(1)YcTaHOBInTe NepeKJIIOuChaTeIb POWER B noJIOKeHne PLAYER.
(2)HaxmTe KhoNky II. HaunHeTcB OBCpOn3BeDeHne N3O6paXeHn, 3aIncAHHoro HaJeHr mini DV.
(3)Держпге сlerка нажатои кноку PHOTOdo Text nop, noka n3o6paхене с lentb mini DV He 6byet "3amopoxkeHo".Ha ekpaheKKД nIN B vIDOnCKaTeIe noRbITcNnDnKaZna "CAPTURE".3anncb noka He hauchETc.
(4)HaXMMTe KHONky PHOTO cnJIbHee. 13o6paXeHne, oTobpaXaEmoe Ha 3KpaHe, 6yJET 3aIncaHO Ha "Memory Stick". 3aIncb cHTaETcRA 3aBepUeHHoJ, ecn INCue3HET nepemEuaOuIcNcNoIocTaBIn HINdkaTop.

When the ACCESS lamp is lit or flashing Never shake or strike the unit. As well do not turn the power off, eject a "Memory Stick" or remove the battery pack. Otherwise, the image data breakdown may occur.
If "□" appears on the LCD screen or in the viewfinder
The inserted "Memory Stick" is incompatible with your camcorder because its format does not conform with your camcorder. Check the format of the "Memory Stick".
If you press PHOTO lightly in the playback mode
Your camcorder stops momentarily.
Sound recorded on a mini DV tape
You cannot record the audio from a mini DV tape.
Titles have already recorded on mini DV tapes You cannot record the titles on "Memory Stick"s. The title does not appear while you are recording a still picture with PHOTO.
When you press the PHOTO button on the Remote Commander
Your camcorder immediately records the image that is on the screen when you press the button.
EcInI JAMnOuKa ACCESS ropnt nIIN Mmraet HnKOrDa He TpRcNte n He CtUHTe no Bauei BnDeokampe. TaKke, He BbIKNoUaHTe nITaHne, He n3BLeKaIte "Memory Stick" n3 OTcKa n He ChIMaIte 6bTaapeHbI 6lOk. B npOTnBHOM clyae daHHbI e N3o6paXeHnM oryT 6bItb NOBpeXdeHbl.
EcnHa 3KpaHe KKIIuB BVduOnckaTeIe NOBHTcH INDnKaUra "
BCTaBHeHHa "Memory Stick" ABnIeTcH HeCOBMeCTmOcBaWei BUnEOKaMepo, nCKoJIbKy ee fOpMaT He COOTBeTcTBeyT BaWei BuDeokAmepe. IpOBepbTe fOpMaT "Memory Stick".
EcIn B pexnme Bocnpon3BeDenr cIerKa haxaTb KhoNkY PHOTO
Baasa Bndeokamepa Ha MrHOBeHne OCTaHOBNTcA.
3Byk, 3aIncHbI HaJeHTy mini DV
Using the search function, you can automatically take in only still images from mini DV tapes and record them on a "Memory Stick" in sequence.
Before operation
- Insert a recorded mini DV tape and rewind the tape.
- Insert a "Memory Stick" into your camcorder.
(1) Set the POWER switch to PLAYER while pressing the small green button.
(2) Press FN to display PAGE1 (p. 18).
(3) Press MENU, then select PHOTO SAVE in l in the menu settings. "PHOTO BUTTON" appears on the LCD screen.
(4) Press PHOTO deeper. The still image from the mini DV tape is recorded on a "Memory Stick". The number of still images copied is displayed. "END" is displayed when copying is completed.
KoHnpoBaHne HeNoDBrXhblx 306paXeHn CJeHTbI mini DV - CoXpaHHeB B nAmrTn fOToCHmKOB
-ToIbKO moIeIb DCR-PC3E
IcnoIb3y4 yhKuIO nonka, Bbl MoKeTe aBTOMaTneCKN BblNOJIHrTB foTOCHMKN TOJbKO HEnoDBNXHbIX N3O6paXeHn CJeHT mini DV n 3aNNCbIbATb nx Ha "Memory Stick" B noCleDoBaTeJbHOCTn.
Ipeed hauaJom pa60tbi
BCTaBBTe 3aHncaHHyJeHTy mini DV nepemOtai Te JeHTy.
BCTaBbTe "Memory Stick" B Bauy BnDeokamepy.
(1)Haximma MaJIeHbKyIO 3eJIeHyIO KHOJky, yCTaHOBITe IpeKJIIOUaTeIb POWER B noJOKeHne PLAYER.
(2)HaxmTe KhoNky FN dIy OTo6paXeHHaPAGE1 (ctp. 18).
(3)HaKMnTe KHOIIky MeHIO, a 3aTEM BbI6epNTe PHOTO SAVE B B yCTaHOBkax MeHIO. "PHOTO BUTTON" NOBUTcra Ha 3KpaHe XKJ.
(4)HaXmIe KhoNky PHOTO cInbHee. HEnoDbVnxHoe n3O6paXeHne CJeHTbI mini DV 6yDet 3aIncAHO Ha "Memory Stick". BSyTe oTO6paXeHo KOJIueCTBO HeNoDbVnxHbIX cKOnIpOBaHHbIX n3O6paXeHn. IIO 3aBepSeHn KOnIpOBaHHn Ha DIncPJIee 6yDet oTO6paXeHa INDnKaCnA "END".
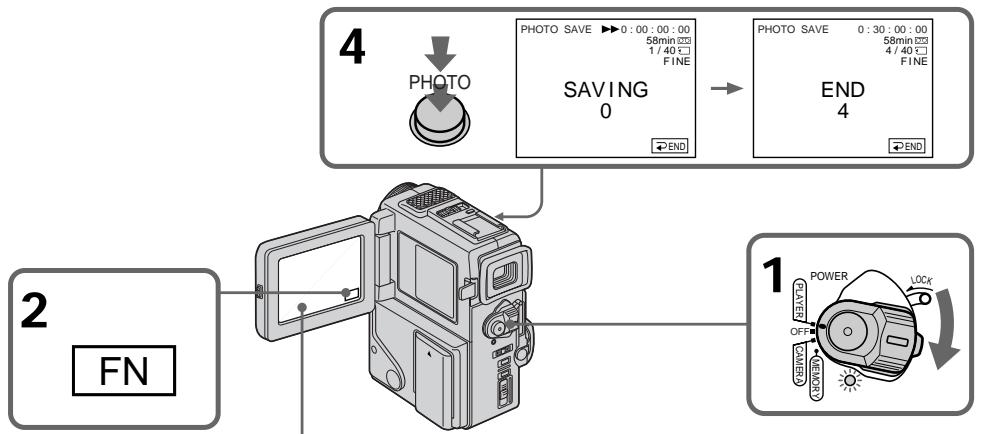

3
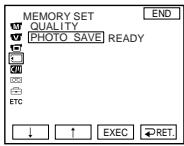

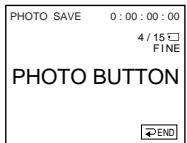
To stop or end copying
Press END.
To return to FN
Press END to return to PAGE1/PAGE2, then press EXIT.
When the memory of the "Memory Stick" is full
"MEMORY FULL" appears on the LCD screen, and the copying stops. Press END, insert another "Memory Stick" and repeat the procedure from step 2.
When the ACCESS lamp is lit or flashing
Never shake or strike your camcorder. As well do not turn the power off, eject a "Memory Stick" or remove the battery pack. Otherwise, the image data breakdown may occur.
To record all the images recorded on the mini DV tape
Rewind the tape all the way back and start copying.
If the write-protect tab on the "Memory Stick" is set to LOCK
"NOT READY" appears when you select the item in the menu settings.
When you change "Memory Stick"s in the middle of copying
Your comcorder resumes copying from the last image recorded on the previous "Memory Stick".
Ecnn lamnoouka ACCESS ropnt nnn muraet
HnKOrda He TpRcnte n CtUHTe no BaWei BnDeOkampe. TaKKe, He BbIKIOuHaTe nITaHne, He BbIHMaIte "Memory Stick" n3 OTceKa n He ChIMaIte 6bTaapeHbI 6lOK. B npOTIBHom clyae daHHbIe N3O6paXeHnM oMyT 6bITb NOBpeXdeHbl.
ДяЗаиси Всexи3o6paхжн,ЗаиcaHHbIX NaJIeTe mini DV
IpepeMoTaIe IeHTy Do KOHua Ha3aN HauchnTe KOnPiPoBaHne.
EcIn IeneCTOK 3aunTbI 3annc Ha "Memory Stick" yctahOBnE H bnoJoxeHne LOCK
Повпся ИндкциЯ NOT READY", ecn Bbl bIbIeTe pyHKT B yctaHOBkx MeHIO.
EcIn Bbl 3amEnHte "Memory Stick"s BcepeHHe KOnnpoBaHn
BaSHA BnDeOkamepa Bo3o6HOBNT KOnIpOBaHne, NaHnaC nOcIeNHe r3o6paJxEnr, 3aHncanHoro Ha npdeIyUeien "Memory Stick".
Viewing a still picture - Memory photo playback
ПрсмOTР HeNoBnXHOrO n3obpaXeHn - BocnpOn3VeJeHne fOTOCHIMKOB n3 pAmrTn
- DCR-PC3E only
You can play back still images recorded on a "Memory Stick". You can also play back 6 images at a time by selecting the index screen.
Before operation
Insert a "Memory Stick" into your camcorder.
(1) Set the POWER switch to MEMORY while pressing the small green button. Make sure that the LOCK is set to the right (unlock) position.
(2) Press PLAY to set the memory playback mode (p. 94). The last recorded image is displayed.
(3) Press - / + on your camcorder or the Remote Commander to select the desired still image.
- : to see the previous image
- : to see the next image
-ToIbKO MoIeJIb DCR-PC3E
BbMOxTe BOCnPOn3BODnTb HEnoDnXHbIe
1306paXeHnI, 3aIncaHHbIe Ha "Memory Stick".
BbMOxTe TaKxe BOCnPOn3BODnTb 6
1306paXeHnI PyTem BbIbOp aNHeKcHoro
3kpaHa.
Ipeed hauanom pa6oTbI
BcTabbTe "Memory Stick" B Bauly Bndeokamepy.
(1)Haximma MaJIeHbKyIO 3eIeHyIO KHOIIky, yCTaHOBITe IpeKJIIOUcATEIb POWER B noLOXKeHne MEMORY. Y6eIITecb, YTO qIKCaTOp LOCK yCTaHOBJIeH B npABOE (He3aΦIKCnPOBaHHOe) noLOXKeHne.
(2)HaxmTe KhoNky PLAY yctaHObKnpeKIma Bocpon3BeDeHn n3 pAmrTn (CTp.94).IocneJHee 3anicaHoe n3o6paXeHne 6yDet oTo6paXeHo.
(3)HaXMMTe - / + Ha nylbTe InCTaHcUHOHOrO ynpaBJIeHnIy BbI6opa JxelaEMoR OHeNoDBNXHORO n3O6paJKeHn. -- DnI npocMOTpa IpeDblDyUeO n3O6paJKeHn ++ DnI BbI6opa CneDyUoJero n3O6paJKeHn
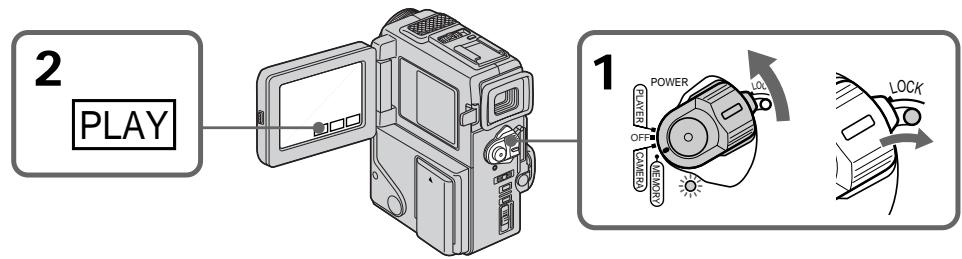
To play back recorded images on a TV screen
- Connect your camcorder to the TV with the A/V connecting cable supplied with your camcorder before the operation.
- When operating memory photo playback on a TV or the LCD screen, the image quality may appear to have deteriorated. This is not a malfunction. The image data is as good as ever.
- Turn the audio volume of the TV down before operation, or noise (howling) may be output from the TV speakers.
Image data modified with personal computers or shot with other equipment
You may not be able to play them back with your camcorder.
Still image
You can select still images also with - / + on PAGE1/PAGE2.
Дя Воспpon3BedeHЯ 3aIncaHHbIX n3O6paXeHn Ha 3KpaHe TeJIeBu3Opa
- IpeJn Hauanam Bocnpo3BedeHnna
noCoeDInHte Bauy BIndeokamepy K
TeEbn3Opy C nOmoIbIO coeDnHtIbHoro
Ka6eJIa ayDIO/BInDe, npinraeMOrO K Bauei
BIndeokamepe.
-Пи упраьгени BOCрпои3БeДнсЕМ ФOTOCHIMKOB ИЗ пamгтИ Na 3Кран Телевзета ИИЖД КачесТВО n3Oбрахен MOжET NOKa3aTbСЯ XУж.ЭTO He YBnIeTc HecnрраьвhoCTь.Даньtle N3Oбрахен 6уdYТ TAKHMЛжеΚАВСERДA.
-Пелегнануалом BOCPON3BeDEHINЯ NOBEPHNTe PERYIANTROPMOKCTN TENEBI3Opa BHN3, HnAte YOpE3 aKyCTMcCeyKO CNTeMу MoKET NocbluHaTbCSaUWM (3aBBBaHMe).
DAnHbIe N3O6paXeHnA, BUnOn3MeHeHHbIe C NOMOsbIO nepcoHaJIbHOro KOMNbIoTepa IIN CHaTbe C NOMOsbIO dpyroI annapaTypbI
BbI He CMOKTe BOCPOn3BecT INx C NOMOuHbBaWei BnDeOkamepbl.
HenoDbuxHoe n3o6paXeHne
Bb MoXeTe TaKxe BbIpaTb HEnOdBnXhBle H3o6paXeHnC NOMOsbHO - / + Na CtpaHnCe PAGE1/PAGE2.
Screen indicators during still image playback
3KpaHHbIe HNДИKaTOpbl BO BpeMBOcPpOu3BeDeHnA HeNoDvXhBIXn3o6paJxehn
The image quality mode indicator
The indicator may show a mode different to the one in which you recorded. This is not a malfunction. The indicator shows the size of the data file. For instance, if the size of FINE image is small enough, it may be displayed as STD. Or if the size of image is large enough, it may be displayed as SFN.
HndkaToppeKImaKaueCTBaI3o6paKeHHA
Инданкатор можект покаьовп ржим, OTлчаошmicг оТTO,ВКOTOPOM Bbl Bынллгпллздпсь.ЗTO He RAJIЯETcH HeUNPAPBANCTbO.Инданкатор покаьовп pa3мер Файla даньх. Hanprimep, ecn pa3мер ИЗБРАЖЕНI FINE RAJIЯETcДОСТATOЧО МалIM, erO MOЖHO OTOБРAZITb KAK STD.IиNe, ecn pa3мер ИЗБРAZKEHry RBЛЯЕТСД ДОСТATOЧО БOLьшIM, erO MOЖHO OTOБРAZITb KAK SFN.
Playing back 6 recorded images at a time (index screen)
You can play back 6 recorded images at a time. This function is especially useful when searching for a particular image.
(1) Set the POWER switch to MEMORY. Make sure that the LOCK is set to the right (unlock) position.
(2) Press INDEX on your camcorder or the Remote Commander to display the index screen.
A red mark appears above the image that is displayed before changing to the index screen mode.
: to display the previous 6 images
: to display the following 6 images
Bocnpo3BeJeHne 6 3aHncaHHbIX n3O6paXeHn OndHOBpeMeHHO (nHdEKCbIy 3KpaH)
BbMOKeTe BOCnpoN3BeCTn 63aINcaHHbIX n3O6paXeHm OndHOBpeMeHNO.
3taФyHKUJIYBJIeTcOOC6EHNO NOE3HO npn BbIIOJIHHeHNI NONCKa OTeJbHbIX n3o6paKHeN.
(1)YcTaHOBInTe NpeKnIOvateIb POWER B noJIOKeHne MEMORY. Y6eIInTeCb, yTO dIKCaTOp LOCK yCTaHOBEn B nPaBoe (He3aΦNkCIPOBaHnOe) noJIOKeHne.
(2)HAnKMte KhONky INDEX Ha BaueB BInDeokamepe NnIyNble DInCTaHIOHOHORO ynpabLeHnA IJN OTo6PaxEHn INDEKCHOrO 3KpaHa.
Kpachara Metka ▪NORBUTc HnI3o6paXeHnEM, KOtOpoe 6byet OTO6paKaTcBnpeEd n3MeHeHnEm pexNImu INDEKCHORO 3KpaHa.
←:ДЯ OTO6paXeHn IpeIbIyuINx 6 n3O6paXeHn
→:ДЯ OTOБРAXKENI CNEДУЮUIX 6 n3O6PaxKENI
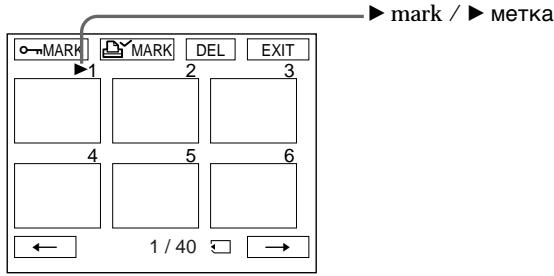
To return to FN
Press EXIT.
To return to the normal playback screen (single screen)
Press the image you want to display.
Note
When displaying the index screen, the number appears above each image. This indicates the order in which images are recorded on the "Memory Stick". These numbers are different from the data file names.
Index screen
Index screen is available in both the memory camera/the memory playback mode.
Files modified with personal computers
These files may not be displayed on the index screen. Image files shot with other equipment may not be displayed on the index screen either.
Viewing the recorded images using a personal computer
The image data recorded with your camcorder is compressed in the JPEG format. If you use the application software, "PictureGear 3.2Lite" supplied with your camcorder, you can see images recorded on a "Memory Stick" on a computer screen. Use the serial port adaptor for "Memory Stick" supplied with your camcorder, the MSAKIT-PC4A "Memory Stick"/PC card kit or MSAC-PC1 PC card adaptor for "Memory Stick" (not supplied) for this operation. For detailed instructions on operation, refer to the operating instructions of the serial port adaptor, "Memory Stick"/PC card kit or PC card adaptor and application software.
PpocMToT 3aHncaHbIX n3o6paXeHn c NOMOuIOp nepcoHaJIbHOrO KOMNbIOTepa
Playing back images in a continuous loop - SLIDE SHOW
- DCR-PC3E only
You can automatically play back images in sequence. This function is useful especially when checking recorded images or during a presentation.
Before operation
Insert a "Memory Stick" into your camcorder.
(1) Set the POWER switch to MEMORY while pressing the small green button. Make sure that the LOCK is set to the right (unlock) position.
(2) Press FN to display PAGE1 (p. 94).
(3) Press MENU, then select SLIDE SHOW in l in the menu settings (p. 78). And press EXEC. READY appears on the LCD screen.
(4) Press START. Your camcorder plays back the images recorded on a "Memory Stick" in sequence.
Bocnpon3BeJeHne n3o6paXeHn BHeIpepbIBHOI NOcJIeObATEJIbHOCTNIO 3aMKHyTOMy cIKJy - SLIDE SHOW
-ToIbKO MoeJIb DCR-PC3
BbMOKTeA BOMaTnueeCKN BOCPOn3BOoNtB n3O6paXeHnB HENpePBbHOIN nocIeNoBaTeNbHOCTn. 3TaФyHNuYRAJIeTcra noIeONeOoo6eHNO pRn IpoOBepKe 3aIIncAHbIX n3O6paHEn nIIN BO BVpEm Ppe3eHTaUIn.
Ipeed hauanpa60tbI
BcTaBbTe "Memory Stick" B BaUy BnDeokamepy.
(1)YcTaHOBnTe BbIKIouaTeIb POWER B noLoXeHne MEMORY,HaXaB MaJIeHbKyIO 3eJIeHyo KhoNkY. Y6eJIteCeB, YTO ΦNKCaTOp LOCK yCTaHOBnE H pNaBoE (He3aΦmKcnpOBaHnOe) nIoXeHne.
(2)HaxmTe KhoNkF NfДЯ OTo6paXeHnPAgE1 (cTp.94).
(3) HαχMnte KHOπKY MEHIO, a 3aTeM BbI6epNTe SLIDE SHOW B BycTaHOBkax MENU (ctp. 78). ΜIoTOM HαχMnte EXEC. READY NOBnTcHa ΘKpaHe ZKKД.
(4)HaxMnTe KhoNky START. Bawa BuDeokaMepa BocPom3BeTe N3o6paKeHna, 3aNaCaHbNe Ha "Memory Stick", BHeNPpeBbHNo nocLeNoBaOteNbHoctn.
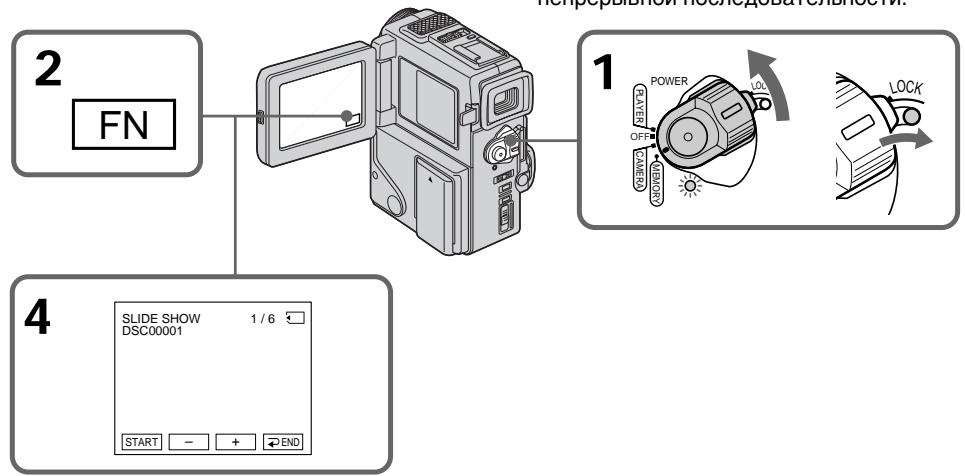
To stop or end the slide show
Press END.
To pause during a slide show
Press PAUSE.
To return to FN
Press EXIT.
To start the slide show from a particular image
Select the desired image using MEMORY - / + buttons before step 3.
ДлЯ OCTaHOBKNIJI NOKOHuaHnB BOCPon3BeDeHnA
HaxmTe END.
Iy3bI BO Bpemr demOHCTpaunn CnaIOB
To view the recorded images on TV Connect your camcorder to a TV with the A/V connecting cable supplied with your camcorder before operation.
If you change the "Memory Stick" during operation
The slide show does not operate. If you change the "Memory Stick", be sure to follow the steps again from the beginning.
To prevent accidental erasure of important images, you can protect selected images.
Before operation
Insert a "Memory Stick" into your camcorder.
(1) Set the POWER switch to MEMORY while pressing the small green button. Make sure that the LOCK is set to the right (unlock) position.
(2) Press INDEX on your camcorder or the Remote Commander to display the index.
(3) Press "o-MARK." The screen to protect the image appears.
(4) Press the image you want to protect. The "O-π" appears on the protected image.
-ToIbKO MoIeJIb DCR-PC3E
ДлпnpedOTbpaSeHnCnyaHOrO CTnpaHnBaxhblx n3o6paXeHn Bbl moKTe 3aunTntbBbl6paHbIe n3o6paXeHn.
Ipeed hauanpa60tbI
BcTaBbTe "Memory Stick" B BaUy BnDeokamepy.
(1)YcTaHOBInTe BbIKIouaTeIb POWER B noLoXeHne MEMORY,HaXab MaIeHbKyUo 3eJeHyIO KHOJky. Y6eIITecB, YTOΦHKCaTOp LOCK yCTaHOBInE H pNaBoE (He3adMckupOBaHnO) nIoXeHne.
(2)HaxmTe KhOnky INDEX Ha BaSei BnDEOkampeI Nn H nyIbTe nCTaHcIOHHoro UnpaBleHnra JnOTo6paXeHnHnDEKCHORo 3kPaHa.
(3)HaxMMTe KhoNkUy “oMARK”.IIOBHTc8 3KpaH 3aunTbI N3O6paXeHn.
(4)HaxMMTe N3o6paXeHne, KOTOpoe Bbl XOTnTe 3aunTb. 3HaK "0" NOBUTcH Ha 3aunIeHOM N3o6paXeHnN.
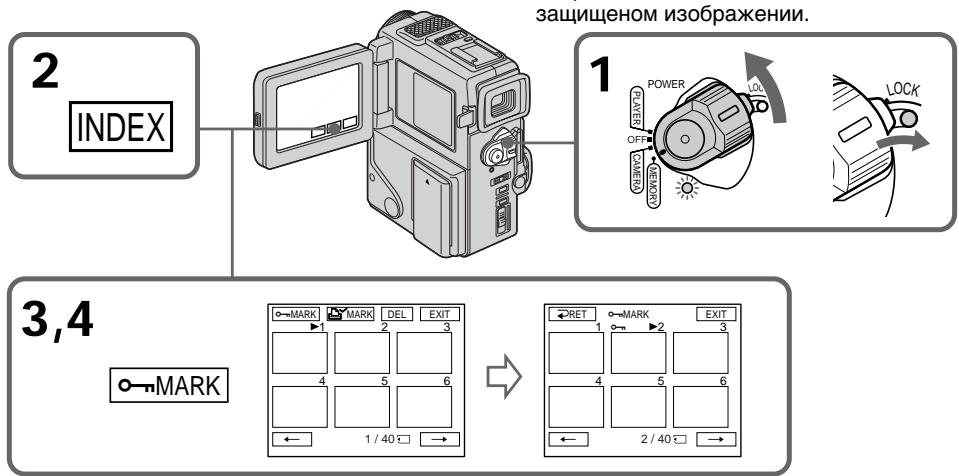
To return to FN
Press EXIT.
To cancel image protection
Press the image you want to cancel image protection in step 4. The "o-n" disappears.
Note
Formatting erases all information on the "Memory Stick", including the protected image data. Check the contents of the "Memory Stick" before formatting.
If the write-protect tab on the "Memory Stick" is set to LOCK
You cannot carry out image protection.
You can delete images stored in a "Memory Stick".
Deleting selected images on the single screen
Before operation
Insert a "Memory Stick" into your camcorder.
(1) Set the POWER switch to MEMORY while pressing the small green button. Make sure that the LOCK is set to the right (unlock) position.
(2) Play back the image you want to delete by pressing - / + (p. 109).
(3) Press FN to display PAGE1 (p. 94).
(4) Press DELETE. "DELETE?" appears on the LCD screen.
(5) Press OK. The selected image is deleted.
-ToIbKO moIeJIb DCR-PC3E
BbIMoKeTeOTMeHnTbN3OpbaxHeHn, coXpaHeHHbE B“Memory Stick”.
YdaJIeHne BbIbpaHHbIX n3o6paxKeHn
Ipeed NaJom pa60tbl
BCTaBbTe "Memory Stick" B BaUy BnIeokamepy.
(1)Установские вълковая Power B noLOXeHne MEMORY, нажав MaJIeHbkyIO 3eIeHyIO KHOJKy. Y6eIInTeCb, YTO ФИКcaTOp LOCK yCTaHOBJIeB INpaBoE (He3aФИKcINpOBaHHoe) noLOXeHne.
(2) Bocnpoun3BveiTe n3o6paXeHne, KOTOpoe Bbl XOTIte ydaJIInTb, HaxnMaJ KHOJKy -/+ (CTp. 109).
(3)HaXMMTe KHONKy FNДЯ OTObpaXeHHaPAGE1 (ctp.94).
(4)HaKmTe DELETE. “DELETE?” noaBntcHa 3kpaHe KKД
(5)HaXMMTe OK.BbI6paHHoe I3O6paXeHHe 6yIDet OTMeHEHO.

To return to FN
Press EXIT.
To cancel deleting an image
Press CANCEL in step 5.
Notes
- To delete a protected image, first cancel image protection.
- Once you delete an image, you cannot restore it. Check the images to delete carefully before deleting them.
- You cannot delete images if the write-protect tab is set to LOCK.
Deleting selected images on the index screen
Before operation
Insert a "Memory Stick" into your camcorder.
(1) Set the POWER switch to MEMORY while pressing the small green button. Make sure that the LOCK is set to the right (unlock) position.
(2) Press INDEX on your camcorder or the Remote Commander to display the index.
(3) Press DEL. Then press the image you want to delete. The number of the selected image is highlighted.
(4) Prees EXEC. "DELETE?" appears on the LCD screen.
(5) Press OK. The selected images are deleted.
YdaJIeHne BbI6paHHbIX n3O6paXKeHn Ha mHndeKCHOM 3KpaHe
BCTaBbTe "Memory Stick" B Bauy BuDeokamepy
(1)YcTaHOBIne BbIKJIOuChaTeNb POWER B noLOXHeHne MEMORY, HaxKaB MaJIeHbKyIO 3eJIeHyIO KNOpKy. Y6eIInTeCb, YTO fNkCaTOp LOCK yCTaHOBIne B npaBoE (He3aФnKcnpoBaHoe) noLOXHeHne.
(2)HaxMMTe KhoNky INDEX Ha BaSei BnDEOKaMpe NnHa NpIbTe DnCTaHcIOHnHO YnpaBJIeHnRA JnOTo6paXeHn INDeKCHOrO 3kPaHa.
(3)Haxmnte KhoNky DEL. 3aTe m Haxmnte n3o6paXeHne, KOtOpoe Bbl XOTnTe ydaJIntb. HomeBbl6paHHoro n3o6paXeHnB bICBeTnCTcR.
(4)Haxmnte EXEC."DELETE?"noaBntcHa 3KpaHe XKd.
(5)HaKMMTe OK. BbIbpaHHe n3O6paXeHne 6yJeT ydaJIeHo.
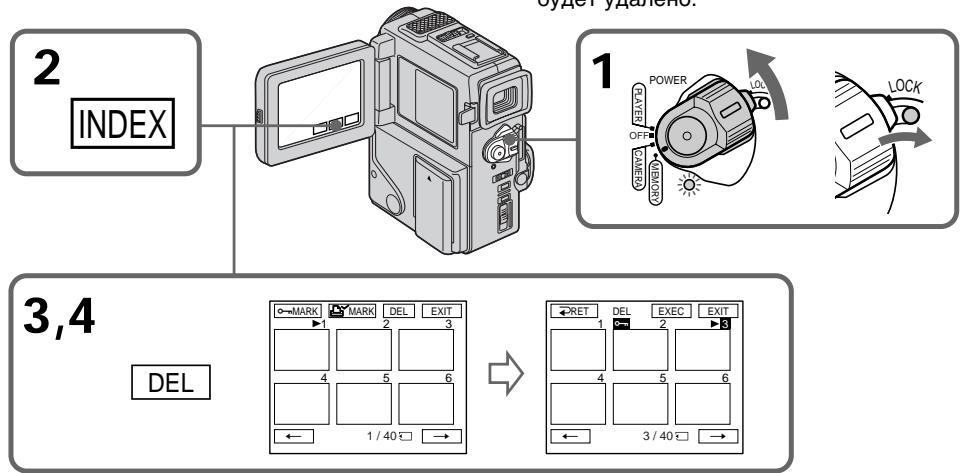
To return to FN
Press EXIT.
To cancel deleting an image
Press CANCEL in step 5.
Deleting all the images
You can delete all the unprotected images in a "Memory Stick".
Before operation
Insert a "Memory Stick" into your camcorder.
(1) Set the POWER switch to MEMORY while pressing the small green button. Make sure that the LOCK is set to the right (unlock) position.
(2) Press FN to display PAGE1 (p. 94).
(3) Press MENU, then select DELETE ALL in l in the menu settings (p. 78).
(4) Select DELETE, then press EXEC. "OK" changes to "EXECUTE".
(5) Select EXECUTE. Then press EXEC. "DELETING" appears on the LCD screen. When all the unprotected images are deleted, "COMPLETE" is displayed.
YdaJIeHne Bcex n3o6paXKeHn
BbMOxTe ydaIITb BCE He3aunHHeHbIe n3o6paXeHnHa "Memory Stick".
Ipeed nayanom pa60tbi
BcTaBbTe "Memory Stick" B BaUy BnDeokamepy.
(1)YcTaHOBInTe BbIKJIOuChaTeNb POWER B noLoXeHne MEMORY, HaxKaB MaJIeHbKyIO 3eJIeHyIO KHOJky. Y6eIInTeCb, YTO qNKCaTOP LOCK yCTaHOBInE B npaBoE (He3aФИKcINpOBaHNo) noLoXeHne.
(2)HaxmTe KhoNkF NdIa OTo6paXeHHaPAGE1 (ctp.94).
(3)HaxMMTe KhONKy MENU, a 3aTem BbI6epNTe DELETE ALL B B yCTaHOBkAX MeHIO (cTp.78).
(4)Выберпе Команду DELETE,а затем нажмпгЕ EXEC.“OK"ИзмeнчтсЯ на "EXECUTE".
(5)3aTeM haxmnte EXEC. Ha 3kpahe KKД NOBtCn INДикauяN“DELETING".Korda BCE He3aUnIeHbIe N3O6paXeHn6bYdUT YdaJIebl, HAnDcJIpeE NOBtCn INДикauяN“COMPLETE”.
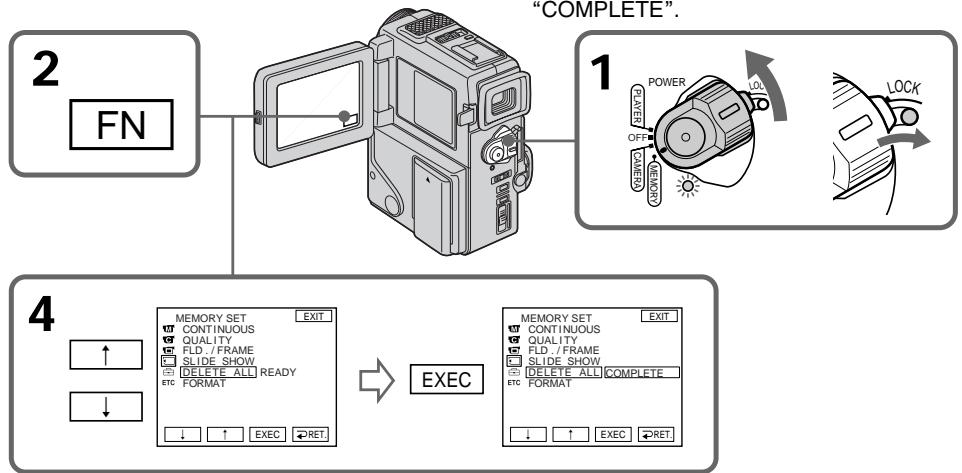
To return to FN
Press EXIT.
To cancel deleting all the images in the "Memory Stick"
Select RET in step 3, then press EXEC.
While "DELETING" appears
Do not turn the POWER switch or press any buttons.
Bo Bpem OTo6paKeHn HnDnKaun "DELETING"
He n3meHnIte noIoxKeHne nepeKJIIOuChaTeNn POWER n He haxImaIte KaKx-1n6o KHOnOK.
Writing a print mark - PRINT MARK
3a\Pncb neyaTHbIX 3HaKOB - PRINT MARK
- DCR-PC3E only
You can specify the recorded still image to print out. This function is useful for printing out still images later.
Your camcorder conforms with the DPOF (Digital Print Order Format) standard for specifying the still images to print out.
Before operation
Insert a "Memory Stick" into your camcorder.
(1) Set the POWER switch to MEMORY while pressing the small green button. Make sure that the LOCK is set to the right (unlock) position.
(2) Press INDEX on your camcorder or the Remote Commander to display the index.
(3) Press MARK. The screen to write a print mark appears.
(4) Press the image you want to write a print mark. The appears on the selected image.
-ToIbKO moIeIb DCR-PC3E
Bb moKeTe yka3aTb 3aIncanHbIe n3o6paXeHHn IIN paCneYATKn. 3Ta fynKUIN RAJIaETcN POJIe3HO IN PAcNeYATKn HEnOdBnKhbIX n3o6paXeHHn IIO3Ke.
Ipeed hauanpa60tbI
BcTaBbTe "Memory Stick" B BaUy BnIeokamepy.
(1)YcTaHOBInTe BbIKJIOuateIb POWER B noLoXeHne MEMORY,HaKaB MaJIeHbKyIO 3eJIeHyIO KNIOKy. Y6eINTeCb, YTO qNKCaTOp LOCK yCTaHOBInE B npaBOe (He3aФnKcnpOBaHHoe) noLoXeHne.
(2)HaxmTe KhONky INDEX Ha BaSei BnDeOkampe NnHa NpIbTe DnCTaHcIOHnHO YnpaBLeHnra DnA OTo6paJxHn INDeKCHOrO 3kpaHa.
(3)HaxmTe KhoNkY MARK".IoBHTc3KpaH dIaInc neaTHoro 3HaKa
(4)HaxMMTe n3o6paXeHne,Ha KOTOpOM BbIXOHTe 3aINCaTb NeaTHbI 3HaK.3HaK NOBNTcRa H BaIBpaHHOM n3o6paXeHn.
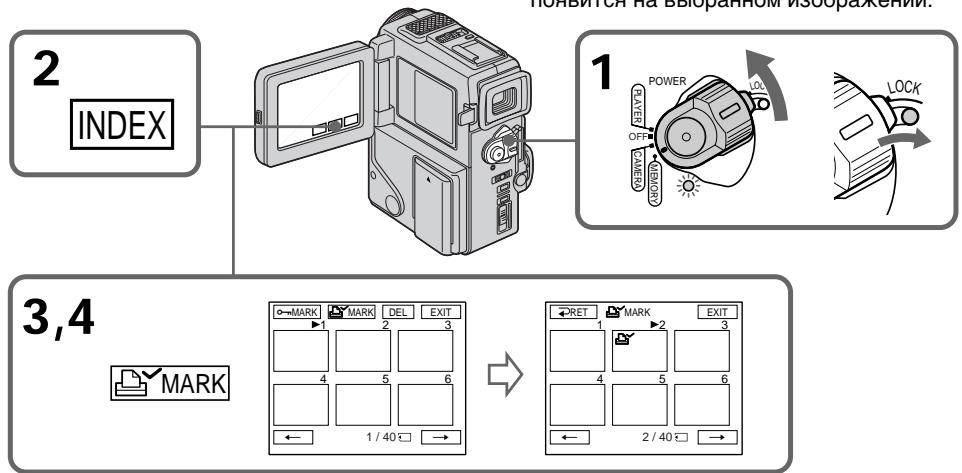
To return to FN
Press EXIT.
To cancel writing print marks
Press the image you want to cancel the print mark. The on the selected image dissapears.
If the write-protect tab on the "Memory Stick" is set to LOCK
You cannot write print marks on still images.
Using the viewfinder
You can operate with the touch panel using the viewfinder.
(1) Pull out the viewfinder until it clicks, and then turn the LCD panel over and move it back to your camcorder body with the LCD screen facing out (p. 22).
The same display as the LCD screen appears in the viewfinder. The LCD screen is turned off.
(2) Press the LCD screen. The appears in the viewfinder.
(3) Move by pressing the LCD screen to select a desired item.
- Do not touch the LCD screen with wet hands.
- Do not press them with sharp objects such as pens.
After a while
The disappears. Press the LCD screen to display again.
When you press the two points on the LCD screen simultaneously
The does not move.
When you keep pressing the left/right edge of the LCD screen
The moves to one button to another continuously. Release your finger to make stop.
PpIMeuaHn
- He trpərəte əkpan JKKmokpbim pykamn.
- He HaximMaTe Ha Hero ocTpblm npeMeTaMn, KaK HanpImep, WapIKoBble pyKn.
Yepe3 HeKOTOpoe Bpemr
3NaK nCye3HET. CHOBa HaxMnTe Ha 3kpaH KKД nIЯ OTO6paxeHnIa 3HaKa
EcIn Bbl HaxmaeTe Dba nyHkTa Ha 3KpaHe KKJ OndHObpemeho
3NaK nepemeeaTbca He 6yDet.
EcIn Bbl DepeKnte HaKaTbIM JeBbI/npaBbI Kpa 3KpaHa KKd
3nak nocneoBaTeNbHO nepemeaetcO oNDH KhoNkK npyro. OTnyctte BaW naeuc JIJI OCTaHOBKn 3HaKa
Selecting cassette types
You can use the MinI mini DV cassette only*. You cannot use any other 8 mm,
Hi8 Hi8, Digital8, VHS VHS, VHSC, SVHS S-VHS, SVHSC S-VHSC, Betamax or DV cassette.
- There are two types of mini DV cassettes: with cassette memory and without cassette memory. We recommend that you use the tape with cassette memory.
The IC memory is built in the cassette with cassette memory. Using this IC memory, you camcorder can read, write, and search data such as the date of recording or titles. The functions using the cassette memory require successive signals recorded on the tape. If the tape has a blank portion in the beginning or between the recorded portions, a title may not be displayed properly or the search functions may not work correctly.
Not to make any blank portion on the tape, press END SEARCH to return to the end of the recorded portion before you begin the next recording when:
- you have ejected the cassette while recording.
- you have played back the tape in the PLAYER mode.
If there is a blank portion or discontinuous signal on your tape, re-record from the beginning to the end of the tape concerning above.
When you record, using a digital video camera recorder without a cassette memory function, on a tape recorded by one with the cassette memory function, the same result may occur.
Tapes with cassette memory have CIII (Cassette Memory) mark. Sony recommends that you use a tape with CIII mark to enjoy your camcorder fully.
CII4K mark on the cassette
The memory capacity of tapes marked with CII4K is 4KB. Your camcorder can accommodate up to 16KB. 16KB tape is marked with CII16K.
Bb6op Tnna Kaccet
BbMOKTe NcNoJIb3OBAbT ToJIbKO KAcCEtBI MmH D V MinD*. Bb He MOKTe NcNoJIb3OBAbT KaKHe-JIb6 OpyrNe KAcCEtBi TnPa 8 MM, Hi8 Hi8, Digital 8, WHS VHS, WHSC VHSC, SVHS S-VHS, SVHS S-VHSC, Betamax IJIn TnPa DV.
*IMeETcBbTnPaKacTeMmH DV:c KaccETHOI NaMTbIO N6e3 KACCETHOI NaMTN. PeKOMeHdyETcNcNOJIb3ObaTb JeHTbIC KaccETHOI NaMTbIO.
Ha Tnne KaccET C KaccTeHOn NaMaTbIO yCTaHOBJIeHO 3aONMHaIOoee yCTpOITcBO B BuJe IIC. NcNoJIb3yI dAnHyIO IIC BaWa bNdeOKaMepe MoKet CUnTIbBAbT, 3aNNcBiBaTb NcKaTb DaHHBe, TaIKe KaJ DaTb BbINONHeHrna3aNcEe NN TnTpbl. FyHKUIn, NcNoJIb3yIOuIe NaCCsTeHYIO NaMaTb, HJXJaOTCR B HeNpePbIBhIX CNHApax, 3aNCAHNbIX Ha JLeHTe. EcIn JeHTa Imeet He3aNICAHNbY uAcTOK B NaHaya NII MExJy 3aNCAHNbIMu YaCTAM, TO TnTp MxEe He OTo6paXaTbCraNdIeXaUIM o6pa3OM, INI fYHKUIN NOnCKaMOrYT pa6OToTB He npabINbHO.
YTo6bHaJeHTe HeNoIyUHIOb HnOJHOHHe3aIncAHHOu cAChn HaxMInTe END SEARCHdIraBO3BpTaK KOHcy 3aIncAHHOu cAChnpeiHaayanOM CLeDyUoSeI 3aIncN, KOrda:
- Bby BbIToJIKNHyNJ KACCety BO BpeM BblIOJIHeHn 3aIInCn.
-BbBocnpon3BennIeHTyBpeXmPELAYER. EcnnHaBaWeJIeHTeNMeTcHesancaHHbIe yuactOKnINIpepbBaIOUoHcCnHaJI,TO BCNECTBVe BbiweynOMaHyTORO nepe3aNNiHTe TakyIO IeHTyOT HaHaJaDo KOHua.
TakoiKepe3yIbTaTMOKETnpO30nT,KOrda BblBbIOJIHReTe3aINcBcNcNOJIb3OBaHNEM uΦpOBoi BVdeOKaMepbl6e3ФyHKUm KACCtHOI pAMrTHNaJIeHTe,3aINcAHHoHa BVdEOKaMepeCfYHKUeN KACCtHOI pAMrTH. JeHTbIC KACCtHOI pAMrTBIO IMeOT 3HaK [11 (KACCtHOI pAMrTH).ΦnprMa Sony peKOMeHdyeT,yTObBI bI NCIOb3OBaJI N KACCtBcO3HAKOcM [11 DnI NOJHOro HacnaXJeHnO TNCIOJIb3OBaHn DaHHo BVdEOKaMepbl.
Using any other video camera recorder, you cannot record on a tape that has recorded a copyright control signals for copyright protection of software which is played back on your camcorder.
When you record
You cannot record software on your camcorder that contains copyright control signals for copyright protection of software.
"COPY INHIBIT" appears on the LCD screen, in the viewfinder or on the TV screen if you try to record such software.
Your camcorder does not record copyright control signals on the tape when it records.
Audio mode
12-bit mode: The original sound can be recorded in stereo 1, and the new sound in stereo 2 in 32 kHz. The balance between stereo 1 and stereo 2 can be adjusted by selecting AUDIO MIX in the menu settings during playback. Both sounds can be played back.
16-bit mode: A new sound cannot be recorded but the original sound can be recorded in high quality. Moreover, it can also play back sound recorded in 32kHz , 44.1kHz or 48kHz . When playing back a tape recorded in the 16-bit mode, 16BIT indicator appears on the LCD screen or in the viewfinder.
PnBocnpOn3BeJeHn
CunHan abTopcKOro npaba
PnB Bocnpon3BeDeHnn
NcnoIb3yraKakyo-Jn60dpuyuBvdeokamepy, BbHe moKeTe BbINOHNbT 3aNNcb HaJeHTy,Ha KOTOpO 3aINCAHb CInHaJIb ABTOPCKOro npaba Dnla3aUNTBaTbOPCkIX npab nporpAMM, BocnpOn3BOIDMbIX Ha BaWeB vDdeOKamepe.
PpN 3aIncn
BbI He MoKTe 3aNcTa b nporpaMMy Ha BaWei BnDeOkAmepe, KOtopar cOepXHT ynpaBnIHOuIe CnHbIb aTbOPcKOro npaba. EcIn Bbl NpblTaTeCb 3aNcTa b TaKyIO nporpaMMy, HkPaHe KKD, BnDOnckaTeIe IIN Ha 3KpaH TeNeBmOpa nOBtCn INdikaun "COPY INHIBIT".
BaSHA BnDEOKaMepa He 3aHncbIbAeT ynpaBnHOUne CnHaJIbI aBTOpCKOrO npaba npn BbINOJIHeHm 3aINcH NaJeHTy.
Aydnopexum
12-6bTobbypeKIM:IepBOHaayBbHb3Byk MOKeT 6bTb 3aIncaH Ha cTepeofoHueckn KaHaI aHObbl 3ByK-Ha cTepeofoHueckn KaHaI 2 B pexIme 32 KfL.BaJAHc MeJdy cTepeofoHueckm KaHaIOM 1 n cTepeofoHueckm KaHaIOM 2 MoXHo OTperylnpoBaT pyTem BbIbopa yCTaHOBKn AUDIO MIX B yCTaHOBkax MeHIO BO Bpemr BOCpOu3BeDeHn. Bbl MoKeTe BOCpOu3BODntb Oba 3Byka.
16-6nTOBbI pEXm:HObI 3Byk He MoXeT 6bITb 3aINcAH, OdHaKO nepBOHaaybHbI 3ByK MOxEe 6bITb 3aINcAH C BblCOKIM KaYeCTBOM. KpOME TOrO, 3ByK MOxHO BOCPON3BOIDNTB B peXImax 32 kT, 44,1 kT uIn 48 kT. PIn BOCPON3BeDeHN IeHTbl, 3aINcAHHO B 16-6nTOBOM pEXmE, Ha ekpaHe KKД uN B BuDOnCKaTeIe NOBuTcH INDnKaTop 16BIT.
When you play back a dual sound track tape
When you play back a dual sound track tape recorded in a stereo system, set "HiFi SOUND" to the desired mode in the menu settings (p. 78).
Sound from speaker
| HiFi Sound Mode | Playing back a stereo tape | Playing back a dual sound track tape |
| STEREO | Stereo | Main sound and sub sound |
| 1 | Left sound | Main sound |
| 2 | Right sound | Sub sound |
You cannot record dual sound programs on your camcorder.
Be sure to affix a label only on the locations as illustrated below [a] so as not to cause malfunction of your camcorder.
Rewind the tape to the beginning, put the cassette in its case, and store it in an upright position.
If the cassette memory function does not work
Reinsert a cassette few times. The gold-plated connector of mini DV cassttes may be dirty or dusty.
Cleaning gold-plated connector
If the gold-plated connector of mini DV cassettes is dirty or dusty, you may not operate the function using cassette memory. Clean up the gold-plated connector with cotton-wool swab, about every 10 times ejection of a cassette. [b]
Pn BocnpOn3BeDeHn JeHTbI C DBOH0N 3ByKO0B ODOXK0N
ПрвВOCирон3БeДeHиЛeHTbI CДБОИН OByKOBоДрОЖКо,ЗАпсанHоВ CtepeOФонHueCKoСNTeMe,yCTaHOBnTe KOMaHdY“HiFi SOUND”B HuxhblpexKIM B yCTaHOBkax MeHIO (Ctp.78).
3Byk OT DnHaMnka
| Рек imm 3Byuahnia HiFi | Восpron3BedeHnne стесофонческо лentebl | Восpron3BedeHnne пentebl с двонь Зыково дорожко |
| STEREO | Стесо | Осовно 3Byk и Вспомогател_nbий 3Byk |
| 1 | 3Byk левого канда | Осовно 3Byk |
| 2 | 3Byk павого канда | Осовно 3Byk |
BbHe MoKeTe 3aHcMbBaT IIpoRpaMMbl C DBoHbIM 3ByaHnEm Ha BaWei BIneOkamepe.
Приимechanical no kaccete mHH DV
PpnpnKpeHneHH 3TKeTKHa KaCCeTy MmH DV
CneIeTe 3a TEM, TTo6bI 3TnKeTKn
PnIKPeINJIIMCb TOJbKO B MeCTax, KaK NOKa3aHO
Ha PnCyHKax HnXe [a], TaK TTo6bI He HApUHtB
HOPMaJIbHoe FyHKUHOHPOBaHHe
BnDEOkAMEpbI.
Pocne NcnoJb3OBaHnKaCCeTbIMHH DV
PepemotaIeNHTy KHaayu, noJoxHte KaccETy B yTnApR xpaHnTe KaccETy B BEpTKaJIbHOM noJooXehm.
Ecni yHKun KaccetHOI pAMrH pa6oTaET
IpeyeCTAHOBNTe KACCETy HECKONbKO pa3. I03OLOUeHHb pa3bEM KACCETbMIHN DV MOKEt 6bItb rpa3HbIM NIN NblNBHM.
OuNCTKa n03oJIoueHHoro pa3bema
Ecni no30onoyHbI pa3bEm KaccET MHN DV 3aqrpa3hen mN 3aBilEn, Bbl He cMOxete ynpabTbФyHKuEn C NMOUbHO KaccetHOJ nAMrTN. OunlaTe No30NoeyHbI pa3bEm C NOMOuBo XlonuTaobMyaxHoTAMnOHa npimepHo nocne 10 pa3 uCnOJIb3OBaHnKACCetBl. [b]
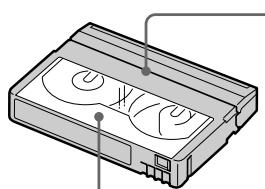
[a]
Do not affix a label around this border. / He npinkpenIaTe 3TKeTKy B 3TOM MeCTe.
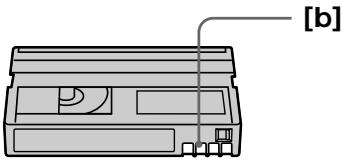
Troubleshooting
If you run into any problem using your camcorder, use the following table to troubleshoot the problem. If the problem persists, disconnect the power source and contact your Sony dealer. If "C:□□:□□" appears on the LCD screen or in the viewfinder, the self-diagnosis display function has worked. See page 130.
In the recording mode
| Symptom | Cause and/or Corrective Actions |
| START/STOP does not operate. | ·The POWER switch is set to OFF or PLAYER. →Set it to CAMERA. (p. 20) ·The tape has run out. →Rewind the tape or insert a new one. (p. 17, 30) ·The write-protect tab is set to expose the red mark. →Use a new tape or slide the tab. (p. 14) ·The tape is stuck to the drum (moisture condensation). →Remove the cassette and leave your camcorder for at least 1 hour to acclimate. (p. 142) |
| Recording stops in a few seconds. | ·START/STOP MODE is set to 5SEC or ↓. →Set it to ↓. (p. 25) |
| The power goes off. | ·While being operated in the CAMERA mode, your camcorder has been in the standby mode for more than 5 minutes. →Set the POWER switch to OFF and then to CAMERA again. (p. 20) |
| The image on the viewfinder screen is not clear. | ·The viewfinder lens is not adjusted. →Adjust the viewfinder lens. (p. 22) |
| The SteadyShot function does not work. | ·STEADYSHOT is set to OFF in the menu settings. →Set it to ON. (p. 78) |
| The autofocus function does not work. | ·FOCUS is set to MANUAL. →Set it to AUTO. (p. 53) ·Shooting conditions are not suitable for autofocus. →Set FOCUS to MANUAL to focus manually. (p. 53) |
| The fader function does not work. | ·START/STOP MODE is set to 5SEC or ↓. →Set it to ↓. (p. 25) ·The digital effect function is working. →Cancel it. (p. 46) |
| The indicator flashes in the viewfinder or on the LCD screen. | ·The video heads may be dirty. →Clean the heads using the Sony DVM12CL cleaning cassette (not supplied). (p. 143) |
| A vertical band appears when you shoot a subject such as lights or a candle flame against a dark background. | ·The contrast between the subject and background is too high. Your camcorder is not a malfunction. |
| A vertical band appears when you shoot a very bright subject. | ·Your camcorder is not a malfunction. |
| Some tiny white spots appear in the viewfinder or on the LCD screen. | ·Slow shutter, low lux or NightShot +Slow shutter mode is activated. This is not a malfunction. |
| An unknown picture is displayed in the viewfinder or on the LCD screen. | ·If 10 minutes elapse after you set the POWER switch to CAMERA or DEMO MODE is set to ON in the menu settings without a cassette inserted, your camcorder automatically starts the demonstration. →Insert a cassette or press the LCD screen. The demonstration stops. You can also cancel DEMO MODE. (p. 83) |
| The picture is recorded in incorrect or unnatural colours. | ·NIGHTSHOT is set to ON. →Set it to OFF. (p. 27) |
| Picture appears too bright, and the subject does not appear in the viewfinder or on the LCD screen. | ·NIGHTSHOT is set to ON in a bright place. →Set it to OFF, or use the NightShot function in a dark place. (p. 27) |
| The click of the shutter does not sound. | ·BEEP is set to OFF in the menu settings. →Set it to MELODY or NORMAL. (p. 78) |
| The picture does not appear in the viewfinder. | ·The LCD panel is open. →Close the LCD panel. (p. 22) ·The viewfinder is not fully pulled out. →Pull it out until it clicks. (p. 22) |
| A horizontal band appears when shooting a TV screen or computer screen. | ·Set STEADYSHOT to OFF in the menu settings. (p. 78) |
| The picture does not appear on the LCD screen or in the viewfinder. | ·The picture disappears when you insert or eject a cassette. (The power lamp flashes.) This is not a malfunction. |
In the playback mode
| Symptom | Cause and/or Corrective Actions |
| The tape does not move when a video control button is pressed. | ·The tape has run out. →Rewind the tape. (p. 30) |
| The playback picture is not clear or does not appear. | ·The television's video channel is not adjusted correctly. →Adjust it. (p. 35) |
| There are nine horizontal lines on the picture or the playback picture is not clear or does not appear. | ·The video head may be dirty. →Clean the heads using the Sony DVM12CL cleaning cassette (not supplied). (p. 143) |
| No sound or only a low sound is heard when playing back a tape. | ·The volume is turned to minimum. →Turn up the volume. (p. 30) ·AUDIO MIX is set to ST2 in the menu settings. →Adjust AUDIO MIX. (p. 78) |
| Displaying the recorded date, date search function does not work. | ·The tape has no cassette memory. →Use a tape with cassette memory. (p. 58, 122) ·CM SEARCH is set to OFF in the menu settings. →Set it to ON. (p. 78) ·The tape has a blank portion in the recorded portion. (p. 59) |
| The title search function does not work. | ·The tape has no cassette memory. →Use a tape with cassette memory. (p. 122) ·CM SEARCH is set to OFF in the menu settings. →Set it to ON. (p. 78) ·There is no title in the tape. →Superimpose the titles. (p. 71) ·The tape has a blank portion in the recorded portion. (p. 60) |
| The new sound added to the recorded tape is not heard. | ·AUDIO MIX is set to ST1 side in the menu settings. → Adjust AUDIO MIX in the menu settings. (p. 78) |
| The title is not displayed. | ·TITLE DSPL is set to OFF in the menu settings. → Set it to ON in the menu settings. (p. 78) ·Screen indicators are displayed on the screen. → Make the screen indicators disappear. (p. 32) |
| The sound is muted or images do not appear when monitoring images through TV. | → Pull out A/V connecting cable from AUDIO/VIDEO jack, then connect it again. |
In the recording and playback modes
| Symptom | Cause and/or Corrective Actions |
| The power does not turn on. | ·The battery pack is not installed, or is dead or nearly dead. →Install a charged battery pack. (p. 12, 15) ·The AC adaptor is not connected to a wall outlet. →Connect the AC adaptor to a wall outlet. (p. 16) |
| The end search function does not work. | ·The tape was ejected after recording when using a tape without cassette memory. ·You have not recorded on the new cassette yet. |
| The end search function does not work correctly. | ·The tape has a blank portion in the beginning or middle. |
| The picture does not appear in the viewfinder. | ·The LCD panel is open. →Close the LCD panel. (p. 22) ·When the viewfinder is not pulled out until it clicks, the picture does not appear in the viewfinder. →Pull out the viewfinder nutil it clicks. |
| The battery pack is quickly discharged. | ·The operating temperature is too low. ·The battery pack is not fully charged. →Charge the battery pack again. (p. 12) ·The battery pack is completely dead, and cannot be recharged. →Replace with a new battery pack. (p. 15) |
| The battery remaining indicator does not indicate the correct time. | ·You have used the battery pack in an extremely hot or cold environment for a long time. ·The battery pack is completely dead, and cannot be recharged. →Replace with a new battery pack. (p. 15) ·The battery is dead. →Use a charged battery pack. (p. 12, 15) |
| The cassette cannot be removed from the holder. | ·The power source is disconnected. →Connect it firmly. (p. 12, 16) ·The battery is dead. →Use a charged battery pack. (p. 12, 15) |
| The ① and ② indicators flash and no functions except for cassette ejection work. | ·Moisture condensation has occurred. →Remove the cassette and leave your camcorder for at least 1 hour to acclimate. (p. 142) |
| CIII indicator does not appear when using a tape with cassette memory. | ·The gold-plated connector of the tape is dirty or dusty. →Clean the gold-plated connector. (p. 124) |
| Remaining tape indicator is not displayed. | ·The ③ REMAIN is set to AUTO in the menu settings. →Set it to ON to always display the remaining tape indicator. (p. 78) |
When operating using the "Memory Stick"
- DCR-PC3E only
| Symptom | Cause and/or Corrective Actions |
| The “Memory Stick” does not function. | · The POWER switch is set to CAMERA. → Set it to MEMORY. (p. 94) · The “Memory Stick” is not inserted. → Insert a “Memory Stick”. (p. 93) |
| Recording does not function. | · The “Memory Stick” has already been recorded to its full capacity. → Erase unnecessary images and record again. (p. 116, 99) · The “Memory Stick” formatted incorrectly is inserted. → Format the “Memory Stick”. (p. 98) · The write-protect tab on the “Memory Stick” is set to LOCK. → Slide the tab to write. (p. 91) |
| The image cannot be deleted. | · The image is protected. → Cancel image protection. (p. 115) · The write-protect tab on the “Memory Stick” is set to LOCK. → Set the tab to write. (p. 91) |
| You cannot format the “Memory Stick”. Deleting all the images cannot be carried out. | · The write-protect tab on the “Memory Stick” is set to LOCK. → Set the tab to write. (p. 91) |
| You cannot protect the image. | · The write-protect tab on the “Memory Stick” is set to LOCK. → Set the tab to write. (p. 91) · The image to protect is not be played back. → Press INDEX to play back the image. (p. 109) |
| You cannot write a print mark on the still image. | · The write-protect tab on the “Memory Stick” is set to LOCK. → Set the tab to write. (p. 91) · The image to write a print mark is not be played back. → Press or INDEX to play back the image. (p. 109) |
| The photo save function does not work. | · The write-protect tab on the “Memory Stick” is set to LOCK. → Set the tab to write. (p. 91) · The battery pack is dead. → Install a charged battery pack or use the AC adaptor instead of the battery pack. (p. 12, 15, 16) |
Others
| Symptom | Cause and/or Corrective Actions |
| The title is not recorded. | ·The tape has no cassette memory. →Use a tape with cassette memory. (p. 122) ·The cassette memory is full. →Erase another title. (p. 75) ·The tape is set to prevent accidental erasure. →Slide the write-protect tab so that red portion is not visible. (p. 17) ·Nothing is recorded in that position on the tape. →Superimpose the title to the recorded position. (p. 71) |
| The cassette label is not recorded. | ·The tape has no cassette memory. →Use a tape with cassette memory. (p. 122) ·The cassette memory is full. →Erase some titles. (p. 75) ·The tape is set to prevent accidental erasure. →Slide the write-protect tab so that red portion is not visible. (p. 17) |
| While editing using the i.LINK cable (DV connecting cable), recording picture cannot be monitored. | ·Remove the i.LINK cable (DV connecting cable), and connect it again. |
| DV synchro-editing does not function. (DCR-PC3E only) | ·The input selector on the VCR is not set correctly. →Set the selector to DV input position. If you use another DV camcorder, set the power switch to PLAYER. ·The camcorder is connected to DV equipment of other than Sony. →Operate normal editing. ·Setting program on a blank portion of the tape is attempted. →Set the program again on a recorded portion. |
| The Remote Commander supplied with your camcorder does not work. | ·COMMANDER is set to OFF in the menu settings. →Set it to ON. (p. 78) ·Something is blocking the infrared rays. →Remove the obstacle. ·The batteries are inserted in the battery holder with the + - polarities incorrectly matching the + - marks. →Insert the batteries with the correct polarity. (p. 156) ·The batteries are dead. →Insert new ones. (p. 156) |
| The picture from a TV or VCR does not appear even when your camcorder is connected to outputs on the TV or VCR. | ·DISPLAY is set to V-OUT/LCD in the menu settings. →Set it to LCD. (p. 78) |
| The melody or beep sounds for 5 seconds. | ·Moisture condensation has occurred. →Remove the cassette and leave your camcorder for at least 1 hour to acclimate. (p. 142) ·Some troubles have occurred in your camcorder. →Remove the cassette and insert it again, then operate your camcorder. |
| No function works though the power is on. | ·Disconnect the Connecting plate of the AC adaptor or remove the battery, then reconnect it in about 1 minute. Turn the power on. If the functions still do not work, press the RESET button beside the Grip strap using a sharp-pointed object. (If you press the RESET button, all the settings including the date and time return to the default.) (p. 153) |
| The buttons do not appear on the touch panel. | ·The DISPLAY/TOUCH PANEL button is pressed. →Press the LCD screen lightly. →Press the DISPLAY button on your camcorder or the Remote Commander. |
| The buttons on the LCD screen do not work. | →Adjust the screen. (CALIBRATION) (p. 145) |
Self-diagnosis display
Your camcorder has a self-diagnosis display function.
This function displays the current condition of your camcorder as a 5-digit code (a combination of a letter and figures) in the viewfinder or on the LCD screen. If a 5-digit code is displayed, check the following code chart. The last two digits (indicated by ) will differ depending on the state of your camcorder.
Viewfinder (or LCD screen)
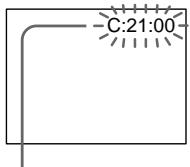
Self-diagnosis display
C:□□:□□
You can service your camcorder yourself.
E:□□:□□
Contact your Sony dealer.
| Five-digit display | Cause and/or Corrective Actions |
| C:04:☐☐ | ·You are using a battery pack that is not an “InfoLITHIUM” battery pack. →Use an “InfoLITHIUM” battery pack. (p. 14) |
| C:21:☐☐ | ·Moisture condensation has occurred. →Remove the cassette and leave your camcorder for at least 1 hour to acclimate. (p. 142) |
| C:22:☐☐ | ·The video heads are dirty. →Clean the heads using the Sony DVM12CL cleaning cassette (not supplied). (p. 143) |
| C:31:☐☐ | ·A malfunction other than the above that you can service has occurred. |
| C:32:☐☐ | ·Remove the cassette and insert it again, then operate your camcorder. →Disconnect the power cord of the AC adaptor or remove the battery pack. After reconnecting the power source, operate your camcorder. |
| E:61:☐☐ | ·A malfunction that you cannot service has occurred. |
| E:62:☐☐ | →Contact your Sony dealer and inform them of the 5-digit code. (example: E:61:10) |
If you are unable to rectify the problem even if you try corrective actions a few times, contact your Sony dealer.
Warning indicators and messages
If indicators and messages appear in the viewfinder, on the LCD screen or in the display window, check the following:
See the page in parentheses “( )” for more information.
The indicators and messages are displayed in yellow.
Warning indicators
The video heads are dirty
Slow flashing:
- You need to clean the heads using the Sony DVM12CL cleaning cassette (not supplied) (p. 143).
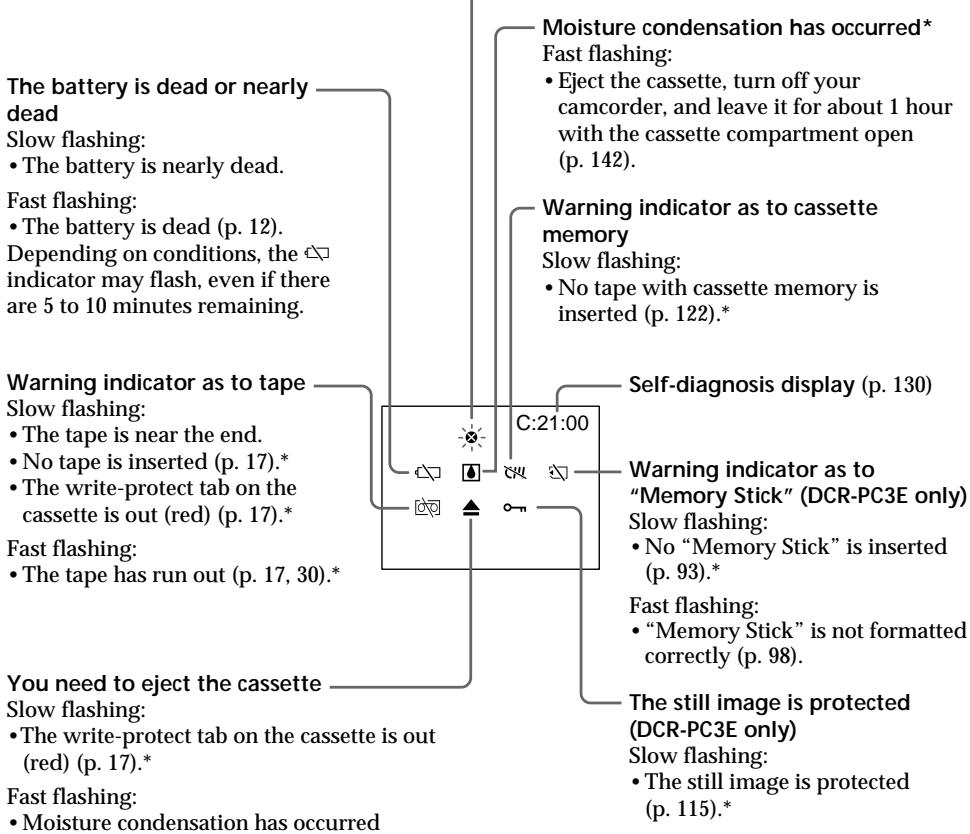
Warning messages
- CLOCK SET
Reset the date and time (p. 89).
- For "InfoLITHIUM" BATTERY ONLY
Use an "InfoLIHIUM" battery pack (p. 14).
CLEANING CASSETTE
The video heads are dirty (p. 143).
FULL
The tape cassette memory is full.
·
The tape has no cassette memory (p. 122).
16BIT
AUDIO MODE is set to 16BIT.* You cannot dub new sound (p. 82).
REC MODE
REC MODE is set to LP.* You cannot dub new sound (p. 82).
TAPE
There is no recorded portion on the tape. You cannot dub new sound.
“i.LINK”CABLE
i.LINK cable is connected (p. 70).* You cannot dub new sound.
FULL
The "Memory Stick" is full (p. 108).* (DCR-PC3E only)
The write-protect tab on the "Memory Stick" is set to LOCK (p. 91).* (DCR-PC3E only)
NOFILE
No still image is recorded on the "Memory Stick" (p. 99).* (DCR-PC3E only)
NO MEMORY STICK
No "Memory Stick" is inserted (p. 93). (DCR-PC3E only)
- You hear the melody or beep sound.
Понск и устараенье несправност
Ecni y Bac Bo3HKnJa kakaJ-Jn6o np6bnema npri nCnOJb3ObaHN BInDeokamepbl, BocOnJb3yITeCb CneDyoUe TaBnuei dny OTBCKaHn iYCTpaHEn Hp6bnMebl. Ecni np6bnema He ycTpaHReTc, TO cJeDyET OTcoEduHHb NCTOCHNK pNTAHN iOBpaHTbc B cepBnchbIeHTp Sony. Ecni Ha 3KpaHe KKД nIN B VnDOnCKaTeNe NOBHTc INDnKaun "C:□□:□□", 3TO 3HaHT, YTO cpa6OTana fynKuJn DnCnJIe CaMOdnaHrOCTkn. Cm. cTp. 138.
B pexkme 3ainnc
B Baae BnDeokamepe NMeetc cyHKuN INDnKaun CamoDnaHNOCTNKn.
3Ta cyHKnI OTo6paKaet Tekyuee CoCTOHNHe BaWei BnDeOkamepbIBnDE 5-3NaHOro KoJa (KOMbHaunr n3 OndH o KyBbl nCnp) B BnDOnCKaTeNe IIN Ha 3KpAne KKd. B cnyae OTo6paKeHn 5-3NaHOro KoJa, CneJyET BbINOHNb IPOBepKy B COOTBeTcTBn CO CNeDyUoSe T a6nuee KOD. PocLeHnE DBe UΦpBl (Obo3NaeHHbIe Ka), 6yDyT OTnNuTbcB R 3aBnCIMOCtN OT CoCTOHNBaWe BnDeOkamepbl.
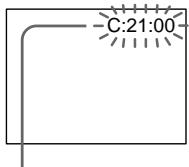
Budonckataelb (nii 3kpan JKKJ)
Hdkaauna cAmoMaarHOCTKn
C:□□:□□
Bbl MoXeTe BbIIOJIHnTb
obcynkUbaHne BaSei BuDeokamepbI
camOCToTeJIbHo.
E:□□:□□
CBAKNTecb BaUNM dIJIepom Sony.
| Патиз haндikaця | Вераян ha рчина и/nл мето устанеця |
| C:04:☐☐ | • Вы Incрпь3уе te 6aтAPEйнь δлOk, кOTорь NeявяETся 6aтAPEйньIM 6лOKOM "InfoLITHIUM".→Испаль3уITE 6aтAPEйнь δлOk "InfoLITHIUM" (cTp.14) |
| C:21:☐☐ | • ПюиЗошla кONDehcaця Blaаги.→ВыиTe kACCETУ и OCTaВыTe Ba晤 bVideokamepy primepeho Na 1 ча ду akКлIMaTиЗаци.(cTp.142) |
| C:22:☐☐ | • 3aGrЯЗнБИ BVIDeOROLOVBи.→ПочиТte BVIDeOROLOVBи C NOMOць OчИСТИТьНОй кACCETb Sony DVM12CL (Ne priplaraetс). (cTp.143) |
| C:31:☐☐ | • ПюиЗошla HeNoJaKa, OTlinuAIOUaSЯСТ OT priNVEdeHbIX BByIse, KOTOPYu Bы можete yCTpaHNTьcamOCTOrTeBJHO. |
| C:32:☐☐ | •ВыиTe KACCETУ и BCTaBbTe ee ChOBa, a 3aTeM BKVIIQUHTe Ba晤 bVideokamepy.→OTcoEДиHITe пobOD злЕКtrPOnITaNHa aДaNTepa PeremehnOrTo TOKa Или УгБы Te bATapeHnBu δлOk.ПосLE NOВТOPHOrO pOdoCoEДиHENry IcSTOHyKa PInTaHIN BKVIIQUHTe Ba晤 bVideokamepy. |
| E:61:☐☐ | • ПюиЗошla HeNoJaKa, KOTOPYu Bы можete yCTpaHNTь camOCTOrTeBJHO. |
| E:62:☐☐ | •ОбразиТеськ Ba晤у ДИлEPy Sony i cooBsuTe o 5-3nauchom КODE. (прIMeP: E:61:10) |
Ecni BbI He MoXeTe cAmOCToAteIbHO yCtpaHInTb HEnOJaKy dJaXe nocLe onpOboHaHn COOTBeTCTByIOUxN MeToOB yCtpaHHeNHa HeckOJIbKO pa3, 6bpaTntecb K BaWemy DInepy Sony.
Преупекдаюше ИнданkaTopы И сообшени
EcIn B VnOnckaTeNe,Ha 3KpaHe KKД nII N B OKOwKe DnCnIe IIOBAtcN HnDnKaTOpbl N COO6UeHNa, npOBepbTe cIeIyIoUe: Cm. cTpaHnCy B KpyIbIX cKo6kax ( ) "IJI 60Jee noIpO6Ho INHΦopMauIN. INDnKaTOpbl n COO6UeHNa OTobpaXaIOTc XeNTbIM UBeTom.
PpeynpexkaIOUne INdNKaTopbI
3aarp3Hnncb BndeoroJIOBKn
Быст Poe маганe:
- Bam HUKHO NOUHCTNtB rOJIOBKn C NOMOuBIO OUHCTNTeNbHO KACCetbI Sony DVM12CL (He npiuraetcA). (cTp. 143).
BaTapeHbI 6JIOK pa3pRdNlCnJI NIOOTn pa3pRdNlC
MedlenHoe MiraHne:
- BaTapeHbI bOLOK noOuTn pa3pJxKeH.
БыICTpoe MINGHHe:
-БатAPEиньблOK pa3ржкeн (cTp.12).
B 3aBcNMOCTn OT yCNoBn, MoKET MInrTaB INDkAToP 已 , DaKe ecIne eue octaIocb 3apraHa 5-10 MNHyT.
IpeynpexkaHoum INdkaTOp OTHOCHTbHO JENTbI
MeJenneHoe MuraHne:
- JeHTa noUtn DoCTnIgna KOHua.
- JIeHTa He BCTaBnHe (ctp. 17).*
JIeNecTOK 3aunTbI 3aNNcH aKaccTe OTCyTCTByET (KpaChbI) (ctp.17).
Быст Poe маганe:
- JeHtTa 3aKoHcHnIacb (CTp.17,30).*
Bam HxkHO BbIHyTb Kaccety
MeJenneHoe MuraHne:
JIeNecTOK 3aunTbI 3anncn Ha KaccTeOTcyTCTByET (KpaChbI) (Ctp.17).
BbICTpoe MuraHne:
-ПОНЗОШа КОндэнcaць влари (ст. 142)
- JeHtTa 3aKoHcHnIacb (ctp.17,30).*
Cpa6oTanaФyHKUINHINDKaUN camOJaIarHOCTnKn (cTp.138).
PpOn3oUJa KOHdEhCaUg BlaRn\* BbICTpe MuraHne:
- BbIToJKNHtE KAcCETy, BbIKHIOHTe BaUy BnDeOKaMepy N OCTaBbTe ee npIMepHo Ha 1 Yac C OTKpbITbIM OTCEKOM dJa KacCETbI (CTp. 142).
PpeDynpexkaIOUne INHnKaTOpbl KACCetbI C nAMrTbIO
MeJHeHHe MURaHne:
- YctaHOBHeHa JeHTa 6e3 KaccetHoi nAMrTu (CTp. 122).*
C:21:00
Инданацни самоdnarHocTNKn (ctrp. 138).*
Преупгекдаюше ИнданkaTopы "Memory Stick" (Товко модь DCR-PC3E)
MeJenneHoe MrraHne:
- He yctaHOBJIeHa "Memory Stick" (cTp. 93).*
BbICTpoe MuraHne:
"Memory Stick" OToΦopMaTIpOBaHa HEnpaBnJIbHo (CTp. 98).
3aunTa n3o6paXeHn (ToIbKO mOeJIb DCR-PC3E)
MeDneHHOe MmraHHe:
- ɪnəbɒpʌkæŋne 3aʌŋuʒeHo (cTp. 115).*
Ipeynpexkaioune coo6eHnA
CLOCK SET IOBtOHO yCTaHOBInTe DaTy IN BpeM (cTp. 89)
- For "InfoLITHIUM" Исторьиме батарейные бл_OK "InfoLITHIUM" (стр. 14) BATTERY ONLY
CLEANING CASSETTE
3aŋpa3Hnncb BndeoRoIOBKn. (cTp. 143)
FULL KaccetHa namTb namTb nepenolHeha.
JIeHTa He IMeET KaccetHoI NamATn. (CTp. 122)
16BIT AUDIO MODE yctaHOBJeHO B noJoxKeHne 16BIT.*BbI He moXeTe nepe3anicaTb HObBi 3ByK (cTp.87).
REC MODE REC MODE yctaHOBJIeHO B noJIOXeHne LP.* Bbl He moXeTe nepe3ancaTb HOBbI 3ByK (CTp.87).
TAPE Ha JeHTe HeT 3aIncaHnOro yuactka. BbI He MoKeTe nepe3anicaTb HOBbI 3ByK.
- “i.LINK” CABLE Ποικοεπινηκης Καβελήν i.LINK (cτρ. 70). Bын He можete nepezeаиcaт b HOBbl 3ByK.
FULL "Memory Stick" nepenonHeHa (cTp. 108). (ToIbko moJeB DCR-PC3E)
Ленистok 3ашисту записна "Memory Stick" усановен в положене LOCK (стр.91). (Toлько модаль DCR-PC3E)
NO FILE Ha "Memory Stick" HeT 3aIncaHbIX HEnoDbNkHbIX N3O6paXeHn (ctp.99). (ToIbKO MoJeB DCR-PC3E)
NO MEMORY STICK He BcTaBHeHa "Memory Stick" (ctp. 93). (ToIbko moJeIb DCR-PC3E)
*BbIyCJIbIbIITeMeNoDIOUIN3ymMepHbI CnHAn.
Using your camcorder abroad
Using your camcorder abroad
You can use your camcorder in any country or area with the AC adaptor supplied with your camcorder within 100V to 240V AC, 50 / 60Hz .
Your camcorder is a PAL system based camcorder. If you want to view the playback picture on a TV, it must be a PAL system based TV with VIDEO/AUDIO input jack. The following shows TV colour systems used overseas.
PAL system
Australia, Austria, Belgium, China, Czech Republic, Denmark, Finland, Germany, Great Britain, Holland, Hong Kong, Italy, Kuwait, Malaysia, New Zealand, Norway, Portugal, Singapore, Slovak Republic, Spain, Sweden, Switzerland, Thailand, etc.
PAL-M system
Brazil
PAL-N system
Argentina, Paraguay, Uruguay
NTSC system
Bahama Islands, Bolivia, Canada, Central America, Chile, Colombia, Ecuador, Jamaica, Japan, Korea, Mexico, Peru, Surinam, Taiwan, the Philippines, the U.S.A., Venezuela, etc.
SECAM system
Bulgaria, France, Guyana, Hungary, Iran, Iraq, Monaco, Poland, Russia, Ukraine, etc.
Simple setting of clock by time difference
You can easily set the clock to the local time by setting a time difference. Select WORLD TIME in the menu settings. See page 78 for more information.
Maintenance information and precautions
Moisture condensation
If your camcorder is brought directly from a cold place to a warm place, moisture may condense inside your camcorder, on the surface of the tape, or on the lens. In this condition, the tape may stick to the head drum and be damaged or your camcorder may not operate correctly. If there is moisture inside your camcorder, the beep sounds and the indicator flashes. When the indicator flashes at the same time, the cassette is inserted in your camcorder. If moisture condenses on the lens, the indicator will not appear.
If moisture condensation occurred
None of the functions except cassette ejection will work. Eject the cassette, turn off your camcorder, and leave it for about 1 hour with the cassette compartment open. Your camcorder can be used again if the indicator does not appear when the power is turned on again.
Note on moisture condensation
Moisture may condense when you bring your camcorder from a cold place into a warm place (or vice versa) or when you use your camcorder in a hot place as follows:
- You bring your camcorder from a ski slope into a place warmed up by a heating device
- You bring your camcorder from an air-conditioned car or room into a hot place outside
- You use your camcorder after a squall or a shower
- You use your camcorder in a high temperature and humidity place
How to prevent moisture condensation
When you bring your camcorder from a cold place into a warm place, put your camcorder in a plastic bag and tightly seal it. Remove the bag when the air temperature inside the plastic bag has reached the surrounding temperature (after about 1 hour).
Hn Onda H3 cyHKcun, Kpome BbItaKnbAHn KaCCeTbI, He 6yDyT pa6oTaTb. N3BNeKeNte KacCETy, BbIKJIOUHTe BNdeOKamepy n OCTaBbTe ee np6JIIN3NTenbHO Ha 1 Yac C OTKpbITbIM OTCEkom DnI KACcTeB. Ecnn pnp NOBTOPHOM BKJIIOUChEN INTAHn INHdNKaTOP He NOBNTca Ha dncPiJe, Bbl MoKeTe cHOBA nOlb3ObaTbcra BNdeOKamepoi.
PpimcHne no KOHdeHcaunn BlaH
Bnara moKeT o6pa3oBaTbCra, ecIn Bbl npHecete BaUy BnDeokamepy n3 xOIoNHOmeCTa B TEnIoe (nnn Hao6OpOT) nn KOrJa Bbl nCnoIb3yeTe BaUy BnDeokamepy B kApKom MeCTe B cIeDyUoXs CnyuAax:
BbI npHecn BaUy BInDeokamepy c IbIXHOcKIOHa B nOmeuHne, rIe yHKUOnHpyeT o6OrpeBaTeIb
BbI npHecn Bauy BuJeokamepy n3 aBTOMOBuII uIN uN3 KOMHaTbIC BO3dyHbIM KOHNIOHPOBaHEm B JxapKoe MeCTo Ha yInie
BbIncnoJIb3yeTe BnDeokamepy nocne rpo3bl nn DoxJd
- Bby nCnoJIb3yeTe BaUy BnDeOkaMepy B OueHb KapKOM IN BnaXHom MecTe.
Kak npedotBpatntb KOHdehcaHIO BnaI
EcIn BnDeOkamepa npnHeceHa n3 xOJNOHoro MeCTa B TeJIIOe,TO IIOJoxITE BnDeOkamepy B IOnIaTINJeHObBI NaKeT IN IIOIHO 3aKJIeTIeero. BbIbTe BnDeOkamepy n3 IOnIaTINJeHOBOr ONaKeTa, KOrJa TEMpePaTypa BO3dYxa BHyTpIn NaKeTa DOCTnHET TempePaTypb OkpyKaIOUeRO BO3dYxa (PpI6bn3nteJbHo uepe3 1 vac).
Maintenance information
Cleaning the video head
To ensure normal recording and clear pictures, clean the video heads. The video head may be dirty when:
- mosaic-pattern noise appears on the playback picture.
- playback pictures do not move.
- playback pictures do not appear.
- the × indicator and "CLEANING CASSETTE" message appear one after another or the × indicator flashes on the LCD screen or in the viewfinder.
If the above problem, [a] or [b] occurs, clean the video heads for 10 seconds with the Sony DVM12CL cleaning cassette (not supplied). Check the picture and if the above problem persists, repeat cleaning.
HΦopMaζη no yxody
Чистka вideorolobok
ДяобсеньяHopMaJIbHоЗапсиУчTKOrO n3O6paxeHЯ cIeIyET nepINOДИЧЕСКИСТNTВ BnDEOrOLOBKn. BnDEOrOLOBKnBO3MOxH0 3aRpa3HeHbl,ecIN:
- Na BOCPON3BOJIMOM N3O6paXeHIN NOBPLHTCA NOMEXN Tnna Mo3aIKN.
BOCPON3BOIDMOE N3O6paXeHne He DBNrAeTcR.
BOCPON3BOIDMOE N3O6paXeHHe HOBBLaTcHa 3KpaHe. - Na 3KpaHe KKД ИИВ ВИДОИСКаTeIe ПОВILAЮТСОДИН 3a Дугим ИИДИКaTOP × И COOБЕНИЕ “CLEANING CASSETTE” ИИ Же мИгает ИИДИКaTOP ×.
EcIn Bo3HKnHyT NOMEXn Tnna [a] nnn [b], ONUCTnTE BnDEoROJOBKn C NOMOuBHO ouCTnTeIbHo Kaccetb Sony DVM12CL (He npunaraetc) B TeueHne 10 cekyH. IpobepbTe n3o6paXeHne n, ecn ONncAHhb Yeblpe npoblemb He yctpaHnncb, nobTopnte YnCTky.


[a]

or/nn

[b]
Cleaning the LCD screen
If fingerprints or dust make the LCD screen dirty, we recommend using a LCD Cleaning Cloth (supplied) to clean the LCD screen.
UncTkα ΚkpaHa KKД
EcHnHa3KpaHe KKD nOBaTcO TneuATKn IIN nbJIb, peKOMeHdyeTcB OBCNoJIb3OBAtbcra ONUCTIteHbHO TKaHbIO (pPUNaRaetc) dJa YNCTKNKKD.
Removing dust from inside the viewfinder
(1) Pull out the viewfinder ①.
Remove the screw 2 with a screwdriver (not supplied).
While pressing the right side of the catch 3 using a sharp-pointed object, remove the eyecup 4.
YdaJIeHne nbln n3HyTpN BVDOnCKaTeIa
(1)BbTaunTe BUNOnCKaTeNb 1
CHINMTE BINT C NOMOUIO OTBepTKN (He npnilareTc).
Hakimma Ha npaByo CTopoHy qnkcaTopopa 3 C nCNoJIb3OBAHNEM 3aOCTpeHHOrO ppeMeta, CHIMMTE OKyIap 4.
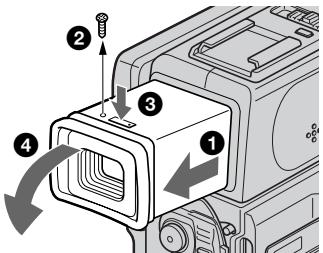
(2) Remove dust from inside the eyecup and viewfinder with a commercially available blower.
(3) In the reverse way of (1), attach the eyecup. Then replace the screw ②.
Charging the vanadium-lithium battery in your camcorder
Your camcorder is supplied with a vanadium-lithium battery installed so as to retain the date and time, etc., regardless of the setting of the POWER switch. The vanadium-lithium battery is always charged as long as you are using your camcorder. The battery, however, will get discharged gradually if you do not use your camcorder. It will be completely discharged in about three months if you do not use your camcorder at all. Even if the vanadium-lithium battery is not charged, it will not affect the camcorder operation. To retain the date and time, etc., charge the battery if the battery is discharged.
Charging the vanadium-lithium battery:
- Connect your camcorder to house current using the AC adaptor supplied with your camcorder, and leave your camcorder with the POWER switch turned off for more than 24 hours.
- Or install the fully charged battery pack in your camcorder, and leave your camcorder with the POWER switch turned off for more than 24 hours.
(2)YdaJInteIbIbI3HHTPNOKyJIraN BnIOINCKaTeJIcPOMOUsbIOIMHeIOUeICBA IpoDAJKe BO3DyXoDyBKn.
(3)B o6paTHOM nopAke nyHKta (1) npNKpeNITe OKyIrp. 3aTeM yCTaHOBITE BINT
3apnKa BaHaJaNeBO-JNITneBOB 6aTapeKn B BaSei BnDeOkaMepe
K Baawen BnuDeokamepe npnilaraeTc BaaHauNeboJNTueBa 6aTaapeKa, yCTaHOBlenHa C TEM, QTObbl CoXpaHnB T B NAMTN DaTy H BPEM N T.I. He3aBNCIMO OT YCTaHOBKN NpeKIIuOaTeJa POWER.BBaHauNBeo-JNTueBa 6aTaapeKa 3apRjkaeTc Bcerda B TO BpeM, KOrDa Bbl NCpONb3yete CBOIO BnuDeokamepy. Ondako 6batapeKa 6yDet nocTeENHO pa3prjxta5cR, ecn BBy He nCNoJIb3yete BaWu Bnu Deokamepy. OHa npakTneckn PNOHOCtBu pa3prJntcR npimepHo Ype3 pNOrOa, ecn BBy He 6ydete IcNoJIb30BaTb BaWu Bnu Deokamepy cobcem. Daxe ecn BaHauNBeo-JNTueBa 6aTaapeKa He 3apRjXeHa, 3To He NoBlinet Ha pa60Tu BnuDeokamebpI.ДЯ COxpaHEnB NAMTN DaTbI n BpeMeHn CneDyET 3apRJntb 6aTaapeKy, ecn OHa pa3prjXeHa.
3apKa BaHaJaNEBO-JInTHeBO 6aTapeKn
-ПодсоeДинITE BaуВиdeokamepyк сети c nOMOьс eTeBOro aДaNTepa NepeMeHnOTo kA,пилагаemorKВашЕВиdeokampe,И OCTaБte BaуВиdeokamepyc BbIKIQUeHHbIM NOJoxeHmE NpeKJIQUaTeIЯ NiTaHn POWER 60nee,чem Ha 24 yaca.
- Iил яж eуctановпе NOIнocьш заржehнь batapeHь n6K B Abyu bIeokamepу n octaBtte Bauy bIeokamepc y BbIKJIQUeHHbIM NOLOXeHnEM NepeKIIQUaTeTЯ nITaHnA POWER 6OJIee, qem Ha 24 Yaca.
Ajusting the LCD screen (CALIBRATION)
The buttons on the touch panel may not work correctly. If this happens, follow the procedure below.
(1) Turn the POWER switch off.
(2) Eject the tape from your camcorder, then disconnect any connecting cable from your camcorder.
(3) Set the POWER switch to PLAYER while pressing DISPLAY/TOUCH PANEL on your camcorder, then keep pressing DISPLAY/TOUCH PANEL for about five seconds.
(4) Follow the produce below with the corner of a "Memory Stick" supplied with your camcorder.
① Touch × at the upper left corner.
② Touch × at the lower right corner.
③ Touch × in the middle of the screen.
PerynpoBka 3KpaHa KK(D CALIBRATION)
KhoNnHa ceHcOphNo paHeN MOryT He paBoTaTb HaIeXaUIM o6pa3OM. EcnI 3TO cLyuNTc, CJeDyIte HNXeOpNCaHHO pOceDype.
(1)ПовернITE Вьклочаель POWERВ ВьклочehHoe NOLOXeHne.
(2)BbIOTJKNHITeKacceTeYn3BaUeINBnDEOKaMepbl, 3aTEMOTCOeHNHTeCOeHNHTeJIbHbI KaBeJIb OT BaUeINBnDEOKaMepbl.
(3)Установпей Вьковаятуль POWER в поожене PLAYER, нахимая конду DISPLAY/TOUCH PANEL на Baшев Вида ekамеpe, a 3aTeM поержпг Нжатой конду DISPLAY/TOUCH PANEL okono cekyнд.
(4) BbIIOJIHnTE npBBeDEHHyo HNKe pOuceDpyc npOMaOBo yOrToKa "Memory Stick", npIlaAeMoN K BaSei BInDeOkAmpe.
①ПикочтеськВВ БернemЛeвомугл.
(2)ПрикочитеськхВнжhemпраьомугл.
③ПрикочитесьКВсерединоЗкрана.

Note
If you do not press the right spot, x always returns to the position at the upper left corner. In this case, start from step 4 again.
Precautions
Camcorder operation
- Operate your camcorder on 3.6V (battery pack) or 4.2V (AC adaptor).
- For DC or AC operation, use the accessories recommended in this operating instructions.
- If any solid object or liquid get inside the casing, unplug your camcorder and have it checked by a Sony dealer before operating it any further.
- Avoid rough handling or mechanical shock. Be particularly careful of the lens.
- Keep the POWER switch set to OFF when you are not using your camcorder.
- Do not wrap your camcorder with a towel, for example, and operate it. Doing so might cause heat to build up inside.
- Keep your camcorder away from strong magnetic fields or mechanical vibration.
- Do not touch the LCD screen with a sharppointed object.
PpimeyaHne
EcIbI He HaxMeTe npAByIO ToCy, X BCerJa 6ydet Bo3BpaAlTaB C NoJoxHe BepXHrO JleBOrO yrla. B TAKOM Cnyae CHObA HauHnTe C nyHKta 4.
MepblnpedoctopoXhOCTn
3KcnnyatazaBnDeokamepbI
3Kcnpnyatnpuyte BnDoeokamepy ot 3,6B (batapeHb 6nok) mnn 4,2B (aanTpepnepeMHORTOkA).
- UTo Kacaetc3Kcnnyataunn BIndeokamepbI OT NOCTOHHORN INpeMeHHORTO TOKA,NCNOJIb3yITe PnHnAdJnEhXHOCTN,peKOMeHNyEmBIE B DaHHOH NCHTpyKUIMN IO KCNpLNYATAUM.
Ecnkakoi-Nb6ydb Tbepbid npedMeTnni XnKoCTb nanaBnHTp KOpNcA,TO bblKnOHTe Bndeokampeu npobepBe y dInepa Sonye neped daJIbHeIeue ee 3Knnyatauein.
- N36eIaTe rpybOro o6paUeHNc BnDEoKamepoI INI MEXaHnueCcknx ydaOpB. BydbTe OocbEHHO OCToPoxhBi C o6bEKTIBO
- ECnBnDnEoKaMaepa He NcNoJIb3yETc, DePKeNTe BbIKNIOuTaTeIb POWER B nOLOXKeHn OFF.
He 3abopauBaIte BaUy BnDeokamepy, Hnppmep, B noNToHue, n He 3KcPiyaTnpuyTe ee B TAKOM COCTOHIN. B npOTnbHOM clyaee MoXeT npOn3OITn NobJIeHne TeMnepaTpbl BHYtpn BVnDeokamepbl.
-ДерхиTe BaWy Bndeokamepy nOdaJIbSe OTCnIbHbIX MaHnTHbIX nOe NmMexaHnueckoBn6paun.
- He πρικαςτεόν κ ἀκραγή ἀκκίος Κστρβήμη πρεδμετάπη.
- If your camcorder is used in a cold place, a residual image may appear on the LCD screen. This is not a malfunction.
- While using your camcorder, the back of the LCD screen may heat up. This is not a malfunction.
On handling tapes
- Do not insert anything into the small holes on the rear of the cassette. These holes are used to sense the type and thickness of the tape and if the recording tab is in or out.
- Do not open the tape protect cover or touch the tape.
- Avoid touching or damaging the terminals. To remove dust, clean the terminals with a soft cloth.
Camcorder care
- Remove the tape, and periodically turn on the power, operate the CAMERA and PLAYER sections and play back a tape for about 3 minutes when your camcorder is not to be used for a long time.
- Clean the lens with a soft brush to remove dust. If there are fingerprints on the lens, remove them with a soft cloth.
- Clean the camcorder body with a dry soft cloth, or a soft cloth lightly moistened with a mild detergent solution. Do not use any type of solvent which may damage the finish.
- Do not let sand get into your camcorder. When you use your camcorder on a sandy beach or in a dusty place, protect it from the sand or dust. Sand or dust may cause your camcorder to malfunction, and sometimes this malfunction cannot be repaired.
AC adaptor
- Unplug the unit from the wall outlet when you are not using the unit for a long time. To disconnect the power cord, pull it out by the plug. Never pull the power cord itself.
- Do not operate the unit with a damaged cord or if the unit has been dropped or damaged.
- Do not bend the power cord forcibly, or place a heavy object on it. This will damage the cord and may cause fire or electrical shock.
- Prevent metallic objects from coming into contact with the metal parts of the connecting section. If this happens, a short may occur and the unit may be damaged.
- Always keep metal contacts clean.
- Do not disassemble the unit.
- Do not apply mechanical shock or drop the unit.
HnΦopMaunno yxOy 3a annapaTom m Mepbl npdeoctopoxkHOCTN
Maintenance information and precautions
- While the unit is in use, particularly during charging, keep it away from AM receivers and video equipment. AM receivers and video equipment disturb AM reception and video operation.
- The unit becomes warm during use. This is not a malfunction.
- Do not place the unit in locations that are: - Extremely hot or cold
- Dusty or dirty
- Very humid
Vibrating
Battery pack
- Use only the specified charger or video equipment with the charging function.
- To prevent accident from a short circuit, do not allow metal objects to come into contact with the battery terminals.
- Keep the battery pack away from fire.
- Never expose the battery pack to temperatures above 60^ (140^) , such as in a car parked in the sun or under direct sunlight.
- Keep the battery pack dry.
- Do not expose the battery pack to any mechanical shock.
- Do not disassemble nor modify the battery pack.
- Attach the battery pack to the video equipment securely.
- Charging while some capacity remains does not affect the original battery capacity.
Notes on dry batteries
To avoid possible damage from battery leakage or corrosion, observe the following:
- Be sure to insert the batteries with the + - polarities matched to the + - marks.
- Dry batteries are not rechargeable.
- Do not use a combination of new and old batteries.
- Do not use different types of batteries.
- Current flows from batteries when you are not using them for a long time.
- Do not use leaking batteries.
If batteries are leaking
- Wipe off the liquid in the battery compartment carefully before replacing the batteries.
- If you touch the liquid, wash it off with water.
- If the liquid get into your eyes, wash your eyes with a lot of water and then consult a doctor.
If any problem occurs, unplug your camcorder and contact your nearest Sony dealer.
HΦopMaunno yxOy 3a annapaTom m Mepbl npdeoctopoxkHOCTn
-Пи ИСПОЛБЗОВАнИN annapaТа,OCOBENHO BO BpeM 3apRДКn,ДeрЖNTe erO noJaIbIe OT ПпeMHNkoB AM-paIIOBeeUHANI n BvIeoAnpapATypbl.ПпeMHNki AMpaIIOBeeUHANI n BvIeoAnpapATypa HApYsaHOT AM-paIIONpHem n pa6oty BvIeoAnnpapATypbl.
B npocce 3KcnIyataun annapat harpeBaetc. 3To rBnraTcBnJIHe HOpMaJbHbIM.
- He pa3meuαηte annapat B mectax:
- Upe3MepHO XapKHX JINXOJOnHbIX
Video camera recorder
System
Video recording system
2 rotary heads
Helical scanning system
Audio recording system
Rotary heads, PCM system
Quantization: 12 bits (Fs 32kHz stereo 1, stereo 2), 16 bits
(Fs 48kHz stereo)
Video signal
PAL colour, CCIR standards
Usable cassette
Mini DV cassette with the Mini DV mark printed
Tape speed
SP: Approx. 18.81mm / s
LP: Approx. 12.56mm / s
Recording/playback time (using cassette DVM60)
SP: 1 hour
LP: 1.5 hours
Fastforward/rewind time (using cassette DVM60)
Approx. 3 min. and 30 seconds (using cassette DVM60)
Viewfinder
Electric viewfinder (colour)
Image device
1/4 inch CCD (Charge Coupled
Device)
Approx. 800,000 pixels
(Effective: Approx. 400,000 pixels)
Lens
Carl Zeiss
Combined power zoom lens
Filter diameter 30~mm (1 3/16 in.)
10 × (Optical), 40 × (Digital)
Focal length
3.3 - 33 mm (5/32 - 1 5/16 in.)
When converted to a 35mm still camera
42 - 420 mm (1 11/16 - 16 5/8 in.)
Colour temperature
Auto, HOLD (Hold), Indoor
(3200K), Outdoor (5800K)
Minimum illumination
5 lux (F 1.7)
0 lux (in the NightShot mode)**
** Objects unable to be seen due to the dark can be shot with infrared lighting.
Input/Output connectors
S video output
4-pin mini DIN
Luminance signal: 1 Vp-p,
75 ohms, unbalanced
Chrominance signal: 0.3Vp - p
75 ohms, unbalanced
Audio/Video output
AV MINI JACK, 1 Vp-p, 75 ohms, unbalanced, sync negative
327mV (at output impedance
more than 47 kilohms)
Output impedance with less than
2.2 kilohms/Stereo minijack
(03.5mm)
DV output
4-pin connector
Headphone jack
Stereo minijack ( 3.5mm)
LANC control jack
Stereo mini-minijack ( 2.5mm)
MIC jack
Minijack, 0.388mV low impedance
with 2.5 to 3.0VDC output
impedance 6.8 kilohms
(0 3.5 mm)
Stereo type
LCD screen
Picture
2.5 inches measured diagonally
50 × 37 ~mm (2 × 1 ~l / 2 in)
Total dot number
200,640 (880× 228)
General
Power requirements
3.6V (battery pack)
4.2 V (AC power adaptor)
Average power consumption (when using the battery pack
During camera recording using
LCD
3.8 W
Viewfinder
3.1 W
Operating temperature
0^ to 40^ (32^ to 104^)
Storage temperature
-20^ to +60^ (-4^ to +140^)
Dimensions (approx.)
56× 119× 94mm
(21 / 4× 43 / 4× 33 / 4 in.) (w / h / d)
Mass (approx.)
490 g (1 lb 1 oz)
excluding the battery pack and cassette
560 g (1 lb 3 oz)
including the battery pack,
NP-FS11, cassette DVM60 and lens cap
Supplied accessories
See page 5.
AC adaptor
Power requirements
100-240VAC,50/60Hz
Power consumption
13 W
Output voltage
DC OUT: 4.2V 1.8 A in the
operatingsmode
Operating temperature
0^ to 40^ (32^ to 104^)
Storage temperature
-20^ to +60^ (-4^ to +140^)
Dimensions (approx.)
49× 39× 85mm (115 / 16× 19 / 16×
3 3/8 in.) (w/h/d) excluding
projecting parts
Mass (approx.)
120 g (4.2 oz)
excluding power cord
Cord length (approx.)
Power cord: 2m (6.6 feet)
Connecting cord: 1.6m (5.2 feet)
Battery pack
Output voltage
DC 3.6 V
Capacity
4.1 Wh
Dimensions (approx.)
30.3 × 16.3 × 50.2 ~mm
(11 / 4× 21 / 32× 2 in.) (w / h / d)
Mass (approx.)
40 g (1.4 oz)
Type
Lithium ion
"Memory Stick" (DCR-PC3E only)
Memory
Flash memory
4MB: MSA-4A
Operating voltage
2.7-3.6V
Power consumption
Approx. 45mA in the operating mode
Approx. 130 A in the standby mode
Dimensions (approx.)
50 × 2.8 × 21.5 ~mm
(2× 1 / 8× 7 / 8 in.) (w / h / d)
Mass (approx.)
4 g (0.14 oz)
Design and specifications are
subject to change without notice.
TexHnueckne XapaKTepeNCTnKN
Bvdeokamepa
CnCTema
Cnctema Bndeo3annc
2Bpaaauouneraonobkn
CnCTemaHaKIOHHOI
MexaHnuecko pa3BepTKN
Cnctema aydnno3annc
DnckpeTn3aun:126ntOB
(CDbnur qactoTb3 32 kU, cTepeo 1, cTepeo 2), 16 mTob (CDbnur qactoTb4 8kU, cTepeo)
BndeocnHa
LBeTobO BcHnPal, cTaHdapt MKKP
Ucnojb3yeMbIe KacceTbl
KacceTb MmH DV C neaTHbM 3HAKOM MinD
CkopoocTb JIeHTbl
SP: npn6nn3. 18,81 MM/c
LP: npn6n3. 12,56 MM/c
В装配ЗИСВОБПОДЗЕDEн� (прпспьлбзOBaHи KacceТы DVM60)
SP:1 yac
LP:1,5 yaca
Bpemy yckopenHHo nepeMOTkn BnpeHnHaazd
(pnncnoB3OBAHmKaccTebl DVM60)
Pn6n3.3MHN.103cKc.( c nONoBtOBOAHmE KacTeB t DVM60)
BudonckateJIb
3JeKTPnueckCN BINOONCKaTeJIb (UbeTHoH)
ΦopMnpoBaTeIb n306paXeHnA
ATopeRyInpObaHne,HOLD
(6NOKIPOBKa),杂Bnomoeienns (3200K), *Ha yunie (5800K)
MmHmAJbHaOBcEueHHoctb 5Jk (F1,7)
0 JK (B pexkme HocHOH CbemKn)
** Cbemky o6bektOB, HEBNIMbIX B TEMHOTe, MOXHO BblNOJHrTb C NOMOuIIOHpKaPacCHO ORCBEUHO.
Pa3beMbI BXOHyBIX/BbIXOHyBIX CnRHaNoB
BbIXoD S BnDeo
4-WTbIpbkOBoe MHNH-rHe3do DIN
CINHAN RPKCTO:pa3MA1B,75OM. HcMMMepHbN
Cunhan UBeTHOCTN:da3Max 0.3 B.
75 OM, HecIMMMeTpNHybI
BbIXoD cnHaHa aydno/BnDeo
AV MINI JACK, pa3max cnHana 1
B,75OM,HEcHMMePnHuHBiN, CINXHOH3NUPOBaHHbS
OtpuataeHbI IOJIoc 327 MB
He BkIIOUa 6aTapeINHO 6JOKa I
KAccetbl
560
BkIoua 6aTaepHbI 6Jok NP-
FS11, kaccety DVM60 n Kpbiuky o6bekTBA
Ppnilaraemble npHaJdxKHOCTN
CM. ctp. 5.
Ceteboa aandaTep nepemehnHoro Toka
Tpe6oBaHnK nIaHmIO
100-240BnepeMeHHoroToKa,50/60Γu
Notpe6JemaM MoUHOCTb
13BT
BbIXoHoe HappkeHne
DC OUT: 4,2 B; 1,8 A b pa6o7em pexMke
Pa6o7a Temnepatypa
OTo 0^ do 40^
TemnepatypxpaHn
O -20^ 1o+60°C
Pa3Mepbl (pnp6n3.)
49× 39× 85MM (W/B/r)
He BKIOUaY BbICTyNaIOuNe YaCTN
Bec (npn6nn3.)
120
He BKJIIOUaI CeTEBOI UHyp
Длннашнура (npn6n3.)
Cetebon shyp: 2 M
CoeHNHTeNbHbIuHyp:1,6M
BaTapeiHbI 6Jok
BbIXoHoe HapRjXeHne
Noct. TOK. 3,6 B
EMKOCTb
4.1 Bt-4
Pa3Mepbl (pnp6n3.)
30,3× 16,3× 50,2 MM
Bec (npn6nn3.)
40
TNO
JIITNEBO-NOHHbI
"Memory Stick" (Toько морел b DCR-PC3E)
PamrB
MiraouzaanmAtb
4 M6: MSA-4A
Pa6oyee HanpJxKeHne
2.7-3.6B
Notpe6JMaMa MOuHocTb
Пибпиз.45 mВ pa6oчem pexime
ПибЛБИ.130 mKAВ ржIMe OJOДДИЗ
Pa3Mepbl (pnp6n3.)
50× 2,8× 21,5MM (U/B/r)
Bec (npn6nn3.)
4
KOHCTpykUmaI IN texHmeeckne xapAKTePbNTIKM MOYt b6Itb N3MEHnBe 6B3 yEbadOMeHHa
Camcorder
Bvneokamepa
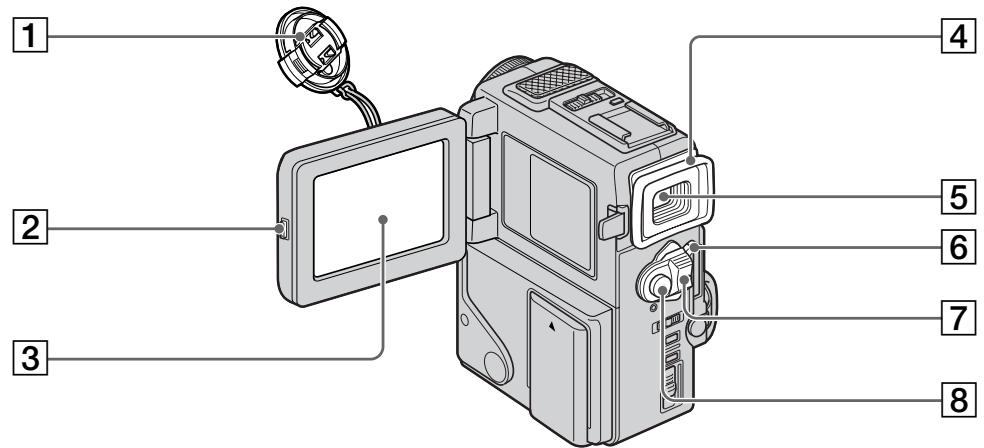
Lens cap (p. 20)
2 OPEN button (p. 18)
LCD screen (p. 23)
4 Eyecup
Viewfinder (p. 22)
6 LOCK (DCR-PC3E only) (p. 20)
7 POWER switch (p. 20)
8 START/STOP button (p. 20)
1 Kpbiika o6bekTnBa (ctp. 20)
2 Khonka OPEN (cTp. 18)
33KpaH KKn (ctp.23)
4OkyIaP
5 BnDOnuCKaTeNb (ctp. 22)
6 LOCK (Tolbko moJeIb DCR-PC3E) (ctp. 20)
7IpepeKJIIOuATEIb POWER (cTp. 20)
8 Khonka START/STOP (ctp. 20)

This mark indicates that this product is a genuine accessory for Sony video products. When purchasing Sony video products, Sony recommends that you purchase accessories with this "GENUINE VIDEO ACCESSORIES" mark.

9 +SLOW SHUTTER button (p. 28)
10 Microphone
11 Lens
12 Camera recording lamp (p. 20)
Remote sensor (p. 155)
14 Accessory shoe
15 NIGHTSHOT switch (p. 27)
16 Focus ring (p. 53)
17 Infrared rays emitter (p. 27)
Note on the Carl Zeiss lens Your camcorder is equipped with a Carl Zeiss lens which can reproduce a fine image. The lens for your camcorder was developed jointly by Carl Zeiss, in Germany, and Sony Corporation. It adopts the MTF* measurement system for video camera and offers a quality as the Carl Zeiss lens.
- MTF is an abbreviation of Modulation Transfer Function/Factor.
The value number indicates the amount of light of a subject penetrating into the lens.
9 Khonka +SLOW SHUTTER (cTp. 28)
10 Minkpofoh
106bekTNB
12 Jlamnocha 3aHcN Kamepoi (ctp. 20)
13 3MnTTep nHΦpaKpaChbIX Jnye (cTp. 155)
14Гнзддв BCNOMORAteьногооборуданя
15 BbIKHouatEnb NIGHTSHOT (ctp. 27)
16 KoIbIcOΦokycuPobKn (ctp. 53)
17ДиctaHcHOnHHbI DaTUnK (cTp.27)
Примочаиме OTHOCHTIELBO OБъektнва Kapл Лев <|im_start|>assistant Kapл Лев Кар�х Самар
Bawa Bndeokamepa ochaueHa 06bekTnBOM
Kapn Lciencc, KOTOpbmyoKeT npOn3BODntb
npBeBOxCODHoe n3O6paXeHne. O6bEKTNB dJa
daHNO KaMepb 6bl pa3pa6OtaH pfnpMOI
Kapn Lciencc B TepMaHm COMeCTHO C
kopnpauney Sony. OH o6naDaET
n3MepNTelbHOH cncTeMoM MTF* dNar
BnDEOKaMepb I o6eCneuBaET kaeeCTBO,
xapaKtepHoe dNl 06bekTnBOB pfnpMbI Kapn
Lciencc.
MTF YBNAETCOKpaueHnEMOT Modulation Transfer Function/Factor, UTO B nepeoJe 03Naaet yHKu/kaKTop nepeJaMOnyJauuN.
UncNoBoe 3HaueHHe yKa3bIbAet KaKoe KOnJIYeCTBO CBETA OTo ObBeKTa nonaJaET Ha OObKeTINB.
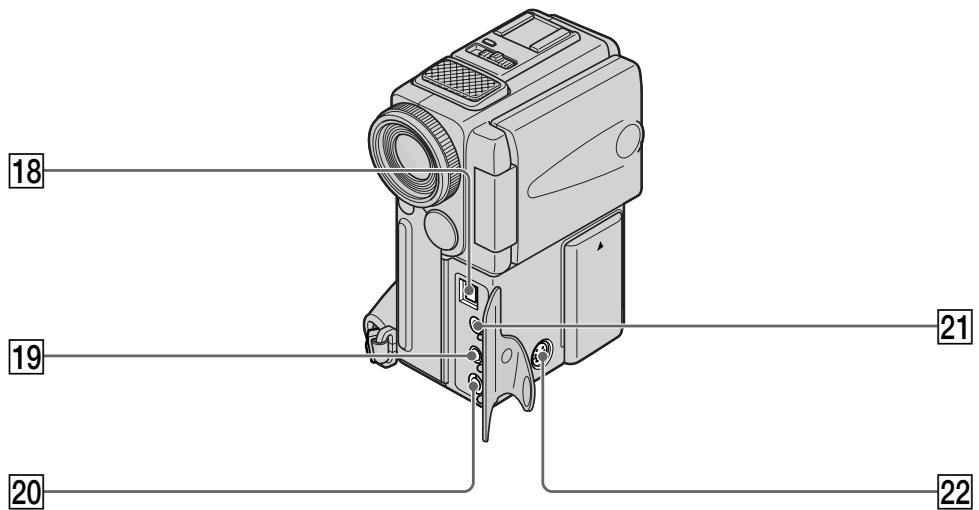
18 DV OUT jack (p. 65)
This "i.LINK" mark is a trademark of Sony Corporation and indicates that this product is in agreement with IEEE 1394-1995 specifications and their revisions.
The DV OUT jack is i.LINK compatible.
MIC jack (PLUG IN POWER) (p. 68)
Connect an external microphone (not supplied). This jack also accepts a "plug-in-power" microphone.
20 AUDIO/VIDEO OUT jack (p. 35, 64)
21 LANC control jack
LANC stands for Local Application Control Bus System. The control jack is used for controlling the tape transport of video equipment and other peripherals connected to the video equipment. This jack has the same function as the jack indicated as CONTROL L or REMOTE.
22 SVIDEO jack (p. 35, 64)
18 Tne3do DV OUT (ctp. 65)
3нak "i.LINK" вьлэтсг Торвов Марков Корпорачи Sony и указьает HaTo,чTo npODYкцу COOTBeTCTByeT TexHnueckim yCIOBnIM IEEE 1394-1995и nx ДОПОЛнEHнЯM.
Ihe3do DV OUT COBmecTmo C KaHaIOM nepedaun cnrhaNoB i.LINK.
19 THe3do MIC (PLUG IN POWER) (cTp. 68)
Длп подоевинь Всшero мкрфога (He npilaraetca).TO rHe3do TaKxe IO3BOJЯET NOДКЛIOчNTb MнкрфOH "C BbIKJIQUaTeIeM ПИТани".
20 THe3da AUDIO/VIDEO OUT (ctp. 35, 64)
21 Tne3do ynpablenLA nC
LANC 03haaet cntemy kaHaJa MeCTHOrO ynpabHeHn. IHe3do ynpabHeHn LcNOIb3yeTcra JN KOHTpON3a nepeMeIeHHeM JeHTb BVJeOaAnpaTpybI n nepiFepnIbIx yIcPoTcTB, PoJKnIOUeHHbIX K He.I DaHHOe IHe3do IMeET TaKyo JKe fYHKNUO, KaK i pa3BeMbI, O6o3NaueHHbIe kak CONTROL L uIN REMOTE.
22 THe3do S VIDEO (ctp. 35, 64)

23 Power lamp (p. 7, 20)
24 START/STOP MODE switch (p. 25)
25 BACK LIGHT button (p. 27)
26 DISPLAY/TOUCH PANEL button (p. 32)
27 OPEN/△EJECT lever (p. 17)
28 ACCESS lamp (DCR-PC3E only) (p. 93)
29 MEMORY RELEASE lever (DCR-PC3E only) (p. 93)
30 RESET button (p. 129)
31 (headphones) jack When you use headphones, the speaker on your camcorder is silent.
[23]JAmnoHaKa nTaHnA (cTp.7, 20)
24Переклюателb START/STOP MODE (стр. 25)
25 Khonka BACK LIGHT (cTp. 27)
26 Khonka DISPLAY/TOUCH PANEL (ctp. 32)
27 Pbyar OPEN/△ EJECT (ctp. 17)
28Ламоча ACCESS (Toько модь DCR-PC3E) (ctp.93)
29 Pbyar MEMORY RELEASE (ToJbKO MoJeJIb DCR-PC3E) (ctp. 93)
30 Khonka RESET (ctp. 129)
31Ihe3do(roJOBHbIeTeJefoHbI) EcnBbIncNoJIb3yeTe roJOBHbIeTeJefoHbI, DnHaMnK Ha BaSei BnDeokampe OTKnIOUaETc.
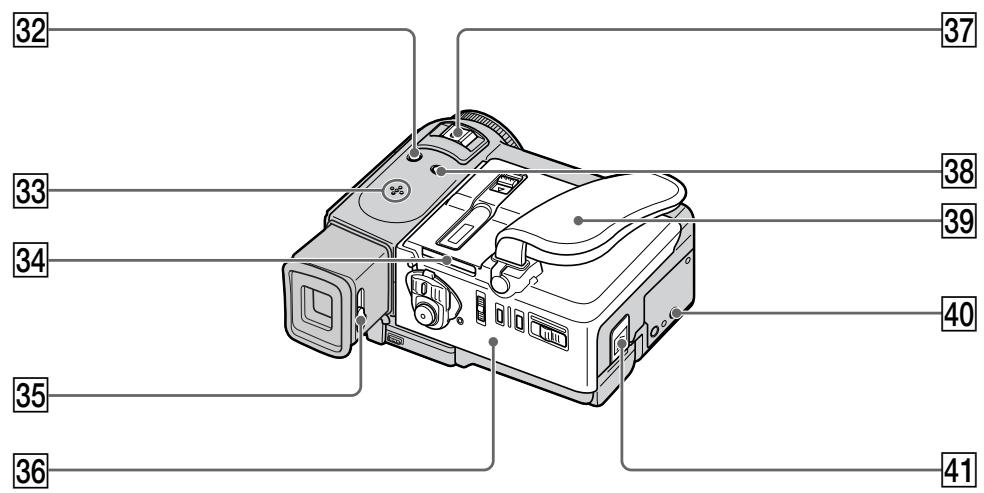
32 PHOTO button (p. 37, 99)
33 Speaker
34 "Memory Stick" slot (DCR-PC3E only) (p. 93)
35 Viewfinder lens adjustment lever (p. 22)
36 Cassette lid (p. 17)
37 Power zoom lever (p. 24)
38 FOCUS switch (p. 53)
39 Grip strap
40 Tripod receptacle Make sure that the length of the tripod screw is less than 6.5mm (9/32 inch). Otherwise, you cannot attach the tripod securely and the screw may damage your camcorder.
41 BATT (battery) RELEASE lever (p. 15)
32 Khonka PHOTO (cTp. 37, 99)
33Динамнк
34 Гешио "Memory Stick" (Тольков модаль DCR-PC3E) (ст. 93)
35 Pbyar perylnpoBKN o6bekTnBa BNDONCKaTeJr (cTp.22)
36 Kpbliika kaccetbl (cTp.17)
37 Pbyar npuBODHoro TpaHcfoKaTopa (ctp. 24)
38 BbIKHouaTeNb FOCUS (cTp. 53)
39 Pemehb 3axbata
40 THe3do dIy TpeHOr Y6eIntecb, yTO DNHa BnHTa TpeHOr MeHee 6,5 MM. B npOTuBHom Cnyuae Bby He cMOxTe HaJeXHO pNkPeINtB TpeHOr, a BnHT MoKeT NOBpeDITb BaUy BNdeOkamepy.
41 Pbyar BATT RELEASE (ocbo6xdeHn 6aTaepHoro 6Joka) (cTp. 15)
Remote Commander
The buttons that have the same name on the Remote Commander as on your camcorder function identically to the buttons on your camcorder.
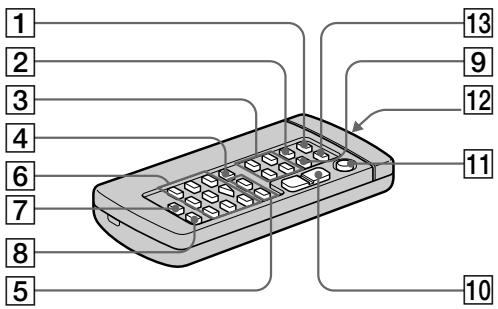
RMT-812
1 PHOTO button (p. 37, 99)
2 DISPLAY button (p. 32)
Memory control buttons (DCR-PC3E only) (p. 103, 109, 111)
4 SEARCH MODE button (p. 58, 60, 61)
5 1▶/▶I buttons (p. 58, 60, 61)
6 Video control buttons (p. 34)
MARK button (DCR-PC3E only) (p. 67)
AUDIO DUB button (p. 69)
9 DATA CODE button (p. 32)
10 Power zoom button (p. 24)
START/STOP button (p. 20)
12 Transmitter Point toward the remote sensor to control your camcorder after turning on your camcorder.
ZERO SET MEMORY button (p. 57, 73)
To prepare the Remote Commander
Insert 2 size R6 (AA) batteries by matching the + and - polarities on the batteries to the + - marks inside the battery compartment.
ДлnoiodroTOBKn nyIbTa ДиCTAHUONHOуnpaBJIeHnA
BcTaBbTe 2 6aTapeiKn R6 (pa3mepa AA), cO6IIOJaHaJIeKaUyIO NIIpHocTb + I - Ha 6aTapeiKax CO 3HaKaMn + - BHyTpN OTCeKa dIa 6aTapeek.
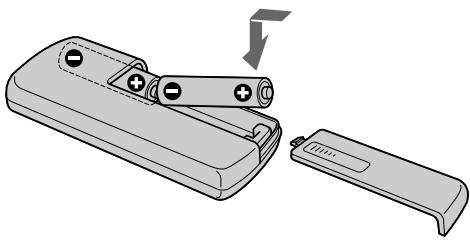
Notes on the Remote Commander
- Point the remote sensor away from strong light sources such as direct sunlight or overhead lighting. Otherwise, the Remote Commander may not function properly.
- Your camcorder works in the commander mode VTR 2. Commander modes 1, 2 and 3 are used to distinguish your camcorder from other Sony VCRs to avoid remote control misoperation. If you use another Sony VCR in the Commander mode VTR 2, we recommend changing the commander mode or covering the sensor of the VCR with black paper.
Operation indicators
Pa60yne HndnKaToptbI
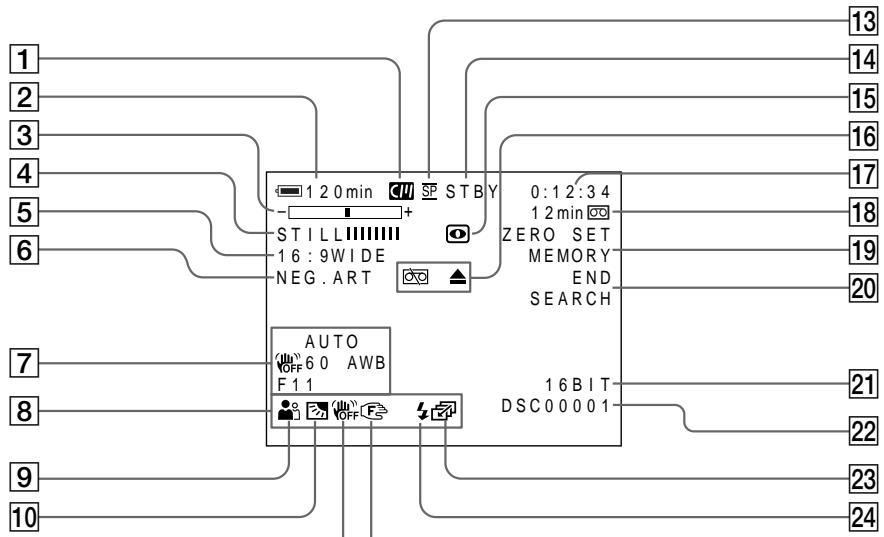
Cassette memory indicator (p. 131)
Remaining battery time indicator (p. 26)
3 Zoom indicator (p. 24)/Exposure indicator (p. 52)/Data file name indicator (p. 99)
4 Digital effect indicator (p. 46)/MEMORY MIX indicator (DCR-PC3E only) (p. 103)
FLD./FRAME indicator (DCR-PC3E only) (p. 99)/16:9WIDE indicator (p. 40)/FADER indicator (p. 42)
6 Picture effect indicator (p. 44)
7 Data code indicator (p. 32)
LCD bright indicator (p. 23)/Volume indicator (p. 30)
9 PROGRAM AE indicator (p. 50)
10 Backlight indicator (p. 27)
11 SteadyShot off indicator (p. 79)
12 Manual focus/Infinity indicator (p. 53)
13 Recording mode indicator (p. 82)
14 Standby/Recording indicator (p. 20)/Video control mode indicator (p. 34)/Image quality mode indicator (DCR-PC3E only) (p. 96)
15 NIGHTSHOT indicator (p. 27)
1 INHdNkaTop KaccTeHOn nAMrTu (cTp. 131)
2 INHdNkaTop octaBweroOca Bp 6aTaapeHoro 6noka (ctp. 26)
3 INHdNkATOp Bapnoo6bekTnBa (ctp. 24)/ INHdNkATOp 3KcNo3mnn (ctp. 52)/ INHdNkATOp Ha3BaHnJaHHbIX (ctp. 99)
4 INHdkaTop uΦpOBOrO 3ΦΦeKta (ctp. 46)/ INHdkaTop MEMORY MIX (ToIbKO MoJeJIb DCR-PC3E) (ctp. 103)
5 INHdNkAtopFLD./FRAME(TOJIbKO MoJeIb DCR-PC3E)(ctp.99)/INHdNkaTOppeKIma16:9WIDE(ctp.40)/INHdNkaTOp FADER(ctp.42)
6 INHdkaTOp 3ΦΦeKta N3OpaXeHnA (cTp.44)
7Индикатор Кда данhhbIX (cTp. 32)
8 INHdNkATOp rPkOCTn XXK (ctp. 23)/ INHdNkATOp rPOMKOCTn (ctp. 30)
9Индикатop PROGRAM AAE (cTp. 50)
10ИндikatopЗадн ПОДCBETК (ctp.27)
11 INHДИКaTOP BbIKNIOUeHHoY yCTOuHBOB CbeMKn (cTp. 84)
12 INHdkaTOppyHOnΦokcnpOBKn/6eckoHeuHocTn (ctp.53)
13ИндикаТор рекима запис (ctp.87)
14 INHДИКaTOP OXиДаHЯ/ROTOBHOCTN (ctp.20)/INHДИKaTOP pexIMa BIneOKoHTpoJr (ctp.34)/INHДИKaTOP pexIMa KaueCTBa H3O6paXeHЯ (ToIbKO mOdeJIb DCR-PC3E) (ctp.96)
15ИндикаTop NIGHTSHOT (ctp.27)
Warning indicators (p. 131)
17 Tape counter indicator (p. 26)/5SEC mode indicator (p. 25)/Time code indicator (p. 26)/Self-diagnosis indicator (p. 130)/ Photo mode indicator (p. 37)/Image number indicator (DCR-PC3E only) (p. 122)
Remaining tape indicator (p. 26)/Memory playback indicator (DCR-PC3E only) (p. 110)
ZERO SET MEMORY indicator (p. 57)
END SEARCH indicator (p. 29)
21 Audio mode indicator (p. 82)
22 Data file name indicator (DCR-PC3E only) This indicator appears when the MEMORY MIX functions work.
23 Continuous mode indicator (DCR-PC3E only) (p. 101)
Video flash ready indicator (p. 38) This indicator appears when you use the video flash light (not supplied).
Functions to adjust exposure (in the recording mode)
In a dark place
NIGHTSHOT (p. 27)
- In insufficient light
Low lux mode (p. 50)
- In dark environments such as sunset, fireworks, or general night views
Sunset & moon mode (p. 50)
- Shooting backlit subjects
BACK LIGHT (p. 27)
- In spotlight, such as at the theater or a formal event
Spotlight mode (p. 50)
- In strong light or reflected light, such as at a beach in midsummer or on a ski slope
Beach & ski mode (p. 50)
Functions to give images more impact (in the recording mode)
- Smooth transition between scenes
FADER (p. 41)
- Taking a still picture
PHOTO (p. 37)
Digital processing of images
PICTURE EFFECT (p. 44)/
DIGITAL EFFECT (p. 45)
- Creating a soft background for subjects
Soft portrait mode (p. 50)
Superimposing a title
TITLE (p. 71)
Functions to give a natural appearance to your recordings (in the recording mode)
- Preventing deterioration of picture quality in digital zoom
D ZOOM [MENU] (p. 78)
- Focusing manually
Manual focus (p. 53)
- Shooting distant subjects
Landscape mode (p. 50)
- Recording fast-moving subjects
Sports lesson mode (p. 50)
Functions to use in editing (in the recording mode)
- Watching the picture on a wide-screen TV
Wide mode (p. 40)
Viewing images using a personal computer (DCR-PC3E only)
"Memory Stick" (p. 91)
Functions to use after recording (in the playback mode)
- Digital processing of recorded images
PICTURE EFFECT (p. 55)/
DIGITAL EFFECT (p. 56)
- Displaying the date/time or various settings when you recorded
Data code (p. 32)
- Quickly locating a desired scene
Zero set memory (p. 57)
- Searching for scenes having a title
Title search (p. 60)
- Searching for scenes recorded in the photo mode
Photo search (p. 61)
- Scanning scenes recorded in the photo mode
Photo scan (p. 63)
- Playing back on monaural sound or sub sound
HiFi SOUND [MENU] (p. 78)
Pexim 3axoDa coInHua n IyHbI (ctp. 50)
"Memory Stick" (ctp. 91)
Camera chromakey 102
Carl Zeiss lens 151
Cassette memory 17, 122
Charging battery 12
Charging vanadium-lithium battery 144
Clock set 89
Connection (viewing on TV) 35 (dubbing a tape) 64
Continuous 100
Data code 32
Date search 58
DEMO 83
DIGITAL EFFECT 45
DISPLAY 32
Dual sound track tape 123
Dubbing a tape 64
DV connecting cable 65
E
END SEARCH 29,34
Exposure 52
External microphone (not supplied) 152
F, G, H
FADER 41
Fade in/out 42
FLASH MOTION 45
FOCUS. 53
Format 98
Full charge 12
Grip strap 154
Heads 143
Headphone jack 153
HiFi SOUND 80
I, J, K, L
i.LINK 152
Image protection 115
Image quality mode 96
INDEX (Multiple) display .... 111
"InfoLITHIUM" battery 14
Infrared rays emitter 27
JPEG 91
Labeling a cassette 76
LANC 152
LCD screen 22
LUMINANCEKEY 45
M, N
Main sound 80
Manual focus 53
Memory chromakey 102
Memory luminancekey 102
Memory mix 102
"Memory Stick" 91
Menu settings 78
Mirror mode 22
Moisture condensation 142
MONOTONE 41
Mosaic fader 41
NIGHTSHOT 27
NightShot +Slow shutter 28
Normal charge 12
O, P, Q
OLD MOVIE 41
Operation indicators 157
OVERLAP 41
PAL system 141
Photo scan 61
Photo search 61
Photo recording 37
PICTURE EFFECT 44
Picture search 33
Playback pause 33
Power sources
(house current) 16
(car battery) 16
(battery pack) 12
Power zoom 24
Printmark 119
PROGRAM AE. 50
R
Recording time 13
Remaining battery time indicator 26
Remaining tape indicator 26
Remote commander 155
Remote control jack (LANC) 152
Remote sensor 156
RESET 129
s
S video jack 35,64
Self-diagnosis display 130
Serial port adaptor 112
Skip scan 34
Slide show 113
Slow playback 34
SLOW SHUTTER 45
+SLOW SHUTTER 28
START/STOP MODE 25
STEADYSHOT 79
Stereo tape 123
STILL 45
Sub sound 80
T, U, V
Tape counter 26, 57
Telephoto 24
Time code 26
Title 71
Title search 60
Touch panel 18
TRAIL 45
Transition 21
TV color systems 141
W,X,Y,Z
Warning indicators 131
White balance 48
Wide-angle 24
Wide mode 40
WORLD TIME 83
Write-protect tab 17
Zero set memory 57
Zoom 24
A,B,B,Γ
AanTep nocTeIOBATEIbHoro nopTa 112
Aydnopepe3aHncb 68
AydnopekIM 87
BalaHc 6eIoro 48
BaTapeHbIb 6Jok 12
БатAPEйьблөк "InfoLITHIUM" 14
BapnoobbektnB 24
BVeDeHnE/BbVeBeHnE n3o6paXeHnA 42
BHeuHmMnKpOΦoH (He npunaraetc) 152
Bpem 3aipncn 13
BcnoMOraTeJIbHbI 3ByK 85
Tolobkn 143