
DCR-IP5E - Camcorder SONY - Free user manual and instructions
Find the device manual for free DCR-IP5E SONY in PDF.


| Product type | Digital MICROMV camcorder |
| Brand | Sony |
| Model | DCR-IP5E |
| Recording format | MICROMV (MPEG2) |
| Sensor | 1/6-inch CCD, approx. 800,000 pixels (effective 400,000) |
| Lens | Carl Zeiss, 10x optical zoom, 120x digital zoom |
| LCD screen | 2.5 inches (6.2 cm), 211,200 pixels (960×220) |
| Viewfinder | Color electronic |
| Power | Lithium-ion "InfoLITHIUM" F series battery (NP-FF50, 7.2 V); AC adapter AC-L20A (100-240 V, 50/60 Hz) |
| Dimensions (W x H x D) | 47 × 103 × 80 mm (without protrusions) |
| Weight | 310 g (body only); 370 g (with NP-FF50 battery, MGR60 cassette, lens cap and hand strap) |
| Operating temperature | 0 °C to 40 °C |
| Storage temperature | -20 °C to +60 °C |
| Connectivity | i.LINK (MICROMV), A/V (10-pin), DC IN |
| Supplied accessories | RMT-818 remote control, AC-L20A AC adapter, NP-FF50 battery, i.LINK cable, A/V cable, lens cap, CD-ROM (Movie Shaker), hand strap |
| Maintenance | Clean the lens with a soft cloth; avoid moisture and extreme temperatures |
| Safety | Do not expose to rain or moisture; refer all repairs to qualified personnel |
| Spare parts and repairability | NP-FF50 battery, AC-L20A adapter available; repair by an authorized Sony center |
Frequently Asked Questions - DCR-IP5E SONY
User questions about DCR-IP5E SONY
0 question about this device. Answer the ones you know or ask your own.
Ask a new question about this device
Download the instructions for your Camcorder in PDF format for free! Find your manual DCR-IP5E - SONY and take your electronic device back in hand. On this page are published all the documents necessary for the use of your device. DCR-IP5E by SONY.
USER MANUAL DCR-IP5E SONY
Digital Video Camera Recorder MICROMV
Operating Instructions
Before operating the unit, please read this manual thoroughly, and retain it for future reference.
HCTPYKUINI NO 3KCNJYATAUNI
Ipeed 3Kcnpnyataune annapaTa BHNMaTeJbHOnpOyTITe, noXaanyCTa, daHHOe pyKOBOdCTBOin COxpaHnTe erO dJaIbHeNIX CNPaBOK.
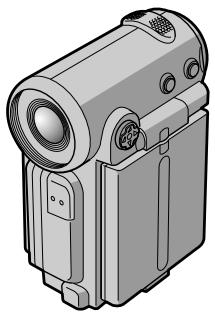
DCR-IP5E/IP7E
Network Handycam IP Digital Handycam IP

micro Cassette Memory


Bluetooth
MPEGMOVIEAD
English
Welcome!
Congratulations on your purchase of this Sony Handycam. With your Handycam, you can capture life's precious moments with superior picture and sound quality. Your Handycam is loaded with advanced features, but at the same time it is very easy to use. You will soon be producing home video that you can enjoy for years to come.
WARNING
To prevent fire or shock hazard, do not expose the unit to rain or moisture.
To avoid electrical shock, do not open the cabinet.
Refer servicing to qualified personnel only.
Memory Stick

N50
NOTICE ON THE SUPPLIED AC POWER ADAPTOR FOR CUSTOMERS IN THE UNITED KINGDOM
A moulded plug complying with BS1363 is fitted to this equipment for your safety and convenience.
Should the fuse in the plug supplied need to be replaced, a 5 AMP fuse approved by ASTA or BSI to BS1362 (i.e., marked with 串 or 串 mark) must be used.
If the plug supplied with this equipment has a detachable fuse cover, be sure to attach the fuse cover after you change the fuse. Never use the plug without the fuse cover. If you should lose the fuse cover, please contact your nearest Sony service station.
For the customers in Europe ATTENTION
The electromagnetic fields at the specific frequencies may influence the picture and sound of this digital camcorder.
This product has been tested and found compliant with the limits set out in the EMC regulation for using connection cables shorter than 3 meters. (9.8 feet)
Pycckn
Добpo пожаловать!
I03dpaBnaem BAc C npno6peTeHnEm daHHoB BuDeokamepb Digital Handycam qnpMb1 Sony. C nOmoobu Baaew BIndeokamepb DigitalHandycam Bby CMOXeTe 3aneuatLeTb doporene Bam MRHOBeHNJ KU3HN C ppeBOxCOaHbIMKaueCTBOM N3o6paXeHNi N 3Byka.BaWa BuDeokamepa Digital Handycam OchaSeHa YCOBepseHCTBOBaHHbIMNfYHKsAMyN, HO B TO Xe BPEM ee OChEh JERKOnCNoB3OBA Tb. BCKope Bby 6yDete co3daBa TbCeMeHbIe BuDeonpOrpAmMbI, KOtOpbIMNMOKeTe HacnJaDaTbCnocNeDuOuine rOdbI.
PNEyPPEKDEHNE
IpypeDToBpaaHnBa 03rOpaHnI INI ONaCHoCTN 3NeKTPnueCKoro ydapa He BbICTaBnIte annapaT Ha DoJb IIN BLaIy.
Bo n36eKaHne nopaxeHn 3JIeKtpnuecknM TOKOM He OTKpbIbAaTe KOpNyc.
3a obcnykubahnem obaaTaBcToIbko K KBaInΦu\PoBaHOMy obcnykuaOeMy nepcohany.
Дл nxynateJeB Ebpone BHIMAHNE
3JIeKtpomarHHTbIe NOIHa ONpeJeHbIX YacToTAX MOrYT BmIaTb Ha N3O6paXeHne I 3ByK, BOCpON3B0DnMOe DaHHo LcNpPoBoB BNDeOKaMepbl.
I3dJIe InpoBepHO Ha COOTBeTCTBHe Tpe6ObaHnAM DnpeKtNbBI EMC OTHocTeJbHo IcNoIb3ObaHnKa6eNei KopoYe 3 MetpoB.
TolbkoДЛЯМоDEЛN DCR-IP7E
Bb moKTe NcNoIb3ObAt b fyHKuIN DoCTyna K cETn TOnbKO B HeKOToPbIX CtpaHax IN pERNoHax. BoJee nOpRo6HbIe CBeDeHnRcM. B OTeJIbHOIn HNCTpyKUIN NO 3KcNlPyatauIN cETn.
ToIbKO IJI MOnEJI N DCR-IP5E

DCR-IP7E only
C∈①
Hereby, Sony Corporation, declares that this Handycam is in compliance with the essential requirements and other relevant provisions of the Directive 1995/5/EC.
Countries and areas where you can use network functions are restricted. For details, refer to the separate Network Function Operating Instructions.
DCR-IP5E only For the customers in Germany
Directive: EMC Directive 89/336/EEC.
92/31/EEC
This equipment complies with the EMC regulations when used under the following circumstances:
Residential area
Business district
Light-industry district
(This equipment complies with the EMC.
standard regulations EN55022 Class B.)
Taking moving or still images, and playing them back
- Recording a picture on a tape (p. 38)
- Recording a still image on a tape (p. 61)
- Playing back a tape (p. 51)
- Recording a still image on a "Memory Stick" (p. 149) (DCR-IP7E only)
- Recording moving pictures on a "Memory Stick" (p. 160) (DCR-IP7E only)
Viewing a still image recorded on a "Memory Stick" (p. 174) (DCR-IP7E only) - Viewing a moving picture on a "Memory Stick" (p. 179) (DCR-IP7E only)
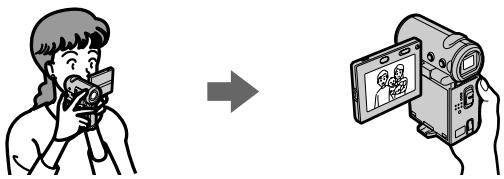
Capturing images on your computer
Viewing an image recorded on a tape using your computer via the i.LINK cable (p. 199)
Viewing an image recorded on a "Memory Stick" using your computer via the USB cable (p. 201) (DCR-IP7E only)

Accessing the Internet via a Bluetooth device (not supplied) (DCR-IP7E only)
- Accessing the Internet and sending/receiving your e-mail. For details, refer to the network function operating instructions supplied with your camcorder.
Other uses
Functions to adjust exposure in recording mode
- Back light (p. 47)
PROGRAM AE (p. 75)
White balance (p. 78) - Adjusting the exposure manually (p. 80)
Functions to give an effect to your recordings
- Digital zoom (p. 124)
The default setting is set to OFF. (To zoom greater than 10× , set up the D ZOOM item in the menu settings.)
Fader (p. 66) - Picture effect (p. 69)
Digital effect (p. 71) - Title (p. 108, 116)
- MEMORY MIX (p. 166) (DCR-IP7E only)
Functions to give a natural appearance to your recordings
- Manual focus (p. 82)
- Landscape mode (p. 75)
Functions used after recording
END SEARCH (p. 50)
DATA CODE (p. 54)
- Multi-picture search (p. 88)
- Title search (p. 93)
- Date search (p. 95)
- Photo search (p. 97)
CbeMa DnKxuXcxn Hn Hn NOBnKbIX n3OpaXeHm n X BocPon3BeDeHne
3aIncb n3o6paXeHnHa nHeHTy (cTp. 38)
3aIncb HeNoDnBxHOro N3O6paXeHn Ha JeHTy (CTp. 61)
Bocnpon3BeHeHneJeHTbl (cTp. 51)
- 3aɪnɪs b Heɪɒdɪŋkɪrə nɪzɔbpaːkæŋnɪ Ha "Memory Stick" (cɪrp. 149) (Tɔlɪkɔ moɪdɪŋb DCR-IP7E)
- 3aɪnçb dBɪŋkʌŋxσr nɪðþækèhɪn Ha "Memory Stick" (ctp. 160) (tɒlβkɔ moɪdʒb DCR-IP7E)
- Пiocмотр Нетодвижого ИЗобрахеня, заимсанlorу на "Memory Stick" (cTp. 174) (Толъко модаь DCR-IP7E)
- Порсмотр движуцегсянзображени на "Memory Stick" (ст. 179) (только мodyель DCR-IP7E)


3aHnCb n3o6paXeHn Ha Baawem KOMnbItepe
Introduction - Basic operations
This section describes the basic operations used to control and ways to operate the camcorder.
How to turn on the power and select the mode
To supply power for the camcorder, see "Step 1" Preparing the power supply" on page 25.
В级以上 - OchoBhble onepaun
B 3TOM pa3dene OINCBIAOTCA OCHOBHbIe onepaUN, INcNoJIb3yEmbIe IJN ynpabNeHN, IN cnoc6bI pa60tbc BnDEOKamepoI.
KaB BKJIIOUHTb NITaHne N BbI6paTb peXIM
YTo6bI BKJIOUHTb NITaHne BUNDeOKaMEpbI, CM. "PyHKT 1 POnIoTobKa NCTOuHnKa NITaHnHa cTp.25.
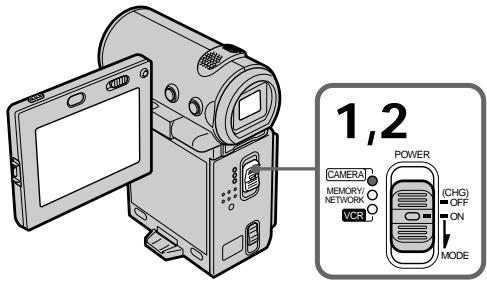
(1) Slide the POWER switch down while pressing the small green button, then release your finger.
The camcorder is turned on, and then the camcorder turns to the CAMERA mode so that the CAMERA lamp lights up.
(2) Slide the POWER switch down. Each time you slide it down, the mode changes as follows and corresponding mode lamp also lights up.
CAMERA Use this mode when you record on a tape.
MEMORY/NETWORK (DCR-IP7E only)
MEMORY: Use this mode when you record on a "Memory Stick", or play back or edit a image in a "Memory Stick".
NETWORK: Use this mode when you use the network function. For details, refer to the supplied network function operating instructions.
VCR Use this mode when you play back or edit an image recorded on a tape or "Memory Stick" (A "Memory Stick" can only be used with the DCR-IP7E).
(1)Передвиьтpeпеклочаель POWER BHN3,нжав MaJIeHbKyIO 3eJIeHyIO KHOINky, 3aTeM OTnycTNe.
Bndeokamepa BkIIOHTcR,3aTeM npeeiDeT B pexim CAMERA, n 3aropntc HndkaTop CAMERA.
(2)ПередиьтeteпеклочаTeь POWER Bn3. Пи Кадом петдвжehи erо Ви3 3aropaetc COOTBeTCTByIOUm INДИКATOp peKIMa, И ржIM n3MeHReTc сеДуOUM mобразOM.
CAMERA IcnoIb3yIe 3OT peKIM npn 3aIncn Ha JeHTy.
MEMORY/NETWORK (ToIbKO moJeIb DCR-IP7E)
How to use the control button
Most of the operations are carried out using the control button. Select a button displayed on the screen using the control button, then press the centre on the control button.
Kak nCnoJb3OBAt b KHOpKy ynpaBLeHn
BoIbIINCTBO ONEpaIIN Ipon3BOJATCc
nOMOsbIO KHNKn ynpaBLeHn. Bbl6epNTe
KhONKy,OTobpaKaemyIO Ha 3kPaNe, c NOMoCbIO
KHNKn ynpaBLeHn, 3aTeM haxmnte Ha ceHTp
Ha KNOpKe ynpaBLeHn.
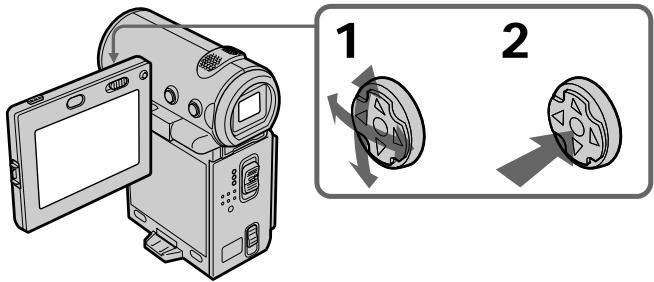
(1) Press / / on the control button repeatedly to select the desired button displayed on the screen. The selected button turns orange.
(1)HaKIMMa / / / Ha KhoNKe ynpaBneHnBa BbI6epnte HxKHyIO KhoNky, OTo6paKaemyuHa 3KpaHe. BbI6paHHa KhoNka cTaHET opaHKeBOi.
(2) Press the centre on the control button to enter the setting. Repeat steps 1 and 2 to execute the function.
(2)HaKmTe Ha zHtP Ha KhONKe ynpaBHeHnI dIy BBOda yCTaHOBKn. IIOBTOpIte NyHKtbl 1 n 2 dIy BbINOJIHeHnI cyHKuIN.
The procedure above is referred to as "Select [XXXX], then press the centre on the control button" in this operating instructions.
When an item is selected
A green bar appears above the item.
If certain items are not available
The colour of those items changes to grey.
How to use the FN screen
If FN is not displayed on the screen, press
DISPLAY or the centre on the control button.
BVeJeHne - OCHOHbIe ONEpaCnN
BbIeONcHnA npOeDpya B INCTpyKuNn IOKcnNyataun Ha3bIBaetcra "BbIbepnte [XXXX], 3aTeM haxmnte Ha ceHTp ● Ha KhONKe ynpabJIeHnR".
PnBbIbope 3JemeHtA
HaHm NOBnEeHaNoIoca.
Ecn KaKne-To 3JeMeHTbI HeoCTynHbI
LbET 3tNx 3JIeMeHToB N3MeHReTcRa Ha cepbI.
Kak nCnoJIb3OBA Tb 3KpaH FN
EcnHa 3kpaHe oTo6pkaeTcFN, HaxMITE DISPLAY Ha nHa ceHtp ● Ha KhoNKe ynpabNeHH.
DISPLAY
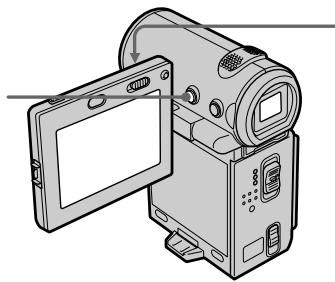
1-3

(1) Select FN with / / / on the control button, then press the centre. The FN screen appears.
(1)BbI6epnteFNcNOMOuBIOA/V/4HahKHOJKe ynpaBHeHn,3aTeM HaxMNTeHaZeHTp. NpOBuTc3kpaH FN.
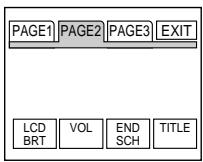
(2) To change the page, select PAGE1, PAGE2, or PAGE3 with / / / on the control button, then press the centre. The PAGE1/PAGE2/ PAGE3 screen appears.
(3) Select the desired item with / / on the control button, then press the centre. The screen that corresponds to that button will appear, or that function will be executed.
(2)Чтобы сменистраниу, Вьберпerte PAGE1, PAGE2 ил PAGE3 с пою /▼/▲/ Na Кнорке ураленя, 3aTeM нажмITE на ZeHTP ●. ПогиТСЯКран PAGE1/PAGE2/PAGE3.
(3)BbI6epNTe Tpe6yembl 3JemeHTC nOMOJIbIO ▲/▼/▲/>Ha KHNKe ynpaBJeHnra, 3aTeM HaxMITE Ha ceHTp .PiOBITcKpaH, COOTBETCTBYUoNn 3ToN KHONKe, ININ 6yJeT BbIIOJIHeHaФyHKUH.
Introduction - Basic operations
To return to the FN screen
Select OK, then RETURN, or END with / / / on the control button, then press the centre. Next, select EXIT with / / / on the control button, then press the centre.
To execute settings
Select OK with / / on the control button, then press the centre. The display returns to the PAGE1/PAGE2/PAGE3 screen.
To cancel settings
Select OFF or AUTO with / / / on the control button, then press the centre. The display returns to the PAGE1/PAGE2/PAGE3 screen.
The screen buttons on the PAGE1/PAGE2/ PAGE3 screen
In CAMERA mode
| PAGE1 | MENU, FADER, SELFTIMER, MEM MIX*, EXPOSURE, FOCUS |
| PAGE2 | LCD BRT, VOL, END SCH, TITLE |
| PAGE3 | DIG EFFT, COUNT RESET |
In VCR mode
| PAGE1 | MENU, VOL, TITLE, MULTI SRCH, ■/PB*, ←← ⇌ *, ➔ ⇌ * |
| PAGE2 | LCD BRT, DIG EFFT, END SCH, ■/PB*, ←← ⇌ *, ➔ ⇌ * |
| PAGE3 | DATA CODE, COUNT RESET, ☑RECCTRL, ■/PB*, ←← ⇌ *, ➔ ⇌ *, ➔ ⇌ * |
- (DCR-IP7E only)
See page 142 for the MEMORY/NETWORK mode (DCR-IP7E only).
To turn on/off the screen buttons
Press DISPLAY. However, the finder can be used only in mirror mode.
A screen where the FN button is displayed is referred to as the FN screen in this operating instructions.
BVeJeHne - OCHOHbIe ONEpaCm
YTO6bI BKJIIOUHTb/BbIKJIIOUHTb 3KpaHHbIE KHOPIKNI
HaKMMTe KhoNky DISPLAY. OHaKo BUNOICKaTeJIb MOXHO NcNOJIb3OBaTb TOJIbKO B 3epKaJIbHOM peKIMe.
B 3toi HCTpyKuIN NO 3KcNlyaTaUIN 3KpaH, HA KOtOpom pacnoJIOKeHa KKnIka FN, HA3bIbAeTcR 3KpaHOM FN.
Table of contents
Main Features 4
Introduction - Basic operations 8
Quick Start Guide 16
Getting started
Using this manual 20
Checking supplied accessories 23
Step 1 Preparing the power supply 25
Installing the battery pack. 25
Charging the battery pack 26
Connecting to the mains 30
Step 2 Setting the date and time 32
Step 3 Inserting a cassette 36
Recording - Basics
Recording a picture 38
Shooting backlit subjects
- BACK LIGHT 47
Self-timer recording 48
Checking the recording
- END SEARCH 50
Playback - Basics
Playing back a tape 51
Viewing the recording on the TV screen.... 59
Advanced Recording Operations
Recording a still image on a tape
-Tape Photo recording 61
Using the wide mode 64
Using the fader function 66
Using special effects - Picture effect 69
Using special effects - Digital effect 71
Using the PROGRAM AE function. 75
Adjusting the white balance manually .... 78
Adjusting the exposure manually 80
Focusing manually 82
AdvancedPlaybackOperations
Playing back a tape with picture effects.... 84
Playing back a tape with digital effects..... 86
Searching for a scene
-Multi-picture search 88
Searching the boundaries of recorded tape by
title - Title search 93
Searching a recording by date
-Date search 95
Searching for a photo - Photo search 97
Editing
Dubbing a tape 99
Recording a programme 103
Superimposing a title 108
Making your own titles 116
The Micro Cassette Memory 120
Customizing Your Camcorder
Changing the menu settings 124
"Memory Stick" Operations - DCR-IP7E only
Using a "Memory Stick" - introduction .. 136
Recording still images on a "Memory Stick"
- Memory Photo recording 149
Recording an image from a tape as a still image 156
Recording moving pictures on a "Memory Stick" - MPEG movie recording 160
Recording a picture from a tape as a moving picture 162
Superimposing a still image in a "Memory Stick" on a moving picture - MEMORY MIX 166
Copying still images from a tape - Photo save 171
Viewing a still image - Memory photo playback 174
Viewing a moving picture - MPEG movie playback 179
Dubbing images recorded on the "Memory Stick" onto the tape 184
Enlarging still images recorded on a "Memory Stick" - Memory PB ZOOM 186
Playing back images in a continuous loop -SLIDE SHOW 188
Preventing accidental erasure - Image protection. 190
Deleting images 192
Writing a print mark - PRINT MARK .... 197
Connecting with a computer
Viewing images recorded on a tape using your computer 199
Viewing images recorded on a "Memory Stick" using your computer - DCR-IP7E only 201
Network operation
- DCR-IP7E only
Accessing the network 209
Troubleshooting
Types of trouble and their solutions 211
Self-diagnosis display 217
Warning indicators and messages 218
Additional Information
Compatible cassettes 229
About the "InfoLITHIUM" battery pack 231
About i.LINK 233
Using your camcorder abroad 235
Maintenance information and precautions 236
Specifications 244
Quick Reference
Identifying the parts and controls. 248
Index 257
Dóbro po noxkaJIOBaTb! 2
OCHOBHbIe yHKcnn 6
BBeHeHne - OChOBhIe onepaunn 8
PykoOIOCTBO no 6bICTpOMy 3aNYcKy ....18
IopdrotOBka K 3KcnpyaatauN
IcnoIb3OBAHne DaHHoro pyKOBoDCTBa 20
PpOBepKa npnilaeraMbIX npHaJdJeXHocTei 23
IyHKT 1 POnIOrTOBka NcToCHNkA
PITaHnIA 25
UcTaHOBka 6bATEpeiHoro 6lOka 25
3aPaJka 6bATEpeiHoro 6lOka 26
IPOdCOeDInHeHne K cTeBoi po3eTke 30
IyHKT 2 YcTaHOBka DaTbI N BpeMeHn .... 32
IyHKT 3 YcTaHObKa KacCeTbI 36
3aIncb - OCHOBhble NOJIOXeHnA
3aHnscb n3o6paXeHn 38
CbeMa 06bEeKToB C3aDHei POncBeTko-BACK LIGHT...47
This guide introduces you to the basic operations for recording/playback. See the page in parentheses “( )” for more information.
1
Connecting the mains lead (p. 30)
Use the battery pack when using your camcorder outdoors (p. 25).
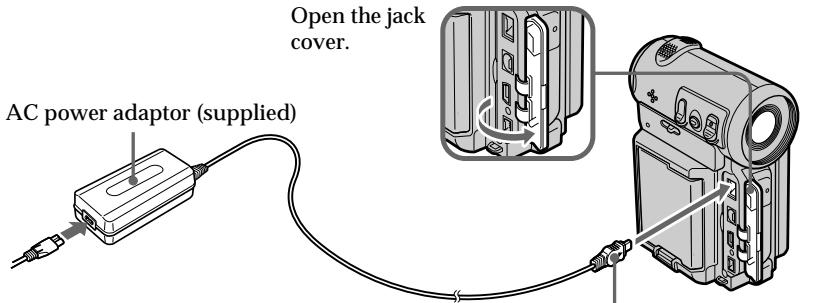
Connect the plug with its mark facing the lens side.
2
Inserting a cassette (p. 36)

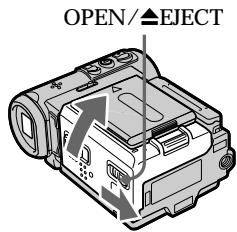
Slide OPEN/△EJECT in the direction of the arrow and open the lid.


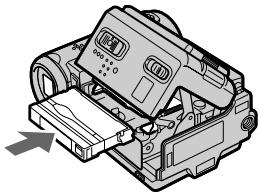
Push the middle portion of the back of the cassette to insert. Insert it the cassette in a straight line deeply into the cassette compartment with the window facing out.

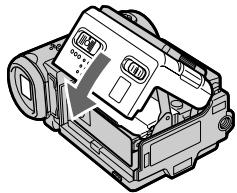
Close the cassette compartment by pushing down the cassette lid halfway. After the cassette compartment goes down completely, close the lid until it clicks.
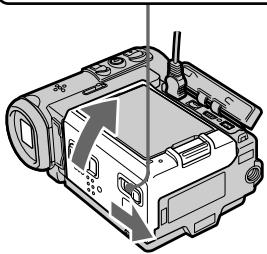
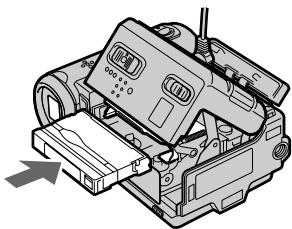
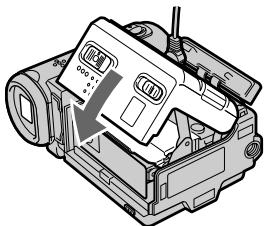
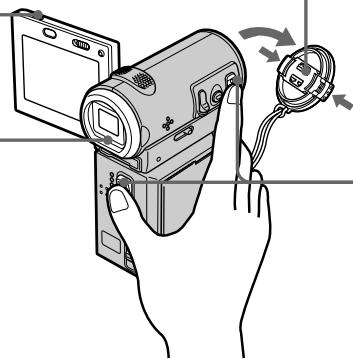
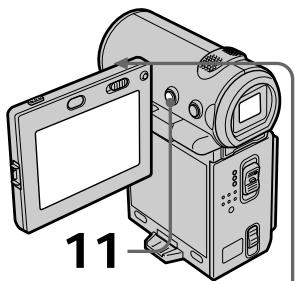
1 Remove the lens cap.
Press OPEN to open the LCD panel.
Viewfinder When the LCD panel is closed, pull out the viewfinder until it clicks and use it to monitor your recording.
When you purchase your camcorder, the clock is not set up yet. Set up the clock before recording (p. 32).
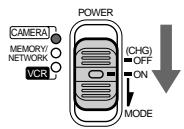
3 Set the POWER switch to CAMERA. The CAMERA lamp lights up.
Press START/STOP. Your camcorder starts recording. To stop recording, press START/ STOP again.

4
Monitoring the playback picture on the LCD screen (p. 51)
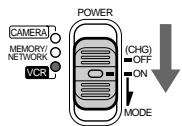
1 Set the POWER switch to VCR. The VCR lamp lights up.

2 Select, then press the centre on the control button to rewind the tape.

3 Select 11 then press the centre on the control button to start playback.

NOTE
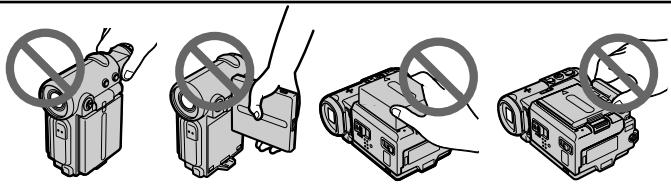
Do not pick up your camcorder by holding the viewfinder, the LCD panel, the battery pack, or the jack cover.
PykoBoIcTBo IIO 6bICTpOmy 3aIpycky
B 3TOM pyKOBoDCTBe OINcIbIaIO TcOCHOBhIe ONEpaCIN 3aNNi/C/BOcPnOuN3BeDeHn. IOnpO6HbIe CBeDeHn npNBedeHbI Ha CTpaHnIe B KpyrJIbIX cKo6KaX "( ).
1ПодсоeДинене npOBODa 3JIeKTPoNTaHnA (cTp. 30)
The instructions in this manual are for the two models listed in the table below. Before you start reading this manual and operating your camcorder, check the model number by looking at the bottom of your camcorder. The DCR-IP7E is the model used for illustration purposes. Otherwise, the model name is indicated in the illustrations. Any differences in operation are clearly indicated in the text, for example, "DCR-IP7E only".
As you read through this manual, buttons and settings on your camcorder are shown in capital letters.
e.g. Set the POWER switch to CAMERA.
When you carry out an operation, you can hear a beep or melody sound to indicate that the operation is being carried out.
Type of difference
| DCR- | IP5E | IP7E |
| MEMORY/NETWORK mark1) (on the POWER switch) | — | ● |
| USB jack | — | ● |
Provided
Not provided
1) The model with MEMORY/NETWORK marked on the POWER switch is provided with memory and network functions. See page 209 for details.
Your camcorder is based on the MICROMV format. You can only use MICROMV cassettes with your camcorder.
- Records and plays back for about 60 minutes with equal quality when compared to DV (digital video).
- The Micro Cassette Memory feature is provided with all MICROMV cassettes. The camcorder can access any scene easily using the memory (Multi-picture search function).
- Adopt the MPEG2 format as a data compression method. This format is the same as the one for DVD (digital video disc).
Note on TV colour systems
TV colour systems differ from country to country. To view your recordings on a TV, you need a PAL system-based TV.
Copyright precautions
Television programmes, films, video tapes, and other materials may be copyrighted.
Unauthorized recording of such materials may be contrary to the provision of the copyright laws.
Precautions on camcorder care
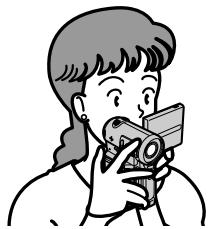
Lens and LCD screen/finder (on mounted models only)
- The LCD screen and the finder are manufactured using extremely high-precision technology, so over 99.99% of the pixels are operational for effective use. However, there may be some tiny black points and/or bright points (white, red, blue or green in colour) that constantly appear on the LCD screen and the finder. These points are normal in the manufacturing process and do not affect the recording in any way.
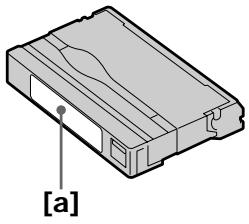
- Do not let your camcorder get wet. Keep your camcorder away from rain and sea water. Letting your camcorder get wet may cause your camcorder to malfunction. Sometimes this malfunction cannot be repaired [a].
- Never leave your camcorder exposed to temperatures above 60^ (140^) , such as in a car parked in the sun or under direct sunlight [b].
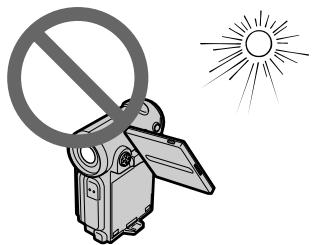
- Be careful when placing the camcorder near a window or outdoors. Exposing the LCD screen, the finder or the lens to direct sunlight for long periods may cause malfunctions [c].
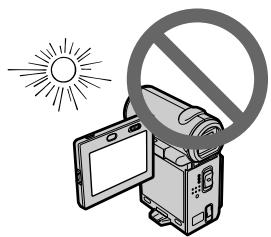
- Do not directly shoot the sun. Doing so might cause your camcorder to malfunction. Take pictures of the sun in any low light conditions such as dusk [d].

[a]
[c]
MepblnpedocTopoKHOCTn npnyxoJe 3a BndeokamepoJ
ObekTbN 3KpaH KKD/BnDOnckaTeNb (ToIbKO dIy yCTaHOBNeHHbIX MoJeIe)
3KpaH KKD n BnOncKaTeNb I3rOToBneHbI C NOMOoiBbYlCOKOpNeu3HOHHo TexHOJOrn, No3TOMy CbBiJe 99,99% 3NEMeTOB N3o6paxEHHaPeDHa3HauEhbl DnA 3ΦΦeKTHBHO rCNoJIb3OBaHHa. Odnako Ha 3KpaHe KKД n B BnOncKaTeNe MoryT NOCTOARHNO NORBAITbCS YepHbIE NII rPkHe CBETHbI ToCH (BeJIbe, KpaCHbIE, CNHHe NII 3eJIbe). NOBaHE He 3TNx ToeK o6bUHO CB83aHO c PON3BOdCTBeHHbIM POnoecCOM, H OHN HKNOM O6paOM He B7INIOt HA 3AnCb.
- He donyckaIte, YuTo6bl Bndeokamepa cTaHOBInacb BlaJxHoi. IpeOxoPahnIte BnDEOKaMepy OTOJQI IN MOpCKoB BObl. Blara MoKet npVBecTn K HEnOJaKam B pa6Ote BnDEOKaMepbI. HOrDa HEnCpPaBHoCTb yCTpaHHTb HeBO3MOxH0 [a].
HnkOrJa He OCTaBnIe BIndeOkAmpy B MeCtax, rIe TEMpePaTypa NDoHNMaEaTcBbIe 60°C, HnPImep, B aBTOMoBHe, npInapKOBaHHom B COJIHeuHOM MecTe, IIN IOd npMByIM COJIHeuHbIM CBEToM [b].
- BydTe BHNMaTeIbHbI, KOrDa ocTabIaReTe BVdeOkaMepy B6n3u OkHa mNn BHe NOMeueHn. DeIcTBne pIamORo CoJIHeuHoro CBeta Ha 3kpan JKД, BUnOnckTaTeB nNn O6BeKTHB B TeueHne dIInTeJbHoro BpeMeHn MOrTy PnVBectn K HeNCpNaBHOCTn [C].
- He ChimaTe COJHcE HENOCpeDCTBeHHO. 3To MOKTe npBcTeK HcNcPabHOCT BInDeOkAmepbl. BbIOJIHRe TcBemKY CoJHcA B yCLOBnA Hm3KoI OCBeUeHHocTn, HAnpMEm, B CymePkax [d].
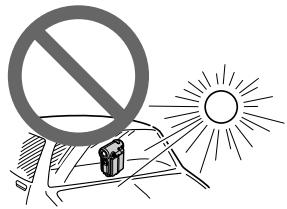
[b]
[d]
Checking supplied accessories
Make sure that the following accessories are supplied with your camcorder.
Y6eIntecb, cyTo cneIyIOuIne npHaIaNExKHOCTn npInaraiOTcK BaSei BnDeokampe.
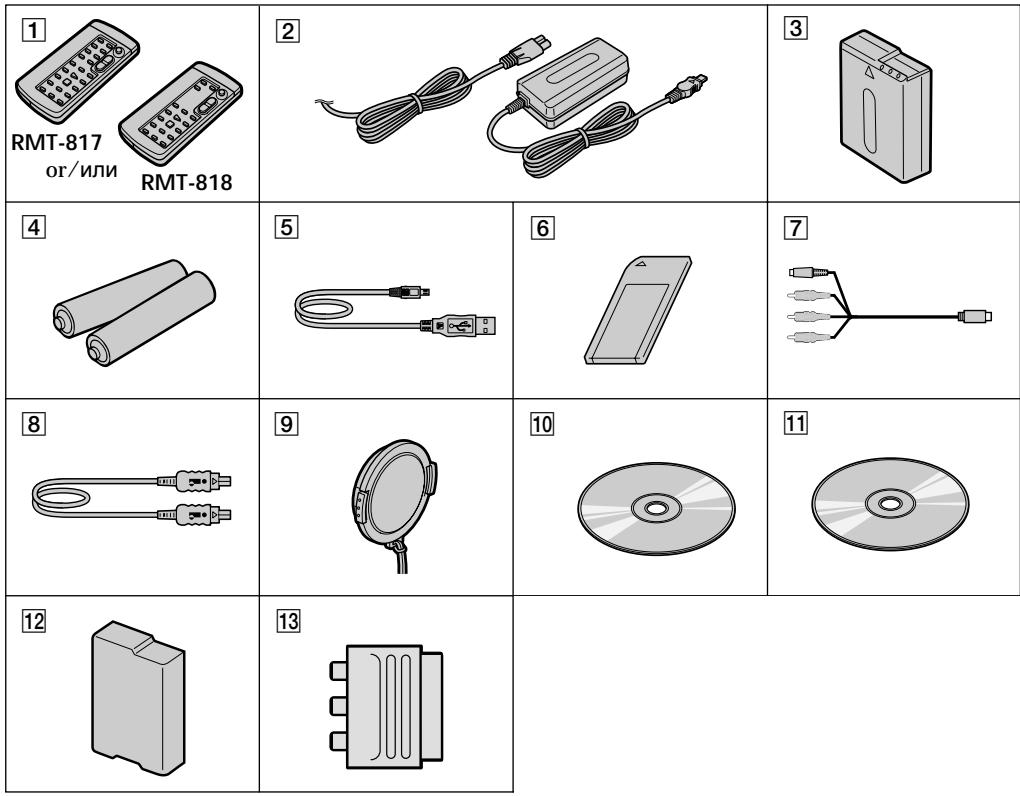
Wireless Remote Commander (1) (p. 253)
RMT-817: DCR-IP7E
RMT-818: DCR-IP5E
2 AC-L20A AC power adaptor (1), the mains lead (1) (p. 26)
3 NP-FF50 battery pack (1) (p. 25, 26)
4 R6 (size AA) batteries for the Remote Commander (2) (p. 254)
5 USB cable (1) (p. 203)
[6] "Memory Stick" (1) (p. 136)
7 A/V connecting cable (1) (p. 59)
8 i.LINK cable (1) (p. 101)
Lens cap (1) (p. 38)
10 CD-ROM (SPVD-004 USB Driver) (1) (p. 202)
11 CD-ROM (Movie Shaker Ver. 3.1 for MICROMV) (1) (p. 199)
12 Battery terminal cover (1) (p. 25)
13 21-pin adaptor (1) (p. 60) European models only
- DCR-IP7E only.
Contents of the recording cannot be compensated for if recording or playback is not made due to a malfunction of the camcorder, storage media, etc.
Step 1 Preparing the power supply
Installing the battery pack
We recommend that you use the battery pack when you use your camcorder outdoors.
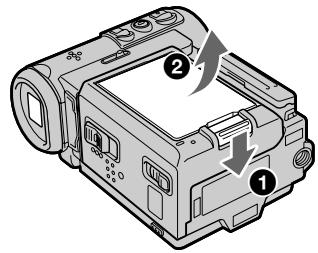
(1) While turning down the BATT (battery) release lever in the direction of the arrow 1, remove the battery terminal cover in the direction of the arrow 2.
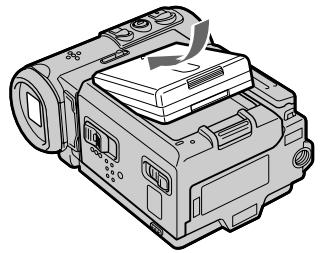
(2) Install the battery pack in the direction of the arrow until it clicks.
UcTaHOBka 6aTapeHoro 6JIOka
PekomEnyETcN cNoJIb3ObaTb 6aTapeHbI bLOK pRn iCNoJIb3ObaHm BaSeB vNeOkamepbl BHe NOMEeHnI.
(1)Припегемшени рычakka освобождени▼BATT (батарного блoka)ВизВНаразьени CTpeken ① ChIMITE Кршky 6атарий HBIX KOHTAKTOВ BНаразьени CTpeken ②.
(2)BcTaBbTe 6aTapeHbI 6LoK B HappaBneHn CTpeKN TaK, YTo6bI OH 3aUeKNyJNC.
1
2
To remove the battery pack
The battery pack is removed in the same way as the battery terminal cover.
Step 1 Preparing the power supply
Note on the battery terminal cover To protect the battery terminals, always install the battery terminal cover after the battery pack is removed.
Note on installing the battery pack
Make sure that the battery pack is properly installed. Check also the battery pack is not attached to the camcorder askew.
Charging the battery pack
Use the battery pack after charging it for your camcorder.
Your camcorder operates only with the "InfoLITHIUM" battery pack (F series).
See page 231 for details on the "InfoLITHIUM" battery pack.
Step 1 Preparing the power supply
Пункт 1 ПОДROTOВКИ NGTOUHINKA NITAHNIA
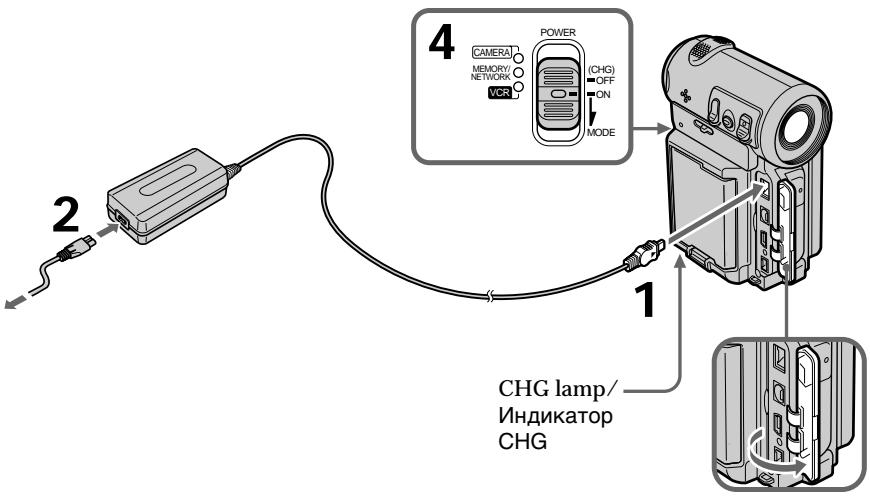
(1) Open the jack cover and connect the AC power adaptor supplied with your camcorder to the DC IN jack with the plug's mark facing the lens side.
(2) Connect the mains lead to the AC power adaptor.
(3) Connect the mains lead to the mains.
(4) Set the POWER switch to OFF (CHG). The CHG lamp lights up when the charge begins. After the charge is completed, the CHG lamp goes out (full charge).
(1)ОТкpoиTe KрblИКу ГеЗда и NOДСоeДИнITE ceTeBOJ aДaNTep nepEMeMHORO ToKa, npINlaeMbI K BnDEOKaMepe, K Гe3dY DC IN, TAK YTO6bI 3Hak ▲Ha WTeKepe 6bln obpaueH B CTOPOHy ObbeKtɪBa.
(2)ПодсоeДинITE npOBODэЛeКТрОпТанИΚ ceTeBOMy aДaNTepу nepemeHorno TOKa.
(3)ПодсоeДинHTe npOBOD эЛeКТрОпТанЯ K ceteBOI po3ETke.
(4)YcTaHOBInTe nepeKlnUoHaTeJIb POWER B noLoXeHne OFF (CHG). KOrJa Nauchetc3apJdka, 3arOpntc JAmNoUka CHG. IocNe OkOHuaHn3apJdkn JAmNoUka CHG norachET (nonHaJ 3apJdka).
After charging the battery pack
Disconnect the AC power adaptor from the DC IN jack on your camcorder.
Pocne 3apnK6aTapeHoro 6Ioka
OTcoeHnHTe ceTeBOaanTep nepemehnHO ToKa oT rHe3da DC IN ha Bauei BnDeokampe.
Step 1 Preparing the power supply
Prevent metallic objects from coming into contact with the metal parts of the DC plug of the AC power adaptor. This may cause a short-circuit, damaging the AC power adaptor.
While the battery pack is being charged, the CHG lamp flashes in the following cases:
- The battery pack is not installed correctly.
- Something is wrong with the battery pack.
When you use the AC power adaptor
Place the AC power adaptor near the mains. If any trouble occurs with this unit, disconnect the plug from the mains as soon as possible to cut off the power.
PpmeaHne
He donyckaTe KOHTaKaTa MeTaalNuecknx npedMeTOB C MeTaalNueeCKMn YacTAMn WTEkepa NOCToHHoro TOKa ceTeBOrO aanTepa. 3To MoKet npNBecTu K KOPOTKOMy 3ambikaHIO N NobpeXdEHNIO BaSei BnDeOKaMepbl.
Bo Bpem 3apdKn 6aTapeHoro 6noka lamnoquKa CHG 6ydt Mrratb B cneyuounx cnuyax:
The charging time may increase if the battery's temperature is extremely high or low because of the ambient temperature.
Approximate number of minutes at 25^ (77^) needed to charge an empty battery pack
Bpem 3apAdkn MOKeT yBeJIuHtbcS,ecIIN Tempepatpa6aTaapeHoro 6boka Upe3MepeHO BbICOKaII IN HN3KaB CJIeDCTBne OKpykaIOSeI Tempepatpl.
PnIbI3ntBbHoe BpeMa B MInHytax npi TemnepaType 25^ IJI 3apAdkn NIOHO pao3pRKeHHoro 6aTapeHoro 6noka
Recording time/Bpem3auncs
| Battery pack/Батуарейный 6лok | Recording with the viewfinder/Запись с помоцью Ви dioискателя | Recording with the LCD screen/Запись с помоцью зкрана XXКД | ||||
| Backlighting on/3адniaюпodeветka - вkl | Backlighting off/3адniaюпodeветka - вkl | |||||
| Continuous*/Hер人民银行* | Typical**/Тинчану** | Continuous*/Hер人民银行* | Typical**/Тинчану** | Continuous*/Hер人民银行* | Typical**/Тинчану** | |
| NP-FF50(supplied)/NP-FF50(приларется) | 80 | 45 | 65 | 35 | 80 | 45 |
| NP-FF70 | 170 | 100 | 140 | 80 | 170 | 100 |
Approximate number of minutes of recording time when you use a fully charged battery
- Approximate continuous recording time at 25^ C( 77^ F) . The battery life will be shorter if you use your camcorder in a cold environment.
** Approximate number of minutes for recording while you repeat recording start/stop, zooming and turning the power on/off. The actual battery life may be shorter.
Pπi6JIu3nTeJbHoe BpeM 3aIncB MmHyTaX npI nCIOJIb3OBAHm NOpHOCTbIO 3apJxEHHOrO 6aTapeHOrO 6Joka
* PnIbI3nteIbHoe BpeMa HnpepeBHBNO 3aIncn pnp TemnepaType 25^ .Pnp IcNoJIb3OBAHN BInDeOKaMepbl B XoJIONbIX ycNoBmX cpoK cnjx6bl 6aTapeHoro 6noka 6yDet KOpOe.
**PnIbIaIeIbHoeBpeMgBMHyTuXdIa3aIcNcCHeOJHOKpaTHbIM NyCKOM/OCTaHOBko3aIcNc,Hae3JDM BUNDeOKaMepeblBkJIooHEm/BbIKLIOUeHEmPiTaHn.ΦaKTuYeckn cPoK cLyXbbl3apHa6batapeHoro bloka MoKeT 6bItb KopoYe.
Playing time/BpemBAocnpom3BedeHnA
| Battery pack/Батуарейный 6лok | Playing time on LCD screen/B越来越大 Bocspoon3BedeHЯ захра themselves into the sea | Playing time with LCD closed/B越来越大 Bocspoon3BedeHЯ захра themselves into the sea |
| NP-FF50 (supplied)/NP-FF50 (прилariaется) | 65 | 80 |
| NP-FF70 | 135 | 165 |
Approximate number of minutes of playing time when you use a fully charged battery
Approximate continuous playing time at 25^ (77^) . The battery life will be shorter if you use your camcorder in a cold environment.
ПриблзnteЛьhoeВремВOCрпОЗБve徳нь MнHyTAX ПИ NСЮЛБЗOBAHIN ПОЛHOCТьO 3аржehнoro 6aTapeHnoro 6Loka
PnIb3ntJIbHOe BpMa HEnpepbIBHORO BocpnOn3BeDeHnprnTeMnpaType 25^ .Pn INcNoB3OBaHN BnDeOKaMepbBXoIOhBix ycNoBnx cpoK cnJx6bl 6aTapeHoro 6noka 6ydet Kopoye.
Step 1 Preparing the power supply
If the power runs out quickly even though sufficient remaining battery time is indicated Fully charge the battery pack so that the correct battery remaining time will be indicated.
Recommended charging temperature
We recommend charging the battery pack in an ambient temperature of between 10 to 30^ (50 to 86^ ).
What is "InfoLITHIUM"?
The "InfoLITHIUM" is a lithium ion battery pack which can exchange data such as battery consumption with compatible electronic equipment. This unit is compatible with the "InfoLITHIUM" battery pack (F series). Your camcorder operates only with the "InfoLITHIUM" battery. "InfoLITHIUM" F series battery packs have the 1^InfoLITHIUM mark. "InfoLITHIUM" is a trademark of Sony Corporation.
Connecting to the mains
When you intend to use your camcorder for a long time, we recommend that you power it from the mains using the AC power adaptor.
(1) Open the jack cover and connect the AC power adaptor supplied with your camcorder to the DC IN jack on your camcorder with the plug's mark facing the lens side.
(2) Connect the mains lead to the AC power adaptor.
(3) Connect the mains lead to the mains.
Пункт 1 ПОДROTOВКИ NGTOHнka NITAHNIA
EcIn 3apRd 6ydt N3pacxOdoBan 6bICTpo, HecMOTpHa To YTO INHnKaTOp NOKa3bIbAet DOCTaToUHoe BpeMa pa60tbl OctabWeroC8 3apJa 6atapeHoro 6Joka
IoiHocTbIO 3apAInTe 6bapeuHbI 6bnok, YTO6bl INDkaZnB BpeMeHN pa6bI ocTabWeroC8 3apJa 6bapeHoro 6Ioka 6blna npabunbHOJ.
PeKOMeHdyemar TempepaTpya 3apAdkn
PeKOMeHdyeTcBbIIOJIHrTb3apRdKy 6batapeHoro 6Ioka npn OkpykaHOuei TemnepaType BnpedeJax oT 10^ do 30^
The set is not disconnected from the AC power source (mains) as long as it is connected to the mains, even if the set itself has been turned off.
Notes
- The AC power adaptor cannot supply power if the battery pack is attached to your camcorder.
- The DC IN jack has "source priority". This means that the battery pack cannot supply power when the mains lead is connected to the DC IN jack, even when the mains lead is not plugged into the mains.
A car battery
You cannot use car batteries with the camcorder.
IPDEIOCTEPEXEHNE
Annapat He OTKIouaetcO NTocuHnKa nepemehoro ToKa Do Tex nop, noka OH noCoedHnK 3JeKTPnuecko CeTn, daXe ecnn Cam annapat BbIKNoueH.
PpimueaHn
-ПИТанго OT ceTeBOrO aДaNTepa nepeMeHHORToKa MoKeT He NOdaBaTbCra,ecN6batapeHbI bLoK npNKpEnnK BaSei BIndeOKaMepe.
ΓHe3do DC IN nIMeET "PnOpntet nCTOchNka". 3To O3NaHaeT, YTO nITaHne OT 6aTapeHOro 6Loka He nOdaeTcR, KOrJa npOBoD 3NeKtpOnNTaHnI PoIDCoEiHEn K ΓHe3dy DC IN, DaJx eCnI npOBoD 3NeKtpOnNTaHnI He BkHIOUeH B cTeByIO p03eTKy.
ABTOMo6nIbHbIaKKymyIaTOp
HeIb3I NCnOJIb3OBAbTa aBTOMo6nJIbHbI aKKyMylTOp IaI NITaHr BInDeOKaMepebl.
Step 2 Setting the date and time
Be sure to set the date and time when you use your camcorder for the first time. "CLOCK SET" will be displayed each time you set the POWER switch to CAMERA or MEMORY (DCR-IP7E only) unless you set the date and time.
If you do not use your camcorder for about 3 months, the date and time settings may be erased (bars may appear) because the built-in rechargeable battery installed in your camcorder will have been discharged (p. 240).
First, set your area, then the summer time, the year, the month, the day, the hour and then the minute.
(1) Set the POWER switch to CAMERA or MEMORY (DCR-IP7E only). The CAMERA or MEMORY lamp (DCR-IP7E only) lights up.
(2) Select FN, then press the centre on the control button. The PAGE1 screen appears.
(3) Select MENU, then press the centre on the control button. The menu appears.
(4) Select, then press the centre or on the control button.
(5) Select CLOCK SET, then press the centre or on the control button.
The illustration: In CAMERA mode/
PucyHok:BpeXmmeCAMERA
Step 2 Setting the date and time
(6) Select your area, then press the centre on the control button.
(7) Select whether your area is in summer time or not, then press the centre on the control button.
When your area is in summer time, select ON, when not in summer time, select OFF.
(8) Select the year, then press the centre on the control button.
(9) Set the month, day and hour with the same procedure as that in step 8.
(10) Set the minute, and enter it using the time signal. The clock starts to move.
(11) Press DISPLAY to turn off the menu. The clock setup is completed.
Пунков 2 YctaHOBka DaTbI IN BpeMeHn
(6) BbIbePte CBoI perNoH, 3aTeM hAkmite Ha ceHTp ● Ha KHOnKe ynpaBHeHn.
(7) BbIbepuTe, nCnoJIb3yETcR uIN He nCNoJIb3yETcR BaUeM perNoHE nepExoJ IeTHeBpeM, 3aTeM HaxMMTe Ha UeHTp ● Ha KHOKe ynpabLeHnA.
EcIn B BaWem pernohe nCnObn3yeTcN IeTHee BpEm, BbI6epnte ON; ecIn HET - Bbl6epnte OFF.
(8) BbIbePnte roi, 3aTeM haxmnte Ha ceHTp ● Ha KhONKe ynpabJIeHnI.
(9) YctaHOBNTe MeCau, DeHb uac C NOMOsbIO npoceDpybl, OINcaHHoB B nyHKTe 8.
(10) YCTaHOBInTe MInHyTbI, BBeJa INx B MOMENT nepeDaun CnRHaJa ToUHOro BpeMeHN. YaCbI NaHuYT cyHKUOnHIpOBaTb.
(11) HaxmTe KhoNky DISPLAYДЯ OTKIOUeHnMeHIO. YcTaHOBKa YacOB 3aBepSeHa.
6,7
CLOCK SET
AREA 26 ↑ GTM-5.0
New York, Bogota
QIANTERTHE
SUMMERTIME OFF ON
DATE Y M D

CLOCK SET
6 ↑ GMT-5.0
New York, Bogota
SUMMEPTIME OFF
COMMUNITY
DATE TMYMDT 1
2002 1 1 12:00AM
↓↓ESEX:NEXT ITEM
8,10
CLOCK SET
AREA 26 GMT-5.0
New York, Bogota
SUMMEPTIME OFF
DATE 1Y 1M 1P 1T
20021 1 1 12:00AM
EXECNEXTITEM

SETUP MENU
CLOCK SET 472002
LTRSIZE17:30:00
DEMO MODE
RETURN
The illustration: In CAMERA mode/
Pucyok:BpeximeCAMERA
The year changes as follows:

Iog n3mehreTc cIeDyUoHm 6pa30m:
Step 2 Setting the date and time
To return to the FN screen
Select , , then press the centre on the control button after step 10. The PAGE1 screen appears. Next, select EXIT, then press the centre on the control button.
If you do not set the date and time
"--- -- -- -- -- " and "--- :- - :- - " are recorded on the tape or the "Memory Stick" (DCR-IP7E only) as the data code.
Note on the time indicator
The internal clock of your camcorder operates on a 24-hour cycle.
Simple setting of clock by time difference
You can easily set the clock to the local time by setting a time difference. Set up the AREA and SUMMERTIME items in the menu settings.
(1) Install the battery pack, or connect the AC power adaptor for the power supply (p. 25 to 31).
(2) Slide OPEN/ EJECT in the direction of the arrow and open the cassette lid. The cassette compartment automatically lifts up and opens.
(3)Push the middle portion of the back of the cassette to insert it. Insert the cassette in a straight line deeply into the cassette compartment with the window facing out.
(4) Close the cassette compartment by pushing down the cassette lid halfway. The cassette compartment automatically goes down.
(5) After the cassette compartment goes down completely, close the lid until it clicks.
(1)Длг подачи ппатня установite 6атapestайы 6лok ил подсенин te aадаNTep nepemehnHoro toka (cTp.25-31).
(2)ПередиьтpepeknohayateIb OPEN/ EJECTB HaprabnEni CTepeKIn OTKpoIe KpbIuKy KaccetHoro OTceKa. KaccetHbIOTcEaBTOMaTneckn NOHNMeTCBBEx NOTkoPoeTc.
(3)HaxmTe Ha cepeiny 3aDnei CTopoHbI KaccTebl, YTO6bI BCTaBtB ee. BCTaBbTe KaccTeYIO pRMOB KACCtTHBI OTCek Do ynpa, TaK YTO6bl OKoUKO 6blnO oBauneHO Hapyxky.
(4)3akpoTe KaccTeBHy OTeK, HaxaB Ha KpbIiKy 6e3 oc6oTo ycNIny. KaccTeBHy OTcEK ABTomAtueCeKn OnyctITcR BHN3.
(5)ПосleteТOroКаССTeHbI OTeCkОуCTnTc
NonHocThbO BnH3,ЗakpoIte KpbIshky TaK,
ЧтобlaОна 3aцeнKHулacb.
2
3,4
5
To eject the cassette
Follow the procedure above, and take out the cassette in step 3.
Notes
- Do not press the cassette compartment down firmly. Doing so may cause a malfunction.
- Before you open the cassette lid, be sure to disconnect the A/V connecting cable, i.LINK cable, and USB cable (DCR-IP7E only). If you open the cassette lid without disconnecting the cables, the cables or plugs of the cables may be damaged.
ДяиЗВLEЧЕнЯ KACCEТI
BbIOnHnTe yka3aHHyO BblSe npoceDpyu N BblbTe Kaccety BnykTe 3.
Примеань.
- He haxkmaite C ycuinme Ha kaccethbi otcek. 3TO MOKeT npuBecTu K HncnpabHOCTn.
-П配电дуемOTkpblTкршkyKacceTHORO OTEka,OBa3aTeIbHo OTKnIOuHTe COeINHITelhBn Ka6eIb ayDIO/BnDeo, Ka6eIb i.LINK n Ka6eIb USB (ToIbKOДЯ moDEJI NDCR-IP7E).EcIn OTkpblTкршky KacCETHORO OTEka,He OTcoeINHЯKa6eJI, MoXHO NOBpeIDt Kb6eJI n pa3beMbl.
Step 3 Inserting a cassette
IyHKT 3 YctaHOBka Kaccetbl
To prevent accidental erasure
Slide the write-protect tab on the cassette to expose the red mark.
Labels may cause a malfunction of the camcorder. Therefore, be sure not to:
- Stick on any labels than the one supplied.
- Stick the label onto any part of the cassette other than the label position [a].
PpIMeAHne OTHOCHTbHO HAKJIeKn
Hakleki Moryt npnbctn K HncpabHOCTn BundeokamepbI. PoToM y6eDiTeCb, YTO:
- Bby npknlenBaTe HaKneIky COOTBeTCTBtuOJero Tnna.
- Bby npKneBaeTe HaKneKy B COOTBeTCTByIOeM MeCeHa KaccTe [a].
Recording a picture
Your camcorder automatically focuses for you.
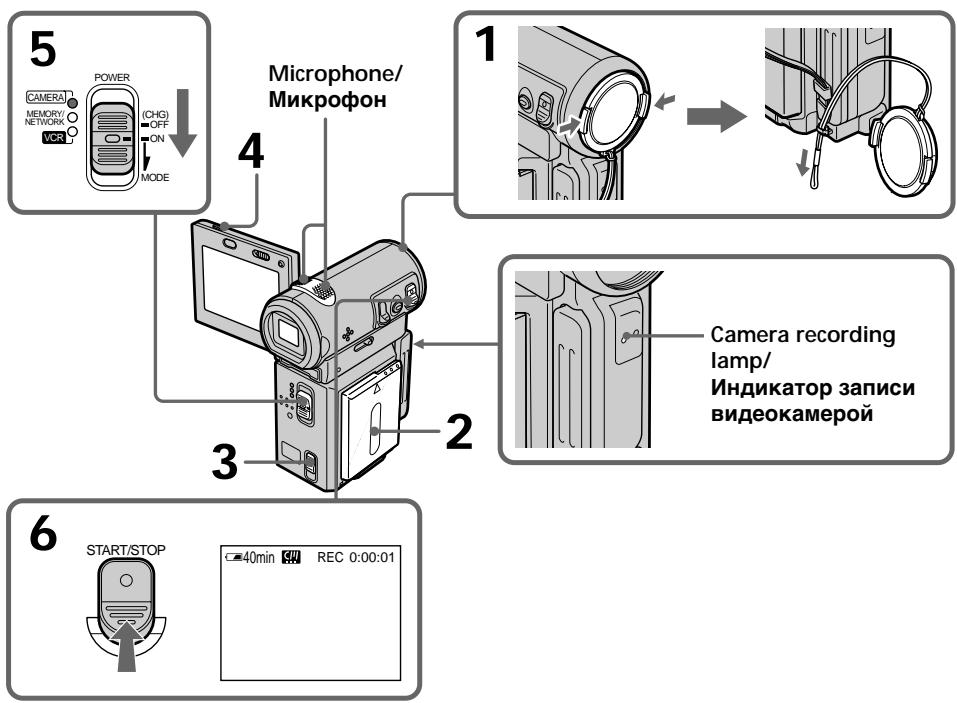
(1) Remove the lens cap and pull the lens cap string to fix it.
(2) Install the power source. See "Step 1 Preparing the power supply" for more information (p. 25).
(3) Insert a cassette. See "Step 3 Inserting a cassette" for more information (p. 36).
(4) Press OPEN, then open the LCD panel.
(5) Set the POWER switch to CAMERA. The CAMERA lamp lights up and your camcorder is set to the standby mode.
(6) Press START/STOP. The STBY indicator flashes. Then, the REC indicator appears instead and the camcorder starts recording. The camera recording lamp located on the front of your camcorder lights up. To stop recording, press START/STOP again.
3a\Pncb n3o6paXeHn
BaSha BnDeOkamepa aBTOMaTHeCKN BbIOnJIHReT φokcnpOBky 3a Bac.
(1)CHIMNTE KpbIiKy o6bekTnBa n NOTHInTe 5Hyp KpbIiKn O6bekTnBa, YTO6bl 3aФИКСИРОВаТe.
(2)YctaHOBInTe NCTOCHNK NITAHIN. CM.“IpyK1 1 PioIroTOBka NCTOCHNka NITAHIN" DnIPOJyEHHa DOIOJIHNTEJBHO INHΦOpMaun (cTp.25).
(3)BCTaBbTe KacceTy.CM. "IyHKT 3 YcTaHOBka KaCCeTb"I DnI NOJUyeHn DOJONHITeNbHOu INHΦOpMaun (CTp. 36).
(4)HaxMMTe OPEN,3aTeM oTKpoIte naHeJIb XKII.
(5)Установпейсян POWERВ в поожене CAMERA.Загор'tяnamnotka CAMERA,и видевокамербудет установлесь реким ождионя.
(6)HaXMMTe KHOKNy START/STOP. INHdNkaTOp STBY HaHneT MIRatb. 3aTeM BmecTo Hero 3aRopITc HINdkaTOp REC, n BnDeokamepa HaHneT 3aINCb. BbcBETnTc TaKxe IaMNoCKa 3aINcN, paCNOJKeHHa Ha nepeDHe N aHei BNdeOKaMepbI. JIn oCTaHOBKn 3aINcN HaXMMTe KHOKNy START/ STOP eue pa3.
After recording
(1) Set the POWER switch to OFF (CHG).
(2) Close the LCD panel.
(3)Eject the cassette.
(4) Remove the power source.
Note
Do not touch the built-in microphone during recording.
To enable unbroken transition
Transition between the last scene you recorded and the next scene is unbroken as long as you do not eject the cassette, even if you turn off your camcorder.
However, check the following:
- When you change the battery pack, set the POWER switch to OFF (CHG).
If you leave your camcorder in standby mode for 5 minutes while a cassette is inserted Your camcorder automatically turns off. This is to save battery power and to prevent battery and tape wear. To resume the standby mode, set the POWER switch to OFF (CHG), and to CAMERA again. However, your camcorder does not turn off automatically when a cassette is not inserted.
Recording data
The recording data (date/time or various settings when recorded) are not displayed during recording. However, they are recorded automatically onto the tape. To display the recording data, press DATA CODE on the Remote Commander during playback. You can also use DATA CODE on the PAGE3 screen for this operation. (p. 54).
The usable battery time when you record using the LCD screen
The battery time is slightly shorter than the shooting time using the viewfinder.
While the STBY indicator is flashing
When you press START/STOP, the camcorder returns to standby. (The recording was not carried out.)
Pocje 3aIncn
While the REC indicator is flashing The START/STOP button does not work. Wait until the camcorder returns to standby. (The recording is being carried out while the REC indicator is flashing.)
Adjusting the angle of the LCD screen
The LCD panel can be rotated as illustrated below.
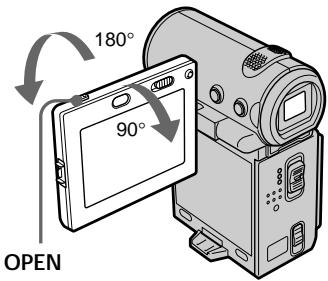
When you want to close the LCD panel, set it horizontally, then swing it into the camcorder body.
Note
When you use the LCD screen (except in the mirror mode), the viewfinder automatically turns off.
When you adjust the angle of the LCD panel Make sure the LCD panel is opened up to 90 degrees.
Shooting with the mirror mode
This feature allows the camera subject to view himself-or herself on the LCD screen.
The subject uses this feature to check his or her own image on the LCD screen while you look at the subject in the viewfinder.
3aHncb n3o6paXeHHa
Korda ropnt nJIM MURAeT nHdkaTop REC
KhoNka START/STOP he pa6oTaet. DoxDntecb Bo3BpaueHn BnDeOkaMepbI B peXmOxndaHn. (3aInCb BblOnHHeTc, KOrdaMnrae INdikatop REC.)
Perynupobka yrna 3kpaHa KKd
ПаньжКД можно nobopaunaBaTb, кak noka3aHo Ha pncyHke.
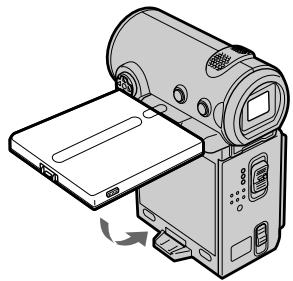
EcHn HeoDmO 3aKpbIb NaHeB JKK, yCTaHOBnTe ee ropu30HTaJIbHO, 3aTeM npCoeDInHnTe ee K Kopnyc BuDeOKaMepbI.
PpmeuHne
In CAMERA or MEMORY (DCR-IP7E only) mode.
Pull out the viewfinder, and open the LCD panel and rotate it as illustrated below.
The indicator appears in the viewfinder and on the LCD screen.
When the POWER switch is set to CAMERA, 11 appears in standby mode, and appears in recording mode. Some indicators appear mirrorreversed and others are not displayed.
Pictures in the mirror mode
The picture on the LCD screen is a mirror-image. However, the picture will be normal when recorded.
During recording in the mirror mode
FN appears mirror-reversed in the viewfinder.
When you press the centre on the control button when FN is displayed on the screen The PAGE screen appears and the indicator is not displayed.
I3o6paXeHnB 3epKaIbHOM pexHmE
I3o6paKeHne Ha 3KpaHe KKd 6yDet OTo6paKaTbC3ePkaJIbHo. OJHaKo 3aInCb I3o6paKeHn6yDet HOpMaJIbHOi.
Bo Bpem 3aHncn B 3epKaJIbHom pexmme
B BnDOnCKaTeNe NOBNTcN HINKaunr FN B 3epKaIbHo OTrpaeHHOM BnDE.
Pn HaxaTn Ha zentp Na KhoNke
ynpabJIeHn BO BpeM OTo6paXeHn FN Ha 3KpaHe
ПогИNTСАКран PAGE,а ИнДикатOP He OTO6paKaetC.
Adjusting the brightness of the LCD screen
When recording in bright conditions, set the LCD BACKLIGHT switch to OFF.
(1) In CAMERA, MEMORY (DCR-IP7E only), playback, or playback pause mode, select FN, then press the centre on the control button. The PAGE1 screen appears.
(2) Select PAGE2, then press the centre on the control button. The PAGE2 screen appears.
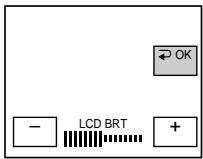
(3) Select LCD BRT, then press the centre on the control button. The screen used for adjusting the brightness of the LCD screen appears.
(4) Select - / + , then press the centre on the control button repeatedly to adjust the brightness.
- : to dim
- : to brighten
You can also adjust the brightness by pressing
/ repeatedly after you select -/+ .
(5) Press DISPLAY to clear the screen buttons.
PeryIinpobKa npKocTn 3KpaHa XKd
(5) Haxmte DISPLAY, yTo6bI y6paTb 3KpaHHbIe KHOIIKn.
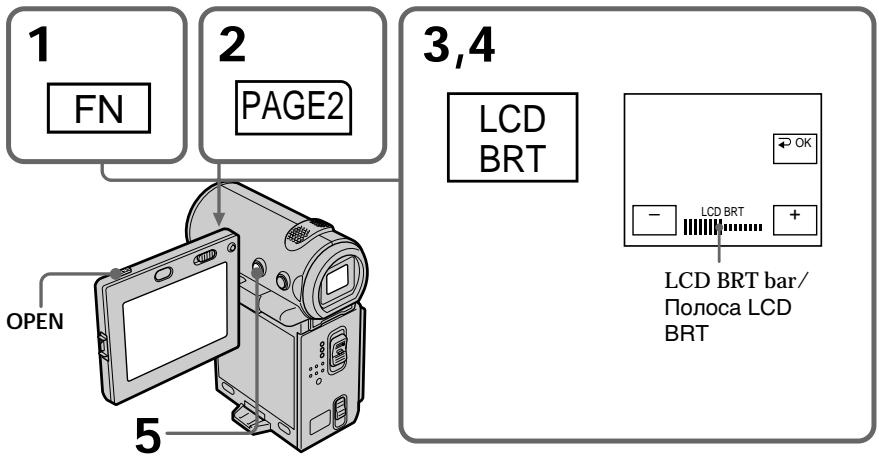
To return to the FN screen
Select OK, then press the centre on the control button after step 4. The PAGE2 screen appears. Next, select EXIT, then press the centre on the control button.
When FN is not displayed on the screen
Press DISPLAY or so that FN is displayed. You can also use DISPLAY on the Remote Commander.
The colour of the LCD screen
You can adjust it using the LCD COLOUR item in the menu settings (p. 124).
Even if you adjust the screen using LCD BRT, LCD COLOUR, or the LCD screen backlight The recorded picture will not be affected.
The setting of the LCD BACKLIGHT switch Normally, set it to ON. When you use the camcorder in bright conditions using the battery pack, set it to OFF. This position saves battery power.
Adjusting the viewfinder
If you record pictures with the LCD panel closed, check the picture with the viewfinder. Adjust the viewfinder lens to your eyesight so that the indicators in the viewfinder come into sharp focus.
Pull out the viewfinder and move the viewfinder lens adjustment lever.
Viewfinder backlight
You can change the brightness of the backlight when using the battery pack. Set up the VF B.L. item in the menu settings (p. 124).
Even if you adjust the viewfinder backlight The recorded picture will not be affected.
Using the zoom feature
Push ZOOM up or down slightly for a slower zoom. Push it firmly for a faster zoom. Using the zoom function sparingly results in better-looking recordings.
"T" side: for telephoto (subject appears closer) "W" side: for wide-angle (subject appears farther away)
3aHnHa noDCBtKa BnOuCKaTeJIa
BbMOKTe N3MeHArTb RPKoCTb 3aDHeN IOcBETKn PnNcNoJIb3OBAHN 6aTapeHOrO 6Ioka.HacToe VF B.L.BycTaHOBkax MeHIO (Ctp.124).
EcIn BblperylnpyeTe 3aHIOIO NOcBETKy BIDONCKATEJI
3To He NoBnIeT Ha 3aIncanHoe n3o6paXeHne.
IcnoJIb3OBAHneФyHKcHn Hae3da BndeOkamepbl
HaKmaiTe ZOOM cnerka BBepx nInn BnH3 dIy MeDneHHoro Hae3da KamepbI. YcKopeHHbI Hae3d IOCTnraeTc6OJee TBepdbIM HaxKaTHem. IcnoIb3OBaHne cyHKuIN Hae3da BNdeOKamepbl B He3NaHTenbHO CTeneHN ObecneuBaet HanJyUWne pe3yJbTaTbI.
CTopoha "T":ДЯ TelepeToO (obBeKT npIbInxKaeTcA)
To use a zoom greater than 10×
A zoom greater than 10× is performed digitally. To activate digital zoom, set D ZOOM to 20× or 120× in the menu settings. The digital zoom function is set to OFF as a default setting (p. 124).
3NaueHne Hae3da Kamepb6oJee 10x
Hae3d BnDEOKaMepb6Olee 10x BbINONHaTeTCA
znpoBbIM MeToDOM. YTo6bI aKTHBn3NpOBaTB
znpoBOH Hae3d, yCTaHOBNTe D ZOOM
3NaueHne 20x nn 120x By cTaHOBkax MeHIO.
Фнкци znpoBOrO Hae3da Ha npEaPnTnU
n3roTOBHTe YcTaHaBnBaETC B NOLOXHeHne
OFF kak yCTaHOBKa no yMOJuaHIO. (cTp. 124).
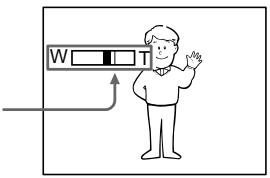
The right side of the bar shows the digital zooming zone.
The digital zooming zone appears when you set D ZOOM to 20× or 120× in the menu settings (p. 124)/
IpaBaT CTOpOHa INoLObi Ha 3KpaHe noka3bIbaeT 3Ohu cNΦpOBoI TpaHcΦoKaun.
30Ha zHpOBoW TpaHcPokaunn
noBnAeTcR, KOrda D ZOOM BVCTaHOBkax MEHO yCTaHOBJIeHO 3HaYeHne 20× n1n 120× (ctp. 124)
Note
During optical zooming or when the zoom position is set to the "W"-end side, the SteadyShot function does not work.
When you shoot close to a subject
If you cannot get a sharp focus, push ZOOM toward the "W" side until the focus is sharp. You can shoot a subject that is at least about 80~cm (about 2 feet 5/8 inch) away from the lens surface in the telephoto position, or about 1cm (about 1/2 inch) away in the wide-angle position.
Notes on digital zoom
- Digital zoom allows you to set values up to 20 × or 120 × .
- The picture quality deteriorates as you push ZOOM down toward the "T" side.
When the POWER switch is set to MEMORY (DCR-IP7E only)
You cannot use the digital zoom.
Ppimechane
PnONTNueckOM Hae3eKamepbI NIN KOrTa nIOJKeHne yHKcIMn Hae3da HaxoNTcB B cTOpOHe W",yHKnZn SteadyShot He pa6oTaET.
PnCbemKe oBekTa C 6JIn3KOro NOJIOXeHn
EcIn Bbl He MoXeTe nOlyuHTb Yetkyo fokycnpoBky, haxMnte ZOOM B HappaBHeHn cToPOhbl "W", noka He nOlyuHTe YetKm foKyc. B nOLOxehn "TeJefoTo" moXHo BblONHrTa cbEmky o6BekTa, KOTOpBn HaxOOnTcHa paacCToHn He Mehee 80 cm OT ob6eKtNb a nn OkOIO 1 cm B nOLOxehn "ShIpOKoyOrlbHbI".
The indicators displayed in recording mode
HДИКaTOPbl, OTo6paKaemble BpeKIme 3aIncN
The indicators are not recorded on the tape.
INdkaTopbI He 3anbcBaHOTcHaJeHTy.
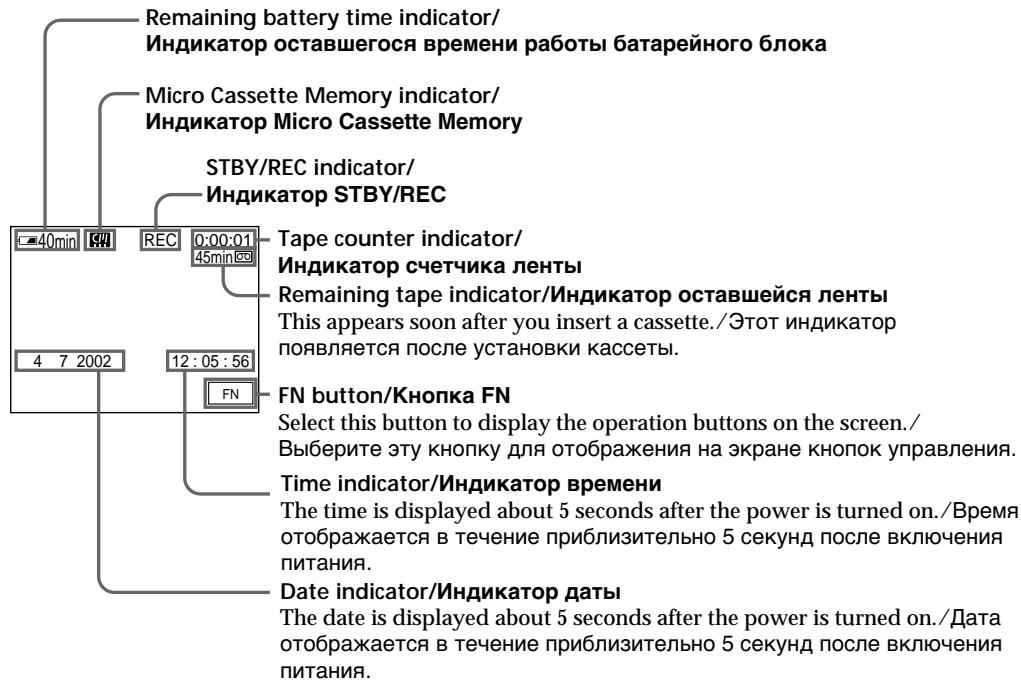
Remaining battery time indicator
The remaining battery time indicator roughly indicates the recording time. The indicator may not be correct, depending on the conditions under which you are recording. When you close the LCD panel and open it again, it takes about 1 minute for the correct remaining battery time in minutes to be displayed.
Tape counter
The tape counter can be reset using COUNT RESET on the PAGE3 screen via the FN screen.
Инданков Врemeи OCTaBшeroCярда 6batapeHoro 6Ioka
INHdkaTopBpeMeHHOCTabWteoC3apraDa 6batapeHoro 6Ioka yka3bIbaeT npn6bn3ntelbHOe Bpem 3aIncn. INHdkaun MoKet 6bITbHe COCBcEM TOHoi, B 3aBNCIMocTOn OT yCLOBn, B KOTOpbIX PON3BOJNTc 3aIncb. EcIn 3aKpbITb NaHeB XKKD n OTKpbITb ee cHOba,TO pN6bn3ntelbHO uepe3 1 MNHTy NOBHTc INHdkaun, OTo6paXkaIOUaT OTHoe OCTabWeec BpeM pa60tbl 6batapeB MnHyTax.
CuetukJeHTbl
C6poc cyeTnKa JIeHTbI MoXHO BblIOJIHnTb C nmoOuCOUNT RESET Ha 3KpaHe PAGE3 uepe3 3KpaH FN.
Remaining tape indicator
The indicator may not be displayed accurately depending on the tape.
Recording data
The recording data (date/time or various settings when recorded) are not displayed during recording. However, they are recorded automatically onto the tape. To display the recording data, press DATA CODE on the Remote Commander during playback. You can also use DATA CODE on the PAGE3 screen via the FN screen for this operation (p. 54).
Shooting backlit subjects - BACK LIGHT
When you shoot a subject with the light source behind the subject or a subject with a light background, use the backlight function.
Press BACK LIGHT in CAMERA or MEMORY (DCR-IP7E only) mode.
The indicator appears on the screen.
To cancel, press BACK LIGHT again.
HnDKaTOp octaBweCJneHTbI
INHДИКATOP MOKET TOUHO He OTObpaXaTbcra B 3aBNCIMOCTN OTJeHTbl.
3aHncaHbIe daHbIe
When the backlight function is activated
The backlight function will be cancelled when you set EXPOSURE to MANUAL on the PAGE1 screen via the FN screen.
While the FN screen is displayed
The backlight function is deactivated.
Korda yHKnna 3aHne noDCBETKn aKTNBHa
ФункцязднйпсбгкьбудтOTмен�а, ecn yctanobntb EXPOSURE B noLoxhene MANUAL Ha 3kpane PAGE1 uepe3 ekpan FN.
B MOMENT OTo6paXeHnE 3KpaHa FN
ФункцязднйпocBETКОТКЛю悔а.
Self-timer recording
Recording with the self-timer starts automatically in 10 seconds. You can also use the Remote Commander for this operation.
(1) In standby mode, select FN, then press the centre on the control button. The PAGE1 screen appears.
(2) Select SELF TIMER, then press the centre on the control button. The (self-timer) indicator appears.
(3) Press DISPLAY to turn off the screen buttons.
(4) Press START/STOP.
Self-timer starts counting down from 10 with a beep sound. In the last 2 seconds of the countdown, the beep sound gets faster, then recording starts automatically.
3aIncb no TaMepy camo3anycka
3aIncb no TaImepy cAmO3aNycka NaHnHaTeCTa aBTOMatUneckn uepe3 10 cekynd.ДЯЗToI ONepaUNMOxHO TaKKe IcNoB3OBAtB NylbT dNCTaHcIOHNOY npabLeHnI.
(1) B pexime oxndaHnB bI6epnte FN, 3aTe mHaKMnte Ha ceHTp Ha KhoNKe ynpablenHn. IoBNTc3KpaH PAGE1.
(2) BbI6epnte SELF TIMER, 3aTeM haxmnte Ha ueHtp ● ha KhoNKe ynpabNeHnA. INdNkATOp (TaIMep cAmO3aNycka) NOBNTcHa 3KpaHe.
(3) Haxmnte KhoNky DISPLAY ДЯТКЛЮЧЕнэ Краньх KhoNOK.
(4) Haxmnte KhoNky START/STOP. TaMep cmo3ayncka haunet o6paTbI OTCuET OT 10c 3ymMePbIM CnHaJOM. B NocLeHnE 2 cekyHdbI o6paTHOrO OTCeTa 3ymMePbI CNrHaJ 6yJeT 3ByuAtb YaIe, a 3aTEM aBTOMaTnueCKn HaunetcraIINCb.
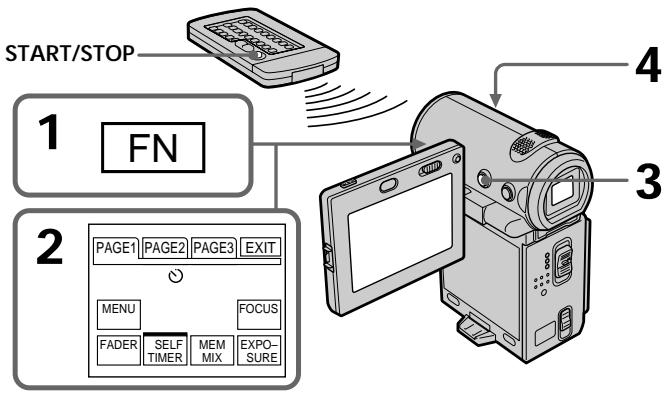
To stop the count down
Press START/STOP. To restart the countdown, press START/STOP again.
To record still images on a tape using the self-timer
Press PHOTO in step 4 (p. 63).
ДлгoctaHObKnобpaTHOrOOTcHeta
HaxmTe KhONky START/STOP.Дя NOBTOphORo 3anycka o6paTHoro OTCeTa HaxmTe KhONky START/STOP eue pa3.
To cancel self-timer recording
Select SELF TIMER, then press the centre on the control button in standby mode. The (self-timer) indicator disappears from the screen.
Note
The self-timer recording mode is automatically cancelled when:
- The self-timer recording is finished.
- The POWER switch is set to OFF (CHG) or VCR.
When the POWER switch is set to MEMORY (DCR-IP7E only)
You can also record a still image on the "Memory Stick" with the self-timer (p. 153).
You can go to the end of the last recorded point.
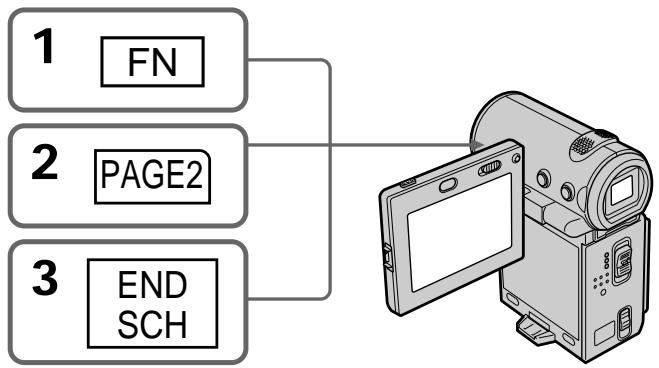
(1) In standby mode, select FN, then press the centre on the control button. The PAGE1 screen appears.
(2) Select PAGE2, then press the centre on the control button. The PAGE2 screen appears.
(3) Select END SCH, then press the centre on the control button. The last 5 seconds of the recorded section are played back and your camcorder returns to the standby mode. You can monitor the sound from the speaker.
BbMOKeTe nepeTn K KOHeuHOn ToUKe nocJeHrero 3aNcAHHoro 3n3Oda.
(1)BpeXmme OxNdaHnBbI6epnte FN,3aTeMaHXMITE Ha zHTp ●Ha KhoNKeynpaBHeHn. IopBnTc3KpaH PAGE1.
(2) Bb6epnte PAGE2, 3aTeM haxMtTe Ha ceHTp H a KhoIKe ynpabHeHn. IoBtCra 3KpaH PAGE2.
(3)BbI6epnteEND SCH,3aTeMaHxMnTe Ha ceHtp HaNONKe ynpaBHeHn. BocnpoIN3BOJrTcN oCNeIhne 5 cekyHd 3aHncaHOrO 3n30da, INBnDeOKamepa BO3BpaUaeTcB peXIM OxNDAHn. Bbl MOKeTe KOHTpOInPObaTb 3ByK Upe3 aKyCTNuCeKYIO CnCTeMy.
To return to the FN screen
Select EXIT, then press the centre on the control button.
To stop searching
Select END SCH, then press the centre on the control button again.
Even if you remove the cassette
The end search function works.
You can monitor the playback picture on the LCD screen. If you close the LCD panel, you can monitor the playback picture in the viewfinder. You can also control playback using the Remote Commander supplied with your camcorder.
Bocnpon3VeJeHne JeHTbl
BbMOKTe KOHTpOINPOBaT BOCpOIN3BOIDIMOE
n3o6paXeHne Ha 3kpaHc JKKD.EcIn Bbl
3aKpoEte NaHeJIb KKII, Bbl CMOKeTe
KOHTpOINPOBaT BOCpOIN3BOIDIMoe
n3o6paXeHne B BuOnCKaTeIe.MoXHO TaKke
KOHTpOINPOBaT BOCpOIN3BeDeHne C NOMOuBIO
nylbTa DnCTaHcNOHHOrO ynpaBNeHnR,
PpNlaRaEMOrO K BnDeOKaMepe.
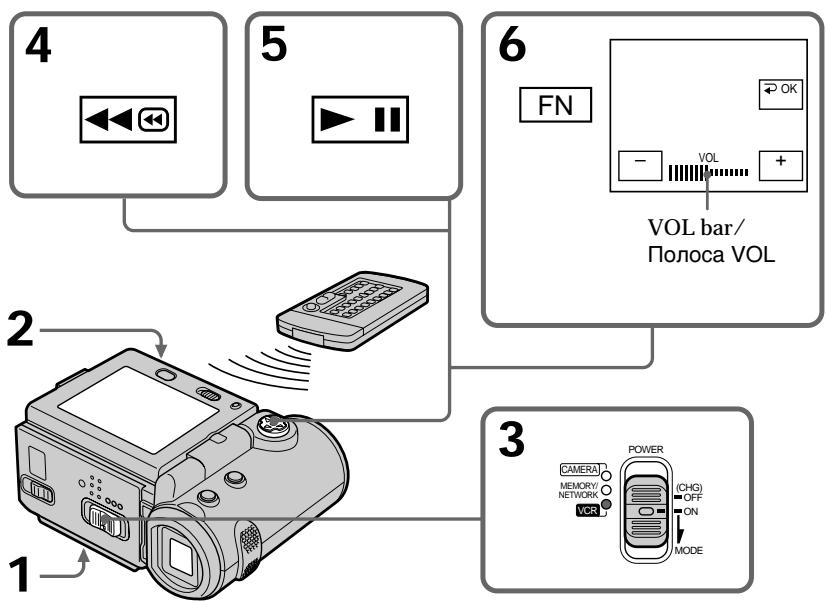
(1) Install the power source and insert a recorded tape.
(2) Press OPEN to open the LCD panel.
(3) Set the POWER switch to VCR. The camcorder turns on and the VCR lamp lights up.
(4) Select 40 , then press the centre on the control button to rewind the tape.
(5) Select 11 , then press the centre on the control button to start playback.
(6) Adjust the volume following the procedure below.
① Select FN, then press the centre ● on the control button. The PAGE1 screen appears.
② Select VOL, then press the centre on the control button. The screen used for adjusting the volume appears.
③ Select - / + , then press the centre on the control button repeatedly to adjust the volume.
- : to turn down the volume
to turn up the volume
You can adjust the volume by pressing repeatedly after you select - / +
(7) Select OK, then press the centre on the control button. The PAGE1 screen appears.
Bocnpoun3BeDeHne JeHTbI
(1)YcTaHOBNTe NCTOUYHK NITaHnI N BCTaBBTe 3aNtcaHHyIOJeHTy.
(2)HaxmTe OPEN, yTo6bl OTKpbIb naneJb XKd.
(3)Установпейсякюатуль POWER в положене VCR. Видаокамерв Клочтсь, И заорптсь Иndикатop VCR.
(4)BbIbePnte ,3aTEM HaxMMTe Ha ceHTp ●Ha KhONKe ynpabNeHnA DnI NpeMOTKnJeHTbl.
(5)BbIbePnte H,3aTEM haxMMTe Ha ueHtp ●Ha KHOJIke ynpabLeHnI dIy HaaylaBOCpOIN3BeEHHN.
(6)Отруелуриteгрмкocь,слдуннжkenpnbEdeHHbIMNYHKTam.
① BbI6epNTeFN,3aTeM haxmnte Ha ceHTp HkONKe ynpabLeHn. IORBntc 3KpaH PAGE1.
② BbI6epnteVOL,3aTeMHaKMMteHaueHTp Ha KHOJKe ynpaBHeHnA. IoRbNTcA 3kpaH perynipOBKn rPOMKOCTn.
③ BbIbepnTe-/+,3aTeM nocJeDoBaTeIbHo HaxmaiTe Ha ceHTp Ha KhONKe ynpAJIeHnI dIypeRyIpOBKn rPOMKoCTn. -- IJr POHNJKeHnI rPOMKoCTn +: IJr IOBbIeHnI rPOMKoCTn MoXHOOTpeRyIpOBaTb rPOMKoCTb, Haxmair nocJeDoBaTeIbHo KhoNkI /noCne BbIbopa-/+.
(7)BbIbepeITe OK,3aTeM haxMMte Ha ceHTp HkONKe ynpabJIeHn. IOnBaNTcA kpaH PAGE1.
To return to the FN screen
Select EXIT, then press the centre on the control button.
To stop playback
Select , then press the centre on the control button.
When monitoring on the LCD screen
You can turn the LCD panel over and move it back to the camcorder body with the LCD screen facing out.
If you leave the power on for a long time
Your camcorder gets warm. However, this is not a malfunction.
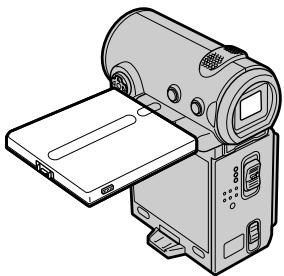
When you open or close the LCD panel
Before you open or close the LCD panel return it to the position illustrated below.
EcIn octaBtB nHTAHne BKJIIOUeHHbIM Ha dIINTEbHOE BpEMr
BndeokamepaHarpeetc.0dako3to He ABnreTcHHeCNpabHOCTbIO.
Korda Bbl OTkpbiBaTe nnn 3aKpbIbAte naHeJI KkI
Ipeepd OTKpbITnem mnn 3aKpbTne mnaHeJI NKd BepHnTe ee B nOLOKeHne, noka3aHnoe Hnke.
Note
Be careful not to touch the BATT lever while you are playing back a tape. The battery pack may accidentally detached from the camcorder.
Приимechание
He doTpaRnBaTecbdo pbluaXka▼BATT Bo BpemB OBCPON3BeHnJIeHTbl. BaTapeHbI 6JOK MOKeT clyaHNOOTCOeDINHTbcr OT BUNDeOKaMepbl.
To display the screen indicators - Display function
Press DISPLAY on your camcorder or on the Remote Commander. The indicators being displayed disappear from the screen. To display the indicators, press DISPLAY again.
Your camcorder automatically records not only images on the tape but also the recording data (date/time and various settings when recorded) (Data code).
Follow the steps below to display the data code using the camcorder or the Remote Commander.
When using the camcorder
To display the data code
(1) In playback or playback pause mode, select FN, then press the centre on the control button. The PAGE1 screen appears.
(2) Select PAGE3, then press the centre on the control button. The PAGE3 screen appears.
(3) Select DATA CODE, then press the centre on the control button. The DATA CODE screen appears.
IcnoB3OBAHne yHKcuN KoDa daTbI
Bndeokamepa aTOMatUeCKn 3anncbIbaet HaJeHTy He TOnbKO n3O6paXeHn, HO n daHHble O 3annc (daTy/Bpemn pa3hIe yCTaHOBKn npn 3annc) (KoD daHHbx).
CneNyTe HnXKePnPBeDeHHbIM NyHKTaIЯ OTo6paXeHnRA KOda DaHHbIX C NcNoJIb3OBaHnEM BnDEOKaMepeBtI INI PyNbTa DnCTaHcUHOHOrO ynpaBHeHnR.
Pnncnojb3OBaHnBndeOkamepbl
YTo6bI OTo6pa3ntb KoD daHhbIX
(1)B pexime Bocnpoun3BeeHn nn nay3bl BOCpOun3BeEHHn BbI6epnte FN, 3aTeM haxmnte Ha ceHTp ● Ha KhoNke ynpablenHn. POnBNTcAkpan PAGE1.
(2)Bb6epTe PAGE3, 3aTeM haxMnte Ha ceHTp Ha KhoNKe ynpabneHn. IoarBntc 3kpaH PAGE3.
(3)BbI6epnte DATA CODE, 3aTeM haxMnTe Ha ceHtp ●Ha KhoNKe ynpabJIeHna. IopBNTca 3KpaH DATA CODE.
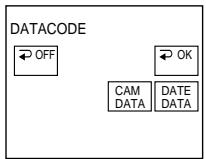
(4) Select CAM DATA or DATE DATA, then press the centre on the control button. The top of the selected button is indicated with a green bar.
(5) Select OK, then press the centre on the control button.
(6) Select EXIT, then press the centre on the control button.
To clear the data code display
(1) Select OFF, then press the centre on the control button in step 4.
(2) Select EXIT, then press the centre on the control button. The data code disappears from the screen.
When using the Remote Commander
Press DATA CODE on the Remote Commander in playback or playback pause mode. The display changes as follows:
date/time various settings (SteadyShot OFF, exposure, white balance, gain, shutter speed, aperture value) no indicator
To not display various settings while operating with the Remote Commander
Set DATA CODE via to DATE in the menu settings (p. 124).
The display changes as follows each time you press DATA CODE on the Remote Commander: date/time no indicator
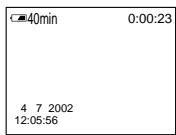
Date/time/ Data/Bpema
[a] SteadyShot OFF indicator
[b] Exposure mode indicator
[c] White balance indicator
[d] Gain indicator
[e] Shutter speed indicator
[f] Aperture value indicator
Bocnpoun3BeDeHne JeHTbI
(4)BbIbepuTe CAM DATA nIN DATE DATA, 3aTEM HaxMnTe Ha ueHTp ● Ha KhoNKe ynpaBHeHn. Cbepxu Bbl6paHHo KNOpKn NOBnTc3eJIeHa nOloca.
(5)BbIbepeTe OK,3aTeM HaKMTe Ha ceHTp Ha KONKe ynpaBJIeHn.
(6)BbIbePntE EXIT,3aTeM HaxMMTe Ha ueHTp ●Ha KHOJIke ynpabJIeHnI.
YtO6bO OYnCTnTb DnCnPnei KOda DaHhbIX
(1)BbIbepeTe OFF,3aTeM haxMITE Ha ceHTp Ha KhoNKe ynpabNeHn B nyKHe 4.
(2)ВыберпгЕ EXIT,ЗаTem нахмпге Нацентр ---н КнОПКУпавлени. Кд даньх Ичсев.TСЗкрана.
IcnoJIb3OBAHne npIbTa dNCTaHcNoHHO ynpabLeHn
HaXmTe KhoNkY DATA CODE Ha nyIbTe
DInCTaHcIOHHOrO ynpabLeHnB B pexIme
BOCpON3BeDeHnA IIN nay3bl
BOcPON3BeDeHnA. INdIKaUH 6yJeT
N3MeHbTcB CNe dyUoUHM O6pa3OM:
DaTa/BpeMRA pa3HbIe yctaHOBKn (ycToHnuBa
cbEmKa OFF, 3KcNo3uHnA, 6baHc 6bEnOro,
ycnHeHne, cKOpocTb 3aTBopa, BeJIuHnA
dnaparMbI) 6e3 INdIKaUH
YTO6bI He OTO6paKaTb pa3JIuHbIe yCTaHOBKn npn pa6Ote C nyltom dNCTaHcIOHnHO ynpaBHeHnA
YcTaHOBnTe npaMeTp DATA CODE c nOmoIbHo ETo B noIoxKeHne DATE BycTaHOBkax MeHIO (Ctp. 124).
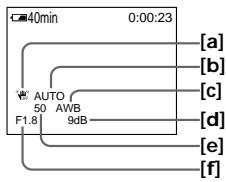
Various settings/ Pa3JInuHbIe yCTaHOBKn
[a] INHdNkaTop OFF yctOuHBOB cbeMkn
[b]ИнданаТор рекима Экноцип
[c] INHdikatop 6aIahca 6eIoro
[d]Индкатор усименя
[e] INHdNKaTOP CKOPoCTn 3aTbopa
[f]ИндикаTopВeINuINHbIДиapparMbI
Various settings
Various settings is your camcorder's information when you recorded. In recording mode, the various settings are not displayed.
When you use the data code function, bars ( ) appear if:
- A blank portion of the tape is being played back.
- The tape is unreadable due to tape damage or noise.
- The tape was recorded by a camcorder without the date and time set.
- The camcorder is in various playback modes.
Data code
When you connect your camcorder to a TV, the data code also appears on the TV screen.
Remaining battery time indicator during playback
The indicator shows the approximate continuous playback time. The indicator may not be correct, depending on the conditions in which you are playing back. When you close the LCD panel and open it again, it takes about 1 minute to display the correct remaining battery time.
Various playback modes
To operate the video control buttons, set the POWER switch to VCR.
To view a still image (playback pause)
- Select 11 , then press the centre on the control button during playback. To resume normal playback, select 11 , then press the centre on the control button again.
- Press PAUSE on the Remote Commander during playback. To resume normal playback, press PAUSE again.
Pa3JIMHbIe yCTaHOBKn
Pa3nHbIe yCTaHOBKn Hecyt INHOpMaUIO O BInDeOKaMepe npn BbINOJIHeHm 3aIncn. B pexKIme 3aIncn pa3nHbIe yCTaHOBKn He oTo6paxaOTcra.
PnncnoJb3ObaHnn FyHKcN Koda daHHbIX NOBJIaIOTcNoIocbl(----),ecn:
-Bocnpo3boDntcHne3aIncAHbIyuactOK JeHTbl.
-JIeHTa RAJIaTeTcH HeuHTaEmoN I3-3a NOBpeKJeHnI JIN NOMex.
-3aIncb Ha JeHTy 6bIa BbIOnHeHa BnDeOKamepo 6e3 yCTaHOBKn DaTbI bPemeHn.
-BnIeOkamepa haxoJITcB pa3JIuHbIX pekimax BocpOIN3BeDHeN.
KoДдaHHbIX
Ecnn BnDeokamepy noDcoeDnHnTb K TeNeBn3Opy, KoJ DaNhbIX TaKke 6ydet OTo6paXaTbcn Ha 3kpaHe TneBn3Opa.
Индикатор Времен octabweroc3apra6batapeHoro 6Ioka BOВрЯ BOCPON3BedeHn
HnDnkaTop oTo6paKaaET npi6bn3nteBhoe Bpem HnpepbIBHOBOcnpoN3BeDeHnA.
Инданатов мост戒ьглелучимВ 3abncimocntуocnoBIM,ВКOTOBIX BbINOJIHReTcBOcPOnI3BeDEHnE. KorDa BbI 3akpbBaTe NaHel JKKД n OTkpBaTe ee CHOBA,Tpe6yETcOKOLO1 MmHTbIДЯ npaBInbHorO OTO6pAXEHnIaOCTaBWeROc BpeMeHn 3apJa 6aTaapeHoro 6JNoKA.
Pa3JIuHbIepeXIMbI BOCIpOn3BeDeHnA
- Select l , then press the centre on the control button when the tape is not being played back. To resume normal playback, select l , then press the centre on the control button.
- Press FF on the Remote Commander when the tape is not being played back. To resume normal playback, press PLAY.
To rewind the tape
- Select , then press the centre on the control button when the tape is not being played back. To resume normal playback, select , then press the centre on the control button.
- Press REW on the Remote Commander when the tape is not being played back. To resume normal playback, press PLAY.
To locate a scene while monitoring the picture (picture search)
- Select or then keep pressing the centre on the control button during playback. To resume normal playback, release the button.
- Keep pressing REW or FF on the Remote Commander during playback. To resume normal playback, release the button.
To monitor the high-speed picture while advancing or rewinding the tape (skip scan)
- Select then keep pressing the centre on the control button while rewinding the tape, or select then keep pressing while advancing the tape. To resume normal rewinding or advancing, release the button.
- Keep pressing REW on the Remote Commander while rewinding the tape, or keep pressing FF on the Remote Commander while advancing the tape. To resume normal rewinding or advancing, release the button.
Дя усокорно nepemOTkn IeHTbI Bnepe
- BbIbepnTe 3aTem HaXmTe Ha ceHtp ●Ha KHOJKe ynpaBLeHnKoTJa JeHTa He BOCpON3BOJNTc.ДЯ BO3O6HOBJIeHnO bIyHOrO BOCpON3BeJeHnBaIbepnTe H3aTEM HaXmTe Ha ceHtp ●Ha KHOJKe ynpaBLeHnA
- HaxkMnte KhONky FF ha nyIbTe DnCTaHnOHHOr ynpabLeHnry, KOrJa JeHTa He BOCpOn3BODnTc. IInr Bo3o6HOBJeHnro O6bUHoro BOCpOn3BeDeHnra HaxkMnte KhONky PLAY.
To view the picture at slow speed (slow playback)
Press SLOW on the Remote Commander during playback. To pause playback, press PAUSE on the Remote Commander. To resume normal playback, press PLAY on the Remote Commander.
To search for the last scene recorded (END SEARCH)
Select END SCH on the PAGE2 screen through the FN screen, then press the centre on the control button when the tape is not being played back. The camcorder plays back the last 5 seconds of the recorded section, then stops the playback.
Video control buttons of the camcorder
To play back or pause a tape
To stop a tape
To rewind a tape
To fastforward a tape
When the playback pause mode lasts for 5 minutes
The playback pause mode will be released, then the camcorder stops the playback. To resume playback, select >11 , then press the centre on the control button or press PLAY on the Remote Commander.
Bocnpon3BeDeHne JeHTbl
Длгпрсмтра BOCрpon3BeDEнги n306ржкеня Ha 3aMeДлгноу ckopoctu (3aMeДлгнhoe BOCрpon3BeDEнe)
HaxmTe KhONky SLOW Ha npIbTe
DnCTaHcUOnHOrO ynpabLeHnBa BpEmr
BOCPoM3BeDeHn. Dny nay3bl
BOcPon3BeDEHn HaxmTe KhONky PAUSE Ha npIbTe DnCTaHcUOnHOrO ynpabLeHn. Dnra
BO3O6HOBNeHn O6bUHOrO BOcPon3BeDEHn
HaxmTe KhONky PLAY Ha npIbTe
DnCTaHcUOnHOrO ynpabLeHn.
Bb6epTe END SCH Ha 3kpaHe PAGE2 uepe3 3kpaH FN, 3aTeM haxmnte Ha ceHTp ● Ha KhONKe ynpabLeHnI, KOrJa IeHTa He BOCPOn3BOOITcR. BUnDeOKaMepa BOCPOn3BOOIT nocJeHnE 5 cekyHd 3aIIncAHHO 3nN3Oda, 3aTeM BOCPOn3BeDeHne OCTaHOBTcR.
KhONKn BnDeoKOHTpOJI BnDeoKaMepbI
BnBocnpOn3BeDeHnIyIay3bI BOCnpOn3BeDeHnJIeHTbl
IIOCTaHOBKnJeHTbl
<10]Длп поети Лentы Ha3aI
Bnepei
Ecn npexn may3bl Bocnpon3BedeHn npoJntc8 5 MmHyT
Pexm nay3bI BOCpOu3BeDeHnO TCKIOUHTcA, 3aTeM BnDEOKaMepa OCTaHOBNT BOCpOu3BeDeHnE. Iyra Bo3o6HOBLeHnB OBCpOu3BeDeHnRA BbIbepnte 一 _ 日 , 3aTeM HaxMtTe Ha ceHtp ● Ha KhONKe ynpabJeHn IIN HAxMtTe KhONky PLAY Ha npblte DInCTaHUNOHoro YnpabHeHn.
Viewing the recording on the TV screen
Connect your camcorder to your TV with the A/V connecting cable supplied with your camcorder to watch the playback picture on the TV screen. You can operate the video control buttons in the same way as when you monitor playback pictures on the camcorder screen. When monitoring the playback picture on the TV screen, we recommend that you power your camcorder from the mains using the AC power adaptor (p. 30). Also, refer to the operating instructions of your TV.
Open the jack cover. Connect your camcorder to the TV using the A/V connecting cable. Then, set the TV/VCR selector on the TV to VCR. The supplied A/V connecting cable is equipped with an S video plug and a video plug. Use either the S video plug or the video plug depending on the TV. Do not connect both of the plugs to the TV.
ДлгпрсмOTра BOCПОИЗВОДИМОТ ИЗБРAPKEHЯ 3КРан TELEВИЗОР ПОДСоЕДИНTE ВИDEОКAMEPУ K TELEВИЗОР Y NOMOÜB OCOEDINHTEЛBO HORO Ka6JIЯ ayДиO/ BIVIeO, KOTOPbI BXODIT B KOMПЛeKT NOCTABKIN BIVIeOКAMEPы. KHOKNaMуypaBLeHЯ BOCSPON3BEDEHem MOXHО ONEPINPOBaTb TAKIM Жe obpa3OM,ΚАК И ПPy INpApyBNeHЯ BOCSPON3BOIDIMbIM I3OBpAXeHЯ 3КранЕ ВИDEОКAMEPы. Пп рпсмOTpe I3OBpAXeHЯ HA 3KPaHc TeLEBVI3Opa peKOMeHNyETcR ПОДКЛЮЧaTB ВИDEОКAMEPY K 3ЛeKTPnueckoJ CETN C NOMOÜB cTeTeBOrO aJaNTepa перemeHHoro TOKa (cTp. 30).См.Takжe ИнСТPyKUINO NO 3KcPnyatauNi Baшero TELEBIV3Opa.
OTkpOte KpbIshky rHe3da. IOpCoEduHInTe BaUy BnDeoKamepy K TeLEBn3Opy C nOMoUbIO coeDHHTeNbHO Ra6eY ayno/BuJeO. 3aTeM yCTaHObITE nepeKluOaTe bTVVCR Ha BaWeM TeLEBn3OpE B noLoXKeHne VCR. PpNlaRaEmbI CoeDHHTeNbHbIKab6eY ayno/ BuJeO o6OpyOBaH pa3bEmom S video n BuDeopaaBemom.B 3aBncmocTn OT TeLEBn3Opa NcNoJb3yIte pa3bEmS video nIb BuDeopaaBem.He npdklouaTe oBa pa3bemaK TeLEBn3Opy.
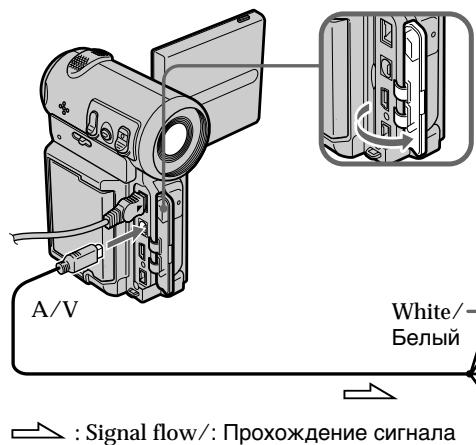
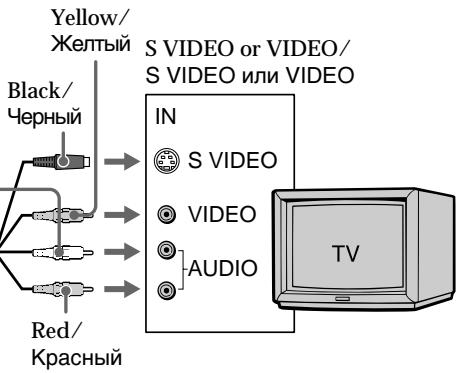
If your TV is already connected to a VCR
Connect your camcorder to the LINE IN input on the VCR using the A/V connecting cable supplied with your camcorder. Set the input selector on the VCR to LINE.
EcnBaw TeJeBn3Op yXe IoDCoeDHeN K BnDeOMaRHNToΦOHy
IoioceHInHe BnDeoKamepy K BXoHOMy
rHe3Ny LINE IN BnDeomarHnTofoHa c nOmoBHO
coeHNHTeJbHoro Ka6ena ayDIO/BnDeo,
KOTOpBn PnpJIraeTcK BnDeoKampe.
YCTaHOBe CeNEkTop BxOHDoro CnHaHa Ha
BnDeomarHnTofoHe B NoLoKeHne LINE.
If your TV or VCR is a monaural type
Connect either the yellow or the black plug of the A/V connecting cable to the video or S video input jack and the white or red plug to the audio input jack on the VCR or the TV. If you connect the white plug, the sound is an L (left) signal. If you connect the red plug, the sound is an R (right) signal.
If your TV/VCR has a 21-pin connector (EUROCONNECTOR)
- European models only
EcnBaw TeIeBn3Op nIn BndeomarHHToΦOH MOHOΦOHnueCKOro Tnna
IoiDcoeDInHnTe JeKtBn IIN uehNb pa3bEm CoeDInHnTeJbHOro Ka6JIa aydno/BuJeO K BxOJHOMy rHe3dy BnDEOCnHaJa IIN K rHe3dy S video,a 6BeJIy INI KpaChbI pa3bEm K BxOJHOMy rHe3dy ayDIOOCnHaJa Ha BnDEOMaHrTOfOHe INI TeNeBnOpe. Ppi IoiDcoEiHNHeHn BeNoRo WTeKepa, Bbl nolYuHTe CnHAn KaHana L (neBoro).A ecn Bbl IoiDcoEiHNTe KpacbHn WTeKepe, To Bbl nolYuHTe CnHAn KaHana R (npaboro).
EcIn B BaWeM TeJeBn3ope/ BuDeomarHnToΦOHe NMeetcra 21- WtblpkbOBbI pa3beM (EUROCONNECTOR)
-ToIbko IaIeBpOneiCKnx MoIeIeN
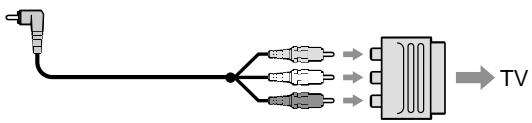
Use the 21-pin adaptor supplied with your camcorder.
If your TV has an S video jack Connect using the S video plug to faithfully obtain original pictures. With this connection, you do not need to connect the yellow (video) plug of the A/V connecting cable. Connect the S video plug to the S video jack on the TV or VCR. This connection produces higher quality MICROMV format pictures.
To display the screen indicators on the TV screen
Set DISPLAY via ETC to V-OUT/LCD in the menu settings (p. 124). You can turn on/off the screen indicators using the DISPLAY button.
IcnoIb3yIte 21-7TbIpbKOBbl aIaNTep, npnlaeraMbl K BaWe BnDeokamepe.
EcIn B Baem TeIeBn3ope IMeetcra He3do S BuJeO
BbIIOJIHInTe CoeINHeHne C NOMOuHpo pa3bema S video IaI NOUYeHNBaICOKOKaYeCTBeHHoro n3o6paXeHn. Ppi DaHHOM CoeINHeHn Bam He HxKHO NoIDCoEINHrTb XeENTbI uTeKeP (BnDeo) CoeINHInTeJbHOrO Ka6JeA ayDINO/BnDeo.
ПодсоeДиНTe Ka6eNB S video K rHe3dY S video Na TeIeBn3Ope nIIN BnIeOMaHrNtOΦOHe. 3To COeДиHcHne N03BOJlReT N0JIyUHTb BbICOKoKaueCTBeHHoe N3O6paXaeHne φopMaTa MICROMV.
Recording a still image on a tape - Tape Photo recording
You can record a still image onto a tape. This mode is useful when you want to print an image using a video printer (optional). You can record about 510 images on a 60-minute cassette. Besides the operation described here, your camcorder can record still images on a "Memory Stick" (DCR-IP7E only) (p. 149).
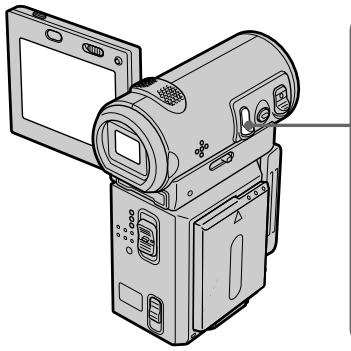
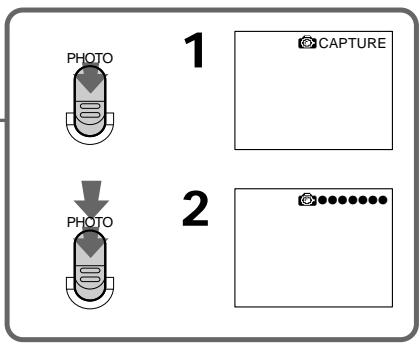
(1) In standby mode, keep pressing PHOTO lightly until a still image appears. The CAPTURE indicator appears. Recording does not start yet.
To change the still image, release PHOTO, select a still image again, and then press and hold PHOTO lightly.
(2) Press PHOTO deeper.
The still image on the screen is recorded for about 7 seconds. The sound during those 7 seconds is also recorded.
The still image is displayed on the screen until the recording is completed.
- ycoBepueHCTBOBaHHbIe Opeaun CbeMkn - 3aIncB HeIOBvXHOrO N3o6paXeHnHa JIeHTy - 3aIncB φOTorpaFm Ha JIeHTy
BbMOxKeTe 3aINcBtBaT HeNoDbNxHoe
n3O6paXeHHe HaJeHTy. DaHHbI peXIM
POnJIe3EN pRn BbINOJIHHeHm NeHaTu n3O6paXeHn
C NOMoUbBO BnDEOpnPHTepa (pnpO6peTaETcra
DOnOHNrTeJIbHO).Ha 60-MnHyTHoKacCeTe
MOxHO 3aINCaTb PpIMepHo 510 n3O6paXeHn.
KpOME BbIweONcaHNo ONepaun,
BbDEOkAmpa MOxET BblIOJInHTb 3aINcB
HeNoDbNIXhIX n3O6paXeHn Ha "Memory Stick" (ToIbKO MoJeJIb DCR-IP7E) (ctp. 149).
(1)В ржиме окданаши држnte сlerka hajkaToи кногу PHOTO до tex nop, noka He noarBtca HeNoDBnKhoe n3obpaxeHne. Пявитс ИндыКТOP CAPTURE. 3aInc b noka eше He NaHaJacb. Дяп n3meHEnH HeNoDbNkHoro n3obpaxeHи OTnyctHTe KhONky PHOTO, Bbl6epnte HenoDbNkHoe n3obpaxeHne CHOBA, a 3aTeM hakmte и deprxnte cIerKa hajkaToи kHonky PHOTO.
(2)Haxmte KhONKy PHOTO cnIbHee. HenoDbHXHoe n3o6paXeHne Ha 3KpaHe 6yDet 3aINCbIBaTbcr OKOJI 7 cekyHd.B TeueHne 3TNx 7 cekyHd 6yDet 3aINCbIBaTbcr I 3Byk. HenoDbHXHoe n3o6paXeHne OTO6paXaETcra Ha 3KpaHe Do Tex nop, poka He 3aKOHHTcra 3aINCb.
Notes
- You cannot make a tape photo recording during normal CAMERA recording.
- During tape photo recording, you cannot change the mode or setting.
- When recording a still image, do not shake your camcorder. The image may fluctuate.
- The tape photo recording function does not work during the following operations:
-Fader
- Digital effect
If you record a moving subject with the tape photo recording function
When you play back the still image using other equipment, the image may fluctuate.
To use the tape photo recording function while using the Remote Commander
Press PHOTO on the Remote Commander. Your camcorder immediately records an image on the screen.
To record clear and less fluctuated still images (DCR-IP7E only)
We recommend that you record on a "Memory Stick".
PpimueaHn
- HeBo3MoXHO BbIOnJIHrTb foTOcBEmKy Ha JIeHTy BO BpEMa o6bIcHOr 3aInci CAMERA.
- Bo BpemФOTOCbEMKn HaJIeHTy HeBO3MOxHo N3MeHnTb peKIM YIIN yCTaHOBky.
-ПиЗЗИСН HeNoBnXHOrO n3O6paXeHnI He DeJaTe pblKOB BnDeOkamepoN.
Избражени может SFbTb HeyctOnuNbIM.
ΦyHKUH pOToCbEKMn HaJIeHTy He paBoTaET BO BpEMr CLeDyUOxN Opeaui:
-Фeienep
-LnФровьэфсфekt
EcIn Bbl BbINOnHHeTe 3aNNbc DbNkUeOcR o6BeKtac NOMoUbO fYHKuH FOToCbeMkn HaJeHTy
ПиВОСПОНЗBEДЕнИН HENODBUNKHOrO n3o6paXeHЯHaДpy罗AnnapaType n3o6paXeHne MoXeT 6bITb pa3MbITbIM.
ДлнИСПОЛБЗОВАHЯФУHKUМФOTOCБЕМКИ На ЛENTу C ПОМОЧБЮ ПЛьТА ДИСТАЦИОНHOrO YINPABJIENHЯ
Haxmte KhoNky PHOTO ha nyIbTe
DnCTaHUNHO HorO ynpaBHeHry. BInDeokamepa
cpa3y Je BbIOJNHr 3aINcB N3o6paXeHry,
OTo6paxaEMOrHa 3kpaHe.
Длгздсчткнxи60лeeуctочньх HeNoDвнЖыxИЗбражehn(ToIbko MoDEJIb DCR-IP7E)
Pekomehnyetc3aHcBbTaHa "Memory Stick".
Self-timer recording
You can make a tape photo recording with the self-timer. You can also use the Remote Commander for this operation.
(1) In standby mode, select FN, then press the centre ● on the control button. The PAGE1 screen appears.
(2) Select SELF TIMER, then press the centre on the control button. The (self-timer) indicator appears on the screen.
(3) Press DISPLAY to turn off the screen buttons.
(4) Press PHOTO firmly. Self-timer starts counting down from 10 with a beep sound. In the last 2 seconds of the countdown, the beep sound gets faster, then the recording starts automatically.
3aInc b no TaMepy camo3anycka
MOxHO BbINOHNrHb FOToCObEMKy HaJeHTy no TaMepy cMo3aNycKa.ДЯ 3TOI onepaun MOxHO TAKKe IcNoIb3ObA Tb NylbT DnCTaHcUNOHOrO ynpabJIeHnR.
(1)BpeXmme OxNdaHnBbI6epnte FN,3aTeMaHXMnTe Ha ceHTp ●Ha KhoNKeynpaBHeHn. IopBnTc3KpaH PAGE1.
(2)BbIbePte SELF TIMER, 3aTeM haxMMTe Ha ueHtp ●Ha KHOJIke ynpaBHeHn. INHdNKatOp (TaIMep cAmo3aYcKa) NOBHTcH Ha 3KpaHe.
(3)HaxmTe DISPLAYДгЯOTKJIQUeHnIg 3KpaHHbIX KHOJOK.
(4)CnIbHee haxMnTe KhoNkpy PHOTO. TaImep cAmO3aNycca HaChET o6paTbI OTCuET OT 10c 3yMMepNbIM CnHAnOM.B NocIeHNHe 2 cekyHdbI o6paTHOrO OTCuTea 3yMMepHbI CnHAn 6yJeT 3ByuTa b Yaue, a 3aTEM aBTOMaTnueCKn HaChETcAanNCb.
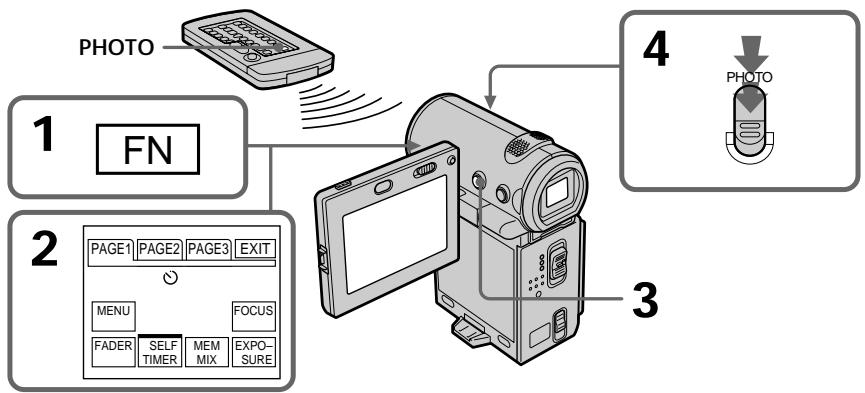
To cancel self-timer recording
Select SELF TIMER on the PAGE1 screen again, then press the centre on the control button in standby mode. The (self-timer) indicator disappears from the screen. You cannot cancel the self-timer recording using the Remote Commander.
Note
The self-timer recording mode is automatically cancelled when:
- The self-timer recording is finished.
- The POWER switch is set to OFF (CHG) or VCR.
You can record a 16:9 wide picture to watch on a 16:9 wide-screen TV (16:9WIDE).
Black bands appear on the screen during recording in 16:9WIDE mode [a]. The pictures viewed during playing back on a normal TV [b] or a wide-screen TV [c] are compressed in the widthwise direction. If you set the screen mode of the wide-screen TV to the full mode, you can watch pictures of normal images [d].
(1) In standby mode, select FN, then press the centre ● on the control button. The PAGE1 screen appears.
(2) Select MENU, then press the centre on the control button. The menu appears.
(3) Select 16:9WIDE via , then press the centre or on the control button.
(4) Select ON, then press the centre on the control button.
(5) Press DISPLAY to turn off the menu.
(1)B pexime oXkndaHnBb6epnte FN,3aTeMaHXMNTe Ha ceHTp Na KHOKe ynpabHeHn. IopBnTc3KpaH PAGE1.
(2)BbIbepuTe MEnu,3aTeM haxmTe Ha ceHtp H Ka KhoNKe ynpabJeHHa. IOnBaTc MeHIO.
(3)BbI6epNTe 16:9WIDE c nOMOuBHO c, 3aTeM haxMnte Ha ueHTp ● nJn ▷ Ha KhoNKe ynpabHeHn.
(4)BbI6epNTe ON,3aTeM haxMMTe Ha ueHTp ●Ha KhoNKe ynpaBHeHn.
(5)HaXMMTe KhoNky DISPLAY OTKJIIOueHnM MeHIO.
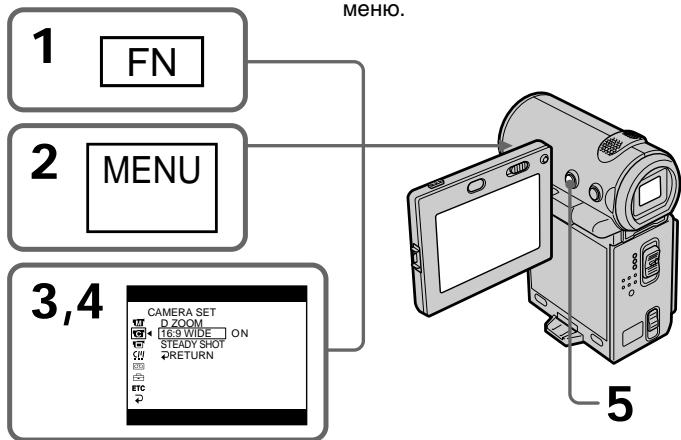
To cancel the wide mode
Set 16:9WIDE to OFF in the menu settings.
To return to the FN screen
Select RETURN, , then press the centre on the control button. The PAGE1 screen appears. Next, select EXIT, then press the centre on the control button.
In wide mode, you cannot select the following functions:
Old movie
- Bounce
During recording
You cannot select or cancel the wide mode. When you cancel the wide mode, set your camcorder to the standby mode and then set 16:9WIDE to OFF in the menu settings.
IcnoJb3OBAHne ⅢnpOKo3KpaHHoro peKIma
Bb6epnte RETURN, 3aTeMaHaxMnTe Ha ceHTp Ha KhoNke ynpabLeHnHa. NOrBNTcaKpaH PAGE1. Daane Bb6epTe EXIT, 3aTeMa HaxMnTe Ha ceHTp Ha KhoNke ynpabLHeHnHa
B shpoko3kpanHom pexime HeIb3a Bbl6paTb cIeDyUOme fYHKcMn:
-CTapHHoe KINHO
-Перескакваиме
BoBpem3aHncn
BbHe MoKeTe N3MeHnTb ININ OTMeHnTb
UInPOKo3KpaHHbI pexHM. EcIn HxJHo
OTMeHnTb UInPOKo3KpaHHbI pexHM,
yCTaHOBtBeNdeOKaMepy B pexHM OxNiDaHnA,
a 3aTeM yCTaHOBtpe pexHM 16:9WIDE B
NoLOXeHne OFF B yCTaHOBkax MeHIO.
Using the fader function
IcnoJb3OBaHne Функци ФeДepa
You can fade in or out to give your recording a professional appearance.
BbMOKeTe BbIOJNHTb PnABHOe BBeDeHne N BbIEDeHne 306paXeHn, YTO6bI pNJaTb BaewcBemKe npOceccNoHaJbHbN BnD.
[a]
STBY
REC
NORM.FADER(fader)/(fendep)

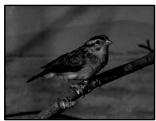
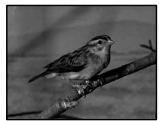
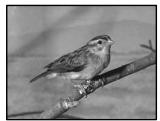
MOSC. FADER (mosaic)/(m03aɪka)
BOUNCE1)2
[b]
STBY
REC
MONOTONE
When fading in, the picture gradually changes from black-and-white to colour.
When fading out, the picture gradually changes from colour to black-and-white.
1) You can use the bounce function when D ZOOM is set to OFF in the menu settings.
2) Fade in only.
MONOTONE
При ВБЕДЕНИ N3ОБРAXЕне 6удET NOCTENEHNO N3MEHЯТбСТ OТ Yерно-6eNoTOdo UBeTHoro.
(1) When fading in [a]
In standby mode, select FN, then press the centre on the control button. The PAGE1 screen appears.
When fading out [b]
During recording, select FN, then press the centre on the control button. The PAGE1 screen appears.
(2) Select FADER, then press the centre on the control button. The FADER screen for selecting the fader mode appears.
(3) Select the desired fader mode, then press the centre on the control button. The top of the selected button is indicated with a green bar.
(4) Press DISPLAY to turn off the screen buttons.
(5) Press START/STOP. The fader indicator flashes, then lights up. After the fade in/out is carried out, your camcorder automatically returns to the normal mode.
(1)При ВБеDEDи n306paXeHnA [a]
B pexime oKuJaHn BbIepeNTe FN, 3aTeM haxmte Ha ceHTp Ha KhoIke ynpabJeHn. IOnBvTcra 3kpaH PAGE1. PnBbIbeHnn N3o6paXeHn [b]
BoBpem3aIncs BbI6epuTeFN,3aTeM
HaxMITE Ha ceHTp Ha KHONKe
ynpaBHeHn. IoBvTcR 3kpan PAGE1.
(2)BbIbepnte FADER,3aTe mHaXMMte Ha ceHtp
Ha KhoNke ynpaBneHn. IoBvTc3 ekpaH FADER nIy BbIbopa peKmua ceipepa.
(3) BbIbepeTte Tpe6yembl peXm fepiepa,
3aTeM HaXmIte Ha ueHtP ● Ha KhoNKe ynpaBHeHn. CBepxy Bb6paHnO KHOpKn NOBnAETc3eHa HnOloca.
(4)Haxmnte DISPLAYДЯOTKIOUeHnA
3KpaHHbIX KHONOK.
(5)Haxmnte KhoNky START/STOP. INdikkaTOp
feiepa MmHET n 3aTeM 3arOpntc. Pocne BbIOnHeHn Opeaun BBeDeHn/ BbIEDeHn I3O6paXeHn BnDEOKamepa aBTOMaTtueckn BepHeTcB ObUHbI peKIM.
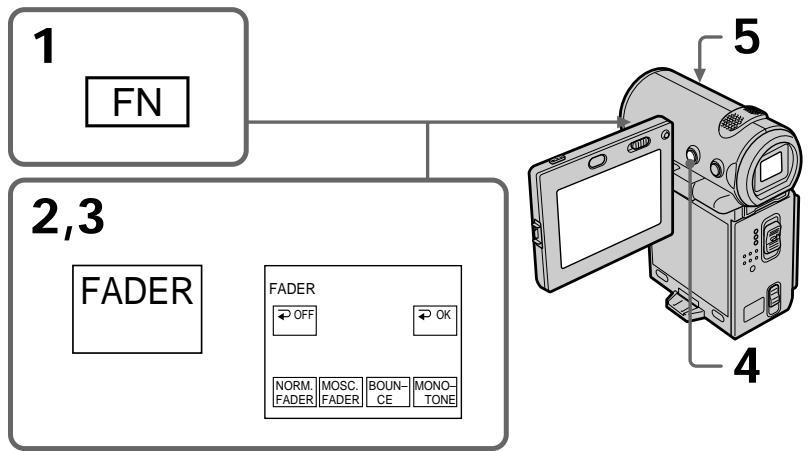
To return to the FN screen
Select OK, then press the centre on the control button after step 3. The PAGE1 screen appears. Next, select EXIT, then press the centre on the control button.
ДлЯ Bo3BpaTa K эКрану FN
Bb6epnte OK, 3aTEM haxMnTe Ha ceHtp Ha KHONKe ynpabHeHn NocLe BbINOnHeHn nyHKta 3. NOBNTcA kpaH PAGE1. Danee Bb6epnte EXIT, 3aTEM haxMnTe Ha ceHtp Ha KHONKe ynpabHeHn.
To cancel the fader function
Before pressing START/STOP, select OFF, then press the centre on the control button.
Note
You cannot use the following functions while using the fader function, and vice versa.
- Digital effect
-Tape Photo recording
While using the bounce mode, you cannot use the following functions:
- Exposure
-Focus
-Zoom - Picture effect
Note on the bounce mode
You cannot select the bounce mode in the following mode or when using these functions:
-D ZOOM is set to 20× or 120× in the menu settings
- Wide mode
- Picture effect
-PROGRAM AE
When the POWER switch is set to MEMORY (DCR-IP7E only)
You cannot use the fader function.
ДЯ OTMeHbI ΦyHKcH ΦeIepa
PpeXeJeHemHaKaTb START/STOP, BbIbepnTe
OFF,3aTeM haxMnTe Ha ceHtp Ha KHNKe ynpabJeHHa.
PpmeuHne
Пи ИСЮЛБЗОВАнИ ΦУнКДИ ΦеДера НЕВОЗМоЖно ИСЮЛБЗОВАТь HИХЕСLEДУЮДИ ФУнКДИ И HAOБОРТ.
-LinФpoBoB 3ΦΦeKT
-ΦOTOCbEMKa Ha JIeHTy
Bo BpemnncnoB3OBaHnpeXnma nepeckaunBaHn HeJIb3n nCNOJb3OBaTb cJeDyUoIne fynKcnn:
-3Kcno3nua
-ФOKycnpOBka
- TpaHcfoKaua
-3ΦΦeKt n3o6paXeHn
PpimueaHne no pexkmy nepeckaKbHaNn
Pexm npeckaKbAHnHa HeIb3a Bbl6paTbB CLeDyUoE m Pexmme nn npn nCpOlb3OBaHn CLeDyUoXn FyHKn:
-ДЯ D ZOOM yctaHOJIeNo 3HaueHne 20x n1n 120× B yCTaHOBkax MeHIO
-Ⅲnpoko3kpaHHbpeXIM
-306paKeHH
-PROGRAM AE
EcInnepeKJIouaTeIb POWER ycTaHOBnE B noJIOXeHne MEMORY (ToIbKO moJeB DCR- IP7E)
BbHe MoXeTe NcIIOJIb3OBA Tb cyHKUIO feiepa.
Using special effects - Picture effect
IcnoJb3OBaHne CpeunalbHbIX 3ΦΦeKTOB - ΘΦΦeKT n3O6paXeHnA
You can digitally process images to obtain special effects like those in films or on TV.
NEG. ART [a]: The colour and brightness of the picture are reversed.
SEPIA: The picture is sepia.
B&W: The picture is monochrome (black-and-white).
SOLARIZE [b]: The light intensity is clearer, and the picture looks like an illustration.
SLIM [c]: The picture expands vertically.
STRETCH [d]: The picture expands horizontally.
PASTEL [e]: The contrast of the picture is emphasized, and the picture looks like an animated cartoon.
MOSAIC [f]: The picture is a mosaic.
O6pa60tky n3o6paXeHnIuPpOBbIM MeToOM MOxHO BblIOJIHrTb IJIa NOnUyeHnI CTeuNaJbHbIX 3ΦΦeKTOB, KAK B KInHOcNlBMax UIN Ha TeJIeBUNDeHN.
NEG. ART [a]: LcBET NApKocTb N3O6paJekHn 6yDyT HeTaTNBbIMN.
SEPIA: ⅠЗобразкебудETВцБete cENIN.
B&W: 13o6paXeHne 6yJeT MOHOxPOMHbIM (YeHNo-6eIbIM).
(1) In CAMERA mode, select FN, then press the centre on the control button. The PAGE1 screen appears.
(2) Select MENU, then press the centre on the control button. The menu appears.
(3) Select P EFFECT via , then press the centre or on the control button.
(4) Select the desired picture effect mode, then press the centre on the control button.
(5) Press DISPLAY to turn off the menu.
(1)BpeKmmeCAMERA BbIbePnteFN,3aTeMaHaxMnTeHaZeHTp Ha KhoNKeynpaBHeHn. IOnBnTc3kpanPAGE1.
(2)BbIbepeTe MENU, 3aTe mHaXmnte Ha ceHtp H Ka KhoNke ynpaBJIeHn. IIOABNTc MeHIO.
(3)BbIbePte P EFFECT c nOmoIbu W,3aTeM haKMITE Ha ueHTp Ⅲn H a KhoNKe ynpabJIeHn.
(4)BbIepeNTe Tpe6yEmblpeXmM 3ΦeKTa n3o6paXeHnA,3aTeM HaxMnTe Ha ceHTp ● Ha KHOKe ynpaBHeHnA.
(5)HaXMMTe KhoNky DISPLAY ⅡIa OTKJIIOueHnMaMeHIO.
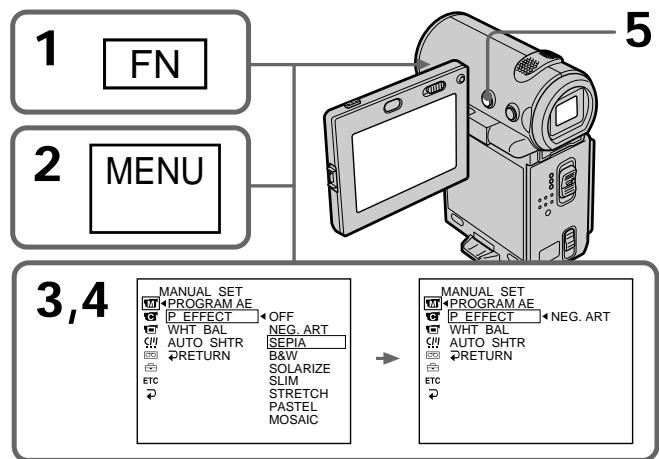
To return to the FN screen
Select RETURN, , then press the centre on the control button after step 4. The PAGE1 screen appears. Next, select EXIT, then press the centre on the control button.
To turn the picture effect function off
Set P EFFECT to OFF in the menu settings.
While using the picture effect function You cannot select the old movie mode with the digital effect function.
When you set the POWER switch to OFF (CHG) The picture effect will be automatically cancelled.
Using special effects - Digital effect
IcnoJb3OBaHne CpeuJaBhBIX 3ΦΦeKTOB -UΦpOBoN 3ΦΦeKT
You can add special effects to recorded pictures using the various digital functions. The sound is recorded normally.
STILL
You can record a still image so that it is superimposed on a moving picture.
FLASH (FLASH MOTION)
You can record still image successively at constant intervals.
LUMI. (LUMINANCEKEY)
You can swap a brighter area in a still image with a moving picture.
TRAIL
You can record a picture so that an incidental image like a trail is left.
SLOW SHTR (SLOW SHUTTER)
You can slow down the shutter speed. The slow shutter mode is good for recording dark pictures more brightly.
OLD MOVIE
You can add an old movie-type atmosphere to pictures. Your camcorder automatically sets the wide mode to ON, the picture effect to SEPIA, and sets the appropriate shutter speed.
BbMOKeTe Do6aBnTb CneuaJIbHbIe 3ΦΦeKtbl K 3aINCbIbAeMOMy N3O6paXeHNI O NOMOcIbIO pa3HbIX cNpPoBbIX cyHKU. 3aINCbIbAeMbI 3Byk 6yDet ObiYHbIM.
STILL
BbMOKTe 3aINcBbTaB HeNoDnBxHoe n3o6paXeHne DnI HaIOKeHn erO Ha dBNcxUeEeN 3o6paXeHne.
FLASH (FLASH MOTION)
BbMOxTe 3aINcBbAtb HEnoDbVnxHoe
n3O6paXeHne B nocJeIOBaTeIbHoCTn Upee
OppeIeENHbIe INHTepBaJIb.
LUMI. (LUMINANCEKEY)
Bb moKeTe 3aMeHrTb npKne o6nactn Ha HeNoDBNkHOM n3o6paXeHm Ha DnKxuIneCn n3o6paXeHn.
TRAIL
BbMOxKeTe 3aINcMbTaB n3O6paXeHne C 3ΦΦEKTOM 3ana3DbBaHnI.
SLOW SHTR (SLOW SHUTTER)
Bb moKeTe 3aMeIINMbCKOpOCTb 3aTbopa. Pekm MeIeHHO 3aTbopa RbIeTcnoDxOJnIM DnIg 3aIInC TeMHbIX N3o6paXeHnB 60nee npKOM CBeTe.
OLD MOVIE
BbMOxTe BbIIOJIHnITb CbEMky C3ΦΦeKtOM CTapHHOrO KInHO. Ba7a BnDeokamepa 6ydet aBTOMATUeCKN yCTaHaBnBaT ⅢPOKo3KpaHHbI peKIMB NIOJoxKeHne ON, 3ΦΦeKT n3OBpaXeHnB NIOJoxKeHne SEPIA n BbICTaBnTb COOTBETCTByIOUYIO CKOpocTb 3aTBopa.
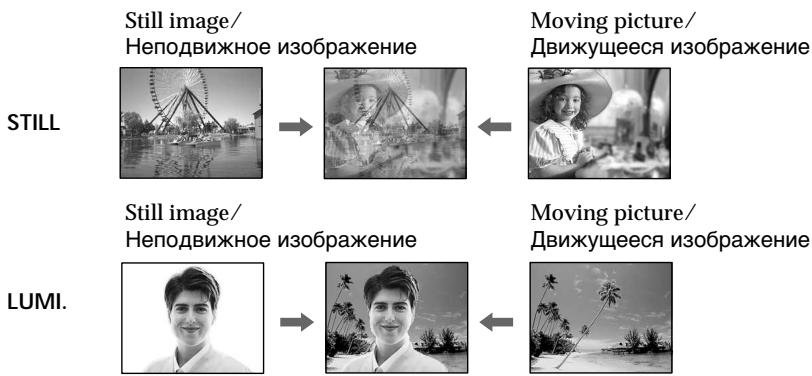
(1) In CAMERA mode, select FN, then press the centre on the control button. The PAGE1 screen appears.
(2) Select PAGE3, then press the centre on the control button. The PAGE3 screen appears.
(3) Select DIG EFFT, then press the centre on the control button. The DIG EFFT screen used for selecting the desired digital effect mode appears.
(4) Select the desired digital effect mode, then press the centre on the control button. In STILL and LUMI modes, the still image is stored in memory.
(5) Select - / + , then press the centre on the control button repeatedly to adjust the effect. You can also adjust the effect by pressing repeatedly after you select - / +
Items to be adjusted
| STILL | The rate of the still image you want to superimpose on the moving picture |
| FLASH | The interval of flash motion |
| LUMI. | The colour scheme of the area in the still image which is to be swapped with a moving picture |
| TRAIL | The vanishing time of the incidental image |
| SLOW SHTR | Shutter speed. The larger the shutter speed number, the slower the shutter speed. |
| OLD MOVIE No adjustment necessary | |
(6) Press DISPLAY to turn off the screen buttons.
(1)В рекиme CAMERA ВьберпгуFN,Затемнжмпгу Нцентг -На кногеуnpавлени. Повиитс Зран PAGE1.
(2)Bb6epTe PAGE3, 3aTeM haxMnTe Ha ceHTp Ha KhoNKe ynpabneHna. IoRbntc 3kpaH PAGE3.
(3)BbI6epnte DIG EFFT,3aTeM haxMnTE Ha ceHtp ●Ha KhoNke ynpabJeHHa. IOnBnTcA kpaH DIG EFFT dna BbI6opa keJaemoropexkMa uΦpoBbIX 3ΦΦeKToB.
(4)Bb6epnte Tpe6yemblpexnM Ucnpobbx 300KTeTOB,3aTeM HaxmTe Ha ceHtp ●Ha KhoNke ynpabIeHn. B pexImax STILL n LUMI. HenoDbXHoe I3o6paKeHne 6ydet coxaHeHO B namrTn.
(5) Bb6epnte - / + 3aTeM nOcNeIOBaTeIbHo HaxKImaIte Ha ceHTp ● Ha KHOKe ynpabIeHn IJn peYInpOBKn 3ΦΦeKtA. ΘΦΦeKT MoXHO TaKHe NaCTPOITb, HaxKImaI IOcJIeIOBaTeJIbHO KHOKN / IocJe Bb6oPa - / +
3JeMeHtblI peryu npOBKn
To return to the FN screen
Select OK, then press the centre on the control button after step 5. The PAGE3 screen appears. Next, select EXIT, then press the centre on the control button.
To cancel the digital effect
Select OFF, then press the centre on the control button in step 3.
Notes
- The following functions do not work when you are working with digital effect:
-Fader - The Low lux mode of PROGRAM AE (The indicator flashes)
-Tape Photo recording - The PROGRAM AE function does not work in slow shutter mode.
- The following functions do not work in old movie mode:
- Wide mode
- Picture effect
-PROGRAM AE - The SteadyShot function does not work in slow shutter or old movie mode.
ДлЯ BOЗВраТа KЭкpaHу FN
Bb6epnte OK, 3aTEM haxMnTe Ha ceHtp Ha KHONKe ynpabHeHn NocLe BbIOJIHeHn NyHKta 5. NOBNTcA kpaH PAGE3. Danee Bb6epnte EXIT, 3aTEM haxMnTe Ha ceHtp Ha KHONKe ynpabHeHn.
ДЯ OTMeHbI UΦpoBbIX 0ΦΦeKTOB
BbI6epnte OFF,3aTeM haxmnte Ha ueHTp ● Ha KHONKe ynpabneHn B nyHKTe 3.
Примейань
CJeIyUOJIeФyHKUHnHe pa6oTaOT npi nCNoJIb3OBAHmN UcΦpOBOrO 3ΦΦeKtA:
-Φeɪdεp
Using special effects - Digital effect
When you set the POWER switch to OFF (CHG) The digital effect will be automatically cancelled.
When recording in slow shutter mode Auto focus may not be effective. Focus manually using a tripod.
Shutter speed
| Shutter speed number | Shutter speed |
| SLOW SHTR 1 | 1/25 |
| SLOW SHTR 2 | 1/12 |
| SLOW SHTR 3 | 1/6 |
| SLOW SHTR 4 | 1/3 |
IcnoJb3OBAHne cneuaJIbHbIX 3ΦΦeKToB -LmΦpOBoI 3ΦΦeKT
Ppnu yctaHOBKe nepeKluOaTeIa POWER B noJIOXeHne OFF (CHG)
LcnpoBoI 3ePfekt 6ydt ABTOMaTnueckn OTMeHEn.
Pn3aHncBpeXmmeMeDJIeHHOro 3aTbopa
ABTOMATUeCKaФOKcnpOBKaMOKET6bITbHe 3ΦeKTnBHO.BbIOnHInTeФOKcnpOBky BpyHyIO,NCIOJIb3yI TpeHory.
CKopoctb 3aTBopa
| Величина скорoctи за Това Скорoctь за Това | |
| SLOW SHTR 1 | 1/25 |
| SLOW SHTR 2 | 1/12 |
| SLOW SHTR 3 | 1/6 |
| SLOW SHTR 4 | 1/3 |
Using the PROGRAM AE function
You can use the PROGRAM AE (Auto Exposure) function to suit your specific shooting requirements.
Spotlight
This mode prevents people's faces, for example, from appearing excessively white when shooting subjects lit by strong light in a theater.
Soft portrait
This mode brings out the subject while creating a soft background for subjects such as people or flowers.
Beach & ski
This mode prevents people's faces from appearing dark in strong light or reflected light, such as at a beach in midsummer or on a ski slope.
Sunset & moon
This mode allows you to maintain atmosphere when you are recording sunsets, general night views, and neon signs.
Landscape
This mode is for when you are recording distant subjects such as mountains and prevents your camcorder from focusing on glass or metal mesh in windows when you are recording a subject behind glass or a screen.
Low lux
This mode makes subjects brighter in insufficient light.
ИспOLTьованецфункциng PROGRAM AE
BbMOKeTe NcNoJIb3OBAt bФyHKUIO PROGRAM AE (aBTOMaTnuecka 3KcNo3nua) B COOTBeTCTBmC O CneuΦnueCKMn Tpe6OBaHnMn K CbeMKe.
Pexm npoxektophoro ocbeHnA
DaHbIpeKIM N03BONAEt BblIOJNHTb CbEMKy TaKIM O6pa3OM, YTO6bl IINa JIOJeH He BByIJIeJI CNIIJKOM 6JIeHNbIMn, HApPIMep, PnCbEMKe O6bekTOB B TeaTpe, rIe qacto npImEHReTcA RPKOE OCBeUeHHe.
(1) In standby or MEMORY (DCR-IP7E only) mode, select FN, then press the centre on the control button. The PAGE1 screen appears.
(2) Select MENU, then press the centre on the control button. The menu appears.
(3) Select PROGRAM AE via , then press the centre or on the control button.
(4) Select a desired PROGRAM AE mode, then press the centre on the control button.
(5) Press DISPLAY to turn off the menu. The PROGRAM AE mode indicator appears at the lower-left corner on the screen.
(1)BpeXmme oXnIaHnI nn MEMORY (ToJbKO moJeIb DCR-IP7E) BbI6epnte FN, 3aTeM haxmnte Ha ceHTp Na KhoNke ynpabHeHH. IIOBtCn 3KpaH PAGE1.
(2)BbIbePte MEnU, 3aTeM haxmnte Ha ceHtp HkONKe ynpabJIeHn. IIOABITc MeHO.
(3)BbIbepeTe PROGRAM AE c nOMOuHo M, 3aTeM hAXMnte Ha ueHTp ● HJN ▷ Ha KHOJIke ynpaBJIeHn.
(4)BbIbeIpTe Tpe6yEmbI peXIM PROGRAM AE,3aTEM HaxMnTe Ha ceHTp ●Ha KhoNKe ynpaBHeHn.
(5)HaKmTe KhONKy DISPLAY OTKIOueHnmeHIO.BJeBOM HIXHem yIy 3KpaHa NOBNTcR INDnKaTOp pexima PROGRAM AE.
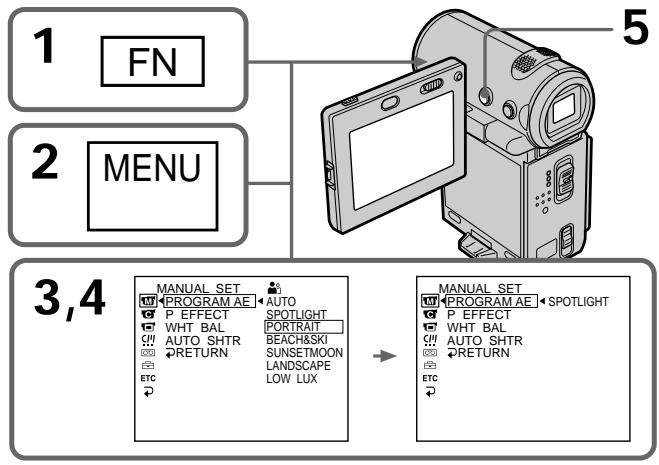
To return to the FN screen
Select RETURN, , then press the centre on the control button after step 4. The PAGE1 screen appears. Next, select EXIT, then press the centre on the control button.
To turn the PROGRAM AE function off
Set PROGRAM AE to AUTO in the menu settings in step 4.
ДлЯ BO3BpaTa KЭкрану FN
Bb6epnte RETURN, 3aTeMaHxMnTe Ha ceHTp HkONKe ynpabHeHnIocne BblONHeHnIyHKTa4. NoBHTc3KpaH PAGE1. Danee Bb6epnte EXIT, 3aTeMaHxMnTe Ha ceHTp HkONKe ynpabHeHnI.
-
Because your camcorder is set to focus only on subjects in the middle to far distance in these modes, you cannot take close-ups in the following modes:
-
Spotlight
-
Beach & ski
-
Your camcorder is set to focus only on distant subjects in the following modes:
-Sunset & moon
- Landscape
-
The following functions do not work in PROGRAM AE mode:
-
Slow shutter
Old movie
-Bounce -
The digital effect function does not work in low lux mode:
- While shooting in MEMORY mode, the low lux mode does not work. (The indicator flashes.) (DCR-IP7E only)
- The SteadyShot function does not work in low lux mode.
When WHT BAL is set to AUTO in the menu settings
The white balance is adjusted even if the PROGRAM AE function is selected.
If you are recording under a discharge tube such as a fluorescent lamp, sodium lamp or mercury lamp
Flickering or changes in colour may occur in soft portrait mode. If this happens, turn the PROGRAM AE function off.
Приимейсаня
-Посковы Ваш вideokamepa hactpoeHaДляфokucnpOBKN TOlbKO Ha ObekeTbI,нхODЯшпесна cpeHem Идалб hempacctoHHx,BbI He MoKTe BblONHATbCbeMKy KpyHbIM ПlaHOM B CneDyIOxPexkImax:
-PexnmpoxekTophoroocbeueHnA
-Пляжн布局и ЛыЖн布局peжим
Baisha Bndeokamepa HacTpoeha Dnfa KocynpOBKn TOnbko Ha ydaJeHHbIe OBeKtblB CneDyUOxN pxpeXmMax:
-PexkIM 3aKaTa COJHcA n LyHHOrO OCBeUeHnA
-JaHdwaΦThbIpeXIM
CneyuOuIe yHKcHn He pa6oTaIOT BpeXmE PROGRAM AE:
Adjusting the white balance manually
You can manually adjust and set the white balance. This adjustment makes white subjects look white and allows more natural colour balance. Normally white balance is automatically adjusted.
(1) In CAMERA or MEMORY (DCR-IP7E only) mode, select FN, then press the centre on the control button. The PAGE1 screen appears.
(2) Select MENU, then press the centre on the control button. The menu appears.
(3) Select WHT BAL through , then press the centre or on the control button.
(4) Select the desired white balance mode, then press the centre on the control button. HOLD (HOLD): Recording a single-coloured subject or background OUTDOOR (※) :
- Recording a sunset/sunrise, just after sunset, just before sunrise, neon signs, or fireworks
- Under a colour matching fluorescent lamp INDOOR (杂):
- When lighting conditions change quickly
- In bright places such as photography studios
- Under sodium lamps or mercury lamps
(5) Press DISPLAY to turn off the menu.
PeruInpoBka 6aHaHca 6eIoro BpyHyU
Bb moxete otperynilpoBaTb uyCTaHOBnTb Bpyuhyo 6baIaHc 6eIoro. 3Ta perynilpoBka nO3BOJraTe npuaTb 6eblm 06BeKTam NCTHHO 6eblu cBTn ONo3BOJraTe Do6tbcra 6olee eCTeTBENHOrO cBeTOBOrO 6aJIaHca. O6bUHO 6baIaHc 6eIoro nOdCTpaIbAetc aBTOMATUeCKn.
(1)B pexime CAMERA uIN MEMORY (ToIbKO mOeJIb DCR-IP7E) Bbl6epnte FN, 3aTeM haxmTe Ha uehtp ● Ha KhoIke ynpabHeHn. IopBvTcraKpaH PAGE1.
(2)BbIbepeTe MEnU,3aTeM haxmTe Ha ceHtp HkONKe ynpabJeHH. IOnBUTc MeHIO.
(3)BbI6epNTe WHT BAL c nOMOuBHO m, 3aTeM haxMTe Ha ueHTp ● HJIN ▷ Ha KHONKe ynpabHeHn.
(4)Bb6epnte Tpe6yembI peXm 6aHaHca 6eIoro,3aTeM HaxMMTe Ha ceHTp ● Ha KhoNKe ynpabLeHna.
To return to the FN screen
Select RETURN, , then press the centre on the control button after step 4. The PAGE1 screen appears. Next, select EXIT, then press the centre on the control button.
To return to the automatic white balance mode
Select AUTO, then press the centre on the control button in step 4.
If the picture is being taken in a studio lit by TV lighting
We recommend that you use the indoor mode.
When you record under fluorescent lighting Use the automatic white balance or hold mode. Your camcorder may not adjust the white balance correctly in indoor mode.
In automatic white balance mode
Point your camcorder at the white subject for about 10 seconds after setting the POWER switch to CAMERA to get better adjustment when:
- You detach the battery for replacement.
- You bring your camcorder from the interior of a house holding the exposure, and vice versa.
In hold white balance mode
Set the white balance to AUTO and reset to HOLD after a few seconds when:
- You change the PROGRAM AE mode.
- You bring your camcorder from the interior of a house, and vice versa.
Adjusting the exposure manually
You can adjust and set the exposure. Normally exposure is automatically adjusted. Adjust the exposure manually in the following cases:
- To make a fine exposure adjustment
- To shoot a bright subject with a dark background
- To record dark pictures (e.g. night scenes) faithfully
(1) In CAMERA or MEMORY (DCR-IP7E only) mode, select FN, then press the centre on the control button. The PAGE1 screen appears.
(2) Select EXPOSURE, then press the centre on the control button. The EXPOSURE screen used for adjusting the exposure appears.
(3) Select MANUAL, then press the centre on the control button.
(4) Select - / + , then press the centre on the control button repeatedly to adjust the exposure.
- : to dim
+: to brighten
You can also adjust the exposure by pressing
/ repeatedly after you select -/+ .
(5) Press DISPLAY to turn off the screen buttons.
PyuHa peRyInpOBka 3KcNo3n
BbMOxKTe OtperyuPobatb N yctaHOBtB 3KcNo3nIO.O6bIyHO 3KcNo3nIO peryInpuyETc ABTomAtneCKN. OtperyuPnyTe 3KcNo3nIO BpyHHyIO B cJeDyUoXn CnyaX:
-ДЯТTOUHON NOIDCTPOKKIN 3KcIPO3NIM
-ДлЯ сбемкиярко ообекта на TemHom Фонe
ДяЗаис TeMHbIX n3O6paXeHn(Ha npimep, HOnHbIX cUeH)C 60JIbWoi DoCTOBePBOcTbIO
(1)В рекимеCAMERAин MEMORY(Toько модев DCR-IP7E)Выберпг� TN,ЗаTem нахмпг Рцен�р ●На Кногке упавлени. Порвntся кразн PAGE1.
(2)BbI6epnte EXPOSURE,3aTeHnaxMnTe Ha ceHtp ●Ha KhoNke ynpabJeHn. IIOABNTc3kpan EXPOSURE dnerpeynpobKn 3Kcno3n.
(3)BbI6epnte MANUAL, 3aTeM haxMnTe Ha ceHtP ●Ha KhONKe ynpabNeHnR.
(4)BbI6epnte-/+,3aTeM nocLeIOBaTeNbHO haxmaiteHa ceHTp Ha KhoNKe ynpablenia dIpeyunipOBKn 3KcNo3nIM.
TEMhee
+:aepue
3Kcno3nIO MOXHO TaKHe HAcTpOuTb, nocJeDoBaTeIbHO HaXImaR 一 / nocJIe Bb6opa -/+
(5)HaXMMTe DISPLAYДлг OTKJIQUeHnЯ 3KpaHHbIX KHOJOK.
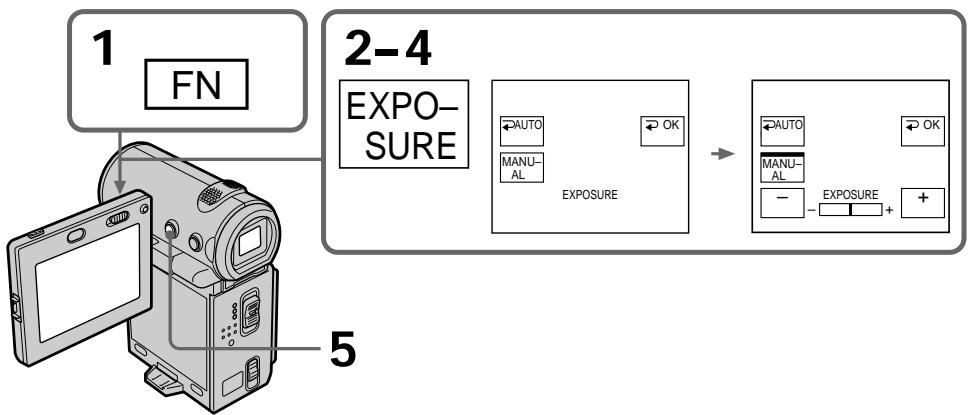
Adjusting the exposure manually
To return to the FN screen
Select OK, then press the centre on the control button after step 4. The PAGE1 screen appears. Next, select EXIT, then press the centre on the control button.
To return to the automatic exposure mode
Select AUTO, then press the centre on the control button in step 4.
Note
When you adjust the exposure manually, the backlight function does not work.
Your camcorder automatically returns to the automatic exposure mode:
- If you change the PROGRAM AE mode.
You can gain better results by manually adjusting the focus in the following cases. Normally, focus is automatically adjusted.
- The autofocus mode is not effective when shooting
- subjects through glass coated with water droplets
- horizontal stripes
- subjects with little contrast with backgrounds such as walls and sky
- When you want to change the focus point from a subject in the foreground to a subject in the background
- Shooting a stationary subject when using a tripod
ФokycnpoBka BpyHyu
JyUHne pe3yIbTaTbI C NOMOuBHO pyHoi φOKCnPOBKN MOXHO NOLYuHTb B CJeDyUoIHX cLyuaX.ObBuHNO φOKCnPOBKa perynpyetc ABTomAtueckn.
-PexkIM aBTOMaTnueckoФokycuropBkn YBJIeTcR He3ΦΦeKTHBbIM PnB BbIOnJIHeHIN CbeMKN
-ObbeKToB Yepe3 CTeKJIO, NOKpbIToE KaJIaMn
-ROPN3OHTaIbHbIx NOLOC
-06beKTOB C MaJIoN KOHTpaCTHO TaKOM FOHe, KAK CTeHa Nn He6o
- EcIn Bby XOTnTE BbIIOJHnTb N3MeHeHne
ФokycuPobKu c ObEKeT a Ha nepeJdHem PJIaHe
Ha ObEKeT Ha 3aJdHem PJIaHe
Пи ВьлпнHeHm CbEKM CtauNoHapbIx 06beKToB C nCnOJIb3ObaHnEm TpeHOrn
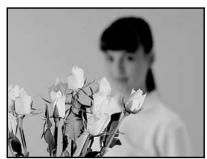


(1) In CAMERA or MEMORY (DCR-IP7E only) mode, select FN, then press the centre on the control button. The PAGE1 screen appears.
(2) Select FOCUS, then press the centre on the control button. The FOCUS screen used for adjusting the focus appears.
(3) Select MANUAL, then press the centre on the control button. The top of the selected button is indicated with a green bar and the indicator appears.
(4) Select or , then press the centre on the control button repeatedly to adjust the focus.
: To move the focus point closer
→▲: To move the focus point further away. You can also adjust the focus by pressing
repeatedly after you select or
(5) Press DISPLAY to turn off the screen buttons.
(1)В рекиме CAMERA улз MEMORY (Толькову модаль DCR-IP7E) ВьберптЕ FN, за temнадимпе на сенчт ● на Конкеуnpавлия. Погвintся заразн PAGE1.
(2)BbI6epnteFOCUS,3aTeM haxMMTe Ha ceHTp Na KhoNke ynpaBJeHn. IoABNTc3kpanFOCUSДЯpeRyIpOBKnФokycinpOBKn.
(3)BbI6epnte MANUAL, 3aTeM haxmTe Ha ceHtp ●Ha KhoNKe ynpaBHeHnA. Cbepxy BbI6paHHoN KHOJKN NpOBNTcR 3eJIeHnA NOLOca n INHdNKaTOP
(4)BbI6epNTe 一 HNI A 3aTeM nocJIeIOBaTeJbHO HaxIMaJIte Ha CEHTp ● Ha KHOJIke ynpabJIeHn IAЯ peYIpOBKn φokycuPobKn.
←:Длгприблнженифokусювки
→▲:Дяудаленифokсировки
Фokсировky moхно takkeнастпь,
последытелно нахимая «/» полес
Быбopa « ини →▲.
(5)HaXMMTe DISPLAYДлг OTKJIQUeHnЯ 3KpaHHbIX KHOJOK.
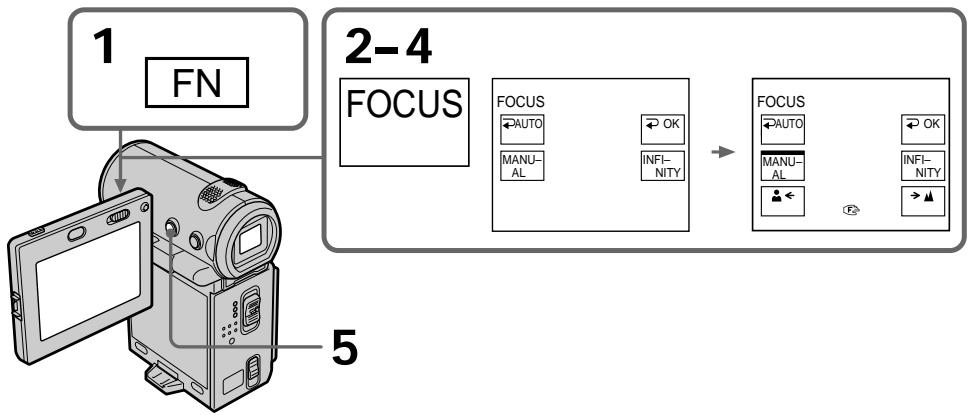
To return to the FN screen
Select OK, then press the centre on the control button after step 4. The PAGE1 screen appears. Next, select EXIT, then press the centre on the control button.
To return to the autofocus mode
Select AUTO, then press the centre on the control button in step 4. The or indicator is turned off, and the camcorder returns to the autofocus mode.
To record distant subjects
In step 4, select INFINITY, then press the centre on the control button. The focus is set to the infinity position and the indicator appears. Use this mode when your camcorder focuses on near by objects even though you are trying to shoot a distant object.
To focus precisely
It is easier to focus on the subject if you adjust the zoom to shoot at the "W" (wide-angle) after focusing at the "T" (telephoto) position.
When you shoot close to the subject Focus at the end of the "W" (wide-angle) position.
changes as follows:
when recording a distant subject.
when the subject is too close to focus on.
ДлЯ Bo3BpaTа Kэкpanу FN
BbIepeNTe OK, 3aTeM haxMnTE Ha ceHTp HAn KhoNKe ynpabLeHnI NocE BbIOnJIHeHnnyHKta 4. IOnBtCn 3KpaH PAGE1. Danee BbIepeNTe EXIT, 3aTeM haxMnTE Ha ceHTp HAn KhONKe ynpabLeHnI.
Playing back a tape with picture effects
During playback, you can process a scene using the picture effect function: NEG.ART, SEPIA, B&W, and SOLARIZE.
(1) In playback or playback pause mode, select FN, then press the centre on the control button. The PAGE1 screen appears.
(2) Select MENU, then press the centre on the control button. The menu appears.
(3) Select P EFFECT via , then press the centre or on the control button.
(4) Select the desired picture effect mode, then press the centre on the control button. See page 69 for details on each picture effect mode.
(5) Press DISPLAY to turn off the menu. Pressing DISPLAY again displays the video control buttons.
Bocnpo3BeDeHne JeHTbIC 3ΦΦeKtAmn n3O6paXKeHnA
Bo BpemBocnpoun3BeDHeNn Bbl MoKeTe BblONHbTb 6pb60TKy 3n13Oda C nOMoCbIO fynKcun 3fFekTa n3o6paXeHn: NEG.ART, SEPIA,B&W u SOLARIZE.
(1)B pexnme Bocnpo3BeHn nI npay3bI BOCnpo3BeHn Bbl6epnte FN, 3aTeM haxmnte Ha ceHTp ● Ha KhoNke ynpablenHa. IopBntc3kpan PAGE1.
(2)BbIbepeTe MEnU,3aTeM haxmTe Ha ceHtp H Ka KhoNke ynpabJeHHa. IOnBaTc MeHIO.
(3)BbIbePte P EFFECT c nOmoUBO m,3aTeMaHxMITE Ha ueHTp Ⅲn H a KHOKe ynpabHeHn.
(4)Bb6epnte Tpe6yembl peXmM 3ΦeKta n3o6paXeHn, 3aTeM HaxmIte Ha ceHTp Na KhoNke ynpaBHeHn. Ioppo6hIe CBeJeHn O kaxdOM peXmMe 3ΦeKTA n3o6paXeHn CM. Ha cTp. 69.
(5)HaXmTe KhONKy DISPLAYДлЯ OTKJIIOUeHnMeHIO.Пи NOBTOPHom HaXaTIN DISPLAYOTO6paKaIOTcKHOKN BUNDeOKOHToPIJ.
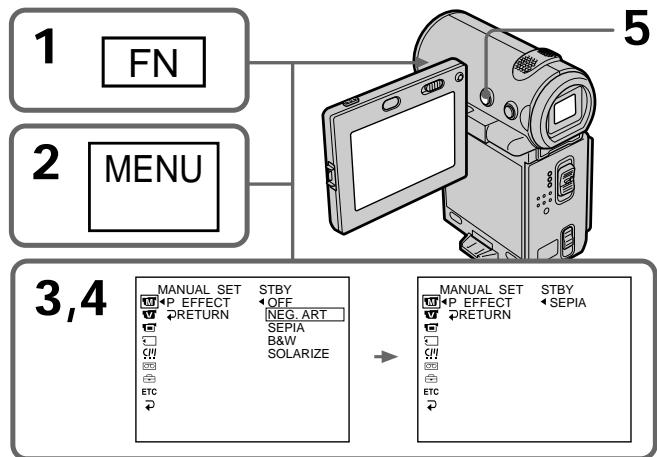
Playing back a tape with picture effects
To return to the FN screen
Select RETURN, , then press the centre on the control button after step 4. The PAGE1 screen appears. Next, select EXIT, then press the centre on the control button.
To cancel the picture effect function
Set P EFFECT to OFF in the menu settings in step 4.
Notes
- You cannot process externally input scenes using the picture effect function.
- You cannot record images on the tape inserted in your camcorder when you have processed the image using the picture effect function. However, you can record images on a "Memory Stick" (DCR-IP7E only) (p. 156, 162), or on a VCR using your camcorder as a player.
Pictures processed by the picture effect function
Pictures processed by the picture effect function are not output through the i.i.LINK (MICROMV) jack.
When you set the POWER switch to OFF (CHG) or stop playback
The picture effect function is automatically cancelled.
Bocnpon3BeDene HeIeHTbI c 3o0fKeTAmn 1306paXeHnA
Playing back a tape with digital effects
During playback, you can process a scene using the digital effect function: STILL, FLASH, LUMI., and TRAIL.
(1) In playback or playback pause mode, select FN, then press the centre on the control button. The PAGE1 screen appears.
(2) Select PAGE2, then press the centre on the control button. The PAGE2 screen appears.
(3) Select DIG EFFT, then press the centre on the control button. The DIG EFFT screen used for selecting the desired digital effect mode appears.
(4) Select the desired digital effect mode, then press the centre on the control button. In STILL or LUMI mode, when the mode is selected, the picture being displayed is stored in memory as a still image.
(5) Select - / + , then press the centre on the control button repeatedly to adjust the effect. See page 71 for details on each digital effect mode.
(6) Press DISPLAY to turn off the screen buttons. Pressing DISPLAY again displays the video control buttons.
BocnpOn3BeDeHne JeHTbI C ZnΦpOBbIMN əΦΦeKtAmN
Bo BpemBocpnOn3BeJeHnBbl MoKeTe BblONJIbTB o6pa60TKy 3nI3OJa C nOMoIbu OfynKmN cnpPoBbIX 3cpeKTob: STILL, FLASH, LUMI. n TRAIL.
(1)B pexnme Bocnpo3BeDHeNn nI npay3bI BOCnpo3BeDHeNn Bb6epnte FN, 3aTeM Haxmnte Ha ceHTp ● Ha KhoIke ynpablenHn. POnBNTcAkpan PAGE1.
(2)Bb6epntePAGE2,3aTeM haxmnte Ha ceHTp Ha KhoNKe ynpabneHn. IoarBntc 3kpaH PAGE2.
(3)Bb6epnte DIG EFFT, 3aTe m HaxMnTe Ha ceHtp ●Ha KhoNke ynpabLeHn. IOnBnTcI 3kpan DIG EFFT nIy Bb6opa JxelaemoropexKIma uOpobIx 3pEKTOB.
(4)Bb6epnte Tpe6yembl peKIM cHpOBoBix 3ΦΦeKToB, 3aTeM HaxKMnTe Ha ceHTp ● Ha KHONKe ynpabJeHnR.
B pexime STILL nI LUMI. npn Bblbopepeximama oTo6paXaemoe n3o6paXeHne coXpaHraTeTcB namrTn KaK HeNoDvNkHOe n3o6paXeHne.
(5) BbIbeIpTe -/+, 3aTeM nocJeIOBaTeJIbHo NaJMaIte Ha ceHTp ● Ha KHOJKe ynpaBHeHn IIN peRyIInpOBKn 3ΦΦeKTA. IOpIpo6HbIe CBeDeHnO pEKMte UcΦpOBbIX 3ΦΦeKToB cM. Ha cTp. 71.
(6)HaKmnte DISPLAY dIy OTKJIUOHeHn 3KpaHHbIX KHOJOK. IpiN IOBTOPHOM HaKaTIN DISPLAY oTo6paXaIOTcR KHOJKN BInDeOKOHTpOJa.
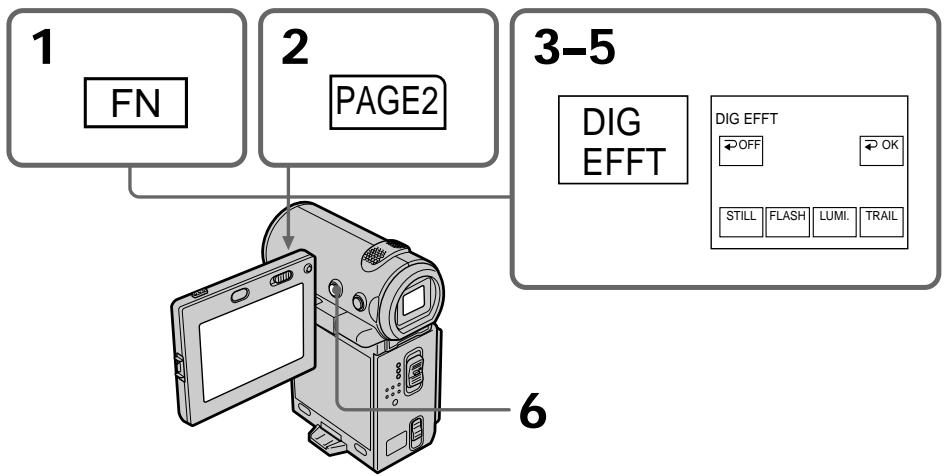
Playing back a tape with digital effects
To return to the FN screen
Select OK, then press the centre on the control button after step 5. The PAGE2 screen appears. Next, select EXIT, then press the centre on the control button.
To cancel the digital effect function
Select OFF, then press the centre on the control button in step 4 or 5.
Notes
- You cannot process externally input scenes using the digital effect function.
- You cannot record images on the tape inserted in your camcorder when you have processed the image using the digital effect function. However, you can record images on a "Memory Stick" (DCR-IP7E only) (p. 156, 162), or on a VCR using your camcorder as a player.
Pictures processed by the digital effect function
Pictures processed by the digital effect function are not output through the i.i.LINK (MICROMV) jack.
When you set the POWER switch to OFF (CHG) or stop playback
The digital effect function is automatically cancelled.
Bocnpo3BeDeHne JeHTbI C uΦpObblm 3ΦΦeKTamn
Searching for a scene - Multi-picture search
Using the multi-picture search function, you can display thumbnails of all the beginning scenes of moving pictures and still images recorded in the tape onto the index screen. The recording date and title of each image or scene are also indicated. Select the thumbnail you want to play back, then press the centre on the control button, the camcorder starts searching for the image or scene and plays it back automatically. You can also control this function using the Remote Commander.
Понь сцehы - Понь Heckoькнx n30брахень
C NOMOUII cyHKUNI IONCKA HeCKOJIbKINX
H3OBpAXeHNI MOXHO OTObpaKaTb He6OJIbShne
H3OBpAXeHNI BCEx HauJIbHbIX CcEH
DINKUxNxCJ I3OBpAXeHNI HENoDBNXbIX
H3OBpAXeHNI, 3aIncAHbIX HaJeHTe, Ha
HNDEKCHOM 3KpaHe. Kpome TORO,
OTOBpAXaIOTc DaTa 3aInci N TnTp KaJdOrO
H3OBpAXeHNI INI cUeHb.I. BbI6epITe
HE6OJIbWoE I3OBpAXeHNI DnI
BOCNPON3BVEHInr, 3aTEM HaxMITE Ha CEHTP
Ha KHONKe ynpabLeHn; BNuDeOKaMepa NaChET
NONCK H3OBpAXeHNI INI cUeHb.I, 3aTEM
ABTOMaTIuCeCKN HaHET BOCNPON3BeDEHnE.
3ToI cyHKUeI MOXHO TaKke YnpaBnTb C
NOMOUII PyJIbTa DnCTaHtIOHHORO ynpaBNeHnA.
(1) Set the POWER switch to VCR.
(2) Select FN, then press the centre on the control button. The PAGE1 screen appears.
(3) Select MULTI SRCH, then press the centre on the control button. The MULTI SCH screen appears.
(4) Select / , then press the centre on the control button. The camcorder starts scanning in the selected direction. When you select , the thumbnails are displayed from the upper-left window, and when you select , they are displayed from the lower-right window. After the scanning is completed, the upper-left window turns black and the thumbnails will be displayed on the index screen.
(1)YctaHOBInTe npeKJIIOUaTeIb POWER B noJIOKeHne VCR.
(2)BbI6epNTeFN,3aTeM haxMMte Ha ceHTp ●Ha KhONKe ynpabNeHnA. TPOBNTcA kpaH PAGE1.
(3)BbIbepuTe MULTI SRCH, 3aTeM haxmTe Ha ceHtp ●Ha KhoNke ynpabHeHn. IoRbntc 3KpaH MULTI SCH.
(4)BbIbepnTe 一 / 一 3aTeM haxmTe Ha zentp Ha KhoNke ynpablenHn. BIndeokamepa HauHET NOMCK B BbIbpaHHOM HAppaBHeHn. Ppi BbIbope , He6OJIbUne n3o6paXeHn OTo6paXaOTc, HauHnA C NeBOrO BepxHero OKHa, a Ppi BbIbope OHI OTo6paXaOTc, HauHnO C npaBOrO HIXHero OKHa. IocNe 3aBepWeHn NOncKa JneBOe BepXHee OKHO cTaHOBITcY cepHBIM, a He6OJIbUne n3o6paXeHn OTo6paXaOTc Ha INDeKCHOM 3kpaHe.
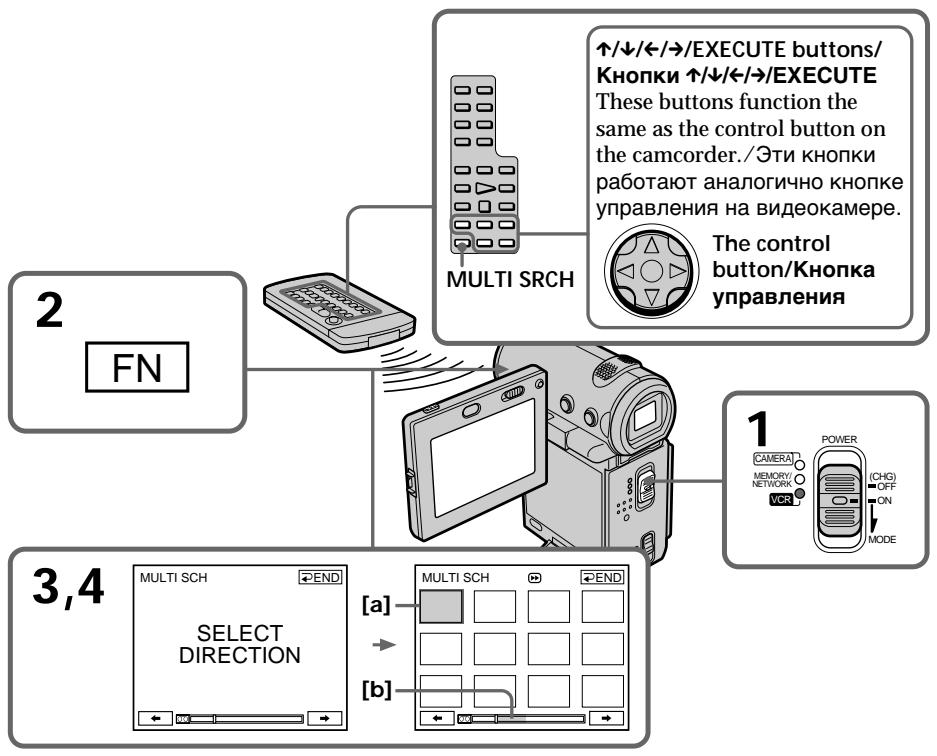
[a] The picture being fast-forwarded or rewound
[b] The blue portion indicates the range of the scan currently being made to display thumbnails
[a] BbIOpJIHЯETc yckopeHHaJI npeMoTka 306paJKeHHaBnpeEd nnHa3aD
[b] TOny6aI nonOka 03HaayeIT INTepBaJ BbIIOHReMOrO B DaHHbIM MOMHT NOnCKa DnI OTo6paXeHnI He6oJIbIuNx I3o6paXeHnI
(5) Select the thumbnail you want to play back, then press the centre on the control button. The camcorder starts searching for the image or scene and plays it back automatically. The blue portion of the bar indicates the scanning range and the white portion of the bar indicates the recorded portion.
(5)Bb6epnte He60JIbwoe n3o6paXeHne IJRA BOCnpon3BeDeHnra, 3aTeM Haxmnte Ha ceHTp Na KhoIke ynpabLeHnra. BIndeokamepa NaHET nonCK n3o6paXeHnra nn CcHbI, 3aTeM aBTOMaTUnCeKn HaHET BOCnpon3BeDeHnre. TOny6aR noLOCKa O3NaHaae INThepBaJI nONcKa, a 6enra nONoca O3NaHaae 3aNCAHHy UacTb.
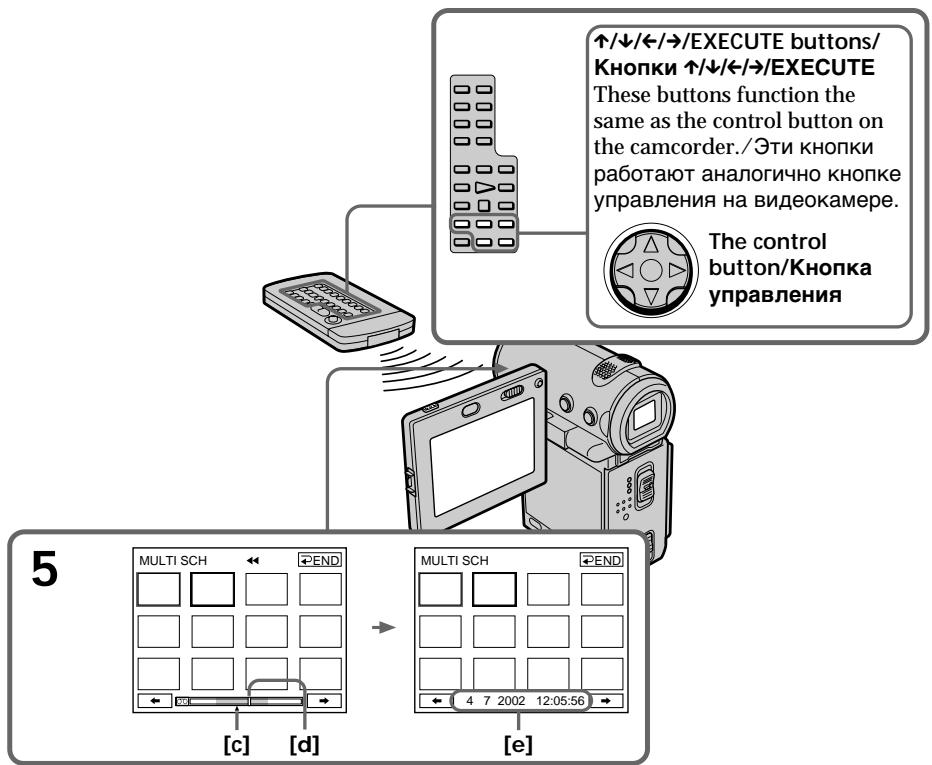
[c] The actual point you are trying to search for (yellow mark)
[d] The present point on the tape (yellow bar)
[e] The title/date (The title turns to the date indication after 5 seconds.)
To return to the MULTI SCH screen from playback
Select RETURN, then press the centre on the control button.
To stop searching
Press STOP on the Remote Commander.
[c]ДиСТВИТЕЛБHоE MecTo, KOTopoe Bbl XOTIte HauTn (XeJIaTЯ MTeKa ▲)
[d] Tekyüee MeCTO HaJIeHTe (JeNTaI nonoca)
[e] Tntp/daTata (Tntp cmeHaeTc daToi cnyc7a 5 CEkyHd.)
ДлвоьзВраТКэкразу MULTI SCHи3 BOCПОНЗБЕDEнЯ
Bb6epnte RETURN,3aTeMaXmTeHa 电HTp Ha KONKe ynpabHeHn.
ДлгocтабкнпОпска
HaxmTe STOP ha npIbTe dNCTaHcNoHHoro ynpaBHeHn.
Searching for a scene - Multi-picture search
To end the multi-picture search function
Select END, then press the centre on the control button.
To end the multi-picture search function from the playback screen
Select EXIT, then press the centre on the control button.
When controlling the camcorder from the Remote Commander
You can use the MULTI SRCH and / / / / EXECUTE buttons.
ДлэзаBERшENЯФункшиNONСКА HeCKoJIbKnxИЗОБрахжEHN
Bb6epnte END,3aTe mHaKMnTe Ha ceHTp HkONKe ynpabJeHn.
If the tape has a blank portion between recorded portions
The multi-picture search function may not work correctly.
The number of thumbnails stored in one cassette
About 400 thumbnails can be stored.
EcIn Ha JeHTe NMeEtca He3aNcAHHbIyUyactOK MeJxdy 3aNcAHHbIMu YactAMn
The number of thumbnails that can be searched for in one scanning
A maximum of 11 thumbnails can be searched for in one scanning.
When you press MULTI SRCH on the Remote Commander
The MULTI SCH screen appears.
During searching
The other functions of this camcorder do not work.
The thumbnail images displayed on the MULTI SCH screen
You cannot modify these thumbnail images.
When you use the multi-picture search function with the digital effect activated The digital effect will be cancelled.
Some of the 11 thumbnails may not be displayed in the following cases:
- These are fewer than 11 recorded images and scenes on the searched portion of the tape.
- When scanning a tape recorded over previous recordings.
- When you have erased all the Micro Cassette Memory of the tape (p. 123).
Notes
- Thumbsails may not be displayed depending on the condition of the tape. This is not a malfunction.
- Noise may appear on the thumbnails. However, this has no effect on the recorded images.
When you select or , then press the centre on the control button during scanning
The next 11 thumbnails will be scanned.
Even if the first thumbnail is not displayed before the scanning is completed
You can play back the image or scene.
KoJInueCTBO He6OJIbIuX I3O6paXeHn, NONCK KOTOpbIX MOXHO BblIOJHHTb 3a OdINH ceaHC
MaKcNMyM 11 He6oBbXn H3O6paXeHm MoxHo NaHTn 3a OdNH CeaHc.
ПинхатиMulti SRCH ha nyIbTeДиctaHOnHOrOупавлени
IorBHTc3KpaH MULTI SCH.
BoBpeMa noncka
Дрг范围内TOBINBIDOKaMepbHe pa6oTaIOT.
He6oJIbUne n3O6paXeHn, OTo6paXaEmbIe Ha 3KpaH e MULTI SCH
3TN He60JIbIe N3O6paXeHnI HeJIb3r I3MeHrTb.
Moxho Bocnpo3BcTn n3obpaJxHne nnCzEHy.
Searching the boundaries of recorded tape by title - Title search
You can search for the boundaries of recorded tape by title. You can only use this function with the Remote Commander.
(1) Set the POWER switch to VCR.
(2) Press SEARCH MODE on the Remote Commander repeatedly until the TITLE SEARCH indicator appears. The indicator changes as follows: TITLE SEARCH DATE SEARCH PHOTO SEARCH (no indicator)
(3) Press or on the Remote Commander to select the title you want to playback. Your camcorder automatically starts playback of the scene having the title that you selected.
MoxHo BbIOnHnTb NOnCK rpaHnC 3aNcN HaJeHTe No TnTpY. 3Ty cyHKnIO MoXHONCNoB3OBaTb TOJIbKO C NOMOuIO NyIbTaDInCTaHIOHHOro ynpabNeHnA.
(1)YctaHOBInTe npeKJIouaTeIb POWER B noJIOKeHne VCR.
(2)HaximaiTe KhoNky SEARCH MODE na nyIbTe DnCTaHnOHHOro ynpaBleHnro Do Tex nop, noka He NoRbTcra HndikaTop TITLE SEARCH. INdikaTop m3MeHHeTcra CneJeYIOUM o6pa30M: TITLE SEARCH DATE SEARCH PHOTO SEARCH (6e3 nHndikaun)
(3)HaxmTe KhONkU nIuN Na nyIbTe DnCTaHIOHHO YnpaBNeHn, YTo6bl BbIbpaTb TtTp dIaN BocpOn3BeDeHn. Ba7a BnDEOKaMepa ABTomATNuCeKn HaHTe BOCpOn3BeDeHne 3Pi3Oda C BbIbpaHHbIM Bamn TtTPom.
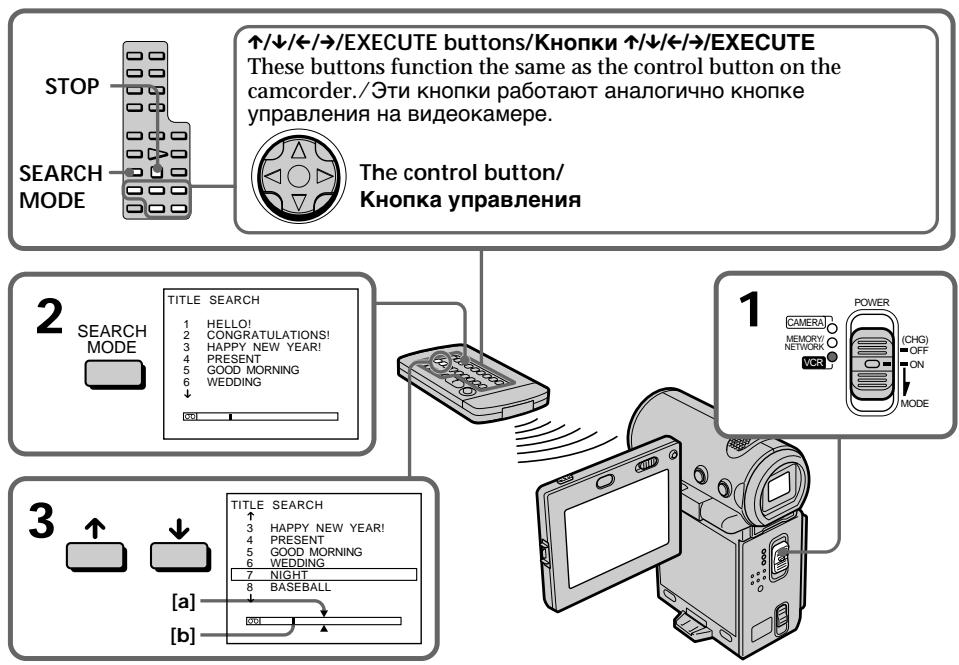
[a] The actual point you are trying to search for
[b] The present point on the tape
[a]ДиEcTBInTeNbHoe MecTo, KOTOpoe Bbl XOTnTe HauTn
[b] Tekyuüee MeCTO ha JeHTe
Searching the boundaries of recorded tape by title - Title search
To stop searching
Press STOP on the Remote Commander.
If the tape has a blank portion between recorded portions
The title search function may not work correctly.
To superimpose a title
See page 108.
Searching a recording by date - Date search
You can automatically search for the point where the recording date changes and start playback from that point. You can only use this function with the Remote Commander.
Use this function to check where recording dates change or to edit the tape at each recording date.
(1) Set the POWER switch to VCR.
(2) Press SEARCH MODE on the Remote Commander repeatedly until the DATE SEARCH indicator appears.
The indicator changes as follows:
TITLE SEARCH DATE SEARCH PHOTO SEARCH (no indicator)
(3) Press or on the Remote Commander to select the date you want to playback. Your camcorder automatically starts playback at the beginning of the selected date.
BbMOKeTe BbIOJIHrTb aBTOMaTHUeCKn IONCK MeCTa, rIe N3MeHReTc DaTa 3aNNcN, IN HauHHaTb BOCpOu3BeDeHne C 3TOFO MeCTa. 3Ty YHKsIO MOKHO NcNoJb3oBaTb TOnbKO C NOMOsbIO pIbTa dNtCa HUoHHO yPpaBHeHn. IVcNoJIb3yIte 3Tu YHKsIO dNn npOBepKn, rIe N3MeHHTc DaTbI 3aNNcN, INN JxE dNIA BbIOJIHHeHn MOHTaKa JHeTbI B KaXdOM MecTe 3aNNcN DaTbI.
(1)YctaHOBInTe npeKJIIOUaTeIb POWER B noJIOKeHne VCR.
(2)HaximaiTe KhoNky SEARCH MODE naIyIbTe DInCTaHcIOHnHO ynpaBJeHnI Do Texnop, noka He IOnBITcN uHdNkATOp DATESEARCH.
INHdkaTOp n3MeHHeTc CNeDyUOuM 06pa30M:
→TITLE SEARCH→DATE SEARCH→PHOTO SEARCH→(6e3инданkaan)
(3)HaKmTe KhoNky ↑nI↓Ha nIbTe DnCTaHcNoHHOro ynpaBJeHnA, YTO6bI BbIbpaTb DaTy dJa BOCpOu3BeDeHnA. BaTa BnDEOKaMepa aBTOMaTHueCKn HaYeT BOCpOu3BeDeHnE B hauane BbIbpaHnO daTbI.
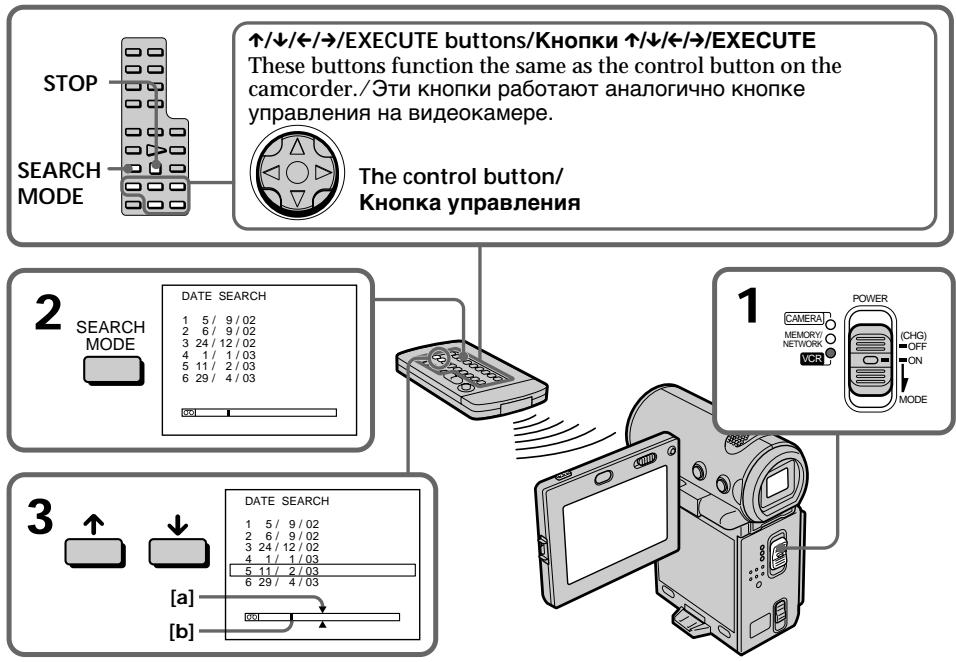
[a] The actual point you are trying to search for
[b] The present point on the tape
[a]ДиEcTBInTeHbHOe MecTo, KOTOpoe Bbl XOTNTe HauTn
[b] Tekyüee MeCTO Ha JIeHTe
Searching a recording by date - Date search
To stop searching
Press STOP on the Remote Commander.
If the tape has a blank portion between recorded portions
The date search function may not work correctly.
Micro Cassette Memory
The Micro Cassette Memory can hold 20 recording date data.
Searching for a photo - Photo search
ПоньфOTO -ФOTONOCK
You can search for a still image you have recorded on a tape.
You can only use this function with the Remote Commander. Use this function to check or edit still images.
(1) Set the POWER switch to VCR.
(2) Press SEARCH MODE on the Remote Commander repeatedly until the PHO SEARCH indicator appears.
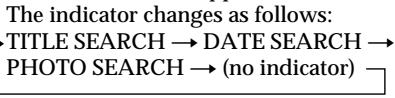
(3) Press or on the Remote Commander to select the date you want to playback. Your camcorder automatically starts playback of the photo having the date that you selected.
BbMOKeTe BbIIOJIHrTb IONCK HEnoDbNkHO r06paXeHn, 3aIncAHHO Ha JeHTe.
3Ty cyHKUIO MOXHO NcNOJb3OBAt b ToJbKO C NOMOuIyNbTa dNCTaHcNHOHHOro ynpabLeHnA.
IcnoIb3yIte 3Ty cyHKcuIO dIra npOBepK nnn MOHTaKa HEnoDVBHXbIX N3OpaXeHn.
(1)YctaHOBInTe npeKJIIOUaTeIb POWER B noJIOKeHne VCR.
(2)HaximaiTe KhoNky SEARCH MODE naIyIbTe IInCTaHnOHHOro ynpaBLeHnIdo Texnop, noka He nOBAHTcRnHnIkAToP PHOTO SEARCH.
[a] The actual point you are trying to search for
[b] The present point on the tape
[a]ДиEcTBInTeHbHOe MecTo, KOTOpoe Bbl XOTnTe HauTn
[b] Tekyuüee MeCTO Ha JIeHTe
To stop searching
Press STOP on the Remote Commander.
If the tape has a blank portion between recorded portions
The photo search function may not work correctly.
The number of photos that can be searched for
The available number is up to approximate 400 photos. However, if a moving picture is recorded, the searchable number decreases.
EcIn Ha IeHTe IMeTcR He3aHncaHHbI yactOK MExdy 3aHncaHHbIMu YactAMN
ФункцуфOTOnOuCKaMOKETpa6oTaTb HENpabUNbHO.
KoJIHcTeBO FOToCHIMKOB,NONCK KOtOpbIX MOXHO BbIIOJIHHTb
IocTyHnOe KOJIuYeCTBO -Pnp6bn3ntelbHO 400
ΦoToRpaФm. Ondako npn 3aIncN DnBnKyuXncr
13o6paXKeHn KOJIuYeCTBO 3IeMeHTOB dIy
NONCA yBeJIuYnBaETcR.
- Using the A/V connecting cable
You can dub or edit on the VCR connected to your camcorder using your camcorder as a player. Connect your camcorder to the VCR using the A/V connecting cable supplied with your camcorder. The supplied A/V connecting cable is equipped with an S video plug and a video plug. Use either the S video plug or the video plug depending on the recorder. Do not connect both of the plugs to the recorder.
Before operation
- Set DISPLAY to LCD in the menu settings. (The default setting is LCD.)
- Press the following buttons to turn off the indicators so that they will not be superimposed on the edited tape:
On your camcorder:
DISPLAY
On the Remote Commander:
DISPLAY, DATA CODE, SEARCH MODE
- Set DATA CODE on the PAGE3 screen to OFF.
Параапсь лeHTы
- IVcnoIb3OBAHnE COeINHnTeNbHOro Ka6eJyauDnO/BuDeo
BbMOxTe BbIOnJIHrTb Ipe3aIINc bIIM MoHTaX Ha BnDeOMarHHToΦOHe, IOIDCOe,IINHeHOM K BnDeOKaMepe, INCIOJIb3yR BnDeOKaMepy B KaueCTBe PIIeIepa.
(1) Insert a blank tape (or a tape you want to record over) into the VCR, and insert a recorded tape into your camcorder.
(2) Prepare the VCR for recording: connect the A/V connecting cable, then set the input selector to LINE. Refer to the operating instructions of the VCR.
(3) Set the POWER switch to VCR.
(4) Play back the recorded tape on your camcorder.
(5) Start recording on the VCR. Refer to the operating instructions of your VCR.
Ipepe3anncb JeNTbl
(1)BCTaBbTe He3aIncaHHyIO JeHTy (uIN JeHTy, Ha KOTopyIO Heo6xOIMBO BInOJIHNtB HOByIO 3aIncb) B BVNeOEMAHnHToΦOH, a 3aIncaHHyIO JeHTy - B BVneOKaMepy.
(2)ПоДг罗TOBbTe BИДeОмагнITocФОн KЗаисn: NOДКЛHOUHTe COEДИнTseЛьну KaБeль ayДио/BИДeо, 3aTeM yCTaHOBuTe ceNeKTop BXOДНOrO CnHаЯВ nIoJoxKeHne LINE. OБразИТecь К ИСТPyКцип NOЗКПлУаТaци BИДeОмагнITocФОн.
(3) VctaHOBnTe npeKJIouaTeIb POWER B noJIOKeHne VCR.
(4)HaunHe BocnpOn3BeJeHne 3aIncaHnoJIeHTbI Ha BaSei BnDeokampe.
(5)HaunTe 3anncb Ha BaueM BnDeomarHnToΦoHe. Obpatntecb K nHcTpkyuynn no 3Kcnnyatauyn BnDeomarHnToΦoHa.
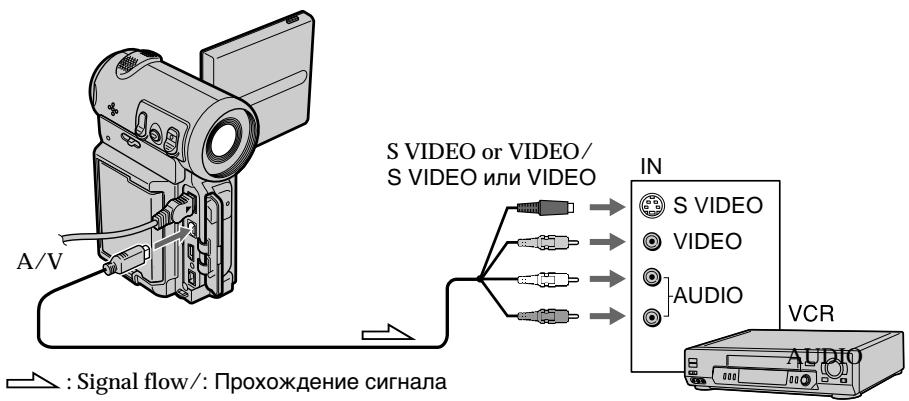
When you have finished dubbing the tape
Stop the recording on the VCR, and stop the playback on the camcorder.
You can edit on VCRs that support the following systems
8 mm, Hi8 Hi8, Digital8, VHS VHS, SVHS S-VHS, VHSVHSC, SVHS S-VHSC,
B Betamax, ED Beta ED Betamax, Mini DV, DV, or MICROMV
Korda nepe3aInc b JeHb 3aKOHueHa
OctaHOBnTe 3aIncb Ha BInDeOMaHHTofoHe n octaHOBnTe BOCpOn3BeDeHne Ha BInDeOKamepe.
Bbl MoXKe Te BbINOJIHrTb MOHTaX Ha BuIeOMaRrHrToΦoHax, KOTOpbie
IopdepxnBaIOT cneyIOUne CnCTembl
8 MM, Hi 8 Hi8, Digital8, VHS VHS S-VHS, VHSC VHSC, SVHSC S-VHSC,
B Betamax,ED Beta ED Betamax, Mini DV, DV uJIMICROMV
If your VCR is a monaural type
Connect the yellow or black plug of the A/V connecting cable to the video or S video input jack on the VCR, and the white or red plug to the audio input jack on the VCR. When the white plug is connected, the left channel audio is output, and when the red plug is connected, the right channel audio is output.
If your VCR has an S video jack
Connect using the S video plug to faithfully obtain original pictures. With this connection, you do not need to connect the yellow (video) plug of the A/V connecting cable. Connect the S video plug to the S video jack of the VCR. This connection produces higher quality MICROMV format pictures.
- Using the i.LINK cable
Simply connect the supplied i.LINK cable to the i.LINK (MICROMV) jack of your camcorder and to the i.LINK (MICROMV) jack of the MICROMV product. With digital-to-digital connection, video and audio signals are transmitted in digital form for high-quality editing. You cannot dub the titles, displayed indicators, the contents of Micro Cassette Memory, or letters on the "Memory Stick" index screen (DCR-IP7E only). (You cannot connect the camcorder to a DV product.)
EcIn BaW BnDeomarHnToΦoH MOHOΦOHNueCKOro TnPa
IoiDCoeDInHnTe JeKtBn IIN YepHbI pa3bEm CoeDInHnTeJbHOro Ka6eIa ayDIO/BuJeO K BxOHDomy rHe3dy BVDeOcNHaIa IIN K rHe3dy S video Ha BnDEOMarHnToΦOHe, a 6BeIb IIN KpaChbI pa3bEM K BXoDHOMy rHe3dy ayDiocnHa Ia BVDeOmaRnHToΦOHe. Ppi NOiDCoeDInHEn H6IeRo 8TKepea 3Byk 6yEdet NoJaBaTbCra Ha JLeBb KaHaI, a pni NOiDCoeDInHEn N KpaCHOrO -Ha npaBbI.
EcIn B BaIeBnIeOMaHrNtOfoHe IMeETcRhe3do S video
BbIIOJIHnTe coeINHeHne c NOMOsbIO pa3bEma S video dIa NOnyueHnBaICOKoKaueCTBeHHoro n3o6paXeHn.Ipn DaHHom CoeINHeHn He HxKHO NOcOeINHnTb JeNTbI bIteKeP (BvJeO) coeINHnTeJbHOrO Ka6eN aayIO/BuDeo. IOncOeINHnTe WTeKeP Ka6eN S video K rHe3dY s video Ha BnDEOMarHTofoHe. 3To coeINHeHne No3BOJAre TNoyHTb BBICOKoKaueCTBeHHoe N3o6paXeHne fOpMaTa MICROMV.
(1) Insert a blank tape (or a tape you want to record over) into the recorder, and insert a recorded tape into your camcorder.
(2)Prepare the recorder for recording. Set the input selector to LINE if it is provided. Refer to the operating instructions of the recorder.
(3) Set the POWER switch to VCR.
(4) Play back the recorded tape on your camcorder.
(5) Start recording on the recorder.
Ipee3aHcB JeHTbI
(1)BCTaBbTe He3aIncaHHyIO JeHTy (IIJIeHTy, Ha KOTopyIO Heo6xoDImO BblIoHNITb HOByIO 3aIncb) B 3aIncsbIBaHOoE yCTpoiCTBO, a 3aIncaHHyIO JeHTy - B BuDeOkamepy.
(2)ПоДгOTOBTe 3aINcBIAIOUe yCTpoIcTBO K 3aINCS. YcTaHOBIne ceJIeKToPbH I nepeKlHouaTeIb BXoJHOrO cInHaNA B noLoXeHne LINE, ecn TaKoe nMeETcA. Cm. INHCTpyKcIuNo NO 3KcIIyatauN 3aINcBIAIOUe yCTpoIcTBA.
(3)Установпейсякюатуь POWER в положене VCR.
(4)HaunHe BocnpOn3BeJeHne 3aIncaHnoJIeHTbI Ha BaSei BnDeokampe.
(5)HaunHe 3aIncB ha 3aIncBbAIOUeM yCTpoIcTBe.
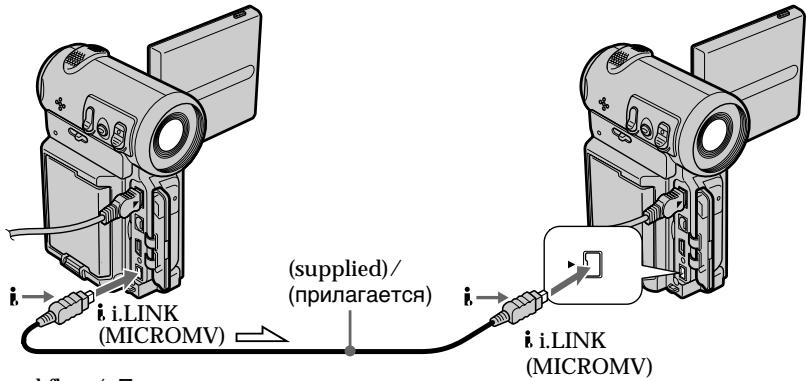
: Signal flow:/ IpoxokdeneHc rHaHa
When you have finished dubbing the tape
Stop the recording on the recorder, and stop the playback on the camcorder.
You can connect only one recorder using the i.LINK cable
See page 233 for more information about i.LINK.
The following functions do not work during digital editing:
- Picture effect
- Digital effect
Note on playback pause pictures
When you dub a playback pause picture:
- The recorded picture becomes rough when recorded through the i.LINK (MICROMV) jack.
- The picture may jitter when you play back the tape on other video devices.
- There may be a time-lag when you play back the tape on other video devices.
Korda nepe3anncb JeHTbI 3aKOHueHa
OctaHOBITE 3aIcMb Ha 3aIcMbBaIOUeM yCTpoNCTBe n OctaHOBITE BOCIPON3BVeDEHne Ha BnDeOKaMepe.
C NOMOsbKabei.LINK MoXHo NOcEOHHTb TOJbKO OdHO 3aINCbIBaIOoee yCTpOICTBO
Cm. cTp. 233 ДЯ пolyчени дононтельных CBeDEHи O ka6ene i.LINK.
Cneyuouine fynkun He pa6oTaOT BO Bpemu npOBOrMOHTaxa:
-ФФeKrI3O6paXeHnI
-LnΦpOBoN 3ΦΦeK
PpIMeuaHne dIa octaHOBLeHHbIX 13o6paXKeHn
Ppi nepe3aIncOcTaHOBJIeHHOro 136pbaxKeHnA:
- 3aɪncaɪhɒeɪnɪðpɑːkæŋne cɪtənɒbɪntcɪy xʊkɛ npɪ 3aɪnciːnɪchɛpɛrɪnɪdɪ. i.LINK (MICROMV).
-ИЗбрахене может дрожаь пи ВOCпpon3бевени Лentы на дугnx BndeoyctpoiCTbax.
Moryt 6bItb3aepxKn IOp BpeMeH npBocpOn3BeJeHmI JeHTbI Ha dpynxBnDeOyCTpoiCTbax.
When using the A/V connecting cable
You can record or edit a programme from another VCR that has video/ audio outputs. Use your camcorder as a recorder.
Switching the video input jack of the A/V connecting cable
The supplied A/V connecting cable is equipped with an S video plug and a video plug. You have to select one of the jacks in the menu settings. The default setting is VIDEO. If the setup is not necessary, go to "2 Making a recording" on page 104.
(1) Set the POWER switch to VCR.
(2) Select FN, then press the centre on the control button. The PAGE1 screen appears.
(3) Select MENU, then press the centre on the control button. The menu appears.
(4) Select VIDEOINPUT via , then press the centre or on the control button.
(5) Select VIDEO or SVIDEO, then press the centre on the control button.
(6) Press DISPLAY to turn off the menu. Pressing DISPLAY again displays the video control buttons.
PnncnoJIb3OBAHn coeHNHTeIbHoro Ka6eJyaDnO/ BnDeO
Moxho 3aNcBtB INI peAaKTHpOBaTb nporpaMMy C npyRTO BnDeomarHHTOfoHa, KOtopb IMeET BnDeo/ayno BblXoDbI. NcnoJb3yTe BnDeokamepy B KaueCTBe 3aNNcBtBAIOeO yCTpoiCTBa.
1IpeeknueHne BXoHoro rHe3a BnDeocnHaJa coeDHNTeNbHO KabeJyayNo/BnDeo
Ppnilaraemb coeHNHtIbHbKabel aydno/ BuDeo o6OpDoban pa3bEmOM S video n BnDEopea3bEomM. Heo6xoJIMo BBi6paTb OHO n3 rHe3d B MeHIO yCTaHOBOK. UcTaHOBka n yOMunAHIO -VIDEO.Ecnl HAcTPOKa He Tpe6yETc, nepeiNITe K nyHKTy " 2 BblONJIHeHne 3aIncn" Ha cTp.104.
(1)YcTaHOBInTe npeKJIouaTeIb POWER B noJIOKeHne VCR.
(2)Bb6epnteFN,3aTeM haxmte Ha ceHTp ● ha KhoIKe ynpabHeHn. IorBntc 3KpaH PAGE1.
(3)BbIbePte MENU, 3aTeM haxmnte Ha ceHtp HkONKe ynpabJeHH. IIOABNTc MeHO.
(4)Bb6epnte VIDEOINPUT c nomoosbu 3aTEM haxmnte Ha ceHTp ● HJN ▷ Ha KhoNKe ynpabJeHn.
(5)ВыберпteVIDEOилSVIDEO,3aTeMнжмпTe Haцentp ●Ha KhoNKeуnpaBNeHЯ.
(6)HaxmTe KhoNky DISPLAY ⅡIg OTKJIoueHn MeHIO. IprI NOBTOpHOM HaxKaTIN DISPLAY OTo6paXaIOTcKHOKN BInDeOKOHTPOJr.
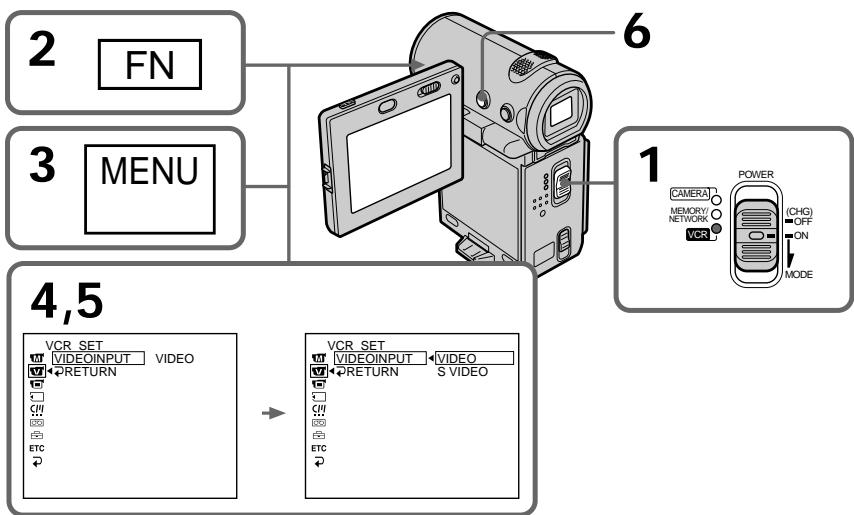
2 Making a recording
Before operation
Set DISPLAY to LCD in the menu settings (The default setting is LCD.) (p. 124).
(1) Insert a blank tape (or a tape you want to record over) into your camcorder and insert a recorded tape into the VCR.
(2) Set the POWER switch to VCR.
(3) Select FN, then press the centre on the control button. The PAGE1 screen appears.
(4) Select PAGE3, then press the centre on the control button. The PAGE3 screen appears.
(5) Select REC CTRL, then press the centre on the control button, and select REC PAUSE, then press the centre on the control button.
(6) Press on the VCR to start playback. The picture from the VCR appears on the screen on your camcorder.
(7) Select REC START, then press the centre on the control button at the scene where you want to start recording. The recording starts.
3ainncb nporpammbi
2 BbIIOJIHeHHe 3aIINCH
Ipeed hauanom pa6oTbI
YctaHOBIne npaMaTe pDISPLAY B noLoXeHne LCDBycTaHOBkaxMeHIO(YcTaHOBkaNo yMOnuHaHIO-LCD.) (CTp.124).
(1)BCTaBtHe He3aIINcaHHyIO JeHTy (IIINJeHTy, Ha KOTopyH HxKHO BbIIOJHnTb HOBYIO 3aIINCb) B BVNeOeKaMepy, a 3aIINcaHHyIO JeHTy - B BVNeOMaHnTTOOH.
(2)Установпейрееклочатуль POWER в положене VCR.
(3)BbI6epNTeFN,3aTeM haxMMte Ha ceHTp ● Ha KhoJIke ynpabHeHn. IorBntc 3KpaH PAGE1.
(4)Bb6epTe PAGE3, 3aTeM haxMnTe Ha ceHTp Ha KhoNKe ynpabNeHna. IoRbntc 3kpaH PAGE3.
(5)BbI6epnte REC CTRL,3aTeMaHaxMnTe HaZeHTp HaKHONKe ynpabJeHnHa BbI6epnte REC PAUSE,3aTeMaHaxMnTe HaZeHTp HaKHONKe ynpabJeHnHa
(6)HaxMMTe KhoNkY Ha BnDeOmaHrHToΦoHe Dnla Hauana BocPon3BcDEHn. IVo6bpaKeHne C BnDeOmaHrHToΦoHa NOBtCnHa 3KpaHe BnDeOkAMepeIb.
(7)BbI6epnteRECSTART,3aTeMaHxMnTeHa ceHTp Ha KHOKe ynpaBLeHnBaTOI cUHe, rJe Heo6XoDmO HauTaTb 3aNcB. HaHETcraNncB.
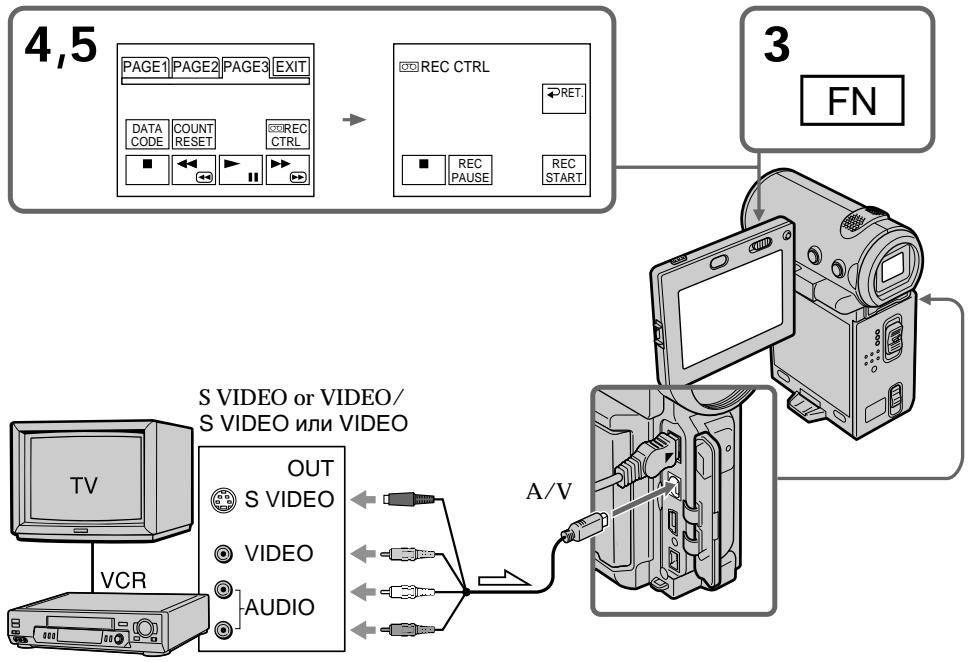
When you have finished dubbing the tape
Select , then press the centre on the control button on your camcorder and stop the playback of the VCR.
If your VCR is a monaural type
Connect the yellow plug of the A/V connecting cable to the video output jack and the white or red plug to the audio output jack on the VCR. When the white plug is connected, the left channel audio is output, and when the red plug is connected, the right channel audio is output.
If your VCR has an S video jack
Connect using the S video plug to faithfully obtain original pictures. With this connection, you do not need to connect the yellow (video) plug of the A/V connecting cable. Connect the S video plug to the S video jack of the VCR. This connection produces higher quality MICROMV format pictures.
Note (DCR-IP7E only)
When you press MEMORY PLAY on the Remote Commander in step 5, an image recorded on the "Memory Stick" is displayed. If you select REC START, then press the centre on the control button, the image will be recorded on the tape. To stop memory playback, press MEMORY PLAY on the Remote Commander again.
When using the i.LINK cable
Simply connect the supplied i.LINK cable to the i. i.LINK (MICROMV) jack of your camcorder and to the i.LINK (MICROMV) jack of the MICROMV product. With digital-to-digital connection, video and audio signals are transmitted in digital form for high-quality editing. (You cannot connect the camcorder to a DV product.)
3aHcB nporpaMMbl
Korda nepezanncIeHTbI 3aKOHueHa
Bb6epnte 3aTeM haxmTe Ha ceHtp HKHONKe ynpaBJIeHn Ha BnDeoKampe N OCTaHOBtE BOCnPOn3BeJeHne BnDeOMarHnToΦOHa.
EcJIN BaW BnDeOMaHrNtOfoh MOHOFOHNueCKORo TnPa
IoiCoeHInHe XeIbIi WTeKep CoeHNHTeJIbHO Ra6JIa ayIIO/BuJeO K BbIXoHOMy THe3Dy BNDeOcNHa, a 6JIb IIN KpaCHbI WTeKep - K BbIXoHOMy THe3Dy ayDiocnHaHa Na BnDEOMarHnTOfoHe. Ppi NODcoEINHeHn 6eIoro WTeKepa3Byk 6yJeT NDoBaTaBcRa Ha JLeBb KaHa, a Ppi NODcoEINHeHn KpaCHO - Ha npaBbI.
EcIn B BaIeM BnDeomarHnToΦOHe IMeETcR He3do S video
BbIIOJIHnTe CoeINHeHne c NOMOsbIO pa3bEma S video dIa IOnyueHnBaICOKoKaueCTBeHHoro n3o6paXeHn. Ppi DaHHom CoeINHeHn He HxHO IOIcOeINHrTb XeNTbI bIteKep (BIVdeo) coeINHTbHOrO Ka6ena ayDINO/BVdeo. IOncOeINHnTe WTeKeP Ka6ena S video K rHe3dy S video Ha BnDeOmaHnTofohe. 3To coeINHeHne IO3BOJraT NOpYHTb BbICOKoKaueCTBeHHoe N3o6paXeHne φopMaTa MICROMV.
Приимechанne (ToIbko moIeJIb DCR-IP7E)
Пин haжати кногКIMEMORY PLAY Ha nyIbTe DnCTaHcNHOHHORO ynpaBLeHINBA NyHKTe 56ydET OTObpaJKeH N3ObpaKHeHne, 3anncahHoe Na "Memory Stick". EcIn Bbl6paTb REC START, a 3aTeM haxaTb Ha ceHTp ● Ha knOKKe ynpaBLeHIN, N3ObpaKHeHne 6bydET 3anncaHo HnJeHTy.ДЯ OCTaHOBKn BocPon3BeDEHIN nAMrTi NaxMITE MEMORY PLAY Ha nyIbTe DnCTaHcNHOHHORo ynpaBLeHIN eue pa3.
PpnsncnoIb3OBaHmKabela i.LINK
Ipocto no. coeHInTe npJraemb KabeB I.LINK k rhe3dy i.i.LINK (MICROMV) Baewi Bndekokampe b n rhe3dy i.LINK (MICROMV) npOyKt a MICROMV. Ppi nCpOJIb3OBAHIN uΦpOBO rO CoeHNHeNRA BnDeo- ayDnOcHnAblI pereaIoTc B nDpOBoI φOpMe dI NaocJeDyUoEro BbICOKKaueCTBeHHORO MOHTaJa. (Bndekokampe HnB3r NpDKIIouHTb K npOduKt y DV.)
(1) Insert a blank tape (or a tape you want to record over) into your camcorder, and insert a recorded tape into the player.
(2) Set the POWER switch to VCR.
(3) Select FN, then press the centre on the control button. The PAGE1 screen appears.
(4) Select PAGE3, then press the centre on the control button. The PAGE3 screen appears.
(5) Select REC CTRL, then press the centre on the control button, and select REC PAUSE, then press the centre on the control button.
(6) Press on the player to start playback. The picture from the player appears on the screen on your camcorder.
(7) Select REC START, then press the centre on the control button at the scene where you want to start recording.
3ainncb nporpammbi
(1)BcTaBbTe He3aIncAHHyIO JeHTy (IINIJeHTy, Ha KOTopyH UHXHO BbIIOJIHNITb HOBYIO 3aIncb) B VInDeOKaMepy, a 3aIncAHHyIO JeHTy - B npOnIrpbIbATEnlb.
(2)Установпейpeключateь POWER в положене VCR.
(3)BbI6epNTeFN,3aTeM haxMMte Ha ceHTp ●Ha KhoJIke ynpabLeHna. IorBntc 3KpaH PAGE1.
(4)Bb6epTe PAGE3,3aTeM haxMnTe Ha ceHTp Ha KhoNKe ynpabNeHn. IoarBntc 3kpaH PAGE3.
(5)BbIbePte REC CTRL,3aTeMaHaxMnTe HaZeHTp NaKHONKe ynpabLeHnN BbIbePteREC PAUSE,3aTeMaHaxMnTe HaZeHTp NaKHONKe ynpabLeHnN.
(6)HaKmTe KhONky ▷ Ha npOurpBbATEne nIra NaHauana BOCnpOn3BeDeHn. N3o6paXeHne C npOurpBbATEJI NOARNTc H a 3KpaHe BInDEOKaMEpbI.
(7)BbI6epnteRECSTART,3aTeMaHxMnTeHa ceHTp HaKHONKe ynpabJIeHnB TOI cHe,Γe Heo6xOdmo HauTaTb 3aINCb.
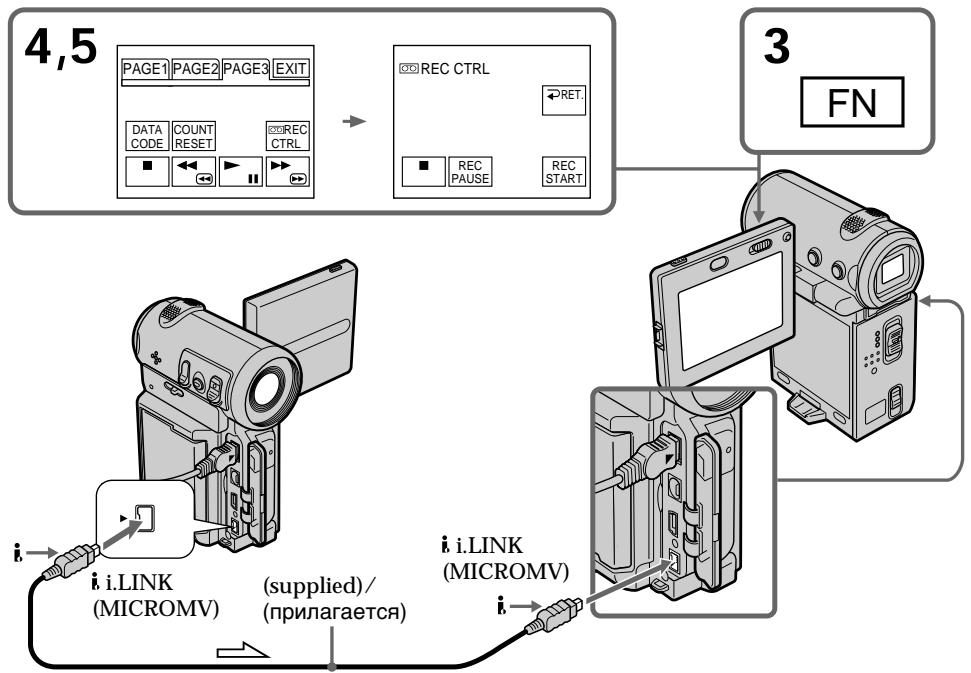
: Signal flow:/ Ipoxokdene hce cnHaHa
When you have finished dubbing the tape
Select , then press the centre on the control button and stop the playback of the player.
Notes
- When an incompatible picture (such as one recorded with the DV format) is input, the message "INPUT ERROR" appears.
- You can connect only one recorder using the i.LINK cable.
When you dub a picture in digital form
The colour of the display may be uneven.
However, this does not affect the dubbed picture.
If you record a playback pause picture with the i.i.LINK (MICROMV) jack
The recorded picture becomes rough. And when you play back the picture using your camcorder, the picture may jitter.
Note
First, start playback or turn to the playback pause mode before the camcorder starts recording or turns to the recording pause mode. If no signal is input into the camcorder, the message "NO INPUT" appears and the camcorder cannot start recording.
Before recording
Make sure the MPEG IN indicator appears on the screen. The MPEG IN indicator may appear on both pieces of equipment.
3aHcB nporpaMMbl
Kornda nepe3anncb JeHTbI 3aKOHYeHa
Bb6epTe 3aTeMaHxMnTe Ha ceHtp HKHONKe ynpaBJIeHnI N OCTaHOBVte BOCpOu3BeDeHne IpOnrPbIbATEJIa.
Примейань
- KorgaHa BxOJ nOdaTcHecOBMeCTnMOe n3o6paXeHne (Ha npimep, 3aIncahHOe BV opMaTe DV), nOraBNTc COo6eHne "INPUT ERROR" (OwN6ka BBOda).
C NOMOUsbKabEnI.LINK MoXHo NOCDoeDINHTb TOJbKO OJHO 3aINcBbAIOUe yCTpoiCTBO.
Pnpe3aHcN 306paXeHnB cHpOBOM BnDe
LBeT n3o6paXeHnHa DnCnIe MoKet 6bItb HeOnHOpOHybIM. OHaKO 3TO He BnAeT Ha KaueCTBO Pepe3aInCbIbAemOro n3o6paXeHn.
Pp3aIncn ocTaHOBJIeHHoro n3o6paXKeHnC nOmoIbI rHe3da i.i.LINK (MICROMV)
3aIncaHHe 1306paXeHne cTaHET xyKe. Ipn BocpOn3BeDeHnN 1306paXeHnHa daHHoB BIndeOkamepe OHO MoKeT dpoXaTb.
Приимechание
Chaçaнla hauchnTe Bocnpoun3BeDeHne nI nepeiDnTe B pexm nay3bl Bocnpoun3BeDeHnra, npexJe yem BIndeOkamepa HaHayet 3aIncb IINI nepeiDnTe B pexm nay3bl Bocnpoun3BeDeHnra. EcIn CunHaN He noJaTcHnBa BXoD BIndeOkamepbI, noBHTc cooocheHne "NO INPUT", IN BIndeOkamepa He hauHet 3aIncb.
Ipeed 3ainnbcio
Y6eIntecb, YTO Ha 3KpaHe NOBnncnIHINkATOP MPEG IN. INdNkATOp MPEG INMOKeT NOBtbcra Ha oObx yCtpoiCTbax.
Superimposing a title
You can superimpose a title for 5 seconds from the recording start point. When you play back the tape, the title is displayed for about 5 seconds from the point where you superimposed it.
You can select one of eight preset titles and two custom titles (p. 116). You can also select the colour, size and position of titles.
HanoxeHne TnTpa
Moxho Hanoxntb TnTp Ha 5 cekyHd C MeCTa Hauana 3aIncn. Ecnn Bbl Bocpon3BODInTe IeHTy, TnTp 6yJed OTobpaXkaTbCra TteHeNe 5 cekyHd C TORO MeCTa, rDe Bbl HanoxNl ero.
BbMOxKeTe BbIbpaTb OINH N3 BOCbMn
PpeBaPnteJIbHO yCTaHOBJIeHHbIX TITPOB IN
DByX C6cTBeHHbIX TITPOB (Ctp. 116). Bbl MOxKeTe TaKKe BbIbpaTb cBeT, pa3MeR n
NoJIOKeHne TITPOB.

Superimposing a title on starting a recording
(1) In standby mode, select FN, then press the centre on the control button. The PAGE1 screen appears.
(2) Select PAGE2, then press the centre on the control button. The PAGE2 screen appears.
(3) Select TITLE, then press the centre on the control button. The title menu appears.
(4) Select , then press the centre or on the control button.
(5) Select the desired title, then press the centre on the control button. The selected title appears on the screen.
HanoxeHne Tttpa npn HauaJe 3aIncn
(1)B pexime oKndaHnBbI6epnte FN, 3aTeMaXMMTe Ha ceHTp ● Ha KhoNKe ynpabHeHn. IopBNTcAkpaH PAGE1.
(2)Bb6epTe PAGE2,3aTeM haxmTe Ha ceHtp Ha KhoNKe ynpabHeHn. IoarBntc 3kpaH PAGE2.
(3)BbI6epNTe TITLE, 3aTeM haxmnte Ha ceHTp H a KhONKe ynpabJeHn. IoRbITcR MeHIO TnTPOB.
(4)BbI6epNTe 3aTeM HaxmTe Ha ceHTp ●HJIu ▷Ha KhoNke ynpaBHeHnA.
(5)BbIepTe HxKhbl TnTp,3aTeM HaXmIte Ha ceHTp Ha KhoNKe ynpabNeHna. BbIpaHHbl TnTp nOBuTcHa 3kpaHe.
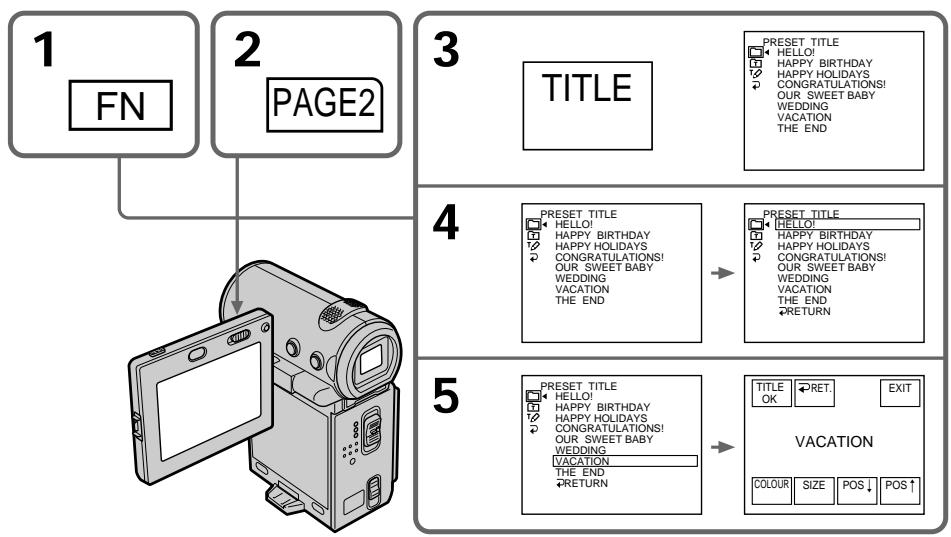
(6) If necessary, change the colour, size, or position by selecting COLOUR, SIZE, POS or POS , then press the centre on the control button repeatedly.
(7) Select TITLE OK, then press the centre on the control button.
(8) Select SAVE TITLE, then press the centre on the control button.
The "TITLE" indicator appears. And when you press START/STOP to start recording, "TITLE SAVE" appears on the screen for about 5 seconds and the title is set.
Hanoxehne TnTpa
(6)EcIIN Tpe6yeTcH3MeHnTe cBET,pa3Mep IINI NIOLOXeHHe TNTPa C NMOUHO COLOUR, SIZE,POS IINI POS↑,3aTEM HeCKoJIbKO pa3 HaKMITE Ha ceHTp ●Ha KHOJKe ynpabJIeHnI.
(7)Bb6epnte TITLE OK,3aTeM haxmnte Ha ceHTp ●Ha KONKe ynpabJIeHnI.
(8)BbIbePte SAVE TITLE,3aTeM haxmnte Ha ceHtp Ha KhoNKe ynpabHeHn. IoAByTcH INdInKaTOp "TITLE".PiH nHaKATn KhoNKn START/STOP dHaHaYana 3aHncn Ha 3KpaHe B TeYeHne 5 cekyHn IOnBaNTc HnDInKaTOp "TITLE SAVE",n yCTaHOVBa THTpa6yDet 3aBepeHa.
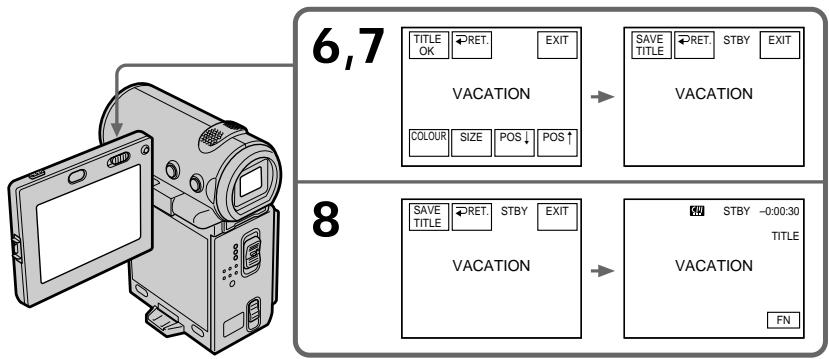
If you set the write-protect tab to lock You cannot superimpose a title. Slide the writeprotect tab to release the write protection.
To use a custom title
If you want to use a custom title, select in step 4 (p.116).
If the tape has a blank portion
You cannot superimpose a title on the blank portion.
If the tape has a blank portion in the middle of the recorded portions
The title may not be displayed correctly.
EcIn 3aunTHbI JeNecTOK yCTaHOBJeH B NOJIOXeHne 3aunTbI OT 3aINcN
HeIb3HaNoXnTb TnTp. IpeepDINHbTe JeNEcTOK 3aunTbI OT 3aNCS DnA OTKJIoueHn 3aunTbI.
ДлИнспльб3OBаHHCo6cTBeHHOROTHTItpa
EcnHyXHOHCNOB3OBAbTOCBCTeHHbI TnTp, BbI6epInTe BnyHKTe 4 (CTp.116).
EcIn Ha IeHTe IMeETc H3aHncaHHbI yUacToK
BbHe CMOKeTe HaIOXnTb TnTpHa He3aIncAHbYyactOK.
EcnHaJeHTe HMeIOTc He3aNcaHHbIe
actm Mekdy 3aNcaHHbIMu cactamM
Tntp MoKET OTo6paKaTaBcHnPaBnJIbHO.
To not display title during playback Set TITLE DSPL to OFF in the menu settings (p. 124).
Title setting
- The title colour changes as follows: WHITE YELLOW VIOLET RED CYAN GREEN BLUE
- The title size changes as follows:
SMALL LARGE
You cannot input more than 12 characters in LARGE size. If you input more than 12 characters, the title size returns to SMALL even if you select LARGE. - If you select the title size "SMALL", you have nine choices for the title position.
If you select the title size "LARGE", you have eight choices for the title position.
The number of titles recordable on one cassette
You can record up to 20 titles when each title consists of 12 characters.
When 20 titles are already superimposed The message "TITLE FULL" appears. Erase unnecessary titles.
Superimposing a title on a recorded tape
The title is recorded for about 5 seconds from the recording start point.
Hanoxehne TnTpa
TtO6bI TnTp He OTo6paXaJcR BO BpEmr BOCPON3BeDeHn
YcTaHOBnTe TITLE DSPL B noJIOKeHne OFF B yCtHaOBkax MeHIO (cTp. 124).
YctaHObKa TnTpa
- LBeT TnTpa N3MeHReTcA CNeDyUOuIM o6pa3oM: WHITE (6eIbI) YELLOW (XeIeTbI) VIOLET (fnoJeToBbI) RED (KpaChbI) CYAN (rOly6oI) GREEN (3eIeHbI) BLUE (CInnI)
- Pa3mep TnTpa n3MeHReTc sJe dyUoiM o6pa3oM: SMALL (MaJIeHbKn) LARGE (6oJIbwoi) Ppi 6OJIbWOM pa3Mepe HeJIb3a BBeCTn 6OJIee 12 cIMBOJOB. EcIIN BBy BBeDeTe 6OJIee 12 cIMBOJOB,TO pa3mep TnTpa BO3BpaTNTcR K yCTaHOBKe SMALL,JaKe npr BblOpe yCTaHOBKn LARGE.
- EcIn BbIbpaH pa3Mep TnTpa "SMALL", moXHo BbIbpaTb OJHO n3 DeBAYn POLOXeHm TnTpa. EcIn BbIbpaH pa3Mep TnTpa "LARGE", moXHo BbIbpaTb OJHO n3 BOcBMN POLOXeHm TnTpa.
KoJInueCTBO THTPOB, KOToPbIe MoXHo 3aIIncatb Ha OJHOH KACCTe
Moxho 3aIncatb do 20 TnTPOB, ecIn KaJdbi H3 HNX COCTOIT 13 CmBOJOB.
Ecn20 TnTpoB yXe hAnOKeHbI
ПОВИТСА COOБSEЕНе“TITLEFULL”.УдалпгенухньTGTPbl.
HaIoxKeHne TnTpHa Ha 3aIncaHHyIO JeHTy
TtTp 3aIncsbIbAeTc npI6JIIN3nteIbHO Ha 5 cekyHd C MeCTa HaYana 3aInci.
(1) Set the POWER switch to VCR.
(2) Select FN, then press the centre on the control button. The PAGE1 screen appears.
(3) Select TITLE, then press the centre on the control button. The TITLE screen appears.
(4) Select INPUT TITLE, then press the centre on the control button. The INPUT TITLE screen appears.
(5) Select / , then press the centre on the control button. The camcorder starts scanning in the selected direction. When you select , the thumbnails are displayed from the upper-left window, and when you select , they are displayed from the lower-right window. After the scanning is completed, the thumbnails are displayed on the index screen.
(6) Select the thumbnail on which you want to superimpose a title, then press the centre on the control button. The title menu appears.
(7) Perform steps 4 to 6 in "Superimposing a title on starting a recording" on page 109.
(8) Select SAVE TITLE, then press the centre on the control button.
The "TITLE SAVE" indicator appears on the screen for about 5 seconds and the title is set.
Hanoxehne TnTpa
(1)YctaHOBInTe IpeKJIIOUaTeIb POWER B noJIOKeHne VCR.
(2)BbI6epNTeFN,3aTeM haxMNte Ha ceHTp ●Ha KhoNKe ynpabNeHn. IorBntc 3KpaH PAGE1.
(3)BbI6epNTe TITLE, 3aTeM haxmnte Ha ceHTp H a KhONKe ynpabJeHn. IoRbTcra 3kpaH TITLE.
(4)BbIbepeTe INPUT TITLE,3aTeM haxMnte Ha ceHtp ●Ha KhoNke ynpabNeHna. IorBntcra 3KpaH INPUT TITLE.
(5)BbIbepnTe / - 3aTeMHaKmnteHaZeHTp Ha KhoNKe UnpaBHeHn. BInDeokamepa HauHET NOMCK B BbIbpaHHom HapPaBHeHn. Ppi BbIbope , He6oNbUne n3o6paXeHn OTo6paXaJIoTcA, HauHnA C Jeboro BepXHero OKHa,aPnBbIbope OHoOTo6paXaIOTcA, HauHnA C npaBOrO HxHKeHOrO OKHa. PocJe 3aBepSeHn NOnCKa HnHdEKCCHom 3kpaHe NOBIAIOCTe He6oNbUne n3o6paXeHn.
(6)BbIepeHte He6oJIbIooe I3O6paXKeHne,Ha KOToOpoe HxKHO HAnOxNtB TnTp, 3aTeM HaxMnTe Ha ceHTp ● Ha KOnKe ynpabLeHna. IOrBaNTcMaHIO TnTPOB.
(7)Вылолинепунктус4 по 6 в раданe "Hanoхене{TITpa пи нарале запис"настр.109.
(8)BbI6epNTe SAVE TITLE,3aTeM haxmnte Ha ceHtp ●Ha KhoNKe ynpaBJeHH. B TeueHne 5 cekyHd Ha 3KpaHe noRbTcH INHdkaTOp "TITLE SAVE",n yctaHOBKa TnTpa 6bydET 3aBepSeHa.
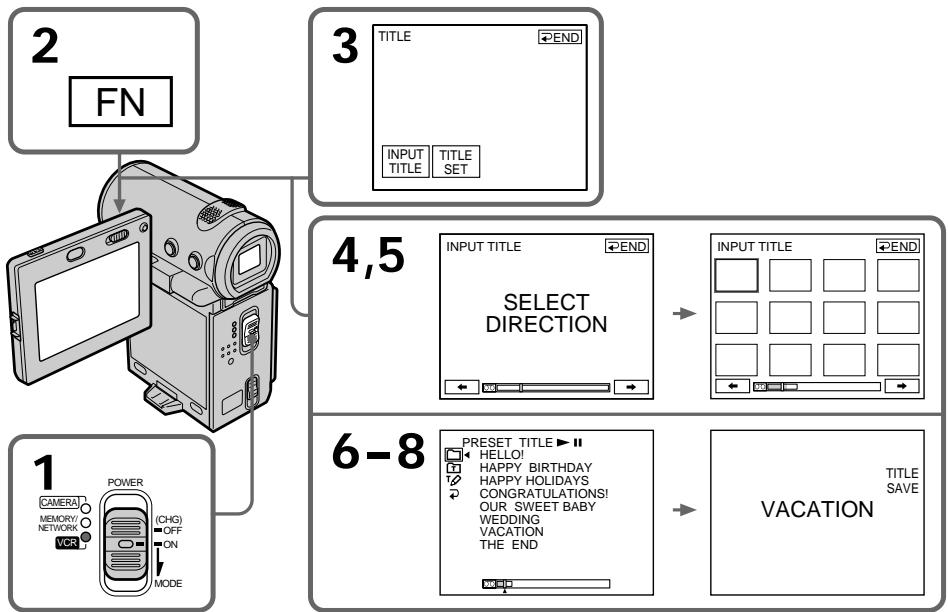
To use a custom title
If you want to use a custom title, select in step 6 (p.116).
Notes
- Thumbsails may not be displayed depending on the condition of the tape. This is not a malfunction.
- Noise may appear on the thumbnails. However, this has no effect on the recorded images.
- You cannot execute TITLE SAVE until the playback picture is displayed in step 8.
(1) Set the POWER switch to CAMERA or VCR.
(2) Select FN, then press the centre on the control button. The PAGE1 screen appears.
(3) Select MENU, then press the centre on the control button. The menu appears.
(4) Select TITLEERASE via , then press the centre or on the control button. The TITLE ERASE screen appears.
(5) Select the title you want to erase, then press the centre on the control button. The message "ERASE OK?" appears.
(6) Make sure the title is the one you want to erase, and select OK, then press the centre on the control button. The message "ERASING" flashes while erasing. After the erasing is completed, the message "COMPLETE" appears.
CTpapanHe TnTpa
(1)Установпейсякючateь POWER в положене CAMERA ини VCR.
(2)BbI6epNTeFN,3aTeM haxMNte Ha ceHTp ●Ha KhoNKe ynpabHeHn. IoRbntc 3KpaHPAGE1.
(3)BbIbepuTe MEnu, 3aTeM haxmTe Ha ceHtp HkONKe ynpabJeHH. IOnBUTc MeHIO.
(4)BbIbepeTTE TITLEERASE C nOMOuHO 3aTeM haxMnte Ha ueHTp ● HnH KhONKe ynpabJIeHn. IOnBaNTc3KpaH TITLE ERASE.
(5) BbIbepnTe TmTp, KOTOpBHyKHO ydaJIntb, 3aTeM HaxKMITE Ha ueHTp ● Ha KhoNKe ynpabJeHn. IoRbNTc coO6eHne "ERASE OK?".
(6)Y6eIntecb, YTO 3TO IMeHNO TOT TnTp, KOTOpBIBy XOTnTe CTepeTb, N Bbl6epnTe OK, 3aTeM hAekmTe Ha CEHTp ● Ha KHONKe ynpabEnn. Bo BpemYdaneHnMiraet coo6uHne "ERASING". IocNe 3aBepHnYdaneHn POnBtCra Coo6uHne "COMPLETE".
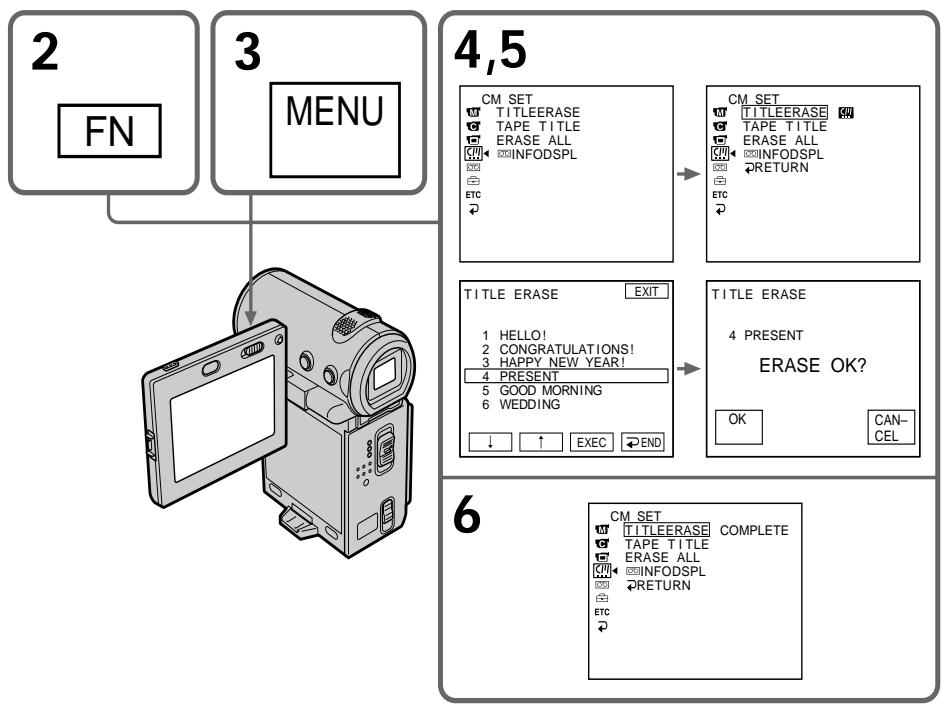
To return to the FN screen
Select 出 , then press the centre on the control button after step 6. Next, select EXIT, then press the centre on the control button.
To cancel erasing
Select CANCEL, then press the centre on the control button in step 5.
Making your own titles
You can make up to two titles and store them in the memory of your camcorder. Each title can have up to 20 characters.
Making a title in CAMERA mode
(1) Set the POWER switch to CAMERA.
(2) Select FN, then press the centre on the control button. The PAGE1 screen appears.
(3) Select PAGE2, then press the centre on the control button. The PAGE2 screen appears.
(4) Select TITLE, then press the centre on the control button. The TITLE SET screen appears.
(5) Select 2 , then press the centre or on the control button.
(6) Select CUSTOM1 SET or CUSTOM2 SET, then press the centre on the control button.
(7) Select the desired character button and press ● repeatedly to select the desired character on the button.
(8) Select another character button, then press the centre on the control button. The cursor moves to the next character. Repeat the same procedure as in steps 6 and 7 to complete your title.
(9) Select SET, then press the centre on the control button. The title is stored in memory.
Co3dAnHe Baunx co6CTBeHHbIX TnTpoB
BbMOxTe CoCTaBHT Do DByx TnTPOB u coXpaHnTB nB namrTaBaWe BnDeokamepbI. KaKdbIe TnTp MoKET CoepKaTb Do 20 CmBOJOB.
To return to the FN screen
Select , then press the centre on the control button after step 9. The PAGE2 screen appears. Next, select EXIT, then press the centre on the control button.
To change the title you have stored
In step 5, select CUSTOM1 SET or CUSTOM2 SET, depending on which title you want to change, then press the centre on the control button and then enter a new title as desired.
ДлЯ BO3BpaTa KЭкрану FN
Bb6epnte 一 ,3aTeM haxMMte Ha ueHTp ●Ha KhONKe ynpaBHeHnI NocLe BbIOJIHeHnI NyHKTa 9. IoBNTcA kpaH PAGE2. DaJeE Bb6epnte EXIT, 3aTeM haxMMte Ha ueHTp ●Ha KhONKe ynpaBHeHnI.
IIN3MeHeHH COxpaHeHHOro B nAMrTu TnTp a
B nyHKTe 5 BbI6epNTe CUSTOM1 SET nINn CUSTOM2 SET B 3aBncmocTOn OT TnTp a, KOTopbl Bbl XOTNe N3MeHnTb,a 3aTeM haxMTte Ha ceHTp ● Ha KONKe ynpabJIeHnA BBeDNTe HOBbl Tpe6yEmbl TnTp.
If you take 5 minutes or longer to enter characters in standby mode while a cassette is in your camcorder
The power automatically goes off. The characters you have entered remain stored in memory. Set the POWER switch to OFF (CHG) once and then to CAMERA again, then complete your title.
We recommend setting the POWER switch to VCR or removing the cassette so that your camcorder is not automatically turned off while you are entering title characters.
To erase the title
Select , then press the centre on the control button. The last character is erased.
To enter a space
Select , then press the centre on the control button.
To enter the same character on the same button in succession
Select , then press the centre on the control button to move the cursor to the next position, and enter the character.
Co3dAnHe Baunx co6CTBeHHbIX TnTPOB
EcIn B pexKIMe OxuHaHnB BVOd CmBOJIOB 3aHnMaet 5 nIi 6OJIee MnHyT, KOrDa KaCCeta HaxoDITcB BVNeOkaMepe
Питане ВьIKночТСАВТOMATИЧЕСК.
CmboJIb, KOtOpBle Bbl BBEnI, coXpaHrTcB namrTn BuDeokamepbl. YCTaHOBInTe nepeKIOUaTeIb POWER cHaJana B noLOXeHne OFF (CHG), 3aTEM CHOBA B noLOXeHne CAMERA, 3aTEM 3aBePunTe COzDaHne TnTpA. PeKoMeHdyETcYCTaHOBnTb nepeKIOUaTeIb POWER B noLOXeHne VCR IIN BblHyTb kaccTeY, UTObBi Ba7a BuDeOKaMepa aBTOMATNueCKn He BbIKIOUaJaCb BO BpEm BAODa CmBOJOB TnTpA.
Дудаленгтра
BbI6epnte 3aTeM HaxMMTe Ha ceHTp ●Ha KhONKe ynpabJIeHn. IocJIeHNi CmBOJ 6yDet ydaJIeH.
Длвьда npobena
BbIbePte ,3aTeM hAkmTe Ha ueHTp ●Ha KHOJKe ynpaBJIeHnI.
Making a title in VCR mode
(1) Set the POWER switch to VCR.
(2) Select FN, then press the centre on the control button. The PAGE1 screen appears.
(3) Select TITLE, then press the centre on the control button. The TITLE screen appears.
(4) Select TITLE SET, then press the centre on the control button. The TITLE SET screen appears.
(5) Select CUSTOM1 SET or CUSTOM2 SET, then press the centre on the control button.
(6) Perform the same procedure as in steps 7 to 8 in "Making a title in CAMERA mode" on page 116.
(7) Select SET, then press the centre on the control button. The title is stored in memory.
Co3dHHe TnTpa BpeXmme VCR
(1)YcTaHOBInTe npeKJIIOUaTeIb POWER B noJIOKeHne VCR.
(2) Bby6epNTe FN, 3aTeM haxMNte Ha ceHTp ● Ha KhoNKe ynpabNeHnA. IorBntc 3KpaH PAGE1.
(3)BbIbepuTe TITLE, 3aTeM haxmnte Ha ceHTp H a KhoNke ynpabJeHn. IoRbTcra 3kpaH TITLE.
(4)BbIbepuTe TITLE SET,3aTeM haxmTe Ha ceHtp ●Ha KhoNke ynpabJeHHa. IOnBHTca 3KpaH TITLE SET.
(5)ВьберпсCustom1 SETин Custom2 SET,Затем нахмпге нацентр -на Кногкуnpавлени.
(6)Повтори Te takyo JKe npOeIpyu, KaK B nyHkTax 7 n 8 pa3deJa "Co3dAnHe TnTp a B peXmE CAMERA" Ha cTp. 116.
(7) BbIbePnte SET, 3aTeM haxMnTe Ha zentp Z ha KhONKe ynpabJIeHn. Tntp 6yJeT coXpaHeN B namrTu.
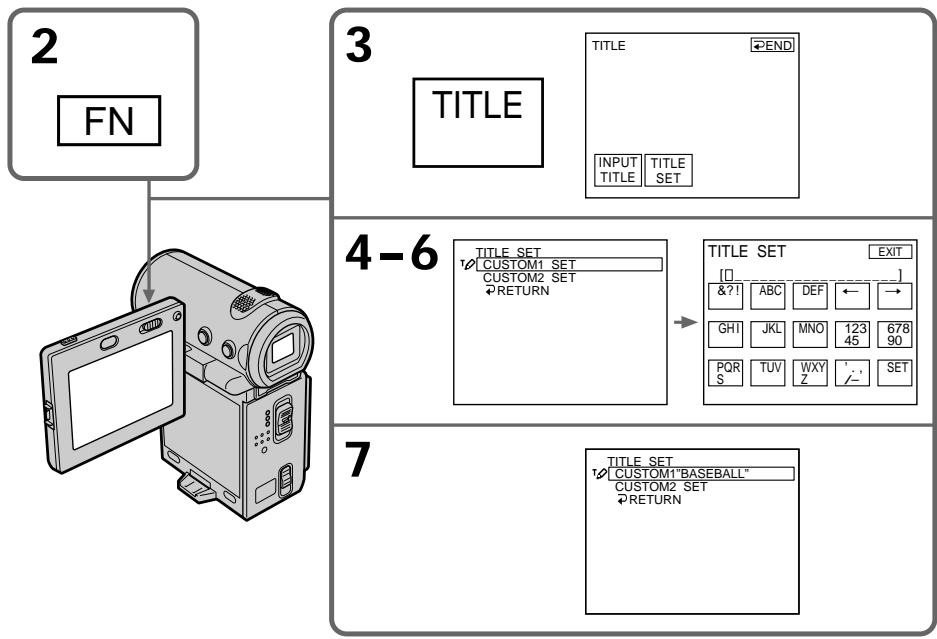
To return to the FN screen
Select RETURN, then press the centre on the control button. The TITLE screen appears. Next, select END, then press the centre on the control button. Last, select EXIT, then press the centre on the control button.
The MICROMV cassette automatically records the recording settings and date. You can also label a cassette. The label can consist of up to 16 characters and is stored in the Micro Cassette Memory. When you insert the labelled cassette and set the POWER switch to CAMERA or VCR, the label is displayed for about 5 seconds.
The cassette information
Micro Cassette Memory
Kacceta MICROMV aBtomatnueckn 3aanncbIbAeT yCTaHOBV 3aHcN i DaTy. MoXHo TaKKe BblONHITb MapKnPOBky KACCETbl. MapKnOBka moKet coepKaTb do 16 CmBbONB n XpaHHTbcra B Micro Cassette Memory. PpN BCTaBKe mapKnPOBaHNoi KaCCETbl u YCTaHOBKe nepeKJIOnuHaTeJIr POWER b noJooKeHne CAMERA n nn VCR b TeueHne OKoIo 5 cekyHd 6yDet OTo6paXaTbCra MapKnOBka.
KaccetnaHΦopMaζη
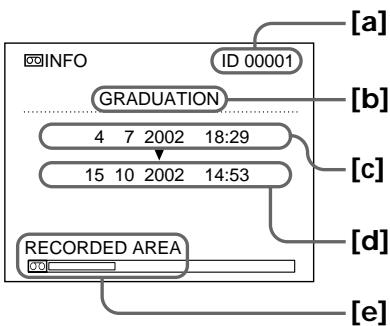
[a] The unique number of each cassette. The camcorder automatically assign this number.
[b] The cassette title set by the TAPE TITLE item in the menu settings (Cassette label).
[c] The first-recorded date in this cassette.
[d] The last-recorded date in this cassette.
[e] The recorded area is indicated by the white bar.
[a] YHnKaJIbHOH HOMe KKaJDoI KAccTebl. BIndeOKaMepa aBtOMaTnueckn Ha3NaHaet 3TOr HOMep.
[b] Ha3BaHne KacCeTbI, yCTaHOBJIeHHoe C nOMOuIIO 3JIeMeHTa TAPE TITLE B MeHIO yCTaHOBOK (MapKINPOBka KACCeTbI).
[c]Даразервоз заимсни Касе.
[d] Data nocleDne 3aIncn Ha KaccTe.
[e] 3aɪncaHna əbIaCTb OTmeyHa 6eJIo nOLOCoN.
Labeling a cassette
(1) Insert the cassette you want to label.
(2) Set the POWER switch to CAMERA or VCR.
(3) Select FN, then press the centre on the control button. The PAGE1 screen appears.
(4) Select MENU, then press the centre on the control button. The menu appears.
(5) Select TAPE TITLE via , then press the centre or > on the control button.
(6) Select the desired character button and press the centre on the control button repeatedly to select the desired character on the button.
(7) Select another character button, then press the centre on the control button. The cursor moves to the next character. Repeat the same procedure as in steps 6 and 7 to complete the label.
(8) Select SET, then press the centre on the control button. The label is stored in memory.
(9) Press DISPLAY to turn off the menu.
MapKupobka KacceTbI
(1)BctaBbTe kaccety, KOTopyu Bby xOTnTe npomapKnpoBaTb.
(2)Установпейсякючateь POWER в положене CAMERA ини VCR.
(3)BbI6epNTeFN,3aTeM haxMMte Ha ceHTp ●Ha KhoNKe ynpabNeHna. IorBntc 3KpaH PAGE1.
(4)BbIbepuTe MEnu,3aTeM haxmTe Ha ceHtp HkONKe ynpabJeHH. IOnBUTcMeHIO.
(5)Bb6epnte TAPE TITLE c nOmoaHIO 3aTeM haxmnte Ha ueHTp ● HJN ▷ KaONKe ynpabJeHnA.
(6) BbIepeNTe KONky HxKHOrO CmBOJa N, HaxMma Ha ueHTp ● Ha KONKe ynpaBHeHn, BblEepTe HxKhBi CmBOJ Ha KHONKe.
(7)BbI6epNTe Dpyrtyo KhoNky CmMbOJa,3aTeMa HaxMnTe Ha zHTp ● Ha KhoNKe ynpaBHeHna. KypcOp nepemecTtCnHa cNe dyuOni CmBOJ. NOBTopnte Takyio Xe npoueDpy, KaK B nyHKtax 6 n 7, YTO6bl 3aKOHHTb CO3dAHne MapKnipOBKn.
(8) BbIbeIpTe SET, 3aTeM HaXMMTe Ha ceHTp ● Ha KhONKe ynpabJeHn. MapKInpOBka 6ydet COxpaHeHa B nAmrTn.
(9)HaKmTe KhONKy DISPLAY OTKIoueHnmeHIO.
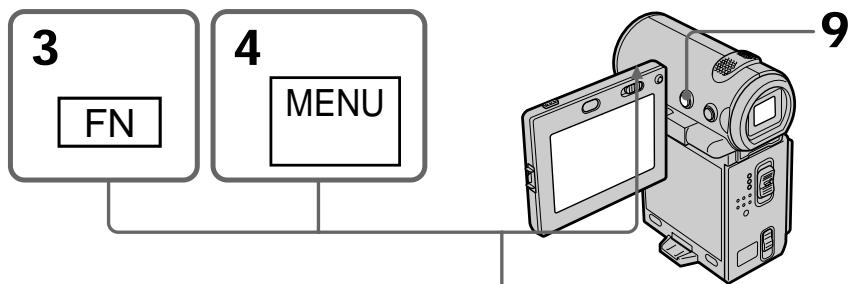
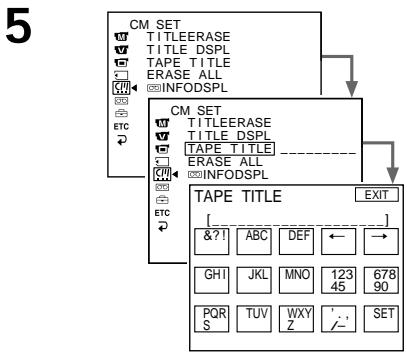
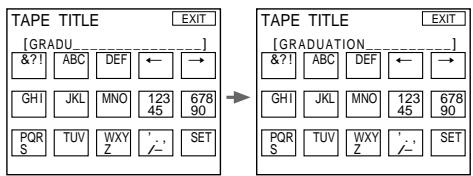
To return to the FN screen
Select l , then press the centre on the control button after step 8. The PAGE1 screen appears. Next, select EXIT, then press the centre on the control button.
To erase the label you have made
Select , then press the centre on the control button in step 6. The last character is erased.
To change the label you have made
Insert the cassette for which you want to change the label, and proceed in the same way as you do to make a new label.
If you set the write-protect tab of the tape to lock
You cannot label the tape. Slide the write-protect tab to release the write protection.
Note on recorded areas
A blank portion between recorded areas is also indicated as a recorded area.
Note on cassette information
You can turn off the cassette information using the INFODSPL item in the menu settings.
When "is flashing
Remove the cassette and insert it again. If the message is still displayed, the Micro Cassette Memory may be corrupted. Replace the cassette with another cassette.
To erase the title
Select , then press the centre on the control button. The last character is erased.
To enter a space
Select , then press the centre on the control button.
To enter the same character on the same button in succession
Select , then press the centre on the control button to move the cursor to the next position, and enter the character.
Ecnn Mmraet HndkaTop
N3BLeKnte KaccTeY u BCTaBbTe ee ChOba. Ecnn coo6ueHne, no-mpexHemy, oTo6paXaetc, BO3MOxHo, NOBpeXdHa Micro Cassette Memory. 3aMeHnTe KaccTeY.
Дудаленгтра
BbI6epnte 3aTeM haxMMTe Ha ceHTp ●Ha KhONKe ynpabJIeHn. IocneHn cIMBOJ 6ydet ydaJeH.
Длвьда npobena
BbIbeIpTe ,3aTeM haxKMITE Ha ueHTp ●Ha KhONKe ynpaBJIeHnI.
Deleting all the data in the Micro Cassette Memory
You can delete all the data (cassette title, date, photo, thumbnail, and cassette information) in Micro Cassette Memory at once.
(1) Set the POWER switch to CAMERA or VCR.
(2) Select FN, then press the centre on the control button. The PAGE1 screen appears.
(3) Select MENU, then press the centre on the control button. The menu appears.
(4) Select ERASE ALL via , then press the centre or on the control button.
(5) Select ERASE OK?, then press the centre on the control button.
(6) Select OK, then press the centre on the control button.
(7) Select EXECUTE, then press the centre on the control button. The message "ERASING" appears on the screen. Once deleting is completed, the message "COMPLETE" appears.
(8) Press DISPLAY to turn off the screen indicators.
To return to the FN screen
Select 1 , then press the centre on the control button after step 7. The PAGE1 screen appears. Next, select EXIT, then press the centre on the control button.
To cancel deleting
Select RETURN in step 5 or 6, then press the centre on the control button.
Note
Once you delete all the data in the Micro Cassette Memory, the following operations do not work:
-Multi-picture search
- Title search
- Date search
- Photo search
Note on the ID number
This item cannot be deleted.
YdaJIeHne Bcex DaHHbIX n3 Micro Cassette Memory
Moxho cpa3y ydaHnTb BCE daHHbIe (Ha3BaHne KacceTb, DaTy, fOTo, He60JIbUne n3o6paXeHn I KaccTeHyIO uHΦopMauHIO) n3 Micro Cassette Memory.
(1)YctaHOBInTe NepeKJIIOUaTeIb POWER B noJIOKeHne CAMERA nIu VCR.
(2)BbI6epNTeFN,3aTeM haxMMte Ha CEHTp ●Ha KHOJIKe ynpabNeHnA. IIOBNTcA əKpaH PAGE1.
(3)BbIbepuTe MEnU, 3aTeM haxmte Ha ceHtp HKHONKe ynpabJeHH. IOnBUTc MeHO.
(4)BbI6epnte ERASE ALL c nOmoUHO 3aTEM hAkmTe Ha ceHTp ● nIn ▷Ha KHONKe ynpabJeHH.
(5)BbI6epNTe ERASE OK?, 3aTeM haxMnTe Ha ceHtP ● Ha KONKe ynpabJeHHa.
(6)BbIepeNTe OK,3aTEM haxmTe Ha ueHTp ●Ha KhoNKe ynpaBHeHn.
(7) BыберпгЕ EXECUTE, 3aTeM hαжмITE ha ZeHTp ● Ha KhoIGNke ynpaBLeHnHa ḋкpaHé nOЯВИТСооБшЕнe “ERASING”. Пocле 3aВершЕнЯ уДалЕнЯ nOЯВИТСооБшЕнe “COMPLETE”.
(8)HaxmTe DISPLAYДгЯOTKJIQUeHnA 3KpaHHbIX INdNkATOpOB.
Iocne ydaJIeHnB CEx EaHHbIX n3 Micro CassetteMemory He 6yDyT pa6oTaTb cJeDuOuHe onepaun:
-ПОИСК HeCKOЛьКИX I306paЖeни
-ПоискТИтра
-ПОИСКДАТБI
-ΦOTONONCK
Ppimmeyane no Homepy ID
3TOT 3nemt ydaJIITb HEnb3a.
Changing the menu settings
To change the mode settings in the menu settings, select the menu items with the control button. The default settings can be partially changed. First, select the icon, then the menu item, and then the mode.
(1) In standby, MEMORY (DCR-IP7E only) or VCR mode, select FN, then press the centre on the control button. The PAGE1 screen appears.
(2) Select MENU, then press the centre on the control button. The menu appears.
(3) Select the desired icon, then press the centre or on the control button.
(4) Select the desired item, then press the centre or on the control button.
(5) Select the desired setting, then press the centre on the control button.
(6) Repeat steps 3 to 5 if you want to change other items. To return to step 3, select RETURN, then press the centre on the control button.
For details, see "Selecting the mode setting of each item" (p. 126).
To turn off the menu
After step 5, press DISPLAY to turn off the menu.
To return to the FN screen
After step 5, select , then press the centre on the control button. The PAGE1 screen appears.
Next, select EXIT, then press the centre on the control button.
ДЯ OTKЛIOUeHnM MeHIO
Посе ВылонHeHЯpyнКТа 5HaЖмITE KНОКY DISPLAYДЯОТКЛЮЧЕнЯ MEHIO.
Menu items are displayed as the following icons:
MANUAL SET
CAMERA SET
VCR SET
LCD/VF SET
MEMORY SET (DCR-IP7E only)
CMSET
TAPE SET
SETUP MENU
ETC OTHERS
IyHKtbl MeHIO OTO6paXaHTcB BVNe npUBeDeHHbIX HNXe NIKTORpAMM:
MANUAL SET
CAMERA SET
VCR SET
LCD/VF SET
□ MEMORY SET (TOnbKO MoJeB DCR- IP7E)
CMSET
TAPE SET
SETUP MENU
ETC OTHERS
English
Selecting the mode setting of each item
is the default setting.
Menu items differ depending on the position of the POWER switch.
The screen shows only the items you can operate at the moment. The MEMORY position of the POWER switch is only available for the DCR-IP7E.
| Icon/item | Mode | Meaning | POWER switch |
| PROGRAM AE | — | To suit your specific shooting requirements (p. 75). | CAMERA MEMORY |
| P EFFECT | — | To add special effects like those in films or on TV to images (p. 69). | CAMERA VCR |
| WHT BAL | — | To adjust the white balance (p. 78). | CAMERA MEMORY |
| AUTO SHTR | ●ON | To automatically activate the electronic shutter when shooting in bright conditions. | CAMERA |
| OFF | To deactivate the electronic shutter even when shooting in bright conditions. | ||
| D ZOOM | ●OFF | To deactivate the digital zoom. Up to 10× zoom is carried out. | CAMERA |
| 20× | To activate the digital zoom. More than 10× to 20× zoom is performed digitally (p. 44). | ||
| 120× | To activate the digital zoom. More than 10× to 120× zoom is performed digitally (p. 44). | ||
| 16:9WIDE | ●OFF | — | CAMERA |
| ON | To record a 16:9 wide picture (p. 64). | ||
| STEADYSHOT | ON | To compensate for camera-shake. | CAMERA |
| OFF | To cancel the SteadyShot function. Natural pictures are produced when shooting a stationary object with a tripod. | ||
| VIDEOINPUT | VIDEO | To use the video plug of the A/V connecting cable when recording from a player. | VCR |
| SVIDEO | To use the S video plug of the A/V connecting cable when recording from a player. | ||
| NTSC PB | ON PAL TV | To play back a tape recorded in the NTSC colour system on a PAL system TV. | VCR |
| NTSC 4.43 | To play back a tape recorder in the NTSC colour system on a TV with the NTSC 4.43 mode. | ||
| LCD COLOUR | --- | To adjust the colour on the LCD screen with▲/▲. | CAMERA MEMORY VCR |
| Low intensity←→high intensity | |||
| VF B.L. | BRT NORMAL | To set the brightness on the viewfinder screen to normal. | CAMERA MEMORY VCR |
| BRIGHT | To brighten the viewfinder screen. | ||
| * STILL SET | |||
| PIC MODE | SINGLE | To not record continuously. | MEMORY |
| MULTI SCRN | To record nine images continuously (p. 151). | ||
| QUALITY | FINE | To record still images in the fine image quality mode. | MEMORY VCR |
| STANDARD | To record still images in the standard image quality mode. | ||
- DCR-IP7E only
Notes on the SteadyShot function
The SteadyShot function may not work properly in the following cases:
- When the camera shake is excessive.
- When shooting in dark conditions.
- When the contrast of the subject and its background is low.
- When the subject is in vertical stripes.
- When shooting a moving subject.
- When attaching a conversion lens (optional).
If you cancel the SteadyShot function
The SteadyShot off indicator "appears. Your camcorder prevents excessive compensation for camerashake.
Notes on VF B.L.
When you select "BRIGHT", the battery life is reduced by about 10 percent during recording.
When you use a power source other than the battery pack
VF B.L. is automatically set to BRIGHT.
| Icon/item | Mode | Meaning | POWER switch |
| *MOVIE SET | |||
| MOVIEMODE | ●SUPER FINE | To record moving pictures with super fine image quality. | MEMORY VCR |
| FINE | To record moving pictures with fine image quality. | ||
| STANDARD | To record moving pictures with standard image quality. | ||
| LIGHTMODE | To record moving pictures to be used as an e-mail attachment. | ||
| SLIDE SHOW | — | To play back images in a continuous loop (p. 188). | MEMORY |
| DELETE ALL | — | To delete all unprotected images (p. 195). | MEMORY |
| FORMAT | ●RETURN | To cancel formatting. | MEMORY |
| OK | To format the inserted “Memory Stick”.1. Select FORMAT, then press the centre ● on the control button.2. Select OK, then press the centre ● on the control button.3. After “EXECUTE” appears, select EXECUTE, then press the centre ● on the control button.“FORMATTING” flashes during formatting.“COMPLETE” appears when formatting is finished. | ||
| PHOTO SAVE | — | To duplicate still images on the tape and save them onto the “Memory Stick” (p. 171). | VCR |
- DCR-IP7E only
Notes on formatting (DCR-IP7E only)
- The "Memory Stick" supplied with your camcorder has been formatted at the factory. Formatting with your camcorder is not required.
- Do not slide the POWER switch or press any button while "FORMATTING" is displayed.
- You cannot format the "Memory Stick" if its write-protect switch is set to LOCK.
- Format the "Memory Stick" if "格式FORMAT ERROR" appears.
Formatting erases all information on the "Memory Stick" (DCR-IP7E only)
Check the contents of the "Memory Stick" before formatting.
- Formatting erases sample images on the "Memory Stick".
- Formatting erases protected image data on the "Memory Stick".
| Icon/item | Mode | Meaning | POWER switch |
| TITLEERASE | —— | To erase a superimposed title (p. 114). | CAMERA VCR |
| TITLE DSPL | ● ON | To display a superimposed title. | VCR |
| OFF | To not display the title. | ||
| TAPE TITLE | —— | To label a cassette (p. 121). | CAMERA VCR |
| ERASE ALL | —— | To erase all the data in the Micro Cassette Memory (p. 123). | CAMERA VCR |
| ○ INFODSPL | ● ON | To display the cassette information of the tape. This is displayed for 5 seconds in the following cases: (p. 120). · When turning on the power with a cassette inserted or inserting a cassette. · When entering the VCR mode using the POWER switch. | CAMERA VCR |
| OFF | To not display the cassette information of the tape. | ||
| ○ REMAIN | ● AUTO | To display the remaining tape bar: · for about 8 seconds after your camcorder is turned on or a cassette is inserted, and also calculate the remaining amount of tape. · for about 8 seconds after you select ◆ and you press the centre ◆ on the control button or DISPLAY is pressed to display the screen indicators. · During fast-forwarding or rewinding the tape. | CAMERA VCR |
| ON | To always display the remaining tape indicator. | ||
| ○ CLOCK SET | —— | To set the date or time (p. 32). | CAMERA MEMORY |
| LTR SIZE | ● NORMAL | To display the selected menu item in normal size. | CAMERA |
| 2× | To display the selected menu item at twice the normal size. | MEMORY VCR | |
| DEMO MODE | ● ON | To make the demonstration appear. | CAMERA |
| OFF | To cancel the demonstration mode. |
Notes on DEMO MODE
- You cannot select DEMO MODE when a cassette is inserted in your camcorder.
- DEMO MODE is set to STBY (Standby) as the default setting and the demonstration starts about 10 minutes after you have set the POWER switch to CAMERA without a cassette inserted. To cancel the demonstration, insert a cassette, set the POWER switch to a position other than CAMERA, or set DEMO MODE to OFF. To set to STBY (Standby) again, leave the DEMO MODE to ON in the menu settings, set the POWER switch to OFF (CHG), and slide the POWER switch to CAMERA.
| Icon/item | Mode | Meaning | POWER switch |
| DATA CODE* | ● DATE/CAM | To display date, time and various settings during playback. | MEMORY VCR |
| DATE | To display date and time during playback. | ||
| AREA SET | —— | To set your area temporarily, when using the camcorder in a new location (p. 34). | CAMERA MEMORY |
| SUMMERTIME | ● OFF | To be used when your area is not in daylight saving time. | CAMERA MEMORY |
| ON | To be used when your area is in daylight saving time. | ||
| BEEP | ● MELODY | To output a melody when you start/stop recording or when an unusual condition occurs on your camcorder. | CAMERA MEMORY VCR |
| NORMAL | To output a beep instead of the melody. | ||
| OFF | To cancel both the melody and beep sound. | ||
| COMMANDER | ● ON | To activate the Remote Commander supplied with your camcorder. | CAMERA MEMORY VCR |
| OFF | To deactivate the Remote Commander to avoid remote control misoperation caused by remote control of other VCRs. | ||
| DISPLAY | ● LCD | To show the indicators on the LCD screen and viewfinder. | CAMERA MEMORY VCR |
| V-OUT/LCD | To show the indicators on the TV screen, LCD screen and viewfinder. | ||
| REC LAMP | ● ON | To light up the camera recording lamp at the front of your camcorder. | CAMERA MEMORY |
| OFF | To turn the camera recording lamp off so that the subject is not aware of your recording. |
- Using the Remote Commander only
Note
If you press DISPLAY with "DISPLAY" set to "V-OUT/LCD" in the menu settings, the picture from the TV or VCR will not appear on the screen even when your camcorder is connected to outputs on the TV or VCR.
Even if the power source is detached from the camcorder
The menu items settings will be retained even if you remove the power source.
When recording a close subject
When REC LAMP is set to ON, the red camera recording lamp on the front of the camcorder may reflect on the subject if it is too close. In this case, we recommend you set REC LAMP to OFF.
Bb6op yctaHOBOK peKIMa kaxdoRo 3JemeHTa ABnAETc yCTaHOBKO I NO yMOJauHIO.
Пунктbi MeHIO OTOJIuaOTcB 3aBnCIMOCTN OT NOLOXeHnI nepeKlNoUaTeTn POWER.
ЗКран OTObpaKaet TOnbKO Te 3JemeHTbl, C KOTOpbIMN MoXHO B DaHHbI MОmEt pa6oTaTB.
ПлоJOxeHne MEMORY nepeKlNoUaTeTn POWER ImeETcR ToIbKO B MoJen DCR-IP7E.
| ПикTORрамma /пункт | Рек imm | Назначениe | Ппеслочател POWER |
| PROGRAM AE | — | Для сооветства Спецаль ус��овьм Съемки (стр. 75). | CAMERA MEMORY |
| P EFFECT | — | Для добavenения спецальский Ффөков, ( побно изображени в Кинокиль_MAX поа эхсанх телевизоров (стр. 69). | CAMERA VCR |
| WHT BAL | — | Для р发电机 Вьаланca Беного (стр. 78). | CAMERA MEMORY |
| AUTO SHTR | ● ON | Для АВТOMATИЕСКОУ Срабатыань эл ekтугОНУ 3atВора рри съемки в ярkinx ус��овьx. | CAMERA |
| OFF | Для OTКLOчЕНИЗЕ ПЕKTPOHONU 3atВора доже рри съемки в ярkinx ус��овьx. | ||
| D ZOOM | ● OFF | Для OTКLOчЕНИЗЕ ПИФРОВОТ ТраHCФОKAUGIN. Hae3d Видекамерьdo 10x ВьлOLнЯETСОТЧЕСКIM Способom. | CAMERA |
| 20x | Для akтувизаши Фөrobою ТраHCФОKAТОР. Hae3d Видекамерьболee, чem ot 10x do 20x, ВьлOLнЯETСА ПИФРОВБIM MeTOdom (стр. 44). | ||
| 120x | Для akтувизаши Фөrobою ТраHCФОKAТОР. Hae3d Видекамерьболee, чem ot 10x do 120x, ВьлOLнЯETСА ПИФРОВБIM MeTOdom (стр. 44). | ||
| 16:9WIDE | ● OFF | — | CAMERA |
| ON | Для записши рokedоэкpanного изображени 16:9 (стр. 64). | ||
| Пикторамma/ Пунckt | Реким | Назначениe | Ппеслочател POWER |
| STEADYSHOT | ●ON | Для коменсанции подраимьань видаокамеры. | CAMERA |
| OFF | Для OTмени φунckции устонов сбемки.При сбемке стоц�арно obъektа с помошью тейоги пolyчотая оочь ectectвенные изобравожения. | ||
| VIDEOINPUT | ●VIDEO | Для Incрпьзовая видаочевуку сбемки кабеля удио/вideо等相关 c поигрывателя. | VCR |
| SVIDEO | Для Incрпьзоваяшteковая video созинтельно的相关及相关等相关 с поигрывателя. | ||
| NTSC PB | ●ON PAL TV | Для Воспразьеведения lentы, записné на заимь видаокамеpe, в сис themselves с来不及 NTSC, н телегиизоре сис themselves PAL. | VCR |
| NTSC 4.43 | Для Воспразьеведения lentы, записné в сис themselves с来不及 NTSC, на телегиизоре сис themselves NTSC 4.43. | ||
| LCD COLOUR | --- | Для ретулировки цьета на заиме ЛКД с помошью кнорok «▼. | CAMERA MEMORY VCR |
| Hизская Интугсialsхость «←» | Вы科协я Интугсialsхость | ||
| VF B.L. | ●BRT NORMAL | Для установки hopмалов ляковские в видаочателя. | CAMERA MEMORY VCR |
| BRIGHT | Для боже лякового посравожения в видаочателя. | ||
| * STILL SET | |||
| PIC MODE | ●SINGLE | Для OTмение несярьевши заимс. | MEMORY |
| MULTI SCRN | Для несярьевши заимс деба rainizа (стр. 151). | ||
| QUALITY | ●FINE | Для заимсни ленидьхьхьхьхьхьхьхьхьхьхьхьхьхьхьхьхьхьхьхьхьхьхьхьхьхьхьхьхьхьхьхьхьхьхьхьхьхьхьхьхьхьхьхьхьхьхьхьхьхьхьx. camoro ВьICOKOTO кач诸葛亮а. | MEMORY VCR |
| STANDARD | Для заимсни ленидьхьхьхьхьхьхьхьхьхьхьхьхьхьхьхьхьхьхьхьхьхьхьхьхьхьхьхьхьхьхьхьхьхьхьхьхьхьхьхьхьхьхьхьхьx. STANDARD | MEMORY STANDARD | |
- Tônbko MôdeNB DCR-IP7E
PpimueaHnno fynkun yctoynboBcbeMK
Функцу yctOuHBOB CbemKn MOKeT He pa6oTaB B CJIeDyUOnx CnyuaX:
Using a "Memory Stick" - introduction
- DCR-IP7E only
You can record an image onto the "Memory Stick" and easily play it back on your camcorder. The following functions are also available using the "Memory Stick".
- To capture an image recorded on the tape using the "Memory Stick".
- To duplicate a still image recorded on the "Memory Stick" onto the tape.
- To duplicate an image and save it to your computer via the supplied USB cable.
- To delete an image, protect an image, and write a print mark.
On file format
Still image (JPEG)
Your camcorder compresses image data in the JPEG format (file extension .jpg).
Moving picture (MPEG)
Your camcorder compresses picture data in the MPEG format (file extension.mpg).
Typical image data file name Still image
100-0001: This file name appears on the screen of your camcorder.
Dsc00001.jpg: This file name appears on the display of your computer.
Moving picture
MOV10001: This file name appears on the screen of your camcorder.
Mov10001.mpg: This file name appears on the display of your computer.
Испобьзоване“Memory Stick”-ВveDEXe
-ToIbkoMoIeJIb DCR-IP7E
BbMoKTe 3aIcMbTaB N3O6paXeHne Ha "Memory Stick" n Ierko BocnpOn3BecTn ero Ha BInDeokamepe. Kpome TOrO, C nomoubIO "Memory Stick" MoKHO BbIOnHraTb cIeNyUoUneФyHKuIN.
- ChmMaTb N3O6paXeHne, 3aIncaHHe HaJIeHTe, c NOMOsbH "Memory Stick".
- CkONIpOBaTb HEnOdBnKHOe N3o6paXeHne, 3aIncaHHe Ha "Memory Stick", Ha JeHTy.
- CkONIPOBaTb N3O6paXeHne i COxpaHnTb ero Ha KOMNbIOTeP c NOMOuBIO npNlaRaemoro Ka6eJIa USB.
- YdaJIITb n3O6paXeHne, 3aIITnTb n3O6paXeHne n 3aIncaTb neaTHbI 3HaK.
OΦopMaTe ΦaJIOB
HenodBuxkHoe n3o6paXeHne (JPEG)
3Ta BnDeokamepa CxKImaeT daHHbIe
H3o6paXeHnBΦopMaT JPEG (c pacuipenem
faiHa.jpg).
Using a "Memory Stick"
IcnoIb3OBaHne "Memory Stick"
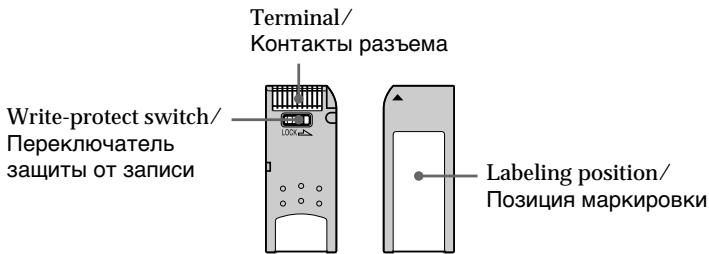
- You cannot record or erase images when the write-protect switch on the "Memory Stick" is set to LOCK.
- The position and shape of the write protect switch may be different depending on the model.
- We recommend backing up important data.
-
Image data may be damaged in the following cases:
-
If you remove the "Memory Stick", turn the power off or detach the battery for replacement when the access lamp is flashing.
-
If you use "Memory Stick" s near magnets or magnetic fields such as those of speakers and televisions.
-
Prevent metallic objects or your finger from coming into contact with the metal parts of the connecting section.
- Stick its label on the labeling position.
- Do not bend, drop or apply strong shock to "Memory Stick"s.
- Do not disassemble or modify "Memory Stick"s.
- Do not let "Memory Stick"s get wet.
-
Do not use or keep "Memory Stick"s in locations that are:
-
Extremely hot such as in a car parked in the sun or under the scorching sun.
-Under direct sunlight. - Very humid or subject to corrosive gases.
-
When you carry or store a "Memory Stick", put it in its case.
-
I3o6paXeHn HeBO3MOxH O 3aIncbIbTa b nI CTnpaTb, ecn nepeKJIouyateIb 3aIuNTbl OT 3aIncn Ha "Memory Stick" yctaHOBneB B noLoXeHne LOCK.
Положени и сорma nepeклочаела 3aц捲ы 3aпси может OTлчаьсь B 3abicnmoctn OT модени. - PekomehnyetcnaIaTb pe3epBhble KOnnn Baxhblx daHHblx.
-Данные ИЗобрахжени могут бытоврекдныВ сеунши сухаях:
-EcIn Bbln3BnkeAeTe "Memory Stick", BbIKIouaTe nITaHne nIN OTcoEINHReTe 6bTapeHbI 6bOK dJIa 3aMeHbI, KOrda Mmraet lamnocha o6paueHna.
-EcIn BbI nCnOJIb3yTe "Memory Sticks" pAOM C MaHHTaMn IJIN NCTOHNKaMn MaHHTbIX NOJIe, TaKIMN KaK rPOMKOrOBOpNTeJI N TeJIeBUN3Opbl.
- He npikacaiTecb MeaJIInueckmU qactMnIIN paJIbcaMn K MeaJIInueckm UCAETMCOeDINHTeJIbHbIX CekLIM.
3TnKeTky cIeJyET npIKpeJIaTb B nO3nIM MapKnipOBKn. - He crn6aITe, He poHraIte n He TpIcIte "Memory Stick".
- He pa3bnpaIte n He BHOcIte I3MeHEni B KOHCTpyKcIIO "Memory Stick".
- He donyckaite nonaadaHna Bnarn Ha "Memory Stick".
- He iconoIb3yIte n He xpaHnTe "Memory Stick":
-BcIiHKOMJkapKHXMeCTax,HanpIMep,B aBTOMO6HNe,IpiNapKObAHOM B COJIHeHOM MeCTe,IIINIOJ PAnJUIMC OJIHcEM.
-Ha coJIHnce.
-B ouheB bIaJbIX MeCTax IIN MeCTax, NOBepKeHHbIX BO3JeICTBIO arpeCCNBbIX ra3OB.
- Пи посяноке Илихранени Heo6xoДимо noloxntb "Memory Stick"Вфутлр.
"Memory Stick"s formatted by a computer
"Memory Stick"s formatted by the Windows OS or Macintosh computers does not have guaranteed compatibility with this camcorder.
Notes on image data compatibility
- Image data files recorded on "Memory Stick"s by your camcorder conform with the Design rule for Camera File system universal standard established by the JEITA (Japan Electronics and Information Technology Industries Association).
On your camcorder, you cannot play back still images recorded on other equipment (DCRTRV890E/TRV900/TRV900E or DSC-D700/D770) that does not conform to this universal standard. (These models are not sold in some areas.)
- If you cannot use the "Memory Stick" that is used with other equipment, format it with this camcorder (p. 128). However, formatting erases all information on the "Memory Stick".
"Memory Stick" and are trademarks of Sony Corporation.
- Windows and Windows Media are either registered trademarks or trademarks of Microsoft Corporation in the United States and/or other countries.
- Macintosh and Mac OS, QuickTime are trademarks of Apple Computer, Inc.
- Pentium is either a registered trademark or trademark of Intel Corporation.
- All other product names mentioned herein may be the trademarks or registered trademarks of their respective companies.
Furthermore, "TM" and "®" are not mentioned in each case in this manual.
"Memory Stick", otформатуpoBaHHbIe Ha KomпьЮтete
"Memory Stick", oTφopMaTnPoBaHhbIe c NOMOuB KOMNbIOTepOB C OpeaunHOHcNCTeMoWindows INM Macintosh, He 6bIaIaOT rapaHTnPoBaHHO CoBMecTmOCTbIO C3TOB BnDEOKaMePOi.
Приимechаши NO COBmecTnMoCTn DaHHbIX n3o6paXeHn
-Фаилдданнбхизобрахен,在апсаньье Видаокамери на“Memory Stick”, COOTBETCTBYIOT yHINBepcaIbHOMy CTaHdapTy CORlaCHO npaBnI npOEKtupOBaHnI Φаиnobix cIcTeM ДЯВидаокамер, yctahOBJIeHNOMY accOuaNueJ JEITA (ЯнOHСКОн accOuaNauZI 3JIeKТроHNo I pOMbIJIeHNOCIn ИИнфОрмAZIOHbIX TEXHOLOrŋ).
Ha 3ToB BVNeOeKaMepe HeJIb3a
BOcPOn3BOJNTb HeNoDVBXHbIe
H3o6paXeHn, 3aIncAHhIbe Ha dpyroI
annapatype (DCR-TRV890E/TRV900/
TRV900E nIN DSC-D700/D770), KOTopar He
COOTBeTCTByET 3tOMy yHNBepCaJIbHOMy
CTaHdApTy. (3Tm MoJeIe Ne IpoJaHTcB
HEKOTOpbIX oBlaCTaX.)
- Ecni BbI He MoKeTe NcNoJIb3ObaTb "Memory Stick", KOTOpBle NcNoJIb3yIOTuC Ha IpyroI annapaType, OTΦopMaTIpyuTe IN C NOMOuHO 3ToI BnDeOkAmepbl (CTp. 133). OdHaKO pIn φoPmaTIPOBaHm INHΦoPMaUHa Ha "Memory Stick" 6yDet ydaNeHa.
"Memory Stick" n MEBMSTK w. RBAJOTCA TOPROBbIMn Mapkamn kopnpaunn Sony.
- Windows n Windows Media ABJHOTc3apeRnCTpnpOBaHHbIMN TopROBbIMN MapkAmnIIN TopROBbIMN MapkAmn Microsoft Corporation B CLJa n/nn dpyrnx cTpaHax.
Macintosh Mac OS, QuickTime ABJIOITc ToprobIMn MapkAmn Apple Computer, Inc. - Pentium ABJARETCA 3apeHnCTpnpoBaHHoT TopROBm MapKo IN TopROBm MapKo Intel Corporation.
- Bce Ha3BaHnIa3dJIeN, yNOMaHyTbIe B DaHHOM pyKOBOJCTBe, MOrYT 6bITb TOPROBbIMI MapKAMN ININ 3apeRNCTpIPoBAHHbIMI TOPROBbIMN MapKAMN COOTBETCTByIOUx KOMNaHm.
Kpome TOrO, CnMBOJbI “TM” N “@” B KaXdOM Cnyuae He yNOMHaOTcB B DaHHOM pyKOBoDCTBe.
Inserting a "Memory Stick"
Insert a "Memory Stick" in the "Memory Stick" slot as far as it can go with the mark facing up as illustrated.
YcTaHOBka "Memory Stick"
BcTaBbTe "Memory Stick" B rHe3do "Memory Stick" do ynpa, TaK, YTo6bI 3NaK ▲6bln obpaueH BBepx, KaK nokaaho Ha pncyHke.
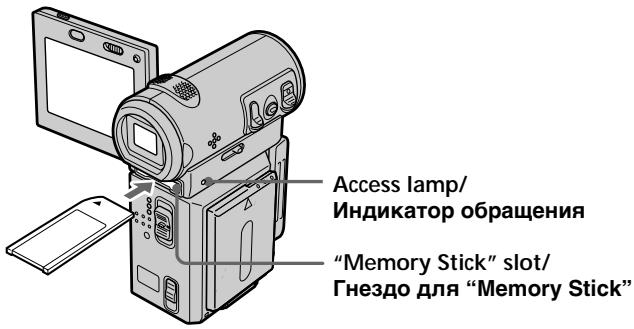
Ejecting the "Memory Stick"
Slide the MEMORY EJECT lever in the direction of the arrow.
Извileченье "Memory Stick"
IpeBnHbTe pbluXko MEMORY EJECT B HappaBHeHn CTpeKn.
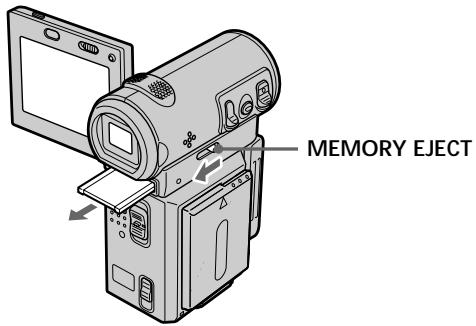
While the access lamp is lit or flashing Do not shake or strike your camcorder because your camcorder is reading the data from the "Memory Stick" or recording data on the "Memory Stick". Do not turn the power off, eject the "Memory Stick" or remove the battery pack. Otherwise, the image data may be corrupted.
If "REMEMORSTICK ERROR" is displayed Remove the "Memory Stick", then insert it again. If the message is still displayed, the "Memory Stick" may be corrupted. Use another "Memory Stick".
Using a button displayed on the screen
Your camcorder has operation buttons on the screen. Use the control button to operate the buttons on the screen.
EcIn lamnocka o6paueHn rOpnt nIIMnraet
He Tpncnte n He ydapnTe no Baewe BnDeokampe, nOTOMy UTo BnDeokamepa CunTBiBaet daHbIe c "Memory Stick" nn 3anncblBaET daHbIe Ha "Memory Stick". He BbIKJIOuayte nHTaHne, He n3BLekaTe "Memory Stick" n He CHImaTe 6aTapeHbI bLOK. B npOTNBHom clyae daHbIe n3OpaXeHnMoryT 6bITb NOBpeXdeHbl.
EcIn OTo6paKaTaTcHnDnKaTOp "3 MEMORYSTICK ERROR"
Изblкite“Memory Stick”,3aTeM BCTaBbTe cHOBa.EcInco6uEHeNeNo-mpexKHeMy oTo6paXaETc,Bo3moXHo,“Memory Stick” noBpeJdeHa.IcnoIb3yIteDpyryo“Memory Stick”.
IcnoJb3ObaHne KhoNKn, OTo6paXaemNo Ha 3KpaHe
Ha 3KpaHe BnDeOkaMepbI IMeIoTcpa6OuHne KhoKn.ДЯ pa6ObIc KhoNkamn Ha 3KpaHne NcNoJIb3yIte KhoNkU ynpaBHeHn.
Испобьзовны "Memory Stick" - Вedlyнe
(1) Set the POWER switch to MEMORY.
(2) Press OPEN to open the LCD panel. Operation buttons appear on the LCD screen. You can switch the memory playback/ memory camera modes by selecting PLAY/ CAM.
(3) Select FN, then press the centre on the control button. The PAGE1 screen appears. Operation buttons appear on the screen.
(4) Select PAGE2, then press the centre on the control button. The PAGE2 screen appears. Operation buttons appear on the screen.
(5) Select PAGE3, then press the centre on the control button. The PAGE3 screen appears. Operation buttons appear on the screen.
(6) Select a desired operation item, then press the centre on the control button. Refer to the relevant pages for each function.
(1)YcTaHOBInTe NepeKJIIOUaTeIb POWER B noJIOKeHne MEMORY.
(2)HaxmTe OPEN,уTo6bI OTKpbIT naHeJIb XXKД. KhoNkU npabLeHnI NOBRTcHa Na3KpaHe XXKД. Bbl moKeTe BkLIOnHTb peXIM BCOpOn3BeDeHnI N3 pAmTn/naMTrn KaMepbI pyTem haxKaTn PLAY/CAM.
(3)BbI6epNTeFN,3aTEMHaXMMTe Ha ceHTp ● Ha KhoNKe ynpabNeHn. IOnBntc 3KpaH PAGE1.KhoNKn ynpabHeHn IOnBtCn Ha 3KpaHe.
(4)Bb6epTe PAGE2,3aTeHaxMnTe Ha ceHTp HkONKe ynpabJeHn. IOnBnTc 3KpaH PAGE2.KhONKn ynpabJeHn nOReTc H 3KpaHe.
(5)Bb6epnte PAGE3,3aTeHaxMnTe Ha ceHTp HkONKe ynpabJeHn. IOnBnTc 3KpaH PAGE3.KhONKn ynpabJeHn nOReTc H 3KpaHe.
(6)BbIbepnTe HxHbI paOohm 3JeMeHT,3aTEM haxMnTe Ha ceHtp ● nN B ha KhoNke ynpaBHeHn. ObaauiTebc K COOTBeTCTByUcIM CTpaHnCaM OTHCnTEJbHO KaXdoN cyHKuN.
3-6
FN
In memory camera mode/B pexime namTn Kaepbl
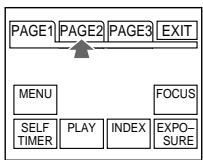
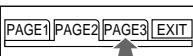
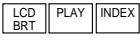
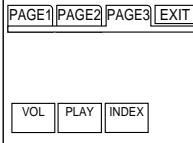
2
In memory camera mode/B pexime namrnt KaempbI
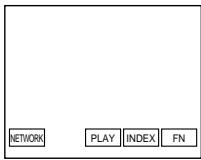
1
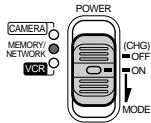
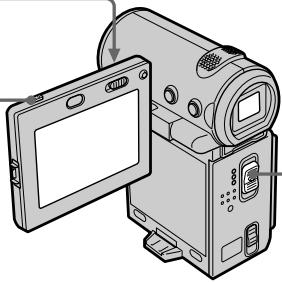
In memory playback mode (still image)/B pexnme BOCIPON3BEDEHNA 13 namrTn (HeNoDBrXKHOe N3O6paXeHne)
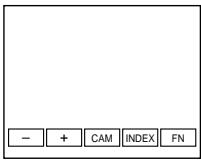
Using a "Memory Stick" - introduction
To return to the FN screen
Select EXIT, then press the centre on the control button.
To execute settings
Select OK, then press the centre on the control button.
If the item is not available
The colour of the item changes to grey.
Select FN, then press the centre on the control button to display the following buttons:
In memory camera mode
| PAGE1 | MENU, SELF TIMER, PLAY, INDEX, EXPOSURE, FOCUS |
| PAGE2 | LCD BRT, PLAY, INDEX |
| PAGE3 | VOL, PLAY, INDEX |
In memory playback mode
| PAGE1 | MENU, CAM, INDEX, DELETE, +, - |
| PAGE2 | LCD BRT, CAM, INDEX, PB ZOOM, +, - |
| PAGE3 | DATA CODE, CAM, INDEX, +, - |
Испобьзовке "Memory Stick" - Вedlyнe
Ecnn 3Jement HeoctyneH
LBeT 3nX 3JIeMeHToB n3MeHaTeC H a cepbI.
Bb6epnteFN,3aTeM haxmte Ha ceHtp Ha KhONKe ynpabLeHHn dIy OTo6paXeHHn CJeDyUoNx KHONK:
Bpekime namrTn kamepbI
| PAGE1 | MENU, SELF TIMER, PLAY, INDEX, EXPOSURE, FOCUS |
| PAGE2 | LCD BRT, PLAY, INDEX |
| PAGE3 | VOL, PLAY, INDEX |
BpeXime BocnpOn3BeDeHnna 13 narnrTn
| PAGE1 | MENU, CAM, INDEX, DELETE, +, - |
| PAGE2 | LCD BRT, CAM, INDEX, PB ZOOM, +, - |
| PAGE3 | DATA CODE, CAM, INDEX, +, - |
Selecting the still image quality mode
You can select the image quality mode for still image recording. The default setting is FINE.
(1) Set the POWER switch to MEMORY.
(2) Select FN, then press the centre on the control button. The PAGE1 screen appears.
(3) Select MENU, then press the centre on the control button. The menu appears.
(4) Select , then press the centre or on the control button.
(5) Select STILL SET, then press the centre or on the control button.
(6) Select QUALITY, then press the centre or on the control button.
(7) Select the desired image quality mode, then press the centre on the control button.
(8) Press DISPLAY to turn off the menu.
Bb6oppeKImaKauecTba n3o6paXeHn
Bo Bpem 3aIncn HeNoDbNghHOro n3obpaXeHHn MoXHO BbIbpaTb pexm KaueCTBa n3obpaXeHHn. Iyo mOJuaHnIO nCnoJb3yETcR FINE.
(1)YctaHOBInTe InepeKJIIOUaTeIb POWER B noJIOKeHne MEMORY.
(2)BbI6epNTeFN,3aTeM haxMMte Ha ceHTp ●Ha KhoNKe ynpabNeHnA. IorBntcra 3kpaH PAGE1.
(3)BbIbePte MENU, 3aTeM haxMtHe Ha ceHTp HKHONKe ynpabJeHH. IOnBUTc MeHIO.
(4)BbI6epNTe 3aTeM HaxMMTe Ha ceHTp ● JINI ▷Ha KHNKe ynpaBHeHn.
(5)BbIbepeNTe STILL SET,3aTeM haxMnTe Ha ceHtp nnn > Ka KhoNke ynpabNeHHa.
(6)BbIbEpnte QUALITY,3aTeM haxMnte Ha ceHtp ● nnn ▷Ha KhONke ynpaBJIeHHa.
(7)Bb6epnte Tpe6yembl pexmkaueCTBa n3o6paXeHn, 3aTeM haxmTe Ha ceHTp H a KHONKe ynpabHeHn.
(8)HaKmTe KhONKy DISPLAYДЯ OTKIQUeHЯ MEHIO.
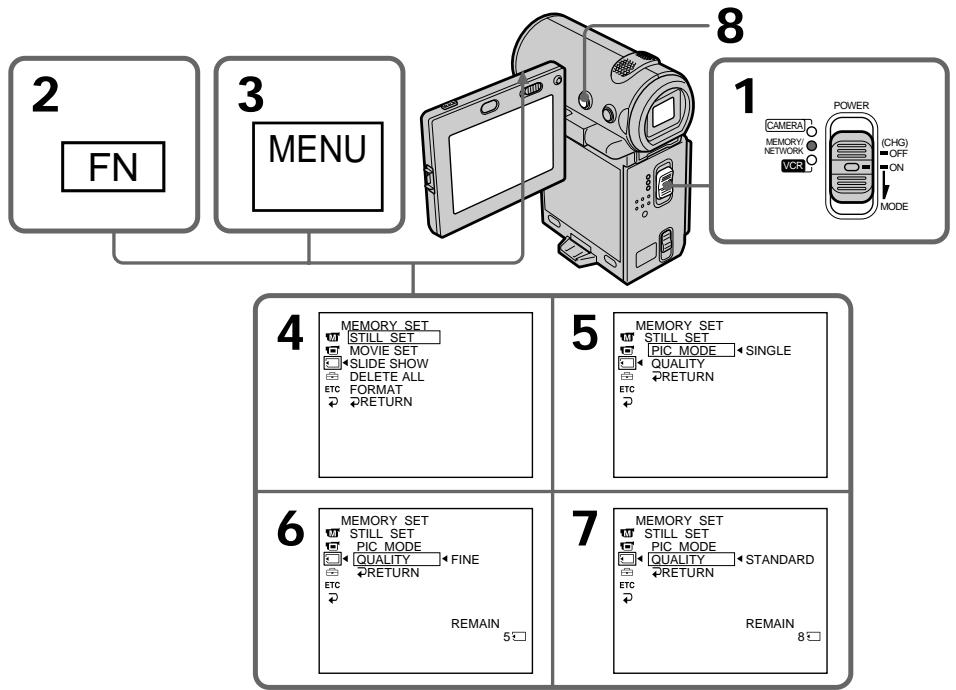
To return to the FN screen
Select RETURN, , then press the centre on the control button after step 7. The PAGE1 screen appears. Next, select EXIT, then press the centre on the control button.
Image quality settings
| Setting | Meaning |
| FINE (Indicator: FINE) | Use this mode when you want to record high quality images. The image is compressed to about 1/6. |
| STANDARD (Indicator: STD) | This is the standard image quality. The image is compressed to about 1/10. |
Approximate number of still images you can record on a "Memory Stick"
The number of images you can record varies depending on which image quality mode you select. The table below indicates the numbers when using a "Memory Stick" formatted with this camcorder.
In some cases, changing the image quality mode may not affect the image quality, depending on the types of images you are shooting.
Ppmeuahne
B HeKoTOpbIX CnyaJx, I3MeHHeNpeXmu KaueCTBa N3O6paXeHn MoKeT He OTPa3ntbcra Ha KaueCTBe N3O6paXeHn, B 3aBNCIMocTn OT TIna N3O6paXeHn, CbeMky KOTopbIX BIpOn3BOJNTe.
Using a "Memory Stick" - introduction
Differences in image quality mode
Recorded images are compressed in the JPEG format before being stored in memory. The memory capacity allotted to each image varies depending on the selected image quality mode. Details are shown in the table below. (The image size is 640 × 480 , regardless of image quality mode. The data size before compression is about 600~KB .)
| Image quality mode | Memory capacity |
| FINE (FINE) | About 100 KB |
| STANDARD (STD) | About 60 KB |
Image quality mode indicator
The image quality mode indicator is not displayed during playback.
Испобьзовке "Memory Stick" - Вedlyнe
OTNIUH B pexime KaeeCTBa n3o6paXeHnA
Ipeep coxpaheHemB namTn 3aHncaHHbIe
n3o6paXeHnCXMiaOTcBΦopMaTe JPEG.
EMKocbI naTn, BbIeJIeHNHa DnI KaJdOro
n3o6paXeHnI, n3MeHReTCB 3aBNCMOCtN OT
BbIbpaHHO pexIMa KaeeCTBa n3o6paXeHnI.
PiOpboHocTn CoedePxAcatB nPiNbEeHHoH
Hnxke Ta6JIue. (Pa3mep n3o6paXeHn - 640 × 480, He3aBncMo OT peXIMa KaeeCTBa
n3o6paXeHnI. Pa3mep nepeD cKaATneM
coCTabJIaET OKOLO 600 K6.)
HdkaToppeKIMaKaueCTBaN3o6paKeHnHe OTo6pkaeTcBOBpMaBOcnPOn3BeDeHn.
Setting the moving picture quality mode
You can select the moving picture quality mode. The default setting is SUPER FINE.
(1) Set the POWER switch to MEMORY.
(2) Select FN, then press the centre on the control button. The PAGE1 screen appears.
(3) Select MENU, then press the centre on the control button. The menu appears.
(4) Select , then press the centre or on the control button.
(5) Select MOVIE SET, then press the centre or on the control button.
(6) Select MOVEMENT, then press the centre or on the control button.
(7) Select the desired movie mode, then press the centre on the control button.
(8) Press DISPLAY to turn off the menu.
YcTaHOBkapeKImaKaueCTBa DnBxUyIeOcN3o6paXeHnA
Image quality settings
| Setting/ Установka | Meaning/ Назнacheни | Frame rate/ Частota кадров | Transmission rate (image and audio)/ Скорость пeredачи (иобравожения и звук) | Indicator (during playback)/ Индikатор (Во Верma Восprочьеведи) |
| SUPER FINE (Indicator: SFN)/ SUPER FINE (Индikатор: SFN) | Records moving pictures at 352 × 288. / Запис движuyaшихся иобравожения初次 352 × 288. | 30 fps/ 30 кадр/c | 1200 Kbps/ 1200 КбNT/c | БFSPN |
| FINE (Indicator: FINE)/ FINE (Индikатор: FINE) | Records moving pictures at 352 × 288. / Запис движuyaшихся иобравожения初次 352 × 288. | 30 fps/ 30 кадр/c | 750 Kbps/ 750 КбNT/c | БFINE |
| STANDARD (Indicator: STD)/ STANDARD (Индikатор: STD) | Records moving pictures at 160 × 128. / Запис движuyaшихся иобравожения初次 160 × 128. | 10 fps/ 10 кадр/c | 400 Kbps/ 400 КбNT/c | БFSTD |
| LIGHTMODE (Indicator: LIGHT)/ LIGHTMODE (Индikатор: LIGHT) | Records moving pictures at 160 × 128. / Запис движuyaшихся иобравожения初次 160 × 128. | 10 fps/ 10 кадр/c | 200 Kbps/ 200 КбNT/c | БLIGHT |
SUPER FINE: You can record moving pictures at the highest quality. This mode is suitable when you intend to modify the pictures using your computer. SUPER FINE is the default setting of the camcorder.
FINE: You can record moving pictures for a longer time than with the SUPER FINE mode, the quality, however, declines slightly.
STANDARD: You can record moving pictures for a longer time than with the FINE mode, the image size, however, is smaller.
LIGHTMODE: Since the file size is small, this mode is suitable for e-mail transmission. The image quality, however, declines.
Note on frame rate
A moving picture consists of continuous still images. Frame rate indicates the number of images played back in one second. The more the number increases, the more natural the moving picture becomes.
Note on transmission rate
The higher the transmission rate, the more natural the moving picture becomes.
SUPER FINE: MoXHo 3aIINcBiBaTb DnBIXuIeCra H3O6paXeHnBa BlicOauJWeRo KaueCTBa. 3ToT peXm Ydo6eH, ecn HcEo6xOJIMNo N3MeHNtB H3O6paXeHnC nOMIoBIO KOMNbIOTepa. SUPER FINE - yCTaHOBkA BInDeOKeMaPbI NO yMOJIuaHIO.
FINE: Moxho 3aIncatb 6oJee npOIoXnTeJIbHbIe IIO BpeMeHN DIBNXUneCra n3o6paJxHeN, Yem B peXmE SUPER FINE, Ondako C 6oJee Hn3KIM KaueCTBOM n3o6paJxHeN.
Using a "Memory Stick" - introduction
Maximum recording time for moving pictures
| Image quality mode time | Maximum recording |
| SUPER FINE | 45 s |
| FINE | 1 min 10 s |
| STANDARD | 2 min 20 s |
| LIGHTMODE | 4 min 40 s |
Approximate length of time of the moving pictures you can record on a "Memory Stick"
The table below indicates the recordable time when using a "Memory Stick" formatted with this camcorder.
Испобьзоване "Memory Stick" - Вedlyнe
MaKcMaJIbHoe BpEmaIncn IJRA DBNkUxxCn 13O6paXKeHn
Recording still images on a "Memory Stick" - Memory Photo recording
- DCR-IP7E only
You can record still images on a "Memory Stick". You can also record nine still images continuously. (MULTI SCRN)
Before operation
Insert the "Memory Stick" into your camcorder.
(1) Set the POWER switch to MEMORY.
(2) Keep pressing PHOTO lightly. The green mark stops flashing, then lights up. The brightness of the image and focus are adjusted, being targeted for the middle of the image and are fixed. Recording does not start yet.
(3) Press PHOTO deeper. The image displayed on the screen will be recorded on the "Memory Stick". Recording is complete when the bar scroll indicator disappears.
3aHnscb HEnoDvXhblx H3O6paXeHn Ha"Memory Stick" -3aHnscbΦOTorpaΦn B namrTb
-ToIbKO MoIeJIb DCR-IP7E
Ha "Memory Stick" MoXHo 3aIINcBbATb HeNoDnKHbIe I3o6paXeHn. Bb TaXKe MoXeTe 3aIINCaTb DeBraTb HEnoDnKHbIX I3o6paXeHn NocJeIOBaTeJbHo. (MULTI SCRN)
Ipeed nayanom pa60tbI
BCTaBtTe "Memory Stick" B VbIeOkaMepy.
(1)YctaHOBInTe InepeKJIIOUaTeIb POWER B noJIOKeHne MEMORY.
(2)Держпге сlerka нажатой кногу PHOTO. 3eJehaH MEtKa ● npeKpaTNT MiraTb N 3aTeM 3aRopuTcA.ЯPkOcTB n3o6paXeHnN I φokycuPobKa HacTppanBaIOTcNo ceHTpy n3o6paXeHnN I φnKcPuyIOTc.3aInCb noka eue He hauJaacb.
(3)Haxmnte KhoNky PHOTO cInbHee.
I3o6paxeHne Ha 3kpahe 3aInuWeTcHa
"Memory Stick". 3aInc b 6yET 3aBepSeHa,
KOrDa IcYe3HeT INDnKaTOP B BVNe pOLOCKn.
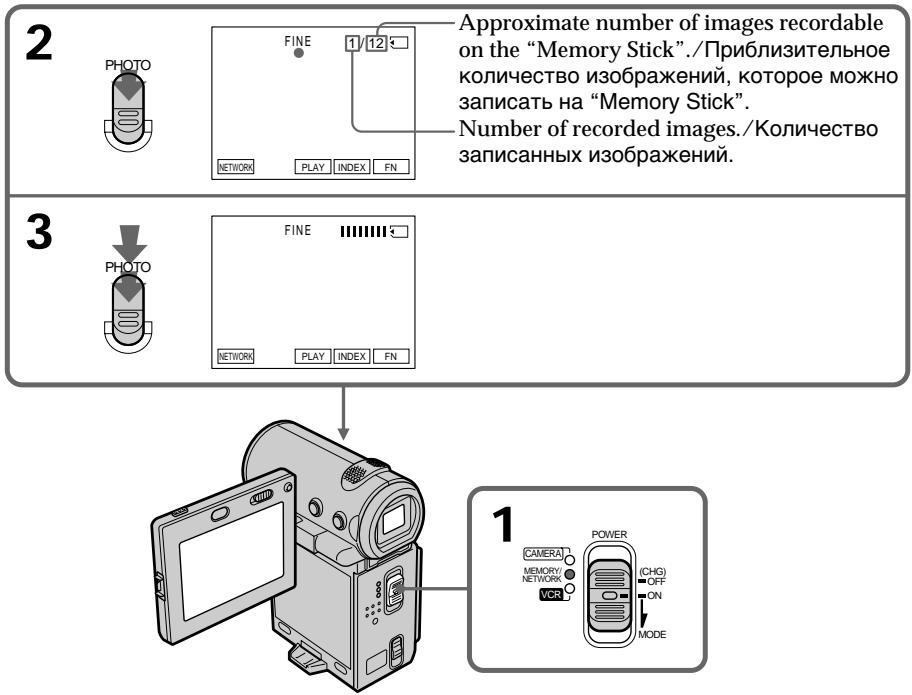
Recording still images on a "Memory Stick" - Memory Photo recording
When the POWER switch is set to MEMORY The following functions do not work:
- Wide mode
- Digital zoom
- SteadyShot
-Fader - Picture effect
- Digital effect
-Title - Low lux mode of PROGRAM AE (The indicator flashes.)
While you are recording a still image
You can neither turn off the power nor press PHOTO.
When you press PHOTO on the Remote Commander
Your camcorder immediately records the image displayed on the screen when you press the button.
When recording a still image in step 2
The image momentarily flickers. This is not a malfunction.
Recording data
The recording data (date/time or various settings used when recording) are not displayed while recording. However, they are automatically recorded onto the "Memory Stick".
To display the recording data, press DATA CODE on the Remote Commander. When using the camcorder for this operation, select CAM DATA or DATE DATA, then press the centre on the control button, via DATA CODE on the PAGE3 screen (p. 54).
The number of still images recordable on a "Memory Stick"
It varies according to the image quality mode and the complexity of the subject.
3aHnscb HeNoDvNkHbIX H3o6paXeHn Ha "Memory Stick" - 3aHnscb fOToRpaΦn B nAmrTb
EcnnpekeKluoyateIb POWER yctaHOBJeH B noJoxKeHne MEMORY
Cneyuoume cyHKnH He pa6oTaIOT:
-шрокоэкрань ржим
-LnФpoBoB Bapnoo6bekTINB
-ФУнкцИЯ yCTOИNBОВ CБЕМКИ
-Φeɪdεp
-3cpfeKTn3o6paXeHn
-LnDpOBoN 3ΦΦeKT
-Tntp
-Рекин Изкон OсБешеньости PROGRAM AE (Инд Mngaet.)
Pn3aHnc HenoBnxHoro n3o6paXeHn
BbI He MOxKeTe HN BbIKNoHTb NITaHHe, HN HaxKaTb KhONKy PHOTO.
Ecnna HaxaBkHONky PHOTO Ha nyIbTe DnCTaHcUHOHOrO ynpabLeHHA
Baa Bndeokamepa cpa3y je 3anwet n3o6paxkHe, KOtOpoe OTo6paxKaETcHa 3KpaH npi HaxaTNI KHOKN.
Pn 3aHNCn HEnoDBNkHBix N3O6paXeHn B nyHKTe 2
N3o6paXeHHe KpaTkoBpeMeHHO IpoKHT.3To He ABJIETCA HEnCnPaBHOCTbIO.
DaHHbIe 3aIncn
JaHHbIe 3aHNCn (JaTa/BpEMn pa3JIuHbIe yCTaHOBKn, BblIOJIeHHbIe npn 3aHNCn) He OTO6paJauOTcBO BVPem BblIOJIeHHN 3aHNCn. OdHako OHn aBTOMaTtueckn 3aINCbIBaIOTcHa "Memory Stick".
Recording still images on a "Memory Stick" - Memory Photo recording
Recording images continuously
You can record still images continuously. Select the multi screen mode described below before recording.
Multi screen mode
Your camcorder shoots nine still images at about 0.5 sec intervals and displays the images on a single page divided into 9 boxes. (Indicator:
3aIncb HeIOBnKhbIX
H3o6paXeHn Ha "Memory Stick" - 3aIncb fOToRpaФn B namrTb
HenpepbBna 3aIncB n3o6paXeHn
MoxHo BbIOnHbTb HnpepbIBHyIO 3aINcB HeNoDnKbIX N3o6paXKeHNI. IpeE 3aINcBIO BbI6epTe MHOrO3KpaHHbI peXIM, OINcaHHbI HNXe.
Mhoro3KpaHbI peXIM
Bndeokamepa ChmaeT DeBtB HeNoDbNkHbIX n3o6paXeHn C nHTepBaIamn PnpMepHo 0,5 cek n OTO6paXaet INx Ha OJHO CTpaHnce, pa3deneHHo Ha 9 prrmoyroJbHnikOB.
(NnDnKaTOp:
Recording still images on a "Memory Stick" - Memory Photo recording
3aHnscb HeNoDvNkHbIX n3o6paXeHn Ha "Memory Stick" - 3aHnscb foToTgpaФn B namrTaB
(1) Set the POWER switch to MEMORY.
(2) Select FN, then press the centre on the control button. The PAGE1 screen appears.
(3) Select MENU, then press the centre on the control button. The menu appears.
(4) Select , then press the centre or on the control button.
(5) Select STILL SET, then press the centre or on the control button.
(6) Select PIC MODE, then press the centre or on the control button.
(7) Select MULTI SCRN, then press the centre on the control button.
(8) Press DISPLAY to turn off the menu.
(1)Установские поеклоча给宝宝 POWER в поожене MEMORY.
(2) Bby6epNTe FN, 3aTeM haxMMte Ha ceHTp ● Ha KhoNKe ynpabNeHn. IorBntc əkpaH PAGE1.
(3)BbIbeIpTe MENU, 3aTeM haxmTe Ha ceHtp HkONKe ynpabJeHHa. IOnBtCm MeHIO.
(4)BbIbePnte 3aTeM HaxMMte Ha UeHTp ●ИЛN▶Ha KHNKe ynpaBHeHЯ.
(5)Выберпе STILL SET,затемнхмпerte Haцентр ИИ >Ha KhoNke ynpaBNeHnI.
(6)Вьберп Te PIC MODE,Затemнхмп Te HaцHTp nI Ka KhoNke ynpaBHeHnI.
(7)ВыберптЕ MULTI SCRN,Затем На KMпe HaцHTp ●Ha KhoПКе уравлени.
(8)HaKmTe KhONKy DISPLAY OTKIOueHnmeHIO.
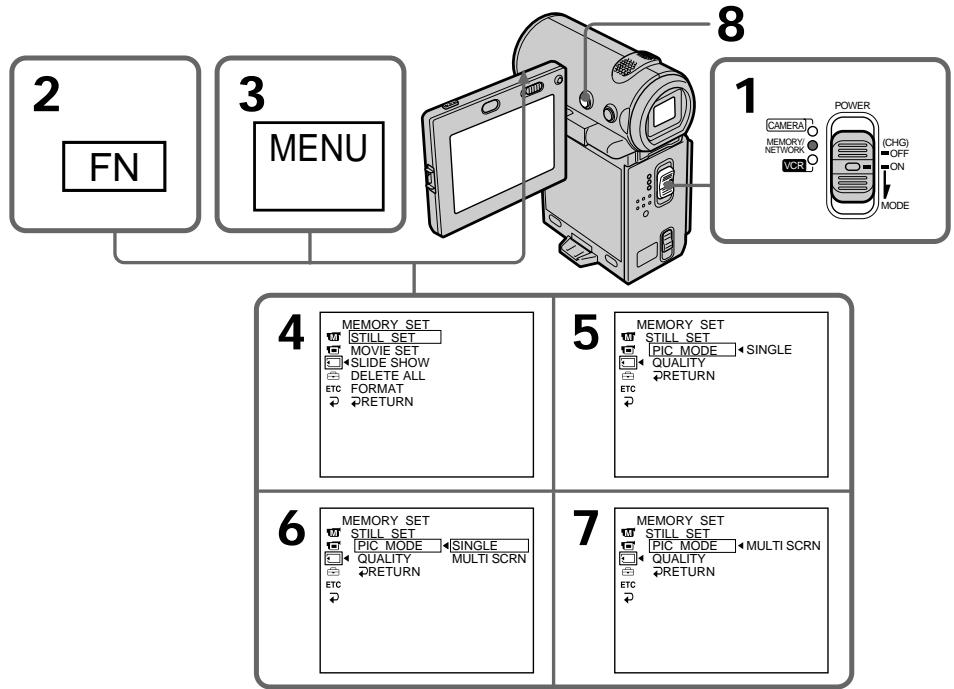
Recording still images on a "Memory Stick" - Memory Photo recording
To return to the FN screen
Select RETURN, , then press the centre on the control button after step 7. The PAGE1 screen appears. Next, select EXIT, then press the centre on the control button.
If the capacity of the "Memory Stick" becomes full
"FULL" appears on the screen, and you cannot record still images on this "Memory Stick".
Self-timer memory photo recording
You can record images on a "Memory Stick" with the self-timer. You can also use the Remote Commander for this operation.
3aHnscb HeNoDvNkHbIX
H3o6paXeHn Ha "Memory Stick" - 3aHncb foToIrpapn B namrTb
(1) Set the POWER switch to MEMORY.
(2) Select FN, then press the centre on the control button. The PAGE1 screen appears.
(3) Select SELF TIMER, then press the centre on the control button.
The (self-timer) indicator appears on the screen.
(4) Press DISPLAY to turn off the screen buttons.
(5) Press PHOTO firmly.
The self-timer starts counting down from 10 with a beep sound. In the last 2 seconds of the countdown, the beep sound gets faster, then recording starts automatically.
(1)Установские поеклочаель POWER в положене MEMORY.
(2)BbI6epNTeFN,3aTeM haxMNte Ha ceHTp ●Ha KhoNKe ynpabNeHn. IorBntc 3KpaH PAGE1.
(3)BbI6epnte SELF TIMER, 3aTeM haxmnte Ha ceHtp ● Ha KhoNke ynpabLeHn. HndnkaTop (taImep camo3ayncKa) nOBuTcra Ha 3kpaHe.
(4)HaXMMTe DISPLAYДлг OTKJIQUeHnЯ
3KpaHHbIX KHOJOK.
(5)CunbHee haxMnTe KhoNky PHOTO. TaHmep cAmo3aNycca HauHET o6paTbH b OTCuET C 10c 3yMMepHbIM CnHaIOM.B NocLeDnHe 2 cekyHdbI o6paTHoro OTCuETA yMMepHbI CNrHaI 6bydET 3ByuTa b Yaue, a 3aTEM aBTOMaTHUeCKn HaUHeTcA 3aINCb.
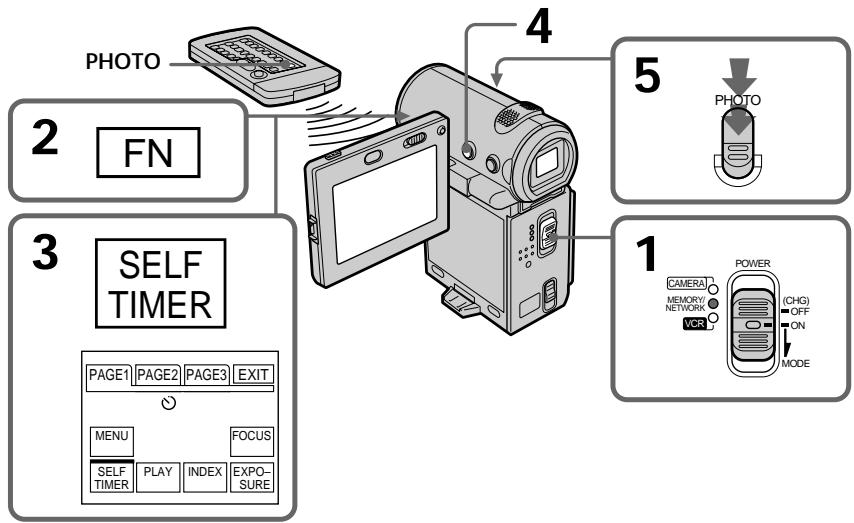
To record moving pictures on a "Memory Stick" with the self-timer
Press START/STOP in step 5. To stop the recording, press START/STOP again.
Recording still images on a "Memory Stick" - Memory Photo recording
To cancel the self-timer recording
Select SELF TIMER on the PAGE1 screen, then press the centre on the control button before the shutter is fired so that the (self-timer) indicator disappears from the screen. You cannot cancel the self-timer recording using the Remote Commander.
Note
The self-timer recording mode is automatically cancelled when:
- The self-timer recording is finished.
- The POWER switch is set to OFF (CHG) or VCR.
3aHnscb HeNoDvNkHbIX H3o6paXeHn Ha "Memory Stick" - 3aHncb fOToRpaΦn B namrTaB
Recording an image from a tape as a still image
- DCR-IP7E only
Your camcorder can read moving picture data recorded on a tape and record it on a "Memory Stick" as a still image.
Your camcorder can also take in moving picture data through the input jack and record it as a still image on a "Memory Stick".
Before operation
- Insert a recorded tape into your camcorder.
- Insert a "Memory Stick" into your camcorder.
(1) Set the POWER switch to VCR.
(2) Select >11 , then press the centre on the control button. The picture recorded on the tape is played back.
(3) Keep pressing PHOTO lightly until the picture from the tape freezes. "CAPTURE" appears on the screen. Recording does not start yet.
(4) Press PHOTO deeper. The image displayed on the screen will be recorded on the "Memory Stick". Recording is complete when the bar scroll indicator disappears.
3a\Pu\c b N3o6paXeHn c JeHTbI KaK HeNoD\nXJHOrO n3o6paXeHn
-ToIbkoMoIeJIbDCR-IP7E
Bndeokamepa moKET cHTbBaT daHHbIe dBXkyoeroa n3o6paXeHna, 3ancaHbIe Ha IeHTe, n 3anCbBaT nx Ha "Memory Stick" KaK HenoDbXkHOe n3o6paXeHne.
Bndeokamepa TaKke MoKeT npHmMaTb DaHHbIe DnNkUyUeOcR n3o6paXeHn Ype3 BXoHNo pa3bEm N 3aNcMbA Tb IX KaK HenoDbNkHoe n3o6paXeHne Ha "Memory Stick".
Ipeed hauanpa60tbI
BCTaBbTe 3aHnCaHHyIeHTy B VIneOkaMepy.
BCTaBbTe "Memory Stick" B BnDoeKamepy.
(1)YCTaHOBnTe IpeKJIouaTeIb POWER B nOLOXKeHne VCR.
(2)BbI6epNTe H,3aTEM HaXMMTe Ha ueHTp Ha KONKe ynpaBHeHn. HaHETcR BOCPOn3BeDeHne N3O6paJxKeHn, 3aNcAHHOro Ha JIeHTe.
(3)ДерхиTe cIeRka hαkaToi Khonky PHOTO Do Tex nop, noka n3o6paXeHne C JeHTbI He 6yJeT 3aФnKcnpObaHo. Ha 3kpaHne NOBtCn "CAPTURE". 3aInCb noka eUe He NaHaJaaCb.
(4)Haxmnte KhoNky PHOTO cnIbHee.
H3o6paxeHne Ha 3kpahe 3aIIuWeTcHa
"Memory Stick". 3aIncb 6yDet 3aBepSeHa,
KOrDa IcYe3HeT INDnKaTOp B BVNe pOLOCKn.
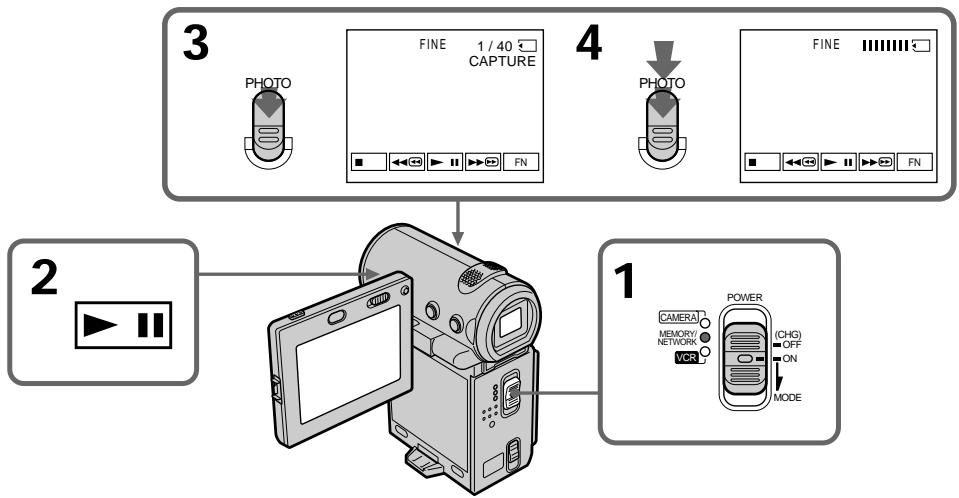
Recording an image from a tape as a still image
When the access lamp is lit or flashing Do not shake or strike the camcorder. Also, do not turn the power off, eject the "Memory Stick" or remove the battery pack. Otherwise, the image data may be corrupted.
If " 品 " appears on the screen The inserted "Memory Stick" is incompatible with your camcorder because its format does not conform with that used by your camcorder. Check the format of the "Memory Stick".
If you press PHOTO lightly in the playback mode
Your camcorder stops momentarily.
Sound recorded on a tape
You cannot record the audio from the tape.
Titles which have already been recorded on tapes
You cannot record the titles on a "Memory Stick". The title does not appear while you are recording a still image with PHOTO.
Recording date/time The date/time when it is recorded on the "Memory Stick" is recorded. Various settings are not recorded.
When you press PHOTO on the Remote Commander
Your camcorder immediately records the image that is on the screen when you press the button.
3aIncb n306paXeHnC JIeHTbI KaK HeNoDbNxHOrO n306paXeHn
EcIn lamnocka obpaueHn ropnt nnn muraet
He TpncTe Bndeokamepy n He ynapaIte no Hne. Kpome Toro, He BbIKJUcaIte NITaHne, He BbIHMaIte "Memory Stick" n3 OTcKa n He CnHaMte 6bTapeHbN 6JOk. B npOTNBOM Clyuae daHHble n3O6paXeHnMOryt 6bItb NOBpeKDeHbl.
EcnnHa3KpaHe nOBnIOcb"
YcTaHOBNeHa "Memory Stick", HecOBMeCTnMaH c BIneOKaMepo, nockOJbky ee fOpMaT He COOTBeTCTByET fOpMaTy, nCNoJIb3YeMoMy BIneOKaMepo. IpoBepbTe fOpMaT "Memory Stick".
EcIn B pexnme Bocnpn3BedeHnC nIerKa haxaTb KhoNkY PHOTO
Baisha Bndeokamepa Ha mRHOBeHne OCTaHOBNTcra.
3Byk, 3aIncahHNo He JeHTe
Bbl He MoXeTe 3aINCbIbA Tb 3ByK CJIeHTbl.
Tttpbl, KOtOpbIe yXe 3aIncaHbI Ha JeHTbl
3TN Tttpbl HeIb3r 3aIncatb Ha "Memory Stick".
TtTp He NOrBtCpI npI 3aInci HEnoDbNkHoro
1306paXeHnI C NOMOsbIO KHOKNI PHOTO.
Data/Bpema 3aunncn
ДаТВБЕМЯЗАПИСУЗПСБИBAJOТСHA“Memory Stick”.РаЗИЧные устовки He 3ANCSIBAJOТСHA.
Ecnna HaxaBk Honky PHOTO ha nyIbTe dNCTaHcOnHOrO ynpabLeHHA
Bawa Bndeokamepa TOTcAc Ze 3anmiet n3o6paXeHne, KOtOpoe 6yDet Ha 3kpaHe npn HaxaTNI KHOPTK.
Recording a still image from other equipment
Before operation
Set DISPLAY in to LCD in the menu settings
(p. 124). (The default setting is LCD.)
(1) Set the POWER switch to VCR.
(2) When using the A/V connecting cable, set VideoINPUT to the appropriate position depending on the player (p. 103).
(3) Play back the recorded tape. The image from the other equipment is displayed on the screen.
(4) Follow steps 3 and 4 on page 156.
Using the A/V connecting cable
3aIncb HeNoDbXHOro n3o6paXeHnC dpyrOro o6OpyIOBaHnA
Ipeed hauanom pa60tbI
YcTaHOBnTe DISPLAY B ETC B NOIOJKeHne LCD B YcTaHOBkax MeHIO (CTp. 124). (YcTaHOBka no yMOnJIaHnIO - LCD.)
(1)Установпейрееклочатуль POWER в положене VCR.
(2)ПиИSCNoJIb3OBAHm COeIINHTeIbHOrO Ka6eIaayINO/BnDEO yCTaHOBtE VIDEOINPUT B COOTBeTCTByIOUeI NOLOXKeHne B 3aBNCIMoCTN OT npOnIrPbIbAteJIa (Ctp.103).
(3)HaunTe BocnpOn3BeJeHne 3aIncanHno JeHTbl. Hso6paKeHne c npyro o6OpyObaHn oTo6paKaetcHa 3KpaHe.
(4) BbINOJIHHTe nyHKtbl 3 n 4 Ha cTp. 156.
UcnoIb3OBAHnE CoeINHTeNbHOKabEny ayDnO/BnDeo
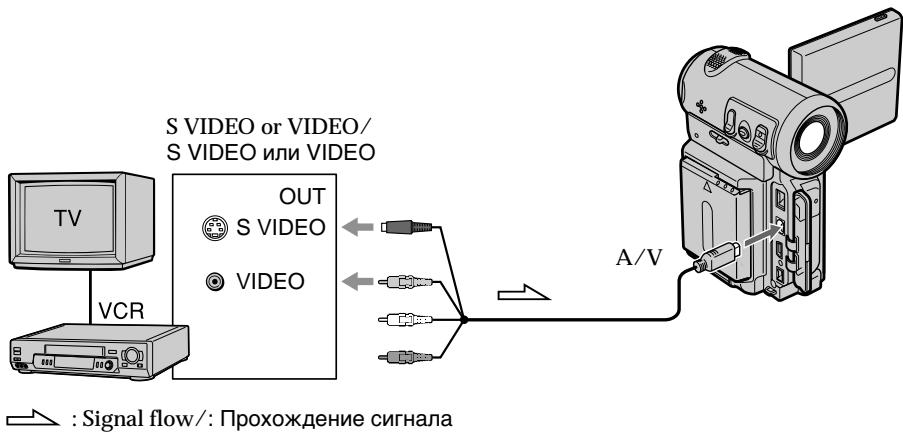
Connect the yellow or black plug of the A/V connecting cable to the video or S video jack on the VCR.
IoiocoeiHnTe JeTbI nIu cepHb pa3bem coeHNHTbHorO ka6eI aydno/BnJeO K rHe3dy BnDeocnHaIa IINrHe3dy S video Ha BnDeomarHnToΦoHe.
If your VCR has an SVIDEO jack Connect using the S video plug to faithfully obtain original pictures. With this connection, you do not need to connect the yellow (video) plug of the A/V connecting cable. Connect the S video plug to the S video jack of the VCR. This connection produces higher quality MICROMV format pictures.
Using the i.LINK cable
EcIn B BaIeM BnDeomarHnToΦOHe IMeetc rHe3do SVIDEO
BbIOpHInTe coeDInHeHne c nOmoUb pa3bema S video dIa nOlyuYehn BbICOKoKaueCTBeHHoro m3o6paXeHn.Ipn DaHHOM coeDInHn He hXkHzIOoDCoeDInHbJxEJIb IteKep (BnuDeo) coeDInHTeNbHorO Ka6en aayNo/BnuDeo. POnDCoeDInHt WTeKeP Ka6en S video K rHe3dy S video Ha BnuDeomarHntofohe. 3To coeDInHHe Np03BOJraT nOlyuHTb BbICOKoKaueCTBeHHoe n3o6paXeHne φopMaTa MICROMV.
IcnoJIb3OBAHne ka6eJia.LINK
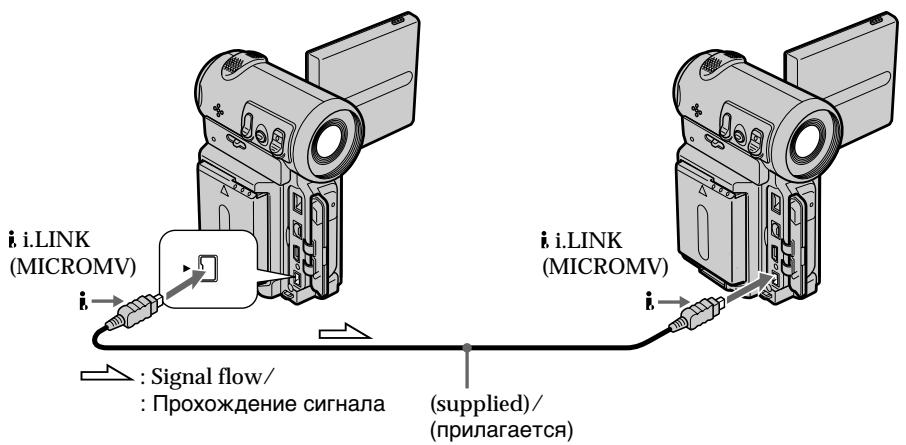
Note
"?” flashes in the following instances. If this happens, eject and insert the "Memory Stick again, and record distortion-free images.
- When recording on a tape in a poor recording state, for example, on a tape that has been repeatedly used for dubbing.
PpmeaHne
INHdkaTop 日 MmraetBcneDyUoxnCnyaX. EcIn 3TO CNYHTCR, IN3BLeKNTe IN CHOBA BCTabBe "Memory Stick", 3aTeM 3aNsiNeIe I306paXeHn8 6e nomex.
Recording moving pictures on a "Memory Stick" - MPEG movie recording
- DCR-IP7E only
You can record moving pictures with sound on a "Memory Stick".
Before operation
Insert the "Memory Stick" into your camcorder.
(1) Set the POWER switch to MEMORY.
(2) Press START/STOP. Your camcorder starts recording. The camera recording lamp located on the front of your camcorder lights up.
3a\Pncb D\nKxUnxCn n3o6paXeHn Ha "Memory Stick" - 3a\PncbФnlbMOB MPEG
-ToIbkoMoIeJIb DCR-IP7E
BbMOKTe 3aINcBtB DnNkUyueCn06paXeHn co 3BykOM Ha "Memory Stick".
Ipeed nayanom pa60tbi
BCTaBtTe "Memory Stick" B VbIeokamepy.
(1)Установпейреклочаель POWER в положене MEMORY.
(2)HaxmTe KhONky START/STOP.BaWa BnDeOKaMepa NaChET 3anncb.3arOpntcnaMnOyKa 3annci,paCnOJIOKeHHaHa nepeDne NaHeJI NnDeOKaMepbl.

2
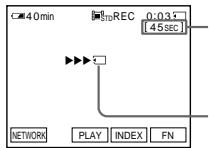
Recordable time on the "Memory Stick"./ OБцee Вретя заимся на "Memory Stick".
This indicator is displayed for 5 seconds after pressing START/STOP. The indicator is not recorded./3TOTиндikatop OTo6paxaetcВ TeueHne 5 cekynd nocne haxatnKHOPIKN START/STOP.NiHdkatop He 3aINCbIbAeTcJ.
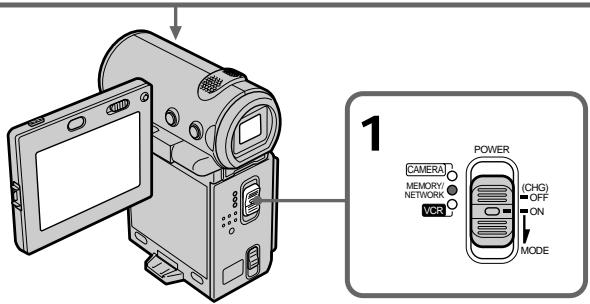
The recordable time for an MPEG movie
| Quality mode | recordable time |
| SUPER FINE | Maximum 45 s |
| FINE | Maximum 1 min 10 s |
| STANDARD | Maximum 2 min 20 s |
| LIGHTMODE | Maximum 4 min 40 s |
Bpem3aHncn pfHbMa MPEG
| Реким качевая | В做什么 здени |
| SUPER FINE | Мakсимуm 45 c |
| FINE | Мakсимуm 1 мн 10 c |
| STANDARD | Мakсимуm 2 мн 20 c |
| LIGHTMODE | Мakсимуm 4 мн 40 c |
Recording moving pictures on a "Memory Stick" - MPEG movie recording
To stop recording
Press START/STOP.
Note
Sound is recorded in monaural.
When the POWER switch is set to MEMORY
The following functions do not work:
- Wide mode
- Digital zoom
- SteadyShot
-Fader - Picture effect
- Digital effect
-Title - Low lux of PROGRAM AE (The indicator flashes.)
Recording date/time
The date/time are not displayed while recording. However, they are automatically recorded onto the "Memory Stick".
To display the recording date/time, press DATA CODE on the Remote Commander during playback. Various settings cannot be recorded.
While recording on a "Memory Stick"
Do not eject the cassette tape from your camcorder. While you are carrying out the eject operation, sound is not recorded on the "Memory Stick".
3aIncB DnKxuXxCn 306paJKeHn Ha "Memory Stick" - 3aIncB cnIbMOB MPEG
ДлгocтабКиЗрсн
HaxmTe KhoNky START/STOP.
Птумецни.
3Byk 3aHncbIbAeTcB BpeKmE MOHO.
EcInnepeKJIIOUaTeIbPOWER yCTaHOBJIeN B noJIOXeHne MEMORY
Cneyuoune cyHKnH He pa6oTaioT:
-Широкоэкраньий реким
-LnФpoBoB Bapnoo6bKeTINB
-ФункияУСТОИΝВО咽喉КИ
-Φeɪdεp
-3ΦΦeKt n306paXeHnA
-LindpoboBn3cpeKT
-TnTp
-PeKIM Hn3KoN OCBeUeHNoCTN PROGRAM AE (INHnKaTOp Mnraet.)
Data/Bpem3auncs
ДаТВЕМ He OTOБраЖАТС BO ВЕМ BыПОЛнЕНЯ 3aIINc.ОДнako OHI aBTOMATиЧECКИ 3aIINcMbIAOTcHa "Memory Stick".
Recording a picture from a tape as a moving picture
- DCR-IP7E only
Your camcorder can read moving picture data recorded on a tape and record it as a moving picture on a "Memory Stick". Your camcorder can also take in moving picture data through the input jack and record it as a moving picture on a "Memory Stick".
Before operation
- Insert a recorded tape into your camcorder.
- Insert a "Memory Stick" into your camcorder.
(1) Set the POWER switch to VCR.
(2) Select >11 , then press the centre on the control button. The picture recorded on the tape is played back.
(3) Press START/STOP at the scene where you want to start recording. Your camcorder starts recording.
3a\Pncb n3o6paXeHnCJIeHTbl KaK DnXkyuTeROcHn3o6paXeHn
-ToIbkoMoIeJIbDCR-IP7E
Baawa Bndeokamepa MoKet CHTbIBaT daHHbIe DnBxuyeocra N3o6paKeHna IeHTe n 3aNNcBbATb IN KAK DnBxuyeecra N3o6paKeHne Ha "Memory Stick". Baawa Bndeokamepa MoKet nOlyaTb Tackke daHHbIe DnBxuyeocra N3o6paKeHna Upe3 BXoJHO pa3bEm n 3aNNcBbATb IN KAK DnBxuyeecra N3o6paKeHne Ha "Memory Stick".
Ipeed hauanpa60tbI
BCTaBBte 3aINcaHHyIOIeHTy BUNdeOKaMepy.
BCTaBbTe "Memory Stick" B BnDoeKamepy.
(1)YCTaHOBnTe IpeKJIouaTeIb POWER B nOLOXKeHne VCR.
(2)BbI6epnte H,3aTEM haXMMTe Ha ueHtp Ha KONKe ynpabJeHnHauchETc BOCpOIN3BeDHeN He3o6paJKeHn, 3aHnCaHHoro Ha JeHTe.
(3)Haxmnte START/STOP ha toi cuehe, c KOTOpoi Heo6xoJIMO hauatb 3aIncb. Ba7a BnDEOKaMepa HauHET 3aIncb.
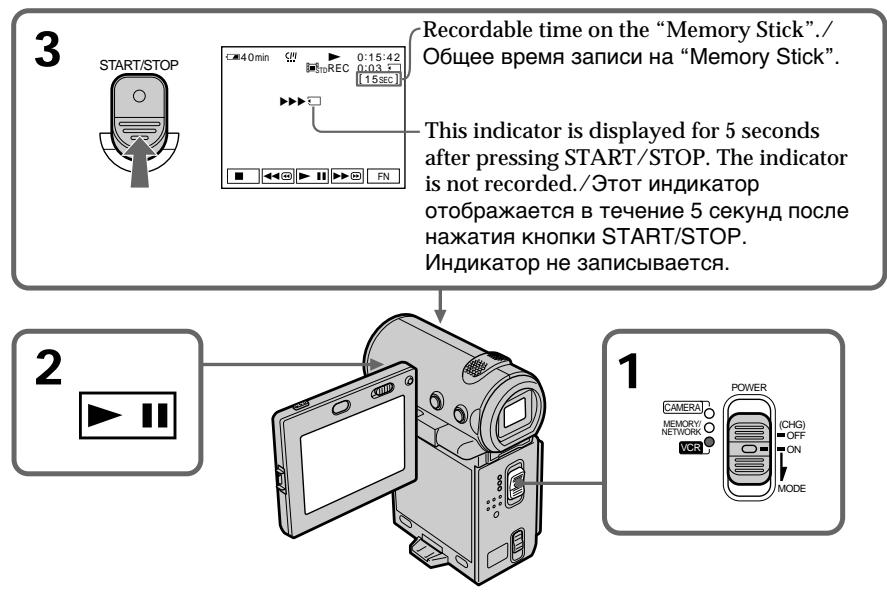
Recording a picture from a tape as a moving picture
The recordable time for an MPEG movie
| Quality mode | recordable time |
| SUPER FINE | Maximum 45 s |
| FINE | Maximum 1 min 10 s |
| STANDARD | Maximum 2 min 20 s |
| LIGHTMODE | Maximum 4 min 40 s |
To stop recording
Press START/STOP.
Note
Sound recorded in stereo is converted to monaural sound when recording from tapes.
When the access lamp is lit or flashing
Do not shake or strike the camcorder. Also, do not turn the power off, eject the "Memory Stick" or remove the battery pack. Otherwise, the image data may be corrupted.
Titles already recorded on tapes
You cannot record the titles on a "Memory
Stick". The title does not appear while you are recording a moving picture.
The data code recorded on the tape
This is not recorded on the "Memory Stick". The camcorder records a new date and time when the recording on the "Memory Stick" is made.
During recording
The video control buttons do not work.
Recording a moving picture from other equipment
Before operation
Set DISPLAY to LCD in the menu settings. (The default setting is LCD.)
3aIncb n306paXeHnC JIeHTbI KaK DnBxJyUeOcH n3o6paXeHn
Bpema 3aannc nMbma MPEG
He TpncTe Bndeokamepu n He ydapnTe no He. TaKxe He BbIKJUaNe Te NITaHne, He BbIHMaIte "Memory Stick" n3 OTcKa n He CnHMaIte 6aTapeHbI 6NOK. B npOTNBOM cLyuae daHHbIe I3O6paXeHn MOrYT 6bITb NOBpeKDeHbl.
Tntpbl, 3aHncaHbIe Ha JIeHTax
Tn TnpbI HeIb3aIncatb Ha "Memory Stick". Tnp He NoBtCBO Bpem3aIncn DnKxueroC n06paKeHna.
KoДаHHbIX,ЗанcaHHbIЯ NeHTe
He 3anncsbIbAeTcHa "Memory Stick".Пи BbINOJIHEnn 3anCn Ha "Memory Stick" BIndeOKaMepa 3anncsbIbAeT HObyIO DaTy n Bpem.
BoBpeMa 3aIncn
KhoIKn BnDeOkoHTpOJa He pa6oTaIoT.
3aIncb DvKxUeOc8 n3o6paXeHnC dpyroJ annapaTypbl
Ipeed hauanom pa6oTbI
YcTaHOBnTe npaMeTp DISPLAY B noLoXeHne LCDBycTaHOBkax MeHIO.(YcTaHOBKaNo yMOnuHaHIO-LCD.)
(1) Set the POWER switch to VCR.
(2) When using the A/V connecting cable, set VideoINPUT to the appropriate position depending on the player.
(3) Play back the recorded tape. The image from the other equipment is displayed on the screen.
(4) Press START/STOP at the point where you want to start recording.
To pause or cancel recording
Press START/STOP again.
Using the A/V connecting cable
3aInCb n306paXeHnC JIeHTbI KaK DnBxKyUeOcR n3o6paXeHn
(1)Установпейразковая Power в положене VCR.
(2)Прии Испоблбовани-coeДИнтельогу
kaбеля aydno/BuDEO yCTaHOBITe
VIDEOINPUTВ COOTBETCTBYUоee
положене ВЗвСИМОТNТ
пponгьытеля.
(3)HaunTe BocnpOn3BeJeHne 3aIncanHno JeHTbl. Hso6paKeHne c npyro o6OpyObaHn oTo6paKaetcHa 3KpaHe.
(4)HaKmTe START/STOP B TOM MecTe, C KOTOPOro Heo6xoDnMo Haayb 3aINCb.
ДлпрноctaHOKNJINOTMeHbI3aHNCN
HaxmTe KhoNky START/STOP eue pa3.
UcnOJIb3OBAHnE CoeHNHTeNbHOKa6eJyauDIO/BuDeo
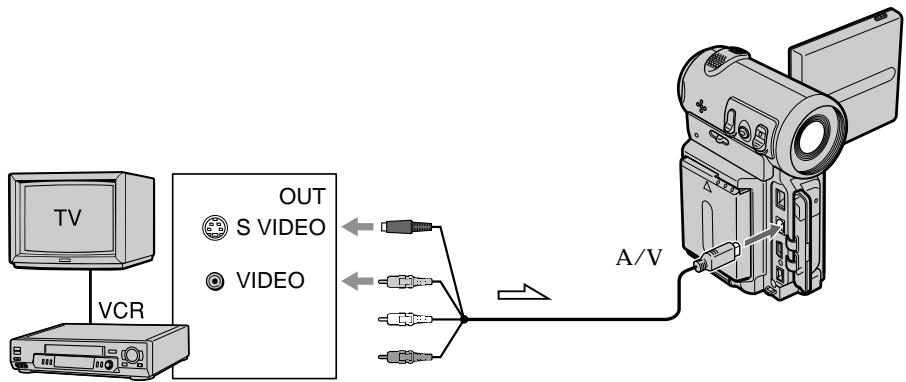

: Signal flow:/PpoxokdHne cHnHa
Connect the yellow or black plug of the A/V connecting cable to the video or S video jack or the black plug to the S video jack on the VCR.
If your VCR has an S video jack
Connect using the S video plug to faithfully obtain original pictures. With this connection, you do not need to connect the yellow (video) plug of the A/V connecting cable. Connect the S video plug to the S video jack of the VCR. This connection produces higher quality MICROMV format pictures.
IoiDCoeDInHInTe JKeJTBn IINu YerHbN pa3BeM COeDHNHTeNbHOrO Ka6eIa ayDIO/BuJeO K rHe3dY BnuDeoCnHaHa IINu K rHe3dy S video IINu YerHbN pa3BeM -K rHe3dy S video Ha BnuDeomarHnToΦOHe.
EcIn B BaIeM BnDeomarHnToΦOHe IMeetcra He3do S video
BbIOpHInTe coeDInHeHne c NOMOsbIO pa3bEma S video dIy nOlyuYehnBaICOKoKaueCTBeHHoro n3o6paXeHn.Ipi DaHHOM coeDInHeHn He hUxKHO nOcOeDInHbT JeENTbI uTeKepe (BvJeO) coeDInHTeJbHOrO Ka6eN aayNo/BuDeo. IOnCoeDInHte uTeKeP Ka6eN S video K rHe3dy S video Ha BnDeoMaHnTofohe. 3To coeDInHeHne No3BOJraT nOlyuHTb BBICOKoKaueCTBeHHoe n3o6paXeHne fOpMaTa MICROMV.
Using the i.LINK cable
IcnoJIb3OBAHne ka6eJiaLINK
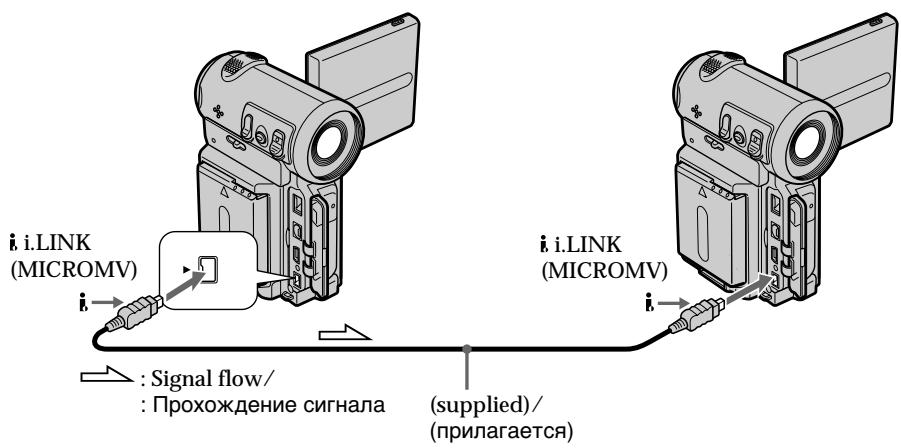
Note
" 空 " flashes in the following instances. If this happens, eject and insert the "Memory Stick" again, and record distortion-free images.
- When recording on a tape in a poor recording state, for example, on a tape that has been repeatedly used for dubbing.
While recording on the "Memory Stick"
Do not eject the cassette tape from your camcorder. While you are carrying out the eject operation, sound is not recorded on the "Memory Stick".
PpimueaHne
INdkkaTOP 三 MmraETB CndeyUox CNyuaX. Ecnn 3TO cnyntcA, n3BleKeNTe u CHOba BCTabBe "Memory Stick", 3aTe m3aNsiTe n3o6paXeHn8 6e nomex.
-ПиЗЗлпсИнlaentу,нaxоДшуOCВ MaJIOnPnIOJHOMДЯЗлпсИ COCTOHRIM, HAnPmEр,HaIeHTy,HeОДнOKpaTHO IcNoIb3OBAWsuOcДЯпeze3aIIncI.
Bo Bpem 3aHn Ha "Memory Stick"
He n3BneKaaiTe KacceTy n3 BnDeokamepbl.Bo BpeMn 3nBleueHnKacceTbI 3Byk He 6ydet 3aNNCbBaTbcNHa "Memory Stick".
Superimposing a still image in a "Memory Stick" on a moving picture - MEMORY MIX
- DCR-IP7E only
You can superimpose a still image you have recorded on a "Memory Stick" on top of the moving picture you are recording.
You can record the superimposed images on a tape. However, you cannot record these images back onto a "Memory Stick".
M. CHROM (Memory chromakey)
You can swap a blue area of a still image such as an illustration or a frame with a moving picture.
M. LUMI (Memory luminancekey)
You can swap a brighter area of a still image such as a handwritten illustration or title with a moving picture. Record a title on a "Memory Stick" before a trip or event for convenience.
C. CHROM (Camera chromakey)
You can superimpose a moving picture on top of a still image such as an image which can be used as background. Shoot the subject against a blue background. The blue area of the moving picture will be swapped with a still image.
M.OVERLAP (Memory overlap)
You can make a moving picture fade in on top of a still image.
HaioxHe HeIOBHXHOrO 36paXeHn Ha "Memory Stick" Ha DvIXyueecn H36paXeHne - MEMORY MIX
-ToIbkoMoIeJIbDCR-IP7E
HenoDbnHexoe n3o6paXeHne, 3anncahHoe Ha "Memory Stick", MoKHO hanoXntb Ha 3anncbIbaemoe DnKyuueecra n3o6paXeHne. Ha IeHTy moKHO 3anncatb HanoXeHHbIe n3o6paXeHn. Ondako 3Tu n3o6paXeHn HeIb3r CHOBA 3anncatb Ha "Memory Stick".
M.CHROM (KHOIIKa 3aMeHbI NO ZBETHOCTn) MoXHo 3aMeHApTc HINIO O6NaCTb HeNoDVBHXHO rN3O6paXeHn, HApPIMep, pNCyHOK INI KApD, DVBHXUcMcR N3O6paXeHnEM.
M. LUMI (KhoNka 3aMeHbI NO npKocTn)
MozHO 3aMeHrTB 60Jee CBeTnyIO oBnaCTb
HeNoDBNXHOrO n3o6paXeHnA, HApnIMep,
pCcyHOK, CdeJaHHbI OT pyKn, NIn TtTp,
DbNxKyUcMcR n3o6paXeHnE. IpeEd
nyTeWeScTBnEM NIn KaKIM-Hn6yDb Co6bITnEM
dIy yDObCTBa 3aAnuWte TtTp Ha "Memory Stick".
C.CHROM (KHOJKA UBeTHOCTN BInDeOKaMEpbI) Bbl MoXeTe HANOxITb DnIXKyUeecr I3o6paXeHne NOBepx HEnoDBNXHOrO I3o6paXeHnHa npIMep TaKOrO, KOtOpoe MOXHO NcNoJIb3OBaTb B KaueCTBe pOHa. CHMNTe OBeEKT Ha CnHEm fOHe.CnHra YacTb DnIXKyUeOcR I3o6paXeHnHa 6yDet 3aMeHena Ha HEnoDnIXKHOe I3o6paXeHne.
M. OVERLAP (HajoxeHne C nOmoUbI NaMaTn) MoxHo cDetaTb TaK, YTO6bI DnBxUeecr I3o6paJxHne NoCTeNEHNO POrBJIaLoCb NOBepx HenoDbNxxHoro I3o6paXeHna.
Superimposing a still image in a "Memory Stick" on a moving picture - MEMORY MIX
Hanoxehne HeNoBnXnHO r3o6paXeHnHa "Memory Stick" Ha DnXyueecn3o6paXeHne - MEMORY MIX
M. CHROM
Still image/ HénpoDBVxHoe n3o6paXeHne
- Insert the tape you want to use for recording into your camcorder.
- Insert the "Memory Stick" with still images recorded into your camcorder.
Ipeed hauanom pa6oTbI
BCTaBbTe Heo6xOIMyI OJIa3aIINJIeHTy BnDeOKaMepy.
BCTaBbTe "Memory Stick" c 3aIncHbIMn HEnoDbNkHbIMn n3O6paXeHnA Mn B BuDeOKaMepy.
Superimposing a still image in a "Memory Stick" on a moving picture - MEMORY MIX
Hanoxehne HeNoBnXnHO r3o6paXeHn 3 "Memory Stick" Ha DnKxueeecr 3o6paXeHne - MEMORY MIX
(1) Set the POWER switch to CAMERA.
(2) In standby mode, select FN, then press the centre on the control button. The PAGE1 screen appears.
(3) Select MEM MIX, then press the centre on the control button. The last recorded or last composed image appears on the lower part of the screen as a thumbnail image.
(4) Select - / + on the lower-right corner of the screen, then press the centre on the control button to select the still image which you want to superimpose.
- : to see the previous image
+: to see the next image
(5) Select the desired mode, then press the centre on the control button. The still image is superimposed on the moving picture.
(6) Select - / + on the lower-left corner of the screen, then press the centre on the control button to adjust the effect.
(7) Select OK, then press the centre on the control button. The PAGE1 screen appears.
(8) Select EXIT, then press the centre on the control button. The FN screen appears.
(9) Press START/STOP to start recording.
(1)YctaHOBInTe IpeKJIIOUaTeIb POWER B NOJOKeHne CAMERA.
(2)В рекиемохидалиь віберп'te FN,Затемінжміті Нацентр ● Ha KhoIGNKeуnpавлени. Порвntся зкразн PAGE1.
(3)BbI6epNTe MEM MIX, 3aTeM haxMnTe Ha ueHTp ● ha KHOHKe ynpaBHeHn. IocJeHne 3aNcAHHOe INI CKOMNoHOBaHHoe N3O6paXeHne IOBnTcB HnxKHe qactn 3kpaHa B VIne He6oJbWoR O N3O6paXeHn.
(4)BbI6epnte-/+B npaBOM HnXHem yrIy 3KpaHa, 3aTeM HaXMITE Ha CEHTp ● Ha KHONKe ynpaBLeHna, YTO6bl BbI6paTb HeNoDnXHoe n3O6paXeHne, KOtOpoe HJXHO HAIOXMTb.
-:ДлгпрсмOTpa Прдыduyцero n3o6paxeHnA +:ДлгпрсмOTpa CneDyUOZero n3o6paxeHnA
(5)Bb6epnte HxhHbIpeKIM,3aTeM hAkmTe Ha ceHtp Ha KHOKe ynpaBHeHn. HeoDbNkHbIe n3O6paXeHnHaKJaNbBaIOTCn Ha DnKyUncEe N3O6paXeHn.
(6) BbIbepeTe -/+ B IeBOM HnXHem yrIy 3kpaHa, 3aTeM haxMnte Ha ueHTp ● Ha KhoNke ynpabJeHHa Nla HacTpOoi KN 3ΦΦeKTa.
(7)BbIbepeITe OK,3aTeM haxMMTe Ha ceHTp H a KhoNKe ynpabJIeHn. IIOBNTcH 3KpaH PAGE1.
(8)BbI6epNTe EXIT,3aTeM Haxmnte Ha ceHtp ●Ha KhoNKe ynpabHeHn. IOnBnTc3kpaH FN.
(9)HaKmTe KhONKy START/STOP nIaHaYana 3aIncn.
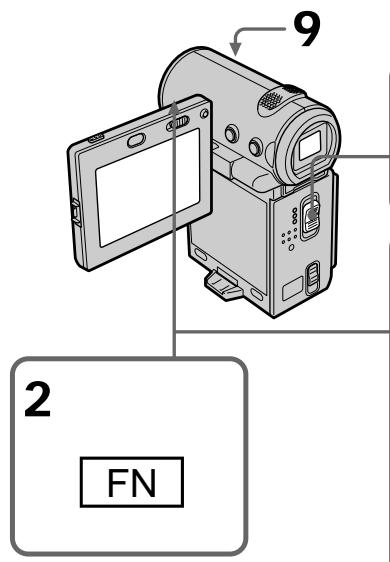
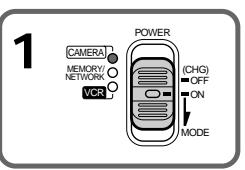
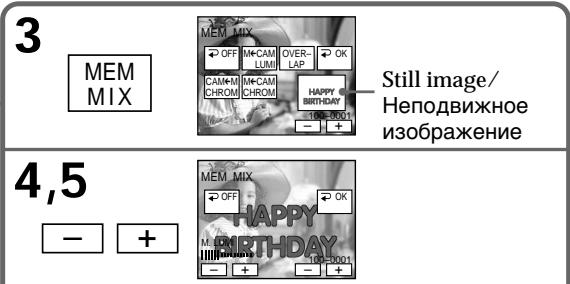
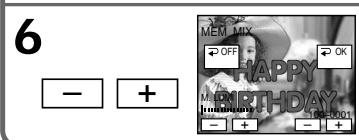
Superimposing a still image in a "Memory Stick" on a moving picture - MEMORY MIX
Items to adjust
| M. CHROM | The colour (blue) scheme of the area in the still image which is to be swapped with a moving picture |
| M. LUMI | The colour (bright) scheme of the area in the still image which is to be swapped with a moving picture |
| C. CHROM | The colour (blue) scheme of the area in the moving picture which is to be swapped with a still image |
| M.OVERLAP | No adjustment necessary |
The fewer bars there are on the screen, the stronger the effect.
To change the still image to be superimposed
Before step 7, select - / + in the lower-right corner, then press the centre on the control button.
To cancel MEMORY MIX
Before step 7, select OFF, then press the centre on the control button.
Notes
- You cannot use the memory mix function using a moving image. If you select a moving image file, the black thumbnail image appears.
- When you try to mix a moving file image recorded on a "Memory Stick," the message "NOT REC" appears and you cannot mix the moving file image onto the tape.
- When the overlapping still image has a large amount of white, the thumbnail image of the picture may not be clear.
- You cannot reselect the mode. Select OFF, then press the centre on the control button again to return to PAGE1.
The "Memory Stick" supplied with your camcorder stores 20 images
-For M.CHROM:18 images (such as a frame) 100-0001\~100-0018
- For C. CHROM: two images (such as a background) 100-0019~100-0020
HanoXeHne HenoBnXhOro n3o6paXeHn 13 "Memory Stick" Na DnKxUeecr n3o6paXeHne - MEMORY MIX
IyHKtbl dna perynipobkn
Superimposing a still image in a "Memory Stick" on a moving picture - MEMORY MIX
Sample images
Sample images stored in the "Memory Stick" supplied with your camcorder are protected (p. 190).
Image data modified with a computer or shot with other equipment
You may not be able to play back such image data with your camcorder.
To record a still image without any effects on a tape
Select - / + on the lower-left corner, then press the centre on the control button to increase the bars to maximum in the M. LUMI mode in step 6.
Note on M.OVERLAP
Once you select M.OVERLAP, you cannot reselect a still image. If you select another image, select OFF, then press the centre on the control button to release M.OVERLAP before step 7 and select another image.
When you press the PHOTO button in step 9. You can record a still image on the tape.
HaIooXeHne HEnoDbNxHoro n3o6paXeHn n3 "Memory Stick" Ha DbNxJUeEc n3o6paXeHne - MEMORY MIX
O6pa3zIu3o6paXeHn
O6pa3zbln3o6paJehn, KoTOpIe coXpaHeHbHa "Memory Stick", npIJIraeMoN KBInDeOkampe, 3aUmIeHbI (CTp. 190).
JaHHbIe N3O6paXeHnA, N3MeHeHHbIe C NOMOuBIO KOMNbIOTepa NII CNrTbIe C NOMOuBIO dpyroI annapatypbl
Bo3MOxHNo, TaKne DaHHbIe HEnb3a 6yJeT BOCpOIN3BecTn C NOMOuBIO BInDeOKaMepebl.
Copying still images from a tape - Photos save
- DCR-IP7E only
Using the search function, you can automatically take in only still images from tapes and record them on a "Memory Stick" in sequence.
Before operation
- Insert a recorded tape into your camcorder and rewind the tape.
- Insert a "Memory Stick" into your camcorder.
KoHnpoBaHne HeNoDBrXhblx 306paXeHn C JeHTbl - CoXpaHeHne B pAmrTn fOToCHmKOB
-ToIbkoMoIeJIb DCR-IP7E
C NOMOUIH OdyHKUIN NOUCKa MOXHO aBTOMaTIneCKN DeIaNb CHIMKn C JeHT IN noCneIOBaTeJIbHO 3aIINCbIBaTb Ix Ha "Memory Stick".
Перед наалом pa60ть
BCTaBbTe 3aHncaHnyIeHTy B VIndeokamepy n NepemOTaIte ee Ha NaHaNo.
BCTaBBTe "Memory Stick" B BnIeokamepy.
(1) Set the POWER switch to VCR.
(2) Select FN, then press the centre on the control button. The PAGE1 screen appears.
(3) Select MENU, then press the centre on the control button. The menu appears.
(4) Select , then press the centre or on the control button.
(5) Select PHOTO SAVE, then press the centre or on the control button. "PHOTO BUTTON" appears on the screen.
(6) Press PHOTO firmly. The still image from the tape is recorded on the "Memory Stick". The number of still images copied is displayed. "END" is displayed when copying is completed.
(7) Select END, then press the centre on the control button. The PAGE1 screen appears.
(8) Select EXIT, then press the centre on the control button. The FN screen appears.
(1)YctaHOBInTe IpeKJIIOUaTeIb POWER B noJIOKeHne VCR.
(2) Bыберпе FN, 3aTeM haxmite He Za eHTp ●
На КнОПКе ураленя. ПогВИТСЯ Кран
PAGE1.
(3)BbIbeIpTe MENU, 3aTe mHaKmnte Ha ceHtp H Ka KhoNke ynpabJeHHa. IOnBaTcMa HeHO.
(4)BbIbePnte ,3aTeM HaxMnTe Ha ceHtp ●ИЛи Na KhONKe ynpaBneHnЯ.
(5)ВьберпЕ PHOTO SAVE,Затем Нахмпerte Haцентр Илн >Ha Kногke упраьени.Инданкаця "PHOTO BUTTON" noЯВится HaЗкpahe.
(6)Силь-hee HaXmTe KHONky PHOTO. HeNoDnKHOe n3o6paXeHne HaJIeHTe 3aIIMeTcRa Ha "Memory Stick". BydET oTo6paXeHo KOJInueCTBO cKOnIpOBAHHbIX HeNoDnKhBix n3o6paXeHn.Io 3aBepSeHn KOnIpOBAHn8 BydET oTo6paXeHa INdikaCuaN "END".
(7)BbIbepuTe END,3aTeM haxmnte Ha ceHtp HkONke ynpabJeHHa. IoABHTcH 3KpaH PAGE1.
(8)BbIepeNTE EXIT,3aTeM haxmnte Ha ueHTp ●Ha KhoNKe ynpabHeHn. IoABNTc3kpaH FN.
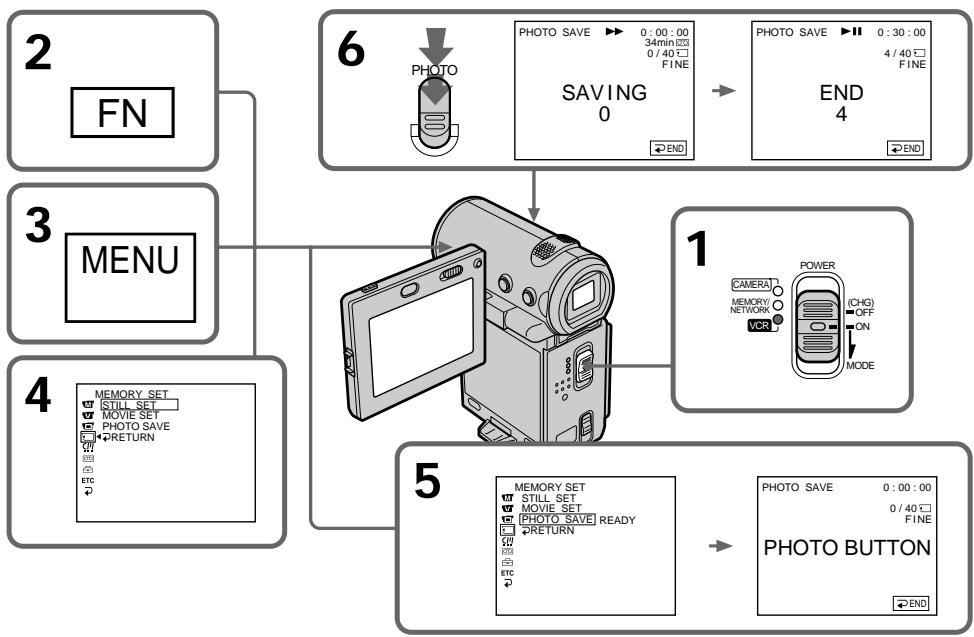
Copying still images from a tape - Photo save
To stop or end copying
Select END, then press the centre on the control button in step 5.
When the "Memory Stick" is full
"MEMORY FULL" appears on the screen, and the copying stops. Select END, then press the centre on the control button, insert another "Memory Stick" and repeat the procedure from step 2.
When the access lamp is lit or flashing
Do not shake or strike your camcorder. Also, do not turn the power off, eject the "Memory Stick" or remove the battery pack. Otherwise, the image data may be corrupted.
If the write-protect switch on the "Memory Stick" is set to LOCK
"NOT READY" appears when you select the item in the menu settings.
When you change the "Memory Stick" in the middle of copying
Your camcorder resumes copying from the last image recorded on the previous "Memory Stick".
Note
The message "NOT READY" appears when you select PHOTO SAVE in the following cases:
- There are no images recorded on the tape.
- Images are recorded before the current position on the tape.
In such cases, do the tape photo recording first, or rewind the tape, then select PHOTO SAVE.
KonipobaHne HeNoDbXhBIX n3o6paXeHn C JeHTbl - CoXpaHeHne B NamATn FOToCHmKOB
He TpncTe H He ydapnTe nO Bndeokamepe TaKke He BbIKnOuayTe nITaHne, He BbIHMaIte
"Memory Stick" n3 OTceKa n He CHIMaIe 6batapeHbI bIok. B npotuBHom cIyae daHHbIe I3O6paXeHnMOrYb6bITb NOBpeKdEhbl.
Ecni nepeKJIIOuATEIb 3aUITbI OT 3aINcH Na "Memory Stick" yCTaHOBNeH B NOJOKeHne LOCK
Пи Вьборе Злем entaВустановкax MeHIO NOBtca INДИКациN“NOT READY”.
При заиме "Memory Stick" в поочецkoноювannah
Bndeokamepa npoDolKNT KOIpOBaHne c nocIeHrO n3o6paXeHn, 3aIncahHoro Ha npedbldyuSei "Memory Stick".
PpmeaHne
Viewing a still image - Memory photo playback
- DCR-IP7E only
You can play back still images recorded on a "Memory Stick". You can also play back six images (including moving pictures) in order at a time by selecting the index screen.
Before operation
Insert the "Memory Stick" into your camcorder.
(1) Set the POWER switch to MEMORY or VCR.
(2) In MEMORY mode, select PLAY, then press the centre on the control button. In VCR mode, select PB, then press the centre on the control button. The last recorded image is displayed.
(3) Select - / + , then press the centre on the control button to select the desired still image. -: to see the previous image ^+ : to see the next image
ПрсмOTР HeNoDvIXHOrO n3o6paXeHnI - BocpOn3BeDeHne FOToCHIMKOB n3 pAmrTu
-ToIbkoMoIeJIb DCR-IP7E
Ipeed nayanom pa60tbi
BcTaBbTe "Memory Stick" B BnDeokamepy.
(1)Установпейсякючать POWER в положене MEMORY ул ВСR.
(2)BpejIMEMEMORYBbIbepTePLAY,3aTeM haxmTeHa zentp Ha KhoNKe ynpabLeHn. BpejIMe VCR BbIbepTePB,3aTeM haxmTeHa zentp Ha KhoNKe ynpabLeHn. Byet OTo6paXeHo nocJeHHe 3aIncaHhoe n3o6paXeHne.
(3)Bb6epnte-/+,3aTeMaHxMnTeHaueHTp Ha KHOJIke ynpabLeHnIy Bb6Opa HxKHO HeoDBHXHOu3OpaXeHH. --:IpyPOcMOrPa IpeDbyUeero u3OpaXeHH +:IpyPOcMOrPa CJeDuOuEero u3OpaXeHH
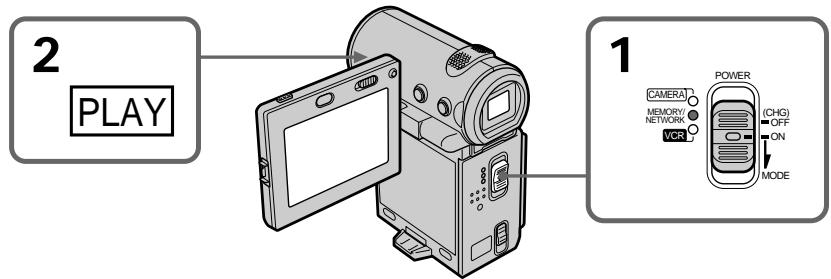
To stop memory photo playback
Select CAM or VCR, then press the centre on the control button.
ДлЯ OCTAHOBKN BOCNPOUN3BedeHNA FOTOCHIMKOB N3 NaMATN
Bb6epnte CAM nVCR, 3aTe m HaxmTe Ha ceHTp Na KhONKe ynpabNeHn.
Note
Playback images recorded on the "Memory Stick" are not output:
From the i.LINK (MICROMV) jack.
From the A/V jack if the i.LINK cable is plugged into the camcorder.
Notes on file names
- The directory number may not be displayed and only the file name may be displayed if the structure of the directory does not conform to the DCF standard.
- "Directory Error" may appear on the screen if the structure of the directory does not conform to the DCF standard. While this message appears, you can play back images but cannot record them on the "Memory Stick".
- The file name flashes on the screen if the file is corrupted or if the file is unreadable.
To play back recorded images on a TV screen
- Connect your camcorder to the TV with the A/V connecting cable supplied with your camcorder before the operation.
- When operating memory photo playback on the TV or on the LCD screen, the image quality may appear to have deteriorated. This is not a malfunction. The image data is as good as ever.
- Turn the audio volume of the TV down before operation, or noise (howling) may be output from the TV speakers.
Image data modified with a computer or shot with other equipment
You may not be able to play back such image data with your camcorder.
Still images
You can also select still images from the PAGE1/ PAGE2/PAGE3 screens by selecting - / +
When no images are recorded on the "Memory Stick"
The message "NO FILE" appears.
Ppimcayane
Bocnpoun3bOoIMbIe n3o6paXeHnI, 3aIncHbIe Ha "Memory Stick", He bVbOaTc:
C rHe3da i.i.LINK (MICROMV).
C rHe3da A/V, ecn Ka6ebI i.LINK noJKnIyueH K BnJeOkaMepe.
PpIMeuaHnO OTHOCHTelbHO mEm haiJIOB
- Ecni CtpyKtpya KaTalora He COOTBeTCTByeT cTahdapTy DCF, Homep KaTalora MoXet He oTo6paXaTbcra, a OTo6paXaTbcra TOnbko Imr faaiJa.
- Ecnn CtpyKtpya KaTaNora He COOTBeTCTByeT cTahdapTy DCF,Ha 3kpahe MoKeT NOBnIbTaC coo6uHHe "O-DIRECTORY ERROR".Ppi NoBJIeHn 3ToTO coo6uHn MOxHO BOCpON3BOJntb H3o6paXeHn, Ho HeNb3aNcBbAtb nx Ha "Memory Stick".
-Имяфайma miraeТ ha экранe, ecпфайповржден Илн HeЧтаetся.
Длв ВсрпоиЗБеDEнгЯ 3аиcaHьIx n3o6paXeHи На 3кpaHе TelenBuN3opa
-Пелеги Началов BOCnpon3BveDeHIN
поДсоЕДИНТЕ ВДеOKamepу K TeLEВИЗOPу C
номоцью COЕДИНТЕЛьНО Кабеля aydno/
Видев,КOTOPь ПирагаETСК ВДeOKampe.
- PInB OBCPON3BeDeHnN fOToCHnMKBo N3 nAMrTn Ha 3kpaHe TeleBn3Opa nIIN KKД KaueCTBO N3O6paXeHnMoKeY yXuDUnTBcA. 3TO He RaBnaETcH eHcnPpABHoCTbIO. DaHHbIe N3O6paXeHn HaxoJaTcB TOM Ke COCTOARHN, KAK IN IpexJde.
- Ipeed nauanom Bocnpn3BeHn yMehbWnte rPOMKoCTb TeJeBn3Opa, nHaueYepe3 akyCTnueckyIO CnCTeMy MoKeT nocblwataCbA Wm (ryn).
DaHHbIe N3O6paXeHnA, N3MeHeHHbIe c NOMOuBIO KOMNbIOTepa NII CNHTbIE C NOMOuBIO dpyroI annapatypbl
Bo3MOxH0, TaKHe DaHHbIe HeIb3a 6yIeT BOCnPoIN3BcEtn C NOMOuBIO BInDeOKaMepebl.
HenoDbnKhbIe n3o6paXeHna
Screen indicators displayed during still image playback
3KpaHHbIe HNДnKaTOpbl, OTo6paXaEmbIe BO BpeM RAocPOn3BeDeHnA HeNodBnXhBIX N3o6paXeHn
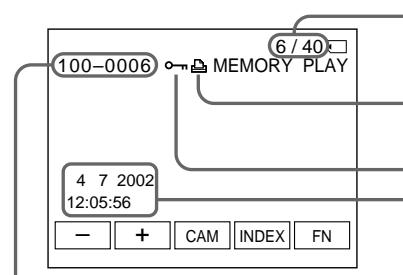
Image number/Total number of recorded images/Homep n3o6paXeHnR/O6uee KOInueCTBO 3aIncaHHbIX n3o6paXeHn Print mark/PeuathBhI 3HaK
Protect indicator/ɪnʌnɪkaTOp 3aʌnɪtbl Recording data/Данные 3aɪnɪcɪ
Data Directory/File Number/Homek KaTalora daHbix/Homep kaIa
Recording data
To display the recording data (date/time or various settings used when recording), select CAM DATA or DATE DATA, then press the centre on the control button via DATA CODE on the PAGE3 screen during playback. You can also use the Remote Commander for this operation (p. 54).
To turn off the screen indicators Press DISPLAY.
Playing back six recorded images at a time (index screen)
You can play back six recorded images at a time. This function is especially useful when searching for a particular image.
DaHHbIe 3aINcN
(1) Set the POWER switch to MEMORY or VCR.
(2) In MEMORY mode, go to step 3. In VCR mode, select PB, then press the centre on the control button.
(3) Select INDEX, then press the centre on the control button to display the index screen.
An orange mark appears above the image that is displayed before changing to the index screen mode.
Selecting the mark makes the colour of the mark change to orange from green. However, the mark remains green when you use - / + or / on the Remote Commander.
: to display the previous six images
: to display the next six images
You can also use - / + or / on the Remote
Commander instead.
(1)Установпейрешичать POWER в положене MEMORY ул ВСR.
(2)BpeKIMEMEMORYnepeiDITeKnyHKTy3.BpeKIMEMVCR BB6epNTe PB,3aTeMaJKMITEHaUeHTp HaKHONKeynpaBHeHn.
(3)BbIbePntE INDEX, 3aTeM haxMtTe Ha ceHTp Ha KONKe ynpaBHeHn IIn OTo6paKeHn HnDEKCHOrO 3kpaHa.
HaI n3o6paXeHnEM NOBHTcO opAHKeBaMeTka ,KOTOPaN OTo6paXaETcNEpeI nepeKJIHOueHnEM B pEXIM INHeKCHOrO 3kpaHa.
PnBbIbOpe MeTKu ee ZbET CMeHITcC 3eJIeHO rHa opaHKeBbI. OJNaKo MeTKa OCTaETc3eJIeHoi pRi NcNoJIb3ObaHIn KHOIOK - / + IIN / Ha NpIbTe DnCTaHcUHOHOr OynpaBHeHr.
← :Длг OTO6paЖеняшостипрдыduyuxn 306paЖени
→ :Длготобрахжияшеси следуюши n3obpaхжиь
Moxho TaKxE nn3TOro nCNoIb3ObaTb KHOKN - / + IIN / Na npIbTe DnCTaHIOHHO ynpabJeHH.
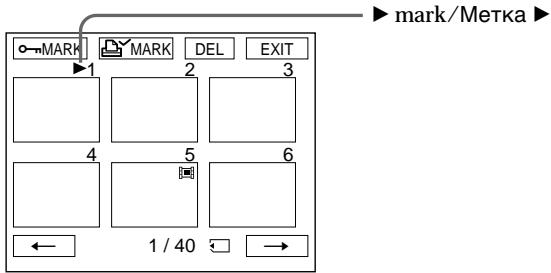
To return to the FN screen
Select EXIT, then press the centre on the control button.
To return to the normal playback screen (single screen)
Move the mark to the image you want to display, then press the centre on the control button. When you use the Remote Commander, move the mark to the image you want to display, then press PLAY.
When displaying the index screen, a number appears above each image. This indicates the order in which images are recorded on the "Memory Stick". These numbers are different from the data file names (p. 136).
Image data modified with a computer or shot with other equipment
These files may not be displayed on the index screen.
PpmeaHne
При OTOбрахени ИнДeКсHOrO 3KpaHa NaI Kaxдыm I3Oбрахениem 6уДeТ NOВЛЯТьСН Homeр.Опи ПOKаЗыВaIOT NOСлeДОВaTeЛьНOCтВ, B KOTOPОИ N3Oбрахеня 3aПИСаны Ha "Memory Stick". 3Ти Homepa OTПИЧАЮТСЯ OT ИМeH Файnob DAнHBIX (cTp.136).
DaHHbIe N3O6paXeHnA, N3MeHeHHbIe c NOMOuBIO KOMNbIOTepa NII CNHTbIE C NOMOuBIO dpyroI annapaTypbl
3Tn paimbl MOrTy He OTo6paXaTbCra Ha INHeKCHOM 3KpaHe.
Viewing a moving picture - MPEG movie playback
You can play back moving pictures recorded on a "Memory Stick". You can also play back six images, including still images, in order, at one time, by selecting the index screen.
Before operation
Insert the "Memory Stick" into your camcorder.
-ToIbkoMoIeJIbDCR-IP7E
MожнвВОспpon3ВОДиТьДВИЖушпеся n3OБрахеня,ЗаисанньieHa“MemoryStick”. Прв Вьборе ИнDEКСHERО 3КраHA можнTOТaKжe ВОспpon3ВОДиТь OДНOBРЕмHo ШeСть n3OБрахен尼(ВКЛЮчая HENoДВИЖньe).
Ipeed hauanom pa6oTbI
BcTaBbTe "Memory Stick" B BnDeoKaMepy.
(1) Set the POWER switch to MEMORY or VCR.
(2) In MEMORY mode, select PLAY, then press the centre on the control button. In VCR mode, select PB, then press the centre on the control button. The last recorded image is displayed.
(3) Select + / - , then press the centre on the control button to select the desired moving picture. To see the previous picture, select -, then press the centre on the control button. To see the next picture, select + , then press the centre on the control button.
(4) Select MPEG II, then press the centre on the control button. Playback starts.
(5) Select VOL -/VOL +, then press the centre on the control button repeatedly to adjust the volume.
- : To turn down the volume.
- : To turn up the volume.
You can adjust the volume by pressing / repeatedly after you select VOL -/VOL+.
Iy3bI BocnpOn3BedeHn
Bb6epnte MPEG II, 3aTeM haxmte Ha ueHTp H Ka KhoNke ynpabHeHn. Haxmte epe pa3 dIHaHaJa BocPon3BeDeHn.
To change the screen size
Select SCRN SIZE, then press the centre on the control button. The screen size changes as follows:
ДиЯзMeHEnpa3Mepa 3KpaHa
Bb6epnte SCRN SIZE,3aTeM haxmnte Ha ceHTp ●Ha KhoNke ynpabIeHnra. Pa3Mep 3kpaHa n3MeHaeTc CneDyUoIM o6pa3OM:
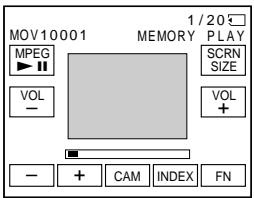
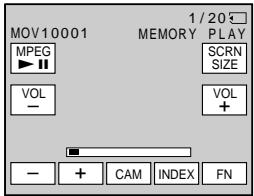
Note
An MPEG movie recorded with the camcorder:
- Is MPEG MOVIE AD.
- Cannot be played back on other digital still cameras and digital video camera recorders.
- Cannot be output from the i.i.LINK (MICROMV) jack.
To play back recorded images on a TV screen
- Connect your camcorder to a TV with the A/V connecting cable supplied with your camcorder before operation.
- Turn the audio volume of the TV down before operation, or noise (howling) may be output from the TV speakers.
Image data modified with a computer or shot with other equipment
You may not be able to play back such images with your camcorder and the volume cannot be adjusted.
When there are no images recorded on the "Memory Stick"
The message "NO FILE" appears.
Moving picture
You can select moving pictures from the PAGE1/ PAGE2/PAGE3 screens by selecting - / +
PpimeyaHne
Bo3MOxH0, TaKne I3O6paXeHnI He 6yDyT BOCpOn3BeDeHbI C NOMOuBIO BuDeOkaMepbl, I rPoMKoCTb HeBO3MOxH0 OTpErpyInpOBaTb.
EcJn Ha "Memory Stick" oTcYtCTByIOT 3aIIncAHHbIe n3O6paXeHnI
IoBntc coo6eHne "NOFILE".
DvNkUeecn306paXKeHne
Notes on the screen size
- The picture may not be displayed at the middle of the screen, depending on the movie.
- Even if you switch the screen size, the picture may not be displayed full-screen size, depending on the movie.
Screen indicators during moving picture playback
Примочаши no pa3mepy ekpaHa
Picture number/Total number of recorded pictures/Homep n3o6paXeHn/ObSeE koIynchecTBo 3aIncanHbIX n3o6paXeHn
Protect indicator/ɪnʌdɪkɑTɒr 3aʌŋtbl
Recording date/time. (Various settings are displayed as “- - -”)./ДаТа/BрЕмЯ запис. (РаЗличные установский OTобразковая сок).Кak“--.”)
Recommended computer environment
Recommended Windows environment
OS: Microsoft Windows 95, Windows 98, or Windows NT 3.51 or later. Standard installation is required.
Operation is not assured if the above environment is an upgraded OS
- MPEG files cannot be handled on Windows 3.1.
Application: InternetExplorer 4.0 or later (This application comes with Windows 98 or later), or Windows Media Player (Active Movie Player) must be installed.
PeKOMeHnyemaj KOMnbIOTepna CpeDa PeKOMeHnyemaj Cpea Windows
OC: Microsoft Windows 95, Windows 98 Windows NT 3.51 ПИЗЕ NOЗДХ ВERCИ. Требуетс стандартустановka.
HopmaJIbHaJa pa60Ta He rapaHTnpyETca, ecIn yKa3aHHaB bIe cpeA YBJIeTcA 6bHOBHeHNo OC
- Pa60Ta c ΦaɪnʌmMPEG B Windows 3.1 HeB03MOXHa.
Прилwxнe: Heo6xOДIMO yCTaHOBuTb InternetExplorer 4.0 uIN 6OJIee no3dNIX Bercn (3TO pRiNoJoxeHne noCTabJIaTeCBAMeTe c Windows 98 uIN 6OJIee no3dNIX Bercn), uIN Windows Media Player (Active Movie Player).
Viewing a moving picture - MPEG movie playback
Recommended Macintosh environment
CPU:PowerPC
OS: Mac OS 7.6.1 or later
Application:QuickTime 3.0 or later
- For details on system requirements for QuickTime, refer to the Web site of Apple Computer, Inc.
Recording date/time
To display the date/time of the recording, press DATA CODE on the Remote Commander during playback. Various settings are not displayed. You can also use DATA CODE on the PAGE3 screen for this operation (p. 54).
To turn off the screen indicators Press DISPLAY.
Dubbing images recorded on the "Memory Stick" onto the tape
- DCR-IP7E only
You can dub a still image or title recorded on a "Memory Stick" to a tape. You can also use the Remote Commander to do this operation.
Before operation
- Insert a tape to be recorded into your camcorder.
- Insert a "Memory Stick" into your camcorder.
(1) Set the POWER switch to VCR.
(2)Locate the desired recording start point of the tape, then stop the tape.
(3) Select PB, then press the centre on the control button. Next, select the still image you want to dub by selecting - / +
(4) Select FN, then press the centre on the control button. The PAGE1 screen appears.
(5) Select PAGE3, then press the centre on the control button. The PAGE3 screen appears.
(6) Select REC CTRL, then press the centre on the control button. The REC CTRL appears.
(7) Select REC START, then press the centre on the control button. The camcorder starts dubbing. To pause the dubbing, select REC PAUSE, then press the centre on the control button.
(8) When you try to dub another image, select -/+ , then press the centre on the control button and carry out step 7.
KoNiPoBaHne n3O6paXeHni, 3a\PuCaHHbIX Ha "Memory Stick", Ha JeHTy
-ToIbkoMoIeJIb DCR-IP7E
Moxho cKoInpOBAt b HeNoDnXHoe
1306paXeHne IIn TtTp, 3aNcAHHbHa
"Memory Stick", Ha leHTy. DnBbIOJIHeHnA
3ToI onepauuMoXHO TaKKe NcNOJb3OBaTb
nyIbT dNCTaHcUHOHOrO ynpabJeHnA.
Ipeed nayanom pa60tbi
BCTaBbTe B BuDeoKaMepy JeHtY, KoTOpyIO Heo6xOIMo 3aIncatb.
- BCTaBbTe "Memory Stick" B BnDeokamepy.
(1)Установпейрееклочатуль POWER в положене VCR.
(2)HaHДиTe HUxHNo MeCTo HaUaJa 3aIncn HaJeHTe, 3aTEM OCTaHOBIne JIeHTy.
(3)Bb6epnte PB,3aTeMaHaxMnTe Ha ceHTp Ha KhoNKe ynpaBneHn. Daane Bb6epnte HeNoDbXHoe H3O6paXeHne, KOToPbIe Tpe6yeTc CKoHIpObaTb,Bb6paB-/+
(4)Bb6epnteFN,3aTeM haxmnte Ha ceHtp ●Ha KhoNKe ynpaBneHn. IoRbTcR 3KpaH PAGE1.
(5) Bb6epTe PAGE3, 3aTeM haxMNte Ha ceHTp Na KhoNKe ynpabHeHn. IOnBntc 3KpaH PAGE3.
(6) BbIePnte RECCTRL, 3aTeM haxmnte Ha ceHTp Ha KhoNKe ynpabNeHn. IOnBNTcHnDnKaTOp REC CTRL.
(7)BbIbePte REC START,3aTeM haxMnTe Ha ueHTp Hau KhoNKe ynpaBHeHn. BInDeokamepa HauHet KOnIpoBaHne.YTo6bl npNoCTaHOBtB KOINPOBaHne,BbIbePte REC PAUSE,3aTeM haxMnTe Ha ceHTp Hau KhoNKe ynpaBHeHn.
(8)При КОПИРОВAHINДPyrOTo I3O6paJKeHNA BbIbepNTe-/+,3aTeM HaxMMTe Ha ZeHTp ●Ha KHOJIke YnpaBJIeHNA N BbIPOJIHnTe DeiCTBnA N3 pyHKTa 7.
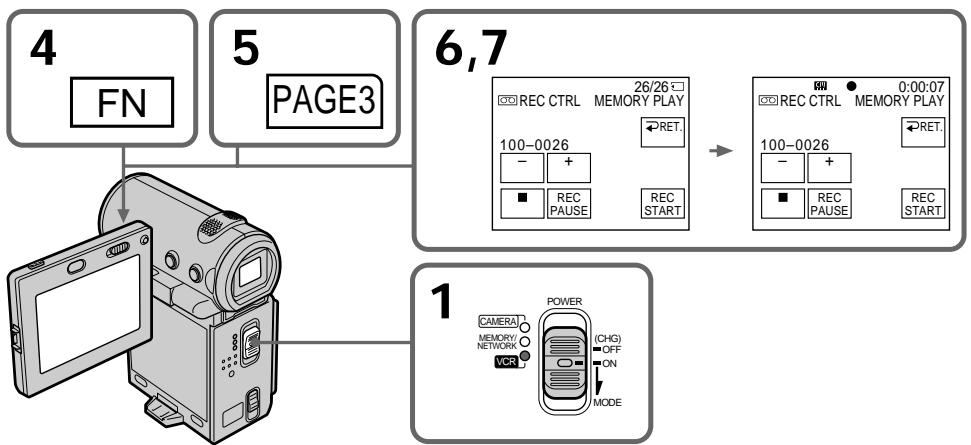
Dubbing images recorded on the "Memory Stick" onto the tape
KoInpOBaHne n3o6paXeHn, 3aIncaHHbIX Ha "Memory Stick", Ha JeHTy
To stop dubbing
Select , then press the centre on the control button, or press the stop button on the Remote Commander.
When using the Remote Commander
Press the REC buttons on the Remote Commander simultaneously after step 3. The camcorder starts dubbing.
- You cannot dub MPEG movie files to the tape.
- You cannot dub the index screen to the tape.
Image files modified with a computer or shot with other equipment
You may not be able to dub these images.
PpIMeuaHn
- HeJIb3a cKoInpObaTb paIbI pIbMOB MPEG HaJeHTy.
- HeJIb3Я CkOJInpoBaTb ИнДeКСын 3Кран HaJIeHTy.
Фаиьи n3обрахжн, n3MeHeHHbIe c NOMOБьЮ KOMьЮТepа ИИ NCHIMКI C dpyroй annapaTypbl
Bo3MOxH0, BbI He cMOxTe CkOIpObaTb 3TN n3o6paXeHn.
Enlarging still images recorded on a "Memory Stick" - Memory PB ZOOM
- DCR-IP7E only
You can enlarge still images recorded on a "Memory Stick".
Before operation
Insert the "Memory Stick" into your camcorder.
(1) In memory playback mode, select FN, then press the centre on the control button. The PAGE1 screen appears.
(2) Select PAGE2, then press the centre on the control button. The PAGE2 screen appears.
(3) Select PB ZOOM, then press the centre on the control button. The PB ZOOM screen appears.
(4) Push down ZOOM to enlarge the image. The zoom scaling can be selected from 2 ×, 3 ×, 4 ×, and 5 × .
(5) Move the enlarged area.
: To view the upper portion of the original image.
: To view the lower portion of the original image.
: To view the left portion of the original image.
To view the left portion of the original image.
YBeJIuHHe HeNoDBrXKbIX n3o6paXeHn, 3aIncHbIX Ha "Memory Stick" - PAmrTB PB ZOOM
-ToIbkoMoIeJIb DCR-IP7E
BbMOxTeYBeJIuHTbHeNoDBrXHbIe n3o6paXeHnI,3aNcAHHbIeHa“MemoryStick”.
Ipeed hauaJom pa6oTbi
BCTaBtTe "Memory Stick" B VbIeokamepy.
(1)В рекиme BOCPON3BeHnI N3 namrTbbl6epnte FN, 3aTeM haxmnte Ha ceHTp ●Ha KhoIKe ynpabHeHn.IoRbNTcN 3KpaHPAGE1.
(2)Bb6epTe PAGE2,3aTeM haxMnTe Ha ceHTp Ha KhoNKe ynpabHeHna. IoAByTc 3kpaH PAGE2.
(3)BbI6epNTe PB ZOOM, 3aTeM haxMnTE Ha ceHTp ●Ha KhoNKe ynpabJeHn. IoABnTcA ekpaH PB ZOOM.
(4)HaxmTe Bn3 ZOOM, yTo6bI yBEniHTb n3o6paXeHne. MoXHO Bb6paTb cIeDyUOuNe MacwTa6bl: 2x, 3x, 4x n 5x.
(5)Перемecтnteувелионнюоблacr.
A:ДлпюсмOTpaВерхHeЧаТи
нанальНOrO n3OBpaЖeHЯ.
V:Длгпрсмоганжнейч actn haayalbHOrO n3o6paXKeHry.
:IJI pOcMoTpaJeBoY qAcTnHaUaJIbHOro n306paXeHN.
:Inpocmotpa npabOu qactnHaayalbHoro n3o6paXeHn.
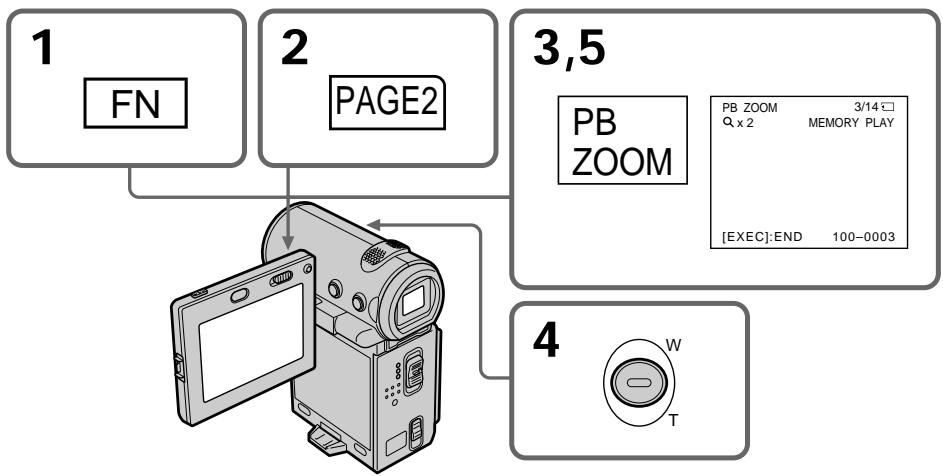
Enlarging still images recorded on a "Memory Stick" - Memory PB ZOOM
YBeJIuYeHne HeNoDBrXHbIX n3o6paXeHn, 3aIncaHHbIX Ha "Memory Stick" - PAmrPB ZOOM
To cancel the Memory PB ZOOM function
Press the centre on the control button.
Note
You cannot record images on the "Memory Stick" which are enlarged by the Memory PB ZOOM function. Record those images on the VCR using your camcorder as a player.
Pictures in the Memory PB ZOOM mode Pictures are not output through the i.i.LINK (MICROMV) jack.
In Memory PB ZOOM mode
If you press DISPLAY, the indicators on the Memory PB ZOOM screen disappear.
The edges of an enlarged image
The edges of an enlarged image cannot be displayed at the centre of the screen.
MPEG movie files recorded on a "Memory Stick"
The PB ZOOM function does not work with these files.
Playing back images in a continuous loop - SLIDE SHOW
- DCR-IP7E only
You can automatically play back images in sequence. This function is useful especially when checking recorded images or during a presentation.
Before operation
Insert the "Memory Stick" with your images recorded into your camcorder.
(1) Set the POWER switch to MEMORY.
(2) Select FN, then press the centre on the control button. The PAGE1 screen appears.
(3) Select MENU, then press the centre on the control button. The menu appears.
(4) Select l , then press the centre or on the control button.
(5) Select SLIDE SHOW, then press the centre or on the control button.
(6) Select START, then press the centre on the control button. Your camcorder plays back the images recorded on the "Memory Stick" in sequence.
Bocnpon3BeJeHne n3o6paXeHn BHeIpepbIBHOI NOcIeIOBaTeJIbHOCTNIO 3aMKHyTOMy cIKJy - SLIDE SHOW
-ToIbkoMoIeJIbDCR-IP7E
BbMOxKeTe aBTOMaTUnHeCKn BOCpOn3BOJNTb n3O6paXeHnB HnpepbIBHOIocLeIOBaTeJIbHOCTN.3TaФyHKUraYRBnETCrPOJe3HOI OcO6eHHo PnI npOBepKe 3aINCaHNbIX n3O6paXeHn IIN BO BVpEm pIpe3eHTaCmI.
Ipeed nayanom pa60tbi
BcTabbTe "Memory Stick" c 3aIncanHbIMn n3o6paXeHnAMN B BuDeOkamepy.
(1)Установпейpeклочаель POWER в положене MEMORY.
(2)Выберпе FN,заTem нажмпe на ceHtp ●
На Кнорke уралгеля. Погвintся кран
PAGE1.
(3)Bb6epnte MENU, 3aTe mHaKmTe Ha ceHtp H Ka KhoNke ynpabJeHH. PoAByTcMa MeHO.
(4)BbI6epNTe 3aTeM HaxMMTe Ha UeHTp ● JINI ▷Ha KHNKe ynpaBneHn.
(5)Выберп TE SLIDE SHOW,ЗаTem habхмп Te HaцHTp ин >Ha KhoNke ynpaBHeHЯ.
(6) Bb6epTe START, 3aTeM haxmTe Ha ceHtp Ha KhoNke ynpabNeHn. BIndeokamepa Bocnpou3BOoNT u3O6paXeHn, 3aINcaHHbIe Ha "Memory Stick", B HenpepbBHOI nocJeIOBaTeJIbHOCTn.
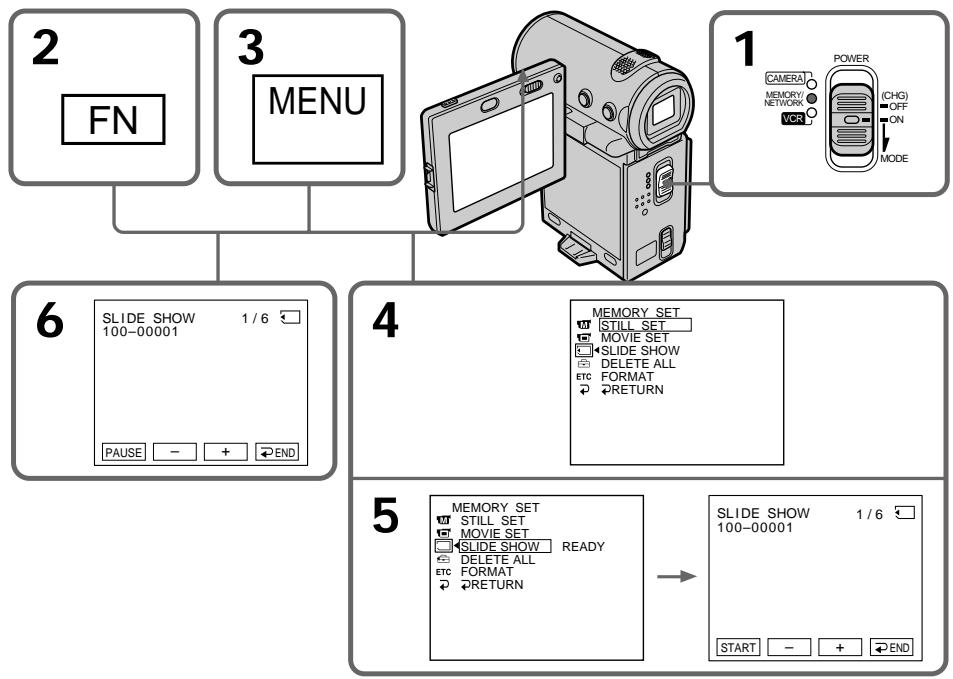
To stop the slide show
Select END, then press the centre on the control button.
To pause during a slide show
Select PAUSE, then press the centre on the control button.
To return to the FN screen
Select END, then press the centre on the control button. The PAGE1 screen appears. Next, select EXIT, then press the centre on the control button.
To start the slide show from a particular image
Select the desired image by selecting - / + before step 5.
To view the recorded images on the TV screen Connect your camcorder to a TV with the A/V connecting cable supplied with your camcorder before operation.
If you change the "Memory Stick" during operation
The slide show does not operate. If you change the "Memory Stick", carry out the procedure again from the beginning.
To play the slide show with the screen indicators turned off
After step 5, press DISPLAY to turn off the screen indicators. You can start/pause the slide show using MEMORY PLAY on the Remote Commander. To end the slide show, press DISPLAY again, next, select END, then press the centre on the control button.
When there are no images on the "Memory Stick"
The message "NO FILE" appears.
ДлЯ OCTaHOBKN DeMOHcTpaCIN cIaNIOB
Bb6epnte END, 3aTeM HaXmTe Ha ceHTp
Ha KhoNKe ynpaBneHna.
Bb6epnte PAUSE,3aTeMaXMMTe Ha ceHTp HnKONKe ynpabJeHn.
To prevent accidental erasure of important images, you can protect selected images.
Before operation
Insert the "Memory Stick" into your camcorder.
(1) Set the POWER switch to MEMORY or VCR.
(2) In MEMORY mode, go to step 3. In VCR mode, select PB, then press the centre on the control button.
(3) Select INDEX, then press the centre on the control button. The index screen appears.
(4) Select o-n MARK, then press the centre on the control button. The screen used for protecting your image appears.
(5) Select the image you want to protect, then press the centre on the control button. The "o-n" mark appears on the protected image.
(6) Repeat step 5 to select other images.
Пре dioTbpaueHne cnyuahoro ctnpaHn - 3aunTa n3o6paXeHn
-ToIbkoMoIeJIbDCR-IP7E
Длпnpedotврашени СCityaHOrO CTnpaHnBaxKbIxИЗБОржениВblMOжTe 3aUHTNbBbIbpaHhIeИЗБОржени.
BcTaBbTe "Memory Stick" B BnDeokamepy.
(1)Установпейсякючать POWER в положене MEMORY ул ВСR.
(2)BpeXmME MEMORY nepenDnTe K nyHKTy 3. BpeXmE VCR BBb6epnte PB,3aTEM HaKMITE Ha ceHTp Na KhoNKe ynpabJIeHnI.
(3)BbIbepeNTEINDEX,3aTeM haxMMTe Ha ceHTp HKHONKe ynpabJIeHnI. IOnBNTcH INdEKChbl 3KpaH.
(4)BbIepeNTe oMARK,3aTeM haxMnte Ha ceHTp Ha KhoNKe ynpabJeHn. IoABITcH 3KpaH dIra 3aunTbI n3O6paXeHn.
(5) BbIbepInTe n3o6paXeHne, KOtOpoe HUxH0 3aIINITb, 3aTEM HaXMnTe Ha ceHTp ● Ha KHOJKe ynpaBJIeHnHa. Ha 3aIIMIeHnOM n3o6paXeHn INoRbNTcR 3HaK "O-n".
(6)Повторе пункт 5дя Вьбoga дуг nx n3o6paЖен.
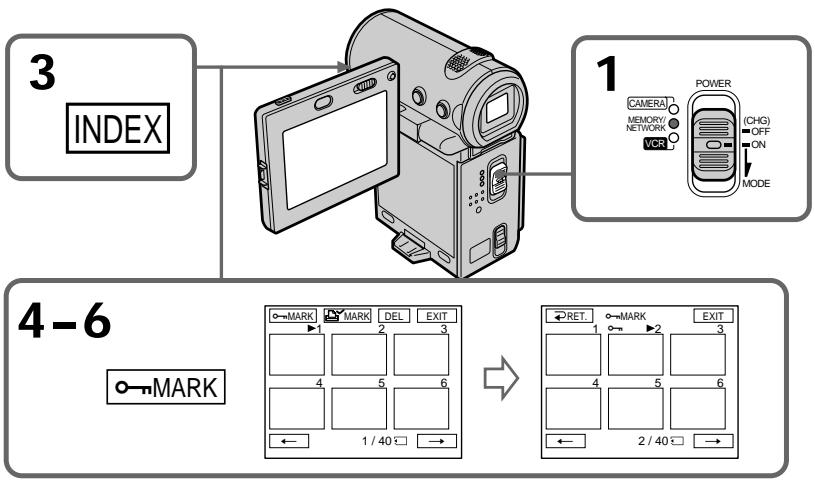
Preventing accidental erasure - Image protection
Пре dioTbpaueHne clyuaHoroCTnpaHn - 3aunTa n3o6paKeHn
To cancel image protection
Select the image for which you want to cancel image protection, then press the centre on the control button in step 5 again. The "O-n" mark disappears.
Note
Formatting erases all information on the "Memory Stick", including the protected image data. Check the contents of the "Memory Stick" before formatting.
If the write-protect switch on the "Memory Stick" is set to LOCK
You cannot carry out image protection.
ДЯ OTMeHbI 3aUHTbI N3O6paXeHNA
BbIbepnTe n3o6paXeHHe, dIa KOTOPoro HuxHo OTMeHNt 3aUNTy, 3aTe m eIe pa3 HaxMnTe Ha ceHTp ●Ha KHONKe ynpabNeHn B nyHKTe 5.
3HaK“0-n"NCHe3HET.
PpmeaHne
Bo Bpemf opMatnpoBaHn ydaJIaIOTcBce daHHbIe Ha "Memory Stick", BKIOUaI daHHbIe 3aunuehnhix n3O6paXKeHNI. PpeJ fOpMaTnpoBaHnem npOBepbTe coJePxKIMoe "Memory Stick".
Ecni nepeKJIIOuAteIb 3aUITbI OT 3aINcH Na "Memory Stick" ycTaHOBLeH B noJoxeHne LOCK
BbI He cMOKeTe BbINoHNHTb 3aUNTu n3O6paXeHn.
- DCR-IP7E only
You can delete images stored in a "Memory Stick". You can delete all images or selected images.
Deleting selected images
Before operation
Insert the "Memory Stick" into your camcorder.
(1) Set the POWER switch to MEMORY or VCR.
(2) In MEMORY mode, select PLAY, then press the centre on the control button. In VCR mode, select PB, then press the centre on the control button.
Select - / + , then press the centre on the control button to select the image you want to delete.
(3) Select FN, then press the centre on the control button. The PAGE1 screen appears.
(4) Select DELETE, then press the centre on the control button. "DELETE?" appears on the screen.
(5) Select OK, then press the centre on the control button. The selected image is deleted.
-ToIbKO MoIeJIb DCR-IP7E
YdaJIeHne BbIbpaHHbIX n3o6paxKeHn
Перед наалом pa60ть
BcTaBbTe "Memory Stick" B BnDeokamepy.
To return to the FN screen
Select EXIT, then press the centre on the control button after step 5.
To cancel deleting an image
Select CANCEL, then press the centre on the control button in step 5.
Notes
- When you want to delete a protected image, first cancel the image protection.
- Once you delete an image, you cannot restore it. Check the images before deleting them.
If the write-protect switch on the "Memory Stick" is set to LOCK
You cannot delete images.
Deleting selected images on the index screen
Before operation
Insert the "Memory Stick" into your camcorder.
UdaJIeHne n3o6paXeHn
BbI He cMOXeTe ydaJIITb N3O6paXeHnA.
YdaJIeHne BbI6paHHbIX n3O6paXKeHn Ha mHndeKCHOM 3KpaHe
Ipeed nayanom pa60tbI
BCTaBtE "Memory Stick" B VbIeokamepy.
(1) Set the POWER switch to MEMORY or VCR.
(2) In MEMORY mode, go to step 3. In VCR mode, select PB, then press the centre on the control button.
(3) Select INDEX, then press the centre on the control button. The index screen appears.
(4) Select DEL, then press the centre on the control button. The DEL screen appears.
(5) Move the mark to the image you want to delete, then press the centre on the control button. The number of the selected image is highlighted.
(6) Repeat step 5 to select other images.
(7) After selecting all the images you want to delete, select EXEC, then press the centre on the control button. "DELETE?" appears on the screen.
(8) Select OK, then press the centre on the control button. The selected images are deleted. The message "ERASING" appears. After the erasing is completed, the index screen appears.
(1)Установские посяклоуател POWER в положене MEMORY ул ВCR.
(2)BpeXmMe MEMORY nepeiDnte K nyHKTy 3. BpeXmE VCR BB6epuTe PB,3aTeMaHaxMITE Ha ceHTp Ha KHONKe ynpaBHeHnA.
(3)BbIbepeITeINDEX,3aTeMHaXMMTe HaZeHTp Ha KONKe ynpaBJIeHn. TOBNTcN HNeKCHbI 3kpaH.
(4) BbIbePte DEL, 3aTeM HaxMMTe Ha ueHTp ● Ha KhONKe ynpabJIeHn. IoRbITcra 3KpaH DEL.
(5)ПереметиTe MeTky KИЗбрахенIO, KOТОроe Tpe6yeTcY yДaNTb, 3aTeM haxмITE Ha ueHTp ● Ha KhoNKe ynpaBLeHЯ. Homeр ВblбpaHNoIо n3OБрахенЯ 6уДeТ BbldeJIeH.
(6)Повторе пункт 5дя Вьбopa дуг nx n306ржehи.
(7)Посл e Вьбора BCex ИЗобразжени, кOTopье Heo6xOДМоуДaЛNTь, ВьберпЕ EXEC, 3aTeM NaЖмITE Ha ZeHTP ● Ha KнОпКe уравlenи. ИндИкатOP "DELETE?" ПОВВITСЯ на Зкран.
(8)Bb6epnte OK,3aTeM haxmTe Ha ceHtp Ha KhoNKe ynpaBleHnHa BbpaHnBe n3o6paXeHn ydaJIHOtca. IOnBNTc coo6JeHne "ERASING".IocNe 3aBepHeHn ydaJIeHn IOBNTc HnDeKChbl 3kpaH.
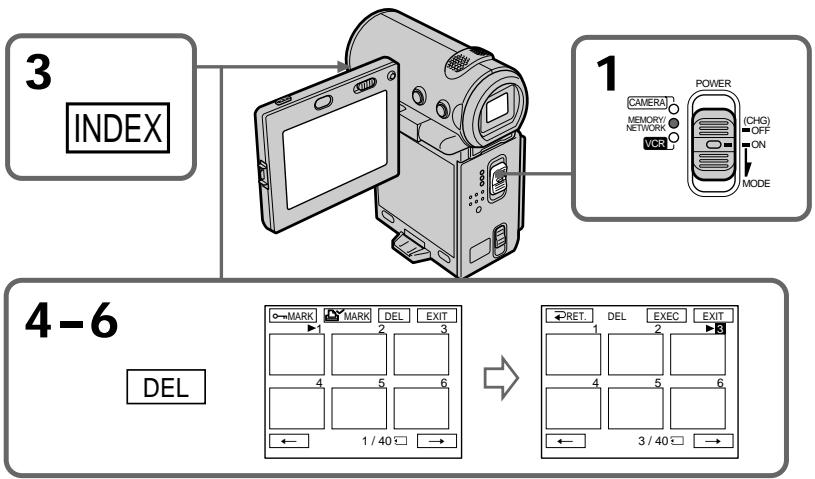
To return to the FN screen
Select EXIT, then press the centre on the control button after step 8.
To cancel deleting an image
Select CANCEL, then press the centre on the control button in step 8.
Deleting all the images
You can delete all the unprotected images in a "Memory Stick".
Before operation
Insert the "Memory Stick" into your camcorder.
(1) Set the POWER switch to MEMORY.
(2) Select FN, then press the centre on the control button. The PAGE1 screen appears.
(3) Select MENU, then press the centre on the control button. The menu appears.
(4) Select , then press the centre or on the control button.
(5) Select DELETE ALL, then press the centre or on the control button.
YdaJIeHHe BCEx n3O6paXKeHn
BbMOKTeYdAINITb BCE He3aUNeHHbIe n3o6paXeHnHa "Memory Stick".
Ipeed hauanom pa60tbi
BcTaBbTe "Memory Stick" B BnDeoKaMepy.
(1)Установпейразковая сь POWER B noJOKeHne MEMORY.
(2)BbI6epNTeFN,3aTeM haxmnte Ha ceHTp ●Ha KhoIKe ynpabHeHn. IorBntc 3KpaHPAGE1.
(3)BbIbepuTe MEnu, 3aTeM haxmTe Ha ceHtp HKHONKe ynpabJeHH. IOnBUTc MeHIO.
(4)BbI6epNTe 3aTeM HaxMMTe Ha UeHTp ● JINH Ka KhoNKe ynpabNeHn.
(5) BbIbepuTE DELETE ALL, 3aTeM haxMnte Ha ceHTp nnn Na KhoNKe ynpabNeHn.
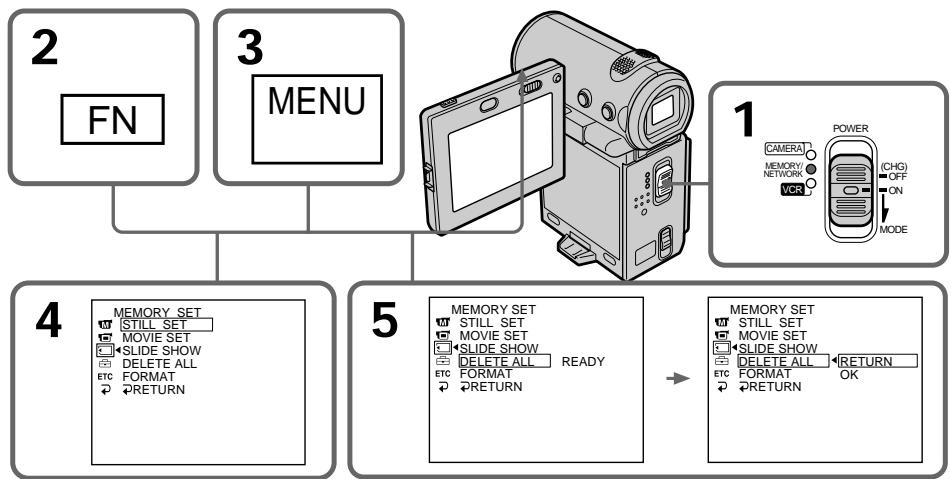
(6) Select OK, then press the centre on the control button. OK changes to EXECUTE.
(7) Select EXECUTE, then press the centre on the control button. "DELETING" appears on the screen. When all the unprotected images are deleted, "COMPLETE" is displayed.
(8) Press DISPLAY to turn off the menu.
(6)BbIbepnte OK,3aTeM haxmnte Ha zehTp ●Ha KhoJIke ynpaBHeHn. INdkaunr OKn3MeHNTcHa INdkaunIO EXECUTE.
(7)Bb6epnte EXECUTE,3aTeM haxmnte Ha ceHTp Na KhONke ynpabLeHn. INdkaTOp "DELETING" noBtcaHa ekpaHe.KoIda BCE He3aunueHbIe n3obpaxHen 6ydyT ydaJeHbI,Ha dncJIee noBtca INDkaCuaN "COMPLETE".
(8)HaXMMTe KhoNky DISPLAY ⅡIa OTKJIIOueHnMaMeHIO.
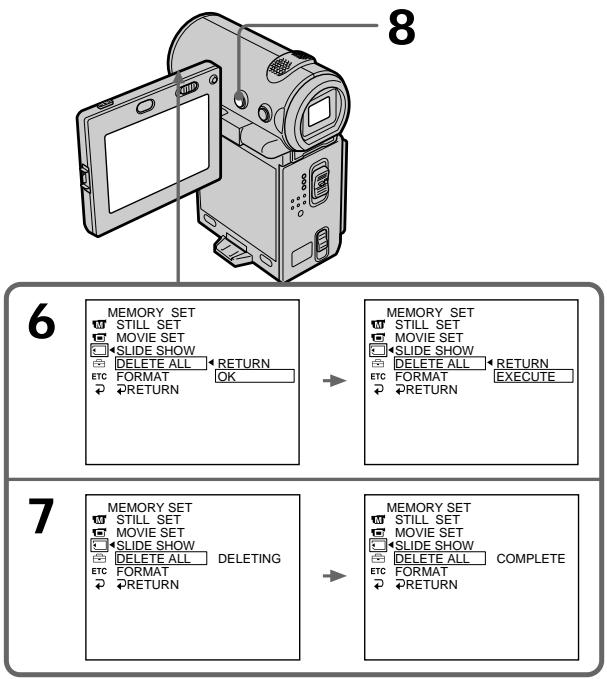
To return to the FN screen
Select RETURN, , then press the centre on the control button.
To cancel deleting all the images in the "Memory Stick"
Select RETURN in step 5 or 6, then press the centre on the control button.
While "DELETING" appears
Do not slide the POWER switch or press any buttons.
You can specify a recorded still image to print out by putting marks on it. This function is useful for printing out still images later.
Your camcorder conforms with the DPOF
(Digital Print Order Format) standard for specifying the still images to print out.
Before operation
Insert the "Memory Stick" into your camcorder.
(1) Set the POWER switch to MEMORY or VCR.
(2) In MEMORY mode, go to step 3.
In VCR mode, select PB, then press the centre on the control button.
(3) Select INDEX, then press the centre on the control button.
The index screen appears.
(4) Select MARK, then press the centre on the control button. The screen used for writing a print mark appears.
(5) Move the mark to the image for which you want to write a print mark, then press the centre on the control button.
The mark appears on the selected image.
(6) Repeat step 5 to write print marks on other images.
(7) After writing all the print marks needed, select EXIT, then press the centre on the control button. The FN screen appears.
-ToIbkoMoIeJIbDCR-IP7E
Bb moKeTe yka3aTb 3aIncHbIe n3o6paXeHn
Dnra pacNeYATKn, NOMETNB u3 3HaKaMn. 3Ta
fynKuYRA VBJeTcN oJne3HOn dJI rnoCneDuOSe
pacNeaTKn HeNoDBNXhBx I3o6paXeHn.
Baasa BnDeOkamepa yDoBLeTBopReT
Tpe6oBaHnA m cTaNdapTa DPOF (UnpoBoi
ΦopMaT npAJa Ka neaTn) dJI noDaun
HeNoDBNXhBx I3o6paXeHn Ha pacNeaTky.
Ipeed hauanom pa60tbI
BCTaBbTe "Memory Stick" B VnDeokamepy.
(1)Установпейсякючateь POWER в положене MEMORY ул ВCR.
(2)BpeKIme MEMORY nepenDnte K nyHKtY 3. BpeKIme VCR BB6epnTe PB, 3aTeMaHaxMITE Ha ueHTp Ha KHONKe ynpaBHeHna.
(3)BbI6epnteINDEX,3aTeM haxMMTe Ha ueHTp Ha KONKe ynpaBHeHn. TOBNTc HnDeKCHb 3kpaH.
(4)BbIepeNTe MARK,3aTeM haxMnte Ha ceHtp H a KhoNke ynpabJeHn. IOnBHTcra 3KpaH dJIr 3aInci NeaTHbIX 3HaKOB.
(5)ПеремecnteMeKу ИЗбраженью,ДЯ КOTOPOro Tpe6byTc3aIncatb NeaTHbI 3HaK,3aTeM HaxMITE Ha ZeHTp ●Ha KHOJIKe ynpabJIeHЯ.
Ha n3o6paXeHn IOBuNTcR 3HaK
(6)Повторипункт 5дязашипесатухзakobндаугхииборхeнx.
(7)После заисн BCEX Heo6xOДмьIX NeуathbIX 3HaKOB, BbIepeNTE EXIT, 3aTeM HaxMnTe Ha ZeHtp ● Ha KhONKe ynpabNeHЯ. ПогВNTcR 3kpah FN.
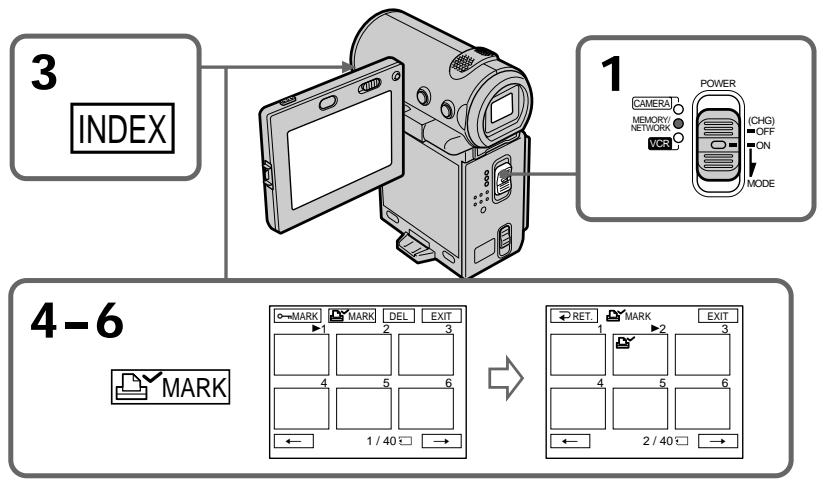
To cancel writing print marks
Select the image for which you want to cancel the print mark, then press the centre on the control button again in step 5. The mark disappears from the image.
If the write-protect switch on the "Memory Stick" is set to LOCK
You cannot write print marks on still images.
Moving pictures
You cannot write print marks on moving pictures.
Длг OTMeHbI 3aInc NeayathbIX 3HaKOB
BbI6epnte n3o6paXeHHe, IJIa KOTOPOro HxKHO OTMeHNt b NeaTHbI 3HaK, 3aTe m eIe pa3 HaxMITE Ha cHTp ● Ha KHONke ynpaBJIeHnBaNyHKTe 5. 3HaK Ncye3HET c n3o6paXeHHe.
Ecni nepeKJIIOUaTeIb 3aUHTbI OT 3aIncn Ha "Memory Stick" yCTaHOBNeH B NOLOXeHne LOCK
BbHe CMOKTe 3aIncatb neaThbte 3HaKn Ha HENoDnXhBIX N3O6paXeHnX.
DvNkUyIeecn 306paXeHn
BbI He CMOXeTe 3aIncatb neaThbte 3HaKn Ha DnKxUxxCra N3OpaXeHnX.
- Connecting with a computer - Viewing images recorded on a tape using your computer
You can view or edit the images recorded on a tape using your computer. You can record images edited with the computer on the tape. To view images on your computer, the application software MovieShaker Ver. 3.1 for MICROMV (supplied) is required.
-ПоркlioочикКOMпьOTepу -ПрсмOTрИЗбрахен,запсаHHbIXHa ЛeHTe,C ПOMоцью KOMпьOTepa
To view images on your computer, you have to install the i.LINK driver and the application software into your computer. They are included in the supplied application software MovieShaker Ver.3.1 for MICROMV. Before installing the i.LINK driver and the application software into your computer, be sure not to connect the camcorder to the computer. For details on installing and on an i.LINK connection, refer to the operating instructions supplied with MovieShaker Ver. 3.1 for MICROMV.
PpimeyaHne
ДлгпрсмOTаи3OBpaЖeннHa KOMNbHOTepe HeOxOdIMo yCTaHOBnT bДраьВер i.LINKи cneuaJIbHoe nporpamMHOe obecneueHne. Bce 3To BXODIT B COCTab npuIaraeMOrO nporpamMHoro obecneueHn MovieShaker Bercn 3.1 ДЯ MICROMV. Празжde Yem yCTaHABnBaT bДраьВер i.LINKи nporpamMHOe obecneueHne Ha KOMNbOTepe, NODKlNoHTe K KOMNbOTepy BInDeOKaMepy. Bolee noДрбHyо Информuaцио ob yctaHOBke и coedinHemn i.LINK cm.ВИнСТукцяnx lo ЗКСПУATAZHI, npurlaeraMbIX K nporpaMMOHy obecneueHn MovieShaker Bercn 3.1 ДЯ MICROMV.
Viewing images recorded on a tape using your computer
Recommended computer environment
Recommended Windows environment
| OS: | Microsoft Windows MillenniumEdition, Windows 2000 Professional, Windows XP Home/Professional (support to be provided). Standard installation is required. Operation is not assured if the above environment is an upgraded OS. |
| CPU: | MMX Pentium III 600 MHz or faster (Required) |
| MMX Pentium III 800 MHz or faster (Recommended) |
| Main memory: | 128 MB or larger (Required) |
| 256 MB or larger | |
| (Recommended) |
| Display: | 800 × 600 or larger screen size/1024 × 480 or larger screen size,16-bit colour or higher |
| Hard disk: | 100 MB hard disk space (for installation), ATA66 or higher speed (required for capturing an image) |
The i.LINK (IEEE1394) connector must be provided as standard.
Note
Operations are not guaranteed for all the recommended computer environments mentioned above.
Viewing images recorded on a "Memory Stick" using your computer
You can view data recorded on a "Memory Stick" using your computer.
Note
Data recorded on a "Memory Stick" is stored in the following formats. Make sure that applications that support these file formats are installed on your computer.
- Still images: JPEG format
-Moving images/audio: MPEG format
Recommended computer environment
Recommended Windows environment
OS: Microsoft Windows 98, Windows 98SE, Windows Me or Windows 2000 Professional standard installation is required.
Operation is not assured if the above environment is an upgraded OS.
CPU:MMX Pentium 200 MHz or faster
- A USB connector must be provided as standard.
- An application such as Windows Media Player, capable of playing back MPEG pictures, must be installed (to play back moving pictures).
Recommended Macintosh environment
Macintosh computer with the Mac OS 8.5.1/8.6/9.0/9.1, Mac OS X standard installation However, note that the update to Mac OS 9.0/9.1 should be used for the following models.
- iMac with the Mac OS 8.6 standard installation and a slot loading type CD-ROM drive
-
iBook or Power Mac G4 with the Mac OS 8.6 standard installation
-
A USB connector must be provided as standard.
- QuickTime 3.0 or later must be installed (to play back moving pictures).
-ToIbkoMoIeJIb DCR-IP7E
Mожно посматрваьтba 3aиcaHHье Ha "Memory Stick" daHHьe, Испьзу KOMьЮТep.
Птумецни
Viewing images recorded on a "Memory Stick" using your computer
Notes
- Operations are not guaranteed for either the Windows or Macintosh environment if you connect two or more USB devices to a single computer at the same time or when using a hub.
- Depending on the type of USB equipment that is used simultaneously, some equipment may not operate.
- Operations are not guaranteed for all the recommended computer environments mentioned above.
Installing the USB driver
Before connecting your camcorder to your computer, install the USB driver to the computer. The USB driver is contained together with the application software used for viewing images on a CD-ROM supplied with your camcorder. Do not connect the USB cable to your computer before installation of the USB driver is completed.
(1) Turn on the power of your computer and allow Windows to load.
(2) Insert the supplied CD-ROM in the CD-ROM drive of your computer. The application software screen appears.
(3) Set the cursor on "USB Driver Installation for Windows 98/98SE/Me and Windows 2000" and click. USB driver installation starts.
(4) Follow the on-screen messages to install the USB driver.
(5) Connect the USB jack on your camcorder to the USB connector on your computer using the supplied USB cable.
(6) Insert a "Memory Stick" into your camcorder, connect the AC power adaptor and set the POWER switch to MEMORY. USB MODE appears on the screen of your camcorder. Your computer recognizes the camcorder, and the Windows Add Hardware Wizard starts.
(7) Follow the on-screen messages to have the Add Hard Ware Wizard recognize the hardware. The Add Hardware Wizard starts twice because 2 different USB drivers are installed. Be sure to allow the installation to complete without interrupting it.
Для польозователей Windows 98, Windows 98SE, Windows Me, Windows 2000 Professional
(1)Вклioчnte komьIoTeРиdoxДnteCb 3arpy3kn Windows.
(2)Установские пилагаимь CD-ROM в дисков CD-ROM komlbiptepa. Порвтуг Краан пикладно рограмного обесенья.
(3) YcTaHOBnTe KypCop Ha nyHKte "USB Driver Installation for Windows 98/98SE/Me and Windows 2000 " n HaxMnTe JeByu KhoNkMybIa. HaHcTcA yCTaHOBka dpaIbepa USB.
(4)CneyuTe yka3aHnM 3kpaHHbIX COo6eHn Iy yCTaHOBKn dpaBepa USB.
(5) CoeHInHTe rHe3Do USB Ha BnDeOkampe c pa3bEmOM USB nepcoHaJIbHorO KOMIbIOTepa c nOmoBIO npnilaraemoro Ka6eIA USB.
(6)Установп("Memory Stick" в Видахомеру, посоедине сетевоадалтep птуни поемен Horo Toka и установп поеклочаел POWER в положени MEMORY.
Ha 3KpaHe BnDeOkamepbI NOBHTcN HnDnKaUra USB MODE. KOMnbIOTepeacno3HaET BnDeOkamepy, n 3aNyCTNTcnporpamMa Windows Add Hardware Wizard.
(7) CneyuTe yka3aHnHm 3KpaHbIX COo6eHn, YTO6bl nporpamma Add Hard Ware Wizard pacno3hana annapaTpy. Pporpamma Add Hardware Wizard 3anyckaetc DaBXdbI, NocKoJIbky yCTaHaBnBaIOTCs 2 pa3LIuHbIX dpaIBepa USB. DoxJntecb 3abepseHn yCTaHOBKn, He npepbIbae ee.

Computer/KompbioTeP
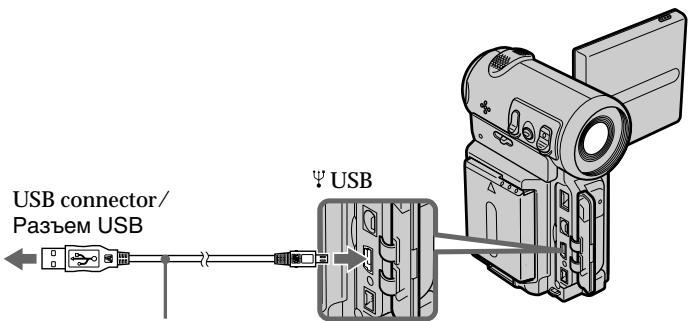
USB cable/ Kaebb USB
Push into the end/ HaxmTe do ynopa
Viewing images recorded on a "Memory Stick" using your computer
Notes
- You cannot install the USB driver if a "Memory Stick" is not in your camcorder. Be sure to insert a "Memory Stick" into your camcorder before installing the USB driver.
- The USB driver has been registered incorrectly as your computer was connected to your camcorder before installation of the USB driver was completed. Re-install the USB driver following the procedure on page 204.
Image data cannot be transferred over the USB connection
The USB driver has been registered incorrectly as your computer was connected to your camcorder before installation of the USB driver was completed. Perform the following procedure to correctly install the USB driver.
Step 1 Uninstall the incorrect USB driver
① Turn on the power and allow Windows to load.
② Connect the USB jack on your computer to the USB jack on your camcorder using the USB cable supplied with your camcorder.
③ Insert a "Memory Stick" into your camcorder, connect the AC power adapter, and set the POWER switch to MEMORY.
④ Open your computer's "Device Manager". Windows 2000 Professional: Open "My Computer" "Control Panel" "Hardware" tab, and click the "Device Manager" button. Other OS: Select "My Computer" "Control Panel" "System", and click "Device Manager".
⑤ Select "Other devices". Select the device prefixed with a "?" mark and delete it. Ex: (?)Sony Handycam
⑥ Turn the power OFF (CHG), and then disconnect the USB cable.
⑦ Reboot your computer.
ПресмOTР n3o6paЖeни, Запсаньх Ha "Memory Stick", cnomоцью KOMьЮтepa
Приимechanicals
- EcInB BvIeOkaMepy He BcTaBNeHa "Memory Stick", yCtahOBka IpaIbepa USB 6yJeT HeBO3MOxHa.
IpeEi yCtahOBko IpaIbepa USB
063aTeIbHO BcTaBbTe "Memory Stick" B
BvIeOkaMepy.
ДраиВер USB заретсгпрован HeВерно, покoly КOMьногер был подкючен К Видахамеpe до заBERшени установки драиВера USB. ПerteустановITE драиВер USB, следу пpoцдуpe на стр. 204.
HeBo3MOxHNo IpePaTb DaHHbIe m3o6paXeHnno CoeINHeHnIO USB
Step 2 Install the USB driver on the CD-ROM
Perform the entire procedure listed in "Installing the USB driver" on page 202.
For Mac OS 8.5.1/8.6/9.0 users
(1) Turn on the power of your computer and allow the Mac OS to load.
(2) Insert the supplied CD-ROM in the CD-ROM drive of your computer.
(3) Double-click the CD-ROM drive icon to open the window.
(4) Double-click the icon of the hard disk containing the OS to open the window.
(5) Move the following 2 files from the window opened in step 3 to the System Folder icon in the window opened in step 4 (drag and drop).
- Sony Camcorder USB Driver
- Sony Camcorder USB Shim
(6) When "Put these items into the Extensions folder?" appears, click OK.
(7) Restart your computer.
For Mac OS 9.1, Mac OS X
The USB driver need not be installed. Your Mac is automatically recognized as a driver just by connecting your Mac using the USB cable.
- Sony Camcorder USB Driver
- Sony Camcorder USB Shim
(6)Korda noarntcBopoc "Put these items into the Extensions folder?", haxmnte KhoNky OK.
(7)Пелеша рушпт ekOMпьтер.
ДиMa Mac OS 9.1, Mac OS X
YcTaHOBkaIpaIbepaUSBHeTpe6yeTe.
KoMnBHOteMac aBTOMaTHueCKn paCNO3HaETcKaK dpaBep cpa3y nocLe nOdkIIOUeHnKoMnBHOtePa Mac c nOmouho Ka6eJRA USB.
Viewing images
For Windows users
(1) Turn on the power of your computer and allow Windows to load.
(2) Connect one end of the USB cable to the USB jack on the camcorder and the other end to the USB connector on your computer.
(3) Insert a "Memory Stick" into your camcorder, and connect the AC power adaptor to your camcorder and then to the mains.
(4) Set the POWER switch to MEMORY. USB MODE appears on the screen of the camcorder.
(5) Open "My Computer" on Windows and double click the newly recognized drive. (Example: "Removable Disk (E:)") The folders inside the "Memory Stick" are displayed.
(6) Select and double-click the desired image file from the folder.
For the detailed folder and file name, see "Image file storage destinations and image files" (p. 208).
As for stored files using the network function, refer to the network function operating instructions.
Ppocmptn3o6paXeHn
Viewing images recorded on a "Memory Stick" using your computer
- Copying a file to the hard disk of your computer before viewing it is recommended. If you play back a file directly from the "Memory Stick", the image and sound may break up.
Unplug the USB cable/Eject the "Memory Stick"
For Windows 2000 Professional, Windows Me users
To unplug the USB cable or eject the "Memory Stick", follow the procedure below.
(1) Move the cursor to the "Unplug or Eject Hardware" icon on the Task Tray and click to cancel the applicable drive.
(2) A message asking you to remove the device from the system appears, then unplug the USB cable or eject the "Memory Stick".
For Macintosh users
(1) Quit any application programmes opened. Make sure that the access lamp of the hard disk is not lit.
(2) Drag and drop the "Memory Stick" icon to theTrash or select Eject under the Special menu.
(3) Eject the "Memory Stick".
Notes on using your computer
"Memory Stick"
- "Memory Stick" operations on your camcorder cannot be assured if a "Memory Stick" formatted on your computer is used on your camcorder, or if the "Memory Stick" in your camcorder was formatted using your computer when the USB cable was connected.
- Do not optimize the "Memory Stick" on a Windows machine. This will shorten the "Memory Stick" life.
- Do not compress the data on the "Memory Stick". Compressed files cannot be played back on your camcorder.
Viewing images recorded on a "Memory Stick" using your computer
Software
- Depending on your application software, the file size may increase when you open a still image file.
- When you load an image modified using a retouch software from your computer to the camcorder or when you directly modify the image on the camcorder, the image format will differ so a file error indicator may appear and you may be unable to open the file.
Communicating with your computer
Communications between your camcorder and your computer may not recover after recovering from Suspend, Resume, or Sleep.
Image file storage destinations and image files
Image files recorded with your camcorder are grouped in folders by recording mode.
The meanings of the file names are as follows. stands for any number within the range from 0001 to 9999.
For Windows Me users (The drive recognizing the camera is [E:])
CBy3b MExJy BnIeOKaMepoN KOMNbIOTepoM MOKeT He BOCCTaHOBNTcR NocJIe BbIXOda KOMNbIOTepa n3 pexmOB Suspend,Resume nIi Sleep.
MecTa xpaHeHnaJIOB n3o6paxKeHn nΦaJIbI n3o6paxKeHn
Folder containing still images and moving picture data /Палка, coapedkaшая данньile HeNoDvBxHbIX u DBVxUxNxCra 306paXkeHn
Accessing the network
- DCR-IP7E only
You can access the Internet using a Bluetooth device that complies to the standards of the camcorder. Once the access is made, you can view a Web page and send/receive your e-mail, etc. This section describes only how to open the Network Menu. For details on network operations, refer to the network function operating instructions supplied with the camcorder.
(1) Set the POWER switch to MEMORY/ NETWORK.
(2) Select NETWORK, then press the centre on the control button. The Network Menu appears and the (Bluetooth) lamp turns on.
Достун К сети
-ToIbkoMoIeJIbDCR-IP7E
Moxho nonyuHTb DocTyk CeTn Internet c
nomouh yctpoictBa Bluetooth, koTopoe
coBmeCTmO CO tHaDapTaMn BVNeOkAmepbI.
POnyHB DoCTyn, MoxHO npocMaTpBaTb Web-
ctpaHnCbI NOTnpaBnTb/NoLyuTaB
3JeKToPOHHBe Coo6UeHn I T.D.B 3tOM
pa3dene ONcMbAeTCr ToJbKO, KaK OTKpbITb
Network Menu. Boone NoDPo6HyIO INΦopMaHIO
o pa6Ote B CetN CM. B INHCTpyKUnx IO
ncNoIb3OBaHNIO cyHKUnn Network,
pnplaeraMbx K BVneOkAmepe.
(1)Установские песеклочаши POWER в пооженке MEMORY/NETWORK.
(2)Bb6epnte NETWORK, 3aTeM haxmTe Ha ceHTp Hn KaHONKe ynpabJeHn. IOnBNTcN Network Menu, n 3arOpntc nHdNkaTOp (Bluetooth).
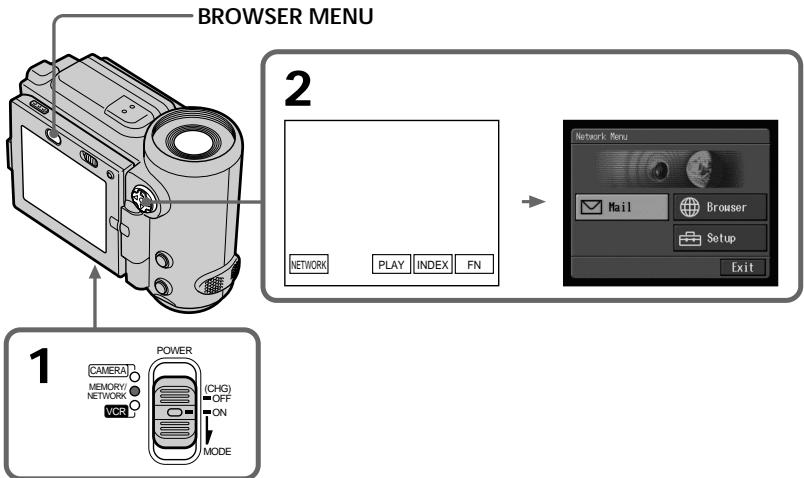
When you send e-mail using the network function, you can attach an image recorded on a "Memory Stick" to your e-mail. Attachable file size is up to 3 MB per one e-mail message. When attaching a moving image file, the available time for the attached image depends on the image quality mode. For details, see the table below.
DoctynKcetn
При OTправKE COOшени 3ЛЕКТРОн HoNTы Cnomoью Функции Network B Hero можно BLOXHTb n3OBpaЖене,ЗаиcaHhoe Ha "Memory Stick".В кадоe COOшени 3ЛЕКТРОнHO IOчТБ MOKHO BLOXHTb Фал pa3меромdo 3 MB.При BLOжени Фалд ВИNWUZEROGA N3OBpaЖени Вретя BOCnpoN3BVEнЯ BLOXFEHHORO N3OBpaЖenHi 3aВИСМТ OER peshima KaueCTBa.Порpo6ьie CBeDEнЯ COpeJxatcB INPbEDEHHOH HIXe Ta6nIe.
| Image quality mode/ Рек imm KMecetba Изобрахени | SUPER FINE | FINE | STANDARD | LIGHTMODE |
| Available time/one e-mail/ Вре'mя Воспочииздени в одом соobшени | 17 s/ 17 c | 29 s/ 29 c | 58 s/ 58 c | 119 s/ 119 c |
Note on trademarks
- The BLUETOOTH trademarks are owned by their proprietor and used by Sony Corporation under license.
- All other product names mentioned herein may be the trademarks or registered trademarks of their respective companies. Furthermore, "TM" and "®" are not mentioned in each case in this manual.
When using the network function Hold the camcorder with both hands as illustrated below.
3ameaHne OTHOCTeJIbHO TOPROBbx MapOK
- Toprobles Mapkn BLUETOOTH npinaJdxkaT COOTBeTCTBlyOuIM BlaJeIbIaM IN cNoJIb3yIOTC KOpnpauee Sony no JInIeH3IN.
- Bce Ha3BaHnIy n3dJIeN, yNOMaHyTbIe B DaHHOM pyKOBOIDCTBe, MOrYT 6bITb TOPROBbIMI MapKaMn INI 3apeINcTpIPoBAHHbIMI TopROBbIMI MapKaMn COOTBeTCTBYIOUHX KOMNaHm. DAnee CImBOJbl "TM" N "B" B KaKdOM cIyuae He yNOMHaIOTcB DaHHOM pyKOBOIDCTBe.
PnncnoB3OBAHnn yHKnn Network
Be careful not to touch the BATT lever while you are operating the camcorder. The battery pack may be accidentally detached from the camcorder.
Ppmeuahne
He doTpaBnBaTecb Do pbluXkKa▼ BATT Bo Bpemr paobToIc BNdeOKaMepo. BaTapeHbI 6Jok MOKeT cNpyaHOb OTCoeDInHITbcra OT BNDeOKaMepbl.
Types of trouble and their solutions
If you run into any problem using your camcorder, use the following table to troubleshoot the problem. If the problem persists, disconnect the power source and contact your Sony dealer. If "C:□□:□□" appears on the screen, the self-diagnosis display function has worked. See page 217.
In recording mode
| Symptom | Cause and/or Corrective Actions |
| START/STOP does not operate. | ·The POWER switch is not set to CAMERA. →Set it to CAMERA (p. 38). ·The tape has run out. →Rewind the tape or insert a new one (p. 36, 56). ·The write-protect tab is set to expose the red mark. →Use a new tape or slide the tab (p. 36). ·The tape is stuck to the drum (moisture condensation). →Remove the cassette and leave your camcorder for at least 1 hour to acclimate it (p. 236). |
| The power goes off. | ·While being operated in CAMERA mode, your camcorder has been in standby mode for more than 5 minutes. →Set the POWER switch to OFF (CHG) and turn on the power (p. 39). ·The battery pack is dead or nearly dead. →Install a fully charged battery pack. |
| The image on the viewfinder screen is not clear. | ·The viewfinder is not extended to the end. →Pull out the viewfinder. ·The viewfinder lens is not adjusted. →Adjust the viewfinder lens (p. 43). |
| The SteadyShot function does not work. | ·STEADYSHOT is set to OFF in the menu settings. →Set it to ON (p. 124). |
| The autofocusing function does not work. | ·The setting is the manual focus mode. →Set it to the auto focus mode (p. 82). ·Shooting conditions are not suitable for autofocus. →Adjust to focus manually (p. 82). |
| The picture does not appear in the viewfinder. | ·The LCD panel is open. →Close the LCD panel (p. 40). |
| A vertical band appears when you shoot a subject such as lights or a candle flame against a dark background. | ·The contrast between the subject and the background is too high. This is not a malfunction. |
| A vertical band appears when you shoot a very bright subject. | ·This is called the smear phenomenon. This is not a malfunction. |
| Some tiny white spots appear on the screen. | ·Slow shutter or low lux mode is activated. This is not a malfunction. |
Types of trouble and their solutions
| Symptom | Cause and/or Corrective Actions |
| An unknown picture is displayed on the screen. | If 10 minutes elapse after you set the POWER switch to CAMERA or DEMO MODE is set to ON in the menu settings without a cassette inserted, your camcorder automatically starts the demonstration. → Insert a cassette. The demonstration stops. You can also cancel DEMO MODE (p. 129). |
| The picture appears too bright, and the subject does not appear on the screen. | The backlight function is active. → Set it to off (p. 41). |
| The click of the shutter does not sound. | BEEP is set to OFF in the menu settings. → Set it to MELODY or NORMAL (p. 124). |
| A horizontal band appears when shooting a TV screen or computer screen. | Set STEADYSHOT to OFF in the menu settings (p. 124). |
In the playback mode
| Symptom | Cause and/or Corrective Actions |
| Playback is not possible. | ·The tape has run out. →Rewind the tape. (p. 56) |
| There are horizontal lines on the picture or the playback picture is not clear or does not appear. | ·The video head may be dirty. →Clean the heads using the cleaning cassette (p. 237). |
| No sound or only a low sound is heard when playing back a tape. | ·The volume is turned to minimum. →Turn up the volume (p. 52). |
| The multi-picture search, title search, date search, or photo search function does not work. | ·The tape has a blank portion at the beginning of the tape or between recorded portions (p. 88, 93, 95, 97). |
| The title is not displayed. | ·TITLE DSPL is set to OFF in the menu settings. →Set it to ON in the menu settings (p. 124). ·The screen indicators are displayed. →Turn off the screen indicators (p. 54). |
| Dubbing cannot be made when using the A/V connecting cable. | ·The setup ofVIDEOINPUT is wrong. →Set it to the appropriate position (p. 103). |
| The playback picture freezes for about 1 second. | ·When playing back a transition of recordings, the playback picture freezes for about 1 second. This is not a malfunction. |
In the recording and playback modes
| Symptom | Cause and/or Corrective Actions |
| The camcorder does not function even if you slide the POWER switch. | · The battery pack is not installed, or is dead or nearly dead. → Install a charged battery pack (p. 25, 26). · The AC power adaptor is not connected to the mains. → Connect the AC power adaptor to the mains (p. 30). |
| The battery pack is quickly discharged. | · The temperature of the environment is too low. · The battery pack is not fully charged. → Charge the battery pack fully again (p. 26). · The battery pack is completely dead, and cannot be recharged. → Replace it with a new battery pack (p. 25). |
| The battery remaining indicator does not indicate the correct time. | · You have used the battery pack in an extremely hot or cold environment for a long time. · The battery pack is completely dead, and cannot be recharged. → Replace it with a new battery pack (p. 25). · The battery is not fully charged. → Use a charged battery pack (p. 26). · A deviation has occurred in the remaining battery time. → Charge the battery pack fully again (p. 26). |
| The power goes off although the battery remaining indicator indicates that the battery pack has enough power to operate. | · A deviation has occurred in the remaining battery time. → Charge the battery pack fully again so that the indication on the battery remaining indicator is correct (p. 26). |
| The cassette cannot be removed from the holder. | · The power source is disconnected. → Connect it firmly (p. 25, 30). · The battery is not fully charged. → Use a charged battery pack (p. 26). |
| The ▲ and ▲ indicators flash and no functions except for cassette ejection work. | · Moisture condensation has occurred. → Remove the cassette and leave your camcorder for at least 1 hour to acclimate it (p. 236). |
| The ▼ indicator is flashing. | · The camcorder cannot recognize the Micro Cassette Memory of the tape. → Insert the cassette again (p. 36). |
| The remaining tape indicator is not displayed. | · □ REMAIN is set to AUTO in the menu settings. → Set it to ON to always display the remaining tape indicator (p. 124). |
When operating using a "Memory Stick"
- DCR-IP7E only
| Symptom | Cause and/or Corrective Actions |
| The “Memory Stick” does not function. | · The POWER switch is not set to MEMORY. → Set it to MEMORY (p. 149). · The “Memory Stick” is not inserted. → Insert a “Memory Stick” (p. 139). |
| Recording does not function. | · The “Memory Stick” has already been recorded to its full capacity. → Delete unnecessary images and record again (p. 192). · An incorrectly formatted “Memory Stick” is inserted. → Format the “Memory Stick” using your camcorder or use another “Memory Stick” (p. 128). · The write-protect switch on the “Memory Stick” is set to LOCK. → Release the lock (p. 137). |
| The image cannot be deleted. | · The image is protected. → Cancel image protection (p. 190). · The write-protect switch on the “Memory Stick” is set to LOCK. → Release the lock (p. 137). |
| You cannot format the “Memory Stick”. | · The write-protect switch on the “Memory Stick” is set to LOCK. → Release the lock (p. 137). |
| Deleting all the images cannot be carried out. | · The write-protect switch on the “Memory Stick” is set to LOCK. → Release the lock (p. 137). |
| You cannot protect an image. | · The write-protect switch on the “Memory Stick” is set to LOCK. → Release the lock (p. 137). · The INDEX screen is not displayed. → The protect marks cannot be written when the single screen is displayed (p. 190). |
| You cannot write a print mark on a still image. | · The write-protect switch on the “Memory Stick” is set to LOCK. → Release the lock (p. 137). · The INDEX screen is not displayed. → The print marks cannot be written when the single screen is displayed (p. 190). · You are trying to write a print mark on a moving picture. → Print marks cannot be written to a moving picture. |
When operating using a "Memory Stick"
- DCR-IP7E only
| Symptom | Cause and/or Corrective Actions |
| The photo save function does not work. | ·The write-protect switch on the “Memory Stick” is set to LOCK. → Release the lock (p. 137). |
| You cannot play back images in actual size. | ·You may not be able to play back images in actual size when you try to play back images recorded by other equipment. This is not a malfunction. |
| No audio during playback. | ·No audio was recorded on the file. |
Others
| Symptom | Cause and/or Corrective Actions |
| The title is not recorded. | ·The 20 number of titles are already recorded. →Erase unnecessary titles (p. 111). ·The tape is set to prevent accidental erasure. →Slide the write-protect tab so that the red portion is not visible (p. 37). |
| The Remote Commander supplied with your camcorder does not work. | ·COMMANDER is set to OFF in the menu settings. →Set it to ON (p. 124). ·Something is blocking the infrared rays of the Remote Commander. →Remove the obstacle. ·The batteries are inserted in the battery holder with the + - polarities incorrectly matching the + - marks. →Insert the batteries with the correct polarity (p. 254). ·The batteries are dead. →Insert new ones (p. 254). |
| The picture from the TV or VCR does not appear even when your camcorder is connected to outputs on the TV or VCR. | ·DISPLAY is set to V-OUT/LCD in the menu settings. →Set it to LCD (p. 124). ·The VIDEOINPUT setting in the menu settings is wrong. →Set it to the appropriate position. |
Others
| Symptom | Cause and/or Corrective Actions |
| No function works though the power is on. | · Disconnect the AC power adaptor from the mains or remove the battery, then reconnect it in about 1 minute. Turn the power on. If the functions still do not work, press the reset button using a sharp-pointed object. (If you press the reset button, all the settings (DCR-IP7E: except the NETWORK mode settings) including the date and time return to the default) (p. 252). |
| While charging the battery pack, the CHG lamp does not light up. | · Charging is completed. · The battery pack is not properly installed. → Install it properly (p. 25). |
| You cannot charge the battery pack. | · The POWER switch is not set to OFF (CHG). → Set it to OFF (CHG). |
| While charging the battery pack, the CHG lamp flashes. | · The battery pack is not properly installed. → Install it properly (p. 25). · Something is wrong with the battery pack. → Please contact your Sony dealer or local authorized Sony service facility. |
| The melody or beep sounds for 5 seconds. | · Moisture condensation has occurred. → Remove the cassette and leave your camcorder for at least 1 hour to acclimate it (p. 236). · Some troubles have occurred in your camcorder. → Remove the cassette and insert it again, then operate your camcorder. |
| The buttons do not appear on the screen. | · DISPLAY was pressed. → Press the centre ● on the control button. → Press DISPLAY on your camcorder or on the Remote Commander (p. 54). |
| The indicators appear mirror-reversed in the viewfinder or on the TV screen. | · The mirror mode is activated. This is not a malfunction. |
| Image data cannot be transferred by the USB connection (DCR-IP7E only). | · The USB cable was connected before installation of the USB driver was completed. → Uninstall the incorrect USB driver and re-install the USB driver (p. 204). |
| Your camcorder gets warm. | · This is not a malfunction. |
| No image is displayed on the screen when connecting with other equipment using the i.LINK cable. | · The camcorder cannot be connected to a DV product. |
Self-diagnosis display
Your camcorder has a self-diagnosis display function.
This function displays the current condition of your camcorder as a 5-digit code (a combination of a letter and figures) on the screen. If a 5-digit code is displayed, check the following code chart. The last 2 digits (indicated by ) will differ depending on the state of your camcorder.
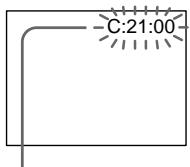
LCD screen or Viewfinder
Self-diagnosis display
C:□□:□□
You can service your camcorder yourself.
· E :□□:□□
Contact your Sony dealer or local authorized Sony facility.
| Five-digit display | Cause and/or Corrective Actions |
| C:04:☐☐ | ·You are using a battery pack that is not an “InfoLITHIUM” battery pack. →Use an “InfoLITHIUM” battery pack. |
| C:21:☐☐ | ·Moisture condensation has occurred. →Remove the cassette and leave your camcorder for at least 1 hour to acclimate it (p. 236). |
| C:22:☐☐ | ·The video heads are dirty. →Clean the heads using the cleaning cassette (p. 237). |
| C:31:☐☐ | ·A malfunction other than the above that you can service has occurred. |
| C:32:☐☐ | ·Remove the cassette and insert it again, then operate your camcorder. →Disconnect the mains lead of the AC adaptor or remove the battery pack. After reconnecting the power source, operate your camcorder. |
| E:61:☐☐ | ·A malfunction that you cannot service has occurred. →If the same code appears again after you remove and attach the power source, contact your Sony dealer or local authorized Sony service facility and inform them of the 5-digit code. (example: E:61:10) |
If you are unable to rectify the problem even if you try corrective actions a few times, contact your Sony dealer or local authorized Sony service facility.
Warning indicators and messages
If indicators and messages appear on the screen, check the following: See the page in parentheses "() for more information.
Warning indicators
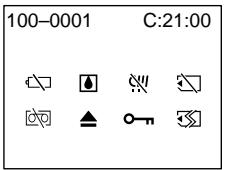
100-0001 Warning indicator as to file (DCR-IP7E only)
Slow flashing:
The file is corrupted.
The file is unreadable.
- You are trying to carry out the MEMORY MIX function on a moving picture.
C:21:00 Self-diagnosis display (p. 217).
The battery is dead or nearly dead Slow flashing:
- The battery is nearly dead. Depending on the operating conditions, environment and battery condition, the indicator may flash, even if there are approximately 5 to 10 minutes remaining.
Fast flashing:
The battery is dead (p. 25).
Moisture condensation has occurred* Fast flashing:
- Eject the cassette, turn off your camcorder, and leave it for about 1 hour with the cassette compartment open (p. 236).
Warning indicator as to "Memory Stick" (DCR-IP7E only)*
Slow flashing:
- No "Memory Stick" is inserted.
Fast flashing: - The "Memory Stick" inserted is not readable with your camcorder (p. 136).
- The image cannot be recorded on "Memory Stick" (p. 159, 165).
Warning indicator as to "Memory Stick" formatting (DCR-IP7E only)*
Fast flashing:
- The "Memory Stick" data is corrupted.
- The "Memory Stick" is not formatted correctly (p. 128).
Warning indicator as to tape
Slow flashing:
- The tape is near the end.
- No tape is inserted.*
- The write-protect tab on the cassette is out (red) (p. 37).*
Fast flashing:
The tape has run out.*
You need to eject the cassette*
Slow flashing:
The write-protect tab on the cassette is out (red) (p. 37).
Fast flashing:
- Moisture condensation has occurred (p. 236).
- The tape has run out.
The self-diagnosis display function is activated (p. 217).
The image is protected (DCR-IP7E only)*
Slow flashing:
The image is protected (p. 190).
Warning indicator as to Micro Cassette Memory*
Slow flashing:
- Eject the cassette, and insert it again. If even then the indicator flashes, the Micro Cassette Memory of the cassette may be faulty.
Fast flashing:
-
The Micro Cassette Memory of the camcorder may be faulty.
-
You hear the melody or beep sound.
Warning messages
CLOCK SET
Set the date and time (p. 32).
FOR "InfoLITHIUM BATTERY ONLY
Use an "InfoLITHIUM" battery pack (p. 26).
- CLEANING CASSETTE
The video heads are dirty (p. 237).
- COPY INHIBIT
You tried to record a picture that has a copyright control signal (p. 229).1
FULL
The Micro Cassette Memory is full (p. 111).2)
FULL
The "Memory Stick" is full (p. 153).
NOFILE
No image is recorded on the "Memory Stick" (p. 175).2)
NO MEMORY STICK
No "Memory Stick" is inserted.2)3
- MEMORY STICK ERROR
The "Memory Stick" data is corrupted (p. 140).
FFORMATERROR
The "Memory Stick" is not recognized (p. 128).2) Check the format.
- DIRECTIONAL ERROR
There are more than two same directories with the same name (p. 175).2)
TAPE END
The tape has reached the end of the tape.2)
- NO TAPE
Insert a cassette tape.2)
- DELETING
You pressed the PHOTO button on your camcorder while deleting data in a "Memory Stick".2)
- FORMATTING
You pressed the PHOTO button on your camcorder while formatting a "Memory Stick".2)
- △ CLEANING END
The cleaning is complete. Eject the cleaning cassette (p. 238).
TITLEFULL
20 titles have been recorded (p. 111).
- INPUT ERROR
A picture in an incompatible format (such as one recorded with the DV format) is input (p. 107).
- NO INPUT
You tried to start recording when no signal is input into the camcorder (p. 107).
- NOTREC
You tried to mix a moving file image (p. 169).3)
- CHANGE TO "CAM" or "VCR"
A cleaning cassette cannot be used in MEMORY mode (p. 238).3)
1) The indicator and the "CLEANING CASSETTE" message appear one after another on the screen.
2) You hear the melody or beep sound.
3) DCR-IP7E only
- Additional Information — Compatible cassettes
Selecting cassette types
You can use MICROMV cassette only. You cannot use any other 8 mm, Hi3 Hi8, Digital8, VHS VHS, VHS CVHSC, SVHS S-VHS, SWISC S-VHSC, Betamax, ED Beta ED Betamax, DV, or mini DV cassettes.
All of the MICROMV cassettes have Micro Cassette Memory.
MICROMV are trademarks of Sony Corporation.
Copyright signal
When you play back
Using any other video camera recorder, you cannot record on a tape that has recorded copyright control signals for copyright protection of software which is played back on your camcorder.
When you record
You cannot record software on your camcorder that contains copyright control signals for copyright protection of software. COPY INHIBIT appears on the LCD screen, in the viewfinder or on the TV screen if you try to record such software. Your camcorder does not record copyright control signals on the tape when it records.
When you play back
You can also play back tapes recorded in the NTSC video system on the LCD screen.
-DoonHnTeIbHaI HhOpMaunr
COBMECTMble KacceTbi
Bb6op Tnna Kaccet
Moxho nCnoJb3ObaTb TOnbKO KacCeTb
MICROMV. HeJb3ra nCnoJb3ObaTb
KaKne-Jin6 OpyRnE KAcCeTb TIna 8 MM, Hi8 Hi8, Digital8, VHS VHS, VHSC VHSC, SVHS S-VHS, SVHSC S-VHSC, Betamax, EoBeta ED Betamax, DV nIN MmHnKacCeTb DV Mini
Bce kaccetbl MICROMV cha6xehbl Micro Cassette Memory.
MICROMV ABJIAOTCA TOPROBbIMM Mapkam Koprnapaun Sony.
CunhaabTOpckoro npaba
PnBocnpon3BeDeHn
IcnoIb3yraKakyIO-nI6o Dpyryu BnDeokamepy, HeIb3ra BblONHITb 3aINCb HaJeHTy,Ha KOTOpO 3aINCaHbC nIHaNbI aBTOpCKOro npaba dIra 3aUNTbI aBTOpCKNX npAB pOrpaMM, BOCnpOn3BOIDMbIX Ha BaWe BnDeokamepe.
Pn3ainnc
Ha 3toB BnDeOkampe HeIb3A BbINOHNATb
3aNcB npOrpAmM, KOTOpbIe CoDEpkaT CnHaNbl
abTOPCKO npaba Dnla 3aUHTb IaBTOPCKNX
npab.
Pn npbItke 3aNcN TaKnx npOrpAmM Ha
3kpaHe KKД, B BnDoNcKaTeIe NII Na 3kpaHe
TeLEBnCopa NoRbITcN HnDkaun COPY
INHIBIT. Bo Bpem 3aNcN 3Ta BnDeOkampe Ha
3aNcBbAet Na JeHTy CnHaNbl aBTOpCKO
npaba.
PnBocnpOn3VeJeHn
BbMOxKe TaKKe BOCnPOn3BOAnTb Ha 3KpaHe XXI neHTbl, 3aINcaHHble B BVInEOcNCTeMe NTSC.
Notes on the MICROMV cassette
When affixing a label on the MICROMV cassette
Be sure to affix a label only on the location illustrated below [a] so as not to cause malfunction of your camcorder.
Приимechanicalа NO Kaccete MICROMV
PpnpnKpeHneHn 3TuKeTkn Ha kaccety MICROMV
3TnKETKcIeMyET npIKpeJIaTb TOnbKO B MeCTe, POKa3aHHOM Ha pncyHKe [a], YTObI OHN He cTaan npuHNO HEnCnpaBHO pa6Otbl BInDeOKaMepbI.
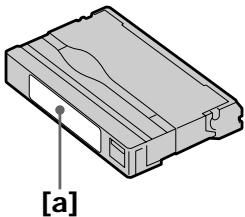
After using the MICROMV cassette
Rewind the tape to the beginning, put the cassette in its case, and store it in an upright position.
When the Micro Cassette Memory function does not work
Reinsert the cassette.
Iocne nCNoJIb3OBAHnKacCeTbIMICROMV
IpeemotaTe JnHTy KHaayany, noJoxKeTekaccety B cyTnp npxapHnTe ee BBePTNKaJIbHOM nOJoxEHHN.
Ecn He pa6oTaet yHkun Micro Cassette Memory
N3BNeKnTe n CHOba BCTaBBTe KAccety.
About the "InfoLITHIUM" battery pack
О затыpenHom блoke "InfoLITHIUM"
What is the "InfoLITHIUM" battery pack?
The "InfoLITHIUM" battery pack is a lithium-ion battery pack that has functions for communicating information related to operating conditions between your camcorder and an optional AC adaptor/charger.
The "InfoLITHIUM" battery pack calculates the power consumption according to the operating conditions of your camcorder, and displays the remaining battery time in minutes.
Charging the battery pack
- Be sure to charge the battery pack before you start using your camcorder.
- We recommend charging the battery pack in an ambient temperature of between 10^ to 30^ (50^ to 86^) until the CHG lamp goes off, indicating that the battery pack is fully charged. If you charge the battery outside of this temperature range, you may not be able to efficiently charge the battery pack.
- After charging is completed, either disconnect the cable from the DC IN jack on your camcorder or remove the battery pack.
Effective use of the battery pack
- Battery pack performance decreases in low-temperature surroundings. So, the time that the battery pack can be used is shorter in a cold place. We recommend the following to use the battery pack longer:
- Put the battery pack in a pocket to warm it up, and insert it in your camcorder immediately before you start taking shots.
- Use the large capacity battery pack (NP-FF70, optional).
- Frequently using the LCD screen or frequently operating playback, fast forward or rewind wears out the battery pack faster. We recommend using the large capacity battery pack (NP-FF70, optional).
- Be certain to slide the POWER switch to OFF (CHG) when not taking shots or playing back on your camcorder. The battery pack is also consumed when your camcorder is in standby or playback paused mode.
About the "InfoLITHIUM" battery pack
- Have spare battery packs handy for two or three times the expected recording time, and make a trial recording before taking the actual recording.
- Do not expose the battery pack to water. The battery pack is not water resistant.
Remaining battery time indicator
- If the power goes off even although the remaining battery time indicator indicates that the battery pack has enough power to operate, charge the battery pack fully again so that the indication on the remaining battery time indicator is correct. Note, however, that the correct battery indication sometimes will not be restored if it is used in high temperatures for a long time or left in a fully charged state, or the battery pack is frequently used. Regard the remaining battery time indication as an approximate shooting time.
- The mark indicating there is little remaining battery time sometimes flashes depending on the operating conditions or ambient temperature and environment even if the remaining battery time is about 5 to 10 minutes.
How to store the battery pack
- Even if the battery pack is not used for a long time, remove the battery pack from the camcorder, store it in a dry, cool place after fully charging it once per year and then using the battery pack fully on your camcorder. This is to maintain the battery pack's functions.
- To use the battery pack fully on your camcorder, turn on your camcorder and leave it as it is without a cassette inserted.
Battery life
- The battery life is limited. Battery capacity drops little by little as you use it more and more, and as time passes. When the available battery time is shortened considerably, a probable cause is that the battery pack has reached the end of its life. Please buy a new battery pack.
- The battery life varies according to how it is stored, the operating conditions, and the environment for each battery pack.
O 6aTapeHOM 6JIoKe "InfoLITHIUM"
- IMeIte 3aIacHbIe 6bTaapeHbIe 6Iokn, oBeecneHbAouHcE BpEm 3aIncN, BДBa-Tprn pa3a npeBbIaHooee OXnDaEMoe BpEm 3aIncN, NipeEd hauAnl HactoIe 3aIncN BblONHnIte npObHyO 3aIncB.
ИЗбагатЕ пonaдань Вды Ha 6batapeинь 6лok.БатAPEинь 6лok HeЯВлэпсь BOOCTОйКIM.
Hdikatop octabweroCBApeMeHpa60tbl 6aTaepHoro 6Ioka
- Ecnn nntahne OTKIIOUaETcR, XOTN INDkaTOp OCTabwerooc BpeMeHn pa6tbo 6atapen NOKa3bIBaET, YTO B HEnOCTaONC JDCoTAtOuHbI 3apd IJIe ee FyHKUHOHPOBAHn, CHOba ONHOCTbO 3apdITe 6atapeHbHb6LOK, YTO6bl INDkaTOp npABINbHO NOKa3bBAn OCTabweecBpeMn pa6tbo 6atapen. ODAKO CNeDeYe OTMeNTb, YTO pnp INCNOJb3OBaHn 6atapeHoro 6LOKa B TeChEne DInTeNbHoro BpeMeHn pnp BBICOKO TEMNEPAType, pnp erO xpaHenn B TeChEne DOJrTO BpeMeHn B INHOCTbO 3apJXeHHOM COCToHn INI npn ERO qACTom INCNOJb3OBaHn INPABINbHa INDHkaun 6atapeHoro 6LOKa MoKet He BOCCTAHOBITcR. CNeDeYe paccMaTrpNBaTb OCTabweecBpeMn pa6tbo 6atapeHoro 6LOKa KAK pnpBIm3HTeNbHO BpeMn CbEMKn.
-Даже ecn ocTabweecBpeM6bapeHoro 6loka coctabIaTe5-10 MNHT,3NaK ,yka3bBAIOuN H TO,TOOCTABWEeC BpeM6bapeHoro 6loka 3aKaHnuBaETc,6ydet INHGda Mrrt.3TO 3aBNCIT OYcNoBm 3KcPnyataUNN NmTmnepaTybl Npyrnx ycNoBn OKpykaUoSe Cpebl.
XpaHHe 6aTaepnHoro 6Ioka
- Ecni 6bataeHbI 6bok He nCnOJIb3yeTcB B TeueHMe DInITeHbHO RBepeMeHN, CHIMITE eRO C BnDEOKaMEbpI INoCE NIOHJ 3aprKn OINH pa3 B rOД nIOHJ pa3pRdKN pYTeM IcNOLb3OBaHnA Ha BnDEOKaMEpe XpHnTE eRO B cyXOM, npoxHaDHom MeCTe. 3TO Heo6xOIMO dIy noDepKahnФyHKuI 6bataeHoro 6boka.
Длгплногиразрдкбатapeн HorOбLOka c NOMOьBO BnDEOKaMepbI BKJIQUHTE ee И OCTaBbTe B TAKOM COCTOHRHIN, He BCTaBJIa KACCeTy.
Cpok cnyx6b6aTaapeHoro 6noka
Cpok cnyxkb6b 6bapeHoro 6boka orpaHnueh. PnK kaxddom nocleduoem mncnoB3ObaHHm c TeueHnEM BpeMeHN eMKoCTb 6bapeHoro 6boka noHemHory cHnkaeTcR. Korda BpeMra6bTo b6aTepeHoro 6boka cTaHOBtC3HaHTeNbHO KOpOe, BepoTHo, Cpok erO cnyxkb6b noDoWeN KOHcy. Kyntte HOBbl 6bapeHnh 6bOk.
Cpok cnyk6bl kaxdofo 6batapeHoro 6Ioka 3aBNCNT OT yCNOBm erO xpaHeHn, 3KcPnlyatauIN N OKpykaIoUe CpeDbI.
The i.LINK (MICROMV) jack on this unit is an i.LINK-compliant MICROMV jack. This section describes the i.LINK standard and its features.
What is i.LINK?
i.LINK is a digital serial interface for handling digital video, digital audio and other data in two directions between equipment having i.LINK jacks, and for controlling other equipment. i.LINK-compatible equipment can be connected by a single i.LINK cable. Possible applications are operations and data transactions with various digital AV equipment. When two or more i.LINK-compatible devices are connected to this unit in a daisy chain, operations and data transactions are possible with not only the equipment that this unit is connected to but also with other devices via the directly connected equipment.
Note, however, that the method of operation sometimes varies according to the characteristics and specifications of the equipment to be connected, and that operations and data transactions are sometimes not possible on some connected equipment.
Note
Normally, only one piece of equipment can be connected to this unit using the i.LINK cable. When connecting this unit to MICROMV-compatible equipment having two or more i.LINK jacks, refer to the instruction manual of the equipment to be connected.
About the Name "i.LINK"
i.LINK is a more familiar term for the IEEE 1394 data transport bus proposed by SONY, and is a trademark approved by many corporations. IEEE 1394 is an international standard standardized by the Institute of Electrical and Electronics Engineers.
THe3do i.LINK (MICROMV) Ha daHOM annapaTe ABJIaETcra i.LINK-COBmecTnMbIM THe3dOM MICROMV. B daHHom pa3deJe OINCbIbAeTcra CTaHapr i.LINK n ero ocObeHnoCTn.
YTo Takoe i.LINK?
i.LINK-3TOUcnpoBOI nocLeIOBAteHbI INHTeppeC dIa NODKIOUeHnI Dpyr Kdpuyr pa3NIuHOrO oOpyoBOAHnI, IMeIoUeI rHe3da i.LINK,cueIbIO nepeDaun B oboix HaprabLHeHHx cNpOBoO BRIOeO- I ayDNOCIRHanaI dpyRnx DaHHbIX,a TaKxeI Jn ynpabLHeHHaDPyIMOBOpUOBAHNEM. i.LINK-COBMeCTMoe OObPOyOBAHne MOXHO NOkLNouTb C NOMOUsbIO OJHO R Ka6EJI i.LINK. MoKe TNCIOBtBaTcBcN LypabLHeHHa I nepeDaun DaHHbIX C NMOUsbIO pao3NIuHORO cNpOBoO aYdINO-BuDEO oOpdyOBAHnI. Korda ONo HIN HeCKoBko i.LINK-COBMeCTMbIX ycToPcTB NODKIOUeHbIK DAHHOMy apnapaTy NO nocLeEOBAteHbOHcxeme ONpoca, UnpaBHeHne I nepeDaay aDHHbIX BO3MOxHbI He ToJbKO dJIy UcToPoICTBa,K KOTOpOMy NOkNIOUeH daHHbI aNnpaAT, HO TaKxE I dJI npyrNXycToPcIBTcepe3OobpyOBAHne, NOkNIOUeHHOE HApmyIO.
CneNyet,ODnako,IMeTbB BnDy,YTOMeToD ynpaBHeHn INOHda MEHReTcB COOTBeTCTBm C xapaKTepNCkAmN i CneuΦnKaunMn IOKnIOUeHHOrO O6OpuyoBaHn. Kpome 3tOrO, ynpaBHeHne I nepeDaay daHHbIX INOHda 6bIbAOt HeBO3MOxHbI Ha HEKOTObiX IOKnIOUeHHbIX YCTPOnCTBax.
PpimcuaHne
KaK npaBnIO, TOLbKO OJHO yCTPOIcTBO MOXHO nOKnIOHTb K DaHOMy aannapatY c NOMOsbIO Ka6eI.i.LINK. Pn POkJIIOUeHm daHHORo annapata K MICROMV-COBMeCTNMOMy yCTPOIcTBY, IMeIoUeMy DBA IIN BOOEe rHe3d i.LINK, o6paTntecb K INCHtpKuIam Po 3KcPnyataun POkJIIOUaEMOrO o6OpdyobAHna.
O Na3BaHn “i.LINK”
i.LINK ABJIeTc6 60Jee 3HaKoMbIM TepMnHOM
IINHbI nepeaun DaHHbIX cTaHapTa IEEE
1394, npednoXeHHbIM Kopnpauee NSONY.3To
TaKxe ABJIeTcTOproBOm MapKo, npn3HaHHo
MHOrIMN KOpnpaUmaN.
IEEE 1394-3TO mExdUnapOnhblcTaNdapt,
pInnHTbINHCTNTyTom INHXeHepOB nO
3JeKTPOTEXHKe I paDIO3LeKtPOHKe.
i.LINK Baud rate
The maximum baud rate of the camcorder is "S400".
i.LINK's maximum baud rate varies according to the equipment. Three maximum baud rates are defined:
S100 (approx. 100 Mbps*)
S200 (approx. 200 Mbps)
S400 (approx. 400 Mbps)
The baud rate is listed under "Specifications" in the instruction manual of each piece of equipment. It is also indicated near the i.LINK jack on some equipment.
The maximum baud rate of equipment, except for this unit, on which it is not indicated is "S100".
When units are connected to equipment having a different maximum baud rate, the baud rate sometimes differs from the indicated baud rate.
*What is Mbps?
Mbps stands for megabits per second, or the amount of data that can be sent or received in one second. For example, a baud rate of 100 Mbps means that 100 megabits of data can be sent in one second.
i.LINK functions on this unit
For details on how to dub when this unit is connected to other video equipment having i.LINK (MICROMV) jacks, see page 101, 105. This unit can also be connected to other i.LINK compatible equipment made by SONY (e.g. VAIO series personal computers) other than video equipment.
Before connecting this unit to your computer, make sure that application software supported by this unit is already installed on your computer.
For details on precautions when connecting this unit, also refer to the instruction manuals for the equipment to be connected.
Required i.LINK Cable
Use the Sony i.LINK 4-pin-to-4-pin cable (during MPEG2 dubbing).
i.LINK and i are trademarks.
Using your camcorder abroad
Using your camcorder abroad
Countries and areas where you can use network functions are restricted. For details, refer to the separate network function operating instructions (DCR-IP7E only).
You can use your camcorder in any country or area with the AC adaptor supplied with your camcorder within 100V to 240V AC, 50 / 60Hz .
Your camcorder is a PAL system based camcorder. If you want to view the playback picture on a TV, it must be a PAL system-based TV with a VIDEO/AUDIO input jack. The following shows TV colour systems used overseas.
PAL system
Australia, Austria, Belgium, China, Czech Republic, Denmark, Finland, Germany, Great Britain, Holland, Hong Kong, Italy, Kuwait, Malaysia, New Zealand, Norway, Portugal, Singapore, Slovak Republic, Spain, Sweden, Switzerland, Thailand, etc.
PAL-M system Brazil
PAL-N system
Argentina, Paraguay, Uruguay
NTSC system
Bahama Islands, Bolivia, Canada, Central America, Chile, Colombia, Ecuador, Jamaica, Japan, Korea, Mexico, Peru, Surinam, Taiwan, the Philippines, the U.S.A., Venezuela, etc.
SECAM system
Bulgaria, France, Guyana, Hungary, Iran, Iraq, Monaco, Poland, Russia, Ukraine, etc.
Maintenance information and precautions
Moisture condensation
If your camcorder is brought directly from a cold place to a warm place, moisture may condense inside your camcorder, on the surface of the tape, or on the lens. In this condition, the tape may stick to the head drum and be damaged or your camcorder may not operate correctly. If there is moisture inside your camcorder, the beep sounds and the indicator flashes. When the indicator flashes at the same time, a cassette is inserted in your camcorder. If moisture condenses on the lens, the indicator will not appear.
If moisture condensation occurred
None of the functions except cassette ejection will work. Eject the cassette, turn off your camcorder, and leave it for about 1 hour with the cassette compartment open. Your camcorder can be used again if the indicator does not appear when the power is turned on again.
Note on moisture condensation
Moisture may condense when you bring your camcorder from a cold place into a warm place (or vice versa) or when you use your camcorder in a hot place as follows:
- You bring your camcorder from a ski slope into a place warmed up by a heating device
- You bring your camcorder from an air-conditioned car or room into a hot place outside
- You use your camcorder after a squall or a shower
- You use your camcorder in a high temperature and humidity place
How to prevent moisture condensation
When you bring your camcorder from a cold place into a warm place, put your camcorder in a plastic bag and tightly seal it. Remove the bag when the air temperature inside the plastic bag has reached the surrounding temperature (after about 1 hour).
Информацnia по ухODу 3a apnapatom И МерыnpedoctopoЖноCTN
KoHdeHcaZnBlaRn
EcIn BnDeOkamepa npHecHa npAMo n3 XONoDHorO MeCTA B TeNIOe,TO BHyTPn BnDeOkamepbI,Ha NOBepxHOCTN JeHTbI INn Ha 06BeKtNBe MoKET npOn3OITN KOHeHCAUIN BJIaR. B TAKOM COCTOHN JLEHTa MOKET npNJINHHTb K 6apabAHy rONOBKN I 6yDet NOBpeXJEda, INN BnDeOkamepa He CMOKet pa6OtaTb HAnLexKaUIM McbzOM. EcIn BNYtpn BnDeOkamepbI npOn3OuJa KOHeHCAUIN BJIaR, TO pOn3ByuHT 3YMMepbH bINrHaN, a Ha 3kpaHe XXKD 6yDet mIRATb INHdNKaTOP eCIn ONDOBpemEHNO 6yDet MIRATb INHdNKaTOP ,3To 3NaHT, YTO BnDeOkamepy BCTABNeHa kacceta. EcIn Bnara cKOHJeHcnpOBaNaIb cBaNkEe, INHdNKaTOP IOBnTbcr He 6yDet.
Ecn npon30wla KOHdeHcaun Bnarn
Hn Onda H3 cyHKui, KpOME n3BneChEniaKaccTeI, He 6yJET pa6oTaTb. N3BNeKeITeKaccTeY, BblKJIOnuTe BInDeOKaMepY IOCTaBBTe ee npi6bn3nteJbHO Ha 1 Yac C OTkpblIMOTcKOM IJN KACCtBJ. Ecnn pni NOBTOPOMBKNUChEN NITaHN INDnKaTOp HeIPOBNTcR, Bbl MoXeTe CHOBA NOLb3OBA TcBnDEOKaMepo.
PpimeyaHne NO KOHdeHcaunn BlaHn
Bnara moKET o6pa3OBAtbcra,ecnn BnDEOKaMepa npHHeCeHa n3 XoJIOHO rO MeCTa B TeNIOe (nIIN HAObOpOT),IIN KOrJa OHa IcNoJIb3yETcB JxapKOM MeCTe B CNeDyUOuNX cLyuaX:
-BnIeOKaMepa npHHeCea H cIbIXHOcKIOHa B NOMeUeHne, Ie pa6Otaet 06OrpeBaTeIb
-BnIeokamepa npHeceha n3 aBTOMobnIy IIN N3 KOMHaTbI C BO3dyuHbIM KOHNIOHOHPoBAHmEBKapKoe MeCTO Ha yIInCe
-BnIeokamepa nCnoNb3yeTc nocne cnJIbHOrO BnaJxHOrO BeTpRa NIN DoXJa
-BnIeOKaMepaNcNoJIb3YeTCB OueHb KApKOM IN BlaJXHOM MecTe
Kak npedotbpaTb KOHdeHcauio Blaar
EcIn BnIeOKaMepa npHecHa n3 xOIOndoro MeCTa B TeJIIOE, NOJoxNt ee B nONi3TnIeHObB nAkET n IIOIHO 3aKJIeTe erO. BbIbTe BnIeOKaMepy n3 nONI3TnIeHOBO rNaKeTa, KOrJa TEmpePaTypa BO3dYxa BHyTp naketa DOCTnIRHTempePaTypbOkpyKaIOUeRO BO3dYxa (PpI6bnI3ntJIbHo Upe3 1 ac).
Maintenance information
Cleaning the video head
To ensure normal recording and clear pictures, clean the video head. The video head may be dirty when:
- mosaic-pattern noise appears on the playback picture.
- playback pictures do not move.
- playback pictures do not appear.
- the × indicator and “CLEANING
CASSETTE" message appear one after another or the × indicator flashes on the screen during recording.
If the above problem, [a], [b] or [c] occurs, clean the video heads with the Sony MGRCLD cleaning cassette. Check the picture and if the above problem persists, repeat cleaning.
HnΦopmaunno yxOdy 3a annapatom
甲CTKa BnDeOroJIOBOK
ДяобсеньяHopMaJIbHо3aIINcN 甲KOrO n3o6paXeHnCneIyET nepIOJnueckn 单Tb BInDeorolOBky. BInDeorolOBKn BO3MOxHO 3arPra3HeHbl, ecIN:
- Ha BOCINpOuN3BODIMOM N3O6paXeHIN NOBBLHOCTC IOMEXI TnIa M03aIKN.
-BOCpON3BOOIMOE N3O6paXeHne He DBNrAeTcR. - BOCPON3BOIDMOE N3O6paXeHne He NOBnRETCa Ha 3KpaHe.
-BO Bpem3aHcHnHa 3KpaHne NooUpeEHD NOBbIHO7CnHdNKaTOp Xu COo6eHne CLEANING CASSETTE",NIN Mngae T HdNKaTOp X.
EcIn Bo3HnKHyT NOMEx Tnna [a], [b] IIN [c], NOUcNTte BnDeorOLOBKn C NOMoUsb YoNCTraue KacceTbI Sony MGRCLD. PpOBepbTe n3o6paXeHne i, ecIn OnicaHHbE BblSe np6JIembl yCTpaHHTb He ydaNoCb, NOBTOpe YnCTKy.
[a]
[b]

[c]
If the video heads get dirtier, the entire screen becomes blue [c].
EcIn BnDeorOnOBKn 3aPr3HNJNCb eue 6oJIbSe, BEc 3KpaH CtaHET CINHM [c].
Playing back a cleaning cassette automatically
The camcorder is equipped with the cleaning cassette auto playback function. Follow the procedure below.
(1) Set the POWER switch to CAMERA or VCR.
(2) Insert the cleaning cassette.
(3) Select OK, then press the centre on the control button. The message "NOW CLEANING" appears. After the cleaning is finished, the message "CLEANING END" appears.
(4) Eject the cleaning cassette.
To cancel cleaning
Select CANCEL, then press the centre on the control button.
The video head
The video head wears out if you use the camcorder for a long time. When use of the cleaning cassette does not make the picture clear, the video head may have worn out. In such cases, you must replace the video head. For details, consult your nearest Sony dealer.
Notes
- When cleaning the video head, do not use any equipment other than the cleaning cassette.
- The cleaning cassette does not work in MEMORY mode (DCR-IP7E only).
Cleaning the LCD screen
If fingerprints or dust make the LCD screen dirty, we recommend using an LCD Cleaning Kit (optional) to clean the LCD screen.
AByTOMaTHueCKoe BOCpON3BVeHne YnCTaUeKACCetbl
Bndeokamepa mMeet yHKuIO aBTOMaTneCKORO BOCpon3BeJeHnY NCTAeKacceTb. BbInOnHnTe cNeDyOuyo npOueDpy.
(1)Установпейреклочатуь POWER в положене CAMERA ини VCR.
(2)BCTaBbTe YnCTaYU KacCeTy.
(3)Bb6epnte OK, 3aTeM haxmnte Ha ueHTp Hn KhoNKe ynpaBHeHn. IoRbNTcra coo6uHne "NOW CLEANING". IocJe OkOHuaHn YnCTKn IoRbNTcra coo6uHne "CLEANING END".
(4)ИзВлевке Ростяукassety.
YTo6bI OTMeHHTb YNCTKy
BbIbepuTE CANCEL, 3aTeM haxmTe Ha ueHTp H a KhONKe ynpabJeHn.
Bundeorolovka
Ecni BnDeokamepa nCnoB3yeTcdoJIOE Bpem, BnDeoRONoBka n3HaunBaetc. Ecni nocne nCNOBJ3OBaHnY uCTauei KACCetbl n3ObpaXeHne He yUyUnIOScB, BO3MOxHO, n3HocnIacb BnDeoRONoBka. B 3TxN cNyuaX Heo6xoDIMO 3aMeHNTb BnDeoRONoBky. DnI noJouHeNe 60Jee npDo6Ho INHpopMaunn 6opatntecb B 6nKkainu cepBnCHb neHTP Sony.
PpmeuHn
-ПиочNTke roJOBkn He nCNoIb3yIte HnKaKOrO obOpUdoBaHn, KpOme YnCTaIe KaccTebl.
-ЧИстаякасанегаботаевржIMEMEMORY(Tолько модьDCR-IP7E).
UncTkα 3KpaHa KKД
EcnHa 3KpaHe KKJ NOBHTCAOTneaTKn naJIbueB ININ nbIb, peKOMeHdyETc BOCNoJIb3OBAtbcra KOMJIeKTOM IJN CYCTKN KKJ (npno6peTaetca OTdeJIbHO).
Removing dust from inside the viewfinder
(1) Pull out the viewfinder in the direction of the arrow ①. Remove the two screws in the direction of the arrow ② with a screwdriver (optional). Remove the eyecup in the direction of the arrow while pressing the projection ③.
YdaJIeHne 3aIrp3HeHn C BHyTpEHHeN CTOpOHbI BNDONCKaTeJRA
(1)BbIDBnHbTe BUNOINCKaTEJB HAnpaBJIeHNn CTpeJIKN ①. CHMNTe DBA BnHTa B HAnpaBJIeHNn CTpeJIKN ② C NOMOuHo OTBeTpKn (Ppno6peTaETcR OTrIbHo). CHMNTe OKyJIrp B HAnpaBJIeHNn CTpeJIKN, HaxKaB Ha BbICTyNaIOUyU YoCTb ③.
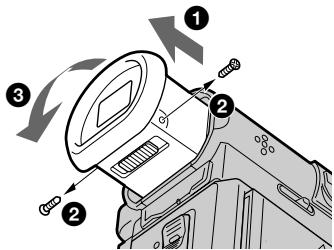
(2) Remove dust from inside the eyecup and viewfinder with a commercially available blower.
(3) In reverse, starting from ③, attach the eyecup. Then replace the screws in the direction of the arrow ②.
Caution
Do not remove any other screws. You may remove only the screws necessary to remove the eyecup.
Notes
- Do not drop or bend the eyecup shaft.
- Be careful when handling the eyecup.
(2)YdaJInte Nblb C BHyTpHeNc STOpOHbI OKyIpaN BnIOckaTeIc N NOMIoBIO IMeIoIeOcR B npOJaXe BEHTINJTopo.
(3)BobpaTHOMnpAKe,HaunHnaC 3, npuCOeDnHInTe OKyIrp.3aTeM BCTaBBTe BnHTbIB HnPaBHeHH CTpeKN 2.
BHMaHne
He ydaJIaIte HnKaKne DpyrNe BnHTbl.
Pa3peShaTe ydaJIaTb TOnbKO Te BnHTbl,
KOTOpBle Heo6xOdMbl Ira ChATn OkyIpa.
PpimueaHn
- He pohajte n He crnbai Te Kopnyc okyjra.
- BydTe ocToPoxKbI npn o6paueHm c OkyIaPOM.
Charging the built-in rechargeable battery
Your camcorder is supplied with a built-in rechargeable battery installed so as to retain the date and time, etc., regardless of the setting of the POWER switch. The built-in rechargeable battery is always charged as long as you are using your camcorder. The battery, however, will get discharged gradually if you do not use your camcorder. It will be completely discharged in about 3 months if you do not use your camcorder at all. Even if the built-in rechargeable battery is not charged, it will not affect the camcorder operation. To retain the date and time, etc., charge the battery if the battery is discharged.
Charging the built-in rechargeable battery:
- Connect your camcorder to the house current using the AC adaptor supplied with your camcorder, and leave your camcorder with the POWER switch turned off for more than 24 hours.
- Install a fully charged battery pack in your camcorder, and leave your camcorder with the POWER switch turned off for more than 24 hours.
Precautions
Camcorder operation
- Operate your camcorder on 7.2V (battery pack) or 8.4V (AC power adaptor).
- For DC or AC operation, use the accessories recommended in this operating instructions.
- If any solid object or liquid gets inside the casing, unplug your camcorder and have it checked by a Sony dealer before operating it any further.
- Avoid rough handling or mechanical shock. Be particularly careful of the lens.
- Keep the POWER switch set to OFF (CHG) when you are not using your camcorder.
- Do not wrap your camcorder with a towel, for example, and operate it. Doing so might cause heat to build up inside.
3apKa BCTpoEHNoaKKyMylTopHoi 6aTapeiKn
Bndeokamepa ochaeta BCtpoehno
akkymyIaTOPHO 6aTapeKoN dIra coxpaHHe
DaTbI IN BpeMeHI N T.D., He3aBMCIMO OT
NoJooKeHHa nepeKlnHauTeHa POWER.
BCTpoHHa AKKymyIaTOPHa 6atapeKa
BcERda NOD3apXkaETc, KOrDa Bbl IcNoIb3yeTe
BnDEokamepy. OdHaKO 6atapeKa 6byet
NoCTeHNO pa3pKaTc, ecIn Bbl He
INcNoIb3yeTe BnDEokamepy. EcIn BOo6Ze He
INcNoIb3OBaTB BnDEokamepy, 6atapeKa
NoJIHOCTbIO pa3PnDITc PnIb3NITeNbHO uepe3
3 MecaHa. DJaXe ECIn BCTpoEHna
AKKymyIaTOPHa 6atapeKa He 3apXkeHa, 3TO
He 6byet BnIaTb Ha paobTy BnDEokamepb. DInla
COxpaHEHnB nAmrTi DaTbI IN BpeMeHI CneJeYET
3apNITb 6atapeKy, ecIn OHa pa3pXkeHa.
3apraKbBCTpoEHHOaKKymJrTopHO 6aTapeiKn:
ПодcoeMHInTe BaSu Bndeokamepy K cetn C nOMOuBIO npnlaeraMORO K Hei CeTeBOr aAnTepa nepemehHoro TOKA,yCTAHOBITE nepeKNIouateIb POWER B BBIKJIueHHOe NOLOXHeH N OCTaBtBe Bndeokamepy Booe, Yem Ha 24 yaca.
- YIIN yCTaHOBnTe B VbIDEOKaMepy NOHOCtBu3 3apaeHHb6NOK, yCTaHOBnTe nepeKIOUaTeJIb POWER B BBIKIOUeHHoe NOLOXHeH N OCTaBBte B VbIDEOKaMepy BOOee, YEM Ha 24 Yaca.
Mepblpeoctopoxhoctn
3Kcnnyataunu BnDeokamepbI
- IcnoIb3yIte nIa BnIeOkaMepbI HapJxHHe 7,2B (6aTapeHbI 6I0K) nIIN 8,4B (ceTeBOI aIanTeP nepemEnHOro ToKa)
- YTO Kacaetc3KcnpyaatauIN BnDeOkamepbI OT NOCTOARHNOr INN INepeMeHHoro TOKa, INCNoJIb3yIte INPINA,IaIeXHOCTN, peKOMeHNyEmbleB DAHNHO INHCTpyKUIN NIO 3KcnpyaatauIN.
- Ecnn BnHytpb Kopnyca nonan KaKoH-Ni6yDb TBeBpyI npeDMet INJN XnDKOCTb, BblKnOHTe BnDeokamepu n peep DaJIbHeMwe ee 3KcIpyataMe npOBepbTe B cepBuChOM ceHTpe Sony.
- BydTe ocToPOxHbI npi o6paueHN C BnDeokamepoN n36eRaTte MexaHuecknx ynapOB. BydTe oc6beHHO ocToPOxHbC o6bekTtBOM.
Korda Bndeokamepa He nCnoIb3yETc, yctahOBInTe nepeKnIOuateJIb POWER B noJoxHe OF OFF (CHG). -
He 3abopauBaIte BnDeokamepy, Hapnpmep, BnoToTeHne, n He 3KcnpyaTnpyIe ee B TaKOM COCTOAHIN. 3TO MOKeT npNBecTN K NOBbIeHNIO TEMNepaTpybl BHyTpNI BnDeokamepbl.
-
Keep your camcorder away from strong magnetic fields or mechanical vibration.
- Do not touch the LCD screen with a sharppointed object.
- Do not strongly press the LCD screen.
- If your camcorder is used in a cold place, a residual image may appear on the LCD screen. This is not a malfunction.
- While using your camcorder, the back of the LCD screen may heat up. This is not a malfunction.
- Do not use the network function in a medical institution or in an aircraft (DCR-IP7E only).
On handling tapes
- Do not insert anything into the small holes on the rear of the cassette. These holes are used to sense the type and thickness of the tape and if the recording tab is in or out.
- Do not open the tape protect cover or touch the tape.
- Avoid touching or damaging the terminals. To remove dust, clean the terminals with a soft cloth.
Camcorder care
- Remove the tape, and periodically turn on the power, operate the CAMERA and VCR sections and play back a tape for about 3 minutes when your camcorder is not to be used for a long time.
- Clean the lens with a soft brush to remove dust. If there are fingerprints on the lens, remove them with a soft cloth.
- Clean the camcorder body with a dry soft cloth, or a soft cloth lightly moistened with a mild detergent solution. Do not use any type of solvent which may damage the finish.
- Do not let sand get into your camcorder. When you use your camcorder on a sandy beach or in a dusty place, protect it from the sand or dust. Sand or dust may cause your camcorder to malfunction, and sometimes this malfunction cannot be repaired.
He noDBepraTe BnDeoKamepy Bo3deICTBIO CnIbHbIX MaHHTbIX NOpE IIN MExaHnueckO Bn6paun.
- He npikacaiTecb k ekpaHy KKД ocTpblmnpedMeTaMn.
- He Haximai Te CunbHo Ha 3KpaH XKII.
-Пин ЗКСПУаТaцИN BДЕОКамеры В XОЛОДHOM MeCTe Ha ЗкpaHe JKKД может ПОВВЯТьсЯ OCTATOчhoe ИЗбрахене. 3TO He YBnEETcH HeICnPpABoHOCbIb.
-Пин Экплуатуи Видевокамерbl 3адня CTOPОHA 3Крана XXД может HarpeBaTbca. 3TO He RAJIЯТСЕ HENCправHOCtBIO.
He nCnoJb3yIte cyHKnIO Network B MeDInHCKNX yIpeKdEHNrX IIN B CaMOJeT (ToJIbKO moJeB DCR-IP7E).
OTHOCHTeJIbHO 6oBaIeHHa CJeHTaMn
- He BCTaBnIe HnHero B MaIeHbKne OTBepCTnHa 3aJHcN CTOpOHe KaccTebl. 3TN OTBepCTn HaCIONb3yOTcN dIra ONpeDeJIeHnTINa N TOIuINbI JeHTbl, a TaKxE IJN ONpeDeJIeHnHaJIuUHn IJN OTCyTCTBnI JeNEcTKa 3aUInTbI OT 3aIncn HaJeHTe.
He OTKpbIbAaTe npEdoxpaHnteJbHyIO KpbIshky JeHTbI N He pNkacaTecb KJeHTe. - He npikacaiTecb K KOHTaKTam n He donyckaIte ux nobpejXeHn. Ipn ydaJeHn. PbJIN YCTNTe KOHTaKTbI C NOMOuB MOrKoT TkaHn.
Yxoid 3a Bndeokamepon
Korda Bndeokamepa B TeueHne DInntelbHoro BpeMeHN He NcNoB3yeTcA, BbIHMaTe KaccTeu nepnoDnueckn BKIOUaTe nITaHne, daTe KaMepe npa6oTaTB B peXmme CAMERA u VCR, BkIouaR BocpnOn3BeDeHne KaccTebl pImepHo Ha 3 MNHyTbI.
- NCTNE OBeKTHB C NOMOUBMOI KIKTOKI Dny ydaJIeHNAbln. EcIn IMeOTCA OTNeYATKN PAnbueB Ha OBeKTKBE, ydaJIte INC NOMOUBMOI KIKO TKAHN.
-нICTNTE KOPnyc BnIeOkAmepbI c NOMOuIc cyXoM MfKoT TkaH NII MfKoT TkaH, CJIeRKa CMOeHHoPacTBOpom CnaBOrO MOIOUeRo CpeDCTBa. He IcNoIb3yIte HnKaKne TINbI paCTBOpHTeNei, KOTOpbIe MOrYT NOBpeDnTb OTdElyK.
He donyckaTe nonaDaHnna necka B BnuDeokamepy.EcnnBnuDeokamepa nCNoIb3yeTcHa NeCyaHOM PnJaXe NnB KAKOM-JIN60 NblbHOM MeCTe, npedoxpaHnTe ee OT necka nnPiNnPi. NecOK nnPiNb MoYr npNBecTN K HeNCnPabHOCTn annpapata, KOtOpaa HOrda MoKet 6bItb HeNCpabHMoN.
AC power adaptor
- Unplug the unit from the mains when you are not using the unit for a long time. To disconnect the mains lead, pull it out by the plug. Never pull the mains lead itself.
- Do not operate the unit with a damaged cord or if the unit has been dropped or damaged.
- Do not bend the mains lead forcibly, or place a heavy object on it. This will damage the cord and may cause fire or electrical shock.
- Prevent metallic objects from coming into contact with the metal parts of the connecting section. If this happens, a short may occur and the unit may be damaged.
- Always keep metal contacts clean.
- Do not disassemble the unit.
- Do not apply mechanical shock or drop the unit.
- While the unit is in use, particularly during charging, keep it away from AM receivers and video equipment. AM receivers and video equipment disturb AM reception and video operation.
- The unit becomes warm during use. This is not a malfunction.
-
Do not place the unit in locations that are:
-
Extremely hot or cold
- Dusty or dirty
- Very humid
Vibrating
About care and storage of the lens
-
Wipe the surface of the lens clean with a soft cloth in the following instance:
-
When there are fingerprints on the lens surface
- In hot or humid locations
- When the lens is used in environments such as at the seaside
- Store the lens in a well-ventilated location subject to little dirt or dust.
To prevent mold from occurring, periodically perform the above preventive tasks.
We recommend turning on and operating the video camera recorder about once per month to keep the video camera recorder in an optimum state for a long time.
Cetebo aadantep nepemehnHoro Toka
- OToeDInHTe annapat OTJIeKTpueckoCetn, ecn OH He IcNoIb3yETcA IInTeIbHoE Bpemr. JIra OToeDInHeHnCeTeBOrO shHpyoTaNHTe ero 3a Bnky. HnkOrDa He TAnHe 3a cam shHyp.
- He ekcnnyatnpyte annapat, ecn noBpeKdEn shHpy, nIn ecn cam annapaT ynaI nIn noBpeKdEn.
He crn6aHTe cTeBoi npoB0d, npinlaragar урe3MepHbIe ycINIIu, n He CTaBbTe Ha Hero TЯжелtie npedMeTbI. 3To MOket NOBpeDNTb npoBOD n npivBeCTK N NOxApy INIIN nopaxeHInO 3JIeKTPmUeCKNIM TOKOM.
He donyckaIte KOHTaKaKnx-Jn6o MetaIIInuecknx npedMeTOB C MeTaNInueCKMn YacTAMn COeINHITeNbHOI nlaCTNbI. EcIn 3TO cIyUHTC, MOXET pOni3OHTu KOPOTKOE 3aMbKaHne, n annapat MoXeT 6bITb NOBpeXDeH. - Bcerda noДержваTe MeТалл ueckne KOHTaKTbI B YIcTOTE.
- He pa36paɪte annapaɪt.
- He noДвергайte annapaT mexanHueckoBn6paunu n He poHaiTe erO.
- Пи ИСПОЛБЗОВАнИ AnnapaТа, OСОБЕНо BO ВьЕМ ЗарДКи, ДерЖITE erо NOДальше OТ ппимнков AM-paДиОВЕanzaHЯ и BИДeoаПAPaTуры. Ппимнки AM-paДиОВЕanzaHЯ и BИДeoаПAPaTура HapyшадOT AM-paДиОПпeМ n pa6OТу BИДeoаПAPaTуры.
B npouecce 3kcnnyataun annapat HarppeBaetc. 3TO He ABJREcH NeuCnpaBHO. -
He pa3meuaiTe annapat B mectax:
-
Ype3MepHo JapKINX INI XOIOHbIX
-ПыньнбIx ИИnpRЯ3HbIX
-OueHbBJIaXKhbIX
-ПОДВЕРЖЕНьx ВИБрациN
06 yxode 3a obbeKTbOBm erO xpaHeHH
OuHuaTe NOBepxHOCTb OBeKTHBa MmRkON TKAHbIO B CNEyUOUX CNyAAX:
- Ecπn Ha nobepxHoctn oBbekTnBa eCtb OTneuATKn NaJIbceB
-BxapKnxnnBnaXhblmecTax
-ПиИСПОЛьЗОВАн ИБЕКТУВВ TaKnx MeCTax,ΚΑΚМΟΡСΚΟΕΝΟΒΕρεχΒe
XpaHnTe o6bekTnB B xopoOIO npOBeTpnaEOM MeCTe, 3aUuIeHHOM OT rP3N I PbJIN.
Bo n36bexaHne noBnEHH nIeSeHH nepNoDnueckn BblONHMy Te ONiCaHhbIe BblIe npOeDpybl.
PekomehnyeTcBkHouaTb BnDeOkamepy nNoIb3ObaTbC8eIo npImepHo 1 pa3 B MecaI dIPOndepXaHnBA NDeOkAmepbIB ONTMaJIbHOM COCToHnB TeueHne DInTeJbHO BpemEH.
Battery pack
- Use only the specified charger or video equipment with for charging function.
- To prevent an accident from a short circuit, do not allow metal objects to come into contact with the battery terminals.
- Keep the battery pack away from fire.
- Never expose the battery pack to temperatures above 60^ (140^) , such as in a car parked in the sun or under direct sunlight.
- Store the battery pack in a cool, dry place.
- Do not expose the battery pack to any mechanical shock.
- Do not disassemble nor modify the battery pack.
- Attach the battery pack to the video equipment securely.
- Charging while some capacity remains does not affect the original battery capacity.
Notes on dry batteries
To avoid possible damage from battery leakage or corrosion, observe the following:
- Be sure to insert the batteries with the + - polarities matched to the + - marks.
- Dry batteries are not rechargeable.
- Do not use a combination of new and old batteries.
- Do not use different types of batteries.
- Current flows from batteries when you are not using them for a long time.
- Do not use leaking batteries.
If batteries are leaking
- Wipe off the liquid in the battery compartment carefully before replacing the batteries.
- If you touch the liquid, with your hands wash it off with water.
- If the liquid gets into your eyes, wash your eyes with a lot of water and then consult a doctor.
If any problem occurs, unplug your camcorder and contact your nearest Sony dealer.
BaTapeHbIb 6Jok
-ИспοлььзуйTe TОЛБКо peKOMeHДуЕМоe 3apЯДhoe ycТpoIeCTBO ИПи BnДeoaПаРаТур c 3apЯДнOH ФункциЕ.
-Пяпгдотьразеня HechacThOrO cnUyar n3-3a KOPOTKOrO 3ambikaHn He DonnyckaIte KOHTaMeTaNJIuYeCKNx PpeMTeOB c noJIocAMn bTaapeHOrO 6Joka.
- He pacnojaraTe 6aTapeHbI 6Jok B6Jn3n orHra.
He noDbepraIte 6aTapeHbI bIok Bo3dJIeCTBnIO TEMpePaTyC bIiue 60^ , He OCTaJIyTe Iero, HApIMeP, B ABTOmObIne, npIapKOBaHHOM B CONHeuHOM MeCTe, INI NOI pRMBIMCONHeuHBMJUcAM.
XpaHnTe 6aTapeHbI 6IOK BCyXOM npoxlaHOM MeCTe.
- He noDBepraiTe 6aTapeiHbI 6Iok BO3DeIcTBIO MexAHuecknx yIapOB.
- He pa3bpaIte 6aTaapeHbI 6Jok I He n3MeHnTe erO KOHCTpyKlIIO.
- Плотно пркpenпг Te 6atapeHbI 6LoK K Bndeoannapatype.
3apnKa He nonHocTbO pa3pJxKeHHoro 6aTaapeHoro 6bOKa HnKaHe OtpaxKaetcHa eero nepBOHaayabHoE MKOCTN.
PpimeuHnI NO cyxM 6aTapeiKam
Bo n36eXaHne Bo3MOxHOro NOBpeXdHnBnDEOKaMepbI BCLeCTBnE yTeuKn BHyTpHeHReBeueCTBa 6aTapeek IIN Kopp03n Co6JIouDaIteCneDyUoee:
-Пиустановкебатapeek co6JIIOаITE npabINbHyI NOJIЯpHOCTb + -В COOTBETCTBIM C METKAMN +-.
Cyxne 6aTapeKn HeIb3a nepe3apKaTb.
He nCnoJb3yIte HOBIIe 6aTapeKn BMeCTe CO CTapblM.
He nCnoJb3yIte 6aTapeiKn pa3Horo Tuna.
- Ecni 6aTapeiKHe nCIOJIb3yIOTcДnITeJIbHOe Bpemr, OHn IOCTeNEHNO pa3PJAOTc.
- He nscnoJIb3yIe 6aTapeuKn, KoTOpbl e nOteKJIn.
EcIn npOn30uHa yTeUka BHyTpEnHero BeuecTb6aTaapeek
-Пеет Tem,Кak 3amehntb 6aTapeeKn, TuaTeIbHNO pOtpnTe OCTaTKN KnIkoCTN B OTCeKe DnA 6aTapeeK.
B cnyuae nonapaHnJxNdkoCTn Ha pykN, CMOnTe ee BOdoi.
Bcnyae nonaadaHnJxNkOcTn B rIa3a, npomTe N6 60JIbUIM KOINueCTBOM BObl, nocne yero o6paTntEc b K BpaCy.
B clyaee Bo3HKnHOBeHn KaKnx-JI6o np6Jem, OTKJIouHTe BnDEOKaMepy OT NCTOHTHnKa nITaHn I O6paTntEcB B 6nXkaiu n cepBnCHbI ueTp Sony.
Video camera recorder
System
Video recording system
2 rotary heads
Helical scanning system
Audio recording system
Rotary heads, PCM system
Quantization: 12 bits
(Fs 48kHz stereo)
Video signal
PAL colour, CCIR standards
Usable cassette
MICROMV cassette with the mark printed
Tape speed
Approx. 5.66mm / s
Recording/playback time
(using cassette MGR60)
1 hour
Fastforward/rewind time (using cassette MGR60)
Approx. 1 min and 30 s
Viewfinder
Electric viewfinder (colour)
Image device
3.0mm (1/6 type) CCD
(Charge Coupled Device)
Approx. 800 000 pixels
(Effective: 400000 pixels)
Lens
Carl Zeiss
Combined power zoom lens
Filter diameter 30mm (1 3/16 in.)
10 × (Optical), 120 × (Digital)
Focal length
2.3 - 23 mm (3/32 - 29/32 in.)
When converted to a 35mm still camera 44 - 440mm (1 3/4 - 17 3/8 in.)
Colour temperature
Auto, HOLD (Hold), Indoor
(3200K),Outdoor(5800K)
Minimum illumination
7 lx (lux) (F 1.7)
Input/Output connectors
Audio/Video input/output
10-pin connector
Input/output auto switch
Video signal: 1 Vp-p, 75 (ohms),
unbalanced, sync negative
Luminance signal: 1Vp - p 75Ω
(ohms), unbalanced
Chrominance signal: 0.3Vp - p 75
(ohms), unbalanced
Audio signal: 327mV (at output impedance more than 47k (kilohms))
Input impedance with more than 47k (kilohms)
Output impedance with less than
2.2 kΩ (kilohms)
USB jack
mini-B
i.LINK (MICROMV) input/output
4-pin connector S400
LCD screen
Picture
6.2 cm (2.5 type)
50 × 37 ~mm (2 × 11 / 2 in)
Total dot number:
211 200 (960× 220)
Wireless communication (DCR-IP7E only)
Communication system
Bluetooth specification Ver. 1.1
Maximum communication speed 1)2)
Approx. 723 kbps
Maximum output
Bluetooth specification Power Class2
Communication distance 2)
Approx. 10m (33 feet) (Open space, when using a Sony BTA-NW1
Modem Adaptor with Bluetooth Function)
Compatible Bluetooth profiles 3)
Generic Access Profile
Dial-up Networking Profile
Usable frequency band
2.4 GHz band
(2.400 - 2.4835 GHz)
1) The maximum rate defined by Bluetooth specification Ver. 1.1
2) Depends on obstacles between the Bluetooth devices, radio wave conditions, etc.
3) Defined by Bluetooth specification for intended use between the Bluetooth devices
General
Power requirements
7.2 V (battery pack)
8.4 V (AC power adaptor)
Average power consumption (when using the battery pack)
During camera recording using the viewfinder (brightness normal)
3.5 W
During camera recording using the LCD (Backlighting on) 4.2 W
During camera recording using the LCD (Backlighting off) 3.5 W
Operating temperature
0^ to 40^ (32^ to 104^)
Storage temperature
-20^ to +60^ (-4^ to +140^)
Dimensions (approx.)
47× 103× 80mm
(17 / 8× 4× 31 / 8 in. (w / h / d)
(excluding protruding parts)
Mass (approx.)
310g (10 oz)
Main unit only
370 g (13 oz)
including the battery pack,
NP-FF50, cassette MGR60, lens cap, and list strap
Supplied accessories
See page 23.
AC power adaptor AC-L20A
Power requirements
100-240VAC,50/60Hz
Power consumption
23 W
Output voltage
DC OUT: 8.4 V, 1.5 A in the
operating mode
Operating temperature
0^ to 40^ (32^ to 104^)
Storage temperature
-20^ to +60^ (-4^ to +140^)
Dimensions (approx.)
125× 39× 62mm
(5× 19 / 16× 21 / 2 in.) (w / h / d)
excluding (projecting parts) mains lead
Mass (approx.)
280 g (9.8 oz)
excluding the mains lead
Battery pack NP-FF50
Maximum output voltage
DC 8.4 V
Output voltage
DC 7.2 V
Capacity
4.8 Wh (675 mAh)
Operating temperature
0^ to 40^ (32^ to 104^)
Dimensions (approx.)
40.8 × 12.5 × 49.1 ~mm
(15 / 8× 1 / 2× 115 / 16 in.)
(w/h/d)
Mass (approx.)
45 g (1.6 oz)
Type
Lithium ion
"Memory Stick" (DCR-IP7E only)
Memory
Flash memory
8 MB: MSA-8A
Operating voltage
2.7-3.6 V
Power consumption
Approx. 45mA in the operating mode
Approx. 130~ A in the standby mode
Dimensions (approx.)
50× 2.8× 21.5mm
(2× 1 / 8× 7 / 8 in.) (w / h / d)
Mass (approx.)
4 g (0.14 oz)
Design and specifications are
subject to change without notice.
Budekamepa
CnCTema
CnCTema BnDeo3annc
LBeTOBoi CnHnPal,CTaHnApT MKKP
Ucnonb3yeMbIe KacceTbi
KacceTbMICROMVc neaTHbIM
3HaKOM III
CKopoctbJIeHTbl
Pn65.5,66 MM/c
Bpem3aHncn/
Bocnpon3BeDeHn
(При Исторьанни Касець MGR60)
14ac
Bpemy yckopenno nepemotkn BnepeHa3a
3NeKtpnueckN BUNOINCKaTeJIb (UBeTHoI)
ΦopMnpoBaTeIb n3o6paXeHnA
3,0 MM (Tuna 1/6) Π3C
AbtoperynipoBaHne,HOLD
(6noknpobka), B nomeeHnn
(3 200K), Ha yu nze (5 800K)
MHHMaJIbHaI OCBEuJHHOCTb
7 JIOKc (F 1.7)
Pa3beMbI BXOДhblX/BblXOДhblXCINHANOB
Aydno/Bndeo BXOJ/ByXoJ
10-штырьковуй pa3beM
ABTomatnueckn nepeKJIIOuateJIb BXOJa/BbIXOJa
BundeocnHaJ:1Vp-p,75Ω (OM), HecMMMeTpNHyBn,
CINHxPOHN3IPOBAHbI
OTpuataTeIbHbI NIOJIoc
CnHnIApKocTn:1Vp-p,75Ω
(OM), HecnMMMeTpHbI
CnHnI ZBETHocTn:0.3 Vp-p,75Ω
(OM), HecnMMMeTpHbI
AydinoosirHan: 327 MB (prn noHOM BbXoHOM cnpotuBlen H60nee 47 kO (kOM) )
Полноe BXODHoe COIpOTINBJIeHne -6oJee
47 kΩ (kOM)
Плно Бьхюдhoe copotubneHne -MeHee 2,2kΩ (KOM)
THe3Do USB
mini-B
Bxod/Bbixo.i.LINK (MICROMV)
4-ITbIPbKObBpa3bem S400
3KpaH KKn
N3o6paXeHne
6,2cm(2,5IOHMa)
50 × 37 MM
06ee koJnueCTBO TOeK:
211 200 (960× 220)
BecnpobodnacCB3b(TolkbO moJeB DCR-IP7E)
CnCTema CBa3N
CneuФkaZna Bluetooth Bercn 1.1
MaKcImaIbHaNcKOpocTb
pepaun daHbIX 1)2
Pn6n.723K6nT/c
MaKcImaJIbHaB BbIXOJHaMoUHOCtB
MoUHOCTb no cneunkaucn
Bluetoothднгкласca2
MaKcImaJIbHoe pacCToHHe npn CB3N 2)
Obu npoPhiNb doctyna (Generic Access Profile)
PpoHb MoEMHO CoeINHeHn (Dial-up Networking Profile)
Icnojb3yeMbI dnaNa3OH qactOT
Dyana3OH 2,4Γ
(2,400-2,4835 ΓΓι)
1)MacKmMajbHaJcKOpocTb, onpeJeHnHa cIeUΦkauei Bluetooth Bercn 1.1
2)3aBnCnT OT npIePANTCBM MekDy uycToPcHbAMn Bluetooth, COCTOHNEM paIIOBOHNI T.D.
CpeHnI npTe6JIeMaH MoUHOCtB
(npnncnoJb3ObaHH
6aTaapeHoro 6Ioka)
NP-FF50, Kaccetom MGR60,
KpbIshKO O6BeKTHBa IpeMeSHKOM
Ppnilaraemble npnHaIeXHocTn
CM. ctp. 23.
CteBoa aDantep nepemehHOro ToKa AC-L20A
Tpe6oBaHnK nHTaHnIO
100 - 240 B nepeMeHHoro ToKa,
50/60 Γ
Iotppe6JrMa MOHocTb
23BT
BbIXoHoe HnpaXeHne
BbIXoD nocT. Toka: 8,4 B,1,5 A B
pa6oem peknme
Pa6ooua TemnepaTpa
ot 0^ do 40^
TemnepaotypxpaHn
OT-20°Cdo+60°C
Pa3mepbI (npn6Jln3.)
125× 39× 62MM ( / / ) ,He
Identifying the parts and controls
Camcorder
1 OPEN button (p. 38)
2 BROWSER MENU button (p. 209) (DCR-IP7E only)
3 LCD screen (p. 40)
Viewfinder lens adjustment lever (p. 43)
5 OPEN/△EJECT lever (p. 36)
6 LCD BACKLIGHT switch (p. 43)
Lens cap (p. 38)
Speaker
9 POWER switch (p. 8)
Cassette lid (p. 36)

This mark indicates that this product is a genuine accessory for Sony video products.
When purchasing Sony video products, Sony recommends that you purchase accessories with this "GENUINE VIDEO ACCESSORIES" mark.
1 Khonka OPEN (cTp. 38)
2 Khonka BROWSER MENU (cTp. 209) (ToIbKO MoJeB DCR-IP7E)
3 3KpaH KKd (ctp. 40)
4 Pbyiar peryI npOBKn o6bekTnBa BvdoNcKaTeJIa (ctp. 43)
5 Pbyar OPEN/△EJECT (ctp. 36)
6 ΠepeKJIIOUaTeIb LCD BACKLIGHT (cTp. 43)
7 KpbIka o6beKTHBa (ctp. 38)
8ДиHamNK
9ПереклioчateJB POWER (ctp.8)
10 KpbIkwKa kaccetHoro OTecka (ctp. 36)

Note on the Carl Zeiss lens
Your camcorder is equipped with a Carl Zeiss lens which can reproduce a fine image. The lens for your camcorder was developed jointly by Carl Zeiss, in Germany, and Sony Corporation. It adopts the MTF* measurement system for video cameras and offers a quality as the Carl Zeiss lens.
- MTF is an abbreviation of Modulation Transfer Function.
The value number indicates the amount of light of a subject penetrating into the lens.
PpIMeuaHne OTHOCHTbHO OsbekTnBa KapI Ceic
B Baawe Bndeokampe yctahOBJeH oBeKtNB Kapn LcEeCC, KOTOpbI nO3BOJReT BOCPOn3BOIDTh BblCOKOKaueCTBeHHbIe N3o6paXeHnI.
O6bekTnBДЯ 3ToB BInDeOKaMepbl 6blI
pa3pa60Tah KOMPnaHnei KapI LcEiCC
(TepMaHn) COBMecTHO C KOPnpaCnei Sony.
Bero OCHOB IeXHT CNTema N3MepeHnri MTF* DnBInDeOKaMep, IN OH ObecNeuNbAeT
kaueCTBO, XapaKTePHoe DnIy O6bekTnBOB
fipMbI KapI LcEiCC.
MTF ABnIeTcCOKpaUeHEmOT Modulation Transfer Function, uTo B nepeBoJe 03NaueT cyHKuJnpeJaHu MoDyJIaU. YncNooe 3NaueHEn yKa3bIbAeT, KaKoe KOJInuEcTBO CBeta OT o6BeKtAnopaEt Ha O6BeKtIB.
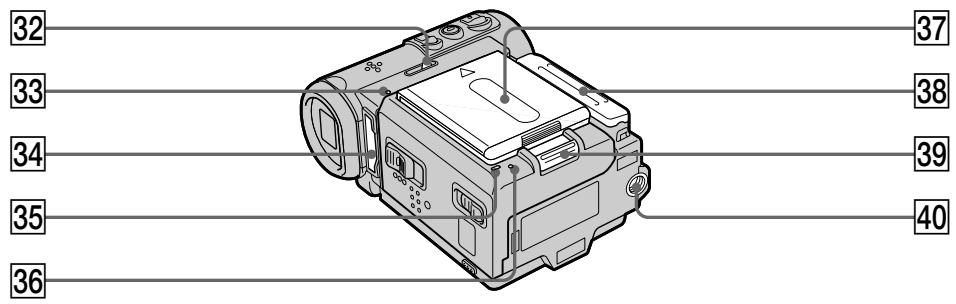
32 MEMORY EJECT lever (p. 139) (DCR-IP7E only)
33 Access lamp (p. 139) (DCR-IP7E only)
34 "Memory Stick" slot (p. 139) (DCR-IP7E only)
35 CHG lamp (p. 27)
36 Reset button (p. 216)
37 Battery/Battery terminal cover (p. 25)
38 Jack cover
39▼BATT (battery) release lever (p. 25)
40 Tripod receptacle Make sure that the length of the tripod screw is less than 5.5mm (7/32 inch). Otherwise, you cannot attach the tripod securely and the screw may damage your camcorder.
32 PbyaXoK MEMORY EJECT (cTp. 139) (ToIbKO moJeB DCR-IP7E)
33Индикаторобрашени(ctrp.139) (ToIbKO moJeJI B DCR-IP7E)
34 Φe3do nla "Memory Stick" (cTp. 139) (ToIbKO moJeB DCR-IP7E)
35 IHHdkatop CHG (ctp. 27)
36 Khonka c6poca (cTp. 225)
37 BaTapeI/KpbIuKa 6aTapeIhIX KOHTaKTOB (cTp.25)
38 Kpbioka rHe3da
39 PbyaXOK OCBO6OXJdHnRA▼BATT (6aTapeiHoro 6Ioka) (cTp. 25)
40 THe3do DnTpeHorn Y6eDInTeCb, yTo dInHa BnHTa TpeHOrn He npReBbIshaet 5,5 MM. B IpOToNBHom Cnyuae BbI He CMOKeTe HaDeXHo pNkPeINtB TpeHOry, a BnHT MoKcET NOBpeINtB BNdeOKaMepy.
Remote Commander
The buttons that have the same name on the Remote Commander as on your camcorder function identically to the buttons on your camcorder.
1 PHOTO button (p. 61, 149)
2 DISPLAY button (p. 54)
3 MEMORY control buttons (DCR-IP7E only)
4 SEARCH MODE button (p. 93 to 97)
5 MULTI SRCH button (p. 89)
6 Transmitter Point toward the remote sensor to control your camcorder after turning on your camcorder.
DATA CODE button (p. 54)
8 START/STOP button (p. 38)
9 Power zoom button (p. 44)
10 Video control buttons (p. 52)
11 / / / EXECUTE buttons These buttons function the same as the control button on the camcorder.
1 Khonka PHOTO (ctp. 61, 149)
2 Khonka DISPLAY (cTp. 54)
3 Khonkn ynpaBHeHn dIy MEMORY (ToIbKO MoJeB DCR-IP7E)
4 Khonka SEARCH MODE (cTp. 93 - 97)
[5] Khonka MULTI SRCH (cTp. 89)
6 NpepaTuk
IynpaBneHn Bndeokamepo HnpaBbTe
nybT Ha DaTHN KnCTaHcNOHOrO
ynpaBHeHn Pocne ee BKJIOUeHn.
7 Khonka DATA CODE (ctp. 54)
8 Khonka START/STOP (cTp. 38)
9 KhoNka npuBODHOro BapNoooBeKtNbA (cTp. 44)
10 Khonkn Bndeokohtpoj (ctp. 52)
11 KhONKU / / / EXECUTE 3TN KHONKU pa60TaIOT aHaJOrnUHO KHONKe ynpabJeHHa BUNDeOKaMepe.
To prepare the Remote Commander
Insert two R6 (size AA) batteries by matching the + and - polarities on the batteries to the + - marks inside the battery compartment.
ДлnoiodrotOBKn nyIbTa ДиctahUHOHHorO ynpaBNeHnA
BctabTe DBe 6aTapeKn R6 (pa3mepa AA), co6IIOdaHaNJIeKaUIO NOnrPHOCTb +N-Ha 6aTapeKax CO 3HaKaAMN + - BHyTpN OTCeKa dIra 6aTapeek.
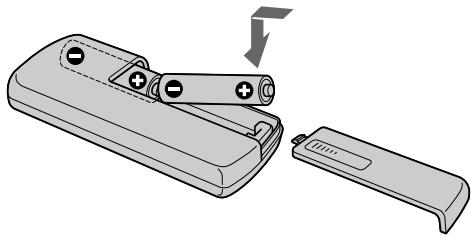
Notes on the Remote Commander
- Point the remote sensor away from strong light sources such as direct sunlight or overhead lighting. Otherwise, the Remote Commander may not function properly.
- Your camcorder works in commander mode VTR 2. Commander modes 1, 2 and 3 are used to distinguish your camcorder from other Sony VCRs to avoid remote control misoperation. If you use another Sony VCR in Commander mode VTR 2, we recommend changing the commander mode or covering the sensor of the VCR with black paper.
PpmeaHnK npIbTy dNCTaHcNoHHoro ynpabJIeHn
-Держnte Датчн Дистанционногуnpablenя поальшо DT CINlbixNCTOCHNKOB CBeta,ΚΑΚΗΝΡΙΜΕρ,прмBLEcONHeYNbIe Iyyn ИлгИЛПOMInHaцЯ.ВIpOTnBHom CNYaEДиСТанционhoeуnpablenie MoKeT He DeiCTBOBaTb.
- 3Ta BnIeOKaMepa pa6oTaET B pexKmpeNbTa DnCTaHnOHHoro ynpabJeHnRA VTR 2. PexKmbi npbTa DnCTaHnOHHoro ynpabJeHn1, 2 n 3 nCNoB3yOTcD JnA OtnuHn DaHHO BnIeOKaMepb OT dpyrnx BnDEomarHnTOcoHOB φnpMb sony BO n36EkaHne HnpaBnBHO pa6oTb. EcnBblncNoB3yeTe pyroY BnDEOMarHnTOcoH φnpMb Sny, pa6oTaIOUH B pexKm VTR 2, peKomeHdyeTc n3MeHntb peKm PnIbTa DnCTaHnOHHoro ynpabJeHn IIN 3aKpbITDaTtNK DnCTaHnOHHoro ynpabHeHn BnDEOMarHnTOcoHa YepHoN 6ymaroi.
Operation indicators
LCD screen and viewfinder
Pa6oyne HndkaTopbI
3KpaH KKD n BnDOncKaTeIb
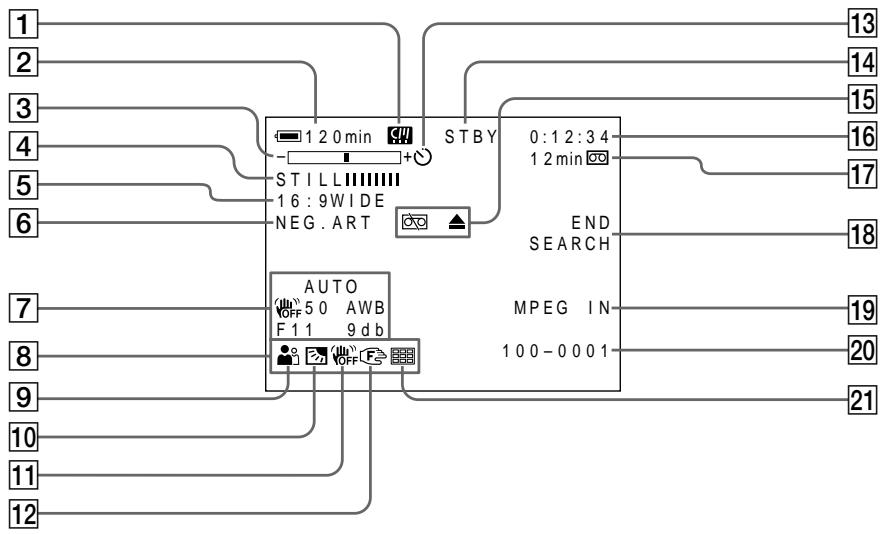
1 Micro Cassette Memory indicator (p. 229)
2 Remaining battery time indicator (p. 46)
3 Zoom indicator (p. 44)/Data file name indicator (p. 136) (DCR-IP7E only)
4 Digital effect indicator (p. 71)/MEMORY MIX indicator (p. 166) (DCR-IP7E only)/ FADER indicator (p. 66)
16:9WIDE indicator (p. 64)
6 Picture effect indicator (p. 69)
7 Data code indicator (p. 54)
Date indicator
9 PROGRAM AE indicator (p. 75)
10 Backlight indicator (p. 47)
11 SteadyShot off indicator (p. 127)
12 Manual focus/Infinity indicator (p. 82)
1Инданкатop Micro Cassette Memory (cTp. 229)
2Индикатор octabшeroCBApeMeHn pa6otbI 6aTapeHoro 6Loka (cTp.46)
3 INHdNkaTop Bapnoo6bKeTnBa (ctp. 44)/ INHdNkaTop mEmnФaJIa DaHHbIX (ctp. 136) (ToIbKO MoJeIb DCR-IP7E)
4 INdikatop uΦpoBOrO 3ΦΦeKta (ctp. 71)/ INdikatop MEMORY MIX (ctp. 166) (TolbKO MOdeIb DCR-IP7E)/INdikatop FADER (ctp. 66)
5 INHdNkaToppeXmHa 16:9WIDE (ctp. 64)
6 INHdNkaTop 3ΦΦeKta n3o6paXeHn (cTp. 69)
7Индикатор Кдааанньх (cTp.54)
8 INHdNKaTOP DaTbl
9 INdkaTop PROGRAM AE (cTp. 75)
10 INHdNkAToP 3aDHei noDCBETK (cTp.47)
11ИндикатOPВыКIOHHeHOnyCTOuHBOB cbeMkn(cTp.132)
12 INHdNkATOp pyHNoI φOKyCnpoBKn/6eCKOHeuHocTn (CTp. 82)
13 Self-timer indicator (p. 48, 63, 153)
14STBY/REC indicator (p. 46)/Video control mode indicator (p. 56)/Movie mode indicator (p. 146) (DCR-IP7E only)/Image quality mode indicator (p. 143) (DCR-IP7E only)
15 Warning indicators (p. 218)
16 Tape counter indicator (p. 46)/Self-diagnosis indicator (p. 217)/Photo mode indicator (p. 61, 149)/Image number indicator (p. 149) (DCR-IP7E only)
17 Remaining tape indicator (p. 46)/Memory playback indicator (p. 176)
18 END SEARCH indicator (p. 50)
19 MPEG IN indicator (p. 105)
20 Data file name indicator (p. 166) (DCR-IP7E only) This indicator appears when the MEMORY MIX functions work. /Time indicator
21 Multi screen mode indicator (p. 151)
13Индikatop TaMepa camo3anycka (CTp. 48,63,153)
14 INHdkaTop STBY/REC (ctp. 46)/ INHdkaTop pexnma BndeOkoHTpoJRA (ctp.56)/INHdkaTop pexnma KnHO (ctp.146) (TolbKO moJeB DCR-IP7E)/ INHdkaTop peXnma KaueCTBa n3o6paKeHnra (ctp.143) (TolbKO moJeB DCR-IP7E)
15Ппeдурждаюше ИнданkaTobbl (cTp. 227)
16 INHДИКaTOP cHTUнKa JENTbI (cTp. 46)/ INHДИKaTOp ΦYHKcHm CamOmaHrOCTuKn (cTp. 226)/INHДИKaTOp FOTopeXkMa (cTp. 61, 149)/INHДИKaTOp HOMepa N3O6paXeHn (cTp. 149) (ToIbKO MoJeJIb DCR-IP7E)
17Индikatop OCTaBseЯСЯHTbI (cTp.46)/ INdikatop BOCpON3BeDEHnI N3 nAMrTn (cTp.176)
18Инданкатор END SEARCH (cTp. 50)
19ИнданkaTOp MPEG IN (cTp. 105)
20 INHdikKaTOP ImeHn faiJa daHHbIX (cTp. 166) (TOnbKO MoJeIb DCR-IP7E) 3TOT INHdkaTop NOBJIaTeCBA Bpemra pa60tbyfYHKuIMEMORYMIX./ INHdkaTop BpeMeHn
[21]ИнданkaTop MHorO3KpaHHoro peXUMa (cTp. 151)
A, B
AC power adaptor 30
Adjusting viewfinder 43
AUTO SHTR. 126
A/V connecting cable 59,100,104,158,164
A/V jack.....59,100,104,158,164
BACK LIGHT 47
Battery pack 25
BEEP 130
BOUNCE 66
C, D
Camera chromakey 166
Carl Zeiss lens 251
Cassette information 120
Charging the battery 26
Clock set 32
Data code 54
Date/time indicator 46
Date search 95
DEMO MODE 129
DIGITAL EFFECT 71,86
DISPLAY 54
Dubbing a tape 99
E
END SEARCH 50, 58
Exposure 80
F, G, H
Fader 66
Fade in/out 66
FLASH MOTION 71
FOCUS. 82
Format 128
Full charge 27
Heads 237
I, J, K, L
i.LINK.....101,105,159,165,233
Image protection 190
Image quality mode 143
Index screen 176
"InfoLITHIUM" battery ... 26, 231
JPEG 136
Labelling a cassette 121
LUMINANCEKEY 71
M, N
Manual focus 82
Memory chromakey 166
Memory luminancekey 166
MEMORY MIX 166
Memory overlap 166
Memory PB ZOOM 186
"Memory Stick" 136
Menu settings 124
Micro Cassette Memory 120
MICROMV format 21, 229
Mirror mode 40
Moisture condensation 236
MONOTONE 66
MOSC.FADER. 66
MPEG 136
Multi-picture search 88
Multi screen mode 151
Multi-screen shooting 151
NORM.FADER 66
O, P, Q
OLD MOVIE 71
Operation indicators 255
PAL system 235
Photo save 171
Photo search 97
PICTURE EFFECT 69,84
Picture search 57
Playback pause 56
Power zoom 44
Printmark. 197
PROGRAM AE. 75
R
Rechargeable battery 240
Recording time 29
Remaining battery time indicator 46
Remaining tape indicator 46
Remote commander 253
Remote sensor 250
Reset 216
s
Self-diagnosis display 217
Self-timer recording ... 48, 63, 153
Skip scan 57
Slide show 188
Slow playback 58
SLOW SHUTTER 71
STEADYSHOT 127
STILL 71
T, U, V
Tape counter 46
Tape Photo recording. 61
Telephoto 44
Time-zone difference 34
Title 108, 116
Title search 93
TRAIL 71
Transition 39
TV colour systems 235
USB 203
W,X,Y,Z
Warning indicators 218
White balance 78
Wide-angle 44
Wide mode 64
Write-protect tab 37
Write-protect switch 137
Zoom 44
AлфаВиТьи yka3aTeЛb
A,B
AUTO SHTR 131
BACK LIGHT 47
BEEP 135
BOUNCE 66
D, E, F
DEMO MODE 134
DIGITAL EFFECT 71,86
DISPLAY 52
END SEARCH 50,58
FLASH MOTION 71
FOCUS 82
I, J, L
i.LINK 101,105,159,165,233
JPEG 136
LUMINANCEKEY 71
M, N
MEMORY MIX 166
"Memory Stick" 136
MONOTONE 66
MOSC.FADER 66
MPEG 136
NORM.FADER 66
O, P
OLD MOVIE 71
PICTURE EFFECT 69,84
PROGRAM AE 75
s
SLOW SHUTTER 71
STEADYSHOT 132
STILL 71
T, U
TRAIL 71
USB 203
A, B
AkkymyIaTOpHa 6aTapee ... 240
BanaHc 6eIoro 78
BaTapeiHbI 6Jok 25
БатAPEйьшблор "InfoLITHIUM" 26,231
B,Γ
Budoeorolovkn 237
Bpem3a.. 29
THe3I0 A/V 59,100,104,158,164
A
DEmOHCTpaCnIcIaIIOB.....188
3
3aMeIeHHOe BocPon3BeJeHne 58
3aIncNo taMepy camo3anycka 48,63,153
3apnka 6aTapeHoro 6loka ... 26
3aunTa n3o6paXeHnA 190
3epkaJIbHbI pexIM 40
#
HnDeKcbn 3KpaH 176
HdkaTop DaTbI/BpeMeHH 46
INIMKATOP octabweroC8BpeMeHn pa6bI 6aTapeHoro6bnoka .46
VNIIKATOP octabueycn JENTbl 46
INHdkauncaMoDnaHocTNkn 226
K
Kacsethna HnΦopMaζηa...... 120
KhoNka ZBcTHoCTn BInDeOKaMepbl 166
KhONka ZBeTHOCTn NaMRTn .. 166
Khonka npkoctn namrTn.....166
KoI daHHbIX 54
KoHdEHaCuaBlaIg 236
1
JIeNEcTOK 3aunTbI OT 3aINCSN 37
M
MapknpoBka kaccetbl 121
MnKpokacceTha namTb.....120
Mhoro3kpaHHbI pexm 151
H
Hanoxehne no namrtn 166
HacrpoKa yacob 32
0
ObekTINB KapIeic 251
Onepaunn noBBeHn/ UcHe3HOBeHH 66
#
PamrPB ZOOM 186
Pay3a BocnpOn3BedeHnA 56
Ppe3aIncb IeHTbl 99
IpeekJIOUoateJIb 3aunTbI OT 3aIncn. 137
PepexoI 39
IeuaTHbI 3HaK 197
Ponck DaTbI 95
Ponck n306paXeHnA 57
Ponck MeToDom nporoHa 57
ПONSКЕСКОЛБКИX n360бархен.Y 88
Ponck TnTpa 93
Ponha3apka 27
Ipeynpexkaioune INDINKaTOpbl 227
Printed on recycled paper
Sony Corporation Printed in Japan

- Digital Video Camera Recorder MICROMV
- Operating Instructions
- HCTPYKUINI NO 3KCNJYATAUNI
- Network Handycam IP Digital Handycam IP
- English
- Welcome!
- WARNING
- Memory Stick
- N50
- NOTICE ON THE SUPPLIED AC POWER ADAPTOR FOR CUSTOMERS IN THE UNITED KINGDOM
- For the customers in Europe ATTENTION
- Pycckn
- Добpo пожаловать!
- PNEyPPEKDEHNE
- Дл nxynateJeB Ebpone BHIMAHNE
- TolbkoДЛЯМоDEЛN DCR-IP7E
- ToIbKO IJI MOnEJI N DCR-IP5E
- DCR-IP7E only
- C∈①
- DCR-IP5E only For the customers in Germany
- Taking moving or still images, and playing them back
- Capturing images on your computer
- Accessing the Internet via a Bluetooth device (not supplied) (DCR-IP7E only)
- Other uses
- CbeMa DnKxuXcxn Hn Hn NOBnKbIX n3OpaXeHm n X BocPon3BeDeHne
- 3aHnCb n3o6paXeHn Ha Baawem KOMnbItepe
- Introduction - Basic operations
- How to turn on the power and select the mode
- В级以上 - OchoBhble onepaun
- KaB BKJIIOUHTb NITaHne N BbI6paTb peXIM
- MEMORY/NETWORK (ToIbKO moJeIb DCR-IP7E)
- How to use the control button
- Kak nCnoJb3OBAt b KHOpKy ynpaBLeHn
- How to use the FN screen
- BVeJeHne - OCHOHbIe ONEpaCnN
- Kak nCnoJIb3OBA Tb 3KpaH FN
- To return to the FN screen
- To execute settings
- To cancel settings
- To turn on/off the screen buttons
- BVeJeHne - OCHOHbIe ONEpaCm
- YTO6bI BKJIIOUHTb/BbIKJIIOUHTb 3KpaHHbIE KHOPIKNI
- Table of contents
- Getting started
- Recording - Basics
- Playback - Basics
- Advanced Recording Operations
- AdvancedPlaybackOperations
- Editing
- Customizing Your Camcorder
- "Memory Stick" Operations - DCR-IP7E only
- Connecting with a computer
- Network operation
- - DCR-IP7E only
- Troubleshooting
- Additional Information
- Quick Reference
- IopdrotOBka K 3KcnpyaatauN
- 3aIncb - OCHOBhble NOJIOXeHnA
- 1
- Connecting the mains lead (p. 30)
- 2
- Inserting a cassette (p. 36)
- Remove the lens cap.
- Press OPEN to open the LCD panel.
- 4
- Monitoring the playback picture on the LCD screen (p. 51)
- Set the POWER switch to VCR. The VCR lamp lights up.
- NOTE
- PykoBoIcTBo IIO 6bICTpOmy 3aIpycky
- 1ПодсоeДинене npOBODa 3JIeKTPoNTaHnA (cTp. 30)
- Note on TV colour systems
- Copyright precautions
- Precautions on camcorder care
- Lens and LCD screen/finder (on mounted models only)
- MepblnpedocTopoKHOCTn npnyxoJe 3a BndeokamepoJ
- ObekTbN 3KpaH KKD/BnDOnckaTeNb (ToIbKO dIy yCTaHOBNeHHbIX MoJeIe)
- Checking supplied accessories
- Step 1 Preparing the power supply
- Installing the battery pack
- UcTaHOBka 6aTapeHoro 6JIOka
- To remove the battery pack
- Charging the battery pack
- Пункт 1 ПОДROTOВКИ NGTOUHINKA NITAHNIA
- After charging the battery pack
- Pocne 3apnK6aTapeHoro 6Ioka
- PpmeaHne
- Recommended charging temperature
- What is "InfoLITHIUM"?
- Connecting to the mains
- Пункт 1 ПОДROTOВКИ NGTOHнka NITAHNIA
- PeKOMeHdyemar TempepaTpya 3apAdkn
- Notes
- A car battery
- IPDEIOCTEPEXEHNE
- PpimueaHn
- ABTOMo6nIbHbIaKKymyIaTOp
- Step 2 Setting the date and time
- Пунков 2 YctaHOBka DaTbI IN BpeMeHn
- 6,7
- 8,10
- Simple setting of clock by time difference
- To eject the cassette
- ДяиЗВLEЧЕнЯ KACCEТI
- Примеань.
- Step 3 Inserting a cassette
- IyHKT 3 YctaHOBka Kaccetbl
- PpIMeAHne OTHOCHTbHO HAKJIeKn
- Recording a picture
- 3a\Pncb n3o6paXeHn
- After recording
- To enable unbroken transition
- Recording data
- Pocje 3aIncn
- Adjusting the angle of the LCD screen
- Shooting with the mirror mode
- 3aHncb n3o6paXeHHa
- Korda ropnt nJIM MURAeT nHdkaTop REC
- Perynupobka yrna 3kpaHa KKd
- PpmeuHne
- Adjusting the brightness of the LCD screen
- PeryIinpobKa npKocTn 3KpaHa XKd
- Adjusting the viewfinder
- Viewfinder backlight
- Using the zoom feature
- 3aHnHa noDCBtKa BnOuCKaTeJIa
- EcIn BblperylnpyeTe 3aHIOIO NOcBETKy BIDONCKATEJI
- IcnoJIb3OBAHneФyHKcHn Hae3da BndeOkamepbl
- To use a zoom greater than 10×
- 3NaueHne Hae3da Kamepb6oJee 10x
- When you shoot close to a subject
- Notes on digital zoom
- When the POWER switch is set to MEMORY (DCR-IP7E only)
- Ppimechane
- PnCbemKe oBekTa C 6JIn3KOro NOJIOXeHn
- The indicators displayed in recording mode
- HДИКaTOPbl, OTo6paKaemble BpeKIme 3aIncN
- Remaining battery time indicator
- Tape counter
- Инданков Врemeи OCTaBшeroCярда 6batapeHoro 6Ioka
- CuetukJeHTbl
- Remaining tape indicator
- Shooting backlit subjects - BACK LIGHT
- HnDKaTOp octaBweCJneHTbI
- 3aHncaHbIe daHbIe
- Self-timer recording
- 3aIncb no TaMepy camo3anycka
- To stop the count down
- To record still images on a tape using the self-timer
- ДлгoctaHObKnобpaTHOrOOTcHeta
- To cancel self-timer recording
- To stop searching
- Bocnpon3VeJeHne JeHTbl
- Bocnpoun3BeDeHne JeHTbI
- To stop playback
- EcIn octaBtB nHTAHne BKJIIOUeHHbIM Ha dIINTEbHOE BpEMr
- Korda Bbl OTkpbiBaTe nnn 3aKpbIbAte naHeJI KkI
- Приимechание
- To display the screen indicators - Display function
- When using the camcorder
- IcnoB3OBAHne yHKcuN KoDa daTbI
- Pnncnojb3OBaHnBndeOkamepbl
- IcnoJIb3OBAHne npIbTa dNCTaHcNoHHO ynpabLeHn
- YTO6bI He OTO6paKaTb pa3JIuHbIe yCTaHOBKn npn pa6Ote C nyltom dNCTaHcIOHnHO ynpaBHeHnA
- Various settings
- When you use the data code function, bars ( ) appear if:
- Data code
- Remaining battery time indicator during playback
- Various playback modes
- To view a still image (playback pause)
- Pa3JIMHbIe yCTaHOBKn
- PnncnoJb3ObaHnn FyHKcN Koda daHHbIX NOBJIaIOTcNoIocbl(----),ecn:
- KoДдaHHbIX
- Индикатор Времен octabweroc3apra6batapeHoro 6Ioka BOВрЯ BOCPON3BedeHn
- Pa3JIuHbIepeXIMbI BOCIpOn3BeDeHnA
- To rewind the tape
- To locate a scene while monitoring the picture (picture search)
- To monitor the high-speed picture while advancing or rewinding the tape (skip scan)
- Дя усокорно nepemOTkn IeHTbI Bnepe
- To view the picture at slow speed (slow playback)
- To search for the last scene recorded (END SEARCH)
- When the playback pause mode lasts for 5 minutes
- Bocnpon3BeDeHne JeHTbl
- Длгпрсмтра BOCрpon3BeDEнги n306ржкеня Ha 3aMeДлгноу ckopoctu (3aMeДлгнhoe BOCрpon3BeDEнe)
- KhONKn BnDeoKOHTpOJI BnDeoKaMepbI
- Ecn npexn may3bl Bocnpon3BedeHn npoJntc8 5 MmHyT
- Viewing the recording on the TV screen
- If your TV is already connected to a VCR
- EcnBaw TeJeBn3Op yXe IoDCoeDHeN K BnDeOMaRHNToΦOHy
- If your TV or VCR is a monaural type
- If your TV/VCR has a 21-pin connector (EUROCONNECTOR)
- EcnBaw TeIeBn3Op nIn BndeomarHHToΦOH MOHOΦOHnueCKOro Tnna
- EcIn B BaWeM TeJeBn3ope/ BuDeomarHnToΦOHe NMeetcra 21- WtblpkbOBbI pa3beM (EUROCONNECTOR)
- EcIn B Baem TeIeBn3ope IMeetcra He3do S BuJeO
- Recording a still image on a tape - Tape Photo recording
- - ycoBepueHCTBOBaHHbIe Opeaun CbeMkn - 3aIncB HeIOBvXHOrO N3o6paXeHnHa JIeHTy - 3aIncB φOTorpaFm Ha JIeHTy
- 3aInc b no TaMepy camo3anycka
- To cancel the wide mode
- During recording
- IcnoJb3OBAHne ⅢnpOKo3KpaHHoro peKIma
- B shpoko3kpanHom pexime HeIb3a Bbl6paTb cIeDyUOme fYHKcMn:
- BoBpem3aHncn
- Using the fader function
- IcnoJb3OBaHne Функци ФeДepa
- [a]
- STBY
- REC
- [b]
- MONOTONE
- ДлЯ Bo3BpaTa K эКрану FN
- To cancel the fader function
- While using the bounce mode, you cannot use the following functions:
- Note on the bounce mode
- ДЯ OTMeHbI ΦyHKcH ΦeIepa
- Bo BpemnncnoB3OBaHnpeXnma nepeckaunBaHn HeJIb3n nCNOJb3OBaTb cJeDyUoIne fynKcnn:
- PpimueaHne no pexkmy nepeckaKbHaNn
- EcInnepeKJIouaTeIb POWER ycTaHOBnE B noJIOXeHne MEMORY (ToIbKO moJeB DCR- IP7E)
- Using special effects - Picture effect
- IcnoJb3OBaHne CpeunalbHbIX 3ΦΦeKTOB - ΘΦΦeKT n3O6paXeHnA
- To turn the picture effect function off
- Using special effects - Digital effect
- IcnoJb3OBaHne CpeuJaBhBIX 3ΦΦeKTOB -UΦpOBoN 3ΦΦeKT
- STILL
- FLASH (FLASH MOTION)
- LUMI. (LUMINANCEKEY)
- TRAIL
- SLOW SHTR (SLOW SHUTTER)
- OLD MOVIE
- To cancel the digital effect
- ДлЯ BOЗВраТа KЭкpaHу FN
- ДЯ OTMeHbI UΦpoBbIX 0ΦΦeKTOB
- Примейань
- IcnoJb3OBAHne cneuaJIbHbIX 3ΦΦeKToB -LmΦpOBoI 3ΦΦeKT
- Using the PROGRAM AE function
- Spotlight
- Soft portrait
- Beach & ski
- Sunset & moon
- Landscape
- Low lux
- ИспOLTьованецфункциng PROGRAM AE
- Pexm npoxektophoro ocbeHnA
- To turn the PROGRAM AE function off
- ДлЯ BO3BpaTa KЭкрану FN
- When WHT BAL is set to AUTO in the menu settings
- If you are recording under a discharge tube such as a fluorescent lamp, sodium lamp or mercury lamp
- Приимейсаня
- Adjusting the white balance manually
- PeruInpoBka 6aHaHca 6eIoro BpyHyU
- To return to the automatic white balance mode
- In automatic white balance mode
- In hold white balance mode
- Adjusting the exposure manually
- PyuHa peRyInpOBka 3KcNo3n
- To return to the automatic exposure mode
- ФokycnpoBka BpyHyu
- To return to the autofocus mode
- To record distant subjects
- To focus precisely
- ДлЯ Bo3BpaTа Kэкpanу FN
- Playing back a tape with picture effects
- Bocnpo3BeDeHne JeHTbIC 3ΦΦeKtAmn n3O6paXKeHnA
- To cancel the picture effect function
- Pictures processed by the picture effect function
- When you set the POWER switch to OFF (CHG) or stop playback
- Bocnpon3BeDene HeIeHTbI c 3o0fKeTAmn 1306paXeHnA
- Playing back a tape with digital effects
- BocnpOn3BeDeHne JeHTbI C ZnΦpOBbIMN əΦΦeKtAmN
- To cancel the digital effect function
- Pictures processed by the digital effect function
- Bocnpo3BeDeHne JeHTbI C uΦpObblm 3ΦΦeKTamn
- Searching for a scene - Multi-picture search
- Понь сцehы - Понь Heckoькнx n30брахень
- To return to the MULTI SCH screen from playback
- ДлвоьзВраТКэкразу MULTI SCHи3 BOCПОНЗБЕDEнЯ
- ДлгocтабкнпОпска
- To end the multi-picture search function
- To end the multi-picture search function from the playback screen
- When controlling the camcorder from the Remote Commander
- ДлэзаBERшENЯФункшиNONСКА HeCKoJIbKnxИЗОБрахжEHN
- Searching the boundaries of recorded tape by title - Title search
- Searching a recording by date - Date search
- Searching for a photo - Photo search
- ПоньфOTO -ФOTONOCK
- - Using the A/V connecting cable
- Before operation
- Параапсь лeHTы
- - IVcnoIb3OBAHnE COeINHnTeNbHOro Ka6eJyauDnO/BuDeo
- Ipepe3anncb JeNTbl
- When you have finished dubbing the tape
- Korda nepe3aInc b JeHb 3aKOHueHa
- If your VCR is a monaural type
- If your VCR has an S video jack
- - Using the i.LINK cable
- EcIn BaW BnDeomarHnToΦoH MOHOΦOHNueCKOro TnPa
- EcIn B BaIeBnIeOMaHrNtOfoHe IMeETcRhe3do S video
- Ipee3aHcB JeHTbI
- Note on playback pause pictures
- Korda nepe3anncb JeHTbI 3aKOHueHa
- C NOMOsbKabei.LINK MoXHo NOcEOHHTb TOJbKO OdHO 3aINCbIBaIOoee yCTpOICTBO
- Cneyuouine fynkun He pa6oTaOT BO Bpemu npOBOrMOHTaxa:
- PpIMeuaHne dIa octaHOBLeHHbIX 13o6paXKeHn
- When using the A/V connecting cable
- Switching the video input jack of the A/V connecting cable
- PnncnoJIb3OBAHn coeHNHTeIbHoro Ka6eJyaDnO/ BnDeO
- 1IpeeknueHne BXoHoro rHe3a BnDeocnHaJa coeDHNTeNbHO KabeJyayNo/BnDeo
- Making a recording
- 3ainncb nporpammbi
- BbIIOJIHeHHe 3aIINCH
- Ipeed hauanom pa6oTbI
- Note (DCR-IP7E only)
- When using the i.LINK cable
- 3aHcB nporpaMMbl
- Korda nepezanncIeHTbI 3aKOHueHa
- EcJIN BaW BnDeOMaHrNtOfoh MOHOFOHNueCKORo TnPa
- EcIn B BaIeM BnDeomarHnToΦOHe IMeETcR He3do S video
- Приимechанne (ToIbko moIeJIb DCR-IP7E)
- PpnsncnoIb3OBaHmKabela i.LINK
- When you dub a picture in digital form
- If you record a playback pause picture with the i.i.LINK (MICROMV) jack
- Before recording
- Kornda nepe3anncb JeHTbI 3aKOHYeHa
- Pnpe3aHcN 306paXeHnB cHpOBOM BnDe
- Pp3aIncn ocTaHOBJIeHHoro n3o6paXKeHnC nOmoIbI rHe3da i.i.LINK (MICROMV)
- Ipeed 3ainnbcio
- Superimposing a title
- HanoxeHne TnTpa
- Superimposing a title on starting a recording
- HanoxeHne Tttpa npn HauaJe 3aIncn
- Title setting
- The number of titles recordable on one cassette
- Superimposing a title on a recorded tape
- TtO6bI TnTp He OTo6paXaJcR BO BpEmr BOCPON3BeDeHn
- YctaHObKa TnTpa
- KoJInueCTBO THTPOB, KOToPbIe MoXHo 3aIIncatb Ha OJHOH KACCTe
- Ecn20 TnTpoB yXe hAnOKeHbI
- HaIoxKeHne TnTpHa Ha 3aIncaHHyIO JeHTy
- To use a custom title
- CTpapanHe TnTpa
- To cancel erasing
- Making your own titles
- Making a title in CAMERA mode
- Co3dAnHe Baunx co6CTBeHHbIX TnTpoB
- To change the title you have stored
- IIN3MeHeHH COxpaHeHHOro B nAMrTu TnTp a
- To erase the title
- To enter a space
- To enter the same character on the same button in succession
- Дудаленгтра
- Длвьда npobena
- Making a title in VCR mode
- Co3dHHe TnTpa BpeXmme VCR
- Micro Cassette Memory
- Labeling a cassette
- MapKupobka KacceTbI
- To erase the label you have made
- To change the label you have made
- Note on recorded areas
- Note on cassette information
- When "is flashing
- Ecnn Mmraet HndkaTop
- Deleting all the data in the Micro Cassette Memory
- To cancel deleting
- Note on the ID number
- YdaJIeHne Bcex DaHHbIX n3 Micro Cassette Memory
- Ppimmeyane no Homepy ID
- Changing the menu settings
- To turn off the menu
- ДЯ OTKЛIOUeHnM MeHIO
- IyHKtbl MeHIO OTO6paXaHTcB BVNe npUBeDeHHbIX HNXe NIKTORpAMM:
- Selecting the mode setting of each item
- Notes on the SteadyShot function
- If you cancel the SteadyShot function
- Notes on VF B.L.
- When you use a power source other than the battery pack
- Notes on formatting (DCR-IP7E only)
- Formatting erases all information on the "Memory Stick" (DCR-IP7E only)
- Notes on DEMO MODE
- Even if the power source is detached from the camcorder
- When recording a close subject
- Bb6op yctaHOBOK peKIMa kaxdoRo 3JemeHTa ABnAETc yCTaHOBKO I NO yMOJauHIO.
- PpimueaHnno fynkun yctoynboBcbeMK
- Using a "Memory Stick" - introduction
- On file format
- Still image (JPEG)
- Moving picture (MPEG)
- Typical image data file name Still image
- Moving picture
- Испобьзоване“Memory Stick”-ВveDEXe
- -ToIbkoMoIeJIb DCR-IP7E
- OΦopMaTe ΦaJIOB
- HenodBuxkHoe n3o6paXeHne (JPEG)
- Using a "Memory Stick"
- IcnoIb3OBaHne "Memory Stick"
- "Memory Stick"s formatted by a computer
- Notes on image data compatibility
- "Memory Stick", otформатуpoBaHHbIe Ha KomпьЮтete
- Приимechаши NO COBmecTnMoCTn DaHHbIX n3o6paXeHn
- Inserting a "Memory Stick"
- YcTaHOBka "Memory Stick"
- Ejecting the "Memory Stick"
- Извileченье "Memory Stick"
- Using a button displayed on the screen
- EcIn lamnocka o6paueHn rOpnt nIIMnraet
- EcIn OTo6paKaTaTcHnDnKaTOp "3 MEMORYSTICK ERROR"
- IcnoJb3ObaHne KhoNKn, OTo6paXaemNo Ha 3KpaHe
- Испобьзовны "Memory Stick" - Вedlyнe
- If the item is not available
- Select FN, then press the centre on the control button to display the following buttons:
- Испобьзовке "Memory Stick" - Вedlyнe
- Ecnn 3Jement HeoctyneH
- Bb6epnteFN,3aTeM haxmte Ha ceHtp Ha KhONKe ynpabLeHHn dIy OTo6paXeHHn CJeDyUoNx KHONK:
- Selecting the still image quality mode
- Bb6oppeKImaKauecTba n3o6paXeHn
- Approximate number of still images you can record on a "Memory Stick"
- Ppmeuahne
- Differences in image quality mode
- Image quality mode indicator
- OTNIUH B pexime KaeeCTBa n3o6paXeHnA
- Setting the moving picture quality mode
- YcTaHOBkapeKImaKaueCTBa DnBxUyIeOcN3o6paXeHnA
- Note on frame rate
- Note on transmission rate
- Approximate length of time of the moving pictures you can record on a "Memory Stick"
- Испобьзоване "Memory Stick" - Вedlyнe
- Recording still images on a "Memory Stick" - Memory Photo recording
- 3aHnscb HEnoDvXhblx H3O6paXeHn Ha"Memory Stick" -3aHnscbΦOTorpaΦn B namrTb
- 3aHnscb HeNoDvNkHbIX H3o6paXeHn Ha "Memory Stick" - 3aHnscb fOToRpaΦn B nAmrTb
- Recording images continuously
- Multi screen mode
- HenpepbBna 3aIncB n3o6paXeHn
- Mhoro3KpaHbI peXIM
- 3aHnscb HeNoDvNkHbIX n3o6paXeHn Ha "Memory Stick" - 3aHnscb foToTgpaФn B namrTaB
- If the capacity of the "Memory Stick" becomes full
- Self-timer memory photo recording
- To record moving pictures on a "Memory Stick" with the self-timer
- To cancel the self-timer recording
- 3aHnscb HeNoDvNkHbIX H3o6paXeHn Ha "Memory Stick" - 3aHncb fOToRpaΦn B namrTaB
- Recording an image from a tape as a still image
- 3a\Pu\c b N3o6paXeHn c JeHTbI KaK HeNoD\nXJHOrO n3o6paXeHn
- -ToIbkoMoIeJIbDCR-IP7E
- Ipeed hauanpa60tbI
- 3aIncb n306paXeHnC JIeHTbI KaK HeNoDbNxHOrO n306paXeHn
- EcIn lamnocka obpaueHn ropnt nnn muraet
- EcnnHa3KpaHe nOBnIOcb"
- EcIn B pexnme Bocnpn3BedeHnC nIerKa haxaTb KhoNkY PHOTO
- 3Byk, 3aIncahHNo He JeHTe
- Data/Bpema 3aunncn
- Ecnna HaxaBk Honky PHOTO ha nyIbTe dNCTaHcOnHOrO ynpabLeHHA
- Recording a still image from other equipment
- Using the A/V connecting cable
- 3aIncb HeNoDbXHOro n3o6paXeHnC dpyrOro o6OpyIOBaHnA
- Ipeed hauanom pa60tbI
- UcnoIb3OBAHnE CoeINHTeNbHOKabEny ayDnO/BnDeo
- Recording moving pictures on a "Memory Stick" - MPEG movie recording
- 3a\Pncb D\nKxUnxCn n3o6paXeHn Ha "Memory Stick" - 3a\PncbФnlbMOB MPEG
- Ipeed nayanom pa60tbi
- To stop recording
- When the POWER switch is set to MEMORY
- Recording date/time
- While recording on a "Memory Stick"
- 3aIncB DnKxuXxCn 306paJKeHn Ha "Memory Stick" - 3aIncB cnIbMOB MPEG
- ДлгocтабКиЗрсн
- Птумецни.
- EcInnepeKJIIOUaTeIbPOWER yCTaHOBJIeN B noJIOXeHne MEMORY
- Data/Bpem3auncs
- Recording a picture from a tape as a moving picture
- 3a\Pncb n3o6paXeHnCJIeHTbl KaK DnXkyuTeROcHn3o6paXeHn
- When the access lamp is lit or flashing
- Titles already recorded on tapes
- The data code recorded on the tape
- Recording a moving picture from other equipment
- 3aIncb n306paXeHnC JIeHTbI KaK DnBxJyUeOcH n3o6paXeHn
- Tntpbl, 3aHncaHbIe Ha JIeHTax
- KoДаHHbIX,ЗанcaHHbIЯ NeHTe
- BoBpeMa 3aIncn
- 3aIncb DvKxUeOc8 n3o6paXeHnC dpyroJ annapaTypbl
- To pause or cancel recording
- 3aInCb n306paXeHnC JIeHTbI KaK DnBxKyUeOcR n3o6paXeHn
- ДлпрноctaHOKNJINOTMeHbI3aHNCN
- UcnOJIb3OBAHnE CoeHNHTeNbHOKa6eJyauDIO/BuDeo
- EcIn B BaIeM BnDeomarHnToΦOHe IMeetcra He3do S video
- PpimueaHne
- Superimposing a still image in a "Memory Stick" on a moving picture - MEMORY MIX
- HaioxHe HeIOBHXHOrO 36paXeHn Ha "Memory Stick" Ha DvIXyueecn H36paXeHne - MEMORY MIX
- Hanoxehne HeNoBnXnHO r3o6paXeHnHa "Memory Stick" Ha DnXyueecn3o6paXeHne - MEMORY MIX
- Hanoxehne HeNoBnXnHO r3o6paXeHn 3 "Memory Stick" Ha DnKxueeecr 3o6paXeHne - MEMORY MIX
- To change the still image to be superimposed
- To cancel MEMORY MIX
- The "Memory Stick" supplied with your camcorder stores 20 images
- HanoXeHne HenoBnXhOro n3o6paXeHn 13 "Memory Stick" Na DnKxUeecr n3o6paXeHne - MEMORY MIX
- HaIooXeHne HEnoDbNxHoro n3o6paXeHn n3 "Memory Stick" Ha DbNxJUeEc n3o6paXeHne - MEMORY MIX
- Copying still images from a tape - Photos save
- KoHnpoBaHne HeNoDBrXhblx 306paXeHn C JeHTbl - CoXpaHeHne B pAmrTn fOToCHmKOB
- Перед наалом pa60ть
- Copying still images from a tape - Photo save
- To stop or end copying
- When the "Memory Stick" is full
- If the write-protect switch on the "Memory Stick" is set to LOCK
- When you change the "Memory Stick" in the middle of copying
- KonipobaHne HeNoDbXhBIX n3o6paXeHn C JeHTbl - CoXpaHeHne B NamATn FOToCHmKOB
- Ecni nepeKJIIOuATEIb 3aUITbI OT 3aINcH Na "Memory Stick" yCTaHOBNeH B NOJOKeHne LOCK
- При заиме "Memory Stick" в поочецkoноювannah
- Viewing a still image - Memory photo playback
- ПрсмOTР HeNoDvIXHOrO n3o6paXeHnI - BocpOn3BeDeHne FOToCHIMKOB n3 pAmrTu
- To stop memory photo playback
- ДлЯ OCTAHOBKN BOCNPOUN3BedeHNA FOTOCHIMKOB N3 NaMATN
- Notes on file names
- To play back recorded images on a TV screen
- Image data modified with a computer or shot with other equipment
- Still images
- When no images are recorded on the "Memory Stick"
- Ppimcayane
- PpIMeuaHnO OTHOCHTelbHO mEm haiJIOB
- Длв ВсрпоиЗБеDEнгЯ 3аиcaHьIx n3o6paXeHи На 3кpaHе TelenBuN3opa
- DaHHbIe N3O6paXeHnA, N3MeHeHHbIe c NOMOuBIO KOMNbIOTepa NII CNHTbIE C NOMOuBIO dpyroI annapatypbl
- HenoDbnKhbIe n3o6paXeHna
- Screen indicators displayed during still image playback
- Playing back six recorded images at a time (index screen)
- DaHHbIe 3aINcN
- To return to the normal playback screen (single screen)
- Viewing a moving picture - MPEG movie playback
- Iy3bI BocnpOn3BedeHn
- To change the screen size
- ДиЯзMeHEnpa3Mepa 3KpaHa
- PpimeyaHne
- EcJn Ha "Memory Stick" oTcYtCTByIOT 3aIIncAHHbIe n3O6paXeHnI
- DvNkUeecn306paXKeHne
- Notes on the screen size
- Screen indicators during moving picture playback
- Примочаши no pa3mepy ekpaHa
- Recommended computer environment
- PeKOMeHnyemaj KOMnbIOTepna CpeDa PeKOMeHnyemaj Cpea Windows
- Dubbing images recorded on the "Memory Stick" onto the tape
- KoNiPoBaHne n3O6paXeHni, 3a\PuCaHHbIX Ha "Memory Stick", Ha JeHTy
- To stop dubbing
- When using the Remote Commander
- Image files modified with a computer or shot with other equipment
- PpIMeuaHn
- Фаиьи n3обрахжн, n3MeHeHHbIe c NOMOБьЮ KOMьЮТepа ИИ NCHIMКI C dpyroй annapaTypbl
- Enlarging still images recorded on a "Memory Stick" - Memory PB ZOOM
- YBeJIuHHe HeNoDBrXKbIX n3o6paXeHn, 3aIncHbIX Ha "Memory Stick" - PAmrTB PB ZOOM
- Ipeed hauaJom pa6oTbi
- YBeJIuYeHne HeNoDBrXHbIX n3o6paXeHn, 3aIncaHHbIX Ha "Memory Stick" - PAmrPB ZOOM
- To cancel the Memory PB ZOOM function
- In Memory PB ZOOM mode
- The edges of an enlarged image
- MPEG movie files recorded on a "Memory Stick"
- Playing back images in a continuous loop - SLIDE SHOW
- Bocnpon3BeJeHne n3o6paXeHn BHeIpepbIBHOI NOcIeIOBaTeJIbHOCTNIO 3aMKHyTOMy cIKJy - SLIDE SHOW
- To stop the slide show
- To pause during a slide show
- To start the slide show from a particular image
- If you change the "Memory Stick" during operation
- To play the slide show with the screen indicators turned off
- When there are no images on the "Memory Stick"
- ДлЯ OCTaHOBKN DeMOHcTpaCIN cIaNIOB
- Пре dioTbpaueHne cnyuahoro ctnpaHn - 3aunTa n3o6paXeHn
- Preventing accidental erasure - Image protection
- Пре dioTbpaueHne clyuaHoroCTnpaHn - 3aunTa n3o6paKeHn
- To cancel image protection
- ДЯ OTMeHbI 3aUHTbI N3O6paXeHNA
- Deleting selected images
- -ToIbKO MoIeJIb DCR-IP7E
- YdaJIeHne BbIbpaHHbIX n3o6paxKeHn
- To cancel deleting an image
- Deleting selected images on the index screen
- UdaJIeHne n3o6paXeHn
- YdaJIeHne BbI6paHHbIX n3O6paXKeHn Ha mHndeKCHOM 3KpaHe
- Deleting all the images
- YdaJIeHHe BCEx n3O6paXKeHn
- To cancel deleting all the images in the "Memory Stick"
- To cancel writing print marks
- Moving pictures
- Длг OTMeHbI 3aInc NeayathbIX 3HaKOB
- DvNkUyIeecn 306paXeHn
- - Connecting with a computer - Viewing images recorded on a tape using your computer
- -ПоркlioочикКOMпьOTepу -ПрсмOTрИЗбрахен,запсаHHbIXHa ЛeHTe,C ПOMоцью KOMпьOTepa
- Viewing images recorded on a tape using your computer
- Viewing images recorded on a "Memory Stick" using your computer
- Recommended Macintosh environment
- Птумецни
- Installing the USB driver
- Для польозователей Windows 98, Windows 98SE, Windows Me, Windows 2000 Professional
- Image data cannot be transferred over the USB connection
- Step 1 Uninstall the incorrect USB driver
- ПресмOTР n3o6paЖeни, Запсаньх Ha "Memory Stick", cnomоцью KOMьЮтepa
- Приимechanicals
- HeBo3MOxHNo IpePaTb DaHHbIe m3o6paXeHnno CoeINHeHnIO USB
- Step 2 Install the USB driver on the CD-ROM
- For Mac OS 8.5.1/8.6/9.0 users
- ДиMa Mac OS 9.1, Mac OS X
- Viewing images
- For Windows users
- Ppocmptn3o6paXeHn
- Unplug the USB cable/Eject the "Memory Stick"
- For Windows 2000 Professional, Windows Me users
- For Macintosh users
- Notes on using your computer
- "Memory Stick"
- Software
- Communicating with your computer
- Image file storage destinations and image files
- MecTa xpaHeHnaJIOB n3o6paxKeHn nΦaJIbI n3o6paxKeHn
- Accessing the network
- Достун К сети
- DoctynKcetn
- Note on trademarks
- 3ameaHne OTHOCTeJIbHO TOPROBbx MapOK
- PnncnoB3OBAHnn yHKnn Network
- Types of trouble and their solutions
- In the playback mode
- In the recording and playback modes
- When operating using a "Memory Stick"
- Self-diagnosis display
- Warning indicators and messages
- Warning indicators
- 100-0001 Warning indicator as to file (DCR-IP7E only)
- The battery is dead or nearly dead Slow flashing:
- Moisture condensation has occurred* Fast flashing:
- Warning indicator as to "Memory Stick" (DCR-IP7E only)*
- Warning indicator as to "Memory Stick" formatting (DCR-IP7E only)*
- Warning indicator as to tape
- You need to eject the cassette*
- The image is protected (DCR-IP7E only)*
- Warning indicator as to Micro Cassette Memory*
- Warning messages
- - Additional Information — Compatible cassettes
- Selecting cassette types
- Copyright signal
- When you play back
- When you record
- COBMECTMble KacceTbi
- Bb6op Tnna Kaccet
- CunhaabTOpckoro npaba
- PnBocnpon3BeDeHn
- Pn3ainnc
- PnBocnpOn3VeJeHn
- Notes on the MICROMV cassette
- When affixing a label on the MICROMV cassette
- Приимechanicalа NO Kaccete MICROMV
- PpnpnKpeHneHn 3TuKeTkn Ha kaccety MICROMV
- After using the MICROMV cassette
- When the Micro Cassette Memory function does not work
- Iocne nCNoJIb3OBAHnKacCeTbIMICROMV
- Ecn He pa6oTaet yHkun Micro Cassette Memory
- About the "InfoLITHIUM" battery pack
- О затыpenHom блoke "InfoLITHIUM"
- What is the "InfoLITHIUM" battery pack?
- Effective use of the battery pack
- How to store the battery pack
- Battery life
- O 6aTapeHOM 6JIoKe "InfoLITHIUM"
- Hdikatop octabweroCBApeMeHpa60tbl 6aTaepHoro 6Ioka
- XpaHHe 6aTaepnHoro 6Ioka
- Cpok cnyx6b6aTaapeHoro 6noka
- What is i.LINK?
- About the Name "i.LINK"
- YTo Takoe i.LINK?
- PpimcuaHne
- O Na3BaHn “i.LINK”
- i.LINK Baud rate
- i.LINK functions on this unit
- Required i.LINK Cable
- Using your camcorder abroad
- PAL system
- PAL-N system
- NTSC system
- SECAM system
- Maintenance information and precautions
- Moisture condensation
- If moisture condensation occurred
- Note on moisture condensation
- How to prevent moisture condensation
- Информацnia по ухODу 3a apnapatom И МерыnpedoctopoЖноCTN
- KoHdeHcaZnBlaRn
- Ecn npon30wla KOHdeHcaun Bnarn
- PpimeyaHne NO KOHdeHcaunn BlaHn
- Kak npedotbpaTb KOHdeHcauio Blaar
- Maintenance information
- Cleaning the video head
- HnΦopmaunno yxOdy 3a annapatom
- 甲CTKa BnDeOroJIOBOK
- Playing back a cleaning cassette automatically
- To cancel cleaning
- The video head
- Cleaning the LCD screen
- AByTOMaTHueCKoe BOCpON3BVeHne YnCTaUeKACCetbl
- YTo6bI OTMeHHTb YNCTKy
- Bundeorolovka
- PpmeuHn
- UncTkα 3KpaHa KKД
- Removing dust from inside the viewfinder
- YdaJIeHne 3aIrp3HeHn C BHyTpEHHeN CTOpOHbI BNDONCKaTeJRA
- Caution
- BHMaHne
- Charging the built-in rechargeable battery
- Charging the built-in rechargeable battery:
- Precautions
- Camcorder operation
- 3apKa BCTpoEHNoaKKyMylTopHoi 6aTapeiKn
- 3apraKbBCTpoEHHOaKKymJrTopHO 6aTapeiKn:
- Mepblpeoctopoxhoctn
- 3Kcnnyataunu BnDeokamepbI
- On handling tapes
- Camcorder care
- OTHOCHTeJIbHO 6oBaIeHHa CJeHTaMn
- Yxoid 3a Bndeokamepon
- AC power adaptor
- About care and storage of the lens
- Cetebo aadantep nepemehnHoro Toka
- yxode 3a obbeKTbOBm erO xpaHeHH
- Battery pack
- Notes on dry batteries
- If batteries are leaking
- BaTapeHbIb 6Jok
- PpimeuHnI NO cyxM 6aTapeiKam
- EcIn npOn30uHa yTeUka BHyTpEnHero BeuecTb6aTaapeek
- Video camera recorder
- System
- Input/Output connectors
- LCD screen
- Wireless communication (DCR-IP7E only)
- General
- AC power adaptor AC-L20A
- Battery pack NP-FF50
- "Memory Stick" (DCR-IP7E only)
- Budekamepa
- CnCTema
- CnCTema BnDeo3annc
- Ucnonb3yeMbIe KacceTbi
- CKopoctbJIeHTbl
- Bpem3aHncn/
- ΦopMnpoBaTeIb n3o6paXeHnA
- MHHMaJIbHaI OCBEuJHHOCTb
- Pa3beMbI BXOДhblX/BblXOДhblXCINHANOB
- Aydno/Bndeo BXOJ/ByXoJ
- THe3Do USB
- Bxod/Bbixo.i.LINK (MICROMV)
- 3KpaH KKn
- N3o6paXeHne
- BecnpobodnacCB3b(TolkbO moJeB DCR-IP7E)
- CnCTema CBa3N
- MaKcImaIbHaNcKOpocTb
- MaKcImaJIbHaB BbIXOJHaMoUHOCtB
- MaKcImaJIbHoe pacCToHHe npn CB3N 2)
- CpeHnI npTe6JIeMaH MoUHOCtB
- 6aTaapeHoro 6Ioka)
- Ppnilaraemble npnHaIeXHocTn
- CteBoa aDantep nepemehHOro ToKa AC-L20A
- Identifying the parts and controls
- Camcorder
- Note on the Carl Zeiss lens
- PpIMeuaHne OTHOCHTbHO OsbekTnBa KapI Ceic
- Remote Commander
- To prepare the Remote Commander
- ДлnoiodrotOBKn nyIbTa ДиctahUHOHHorO ynpaBNeHnA
- Notes on the Remote Commander
- PpmeaHnK npIbTy dNCTaHcNoHHoro ynpabJIeHn
- Operation indicators
- LCD screen and viewfinder
- Pa6oyne HndkaTopbI
- 3KpaH KKD n BnDOncKaTeIb
- A, B
- C, D
- E
- F, G, H
- I, J, K, L
- M, N
- O, P, Q
- R
- s
- T, U, V
- W,X,Y,Z
- AлфаВиТьи yka3aTeЛb
- A,B
- D, E, F
- I, J, L
- O, P
- T, U
- B,Γ
- A
- 3
- #
- K
- M
- H
- 0
Brand : SONY
Model : DCR-IP5E
Category : Camcorder