
DCR-IP45E - Camcorder SONY - Free user manual and instructions
Find the device manual for free DCR-IP45E SONY in PDF.

| Product type | Digital camcorder |
| Brand | SONY |
| Model | DCR-IP45E |
| Recording media | MicroMV cassette |
| Video resolution | Standard (480i) |
| Sensor | 1/6 inch CCD |
| Optical zoom | 10x |
| Digital zoom | 120x |
| Screen | 2.5-inch LCD (6.2 cm) |
| Viewfinder | Color electronic |
| Dimensions (L x H x D) | Approx. 150 x 80 x 100 mm |
| Weight (without battery) | Approx. 500 g |
| Power source | Rechargeable InfoLithium battery (NP-FF50) |
| Battery life | Approx. 60 minutes |
| Main functions | Video recording, photo, electronic image stabilizer, zoom, stereo audio recording |
| Input/Output | USB, AV output, microphone input (stereo mini-jack) |
| Maintenance and cleaning | Clean the exterior with a soft dry cloth. Avoid any liquids. |
| Safety | Do not expose to moisture, shocks, or extreme temperatures. |
| Spare parts and repairability | Parts available from SONY after-sales service. Professional repair recommended. |
| General information | Complete user manual (296 pages) available for download. |
Frequently Asked Questions - DCR-IP45E SONY
User questions about DCR-IP45E SONY
0 question about this device. Answer the ones you know or ask your own.
Ask a new question about this device
Download the instructions for your Camcorder in PDF format for free! Find your manual DCR-IP45E - SONY and take your electronic device back in hand. On this page are published all the documents necessary for the use of your device. DCR-IP45E by SONY.
USER MANUAL DCR-IP45E SONY
Digital Video Camera Recorder MICROMV
Operating Instructions
Before operating the unit, please read this manual thoroughly, and retain it for future reference.
HCTPYKUINI NO 3KCNJYATAUNI
Ipeed 3Kcnpnyataauei annapaTa BnHMaTeNbHO npOuTnte, noKaanycta, daHHoe pykoBoDCTBO IN COxpaHnTe erO dJaalbHeHmIX CNpaBOK.

DCR-IP45E/IP55E
Digital
Handycam IP
Network
HandycamIP

InfoLITHIUM


micro Cassette Memory


MEMORY STICK TM

Bluetooth
MPEGMOVIEAD
English
Welcome!
Congratulations on your purchase of this Sony Handycam. With your Handycam you can capture life's precious moments with superior picture and sound quality.
Your Handycam is loaded with advanced features, but at the same time it is very easy to use. You will soon be producing home video that you can enjoy for years to come.
WARNING
To prevent fire or shock hazard, do not expose the unit to rain or moisture.
To avoid electrical shock, do not open the cabinet.
Refer servicing to qualified personnel only.
Memory Stick

N50
NOTICE ON THE SUPPLIED AC POWER ADAPTOR FOR CUSTOMERS IN THE UNITED KINGDOM
A moulded plug complying with BS1363 is fitted to this equipment for your safety and convenience.
Should the fuse in the plug supplied need to be replaced, a 5 AMP fuse approved by ASTA or BSI to BS1362 (i.e., marked with or mark) must be used.
If the plug supplied with this equipment has a detachable fuse cover, be sure to attach the fuse cover after you change the fuse. Never use the plug without the fuse cover. If you should lose the fuse cover, please contact your nearest Sony service station.
For the customers in Europe
CLASS 1 LASER PRODUCT
LASER KLASSE 1
LUOKAN 1 LASERLAITE
KCLASS 1 LASERAPPARAT
Pycckn
Добpo пожаловать!
ПоздравламьмВаспсбретенемДаннои Вида ekамерbl Digital Handycam Фирмbl Sony.СпомошьуВаши Вида ekамерbl Digital HandycamБысможеЗалчateTлдорге Bam МновеняЖИЗНСпразбхODьIM KauectbOM N3OBpaженяИ 3Byka.
BaHa BnDeOkaMepa Digital Handycam OchaueHa ycOBepHcHbOMN fynKzmaM, HO B To Je BpemE ee OeHb JERKO nCnoIb3oBaTb. Bckope Bby 6ydeTe co3daBaTb cEmeHbIe BnDeOpnpaMMbl, KOToPbIMM MoKeTe HacnaXDaTbcr NocJeDyIOuie rObl.
PNEyPPEXDEHNE
Длп п dedOTbpaSeHnBa 630ropaHnI INI ONaCHOCTN 3JIeKTPuYeCKOrO ydapa He BbICTaBnIte annapaT Ha DoJkb IINI Bnary.
Bo n36bexaHne npaJxehn 3JIeKtpnuecknM TOKOM He OTkpBaIte Kopnyc.
3a obcnyxnbAHnem o6paTaBcTToIbKO K KBaINΦuNpOBaHHOMy obcnyxNbAIOUeMy nepcoHany.
Дя nokynateJIe B Ebpone
CLASS 1 LASER PRODUCT
LASER KLASSE 1
LUOKAN 1 LASERLAITE
KCLASS 1 LASERAPPPARAT
BHIMAHNE
3NeKtpomarHHTbIe NOIpy INpEpeJIeHHbIX
YactOTax MOryT BnIaTb Ha KaYeCTBO
N3O6paXeHn I 3ByKa DaHHo NcPpOBoB
BnDeOkamepbl.
3To n3dennepnooI npOBepky Ha COOTBETCTBNE Tpe6OBAHnM DnpeKTHBbI EMC dIy IcN0JIb3OBAHnRA CoeDnHTeNbHbIX Ka6eNei, Kopoye 3 MeTPOB.
PpeynpexdHne
Ecni cTatnueckoe 3neKtpnuecTBo nIIN 3neKtpomarHetn3m npNBeTeK nIpepbBaHIO (HeBbIOnJIHeHIO) nepeaun daHHbIX,TO nepe3anycntte npNKlaHnyo nporpaMMy nIIN oTcoeHNHTe n PoDCoeDHNITE USB-ka6ebb ONrTb.
ATTENTION
The electromagnetic fields at the specific frequencies may influence the picture and sound of this Handycam.
This product has been tested and found compliant with the limits set out in the EMC Directive for using connection cables shorter than 3 meters (9.8 feet).
DCR-IP55E only

Hereby, Sony Corporation, declares that this Handycam is in compliance with the essential requirements and other relevant provisions of Directive 1999/5/EC.
Countries and areas where you can use network functions are restricted. For details, refer to the separate Network Operating Instructions.
DCR-IP45E only
For the customers in Germany
Directive: EMC Directive 89/336/EEC. 92/31/EEC
This equipment complies with the EMC regulations when used under the following circumstances:
Residential area
Business district
Light-industry district
(This equipment complies with the EMC standard regulations EN55022 Class B.)
ToIbKO IaI MoJoI DCR-IP55E
BbMOKTe NcNoJIb3OBAt cyHKuIN DoCTyNA K cETn TOnIbKO B HeKOToPbIX CToPAHx IN PerNoHax. BoJee nOpRo6HbIe CBeDeHnC M. B OTeJIbHOIn HCTpyKUIN NO 3KcNpYaTaUIN cETn.
ToIbKO IaI MoeJI DCR-IP45E


- Recording moving pictures on tapes (p. 39)
-Playing back tapes (p. 55) - Recording still images on the "Memory Stick" (p. 143)
- Recording moving pictures on the "Memory Stick" (p. 165)
Viewing still images recorded on the "Memory Stick" (p. 173)
Viewing moving pictures on the "Memory Stick" (p. 177)
Viewing moving pictures recorded on tapes using the i.LINK cable (p. 196)
(The i.LINK of this camcorder adopts the MM format only. It does not adopt the DN or the MPEG2 format of DVHS.)
- Viewing images recorded on the "Memory Stick" using the USB cable (p. 214, 219)
Viewing moving pictures recorded on tapes using the USB cable (p. 208)
- Capturing images on your computer from your camcorder using the USB cable (p. 210)

Accessing the Internet, sending/ receiving your e-mail. For details, refer to the Network Function Operating Instructions supplied with your camcorder. (DCR-IP55E only) (p. 221)
Other uses
Functions to adjust exposure in the recording mode
- BACK LIGHT (p. 48)
NightShot/Super NightShot/Colour Slow Shutter (p. 49) - Recording with the flash (p. 65, 148)
PROGRAM AE (p. 81) - White balance (p. 69)
- Adjusting the exposure manually (p. 84)
- Flexible Spot Meter (p. 85)
HOLOGRAM AF (p. 150)
Functions to give images more impact
- Digital zoom (p. 44). The default setting is set to OFF. (To zoom greater than 10 × , select the digital zoom power in D ZOOM in the menu settings.)
Fader (p. 73) - Picture effect (p. 76)
- Digital effect (p. 78)
- Title (p. 114, 120)
- MEMORY MIX (p. 158)
Functions to give a natural appearance to your recordings
Sports lesson (p. 81)
- Landscape (p. 81)
- Manual focus (p. 87)
- Spot Focus (p. 89)
Functions to use after recording on a tape
END SEARCH (p. 54)
DATA CODE (p. 57)
-MULTI-PICTURE SEARCH (p.98)
- Tape PB ZOOM (p. 96)
- TITLE SEARCH (p. 102)

3aIncb DnBxKyuXcxn 13o6paXeHn HaJeHTbl (ctp.39)
Bocnpon3BeDHeNeIeHT (CTp. 55)
- 3aɪnscb HeɪnoDVBIXhBIX nɪðþaːkæŋn Ha "Memory Stick" (cɪp. 143)
- 3aɪnçb dBɪŋkʌyɪnxcər nɪzɔpɑɡeɪnɪ
ha "Memory Stick" (cɪtp. 165)
-ПюсмOTР HeNoДВИХнБИx
иЗБражЕн, ЗАпSCаHHБИХ на
"Memory Stick" (cTp. 173)
Плосмовдвжушихсизобрахенни“Memory Stick" (cTp. 177)
-ПюсмOTРДВИЖУSHСЯ
n3OBpaxeHи,ЗаиcaHbIXHaJIeHTy,
cIcnoIb3OBAHneM Ka6eIa I.LINK
(cTp.196)
(CtahdapT i.LINK dAnHoN
BnDEOKaMEpbI IOxOJNT TOnbKO K
ФорMaTy MIV.
MIMY. ON He IOxOJNT K
ФорMaTy DNY mIn ΦopMaTy MPEG2
CTAHdapTa DVIS.)
-ПюсмOTРиЗОБрахжел,
Занисаньх на "Memory Stick", с
инользоваимем кабеля USB (cTp.
214, 219)
-ПюсмOTРДВИЖУССЯ
нзобрахжени,Записнных на ЛeHTу,
сInsпльбоваиме Кабеля USB (стр.
208)
BBoD n3o6paXeHn B BaW KOMPbIOpTe p C BaWe BnDeOkaMepbl c NMOuBIO KaBeJIa USB (cTp. 210)

IocTyB INHTepHeT,OTnpaBka/NoJyHneBaSei 3JeKToPOnHOI NoTbI.3aNoJyHneEM6OJIe IIOpObHOINHOpMaUIno6paTnTeCbK INcTHpyKUmNIO NcIOJIb3OBAHNIO CeTeBbIXfynKUIM, pniJaRaEmbIX K BaWeBnDeokAmpe. (ToIbKO MoJeIb DCR-IP55E) (cTp.221)
PpOyne npMHeHnA
- Recording on a tape 14
- Recording on a "Memory Stick" 16
Getting started
Using this manual 22
Checking supplied accessories 25
Step 1 Preparing the power supply..... 26
Installing the battery pack. 26
Charging the battery pack. 27
Connecting to a wall socket 30
Step 2 Setting the date and time 31
Step 3 Inserting a cassette 35
Step 4 Using the touch panel. 37
Recording - Basics
Recording a picture 39
Shooting a backlit subject
- BACK LIGHT 48
Shooting in the dark
- NightShot/Super NightShot/
Colour Slow Shutter 49
Self-timer recording 52
Checking the recording
- END SEARCH 54
Playback - Basics
Playing back a tape 55
To display the screen indicators -Display function 57
Viewing the recording on TV 61
Advanced Recording Operations
Recording still images inCAMERAmode 63
Adjusting the white balance manually ... 69
Using the wide mode 71
Using the fader function 73
Using special effects -Picture effect 76
Using special effects Digital effect 78
Using the PROGRAM AE 81
Adjusting the exposure manually 84
Using the spot light-metering mode - Flexible Spot Meter 85
Focusing manually 87
Using the spot focus mode -Spot Focus. 89
Using the viewfinder 90
AdvancedPlayback Operations
Playing back a tape with picture effects ... 92
Playing back a tape with digital effects.. 94
Enlarging images recorded on tapes - Tape PB ZOOM 96
Searching for a scene
- MULTI-PICTURE SEARCH 98
Searching the boundaries of recorded tape by title - TITLE SEARCH 102
Searching a recording by date -DATE SEARCH 103
Editing
Dubbing a tape 105
Recording video or TV programmes .... 109
Superimposing a title 114
Making your own titles 120
The Micro Cassette Memory 124
Labelling a cassette
"Memory Stick" Operations
Using a "Memory Stick"
- Introduction 127
Recording still images on a "Memory Stick"
-Memory photo recording 143
Recording an image from a tape as a still
image 154
Superimposing a still image in
a "Memory Stick" on an image
-MEMORYMIX. 158
Recording moving pictures on the
"Memory Stick"
-MPEGmovie recording. 165
Recording a picture from a tape as a
moving picture 169
Viewing a still image
-Memory photo playback 173
Viewing a moving picture
-MPEGmovie playback 177
Copying still images recorded on the
"Memory Stick" to a tape 180
Enlarging still images recorded on the
"Memory Stick"
-MemoryPB ZOOM 182
Playing back images continuously
- SLIDE SHOW 184
Preventing accidental erasure
-Image protection. 186
Deleting images - DELETE 188
Writing a print mark - PRINT MARK .... 192
Viewing Images Using your Computer
Viewing images on your computer
- Introduction 194
Connecting your camcorder to your
computer using the i.LINK cable
-For Windows users 196
Connecting your camcorder to your
computer using the USB cable
-For Windows users 198
Viewing images recorded on a tape on your computer
-For Windows users 208
Viewing images recorded on a "Memory
"Stick" on your computer
-For Windows users 214
Connecting your camcorder to your
computer using the USB cable
-For Macintosh users 217
Viewing images recorded on a "Memory
Stick" on your computer
-For Macintosh users 219
Using the Network function (DCR-IP55E only)
Accessing the network 221
Customising Your Camcorder
Changing the menu settings 223
Troubleshooting
Types of trouble and how to correct trouble 241
Self-diagnosis display 248
Warning indicators and messages 249
Additional Information
Usable cassettes 261
About the "InfoLITHIUM" battery pack 263
About i.LINK 266
Using your camcorder abroad 269
Maintenance information and precautions 270
Specifications 279
Quick Reference
Identifying the parts and controls. 283
Index 293
OchOBHbIe FyHKcIMN 6
BVeDHeNc
- OchoBhIe onepaunn 12
PykoBoIDCTBO no 6bICTpomy 3anycky
-3aIncbHaJIeHTy 18
-3aHnscbHa“Memory Stick” 20
Iodrotobka K 3KcnIyatauIN
IcnoIb3OBAHne DaHHoro pyKOBoDCTBa 22
PpOBepKa npIlaRaembIX npINaIeXHocTei 25
IyHKT1IIOJROTOBkaNCTOCHNkA nHTAHIA 26
UctahOBka 6aTaapeHoro 6noka ....26
3apnka 6aTaapeHoro 6noka. 27
IocoeHHneK cTeBOi
po3eTke. 30
IyHKT 2 YcTaHOBka DaTbI N BpeMeHn .. 31
IyHKT 3 YcTaHOBka KacCEtbl 35
IyHKT 4 IcnoIb3ObaHne ceHCOPHOI naHei 37
3aInscb - OCHOBhbIe NOJIOXeHnA
3ainncb n3o6paXeHnA 39
CbeMka oBekTOB C 3aJHei
noDCBeTko-BACKLIGHT 48
CbemKa B TEMHOTE-HouhAcbemKa/
Houha cynepeMka/LbTeHa
CbeMka C MeIeHHbIM 3aTbOpom ... 49
3aHnCb no TaMepy camo3anycka .. 52
Поберка заимс - END SEARCH .... 54
Cnppon3BedeHne
- OCHOBHbIe NIOJoxKeHnA
Bocnpon3BeJeHne JeHTbI 55
Bocnpoun3BeDeHneJeHTbICuOpOBbIMN 3oΦeKtAmn 94
YBeJIuHHe He 3aIncaHHbIX Ha IeHTbl N3o6paXeHn -FyHKcIa PB ZOOM JeHTbl.96
OTbickaHne 3nI3oJa -MULTI-PICTURE SEARCH.98
Pa3HOBUNHOCTHHeNCnPaBHOCTeH MeTODbI IN yCTpaHEHNA 251
Hdkaqma cmoDnaHoctnK 258
PpeDynpexKaIOUne INDnKaTOpbln coo6uHnra 259
DOnOpHnTeNbHa NnΦopMaζη
IcnoJb3yeMbIe KacceTbl 261
O 6aTapeiHOM 6JIOKe "InfoLITHIUM" .... 263
O cTaHdapTe i.LINK 266
IcnoIb3OBAHnE BaSei BInDeokamepb 3a rpaHncei 269
INHΦopMaZnI NO yXoY 3a aannapatom mEpbI npdeOCTOpOXHocTn .270
Texnueckne xapaKtepcntukn 281
OnepaTnBbI CNpaBOuHnK
6o3naHHe uacteH npreYJrTopoB .... 283
AilpaBnThb yka3aTeIb 294
Introduction - Basic operations
This section describes the basic operations to operate the camcorder.
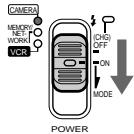
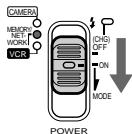
How to turn on the power and select the mode
To supply power for the camcorder, see "Step 1" Preparing the power supply" on page 26.
Kak BKJIIOUHTb NITaHne n Bbl6paTb peXIM
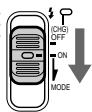
(1) Slide the POWER switch down while pressing the small green button, then release your finger.
The camcorder is turned on, and then the camcorder turns to the CAMERA mode so that the CAMERA lamp lights up.
(2) Slide the POWER switch down. Each time you slide it down, the mode changes as follows and corresponding mode lamp also lights up.
CAMERA Use this mode when you record on a tape.
MEMORY/NETWORK (DCR-IP55E)
MEMORY: Use this mode when you record on a "Memory Stick," or play back or edit an image in a "Memory Stick."
NETWORK (DCR-IP55E only):
Use this mode when you use the network function. For details, refer to the supplied network function operating instructions.
VCR Use this mode when you play back or edit an image recorded on a tape or "Memory Stick".
(1)ПepeДинБтЕпeрклочаTeь POWER Bn3, ydepxmbaHaxaToM MaNeHbkyIO 3eJeHyIO KONKу, a 3aTeM OTNcyCTnte NaIeU. BuDeOkamepa BKNIOHTcR, a 3aTeM yctaHOBNTcB pexm CAMERA, B pe3yIbTaTe Yero IamNoquka CAMERA BblCBETNTCRA.
(2)ПepeДВиНБтЕпeрКлЮчаTeь POWER BnH3. BcKm pa3, KOrJa Bbl pepeBnIraeTe erO BnH3,peXIM n3MeHЯeTc SNeDyIooM mOBpa3OM,И lamNoUka COOTBeTcTBYIOUeTopeXIMa TaKKe BbICBeuNBAeTc.
CAMERA IcnoIb3yIte 3OT peXIM npn BblIOJIHeHIN 3aIncn HaJeHTy.
MEMORY/NETWORK (mojeь DCR-IP55E)
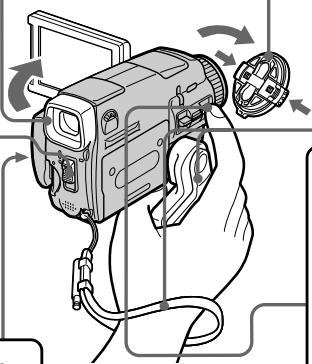
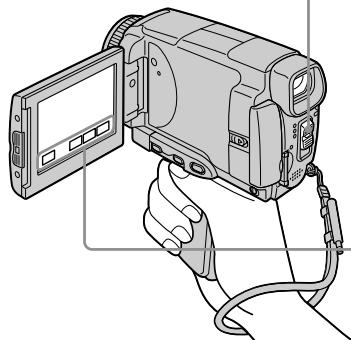
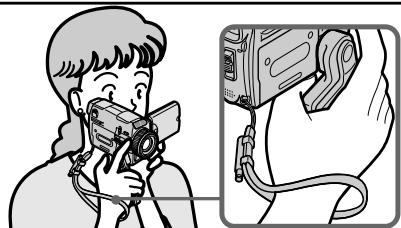
The grip on this camcorder can be moved to three positions. Turn the grip to the appropriate position depending on your purpose.
Turn the grip to this position when you store your camcorder.
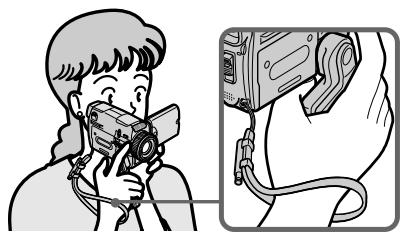
Recording position
Turn the grip until it comes to a steady position or where it is easy to grip in order to perform operations such as the zoom function. Then hold your camcorder through the wrist strap to prevent the camera from dropping.
Cassette inserting/ejecting position
Turn the grip to this position so that the cassette lid can be seen completely.
Note
When inserting or ejecting the cassette, be sure to turn the grip to the cassette inserting/ejecting position. Otherwise, the cassette cannot be inserted or ejected.
IoloxeHne yctahOBKn
IonoXeHne yCTaHOBKn/IN3BJeHnKacceTbI
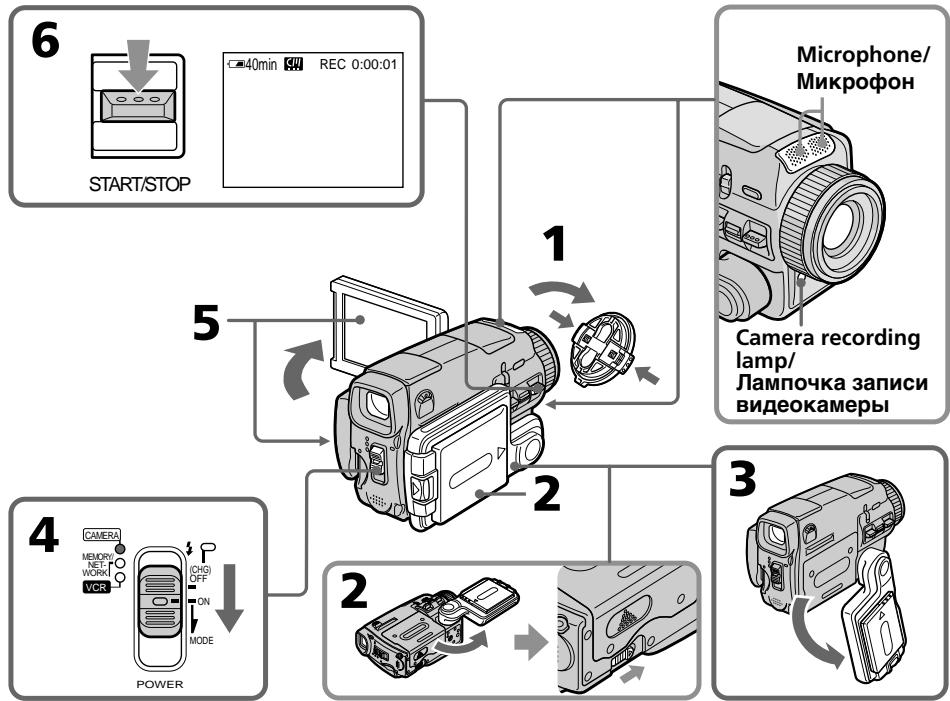
Quick Start Guide - Recording on a tape

This chapter introduces you to the basic features to record pictures on tepes of your camcorder. See the page in parentheses "() for more information.
Turn the grip to the recording position, and hold your camcorder through the wrist strap to prevent the camera from dropping as illustrated.
1 Connecting the mains lead (p. 30)
Use the battery pack when using your camcorder outdoors (p. 26).
Connect the plug with its mark facing up.
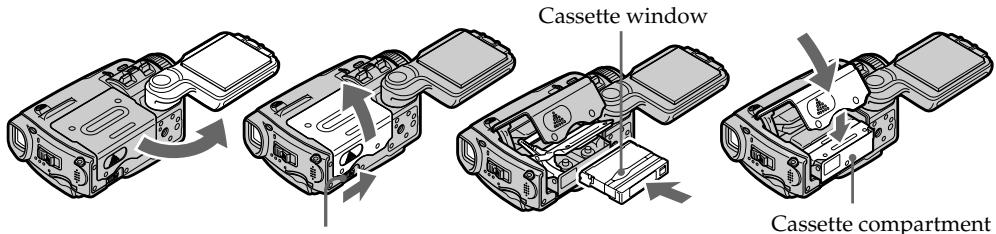
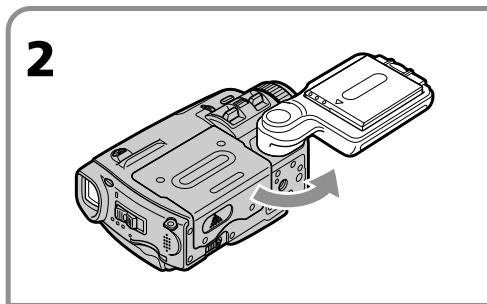
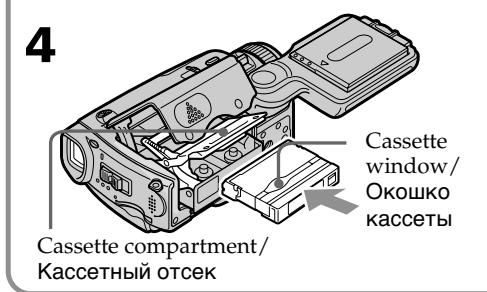
2 Inserting a cassette (p. 35)
1 Turn the grip to the cassette inserting/ ejecting position. Otherwise, the cassette cannot be inserted or ejected.
Slide OPEN/EJECT in the direction of the arrow and open the lid.

Push the middle portion of the back of the cassette into the cassette compartment. Insert the cassette in a straight line deeply into it with the cassette window facing out.
Press the cassette compartment lightly to close. After the cassette compartment goes down completely, close the lid until it clicks.
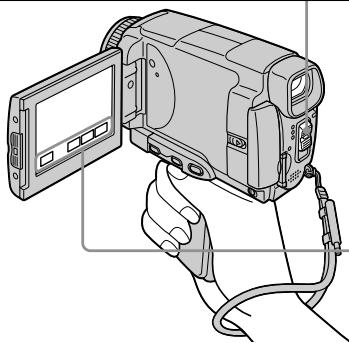
Viewfinder
When the LCD panel is closed, use the viewfinder.
Adjust the viewfinder lens to your eyesight (p. 43).

Set the POWER switch to CAMERA. The CAMERA lamp lights up.

Slide OPEN in the direction of the mark indicated on the camcorder to open the LCD panel. The picture appears on the LCD screen.

Remove the lens cap.

Turn the grip to the recording position, and hold your camcorder through the wrist strap.

Press START/STOP. Your camcorder starts recording. To stop recording, press START/STOP again.

START/STOP
When you purchase your camcorder, the clock setting is not set up yet. Set the clock setting before recording (p. 31).

Monitoring the playback picture on the LCD screen (p. 55)

Set the POWER switch to VCR.
The VCR lamp lights up.
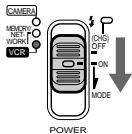
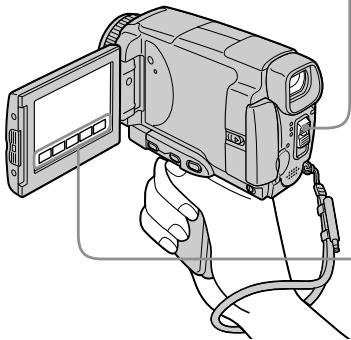

Press l of the touch panel to rewind the tape.


Press 11 of the touch panel to start playback.

Note
When using the touch panel, press operation buttons lightly with your thumb or the supplied stylus (DCR-IP55E only) supporting the LCD screen from the rear of it. Do not press the LCD screen with sharp objects other than the stylus supplied (DCR-IP55E only).
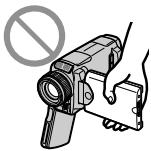
Note
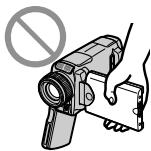
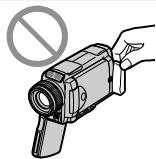
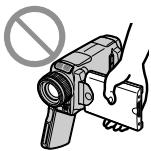
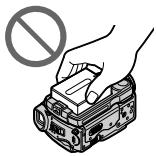
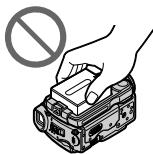
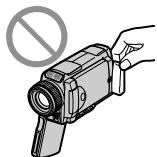
Do not pick up your camcorder by the LCD panel, the battery pack, the flash or the jack cover.
Quick Start Guide – Recording on a "Memory Stick"
This chapter introduces you to the basic features to record on a "Memory Stick" of your camcorder. See the page in parentheses () for more information.
Turn the grip to the recording position, and hold your camcorder through the wrist strap to prevent the camera from dropping as illustrated.
1 Connecting the mains lead (p. 30)
Use the battery pack when using your camcorder outdoors (p. 26).
Connect the plug with its mark facing up.
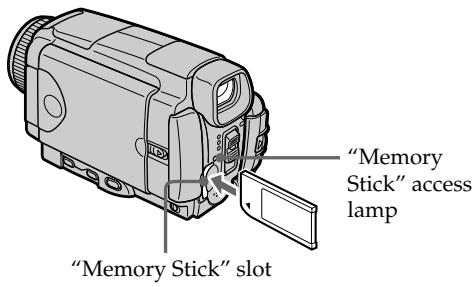
2 Inserting a "Memory Stick" (p. 130)
Position the mark on the "Memory Stick" as illustrated and insert a "Memory Stick" in the "Memory Stick" slot as far as it can go.
Viewfinder
When the LCD panel is closed, use the viewfinder. Adjust the viewfinder lens to your eyesight (p. 43).

Set the POWER switch to MEMORY/ NETWORK (DCR-IP55E only). The MEMORY/NETWORK lamp lights up.

Slide OPEN in the direction of the mark indicated on the camcorder to open the LCD panel. The picture appears on the LCD screen.
When you purchase your camcorder, the clock setting is not set up yet. If you want to record the date and time for a picture, set the clock setting before recording (p. 31).

Remove the lens cap.

Turn the grip to the recording position, and hold your camcorder through the wrist strap.

Press PHOTO lightly. When the green mark stops flashing, then lights up, you can record a still image.
PHOTO

Press PHOTO deeper. The image when you pressed PHOTO deeper will be recorded on a "Memory Stick".

PHOTO

Monitoring the still image on the LCD screen (p. 173)

Set the POWER switch to MEMORY/NETWORK (DCR-IP55E only) or VCR. The MEMORY/NETWORK or VCR lamp lights up.

Press PLAY or PB. The last recorded image is displayed


Note
Do not pick up your camcorder by the LCD panel, the battery pack, the flash or the jack cover.

PykoBoCTBO IO 6bICTpOMy 3aIycKy - 3aIncb Ha IeHTy
B daHnoI rnaBe npBbeHeOcHbIe fynKcnn Bauei BnDEokamepbl, kacaIOUneec3aIncn 3IO6paKeHN HaJeHTy. PIOpO6HbIe CBeDEHN npBbeHeHa cTpaHnce B KpyrIbIX cKOBkax "( ). " IObepHnte pyKoTky 3axBaTa B nOLOXeHne 3aIncn, uYepKbBaTe BaSy BnDEokamepy, pONpCTNbPyKcBO3b peMeH dIn 3axBata, KaK nOKa3aHO Ha pNCyHke, BO m36exKaHne naDeHN BnDEOkamepbl.
1 ПодсоeДиненue npOBODa элжКТрОпNTаHЯ (cTp. 30)
BnDeokamepa HauHET 3aNNc. JnA OCTaHOBKn 3aINcN HaxMNTe KHONKY START/STOP eue pa3.

START/STOP
noJoxHe MEMORY/NETWORK (ToIbko
moedJIb DCR-IP55E) nIIN VCR.
Ламочka MEMORY/NETWORK vCR
BbICBETNTCA.

POWER

HaxmTe KhONky PLAY nnn
PB.
Ha 3kpahe oTo6pa3ntc8
IocJIeJHee 3aIncaHnOe
n3o6paKeHne.
PLAY

P B
ПРИМЕЧАНИС
He noDHMaIe Bauy BnDEOKAMepy, B3BbUnCb naHeb KKД, 6aTapeHb 6Jok, BCbIuKу nI IN KpbI rHe3da.
Using this manual
The instructions in this manual are for the two models listed in the table below. Before you start reading this manual and operating your camcorder, check the model number by looking at the bottom of your camcorder. The DCR-IP55E is the model used for illustration purposes. Otherwise, the model name is indicated in the illustrations. Any differences in operation are clearly indicated in the text, for example, "DCR-IP55E only".
As you read through this manual, buttons and settings on your camcorder are shown in capital letters.
e.g. Set the POWER switch to CAMERA.
When you carry out an operation, you can hear a beep to indicate that the operation is being carried out.
Types of differences
| DCR- | IP45E | IP55E |
| Mark on the POWER switch | MEMORY | MEMORY/ NETWORK |
| Network function | — | ● |
- Provided
Not provided
ИсpenьзованецдаHHORO pyKOBOdCTBa
HnCTpykCmN B daHHOM pyKOBOcTBe npBBeDeHbI dIy DByx MoJeIe, yKa3aHHbIX B Ta6JInce HnKe. IpeEi TcEHm E daHHoro pyKOBOcTBA n 3KcPnyatauNei BaWei BnDEOKaMepbl npOBepbTe HOpem MOeIi, NocMOpteB Ha HnKHO CTopoHY BaWei BnDEOKaMepbl. MoJelb DCR-IP55E RaJIeTcB moJIbHO, IcNoIb3yeMoI dy INIIOCTpaTHBHX cIeJIe. B npOTNBHom Cnuyae HauMeHOBaHne moJen yKa3bIbAEtCAHa PnCYHKax. IIo6bIe OTNIYB a3KcNPyatauIN rCHO OTO6paxaOTcB TKeCTe, HanpIMep, "ToIbKO moJeB DCR-IP55E".
PnUyTeHn DaHOro pyKOBoIcTbA yuHTbIbAaTe, UTO KHOKNi uCTaHOBKn Ha BaSei BUNDeOKaMepe noka3aHbI 3aJIaBHBIMn 6yKBaMn.
Hanp. YctahOBuTe nepeKluOaTeIb POWER B noJoxeHne CAMERA.
PnBbIOnHeHnOePaunHa BnDeOkamepe BbCMOKTe yCbIbTaB 3ymMepHycHnA, nOaTBepXdaIOuNn BblONHeHne OepauN.
Tunbl pa3nnu
IpeymcMTopeHo
He npeducmOTpeHo
Note on the MICROMV format
III
MICROMV Your camcorder is based on the MICROMV format. You can only use MICROMV cassettes with your camcorder.
- Records and plays back for about 60 minutes with equal quality when compared to DV (digital video).
- The Micro Cassette Memory feature is provided with all MICROMV cassettes. The camcorder can access any scene easily using the memory (MULTI-PICTURE SEARCH function).
- Adopt the MPEG2 format as a data compression method. This format is the same as the one for DVD (digital versatile disc). Records in 12 Mbps bit rate to obtain a higher quality of image.
- Transition between the last scene you recorded and the next scene is the still image. This is not malfunction.
The mark is indicated on the MICROMV cassette.
Note on TV colour systems
TV colour systems differ from country or area. To view your recordings on a TV set, you need a PAL system-based TV.
Copyright precautions
Television programmes, films, video tapes, and other materials may be copyrighted.
Unauthorized recording of such materials may be contrary to the provision of the copyright laws.
Ппмецни по системацьETHORO TEJIeBndeHIN
CnCTeMbI ZBETHORo TEeBnDEHn OTOHuaOTcB 3aBnCmOocTn OT oBnactn.ДЯ npocMOTpa Baunx 3anucseHa 3Kpane TeBn3Opa Bam Heo6xoDnMo nCnoJb3OBaTb TeBn3Op, OCHOBaHHbI Ha CnCTeMe PAL.
Пре dioctepexeHne o6 aBTopcKom npaBe
TeIeBn3NoHbIe IpOgpaMMbl, KINHOJIbMbbl, BInDeoJeHTbI IN DpyrHe MaTePnaJIb MoYr 6bITb 3aUuIeHbI aBTOpCKM npaBOM. HeIiueH3npoBaHHa 3aNcB TaKx MaTePnaJIOB MOKeT IpOTNbOpEHTb NIOJoxKeHnR M 3aKOHOB 0b aBTOpCKOM npaBe.
Precautions on camcorder care
Lens and LCD screen/finder
- The LCD screen and the finder are manufactured using extremely high-precision technology, so over 99.99% of the pixels are operational for effective use. However, there may be some tiny black points and/or bright points (white, red, blue or green in colour) that constantly appear on the LCD screen and the finder. These points are normal in the manufacturing process and do not affect the recording in any way.
- Do not let your camcorder get wet. Keep your camcorder away from rain and sea water. Letting your camcorder get wet may cause your camcorder to malfunction. Sometimes this malfunction cannot be repaired [a].
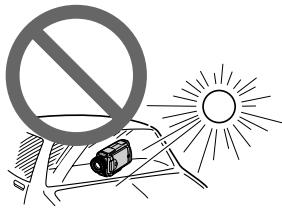
- Never leave your camcorder exposed to temperatures above 60^ (140°F), such as in a car parked in the sun or under direct sunlight [b].
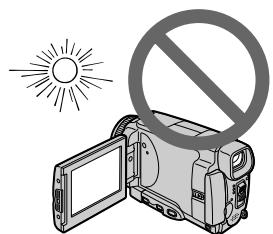
- Be careful when placing the camera near a window or outdoors. Exposing the LCD screen, the finder or the lens to direct sunlight for long periods may cause malfunctions [c].
- Do not directly shoot the sun. Doing so might cause your camcorder to malfunction. Take pictures of the sun in low light conditions such as dusk [d].

[a]

[c]
MepblnpedocTopoXHocTn npu yxoJe 3a Bndeokamepo
ObekTbN 3KpaH KKnBvDOnckaTeIb
3KpaH KKD n BvDOnCKaTeJIb N3rOToBJeHbI C NOMOuBbO BbICOKOpneu3HOHHO TexHOJorHn, TaK TcTO CbBiEe 99.99% 3JeMeHTOB N3o6paXeHnpePdHa3HaueHbI DnA 3ΦΦeKTHBHO McNOJIb3OBAHn. ODAHko Ha 3KpaHe KKД n B vDOnCKaTeJIe MOryT NOCToRHHo NOBnTbcra KpOSeUHbI ueHbI WJIN JRPKne UBeTHbI ToQKn (6eJIbe, KpachIbe, CNHHe NIn 3eJIeHbI. POnBLaHHe 3TxN ToeK BnONHe HOpMaJIbHO dJI NaPoceCa CBEmKn HNKoM O6pa3OM He BnIReT Ha 3aNNCbIbAemoe N3o6paXeHne.
- He Дусякайу, Утобы Видаокамера CTановлась влжнoor. Ррдoxраиму Te Видаокамеру OT DoЖДИ MOPСОВ BODby. EcInи Ви hamочite Видаокамеру, зTO может npinвесг К Инсправноannapata. Иногда 3Та ИнсправноHe может OKa3aTbCS HeyctpaHIMoI [a].
- HNkorda He octaBnIte Bndeokamepy B MeCTe C TempeaTpyo CBblue 60^ ,KaK, NaPImep,BAbTOMObnE,OCTaBnEHOM Ha COINHcne NIOI NOI pRmblm COJIHeuHbIM CBETOM [b].
- BydTe BHNMaTeIbHbI, KOrDa ocTabIaReTe BVdeOKaMepy B6n3u OkHa nIIN BHe NOMeueHna. DeCTBne nprMoRO coJIHeuHoro CBeta Ha 3KpaH KKД, BUnOnCKaTeIb nIIN O6BeKTnB B TeUeHne dNITeJIbHbIX npOMeJxTyKOB BpeMeHn MoXeT Bbl3BaTb HeNCnpaBHOCTn [c].
He ChImaIte CoINHcE HeNOCpeDCTBeHNHO.3To MOKTe PnIBeCTN K HEnCnpABHOctu BInDEOKaMEpbI. BbINOJIHNe TcBEmKy CoINHca BVcIOBIAx HN3KO OCEueHNOCTn, HApIMep, npn 3akaTe [d].
[b]
[d]
Make sure that the following accessories are supplied with your camcorder.
Y6eIntecb, YTO CNEyIOUne IpnHa,IaNEXKHOCTn npnilaraIOTcK BaWei BnuDeokampe.
| 1 | 2 | 3 | 4 |
| 5 | 6 | 7 | 8 |
| 10 | 11 | 12 | 13 |
1 AC-L20A AC power adaptor (1), the mains lead (1) (p. 27)
2 NP-FF50 battery pack (1) (p. 26, 27)
3 A/V connecting cable (1) (p. 61, 105, 110, 171)
4 Wireless Remote Commander (1) (p. 289)
5 R6 (Size AA) batteries for the Remote Commander (2) (p. 290)
6 Lens cap (1) (p. 39), String (1) (p. 288)
7 "Memory Stick" (1) (p. 127)
USB cable (1) (p. 194)
[9] CD-ROM (SPVD-008 USB Driver) (1) (p. 198, 217)
CD-ROM (MovieShaker Ver.3.1 for MICROMV) (1) (p. 196)
11 Battery terminal cover (1) (p. 26)
12 Cleaning cloth (1) (p. 272)
13 Stylus (DCR-IP55E only) (p. 222)
14 21-pin adaptor (1) (p. 62) European models only
Contents of the recording cannot be compensated if recording or playback is not made due to a malfunction of the camcorder, storage media, etc.
1 CeTeBoi aAnTep nepeMeHHoro ToKa AC-L20A (1), npoBoI 3JIeKTPoNtAHnIa (1) (ctp. 27)
2 BaatarpeiHbIb 6Jok NP-FF50 (1) (CTp. 26, 27)
3 CoeHHnteHbHbKabEJIyauNo/BnIeO (1) (cTp. 61, 105, 110, 171)
4 BeCnpoBOHbI nyIbT dNCTaHcNoHHoro ynpaBHeHn (1) (ctp. 289)
[BaTapei Ka pa3mepa R6 (pa3mepa AA) ]IyIyIbTa InCTaHcNHOHOrO ynpabLeHn (2) (ctp. 290)
6 Kpbiika oBbekTnBa (1) (cTp. 39), lHypok (1) (cTp. 288)
7 "Memory Stick" (1) (ctp. 127)
8 Ka6eJb USB (1) (cTp. 194)
9 CD-ROM (SPVD-008, Дразов EP USB) (1) (ctrp. 198, 217)
10 CD-ROM (MovieShaker Ver.3.1. Деля MICROMV) (1) (ctp. 196)
11 KpbiIka 6aTapeHOro rHe3da (1) (cTp. 26)
12 JIoKyt YIcTЯeI TkaHn (1) (ctp. 272)
13 Пера (Толъко морель DCR-IP55E) (1) (cTp. 222)
14 21-wTbIpbKOBbI aJaANTep (1) (cTp. 62) ToIbKO eBpOneuCKne MoJeTI
CopejkanHe 3aIncn He MoXeT bItb KOMpeHcIpOBAHO B Cnyuae,ecII 3aIncb IINBOCpON3BeDeHne He BblIOJIHeHb I3-3a HEnCpPABHOCTN BIDeOKaMepbl,HocNTeJIa DAnHbIX N.T.I.
Step 1 Preparing the power supply
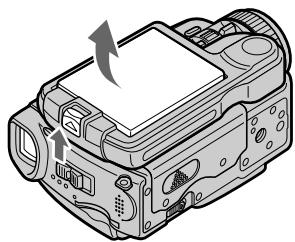
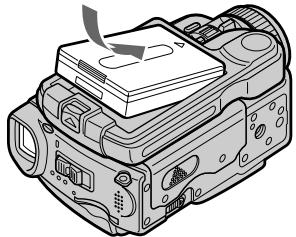
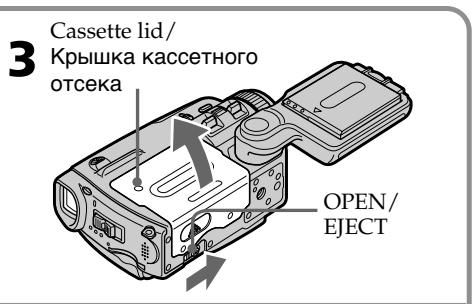
Installing the battery pack
(1) Lift BATT (battery) RELEASE in the direction of the arrow to release the battery terminal cover.
(2) Insert the battery pack in the direction of the arrow until it clicks.
UcTaHOBka 6aTapeHoro 6Joka
(1)ПоднIMITEpbIyar BATT (6aTapeи) RELEASEB HappaBJIeHm CtpeJKN,чTo6bl ocBO6OДNTb KpbIshKу 6aTapeHOro rHe3da.
(2)YcTaHOBnTe 6aTapeHbIb 6JOK B HAnpBaJIeHmCtpeJIKN, NOKa OH He 3aUeJIKHTcI.
1
2
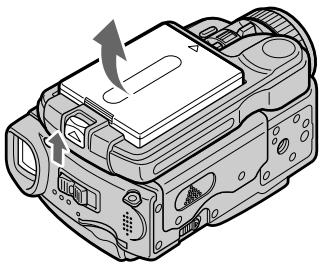
To remove the battery pack
The battery pack is removed in the same way as the battery terminal cover.
ДлСНТИЗбатeРиHOrOБLOka
BaTapeHbIb 6nOK CHNMAeTcra TaKIM Xe 06pa3OM, KaK N KpbIwKa 6BaTapeHOro rHe3da.
Battery terminal cover
To protect the battery terminals, install the battery terminal cover after the battery pack is removed.
Installing the battery pack
Make sure that the battery pack is properly installed. Check also the battery pack is not attached to your camcorder askew.
Kpbiuka 6aTaepenHoro oTceKa
UcTaHOBtKe KpbIuKy 6batapeHoro rHe3da nocNe CHaTn8 6batapeHoro 6Loka dJa 3aunTbI 6batapeHbIXrHe3d.
YctaHObKa 6atapeHoro 6noka
Y6eIITecbBTOM,70To 6aTapeHbI 6loK yCTaHOBJIe HnIeXaUIMo6pa3OM.PpOBepTe TaKKe,70To6bl6aTapeHbI 6lOK He 6bl npIKpeIIe K BnDEOkamepe HepOBHO.
Charging the battery pack
Charge the battery pack before using your camcorder.
Your camcorder operates only with the "InfoLITHIUM" battery pack (F series).
See page 263 for details of the "InfoLITHIUM" battery pack.
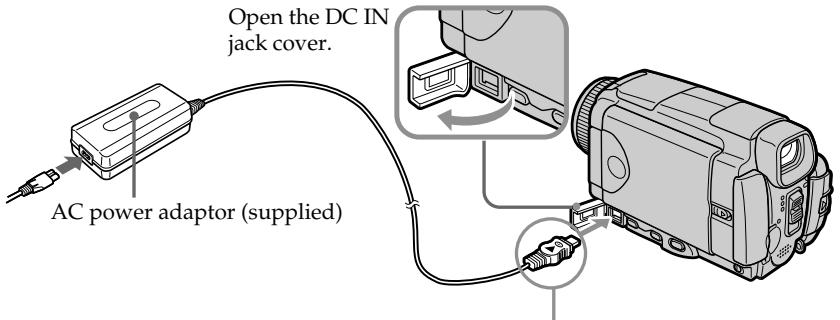
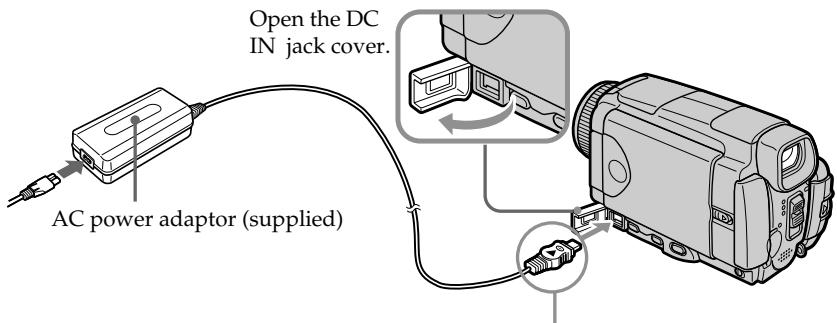
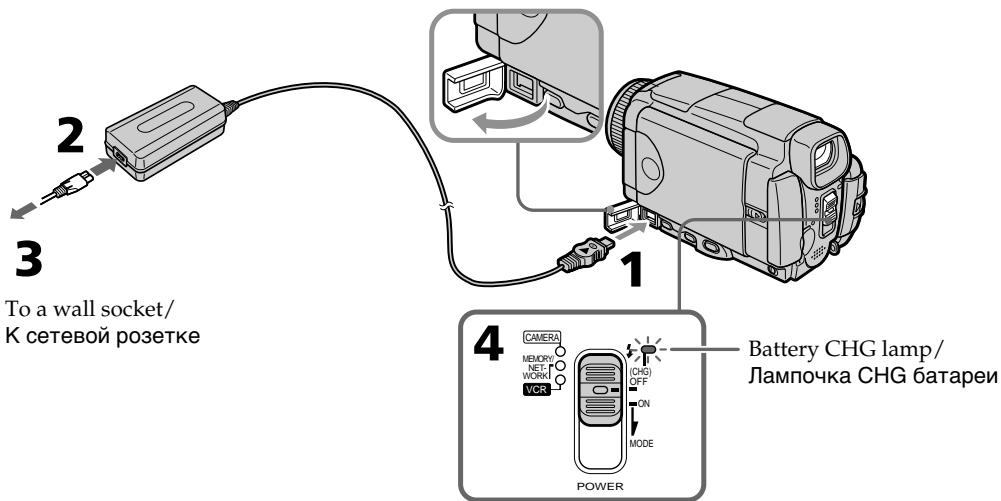
(1) Open the DC IN jack cover and connect the supplied AC power adaptor to the DC IN jack on your camcorder with the plug's mark facing up.
(2) Connect the mains lead to the AC power adaptor.
(3) Connect the mains lead to a wall socket.
(4) Set the POWER switch to OFF (CHG). The battery CHG lamp lights up when the charge begins. After charging is completed, the battery CHG lamp goes off (full charge).
3apka 6aTapeHoro 6loKa
Ipeep nCpOJIb3OBAHnEM BaSei BnDeOkamepbl 3apJnte 6aTapeHbI 6nok.
BaaBaNdeOkamepa pa6oTaet TOnbko C 6aTapeHbIM 6Iokom "InfoLITHIUM" (cepu F).
Bollee noDpo6bIe CBeDeHnO 6aTapeHOM 6Ioke "InfoLITHIUM" npBVeDeHbHa cTp.263.
(1)ОткpoиTe KpbIshky rHe3da DC IN n noCoEOHHnTe npnilaraembI CEteBOI aanTep nepemehHoro Toka K rHe3dy DC IN ha BaWei BnDeokkamepe, TaK YTO6bl 3HaK A Tekepa 6bl HaprabLeh BBepx.
(2)ПодсоевинTe npOBOD эЛКТрОпТАнИ K cTeBOMy aДaNTepу nepemeHOrO TOKa.
(3)ПодсоeДинITE npOBOD эЛeКТрОпИТаHЯ K ceteBOI po3eTke.
(4)YcTaHOBInTe NpeKJIIOUaTeIb POWER B noLoXeHne OFF (CHG).JaMnOuKa 6aTapei CHG BbICBeNTtC, KOrDa NaUHeTc3aPAnka. Korda 3apAnka 6yDet 3aBepSeHa, JaMnOuKa 6aTapei CHG norachet (noHna 3apAnka).
After charging the battery pack
Disconnect the AC power adaptor from the DC IN jack on your camcorder.
Note
Prevent metallic objects from coming into contact with the metal parts of the DC plug of the AC power adaptor. This may cause a short-circuit, damaging the AC power adaptor.
Iocne 3apdKn 6aTapeHoro 6Joka
OTcoeHnHTe ceTeBOaIaNTep npeMeHnHOToKa oT rHe3da DC IN BaWe BIndeOkaMepbI.
PpimeyaHne
He donyckaTe KOHTaKaTa MeTaJIInuecknx npedmetOB C MeTaJIInueeCKmU YacTAMn WTEkepa NoCToAHHOro TOka CeTeBOr aanTepe napeMeHHoro TOka. 3To MoKet PnIBecTu K KOPOTKOMy 3aMbIkaHIO N IOBpeJDeHIO cTeBOr aanTepe napeMeHHoro TOka.
Step 1 Preparing the power supply
While charging the battery pack, the battery CHG lamp flashes in the following cases:
- The battery pack is not installed correctly.
- Something is wrong with the battery pack.
When you use the AC power adaptor
Place the AC power adaptor near the wall socket. If any trouble occurs with this unit, disconnect the plug from the wall socket as soon as possible to cut off the power.
Approximate minutes when you use a fully charged battery
- Approximate recording time when you repeat recording start/stop, zooming and turning the power on/off. The actual battery life may be shorter.
PnIb3ntJIbHOe BpMaB MInHyTaX npNcNoJb3OBAHm NOnHOCTbIO 3apJxehHOro 6aTapeHoro 6noka
*Pn6Bn3nteIbHoe BpeMn B MInHytax npn 3aIncn C HeOAnHOKpaTHbIM NyCKOM/OCTaHOBKO 3aIncn, Hae3dOM BNDeOKaMEpbI IN BKJIIOUeHNEM/BblKJIIOUeHNEM PNTAHN. ΦakTtueckn cpoK cnJxkbI 6aTaapeHoro 6JOKa MoKeT 6bITb KopoYe.
Playing time/BpemBAocnpoun3BeDeHNA
| Battery pack/ Батуарейный 6лok | Playing time on LCD screen/ Время воспождени на экpaneх_KКД | Playing time with LCD closed/ Время воспождени на pri- зakрытом_KКД |
| NP-FF50 (supplied)/(прилагаетсу) | 60 | 70 |
| NP-FF70 | 130 | 155 |
Approximate minutes when you use a fully charged battery
Note
Approximate recording time and continuous playing time at 25^ (77^) . The battery life will be shorter if you use your camcorder in a cold environment.
If the power goes off although the battery remaining indicator indicates that the battery pack has enough power to operate
Charge the battery pack fully again so that the indication on the battery remaining indicator is correct.
Recommended charging temperature
We recommend charging the battery pack in an ambient temperature of between 10^ to 30^ (50^ to 86^) .
What is "InfoLITHIUM"?
The "InfoLITHIUM" is a lithium ion battery pack which can exchange data such as battery consumption with compatible electronic equipment. This unit is compatible with the "InfoLITHIUM" battery pack (F series). Your camcorder operates only with the "InfoLITHIUM" battery. "InfoLITHIUM" F series battery packs have the Q InfoLITHIUM mark. "InfoLITHIUM" is a trademark of Sony Corporation.
PnIbIeBHOe BpMaB MHyTax npNcNoIb3OBAHm NIOHOCTbIO 3apJKeHHORo 6aTapeHoro 6noka
PpmeuHne
PnIbI3HbHOe Bpem 3aIncn I HnpepbIBHOrO BoCpOn3BeDeHnY kA3aHo npn 25^ . Cpok cnyXkb6bl 6atapeHoro 6loKa 6ydet Kopohe pnp nCpOJIb3OBAHN BIndeOkamepbl BXoJNOHbIX ycIOBnX.
EcIn nHTaHne nponaadaet, xOTn HnDnKaTOp oCTaBWeOc3apra6batapeHoro 6Noka nOKa3bIbaET, YTO 6batapeHbIM 6NOK o6Jaadaet DOCTaToUHbIM dIn pa60tbl 3apydom
3apndte noJHocTbIO 6aTapeHbIb 6Jok eue pa3, YTO6bI NOKa3aHnIHdNkAtopa OCTabWeroC3apJa 6aTaepHoRo 6Joka 6bln npaBnIbHbIM.
PeKOMeHdyemar TempepaTpya 3apAdkn
PeKOMeHnyETc BbIOnJIrTb 3apHky 6aTapeHnHO 6Ioka npu TempepaType okpykaOoue cpebl ot 10^ do 30^
Connecting to a wall socket
When you use your camcorder for a long time, we recommend that you power it from a wall socket using the AC power adaptor.
(1) Open the DC IN jack cover and connect the supplied AC power adaptor to the DC IN jack on your camcorder with the plug's mark facing up.
(2) Connect the mains lead to the AC power adaptor.
(3) Connect the mains lead to a wall socket.
The camcorder is not disconnected from the AC power source (the mains) as long as it is connected to a wall socket, even if the camcorder itself has been turned off.
Notes
- The AC power adaptor can supply power even if the battery pack is attached to your camcorder.
- The DC IN jack has "source priority." This means that the battery pack cannot supply any power if the mains lead is connected to the DC IN jack, even when the mains lead is not plugged into a wall socket.
- Prevent metallic objects from coming into contact with the metal parts of the DC plug of the AC power adaptor. This may cause a short-circuit, damaging the AC power adaptor.
A car battery
You cannot use a car battery with the camcorder.
ПЕДОCTEPEЖЕΗΝ
BnDeokamepa He OTKIIOUaETCAOTNCTOCHNkA nHTAHNA NEPEMEHNO TOKA (CETEBOI PO3ETKN) DO TEX NOP, NOKA OHNoDCOEINHeKa 3JIeKTPnueCKoC SETN, daJXEcNI cama BnDeokamepa N BbIKIOUeHa.
PpimueaHn
Плтынго OT cTeBOrO aДaNTepa NepeMeHHORo TOKA MOKeT NOdABaTBcR ДаЖeВ CnUyae,ecnIb6aTapeHb 6bOK pNkPepJIeN K BaWei BnDeOkampe.
ΓHe3do DC IN nImeet "PnpOpntET nCTOChnka". 3TO 3NaHT, YTO nITaHne OT bATapeHORo 6bLOKa He MOKeT NODaBaTcBcE, cEnI npOBoD 3NeKTPoNtAnHn I ONDoeONeHN K rHe3dy DC IN, daxe cEnI npOBoD 3NeKTPoNtAnHn I ne NODcoEINHn K CTeBOH p03eTke.
- He donnyckaanTe KOHTaKTa MeTaNnueCecknx PnpEdMeTOB C MeTaNnueCeCKMn YacCTAMn UTekepa NOCToAHNHO TOKa CeTeBOr o aDANTepa NpeMeHHORo TOKA. 3To MOKeT npINBeCTN K KOPOTKOMy 3aMbIkaHIO n NobpeXJeHNO CeTeBO r aDANTepa nepemEHORO TOKA.
ABTOMO6nIbHbIaKKymyIaTOP
BbI He MoXeTe NcNoJIb3OBAt bAByTOMo6JIbHbI aKkyMnyIaTocBaWeI BnDeokamepoI.
Step 2 Setting the date and time
Set the date and time when you use your camcorder for the first time. "CLOCK SET" will be displayed each time you set the POWER switch to CAMERA or MEMORY/NETWORK (DCR-IP55E only) unless you set the date and time settings.
If you do not use your camcorder for about three months, the date and time settings may be released (bars may appear) because the built-in rechargeable battery installed in your camcorder will have been discharged (p. 273). In this case, charge the built-in rechargeable battery, then set your area, the summer time, the year, the month, the day, the hour and the minute.
(1) Set the POWER switch to CAMERA or MEMORY/NETWORK (DCR-IP55E only). The CAMERA or MEMORY/NETWORK lamp lights up.
(2) Press FN (Function) to display PAGE1 (p. 37).
(3) Press MENU to display the menu.
(4) Press / to select , then press EXEC.
(5) Press / to select CLOCK SET, then press EXEC.
(6) Press / to select your area, then press EXEC.
(7) Press / to select whether your area is in the summer time or not, then press EXEC.
(8) Press / to select the desired year, then press EXEC.
(9) Set the month, day and hour with the same procedure as step 8.
(10) Press / to set the minute, then press EXEC by the time signal. The clock starts to move.
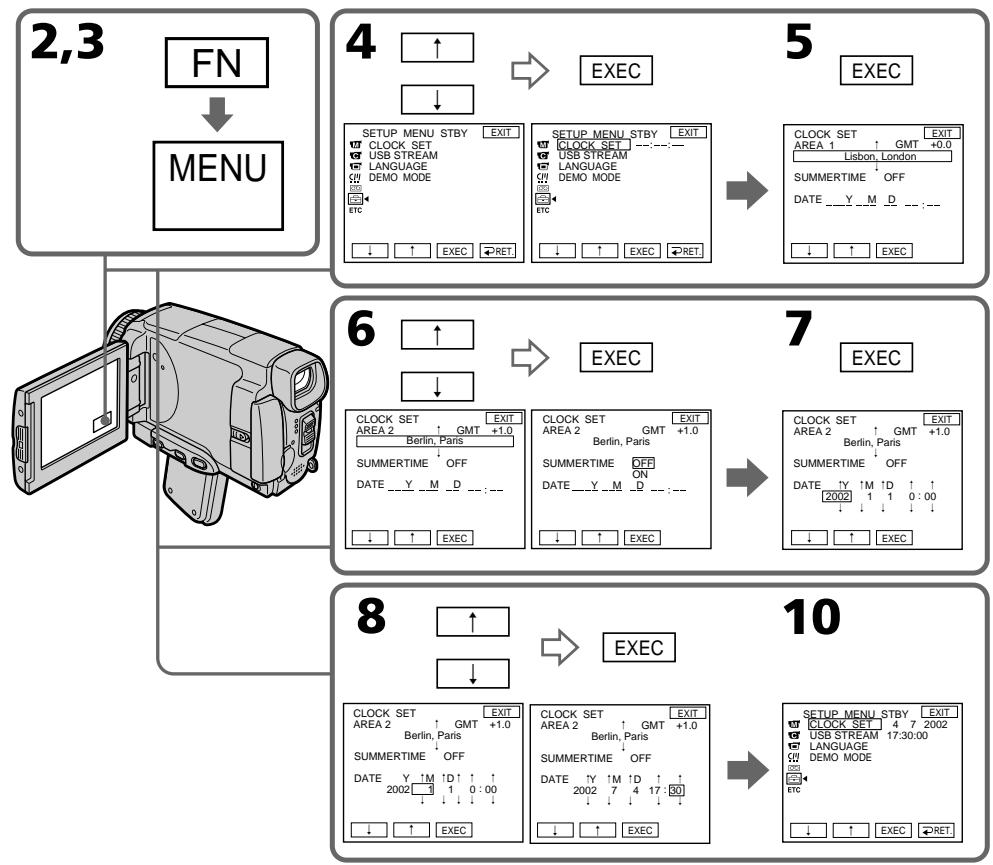
The year changes as follows:

Tod n3mehetc cneyuouum o6pa3om:
To return to FN (Function)
Press EXIT.
When using your camcorder abroad
Set the clock to the local time (p.33).
If you use the camcorder in a region where summer time is used
Set SUMMERTIME to ON in the menu settings.
If you do not set the date and time
"--- -- -- -- -- " and "--- :--- :-- " are recorded on the tape or the "Memory Stick" as the data code.
ДлЯ BOЗВРаТа К ИнДИКаци N F (Функця)
HaxMMTe KhoNky EXIT.
Step 2 Setting the date and time
Note on the time indicator
The internal clock of your camcorder operates on a 24-hour cycle.
Simple setting of clock by time difference
You can easily set the clock to the local time by setting a time difference. Set up the AREA SET and SUMMERTIME items in the menu settings.
See page 232 for more information.
YcTaHOBtIe nyHtBi AREA SET
SUMMERTIME BYcTaHOBkax MeHIO.
Cm. ctp. 240 Дяп пolyчени 6оле поробнoi nHфорmaци.
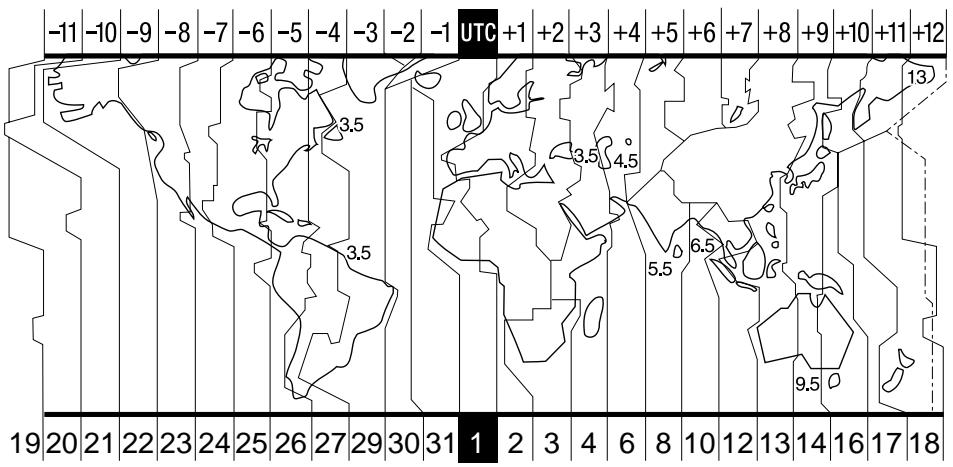
| Area code | Time-zone differences | Area setting |
| 1 | GMT | Lisbon, London |
| 2 | GMT+01:00 | Berlin, Paris |
| 3 | GMT+02:00 | Helsinki, Cairo |
| 4 | GMT+03:00 | Moscow, Nairobi |
| 5 | GMT+03:30 | Tehran |
| 6 | GMT+04:00 | Abu Dhabi, Baku |
| 7 | GMT+04:30 | Kabul |
| 8 | GMT+05:00 | Karachi, Islamabad |
| 9 | GMT+05:30 | Calcutta, New Delhi |
| 10 | GMT+06:00 | Almaty, Dhaka |
| 11 | GMT+06:30 | Rangoon |
| 12 | GMT+07:00 | Bangkok, Jakarta |
| 13 | GMT+08:00 | HongKong, Singapore |
| Кódperноha | Разнистекларычасовыимпосамьовсеймен | Установka ретиона |
| 1 | GMT | Lisbon, London |
| 2 | GMT+01:00 | Berlin, Paris |
| 3 | GMT+02:00 | Helsinki, Cairo |
| 4 | GMT+03:00 | Moscow, Nairobi |
| 5 | GMT+03:30 | Tehran |
| 6 | GMT+04:00 | Abu Dhabi, Baku |
| 7 | GMT+04:30 | Kabul |
| 8 | GMT+05:00 | Karachi, Islamabad |
| 9 | GMT+05:30 | Calcutta, New Delhi |
| 10 | GMT+06:00 | Almaty, Dhaka |
| 11 | GMT+06:30 | Rangoon |
| 12 | GMT+07:00 | Bangkok, Jakarta |
| 13 | GMT+08:00 | HongKong, Singapore |
Step 2 Setting the date and time
| Area code | Time-zone differences | Area setting |
| 14 | GMT+09:00 | Seoul, Tokyo |
| 15 | GMT+09:30 | Adelaide, Darwin |
| 16 | GMT+10:00 | Melbourne, Sydney |
| 17 | GMT+11:00 | Solomon Is |
| 18 | GMT+12:00 | Fiji, Wellington |
| 19 | GMT-12:00 | Eniwetok, Kwajalein |
| 20 | GMT-11:00 | Midway Is., Samoa |
| 21 | GMT-10:00 | Hawaii |
| 22 | GMT-09:00 | Alaska |
| 23 | GMT-08:00 | LosAngeles, Tijuana |
| 24 | GMT-07:00 | Denver, Arizona |
| 25 | GMT-06:00 | Chicago, Mexico City |
| 26 | GMT-05:00 | New York, Bogota |
| 27 | GMT-04:00 | Santiago |
| 28 | GMT-03:30 | St. John's |
| 29 | GMT-03:00 | Brasilia, Montevideo |
| 30 | GMT-02:00 | Fernando de Noronha |
| 31 | GMT-01:00 | Azores |
To set your local time
Select AREA in the menu settings, then press
EXEC. Next, select the country or area where you stay in, using the table above, then press EXEC.
Пун=kT 2 YctaHOBka DaTbI IN BpeMeHn
| Кód Perennialа | Разнения меничесы医务人员 посаму в的服务ш� | Установka Perenniala |
| 14 | GMT+09:00 | Seoul, Tokyo |
| 15 | GMT+09:30 | Adelaide, Darwin |
| 16 | GMT+10:00 | Melbourne, Sydney |
| 17 | GMT+11:00 | Solomon Is |
| 18 | GMT+12:00 | Fiji, Wellington |
| 19 | GMT-12:00 | Eniwetok, Kwajalein |
| 20 | GMT-11:00 | Midway Is., Samoa |
| 21 | GMT-10:00 | Hawaii |
| 22 | GMT-09:00 | Alaska |
| 23 | GMT-08:00 | LosAngeles, Tijuana |
| 24 | GMT-07:00 | Denver, Arizona |
| 25 | GMT-06:00 | Chicago, Mexico City |
| 26 | GMT-05:00 | New York, Bogota |
| 27 | GMT-04:00 | Santiago |
| 28 | GMT-03:30 | St. John's |
| 29 | GMT-03:00 | Brasília, Montevideo |
| 30 | GMT-02:00 | Fernando de Noronha |
| 31 | GMT-01:00 | Azores |
(1) Prepare the power source.
(2)Turn the grip to the cassette inserting/ejecting position. See "Introduction-Basic operations" (p.13) for more information.
(3) Slide OPEN/EJECT in the direction of the arrow and open the lid. The cassette compartment automatically lifts up and opens.
(4)Push the middle portion of the back of the cassette into the cassette compartment. Insert the cassette in a straight line deeply into it with the cassette window facing out.
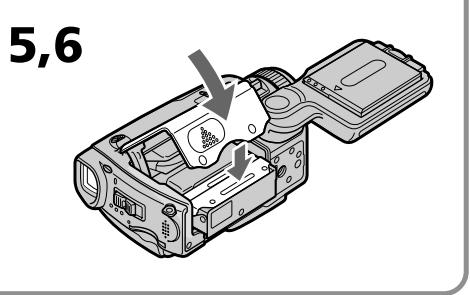
(5) Press the cassette compartment lightly to close. The cassette compartment automatically goes down.
(6) After the cassette compartment goes down completely, close the lid until it clicks.
(1)ПоД�ТОВБTe ИСTOУнК ПИТАнЯ.
(2)ПовернITE руковурахва в пооженец установки/ИЗВлесеня kaccetы. См.раздел "В蜱edingе - осовьные onepaши" (ст. 13). Д Claire пolyевни бOLTшей Инфорmaши.
(3)Перединьту поел OPEN/EJECTВ наразавлени Stрелки OТКpoITEКршky.Касстны OТсЕК abTomatчecknNOДнHMETСИ OТКpoETCЯ.
(4)HaxMMTeNoZeHTpy3aJHeuactnKaccetbIB HappaBneHm KaccETHO TcEka.BCTabBeKaccETy npAmo BHyTpTaK, YTO6bOkOwko KaccetbIbilo ObaPeHo HApxy.
(5)3aKpOTe KaccETbI OTEcK, cIeRka HaxKaB Ha Hero. KaccETbI OTEcK aBTOMaTnueckn ONyCTNTcR.
(6)Посlete toro,Кak Kaccetнь OTCeK nonHocTbO ONyCTNTcR,3aKpoTe KpbIshKy, YTO6bl OHa 3auekenKhynacb.
To eject a cassette
Follow the procedures above, and take out the cassette after the cassette compartment opens completely in step 3.
IIN3BLeuHnKaccTebl
BbIIOJIHnTe npNBeDeHHyIO BbIe npOeDpy nI3BNEKHTe KACCETy pN BbIOJIHeHm DeIcTBn IyHKTa 3 Nocne TORo, KaK KACCetHbI OTCek IOJHOCTbIO OTKpOeTcra.
Notes
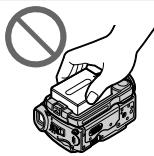
- Do not press the cassette compartment down. Doing so may cause malfunction.
- Be sure to turn the grip to the cassette inserting/ejecting position. Otherwise, the cassette cannot be inserted or ejected.
To prevent accidental erasure
Slide the write-protect tab on the cassette to expose the red mark.
PpmeuHn
- He BdabJIbBaIe KaccTeHbI OTCeK Bn3. 3To MoKeT npBecT N HEnCnpaBHOCTN.
- 06a3aTeIbHO NOBepHIne pyKoRTky dIra 3axBaTa B nOIOXeHHe yCTaHOBKn/IN3BNeUeHn Kaccetbl. B npOTuBHom cnyae kaccete Ha MoKeT 6bItb yCTaHOBJIeHa nn IN3BNeUeHa.
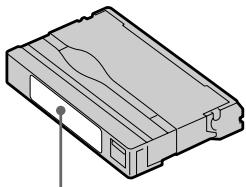
Labels may cause a malfunction of the camcorder. Therefore, be sure not to:
- Stick on any labels other than the one supplied.
- Stick the label onto any part of the cassette other than the label position [a].
3TnKETke
3TUKETM OMT BbI3BaTb HEINCPaBHOCTb BVNeOkaMepbI. TaKIM o6pa3OM, 06ra3aTeJbHo IMeIte BBnDy:
- He NaKneBaiTe HnKaKnx DpyrNx 3TuKeTOK, 3a NCKJIuOyeHnem npNJlaeMoI.
- He HaKJIeINBaIte 3TKeTky Hn Ha KaKoe DpyroE MeCTo Ha KaccTe, 3a NCKIIoueHHeM MeCTa, NpeDHa3HaueHHOrO IJr 3TKeTKn [a].
[a]
Step 4 Using the touch panel
Your camcorder has operation buttons on the LCD screen. Press the LCD screen with your finger or the supplied stylus (DCR-IP55E only) to operate each function. This section describes how to operate the touch panel during recording or playing back images on a tape.
(1) Prepare the power source (p. 26 - 30).
(2) Slide OPEN in the direction of the mark indicated on the camcorder to open the LCD panel.
(3)Set the POWER switch to CAMERA, MEMORY/NETWORK (DCR-IP55E only) or VCR.
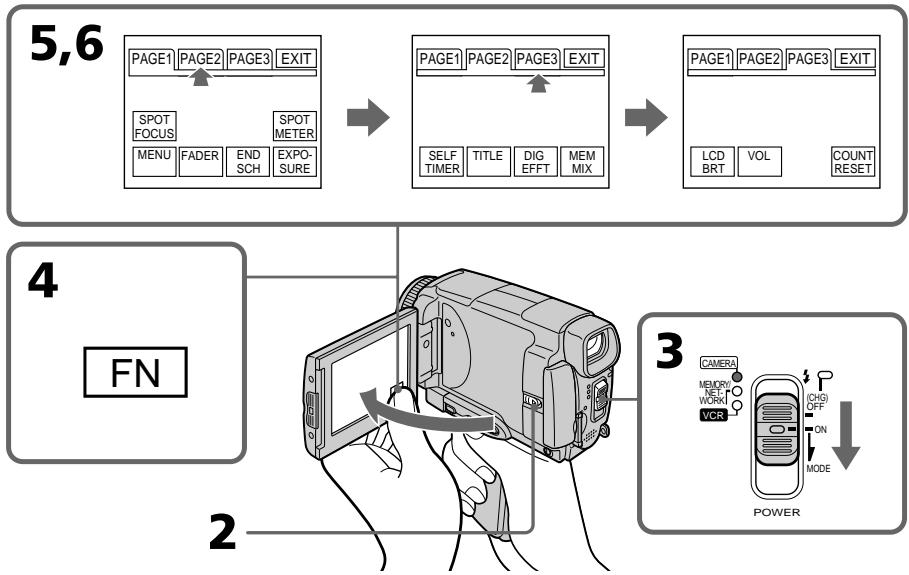
(4) Press FN to display PAGE1. The operation buttons of PAGE1 appear on the LCD screen.
(5) Press PAGE2 to go to PAGE2. The operation buttons of PAGE2 appear on the LCD screen.
(6) Press PAGE3 to go to PAGE3. The operation buttons of PAGE3 appear on the LCD screen.
(7) Press a desired operation item. See relevant pages of this manual for each function.
Пункт 4 Исторьанец сенихов панели
Ha 3kpahe KKД Baшew Bndeokamepbl nmeotc ceHCOPHbIe FyHKUHOHaJIbHbIe KhoIKN. PpI pa6Ote c kaxdoJФyHKUeHn JaxmIaTe Ha 3kpAn KKД BaWIM naJIbCem IIn npinraaemBn pOpM (Tolko moJeB DCR-IP55E).BdAHHom pa3dJe OINcaHo, KaK o6paatbSc n NaHeBly UynpaBHeN BO vPem 3aIncn IIn BocPon3BeDeHn N3o6paXeHn Ha neHe.
(1)ПодгOTOBTe ИСТОЧИК ПИТАнЯ. (Стр.26-30)
(2)Пелевинты Конду В наразвлени
3нда》,уkaаано на вдюкаме,чтбь
OTКдьп танель кДК.
(3) UctahOBHTe nepeKIOUATEb POWER B noLoXoHeMe CAMERA, MEMORY/NETWORK (Tolbko MoJoB DCR-IP55E) mVcR.
(4) Haxmnte KhoiNy FNDI OTo6paXeHnCTpaHnCbI PAGE1. Ha 3KpAne KKД NOBArTcNФYHKUHOHaJIbHe KhoiNKc TpaHnCbI PAGE1.
(5) HακΜΙΝΑ Κτρανιμί ΕΑΡΕZ ΑΝΙ Μερεύδος κ Κτρανιμί ΕΑΡΕZ.Η ἀκραη εΚΚД Μοῦτας Φγικύνηλήν έκουσε Κθρανιμί ΕΑΡΕZ.
(6) HaxkMITE CTpaHNIY PAGE3 dIra BbIbOpa CtpaHnIbI Page3. Ha 3kpAne JKKI NOBArTcN CyHKNUHOHbIe KhoNKn CTpaHniBly PAGE3.
(7) HaxMMTe HxKhBf yHKUHOHaIbHbI NyHKT. OINCAHne KaJDoI fYHKmIn pNBEdeHO Ha COOTBeTCTByOuXn CTpaHnuaX daHORo pyKOBOdCTBa.
To return to FN
Press EXIT.
To execute settings
Press EXEC or OK. The display returns to PAGE1, 2 or 3.
To cancel settings
Press OFF. The display returns to PAGE1, 2 or 3.
ДЯ BO3Bpata K Индан KaunFN
HakmTe KhONky EXIT.
ДлгБынолпенунуctановok
HaxmTe KhoNky EXEC nnn OK. HndkaunBepHeTcK cTpaHncaM PAGE1, 2 nnn 3.
ДЯ OTMeHbI yCTaHOBOK
Haxmte KhoNky OFF. INdkaunBepHeTcK CTpaHncaM PAGE1, 2 nJn 3.
Notes
- When using the touch panel, press the LCD screen lightly with your thumb, the supplied stylus (DCR-IP55E only) or index finger supporting the LCD screen from the back side of it.
- Do not press the LCD screen with sharp objects other than the stylus supplied (DCR-IP55E only).
- Do not press the LCD screen too hard.
- Do not touch the LCD screen with wet hands.
- If FN is not on the LCD screen, touch the LCD screen lightly to make it appear. You can make the display appear and disappear with DSPL/ TOUCH PANEL on your camcorder.
- When the operation buttons do not work even if you press them, an adjustment is required (CALIBRATION) (p. 274).
- When the LCD screen gets dirty, use the supplied cleaning cloth.
When executing each item
The green bar appears above the item.
If an item is not available
The colour of the items changes to grey.
Touch panel
You can operate with the touch panel using the viewfinder (p. 90).
Press FN to display the following buttons:
In CAMERA mode
| PAGE1 | SPOT FOCUS, MENU, FADER, END SCH, EXPOSURE, SPOT METER |
| PAGE2 | SELF TIMER, TITLE, DIG EFFT, MEM MIX |
| PAGE3 | LCD BRT, VOL, COUNT RESET |
In VCR mode
| PAGE1 | MENU, VOL, TITLE, MULTI SCH |
| PAGE2 | LCD BRT, DIG EFFT, PB ZOOM, END SCH |
| PAGE3 | DATA CODE, COUNT RESET, REC CTRL |
See page 133 when you set the POWER switch to MEMORY/NETWORK (DCR-IP55E only).
PpimueaHn
-ПиИСПОЛьЗOBAHINсЕнсOPHои панели,надимаTe Cпгka 3Кран XXД cnomошьВашero 60льшоу палba,прларaemoro nepa(Toьko moDEJB DCR-IP55E)ииуka3aTeJbHOrO палba,пдерЖИВая 3Кран XXД c erо 3aДнeСТороны.
- He haЖимай Te 3кран XXД оctpoKоHeчныIMnpeДметамИ, OTЛУЧьIMN OТ пиларeMOronepa(ToьбКо моДь DCR-IP55E).
- He haxkmaTe 3KpaH KKД cInuKOM cInbHO.
- He kacaiaTecb 3KpaHa KKД MOKpbIM pykam.
- Ecni INIINKauJN FN OTCyTCTByET Ha 3KpaHe KKD, cIeRka KOCHNTecb 3KpaHa KKd, yTO6bl OHa NORBnAcb. Bbl MoXeTe BblBaTb NORBLeHne INI INCye3HOBeHne INIINKaUcN C nOMOuBIO nepeKlnOuTaJIa DSPL/TOUCH PANEL Ha BaWeB BuDeOkamepe.
- EcniФункионаьньie KhoNkI He pa6oTaIOr, dajke Korda Bbynx haxnmaeTe, Tpe6yeTcR perynipobka (CALIBRATION) (ctp. 274).
- EcInn 3Kpan JKKJ 3aarpH3HnIcN, BOCIOJIb3yITeCb npINlaeMbIM NockyTOM YICTAJIe TKAHI.
PnBbInoJIHeHHKaXdOrO nyHKTa
HaŋnyHKToM NOABBLaETc3eHNaNoIoca.
EcnnyHKT He doctyneH
Lbeta INHINKAaN NyHKTOB cTaHOBATcCepbIM.
Cehcopna naHeIb
BbMOxKeTaPbTaTb C cHcOpHo nHaHeIbIO c nOMOsbIO BUNoINCKaTeJIa (CTp.90).
Haxmte KhONky FN dIy oTo6paXeHHa
CneedyouxKHONOK:
BpexmeCAMERA
| PAGE1 | SPOT FOCUS, MENU, FADER, END SCH, EXPOSURE, SPOT METER |
| PAGE2 | SELF TIMER, TITLE, DIG EFFT, MEM MIX |
| PAGE3 | LCD BRT, VOL, COUNT RESET |
B pexime VCR
| PAGE1 | MENU, VOL, TITLE, MULTI SCH |
| PAGE2 | LCD BRT, DIG EFFT, PB ZOOM, END SCH |
| PAGE3 | DATA CODE, COUNT RESET, REC CTRL |
См.ст. 133, eclin nepeknluoyatelb POWER yctaHOBJIeB bnoLoJxHe MEmORY/NETWORK (ToIbKO moJeB DCR-IP55E).
Recording a picture
Your camcorder automatically focuses for you.
(1) Remove the lens cap by pressing both knobs on its sides.
(2) Install the power source and insert a cassette. See "Step 1" to "Step 3" (p. 26 - 36) for more information.
(3)Turn the grip to the recording position, and hold your camcorder through the wrist strap. See "Quick Start Guide" (p. 14).
(4) Set the POWER switch to CAMERA. Your camcorder is set to the recording standby mode.
(5) Slide OPEN in the direction of the mark indicated on the camcorder to open the LCD panel. The viewfinder automatically turns off.
(6) Press START/STOP. Your camcorder starts recording. The REC indicator appears. The camera recording lamp located on the front of your camcorder lights up. To stop recording, press START/STOP again.
3a\Pncb n3o6paJxHnIa
Baasa Bndeokamaepa aBtOMaTneCKN BbINOJIHReT φokcnpOBky dJa Bac.
(1)CHIMITE KpbIiKy O6BeKTHB, HaxaB Ha o6e KHONK C ee 6OKOBbIX CTOpOH.
(2)YcTaHOBtTe NCTOCHNK NITaHn IN BCTaBBte KaCCeTy.CM.“IyHKtbl 1-3"(ctp.26-36)dnoJolUyeHn6olee NoDpo6HoN HOpMaun.
(3)ПовернITE рукову 3axbaTа в полохене 3a\Pu\NcN,и удахиBaNTe BaTu BnDEokamepy, npOnyCTnB pyKy cKBo3b peMeHдЯ 3axbaTа.CM.pa3dEe "PyKOBoCTBO NO 6bIcTpOmy 3anucy" (ctp.18).
(4)Установпейсян POWER в положене CAMERA. Ваши видаокамера щейкийчтсь ржим окданя.
(5)Пелевинты панелЖКДВипавлени
Знaka》,уka3аHHOrHa рсунke Нжke,
Чтобл оTKрblт.ee.
(6)Haxmnte KhoNky START/STOP.Baisha BnuDeokamepa Hauheta3anCb. TOBuTcnaHnDnKaTOp REC.BbICBeNTcJaMnOchka 3aHNC,paCNoJoxeHHaHa nepeDneH naHEnBnuDeokamepbI. JnraocTaHOBKn 3aHNCn Haxmnte KhoNky START/STOP eue pa3.
After recording
(1) Set the POWER switch to OFF (CHG).
(2) Close the LCD panel and turn the grip to the cassette inserting/ejecting position.
(3)Eject the cassette.
(4) Turn the grip to the storing position.
(5) Remove the power source.
Note
Do not touch the built-in microphone during recording.
To enable transition
Transition between the last scene you recorded and the next scene can be performed as long as you do not eject the cassette even if you turn off your camcorder. When you want to change the battery pack, be sure to set the POWER switch to OFF (CHG). It does not affect transition.
Note
The recording data (date/time or various settings when recorded) are not displayed while recording. However, they are recorded automatically onto the tape. To display the recording data, press DATA CODE during playback. You can also use the Remote Commander for this operation (p. 57).
If you leave your camcorder in the standby mode for five minutes while the cassette is inserted
Your camcorder automatically turns off. This is to save battery power and to prevent battery and tape wear. To resume the standby mode, set the POWER switch to OFF (CHG), and to ON again. However, your camcorder does not turn off automatically while the cassette is not inserted.
The battery life when you record using the LCD screen
The battery time is slightly shorter than the shooting time using the viewfinder.
PocJe BbInOpHeHn 3aIncn
(1)Установпейсяклочаю POWER в положене OFF (CHG).
(2)3aKpOTe NaHeJI KKДи NOBepHnTe pyKOrTky 3axBaTa B NOLOKeHne yCTaHOBKn/ n3BVeHnRA KAcceTbl.
(3)Изгькпту касу.
(4)ПовернitepykoRTky 3axBaTaВ положенехра themselves.
(5)YdaJInte nCTOuHnK nTaNHa.
PpmeaHne
He KacaItebc BCTpoeHORO MmKpOPOHa BO BpEmy BbIIOJIHeHn 3aIncn.
Длгобсесенпегхда
BbMOxTe BbIOJNHaTb PnABHbI NepExoM MEXyNOCJIeDNHM 3aINsCAHHbIM 3nI3ODOM IN CLeDyUOM 3IN3ODOM DO Tex NOP, nOKa He n3BLeueTe KAcceTy, daJe npR BbIKJIOUeHn BAsWe BNDeOkAmepbI. EcIn Bb XOTnTe 3aMeHNtB 6BaTapeHbIb6Jok, 083aTeNbHO yCTaHOBtpeKJIuOuTaTeNB POWER B noLOXKeHne OFF (CHG). 3To He noOBnIeT ha PnABHoCTb nepExoJa.
Ppimcayane
Adjusting the LCD screen
The LCD panel turns about 90 degrees to the viewfinder side and about 180 degrees to the lens side.
PerynnpobKa 3KpaHa KKД
Panaelb KKKd moKeT nepeDVBraTbc npImepHo Ha 90 rpaIycob B CTOpOHy BNIOINCKaTeHa npImepHO Ha 180 rpaIycob B CTOpOHy O6bekTnBa.
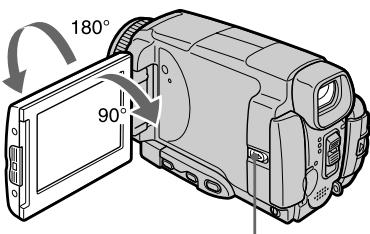
Slide OPEN to open the LCD panel./
Перед��ньш Конту酮 OPEN,чтобу
OTКръп панец ЛжкД.
When closing the LCD panel, set it vertically, and hold it into the camcorder body.
Призakрьвани панели XXД установite ee Bертукально,а затем поBERPнITE ee K KOPnycy BИдeOKamepbl.
Note
When using the LCD screen except in the mirror mode (p. 45), the viewfinder automatically turns off.
When you use the LCD screen outdoors in direct sunlight
The LCD screen may be difficult to see. If this happens, we recommend that you use the viewfinder.
When you adjust the angle of the LCD panel
Make sure the LCD panel is opened up to 90 degrees.
PpmeaHne
ПиИСЮЛБЗОВАнИЗКраНЖКД,зa ИСКЛЮЧЕНМЕЗеркальною ржIMа (Стр.45), ВИДОИСКATEЛБ ВИКЛЮЧАETСАВТOMATNUECEKN.
EcIn BbI nCNoJIb3yTe 3KpaH XXD BHe NOMeueHnI NOI npRmbIM COJHeuHbIM CBETOM
Bo3MOxH0, 6yET TpydHOp pa3rIaTeTb 3KpaH KkD. B 3tOM cIyuae peKoMeHdyetc INCNoB3OBA Tb BnDOuCKaTeJIb.
Ppi perynipobKe yrgna naHEn JKKd
Y6eIITecb, YTO naneIb KKIOKpbIta Do 90 rpaIycob.
Adjusting the brightness of the LCD screen
(1) Set the POWER switch to CAMERA. Press FN and select PAGE3 (p. 37). You can also adjust the brightness of the LCD screen in the following operations.
- Set the POWER switch to VCR. Press FN and select PAGE2.
- Set the POWER switch to MEMORY/ NETWORK (DCR-IP55E only). Press FN and select PAGE3.
(2) Press LCD BRT. The screen to adjust the brightness of the LCD screen appears.
(3) Adjust the brightness of the LCD screen using - / +
- to dim
- : to brighten
(4) Press OK. The display returns to PAGE3.
PerynipoBka npKocTn 3KpaHa KKd
(4)HaxmTe KhoNky OK. INdkaunBepHeTcK CtpaHnue PAGE3.
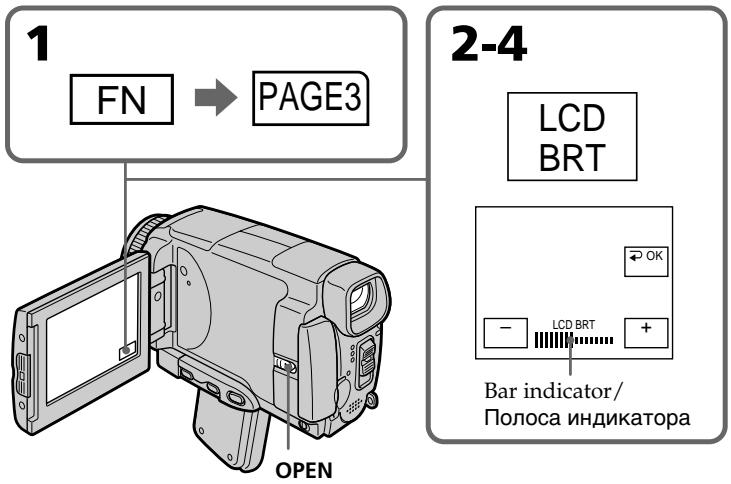
To return to FN
Press EXIT.
The colour of the LCD screen
You can adjust it in LCD COLOUR in the menu settings (p. 227).
Even if you adjust the LCD screen using LCD BRT, LCD COLOUR, or the LCD screen backlight The recorded picture will not be affected.
The setting of the LCD BACKLIGHT switch
Normally, set it to ON. When you use the camcorder in bright conditions using the battery pack, set it to OFF. This position saves battery power.
Adjusting the viewfinder
If you record pictures with the LCD panel closed, check the picture with the viewfinder. Adjust the viewfinder lens to your eyesight so that the indicators in the viewfinder come into sharp focus.
Adjust with the viewfinder lens adjustment lever.
UBeT 3KpaHa KKd
BbMOxTe OTperynpoBaTb Eero C NOMOuIbO onuN LCD COLOUR B yctaHOBkax MeHIO (CTp. 235).
Дахе ecn Bbl 6byepe rpylnpoBaTb 3kpa n cnooBIO onuIN LCD BRT, LCD COLOUR nIi 6byepe rpylnpoBaTb npKocTb 3aDneH noCDcBeTkN 3kpaHa KKД
Ha 3aIncanHoe n3o6paXeHne 3TO He IOBnIeT.
YcTaHOBKa nepeKJIouaTeIy LCD BACKLIGHT B HopMaIbIbIx ycLobINx yCTaHOBITe nepeKJIouaTeIy B noLOXKeHne ON.EcNb Bbl 6ByTe IcNoJIb3ObA tB VIneOKaMepy C 6aTapeHbIM 6lOkOM B ycLobINx rPkOJ OcBeUeHNCHOTc, YcTAHOBITe erO B noLOXKeHne OFF.B 3tOM noLOXKeHn NkOHOMNTc 3aprD 6aTapeHnHO 6lOkA.
Viewfinder lens adjustment lever/
PbUar perynipOBKn 06beKTnBa BUDONCKaTeIa
You can turn the LCD panel over and move it back to your camcorder body with the LCD screen facing out. You can operate with the touch panel through the viewfinder in CAMERA or MEMORY/NETWORK (DCR-IP55E only) mode (p. 90).
Viewfinder backlight
You can change the brightness of the backlight. Select VF B.L. in the menu settings when using the battery pack (p. 227).
Even if you adjust the viewfinder backlight
The recorded picture will not be affected.
BbMoKeTe nepeBepHyTb NaHEnb XXKd n
PnDnBuNHyTb ee 6oPaTHO K KopnyCy
BnDEOKaMepb, TaK yTO eKpAn JKKD 6yDeT
Obpaen Hapuyx. Bb MoKeTe paBoTaTb C
CeHCOPHn PaHeNbO c NMOUbIO BnDOuCKaTeJIa
B pexHme CAMERA nIIM MEMORY/NETWORK (ToIbKO moJeNb DCR-IP55E) (cTp.90).
3aHnnoDcBtKa BnOOnckateJr
BbMOKeTe N3MeHrTb rPkOcTb 3aDHe IIOCBETKn.
Пи Иснольбовни Батугенорбokа Вьберп Te onuio VF B.L.В установкам MeHIO (ctp.235).
JaXe ecn Bbl Otperyu npye Te RpKoCTb 3aDHe NIOCBETKN BIDOMCKaTeJI
Ha 3aɪncaɪnHoE n3o6paXeHne 3To He nOBJInAeT.
Using the zoom feature
Move the power zoom lever a little for a slower zoom. Move it further for a faster zoom.
"T" side: for telephoto (subject appears closer)
"W" side: for wide-angle (subject appears further away)
IcnoJIb3OBAHneФyHKcHn Hae3da BnDEOKaMepbl
Cnerka nepeBnHbTe pbyar npBNOHOro BapnoObeKtNaДЯ OTHOCTeJbHO MeJeHHoro Hae3da BVNeOKeMaPbI.
IpeeBnHbTe ero daJIbWe dIy yCKopeHHoro Hae3da BnDeOKaMepbl.
Using the zoom function sparingly results in better-looking recordings.
To zoom greater than 10×
Zoom greater than 10× is performed digitally. To activate the digital zoom, select the digital zoom power in D ZOOM in the menu settings. The digital zoom function is set to OFF in the default setting (p. 226).
Heuactoe nCnoJb3ObaHne yHKnHn Hae3da BnDeoKamepbl ObecneuBaet HanIyUWepe3yIbTaTbI.
The right side of the bar shows the digital zooming zone.
The digital zooming zone appears when you select the digital zoom power in the menu settings.
Ppabaa CTOpOHa NIOocbI NOKa3bIbAeT 30Hy cnqpoBoi TpaHcΦokaun.
30ha znpoBo TpaHcfoKaunnoBnTcA,ecn BbYbIbepeTe CteeneHb znpoBOrHOa3daB yCTaHOBkx MeHIO.
When you shoot close to a subject
If you cannot get a sharp focus, move the power zoom lever to the "W" side until the focus is sharp. You can shoot a subject that is at least about 80~cm (about 2 feet 5/8 inch) away from the lens surface in the telephoto position, or about 1cm (about 1/2 inch) away in the wide-angle position.
Notes on digital zoom
- Digital zoom starts to function when zoom exceeds 10 × . Up to 20 × or 120 × zoom is performed digitally.
- The picture quality deteriorates as you move the power zoom lever toward the "T" side.
When the POWER switch is set to MEMORY/ NETWORK (DCR-IP55E only)
You cannot use the digital zoom.
Shooting with the mirror mode
This feature allows the camera subject to view him or herself on the LCD screen.
The subject can see his or her own image on the LCD screen while you look at the subject in the viewfinder.
Set the POWER switch to CAMERA or MEMORY/NETWORK (DCR-IP55E only) and, rotate the LCD screen 180 degrees.
The indicator appears in the viewfinder and on the LCD screen.
appears in the standby mode, and appears in the recording mode. Some other indicators appear mirror-reversed and others are not displayed.
PnCbemKe oBeKTa C 6JIn3KOropacCTOHHN
EcInn Bbl He moKxTe nOlyuHt bYeTKoI
fokycnpoBKN, npeaBnHbTe pblar npNBOHO
Bapnooo6bekTNa B CTOpOny W" Do nOlyueHn
yeTKoI fokocypOBKn. Bbl MoXeTe BblONHaTb
cbEMky o6bekTa B NOLOKeHN TeteΦOTO,
KOTOpB HaxoDntCra, No KpaHne Mepe, Ha
pacCToAHN 80 cm OT noBepxHoCTn O6bekTnBa
HJN Jx e OKJono 1 CM B noLOKeHN
ShpOKoYrOblHO RbDa.
ПпмецькНHae3dByBndeokamepbl цфровьmetoDOM
LcHpOBoB Bapnoo6bEkTNb HauHnaeTp cpa6aTbIaTb, KOrla Hae3d BIndeOkamepbl npebIbaet 10x. Hae3d BIndeOkamepbl ot 20x do 120x BbINONHReTcYHpOBoBm CnOCo6om.
KaueCTBO n3O6paXeHn yxUdlaeTc nO Mepe np6nXeHn pbla rnpBODHO Bapnoo6bekTtBa K CTOpHe "T".
EcInn nepeKJIouaTeIb POWER ycTaHOBNeB B noJIOxHeNne MEMORY/NETWORK (ToIbKO moJeIb DCR-IP55E)
BbHe moKTeIIOJIb3OBAbTcAФyHKUeIuΦpOBOrO Hae3da.
CbeMkaB 3epKaJIbHOM peXnme
3raФнКIMЯ NOЗBOJIЯТ YeNoBExy, BbINOJIHIOUeMy CBeMky, HbIIOJaTb Ce6a Ha 3KpaE KKД.
YeJIOBeK MoXeT BnIeTb CBoe N3O6paXeHne Ha 3KpaHe KKДВ To Bpem, KaK Bbl CmOTpnte Ha Hero B BuOnckaTeNe.
UcTaHOBnTe nepeKlIOuHaTeIb POWER B noLoXeHne CAMERA uIn MEMORY/ NETWORK (ToIbKO moJeIb DCR-IP55E) n nobepHnTe 3KpaH JKKD ha 180 rpaucob.
Picture in the mirror mode
The picture on the LCD screen is a mirror-image.
However, the picture will be normal when recorded.
During recording in the mirror mode
FN appears mirror-reversed in the viewfinder.
When you press FN
The indicator does not appear on the LCD screen.
I3o6paXeHneB 3epKaIbHOM pexnme.
N3o6paKeHHe Ha 3KpaHe KKd 6yDet OTo6paKaTbCz 3epKaIbHo. HecMOTpHa 3TO, 3aNNc b N3o6paKeHn 6yDet HopMaJIbHOi.
Bo Bpem 3aHcN B 3epKaIbHOM pexHme
ИндикатOPFNВВиюнckeTeNe OTo6paKaetaCnB3epkaJIbHOMBIne.
Ecnn Bbl HaXMeTe KhoNky FN
Indicators displayed in the recording mode
The indicators are not recorded on the tape.
HДИКaTOPbl, OTo6paXkaemble BpeKIme 3aIncN
INHnKaToPbI He 3aInCbBaIOTcHaJIeHTbl.
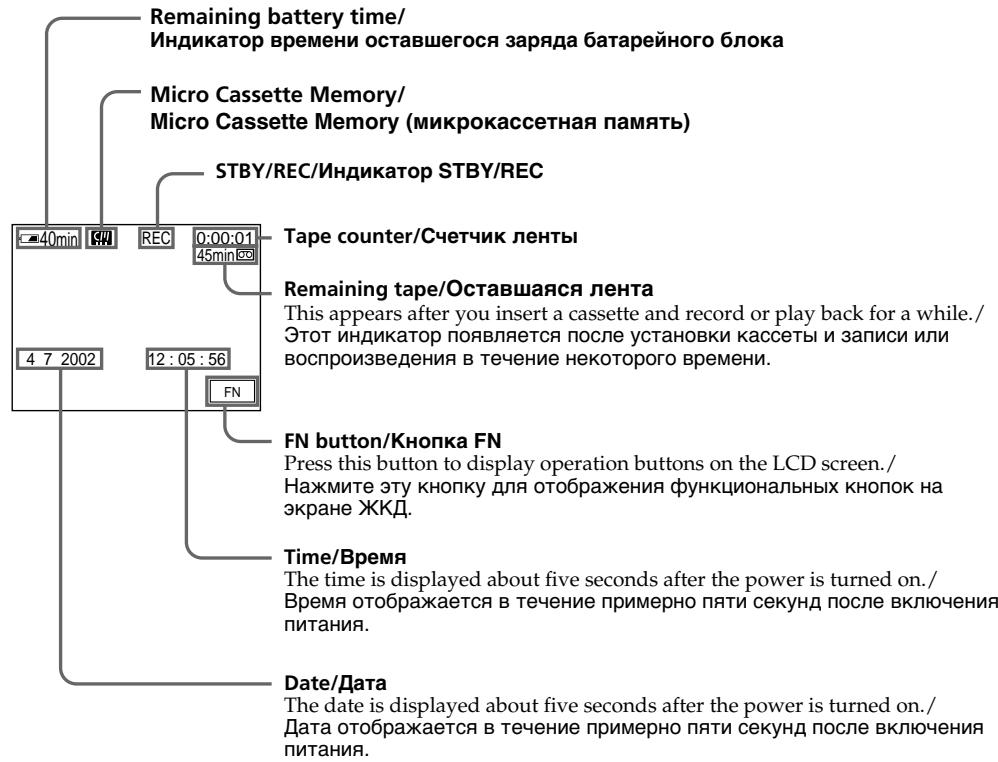
Remaining battery time indicator during recording
The remaining battery time indicator shows the approximate recording time. The indicator may not be correct, depending on the conditions in which you are recording. When you close the LCD panel and open it again, it takes about one minute for the correct remaining battery time in minutes to be displayed.
Tape counter
The tape counter can be reset using COUNT RESET in the PAGE3 screen.
Remaining tape indicator
The indicator may not be displayed accurately depending on the tape.
Recording data
The recording data (date/time or various settings when recorded) are not displayed while recording. However, they are recorded automatically on the tape. To display the recording data, press DATA CODE on the Remote Commander during playback. You can also operate in the PAGE3 screen during playback (p. 57).
HnDkaTOp BpeMeH NocTaBweroC8aPda 6aTapeHoro 6Ioka BO BpeM 3aHNCi
INHdkaTOp BpeMeHIOCTabWeroC3apHa6batapeHoro 6noka noka3bIbaet np6bnitEnbHOe Bpema 3annc. INHdkaTOp MoKcET 6bITb HteOCHbIM 3aBNCMOCTNOT ycNoB, B KOTobIX Bbl pOn3BOIDTe 3anbc. Korda Bbl 3akpbBaete NaHeJI JKKd n OKpbBaete e eCHOBA, Tpe6yeTcR OKOLONDH MHNyTbI DnI npABnHBOrO OTo6paXeHnO OCTabWeroC3BpeMeHIO 3apHa6batapeHoro 6noka BMHyTax.
CuetukJeHTbl
CyeTnK JeIeIbI MoXeT 6bITb IpeyeCTaHOBLeH c nOmoUbIO onuM COUNT RESET Ha 3kpaHe PAGE3.
Hdkatop octabwerooc yactka JehtbI
INHdkaTOPMOKETOTO6paKaTbCnHETOUHO B 3aBNCIMOCTNOTJeHTbl.
DaHHbIe 3aINcN
When you shoot a subject with the light source behind the subject or a subject with a light background, use the backlight function.
CbeMa o6BeKToB c 3aHnei noCDBeTkoI - BACK LIGHT
EcIn BbBbIOJIHHeTe CbEMKy oBeKTa c nCTOCHNKOM CBeTA N03aI IN Heo IIN JKe oBeKTA CO CBETNbIM fOHOM, INCIOJIb3yIte fYHKUIO 3aDHe NIOCBETKN.
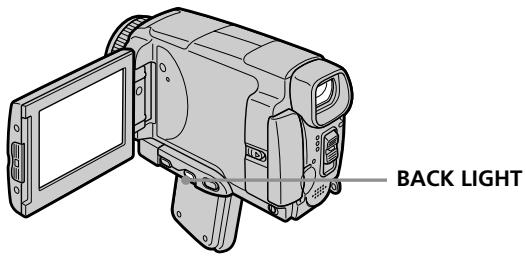
Set the POWER switch to CAMERA or MEMORY/NETWORK (DCR-IP55E only) and press BACK LIGHT.
The indicator appears on the LCD screen.
To cancel, press BACK LIGHT again.
During back light function
The backlight function will be cancelled when you press MANUAL in the EXPOSURE mode (p. 84) or SPOT METER (p. 85).
YcTaHOBnTe NepeKJIouHaTeIb POWER B nIoJoxKeHne CAMERA uNIMEMORY/ NETWORK (ToIbko moJeIb DCR-IP55E) n HaxMnte KOnIky BACK LIGHT.
Ha 3kpaHne NOBNTCA INDnKaTOp
Дя OTmeны НжмITE KhoNky BACK LIGHT eue pa3.
Bo Bpempa60bI yHKcun 3aHne noDCBETK
ФункциязднйпocбeткбуdETOTMeHeHa, ecn BынхмeteКнОнКУMANUALВржИМE EXPOSURE(cTp.84)ил SPOT METER(cTp. 85).
Shooting in the dark - NightShot/Super NightShot/ Colour Slow Shutter
Using NightShot
NightShot enables you to shoot a subject in a dark place. For example, you can satisfactorily record the environment of nocturnal animals for observation when you use this function.
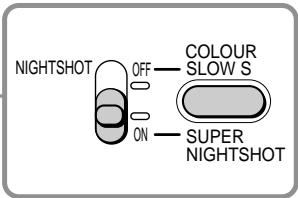
Set the POWER switch to CAMERA or MEMORY/NETWORK (DCR-IP55E only) and set NIGHTSHOT to ON.
and "NIGHTSHOT" indicators flash on the LCD screen. To cancel NightShot, set NIGHTSHOT to OFF.
Cbemka B TemHote - HocnHa Cbemka/HouHa cynpcBemka/LBeTHa CbemKa C MeJleHHbIM 3aTBoPOM
IcnoJb3OBAHnepeXIMMaHOUHOn CbeMKN
PexIM HcHOn CbEMKn No3BOJnReT Bam BbIIOHNrBt CbEMKY ObEkoTOB TemHom MeCTe. HanpImep, Bbl cMOxete CycNEXOM BbIIOHNrBt CbEMKY npn Ha6IoNoDeHm HoNbIX XINBOTbIX CnCnOb3OBAHnEm DaHHoФyHKuIN.
UcTaHOBnTe NepeKlIoUaTeIb POWER B noLoXeHne CAMERA uJIMEMORY/ NETWORK (ToJIbKO MoJoIb DCR-IP55E) u cTaHOBnTe NepeKlIoUaTeIb NIGHTSHOT B noLoXeHne ON.
ИндикatoPь iN“NIGHTSHOT" NaHnyT MMrTaMb Ha 3KpaHe.ДЯ OTMehbI peXmHa HOnHou CbeMKN yCTaHOBHTe nepeKJIQUaTeIb NIGHTSHOT B noJoxKeHme OFF.
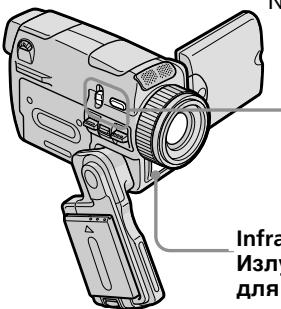
Infrared rays (NightShot Light) emitter/
Излуателынфракpacbix лучey (погсветка).Для Ночи CBemKи)
Using Super NightShot
Super NightShot makes subjects more than 16 times brighter than those recorded in NightShot.
(1) Set the POWER switch to CAMERA.
(2) Set NIGHTSHOT to ON. The O and "NIGHTSHOT" indicators flash on the LCD screen.
(3) Press SUPER NIGHTSHOT. The S and "SUPER NIGHTSHOT" indicators flash on the LCD screen. To cancel Super NightShot, press SUPER NIGHTSHOT again.
Using the NightShot Light
The picture will be clearer with the NightShot Light on. To activate NightShot Light, set N.S.LIGHT to ON in the menu settings (The default setting is ON) (p. 225).
IcnoJb3OBAHne pexmHa HOHOn cynepcbemKn
PexMM HooHou cypeRcBEmKn No3BOJnReT cEnaTb OobekTb 6OJIee Yem B 16 pa3 npYe, Yem B CnUyae, eNIn Bbl 6DyTe BbIOJnHTb CBEMKBy PexmE HoHOH CbEMKn.
(1)YCTaHOBInTe NepeKJIouaTeIb POWER B noJoxKeHne CAMERA.
(2)Установские поЕк nullаTeь NIGHTSHOT в поожене ON. И заразе начHT MraТь ИДИКАТОРБI n "NIGHTSHOT".
(3)HaxmTe KhoNky SUPER NIGHTSHOT. Ha 3KpaHe KKd NaHyT Mnatb HnDkaTopbS NO "SUPER NIGHTSHOT". IaI OTMHeIpeXIMa HoUHO cynepcBeEMKn HaxmTe KhoNky SUPER NIGHTSHOT eue pa3.
IcnoJIb3OBAHne IODCBETKn HOUHOJ CbeMKN
N3o6paXeHne cTaHET apYe,ecnBbKJIouHtB ΦyHKUIO NOcCBETKN HOcHOBcEMKn.ДЯ BKJIIOHEnaYHKUIN IOcCBETKN HOcHOB cEBMn yCTaHOBnTe ONUIO N.S.LIGHT B yCTaHOBkax MeHNO B NOJIOKeHHe ON (Ctp.233). (No yMOuHaHIno yCTaHOBLeHo 3NaueHne ON.)
Using Colour Slow Shutter
Colour Slow Shutter enables you to record colour images in a dark place.
(1) Set the POWER switch to CAMERA.
(2) Set NIGHTSHOT to OFF.
(3) Press COLOUR SLOW S. The and COLOUR SLOW SHUTTER indicators flash on the LCD screen. To cancel the Colour Slow Shutter function, press COLOUR SLOW S again.
Notes
- Do not use the NightShot function in bright places (ex. outdoors in the daytime). This may cause your camcorder to malfunction.
- When you keep NIGHTSHOT set to ON in normal recording, the picture may be recorded in incorrect or unnatural colours.
- If focusing is difficult with the autofocus mode when using the NightShot function, focus manually.
- Do not cover the NightShot Light emitter when using the NightShot function.
While using NightShot, you cannot use the following functions:
- Exposure
- Flexible Spot Meter
- PROGRAM AE
-White balance
-HOLOGRAM AF
While using Super NightShot, you cannot use the following functions:
-Fader
- Exposure
-Digital effect
- PROGRAM AE
- Recording still images
-White balance
- Flexible Spot Meter
- HOLOGRAM AF
- Recording with the flash
IcnoIb3OBAHne cyHKCnN CBeTHoN CbeMKn C MeJleHHbIM 3aTBOPOM
ФункцяцьETHOn CbEMKcMeДлEHbIM 3aTbOPOM nO3BOLJIeT Bam 3aIINCbIBaTb cBETHbie 1306paxKeHHB TEmHom MeCTe.
(1)Установские песеклоча teleportь POWER в положене CAMERA.
(2)Установские поеклочаюв NIGHTSHOT в положене OFF.
(3)HaKmTe KhONKy COLOUR SLOW S. Ha 3KpaHe NaHyT MnaTaB nHnDnKaTopb COLOUR SLOW SHUTTER. Ia OTMeHbI cyHKcN uBeTHoN cBemKn C MeJIeHHbIM 3aTbOpOM HaKmTe KhONKy COLOUR SLOW S eue pa3.
PpIMeuaHnA
He nCnoJb3yIte cyHKUIO HOUHOcBcEMKn B npKO oCBeUeHHbIX MecTax (HapnMep, Ha yuNue B DneBHOe Bpem). 3TO MOKeT npBvEcTN K HeNCnpaBHoCTN BaWeu BnuDeOKaMepbI.
-Пи удерхашиустань NIGHTSHOTВ noloxhen ON npиHopmaьн 3aicn n3o6paжehne moket 6bIb 3aICaHO B HENpaBnIbHbIX IJIH HeECTBeHHbIX cBetax.
- EcInФokycuPobKa B aBTOMaTnueckom pexKIMe npi nCIOJIb3OBAHmI ΦyHKUIM HOUHO CBEMKIN 3aTpYdHeHa, BbIPOJHnTe pyHyIO φokycuPobKy.
- He 3aKpbIbAaTe n3IyauTeb IOcBETKn dIra HOHHO CBemKN pRn IcNOJIb3OBAHmN OyHKuIN HOHHO CBemKn.
PnncnoIb3OBAHnn FyHKcHm HocHoN CbeMkn Bbl He MoXeTe NcNoJIb3OBAtB cJeDyUoJne FyHKcHn:
-3Kcno3nua
-Perynnpyemoe nTHOΦOTOMetnn
- PROGRAM AE
- Baanac 6eIoro
- HOLOGRAM AF
PnncnoIb3OBAHnn FyHKmN HcnpcBemKn Bbl He moKTe nCnoIb3OBaTb cJeDyUoJIne FyHKmN:
-Φeɪdεp
-3Kcno3nua
-LinpoBbIe 3cppeKtbl
-PROGRAM AE
-3aπncb HénpoBxKbIX n3O6paXeHn
- BaJaanC 6eNoRo
-PeRyIInpyEmoe nIaTHoΦOTOMetpnn
- HOLOGRAM AF
-3aIncb CO BCpbuKoJ
While using the Colour Slow Shutter function, you cannot use the following functions:
-Fader
- Exposure
- Digital effect
- PROGRAM AE
- Recording still images
- Flexible Spot Meter
- HOLOGRAM AF
- Recording with the flash
While using Super NightShot or Colour Slow Shutter
The shutter speed will be automatically adjusted depending on the brightness of the background. The motion of the moving picture may slow down.
When the POWER switch is set to MEMORY/ NETWORK (DCR-IP5SE only)
You cannot use following functions:
Super NightShot function
-Colour Slow Shutter
NightShot Light
NightShot Light rays are infrared and so are invisible. The maximum shooting distance using the NightShot Light is about three meters (10 feet).
In dark places
Colour slow shutter may not work properly.
3ainncb n3o6paXeHnA
PnncnoJIb3OBaHmФyHKcIuZBeTHoCbeMkn C MeJLeHHbIM 3aTbOpom BbI HMeOKeTe NcNoJIb3OBaBt cJeDyUoJneФyHKcIu:
-Φeɪdεp
-3Kcno3nua
-LnDpOBBie 3oΦeKtB1
- PROGRAM AE
-3aIncb HnOdbNkHbIX N3o6paKeHm
-Perynnpemyoe nTHOΦOTOMetpn
- HOLEGRAM AF
-3aIncbcoBcblskoJ
Ppi nCnoJIb3OBAHm FyHKcHn HooHoC cynepeBcEMKn IIN FyHKcHn CBeTHoN CbeMKcC MeJleHHbIM 3aTBOPOM
CkopocTb 3aTbopa 6yDet aBTOMaTHueckn peRyIINPOBaTbCBy 3aBNCIMOCTN OT RPKOCT foHa. PInr 3tOM BOCPON3BeDEHne DIBNUKUHXc N3o6paXeHn MOKeT 3aMeDJIITbCra.
EcInnepeKJIuOaTeIb POWER B nIoJoxHe MEMORY/NETWORK (ToIbKO moJeIb DCR- IP55E)
BbHe MoKTe IcNoJIb3ObaTb CneIyUOUIe cyHKuIN:
-Функцию HOHOn cynepeCbeMKN
-Функию CBeTHOД CbeMKN C MeДЛeHHbIM 3aTBOPOM
IoDCBETKa HOUHOcBcEMKn
JyHn NODCBETKN HUHON CbEMKn ABJIYOTCA
HΦpaKpaChbIMN, INoTOMY OHN HeBNIIMbl.
MaKcImaJIbHOe paCCTOAHne IJr CbEMKn pni
NCIOJIb3OBaHmN NODCBETKN HOUHOH CBEMKn
COCTaBJIReT OKIIO Tpex M.
B OueHb TEMhbIX MecTAX
Функцицьевтой сбемкс MeДлелньIM 3aTbOpOM MOket He pa60TaTb HaДлжашIM 6pbazom.
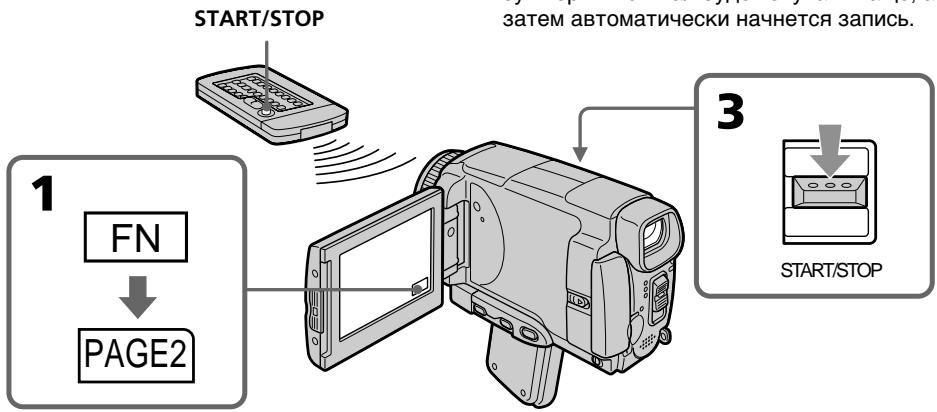
Self-timer recording
Recording automatically starts in 10 seconds after you set the self-timer. You can also use the Remote Commander for this operation.
(1) In the standby mode, press FN and select PAGE2 (p. 37).
(2) Press SELFTIMER. The (self-timer) indicator appears on the LCD screen.
(3) Press START/STOP. The self-timer starts counting down from 10 with a beep sound. In the last two seconds of the countdown, the beep sound gets faster, then recording starts automatically.
3aInc b no TaMepy camo3anycka
3aHnCb NaHnHaeTc aBTomatNueckn Ypeez 10 CEkyH nocIe yCTaHOBk Taimepa cAmo3anycKa. Iyra 3ToI Oepauu Bby MoKeTe TaKke NcnoIb3ObaT NyIbT DnCTaHNoHHOro ynpablenna.
(1)BpeXmme OxNdaHnHaXMMTe KhONky FN, a 3aTEM BbI6epNTe CtpAHu PAGE2 (Ctp. 37).
(2)HaxmTe KhoNky SELFTIMER. HdkaTop (taMepa cmo3anycka) NOBNTcHa 3KpaHe KKd.
(3)Haxmnte KhoNky START/STOP. TaMep camo3anycka haunet o6paTHbI OTCuETOT 10c3yMMephBIM CnHaJOM.B NocJeDHe IBe CeKHyIbI o6paTHO OTCeTa 3yMMepHbI CnHaIbI 6yUdET 3ByuTa b Yaae, a 3aTEM ABToMaTnueckn Haunetc3aInCb.
To stop the countdown
Press START/STOP.
To restart the countdown, press START/STOP again.
To cancel self-timer recording
Press SELFTIMER so that the (self-timer) indicator disappears from the LCD screen while your camcorder is in the standby mode. You cannot cancel self-timer recording using the Remote Commander.
ДлЯ OCTaHOBKn O6paTHOrO OTCheTa
Haxmnte KhONky START/STOP.
Для NOВТOPHORO 3anycka o6paTHORO OTCeTa haxmTe KhONky START/STOP eue pa3.
Длг OTMeHbI 3aIncn no TaImepy camo3anycka
HaximaiTe KhoNky SELFIMER, taK YtO6bI HnDnKaTOp (taImepa cAmo3anycka) nCye3 C 3kpaHa KKД B To BpeM, KOrda BaWa BuDeOkAmepa HaxoDITcB PexIMe OxNiDaHn. BbI He MoKeTe OTMeHnTB TaIMep cAmo3anycka C NOMOsbIO NyIbTa DnCTaHNoHHoro ynpabJIeHn.
Note
The self-timer recording mode is automatically cancelled when:
- Self-timer recording is finished.
- The POWER switch is set to OFF (CHG) or VCR.
When the POWER switch is set to MEMORY/ NETWORK (DCR-IP55E only)
You can also record still images on the "Memory Stick" with the self-timer (p. 152).
PpmeaHne
Pexim 3aIncn no TaImepy caMo3anycca 6ydet abTomatueckn OTMeHEn B CJIyuaX:
-Окончаня заимся по таймени самоануcke.
- YctaHOBKn IpeKJIouaTeTn POWER B nIoJoxHeNc OFF (CHG) uNn VCR.
EcInnepeKlnHouaTeNb POWER yctaHOBJeH B noJIOxHeNMe MEMORY/NETWORK (ToIbKO moJeNb DCR-IP55E)
BbMOxKeTe TaKxE 3aINCbIbTaH HeNoDBrXHbIe H3o6paXeHnHa "Memory Stick" c nOmoIbIO TaMepa camO3ayncKa (CTp.152).
Checking the recording - END SEARCH
You can go to the end of the recorded section after you record. It is convenient when you make the transition between the last recorded scene and the next scene you record smooth.
(1) In the standby mode, press FN to display PAGE1 (p. 37).
(2) Press END SCH.
The last five seconds of the recorded section are played back and your camcorder returns to the standby mode. You can monitor the sound from the speaker.
Поберка заимсн - END SEARCH
BbMOxKeTe DoTn Do KOHua 3aNcAHHoro yactka nocTe 3aNcN. 3To RaJIeTcYdO6HbIM, KOrDa BbXoTne BbIOnHnTb PnABHyI nepeXoM mKdy nocJeHNM 3aNcAHHbIM 3Nt3oDM N CLeDyUOM 3aINCbIAEbmI 3Nt3oDM.
(1)BpeXmmeOxNdaHnHaXMMTe KhoNkyFN Ia OTo6paXeHNcTpaHnCbI PAGE1 (ctp. 37).
(2)HaxmTe KhoNky END SCH. Byuyt Bocnpo3BeDeHb IocneDnne pIaTb cekyHd 3anicaHHo YacTn, n Ba7a BIndeOkamepa BepHeTcB PexKIM OxJaHn. Bbl moKeTe KOHTpOINpOBaTb 3Byk Chepe3 akycTuYeCKyIO CnCTeMy.
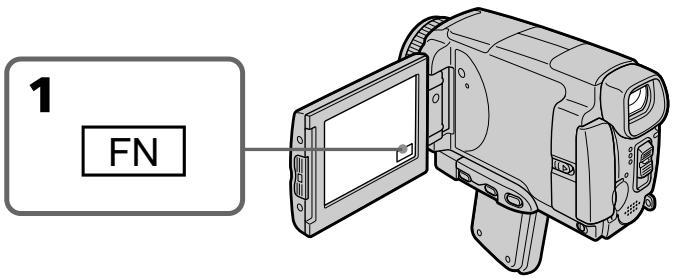
To return to FN
Press EXIT.
To stop searching
Press END SCH again.
Even once you eject the cassette
The end search function works.
Длво3ВраТКИнДикалиFN
HaxMMTe KhONKy EXIT.
ДлгoctaHOBknNONCKa
HaxmTe KhoNky END SCH eue pa3.
Дахе eclin ВинзblueTe kaccety
You can monitor the recorded tape etc. on the LCD screen. If you close the LCD panel, you can monitor the playback picture in the viewfinder. You can also control playback using the Remote Commander.
(1) Prepare the power source and insert the recorded tape.
(2) Set the POWER switch to VCR.
(3) Slide OPEN in the direction of the mark to open the LCD panel.
(4) Press l to rewind the tape.
(5) Press 11 to start playback.
(6) Adjust the volume following the steps below.
① Press FN to display PAGE1 (p. 37).
② Press VOL. The screen for the volume adjustment appears.
③ Press - / + to adjust the volume.
- : to decrease the volume.
- : to increase the volume.
(7) Press OK. The display returns to PAGE1.
Bocnpon3BeDeHne JeHTbI
BbMOxTe HabIIOdaTb 3aIncaHNoe Ha IeHTe
n3o6paXeHne n T.I. NaKpaHe XKd.EcNb Bbl
3aKpoEte naHEnb XKd, Bbl MoxTe
KOHTpOINPOBaTB BOCpON3BOIDMOe
n3o6paXeHne B BuOnCKaTeNe. Bbl MoxTe
TaKKe KOHTpOINPOBaTB BOCpON3BeDEHne C
nOMOsbIy NylTa DnCTaHcNOHOrO ynpabJIeHNA.
(1)ПоД�ТОВБTe ИСTOЧИК ПИТАнЯ И BCTаБТe 3aПИСАНHyю ЛЕТY.
(2)Установские посяклоуатель POWER в положене VCR.
(3)ПepeДиньтpeпeркluчateь OPEN B
Hаправлеснизда >,уkaЗаHHOro Ha
Видевокамеpe,чToбыОТКрьтпанель XXKД.
(4)HaxmTe KhONky Dny yckopeHHoI nepeMOTKJIeHTbI Ha3aI.
(5)HaKMMTe KHNKky IIДЯ BKJIQUeHnBOCNpOu3BeDeHnY.
(6)Отergyніріte Грмкоctь, сіл\'угпів\'е\'HHbIM HIXke nyHkTam.
① Haxmnte KhONky FN, YTO6bI OTo6pa3nTb cTpaHnCy PAGE1 (cTp. 37).
② HaxmTe KhONky VOL. IOrBntc 3KpaH peYnnpOBKn rPOMKoCTn.
③ДяperулровкгромкocTNнхимаTe KHOHKN-/+
-:ДЯУMeHbIeHnI rPOMKoCTN.
+:ДЯ yBéJIuYeHn rPOMKoCTn.
(7)HaxmTe KhoNky OK. INdkaunBepHeTcK CTpaHnCe PAGE1.
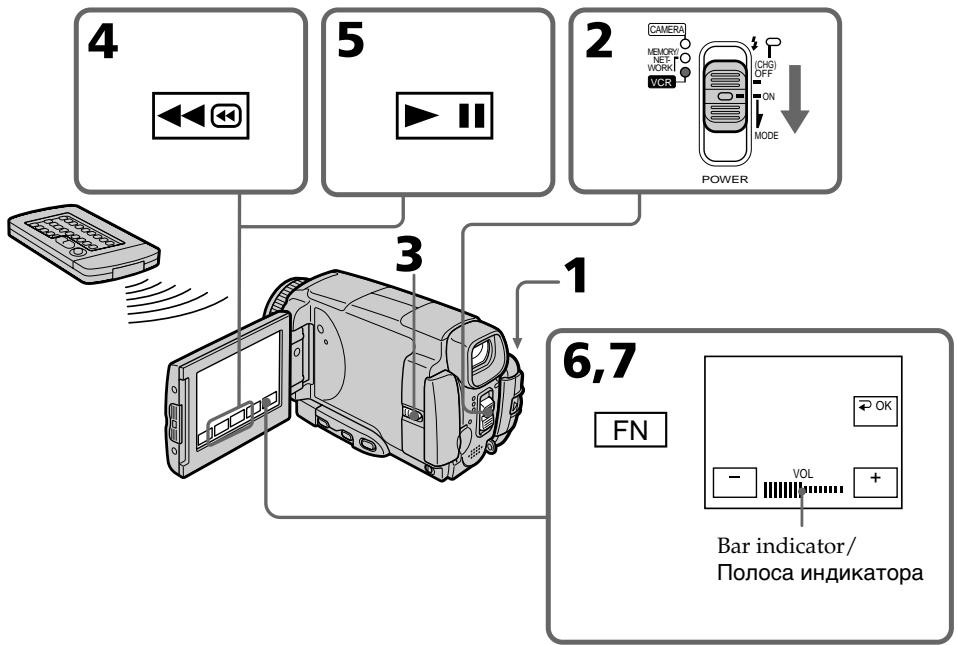
To return to FN
Press EXIT.
To stop playback
Press on the LCD screen or STOP on the Remote Commander.
When monitoring on the LCD screen
You can turn the LCD panel over and move it back to the camcorder body with the LCD screen facing out.
If you leave the power on for a long time Your camcorder gets warm. This is not a malfunction.
When you open or close the LCD panel Make sure that the LCD panel is set vertically.
EcIn Bbl octabnte nHTaHne BKIOUeHHbIM Ha dIINTEJbHOE Bpemr
BaSHA BnIeOKaMepa HArpeTcR.3To He ABIIraTcH NeuCnpaBHOCTbIO.
Korda Bby OTKpbIbAeTe nIIN 3akpbIbAeTe naHeJI KKJ
Y6eIntecb, YTO nHaHb JKKd yCTaHOBJIeHa BepTnKaJIbHO.
To display the screen indicators - Display function
Press DSPL/TOUCH PANEL on your camcorder or DISPLAY on the Remote Commander. The indicators disappear from the LCD screen. To make the indicators appear, press DSPL/TOUCH PANEL or DISPLAY again.
Using the data code function
Your camcorder automatically records not only images on the tape but also the recording data (date/time or various settings when recorded) (Data code).
Follow the steps below to display the data code using the touch panel or the Remote Commander.
Using the touch panel
(1) In the playback mode, press FN and select PAGE3.
(2) Press DATA CODE.
Длг OTO6paXeHn3KpaHHbIX INHdNKaTOPOB -ФУнКцИ NHDINKaUIM
HaKMMTe KhoNky DSPL/TOUCH PANEL Ha BaWei BnDeOekampe nIIN KhoNky DISPLAY Ha nyIbTe INCTaHcNOHOro ynpaBJeHn. INdKaToPbI nCHe3HyT c 3kpaHa KKd. Ha 3Kpae He KKД nOaBtCra INdKaToPbI. DJIrTOrO uTObbl INdKaToPbI nCHe3n, HaxKMTe KhoNky DSPL/TOUCH PANEL IIN DISPLAY eue pa3.
IcnoJb3OBAHne yHKunn Koda daHHbIX
Baisha Bnideokamepa ABTomatueckn 3anCbIbAeT Ha JeHTy He TOnbKO N3o6paXeHn, HO TaKKe I daHHbIe 3anCn (DaTy/Bpemn pa3nnuHbIe yCTaHOBKn npn 3anCn) (KoD DaHHbIX).
CneyuTe npBBeEHbIM HnKe nyHKTaM dIa OTo6paXeHnKaOda DaHHbIX C NOMOuBcEOHCOPHO NaHeIN INI PyNbTa DnCTAHUHOHOynpaBLeHnA.
IcnoJIb3OBAHHe ceHcopHoI naHeJIi
(1)В ржиме BOCПОИЗБЕДENHAЖМЛТЕ Kногу FNи Вьберпгс.Tраниу PAGE3.
(2) Haxmnte KhoNky DATA CODE.
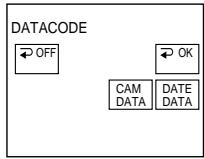
(3) Select CAM DATA or DATE DATA, then press OK.
(4) Press EXIT.
Using the Remote Commander
Press DATA CODE on the Remote Commander in the playback mode.
The display changes as follows: date/time various settings (SteadyShot OFF, exposure, white balance, gain, shutter speed, aperture value) no indicator
Not to display various settings
Set DATA CODE to DATE in the menu settings (p. 232).
The display changes as follows when you press DATA CODE on the Remote Commander: date/time no indicator
(3)Bb6epnte onuHOCAM DATA nJIN DATE DATA,a 3aTeM haxmnte KhoNky OK.
(4)HaxmTe KhoNky EXIT.
IcnoJIb3OBAHne nyIbTa InCTaHcNoHHO ynpabLeHn
B pexime Bocnpon3BeDenHaXMMTe KHOIky DATA CODE Ha npIbTe DnCTaHcNoHHoro ynpabLeHna.
INDnkaun6yJeT n3MeHrTaCnEduOuIM 06pa3oM:
daTa/BpEm pa3JNUHbIe ycTaHOBKN (BbIKIOUcHHe yCTOuINBOI CbEMKn, 3KcNO3UNIA, 6aJIaHC 6eNoRo, yCnJIeHNe, cKOpocTb 3aTbOpa, BeINuHa dnaaparMbI) 6e3 INdNkaun
ДпгТOrO,ЧTO6bI He OTO6paKaJIncb pa3JIuHbIe YCTaHOBKn
YcTaHOBInTe OOnuHoD ADATA CODE By yCTaHOBkax MeHIO B IIOJoxeHne DATE (ctp. 240).
PnHaKaTmKHOKnDATA CODE Ha npIbTe DnCTaHcUOHOrO ynpaBLeHnINHdNkaun6byet N3MeHrTbcra CneDyUoMm 06pa30M:
daTa/Bpemr 6e3 INHdkaun
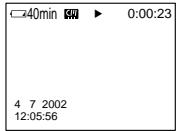
Date/time/ Data/Bpemr
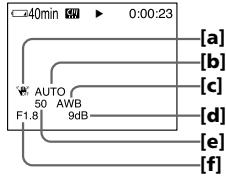
Various settings/ Pa3nuchyIe ycTaHOBKn
[a] SteadyShot OFF
[b] Exposure mode
[c] White balance
[d] Gain
[e] Shutter speed
[f] Aperture value
Various settings
Various settings show the camcorder's recording information at the time of recording. In the recording mode, the various settings will not be displayed.
When you use the data code function, bars (-- - - - ) appear if:
- A blank portion of the tape is being played back.
- The tape is unreadable due to tape damage or noise.
- The tape was recorded by a camcorder without the date and time set.
Data code
When you connect your camcorder to a TV, the data code also appears on the TV screen.
Remaining battery time indicator during playback
The indicator shows the approximate continuous playback time. The indicator may not be correct, depending on the conditions in which you are playing back. When you close the LCD panel and open it again, it takes about one minute for the correct remaining battery time to be displayed.
[a] BbIKJI yctOuHINBO CBEMKJ
[b] PeknM 3KcI03NIM
[c] Baanhc 6enoro
[d] YcunHeHne
[e] Ckopooc3aTbopa
[f]BelenuHa dnaaparMbI
Pa3JIuHbIe yCTaHOBKn
Pa3nHbIe yCTaHOBKn OTo6paXaIoT
HΦopMaunIO BaWei BnDeOkamepe np
BbIpOnHeHN 3annc. B pexIme 3anncn
pa3nHbIe yCTaHOBKn OTo6paXaTbc He 6ydyT.
EcIn BbI nCnOJIb3yeTe fynKcNIO KOA daHHbIX,TO NOBBArTcNOIOcbI (-- --),ecIN:
- Bocnpon3boDntcH He3aIncAHbI yUacToK HaJIeHTe.
-JIeHTa RbJIeTcR HeuHtAeMoI n3-3a NOBpeKJdeHnI JIN NOMex.
-3aIncb Ha JeHTy 6bJa N BbINOnHeHa BnDeOkamepoi 6e3 yCTaHOBKn DaTbI IN BpemeHn.
KoДдaHHbIX
Ecni Bby noDcoeMHnTE Bauy BNdeOkamepy K TeJeBn3OpY, KOJ daHbIX NOABNTCA TAKKe Ha 3KpaHe TeJeBn3Opa.
Инданковор octabшeroocврemeи зарда 6атAPEHORO 6лOKA BO BPEMВOCПОНЗBEDEHIN
3TOT INHdNkatop OTo6paXaET
PnIbIIN3NTeJIbHOe BpEMr HnIpepbIBHOrO
BOcPOn3BeDeHn. INHdNkatop MOKeT 6bITb
HEtOCHbIM B 3aBNCMocTn OT yCNOBn, B
KOTOpbIX BbI bInOJIHReTe BOCPOn3BeDeHne.
KOrDa BbI 3aKpbIbAeTe NaHeIb JxKDn
OTKpbIbAeTe eE CHOBA, Tpe6yeTcR OKoNo ONDH
MNHyTbI DnI npABINbHOrO OTo6paXeHn
OCTabUWeOcR BpEmH 3apJa 6aTaapeHOrO
6loka.
Various playback modes
To operate video control buttons, set the POWER switch to VCR.
To view a still image (playback pause)
- Press during playback. To resume playback, press again.
- Press PAUSE on the Remote Commander during playback. To resume normal playback, press PAUSE again.
To fastforward the tape
- Press in stop mode. To resume normal playback, press
- Press FF on the Remote Commander in stop mode. To resume normal playback, press PLAY.
To rewind the tape
- Press 回 in the stop mode. To resume normal playback, press .
- Press REW on the Remote Commander in stop mode. To resume normal playback, press PLAY.
To locate a scene monitoring the picture (picture search)
- Keep pressing or during playback. To resume normal playback, release the button.
- Keep pressing REW or FF on the Remote Commander during playback. To resume normal playback, release the button.
To monitor the high-speed picture while fastforwarding or rewinding the tape (skip scan)
- Keep pressing while rewinding or while advancing the tape. To resume rewinding or advancing, release the button.
- Keep pressing REW on the Remote Commander while rewinding the tape, or keep pressing FF on the Remote Commander while advancing the tape. To resume normal rewinding or advancing, release the button.
Pa3nHbIepeXmblBocnpOn3BeDeHna
To view the picture at slow speed (slow playback)
Press SLOW on the Remote Commander during playback. To pause playback, press 11 or PAUSE on the Remote Commander. To resume normal playback, press 11 or PLAY on the Remote Commander again.
To search the last scene recorded (END SEARCH)
Press END SCH on PAGE2 in the stop mode. The last five seconds of the recorded section are played back then the camcorder stops.
Video control buttons on the LCD screen
To play back or pause a tape
To stop a tape
To rewind a tape
To fastforward a tape
When the playback pause mode lasts for five minutes
Your camcorder automatically enters the stop mode. To resume playback, press 11 or PLAY on the Remote Commander.
Bocnpon3BeDenHeJeHtBi
ДлпюсмOTpa ИЗбрахенЯ Ha 3amEДLEHHOckopocTN (3amEДLEHHOe BOCPpOu3BedeHne)
HaKmTe BO BpemB OBCpnOn3BeDenHn KONkny SLOW Ha npIbTe DnCTaHcUHOHOro ynpaBLeHn. IyBaBIOJIeHn Nay3bI BOCpnOn3BeDenHn HaxMTe KONkY nIIN PAUSE Ha npIbTe DnCTaHcUHOHOrO ynpaBLeHn. IyB036HOblHn ObbyHOrO BOCpnOn3BeDenHn HaxMTe KONkY nIIN PLAY Ha npIbTe DnCTaHcUHOHOrO ynpaBLeHn.
Baisha Bnndeokamepa aBTOMaTHueckN BOJTeB pexmOcTaHOBKn. IJIa BO3o6HOBLeHnI BOCpOn3BeHeHn HaxMnte KHOInKy 11IPLAY Ha nylte dncTaHcIOHnHO ynpabLeHnI.
Viewing the recording on TV
Connect your camcorder to your TV with the A/V connecting cable supplied with your camcorder to watch the playback pictures on the TV screen. You can operate the playback control buttons in the same way as when you view playback pictures on the LCD screen. When viewing the playback picture on the TV screen, we recommend that you power your camcorder from a wall socket using the AC power adaptor (p. 30). Refer to the operating instructions of your TV.
Open the jack cover. Connect your camcorder to the TV with the A/V connecting cable. Then, set the TV/VCR selector on the TV to VCR. The supplied A/V connecting cable is equipped with an S video plug and a video plug. Use either the S video plug or the video plug depending on the TV. Do not connect both of the plugs to the TV.
ПодсоeДинTe Baуw BndeOKaMepy K BaWemy
TeLEBn3Opy c nOMoUbIO COeDInHTeNbHOrO
Ka6eIaYdNo/BnDeO, KOtOpbI pRnlaRaetcK BaWei BnDeOKaMepe, dIЯ npocMoTpa
BOcPpOn3BOdIMoro n3ObpaJxEHnHa 3KpaHe
TeLEBn3Opa. Bbl MoKeTe nOJIb3OBaTbcra
KHOpKaMn KOHTPOJI BOCPpOn3BeDeEHnHa TAKIM
Xe obpa30M, KaI npI npocMoTpe
BOcPpOn3BOdIMoro n3ObpaJxEHnHa 3KpaHe
XKJd. Ppi npocMoTpe BOCpOn3BOdIMoro
n3ObpaJxEHnHa 3KpaHe TELeBn3Opa
peKOMeHdyeTcI nOdkNlOuHTb nITaHne K BaWei
BnDEOKaMepe OT 3JIeKTPnueCKoI CETn C
nomoUbIO ceTeBOrO aJaNTepa nepeMeHHOrO
ToKa (ctp. 30). CM. INHCTpyKcIHO IO
3KcnPyatauIN BaWero TEleBn3Opa.
OtkpoiTe KpbIuKy rHe3da. POncoeDInHtBe BaUy BnDeoKamepy K TeJeBn3Opy C NOMOsbHo CoeDInHtEhBO Hor Ka6eJra aydno/BnDeo. 3aTeM yCTaHObITe CEJIeKTOpHbI NpeKeJIIOvAteNb TV/ VCR Ha BaWem TeteBn3ope B NOJoxeHne VCR. PrnPnaRaEmbl CoeINHtEhBbI KabeJb aydno/ BnDeo OChauhen WTekepom S BnDeo IN BnDeoWTekepom. IcNoJIb3yJrTe WTekep S BnDeo INIbn DIOwTekep 3aBaUNCIMoCTH OT MoDEJI IN TeJeBn3Opa. He NoDCoeDInHraTKe TeteBn3Opy oBa WTekepa.
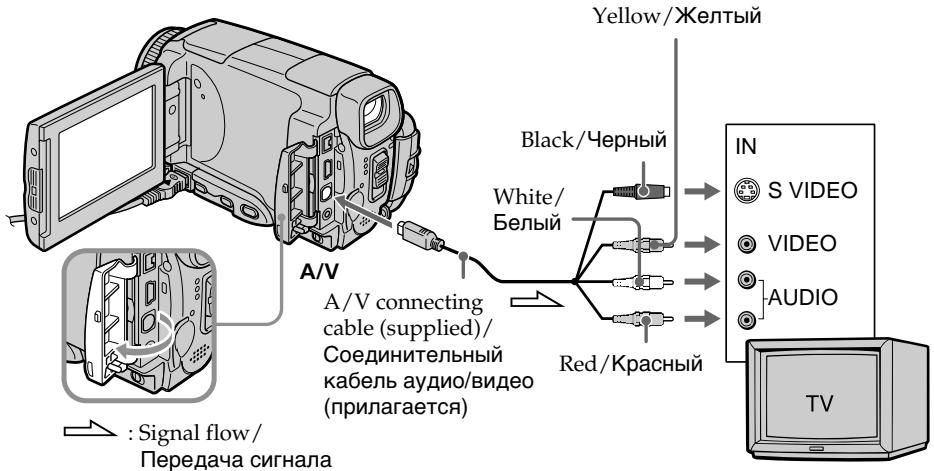
If your TV is already connected to the VCR
Connect your camcorder to the LINE IN input on the VCR with the A/V connecting cable supplied with your camcorder. Set the input selector on the VCR to LINE.
EcIn BaW TeJIeBn3Op yKe IoIcoEiHHeN K KBM
IopoceHnHTe BaUy BnDeokamepy K BxOndomy rHe3dy LINE IN Ha KBM c nOmoBIO coeHNHTeJbHoro Ka6ena ayDno/BuJeO, KOtOpB yPnlaeraTc KaBaWe BnDeokamepe. YctaHOBe TceNeKTop BxOnHOro CnRHaHa HA KBM b noLoXeHne LINE.
If your TV or VCR is a monaural type
Connect the yellow plug of the A/V connecting cable to the video input jack and the white or red plug to the audio input jack on the VCR or the TV. If you connect the white plug, the sound is an L (left) signal. If you connect the red plug, the sound is an R (right) signal.
If your TV/VCR has a 21-pin connector (EUROCONNECTOR)
- European models only
Ecni BaW TeNeBn3Op nJN KBM MOHOΦOHNueCKOro TUna
IoioceHInHe XeIbIy IwTekep coeHNHTeJIbHO Ka6eJn ayDIO/BnDEO K BXoHOMy rHe3dy dJa BnDEOCnHa, a 6BJI nIIN KpaCHN bIwTekep-KBXODHomy rHe3dy dJa ayDIOcHnHaNA KBM nII IN TeBn3OpA.EcnBbl IOoEOHNTE 6BJI WTekep, 6yDet cblWeH 3ByKOBOn CnHaL L (JeB).EcIn Bbl IOoEOHNHe KpaCHN bIwTekep, 6yDet cblWeH 3ByKOBOn CnHaL R (npabBI).
EcnB Bau TeIeBn3Op/KBM OcHaueH 21-7bIpbkOBbIM pa3beMOM (EUROCONNECTOR)
-ToIbKO eBpOeNCKne moJeN
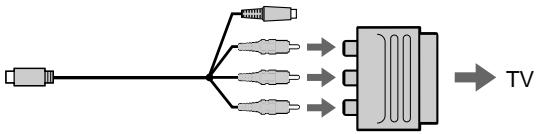
Use the 21-pin adaptor supplied with your camcorder.
This adaptor is exclusive to an output.
If your TV has an S video jack
Connect using the S video plug to faithfully obtain original pictures. With this connection, you do not need to connect the yellow (video) plug of the A/V connecting cable. Connect the S video plug to the S video jack on the TV or VCR. This connection produces higher quality MICROMV format pictures.
To display the LCD screen indicators on TV
Set DISPLAY to V-OUT/LCD in the menu settings (p. 232).
Then press DSPL/TOUCH PANEL. To turn off the LCD screen indicators, press DSPL/TOUCH PANEL again.
IcnoIb3yIte 21-ItbIpbKOBbI aanTep, KOTOpB I npnlaeraTcK BaSei BInDeokampe. 3TO T aanTep npedHa3NaueH NCKIOHTeJbHo DJIY BblXoDHorO CnHana.
EcIn BaI TeIeBn3Op OchaueH rHe3dOM S BnDeo
Recording still images in CAMERA mode
You can record still images on a "Memory Stick" in CAMERA mode.
Before operation
Insert a "Memory Stick" into your camcorder.
(1) Set the POWER switch to CAMERA.
(2) Keep pressing PHOTO lightly until a still image appears. The CAPTURE indicator appears. Recording does not start yet. To change the still image, release PHOTO, select a still image again, and then press and hold PHOTO lightly.
(3) Press PHOTO deeper. The still image will be displayed. Recording is complete when the bar scroll indicator disappears. The image when you pressed PHOTO deeper will be recorded on the "Memory Stick."
3aIncb HeIOBnKhbIX n3o6paXeHm B pexIme CAMERA
BbMOxKeTe 3aIcIbIaTb HeNoDBrXKHbIe I3o6paJekHa "Memory Stick" BpeKIme CAMERA.
Ipeed BbinoJHHeHem Oepaun
YctaHOBnTe "Memory Stick" B BaCy BnDeOKaMepy.
(1)Установские песеклоча teleportь POWER в положене CAMERA.
(2)Держпгс слгка нахало кногу PHOTOdo Text nop, nOKa He NOBtca HnOdBxHnoe n3obpaxhenue.ПогвntcHaNdkaTop CAPTURE.3anncb noka euple He haujalac.ДяиЗMeHEnHЯнoDBrXHoro n3obpaxhenue OTnyctnte Khonky PHOTO, Bbl6epnte HeNoDbxHnoe n3obpaxhenue choBa, a 3atem Haxmmte In derjKngte cIerka naXaToi KhoNky PHOTOn.
(3)Haxmnte KhoNky PHOTO cnIbHee. HenoDbnXHoe n3o6paXeHne oTo6pa3ntcHa 3kpaHe. 3aInCb 6yDet 3aBepSeHa, KOrDa nCHe3HET INDikatop INoOcbI npokpyTkn. I3o6paXeHne, KOrDa Bbl HaxMeTe KHOIpKY PHOTO cnIbHee, 6yDet 3aIncAHO Ha "Memory Stick".
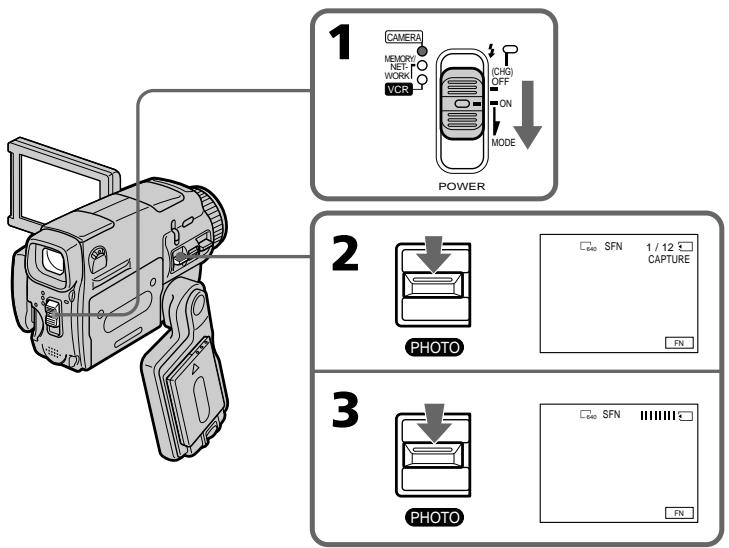
"Memory Stick"
For details, see 127 for more information.
Image size of still images
Image size is automatically set to 640 × 480 .
When you want to record still images in different sizes, use the Memory Photo recording function (p. 143).
When POWER switch is set to CAMERA
You cannot select image quality mode.
The image quality mode you last selected is used.
(The default setting is SUPER FINE).
For details, see 228 for more information.
Notes
- Do not shake or strike your camcorder when you record still images.
The image may fluctuate. - You cannot record still images on a "Memory Stick" during following operations (flashes):
- Wide mode
-Fader - Digital effect
- Picture effect
Super NightShot
-Colour Slow Shutter - END SEARCH
-MEMORYMIX
During and after recording still images on a "Memory Stick"
Your camcorder continues recording on tape.
When you press PHOTO on the Remote Commander to record still images
The image when you press PHOTO will be recorded on the "Memory Stick"
To record still images on a "Memory Stick" during tape recording
You cannot check an image on the screen by pressing PHOTO lightly.
To record images with higher quality
We recommend you use the Memory Photo recording function (p. 143).
You cannot record a title.
"Memory Stick"
Iopob6bIe CBeDeHnI npBVeDeHbI Ha cTp. 127.
Pa3Mep HenoBxKhIx n3o6paXeHn
Pa3Mepn3o6paXeHnA bTOMaTnueckn yCTaHaBnBaETcRa 640x480.
EcIb Bby xOTHTe 3aIncatb HHeIOBnKHbIe I3o6paKeHnI pyrTO rO pa3Mepa, IcNoIb3yTe yHKUHO pOTOCbEMKn C COxPaHEHmEB namrTt (ctp.143).
EcJn nepeKJIIOUaTeIb POWER ycTaHOBNeH B noJIoXeHne CAMERA
BbI He MoXeTe N3MeHrTb peXIM KaYeCTBa n3o6paKeHn.
Bawa Bndeokamepa 6ydet npoonkatb 3anncb Ha Jenty.
EcJn Bbl HaxMeTe KhONky PHOTO Ha nyIbTe DcHtAnCuHNOHoro ynpaBLeHnA dIy 3aINcH HenoBnBXKbIx N3O6paXeHn
Recording images with the flash
The flash pops up automatically. The default setting is auto (no indicator). To change the flash mode, press 4 (flash) repeatedly until the flash mode indicator appears on the LCD screen.
3aIncb n3O6paXeHn co BCnbIshKoI
Bcblka cpaabaetabmatueckn. ABTomatueckoe cpaabaBaHne (6e3 nHdkaTopa) ABJHeTc yCTaHOBKOI NO yMOJIaHIO.ДЯИЗMEHEnpeXIMAbCbIaKn HaxIMaTe NOBTOPOK HONIKy (BCblIaK), nOKa INDkATOp peXIMAb CbIaKNe He NoABNTcA Ha 3KpaHe KKd.
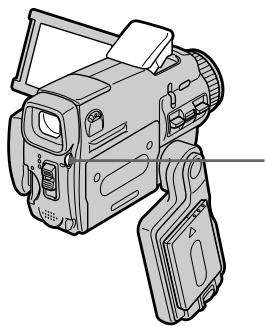
(flash)/(bcnbioka)
Each press of ±b (flash) changes the indicator as follows:
t AUTO (No indicator)
Auto red-eye reduction:
The flash fires before
recording to reduce red-eye.
Forced flash: The flash fires regardless of the surrounding brightness.
No flash: The flash does not fire.
The amount of flash is automatically adjusted to the appropriate brightness. You can also change FLASH LVL to the desired brightness in the menu settings (p. 225). Try recording various images to find the most appropriate setting for FLASH LVL.
KaKdbi pa3 npn haxkTmN KhoNk (BCnbIuK) INHdNKaTOP n3MeHReTcA CneDyUOUM 06pa3OM:
出 AUTO(6e3nHnKaTopa)
A B T O M A T N U C E K O E y m e h b u s h e n e 3 p f e k t a K p a c h b i x r I n a 3:
BcnbIka cpa6aTbIbAeT
peep3aHcBIO nA
ymehbweHHaKpaChbIX rna3.
PnHynteBna BCbIka:
Bcblska cpaabaet BHe 3aBNCMOCTN OT RPKOCTN
OKpykaIOUeO OCEueHnA.
Be3 BCnIiKn:
Bcnbikka He cpa6aTbIbAeT.
INHTeHCNBHOCTb BCNbIbIKn peRyIInpyeTcra
aBTOMaTHUeCKN B COOTBETCTBUN C RApKoCTbHO.
BbMOKeTe TaXKe yCTaHOBNTb Ha HyXHyIO
rRpKOCTb ONuIO FLASH LVL B yCTaHOBKaX MeHIO (cTp.233).PONbITaHTecb 3aNcA Tb pa3NlHuBle
n3O6paXeHn I nO bICKaHn HAnboJe e
noDxOJaIeO 3HaueHn yCTaHOBKn FLASH LVL.
Notes
- The recommended shooting distance using the built-in flash is 0.3m to 2.5m (31/32 feet to 8 1/3 feet).
- Attaching the lens hood (optional) or a conversion lens (optional) may block the light from the flash or cause lens shadow to appear.
- Auto red-eye reduction (R) may not produce the desired effect depending on individual differences, the distance to the subject, the subject not looking at the pre-recording flash or other conditions.
- The flash effect cannot be obtained easily when you use forced flash in a bright location.
- When recording with the flash, it takes longer to prepare for image capture. This is because your camcorder starts to charge power for firing after the flash pops up. Darken the surroundings by covering the lens, and press PHOTO lightly so that your camcorder starts to charge power after the flash pops up.
- The flash CHG lamp flashes while the power for firing is being charged. After charging is completed, the flash CHG lamp lights up.
- If it is not easy to focus on the subject automatically, for example, when recording in the dark, use the focal distance information (p. 88) for focusing manually.
If you leave your camcorder for five or more minutes after disconnecting the power source
Your camcorder returns to the default setting (auto).
Приимechanicals
- PeKoMeHdyeMoE dIa CbEmKn paCCTOHaHne npuNCNoJIb3OBAHm BcTPOeHHoB BCNbIiKhn CoCTaBJIaR eT 0,3do2,5M.
-Пикреленс CBETO3auntHoi6JIeHdbI obKeTnBa (прпобетаetcR OTeJbHo) nI npoeobpa3OBaTeJbHOrO obKeTnBa (прпобетаetcR OTeJbHo) MoXeT npERpaNTb CBET O BCJIbIuKn nI npiBecTN K NOBHeHIO TeHn ObKeTnBa. - ABTomatnueckoe yMeHbWeHne 3ΦΦeKta KpaChbIX rna3 (区) MOKeT He oBeCneuBaTb HxNHO rΦΦeKTA B 3aBNCmOCTn OT INDbNduyAaNbIx pa3JInu, pacCToHnA DO 06BeKTA,OT TORO, CMOTn JI N ObEeKT Ha cpa6aTbBAIOUyIO BCnbIiKy, n Dpynx ycNoBn.
-ФФ�EKT BCnblk MoKet 6bITb TpydnoOCTNkMlbIM,ecIN BblncNoIb3yeTe npHnyDInTeJbHyU BCnblkky BycNoBnxApKOrO OCBeueHnI.
-Пи 3aIINcO BCbIbKoN IOIroTOBka K CbEmKe n3O6paXeHnI 3aHmMaet BoJIbWe BpeMeH. 3To IpoIcxOdI NTOTOMy, YTO Ba7a BnDEOKaMePa HauHHaE t AKKymUInpOBAt b 3apJd DnIg Cpa6aTbIBaHnI NocIe Cpa6aTbIBaHnI BCnblSiK. UMeHbWnte npKoCTb OKpyKaIoUcero OCBeSeHnI, 3aKpbIb OBseKTIV, IN cIerKa hAnMnte KhONky PHOTO, B pe3yIbTaTe Yero Ba7a BnDEOKaMePa HauHe T aKKymUInpOBAt b 3apJd DnIg Cpa6aTbIBaHnI NocIe Cpa6aTbIBaHnI BCnblSiK.
BoBpemraakkymnya3apyaДЯ npca6abTbBaHnnaLamnocha BCbIuKCHG 6ydetMiraTb.Pocne3aBepueHn3apAKn lamnocha BcIbIuKn CHG BbICBeTITcR. - EcniabTOMaTHueckaФokycuPOBkaHa 06bKeTe 3aTpUdHeHa,HaNPIMep,Ipi CbEmKe B TEMHote,NCNoJIb3yIte INHΦOpMaUH OФokychompacCToRHH(CTp.88)ДЯ BBINOJIHeHnФokycuPOBKnBpyHyIO.
EcIn BbI octaBte BaUy BnDeokamepy Ha nTb I 60Jee MnHyT NocJe OTCoeDnHeHn HCTOUYKAp NHTAHN
BaSHA BnDeOKaMepa BepHeTcK yctaHOBKe nO yMoJUaHnIO (ABTomaTnueCKoe cpa6aTbIbAHne).
You cannot shoot images with the flash during the following operations:
- Wide mode
-Fader - Digital effect
- Picture effect
Super NightShot
-Colour Slow Shutter - END SEARCH
-MEMORYMIX - Recording
The flash does not fire even if you select auto (no indicator) and (auto red-eye reduction) during the following operations:
- Exposure
NightShot - Spotlight of PROGRAM AE
- Sunset & moon of PROGRAM AE
- Landscape of PROGRAM AE
- Flexible Spot Merter
BbI He MoXeTe BbIIOJIHЯTb CbEmKy n3O6paXeHn CO BCnbIshKo BO BpeM BbIIOJIHEnr cIeDyUoJx Onpaun:
-Шиpopokоэкразнный ржим
-Φeɪdεp
-LcnpoBoN 3ΦΦeKT
-3ΦΦeKt n306paXeHn
-Houha cynepcbemka
-LBetheHa CbeMka C MeIeHHbIM 3aTBoPOM
- END SEARCH
-MEMORY MIX
-3aInscb
Bcblska He 6ydt cpa6aTbIbAtb, daXe ecn Bbl Bbl6epete ABTomatueckoe cpa6aTbIbAHne (6e3 mHdkaTopa) n (abTomatueckoe yMehSeHne 3ΦΦeKta KpacHbIX rna3) BO BpemBaINOnHeHn CJeDyUoNx Onpaun:
-3Kcno3nua
-Houha Cbemka
-PexkIM npoxeKTopHO OcBeueHnYhKcN PROGRAM AEP
-PexMM 3axoJa cOnnca n Lyhbl yHKcIM PROGRAM AE
-Ландашафтнып ржим ФункцИng PROGRAM AEO
-Perynnpemyoe nTHOΦoTOMetpn
Self-timer recording
You can record still images with the self-timer. You can also use the Remote Commander for this operation.
Before operation
Insert a "Memory Stick" into your camcorder.
(1) In the recording standby mode, press FN and select PAGE2.
(2) Press SELFTIMER.
The (self-timer) indicator appears on the LCD screen.
(3) Press PHOTO deeper.
The self-timer starts counting down from 10 with a beep. In the last two seconds of the countdown, the beep gets faster, then the recording starts automatically.
3aHcB no TaMepy camo3anycka
BbMOxTe 3aINcBtHeNoDBrXHbIe
n3o6paKeHnC NOMOuHO TaMepa
camo3anycka.DJIa 3ToOnepaunn BblMOxTe
TaKke nCpONb3OBaT pNbT DnCTaHcNOHOrO
ynpabLeHn.
Ipeed BbINOJIHeHEm Opeaun
YctaHOBnTe "Memory Stick" B Bauly BndeOKamepy.
(1)BpeXmme OxuHaHna 3aIncn HaxMnTe KhoNky FN u Bb6epnte CtpaHny PAGE2.
(2)HaKMTe KhoNky SELFTIMER. Ha 3KpaHe KKД nOraBntcHnDnKaTOp (TaIMepa cAmO3anyCka).
(3)Haxmnte KhONky PHOTO cnIbhee. TaMep cAmO3ayncka HauHET 6paTHbIOTCHTOT 10c 3ymMePbIM CInHaON.B NocIeHNHe DBe cKeYNbIb 6paTHOrO OTCYeTa 3ymMePbIK CnIHaNb 6yDeT 3ByuTaB YaIe, a 3aTeM ABTomATNuCeKN HaunETcra 3aINCb.
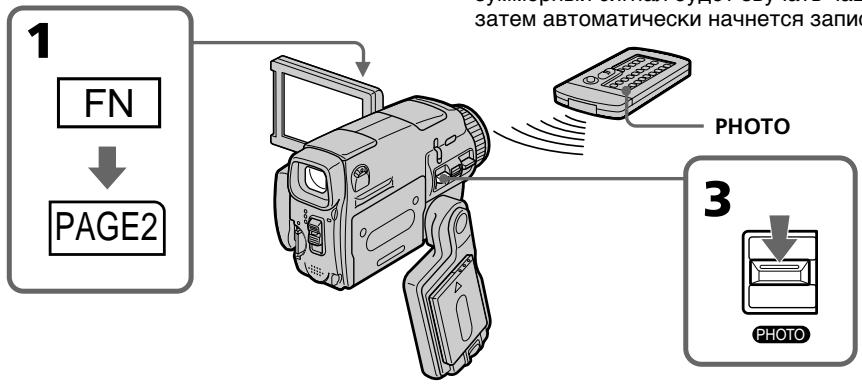
To cancel self-timer recording
Press SELFTIMER so that the (self-timer) indicator disappears from the LCD screen while your camcorder is in the standby mode. You cannot cancel the self-timer recording using the Remote Commander.
Note
The self-timer recording mode is automatically cancelled when:
- Self-timer recording is finished.
- The POWER switch is set to OFF (CHG) or VCR.
During recording to the tape
You cannot use self-timer recording.
Длг OTMeHbI 3aIncn no TaImepy camo3anycka
HaximaiTe KhoNkY SELFIMER, TaK TTo6bI HnDnKaTOp (TaMepa cAmo3anycka) nCye3 C 3KpaHa JKKB To BpeM, KorDa BaWaa BnDeOkAmepa HaxoOnTCB PexmE OxNiDaHNr. BbI He MoKeTe OTMeHnTB TaMep cAmo3anycka C NMOuBIO npJbTA DnCTaHnOHHO ynpaBHeH.N. Bbl He MoKeTe OTMeHnTB 3aNcB no TaMepy cAmo3anycka, nCNoJIb3y nPbT dNCTaHnOHHO ynpaBHeH.N.
PpimueaHne
Pexim 3aIncn no TaImepy cAmO3anycca bUdet aBTOMaTnueckn OTMeHEn B CJIyuaX:
-Окончаня заимся по таймeperу самозаунcke.
- YctaHOBKn nepeKJIouaTeIy POWER B nIoJoxHeNc OFF (CHG) uNn VCR.
Bo BpemBbIOpHeHn3aIncHaJeHTy
BbHe CMOKTe NcNoJIb3OBA Tb 3aINCb nTo TaMepy cMo3aNycKa.
Adjusting the white balance manually
You can manually adjust and set the white balance. This adjustment makes white subjects look white and allows more natural colour balance. Normally white balance is automatically adjusted.
(1) Set the POWER switch to CAMERA or MEMORY/NETWORK (DCR-IP55E only).
(2) Press FN to display PAGE1.
(3) Press MENU, then select WHT BAL in in the menu settings to select a desired white balance mode (p. 225).
HOLD: Recording a single-coloured subject or background
OUTDOOR
- Recording a sunset/sunrise, just after sunset, just before sunrise, neon signs, or fireworks
- Under a colour matching fluorescent lamp
(INDOOR):
- When lighting conditions change quickly
- In too bright places such as photography studios
- Under sodium lamps or mercury lamps
PeruInpoBka 6aHaHca 6eIoro BpyHyU
BbMOxKeTe OTpeyInpoBaT BpyHyIO uYctaHOBHT b6aHaHC 6eNoRo. B pe3yIbTaTe peyInpOBKn 6eNbIe IpeDMeTb 6ByT BblJAEb 6eJIbIMn, a TAKKe 6yJeT DOCTuHHT 6OJIee eCTeCTBeHHbI yBeTOBOB 6aHaHC. O6bUHO 6aHaNC 6eNoTopeyInpyuETcra ABTomATUeCKn.
(1)Установские pepeклочатуь POWER в положене CAMERA улл MEMORY/ NETWORK (товко морень DCR-IP55E).
(2)HaxmTe KhONky FN dIy OTo6paXeHHaCTpaHnIyI PAGE1.
(3)HaxmTe KhoIky MENU, a 3aTeM BbI6epnte onuH WHT BAL B wCtahOBkax MeHIO dIy BbI6opa HyxHoro pexKMa 6aHaHca 6enoro (ctp.233).
To return to the automatic white balance mode
Set WHT BAL to AUTO in the menu settings.
If the picture is being taken in a studio lit by TV lighting
We recommend that you record in the (INDOOR).
When you record under fluorescent lighting
Select AUTO or HOLD.
Your camcorder may not adjust the white balance correctly in the (INDOOR) mode.
In the AUTO mode
Point your camcorder at the white subject for about 10 seconds after setting the POWER switch to CAMERA to get better adjustment when:
-
You detach the battery for replacement.
-
You bring your camcorder from indoors to outdoors holding the exposure, or vice versa.
In the HOLD mode
Set the white balance to AUTO and reset to HOLD after few seconds when:
- You change the PROGRAM AE mode.
- You bring your camcorder from indoors to outdoors, or vice versa.
You can record a 16:9 wide picture to watch on the 16:9 wide-screen TV (16:9WIDE).
Black bands appear on the LCD screen during recording in 16:9WIDE mode [a]. The picture during playing back on a normal TV [b] or a wide-screen TV [c] are compressed in the widthwise direction. If you set the screen mode of the wide-screen TV to the full mode, you can watch pictures of normal images [d].
ИспOLSьЗОВане ШирOKоЗКранHoRo рекиma
BbMOKTe3aIncsbTaB WpOKoOpMaTHoe
H3O6paXeHne16:9ДЯnpcMoTpaHa
HIMPOKO3KpaHOM TeLEBn3ope fOpMaTa 16:9
(16:9WIDE).
Bo BpMg 3aIncn B pexmE 16:9WIDE Ha
3KpaHe JKKJ IOBbTcY cepHbI NOIOcbI [a].
H3O6paXeHne BO BpEM BoCpPOn3BeDeHnHa
06bUHOM TeLEBn3ope [b] INnHa
HIpOKo3KpaHOM TeLEBn3ope [c] 6yDet cKaTo
no 7uRnHe.EcNBI YcTaHOBtpeKxM
3KpaHa HIpOKo3KpaHOrO TeLEBn3opa B
NoIIHOKpaHbI peKm, BblCMoxeTe
Ha6JIIODaTb 06bUHbIe N3O6paXeHn 6e3
NCKaXeHn [d].
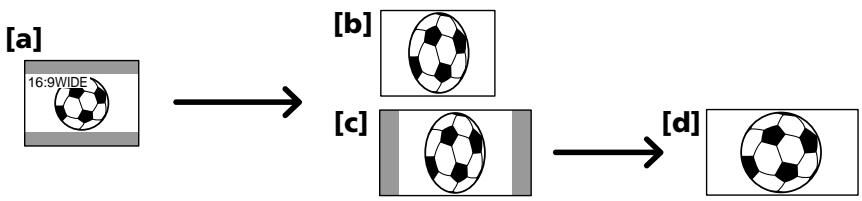
(1) Set the POWER switch to CAMERA.
(2) Press FN to display PAGE1.
(3) Press MENU, then set 16:9WIDE to ON in in the menu settings (p. 226).
(1)Установпейсяклочаель POWER в положене CAMERA.
(2)HaxmTe KhoNky FN dIy OTo6paXeHnCTpaHnIyI PAGE1.
(3)HaxMMTe KhoNky MENU, a 3aTeM yCTaHOBnTe ONUI6:9WIDE B C B yCTaHOBkax MHeIO B NIOJoxeHne ON (cTp. 234).
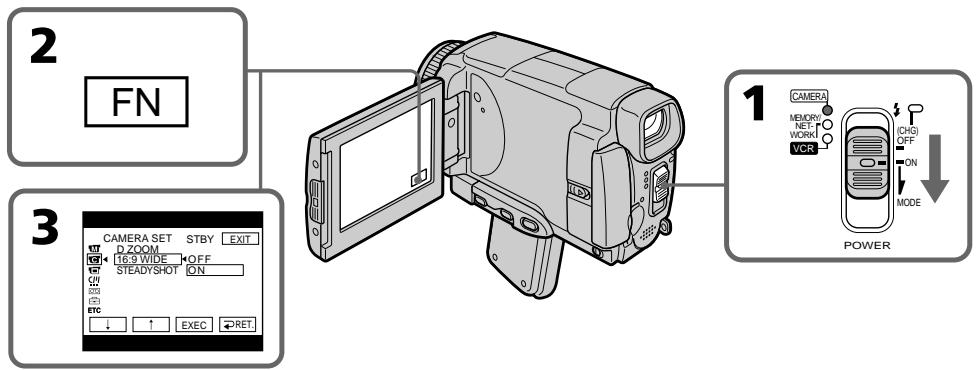
To return to FN
Press EXIT.
To cancel the wide mode
Set 16:9WIDE to OFF in the menu settings.
In the wide mode, you cannot select the following functions:
- Recording still images
-OLD MOVIE - BOUNCE
During recording
You cannot select or cancel the wide mode. When you cancel the wide mode, set your camcorder to the recording standby mode and then set 16:9WIDE to OFF in the menu settings.
B shpoko3kpaHHom pexKHe BbI He MoXeTe BblpaTcJeDyUOune fynKunn:
-3anncb HnOoBnxhBx N3o6paXeHn
-Рекимстаринно КИно (OLD MOVIE)
-Pexim nepeckaunbaHn (BOUNCE)
BoBpeMa 3aHmch
BbI He MoXKeTe BbI6paTb IJIN OTMeHnITb UpiPOKo3KpaHnbl pexm.ДЯ O'TMeHbI UpiPOKo3KpaHnHO pexmua yCTaHOBnTE BaUy BnDEOkamepy B pexmOxuJaHn 3aIncN, a 3aTeM yCTaHOBnTE onuio 16:9WIDE B yCTaHOBkax MeHIO B noJIoKeHne OFF.
Using the fader function
You can fade in or out to give your recording a professional appearance.
BbIMoKeTe BbINOpHbT PbIaHBoe BBeJeHne IINBbIEeHne N3O6paXeHn, YTO6bI npHaTbBaSeI cbEmke npOpeccnHaJIbHbI BN.
[a]
STBY
REC
NORM.FADER(fader)/ NORM.FADER (Фeйдер)


MOSC.FADER (mosaic)/ Mosc. FADER (mo3aika)


BOUNCE1)2


[b]
STBY
REC
MONOTONE
When fading in, the picture gradually changes from black-and-white to colour.
When fading out the picture gradually changes from colour to black-and-white.
1) You can use the bounce function when D ZOOM is set to OFF in the menu settings.
2) Fade in only.
MONOTONE
PnBBeDeHnN306paXeHne 6yDet NocTeENHO n3MeHrTbCt OT UepHo-6eNo DO UcBETHOrO. Pn BbBeDeHnN306paXeHne 6yDet NOCTeNEHNO n3MeHrTbCt OT UcBETHOrO Do UepHo-6eNoRo.
1) BbIMoKTe NcNoJIb3OBA Tb yHKUIO nepeCKaKuBaHn, KOrDa onCuIa D ZOOM b yCTaHOBkax MeHIO yCTaHOBJeHa B NOJIOKeHne OFF.
2)ToIbKO BVeJeHne I3O6paXeHnA
(1) To fade in [a]
In the recording standby mode, press FN to display PAGE1.
To fade out [b]
In the recording mode, press FN to display PAGE1.
(2) Press FADER. The FADER screen appears.
(3) Select a desired fader mode.
(4) Press OK to return to PAGE1, and press EXIT to return to FN.
The fader indicator you selected flashes.
(5) Press START/STOP. The fader indicator stops flashing, then lights up.
After the fade in/out is carried out, the fader indicator goes off and your camcorder automatically returns to the normal mode.
(1)ДлЯ BVEdeHnI N3O6paXeHnI [a]
B pexmme oXnidaHna3aIncn HaxMMTe KhoNky FN, yTo6bI OTo6pa3nTb CtpaHnCy PAGE1.
ДЯ BBiBeHnN n3O6paXeHn [b]
B pexkme 3aicn haxmnte KhONky FN, yTo6bI OTo6pa3ntb cTpaHniCy PAGE1.
(2)HaXMMTe KHOIpKy FADER. IIOBnTcR 3KpaH FADER.
(3)Bb6epnte HxKbIpeKIM pEiepa.
(4)HaxMMTe KhoNkky OK dIy Bo3Bpata K cTpaHnue PAGE1, a 3aTeM HaxMMTe KhoNkY EXIT dIy Bo3Bpata K INDnKaun FN.
BbIbpaHHbI Bamn HNdkaTOp feiDepa 6ydt Mrtatb.
(5)Haxmnte KhONky START/STOP. INdkaTop feiDepa nepeCTaHET MInraTb, a 3aTeM BbICBETITcR.
Iocne toro, KaB BbINOJIHeNo BBeDEHnE/ BbBeDeHne N3O6paXKeHnA, INDnKaTOp feIepa OTKIOUHTcR, n Ba7a BInDeOKaMepa aBTOMaTNUeCKn BepHETcB ObBuHbI peKIM.
![SONY DCR-IP45E - ДЯ BBiBeHnN n3O6paXeHn [b] - 1](/content/2020/05/48647/images/161697fba09ecd17bc8645e1865c97d5acdc2cd86ecda05cac86e8e437dfa28b.jpg)
To cancel the fader function
Before pressing START/STOP, press OFF in step 2. The display returns to PAGE1. Press EXIT to return to FN.
Длг OTMeHbI Функци Фeндара
Пелд Tem, Кан Наразь конику START/STOP, нахмпту конику OFF в nyнгte 2.
You cannot use the following functions while using the fader function. Also, you cannot use the fader function while using the following functions:
-Digital effect
Super NightShot
Colour Slow Shutter
- Recording still images
While using the BOUNCE function, you cannot use the following functions:
- Exposure
- Flexible Spot Meter
-Focus
-Zoom - Picture effect
Note on the BOUNCE function
You cannot select the BOUNCE function in the following mode or functions:
-D ZOOM is activated in the menu settings
- Wide mode
- Picture effect
-PROGRAM AE
When the POWER switch is set to MEMORY/ NETWORK (DCR-IP55E only)
You cannot use the fader function.
Приимechаиме
BbHe MoKTe IcNoIb3OBA Tb CNeDyUoUne
fYHKuIMBO BpEmr IcNoIb3OBAHnA fYHKuIM
peiepa.BbTaKxHe MoKTe IcNoIb3OBA Tb
fYHKuIM Oeipera BO BpEmr IcNoIb3OBAHnA
CNeDyUoUnx fYHKuIM:
-LincpoBbIe 3cpeKtbl
-Houha cynepcbemka
-LBETHa CbEMKa C MeDIneHHbIM 3aTBoPOM
-3aπncb HEnoDvXhblx N3O6paXeHn
Bo BpemnncnoB3OBAHnIyHKcnn BOUNCE,BbI He moXeTe nCNOB3OBAtbcJeDyoUne yHKcnn:
-3Kcno3nua
-Perynnpemyoe nTTHo oToMeTpnn
-ΦokycnpOBka
-Hae3BnndeokamepbI
-3ΦΦeKtbln3o6paXeHn
PpimmeaHne no fynkunn BOUNCE
BbHe MoKxTe BbIbIpaTb cyHKcIIO BOUNCE npn IcNoIb3OBAHm CNeIyUoX pExkMOB nnn CyHKcI:
-Korda onuD ZOOM aKtubn3npoBaHa BycTaHOBkax MeHIO
-Широкоэкразнberrypeжим
-306paekhen
-PROGRAM AE
EcIn Bby ycTaHOBtne nepeKJIouaTeIb POWER B noJIoXeHne MEMORY/NETWORK (ToIbKO moJeIb DCR-IP55E).
BbHe cMOKeTe nCIOJIb3OBAt bФyHKUIO feiepa.
Using special effects
- Picture effect
You can digitally process images to obtain special effects like those in films or on the TV.
NEG. ART [a]: The colour and brightness of the picture are reversed.
SEPIA : The picture is sepia.
B&W: The picture is monochrome (black-and-white).
SOLARIZE [b]: The light intensity is clearer, and the picture looks like an illustration.
PASTEL [c]: The contrast of the picture is emphasised, and the picture looks like an animated cartoon.
MOSAIC [d]: The picture is mosaic.
IcnoJb3OBaHne CpeHaJIbHbIX 3ΦΦeKTOB - ΘΦΦeKT n3O6paXeHnA
BbMOxTe BbIOJNHTb 06pa6OtKy
I3O6paXeHNI UcPpOBbIM MeTOOM DnI
IIOJyEHNA CNEUaJIbHbIX 3ΦΦeKToB, KaK B
KINHOJIbMax NIN B TeJIepeJaayax.
NEG. ART [a]: LbetияркocтьИЗображени 6byT HeRaTINBbIMI.
SEPIA: Ⅲo6paXeHne 6yJeT B CBeTe cENIN.
B&W: 136paXeHne 6yJeT MOHOxPOMaTHueCKIM (YePHo- 6enbIM).
(1) Set the POWER switch to CAMERA.
(2) Press FN to display PAGE1.
(3) Press MENU, then select P EFFECT in in the menu settings to select a desired picture effect mode (p. 225).
(1)Установские поеклоча teleportь POWER в положене CAMERA.
(2)HaxmTe KhoNky FN dIy OTo6paXeHnCTpaHnCByPAGE1.
(3)HaxmTe KhONky MENU, a 3aTeM Bb6epnte onuio P EFFECTB uYcTaHOBkax MeHIO dIy Bb6opa HxKHO rpeXIMa eΦΦeKTA n3o6paXeHnA (CTp.233).
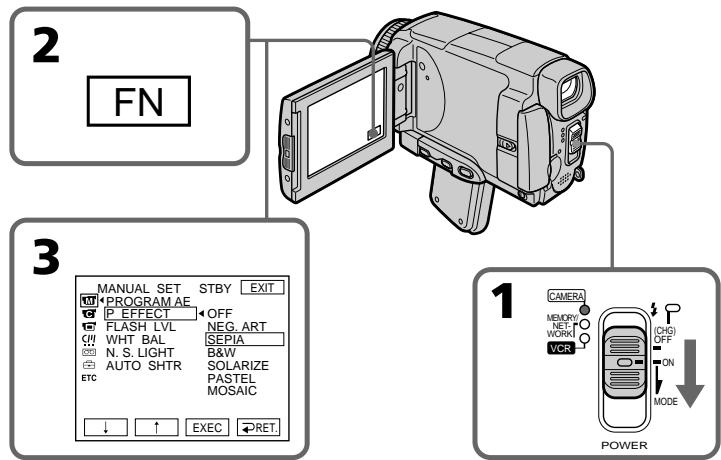
To return to FN
Press EXIT.
To turn the picture effect function off
Select OFF in P EFFECT in the menu settings.
While using the picture effect function, you cannot use following functions:
-OLD MOVIE
-
BOUNCE
-
Recording still images
When you set the POWER switch to OFF (CHG)
The picture effect is automatically cancelled.
Using special effects - Digital effect
You can add special effects to recorded pictures using the various digital functions. The sound is recorded normally.
STILL
You can record a still image so that it is superimposed on a moving picture.
FLASH (FLASH MOTION)
You can record still images successively at regular intervals.
LUMI. (LUMINANCEKEY)
You can swap the brighter area in a still image with a moving picture.
TRAIL
You can record a picture so that an incidental image like a trail is left.
SLOW SHTR (SLOW SHUTTER)
You can slow down the shutter speed. The slow shutter mode is good for recording dark pictures more brightly.
OLD MOVIE
You can add an old movie type atmosphere to pictures. Your camcorder automatically sets the wide mode to ON, the picture effect to SEPIA, and the appropriate shutter speed.
IcnoJb3OBaHne CpeHaJIbHbIX 3ΦΦeKTOB -LnpoBoi 3ΦΦeKT
BbMOxKeTe Do6abTb CneuaJIbHbIe 3ΦΦeKtBi K 3aINCbIbAeMOMy N3O6paXeHNIO C NOMUBo pa3NCHbIX UΦpOBbIX ΦyHKuN.
3aIncbIbAembI 3ByK 6yDeT 0bIyHbIM.
STILL
BbMOKeTe 3aINcBiBaTb HEnoDbNkHoe n3O6paXeHne, KOTope 6yDet HaIaratbCra Ha dBnKyuEecr n3O6paXeHne.
FLASH (FLASH MOTION)
BbMOKTe 3aINcBtBHeNoDvXHbIe
N3O6paXeHnB NocJeDoBaTeJbHOCTnYepe3
NOCTOHHbIe INHTepBaJIbI.
LUMI. (LUMINANCEKEY)
BbMOxTe N3MeHrTb rPkne MeCtHa HEnoDBNXHOM N3O6paXeHn Ha NDoBnxHbIe N3O6paXeHn.
TRAIL
BbMOxTe 3aINcBtBn3O6paXeHne TaK,TO 6yIet OCTaBtBcra NIO6OHOe N3O6paXeHne B BInDe CNeJa.
SLOW SHTR (SLOW SHUTTER)
BblMOKeTe 3aMeIINITb CKOpOCTb 3aTbopa.
Pexim MeIeHOro 3aTbopa RaIYeTcI IOxOdIuM dIra 3aInci TemhBix N3O6paKeHn B60nee IPRKOM CBETe.
OLD MOVIE
BbMOKeTe npINBHOCnTb aTMoccpepy
CTaPINHHOrO KInHO B n3o6paXeHn. Ba7a
BnDEOKaMepa 6yJeT aBOMaTnueckn
ycTaHaBnBaTb SiPkoKoKpHaHbI pExm B
noLoXeHne ON, aΦpEKT n3o6paXeHn B
noLoXeHne SEPIA, N bCbTaNtB
COOTBeTCTByIOUyIO CKOpOcTb 3aTBopa.
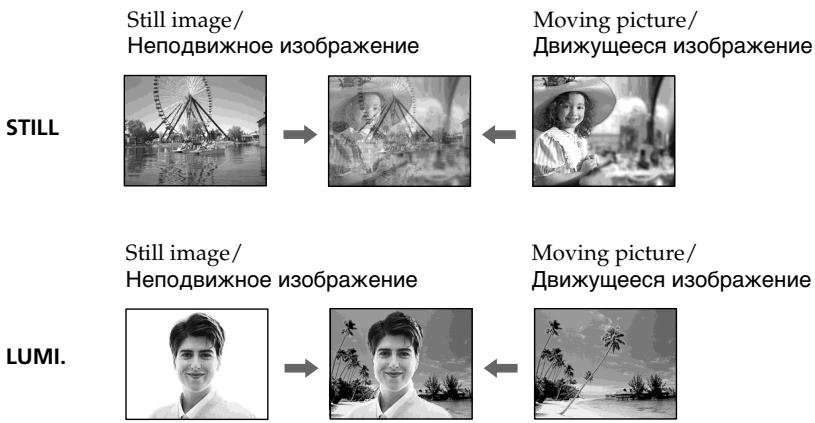
(1) Set the POWER switch to CAMERA.
(2) Press FN to display PAGE2.
(3) Press DIG EFFT. The DIG EFFT screen appears.
(4) Press a desired digital effect mode. In the STILL and LUMI modes, the still image is stored in memory.
(5) Press - / + to adjust the effect.
Items to adjust
| STILL | The rate of the still image you want to superimpose on the moving picture |
| FLASH | The interval of frame by frame playback |
| LUMI. | The colour scheme of the area in the still image which is to be swapped with a moving picture |
| TRAIL | The vanishing time of the incidental image |
| SLOW SHTR | Shutter speed. The larger the shutter speed number, the slower the shutter speed. |
| OLD MOVIE | No adjustment necessary |
(6) Press OK. The display returns to PAGE2.
(1)Установские постенуател b POWER b noложения CAMERA.
(2) HaxMMTe KhoNkF NДЯ OTo6paXeHnA CTpaHnUbI PAGE2.
(3) HαχΜΙΤe ΚΗΝΚγ DIG EFFT. ΠΟΑΒιΤρΑ Θκραή DIG EFFT.
(4) Haxmnte INdkaHIO HyxHOro peKIMa Udpoboro 3cpfekTa. B peKImax STILL LUMI. HenoDbMxHoe n3O6paXeHne 6yJET coXpAHeHO B pAmrTn.
(5) Haximai Te KhoiKn -/+ДяpeyIpOBKn 3ΦΦeKtA.
PerylnpyembIe xapaKtepncTnKu
To cancel the digital effect
Press OFF. The display returns to PAGE2.
Notes
- The following functions do not work during digital effect:
-Fader
Super NightShot
-Colour Slow Shutter - Recording still images
- The PROGRAM AE function does not work in the slow shutter mode.
- The following functions do not work in the OLD MOVIE mode:
- Wide mode
- Picture effect
- PROGRAM AE
When you set the POWER switch to OFF (CHG)
The digital effect will be automatically cancelled.
When recording in the slow shutter mode
Auto focus may not be effective. Focus manually using a tripod.
Shutter speed
| Shutter speed number | Shutter speed |
| SLOW SHTR 1 | 1/25 |
| SLOW SHTR 2 | 1/12 |
| SLOW SHTR 3 | 1/6 |
| SLOW SHTR 4 | 1/3 |
ДяВОЗВраТКИнДИКациFN
HaxMMTe KhONKy EXIT.
ДЯ OTMeHbI UΦpOBOrO 3ΦΦeKtA
HaKmTe KhoNk Ky OFF. INdkaunBepHeTcK C tpaHnue PAGE2.
PpIMeuaHnA
CneIyUOJIe cyHKnUH He pa6oTaIOT npn IcNoJIb3OBAHmI UINpOBoBIX 3ePfKeKToB:
-Φeɪdεp
-Houhna cynepcbemka
-LibetHaCbemKa CMeIeHHbIM 3aTBoPOM
-3anncb HnOoBnxhHbIX N3o6paXeHn
-ФункцЯ PROGRAM AE He pa6oTaetВ pekime MeDneHoro 3aTbopa.
CJeIyUOuIe FyHKuIN He pa6oTaIOr BpeXnme OLD MOVIE:
-ШиpopokоэКраHHь ржим
-3ΦΦeKtBn3o6paXeHnA
-PROGRAM AE
Ppnu yctaHOBKe nepeKlnouaTeIa POWER B noJIOXeHne OFF (CHG)
LHpOBBie 3pEeKtbl 6yET aBTOMaTnueckn OTMeHeHbl.
Pn3aIncBpeKImeMeIeHnHO 3aTbopa
ABTOMATUeCKaΦOKCnPOBKa MoKET 6bITb He3ΦΦeKTnBHO. BbIOJIHnTe pyHyO ΦOKcNPOBky, NcIOnIb3yr TpeHory.
CKopoctb 3aTBopa
| Величина скорoctи 3atbopa | Сkopocть 3atbopa |
| SLOW SHTR 1 | 1/25 |
| SLOW SHTR 2 | 1/12 |
| SLOW SHTR 3 | 1/6 |
| SLOW SHTR 4 | 1/3 |
Using the PROGRAM AE
Исpenьзованецфункциng PROGRAM AE
You can select PROGRAM AE (Auto Exposure) mode to suit your specific shooting requirements.
Spotlight
This mode prevents people's faces, for example, from appearing excessively white when shooting subjects lit by strong light in the theatre.
Soft portrait
This mode brings out the subject while creating a soft background for subjects such as people or flowers.
Sports lesson
This mode minimises shake on fast-moving subjects such as in tennis or golf.
Beach & ski
This mode prevents people's faces from appearing dark in strong light or reflected light, such as at a beach in midsummer or on a ski slope.
Sunset & moon
This mode allows you to maintain atmosphere when you are recording sunsets, general night views, fireworks displays and neon signs.
Landscape
This mode is for when you record distant subjects such as mountains. Also it prevents your camcorder from focusing on glass or metal mesh in windows when you are recording a subject behind glass or a screen.
BbMOKeTe Bb6paTb peKIM PROGRAM AE (aBTOMaTHueCKa3 KcN03u7A) B COOTBeTCTBm C BaUMOOCbIMTNpe6oBaHnMnKcbEmke.
Pexm npoxektophoro ocbeuen
DaHHb peKm npeDoTbpaaet, K npImepy, IInuIIOeOTn36bIToOHoB eIN3HbI npC bEmKe 06BeKToB,OCBeUeHHbIX CnJIbHbIM CBETOM B TeaTpe.
MЯrkni npOtePthbI pexHM
3TOT pexmIO3BONrET BbIeINITb OBeKT npn CO3aHm MfKOrO fOHa IJr OBeKTOB IN NOxODNT DnA CbEMKn, HApPIMep, JIODeN NIN cBETOB.
PexkIM cNoptNBbIX COCT3aHm
3TOPTeKIMNIO3BOJnEITMHINM3IPOBaTbДрЖaHHe npCbEMKe 6bICTpo DvIXyUxxCnIpeDmETOB,HaNPImep,pNiIrpeB TeHHnc NIIrOJIbΦ.
T PnJXHbI N IblXHbI peKIM
3TOT pexmI pnenATCTByET NOTEMHEHIO IINILOE B 30HE CNbHORO CBeta INIOTpaxeHHOro CBeta, HApIMep, Ha INaXe Bpa3rap Jeta INI HA CHEKHOM CKNoHe.
C PeKm 3axoJa coJHua n Lyhbl
3TOT peKIM N03BOJHET B TOUHOCTN OTPaKaTb
O6CTaHOBky pIe CbEMKe 3axoDOB COJIHca,
O6uIX HOUYbIX BnIOB, fpeIepBepKOB I
HEOHOBbIX peKlAm.
LanDwaΦThbI pexIM
3TOT pexmI IO3BONAEt BbIOJNHTb CbEMKy OTdAeHbIX O6BeKTOB, TaNX, KaK rOpbl. OH TaKKe IpeDToBpaaet fokycnPOBky BInDeOKaMepbl Ha CTekIIO INI MTeaJIINUcckyO peWetKy Ha OKhax, KOrDa Bbl BbIOJNHeTe 3aNNCb O6BeKTOB IO3aDNCTekla INI peWETKn.


(1)Set the POWER switch to CAMERA or MEMORY/NETWORK (DCR-IP55E only).
(2) Press FN to display PAGE1.
(3) Press MENU, then select PROGRAM AE in in the menu settings to select a desired mode (p. 225).
(1)Установпейсякуна teь POWER в положене CAMERA улл MEMORY/ NETWORK (тлько модь DCR-IP55E).
(2)HaxmTe KhONky FN dIy OTobpaXeHnCTpaHnCi PAGE1.
(3)HakmTe KhoNky MENU,a 3aTe m ykaKnte onuio PROGRAM AE B W yctaHObKaX MeHIO nIy BbIbopa HuyxHoro peXIma (CTp. 233).
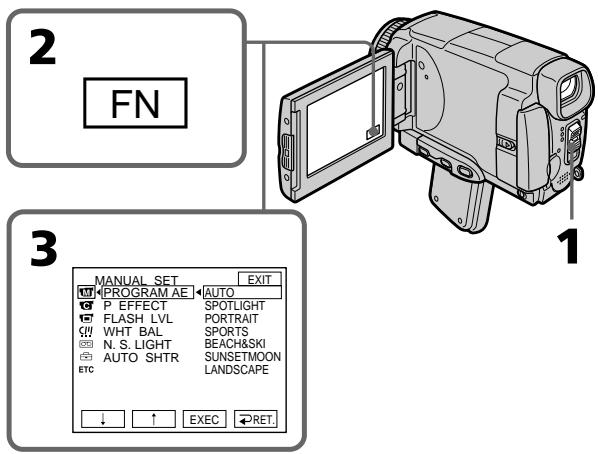
To return to FN
Press EXIT.
To turn the PROGRAM AE off
Select AUTO in PROGRAM AE in the menu settings.
Notes
-
Because your camcorder is set to focus only on subjects in the middle to far distance, you cannot take close-ups in the following modes:
-
Spotlight
-Sports lesson -
Beach & ski
-
Your camcorder is set to focus only on distant subjects in the following modes:
-Sunset & moon
- Landscape
The following functions do not work in PROGRAM AE:
Colour Slow Shutter
- Slow shutter
- OLD MOVIE
- BOUNCE
Дя ВОЗВраТа К Инданкали FN
Hakmnte KhoNky EXIT.
- The PROGRAM AE does not work in the following cases (The indicator flashes):
- To set the NIGHTSHOT to ON.
- To record images on a "Memory Stick" using the MEMORY MIX.
- When you set the POWER switch to MEMORY/NETWORK (DCR-IP55E only), sports lesson does not work. (The indicator flashes.)
While WHT BAL is set to AUTO in the menu settings
The white balance is adjusted even if the PROGRAM AE is selected.
You can adjust the following functions while using the PROGRAM AE:
- Exposure
-Flexible Spot Meter
If you record under a discharge tube such as a fluorescent lamp, sodium lamp or mercury lamp
Flickering or changes in colour may occur in the following modes. If this happens, turn the PROGRAM AE off:
- Soft portrait
-Sports lesson
-MrKm npOpTeHbI pExMM
-PexnM CnpOTNBbIX COCTaHnI
Adjusting the exposure manually
You can adjust and set the exposure. Normally the exposure is automatically adjusted. Adjust the exposure manually in the following cases:
- The subject is backlit
- To shoot a bright subject against a background
- To record dark pictures (e.g. night scenes) faithfully
(1) Set the POWER switch to CAMERA or MEMORY/NETWORK (DCR-IP55E only).
(2) Press FN to display PAGE1.
(3) Press EXPOSURE. The EXPOSURE screen appears.
(4) Press MANUAL.
(5) Adjust the exposure using - / +
-
: to dim
-
: to brighten
(6) Press OK. The display returns to PAGE1.
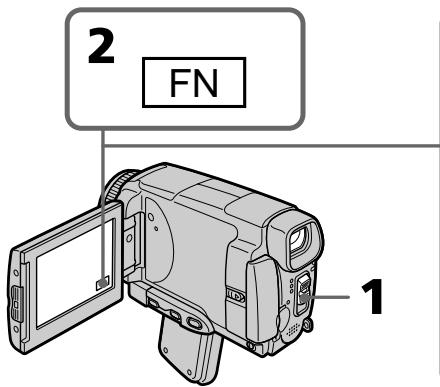
To return to FN
Press EXIT.
To return to the automatic exposure mode
Press AUTO in step 5. The display returns to PAGE1.
Note
When you adjust the exposure manually, the following functions do not work:
-Colour Slow Shutter
-Backlight
Your camcorder automatically returns to the automatic exposure mode:
- If you change the PROGRAM AE mode.
- If you set NIGHTSHOT to ON.
PerynpoBka 3Kcno3nN BpyHyO
BbMOKeTe OTperyuHnpoBaTb N yCTaHOBtB 3KcNo3NIO.ObbHNO 3KcNo3N
perynypetyacabTOMatueckn. OtperynpyTe 3KcnouIOBpyHHyIO BcneDyoUx CNyuaX:
-Obbekt HaΦOHe 3aDHe NpOcBETKn
-ПисьемкярковообъektaHa TeMHOM pOHe
ДлгЗдпс.TeMHbIX n3O6paXeHn(HaNPIMep, HOnHbIX cUeH)C60JIbWOndoCTOBePBOcTbIO
(1)Установпейсятабалоюгель POWER в положене CAMERA ил MEMORY/ NETWORK (тлько мдель DCR-IP55E).
(2)Haxmnte KhoNky FN dIy OTo6paXeHnCTpaHnCiPAGE1.
(3)Hajmte KhoNky EXPOSURE. NORBUTCR 3KpaH EXPOSURE.
(4)Haxmnte KhoNky MANUAL.
(5)Отreyнору Te 3Kcno3nIO C nOmoIbIO KHOJOK -/+
:ДЯУМЕньшеняЧETKOCTN
+:ДЯУВЕЛЧЕНИЧЕТКОCTN
(6)HaxmTe KhoNkY OK. INHnKaunBepHeTcK CtpaHnCe PAGE1.
3-6

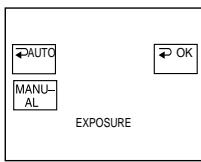
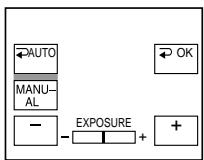
You can take a picture with the appropriate exposure automatically for just the point you want to focus on and with its exposure fixed. Use the Flexible Spot Meter mode in the following cases:
- The subject is backlit.
- When there is strong contrast between the subject and background such as with a subject that is on stage and lighted by a spotlight.
(1)Set the POWER switch to CAMERA or MEMORY/NETWORK (DCR-IP55E only).
(2) Press FN to display PAGE1.
(3) Press SPOT METER. The SPOT METER screen appears.
(4) Press the desired area in the frame on the LCD screen. The SPOT METER indicator flashes on the LCD screen. The exposure of the point you selected is adjusted.
(5) Press OK. The display returns to PAGE1.
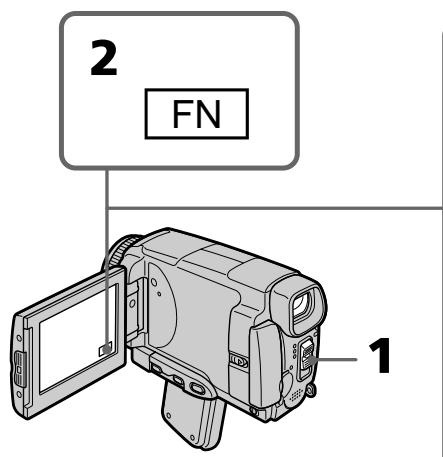
To return to FN
Press EXIT.
To return to the automatic exposure mode
Press AUTO in step 3. The display returns to PAGE1.
IcnoIb3OBAHne pexnMa CBeTOBOro ΦOTOMETpNueCKOrO PHTHa -PeryIpyEmoe PRTHOΦOTOMETpN
Bb moKeTe ChrTb N3o6paXeHne C HxKHOI 3KcNo3nUnei, yCTaHOBJIeHHoA BtOMaTHueCKN 3aФNKCuPobAHHOH NaTOUKe, Ha KOTOpO Bb XOTHe BbINOHHTb FOkycuPOBky. IVcNoJIb3yIte peKIMpeRyIInpyeMOro PAnTHa FOtOMeTpIN B cJeDyUOxN ClyuYax:
The following functions do not work during the Flexible Spot Meter:
-Colour Slow Shutter
-Backlight
Your camcorder automatically returns from the Flexible Spot Meter to the automatic exposure:
-If you change the PROGRAM AE mode
-If you set NIGHTSHOT to ON
Ppimcayane
Cneyuoune cyuHKmH He pa6oTaOT npnNCIOb3OBAHN peryInpyEmoTO PAHTHaΦoTOMeTpnn
-LBETHcBEmKa CMeIeHHbIM 3aTBOPOM
-3aHnHnnoCBETKa
Bawa bnupeokamaepa abTOMATUeCKn BepheTc n3 pexkma perynpemyoro nITHa foTOMETpN K aTOMATUeCKO 3KcNo3n:
-Есни Выизменные реким PROGRAM AE
- Ecni Bby yctaHOBHTe nepeKIOUaTeJIb NIGHTSHOT B noIoXeHne ON
Focusing manually
You can gain better results by manually adjusting the focus in the following cases. Normally, focus is automatically adjusted.
- The autofocus mode is not effective when shooting:
-subjects through glass coated with water droplets
horizontal stripes
-subjects with little contrast with backgrounds such as walls or the sky - When you want to change the focus from a subject in the foreground to a subject in the background
- Shooting a stationary subject when using a tripod
Pуная Фокусювka
BbMOxTeNoJyUHTbLyUHnepe3yJIbTaTbI nyTEMpyHOnpeYunipOBKnΦokyca B cJeDyUOxNcLuyAax.ObuHNoΦokyc peYunpyeTcABTOMaTnueckn.
- Pexm aBtOMaTnuecko fokycnpOBKn ABJIeTcR He3fpeKTnBbIM npu BblIOJIHeHm CbeMKI:
-ObbeKToB Uepe3 NOKpbIToE KAnJIaMn CTeKIO
-ROPn3OHTaIbHbIX NOLOC
-06bekTOB C MaJIOI KOHTpactHOCTbIO Ha TAKOM FOHe, KAK CTeHb INJIN He6O - EcIn Bbl XOTnTe BblIOJIHnTb N3MeHeHne
ФokycuPobKn C obEkTa Ha nepeDhem ПlaHa
Ha obEkT Ha 3aDhem ПlaHa
-Пи BыллгнHeHm CьeMKn CTaNoHapbIx 06beKToB C ИСпОЛьЗOBаHnEМ TpeHOrn


(1) Set the POWER switch to CAMERA or MEMORY/NETWORK (DCR-IP55E only).
(2) Press FOCUS. The _非 indicator appears.
(3) Turn the focus ring to sharpen focus.
To return to the autofocus mode
Press FOCUS to turn off or indicator.
To focus precisely
It is easier to focus on the subject if you adjust the zoom to shoot at the "W" (wide-angle) position after focusing at the "T" (telephoto) position.
When you shoot close to the subject
Focus at the end of the "W" (wide-angle) position.
changes as follows:
when recording a distant subject
when the subject is too close to focus on
Focal distance information is displayed for about three seconds on the LCD screen in the following cases:
- When switching the focus adjustment mode from autofocus to manual
- When turning the focus ring
Focal distance information
- This information aids focusing if it is not easy to focus on the subject, for example, when recording in the dark. Use this information as a rough guide to get a sharp focus.
- You cannot get correct information if you have attached a conversion lens (optional) to your camcorder.
Using the spot focus mode - Spot Focus
You can take a picture with the appropriate focus automatically for just the point you want to focus on and with its focus fixed.
(1) Set the POWER switch to CAMERA or MEMORY/NETWORK (DCR-IP55E only).
(2) Press FN to display PAGE1.
(3) Press SPOT FOCUS. The SPOT FOCUS screen appears.
(4) Press the desired area in the frame on the LCD screen. The SPOT FOCUS indicator flashes on the LCD screen. When the focus of the point you selected is adjusted, the indicator appears.
(5) Press OK to return to PAGE1.
IcnoIb3OBAHne peXnMa IaTHa fOKycnPOBKn -IaTHo fOKycnPOBKn
BbMOKeTe CnHTb N3O6paXeHne C HxKhbIM fOKyCOM, yCTaHOBJIeHHbIM aBTOMaTUnCeCKN 3aФИКСИРОВАнБИМ Ha ToUKe, Ha KOTOpOu Bbl XOTNe BbINONHtB fOKycIPOBky.
(1)Установские поеклочатуль POWER в пооженке CAMERA улл MEMORY/ NETWORK (товко морень行贿 DCR-IP55E).
(2)HaxmTe KhoNkF N dIa OTo6paXeHnA CTpaHnCi PAGE1.
(3)HaxmTe KhoNky SPOT FOCUS.IoBHTcJ 3KpaH SPOT FOCUS.
(4)HaXMMTe HxKHyIO 6bIaCTb B KaIpe 3KpaHa XKJ. Ha 3KpaHe KKJ 6yIeT MIRaTb INHdNkaTOP SPOT FOCUS. KordaΦOKyc Bbl6paHHoB Bam ToCHk 6yIeT yCTaHOBJIeH, NOABITcA INHdNkaTOP
(5)HaxMMTe KhoNky OK dIa BO3BpaTa K cTpaHnue PAGE1.
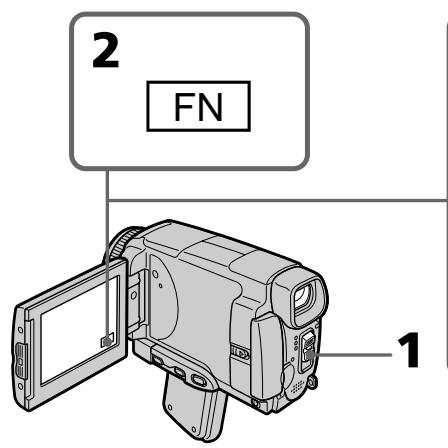
To return to FN
Press EXIT.
To return to the autofocus mode
Press AUTO in step 4. The display returns to PAGE1.
Note
When adjusting Spot Focus, the following modes do not work:
-Fader
-PROGRAM AE
Focal distance information
It is not displayed on the screen.
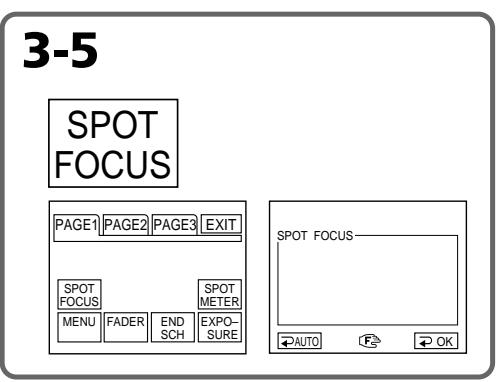
OHa He OTo6paXaEtCn Ha 3KpaHe.
Using the viewfinder
Turn the LCD panel over and move it back to your camcorder body with the LCD screen facing out. You can operate with the touch panel using the viewfinder.
Use the viewfinder in the following case: When operating camera brightness and the fader (only in CAMERA mode) on the touch panel using the viewfinder
(1)Set the POWER switch to CAMERA or MEMORY/NETWORK (DCR-IP55E only).
(2)Turn the LCD panel over and move it back to your camcorder body with the LCD screen facing out.
(3) Press OFF. The message PANEL OFF appears on the LCD screen.
(4) Press OK. The LCD screen is turned off.
(5) Press the LCD screen through the viewfinder. EXPOSURE, OK, ON and FADER (only in CAMERA mode) appear.
(6)Select the desired item, then press OK.
ИсpenьзованецВионскателя
Ipebehnte naheJIb KKD n pniDnHbTe ee o6paTHo K Kopnyc Bauei BnEokamepbl, TaK yTO 3kpan KKd 6ydt Obpauen hapxky. BbIO MoKeTe pa6oTaTb C cEHcOpHo naneBIO C NOMOuB BuOnCKaTeJIa.
IcnoIb3yIe BnIOuCKaTeIb B CneDyUoIeM cnyae:
PnpepynpOBKe npKocTN BnDeokamepbI npna paboTe cpeiepom (ToJbKO B pejHMe CAMERA)Ha ceHCOPHO naHeJI NcNoJIb3yJTe BnDOncKaTeJIb.
(1)Установпейсякуна teь POWER в положене CAMERA ил MEMORY/ NETWORK (тлько мдел BCR-IP55E).
(2)Перевернite паненьжд и ппдвиьтей сбраим К корпуну Вашей видегокамерbl,ТakчToЗкpanждБудт образецн hapуж.
(3)HaxMMTe KhoNky OFF.Ha 3KpaHe JKKI NOBNTcCoO6eHne PANEL OFF.
(4)Haxmnte KhoNky OK.3KpaH KKDbBbIKJIOUHTCra.
(5)Haxmnte3kpanXKDCnOmoIbU BINOUCKaTeJIa. Ha 3kpaHe NOBRTcI INDkaUN EXPOSURE, OK, ONu FADER (ToIbKO BpeJMe CAMERA).
(6)BbIbepuTe HUxHbIyHKT,a 3aTeM HaXmTe KhoNky OK.

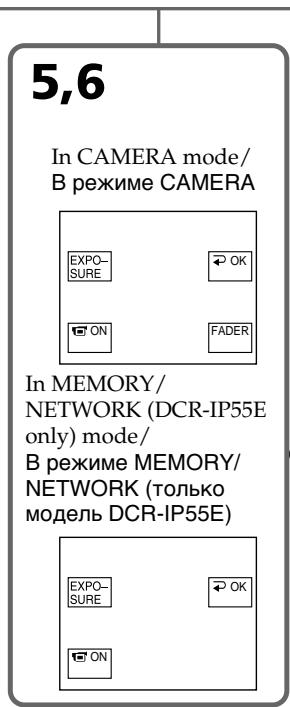
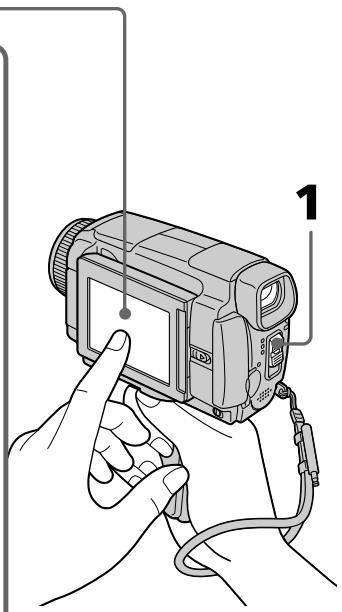
EXPOSURE: adjust the exposure by pressing - / +
FADER: press FADER until the desired fader mode is displayed. The indicator changes as follows:

ON: The LCD screen lights up in the mirror mode.
To make the buttons on the LCD screen disappear
Press OK.
Notes
- Do not touch the LCD screen with wet hands.
- Do not press the LCD screen with sharp objects other than the stylus supplied. (DCR-IP55E only).
- In VCR or memory playback mode, you cannot operate with the touch panel through the viewfinder.
To operate the items that are not displayed
Set the LCD screen back to the previous position.
Operate the items through the LCD screen.
FN, OFF, PLAY, INDEX and NETWORK in the viewfinder
These buttons appear mirror-reversed.
Available recording time
See the table on page 28 for details of the recording time using the viewfinder.
IcnoJIb3OBAHne BnDOnCKaTeJIa
EXPOSURE: Otpereynpuye TcKcno3nio nyTEM HaxKaTna KHOPOK -/+
FADER: HaxmMaTe KhoNky FADER, noka He OTo6pa3ntcH yKhblpeXnM feiDepa. INdkaTOp 6ydet N3MeHrTaC cJeDuOuM o6pa30m:

ON: ΘΚραη XKД BBICBETιTCE B 3ερΚαJBHOM pěχΜme.
YTo6bI KHOIIKHa 3KpaHe KKd nCue3n HaxMMTe KHOIIKy OK.
Примechаня
- He kacaiTecb 3kpaHa KKIMOKpbIM pyKaAM.
He haxmaite Ha 3kpan JKKIOCTPOKHOeHbIMn IpEIMTaMn,OTJNUHbIMN OT npnilaraemoro nepa. (ToIbko moJeB DCR-IP55E).
BpeKIMe KBM nIN BOCpON3BeDenHnI3 namrTn BbI He CMOXeTe pa6oTaTb c ceHCOPHOI NaHeJIbIO C NOMOuB BuOnCKaTeJI.
Дярабовспункови, He OTO6paKaembIMn Ha 3KpaHc
YcTaHOBnTe 3KpaH XXKD o6paTHOB npeBldyuee neoJKeHne.
Pa6oTaIe C 3TmN IyHKTaM NToJbKO C nOmoUbO 3KpaHa JKKJ.
Инд�示ь FN, OFF, PLAY, INDEX NETWORK B BIDONCKaTeJI
3TN KHOJKN BbICBeyNBaIOTc 3epKaJIbHO OTo6paJxHbIM.
Ooctynhoe Bpem3aHncn
Iopobha HOpmaun O BpeMeH 3aHnC nOMOsbu BVIOCKaTeN npBBeDeHa B TaJIne Ha cTpaHnCe 28.
Playing back a tape with picture effects
During playback, you can process a scene using the picture effect functions: NEG.ART, SEPIA, B&W and SOLARIZE.
(1) In the playback or playback pause mode, press FN to display PAGE1.
(2) Press MENU, then select P EFFECT in in the menu settings to select a desired picture effect mode (p. 225).
See page 76 for details of each picture effect function.
Bocnpo3BeDeHne JeHTbI C 3ΦΦeKtAmn n3o6paXKeHn
Bo BpemBocpnOn3BeJeHnBbl MoKeTe BUNOn3MeHrTb N3OpaXeHne C NOMoUbCNeIyUOxN cxyHKuN 3ΦΦeKToB N3OpaXeHn: NEG.ART,SEPIA,B&W u SOLARIZE.
(1)B pexime Bocnpo3BeDHeNn nn nay3bl BOCnpo3BeDHeNn HaxmTe KhoNky FN, yTo6bI OTo6pa3ntb CtpaHnCy PAGE1.
(2)HaxmTe KhoNky MENU, a 3aTeM Bb6epnte onuio P EFFECTB uYcTaHOBkax MeHIO dIy Bb6opa HyxHoro pexima 0000KeKta n3o6paXeHnra (ctp. 233).
Iopob6bIe CBeDeHn Io KaJdoi n3
fynKcui 3OpeKToB n3o6paXeHn
npuBeHebl Ha cTp.76.
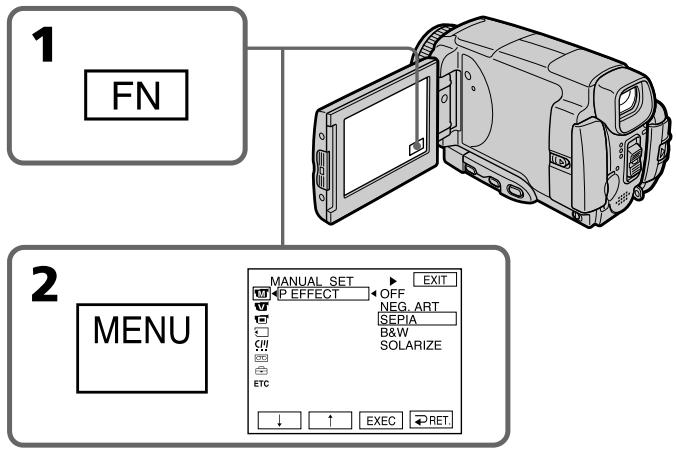
To return to FN
Press EXIT.
To cancel the picture effect function
Set P EFFECT to OFF in the menu settings.
Длв BO3ВраТКИнДикалTN FN
HaxMMTe KhoNky EXIT.
ДЯ OTMeHbI ΦyHKcH N 3ΦΦeKTa n3O6paXeHn
YcTaHOBnTe OOnuIO P EFFECT B yCtHaOBkax MeHIO B nOLOXeHne OFF.
Playing back a tape with picture effects
Bocnpon3BeDeHne JeHTbI c 3ΦΦeKTamn N3O6paXeHnA
Notes
- You cannot process externally input scenes using the picture effect function.
- You cannot record images on a tape on your camcorder while you are processing the image using the picture effect function. However, you can record images on a "Memory Stick" (p. 154, 169), or on a VCR using your camcorder as a player.
Pictures processed by the picture effect function
Pictures processed by the picture effect function are not output through the i.LINK (MICROMV Interface).
When you set the POWER switch to OFF (CHG) or stop playing back
The picture effect function is automatically cancelled.
PpIMeuaHnA
- BbI He MoXeTe BUNOIN3MeHHTb N3o6paXeHnA OT BHeUHNIX NCTOCHNKOB C NOMOUIBO FyHKcIMN 3ΦΦeKTA N3o6paXeHnA.
BbI He MoXeTe 3aINCbIbAtb Ha BaWei BuaDEOKaMepe I3o6paXeHnHa JIeHTy, Noka BbI O6paBaTbBaTe I3o6paXeHnE, IcNoJIb3yI yHKUIO 3ΦΦeKTA I3o6paXeHnI. OJHaKO, Bbl MoXeTe 3aINCbIbTa I3o6paXeHnHa "Memory Stick" (ctp. 154, 169) uNn Ha KBM, IcNoJIb3yBaWy BuaDEOKaMepy B KaueCTBe nJIeepa.
N3o6paXeHn, o6pa6oTaHHbIe C NIOMOuBIO fYHKmN 3ΦΦeKtA N3o6paXeHn
Playing back a tape with digital effects
During playback, you can process a scene using the digital effect functions: STILL, FLASH, LUMI. and TRAIL.
(1) In the playback or playback pause mode, press FN and select PAGE2.
(2) Press DIG EFFT. The DIG EFFT screen appears.
(3) Select a desired digital effect mode. In the STILL or LUMI mode, the picture being displayed is stored in memory as a still image.
(4) Press - / + to adjust the effect. See page 78 for details.
(5) Press OK. The display returns to PAGE2.
Bocnpo3BeDeHne IeHTbI C uΦpOвыIMN ΘΦΦeKtAmN
Bo BpemB OBCnpOn3BeJeHnA, Bbl MoKeTe BUNOIN3MeHbI N3o6paXeHne C NMOUbIO cNeDuOuNX cyHKmI uCpPoBbIX 3cFKeKToB: STILL, FLASH, LUMI. n TRAIL.
(1)B pexime Bocnpoun3BeDeHnI INI nay3bl BOCpOun3BeDeHnI HaxmTe KhoNky FN IN BbI6epIne CTpaHnU y PAGE2.
(2)Haxmnte KhoNky DIG EFFT. IoABNTcA 3KpaH DIG EFFT.
(3)Bb6epnte Hxhblpekmuuzpoboro 3ΦΦeKta.BpekmE STILL nLUMI, Bocnpou3BOdmoe N3o6paKeHne 6ydet 3aHeceHO B pAmrTb KaK HeNoDbHXHoe N3o6paKeHne.
(4)HaxmTe KhoNky - / + IypeRyInpOBKn 30fkeTa. PioPobHbI cBeDeHn npBBeHbI Ha cTp.78.
(5)HaxmTe KhoNky OK. INdkaunBepHeTcK CTpaHnue PAGE2.

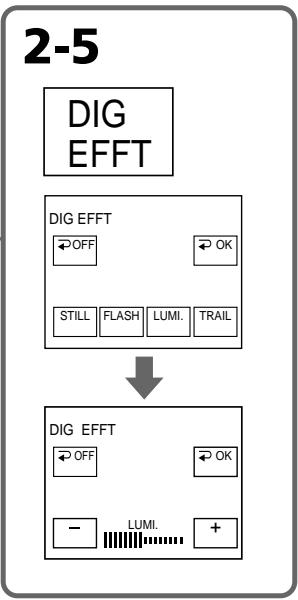
To return to FN
Press EXIT.
To cancel the digital effect function
Press OFF in step 2. The display returns to PAGE2.
Длво3ВраТКИнДикалиFN
HaxMMTe KhONky EXIT.
Длг OTMeHbI Φункци nФрoboro 3ффекta
HaxmTe KhoNky OFF B nyHKte 2.
Playing back a tape with digital effects
Notes
- You cannot process externally input scenes using the digital effect function.
- You cannot record images on a tape on your camcorder while you are processing the image using the digital effect function. However, you can record images on a "Memory Stick" (p. 154, 169), or on a VCR using your camcorder as a player.
Pictures processed by the digital effect function
Pictures processed by the digital effect function are not output through the i.LINK (MICROMV Interface).
When you set the POWER switch to OFF (CHG) or stop playing back
The digital effect function is automatically cancelled.
Bocnpo3BeJeHne JeHTbI c cnΦpOBbIM 3ΦΦeKTamn
Приимechаима
BbI He MoXeTe BUNOIN3MeHHTb N3o6paKeHnAOT BHeUHHN IXTOUYHKOB C NOMUBo FOYHKuNcUdpoboro 3ofoekTa.
BbI He MoKTe 3aInCbIbTa Hb Bauei BnDEOKaMepe n3o6paXeHnHa IeHTy, Noka BbI o6paBaTbIbAeTe n3o6paXeHne, nCNoIb3yu fynKcUHO cNpPoBOrO eΦeKtA. Ondako, Bbl MoKeTe 3aINCbIbTa n3o6paXeHnHa "Memory Stick" (cTp. 154, 169) nIi Ha KBM, nCNoIb3yBaWy BnDEOKaMepy B KaueCTBe nJIeepa.
N3o6paXeHn, o6pa6OtaHHbIe c IIMOuBIO fYHKmN uΦpOBOrO 3ΦΦeKtA
Enlarging images recorded on tapes - Tape PB ZOOM
You can enlarge playback images recorded on tapes. Your camcorder can enlarge still images recorded on the "Memory Stick", too (p. 182).
(1) In the playback or playback pause mode, press FN and select PAGE2.
(2) Press PB ZOOM. The PB ZOOM screen appears.
(3) Press the area you want to enlarge in the frame on the PB ZOOM screen.
The area you pressed moves to the centre of the LCD screen, and the playback image is enlarged to twice the size. If you press the other area again, the area moves to the centre of the LCD screen.
(4) Adjust the zoom ratio by the zoom lever.
You can select the image from 1.1 times up to five times its size.
"W" side: Decrease the zoom ratio.
"T" side: Increase the zoom ratio.
YBeJIuYeHne 3aIIncaHHbIX HaJIeHTbl N3O6paJxHenn -ФункцЯ PB ZOOMJIeHTbl
BbMOxKeTe yBeInuHbTaB BOCnPOn3BODnMbIe
1306paXeHnA, 3aNcAHbIe Ha JeHTax. BaHa
BUNDeOKaMepa TaKxe MoXeT yBeInuHbTaB
HeNoDINXHbIe 1306paXeHnA, 3aNcAHbIe Ha "Memory Stick" (cTp. 182).
(1)B pexime Bocnpo3BeDeHnI INI npay3bl BOCpOIN3BeDEHnI HaxMnte KhoNky FN IN BbIbepInTe CTpaHnU y PAGE2.
(2)Haxmnte KhoNky PB ZOOM. IopBntcI 3KpaH PB ZOOM.
(3)Haxmnte Ha 3kpahe PB ZOOM Ha o6nactb, KOtopyO Bby XOTnTe yBvIuHTb KaJpe. O6nactb,Ha KOTOpYo Bby Haxmete, nepemecTnCTBaHTp 3KpHa JKKD,a BOCpnOn3BOIMOE N3O6paXeHne yBvIuNTcBABoEOT nepBOHaJaNbHoro pa3Mepa.EcNl BBy eue pa3 haxmete Ha dpyrUO 6nactb,3ta 6nactb nepemecTnCTB CuHTp 3KpaHa KKd.
(4)OtpereynpuyeMacstabyBelenueHnncn C nOMooub pbyhara npnbODHO BapnoooBeKtNBa. Bbl moKeTe yBelenuHTb n306paXeHne ot 1,1 pa3a do pIATNKpaTHoro erop a3mepa.
CTopoHa"W:ymeHbwaetMacuTa6 yBeJIyHeHnI.
CTopoHa "T": yBelenuBaet MacuTa6 yBeIInuEHHa.
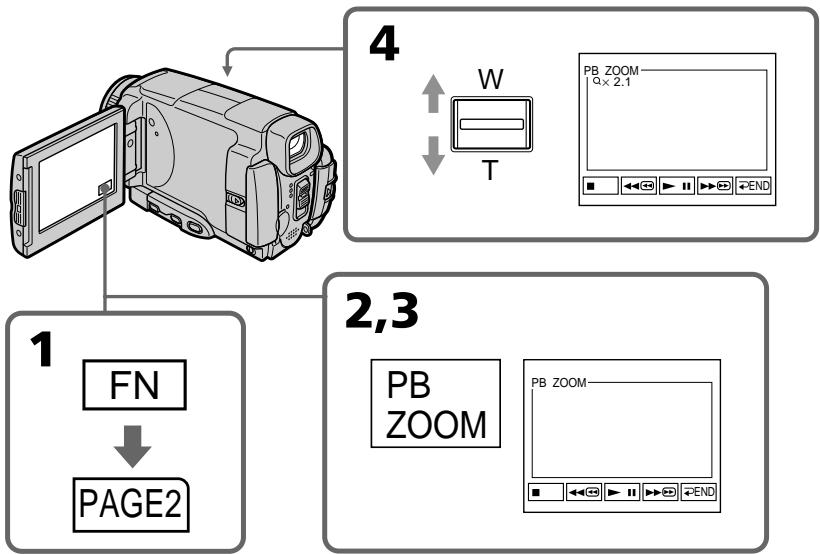
Notes
- You cannot process externally input scenes using the PB ZOOM function with your camcorder.
- You cannot record images on a tape on your camcorder while you are processing the image using the tape PB ZOOM function. However, you can record images on a "Memory Stick" (p. 154), or on a VCR using your camcorder as a player.
- You cannot record moving pictures on a "Memory Stick" on your camcorder while you are processing the picture using the tape PB ZOOM function.
The PB ZOOM function is automatically cancelled when you operate the following functions:
- Set the POWER switch to OFF (CHG)
- Stop playing back
- Insert a "Memory Stick"
Images in the PB ZOOM
Images in the PB ZOOM mode are not output through the i.LINK (MICROMV Interface) and (USB) jack.
In the PB ZOOM mode
If you press DSPL/TOUCH PANEL button, the frame on the PB ZOOM screen disappears. You cannot move the part you pressed to the centre of the LCD screen.
Edge of the enlarged image
The edge of the enlarged image cannot be displayed at the centre of the LCD screen.
Примеань.
- Bы He MoxKeTe BnДонЗмeHЯТь ИЗБрахeHЯOT BHeuHnx INCTOчнIKOB C NOMOиьФункиIN PB ZOOM Baшeŋ BnДeOKaМерры.
BbI He MoKTe 3aInCbBaTb Ha BaSei BvIeOkaMepe I3o6paXeHnHa IeHTy, Noka BbI o6paBaTbBaTe I3o6paXeHne, IcNoIb3yI yfHKcuIO PB ZOOM IeHTb. OJaHko, Bbl MoKeTe 3aInCbBaTb I3o6paXeHnHa "Memory Stick" (cTp. 154) nIi Ha KBM, IcNoIb3yI BaUy BvIeOkaMepy B KaueCTBe nJIeepa. - Bы He можete Ha Baшeи Видаеокамpe 3апсать Двнхушиеся ИЗбрахеня Ha "Memory Stick", noka Bы obpaбаыbaete ИЗбрахене, IncnoIb3у phyнкцю PB ZOOM leHTbl.
Функця PB ZOOM 6удет abTomatueckn OTMeHeHa, ecIn Bbl BbInonHnTe Ondy n3 cIeMyUoXhФунKcI:
-YcTaHOBKa napeKJIIOUaTeIa POWER B noJIoXeHne OFF (CHG)
- OctaHOBKa BOCnpon3BeDeneHna
-YctaHOBka "Memory Stick".
Searching for a scene - MULTI-PICTURE SEARCH
Using the multi-picture search function, you can display thumbnails of all the beginning scenes of images recorded in the tape onto the index screen. The recording date and title of each image or scene are also indicated.
The thumbnails described in this section are the still images of all the beginning scenes of each recorded moving pictures and still images to help you search for the desired scene easily. When you select the thumbnail you want to play back, the camcorder starts searching for the image or scene and plays it back automatically. You can also control this function using the Remote Commander.
(1) Set the POWER switch to VCR.
(2) Press FN to display PAGE1.
(3) Press MULTI SCH. The MULTI SCH screen appears.
(4) Press / to select the direction to scan. The camcorder starts scanning in the selected direction. When you select , the thumbnails are displayed from the upper-left window, and when you select , they are displayed from the lower-right window. When scanning is completed, it stops automatically. The upper-left window turns black and the thumbnails will be displayed on the index screen.
Оъckaне заюда - MULTI-PICTURE SEARCH
IcnoIb3yra fyuHKUIO MyIbTnKaIdpOBO rONcKa, Bbl MoKTe OTo6paXaTaHa NINDeKCHOM 3KpaHe MHNAtOpHBe I3o6paxeHHaNepBbIX KaIDPOB BCEx 3NtIOoB I3o6paXeHHa 3aINCaHbIX Ha JIeHTe. Yka3BaIbaETc TAKKe data 3aINcN tTNr KaJdORo I3o6paXeHHa INI 3nIM3Oda.
MmHnataOpHbIe N3o6paXeHnra, OINcaHNbIe B 3TOM
pa3dJe, npeCTaBnHOT cO60I HEnoDbNxHbIe
N3o6paXeHnra HauJIbHbIX 3nI3oOB KaJDoR I3
3aINcAHHbIX DnBnJyUxCXRe N3o6paXeHnra
HEnoDbNxHbIe N3o6paXeHnra, KOToPbIe N3oBONr H
JIERKO HaxOHTb Hynhbl 3nn3oJ. EcnI Bbl
BblBepeTe MmHnataOpHoe N3o6paXeHnra, KOTOpoe Bbl
XOTnte BOCpOn3BeCTn, BInDeOKaMePa HaChET NOnCK
N3o6paXeHnra NN 3nI3oDa n ABTOMaTuYeckn
BOcPOn3BeDeT erO.
BbTaKxMe MoKTe UnpaBnTb 3ToI ΦyHKuNei C nOMOsbIO npbTa DnCTaHcNtOHoro ynpabLeHra.
(1) YctaHOBnTe nepeKIOuChaTeIb POWER B noLOXeHne VCR.
(2) Haxmite KhoNky FN dny oTo6paXeHnCTpaHnCpI PAGE1.
(3) HaxMITE KhoNky MULTI SCH. NpBntcKkpan MULTI SCH.
(4) Haxmnte KhONky DnBbIbopa HnpaBnEHn CkAnHPOBaHN. BIneOkaMepa HauHcTcAhnPOBaHne B bIbpaHOM HnpaBnEHn. EcnBbYbIbIbEpTe KOnKny MInHaTIOHPbIE N3o6paxHeN 6yDyT OTO6pAXATbCn, hauHnC nEboRr BepxHero yrna OKHa, a ecn BblbIb6peTe KOnKpy OHb6yDyT OTO6paxKaTcBn, hauHnC npaboro HnXHero yrNa OKHa. IocNe 3aBepseHn CkAnHOBAHH, OHO ABTomATuYeCKn OCTaHOBNTc. JLeBaBexPbXnObnactb OkHa cTaHET YerHO, a MInHaTIOHPbIE N3o6paxHeN 6byDyT OTO6paxHeH Na INDeKCHOM 3kPaHe.
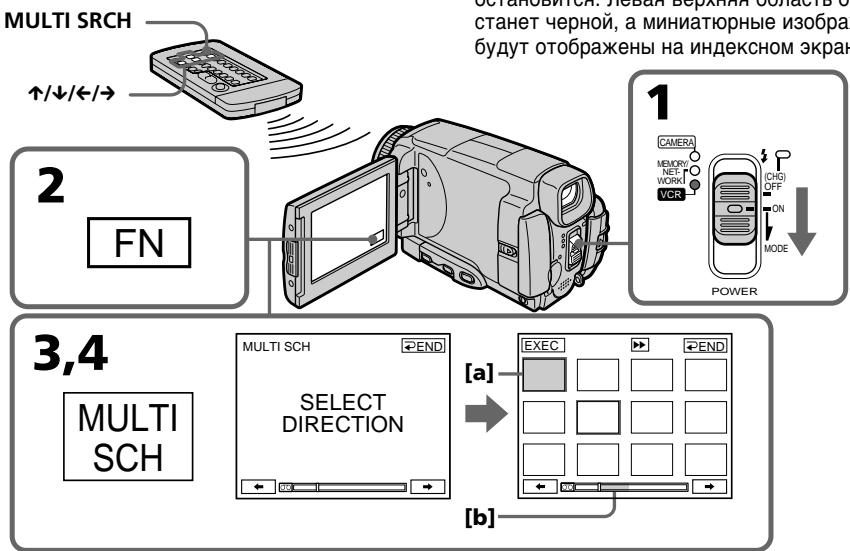
[a] The picture being fast-forwarded or rewound
[b] The blue portion indicates the range of t scan currently being made to display thumbnails
[a] N3o6paXeHne BOCpON3BODITcnyTeM yCKopeHHoN nepeMOTKBNEPeD ININ HA3aD
[b] Tony6a o6IbAc7b yka3bIbAeT npOcKaHnPObaHHbK TEkyuemy MOMeHTy dIana3OH dIra OTO6paKeHnA
(5) Select the thumbnail you want to play back, then press EXEC. The camcorder starts searching for the image or scene and plays it back automatically. The blue portion of the bar indicates the scanning range and the white portion of the bar indicates the recorded portion.
When you want to change the thumbnail Press RET, and select the thumbnail you want to play back again, then press OK.
(5)Выберпт МннаТюрhoeи306paжehne, kOTOpoe BbyXOTnTE BOCnpOn3BecTn,a 3aTeM haxMNTe KhoNky EXEC.BndeOkaMepa NaHET nONCK n306paжehnaIIN 3n3Oda n aBTOMaTnueckn BOCnpOn3BedeT erO. Toly6a8OBnactb nONoCb yKa3bIBaet npocKaHnPoBaHbI dInaNa3oH,a 6eNa8 o6JaCTb nONoCb yKa3bIBaET 3aNicaHHbI yUCAcTOK.
EcIn Bbl XOTnTe 3aMeHnTb MNHaTHOpHoe n3o6paXeHne
Haxmnte KhoNkY RET, n Bb6epnte MmHaTHOpHoe N3o6paXeHne, KOtOpoe Bbl XOTnte BOCnpOn3BecTn eue pa3, a 3aTeM haxmnte KhoNkY OK.

[c] The title/date (The title turns to the date indication after five seconds.)
[d] The actual point you are trying to search for (yellow mark)
[e] The present point on the tape (yellow bar)
[c] Tntp/daTAt (HnDnkaaTnTtpa npEbpaaeTcB INDnKaUHO daTbI CnYCTa PnTb ceKyHd.)
[d]ДиCTBNTeNBHeMecTo, KOtOpoe BblbITaTeCb HauTn(KeNTaA MeTKa)
[e] Tekyüee MeCTO HaJIeHTe (JeIITaI NOIocA)
To return to the MULTI SCH screen from playback
Press RET.
To stop searching
Press STOP on the Remote Commander.
To end the multi-picture search function
Press END. The display returns to PAGE1.
To end the multi-picture search function from the playback screen
Press EXIT.
When controlling the camcorder with the Remote Commander
You can use the MULTI SRCH and / / / EXECUTE buttons.
If the tape has a blank portion in the beginning of the tape or between recorded portions
The multi-picture search function may not work correctly.
The number of thumbnails stored in one cassette
About 400 thumbnails can be stored.
The number of thumbnails that can be displayed for in one scanning
A maximum of 11 thumbnails can be displayed for in one scanning.
EcIn Ha JeHTe NMeETcH He3anuCaHHbI yAcTOK B HauaJIe IeHTbI INI MExkDy 3anuCaHHbIMyYacTkAMn
ФункцЯ МьтTKаДровоу NOИСКа мОжET pa6oTaTb HENpaBnIbHo.
KoInueCTBO MNHaTIOpHbIX n3O6paXeHn, coXpaHReMbIX Ha OJHOi KAccTe
Moxet 6bItb coxpaHeNo Okono 400 MNHaTHOpHbIX N3o6paXeHn.
KoJIuYeCTBO MmHaTOpHbIX n3O6paXeHn, KOtOpBle MOryT 6bITb OTo6paXeHbI 3a OJHo cKaHnpOBaHne
3a OJHO cKaHnPOBaHHe MOKeT 6bITb OTo6paXeHo He 6oJIee 11 MInHaTHOpHbIX N3O6paXeHn.
When you press MULTI SRCH on the Remote Commander
The MULTI SCH screen appears.
During searching
The other functions of this camcorder do not work.
The thumbnail images displayed on the MULTI SCH screen
You cannot modify these thumbnail images.
When you use the multi-picture search function with the digital effect activated
The digital effect will be cancelled.
Some of the 11 thumbnails may not be displayed in the following cases:
- There are fewer than 11 recorded images and scenes on the searched portion of the tape.
- When scanning a tape recorded over previous recordings.
- When you have erased all the Micro Cassette Memory of the tape (p. 126).
To select the thumbnail with the Remote Commander
Press /// on the Remote Commander.
When you press DATE or POS
You can switch to the title/date display or the tape bar display that shows the present point on the tape.
While the camcorder is searching for the image or scene, the tape bar display appears even if you select Title/Date.
Notes
- Thumbs nails may not be displayed depending on the condition of the tape. This is not a malfunction.
- Noise may appear on the thumbnails. However, this has no effect on the recorded images.
When you select or during scanning
The next 11 thumbnails will be scanned.
Even if the first thumbnail is not displayed before the scanning is completed
You can search and play back the image or scene.
BbI He MoXKeTe MoIOnHcNIpOBoTa 3TN MnHaTIOpHbIe N3O6paXeHnI.
Пи ИСПОЛБ3OBAHINФУнКИМ МЛВТКАДРОВО РОДССССС АKTIBN3IPOBAOBHIMЦФПОВМФФФЕKTOM LICPPOB0I 3ФФEKT6уDEТOTMEHEH.
HekotopbIe n3 11 MmHaTOpHbIX n3o6paXeHn MOrYt He 6bITb OTo6paXeHbIB CJIeDyUOxN CnyuAax:
Ha npockaHnpoBaHHom yuactke IeHTbI 3aIncaHO MeHee 11 n3o6paXeHIn n 3n3oDoB.
-Пи сkaировани Лentы, coоржаш
3aпсь поверх п徴дыduуших 3аисян.
- Ecnn Bbl Ctepln BcIO Micro Cassette Memory (MnKpOKacCETha NAMrTb) JeHTb (Ctp. 126).
Searching the boundaries of recorded tape by title - TITLE SEARCH
You can search for the boundaries of a recorded tape by selecting the title. Use the Remote Commander for this operation.
(1) Set the POWER switch to VCR.
(2) Press SEARCH MODE on the Remote Commander repeatedly, until the TITLE SEARCH indicator appears. The indicator changes as follows:
$$ \begin{array}{c}\text {T I T L E S E A R C H} \rightarrow \text {D A T E S E A R C H}\\uparrow - (\text {n o i n d i c a t o r}) \leftarrow\end{array} $$
(3) Press or on the Remote Commander to select the title for playback, then press EXECUTE on the Remote Commander. Even if you do not press EXECUTE, playback starts automatically in two seconds after you press or .
[a] Actual point you are trying to search for
[b] Present point on the tape
To stop searching
Press STOP on the Remote Commander.
If a tape has a blank portion in the beginning of the tape or between recorded sections
The title search function may not work correctly.
To superimpose a title
See page 114.
[a]ДeИСТВИТЕЛБHоМecTO,KOTOPoe Bbl NbITaTeCb HauTn
[b] TeKyuee MeTo Ha JIeHTe
ДлЯ OCTaHOBKn NONcKa
HaxmTe KhoNky STOP ha nyIbTe duCTaHIOHHO ynpabNeHH.
EcJH Na IeHTe NMeTcR He3aIncaHHbI yAcTOK B HauAte JeNTbI MIn MeKdY 3aIncaHHbIM yAcTcKAM
Searching a recording by date - DATE SEARCH
Your camcorder automatically searches for the point where the recording date changes and starts playback from that point by selecting the recording date (Date search). Use the Remote Commander for this operation.
Use this function to check where recording dates change or to edit the tape at each recording date.
Searching for the date by using cassette memory
(1) Set the POWER switch to VCR.
(2) Press SEARCH MODE on the Remote Commander repeatedly, until the DATE SEARCH indicator appears.
The indicator changes as follows:
TITLE SEARCH DATE SEARCH
( no indicator)
(3) Press or on the Remote Commander to select the date for playback, then press EXECUTE on the Remote Commander.
Even if you do not press EXECUTE, playback starts automatically in two seconds after you press or .
ПОИСДаТысИСПОЛБ3OBAHнEM KACCETHоIпamЯтN
(1)YcTaHOBInTe NepeKJIouaTeIb POWER B noJIOKeHne VCR.
(2)HaximaiTe NOBtOPO KhoNky SEARCH MODE Ha Nylte DnCTaHOnHOro ynpaBneHnI Do TEX NOp, Noka Ha 3KpaHe He nOByTcN HdNkaTOp DATE SEARCH. INDkaTOp 6yEd Tn3MeHbTbC sJeDyoUIm 06pa3oM:
TITLE SEARCH DATE SEARCH
(Бe3индикаТopa)←
(3)HaKmTe KHONky nIu Ha nyIbTe DnCTaHcUHOHOrO ynpabLeHHa IyBbOpa DaTbI dNBA BOCpOn3BeDeHHa 3aTeM HaxMMTe KHOKNy EXECUTE HaNyIbTe DnCTaHcUHOHOrO ynpabLeHHa ECnBbHe HaxMeTe KHOKNy EXECUTE, BOCpOn3BeDEHHe HaHETcA bTOMaTHueCKn CnyCTa DBe CEkyHdbI nocTe TOrO, KaK BbI HaxMeTe KHOKNy nIu
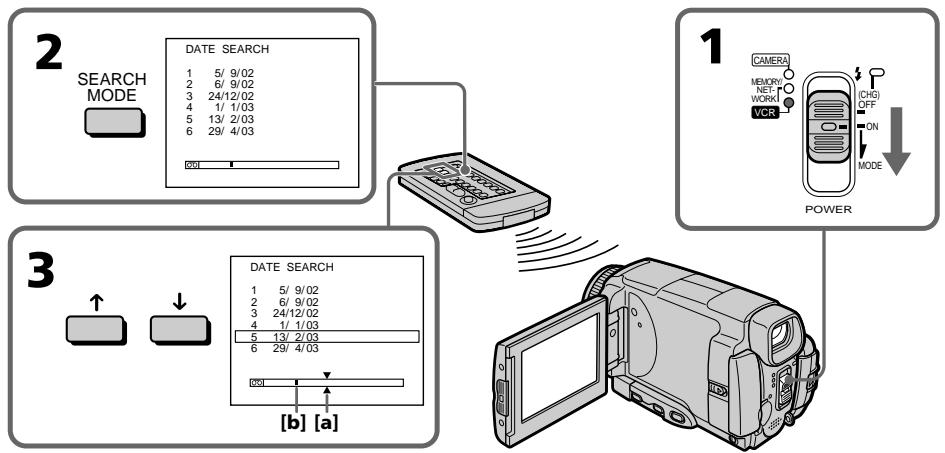
[a] Actual point you are trying to search for
[b] Present point on the tape
[a]ДиСТВИТЕNBHOМECTO,KOTOPOE BbI NBITaTeCb HauTn.
[b] Tekyuüee MeCTO Ha JIeHTe.
To stop searching
Press STOP on the Remote Commander.
If a tape has a blank in the beginning of the tape or a portion between recorded sections
The date search function may not work correctly.
Micro Cassette Memory
The tape cassette memory can hold 20 recording date data.
EcJn Ha JeHTe NMeETcR He3aNtcaHHbI yAcTOK B HauaJIeHtbl IJIN MExkdy 3aNtcaHHbIMyAcTkAMn
Using the A/V connecting cable
You can dub or edit on the VCR connected to your camcorder using your camcorder as a player. Connect your camcorder to the VCR using the A/V connecting cable supplied with your camcorder. The supplied A/V connecting cable is equipped with an S video plug and a video plug. Use either the S video plug or the video plug depending on the recorder. Do not connect both of the plugs to the recorder.
Before operation
- Set DISPLAY to LCD in the menu settings. (The default setting is LCD.)
- Press the following buttons to make the indicator disappear so that they will not be superimposed on the edited tape:
On your camcorder:
DSPL/TOUCH PANEL
On the Remote Commander:
DISPLAY, DATA CODE, SEARCH MODE
(1) Insert a blank tape (or a tape you want to record over) into the VCR, and insert the recorded tape into your camcorder.
(2) Prepare the VCR for recording, then set the input selector to LINE. Refer to the operating instructions of the VCR.
(3) Set the POWER switch to VCR.
(4) Play back the recorded tape on your camcorder.
(5)Start recording on the VCR.
Refer to the operating instructions of your VCR.
Пepe3a\Pncb ЛeHTbl
IcnoJb3OBAHnE CoeHNHTeNbHOKabEny aydno/BuDeo
BbMOxTe BbINHnTb MOHTax IINI nepe3aNcB Na KBM, nOcOeDInHemK BaSeI BnDEOkampe, nCnOJ3yR BaSy BnDEOkampey BkauCTBe PnEIEpa. POnOeDInHte BauY BnDEOkampey K KBM, nCnOJ3yR coeDInHtBelhBn Ka6JIb ayDIO/BuJeO, npInarAeMbI K BaSeI BnDEOkampe. PpInaRaEMbI coeDInHtBelhBn Ka6JIb ayDIO/ BuJeO OChaUeH uTEKePOM S BnDeo n BuDeoTuKEpOM. NcNoJ3yIte uTEKeP S BuJeO IIN BNuOHTeKep B 3aBucIMocTn OT MoDenI 3aNNcbBaIoUeO yCTpoiCTBa. He nOcOeDInHtIe K 3aINCbBaIoUeMy yCTpoiCTBy o6a uTEkepa.
Ipeed BbInOJIHeHnEM Onpaun
VCTaHOBNTe ONUHNO DISPLAY BY VCTaHOBkAX MENI B NOJoxKeHne LCD. (LCD YBJIaTeCtca YCTaHOBKOI NO yMOnuChnIO.)
HaxMMTE CNeIyIOJIe KHOJIK, YTO6bl I0oBnTbCnIcE3HOBeHnIHIMKAtOPOB BO N36ExaHHe IN HALOXKeHnHa MOHTpyEmyIOJeHTy:
Ha Baalen Bundeokamepe:
DSPL/TOUCH PANEL
Ha npIbTe duCTaHcUHOHorO ynpaBHeHra:
DISPLAY, DATA CODE, SEARCH MODE
(1)YcTaHOBnTe He3aIncAHHyIO JeHTy (uINJeHTy, KOtOpYIO BbXoTnTe nepe3aIncatb) B KBM, uYcTaHOBnTe 3aIncAHHyIO JeHTy B Bauy BInDeOkamepy.
(2)ПОДЮТOBБТЕ KBМ K 3аПИСИ, a 3aTeM yCTaHOBNTe CEЛКTOP BXOДВ B ПОЛЖЕни LINE.
Bolee noDpO6HbIe CBeDeHnBb MoKTe NaHTn B INCTpykUIN IO 3KcPnyatauIN KBM.
(3)Установские поpeклоча teleportь POWER в положене KBM.
(4)Haunite BoCpOn3BeJeHne 3aIncaHHoJ HeTbI Ha BaSei BnDEOkampe.
(5)Haunnte 3a ncb Ha Baewem KBM. Bolee noPpO6HbIe CBeDeHNr Bbl MoKeTe haHTn BInCHpyKcNn No 3KnPnyaTaunn Baewero KBM.
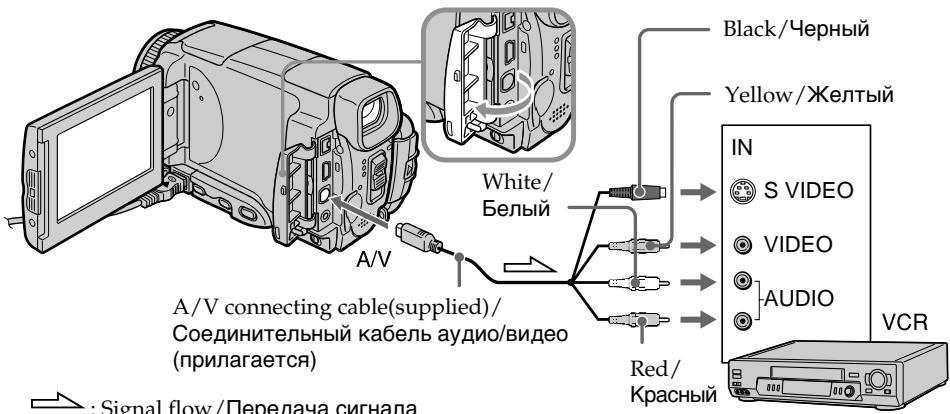
When you have finished dubbing a tape
Stop recording on the VCR, and stop playback on your camcorder.
You can edit on VCRs that support the following systems
8 8 mm, Hi8 Hi8, Digital8, VHS VHS, SWHS S-VHS, VHSC VHSC S-VHSC, Betamax, Mini DV, DV or MICROVM MICROV
If your VCR is a monaural type
Connect the yellow plug of the A/V connecting cable to the video input jack on the VCR and the white or red plug to the audio input jack on the VCR. When the white plug is connected, the left channel audio is output, and when the red plug is connected, the right channel audio is output.
If your VCR has an S video jack
Connect using the S video plug to faithfully obtain original pictures. With this connection, you do not need to connect the yellow (video) plug of the A/V connecting cable. Connect the S video plug to the S video jack of the VCR. This connection produces higher quality MICROMV format pictures.
Ipepe3anncb JeNTbl
Ecnn Bbl 3aKOHnJI INpe3aINCb JeHTbI OctaHOBIne 3aINc b Na KBM, n octaHOBIne BOCpOn3BeDeHne Ha BaSei BIndeOkamepe.
BbMOxTe BbINoINHrTb MOtAaK Ha KBM, KOtOpbIe NODePKeINBaIOT CneDyUOuNe CnCTeMbI
8 MM, Hi8 Hi8, Digital8, VHS VHS, S-VHS, VHSC VHSC, S-VHSC S-VHSC, Betamax, Mini DV, DV wJN MICRO MV
EcnBaw KBM MOHOponHueckoro Tnna
IopDCoeDHHTe JKeTbI WTeKep COeHNHTBHO KabEna ayDIO/BuDeO K BXoHOMy BUnDeOrHe3dy Ha KBM, a 6bIy IIN KpaCHbI WTeKep K BXoHOMy ayDIOrHe3dy Ha KBM. EcNI POdCoEduHE 6bIy WTeKep, To BbIXoHbIM CnHAnOM 6yDet 3Byk IeBOr KAHaJa, a ecNI POdCOeDInHeN KpaCHbI WTeKep, TO BbIXoHbIM CnHAnOM 6yDet 3Byk npaboro KaHaJa.
EcIn B Baem KBM ImeeTc rHe3do S Bndeo
BbIOpHnTe NoOcOeHNHeHne, NcOpIb3yur 7TeKepe S BnDeo, dIa 60Jee BbICOKKaueCTBeHHoro BocPON3BVeDEHnNcxOaHbIX N3O6paXeHn.
PiT TAKOM NoCoeHNHeHn Bam He HuxHO NoDcoEHNHT b KeJIbI (BnDeo) 7TeKepe coeHNtJeBHoro Ka6eNa aydno/BnDeo.
PiOnCoeHNHrTe 7TeKepe S BnDeo K rHe3dy S BnDeo Ha KBM. 3To coeHNHeHne o6ecneuBaet 60Jee BbICOKoe KaueCTBO n3O6paXeHn fOpMaTa MICROMV.
Using the i.LINK cable
Simply connect the i.LINK cable (optional) to the i.LINK (MICROMV Interface) of your camcorder and to the i.LINK (MICROMV Interface) of the MICROMV product. With digital-to-digital connection, video and audio signals are transmitted in digital form for high-quality editing. (You cannot connect the camcorder to a DV product.) You cannot dub the titles, displayed indicators, the contents of Micro Cassette Memory, or letters on the "Memory Stick" index screen.
(1) Insert a blank tape (or a tape you want to record over) into the VCR, and insert the recorded tape into your camcorder.
(2)Prepare the VCR for recording.
(3) Set the POWER switch to VCR.
(4) Play back the recorded tape on your camcorder.
(5)Start recording on the VCR. Refer to the operating instructions of the VCR.
Icnojb30BaHne ka6eJiaLINK
IpocTo noCoeHnHte Ka6JIb i.LINK (npno6peTaetc8 OTeNbHo) K rHe3dy i.LINK (InTEPeCy MICROMV) BaSeB BnDeOkaMepbl nK rHe3dy i.LINK (InTEPeCy MICROMV) n3dEHHaMICROMV. Ppi cHpO-cuPPOBOM coEHHEHn BnDeo- aynocnHaJIb IpeDAHTCB uHpOBOm FOpmate dJIy BbICOKOKaueCTBeHHORo MOHTaxa. (Bbl He MoXeTe NOcEOHNrTb 3Ty BnDEOkAmepy K n3dEHHDV.) Bbl He MoXeTe BbINOJHrTb nepe3aINCb TITPOB, EKpaHbIX INDnKaTOPOB, COdepXmOro Micro Cassette Memory (MnKpOKacCEtHaN pAmrTB) IJI NlTEp Ha INHeekChom 3kpahe "Memory Stick".
(1)YcTaHOBnTe He3aIncaHHyIO JeHTy (IJIINJeHTy, KOtOpyo BbI XOTNe Ipe3aIncaTb) B KBM, u YcTaHOBnTe 3aIncaHHyIO JeHTy B BaUy BuDeOkamepy.
(2)Под�товыткВМ дязпс.
(3)Установпейсякolyатуль POWER в положене KBM.
(4)HaunHe Bocpon3BeJeHne 3aNaHHoJentbHa BaSei Bndeokamepe.
(5)HaunHe 3aInc h Ka KBM. Boone noopobhIe CBeHnBb MoKeTe HaTn B INCTpyKuIN No 3KcnLyatau KBM.
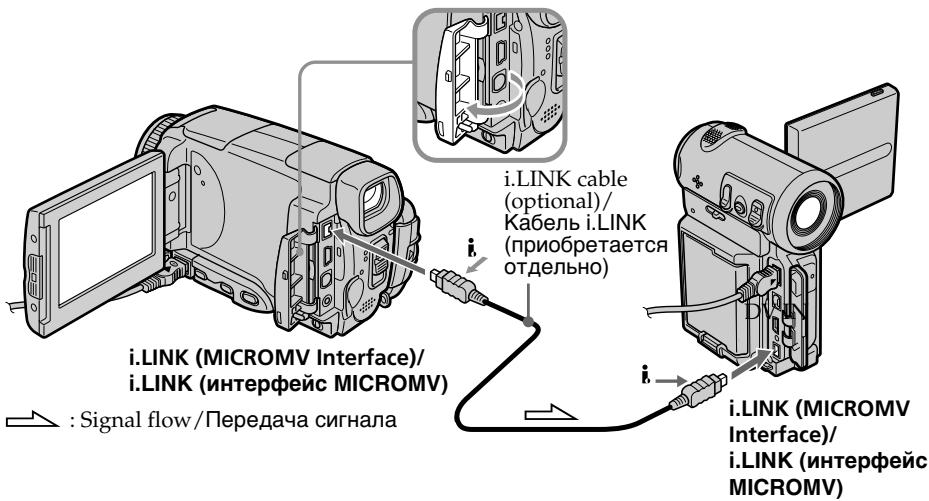
When you have finished dubbing a tape
Stop recording on the VCR, and stop playback on your camcorder.
Ecnn Bbl 3aKOHnIn npe3anncb IeHTbl
OctaHOBIne 3aIncb Ha KBM, in octaHOBIne BocpOn3BeDeHne Ha BaWei BnEoKaMepe.
You can connect one VCR only using the i.LINK cable
See page 266 for more information about i.LINK.
Pictures processed by the picture effect, the digital effect or PB ZOOM function
These pictures are not output through the i.LINK (MICROMV Interface).
The following functions do not work during digital editing:
- Picture effect
-Digital effect
-PB ZOOM
Note on playback pause pictures
When you record a playback pause picture:
- The recorded picture becomes rough when recorded through the i.LINK (MICROMV Interface).
- The picture may jitter when you play back the tape on other video equipment. And there may be a time-lag when you play back the tape on other video equipment.
BbMOxETe NOdcoEduHHTb ODNH TOJbKO KBM c NOMOsbu Ka6eI i.LINK
Recording video or TV programmes
3a\Pncb BnDeo nIITeJIeBn3nOHhbIX npOprpamM
When using the A/V connecting cable
You can record a tape from another VCR or a TV programme from a TV that has video音频 outputs. Use your camcorder as a recorder.
Switching the video input jack of the A/V connecting cable
The supplied A/V connecting cable is equipped with an S video plug and a video plug. You have to select one of the jacks in the menu settings. The default setting is VIDEO. If the setup is not necessary, go to "2 Making a recording" on page 110.
(1) Set the POWER switch to VCR.
(2) Press FN to display PAGE1.
(3) Press MENU, then select VideoINPUT in in the menu settings, then press EXEC.
(4) Select VIDEO or SVIDEO, then press EXEC.
PnncnoJIb3ObaHn coeHHTeIbHoro Ka6eJyayNo/ BnDeo
BbMoKeTe 3aNcTaB IeHTy C pyrOro KBM nI IN TeLEBn3MOHHyo IporpaMMy C TeLEBn3Opa, y KOtOpRo eTb BnDeo/ayNo BbIXoDbI. UcNoJIb3yIte BaUy BIneOekamepy KaK 3aNNCbBaIOoee yCTpoiCTBO.
1IpeekJIOueHne BXOHDoro BnDeoRHe3da COeHNHTelbHoro Ka6eJaayDNo/BnDeo
PpIlaRaembl CoeINHtBbIy Ka6eIb ayDIO/ BnDEO OcnaueH wTekePOM S BnDEO n BnDEOUITEKOpM. Bbl MoKeTe Bb6paTb ODHO I3 rHe3d b Y cTaHOBkax MeHIO. VIDEO RAJIaETcA yCTaHOBKO pNoJUaHIO.EcNlYcTAHOBKa He RBAJIaTeCra Heo6XoDmO, nepeiNITe K pa3dEny 2 Co3daHne 3aIncn" Ha cTp. 110.
(1)YcTaHOBnTe npeKJIouaTeIb POWER B noJIOKeHne VCR.
(2)HaxmTe KhONky FN, yTo6bI OTo6pa3nTb cTpaHnU y PAGE1.
(3)HaxmTe KhoNky MENU, 3aTeM BbI6epnTe onuio VIDEOINPUT B W B yTaHOBkax MeHIO, a 3aTeM HaxmTe KhoNky EXEC.
(4)Выберпе onцию VIDEO улл SVIDEO,a 3aTeM naxmITE KhoIGNky EXEC.
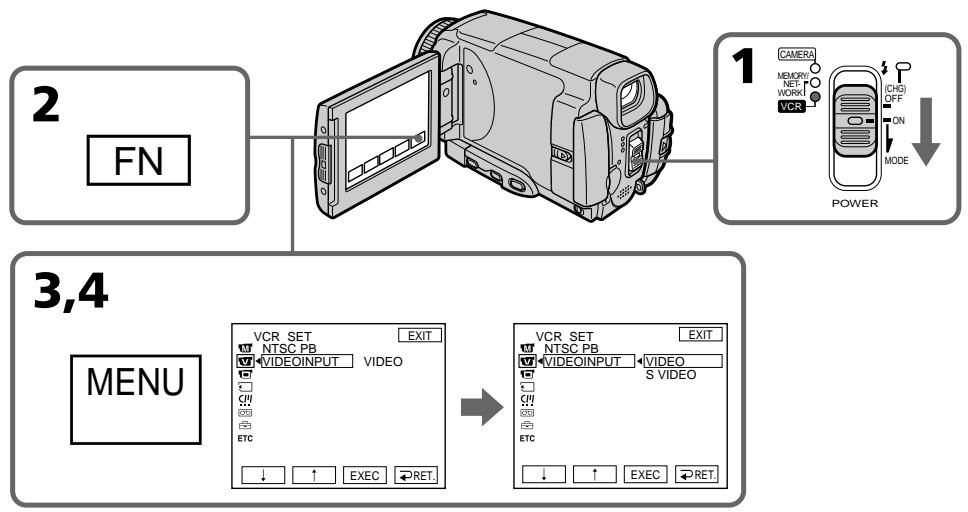
2 Making a recording
Before operation
Set DISPLAY to LCD in ETC in the menu settings.
(The default setting is LCD.)
(1) Insert a blank tape (or a tape you want to record over) into your camcorder. If you are recording a tape from the VCR, insert a recorded tape into the VCR.
(2) Set the POWER switch to VCR.
(3) Set the camcorder in the recording pause mode.
Press FN and select PAGE3, then press
REC CTRL. Next, press REC PAUSE.
(4)Start playback on VCR if you record a tape from VCR. Select a TV programme if you record from TV. The picture from VCR or TV appears on the LCD screen or through the viewfinder.
(5) Press REC START at the scene where you want to start recording from.
2 Co3dHne 3aIncn
Ipeed BbINOJIHeHEm Opeaun
YcTaHOBInTe OIuIO DISPLAY B ETC B YcTaHOBkax MeIO B IOnOKeHne LCD. (LCD ABnEeTcra YcTaHOBkoI NO yMOJuaHIO.)
(1)YcTaHOBInTe YnCTyIO JeHTy (IIN JIeHTy, KOTOpYIO BbI XOTnTE nepe3aNcapTb) B BaSy BuJeOKaMepy.EcNI BbI 3aINCbBaTeJeHTy c KBM,yCtAHOBInTe 3aINCaHHyIO JeHTy B KBM.
(2)Установпейpeклочать POWER в положене VCR.
(3)YcTaHOBnTe BnDeOKaMepy BpeXm nay3by 3aHNCi. HaxMnTe KhONky FN n BbIbePte CtpaHnCy PAGE3,a 3aTeM haxMnTe KhONky REC CTRL.DaJIee,HaxMnTe KhONky REC PAUSE.
(4)HaunHe BoCpOn3BeDeHne Ha KBM,ecn BblBbIOpHNReTe 3aNcB JENTbIC KBM. BbIeepnTe TeneBu3IOHOHyO IpORpaMMy,ecn Bbl BblOpHNReTe 3aNcB C TeJeBn3Opa. N3o6paKeHne C TeJeBn3Opa nn KBM noBtca Ha 3KpaHe KKd nll B BuONCKaTene.
(5)HaxMMTe KhoNky REC START B TOM MecTe, c KOtOpRo Bbl XOTNe HaayTb 3aNNcb.

When you have finished dubbing a tape
Press on the LCD screen or STOP on the Remote Commander to stop recording on your camcorder and stop playback on VCR or TV.
Note
Your camcorder only records pictures for viewing on a PAL system based TV and VCR. See "Using your camcorder abroad" on page 269 for the TV colour systems used in each country and area.
If your TV or VCR is a monaural type
Connect the yellow plug of the A/V connecting cable to the video output jack and the white or the red plug to the audio output jack on the VCR or the TV. When the white plug is connected, the left channel audio is output, and when the red plug is connected, the right channel audio is output.
If your TV or VCR has an S video jack
Pictures can be reproduced more faithfully by using an S video cable.
With this connection, you do not need to connect the yellow (video) plug of the A/V connecting cable.
Connect an S video cable to the S video jacks of both your camcorder and the TV or VCR. This connection produces higher quality MICROMV format pictures.
Ecnn Bbl 3aKoHnJIn nepe3anCb IeHTbl
HaKmTe KhONkHa 3KpaHe KKДи nKnONky STOP Ha nyIbTe DnCTaHnOHHoYnpaBJIeHn, YTO6bI OcTaHOBt 3aINCb HaBaWe BnDEokamepe, n OcTaHOBtEOcPOn3BeDeHne Ha KBM nN TeNeBn3ope.
PpmeuHne
Baasa Bndeokamepa 3anncbIbaeT n3o6paKeHnaToIbko dI npocmOtpa Ha TeJeBn3Opax n KBMCnCTembl PAL.Cm. pa3dEn "VcnoIb3oBAHneBaew Bndeokamepbl 3a rpaHnIe"Ha cTp.269dIyNoIyuHnCBeDeHn O CnCTeMaX UBeTHoroTeJeBnDeHn B KaKdoN CTpaHe N oBlaactn.
EcnBnBeomarHHTofohMOHOFOHNueckn
ПодсоeДиНTe JжелТьштЕр COeДиНTeьнОг КаБЕЯ ayДиNo/BuДeо K BByxOДнOMуВиDEORHe3dу,aБeBJNIM KpaCHь WtTEKeP K ByxOДнOMу AyDINOrHe3dYHa KBM nIi TseLBeN3ope.EcIIN PОдсоeДиH e6BЛB WtTEKeP TO ByxOДнBIM ayDINOCnHaNOM 6yDeT 3ByK JEBORO KaHaN, a ecIIN PОдсоeДиH eN KpaCHь WtTEKeP,TO ByxOДнBIM ayDINOCnHaNOM 6yDeT 3ByK npaBOrO KaHaN.
EcIn B BaWem TeJIeBn3ope nI KBM IMeetc rHe3do S bVdeo
N3o6paXeHnMOryT 6bItb BocPOn3BeJeHbI 60JIee BbICOKOKaYeCTBcHHO pR NcPOnb3OBAHN Ka6eJr S BnDeo.
Pn DaHHOM CoeHHeHn Bam He HxHo NOdCoeHNHTb XeNtbi WTeKepe (BnDeo) CoeHNHTelbHor KaBeJra ayDIO/BnDeo.
ПодсоeДиНTe Ka6ьb S BnIeO K rHe3dAm S BnIeO Baшe BnIeOkaMepbl n TeIeBn3opa nII KBM.
3To coeDInHeHne oBecnEynBaET 60Jee BbICOKoe KaueCTBO n3O6paKeHnФopMaTa MICROMV.
When using the i.LINK cable
Simply connect the i.LINK cable (optional) to the i.LINK (MICROMV Interface) of your camcorder and to the i.LINK (MICROMV Interface) of the MICROMV product. With digital-to-digital connection, video and audio signals are transmitted in digital form for high-quality editing. (You cannot connect the camcorder to a DV product.)
(1) Insert a blank tape (or a tape you want to record over) into your camcorder, and insert the recorded tape into VCR.
(2) Set the POWER switch to VCR.
(3)Start playback on VCR. The picture from the VCR appears on the LCD screen of your camcorder.
(4) Set the camcorder in the recording pause mode.
Press FN and select PAGE3, then press REC CTRL. Next, press REC PAUSE.
(5)Press REC START at the scene where you want to start recording.
PpnsocnoIb3OBaHmKa6eJia.LINK
ПрocTo noCoeHnHTe Ka6eJIb i.LINK (прбретаetcг OТдьно) K rHe3dу i.LINK (ИНтерфсу MICROMV) Bauei BnDEokampebl n K rHe3dny i.LINK (Интерфсу MICROMV) n3ДeЯMICROMV. Пpru ZnФpo-ZnФpoBOM coeINHEnBn VDeo-и ayDIOncHaIbI nepeDaIOrTa B zuФpOBom fopMaTe ДЯ BBICOKOKaYeCTBeHHORO MOHTaxa.(BbI He MoXKeTe noCoeHNrTb 3Ty BnDEokamepy K n3ДeJeIO DV.)
(1)YcTaHOBnTe YnCTyIO JeHTy (UINJeHTy, KOTOpIy BbXOTITe nepe3aNtCaTb) B BaUy BInDeOkamepy, U yCTaHOBnTe 3aNNcaHHIOJeHTy B KBM.
(2)Установпейрееклочатуль POWER в положене VCR.
(3)HaunTe BocnpOn3BeJeHne Ha KBM. N3o6paKeHne c KBM nOaBnTcHa 3KpaHe XKД BaSei BnDeokamepbl.
(4)YcTaHOBnTe BnDeOkAmepy BpeKm nay3bl 3aIncn. HaxMnTe KhoNky FN n BbI6epnTe CtpaHnuy PAGE3,a 3aTeM haxMnTe KhoNky REC CTRL.DaJIee,HaxMnTe KhoNky REC PAUSE.
(5)HaKMITE KHOIIky REC START B TOM MecTe, c KOtOpRo Bbl XOTNe HaayTb 3aIINCb.
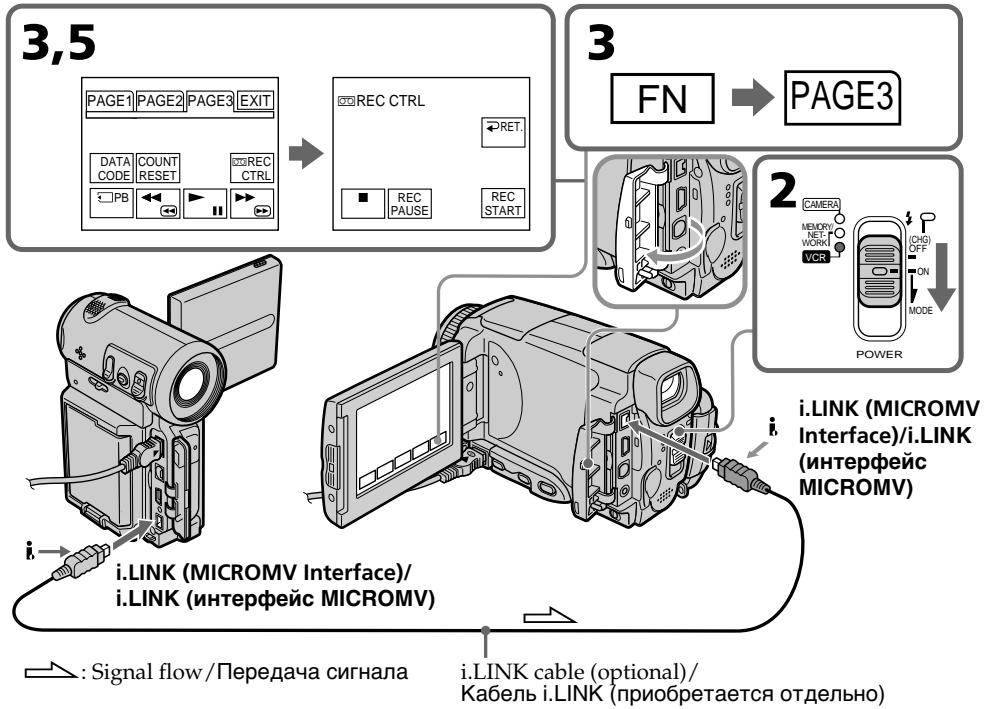
When you have finished dubbing a tape
Press on the LCD screen or STOP on the Remote Commander to stop recording on your camcorder and stop playback on VCR or TV.
Notes
- When an incompatible picture (such as one recorded with the DV format) is input, the message INPUT ERROR appears.
-
You can connect one VCR only using the i.LINK cable.
-
First, start playback or turn to the playback pause mode before the camcorder starts recording or turns to the recording pause mode. If no signal is input into the camcorder, the message NO INPUT appears and the camcorder cannot start recording.
Note on playback pause pictures
When you record a playback pause picture:
- The recorded picture becomes rough when recorded through the i.LINK (MICROMV Interface).
- The picture may jitter when you play back the tape on other video equipment. And there may be a time-lag when you play back the tape on other video equipment.
Before recording
Make sure if the MPEG IN indicator appears on the LCD screen. The MPEG IN indicator may appear on both equipment.
Ecnn Bbl 3aKoHnJIn nepe3anCb IeHTbl
HaKmnte KhONky Ha 3kpahe KKДи nKnONky STOP ha nyIbTe dinCTaHIOHOHorO ynpaBJIeHn, YTO6bI OCTaHOBT 3aINCb Ha BaWei BInDeOKaMepe, n OCTaHObIT BoCnpOn3BeDeHne Ha KBM nII TeNeBn3ope.
Примейане
- Пи ВьODE HeCOBMeCTMOrO n3o6paKeHnE (HaPIMeP, 3aIncaHoro BΦopMaTe DV) NOBNTcQo6uHHe INPUT ERROR.
BbMOKeTeNoDcoEINHTbToJIbKO OINH KBM, nCnOJb3yKa6eIb i.LINK. - NauchnTe cHaayana Bocnpoun3BeDeHne, nIn nepeKlOuHTeB pexm nay3bl BOCpoun3BeHnA, npExJe Yem BnuDeOkamepa hauHeT 3anncb nIn nepeKlOuHTcB pexm nay3bl 3annc. Ecn nCirHan Ha BnuDeOkamepy He noJaTcR, noBHTcR coo6JeHne NO INPUT, n BnuDeOkamepa He cMOxet HauTaB 3anncb.
PpmeaHne no 3o6paXeHnM BO BpeMa nay3bl BOCnpOn3BeDeHHN
EcnBbI 3aPiuTe N3o6paXeHne BO BpeMaay3bl Bocnpou3BeJeHn:
- 3aɪncaɪnHoeɪə3ɔbpaXeHne CτaHET HeUeTkɪm
πρι 3aɪnci ÜpeεrHe3dO i.LINK (ɪntεpɒeɪcMICROMV). - ɪЗобрахене может подагиВаы, ecл n Bbl 6удente BOCПОИЗБОДТь ЛЕNTу Ha ДPy罗и BИdeоапapatype. A TaKxe Bo3MOжeh npOMexkyTOK ВрemeHи пи BOCПОИЗБeDEни ЛeHTы Na дPy罗и BИdeоапapatype.
PpeB BbINOJIHeHEm 3aIncs
Y6eIntecb, YTO INHdkaTOp MPEG IN NOBnICHa 3KpaHe KKD. INHdkaTOp MPEG IN MoKeT NOBnTBcRa Ha Obox yCTpOiCTbax.
Superimposing a title
You can superimpose a title for five seconds from the recording start point. When you play back the tape, the title is displayed for about five seconds from the point where you superimposed it.
HanoxeHne TnTpa
BbMOxTe HAnOxNtB TnTp B TeYeHne PAnTn cekyH, NaunHa C Tockn Haana 3aIncn. PnBocnpOn3BeDeHm JeHTb TnTp 6yDet OTo6paKaTbcR B TeYeHne PpImepHo PAnTn cekyH, NaunHa C Tockn, B KOTopoB Bblero HAnOxNtN.

Superimposing a title on starting a recording
(1) Set the POWER switch to CAMERA.
(2) Press FN and select PAGE2.
(3) Press TITLE.
(4) Press / to select , then press EXEC. The PRESET TITLE screen appears.
(5) Press / to select a desired title, then press EXEC. The title is displayed on the LCD screen.
(6) If necessary, change the colour, size, or position by pressing COLOUR, SIZE, POS or POS .
(7) Press TITLE OK. The screen to save a title appears on the LCD screen.
(8) Press SAVE TITLE. The TITLE indicator appears. And when you press START/STOP to start recording, TITLE SAVE appears on the LCD screen for about five seconds and the title is set.
Hanoxehne TnTpa Ha HauaNo 3aInscn
(1)YctaHOBInTe IpeKJIIOuChaTeIb POWER B noJIOXeHne CAMERA.
(2)HaKmTe KhoNky FN n BbIepeNte CtpaHnCy PAGE2.
(3)HaxMMTe KhoNky TITLE.
(4)Haxmaite KhoNky dIy BbIbopa onuIa, a 3aTe Haxmite KhoNky EXEC. IoBntcraKpaH PRESET TITLE.
(5)HaximMaTe KhoNKn IaIbBbIbopa HyxHoro TnTp,a 3aTeM HaxmTe KhoNky EXEC. TnTp oTo6pa3ntcHa 3KpaHe KKJ.
(6)Прин Heo6xOДmOCtN n3MeHnTe ZbET, pa3Mep
nIN NOJoxKeHne TITpa, haxIMaK KHOPIK
COLOUR, SIZE, POS ↓ nIN POS ↑.
(7)Haxmnte KhoNky TITLE OK. Ha 3kpaHe XXKД nOraBNTcA kpaH coXpHaENH TnTpa.
(8)HaKMMTe KhoNky SAVE TITLE. IOnBntc HnDnKaTOp "TITLE".A Korda Bbl NaXMeTe KhoNky START/STOP nIra NaHauNa 3aPiNCi,Ha 3KpaHe B TeueHne npIMepHO nIa TceKHy nOaBNTc HnDnKaZuY TITLSAVE, n TnTp 6yJeT yCTaHoBJIe.
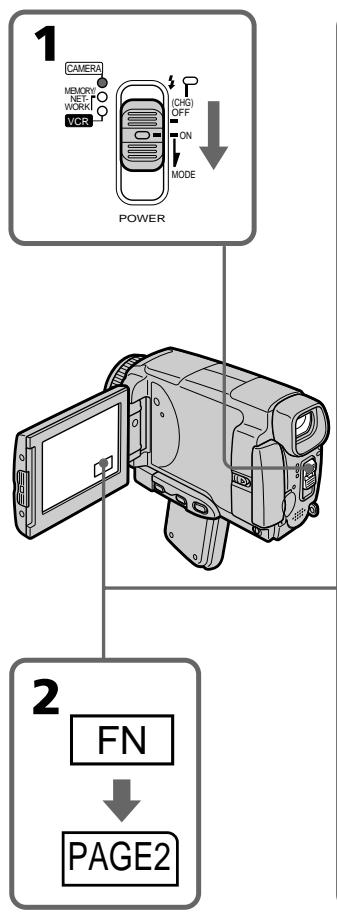
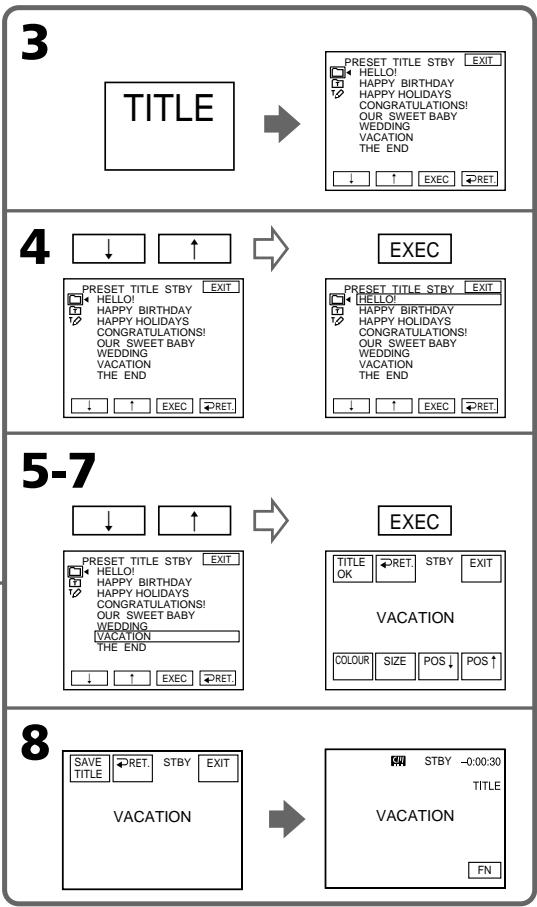
If you set the write-protect tab to lock
You cannot superimpose or erase the title. Slide the write-protect tab to release the write protection.
To use the custom title
If you want to use the custom title, select in step 4.
On a blank portion of the tape
You cannot superimpose a title on the tape.
EcIn Bbl yctaHOBnTe JeneCTOK 3aunTbI OT 3anncn B noLOXeHne 6JOKuPobKn
BbI He CMOXeTe BbIOnHnTb HaIOXeHne NJI CTnpaHne TITpa. IpeEdbnHbTe IeneCTOK 3aunTbI OT 3aNcN, YTObI CHrTb 3aunTy OT 3aNcN.
ДиИСПОЛьЗOBАнHA CO6CTBEHHorO THTpa
EcIn BbXOTTe NcNoJIb3ObaTb Co6CTBeHHbI TnTp, Bbl6epnte yCtahOBky npu BBINOJIHHeHHN DeIcTBn IyHKta 4.
O He3aHncaHHOM yuactke Ha JeHTe
BbI He cMOXeTe BbINoHHTb HAnIOXeHne TtTp a Ha 3TOT yAcTOK JENTbl.
If the tape has a blank portion in the middle of the recorded parts
The title may not be displayed correctly.
The titles superimposed with your camcorder
- They are displayed only by the MICROMV format video equipment with index titer function.
- The point you superimposed the title may be detected as an index signal when searching a recording with other video equipment.
Not to display title during playback
Set TITLE DSPL to OFF in the menu settings (p. 230).
Title setting
The title colour changes as follows:

- The title size changes as follows:
SMALL LARGE
You cannot input 13 characters or more in LARGE size. If you input more than 12 characters, the title size returns to SMALL even if you select LARGE.
- If you select the title size SMALL, you have nine choices for the title position.
If you select the title size LARGE, you have eight choices for the title position.
The number of titles recordable on one cassette
You can record up to 20 titles when each title consists of 12 characters.
When 20 titles are already superimposed
The message TITLE FULL appears. Erase unnecessary titles.
EcIn Ha IeHTe IMeETcH He3aHncaHHbI yAcTOK MExdy 3aHncaHHbIMu YacTkAmu TtTp MoKet OTo6paKaTbcN HeKOppeKTHO.
Tntpbl,HaJIOXeHHbIe c nOmoIbU BaWeBnDeOKaMepbl
- OHI OTobpaKaIoTcA ToIbko Ha BnDeoannapaType fOpMaTa MICROMV, IIOdEprKuBaIOUeI cyHKUIO INHeKCHbIX TITPOB.
-ПипonskeЗаиснHaДуroy BndeoannapaTypeTOUka,BKOTOpOBNbI HAnIOxNInTnTp,MOKeT6bITbHaNDeHaNo INHeKCHOMyCnHany.
YtO6bI He OTo6paXaTb TnTp BO BpEmr BOCPpon3BeDeHn
YcTaHOBInTe OIuHIO TITLE DSPL B yCTaHOBkax MEHIO B NpOJKeHne OFF (Ctp. 238).
HactpoKa TnTpA
LBeT TnTpA n3MeHReTcra CNeIyUOuIM 06pa3OM:

- Pa3mep TITpa n3MeHReTcra CNeIyUOuIM 6bpa30m:
SMALL (MaJIeHbKm) LARGE (6oJIbWoJ)
BbI He MoXeTe BBecTn 13 CmMBOJOB nII
60nee IJIpa pa3Mepa THTpa LARGE.EcIN Bbl
BBeJeTe 60nee, Yem 12 CmMBOJOB, pa3Mep
THTpa BepHeTcK SMALL, daXe ecIn Bbl
BbIbepTe LARGE.
- Ecni Bbl BblbepeTe pa3mep Tntpa SMALL, Bbl CMOxTe BblbpaTb OndHO n3 DeBRTn NonoKeHm TnTpA.
EcIn BbBb6epeTe pa3mep Tttpa LARGE, Bbl CMOKeTe Bb6paTb OJHO N3 BOcMbN NOJIOKeHn Tttpa.
KoJIuYeCTBO THTPOB, KOTOpbIe MOryT 6bITb 3aIIncAhbl Ha Ondy Kaccety
BbMOKeTe 3aIINCaTb Do 20 TnTpoB, nO 12 CmBOJOB B KaXdOM TnTpe.
Ecnnye3ancaHO20TntpOB
Поговпс cooшени Title FULL.Сotpinte HeHyxHbIe TITpbI.
Superimposing a title on a recorded tape
You can superimpose a title for five seconds from the recording start point.
(1) Set the POWER switch to VCR.
(2) Press FN to display PAGE1.
(3) Press TITLE. The TITLE screen appears.
(4) Press INPUT TITLE. The TITLE SET screen appears.
(5) Press / to select the direction to scan. The camcorder starts scanning in the selected direction. When you select , the thumbnails are displayed from the upper-left window, and when you select , they are displayed from the lower-right window. After the scanning is completed, the thumbnails are displayed on the index screen.
(6) Select the thumbnail on which you want to superimpose a title, then press EXEC. The title menu appears.
(7) Perform step 4 to 7 in "Superimposing a title on starting a recording" on page 114.
(8) Press SAVE TITLE. TITLE SAVE appears on the LCD screen for about five seconds and the title is set.
HanoXeHne TnTpa Ha 3anncahnyo JeHTy
BbMOxTe HAnOxNtB TnTp B TeueHne nTnCEkyH,HaunHaC ToKn HaaJa 3aIncN.
(1)YcTaHOBInTe npeKJIIOUaTeIb POWER B noJIOKeHne VCR.
(2)HaxmTe KhoNky FN dIy OTo6paXeHnCTpaHnCi PAGE1.
(3)Haxmte KhoNky TITLE. IorBntc 3kpan TITLE.
(4)Haxmnte KhoNky INPUT TITLE. NOrBntcR 3KpaH TITLE SET.
(5)HaKMMTe KHONKy →ДЯ BBi6opa
HanpaBHeHncaHnpoBaHn. BInDeOkamepa
NaHHeT cKaHnpoBaHme B BbI6paHHom
HanpaBHeHn. EcNl Bbl Bi6epeTe KHONKy
→, MnHaTOpHbIe N3O6paXeHn 6yDyT
OTo6paXaTbCn, HauHnA C JEBoro BepXHero
YrJa OKHa, a ecNl Bbl Bi6epeTe KHONKy ←,
OHN 6yDyT OTo6paXaTbCn, HauHnA C
npaBOrO HnXHero yrJa OKHa. TocNe
3aBePseHncaHnpoBaHn MInHaTIOpHbIe
N3O6paXeHn 6yDyT OTo6paXeHbI Ha
INDEKCHOM 3kPAnE.
(6)Быберпente МИннаюрhoe ИЗобрахене,Ha
КOTOPOE BBy XOTITE HANJOXNTb TnTp,a 3aTeM
HЯЖМITE KHNKky EXEC. ПОВТСЕ МEHIO
TnTpа.
(7) BbINOHNHe DeIcTBnI NyHKToB c 4 n0 7 pa3dena "HaJIOKeHne TnTp a Ha Hauano 3aIncn" Ha cTp. 114.
(8)Haxmnte KhoiKy SAVE TITLE. Ha 3kpane XKII npimepno Ha nptb cekyHn noBnTc" HnDkaunra "TITLE SAVE", n TnTp 6ydt yctaHOBneH.
To use a custom title
If you want to use a custom title, select in step 7.
Notes
- Thumbs nails may not be displayed depending on the condition of the tape. This is not a malfunction.
- Noise may appear on the thumbnails. However, this has no effect on the recorded images.
- You cannot execute TITLE SAVE until the playback picture is displayed in step 8.
Длнспьзовая сбстевно.TNTpa
EcIn Bby XOTNe IcNoIb3OBaTb CO6tBeHHbI
TNTp, Bbl6epNte YctahOBky npn
BblONHeHn DeiCTBnpyHKta 7.
PpimmeaHnA
MHNHaTHOpHbIe N3O6paXeHnMaMOrYT He OTo6paXaTbCBy B 3aBNCIMoCTn OT COCTORHnJIeHTbl.3TO He ABJREcHHeNCIPaBHOCTbIO.
- Ha MInHaTIOpHbIX N3O6paXeHnX MOrYT NOrBntbcr NOMexN. OdHaKO 3To He OKa3bIbAet BJIINHn Ha 3aIIncAHhble N3O6paXeHnI.
- Bы He CMOKTe BbIOnHInTb KOMaHny TITLE SAVE, noka B nyHKe 8 He 6yJeT OTo6paXeHo BocPpOIN3BOIDmOE N3O6paXeHne.
Erasing a title
(1) Set the POWER switch to CAMERA or VCR.
(2) Press FN to display PAGE1.
(3) Press MENU, then select TITLEERASE in in the menu setting, then press EXEC (p. 230).
(4) Press / to select the title you want to erase, then press EXEC. ERASE OK? appears.
(5) Make sure the title is the one you want to erase, then press OK.
CTupaHne TnTpa
(1)Установпейреклочатуль POWER в положене CAMERA ини VCR.
(2)HaxmTe KhONky FN dIy OTo6paXeHHaCTpaHnCi PAGE1.
(3)HaxmTe KhONky MENU, 3aTe MByIbepTe onuHIO TITLEERASE B B yCTaHOBkax MeHIO, a 3aTeM HaxmTe KhONky EXEC (ctp. 238).
(4)Haxmamte KhoNkU Inna BbIbopa TITpa, KOtOpBb Bbl XOTne CTepeTb,a 3aTeMaHXMnTE KHOINky EXEC. IoARBnTCn INDnKaun ERASE OK?.
(5)Y6eIITecb, YTO Bbl6paH IMMeHHO TOT TnTp, KOtOpbl Bbl XOTnTe cTepeTb,a 3aTEM HaxMnTe KhoNkOY OK.
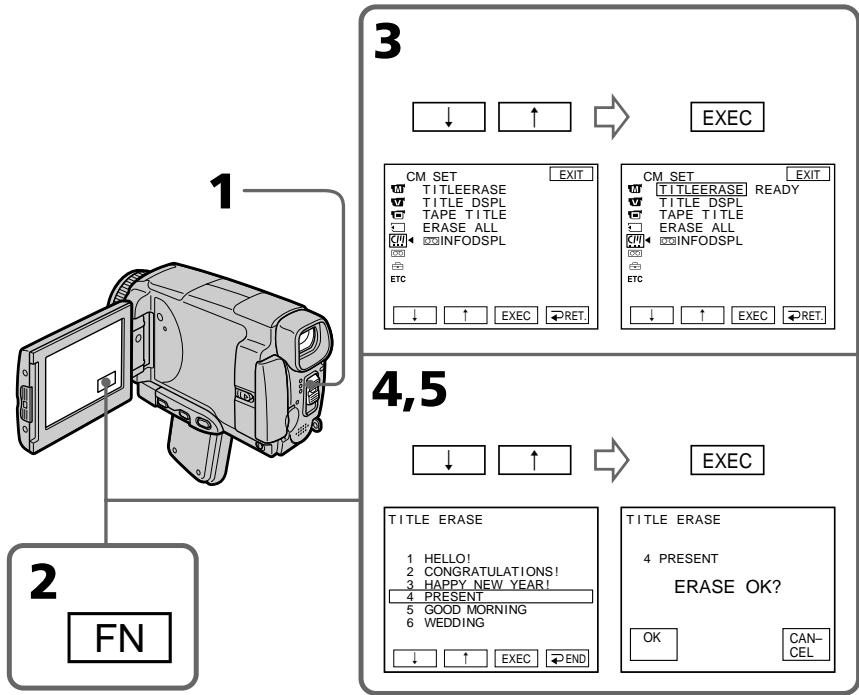
To return to FN
Press EXIT.
To cancel erasing
Press CANCEL in step 4.
Making your own titles
You can make up to two titles and store them in the memory of your camcorder. Each title can have up to 20 characters.
Making a title in CAMERA mode
(1) Set the POWER switch to CAMERA.
(2) Press FN to display PAGE2.
(3) Press TITLE.
(4) Press / to select , then press EXEC. The TITLE SET screen appears.
(5) Press / to select CUSTOM1 SET or CUSTOM2 SET, then press EXEC.
(6) Select the desired character. Repeat pressing a key to select the desired character on the key.
(7) Press to move the cursor for the next character. Repeat the same procedure as step 6 and 7 to complete your title.
(8) Press SET. The title is stored in memory.
Co3dAnHe BaushxCo6CTBehHbIX TnTPOB
BbMOxTe COCTaBHT Do DByx TnTPOB u coXpaHnTB nB namrTaBaWe BnDeokamepbl. KaKdbIe TnTp MoKET CoepKaTb Do 20 CmBOJOB.
To change a title you have stored
In step 5, select CUSTOM1 SET or CUSTOM2 SET depending on which title you want to change, then press EXEC and enter the new title as desired.
To superimpose your own title on a tape
Follow the procedure in "Superimposing a title on starting a recording" on page 114.
Длво3ВраТКИнДикалиFN
HaxmmTe KhOnKy EXIT.
ДлЯ Измени coхраен Horo Bamn Tntpa
При Вылonaнец DeиctBи nyHkTa 5 Bыберпe onци Custom1 SET nIn CUSTOM2 SET,В 3aBicnmoCTn OT TnTp, KOTopbI Bbl XOTnTe n3MeHnTb,a 3aTeM HaxmTe KhoNky EXEC n BBeДnte HOьИ TnTp NO JxelaHIO.
Дя habохен Baшero co6ctbeHHoro THTpa Ha Jenty
CneIyTe DeIcTBnM IpoueIpybI B pa3dJe "HaNoXeHHe TITpa Ha NaHauJIO 3aInci" Ha Ctp. 114.
If you take five minutes or longer to enter characters in the standby mode while a cassette is in your camcorder, the power automatically goes off.
The characters you have entered remain stored in memory. Set the POWER switch to OFF (CHG) once and then to CAMERA again, then complete your title.
We recommend setting the POWER switch to VCR (p. 123) or removing the cassette so that your camcorder does not automatically turn off while you are entering title characters.
To erase the character
Press . The last character is erased.
To enter a space
Press
To enter the character on the same button in succession
Press to move the cursor to the next position, and enter the character.
Co3dAnHe Baunx Co6CTBeHHbIX TnTPOB
EcIn Bbl 6ydeTe BBOOnTb CnMBOnbl nTb MNHy TmN 60Jee B pexime OxuaHnB TO BpeM, KOrda kacceta HaxoNTcB BaWeu BnDeokamepe, Ntahne aBtOMaTueckn BBIKIOHTcR.
Cnmbolbl, KOtOpbIe Bbl BBEni, CoxpaHATcB namTn.YctahOBInTe nepeKJIouHaTeIb POWER B noIOKeHne OFF (CHG), 3aTeM cHOba B noIOKeHne CAMERA, a 3aTeM 3aBePunTe coCTabLHeHne BaWero TnTpA.
PekomEnyetycYCTaHOBnTb nepeKIOuOaTeIb POWERB noIOxKeHne VCR (ctp.123) nIb BbHyTb KaccTeY, YTO6bI Ba7a BnDeoKaMepa aBTOMaTnueCKN He BbIKIOUaJacB BO BpEmBABOda CmMBOJOB TITpa.
ДлСТИРАПИСЧМВОЛА
HaxmTe KhoNky .PocneDnCnBOn 6ydet CTepT.
Длвьда npобета
HaxmTe KhoNkY
Making a title in VCR mode
(1) Set the POWER switch to VCR.
(2) Press FN to display PAGE1.
(3) Press TITLE. The TITLE screen appears.
(4) Press TITLE SET. The TITLE SET screen appears.
(5) Press / to select CUSTOM1 SET or CUSTOM2 SET, then press EXEC.
(6) Perform step 6 to 7 in "Making a title in CAMERA mode" on page 120.
(7) Press SET. The title is stored in memory.
Co3dAnHe TnTpBa BpeKIme VCR
(1)YcTaHOBInTe IpeKJIIOUaTeIb POWER B noJIOKeHne VCR.
(2)HaxmTe KhONky FN dIy OTo6paXeHHaCTpaHnCi PAGE1.
(3)Haxmte KhoNky TITLE. IorBntc 3kpan TITLE.
(4)HaxmTe KhONkY TITLE SET. NOrBntcA 3KpaH TITLE SET.
(5)Haxmamte KhoNKn dIy BbIbopa onnCUSTOM1 SET nJIn CUSTOM2 SET, a3aTeM haxmnte KhoNky EXEC.
(6)Былолине Демства ПУКТВС 6 по 7 paЗдени "Coэдanie ТИТра В ржиме CAMERA" на стр. 120.
(7)Haxmnte KhoNky SET. Tntp 6ydt coxpaHb B namrtn.
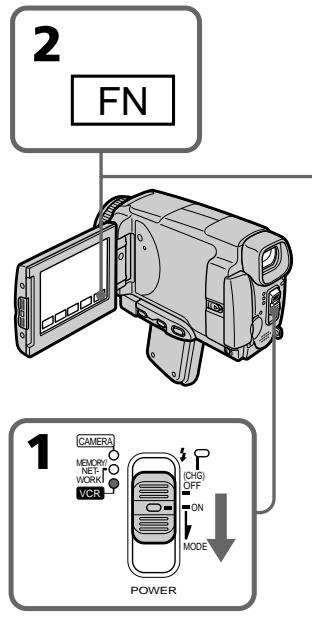
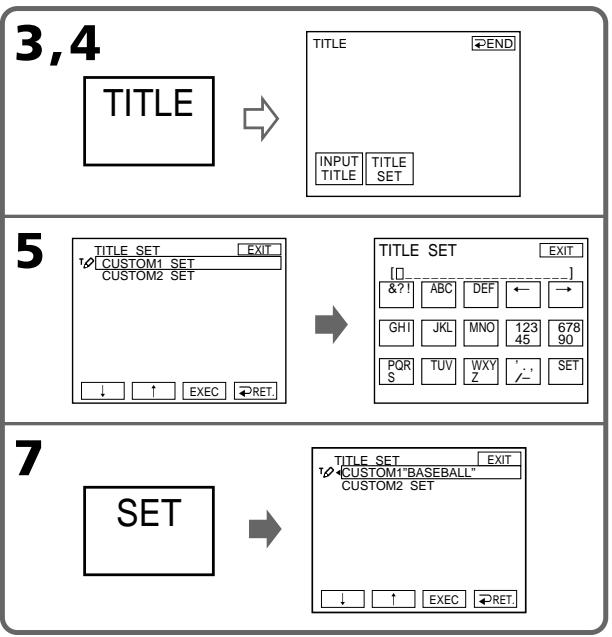
To return to FN
Press EXIT.
To superimpose your own title on a tape
Follow the procedure in "Superimposing a title on starting a recording" on page 114.
Длв BO3ВраТКИнДикauи FN
HaxmTe KhONky EXIT.
Дя habохен Baшero co6ctbeHHoro THTpa Ha Jenty
CneIyTe IeNCTBnM npOeIpybI B pa3dJe "HaNoXeHHe TITpa Ha NaUaIO 3aIncn" Ha cTp. 114.
The Micro Cassette Memory
The MICROMV cassette automatically records the recording settings and date. When you insert a cassette with the POWER switch set to CAMERA or set the POWER switch to VCR, the cassette information is automatically displayed for about five seconds.
Micro Cassette Memory (Mнкрокаснаяпамять)
Kacceta MICROMV 3aIncsbIaET yctahOBkn 3aIncn n dAty aBTOMaTHueeCKn. EcIn BbI BCTaBnTe Kaccety BTo Bpemr, KOrda nepeKIOuateJIb POWER ycTaHOBHeN B noLOXeHne CAMERA nn Korda Bbl ycTaHOBtne peKIOUoateJIb POWER B noLOXeHne VCR, INΦopMaunO kaccete 6ydet aBTOMaTHueeCKn OTObpaKaTbcHa nDCnPlee OKOIO PAn TceKyHd.
The cassette information
HΦopmaζη o kaccete
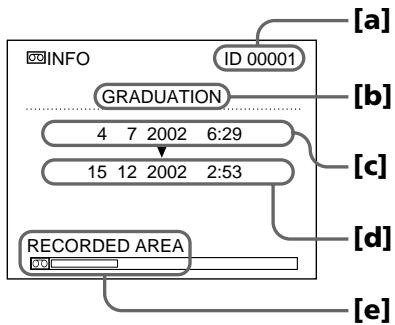
[a] The unique number of each cassette. The camcorder automatically assign this number.
[b] The cassette title set by the TAPE TITLE item in the menu settings (Cassette label).
[c] The first-recorded date in this cassette.
[d] The last-recorded date in this cassette.
[e] The recorded area is indicated by the white bar.
Recorded areas
A blank portion between recorded area is also indicated as a recorded area.
Cassette information
You can turn off the cassette information using the INFODSPL item in in the menu settings.
When " ※ " is flashing
Remove the cassette and insert it again. If the message is still displayed, the Micro Cassette Memory may be corrupted. Replace the cassette with another cassette.
[a] YHnKaJIbHbI HOMeK KaXDoI KAcCtbl. BIndeOkamepa npncBaIbaet 3TOT HOpem aBTOMATUYeCKI.
[b] Tntp KaCCeTbI, yCTaHaBnBaembI B nYHKTe TAPE TITLE B yCTaHOBkax MeHIO (MeTKa KaCCeTbI).
[c] DaTa nepBoW 3aIncn Ha 3Toi KaCCTe.
[d]Дараз nocleнглэпсн Ha 3ToKaccTe.
[e]ObnaCTb3aIncn,yka3bIbAemar6eIOnI nOcoi.
3aHncaHHbIe yHaCTKn
He3anicaHbIyUacTOK MExMy 3aNICAHHbIMu yAcTKaMn TaKxyeYKa3bIbaeTCaK 3aNICAHHbIyUacTOK.
HΦopmaun o Kaccete
BbMOKTeOTKJIIOHHTb INHOpMaUHO KacCeTe,INcNoIb3yIpyHKT INFODSPL B B yCTaHOBkAX MeHIO.
EcnMnraetHndkaqna
N3BLeKnte KaccTeY u BCTaBbTe ee ChOba. Ecnn coo6ueHne BCE eune OTO6paXaETcA, Micro Cassette Memory (MnKpOKacCEtHa nAmTb) MOKeT 6bTb NOBpeXdEHa. 3aMeHnTe KaccTe y dpyroI KaccToI.
Labelling a cassette
The label can consist of up to 16 characters and is stored in cassette memory. When you insert the labelled cassette and set the POWER switch to CAMERA or VCR, the label is displayed for about five seconds.
(1) Insert the cassette you want to label.
(2) Set the POWER switch to CAMERA or VCR.
(3) Press FN to display PAGE1.
(4) Press MENU, then select TAPE TITLE in in the menu settings, then press EXEC (p. 230). The TAPE TITLE screen appears.
(5)Select a desired character. Repeat pressing a key to select the desired character on the key.
(6) Press to move the cursor for the next character. Repeat the same procedure as step 5 and 6 to complete the label.
(7) Press SET. The label is stored in memory.
MapKupobka kaccetbl
MeKta moKet coDePkaTb 10 16 CmBBOJOB mCoXpaHrTaBcB KacCeTHoN pAmrTn. PnB BCTaBKe MapKnIOBaHHo KacCeTbI u YctaHOBKe nepeKlNoCuTeJIPOWER B nOJoxeHne CAMERA nnVCR, MeTKa 6ydt OTo6paxTaBcB TteHne npImepHo 5 cekyHd.
(1) BCTaBbTe Kaccety, Дя КOTOpОВБI XOTHTe BbINOHHTb МApKINPOBky.
(2)VctaHOBITE npeKJIOHATeNB POWER B nIOJOEHNHE CAMERA INM VCR.
(3)HaxMMTe KhoNky FNДЯ OTo6paXeHnA CTpaHnUbI PAGE1.
(4) HaxmTe KhoNkY MENU, 3aTeM Bb6epnTe onuHO TAPE TITLE B yctaHOBkAX MeHIO, a 3aTeH XaxmTe KhoNkY EXEC (ctp. 238). IorBntc3KpaH TAPE TITLE.
(5) Bb6epnTe HxhHbI CmBON. NOBTOPO HaxkMaIe COOTBeTCTByHOu KJABNuy DJIa BbOopa HxhHO CmBONA.
(6) HaxmTe KhoNky nIpeMeueHnKycpOa K cneJyOeMy CmBOny. IobTopuTe npOcepy, ONcaHHyOB nyHKtax 5 u 6, dIy3aBepWeHnCCCTabJIeHNMeTkn.
(7) Haxmnte KhoNky SET. MeTka 6yTe coXpaHeHa B nAMrTn.

To return to FN
Press EXIT.
To erase the label you have made
Select in step 4. The last character is erased.
To change the label you have made
Insert the cassette to change the label, and operate in the same way to make a new label.
ДЯ BO3BpaTа KИндакалFN
Haxmnte KhoNky EXIT.
Длг STИРанг CO3DAHHOу Bamn MetKu
Bb6epnte onuio npn BbINOHeHm DeiCTBn NyHKta
4.ПослднссIMBOJ6уDEТСTEPТ.
ДлгИЗМЕHEHЯ CO3DAHHOH Bamn MetKn
BCTabTe kaccety, y KOTOpO Bbl XOTnTE n3MeHnTb METky, IVeIeTHyTe TAKIM JxE O6pa3OM, KAK pN0 CO3dAHM HOBO METKN.
If you set the write-protect tab of the tape to lock
You cannot label the tape. Slide the write-protect tab to release the write protection.
To erase the character
Press . The last character is erased.
To enter a space
Press
To enter the character on the same button in succession
Press to move the cursor to the next position, and enter the character.
Erasing all the data in Micro Cassette Memory
You can delete all the data (cassette title, date, photo, thumbnail, and cassette information) in Micro Cassette Memory at once.
(1) Set the POWER switch to CAMERA or VCR.
(2) Press FN to display PAGE1.
(3) Press MENU, then select ERASE ALL in in the menu settings, then press EXEC (p. 230).
(4) Press / to select OK, then press EXEC.
(5) Press / to select EXECUTE, then press EXEC. ERASING flashes on the LCD screen. Once deleting is completed, COMPLETE is displayed.
To return to FN
Press EXIT.
To cancel deleting
Select RETURN in step 4, then press EXEC.
Note
Once you delete all the data in the Micro Cassette Memory, the following operations do not work:
-MULTI-PICTURE SEARCH
-TITLE SEARCH
-DATE SEARCH
Note on the ID number
This item cannot be deleted.
Micro Cassette Memory (MnKpokacceTha namrTb)
EcInn Bby yctaHOBtJe IeneCTOK 3aunTbI OT 3anncn B noLoXeHne 6loKnpOBKn JeHTbl
BbI He CMOXeTe BbINOLHnTb MapKnIpOBKy JeNTbl.
PipeDbHNbTe JIeNecToK 3aunTbO t3aNcN,
YTOb6 ChrTa 3aunTy O3aNcN.
ДЯ CTupaHnCmBOJa
HaxmTe KhoNky .IocneDnCnBOn 6yJeT cTept.
Длввoda npo6ena
HaKmTe KhoNky
— "Memory Stick" Operations — Using a "Memory Stick"- Introduction
You can record and play back still images and moving pictures on a "Memory Stick" supplied with your camcorder. You can easily play back, record or delete images. You can exchange image data with other equipment such as your computer etc., using the USB cable for the "Memory Stick" supplied with your camcorder.
File format Still image (JPEG)
Your camcorder compresses image data in JPEG format (extension.jpg).
Moving picture (MPEG)
Your camcorder compresses picture data in MPEG format (extension .mpg).
Typical image data file name Still image
100-0001: This file name appears on the LCD screen of your camcorder.
Dsc00001.jpg: This file name appears on the display of your computer.
Moving picture
MOV10001: This file name appears on the LCD screen of your camcorder.
Mov10001.mpg: This file name appears on the display of your computer.
-Операци c“Memory Stick” -Исpoлььзоване“Memory Stick”-Вveденe
BbMOxTe 3aINcBtBn BOCIpOn3BODnTb HeIODbXKhIe N3OpaXeHnHa "Memory Stick", npInarAeMoN K BaWe BnDeOkamepe. Bbl MOxTe IerKO BbINOJIHrT BocPOn3BeDeHne, 3aNNc bnn ydaJeHne N3OpaXeHn. Bbl MOxTe BbINOJIHrT b OMeH daHHbIMN N3OpaXeHn C dpyro nAnapatypo, TaKoJ, KaK BaW npcoHaIbHbN kOMnIbOTep n T.n., IcNoIb3yra Ka6eJIb USB dJa"Memory Stick", npInarAeMbn K BaWe BnDeOkamepe.
Using a "Memory Stick"
- You cannot record or erase images when the write-protect tab on the "Memory Stick" is set to LOCK.
- The position and shape of the write protect tab may be different depending on the model.
- We recommend backing up important data on the hard disk of your computer.
-
Image data may be damaged in the following cases:
-
If you remove the "Memory Stick", turn the power off or detach the battery for replacement when the access lamp is flashing
-
If you use the "Memory Stick" near magnets or magnetic fields such as those of speakers and televisions
-
Prevent metallic objects or your finger from coming into contact with the metal parts of the connecting section.
- Stick its label on the labelling position.
- Do not bend, drop or apply strong shock to the "Memory Stick".
- Do not disassemble or modify the "Memory Stick".
- Do not let the "Memory Stick" get wet.
-
Do not use or keep the "Memory Stick" in locations that are:
-
Extremely hot such as in a car parked in the sun or under the scorching sun
-Under direct sunlight - Very humid or subject to corrosive gases
- When you carry or store a "Memory Stick", put it in its case.
BbI He MoXeTe 3aIncbIbA Tb NIN CTnpaTb n3o6paXeHn,ecnJIeNEcTOK 3aunTbI OT 3aIscn Ha "Memory Stick" yCTaHOBneB bnoLoXeHne LOCK.
-Положени и сорма пелеска 3ашитbi OT 3a\PuС MOrTy pa3ЛИЧаТьСВ 3abUcIMOCTN OT MOdJI.N.
- PeKoMeHdyeTcBbIOnJIHrTppe3epBHOe KOIIPOBaHHe BaJXhIx daHHbIX Ha JeecTkI dNcK BaUero nepcoHaJIbHoro KOMNbIOTepa.
-Данныеизобрахеня могутбыт nobрждныВследюши сCityaX:
-Ecnn Bbl BbHeTe "Memory Stick", BbIKIOHHTe PINTaHne NINOTCOEINHITe 6batapeo dna3aMeHbI, noka Mmraet lamnOuKa doCTyNa
- Ecni Bbl 6byTe nCnoIb3ObaTb "Memory Stick" B6IIN3n MaHHTOB INI MaHHTbIX IOne, TaKnx, KAc y DInHaMnKOB IN TeJIeBn3OpOB
He donyckaIte npNKoCHOBENH MeTALNueCKMn PpeDMeTAMn IIN BaUMn paJIbCaMn KMeTALNueCKM uactrM COeDHHTeJbHOrO KOHTaKTa.
-
Hakne Te 3TuKeTky B No3uMn MapKnpOBKn.
-
He cngbaTe, He poHnTe n He noDbepraTe cnIbHbIM ydpam "Memory Stick".
-
He pa3bnpaIte n He moIqnIupyIte "Memory Stick".
-
He donyckaite nona da Hn Bna n Ha "Memory Stick".
-
He nCnoJIb3yIe n He xpaHnTe "Memory Stick": -B Upe3MepHO JxapKnx MecTx, HapPIMep, B npINapKOBaHHOM IOD COIHcEM aBTOMo6Jle IJIN IOD NaJIaIIM COIHcEM
-ПОДпразьIMCOЛнЕЧныIMCBETOM
-B ouheb BnaXhBix nIIN coepXaunx BblBaioune Koppo3IO ra3bi Mectax
-Припапернохе Иихранени поесгпe "Memory Stick"ВeeФутлар.
"Memory Stick" formatted by a computer
"Memory Stick" formatted by Windows OS or Macintosh computers do not have a guaranteed compatibility with this camcorder.
Notes on image data compatibility
- Image data files recorded on the "Memory Stick" by your camcorder conform with the Design Rules for Camera File Systems universal standard established by the JEITA (Japan Electronics and Information Technology Industries Association). On your camcorder, you cannot play back still images recorded on other equipment (DCR-TRV890E/TRV900/TRV900E or DSC-D700/D770) that does not conform to this universal standard. (These models are not sold in some areas.)
-
If you cannot use the "Memory Stick" that is used with other equipment, format it with this camcorder (p. 229). Note that formatting erases all information on the "Memory Stick."
-
"Memory Stick" and STCK are trademarks of Sony Corporation.
- All other product names mentioned herein may be the trademarks or registered trademarks of their respective companies. Furthermore, "TM" and "®" are not mentioned in each case in this manual.
"Memory Stick", otФopMaTnpoBaHnaHa nepcoHaJIbHOM KOMNbIOTepe
CoBmecTnMoocb BaWei BnDeokamepoR "Memory Stick", otFopMaTnpOBaHHoH Na KOMNbHOtepax COnepaUNOHHO CnCTeMoH Windows nnn Macintosh, He rapaTnpyETcH.
Примочаю NO COBmecTUMOCTN daHHbIX n3o6paXeHn
-Фаилдданнбхи306ржeh,在aпсанье Ha "Memory Stick"c nomоьв Baшeи Bndeokampebl,OTBeuaiOT npoeKTHbIM Tpe6obAHmДЯуHnBepcaIbHoroCTaHdapTa faHOBxICCTEM BnDEokampebl, pa3pa6oTahHoro JEITA (aNoHcKoI accouauee 3JNeKTPoHHO npOMbIJIeHHOCTn INHΦopMaioHbIXTexHOnOri). BbI He moKeTe BOCppon3BodntbHa BaшeIN BnDEokampe HeNoDvXHbIe N306paXeHnA 3aHncAHbIe Na pyroI annapaType(DCRTRV890E/TRV900/TRV900E nIn DSC-D700/ D770),KOTpbIe HcCOOTBeTCTBYIOIT 3ToMy yHnBepcaIbHOMy CTaHdApTy.(3Tn MoDeIe Ne npOdaHTCBAHEKOToPbIXperNoHax).
- Ecni BbI He MoXeTe IcNoJIb3ObaTb "Memory Stick", KOTOPaI NcNoJIb3OBAJacb Ha IpyroI annapatype, OToΦopMaTIpyuTe "Memory Stick" Ha BaIe BnIeOkampe (CTp. 237). IMeIte B BnIy, UTO npI ΦOpMaTInpOBaHmN BCn HΦopMaIaHa "Memory Stick" CTnpaETca.
"Memory Stick" MAnMnRy51Kk, ABNHOITcA npMpHeHbIMn 3HaKaAMn Sony Corporation.
Bce npytne Ha3BaHnHa3deJInyNOMHyTbIe BdaHHOM pyKOBoDCTBe,MOYr 6blb fnpMeHHbIMN 3HaKaMn INI 3apeINCTpnpOBAHHbIMN TOPROBbIMN MapKaMn COOTBEcTCTBVIOUxKOMNaHn.
B dαJIbHeIWeM, 3HaKn T M I R He 6yUdY yKa3bIbAITcK KaXdbI pa3 B DaHHOM pyKOBoDCTBe.
Inserting a "Memory Stick"
Position the mark on the "Memory Stick" as illustrated, and insert a "Memory Stick" in the "Memory Stick" slot as far as it can go.
YctaHOBka "Memory Stick"
Bo3bMnte "Memory Stick" TaK, YTO6bI 3nak 6bIJ o6paueH, KaK noka3aHo Ha pncyHKe, IN BCTABbTe "Memory Stick" B cNoT "Memory Stick" Do ynpa.
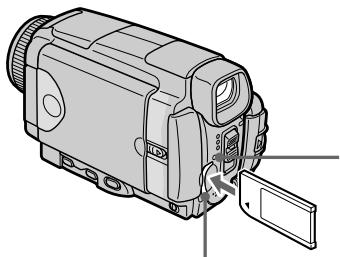
"Memory Stick" access lamp/
Лампочka дocтуна "Memory Stick"
"Memory Stick" slot/ Cnot "Memory Stick"
Ejecting a "Memory Stick"
Confirm that the "Memory Stick" access lamp is not lit, then press the "Memory Stick" once lightly.
Извileченье "Memory Stick"
Y6eIntecb, YTO lamnoUka DocTyna "Memory Stick" He ropt, a 3aTeM cIerKa haxmnte "Memory Stick" oJINH pa3.
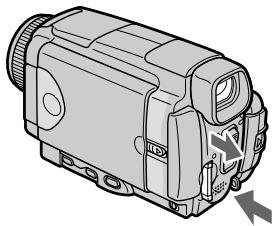
While the "Memory Stick" access lamp is lit or flashing
Do not shake or strike your camcorder because your camcorder is reading the data from the "Memory Stick" or recording the data on the "Memory Stick". Do not turn the power off, eject a "Memory Stick" or remove the battery pack. Otherwise, image data breakdown may occur.
If MEMORystICK ERROR is displayed
Reinsert a "Memory Stick" a few times. The "Memory Stick" may be damaged if the indicator is still displayed. If this occurs, use another "Memory Stick."
EcInI lamnoka DocTyna "Memory Stick" ropt nJn Muraet
He trpncite n He cTuHne no Bauei BnDeokampe,notomyuTo BnDeokamepa CunTBiBaet daHbIe c"Memory Stick"nn 3anncbIbaert daHbIe Ha"Memory Stick".He BbIKJIOuaTe nTahHe,He n3BNekaTe "Memory Stick" n He chImaTe 6aTaPeHbI bloK.B npOTNBOMcUyae daHbIe n3OpbaxKeHnMory T 6bITb NOBpeXdeHbl.
Ecnn oTo6paKaetcHnDnKaTOp
MEMORYSTICK ERROR
IpeyeCTaHOBInTe "Memory Stick" HeckOJIbKO pa3. EcIn INdNkaTOp Bce eue OTo6paXaETcA, BO3MoXHo, "Memory Stick" nobpeXKeHa. EcIn 3TO npOn3oUNo, nCnoNb3yInTe DpyrHyo "Memory Stick".
Using a touch panel
Operation buttons for most functions using a "Memory Stick" are displayed on the LCD screen. Press the LCD panel directly with your finger or the supplied stylus (DCR-IP55E only) to operate each function.
(1)Set the POWER switch to MEMORY/ NETWORK (DCR-IP55E only).
(2) Slide OPEN in the direction of the mark indicated on the camcorder to open the LCD panel. The operation buttons appear on the LCD screen. You can switch the memory playback/memory camera mode by pressing PLAY/CAM.
(3) Press FN. The operation buttons of PAGE1 appear on the LCD screen.
(4) Press PAGE2 to go to PAGE2. The operation buttons of PAGE2 appear on the LCD screen.
(5) Press PAGE3 to go to PAGE3. The operation buttons of PAGE3 appear on the LCD screen.
(6) Press a desired operation item. See relevant pages for each function.
IcnoJb3ObaHne ceHCOPHOI naHeJI
Длбьшнства Функши,ОТнocихсгК "Memory Stick", на заране XXKД OTo6ржаOTСЯФункшоньпькн. Haximмaite naHь XKKД HeNoceDCTBeHNO Baamn NaIbceM nI npinraeMbIM nepom (Tolbko moJeB DCR-IP55E) Для управлия кадд Функши.
(1)Установские полесене MEMORY/NETWORK (Толбковая мостеговский DCR-IP55E).
(2)ПередвиьтpeпеклioчateJB OPEN B Haprableni 3HaKa ,yka3aHnroHa BvIeokampe,чTO6bI OTKpbITb NaHeJI bKKJ. Ha 3KpaHe XXKD nO8BraTcФуHKUHOHaJIbHbIe KhoNKn. Bbl MoKeTe pepeKlIOuTaBCr MeKdY pexIMAMN BOCPON3BeDEHnI N3 nAmrTn/ 3aIncn B nAmrTb, haxmair KhoNkn PLAY/ CAM.
(3)HaxmTe KhoNky FN. Ha 3KpaHe KKIOIPOBRTcFyHKUHOHaJIbHbE KhoNkPAGE1.
(4)Haxmnte 3aRoiOBOK PAGE2, yTo6bl nepeiTu Ha cTpaHnUy PAGE2. Ha ekpaHe XKД nOraBtcaФункцioHaJIbHbIe KhoIKN PAGE2.
(5)HaXMMTe 3aRoiOBOK PAGE3, YTO6bl nepeiTu Ha cTpaHnUy PAGE3. Ha 3KpaHe KKД nO8BtcrФyHKcIOHaJIbHbIe KHOPIK PAGE3.
(6)HaXMMTe HUxHbI ΦyHKuHOHaJIbHbI NyHKT. OINcAHne KaKDof yHKuIN npIBeDEHO Ha COOTBETCTBYIOUX CTpaHnIax.
3-6
FN
In the memory camera mode/
BpeKIme 3aIncn B namrTb


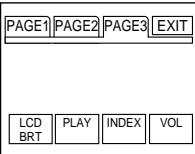
1
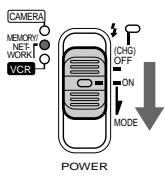
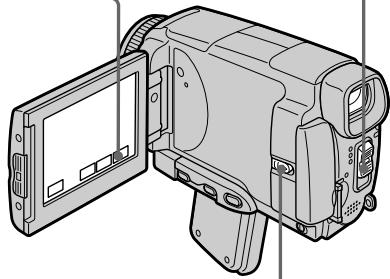
2
In the memory camera mode/ B pexmme 3aPiNCn B namrTb
In the memory playback mode (still image)/B pexnme Bocnpo3BeDeHnIu n3 namrTn (HeIODbXhOro n3o6paKeHnI)

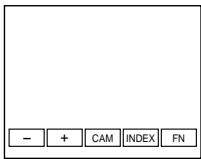
To return to FN
Press EXIT.
To execute settings
Press EXEC or OK.
To cancel settings
Press OFF or AUTO. The display returns to PAGE1, 2 or 3.
Дя BO3BpaTа KИндакциFN
HaxMMTe KhONKy EXIT.
ДЯ BBINOJIHHeN yCTaHOBOK
HaxmTe KhoNky EXEC nIN OK.
ДЯ OTMeHbI yCTaHOBOK
HaxmTe KhoNky OFFn AUTO. INdkaunBepHeTcK cTpaHnam PAGE1,2 nJ3.
Notes
- When using the touch panel, press the LCD screen lightly with your thumb, the supplied stylus (DCR-IP55E only) or index finger supporting the LCD screen from the back side of it.
- Do not press the LCD screen with sharp objects other than the stylus supplied (DCR-IP55E only).
- Do not press the LCD screen too hard.
- Do not touch the LCD screen with wet hands.
- If FN is not on the LCD screen, touch the LCD screen lightly to make it appear. You can control the display with DSPL/TOUCH PANEL on your camcorder.
- When operation buttons do not work even if you press them, an adjustment is required (CALIBRATION) (p. 274).
- When the LCD screen gets dirty, use the supplied cleaning cloth.
When executing each item
The green bar appears above the item.
If the items are not available
The colour of the items changes to grey.
Touch panel
You can operate with the touch panel through the viewfinder (p. 90).
Press FN to display the following buttons:
In the memory camera mode
| PAGE1 | SPOT FOCUS, MENU, PLAY, INDEX, SPOT METER, EXPOSURE |
| PAGE2 | SELFTIMER, PLAY, INDEX, MEM MIX |
| PAGE3 | LCD BRT, PLAY, INDEX, VOL |
In the memory playback mode
| PAGE1 | MENU, CAM, INDEX, DELETE, +, - |
| PAGE2 | PB ZOOM, CAM, INDEX, DATA CODE, +, - |
| PAGE3 | LCD BRT, CAM, INDEX, VOL, +, - |
Приимейчения
-ПиИСПОЛБ3OBAHIN cEHcOPHoi nAHeNn, nAkhIMaTe cIeRka 3KpaH XXKD c nOmoBIO Bawero 6oIbWOrO nAlbUca, npInaraemoro nepa (ToJIbKO moJeB DCR-IP55E) nIyuka3aTeJbHO r aIbUca, noIdepKuBaI 3KpaH XXKD c erO 3aJHeI CTOpOHbl, nIi cIeRka nAkhIMaTe 3Tn KhoNkC n OMOsbIO Bawero yKa3aTeJbHOrO nAlbUca.
- He HaxkImaTe 3KpaH KKД OcTpoKoHeuHbIMn npeDMeTaMn, OTJIuHbIMn OT npuNarAeMOro nepa (ToJbKO MoJeB DCR-IP55E).
- He hαkmaɪte əkpaɪn JʌKKД сɪnɪsKOM cɪnlbHo.
- He kacaɪtec b əkpaHa JKKД mokpbɪm pykʌm.
- EcInnHnDnKaunFN OTCyTCTByeT Ha 3KpaHe KKJ, CnErka KOnCHTeCb 3KpHaN XKKJ, YTo6bl OHa NoBnAcB. Bbl MoKeTe ynpaBnTb DnCnPneem c NmOuSbIbpepeKnUoatejTSDSPL/ TOUCH PANEL Ha BaSei BnDeokamepe.
- EcnnФункционаьнье Kногн He pa6oTaIOr, Дадж Когда Bыnx haxnmaeTe, Tpe6yeTcR perynipobka (CALIBRATION) (ctp. 274).
EcnI 3KpaH XKd 3aRpa3Hnncra, BocNoJIb3yIteCb npINaRaEm IockyTOM YIcTAAIe TKAHN.
Pn BbINOHeHH KKaDOro nyHKta
HaŋnyHKToM NOABBLaETc3eJIeHaŋ noIoca.
Ecnn nyHKtbI He doctynHbI
Lbeta INHINKAaN pyHKTOB cTaHOBTcA cepbIM.
Cehcopna naneIb
Bb moKTe pa60TaTb C cHcOpHoi nHaenIbIO c nOMOuBIO BnDOnCKaTeJIa (Ctp. 90).
Haxmte KhONky FN nIa oTo6paXeHH cJeDuOxN KHONoK:
BpeKIme 3aIncn B nAmrTb
| PAGE1 | SPOT FOCUS, MENU, PLAY, INDEX, SPOT METER, EXPOSURE |
| PAGE2 | SELFTIMER, PLAY, INDEX, MEM MIX |
| PAGE3 | LCD BRT, PLAY, INDEX, VOL |
Bpekme Bocpn0n3BeDeHnI n3 naMaTIn
| PAGE1 | MENU, CAM, INDEX, DELETE, +, - |
| PAGE2 | PB ZOOM, CAM, INDEX, DATA CODE, +, - |
| PAGE3 | LCD BRT, CAM, INDEX, VOL, +, - |
Selecting still image quality mode
You can select the image quality mode in still image recording and store the setting in memory. The default setting is SUPER FINE.
(1)Set the POWER switch to MEMORY/ NETWORK (DCR-IP55E only) or VCR.
(2) Press FN to display PAGE1.
(3) Press MENU, then select STILL SET in in the menu settings, then press EXEC (p. 228).
(4) Press / to select QUALITY, then press EXEC.
(5) Press / to select the desired image quality, then press EXEC.
Bb6oppekimaKauecTba HeNoDnXHOro n3O6paKeHn
BbMOxTe Bb6paTb peKIM KauEcTba
n3o6paXeHnI npI 3aIncn HenoDbXHOrO
n3o6paXeHnI COxpaHeHn yCTaHOBKn B
namrIn. IyoymUHaHIO yCTaHOBLeH peKIM
SUPER FINE.
(1)Установпейсяклочатуль POWER в поожене MEMORY/NETWORK (Толъков мodyдь DCR-IP55E) ини VCR.
(2)Haxmnte KhoNky FN dIy OTo6paXeHnCTpaHnCblPAGE1.
(3)HaxmTe KhoNky MENU, 3aTeM BbI6epnTe onuHO STILL SET B B yctaHOBkax MeHIO. a 3aTeM HaxmTe KhoNky EXEC (cTp. 236).
(4)HaKIMaTe KHOKNI IaI BbIbOpa OIuINI QUALITY, a 3aTeM HaKMITE KHOKNY EXEC.
(5)HaximMaTe KhoNkI IДЯ BbIbOpa HxKHO KaueCTBa N3O6paXeHnA, a 3aTEM HaxMnte KhoNky EXEC.
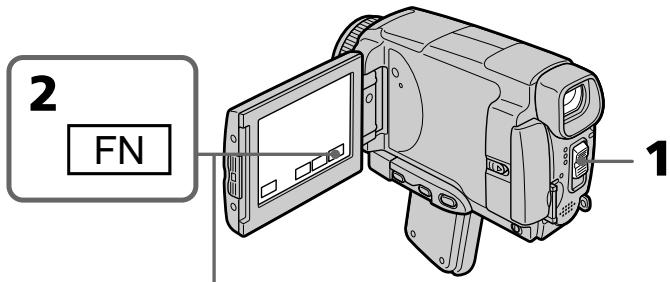

3-5


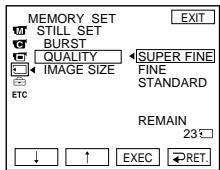
To return to FN
Press EXIT.
Длво3ВраТКИнДикалTN FN
HaxMMTe KhoNkY EXIT.
Image quality settings
| Setting | Meaning |
| SUPER FINE (SFN) | This is the highest image quality in your camcorder. The number of still images you can record is less than in FINE mode. Super fine images are compressed to about 1/3. |
| FINE (FINE) | Use this mode when you want to record high quality images. Fine images are compressed to about 1/6. |
| STANDARD (STD) | This is the standard image quality. Standard images compressed to about 1/10. |
Note
In some cases, changing the image quality mode may not affect the image quality, depending on the type of images you are shooting.
Differences in image quality mode
Recorded images are compressed in JPEG format before being stored in memory. The memory capacity allocated to each image varies depending on the selected image quality mode and image size. Details are shown in the table below. (You can select 1152 × 864 or 640 × 480 image size in the menu settings.)
YcTaHOBKn KaueCTBa n3o6paXeHnA
Image quality mode indicator
The image quality mode indicator is not displayed during playback.
When you select image quality
The number of images you can shoot in the currently selected image quality appears on the LCD screen.
Испобьзовке "Memory Stick" - Вedlyнe
Pa3mepn3o6paKeHn1152×864
Selecting moving picture quality mode
There are SUPER FINE, FINE, STANDARD and LIGHTMODE in the moving picture quality mode. The default setting is SUPER FINE.
(1)Set the POWER switch to MEMORY/ NETWORK (DCR-IP55E only) or VCR.
(2) Press FN to display PAGE1.
(3) Press MENU, then select MOVIE SET in in the menu settings, then press EXEC (p. 228).
(4) Press / to select MOVEMENT, then press EXEC.
(5) Press / to select the desired quality mode, then press EXEC.
Bb6op pexkma kaectBaDbNkUyIeOcN 306paXeHnA
Bpejime KaueCTBa DnKUeeroCn3o6paKeHnI MeIoTcOnuM SUPER FINE,FINE,STANDARD n LIGHTMODE.SUPERFINE ABJIaETcA yTaHOBKOIOyMOJHaHIO.
(1)Установские полескolyчateь POWER в положене MEMORY/NETWORK (толъковая DCR-IP55E) уи VCR.
(2)Выберпту коньу FN дя отоображени CTpaHIczbl PAGE1.
(3)HaxmTe KhoNky MENU, 3aTeM BbIbepnTe onuio MOVIE SET B B yctaHOBkax MeHIO,a 3aTeM haxmTe KhoNky EXEC (cTp. 236).
(4)HaximMaTe KhoIKN Iy BbIbOpa OIcIM MOVIEMODE, a 3aTeM HaxmTe KhoIky EXEC.
(5)HaxmMaTe KHOJKN ДЯ BbIbOpa HxKHOpeXIMa KaYeCTBa, a 3aTEM HaxMITE KHOJKNy EXEC.
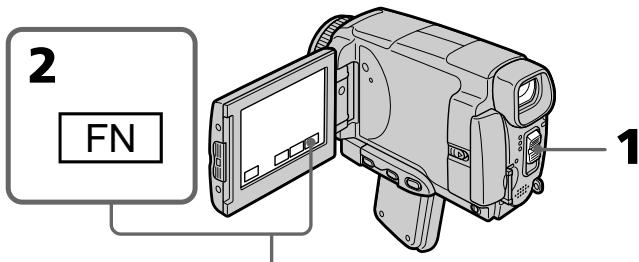
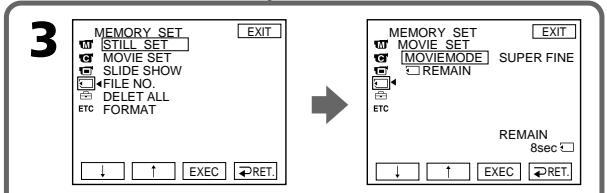
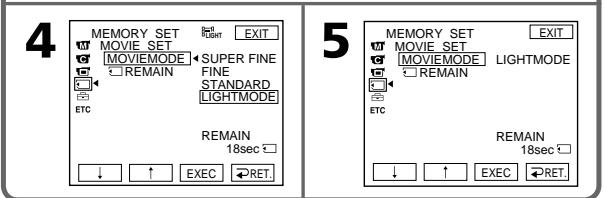
Image quality settings/YctaHOBKn KaueCTBa n3o6paKeHnA
| Setting/Yctanobka | Image size/ Размер n3обрахени | Frame rate/ Частota кадров | Bit rate (image and audio)/ Битовая частota (n3обрахении звук) | Indicator (during recording)/ Индikатор (Во Верma записи) |
| SUPER FINE (SFN) | 352×288 | 25 fps/ 25 kадрав секунду | 1200 Kbps/ 1200 келовпВ секунду | SFN |
| FINE (FINE) | 352×288 | 25 fps/ 25 kадрав секунду | 750 Kbps/ 750 келовпВ секунду | FINE |
| STANDARD (STD) | 160×128 | 10 fps/ 10 kадрав секунду | 400 Kbps/ 400 келовпВ секунду | STD |
| LIGHTMODE (LIGHT) | 160×128 | 10 fps/ 10 kадрав секунду | 200 Kbps/ 200 келовпВ секунду | LIGHT |
SUPER FINE: You can record moving pictures at the highest quality. This mode is suitable when you intend to modify the pictures using your computer. SUPER FINE is the default setting of the camcorder.
FINE: You can record moving pictures for a longer time than with the SUPER FINE mode, the quality, however, declines slightly.
STANDARD: You can record moving pictures for a longer time than with the FINE mode, the image size, however, is smaller.
LIGHTMODE: Since the file size is small, this mode is suitable for e-mail transmission. The image quality, however, declines.
SUPER FINE: Bbl MoXeTe 3aHNCbIBaTb ДВИЖУПЕСЕ N3OBPaxeHIN C HANBcIIM kaYeCTBOM. 3ToT peXIM yIob6eH, ecIn Bbl coBnpaTeCtB bIOn3MeHrTb N3OBpaxeHIN C nOMOJIbBaWero nepCOHaJIbHoro KOMNbIOTepa. SUPER FINE AByIaETcYcTaHOBKoi BnDEOkamepbl no yMOJIuHaHIIO.
FINE: Bbl MoKeTe 3aIncbIbAte DnBxUneCe n3o6paXeHnB TeeyHe 60Je e IInTeIbHoR OBeMeHn, Yem npu NcNoIb3OBaHn pexMa SUPER FINE, npu 3TOM KaueCTBO, OHaKo, HeCKoJIbKO yxDUnTCr.
STANDARD: Bby MoKeTe 3aIINcBbAtb ДВИЖУПЕСЕг ИЗБРAXКЕнЯВ TeЧЕпe 6ОЛe ДЛNTeЛьHOrO ВрЕмEH, YeM Пи ИСПОЛьЗОВAHи рекima FINE, пп зTom pa3Мер ИЗБРAXКЕня, ODHaKO, bYdET MeHbWe.
A moving picture consists of continuous still images. Frame rate indicates the number of images played back in one second. The more the number increases, the more natural the moving picture becomes. You can play back a maximum of 30 still images per second with your camcorder (30 fps/frame per second).
Bit rate
The higher the transmission rate, the more natural the moving picture becomes.
Maximum recording time for moving pictures
| Image quality mode | Maximum recording time |
| SUPER FINE | 45 s |
| FINE | 1 min 10 s |
| STANDARD | 2 min 20 s |
| LIGHTMODE | 4 min 40 s |
Selecting the size of still image
You can select either of two image sizes.
Still images: 1152 × 864 or 640 × 480 . (When the POWER switch is set to CAMERA or VCR, the image size is automatically set to 640 × 480 .) The default setting is 1152 × 864 .
(1)Set the POWER switch to MEMORY/ NETWORK (DCR-IP55E only).
(2) Press FN to display PAGE1.
(3) Press MENU, then select STILL SET (still image) in in the menu setting, then press EXEC (p. 228).
(4) Press / to select IMAGESIZE, then press EXEC.
(5) Press / to select the desired quality mode, then press EXEC.
The indicator changes as follows:


Bb6op pa3mepa HeNoDbNxHoro n3o6paXeHn
BbMOKET Bb6paTb JIO60n 13 DByx pa3MepOB n3OpaXeHn.
HenoDbnKhBie n3o6paXeHn:
1152× 864 nnn 640× 480 (KoIa
nepeklnoateNB POWER yctanobnB npoIooJeHcME CAMERA IIN VCR,pa3mepu3o6paxeHnABTomatueckynycTahabInBaetCn B 640×80.)
IyoMOnuHaHIO BbIbIpaeTcpa3MeP 1152×864.
(1) UctaHOBITe nepeKIOUaTeIb POWER B noIOXeHHe MEMORY/NETWORK (ToIbko moJoEh DCR-IP55E).
(2)HaxMMTe KhoNkF NДЯ OTo6paXeHnA CTpaHnUbI PAGE1.
(3) Haxmnte KhoNky MENU, 3aTem Bb6epnTe oniHIO STILL SET (HenoBnKHoe n3o6paXeHne) B vCTaHOBkax MeHIO, a 3aTem Haxmnte KhoNky EXEC (cTp.236).
(4)HaxmMaTe KhoNkU↑ДЯ BbI6pa OпиIMAGESIZE,a 3aTeM HaxmTe KhoNky EXEC.
(5) HaxmaiTe KhoNkI TnBbOpa HyxHoro pa3Mepa n3o6paxeHHa 3aTe m HaxMnte KhoNky EXEC. HndkaTOp bdyet n3MeHrTBcra CneDyUoHm 06pa3aOM:


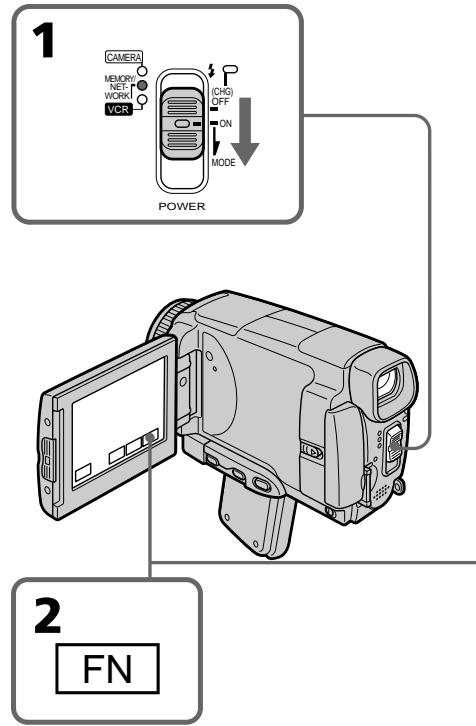

3
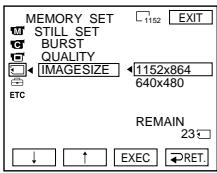
4
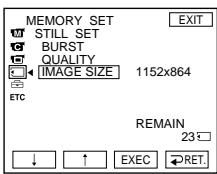
5
Using a "Memory Stick" - Introduction
Испобьзовке "Memory Stick" - Вedlyене
Note
When still images recorded on your camcorder in 1152 × 864 size are played back on other equipment that does not support 1152 × 864 size, the full image may not appear.
PpmeaHne
Bcnyae Bocnpon3BeDeHnna 3aNaCnHbIX Ha Bauei BIndeokamepe HnOdBnKhbIX n3o6paXeHn C pa3mepom 1152 × 864 Ha dpyro annapatype, KOTopar He noDepxNbaET pa3mep 1152 × 864, n3o6paXeHne MoXeT 6bITb HnOINbIM.
Image size settings
YcTaHOBKn pa3Mepa n3o6paKeHnA
Approximate number of still images you can record on a "Memory Stick"
The number of images you can record varies depending on which image quality mode you select and the complexity of the subject.
Pn6I3ntbHoe KOJIueCTBO HeoBxHbIX N3OpaXeHn, KOTOpbie Bbl MoXeTe 3aIncatb Ha "Memory Stick"
KoJIuYeCTBo I3O6paJxHnI, KOtOpbIe Bbl MoKeTe 3aIncatb, I3MeHReTcB 3aBcIMocTn OT BbIbpaHHoro BampeXIma KaueCTBa I3O6paJxHnI n CNOxHocTn O6beKtA.
| Image quality/Качес硐изобрахеня | Image size/Размеризобрахеня | Capacity of "Memory Stick"/Емкость "Memory Stick" | ||||
| 8 MB(supplied)/8 M6(nprinlaraeTcЯ) | 16 MB(optional)/16 M6(nprinobpeTaetcЯOTděльно) | 32 MB(optional)/32 M6(nprinobpeTaetcЯOTděльно) | 64 MB(optional)/64 M6(nprinobpeTaetcЯOTděльно) | 128 MB(optional)/128 M6(nprinobpeTaetcЯOTděльно) | ||
| SUPER FINE | 1152×864640×480 | 12 images/12изобрахеня40 images/40изобрахеня | 25 images/25изобрахеня80 images/80изobрахеня | 51 images/51изobрахеня160 images/16изobрахеня | 100 images/100изobрахеня325 images/325изobрахеня | 205 images/205изobрахеня650 images/650изobрахеня |
| FINE | 1152×864640×480 | 25 images/25изobрахеня80 images/80изobрахеня | 50 images/50изobрахеня160 images/16изobрахеня | 100 images/100изobрахеня325 images/325изobрахеня | 205 images/205изobрахеня650 images/650изobрахеня | 415 images/415изobрахеня1310 images/1310изobрахеня |
| STANDARD | 1152×864640×480 | 37 images/37изobрахеня120 images/120изobрахеня | 74 images/74изobрахеня240 images/240изobрахеня | 150 images/150изobрахеня485 images/485изobрахеня | 300 images/300изobрахеня980 images/980изobрахеня | 600 images/600изobрахеня1970 images/1970изobрахеня |
Approximate time of moving pictures you can record on a "Memory Stick"
The time of moving pictures you can record varies depending on the complexity of the subject.
ПиблзnteьнанДлteьнocтБдвжуцхсгИЗOBpaЖeHи,КOTopbieBbl moKeTe 3aIncaТь Ha“MemoryStick"
ДинтельhoeТь ДвИжушихСЯ 3иборазжehи, KOtOpble Bы можete 3anicaTb, 3mMeHReTcB 3aBnCIMOCTN OT CLOXHOCTN obEkTa.
| Quality/Kauchestvo | Capacity of "Memory Stick"/Emkocstb "Memory Stick" | ||||
| 8 MB(supplied)/8 M6(priinaraetcna) | 16 MB(optional)/16 M6(priinobpeetaetcnoTdelloho) | 32 MB(optional)/32 M6(priinobpeetaetcnoTdelloho) | 64 MB(optional)/64 M6(priinobpeetaetcnoTdelloho) | 128 MB(optional)/128 M6(priinobpeetaetcnoTdelloho) | |
| SUPER FINE | 45 s/45 c | 1 min/1 MmH | 3 min/3 MmH | 6 min/6 MmH | 13 min/13 MmH |
| FINE | 1 min/1 MmH | 2 min/2 MmH | 5 min/5 MmH | 10 min/10 MmH | 20 min/20 MmH |
| STANDARD | 2 min/2 MmH | 5 min/5 MmH | 10 min/10 MmH | 20 min/20 MmH | 41 min/41 MmH |
| LIGHTMODE | 5 min/5 MmH | 10 min/10 MmH | 20 min/20 MmH | 41 min/41 MmH | 82 min/82 MmH |
The table above shows approximate number and times of still images and moving pictures you can record on a "Memory Stick" formatted by your camcorder.
B Tablunqax BbIe npBBeNo np6bn3ntelbHoe
KoIyueCTBO HeNOdBnKbIX n3OpaKeHn I
DInTeBbHOCTb DnJxUxNcXr n3OpaKeHn,
KOTOpBie Bbl MoKeTe 3aNcAtb Ha "Memory Stick",
OTfOpMaTnpOBaHHy Ho BaWe BnDeOkamepe.
Recording still images on a "Memory Stick" - Memory photo recording
You can record still images on the "Memory Stick".
Before operation
Insert a "Memory Stick" into your camcorder.
(1)Set the POWER switch to MEMORY/ NETWORK (DCR-IP55E only).
(2) Keep pressing PHOTO lightly. The green mark stops flashing, then lights up. The brightness of the image and the focus are adjusted and fixed while your camcorder is targeted at the middle of the image. Recording does not start yet.
(3) Press PHOTO deeper. The image displayed on the LCD screen will be recorded on a "Memory Stick". Recording is complete when the bar scroll indicator disappears.
3aIncb HeNoDBrXhBIX N3O6paXeHn Ha "Memory Stick" - FOToCbEMKa C COxpaHeHEm B IamrTn
BbMOxTe 3aIINcIbIaTb Ha "Memory Stick" HEnoDbNkHbIe N3O6paXeHnI.
Ipeed BbINOJIHeHEm Opeaun
BcTaBbTe "Memory Stick" B Bauy BnDeokamepy.
(1)Установские песеклоча Teьь POWER в положене MEMORY/NETWORK (Толъкову мodyел BCR-IP55E).
(2)ДерхиTe cnerka haKaToH kHonky PHOTO. 3eIeHaMaTka nepeCTaHET MIRaTb, a 3aTeM BbICBETnTcR. JpKoCTb N3O6paXeHnR n φokucipOBkA peryniPyIOTcN n ΦNKcPiYIOrC, noka BaWa bIeOkaMepa HaueJIeHa Ha cepeDInHy N3O6paXeHnR. 3aINCb nOKa He NaHInHaEaTcN.
(3)Haxmnte KhoNky PHOTO cnIbhee.
Изобрахено, OTбрахаemoe Ha 3кpahe,
6удт злпсано на "Memory Stick". 3aINCb
chITaTcTЯ 3aBepшeнHi, KORДЯчсEHT
инДиКaTOp nOLOcb npOKpyTkI.
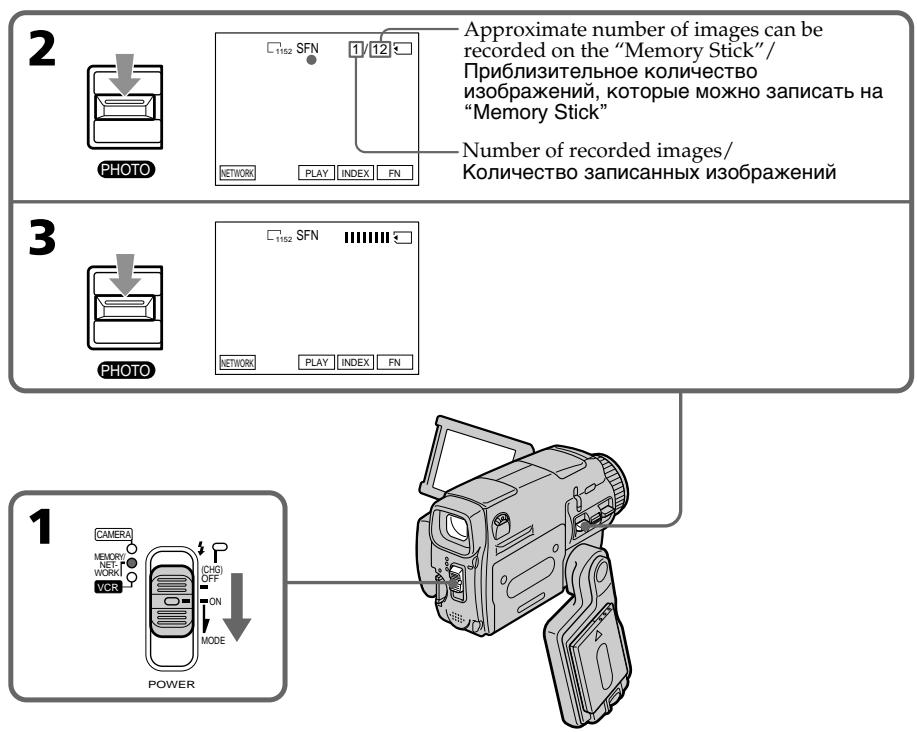
You can record still images on the "Memory Stick" in CAMERA mode
For the details, see page 63.
Bbl MoXeTe 3aIncsblBaTb HEnoDBrXHbIe n3O6paXeHnHa "Memory Stick" BpeXmE CAMERA
Bolee noipobHa HOpMaun npBedeHa ha cTp.63.
When the POWER switch is set to MEMORY/ NETWORK (DCR-IP55E only)
The following functions do not work:
- Wide mode
-Digital zoom - SteadyShot function
Super NightShot
-Colour Slow Shutter
-Fader - Picture effect
- Digital effect
- Title
-Sports lesson mode of PROGRAM AE (The indicator flashes.)
While you are recording a still image
You cannot turn off the power or press PHOTO.
When you press PHOTO on the Remote Commander
Your camcorder immediately records the image that is on the LCD screen when you press the button.
When you press PHOTO lightly in step 2
The image momentarily flickers. This is not a malfunction.
The number of still images you can record on a "Memory Stick"
It varies according to the image quality mode and the complexity of the subject.
Recording data
The recording data (date/time or various settings when recorded) are not displayed while recording. However, they are recorded automatically onto the "Memory Stick". To display the recording data, press DATA CODE during playback. You can also use the Remote Commander for this operation (p. 57).
When the POWER switch is set to MEMORY/ NETWORK (DCR-IP55E only)
The angle of view is slightly larger compared with the angle of view in CAMERA mode.
EcInn nepeKJIouaTeIb POWER ycTaHOBneB B noJIOxHeNHE MEMORY/NETWORK (ToIbKO moJeIb DCR-IP55E)
CneyuunheyHKnHepa6oTaIOT:
-Широкоэкразнberrypeжим
-LuΦpOBoH Hae3d
-Функияустоньовсбемки
-Houha cynepcbemka
-LBETHcBEMKa C MeDJIeHHbIM 3aTBOPOM
-Φeɪdεp
-3ΦΦeKtBn3o6paXeHn
-LinpoBbIe 3cppeKtbl
-Tntpbl
-PeKIM CnOpTnBbIx CoCTaHNI PROGRAM AE (INHdkaTop Mraet.)
EcIn Bbl 3aIINcbiBaete HeNoOBnKHOe n3o6paXeHne
BbI He CMOXeTe HN BbIKJIOUHTb NITaHHe, HN HaxaTb KOnKy PHOTO.
EcIn Bbl HaxMeTe KhoNky PHOTO ha nyIbTe ductaHcnoHHoro ynpabLeHn
BaSHA BnDeOKaMepa TOTcAc Ze 3aNIMeT n3o6paXeHne, KOtOpoe 6yDet Ha 3KpaHe npi HaxaTNI KHOKN.
EcJn Bbl cIerKa haxMeTe KhONkY PHOTO npn BblOnHeHn DeiCTBn IyHKta 2
1306paXeHHe Ha mHOBeHHe 6yTeT MepuTaB. 3To He ABJRETCa HEnCnpabHOCTbIO.
KoJInueCTBO HeNoDVBHXbIX n3O6paXeHn, KOTope Bbl MoXeTe 3aIncatb Ha "Memory Stick"
OHO 3aBnCt OT pexkma KaueCTBa n3o6paXeHn I CLOXHoCTn OBeKta.
DaHHbIe 3aHmCn
Recording still images on a "Memory Stick"
- Memory photo recording
3aɪnscb HeɪnoDβʌŋkHbɪx ɪz3o6pʌkæŋn Ha "Memory Stick"
-ФOTOCbEMKa C COxpaHeHEm B NaMaTn
Recording images continuously
You can record still images continuously. Before recording, select one of the three modes described below in the menu settings.
NORMAL [a]
Your camcorder shoots up to four still images in 1152 × 864 size or 13 still images in 640 × 480 size at about 0.5 sec intervals. (□)
EXP BRKTG
Your camcorder automatically shoots three images at about 0.5 sec intervals at different exposures. (BRK)
MULTI SCRN [b]
Your camcorder shoots nine still images at about 0.5 sec intervals and displays the images on a single page divided into nine boxes. Still images are recorded in 640 × 480 size. (
HenpepbBna 3aIncsbn3o6paXeHn
BbMOKTe 3aINCbIBaTb HEnoDbNkHbIe
n3O6paXeHnI HEnpepbIBHO. PpeI HaayanOM
3aINcN, BbIbepIne OOnn I3 Tpex pExIMOB,
ONiCaHHbIX HNXe, B yCTaHOBKaX MeHIO.
Pexmm NORMAL [a]
BaSHA BnIeOKaMepa ChIMMaET Do YeTbIpeX HEnoDnBnKhbIX N3O6paXKeHn pa3Mepom 1152 x 864 nIN 13 HeNoDnBnKhbIX N3O6paXKeHn pa3Mepom 640 x 480 c INHTepBaJOM npIMepHO B 0,5ceK. (
Pexim EXP BRKTG
Baasa Bndeokamepa ABToMaTNUeCKN CHIMaET TpN 306paXeHn C INHTepBaIOM PpIMepHO B 0,5 cek C pa3nHuO h 3KcNo3uMe. (BRK)
Pexim MULTI SCRN [b]
BaSHA BnDEOKaMepa CHNMaET DeBraTb
HEnoDBNXHbIX N3O6paXeHn C INHTepBaJOM
npIMepHO B 0,5 cek n OTO6paXaET
N3O6paXeHn Ha oNDHO CTpaHnCe,
pa3DeENHOn HA DeBraTb OKOH. 3aINcBIAeMbIe
HEnoDBNXHbIE N3O6paXeHn IMEIoT pa3Mep
640×480.()
![SONY DCR-IP45E - Pexim MULTI SCRN [b] - 1](/content/2020/05/48647/images/8f79e85c279bf5efa167d874ae3601c7c48aecb22d9675ca73cbcf2d16e7de12.jpg)
[a]
![SONY DCR-IP45E - Pexim MULTI SCRN [b] - 2](/content/2020/05/48647/images/0f65994ed68da1c446dc7925a9f5a305a35a7b9735a2dae491c7b4ef6b5d35bd.jpg)
[b]
![SONY DCR-IP45E - Pexim MULTI SCRN [b] - 3](/content/2020/05/48647/images/6a12f95bc76f7d45f6268bfc5ddb559a4d5844134486cdee4fffeca59e3812dd.jpg)
![SONY DCR-IP45E - Pexim MULTI SCRN [b] - 4](/content/2020/05/48647/images/5c9f2f9364706d6e7220fd979beb99ad4b60089322a23dcc61432d00a86bfcb2.jpg)
![SONY DCR-IP45E - Pexim MULTI SCRN [b] - 5](/content/2020/05/48647/images/67f8db3f92943ff876eeb43f41b1d398167980b6fbd740b072bea2897fbebe31.jpg)
![SONY DCR-IP45E - Pexim MULTI SCRN [b] - 6](/content/2020/05/48647/images/bebb687973a1c8de8ed7cbde6dde7948bd0fa78cd7f5fbe9fcb6866fee0de976.jpg)
![SONY DCR-IP45E - Pexim MULTI SCRN [b] - 7](/content/2020/05/48647/images/f5366c28e3ee2d633b086fba2e68de32215d2901a6cc0a2faebd7f4a31a33bfc.jpg)
![SONY DCR-IP45E - Pexim MULTI SCRN [b] - 8](/content/2020/05/48647/images/8ce642b29fd4124eeade7421aed49f6d3eee9cdf457741363f7bbec2ba8e7a09.jpg)
![SONY DCR-IP45E - Pexim MULTI SCRN [b] - 9](/content/2020/05/48647/images/ff1fccf1b35f67eea3ed1b6d59c1428c64b5f70827f2b1de28c163464d8426c4.jpg)
![SONY DCR-IP45E - Pexim MULTI SCRN [b] - 10](/content/2020/05/48647/images/81ee6ee2795d11dc61667a5c561203c607ac7abf9c5d531c139a36ff4100c0d9.jpg)
(1) Set the POWER switch to MEMORY/ NETWORK (DCR-IP55E only).
(2) Press FN to display PAGE1.
(3) Press MENU, then select STILL SET in in the menu settings, then press EXEC.
(4) Press / to select BURST, then press EXEC (p. 228).
(5) Press / to select the desired settings.
(6) Press EXIT to make the menu settings disappear.
(7) Press PHOTO deeper.
(1)Установские песеклоча teleportь POWER в положене MEMORY/NETWORK (Толъковские DCR-IP55E).
(2)HaxmTe KhoNky FN, yTo6bI OTo6pa3ntb cTpaHnCy PAGE1.
(3)HaxmTe KhoNky MENU, 3aTem Bby6epnTe onuio STILL SET B B yctahOBkax MeHIO, a 3aTem HaxmTe KhoNky EXEC.
(4)HaxmamTe KhoNkU Iy BbIbOpa onuBURST, a 3aTe m HaxmTe KhoNky EXEC (cTp.236).
(5)HaximaiTe KhoNkI TnBb6opa HyXhbx yCTaHOBOK.
(6)Haxmnte KhoNky EXIT, YTO6bI OTO6paXeHne yCTaHOBOK MEHIO Ncye3No.
(7)HaxmTe KhoIky PHOTO cnJIbHee.
![SONY DCR-IP45E - Pexim MULTI SCRN [b] - 11](/content/2020/05/48647/images/5a577c578f12f05810116928c28c2de4559ec00688257f81c59757532245792f.jpg)
If the "Memory Stick" becomes full
FULL appears on the LCD screen, and you cannot record still images on this "Memory Stick."
Ecnm emkoctb "Memory Stick" 3aNOJHNTcR
Ha 3KpaHne NOBHTcH INDnKaUH FULL, n Bbl He CMOXeTe 3aINCbIBaTb HEnoDBNxHbIe I306paxKeHHa 3Tu "Memory Stick".
The number of still images in continuous shooting
The number of still images you can shoot continuously varies depending on the image size and the capacity of the "Memory Stick."
During recording still images continuously
The flash does not work.
When shooting with the self-timer function or the Remote Commander
Your camcorder automatically records up to the maximum recordable number of still images.
If the remaining capacity of the "Memory Stick" is less than for three images
EXP BRKTG does not work. When you press PHOTO lightly, l FULL appears on the screen.
When selecting NORMAL
Recording continues up to the maximum number of still images during pressing PHOTO deeper. Release PHOTO to stop recording.
The effect of EXP BRKTG
The effect of EXP BRKTG may not be noticeable on the LCD screen.
We recommend viewing images on TV or the computer to realise the effect.
KoJIuYeCTBO HeNoD8nXhBIX n3O6paXeHn npHnepepbIBHOcEMKe
KoIuYeCTBO HeNoOdBnXhBIX n3O6paXeHn, KOtOpbIe Bbl MoXeTe ChImaTb HnpepebIBHO, n3MeHHeTcB 3aBNCIMOCtN OT pa3Mepa n3O6paXeHn nEmKocTn "Memory Stick".
Bo Bpem HnpepbBHO 3aHncn HeNoDBrXhBix N3o6paKeHn
Bcnbiika he pa6oTaet.
PnCbEMKe C nCIOJIb3OBAHEm FyHKcIM TaMepa cAmO3aNyCKa Nm NpIbTa DnCTaHcUNOHORo ynpabJIeHHN
BaSha BnDeOKaMepa ABToMaTNUeCKN BbIIOJIHReT 3aINCb DO DCtNXeHNA MaKcIMaJIbHOro KOJIuYeCTBa 3aINCbIbAeMbIX HEnoDVBHXhBIX n3O6paJxehNI.
EcIn octaBaaeremKocTb "Memory Stick" coCTaBnAeMeHee Tpex n3o6paXeHn
ФункцИExp BRKTG He pa6oTaeT. EcIn Bbl cIerka haxMeTe KhoNky PHOTO,Ha 3KpaH e noBvTcHnDnKaunFULL.
EcnBb Bb6epete onuio NORMAL
Pp60JIeCnIbHOM HaxKaTmN KhONKn PHOTO 3aIncb BydET PPOJOnKaTbcra Do DCtNXKeHHa MaKcIMaJIbHOrO KOJIuYeCTBa HEnoDBrXkHbIX N3O6paXeHn. DnA ocTaHOBKn 3aIncn OTnyctnte KhONky PHOTO.
3ΦΦeKT cepnn 3Kcno3nui EXP BRKTG
Ha 3kpahe KKД 3ффekt EXP BRKTG moKet npoRbIaTbcr HeOTcTeJIbO.
PnBbIOpJIHeHm 3TOrO 3ΦΦeKTa peKOMeHnyETcR npOCMaTpNbBaTb N3O6paJxehn Ha 3KpaH TeLeBn3opa nI IN nepCOHaJIbHOro KOMNbHOtepa.
Recording images with the flash
The flash automatically pops up to strobe. The default setting is auto (no indicator). To change the flash mode, press (flash) repeatedly until the flash mode indicator appears on the LCD screen.
3aIncb n3o6paXeHn co BCnbIshKoI
BcnbIka cpa6aTbIbaET aBTOMaTnueeKn. ABTomatueeckoe cpa6aTbIbaHne (6e3 INdikatopa) ABJIeTCyCTaHOBKOI NO yMOJUahNIIO.ДЯИЗMEHEnPEXIMAbCbIshKIN hAXIMaTe NOBTOPOK HONKY (BCnbIshK), IOKa INDikATOppeXIMAbCbIshKNe He NOBHTCA Na 3kpaHe.
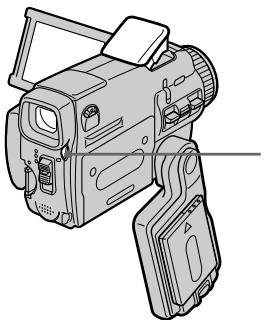
3 (flash)/(Bcnbiioka)
Each press of ±b (flash) changes the indicator as follows:
t AUTO (No indicator)
Auto red-eye reduction:
The flash fires before recording to reduce the redeye phenomenon.
Forced flash: The flash fires regardless of the surrounding brightness.
No flash: The flash does not fire.
The amount of flash is automatically adjusted to the appropriate brightness. You can also change FLASH LVL to the desired brightness in the menu settings (p. 225). Try recording various images to find the most appropriate setting for FLASH LVL.
KaKdbi pa3 npn HaxkaTnn KhoNkN (BCbIuKn) INDnKaTOP n3MeHReTCa CneDuOuMm 06pa3oM:
& 田 山 区 AUTO(БeинДиКаТор)
ABTOMATNueckoe yMeHbSeHne 3ΦΦeKta KpaChbIX rna3: Bcblska cpa6aTbBaet
peep3aipncbIO pnyMehbueHn 3oPekTaKpaChbIX Tna3.
4ПинHynteNBHa BCnbiuka: Bcblska cpaabaBae T BHe 3aBucmocTOn OT rpkoctn Okpykaioo OcBeueHn.
Be3 BCnIiKn:
Bcnbikka He cpaabaBaet.
PerylnpobKa BcblIiKn Ha noDxoJauyio RpkocTb BbIOJIHHeTc ABTOMaTHueCKn. Bbl MoKeTe TaKxye yCTaHOBNTb Ha HyXHyIO RpkOCTb OuNIO FLASH LVL B yCTaHOBkax MeHIO (ctp. 233). POnbTaIteCb 3aIncaTb pa3IInHbIe I3o6paXeHnI dIyOTbICKaHnHaHbOJe e NDoXoJaIeero 3NaUeHnY yCTaHOBKn FLASH LVL.
Recording still images on a "Memory Stick"
- Memory photo recording
3aɪnscb HeɪnoDβʌŋkHbɪx ɪz3o6pʌkæŋn Ha "Memory Stick"
-ФOTOCbEMKa C COxpaHeHEm B nAmrTu
Notes
- The recommended shooting distance using the built-in flash is 0.3m to 2.5m (31/32 feet to 8 1/3 feet).
- Attaching the lens hood (optional) or a conversion lens (optional) may block the light from the flash or cause lens shadow to appear.
- Auto red-eye reduction (区) may not produce the desired effect depending on individual differences, the distance to the subject, the subject not looking at the pre-recording flash or other conditions.
- The flash effect cannot be obtained easily when you use forced flash in a bright location.
- The flash CHG lamp flashes while the power for firing is being charged. After charging is completed, the flash CHG lamp lights up.
- If it is not easy to focus on a subject automatically, for example, when recording in the dark, use HOLEGRAM AF (p. 150) or the focal distance information (p. 88) for focusing manually.
If you leave your camcorder for five or more minutes after disconnecting the power source
Your camcorder returns to the default setting (auto).
The flash does not fire even if you select AUTO and Auto red-eye reduction (☑) during the following operations:
-NightShot
- Exposure
- Spotlight of PROGRAM AE
Sunset & moon of PROGRAM AE
- Landscape of PROGRAM AE
- Flexible Spot Meter
During recording images continuously
The flash does not work.
Приимейкия
- PekomeHnyeMoE dIy cBeMKn paCCToHne npn IcNoJIb3OBAHmN BCTpoEHHO BCNbIiKu CoCTaBJIReT O 0,3 Do 2,5 M.
- PnKpEnHHe CBeTo3aUnTHoB 6JeHbI oBeKtNbA (PnpO6peTaetc rOTeJIbHO) nI npOeOpa3OBaTeJIbHOro OBeKtNbA (PnpO6peTaetc OTeJIbHO) MoKeT nPeRaNTb CBeT OT BCbIuIKn IIN pNpBEcT N K NOBHeHIO THe OBeKtNbA.
- ABTomatnueckoe yMeHbWeHne 3ΦΦeKta KpaChbIX rIa3 (区) MOKeT He oBeCneuBaTb HxKHO TΦΦeKTa B 3aBNCIMoCTN OT INDbNDbYalbHbIX pa3JIuH, pacCTOHaNo obBeKaT,OT TORO,CMOTNT JIN ObeKT Ha cpa6aBtBAIOU IOpeD 3aINcBIO BCNbIiKy, IN dpyrnx ycIOBn.
3ΦΦeKT BCbIuKIMoKET 6bITb TpydnoOCTNJMMbIM,ecnBbIncNoJIb3yeTe npHyDnteHbHyO BCbIuKBycNoBnx Jpkoro OCBeueHna.
BoBpemAakKymJauu3apJa dIpaCpaBaTaBAnHJaAMNoUka BCbIuKn CHG6yTeMgAtb. IocJe 3aBepueHna 3apJKnJaAMNoUka BCbIuKn CHG BbcBeTITcR.
Ecnn aBtomaTnecka fokycnpobka Ha oBekeTe 3atpydHeHa, Hapnimep, npc CbEmKe TE MhOTe, mCnoJIb3yIte cyHKuHIO HOLOGRAM AF (ctp.150) INn INhOpmauio o fokycHom pacCToRHH (ctp.88)ДЯ BbINONHeHnA fokycnpOBKn BpyHyIO.
EcIn Bbl octabte Bauy Bndeokamepy Ha nTb 6oJee MmHT NocJe OTCoeDnHeHn nCTOCHNkA NITAHN
Baisha BndeokamaebaPheTcK yctaHOBKe no yMOnuHaHIO (abTomatNueeCKoe cpaabaHne).
Bcblska He 6ydt cpa6a7b1Ba7b, daXe ecnBb Bbl6epTe yctahOBky AUTO n aBTOMaTHueCKoe yMeHbIeHne 3ΦΦeKTA KpaChbIX rna3 BO BpEm BblONHeHnCJeDyUxN onepaun:
-Houha CbemKa
-3Kcno3nua
-PexkIM npoxeKtopHO OcBeueHnYnKcN PROGRAM AE
-Pexm 3axoJa cOnHua n Lyhbl yHKcnn PROGRAM AE
-JIaHdwaΦTHbI pexnM ΦyHKcN IN PROGRAM AE
-Perynnpyemoe nTHOΦOTOMetpn
Bo Bpemr HnpepbBHOJ 3aHcN n3o6paKeHn
Bcnbiika he pa6oTaet.
Shooting with an auxiliary light
- HOLEGRAM AF
The HOLOGRAM AF is an auxiliary light source used for focusing on subjects in dark places.
Set HOLEGRAM F to AUTO in 6 in the menu settings. (The default setting is AUTO.)
When _ON appears on the LCD screen in a dark place, press PHOTO lightly. Then the auxiliary light will automatically emit until the subject is focused.
CbeMa co BCnOMoTeJIbHbIM OCEueHnEM
-ФункцИHOLEGRAM AF
Ioi rionorpammHoi aBTOfokcnpobKoH OLOGRAM AF POJrpa3yMeBaetc BcNOMOrTaTeNbHbI NCTOCHNk CBeta,NCIOJIb3yeMbI dIPOKcnpOBKn Ha o6BeKTax B TeMHbIX MecTax.
YctaHOBIne OIuHIO HOLOGRAM F B B YcTaHOBkax MeHIO B IOnOxKeHne AUTO. (AUTO ABJIReTc YCTaHOBKOI NO yMOnUaHIO.)
KordaHa3KpaHeB TEMHOM MecTe NOBHTc HnDnKaun _ON ,Cnerka HaxmTE KhoNky PHOTO.
3aTeM BCNOMORAteIbHbI INCTOCHNK CBeTa 6yDet aBTOMATNUeCKN NcNyckaTb CBET, NOKa FOKycnPOBka Ha 06BeKeT He 6yDet BbINONHeHa.
HOLOGRAM AF emitter/
I3nyateIb roIorpamMHO
aBToΦokycnpOBKn HOLOGRAM AF
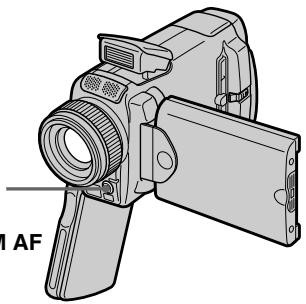
About HOLEGRAM AF
"HOLEGRAM AF (Auto-Focus)," an application of laser holograms, is a new AF optical system that enables still image shooting in dark places.
Having gentler radiation than conventional high-brightness LEDs or lamps, the system satisfies Laser Class 1 (^*) specification and thus maintains higher safety for human eyes.
No safety problems will be caused by directly looking into the HOLEGRAM AF emitter at a close range. However, it is not recommended to do so, because you may experience such effects like several minutes of image residual and dazzling, that you encounter after looking into a flashlight.
- HOLEGRAM AF satisfies Class 1(time base 30 000 seconds), specified in all of JIS (Japan), IEC(EU), and FDA(US) industry standards.
Complying with these standards identifies the laser product to be safe, under a condition that a human looks at the laser light either directly or even through a lens for 30 000 seconds.
O roJorpamMHOaBToΦOKcHPOBKe HIOLOGRAM AF
"HOLOGRAM AF (aBToΦokcnpOBka)”, oJNo I3 npImeHEnI na3epHbIX rOJOrpamM, npedCTabJIaET cO60I HOBYIO NTINueCKyIO CNCTeMy aBTOΦOKcnpOBKn, IO3BOJIAOuIyIO BbIIOJIHATb CBeMKY HeoDBrXhBix N3O6paXeHN B TEMbIX MeCTax.
Ime860lee Hn3kyn ypoBeHb paJaauu nno
cpaBHeHIO C 06blHbIMN CBETOJNOdAMNI
JIaAMnAm BbICOKO JRPKCTN,3Ta CSTeMa
yOBNeTbOPaER Tpe6oBAHN K Ja3ePbHM N3DeJIINrM
1Knacca (^*) I,TakmM o6pa3OM,ObecneuBaET
NoBbIweHHyIO 6e3oNaCHOCTb DnA YeNoBEueCKnx rna3.
HnkAKNX np6OBemC 6e3oNaCHOCbTO He BO3HnKaET,
daXe eCN pCMToPBnMO B IN3yuaTeNb
RorOrpAMHMn ABtOFOKcUcnPOBKn HOLOGRAM AF c
6bn3KORo pacCToAHN.I Bce Xe,JeLaTb 3TO He
peKOMeHNyETCR,NOTOMY UTO Bbl MoKeTe B TeYeHne
HECKONbKNX MMHT NCblTbIBaTB TAKNE RAJIENH,KAc
OctaToOHoe N3OboXaeHne N pInTyUpJIeHne 3peHnA,
KOTobIE Bbl OwUyAte, NOcmOTpeB Ha ropAUYo
3JeKTpuChekyo lamnoQky.
*TolorpaMmHa aBTofoKcUPOBka HOLOGRAM AF ydoBNETbOpRe1 KnaCcy (Ba3OBoE BpEmr 30006ceyHd), onpeJeHemHom BO CExe npOMblIeHHbIX CTAnDapeTxJIS (RnoHn), IEC (EBpcoIO3), FDA (CoeDiHHeHHbIe lTaTbI).
COOTBETCTBNE 3TMM CTaHdaptam NOpda3yMeBaET, qTO Na3ePHOE N3dJIe NABRAETCA 6E0NaChbIM DaJce npu cYOBnO, YTO choNobek 6yEd TCMOTpeTB pIraMo H Na3ePbHb Nluy, DaJIe NcNOJIb3yJ
yBéHnHTeBHyO JInH3y, B TeueHne 30 000 cekyHd.
Recording still images on a "Memory Stick"
- Memory photo recording
3aɪnscb HeɪnoDβʌŋkHbɪx ɪz3o6pʌkæŋn Ha "Memory Stick"
-ФОТOCьемКаСCOхpaHeHnEМВЯмТИ
Notes
- A conversion lens (optional) may obstruct the HOLEGRAM AF light and make focusing difficult.
- If enough light does not reach the subject even if the HOLOGRAM AF emitter is emitted (recommended shooting distance is 2.5m (81/3 feet)), the subject will not be focused.
- Focusing may be hampered if the light emitted from the HOLEGRAM AF is blocked by an obstruction.
- Focus is achieved as long as HOLEGRAM AF light reaches to the subject even if its light is slightly out of the middle position of the subject.
- If HOLEGRAM AF light is dim, it sometimes becomes difficult to focus. If this happens, wipe the HOLEGRAM AF emitter with a soft, dry cloth.
The HologRAM AF does not emit when:
-Flash is set to (No flash)
NightShot is set to ON
-Focusing manually
-Using Spot Focus
Sunset & moon of PROGRAM AE
- Landscape of PROGRAM AE
- Continuous photo recording
Примеань.
-П_REОбразаоВаTeьнБиОобeКТИB (прИОвретаeТСАОДeЛьНО)MOжET3aTeHЯТь CBETROIOrpamMнОaBTOФOKсИрOBKIN HOLOGRAM AFи,TakIMOBa3OM, 3aTpPydHЯТьФokcИрOBKy.
- EcIn Ha o6bekt He nonaadaet DocTaTOH CBeta, XOTnI3nyaTeIb rOIOrpaMMHO abToΦokycuPobKn HOLOGRAM AF nCnyckaet CBET (peKOMeHNyEMoe dIry cBEmKn pacCToHHe COCTaBnAeT 2,5 M),ΦokycuPobKa Ha o6bekte BbINOJIHeHa He 6yJeT.
-ФOKycnpoBka MoKTe 6bItb 3aTpUdHeHa,ecnCBET,NCyckaemblPn rOJorpaMMHO abToΦokcnpOBKe HOLOGRAM AF, 6IOKIpyeTc KaKIM-JIn6o PpeTCTBnEM.
-ФokycinpobKa 6yIeT BbINOnHeHa, KaK TOnbKO CBET RONrpaMMHO aBTOfOKcypOBKn HOLOGRAM AF DoCTnIRHT ObBeKTa, dJaKe ecnCBET 6yIeT nonaDaTb Ha OBeKT cnerKa MIMO erO ceHtpaJIbHOu YAcTI.
- Ecni CBET roIorpaMMHO aBTOfOKcNPOBKn HOLOGRAM AF OKa3bIbaeTcT TycKJIbIM, fOOKcNPOBKa INHOrda MOXeT 6blTb 3aTpUdHeHa. EcNI 3TO npOn3oJDeT, npOTpnte n3nyaTeNb roIorpaMMHO aBTOfOKcNPOBKn HOLOGRAM AF lockyToM mRkoJ cyxO tKaHn.
TolorpamMnaA BTOΦOKcnpOBka HOLOGRAM AF He 6ydt Ncnyckatb CBet BCJeDyUoInx pexkMax:
- BcnbIiKa yCTaHOBJIeHa B noJIoXeHne (Be3 BCnbIiKn)
- Houhaj Cbemka yctahOBHeHa B noJIOKeHne ON
-PyHaФokycnpoBka
-Исплььзоваиме пт haфokусировки
-Pexim 3axoJa cOnHua n Lyhbl yHKcnn PROGRAM AE
-JaHdwaΦTHbI pexmФyHKcIN PROGRAM AE
-HenpepbBnaH aTocbEmKa
Self-timer memory photo recording
You can record images on the "Memory Stick" with the self-timer. You can also use the Remote Commander for this operation.
(1) Set the POWER switch to MEMORY/ NETWORK (DCR-IP55E only).
(2) Press FN and select PAGE2.
(3) Press SELFTIMER in the standby mode. The (self-timer) indicator appears on the LCD screen.
(4) Press PHOTO deeper. The self-timer starts counting down from 10 with a beep sound. In the last two seconds of the countdown, the beep sound gets faster, then recording starts automatically.
3aɪncb HeɪnoDβʌŋkHbɪx ɪzə6pʌkæhɪn Ḥa "Memory Stick"
To cancel self-timer recording
Press SELFTIMER so that the (self-timer) indicator disappears from the LCD screen. You cannot cancel self-timer recording using the Remote Commander.
Recording still images on a "Memory Stick"
- Memory photo recording
3aɪncb HeɪnoDθBuxHbIX n3o6paXkeHn Ha "Memory Stick"
-ФOTOCbEMKa C COxpaHeHEm B NaMaTn
Note
The self-timer recording mode is automatically cancelled when:
- Self-timer recording is finished.
- The POWER switch is set to OFF (CHG) or VCR.
To check the image to be recorded
You can check the image by pressing the PHOTO button lightly, then press it deeper to start the self-timer recording.
PpmeaHne
Pexim 3aIncn no TaImepy cAmO3anycca 6ydet abTomatUeCKN OTMeHEn B CJIyuaX:
-Окончаня запси по таймени самоануcke.
- YctaHOBKn IpeKJIIOUaTeIy POWER B noJoxHeNc OFF (CHG) nIu VCR.
Дпя поверки n3обрахен,在,KOTOPOE 6удET 3aINcblBaTbC8
BbMOxKeI npOBepntb 1306paXeHne, cnerKa haxaB KhoNky PHOTO,a 3aTeM haxaB ee cnIbHee dIy Hauana 3aIncn Po TaIMepy camO3aNycka.
Recording an image from a tape as a still image
Your camcorder can read moving picture data from other equipment recorded on a tape and record it as a still image on a "Memory Stick." Your camcorder can also take in moving picture data from other equipment through the input connector and record it as a still image on a "Memory Stick."
Before operation
- Insert a recorded tape into your camcorder.
- Insert a "Memory Stick" into your camcorder.
(1) Set the POWER switch to VCR.
(2) Press The picture recorded on the tape is played back.
(3) Keep pressing PHOTO lightly until the picture from the tape freezes. CAPTURE appears on the LCD screen. Recording does not start yet.
(4) Press PHOTO deeper. The image displayed on the LCD screen will be recorded on a "Memory Stick." Recording is complete when the bar scroll indicator disappears.
3a\Pncb n3o6paXeHnCJIeHTbI KaK HeNoDBrXJHOrO n3o6paXeHnA
Baawa Bndeokamepa MoKet YntaTb C npyroannapaTypbl DaHHbIe DnBxKyueroCn3o6paXeHnI, 3aNcAHHoro Ha JeHTe, n3aNNCbBAbTe erO KaK HEnoDBNXHoe n3o6paXeHne Ha "Memory Stick".Baawa Bndeokamepa MoKet TaKke npHnMaTb Cdpyro annapaTypbl DaHHbIe DnBxKyueroCn3o6paXeHne Upe3 BXoHOn pa3bEm, n3aNNCbBAbTB Nk KaK HEnoDBNXHoe n3o6paXeHne Ha "Memory Stick".
Ipeed BbINOJIHeHEm Opeaun
- YCTAHOBITE 3aIINCAHNHYIO KACCETY CJIeHTOIB BaUy BnDeOkamepy.
- YcTaHOBnTe "Memory Stick" B BaCy BnDeOkamepy.
(1)Установские песеклоча给宝宝 POWER в поожене VCR.
(2)Haxmnte KhoNky II. Bydet Bocnpo3BODntbCn306paXeHne, 3aIncaHHoe HaJIeHTe.
(3)Haxmnte u yedejkuaBaiTe CnErka HaxaToi KhoIky PHOTO, noka n3o6paXeHne cJeHTbI He 3actbIHeT. INDnKaunCA TAPTURE NOBHTcRa Ha 3KpaHe. 3aNc b noka He NaUnHaETcA.
(4)HaxmTe KhoNky PHOTO cnIbHee. 3o6paXeHne, oTo6paXaEmoe Ha 3KpaHe, 6yDet 3aIncAHO Ha "Memory Stick". 3aIncB cHTaETcRA 3aBepSeHHoN, KOrDa IcYe3HET INDnKaTOp NIOcBi npOKpyTKI.
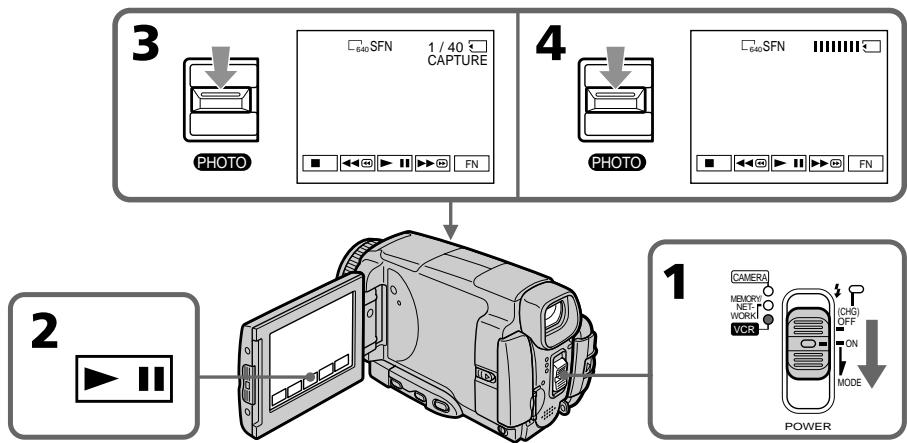
Image size of still images
Image size is automatically set to 640 × 480 .
When the "Memory Stick" access lamp is lit or flashing
Do not shake or strike the unit. As well do not turn the power off, eject a "Memory Stick" or remove the battery pack. Otherwise, the image data breakdown may occur.
If 念 MEMORY STICK FORMAT ERROR appears on the LCD screen
The inserted "Memory Stick" is incompatible with your camcorder because its format does not conform with your camcorder. Check the format of the "Memory Stick."
If you press PHOTO lightly in the playback mode
Your camcorder stops momentarily.
Sound recorded on a tape
You cannot record audio from a tape.
Titles which have already been recorded on tapes
You cannot record the titles on the "Memory Stick". The title does not appear while you are recording a still image with PHOTO.
Recorcing date/time
The date/time when it is recorded on a "Memory Stick" is recorded. Various settings are not recorded.
When you press the PHOTO button on the Remote Commander
Your camcorder immediately records the image that is on the LCD screen when you press the button.
Pa3mep HenoobnKbIx n3o6paKeHm
Pazmepn3o6paXeHn aBTOMaTnueckn yCTaHaBnBaETCB 640×480.
EcIn lamnoka Doctyna "Memory Stick" ropt n nn mnaeT
He TpncTe n He cTuynte no annapaTy. TaKke, He BbIKIouaHTe NITaHne, He N3BLeKaIte "Memory Stick" n He CHImaTte 6aTapeHbI bLOk. B npotNBHom clyuae daHHbI e 1306paXeHnA MOyT 6bIT nbOBpeXJeHbl.
EcIn Ha 3KpaHe NOBITCA INHdkaTOp MEMORY STICK FORMAT ERROR
BCTaBHeHnAra "Memory Stick" HecOBMeCTnMa C Bauei BnDeokamepo,notomyuTo ee fOpMaT He COOTBeTCTBye Tauei BnDeokampe. IpOBepe fOpMaT "Memory Stick".
EcIn B pexnme Bocnpn3BedeHnaerKa HaxaTb KhoNky PHOTO
Baisha Bnideokamepa Ha mRHOBeHne OCTaHOBNTcra.
3Byk, 3aHcaHHbI Ha JeHTe
Bbl He MoXeTe 3aINCbIbA Tb 3ByK CJIeHTbl.
Tntpbl, yke 3auncaHbIe Ha Kaccetax
BbHe MoKTe 3aIncbIbTaT TnTp bHa "Memory Stick". TnTp bHe 6yUyt NOBnAeTbC H a 3kpaHe, noka Bb6yTe 3aIncbIbTaH eNoDnBxHbIe n3o6paXeHnC nOMOuBIO KHOKn PHOTO.
3aTncb daTbl/BpeMeHn
ДаТВБЕМЯЗАПСБИБАЕТСппзАПСИНа "Memory Stick".РазлЧьIEуCTановКИн ЗАПСБИBAIOTСЯ.
Korda Bby haxkmaete KhONky PHOTO ha nyIbTe dNCTaHcNoHHoro ynpabJeHnA
Baisha Bnndeokamaepa HemeIeHNO 3aIncsbIbaET nO6paXeHne, haxoJaIeecHa 3KpaHc, KOrda BbI haximaTe KOnKy.
Recording a still image from other equipment
Before operation
Set DISPLAY in ETC to LCD in the menu settings (p. 232). (The default setting is LCD.)
(1) Set the POWER switch to VCR.
(2) When using the A/V connecting cable, set VideoINPUT to the appropriate position depending on the player. (P. 109)
(3) Play back the recorded tape on the VCR, or turn the TV on to see the desired programme. The image of the other equipment is displayed on the LCD screen or in the viewfinder.
(4) At the point where you want to record, follow the steps 3 and 4 on page 154.
Using the A/V connecting cable
IcnoB3OBAHnE CoeMHHTeNbHOKabEnyaydno/BuDeo
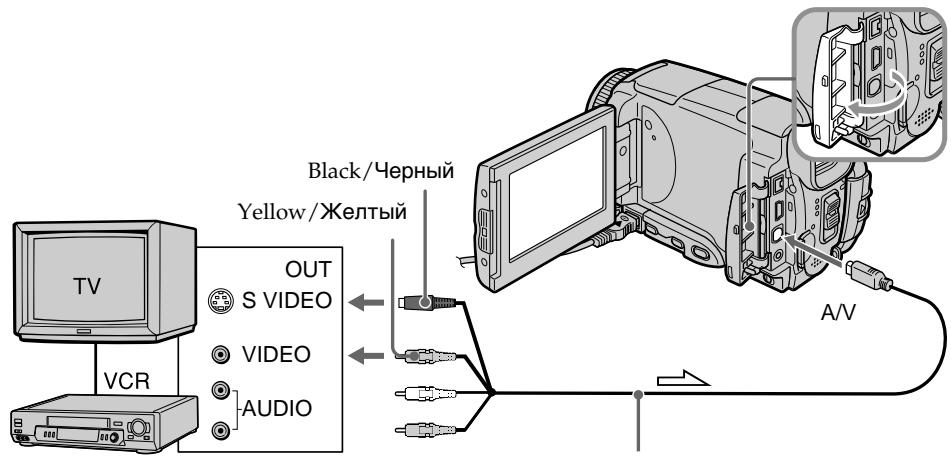
: Signal flow/Переда синнаla
3aIncB HeNoDBrXHOro n3O6paKeHnC dpyroI annapaTypbl
Ipeed BbInoJHHeHem Otnepaunn
YcTaHOBnTe OIuHIO DISPLAY B ETC B
yCtAHOBkax MeHIO B NoIoXeHne LCD (ctp. 240).
(No yMOnUaHHIO yCtAHOBJIeHO NoIoXeHne LCD.)
(1)Установпейразковая POWER в положене VCR.
(2)Прии NCIOJIb3OBAHIN COeIMHNITeJIbHORO Ka6eIaayINO/BuJeO yCTaHOBITE ONUVIDEOINPUT BHaJNeKjaUee noJoxKeHne, B 3aBnCmOcTn OT BOCpOn3BOJaUeO yCTpoiCTBa. (Ctp.109)
(3)BocnpoIN3BeDInTe 3aIncanHHyJeHTyHa KBM IIN BKNIOHnTE TeJeBn3Op DJI npOCMOtpa HxKHO nporpAMMbI. N3o6paKeHne c dpyroI annapaTypbI OTO6pa3ntcHa 3kpaHe JKKD IIN B BuOnCKaTene.
(4) B MeCTe, B KOtOpOM Bbl XOTnTE BblONlHnTb 3aINcB, CJIeDyIte DeIcTBnAM NyHKTOB 3 n 4 Ha cTp. 154.
IoiocoeDHHnTe JeTbI WTeKepe coeHNHTbHOro Ka6eY ayDNo/BnDeO K rHe3y BnDeocnHaJa KBM nIIN TeNeBn3opa.
Connect the yellow plug of the A/V connecting cable to the video jack on the VCR or the TV.
If your TV or VCR has an S video jack
Pictures can be reproduced more faithfully by using an S video cable.
With this connection, you do not need to connect the yellow (video) plug of the A/V connecting cable.
Connect an S video cable to the S video jacks of both your camcorder and the TV or VCR.
EcIn B BaWem TeJIeBn3ope nI IN KBM IMeetc rHe3do S bVdeo
N3o6paKeHnMOryT 6bItb BocPOn3BeJeHbI 60JIee BbICOKOKaYeCTBcEHNO pRi NcPONb3OBaHN KabEnr S BuDeo.
Ppi daHHOM coeHHeHH Bam He HxKHO IOdcoeHNHTb XeNTbI WTeKepe (BnDeO) COeHNHTelbHor KaBeJra ayDIO/BnDeO.
ПолбeoинITE ka6ьb S bVideo K rHe3dAm S bVideo Baшe bVideokamepbI n TeleBv3opa nnn KBM.
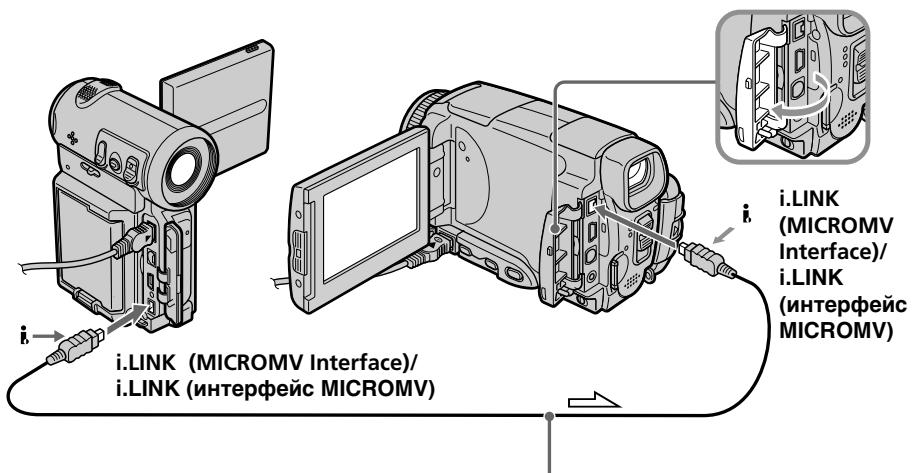
Using the i.LINK cable
IcnoJIb3OBAHne Ka6eJiaLINK
When recording from a tape in poor recording condition, for example, a tape that is worn out from repeated dubbing, recording is interrupted, or REC ERROR appears and recording cannot be carried out. Record distortion-free images.
PpmeuHne
Superimposing a still image in a "Memory Stick" on an image - MEMORY MIX
You can superimpose a still image you have recorded on a "Memory Stick" on top of the moving picture you are recording.
You can record the superimposed images on a tape or a "Memory Stick." (However, you can record only superimposed still images on the "Memory Stick.")
M. CHROM (Memory chromakey)
You can swap only the blue area of a still image such as an illustration or a frame with a moving picture.
M. LUMI (Memory luminancekey)
You can swap the brighter area of a still image (such as a handwritten illustration or a title) with a moving picture. To use this function, we recommend recording a title on a "Memory Stick" before a trip or event.
C. CHROM (Camera chromakey)
You can superimpose a moving picture on top of a still image such as an image which can be used as background. Shoot the subject against a blue background. Only the blue area of the moving picture will be swapped with a still image.
M. OVERLAP* (Memory overlap)
You can make a moving picture fade in on top of a still image.
HaioxHeHne HnOdBnXHoRo n3o6paXeHnB“Memory Stick"Ha n3o6paXeHne-ΦyHKcHr MEMORY MIX
BbMOxKeTe HAnOxKntb HEnoDbNxHoe n3o6paXeHne, 3aIncAHHoe Ha "Memory Stick", nobepx 3aIncsbIAeMOrO DnIXyUeROc n3o6paXeHna.
BbMoXeTe 3aIncBbAtb HaIOxehHbIe
n3O6paXeHnHa IeHTy nIIHa "Memory Stick". (OdHako, Bb MoXeTe 3aIncBbAtb TOnbKO
haIOxehHbIe HEnoDbNkHbIe N3O6paXeHnHa "Memory Stick".)
Pexm M. CHROM (cBETOBa pnpnoeknna namrtn)
BbMOKTe MeHrTb MeCTaMToTolbKO CnHIOU
CaTb HeNoDVBxHOrO N3o6paXeHn, HApNIMep,
IJIIOCTpaUN IJN KaJaPa, C DvNxKyUMcra
N3o6paXeHnEM.
Pexm M. LUMI (aRPoCTHa pRpnpoeKuia nAMrTu)
BbMOxTe MeHrTb MecTaMn 6oJee npKyu
auctb HeNoDBHXHO r3O6paXeHnna (HaNPmep, BbIOJIHeHHo OT pyKu IINIOCTpaunn nn TnTpap) C DBNXUIMCRA3O6paXeHnem. Pnp
NCIb3OBaHnn 3ToI fynKcnn peKOMeHNyETcR 3anncatb TnTp Ha "Memory Stick" nepei nyTeUeCTBnEM nI IN KaKIM-JIn6o Co6bltnem.
Pexm C.CHROM (UBeTobar npnpoeKuBnDeOkamepbI)
BbMOxTe HaIOxNtB DnKUeecr
1306paXeHHe NOBepx HEnoDBNXHOrO
1306paXeHn, HApnPmEp, 1306paXeHn,
KToOpoe MoKeT Cnykntb fOhom. BbInOnHte
CbeMky ObBeKTA Ha CNHE fOHe.ToIbKO CnHnA
CaCTb DnKxyEroCn 1306paXeHn IOMeHReTCa
MeCTaMn C HeIODbNxHbIM 1306paXeHnEM.
PexkM. OVERLAP* (nepeKpbIteN nAMrTn)
BbIMoKeTe CdeNaTb PnabHbI BBOd DnKjUeOcR N3o6paXeHr NOBepx HenoDnKHO rN3o6paXeHr.
Superimposing a still image in a "Memory Stick" on an image - MEMORY MIX
HaIooKeHne HnOoBnXnHO r3o6paXeHnB“Memory Stick"Ha n3o6paXeHne-ΦyHKuN MEMORY MIX
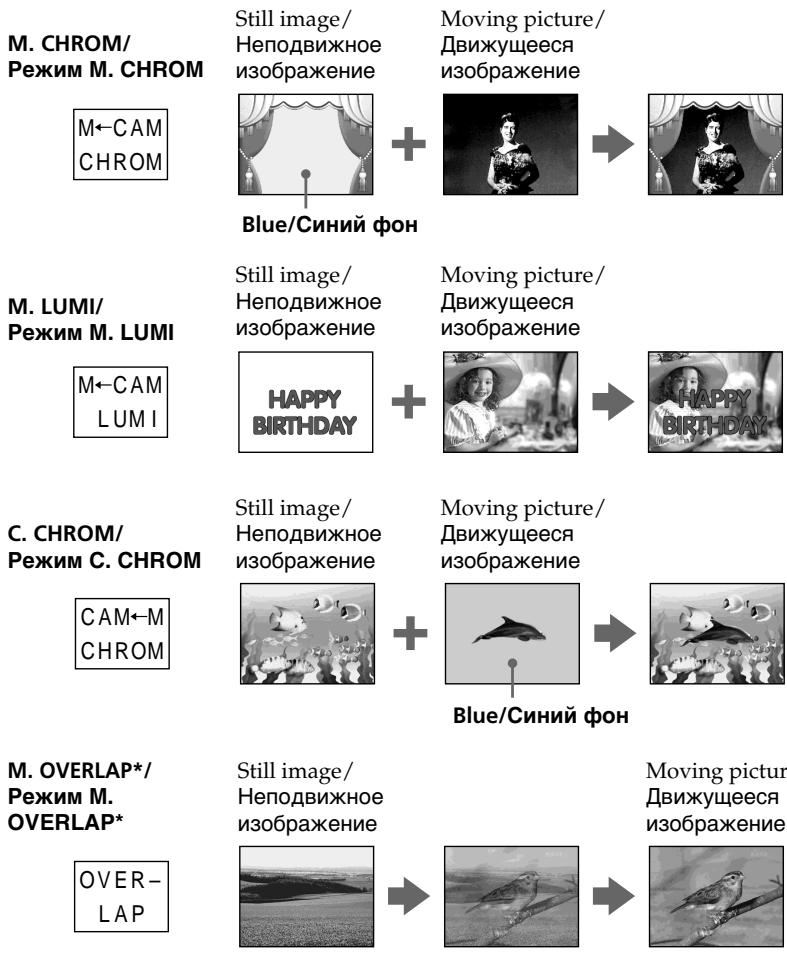
- The superimposed image using Memory overlap function can be recorded on tapes only.
*Hanoxehhbe C nCnOlb3ObaHNem yHKunnepeKpbTIN naMAtN 13o6paXeHn MoryT6bTB 3aNcAhnbTOJbKO HaJeHTax.
Superimposing a still image in a "Memory Stick" on an image - MEMORY MIX
HaIooKeHne HenoBnXnHoro n3o6paKeHnB“Memory Stick”Ha n3o6paKeHne-ΦyHKuN MEMORY MIX
Recording a superimposed image to a tape
Before operation
- Insert a tape for recording into your camcorder.
- Insert a "Memory Stick" recorded with still images into your camcorder.
(1) Set the POWER switch to CAMERA.
(2) In the standby mode, press FN and select PAGE2.
(3) Press MEM MIX. The last image recorded on the "Memory Stick" appears on the right lower part of the LCD screen.
(4) Press - / + on the right lower corner of the LCD screen to select the still image which you want to superimpose.
- : to see the previous image
- : to see the next image
(5) Press a desired mode. The still image is superimposed on the moving picture.
(6) Press - / + on the left lower corner of the LCD screen to adjust the effect, then press OK to return to PAGE2.
M. CHROM - The colour (blue) scheme of the area in the still image which is to be swapped with a moving image
M. LUMI - The colour (bright) scheme of the area in the still image which is to be swapped with a moving image
C.CHROM - The colour (blue) scheme of the area in the moving image which is to be swapped with a still image
M. OVERLAP - No adjustment necessary
The fewer bars there are on the LCD screen, the stronger the effect.
(7) Press EXIT to return to FN.
(8) Press START/STOP to start recording.
3aInscb HanoXeHHoro n3o6paxeHnHa JeHTy
Ipeed BbinoJHHeHem Oepaun
- YctaHOBNTe IeHTy IJnI 3aIncn B BaSy BuJeOKaMepy.
- YcTaHOBnTe "Memory Stick" c 3aIncAHbIMn HEnoDbXhMbIMn n3O6paXeHnA Mn B BaSy BnDeOKaMepy.
(1)YCTaHOBnTe NepeKJIIOuTaTeIb POWER B nOLOXKeHne CAMERA.
(2)В рекиме ожиданя нахмптей коньу FN выберпстсанцу PAGE2.
(3)HaxmTe KhoNky MEM MIX.ПocneJHee 3aIncahHoe Ha "Memory Stick" I3O6paKeHne IOBnTcB B npabOM HIXKHeM yrIy 3kpaHa.
(4)HaximaiTe KhoPiKn -/+ B npaBOM HxHxHem yIy 3kpaHa IЯ BbIbOpa HeNoDbIXHoro nI3o6paXKeHnI, KOtOpoe BbI XOTInTe HAnOxITb.
Pexm M. OVERLAP - He tpebyetc HnkaKnx peryInpoBOK
Yem MeHbIe NIOOC Ha 3KpaHe, Tem CINbHee 3OcpeKT.
(7)Haxmnte KhoNky EXIT nIy Bo3BpaTa K nHnkaun FN.
(8)Hajmte KhoNky START/STOP nHaayana 3aIncn.
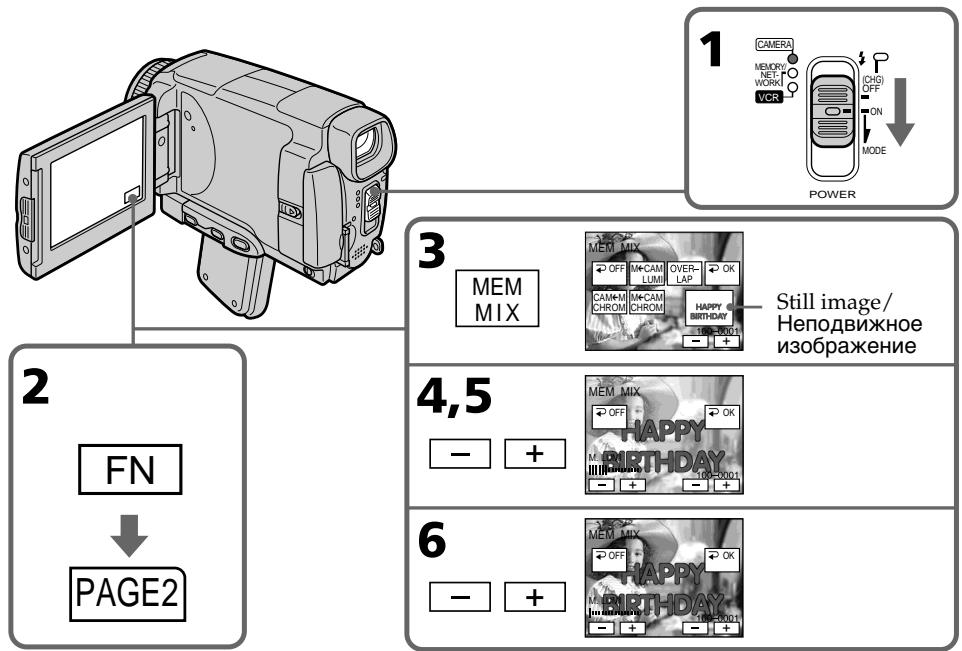
To change the still image to be superimposed
Press - / + on the right lower corner before step 6.
To cancel MEMORY MIX
Press OFF. The display returns to PAGE2.
Notes
- You cannot use the MEMORY MIX function for moving pictures recorded on the "Memory Stick".
- When the overlapping still image has a large amount of white, the thumbnail image of the picture may not be clear.
- During recording you cannot reselect the mode setting. Press OFF to return to PAGE2.
Image data modified on your computer or shot with other equipment
You may not be able to play modified images back with your camcorder.
When you select M. OVERLAP
You cannot change the still image. Press OFF to cancel the M. OVERLAP mode, then select the image again.
UTo6bI n3MeHnTb HEnoDnBxHHeu n3O6paXeHne dIa HAnOKeHnI
IpepeBbIIOJIHeHEm DeIcTBnI pyHKTa 6 HaxmamTe KHOKN - / + B IpaBOM HIXHem yIy 3KpHa.
ДЯ OTMeHbI yCTaHOBKn MEMORY MIX
HaKmTe KhoNk Ky OFF. INdkaunBepHeTcK C tpaHnue PAGE2.
PpmeaHnA
- Bé He MoXeTe IcNoJIb3OBaTb ΦyHKeIIO MEMORY MIX dIaBnJxuIxxcI n3oBpaXeHni, 3aIncAHHbIX Ha "Memory Stick".
- EcnnepeKpbIbAIOoee HeNoDbNIXHoe n036paXeHNe COJepXnT 60JIbOe KOINcTeB0 6BeIoro UcBera, ero MInHaTOpHoe n036paXeHNe MOKeT 6bITb HEcETKIM.
- Bo BpEMr BbIOnJIHeHn 3aIIncBbI He MoKTeuM3MeHnTb BbIOp yCTaHOBKnpeXIMMa.ДЯBo3BpTaK CTpaHnue PAGE2 HaxmnteKhONKy OFF.
DaHHbIe N3O6paXeHnB, BUNoN3MeHeHbIX Ha BaWeM nepcoHaBbHom KOMNbIOtepe nn ChrTbIX C NOMoUbIO pyroO annpaTypbl Bo3MOxHO, Bbl He cMOxTe BocPOn3BecTn MoDnФuINpOBaHHbIe N3O6paXeHnHa BaWei BNuDeOKaMepe.
EcnBbI bIbepeTe pexM M. OVERLAP
BbI He CMOKeTe N3MeHHTb HEnoDBrXKHOe
n3O6paXeHHe. HaxMITE KONkny OFF dIra
OTmEhblpeXIMMa M. OVERLAP, a 3aTeM
BbIbepTe N3O6paXeHHe eIe pa3.
Superimposing a still image in a "Memory Stick" on an image - MEMORY MIX
Recording a superimposed image to a "Memory Stick" as a still image
Before operation
Insert a recorded "Memory Stick" into your camcorder.
(1)Set the POWER switch to MEMORY/ NETWORK (DCR-IP55E only).
(2) In the standby mode, press FN and select PAGE2.
(3) Press MEM MIX. The last image recorded on the "Memory Stick" appears on the small screen at the lower right corner of the LCD screen.
(4) Press - / + on the right lower corner of the LCD screen to select the still image which you want to superimpose. - : to see the previous image + : to see the next image
(5) Press a desired mode. The still image is superimposed on the moving picture.
(6) Press - / + on the left lower corner of the LCD screen to adjust the effect, then press OK. The display returns to PAGE2.
M. CHROM - The colour (blue) scheme of the area in the still image which is to be swapped with a moving image
M. LUMI - The colour (bright) scheme of the area in the still image which is to be swapped with a moving image
C.CHROM - The colour (blue) scheme of the area in the moving image which is to be swapped with a still image
The fewer bars there are on the LCD screen, the stronger the effect.
(7) Press EXIT to return to FN.
(8) Press PHOTO deeper to start recording. The image displayed on the LCD screen will be recorded on a "Memory Stick." Recording is complete when the bar scroll indicator disappears.
HaIoxKeHne HEnoBnXHoRo I3O6paXeHnA B "Memory Stick" Ha I3O6paXeHne -ФункцЯ MEMORY MIX
3aInscb HanoXeHHoro n3o6paXeHnHa "Memory Stick" KaK HeNoDvXHoro n3o6paXeHnA
Ipeed BbINOJIHeHEm Opeaun
YcTaHOBnTe 3aIncaHnyo "Memory Stick" B BaUy BnDeokamepy.
(1)Установпейреклочаель POWER в положене MEMORY/NETWORK (Толъков мodyдль DCR-IP55E).
(2)B pexime oXnidaHnaXmTe KhoNky FN n BbIbepeTe cTpaHnU y PAGE2.
(3)HaxMMTe KhoIky MEM MIX. Послдец Изобрахене, Занcaнhoe на "Memory Stick", поВИТСЯ на малЕньКOM ЗкpaHe B HIXHem павOMуг lyэКраHaKKД.
(4)HaximMaTe KHOJIKN-/+B npabOM HNXHEmyIy 3KpaHa DnIe BbIbopa HeNoDnIXHOrO n3o6paXeHn, KOtOpoe BbI xOTnte HaIOXuTb.
:ДлгпрсмOTpa npeыduyцero n3o6paxKeHnA
+:ДлгпрсмOTpaСледуюцero n30бразжени
(5)BbIbepTe HxHbI pexIM. HeIODbHXHoe n3o6paXeHne 6yJeT hAOJKeHO Ha dBNkUeEe n3o6paXeHne.
(6)Haxmamte KhoNkN - / + BJIeBOM HxHHEmyIgKpaHa dIgpeRyIuPObKN 3ΦΦeKta,a 3aTeM haxmTe KhoNkY OK. INdkaUBeBepHeTcK CTpaHnue PAGE2.
PexmM.CHROM-LBetoBa cxema (no CnHemyuBety)oblaactnHeNoDbxHoro n3o6paXeHnKOTopar 6yDet 3aMeHena DBHXUIMCRA N3o6paXeHnEM
Pekim M. LUMI -LBeTobar cxema (no ypOBHIO npKoCTn) 06NaCTn HEnOdBxHOro n3o6paXeHn, KOtOpA 6yDet 3aMeHeHa DBNkUcMCA N3o6paXeHnEM
Pexim C.CHROM-LBeToBa cxema (no cnHemy cBety) oBlaCTn DInkUeROCA n3o6paXeHnA, KOTOPa 6yDeT 3aMeHeHa HeoDnKhbIM n3o6paXeHnEM
Yem MeHbIe NIOOC Ha 3KpaHe, Tem CINbHee 3OcpeKT.
(7)Haxmnte KhoNky EXIT nIy Bo3BpaTa KnHnkaun FN.
(8)HaXMMTe KHOINky PHOTO cInIbHee dIra naHa7a7a3aInc. OTo6paXaemoe Ha 3KpaH eN3o6paXeHne 6yJeT 3aIncAHO Ha "Memory Stick". 3aIncb CHTaETc 3aBepueHHoJ, KOrda nCye3HET INDkaTop NIOocbl npOKpyTKn.
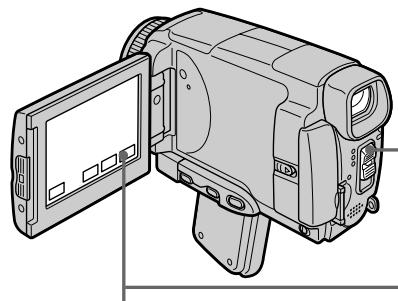
1
POWER

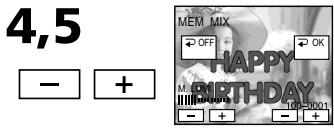
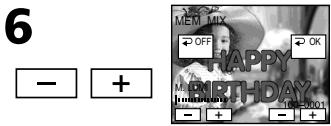
To change the still image to be superimposed
Press - / + on the right lower corner before step 6.
To cancel MEMORY MIX
Press OFF. The display returns to PAGE2.
Notes
- You cannot use MEMORY MIX function for moving pictures recorded on the "Memory Stick".
- If the overlapping still image has a large amount of white, the thumbnail image of the picture may not be clear.
- You cannot reselect the mode. Press OFF again to return to PAGE2.
Image size of still images
Image size is automatically set to 640 × 480 .
Image data modified with your computers or shot with other equipment
You may not be able to play them back with your camcorder.
UTo6bI n3MeHnTb HEnoDnBnKHoe n3O6paXKeHne dJa HaNoXKeHn
IpepeBbIIOJIHeHEm DeIcTBnI pyHKTa 6 HaxmamTe KHOJKN - / + B IpaBOM HIXHem yIy 3KpHa.
Bo3MOxHObI He cMOxKeTe BOCIpOu3BecTuNX Ha Bauei BuDeokamepe.
Superimposing a still image in a "Memory Stick" on an image - MEMORY MIX
When recording images on a "Memory Stick" using MEMORY MIX The PROGRAM AE does not work.
The "Memory Stick" supplied with your camcorder stores 20 images:
-For M.CHROM:18 images (such as a frame) 100-0001\~100-0018
-For C.CHROM:2 images (such as a background)100-0019\~100-0020
Sample images
Sample images stored in the "Memory Stick" supplied with your camcorder are protected (p. 186).
HaIoxKeHne HEnoBnKHO n36paXeHnB "Memory Stick" Ha n36paXeHne-ФункцЯ MEMORY MIX
Ппз заимси n3обрахжени на "Memory Stick"синрьзованем ФункциIMEMORYMIXФункциЯ PROGRAM AЕ не павотаeT.
"Memory Stick", npnilaraemam K Baweim Bndeokamepe, yxe Bmeuaet 20 n3o6paxheni
Recording moving pictures on the "Memory Stick" - MPEG movie recording
You can record moving pictures with sound on the "Memory Stick".
Before operation
Insert a "Memory Stick" into your camcorder.
(1)Set the POWER switch to MEMORY/ NETWORK (DCR-IP55E only).
(2) Press START/STOP. Your camcorder starts recording. The camera recording lamp located on the front of your camcorder lights up.
| Quality mode | recordable time |
| SUPER FINE | Maximum 45 s |
| FINE | Maximum 1 min 10 s |
| STANDARD | Maximum 2 min 20 s |
| LIGHTMODE | Maximum 4 min 40 s |
3a\Pncb DvNxUxxCn m3o6paXeHn Ha "Memory Stick" - 3a\PncbФиЛьмa MPEG
BbMOKeTe 3aINcBbA Tb DnBxKyuIeCn06paXeHn co 3BykOM Ha "Memory Stick".
Ipeed BbinoJHHeHem Oepaun
YcTaHOBnTe "Memory Stick" B BaCy BnDeOkaMepy.
(1)Установские полочатуль POWER в положене MEMORY/NETWORK (Толъковские DCR-IP55E).
(2)HaXMMTe KHOJNky START/STOP.BaWa BnDEOKaMepa NaHcET 3aIncb.3arOpNTcI NaMNoUka 3aIncu BNDeOKaMepbl, paCNOJoxEHHa Ha nepeDne IaHei BaWei BNDeOKaMepbl.
Recording time indicator can be recorded on the "Memory Stick."
This indicator is displayed for five seconds after pressing START/STOP. This indicator is not recorded./
3TOT INDnKaTOP OTObpaKaetcB TceHne nTn CeKyHn NocHe HaxKaTn KhONKn START/ STOP. 3TOT INDnKaTOP He 3aIncsbIbaETcH.
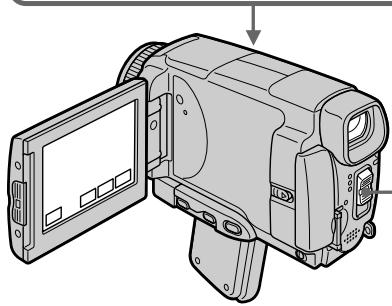
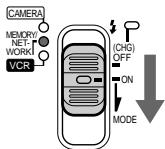
1
POWER
Recording moving pictures on the "Memory Stick"
- MPEG movie recording
To stop recording
Press START/STOP.
Note
Sound is recorded in monaural.
MPEG movie recorded with the camcorder:
- Is MPEG MOVIE AD
- Cannot be played back on other digital still cameras and digital video camera recorders.
- Cannot be output from the i.LINK (MICROMV Interface).
When the POWER switch is set to MEMORY/ NETWORK (DCR-IP55E only)
The following functions do not work:
- Wide mode
-Digital zoom - SteadyShot function
Super NightShot
-Colour Slow Shutter
-Fader - Picture effect
- Digital effect
-Title - Sports lesson of PROGRAM AE (The indicator flashes.)
When using an external flash (optional)
Turn the power of the external flash off when recording moving pictures on the "Memory Stick".
Otherwise, the charging sound of the flash may be recorded.
Recording date/time
The date/time are not displayed while recording. However, they are automatically recorded onto the "Memory Stick". To display the recording date/time, press DATA CODE during playback.
Various settings cannot be recorded. You can also use the Remote Commander for this operation (p. 57).
During recording on a "Memory Stick"
Do not eject the cassette tape from your camcorder. While ejecting the tape, sound is not recorded on "Memory Stick."
When the POWER switch is set to MEMORY/ NETWORK (DCR-IP55E only)
The angle of view is slightly larger compared with the angle of view in CAMERA mode.
3a\Pncb D\nKxuXcxg n3o6paJxHn Ha "Memory Stick"
- 3aɪnscb Φɪŋbma MPEG
ДлЯ OCTaHOBKи 3aПСИ
Haxmnte KhoNky START/STOP.
Ppimcayane
3Byk 3aIINcIbIaETCA B MOHOΦOHNUeCKOM pEXKIMe.
Self-timer MPEG movie recording
You can record images on the "Memory Stick" with the self-timer. You can also use the Remote Commander for this operation.
(1)Set the POWER switch to MEMORY/ NETWORK (DCR-IP55E only).
(2) Press FN and select PAGE2.
(3) Press SELFTIMER in the standby mode. The (self-timer) indicator appears on the LCD screen.
(4) Press START/STOP. Self-timer starts counting down from 10 with a beep. In the last two seconds of the countdown, the beep gets faster, then recording starts automatically.
3aInc bФilbMa MPEG no TaMepy camo3anycka
BbMOxTe 3aIncsbIbTaNIO6paXeHnHa Ha "Memory Stick" no TaImepy camO3anycka. Bbl MOxTe TaKKe IcNoIb3ObA TbДЯ 3ToI onepaun NpIbT dIcTaHIOHHO ynpabNeHn.
(1)Установские полочатуль POWER в положене MEMORY/NETWORK (Толъковая DCR-IP55E).
(2)HaXMMTe KHOIpKy FN n BbIbepnTe cTpaHnCy PAGE2.
(3)В рекике ожиданя нахмITE KHONKY SELFTIMER. Ha зкрапЕ XXД повится Ид尼克атор (Таймера самоануcka).
(4)Haxmnte KhoNky START/STOP. TaMep cAmo3anycka hauhET o6paThbI oTcHT OT 10 c 3ymmepHBIM CnHaIOM.B nocLeDnHe DBe CeKHyDbI o6paTHOrO OTCeTa 3ymmepbI CNrHaI 6yDet 3ByuTa bAaIe, a 3aTEM ABTomatueckn HauhETcra NINCb.
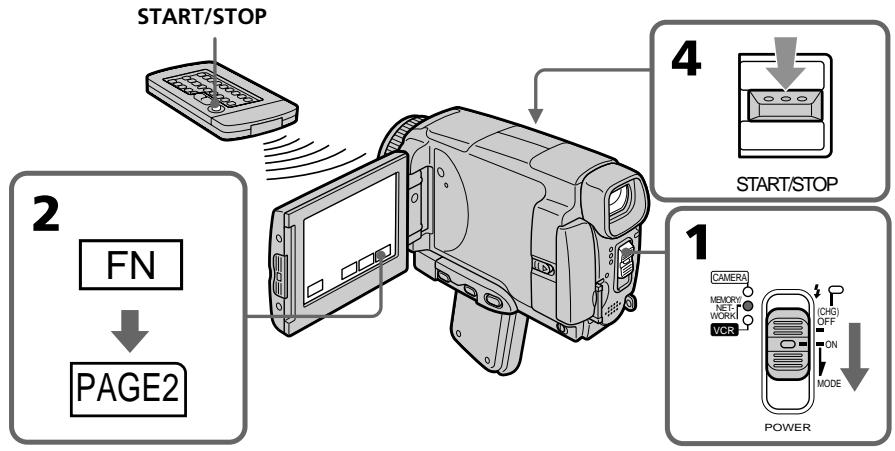
Recording moving pictures on the "Memory Stick"
- MPEG movie recording
To stop the countdown
Press START/STOP.
To restart the countdown, press START/STOP again.
To cancel the self-timer recording
Press SELFTIMER so that the (self-timer) indicator disappears on the LCD screen. You cannot cancel the self-timer recording using the Remote Commander.
Note
The self-timer recording mode is automatically cancelled when:
- Self-timer recording is finished.
- The POWER switch is set to OFF (CHG) or VCR.
3aIncB DvNcxuXxra 13o6paKeHn Ha "Memory Stick" -3aIncB fMbMa MPEG
Recording a picture from a tape as a moving picture
Your camcorder can read moving picture data recorded on a tape and record it as a moving picture on a "Memory Stick." Your camcorder can also take in moving picture data through the input connector and record it as a moving picture on a "Memory Stick."
Before operation
- Insert a recorded tape into your camcorder.
- Insert a "Memory Stick" into your camcorder.
(1) Set the POWER switch to VCR.
(2) Press The picture recorded on the tape is played back.
(3) Press START/STOP at the scene where you want to start recording from.
| Quality mode | recordable time |
| SUPER FINE | Maximum 45 s |
| FINE | Maximum 1 min 10 s |
| STANDARD | Maximum 2 min 20 s |
| LIGHTMODE | Maximum 4 min 40 s |
3a\Pncb n3o6paXeHnCJIeHTbI KaK DnJxUeROcN3o6paXeHn
Baasa Bndeokamepa MoKet CHTbIBaTb DaHHbIe DnBxuyeoCn 306paXeHn, 3aNcAHHbIe Ha JeHTe, n 3aNcBtBA Tb IN KAK DnBxUyeecn 1306paXeHne Ha "Memory Stick". Baasa Bndeokamepa MoKet TaKKe npINHMaTb DaHHbIe DnBxuyeoCn 306paXeHn YpeEz BXOdHoi pa3bEm n 3aNcBtBA Tb IN KaK DnBxUyeecn 1306paXeHne Ha "Memory Stick".
Ipeed BbInOpHeHnEm Oepaun
- YCTAHOBITe 3aIINCaHHyIO KACCETy CJIeHToB BaUy BUnDeOKaMepy.
- YcTaHOBnTe "Memory Stick" B BaIy BnDeOKaMepy.
(1)Установпейразець POWER в положене VCR.
(2)HaxmTe KhoNky II. Byet Bocnpo3BeJeHO n3OpaXeHne, 3aIncanHoe Ha JeHTe.
(3)HaxmTe KhoNky START/STOP B MeCe, c KOtOpOro Bbl XOITNe HaaTb 3aIncb.
Recording time indicator can be recorded on the "Memory Stick."
This indicator is displayed for five seconds after pressing START/STOP. This indicator is not recorded./
3TOT INdikatop OTObpaKaTeC B TceHMe nATN cekyND Noche HaxaTnA KHONK START/ STOP. 3TOT INdikatop He 3anicbbaeTcH.

2


1
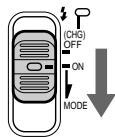
POWER
Recording a picture from a tape as a moving picture
To stop recording
Press START/STOP.
Note
Sound recorded in stereo is converted to monaural sound when recording from a tape.
When the "Memory Stick" access lamp is lit or flashing
Do not shake or strike the unit. As well do not turn the power off, eject a "Memory Stick" or remove the battery pack. Otherwise, the image data breakdown may occur.
Titles cannot be recorded
You cannot record them on the "Memory Stick". The title does not appear while you are recording a moving picture with START/STOP.
Various settings recorded on a tape
They cannot be recorded on the "Memory Stick". The date/time when it is recorded on the "Memory Stick" is recorded.
3a\Pncb n306paXeHn c JeHTbI KaK dBHXyUeOcH n3o6paXeHn
ДлЯ OCTaHOBK 3aHnCn
Haxmnte KhoNky START/STOP.
Примеане
3Byk, 3aIncanHbB B CTepeofoHnueckom pexKIme, Ppeo6pa3yeTcB MOnofoHnueckn 3Byk Pn3aIncnC JHeHTbl.
Ecln lamnoka Doctyna "Memory Stick" roput nJn MnaeT
He trpncte n He ctyuhte no annapaty. TaKke, He BbIKIIOUaHTe PNTaHne, He N3BLeKaIte "Memory Stick" n He CHIMaTe 6aTapeHbI bLOk. B npOTnBHom clyuae daHHble u3o6paXeHnMa MOYr 6bITb yTePAHbI.
Tntpbl He Moryt 6bItb 3anncaHbl
BbI He MoKeTe 3aIINcBiBaTb TnTpbl Ha "Memory Stick". TnTpbl He NOBRTc BO BpEma 3aIINcN DInKxUeROc N3O6paXeHnC NOMOuH KHNKl START/STOP.
Pa3nHbIe yCTaHOBKn, 3anucaHHbIe HaJIeHTe
Они мoryт 6byTb 3ancaHbHa "Memory Stick".Дata/BpeM 3ancbiBaetc npn 3anucn Ha"Memory Stick".
Recording a moving picture from other equipment
Before operation
Set DISPLAY to LCD in the menu settings (p.
232). (The default setting is LCD.)
(1) Set the POWER switch to VCR.
(2) When using the A/V connecting cable, set VideoINPUT to the appropriate position depending on the player. (p. 226)
(3) Play back the recorded tape, or turn the TV on to see the desired programme.
The image of the other equipment is displayed on the LCD screen or in the viewfinder.
(4) Press START/STOP at the scene where you want to start recording from.
Using the A/V connecting cable
3aHnCb DvNjxueroocn 3o6paXeHnC dpyro annapaTpybl
Ipeed BbinoJHHeHem Otnepaun
YcTaHOBInTe OOnuIO DISPLAY B yCTaHOBkax MeHIO B nIoXeHne LCD (ctp. 240). (IyoMOnUaHnIO yCTaHOBNeHo nIoXeHne LCD.)
(1)YctaHOBInTe npeKJIouaTeIb POWER B noJIOKeHne VCR.
(2)Прии ИСПОЛьЗОВАнINCOЕДИНТЕЛБHorO Ka6IEL aYДЮ/BuДeo YcTaHOBNTe ONUVIDEOINPUTВHaINeJkaUee NIOJOKeHne,B3aBICIMOCtNOTBOCpOu3BODЯJIeOуCTpoIcTBa.(ctp.234)
(3)BocnpoIN3BeInTe 3aIncaHHyJeHTy nII IN BKNIOHTe TEJIeBn3Op IJr IpOCMOtpa HJXHOI pOgrpAMMbI.
I3o6paXeHne C npyro annpaTpybOTo6pa3ntcHa 3kpaHe KKД nIn B BuDOnCKaTeNe.
(4)Haxmnte KhoNky START/STOP B TOM 3nI3Oe, c KOtOporo Bby XOTne HaaTaB 3aIINCb.
IcnoJb3OBAHnE COeINHHTeNbHOKabEJI aydno/BuJeO
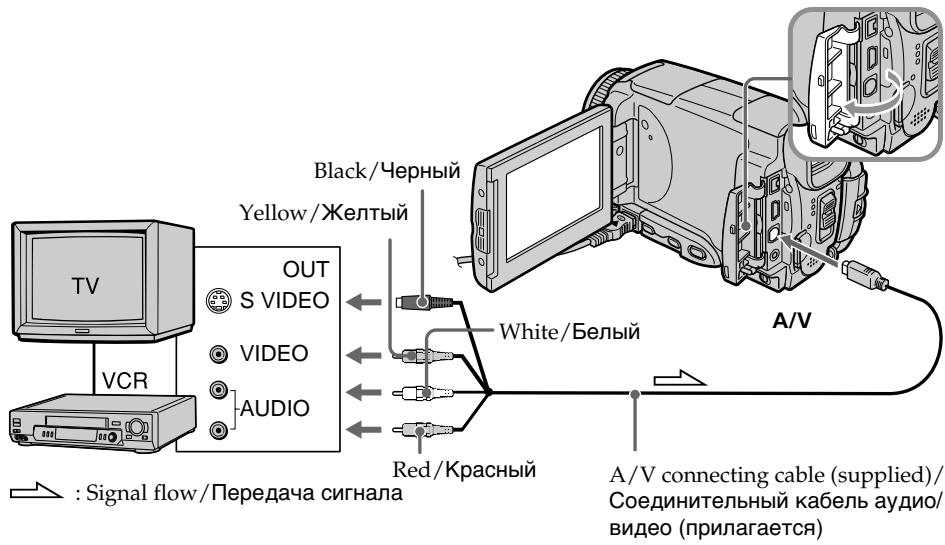
Connect the yellow plug of the A/V connecting cable to the video jack on the VCR or the TV.
IopcOeHnHTeKeJbIyWTeKep coEHHnTeJbHOroKa6eJaayNo/BuJeO K rHe3dy BnDeocnHaHa KBMnn TeNeBn3opa.
If your TV or VCR has an S video jack
Pictures can be reproduced more faithfully by using an S video cable.
With this connection, you do not need to connect the yellow (video) plug of the A/V connecting cable.
Connect an S video cable to the S video jacks of both your camcorder and the TV or VCR.
EcIn B BaWem TeJIeBn3ope nI KBM IMeetc rHe3do S bVideo
N3o6paKeHnMoYr 6bITb BOCpOu3BeDeHbI 60JIe BvICOKoKaYeCTBcEHNO pR NcIOJb3OBaHn Ka6eNa S BuJeO.
Ppi daHOM coeDHHENn Bam He HxKHO nOdoeDInHbT bXeNtBn WTeKepe (BnDeo) coeDHNHTelbHorKaBeJr ayDIO/BnDeo.
ПолбeoинITE ka6ьb S bVideo K rHe3dAm S bVideo Baшew bVideokamepbI n TeleBv3opa nnn KBM.
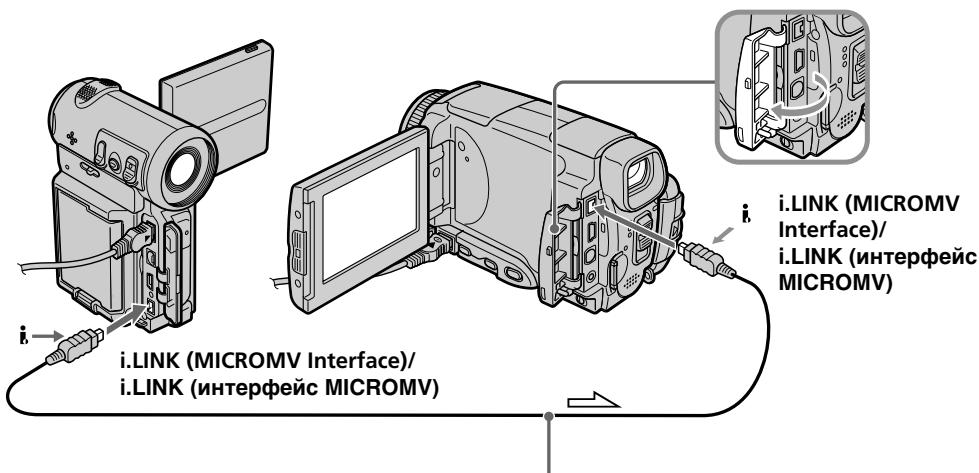
Using the i.LINK cable
Icnojb3oBaHne ka6eJia.LINK
When recording from a tape in poor recording condition, for example, a tape that is worn out from repeated dubbing, recording is interrupted, or REC ERROR appears and recording cannot be carried out. Record distortion-free images.
PpmeuHne
Viewing a still image - Memory photo playback
ПрсмOTР HeNoBmXHOrO n3O6paXeHnA - Bocpon3BeJeHne FOToCHIMKOB n3 nAMATN
You can play back still images recorded on a "Memory Stick." You can also play back six images including moving pictures on single screen arranged in the same order as a "Memory Stick" by selecting the index screen.
Before operation
Insert a "Memory Stick" into your camcorder.
(1)Set the POWER switch to MEMORY/ NETWORK (DCR-IP55E only) or VCR.
(2) Press PLAY or PB. The last recorded image is displayed.
(3) Press - / + to select the desired still image. - : to see the previous image +: to see the next image
BbMOxTe BOCPON3BOIDnTB HeNoDnBXKnHbIe n3O6paXeHn, 3aIncAHnHbIe Ha "Memory Stick". BbMOxTe TaKxpe BOCPON3BOIDnTB WeCtB n3O6paXeHn, BKlHOyAa DnBXKyUInCe n3O6paXeHn,Ha OHNOM 3KpAHe, paCNOJoxKeHHbIe B NocJeDoBaTeNbHOCTn INX paCNOJoxKeHHa Ha "Memory Stick", nyTeM BbIOba INDeKCHOrO 3KpAHa.
Ipeed BbINOJIHeHEm Opeaun
YctaHOBnTe "Memory Stick" B Bauly BnDeOkaMepy.
(1)Установские песеклочатуль POWER в пооженке MEMORY/NETWORK (Толков мodyдль DCR-IP55E) ул ВСR.
(2)HaxmTe KhONky PLAY nIIN PB. Bydet OTo6paXeHo nOcIeDHee 3aIncaHHoe n3o6paXeHne.
(3)HaximaiTe KhoNkN -/+ДЯ Bbl6opa hyxHoro HenoDbNxHoro n3o6paXeHnA.
:ДлгпрсмOTpa npeыduyцero n3o6paXeHЯ
+:ДлгпрсмOTpa cIeIyUOJIeRo n306paxKeHnA
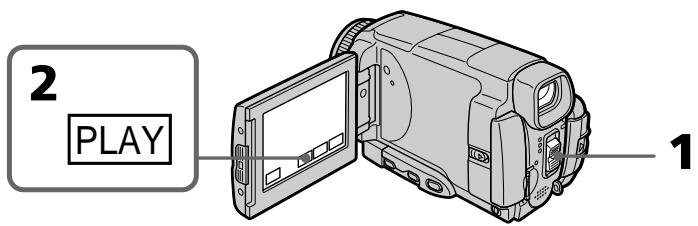
To stop memory photo playback
Press CAM or VCR, or MEMORY PLAY on the Remote Commander.
Note
You may not be able to play back images with your camcorder:
- when playing back image data modified on your computers.
- when playing back image data shot with other equipment.
Playback still images recorded on the "Memory Stick"
Playback images are not output from the i.LINK (MICROMV Interface).
ДлЯ OCTAHOBKN BOCNpON3BedeHnФOTOCHIMKOB N3 NaMRTN
Haxmte KhoNky CAM, VCR uIN MEMORY PLAY Ha npbTe dinCTaHcNoHHoro ynpabIeHn.
PpimueaHne
Bo3MOxHOb, BbI He cMOxTe BbIOnHnTb Bocnpo3BeDeHne n3O6paXeHn C nOMoUbO BaSeBnDEOkamepbl:
-при ВOCNPOM3BEdENMHДaHbIx ИЗбражEHIM, BnOIN3MeHEnHbIX C NOMOБь BaWero nepCOHAlbHOrO KOMNbIbTepa.
- npn BOCnpOn3BVeDEHm DaHbIX N3O6paXeHm, CHrTbIX C NOMOsbIO dpyro annapaTpybl.
BocnpoImbOIMbIe HnOaBnXHbIe n3o6paKeHna,3aIncAHbIe Ha "Memory Stick"
Bocpn3bOIMbIe H3o6paXeHnnepeaTcyeep3rHe3do i.LINK (nHTepfncMICROMV).
File name
- The directory number may not be displayed and only the file name may be displayed if the structure of the directory does not conform to the DCF standard.
- oDirectory ERROR may appear on the LCD screen if the structure of the directory does not conform to the DCF standard. If this message appears, you can play back images but cannot record them on the "Memory Stick."
- The file name flashes on the LCD screen if the file is corrupted or the file is unreadable.
To play back recorded images on a TV screen
- Connect your camcorder to the TV with the A/V connecting cable supplied with your camcorder before the operation.
- When operating memory photo playback on a TV or on the LCD screen, the image quality may appear to have deteriorated. This is not a malfunction. The image data is as good as ever.
- Turn the audio volume of the TV down before operation, or noise (howling) may be output from the TV speakers.
Still image
You can select still images also with - / + on PAGE1, PAGE2 or PAGE3.
ПрсмOTР HeNoDBrNkHOrO n3o6paXeHnA -BocnpOn3BeDeHneФOTOCHmKOB n3 namrTn
Ha3BaHne paJIa
Homep kataIora MoKet He OTo6paKaTbCn, n ToJIbKO mRfAaJNa MoKet OTo6paKaTbCn, ecnn CtpyKtpya kataIora He COOTBETCTBye Tpe6obAHm CTAndapTa DCF.
- INДИКАЦИ -DIRECTORY ERROR MOЖET NOВИТСЕ на ЗкpaneжКД, ecn CTpyKТура KaTалORA He COOTBeTCTByET Tpe6OBaHЯm CTaHДapTa DCF. Ecn 3TO COOБцEHNE OTOбраЖаETС, Bbl CMоЖeTe BOCПОИЗВОДТь ИЗБржEHЯ, Ho He CMOЖeTe INx 3aIINcSbIbAын Ha "Memory Stick".
-IMaIaMnraTHa3KpaHeKKI,ecnn 10nOBpeXkDeHnHHeYHTaeTc.
Длв BOCPON3BeDEHNA 3aNcAHNbIX n3O6paXeHn Ha 3KpaH TeJIeBn3Opa
-Перед Вьлеленем ореташи
пдоздг Te Baу Wd ekamepу K
Телевизус pOMOцью coeHnITeIbHoro
Кабеля ayduo/BuDeo, рплагамо К Baшей
Вd ekampe.
-Пи BOCPON3BedeHnФOTOCHIMKOBИЗ
namrTaHa 3kpaHe TEJIeBn3Opa ИIHa 3kpaHe
KKД, KaeeCTBO N36paXeHn MOKeT
BbIJIaDeTb yUxDiWeHHbI. 3To He RaBnaTeC
HcNcPaBHOCTbI. DaHbIe N36paXeHn
HaxoJITcB TOM Xe COCTOHN, YTO I
npexJde.
-Перед началов ВОсрпоиЗБеДеняумьштЕ ромКоCTь TeLEВИЗОра,Ин<aуЧepeз ДИнHamNKI TeLEВИЗОра можетпосьшаТСЯУМ (3aBbIBaHNe).
HenoDbnKHOe n3o6paXeHne
BbMOKeTe BbIbpaTb HnOdBxKHbIe
n3o6paXeHHaTKe C nOMOsbIO KHOIOK-/+Ha
cTpaHnUax PAGE1, PAGE2 nn PAGE3.
Screen indicators during still image playback
3KpaHHbIe HNdNkAToPbI BO BpeMBOcnpOn3BeDeHnH HeNoDnXnHOu3o6paXKeHn
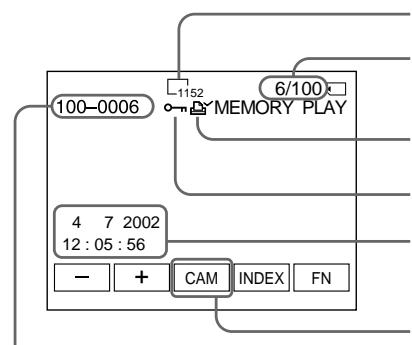
Data Directory Number, File Number/
Homep KaTanaIora DaHHbIX, Homep
phaJna
Image size/Pa3mepn3o6paKeHHN
Image number/Total number of recorded images/
Homep n3o6paXeHn/O6uee KoIInueCTBo
3aIncanhblx n3o6paXeHn
Print mark/3nak neuATn
Protect/INHdkaTop 3auNTbI
Recording date/time/ various settings/ DaTa 3aIncu/BpeMra/pa3JIuHbIe yCTaHOBKn
When the POWER switch is set to VCR, VCR is displayed instead of CAM (camera)/ EcnnnepeKIOUaTeB POWER yCTaHOBJIeB B noIooKeHne VCR, BmecTo INdNkauIN CAM (BnDeOkamepa) OTo6paXaAETcN INdNkaUaY VCR
When no images are recorded on the "Memory Stick"
When you press MEMORY PLAY on the Remote Commander, NO FILE appears.
Recording data
To display the recording data (date/time or various settings when recorded), press DATA CODE during playback. You can also use the Remote Commander for this operation (p. 57).
To make LCD screen indicators disappear
Press DSPL/TOUCH PANEL.
EcIn Ha "Memory Stick" HeT 3aIncHbIX n3o6paxKeHn
EcnBbHaXMeTe KhoNky MEMORY PLAY Ha nyIbTe DnCTaHcUHOHOrO ynpaBJeHn, NOBNTcA coo6eHne NOFILE.
DaHHbIe 3aHNCn
Playing back six recorded images at a time (index screen)
You can play back six recorded images at a time. This function is especially useful when searching for a particular image.
(1)Set the POWER switch to MEMORY/ NETWORK (DCR-IP55E only) or VCR.
(2) In MEMORY/NETWORK mode, go to step 3. In VCR mode, press PB.
(3) Press INDEX to display the index.
A red mark appears above the image that is displayed before changing to the index screen mode.
- To display the previous six images, press .
- To display the following six images, press .
You can also use - / + on the Remote Commander instead.
ПрсмOTР HeNoDBrNkHOrO n3o6paXeHnA -BocnpOn3BeDeHneФOTOCHmKOB n3 namrTn
Bocnpo3BeJeHne 6 3aIncaHHbIX n3O6paXeHn OndHOBpeMeHHO (nHdEKCbHn 3KpaH)
BbMOxTe BOCpOn3BeCTn 5eCTn 3aHnCaHHbIX n3o6paXeHn OndHOBpeMeHNo. 3Ta cyHKUra RbJIaTcOOC6eHNO POJe3HOI pRn BBIOJHHeHn NONCAOTDeIbHorO n3o6paXeHn.
(1)Установпейсякючateь POWER в положене MEMORY/NETWORK (толъковideль DCR-IP55E) уи VCR.
(2)Bpexime MEMORY/NETWORK napeiNTe K BbIOJIHeHIO DeIcTBnI NyHKTa 3. Bpexime VCR haxmTe KhoNkY PB.
(3)HaxmTe KhoNky INDEX dIy OTo6paKeHHdeKCHOrO 3kpaHa.
KpaChHa MeTka NOBHTcHa HaI3O6paXeHHeM, KOtOpoe OTo6paXaEcTcpeIepeXoDOM B pexIM HnDeKCHOrO 3kpaHa.
- OTo6paXeHnI npEbldyuXh WeCTn H3O6paXeHn HaxMnte KhoNkY
-ДЯ OTO6paKHeH NcIeDyUOuXx WeCTN 1306paKHeH NaXMITE KONKy BmecTo 3tOrO, BbI TaKxe MoKeTe NcNoIb3oBaTb KONKn -/+Ha NpIbTe DnCTaHcNHOHOrO ynpaBLeHn.
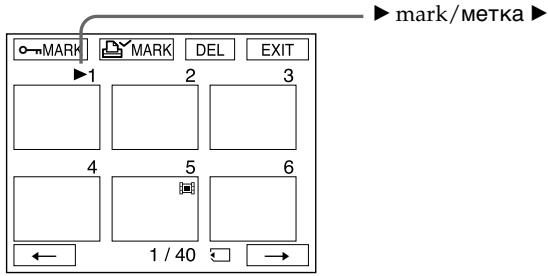
To return to FN
Press EXIT.
To return to the normal playback screen (single screen)
Press the image you want to display.
Note
When displaying the index screen, the number appears above each image. This indicates the order in which images are recorded on the "Memory Stick." These numbers are different from the data file names (p. 127).
Image data modified with personal computers or shot with other equipment
These files may not be displayed on the index -screen.
Viewing a moving picture - MPEG movie playback
You can play back moving pictures recorded on a "Memory Stick." You can also play back six images including still images in order at a time by selecting the index screen.
Before operation
Insert a "Memory Stick" into your camcorder.
(1)Set the POWER switch to MEMORY/ NETWORK (DCR-IP55E only) or VCR.
(2) Press PLAY or PB. The last recorded image is displayed.
(3) Press - / + to select the desired moving pictures. -: to see the previous picture + : to see the next picture
(4) Press MPEG to start playback.
(5) Press VOL- or VOL+ to adjust the volume. VOL- : to decrease the volume. VOL+ : to increase the volume. When the LCD screen is closed, no sound is heard.
You may not be able to play back images with your camcorder:
- when playing back image data modified on your computers.
- when playing back image data shot with other equipment.
MPEG movie recorded with the camcorder:
- Is MPEG MOVIE AD
- Cannot be played back on other digital still cameras and digital video camera recorders.
- Cannot be output from the i.LINK (MICROMV Interface).
To play back recorded images on a TV screen
- Connect your camcorder to the TV with the A/V connecting cable supplied with your camcorder before operation.
- Turn the audio volume of the TV down before operation, or noise (howling) may be output from the TV speakers.
Moving picture
You can select moving pictures also with - / + on PAGE1, PAGE2 or PAGE3.
When no images are recorded on the "Memory Stick"
When you press MEMORY PLAY on the Remote Commander, NO FILE appears.
To change the screen size
Press SCRN SIZE. The screen size changes as follows:
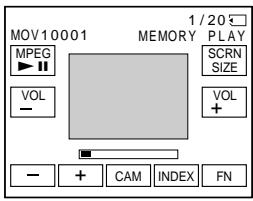
Notes on the screen size
- The picture may not be displayed at the middle of the LCD screen, depending on the movie.
- Even if you switch the screen size, the picture may not be displayed full-screen size, depending on the movie.
Ppimcayane
Bo3MOxHO, BbI He CMOxKeTe BbIIOHnTb BOcPOn3BedeHne N3O6paXeHm C NOMoCbHO Bauei BuDeOkampeHbI:
- npn BocnpoImBeDeHm DaHbIx I3O6paXeHm, BvOnImMeHeHHbIX c NOMOBy BaWero nepcoHaihBHorO KOMNbIOTepa.
- npn BOCnpOn3BVeDEHm DaHbIX N3O6paXeHm, CHrTbIX C NOMOsbIO dpyro annapaTpybl.
- RAJIaTeC HJNbMOM MPEG MOVIE AD
He MoXeT 6bITb BOCpOn3BcEHe Hn ApyHnx UuΦpOBoVxΦoToaannapatax NcΦpOBoVbx BuDeOkAmePax. - He MoXeT 6bIbI nepeIaI an uee3 rHe3do i.LINK (nHTepFeIc MICROMV).
Дя Воспpon3BeDEHЯ 3aIncaHHbIX n3o6paXeHn Ha 3kpaH TeLeBn3opa
IpeBbINHeHemonepaunn noCoEaHInTe BAsy BuDeokamepy K TeLEB3Opy c NOMoCbIO COeDHNITelbHoro Ka6eNa ayDIO/BuDeo, npinaraemoro K BaSei BuDeokamepe.
-Перед Наалов ВорсpondиеваянумehьшпЕТРOMKOSTТелевиЗОра,Ин<aучepe3ДиHamMkiNТelveBnOPOmaMOKTe NocblshaTcbSlym(3aBbBaHne).
DvIXyueecn306paXeHne
Bb MojTe BbIbnpaT bDnKyuJneCn 1306paXeHnA TaKe c NOMOuB KONOK-/+Ha CTpaNuax PAGE1, PAGE2 nn nnPAGE3.
EcIn Ha "Memory Stick" He 3aIncHo HnKaKnx n3O6paXeHn
EcnBbHaKMeTe KhoNkY MEMORY PLAY Ha nyIbTe NcTaNtauHOnHOro ynpaBLeHnna, NOABTc HnDkaZu NOFILE.
ДлнИЗМЕHEHЯ pa3mepa 3KpaHa
Haxmnte KhoNky SCRN SIZE. Pa3mep 3KpaHa n3MeHReTcR CJeDyOuM mOBpa30M:
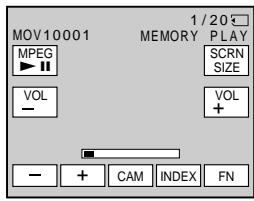
Screen indicators during moving picture playback
3KpaHHbIe HNdkaTopbI BO BpeMa BOCpON3BeDeHnBnXyUeROcA n3o6paJxehn
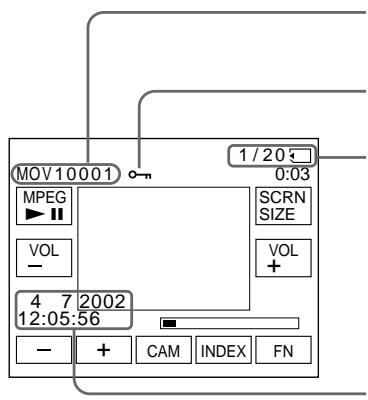
Data Directory Number, File Number/ Homep kaTanora danHbIX/Homep paIna
Protect/VHdNkaTOp 3aunTbI
Picture number/Total number of recorded pictures/Homep n3o6paXeHn/Y/O6uee KOnIyecTBo 3aIncAHbIX n3o6paXeHn
Recording date/time. (Various settings are displayed as “--”)./
To display the recording date/time, press DATA CODE during playback. You can also use the Remote Commander for this operation (p. 57).
To make screen indicators disappear
Press DSPL/TOUCH PANEL.
3aTncb daTbl/BpeMeHn
Copying still images recorded on the "Memory Stick" to a tape
You can copy still images recorded on the "Memory Stick" and record them to a tape. You can also use the Remote Commander for this operation.
Before operation
- Insert a tape for recording into your camcorder.
- Insert a "Memory Stick" into your camcorder.
(1) Set the POWER switch to VCR.
(2) Using the video control buttons, search a point where you want to record and stop playback.
(3) Press PB. The last recorded image is displayed.
(4) Press + / - to select the desired image. - to see the previous image +: to see the next image
(5) Press FN and select PAGE3.
(6) Press REC CTRL, then REC START. Copying starts. Press REC PAUSE at the scene where you want to stop recording.
(7) If you have more to copy, repeat steps 4 to 6.
Ko\Pu\rO\BaHne He\Po\OBuXhBIX n3O6paXeHn, 3a\Pi\ncAHHbIX Ha "Memory Stick", Ha JIeHTy
BbMOxTe KOINPOBaTb HENoDnXHbIe
13O6paXeHnI, 3aNcAnHbIe Ha "Memory Stick",
13aNcSbIbTaB INx HA IeHTy. BbMOxTe TaKKe
1CNoIb3OBaTb DnA 3ToI onepaun nynbT
1nCTaHUnHOHorO ynpabLeHnI.
Ipeed BbInOpHeHem onepaunn
- YctahOBHTe KaCCety CJIeHToI JnIaPiNCn B BaUy BuJeOkaMepy.
- YcTaHOBnTe "Memory Stick" B BaCy BnDeOKaMepy.
(1)YctaHOBInTe IpeKJIouaTeIb POWER B noJIOXeHne VCR.
(2)Исплььзу.KHONКи BnDEOKOHТРОЯ,HAДNTToTOKy,IeBbXOTITE BbINONHtB 3aINCb,IOCTAHOBITBEBOCPON3BeDeHne.
(3)HaxmTe KhoNky PB. BydEt OTo6paXeHo nocJeHHe 3aIncahHoe I3o6paXeHne.
(4)HaxmMaTe KHOnKn+/-ДЯ BbIbopa HxKHOro N3O6paXeHnA.
Copying still images recorded on the "Memory Stick" to a tape
To stop copying in the middle
Press on the LCD screen or STOP on the Remote Commander.
Notes
- You cannot copy MPEG movie files to the tape.
- You cannot copy the index screen to the tape.
During copying
You cannot operate the following functions:
-MEMORY PLAY
-MEMORY INDEX
-MEMORY DELETE
-MEMORY-/+
-MEMORYMIX
Image data modified on your computers or shot with other equipment
You may not be able to copy modified images with your camcorder.
KonipobaHne HeNoDbXhBIX n3o6paxKeHn, 3aIncaHHbIX Ha "Memory Stick", Ha JeHTy
IJIa OCTaHOBKn B cepeHne npocecca KOINPOBaHnA
Hakmte KhONky Ha 3kpahe KKД nII KhONky STOP Ha npIbTe dIcTaHNoHnHO ynpaBHeHn.
Примейаня
Bo3MOxHOb, BbI He cMOxKeTe cKoINpOBAtB BuON3MeHeHHbIe N3O6paXeHnHa BaUy BuDeOKaMepy.
Enlarging still images recorded on the "Memory Stick" – Memory PB ZOOM
You can enlarge still images recorded on a "Memory Stick". You can select and view a desired part from the enlarged still image. Also, you can copy the desired part of the enlarged still image to the "Memory Stick".
Before operation
Insert a "Memory Stick" into your camcorder.
(1) In the memory playback mode, press FN and select PAGE2.
(2) Press PB ZOOM. PB ZOOM screen appears.
(3) Press the area that you want to enlarge in the frame on the PB ZOOM screen.
The area you pressed moves to the centre of the LCD screen, and the playback image is enlarged at twice the size. If you press the other area, the area moves to the centre of the LCD screen.
(4) Adjust the zoom ratio by the zoom lever.
You can select the image from 1.1 times up to five times its size
"W" side: Decrease the zoom ratio.
"T" side: Increase the zoom ratio.
YBeJIuYeHne HEnoDbXhblx 1306paXeHn, 3aIncAHbIX Ha "Memory Stick" -ФункцЯ PB ZOOM namrtn
BbMoKeTe yBeJIuNBAt bHeNoIbNxHbIe
n3o6paXeHn, 3aIncAHHbIe Ha "Memory Stick".
Bb MoKET BbIbPaTb I nPocMaTpNaTb HxHHyO
yAcTb yBeIuNcEHnO HeNoIDBnxHoro
n3o6paXeHn. Bb MoKET TaKxE KOnIpOBaTb
hKyHyO YaCTb yBeJIuNcEHnO HeNoDBrNxHoro
n3o6paXeHn Ha "Memory Stick".
Ipeed BbinoJHHeHem Oepaun
YcTaHOBnTe "Memory Stick" B BaCy BnDeOkaMepy.
(1)В реки IMe BOCPOn3BeDEHnI N3 nAMrTn HaxMnTe KhoNky FN n BbIbepInTe cTpaHnUy PAGE2.
(2)Haxmnte KhoNky PB ZOOM. IorBntcnaKpaH PB ZOOM.
(3)HaXMMTe Ha 06NaCTb, KOtOpYIO Bb XOTnTe yBeIuNHTB KaIpe Ha 3KpaHe PB ZOOM. O6NaCTb, Ha KOTOpYIO Bbl HAXMeTe, nepEMecNTcB UeHTp 3KpaH JaKKД, n BOCnpOn3BODImOe N3O6paKeHne yBeIuNCTcB DBoE OT nepBOHaJauNbHorO pa3Mepa. Ecnbl Bbl HaxMeTe Ha npryUo 06NaCTb, COOTBeTCTBeHNO, dpyraJ O6NaCTb nepEMecNTcB UeHTp 3KpaH JaKKД.
(4)Отergyлару Te Macштаб увелоченя спомоцью рьчara пивовноговарнообектува.
Bb mokeTe yBeIunHTb n3o6paXeHne ot 1,1 pa3a do nTnKpaTHoro ero pa3mepa.
CTopoHa"W:ymeHbwaetMacuTa6 n3o6paXeHn.
CTopoHa "T": YBEnuHbAeT MacuTa6 n3o6paXKeHn.
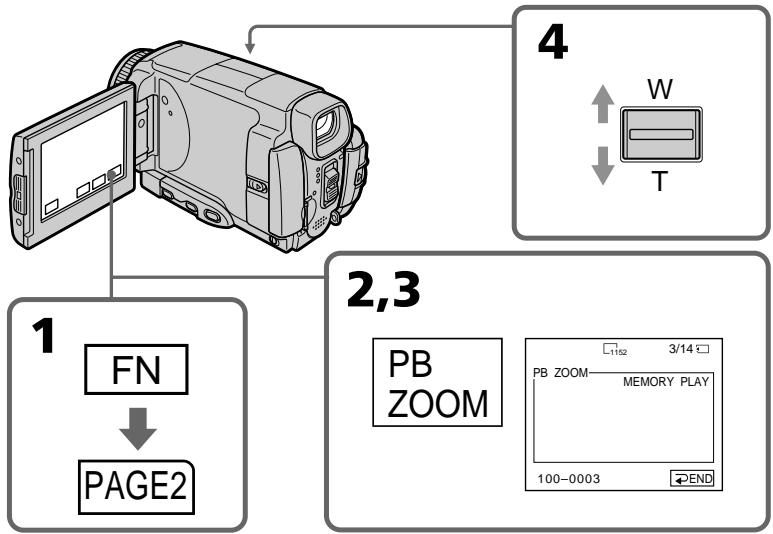
Enlarging still images recorded on the "Memory Stick" - Memory PB ZOOM
YBeJIuHHe HeNoDBrXhBIX 3o6paXeHn, 3aIncAHbIX Ha "Memory Stick" -ФункцЯ PB ZOOM namTIn
To cancel the Memory PB ZOOM function
Press END.
Длг OTMeHbI peKIma PB ZOOM namrHu HaxmTe KhONKy END.
Pictures in the Memory PB ZOOM mode
Pictures are not output through the i.LINK (MICROMV Interface).
In the Memory PB ZOOM mode
If you press DSPL/TOUCH PANEL button, the frame on the Memory PB ZOOM screen disappears. You cannot move the part you pressed to the centre of the LCD screen.
Edge of an enlarged image
The edge of an enlarged image cannot be displayed in the centre of the LCD screen.
Moving pictures recorded on the "Memory Stick"
The PB ZOOM function does not work.
To record an image processed by PB ZOOM on the "Memory Stick"
Press the PHOTO button to record the image processed by PB ZOOM. (Images are recorded at 640 × 480 size.)
I3o6paXeHnBpeXmpePB ZOOM namrtn
I3o6paXeHnHa He npepaTcY uepe3 rHe3do i.LINK (uHTepFeic MICROMV).
B pexime PB ZOOM namrtn
Ecnn BbHaxMeTe KhoNky DSPL/TOUCH PANEL, KaDp 3kpaHa PB ZOOM namrIn uCye3NeT. Bbl He CMOXeTe nepemecTnB bIbpaHHyO Bamu qacTh n3o6paKeHn B ceHTp 3kpaHa XXKd.
Kpomka yBeInuHOro n3o6paXeHn
KpOMka yBEnHcHOrO n3o6paXeHnHe moKeT 6bITb OTo6paXeHa B cHTpe 3kpaHa KKД.
Playing back images continuously - SLIDE SHOW
Your camcorder can automatically play back images in sequence. This function is especially useful when checking recorded images or during a presentation.
Before operation
Insert a "Memory Stick" into your camcorder.
(1) Set the POWER switch to MEMORY/ NETWORK (DCR-IP55E only).
(2) Press FN to display PAGE1.
(3) Press MENU, then select SLIDE SHOW in in the menu settings (p. 229). And press EXEC.
(4) Press START. Your camcorder plays back the images recorded on a "Memory Stick" in sequence.
Bocnpon3BeDeHne n3o6paXeHnI NO 3aMKHyTOMy uKny -ФункцЯ SLIDE SHOW
BaWbNdeOkaMepaMOKETABTomatueckn Bocnpo3BODNTb N306paXeHnB nocJeBOaTeIbHOCTn. 3TaФyHKuYABJIeTcOOC6eHHNoPOnE3HoI pRn PpOBepKe 3aIncaHHbx N306paXeHn IIN BO BVpeM rpe3eHTaUH.
PpeB BbINOJIHeHEm Opeaun
YctaHOBnTe "Memory Stick" B Bauly Bndeokamepy.
(1)Установские поЕкlioчateль в положене MEMORY/NETWORK (Толбко модаль DCR-IP55E).
(2)HaxmTe KhoNky FN, yTo6bI OTo6pa3ntb cTpaHnCy PAGE1.
(3)HaKMTe KHOIpKy MENU, a 3aTe MByIb6epnte onuio SLIDE SHOW B B yCTaHOBkax MeHIO (ctp. 237). 3aTeMa HxKMnTe KHOIpKy EXEC.
(4)Haxmnte KhoNky START. Bawa BndeOkamepa Bocnpo3BeTeI 306paKeHna, 3aIncaHHbIe Ha "Memory Stick", B nocJeDoBaTeJIbHOCTN.
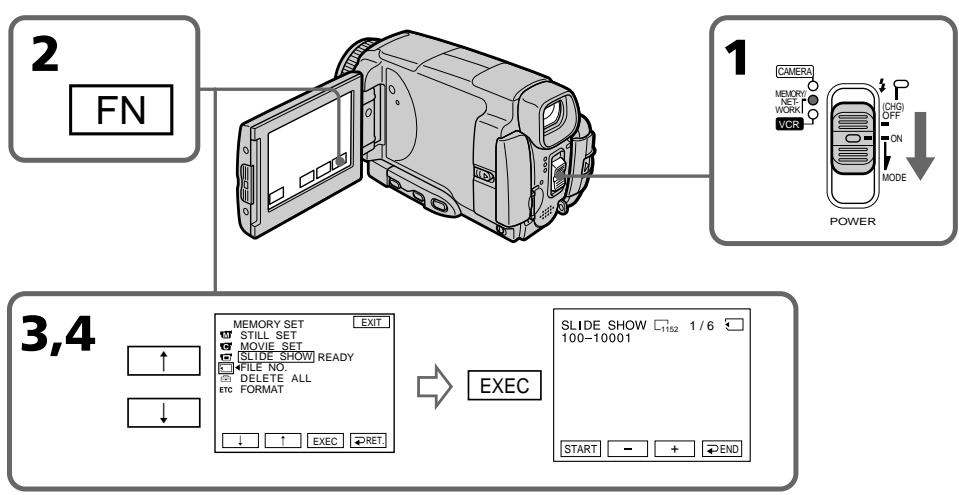
To stop the slide show
Press END.
To pause during a slide show
Press PAUSE.
To return to FN
Press END, then EXIT.
To start the slide show from a particular image
Select the desired image using - / + buttons before step 4.
To view the recorded images on TV
Connect your camcorder to a TV with the A/V connecting cable supplied with your camcorder (p. 61) before operation.
If you change the "Memory Stick" during operation
The slide show does not operate. If you change the "Memory Stick," be sure to follow the steps again from the beginning.
When there are no images on the "Memory Stick"
NOFILEappears.
Дя OCTaHOBKи noka3 сnaIdoB
HaxmTe KhoNkY END.
Iy3bI BO BpeMa noka3cIaIOB
HaxmTe KhoNky PAUSE.
Длг BO3BpaTa K Индикади FN
HaKMMTe KhoNky END, a 3aTEM KhoNky EXIT.
Длн haуала noka3a сайдов c onpedeleHHoro n3o6paKeHn
BbIepeTe HxHoe N3O6paXeHne C NOMOu bKHOPOK - / + nepeD BbIOnHeHEm DeiCTBnnyHKTa 4.
To prevent accidental erasure of important images, you can protect selected images.
Before operation
Insert a "Memory Stick" into your camcorder.
(1)Set the POWER switch to MEMORY/ NETWORK (DCR-IP55E only) or VCR.
(2) In MEMORY/NETWORK mode, go to step 3. In VCR mode, press PB.
(3) Press INDEX to display the index.
(4) Press oMARK. The screen to protect the image appears.
(5) Press the image you want to protect. The "O-n" appears above the protected image.
Пре dioTbpaueHne cIyuaHoro CTnpaHn - 3aunTa n3o6paXeHn
InpedotBpaueHn CnyaHoro CTnpAHn BaxhIx n3o6paxeHn Bbl MoKeTe 3aunTtB BblpaHHbe n3o6paxeHn.
Ipeed BbINOJIHHeHEm OIepaun
YctaHOBnTe "Memory Stick" B Bauy BnDeOKaMepy.
(1)Установпейреклочатуль POWER в положене MEMORY/NETWORK (толъков мodyдь DCR-IP55E) ун VCR.
(2)Bpexime MEMORY/NETWORK napeiDnte K BbIOJIHeHIO DeIcTBNIyHKTa 3. Bpexime VCR haxmTe KhoNky PB.
(3)HaxmTe KhoNky INDEX dIЯ OTo6paKeHn IHNdekCHOrO 3KpaHa.
(4)Haxmnte KhoNky o-MARK. IoABNTcA 3KpaH 3aunTbI n3o6paXeHnI.
(5)HaXmnte Ha n3o6paXeHne, KOtOpoe Bbl XOTnTe 3aunTntb. HaI 3aunIeHhbIM n3o6paXeHneM NOBtC3 3hak "O-n".

Preventing accidental erasure - Image protection
To cancel image protection
Press the image you want to cancel image protection in step 5 again. The "O-n" disappears.
ДЯ OTMeHbI 3aunTbI N3o6paXeHnA
Formatting erases all information on the "Memory Stick," including the protected image data. Check the contents of the "Memory Stick" before formatting.
If the write-protect tab on the "Memory Stick" is set to LOCK
You cannot carry out image protection.
PpmeuHne
BbI He cMOXeTe BbIIOJIHITb 3aUHTy n3O6paXeHEN.
Deleting images
- DELETE
You can delete images stored in a "Memory Stick." You can delete all images or selected images.
Deleting selected images
Before operation
Insert a "Memory Stick" into your camcorder.
(1)Set the POWER switch to MEMORY/ NETWORK (DCR-IP55E only) or VCR.
(2) Press PLAY or PB, then press - / + to select the image you want to delete.
(3) Press FN to display PAGE1.
(4) Press DELETE. DELETE? appears on the LCD screen.
(5) Press OK. The selected image is deleted.
Ydalenne n3o6paXeHn -ФункцЯ DELETE
BbMoKeTe ydaJIbNb 1306paXeHnA, coXpaHeHHbIe Ha "Memory Stick". Bb MoKeTe ydaJIbNb BCE 1306paXeHnA nII BbIbpaHHbIe 1306paXeHnA.
YdaJIeHne BbI6paHHbIX n3o6paXKeHn
Ipeed BbINOJIHeHnEM OIepaun
YctaHOBnTe "Memory Stick" B Bauly Bndeokamepy.
(1)Установские полескolyчateь POWER в положене MEMORY/NETWORK (толъковая DCR-IP55E) уи VCR.
(2)HaxMMTe KhoNky PLAY uIN PB, a 3aTEM haxMmaIte KhoNkn-/+ДЯ Bbl6opa n3o6paJxHnA, KOtOpoe Bbl xOITNe ydaJINbTb.
(3)HaxmTe KhoNky FN, yTo6bI OTo6pa3nTb cTpaHnCy PAGE1.
(4)HaxMMTe KhoNky DELETE. Ha 3kpane KKД NOBNTcA INDnKauny DELETE?
(5)Haxmnte KhoNky OK. BbIbpaHnoe n3o6paXeHne 6yJeT ydaJeHo.
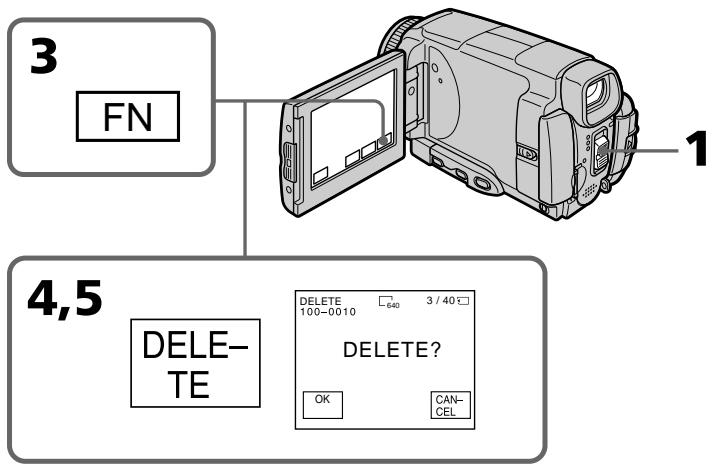
To return to FN
Press EXIT.
To cancel deleting an image
Press CANCEL in step 5.
Notes
- To delete a protected image, first cancel image protection.
- Once you delete an image, you cannot restore it. Check the images to delete carefully before deleting them.
If the write-protect tab on the "Memory Stick" is set to LOCK
You cannot delete images.
Deleting selected images on the index screen
Before operation
Insert a "Memory Stick" into your camcorder.
(1) Set the POWER switch to MEMORY/ NETWORK (DCR-IP55E only) or VCR.
(2) In MEMORY/NETWORK mode, go to step 3. In VCR mode, press PB.
(3) Press INDEX to display the index.
(4) Press DEL, then press the image you want to delete. The number of the selected image is highlighted.
(5) If there is other image you want to delete, press the image.
(6) After selecting the image to be deleted, press EXEC. DELETE? appears on the LCD screen.
(7) Press OK. The selected images are deleted.
YdaJIeHHe BbI6paHHbIX N3O6paXeHnHa HnHeKcHOM 3KpaHe
Ipeed BbINOJIHeHem Opeaun
YcTaHOBnTe "Memory Stick" B Bauly BnDeOkaMepy.
(1)Установпейреклочатуль POWER в поожене MEMORY/NETWORK (толъкову мodyдь DCR-IP55E) уи VCR.
(2)В ржиме MEMORY/NETWORK,пердnte K Влобнени дійствий пункta 3.В ржиме VCR нахмnte конky PB.
(3)HaxmTe KhoNky INDEX dIy OTo6paKeHHdeKCHOrO 3kpaHa.
(4)HaKMITE KONky DEL, a 3aTeM HaKMITE Ha n3o6paXeHne, KOtOpoe Bby XOTNe yJaInTb. Homep Bbl6paHHoro n3o6paXeHn6yDet noDCBeHeH.
(5)EcInnImeTcIpyroeN3o6paKeHne, KOtOpoe BbIXoNTe ydaIITb,HaxMITE 3TO n3o6paKeHne.
(6)Послевобogaибоваржени,пдөкшeroудаленю,нхмITE кногky EXEC.HаэкранжКД NOВТСИНДИКАЦA DELETE?.
(7)HaxmTe KhoNky OK. BbI6paHHbIe n3o6paXeHn8 6yDyT ydaJIeHbl.
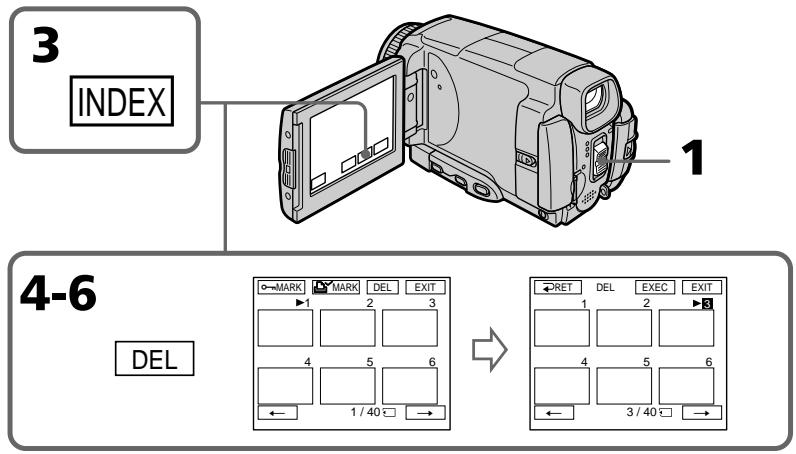
To return to FN
Press EXIT.
To cancel deleting an image
Press CANCEL in step 6.
ДяВОЗВраТКИнДИКациFN
HakmTe KhOnKy EXIT.
Длг OTMeHbI ydaJIeHnI n3O6paXeHnI
HaxmTe KhoNky CANCEL npn BbInonHeHHn DeiCTBnIpyHKta 6.
Deleting all the images
You can delete all the unprotected images in a "Memory Stick."
Before operation
Insert a "Memory Stick" into your camcorder.
(1)Set the POWER switch to MEMORY/ NETWORK (DCR-IP55E only).
(2) Press FN to display PAGE1.
(3) Press MENU, then select DELETE ALL in in the menu settings (p. 229). And press EXEC.
(4) Press / to select OK, then press EXEC. OK changes to EXECUTE.
(5)Press EXEC. DELETING appears on the LCD screen. When all the unprotected images are deleted, COMPLETE is displayed.
YdaJIeHne Bcex n3o6paXKeHn
BbMOxTe ydaIITb BCE He3aunuHHeHbIe n3o6paXeHnHa "Memory Stick".
Ipeed BbINOJIHeHEm Opeaun
YcTaHOBnTe "Memory Stick" B Bauly BnDeOkamepy.
(1)Установские полесене MEMORY/NETWORK (Толъковский DCR-IP55E).
(2)HaxMMTe KhoNkF N, yTo6bl OTo6pa3nTb cTpaHmU PAGE1.
(3)HaKmTe KHONky MENU, 3aTeM BbIbepnTe onuIO DELETE ALL B B yCTaHOBkax MeHIO (cTp.237). HauKmTe KHONky EXEC.
(4)HajmamTe KhoNKe ↑/↓ДЯ BbIbOpa OUcN OK, a 3aTem HauKmTe KhoNKe EXEC. INdkaUN OK n3MeHnTcHa INdkaCIO EXECUTE.
(5)HaXmnte KhoNky EXEC. Ha 3kpaHe JxKd IOBnTc rHnDnKaunr DELETING.KoIgA Bce He3aunueneHbIe N3o6paxenHb6yUdT ydaJHbI,Ha dncPlee oTo6paNTc rHnDnKaunr COMPLETE.
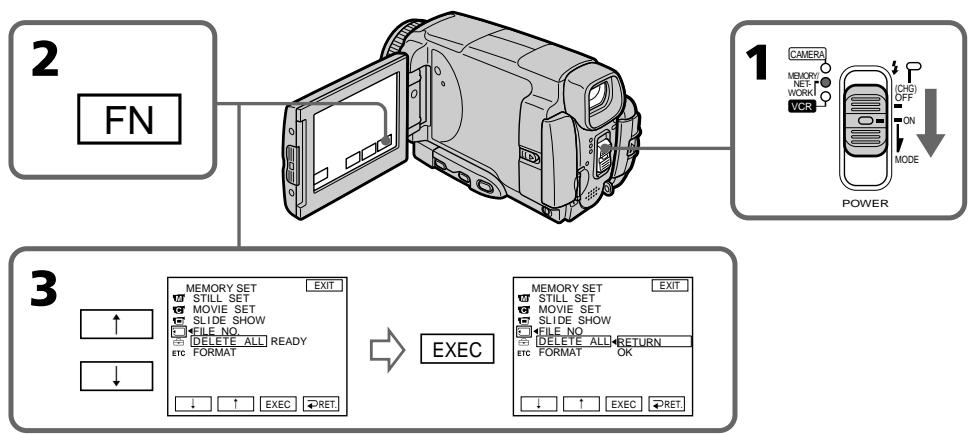
To return to FN
Press EXIT.
To cancel deleting all the images in the "Memory Stick"
Press / to select RETURN in step 5, then press EXEC.
While DELETING appears
Do not turn the POWER switch or press any buttons.
Длг BO3BpaTa K Индикади FN
HakmTe KhoNky EXIT.
Дя OTMeHbI ydaJIeHnB BcEx n3O6paXKeHn Ha "Memory Stick"
Haxmaite KhoNky / DnIy BbIbOpa onuIN RETURN B nyHKTe 5, a 3aTEM Ha Haxmite KhoNky EXEC.
Bo Bpemr OTo6paXeHn HnDnKaCn DELETING
He n3meHnIte nOIOxKeHne nepeKJIIOuChaTeJIPOWER n He hAnKImaIte KaKnx-JIn6o KHOJOnk.
Writing a print mark - PRINT MARK
You can specify the recorded still image to print out by putting marks. This function is useful for printing out still images later.
Your camcorder conforms with the DPOF
(Digital Print Order Format) standard for specifying the still images to print out.
Before operation
Insert a "Memory Stick" into your camcorder.
(1)Set the POWER switch to MEMORY/ NETWORK (DCR-IP55E only) or VCR.
(2) In MEMORY/NETWORK mode, go to step 3. In VCR mode, press PB.
(3) Press INDEX to display the index.
(4) Press MARK. The screen to write a print mark appears.
(5) Press the image you want to write a print mark. The appears on the selected image.
3aHcB 3HaKa neaTn -ФункцЯ PRINT MARK
Bb mokeTe yka3aTb 3aIncAHhHe HnOdBHXHbIe
n3o6paXeHn Iy paCneYaTK, NOMEyAa Ix
3HaKAMn neaTn. 3Ta cyHKUra RbIaETc
noJIe3HOJ Iy paCneYaTKn HnOdBHXHbIX
n3o6paXeHn I03dHee.
Baawa Bndeokamepa COOTBETCTBye TcAndapTy DPOF (uΦpOBoi φopMaT nopAKeNa neaTu) dIyukaHHeNoDvXhIX N3o6paKeHm dIpaCneHaTkN.
Ipeed BbINOJIHeHEm Opeaun
YctaHOBnTe "Memory Stick" B Bauy BnDeOKaMepy.
(1)Установпейсякolyчateь POWER в положене MEMORY/NETWORK (толъковideль DCR-IP55E) уи VCR.
(2)В ржиме MEMORY/NETWORK,пердиerte К Выллению DeиctBиpyнкта 3.В ржиме VCR нахмITE KhoNky PB.
(3)Haxmnte KhoNky INDEX dIra oTo6paXeHn IHNdekCHOrO 3KpaHa.
(4)HaxmTe KhoNky MARK. NoBtCn 3KpaH 3aIncn 3HaKa neaTn.
(5)HaXMMTe Ha n3o6paXeHHe, Ha KOTOpoe BbIXOHTe 3aIINCaTb 3HaK NeaTn. HaBbIbPaHHOM n3o6paXeHm NOrBNTcR 3HaK
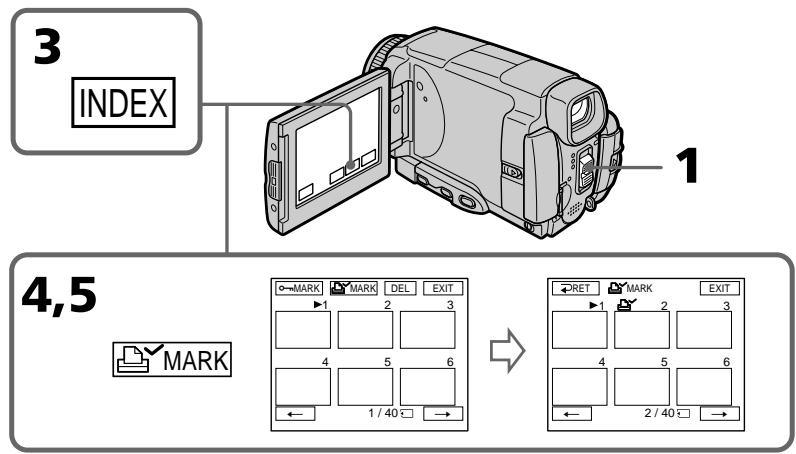
Writing a print mark - PRINT MARK
3aHcB 3HaKa peaTu -ФункцЯ PRINT MARK
To return to FN
Press EXIT.
To cancel writing print marks
Press the image you want to cancel the print mark in step 5 again. The disappears.
ДЯ OTMeHbI 3aHcN 3HaKOB NeaTu
ПиВБИОЛНЕнДeIeCTBnIpyHKTa5HaxMITEHaN3O6paXeHne,CKOTOPOroBbIXOTITeCHrTb3HakNeaTu,eIe pa3.NHdNKaTOPYNCue3HeT.
If the write-protect tab on the "Memory Stick" is set to LOCK
You cannot write print marks on still images.
EcInI IeneCTOK 3aunTbI 3annc Ha "Memory Stick" yctahOBlen B noJIOxHeNc LOCK
BbI He MoKTe 3aIINCaTb 3HaKn NeayTu Ha HEnoDbXkHbIe N3O6paXeHnA.
Moving pictures
You cannot write print marks on moving pictures.
DnKyuueeHn3o6paXeHH
BbI He MoKTe 3aIINCaTb 3HaKn NeYaTu Ha DInkXyUeCeN3O6paXeHn.
Viewing Images Using your Computer
Viewing images on your computer - Introduction
There are the following ways of connecting the camcorder to a computer in order to view images saved on a "Memory Stick" or recorded on a tape on your computer.
To view images on a computer which has a "Memory Stick" slot, first remove the "Memory Stick" from the camcorder and then insert it into the computer's "Memory Stick" slot.
When connecting to a computer via the USB jack, complete installation of the USB driver before connecting the camcorder to the computer. If you connect the camcorder to the computer first, you will not be able to install the USB driver correctly.
Pn nOIOCoEINHeHn BInDeOKaMepbI K nepcoHaJIbHOMy KOMnbIoTepy uepe3 rHe3do USB nOIIHOCTbIO BbIIOJNHTe yCTaHOBky dpaIbepa USB nepei NOIOCoEINHeHnEM BInDeOKaMepbI K KOMnbIoTepy. Ecnn Bbl Chauana NOIOCoEINHnTE BInDeOKaMepy K KOMnbIoTepy, Bbl He cMOxKeTe npabNJIbHO yCTaHOBNTb DpaIBep USB.
For details about your computer's connectors and editing software, contact the computer manufacturer.
*When connecting to a computer without a USB jack
Use an optional floppy disk adaptor for the "Memory Stick" or a PC card adaptor for the "Memory Stick".
When purchasing an accessory, check its catalog beforehand for the recommended operating environment.
Notes on using your computer
"Memory Stick"
- "Memory Stick" operations on your camcorder cannot be assured if a "Memory Stick" formatted on your computer is used on your camcorder, or if the "Memory Stick" in your camcorder was formatted from your computer when the USB cable was connected.
- Do not compress the data on the "Memory Stick." Compressed data cannot be played back on your camcorder.
Software
- Depending on your application software, the file size may increase when you open a still image file.
- When you load an image modified using retouching software from your computer to your camcorder or when you directly modify the image on your camcorder, the image format will differ so a file error indicator may appear and you may be unable to open the file.
Communications with your computer
Communications between your camcorder and your computer may not recover after recovering from Suspend, Resume, or Sleep.
3a noDpO6Hoi nHOpMaUeNe o pa3bEmax nporpamMHom oBecneueHn dIa MOtaja, IMeIoXxCra Ha BaIeM KOMNbHOtepe, 06paauTeCb K pOnu3BoNDTeIIO KOMNbHOtepa.
\*Pn nOdoCoeDInHeHn K KomNbIoTepy 6e3 rHe3da USB
IcnoIb3yIte npNo6peTaembOToIeNbHO aadTep HaФlonnn-DnscKe dIa "Memory Stick" nIaadTep PC-KapTbI dIa "Memory Stick". Ipn NOKynke DOnoNHTeBHO npHaJdEJXHocTn 3apaHee pOBebpTe no KaTaNOrgy peKOMeHdyEmy dIa Hee KOhΦnHypaunIO.
PpimcHnno nCNoJIb3OBAHnIO BaWero KOMNbIOTepa
"Memory Stick"
- HaJIeJaAaee fynKcIOnHnOpaBAnHe "Memory Stick" B BaSei BnDeokampe He rapaHTnpyETcA, ecIn B BaSei BnDeokampe nCNoB3yETcA "Memory Stick", otfopMaTIpOBAHnHa Na BaSeM KOMbIoTepe, nnE cSs "Memory Stick" B BaSei BnDeokampe 6blna OTfOpMaTIpOBAHa c BaWero KOMbIoTepe, kOrda 6bln noDcoEduHen Ka6eb USB.
He CxIMaIte daHbIe Ha "Memory Stick". CxTaIe DaHbIe He MOrY T 6bITb BocPOn3BeDeHbHa BaSei BInDeokAmpe.
IporpamMHOe o6ecneHHe
B3aBnCmOCTOn OT BaJIero nporpAMMHoro
OeCEneHn, pRn OTKpbTInn caiHa
HeNoDBNXHOrO n3O6paXeHn pa3MeP caiHa
MOxET YBEJIuNtBcR.
EcNn Bbl 3arpy3nte c BaIero KOMNbIoTepa B Bauy BInDeoKaMepu n306paxKeHne, MOINΦUINPOBAHHO C NcNOJb3OBaHEm nporpamMHO OBeCnepeHNe DnpeTuINPOBaHn, INN eCNI Bbl MoINΦUINpye Tn306paxKeHne HEnocPeIdCTBeHHo Ha BaIeW BInDeoKaMepe, φOpMaT n306paxHnN3MeHnTCB, B pe3yJIbTaTe Yero MoXET NOBtCBsN INDkAToP OwN6Kn FaiJa, N Bbl, BO3MOxKHo, He CMOXeTe OTKpbItb FaiJ.
CBA3b BaAMnepcoHaJIbHbIM KOMNbIOpom
C8a3b Mexdy BaSei BnDeokamepoi BaWIM nepcoHaIbHbIM KOMNbIOTePOM MoKeT He BOCCTaHOBtCBa Iocne BbIXOda KOMNbIOTePa n3 peKIMOB Paly3bl, Bo3o6HOBLeHnI nn Cnraeero peKIma.
Connecting your camcorder to your computer using the i.LINK cable – For Windows users
You can view or edit the images recorded on a tape using your computer. You can record images edited with the computer on the tape. To view images on your computer, the application software MovieShaker Ver.3.1 for MICROMV (supplied) and i.LINK cable is required.
To view images on your computer, you have to install the i.LINK driver and the application software into your computer. They are included in the supplied application software MovieShaker Ver.3.1 for MICROMV. Before installing the i.LINK driver and the application software into your computer, be sure not to connect the camcorder to the computer. For details on installing and on an i.LINK connection, refer to the operating instructions supplied with MovieShaker Ver.3.1 for MICROMV.
PpmeaHne
Connecting your camcorder to your computer using the i.LINK cable – For Windows users
Recommended computer environment
Recommended Windows environment
OS: Microsoft Windows Me, Windows 2000 Professional, Windows XP Home Edition/ Professional. Standard installation is required. Operation is not assured if the above environment is an upgraded OS.
CPU: Pentium III 600 MHz or faster (Required) Pentium III 800 MHz or faster (Recommended)
Main memory: 128 MB or larger (Required)
256 MB or larger
(Recommended)
Display: 800 × 600 or larger screen size/ 1024 × 480 or larger screen size, 16-bit colour or higher
100 MB hard disk space (for installation), ATA66 or higher speed (required for capturing an image)
The i.LINK (IEEE1394) connector must be provided as standard.
PekomeHdoBaHHa KOnΦnrgypaun KOMnbIOTepa
Pekomendobanhna KOHpypaun Windows
OC: Microsoft Windows Me,Windows 2000 Professional,Windows XP Home Edition/Professional. Tpe6yeTcraTaNapTha yctaHOBka. FyHKUHOHPOBaHne He rapaHTnpyETc,ecnYka3aHna Bblie KOHNpyrpaia nOlyeHa B pe3yIbTaTe o6HOBJIeHNA OC.
Lentpahlbny npocccop: Pentium III 600 Mf, nIe 6oJee 6bCTpy (Tpe6yeTc) Pentium III 800 Mf, nIe 6oJee 6bCTpy (peKOMeHdyTeC)
OchOBHnI naMTb: 128 M6 nII 60Jee (Tpe6yeTeC) 256 M6 nII 60Jee (peKOMeHdyTeC)
Диспел: Pa3mep экранa 800×600 nnn 6oJIe/1024×480 nnn 6oJIe, CBET 16-6nTHbI nnn 6oJIe
XecTkni DnCK: 100 M6 npoctpaHCTBa Ha XecTKOM DnCKe (dya yctahOBKn), ckopoctb ATA66 nINBbIe (Tpe6yeTcR dJIa CbeMKn n3O6paKeHH)
Pa3bem i.LINK (IEEE1394)Должен BxOДиТьВ CTaHapTHyI NOCTaBky.
Note
Operations are not guaranteed for all the recommended computer environments mentioned above.
Примейане
Функционьогане He rapaHTnpyeTcЯДЯ BCex yONOMAHybIX BblIe peKOMeHnyEmbIX KOHNrUpaNk KOMNbIOTepa.
Connecting your camcorder to your computer using the USB cable – For Windows users
Complete installation of the USB driver before connecting the camcorder to the computer. If you connect the camcorder to the computer first, you will not be able to install the USB driver correctly.
When connecting to a computer via the USB jack
You must install a USB driver onto your computer in order to connect the camcorder to the computer's USB connector. The USB driver can be found on the CD-ROM supplied, along with the application software required for viewing images.
If you connect your camcorder and your computer using the USB cable, you can view pictures live from your camcorder and pictures recorded on a tape on your computer (USB streaming function).
Furthermore, if you download pictures from your camcorder to your computer, you can process or edit them in image processing software and append them to e-mail.
You can view images recorded on a "Memory Stick" on your computer.
Recommended computer usage environment when connecting via USB cable and viewing tape images on the computer
OS:
Microsoft Windows 98SE,Windows Me, Windows 2000 Professional,Windows XP Home Edition or Windows XP Professional Standard installation is required.
However, operation is not assured if the above environment is an upgraded OS.
You cannot hear sound if your computer is running Windows 98, but you can read still images.
CPU:
Pentium III 500 MHz or faster (800 MHz or faster recommended)
Application:
DirectX 8.0a or later
Sound system:
16 bit stereo sound card and stereo speakers
Memory:
64 MB or more
Hard disk:
Available memory required for installation: at least 200MB
Available hard disc memory recommended: at least 1GB (depending on the size of the image files edited)
Display:
4 MB VRAM video card, Minimum 800× 600 dot High colour (16 bit colour, 65000 colours), Direct Draw display driver capability (At 800× 600 dot or less, 256 colours and less, this product will not operate correctly.)
Others:
This product is based on DirectX technology, so it is necessary to install DirectX.
The USB connector must be provided as standard.
You cannot use this function in the Macintosh environment.
PekomehdoBaHHa KOnfHypaunia KombIyTepa npn PoJcOeINHeHm Ype3 Ka6eB USB n IpcOMtpe Ha KOMbIyTepe 1306paXeHm, 3aNcAHbIX Ha JeHTy
OC:
Tpe6yertc Microsoft Windows 98SE,Windows Me,Windows 2000 Professional,Windows XP Home Edition nWindows XP Professional Standard.
OndaKo, BbIOnJIHeHne OePaCn He rapaHTnpyETc, ecIn yKa3aHHaB BblSe KOHpIgpaCn IOnUyeHa B pe3yIbTaTe 6OBHObHeHc OC.
Ecnn BaW KOMnIbIepe pa6oTaET noJ npabJIeHnEM Windows 98, Bbl He CMOXeTe npocLnyuINBaTb 3ByK, HO CMOXeTe CHTbIBaTb HenoDbNkHbIe N3O6paKeHnA.
UeHTpaIbHbI npOceccop:
Recommended computer usage environment when connecting via USB cable and viewing the "Memory Stick" images on the computer
Recommended Windows environment OS:
Microsoft Windows 98, Windows 98SE, Windows Me, Windows 2000 Professional, Windows XP Home Edition or Windows XP Professional standard installation is required. However, operation is not assured if the above environment is an upgraded OS.
CPU:
MMX Pentium 200 MHz or faster
The USB connector must be provided as standard.
Windows Media Player must be installed (to play back moving pictures).
Notes
- Operations are not guaranteed for the Windows environment if you connect two or more USB equipment to a single computer at the same time, or when using a hub.
- Some equipment may not operate depending on the type of USB equipment that is used simultaneously.
- Operations are not guaranteed for all the recommended computer environments mentioned above.
- Windows and Windows Media are trademarks or registered trademarks of Microsoft Corporation in the United States and/or other countries.
- Pentium is trademark or registered trademark of Intel Corporation.
- All other product names mentioned herein may be the trademarks or registered trademarks of their respective companies. Furthermore, "TM" and "®" are not mentioned in each case in this manual.
Подсоeннe He BaSei BndeokamepbI K BaWeMy KOMlbTepy c nOmozku Ka6JIr USB -ДЯ пьзOBaTeJei Windows
PeKOMeHDoBaHHa KOnΦnHypauZn KOMMbIOTepa npn pOdCoEduHeHn Upe3 Ka6JIb USB nIpcSoMToTe Ha KOMMbIOTepe n3o6paXKeHn "Memory Stick"
PeKOMeHDoBaHHa KOnΦmrgpaun OC Windows:
Tpe6yetcStaHapTha yCTaHOBka Microsoft Windows 98,Windows 98SE,Windows Me, Windows 2000 Professional,Windows XP Home Edition nIn Windows XP Professional.
OndaKo, BbIOpJIHHeNHe OePaCn He rapaHTnpyETc, ecn yka3aHHaB bIwe KOhFmUpaCn nOlyeHa B pe3yIbTaTe 6HObLnEHNr OC.
LcHtpaIbHbI npOceccop:
MMX Pentium 200 Mf u nn 6oJee 6bictpbl
Pazbem USBДолженВхODиТьВCTaHДapTHyO KOMПЛЕКТAUIO.
Installing the USB driver
Start the following operation without connecting the USB cable to your computer. Connect the USB cable according to "Making the computer recognise the camcorder".
If you are using Windows 2000 Professional, log in with permission of administrators.
If you are using Windows XP, log in with permission of computer managers.
(1) Turn on your computer and allow Windows to load.
(2) Insert the supplied CD-ROM in the CD-ROM drive of your computer. The application software starts up and the title screen appears.
(3) Move the cursor to USB Driver and click. This starts USB driver installation.
YcTaHOBka dpaBepa USB
Haunnte BbInonHeHne cIeMyoUnx
DeiCTBn 6e3 noCoeHNHeHna Ka6eNa
USB K Baewemy KomnbIoTepy.
PiocoeHNHe TKe Ka6eNb USB cornacho
pa3dEny "KaK do6nTbcra, YTO6bl
KOMnbIoTep paCnO3HaBaI
BnDeOkamepy".
EcnBbncnolb3yeTe Windows 2000 Professional,BoiDnTE B CnCTeMy c pa3peSeHnaDMnHnCTpaTOpOB.EcN Bbncnolb3yeTe WindowsXP,BoiDnTE B CnCTeMy c pa3peSeHnMeHeJKePOB n KOMNbIOTePam.
(4) Follow the on-screen messages to install the USB driver.
(5) Remove the CD-ROM and then restart the computer, in accordance with the instructions on the screen.
Note
If you connect the USB cable before USB driver installation is complete, the USB driver will not be properly registered. Carry out installation again in accordance with the steps on page 205.
(4)CneyuTe 3KpaHbIM COo6eHnM nIy yctaHOBKn dpaBepa USB.
(5)ИЗБЛЕКИTe CD-ROM,a 3aTeM nepe3aIyCtIe KOMnIbIOTep,B COOTBETCTBIM C INHCTpyKUЯR Mn Ha 3KpaHe.
PpmeuHne
Making the computer recognis the camcorder
Viewing images recorded on a tape on your computer
Refer to page 214, 217 for details on viewing the "Memory Stick" images on your computer.
You need to install PILXELA ImageMixer to view images recorded on a tape on your computer. Install it from the CD-ROM supplied with your camcorder.
To install and use this software in Windows 2000 Professional, you must be authorized as Power Users or Administrators. For Windows XP, you must be authorized as Administrators.
(1) Turn on your computer and allow Windows to load. If you are using your computer, close all running applications.
(2) Insert the supplied CD-ROM into the CD-ROM drive of your computer. The application software starts up and the title screen appears. If the title screen does not appear, double-click "My Computer" and then "ImageMixer" (CD-ROM Drive). The application software screen appears after a while.
(3)Move the cursor to "PIXELA ImageMixer" and click. The Install Wizard program starts up and the "Select Settings Language" screen appears.
(4) Select the language for installation.
(5)Follow the on-screen messages. The installation screen disappears when installation is complete.
(6) Click DirectX. Follow the on-screen messages to install DirectX. Restart your computer when the installation is completed.
(7)Connect the AC power adaptor to your camcorder. Set the POWER switch to VCR.
(8) Select USB STREAM to ON in in the menu settings (p. 231).
KaKdo6ntbca,HTo6bI KOMNbIOTepepaNo3HaBaJ BnDeOKaMepy
Connecting your camcorder to your computer using the USB cable – For Windows users
ПодсоeнHeHne BaSei BnDeokamepbI K BaWeMy KOMlbTepy c nOmoaKo Ka6eIy USB -ДЯ пьзOBateJei Windows
(9) With the CD-ROM inserted, connect the USB jacks of the camcorder and computer using the USB cable supplied with your camcorder. Your computer recognises the camcorder, and the Windows Add Hardware Wizard starts.
(10) Follow the on-screen messages so that the Add Hardware Wizard recognises that the USB drivers have been installed. The Add Hardware Wizard starts three times because three different USB drivers are installed. Be sure to allow the installation to complete without interrupting it.
For Windows 2000 Professional, Windows XP Home Edition/Professional users
(11) After the "File Needed" screen appears. Open "Browse..." → "My Computer" → "ImageMixer" → "Sonyhcb.sys", and click "OK".
(10) CneDyIte COO6eHnM Ha 3KpaHe, TaK yTo6bIMactep yCTaHOBKn DOONIHITeNBHorO o6OpYIOBaHn paCNo3HaJ, YTO yCTaHOBNeHb IpaaiBepb USB. Mactep yCTaHOBKn DOnONIHITeNBHO O6OpYIOBaHn 6byet 3anyckatcb TpNkDbI, NocKoJIbKy yCTaHOBJIeHb TPn pa3NIuHbIX dpaaiBepa USB. PIpocJeNTe, yTo6bI yCTaHOBka 6bla BblIOJIHeHa do KOHua, He nppepbIBa ee.
Д�� польозастей Windows 2000 Professional, Windows XP Home Edition/ Professional
(11)После повлесни Крара "Hyжнь саи". OTKроTe pyнктbl "Ob3op..." →"МоКOMпьЮТер" → "ImageMixer" → "Sonyhcb.sys", n щeелкнITE по Кногпke "OK".
Connecting your camcorder to your computer using the USB cable – For Windows users
Viewing images recorded on a "Memory Stick"
(1) Insert a "Memory Stick" into your camcorder.
(2)Connect the AC power adaptor and set the POWER switch to MEMORY/NETWORK (DCR-IP55E only).
(3) Connect the (USB) jack on your camcorder to the USB connector on your computer using the supplied USB cable.
USB MODE appears on the LCD screen of your camcorder. Your computer recognises the camcorder, and the Add Hardware Wizard starts.
ПпocмотгИЗбрахжи,зaнcaHHbIX Na"Memory Stick
(1)Установп trade "Memory Stick" в Башу Вида ekamepy.
(2)ПодсоeДинITE сеTeВоаадпетерпермehногToTOKa,ИуctановпетерклчateЛь POWERВ поожениMEMORY/NETWORK(ToЛьКо модьDCR-IP55E).
(3)CoeHnHTe rHe3do (USB)Ha BaWei BnDeOkamepc pa3bEmOM USB Ha BaWeM KOMNbIbTepe c nOMoUbIO npInaraeMOro Ka6enj USB. Ha 3KpaHe JKKD BaWei BnDeOkamepbl NOBITcHnDnKaucuN USB MODE.BaW KOMNbIbTePp paCnO3Haet BnDeOkamepy, H 3aYCyTmTC MaCTep yCTAHOBKn DONOJIHnTeJbHOro O6OpyDobAHIN Windows.
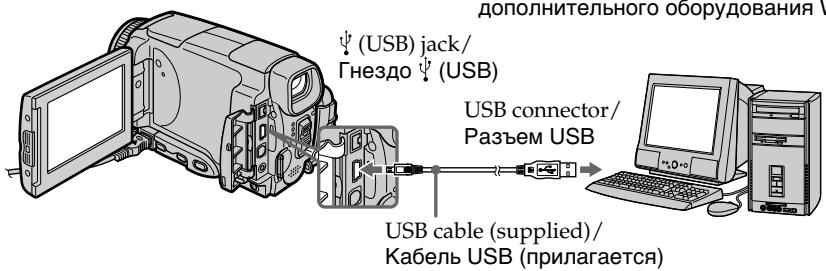
(4) Follow the on-screen messages so that the Add Hardware Wizard recognises that the USB drivers have been installed. The Add Hardware Wizard starts two times because two different USB drivers are installed. Be sure to allow the installation to complete without interrupting it.
You cannot install the USB driver if a "Memory Stick" is not in your camcorder. Be sure to insert a "Memory Stick" into your camcorder before installing the USB driver.
(4)CneyuTe COo6eHnM Ha 3KpaHe, B pe3yIbTaTe Yero MaCTep yCTaHOBKn DOONHITeJIbHOrO O6OpUdOBaHnI paCNo3Haet O6OpUdOBaHne. MAcTep yCTaHOBKn DOONHITeJIbHOrO O6OpUdOBaHnI 6yDet 3anyckatbCn DbaJdbI, NOTOMy UTO yCTaHOBJIeHo DBA pa3nHybIX dpaiBepa USB.O63aTeJIbHO DoBeDInTe KaJdyu yCTaHOBky Do KOHcA, He npepbIBa ee.
BbI He cMOxKeTe yCTaHOBnTb dpaiBep USB, ecIn "Memory Stick" He BcTaBneHa B Aby BnDeOKaMepy.
ОБаTeьнов ВсТаВьTe "Memory Stick"ВБауВидевимерупeped yCTaHOBКоДраиВераUSB.
If you cannot install the USB driver
The USB driver has been registered incorrectly as your computer was connected to your camcorder before installation of the USB driver was completed. Perform the following procedure to correctly install the USB driver.
Viewing images recorded on a tape
Step 1: Uninstall the incorrect USB driver
① Turn on your computer and allow Windows to load.
② Connect the AC power adaptor, and set the POWER switch to VCR.
③ Connect the USB connector on your computer to the (USB) jack on your camcorder using the USB cable supplied with your camcorder.
④ Open your computer's "Device Manager".
Windows XP:
Select "Start" "Control Panel" "System" "Hardware", and click the "Device Manager" button.
If there is no "System" inside "Pick a category" after clicking "Control Panel", click "Switch to classic view" instead.
Windows 2000 Professional:
Select "My Computer" "Control Panel" "System" "Hardware" tab, and click the "Device Manager" button.
Windows 98SE/Windows Me:
Select "My Computer" "Control Panel" "System", and click "Device Manager".
EcII BbI He MoXeTe yCTaHOBtB dpaBep USB
Connecting your camcorder to your computer using the USB cable – For Windows users
⑤ Select and delete the underlined devices below.
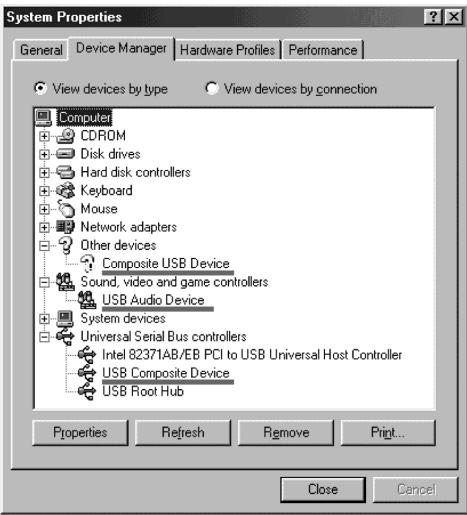
Windows 98SE
Connecting your camcorder to your computer using the USB cable – For Windows users
⑥ Set the POWER switch to OFF (CHG) on your camcorder, and then disconnect the USB cable.
⑦ Restart your computer.
Step 2: Install the USB driver on the supplied CD-ROM
Perform the entire procedure described in "Installing the USB driver" on page 201.
Viewing images recorded on a "Memory Stick"
Step1: Uninstall the incorrect USB driver
① Turn on your computer and allow Windows to load.
② Insert a "Memory Stick" into your camcorder.
③ Connect the AC power adaptor, and set the POWER switch to MEMORY/NETWORK (DCR-IP55E only).
④ Connect the USB connector on your computer to the (USB) jack on your camcorder using the USB cable supplied with your camcorder.
⑤ Open your computer's "Device Manager".
Windows 2000 Professional:
Select "My Computer" "Control Panel" "System" "Hardware", and click the "Device Manager" button.
Other OS:
Select "My Computer" "Control Panel" "System", and click "Device Manager".
⑥ Select "Other devices".
Select the device prefixed with the "?" mark and delete.
Ex: (?)Sony Handycam
⑦ Turn the POWER switch to OFF (CHG) on your camcorder, and then disconnect the USB cable.
⑧ Restart your computer.
Step2: Install the USB driver on the supplied CD-ROM
Perform the entire procedure described in "Installing the USB driver" on page 201.
BbIIOJIHnTe NoJIHOCTbI OpoeDpy, OINcAHHyU B pa3dene "YcTaHOBka IpaIbepa USB"Ha cTp. 201.
Viewing images recorded on a tape on your computer – For Windows users
Capturing images with "PIXELA ImageMixer Ver.1.0 for Sony"
You need to install the USB driver and PILXELA ImageMixer to view images recorded on a tape on your computer (p. 202).
If you are using Windows 2000 Professional, you must be authorised as Power Users or log in with permission of administrators. If you are using Windows XP, log in with permission of managers.
Viewing images recorded on a tape
(1) Turn on your computer and allow Windows to load.
(2) Connect the AC power adaptor, and insert a cassette into your camcorder.
(3) Set the POWER switch to VCR. Select USB STREAM in to ON in the menu settings (p. 231).
(4) Select "Start" "Programs" "PIXELA" "ImageMixer" "PIXELA ImageMixer Ver.1.0 for Sony".
The "PIXELA ImageMixer Ver.1.0 for Sony" startup screen appears on your computer. The title screen appears.
(5) Click on the screen.
Viewing images recorded on a tape on your computer - For Windows users
Прсмотр n3o6paхени, 3aIncaHHbIX HaJIeHTy,Ha BaWeM KOMNbIoTepe-ДЯ NOJb3OBAteJe Windows

(6)Select

(6)BbIbepeITe onuHIO
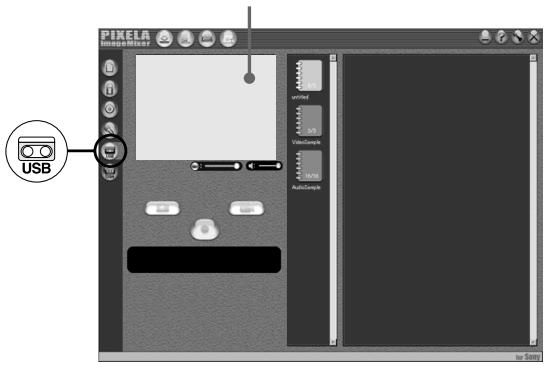
Preview window/ Okno npedbarntelbHoro npocmoTpa
(7) Connect the (USB) jack on your camcorder with the USB connector on your computer using the supplied USB cable.
(7) CoeHInHTe rHe3do (USB) Ha BaWei BnDeOkampe c rHe3dom USB Ha BaWei KOMNbIOTepe, nCNoB3y npNlaRaembl Ka6enb USB.
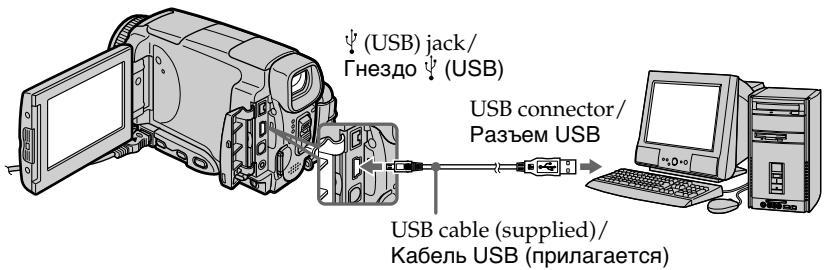
(8) Press 11 on the LCD screen to start playback. The picture from the tape appears on preview window on your computer.
(8)HaxmTe KhoNky ⅡI nla Hauana Bocnpo3BeDeHn.
136paXeHne C IeHTbIOPABITcB OKHe npEdBaPntelbHorO npocMOTpa Ha 3kpaHe BaWero KOMNbTopeA.
Viewing images recorded on a tape on your computer - For Windows users
Прсмтгибхажни,занcaHHbIX HaJIENTy,нБашемКOMпьЮтete-ДЯп поьзовате Windows
Viewing pictures live from your camcorder
(1) Follow the steps 1, 2 on page 208.
(2) Set the POWER switch to CAMERA. Select USB STREAM in to ON in the menu settings (p. 231).
(3) Follow the steps 4 to 7 on pages 208 and 209. The picture from your camcorder appears on preview window on your computer.
PpocMToP KINBbIX N3O6paXeHn C Bauei Bndeokamepbl
(1)CneNyTe DeiCTBnAM NyHKTOB 1,2 Ha cTp. 208.
(2)YcTaHOBInTe NepeKJIIOuHaTeJIb POWER B noIOXeHne CAMERA. YcTaHOBInTe OIciHo USB STREAM B B noIOXeHne ON B ycTaHOBkax MeHIO (CTp. 239).
(3)CneyuTe DeiCTBnM NyHKTOB c 4 no 7 Ha cTp.208 n 209. N3o6paKeHne c BaWe BnDeOkamepbI NOABNTcHa 3KpaHe BaWero KOMNbHOtepa.
Capturing still images
BbOd HnOoDbNkHbIX N3o6paXeHn
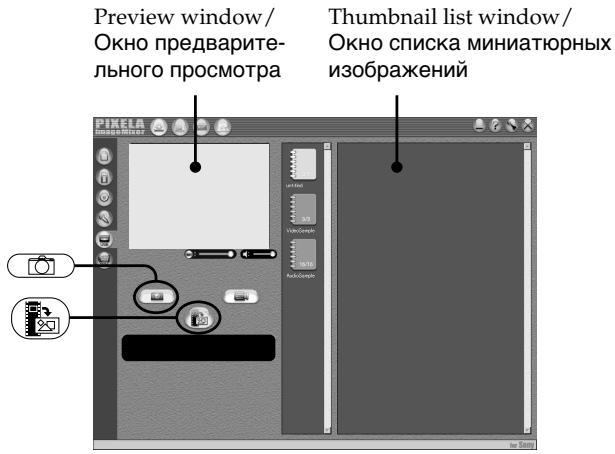
(1)Select
(2) Looking at the preview window, move the cursor to and press it at the point you want to capture. The still image on the screen is captured. Captured images are displayed in the thumbnail list window.
(1)BbIbepeHTe onuHo
(2)Глдя Ha OKHO npeBapnteHbHOro npocMoTpa, nepemecTe Kypcop K nIKToPamme HnHaXMITE ee B MeCTe, KOtOpoe Bbl XOTne BBcTe. HenoDbNxHHe N3O6paxKeHne Ha 3KpaHe 6ydet BVeDeHo. BBeDenHbIe N3O6paxKeHn8 6ydy OTO6paxKaTbCBA OKHe CnNcKa MInHaTOpHbIX N3O6paxKeHn.
Viewing images recorded on a tape on your computer - For Windows users
Прсмотр n3o6paхени, 3aIncaHHbIX HaJIeHTy,Ha BaWeM KOMNbIoTepe-ДЯ NOJb3OBAteJe Windows
Capturing moving pictures
Preview window/Okho npeDbapntelbHoro npocmoTpa
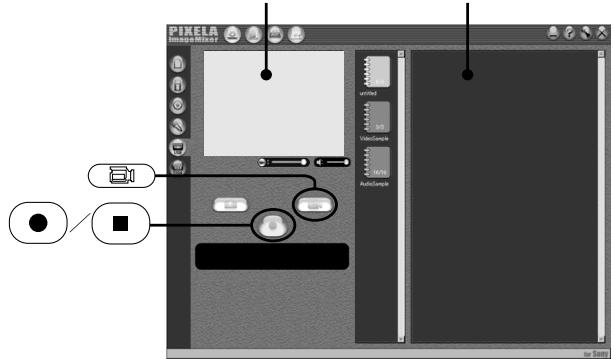
BbOd dBnKyuIcxc n3o6paXeHn
Thmbnail list window/ Okho cncka MmHaTHOpHbIX n3O6paXKeHn
(1)Select
(2) Look at the preview window and click on at the first scene of the movie you want to capture. changes to .
(3) Look at the preview window and click on at the last scene you want to capture. The moving picture is captured. The captured images appear in the thumbnail list window.
(1)BbIepeTe onIuHO
(2)ПосмOTРпЕ Na 3Кран прдВартельНOro
посмOTра И ZeLEKNITe NO ПИКТORpAMMe
●
Ha PerBOM 3ПИЗODE ФИЛБМа, KOTOPы
Вы XOTNTe BBeCTN. ИнДиKaцЯ
СмEHHTcR INДиKaцIeN
(3)ПосмOTPITe Ha ЗкранnpeДВapITeIbHOrOpnoCmOTpaиИцELKHITe NOПКТORpAMMeHa nocLeDHEm 3IN3OdeФINlbMa,KOtOpbI BbyXOTITE BBecT.N.BydET BVEdeHODbNkUyIeEcaI N3OpaJxHe. BBeDeHbIeN3OpaJxHЯ NOBaTcB OKHe CnNcKaMHNHaTIOhIX N3OpaJxHЯ.
Notes
- The following may occur while using your camcorder, and are not due to any malfunction.
- The image shakes up and down.
- Some images are not displayed correctly due to noise, etc.
- Images of different colour systems to that of the camcorder are not displayed correctly.
- When your camcorder is in the standby with a cassette inserted, it turns off automatically after five minutes.
- We recommend setting DEMO MODE to OFF in the menu settings when your camcorder is in the standby, and no cassette is inserted.
- Indicators in the camcorder LCD screen do not appear on images that are captured into your computer.
- AXIELA ImageMixer is only for the DV equipment though it has the function that adopts the i.LINK cable. To view images recorded on a MICROMV tape, use the application software MovieShaker Ver. 3.1 for MICROMV.
Приимейчения
Пи ИСОЛТБЗОВАМИВашей ВИДЕОКAMEPь можETпюзOTNсLEдуЮоcee,ЧTO HeЯВлгетСНЕСРВАНСТБIO.
-Изобрахени 6удET подариВаь Вьерх И ВиЗ.
- HeKoTOpBle I3ObpaXaJHnHe OToObpaXaIOTcN HauJIeKaUIM O6pa3OM I3-3a NOMEX T.I.
NtO6paKaHEna Pa3hBx C1CTEM LBeTHOrO TNeBvIeHnHa DaHHOB BUNDeOKaMepe He OTO6paKaHaoTcH NaJnHexaMmOBpazAm.
- Ecnn BaSha cnBdoekamepa HaxoJntcB Pexime OxknaHn CbCTabJIeHHK KaceToB BHTpO, OHa ABTOMATHECKN OTKJIOHTCnCyTb MHyT.
- PekOMeHdyeTcA yctaHOBnTb onuHIO DEMO MODE B yctaHOBkA MeHIO B nIOnXeHne OFF, KOrJa BaHa a BnDEOkAMepa HaxoJITcB B pEXMme OxNdaHn, N B He He BCTABHeHa KACCeta.
- HNDAKATOpbHa 3KpaHe KKDb BmDoeOKaMEpbI He NOBJIOTcH A306paXeHHx, BBeDeHHbIX B BaW KOMblOtEP.
- Плогамma PILXELA ImageMixer педназа既可以 на Тольк ддцфрови ВдебоанnapaТуbl DV,хот в Не Иметсу Фундь,КOTOPANпера.Tсг Тольк черз кабел i.LINK.Дд посмтра n3обрахени, засянных на лente MICROMV, Incotьытп ржknlahoe погамmarho obecneочени MovieShaker Ver.3.1 for MICROMV.
Viewing images recorded on a tape on your computer - For Windows users
Прсмтгиббхажни,занcaHHbIX HaJIENTy,нБашемКOMпьЮ-tepe-ДЯ поьзовateел Windows
If image data cannot be transferred by the USB connection
The USB driver has been registered incorrectly as your computer was connected to your camcorder before installation of the USB driver was completed. Reinstall the USB driver following the procedure on page 201.
If any trouble occurs
Close all running applications, then restart your computer.
Carry out the following operations after quitting the application:
- Disconnect the USB cable.
- Change the POWER switch to the other position or set the POWER switch to OFF (CHG) on your camcorder.
When operating the following modes, they do not function for the image to be output, or the image cannot be output
-Colour Slow Shutter
Super NightShot
-Digital effect
-MEMORY MIX
EcIn DaHbIe N3O6paXeHnH He MOryT 6bITb nepeDaHbI Chee3 coEdHeHne USB
Seeing the on-line help (operating instructions) of "PIXELA ImageMixer Ver.1.0 for Sony"
A "PIXELA ImageMixer Ver.1.0 for Sony" on-line help site is available where you can find the detailed operating method of "PIXELA ImageMixer Ver.1.0 for Sony".
(1) Click ② located in the upper-right corner of the screen. The ImageMixer's Manual screen appears.
(2) You can find the information you need from the list of contents.
To close on-line help
Click at the top right of the screen.
If you have any questions about "PIXELA ImageMixer Ver.1.0 for Sony"
"ImageMixer Ver.1.0 for Sony" is a trademark of PILXELA corporation. For more information, refer to the instruction manual of the CD-ROM supplied with your camcorder.
Note on using your computer
Communications with your computer
Communications between your camcorder and your computer may not recover after recovering from Suspend, Resume, or Sleep.
ПрсмOTР сNTeMbI BCTroeHNoI NOMOuN (Инстукци NOЗКСЛУаТAU)nporpamMHoro obecneueHnN "PIXELA ImageMixer Ver.1.0 for Sony"
Viewing images recorded on a "Memory Stick" on your computer - For Windows users
- You need to install the USB driver to view the "Memory Stick" images on your computer (p. 201).
- An application such as Windows Media Player must be installed to play back moving pictures in Windows environment.
(1) Turn on your computer and allow Windows to load.
(2) Insert a "Memory Stick" into your camcorder, and connect the AC power adaptor to your camcorder. Set the POWER switch to MEMORY/NETWORK (DCR-IP55E only).
(3) When the CD-ROM is inserted on your computer, connect the (USB) jack on your camcorder to the USB connector on your computer using the supplied USB cable. USB MODE appears on the LCD screen of your camcorder.
Ppocmptn3o6paXeHn
Ipeed BbInOpHeHnem Otnepaun
(4) Open "My Computer" on Windows and double-click the newly recognised drive (Example: "Removable Disk (E):"). The folders inside the "Memory Stick" are displayed.
(4)ОткpoиTeВсpeDEWindowsnanKy“Moi KOMMbHOTep"иДвЖдыцELKNHTe NO BHOBb paCNo3HaHHOMy HakOINTeIIO(ПрIMeP: “CbeMHbIДИСК(E:)”). OTo6pa3rTcHпanknВHyTpN“MemoryStick”.
Viewing images recorded on a "Memory Stick" on your computer – For Windows users
(5)Select and double-click the desired image file from the folder. For the detailed folder and file name, see "Image file storage destinations and image files."
(5)Bb6epnte nIbaxkblIeKnHTe no paimny HxhHorO n3o6paXeHn I3 npAn. PioDpO6HbIe CBeDeHn O6 IMeHax npAnKn I paimNoB npVBeDeHbI B pa3deNe "Mecta XpanEHn paimLoN n3o6paXeHn I paimNbI n3o6paXeHn".
- Copying a file to the hard disk of your computer before viewing it is recommended. If you play back the file directly from the "Memory Stick," the image and sound may break off.
Image file storage destinations and image files
Image files recorded with your camcorder are grouped in folders by recording mode. The meanings of the file names are as follows. stands for any number within the range from 0001 to 9999.
For Windows Me users (The drive recognizing your camcorder is [E:].)
- Pekomehyetca neped npocmptom ckonnpoBaTb faaIHa JxecTkndn Bawero nepcoHahBHorO KOMtbIoTepa. EcIn Bbl 6ydeTe BOCpOn3BOJNTb faaI npAmo C "Memory Stick", n3obpaxeHne n 3ByK MOrTy BHe3aHNo 06pbBaTcbr.
MecTa xpaHeHnI ZaJIIOB n3o6paxKeHn I ZaJIbI n3o6paxKeHn
Фаилbln306paxKeHm,3aIncaHhbIe C nOMObIO BaueBnDteOkamepbl,crpyPiNpOBaHbIBnAnKn nopeKIMy 3anci.
3NaueHnIMeH paiNoB TaKOBbl.
□□□□ 06o3Haayet JIO6oe Ynclo B DnaPana3OHe ot 0001do9999.
Для польбател Windows Me (УстroyCTBO, пedingtabлiouslyee Bndeokamepy - [E:])
![SONY DCR-IP45E - Для польбател Windows Me (УстroyCTBO, пedingtabлiouslyee Bndeokamepy - [E:]) - 1](/content/2020/05/48647/images/93b0fc24c2dc7795ef24efb2a5c32d9a39bd2a023cb74ca8c671b5bfb0cd1454.jpg)
Folder containing still image and moving picture data/Палка, соржаши данные неювЖных и DBиЖушихсиЗборжени
Disconnect the USB cable and remove the "Memory Stick" or set the POWER switch to OFF(CHG)
- For Windows 2000 Professional/Windows Me, Windows XP Home Edition/Professional users
To unplug the USB cable, eject the "Memory Stick" or set the POWER switch to OFF(CHG), follow the procedure below.
(1)Move the cursor to the "Unplug or Eject Hardware" icon on the Task Tray and click to cancel the applicable drive.
(2) After the "Safe to remove" message appears, disconnect the USB cable and remove the "Memory Stick" or set the POWER switch to OFF(CHG).
OTcoeHnHTe Ka6eJb USB n ɪzBleKnte “Memory Stick”, nɪn yCTaHOBnTe nepeKlIoUaTeJb POWER B noIolOxHeNe OFF (CHG)
- Дд полььстел Windows 2000 Professional/Windows Me, Windows XP Home Edition/Professional
YtO6bl OTOeDNHnTb Ka6eNb USB, n3BNeu b "Memory Stick" uNn ycTaHOBNt b nepeKnIOuATEnb POWER B noLoXeHne OFF (CHG), cIeNyTe oNcAHHo HnHex pnoeDype.
(1)Перементе Ксрор на пiktortраму "Отклочин Или ИЗВлесь оборудованe" в па themselves 3адаун, И селкни Сдг OTмени COOTBETCTBYUоцero yctpoiuctBa.
(2)После появеленя-coobшени "Tepeь Bby loMeKTe ydaJIntb ycTpoIcTBO"OTcoeДиHnTe Ka6eNB USBи ydaJInte "Memory Stick", nIn yctahOBITE nepekJIIOUaTeIb POWER B noLoXeHne OFF (CHG).
Connecting your camcorder to your computer using the USB cable – For Macintosh users
When connecting to a computer via the USB jack
You must install a USB driver onto your computer in order to connect the camcorder to the computer's USB connector. The USB driver can be found on the CD-ROM supplied, along with the application software required for viewing images.
Recommended Macintosh environment
Mac OS 8.5.1/8.6/9.0/9.1/9.2 or Mac OS X (v10.0/v10.1) standard installation is required. However, note that the update to Mac OS 9.0/9.1/9.2 should be used for the following models.
- iMac with the Mac OS 8.6 standard installation and a slot loading type CD-ROM drive
- iBook or Power Mac G4 with the Mac OS 8.6 standard installation
The USB connector must be provided as standard.
QuickTime 3.0 or newer must be installed (to play back moving pictures).
Notes
- Operations are not guaranteed for the Macintosh environment if you connect two or more USB equipment to a single computer at the same time, or when using a hub.
- Some equipment may not operate depending on the type of USB equipment that is used simultaneously.
- Operations are not guaranteed for all the recommended computer environments mentioned above.
- Macintosh and Mac OS, QuickTime are trademarks of Apple Computer Inc.
- All other product names mentioned herein may be the trademarks or registered trademarks of their respective companies. Furthermore, "TM" and "®" are not mentioned in each case in this manual.
Installing the USB driver
Do not connect the USB cable to your computer before installation of the USB driver is completed.
For Mac OS 8.5.1/8.6/9.0 users
(1)Turn on your computer and allow the Mac OS to load.
(2) Insert the supplied CD-ROM in the CD-ROM drive of your computer. The application software screen appears.
YctaHOBka dpaBepa USB
He IocoeHnIte Ka6eJb USB K Baewemy KomlbTepy Do 3aBepWeHn yctaHOBKn dpaBepa USB.
(3) Click the "USB Driver" to open the folder containing the six files related to "Driver."
(4) Select the following two files, and drag and drop them into the System Folder.
- Sony Camcorder USB Driver
- Sony Camcorder USB Shim
(5) When the message appears, click "OK."
The USB driver is installed on your computer.
(6) Remove the CD-ROM from the computer.
(7) Restart your computer.
For Mac OS 9.1/9.2/Mac OS X (v10.0/v10.1)
The USB driver need not be installed. Your Mac is automatically recognized as a drive just by connecting your Mac using the USB cable.
(4)Bb6epnte cneIyUOuNe IBa paIa n nepetataunTe uOnyCTnTe INB CnCTemHyo npAnky.
- Sony Camcorder USB Driver
- Sony Camcorder USB Shim
(5)Korda noBHTc coo6eHne, ueiKHnTe no KhoNKe "OK".
Viewing images recorded on a "Memory Stick" on your computer – For Macintosh users
ПрсмOTР ИЗбрахени,ЗдИСаHHbIX Ha "Memory Stick",Ha Baшем KomпьЮтepe -ДЯ пользовател Масintosh
Viewing images
Before operation
You need to install the USB driver to view the
"Memory Stick" images on your computer. (p. 201)
QuickTime 3.0 or newer must be installed to play back moving pictures.
(1) Turn on your computer and allow Mac OS to load.
(2) Insert a "Memory Stick" into your camcorder, and connect the AC power adaptor to your camcorder.
(3) Set the POWER switch to MEMORY/ NETWORK (DCR-IP55E only).
(4) Connect the (USB) jack on your camcorder with the USB connector on your computer using the supplied USB cable. USB MODE appears on the screen of your camcorder.
(5) Double-click the "Memory Stick" icon on the desktop. The folders inside the "Memory Stick" are displayed.
(6)Select and double-click the desired image file from the folder.
Ppocmptn3o6paXeHn
Ipeed BbinoJHHeHem Oepaun
YtO6bI pIOcMAtPnBaTb N3o6paXeHnra "Memory Stick"Ha 3KpaHe BaUero KOMNbIoTepa,Bam HynxHo yCTaHOBnTb DpaBep USB (ctp.201). IJrBOCnpOn3BeDeHnRA DvIXKyUnxCra N3o6paXeHnI DoJIxKeH 6bITb YcTaHOBnEe QuickTime 3.0 nII 6Oee HOBaB BepCnra.
(1)ВключITE Baш nepcoHaJIbHbI KOMlbHOTepиdoЖДИТecb 3arpyЗКn Mac OS.
(2)Установпг "Memory Stick" в Башу Видаокамеру, И посоединтесеньoi aданлрсямен Horo Toka K Baшей Видаокамеpe.
(3)Установские полочатуль POWER в положене MEMORY/NETWORK (Толъкову мостел BCR-IP55E).
(4) CoeDInHnTe rHe3do (USB) BaWei BnDeOKaMepbI n pa3bEm USB BaWero KOMMbIOTepa C NMOUbIO npuNlaeMoRo Ka6eNa USB. Ha 3kpaNe BaWei BnDeOKaMepbI pOBNTcR INDnKaZn USB MODE.
(5)Двждьи龟КнHTe NOПКТогpaMMe "Memory Stick"Ha pa6oчem cTone. OTo6pa3rTcЯпки BHyTpN "Memory Stick".
(6)BbIbepuTe n IaBXkblIeKHNte nO paIny HxKHorO n3o6paXeHnI n3 npKn.
| Desired file type/ Huxkhney Tnp Фальа | Double-click in this order/ Henodbvinxhoe n3obpaxe(hne |
| Still image/Moving picture*/ Henodbvinxhoe n3obpaxe(hne/ Движшем ся n3obpaxe(hne* | "Dcim" folder → "100msdcf" folder → Image file/ Палka "Dcim" → Палka "100msdcf" → Фаль n3obpaxe(hne |
-
Copying a file to the hard disk of your computer before viewing it is recommended. If you play back the file directly from the "Memory Stick," the image and sound may break off.
-
Pekomehnyetca napei npocmotpom ckonnpoBaTb faaIHa JxecTkI dNcK BaJero nepcoHaJIbHoro KOMbIoTepa. EcI N Bbl 6yJeTe Bocpnoun3BODnTb faI npAmo C "Memory Stick", n3OpbaxKeHne n 3Byk MOryt BHe3aHNo 06pbIBaTbCra.
Disconnect the USB cable and remove the "Memory Stick" or set the POWER switch to OFF(CHG)
Follow the procedure below.
(1) Close all running applications.
Make sure that the access lamp of your camcorder is not lit.
(2) Drag the "Memory Stick" icon into the "Trash". Alternatively, select the "Memory Stick" icon by clicking on it, and then select "Eject disk" from the "Special" menu at the top left of the screen.
(3) Disconnect the USB cable and remove the "Memory Stick" or set the POWER switch to OFF (CHG).
For Mac OS X (v10.0) users
Shut down your computer, then disconnect the USB cable and remove the "Memory Stick" or set the POWER switch to OFF (CHG).
OTcoeHnHTe Ka6eJb USB n3BLeKNTe "Memory Stick", nIyctaHOBnTe nepeKlOuChaTeJB POWER B noLoXHeHne OFF (CHG)
CneyuTe onncanHnHxepnpoedype.
(1)3akpoTe BCE OTKpbTbIe npInOxHeHnY. Y6eInTeCb, YTO lamna doctyna BaSei BnDEOKaMepbI He rOpNT.
(2)Переташип Te ПКТогрму "Memory Stick" И OTистп Te ee NaД "Kорзинов". ИИ Bыдени Te ПКТогрму "Memory Stick" OДинарны IM Zeileчkom NO Hei, a 3aTeM Bыберп Te Komанду "Eject disk" В мeю "Special" В Левом Берхем углу ekpa ha.
(3)ОтwoeДинTe KaБeЛB USВ и ИЗВлeКИTe "Memory Stick", Или усТановиTe nepeкliюЧаTeЛь POWER в положене OFF (CHG).
You can access the Internet using a Bluetooth equipped device that is complied to the camcorder. Once the access is made, you can view a Web page, send/receive your e-mail, etc. This section describes only how to open the Network Menu.
(1) Set the POWER switch to MEMORY/ NETWORK.
(2) Press [NETWORK]. (Bluetooth) lamp lights up and Network Menu appears.
For the details, refer to the Network Function Operating Instructions supplied with your camcorder.
- The Bluetooth trademarks are owned by their proprietor and used by Sony Corporation under license.
- All other product names mentioned herein may be the trademarks or registered trademarks of their respective companies. Furthermore, "TM" and "®" are not mentioned in each case in this manual.
Note
Make sure that your camcorder is in the standby with the POWER switch set to MEMORY/ NETWORK.
OToprobbixMapkax
ToprobIe MapKn Bluetooth ABJIOTcN co6CTBENHOx BnaJeNbca, INCnOJb3yIOCTK Kopnpauee Sony Corporation corNaCHO NlueH3nn.
Bce npyrhe Ha3BaHnHa 3JeInyNOMHaemble 3Decb, MOrYT ABLTbCA TOpROBbIMN MapKaMn INI 3apeINCTpnpOBaHHbIMN TOpROBbIMN MapKaMn INx COOTBeCTbYIOuNX KOMNaHm. B DaJIbHeIWeM, 3NaKn "TM" n ^ He yNOMHaOTcB KaJDom Clyuae B daHHom pyKOBOdCTBe.
PpmeuHne
Y6eIntecb, YTO Ba7a BnIeOkaMepa HaxoIITcB BpeXIMe OxuHaHnA, a nepeKlIOuTeJIb POWER yCTaHOBJIeN B noJIoXeHne MEMORY/ NETWORK.
How to hold your camcorder when operating in NETWORK mode
Hold your camcorder with your hand through the wrist strap to keep from dropping it.
The operation buttons needed in NETWORK mode are displayed on the LCD screen. Press the buttons with the stylus supplied.
Kak deprkaTb Baws Bndeokamepy npi pa6oTe b pexime NETWORK
YTo6bI He ypoHnTb BaUy BnJeokamepy,
dEprKnte ee, npOnyCTuB pyKy cKBo3b peMeHb
JnI 3axBaTa.
Put it back in the holder on the wrist strap. Hold the stylus correctly as shown in the illustration and insert it until it clicks.
Iocne nCnoJb3ObaHnna nepa
- Customising Your Camcorder - Changing the menu settings
To change the mode settings in the menu settings, press / to select the menu items. The default settings can be partially changed. First, select the icon, then the menu item and the mode.
(1)Set the POWER switch to CAMERA, MEMORY/NETWORK (DCR-IP55E only) or VCR.
(2) Press FN to display PAGE1.
(3) Press MENU to display the menu.
(4) Press / to select a desired icon, then press EXEC.
(5) Press / to select a desired item, then press EXEC.
(6) Press / to select a desired setting, then press EXEC.
(7) Repeat steps from 4 to 6 if you want to change other items. Press RET. to return to step 4.
For details, see "Selecting the mode setting of each item" (p. 225 - 232).
- BbInOpHeHne HmDmBnDyajlbhXyCTaHOBOK Ha BaSei BnDeokampe -
Menu items are displayed as the following icons:
M MANUAL SET
CAMERA SET
VCR SET
LCD/VF SET
MEMORY SET
CMSET
TAPE SET
SETUP MENU
ETC OTHERS
Дя ВОЗВраТа К Инданци FN
Hakmnte KhoNky EXIT.
OnuM MeHIO OTo6paXaOTcB BVide cJeDyUOxN NIKTORpAMM:
MANUAL SET
C CAMERA SET
VCR SET
LCD/VF SET
MEMORY SET
CMSET
TAPE SET
SETUP MENU
ETC OTHERS
English
Selecting the mode setting of each item is the default setting.
Menu items differ depending on the position of the POWER switch.
The LCD screen shows only the items you can operate at the moment.
| Icon/item | Mode | Meaning | POWER switch |
| MANUAL SET | |||
| PROGRAM AE | — | To suit your specific shooting requirement. | CAMERA MEMORY/ NETWORK* |
| P EFFECT | — | To add special effects like those in films or on the TV to images (p. 76, 92). | CAMERA VCR |
| FLASH LVL | HIGH | To make the flash level higher than normal. | CAMERA MEMORY/ NETWORK* |
| ●NORMAL | To use the normal setting. | ||
| LOW | To make the flash level lower than normal. | ||
| WHT BAL | — | To adjust the white balance (p. 69). | CAMERA MEMORY/ NETWORK* |
| N.S. LIGHT | ●ON | To use the NightShot Light function (p. 49). | CAMERA MEMORY/ NETWORK* |
| OFF | To cancel the NightShot Light function. | ||
| AUTO SHTR | ●ON | To automatically activate the electronic shutter when shooting in bright conditions. | CAMERA |
| OFF | To not automatically activate the electronic shutter even when shooting in bright conditions. | ||
- DCR-IP55E only.
FLASH LVL
You cannot adjust FLASH LVL if the external flash (optional) is not compatible with the flash level.
Changing the menu settings
| Icon/item | Mode | Meaning | POWER switch |
| CAMERA SET | |||
| D ZOOM | ● OFF | To deactivate the digital zoom. Up to 10× zoom is carried out. | CAMERA |
| 20× | To activate the digital zoom. More than 10× to 20× zoom is performed digitally (p. 44). | ||
| 120× | To activate the digital zoom. More than 10× to 120× zoom is performed digitally (p. 44). | ||
| 16:9WIDE | ● OFF | Not to record a 16:9 wide picture (p. 71). | CAMERA |
| ON | To record a 16:9 wide picture. | ||
| STEADYSHOT | ● ON | To compensate for camera-shake. | CAMERA |
| OFF | To cancel the SteadyShot function. Natural pictures are produced when shooting a stationary subject with a tripod. | ||
| HOLOGRAM F | ● AUTO | The HOLOGRAM AF emits when focusing on subjects is difficult in dark places (p. 150) | MEMORY/ NETWORK* |
| OFF | The HOLOGRAM AF does not emit. | ||
| VCR SET | |||
| NTSC PB | ● ON PAL TV | To play back a tape recorded in the NTSC colour system on a PAL system TV | VCR |
| NTSC 4.43 | To play back a tape recorder in the NTSC colour system on a TV with the NTSC 4.43 mode | ||
| VIDEOINPUT | ● VIDEO | To use the video plug of the A/V connecting cable when recording from a player. | VCR |
| S VIDEO | To use the S video plug of the A/V connecting cable when recording from a player. | ||
- DCR-IP55E only.
SteadyShot function
- The SteadyShot function may not correct excessive camera-shake. Even if STEADYSHOT is set to ON.
- Attachment of a conversion lens (optional) may influence the SteadyShot function.
If you cancel the SteadyShot function
The SteadyShot off indicator "appears. Your camcorder prevents excessive compensation for camera-shake.
NTSC PB
When you play back a tape on a Multi System TV, select the best mode while viewing the picture on the TV.
Changing the menu settings
| Icon/item | Mode | Meaning | POWER switch |
| LCD/VF SET | |||
| LCD B.L. | ●BRT NORMAL | To set the brightness on the LCD screen normal. | CAMERA MEMORY/ NETWORK* VCR |
| BRIGHT | To brighten the LCD screen. | ||
| LCD COLOUR | — | To adjust the colour on the LCD screen with ↓/↑. | CAMERA MEMORY/ NETWORK* VCR |
| low intensity ←→ high intensity | |||
| VF B.L. | ●BRT NORMAL | To set the brightness on the viewfinder screen to normal. | CAMERA MEMORY/ NETWORK* VCR |
| BRIGHT | To brighten the viewfinder screen. | ||
- DCR-IP55E only.
LCD B.L. and VF B.L.
- When you select BRIGHT, battery life is reduced by about 10 percent during recording.
- When you use power supplies other than the battery pack, BRIGHT is automatically selected.
Even if you adjust LCD B.L., LCD COLOUR and/or VF B.L.
The recorded picture will not be affected.
Changing the menu settings
| Icon/item | Mode | Meaning | POWER switch |
| MEMORY SET | |||
| STILL SET | |||
| BURST | ●OFF | Not to record continuously. | MEMORY/ NETWORK* |
| NORMAL | To record from four to 13 images continuously (p. 145). | ||
| EXP BRKTG | To record three images continuously with different exposure. | ||
| MULTI SCRN | To record nine images continuously (p. 145). | ||
| QUALITY | ●SUPER FINE | To record still images in the finest image quality mode (p. 134). | MEMORY/ NETWORK* VCR |
| FINE | To record still images in the fine image quality mode. | ||
| STANDARD | To record still images in the standard image quality mode. | ||
| IMAGESIZE | ●1152×864 | To record still images at 1152×864 size (p. 140). | MEMORY/ NETWORK* |
| 640×480 | To record still images at 640×480 size. | ||
| MOVIE SET | |||
| MOVIEMODE | ●SUPER FINE | To record moving pictures with super fine image quality (p. 137). | MEMORY/ NETWORK* VCR |
| FINE | To record moving pictures with fine image quality. | ||
| STANDARD | To record moving pictures with standard image quality. | ||
| LIGHTMODE | To record moving pictures to be used as an e-mail attachment. | ||
| REMAIN | ●AUTO | To display the remaining capacity of the "Memory Stick" in the following cases: ·for five seconds after inserting a "Memory Stick" into your camcorder. ·when the capacity of the "Memory Stick" is less than one minute after the POWER switch is set to MEMORY/NETWORK. ·for five seconds after completing recording. | MEMORY/ NETWORK* VCR |
| ON | To always display the remaining capacity of the "Memory Stick". | ||
- DCR-IP55E only.
If you select QUALITY
The number of images you can shoot in the currently selected image quality appears on the LCD screen.
| Icon/item | Mode | Meaning | POWER switch |
| MEMORY SET | |||
| SLIDE SHOW | — | To play back images in a continuous loop (p. 184). | MEMORY/ NETWORK* |
| FILE NO. | ● SERIES | To assign numbers to file in sequence even if the "Memory Stick" is changed. | MEMORY/ NETWORK* VCR |
| RESET | To reset the file numbering each time the "Memory Stick" is changed. | ||
| DELETE ALL | — | To delete all the unprotected images (p. 191). | MEMORY/ NETWORK* |
| FORMAT | ● RETURN | To cancel formatting. | MEMORY/ NETWORK* |
| OK | To format an inserted "Memory Stick." Formatting erases all information on the "Memory Stick".1. Press ↓↑ to select FORMAT then press EXEC.2. Press ↓↑ to select OK, then press EXEC.3. After EXECUTE appears, press EXEC."FORMATTING" flashes during formatting.COMPLETÉ appears when formatting is finished. | ||
- DCR-IP55E only.
Notes on formatting
- The "Memory Stick" supplied with your camcorder has been formatted at factory. Formatting with your camcorder is not required.
- Do not turn the POWER switch or press any button while FORMATTING is displayed.
- You cannot format the "Memory Stick" if the write-protect tab on the "Memory Stick" is set to LOCK.
- Format the "Memory Stick" if ☑ FORMAT ERROR appears.
- Formatting erases protected image data on the "Memory Stick".
Changing the menu settings
| Icon/item | Mode | Meaning | POWER switch |
| CM SET | |||
| TITLEERASE | — | To erase the title you have superimposed (p. 119). | CAMERA VCR |
| TITLE DSPL | ●ON | To display the title you have superimposed. | VCR |
| OFF | Not to display the title. | ||
| TAPE TITLE | — | To label a cassette (p. 124). | CAMERA VCR |
| ERASE ALL | — | To erase all the data in cassette memory (p. 126). | CAMERA VCR |
| INFODSPL | ●ON | To display the cassette information of the tape. This is displayed for five seconds in the following cases: (p. 124). · When you insert a cassette with the POWER switch set to CAMERA. · When setting the POWER switch to VCR. | CAMERA VCR |
| OFF | To not display the cassette information of the tape. | ||
| TAPE SET | |||
| REMAIN | ●AUTO | To display the remaining tape bar: · for about eight seconds after a cassette is inserted and your camcorder calculates the remaining amount of tape. · for about eight seconds after the playback button ➔ ➔ is pressed in VCR mode. · for about eight seconds after DSPL/TOUCH PANEL is pressed to display the screen indicators. | CAMERA VCR |
| ON | To always display the remaining tape indicator. | ||
| SETUP MENU | |||
| CLOCK SET | — | To set the date or time (p. 31). | CAMERA MEMORY/ NETWORK* |
| USB STREAM | ●OFF | To deactivate the USB Streaming function. | CAMERA VCR |
| ON | To activate the USB Streaming function. | ||
| LANGUAGE | ●ENGLISH | To display the following information indicators in English: min, STBY, REC, CAPTURE, VOL, END SEARCH and START. | CAMERA MEMORY/ NETWORK* VCR |
| FRANÇAIS 1) | To display the information indicators in French. | ||
| ESPÁNOL 1) | To display the information indicators in Spanish. | ||
| PORTUGUES 1) | To display the information indicators in Portuguese. | ||
| DEUTSCH 1) | To display the information indicators in German. | ||
| ITALIANO 1) | To display the information indicators in Italian. | ||
| ΕΑΗΝΙΚΑ 1) | To display the information indicators in Greek. | ||
| 中文[COMP] 2) | To display the information indicators in Chinese (traditional). | ||
| 中文[SIMP] 2) | To display the information indicators in Chinese (simplified). | ||
| DEMO MODE | ●ON | To make the demonstration appear. | CAMERA |
| OFF | To cancel the demonstration mode. | ||
- DCR-IP55E only.
1) European models only
2) Except for European models
Notes on DEMO MODE
- You cannot select DEMO MODE when a cassette or the "Memory Stick" is inserted in your camcorder.
- When NIGHTSHOT is set to ON, the "NIGHTSHOT" indicator appears on the LCD screen and you cannot select DEMO MODE in the menu settings.
- If you press the touch panel during the demonstration, the demonstration stops for a while, then it starts again after about 10 minutes.
- DEMO MODE is set to STBY (Standby) at the default setting and the demonstration starts about 10 minutes after you have set the POWER switch to CAMERA without a cassette inserted.
To cancel the demonstration, insert a cassette, set the POWER switch to other than CAMERA, or set DEMO MODE to OFF. To set to STBY (Standby) again, leave the DEMO MODE at ON in the menu settings, turn the POWER switch to OFF (CHG), and return the POWER switch to CAMERA.
| Icon/item | Mode | Meaning | POWER switch |
| ETC OTHERS | |||
| DATA CODE (On the Remote Commander) | ● DATE/CAM | When you press the DATA CODE button on the Remote Commander, the date, time and various settings are displayed during playback (p. 57). | MEMORY/ NETWORK* VCR |
| DATE | The date and time are displayed during playback. | ||
| AREA SET | — | To set your area temporarily, when using the camcorder, in a new location (p. 33). | CAMERA MEMORY/ NETWORK* |
| SUMMERTIME | ● OFF | To be used when your area is not in daylight saving time. | CAMERA MEMORY/ NETWORK* |
| ON | To be used when your area is in daylight saving time. | ||
| BEEP | ● MELODY | To output the melody when you start/stop recording or when an unusual condition occurs on your camcorder. | CAMERA MEMORY/ NETWORK* VCR |
| NORMAL | To output the beep instead of the melody. | ||
| OFF | To cancel melody and the beep sound. | ||
| COMMANDER | ● ON | To activate the Remote Commander supplied with your camcorder. | CAMERA MEMORY/ NETWORK* VCR |
| OFF | To deactivate the Remote Commander to avoid remote control misoperation caused by other VCR's remote control. | ||
| DISPLAY | ● LCD | To show the display on the LCD screen and viewfinder. | CAMERA MEMORY/ NETWORK* VCR |
| V-OUT/LCD | To show the display on the TV screen, LCD screen and viewfinder. | ||
| REC LAMP | ● ON | To light up the camera recording lamp at the front of your camcorder. | CAMERA MEMORY/ NETWORK* |
| OFF | To turn the camera recording lamp off so that the subject is not aware of recording. | ||
- DCR-IP55E only.
Note
If you press DSPL/TOUCH PANEL with DISPLAY set to V-OUT/LCD in the menu settings, the picture from a TV or VCR will not appear on the LCD screen even when your camcorder is connected to the output jacks on the TV or VCR.
When recording a close subject
When REC LAMP is set to ON, the red camera recording lamp on the front of the camcorder may reflect on the subject if it is close. In this case, we recommend you set REC LAMP to OFF.
In more than five minutes after removing the power source
The PROGRAM AE, FLASH LVL, WHT BAL and COMMANDER items return to their default settings. Other menu items are held in memory even when the battery is removed.
Pycckn
Bb6op yctaHOBOK peKIma no KaXdoI onqun ABJIaeTcYCTaHOBKOIO yMOJuaHIO.
Onu MeHIO OTJNUaOTcB 3aBnCIMoCTN ONoJoxHeI nepeKliOaTeJI POWER.
Ha 3kpahe KKД OTObpaKaOTcA TOnbKO Te onuN, KOToPbIMn Bbl MoXeTe OneepuPoBaTb B daHbI MOMENT BpeMeHn.
Types of trouble and how to correct trouble
If you run into any problem using your camcorder, use the following table to troubleshoot the problem. If the problem persists, disconnect the power source and contact your Sony dealer. If "C:□□:□□" appears on the LCD screen, the self-diagnosis display function has activated. See page 248.
In the recording mode
| Symptom | Cause and/or Corrective Actions |
| START/STOP does not operate. | ·The POWER switch is not set to CAMERA. →Set it to CAMERA (p. 39). ·The tape has run out. →Rewind the tape or insert a new one (p. 35, 59). ·The write-protect tab is set to expose the red mark. →Use a new cassette or slide the tab (p. 36). ·The tape is stuck to the drum (moisture condensation). →Remove the cassette and leave your camcorder for at least one hour to acclimatise (p. 270). |
| The power goes off. | ·When your camcorder is in the recording standby mode for more than five minutes, the camcorder automatically turns off to save battery power and to prevent battery and tape wear. →Set the POWER switch to OFF (CHG) and then to ON. ·The battery pack is dead or nearly dead. →Install a fully charged battery pack. |
| The image on the viewfinder screen is not clear. | ·The viewfinder lens is not adjusted correctly. →Adjust the viewfinder lens (p. 43). |
| The SteadyShot function does not work. | ·STEADYSHOT is set to OFF in the menu settings. →Set it to ON in the menu settings (p. 226). |
| The autofocusing function does not work. | ·The setting is the manual focus mode. →Press FOCUS to set to the auto focus mode (p. 87). ·Shooting conditions are not suitable for autofocus. →Adjust to focus manually (p. 87). |
| The picture does not appear in the viewfinder. | ·The LCD panel is open. →Close the LCD panel when you record using the viewfinder (p. 41). |
| A vertical band appears when you shoot a subject such as lights or a candle flame against a dark background. | ·The contrast between the subject and background is too high. This is not a malfunction. |
| A vertical band appears when you shoot a very bright subject. | ·This is not a malfunction. |
| Some tiny white, red, blue or green spots appear on the LCD screen. | ·SLOW SHUTTER, Super NightShot or Colour Slow Shutter mode is activated. This is not a malfunction. |
(continued on the following page)
Types of trouble and how to correct trouble
| Symptom | Cause and/or Corrective Actions |
| An unknown picture is displayed on the LCD screen or in the viewfinder. | If 10 minutes elapse after you set the POWER switch to CAMERA without a cassette inserted, your camcorder automatically starts the demonstration. → Insert a cassette or press the LCD screen. The demonstration stops. You can also cancel DEMO MODE (p. 231) in the menu settings. |
| The picture is recorded in incorrect or unnatural colours. | ·NIGHTSHOT is set to ON. → Set it to OFF (p. 49). |
| Picture appears too bright, and the subject does not appear on the LCD screen. | ·NIGHTSHOT is set to ON in a bright place. → Set it to OFF (p. 49). ·The BACKLIGHT function is active. → Set it off (p. 48). |
| The click of the shutter does not sound. | ·BEEP is set to OFF in the menu settings. → Set it to MELODY or NORMAL (p. 232). |
| A black band appears when recording a TV screen or computer screen. | ·Set STEADYSHOT to OFF in the menu settings (p. 226). |
In the playback mode
| Symptom | Cause and/or Corrective Actions |
| Playback is not possible. | ·The tape has run out. →Rewind the tape (p. 59). |
| There are horizontal lines on the picture or the playback picture is not clear or does not appear. | ·The video head may be dirty. →Clean the head using the cleaning cassette (optional) (p. 272). |
| No sound or only a low sound is heard when playing back a tape. | ·Volume is turned to minimum. →Turn up the volume (p. 55). |
| The multi-picture search, title search or date search function does not work. | ·There is no title in the tape. →Superimpose the titles (p. 114). ·The tape has a blank portion in the beginning of the tape or between record portion (p. 100, 102, 104). |
| The title is not displayed. | ·TITLE DSPL is set to OFF in the menu settings. →Set it to ON in the menu settings (p. 230). |
| Dubbing cannot be made when using the A/V connecting cable. | ·VIDEOINPUT is not set correctly in the menu settings. →Set it to the appropriate position (p. 226). |
| The playback picture freezes for about one second. | ·When playing back a transition of recordings, the playback picture freezes for about one second. This is not a malfunction. |
In the recording and playback modes
| Symptom | Cause and/or Corrective Actions |
| The POWER switch does not turn on. | ·The battery pack is not installed, or is dead or nearly dead. →Install a charged battery pack (p. 26). ·The AC power adaptor is not connected to a wall socket. →Connect the AC power adaptor to a wall socket (p. 30). |
| The battery pack is quickly discharged. | ·The temperature of the environment is too low. ·The battery pack is not fully charged. →Charge the battery pack fully again (p. 27). ·The battery pack is completely dead, and cannot be recharged. →Replace with a new battery pack (p. 26). |
| The battery remaining indicator does not indicate the correct time. | ·You have used the battery pack in an extremely hot or cold environment for a long time. ·The battery pack is completely dead, and cannot be recharged. →Replace with a new battery pack (p. 26). ·The battery is exhausted. →Use a charged battery pack (p. 26, 27). ·A deviation has occurred in the remaining time. →Charge the battery pack fully again so that the indication on the battery remaining indicator is correct (p. 27). |
| The power goes off although the battery remaining indicator indicates that the battery pack has enough power to operate. | ·A deviation has occurred in the remaining battery time. →Charge the battery pack fully again so that the indication on the battery remaining indicator is correct (p. 27). |
| The cassette cannot be removed from the holder. | ·The power source is disconnected. →Connect it firmly (p. 30). ·The battery is exhausted. →Use a charged battery pack (p. 26, 27). |
| The ① and ② indicators flash and no functions except for cassette ejection work. | ·Moisture condensation has occurred. →Remove the cassette and leave your camcorder for at least one hour to acclimatise (p. 270). |
| Remaining tape indicator is not displayed. | ·The ③ REMAIN is set to AUTO in the menu settings. →Set it to ON to always display the remaining tape indicator (p. 230). |
When operating using the "Memory Stick"
| Symptom | Cause and/or Corrective Actions |
| The "Memory Stick" does not function. | · The POWER switch is not set to MEMORY/NETWORK (DCR-IP55E only). → Set it to MEMORY/NETWORK (p. 17, 143). · The "Memory Stick" is not inserted. → Insert a "Memory Stick" (p. 130). |
| Recording does not function. | · The "Memory Stick" has already been recorded to its full capacity. → Delete unnecessary images and record again (p. 188). · The "Memory Stick" formatted incorrectly is inserted. → Format the "Memory Stick" using your camcorder or use another "Memory Stick" (p. 229). · The write-protect tab on the "Memory Stick" is set to LOCK. → Release the lock (p. 128). |
| The image cannot be deleted. | · The image is protected. → Cancel image protection (p. 186). · The write-protect tab on the "Memory Stick" is set to LOCK. → Release the lock (p. 128). |
| You cannot format the "Memory Stick." | · The write-protect tab on the "Memory Stick" is set to LOCK. → Release the lock (p. 128). |
| Deleting all the images cannot be carried out. | · The write-protect tab on the "Memory Stick" is set to LOCK. → Release the lock (p. 128). |
| You cannot protect the image. | · The write-protect tab on the "Memory Stick" is set to LOCK. → Release the lock (p. 128). · The INDEX screen is not displayed. → Press INDEX to display the index screen, then protect the image (p. 186). |
| You cannot write a print mark on the still image. | · The write-protect tab on the "Memory Stick" is set to LOCK. → Release the lock (p. 128). · The INDEX screen is not displayed. → Press INDEX to display the index screen, then write a print mark (p. 192). · You are trying to write a print mark on a moving picture. → Print marks cannot be written to moving picture. |
| You cannot play back images in actual size. | · You may not be able to play back images in actual size when you try to play back images recorded by other equipment. This is not a malfunction. |
| You cannot play back image data. | · Your camcorder cannot play back some images processed with a computer (The file name flashes on the LCD screen). · Your camcorder may not be able to play back the image recorded using other camcorder. |
Others
| Symptom | Cause and/or Corrective Actions |
| A title is not recorded. | ·20 titles have been recorded. →Erase unnecessary title (p. 119). ·The cassette is set to prevent accidental erasure. →Slide the write-protect tab so that red portion is not visible (p. 36). ·The tape has a blank portion in the recorded portion. →Superimpose the title to the recorded position (p. 117). |
| A cassette label is not recorded. | ·The tape is set to prevent accidental erasure. →Slide the write-protect tab so that red portion is not visible (p. 36). |
| The Remote Commander supplied with your camcorder does not work. | ·COMMANDER is set to OFF in the menu settings. →Set it to ON (p. 232). ·Something is blocking the infrared rays. →Remove the obstacle. ·The batteries are inserted in the battery holder with the +– polarities incorrectly matching the +– marks. →Insert the batteries with the correct polarity (p. 290). ·The batteries are dead. →Insert new ones (p. 290). |
| The picture from a TV or VCR does not appear even when your camcorder is connected to the outputs on the TV or VCR. | ·DISPLAY is set to V-OUT/LCD in the menu settings. →Set it to LCD (p. 232). ·VIDEOINPUT is not set correctly in the menu settings. →Set it to the appropriate position (p. 226). |
| The melody or beep sounds for five seconds. | ·Moisture condensation has occurred. →Remove the cassette and leave your camcorder for at least one hour to acclimate (p. 270). ·Some troubles have occurred in your camcorder. →Remove the cassette and insert it again, then operate your camcorder. |
| No function works though the power is on. | ·Disconnect the AC power adaptor from a wall socket or remove the battery, then reconnect it in about one minute. Turn the power on. If the functions still do not work, press RESET using a sharp-pointed object. (If you press RESET, all the settings (DCR-IP55E: except the NETWORK mode settings) including the date and time return to the default) (p. 283). |
| While charging the battery pack installed on the camcorder, the battery CHG lamp does not light up. | • Charging is completed. • The battery pack is not properly installed. → Install it properly (p. 26). |
| You cannot charge the battery pack installed on the camcorder. | • The POWER switch is not set to OFF (CHG). → Set it to OFF (CHG). • The AC power adapter is not connected to a wall socket. → Connect it to a wall socket (p. 27). |
| While charging the battery pack, the battery CHG lamp flashes. | • The battery pack is not properly installed. → Install it properly (p. 26). • Something is wrong with the battery pack. → Please contact your Sony dealer or local authorized Sony service facility. |
| When you set the POWER switch to VCR or OFF (CHG), if you move your camcorder, you may hear a clattering sound from inside your camcorder. | • This is because some functions use a linear mechanism. This is not a malfunction. |
| The buttons do not appear on the touch panel. | • The DSPL/TOUCH PANEL button is pressed. → Press the LCD screen lightly. → Press DSPL/TOUCH PANEL on your camcorder or DISPLAY on the Remote Commander (p. 57). |
| The buttons on the touch panel do not work. | → Adjust the LCD screen (CALIBRATION) (p. 274). |
| The indicators appear mirror-reversed in the viewfinder. | • The mirror mode is activated. This is not a malfunction (p. 45). |
| The characters on the TV screen are reversed. | • It occurs if you set DISPLAY to V-OUT/LCD in the menu settings when using mirror mode. This is not a malfunction. |
| Image data cannot be transferred by the USB connection. | • The USB cable was connected before installation of the USB driver was completed. → Uninstall the incorrect USB driver and reinstall the USB driver (p. 201). |
| A cassette cannot be removed even if the cassette lid is open. | • Moisture condensation has started to condense in your camcorder (p. 270). |
English Self-diagnosis display
Your camcorder has a self-diagnosis display function.
This function displays the current condition of your camcorder as a five-digit code (a combination of a letter and figures) on the LCD screen. If a five-digit code is displayed, check the following code chart. The last two digits (indicated by ) will differ depending on the state of your camcorder.
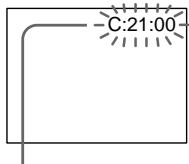
LCD screen or Viewfinder
Self-diagnosis display
C:□□:□□
You can service your camcorder yourself.
E:□□:□□
Contact your Sony dealer or local authorised Sony facility.
| Five-digit display | Cause and/or Corrective Actions |
| C:04:☐☐ | • You are using a battery pack that is not an “InfoLITHIUM” battery pack. → Use an “InfoLITHIUM” battery pack (p. 263). |
| C:21:☐☐ | • Moisture condensation has occurred. → Remove the cassette and leave your camcorder for at least one hour to acclimatise (p. 270). |
| C:22:☐☐ | • The video heads are dirty. → Clean the heads using the cleaning cassette (optional) (p. 271). |
| C:31:☐☐ | • A malfunction other than the above that you can service has occurred.* |
| C:32:☐☐ | • Remove the cassette and insert it again, then operate your camcorder. → Disconnect the mains lead of the AC adaptor or remove the battery pack. After reconnecting the power source, operate your camcorder. |
| E:20:☐☐ | • A malfunction that you cannot service has occurred. |
| E:61:☐☐ | • Contact your Sony dealer or local authorised Sony service facility and inform them of the 5-digit code. example: E:61:10) |
| E:62:☐☐ |
If you are unable to rectify the problem even if you try corrective actions a few times, contact your Sony dealer or local authorised Sony service facility.
- Do not perform this operation if moisture starts to condense (p. 270).
Warning indicators and messages
If indicators and messages appear on the LCD screen, check the following: See the page in parentheses "() for more information.
Warning indicators
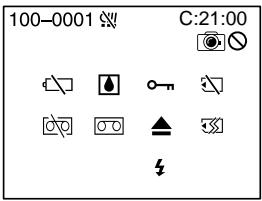
100-0001 Warning indicator as to file
Slow flashing:
The file is corrupted.
- The file is unreadable.
- You are trying to carry out MEMORY MIX function on moving picture (p. 158).
C:21:00 Self-diagnosis display (p. 248).
The battery is dead or nearly dead
Slow flashing:
- The battery is nearly dead. Depending on operational, environmental or battery conditions the indicator may flash, even if there are approximately five to 10 minutes remaining.
Moisture condensation has occurred*
Fast flashing:
- Eject the cassette, turn off your camcorder, and leave it for about one hour with the cassette compartment open (p. 270).
Warning indicator as to Micro Cassette
Memory*
Slow flashing:
- Eject the cassette, and insert it again. If even then the indicator flashes, the Micro Cassette Memory of the cassette may be faulty.
Fast flashing:
- The Micro Cassette Memory of the camcorder may be faulty.
Warning indicator as to "Memory Stick"
Slow flashing:
- No "Memory Stick" is inserted.
Fast flashing*:
-
The "Memory Stick" is not readable with your camcorder (p. 128).
-
The image cannot be recorded on "Memory Stick".
Warning indicator as to "Memory Stick" formatting*
Fast flashing:
- The "Memory Stick" data is corrupted.
- "Memory Stick" is not formatted correctly (p. 229).
Warning indicator as to tape
Slow flashing:
- The remaining tape is less than five minutes.
- No cassette is inserted.*
- The write-protect tab on the cassette is out (red) (p. 36).*
Fast flashing:
The tape has run out.*
Warning indicator as to a cleaning cassette
Slow flashing:
- The cleaning cassette is inserted in the camcorder in NETWORK (DCR-IP55E only) mode (p. 272).
You need to eject the cassette*
Slow flashing:
- The write-protect tab on the cassette is out (red) (p. 128).
Fast flashing:
- Moisture condensation has occurred (p. 270).
- The tape has run out.
- The self-diagnosis display function is activated (p. 248).
The image is protected*
Slow flashing:
The image is protected (p. 186).
Warning indicator as to the flash
Slow flashing:
- During charging.
Fast flashing: - The self-diagnosis display function is activated (p. 248).
- There is something wrong with the flash.
Warning indicator as to recording of still image
Slow flashing:
-
The still image cannot be recorded on a "Memory Stick" (p. 64).
-
You hear the melody or beep sound.
Warning messages
- CLOCK SET Set the date and time (p. 31).
FOR "InfoLITHIUM" Use an "InfoLIHIUM" battery pack (p. 29). BATTERY ONLY - CLEANING CASSETTE2) The video heads are dirty (p. 271).
- COPY INHIBIT You tried to record a picture that has a copyright control signal (p. 261).1)
FULL The "Memory Stick" is full (p. 147).1)
The write-protect tab on the "Memory Stick" is set to LOCK (p. 128).
NO FILE No image is recorded on the "Memory Stick" (p. 175).1)
NO MEMORY STICK No "Memory Stick" is inserted.1) - MEMORY STICK ERROR The "Memroy Stick" data is corrupted (p. 130).
- FORMAT ERROR The "Memory Stick" is not recognised (p. 229).1) Check the format.
- o-DIRECTORY ERROR There is more than two same directories (p. 174).
- PLAY ERROR The image is distorted and cannot be played back.1)
- REC ERROR Check the input signal, then record again (p. 157, 172).1)
- TAPE END The tape has reached the end of the tape.1)
- NO TAPE Insert a cassette.1)
- DELETING You press PHOTO while deleting data in a "Memory Stick".1)
- FORMATTING You press PHOTO while formatting a "Memory Stick."1)
- NOW CHARGING Charging flash does not work correctly. ^1)
- ▲ CLEANING END The cleaning is complete. Eject the cleaning cassette (p. 272).
- ▲ CLEANING TAPE END The cleaning tape has run out.
- TITLE FULL 20 titles have been recorded ^1) (p. 116).
- INPUT ERROR A picture in an incompatible format (such as one recorded with the DV format) is input ^1) (p. 113).
- CHANGE TO "CAM" or "VCR" A cleaning cassette cannot be used in MEMORY/NETWORK (DCR-IP55E only) mode (p. 272).
Pysckn
Pa3HOBnIHOCTn HEnCpPaBHOCTeN MeToDbI Nx yCTpaHeHNA
Ecn y Bac Bo3HKnla kakaan-1n6o np6IeMa npn nCpObn30BaHNn Bawei BndeOkamepbl, BocnoB3yTecb CneDnyoet TaBniuee JIaONBcHnN uCTpaHEHn np6IeMbl. Ecn np6IeMa He ycTaPAHETcR, To cJeUyeT OTOeDNHtB NCTOUYHK NITAHN I o6PaNTbCn B cepBnchB CEHTP Sony. Ecn na 3KpaHe NOBNTB INdKaunr "C:□□:□□", 3To 3NaHT, YTO cpa6oTanaФyHKnIn Hdkaunn camOdnarHoctkn. Cm. CTp. 258.
Bpekme 3ainnc
HdNkauncaMoDnaarHOCTNK
C:□□:□□
BbMOKeTe BbIOnHnTb 06cLyKuBaHne BaWeuBnDeOkamepbI camOCToTeJbHO.
E:□□:□□
O6paTInTeB C cepBnChbI ueHtp Sony nnn B MeCTHO yNOJHOMOHcHHe pneDprrAtne no 06cnyKbAHINU n3denny Sony.
BpeMaOCTabWeiCAJeHTbIcoCTaBnAeTMeHeeIPTMNHYT.
He BCTabJIeHa Kacceta.
JIeNEcTOK 3aunItbO t3aHnHa KaCCTe (KpaCHbI) BbICTabHeH HApJyK (CTp. 36).
Bbictpoe MuraHne:
- JeHTa 3aKOHyUJaCb.*

PpeynpeKdaUcHmNnKaTOp HocHTeBHO UCTaHcKacCtbl
MeDneHHOe MmraHHe:
YchTuaJg KaccetA BCTabJIeHa B VbIeOkaMepyB pexmme NETWORK (ToIbKO moJeIb DCR-IP55E) (ctp.272).

Bam Huxho n3Bneb kaccety*
MeJenHoe MItaHne:
JIeNEcTOK 3aunItbO tO 3aInCn Ha KaCCTe (KpaCHbI) BbICTabHeH HApJyX (CTp.128).
БыICTpoe MmraHne:
-ПОНЗOWla KOндeнcaци Ваги (Стр.270).
- JeHTa 3aKoHUnlaCb.
Cpa6o7ana pfynKuIN HnDnKaun CaMODaHOctKN (cTp. 258).

N3o6paXeHHe 3aunuEHO*
MeJenHoe MItaHne:
- 1306paXeHHe 3aunuSeHo (cTp. 186).

Ipeynpexdauoui HndkaTop OTHOCHTbHO cnbluK
MeJenneHoe MURaHne:
- BoBpeM3aPdKn.
Bbictpoe MuraHne:
-ПивБе enda B DeIcTBnE cyHKuNIA INHINKauni camOdnarHocTNKn (CTp.258) - IMeIOTcHHeNoJaDKn CO BCnblIKoN.

Ipeynpexkaioi MHdkKaTOPOHOCHTeBHO 3aIMNC HENOdBHXHORO6bopaXenH
MeJenHoe MiraHne:
- HénoDbnKHoe n3o6paXeHne He MoKeT 6bItb 3aIncaHo "Memory Stick" (ctp. 64).
*BbyucbIuHITMe moDIOH uIN 3yMMepHbN CnHAn.
Ipeynpexkaioune coocheHnA
| • CLOCK SET | Установские дату и врейм (стр. 31). |
| • FOR "InfoLITHIUM" | Исторьштейп'sьбдддддддддддддддддддддддддддддддддддддддддддддддддддддддддддддддддддддддддддддддддддддддддддддддддддд徴. |
| BATTERY ONLY | |
| • CLEANING CASSETTE2) | Заграшильский вideогаловки (стр. 271). |
| COPY INHIBIT | Вы понылесь запись Изобравожени, соржашие сигнал упавлия вторсимп правам (стр. 261).1) |
| FULL | Емкость "Memory Stick" заолнона (стр. 147).1) |
| O- | Легосток зашилы OT зашини на "Memory Stick" установли в пооженияlock (стр. 128). |
| NO FILE | На "Memory Stick" не зашитоюни оданого Изобравожени (стр. 175).1) |
| NO MEMORY STICK | Не установке "Memory Stick".1) |
| MEMORY STICK ERROR | Дашиные "Memory Stick" поразожdenы (стр. 130).1) |
| FORMAT ERROR | "Memory Stick" He paclnoэется (стр. 237).1) П robерътейформатеровани. |
| DIRECTORY ERROR | Имейся бочees Двух обинковых кatableогов (стр. 174).1) |
| PLAY ERROR | Изобравожени поразождэн и Не можеть вocрони Зеведен.1) |
| REC ERROR | П robеръть вховень сигнал, a за tem посторп'te зашиь (стр. 157, 172).1) |
| TAPE END | Лени в касец досиглар конца.1) |
| NO TAPE | Вставътей касец.1) |
| DELETING | Вы похимаete кноку PHOTO BO Вөрөгүйүүүүүүүүүүүүүүүүүүүүүүүүүүүүүүүүүүүүүүүүүүүүүүүүүүүүүүүүүүүүүүүүүүүүүүүүүүүүүүүүүүүүүүүүүүүүүүүүүүүүuces. |
| FORMATTING | Вы похимаete кноку PHOTO BO Вөрөгүйүүүүүүүүүүүүүүүүүүүүүүүүүүүүүүүүүүүүүүүүүүүүүүүүүүүүүүүүүүүүүүүүүүүүүүүүүүүүүuces. |
| NOW CHARGING | Заяда в сьшкп работаet 퍼павиьно.1) |
| ▲ CLEANING END | Очирара Завэршиа.Извеничесу чістяшую касец (стр. 272). |
| ▲ CLEANING TAPE END | Зakончлась чістяша щentа. |
| TITLE FULL | Былно записло 20 титров (стр. 116).1) |
| INPUT ERROR | На вхов постулно Изобравожени в песовмecтумом Форmate (handimер, Изобравожени, записанhoe в Форmate DV) (стр. 113). |
| CHANGE TO "CAM" ил "VCR" | Числавая кассятабе можеть 셶ьь И сpenьизована в ржимeme MEMORY/NETWORK (товко мodyель DCR-IP55E) (стр. 272). |
1) Bby ycbiunTe MeIoNIO IIN 3ymMeHbI CNHaJ.
2)Инданатор xи cooшениCLEANING CASSETTE nOBaTcHа Экране одно за дугим.
Additional Information - Usable cassettes
Selecting cassette types
You can use MICROMV cassette only. You cannot use any other 8 mm, Hi8 Hi8, Digital8, VHS VHS, VHSC VHSC, S-VHS, VHSC S-VHSC, Betamax, DV, or mini DV cassettes.
All of the MICROMV cassettes have Micro Cassette Memory.
MICROMV are trademarks of Sony Corporation.
Playing back a NTSC-recorded tape You can play back tapes recorded in the NTSC-video system on the LCD screen.
Copyright signal
When you play back
If the tape you play back on your camcorder contains copyright signals, you cannot copy it with another video camera connected to your camcorder.
When you record
You cannot record software on your camcorder that contains copyright control signals for copyright protection of software. COPY INHIBIT appears on the LCD screen or on the TV screen if you try to record such software. Your camcorder does not record copyright control signals on the tape when it records.
MICROMV ABJIOTCA ToprobIMN Mapkam KoprnapuSny Corporation.
Bocnpo3BeJeHne JeHT, 3aIncaHHbIX BCnCTeme NTSC
BbMOxTe BOCPON3BOIDTbJeHTbl, 3aIncahHbIe B BuDeocnCTeme NTSC,Ha 3KpaHe XXk.
CunhaabTOPcKOr npaba
PnB Bocnpon3BeDeHm
Ecni JeHTa, KOTOpyU BbI BocnpOn3B0dnte Ha BaWei BnDeOkAmepe, CoepKNT CnHaNbl ynpabLeHn ABTopCKM npabOM, BbI He CMOKeTe cKoNpOBAt b ee c NOMOuDpyroB BnDeOkAmepbI, POnCoeDInHeHNo K BaWei BnDeOkAmepe.
PpH3aHnC
BbHe CMOKeTe 3aIncatb nporpAMMHOe
obecneueHHe BaWe BnDeokamepe, KOTOpoe
coepKNT CnHaJIb ynpabLnEHHA BTOPCKM
npaBOM DnI 3aunTb ABTOPcKOrO npBa
npoRpaMMHOrO obecneueHn.
Ha 3kpahe XXKД nII Na 3kpahe TeJIeBn3opa noBnTcH INdIkaZnCOPY INHIBIT, ecN Bbl nonbTaTeCb 3aIncatb TaKoe nporpaMMHoe obecneueHne.
BaSha BnDeOkamepa He 3anncbIaET CnHaNbly npabNeHHA BTOPCKM npaBOM Ha JeHTy, KOrDa OHa BbINOJIHReT 3aNcB.
Notes on the MICROMV cassette
When affixing a label on the MICROMV cassette
Be sure to affix a label only on the location illustrated below [a] so as not to cause malfunction of your camcorder.
After using the MICROMV cassette
Rewind the tape to the beginning, put the cassette in its case, and store it in an upright position.
When the Micro Cassette Memory function does not work
Reinsert the cassette.
About the "InfoLITHIUM" battery pack
What is the "InfoLITHIUM" battery pack?
The "InfoLITHIUM" battery pack is a lithium-ion battery pack that has functions for communicating information related to operating conditions between your camcorder. The "InfoLITHIUM" battery pack calculates the power consumption according to the operating conditions of your camcorder, and displays the remaining battery time in minutes.
Charging the battery pack
- Be sure to charge the battery pack before you start using your camcorder.
- We recommend charging the battery pack in an ambient temperature of between 10^ to 30^ (50^ to 86^) until the battery CHG lamp goes off, indicating that the battery pack is fully charged. If you charge the battery outside of this temperature range, you may not be able to efficiently charge the battery pack.
- After charging is completed, either disconnect the cable from the DC IN jack on your camcorder or remove the battery pack.
Effective use of the battery pack
-
Battery pack performance decreases in low-temperature surroundings. So, the time that the battery pack can be used is shorter. We recommend the following to use the battery pack longer:
-
Put the battery pack in a pocket to warm it up, and insert it in your camcorder immediately before you start taking shots.
- Use the large capacity battery pack (NP-FF70, optional).
About the "InfoLITHIUM" battery pack
- Frequently using the LCD panel or frequently operating playback, fast forward or rewind wears out the battery pack faster. We recommend using the large capacity battery pack (NP-FF70, optional).
- Be certain to turn the POWER switch to OFF (CHG) when not taking shots or playing back on your camcorder. The battery pack is also consumed when your camcorder is in the standby mode or playback is paused.
- Have spare battery packs handy for two or three times the expected recording time, and make trial recordings before taking the actual recording.
- Do not expose the battery pack to water. The battery pack is not water resistant.
Remaining battery time indicator
- If the power goes off although the remaining battery time indicator indicates that the battery pack has enough power to operate, charge the battery pack fully again so that the indication on the remaining battery time indicator is correct. Note, however, that the correct battery indication sometimes will not be restored if it is used in high temperatures for a long time or left in a fully charged state, or the battery pack is frequently used. Regard the remaining battery time indication as the approximate shooting time.
- The mark indicating little remaining battery time sometimes flashes depending on the operating conditions or ambient temperature and environment even if the remaining battery time is about five to ten minutes.
O 6aṭapeɪhɒm 6jloke “InfoLITHIUM”
- Yactoe nCnOJb3OBAHne nAHeJI XKД nIu Yactoe npIMeHHe BOCPON3BEdHn, yCKOpEHNo nepEMOTKn BpeE d nIu Ha3aD 6bICTpee pa3prXaet 6aTapeiHbI 6lOk. PeKOMeHNyETc nCnOJb3OBAt b6aTapeiHbI 6bOK 6oJIbIoW emKocTn (NP-FF70, npno6peTaetc oTdeNbHo).
- 063aTeIbHO yCTaHaBnBaIte nepeKlHouaTeIb POWER B noLoXeHne OFF (CHG), B To BpEm, KOrDa Bbl He npOn3BoDInTe cBemky H He BblONHHeTE BOCpOn3BeDeHne Ha BaSei BnDEOkampe. 3apRd 6aTapeHoro 6Joka TakKe paCxOdyETc, KOrDa BaVa BAJeOKaMepa HaxoITcB peXmE OxuJaHn IIN Nay3bl BOCpOn3BeDeHn.
-Держnte npуко 3anaChbte 6aTaapeHbte 6Iokn,ИЗpacYeHaВpeMBAДBaИПТрpa3a 6Oblwee,чЕ OxNdaemoe BpeMcBemKn,I npOBoJTe npObHyIO CbeMkypePeTEm,KaK BblONHtBpeaJIbHyIO CbeMky. - He noDBepraTe 6aTapeHbI 6nok BO3DeIcTBIO BObl. 6aTapeHbI 6nok He ABJIeTcBOdoHepOnHuaembIM.
Индикатор Врemeи OCTabweroocn 3apya 6batapeHoro 6Ioka
- Ecni NiTaHne MoKTe BbIKIIOUHTbcR, XOTa HNDiKAtOp OCTaBWeOcR BpeMeHn 3aprda6batapeHoro 6Joka noka3bIbaetdoCTaTOChbI dPaobToI 3aprd 6batapeHoro 6Joka, 3apdnte 6batapeHbI bLOKNOHOCbHO eue pa3, YTObI OTObpaXeHne HNDiKAtOp aCCTaBwEOcR BpeMeHn 3aprda6batapeHoro 6Joka cTALo npABINbHbIM.3ameTbe, TEM He MeHee, YTO TOuHaNAnDkaHn BpAeHoro 6Joka INOHDA He 6yDet BOCCTaHabINBaTbcra,ecNI OH DInTeJIbHOE BpeMn IcNoJIb3OBAIcN pRn BbICOKNX TempePAx PIn NblOCTaBHe B NOHOCbIO 3aprJxHeHOM COCTOHN, INPi Prn CactOM IcNoJIb3OBAHn INaTEHoro 6Joka.CuNTaIte INNDiKAcuHIO OCTaBWeOcR BpeMeHn 3aprDa 6batapeHoro 6Joka pInbIbn3IteJIbHbIM BpeMeHemCbEMKn.
- INHOrda MeTka,yKa3bIbAIOUaHaTo,YTO BpemEni 3apJa 6atapeHoro 6noka OCTaIOcB MaIO,MraeT B 3aBVCIMOCtN OT YCNOB NkCNIpyatauIN IIN OKpyXaIOSeI TempePaTypbI n CpeDbI,Daxe ecNn BpemEni 3apJa 6atapeHoro 6noka OCTaIOcB npImepHOOTnTDO DecaTmMHyt.
How to store the battery pack
-
If the battery pack is not used for a long time, do the following procedure once per year to maintain proper function.
-
Fully charge the battery.
- Discharge on your electronic equipment.
- Remove the battery from the equipment and store it in a dry, cool place.
- To use the battery pack up on your camcorder, leave your camcorder in the recording mode until the power goes off without a cassette inserted.
Battery life
- The battery life is limited. Battery capacity drops little by little as you use it more and more, and as time passes. When the available battery time is shortened considerably, a probable cause is that the battery pack has reached the end of its life. Please buy a new battery pack.
- The battery life varies depending on how it is stored and operating conditions and environment for each battery pack.
Kak xpaHb6aTapeHbI 6JOK
- Ecni 6atapeiHbI 6bok He nCnoIb3yeTcA DInTeIbHoe Bpem, npoBOJte CneDyUOuy IpoCeIpy OOn H pa3 B rOd IpnIPOIepKaHHaHaNHaIeXaIero fYHKUHOHropOBaHH6atapeiHorO 6boka.
1.Полноctьюзардпесатapestейньшолк.
2. PazraDte ero Ha BaSei 3JIeKtpOnHno annapaType.
3.ИЗВLEКИТЕбАтейнБИйБLOKИЗ
annapatypbIиханITe erOВсУXOM,
IPOXЛДHOM MeCTe.
-ДЯТOrO,чTo6bI pa3PnTb 6aTapeHbI 6JOK ha BaWeB vBHeOKaMepe, oCTaBtE BaUy BvHeOKaMepy B pexmE 3aInCn 6e3 BCTaBLeHNo KaccTebl, noka 3apd 6aTapeHoro 6JOKa He nCpePnaETcra.
Cpok cnjx6bl 6aTapeHoro 6noka
Cpok clyk6bl 6bapeHoro 6Ioka orpaHueh EmKocTb 6bapeHoro 6Ioka mano-nomany naaet, no Mepe toro, kak Bby nCnOJb3yeTeero BCE 60nbwe n 60nbwe, a taKxte C teuHemBpeMeHN. Korda doCTyHnoe BpeM 3apra 6bapeHoro 6Ioka 3NaHTeNbHO COkparITcR, BO3MOXHO npUHHo JBAJIeTcR To, YTO cPOK clyk6bl 6bapeHoro 6Ioka 3aKOHnLcN. PnIO6pETnTe, noKaanyIcTa, HOBbl 6bapeHnB 6Iok.
Cpok cnyk6bl 6batapeHoro 6loka
n3MeHReTcB COOTBeTCTBm C TeM, KaK OH
xpaHNTcA, a TaKKe B 3aBNCIMOCtN OT YcNoBNI
3KcPiIyatauIN N OKpyKaIOSe CpeDJI DnA
KaKDoR 6batapeHoro 6loka.
The i.LINK (MICROMV Interface) on this unit is an i.LINK-compliant MICROMV interface. This section describes the i.LINK standard and its features.
What is i.LINK?
i.LINK is a digital serial interface for handling digital video, digital audio and other data in two directions between equipment having the i.LINK jack, and for controlling other equipment.
i.LINK-compatible equipment can be connected by a single i.LINK cable. Possible applications are operations and data transactions with various digital AV equipment. When two or more i.LINK-compatible equipment are connected to this unit in a daisy chain, operations and data transactions are possible with not only the equipment that this unit is connected to but also with other devices via the directly connected equipment.
Note, however, that the method of operation sometimes varies according to the characteristics and specifications of the equipment to be connected, and that operations and data transactions are sometimes not possible on some connected equipment.
Note
Normally, only one piece of equipment can be connected to this unit by the i.LINK cable. When connecting this unit to i.LINK-compatible equipment having two or more i.LINK (MICROMV Interface), refer to the operating instructions of the equipment to be connected.
O ctaндарт e i.LINK
Ihe3do i.LINK (uHTepcpeic MICROMV)Ha daHHOM annapaTe RBnEeTcH INTEppeiCOM MICROMV, COBmecTumbIM CO cTaHaprTom i.LINK. 3ToT pa3deJ onncbBaet cTaHapr i.LINK uero xapaKTepeNCTKn.
4To Takoe i.LINK?
i.LINK npedctabneta n3 ce6a znpboBoi nocneobatoBbHb INHTepceic nIpepaHn znpboBO rBnDeocnHa, znpboBOr ayDnOscnHaHa n dpynx daHbIX B dByx HanpabLnHmX MeJy annapaTpyo, mMeIouei rHe3do i.LINK, nI pyynapBnHn DpyroannapaTpyo.
i.LINK-COBMeCTMmaa annapatypa MoKeT 6bITb NOcOeINHeHa eINHCTBeHHbIMKa6eIeM i.LINK. Bo3MOXhIe pImeHEnHn BKJIouHaOT oBa6oTKy I nepeDaU daHbIX C NOMOuBIO pa3NHyOH uΦpOBo aUdNO/BnDeo annapatypbl. EcIn Dba IINb Bolee i.LINK-COBMeCTMbx annapata NOcOeINHeHbIK DaHOMy annapaty NocJeOBATElbHO UcNoCHKO, BO3MOxHbI Opb6oTKa I nepeDaHa daHNbIX He ToIbKO Ha annapatype, K KOtOpoi NOcEOINHeH daHNbI annapat, HO TaKke I Na dpyrNX yCTpoiCTBax ChePe3 HApPMyIO NOcEOINHeHHyO annapatypy. 3aMeTbTe, TEM He MeHee, YTO MeToD pa6oTbI INHOrda OTNIuaeTcORlacoHO OcOBeHHoCTaM I TexNHueCeMK XapaKTepnCTnKaM annapatypbl, KOTOpYIO HJXHO NOcOeINHTb, I YTO Opb6oTKa I nepeDaHa daHNbIX INHorda HEBO3MOxHbI Ha HeKOTopBX NOcOeINHeHHbIX annapatax.
Ppimcayane
O6bIyHO TOJbKO OINH aannapaT MOKeT 6bITb NOcEOHNEN K DaHHOMY aannapaty C NMOUbIO Ka6eI i.LINK. Iprn NOcEOHNEN DaHHoro aannapata K i.LINK-COBMeCTMmOa annapatype c DByM INI 60oe THe3dAmi i.LINK (INTEppeMICROMV), o6paauTeCb K pyKoBOIDCTBy no 3KcPnyatauH aannapatypbl, KOtopuy HxHo NOcEOHNHTb.
About the name "i.LINK"
i.LINK is a more familiar term for IEEE 1394 data transport bus proposed by Sony, and is a trademark approved by many corporations. IEEE 1394 is an international standard standardized by the Institute of Electrical and Electronics Engineers.
i.LINK baud rate
The maximum baud rate of the camcorder is "S400".
i.LINK's maximum baud rate varies according to the equipment. Three maximum baud rates are defined:
S100 (approx. 100 Mbps*)
S200 (approx. 200 Mbps)
S400 (approx. 400 Mbps)
The baud rate is listed under "Specifications" in the instruction manual of each equipment. It is also indicated near the i.LINK (MICROMV Interface) on some equipment.
The maximum baud rate of equipment, except for this unit, on which it is not indicated is "S100".
When units are connected to equipment having a different maximum baud rate, the baud rate sometimes differs from the indicated baud rate.
*What is Mbps?
Mbps stands for megabits per second, or the amount of data that can be sent or received in one second. For example, a baud rate of 100Mbps means that 100 megabits of data can be sent in one second.
O Ha3BaHn "i.LINK"
i.LINK yBnEETc60Jee y3HaabaembIM
onpeJeIeHEm dJa 7HHb I TraHCnOpTa daHHbx
IEEE 1394, npeJIOKeHHbIM Sony, n ABJIeTcA
fmpMeHHbIM 3NaKOM, yTBepXdEHHbIM MHOrmNk
kopnpaunM. IEEE 1394 ABnEETc
MeKdyHapOndbIM cTaHdApTOM,
CTaHdaptNtOBAHbIM IVHCTHTyTOM IHxHePob
no 3JektpToTEXHke n 3JektpOnHeke.
CkopocTb nepe#aun daHHbIX i.LINK B 6oJax
MaKcImaJIbHa cKOpocTb nepeDaun daHHbIX BnDeOkamepbB 6oJax coCTabJIeT "S400". MaKcImaJIbHa cKOpocTb nepeDaun daHHbIX i.LINK B 6oJax pa3InuaTeC corJaacHO annapaType. OnpeJeIeHbI TpN MaKcImaJIbHbIe ckOpocTu nepeDaun daHHbIX B 6oJax:
S100 (npn6n. 100 M6nT/c*)
S200 (npn6π. 200 M6nt/c)
S400 (npn6π. 400 M6nt/c)
For details on how to dub when this unit is connected to other video equipment having i.LINK (MICROMV Interface), see pages 107 and 112.
This unit can also be connected to other i.LINK (MICROMV Interface) compatible equipment made by Sony (e.g. VAIO series personal computer) other than video equipment.
Before connecting this unit to your computer, make sure that application software supported by this unit is already installed on your computer.
For details on precautions when connecting this unit, also refer to the operating instructions for the equipment to be connected.
Required i.LINK cable
Use the Sony i.LINK 4-pin-to-4-pin cable (during MPEG2 dubbing).
i.LINK and are trademarks.
Функции i.LINK Ha 3Tom annapate
YTO kacaetcnoDpO6HocTe OTHOCHTbHO TORO, KAK BbIOnnHrTb Npe3aNcB TO BpEmr, KOrDa aannapaT noDCoeDmHEn K dpyroBnDeoannpaType co 3aKOM i.LINK (INTEPpeMICROMV), cM. cTp. 107 n 112.
Данньй annapatТakke MoKet 6bITb ПОДСоЕДИЕНК ДPy罗у COВмecTиМос i.LINK (Интерфеic MICROMV) annapaType, пponЗБeDEнHоN Sony (HanpIMep, пэрсонльные КOMMbHTeры Сери VAIO) и He ЯВЛЯЮSEЧВдeoаПapatypeо.
Ipepe noocenHeHem 3toro annapata K Baewemy nepcohaHOMy kOmbltopepy y6eintecb, YTO Ha nepcoHaBHom KOMbltopeye yke yctahOBHeNo nporpaMMHOe oecneueHne, noDepkNBAeMOe daHHbIM annapaTOM.
Длп пolyчени 60ле поюбнй Инфорmaци O Мерх пededocotopoxнoctи рппдсоeинени данHoro annapata,обрашaitecb taKxeК руковodcTBam NO 3крлyaataци annapaTypbl, KOTopyH yxHo NOДСоeINHNTb.
Tpe6yeMbI Ka6eJIb i.LINK
IcnoIb3yIe Ka6eIb 4 StlbpbKa-4 Stlbpka i.LINK Sony (Bo Bpem nepezamnc cnrHana MPEG2).
i.LINK n ABJIHOITcФИрмEHbIM3HaKaAM.
Using your camcorder abroad
Using your camcorder abroad
Countries and areas where you can use network functions are restricted. For details, refer to the separate network function operating instructions (DCR-IP55E only).
You can use your camcorder in any country or area with the AC adaptor supplied with your camcorder within 100V to 240V AC, 50 / 60Hz .
Your camcorder is a PAL system based camcorder. If you want to view the playback picture on a TV, it must be a PAL system based TV with VIDEO/AUDIO input jack. The following shows TV colour systems used overseas.
PAL system
Australia, Austria, Belgium, China, Czech Republic, Denmark, Finland, Germany, Holland, Hong Kong, Hungary, Italy, Kuwait, Malaysia, New Zealand, Norway, Poland, Portugal, Singapore, Slovak Republic, Spain, Sweden, Switzerland, Thailand, United Kingdom, etc.
PAL-M system
Brazil
PAL-N system
Argentina, Paraguay, Uruguay
NTSC system
Bahama Islands, Bolivia, Canada, Central America, Chile, Colombia, Ecuador, Guyana, Jamaica, Japan, Korea, Mexico, Peru, Surinam, Taiwan, the Philippines, the U.S.A., Venezuela, etc.
SECAM system
Bulgaria, France, Guiana, Iran, Iraq, Monaco, Russia, Ukraine, etc.
Maintenance information and precautions
Moisture condensation
If your camcorder is brought directly from a cold place to a warm place, moisture may condense inside your camcorder, on the surface of the tape, or on the lens. In this condition, the tape may stick to the head drum and be damaged or your camcorder may not operate correctly. If there is moisture inside your camcorder, the beep sounds and the indicator flashes. When the indicator flashes at the same time, the cassette is inserted in your camcorder. If moisture condenses on the lens, the indicator will not appear.
If moisture condensation occurred
None of the functions except cassette ejection will work. Eject the cassette, turn off your camcorder, and leave it for about one hour with the cassette compartment open. Your camcorder can be used again if the indicator does not appear when the power is turned on again.
If moisture starts to condense, your camcorder sometimes cannot detect condensation. If this happens, the cassette is sometimes not ejected for 10 seconds after the cassette lid is opened. This is not a malfunction. Do not close the cassette lid until the cassette is ejected.
Note on moisture condensation
Moisture may condense when you bring your camcorder from a cold place into a warm place (or vice versa) or when you use your camcorder in a hot place as follows:
- You bring your camcorder from a ski slope into a place warmed up by a heating device
- You bring your camcorder from an air-conditioned car or room into a hot place outside
- You use your camcorder after a squall or a shower
- You use your camcorder in a high temperature and humidity place
Информацnia по ухODу 3a apnapaTom И МерыnpedoctopoxKHOCTN
KoHdeHcaZnBlaRn
EcIn BnIeOKaMepa npHecHa npMaO n3 XoJOnHOrO MeCTA B TeNIOE,TO BHyTpIN BnIeOKaMepbI,Ha NOBepXHOCTN IeHTbI INI Ha 06BeKtNBe MoKET npOn3OITN KOHeHCAuN BJIaR. B TAKOM COCTORHN JIeHTA MOKET npNJINHHTb K 6baPabAHy rONOBKn I 6yDet NOBpeJxDeHa, INI JVE Ba7a BnIeOKaMepa He CMOKET pa6OtaTb HAnLEXKaUIM o6pa3OM. EcIn BnIra npOnHKNa BHYtpb BaWei BnIeOKaMepbl, TO pO3BvHTY 3ymMePbH bCirHan, IN 6yDet MIRATb INDkaTOP E.Cnn To ITo xe camoe Bpem 6yDet MMrTaB INDkaTOP A, 3TO 3HaHT, YTO B BA7y BnIeOKaMepy BCTABJeHa KaccetA. EcIn Bnara cKoHdEHCipOBaIacb Ha O6BeKtNBe, INNDkaTOp NOrBtbcn He 6yDet.
Ecnn npon3oJna KOHdeHcaun Blaarn
Hn Onda H3 cyHKm, KpOME n3BHeeHnKacceTbI, paOtaTb He 6yDet. N3BNeKeNtkeCCTy, BblKnOuHTe BaUw Bnu DeokAmepy nOCTaBbTe ee Pn6bn3ntJbHO Ha Odn Yac COTKpbItbIM KaccetThbIM OTcEKOM. Ecnn npINOBTOPHom BKIOUChEN NiTaHn INdNKaTOp Hne NOBbTcB, Bbl MoXeTc CHObA NoJIb3ObaTbcBnDeOkAmepoN.
EcniBlaRaHaJanaKoHdEHCnpoBaTbCBAwa BnDeOkAmepa HNOrDa He MoXeT O6hApYxNtB KOHdEHCaIuH. B3OM Cnyae, KaccTea HNOrDa MOXeT He N3BLeKaTcB B TeUeHne DecrTa CekyHn NocTe TOrO, KaK 6yDet OTKpbIta KpbIuKa KaccTeHoro OTceKa. 3To He JbIaTeCnHeNCpNaBHOCTbIO. He 3akPbIaIte KpbIuKy KaccTeHoro OTceKa, Noka KaccTea He 6yDet N3BNeHeHa.
PpimeyaHne no KOHdeHcaun Blaar
Bnara moKET o6pa3OBAtbcra, ecn Bbl npHecete BaUy BnDEOKaMepy n3 xoNoDHorO MeCTa B TEnIoe MeCTO (nIn HAObOpOT), nIn KOrDa Bbl nCnOJIb3yEt eBaUy BnDEOKaMepy B XapkOM MeCTe B CNeDyUOuX CNyuaX:
-Bb npHecn BaWy BnDeokamepy C JbIXHO rCKIOHa B TEnIOe NmoeJeHne, rIe OyHKuOHnpyTe oBOrpeBaTeIb.
-BbI BbIHeCnBaUy BInDeOkaMepu n3 aBTOMo6nJI nnN I3 KOMHaTbI C Bo3dUHbIM KOHNIOHOHpOBaHneM B XapKoe MeCTO Ha yInue.
-BbI nCnoJIb3yeTe BnDEOKaMEpy NocIe 1KBaIa IJIN JINBHR.
-BbI nCnoJIb3yete BaUy BInDeOkaMepy B MeCTe C BbICOKoTempeaTpyo N BlaXHOCTbIO.
How to prevent moisture condensation
When you bring your camcorder from a cold place into a warm place, put your camcorder in a plastic bag and tightly seal it. Remove the bag when the air temperature inside the plastic bag has reached the surrounding temperature (after about one hour).
Maintenance information
Cleaning the video head
To ensure normal recording and clear pictures, clean the video head. The video head may be dirty when:
- mosaic-pattern noise appears on the playback picture.
- playback pictures do not move.
-playback pictures do not appear. - the × indicator and CLEANING
CASSETTE message appear one after another on the LCD screen during recording.
If the above problem, [a] or [b] occurs, clean the video heads with the Sony MGRCLD cleaning cassette (optional). Check the picture and if the above problem persists, repeat cleaning.
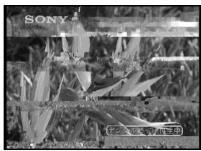
[a]
If the video heads gets dirtier, the entire screen becomes blue [b].
Kak npedotBpataNb KOHdeHcauio BlaH
Ecni BnDeokamepa npinheca n3 xonoDhoro MeCTa B TENIOE MeCTO, noIOnKnte Bauy BnDeokamepy B nON3TUNHeOBbI naKeTn HAdexHo 3akpoTe erO. Y6epTe naKeT, KOrda TempepaTypa BO3dyxa BHyTpN nON3TUNHeOBOro naKeta DOCTURHeT TempepaTypbI OKpykaIoUeRo BO3dyxa (npi6JIIn3nTeJbH Ope3 OINH qac).
HΦopmaunno yxody 3a annapaTOM
OuNTka BnDeorolOBOK
Дя obecneeyHn HopMaJIbHoJ 3aIncn UeTKOrO n3o6paXeHn CNe dyET nepIOOnueckn OuNtB vIeOrONoBKn. BInDeorONoBKn, BO3MOxH0, 3aRpy3HeHbl, ecnI:
-Ha BOCIPON3BOIDMOM N3O6paXeHIN NOBILIOTC NOMEXN TINA MO3aIKN.
-BoCnpOn3B0DumbIe N3O6paXeHnHa He DnurraOTc.
- Bocnpoan3BDOUmbie n3O6paXeHn He noRBnIbOTc.
-BoBpem3aHnHmKaTOpNcoo6eHneCLEANING CASSETTE NOBJIOTcHa3kpaHe OJHO 3a npYHM Ha 3kpaHe KKД.
B clyae Bo3nKnHOBeHn np6JIeM [a] nIi [b], noCTte BnDEOrOLOBKn C nOMoBtu YnCTAue KaccTe bI Sony MGRCLD (npno6peTaetc r otJeHo).PiPoBepTe n3o6paXeHne,ecIn yKa3aHaNha BblIe np6JIeMa He ycTpaHareTc, NOBTOPe TnCTKy.

[b]
EcIN BnIeOrOJIOBKn 3aRpa3HrTcR, BeCb 3KpaH CTaHeT rOljy6bIM [b].
Using a cleaning cassette
Follow the procedure below.
(1) Set the POWER switch to CAMERA or VCR.
(2) Insert the cleaning cassette.
(3) Press OK. The message NOW CLEANING appears.
After the cleaning is finished, the message
CLEANING END appears.
(4)Eject the cleaning cassette.
To cancel cleaning
Press CANCEL.
The video head
The video head wears out if you use the camcorder for a long time. When use of the cleaning cassette does not make the picture clear, the video head may have worn out. In such cases, you must replace the video head. For details, contact your Sony dealer or local authorised Sony service facility.
Notes
- When cleaning the video head, do not use any equipment other than the cleaning cassette.
- The cleaning cassette does not work in MEMORY/NETWORK (DCR-IP55E only) mode (The message CHANGE TO "CAM" or "VCR" appears).
Cleaning the LCD screen
If fingerprints or dust make the LCD screen dirty, we recommend using a LCD cleaning cloth (supplied) to clean the LCD screen. When you use the LCD Cleaning Kit (optional), do not apply the cleaning liquid directly to the LCD screen. Clean the LCD screen with a cleaning paper moistened with the liquid.
IcnoJIb3OBAHne YnCTaSei KacceTbI
CneyuTe onncanHno Hnke npoceDype.
(1)Установпейсякючать POWER в положене CAMERA ини VCR.
(2)Bctabte UcTauyoo Kaccety.
(3)HaxMMTe KhoNkOy OK. TIOABNTc8 COo6eHne NOW CLEANING.
Charging the built-in rechargeable battery
Your camcorder is supplied with a built-in rechargeable battery installed so as to retain the date and time, etc., regardless of the setting of the POWER switch. The built-in rechargeable battery is always charged as long as you are using your camcorder. The battery, however, will get discharged gradually if you do not use your camcorder. It will be completely discharged in about three months if you do not use your camcorder at all. Even if the built-in rechargeable battery is not charged, it will not affect the camcorder operation. To retain the date and time, etc., charge the battery if the battery is discharged.
Charging the built-in rechargeable battery
- Connect your camcorder to the mains using the AC adaptor supplied with your camcorder, and leave your camcorder with the POWER switch turned off for more than 24 hours.
- Or install the fully charged battery pack in your camcorder, and leave your camcorder with the POWER switch turned off for more than 24 hours.
3apKa BCTpoEHNoIpeepaJkaem6aTaapeKn
Baacha Bndeokamepa Ochauheha BCTpoehnoi nepe3apjxaeMo 6atapeyko, yctahOBlenho IJRA TORO, YTObI NOdEprXNBAT DaTy, Bpemn T.N., BHE 3aBNCIMOCNt OT UCTAHOBKn nepeKIOUcATEJIPOWER. BCTpoEHnae pe3apjxaeMa 6atapeyka BCerda 3apjxaeTc, KOrDa BBy iCNOb3yeTe Bauy BnDEOKAMepy. Ondako, 6atapeyka NocTeENHO pa3prDNTcA, eCNI BBy He 6byTe NCNoB3OBaTB BAsy BuDeOKAMepy. OHa 6byET NoHOCbIO pa3prKeHa npimepeHo Ype3 TPr Mecau, eCNI BBy BOo6he Ye 6byTe NOb3OBaTCB BAsei BnDEOKAePoI. Daxe eCNI BCTpoEHnae pe3apjxaeMa 6atapeyka He 3apjxeha, 3TO He NOBInreT Ha paBoTy BnDEOKAePbI. YTObI NOdEprXNBAtb DaTy, Bpemn T.N., 3apJnte 6batapekky, eCNI OHa pa3prDnlaCb.
3apnka BCTpoehnoi nepe3apxjaemoi 6aTapeiKn:
Ajusting the LCD screen (CALIBRATION)
The buttons on the touch panel may not work correctly. If this happens, follow the procedure below.
(1) Set the POWER switch to OFF (CHG).
(2)Eject the tape from your camcorder, then disconnect any connecting cable from your camcorder.
(3) Set the POWER switch to VCR while pressing DSPL/TOUCH PANEL on your camcorder, then keep pressing DSPL/TOUCH PANEL for about five seconds.
(4) Follow the procedure below with your finger or the supplied stylus (DCR-IP55E only).
① Touch x at the upper left corner.
② Touch × at the lower right corner.
③ Touch × in the middle of the LCD screen.
PerynipoBka 3KpaHa XXKd (CALIBRATION)
KhoNKn Ha ceHcOpHo nHaeJIn MoryT He pa6oTaTb HAdIeKaUIM o6pa3OM. Ecnn 3To npOn3OyDeT, cIeDyIte OINcaHHo HnKe npOceDype.
- If you do not press the right spot, x always returns to the position at the upper left corner. In this case, start from step 4 again.
- You cannot carry out this operation with the LCD panel reversed.
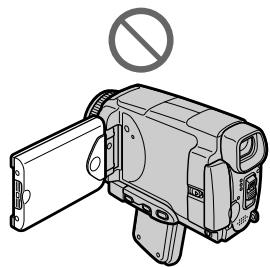
Примейань
- EcIn BbI He haxMeTe HxHoe MeCTO, INHdkaun X 6ydet BCE BpeMBA03BpaataBcra B NIOLOXeHne B JEBOMBepxHem yrgny 3KpaHa. B 3TOM cnyuae NaHnHTe BblONHeHne DeiCTBn C nyHKta 4 eue pa3.
- Bы He можete Вьионнть 3Ту onepaцию рпи nepeberpytoи панели XXД.

Precautions
Camcorder operation
- Operate your camcorder on 7.2V (battery pack) or 8.4V (AC adaptor).
- For DC or AC operation, use the accessories recommended in this operating instructions.
- If any solid object or liquid get inside the casing, unplug your camcorder and have it checked by a Sony dealer before operating it any further.
- Avoid rough handling or mechanical shock. Be particularly careful of the lens.
- Keep the POWER switch set to OFF (CHG) when you are not using your camcorder.
- Do not wrap your camcorder with a towel, for example, and operate it. Doing so might cause heat to build up inside.
- Keep your camcorder away from strong magnetic fields or mechanical vibration.
- Do not touch the LCD screen with a sharp object other than the stylus supplied (DCR-IP55E only).
- If your camcorder is used in a cold place, a residual image may appear on the LCD screen. This is not a malfunction.
- While using your camcorder, the back of the LCD screen may heat up. This is not a malfunction.
- Do not use the network function in a medical institution or in an aircraft (DCR-IP55E only).
On handling tapes
- Do not insert anything into the small holes on the rear of the cassette. These holes are used to sense the type and thickness of the tape and if the recording tab is in or out.
- Do not open the tape protect cover or touch the tape.
- Avoid touching or damaging the terminals. To remove dust, clean the terminals with a soft cloth.
MepblnpedocTopoXHoctn
3KcnIyataunBndeokamepbI
- 3KcπnyaTpyuTe Bauy BnDeokamepy np7 7,2 B (6bTaapeHbIb 6JIoK) nII 8,4 B (ceTeBoi aDanTepepeMeHHoro Toka).
- UTo Kacaetc3KcNpyatauIMn BVdeOkamepbI OT NOCTOHHORIO INepeMeHHORO TOKA, IcNoJIb3yIte PpHaJdJeXHOCTn, peKOMeHnyEmbIe B DaHHoINHCTpykUIMn PO 3KcNpyatauIMn.
Ecni KaKoi-Ni6yDb TBBepbI npEIMeT nnXIKoCTb NOpaII BHyTpB KOpNyaC, BbIKIOUHTBe BNDeOKaMepu I npOBepbTe ee BcePBnCHOM ueHrpe Sony nepeed aeDaJIbHeIwe 3KcNpyaTuanei.
-Изberаитгрубогообразшенивдөдөкамероил mexaнчecкx ударов.Будт ecobehno octopoxkhblc obkektimbom. - Ecni Bndeokamepa He nCnoJIb3yeTcay, yctahOBInTe nepeKlnOuataIb POWER B noJoxHeNE OFF (CHG).
He 3abopauBaIe BaUy BnEOKaMepy, HnAPmEp, BnOJToHne, I ne 3KcNpyaTnpuYTe ee B TAKOM COCToHnn. B npOTnbHom cnyae MOKeT npOn3OHTn NOBbIeHne TempepaTpyb BYHTPN BnDEOKaMepbl.
-Держпerte Baшу видаокамepy поальше ot Cильных МагнITHых поелей Или Меническов Вибраци. - He npikacaiTebc K 3kpaHy KKcBOMn paJIbIaMn IINOCTpblIMnpEJaMaTAM, OTIIuHbIMNOT npUlaemoro nepa. (ToJbKO moJeIb DCR-IP55E)
-Призкплuyaataun Baшewибдевokamepbl BXOLOHOM MeCTe Ha 3KpaHe XXKД может NOBBLIbCS OCTaTOUHOe N3O6paXeHne.3To HE ABJIETcH HeNCnPaBHOcTbIO. - Пиэкплuyaataun Baшew Bndeokamepbl 3aДнЯ CTopoHa 3kpaHa KKД может HarpeBaTcR. 3TO HeЯBnEeTcR HeicnpaBHOCTbI.
- He nCnOJb3yIte CeTeByIO cyHKnIIO, HaxoJaCb B MeDnIHCKOM YUpeXJeHm NII Ha camOJte (TolbKO MoJeJI B DCR-IP55E).
06obpaueHnCJeHTamn
He BCTabnIe HUcero B MaIeHbKne OTBepCTNa HA 3aIdHe CTOpOHe KAcceTbI.3TN OTBepCTNa IcONb3yOTcR dIra ONpeDeIeHn TINa NTOJIuNbI JeHTbI, a TaKKe dIra ONpeDeIeHn HAIuHn IINI OTCyTCTBn JIeNEcTKa 3aUInbI 3aINCnHa JNeHTe.
He OTKpbIbAaTe 3aunTHyU KpbIuKy IeHTbI He npKacauTecb KJeHTe.
- ɪəsərəiTe npɪkɔchOBeHŋ K KOHTaKTam nɪn
ɪx nobpeXdEHH. YtɒbI ydaɪntb nbɪnb,
npɒtpɪte KOHTaKTbI JOCKYtOM MærKɔj TkaHɪ.
Camcorder care
- Remove the tape, and periodically turn on the power, operate the CAMERA and VCR sections and play back a tape for about three minutes when your camcorder is not to be used for a long time.
- Clean the lens with a soft brush to remove dust. If there are fingerprints on the lens, remove them with a soft cloth.
- Clean the camcorder body with a dry soft cloth, or a soft cloth lightly moistened with a mild detergent solution. Do not use any type of solvent which may damage the finish.
- Do not let sand get into your camcorder. When you use your camcorder on a sandy beach or in a dusty place, protect it from the sand or dust. Sand or dust may cause your camcorder to malfunction, and sometimes this malfunction cannot be repaired.
AC power adaptor
- Unplug the unit from a wall socket when you are not using the unit for a long time. To disconnect the mains lead, pull it out by the plug. Never pull the mains lead itself.
- Do not operate the unit with a damaged lead or if the unit has been dropped or damaged.
- Do not bend the mains lead forcibly, or place a heavy object on it. This will damage the lead and may cause fire or electrical shock.
- Prevent metallic objects from coming into contact with the metal parts of the connecting section. If this happens, a short may occur and the unit may be damaged.
- Always keep metal contacts clean.
- Do not disassemble the unit.
- Do not apply mechanical shock or drop the unit.
- While the unit is in use, particularly during charging, keep it away from AM receivers and video equipment. AM receivers and video equipment disturb AM reception and video operation.
- The unit becomes warm during use. This is not a malfunction.
-
Do not place the unit in locations that are:
-
Extremely hot or cold
Dusty or dirty - Very humid
Vibrating
Yxoi3a BnIeokamepo
BbHIMaTe KaccTe CJIeHToI NepIOdUceckn BKNIOUaTe NITaHHe,pepeKNIuOaTeCb B NOJoxEHNA CAMERA u VCR u BOCpON3BOJNTe JENTy B TeueHne pImePHO Tpx MInHyT,ecn Ba7a BuDEOKaMepa He bEydt IcNoIb3OBaTbcr DInTeJIbHOe Bpema.
OuHuaTe oBekTnB C NOMObIO MRKoI KNTOcNIN DnA ydaENHn PbIn. Ecnn IMeHTC OTNeaTKn NaJIbcE Ha oBekTnBE, ydaJIte INx C NOMObIO MRAKO TKAHI.
OchnaTe Kopnyc BnDeokampebI C NOMoCbIO cyXoMFRKO TKAHN IIN MFRKO TKAHN, CJIeKa CMOeHNoi pactBOPOM yMepeHHoro MOIoJe OcRedTa. He IcnoJb3yTe KaKnx-JIn6o TInOB pactBopnteJe, KOToPbIe MOrT NOBpeDITb OTDenKy.
- He donyckaite nonadahnna necka B Bauy BnuDeokamepy. EcIn Bbl IcNoIb3yeTe BnuDeokamepy Ha necuHOM PIIaKe ININ B KaKOMIb6o PbIbHOM MeCTe, ppeOxpaHnTe ee OT necka ININ PbIJN. NecOK ININ PbIJb MOryt npBecTn K HncnPabHocTn Bauei BnuDeokamepbI, KOTopar IHOrda MoXET 6bITb HeyctpamHmOi.
Cteboa aanTep nepemehHoro Toka
- OToeDHHITE annapat OT aJeKTpneCKoI cTeI, ecNI OH He IcNOnbYeTc dJIInTeNbHoe BPEMa. JIra OToeDHHHnE CTeBEOI SHypa NOTAHITE erO 3a WTEKeP. HIKORDa HE TAHNITE 3a cam WHyp.
- He 3KcNpyatnpyIe annapaT c nobpejXeHNbIM HHypom nnn Jke B cnlyae, ecn annapaT ynaI nn6bln nobpejXeH.
He crnbaiTe cTeBoI npoBod CnIoN I He CTaBbTe Ha hero TaeJeIbe IpeMeTbI. 3To NOBPeNT npoBOd MoKET npuBeCTN K NOXAPy IIN NOPaxeHIO 3NeKTpUneCKM TOKOM.
He donyckaTe cOpnKoCHOBeHnMaTeJIuueeCKNx PpeIMETOB C MeTaJIuueeCKnMI KOnthaKTAMn CoEOHNHTeBHOI NpactINbI. Ecnn 3TO cLnyTcR, TO MOXet IpnOZIOITK KopOTKoe 3AmbikaHne, n annapat MOXet 6bItb NOBpeXJeH.
Cneinte 3a TEM, TTObI MetaJIInueckne KOHTaKTbI 6bII INCtBIMN. - He pa3bpaaiTe annapaT.
- He подеврагайе anecdарат менистую ударази не роняпесу erо.
-Пи ИСЮЛБЗОВАнИ AnnapaTa, OOCБEHNO BO BpeM 3apRdKn,Держnte erOпадьше OT npIeMHNKOB AM-paДIOBeZAHAH N BvIeOaIIpAPaTpyb.у pIeMHNKOB AMpaIIOBeUHaH N bIeOeAIIpAPaTpyb HApuJaTecA AM-paIIOpPnEM nФyHKCUHOHPOBAHne BvIeO.
B npocce 3kcnnyataaannapat harpebaetc. 3TO He nBnAeTcHnCnpabHOCTbIO. - He pa3meuaIte annapaT B MecTaX: -Yepe3MepHO JkaKnIX nII XOIONbIbIX
-ПылбнblIX ИИ Гра3HbIx
-OueHbBnaXhblx
-ПоДВержЕньх Вибраци
About care and storage of the lens
- Wipe the surface of the lens clean with a soft cloth in the following instance:
- When there are fingerprints on the lens surface
-In hot or humid locations - When the lens is used in environments such as the seaside
- Store the lens in a well-ventilated location subject to little dirt or dust.
To prevent mold from occurring, periodically perform the above.
We recommend turning on and operating the video camera recorder about once per month to keep the video camera recorder in an optimum state for a long time.
Battery pack
- Use only the specified charger or video equipment with the charging function.
- To prevent an accident from a short circuit, do not allow metal objects to come into contact with the battery terminals.
- Keep the battery pack away from fire.
- Never expose the battery pack to temperatures above 60^ (140^) , such as in a car parked in the sun or under direct sunlight.
- Store the battery pack in a cool, dry place.
- Do not expose the battery pack to any mechanical shock.
- Do not disassemble nor modify the battery pack.
- Attach the battery pack to the video equipment securely.
- Charging while some capacity remains does not affect the original battery capacity.
06 yxode 3a obbeKTbOM n o erO xpaHeHH
OuHuaTe NOBepxHOCTb OBeKTHBa MmRkON TKAHbIO B CNeDyUOUX CNyAAX:
-EcIn Ha NOBepxHocTn OObekTnBa ecTb OTneuATKn NaIbueB
-Bxapknx nnn BnaJkhbIX MeCTax
-ПиИСПОЛБЗОВАн ИББЕКТУВАВТAKИX MeCTAX,ΚΑΚ MΟΡСΚΟΕ ΝΝΟΒΕΡΕχБe
XpaHnTe o6bekTnB B xopoOIO npOBeTpnaEOM MeCTe,3aUuEHHOM OT rpa3n I PbJIN.
Bo n36bexkHne noRbIeHn IpeceHn nepINOdUHeCKN BblIOJIHrTe OINcaHHbIe BblIe npOcEduPbl.
PekomeHnyeTcB KJIIOuATb BInDeOKaMepy INoIb3OBAbTcB eI O npIMepHO OINH pa3 B MeCau IJNIOIDepXaHnB NDeOKaMepbl B ONTIMaJIbHOM COCTOAHm B TeueHne DJIInTeJIbHOrO BpeMeHn.
BatapeHbIb6Jok
- IcnoIb3yIte TOnIbKO peKoMeHdyEmoe 3apJHOe yCTPOIcTBO ININ BnDeoanpaAtpy C 3apJHOHФyHKUeN.
-ДлгпрдOTьразенн HeсчacTHOrO clyuHn3-3a KOPOTKOrO 3aMbIkaHnHe ДОпуСКаNTe KOHTaKTa MeTaNJIuYeCKNx ПpeDMeTOB C KOHTaKTam6BaTapeHnHO6bNoKa.
XpaHnTe 6aTapeeHbI 6JOK BdaIOn OTOrHa. - Hikorda He noDBepraTe 6aTapeHbI b6nok BO3deICTBIO TEMpepaTy CbIe 60°C, Haprimep, B npnapkoBAHHOM IOd cOnHcEm aBTOMOJIne IIN IOd pRMBIM COJHeHbIM CBETOM.
XpaHnTe 6aTaapeHbI 6JIOB B npoxlaHOM, cyXOM MecTe. - He noDBeprAte 6aTapeHbI 6NoK BO3DeIcTBnIO KaKnx-Jn6o MExaHnuecknx yIapOB.
- He pa3bnpaIte n He BUNoIN3MeHnIe 6bapeiNbi6NoK.
-Плотно пркрпгпг Te 6aтAPEнь 6LoK K BndeoannapaType. - 3apnka 6atapeu, y KOTOPoE uEe NMeetcHemHoro 3apna, He NOBInaRET Ha INCXOHyEOMKoCTb 6atapeu.
Notes on dry batteries
To avoid possible damage from battery leakage or corrosion, observe the following:
- Be sure to insert the batteries with the + polarities matched to the + marks.
- Dry batteries are not rechargeable.
- Do not use a combination of new and old batteries.
- Do not use different types of batteries.
- Current flows from batteries when you are not using them for a long time.
- Do not use leaking batteries.
If batteries are leaking
- Wipe off the liquid in the battery compartment carefully before replacing the batteries.
- If you touch the liquid, wash it off with water.
- If the liquid get into your eyes, wash your eyes with a lot of water and then consult a doctor.
If any problem occurs, unplug your camcorder and contact your nearest Sony dealer.
EcIn npOn3oUna yTeUka BHyTpEnHero BeuecTb6aTaapeek
-Пеет Tem,кakЗamehntbбатуКи,TцательноptnteoctaTKKndkocTN BOTcekeДЯбатapeek.
Bcnyae nonaandaHnJkuKoCTnHa Koxy, CMOITe KnuKoCTb BOIoN.
Bcnyae nonaahanna kndkoctn B rla3a, npomTe cBOI rla3a 60bIIM KOnIYeCTBOM BObl, nOcne Yero o6paTntEc b BpaCy.
B clyae Bo3HKnHOBeHn KaKnx-JI6o np6Jem, OTKIOUHTe Bauy BnDeOkaMepy OT nCTOuHnKa nITaHn I o6paTntEcB B 6nXaIuN cepBnCHbl ueHtp Sony.
Video camera recorder
System
Video recording system
2 rotary heads
Helical scanning system
Audio recording system
MPEG1 Audio Layer2 (Fs 48 kHz, stereo)
Video signal
PAL colour, CCIR standards
Usable cassette
MICROMV cassette with the mark printed
Tape speed
Approx. 5.66mm / s
Recording/playback time
(using cassette MGR60)
one hour
Fastforward/rewind time
(using cassette MGR60)
Approx. one min. and 30 seconds
Viewfinder
Electric viewfinder (colour)
Image device
3.8mm (1/4.7 type) CCD
(Charge Coupled Device)
Gross: Approx. 1070000 pixels
Effective (still): Approx. 1000000 pixels
Effective (moving): Approx. 690 000 pixels
Lens
Carl Zeiss
Combined power zoom lens
Filter diameter 30mm (1 3/16 in.)
10× (Optical), 120× (Digital)
Focal length
3.7 - 37 mm (5/32 - 1 1/2 in.)
When converted to a 35mm still
camera
CAMERA:
50 - 500 mm (2 - 193/4 in.)
MEMORY/NETWORK
(DCR-IP55E):
42 - 420 mm (1 11/16 - 16 5/8 in.)
Colour temperature
Auto,HOLD(Hold),Indoor
(3200K), Outdoor (5800K)
Minimum illumination
7 lx (lux) (F 1.8)
0 lx (lux) (in the NightShot mode)*
- Objects unable to be seen due to the dark can be shot with infrared lighting.
Input/Output connectors
Audio/Video input/output
10-pin connector Input/output auto sw
Video signal: 1 Vp-p, 75 Ω (ohms), unbalanced, sync negative
Luminance signal: 1 Vp-p, 75 (ohms), unbalanced
Chrominance signal: 0.3 Vp-p, 75 Ω (ohms), unbalanced
Audio signal: 327mV (at output impedance more than 47k (kilohms))
Input impedance with more than 47k (kilohms)
Output impedance with less than 2.2k (kilohms)
i.LINK (MICROMV Interface) input/output
4-pin connector S400
LANC jack
Stereo mini-minijack ( 2.5mm)
USB jack
mini-B
LCD screen
Picture
6.2 cm (2.5 type)
50 × 37 ~mm (2 × 1 ~l / 2 in)
Total dot number:
211 200 (960× 220)
Wireless communication (DCR-IP5SE only)
Communication system
Bluetooth specification Ver. 1.1
Maximum communication speed 1)2)
Approx. 723 kbps
Maximum output
Bluetooth specification Power Class2
Communication distance 2)
Approx. 10m (33 feet) (Open space, when using a Sony BTA-NW1/
NW1A Modem Adaptor with Bluetooth Function)
Compatible Bluetooth profiles 3)
Generic Access Profile
Dial-up Networking Profile
Usable frequency band
2.4 GHz band
(2.400 - 2.4835 GHz)
1) The maximum rate defined by Bluetooth specification Ver. 1.1
2) Depends on obstacles between the Bluetooth devices, radio wave conditions, etc.
3) Defined by Bluetooth specification for intended use between the Bluetooth devices
General
Power requirements
7.2 V (battery pack)
8.4 V (AC power adaptor)
Average power consumption (when using the battery pack
During camera recording using
LCD: 4.4 W
Viewfinder: 3.8 W
Operating temperature
0^ to 40^ (32^ to 104^)
Storage temperature
-20^ to +60^ (-4^ to +140^)
Dimensions (approx.)
60× 73× 128.5mm
(23 / 8× 27 / 8× 51 / 8 in. (w / h / d)
Mass (approx.)
435 g (15 oz)
excluding the battery pack and cassette
480g (1 lb 0 oz)
including the battery pack,
NP-FF50, cassette MGR60, lens cap and wrist strap
Supplied accessories
See page 25.
AC power adaptor
Power requirements
100 - 240 V AC, 50/60 Hz
Power consumption
23 W
Output voltage
DC OUT: 8.4V 1.5 A in the
operating mode
Operating temperature
0^ to 40^ (32^ to 104^)
Storage temperature
-20^ to +60^ (-4^ to +140^)
Dimensions (approx.)
125× 39× 62mm (5× 19 / 16× 21 / 2
in.) (w / h / d) excluding projecting parts
Mass (approx.)
280 g (9.8 oz)
excluding power cord
Battery pack
Maximum output voltage
DC 8.4 V
Output voltage
DC7.2V
Capacity
4.8 Wh (675 mAh)
Operating temperature
0^ to 40^ (32^ to 104^)
Dimensions (approx.)
40.8× 12.5× 49.1mm
(15 / 8× 1 / 2× 115 / 16 in.)
(w/h/d)
Mass (approx.)
45g (1.6 oz)
Type
Lithium ion
"Memory Stick"
Memory
Flash memory
8MB: MSA-8A
Operating voltage
2.7-3.6V
Power consumption
Approx. 45mA in the operating mode
Approx. 130 A in the standby mode
Dimensions (approx.)
50 × 2.8 × 21.5 ~mm
(2× 1 / 8× 7 / 8 in.) (w / h / d)
Mass (approx.)
4 g (0.14 oz)
Design and specifications are subject to change without notice.
Texhnueckne xapaKTepeNCTnKN
Bnupeokamepa
CnCTema
CnCTema Bunde03aHncn
2BpaaioiuecraIIOBkn
CnCTema BnHTOBORO cKaHIpOBaHnA
Cnctema aydnno3anncn
MPEG1 Audio Layer2 (yactota
48 kTt, cTepeo)
Bndeocnra
LBeTOB0 CNrHAN PAL, cTaNapT MKKP
HcnoJIb3yemaKaCCeta
MnHaOpHa Kacceta MICROMV
CMETKON
CKopoctbJIeHTbl
Ppmbn3.5,66 MM/c
Bpem3a#ncn/
Bocnpon3BeDeHn(npn
NCNoJb3OBaHn KAcceTbI
MGR60)
ODIN Yac
Bpema yckopenho npeomotkn BnpepdHaazdp (npn
MGR60)
Pn6Jn3. OJHa MmH n 30 cekyHd
BudonckateJIb
3NeKTPnIeCKN BIVDOnCKaTeNb (UbTeTHO)
ΦopMnpoBaTeIb n306paXeHn
(OM), HecnMMeTpUHbI, C
OTPncaTeIbHOn CnHxPOHn3aCnei
CnHnApKocTn:pa3Max1B,75Ω
(OM), HecmmMeTpHbI
CnHnIzBcTHoCTn:pa3Max0,3B
75Ω (OM), HecnMMeTpnuHbI
Aydno cnHnJI: 327 MB (pni
IOLHOM BbIXOJHOM CONPOTNBJIeHN
60JIe 47 KΩ (KJIOOM)
PoiHoe BXoDHOe COnpOTnBJIeHne
60Jee 47 KΩ (KUNOOM)
Полhoe Вьхонhoe copotublenne
Mehee 2,2 KΩ (KNUOOM)
Bxod/bxod i.LINK (nHTepfenc MICROMV)
4-ITbIpbKOBbI pa3bem S400
THe3do LANC
Ctepeoohueeckoe MNH
MNHHHe3do(02,5MM)
THe3Do USB
THe3D0 MHHN-B
3KpaHKKd
U306paXeHne
6,2 cm (Tnna 2,5)
50× 37 MM
O6eue KOInuCteBO 3JeMeHToB 1n06paxKeHHa:
211 200 (960× 220)
BecnpobodnacCB3b(TolkbO moJeIb DCR-IP55E)
CnCTema CB3N
Bluetooth specification Ver. 1.1
MaKcMmaJIbHaN cKOPOCTb CBA3N 1)2
Pn6nn3.723K6/c
MaKcImaJIbHaR MoUHOCTb
Bluetooth specification Power Class2
PaCCTOAHHe CB83n 2)
Pn6bn3.10 M (BnOtpbIOM npoCTpaHCTBe, BnIONb3ObaHNMOdEMHO aadantepa Sony BTA-
NW1/NW 1A c cyHkUnei
Bluetooth)
COBmectnmbie npoJnn
Bluetooth 3)
PpOoHb oBcero Doctyna
PpOoPnJIb CeTeBOrO Bbl30Ba
NcnoIb3yEmbYHCTOHTbI dnaaONH
Duaana30n2,4T
(2,400-2,4835ΓΓu)
1) MaKcMmaJIbHaI cKOpOCTb onpeJeIeTcRA TeXHmecKMMx xapaKeTpMcTnKaMm Bluetooth specification Ver. 1.1
2)3aBnCtOT npenrTCTBm, pacnoJoxeHHbIX MEXd yctpoiCTbAmu Bluetooth, ycNoBnMn pacpocOtpaHeHnraDIOBOHN, H.T.I.
3) OnpeJeIeTcXaKAPTeRNCtIKaMn BluToothdIy npEHaMepeHnHOICNOJb3OBAHn MekJyycTpoiCTbAmn Bluetooth
06uee
Tpe6obAHNA K NHTaHnO
7,2B(6aTapeHbIb 6JIOK)
8,4 B (ceTeBoa aanTep
nepemehhoro TOKa)
CpeHnra notpe6nema
MOUHOCTb(NpI NcNOJb3OBAHm 6baTeepHOro 6IoKa)
BovBpeM 3aIncn BnuDeokamepoC cnNoNb3OBAHmE
KKI:4.4BT
BudonckaTeJIa:3,8BT
Pa6o7a Tempepatya
OT 0^ C Do 40^ C
Temnepatypa xpaheHNA
OT-20° Cdo+60°C
Pa3mepbl (npn6Jn3.)
60 × 73 × 128.5 MM
(ω/B/r)
Bec (npn6n3.)
435
He BKJIOUa 6batapeHbI bNOK n KACCETY
480
BKNIOUa 6aTapeHbI bIoK, NPFF50, Kaccety MGR60, KpbIky
OBeKtBnA n PemHeB dIra 3aXBaTa
Ppnilaraemble npnHaJnxKHOCTN
CM. cTp. 25.
CteBoa aanTep nepemehHoro TOka
Tpe6oBaHnK nHTaHnIO
100-240BnepeMeHHoroToKa, 50/60 T
Notpe6JIaERMa MOUHOCTb 23BT
BbIXoHoe HappKeHne
DC OUT: 8.4 B, 1.5 A b pa6o7em pekimme
Pa6oayTemnepaTypa
OTo 0^ Cdo 40^ C
TemnepaTypa xpaHeHn
OT-20° Cdo+60°C
Pa3mepbl (npn6bn3.)
125× 39× 62MM (u/B/Γ)
He BKIOUaBbICTyNaIOuNe YAcTn
Bec (npn6n3.)
280
He BKIOUOaIshyp NITaHnA
"Memory Stick"
NamrTa
Флш-намгтб
8 M6: MSA-8A
Pa60ee HappxeHne
2,7-3,6B
Notpe6MaMoHocTb
Пибпи.45 mВ pa6ochem pexime
Пиблб.130 mКВ bржиме ОЖДANHIN
Pa3mepbI (npn6bn3.)
50× 2,8× 21,5MM (U/B/r)
Bec (npn6n3.)
4
KOHCTyKUINuTexHmueckne xapaKTepnCtNMOYbTb6I 13MNEHeB6e3 yBeDMoENHeN.
BaTapeiHbI 6JIOK
MaKcImaJIbHoe BbIXoJHoe HapraXeHne
8,4 B noctoHHoro ToKa
BbIXoHoe HapRjKeHne
7,2B noctoHHoro Toka
EMKOCTb
4,8BT-4(675MA-4)
Pa6o7a TemnepaTpa
OTo 0^ Cdo 40^ C
Pa3Mepbl (np6bn3.)
40,8 × 12,5 × 49,1MM
(ω/B/r)
Bec (npn6n3.)
45
Tin
JIITNTEBO-NOHHbI
Identifying the parts and controls
LANC stands for Local Application Control Bus System. The control jack is used for controlling the tape transport of video equipment and other peripherals connected to the video equipment. This jack has the same function as the jack indicated as CONTROL L or REMOTE.
15 LCD BACKLIGHT switch (p. 43)
16 Jack cover
11 Pbyar ocbo6oxJeHnB BATT (6aTapeu) RELEASE (cTp. 26)
12 THe3do (USB) (CTp. 194)
13 THe3do A/V (ctp. 61, 105, 110, 171)
14 THe3do LANC)
LANC O3Haayet CNTEmy IINHbI MeCTHOYnpaBHeNIA.ΓHe3do ynpaBHeNIAUCNObb3yeTcA DnKoHTpOJIaJIeHTOpPoTJxHbIM MExaHn3MOMBnDeoanPapaTypbI NdpuNXnepnpepnHbIX yCTpoiCTB,NOdCOeDInHeHHbIX K BnDeoanPapaType.DaHHOe THe3do IMMeET TaKyIO JekfynKcUIO,KaIK nHe3do,ob03NaueHHOeKaK CONTROL Lnn REMOTE.
17 Flash (p. 65, 148)
18 Focus ring (p. 87)
19 Lens
20 Camera recording lamp (p. 39)
21 Infrared rays (Nightshot Light) emitter (p. 49)
Remote sensor
23 OPEN button (p. 39)
24 (Bluetooth) lamp (DCR-IP55E only) (p. 221)
25 HOLEGRAM AF emitter (p. 150)
Note on the Carl Zeiss lens
Your camcorder is equipped with a Carl Zeiss lens which can reproduce a fine image. The lens for your camcorder was developed jointly by Carl Zeiss, in Germany, and Sony Corporation. It adopts the MTF* measurement system for video camera and offers a quality as the Carl Zeiss lens.
- MTF is an abbreviation of Modulation Transfer Function. The value number indicates the amount of light of a subject penetrating into the lens.
17 Bcnbilka (ctp. 65, 148)
18KoIbIooΦokycnpoBKn (cTp.87)
19 06beKTHB
20 JIamnoquKa 3aHnCn BnDeOkamepbI (cTp. 39)
21 N3JIyuaTeJIb INHΦpaKpaChbIX Lyyei (NODCBETKa HOUHOH CbeMKn) (CTp. 49)
22 DaTtHK DnctaHcNoHHoro ynpabJIeHna
23 KhoNka OPEN (CTp. 39)
24 JIamnocha (Bluetooth) (ToIbko MoedJI B DCR-IP55E) (ctp. 221)
25 I3nyaTeIb roJorpaMMHoi aBTOΦOKycnpoBKN HOLOGRAM AF (cTp. 150)
Make sure that the length of the tripod screw is less than 5.5mm (7/32 inch). Otherwise, you cannot attach the tripod securely and the screw may damage your camcorder.
39 OPEN/EJECT lever (p. 35)
40 Hook for wrist strap (p. 288)
41 Speaker
35 Cnot "Memory Stick" (ctp. 130)
36 Kpbiika kaccethoro oTceka (CTp. 35)
37 PykoRTka 3axBaTa (cTp.13)
38 THe3do DnTpeHorn
Y6eIITecb, YTO IINHa BnHTa TpeHOr mHee 5,5 MM. B npOTnbHom cnyae, Bbl He CMOKeTe HaJExJHO pNkPeNTb TpeHOry, a BnHT MoKet NOBpeNTb BaUy BnDeOKaMepy.
39 Pbyar OPEN/EJECT (ctp. 35)
40 KpOcK dIpaemHra 3aXBaTa (CTp. 288)
41 DnHaMnK
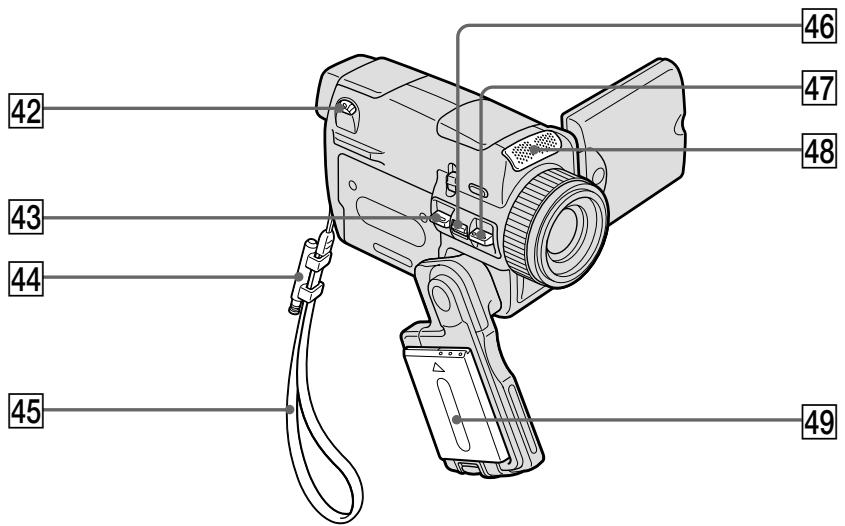
42 Viewfinder lens adjustment lever (p. 43)
43 PHOTO button (p. 63, 146)
44 Stylus holder (DCR-IP55E only) (p. 222)
45 Wrist strap (p. 14, 16)
46 Power zoom lever (p. 44)
47 START/STOP button (p. 39)
48 Microphone
49 Battery pack or battery terminal cover (p. 26)
42 Pbyar perynipoBkn obbektna BNDOnckaTeJIa (cTp. 43)
43 KhoNka PHOTO (cTp. 63, 146)
44ДержateNBпera(TOЛькоMOдель DCR-IP55E)(cTp.222)
45 PemeHb dJIa 3axBaTa (cTp.18,20)
46 Pbyar npBbOHoro BapNo06BeKtNbA (cTp. 44)
47 Khonka START/STOP (ctp. 39)
48 Minkpofoh
49 BaTapeHbI 6JOK nJIn KpbIkwKa 6BaTeeHoro OTecka (cTp.26)
How to attach the supplied lens cap and wrist strap
Cnocob npKpeHnHa npJIraeMoN KpbIuKn OObEKTnBa HapyHoro peMHa
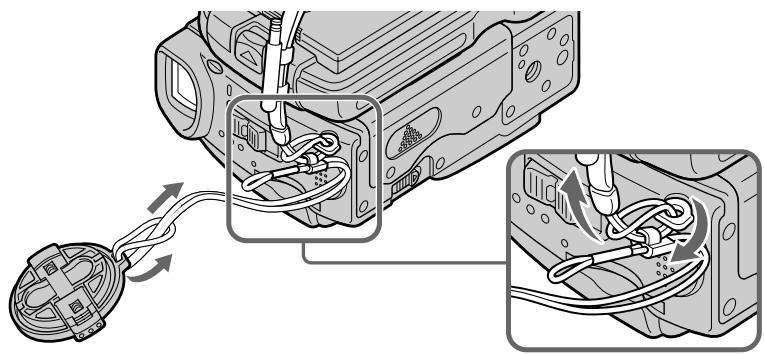
Remote Commander
The buttons that have the same name on the Remote Commander as on your camcorder function identically to the buttons on your camcorder.
1 PHOTO button (p. 64, 68, 152)
2 DISPLAY button (p. 57)
3 MEMORY control buttons
4 SEARCH MODE button (p. 102, 103)
5 MULTI SRCH button (p. 98)
6 Transmitter Point toward the remote sensor to control your camcorder after turning on your camcorder.
DATA CODE button (p. 57)
8 START/STOP button (p. 39)
9 Power zoom button (p. 44)
Video control buttons (p. 55, 59)
1↑/↓/←/→/EXECUTE buttons
1 KhoNka PHOTO (cTp. 64, 68, 152)
2 KhoNka DISPLAY (cTp. 57)
3 KhoNknypaBHeHnEMORY
4 KhoNka SEARCH MODE (ctp. 102, 103)
5 KhoNka MULTI SRCH (ctp. 98)
6 NpepaTukn HapabbTe Ha daTtck DnCTaHIOHHO ynpabLeHnI dny ynpabLeHnBaSei BInDeOKaMepo Iocne BKJIoueHnBnDeOKaMepbl.
7 KhoNkA DATA CODE (cTp. 57)
8 KhoNka START/STOP (cTp. 39)
9 KhoNka npBbOdHOro BapNo06BeKtNbA (cTp. 44)
10 KhoNKn BnDeoKoHToJa (cTp. 55, 59)
11 KhoNKn / / / EXECUTE
To prepare the Remote Commander
Insert two R6 (size AA) batteries by matching the + and - polarities on the batteries to the + marks inside the battery compartment.
ДлnoiodroTOBKn nylbTa ДиctahUHOHHoro ynpaBJIeHnA
BcTaBbTe 2 6aTapeiKn R6 (pa3Mepa AA), YTo6bl POnJIrPHoCTb + I - Ha 6aTapeiKax CoBnaja co 3HaKaAMn + - BHyTpN OTCeKa DJIa 6aTapeeK.
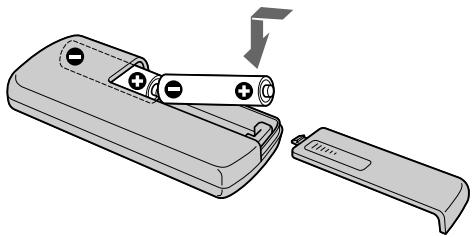
Remote Commander
- Point the remote sensor away from strong light sources such as direct sunlight or overhead lighting. Otherwise, the Remote Commander may not function properly.
- Your camcorder works in the commander mode VTR 2. Commander modes 1, 2 and 3 are used to distinguish your camcorder from other Sony VCRs to avoid remote control misoperation. If you use another Sony VCR in the Commander mode VTR 2, we recommend changing the commander mode or covering the sensor of the VCR with black paper.
IyltDnCTaHcNHO ynpabHeH
- HanpaBnIe TaTcH NcCTaHcHNOHOrO ynpaBHeHn B CTOpHy OT CnIbHbIX nCToHnKOB CBtA, KaK HApPmEp, npMble coJIHeHbIe IyHn IIN BepXHee OCBeSeHne. B npOTNBOM cNyuae PylbT nCTaHcHNOHOrO ynpaBHeHn MoKeT He DeiCTBOBaTb HaJIeKaUIM o6pa3OM.
Baawa BnuDeokamepa pa6oTaetB pexIme nybTa dinCTaHnOHHoro ynpabLeHnV TVR2. PexKMBI npbTa dinCTaHnOHHoro ynpabLeHn1, 2 n3 uCNoB3yOTcJdN oTnUHnBaWei BnuDeokamepbOt dpyrKX KBM fnpMb i Sony BO n36ExHaHe HnpaBnBHO pa60tbl DnCTaHnOHHo ynpabLeHn.EcIn Bbl nCNoB3yeTe dpyroKBM fnpMb i Sony, pa6oTaIOuHn B pexIme npbTa dinCTaHnOHHo ynpabLeHn VTR2, peKOMeHNdyETcN3MeHnTBpeXIM npbTa dinCTaHnOHHo ynpabLeHn INI 3akpblB nCTaHnOHHbI daTChK KBM cepHoN 6ymaroi.
Operation indicators
LCD screen and viewfinder
Pa6oyne HndnKaToptbI
3KpaH KKD n BnDOnckaTeNb
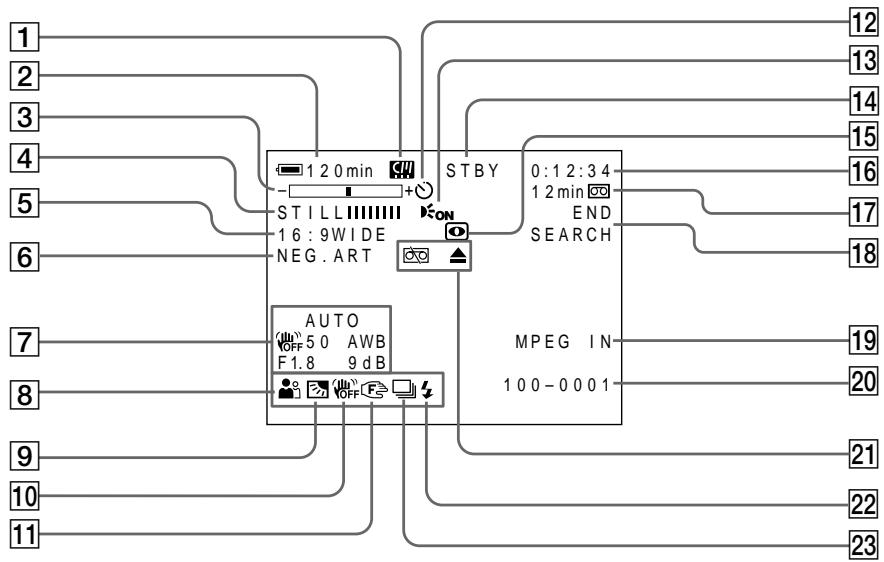
1 Micro Cassette Memory (p. 46)
2 Remaining battery time (p. 46)
3 Zoom (p. 44)/Data file name (p. 127)
4 Digital effect (p. 78, 94)/MEMORY MIX (p. 158)/FADER (p. 73)
16:9WIDE (p. 71)
6 Picture effect (p. 76, 92)
7 Data code (p. 57)/Date
8 PROGRAM AE (p. 81)
9 BACK LIGHT (p. 48)
10 SteadyShot off (p. 226)
11 Manual focus (p. 87)
[12] Self-timer (p. 68, 152)
13 HOLEGRAM AF (p. 150)
1 Micro Cassette Memory (Инд MdkpokacctHо namTn) (cTp. 46)
2 INHdNkaTop octaBweroC8 BpeMeH 3apHa 6aTaapeHoro 6Ioka (cTp.46)
3 INHdNkaTOp yBeJIuYeHnA (CTp. 44)/ INHdNkaTOp nMeHn faiJa daHHbIX (CTp. 127)
4 INHdkaTop UHpOBOrO 0000kTa (ctp. 78,94)/INHdkaTop MEMORY MIX (ctp. 158)/INHdkaTop FADER (ctp. 73)
5 INdikatop 16:9WIDE (cTp.71)
6 INHdkaTop 3ΦΦeKta H3o6paXeHnA (cTp.76,92)
7Инданкатор КОда дaHHbIX (cTp. 57)/Инданкатор ДaТы
8 INdkaTop PROGRAM AE (ctp. 81)
9 ИнданаTop BACK LIGHT (ctp. 48)
10 INHnKaTOp BbIKHIOeHHoYHyHKuN yCTOuHBOB CbEMKn (ctp. 234)
11 NHHaKATOp pyHOn ΦokycnpoBKn (cTp. 87)
12Индикатop TaMepa caMo3anycKa (cTp. 68,152)
13ИнданаTop HOLEGRAM AF (cTp. 150)
STBY/REC (p. 39)/Video control mode (p. 59)/Image size (p. 140)/Image quality mode (p. 134)
15 NIGHTSHOT/SUPER NIGHTSHOT (p. 49)/ COLOUR SLOW SHUTTER (p. 49)
16 Tape counter (p. 46)/Self-diagnosis (p. 248)/ Memory photo (p. 143)/Image number (p. 175)
17 Remaining tape (p. 46)/Memory playback (p. 175)
18 END SEARCH (p. 54)
19 MPEG IN (p. 107)
20 Data file name (p. 127)
This indicator appears when the MEMORY MIX functions work. /Time (p. 46)
21 Warning (p. 249)
22 Flash
23 Continuous photo recording (p. 145)
14 INHdNKaTop STBY/REC (ctp. 39)/ INHdNKaTop pexnma BndeOkoHTpoJIa (ctp. 59)/INHdNKaTop pa3Mepa IN3o6paXeHnra (ctp. 140)/INHdNKaTop KaueCTBa IN3o6paXeHnra (ctp. 134)
15 INHДИΚaTOP NIGHTSHOT/INHДИΚaTOP SUPER NIGHTSHOT (ctp. 49)/ INHДИΚaTOP COLOUR SLOW SHUTTER (ctp. 49)
16 INHdNKaTOP CHTUKNKa JIeHTbI (cTp. 46)/ INHdNKaTOP CAMOHaNarHOCTNU (cTp. 258)/INHdNKaTOP FOOTOCbEMKn C COxpaHeHnEM B NAmrTn (cTp. 143)/ INHdNKaTOP Homepa N3o6paxKeHnA (cTp. 175)
17 INHdNKaTOP ocTabWeiCJIeHTbl (ctp. 46)/INHdNKaTOP BOCnpon3BeDeHnI N3 pAMrTn (ctp. 175)
18 ИнданkaTop END SEARCH (cTp. 54)
19 INdkaTop MPEG IN (ctp. 107)
20 INHdNKaTOP ImeHN faiJa DaHHbIX (ctp. 127) ΘTOI INHdNKaTOp NOBJIaTeCn Ipn pa6Ote cyHKcN MEMORY MIX./INHdNKaTOp BpeMeHN (ctp. 46)
[21]Предупгждаюци ИнданkaTopы (стр. 259)
22 INHIMKATOP BCNbIshKn
23 INdkaTOp HnpepbIBHOn FOToCbEMKn (cTp. 145)
A, B
AC power adaptor 25, 27, 30, 276
Adjusting viewfinder 43
Adjusting volume 55
Auto red-eye reduction.....65,148
AUTO SHTR. 225
A/V connecting cable 25,61,105,110,171
BACK LIGHT 48
Battery pack 26
BEEP 232
BOUNCE 73
B&W 76
C, D
CALIBRATION 274
Camera chromakey 158
Carl Zeiss lens 285
Cassette information 124
Cassette memory 124
Charging battery 27
Charging built-in rechargeable battery 273
Cleaning cassette 272
Clock set 31
COLOUR SLOW SHUTTER ....49
Continuous photo recording.. 145
Data code 57
DATE SEARCH 103
DEMO MODE 231
Digital effect 78,94
DISPLAY 232
Dubbing a tape 105
E
END SEARCH 54
EXP BRKTG 145
Exposure 84
F, G, H
Fader 73
Fade in/out. 74
Flash recording 65, 148
FLASH 78
FLASH MOTION 78
Flexible Spot Meter 85
FOCUS. 87
Focusing manually 87
FORMAT 229
Full charge 27
Grip 13
Heads 271
HOLOGRAM AF 150
I, J, K, L
i.LINK (MICROMV Interface) 107, 112, 172
Image protection 186
Image quality mode 134, 137
Image size 140
Index screen 176
"InfoLITHIUM" battery ... 29, 263
Infrared rays emitter 49
JPEG 127
Labelling a cassette 125
(LANC) jack 284
LUMINANCEKEY 78
M, N
Manual focus 87
Memory chromakey 158
Memory luminancekey 158
MEMORY MIX 158
Memory overlap 158
Memory PB ZOOM 182
Memory photo playback 173
Memory photo recording 143
"Memory Stick" 127
Menu settings 223
Micro Cassette Memory 124
Mirror mode 45
Moisture condensation 270
MONOTONE 73
MOSAIC 76
MOSC.FADER. 73
MPEG 127
MULTI-PICTURE SEARCH....98
NEG.ART. 76
MULTI SCRN 145
NETWORK 221
NIGHTSHOT 49
NORM.FADER 73
NTSC system 269
O, P, Q
OLD MOVIE 78
Operation indicators 291
PAL system 269
PASTEL 76
PB ZOOM 96,182
Picture effect 76
Playback pause 59
Playing time 29
Power zoom. 44
Printmark. 192
PROGRAM AE 81
R
Recording time 28
Remaining battery time indicator 264
Remaining tape indicator .. 47, 230
Remote Commander 289, 290
Remote sensor 285, 290
RESET 246
s
Self-diagnosis display 248
Self-timer recording 52,68,152,167
SEPIA 76
Slide show 184
SLOW SHUTTER 78
SOLARIZE 76
SPOT FOCUS 89
STEADYSHOT 226
STILL 78
Stylus 38,222
SUPER NIGHTSHOT 49
SVIDEO jack 61,105,109,156,171
T, U, V
Tape counter 46
Tape PB ZOOM 96
Telephoto 44
Title 114, 120
TITLE SEARCH 102
Touch panel 37, 131
TRAIL 78
Transition 40
TV colour systems 269
USB jack 194, 198, 217
USB Streaming 231
W, X, Y, Z
Warning indicators 249
White balance 69
Wide-angle 44
Wide mode 71
Wrist strap 288
Write-protect tab 36
Zoom 44
Aлфавиньи yka3aTeJB
A,B,B,Γ
ABTOMATNUeCKOE yMeHbIeHne 65,148
BaIaHc 6eIoro. 69
BaTapeiHbI 6Jok. 26
БатAPEйьблор "InfoLITHIUM". 29, 263
BBeHeHne/BbIBeDeHne.74
BapnoooBeKTHB 44
Bocnpoan3BeJeHne ФOTOCHIMKOBИЗпamгТи..173
Bpem Bocnpoun3BeDeHHa. ..29
Bpema 3a\PuCn 28
Tolobkn. 271
THe3do LANC 284
ГнэздО SVIDEO 61,105,109,156,171
Гнэзdo USB 194, 198, 217
D,E,X,3
INHnKauncaMoDnaHOctKn 248
INHOpMaIaO KaccTe 124
KaccetHa namrTb 124
KoI daHHbIX 57
KoHdeHcaunBlaIg 270
JIeNecToK 3aunTbI 3anncn ....36
Mapknipobka kaccetbl 125
MikpokacceTha naMTb..... 124
H, O
Hae3n Bndeokamepbbl 44
HapuHbI peMeHb 288
HenpepbBnaH aTOcBemKa 145
ObekTINB KapI LcHcc. 285
P
Pay3a Bocnpon3BedeHnA 59
Ppe3aIncb IeHTbl 105
PpeekpbItne namrtn 158
Pepexo40
Pepo 38,221
Ponck DaTbI .Xx
ПОИСТИТРА ...XX
Poka3 cnaIOB 184
Ponha 3apka 27
IToKOBaF cyHkUa USB ... 231
IpeDynpexKaIoUne INDnKaTOpbl 249
PpIBoDHOB BapnoooBeKTeNB ..44
Пульт ДICTАнTOHOrOуразВлЕн.. 289,290
Pa3mep n3o6paXeHnA 140
PerylnpobKa BIDOnckaTeJI.43
PerynipoBbKa rpoMkoCTn 55
Peynpyemoe pHTHO
pOTOMeTPII 85
PexkimKaueCTBa 134,137
PemeHbIa3axBaTa 13
PyuHaФokycnpoBka 87
C, T
CehcopnnaHeIb 37,131
Cetebo aandep nepemehnhoro Toka. 26, 27, 30, 276
CINHXPOHHO 03ByuBaHHe ....xx
CucTeMa PAL 269
CnCTema NTSC 269
CnCTemblcBETHORo TeneBnDEnH.. 269
CoeHInHTeINbHbKabEb ayDIOBvIeO ....25,61,105,110,171
CueTnK JeHtbl 46
Tepeoto 44
TnTp 114,120
y-
YCTaHOBka Yacob 31
YCTaHOBKe MEHIO 223
Fendep 73
ΦokycinpobKa BpyHu 87
ΦOTOCbEMKa C COxpaHeHEm B nAMrTn 143
LBeTobar npnpoeKzur BnDeokamepbl 158
LcBeToBa npnpoeKzna naMTn 158
LcnpoBOn 3cpfekT 78,94
YnctraaKaCCeta 272
UnpokoyrolbHaCbEmka 44
山npoKo3KpaHHbIpeXIM.....71
84
30607 76
Rpkocthn npnpoeeknna narnn 158
A,B,C,D
AUTO SHTR 225
BACK LIGHT 48
BEEP 232
BOUNCE 73
B & W 76
CALIBRATION 274
COLOUR SLOW SHUTTER ... 49
DATE SEARCH 103
DEMO MODE 231
DISPLAY 232
E,F,G,H
END SEARCH 54
EXP BRKTG 145
FLASH 78
FLASH MOTION 78
FOCUS 87
HOLOGRAM AF 150
1-0
i.LINK (HHTeppeic MICROMV).. 107,112,172
JPEG 127
LUMINANCEKEY 78
MEMORY MIX 158
"Memory Stick" 127
MONOTONE 73
MOSAIC 76
MOSC.FADER 73
MPEG 127
MULTI-PICTURE SEARCH .... 98
NEG.ART 76
Micro Cassette Memory (MnKpokaccctHaanamrTa).....124
MULTI SCRN 145
NETWORK 221
NIGHTSHOT 49
NORM.FADER 73
OLD MOVIE 78
P-Z
PASTEL 76
PB ZOOM 96,182
PROGRAM AE 81
RESET 246
SEPIA 76
SLOW SHUTTER 78
SOLARIZE 76
SPOT FOCUS 89
STEADYSHOT 226
78
SUPER NIGHTSHOT 49
TITLE SEARCH 102
TRAIL 78
N3roTOBnTeIb: CoHn KopnpoeiHn
Aapec: 6-7-35 KntaunHaraba,
UHHaraba-Ky, Tokno 141-0001, JnoHna
CTpHa-nPOn3BOJNTeJIb: JnoHna
Printed on recycled paper. Printed using VOC (Volatile Organic Compound)-free vegetable oil based ink.
HaneataHO Ha 6ymare, n3rotOBenHOn nyTem BtopuHOn nepepa60TKn. HaneataHO C nCnoIb3ObaHNem neaTHoN KapcKn Ha OCHObe paCTnteBHO macna 6e3 npImecEJIOC (JeTyuX opraHuecknx coeDInHeHn).
http://www.sony.net/
- Digital Video Camera Recorder MICROMV
- Operating Instructions
- HCTPYKUINI NO 3KCNJYATAUNI
- English
- Welcome!
- WARNING
- Memory Stick
- N50
- NOTICE ON THE SUPPLIED AC POWER ADAPTOR FOR CUSTOMERS IN THE UNITED KINGDOM
- For the customers in Europe
- Pycckn
- Добpo пожаловать!
- PNEyPPEXDEHNE
- Дя nokynateJIe B Ebpone
- BHIMAHNE
- PpeynpexdHne
- ATTENTION
- DCR-IP55E only
- DCR-IP45E only
- For the customers in Germany
- ToIbKO IaI MoJoI DCR-IP55E
- ToIbKO IaI MoeJI DCR-IP45E
- Other uses
- PpOyne npMHeHnA
- Getting started
- Recording - Basics
- Playback - Basics
- Advanced Recording Operations
- AdvancedPlayback Operations
- Editing
- "Memory Stick" Operations
- Viewing Images Using your Computer
- Using the Network function (DCR-IP55E only)
- Customising Your Camcorder
- Troubleshooting
- Additional Information
- Quick Reference
- BVeDHeNc
- PykoBoIDCTBO no 6bICTpomy 3anycky
- Iodrotobka K 3KcnIyatauIN
- 3aInscb - OCHOBhbIe NOJIOXeHnA
- Cnppon3BedeHne
- - OCHOBHbIe NIOJoxKeHnA
- DOnOpHnTeNbHa NnΦopMaζη
- OnepaTnBbI CNpaBOuHnK
- Introduction - Basic operations
- How to turn on the power and select the mode
- Kak BKJIIOUHTb NITaHne n Bbl6paTb peXIM
- MEMORY/NETWORK (DCR-IP55E)
- MEMORY/NETWORK (mojeь DCR-IP55E)
- Recording position
- Cassette inserting/ejecting position
- Note
- IoloxeHne yctahOBKn
- IonoXeHne yCTaHOBKn/IN3BJeHnKacceTbI
- Quick Start Guide - Recording on a tape
- Connecting the mains lead (p. 30)
- Inserting a cassette (p. 35)
- Viewfinder
- Monitoring the playback picture on the LCD screen (p. 55)
- Quick Start Guide – Recording on a "Memory Stick"
- Inserting a "Memory Stick" (p. 130)
- Monitoring the still image on the LCD screen (p. 173)
- PykoBoCTBO IO 6bICTpOMy 3aIycKy - 3aIncb Ha IeHTy
- ПодсоeДиненue npOBODa элжКТрОпNTаHЯ (cTp. 30)
- ПРИМЕЧАНИС
- Using this manual
- ИсpenьзованецдаHHORO pyKOBOdCTBa
- Note on the MICROMV format
- III
- Note on TV colour systems
- Copyright precautions
- Ппмецни по системацьETHORO TEJIeBndeHIN
- Пре dioctepexeHne o6 aBTopcKom npaBe
- Precautions on camcorder care
- Lens and LCD screen/finder
- MepblnpedocTopoXHocTn npu yxoJe 3a Bndeokamepo
- ObekTbN 3KpaH KKnBvDOnckaTeIb
- Step 1 Preparing the power supply
- Installing the battery pack
- UcTaHOBka 6aTapeHoro 6Joka
- To remove the battery pack
- ДлСНТИЗбатeРиHOrOБLOka
- Battery terminal cover
- Kpbiuka 6aTaepenHoro oTceKa
- YctaHObKa 6atapeHoro 6noka
- Charging the battery pack
- 3apka 6aTapeHoro 6loKa
- After charging the battery pack
- Iocne 3apdKn 6aTapeHoro 6Joka
- PpimeyaHne
- While charging the battery pack, the battery CHG lamp flashes in the following cases:
- When you use the AC power adaptor
- If the power goes off although the battery remaining indicator indicates that the battery pack has enough power to operate
- Recommended charging temperature
- What is "InfoLITHIUM"?
- PpmeuHne
- EcIn nHTaHne nponaadaet, xOTn HnDnKaTOp oCTaBWeOc3apra6batapeHoro 6Noka nOKa3bIbaET, YTO 6batapeHbIM 6NOK o6Jaadaet DOCTaToUHbIM dIn pa60tbl 3apydom
- PeKOMeHdyemar TempepaTpya 3apAdkn
- Connecting to a wall socket
- Notes
- A car battery
- ПЕДОCTEPEЖЕΗΝ
- PpimueaHn
- ABTOMO6nIbHbIaKKymyIaTOP
- Step 2 Setting the date and time
- To return to FN (Function)
- When using your camcorder abroad
- If you use the camcorder in a region where summer time is used
- If you do not set the date and time
- ДлЯ BOЗВРаТа К ИнДИКаци N F (Функця)
- Note on the time indicator
- Simple setting of clock by time difference
- To set your local time
- To eject a cassette
- IIN3BLeuHnKaccTebl
- To prevent accidental erasure
- PpmeuHn
- 3TnKETke
- Step 4 Using the touch panel
- Пункт 4 Исторьанец сенихов панели
- To return to FN
- To execute settings
- To cancel settings
- ДЯ BO3Bpata K Индан KaunFN
- ДлгБынолпенунуctановok
- ДЯ OTMeHbI yCTaHOBOK
- When executing each item
- If an item is not available
- Touch panel
- Press FN to display the following buttons:
- PnBbInoJIHeHHKaXdOrO nyHKTa
- EcnnyHKT He doctyneH
- Cehcopna naHeIb
- Haxmte KhONky FN dIy oTo6paXeHHa
- CneedyouxKHONOK:
- Recording a picture
- 3a\Pncb n3o6paJxHnIa
- After recording
- To enable transition
- If you leave your camcorder in the standby mode for five minutes while the cassette is inserted
- The battery life when you record using the LCD screen
- PocJe BbInOpHeHn 3aIncn
- PpmeaHne
- Длгобсесенпегхда
- Ppimcayane
- Adjusting the LCD screen
- PerynnpobKa 3KpaHa KKД
- When you use the LCD screen outdoors in direct sunlight
- When you adjust the angle of the LCD panel
- EcIn BbI nCNoJIb3yTe 3KpaH XXD BHe NOMeueHnI NOI npRmbIM COJHeuHbIM CBETOM
- Ppi perynipobKe yrgna naHEn JKKd
- Adjusting the brightness of the LCD screen
- PerynipoBka npKocTn 3KpaHa KKd
- The colour of the LCD screen
- The setting of the LCD BACKLIGHT switch
- Adjusting the viewfinder
- UBeT 3KpaHa KKd
- Дахе ecn Bbl 6byepe rpylnpoBaTb 3kpa n cnooBIO onuIN LCD BRT, LCD COLOUR nIi 6byepe rpylnpoBaTb npKocTb 3aDneH noCDcBeTkN 3kpaHa KKД
- Viewfinder backlight
- Even if you adjust the viewfinder backlight
- 3aHnnoDcBtKa BnOOnckateJr
- JaXe ecn Bbl Otperyu npye Te RpKoCTb 3aDHe NIOCBETKN BIDOMCKaTeJI
- Using the zoom feature
- IcnoJIb3OBAHneФyHKcHn Hae3da BnDEOKaMepbl
- To zoom greater than 10×
- When you shoot close to a subject
- Notes on digital zoom
- When the POWER switch is set to MEMORY/ NETWORK (DCR-IP55E only)
- Shooting with the mirror mode
- Set the POWER switch to CAMERA or MEMORY/NETWORK (DCR-IP55E only) and, rotate the LCD screen 180 degrees.
- PnCbemKe oBeKTa C 6JIn3KOropacCTOHHN
- ПпмецькНHae3dByBndeokamepbl цфровьmetoDOM
- EcInn nepeKJIouaTeIb POWER ycTaHOBNeB B noJIOxHeNne MEMORY/NETWORK (ToIbKO moJeIb DCR-IP55E)
- CbeMkaB 3epKaJIbHOM peXnme
- UcTaHOBnTe nepeKlIOuHaTeIb POWER B noLoXeHne CAMERA uIn MEMORY/ NETWORK (ToIbKO moJeIb DCR-IP55E) n nobepHnTe 3KpaH JKKD ha 180 rpaucob.
- Picture in the mirror mode
- During recording in the mirror mode
- When you press FN
- I3o6paXeHneB 3epKaIbHOM pexnme.
- Bo Bpem 3aHcN B 3epKaIbHOM pexHme
- Ecnn Bbl HaXMeTe KhoNky FN
- Indicators displayed in the recording mode
- HДИКaTOPbl, OTo6paXkaemble BpeKIme 3aIncN
- Remaining battery time indicator during recording
- Tape counter
- Remaining tape indicator
- Recording data
- HnDkaTOp BpeMeH NocTaBweroC8aPda 6aTapeHoro 6Ioka BO BpeM 3aHNCi
- CuetukJeHTbl
- Hdkatop octabwerooc yactka JehtbI
- DaHHbIe 3aINcN
- CbeMa o6BeKToB c 3aHnei noCDBeTkoI - BACK LIGHT
- Set the POWER switch to CAMERA or MEMORY/NETWORK (DCR-IP55E only) and press BACK LIGHT.
- During back light function
- YcTaHOBnTe NepeKJIouHaTeIb POWER B nIoJoxKeHne CAMERA uNIMEMORY/ NETWORK (ToIbko moJeIb DCR-IP55E) n HaxMnte KOnIky BACK LIGHT.
- Bo Bpempa60bI yHKcun 3aHne noDCBETK
- Shooting in the dark - NightShot/Super NightShot/ Colour Slow Shutter
- Using NightShot
- Set the POWER switch to CAMERA or MEMORY/NETWORK (DCR-IP55E only) and set NIGHTSHOT to ON.
- Cbemka B TemHote - HocnHa Cbemka/HouHa cynpcBemka/LBeTHa CbemKa C MeJleHHbIM 3aTBoPOM
- IcnoJb3OBAHnepeXIMMaHOUHOn CbeMKN
- UcTaHOBnTe NepeKlIoUaTeIb POWER B noLoXeHne CAMERA uJIMEMORY/ NETWORK (ToJIbKO MoJoIb DCR-IP55E) u cTaHOBnTe NepeKlIoUaTeIb NIGHTSHOT B noLoXeHne ON.
- Using Super NightShot
- Using the NightShot Light
- IcnoJb3OBAHne pexmHa HOHOn cynepcbemKn
- IcnoJIb3OBAHne IODCBETKn HOUHOJ CbeMKN
- Using Colour Slow Shutter
- While using NightShot, you cannot use the following functions:
- While using Super NightShot, you cannot use the following functions:
- IcnoIb3OBAHne cyHKCnN CBeTHoN CbeMKn C MeJleHHbIM 3aTBOPOM
- PpIMeuaHnA
- PnncnoIb3OBAHnn FyHKcHm HocHoN CbeMkn Bbl He MoXeTe NcNoJIb3OBAtB cJeDyUoJne FyHKcHn:
- PnncnoIb3OBAHnn FyHKmN HcnpcBemKn Bbl He moKTe nCnoIb3OBaTb cJeDyUoJIne FyHKmN:
- While using the Colour Slow Shutter function, you cannot use the following functions:
- While using Super NightShot or Colour Slow Shutter
- When the POWER switch is set to MEMORY/ NETWORK (DCR-IP5SE only)
- NightShot Light
- In dark places
- 3ainncb n3o6paXeHnA
- PnncnoJIb3OBaHmФyHKcIuZBeTHoCbeMkn C MeJLeHHbIM 3aTbOpom BbI HMeOKeTe NcNoJIb3OBaBt cJeDyUoJneФyHKcIu:
- Ppi nCnoJIb3OBAHm FyHKcHn HooHoC cynepeBcEMKn IIN FyHKcHn CBeTHoN CbeMKcC MeJleHHbIM 3aTBOPOM
- EcInnepeKJIuOaTeIb POWER B nIoJoxHe MEMORY/NETWORK (ToIbKO moJeIb DCR- IP55E)
- IoDCBETKa HOUHOcBcEMKn
- B OueHb TEMhbIX MecTAX
- Self-timer recording
- 3aInc b no TaMepy camo3anycka
- To stop the countdown
- To cancel self-timer recording
- ДлЯ OCTaHOBKn O6paTHOrO OTCheTa
- Длг OTMeHbI 3aIncn no TaImepy camo3anycka
- EcInnepeKlnHouaTeNb POWER yctaHOBJeH B noJIOxHeNMe MEMORY/NETWORK (ToIbKO moJeNb DCR-IP55E)
- Checking the recording - END SEARCH
- Поберка заимсн - END SEARCH
- To stop searching
- Длво3ВраТКИнДикалиFN
- ДлгoctaHOBknNONCKa
- Bocnpon3BeDeHne JeHTbI
- To stop playback
- When monitoring on the LCD screen
- EcIn Bbl octabnte nHTaHne BKIOUeHHbIM Ha dIINTEJbHOE Bpemr
- Korda Bby OTKpbIbAeTe nIIN 3akpbIbAeTe naHeJI KKJ
- To display the screen indicators - Display function
- Using the data code function
- Using the touch panel
- Длг OTO6paXeHn3KpaHHbIX INHdNKaTOPOB -ФУнКцИ NHDINKaUIM
- IcnoJb3OBAHne yHKunn Koda daHHbIX
- IcnoJIb3OBAHHe ceHcopHoI naHeJIi
- Using the Remote Commander
- Not to display various settings
- IcnoJIb3OBAHne nyIbTa InCTaHcNoHHO ynpabLeHn
- ДпгТOrO,ЧTO6bI He OTO6paKaJIncb pa3JIuHbIe YCTaHOBKn
- Various settings
- When you use the data code function, bars (-- - - - ) appear if:
- Data code
- Remaining battery time indicator during playback
- Pa3JIuHbIe yCTaHOBKn
- EcIn BbI nCnOJIb3yeTe fynKcNIO KOA daHHbIX,TO NOBBArTcNOIOcbI (-- --),ecIN:
- KoДдaHHbIX
- Инданковор octabшeroocврemeи зарда 6атAPEHORO 6лOKA BO BPEMВOCПОНЗBEDEHIN
- Various playback modes
- To view a still image (playback pause)
- To fastforward the tape
- To rewind the tape
- To locate a scene monitoring the picture (picture search)
- To monitor the high-speed picture while fastforwarding or rewinding the tape (skip scan)
- Pa3nHbIepeXmblBocnpOn3BeDeHna
- To view the picture at slow speed (slow playback)
- To search the last scene recorded (END SEARCH)
- Video control buttons on the LCD screen
- When the playback pause mode lasts for five minutes
- Bocnpon3BeDenHeJeHtBi
- ДлпюсмOTpa ИЗбрахенЯ Ha 3amEДLEHHOckopocTN (3amEДLEHHOe BOCPpOu3BedeHne)
- Viewing the recording on TV
- If your TV is already connected to the VCR
- EcIn BaW TeJIeBn3Op yKe IoIcoEiHHeN K KBM
- If your TV or VCR is a monaural type
- If your TV/VCR has a 21-pin connector (EUROCONNECTOR)
- Ecni BaW TeNeBn3Op nJN KBM MOHOΦOHNueCKOro TUna
- EcnB Bau TeIeBn3Op/KBM OcHaueH 21-7bIpbkOBbIM pa3beMOM (EUROCONNECTOR)
- If your TV has an S video jack
- To display the LCD screen indicators on TV
- EcIn BaI TeIeBn3Op OchaueH rHe3dOM S BnDeo
- Recording still images in CAMERA mode
- Before operation
- 3aIncb HeIOBnKhbIX n3o6paXeHm B pexIme CAMERA
- Ipeed BbinoJHHeHem Oepaun
- "Memory Stick"
- Image size of still images
- When POWER switch is set to CAMERA
- During and after recording still images on a "Memory Stick"
- When you press PHOTO on the Remote Commander to record still images
- To record still images on a "Memory Stick" during tape recording
- To record images with higher quality
- Pa3Mep HenoBxKhIx n3o6paXeHn
- EcJn nepeKJIIOUaTeIb POWER ycTaHOBNeH B noJIoXeHne CAMERA
- EcJn Bbl HaxMeTe KhONky PHOTO Ha nyIbTe DcHtAnCuHNOHoro ynpaBLeHnA dIy 3aINcH HenoBnBXKbIx N3O6paXeHn
- Recording images with the flash
- 3aIncb n3O6paXeHn co BCnbIshKoI
- If you leave your camcorder for five or more minutes after disconnecting the power source
- Приимechanicals
- EcIn BbI octaBte BaUy BnDeokamepy Ha nTb I 60Jee MnHyT NocJe OTCoeDnHeHn HCTOUYKAp NHTAHN
- You cannot shoot images with the flash during the following operations:
- The flash does not fire even if you select auto (no indicator) and (auto red-eye reduction) during the following operations:
- BbI He MoXeTe BbIIOJIHЯTb CbEmKy n3O6paXeHn CO BCnbIshKo BO BpeM BbIIOJIHEnr cIeDyUoJx Onpaun:
- Bcblska He 6ydt cpa6aTbIbAtb, daXe ecn Bbl Bbl6epete ABTomatueckoe cpa6aTbIbAHne (6e3 mHdkaTopa) n (abTomatueckoe yMehSeHne 3ΦΦeKta KpacHbIX rna3) BO BpemBaINOnHeHn CJeDyUoNx Onpaun:
- 3aHcB no TaMepy camo3anycka
- Ipeed BbINOJIHeHEm Opeaun
- During recording to the tape
- PpimueaHne
- Bo BpemBbIOpHeHn3aIncHaJeHTy
- Adjusting the white balance manually
- OUTDOOR
- (INDOOR):
- PeruInpoBka 6aHaHca 6eIoro BpyHyU
- To return to the automatic white balance mode
- If the picture is being taken in a studio lit by TV lighting
- When you record under fluorescent lighting
- In the AUTO mode
- In the HOLD mode
- ИспOLSьЗОВане ШирOKоЗКранHoRo рекиma
- To cancel the wide mode
- In the wide mode, you cannot select the following functions:
- During recording
- B shpoko3kpaHHom pexKHe BbI He MoXeTe BblpaTcJeDyUOune fynKunn:
- BoBpeMa 3aHmch
- Using the fader function
- [a]
- STBY
- REC
- [b]
- MONOTONE
- To fade in [a]
- To fade out [b]
- (1)ДлЯ BVEdeHnI N3O6paXeHnI [a]
- ДЯ BBiBeHnN n3O6paXeHn [b]
- To cancel the fader function
- Длг OTMeHbI Функци Фeндара
- While using the BOUNCE function, you cannot use the following functions:
- Note on the BOUNCE function
- Приимechаиме
- Bo BpemnncnoB3OBAHnIyHKcnn BOUNCE,BbI He moXeTe nCNOB3OBAtbcJeDyoUne yHKcnn:
- PpimmeaHne no fynkunn BOUNCE
- EcIn Bby ycTaHOBtne nepeKJIouaTeIb POWER B noJIoXeHne MEMORY/NETWORK (ToIbKO moJeIb DCR-IP55E).
- Using special effects
- - Picture effect
- IcnoJb3OBaHne CpeHaJIbHbIX 3ΦΦeKTOB - ΘΦΦeKT n3O6paXeHnA
- To turn the picture effect function off
- While using the picture effect function, you cannot use following functions:
- When you set the POWER switch to OFF (CHG)
- Using special effects - Digital effect
- STILL
- FLASH (FLASH MOTION)
- LUMI. (LUMINANCEKEY)
- TRAIL
- SLOW SHTR (SLOW SHUTTER)
- OLD MOVIE
- IcnoJb3OBaHne CpeHaJIbHbIX 3ΦΦeKTOB -LnpoBoi 3ΦΦeKT
- To cancel the digital effect
- When recording in the slow shutter mode
- ДяВОЗВраТКИнДИКациFN
- ДЯ OTMeHbI UΦpOBOrO 3ΦΦeKtA
- Ppnu yctaHOBKe nepeKlnouaTeIa POWER B noJIOXeHne OFF (CHG)
- Pn3aIncBpeKImeMeIeHnHO 3aTbopa
- Using the PROGRAM AE
- Исpenьзованецфункциng PROGRAM AE
- Spotlight
- Soft portrait
- Sports lesson
- Beach & ski
- Sunset & moon
- Landscape
- Pexm npoxektophoro ocbeuen
- MЯrkni npOtePthbI pexHM
- PexkIM cNoptNBbIX COCT3aHm
- T PnJXHbI N IblXHbI peKIM
- C PeKm 3axoJa coJHua n Lyhbl
- LanDwaΦThbI pexIM
- To turn the PROGRAM AE off
- Дя ВОЗВраТа К Инданкали FN
- While WHT BAL is set to AUTO in the menu settings
- You can adjust the following functions while using the PROGRAM AE:
- If you record under a discharge tube such as a fluorescent lamp, sodium lamp or mercury lamp
- Adjusting the exposure manually
- To return to the automatic exposure mode
- Your camcorder automatically returns to the automatic exposure mode:
- PerynpoBka 3Kcno3nN BpyHyO
- 3-6
- IcnoIb3OBAHne pexnMa CBeTOBOro ΦOTOMETpNueCKOrO PHTHa -PeryIpyEmoe PRTHOΦOTOMETpN
- Your camcorder automatically returns from the Flexible Spot Meter to the automatic exposure:
- Bawa bnupeokamaepa abTOMATUeCKn BepheTc n3 pexkma perynpemyoro nITHa foTOMETpN K aTOMATUeCKO 3KcNo3n:
- Focusing manually
- Pуная Фокусювka
- To return to the autofocus mode
- To focus precisely
- When you shoot close to the subject
- changes as follows:
- Focal distance information is displayed for about three seconds on the LCD screen in the following cases:
- Focal distance information
- Using the spot focus mode - Spot Focus
- IcnoIb3OBAHne peXnMa IaTHa fOKycnPOBKn -IaTHo fOKycnPOBKn
- Using the viewfinder
- ИсpenьзованецВионскателя
- To make the buttons on the LCD screen disappear
- To operate the items that are not displayed
- FN, OFF, PLAY, INDEX and NETWORK in the viewfinder
- Available recording time
- IcnoJIb3OBAHne BnDOnCKaTeJIa
- YTo6bI KHOIIKHa 3KpaHe KKd nCue3n HaxMMTe KHOIIKy OK.
- Примechаня
- Дярабовспункови, He OTO6paKaembIMn Ha 3KpaHc
- Инд�示ь FN, OFF, PLAY, INDEX NETWORK B BIDONCKaTeJI
- Ooctynhoe Bpem3aHncn
- Playing back a tape with picture effects
- Bocnpo3BeDeHne JeHTbI C 3ΦΦeKtAmn n3o6paXKeHn
- To cancel the picture effect function
- Длв BO3ВраТКИнДикалTN FN
- ДЯ OTMeHbI ΦyHKcH N 3ΦΦeKTa n3O6paXeHn
- Bocnpon3BeDeHne JeHTbI c 3ΦΦeKTamn N3O6paXeHnA
- Pictures processed by the picture effect function
- When you set the POWER switch to OFF (CHG) or stop playing back
- N3o6paXeHn, o6pa6oTaHHbIe C NIOMOuBIO fYHKmN 3ΦΦeKtA N3o6paXeHn
- Playing back a tape with digital effects
- Bocnpo3BeDeHne IeHTbI C uΦpOвыIMN ΘΦΦeKtAmN
- To cancel the digital effect function
- Длг OTMeHbI Φункци nФрoboro 3ффекta
- Pictures processed by the digital effect function
- Bocnpo3BeJeHne JeHTbI c cnΦpOBbIM 3ΦΦeKTamn
- Приимechаима
- N3o6paXeHn, o6pa6OtaHHbIe c IIMOuBIO fYHKmN uΦpOBOrO 3ΦΦeKtA
- Enlarging images recorded on tapes - Tape PB ZOOM
- YBeJIuYeHne 3aIIncaHHbIX HaJIeHTbl N3O6paJxHenn -ФункцЯ PB ZOOMJIeHTbl
- The PB ZOOM function is automatically cancelled when you operate the following functions:
- Images in the PB ZOOM
- In the PB ZOOM mode
- Edge of the enlarged image
- Примеань.
- Функця PB ZOOM 6удет abTomatueckn OTMeHeHa, ecIn Bbl BbInonHnTe Ondy n3 cIeMyUoXhФунKcI:
- Searching for a scene - MULTI-PICTURE SEARCH
- Оъckaне заюда - MULTI-PICTURE SEARCH
- EcIn Bbl XOTnTe 3aMeHnTb MNHaTHOpHoe n3o6paXeHne
- To return to the MULTI SCH screen from playback
- To end the multi-picture search function
- To end the multi-picture search function from the playback screen
- When controlling the camcorder with the Remote Commander
- If the tape has a blank portion in the beginning of the tape or between recorded portions
- The number of thumbnails stored in one cassette
- The number of thumbnails that can be displayed for in one scanning
- EcIn Ha JeHTe NMeETcH He3anuCaHHbI yAcTOK B HauaJIe IeHTbI INI MExkDy 3anuCaHHbIMyYacTkAMn
- KoInueCTBO MNHaTIOpHbIX n3O6paXeHn, coXpaHReMbIX Ha OJHOi KAccTe
- KoJIuYeCTBO MmHaTOpHbIX n3O6paXeHn, KOtOpBle MOryT 6bITb OTo6paXeHbI 3a OJHo cKaHnpOBaHne
- When you press MULTI SRCH on the Remote Commander
- During searching
- The thumbnail images displayed on the MULTI SCH screen
- When you use the multi-picture search function with the digital effect activated
- Some of the 11 thumbnails may not be displayed in the following cases:
- To select the thumbnail with the Remote Commander
- When you press DATE or POS
- When you select ← or during scanning
- Even if the first thumbnail is not displayed before the scanning is completed
- Пи ИСПОЛБ3OBAHINФУнКИМ МЛВТКАДРОВО РОДССССС АKTIBN3IPOBAOBHIMЦФПОВМФФФЕKTOM LICPPOB0I 3ФФEKT6уDEТOTMEHEH.
- HekotopbIe n3 11 MmHaTOpHbIX n3o6paXeHn MOrYt He 6bITb OTo6paXeHbIB CJIeDyUOxN CnyuAax:
- Searching the boundaries of recorded tape by title - TITLE SEARCH
- If a tape has a blank portion in the beginning of the tape or between recorded sections
- To superimpose a title
- ДлЯ OCTaHOBKn NONcKa
- EcJH Na IeHTe NMeTcR He3aIncaHHbI yAcTOK B HauAte JeNTbI MIn MeKdY 3aIncaHHbIM yAcTcKAM
- Searching a recording by date - DATE SEARCH
- Searching for the date by using cassette memory
- ПОИСДаТысИСПОЛБ3OBAHнEM KACCETHоIпamЯтN
- Micro Cassette Memory
- Using the A/V connecting cable
- Пepe3a\Pncb ЛeHTbl
- IcnoJb3OBAHnE CoeHNHTeNbHOKabEny aydno/BuDeo
- Ipeed BbInOJIHeHnEM Onpaun
- When you have finished dubbing a tape
- You can edit on VCRs that support the following systems
- If your VCR is a monaural type
- If your VCR has an S video jack
- Ipepe3anncb JeNTbl
- BbMOxTe BbINoINHrTb MOtAaK Ha KBM, KOtOpbIe NODePKeINBaIOT CneDyUOuNe CnCTeMbI
- EcnBaw KBM MOHOponHueckoro Tnna
- EcIn B Baem KBM ImeeTc rHe3do S Bndeo
- Using the i.LINK cable
- Icnojb30BaHne ka6eJiaLINK
- Ecnn Bbl 3aKOHnIn npe3anncb IeHTbl
- Recording video or TV programmes
- 3a\Pncb BnDeo nIITeJIeBn3nOHhbIX npOprpamM
- When using the A/V connecting cable
- Switching the video input jack of the A/V connecting cable
- PnncnoJIb3ObaHn coeHHTeIbHoro Ka6eJyayNo/ BnDeo
- 1IpeekJIOueHne BXOHDoro BnDeoRHe3da COeHNHTelbHoro Ka6eJaayDNo/BnDeo
- Making a recording
- Co3dHne 3aIncn
- If your TV or VCR has an S video jack
- Ecnn Bbl 3aKoHnJIn nepe3anCb IeHTbl
- EcnBnBeomarHHTofohMOHOFOHNueckn
- EcIn B BaWem TeJIeBn3ope nI KBM IMeetc rHe3do S bVdeo
- When using the i.LINK cable
- PpnsocnoIb3OBaHmKa6eJia.LINK
- Note on playback pause pictures
- Before recording
- Примейане
- PpmeaHne no 3o6paXeHnM BO BpeMa nay3bl BOCnpOn3BeDeHHN
- PpeB BbINOJIHeHEm 3aIncs
- Superimposing a title
- HanoxeHne TnTpa
- Superimposing a title on starting a recording
- Hanoxehne TnTpa Ha HauaNo 3aInscn
- If you set the write-protect tab to lock
- To use the custom title
- On a blank portion of the tape
- EcIn Bbl yctaHOBnTe JeneCTOK 3aunTbI OT 3anncn B noLOXeHne 6JOKuPobKn
- ДиИСПОЛьЗOBАнHA CO6CTBEHHorO THTpa
- O He3aHncaHHOM yuactke Ha JeHTe
- If the tape has a blank portion in the middle of the recorded parts
- The titles superimposed with your camcorder
- Not to display title during playback
- Title setting
- The number of titles recordable on one cassette
- When 20 titles are already superimposed
- Tntpbl,HaJIOXeHHbIe c nOmoIbU BaWeBnDeOKaMepbl
- YtO6bI He OTo6paXaTb TnTp BO BpEmr BOCPpon3BeDeHn
- HactpoKa TnTpA
- KoJIuYeCTBO THTPOB, KOTOpbIe MOryT 6bITb 3aIIncAhbl Ha Ondy Kaccety
- Ecnnye3ancaHO20TntpOB
- Superimposing a title on a recorded tape
- HanoXeHne TnTpa Ha 3anncahnyo JeHTy
- To use a custom title
- PpimmeaHnA
- Erasing a title
- CTupaHne TnTpa
- Making your own titles
- Making a title in CAMERA mode
- Co3dAnHe BaushxCo6CTBehHbIX TnTPOB
- To change a title you have stored
- To superimpose your own title on a tape
- ДлЯ Измени coхраен Horo Bamn Tntpa
- Дя habохен Baшero co6ctbeHHoro THTpa Ha Jenty
- Co3dAnHe Baunx Co6CTBeHHbIX TnTPOB
- Making a title in VCR mode
- Co3dAnHe TnTpBa BpeKIme VCR
- Длв BO3ВраТКИнДикauи FN
- The Micro Cassette Memory
- Micro Cassette Memory (Mнкрокаснаяпамять)
- The cassette information
- HΦopmaζη o kaccete
- Recorded areas
- Cassette information
- When " ※ " is flashing
- 3aHncaHHbIe yHaCTKn
- HΦopmaun o Kaccete
- EcnMnraetHndkaqna
- Labelling a cassette
- MapKupobka kaccetbl
- To erase the label you have made
- To change the label you have made
- ДЯ BO3BpaTа KИндакалFN
- Длг STИРанг CO3DAHHOу Bamn MetKu
- ДлгИЗМЕHEHЯ CO3DAHHOH Bamn MetKn
- Erasing all the data in Micro Cassette Memory
- Micro Cassette Memory (MnKpokacceTha namrTb)
- — "Memory Stick" Operations — Using a "Memory Stick"- Introduction
- File format Still image (JPEG)
- Moving picture (MPEG)
- Typical image data file name Still image
- Moving picture
- -Операци c“Memory Stick” -Исpoлььзоване“Memory Stick”-Вveденe
- Using a "Memory Stick"
- "Memory Stick" formatted by a computer
- Notes on image data compatibility
- "Memory Stick", otФopMaTnpoBaHnaHa nepcoHaJIbHOM KOMNbIOTepe
- Примочаю NO COBmecTUMOCTN daHHbIX n3o6paXeHn
- Inserting a "Memory Stick"
- YctaHOBka "Memory Stick"
- Ejecting a "Memory Stick"
- Извileченье "Memory Stick"
- While the "Memory Stick" access lamp is lit or flashing
- If MEMORystICK ERROR is displayed
- EcInI lamnoka DocTyna "Memory Stick" ropt nJn Muraet
- Ecnn oTo6paKaetcHnDnKaTOp
- MEMORYSTICK ERROR
- Using a touch panel
- IcnoJb3ObaHne ceHCOPHOI naHeJI
- FN
- 2
- Дя BO3BpaTа KИндакциFN
- ДЯ BBINOJIHHeN yCTaHOBOK
- If the items are not available
- Приимейчения
- Pn BbINOHeHH KKaDOro nyHKta
- Ecnn nyHKtbI He doctynHbI
- Cehcopna naneIb
- Haxmte KhONky FN nIa oTo6paXeHH cJeDuOxN KHONoK:
- Selecting still image quality mode
- Bb6oppekimaKauecTba HeNoDnXHOro n3O6paKeHn
- Differences in image quality mode
- Image quality mode indicator
- When you select image quality
- Испобьзовке "Memory Stick" - Вedlyнe
- Selecting moving picture quality mode
- Bb6op pexkma kaectBaDbNkUyIeOcN 306paXeHnA
- Bit rate
- Selecting the size of still image
- Bb6op pa3mepa HeNoDbNxHoro n3o6paXeHn
- Using a "Memory Stick" - Introduction
- Испобьзовке "Memory Stick" - Вedlyене
- Approximate number of still images you can record on a "Memory Stick"
- Pn6I3ntbHoe KOJIueCTBO HeoBxHbIX N3OpaXeHn, KOTOpbie Bbl MoXeTe 3aIncatb Ha "Memory Stick"
- Approximate time of moving pictures you can record on a "Memory Stick"
- Recording still images on a "Memory Stick" - Memory photo recording
- 3aIncb HeNoDBrXhBIX N3O6paXeHn Ha "Memory Stick" - FOToCbEMKa C COxpaHeHEm B IamrTn
- You can record still images on the "Memory Stick" in CAMERA mode
- Bbl MoXeTe 3aIncsblBaTb HEnoDBrXHbIe n3O6paXeHnHa "Memory Stick" BpeXmE CAMERA
- While you are recording a still image
- When you press PHOTO on the Remote Commander
- When you press PHOTO lightly in step 2
- The number of still images you can record on a "Memory Stick"
- EcInn nepeKJIouaTeIb POWER ycTaHOBneB B noJIOxHeNHE MEMORY/NETWORK (ToIbKO moJeIb DCR-IP55E)
- EcIn Bbl 3aIINcbiBaete HeNoOBnKHOe n3o6paXeHne
- EcIn Bbl HaxMeTe KhoNky PHOTO ha nyIbTe ductaHcnoHHoro ynpabLeHn
- EcJn Bbl cIerKa haxMeTe KhONkY PHOTO npn BblOnHeHn DeiCTBn IyHKta 2
- KoJInueCTBO HeNoDVBHXbIX n3O6paXeHn, KOTope Bbl MoXeTe 3aIncatb Ha "Memory Stick"
- DaHHbIe 3aHmCn
- Recording still images on a "Memory Stick"
- - Memory photo recording
- 3aɪnscb HeɪnoDβʌŋkHbɪx ɪz3o6pʌkæŋn Ha "Memory Stick"
- -ФOTOCbEMKa C COxpaHeHEm B NaMaTn
- Recording images continuously
- NORMAL [a]
- EXP BRKTG
- MULTI SCRN [b]
- HenpepbBna 3aIncsbn3o6paXeHn
- Pexmm NORMAL [a]
- Pexim EXP BRKTG
- Pexim MULTI SCRN [b]
- If the "Memory Stick" becomes full
- Ecnm emkoctb "Memory Stick" 3aNOJHNTcR
- The number of still images in continuous shooting
- During recording still images continuously
- When shooting with the self-timer function or the Remote Commander
- If the remaining capacity of the "Memory Stick" is less than for three images
- When selecting NORMAL
- The effect of EXP BRKTG
- KoJIuYeCTBO HeNoD8nXhBIX n3O6paXeHn npHnepepbIBHOcEMKe
- Bo Bpem HnpepbBHO 3aHncn HeNoDBrXhBix N3o6paKeHn
- PnCbEMKe C nCIOJIb3OBAHEm FyHKcIM TaMepa cAmO3aNyCKa Nm NpIbTa DnCTaHcUNOHORo ynpabJIeHHN
- EcIn octaBaaeremKocTb "Memory Stick" coCTaBnAeMeHee Tpex n3o6paXeHn
- EcnBb Bb6epete onuio NORMAL
- 3ΦΦeKT cepnn 3Kcno3nui EXP BRKTG
- -ФOTOCbEMKa C COxpaHeHEm B nAmrTu
- The flash does not fire even if you select AUTO and Auto red-eye reduction (☑) during the following operations:
- During recording images continuously
- Приимейкия
- EcIn Bbl octabte Bauy Bndeokamepy Ha nTb 6oJee MmHT NocJe OTCoeDnHeHn nCTOCHNkA NITAHN
- Bcblska He 6ydt cpa6a7b1Ba7b, daXe ecnBb Bbl6epTe yctahOBky AUTO n aBTOMaTHueCKoe yMeHbIeHne 3ΦΦeKTA KpaChbIX rna3 BO BpEm BblONHeHnCJeDyUxN onepaun:
- Bo Bpemr HnpepbBHOJ 3aHcN n3o6paKeHn
- Shooting with an auxiliary light
- - HOLEGRAM AF
- CbeMa co BCnOMoTeJIbHbIM OCEueHnEM
- -ФункцИHOLEGRAM AF
- About HOLEGRAM AF
- O roJorpamMHOaBToΦOKcHPOBKe HIOLOGRAM AF
- -ФОТOCьемКаСCOхpaHeHnEМВЯмТИ
- The HologRAM AF does not emit when:
- TolorpamMnaA BTOΦOKcnpOBka HOLOGRAM AF He 6ydt Ncnyckatb CBet BCJeDyUoInx pexkMax:
- Self-timer memory photo recording
- 3aɪncb HeɪnoDθBuxHbIX n3o6paXkeHn Ha "Memory Stick"
- To check the image to be recorded
- Дпя поверки n3обрахен,在,KOTOPOE 6удET 3aINcblBaTbC8
- Recording an image from a tape as a still image
- 3a\Pncb n3o6paXeHnCJIeHTbI KaK HeNoDBrXJHOrO n3o6paXeHnA
- When the "Memory Stick" access lamp is lit or flashing
- If 念 MEMORY STICK FORMAT ERROR appears on the LCD screen
- If you press PHOTO lightly in the playback mode
- Sound recorded on a tape
- Titles which have already been recorded on tapes
- Recorcing date/time
- When you press the PHOTO button on the Remote Commander
- Pa3mep HenoobnKbIx n3o6paKeHm
- EcIn lamnoka Doctyna "Memory Stick" ropt n nn mnaeT
- EcIn Ha 3KpaHe NOBITCA INHdkaTOp MEMORY STICK FORMAT ERROR
- EcIn B pexnme Bocnpn3BedeHnaerKa HaxaTb KhoNky PHOTO
- 3Byk, 3aHcaHHbI Ha JeHTe
- Tntpbl, yke 3auncaHbIe Ha Kaccetax
- 3aTncb daTbl/BpeMeHn
- Korda Bby haxkmaete KhONky PHOTO ha nyIbTe dNCTaHcNoHHoro ynpabJeHnA
- Recording a still image from other equipment
- 3aIncB HeNoDBrXHOro n3O6paKeHnC dpyroI annapaTypbl
- Ipeed BbInoJHHeHem Otnepaunn
- EcIn B BaWem TeJIeBn3ope nI IN KBM IMeetc rHe3do S bVdeo
- Superimposing a still image in a "Memory Stick" on an image - MEMORY MIX
- HaioxHeHne HnOdBnXHoRo n3o6paXeHnB“Memory Stick"Ha n3o6paXeHne-ΦyHKcHr MEMORY MIX
- HaIooKeHne HnOoBnXnHO r3o6paXeHnB“Memory Stick"Ha n3o6paXeHne-ΦyHKuN MEMORY MIX
- HaIooKeHne HenoBnXnHoro n3o6paKeHnB“Memory Stick”Ha n3o6paKeHne-ΦyHKuN MEMORY MIX
- Recording a superimposed image to a tape
- 3aInscb HanoXeHHoro n3o6paxeHnHa JeHTy
- To change the still image to be superimposed
- To cancel MEMORY MIX
- Image data modified on your computer or shot with other equipment
- When you select M. OVERLAP
- UTo6bI n3MeHnTb HEnoDnBxHHeu n3O6paXeHne dIa HAnOKeHnI
- ДЯ OTMeHbI yCTaHOBKn MEMORY MIX
- PpmeaHnA
- EcnBbI bIbepeTe pexM M. OVERLAP
- Recording a superimposed image to a "Memory Stick" as a still image
- HaIoxKeHne HEnoBnXHoRo I3O6paXeHnA B "Memory Stick" Ha I3O6paXeHne -ФункцЯ MEMORY MIX
- 3aInscb HanoXeHHoro n3o6paXeHnHa "Memory Stick" KaK HeNoDvXHoro n3o6paXeHnA
- Image data modified with your computers or shot with other equipment
- UTo6bI n3MeHnTb HEnoDnBnKHoe n3O6paXKeHne dJa HaNoXKeHn
- The "Memory Stick" supplied with your camcorder stores 20 images:
- Sample images
- "Memory Stick", npnilaraemam K Baweim Bndeokamepe, yxe Bmeuaet 20 n3o6paxheni
- Recording moving pictures on the "Memory Stick" - MPEG movie recording
- 3a\Pncb DvNxUxxCn m3o6paXeHn Ha "Memory Stick" - 3a\PncbФиЛьмa MPEG
- Recording moving pictures on the "Memory Stick"
- - MPEG movie recording
- To stop recording
- MPEG movie recorded with the camcorder:
- When using an external flash (optional)
- Recording date/time
- During recording on a "Memory Stick"
- 3a\Pncb D\nKxuXcxg n3o6paJxHn Ha "Memory Stick"
- - 3aɪnscb Φɪŋbma MPEG
- ДлЯ OCTaHOBKи 3aПСИ
- Self-timer MPEG movie recording
- 3aInc bФilbMa MPEG no TaMepy camo3anycka
- To cancel the self-timer recording
- 3aIncB DvNcxuXxra 13o6paKeHn Ha "Memory Stick" -3aIncB fMbMa MPEG
- Recording a picture from a tape as a moving picture
- 3a\Pncb n3o6paXeHnCJIeHTbI KaK DnJxUeROcN3o6paXeHn
- Ipeed BbInOpHeHnEm Oepaun
- Titles cannot be recorded
- Various settings recorded on a tape
- 3a\Pncb n306paXeHn c JeHTbI KaK dBHXyUeOcH n3o6paXeHn
- ДлЯ OCTaHOBK 3aHnCn
- Примеане
- Ecln lamnoka Doctyna "Memory Stick" roput nJn MnaeT
- Tntpbl He Moryt 6bItb 3anncaHbl
- Pa3nHbIe yCTaHOBKn, 3anucaHHbIe HaJIeHTe
- Recording a moving picture from other equipment
- 3aHnCb DvNjxueroocn 3o6paXeHnC dpyro annapaTpybl
- Ipeed BbinoJHHeHem Otnepaun
- IcnoJb3OBAHnE COeINHHTeNbHOKabEJI aydno/BuJeO
- EcIn B BaWem TeJIeBn3ope nI KBM IMeetc rHe3do S bVideo
- Viewing a still image - Memory photo playback
- To stop memory photo playback
- Playback still images recorded on the "Memory Stick"
- ДлЯ OCTAHOBKN BOCNpON3BedeHnФOTOCHIMKOB N3 NaMRTN
- BocnpoImbOIMbIe HnOaBnXHbIe n3o6paKeHna,3aIncAHbIe Ha "Memory Stick"
- File name
- To play back recorded images on a TV screen
- Still image
- ПрсмOTР HeNoDBrNkHOrO n3o6paXeHnA -BocnpOn3BeDeHneФOTOCHmKOB n3 namrTn
- Ha3BaHne paJIa
- Длв BOCPON3BeDEHNA 3aNcAHNbIX n3O6paXeHn Ha 3KpaH TeJIeBn3Opa
- HenoDbnKHOe n3o6paXeHne
- Screen indicators during still image playback
- 3KpaHHbIe HNdNkAToPbI BO BpeMBOcnpOn3BeDeHnH HeNoDnXnHOu3o6paXKeHn
- When no images are recorded on the "Memory Stick"
- To make LCD screen indicators disappear
- EcIn Ha "Memory Stick" HeT 3aIncHbIX n3o6paxKeHn
- DaHHbIe 3aHNCn
- Playing back six recorded images at a time (index screen)
- Bocnpo3BeJeHne 6 3aIncaHHbIX n3O6paXeHn OndHOBpeMeHHO (nHdEKCbHn 3KpaH)
- To return to the normal playback screen (single screen)
- Image data modified with personal computers or shot with other equipment
- Viewing a moving picture - MPEG movie playback
- To change the screen size
- Notes on the screen size
- Дя Воспpon3BeDEHЯ 3aIncaHHbIX n3o6paXeHn Ha 3kpaH TeLeBn3opa
- DvIXyueecn306paXeHne
- EcIn Ha "Memory Stick" He 3aIncHo HnKaKnx n3O6paXeHn
- ДлнИЗМЕHEHЯ pa3mepa 3KpaHa
- Screen indicators during moving picture playback
- Copying still images recorded on the "Memory Stick" to a tape
- Ko\Pu\rO\BaHne He\Po\OBuXhBIX n3O6paXeHn, 3a\Pi\ncAHHbIX Ha "Memory Stick", Ha JIeHTy
- Ipeed BbInOpHeHem onepaunn
- To stop copying in the middle
- During copying
- Image data modified on your computers or shot with other equipment
- KonipobaHne HeNoDbXhBIX n3o6paxKeHn, 3aIncaHHbIX Ha "Memory Stick", Ha JeHTy
- IJIa OCTaHOBKn B cepeHne npocecca KOINPOBaHnA
- Примейаня
- Enlarging still images recorded on the "Memory Stick" – Memory PB ZOOM
- YBeJIuYeHne HEnoDbXhblx 1306paXeHn, 3aIncAHbIX Ha "Memory Stick" -ФункцЯ PB ZOOM namrtn
- Enlarging still images recorded on the "Memory Stick" - Memory PB ZOOM
- To cancel the Memory PB ZOOM function
- Pictures in the Memory PB ZOOM mode
- In the Memory PB ZOOM mode
- Edge of an enlarged image
- Moving pictures recorded on the "Memory Stick"
- To record an image processed by PB ZOOM on the "Memory Stick"
- I3o6paXeHnBpeXmpePB ZOOM namrtn
- B pexime PB ZOOM namrtn
- Kpomka yBeInuHOro n3o6paXeHn
- Playing back images continuously - SLIDE SHOW
- Bocnpon3BeDeHne n3o6paXeHnI NO 3aMKHyTOMy uKny -ФункцЯ SLIDE SHOW
- PpeB BbINOJIHeHEm Opeaun
- To stop the slide show
- To pause during a slide show
- To start the slide show from a particular image
- To view the recorded images on TV
- If you change the "Memory Stick" during operation
- When there are no images on the "Memory Stick"
- Дя OCTaHOBKи noka3 сnaIdoB
- Iy3bI BO BpeMa noka3cIaIOB
- Длг BO3BpaTa K Индикади FN
- Длн haуала noka3a сайдов c onpedeleHHoro n3o6paKeHn
- Пре dioTbpaueHne cIyuaHoro CTnpaHn - 3aunTa n3o6paXeHn
- Ipeed BbINOJIHHeHEm OIepaun
- Preventing accidental erasure - Image protection
- To cancel image protection
- ДЯ OTMeHbI 3aunTbI N3o6paXeHnA
- If the write-protect tab on the "Memory Stick" is set to LOCK
- Deleting images
- - DELETE
- Deleting selected images
- Ydalenne n3o6paXeHn -ФункцЯ DELETE
- YdaJIeHne BbI6paHHbIX n3o6paXKeHn
- Ipeed BbINOJIHeHnEM OIepaun
- To cancel deleting an image
- Deleting selected images on the index screen
- YdaJIeHHe BbI6paHHbIX N3O6paXeHnHa HnHeKcHOM 3KpaHe
- Длг OTMeHbI ydaJIeHnI n3O6paXeHnI
- Deleting all the images
- YdaJIeHne Bcex n3o6paXKeHn
- To cancel deleting all the images in the "Memory Stick"
- While DELETING appears
- Дя OTMeHbI ydaJIeHnB BcEx n3O6paXKeHn Ha "Memory Stick"
- Bo Bpemr OTo6paXeHn HnDnKaCn DELETING
- Writing a print mark - PRINT MARK
- 3aHcB 3HaKa neaTn -ФункцЯ PRINT MARK
- 3aHcB 3HaKa peaTu -ФункцЯ PRINT MARK
- To cancel writing print marks
- ДЯ OTMeHbI 3aHcN 3HaKOB NeaTu
- EcInI IeneCTOK 3aunTbI 3annc Ha "Memory Stick" yctahOBlen B noJIOxHeNc LOCK
- Moving pictures
- DnKyuueeHn3o6paXeHH
- Viewing images on your computer - Introduction
- *When connecting to a computer without a USB jack
- Notes on using your computer
- Software
- Communications with your computer
- \*Pn nOdoCoeDInHeHn K KomNbIoTepy 6e3 rHe3da USB
- PpimcHnno nCNoJIb3OBAHnIO BaWero KOMNbIOTepa
- IporpamMHOe o6ecneHHe
- CBA3b BaAMnepcoHaJIbHbIM KOMNbIOpom
- Connecting your camcorder to your computer using the i.LINK cable – For Windows users
- Recommended computer environment
- Recommended Windows environment
- PekomeHdoBaHHa KOnΦnrgypaun KOMnbIOTepa
- Pekomendobanhna KOHpypaun Windows
- Connecting your camcorder to your computer using the USB cable – For Windows users
- When connecting to a computer via the USB jack
- Recommended computer usage environment when connecting via USB cable and viewing tape images on the computer
- OS:
- CPU:
- Application:
- Sound system:
- Memory:
- Hard disk:
- Display:
- Others:
- PekomehdoBaHHa KOnfHypaunia KombIyTepa npn PoJcOeINHeHm Ype3 Ka6eB USB n IpcOMtpe Ha KOMbIyTepe 1306paXeHm, 3aNcAHbIX Ha JeHTy
- OC:
- UeHTpaIbHbI npOceccop:
- Recommended computer usage environment when connecting via USB cable and viewing the "Memory Stick" images on the computer
- Recommended Windows environment OS:
- PeKOMeHDoBaHHa KOnΦnHypauZn KOMMbIOTepa npn pOdCoEduHeHn Upe3 Ka6JIb USB nIpcSoMToTe Ha KOMMbIOTepe n3o6paXKeHn "Memory Stick"
- PeKOMeHDoBaHHa KOnΦmrgpaun OC Windows:
- LcHtpaIbHbI npOceccop:
- Installing the USB driver
- YcTaHOBka dpaBepa USB
- Making the computer recognis the camcorder
- Viewing images recorded on a tape on your computer
- KaKdo6ntbca,HTo6bI KOMNbIOTepepaNo3HaBaJ BnDeOKaMepy
- ПодсоeнHeHne BaSei BnDeokamepbI K BaWeMy KOMlbTepy c nOmoaKo Ka6eIy USB -ДЯ пьзOBateJei Windows
- Viewing images recorded on a "Memory Stick"
- ПпocмотгИЗбрахжи,зaнcaHHbIX Na"Memory Stick
- If you cannot install the USB driver
- Viewing images recorded on a tape
- Step 1: Uninstall the incorrect USB driver
- Windows XP:
- Windows 2000 Professional:
- Windows 98SE/Windows Me:
- EcII BbI He MoXeTe yCTaHOBtB dpaBep USB
- Step 2: Install the USB driver on the supplied CD-ROM
- Step1: Uninstall the incorrect USB driver
- Other OS:
- Step2: Install the USB driver on the supplied CD-ROM
- Viewing images recorded on a tape on your computer – For Windows users
- Capturing images with "PIXELA ImageMixer Ver.1.0 for Sony"
- Viewing images recorded on a tape on your computer - For Windows users
- Viewing pictures live from your camcorder
- PpocMToP KINBbIX N3O6paXeHn C Bauei Bndeokamepbl
- Capturing still images
- BbOd HnOoDbNkHbIX N3o6paXeHn
- Прсмотр n3o6paхени, 3aIncaHHbIX HaJIeHTy,Ha BaWeM KOMNbIoTepe-ДЯ NOJb3OBAteJe Windows
- Capturing moving pictures
- BbOd dBnKyuIcxc n3o6paXeHn
- If image data cannot be transferred by the USB connection
- If any trouble occurs
- Carry out the following operations after quitting the application:
- When operating the following modes, they do not function for the image to be output, or the image cannot be output
- EcIn DaHbIe N3O6paXeHnH He MOryT 6bITb nepeDaHbI Chee3 coEdHeHne USB
- Seeing the on-line help (operating instructions) of "PIXELA ImageMixer Ver.1.0 for Sony"
- To close on-line help
- If you have any questions about "PIXELA ImageMixer Ver.1.0 for Sony"
- Note on using your computer
- ПрсмOTР сNTeMbI BCTroeHNoI NOMOuN (Инстукци NOЗКСЛУаТAU)nporpamMHoro obecneueHnN "PIXELA ImageMixer Ver.1.0 for Sony"
- Viewing images recorded on a "Memory Stick" on your computer - For Windows users
- Ppocmptn3o6paXeHn
- Ipeed BbInOpHeHnem Otnepaun
- Viewing images recorded on a "Memory Stick" on your computer – For Windows users
- Image file storage destinations and image files
- For Windows Me users (The drive recognizing your camcorder is [E:].)
- MecTa xpaHeHnI ZaJIIOB n3o6paxKeHn I ZaJIbI n3o6paxKeHn
- Для польбател Windows Me (УстroyCTBO, пedingtabлiouslyee Bndeokamepy - [E:])
- Disconnect the USB cable and remove the "Memory Stick" or set the POWER switch to OFF(CHG)
- - For Windows 2000 Professional/Windows Me, Windows XP Home Edition/Professional users
- OTcoeHnHTe Ka6eJb USB n ɪzBleKnte “Memory Stick”, nɪn yCTaHOBnTe nepeKlIoUaTeJb POWER B noIolOxHeNe OFF (CHG)
- - Дд полььстел Windows 2000 Professional/Windows Me, Windows XP Home Edition/Professional
- Connecting your camcorder to your computer using the USB cable – For Macintosh users
- Recommended Macintosh environment
- For Mac OS 8.5.1/8.6/9.0 users
- For Mac OS 9.1/9.2/Mac OS X (v10.0/v10.1)
- Viewing images recorded on a "Memory Stick" on your computer – For Macintosh users
- Viewing images
- For Mac OS X (v10.0) users
- OTcoeHnHTe Ka6eJb USB n3BLeKNTe "Memory Stick", nIyctaHOBnTe nepeKlOuChaTeJB POWER B noLoXHeHne OFF (CHG)
- OToprobbixMapkax
- How to hold your camcorder when operating in NETWORK mode
- Kak deprkaTb Baws Bndeokamepy npi pa6oTe b pexime NETWORK
- Iocne nCnoJb3ObaHnna nepa
- - Customising Your Camcorder - Changing the menu settings
- Дя ВОЗВраТа К Инданци FN
- Selecting the mode setting of each item is the default setting.
- FLASH LVL
- SteadyShot function
- If you cancel the SteadyShot function
- NTSC PB
- LCD B.L. and VF B.L.
- Even if you adjust LCD B.L., LCD COLOUR and/or VF B.L.
- If you select QUALITY
- Notes on formatting
- Notes on DEMO MODE
- When recording a close subject
- In more than five minutes after removing the power source
- Bb6op yctaHOBOK peKIma no KaXdoI onqun ABJIaeTcYCTaHOBKOIO yMOJuaHIO.
- Types of trouble and how to correct trouble
- In the recording mode
- In the recording and playback modes
- When operating using the "Memory Stick"
- English Self-diagnosis display
- Self-diagnosis display
- Warning indicators and messages
- Warning indicators
- 100-0001 Warning indicator as to file
- The battery is dead or nearly dead
- Moisture condensation has occurred*
- Warning indicator as to Micro Cassette
- Memory*
- Warning indicator as to "Memory Stick"
- Warning indicator as to "Memory Stick" formatting*
- Warning indicator as to tape
- Warning indicator as to a cleaning cassette
- You need to eject the cassette*
- The image is protected*
- Warning indicator as to the flash
- Warning indicator as to recording of still image
- Warning messages
- Pysckn
- Pa3HOBnIHOCTn HEnCpPaBHOCTeN MeToDbI Nx yCTpaHeHNA
- Bpekme 3ainnc
- HdNkauncaMoDnaarHOCTNK
- PpeynpeKdaUcHmNnKaTOp HocHTeBHO UCTaHcKacCtbl
- Bam Huxho n3Bneb kaccety*
- N3o6paXeHHe 3aunuEHO*
- Ipeynpexdauoui HndkaTop OTHOCHTbHO cnbluK
- Ipeynpexkaioi MHdkKaTOPOHOCHTeBHO 3aIMNC HENOdBHXHORO6bopaXenH
- Ipeynpexkaioune coocheHnA
- Additional Information - Usable cassettes
- Selecting cassette types
- Copyright signal
- When you play back
- When you record
- Bocnpo3BeJeHne JeHT, 3aIncaHHbIX BCnCTeme NTSC
- CunhaabTOPcKOr npaba
- PnB Bocnpon3BeDeHm
- PpH3aHnC
- Notes on the MICROMV cassette
- When affixing a label on the MICROMV cassette
- After using the MICROMV cassette
- When the Micro Cassette Memory function does not work
- About the "InfoLITHIUM" battery pack
- What is the "InfoLITHIUM" battery pack?
- Effective use of the battery pack
- Remaining battery time indicator
- O 6aṭapeɪhɒm 6jloke “InfoLITHIUM”
- Индикатор Врemeи OCTabweroocn 3apya 6batapeHoro 6Ioka
- How to store the battery pack
- Battery life
- Kak xpaHb6aTapeHbI 6JOK
- Cpok cnjx6bl 6aTapeHoro 6noka
- What is i.LINK?
- O ctaндарт e i.LINK
- 4To Takoe i.LINK?
- About the name "i.LINK"
- i.LINK baud rate
- *What is Mbps?
- O Ha3BaHn "i.LINK"
- CkopocTb nepe#aun daHHbIX i.LINK B 6oJax
- Required i.LINK cable
- Функции i.LINK Ha 3Tom annapate
- Tpe6yeMbI Ka6eJIb i.LINK
- Using your camcorder abroad
- PAL system
- PAL-M system
- PAL-N system
- NTSC system
- SECAM system
- Maintenance information and precautions
- Moisture condensation
- If moisture condensation occurred
- Note on moisture condensation
- Информацnia по ухODу 3a apnapaTom И МерыnpedoctopoxKHOCTN
- KoHdeHcaZnBlaRn
- Ecnn npon3oJna KOHdeHcaun Blaarn
- PpimeyaHne no KOHdeHcaun Blaar
- How to prevent moisture condensation
- Maintenance information
- Cleaning the video head
- Kak npedotBpataNb KOHdeHcauio BlaH
- HΦopmaunno yxody 3a annapaTOM
- OuNTka BnDeorolOBOK
- Using a cleaning cassette
- To cancel cleaning
- The video head
- Cleaning the LCD screen
- IcnoJIb3OBAHne YnCTaSei KacceTbI
- Charging the built-in rechargeable battery
- 3apKa BCTpoEHNoIpeepaJkaem6aTaapeKn
- 3apnka BCTpoehnoi nepe3apxjaemoi 6aTapeiKn:
- Ajusting the LCD screen (CALIBRATION)
- PerynipoBka 3KpaHa XXKd (CALIBRATION)
- Примейань
- Precautions
- Camcorder operation
- On handling tapes
- MepblnpedocTopoXHoctn
- 3KcnIyataunBndeokamepbI
- 06obpaueHnCJeHTamn
- Camcorder care
- AC power adaptor
- Yxoi3a BnIeokamepo
- Cteboa aanTep nepemehHoro Toka
- About care and storage of the lens
- Battery pack
- yxode 3a obbeKTbOM n o erO xpaHeHH
- BatapeHbIb6Jok
- Notes on dry batteries
- If batteries are leaking
- EcIn npOn3oUna yTeUka BHyTpEnHero BeuecTb6aTaapeek
- Video camera recorder
- System
- Input/Output connectors
- LCD screen
- Wireless communication (DCR-IP5SE only)
- General
- Texhnueckne xapaKTepeNCTnKN
- Bnupeokamepa
- CnCTema
- 3KpaHKKd
- BecnpobodnacCB3b(TolkbO moJeIb DCR-IP55E)
- 06uee
- BaTapeiHbI 6JIOK
- Identifying the parts and controls
- Note on the Carl Zeiss lens
- Remote Commander
- To prepare the Remote Commander
- ДлnoiodroTOBKn nylbTa ДиctahUHOHHoro ynpaBJIeHnA
- IyltDnCTaHcNHO ynpabHeH
- Operation indicators
- LCD screen and viewfinder
- Pa6oyne HndnKaToptbI
- 3KpaH KKD n BnDOnckaTeNb
- A, B
- C, D
- E
- F, G, H
- I, J, K, L
- M, N
- O, P, Q
- R
- s
- T, U, V
- W, X, Y, Z
- Aлфавиньи yka3aTeJB
- A,B,B,Γ
- D,E,X,3
- H, O
- P
- C, T
- y-
- A,B,C,D
- E,F,G,H
- 1-0
- P-Z
Brand : SONY
Model : DCR-IP45E
Category : Camcorder