
DCR-IP220E - Camcorder SONY - Free user manual and instructions
Find the device manual for free DCR-IP220E SONY in PDF.

| Product type | Digital camcorder |
| Brand | SONY |
| Model | DCR-IP220E |
| Recording format | MicroMV |
| Sensor | CCD 1/4.7" |
| Recording resolution | 1.0 megapixel |
| Optical zoom | 10x |
| Digital zoom | 120x |
| Image stabilizer | SteadyShot Super |
| LCD screen | 2.5 inches (6.2 cm), 211 200 pixels (960 x 220) |
| Viewfinder | Color electronic |
| Bluetooth | Version 1.1, Class 2 |
| Power supply | InfoLithium NP-FM30 battery |
| Weight | Approx. 540 g (with battery and cassette) |
| Main functions | Video recording, photo, manual exposure, fade |
| Maintenance and cleaning | Clean the lens with a soft cloth, avoid humidity |
| Safety | Use only recommended accessories |
| Spare parts and repairability | Battery, cable, remote control available |
Frequently Asked Questions - DCR-IP220E SONY
User questions about DCR-IP220E SONY
0 question about this device. Answer the ones you know or ask your own.
Ask a new question about this device
Download the instructions for your Camcorder in PDF format for free! Find your manual DCR-IP220E - SONY and take your electronic device back in hand. On this page are published all the documents necessary for the use of your device. DCR-IP220E by SONY.
USER MANUAL DCR-IP220E SONY
Digital Video Camera Recorder MICROMV
Operating Instructions
Before operating the unit, please read this manual thoroughly, and retain it for future reference.
HnctpyKUna NO 3KcnIyatauIN
Congratulations on your purchase of this Sony Handycam. With your Handycam you can capture life's precious moments with superior picture and sound quality.
Your Handycam is loaded with advanced features, but at the same time it is very easy to use. You will soon be producing home video that you can enjoy for years to come.
WARNING
To prevent fire or shock hazard, do not expose the unit to rain or moisture.
To avoid electrical shock, do not open the cabinet.
Refer servicing to qualified personnel only.
"Memory Stick"

N50
NOTICE ON THE SUPPLIED AC POWER ADAPTOR FOR CUSTOMERS IN THE UNITED KINGDOM
A moulded plug complying with BS1363 is fitted to this equipment for your safety and convenience.
Should the fuse in the plug supplied need to be replaced, a 5 AMP fuse approved by ASTA or BSI to BS1362 (i.e., marked with or mark) must be used.
If the plug supplied with this equipment has a detachable fuse cover, be sure to attach the fuse cover after you change the fuse. Never use the plug without the fuse cover. If you should lose the fuse cover, please contact your nearest Sony service station.
For the customers in Europe
CLASS 1 LASER PRODUCT
LASER KLASSE 1
LUOKAN 1 LASERLAITE
KCLASS 1 LASERAPPARAT
Pysckn
Добpo пожаловать!
I03dpabJIeM BAc C npIObpeTeHnEM cIuPpOBoB BInDeOKaMEpbH Handycam pnpMbly Sony.C NOMOsbU BaWei BInDeOKaMEpbH Digital Handycam BBy cmOKeTe 3aneuATneTb DOpORHe Bam MTHOBeHnJ Xn3Hn C npeBOcXoDHBIM KaueCTBOM I3O6paXeHnI 3Byka.
Baasa unffpoBaa Bnueokamaepa Handycam Ochaueta yCOBepHeCTBOBaHHbIMN
fYHKUHMMN, HO TO JKe BpEme ee OueHb JERKO pIb3ObaTbcr. BcKope Bbl 6ydeTe co3daBaTb cEmeHbIe BnDeOpnporpaMMbl, KOtOpbIMN
CMOXETHeHacnaXdaTbcaNocLeNyUOuIe RoDbl.
PNEyPPEKDEHNE
CLASS 1 LASER PRODUCT
LASER KLASSE 1
LUOKAN 1 LASERLAITE
KCLASS 1 LASERAPPARAT
ATTENTION
The electromagnetic fields at the specific frequencies may influence the picture and sound of this camcorder.
This product has been tested and found compliant with the limits set out in the EMC regulation for using connection cables shorter than 3 meters. (9.8 feet)
Notice
If static electricity or electromagnetism causes data transfer to discontinue midway (fail), restart the application or disconnect and connect the USB cable again.
DCR-IP220E only

Hereby, Sony Corporation, declares that this Handycam is in compliance with the essential requirements and other relevant provisions of Directive 1999/5/EC.
Countries and areas where you can use network functions are restricted. For details, refer to the separate Network Function Operating Instructions.
BHIMMAHNE
3JIeKtpomarHHTbIe NOIHa ONpeJeHbIX YacToTAX MOrYT BnIaTb Ha N3O6paJxHeN 3ByK,BOcPpOn3B0DmblE DaHHo LIpPoBoi BnDeOKaMepoN.
3To n3dennpeoWn npOBepky Ha COOTBETCTBNE Tpe6oBAHnM DnpeKTHBbI EMC dIy nCNoB3OBAHnCoEHNHTeNbHbIX KaBeNei, KopoYe 3 MeTpOB.
PpeynpeKdHne
Ecni ctaTnueckoe 3neKtpnuecTBO nIIN 3neKtpomarHetn3M npNBedeT K npepbBaHIO (HeBbIOJIHEnIO) nepeaun daHHbIX,TO nepe3anyctnte npNKlaHnyo nporpaMMy nIIN oTcoeHNHTe n PoDCoeDHNITE USB-ka6ebb ONrTb.
Tolbko Дли мода DCR-IP220E
BbMOKTe NcNoJIb3OBAbT cyHKnIN DoCTyna K cETn TOnIbKO B HeKOToPbIX CtpaHax IN pERHOHAX. Bolee noIpO6HbIe CBeDeHn CM. B OTdJIbHOH IHCTpyKuIN IO 3KcNpYatauIN cETn.
Tolbko Дд мода DCR-IP210E

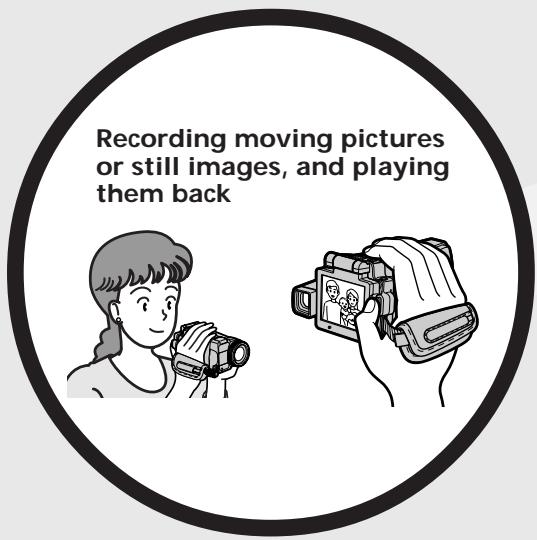
- Recording moving pictures on tapes (p. 38)
-Playing back tapes (p. 55) - Recording still images on a "Memory Stick" (p. 63, 144)
- Recording moving pictures on a "Memory Stick" (p. 167)
- Viewing still images recorded on a "Memory Stick" (p. 174)
Viewing moving pictures recorded on a "Memory Stick" (p. 178)
Viewing moving pictures recorded on tapes using the i.LINK cable (p. 196)
(The i.LINK of your camcorder adopts the MM format only. It does not adopt the D or the MPEG2 format of DVHS.)
Viewing images recorded on a "Memory Stick" using the USB cable (p. 215, 222)
Viewing moving pictures recorded on tapes using the USB cable (p. 209)
- Capturing images on your computer from your camcorder using the USB cable (p. 211)

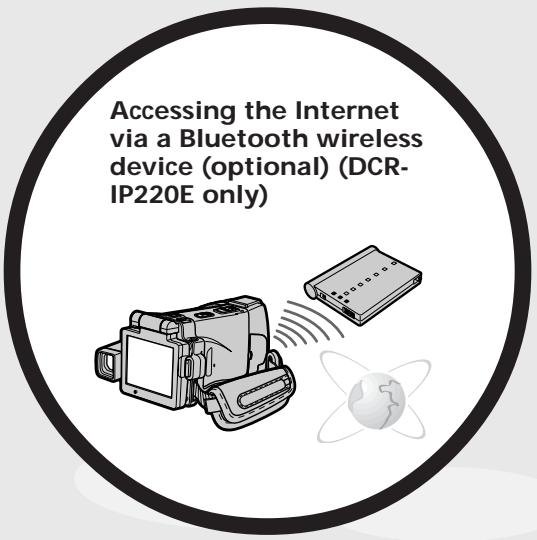
Accessing the Internet, sending/receiving your e-mail. For details, refer to the Network Function Operating Instructions supplied with your camcorder. (DCRP220E only) (p. 224)
Other uses
Functions to adjust exposure in the recording mode
- BACK LIGHT (p. 48)
NightShot/Super NightShot/Colour Slow Shutter (p. 49) - Recording with the flash (p. 65, 149)
- White balance (p. 69)
PROGRAM AE (p. 81) - Adjusting the exposure manually (p. 84)
- Flexible Spot Meter (p. 86)
HOLOGRAM AF (p. 151)
NightFraming (p. 153)
Functions to give images more impact
- Digital zoom (p. 43) The default setting is set to OFF. (To zoom greater than 10 × , select the digital zoom power in D ZOOM in the menu settings.)
Fader (p. 73) - Picture effect (p. 76)
Digital effect (p. 78) - Title (p. 114, 120)
- MEMORY MIX (p. 160)
Functions to give a natural appearance to your recordings
PROGRAM AE (p. 81)
- Sports lesson
- Landscape
- Manual focus (p. 88)
- Expanded focus (p. 89)
- Spot Focus (p. 90)
Functions to use after recording on a tape
END SEARCH (p. 54)
DATA CODE (p. 57)
Tape PB ZOOM (p. 95)
MULTI-PICTURE SEARCH (p. 97)
- TITLE SEARCH (p. 102)

-3aINcB DnJxuyuxcxra n3o6paKeHn Ha JeHTbI (CTp. 38)
Bocnpou3BepeHne nENT (CTp. 55)
3aHnCb HEnoDvNkHbIX n3O6paXeHn Ha "Memory Stick" (cTp. 63, 144)
- 3aπncb dBnxyuixxcn
изобрахени Ha “Memory Stick” (ctp. 167)
Плостмт Неловиньхизбражени,ЗаписнbosHA "Memory Stick" (cTp.174)
Плостмордвижушихаязобрахен,在апсаньхHA“Memory Stick”(ctp.178)
-ПюсмOTРДВИЖУДССЯ
н3обрахжел,ЗАпSCаннБИХи
ЛЕНТь,СИСПОЛьЗОВаHNе Мкбел
i.LINK (Стр.196)
(Kабелi.LINKВашен
ВИДeOKамеры ПОЗВOLЯТ
пегдавытTOльКо n3обрахжел
формanta mIMICRUMN.Он He no3BOJЯТ
пегдавыт n3обрахжел
формanta NИли MPEG2 DVIHS.)
-ПюсмOTиЗОБражЕн, 3аписаньх Ha "Memory Stick", сИСпONSьОВАнем Kaбеля USB (ст. 215, 222)
-ПюсмOTРДВИЖУСХС
н3ОБражЕн,ЗАпSCaHHbIXHa
ЛeHTы,СИСПОЛьЗОВаHиЕМΚaБЕЯ
USB (cTp.209)
- 3axBaT n3o6paXeHn B BaW KOMNbIOpTeP c BaSei BnDeOKaMepbI C NMOUbIO Ka6eJIY USB (ctp. 211)

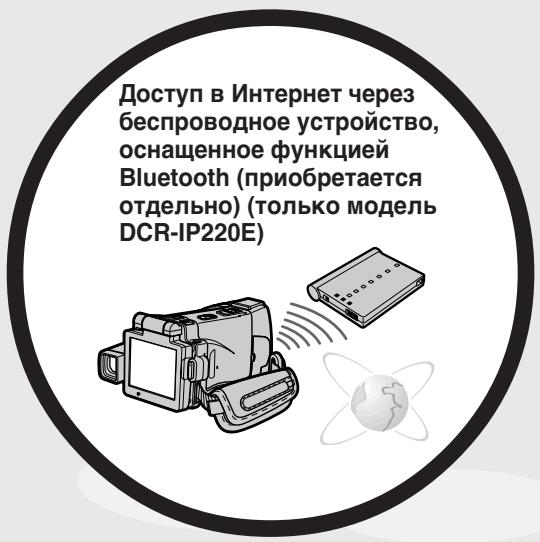
IocTyB INHTepHeT,OTnpaBka/ noJyehne BaWei 3NeKtpOnHoi noTbI.3a noJyehnem 6oJee noDpObHO IHΦOpMauIM o6paTntEc b K INCTpyKcUAM IO nCNoJIb3OBAHnIO cTeBbIX yHKsI, npInlaeraMbx K BaWei BInDeOKaMepe. (ToIbKO MoJeB DCR-IP220E) (ctp. 224)
Ipooyne npimehenma
- CnpoptBhble COCT3aHNA
-JaHdwaΦT
-PyuHaJΦokycuPoBka (CTp.88)
- YДлнehнhoe ФokychoepacctoHHne (cTp.89)
- PAnTHoФOKyCnPOBKn (CTp. 90)
- Recording on a tape 14
- Recording on a "Memory Stick" 16
Getting Started
Using this manual 22
Checking supplied accessories 25
Step 1 Preparing the power supply. 26
Inserting the battery pack 26
Charging the battery pack. 27
Connecting to a wall socket 30
Step 2 Setting the date and time 31
Step 3 Inserting a cassette 34
Step 4 Using the touch panel. 36
Recording - Basics
Recording a picture 38
Shooting a backlit subject
- BACK LIGHT 48
Shooting in the dark
- NightShot/Super NightShot/
Colour Slow Shutter 49
Self-timer recording 52
Checking the recording
- END SEARCH 54
Playback - Basics
Playing back a tape 55
To display the screen indicators -Display function 57
Viewing the recording on TV 61
Advanced Recording Operations
Recording still images on a "Memory Stick" in CAMERA mode 63
Adjusting the white balance manually 69
Using the wide mode 71
Using the fader function 73
Using special effects - Picture effect .... 76
Using special effects-Digital effect.....78
Using the PROGRAM AE 81
Adjusting the exposure manually 84
Using the spot light-metering mode - Flexible Spot Meter 86
Focusing manually 88
Using the spot focus mode - Spot Focus 90
AdvancedPlaybackOperations
Playing back a tape with picture effects 91
Playing back a tape with digital effects 93
Enlarging images recorded on tapes - Tape PB ZOOM 95
Searching for a scene -MULTI-PICTURE SEARCH 97
Searching the boundaries of recorded tape by title - TITLE SEARCH 102
Searching a recording by date -DATE SEARCH 103
Editing
Dubbing a tape 105
Recording video or TV programmes ... 109
Superimposing a title 114
Making your own titles. 120
The micro Cassette Memory 124
"Memory Stick" Operations
Using a "Memory Stick" - Introduction 128
Recording still images on a "Memory Stick" - Memory photo recording 144
Recording an image from a tape as a still image 156
Superimposing a still image in a "Memory Stick" on an image -MEMORY MIX 160
Recording moving pictures on a "Memory Stick" - MPEG MOVIE recording 167
Recording a picture from a tape as a moving picture 170
Viewing a still image - Memory photo playback 174
Viewing a moving picture
-MPEG MOVIE playback 178
Copying still images recorded on a "Memory Stick" to a tape 181
Enlarging still images recorded on a "Memory Stick" - Memory PB ZOOM 183
Playing back images continuously -SLIDE SHOW. 185
Preventing accidental erasure - Image protection. 187
Deleting images - DELETE 189
Writing a print mark - PRINT MARK 192
Viewing Images Using your Computer
Viewing images on your computer - Introduction 194
Connecting your camcorder to your computer using the i.LINK cable (For Windows users) 196
Connecting your camcorder to your computer using the USB cable (For Windows users) 198
Viewing images recorded on a tape on your computer - USB Streaming (For Windows users) 209
Viewing images recorded on a "Memory Stick" on your computer (For Windows users) 215
Connecting your camcorder to your computer using the USB cable (For Macintosh users) 219
Viewing images recorded on a "Memory Stick" on your computer (For Macintosh users) 222
Using the Network function (DCR-IP220E only)
Accessing the network 224 For the details, refer to the Network Function Operating Instructions supplied with your camcorder.
Customising Your Camcorder
Changing the menu settings. 226
Troubleshooting
Types of trouble and how to correct trouble 244
Self-diagnosis display 251
Warning indicators and messages 252
Additional Information
Usable cassettes 264
About the "InfoLITHIUM" battery pack 266
About i.LINK 268
Using your camcorder abroad 270
Maintenance information and precautions 271
Specifications 280
Quick Reference
Identifying the parts and controls 284
Index 294
OchOBhIe yHKcHn 6
Bveedene
- OCHOBhIe Onpaunn 12
PyKOBoIcTBo nO 6bICTpOMy 3aNycky
-3aINCb Ha JeHTy 18
-3a\Pncb Ha "Memory Stick" 20
Iopdrotobka K 3Kcnpyaataun
IcnoIb3OBAHnE DaHHoro pyKoBOOdCTBa 22
PpOBepKa npnlaRaembIX npHaJdNexKHOCTe 25
IpyHKT1 PoiDROTOBka NCTOCHNka nHTaHn. 26
UctaHOBka 6aTapeiHoro 6Ioka .... 26
3apyaKa 6aTapeHoro 6Joka .27
IopDcoeDINHeHneKceTeBOpO3eTKe 30
IyHKT 2 YcTaHOBKa DaTbI N BpeMeHH ... 31
IyHKT 3 YcTaHOBka KacCeTbI 34
IyHKT 4 IcnoJIb3OBAHne ceHCOPHOI naHeJI .36
3aHcB - OCHOBHbIe NOJIOXeHnA
3ainnbc n3o6paXeHn 38
CbeMka obBeKToB c 3aJHeN noDCBeTko-BACK LIGHT.....48
Cbemka B TemHote - Houhna Cbemka/Houhna cynepcbemka/LBeTHna Cbemka c MeJHeHHbIM 3aTbOPOM ......... 49
3a\Pncb no TaMepy camo3anycka 52
U3meHHeNyeCTaHOBOK MeHIO 226
Introduction - Basic operations
This section describes the basic operations to operate your camcorder.
How to turn on the power and select the mode
To supply power for your camcorder, see "Step 1" Preparing the power supply" on page 26.
В级以上 - OCHOBьeОпаци
B daHHom pa3eIe OINcIbAIOCTc OCHOBHbIe onepaun Baew Bndeokamepbl.
KaBbJIIOuHTb NITaHne N BbI6paTb peXIM
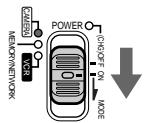
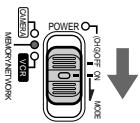
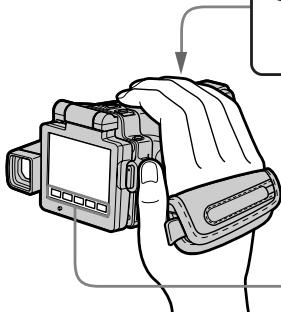
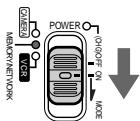
(1) Slide the POWER switch in the direction of the arrow while pressing the small green button, then release your finger.
Your camcorder is turned on, and then your camcorder turns to the CAMERA mode so that the CAMERA lamp lights up.
(2) Slide the POWER switch in the direction of the arrow. Each time you slide it down, the mode changes as follows and corresponding mode lamp also lights up.
CAMERA Use this mode when you record on a tape.
MEMORY/NETWORK (DCR-IP220E) or MEMORY (DCR-IP210E)
MEMORY: Use this mode when you record on a "Memory Stick," or play back or edit an image in a "Memory Stick."
NETWORK (DCR-IP220E only): Use this mode when you use the network function. For details, refer to the supplied Network Function Operating Instructions.
VCR Use this mode when you play back or edit an image recorded on a tape or "Memory Stick."
VCR IcnoJb3yIte 3OT peXIM npIN BOCnPOn3BVeDeHIn NmMOtTaKe n3o6paJxEHn, 3aNcAHHOrO Ha neHTy nn "Memory Stick".
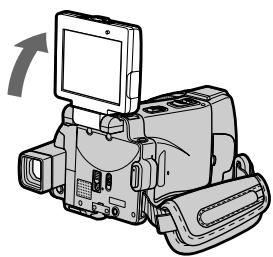
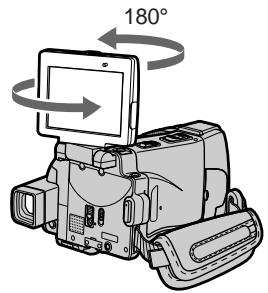
How to open the LCD panel
Kak oTKpbItb naHeIb XXK
1
2
3
(1) Open the LCD panel in the direction of the arrow.
(2)Turn the LCD panel 180 degrees anticlockwise.
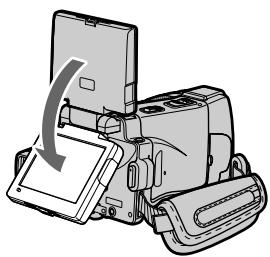
(3) Close the LCD panel with the LCD screen facing out. When closing the LCD panel, set it vertically, and swing it into your camcorder body.
Notes
- The LCD panel rotates 180 degrees anticlockwise and 90 degrees clockwise.
- When using the LCD panel except in the mirror mode (p. 45), the viewfinder automatically turns off.
When you set the LCD screen outdoors in direct sunlight
The LCD screen may be difficult to see. If this happens, we recommend that you use the viewfinder.
When you adjust the angle of the LCD panel Make sure if the LCD panel is opened in the step 2 position.
(1)OTKpoIe naHeIb KKD B HnPaBJIeHn nCTpeKN.
(2)Повернite паньжКД ha 180 rpaусов npOTnB YacOBо CTpeJKN.
(3)ЗakpoIte пaHeJIb XXKД c эКpaHOM XXKД,обрашeHHbIM hapyKy.При зakpbItn пaHelen XXKД yCTaHOBInTe eeВерТиKaJbHo, И NOBepHInTe ee K KOpNycBuIdeOKaMepbl.
Приимechания
Quick Start Guide - Recording on a tape

This chapter introduces you to the basic features to record pictures on tapes of your camcorder. See the page in parentheses "() for more information.
1 Connecting the mains lead (p. 30)
Use the battery pack when using your camcorder outdoors (p. 26).
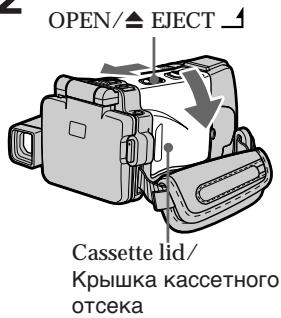
2 Inserting a cassette (p. 34)
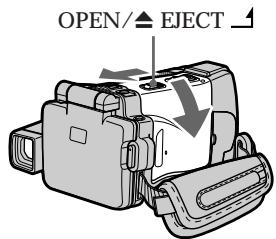
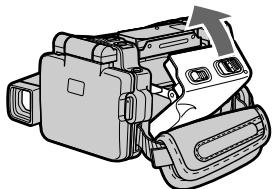
1 Slide OPEN/△ EJECT in the direction of the arrow and open the lid.

Push the middle portion of the back of the cassette into the cassette compartment. Insert the cassette in a straight line deeply with the cassette window facing the cassette lid.
3 Close the cassette compartment by pushing down the cassette lid halfway. After the cassette compartment goes down completely, close the lid until it clicks.


Set the POWER switch to CAMERA. The CAMERA lamp lights up.
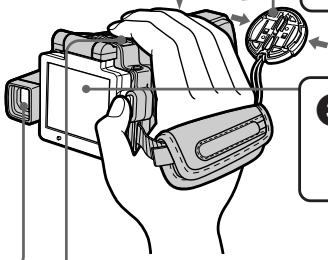
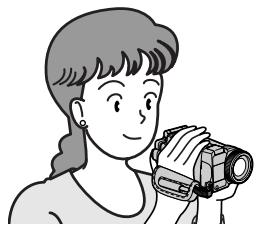
Viewfinder
When the LCD panel is closed with the
LCD screen facing inwards, use the viewfinder.
Adjust the viewfinder lens to your eyesight (p. 41).

Open the LCD panel. The picture appears on the LCD screen.
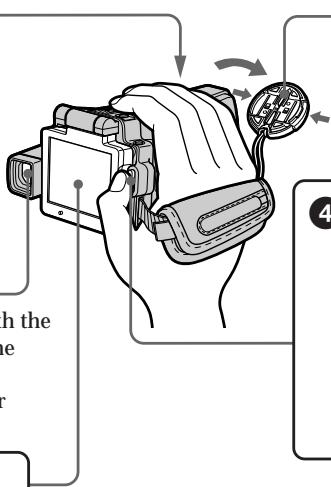

Remove the lens cap.

Press START/STOP. Your camcorder starts recording. To stop recording, press START/STOP again.

When you purchase your camcorder, the clock setting is not set up yet. Set the clock setting before recording (p. 31).

Monitoring the playback picture on the LCD screen (p. 55)

Set the POWER switch to VCR. The VCR lamp lights up.


Press 440 of the touch panel to rewind the tape.


Press 11 of the touch panel to start playback.

Note
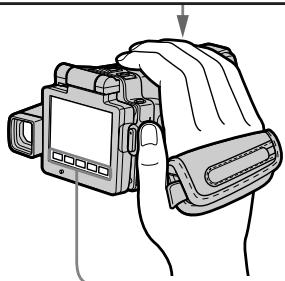
When using the touch panel, press operation buttons lightly with your finger or the supplied stylus (DCR-IP220E only). Do not press the LCD screen with sharp objects other than the stylus supplied (DCR-IP220E only).
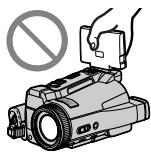
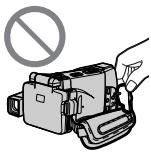
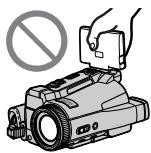
Note
Do not pick up your camcorder by the LCD panel or the jack cover.
This chapter introduces you to the basic features to record on a "Memory Stick" of your camcorder. See the page in parentheses () for more information.
1 Connecting the mains lead (p. 30)
Use the battery pack when using your camcorder outdoors (p. 26).
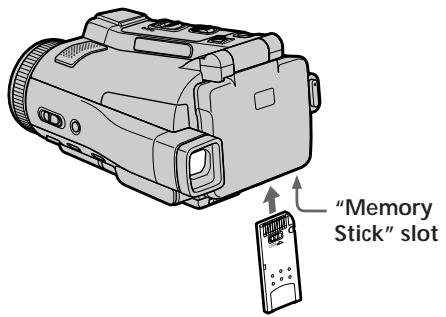
2 Inserting a "Memory Stick" (p. 131)
Insert a "Memory Stick" in the "Memory Stick" slot as far as it can go, as illustrated below.

Set the
POWER
switch to
MEMORY.
The
MEMORY
lamp lights
up.

Remove the lens cap.

Open the LCD panel. The picture appears on the
LCD screen.
Viewfinder
When the LCD panel is closed with the LCD screen facing inwards, use the viewfinder.
Adjust the viewfinder lens to your eyesight (p. 41).
When you purchase your camcorder, the clock setting is not set up yet. If you want to record the date and time for a picture, set the clock setting before recording (p. 31).

Press
PHOTO
lightly.

When the green mark stops flashing, then lights up, you can record a still image.

Press
PHOTO
deeper.

The image when you pressed PHOTO deeper will be recorded on a "Memory Stick."

Monitoring the still image on the LCD screen
(p. 174)

Set the POWER switch to MEMORY or VCR.
The MEMORY or VCR lamp lights up.

Press PLAY or PB. The last recorded image is displayed.

or

Note
Do not pick up your camcorder by the LCD panel or the jack cover.


PykoBoCTBO IO 6bICTpOMy 3aIycKy - 3aIncb Ha JeHTy
B daHnoI rnaBe npBVeJeHbIO cNOBHeIe cyHKcIM BaSei BnDEOKaMebpI, kacaOuNecE 3aIncn N3o6paXeHn Ha JeHTbI. IOpO6HbIe CBeDeHn npBVeJeHbI Ha cTpaHnCe B KpyrIbIX cKo6kax "( ).
1 ПодсоeДиненue npOBODa элжКТрОпNTаHЯ (cTp. 30)
The instructions in this manual are for the two models listed in the table below. Before you start reading this manual and operating your camcorder, check the model number by looking at the bottom of your camcorder. The DCR-IP220E is the model used for illustration purposes. Otherwise, the model name is indicated in the illustrations. Any differences in operation are clearly indicated in the text, for example, "DCR-IP220E only."
As you read through this manual, buttons and settings on your camcorder are shown in capital letters.
e.g. Set the POWER switch to CAMERA.
When you carry out an operation, you can hear a beep to indicate that the operation is being carried out.
ИсpenьзованецдаHHORO pyKOBOdCTBa
HnCTpykCmB daHHom pyKOBOcTBe npnbDeHbI dIy DBx MoJeNe, yKa3aHHbIX B Ta6JInce HnKpe.IpeEi TcEHm E daHHoro pyKOoDCTBa n 3KcNpyatauNei BaWei BnDEOkAmepbI npOBepBte HOpem MoJeN, NocMOTpeB Ha HnKHeIO CTopoHy BaWei BnDEOkAmepbI. MoJelbDCR-IP220E YBnTeTc MaOJIbIO, IcNoIb3yeMoN dJa IIINIOCTpaTHBHX CEneB. B npOTNBHom Cnyae HaImeHOBAHne MoJenYka3bIAeTcHa pncyHKax. JIObIbe OTNIyB a3KcNpyatauNi rCHO OTO6paxaHTC B TEKCTe, HanPIMep, "ToIbko MoJeNb DCR-IP220E".
Причтениданногукововсва учтьавиTe,чTo KhoTNKИ yCTaHOBKN Ha BaшeиВидаокаме рпokазны 3агларынби 6уКВами.
Hanp. YctaHOBnTe nepeKlOuTaTeIb POWER B noJoxeHne CAMERA.
PnBbIOnHeHnOePaunHa BnDeOkamepe BbCMOKeTe yCbIwaTb 3ymMeHbN CnHaJ, NoTBePxAIOUyBbIOnHeHne Oepaun.
Types of differences/Tunbi pa3nny
| DCR- | IP210E | IP220E |
| Mark on the POWER switch/Метка на пerečnéючATELE POWER | MEMORY | MEMORY/NETWORK |
| Network function/CeTeXDA Фунkedия | — | ● |
Provided/IpedeymoTpeHo
Not provided/He npedycmTopeHo
Note on the MICROMV format
MICROMV Your camcorder is based on the MICROMV format. You can only use MICROMV cassettes with your camcorder.
- Records and plays back for about 60 minutes with equal quality when compared to DV (digital video).
- The micro Cassette Memory feature is provided with all MICROMV cassettes. Your camcorder can access any scene easily using the memory (MULTI-PICTURE SEARCH function).
- Adopt the MPEG2 format as a data compression method. This format is the same as the one for DVD (digital versatile disc). Record in 12Mbps bit rate to obtain a higher quality of image.
- Transition between the last scene you recorded and the next scene is the still image. This is not a malfunction.
The 11 mark is indicated on the MICROMV cassette.
Note on TV colour systems
TV colour systems differ depending on the country or area. To view your recordings on a TV, you need a PAL system-based TV.
Copyright precautions
Television programmes, films, video tapes, and other materials may be copyrighted.
Unauthorised recording of such materials may be contrary to the provision of the copyright laws.
Precautions on camcorder care
Lens and LCD screen/finder
- The LCD screen and the finder are manufactured using extremely high-precision technology, so over 99.99% of the pixels are operational for effective use. However, there may be some tiny black points and/or bright points (white, red, blue or green in colour) that constantly appear on the LCD screen and the finder. These points are normal in the manufacturing process and do not affect the recording in any way.
- Do not let your camcorder get wet. Keep your camcorder away from rain and sea water. Letting your camcorder get wet may cause your camcorder to malfunction. Sometimes this malfunction cannot be repaired [a].
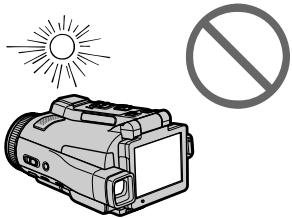
- Never leave your camcorder exposed to temperatures above 60^ (140^) , such as in a car parked in the sun or under direct sunlight [b].
- Be careful when placing the camera near a window or outdoors. Exposing the LCD screen, the finder or the lens to direct sunlight for long periods may cause malfunctions [c].
- Do not directly shoot the sun. Doing so might cause your camcorder to malfunction. Take pictures of the sun in low light conditions such as dusk [d].
MepblnpedocTopoKHOCTn npnyxoJe 3a BndeokamepoJ
06beKTHB n 3KpaH KKDvDOnckaTeIb
3KpaH XXKД n BvDOnCKaTeJIb n3rOToBJIeHbI c NMOUbIO BbICOKOpneu3HOHoi TexHOJOrn, TAK YTO CbBiJe 99,99% NIKCeJIe npEdHa3NaHe Hd Ia 3ΦΦeKTbHOrO uCnOJIb3OBAHn. OdHaKO Ha 3KpaHe XXKД n B vDOnCKaTeJIe MOrYT NOCToAHHO NOABJIaTBcR KPOWeHbIe YepHbIe W/IN JRPKHe ZCBtBHe TOckN (6eJIbe, KpachIbe, CnHNe INI 3eJIeHbIe). POBJIeHne 3TxX ToeK BnONHe HopMaJIbHO dJI npOcecca bEKMn H NkOMm 6bAp3Om He BnIReT Ha 3aNNCbIbAeMoE M3O6paKeHne.
- He donnyckaanie,чтобы Ваши вида ekamepactaTOHINACb BIAJXHO.IIpeOxpaHnTeBUNDEOKAMEPYOTdoJMyMOPCKOBdI.EcIn Bbl haMoUHTe BaUy BInDEOKAMEPY,3ToMOKET npINBeCTN K ee HEnCnpABHocT.NHorda3Ta HEnCnpaBHOCTh MokKet OKa3aTbcrHeycTPaHmOi [a].
- HNKoRda He OcTabnIe BnDeOkaMepy B MeTe C TeMnepaTpyoB CbIiSe 60^ KaK, HApnpMeR, B aBTOMoBnJIe, npnnapKObaHHOM Ha CoJIHnce IIN NIO pRmblm COJHeuHbIM CBETOM [b].
- ByIbTe BHNMaTeIbHbI, KOrDa OcTAbIaReTe BVdEOKaMepy B6JIMn OKHa IINB HBe NOMeUeHn. DeNCTBnE nprMoRo COJIHeuHOrO CBeta Ha 3KpaH XKKD, BUNOnCKaTeIb IIN ObbEkTNB B TeueHne dInTeJIbHbIX nPOMeXyTKOB BpeMeHn MOxET Bbl3BaTb HeNCpRaBHOCTn [c].
He ChImaIte CoINHcE HenOncpeDCTBeHNHO.3To MOKeT pInBecTI K HEnCnPabHOCHT BInDeOkampeBb. BInOpHJTe CbeMky CoINHcA BycNoBIAx HN3KO OCEueHHOCTn, HAnpIMep, npn 3akaTe [d].

[a]
[b]
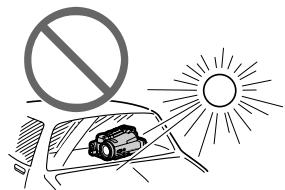
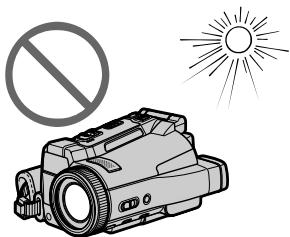
[c]
[d]
Make sure that the following accessories are supplied with your camcorder.
Y6eIntecb, yTO cNeIyUOuIne npHnAaNExKHOCTn npHaIarauTcK BaSei BIndeokampe.
| 1 | 2 | 3 | 4 |
| 5 | 6 | 7 | 8 |
| 10 | 11 | 12 | 13 |
- Differs from area to area.
This is supplied with European models only.
1 AC-L20A AC power adaptor (1), Mains lead (1) (p. 27)
NP-FF70 battery pack (1) (p. 26, 27)
3 A/V connecting cable (1) (p. 61)
4 Wireless Remote Commander (1) (p. 290)
5 R6 (Size AA) batteries for the Remote Commander (2) (p. 291)
6 Lens cap (1) (p. 38)
Lens hood (1) (p. 42)
"Memory Stick" (1) (p. 128)
9 USB cable (1) (p. 194)
10 CD-ROM (SPVD-008 USB Driver) (1) (p. 198, 219)
CD-ROM (Movie Shaker Ver.3.1 for MICROMV) (1) (p. 196)
12 Cleaning cloth (1) (p. 273)
Stylus (1) (DCR-IP220E only) (p. 225)
14 21-pin adaptor (1) (European models only) (p. 62)
Contents of the recording cannot be compensated if recording or playback is not made due to a malfunction of the camcorder, storage media, etc.
*Pa3JIuHaeTcB 3aBnCmOCTn OT perNoHa. PpJlaRaETcTOJbKO cEBPoneiCKnM MoJeIaMn.
1 CTeBoi aIaIaTep nepeMeHHoro ToKa AC-L20A (1), npoBoI 3JIeKtpOnHtAHn (1) (cTp. 27)
2 BaTapeiHbI 6JIoK NP-FF70 (1) (cTp. 26, 27)
3 CoeunHntbHbI Ka6JIb ayDnO/BnDeo (1) (ctp. 61)
4 BecepnoBODHyI NyIbT dNCTaHcNoHHoro ynpabJeHn (1) (ctp. 290)
5 BaTapeiKn R6 (pa3Mepa AA) IJyIyIbTa IInCTaHcUOnHOrO ynpabLeHn (2) (ctp. 291)
6 Kpbiika oBeKTnBa (1) (cTp. 38)
7Блендаобъektнва(1)(ctp.42)
8 "Memory Stick" (1) (cTp. 128)
9 Ka6eJb USB (1) (cTp. 194)
10 CD-ROM (SPVD-008 USB Driver) (1) (cTp. 198, 219)
CD-ROM (Movie Shaker Ver.3.1 for MICROMV) (1) (ctp. 196)
12 JIoCKyT UcHCTaUeI TkaHN (1) (cTp. 273)
13 Пера (1) (Толбко модаль DCR-IP220E) (cтр. 225)
14 21-Мырьковыйаадпет (1) (Толъков
еврейckeMo'deи) (Стр.62)
CopejkaHne 3aIncn He MoKTe6bItb KOMpeHcIPOBaHO B Cnyuae,ecJIN 3aIncb NII BOCpON3BeDeHne He BbIOJIHeHb I3-3a HEnCpABHoCTN BIneOKaMepbl, HocNTeJIa DHaHHbIX N T.I.
Step 1 Preparing the power supply
Inserting the battery pack
Your camcorder operates only with the NP-FF70 battery pack.
(1) Slide OPEN in the direction of the arrow and open the battery compartment lid.
(2) Insert the battery pack with its terminal side facing your camcorder.
(3) Close the battery compartment lid.
UcTaHOBka 6aTapeHoro 6Joka
Bawa Bndeokamepa yHKUOHnpyET TolbKo c 6atapeHbIM 6IOKOM NP-FF70.
To take out the battery pack
Open the battery compartment lid and slide the lever to take out the battery pack.
Your camcorder operates only with the NP-FF70 battery pack. You cannot use the NP-FF50 battery pack.
PpmeaHne
Baasa Bnndeokamepa cyHKUHOHpye ToIbko c nmoou6aTaapeHoro 6Ioka NP-FF70.Bbl He moKeTe nCnoB3ObaTb 6aTaapeHbN 6IOK NP-FF50.
Charging the battery pack
Charge the battery pack before using your camcorder.
Your camcorder operates only with the "InfoLITHIUM" battery pack (NP-FF70).
See page 266 for details of the "InfoLITHIUM" battery pack.
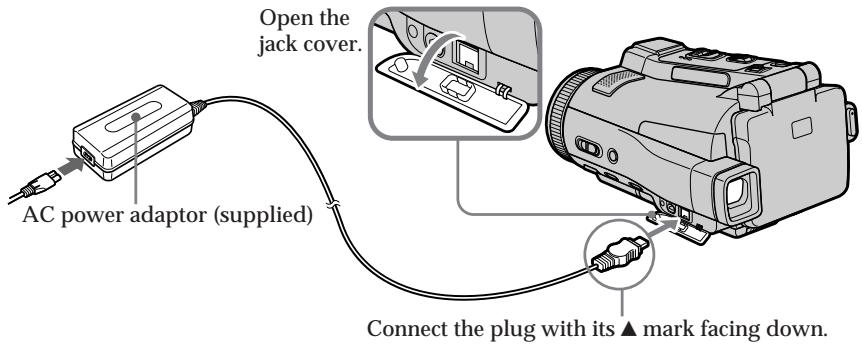
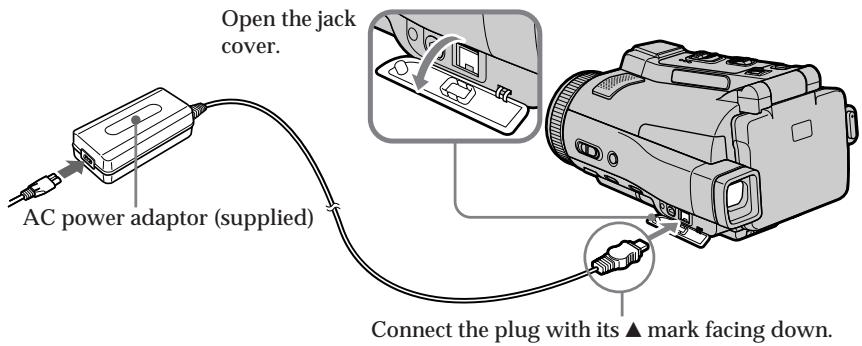
(1) Open the jack cover and connect the supplied AC power adaptor to the DC IN jack on your camcorder with the plug's mark facing down.
(2) Connect the mains lead to the AC power adaptor.
(3) Connect the mains lead to a wall socket.
(4) Set the POWER switch to (CHG) OFF. The battery CHG lamp lights up when the charge begins. After charging is completed, the battery CHG lamp goes off (full charge).
3apka 6aTapeHoro 6loKa
Ipepe nCnoB3OBAHnEM Bauee BnDeOkamepbi 3apdnte 6aTaepnHb6nok.
Bava bVideokamepa pa6oTaet TOnbko C 6aTapeiHbIM 6Iokom "InfoLITHIUM" (NP-FF70).
Bollee noDpo6bIe cBeDeHnO 6aTapeHOM 6loKe "InfoLITHIUM" npBVeDeHb Ha cTp. 266.
After charging the battery pack
Disconnect the AC power adaptor from the DC IN jack on your camcorder.
Pocne 3apnK6aTapeHoro 6Ioka
OTcoeHInHTe ceTeBOaIaNTep npeMeHHoro Toka oT rHe3da DC IN Bauei BndeokamepbI.
Step 1 Preparing the power supply
Note
Prevent metallic objects from coming into contact with the metal parts of the DC plug of the AC power adaptor. This may cause a short-circuit, damaging the AC power adaptor.
While charging the battery pack, the battery CHG lamp flashes in the following cases:
- The battery pack is not inserted correctly.
- Something is wrong with the battery pack.
- The ambient temperature is extremely high or low.
When you use the AC power adaptor
Place the AC power adaptor near the wall socket. If any trouble occurs with this unit, disconnect the plug from the wall socket as soon as possible to cut off the power.
Пункт 1 ПОДROTOВКИ NGTOUHINKA NITAHNIA
Приимechаиме
HeOnyckaTe KOHTaMeTaJIuYeCKnx npedmTOB CMetaJIuYeCKMn YacTAMn WTeKepa NoCToHHORo TOKa cTeBOrO aAnTepa nepemHOrO ToKa.3To MoKet PnIBecTu K KOPOTKOMy 3aMbKaHNIO NOBpeXDeHNo cTeBOrO aAnTepa nepemHHoro TOKA.
Bo Bpem 3apRKn 6atapeHoro 6Joka lamnoouka 6atapeu CHG 6ydet Mrgatb B cJeDyUoNxCnuyax:
-БатAPEньшбLOK yCTaHOBJIeH HeNPaBnJIbHO.
-B 6aTapeHOM 6Ioke HMeeTcH HeNCpPaBHOCTb.
- OkpykaIoouaI TempepaTpa IABJIeTcA Ype3BbUHaIHO BbICOKO INIIN HN3KOI.
PnncnoB3ObaHn cTeBOro aanTepa nepemehnHO TOka
Пометине сeteвоаадперпepemeHHORO TOKA B6IIM3N ceteво рOSTK.Есинсэ.TMМУCTPOHCTBOM BO3NHKNHT KaKe-ЛбОпблм,OTCOeДИНTE WTeNTbHyU Bnky OT ceteво рOSTK.KaK MoXHO b6IcTpee ДЯг OTKJIQUeHIN NITaHn.
Charging time/Bpem3apdKn
| Battery pack/БатAPEйный 6лok | Full charge/Полная зардka |
| NP-FF70 (supplied)/(прилагаетс) | 150 |
Approximate minutes at 25^ (77^) to charge an empty battery pack
The charging time may increase if the battery's temperature is extremely high or low because of the ambient temperature.
ПибИЗNTeIbHoeВрЯВ MInHytaxпри ТмпераType 25°C ДЯЗарДКIN ПОЛнocью pa3prJxehNOrO 6aTapeiHOrO 6bNoka ВрЯЗдкMonKet yBeIuHnBaTbcR,ecIи ТмпераType 6aTapeiЧрЗМерHo BbICOKa Ил ИнЗкa, BCJIeDCTBnE Bo3dIeNCTBnI TmpePAtby OkpykaHouSeI cpebl.
Recording time/Bpema 3auncs
Approximate minutes when you use a fully charged battery
- Approximate recording time when you repeat recording start/stop, zooming and turning the power on/off. The actual battery life may be shorter.
PnI6JIIN3NTeJIbHOE BpEMB MmHyTax npi nCIOJIb3OBAHm NOnHOCTbIO 3apJKeHHORO 6batapeHoro 6noka
*Pn6IIN3ITeHbHO BpEM 3aInci C HeoDHOKpaTHbIM NyCKOM/OCTaHOBKO3aInci, Hae3DOM BUNDeOKaMepbN BKJIIOUeHNEm/ BbIKJIOUeHNEm PNTaHn.ФakTNUeCKn cPOK CnyXkb6aTapeHOrO 6lOka MoKeT 6bTb KopoYe.
Playing time/BpemBAocnpoun3BeDeHn
| Battery pack/БатAPEйный 6лok | Playing time on LCD screen/B越来越大 BOCPON3BVEHENNAЗКРANES | Playing time with LCD closed/B越来越大 BOCPON3BVEHENNAЗКРANES |
| NP-FF70 (supplied)/(приларетса) | 145 | 180 |
Approximate minutes when you use a fully charged battery
Note
Approximate recording time and playing time at 25^ (77^) . The battery life will be shorter if you use your camcorder in a cold environment.
If the power goes off although the battery remaining indicator indicates that the battery pack has enough power to operate
Charge the battery pack fully again so that the indication on the battery remaining indicator is correct.
Recommended charging temperature
We recommend charging the battery pack in an ambient temperature of between 10^ to 30^ (50^ to 86^) .
What is "InfoLITHIUM"?
The "InfoLITHIUM" is a lithium ion battery pack which can exchange data such as battery consumption with compatible electronic equipment. This unit is compatible with the "InfoLITHIUM" battery pack (NP-FF70). Your camcorder operates only with the "InfoLITHIUM" battery. "InfoLITHIUM" F series battery packs have the ① InfoLITHIUM ② mark.
"InfoLITHIUM" is a trademark of Sony Corporation.
PnIbI3ntJIbHOe BpemB MmHyTax npi nCIOJIb3OBAHmN IOJIHOCTbHO 3apJKeHHORo 6aTapeHOro 6loka
PpimeyaHne
PnIbI3ntBHOe Bpem 3aIncn I Bocnpo3BeDHeN yKa3aH0 npi 25^ .Cpok Cnyk6bl 6batapeHoro 6loka 6ydt Kopoe npi NCIOJIb3OBAHN BVNeOkaMepbI B XOJIoNbIx ycNOBIAx.
Ecnn nntanhe nponaadaet, xotn HndkaTop octabwerooc3apra6batapeHoro 6loka noka3bIbaeT,TO 6batapeHbI 6LOK o6naaet doCTaTOHbIM dny pa60tbi 3aprdom
3apndte noJHocTbIO 6aTapeHbIb 6Lok eue pa3, YTO6bI NOKa3aHnIHdNkAtopa octabweoC3apJa 6aTaepHoRo 6Loka 6bln npabINbHbIM.
PekomehnyeMa TEMnepaTypa 3apAdkn
PekomeHdyETcBbINOHNHTb 3apAky 6aTapeHoro 6noka npu Tempepatype okpykaOuee cpebl ot 10^ do 30^
Step 1 Preparing the power supply
Connecting to a wall socket
When you use your camcorder for a long time, we recommend that you power it from a wall socket using the AC power adaptor.
(1) Open the jack cover and connect the supplied AC power adaptor to the DC IN jack on your camcorder with the plug's mark facing down.
(2) Connect the mains lead to the AC power adaptor.
(3) Connect the mains lead to a wall socket.
Пункт 1 ПОДROTOВКИ NGTOUHINKA NITAHNIA
The set is not disconnected from the AC power source (mains) as long as it is connected to the wall socket, even if the set itself has been turned off.
Notes
- The AC power adaptor can supply power even if the battery pack is inserted in your camcorder.
- The DC IN jack has "source priority." This means that the battery pack cannot supply any power if the mains lead is connected to the DC IN jack, even when the mains lead is not plugged into a wall socket.
A car battery
You cannot use a car battery with your camcorder.
IPEIOCTEPEXEHNE
Annapat He OTKIIOUaETcA ON CTUNCTOUYHnKa nITaHnI NpeMeHHoro TOKa (CETeBOI PO3eTKn) Do TEX NOp, NOKa OH NODCOEINHeN K CETeBOI PO3eTKe, DaXe ECNI CAM Annapat IN BbIKLIouH.
PpimueaHn
-Питане OT ceTeBOrO aДanTepa nepemEnHoro TOka MoKET nOaBaTbCЯ dAnke B cIyuae,ecn6bTaapeHbI bLOK BCTaBNeH B BaSy BIndeOKaMepy.
- THe3do DC IN nImeet "PnOpntET nCTOchnka". 3To 3NaHT, YTO nTahne OT 6TaapeHoro 6Loka He MoKTe NpDaBaTbC8, ecIn npBOd 3JeKtpoNTaHn I ODCoeDnHEn K THe3dy DC IN, daJx eCnI npOBd 3JeKtpoNTaHn I ne IOndcoEHN H C cTeBOi po3eTke.
ABTomo6nIbHbI aKKyMylrTop
BbI He MoKeTe IcNoIb3ObAtb c BaIeI BnDeOkamepo aBTOMo6nIbHbI aKKyMylTOp.
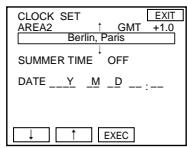
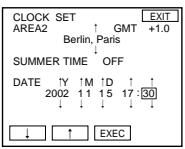
Step 2 Setting the date and time
Set the date and time when you use your camcorder for the first time. "CLOCK SET" will be displayed each time you set the POWER switch to CAMERA or MEMORY unless you set the date and time settings.
If you do not use your camcorder for about three months, the date and time settings may be released (bars may appear) because the built-in rechargeable battery installed in your camcorder will have been discharged (p. 273). In this case, charge the built-in rechargeable battery, then set your area, the summer time, the year, the month, the day, the hour and the minute.
(1) Set the POWER switch to CAMERA or MEMORY.
The CAMERA or MEMORY lamp lights up.
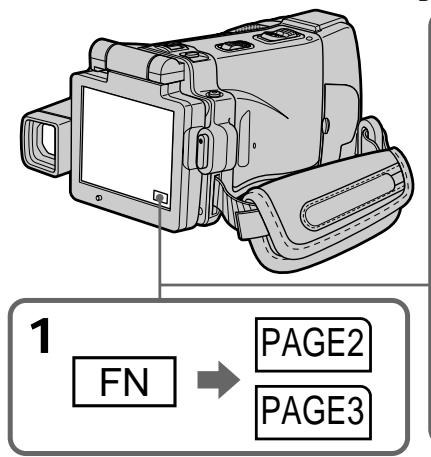
(2) Press FN (Function) to display PAGE1 (p. 36).
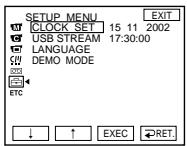
(3) Press MENU to display the menu.
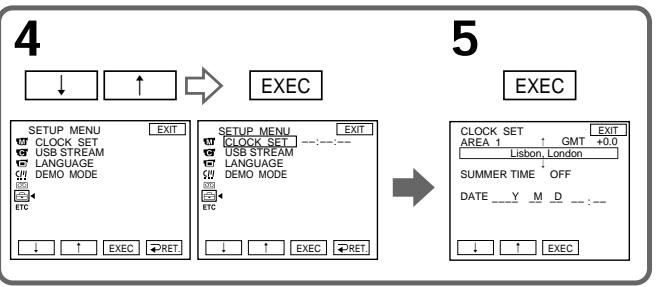
(4) Press / to select = , then press EXEC.
(5) Press / to select CLOCK SET, then press EXEC.
(6) Press / to select your area, then press EXEC.
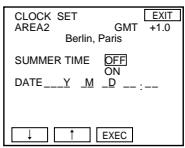
(7) Press / to select whether your area is in the summer time or not, then press EXEC.
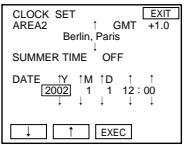
(8) Press / to select the desired year, then press EXEC.
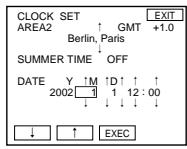
(9) Set the month, day and hour with the same procedure as step 8.
(10) Press / to set the minute, then press EXEC by the time signal. The clock starts to move.
Пун=kT 2 YcTaHOBKaДaTbI NВрemeHn
BbINOHNTe yCTaHOBky DaTbI N BpeMeHn, KOrJa BbI nCNoIb3yeTe BaWy BInDeOkaMepy B nepBbI pa3. Do Tex nop, noka Bbl He BblONHtE yCTaHOBky DaTbI N BpeMeHn, KaJdbI pa3 npu yCTaHOBKe nepeKJIIOUaTeIa POWER B nOLOXeHne CAMERA uNl MEMORY 6yDet OTO6paKaTbCS INDnKaUaYR "CLOCK SET". EcJb Bbl He 6yDet EcNOJb3oBaTb BaWy BInDeOkaMepy OKOIO TpEx MecAueB, yCTaHOBKn DaTbI N BpeMeHn MOrYT 6bITb CtePbI uN3 pAmrtn (MOrYT NOBHTCBa NOnocbl), uN3-3a TORO, YTO BCTpoEHHa NEpe3apjXkaemar 6bataeKa, yCTaHOBLeHHa B WaSe BInDeOkaMepe, 6yDet pa3prjXeHa (Ctp. 273). B 3TOM cLyuae 3apJNTe BCTpoEHHyo nepe3apjXaEMyIO bTaapeIKy, a 3aTEM yCTaHOBtE BaW perIOH, JeTHee BpeMn, rOd, MeCaU, DeHb, Yac I MNHyTu.
(1)Установпейсяклочату POWER в поожене CAMERA ил MEMORY. Ламочka CAMERA ил MEMORY BBICBETITС.
(2) Haxmnte KhoNky FN (Функця) Длг OTO6paXeHЯ CTpaHnUzI PAGE1 (CTp. 36).
(3) HaxmTe KhoNky MENU dny oTo6paKeHnMeHIO.
(4) Haxmaite KhoKnI IaBbIbopa onuM a 3aTe Haxmite KhoNky EXEC.
(5) HaxmajTe KhoNkI ДЯ BbIbopa onCnCLOCK SET, a 3aTe m haxmTe KhoNky EXEC.
(6) Haxmamte KhoNkN ДЯ BbIbOpa BaIero perNoHa, a 3aTeM HaXmTe KhoNky EXEC.
(7) Haxmaite KhoKnI Iyka3aHnI, DeiCTbyET IIN B BaWe mperNohe JeTHee Bpem, a 3aTe HaxmTe KhoNky EXEC.
(8) HaxmamTe KhoNkU ДЯ BbI6opa hyxHOrO roJa, a 3aTeM HaxMMTe KhoNky EXEC.
(9) YCTaHOBInTe Mecu, DeHb N uac C NOMOuToI Kne npoueDpybl, UTO IN B NyHKTe 8.
(10)HaKIMaIe KHOJIKN↓IДЯ YCTaHOBKn MInHyTbI, a 3aTeM HaxMMTe KHOINy EXEC B MOMENT NepeJaN CuRHaJa ToUHOrO BpEmEni. YaCbI NaHyTФyHKUOnHIpObaTb.

2,3
FN

MENU
6

EXEC

7
8,9

EXEC

10
The year changes as follows:
Tod n3mehreTc cneDyUoHm o6pa30m:
$$ 2 0 0 0 \leftarrow \dots \dots \rightarrow 2 0 0 2 \leftarrow \dots \dots \rightarrow 2 0 7 9 $$

To return to FN (Function)
Press EXIT.
When using your camcorder abroad
Set the clock to the local time (p. 33).
If you use your camcorder in a region where summer time is used
Set SUMMERTIME to ON in the menu settings.
If you do not set the date and time
"-------" and "---:---:" are recorded on the tape or the "Memory Stick" as the data code.
Note on the time indicator
The internal clock of your camcorder operates on a 24-hour cycle.
Simple setting of clock by time difference
You can easily set the clock to the local time by setting a time difference. Select AREA SET and SUMMERTIME in the menu settings. See page 235 for more information.
World time difference
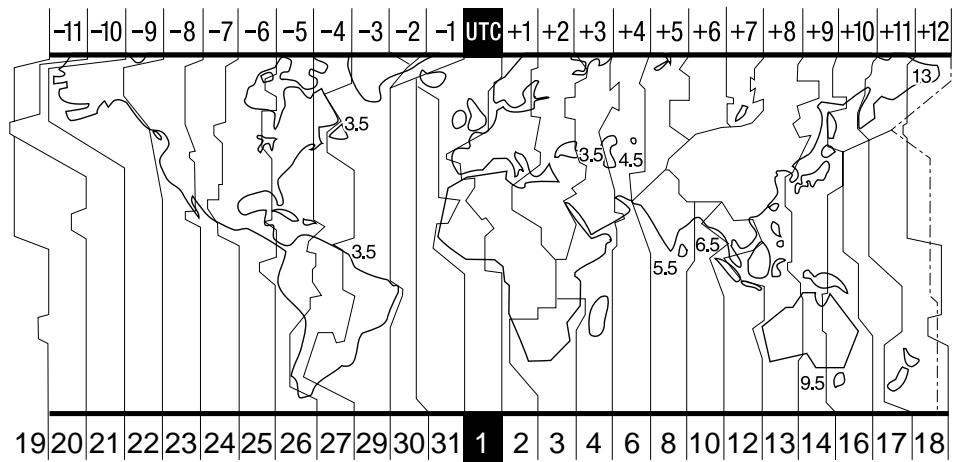
Pa3Hnca MnpOBoro BpemEn
| Area code/Код Perмona | Time-zone differences/Разнице меничу часовыим посами-bo вremeны | Area setting/Установka PermaHa |
| 1 | GMT | Lisbon, London |
| 2 | +01:00 | Berlin, Paris |
| 3 | +02:00 | Helsinki, Cairo |
| 4 | +03:00 | Moscow, Nairobi |
| 5 | +03:30 | Tehran |
| 6 | +04:00 | Abu Dhabi, Baku |
| 7 | +04:30 | Kabul |
| 8 | +05:00 | Karachi, Islamabad |
| 9 | +05:30 | Calcutta, New Delhi |
| 10 | +06:00 | Almaty, Dhaka |
| 11 | +06:30 | Rangoon |
| 12 | +07:00 | Bangkok, Jakarta |
| 13 | +08:00 | HongKong, Singapore |
| 14 | +09:00 | Seoul, Tokyo |
| 15 | +09:30 | Adelaide, Darwin |
| 16 | +10:00 | Melbourne, Sydney |
To set your local time
Select AREA SET in the menu settings, then press EXEC. Next, select the country or area where you stay in, using the table above, then press EXEC.
PpocTay yctaHOBKa yaCob no pa3Hnue BO BpeMeHn
BbMOKeTeJeTko yCTaHOBnTB yacbl Ha MeCTHoe BpEMr NytEm YcTaHOBkM pa3HnUb BO BpEMeHn. Bb6epNTe onuA AREA SET u SUMMERTIME B yCTaHOBkax MeHIO. DOnoJIHnTeJIbHa nHΦopMaua npuBeDeHa ha cTp.243.
| Area code/Кód Perúnoha | Time-zone differences/Разниц меничдун calobímin norycambo врemeи | Area setting/Установka Perúnoha |
| 17 | +11:00 | Solomon Is |
| 18 | +12:00 | Fiji, Wellington |
| 19 | -12:00 | Eniwetok, Kwajalein |
| 20 | -11:00 | Midway Is., Samoa |
| 21 | -10:00 | Hawaii |
| 22 | -09:00 | Alaska |
| 23 | -08:00 | LosAngeles, Tijuana |
| 24 | -07:00 | Denver, Arizona |
| 25 | -06:00 | Chicago, MexicoCity |
| 26 | -05:00 | New York, Bogota |
| 27 | -04:00 | Santiago |
| 28 | -03:30 | St. John's |
| 29 | -03:00 | Brasilia, Montevideo |
| 30 | -02:00 | Fernando de Noronha |
| 31 | -01:00 | Azores |
Для установки Baшero мостhorо Времен Вьбөрөnte вүстановкх мөно оюи NOUHIO AREA SET, a 3aTeM hαхмITE кногк IXECK. Далee Бьбөрөnte CTpaHy Ил PernoH, B KOTOPOM Bbl haxoJNTeCb, ИСПОЛьЗУ ПИРБЕDEнHу Bblse ТаБичу, a 3aTeM hαхмITE кногк IXECK.
Step 3 Inserting a cassette
Пун=kТ 3 Yстановka KacceTbl
(1) Prepare the power source (p. 26).
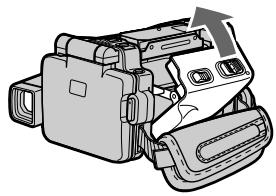
(2) Slide OPEN/△ EJECT in the direction of the arrow and open the lid. The cassette compartment automatically lifts up and opens.
(3)Push the middle portion of the back of the cassette into the cassette compartment. Insert the cassette in a straight line deeply with the cassette window facing the cassette lid.
(4) Close the cassette compartment by pushing down the cassette lid halfway. The cassette compartment automatically goes down.
(5) After the cassette compartment goes down completely, close the lid.
(1)ПоДг罗TOBБTe INCTOчнК ПИТанЯ (Стр.26).
(2)ПередвиьтpeпеклioчateJB OPEN/ EJECT 1B HanpaBneHm cTeJIKN u OTKpoIte KpbIshky. KaccetHbI OTCeK aBTOMaTnueckn POnHIMETcN OTKpoETcN.
(3)HaxMMTeNoZeHTpy3aJHeuactnKaccetbIB HAnpabLeHmN KaccETHOOTcKa.BCTaBtkeKaccetynpaMO BHyTpTaK,OTobOkOwKO KaccETb6blIOOBpaSeHoKkpIwKeKaccETHOOTcKa.
(4)3aKpOte KaccetHbI OTCeK,HaXaB Ha npIOrKpbItyIO KpbIuKy KaccETHO OTCeKa HanoIOBHy.KaccETbI OTCeK aBTOMaTnueCKOnyCTNTcBHN3.
(5)ПосleteТого,КакКасецьйОТсЕК
ноноctьюОпустся,ЗakpoиTe Крblшky.
2

3
4,5
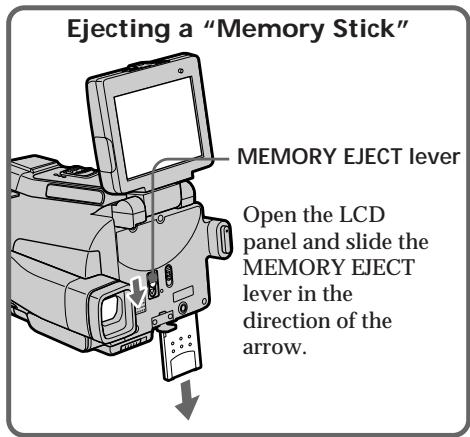
To eject a cassette
Follow the procedures above, and take out the cassette after the cassette compartment opens completely in step 2.
ДяиЗВLEЧЕнЯ KACCEТI
CneNyTe npBVeHNoB BblSe npOeDype n3BnEKeNTe KaccETy PnB BbINOpHeHm DeIcTBn nyHKta 2nocLe TOrO, KaK KaccetHbI OTCek nonHOCTbIO OTkPoETcra.
Note
Do not press the cassette compartment down.
Doing so may cause a malfunction.
To prevent accidental erasure
Slide the write-protect tab on the cassette to expose the red mark.
Ppimcaynne
HeBdabJINBaIteKaccTeHbIOTcEKBH3.3To MoKeT PnBecTn K HeNCnpaBHOCTn.
ДлпpenotBpaueHnCnyaHOrO CTnpaHn
IpeBnHbTe JneTcOK 3aunTbI 3aINCN Ha KaCCTe TaK, YTO6bI NOBUNacb KpaCHaMeTkA.

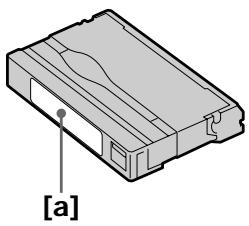
Note on the label
Labels may cause a malfunction of your camcorder. Therefore, be sure not to:
- Stick on any labels other than the one supplied.
- Stick the label onto any part of the cassette other than the label position [a].
Прмочаимеобзкетke
3TnKETK MOrTy BbI3BaTb HeNCnPabHOCtB BaWei BnDeOkamepbl. TaKIM 6pb3OM, 683aTeJbHO NMeIte BBNDy:
- He NaKNeBaiTe HnKaKInx DpyrInx 3TnKeToK, 3a NCKJIuOHeHEm npJUraEmoi.
- He HaKJIeNBaIte 3TNIkeTKy Hn Ha KaKoe DpyroE MeCTo Ha KACCTe, 3a NCKJIIOUeHNeM MeCTa, PpeHa3NaueHHoro DnA 3TNIKeTKn [a].
Step 4 Using the touch panel
Your camcorder has operation buttons on the LCD screen. Press the LCD screen with your finger or the supplied stylus (DCR-IP220E only) to operate each function. This section describes how to operate the touch panel during recording or playing back images on a tape.
(1) Prepare the power source (p. 26 to 30).
(2) Open the LCD panel.
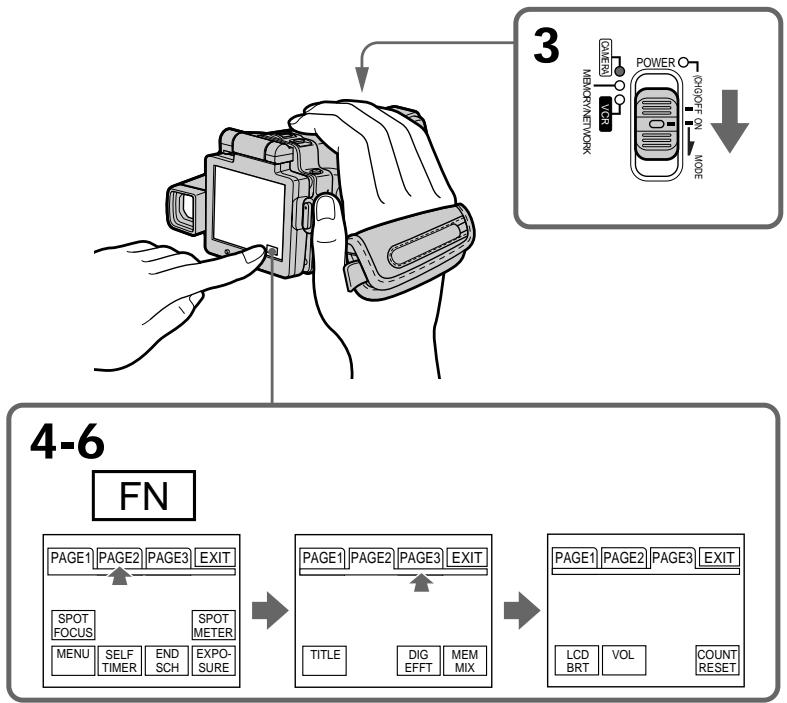
(3) Set the POWER switch to CAMERA to record or VCR to play back.
(4) Press FN to display PAGE1. The operation buttons of PAGE1 appear on the LCD screen.
(5) Press PAGE2 to go to PAGE2. The operation buttons of PAGE2 appear on the LCD screen.
(6) Press PAGE3 to go to PAGE3. The operation buttons of PAGE3 appear on the LCD screen.
(7) Press a desired operation item. See relevant pages of this manual for each function.
Ha 3kpahe JKKД BaSei BnDeokamepbI NmEOTc
ceHCOPbIe cyHKUHOHaJIbHbIe KHOKn. PpI
paOBe c KaXdoI cyHKUeH HAXIMaIte Ha
3KpaH XKD BaWM nPaIbIeM IIN pNlraeMbIM
npom (ToIbKO moJeB DCR-IP220E). B daHOM
pa3Dene OOnCbIbAeTcR, Ka pa6oTaTb C
ceHCOPHO NaHeJIbIO BO BVpeM 3AnICN IIN
BOcPON3BeDEHn I3OpaXeHn Ha neHTe.
(1)ПоД�ТОВБTe ИСТОЧИК ПИТАнЯ (Стр.с 26 no30).
(2)OTKpoTe naneJb XXI.
(3) VctaHOBNTe NpeKJIouyateNB POWER B nIOJKeHne CAMERA dIraB bIIIOJIHeHnI 3aIncn nnB nIOJKeHne VCR dIra BbIIOJIHeHnI BOCpOm3BEdEHnI.
(4)Haxmnte KhONky FN, YTO6bI OTO6pa3nTb CTpaHcy PAGE1. Ha 3kpAne KJKD NOBATcN ΦHKUHOHaNbHbIe KhONKn CTpaHcuPi PAGE1.
(5)Hakmite 3aIOnOBOK PAGE2,HTo6bI nepeiTnHa CTpaHnU y PAGE2. Ha 3KpaHe KKД noBaTcRy FyHKuOHaJIbHbIe KONKnCTpaHnUbPAGE2.
(6)HakMMte 3aIOnOBK PAGE3,HTo6bI nepeiTn Ha CTpaNtU PAGE3. Ha KpAne KKД NOBtCЯФHKNUOHaJIbHbIe KONKn CTpaHbIu PAGE3.
(7)HaxMMTe HUxHbI ΦyHKmOHaJIbHbI NpYHKT. OniCaHne KaJDoI FyHKcIN pNBeDEHO Ha COOTBeTCTByOuNX CTpaHnIaX DaHHORO PYKOBOCTBa.
To execute settings
Press EXEC or OK. The display returns to PAGE1, 2 or 3.
To cancel settings
Press OFF. The display returns to PAGE1, 2 or 3.
Notes
- When using the touch panel, press the LCD screen lightly with your finger or the supplied stylus (DCR-IP220E only).
- Do not press the LCD screen with sharp objects other than the supplied stylus (DCR-IP220E only).
- Do not press the LCD screen too hard.
- Do not touch the LCD screen with wet hands.
- If FN is not on the LCD screen, touch the LCD screen lightly to make it appear. You can make the display appear or disappear with DISPLAY/TOUCH PANEL on your camcorder.
- When the operation buttons do not work even if you press them, an adjustment is required (CALIBRATION) (p. 275).
- When the LCD screen gets dirty, use the supplied cleaning cloth.
When executing each item
The green bar appears above the item.
If an item is not available
The colour of the items changes to grey.
Press FN to display the following buttons:
In CAMERA mode
| PAGE1 | SPOT FOCUS, MENU, SELF TIMER, END SCH, EXPOSURE, SPOT METER |
| PAGE2 | TITLE, DIG EFFT, MEM MIX |
| PAGE3 | LCD BRT, VOL, COUNT RESET |
In VCR mode
| PAGE1 | MENU, VOL, TITLE, MULTI SCH |
| PAGE2 | LCD BRT, DIG EFFT, PB ZOOM, END SCH |
| PAGE3 | DATA CODE, COUNT RESET, ☑REC CTRL |
See page 134 when you set the POWER switch to MEMORY.
ДЯ Bынолпену yctahOBOK
HaxmTe KhoNky EXEC uIN OK. INdkaunBepHeTcK cTpaHnIaM PAGE1,2 uIN 3.
ДЯ OTMeHbI yCTaHOBOK
HaKmTe KhoNky OFF. INdkaunBepHeTcK CTpaHncaM PAGE1, 2 nJin 3.
Примеанья
-Пин Испльь�ани сеньсорно паени сlerka нажимаши На ЗранЖКД Вашим пальем плл рплараembl有很大 похamТолько модель DCR-IP220E).
He haxkmaite Ha 3KpaH KKD octPOKOHeUbIMn pEaMeTaMn,OTJNUHbIMN OT npinuraemoro nepa (ToIbko MoJeB DCR- IP220E).
- He hαxμmaɪte əkpaɪn JʌKKД сɪnɪskOM cɪnlbHO.
- He kacaiaTecb 3KpaHa KKД MOKpbIM pykam.
- Ecni INHINKauJN FN OTCyTCTByeT Ha 3kpaHe KKD, CnEka KOCHInTeCb 3kpaHa JKKd, YTO6bl OHa NOBnAcb. Bb MoXeTe BbIbBAbTb NOBJIeHne INNcUe3HOBHeNc INHINKaUmC nOMoUsbIOpeKlnOuTaTeJN DISPLAY/TOUCH PANEL H BaWei BuDeOKeMaPe.
- EcnnФункциональьпье Kногн He pa6oTaIOT, Дадж Когда Bыnx haxnmaeTe,Тpe6yeTe rperynipobka (CALIBRATION) (ctp. 275).
- Ecnin 3kpan JKKJ 3aqr3HnIcR, BOCNoJIb3yIteCb npInaRaEmbIM NockyTOM YNCTAUIE TKAHN.
Pn BbINOJIHeHn KaJdOrO nyHKta
HaŋnyHKToM NOBbIeTc3eJIeHaNoIocA.
Ecnn nyHKT He doctynen
Lbeta INHINKAaN NyHKTOB CTAHOBTCA cepbIM.
Haxmte KhONky FN dIy oTo6paXeHHa CJeDyUoNx KHOK:
B peximeCAMERA
| PAGE1 | SPOT FOCUS, MENU, SELF TIMER, END SCH, EXPOSURE, SPOT METER |
| PAGE2 | TITLE, DIG EFFT, MEM MIX |
| PAGE3 | LCD BRT, VOL, COUNT RESET |
B pexime VCR
| PAGE1 | MENU, VOL, TITLE, MULTI SCH |
| PAGE2 | LCD BRT, DIG EFFT, PB ZOOM, END SCH |
| PAGE3 | DATA CODE, COUNT RESET, ☑REC CTRL |
См.ст. 134, ecni pepeknjucaTeNb POWER yctaHOBJIeB bnoJoxeHne MEMORY.
Recording a picture
Your camcorder automatically focuses for you.
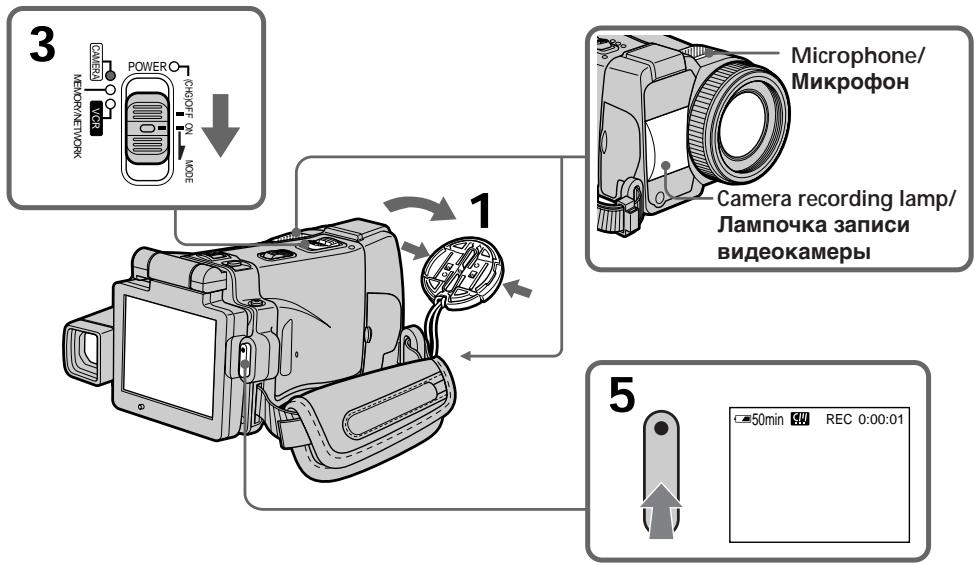
(1) Remove the lens cap by pressing both knobs on its sides.
(2) Prepare the power source and insert a cassette. See "Step 1" to "Step 3" (p. 26 to 35) for more information.
(3) Set the POWER switch to CAMERA. The CAMERA lamp lights up and your camcorder is set to the recording standby mode.
(4) Open the LCD panel. The picture disappears from the viewfinder and appears on the LCD screen.
(5) Press START/STOP. Your camcorder starts recording. The REC indicator appears. The camera recording lamp located on the front of your camcorder lights up. To stop recording, press START/STOP again.
3a\Pncb n3o6paXeHn
Baasa Bndeokamepa aBtOMaTneCKN BbIIOJIHReT φokcnpOBky dЯ BaC.
(1)CHIMNEKpbIuKyObeKeTnBa,HaKaBHa BbICTyNtI NO OeMM ee CToPOHam.
(2)ПоДгOTOBbTe NICTOCHNK ПИТAHINI UcTaHOBtE KAcCteTy.ПОДрбНьe CБЕdENH INpINBeDEHbI B pa3dEnaX c "ПункT 1" no "ПункT 3" (cTp.c 26 no 35).
(3)Установпейреклiouslyаль POWER в положене CAMERA. Ламночka CAMERA ВьсБетится, И Ваши Видаокамера установпсь в ржим ождионя залис.
(4)ОТкpoиTe пань XKД.ИЗображене ИчсeзHTСВИДОПСКАТЕЛЯ И NOВВITСА Ha эКране XXKД.
(5)HaxMMTe KhoNky START/STOP.Ba7a BnDEOKamepa NaHET 3anncb.Ha 3kpahe NOBNTcN INDnKaTOp REC. BblCBeNTcN JAMNoUka 3annci, paCNOJKeHHa Ha nepeDne NpHeN BnDEOKamepbI.ДЯ OCTaHOBKn 3annci HaxMMTe KhoNky START/ STOP eue pa3.
After recording
(1) Set the POWER switch to (CHG) OFF.
(2) Close the LCD panel with the LCD screen facing inwards.
(3)Eject the cassette.
(4) Remove the power source.
Notes
- Fasten the grip belt firmly.
- Do not touch the built-in microphone during recording.
To enable transition
- Transition between the last scene you recorded and the next scene can be performed as long as you do not eject the cassette even if you turn off your camcorder. You can perform the transition with the end search function (p. 54) even after ejecting the cassette.
- When you want to change the battery pack, be sure to set the POWER switch to (CHG) OFF. It does not affect transition.
Recording data
The recording data (date/time or various settings when recorded) are not displayed during recording. However, they are recorded automatically onto the tape. To display the recording data, press DATA CODE during playback. You can also use the Remote Commander for this operation (p. 57).
If you leave your camcorder in the standby mode for five minutes while the cassette is inserted
Your camcorder automatically turns off. This is to save battery power and to prevent battery and tape wear. To resume the standby mode, set the POWER switch to (CHG) OFF, and to CAMERA during playback again. However, your camcorder does not turn off automatically while the cassette is not inserted.
The battery life when you record using the LCD screen
The battery time is slightly shorter than the shooting time using the viewfinder.
PocJe BbInOpHeHn 3aIncn
Adjusting the brightness of the LCD screen
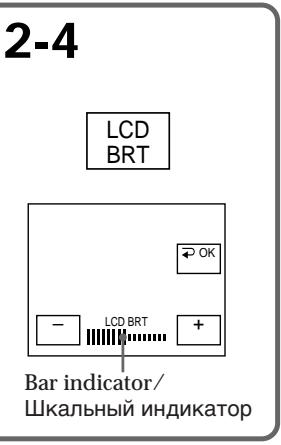
(1) Set the POWER switch to CAMERA or MEMORY, then press FN and go to PAGE3. Set the POWER switch to VCR, then press FN and go to PAGE2.
(2) Press LCD BRT. The screen to adjust the brightness of the LCD screen appears.
(3) Adjust the brightness of the LCD screen using - / + - : To dim + :To brighten
(4) Press OK. The display returns to PAGE2/ PAGE3.
PerynpoBka npKocTn 3KpaHa KKd
(1)УстановпейсятEL POWER B
ножichte CAMERA ИИ MEMENTORY, a
Затем нахмпг КНПКУ FN И поевДиTe K
Стравице PAGE3.
YctaHOBInTe nepeKlnOuTaTeIb POWER B nIoXeHne VCR, a 3aTeM haxMnTE KhoNky FN n IpeEInTe K cTpaHnue PAGE2.
(2)HaxmTe KhONky LCD BRT. IoBtca 3KpaH peYnnpOBKn npKocTn 3KpaHa KKd.
(3)ОтreyларугяркocьжранжКд c nOMOцьЮ KHOПОК -/+
::ДЯумьшенияркости
+:ДЯ yBéJIuHEnIApKoCTN
(4)HaxmTe KhoNky OK. INdkaunBepHeTcK CTpaHncaM PAGE2/PAGE3.
To return to FN
Press EXIT after step 4.
The colour of the LCD screen
You can adjust the colour of the LCD screen.
Select LCD COLOUR in the menu settings (p. 230).
Even if you adjust the LCD screen using LCD BRT, LCD COLOUR, or the LCD screen backlight The recorded picture will not be affected.
The setting of the LCD BACKLIGHT switch
Normally, set it to ON. When you use your camcorder in bright conditions using the battery pack, set it to OFF. This position saves battery power.
BbMOxKeTepeRyIINPOBaTbZBeT3KpaHaXKKD. Bb6epnte onuLCD COLOUR By yctahOBkax MeHIO (CTp.238).
Дахе ecn Bbl 6ydeTe perylnpoBaTb 3kpan XXKd c nomoosbuOOnu LCD BRT, LCD COLOUR nnn 6ydeTe perylnpoBaTb npKocTb 3aHne noCBeTKn 3kpana XXKd
Ha 3aɪncaHnoɪ 306paXeHne 3TO He NOBJIInAET.
YctaHOBka nepeKlioyateJLa LCD BACKLIGHT
B HopMaJIbHbIX yCIOBnX yCTaHOBnTe
peKJIuOaTeIb B NOJoxeHne ON. EcIi Bbl
6yIteIcNOLb3OBAtB BaUy BnDEoKaMepy C
6aTapeHbIM 6NoKOM B yCIOBnIX npKOI
0CBSeUHeHHOCTn, yCTaHOBnTE eRO B NOJoxeHne
OFF. B 3TOM NIOJoxeHIn 3KOHOMITc 3aprD
6aTapeHOrO 6NoKa.
Adjusting the viewfinder
If you record pictures with the LCD panel closed, check the picture with the viewfinder. Adjust the viewfinder lens to your eyesight so that the indicators in the viewfinder come into sharp focus.
Adjust with the viewfinder lens adjustment lever.
Perynnpovka BuidonckaTeJia
EcIn BbI 3aINcBbAteTe I3o6paXeHne C 3aKpbTToI NaHeJIbIO KKД, npOBepbTe I3o6paXeHne C nOMOuBIO BVIOUCKaTeJIa. OtperyIpyuTe oJIeKtNB BVIOUCKaTeJIa B COOTBeTCTBnC BaIIM 3peHnE m TaK, YTObI INHdNKaTOPbI BVIOUCKaTeJIe 6blIyETKO cΦOKycuPobAHbl.
BbInonHnIte perynipOBky c nOmoIbOpbIyara perynipOBKn obBeKtNbBa BUNOnCKaTeN.
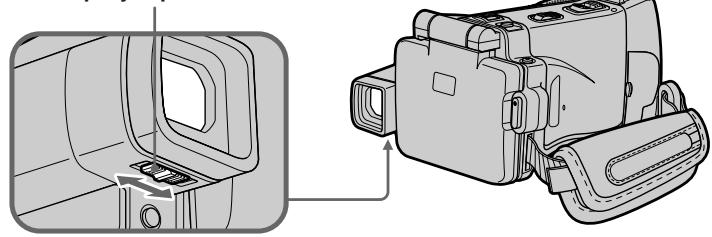
Viewfinder lens adjustment lever/ Pbyar perylnpobkn o6BeKtiv
Viewfinder backlight
You can change the brightness of the backlight. Select VF B.L. in the menu settings when using the battery pack (p. 230).
Even if you adjust the viewfinder backlight The recorded picture will not be affected.
3aHnnoDcBtKa BIOONCKaTeJIa
BbMOxKTe N3MeHrTb RPKoCTb 3aDHei PODCBeTKn. Pn nCNoIb3OBAHN 6aTapeHOrO 6Joka BbIbepnte ONcHIO VF B.L. ByctahOBkax MeHIO (CTp.238).
JaXe ecn Bbl OtperyInpyeTe npKoCTb 3aHne nOcBETKn BuOnckatela
Ha 3aɪncaɪnHoɪəbɒpʌkæne 3TO He nɒBnɪaŋeT.
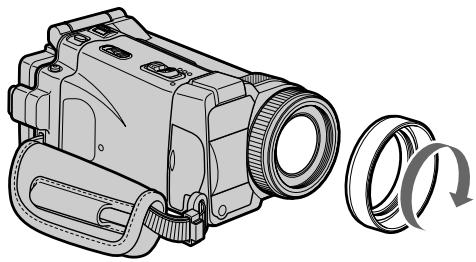
Attaching the supplied lens hood
To record fine pictures under strong light, we recommend attaching the lens hood. Also the lens cap can be attached even with the lens hood on.
PpKpeHne npnlaeMo6JeHdbI obBeKTbBa
Дялзпсин3ображенCвicokim KauecTBOMПИСЛьHOMOCBeшени pekomehnyetcnpkpenTb6JeHdy obkeKTnBa.KpbIshaКobekTnBaMoxket NaideBaTbc,дaxeKorda npikpenHa 6JeHda obkeKTnBa.
Note
You cannot attach filters or other objects onto the lens hood.
If you forcibly attach these objects onto the lens hood, you will no longer be able to remove filters or other objects from the hood.
When you use the filter (optional)
The shadow of the lens hood may appear in the corners of the screen.
PpmeaHne
BbHe MoKxTe npKpeNnTb K 6JeHd e oBeKTnBa QnIbTpbl nn Dpyrne npEmdtbl. EcIn Bb HacnlbNo npKpeNte 3tn npEmdtbl K 6JeHd e oBeKTBa, Bbl 6Obnse He CMOxTe cHbT bnnIbTpbl nn Dpyrne npEmdtbl C 6JeHdbI.
PnncnoIb3OBAHm nIbItpa (npno6peTaetcOndJIbHO)
ByraXkpaHaMOKETNOBITbCTeHbOT 6JeHdbIObBeKTnBa.
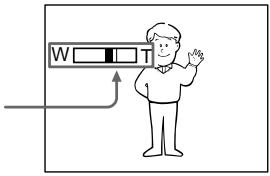
Using the zoom feature -Zoom lever
Move the zoom lever a little for a slower zoom. Move it further for a faster zoom.
"T" side: for telephoto (subject appears closer)
"W" side: for wide-angle (subject appears further away)
IcnoJIb3OBAHneФyHKcHn Hae3da BnDEOKaMepbl
- Pbyar Bapnoo6bekTnBa
Cnerka nepeBnHbTe pbuH Bapnoo6bekTnBaДЯ MeDneHHoro Hae3da BnDeOKaMepbI.
IpeeBnHbTe ero daJIbWe dIy yckopeHHoro Hae3da BnDeOkamepbl.
CTopoha "T":ДЯ TelepeToO (ObbeKT npBnKaeTcR)
Using the zoom function sparingly results in better-looking recordings.
To zoom greater than 10 ×
Zoom greater than 10× is performed digitally. To activate the digital zoom, select the digital zoom power in D ZOOM in the menu settings (p. 229).
The digital zoom is set to OFF as the default setting.
Heuactoe nIcNoJIb3OBAHne cyHKnI Hae3da BIndeOkamepbl obecneuHbaet HanJyUHne pe3yJbTaTbI.
The right side of the bar shows the digital zooming zone.
The digital zooming zone appears when you select the digital zoom power in the menu settings./
Ppabar CTOPoHa NIOcbl NOKa3bIbAeT 3OHy cnppoBov TpaHcPokaun.
3OHa ZnΦpOBo TpaHcΦokaun noBvTcA, KOrJa BbI Bbl6epTe CTeneHb ZnΦpOBoro Hae3da B yCTaHOBkax MeHIO.
When you shoot close to a subject
If you cannot get a sharp focus, move the power zoom lever to the "W" side until the focus is sharp. You can shoot a subject that is at least about 80~cm (about 2 feet 5/8 inch) away from the lens surface in the telephoto position, or about 1cm (about 1 / 2 inch) away in the wide-angle position.
Notes on digital zoom
- Digital zoom starts to function when zoom exceeds 10 × . Up to 20 × or 120 × zoom is performed digitally.
- The picture quality deteriorates as you move the power zoom lever toward the "T" side.
When the POWER switch is set to MEMORY You cannot use the digital zoom.
Using the zoom feature - Zoom ring
You can use the zoom ring to zoom in and out at the desired speed. You can also use it to fine adjust.
Set FOCUS to ZOOM.
The indicator appears on the LCD screen.
Turn the zoom ring at the desired speed to zoom in or out.
Ppncbemke o6beKta c 6n3KoropacctoHHN
EcIn Bb He MoKTe NOnUyHtB YeTKoI
fokycnOBKn, NepeDInhBte pblar PnIBOJHOrO
BapnoooBeKtnBA CTOPOHY W" Do NOnUyeHn
YeTKoI fokycnOBKn. Bbl MoKTe BblONJIHTb
CbEmky O6BeKta B NIOJOKeHn TeJeFOTo,
KOTOpB hAnODnTcN, No KpaJHeMpe, Ha
pacCToAHmN 80 cm OT NOBepxHOctN o6BeKTNa,
HInn Je OKOJ01 C M B NNoJKeHn
ShpOKoyrObnHO BnDa.
- Do not rotate the zoom ring too quickly. Rotating it too quickly will prevent correct focusing.
- Your camcorder changes to the autofocus mode when FOCUS is set to ZOOM.
Приимейке
He BpaaJte KOJIbO BapNoo6bEaKTNaBcnnKoM 6bIcTpo.IPi cnnKoM 6bICTpOM BpaueHn KOnBaHa He yJaCTcN DoCTNu b npaBnBHO fokycuPobKn.
Ваша вдебокамера мимп ржим abtofockucinpobkn, ecnOnцЯ FOCUS 6удет установся в поожени ZOOM.
Shooting with the mirror mode
This feature allows the camera subject to view him or herself on the LCD screen.
The subject uses this feature to check his or her own image on the LCD screen while you look at the subject in the viewfinder.
Set the POWER switch to CAMERA or MEMORY.
Open the LCD panel, then rotate the LCD panel 180 degrees anticlockwise.
The indicator appears in the viewfinder and on the LCD screen.
appears in the standby mode, and appears in the recording mode. Some other indicators appear mirror-reversed and others are not displayed.
CbeMaB 3epKaJIbHOM peXnme
3TaФункциЯ NO3BOJnEтЧeNoBeky,
YBJIIOUSeMycr OБьЕKTOM CbEМКИ,Ha6JIIOdaTb
ce6Я Na 3KpaHe JKKД.
YeIOBek IcNoJIb3yET 3Ty cyHKnIuO, YTO6bl KOHTpOJIIpOBaTb CBOE cO6CTBeHHoe N3o6paXeHHe Na 3KpaHc KKД B TO BpeM, KaK BbI CMOTpIte Ha Hero B BuOnICKaTeNe.
UctaHOBtTe nepeKJIoucTaIb POWER B noJIOKeHne CAMERA nIM MEMORY.
OTkpOte naHeJIb KKd, a 3aTeM NOBepHnTe naHeJIb KKd Ha 180 rpaIycob npoTb YacOB O CTpeKN.
You can only rotate the LCD panel anticlockwise.
Picture in the mirror mode
The picture on the LCD screen is a mirror-image. However, the picture will be normal when recorded.
During recording in the mirror mode
FN appears mirror-reversed in the viewfinder.
When you press FN
The indicator does not appear on the LCD screen.
PpmeaHne
Bb moKeTe BpaTaT naHeIb KKToJIbKO npOTnB YacOBn CTpeJIKn.
I306paXeHne B 3epKaJIbHom pexnme.
I3o6paKeHne Ha 3KpaHe KKd 6yDet OTo6paKaTbCra 3epKaJbHo. HecMOTpr Ha 3TO, 3aNNc bI3o6paKeHn8 6yDet HopMaJIbHOi.
BoBpeM3aHcN B3epKaIbHOM pexHme
INdkaTOpFNBbDOnckaTeJeOTobpaKaeta CB3epKaIbHOM BIne.
EcJn BbI HaxMeTe KhONKy FN
INHdkaTop He NOBNTcHa 3KpaHe KKII.
Indicators displayed in the recording mode
HДИКaTOPbl, OTo6paXkaemble BpeXmte 3aInscn
The indicators are not recorded on the tape.
INdkaTopbI He 3anbcBaHOTcHaJeHTy.
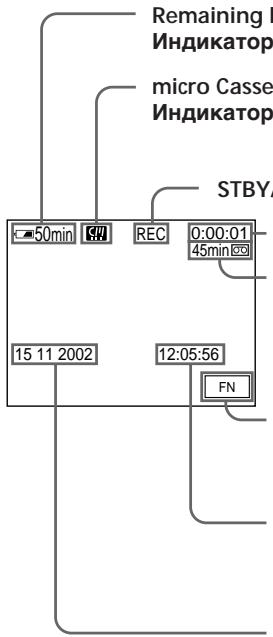
Remaining battery time/
Индikatop Врemeи OCTabweroCЯЗа 6aTapeHoro 6Ioka
micro Cassette Memory/
Индikatop micro Cassette Memory (mKpokaccetno namrtn)
STBY/REC/ндкатop STBY/REC
Tape counter/ндикaTop сeтчиka lentbI
Remaining tape/ɪnʌdkaTOp ocTabweCry Iæntbɪ
This appears after you insert a cassette and record or play back for a while.
3TOT INHINKATOP NOBILNETCN ONCJEYCTAHOBKN KACCETBI 3aINCN INN BOCIPON3BVEENNA B TEUHENE HEKOToPOrO BpemEni.
FN button/Khonka FN
Press this button to display operation buttons on the LCD screen./
Haxmnte 3Ty KhoNky IJNA OTo6paXeHnI yHKUHOHaNbHbIX KHONoK ha 3kpaHe KKД.
Time/INHdkaTop BpemeHH
The time is displayed about five seconds after the power is turned on./Bpemr oTo6paJxaeTcB TeueHne npimepHo pTn cekynd nocne BKJIooHEnI NITaHIn.
Date/IMHdNkATOp daTbI
The date is displayed about five seconds after the power is turned on./
Data OTo6pKaaETcB TteHHe PnIMepHo IaTn CeKHyI NocIe BKJIouEHINI NITAHII.
Remaining battery time indicator during recording
The remaining battery time indicator shows the approximate recording time. The indicator may not be correct, depending on the conditions in which you are recording. When you close the LCD panel and open it again, it takes about one minute for the correct remaining battery time in minutes to be displayed.
Tape counter
The tape counter can be reset using COUNT RESET in the PAGE3 screen.
Recording data
The recording data (date/time or various settings when recorded) are not displayed during recording. However, they are recorded automatically onto the tape. To display the recording data, press DATA CODE during playback. You can also use the Remote Commander for this operation (p. 57).
HnDKaTOp BpeMeHN OCTaBWeOc3apJa 6aTaPeHOro 6Ioka BO BpeM 3aIncn
Инданкатор Временocctabweeroce 3apra6batapeiHoro 6Ioka noka3bIbaet np6nnteHbOe Bpemz3aIncn.Инданкot MOKET 6bITb HToCHbIM B3aBcIMMOCTNOTycNOB,В KOTobIX Bbl npOn3BOInTe 3anbc. KordaBb3akpbBaete Naelj XKДи OTkpBaete e chOba, Tpe6yeTc8 OkoNo OdHOMnHyTbI JnPabINbHOrO OTo6paXeHnO OCTabweeroC BpemHn3apraJa 6batapeHoro 6Ioka BmHyTax.
CuetukJeHTbI
CuetnK JENTbIMoKET 6bITb yCTaHOBHeH Ha HOBc NOMOUsIOIcN COUNT RESET Ha 3kpahe PAGE3.
DaHHbIe 3aHcN
When you shoot a subject with the light source behind the subject or a subject with a light background, use the backlight function.
CbeMa o6BeKToB c 3aHnei noCDBeTkoI - BACK LIGHT
EcIn BbBbIOJIHReTe CbEMKy o6BeKTa c nCTOHHKOM CBeTA N03aI IN Hero IIN JKe o6BeKTA CO CBETNbIM fOHOM, IcNoIb3yIte fYHKUIO 3aDHe NIOCBETKN.
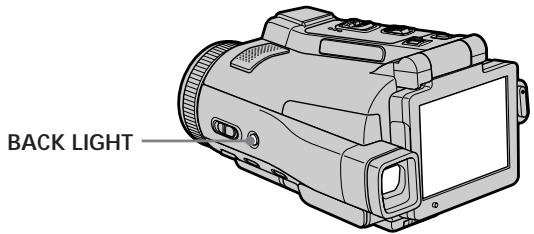
(1) Set the POWER switch to CAMERA or MEMORY.
(2) Press BACK LIGHT. The indicator appears on the LCD screen. To cancel, press BACK LIGHT again.
During back light function
The backlight function will be cancelled when you press MANUAL in the EXPOSURE mode (p. 84) or SPOT METER (p. 86).
(1)Установпейсякючateь POWER в положене CAMERA ил MEMORY.
(2)HaxmTe KhoNky BACK LIGHT. Ha 3KpaHe XKJI IOBnTcH INDkaTop IINr OTMehb HaxmTe KhoNky BACK LIGHT eue pa3.
Bo Bpempa60bI cyHKcnn 3aAnHe noDCBETK
Функциязаднй посветкбудETOTMeHeHa, ecn BынхмeteКногкуMANUALВржИМEXPOSURE(cTp.84)ил SPOT METER (cTp.86).
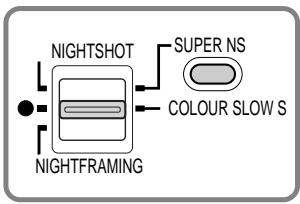
Shooting in the dark - NightShot/Super NightShot/ Colour Slow Shutter
Using NightShot
NightShot enables you to shoot a subject in a dark place. For example, you can satisfactorily record the environment of nocturnal animals for observation when you use this function.
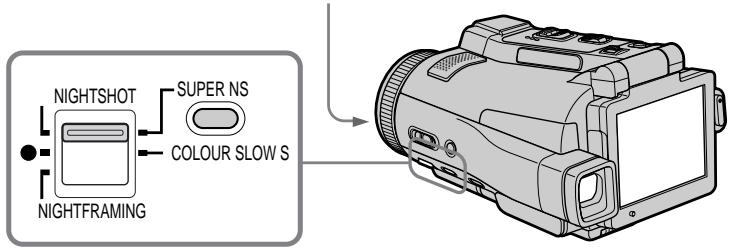
(1) Set the POWER switch to CAMERA or MEMORY.
(2) Set NIGHTSHOT/NIGHTFRAMING to NIGHTSHOT.
The 0 and "NIGHTSHOT" indicators flash on the LCD screen.
To cancel NightShot, set NIGHTSHOT/NIGHTFRAMING to the centre position (green position).
Cbemka B TemHote - HocnHa Cbemka/HocnHa cynepcbemka/LBeTHa CbemKa c MeJleHHbIM 3aTBOPOM
IcnoIb3OBAHne pexmHa HOHcBEmKu
Pexm HcHOn CbEMKn No3BOJnEeT Bam BbIOJNHTb CbEMKy O6BeKTOB B TEMHom MecTe. Hanpimep, BblcmoKeTe cYcnExom BblIOJNHTb CbEMKpy NAbIoJeHm HoCHbIX XINBOTbIX nCnOJIb3OBaHNem DaHHoФyHKUIN.
(1)Установпейреклочать POWER в положене CAMERA ил MEMORY.
(2)YcTaHOBInTe nepeKJIIOUaTeIb NIGHTSHOT/NIGHTFRAMING B noLoXeHne NIGHTSHOT. HnDnKaToPbI n "NIGHTSHOT"HauchyT mRaTb Ha 3KePaHe KKJ. DnA OTMeHbI cyHKuIN HoHOn CbEMKn, ycTaHOBInTe OIIuNo NIGHTSHOT/NIGHTFRAMING B ceHTpaJIbHoE noLoXeHne (noLoXeHne c 3eJIeHbIM KpyxKOM).
Infrared rays (NightShot Light) emitter/
Излучателы Инфрахсаньх Луев (ЮдсвETКДЯ Ночон Сбемки)
Using Super NightShot
Super NightShot makes subjects more than 16 times brighter than those recorded in NightShot.
(1) Set the POWER switch to CAMERA.
(2) Set NIGHTSHOT/NIGHTFRAMING to NIGHTSHOT. The and "NIGHTSHOT" indicators flash on the LCD screen.
(3) Press SUPER NS.
The S and "SUPER NIGHTSHOT" indicators flash on the LCD screen. To cancel Super NightShot, press SUPER NS again and then set NIGHTSHOT/NIGHTFRAMING to the centre position (green position).
IcnoJb3OBAHne peKIma HocHoN cynpceMkn
Pexm HcHOn cyNepcbEMKn PO3BOJnEe TcEnaTb obBeKtbl 60Je eM B 16 pa3 npYe, cEm Bcnyae, ecIn Bbl 6yDeTe bblONHrTa CbEMky B pexmHe HcHOn cbEMKn.
(1)YctaHOBInTe IpeKJIouaTeIb POWER B noJIOKeHne CAMERA.
(2)Установпейсякючateь NIGHTSHOT/NIGHTFRAMINGВ поожене NIGHTSHOT.На зкраеЖКД начHyMuRaTы Индикаготы n" NIGHTSHOT".
(3)HaXmnte KhoNky SUPER NS. Ha 3Kpahe XKd NaHyT Mngatb INndkaTopbl S"SUPER NIGHTSHOT". IЯ OTMeHbI pexMma Hocn cypepcbemKn hXaMnte KhoNky SUPER NS espe pa3, a 3aTEM yctahOBITE onuHIO NIGHTSHOT/ NIGHTFRAMING B ceHTpablbHoe noLoXeHne (noLoXeHne ● c3eJIeHbIM KpyxKOM).
Using the NightShot Light
The picture will be clearer with the NightShot Light on. To activate NightShot Light, set N.S. LIGHT in to ON in the menu settings (The default setting is ON.).
Using Colour Slow Shutter
Colour Slow Shutter enables you to record colour images in a dark place.
(1) Set the POWER switch to CAMERA.
(2) Set NIGHTSHOT/NIGHTFRAMING to the centre position (green position).
(3) Press COLOUR SLOW S. The [2] and COLOUR SLOW SHUTTER indicators flash on the LCD screen. To cancel Colour Slow Shutter, press COLOUR SLOW S again.
IcnoJIb3OBAHne IOpCBETKn HOyHOJ CbeMKN
I3o6paXeHHe cTaHET apYe,ecnBVKIOHTb fYHKUHOIOcCBETKN HOHOr cBeMKn.ДЯ BKJIQUeHnI FyHKUHOIOcCBETKN HOHOr cBeMKn yCTaHOBtne OToNIO N.S.LIGHT B UycTaHOBkAX MeHNO B NOIOXeHHe ON (ON ABJRAETCA YCTaHOBKO NO yMOJuaHIO.).
IcnoIb3OBAHne cyHKcHn CBeTHoN CbeMKn C MeJleHHbIM 3aTBOPOM
Функлuar CBETHOH CbEMKc MeDnEHHbIM 3aTbOpom No3BONBeRt Bam 3aNcMbA t bCETHbIe N3o6paxeHH B TEMHOM MeCTe.
(1)YCTaHOBInTe NepeKJIIOuChaTeIb POWER B NOJIOXeHne CAMERA.
(2)YCTAHOBITE ONUMO NIGHTSHOT/NIGHTFRAMING B UeHTpAJIbHoe NOJIOXeHne (NOJIOXeHne C 3eNEHbIM KpyXKOM).
(3)HaKmTe KhoNky COLOUR SLOW S. Ha 3kpAne JKKI haHyT MnraTb INHdkaTopb N COLOUR SLOW SHUTTER. IyOTMeHbl FyHKuINCBetHOIN CbeEMKn C MeJlEHHbIM 3aTBOPOM HxKmTe KhoNky COLOUR SLOW S eue pa3.
Notes
- Do not use the NightShot in bright places (ex. outdoors in the daytime). This may cause your camcorder to malfunction.
- While using the NightShot in normal recording, the picture may be recorded in incorrect or unnatural colours.
- If focusing is difficult with the autofocus mode when using the NightShot, focus manually.
- Do not cover the NightShot Light emitter when using the NightShot.
- Detach the lens hood when you shoot with the NightShot Light since the lens hood may block the NightShot Light.
While using NightShot, you cannot use the following functions:
-White balance
- PROGRAM AE
- Exposure
- Flexible Spot Meter
- HOLEGRAM AF
PpmeuHn
He nCnoJb3yIte FyHKUIO HOHyOH CbeMKB RApKO OcBeUeHbIX MecTAX (HaNPIMep, Ha yInCe B DHeBHOe Bpem). 3To MoKet npuBectn K HeNCnpaBHoCTn BaJeu BUnDeOKaMepbl.
-Пи ИСПОЛБЗОВАнМpyHКДМИНЧУНОИ CBEMKIN
РИн HOPMaIbHо 3aIcNc I3O6paxKeHne MOKeT
Быт b3aIcMaoH B HePnAblNbHbIX NII
HeECTeTBHbIX LBEtAX.
EcnIΦOKCnPOBkA B aBTOMaTnueckom
pKmme npri nCnObl3OBaHmФyHKmH NCHoH
CbEMKn 3aTpYdHeHa, BbIOnHnTe pyHyUO
ΦOKCnPOBky.
He 3aKpbBaIte n3NyuaTeIb NOcBETKN IJN HOHON CbEMKN Pn INCNOJIb3OBAHN FyHKUN HOHON CbEMKN.
-Пис bemke C nCOnNoB3OBAHnEM NOcCBeTKn dЯн HOHcN bemKn OTOeDnHnTe 6NeHdy 0bEKtIBa, NOCOKlbky OHa MOKet 6JOKIPoBaTb NOcCBeTKy dЯн HOHcN bemKn.
PnHcNoJIb3OBAHnHyHKuH NHOHOBcbEMKn BbI He MoKeTe HcNoJIb3OBA TbCJeDyUoJne FyHKuH:
-Балансбелого
-PROGRAM AE
-3Kcno3nua
-Perynipyemoe nTHOΦOTometpn
-HOLOGRAM AF
While using Super NightShot, you cannot use the following functions:
- Recording still images
- Recording with the flash
-White balance
-Fader - Digital effect
- PROGRAM AE
- Exposure
- Flexible Spot Meter
- Memory overlap of MEMORY MIX
While using Colour Slow Shutter, you cannot use the following functions:
- Recording still images
- Recording with the flash
-Fader - Digital effect
- PROGRAM AE
- Exposure
- Flexible Spot Meter
- Memory overlap of MEMORY MIX
While using Super NightShot or Colour Slow Shutter
The shutter speed will be automatically adjusted depending on the brightness of the background. The motion of the moving picture may slow down.
When the POWER switch is set to MEMORY
You cannot use following functions:
Super NightShot
Colour Slow Shutter
NightShot Light
NightShot Light rays are infrared and so are invisible. The maximum shooting distance using the NightShot Light is about 3m (10 feet).
In dark places
Colour Slow Shutter may not work properly.
About NightFraming
See page 153.
PnncnoIb3OBAHnn FyHKuH NHOH cynepcbemKn BbI He moXe TcNoJIb3OBaTb cJeDyUoNe FyHKuH:
-3a\Pncb HeNoDvXhBIX N3O6paXeHn
-3aHnscbCoBCnbIiKoI
- BaJaanC 6enoro
-Φeɪndep
-LnDpOBBle 3cppeKtbl
-PROGRAM AE
-3Kcno3nU
-Perynnpyemoe nTHOΦOTometpnn
- HaioxheHne namrTn MEMORY MIX
PnncnoJIb3OBaHnn fynKcun cBETHO cnBemKn C MeJInHHbIM 3aTbOpom Bbl He moXkTe nCNOJIb3OBaTb cNeDyUoIue fynKcun:
-3a\Pncb HeNoD\BnKhBIX N3O6paJxHn
-3aIncbcoBcblskoI
-Φeɪdεp
-LucpObIe 3cpeKtbl
-PROGRAM AE
-3Kcno3nua
-Perynipyemoe nTTHo oToMeTpnn
-Перексытne памгТИ MEMORY MIX
PnncnoIb3OBAHm yHKcHn HocHoCynepcbemKn nIyHKcHn CBetHO CbeMKc C MeJeHHbIM 3aTBOPOM
CkopocTb 3aTbopa 6yDeT aBTOMaTnueeKnpepyIINPOBaTbCBy B 3aBNCIMOCTN OT ARPKOCTHfOHa. PInr 3Tom BOCPON3BeDEHneDIBNXUxXcN 3o6paXeHm MOKeT3aMeJNTbCra.
EcInnepeKJIIOUaTeIb POWER yCTaHOBJeH B noJIOXeHne MEMORY
BbI He MoXeTe IcNoJIb3ObaT bI cIeIyIOUne cyHKuM:
-Функию HOHOn cynepeMbKN
-ФУнкцю CBETHOД CБЕМКИ C MeДЛЕНБIM 3aTВОРМ
IoDCBETKa HOUHOcEMKn
JyHn NIOCBETKN HUHON CbEMKn ABJIYOTCA INHcpaKpaChbIMN, INo3TOMY OHN HeBUNMbI. MaKcImaJIbHOe pacCTOARHne IJr CbEMKn npn IcNoJIb3OBaHmN IOCDBeTKN HOuHOH CbEMKn COCTaBJIeR OKJNO 3 M.
B TemHbix MecTax
Функцял CBeTHOД CьeMКС MeДлЕнБIM 3aTbOPOM MOxET He pa6oTaTb HaNJIeXaUIM 06pa3OM.
O HouHOM KaDpnpoBaHH
CM. cTp. 153.
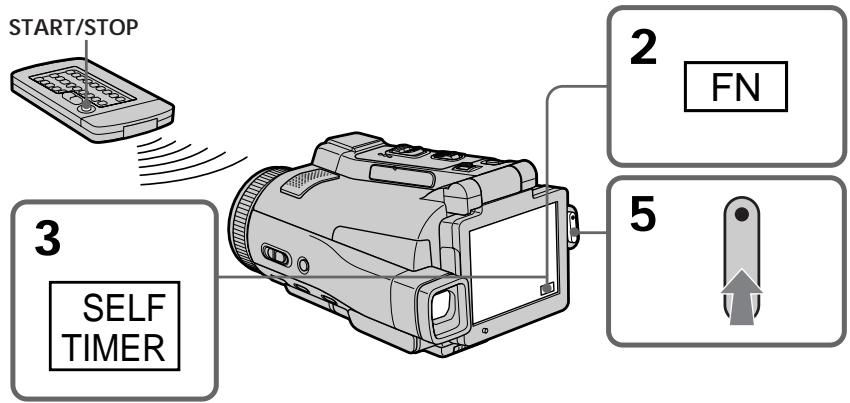
Self-timer recording
Recording automatically starts in about 10 seconds after you set the self-timer. You can also use the Remote Commander for this operation.
(1) Set the POWER switch to CAMERA.
(2) Press FN to display PAGE1 (p. 36).
(3) Press SELFTIMER.
The (self-timer) indicator appears on the LCD screen.
(4) Press EXIT to make PAGE1 disappear.
(5) Press START/STOP.
The self-timer starts counting down from about 10 with a beep sound. In the last two seconds of the countdown, the beep sound gets faster, then recording starts automatically.
3aInc b no TaMepy caMo3anycKa
3aIINc bHaHnHaeTc aBOMatNueeCKn pnpMepHo uepe 10 cekyhd nocJe yctahOBKn taMepa caMo3anycka.ДЯ 3Toi onepaunn Bbl moKTe TaKKe IcNoIb3OBA Tb Nylb T dNCTaHcIOHOro ynpablenia.
(1)Установпейреклочаель POWER в положене CAMERA.
(2)HaxmTe KhoIky FN dIy OTo6paKeHHnDnKaun PAGE1 (cTp. 36).
(3)HaxmTe KhoNky SELFTIMER. HndnKaTOp (taimepa camo3anycka) NOABNTcHa 3KpaHe KKd.
(4)Haxmnte KhoNky EXIT nTTO, yTo6blnDnkaqna PAGE1 nCte3na.
(5)Haxmnte KhoNky START/STOP. TaMep cAmo3anycKa haNuHET o6paTHbI OTCuET npImepHO OT 10c3yMMepHBIM CnHaIOM.B nOcneHne DBe ceKynDbI o6paTHoro OTCuETa 3yMMepHbI CnHaJI 6yDet 3ByuTa b Haue, a 3aTe M ABTOMATUHeCKn HaUHETcAaINCb.
To stop the countdown
Press START/STOP.
To restart the countdown, press START/STOP again.
To cancel self-timer recording
Press SELFTIMER so that the (self-timer) indicator disappears from the LCD screen while your camcorder is in the standby mode. You cannot cancel self-timer recording using the Remote Commander.
The self-timer recording is automatically cancelled when:
- Self-timer recording is finished.
- The POWER switch is set to (CHG) OFF or VCR.
PpimcuaHne
Pekim 3aIncn no TaImepy cAmO3anycca 6ydet abTomatUeCKN OTMeHEn B CJIyuaX:
- OkonhaHnI 3aPiCn IIO TaMepy cAmO3aNycka.
- YctaHOBKn nepeKJIouaTeIy POWER B noJoxHeIe (CHG) OFF uNn VCR.
Checking the recording - END SEARCH
You can go to the end of the recorded section after you record. It is convenient when you make the transition between the last recorded scene and the next scene you record smooth.
(1) Set the POWER switch to CAMERA.
(2) Press FN to display PAGE1 (p. 36).
(3) Press END SCH.
The last five seconds of the recorded section are played back and your camcorder returns to the standby mode. You can monitor the sound from the speaker or headphones.
Press EXIT after step 3.
To stop searching
Press END SCH again.
Even once you eject the cassette
The end search function works.
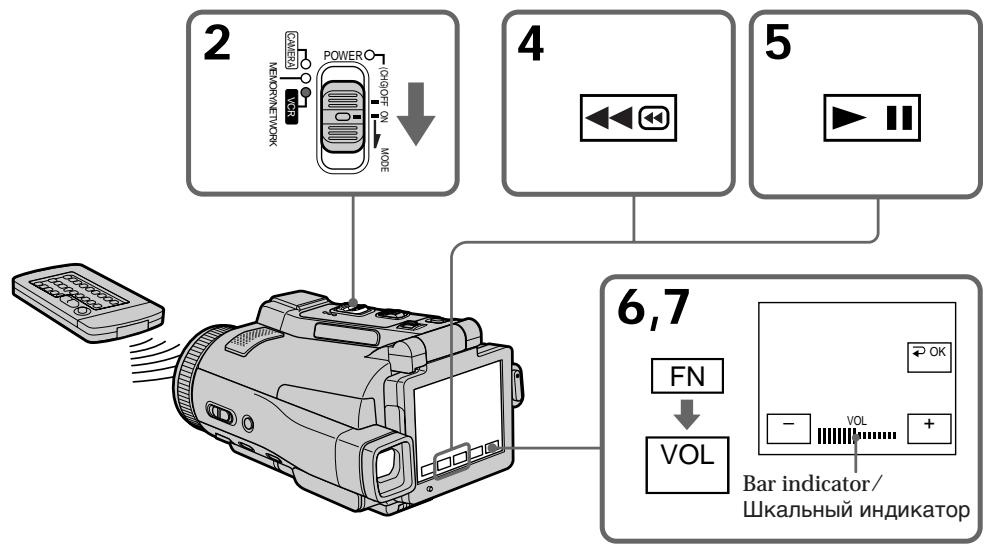
You can monitor the recorded tape on the LCD screen. If you close the LCD panel, you can monitor the playback picture in the viewfinder. You can also control playback using the Remote Commander.
(1) Prepare the power source and insert the recorded tape.
(2) Set the POWER switch to VCR. The VCR lamp lights up.
(3) Open the LCD panel.
(4) Press to rewind the tape.
(5) Press >11 to start playback.
(6) Adjust the volume following the steps below. ① Press FN to display PAGE1 (p. 36).
② Press VOL. The screen for the volume adjustment appears.
③ Press - / + to adjust the volume.
- : To decrease the volume
+ : To increase the volume
(7) Press OK. The display returns to PAGE1.
Bocnpo3BeDeHneJeHTbl
BbMOxKeTe HabJIOdaTb 3aIncaHNoe HaJeHTe
n3o6paXeHne Ha 3KpaHe KKd. EcIn Bbl
3aKpoEte NaHEnb XKd, Bbl MoXeTe
KOHTPOIpOBAbTB BOCpON3BOIDMOe
n3o6paXeHne B BuOnCKaTeNe. Bbl MoXeTe
TaKke KOHTPOIpOBAbTB BOCpON3BeDeHne C
POMOuBIO NylTa DnCTaHcNHOHorO ynpaBHeHna.
(1)ПоД�TOВБTe ИСTOЧИК ПИТAHИ N BCTаББTe 3aПИСАнHyО ЛEHTY.
(2)Установпейпеклочаель POWER в положене VCR. Ламоча VCR ВсВсВетгс.
(3) OTKpoIe TnAneJIb KKД.
(4)HaxMMTe KhoNkky 1Ia IepemOTkn JIeHTbl Ha3aI.
(5)HaxMMTe KhoNky [1]nHaYana BOCpPON3BVeDEHnI.
(6)Отруглипу Te rpoMkoCTb, cneуru npuBeDeHHbIM HnIXe nyHKTam.
① HaxmTe KhoIky FN, yTo6bl OTo6pa3nTb cTpaHnU y PAGE1 (cTp. 36).
② Haxmnte KhoNky VOL. IoBHTc3KpaH peYnnpOBKn rPOMKocTn.
③Дя ретулровки رомковости нахимаite Кногк -/+
-:ДЯумehbш�нгрOMKOCTN
+:yBENHrPOMKoCTN
(7)HaxmTe KhoNky OK. INdkaunBepHeTcK cTpaHnue PAGE1.
To return to FN
Press EXIT after step 7.
To stop playback
Press on the LCD screen or STOP on the Remote Commander.
If you leave the power on for a long time Your camcorder gets warm. This is not a malfunction.
Bocnpon3BeDenHe JeHtbl
Baa Bndeokamepa Harpeetc.3To He ABnreTc HEnCnpaBHOCTbIO.
To display the screen indicators - Display function
Press DISPLAY/TOUCH PANEL on your camcorder or DISPLAY on the Remote
Commander. The indicators disappear on the LCD screen.
To make the indicators appear, press DISPLAY/TOUCH PANEL or DISPLAY again.
Using the data code function
Your camcorder automatically records not only images on the tape but also the recording data (date/time or various settings when recorded) (data code).
Follow the steps below to display the data code using the touch panel or the Remote
Commander.
Using the touch panel
(1) In the playback mode, press FN and go to PAGE3.
(2) Press DATA CODE.
Using the Remote Commander
Press DATA CODE on the Remote Commander in the playback mode.
The display changes as follows:
date/time various settings (SteadyShot off, exposure, white balance, gain, shutter speed, aperture value) no indicator
(3)Bb6epnte onuHOCAM DATA nIN DATE DATA,a 3aTeM haxmnte KhoNky OK.
(4)Haxmnte KhoNky EXIT.
IcnoJIb3OBAHne nylbTa dNCTaHcNoHHoro ynpabLeHn
B pexime Bocnpou3BeDeHnHaXmTe KhoNky DATA CODE Ha npIbTe DnctaHcNoHoro ynpabLeHn.
INIIKauN6byET N3MeHATbCnEyUOuM 06pa30m:
daTa/BpeMa pa3nUHbIe ycTaHOBKn (BbIKHouEHe ycTouHBOcBeMKn, 3KcNo3nUra, 6aJHc6eNo, yCInJeHne, cKOpocTb 3aTbOpa, BeINuHa dnaΦparMbI) 6e3 INdNkaUm
To not display various settings
Set DATA CODE in ETC to DATE in the menu settings (p. 235).
The display changes as follows when you press DATA CODE on the Remote Commander: date/time no indicator
ДяТOrO,чTo6bI He OTo6paXaJIncb pa3JIuHbIe YcTaHOBKn
YcTaHOBInTe OuHIO DATA CODE B ETC B
yCtAHOBkax MeHIO B NoIooJHe Nte DATE (ctp. 243).
Pn HaxKaTmN KhoNKn DATA CODE Ha nyIbTe
DnCTaHcUOHNO ynpaBJIeHnN INdNkaUIN6yJeT
n3MeHnTbCn CJeDyUOUM o6pa3OM:
DaTa/BpeM 6e3 INdNkaUIN
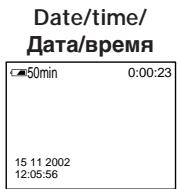
Various settings/ Pa3nHbIe ycTaHOBKn
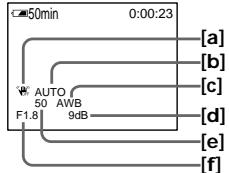
[a] SteadyShot off
[b] Exposure mode
[c] White balance
[d] Gain
[e] Shutter speed
[f] Aperture value
Various settings
Various settings show your camcorder's recording information at the time of recording. In the recording mode, the various settings will not be displayed.
When you use the data code function, bars ( ) appear if:
- A blank portion of the tape is being played back.
- The tape is unreadable due to tape damage or noise.
- The tape was recorded by a camcorder without the date and time set.
Data code
When you connect your camcorder to a TV, the data code also appears on the TV screen.
Remaining battery time indicator during playback
The indicator shows the approximate continuous playback time. The indicator may not be correct, depending on the conditions in which you are playing back. When you close the LCD panel and open it again, it takes about one minute for the correct remaining battery time to be displayed.
[a] INHdNKaTOP BbIKIQUeHn yCTOuHBOB CbEMKn
[b] INДикаTop peЖIMа эКспозин
[c]ИнданkaTopбаланcaбелого
[c]Индикатор услеленя
[e] INdikatop ckopoctn 3aTbopa
[f]ИндикаТор Велунни Диафрагмь]
Pa3JIMHbIy yCTaHOBKn
Pa3nHbIe yCTaHOBKn OTo6paKaIoT
INΦopMaunIO BaWei BnDeOkamepe np
BbIpOnHeHHn 3annc. B pexmE 3anncn
pa3nHbIe yCTaHOBKn OTo6paKaTbc He 6ydyT.
EcIn BbI nCnOJIb3yeTe fynKcNIO KOA daHHbIX,TO NOBRArTcNOIOcbI (--- --),ecIN:
-Bocnpo3boDntcH He3aIncAHbI yUacToK HaJIeHTe.
-JIeHTa JIbJIeTcR HeuHtAeMoI I3-3a IOBpeKJdeHnI JIN NOMEX.
-3aINcB ha JeHTy 6bJa BbINOJIHeHa BnJeOKaMePoI 6e3 yCTaHOBKn DaTbI IN BpemeHn.
KoDaHHbIX
EcnBbI noCDcoeDHHte BaUy BnDEOKaMepy K TeLEBn3Opy, KOd DaHHbIX NORBUTCRA TAKKe Ha 3KpaHe TELEBn3Opa.
Hndkatop octabweroocBpeMeHH 3apda 6aTaepenHoro 6Ioka BO BpeMBOcnpoN3BeDeHH
3TOT INHdNkaTop OTo6paXaet npi6n3nteJIbHOE Bpemr HenpepbIBHOrO BocPOn3BeDeHNr.
INHdkaTop MOKET 6bITb HToCHbIM B 3aBnCmOCTN OT yCNoBn, B KOtOpBX BblBbINOHNHeTe BOCpOn3BeDeHne. KorDa Bbl 3aKpbBaete NaHJI KKД n OTkpBbAeTe e cHOBA, Tpe6yETc OKIo OJHOI MNHyTb IIN npabInbHoro OTObpaXeHnO OCTaBWeOcR BPemEH 3apHa 6aTaapeHoro 6Ioka.
Various playback modes
To operate video control buttons, set the POWER switch to VCR.
To view a still image (playback pause)
- Press during playback. To resume playback, press again.
- Press PAUSE on the Remote Commander during playback. To resume normal playback, press PAUSE again.
To fast-forward the tape
- Press in the stop mode. To resume normal playback, press .
- Press FF on the Remote Commander in the stop mode. To resume normal playback, press PLAY.
To rewind the tape
- Press < in the stop mode. To resume normal playback, press >11 .
- Press REW on the Remote Commander in the stop mode. To resume normal playback, press PLAY.
To locate a scene monitoring the picture (picture search)
- Keep pressing or during playback. To resume normal playback, release the button.
- Keep pressing REW or FF on the Remote Commander during playback. To resume normal playback, release the button.
To monitor the high-speed picture while fast-forwarding or rewinding the tape (skip scan)
- Keep pressing while rewinding or 回 while advancing the tape. To resume rewinding or advancing, release the button.
- Keep pressing REW on the Remote Commander while rewinding the tape, or keep pressing FF on the Remote Commander while advancing the tape. To resume normal rewinding or advancing, release the button.
Pa3nHbIe peXmblBocnpOn3BeDeHnA
ДлЯ ИСПОЛьЗOBАИЙ KHOПОК BИДЕКОHTРОЛУCTАнБИТЕ поЕКЛЮЧАТЕВ POWER B NOLOЖЕНИ VCR.
To view the picture at slow speed (slow playback)
Press SLOW on the Remote Commander during playback. To pause playback, press or PAUSE on the Remote Commander. To resume normal playback, press or PLAY on the Remote Commander again.
To search the last scene recorded (END SEARCH)
Press END SCH on PAGE2 in the stop mode. The last five seconds of the recorded section are played back then your camcorder stops.
Video control buttons on the LCD screen

To play back or pause a tape

To stop a tape

To rewind a tape

To fast-forward a tape
When the playback pause mode lasts for five minutes
Your camcorder automatically enters the stop mode. To resume playback, press 11 or PLAY on the Remote Commander.
Bocnpoun3BeDeHne JeHTbI
ДлпюсмOTpa ИЗбрахенЯ Ha 3aMeДLEнHоI ckOpoCTn (3aMeДLEнHHOE BOCPpON3BedeHne)
HaKmTe BO BpemB OBCpnOn3BeDeHnA KHOkny SLOW Ha npIbTe DnCTaHcUOnHOrO ynpabLeHnA. IyBaBIOJIoHHeHn Nay3bI BOCpnOn3BeDeHnHAxMTe KHOkky uIN PAUSE Ha npIbTe DnCTaHcUOnHOrO ynpabLeHn. IyBaBO3o6HOBJIeHn OblyHOrO BOCpnOn3BeDeHn HAxMTe KHOkky uIN PLAY Ha npIbTe DnCTaHcUOnHOrO ynpabLeHn eue pa3.
Viewing the recording on TV
Connect your camcorder to your TV with the supplied A/V connecting cable to watch the playback pictures on the TV screen. You can operate the playback control buttons in the same way as when you view playback pictures on the LCD screen. When viewing the playback picture on the TV screen, we recommend that you power your camcorder from a wall socket using the AC power adaptor (p. 30). Refer to the operating instructions of your TV.
Open the jack cover. Connect your camcorder to the TV with the A/V connecting cable. Then, set the TV/VCR selector on the TV to VCR. The supplied A/V connecting cable is equipped with an S video plug and a video plug. Use either the S video plug or the video plug depending on the TV. Do not connect both of the plugs to the TV.
ПодсоeДинTe Baшу BИdeOKaМepу K BaшeMy
TeLEBn3Opy c nOMOьLO COeДинTeIbHOrO
ka6eЯ aydno/BuJeO, npINaRaemoro K BaWeJ
BnDEOKaMepe dny npocmToPa
BOcPpON3BODImORo N3OBpaXeHnHa 3KpaHe
TeLEBn3Opa. Bbl MoKeTe NOJIb3OBAbTcR
KHOpKaMn KOHTPOrN BOCPpON3BeDeHn TaKIM
Xe obpa3Om, Ka npr npocmTope
BOcPpON3BODImbIX N3OBpaXeHn Ha 3KpaHe
XKJd. PprnpocmTope BOCPpON3BODImORo
N3OBpaXeHnHa 3KpaHe TELeBn3Opa
peKOMeHdyeTcra NODKlNoUHTb NITaHne K BaWeJ
BnDEOKaMepe OT 3JIeKTPnueckoR cETn C
nomOu bIO ceTeBOrO aIaNTEpa nepeMeHnHO
TOka (cTp. 30). CM. INHCTpyKcHIO nO
3KcnPyataCIn BaWero TEleBn3Opa.
OTkpOte KpbIshky rHe3da. IOpCoeDInHtBe BaUy BnDeoKamepy K TeJeBn3Op cy NOMOuBcoEduHtTeNbHOrKa6eJy ayDIO/BnDEo.3aTeM yCTaHOBtCe cJIeKToPbHbI nepeKJIouYaTeIb TV/VCR Ha TeJeBn3Op B noLOXKeHne VCR. PpINaRaEmbI coeDInHtTeNbHbI Ka6eB ayDIO/BnDEo OcHaueH wTeKePOM S BnDEo IN BnDeoWTEKePOM. IVcNoJIb3yIte WTeKeP S BnDEo IN BnDeoWTEKeP B 3aBNCIMocTn OT MOneIN TeteBn3Opa.He NoDCoeDInHraTe K TeJeBn3Op oBa wTeKePa.
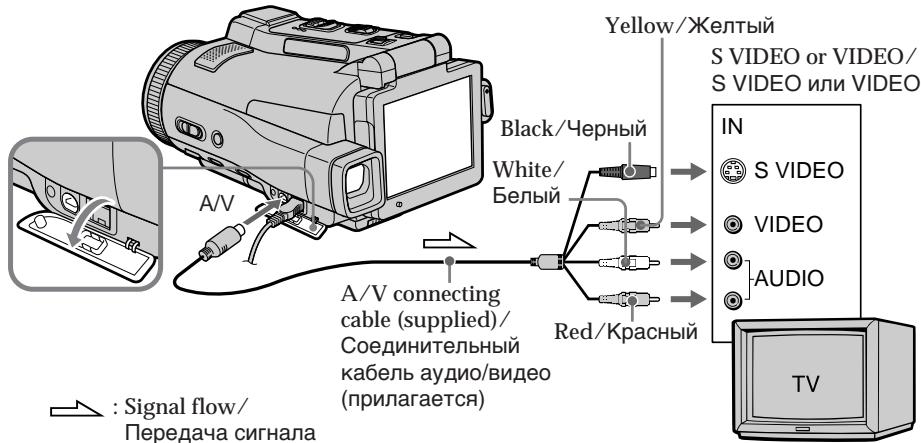
If your TV is already connected to the VCR
Connect your camcorder to the LINE IN input on the VCR with the A/V connecting cable supplied with your camcorder. Set the input selector on the VCR to LINE.
Ecni BaW TeJIeBn3Op yXe npDoceDInHeN K KBM
IopocenHnTe Bauy Bndeokamepy K BxoHomy rhe3ny LINE IN ha KBM c nomoosbo coeHNHTbHoro Ka6ena ayDIO/BnDeo, KOtOpB npnilaraetc K Baue Bndeokamepe. YctahOBnTe celenkTop BxODHORO CnHana Ha KBM bnoJoxehne LINE.
If your TV or VCR is a monaural type
Connect the yellow plug of the A/V connecting cable to the video input jack and the white or red plug to the audio input jack on the VCR or the TV. If you connect the white plug, the sound is an L (left) signal. If you connect the red plug, the sound is an R (right) signal.
If your TV/VCR has a 21-pin connector (EUROCONNECTOR)
- European models only
Use the 21-pin adaptor supplied with your camcorder.
This adaptor is exclusive to an output.
If your TV has an S video jack
Connect using the S video plug to faithfully obtain original pictures. With this connection, you do not need to connect the yellow (video) plug of the A/V connecting cable. Connect the S video plug to the S video jack on the TV or VCR. This connection produces higher quality MICROMV format pictures.
To display the LCD screen indicators on TV Set DISPLAY in to V-OUT/LCD in the mode settings (p. 235).
To turn off the LCD screen indicators, press DISPLAY/TOUCH PANEL.
IcnoIb3yIte 21-ItbIpbKOBbI aIaITeP, KOTOpB I npINarAeTcK BaSeI BnDEokAmpe. 3ToT pa3bEM npEHa3HaueH NCKIOUHTeJIbHO dIyBbIXOHDoro CnHana.
EcIn Baw TeIeBn3Op oShaueH rHe3dOM S BuJeO
Дяп полuyehня 60лee BBICOKOKaYeCTBHeHbIX NCxOДнБИ X3ОБраЖeHи BBINONHnTe NOДСоЕДИЕНЕ C NOMOБьH O STeKepa S BnDEo.
Ppi daHHOM coeHHeHH Bam He HuxHo nOIOcoEHNHTb XeNTbI WTeKepe (BnDeo) coeHNHTeJbHoro Ka6eJra ayDno/BnDeo.
ПодсоeДинITE wTekep S BnIeO K rHe3dY S BnIeO Ha TeJIeBn3ope uJN KBM.
3To coeDInHeHne 06ecnueHbaet 6OJIee BbICOKoe KaueCTBO n3o6paXeHnФopMaTa MICROMV.
Дпг OTO6paхени ИнdkaTopOB 3kpHa JKKД Ha 3kpAne TeIeBu3opa
YcTaHOBnTe OOnuHo DISPLAY B ETC B
yCtHaOBkax MeHIO B NoLoXeHne V-OUT/LCD (CTp. 243).
YtO6bI BByKJIIOuHTb INHДиKaTOpbl 3KpaHa JKKI, HaxMnTe KhONKy DISPLAY/TOUCH PANEL.
Recording still images on a "Memory Stick" in CAMERA mode
You can record still images on a "Memory Stick" in the recording standby mode or while recording on tape in CAMERA mode.
Before operation
Insert a "Memory Stick" into your camcorder.
(1) Set the POWER switch to CAMERA.
(2) In the recording standby mode, keep pressing PHOTO lightly until a still image appears. The CAPTURE indicator appears. The still image will be displayed. Recording does not start yet. To change the still image, release PHOTO, select a still image again, and then press and hold PHOTO lightly.
(3) Press PHOTO deeper.
Recording is complete when the bar scroll indicator disappears.
The image when you pressed PHOTO deeper will be recorded on the "Memory Stick."
BcTaBbTe "Memory Stick" B BaUy BnDeokamepy.
IIOABNTcNINdkaTop CAPTURE.
HenoDbnKHOe n3o6paXeHne OTo6pa3ntcHa 3kpaHe.3aInncb noka eue He Haayalacb.ДЯи3MeHEnH HenoDbNxHoro n3o6paXeHnO rTnyCTnTe KhoNky PHOTO, Bbl6epnTe HenoDbNxHoe n3o6paXeHne CHOba,a 3aTeM haxmTe n depXnTe cnerKa haxatoi Khonky PHOTO.
(3)HaxmTe KhONky PHOTO cnJIbHee.
3aHnscb 6ydt 3aBepseHa, KOrda nChe3HeT INHdkaTOP NIOcbl npOKpyTKn.
Recording still images on a "Memory Stick" in CAMERA mode
Notes
- Do not shake or strike your camcorder when you record still images. Mosaic pattern image may appear.
- You cannot record still images on a "Memory Stick" during following operations ( indicator flashes on the LCD screen.)
Super NightShot
Colour Slow Shutter - END SEARCH
- Wide mode
-Fader - Picture effect
- Digital effect
-MEMORYMIX
"Memory Stick"
See page 128 for more information.
Image size of still images
Image size is automatically set to 640 × 480 .
When you want to record still images in different sizes, use the Memory Photo recording function (p. 144).
When the POWER switch is set to CAMERA
You cannot select image quality mode.
The image quality mode you last selected is used. (The default setting is SUPER FINE.)
See page 135 for more information.
To record still images on a "Memory Stick" during tape recording
- You cannot check an image on the LCD screen by pressing PHOTO lightly.
- During and after recording still images on a "Memory Stick," your camcorder continues recording on tape.
When you press PHOTO on the Remote Commander to record still images
The image when you press PHOTO will be recorded on the "Memory Stick."
To record images with higher quality
We recommend you use the Memory Photo recording function (p. 144).
You cannot record a title.
3aIncb HeNoDBrXhBIX H3o6paXeHn Ha "Memory Stick" BpeKIme CAMERA
Приимейсан<|im_start|>
He Tpncnte n He cTuynte no Bauei BnBeOekampebe BOBpe3aNNcHneNOdBKNhBXn06paXehN. B npotNBom cnyae n06paXaeHne MOKET IMETb Mo3auHbI BnD.
- Bbl He MoXeTe 3aIncbIbAToH HeIOBbIXbHbIe N3o6paKHeNHa "Memory Stick" BO BpeM BblONHeNcEduOuixn Oepaun (Ha 3kpeAn KkD 6ydt MeRaTb HndnKaTop
-Houhanycnpcepmka
-LBeTHaCbeMka C MeJHeHHbIM 3aTBOpOM
- Pexim END SEARCH
-ШпpoКоэКраHHь ржIM
-Φeɪdεp
-3ΦΦeKtBn306paKeHn
-LnDpOBBie 3cppeKtbl
-Pexmm MEMORY MIX
"Memory Stick"
BbI He MoXeTe N3MeHrTb peXIM KaYeCTBa n3o6paKeHn.
Bbl He MoXKeTe 3aNcBbAte TnTp.
Recording images with the flash
The flash pops up automatically. The default setting is auto (no indicator). To change the flash mode, press (flash) repeatedly until the flash mode indicator appears on the LCD screen.
3aIncb n3o6paXeHn co BCnbIshKoI
BcnbIka cpa6aTbIbaet abTomatueeKn. ABtOMaTnueecko cpa6aTbIbAHne (6e3 INHdkaTopa) RBJIeTcYCTAOHBKOI NO yMOJUahIO.ДЯИЗMEHnpeXIMAb BCNbIshKn HaxIMaTe NOBTOPH KONKy (BCNbIshK), NOKA INHdkaTOp peXIMAb BCNbIshKn He NOBHTCn Ha 3kpaHe KKД.
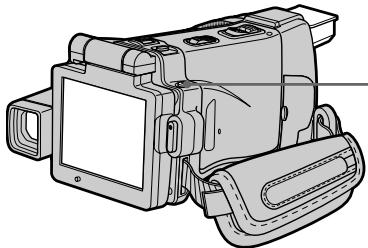
(1ash)/ (BcNbluka)
Each press of ±b (flash) changes the indicator as follows:
车 车 AUTO (No indicator)
When you set RED EYE R in to ON in the menu settings (p. 228), the indicator changes as follows:
→0→0→
Forced flash: The flash fires regardless of the surrounding brightness.
- Auto red-eye reduction: The flash fires before recording to reduce red-eye.
Forced red-eye reduction: The flash fires before recording to reduce red-eye regardless of the surrounding brightness.
No flash: The flash does not fire.
The amount of flash is automatically adjusted to the appropriate brightness. You can also change FLASH LVL to the desired brightness in the menu settings (p. 228). Try recording various images to find the most appropriate setting for FLASH LVL.
Kakdbi pa3 npn haxkTNI KhoNk (BCbIuK) INDnKaTOP n3MeHReTcA CneDyUOIM 06pa3OM:
④ Be3 BCnblIiKn: BcblIka He cpa6aTbIbaeT.
HHTeHCNBHOCTb BCNbIiKn peRynpyeTcA
ABOTMATUeCKn B COOTBETCTBn C RApKoCTbIO.
Bb MOKeTe TAKKe YcTaHOBnTb Ha HyXHyO
rPkoCTb ONuIO FLASH LVL B yCtAHOBkAm MeIO
(cTp.236).PiOnbTaIeTce 3aNaCaTb pa3nHuIbe
n3o6paXeHHn Dn OTBICKaHHn HAnBoJee
noDxOJaIeero 3HaueHHy ycTaHOBKn FLASH LVL.
Recording still images on a "Memory Stick" in CAMERA mode
Notes
- The recommended shooting distance using the built-in flash is 0.3m to 2.5m (31/32 feet to 8 1/3 feet).
- Attaching the lens hood (supplied) or a conversion lens (optional) may block the light from the flash or cause lens shadow to appear.
- Auto red-eye reduction (O) and Forced red-eye reduction (O S) may not produce the desired effect depending on individual differences, the distance to the subject, the subject not looking at the pre-recording flash or other conditions.
- The flash effect cannot be obtained easily when you use forced flash in a bright location.
- When recording with the flash, it takes longer to prepare for image capture. This is because your camcorder starts to charge power for firing after the flash pops up.
- The flash charge lamp flashes while the power for firing is being charged. After charging is completed, the flash charge lamp lights up.
- If it is not easy to focus on the subject automatically, for example, when recording in the dark, use the focal distance information (p. 89) for focusing manually.
If you leave your camcorder for five or more minutes after removing the power source Your camcorder returns to the default setting (auto).
You cannot shoot images with the flash during the following operations:
- Recording on the tape
Super NightShot
Colour Slow Shutter - END SEARCH
- Wide mode
-Fader - Picture effect
- Digital effect
-MEMORY MIX
3aIncb HeNoDBrXhBIX H3o6paXeHn Ha "Memory Stick" BpeKIme CAMERA
Приимейань
- PeKoMeHdyeMoE dIra CbEmKn paCCTOHaNHe npi IcNoJIb3OBAHmN BCTPoeHHoB BCNbIiKN CoCTaBnIeT O 0,3 Do 2,5 M.
-Пикрелене 6нены оьектува (прларетс) ИИnpeобразоватelloю оьектува (пибретаertс OДелвHO) может 6лokнроват CBET BCblIKN ИИ ВьзВТ NOЯВнене TeHOT Oьектува.
BpeKIMe aBTOMaTnueckOro yMeHbWeHHN 3ΦΦeKtA KpaChbIX rIa3 (O) IN npHnyDInTeJIbHOrO yMeHbWeHHN 3ΦΦeKt KaPcHbIX rIa3 (O) JxEJaEMbI 3ΦΦeKT MoKeT He DOCTINATCBa B 3aBNCMOCTN OT INHdINBHyAaJIbHbIX pa3JIuH, PACCTOHN IOObBeKt, TO TTO, CMOTn IIN ObeKt Ha cpa6aTbIBaIOUIOpeD 3aINCbIO BCbTIiKy, IN dpyrNX ycNOBm.
3ΦΦeKT BCbIiKIMoKET 6bITb TpydnoocTnKIMbIM,ecN BblncNoJIb3yeTe npHyDntelbHyIO BCbIiKBycIOBnx rpkoro OCBeueHnI.
-ПиЗЗИССОВВСБИШКОДNOТОВКА СБЕМКЕИЗБРAXЕНИЗ3AHAIMAEТБОЛБЕ ВЕмEH.NTOПОПСXODITNOTOMY,ЧТВБа ВИDEOKAMEPaHaUNHaeTakKymUNPOBaTb ЗAPДДЯOCBSECHENBAСБИШКОПОСLE СРаБаТВИВANHBAСБИSHК.
BoBpemAaKkMnyIzIu3apJaIaOBceUeHnBCbIbKOJIaMnOuKa3apJKnBCbIbKN6byETMgRaT.10cne3aBepWeHn3apJKnIaMnOuKa3apJKnBCblIKN BbICBeTITCRA. - Ecni aBTomataueckar fokycinpobka Ha 0bkeTe 3aTpudHeHa, Hapnimep, npi CbeMeK B TEmHote, nCnIb3yIte NfOpmauIO o fokychom pacctoHH (ctp.89) JnB bInOJIHeHn fokycinpOBKn BpyHyIO.
EcIn Bbl ocTabte Bauy Bundeokamepy Ha nTb nn 6oonee MnHyT Nocne OTCoeDHeHn HCTOCHKA NITAHN
BaSha Bndeokamepa BepHeTcK yctahOBKe nO yMOnuHaHIO (ABTomatNueceKoe cpaBaTaBbAHne).
BbI He MoXeTe BbINOJIHrTb CbEmKy 1306paXeHn Co BCnbIshKo BO BpeMa BblONHeHn CneDyUOxN OepaN:
-3aIncbHaJeHTy
-Houha cynepcbemKa
-LBethea CbemKa C MeDneHHbIM 3aTBoPOM
-PexkIM END SEARCH
-ШиpopokоэКраHHьй ржим
-ФeINDEP
-3ΦΦeKtBn306paKeHn
-LincpoBbIe 3cpeKtbl
- Pekzum MEMORY MIX
Recording still images on a "Memory Stick" in CAMERA mode
The flash does not fire even if you select auto (no indicator) and (auto red-eye reduction) during the following operations:
- NightShot
- Spotlight of PROGRAM AE
- Sunset & moon of PROGRAM AE
- Landscape of PROGRAM AE
- Exposure
- Flexible Spot Meter
3aIncb HeNoDBrXhBIX H3o6paXeHn Ha "Memory Stick" BpeKIme CAMERA
Bcblska He 6ydt cpa6aTbIbAtb, daXe ecn Bbl bIbepeTe aBTOMaTHueckoe cpa6aTbIBAHne (6e3 HndnKaTopa) n O (aBTOMaTHueCKoe yMeHbSeHne 3ΦΦeKta KpacHbIX rna3) BO BpEm BAINONHeHn CJeDyUoNx Onpaun:
-Houhna Cbemka
-PexkIM npoxeKTopHOrO ocBeueHnA yHKcN PROGRAM AE
-Pexim 3axoJa cOnHca n Lyhbl yHKcIN PROGRAM AE
-JIaHdwaΦTHbI pexIm φyHKcIN PROGRAM AE
-3Kcno3nua
-Perynnpyemoe nTHOΦOTometpnn
Self-timer recording
You can record still images with the self-timer. You can also use the Remote Commander for this operation.
Before operation
Insert a "Memory Stick" into your camcorder.
(1) Set the POWER switch to CAMERA.
(2) Press FN to display PAGE1.
(3) Press SELFTIMER.
The (self-timer) indicator appears on the LCD screen.
(4) Press EXIT to make PAGE1 disappear.
(5) Press PHOTO deeper.
The self-timer starts counting down from about 10 with a beep. In the last two seconds of the countdown, the beep gets faster, then the recording starts automatically.
3aHcB no TaMepy camo3anycka
BbMOxTe 3aINcBtBHeNoDBNxHbIe
1306paKeHnC NOMOuTo TaMepa CaMo3anycka.
DnA 3TOI ONePaunn Bb MoXTe TaKke
NCIOB3OBaTb PnBt DnCTaHUNOHOro ynpabJIeHnA.
Ipeed BbINOJIHeHem Oepaunn
BcTaBbTe "Memory Stick" B BaUy BuJeokamepy.
(1)YCTaHOBInTe NepeKJIIOuTaTeIb POWER B NOJIOXeHne CAMERA.
(2)Haxmnte KhoNky FN dIy OTo6paKeHn Hndnkaun PAGE1.
(3)Haxmnte KhoNky SELFTIMER. Ha 3kpaHe XXKД nOraBnTcHnDnKaTOp (TaIMepa cAmo3aNoCka).
(4)HaxmTe KhONky EXIT JnTTOrO, YTo6bl Hndkaun PAGE1 nChe3Ja.
(5)Haxmnte KhoNky PHOTO cunbHee. TaImep cAmO3aNycca hauHnet o6paTHbIOTcUeT pImMePHO OT 10 c3yMMepHBIM CnHaIOM. B NocJeDHe nDe bceKyuNbIo 6paTHoro OTCuTeA 3yMMepHbI CNrHaJI 6yDet 3BuaTb Haue, a 3aTEM ABTomATNuCeKn HauHETcra 3aINCb.
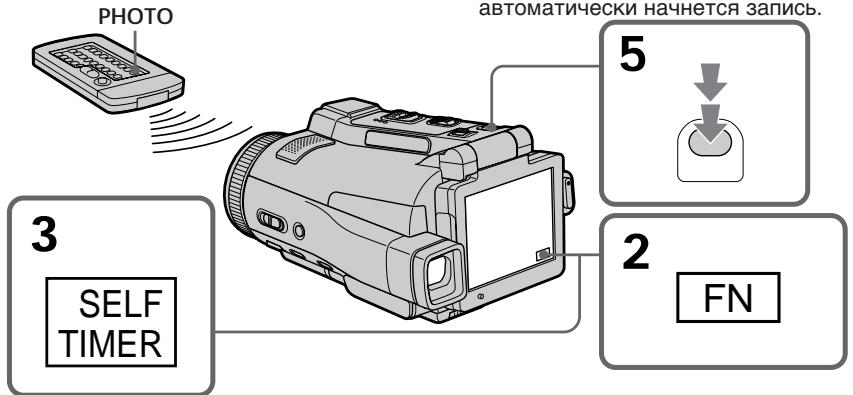
To cancel self-timer recording
Press SELFTIMER so that the (self-timer) indicator disappears from the LCD screen while your camcorder is in the standby mode. You cannot cancel the self-timer recording using the Remote Commander.
Note
The self-timer recording is automatically cancelled when:
- Self-timer recording is finished.
- The POWER switch is set to (CHG) OFF or VCR.
During recording on the tape
You cannot use self-timer recording.
Длг OTMeHbI 3aIncn no TaMepy camo3anycka
Ioka Baasa Bnideokamepa haxoDITcB pexime OxHdAnHa, haxMnte KhONky SELFTIMER, B pe3yNbTate cero HnDnKaTOp () (TaMepa camo3aNyCa) nCye3He T c 3KpaHa KKД. BbI He MOKeTe OTMeHNtB 3aNNCb NO TaMepy camo3aNcycka, NcNoNb3yR NybT dNCTaHcUNHOY npaBNeHnA.
PpimueaHne
Pexim 3aIncn no TaImepy cAmo3anycka 6ydet aBTOMaTnueckn OTMeHEn B CJIyuaX:
- OkohaHn 3aIncNo TaMepy caMo3aynca.
- YctanobknnepekniouateTn POWER b noIoxKeHnE (CHG) OFF nnn VCR.
Bo BpemBbIIOJIHeHn 3aInc Ha JeHTy
BbHe CMOKeTe NcNoJIb3OBA Tb 3aIINCb NO TaIMepy cMo3aNycKa.
Adjusting the white balance manually
PeruInpoBka 6aHaHca 6eIoro BpyHyIO
You can manually adjust and set the white balance. This adjustment makes white subjects look white and allows more natural colour balance. Normally white balance is automatically adjusted.
(1) Set the POWER switch to CAMERA or MEMORY.
(2) Press FN to display PAGE1.
(3) Press MENU, then select WHT BAL in in the menu settings to select a desired white balance mode (p. 228).
HOLD: Recording a single-coloured subject or background
- Recording a sunset/sunrise, just after sunset, just before sunrise, neon signs, or fireworks
- Under a daylight fluorescent lamp
INDOOR
- When lighting conditions change quickly
- In too bright places such as photography studios
- Under sodium lamps or mercury lamps
BbMOxTe OTpeylnpoBaTb yCTaHOBtB
6aJHc 6eIoro BpyHyu. B pe3yIbTaTe
peylnpoBKn 6eIbIe IpeDMeTb 6byT
BbIJIaTeB 6eJIbIMn, a TAKKe 6yDet DOCTINHTY
6OJIee eCTeCTBeHHbI uBeTOBOB 6aJAHC.
06bUHO 6aJAHc 6eIoro peylnpyeTcra
aBTOMATUeCKn.
(1)Установпейсякючateь POWER в положене CAMERA ил MEMORY.
(2)Haxmnte KhoNky FN dIy OTo6paXeHnCTpaHnCbI PAGE1.
(3) Haxmte KhoIky MENU, a 3aTeM BbI6epnte onuH WHT BAL B B yCtahOBkax MeHIO dIy BbI6opa HyxHoro peXIma 6aIahca 6enoro (ctp. 236).
HOLD:Пиздусн OДНUGHTHO npeДмета Ипфога
Adjusting the white balance manually
To return to FN
Press EXIT.
To return to the automatic white balance mode
Set WHT BAL to AUTO in the menu settings.
If the picture is being taken in a studio lit by TV lighting
We recommend that you record in the INDOOR mode.
When you record under fluorescent lighting Select AUTO or HOLD.
Your camcorder may not adjust the white balance correctly in the INDOOR mode.
In the AUTO mode
Point your camcorder at the white subject for about 10 seconds after setting the POWER switch to CAMERA to get better adjustment when:
- You take out the battery for replacement.
- You bring your camcorder from indoors to outdoors holding the exposure, or vice versa.
In the HOLD mode
Set the white balance to AUTO and reset to HOLD after a few seconds when:
- You change the PROGRAM AE mode.
- You bring your camcorder from indoors to outdoors, or vice versa.
PerynipoBka 6aJaanca 6eJoro BpyHyU
You can record a 16:9 wide picture to watch on the 16:9 wide-screen TV (16:9WIDE). Black bands appear on the LCD screen during recording in 16:9WIDE mode [a]. The picture during playing back on a normal TV [b] or a wide-screen TV [c] are compressed in the widthwise direction. If you set the screen mode of the wide-screen TV to the full mode, you can watch pictures of normal images [d].
Bbl MojkeTe 3aIncIbIaTb IuPOKofoopMaTHoe
n3O6paXeHne16:9ДЯ npocMOTpa Ha
IuPOKo3KpaHOM TeNeBUN3ope fOpMaTa 16:9
(16:9WIDE).Bo BpeM 3aIncN B pexIme
16:9WIDEHa 3KpaHe KKJIOBBAITc YepHbIe
noLcB[a].N3O6paXeHne BO BpeM
BOcnpOn3BeDeHnHa O6bUHOM TeNeBUN3ope [b]
HINHa UuPOKo3KpaHOM TeNeBUN3ope [c] 6yJeT
cKaToNo upiHne.EcIn BBy UcTaHOBtpe pexIM
3KpaHa UuPOKo3KpaHnHO TeNeBUN3opa B
NoJIHo3KpaHHbIpeXIM, Bbl CMOxKeTe
Ha6JIIOdaTb 06bUHbIE N3O6paXeHn 6e3
nCKaKeHn [d].

(1) Set the POWER switch to CAMERA.
(2) Press FN to display PAGE1.
(3) Press MENU, then set 16:9WIDE in to ON in the menu settings (p. 229).
(1)Установпейpeклочаель POWER в положене CAMERA.
(2)HaxmTe KhoNky FN dIy OTo6paXeHnCTpaHnCbI PAGE1.
(3)HaxmTe KhoNky MENU, a 3aTe m yctaHOBte OIuio 16:9WIDE B C yctaHOBkax MeHIO B noJIoKeHne ON (cTp.237).
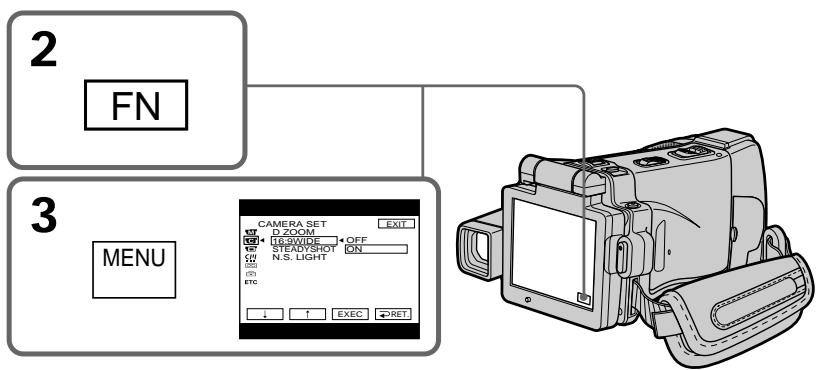
To return to FN
Press EXIT.
To cancel the wide mode
Set 16:9WIDE to OFF in the menu settings.
Дя BO3Bpata K Индакци FM
HaxMMTe KhoNkY EXIT.
In the wide mode, you cannot select the following functions:
- Recording still images
- BOUNCE
- OLD MOVIE
During recording
You cannot select or cancel the wide mode. When you cancel the wide mode, set your camcorder to the recording standby mode and then set
16:9WIDE to OFF in the menu settings.
B wipoko3kpaHHom pexKme Bbl He moKTe BblpaTb cIeDyUOuE cyHKun:
-3aIncb HenoDbVXKbIX N3O6paXeHn
- Pekim BOUNCE
-РекиМ OLD MOVIE
BoBpem3aHncn
BbI He MoXKeTe BbI6paTb IJIN OTMeHnTb UpiPOKo3KpaHHbI pexM.ДЯ OTMeHbI UpiPOKo3KpaHHOrO pexMma yCTaHOBnTe BaUy BnDEOkamepy B pexMm OxNJaHn 3aInCn, a 3aTEM yCTaHOBnTe onuio 16:9WIDE b yCTaHOBkax MeHIO B noJIoKeHne OFF.
Using the fader function
IcnoJb3OBaHneФункци ФeДера
You can fade in or out to give your recording a professional appearance.
BbMOKTe BbINOnHbT NJIaHBoe BBeDeHne NJI BbIEeHne N3O6paXeHn, YTO6bI pNiDaTb BaWei cBemKe npocceccnHaJIbHbI BVd.

[a]
STBY
REC
FADER
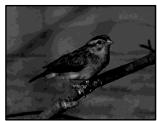
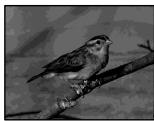


M. FADER (mosaic)/ (mo3aika)


BOUNCE1)2
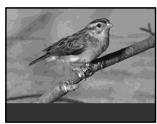

[b]
STBY
REC
MONOTONE
When fading in, the picture gradually changes from black-and-white to colour.
When fading out, the picture gradually changes from colour to black-and-white.
1) You can use the BOUNCE function when D ZOOM is set to OFF in the menu settings.
2) Fade in only
MONOTONE
Pn BBeDeHn n3O6paXeHne 6yDet nocTeenHNO n3MeHrTbCn OT UepHO-6eNo DO uBcTHoro. Pn BblBeDeHn n3O6paXeHne 6yDet nocTeENHO n3MeHrTbCn OT uBcTHoro Do UepHO-6eNo.
1) Bы можete Испьзова Тункцию BOUNCE, Когда onця D ZOOMВ yctahOBkax MeHIO yCTaHOBJIeHa B NOJoxKeHne OFF.
2)ToIbKO BVeDeHne n3O6paXeHnI
(1) When fading in [a]
In the recording standby mode, press FADER until the desired fader indicator flashes.
When fading out [b]
In the recording mode, press FADER until the desired fader indicator flashes.
The indicator changes as follows:

The last selected fader is indicated first of all.
(2) Press START/STOP. The fader indicator stops flashing, then lights up.
After the fade in/out is carried out, the fader indicator goes off and your camcorder automatically returns to the normal mode.
Before pressing START/STOP, press FADER until the indicator disappears.
Note
You cannot use the following functions while using the fader function. Also, you cannot use the fader function while using the following functions:
Super NightShot
Colour Slow Shutter
- Recording still images
- Digital effect
- Memory overlap of MEMORY MIX
While using the BOUNCE function, you cannot use the following functions:
-Zoom
- Picture effect
- PROGRAM AE
- Exposure
- Flexible Spot Meter
-Focus
You cannot select the BOUNCE function in the following mode or functions:
-
D ZOOM is activated in the menu settings.
-
Wide mode
- Picture effect
-PROGRAM AE
When the POWER switch is set to MEMORY
You cannot use the fader function.
PpimmeuHne no yHKun BOUNCE
BbHe MoKeTe BbIbIpaTb yHKUIO BOUNCE npn IcNoIb3OBAHmCNeDyUoX pEKMOB nnn fYHKU:
-Korda onuD ZOOM aKtubn3npoBaHa BycTaHOBkax MeHIO.
-山poko3KpaHbIpeXIM
-3ΦΦeKtbln3o6paXeHna
-PROGRAM AE
EcjinpekeKJIouaTeIb POWER ycTaHOBLeH B noJIOXeHne MEMORY
BbI He cMOxTe IcNoIb3OBaTb cyHKUIO feiepa.
Using special effects - Picture effect
You can digitally process images to obtain special effects like those in films or on the TV.
NEG. ART [a]: The colour and brightness of the picture are reversed.
SEPIA: The picture appears in sepia.
B&W: The picture appears in monochrome (black-and-white).
SOLARIZE [b]: The picture looks like an illustration with a strong contrast.
PASTEL [c]: The picture looks like a pale pastel drawing.
MOSAIC [d]: The picture appears mosaic-patterned.
IcnoJb3OBaHne CpeunalbHbIX 3ΦΦeKTOB - ΘΦΦeKT n3o6paXKeHnA
BbMOKeTe BbIOJIHrTb O6pa6OtKy 1306paXeHNI cIcPpOBbIM MeTOOM dIa IIOJyEHNA CNEUaJIbHbIX 3ΦΦeKToB, KaK B KInHOOpJIbMax NIN B TeJIepeJaayax.
NEG. ART [a]: LcBET NЯРKOCt b N3O6paXeHn 6yDyT HeTaTNBbIMN.
SEPIA: 1306paXeHne 6yJeT B CBeTe cENIN.
B&W: 136paKeHne 6yJeT MOHOxPOMaTHueCKIM (YePHo- 6eIbIM).
(1) Set the POWER switch to CAMERA.
(2) Press FN to display PAGE1.
(3) Press MENU, then select P EFFECT in in the menu settings to select a desired picture effect mode (p. 228).
(1)YcTaHOBInTe NepeKJIIOUaTeIb POWER B noJIOKeHne CAMERA.
(2)HaxmTe KhoNky FN dIy OTo6paXeHHCTpaHnIyI PAGE1.
(3)HaxmTe KhoNky MENU, a 3aTeM BbI6epnte onuHO P EFFECTB uYcTaHOKax MeHIO drr BbI6opa HxKHOpeKIMa eOΦeKTA n3o6paXeHnA (ctp.236).
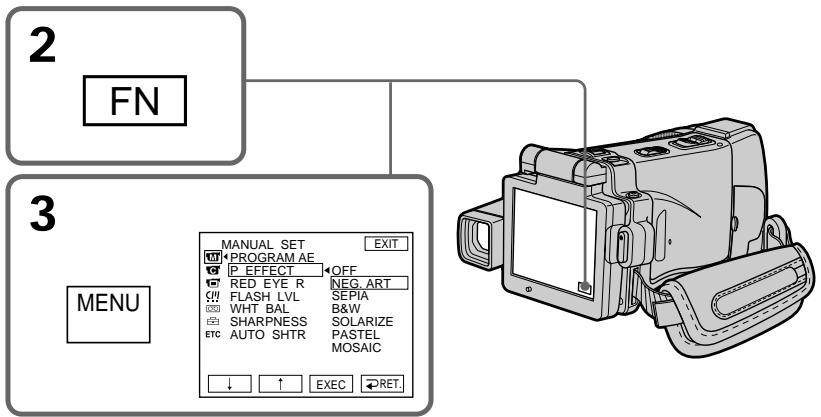
To return to FN
Press EXIT.
To turn the picture effect function off
Select OFF in P EFFECT in the menu settings.
While using the picture effect function, you cannot use following functions:
- Recording still images
- BOUNCE
- OLD MOVIE
When you turn the POWER switch to the other position
The picture effect is automatically cancelled.
ДЯ BO3Bpata K ИнданFN
HakmTe KhoNky EXIT.
ДЯ OTKЛIOUeHnФункuIN 3ΦΦeKTa n3O6paXeHn
UcTaHOBInTe OOnuH P EFFECT B ycTaHOBkax MeHIO B IIOJxHeH e OFF.
Pn nCnoB3OBAHnn FyHKuN 3ΦΦeKta n3o6paXeHH Bb He moKeTe nCNoB3OBA Tb cJeDyUoIne FyHKuN:
-3anncb HeNoDBNXHbIX N3o6paXeHn
- BOUNCE
-OLD MOVIE
EcIn Bbl nobephe TepeKluoyateIb POWERBdpyro neJoxHe
3ФФЕKT n3o6paXeHn8 6yTeT aBTOMaTnueckn OTMeHEN.
Using special effects - Digital effect
You can add special effects to recorded pictures using the various digital functions. The sound is recorded normally.
STILL
You can record a still image so that it is superimposed on a moving picture.
FLASH (FLASH MOTION)
You can record still images successively at regular intervals.
LUMI. (LUMINANCE KEY)
You can swap the brighter area in a still image with a moving picture.
TRAIL
You can record a picture so that an incidental image like a trail is left.
SLOW SHTR (SLOW SHUTTER)
You can slow down the shutter speed. The slow shutter mode is good for recording dark pictures more brightly.
OLD MOVIE
You can add an old movie type atmosphere to pictures. Your camcorder automatically sets the wide mode to ON, the picture effect to SEPIA, and the appropriate shutter speed.
IcnoJb3OBaHne cpeuaJIbHbIX 3ΦΦeKTOB -UnpoBoi 3ΦΦeKT
BbMOxKeTe Do6aBnTb CneuaJIbHbIe 3ΦΦeKtbl K 3aINCbIAEmbIM N3O6paXeHNrM C NOMOuBo pa3NCHbIX cnpoBbIX cyHKm. 3aINCbIAeMbIM 3Byk 6yDet O6bUHbIM.
STILL
Bb moKeTe 3aIcIbIaTb HEnoDbNkHoe n3O6paKHeHne, KOTope 6yJeT HaIarAeTbCnHa dBNkUyueecr n3O6paKHeHne.
FLASH (FLASH MOTION)
Bb mojkeTe 3aIncsbIbTaH HeNoDbVHXHbIe
n3o6paXeHnB B NocJeDoBaTeJIbHOCTN Upe3
IOCTOAHHbIe INHTepBaJIbI.
LUMI. (LUMINANCE KEY)
Bb moKeTe 3aMeHrTb npKne MeCtHa HnOoBnXhOM n3o6paXeHn Ha DnKxuIeCn n3o6paXeHn.
TRAIL
Bb moKeTe 3aInCbBaTb N3o6paXeHne TaK, YTO 6yJeT OCTaBaTbCnO6OuHoe N3o6paXeHne B BuIe CNeJa.
SLOW SHTR (SLOW SHUTTER)
BbMOKeTe 3aMeDnITb cKOpOCTb 3aTbopa.
Pexm MeIeHOro 3aTbOp aRbIeTcra IOxOJIuIM dIg 3aINc TeMHbIX N3O6paXeHn B 60lee npKOM CBeTe.
OLD MOVIE
BbMOxKeTe npINBHOCnTb aTMocfepy
CTapHHNHO KInHO B n3O6paXeHn. Ba7a
BnDEOKaMepa 6ydt ABToMaTuYeCKn
YCTaHaBnBaTb WnPOKo3KpaHbI pExm B
PNOJoxHe N, a 3pFekr N3O6paXeHn B
PNOJoxHe SEPIA, IN BbICTaBnTb
COOTBeTCTByIOUyIO CKOpOcTb 3aTBopa.
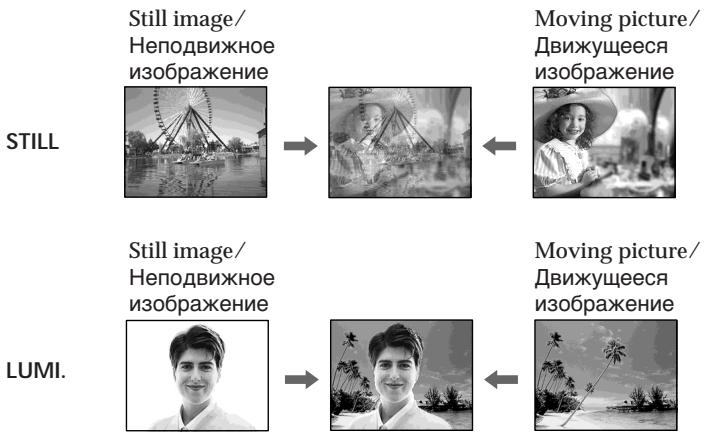
IcnoJb3OBAHHe cneuaJIbHbIX 3ΦΦeKTOB -LcnpoBOI 3ΦΦeKT
(1) Set the POWER switch to CAMERA.
(2) Press FN and go to PAGE2.
(3) Press DIG EFFT. The DIG EFFT screen appears.
(4) Press a desired digital effect mode. In the STILL and LUMI modes, the still image is stored in memory.
(5) Press - / + to adjust the effect.
Items to adjust
| STILL | The rate of the still image you want to superimpose on the moving picture |
| FLASH | The interval of frame by frame playback |
| LUMI. | The colour scheme of the area in the still image which is to be swapped with a moving picture |
| TRAIL | The vanishing time of the incidental image |
| SLOW SHTR | Shutter speed. The larger the shutter speed number, the slower the shutter speed. |
| OLD MOVIE | No adjustment necessary |
(6) Press OK. The display returns to PAGE2.
(1)Установпейреклочаель POWER в положене CAMERA.
(2)HaxmTe KhoIky FN n nepeiDnTe ha cTpaHnU y PAGE2.
(3)HaKmTe KhONky DIG EFFT. NOrBntcJ 3kpaH DIG EFFT.
(4)Haxmnte HnDnKaunu HxHoro peKmua ndpOBOrO 3oPekTa.BpeKmMax STILL n LUMI. HenoDbNuxHoe n3o6paXeHne 6ydet coXpaHeHO B nAmrTn.
(5)HaKmMaTe KHOpKn - / + dansperylnipOBkn 3ΦΦeKta.
PerynupyembIe xapaKtepcntuK
Press EXIT after step 6.
To cancel the digital effect
Press OFF in step 3. The display returns to PAGE2.
Notes
- The following functions do not work during digital effect:
Super NightShot
Colour Slow Shutter - Recording still images
-Fader - The PROGRAM AE function does not work in the slow shutter mode.
- The following functions do not work in the OLD MOVIE mode:
- Wide mode
- Picture effect
- PROGRAM AE
When you turn the POWER switch to the other position
The digital effect will be automatically cancelled.
When recording in the slow shutter mode
Auto focus may not be effective. Focus manually using a tripod.
Shutter speed
| Shutter speed number | Shutter speed |
| SLOW SHTR 1 | 1/25 |
| SLOW SHTR 2 | 1/12 |
| SLOW SHTR 3 | 1/6 |
| SLOW SHTR 4 | 1/3 |
You can select PROGRAM AE (Auto Exposure) mode to suit your specific shooting requirements.
SPOTLIGHT
This mode prevents people's faces, for example, from appearing excessively white when shooting subjects lit by strong light in the theatre.
PORTRAIT (Soft portrait)
This mode brings out the subject while creating a soft background for subjects such as people or flowers.
SPORTS (Sports lesson)
This mode minimises shake on fast-moving subjects such as in tennis or golf.
BEACH&SKI
This mode prevents people's faces from appearing dark in strong light or reflected light, such as at a beach in midsummer or on a ski slope.
SunSETMOON (Sunset & moon)
This mode allows you to maintain atmosphere when you are recording sunsets, general night views, fireworks displays and neon signs.
LANDSCAPE
This mode is for when you are record distant subjects such as mountains. Also it prevents your camcorder from focusing on glass or metal mesh in windows when you are recording a subject behind glass or a screen.
BbMOxTe Bb6paTb pexIM PROGRAM AE (aBTOMaTHuecka3KcN03uIN) B COOTBeTCTBm C BaAMM OOCbIMn Tpe6oBaHnAm N C bEmke.
SPOTLIGHT
JaHHbI pexHM IpeDoTbpaaeeT, K npImepy, liuza IIOJeO Tn36bIToOH BoJIIN3HbI npi CbeMeKc OBeKToB,OCBeUeHHbIX CNJbHbIM CBETOM B TeaTpe.
PORTRAIT (Märkni nopTeHbI peKIM)
3TOT pexIM PO3BONrE BbIeINITb O6BeKT npn CO3aHm MfKOrO fOHa dIra O6BeKTOB IN IOxODIT IJIa CbEMKn, HApPImep, IIODeI NIN CBETOB.
SPORTS (Pexm CnpTbIX COCTaHn)
3TOPTeKIMNIO3BOJHETMHNHM3INPOBaTbДрЖаHHe npCbEMKe 6bICTpO DnBxKyUxxCnIpeDMeTOB,HaPmEep,piuIrpeB TeHHc NIIrOJIbΦ.
BEACH&SKI
3TOT pexkIM npenATCTByet NOTEMHeHIO IuILOJeB 3OHe CINbHOrO CBeta NIN OTpaxKeHHoro CBeta, HApnpMeP, Ha NNJaXe B pa3rap NeTa NIN Ha NbIXHom CKIoHe.
SUNSETMOON (Pekim 3axo#a coHua n lyHbI)
3TOT pEXKIM N03BOJnE8 T TOUHOCTN OTpAXaTb
OBCTAHOBKY pIn CBeMKe 3axOIOB COINHa,
OBxHx HOHyBIX BnIOB, fpeIepBepKOB IN
HEOHOBbIX peKlAm.
LANDSCAPE
3TOT pexmI NO3BONAEt BbINOJHnTb CbEmKy OTdAneHHbIX o6BeKTOB, TaNX, KaK rOpbl. OH TaKKe IpeoTbPaUaEaT fokycuPobKy BaWei BnDeOkamepbHa CTekIO nn MeTaIInueckyo peWetKy Ha OKhax, KOrDa BbI bIoNHeTe 3anncb O6BeKToB nO3aDn CTekNa nn peWetKn.


(1) Set the POWER switch to CAMERA or MEMORY.
(2) Press FN to display PAGE1.
(3) Press MENU, then select PROGRAM AE in in the menu settings to select a desired mode (p. 228).
(1)Установпейсякючateь POWER в положене CAMERA ин MEMORY.
(2)HaxmTe KhoNky FN dIy OTo6paXeHHCTpaHnIyI PAGE1.
(3)Hakmte KhoNky MENU, a 3aTeM ykaKnte onuio PROGRAM AEByctaHOBkax MeHIO DnA BbIbopa HyxHoro peKIma (cTp.236).
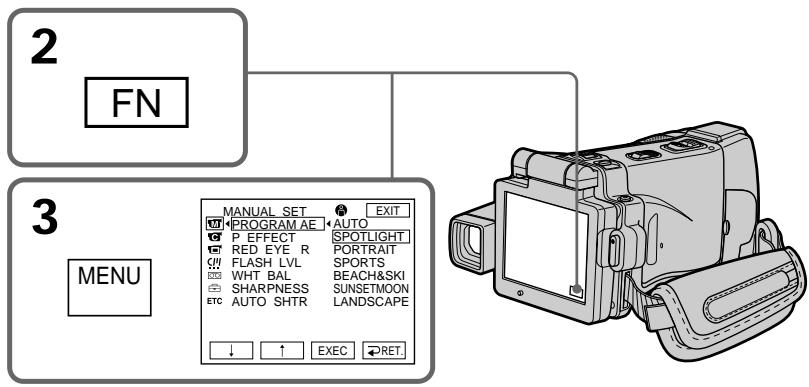
To return to FN
Press EXIT.
To turn the PROGRAM AE off
Select AUTO in PROGRAM AE in the menu settings.
Notes
-
Because your camcorder is set to focus only on subjects in the middle to far distance, you cannot take close-ups in the following modes:
-
Spotlight
- Sports lesson
-
Beach & ski
-
Your camcorder is set to focus only on distant subjects in the following modes:
Sunset & moon
- Landscape
The following functions do not work in PROGRAM AE:
Colour Slow Shutter
- BOUNCE
- Slow shutter
- OLD MOVIE
Дя BO3BpaTа KИндикади FN
HaxmTe KhoNky EXIT.
- The PROGRAM AE does not work in the following cases (The indicator flashes):
NightShot - NightFraming
- To record images on a "Memory Stick" using the MEMORY MIX.
- When you set the POWER switch to MEMORY, sports lesson does not work. (The indicator flashes.)
While WHT BAL is set to AUTO in the menu settings
The white balance is adjusted even if the PROGRAM AE is selected.
You can adjust the following functions while using the PROGRAM AE:
- Exposure
- Flexible Spot Meter
If you record under a discharge tube such as a fluorescent lamp, sodium lamp or mercury lamp
Flickering or changes in colour may occur in the following modes. If this happens, turn the PROGRAM AE off:
- Soft portrait
- Sports lesson
ΦyнкцЯ PROGRAM AЕ He pa6oTaetВ cIeIduOuix ClyuaX (ИнДиКaTOp MnraeT):
-BpeKmHeHOHcBEmKn
-BpekmeHouHoYcTaHOBKnKaJaPa
-ПиЗлпси n3обрахени Ha "Memory Stick" cИнрьзованemФункшIMEMORYMIX.
- Ecni Bby yctaHOBnte nepeKlnOuataJIb POWER B pIoJoxKeHne MEMORY, pexIM cNoptNBbIX COCTaHn pa6oTaTb He 6yJeT. (INHdNKaTOp Mmraet.)
Ioka onzra WHT BAL B yctahOBkax MeHIO yctaHOBJIeHa B noJoxHeA AUTO
BaIaHc 6eJorO 6yJeT peYInpoBaTbCra, daKe ecnBbIbpaHa yHKzma PROGRAM AE.
Bb moKTe BbInOnHb terpyInpOBy cJeDyUoXx FyHKcN BO BpeMn CnoJb3OBAHn FyHKcN PROGRAM AE:
-3Kcno3nU
-Perynnpyemoe nTHOΦOTOMetpn
Ecnn Bbl BbINOJIHReTe 3anncb C nCNOJIb3OBAHnEM ra3Opa3PAnHO JAmNbl, TAKOH, KAK fnyopecueHTHa, HATPneBaJ nn pTyTHa JAMNa
B cneyuiox npexmMax moryT Bo3HnKHyTb MepaHne nIIN 3MeHeHnI CBeTOB0I NaJIInTpbl.
EcnI NTOpn3oNdET, BbIKJIouHITe cyHKcIIO PROGRAM AE:
Adjusting the exposure manually
You can adjust and set the exposure. Normally the exposure is automatically adjusted. Adjust the exposure manually in the following cases:
- To make a fine exposure adjustment
- To shoot a bright subject against a background
- To record dark pictures (e.g. night scenes) faithfully
(1) Set the POWER switch to CAMERA or MEMORY.
(2) Press FN to display PAGE1.
(3) Press EXPOSURE. The EXPOSURE screen appears.
(4) Press MANUAL.
(5) Adjust the exposure using - / +
Press EXIT after step 6.
To return to the automatic exposure mode
Press AUTO in step 5. The display returns to PAGE1.
When you adjust the exposure manually, the following functions do not work:
-Backlight
Colour Slow Shutter
Your camcorder automatically returns to the automatic exposure mode:
NightShot
- If you change the PROGRAM AE mode
- NightFraming
Примеане
PnBbIOpJIHeHmpeyIIpOBK3KcIOn3NIM BpyHyIO He pa6oTaIOT cJeDyIOUneФyHKUm:
-3aDnHnNoDCBETKa
LBeTHaCbEmKa C MeIeHHbIM 3aTBOpOM
Bawa bVideokamaepa aBTOMaTueckn BepHeTcB pexm aBTOMaTuecko 3KcNo3nM:
-BpeKmHeHOHcBEmKn
-Ες Μυ Bγι ΑνημερχμΜ PROGRAM ΑE
-B pexime HouHou yctahOBKn KaIpa
Using the spot light-metering mode - Flexible Spot Meter
You can take a picture with the appropriate exposure automatically for just the point you want to focus on and with its exposure fixed. Use the Flexible Spot Meter mode in the following cases:
- The subject is backlit.
- When there is strong contrast between the subject and background such as with a subject that is on stage and lighted by a spotlight.
(1) Set the POWER switch to CAMERA or MEMORY.
(2) Press FN to display PAGE1.
(3) Press SPOT METER. The SPOT METER screen appears.
(4) Press the desired area in the frame on the LCD screen. The SPOT METER indicator flashes on the LCD screen. The exposure of the point you selected is adjusted.
(5) Press OK. The display returns to PAGE1.
IcnoJb3OBAHne pexnMa CBetOBORoΦOTometpnueCKoro PHTA-PeryJnpyEmoe PANTHOΦOTometpn
BbMOxTe CnTb N3O6paXeHne C HxKHO 3KcNo3nUne, yCTaHOBJIeHHo ABOTMaTHueCKu 3aФNKCuPBOaHHo Ha ToUke, Ha KOTOpoi Bb XOTHe BByIOnHnTb QOKyCupOBky. IcNoJIb3yIte peXIMpeYJInpyeMOro PAnTHa QOTOMeTpnn B cJeDyUOxN ClyUaX:
-Obekt Ha pohe 3aDHei PoDCBeTKn.
-Пи habлчи сиьного контраст мжду obbeKtOM И ранример, пи CBemKe obbeKtHa cц He, OcBeueHOrO JyUOM npoxeKTopa.
(1)Установпейсякючateь POWER в положене CAMERA ил MEMORY.
(2)Haxmnte KhoNky FN dny OTo6paXeHHCTpaHnCi PAGE1.
(3)HaxmTe KhoNky SPOT METER. IorBHTcA 3KpaH SPOT METER.
(4)HaXMMTe HxKHyIO 6bIacTb B KaIpe 3KpaHa XKJ. Ha 3KpaHe KKJ 6yJeT MIRaTb INHINKaTOp SPOT METER. 3Kcno3nua Bbl6paHHo Bamu ToCkN 6yJeT yCTaHOBJIeHa.
(5)HaxmTe KhoNkY OK. INdkaunBepHeTcK C tpaHnue PAGE1.
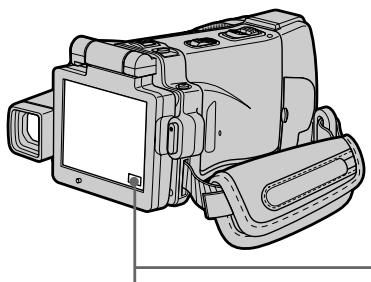
2
FN
To return to FN
Press EXIT after step 5.
To return to the automatic exposure mode
Press AUTO in step 3. The display returns to PAGE1.
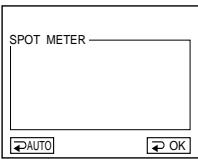
3
SPOT METER
Длв BO3ВраТКИнДикалиFN
HaxmTe KhONky EXIT nocJe BbINOJIHeHHn DeiCTBnIyHKTa 5.
ДЯВОЗВРаТВрекIM
abTomatnuecko3Kcno3n
The following functions do not work during the Flexible Spot Meter:
-Backlight
Colour Slow Shutter
Your camcorder automatically returns from the Flexible Spot Meter to the automatic exposure:
- NightShot
- If you change the PROGRAM AE mode
- NightFraming
PpimueaHne
Cneyuüne fynkun He pa6oTaIOT npnNCNoB3OBAHN peryInpyeMOrO pTHaΦoTomeTpnn:
-3aHnHnOoCBeTKa
-LiBETHaCbEMKa CMeIeHHbIM 3aTBoPOM
Baasa Bnideokamaepa aBTOMaTueeCKn BepHeTc n3 peXkMa peryInpyEmo rTHa foToMeTpnn K aBTOMaTueeCKO 3KcNo3nU:
-BpeximeHouhoCbeMKn
-Есни Выизmedипешким PROGRAM AE
-BpeximeHouHouyctahOBKnKaIpa
Focusing manually
You can gain better results by manually adjusting the focus in the following cases. Normally, focus is automatically adjusted.
In MEMORY mode you can adjust the focus manually with the image enlarged to twice the size.
- The autofocus mode is not effective when shooting:
- Subjects through glass coated with water droplets
- Horizontal stripes
- Subjects with little contrast with backgrounds such as walls or the sky
- When you want to change the focus from a subject in the foreground to a subject in the background
- Shooting a stationary subject when using a tripod
Pуная Фокусювka
BbMOjkeTe nOlyuHTbIyUHepe3yJIbTaTbI nyTEMpyHnOperyJInpOBKnΦokyca B cJeDyUoXnCnyaXx.O6bHuOΦokyc perJInpyeTcABTomAtueckn. B peXmME MEMORY BblMOjkeTe oTpeRyJInpOBaTbΦokychoe pacCTOHNHe BpyHyUcN3O6paKeHHem,yBeJIuYehHbIM Do DBoHOro pa3Mepa.
- Pexk m aTOMaTnuecko fokycnpobkn yBJIeTcH He3fkeKTnBbIM npu BblNOJIHeHm CbeMKn:
-ObbeKToB Yepe3 NOKpbIToE KaJIaMn CTekJIO
-Topn3OHTaIbHbIX NOLOC
-06bekTOB C MaJIOI KOHTpactHcOCTbI Ho TaKOM ΦOHe, KAK CTeHb IJIIN He6O - Ecni Bby XOTNTe BbIOnJIHITb N3MeHeHHe
ФOKycuPObKn C obEkTa Ha nepeJdHem ПlaHa
Ha obEkT Ha 3aJdHem ПlaHa
-При ВьлОнHeHи CьЕмКСТацИоHapHOrO 06БeКТСИСПОЛБ3ОВАнHМ TpeHOrI


(1) Set the POWER switch to CAMERA or MEMORY.
(2) Set FOCUS to MANUAL. The _ indicator appears.
(3) Turn the focus ring to sharpen focus.
To return to the autofocus mode Set FOCUS to AUTO.
About expanded focus
If you set EXPANDED F in to ON in the menu settings (p. 229) in MEMORY mode, the indicator appears and the image is enlarged to twice the size. The focal distance information is also displayed. Adjustment is completed, the image returns to its original size.
To focus precisely
It is easier to focus on the subject if you adjust the zoom to shoot at the "W" (wide-angle) position after focusing at the "T" (telephoto) position.
When you shoot close to the subject Focus at the end of the "W" (wide-angle) position.
changes as follows:
when recording a distant subject
when the subject is too close to focus on
Focal distance information is displayed for about three seconds on the LCD screen in the following cases:
- When switching the focus adjustment mode from autofocus to manual
- When turning the focus ring
Focal distance information
- This information aids focusing if it is not easy to focus on the subject, for example, when recording in the dark. Use this information as a rough guide to get a sharp focus.
- You cannot get correct information if you have attached a conversion lens (optional) to your camcorder.
PuchanФokycnpobka
HnDnKaun 6yDen H3MeHrTbCnJeDyUoMn 06pa30m:
πpi 3aπnc ydaJIeHnHO oBekTa
ecnObeKT HaxoNTcCNIWKOM 6Nt3KO, TTo6bl BbIOnHnTb POKcUPOBky Ha Hero
HOpMaun OokcHOM paCtOHHn OTo6paXaETcHa 3KpaHe KKDb TeueHne npImepHo Tpex cekyHb CneDyUoXn Clyuayx:
Using the spot focus mode - Spot Focus
You can take a picture with the appropriate focus automatically for just the point you want to focus on and with its focus fixed.
(1) Set the POWER switch to CAMERA or MEMORY.
(2) Set FOCUS to MANUAL.
(3) Press FN to display PAGE1.
(4) Press SPOT FOCUS. The SPOT FOCUS screen appears.
(5) Press the desired area in the frame on the LCD screen.
The SPOT FOCUS indicator flashes on the LCD screen. When the point you selected is correctly focused, the SPOT FOCUS indicator stops flashing.
(6) Press OK to return to PAGE1.
IcnoJb3OBAHne peKIma PAnTha 0OKycnPOBKn - PAnTHo 0OKycnPOBKn
BbMOKeTe CnHTb N3O6paXeHne C HxKhbIM OKyCOM, yCTaHOBJIeHHbIM aBTOMaTNUeCKN 3aФнКcIpuBaHbIM Ha ToUke, Ha KOTOpoB Bbl XOTNe BbINONHtB OKycuPbKy.
(1)Установпейсякючateь POWER в положене CAMERA ил MEMORY.
(2)Установпей onцино FOCUS в положене MANUAL.
(3)HaxmTe KhoNky FN dIy OTo6paXeHnCTpaHnCbI PAGE1.
(4)HaXMMTe KHOIIky SPOT FOCUS. IIOBHTcIaKpaH SPOT FOCUS.
(5)Haxmnte Hxkyu oIacTb B KaIpe 3KpaHa XKJ. Ha 3KpaHe XKJ 6yJeT MnRaTb INHdNkATop SPOT FOCUS.KoJa BB6paHHb Bamn yUacToK 6yJeT cfoKycuPobAH KoppeKTHO, INHdNkATop SPOT FOCUS npeKpaTIT MMraHne.
(6)HaxMMTe KhoNky OKДЯ BO3BpaTa KCTpaHnue PAGE1.
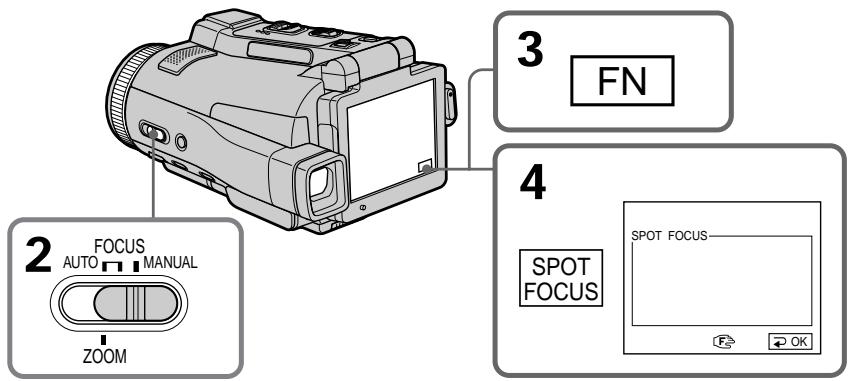
To return to FN
Press EXIT after step 6.
To return to the autofocus mode
Set FOCUS to AUTO.
Note
When adjusting Spot Focus, the following modes do not work:
-Backlight
-Fader
Focal distance information
It is not displayed on the screen.
Playing back a tape with picture effects
During playback, you can process a scene using the picture effect functions: NEG. ART, SEPIA, B&W and SOLARIZE.
(1) Set the POWER switch to VCR. In the playback or playback pause mode, press FN to display PAGE1.
(2) Press MENU, then select P EFFECT in in the menu settings to select a desired picture effect mode (p. 228). See page 76 for details of each picture effect function.
Bocnpo3BeDeHne JeHtbi C əΦΦeKtAmn n3o6paXkeHnA
Bo BpemBocpnOn3BeJeHnBbMoKeTe BUNoIN3MeHrTb N3OpaJxHeNc POMoUbO CNeIyUoXnФyHKuN 3ΦΦeKToB N3OpaJxHeNr: NEG.ART,SEPIA,B&W n SOLARIZE.
(1)YctaHOBInTe nepeKJIIOUcATEb POWER B noJIOKeHnE VCR.BpeXmE BOCpOIN3BeDEHHnI INI pAY3bl BOCpOIN3BeDEHHnI HaxMInTe KhONkY FN, YTO6bI OTo6pa3NtB CTpaHnCy PAGE1.
(2)HaxmTe KhoNky MENU, a 3aTeM Bb6epnte onuHO P EFFECTB uYcTaHOBkax MeHIO IyBb6opa HxKHO pexima 3o6paXeHnra (ctp. 236). Iopro6hble CBeDeHnRA IO KaJdoi n3 cyHKnI 3o6paXeHnra npBVeDeHbHa cTp.76.
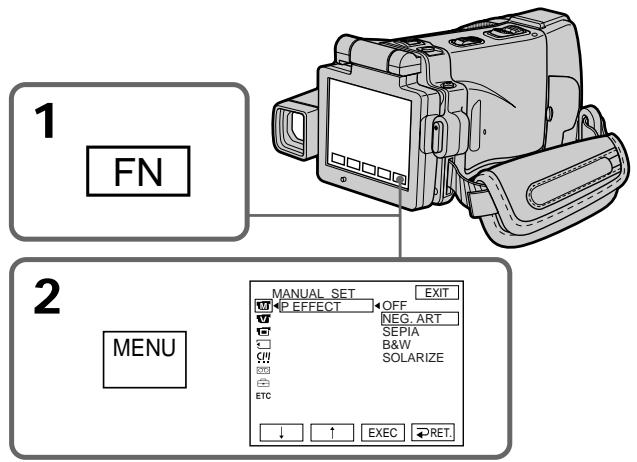
To return to FN
Press EXIT.
To cancel the picture effect function
Set P EFFECT to OFF in the menu settings.
- You cannot process externally input scenes using the picture effect function.
- You cannot record images on a tape on your camcorder while you are processing the image using the picture effect function. However, you can record images on a "Memory Stick" (p. 156, 170), or on a VCR using your camcorder as a player.
Pictures processed by the picture effect function
Pictures processed by the picture effect function are not output through the i.LINK (MICROMV Interface).
When you turn the POWER switch to the other position or stop playing back
The picture effect function is automatically cancelled.
Приимechanicals
BbI He MoXeTe BUNOIN3MeHrTb N3o6paKeHnIOT BHEWHNX NCTOCHNKOB C NOMOuHbO yHKuN3cpeKta N3o6paKeHnI.
BbI He MoKTe 3aInCbIbTa Ha BaSei BnDEOkampe H3O6paXeHnHa IeHTy, Noka BbI O6paBaTbIaBeTe H3O6paXeHne, NcNoB3yU fYHKuHIO 3ΦPeKTA H3O6paXeHn. OdHaKO, Bbl MoKTe 3aINCbIbTa H3O6paXeHn Ha "Memory Stick" (cTp. 156, 170) nIi Ha KBM, nCNoB3yB Aawy BnDEOkamepy B KaueCTbe nIeepa.
N3o6paXeHn, 6pa6oTaHHbIe C nOmoBIO cyHKUIM 3ΦΦeKTA N3o6paXeHn
CnHnI n3o6paXeHn, o6pa60TaHHbIX C nOmoIbu OfynKcun 3ΦΦeKta n3o6paXeHn, He nepeJaETca Ype3 rHe3do i.LINK (nHTeppeic MICROMV).
Ecnn Bbl nobephe Te nepeKlnouateIb POWERB dpyroe noJoxKeHne nn ocTaHOBnTe Bocnpoun3BeJeHne
Playing back a tape with digital effects
Bocnpon3BeDeHne JeHTbI C cnΦpOBbIMN ΘΦΦeKtAmn
During playback, you can process a scene using the digital effect functions: STILL, FLASH, LUMI and TRAIL.
(1) Set the POWER switch to VCR. In the playback or playback pause mode, press FN and go to PAGE2.
(2) Press DIG EFFT. The DIG EFFT screen appears.
(3) Select a desired digital effect mode. In the STILL or LUMI mode, the picture that you select the mode is stored in memory as a still image.
(4) Press - / + to adjust the effect. See page 78 for details.
(5) Press OK. The display returns to PAGE2.
Bo BpemB OocnpOn3BeJeHnB, BbIMoKeTe BUNOIN3MeHbT N3ObpaXeHne C NMOUcIbO CJIeDyIOxN cyHKmI cNpPoBbIX eΦΦeKToB: STILL, FLASH, LUMI. n TRAIL.
(1)YcTaHOBnTe nepeKlnOuateJIb POWER B noJoxeHne VCR.B peXmE BOCpOn3BeJeHnI nnI nay3bl BOCpOn3BeJeHnI NaXMITE KhONky FN n nepeiDnTe Ha cTpaHnCy PAGE2.
(2)HaxmTe KhONky DIG EFFT. IORBntcJ 3KpaH DIG EFFT.
(3)Bb6epnte HxKhblpeXnM uΦpOBOrO 3ΦΦeKta.BpeXnme STILL nLUMI.B MOMENT Bb6opa peXnma n3o6paXkHeNe 6ydt 3aHeceHO B nAmrTb KaK HeNoDbNkHoe n3o6paXkHeNe.
(4)HaxmTe KhoNky - / + IypeRyInpOBKn 3ΦΦeKta. PoiPob6HbIe CBeJeHnI npBVeDeHbI Ha cTp.78.
(5)HaxMMTe KhoNkU OK. INHdNkaunBepHeTcK C tpaHnue PAGE2.

To return to FN
Press EXIT after step 5.
To cancel the digital effect function
Press OFF in step 2. The display returns to PAGE2.
- You cannot process externally input scenes using the digital effect function.
- You cannot record images on a tape on your camcorder while you are processing the image using the digital effect function. However, you can record images on a "Memory Stick" (p. 156, 170), or on a VCR using your camcorder as a player.
Pictures processed by the digital effect function
Pictures processed by the digital effect function are not output through the i.LINK (MICROMV Interface).
When you turn the POWER switch to the other position or stop playing back
The digital effect function is automatically cancelled.
Приимechanicals
BbI He MoXeTe BUNOIN3MeHHTb N3o6paKeHnIOT BHeUHHN IXTOUYHKOB C NOMOuHo yHKuNcUΦpOBOrO 3ΦΦeKtA.
BbI He MoKTe 3aIncbIbTa bHa BaIeB uIeOkaMepe I3o6paXeHnHa IeHTy, noka BbI o6paBaTbIbAte I3o6paXeHne, nCNoB3yur fYHKcIIu cIqPbOro 3cΦcEKeTb. Ondako, Bbl MoKTe 3aIncbIbTa I3o6paXeHnHa "Memory Stick" (cTp. 156, 170) nIi Ha KBM, nCNoB3yR BaWy BIndeOkaMepy B KaueCTbe nIeepa.
N3o6paXeHn, o6pa6oTaHHbIe c nOmoUbO cyHKcMn UΦpOBOrO 3ΦΦeKta
CnHnI n3o6paXeHn, o6pa6oTaHHbIX C nmoOuI O fynKUm UΦpOBOr OΦΦeKtA, He nepeJaTeCaypeE3 rHe3do i.LINK (iHTepFeic MICROMV).
Ecnn BbI nobepheTe nepeKluoyateIb POWERBdpyroe noloxhenne IIN octaHOBnTE BOCPON3BeHHe
Enlarging images recorded on tapes - Tape PB ZOOM
YBéniuheHne 3aPiNcaHHbIXHa JeHTbI n3O6paJxHenn- ΦyHKZnP B ZOOM JeHTbI
You can enlarge playback moving pictures recorded on tapes. Besides the operation described here, your camcorder can enlarge still images recorded on a "Memory Stick" (p. 183).
(1) Set the POWER switch to VCR. In the playback or playback pause mode, press FN and go to PAGE2.
(2) Press PB ZOOM. The PB ZOOM screen appears.
(3) Press the area you want to enlarge in the frame on the PB ZOOM screen. The area you pressed moves to the centre of the LCD screen, and the playback image is enlarged to twice the size. If you press the other area again, the area moves to the centre of the LCD screen.
(4) Adjust the zoom ratio by the zoom lever. You can enlarge the image from 1.1 times up to five times its size. "W" side: Decrease the zoom ratio. "T" side: Increase the zoom ratio.
BbMoKeTe yBeInuHbTaB BocnpOn3BOdImbIe DnKxUmeC8 n3O6paXeHn, 3aIncaHbIe Ha IeHTax. Kpome OIncaHNoI 3deCb opeaun, Baasa BnuDeokamepa MoKeT yBeInuHbAtb HenoDnBxHbIe n3O6paXeHn, 3aIncaHbIe Ha "Memory Stick" (cTp. 183).
(1)YcTaHOBInTe nepeKlnOuChaTeIb POWER B noLoXeHnE VCR.B pexKmHe BOCpOn3BeDeHnI nnNay3bl BOCpOn3BeDeHnI NaXMnTe KhoNkFy FN n nepeiDte HcTpaHnCy PAGE2.
(2)HaxMMTe KhONKy PB ZOOM. IORBnTcR 3KpaH PB ZOOM.
(3)Haxmnte Ha 3kpahe PB ZOOM Ha o6nactb, KOtopyO Bby XOTnTe yBvIuHTb B KaIpe. O6nactb,Ha KOTOpYo Bby Haxmete, nepemecntTCBa CEHTp 3KpHa a KKД, a BOCpnOn3BOIDMOE n3O6paXeHne yBvIuNTcBA BoOE OT nepBOHaayalbHoro pa3Mepa.EcNBy Eepe pa3 haxmete Ha npryIO 6nactb,3Ta 06nactb nepemecntTCB BuHTP 3KpaHa KKД.
(4)ОтreyириуTe MacшtabyBeyiueHnC nOMOsbIO pbUaRa npINBOHOro BapnoooBbEKTNaBa. BblMOxTe yBeyiueHTbN3OBpaXeHne OT 1,1 pa3a Do pIaTnKpaTHoro erO pa3mepa. CToPOHa "W":YMeHbIaETMacSTab6 yBeyiueHn. CToPOHa "T":YBeyiueHbaET MacSTab6 yBeyiueHn.
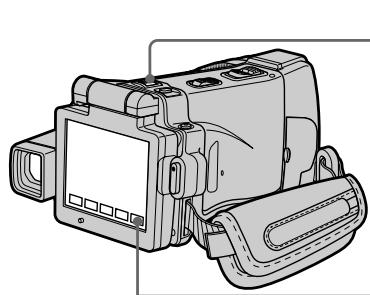
4


W T
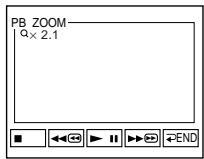
1
FN

PAGE2
2,3
PB ZOOM
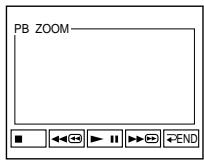
Notes
- You cannot process externally input scenes using the PB ZOOM function with your camcorder.
- You cannot record images on a tape on your camcorder while you are processing the image using the tape PB ZOOM function. However, you can record images on a "Memory Stick" (p. 156), or on a VCR using your camcorder as a player.
- You cannot record moving pictures on a "Memory Stick" on your camcorder while you are processing the picture using the tape PB ZOOM function.
The PB ZOOM function is automatically cancelled when you operate the following functions:
- Turn the POWER switch to the other position.
- Stop playing back.
- Insert a "Memory Stick."
Images in the PB ZOOM
Images in the PB ZOOM mode are not output through the i.LINK (MICROMV Interface) and (USB) jack.
In the PB ZOOM mode
If you press DISPLAY/TOUCH PANEL, the frame on the PB ZOOM screen disappears. You cannot move the part you pressed to the centre of the LCD screen.
Edge of the enlarged image
The edge of the enlarged image cannot be displayed at the centre of the LCD screen.
When FOCUS is set to ZOOM
You can change the zoom ratio using the zoom ring.
Приимechanicals
BbI He MoXeTe BUNOIN3MeHnTb N3O6paKeHnIOT BHeUHNX INTOUYHKOB C NOMOuBHO yHKuPB ZOOM BaueBnDEoKaMepbl.
BbI He MoKTe 3aInCbBaTb Ha BaSei BnuDeOkaMepe I3o6paXeHnHa IeHTy, Noka BbI O6pa6TaBbAeTe I3o6paXeHne, IcNoIb3yI yHKcuIPO PB ZOOM IeHTb. OJaHo, Bbl MoKTe 3aInCbBaTb I3o6paXeHnHa "Memory Stick" (cTp. 156) nIi Ha KBM, IcNoIb3yB AByu BnuDeOkaMepy B KaueCTBe nIeepa.
- Bы He можerte Ha Baшeи Видаокаме
3апсать Движушиеся ИЗБрахженя
"Memory Stick", пoka Bы орбастыbaete
ИЗБрахжени, Incpoьзу phункцию PB ZOOM
ЛeHTbl.
Функця PB ZOOM 6удет abTomatueckn OTmeheha, ecIn BblbInonHnte OndHy n3 cJeMyuuxx Функци:
-YcTaHOBuTepeKeKnUoYaTeIbPOWERB DpyrOeNoJoxKeHne
- OctaHOBka Bocppon3BeDeHnI.
- BCTaBka "Memory Stick".
N3o6paXeHnBpeXnmePBZOOM
CnHann 306paXeHn, 6pb6oTaHbIX BpeKIme PB ZOOM, He nepedaeTcay epe3 rHe3do i.LINK (nHTeppeic MICROMV) n (USB).
B pexkme PB ZOOM
EcInn BbI haxMeTe KhoNky DISPLAY/TOUCH PANEL, KaIp 3KpaHa PB ZOOM nCye3HeT. Bbl He cMOxKeIe npemecTntb o6laCTb, Ha KOtopyIO Bbl haxMeTe, B ceHtp 3KpaHa KKd.
KpOMKa yBENHHeHO n3o6paXeHNr
KpOMka yBemHHeHOro n3ObpaXeHn He MoXeT 6bITb OTo6paXeHa B ceHTpe 3kpaHa KKД.
Ecnn nepeeknoateIb FOCUS yctaHOBNeHa B noJoxHe ZOOM
BbMOKeTe N3MeHnTb MacuTa6 yBeJIuYeHnC nOMOuBIO KOnBa BApNoo6BeKtUBa.
Searching for a scene - MULTI-PICTURE SEARCH
Оъckaне зпиЗода -ФункцЯ MULTIPICTURE SEARCH
Using the multi-picture search function, you can display thumbnails of all the beginning scenes of moving pictures recorded on the tape onto the index screen. The recording date and title of each image or scene are also indicated. The thumbnails described in this section are the still images of all the beginning scenes of each recorded moving pictures and still images to help you search for the desired scene easily. When you select the thumbnail you want to play back, your camcorder starts searching for the image or scene and plays it back automatically. You can also control this function using the Remote Commander.
(1) Set the POWER switch to VCR.
(2) Press FN to display PAGE1.
(3) Press MULTI SCH. The MULTI SCH screen appears.
IcnoJb3yI cyHKUIO MyJbTnKa,IpOBOrO nOnCKa, Bbl MojkeTe OTo6paXaKbHa HINdeKCHOM 3KpaHe MNHnATOpHbIe I3o6paXeHnI nepBbIX KaIPOB BCEx 3PiN3oOB DBNXuXxCra I3o6paXeHn, 3aIncAHHbIX HaJIeHTe. Yka3bIbAEtCraTakKe DaTa 3aInci N TITP kaKdOrO I3o6paXeHn IINI 3PiN3oDa.MHNAtOpHbIe I3o6paXeHnI, ONIcaHHbIe B 3TOM pa3Dene, PpeDCTabJIHOt CO60 HeNoDBNXHbIe I3o6paXeHn BCex HaayalbHbIX 3PiN3oOB 3aIncAHHbIX DVBXuXxCra I3o6paXeHn, I HeNoDBNXHbIe I3o6paXeHn, KOToPbIe No3BOJANOT Bam JeKoHoxOJNb HxhHbIe 3PiN3oD.Ecnn Bbl Bbl6epete MNHnATOpHoe I3o6paXeHnE, KOTopoe Bbl XOTNeBocPon3BecTn, BaWa BInDeokamepa NaHHT eONCK I3o6paXeHn IINI 3PiN3oDa n ABTomatueckn BOCPon3BeDeT erO. Bbl TaXke MojKeTe ynpabJIbTb 3ToI cyHKUneI c NOMOuIyIbTa dNCTaHcUOHHO r npabJIeHn.
(1)YctaHOBInTe IpeKJIIOUaTeIb POWER B noJIOKeHne VCR.
(2)Haxmnte KhoNky FN dny OTo6paXeHHCTpaHnIy PAGE1.
(3)HaxMMTe KhoNkY MULTI SCH. NOrBnTcR 3KpaH MULTI SCH.
(4) Press / to select the direction to scan. Your camcorder starts scanning in the selected direction. When you select , the thumbnails are displayed from the upper-left window, and when you select , they are displayed from the lower-right window. When scanning is completed, it stops automatically. The upper-left window turns black and the thumbnails will be displayed on the index screen.
(4)HaximaiTe KhoNkI / IJNA Bb6opa HaprabLeHnC kAnHnpOBaHnB. Ba7a BnDeokamepa Haunet cKaHnpOBaHne B Bbl6paHnOM HaprabLeHnM. EcnB Bbl6epeTe KhoNkY , MInHaTOpHbIe N3o6paxHeHn 6byT OTo6paxKaTcb, HauHHa C neBorO bexHero yrJa OKHa,a ecnn Bbl6bepeTe KhoNkY ,Onn 6yDyT OTo6paxTaBC, HauHHa C npaboro HnxHero yrJa OKHa.PocNe 3aBepseHnCKaHnpOBaHn, OHO aBTOMaTHueCKn OCTaHOuNTcN. JBeBa BepxHra O6naCTb OKHa CTaHET YerHoi, a MinHaTOpHbIe N3o6paxHeHn 6byT OTo6paxHeHbI Ha INHeKCHom 3KpaHe.
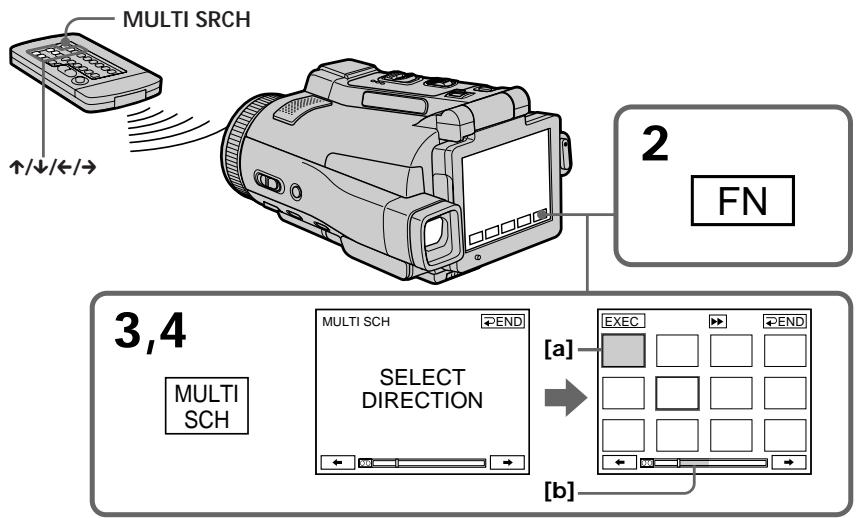
[a] The picture being fast-forwarded or rewound
[b] The blue portion indicates the range of the scan currently being made to display thumbnails
[a]ИЗбрахен,在лучehhoeпуtemусокорнй поремOTКВпердинha3aД
[b] TOny6aI O6nactb yka3bIBAeT npocKaHnpOBaHHbK TEkyUeMy MOMeHTy dnaNa3OH dJa OTo6paJKeHn MHNAtOpHBix N3o6paJKeHn
(5) Select the thumbnail you want to play back, then press EXEC or press the thumbnail you selected again. Your camcorder starts searching for the image or scene and plays it back automatically. The blue portion of the bar indicates the scanning range and the white portion of the bar indicates the recorded portion.
When you want to change the thumbnail Press RET, and then select the thumbnail you want to play back again, then press EXEC.
(5) Bb6epnte MNHaTIOHoe I3O6paXeHne, KOTope BbI XOTnte BOCnpOn3BecTn, a 3aTeM HaxMNTe KHOJky EXEC nIn haxMNTe MmHaTIOHoe I3O6paXeHne, KOTope Bbl BbI6pAln, eue pa3. Ba7a BIndeokamepa NaHET nonck I3O6paXeHne nIn 3n30da n ABTomatUeCKN BOCnpOn3BeDeT erO. TOnyba8 o6NaCTb noNoCb yKa3bIBaet npockaHnPoBaHNbI dInana3OH, a 6Bela O6NaCTb noNoCb yKa3bIBaet 3aINcaHNbI yAcTOK.
EcIn Bbl XOTnTe 3aMeHnTb MNHaTHOpHoe n3o6paXeHne
HaKmTe KhONkY RET, 3aTEM BbI6epNTe MmHnA tOpHoe n3o6paXeHne, KOtOpoe Bbl XOTNe CHOba BOCpOuN3BcTn, a 3aTEM HaKmTe KhONkY EXEC.
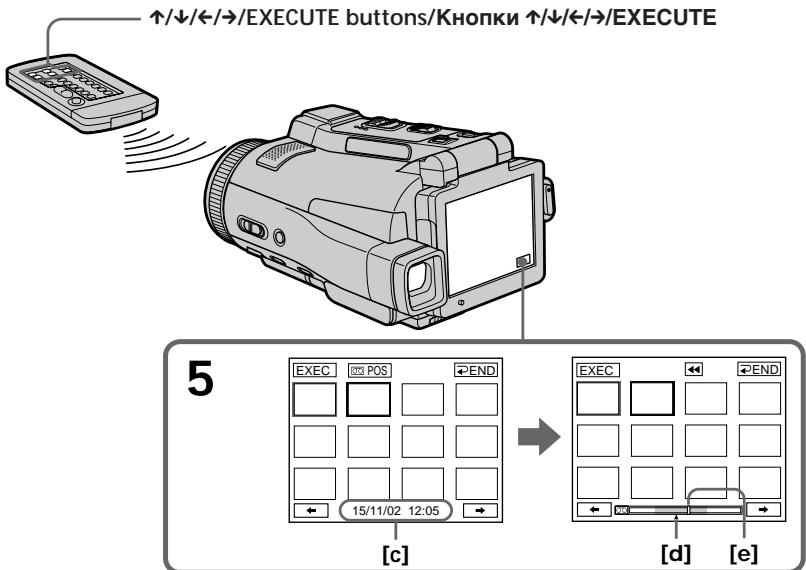
[c] The title/date (The title turns to the date indication after five seconds.)
[d] The actual point you are trying to search for (yellow mark)
[e] The present point on the tape (yellow bar)
[c] Tntp/daTa (INHdNkaunn TnTp a npEbpaaetcB INHdkauuO daTbI cnYCTn pTb CekyHd.)
[d]ДиCTBNTeHbHOe MeCTO, KOTOpoe BbI bITaTeCb HauTn (XeJI TaA MetKa)
[e] Tekyüee MecTo Ha JIeHTe (JKeJIaTЯ nOloca)
To return to the MULTI SCH screen from playback
Press RET, or press EXECUTE on the Remote Commander.
To stop searching
Press STOP on the Remote Commander.
To end the multi-picture search function
Press END. The display returns to PAGE1, or press MULTI SRCH on the Remote Commander to return to FN.
To end the multi-picture search function from the playback screen
Press EXIT.
When controlling your camcorder with the Remote Commander
You can use the MULTI SRCH and / / / / EXECUTE buttons.
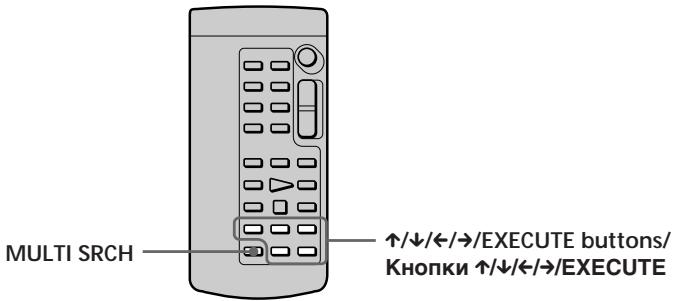
Notes
- Thumbs nails may not be displayed depending on the condition of the tape. This is not a malfunction.
- Noise may appear on the thumbnails. However, this has no effect on the recorded images.
If the tape has a blank portion in the beginning of the tape or between recorded portions
The multi-picture search function may not work correctly.
The number of thumbnails stored in one cassette
About 400 thumbnails can be stored.
MHHnHaTOpHbIe N3O6paXKeHn MOryT He OTo6paXaTbCBy B 3aBNCmOCTn OT COCToHnJeHTbl.3TO He ABlIReTc HEnCIPpaBHOctbIO.
- Ha MnHnataOpNbIx N3o6paXeHnX MOrYT NOrBntbCn NOMexN. OdHaKo 3To He OKa3bBaET BJIINHn Ha 3aNNcaHbIe N3o6paXeHnY.
EcIn Ha JeHTe IMeETcRe He3aNtcaHHbI yAcTOK B HauaJIe JHeTbI INJIM MeKdY 3aNtcaHHbIMyAcTkAmI
The number of thumbnails that can be displayed for in one scanning
A maximum of 11 thumbnails can be displayed for in one scanning.
When you press MULTI SRCH on the Remote Commander
The MULTI SCH screen appears.
While using the multi-picture search function The other functions of your camcorder do not work.
The thumbnail images displayed on the MULTI SCH screen
You cannot modify these thumbnail images.
When you use the multi-picture search function, you cannot use the following functions:
- Picture effect
- Digital effect
Some of the 11 thumbnails may not be displayed in the following cases:
- These are fewer than 11 recorded images and scenes on the searched portion of the tape.
- When scanning a tape recorded midway over previous recordings
- When you have erased all the micro Cassette Memory of the tape (p. 127)
To select the thumbnail with the Remote Commander
Press /// on the Remote Commander.
When you press DATE or POS
You can switch to the title/date display or the tape bar display that shows the present point on the tape.
While your camcorder is searching for the image or scene, the tape bar display appears even if you select Title/Date.
When you select or during scanning The next 11 thumbnails will be scanned.
Even if the first thumbnail is not displayed before the scanning is completed
You can play back the image or scene.
OTbICKaHne 3n3oJa -ФункцЯ MULTI-PICTURE SEARCH
KoJIuYeCTBO MmHaTOpHbIX n3O6paXeHn, KOtOpBle MoYr 6blTb OTO6paXeHbI 3a oJHo cKaHnpOBaHne
3a odHcKaHnPOBaHne MoKet 6bITb OTo6paJKeHo He 60nee 11 MmHaTOpHbIX N3o6paJKeHn.
EcIn Bbl HaxMeTe Ha npIbTe DnCTaHNoHHoro ynpabLeHn KhONkY MULTI SRCH
IOnBnTc3KpaH MULTI SCH.
Bo BpemnncnoB3oBaHnna yHKunm MyIbTKaOpOBOrONcKa
BbI He MoXKeTe MoIOnOpuBaTb 3TN MInHaTHOpHbIe I3O6paXeHHa.
Ecnn Bbl nCnoB3yeTe fynKcHmO MyIbTnKaIopOBoro noncKa Bbl He moXeTe nCNOJb3OBaTb cJeDyUoNe fynKcHm:
-ФФфekt n306paKeHnA
-LnDpOBoN 3ΦΦeKT
HekoTopbIe n3 11 MmHaTOpHbIX
n3o6paXeHm MOrYt He 6bITb OTo6paXeHbIB CJeDyUOxN CnyuAax:
- Ha npockaHnpOBaHHom yuacTke JeHTbI 3aHncaHO MeHee 11 n3o6paXeHm n 3n3oDoB.
- Пи сканировянл leNTbl, coDEржацей наноловиу 3aПИСь NOВЕХ пpeДыdУшь ЗАписeI
- Ecnn Bbl CTepnBcIO micro Cassette Memory (MnKpOKacCeTHyIO nAmTb) JeHTb (ctp. 127)
Searching the boundaries of recorded tape by title - TITLE SEARCH
You can search for the boundaries of a recorded tape by selecting the title. Use the Remote Commander for this operation.
(1) Set the POWER switch to VCR.
(2) Press SEARCH MODE on the Remote Commander repeatedly, until the TITLE SEARCH indicator appears. The indicator changes as follows:
TITLE SEARCH DATE SEARCH (no indicator)
(3) Press or on the Remote Commander to select the title for playback, then press EXECUTE on the Remote Commander. Searching the boundaries starts, and playback automatically starts at the scene with the title selected. Even if you do not press EXECUTE, searching the boundaries starts automatically in two seconds after you select the title.
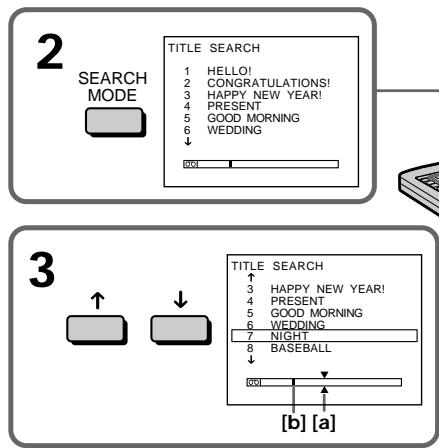
[a] Actual point you are trying to search for
[b] Present point on the tape
To stop searching
Press STOP on the Remote Commander.
If a tape has a blank portion in the beginning of the tape or between recorded sections The title search function may not work correctly.
To superimpose a title See page 114.
EcIn Ha JeHTe IMeETcRe He3aIncaHHbI yAcTOK B Hauane JeHTbI INn MeKdY 3aIncaHHbIMyAcTkAmn
Searching a recording by date - DATE SEARCH
Your camcorder automatically searches for the point where the recording date changes and starts playback from that point by selecting the recording date (Date search).
Use the Remote Commander for this operation.
Use this function to check where recording dates change or to edit the tape at each recording date.
Searching for the date by using cassette memory
(1) Set the POWER switch to VCR.
(2) Press SEARCH MODE on the Remote Commander repeatedly, until the DATE SEARCH indicator appears.
The indicator changes as follows:
TITLE SEARCH DATE SEARCH (no indicator)
(3) Press or on the Remote Commander to select the date for playback, then press EXECUTE on the Remote Commander.
Searching the boundaries starts, and playback automatically starts at the scene with the date selected. Even if you do not press EXECUTE, searching the boundaries starts automatically in two seconds after you select the date.
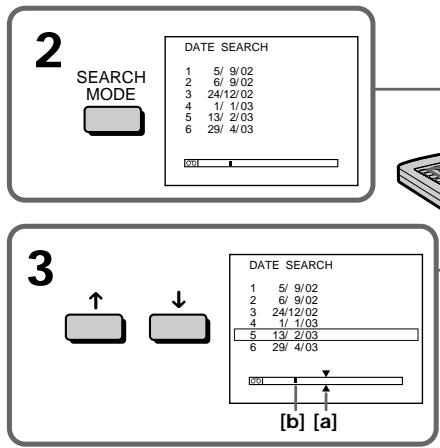
[a] Actual point you are trying to search for
[b] Present point on the tape
To stop searching
Press STOP on the Remote Commander.
[a] DeiCTBNTeHbHOe MecTo, KOTOpoe Bbl NblTaTeCb HaHTN.
[b] Tekyüee MeCTO Ha JIeHTe.
ДлЯ OCTaHOBKINONCKA
Haxmte KhoNky STOP ha npIbTe
ДиСТанCUОНHOrOУпразБЕнЯ.
If a tape has a blank portion in the beginning of the tape or between recorded portions The date search function may not work correctly.
micro Cassette Memory The tape cassette memory can hold 20 recording date data.
EcJn Ha JIeHTe NMeETcR He3aIncaHHbI yuactOK B HauaJIeHtBi IJI MExdY 3aIncaHHbIMyUaCTkAMN ΦyHKZIN PONCKa DaTb MoKeT pa6oTaB hEnpaBnJIbHO.
micro Cassette Memory (MnKpokaccetna naMTb) Kaccetna naMTb IeHTb MoKET COpePKaTb daHbIe 20 daTax 3aHcN.
Dubbing a tape
Using the A/V connecting cable
You can dub or edit on the VCR connected to your camcorder using your camcorder as a player. Connect your camcorder to the VCR using the A/V connecting cable. The supplied A/V connecting cable is equipped with an S video plug and a video plug. Use either the S video plug or the video plug depending on the recorder. Do not connect both of the plugs to the recorder.
Before operation
- Set DISPLAY in to LCD in the menu settings. (The default setting is LCD.)
- Press the following buttons to make the indicator disappear so that they will not be superimposed on the edited tape:
On your camcorder:
DISPLAY/TOUCH PANEL
On the Remote Commander:
DISPLAY, DATA CODE, SEARCH MODE, MULTI SRCH
(1) Insert a blank tape (or a tape you want to record over) into the VCR, and insert the recorded tape into your camcorder.
(2) Prepare the VCR for recording, then set the input selector to LINE. Refer to the operating instructions of the VCR.
(3) Set the POWER switch to VCR.
(4)Play back the recorded tape on your camcorder.
(5) Start recording on the VCR. Refer to the operating instructions of your VCR.
Параапсь лeNTы
IcnoJIb3OBAHnE CoeHNHTeNbHOKa6eJnyDNo/BuDeo
BbMOxTe BbINONHtB MOHTax NnI nepe3aHnCb na KBM, nOcOeHNHeHOM K BaWei BnDEOkampe, nCOnb3yBaWy BnDEOkampey B kaeeCTBe Pneepa. IOncOeDInHte BAw yBnDEOkampey K KBM, nCOnb3yra CoeHNHTJIbHbIK KaebI aydno/BnDeo. Prnilaraembl CoeHNHTJIbHbIK KaebI aydno/ BnuDeo OShaueH uTKePOM S BuDeo IN BuDeoUTheKOpM. IcNoB3yIe UTheKpS BuDeo INn BnDEoUTheKOpE 3ABNCIMOCTN OT MoJEN 3aNcBlaBaIOseO yCTPOJCTBA. He noCoeDNHnTe K 3aNcBlaBaIOSeMy yCTPOJCTBy o6a uTKepea.
Peped BbINOJIHeHnEM Opeaun
VCTaHOBnTE OUNCIO DISPLAY B [EC] B yctaHOBkax MEOH BO NIOJoxKeHne LCD. (LCD ABJIeTcY cHTaHOBKONo yMOJnuAHNO.)
HaxMMITE CnEduyUOuINE KHOJKN, YTO6blIO6bIcS8C NcE3HOBENH INDNIKATOPOB BO I36bExaHHe IN HALOXeHINA MoHTNpyeMUYoJeHTY:
Ha Bašen Bvndeokampe:
DISPLAY/TOUCH PANEL
Ha npIbTe DnCTaHIOHOrO ynpaBneHnA: DISPLAY, DATA CODE, SEARCH MODE, MULTI SRCH
(1)YcTaHOBnTe He3aIncaHHyIO JeHTy (UINJIeHTy, KOtOpYIO BbI XOTnTe Nepe3aIncaTb) B KBM, UycTaHOBnTe 3aIncaHHyIO JeHTy B Bauy BInDeOkamepy.
(2)ПОД�ТОБТЕ KBМ K 3апси,а 3атем установInterface сельктор BXODOB B NOLOЖЕни LINE.
Bollee noDpO6HbIe CBeDeHn Bbl MoKTe HaHTn BInHCTpykUmno 3KnPnyatauMn KBM.
(3)UtaHOBnTepeKeIIOuHaTeJIbPOWER B mIoJooHeHc VCR.
(4)HaunHe BoCnpOn3BeJeHne 3aIncaHnoJIeHTbI Ha BaSei BnDeOkaMepe.
(5)HaunTe 3aInc bHa KBM. Bolee noPpO6HbIe CBeDeHnB bMoKeTe haHTn B INCTpyKuINo 3KcNpyaTaUNBauero KBM.
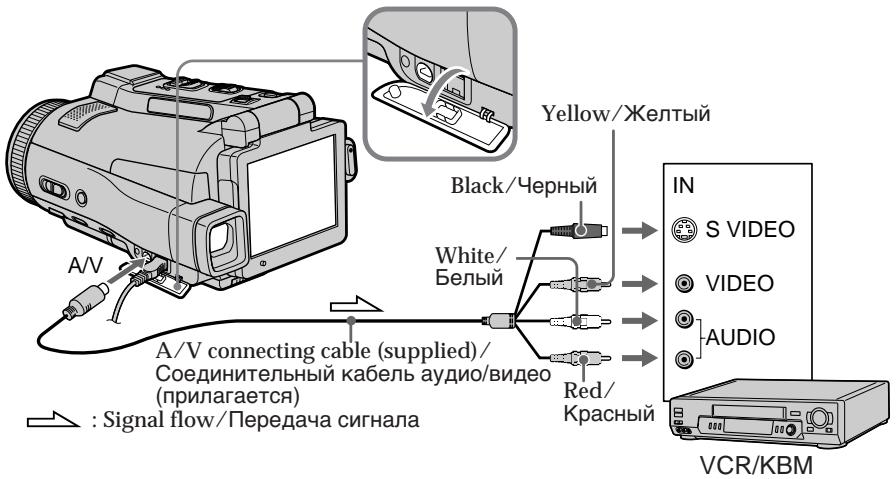
When you have finished dubbing a tape
Stop recording on the VCR, and stop playback on your camcorder.
You can edit on VCRs that support the following systems
8 mm, Hi8 Hi8, Digital8, VHS VHS,
SVHS S-VHS, WHSC VHSC, SVHSC S-VHSC,
B Betamax, Mini DV, DV or MICROMV MICROMV
If your VCR is a monaural type
Connect the yellow plug of the A/V connecting cable to the video input jack on the VCR and the white or red plug to the audio input jack on the VCR. When the white plug is connected, the left channel audio is output, and when the red plug is connected, the right channel audio is output.
If your VCR has an S video jack
Connect using the S video plug to faithfully obtain original pictures. With this connection, you do not need to connect the yellow (video) plug of the A/V connecting cable. Connect the S video plug to the S video jack of the VCR. This connection produces higher quality MICROMV format pictures.
Ipee3aIncb JeHTbl
Ecnn Bbl 3aKOHnJI npe3anCb IeHTbl
OcTaHOBnTe 3aIncb Ha KBM, n OcTaHOBnTe BocnpOn3BeDeHne Ha BaWei BnJeOkampe.
BbMOxTe BbINONHtB MOHTaX Ha KBM, KOtOpbIe NODepXnBaHOT CNeDyUoUne CNUCTEMbl
8 MM, Hi8 Hi8, Digital8, VHS VHS, S-VHS, VHSC VHSC, VHSC S-VHSC, Betamax, Mini DV, DV uJIM MICROMV
Ecnn BaW KBM moHooHueckoro Tuna
PoiDcoeHInHe JKeIbIy wTeKep COeHNHTelbHO Ra6eJIa ayDIOBvIeO K BXoDHOMy BnDEOrHe3dy Ha KBM, a 6eJIbI yNI KpaCHbY wTeKep K BXoDHOMy ayDIOrHe3dy Ha KBM. EcNI PNOcEOdINHe6eJIbI wTeKep, TO BbIXoHbIM CnHAnOM 6yDet 3Byk IeBORO KaHaJa, a ecNI PNOcEOdINHeN KpaCHbI wTeKep, TO BbIXoHbIM CnHAnOM 6yDet 3Byk npaboro KaHaJa.
EcnnBaawem KBM mmeetc rhe3do S Bndeo
BbINOHNHe NOcOeDInHHe, NcNoJIb3yI uTeKeP S BvJeO, dJa 6oJee ToUHoro BocpOn3BeDeHn IxCOdHBx N3o6paXeHn. Pnp TakOM NoDCoeDInHeHn Bam He HuxHo NDoCoeDInHtB XeJIbIy (BvJeO) uTeKeP coeDInHTenbHor KabeIa ayDIO/uJeO. NDoCoeDInHtSe uTeKeP S BvJeO K rHe3dy S BvJeO Ha KBM. 3To coeDInHeHne oEbcpeuBaet 6oJee BbICOKoe KaueCTBO n3o6paXeHn fOpMaT aMICROMV.
Using the i.LINK cable
Simply connect the i.LINK cable (optional) to the i.LINK (MICROMV Interface) of your camcorder and to the i.LINK (MICROMV Interface) of the MICROMV product. With digital-to-digital connection, video and audio signals are transmitted in digital form for high-quality editing. (You cannot connect your camcorder to a DV product.) You cannot dub the titles, displayed indicators, the contents of micro Cassette Memory, or letters on the "Memory Stick" index screen.
(1) Insert a blank tape (or a tape you want to record over) into the VCR, and insert the recorded tape into your camcorder.
(2) Prepare the VCR for recording.
(3) Set the POWER switch to VCR.
(4) Play back the recorded tape on your camcorder.
(5) Start recording on the VCR. Refer to the operating instructions of the VCR.
Icnojb30BaHne ka6eJiaLINK
ПрocTo noCoeHnHTe KaBefIb i.LINK (npno6peTaetc8 OTeJIbHO) K rHe3dy i.LINK (nHTepFeCy MICROMV) Bauei BnDeokampebl nK rHe3dy i.LINK (nHTepFeCy MICROMV) n3dEInaMICROMV. Prp uFpo-LuFpoBOM coEHNHeHHn BVJeO- n ayDIOcNHaJIbI nepeAIOCTB UuFpoBOM FOpmATE nJa BBICOKoKaueCTBeHHoro MOHTaxa.(BbI He moXeTe NoCoeHNrTb BaSy BuDeokamepy K n3dEIno DV.) BbI He moXeTe BbINOnHrTb nepe3aIIcB TnTPOB, 3kpaANbIX INdNKaTOPOB, coDEpxMOrO micro Cassette Memory (mIKpOKacCCeTHoN pAMrTn) nJIn 6yKB Ha nHNeKCHOM 3kpane "Memory Stick".
(1)YcTaHOBnTe He3aIncaHHyIO JeHTy (IJIINJeHTy, KOtOpyo BbI xOTnTe nepe3aIncaTb) BKBM, u YcTaHOBnTe 3aIncaHHyIO JeHTy BBaUy BuDeOkamepy.
(2)Под�отовыткВМдгзпс.
(3) VctaHOBnTe npeKJIIOuTaTeIb POWER B noJIOxHeHc VCR.
(4)HaunHe Bocpon3BeHne 3aNaHno JentbHa BaSei Bndeokamepe.
(5)Haunnte 3anncb Ha KBM.Boone noopobhble CBeHnBbl MoKeTe haTn B nHcTpkyu nnno 3KnpyatauKNBM.
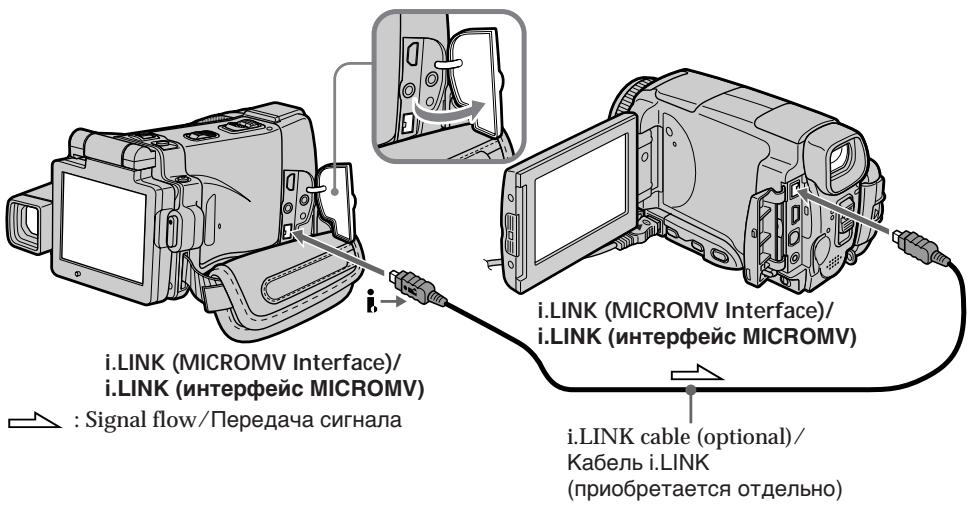
When you have finished dubbing a tape
Stop recording on the VCR, and stop playback on your camcorder.
Ecnn Bbl 3aKOHnJI npe3anCb JeHTbI
OctaHOBIne 3aIncb Ha KBM, n octaHOBIne BocpOn3BeHeHne Ha BaWei BnDeokampe.
You can connect one VCR only using the i.LINK cable
See page 268 for more information about i.LINK.
Pictures processed by the picture effect, the digital effect or PB ZOOM function
These pictures are not output through the i.LINK (MICROMV Interface).
The following functions do not work during digital editing:
- Picture effect
- Digital effect
-PB ZOOM
Note on playback pause pictures
When you record a playback pause picture:
- The recorded picture becomes rough when recorded through the i.LINK (MICROMV Interface).
- The picture may jitter when you play back the tape on other video equipment. And there may be a time-lag when you play back the tape on other video equipment.
Bb moxete noDcoeHNHTb TOnbKO OINH KBM c nOmoosbIO ka6eI i.LINK
Recording video or TV programmes
When using the A/V connecting cable
You can record a tape from another VCR or a TV programme from a TV that has video/ audio outputs. Use your camcorder as a recorder.
Switching the video input jack of the A/V connecting cable
The supplied A/V connecting cable is equipped with an S video plug and a video plug. You have to select one of the jacks in the menu settings. The default setting is VIDEO.
If the setup is not necessary, go to "2 Making a recording" on page 110.
(1) Set the POWER switch to VCR.
(2) Press FN to display PAGE1.
(3) Press MENU, then select VideoINPUT in in the menu settings, then press EXEC.
(4) Select VIDEO (When using a video plug) or SVIDEO (When using an S video plug), then press EXEC.
3a\Pncb BnDeo nJI TeIeBn3nOHhbIX npOprpamM
PnncnoJIb3ObaHn coeHHTeIbHOro Ka6eJyauNo/ BndeO
Bb mokeTe 3a ncaTb Jenty c pyroro KBM nn TeJIeBn3IOHHyI npOrpaMMy C TeJIeBn3Opa, y KOtOpRo eCTb BVJeO/ayNo BblXoDbI. IcnoJb3yIte BaUy BVJeOkaMepy KaK 3aIncbIbAHOoee yCTpOInCTBO.
1IpeekJIOUeHne BXOHDoro BnDeoRHe3da COeINHtEnbHOrKa6eJaayDNo/BnDeo
Ppnilaraembl coeunHntelhkb ka6ebnb aydno/ Bndeo ochaueh wTekepor S bndeoi BNdeoouTekepor. Bam hUxHo bIbpaTb oJHO n3 rHe3D BVCTaHOBkax MeHIO.
VIDEO RA BNAE TCR YCTAHOBKOI NO yMOJUHIO.
EcINy yCTaHOBKA He RA BNAE TCR HEO6XoDMOi,
nepeiDNTe K pa3dEny "2 Co3dAnHe 3aPiNCn"
Ha cTp. 110.
(1)YcTaHOBInTe npeKJIouaTeIb POWER B noJIOKeHne VCR.
(2)Haxmnte KhONky FN, yTo6bl OTo6pa3ntb cTpaHnuy PAGE1.
(3)Haxmnte KhoNky MENU, 3aTeM bIbepnTe onuio VIDEOINPUT B vB yTaHOBkax MeHIO, a 3aTeM Haxmnte KhoNky EXEC.
(4)Выберпгол video (при
Исплььзованьдeoшт ekра) Ии S
VIDEO (при Исплььзованьшт ekра S
Бидeo),а затем нахмпге Кногку EXEC.
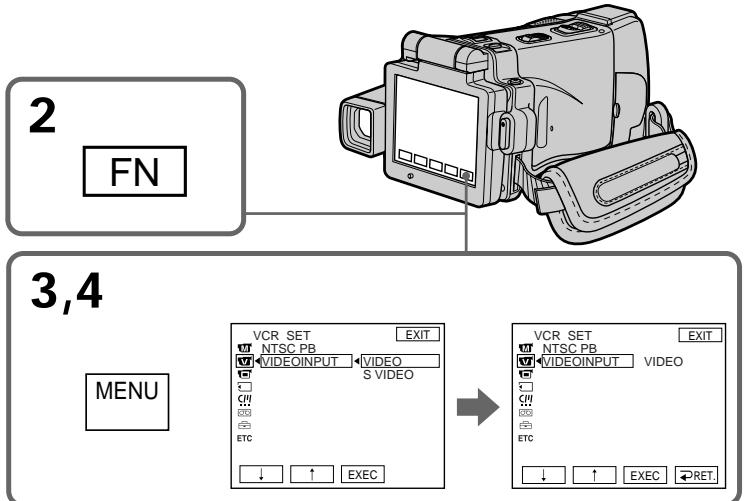
2 Making a recording
Before operation
Set DISPLAY in to LCD in the menu settings.
(The default setting is LCD.)
(1) Insert a blank tape (or a tape you want to record over) into your camcorder. If you are recording a tape from the VCR, insert a recorded tape into the VCR.
(2) Set the POWER switch to VCR.
(3) Set your camcorder in the recording pause mode.
Press FN and go to PAGE3, then press REC CTRL. Next, press REC PAUSE.
(4) Start playback on VCR if you record a tape from VCR. Select a TV programme if you record from TV. The picture from VCR or TV appears on the LCD screen or in the viewfinder.
(5) Press REC START at the scene where you want to start recording from.
2 Co3dHne 3aHncn
Ipeed BbINOJIHeHEm Opeaun
YcTaHOBnTe OIuHIO DISPLAY B ETC B yCTaHOBkax MeHIO B nOIoXeHne LCD. (LCD YBaJIaETCAyCTaHOBkoI NO yMOJuaHIO.)
(1)YcTaHOBnTe He3aIncaHHyIO JeHTy (HInnJeHTy, KOTOpYIO BbI XOTnTE nepe3aIncaTb) BBaUy BnDeOkamepy. EcNn Bbl 3aIncbIbaeTeJeHTy C KBM, ycTaHOBnTe 3aIncaHHyIO JeHTy B KBM.
(2)Установпейразець POWER в положене VCR.
(3)Установite Baшу вдебокамеру в ржим пayзbl 3апсин.
HaxMNTe KhoNky FNиpeEiNte Ha cTpaHnU PAGE3,a 3aTeM HaxMNTe KhoNky REC CTRL.DaJIee,HaxMNTe KhoNky REC PAUSE.
(4)HaunHe BoCnpOn3BeJeHne Ha KBM,ecn Bbl 3aIncbIbAeTe JEnHTy c KBM. Bbl6epnte TeLeBn3IOHHyo IporpAmMy,ecn Bbl 3aIncbIbAeTe C TeLeBn3Opa.N3OpaxKeHne c KBM nIn TeLeBn3Opa NOBbTcRa H ekpaHe KKd nn B BuOnckatene.
(5)HaxMMTe KhoNky REC START B 3n3Oe, c KOtOpOro Bby XOTne Haatb 3aNcB.
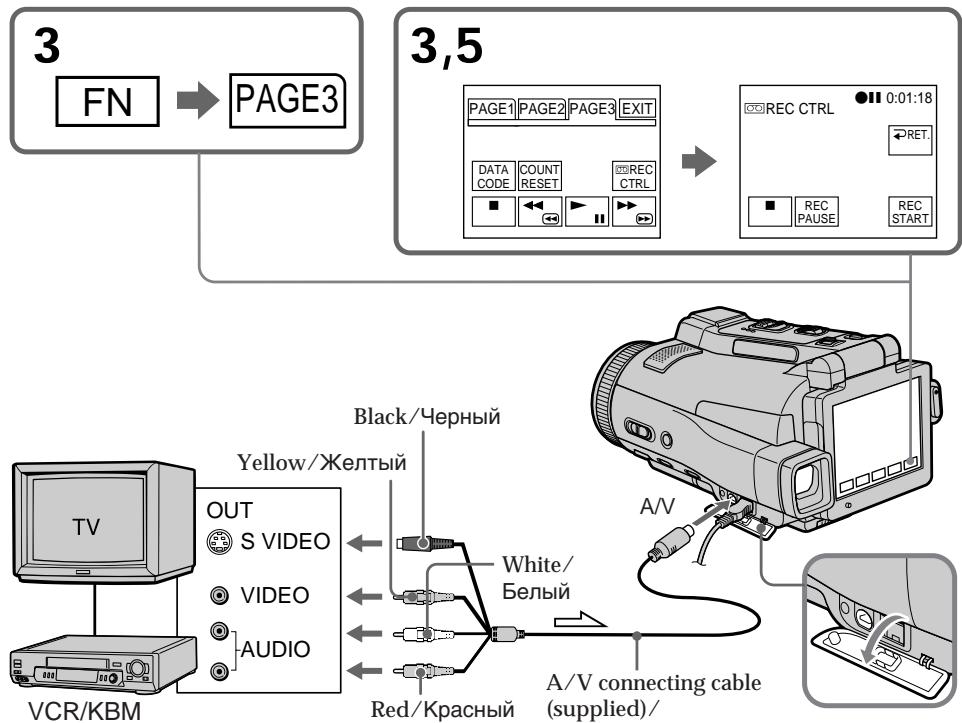
When you have finished dubbing a tape
Press on the LCD screen to stop recording on your camcorder and stop playback on VCR or TV.
Using the Remote Commander
You don't need to perform step 3. In step 5, press both REC and the right button simultaneously to start recording.
Ecnn Bbl 3aKOHnIn npe3anncb IeHTbl
HaKMMTe KhoNky Ha 3KpaHe KKД,чTO6bIOCTaHOBnTb 3aINcHа BaSei BInDeokampe,IOCTaHOBnTe BocpOn3BeDHeHne Ha KBM nIITeJIeBn3Ope.
UcnoJIb3OBAHne nIyIbTa dNCTaHcUNOHHorO ynpabNeHnA
Bam He HuyxHOb BbINOHNrTb DeiCTBnnyHKTa 3. B nyHKTe 5, haxMnte OJHOBpeMeHHo KhoNky REC n npabyIO KhoNkY dna HaHaJa 3aannc.
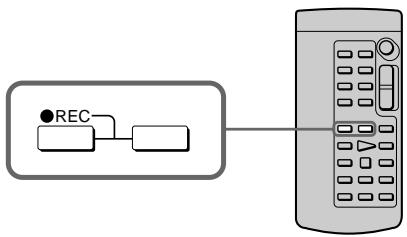
Note
Your camcorder only records pictures for viewing on a PAL system based TV and VCR. See "Using your camcorder abroad" on page 270 for the TV colour systems used in each country and area.
If your VCR is a monaural type
Connect the yellow plug of the A/V connecting cable to the video output jack and the white or the red plug to the audio output jack on the VCR or the TV. When the white plug is connected, the left channel audio is output, and when the red plug is connected, the right channel audio is output.
If your TV or VCR has an S video jack
Connect using the S video plug to faithfully obtain original pictures. With this connection, you do not need to connect the yellow (video) plug of the A/V connecting cable. Connect the S video plug to the S video jack of the VCR. This connection produces higher quality MICROMV format pictures.
PpimueaHne
Baasa Bndeokamepa 3anncbIbaet n3o6paKeHna TOnbKO IINI pOcMOtpa Ha TeNeBn3Opax N KBM CnCTembl PAL.Cm. pa3dEn "VcnPb3OBaHne BaSei BndeokamepbI 3a rpaHnIe" Ha cTp.270 IaII NOJyEHnCBeHeHn O CnCTeMaX UBeTHoro TeJeBnDEHnB KKaJdoN CTpAne H o6NaCTn.
EcnBaw KBMMOHooHueckoro Tnna
IoioceHnHTe JKeIbIy wTekep coeHNHTeJIbHO rKa6eIa ayIOo/BuJeO K bIxOHDOMy BUNDeORHe3dy, a 6BeIy IIN kpaCHbY wTekep K bIXoDHomy ayDNOrHe3dy Ha KBM IIN TeJebN3ope. EcIn noDCoeHNHe h 6JIbI yTekep,TO bIXoDHBIM ayDNOCrHaON 6yDet 3ByK neBoro KaHana,a ecIn noDCoeHNHe KpaChbY wTekep,TO bIXoDhblm ayDNOCrHaON 6yDet 3ByK npaboro KaHana.
EcnB Baem TeleBn3ope nKBM nMeetc rHe3do S Bndeo
BbIOpHnTe NoIOCoEINHeHne, IcNoJIb3yI uTeKepe S BvJeO, dIa 6oJee ToCHoro BocIpOn3BeDeHn IcXODhBIX N3ObpaXeHn. Ppi TaKOM IOIOCoEINHeHn Bam He HuxHo IOIOCoEINHrTb XeHTbI (BvJeO) uTeKepe CoEINHtEnbHO Ka6eIra ayDINO/BuJeO. PoIOCoEINHte uTeKepe S BvJeO K rHe3dY S BvJeO Ha KBM. 3To coEINHeHne o6ecNeuBaet 6oJee BbICOKoe KaueCTBO n3ObpaXeHn fOpMaTa MICROMV.
When using the i.LINK cable
Simply connect the i.LINK cable (optional) to the i.LINK (MICROMV Interface) of your camcorder and to the i.LINK (MICROMV Interface) of the MICROMV product. With digital-to-digital connection, video and audio signals are transmitted in digital form for high-quality editing. (You cannot connect your camcorder to a DV product.)
(1) Insert a blank tape (or a tape you want to record over) into your camcorder, and insert the recorded tape into VCR.
(2) Set the POWER switch to VCR.
(3) Start playback on VCR. The picture from the VCR appears on the LCD screen of your camcorder.
(4) Set your camcorder in the recording pause mode.
Press FN and go to PAGE3, then press REC CTRL. Next, press REC PAUSE.
(5)Press REC START at the scene where you want to start recording.
PnncnoJb3ObaHnn Ka6eJIaLINK
When you have finished dubbing a tape
Press on the LCD screen to stop recording on your camcorder and stop playback on VCR or TV.
Using the Remote Commander
You don't need to perform step 4. In step 5, press both REC and the right button simultaneously to start recording.
Ecnn Bbl 3aKOHnJI npe3anCb JeHTbI
HaKMMTe KhoNky Ha 3KpaHe KKД,чTO6bIOCTaHOBnTb 3aINcHа BaSei BInDeokampe,IOCTaHOBnTe BocpOn3BeDHeHne Ha KBM nIITeJIeBn3Ope.
IcnoJIb3OBAHnne nylbTa dNCTaHcUHOHHOro ynpabJeHn
Bam He HuyxHOb BbINOHNrTb DeiCTBnnyHKTa 4. B nyHKTe 5, haxMnte OJHOBpeMeHHo KhoNky REC n npabyIO KhoNkY dna HaHaJa 3annci.
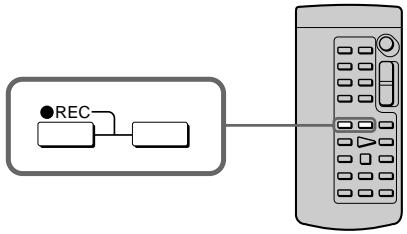
Notes
- When an incompatible picture (such as one recorded with the DV format) is input, the message "INPUT ERROR" appears.
- You can connect one VCR only using the i.LINK cable.
- First, start playback or turn to the playback pause mode before your camcorder starts recording or turns to the recording pause mode. If no signal is input into your camcorder, the message "NO INPUT" appears and the camcorder cannot start recording.
Note on playback pause pictures
When you record a playback pause picture:
- The recorded picture becomes rough when recorded through the i.LINK (MICROMV Interface).
- The picture may jitter when you play back the tape on other video equipment. And there may be a time-lag when you play back the tape on other video equipment.
Before recording
Make sure if the MPEG IN indicator appears on the LCD screen. The MPEG IN indicator may appear on both equipment.
Приимейсаня
- Пи ВьODE HeCOBMeCTUMORO n3o6paXeHnE (HaPmEp, 3aIncAHoro BΦopMaTe DV) NOBNTcQ COO6eHne "INPUT ERROR".
- Bы мохete посоевншт Только одн KBM, н спльзу karбел i.LINK.
- Nauchnite cnaaJala BocpOun3BeJeHne, nI nepeKJIouHTeCb B pexIM nay3bl BOCpOun3BeJeHn, npexJe cem Ba7a BnuDeOKaMepa HauHet 3aIncb nI nepeKJIouHTcB B pexIM nay3bl 3aIncn. Ecnn CnIHal Ha Ba7y BnuDeOKaMepy He noJaetc, NOBNTcCoooJIeNE "NO INPUT", n BnuDeOKaMepa He cMOKeT hauTa b 3aIncb.
PpmeaHne no n3o6paXeHNrM BO BpeMa npay3bl Bocnpoun3BeDeHHA
EcnBb3aPiuTe H3o6paKeHne BO BpeMa nay3bl Bocpon3BeJeHn:
- 3aɪncaHnoe n3ɔbpaXeHne cTaHET HeeTKeIM npri 3aɪnci Yepe3 rHe3dO i.LINK (ɪntεpʃeɪc MICROMV).
-ИЗбрахене может подагиВаы, ecп Bы 6удete BOCPON3BODITь leHTy Ha дуroy BndeoannapaType. A TaKxe Bo3MOxKe npomexyTOK BpeMeHn При BOCPON3BeDEHn JENTbHa dpyroBnDeoannapaType.
Ipeed BbINOJIHeHnem 3aIncs
Y6eIntecb, yTO INnDnkaTOp MPEG IN noBnCnHa 3KpaHe KKD. INnDnkaTOp MPEG IN moXet nOBAITbcr Ha o6oNx annapatax.
Superimposing a title
You can superimpose a title. When you play back the tape, the title is displayed for about five seconds from the point where you superimposed it.
HanoxeHne TnTpa
BbMOxTe HANOxNtB TnTp. Ppi BOCpOn3BeDeHn JeHTb TnTp 6yJeT OTo6paXaTbCBA TeYeHne PnpMepHO nTn CekyHd, NaHnHa C Tockn, B KOTopoB Bbl erO HANOxNl.

Superimposing a title on starting a recording
(1) Set the POWER switch to CAMERA.
(2) Press FN and go to PAGE2.
(3) Press TITLE. The TITLE screen appears.
(4) Select with / . The PRESET TITLE screen appears. Press EXEC.
(5) Press / to select a desired title, then press EXEC. The title is displayed on the LCD screen.
(6) If necessary, change the colour, size, or position by pressing COLOUR, SIZE, POS or POS .
(7) Press TITLE OK. The screen to save a title appears on the LCD screen.
(8) Press SAVE TITLE. The TITLE indicator appears. And when you press START/STOP to start recording, TITLE SAVE appears on the LCD screen for about five seconds and the title is set.
Hanoxehne TnTpa Ha hauaNo 3aIncN
(1)YctaHOBInTe IpeKJIouaTeIb POWER B noJIOKeHne CAMERA.
(2)HaxmTe KhoIky FN dIy nepexoJa cCTpaHnue PAGE2.
(3)Haxmte KhoNky TITLE. NpBntc 3KpaH TITLE.
(4)BbIbepnTe OIuHIO c NOMOuH KOHONOK↓↑. IIOaBntc3KpaH PRESET TITLE.HaXmTe KhoNky EXEC.
(5)Haxmamte KhoNkU I nnBbIbOpa HxKhoro TnTp,a 3aTeM hXmnte KhoNky EXEC. TnTp oTo6pa3ntcHa 3kpahe KKД.
(6)Прин Heo6xOДmOCTи n3MeHnTe ζВeT, pa3Mep
Илп ПОLOЖЕне TИТра, habIMaЯ KHONKIn
COLOUR, SIZE, POS ↓Илп POS ↑.
(7)HaKMMTe KhoNkTy TITLE OK. Ha 3KpaHeKKD NOBnTc3 3KpaH coXpAHENr TnTpa.
(8)HaxmTe KhoNky SAVE TITLE. IoBntc HnDnKaTOp TITLE.A KOrda Bbl HaxMeTe KhoNky START/STOP nHaayana 3aInci,Ha 3KpaHe KKДВ TeueHne npImepHO nTn CeKYn IOBNTc HnDnKaCnI TlTe SAVE, nTtTp bdyet yctaHObNeH.
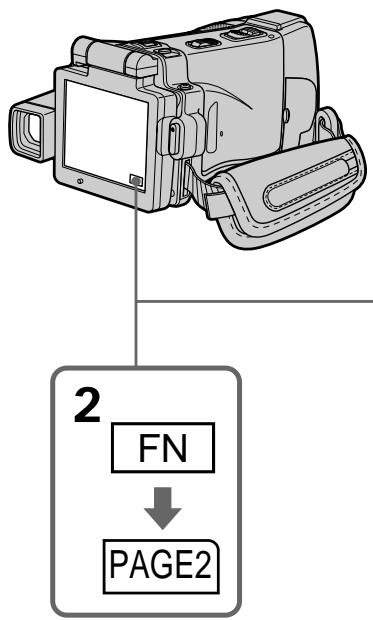
3
TITLE

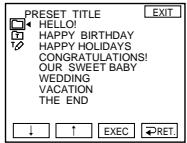
4
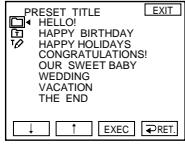

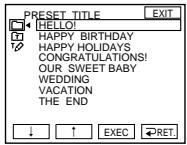
5-7
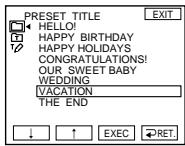

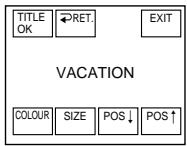
8
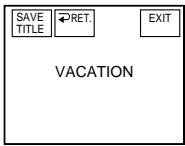


If you set the write-protect tab to lock You cannot superimpose or erase the title. Slide the write-protect tab to release the write protection.
To use the custom title If you want to use the custom title, select in step 4.
If the tape has a blank portion in the beginning of the tape or between recorded portion
The title may not be displayed correctly.
Ecnn Bby yctaHOBnTe JeneCTOK 3aunTbI OT 3anncn B noLOXeHne 6JOKuPOBKn
BbHe CMOXeTe BbIOnHnTb HaIOXeHne NJI CTnpaHne TITpa. IpeEdbnhte IeneCTOK 3aunTbI OT 3aNcN, YTObI CHrTb 3aunTy OT 3aNcN.
ДлнИСПОЛБ3OBAHNA CO6CTBEHHO THTpa
EcIN BbI XOTnTE ICSNOLB3OBaTB CO6CTBEHbIb
TNTp, Bbl6epnte ONUIO [Pn BblONHeHIM
deICTBm NyHKta 4.
EcIn Ha IeHTe IMeTcR He3aIncaHHbI yAcTOK B Hauane IeHTbI INI Mekdy 3aIncaHHbIMyAcTkAmI
Tttp moKet OTo6paKaatbca HeKOppeKTHo.
The titles superimposed with your camcorder
- They are displayed only by the MICROMV format video equipment with index titer function.
- The point you superimposed the title may be detected as an index signal when searching a recording with other video equipment.
To not display title during playback Set TITLE DSPL to OFF in the menu settings (p. 233).
Title setting
- The title colour changes as follows:

- The title size changes as follows:
SMALL LARGE
You cannot input 13 characters or more in LARGE size.
- If you select the title size "SMALL", you have nine choices for the title position.
If you select the title size "LARGE", you have eight choices for the title position.
The number of titles recordable on one cassette
You can record up to 20 titles when each title consists of 12 characters.
When 20 titles are already superimposed The message "TITLE FULL" appears. Erase unnecessary titles.
Tntpbl, haJIOXeHHbI c nOmoIbI BaIeBnDcOkamepbl
- OHI OTobpaKaIoTc TOnIbKO Ha BnIeOaInpaType fOpMaTa MICROMV, IIOJIepKIMBaIOUSeI cyHKUIO INHeKChbIX TITPOB.
-При поис заимсн Н друю видевогларType TOTka,В кOTOPО Bbl HANOJIN TITp,MOKET 6bITb NaIeHa no INHdeKCHOMY CnHany.
YtobHe OTo6paKaTb TnTp BO BpemBocnpOn3BeDeHn
YcTaHOBnTe OIuNIO TITLE DSPL B yCTaHOBkax MeHIO B nIoXeHne OFF (ctp. 241).
Hactpoika Tntpa
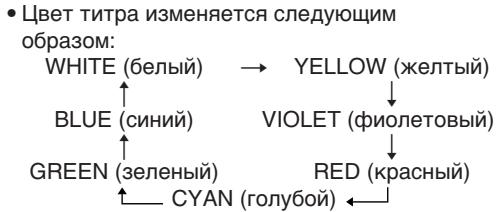
- Pa3Mep TnTpa N3MeHReTcra CneDyUOuIM 6bpa30m: SMALL (MaJIeHbKni) LARGE (6oJIbwoi) Bbl He MoXeTe BBecTN 13 cMBOJOB nII 6oJIee dIpa3Mepa TnTpa LARGE.
- EcIn BbBb6epeTa pa3Mep TnTpa "SMALL", Bbl CMOxTe Bb6paTb OJHO n3 DeBArTu noLoKeHn TnTpa.
EcIn BbI BbIbepeTe pa3Mep TnTp a "LARGE", Bbl CMOKeTe Bbl6paTb OJHO n3 BOcBmN IIOJoxeHn TnTp.
KoJIuYeCTBO THTPOB, KOToPbIe MOryT 6bITb 3aIIncAhI Ha Ondy Kaccety
Bb moKeTe 3aIncatb Do 20 TnTpoB, nO 12 CmBOnOB B KaJDom TnTpe.
Ecnnyx3aHcAno20TnTpOB
ПОВИТСС COOБЕНИЕ “TITLE FULL”.
Cotpnte HeHyXhble TnTpbl.
Superimposing a title on a recorded tape
You can superimpose a title for five seconds from the recording start point.
(1) Set the POWER switch to VCR.
(2) Press FN to display PAGE1.
(3) Press TITLE. The TITLE screen appears.
(4) Press INPUT TITLE. The INPUT TITLE screen appears.
(5) Press / to select the direction to scan. Your camcorder starts scanning in the selected direction. When you select , the thumbnails are displayed from the upper-left window, and when you select , they are displayed from the lower-right window. After the scanning is completed, the thumbnails are displayed on the index screen.
(6) Select the thumbnail on which you want to superimpose a title, then press EXEC or the thumbnail again. The title menu appears.
(7) Perform step 4 to 7 in "Superimposing a title on starting a recording" on page 114.
(8) Press SAVE TITLE. "TITLE SAVE" appears on the LCD screen for about five seconds and the title is set.
HaJIOKeHne TnTpHa 3aIncaHHyU JIeHTy
BbMOxTe HAnOxNtB TnTp B TeueHne nTn CekyHd,HaunHaC ToKn HaaJa 3aIncN.
(1)YcTaHOBInTe NepeKJIouaTeIb POWER B noJIOKeHne VCR.
(2)HaxmTe KhoNky FN dIy OTo6paXeHnCTpaHnIyI PAGE1.
(3) Haxkmtte KhoNky TITLE. NpBntc 3KpaH TITLE.
(4)HaxMMTe KhoNky INPUT TITLE. NOrBntcR 3KpaH INPUT TITLE.
(5)HaKMMTe KHNkY —ДЯ BBi6opa HnpaBHeHnra cKaHnpOBaHnra. Bawa BnDEOkAmeRa HauHET cKaHnpOBaHne B BbIbApHHom HnpaBLeHnra. EcnNb Bi BbIbEpeTe KHNkY ,MInHaTOpHbIe N3o6paXeHnRA 6yDyT OTo6paXaTbCn, NaHnHa C NeBOrO BepxHero yrNa OKHa, a ecNb Bi BbIbEpeTe KHNkY ,OnH bdyT OTo6paXaTbCn, NaHnHa C npBaRTO HnXHero yrNa OKHa. PocNe 3aBepseHnra cKaHnpOBaHnra MInHaTOpHbIe N3o6paXeHnRA 6yDyT OTo6paXeHbI Ha INDeKCHOM 3KpaHe.
(6) BbIePnte MmHnATOpHoe n3o6paXeHne, Ha KOTOpOE BbIXOHTNE HAnOJNTb TnTp, 3aTEM HaxMNTe KhONky EXEC nNN MmHnATOpHoe n3o6paXeHne eUe pa3. POrBnTcR MeHIO TnTPOB.
(7)Былонтейпные DeястBNЯ ПУНКТОВ C 4 NO 7 pa3дени "Hаюжень ТИТра на Ha NaчANO заими" ha CTp. 114.
(8)HaxMMTe KhoNky SAVE TITLE. Ha 3kpaHe KKД b TeueHne npIMepHo pIaTn cekYH IOBtCn INdKacua" "TITLE SAVE, n THTp 6ydt YcTaHOBNeH.
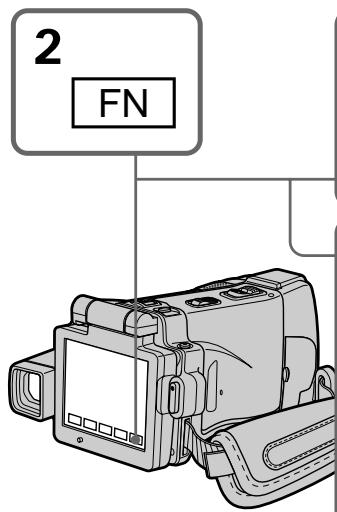
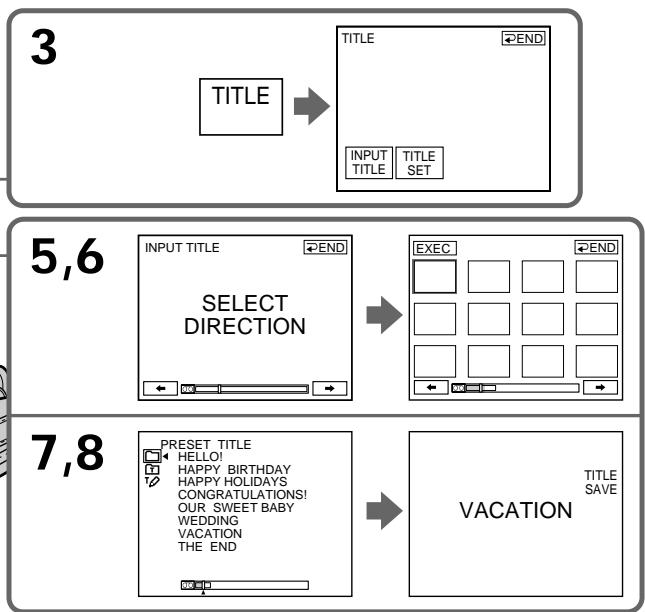
Notes
- Thumbs nails may not be displayed depending on the condition of the tape. This is not a malfunction.
- Noise may appear on the thumbnails. However, this has no effect on the recorded images.
- You cannot execute TITLE SAVE until the playback picture is displayed in step 8.
To use a custom title
If you want to use a custom title, select in step 7.
On a blank portion of the tape
You cannot superimpose a title on the tape.
Приимechanicals
MHNHaTOpHbIe N3O6paXeHnMa MOrYT He OTo6paXaTbCBy B 3aBNCmOCTn OT COCTORHnJeHTbl.3TO He ABlIReTc HEnCnPabHOctbIO.
HaMinHnAToHbIXN3o6paXeHNxMOrYT NOrBntbcr NOMexu.OdHako 3To He OKa3bIbaET BInRHHa 3aIncAHhble N3o6paXeHNy.
BbI He CMOKTe BbIIOJIHnITb KOMaHny TITLE SAVE, noka B nyHKe 8 He 6yJeT OTo6paJKeHO BocpOIN3BOIDmOE N3o6paJKeHne.
IINcN0b3OBaHHco6CTBeHHoro TnTpa
EcIn BbXOTnTe IcNoJIb3ObaTb Co6CTBeHHbI TnTp, Bbl6epnte OIzHIO npN BblONHeHm DeiCTBn NyHKTa 7.
Ha He3ancaHHom yactke JeHTbI
BbMOKeTe HaIoxKntb TnTp HaJeHTy.
Erasing a title
(1) Set the POWER switch to CAMERA or VCR.
(2) Press FN to display PAGE1.
(3) Press MENU, then select TITLEERASE in in the menu setting, then press EXEC (p. 233).
(4) Press / to select the title you want to erase, then press EXEC. "ERASE OK?" appears.
(5) Make sure the title is the one you want to erase, then press OK. The message "ERASING" flashes while erasing. After the erasing is completed, the message "COMPLETE" appears.
CTpapanHe TnTpa
(1)YcTaHOBInTe IpeKJIIOUaTeIb POWER B noJIOKeHne CAMERA nnn VCR.
(2)HaxmTe KhoNky FN dIy OTo6paXeHnCTpaHnIyI PAGE1.
(3) HaxmTe KhONky MENU, 3aTe BbI6epnTe onuIO TITLEERASE B B yCtahOBkax MeHIO, a 3aTe HaxmTe KhONky EXEC (cTp. 241).
(4)Haxmamte KhoNkN I nla BbIbOpa TnTpa, KOtOpBb Bbl XOTne cTepeTb, a 3aTeM Haxmnte KhoNky EXEC. IoarBntcra INDnKaun "ERASE OK?".
(5)Y6eIITecb,HTO Bbl6paH IMeHHO TOT TnTp, KOtOpBb Bbl XOTnTe CtepeTb,a 3aTeM haxMtTe KhoNkY OK. Bo BpMa CTnpAH Ha 3KpaHe 6yDet MraTb COo6uHHe "ERASING".Pocne 3abepuHn CTnpAH NORBnTcR Coo6uHHe "COMPLETE".
To return to FN
Press EXIT.
To cancel erasing
Press CANCEL in step 4.
3
MENU
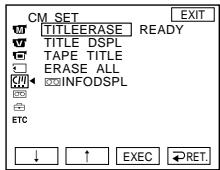


4,5
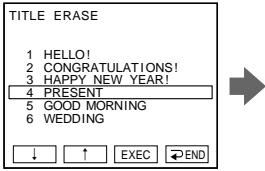

Making your own titles
You can make up to two titles and store them in the memory of your camcorder. Each title can have up to 20 characters.
Making a title in CAMERA mode
(1) Set the POWER switch to CAMERA.
(2) Press FN and go to PAGE2.
(3) Press TITLE.
(4) Press / to select . The TITLE SET screen appears. Press EXEC.
(5) Press / to select CUSTOM1 SET or CUSTOM2 SET, then press EXEC.
(6) Select the desired character. Repeat pressing a key to select the desired character on the key.
(7) Press to move the cursor for the next character. Repeat the same procedure as steps 6 and 7 to complete your title.
(8) Press SET. The title is stored in memory.
Co3dahne BaushxCo6CTBHeHHbIX THTPOB
BbMOxTe COCTaBHT Do DByx TnTPOB u CoXpaHnTB nB nAmrTn BaSei BnDeokamepbl. KaKdIy TnTp MoKET coePkaTb do 20 CmBOJOB.
To change a title you have stored
In step 5, select CUSTOM1 SET or CUSTOM2 SET depending on which title you want to change, then press EXEC and enter the new title as desired.
To superimpose your own title on tape
Follow the procedure in "Superimposing a title on starting a recording" on page 114.
If you take five minutes or longer to enter characters in the standby mode while a cassette is in your camcorder
The power automatically goes off. The characters you have entered remain stored in memory. Set the POWER switch to (CHG) OFF and start again from step 1 to complete your title.
We recommend setting the POWER switch to VCR (p. 123) or removing the cassette so that your camcorder does not automatically turn off while you are entering title characters.
To erase the character
Press . The last character is erased.
To enter a space
Press
To enter the character on the same button in succession
Press to move the cursor to the next position, and enter the character.
Co3dHne Baunx co6CTBeHHbIX TnTPOB
EcIn BbI BBOINTE CmMBOJI bTb MnHyT nJI 6oJee B pexKme OxuJaHn, Noka Kacceta haoDITcB BaWe BNDeOKaMepe
Питainede ВьклioчNTcA abTomaTnueckn.
CmBolbl, KOTOpbl Bbl BBeJn, CoXpaHrTcB namTn. YCTaHOBInTe nepeKJIIOUaTeJb POWER B noLOXeHne (CHG) OFF n cHOBa NaHnTe BblNOJHeHne DeIcTBn C pNYkTa 1, yTO6bl 3aBepuNTb COCTaBLHeHne BaWero Tttpa. PeKOMeHNyTeCra yCTaHOBInb nepeKJIIOUaTeJb POWER B noLOXeHne VCR (ctp. 123) nII bBlHyTB kAcceTy, yTO6bl BaWa BIndeOkaMepa aBTOMaTIueCKN He BblKJIIOUaJaCb BO BpEma BBOda CmMBOLOB TtTpA.
Длг STираннсИМВОЛа
HaxmTe KhoNky .PocneDnCnBOn 6yDet Ctept.
Длвьда npobena
HaKmTe KhoNkY
IINIOcneIOBaTeBHO BBOa CNMBOHa H ODHON TOJ KHONKe
HaKMMTe KHONKY ,YTO6bI nepeMeCTnTb KypCop B CNeDyUOuIO N03NcIIO,a 3aTEM BBeDNTE CIMBOJ.
Making a title in VCR mode
(1) Set the POWER switch to VCR.
(2) Press FN to display PAGE1.
(3) Press TITLE. The TITLE screen appears.
(4) Press TITLE SET. The TITLE SET screen appears.
(5) Press / to select CUSTOM1 SET or CUSTOM2 SET, then press EXEC.
(6) Perform steps 6 and 7 in "Making a title in CAMERA mode" on page 120.
(7) Press SET. The title is stored in memory.
Co3dHHe TnTpa BpeXmme VCR
(1)YcTaHOBInTe IpeKJIIOUaTeIb POWER B noJIOKeHne VCR.
(2)HaxmTe KhoNky FN dIy oTo6paXeHnCTpaHnIyI PAGE1.
(3)Haxmte KhONky TITLE. IorBntc 3kpan TITLE.
(4)HaxmTe KhoNky TITLE SET. NOrBntcA 3KpaH TITLE SET.
(5)Haxmamte KhoNKn ДЯ BbIbopa onnCUSTOM1 SET nJIn CUSTOM2 SET, a3aTeM haxmTe KhoNky EXEC.
(6) BbINOHNTE DeIeCTBnI NyHKTOB 6 n7 pa3dela "Co3daHne TnTpa B peXnme CAMERA" Ha cTp. 120.
(7)HaKmTe KhONky SET. TnTp 6yDet coxpanen B nAMrTu.
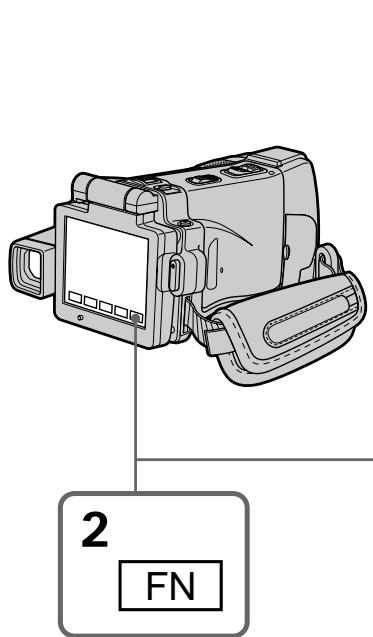
To return to FN
Press EXIT.
To superimpose your own title on tape
Follow the procedure in "Superimposing a title on starting a recording" on page 114.
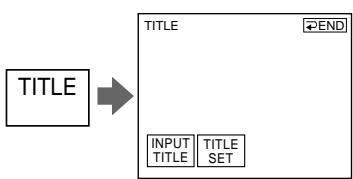
3
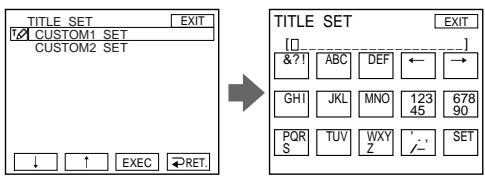
5
7
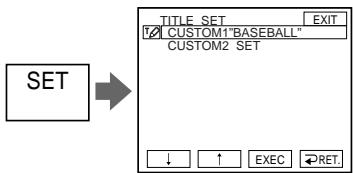
Дя BO3ВраТКИнДикали FN
HaxmTe KhoNkY EXIT.
Hn HAnOxHn Ha NENTy BaWero co6CTBeHHoro TnTpa
CneyuTe npoceJeype "HanoXeHne Tntpa Ha NaHauano 3aIncn"Ha cTp.114.
The micro Cassette Memory
The MICROMV cassette automatically records the recording settings and date. When you insert a cassette with the POWER switch set to CAMERA, or when you set the POWER switch to VCR, the cassette information is displayed for about five seconds.
The cassette information
micro Cassette Memory (MнКрokedTHапамгь)
KaccetaMICROMV3aIINcBbAeT yCTaHOBKn 3aIINcNn dAty aBTOMaTHueCKn. Ecnn BbI BCTaBnTe Kaccety BTO BpEm, KOgda nepeKIOuateJIb POWER ycTaHOBHeN B noLOXeHne CAMERA nIn KOrDa Bbl ycTaHOBtne nepeKIOUaTeJIb POWER B noLOXeHne VCR, INΦOpMaUNO kACCete 6yDet OTo6paKaTbCn OKOJ NoTn CekYHd.
HΦopmaζη o kaccete
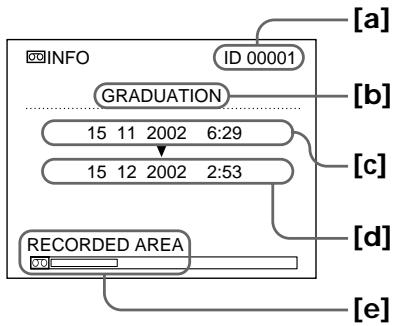
[a] The unique number of each cassette. Your camcorder automatically assign this number.
[b] The cassette title set by TAPE TITLE in the menu settings (Cassette label).
[c] The first-recorded date in this cassette.
[d] The last-recorded date in this cassette.
[e] The recorded area is indicated by the white bar.
Recorded areas
A blank portion between recorded area is also indicated as a recorded area.
To not display the cassette information
Set INFOFODSPL to OFF in the menu settings.
When " ※ " is flashing
Eject the cassette and insert it again. If the message is still displayed, the micro Cassette Memory may be corrupted. Replace the cassette with another cassette.
[a] YHnKaJIbHbI HOMep KaKDoI KAcCeTbI. BaIa BnDeOkamepa IpiCBAuBaET 3TOT HOpE aBTOMaTIueCKN.
[b] Tɪtp Kɑːcːteɪbɪ, yCTaHaBʌnɪBaæmbl C
POMOʊþI OŋúɪN TE A P E T I T E B yCTaHOBkʌx
MehIɔ (MeTka Kɑːcːteɪbɪ).
[c] DaTa nepBoN 3aIncn Ha 3Toi KaccTe.
[d]ДаТа NOслeн HeI 3aHnCn Ha 3ToI KaccTe.
[e] O6nactb 3aHncn, yKa3bIbAemar 6eJIoN pOJocOi.
3aHncaHHbIe 06JaCTN
He3anicaHHbIy yAcTOK MEKdy 3anicaHHbIMy yAcTKaMn TaKxKe yKa3bIBaeTcR KaK 3anicaHHbIy yAcTOK.
UTo6bI He OTo6paXaTb INHΦopMaζuO o Kaccete
YcTaHOBnTe OOnuIO INFODSPL B noJoxeHne OFF By yCTaHOBkax MeHIO.
EcnMnraTeHndkaZna “
N3BLeKnte KaccTeY n BCTaBbTe ee cHObA. Ecnn COo6uHHe BCE eune OTo6paXaETcT, micro Cassette Memory (MnKpokacCeTHa nAmTb) MoKeT 6bl T nobpeXdHa. 3aMeHnTe KaccTe y dpyroJ KaccToI.
Labelling a cassette
The label can consist of up to 16 characters and is stored in cassette memory.
(1) Insert the cassette you want to label.
(2) Set the POWER switch to CAMERA or VCR.
(3) Press FN to display PAGE1.
(4) Press MENU, then select TAPE TITLE in in the menu settings, then press EXEC (p.233). The TAPE TITLE screen appears.
(5) Select a desired character. Repeat pressing a key to select the desired character on the key.
(6) Press to move the cursor for the next character. Repeat the same procedure as steps 5 and 6 to complete the label.
(7) Press SET. The label is stored in memory.
MapKnpOBka KaccTebl
MeTka MoXeT coDepKxTaB Do 16 CmB0NoB u COxpaHrTaBcBA KaccTeHOn nAmrTu.
(1)BCTaBbTe Kaccety,ДЯ KOTOpO Bby XOTnTe BbIIOJIHITb MapKIpOBky.
(2)Установпейсякючать POWER в положене CAMERA ии VCR.
(3)HaxmTe KhoNky FN dIy OTo6paXeHnCTpaHnIyI PAGE1.
(4)HaxmTe KhoNky MENU, 3aTem BbIbepeTne onuio TAPE TITLE B [B] B yctaHOBkax MeHIO, a 3aTem HaxmTe KhoNky EXEC (ctp.241). IorBntc3KpaH TAPE TITLE.
(5)BbI6epITHe HUxHbI CmB0JI. NOBTOpHO hAXMImTe COOTBeTCTByIOUYo KJIaBNuYdNBA BbI6OpA HUxHKOrO CmB0JNA.
(6)HaxmTe KhoNky ДЯперemeшena Kypcopa K cIeNyUOeMy CnMBOJy. ПOBTOPte npOeDpy,ОпИсанHyюВ nyHkTax 5и 6,ДЯЗаBEReHЯ COCTaBJIeHЯ MEtKN.
(7)HaxmTe KhoNky SET. Metka 6ydt COxpaHeHa B nAmrTn.
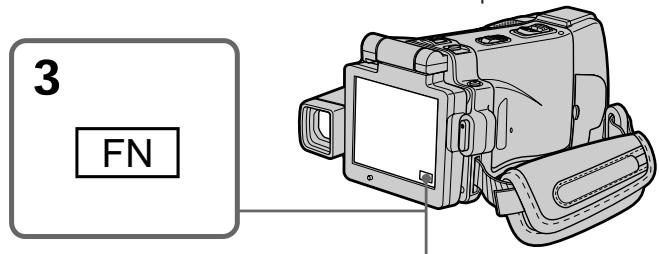
4
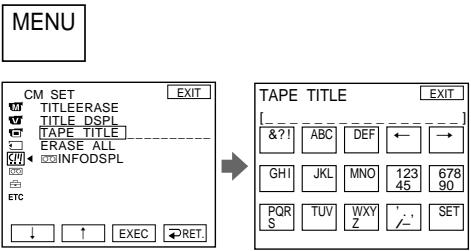
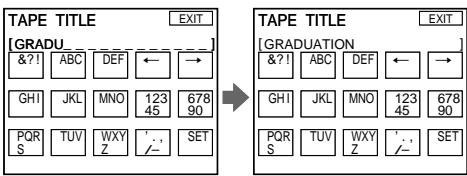
5-7
To return to FN
Press EXIT.
To erase the label you have made
Select in step 4. The last character is erased.
To change the label you have made
Insert the cassette to change the label, and operate in the same way to make a new label.
If you take five minutes or longer to enter characters in the standby mode while a cassette is in your camcorder
The power automatically goes off. The characters you have entered remain stored in memory. Set the POWER switch to (CHG) OFF once and then to CAMERA again. After that, repeat the procedure from step 3. The power does not go off if you enter characters in VCR mode.
If you set the write-protect tab of the tape to lock
You cannot label the tape. Slide the write-protect tab to release the write protection.
To erase the character
Press . The last character is erased.
To enter a space
Press
To enter the character on the same button in succession
Press to move the cursor to the next position, and enter the character.
Erasing all the data in micro Cassette Memory
You can delete all the data in micro Cassette Memory at once.
(1) Set the POWER switch to CAMERA or VCR.
(2) Press FN to display PAGE1.
(3) Press MENU, then select ERASE ALL in in the menu settings, then press EXEC (p. 233).
(4) Press / to select OK, then press EXEC. "OK" changes to "EXECUTE."
(5) Press / to select EXECUTE, then press EXEC. "ERASING" flashes on the LCD screen. Once deleting is completed, "COMPLETE" is displayed.
To return to FN
Press EXIT.
To cancel deleting
Select RETURN in step 4 or 5, then press EXEC.
Note
Once you delete all the data in the micro Cassette Memory, the following operations do not work:
-MULTI-PICTURE SEARCH
-TITLE SEARCH
-DATE SEARCH
Note on the ID number
This item cannot be deleted.
Стupaне BCex ДаHHbIX micro Cassette Memory (МКрокассгонпamATN)
BbMOxTe ydaNTb BCE daHHbIe micro Cassette Memory (MnKpokaccctHoi namrTu) 3a Odn pa3.
(1)YcTaHOBInTe IpeKJIIOUaTeIb POWER B noJIOKeHne CAMERA nnn VCR.
(2)Haxmnte KhoNky FN dny oTo6paXeHHCTpaHnCi PAGE1.
(3)HaxmTe KhoNky MENU, 3aTe BbI6epnTe onuIO ERASE ALL B yCTaHOBkax MeHIO, a 3aTe HaxmTe KhoNky EXEC (cTp.241).
(4)HaxmTe KhoNkI IaIy BbIbopa OIuIN OK, a 3aTeM haxmTe KhoNky EXEC. INdikauin "OK" CMeHnTCaINKauinei "EXECUTE".
(5)Haxmnte KhoNk nIy BbIbopa OIqnn EXECUTE,a 3aTeM Haxmnte KhoNky EXEC. Ha 3KpaHe KKd 6yDet MnraTb INHdkaunr "ERASING".Korda ydaJIeHne 6yDet 3aBepSeHo,OTo6pa3ntc HnDnKaunr "COMPLETE".
Для BOЗВраТа К ИнДиКаци FN
HaxmTe KhoNky EXIT.
ДлгOTMeHbI ydaJIeHnA
Bb6epnte onuio RETURN npn BbInonHeHHn DeiCTBn PnykTa 4 nIIN 5,a 3aTeM haxmTe KhONky EXEC.
Ppmeuahne
Pn ydaJIeHm Bcex DaHHbIX micro Cassette Memory (MnKpOKaccTeHOn namrTn) cIeDyUoJne onepaun pa60TaTb He 6yDyT:
-MULTI-PICTURE SEARCH
-TITLE SEARCH
-DATE SEARCH
PpmeaHne 06 yHkaJIbHOM Homepe ID
3TOT nyHKTe He MoKTe 6bItydaJeH.
Using a "Memory Stick" - Introduction
You can record and play back still images and moving pictures on a "Memory Stick" supplied with your camcorder. You can easily play back, record or delete images. You can exchange image data with other equipment such as your computer etc., using the USB cable and the "Memory Stick" supplied with your camcorder.
File format
Still image (JPEG)
Your camcorder compresses image data in JPEG format (extension.jpg).
Moving picture (MPEG)
Your camcorder compresses picture data in MPEG format (extension .mpg).
Typical image data file name
Still image
100-0001: This file name appears on the LCD screen of your camcorder.
Dsc00001.jpg: This file name appears on the display of your computer.
Moving picture
MOV10001: This file name appears on the LCD screen of your camcorder.
Mov10001.mpg: This file name appears on the display of your computer.
ИспOLTьзоване "Memory Stick" - Вて deane
BbMOKTe 3aINcBtB N BOCpON3BOIDnTb HENoDnXHbIe IN DVBxKyUneCg N3O6paKeHnHa "Memory Stick", pInlaraeMoN K BaSei BnDeOkampe. Bb MOKTe JERKO BbIOJNHTb BOCpON3BeDeHne, 3aNcB IIN ydaJIeHne N3O6paKeHn. Bb MOKTe BbIOJNHTb OMeH daHHbIMN N3O6paKeHnC dpyroI aPnpaIyPoI, TaKoi, KaK BaW nepcoHaJIbHbI KOMMbToP e T.I., IcNoJIb3yR KabeNB USB n "Memory Stick", pInlaraeMble K BaSeI BnDeOkampe.
Φopmat φaɪnəb
Helenobvnxhoe n3o6paXeHne (JPEG)
Baaia Bnideokamepa CxNMaet DaHhble
I3o6paXeHnBΦopMaT JPEG (c pacuipenem
.jpg).
Using a "Memory Stick"
IcnoIb3OBaHne "Memory Stick"

- You cannot record or erase images when the write-protect tab on the "Memory Stick" is set to LOCK.
- The position and shape of the write protect tab may be different depending on the model.
- We recommend backing up important data on the hard disk of your computer.
-
Image data may be damaged in the following cases:
-
If you remove the "Memory Stick," turn the power off or take out the battery for replacement when the access lamp is flashing
-
If you use a "Memory Stick" near magnets or magnetic fields such as those of speakers and televisions
-
Prevent metallic objects or your finger from coming into contact with the metal parts of the connecting section.
- Stick its label on the labelling position.
- Do not bend, drop or apply strong shock to a "Memory Stick."
- Do not disassemble or modify a "Memory Stick."
- Do not let a "Memory Stick" get wet.
-
Do not use or keep a "Memory Stick" in locations that are:
-
Extremely hot such as in a car parked in the sun or under the scorching sun
-Under direct sunlight - Very humid or subject to corrosive gases
-
When you carry or store a "Memory Stick," put it in its case.
-
Bы He можete 3аисьiBaTb Ил CTиpaTb n3обрахeня, ecn ЛпесТOK 3aитbl OT 3aисн Ha "Memory Stick" yctановен B noLOжehne LOCK.
-Положени и сорма лесенька 3ашитbi OT 3a\PuС MOrTy pa3ЛУЧТьСВ 3abUCMocTи OT MoДeПИ. - PeKoMeHdyeTcBbIOnJIHrTbpe3epBHOe KOIpnoBaHnE BaXhIx daHbIX Ha JeecTkIn Dnck BaUero nepcoHaJIbHorO KOMNbIoTepa.
ДанныеизобрахенmaMorytбытNBOBpeKdHebIВсLEdYIOUXClyuax:
-EcIn BbI BbIHeTe "Memory Stick", BbIKIOUHTe NITaHne ININ BbIbTe 6aTapeIO IJRA 3aMeHbI, KOrJa Mmraet JAmNoUHa Ka DoCTyNa
-EcIn Bbl 6byTe nCnoIb3ObaTb "Memory Stick" B6n3n MaHHTOB INN MaHHTbIX nOJIe, TaKnx, KaK y DnHaMnKOu IN TeJebu3OpOB
- He donyckaite npinkochobehnme Taillneckmnpedmetamn nIn BaunmnaJIbCaM K MetaJIInueckm YactmcoeHNHTelbHOrO yAcTka.
- Hakleite 3Tuketky B no3uun Mapknpobkn.
- He cπiδaηTe, He pοηaTe n He ποινβερaTe cnIbHbIM ydpam "Memory Stick".
- He pa3bnpaIte n He moIqnIupyIte "Memory Stick".
- He donyckaite nonaanda Hbarn Ha "Memory Stick".
- He nçnojlbzyu Te n He xpaHnTe "Memory Stick":
-Bype3MepHoJxapKnxMeCTax,HanpIMep,B npnnapKObaHHOM IOI COJIHcEm aBTOMO6nIe IINIOIpaJIaIcMM COJIHcEM
-ПОД ПРЯМВИМ COЛHEЧныМ CBETOM
-BOueHbIaJXbIxIINcOpEpauxN Bbl3bIBaHOuNe Koppo3nIO ra3bl MeCTax
- Пи переньке улпханенпомecтnte "Memory Stick" B ee Футлар.
"Memory Stick" formatted by a computer
The "Memory Stick" formatted by Windows OS or Macintosh computers do not have a guaranteed compatibility with your camcorder.
Notes on image data compatibility
- Image data files recorded on a "Memory Stick" by your camcorder conform with the Design Rules for Camera File Systems universal standard established by the JEITA (Japan Electronics and Information Technology Industries Association).
On your camcorder, you cannot play back still images recorded on other equipment (DCRTRV890E/TRV900/TRV900E or DSC-D700/D770) that does not conform to this universal standard. (These models are not sold in some areas.) -
If you cannot use the "Memory Stick" that is used with other equipment, format it with your camcorder (p. 232). Note that formatting erases all information on the "Memory Stick."
-
"Memory Stick" and STICK are trademarks of Sony Corporation.
- All other product names mentioned herein may be the trademarks or registered trademarks of their respective companies.
Furthermore, "TM" and "®" are not mentioned in each case in this manual.
"Memory Stick", OTΦopMaTnpoBaHnaHa nepcoHaJIbHOM KOMNbIOTepe
CoBmecTnMoocTb CaWei BnDeoKaMepoR "Memory Stick", oTfOpMaTnpoBaHNoI HaKOMnbTOpepax C OpeaOnHOHcNCTeMoI Windows nIi Macintosh, He rapaTnpyETcA.
Приимechаши NO COBmecTUMOCTN daHHbIX N3O6paKeHnI
-Фаилдданнбхи n3obpaжeh,在aicncaHHbIe Ha "Memory Stick"c nomoiB Baewi Bndeokamepbl,OTbeayiot npoeKTHbIM Tpe6oBaHnI MДЯ yHnBepcaJIbHOrO CTaHdapTa φaIIOBxCnCTEm Bndeokamepbl, pa3pa6oTaHnHO JEITA (rnoHckoI accounauee 3JekTPOHHo IpomblJeHHoctn IN HΦopMaunOHbIX TexHONOr).
BbI He MoXeTe BOCnpOn3BODnTb Ha BaWei BuaJeOkaMepe HEnoDbMnKHbIe N3OpBXeHNIA, 3aIIncAHbIe Ha dpyroI anpapaType (DCR-TRV890E/TRV900/TRV900E mN DSC-D700/ D770), KOTOPaHE COOTBeTcByET 3OMy YHINBepCajbHOMy CTaNaprTy. (3TN MDoJIH He npOdaIOCTB IN EKoTOpBIX pERHOax).
- Ecni BbI He MoKeTe IcNoIb3OBaTb "Memory Stick", KOTOPaI NcNoIb3OBAJacb Ha dpyroI annapaType, OToΦopMaTnpUte eHa BaSei BnDeOkamepe (CTp. 240). IMeIe TBNuIy, YTO npI φOpMaTnpOBaHIn BcR INHΦopMaZrHa "Memory Stick" cTnpaETcra.
"Memory Stick" MwMnStK, ABNHOCTc npMpHbIMN 3HaKaAMN Sony Corporation.
Bce npyhe Ha3BaHnI u3JeIi, yNOMaHyTbIe B daHHOM pyKOBOdCTBe, MOrY T 6blb fnpMeHHbIMN 3HaKaMn IIN 3apeRNCtPupOBaHHbIMN TOPROBbIMN MapKAMN COOTBETCTBYOUX KOMNaHNI.
B dαJIbHeIeM, 3nAkn “TM” n “®” He 6yUyt yKa3bIbATbcN KaJdbI pa3 B DaHOM pyKOBoDCTBe.
Inserting a "Memory Stick"
Insert a "Memory Stick" in the "Memory Stick" slot as far as it can go, as illustrated below.
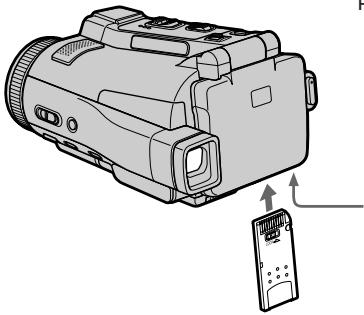
"Memory Stick" slot/ Cnot "Memory Stick"
Извileченье "Memory Stick"
OTkpOte pAnHeJI KKД n y6eIITecb,чTo lamNoUka DocTyna "Memory Stick" He ropnt. 3aTe mpeEdbHbTe pbuar MEMORY EJECT B HappaBHeHn CTpeKn.
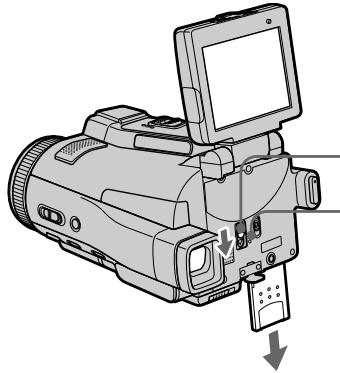
MEMORY EJECT lever/
Pbivar MEMORY EJECT
"Memory Stick" access lamp/ Jamnocka doctyna "Memory Stick"
While the "Memory Stick" access lamp is lit or flashing
Do not shake or strike your camcorder because your camcorder is reading the data from the "Memory Stick" or recording the data on the "Memory Stick." Do not turn the power off, eject a "Memory Stick" or take out the battery pack. Otherwise, image data breakdown may occur.
If "REMEMORY STICK ERROR" is displayed Reinsert a "Memory Stick" a few times. The "Memory Stick" may be damaged if the indicator is still displayed. If this occurs, use another "Memory Stick."
EcInI lamnoka doctyna "Memory Stick" roput nJn Muraet
He trpncite n He ctyuhte no Bauei Bndeokampe,notomyTO Bndeokamepa CuntbIbAet daHhble c "Memory Stick" nn 3anncbIbAET daHhble Ha "Memory Stick".He BbIKJIOuaTe pHTaHne,He n3BNekaTe "Memory Stick" n He chImaIte 6bTapeHbI b6loK.B npOTNBOM clyuae daHHbI e N3o6paKeHm MOryt 6bITb NOBpeXdEhl.
Ecnn oTo6paXaTeTcHnDnKaTOp "MEMORY STICK ERROR"
BCTaBbTe NOBtOropHo "Memory Stick" HeckoJIbKO pa3. EcIn INdIkaTOp Bce eue OTo6paXaETcra, BO3MoXHo, "Memory Stick" NobpeXKeHa. EcIn 3TO npOn3oUNo, nCnoJIb3yIe DpyrHyo "Memory Stick".
Using a touch panel
Operation buttons for most functions using a "Memory Stick" are displayed on the LCD screen. Press the LCD panel directly with your finger or the supplied stylus (DCR-IP220E only) to operate each function.
(1) Set the POWER switch to MEMORY.
(2) Open the LCD panel. The operation buttons appear on the LCD screen. You can switch the memory playback/memory camera mode by pressing PLAY/CAM.
(3) Press FN to display PAGE1. The operation buttons of PAGE1 appear on the LCD screen.
(4) Press PAGE2 to go to PAGE2. The operation buttons of PAGE2 appear on the LCD screen.
(5) Press PAGE3 to go to PAGE3. The operation buttons of PAGE3 appear on the LCD screen.
(6) Press a desired operation item. See relevant pages of this manual for each function.
IcnoJb3ObaHne ceHCOPHO naneJn
- When using the touch panel, press the LCD screen lightly with your finger or the supplied stylus (DCR-IP220E only).
- Do not press the LCD screen with sharp objects other than the stylus supplied (DCR-IP220E only).
- Do not press the LCD screen too hard.
- Do not touch the LCD screen with wet hands.
- If FN is not on the LCD screen, touch the LCD screen lightly to make it appear. You can control the display with DISPLAY/TOUCH PANEL on your camcorder.
- When operation buttons do not work even if you press them, an adjustment is required (CALIBRATION) (p. 275).
- When the LCD screen gets dirty, use the supplied cleaning cloth.
When executing each item
The green bar appears above the item.
If the items are not available
The colour of the items changes to grey.
Press FN to display the following buttons:
In the memory camera mode
| PAGE1 | SPOT FOCUS, MENU, PLAY, INDEX, SPOT METER, EXPOSURE |
| PAGE2 | SELFTIMER, PLAY, INDEX, MEM MIX |
| PAGE3 | LCD BRT, PLAY, INDEX, VOL |
In the memory playback mode
| PAGE1 | MENU, CAM, INDEX, DELETE, +, - |
| PAGE2 | PB ZOOM, CAM, INDEX, DATA CODE, +, - |
| PAGE3 | LCD BRT, CAM, INDEX, VOL, +, - |
Приимechanicals
-ПиИСПОЛБЗОВАнМсЕнССРНОпанелСпeгка нажимайтэзранЖКДВашIMпальсемпли пиларaemыm nepom(ТольковмодельDCR-IP220E).
- He haximai Te 3kpan JKKD octpokonehybIMn npedMeTaM, OTNIHbIMN OT npunaRaemoro nepa (ToIbko MoJeB DCR-IP220E).
-He haximaiTe 3KpaH XKД cInIshKom CInIbHO.
- He kacaTecb 3KpaHa KKД mOKpbIM pyKaMn.
- Ecnn INnDnKaunFN OTCyTCTByeT Na 3KpaHe KKD, cIerka KOCHNTecb 3KpaHa KK, yTO6bl OHa NORBnAoc. Bbl MoXte ynpabNtB DnCnIeem C nOmoBIO KHOKN DISPLAY/ TOUCH PANEL Ha BaWeB BuDeokamepe.
- EcnnФункциональьпье Кногн He pa6oTaIOT, Дадж Кorda Bbynx HaximaeTe, Tpe6yeTcR perynipobka (CALIBRATION) (ctp. 275).
- Ecni 3Kpan JKKJ 3aarp3HnIcN, BOCNoJIb3yIteCb IpuInaRaEmbIM NockyTOM YnCTAUIE TKAHN.
PnBbInoJIHeHHKaKdOrO NyHKta
HaŋnyHKToM NOBbIeTc3eJIeHaa noLoCa.
Ecnn nyHKtbI He doctynHbI
LBeTa INDnKaunnyHKTOB cTahOBaTcA cepbIMN.
Haxmte KhONky FN dny oTo6paKeHHcJeDyUoNx KHOK:
Bpekme 3aicn B namrTa
| PAGE1 | SPOT FOCUS, MENU, PLAY, INDEX, SPOT METER, EXPOSURE |
| PAGE2 | SELFTIMER, PLAY, INDEX, MEM MIX |
| PAGE3 | LCD BRT, PLAY, INDEX, VOL |
BpeXime Bocnpo3BeDeHnI nIamrTn
| PAGE1 | MENU, CAM, INDEX, DELETE, +, - |
| PAGE2 | PB ZOOM, CAM, INDEX, DATA CODE, +, - |
| PAGE3 | LCD BRT, CAM, INDEX, VOL, +, - |
Selecting still image quality mode
You can select the image quality mode in still image recording and store the setting in memory. The default setting is SUPER FINE.
(1) Set the POWER switch to MEMORY or VCR.
(2) Press FN to display PAGE1.
(3) Press MENU, then select STILL SET in in the menu settings, then press EXEC (p. 231).
(4) Press / to select QUALITY, then press EXEC.
(5) Press / to select the desired image quality, then press EXEC.
Bb6oppekimaKauecTba HeNoDbXHOro 306paXeHn
BbMOxTe Bb6paTb peKIM KaucctBa n3o6paXeHnI npI 3aIncn HenoDbNkHO r n3o6paXeHnI COxpaHnTb 3Ty yCTaHOBky B naMRTn. IyoymOJuaHnIO yCTaHOBJeHpeKIM SUPER FINE.
(1)Установпейсякючateь POWER в положене MEMORY ул ВCR.
(2)Haxmnte KhoNky FN dny OTo6paXeHHCTpaHnCi PAGE1.
(3)HaxmTe KhoNky MENU, 3aTem BbI6epnTe onuHO STILL SET B B yctaHOBkax MeHIO, a 3aTem HaxmTe KhoNky EXEC (ctp.239).
(4)HaKmaite KhoNk IaI BbIbopa onuIN QUALITY, a 3aTeM hKaMnte KhoNky EXEC.
(5)HaximMaTe KhoNkI IJnBbIbOpa HxKHO kaueCTBa n3o6paXeHnA, a 3aTEM HaXMITE KhoNky EXEC.
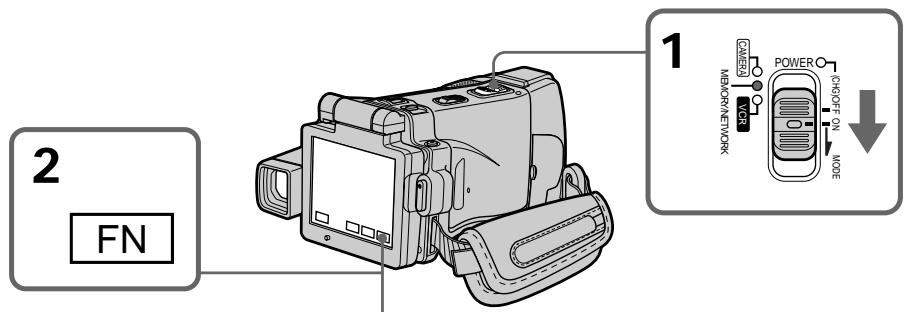
3-5
MENU
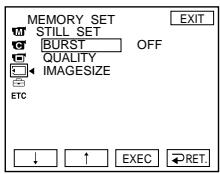

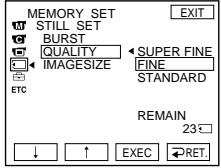


To return to FN
Press EXIT.
ДЯ BO3BpaTa K mHdNkaqm FN
HaxmTe KhoNky EXIT.
Image quality settings
| Setting | Meaning |
| SUPER FINE (SFN) | This is the highest image quality in your camcorder. The number of still images you can record is less than in FINE mode. Super fine images are compressed to about 1/3. |
| FINE (FINE) | Use this mode when you want to record high quality images. Fine images are compressed to about 1/6. |
| STANDARD (STD) | This is the standard image quality. Standard images compressed to about 1/10. |
Note
In some cases, changing the image quality mode may not affect the image quality, depending on the type of images you are shooting.
Differences in image quality
Recorded images are compressed in JPEG format before being stored in memory. The memory capacity allocated to each image varies depending on the selected image quality mode and image size. Details are shown in the table below. (You can select 1600 × 1200 or 640 × 480 image size in the menu settings.)
YctaHOBKn KaueCTBa n3o6paXeHnA
Image quality mode indicator
The image quality mode indicator is not displayed during playback.
When you select image quality
The number of images you can shoot in the currently selected image quality appears on the LCD screen.
Испобьзовке “Memory Stick” - Вedlyнe
Pa3mepn3o6paxeHn1600×1200
Setting the moving picture quality mode
There are SUPER FINE, FINE, STANDARD and LIGHTMODE in the moving picture quality mode. The default setting is SUPER FINE.
(1) Set the POWER switch to MEMORY or VCR.
(2) Select FN to display PAGE1.
(3) Press MENU, then select MOVIE SET in l in the menu settings, then press EXEC (p. 231).
(4) Press / to select MOVEMENT, then press EXEC.
(5) Press / to select the desired image quality, then press EXEC.
Bb6op pexkma kaecTba DnKxUeOcN 306paXeHnA
Imeotc cJeDyUOupe pexmbkaueCTBa DbnuKyueroa n3o6paKeHnR: SUPER FINE, FINE, STANDARD u LIGHTMODE. NoyMOnuHaHIO yctaHOBJIeN peXm SUPER FINE.
(1)Установпейсякючateь POWER в положене MEMORY ул ВCR.
(2)HaxMMTe KNONky FN dIy OTobpaXeHHaCTpaHnIyI PAGE1.
(3)HaxmTe KhoNky MENU, 3aTeM BbI6epnTe onuIO MOVIE SET B B yCTaHOBkax MeHIO, a 3aTeM HaxmTe KhoNky EXEC (cTp.239).
(4)HaxmamTe KhoNkI DnBb6opa onuMOVIEMODE,a 3aTeMaHXMnTe KhoNky EXEC.
(5)HaxmamTe KhONkU↓I nnBbIbOpa HxKHO kaueCTBa n3O6paXeHnA, a 3aTEM haxMnte KhoNky EXEC.
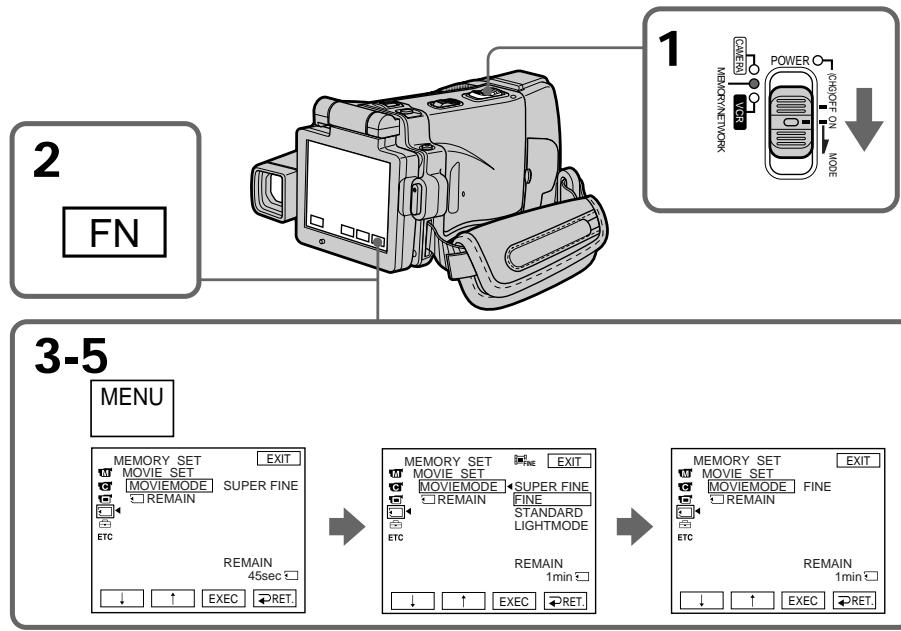
Image quality settings/YctahOBKn KaueCTBa n3o6paKeHnA
SUPER FINE: You can record moving pictures at the highest quality. This mode is suitable when you intend to modify the pictures using your computer. SUPER FINE is the default setting of your camcorder.
FINE: You can record moving pictures for a longer time than with the SUPER FINE mode, the quality, however, declines slightly.
STANDARD: You can record moving pictures for a longer time than with the FINE mode, the image size, however, is smaller.
LIGHTMODE: Since the file size is small, this mode is suitable for e-mail transmission. The image quality, however, declines.
SUPER FINE: Bbl MoXeTe 3aINCbIbA Tb DnKyuUneCn I3O6paXeHn C HnBbICuM KaucTeBOM. 3TOT pExnM yDObEh, ecn Bbl Co6npaTeCb BNIOUm3MeHrT b I3O6paXeHn C nOMoUb BaWero nepcoHaJIbHoro KOMNbOtepa. SUPER FINE ABnIeTcYcTaHObKOi BaSei BnDEOkamepbI NO yMOJUaHnIO.
FINE: Bbl MoXeTe 3aIncbIbTaB dBNkUzneCn3o6paXeHnB TeueHne 60Jee dIITeJIbHOBVPemHe, Yem npu nCIOb3OBAHn pexmAsuperFINE, npn 3TOMKaueCTBO,OHaKo,HECKoNbKO yxDUnTCr.
A moving picture consists of continuous still images. Frame rate indicates the number of images played back in one second. The more the number increases, the more natural the moving picture becomes. You can play back a maximum of 25 still images per second with your camcorder (25 fps/frame per second).
Bit rate
The higher the bit rate, the more natural the moving picture becomes.
Maximum recording time for moving pictures
| Image quality mode | Maximum recording time |
| SUPER FINE | 45 s |
| FINE | 1 min 10 s |
| STANDARD | 2 min 20 s |
| LIGHTMODE | 4 min 40 s |
Selecting the size of still image
You can select either of two still image sizes. 1600 × 1200 or 640 × 480 . (When the POWER switch is set to CAMERA or VCR, the image size is automatically set to 640 × 480 .) The default setting is 1600 × 1200 .
(1) Set the POWER switch to MEMORY.
(2) Press FN to display PAGE1.
(3) Press MENU, then select STILL SET (still image) in in the menu setting, then press EXEC (p. 231).
(4) Press / to select IMAGESIZE, then press EXEC.
(5) Press / to select the desired image size, then press EXEC. The indicator changes as follows:
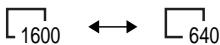
Bb6op pa3mepa HeNoDbNxHoro n3o6paXeHn
Bb moke Te Bb6paTb IIO60 n3 DvX pa3MepOB HnODBMKHOrO n3o6paXeHnR. 1600 x 1200 nIIN 640 x 480. (Korda nepekKnUoyatEnb POwER yCTaHOBNeH B noLoXeHne CAMERA nIIN VCR, pa3mep N3o6paXeHnA bTOMaTHueckn ycTaHaBnBaTeCn B 640 x 480.) Pa3mep 1600 x 1200 YBaJIeTcN yCTaHOBKO nO yMOJUahHIO.
(1)YcTaHOBInTe NepeKJIIOuChaTeIb POWER B noJIOKeHne MEMORY.
(2)Haxmnte KhoNky FN dny OTo6paXeHnCTpaHnCi PAGE1.
(3) HaxmTe KhoNky MENU, 3aTeM BbI6epnTe onuHIO STILL SET (HeNoBnKHOe N3o6paXeHne) B B yCTaHOBkax MeHIO, a 3aTeM HaxmTe KhoNky EXEC (ctp. 239).
(4)HaxmMaTe KHOJKN↓TnA BbIbOpa ONuIMAGESIZE, a 3aTEM HaxmTe KHOJky EXEC.
(5)Haxmamte KhoNk 1nBbIbOpa HyxHoropazMepa n3o6paXeHnA, a 3aTeM HaxMnteKhoNky EXEC.Инdkatop 6ydt N3MeHrTbcra CneDyUOUMO6pa30m:
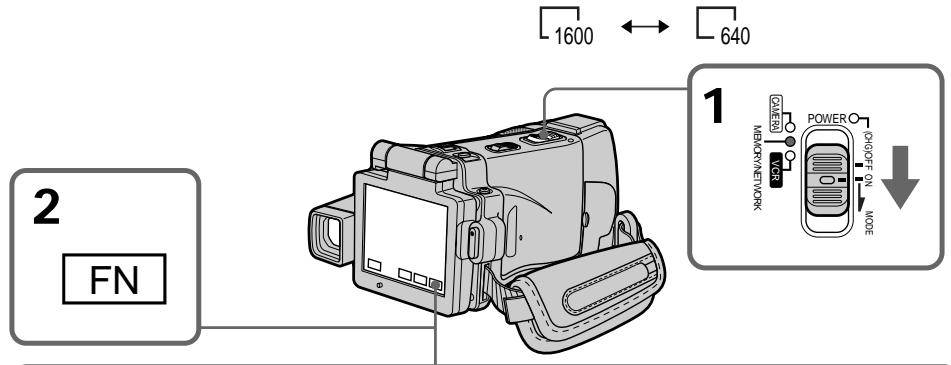
3-5
MENU
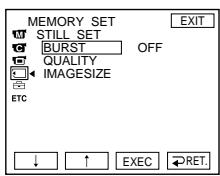

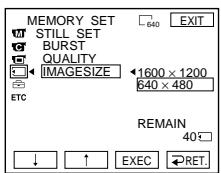

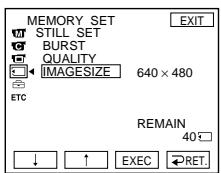
Note
When still images recorded on your camcorder in 1600 × 1200 size are played back on other equipment that does not support 1600 × 1200 size, the full image may not appear.
PpimueaHne
Image size settings/Yctanobk pa3mepa n3o6paKeHHA
Approximate number of still images you can record on a "Memory Stick"
The number of still images you can record varies depending on the complexity of the subject.
The table above shows approximate number of still images you can record on a "Memory Stick" formatted by your camcorder.
Approximate time of moving pictures you can record on a "Memory Stick"
The time of moving pictures you can record varies depending on the complexity of the subject.
ПриблзnteьногДиTeьнocтБдвжуцхсгИЗOBpaхжн,KOTopbieBbl moxkeTzeapncatbHa“MemoryStick"
ДинтельноctыDbИнkyшхсЯЗ3брaxkeни,КOTOpbIe Bbl MoKTe 3aIncatb,I3MeHReTcB 3aBnCmOCTn OT CLOXHOCTNObEkTa.
The table above shows approximate times of moving pictures you can record on a "Memory Stick" formatted by your camcorder.
Приваденая Вьile Таблма nOKa3bIBAeT пriбингельну ДИТELьHOCТ bDINKUxxCN ИЗБРАжени, кOTOBIE Bbl moKTe 3aIIncatb на "Memory Stick", оТформатирobанHyю на Ваше ВиDEOKampe.
Recording still images on a "Memory Stick" - Memory photo recording
You can record still images on a "Memory Stick."
Before operation
Insert a "Memory Stick" into your camcorder.
(1) Set the POWER switch to MEMORY.
(2) Keep pressing PHOTO lightly. The green mark stops flashing, then lights up. The brightness of the image and the focus are adjusted and fixed while your camcorder is targeted at the middle of the image. Recording does not start yet.
(3) Press PHOTO deeper. The image displayed on the LCD screen will be recorded on a "Memory Stick."
3aIncb HeIOBbIX H3O6paXeHn Ha "Memory Stick" - FOToCbEmKa c COxpaHeHmEBnAMrTn
BbMOxTe 3aHcMbTaH Na "Memory Stick" HENoDvNkHbIe N3O6paJxehn.
Ipeed BbINOJIHeHem Oepaun
BcTaBbTe "Memory Stick" B Bauy BnDeokamepy.
(1)Установские песеклоча teleportь POWER в поожене MEMORY.
(2)ДерхиTe cIerKa hαkaToi KhONkY PHOTO. 3eJIeHЯ MeTka ● nepeCTaHET MmraTb, a 3aTEM BbICBeTnTcR.ЯрКоCTb N3O6paXeHЯ n ΦOKycuPObBA peryInpIpyOTcN n ΦNKcIpyIOcT, noka BaWa bIKeOkamepa NaZeJIeHa Ha cepeDInHy N3O6paXeHЯ. 3aIIncb noka He HauINHaetcN.
(3)HaxMMTe KhoNkpy PHOTO cnIbHee. 1306paXeHne,OTo6paXaEmoe Ha 3KpaHe JKKD,6yJeT 3aIncAoHa "Memory Stick".
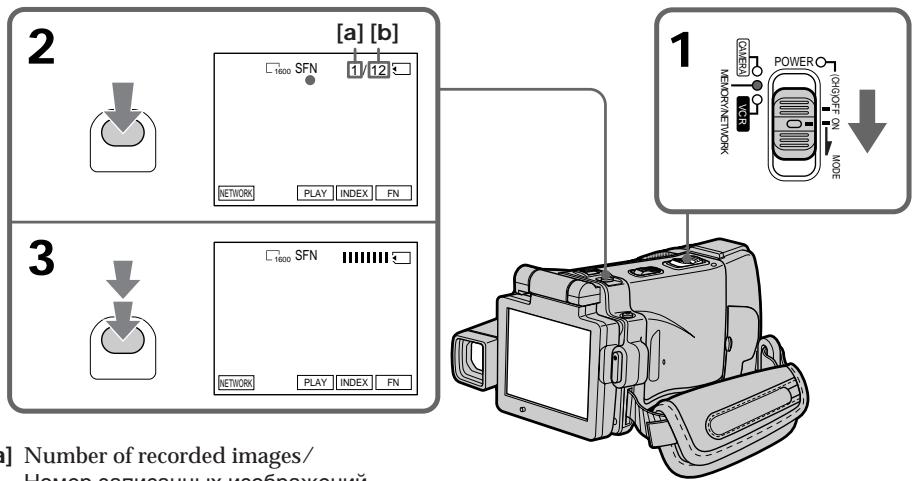
[a] Number of recorded images/ Homep 3aɪncaHbɪx ɪəðpaːkæŋn
[b] Approximate number of images can be recorded on the "Memory Stick"/ПиблзИтельhoe колиесТВО ИЗобразжени, КOTOPье моЖно 3aПиСаТь на "Memory Stick"
You can record still images on a "Memory Stick" in the recording standby mode or while recording on tape in CAMERA mode For the details, see page 63.
BbMOxTe 3aINCbIbTaHHeNoDbXKHbIe I3O6paXeHHa Ha "Memory Stick" B pexIme OXJaAHn 3aINcHn Nn BO BpeM 3aINcN Ha JeHTy B pexIme CAMERA
Bolje noIpo6ha nHΦopMaζη npVBeDeHa ha cTp. 63.
When the POWER switch is set to MEMORY The following functions do not work:
-Digital zoom
Super NightShot
Colour Slow Shutter
- Wide mode
-Fader
- Picture effect
- Digital effect
- Sports lesson of PROGRAM AE (The indicator flashes.)
-Title
- SteadyShot
While you are recording a still image You cannot turn off the power or press PHOTO.
When you press PHOTO on the Remote Commander
Your camcorder immediately records the image that is on the LCD screen when you press the button.
When you press PHOTO lightly in step 2
The image momentarily flickers. This is not a malfunction.
Recording data
The recording data (date/time or various settings when recorded) are not displayed while recording. However, they are recorded automatically onto the "Memory Stick." To display the recording data, press DATA CODE during playback. You can also use the Remote Commander for this operation (p. 57).
When the POWER switch is set to MEMORY
The angle of view is slightly larger compared with the angle of view in CAMERA mode.
The number of still images you can record on a "Memory Stick"
It varies according to the image quality mode and the complexity of the subject.
EcJn nepeKJIIOUaTeIb POWER yCTaHOBNeH B noJIOKeHne MEMORY
CneyuunheyHKnH He pa6oTaIOT:
-UnpOBoHae3D
-Houha cynepcbemka
-LBETHcBemKa CMeIeHHbIM 3aTBOPOM
-Широкоэкразнный реким
-Φeɪdεp
-3ΦΦeKtBn306paXeHn
-LnDpOBBie 3oPfKeKtbl
-CnopTnBhIe coCTa3aHnI PROGRAM AE (VHdNkATOp Mmraet.)
-Tntpbl
-ФУнкцИЯ yCTOИNBОВ CBEMKN
Ioka Bby 3aINCbIBaTe HeNoDBNXKHOe n3o6paXeHne
BbI He cMOXeTe HN BbIKJIOuNTb NITaHHe, HN HkaTb KhoNkY PHOTO.
EcIn Bbl HaxMeTe KhoNky PHOTO ha nyIbTe ductaHOnHOrO ynpabLeHH
Baa Bndeokamepa TOTcac Jxe 3anuet n06paXeHne, KOtopoe 6ydt Ha 3kpane KKД npn Haxatm KHOKN.
Korda Bbl cnerka haxnmaeTe KhONky PHOTO npB bInOJHHeHN DeIcTBnnyHKTa 2
ИЗбрахени на мгновени Мерцael.ЭТо He RAJIЯТСЕНСРаВHOCТБИО.
DaHHbIe 3aHNCN
Recording images continuously
You can record still images continuously. Before recording, select one of the four modes described below in the menu settings.
NORMAL [a]
Your camcorder shoots up to four still images in 1600× 1200 size or 25 still images in 640× 480 size at about 0.5 sec intervals. ( )
HIGH SPEED [a]
Your camcorder shoots up to 32 still images in 640 × 480 size at about 0.07 sec intervals. (马)
EXP BRKTG (Exposure Bracketing)
Your camcorder automatically shoots three images at about 0.5 sec intervals at different exposures. ( BRK )
MULTI SCRN (Multi Screen) [b]
Your camcorder shoots nine still images at about 0.5 sec intervals and displays the images on a single page divided into nine boxes. Still images are recorded in 640 × 480 size. ( )
HenpepbBna 3aNcB n3o6paXeHn
BbMOxTe 3aNcBtBHeNoDnKHbIe
13o6paXeHnHnepepbIBHO. Bb6epnte nepei
3aNNcBIO yCTaHOBkAX MeH0 OINH n3 YeTbIpex
peKIMOB, ONNCaHHbIX HNXe.
PexkmN NORMAL [a]
Baisha Bndeokamepa ChmaeTdo YeTbipex HenoDBNXhIX n3o6paXeHn pa3Mepom 1600x1200 nIIN 25 HeNoDBNXhIX n3o6paXeHn pa3Mepom 640x480c INHTepBaJOM pIpMePHO B0,5ceK.(
Pexim HIGH SPEED [a]
Baisha Bnideokamaepa Chnmaet do 32 HneoDBNkHbIX n3O6paXeHn pa3Mepom 640× 480 cnHTepBaIOM npImepHO B 0,07 cek. ()
Pexim EXP BRKTG (cepna 3Kcnozni)
Bawa Bndeokamepa ABTomatNueckn Chnmaet TpN 306paXeHn C INTEpBaJOM PnIMepHO B 0,5 cek c pa3nHoh 3KcNo3nnei. ( BRK )
PexzMMULTISCRN (mylbTu3KpaH) [b]
BaSHA BnDEOKaMepa CHNMaET DeBArTb HENoDnBXHbIX N3o6paXeHIn C INHTepBaIOM npIMepHO B 0,5 cek n OTO6paXaet 3TN N3o6paXeHIn Ha ONDHcSTpAHnCe, pa3delenHo Hn DEBraTb OKOH. 3aINCbIBaEMble HENoDnBXHbIE N3o6paXeHIn IMeOT pa3Mep 640× 480 (
![SONY DCR-IP220E - PexzMMULTISCRN (mylbTu3KpaH) [b] - 1](/content/2020/04/48645/images/baf2b747357bd3ff4d038832d61b10fe00bcb4fd55e798cc788914677cc3b027.jpg)
[a]
![SONY DCR-IP220E - PexzMMULTISCRN (mylbTu3KpaH) [b] - 2](/content/2020/04/48645/images/44d533d15159abc9ac1b964e3e2d8971d3c10f08087017cb4ea658c084a0e3c6.jpg)
[b]
(1) Set the POWER switch to MEMORY.
(2) Press FN to display PAGE1.
(3) Press MENU, then select STILL SET in l in the menu settings, then press EXEC (p. 231).
(4) Press / to select BURST, then press EXEC.
(5) Press / to select the desired settings.
(6) Press EXIT to make the menu settings disappear.
(7) Press PHOTO deeper.
(1)Установские песеклоча teleportь POWER в положене MEMORY.
(2)HaxmTe KhONky FN, yTo6bI OTo6pa3nTb cTpaHnU y PAGE1.
(3)Haxmnte KhoNky MENU, 3aTeM BbI6epnTe onuHO STILL SET B B yctaHOBkax MeHIO, a 3aTeM Haxmnte KhoNky EXEC (cTp.239).
(4)Haxmaite KhoNkU↓IДЯ BbIbopa onuBURST,a 3aTeM Haxmite KhoNky EXEC.
(5)HaKImaIte KHOpKn / ДЯ Вьбopa HyЖныx yCTaHOBOK.
(6)HaKMMTe KhoNkY EXIT, YTo6bI OTo6paXeHne yCTaHOBOK MeHIO NcYe3No.
(7)Haxmnte KhoNky PHOTOCnJIbHee.
![SONY DCR-IP220E - PexzMMULTISCRN (mylbTu3KpaH) [b] - 3](/content/2020/04/48645/images/a81ac21c33a5201cd1444742fe878ec58d03dfea06855ae5b3cadc8debff9aef.jpg)
If the "Memory Stick" becomes full
"FULL" appears on the LCD screen, and you cannot record still images on this "Memory Stick."
The number of still images in continuous shooting
The number of still images you can shoot continuously varies depending on the image size and the capacity of the "Memory Stick."
During recording still images continuously The flash does not work.
When shooting with the self-timer function on the Remote Commander
Your camcorder automatically records up to the maximum recordable number of still images.
Ecπη emKocTb "Memory Stick" 3aNoJIHNTCA
Ha 3KpaHe KKД NOBHTcH INDnKaUH N FULL",и Bbl He cMOKeTe 3aINCbIbTaH HeNoDbNkHbIe I3O6paxKeHn Ha 3Ty "Memory Stick".
KolnueCTBO HeNoDBNXHbIX n3O6paXeHn npn HnpepbBHOcBemKe
KoIuYeCTBO HeNoOdBnXbIx N3o6paXeHn, KOtOpBle Bbl MoXeTe CHImaTb HnpePbIBHO, N3MeHReTcB 3aBNCIMocTn OT pa3Mepa N3o6paXeHn nEmkocTn "Memory Stick".
Bo Bpem HnpepbBHOJ 3aHNC HeNoDBrXhblx N3o6paKeHn
Bcπbιιka He pa6oTaet.
Ppi Cbemke C nCnOJIb3OBAHEm FyHKcnn TaMepa cAmO3anycka Nn NpIbTa dNCTaHcUNOHoro ynpabJeHH
Baasa Bndeokamaepa ABToMaTnueckn BbInOJIHReT 3aIINcBdo DCtNXeHNA MaKcIMaJIbHOrO KOJINUeCTBa 3aIINCbIBaEMbIX HEnoDVBHXHBIX n3o6paXeHNI.
When selecting HIGH SPEED
Flickering or changes in colour may occur. Also, your camcorder prevents focusing on near objects.
If the remaining capacity of the "Memory Stick" is less than three images
EXP BRKTG does not work. When you press PHOTO lightly, "FULL" appears on the screen.
The effect of EXP BRKTG
The effect of EXP BRKTG may not be noticeable on the LCD screen.
We recommend viewing images on a TV or computer to realise the effect.
When selecting NORMAL or HIGH SPEED
Recording continues up to the maximum number of still images during pressing PHOTO deeper.
Release PHOTO to stop recording.
EcnBbBb6peTe onuHIGHSPEED
Moxet IMeTb MeTo MepaHne IINI N3MeHeHHa CBETOBo rAMMbI. KpOme TORo, Ba7a BnDeOKaMepa He CMOxET BblNOJHrTB fokycuPoBky Ha 6JI3Ko paCNoJoxKeHHbI npedMeTbI.
EcIn ocTabsaHcE mKocTb "Memory Stick" coCTabJIaRt MeHee TpEx n3o6paXeHn
ФункцИЕXP BRKTG He pa6oTaeT. EcIn Bbl cIerka haxMeTe KhoNkY PHOTO,Ha 3KpaH e NOBvTcH INDnKaZuN "FULL".
3ΦΦeKT cepn 3KcNo3uN EXP BRKTG
Ha 3kpahe KKД əффekt EXP BRKTG можетпювлгсг HeOTHTJINBO.
Дя осуцьгеленя 3того зфөкта pekomehnyetcar npocmatpnbatb n3obpaхени Ha 3kpane TeleBn3opa nIn nepcoHaIbHoro KOMlbOTepa.
EcIn BbI BbI6eTe onuNORMAL nHIGHSPEED
ПрибожeeсиьHomнжakTNKNHONKINPHOTO 3anncb6ydetnpoDJIkaTbCnДIOCTNXeHnMaKcIMaJIbHOrO KOnIYeCTBa HEnoDbNkHbIX n3obpaXeHn.ДЯocTaHOBKn3anncn OTnyctnte KhONky PHOTO.
Recording images with the flash
The flash automatically pops up to strobe. The default setting is auto (no indicator). To change the flash mode, press (flash) repeatedly until the flash mode indicator appears on the LCD screen.
3aIncb n3O6paXeHn co BCnbIshKoI
Bcblska cpa6aTbIbaet abTomatueckn. ABtOMatueckoe cpa6aTbIbAHne (6e3 INdikatopa) ABJIeTc yCTaHOBKOI NO yMOJUahHIO.ДЯИЗMEHHepeKIMAbCbIshKn HaxkMaIte NOBTOPO KHOKNy 4 (BCblsIKN), NOKA INDikatoppeKIMAb CbIshKn He NOABITcH Na 3KpaHe KKД.
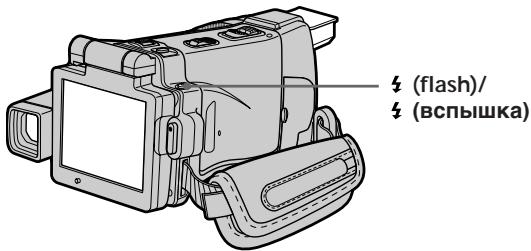
Each press of ±b (flash) changes the indicator as follows:

When you set RED EYE R in to ON in the menu settings (p. 228), the indicator changes as follows:
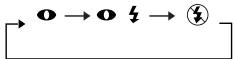
Forced flash: The flash fires regardless of the surrounding brightness.
- Auto red-eye reduction: The flash fires before recording to reduce the red-eye.
Forced red-eye reduction: The flash fires before recording to reduce red-eye regardless of the surrounding brightness.
No flash: The flash does not fire.
The amount of flash is automatically adjusted to the appropriate brightness. You can also change FLASH LVL to the desired brightness in the menu settings (p. 228). Try recording various images to find the most appropriate setting for FLASH LVL.
KaJdbi pa3 npn HaxkataH KNOpKn (BCnbIkwK) INDkaTOp N3MeHaETcN cNeDuOuM 6bpa30m:

EcIn Bby yctahOBHTe onuHIO RED EYE R B mB noJoxHeN ON B yCTaHOKax MeHIO (cTp. 236), HnDnKaTOp 6ydt N3MeHArbCra CNeDyUOIM o6pa30m:
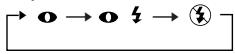
ПинHyДиТeьнэВ BCbIшka:
BcMbka6ydet
Cpa6aTbIbTaB He3aBNCIMO OT
OKpykaUoIeIrpKocTn.
A BtOMaTnueckoe yMeHbIeHne 3ΦΦeKTa KpaChbIX rna3:
Bcnbikca cpa6aTbIbaeT
peep3aINscbIO nla
UMeHbueHnKpachOTblTna3.
0 ΠπiHydnteHbHoe yMeHbIeHne 3ΦΦeKtA KpaChbIX rna3:
Bcblska cpaabaet Bhe 3aBNCMOCTNOT RPKOCTN
OKpyxkaIooeroOCBeseHnA.
BcBnK:
Bcnbiuka He cpa6aTbIbaeT.
PerynpoBka BcblkHa noDxOJaIyOp
rpkocTb BblONHHeTCR abTomaTneCKn. Bbl
MOXeTe TaKxe yCTaHOBnTB Ha HyxHyIO rpkocTb
oIuIO FLASH LVL B yCTaHOBkax MeHIO
(cTp.236).PiOnItaTecb 3aIncaTb pa3IuHbIe
n3O6paXeHnI dIra OTbICKaHnHaNboJe
noDxoJIeero 3NaHeHnY cTaHOBKn FLASH LVL.
Notes
- The recommended shooting distance using the built-in flash is 0.3m to 2.5m (31/32 feet to 8 1/3 feet).
- Attaching the lens hood (supplied) or a conversion lens (optional) may block the light from the flash or cause lens shadow to appear.
- Auto red-eye reduction (O) and Forced red-eye reduction (O S) may not produce the desired effect depending on individual differences, the distance to the subject, the subject not looking at the pre-recording flash or other conditions.
- The flash effect cannot be obtained easily when you use forced flash in a bright location.
- The flash charge lamp flashes while the power for firing is being charged. After charging is completed, the flash charge lamp lights up.
- If it is not easy to focus on a subject automatically, for example, when recording in the dark, use HOLEGRAM AF (p. 151) or the focal distance information (p. 89) for focusing manually.
If you leave your camcorder for five or more minutes after removing the power source Your camcorder returns to the default setting (auto).
The flash does not fire even if you select AUTO and Auto red-eye reduction (O) during the following functions:
NightShot
- Spotlight of PROGRAM AE
- Sunset & moon of PROGRAM AE
- Landscape of PROGRAM AE
- Exposure
- Flexible Spot Meter
During recording images continuously The flash does not work.
Приимechanicals
- PeKoMeHdyeMoE dIra CbEmKn paCCTOHaNHe npi NCNoJIb3OBAHmN BCTPoeHHoB BCnblIKu COCTaBJIaRrOT O,3do2,5M.
-Пикрелене ьнды оьektuBa (плараetс) ИИnpeoobpa30BaTeьного obektuBa (пpoobpeaetc OТДьHo) MoKET 6LOKINPOBAtb CBET BCblIiKN IIN Bbl3BaTb NOBJIeHne TeHn OT oBekTua.
BpejKIMe (aBTOMaTnueckoe yMeHbWeHne 30fkeKTa KpacbIX rna3) n npuHyDnteJbHOrO 30fkeKTa yMeHbWeHnKpacbIX rna3 (04) JKeJaembl 30fkeKT MoKET He DoCTnRaTcB 3aBNCMOCTN oN HdNBduAalbHbIX pa3nUH, pacCToHnIO do 6BeKTa,OT TORO, CMOTpnT Jn 6BeKtHa cpa6atbIbAouy Ipepe 3aInCbo BCbIshky, INpyrnx ycNoBn.
-3ΦΦeKT BCnblk MoKet 6bITb TpydnoocTnxMlbIM,ecINBblncNoIb3yeTe npHnuNTeJIbHyO BCnblkky BycNobnxApKoro OCBeueHn.
-BoBpemAaKKyMylIzIuN3apraIaIpa cpa6aTbIBaHnIJaMNoUka 3aprIKN BCblIuKu 6byET MIRaTb. Iocne 3aBepWeHnI 3aprIkn JaMNoUka 3aprIKN BCblIuKu BbICBeTITcR. - EcniabTOMaTuYeCKaФokycuPoBkaHa
ObkeTe 3aTpUdHeHa,HaPmEp,piCcEmKe
BTemHote,ncnOJIb3yIteФyHKUIO
HOLOGRAM AF (ctp.151) nIINHΦopMaUIO
OΦokycHompacCToAHNN(ctp.89)dJIa
BbIOnJIHeHnФokycuPoBKnBpyHyIO.
EcIn Bbl octabte Bawy Bndeokamepy Ha nTb nn 60lee MNHyT Nocne OTcoeDHeHn HCTOCHKA NITAHN
BaSHA BnDeOKaMepa BepHeTcK yCTaHOBKe nO yMOJUaHInO (ABTOMaTNUeCKoe cpa6aTaBbAHne).
Bcblska He 6ydt cpa6aTbIBaTb, daXe ecn Bbl bIbepeTe onuHO AUTO n aBTOMaTHueckoe yMeHbWeHne 3ΦΦeKta KpacHbIX rna3 (O) BO BpEmra pa6oTbI cJeDyUoNx ΦyHKm:
-HouHaCbemKa
-PexkIM npoxeKtopHOrO ocBeueHnYyHKcN PROGRAM AEP
-Pexm 3axoJa cOnnca n Lyhbl yHKcIM PROGRAM AE
-JIaHdwaΦTHbI pexmФyHKcIN PROGRAM AE
-3Kcno3nua
-Pereynipemyoe nTHOΦoTomeTpnn
Bo Bpemr HepepbBHOJ 3aHNCn 1306paXeHn
Bcnbikha He pa6oTaet.
Shooting with an auxiliary light - HONOGRAM AF
The HOLOGRAM AF is an auxiliary light source used for focusing on subjects in dark places. Set HOLOGRAM F in to AUTO in the menu settings. (The default setting is AUTO.) When _ON appears on the LCD screen in a dark place, press PHOTO lightly. Then the auxiliary light will automatically emit until the subject is focused.
CbeMka co BCnOMoRAteIbHbIMOCBeueHem -ФункцЯ HOLOGRAM AF
Ioi roIolrpaMMHoi aBToOfoKcnpOBKOI
HOLOGRAM AF noJpa3ymEbaETcra
BCNOMORAteBbHbI NCTOCHNK CBEtA, INCNoB3yeMbI
dJIa FOKcnpOBKn Ha o6BeKtax B TEMbIX MecTax.
YCTaHOBnTE OUHIO HOLOGRAM F B C B
yCTaHOBkAX MeHIO B NOJLOXeHne AUTO. (AUTO
ABLHeTcRA YCTaHOBKOI NO yMOJuaHNIO.)
KOrDa Ha 3KpaHe KKД B TEmHom MecTe NOBHTCR
HINDKaUNe PON, cNeRka HaxMnTE KHOKNy PHOTO.
3aTEM BCNOMORAteBbHbI NCTOCHNK CBEtA 6yDet
ABTOMATUHECKNI NCYNCKaTB CBT, NOKa
FOKcnpOBKa Ha o6BeKte He 6yDet BvINOnHeHa.
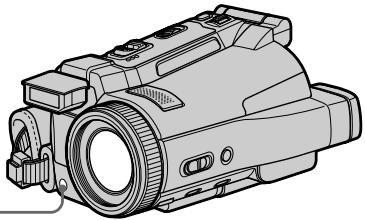
"HOLEGRAM AF (Auto-Focus)," an application of laser holograms, is a new AF optical system that enables still image shooting in dark places. Having gentler radiation than conventional high-brightness LEDs or lamps, the system satisfies Laser Class 1 (*) specification and thus maintains higher safety for human eyes. No safety problems will be caused by directly looking into the HOLEGRAM AF emitter at a close range. However, it is not recommended to do so, because you may experience such effects like several minutes of image residual and dazzling, that you encounter after looking into a flashlight.
- HOLEGRAM AF satisfies Class 1(time base 30 000 seconds), specified in all of JIS (Japan), IEC(EU), and FDA(US) industry standards. Complying with these standards identifies the laser product to be safe, under a condition that a human looks at the laser light either directly or even through a lens for 30 000 seconds.
O roJorpamMHO aBToΦOKcnpOBKe HIOLOGRAM AF
"HOLOGRAM AF (aBTofoKycuPbKa), OJHO n3
npimHeHnJa3epbIbx rIoRpaMM,
npedCTaBnIeT cboo HOByo ONtUeCKyIO
CnCTMeY aBTOdoKocpBNk, PO3BOJHOUYIO
BbIOnJIHTb CbEMKY HNODBMIXhBX
N3O6paXeHn B TEmhBX MeCTax.
Imer 60nee Hn3Kn yPoBeHb paDnaunn IO
cpaBHeHNo C oblyHbIMn CBETOINOdAMn IIN
IaMnAm BiCOKO npKOCTn, 3Ta CnCTema
yOBNeTbOPaReTTre6OBAHNK N J3aeHNMA1 KJLACCA (^*) I, TaKIM o6pa3OM, ObecneuBaET
noBbIeHHyio 6e3oNaChOCtB dny eJeOBeYeCKx rla3.
HnKaKInx npOblem C 6e3oNaChOCtBu He
BO3HnKaAet, DaeKe cEIN CMOTpeB npMO B
m3JLyataJIb rONoRpaMMHO bAToOpKocpBNk
HOLOGRAM AF C 6bn3KOro paccToHnN. IN BCE
xe, DeNaTb 3TO He peKOMeHdyeTcN, NOTOM YTO
Bbl MoKete B TceHHe NEckOblKn MmHT
ncbItbBaTb TAKne RBLNeHn, KAK OCTaTOOHoe
m3O6paXeHn N OcIeNlHe, KOtOpBe Bbl
ouyuaTe, NOcmOTpeB Ha ropAuyIO
3JIeKTpUveckyIO lamNoQky.
*TolorpamHna ABtofoKycnpobKa HOLOGRAM AF yDobIeTBopReT 1 KnaCcy (6a30Boe BpeM 30000 cekyn),OppeJeHHomy BO BCex npomblJehhbx CTanAdaptax JIS (RnoHn),IEC (EBPocO3),FDA (CoeHNHeHbE ⅢTaTbI). CooTBetCTBne 3tUm CTanAdaptam NoJa4zMyemaebT, qTO na3epHoe N3dEmne RaJIeTe 6e3OnaChbIM dAxe npYcNOBm,qTO YenOBek 6yDeT CMOTpeT nprMo Ha na3epHbI IyU,daXe IcNoJIb3yur yBeNCHTEhHyIO HIN3y,BTceHeNe 30000 cekyn.
Notes
- A conversion lens (optional) may obstruct the HOLEGRAM AF light and make focusing difficult.
- If enough light does not reach the subject even if the HONOGRAM AF emitter is emitted (recommended shooting distance is 2.5m (81/3 feet)), the subject will not be focused.
- Focusing may be hampered if the light emitted from the HOLOGRAM AF is blocked by an obstruction.
- Focus is achieved as long as HOLEGRAM AF light reaches to the subject even if its light is slightly out of the middle position of the subject.
- If HOLEGRAM AF light is dim, it sometimes becomes difficult to focus. If this happens, wipe the HOLEGRAM AF emitter with a soft, dry cloth.
The HOLOGRAM AF does not emit when:
- The POWER switch is set to CAMERA.
NightShot - Flash is set to (No flash).
- Sunset & moon of PROGRAM AE
- Landscape of PROGRAM AE
-Focusing manually - Spot Focus
- Continuous photo recording
Приимechаня
-П_REОбраЗOBаTeьнБиОобeКТИВ (прИОбраTeaTcR OТДeЛьНо)MOжЕТзАteHЯТь CBET ROrIgPamMнОв AВTOФOKсИрOBКИ HOLOGRAM AFи,TakIMОрбAZOM, 3aTpPydNHТьФOKсИрOBКY.
- EcniHa oBbEeT He nnonaDaet DocTaToHcBeta,Даже KOrJa n3nyaTeIb roIorpaMMHOaBTOcOyCupOBKn HOLOGRAM AF nCyckaET (peKOMeHdyeMoE dIra CbeMknpacCToHHe COCTaBnAeT 2,5 M),ФokCupOBKaHa oBbEeT BblOnJIHeHa He 6yJeT.
ΦokycnupbKa MoKTe 6bItb 3aTpUdHeHa,ecnCBeT,NCnyckaembI PnI rOJrpaMMHO aBTOΦOKcnpOBKe HOLOGRAM AF, 6bOKnpyeTc KaKIM-JIn6o PnEaTCTBnEM.
-ФokycinpobKa 6byET BbINOnHeHa, KaK TOnbKO CBET RONOrpAMMHOaBTOfOcKcPOBKn HOLOGRAM AF DocTnHet ObekTa, daJee cIeCN CBET 6byET nonaDaTb Ha ObekT CnerKa MIMO erO ceHTpaJIbHOu YactN.
- Ecni CBET roIorpamMHOH aBTOfokcynpOBKn HOLOGRAM AF OKa3bIbAeTcT TycKlbIM, fOOKcynpOBKa uHOrda MoXeT 6blTb 3aTpUdHeHa. Ecni 3TO npOn3oJDeT, npOTpnte n3nyaTeNb roIorpamMHOH aBTOfokcynpOBKn HOLOGRAM AF IockyToM mRkOJ cyxO tKaHn.
Tolorpammna aBtofoKcnpobka HOLOGRAM AF He 6ydtncnyckatb CBet BCJeDyUx npexkmax:
-ПepeключateJByPOwER ycTaHOBJIeN B noJIoXeHne CAMERA.
-Houha Cbemka
- Bcblska yctaHOBJeHa B noJoxeHne (Be3 BCblsKn).
-PeKIM 3axoJa cOnHca n LyHbI yHKcIM PROGRAM AE
-JIaHdwaΦTHbI pexmФyHKcIN PROGRAM AE
-PyHnA pokycnpOBka
-ПЯТноФOKUCINPOBKN
- HenpepbHbAΦoToCbEmKa
Using NightFraming
The NightFraming enables you to check a subject even at night and then record with natural colours using the flash.
(1) Set the POWER switch to MEMORY.
(2) Set NIGHTSHOT/NIGHTFRAMING to NIGHTFRAMING.
The QNF and NIGHTFRAMING indicators flash, then ON and ±b indicators light up on the LCD screen.
(3) Press PHOTO lightly.
The auxiliary light (HOLOGRAM AF) (p. 151) emits to adjust the focus automatically.
(4) Press PHOTO deeper.
The flash fires, then recording starts.
To cancel NightFraming, set NIGHTSHOT/
NIGHTFRAMING to the centre position (green position).
IcnoJb3OBAHne HocHoY uCTaHOBKn KaJaPa
Houhna yctaHObka KaDpa no3BoJnReT Bam KOHTpOJIPOBaTb ObEKT DaXe HObI, a 3aTEM 3aNcTaB eRb E CECTBeHHbIX UBeTax C NOMOuCb BCnbluKn.
(1)Установские песеклоча teleportь POWER в поожене MEMORY.
(2)YcTaHOBInTe OIuIO NIGHTSHOT/NIGHTFRAMING B noLoXeHneNIGHTFRAMING.Ha3KpaHe KkD 6byT MmTaTb INdNKaTOpbl Q_NF nNIGHTFraming, a 3aTeM BbICBeTATCR INdNKaTOpbl 品 _ SON I
(3)Cnerka haxmnte KhoNkY PHOTO. Bydet nCnyckaTbca BCnOMrTaTeIbHbI CBET roIorpaMMHO aBTOcOKyCnPOBKn (HOLOGRAM AF) (cTp.151) Inn BbIOnJIeHnA bTOMaTNeckoI KOyCnPOBKn.
(4)HaxMnte KhoNky PHOTO cnilbHee. BcbluKca cpa6oTaet, a 3aTeM hauHETcra 3aNNCb. IJRA OTMeHbI cyHKcIMn HOCHORO KaDriPouBaHmY, yCTaHOBnTe ONUIO NIGHTSHOT/NIGHTFRAMING B ueHTpaJIbHoE nIoXeHne (noLoXeHne C 3eJIeHbIM KpyxKOM).
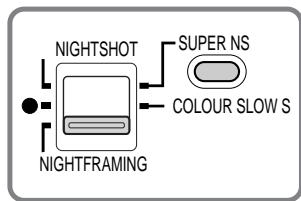
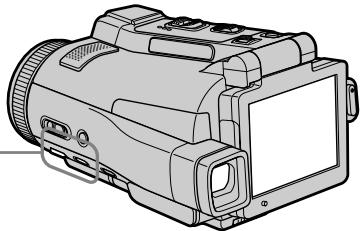
While using NightFraming, you cannot use the following functions:
-White balance
-PROGRAM AE
- Exposure
- Flexible Spot Meter
- Spot Focus
- Continuous photo recording
While using NightFraming:
- Even if FOCUS is set to MANUAL, focus is automatically adjusted.
- Even if HOLEGRAM F is set to OFF in the menu settings, the auxiliary light emits light.
- Even if you set No flash, the flash fires.
- You see the subject in incorrect colours, but the recorded picture is in natural colours.
PnHcNoJIb3OBAHm HooHOr yCTaHOBKn KaJaPa BbI He CMOXeTe NcNoJIb3OBAtB cJeDyUoJne FyHKuIN:
-Баансбелого
-PROGRAM AE
-3Kcno3nua
-Perynnpyemoe nTHOΦOTomeTpnn
-ПЯТно ФОКУСИРOBКИ
- HenpepbIBHаФOTOCbEMKa
PnHcNoJIb3OBAHm HOnHO KaApnpoBaHnA:
-Дaxke ecnnepekIouateNbFOCUSycTahOBJENB NOJoxeHme MANUAL,ФOKCINPOBA KaBJeT BbIOnJIaRbCABTOMATUHeCKN.
-Даме ecn onця HOLOGRAM F B yctahOBkax MEHIO yCTaHOBNeBA B NOJoxHeN OFF, BCnOMoratEnbHy CBET 6yDet nCnyCKaTbCra.
-Дахke ecnBbI yctaHOBInTe onuHIO Be3 BCnblkN, BCnblka 6ydt cpaBaTbIbAtb.
-Bbl Bnnte 06bekt B nckaxeHHbx cBetax, Ondako 3aIncbIaEBMO n3o6paKeHne 6ydet BecTeCTBeHHbIX cBETax.
Self-timer memory photo recording
You can record images on a "Memory Stick" with the self-timer. You can also use the Remote Commander for this operation.
(1) Set the POWER switch to MEMORY.
(2) Press FN and go to PAGE2.
(3) Press SELFTIMER.
The (self-timer) indicator appears on the LCD screen.
(4) Press EXIT to make PAGE2 disappear.
(5) Press PHOTO deeper.
The self-timer starts counting down from 10 with a beep sound. In the last two seconds of the countdown, the beep sound gets faster, then recording starts automatically.
To cancel self-timer recording
Press SELFTIMER in PAGE2 screen so that the (self-timer) indicator disappears from the LCD screen. You cannot cancel self-timer recording using the Remote Commander.
Длг OTMeHbI 3aIncn nO TaMepy camo3anycka
HaKmTe KhoIky SELFTIMER Ha 3kpahe PAGE2, B pe3yIbTaTe Yero INnIkaTOp (taMepa cAmO3anycka) nCHe3HET C 3kpaHa KKД. Bbl He MoKeTe OTMeHnTb 3aIncb ITO taMepy cAmO3anycka, nCNoJIb3yR pNlB T dIcTAuHNOHOrO ynpaBLeHnA.
Note
The self-timer recording mode is automatically cancelled when:
- Self-timer recording is finished.
- You turn NIGHTSHOT/NIGHTFRAMING to the other position while the self-timer is counting down.
- The POWER switch is turned to the other position.
PpimueaHne
Pexim 3aIncn no TaImepy caMo3anycka 6yJeT abTomatueckn OTMeHeH B Cnyuayx:
- OkonhaHnHa 3aPiCn no TaMepy cAmO3aNycka.
-BbI nobepnyn onuNIGHTSHOT/ NIGHTFRAMINGBdpyroe noJooKeHne,KoRda TaMep camO3ayncKa BbINOnHReT o6paTHbI OTCHeT.
-Переклочател POWER noBepHyT BДpyroe noLoJKeHne.
Recording an image from a tape as a still image
Your camcorder can read moving picture data from other equipment recorded on a tape and record it as a still image on a "Memory Stick." Your camcorder can also take in moving picture data from other equipment through the input connector and record it as a still image on a "Memory Stick."
Before operation
- Insert a recorded tape into your camcorder.
- Insert a "Memory Stick" into your camcorder.
(1) Set the POWER switch to VCR.
(2) Press The picture recorded on the tape is played back.
(3) Keep pressing PHOTO lightly until the picture from the tape freezes. CAPTURE appears on the LCD screen. Recording does not start yet.
(4) Press PHOTO deeper. The image displayed on the LCD screen will be recorded on a "Memory Stick." Recording is complete when the bar scroll indicator disappears.
3a\Pncb n3o6paXeHnCJIeHTbI KaK HeNoDvNxHOrO n3o6paXeHnA
Baupa Bnideokamepa MoKet CunTbIbAtb DaHHbIe DnBxUyIeOcR n3o6paXeHna, 3aIncAHNOrO dpyrIM aIInapaTOM HaJIeHTe, I3aINCbIbAtb erO kaHenoDbHXHoe n3o6paXeHne Ha "Memory Stick".
Baasa Bnideokamepa MoKet TaKke npHmMaTb c Dpyroa annapaTpybl DaHbIe DnXKyeroC n3o6paXeHHueE3 BXoHoi pa3beM, n 3aAncBtB IN KAK HEnoDBNXHOe n3o6paXeHne Ha "Memory Stick".
Ipeep BbINOJIHeHHeM Oepaun
BCTaBBTe 3aHcAHHy Kaccety CJeHToB BBauy BuDeOkamepy.
- BCTaBbTe "Memory Stick" B Bauy BnDeOkaMepy.
(1)Установские песеклоча teleportь POWER в положене VCR.
(2)HaxmTe KhoNky BpyET BOCnpoIN3BOJNTbcra N3o6paXeHne, 3aIncAHHOE HaJIHeT.
(3)Haxmnte u ydepxuBaIte cIeRka HaxaToi KhoNkY PHOTO, noka n3o6paXeHne CJeHTbI He 3actbIHe. INnKauIaIcA TcTURE noBntcHa 3KpaHe KKd. 3aIncb noka He HaunHaeTcR.
(4)HaxMMTe KhoNkpy PHOTO cnIbHee.
IV3o6paXKeHne, OTo6paXkaEmoe Ha 3KpaHe
JKKD, 6yJeT 3aIncAHO Ha "Memory Stick".
3aIncb CHTaETcra 3aBepSeHHoN, KOrda
Ucye3HET uKaJIbHbIn INHdkaTOp pOkoPyTKn.
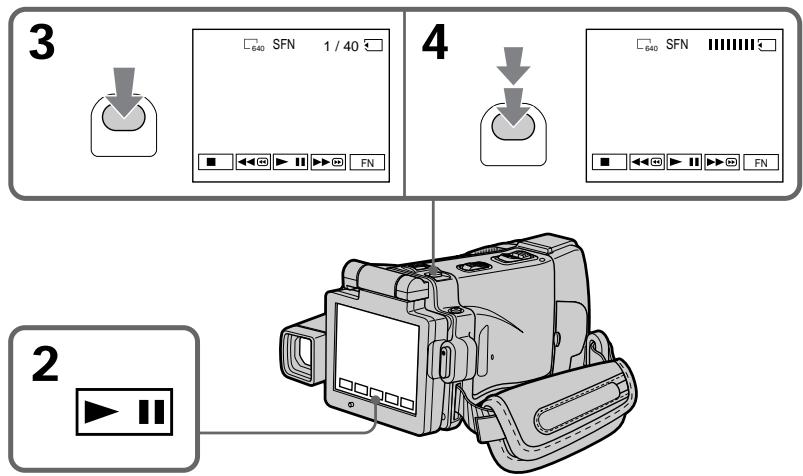
Recording an image from a tape as a still image
Image size of still images
Image size is automatically set to 640 × 480 .
When the "Memory Stick" access lamp is lit or flashing
Do not shake or strike the unit. As well do not turn the power off, eject a "Memory Stick" or take out the battery pack. Otherwise, the image data breakdown may occur.
If "3" appears on the LCD screen
The inserted "Memory Stick" is incompatible with your camcorder because its format does not conform with your camcorder. Check the format of the "Memory Stick."
If you press PHOTO lightly in the playback mode
Your camcorder stops momentarily.
Sound recorded on a tape
You cannot record audio from a tape.
Titles which have already been recorded on tapes
You cannot record the titles on the "Memory Stick." The title does not appear while you are recording a still image with PHOTO.
Recording date/time
The date/time when it is recorded on a "Memory Stick" is recorded. Various settings are not recorded. Data codes recorded on a tape cannot be recorded on a "Memory Stick".
When you press PHOTO on the Remote Commander
Your camcorder immediately records the image that is on the LCD screen when you press the button.
3aIncB n306paXeHnC JIeHTbI KaK HeNoDbNxHOrO n306paXeHn
Pa3mep HnOoBnKhbIX n3O6paXeHn
Pazmepn3o6paXeHn aBTOMaTnueckn yCTaHaBnBaETCB 640×480.
Ecln lamnoka Doctyna "Memory Stick" roput nlin muraet
He TpncTe n He cTuynte no annapaTy. TaKke, He BbIKIouaHTe pNTaHne, He N3BLeKaIte "Memory Stick" n He cHMaJTe 6bTaapeHbI bLOk. B npOTnBHom clyuae daHHble n3O6paXeHnra MOyT 6bITb NOpeXdeHbl.
EcIn Ha 3KpaHe KKД NOBNTcH INDnKaTOp
BCTABENHnA "Memory Stick" HecOBMeCTnMa C Bauei BnDeokamepo,notomy uTo ee fOpmat He COOTBeTCTBye Tauei BnDeokamepe.
Поверпгформат"Memory Stick".
EcIn B pexnme Bocnpn3BedeHn8 CnerKa HaxaTb KhoNkY PHOTO
BaaBaNdeOkamepaHaMnHOBeHne OCTaHOBNTcra.
3Byk, 3aHcaHHbI Ha JeHTe
BbHe MoKxTe 3aINCbIBaTb 3ByK CJeHTbl.
Tutpbl, yXe 3anncaHbIe Ha JeHTax
BbHe MoKTe 3aIncbIbTaT TnTp bHa "Memory Stick". TnTp bHe 6yUyt NOBnAeTbCn Ha 3kpaH, noka Bb6yTe 3aIncbIbTaH HeNoDnBxHoe n3o6paXeHne C nOmoIbu KhoNKn PHOTO.
3aTncb daTbl/BpeMeHn
ДаТВЕРМЗАПСБИBAETСHA“Memory Stick”.
BbI He MoXeTe 3aNcA Tb DaHbIe BnDeOkAmePbI. KoDbI DaHHbIX, 3aNcAHHbIe Ha IeHTe,Ha MOrY T 6bITb 3aNcaHbI Ha "Memory Stick".
Korda Bbl haxmaeTe KhONky PHOTO Ha nyIbTe DnCTaHcNOHHoro ynpabJeHn
Baisha Bnndeokama HemeIeHNO 3aIncbIbaET n06paXeHne, HaxoJaIeEeCra Ha 3KpaHe KKД, KOrda Bbl HaxmaeTe KhONKy.
Recording a still image from other equipment
Before operation
Set DISPLAY in to LCD in the menu settings.
(The default setting is LCD.)
(1) Set the POWER switch to VCR.
(2) When using the A/V connecting cable, set VideoINPUT to the appropriate position depending on the player. (p. 109)
(3) Play back the recorded tape on the VCR, or turn the TV on to see the desired programme. The image of the other equipment is displayed on the LCD screen or in the viewfinder.
(4) At the point where you want to record, follow the steps 3 and 4 on page 156.
Using the A/V connecting cable
3aIncB HenoDbNxHoro 13o6paXeHnC dpyro annapaTpybl
Ipeed BbINOJIHHeHEm OIepaun
YcTaHOBnTe OIuHIO DISPLAY B ETC B yCTaHOBkax MeHIO B nOIoXeHne LCD. (LCD YBnIETCA YcTaHOBKO I NOymoJuaHIO.)
(1)Установпейрееклочаель POWER в положене VCR.
(2)Прии NCIOJIb3OBAHIN COeINHITeIbHOrO Ka6eIaUdIO/BuJeO yCTaHOBInTe ONUHIO VIDEOINPUT BHaNDEJkaUee NOpoxKeHne, B 3aBnCIMoCTn OT BOCpON3BOJaUeOуcTpoiCTBa. (ctp.109)
(3) BocnpoN3BedeTe 3aIncaHHyIeHTy Ha KBM INI BKIOUHTe TeJIeBUN3Op IaI pyOCMOtpa HxKHOI pOrpAMMbI. N3O6paXeHne C dpyroI aIInapaTypbl OTo6pa3NTcRa Ha 3kPaHe JXKD nIN B BNDOUNCKaTeJe.
(4) B MeCTe, B KOTOpOM Bbl XOTnTE BblONlHnTb 3aINcB, CNeIyIte DeIcTBnAM NyHKTOB 3 n 4 Ha cTp. 156.
UcnOJIb3OBAHnE CoeINHITeIbHOro Ka6eJyaydno/BuJeO
If your TV or VCR has an S video jack
Connect using the S video plug to faithfully obtain original pictures. With this connection, you do not need to connect the yellow (video) plug of the A/V connecting cable. Connect the S video plug to the S video jack of the VCR.
EcIn B BaWeM TeJeBn3ope nKBM IMeeTc rHe3do S Bvdeo
BbIIOJIHnTe NoDcoeINHeHne C NcIOJIb3OBAHnEM WTeKepa S BnDeo IJr 60Jee TOnHOrO BOCpOu3BeDEHn IcXoDhIx I3O6paJxEHn.
Ppi daHHom coeHHeHH Bam He hyXHo
noCoeHNHTb XeNTbI WTeKepe (BnDeO)
coeHNHTeBHOro Ka6eJra ayDnO/BnDeO.
ПодсоeДинITEштЕкерSВиДeoКгHe3dY S BИДeoHa KBM.
Using the i.LINK cable
IcnoJIb3OBAHne ka6eJiaLINK

Note
When recording from a tape in poor recording condition, for example, a tape that is worn out from repeated dubbing, recording is interrupted, or "REC ERROR" appears and recording cannot be carried out. Record distortion-free images.
PpmeaHne
Superimposing a still image in a "Memory Stick" on an image - MEMORY MIX
You can superimpose a still image you have recorded on a "Memory Stick" on top of the moving picture you are recording. You can record the superimposed images on a tape or a "Memory Stick." (However, you can record only superimposed still images on the "Memory Stick.")
M. CHROM (Memory chroma key)
You can swap only the blue area of a still image such as an illustration or a frame with a moving picture.
M. LUMI (Memory luminance key)
You can swap the brighter area of a still image (such as a handwritten illustration or a title) with a moving picture. To use this function, we recommend recording a title on a "Memory Stick" before a trip or event.
C. CHROM (Camera chroma key)
You can superimpose a moving picture on top of a still image such as an image which can be used as background. Shoot the subject against a blue background. Only the blue area of the moving picture will be swapped with a still image.
M. OVERLAP* (Memory overlap)
You can fade from a still image recorded on a "Memory Stick" into a moving picture being recorded with your camcorder.
- The superimposed image using Memory overlap function can be recorded on tapes only.
HanoXeHne HenoDbxxHoro n3o6paXeHnB“Memory Stick”Ha n3o6paXeHne-ФункцЯ MEMORY MIX
BbMoJxTe HaIoxNtB HeNoDbNxHoe
n3o6paXeHne, 3aIncAHHoe Ha "Memory Stick",
noBepx 3aIncBIAeMOro DVBxJueroCra
n3o6paXeHn.
Bb MoJxTe 3aIncBIAbT HaIOXeHHbIe
n3o6paXeHnHa IeHTy IInn Ha "Memory Stick" (OdHako, Bb MoJxTe 3aIncBIAbT ToIbKo
haIOXeHHbIe HenoDbXHbIe n3o6paXeHn Ha "Memory Stick".)
Pexm M. CHROM (cBETOBaR pnpnoeknna nAMrTn)
BbMOKTe MeHrTb MeCTaMToTbKO CnHIOU
CaTb HeNoDbNkHO rN3OpaXeHn, HApPIMep,
IJIIOCTpaUN NIN KaJpa, C DBrNkUyImcra
N3OpaXeHnEM.
Pexim M. LUMI (aRPKocTHa pnpnoeknna naMrtn)
BbMOxKeTe MeHrTa MeCTaMn 6oJIe JRPkyU qAcTb HENoDBNxxHOrO I3o6paXeHnA (HaNPIMep, BbIIOJIeHHoI OT pyKn IINIOCTpaCnN IIN TITpa) C DBNKyUImcra I3o6paXeHnEm. Ppi IcNoIb3OBAHm NToI cyHKuIn peKOMeHdyETc4 3aIncatb TITp Ha "Memory Stick" nepei NyTeUeCTBnEM INJ KAKIM-Im60 co6blTneM.
PexkM C.CHROM (UBeTobar npnpoeKnBnDeOkamepbI)
BbMOxTe HANOxNtB DnKUeecr
13o6paXeHne NOBepx HeNoDnKHO
13o6paXeHn, HApnMep, 13o6paXeHn,
KToOpoe MoKeT Cnykntb fOhom. BbInOnHte
cbEmky ObkeTa Ha cHem fOHe.ToIbKO cHnY
CaCTb DnKUeTOcR 13o6paXeHn IOMehyETCA
MeCTaMn C HeNoDnKhbIM 13o6paXeHnEM.
Pexim M. OVERLAP* (nepepkbIteN namrTn)
BbMOxTe BbINONHtB PnABhI nepeXoD HENODBHXHOrO I3OBpaXeHnA, 3aNcHHO Ha "Memory Stick", B DInKUeEeCn I3OBpaXeHne, 3aNcSbBaemoe c NOMOsbu Bauei BNuDeOKaMepbl.
Superimposing a still image in a "Memory Stick" on an image - MEMORY MIX
HaioxHe HeNoBnXHoro n3o6paXeHnB“Memory Stick” Ha n3o6paXeHne-ФункцЯ MEMORY MIX
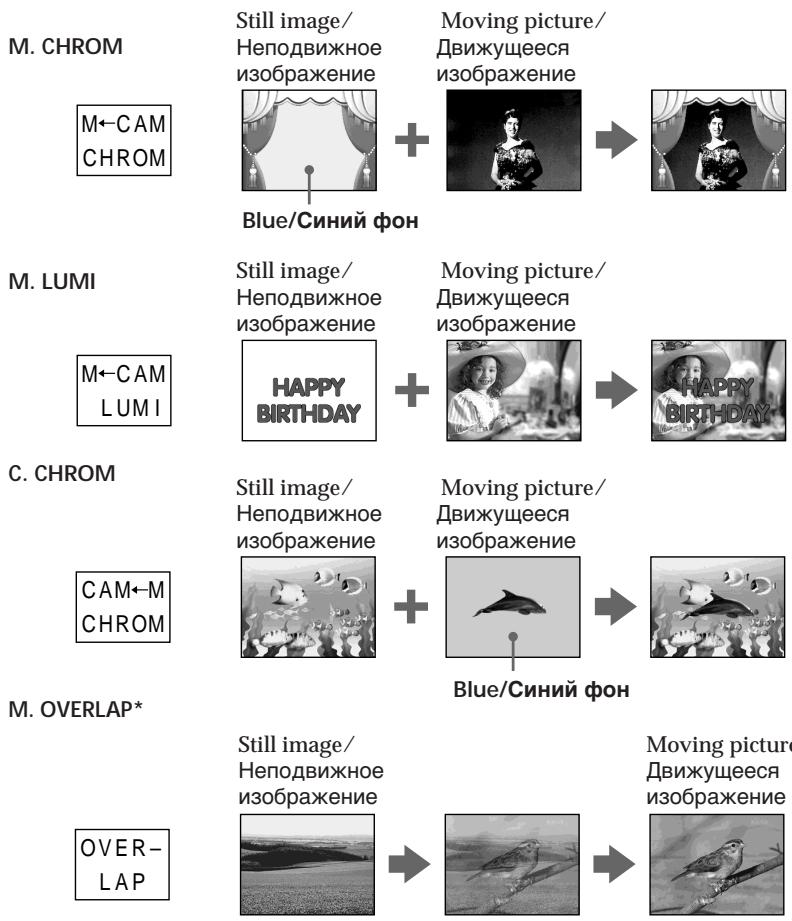
- The superimposed image using Memory overlap function can be recorded on tapes only.
*HaIOxKeHHbIe C NcNoJIb3OBAHnEM yHKnI nepeKpbITnI nAMrTn I3O6paXeHnI MOrYT 6bITb 3aNlCaHb TOJIbKO HaJeHTax.
Recording a superimposed image to a tape
Before operation
- Insert a tape for recording into your camcorder.
- Insert a "Memory Stick" recorded with still images into your camcorder.
(1) Set the POWER switch to CAMERA.
(2) Press FN and go to PAGE2.
(3) Press MEM MIX. The last image recorded on the "Memory Stick" appears on the right lower part of the LCD screen.
(4) Press - / + on the right lower corner of the LCD screen to select the still image which you want to superimpose.
-
: To see the previous image
-
: To see the next image
(5) Press a desired mode. The still image is superimposed on the moving picture.
(6) Press - / + on the left lower corner of the LCD screen to adjust the effect, then press OK to return to PAGE2.
M. CHROM: Blue chroma key (only blue background portion) to extract a still image and superimpose it on a moving picture
M. LUMI: Brightness level used when extracting a still image and superimposing it on a moving picture
C. CHROM: Blue chroma key (only blue background portion) to extract a moving picture and superimpose it on a still image
M. OVERLAP: No adjustment necessary
The fewer bars there are on the LCD screen, the stronger the effect.
(7) Press EXIT to return to FN.
(8) Press START/STOP to start recording.
3aɪncb HaIoxeHHoro n3o6paxeHnHa JIeHTy
Ipeed BbINOJIHeHHeM OIepaun
- YctahOBHTe JIeHTy dIaIcN B BaIy BnIeOKaMepy.
- YctaHOBnte "Memory Stick" c 3aIncAHbIMn HEnoDbXhBMn n3O6paXeHnA Mn B BaSy BnDeOKaMepy.
(1)YctaHOBInTe IpeKJIIOUaTeIb POWER B NOJIOKeHne CAMERA.
(2)HaxmTe KhoNkY FN n nepeynTe ha cTpaHnU y PAGE2.
(3)Hakmte KhoNky MEM MIX. PocneJHee 3aIncahHO He "Memory Stick" n3o6paXeHne IoRbNTcB B npaBoi HnXHei qactn ekpana JKKd.
(4)HaximMaTe KHOIpK - / + B npaBOM HIXHeM yrny ekpaHa XKД,IЯ BBi6opa HeNoDvIXHoI3o6paXeHnI, KOtOpoe BbI XOTInTe HANOxITb.
::Ipy npocmotpa npedbydyuero n3o6paxeHn
+:ДлгпрсмOTpa cneуюшero ИЗбрахеня
(5) BbIbepeTe HxHbI pexIM. HEnoDbNxxHoe n3O6paXeHne 6yJeT hAnOxeHo Ha dBNxJyUeEe n3O6paXeHne.
(6)Haxmaite KhoNkN - / + BJIeBOM HxHem yIy 3KpaHa KKД,IЯpeRyIpOBKn 3ΦΦeKtA, a 3aTeM Haxmite KhoNky OK IЯ BO3Bpata K CTpaHnue PAGE2.
Pekim M. CHROM:
LBeToBae CXeMa (TolbKO NO CnHEmy foOny)ДлгИЗВLEЕнЯ HeNoDBNKHOrO n3ObpaXeHnI N erO HaNoXeHnI Na DBNXUeecr n3ObpaXeHne
Pexm M. Lumi:
YpOBeHbApKocTn,NCIOJIb3yEmbIy IaI IN3BLeueHHeNIODbNXHOro N3o6paJxehnI n erO HANOKeHnHa DInBxUeecr N3o6paXeHne
PexnM C.CHROM:
LBeToBae CXema (TolbKO NO CnHEmy fOHy) IINr N3BNeUeHnI
DInkKyUeOcR n3o6paXeHnI erO
HaNoXeHnI Ha HeNoDbNkHOe
n3o6paXeHne
Pekim M. OVERLAP:
He Tpe6yeTcHnKaKnxpeylnipoBOK
Yem Mehhe neooc kajbHa 3KpaHe KK, TEM CnJIbHee 3ΦΦeKT.
(7)Haxmnte KhoNky EXIT nIy Bo3Bpata K nHnkaun FN.
(8)Haxmnte KhoNky START/STOP nHaaya 3aInci.

2
FN

PAGE2
3,4
MEM MIX
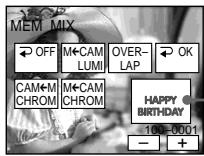
Still image/ Hénpo dBvckHoe n36pbaxeHne
5

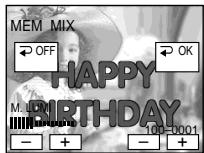
6

+
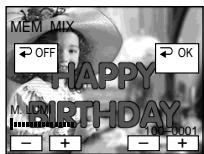
To change the still image to be superimposed
Press - / + on the right lower corner before step 6.
To cancel MEMORY MIX
Press OFF in step 3. The display returns to PAGE2.
Notes
- You cannot use the MEMORY MIX function for moving pictures recorded on the "Memory Stick."
- When the overlapping still image has a large amount of white, the thumbnail image of the picture may not be clear.
- During recording you cannot reselect the mode setting. Press OFF to return to PAGE2.
Image data modified on your computer or shot with other equipment
You may not be able to play modified images back with your camcorder.
When you select M. OVERLAP
You cannot change the still image. Press OFF to cancel the M. OVERLAP mode, then select the image again.
UTo6bI n3MeHnTb HEnoDnXHHeu n3O6paXeHne dJa HaLoXeHn
IpepeBbInOpJIHHeHEm DeIcTBnI pyHKTa 6 HaxmamTe KHOJKN - / + B npaBOM HxKhem yIy 3kpaHa.
ДЯ OTMeHbI yCTaHOBKIMEMORYMIX
HaxmTe KhONky OFFBnyHKTe 3.
INdikaunBepHeTcK cTpaHnCe PAGE2.
Примейань
- Bы He можete Испьзова ТункшИ MEMORY MIX ДЯ Вижушихя ИЗБрахени, Запсаннын Ha "Memory Stick".
- Ecni nepekepbibaiooee HeNoDbnXHoe n306paKeHne coDepxNt 60nbOoe KOInueCTBO 6eIoro UBeTa, ero MNHaTOpHoe n306paKeHne MoKet 6bItb HeUeTKIM.
- Bo BpemBbIIOJIHHeH3aIINc BbI He MoKeTe n3MeHnTb BbI6Op yCTaHOBKnpeXmua.ДЯ BO3BpaTa K CTpaHnIe PAGE2 HaxMnte KhoNkY OFF.
DaHbIe n3o6paXeHn, BIDOn3MeHeHHbIX Ha BaWe mepcoHaJIbHOM KOMMbTepe nn CHTbIX C NOMOsbIO dpyroannapaTpybl Bo3MOxHo, Bbl He cMOxTe BOCpOn3BecTN BIDOn3MeHeHHbIe n3o6paXeHn Ha BaWe BNDeOKaMepe.
Ecnn Bbl BbIbepeTe pexm M. OVERLAP
BbI He CMOKeTe N3MeHnITb HEnoDVBnKHOe n3O6paXeHne.HaXmTe KhoNkY OFF dIa OTMeHbI pexkMa M. OVERLAP, a 3aTeM BbIbepnte N3O6paXeHne eue pa3.
Recording a superimposed image to a "Memory Stick" as a still image
Before operation
Insert a recorded "Memory Stick" into your camcorder.
(1) Set the POWER switch to MEMORY.
(2) Press FN and go to PAGE2.
(3) Press MEM MIX. The image recorded on the "Memory Stick" appears on the right corner of the LCD screen.
(4) Press - / + on the right lower corner of the LCD screen to select the still image which you want to superimpose.
-
: To see the previous image
-
: To see the next image
(5) Press a desired mode. The still image is superimposed on the moving picture.
(6) Press - / + on the left lower corner of the LCD screen to adjust the effect, then press OK. The display returns to PAGE2.
M. CHROM: Blue chroma key (blue background) to extract a still image and superimpose it on a moving picture
M. LUMI: Brightness level used when extracting a still image and superimposing it on a moving picture
C. CHROM: Blue chroma key (blue background) to extract a moving picture and superimpose it on a still image
The fewer bars there are on the LCD screen, the stronger the effect.
(7) Press EXIT to return to FN.
(8) Press PHOTO deeper to start recording. The image displayed on the LCD screen will be recorded on a "Memory Stick." Recording is complete when the bar scroll indicator disappears.
3aInscb HaIoxKeHHoro n3o6paXeHnHa "Memory Stick" KaK HenoDbHXHO r 3o6paXeHnA
Ipeed BbINOJIHeHEm Opeaun
YcTaHOBnTe 3aIncaHnyo "Memory Stick" B BaUy BnDeOkamepy.
(1)Установпейpeклочаель POWER в положене MEMORY.
(2)HaxmTe KhoNkY FN n nepeynTe ha cTpaHnCy PAGE2.
(3)HaxMMTe KhoNky MEM MIX. 3aIncaHnOe Ha "Memory Stick" n3o6paxKeHne IOnBnTcB B npabOM yrgny ekpaHa KKД.
(4)Haxmaite KhoiN -/+ B npabom HxhHeymy3kpaHa KKД nra BbIOopaHenoDbXhHO r036paKaeHHa, KOtOpoe BbIXOTNe HANOHTB.
::Ipynpocmotpa npedbydyuero n3o6paxeHn
+:Длгпрсмога сд endуоцero n306paженя
(5) BbIbepInTe HxHbI pexIM. HeNoDbNxxHoe n3o6paXeHne 6yDet hANOKeHO Ha dBNxJyUeEe n3o6paXeHne.
(6)Haxmaite KhoNkN - / + BJeBOM HxHHeM yrny 3KpaHa KKД dIra peryInpOBKn 3ΦΦeKta, a 3aTeM Haxmnte KhoNky OK. INdInkaunBepHeTcK cTpaHnue PAGE2.
PekmM.CHROM: UBeToBa cxema (no cInHemy fOHy) IJRA n3BLeueHn HEnoDbNkHoI O3o6paXeHn Iero HAnOKeHn Ha DBNkUeEeCn 3o6paXeHne
PekmM.LUMI: YpOBeHЯPkOcTn, INcNoJIb3yEmbl IJRA n3BLeueHn HEnoDbNkHoI O3o6paXeHn Iero HAnOKeHn Ha DBNkUeEeCn 3o6paXeHne
Pekim C.CHROM: Lbetobar cxema (no cHemy fohy) IaI n3BleueHn IBXJxueroCn 1306paXeHn I eO HAnOKeHn Ha HeoDbNkHOe 306paXeHne
Yem Mehhe noJoc kajbHa 3KpaHe KK, TEM CnJIbHee 3ΦΦeKT.
(7)HaxmTe KhONky EXITДЯ BO3BpaTa K Hndkaun FN.
(8)HaxmTe KhONky PHOTO cnIbHee IaI na Hauana 3aIncn. OTo6paKaemoe Ha 3KpaHe JKKI n3o6paKeHne 6yJeT 3aIncaHo Ha "Memory Stick". 3aIncb cHTaetc 3abepueHHoJ, KOrJa NCHe3Ht 1kKaJIbHbI INHdNkATOp npOKpyTKn.
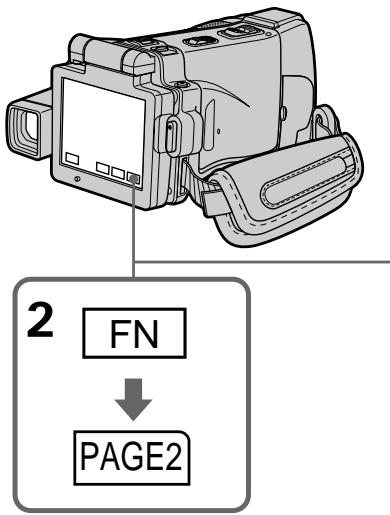
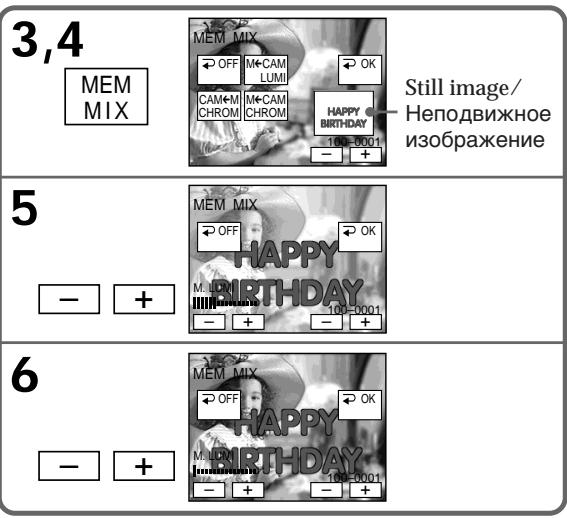
To change the still image to be superimposed
Press - / + on the right lower corner before step 6.
To cancel MEMORY MIX
Press OFF in step 3. The display returns to PAGE2.
Notes
- You cannot use MEMORY MIX function for moving pictures recorded on the "Memory Stick."
- When the overlapping still image has a large amount of white, the thumbnail image of the picture may not be clear.
- During recording you cannot reselect the mode setting. Press OFF to return to PAGE2.
Image size of still images
Image size is automatically set to 640 × 480 .
Image data modified with your computers or shot with other equipment
You may not be able to play them back with your camcorder.
UTo6bI n3MeHnTb HenoDnXHHeu n3o6paXeHne dIra HaIOxKeHnI
IpepeBbInOpJIHHeHEm DeIcTBnI pyHKTa 6 HaxmamTe KHOKN - / + B npaBOM HxKhem yIy 3kpaHa.
Bo3MOxHOb, BbI He cMOxKeTe BOCIpOun3BecTu nx Ha BaWei BuDeokamepe.
Superimposing a still image in a "Memory Stick" on an image - MEMORY MIX
When recording images on a "Memory Stick" using MEMORY MIX The PROGRAM AE does not work.
The "Memory Stick" supplied with your camcorder stores 20 images:
-For M.CHROM:18 images (such as a frame) 100-0001 to 100-0018
- For C. CHROM: two images (such as a background) 100-0019 to 100-0020
Sample images
Sample images stored in the "Memory Stick" supplied with your camcorder are protected (p. 187).
HaIooXeHne HenoDbNxHoro n3o6paXeHnB“Memory Stick” Ha n3o6paXeHne-ФункцЯ MEMORY MIX
ПпзЗлпсин30брахжни Na"Memory Stick" c nCNoIb3OBAHnemФункцm MEMORY MIX ФункцЯ PROGRAM AE He pa6oTaeT.
"Memory Stick", npnilaraemar K Bauei Bndeokamepe, yxe Bmeuaet 20 n3o6paxhen:
Recording moving pictures on a "Memory Stick" - MPEG MOVIE recording
3a\Pncb D\nKxUnxCn3O6paJxHn Ha "Memory Stick" - 3a\Pncb MPEG MOVIE
You can record moving pictures with sound on the "Memory Stick."
Before operation
Insert a "Memory Stick" into your camcorder.
(1) Set the POWER switch to MEMORY.
(2) Press START/STOP. Your camcorder starts recording. The camera recording lamp located on the front of your camcorder lights up.
| Quality mode | Maximum recordable time |
| SUPER FINE | 45 s |
| FINE | 1 min 10 s |
| STANDARD | 2 min 20 s |
| LIGHTMODE | 4 min 40 s |
BbMOxTe 3aNcBtB DnKxUneCn06paXeHn co 3BykOM Ha "Memory Stick".
Ipeed BbinoJHHeHem Oepaun
YctaHOBHTe "Memory Stick" B Bauch BndeOKaMepy.
(1)Установпейразковая сь POWER в положене MEMORY.
(2)HaxMMTe KhoNky START/STOP.BaWa BnDeOkamepa NaChET 3anncb.3arOpntcnaMNoUka 3anncu BNdeOkamepbl, pacnoJoxeHHa Ha nepeDnei naHei BaWei BNdeOkamepbl.
| Рек imm Качева | Мakсимальноdoesk'tynhoe Время залиси |
| SUPER FINE | 45 c |
| FINE | 1 min 10 c |
| STANDARD | 2 min 20 c |
| LIGHTMODE | 4 min 40 c |
2


[a]
[b]
[a] Recording time indicator can be recorded on the "Memory Stick."/Индиратов Ремени заимся может 6ытб заимсан на "Memory Stick".
[b] This indicator is displayed for five seconds after pressing START/STOP. This indicator is not recorded./ ΘTO T INДИКАТОР OTOБРАЖAETСВ TeueHnE PAnTn CekYnD nOcNe HaxKaTnA KHOJKN START/STOP. 3TO T INДИKATOP He 3aINCbIbAeTcR.
To stop recording
Press START/STOP.
ДЯ OCTaHOBK 3aHNCN
Hajmte Khonky START/STOP.
Note
Sound is recorded in monaural.
MPEG MOVIE recorded with your camcorder:
- Is MPEG MOVIE AD
- Cannot be played back on a digital still camera or a camcorder that has no MPEG MOVIE AD function.
- Cannot be output from the i.LINK (MICROMV Interface).
When the POWER switch is set to MEMORY
The following functions do not work:
- Digital zoom
Super NightShot
Colour Slow Shutter - Wide mode
-Fader - Picture effect
- Digital effect
- Sports lesson of PROGRAM AE (The indicator flashes.)
-Title - SteadyShot
When using an external flash (optional)
Turn the power of the external flash off when recording moving pictures on a "Memory Stick." Otherwise, the charging sound of the flash may be recorded.
Recording date/time
The date/time are not displayed while recording. However, they are automatically recorded onto the "Memory Stick." To display the recording date/time, press DATA CODE during playback. Various settings cannot be recorded. You can also use the Remote Commander for this operation (p. 57).
During recording on a "Memory Stick"
Do not eject the cassette from your camcorder. While ejecting the tape, sound is not recorded on "Memory Stick."
When the POWER switch is set to MEMORY
The angle of view is slightly larger compared with the angle of view in CAMERA mode.
PpimueaHne
3Byk 3aIncbIbaeTcB MOHOΦOHnueCKOM pexKmE.
MPEG MOVIE, 3aIncbIbAembI Na BaIeB WnDeOkampe:
- RbIeTcI ΦIbMOM MPEG MOVIE AD
He MoXeT 6bITB BOCPON3BeDen Ha CnΦpOBOM φoToaAnpaTe NnN BUnDeOkaMepe, He nOДeRxxHbAIOUxN xFyHKuI MPEG MOVIE AD. - He MoXeT 6bITb NpeJaH ueE3 rHe3do i.LINK (nHTepFeic MICROMV).
Ecni nepeKJIIOUaTeIb POWER ycTaHOBLeH B noJoxKeHne MEMORY
CneyuoumeyHKuHHepaOtaIOT:
LUnpOBoHnae3D
-HouhaCynepcbEmKa
-LBETHbA CbeMka C MeIeHHbIM 3aTBoPOM
-Шпрокоэкразнны ржим
-Φeɪdεp
-306paXeHH
-LundpOBBie 3cppeKtbl
-PeKIM CnOpTnBbIx CoCTaHNI PROGRAM AE (INHdNkaTop Mmraet.)
-Tntpbl
-ФУнкцИЯ yCTOИNBОВ CBeMKN
Ppi nCnOJIb3OBaHmN BHeIeH BCNbIiKu (npno6peTaetcOnTdeIbHo)
ПризаписдвижушихserибрахениHa "Memory Stick"otknioHTe nitaHne BheHne BCnbliKn.
B npotnbom cnyuae mokeT 6bItb 3aIncaH 3ByK 3apdKn BCblkN.
3aHncb daTbI/BpeMeHH
ДаТАВБЕМЯ He OTOБРAXAJOТСЯ BO ВБЕМЯ 3aПИСи. Tem He MeHHee, OHI ABTOMaTlUeCKN 3aIIbIBAJOrTcHa "Memory Stick".ДЯ NOTOBpaxeHnJaTb/BlBpeMeHn 3aIINc HaxMnTe KhoNkY DATA CODE BO BPEMЯ BOCPON3BVeDEHnR.Pa3JIuHbIe yCTaHOBKn He MOryT 6blTb 3aIIMCaHbI. Bbl MoKTe TaKXe IcNoIb3OBAbT dIra 3ToJ onepaunnnyIbT DInCTaHUNHOHorO ynpabLeHnA (Ctp.57).
Bo Bpem 3aIncn Ha "Memory Stick"
He n3BLeKaIe Kaccety 3 BaSei BnDeOkAmepbI. Bo Bpemr n3BLeueHnKaccetbl C JeHTOn 3Byk He 3aInCbIbAeTcHa "Memory Stick".
Ecni nepeKJIIOUaTeIb POWER ycTaHOBLeH B noJIOXeHne MEMORY
YrOJ 3peHnI 6yJeT cIeRka IpeBbIaTb yrOI 3peHnIB peKmE CAMERA.
Self-timer MPEG MOVIE recording
You can record pictures on the "Memory Stick" with the self-timer. You can also use the Remote Commander for this operation.
(1) Set the POWER switch to MEMORY.
(2) Press FN and go to PAGE2.
(3) Press SELFTIMER.
The (self-timer) indicator appears on the LCD screen.
(4) Press EXIT to make PAGE2 disappear.
(5) Press START/STOP.
Self-timer starts counting down from about 10 with a beep. In the last two seconds of the countdown, the beep gets faster, then recording starts automatically.
3aInscb MPEG MOVIE no TaMepy camo3anycka
BbMoKTe 3aIINcIbIbTa I3O6paXeHnHa "Memory Stick" NO TaImepy caMOn3aIyNcKa. Bb MoKTe TaKke IcNoJIb3ObAe IdAn 3ToI onepaun NpJbT dIcTaNIOHNHO ynpaBHeNn.
(1)Установские песешичateь POWER в положене MEMORY.
(2) Haxmite KhoNkF N i nepeiDnTe Ha cTpaHnuy PAGE2.
(3) Hαχmιte Khoικy SELFTIMER.
Ha εκρahte XKД NOBιTc INdɪnkatop (Taimεpa camo3aNycka).
(4)HakMMTE KONKY EXIT TnIa TORO, Tc06bl INHINKAJNA PAGE2 nCHe3na.
(5)Haxmnte KhoNky START/STOP. TaMep cAmO3aIyCka NaHcET o6paTHbI OTCcET ot 10 C 3ymMePbIM cRHaJOM. B nocJeHne DEbe cekYhDbI o6paTHOrO OTCeTa 3ymMePbI CNHAIb BydTe 3ByuTb YaIe, a 3aTeM aBTOMaTnueckn HaHcETcAanncb.
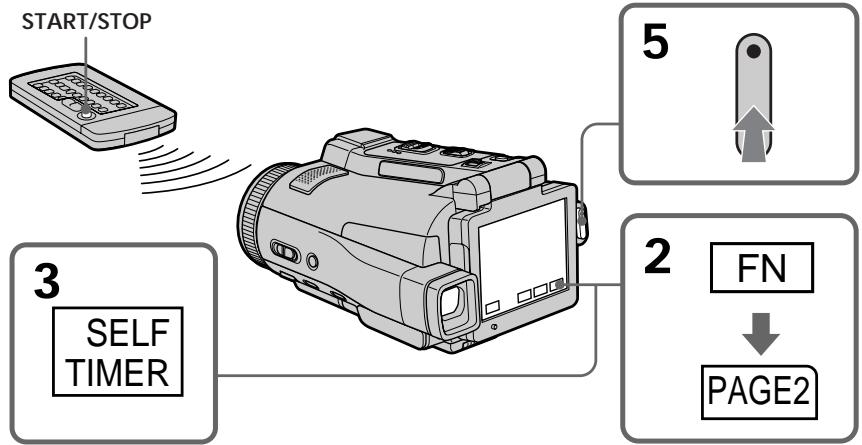
To stop the countdown
Press START/STOP.
To restart the countdown, press START/STOP again.
To cancel the self-timer recording
Press SELFTIMER in PAGE2 screen so that the (self-timer) indicator disappears on the LCD screen. You cannot cancel the self-timer recording using the Remote Commander.
Note
The self-timer recording mode is automatically cancelled when:
- Self-timer recording is finished.
- You turn NIGHTSHOT/NIGHTFRAMING to the other position while the self-timer is counting down.
- The POWER switch is turned to the other position.
Дл оctановки образноро оtcуета
HaxmTe KhONky START/STOP.
Recording a picture from a tape as a moving picture
Your camcorder can read moving picture data recorded on a tape and record it as a moving picture on a "Memory Stick." Your camcorder can also take in moving picture data through the input connector and record it as a moving picture on a "Memory Stick."
Before operation
- Insert a recorded tape into your camcorder.
- Insert a "Memory Stick" into your camcorder.
(1) Set the POWER switch to VCR.
(2) Press The picture recorded on the tape is played back.
(3) Press START/STOP at the scene where you want to start recording from.
| Quality mode | Maximum recordable time |
| SUPER FINE | 45 s |
| FINE | 1 min 10 s |
| STANDARD | 2 min 20 s |
| LIGHTMODE | 4 min 40 s |
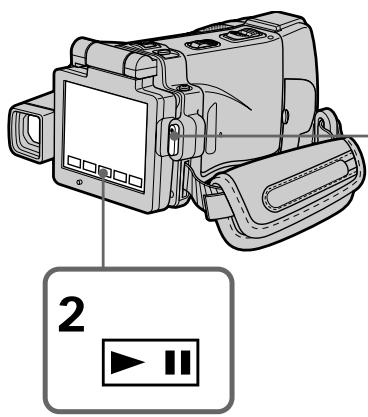
To stop recording
Press START/STOP.
3aHnscb n3o6paXeHnCJIeHTbl KaK DnXkyuTeROcHn3o6paXeHn
Baasa Bndeokamepa Moxet CHTbIBaTb DaHHbIe DBNkXyUeOcra N3o6paXeHnI, 3aINcaHHbIe Ha JeHTe, n 3aINCbIBaTb INK KaK DnBkUeEeCra N3o6paXeHne Ha "Memory Stick". Baasa Bndeokamepa Moxet TaKKe IpnHmAtb DaHHbIe DBNkXyUeOcra N3o6paXeHnI Yepe3 BXoHoi pa3bEm n 3aINCbIAbTa IN K KaK DnBkUeEeCra N3o6paXeHne Ha "Memory Stick".
Ipeed BbinoJHHeHem Otnepaun
- YCTAHOBITE 3aIINCAHNyIO KACCETy C JIeHTO B BaUy BnDEOKamepy.
- YctaHOBnTe "Memory Stick" B BaCy BnDeokamepy.
(1)Установпейразковая Power в положене VCR.
(2)HaxMMTe KhoNky II. ByIeT BOCpOu3BeDeHo I3o6paXeHne, 3aIncaHHe HaJIeHTe.
(3)HaxmTe KhoNky START/STOP B 3n3Oe, c KOtOpOro Bby XOTne Haayatb 3aInCb.
| Рек imm Качева | Мakсималь碍остунhoe Врем залиси |
| SUPER FINE | 45 c |
| FINE | 1 м unin 10 c |
| STANDARD | 2 м unin 20 c |
| LIGHTMODE | 4 м unin 40 c |

3
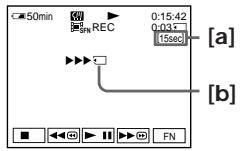
[a] Recording time indicator can be recorded on the "Memory Stick." / Индиротр Вразец заимся может 6ыть заимсан на "Memory Stick".
[b] This indicator is displayed for five seconds after pressing START/STOP. This indicator is not recorded./ ΘΤΟΤ ένδικατόρ ΟΤΟσραχαεΤΑΝ Β Teύεην έπλης εκυγήν Κοσέν Μακατήν ΚΚΟΠΚΑ ΣΤΑΓΟ/ ΘΤΟΤ ένδικατόρ Ε Β Απικόν ΒΑβεΤΑΝ
ДлЯ OCTaHOBKи 3aПСн
Haxmte Khonky START/STOP.
Recording a picture from a tape as a moving picture
Note
Sound recorded in stereo is converted to monaural sound when recording from a tape.
When the "Memory Stick" access lamp is lit or flashing
Do not shake or strike the unit. As well do not turn the power off, eject a "Memory Stick" or take out the battery pack. Otherwise, the image data breakdown may occur.
Titles which have already been recorded on tapes
You cannot record the titles on the "Memory Stick." The title does not appear while you are recording a moving picture with START/STOP.
Recording date/time
The date/time when it is recorded on a "Memory Stick" is recorded. Various settings are not recorded. Data codes recorded on a tape cannot be recorded on a "Memory Stick".
3aIncB n3o6paXeHnC JIeHTbI KaK DnKxUeOcR n3o6paXeHn
Ppimcaynne
3Byk, 3aIncaHHb B CTepeofoHnueckOM pexKIme, npeo6pa3yeTcB MHOofoHnueckm 3Byk npi 3aInciC JIeHTbl.
Ecln lamnoka Doctyna "Memory Stick" roput nlin muraet
He TpncTe n He cTuynte no annapaTy. TaKke, He BbIKIouaYte nItaHne, He N3BLeKaIte "Memory Stick" n He ChnMaIte 6aTaapeHbI blok. B npotNBHom clyuae daHHble n3o6paXeHnmaOyT 6bITnb NobpeXJeHbl.
TntpbI, yke 3aHncaHHbIe Ha JIeHTax
BbHe MoKxTe 3aNcBbAtb TtTpbHa "Memory Stick".TtTpbHe NOBATCBO BpEma 3aNcN DnKxUeOc n3o6paXeHnC NOMOuHO KhoNkN START/STOP.
3aHcB daTbI/BpeMeHN
ДаТВбЕМЗANCSbIBAeTcHа"MemoryStick". BbI He MoKTe 3aNcA Tb DAHHbIe BnDEOKaMEpbI. KoDbI DaHHbIX, 3aNcCaHHbIe HaJIeHTe,Ha MOrY T 6bITb 3aNcA hI Ha"Memory Stick".
Recording a moving picture from other equipment
Before operation
Set DISPLAY in to LCD in the menu settings.
(The default setting is LCD.)
(1) Set the POWER switch to VCR.
(2) When using the A/V connecting cable, set VideoINPUT to the appropriate position depending on the player. (p. 230)
(3) Play back the recorded tape on the VCR, or turn the TV on to see the desired programme. The image of the other equipment is displayed on the LCD screen or in the viewfinder.
(4) Press START/STOP at the scene where you want to start recording from.
Using the A/V connecting cable
3ainncb n3o6paXeHnC JIeHTbI KaK DnBxKyUeOcR n3o6paXeHn
3aIncb DvNxUeOcra n3o6paXeHnC dpyro annapaTpybl
Ipeed BbINOJIHHeHEm OIepaun
YcTaHOBnTe OIuHIO DISPLAY B ETC B yCTaHOBkax MeHIO B nOIoXeHne LCD. (LCD YBaJIaETCAyCTaHOBkoI NO yMOJuaHIO.)
(1)Установпейрееклочатуль POWER в положене VCR.
(2)ПиИСПОЛБЗOBAHIN COЕДИНТЕЛБHOrO Ka6eЯ ayДIOВ/ВИDEO yCTaHOBInTE OПИЮ VIDEOINPUT BHaINeKJaUee NOLOXKeHne,В 3aBnCIMOCtN OT BOCPOnO3BODaJIeYO yCTpoJCTBa.(CTp.238)
(3) Bocnpoin3BedeInTe 3aIncaHnyIeHTy Ha KBM IIN BKIOUHTe TELeBUN3Op IJRA npOCMOtpa HxKHO npORpAMMbI. I3O6paKeHne C dpyroI aNnapaTpybI OTO6pa3NTcRa HA eKpaHe JKKD nII IN B BuONCKaTEJe.
(4)Haxmnte KhoNky START/STOP B TOM 3nI3OJe, C KOtOporo Bby XOTne Haayab 3aIINCb.
UcnoIb3OBAHnE CoeINHITeNbHOrKa6eJyauDNo/BuDeo
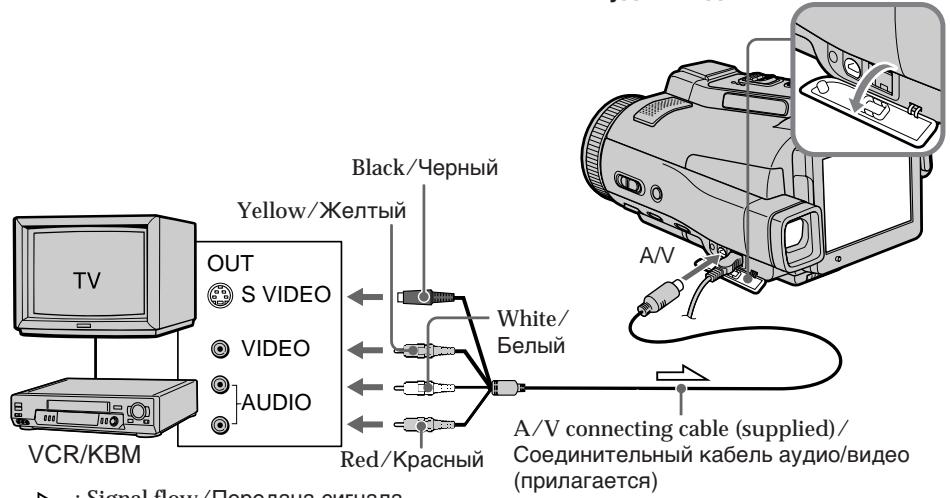
Signal flow/Pepea cunhana
If your TV or VCR has an S video jack
Connect using the S video plug to faithfully obtain original pictures. With this connection, you do not need to connect the yellow (video) plug of the A/V connecting cable. Connect the S video plug to the S video jack of the VCR.
EcIn B BaWeM TeJIeBn3ope nI IN KBMIeTeTcRHe3do S Bvdeo
BbIIOJIHnTe NoDcoeINHeHne C NcIOJIb3OBAHnEM WTeKepa S BnIeO dIra 6oJIee ToUHorO BOCpOn3BeDeHnI NCXoDHbIX I3O6paJxehN.
Ppi daHHOM coeHHeHH Bam He HuxHo NOcOeHNHTb XeNTbI WTeKepe (BnDeo) COeHNHTeJbHOrKa6eJr ayDIO/BnDeo.
ПодсоeДинITEштЕр SВиДeoКгHe3dY S BИДeoHa KBM.
Using the i.LINK cable
IcnoJIb3OBAHne ka6eJiaLINK
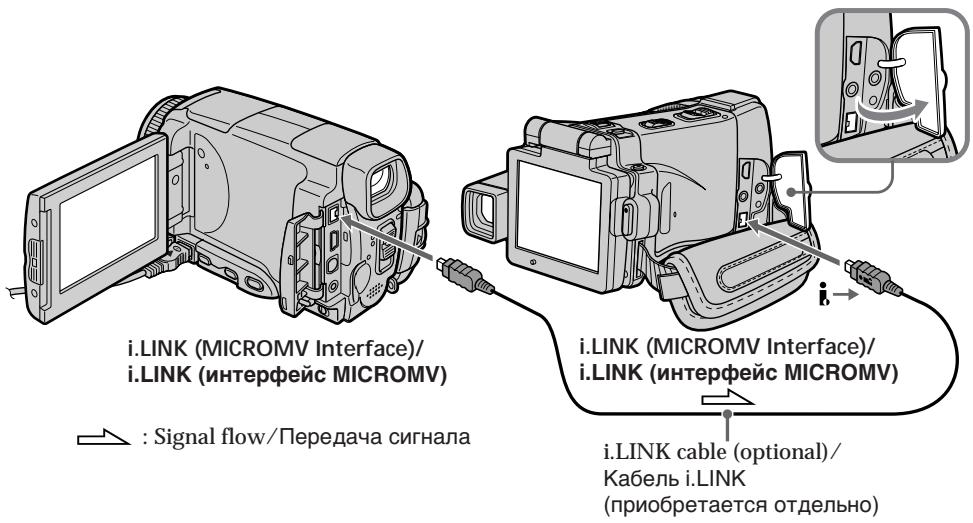
Note
When recording from a tape in poor recording condition, for example, a tape that is worn out from repeated dubbing, recording is interrupted, or "REC ERROR" appears and recording cannot be carried out. Record distortion-free images.
PpmeaHne
Призапись,在нгов,在нлхом COCTОHи,在нгов,在ншоенho BCLEDCBVE HeODHOKpaTHOHpe3anCS, 3anCb6ydetпретыбс,在иЯ наЗкранпогвNTСИнДИКаUNA"RECERROR", 3anCb OKakTeCHeBO3MOxHOn.3anCbIbAte n3obpaxeHn,He cOdepxaunie NCKaXeHn.
Viewing a still image - Memory photo playback
You can play back still images recorded on a "Memory Stick." You can also play back six images including moving pictures on single screen arranged in the same order as a "Memory Stick" by selecting the index screen.
Before operation
Insert a "Memory Stick" into your camcorder.
(1) Set the POWER switch to MEMORY or VCR.
(2) Press PLAY or PB. The last recorded image is displayed.
(3) Press - / + to select the desired still image.
- : To see the previous image
- : To see the next image
YcTaHOBnTe "Memory Stick" B BaCy BnDeOkaMepy.
(1)Установские посяклоуател POWER в положене MEMORY улп VCR.
(2)HaxmTe KhONky PLAY nIIN PB. Bydet oTo6paXeHo nOcIeDHee 3aIncahHoe n3o6paXeHne.
(3)HaxkImaIte KHOJKN-/+ДЯВБIOba hyxHOrO HeNoDvIXHOrO N3o6paXeHnA.
:IπpocmOTpa npébIyuzero n3o6paXeHn
+:ДпяnpocmoTpa cneуюцero n3o6paxKeHnI
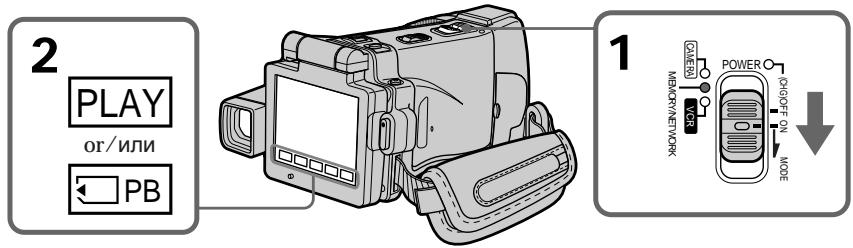
To stop memory photo playback
Press CAM, VCR on your camcorder or MEMORY PLAY on the Remote Commander.
Note
You may not be able to play back images with your camcorder:
- When playing back image data modified on your computers
- When playing back image data shot with other equipment
Playback still images recorded on the "Memory Stick"
Playback images are not output from the i.LINK (MICROMV Interface).
ДлЯ OCTAHOBKN BOCNPOUN3BedeHNA FOTOCHIMKOB N3 NaMRTN
HaxmTe KhoNky CAM, VCR Ha Bauei Bndeokampe nIM MEMORY PLAY ha nyIbTe DnCTaHcIOHnO ynpabJeHH.
Примейане
Bo3MOxHo, Bbl He cMOxTe BbIIOHNHTb Bocnpou3BeDeHne 1306paXeHn C nOmoUbO Bauei BuJeokamepbl:
- npn Bocnpo3BveeHn DaHbix N3obpaXeHn, BuOn3MeHeHHbx C nOmoIb BoBaJero nepcoHaJIbHOrO KOMIbIOTepa.
- npn BOCnpoN3BVeDEHm DaHbIX N3O6paXeHm, CHaTbIX C NOMOsbIO dpyro annapaTpybl.
Bocnpo3BoDmblc HeNoDbNxHbIe n3O6paXeHn, 3aIncahHbIe Ha "Memory Stick"
Bocnpn3BOdmbIe n3o6paKeHNe He nepedaOTcY epe3 rHe3do i.LINK (uHTeppeNC MICROMV).
File name
- The directory number may not be displayed and only the file name may be displayed if the structure of the directory does not conform to the DCF standard.
- "Directory ERROR" may appear on the LCD screen if the structure of the directory does not conform to the DCF standard. If this message appears, you can play back images but cannot record them on the "Memory Stick."
- The file name flashes on the LCD screen if the file is corrupted or the file is unreadable.
To play back recorded images on a TV screen
- Connect your camcorder to the TV with the A/V connecting cable supplied with your camcorder before the operation.
- When operating memory photo playback on a TV or on the LCD screen, the image quality may appear to have deteriorated. This is not a malfunction. The image data is as good as ever.
- Turn the audio volume of the TV down before operation, or noise (howling) may be output from the TV speakers.
Still image
You can select still images also with - / + on PAGE1, PAGE2 or PAGE3.
Mma
- Homep kaTanaIora MOKeT He OTo6paKaTbCn, n ToIbKO IMr pAinla MoKeT OTo6paKaTbCn, ecnn CTpyKtypa KaTanaIora He COOTBeTcTByET Tpe6oBaHnM cTaNdapTa DCF.
- INДИКАЦИ “Directory ERROR” MoKET NOBHTbCЯЗкpaneЖКД,ecn CTpyKtypa KaTalOra He COOTBeTCTByet Tpe6OBaHnIcTaNdapTa DCF. EcIn 3TO COO6UHeN OTo6paJxAeTc, BbI cMOKeTe BOCPON3BOuNTb N3O6paXeHnI, Ho He cMOKeTe Ix 3aIncbIbAtb Ha "Memory Stick".
-IMaФaIa Mmraet Ha 3KpaHe KKД,ecnI φaI NOBpeXdE H IIN He YHtAeTcR.
Дявocиpondибendeязапсаньхи n3o6paxeну Ha ekpahe TelebeN3opa
-Перед Вьлеленем ореташи
пд_COЕДНITE Baшу BИДЕКAMepy К
Телевизору сnomоцью COЕДНITEЛьного
Кабеля aydno/Bиdeо, пилагамoro K Baшей
ВИДЕКAMеpe.
-Пи ВOCPNON3BHeHIMФOTOCHIMKOBИЗ
пamTи Ha 3Кранe TEJIeBn3Opa ИИн Ha 3KpaHEn
KKД, KaueCTBO N3O6paxeHINМожET
ВыглдeТь ухDiSeHHbIМ. 3TO He RaBJIeTcR
HcNcPabHocTbI. ДaHHbIe N3O6paxeHIN
HaxoJATcB TOM Xe COCTOAHIN, YTO I
npexJde.
-Пеетн haуалOM BOCPOn3BeDEHnAymeHbUnTe rPOMKoCTb TeLEBn3Opa,ИhaYepee3ДиHaMnKtTeLEBn3Opa MoKeT NocblIwATbC7Uym (3aBbIBaHne).
HenodBuxKHe u3o6paXeHne
Bb mojke Te Bbl6npaTb HneoDBNxHbIe
1306paXeHnra TaKxE C NMOUbIO KHOIOK -/+ Ha
CTpaHnuax PAGE1, PAGE2 nn PAGE3.
Screen indicators during still image playback
3KpaHHbIe INHdNkaTopbI BO BpeMBAocpOu3BeJeHn HEnoDbXJHOrO n306paXeHn
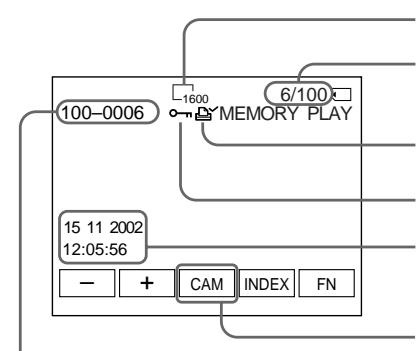
Data file number/
Homep Фальданhhbx
Image size/Pa3mep n3o6paXeHnA
Image number/Total number of recorded images/Homep n3o6paXeHn/O6uEe KoJIuYeCTBO 3aIINcaHHbIX n3o6paXeHn
Print mark/3nak neayatn
Protect/VHdNkaTOp 3aunTbI
Recording date/time/Various settings/ДаТаВрЕмЗапис/Разичные
When the POWER switch is set to VCR, VCR is displayed instead of CAM (camera)/
Ecni nepeKIOUaTeIb POWER ycTaHOBnE B noLoXeHne VCR, BMeTo nHdkaun CAM (BnDeOkamepa) oTo6paKaaeTcN Hdkaun VCR
When no images are recorded on the "Memory Stick"
When you press MEMORY PLAY on the Remote Commander, "NO FILE" appears.
Recording data
To display the recording data (date/time or various settings when recorded), press DATA CODE during playback. You can also use the Remote Commander for this operation (p. 57).
To make LCD screen indicators disappear Press DISPLAY/TOUCH PANEL.
Ecni Ha "Memory Stick" HeT 3aIncHbIX n3o6paXeHn
EcnBbHaxMeTe KhoNky MEMORY PLAY ha nyIbTe DnCTaHcUHOHOrO ynpaBJIeHn, NOBNTcR coo6ueHne "NOFILE".
DaHHbIe 3aHmci
Дяг OTOBpaXeHЯДaHHbIX 3aIINcN (daTbI/ BpeMeHиИпа3JIuHbIX yCTaHOBOK pRn 3aIINc)нжмTe BO BpeMЯ BOCpON3BeDEHЯ KhoNkY DATA CODE. Bbl MoKeTe TaKxe IcNoIb3OBaTb dЯ 3ToJ onepaUNyIbT dIcTaHcIOHnHOуnpaBNeHЯ (ctp.57).
YTo6bI INDkaTopbI 3KpaHa XKД nCye3nI
HaxmTe KhoNky DISPLAY/TOUCH PANEL.
Playing back six recorded images at a time (index screen)
You can play back six recorded images at a time. This function is especially useful when searching for a particular image.
(1) Set the POWER switch to MEMORY or VCR.
(2) In VCR mode, press PB.
In MEMORY mode, go to step 3.
(3) Press INDEX to display the index.
A red mark appears above the image that is displayed before changing to the index screen mode.
- To display the previous six images, press .
- To display the following six images, press .
You can also use - / + on the Remote
Commander.
Bocnpo3BeDeHne WecTn 3aHncahHbIX N3O6paXeHn OndHObpemEHNO (HHeKeCHbI eKpaH)
BbMOKTe BOCPON3BecTn 1eCTb 3aNcAHhBIX n3o6paXeHn OJHOBpeMeHHO. 3Ta fynKUma ABJIeTCr OC06eHNO IOnE3HOI npN BblIOJIHeHHI nonCKa OTdJIbHOrO n3o6paXeHn.
(1)Установпейсякючateь POWER в положене MEMORY ул ВCR.
(2)BpeximeVCR haxmnte KhoNky PB. Bpexime MEMORY nepeiIne Tc KBbIOJIHHeHIO DeiCTBnI pyHKTa 3.
(3)Haxmte KhoIky INDEX dIy oTo6paKeHHNeKcHOrO 3kpaHa.
Kpacna MeTKa nOBnTcHaI n3o6paXeHem, KOtOpoe OTo6paXaETc nepeI nepexoDM B pexim INHeKCHOrO 3KpaHa.
-Дя OTO6paXeHnI npeIbIyUxN XeCTn n3O6paXeHn, HaxMITE KHNK Ky←.
-ДЯ OTO6paJeHnI CJIeIyUOuX WecTn I3O6paJeHnI, HaxKMTe KHOIpKy . BbIMoKTe TaKxe IcNoIb3OBaTb KHOIpKn - / + Ha nyIbTe DnCTaHcNIOHOrO ynpabLeHnI.
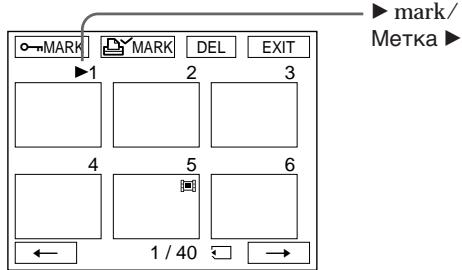
To return to FN
Press EXIT.
To return to the normal playback screen (single screen)
Press the image you want to display.
Note
When displaying the index screen, the number appears above each image. This indicates the order in which images are recorded on the
"Memory Stick." These numbers are different from the data file names (p. 128).
Image data modified with your computer or shot with other equipment
These files may not be displayed on the index screen.
Длг BOЗВраТКИнДикauци FN
Hakmnte KhoNky EXIT.
Длво3ВраТКЗКрануОььчногOBocрpon3ВeDEнг(OДиHOCHbIЗKран)
Haxmnte ha n3o6paXeHne, KOtOpoe Bbl xotnte oTo6pa3nTb.
PpmeaHne
При OTOBрахени INHdeKCHOrO 3kpHa Na KaKdIbIM N3OBpaXeHnEM NpAIBJIeTc HOMep. OH OTOBpaXaet NopHdoK, B KOTOpOM N3OBpaXeHnЯ 3anicaHbI Ha "Memory Stick". 3TN HOMepa OTInuAOTcR O TImeH paiJIOB dAnHHbIX (CTP.128).
Danhble n3o6paXeHn, BUNOn3MeHenHbIX C nOMOuB BaWero nepcoHaJIbHOrO KOMNbIOTepa HIN CHATbIX C NOMOuB DpyrO annapaTypbl
3Tn paaiNbI MOryT He OTo6paKaTbcHa HNHeKCHOM 3KpaHe.
Viewing a moving picture - MPEG MOVIE playback
You can play back moving pictures recorded on a "Memory Stick." You can also play back six images including still images in order at a time by selecting the index screen.
Before operation
Insert a "Memory Stick" into your camcorder.
(1) Set the POWER switch to MEMORY or VCR.
(2) Press PLAY or PB. The last recorded image is displayed.
(3) Press - / + to select the desired moving pictures.
- : To see the previous picture
+ : To see the next picture
(4) Press MPEG to start playback.
(5) Press VOL- or VOL + to adjust the volume.
VOL- : To decrease the volume
VOL+ : To increase the volume
When the LCD panel is closed with the LCD screen facing inwards, no sound is heard from your camcorder.
UcTaHOBnTe "Memory Stick" B Bauly BnIeOkaMepy.
(1)Установпейсякючateь POWER в поожене MEMORY ул VCR.
(2)Haxmnte KhoNky PLAY nIN PB. ByeToO6paXeHo nocJeDHee 3aIncaHHeo n3o6paXeHne.
(3)HaximMaTe KHOIpKn - / + DnIy BbIbOpa HyXhBIX DBNXUxxCra n3O6paKeHn.
-:Длгпрсмогра прдыdуцero
1306paXeHn
+:ДлгпюсмOTpa cNeуюшero n3o6paXeHnI
(4)HaxMMTe KhoNkY MPEG ▶IДЯ NaHaJaB OBCPON3BeDeHn.
(5)HaximaiTe KhoNky VOL- nIin VOL+ДпяperyIpOBKn rPOMKoCTn.
BnDeokamepbI CblIeH He 6yJeT.
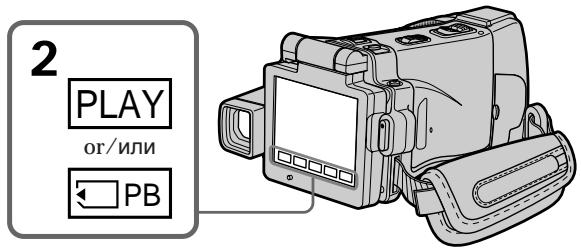
To pause MPEG MOVIE playback
Press MPEG II. To resume playback, press
MPEG again.
To change the screen size
Press SCRN SIZE. The screen size changes as follows:
Haxmnte KhoNky SCRN SIZE. Pa3mep 3kpaHa n3MeHnETCr CneDyUOUM o6pa30M:
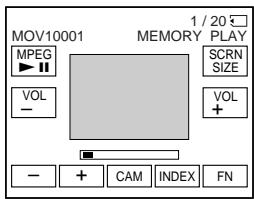


Notes on the screen size
- The picture may not be displayed at the middle of the LCD screen, depending on the movie.
- Even if you switch the screen size, the picture may not be displayed full-screen size, depending on the movie.
Note
You may not be able to play back images with your camcorder:
- When playing back image data modified on your computer
- When playing back image data shot with other equipment
MPEG MOVIE recorded with your camcorder:
- Is MPEG MOVIE AD
- Cannot be played back on a digital still camera or a camcorder that has no MPEG MOVIE AD function.
- Cannot be output from the i.LINK (MICROMV Interface).
To play back recorded images on a TV screen
- Connect your camcorder to the TV with the A/V connecting cable supplied with your camcorder before operation.
- Turn the audio volume of the TV down before operation, or noise (howling) may be output from the TV speakers.
Moving picture
You can select moving pictures also with - / + on PAGE1, PAGE2 or PAGE3.
When no images are recorded on the "Memory Stick"
When you press MEMORY PLAY on the Remote Commander, "NO FILE" appears.
PpmeuHnO pa3Mepe 3KpaHa
B3aBcIMocTnOTfNbMaH3o6paKHeHne moKTe OTobpaKaTbcr He B ceHTpe 3kpaHa KKd.
JaXe ecnBbI nepeKIOUHTe pa3Mep 3kpaHa, B 3aBNCIMOCTN OT ΦINbMa, N3O6paKeHne MOKeT He OTO6pa3NTcB BO BeCb 3KpaH.
Приимechанинe
Bo3MOxHObI He CMOKeTe BbINOpHnTb Bocnpou3BeDeHne N3O6paXeHn C NOMoUbO Bauei BuJeOkamepbl:
- npn Bocnpo3BveeHn DaHbIX N3O6paXeHn, BUNOn3MeHeHHbIX C nOmoIbU BaJero nepcoHaJIbHOrO KOMIbIOTepa.
- npn BOCnpOn3BVeDEHm DaHbIX N3O6paXeHm, CHaTbIX C NOMOsbIO dpyro annapaTypbl.
MPEG MOVIE, 3aIncaHbI Ha BaSei BnDeokamepe:
- RAIBAETCAФИЛBMOM MPEG MOVIE AD
- He MoXeT 6bITB BOCPpOu3BeDen Ha CnDpPoBOM ФоTOaPnapaTe NII IN BIndeOkaMepe, He IpoIepxNBAIOUxN x PhyHKnIO MPEG MOVIE AD.
- He MoXeT 6bITb NpeJaH uePe3 rHe3do i.LINK (nHTepFeic MICROMV).
Дявocрpon3BedeHЯ 3aINcAHbIX n3o6paXeHn Ha 3kpaHe TeneBuN3opa
EcIn Ha "Memory Stick" HeT 3aIncHbIX n3o6paxKeHn
EcIn BbI haxMeTe KhoNky MEMORY PLAY Ha nyJIbTe DnCTaHcUHOHHOrO ynpaBLeHnI, NOBNTcR coo6eHne "NOFILE".
Screen indicators during moving picture playback
3KpaHHbIe INHdNkAToPbI BO BpeMBOcnpOn3BeJeHnI DBNXJuEroOcN3o6paXKeHnI
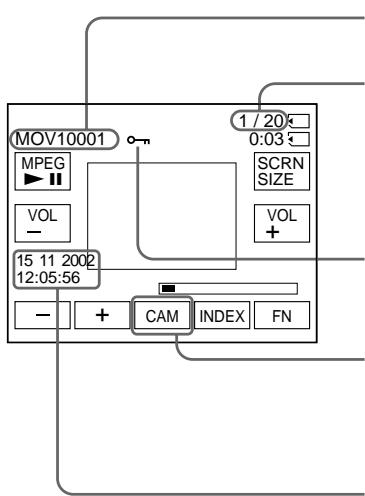
Data file number/Homep qaiJa daHHbIX
Picture number/Total number of recorded pictures/Homep n3o6paXeHn/Obuee KOnIueCTBO 3aIncanHbIXn3o6paXeHni
Protect/VHdNkatOp 3aunTbI
When the POWER switch is set to VCR, VCR is displayed instead of CAM (camera)/
Ecni nepeknluoyateIb POWER yctaHOBnEn B noLoJKeHne VCR, To Na dinCnIe 6ydt OTo6paKaTbcr INDnKauNIA VCR BMecTo INDnKauN CAM (BnDeokamepa)
Recording date/time (Various settings are displayed as “- - - ”)/
To display the recording date/time, press DATA CODE during playback. You can also use the Remote Commander for this operation (p. 57).
To make screen indicators disappear Press DISPLAY/TOUCH PANEL.
Data/Bpema 3anncn
Copying still images recorded on a "Memory Stick" to a tape
You can copy still images recorded on a "Memory Stick" and record them to a tape. You can also use the Remote Commander for this operation.
Before operation
- Insert a tape for recording into your camcorder.
- Insert a "Memory Stick" into your camcorder.
(1) Set the POWER switch to VCR.
(2) Using the video control buttons, search a point where you want to record the desired images and stop playback.
(3) Press PB. The last recorded image is displayed.
(4) Press - / + to select the desired image.
- : To see the previous image
- : To see the next image
(5) Press FN and go to PAGE3.
(6) Press REC CTRL, then REC START.
Copying starts.
Press REC PAUSE at the scene where you want to stop recording.
(7) If you have more to copy, repeat steps 4 to 6.
KoNiPoBaHne HeNoDvXhBIX n3O6paXeHn, 3aIncAHHbIX Ha "Memory Stick", Ha JeHTy
Bb MojKeTe KOIpNoBaTb HHeNoDBrNkHbIe
n3o6paxaHnHa "Memory Stick",
n 3aInCbIaTb Nx Ha JeHTy. Bb MojKe TaKKe
NCOnNoB3oBaTb DnA 3ToI Opeaunn NynbT
nDCtAHCIOHOHorO UnpaBNeHn.
PpeB BbINOJIHeHEm Opeaun
- YCTAHOBITE KACCETY CJIeHTOJ DJIa 3aIINCn B BaUy BuDeOkamepy.
- YctaHOBnTe "Memory Stick" B Bauy BnDeOKaMepy.
(1)YcTaHOBInTe NepeKJIIOUaTeIb POWER B noJIOKeHne VCR.
(2)Исплььзу Кнорки Видахонтюг, Ндптуку, Гд Быхотие 3аиcaль hyжны Иобрахени, И оctанови ВОсчрпошпбдевен.
(3)HaxmTe KhONky PB. BydTe OTo6paXeHo nOcIeJHee 3aIncaHnoe I3o6paXeHne.
(4)HaxkImaIte KHOJKN-+ДЯ BbIbOpaHyxHOrO N3O6paXKeHn.
:Inpocmotpa npedbyuyeo n306paxeHn
+:ДпяnpocmoTpacneуюцero n306paqkenia
(5)HaxmTe KhoIky FN n nepeiDnTe ha cTpaHnCy PAGE3.
(6)Haxmnte KhONky REC CTRL, a 3aTeM KhONky REC START. Haunetca KOINPOBaHne. Haxmnte KhONky REC PAUSE ha 3n3oJe, rDe BbXOTnTE ocTaHOBnTB 3aNNCb.
(7)EcHnBamHyxKHOCKONIpOBaTbYTO-Toeue, noBTOpnte DeiCTBnIyHKTOBc4no6.
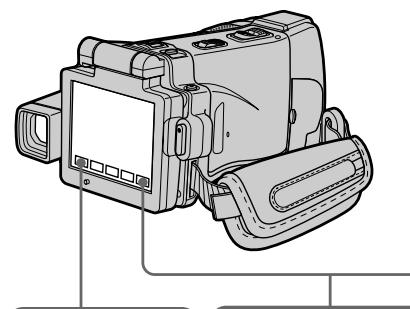

3

5
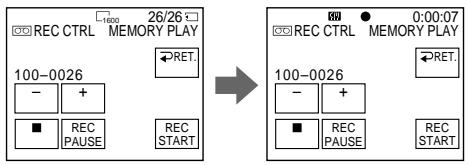
6
To stop copying in the middle
Press on the LCD screen or STOP on the Remote Commander.
To return to FN
Press RET. after step 6, then press EXIT.
To start copying using the Remote Commander
After step 4, press both REC and the right button simultaneously to start copying.
Дя NaHaJana KOnIpOBaHnC nOMoIbIpyIbTa dNCTaHcNoHHOrO ynpabJIeHn
Iocne nyKta 4, haxMnte OndHOBpeMeHHO KhoNKn REC n npabyIO KhONky dny Hauana KOnipoBaHn.
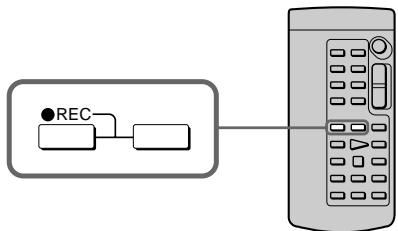
Notes
- You cannot copy MPEG MOVIE files to the tape when "NOT REC" is displayed.
- You cannot copy the index screen to the tape.
During copying
You cannot operate the following functions:
-MEMORY PLAY
-MEMORY INDEX
-MEMORY DELETE
-MEMORY + / -
-MEMORYMIX
Image data modified on your computer or shot with other equipment
You may not be able to copy modified images with your camcorder.
PpimueaHn
BbI He MoXeTe IcNoJIb3ObaTb CJIeDyIOUne cyHKc:
-MEMORY PLAY
-MEMORY INDEX
-MEMORY DELETE
-MEMORY + / -
-MEMORY MIX
DaHHbIe I3o6paXeHn, BnDOn3MeHeHHbIX Ha BaWeM nepcoHaJIbHOM KOMNbIOTepe HIN CHaTbIX C NOMOsbIO dpyroI annapaTypbl
Bo3MOxHOb, BbI He cMOxTe CkONIpOBaTb BuOn3MeHeHHbIe N3O6paXeHNr C NOMoUbO BaWei BnDeOkamepbl.
Enlarging still images recorded on a "Memory Stick" – Memory PB ZOOM
You can enlarge still images recorded on a "Memory Stick." You can select and view a desired part from the enlarged still image. Also, you can copy the desired part of the enlarged still image to a "Memory Stick."
Before operation
Insert a "Memory Stick" into your camcorder.
(1) In the memory playback mode, press FN and go to PAGE2.
(2) Press PB ZOOM. PB ZOOM screen appears.
(3) Press the area that you want to enlarge in the frame on the PB ZOOM screen. The area you pressed moves to the centre of the LCD screen, and the playback image is enlarged at twice the size. If you press the other area, the area moves to the centre of the LCD screen.
(4) Adjust the zoom ratio by the zoom lever. You can select the image from 1.1 times up to five times its size.
"W" side: Decrease the zoom ratio.
"T" side: Increase the zoom ratio.
YBeHnueHne HEnoDbHXhBIX 306paXeHn, 3aIncaHHbIX Ha "Memory Stick" -ФункцЯ PB ZOOM namrtn
Bbl MoxKeTe yBeJIuINBaT bHeNoIbIXHbIe
n3o6paXeHn, 3aIncAHHbIe Ha "Memory Stick".
Bbl MoxET BbIbPaTb I nPoCmATpNaTb HxHyHO
yAcTb yBeJIuNeHHoro HeNoDBNXHoro
n3o6paXeHn. Bbl MoxETaTKxe KOnIpObaTb
hXHyHo YaCTb yBeJIuNeHHoro HEnoDbIXHoro
n3o6paXeHn Ha "Memory Stick".
Ipeed BbInoJIHeHnEM Onpaun
YcTaHOBInTe "Memory Stick" B Bauy BnDeokamepy.
(1)В ржиме Воспожибения ИЗ памгту нахмтete Кногку FN и поевдente настраницу PAGE2.
(2)HaxMMTe KhoNkY PB ZOOM. IorBnTcR 3KpaH PB ZOOM.
(3)HaXMMTe Ha 06NaCTb, KOtOpYIO Bb XOTnTe yBeHnnTb KaIpe Ha 3KpaHe PB ZOOM. O6NaCTb, Ha KOTOpYIO Bbl HaxMeTe, nepEMecITcB UeHTp 3KpAna KKД, n BOCnPOn3BOOIMoE uO6paKeHne yBeHnnTcB DBoE OT NepBOHaJauNbHorO pa3Mepa. EcnI Bbl HaxMeTe Ha dpyrHyO 06NaCTb COOTBETCTBeHHO, dpyraJ 06NaCTb nepEMecITcB UeHTp 3KpAna KKД.
(4)Отreyноруг Te Macштаб ybeileчehna c
nomоью pbuha ra npnbODHORO
BapnooobbektnBa.
Бы можete ybeileчпь n3o6paхене OT 1,1
pa3a Do пяtnkparthoro ero pa3mepa.
Сторopa "W":Умehьшет macsttab
ybeileчehna.
Сторopa "T": Ybeileчнbaet macsttab
ybeileчehna.
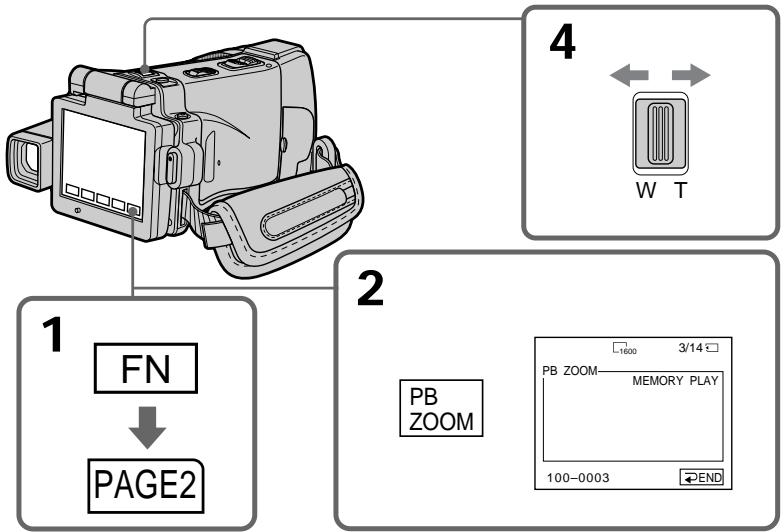
To cancel the Memory PB ZOOM function
Press END.
ДЯ OTMeHbI ΦyHKcN PB ZOOM nAMrTn
HaxmTe KhoNkY END.
Images in the Memory PB ZOOM mode Images are not output through the i.LINK (MICROMV Interface).
In the Memory PB ZOOM mode If you press DISPLAY/TOUCH PANEL, the frame on the Memory PB ZOOM screen disappears. You cannot move the part you pressed to the centre of the LCD screen.
Edge of an enlarged image The edge of an enlarged image cannot be displayed in the centre of the LCD screen.
Moving pictures recorded on the "Memory Stick" The PB ZOOM function does not work.
To record an image processed by PB ZOOM on the "Memory Stick" Press PHOTO to record the image processed by PB ZOOM. (Images are recorded at 640× 480 size.)
When FOCUS is set to ZOOM
You can change the zoom ratio using the zoom ring.
Your camcorder can automatically play back images in sequence. This function is especially useful when checking recorded images or during a presentation.
Before operation
Insert a "Memory Stick" into your camcorder.
(1) Set the POWER switch to MEMORY.
(2) Press FN to display PAGE1.
(3) Press MENU, then select SLIDE SHOW in l in the menu settings (p. 232). And press EXEC.
(4) Press START. Your camcorder plays back the images recorded on a "Memory Stick" in sequence.
Bocnpo3BeDeHne n3o6paXeHn IO 3aMKHyTOMy zukny -ФункцЯ SLIDE SHOW
BaSha BnDeOkamepa MoKet ABTOMaTneckn Bocnpo3BODNTb N3O6paXeHnB nocJeDoBaTeIbHOCTN. 3Ta fynKuY ABJIeTc8 Ooc6eHHNo POnE3HoI npi npOBepKe 3aIncaHHbx N3O6paXeHn IIN BO BVpeM rpe3eHTaUH.
PpeB BbINOJIHeHEm Opeaun
YctaHOBNTe "Memory Stick" B Bauy BnDeOkaMepy.
(1)Установпейразковая сь POWER в положене MEMORY.
(2)Haxmnte Khonky FN, yTo6bI OTo6pa3ntb cTpaHnU y PAGE1.
(3)HaxmTe KhoNky MENU, a 3aTe Mbl6epnTe onuio SLIDE SHOW B B yCTaHOBkax MeHIO (CTp. 240). 3aTe HaxmTe KhoNky EXEC.
(4)Haxmnte KhoNky START. Bawa BndeOkamepa BocnpOn3BeJeT n3o6paXeHna, 3aIncaHbIe Ha "Memory Stick", BnoCleDoBaTeJIbHoCTn.
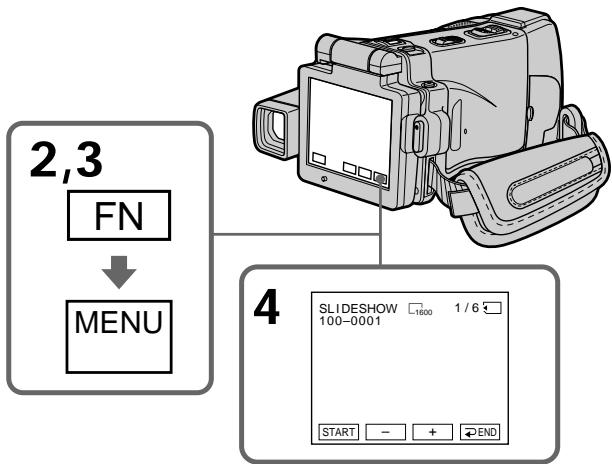
To stop the slide show
Press END.
To pause during a slide show
Press PAUSE.
To return to FN
Press END, then press EXIT.
To start the slide show from a particular image
Select the desired image using - / + buttons before step 4.
Дл OCTaHOBKи NOKa3сlaйдов
Haxmnte KhoNky END.
Iy3bI BO BpeMa noka3a cnaIOB
Haxmnte KhoNky PAUSE.
To view the recorded images on TV Connect your camcorder to a TV with the A/V connecting cable supplied with your camcorder (p. 61) before operation.
If you change the "Memory Stick" during operation
The slide show does not operate. If you change the "Memory Stick," be sure to follow the steps again from the beginning.
When there are no images on the "Memory Stick"
NOFILE"appears.
To prevent accidental erasure of important images, you can protect selected images.
Before operation
Insert a "Memory Stick" into your camcorder.
(1) Set the POWER switch to MEMORY or VCR.
(2) In VCR mode, press PB.
In MEMORY mode, go to step 3.
(3) Press INDEX to display the index.
(4) Press oMARK. The screen to protect the image appears.
(5) Press the image you want to protect. The "O-n" appears above the protected image.
ДлпnpedotврашенисуайностараиьхьIxИЗбрахениВbl можete 3auntntb bblбраньиИЗбрахени.
PpeB BbINOJIHeHEm Opeaun
YctaHOBnTe "Memory Stick" B Bauy BnDeOKaMepy.
(1)Установские посяклочать POWER в положене MEMORY ул ВCR.
(2)BpeXnmeVCRnaXmnteKHOknyPB. BpeXnme MEMORY nepeiDnte K BBIOJIHeHIO DeIcTBNIyHKTa 3.
(3)Haxmte KhoNky INDEX dIa OTo6paKeHHdEKCHO 3KpaHa.
(4)HaxMMTe KhoNkO MARK. NOrBntcR 3KpaH 3aunTbI 3o6paXeHnI.
(5)HaXMMTe Ha n3o6paXeHne, KOtOpoe Bbl XOTnTe 3aunTntb. HaI 3aunIeHhbIM n3o6paXeHneM NOBtC3 3NaK "O-n".
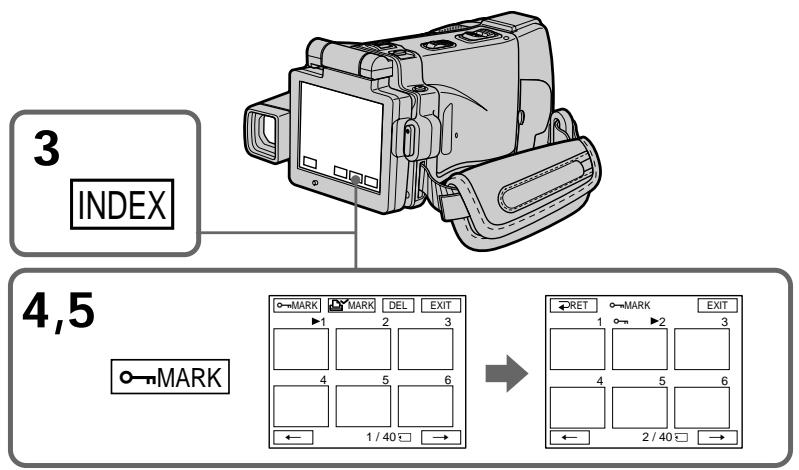
Preventing accidental erasure - Image protection
To return to FN
Press EXIT.
To cancel image protection
Press the image you want to cancel image protection in step 5 again. The "O-n" disappears.
Note
Formatting erases all information on the "Memory Stick," including the protected image data. Check the contents of the "Memory Stick" before formatting.
If the write-protect tab on the "Memory Stick" is set to LOCK
You cannot carry out image protection.
Предотьразецни слуайHoro ctrupaши - 3ацита n3обрахени
Deleting images - DELETE
You can delete images stored in a "Memory Stick." You can delete all images or selected images.
Deleting selected images
Before operation
Insert a "Memory Stick" into your camcorder.
(1) Set the POWER switch to MEMORY or VCR.
(2) Press PLAY or PB, then press - / + to select the image you want to delete.
(3) Press FN to display PAGE1.
(4) Press DELETE. "DELETE?" appears on the LCD screen.
(5) Press OK. The selected image is deleted.
Ydajenne n3o6paXeHn -ФункцЯ DELETE
BbMoXeTe ydaIITb n3o6paXeHnra, coXpaHeHHbIe Ha "Memory Stick". Bb MoXeTe ydaIITb BCE n3o6paXeHnra nn BBbpaHHbIe n3o6paXeHnra.
YdaJIeHne BbI6paHHbIX n3o6paXKeHn
Ipeed BbINOJIHeHEm Opeaun
UcTaHOBInTe "Memory Stick" B Bauy BnDeokamepy.
(1)Установские песеклочатуль POWER в пооженке MEMORY ул ВCR.
(2)HaxmTe KhoNky PLAY nIN PB, a 3aTEM haxmaiTe KhoNkN -/+ДЯ BbIbopa u3o6paJxHn, KOtOpoe Bbl xOITNe ydaJINb.
(3)Haxmnte KhoNkFN, yTo6bl OTo6pa3nTb cTpaHnU y PAGE1.
(4)HaxMMTe KhoNky DELETE. Ha 3KpaHe KKД NOBHTcI INdNKaUЯ "DELETE?"
(5)Haxmnte KhoNky OK. BbIbpaHnoe n3o6paXeHne 6yJeT ydaJeHo.
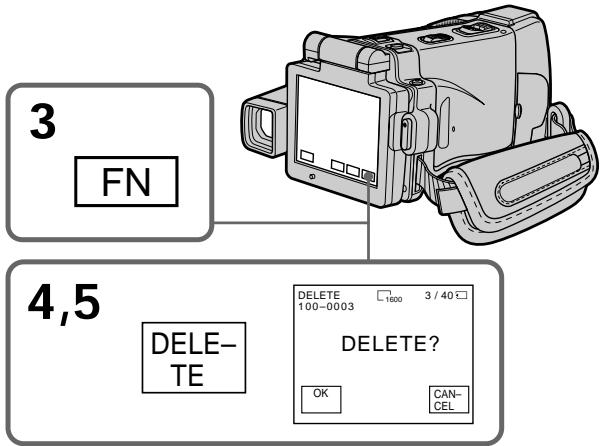
To return to FN
Press EXIT after step 5.
To cancel deleting an image
Press CANCEL in step 5.
Notes
- To delete a protected image, first cancel image protection.
- Once you delete an image, you cannot restore it. Check the images to delete carefully before deleting them.
If the write-protect tab on the "Memory Stick" is set to LOCK
You cannot delete images.
Deleting selected images on the index screen
Before operation
Insert a "Memory Stick" into your camcorder.
(1) Set the POWER switch to MEMORY or VCR.
(2) In VCR mode, press PB.
In MEMORY mode, go to step 3.
(3) Press INDEX to display the index.
(4) Press DEL, then press the image you want to delete. The number of the selected image is highlighted.
(5) If there is other image you want to delete, press the image.
(6) After selecting the image to be deleted, press EXEC. "DELETE?" appears on the LCD screen.
(7) Press OK. The selected images are deleted.
YdaJIeHne BbI6paHHbIX n3O6paXKeHn Ha mHndeKCHOM 3KpaHe
Ipeed BbINOJIHeHHeM OIepaunu
YctaHOBnTe "Memory Stick" B Bauly BndeOKamepy.
(1)Установские песеклочатуль POWER в положене MEMORY ул ВCR.
(2)BpeXmmeVCRnaxmnteKHOKnpyPB. BpeXmme MEMORY npeiDnTe K BBIOJIHHeHIO DeIcTBNIyHKta 3.
(3)HaxmTe KhoNky INDEXДЯ OTo6paKeHnIHNeKCHOrO 3kpaHa.
(4)HaKMITE KhoNky DEL, a 3aTeM HaKMITE Ha n3o6paXeHne, KOtOpoe BbXOTNe ydaInTb. Homep BbIbpaHHoro n3o6paXeHn6bydet noDCBeHeH.
(5)Ecnn nmeetc eue n3o6paXeHne, KOtOpoe Bby xOTnte ydaJIntb, HaxMnte Ha 3TO n3o6paXeHne.
(6)Посл e Вьбopa n3obpaхжня, noДпжацero ydaJIeHnIO, haxmTe KhONky EXEC. Ha 3KpaHe JKKД NOBHTcR INdNkaZnIg "DELETE?"
(7)Haxmnte KhoNky OK. BbI6paHnBle n3o6paXeHn8 6yDyT ydaJIeHbl.
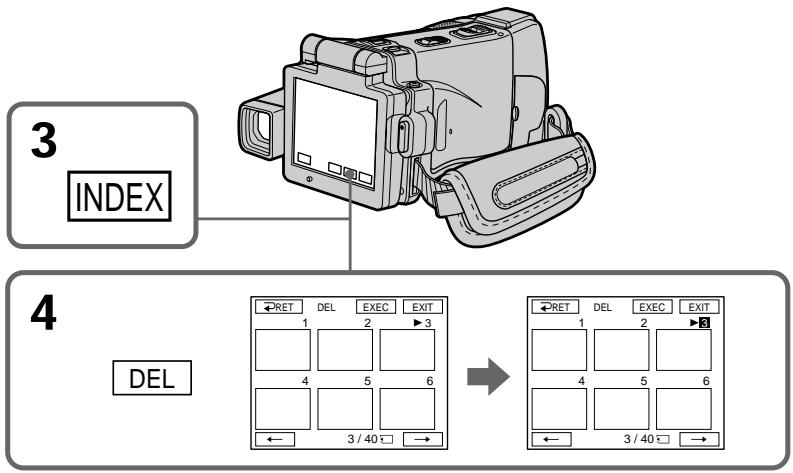
To return to FN
Press EXIT after step 7.
To cancel deleting an image
Press CANCEL in step 7.
Длв Bo3ВраТКИнДикалTN FN
HaxmTe KhOnky EXIT nocIe nyKta 7.
ДЯ OTMeHbI ydaJIeHn I3O6paXKeHn
HaKmTe KhoNky CANCEL npn BbIOnJIHeHn nDeiCTBnI pyHKta 7.
Deleting all the images
You can delete all the unprotected images in a "Memory Stick."
Before operation
Insert a "Memory Stick" into your camcorder.
(1) Set the POWER switch to MEMORY.
(2) Press FN to display PAGE1.
(3) Press MENU, then select DELETE ALL in l in the menu settings (p. 232). And press EXEC.
(4) Press / to select OK, then press EXEC. "OK" changes to "EXECUTE".
(5) Press EXEC. DELETING appears on the LCD screen. When all the unprotected images are deleted, COMPLETE is displayed.
YdaJIeHne Bcex n3O6paXKeHn
BbIMoKTeYdAnITb BCE He3aUnIeHHbIe 1306paXeHnHa "Memory Stick".
Ipeed BbINOJIHeHEm Opeaun
UcTaHOBInTe "Memory Stick" B Bauy BnDeokamepy.
(1)Установские поеклоча给宝宝 POWER в поожене MEMORY.
(2)Haxmnte KhONky FN, yTo6bI OTo6pa3ntb cTpaHnUy PAGE1.
(3)HaxMMTe KhONky MENU, a 3aTeM BbI6epNte onuHo DELETE ALL B B yCTaHOBkax MeHIO (CTp. 240). 3aTeM HaxMMTe KhONky EXEC.
(4)Haxmaite KhoNkI / IJy BbIbopa OIcIN OK,a 3aTeM haxmTe KhoNky EXEC. INdikacn "OK" n3MeHnTCra Ha INdikacnIO "EXECUTE".
(5)HaXMMTe KhoNky EXEC. Ha 3KpaHe XKKI NOBHTcH INDkaCnIy DELETING.KoTda Bce He3aunuEHHbIe I3O6paXKeHn6bydUT ydaJIeHbI,Ha DnCpJIee oTo6pa3ntcH INDkaCnIy COMPLETE.
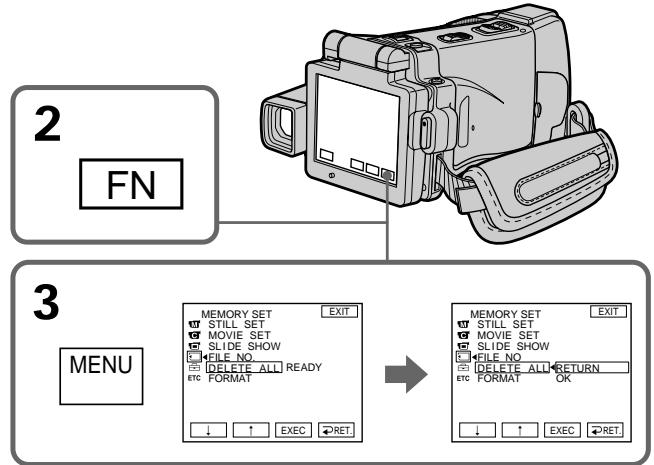
To return to FN
Press EXIT.
To cancel deleting all the images
Press / to select RETURN in step 5, then press EXEC.
While "DELETING" appears
Do not turn the POWER switch to the other position or press any buttons.
You can specify the recorded still image to print out by putting marks. This function is useful for printing out still images later.
Your camcorder conforms with the DPOF
(Digital Print Order Format) standard for specifying the still images to print out.
Before operation
Insert a "Memory Stick" into your camcorder.
(1) Set the POWER switch to MEMORY or VCR.
(2) In VCR mode, press PB.
In MEMORY mode, go to step 3.
(3) Press INDEX to display the index.
(4) Press MARK. The screen to write a print mark appears.
(5) Press the image you want to write a print mark. The appears on the selected image.
3aHnscb 3HaKa NeuATn -ФункцЯ PRINT MARK
Bb mokeTe yka3aTb 3aIncaHHbIe HEnoDBNkHbIe
n3o6paXeHn IJpa pacNeYaTK, NOMEyAaNX
3HaKAMn NeaTn. 3Ta cyHKUra YBJIaETcR
noJe3Ho JnPa pacNeYaTKn HEnoDBNkHbIX
n3o6paXeHn I03dHee.
Baawa Bnndeokamepa cooTBetCTByeT cTaHapTy DPOF (uΦpOBoi φopMaT nopAka neaTu) Дя уKa3aHЯ HEnoDbNkHbIX n3O6paXeHm Дя paCneuATkn.
Ipeed BbINOJIHeHEm Opeaun
YctaHOBHTe "Memory Stick" B BaCy BnDeOkamepy.
(1)Установпейсякючateь POWER в положене MEMORY ул ВCR.
(2)BpeXmmeVCRnaxMnteKHOKnpyPB. BpeXmme MEMORY npeiDnTe K BbIOJIHeHIO DeIcTBn IyHKTa 3.
(3)Haxmnte KhoNky INDEX dIra OTo6paKeHHdeKCHOrO 3kpaHa.
(4)HaxmTe KhoNky MARK. NpBtCn 3KpaH 3aPiNC 3HaKa neaTn.
(5)Haxmnte Ha n3o6paXeHHe,Ha KOTOpoe BbIXOHTe 3aIncatb 3HaK NeaTn. HaBb16paHHOM n3o6paXeHIn NOrBNTcR 3HaK
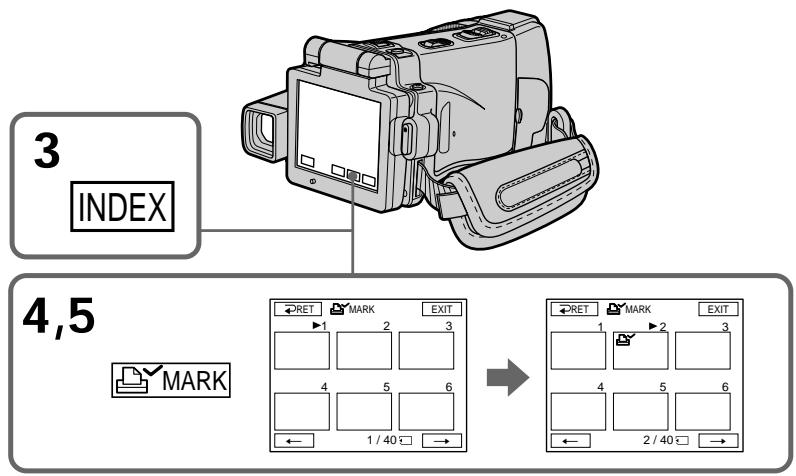
To return to FN
Press EXIT.
To cancel writing print marks
Press the image you want to cancel the print mark in step 5 again. The l disappears.
If the write-protect tab on the "Memory Stick" is set to LOCK
You cannot write print marks on still images.
Moving pictures
You cannot write print marks on moving pictures.
EcnIJIeNecTOK3aunItbIOT3aHcNHa
"Memory Stick" yctahOBJIeH bIOJIOXeHne
LOCK
BbI He moKeTe 3aNcAtb 3HaKn NeaTn Ha
HeNoDvNxHbIe I306paXKeHnI.
DvKyuueeHn3o6paXeHHa
BbI He MoKxTe 3aIncatb 3HaKn NeayTu Ha DInkXyUeCeA N3O6paXeHn.
Viewing Images Using your Computer
Viewing images on your computer - Introduction
There are the following ways of connecting your camcorder to a computer in order to view images saved on a "Memory Stick" or recorded on a tape on your computer.
To view images on a computer which has a Memory Stick slot, first remove the "Memory Stick" from your camcorder and then insert it into the computer's Memory Stick slot.
*When connecting to a computer without a USB jack
Use an optional floppy disk adaptor for Memory Sticks or a PC card adaptor for Memory Sticks. When purchasing an accessory, check its catalog beforehand for the recommended operating environment.
\* Pnp noDcoeHHeHn K KomNbIOTepy 6e3 rHe3da USB
IcnoIb3yIte npNo6peTaemb oyTeNbHO aadTep fJIoNN-tncka dJaMemory Stick an aadTep PC-KapTbI dJaMemory Stick. Pn nokynke doonolHntelbHo npHaadJeKhoCTn 3apahee npOBepbTe no KaTaNory peKoMeHNdyEmyIO dJa Hee KOhOpyauuio.
When connecting to a computer, complete installation of the i.LINK driver, the USB driver or the application softwares before connecting your camcorder to the computer. If you connect your camcorder to your computer first, you will not be able to install the i.LINK driver or the USB driver correctly.
For details about your computer's connectors and editing software, contact the computer manufacturer.
Notes on using your computer
"Memory Stick"
- "Memory Stick" operations on your camcorder cannot be assured if a "Memory Stick" formatted on your computer is used on your camcorder, or if the "Memory Stick" in your camcorder was formatted from your computer when the USB cable was connected.
- Do not compress the data on the "Memory Stick." Compressed files cannot be played back on your camcorder.
Software
Depending on your application software, the file size may increase when you open a still image file.
- When you load an image modified using retouching software from your computer to your camcorder or when you directly modify the image on your camcorder, the image format will differ so a file error indicator may appear and you may be unable to open the file.
Communications with your computer
Communications between your camcorder and your computer may not recover after recovering from Suspend, Resume, or Sleep.
Connecting your camcorder to your computer using the i.LINK cable (For Windows users)
You can view or edit the images recorded on a tape using your computer. You can also record images edited with the computer on the tape. To view images on your computer, the application software MovieShaker Ver.3.1 for MICROMV (supplied) and i.LINK cable (optional) is required.
BbMOxTe npocMaTpNbBaT bIN MOHTnpoBaT b3O6paXeHn, 3aNcAHHbe HaJeHTe, c NOMOuB BaWero KOMnbIOTepa. Bb MoXeTe TaKKe 3aNcBbATb N3O6paXeHn, CMOHTnpoBaHNbIE c NOMOuB KO mNbIOTepa, H aENTy. DnI npocMToPa N3O6paXeHn Ha BaWeM KOMnbIOtepe Tpe6yeTc nporpaMMhoe oBeCneHHe MovieShaker Ver.3.1 for MICROMV (npunaraetc) n Ka6elb i.LINK (npno6peTaetc OTdEhHO).
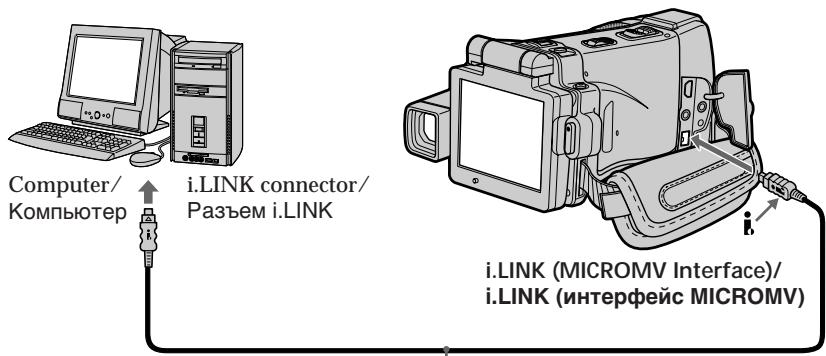
i.LINK cable (optional)/ Ka6eIb i.LINK (npno6peTaetc8 OTdelenho)
Before installing the i.LINK driver and the application software into your computer, be sure not to connect your camcorder to the computer.
Note
To view images on your computer, you have to install the i.LINK driver and the application software into your computer. They are included in the supplied application software MovieShaker Ver.3.1 for MICROMV. For details on installing and on an i.LINK connection, refer to the operating instructions supplied with MovieShaker Ver.3.1 for MICROMV.
Ipeed yctahOBKoHa Baewem nepcoHbHOM KOMnbIoTepe dpaBepa i.LINK nporpamMHO o6ecneHnra y6eHntecb, cTo Bawa BndeokamaPe Ka KOMnbIoTepy He noDcoEduHeHa.
Ppmeuahne
Connecting your camcorder to your computer using the i.LINK cable (For Windows users)
Recommended computer environment
Recommended Windows environment
OS: Microsoft Windows Me, Windows 2000 Professional, Windows XP Home Edition, Windows XP Professional. Standard installation is required. Operation is not assured if the above environment is an upgraded OS.
CPU: Pentium III 600 MHz or faster (Required) (Pentium III 800 MHz or faster (Recommended))
Main memory: 128 MB or larger (Required)
(256 MB or larger)
(Recommended))
Display: 800 × 600 or larger screen size/ 1024 × 480 or larger screen size, 16-bit colour or higher
Hard disk: 100 MB hard disk space (for installation), ATA66 or higher speed (required for capturing an image)
The i.LINK terminal (IEEE1394) shall be equipped.
Note
Operations are not guaranteed for all the recommended computer environments mentioned above.
PekomeHdoBaHHa KOnΦnrgpaunKOMnbIOTepa
PekomehoBaHHa KOHpyaun Windows
OC: Microsoft Windows Me, Windows 2000 Professional, Windows XP Home Edition, Windows XP Professional. Tpe6yetc stanaptna yctahOBka. Φункюнроване He rapaHTnpyeTc, ecnуka3aHHa Bblse KOHfrypaци поучenaВ pe3yIbTaTe obNoBJIeHr OC.
LcHTpaIbHbI npOceccop: Pentium III 600 MΓU, nIi 6oJIe 6bICTpB (Tpe6yETc) (Pentium III 800 MΓU, nIi 6oJIe 6bICTpB (peKOMeHNdyETc))
OchOBHЯпamrTb: 128 M6 nII 6oJIe (Tppe6yETc) (256 M6 nII 6oJIe (peKOMeHdyETc))
Connecting your camcorder to your computer using the USB cable (For Windows users)
Complete installation of the USB driver before connecting your camcorder to your computer. If you connect your camcorder to your computer first, you will not be able to install the USB driver correctly.
When connecting to a computer via the USB jack
You must install a USB driver onto your computer in order to connect your camcorder to the computer's USB connector. The USB driver can be found on the CD-ROM supplied, along with the application software required for viewing images.
If you connect your camcorder and your computer using the USB cable, you can view pictures live from your camcorder and pictures recorded on a tape on your computer (USB Streaming function).
Furthermore, if you download pictures from your camcorder to your computer, you can process or edit them in image processing software and append them to e-mail.
You can view images recorded on a "Memory Stick" on your computer.
Connecting your camcorder to your computer using the USB cable (For Windows users)
Recommended computer usage environment when connecting via USB cable and viewing tape images on your computer
OS:
Microsoft Windows 98SE, Windows Me,
Windows 2000 Professional, Windows XP Home
Edition or Windows XP Professional
Standard installation is required.
However, operation is not assured if the above environment is an upgraded OS.
You cannot hear sound if your computer is running Windows 98, but you can read still images.
CPU:
Pentium III 500 MHz or faster (800 MHz or faster recommended)
Application:
DirectX 8.0a or later
Sound system:
16 bit stereo sound card and stereo speakers
Memory:
64 MB or more
Hard disk:
Available memory required for installation: at least 200MB
Available hard disc memory recommended: at least 1GB (depending on the size of the image files edited)
Display:
4 MB VRAM video card, Minimum 800 × 600 dot High colour (16 bit colour, 65 000 colours), Direct Draw display driver capability (At 800 × 600 dot or less, 256 colours and less, this product will not operate correctly.)
Others:
This product is based on DirectX technology, so it is necessary to install DirectX.
The USB connector must be provided as standard.
You cannot use this function in the Macintosh environment.
PoncoeHHeHne BaWei BnDeoKamepbI K Baewemy KomnbIoTepy c nomoubIO Ka6eJI USB (ДлЯ пььзовateJe Windows)
PeKOMeHdEma KOMNbIOTePna OepaauonHaA Cpea npi IoDCoeDInHeHm Upe3 Ka6eB USB nIpocMOrpe Ha KOMbIOTepe H3O6paXeHm, 3aNtcaHHbIX Ha JeHTy
OC:
Tpe6yeTcAaHdapThaYcTaHObKa Microsoft Windows 98SE,Windows Me,Windows 2000 Professional,Windows XP Home Edition ninn Windows XP Professional.
OndaKo, BbIOpJIHHeNHe OePaCn He rapaHTnpyETc, ecJyka3aHHaB bIiSe KOHcHpyraCaII NOUyeHa B pe3yIbTaTe 6HOBJIeHn OC.
Ecni BaW KOMMbIOp Ta60TaET noJ ynpaBHeHem Windows 98, BbI He CMOKeTe npocnyuWBaTb 3ByK, HO CMOKeTe CHTbIBaTb HEnoDnXHbIe N3O6paXeHnI.
ZeHTpaJIbHbI npOceccop:
Pentium III 500 MΓu, uIn 6oJIe 6bIcTpbl (peKOMeHdyeTc8 800 MΓu uIn 6oJIe)
PnPKlaaHa nporpaMa:
DirectX 8.0a nii 6oJee no3dHnBepcn
Akyctnuecka cnTeMa:
16-6nTHa nCTepeofoHuecka 3ByKOBa KaPa n CTepeofoHueckne dHaMnKu
NamrB:
64 M6 u nn 60nee
KecTkniDnck:
Tpe6yembl dIy yCTaHOBKn Objem DoCTynHOn nAMrTI:
KAK MUNHIMYM, 200 M6
Pekomehnyembl obbem DocTyHNOI nAMrTn Ha JeCTKOM DnCKe:
KaK MInHmym, 1 Γ6 (B 3aBnCmOCTn OT pa3MepOB MOHTnpyembIX φaNIOB N3o6paJxHnI)
Ducnnei:
BndeokapTa 4 M6 VRAM, MNHmym 800 x 600 ToeK, High colour (16-6nTHbI yBeT, 65000 cBetOB), Hndnexkaun dpaiBep nCnpeR Direct Draw (npu 800× 600 nKcenei nn Meee, 256 cBetax n Meee, daHnoe ycTrooCTBO He 6ydet pa6oTaTb HaNExkaum o6pa3om.)
PpOuee:
Данhoeиздение OCHOвано Ha TeхнOLоги DirectX,пOTOMу Heo6xOДIMо yCTaHOBNTb DirectX.
Pazbem USBdoJxeh BxoDntb CtahdapTHyIO KOMIIeKTAuio.
BbI He MoKxTe NcNoJIb3ObA Tb 3Ty FyHKUIO B OnerpaunOHn CpeMacintosh.
Connecting your camcorder to your computer using the USB cable (For Windows users)
Recommended computer usage environment when connecting via USB cable and viewing the "Memory Stick" images on your computer
Recommended Windows environment OS:
Microsoft Windows 98, Windows 98SE,
Windows Me, Windows 2000 Professional, Windows XP Home Edition or Windows XP Professional
Standard installation is required.
However, operation is not assured if the above environment is an upgraded OS.
CPU:
MMX Pentium 200 MHz or faster
The USB connector must be provided as standard.
Windows Media Player must be installed (to play back moving pictures).
Notes
- Operations are not guaranteed for the Windows environment if you connect two or more USB equipment to a single computer at the same time, or when using a hub.
- Some equipment may not operate depending on the type of USB equipment that is used simultaneously.
- Operations are not guaranteed for all the recommended computer environments mentioned above.
- Windows and Windows Media are registered trademarks of Microsoft Corporation in the United States and/or other countries.
- Pentium is trademark or registered trademark of Intel Corporation.
- All other product names mentioned herein may be the trademarks or registered trademarks of their respective companies. Furthermore, "TM" and "®" are not mentioned in each case in this manual.
Installing the USB driver
Start the following operation without connecting the USB cable to your computer. Connect the USB cable according to "Making the computer recognise your camcorder".
If you are using Windows 2000 Professional, log in with permission of administrators. If you are using Windows XP, log in with permission of computer administrators.
(1) Turn on your computer and allow Windows to load.
(2) Insert the supplied CD-ROM in the CD-ROM drive of your computer. The application software starts up and the title screen appears.
(3) Move the cursor to "USB Driver" and click. This starts USB driver installation.
YcTaHOBka dpaBepa USB
HaunTe BbInOpHeHne CLeDyUoXn
DeiCTBn 6e3 NODcoEINHeHnra
Ka6eJr USB K BaWemy KomNbIOTepy.
PiDCoeHNHTe Ka6eJb USB
corlacho pa3dJeN "Kak DoBuTbcra,
TuO6bl KOMNbIOTep pacNo3HaBaJn
BnDeOKaMepy".
EcnBbncnoB3yeTe Windows 2000 Professional,BoJnte B cncTeMy c pa3peHn aDMNHcTpaTopoB.
EcN BblncnoB3yeTe Windows XP,BoJnte B cncTeMy c pa3peHn aDMNHcTpaTopoB KOMNbTOpea.
(4) Follow the on-screen messages to install the USB driver.
(5) Remove the CD-ROM and then restart the computer, in accordance with the instructions on the screen.
Note
If you connect the USB cable before USB driver installation is complete, the USB driver will not be properly registered. Carry out installation again in accordance with the steps on page 206.
(4)CneyuTe 3KpaHHbIM COo6eHnM dIy yctaHOBKn dpaaiBepa USB.
(5)ИЗБЛЕКИTe CD-ROM,a 3aTeM nepe3aIyCtIte KOMMbIOTep,B COOTBETCTBn C INHCTpyKUЯRm Ha 3KpaHe.
PpimueaHne
Installing Image Transfer
This function enables image data recorded on a "Memory Stick" to be automatically transferred (copied) to your computer.
If you are using Windows 2000 Professional, log in with permission of administrators.
If you are using Windows XP, log in with permission of computer administrators.
(1) Turn on your computer and allow Windows to load.
(2) Insert the supplied CD-ROM in the CD-ROM drive of your computer. The application software starts up and the title screen appears.
(3) Move the cursor to "Image Transfer" and click. This starts Image Transfer installation.
YcTaHOBka nporpaMMbI Image Transfer
3TaФункци NOЗВОЛЯТ 3aIncaHьIE Ha "Memory Stick"ДaHHbIe N3O6paXeHnA bTOMaTnueccknpepeDaBaTb (KoInpoBaTb)Ha BaW KOMNbIoTeP.
EcnBbncnoIb3yeTe Windows 2000 Professional,BoJnte BcntEmy c pa3peHnna aDMNHCTpaTOPOB.
EcN BblncnoIb3yeTe Windows XP,BoJnte BCNTEmy c pa3peHnna KOMNbIOTePbIX aDMNHCTpaTOPOB.
(1)ВключITE Baшперсоньнький ComlbHTepиdoхдntecb 3arpy3kn Windows.
(2)Установские пилараевский CD-ROM в Нakониеловский Baшero komьотера. Пюпоздатусяк пиложеняп рогамного обесень,在 повту с Кранс назваим.
(3) YctaHOBInTe KypCop Ha onuHIO "Image Transfer" n ⅢeKnHTe. 3To 3aynCTn nporpamMy yctaHOBKn Image Transfer.
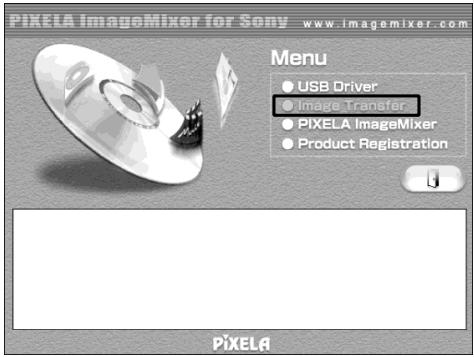
(4)Follow the on-screen messages to install Image Transfer.
(4) CneyuTe 3KpaHbIM COO6eHNm dIy yctahOBKn nporpamMb Image Transfer.
Connecting your camcorder to your computer using the USB cable (For Windows users)
Installing_PIXELA ImageMixer
Make sure USB driver installation is complete.
You need to install PILXELA ImageMixer to view images on your computer. Install it from the CD-ROM supplied with your camcorder.
To install and use this software in Windows 2000 Professional, you must be authorised as Power Users or administrators. For Windows XP, you must be authorised as administrators.
(1) Turn on your computer and allow Windows to load.
(2) Insert the supplied CD-ROM into the CD-ROM drive of your computer. The application software starts up and the title screen appears. If the title screen does not appear, double-click "My Computer" and then "ImageMixer" (CD-ROM Drive). The application software screen appears after a while.
(3) Move the cursor to "PIXELA ImageMixer" and click. The Install Wizard programme starts up and the "Select Settings Language" screen appears.
(4) Select the language for installation.
(5) Follow the on-screen messages. The installation screen disappears when installation is complete.
(6) If DirectX 8.0a or later is not installed on your computer, continue installation after installing ImageMixer.
Follow the on-screen messages to install DirectX 8.0a. After installation is complete, restart your computer.
Note
The title screen is not displayed if the screen size of your computer is set to less than 800 × 600 dots and 256 colours or less. See page 197 about the recommended computer environment.
PoncoeHHeHne BaWei BnDeoKamepbI K Baewemy KomnbIoTepy c nomoubIO Ka6eJI USB (ДлЯ пььзовateJe Windows)
YcTaHOBka nporpaMMbI_PIXELA ImageMixer
Y6eIntecbTOM,HTO yCTaHOBka IpaIbepa USB 3aBepseHa.
Длгпрсмотра Ha Baшем Komпьютешизбрахени Bam Heобхдиму yctановиnporрамнhoe obecneчени PILXELA ImageMixer. Yctановиerte eroc CD-ROM, npinlaraemoro K Baшй Виdeokampe.
Making the computer recognise your camcorder
Viewing images recorded on a tape
(1) Connect the AC power adaptor to your camcorder. Set the POWER switch to VCR.
(2) Select USB STREAM in to ON in the menu settings (p. 234).
(3) With the CD-ROM inserted, connect the (USB) jack on your camcorder to the USB connector on your computer using the supplied USB cable.
Your computer recognises your camcorder, and the Windows Add Hardware Wizard starts.
Kak do6ntbcra, cy06b1 KOMnbIOTepepacno3han Bauy Bndeokamepy
(4) Follow the on-screen messages so that the Add Hardware Wizard recognises that the USB drivers have been installed. The Add Hardware Wizard starts three times because three different USB drivers are installed. Be sure to allow the installation to complete without interrupting it.
For Windows 2000 Professional, Windows XP users:
(5) After the "Files Needed" screen appears. Open "Browse..." "My Computer" "ImageMixer" "Sonyhcb.sys", and click "OK."
(4)CneyuTe 3KpaHbIM COO6eHnIaM,B pe3yIbTaTe Yero MaTep yCTaHOBKn DOnONHtJIbHOro O6OpUdoBaHnI paCNo3Haet, YTO dpaiBepbl USB 6bln UcTaHOBJIeHb.I. MAcTe yCTaHOBKn DOnONHtJIbHOro O6OpUdoBaHnI 6yDet 3anyckaTbcra TpIXkDbI, NOTOMy YTO yCTaHOBJIeHo Tpr pa3NIuHbIX dpaiBepa USB.O63aTeJIbHO DoBeJIte yCTaHOBky do KOHca, He npepbIbae ee.
Connecting your camcorder to your computer using the USB cable (For Windows users)
Viewing images recorded on a "Memory Stick"
(1) Insert a "Memory Stick" into your camcorder.
(2) Connect the AC power adaptor and set the POWER switch to MEMORY.
(3) Connect the ^ (USB) jack on your camcorder to the USB connector on your computer using the supplied USB cable.
USB MODE appears on the LCD screen of your camcorder. Your computer recognises your camcorder, and the Add Hardware Wizard starts.
ПпocмотгИЗбрахжи,зaнcaHHbIX ha"Memory Stick
(1)Установâte "Memory Stick" в Башу Видаеокамер.
(2)ПоДсоeДиНTe cTeБоЯ aДaNTep nepeMeHnOrToKa,И yCTaHOBuTe nepeKIIuOHaTeNb POWER B nIoJoxeHne MEMORY.
(3) CoeHnTe rHe3do (USB) Bauei BnDeokamepbI c pa3bEmOM USB BaWero KOMNbIOTepa C nOMOBIO npNlaRaEMORo Ka6eNA USB. Ha 3KpaHe XKd Bauei BnDeokamepbI nOBITcNnDnKaunr USB MODE.BaW KOMNbIOTe pacNo3Haet BnDeokamepy, n 3aNyCTNTcMaCTep yctaHOBKn DOnONHnTEJbHOrO o6OpyDoBaHN.

(4) Follow the on-screen messages so that the Add Hardware Wizard recognises that the USB drivers have been installed. The Add Hardware Wizard starts two times because two different USB drivers are installed. Be sure to allow the installation to complete without interrupting it.
You cannot install the USB driver if a "Memory Stick" is not in your camcorder. Be sure to insert a "Memory Stick" into your camcorder before installing the USB driver.
(4)CneyuTe 3KpaHbIM COO6eHnM, B pe3yIbTaTe Yero MaCTep yCTaHOBKn DOnONHInTeJbHOrO O6OpUdoBaHn paCNo3Haet, YTO dpaBEBpI USB 6bln yCTaHOBJIeHb.I. MAcTepeYCTaHOBKn DOnONHInTeJbHOrO O6OpUdoBaHn 6yDet 3anyCKaTbcra DBaxDbI, NotOMy yTO yCTaHOBJIeHo DBA pa3NIuHbIX dpaBEBpa USB.O63aTeJbHo DoBeJeTpe yCTaHOBky do KOHcA, He npepbIba ee.
BbI He cMOxKeTe yCTaHOBnTb dpaiBep USB, ecIn "Memory Stick" He BcTaBnHeBaWu ByndeOKaMepy
ОьзATEьнOуCTaHOBuTe“Memory Stick"В BaшУВиDEOKaMepyпepeДуСТАнБКоДраиВерaUSB.
If you cannot install the USB driver
The USB driver has been registered incorrectly as your computer was connected to your camcorder before installation of the USB driver was completed. Perform the following procedure to correctly install the USB driver.
Viewing images recorded on a tape
Step 1: Uninstall the incorrect USB driver
① Turn on your computer and allow Windows to load.
② Connect the AC power adaptor, and set the POWER switch to VCR.
③ Connect the USB connector on your computer to the (USB) jack on your camcorder using the USB cable supplied with your camcorder.
④ Open your computer's "Device Manager".
Windows XP:
Select "Start" "Control Panel" "System"
"Hardware", and click the "Device
Manager" button.
If there is no "System" inside "Pick a
category" after clicking "Control Panel", click
"Switch to classic view" instead.
Windows 2000 Professional:
Select "My Computer" "Control Panel"
"System" "Hardware" tab, and click the
"Device Manager" button.
Windows 98SE/Windows Me:
Select "My Computer" "Control Panel"
"System", and click "Device Manager".
EcIbI He MoXeTe yCTaHOBnTb IpaBep USB
"PepeKJIIOUHTbCBy KJIaCCNUeCKN BnD".
Windows 2000 Professional:
BbIbeIpTe npHKT "MoK kOMnblOpTe"
"PaHEnb ynpaBneHnna" "CncTeMa"
3aKnlaKa "ObopydObaHne" nIeJIKNHTe no KhONKe "MeHeJxep yCTpoiCTB".
Windows 98SE/Windows Me:
BbI6epnte npHKT "MoN KOMnIbIOTep"
Connecting your camcorder to your computer using the USB cable (For Windows users)
⑤ Select and delete the underlined devices below.
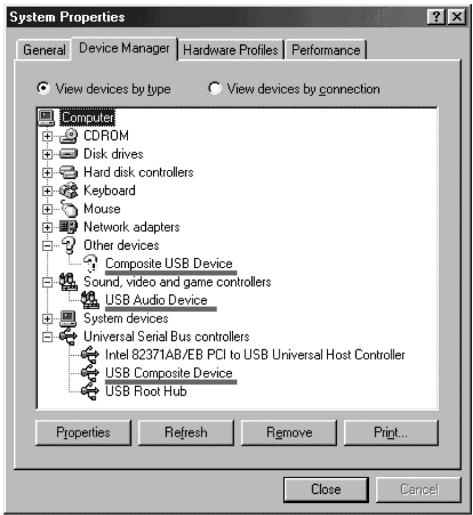
Windows 98SE
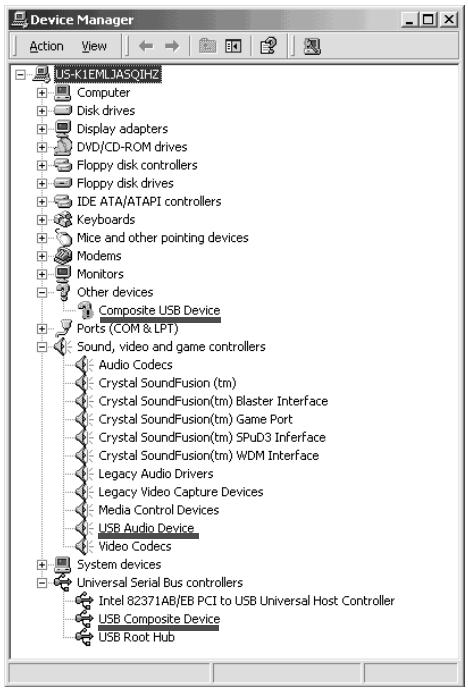
Windows 2000 Professional
PoncoeHHeHne BaWei BnDeoKamepbI K Baewemy KomnbIoTepy c nomoubIO Ka6eJI USB (ДлЯ пььзовateJe Windows)
⑤ BbIbePte n ydaJIte noUdEeKHyTbie HnJKe yCTpoiCTBa.

Windows Me
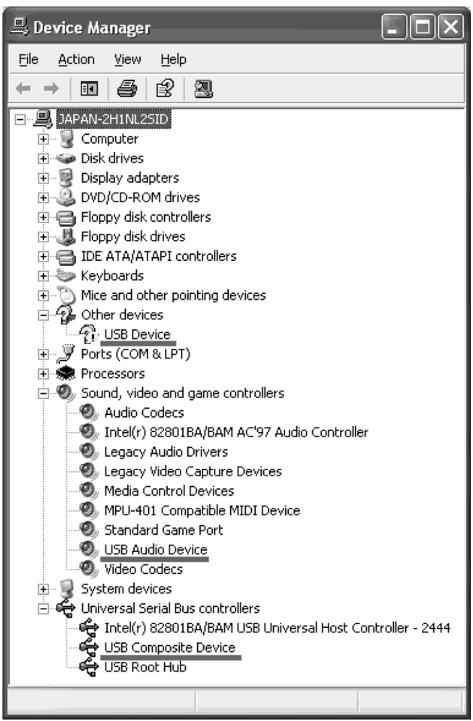
Windows XP
Connecting your camcorder to your computer using the USB cable (For Windows users)
⑥ Turn the POWER switch to (CHG) OFF on your camcorder, and then disconnect the USB cable.
⑦ Restart your computer.
Step 2: Install the USB driver on the supplied CD-ROM
Perform the entire procedure described in "Installing the USB driver" on page 201.
Viewing images recorded on a "Memory Stick"
Step 1: Uninstall the incorrect USB driver
① Turn on your computer and allow Windows to load.
② Insert a "Memory Stick" into your camcorder.
③ Connect the AC power adaptor, and set the POWER switch to MEMORY.
④ Connect the USB connector on your computer to the (USB) jack on your camcorder using the USB cable supplied with your camcorder.
⑤ Open your computer's "Device Manager".
Windows 2000 Professional:
Select "My Computer" "Control Panel" "System" "Hardware", and click the "Device Manager" button.
Other OS:
Select "My Computer" "Control Panel" "System", and click "Device Manager".
⑥ Select "Other devices".
Select the device prefixed with the "?" mark and delete.
Ex: (?)Sony Handycam
⑦ Turn the POWER switch to (CHG) OFF on your camcorder, and then disconnect the USB cable.
⑧ Restart your computer.
Step 2: Install the USB driver on the supplied CD-ROM
Perform the entire procedure described in "Installing the USB driver" on page 201.
BbIOnHnTe NoJIHoCTbI OpoeDpy, OINcaHHyU B pa3dene "YcTaHOBka IpaIbepa USB" Ha cTp. 201.
ПрсмOTиЗбрахен,зАпсаHHbIX Нa "Memory Stick"
Viewing images recorded on a tape on your computer - USB Streaming (For Windows users)
Capturing images with "PIXELA ImageMixer Ver.1.0 for Sony"
You need to install the USB driver and PILXELA ImageMixer to view images recorded on a tape on your computer (p. 201, 203).
Viewing images recorded on a tape
(1) Turn on your computer and allow Windows to load.
(2) Connect the AC power adaptor, and insert a cassette into your camcorder.
(3) Set the POWER switch to VCR on your camcorder. Select USB STREAM in to ON in the menu settings (p. 234).
(4) Select "Start" "Programs" "PIXELA" "ImageMixer" "PIXELA ImageMixer Ver.1.0 for Sony". The "PIXELA ImageMixer Ver.1.0 for Sony" startup screen appears on your computer. The title screen appears.
(5) Click on the screen.
3axBaT n3o6paXeHn C pOMOsbIO nporpamMHorO oBecneueHn "PIXELA ImageMixer Ver.1.0 for Sony"
ДлгпорсмOTраиЗОБрахжEH,3апсанньхHaJIeHTy,HaBaшЕМКOMПьЮтpe,BaMHeOбxODIMO yCTaHOBITb ДраВер USBи nporpaMMHoe obecneueHne PXELA ImageMixer(cTp.201,203).
ПрсмOTР n3o6paXeHn, 3aIncAHbIX NaJIeHTy
(1)ВключITE Baш nepcoHaJIbHbI KOMMbOTep ndoKdntecb 3arpy3kn Windows.
(2)ПодсоeДинITE сeTeВОй aДanTepepeMeHnOro TOKa,И yCTaHOBnTe KAcCETyВBaSu BnDeokamepy.
(3) YcTaHOBnTe nepeKNIuOaTeIb POWER Ha BaSei BnDEOkampe B nIoXeHne VCR. YcTaHOBnTe onuHo USB STREAM B yCtAHOBkax MeHb B nIoXeHne ON (ctp. 242).
(4)Bb6epnte npHKT "PycK" "PporpamMbI" "PIXELA" "ImageMixer" "PIXELA ImageMixer Ver.1.0 for Sony". Ha 3kpane BaJero KOMnbIOTepa NOABNTcnaaJIbHbI 3KpAH "PIXELA ImageMixer Ver.1.0 for Sony". IOnABNTcraIaBHyI 3KpAH pOporpAMbl.
(5) ΜιεπΚΗΝΙΕ ΠΟ πικΤΟΡΑΜΜΕ ἀς ὅλης ἀντας ἀντας ἀντας ἀντας ἀντας ἀντας ἀντας ἀντας ἀντας ἀντας ἀντας ἀντας ἀντας ἀντας ἀντας


(6) Click

(6)LeKHNTe IIO NIKTORpamme
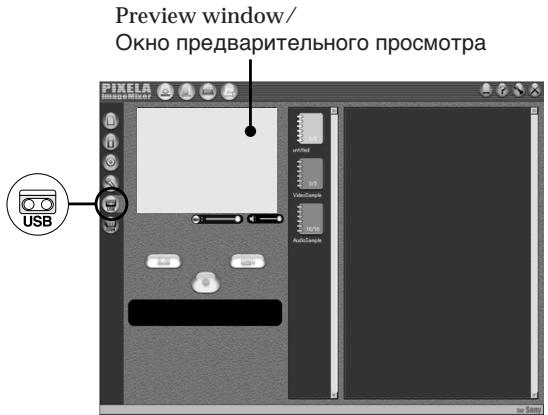
(7) Connect the (USB) jack on your camcorder to the USB connector on your computer using the supplied USB cable.
(7) CoeHInTe rHe3do (USB) BaWei BnDeOkamepbI c pa3bEmOM USB BaWero KOMNbIOTepa C nOMOBIO npUnaraEMoro Ka6eIa USB.
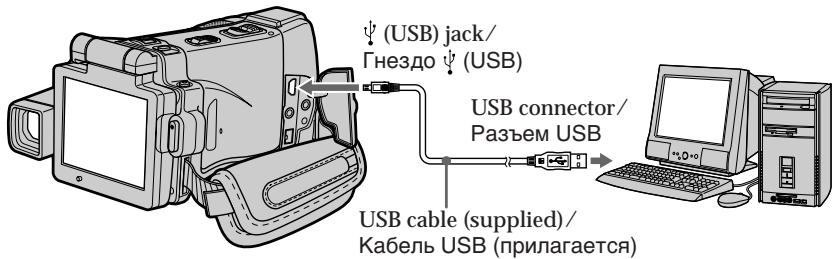
(8) Press >11 on the LCD screen to start playback.
The picture from the tape appears on preview window on your computer.
(8)HaxMMTe KhoNkU Ha 3KpaHe XXD nla Hauana BocnpOn3BeDeHnI.
I306paXeHHe C IeHTbIOIPOBNTcB OKHe npEdbapntelbHOro IpocMOTpa Ha 3KpaHe BaWero KOMNbIoTepa.
Viewing images recorded on a tape on your computer - USB Streaming (For Windows users)
Viewing pictures live from your camcorder
(1) Follow the steps 1, 2 on page 209.
(2) Set the POWER switch to CAMERA. Select USB STREAM in to ON in the menu settings (p. 234).
(3) Follow the steps 4 to 7 on pages 209, 210. The picture from your camcorder appears on the preview window on your computer.
PpocMToP KINBbIX N3O6paXeHn C Bauei Bndeokamepbl
(1)CneIyIe TeIeIcTBnM IyHKTOB 1,2 Ha cTp.209.
(2) YcTaHOBnTe nepeKJIIOuChaTeIb POWER B noJoxeHne CAMERA. YcTaHOBnTe onUIO USB STREAM B B ycTaHOBkax MeHIO B noJoxeHne ON (ctp. 242).
(3)CneIyIeIeCTBnMpyHKTOBc4no7Ha cTp.209,210. Ⅲo6paXeHHe C BaWei BnDEOkAmepbI nOBAITcB OKHe IpeBaPnteJbHoro npocMOrPaHa3kPaHeBaWero KOMNbIoTepa.
Capturing still images
3axBaT HeNoDvBxHbIX N3o6paKeHn
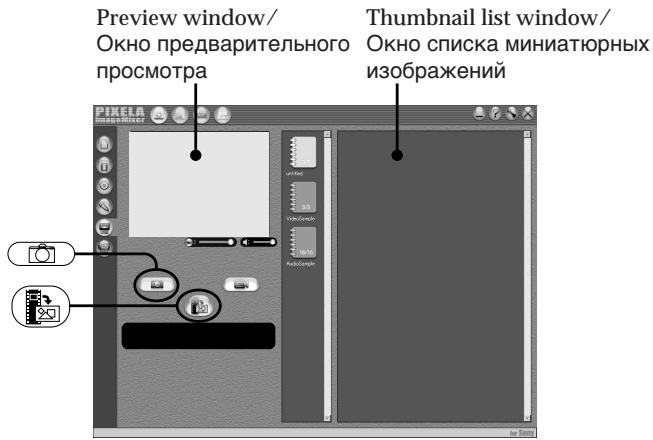
(1) Click
(2) Looking at the preview window, move the cursor to and click it at the point you want to capture.
The still image on the screen is captured. Captured images are displayed in the thumbnail list window.
(1)UeJKNHnTe no NIKTOrpamMe
(2)ГлдьВОКНпрДВарNTeьногor npocMOTpa,пермecTne Kypcop K nKToRpAMMe и ueJIKNITE NO HeB TOM MeCTe,КOTOpOE BbXOTNe 3axBaTnTB. HenoDbVxHoe n3obpaJehne Ha 3kpaHe 6yDet 3axBaUeHo. 3axBaueHbIe n3obpaJehne 6byT OTObpaJaTcB aOKHe cNcKa MmHaTOpHbIX n3obpaJehn.
Capturing moving pictures
3axBaT DnBxkyuxxCn3o6paXeHn
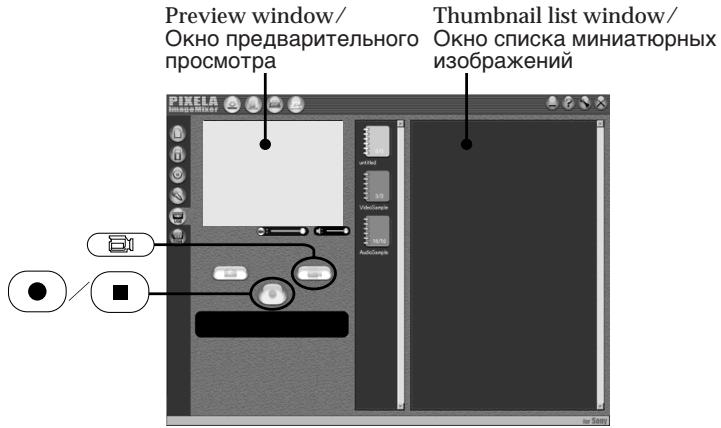
(1) Click 回 .
(2) Looking at the preview window, click at the first scene of the movie you want to capture. changes to .
(3) Looking at the preview window, click at the last scene you want to capture. The moving picture is captured. The captured images appear in the thumbnail list window.
Notes
- When you view images on your computer with the USB connection, the following may occur. This is not a malfunction.
- The image shakes up and down.
- Some images are not displayed correctly due to noise, etc.
Images of different colour systems to that of your camcorder are not displayed correctly. - When your camcorder is in the standby mode with a cassette inserted, it turns off automatically after five minutes.
- We recommend setting DEMO MODE to OFF in the menu settings when your camcorder is in the standby mode, and no cassette is inserted.
- Indicators in your camcorder LCD screen do not appear on images that are captured into your computer.
- If you capture a fast moving picture, the preview window may not move smoothly. You can make the picture move more smoothly by shifting the slider on the bottom of the preview window to the left, although this reduces the picture quality.
(1) Μεικηνιτε πούπικτοργαμΜε
(2)ГлдьВОКHOпрДВарИТелБНОРOCMOTpa,単ЕнКНITE ПОПИКТOrpAMMEHa nepBOM3ПИЗODEФИЛьмA,KOTOpыиВыхOTITE3aXBaTNTb.ИнДИКАцИЯ CMeHITcR ИнДИКАцИeN
(3)ΓIJIaB OOKHO pIeDbapHTeJbHOro npOCMOTpa, ⅢeIKHnTe IIO NIKTORpAMME Ha nocJeDHEm 3NIN3Ode,KOTOpBb Bbl XOTNe 3axBaTNTb. DInKxUeecra N3O6paXeHne 6yDet BBeDeHo. 3axBaueHHble N3O6paXeHnna N0AByTcB B OKHe Cnicka MInHaTOpHbIX N3O6paXeHn.
Приимейсаня
Пи npocmTope n36paXeHn Ha 3KpaHe BaUero KOMbToTepe YcePe3 CoeMHeHne USB MOryT pOnCxOJntb CLeJeYIOuNe RaBLeHn.3To He RAJIReTcR HeNCnPraBHOCTbIO.
-Изобрахженидергаert CBepxиВнз.
-HeKoTOpbIe N3O6paXeHnI He OTo6paXaIoTcKoppeKTHO BCJeDCTBVe NOMEx, I.T.I.
-Избржehн,Злсаимьи CBETOBbIX CnCTeMax, He COOTBeTCTByIOxN Baшен BUNDEOKaMepe, He OTOBpaKaOTcN KOPKEKTHO.
EcnB BaaBa BnDeoKaMePA haoDITCB Pexnme OxkDaHnC BoCTaBnEHNO KacTeON BHYTpO, OHa ABOTMATHECKN OTKJIIOUHTC NcyTBA NTb MMHTy.
- PekomehnyeTc yctahOBnTb ONUHIO DEMO MODE BY cTaTHOBkax MeHO B NOLOXHeN EOff, KOrda BaVa BnIeOKaMepa HaxoDnTcB pexmE OxNiDaHH, IN B Hee N BCTaBnHa KACCteT.
ИнданаТорьи на захаре XXД Ваши BИДЕОКAMЕРБI He NOВВЛАЙСТЯ ИЗБФАСЕНХ, XIIIBAчAEHнь в Баш кOMMbHTep.
- Ecni Bbl BblonHReTe cBemky 6bIcTpo
DInBxuyueOra n3o6paXeHHa, npdeBlyuee
OKHO MOKET He nepemeeaTaBc pIIaBHO. Bbl
MOXETe CDEJaTb TaK, YTO npdeBlyuee OKHO
6ydet npemeeaTaBc 60Jee pIIaBHO,
pepeBNYbN PON3yHOB K HIXHIOUacTb
npdeBlyuye OKHa BBeBO, XOTA 3TO npINBeDet
K yxyduhenHIO kauceCTBa n3o6paXeHHa.
Viewing images recorded on a tape on your computer - USB Streaming (For Windows users)
If image data cannot be transferred by the USB connection
The USB driver has been registered incorrectly as your computer was connected to your camcorder before installation of the USB driver was completed. Reinstall the USB driver following the procedure on page 206.
If any trouble occurs
Close all running applications, then restart your computer.
Carry out the following operations after quitting the application:
- Disconnect the USB cable.
- Change the POWER switch to the other position or set the POWER switch to (CHG) OFF on your camcorder.
When operating the following functions, they do not function for the image to be output, or the image cannot be output
Super NightShot
Colour Slow Shutter
- Digital effect
-PB ZOOM
-MEMORYMIX
EcIn DaHHbe H3O6paXeHn He MOryT 6bItb nepeDaHbI Chee3 CoeDInHeHne USB
Viewing images recorded on a tape on your computer - USB Streaming (For Windows users)
Seeing the on-line help (operating instructions) of "PIXELA ImageMixer Ver.1.0 for Sony"
A "PIXELA ImageMixer Ver.1.0 for Sony" on-line help site is available where you can find the detailed operating method of "PIXELA ImageMixer Ver.1.0 for Sony".
(1) Click located in the upper-right corner of the screen. The ImageMixer's Manual screen appears.
(2) You can find the information you need from the list of contents.
To close on-line help
Click at the top right of the screen.
If you have any questions about "PIXELA ImageMixer Ver.1.0 for Sony"
"ImageMixer Ver.1.0 for Sony" is a trademark of PILIXELA corporation. For more information, refer to the operating instructions of the CD-ROM supplied with your camcorder.
Note on using your computer
Communications with your computer
Communications between your camcorder and your computer may not recover after recovering from Suspend, Resume, or Sleep.
Viewing images recorded on a "Memory Stick" on your computer (For Windows users)
ПюсмOTР ИЗOB PaxжENи,ЗАпSCaHHbIX Ha "Memory Stick",Ha BaшeM KOMnBIOtepe (ДЯ пьзOBaTeNei Windows)
The image data recorded on a "Memory Stick" is automatically transferred (copied) to your computer with Image Transfer. You can view images with PILXELA ImageMixer.
(1) Turn on your computer and allow Windows to load.
(2) Insert a "Memory Stick" into your camcorder, and connect the AC power adaptor to you camcorder.
(3) Set the POWER switch to MEMORY.
(4) Connect the (USB) jack on your camcorder to the USB connector on your computer using the supplied USB cable.
(5) Image Transfer automatically starts up and the transfer of image data begins.
(6) ImageMixer automatically starts up, enabling you to view the copied image.


(6) ABOTMATNueCk3aNYCTNTcR npOrpamMa ImageMixer, no30BnAIOUaB Bam npOcMaTpNbBaTb ckOnIPOBAHbIe N3o6PaxEHH.
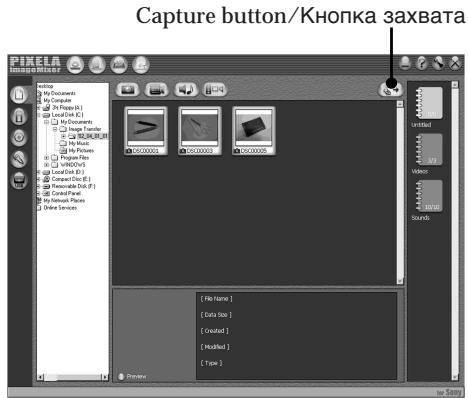
(7) Select an album and the image, then press the capture button. The image is added in your album, and you can edit the image.
Viewing images recorded on a "Memory Stick" on your computer (For Windows users)
Viewing images without Image Transter
Before operation
An application such as Windows Media Player must be installed to play back moving pictures in Windows environment.
(1) Turn on your computer and allow Windows to load.
(2) Insert a "Memory Stick" into your camcorder, and connect the AC power adaptor to your camcorder.
(3) Set the POWER switch to MEMORY.
(4) Connect the (USB) jack on your camcorder to the USB connector on your computer using the supplied USB cable. USB MODE appears on the LCD screen of your camcorder.
ПрсмоТР ИЗОБрахени, 3апиcaHHbIX Ha "Memory Stick", Ha Baшем KMньЮтepe (ДЯ польбовateел Windows)
PpocmTo p3o6paXeHn 6e3 PpeDaun 3o6paXeHn
Ipeed BbinoJHHeHem Otnepaun
Дявocmpon3BedeHЯДВИЖуuxcra
I3O6paXeHn B OpeaunOHoi cpeDe Windows
doJxHO 6bITb yCTaHOBJIeHO npINOxKeHne,
Takoe, kak Windows Media Player.
(5) Open "My Computer" on Windows and double-click the newly recognised drive (Example: "Removable Disk (E):"). The folders inside the "Memory Stick" are displayed.
(5)ОткpoиTe B cpeJe Windows "MoJ KOMMbIoTeP"ИДвЖдbl ueKNHITe NO BVOBb paCNo3HaHHOMy hakOnIteJIIO (ПрIMeP: "CbeMHbI dIck (E:)"). OTo6pa3rTcЯпКи, coDEprKaUneCЯ Ha "Memory Stick".
Viewing images recorded on a "Memory Stick" on your computer (For Windows users)
(6) Select and double-click the desired image file from the folder. For the detailed folder and file name, see "Image file storage destinations and image files."
(6)BbIepeHteN DBaXDbI ueKHNte NO paIy Hny HxHoro n3o6paJxehn I3 npKn. Ipy noDpOboHO OINCAHn Ha3BaHn npOK n paIyOB oBaIaITeCb K pa3dEny "Mecta xpaHeHn paIyOB n3o6paJxehn I paIyI bI n3o6paJxehn".
| Desired file type/ Нужный{Tи phайla} | Double-click in this order/ Двийною сelinesь{Tаков поядке} |
| Still image/Moving picture*/Helenobvwxhnoe n3обрахениe/ Движшемся n3обрахениe* | "DCIM" folder → "100MSDCF" folder → Image file/ Палka "DCIM" → Палka "100MSDCF" → Файл n3обрахения |
-
Copying a file to the hard disk of your computer before viewing it is recommended. If you play back the file directly from the "Memory Stick," the image and sound may break off.
-
Pekomehyetcnapei npocmptom ckonnpoBaTb faaIHa JxecTkni Dnck Baawero nepcoHahBHO KOMNbHTepa. EcIn Bbl 6ydtE BOCPON3BOIDtB faaI npraMo c "Memory Stick", n3obpaXeHne i 3Byk MOryt BHe3aHNO o6pbBaTcb.
Image file storage destinations and image files
Image files recorded with your camcorder are grouped in folders by recording mode. The meanings of the file names are as follows. stands for any number within the range from 0001 to 9999.
For Windows Me users (The drive recognising your camcorder is [E:].)
MecTa xpaHeHЯ φaIIOB n3o6paxKeHn I φaJIbI n3o6paxKeHn
Фаилbln306paхжн,Запсанhhьс c nOmoшьВашевидевokamepbl, crpypnpobahbВ пankno pexkmy 3annci.3naeHnIMeHфaINoB TaKOBbl.□□□□ 6o63NaHaet JIO6oe YncNo B dInaNa3OHeOT 0001do9999.
Длг польбизовател Windows Me (Yc tropoicbOM, pacno3naiozum Baу Bndeokamepy, nBJIaTeCn [E:])
![SONY DCR-IP220E - Длг польбизовател Windows Me (Yc tropoicbOM, pacno3naiozum Baу Bndeokamepy, nBJIaTeCn [E:]) - 1](/content/2020/04/48645/images/8735074e17d68b6beffd145f0afe93e8c5130a0e2b42fe45eeeedfe02dc3f1a0.jpg)
Folder containing still image and moving picture data/
Палкa, сорпацая даньie HeNoDvnxHbIX
иЗБрахени nДВИХуцхсЯнЗБрахени
Viewing images recorded on a "Memory Stick" on your computer (For Windows users)
Disconnect the USB cable and remove the "Memory Stick" or set the POWER switch to (CHG) OFF
-For Windows 2000 Professional,Windows Me,Windows XP users
(1)Move the cursor to the "Unplug or Eject Hardware" icon on the Task Tray and click to cancel the applicable drive.
(2) After the "Safe to remove" message appears, disconnect the USB cable and remove the "Memory Stick" or set the POWER switch to (CHG) OFF.
Connecting your camcorder to your computer using the USB cable (For Macintosh users)
When connecting to a computer via the USB jack
You must install a USB driver onto your computer in order to connect your camcorder to the computer's USB connector. The USB driver can be found on the CD-ROM supplied, along with the application software required for viewing images.
Recommended Macintosh environment
Mac OS 8.5.1/8.6/9.0/9.1/9.2 or Mac OS X
(v10.0/v10.1) standard installation is required.
However, note that the update to Mac OS 9.0/9.1 should be used for the following models.
- iMac with the Mac OS 8.6 standard installation and a slot loading type CD-ROM drive
- iBook or Power Mac G4 with the Mac OS 8.6 standard installation
The USB connector must be provided as standard.
QuickTime 3.0 or newer must be installed (to play back moving pictures).
Notes
- Operations are not guaranteed for the Macintosh environment if you connect two or more USB equipment to a single computer at the same time, or when using a hub.
- Some equipment may not operate depending on the type of USB equipment that is used simultaneously.
- Operations are not guaranteed for all the recommended computer environments mentioned above.
- Macintosh and Mac OS, QuickTime are trademarks of Apple Computer Inc.
- All other product names mentioned herein may be the trademarks or registered trademarks of their respective companies. Furthermore, "TM" and "®" are not mentioned in each case in this manual.
Installing the USB driver
Do not connect the USB cable to your computer before installation of the USB driver is completed.
For Mac OS 8.5.1/8.6/9.0 users
(1) Turn on your computer and allow the Mac OS to load.
(2) Insert the supplied CD-ROM in the CD-ROM drive of your computer. The application software screen appears.
YctaHOBka dpaBepa USB
He noDCoeHnHnTe Ka6eJb USB K BaWemy KomNbIOTepy do 3aBepWeHn yCTaHOBKn dpaBepa USB.
(3) Click the "USB Driver" to open the folder containing the six files related to "Driver."
Connecting your camcorder to your computer using the USB cable (For Macintosh users)
(4) Select the following two files, and drag and drop them into the System Folder.
- Sony Camcorder USB Driver
- Sony Camcorder USB Shim
(5) When the message appears, click "OK."
The USB driver is installed on your computer.
(6) Remove the CD-ROM from the computer.
(7) Restart your computer.
For Mac OS 9.1/9.2/Mac OS X (v10.0/v10.1)
The USB driver need not be installed. Your camcorder is automatically recognised as a drive just by connecting your Mac using the USB cable.
PoiocoeHHeHne BaWei BnDeoKamepbI K Baewemy KomnbIoTepy c nOmoobko6eJI USB (DnIy noIb30BaTeJei Macintosh)
(4)BbIbePnte CNeDyUOuNe DaBa paJna n nepetatauTe uOnyCTnTe INx B CnCTemHyIO npKky.
- Sony Camcorder USB Driver
- Sony Camcorder USB Shim
(5)KorДа noRbntc coo6eHne, ueIKNHTe no KhoNKe "OK".
Viewing images recorded on a "Memory Stick" on your computer (For Macintosh users)
ПрсмOTР ИЗБрахени,ЗАпSCаHHbIX Ha "Memory Stick",н Вашем KomпьЮтepe (ДЯ пьзOBaTeNei Macintosh)
Viewing images
Before operation
You need to install the USB driver to view the "Memory Stick" images on your computer (p. 201).
QuickTime 3.0 or newer must be installed to play back moving pictures.
(1) Turn on your computer and allow Mac OS to load.
(2) Insert a "Memory Stick" into your camcorder, and connect the AC power adaptor to your camcorder.
(3) Set the POWER switch to MEMORY.
(4) Connect the (USB) jack on your camcorder to the USB connector on your computer using the supplied USB cable. USB MODE appears on the LCD screen of your camcorder.
(5) Double-click the "Memory Stick" icon on the desktop. The folders inside the "Memory Stick" are displayed.
(6) Select and double-click the desired image file from the folder.
PpocmToP u3o6paXeHn
Ipeed BbINOJIHeHHeM OIepaun
YTo6bl npocmatpmbaTn3o6paXeHnra "Memory Stick"Ha 3kpahe BaWero KOMnbIOTepa,Bam HynKHO yCTaHOBnTB dpaBep USB (cTp.201). IInBa BOCnpOn3BeDeHnRA DvNkUxnxCn I3o6paXeHnI DoJXKeH 6bITb yCTaHOBnEe QuickTime 3.0 nII 6Olee HOBaB aBpcn.
(1)Включite Baш персоньній komпьOTepи дождntecь загузк Mac OS.
(2)Установские "Memory Stick" в Башу Видаеокамеру, поcodoeinihteк Ваши Видаеокамере сетевой дадпетерпераMuHoroToka.
(3)Установпейразковая сь POWER в положене MEMORY.
(4) CoeDInHnTe rHe3do (USB) BaSei BnDeOKaMepbI c pa3bEmOM USB BaWero KOMNbIOTepa C nOMOCbIO npINarAemoro Ka6eIy USB. Ha 3KpAnE JKKD BaSei BnDeOKaMepbI nOBuTcN HnDnKaUIN USB MODE.
(5)ДвждьиелкнITE no NIKTORpamme "Memory Stick"Ha pa6ooyem cTone. OTo6pa3aTcH naKn BHyTpN "Memory Stick".
(6)BbIepeHte n DBaXkbI ueKHNte no paIny HxKHO n3O6paXeHn I3 npKn.
- Copying a file to the hard disk of your computer before viewing it is recommended. If you play back the file directly from the "Memory Stick," the image and sound may break off.
- Pekomehyetcnapei npocmptom ckonnpoBaTb faaIHa JxecTkni Dnck Baawero nepcoHahBHOKOMNbHTepa. EcIn Bbl 6yndeBOcPOn3BOOHTb faaI npraMo c "Memory Stick", n3obpaXeHne n 3Byk MOryt BHe3anHo o6pbBaTcb.
Viewing images recorded on a "Memory Stick" on your computer (For Macintosh users)
Disconnect the USB cable and remove the "Memory Stick" or set the POWER switch to (CHG) OFF
(1) Close all running applications.
Make sure that the "Memory Stick" access lamp of your camcorder is not lit.
(2) Drag the "Memory Stick" icon into the "Trash". Alternatively, select the "Memory Stick" icon by clicking on it, and then select "Eject disk" from the "Special" menu at the top left of the screen.
(3) Disconnect the USB cable and remove the "Memory Stick" or set the POWER switch to (CHG) OFF.
For Mac OS X (v10.0) users
Shut down your computer, then disconnect the USB cable and remove the "Memory Stick" or set the POWER switch to (CHG) OFF.
ПрсмоТР ИЗОБрахени, 3аИнcaHHbIX Ha "Memory Stick", Ha Baшем КOMпьЮтetime (Дя польбовате Л Macintosh)
OTcoeHnHTe Ka6eJIb USB nI3BLeKInTe "Memory Stick", nIynycTaHOBnTe nepeKlIoUaTeJIb POWER B noJIoXeHne (CHG) OFF
(1)3akpoTe Bce DeiCtBvUOJIne npIIOJKeHnYbEduTecb, yTo IaMna DoCTyNa JKeCTKOro "Memory Stick" BaSeu BInDeOKaMePbI He rOpNT.
(2)Переташипгу "Memory Stick" И OTиустпe ee hab "Kopзион". ИИ N BыДeлNTe ПИКТ罗рмMy "Memory Stick" OДинарьIM UeIчКOM Ha Hei, a 3aTeM BыБерпTe KOMaHdY "Eject disk" В MeHIO "Special"В Левом ВерхHam yrgly ekpaHa.
(3)ОтwoeДинITE Ka6eJIb USBиИЗВЛЕКИТe "Memory Stick",иИиуСТановITE nepeклЮчateЛь POWERВположене (CHG) OFF.
Accessing the network
You can access the Internet using a Bluetooth equipped device that is complied to your camcorder. Once the access is made, you can view a Web page, send/receive your e-mail, etc. This section describes only how to open the Network Menu.
(1) Set the POWER switch to MEMORY/ NETWORK.
(2) Press NETWORK. Network Menu appears.
For the details, refer to the Network Function Operating Instructions supplied with your camcorder.
-ToIbKO MoIeJIb DCR-IP220E
BbMoKTe NOnUyatb DoCTyn B INHTepHcT c NMOOuYcTPOrCtBA, NOdEePXBaUoZero
fHyKnUIO Bluetho, CoMBeMtOMuro C BaWei
BnDEOkAmePo. IocNe NOnUyHeNIO DoCTyna Bbl MoKTe PnOCMaTpNbATb Be6-CTpaHnCbI,
NoCbIaNb/npINHMAtb BaAn 3JeKtpOHnbIE COo6UeHN, n T.I.
B DaHHom pa3dene OInCbBaEtc TOnbKO
CnOCoB oTKpbITnC eTeBOrO MeHO.
(1)Установские поедима touchь POWER в положене MEMORY/NETWORK.
(2)HaXMMTe KHOINky NETWORK. IIOBNTCA CETEBOE MEHIO.
IopobhBie CBeDeHnnpBBeHbIB HNCTpyKunx no nCnoJb3ObaHnIO cTeBOI cyHKun, npInaraembIX K BaWe Bndeokamepe.
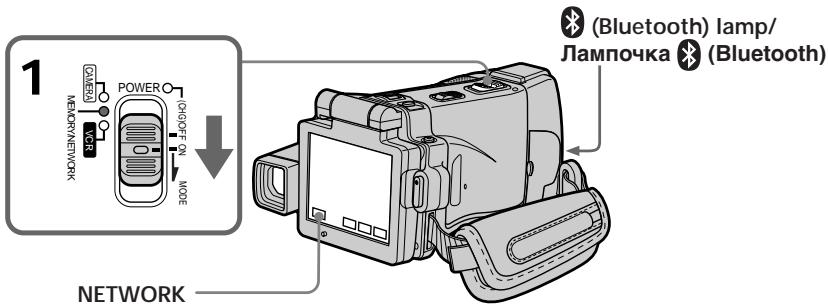
On trademarks
- The Bluetooth trademarks are owned by their proprietor and used by Sony Corporation under license.
- All other product names mentioned herein may be the trademarks or registered trademarks of their respective companies. Furthermore, "TM" and "®" are not mentioned in each case in this manual.
About (Bluetooth) lamp
The blue lamp lights up when your camcorder is exchanging data with a device which has Bluetooth function.
Notes
- Make sure that your camcorder is in the standby mode with the POWER switch set to MEMORY/NETWORK.
- Do not remove the power source while operating the network functions or your NETWORK mode settings may be erased. Also, close NETWORK mode before you turn the POWER switch to (CHG) OFF or change the mode.
OToprobbixMapkax
Toprobble Mapkn Bluetooth ABJIAOTc Co6CTBEHNOCTbIO XN BnAedJIbua, INCNoJIb3yOITcKOpnpauee Sony Corporation CORNAHO JIUEH3NI.
Bce npyrHe Ha3BaHnI N3dJIIn, yONMHaembIe 3Decb, MOrYT RbJIaTbcr TOpROBbIMn MapKaMn IIN 3apeIcTprPOBaHHbIMN TOpROBbIMn MapKaMn IN COoTBcETCTByIOxN KOMNaHm. B DaJIbHeJWeM, 3HaKn "TM" n "⑧" He yONMHaOTcB K KaJDom CNYae B DaHHom pyKOBOdCTBe.
O JIaMnOuKe Bluetooth
Ecni Bawa Bndeokamepa 6ydet O6meHnBaTbC4 daHHbIMc C yCTpoiCTBOM, B KOTOpOM HmEeTc4 fynkUa Bluetooth, To 6ydet BbICBeHnBaTc4 roNybaI lamnOuka.
PpimueaHn
- Y6eДиТecь,ЧTo BaаBa ВиДеОКамер
нхДИNTСВ ржIMe OЖиДАн,在
пөрКлЮчател POWER yCtAHOBЛен в
пложене MEMORY/NETWORK.
He OTOeINHnIte NCTOCHN KNTAHN BO BVPemra pabotb CeTebbIX yHKnLIM, HNaYe ycTaHOBKn peXmNA NETWORK MOrYt 6bITb CTepTb. TaKxke, 3aBepuNTe peXmNETWORK Do TOrO, KaB Bi nOBepHeTe nepeKIOuATeNB POWER B noLoXeHne (CHG) OFF nn INImMeHNTE peXm.
How to hold your camcorder when operating in NETWORK mode
When operating the network functions, put your camcorder in a stable place and adjust the LCD panel to the best viewing angle.
The operation buttons needed in NETWORK mode are displayed on the LCD screen. Press the buttons with the supplied stylus.
Put it back in the holder on the grip belt. Insert it until it clicks as shown below.
Pocne nCnoJIb3OBaHnI nepa
Пложи-te erо obpaTHoВфутларHa péMHeДЯ 3axbata.BCTaBte erOdoTex,poKa He pa3dactcIeIeHOK,Kak noka3aHoHa pucyHKe HIXke.
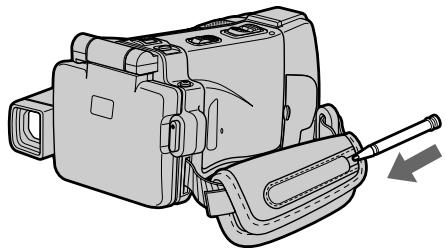
Note
While operating the network functions
- Press the buttons lightly with your finger or the supplied stylus supporting the back of the LCD panel.
- Do not cover the part shown in the illustration or radio waves may be blocked.
PpimueaHne
BoBpempa60bIcTeBbIXyHKcH
-HaKImaIte CnIeKa KHOIIc NOMOuBbBaUero nalbaIa IIN npIJIraEMO repa, noIdepXINBAI 3aIHOIO CTOpOHy naHEnI XKII.
-He 3akpbIbaiTe YacTb, NOKa3aHHyU Ha pncyuHke, INaue paJIOBOJIHbI MOrY T 6bITb 6JOKnPOBaHbl.
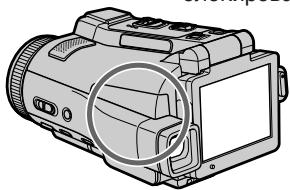
Changing the menu settings
To change the mode settings in the menu settings, press / to select the menu items. The default settings can be partially changed. First, select the icon, then the menu item and the mode.
(1) Set the POWER switch to CAMERA, MEMORY/NETWORK (DCR-IP220E only), MEMORY (DCR-IP210E only) or VCR.
(2) Press FN to display PAGE1.
(3) Press MENU to display the menu.
(4) Press / to select a desired icon, then press EXEC.
(5) Press / to select a desired item, then press EXEC.
(6) Press / to select a desired setting, then press EXEC.
(7) Repeat steps from 4 to 6 if you want to change other items. Press RET. to return to step 4.
For details, see "Selecting the mode setting of each item" (p. 228).
BbINOJIHeHne HnDnBnDyAaNbHbIx yCTaHOBOK Ha BaWei BnDeokamepe —
Изменистановок мени
ДлгиИЗмeнeну cYtaHOBOK peЖIMaВ yCTaHOBkax MeHIO hAKmMaIte KHOKNI Длг BbIbopaОПцИМeHIO.YcTAHOBKINo yMOJUHaHIO MOxH OuaTChO Hn3MeHITb.ChaJaI bIbepnte IINKTOrpaMMy, 3aTeM ONUHIO MeHIO, a 3aTeM peXIM.
(1)Установпейсякунаель POWER в положене CAMERA, MEMORY/NETWORK (Толъков ДCR-IP220E), MEMORY (Толъков ДCR-IP210E) уи VCR.
(2)Haxmnte KhoNky FN, yTo6bl OTo6pa3nTb cTpaHnU y PAGE1.
(3)HaKmTe KhoNky MENU, YTo6bI OTo6pa3nTb MEHIO.
(4)HaximmaTe KHONKIN↓↑ДЯ BbIbopa HxKHOI NIKTORpAMMbI, a 3aTeM HaxMNTE KHONKY EXEC.
(5)Haxmamte KhoNkI IJIy BbI6opa HxKHOI ONuIN, a 3aTeM HaxMnTe KhoNky EXEC.
(6)Haxmamte KhoNkI TnBbOpa HxhNoyycTaHOBKn, a 3aTeM HaxmTe KhoNky EXEC.
(7)Ecnn Bby xOTnTe n3MeHnTb dpyrne onuinn, noBTOpTe deiCTBnI pyHKTOB c 4 nO 6.ДЯ BO3BpaTa K nyHKTy 4 HaXMMTe KHOJNKy RET..
- Only the DCR-IP220E has NETWORK mode./
ToIbKO B MoJeTI DCR-IP220E IMeeTcpeXIM NETWORK.
To return to FN
Press EXIT.
Дя BO3Bpata K Индакци FM
HaxmTe KhONky EXIT.
Menu items are displayed as the following icons:
M MANUAL SET
CAMERA SET
VCR SET
LCD/VF SET
MEMORY SET
CMSET
TAPE SET
SETUP MENU
ETC OTHERS
OnuM MeH OTo6paXaOTcB B VnE cJeDyUOxN NKTOrpamM:
M MANUAL SET
CAMERA SET
VCR SET
LCD/VF SET
MEMORY SET
CMSET
TAPE SET
SETUP MENU
ETC OTHERS
English
Selecting the mode setting of each item is the default setting.
- Menu items differ depending on the position of the POWER switch. The LCD screen shows only the items you can operate at the moment
| Icon/item | Mode | Meaning | POWER switch |
| MANUAL SET | |||
| PROGRAM AE | — | To suit your specific shooting requirement (p. 81) | CAMERA MEMORY |
| P EFFECT | — | To add special effects like those in films or on the TV to images (p. 76, 91) | CAMERA VCR |
| RED EYE R | ● OFF | Red-eye reduction does not function. | CAMERA MEMORY |
| ON | Preliminary flash before recording prevents red-eye. | ||
| FLASH LVL | HIGH | To make the flash level higher than normal. | CAMERA MEMORY |
| ● NORMAL | To use the normal setting. | ||
| LOW | To make the flash level lower than normal. | ||
| WHT BAL | — | To adjust the white balance (p. 69) | CAMERA MEMORY |
| SHARPNESS | — | To adjust the sharpness of the image outline with ↑/↓. | CAMERA MEMORY |
| soften image ↓→ sharpen image | |||
| AUTO SHTR | ● ON | To automatically activate the electronic shutter when shooting in bright conditions | CAMERA |
| OFF | To not automatically activate the electronic shutter even when shooting in bright conditions | ||
FLASH LVL
You cannot adjust FLASH LVL if the external flash (optional) is not compatible with the flash level.
| Icon/item | Mode | Meaning | POWER switch |
| CAMERA SET | |||
| D ZOOM | ● OFF | To deactivate the digital zoom. Up to 10× zoom is carried out. | CAMERA |
| 20× | To activate the digital zoom. More than 10× to 20× zoom is performed digitally (p. 43). | ||
| 120× | To activate the digital zoom. More than 10× to 120× zoom is performed digitally (p. 43). | ||
| EXPANDED F | ● OFF | Not to activate the expanded focus | MEMORY |
| ON | While focusing manually, the centre of the screen is displayed at twice the size. | ||
| 16:9WIDE | ● OFF | Not to record a 16:9 wide picture | CAMERA |
| ON | To record a 16:9 wide picture (p. 71) | ||
| STEADYSHOT | ● ON | To compensate for camera-shake | CAMERA |
| OFF | To cancel the SteadyShot. Natural pictures are produced when shooting a stationary subject with a tripod. | ||
| HOLOGRAM F | ● AUTO | The HOLOGRAM AF emits when focusing on subjects is difficult in dark places (p. 151). | MEMORY |
| OFF | The HOLOGRAM AF does not emit. | ||
| N.S. LIGHT | ● ON | To use the NightShot Light function (p. 50) | CAMERA |
| OFF | To cancel the NightShot Light function | MEMORY | |
Notes on the SteadyShot
- The SteadyShot may not correct excessive camera-shake. Even if STEADYSHOT is set to ON.
- Attachment of a conversion lens (optional) may influence the SteadyShot.
If you cancel the SteadyShot
The SteadyShot off indicator appears. Your camcorder prevents excessive compensation for camera-shake.
(continued on the following page)
Changing the menu settings
| Icon/item | Mode | Meaning | POWER switch |
| V VCR SET | |||
| NTSC PB | ● ON PAL TV | To play back a tape recorded in the NTSC colour system on a PAL system TV | VCR |
| NTSC 4.43 | To play back a tape recorder in the NTSC colour system on a TV with the NTSC 4.43 mode | ||
| VIDEOINPUT | ● VIDEO | To use the video plug of the A/V connecting cable when recording from a player | VCR |
| S VIDEO | To use the S video plug of the A/V connecting cable when recording from a player | ||
| LCD/VF SET | |||
| LCD B.L. | ● BRT NORMAL | To set the brightness on the LCD screen normal | CAMERA MEMORY VCR |
| BRIGHT | To brighten the LCD screen | ||
| LCD COLOUR | — | To adjust the colour on the LCD screen with -/+ low intensity → high intensity | CAMERA MEMORY VCR |
| VF B.L. | ● BRT NORMAL | To set the brightness on the viewfinder screen to normal | CAMERA MEMORY VCR |
| BRIGHT | To brighten the viewfinder screen | ||
NTSC PB
When you play back a tape on a Multi System TV, select the best mode while viewing the picture on the TV.
LCD B.L. and VF B.L.
- When you select BRIGHT, battery life is reduced by about 10 percent during recording.
- When you use power supplies other than the battery pack, BRIGHT is automatically selected.
Even if you adjust LCD B.L., LCD COLOUR and/or VF B.L.
The recorded picture will not be affected.
| Icon/item | Mode | Meaning | POWER switch |
| MEMORY SET | |||
| STILL SET | |||
| BURST | ● OFF | Not to record continuously | MEMORY |
| NORMAL | To record from four to 25 images continuously (p. 146) | ||
| HIGH SPEED | To record up to 32 images continuously fast | ||
| EXP BRKTG | To record three images continuously with different exposure | ||
| MULTI SCRN | To record nine images continuously | ||
| QUALITY | ● SUPER FINE | To record still images in the finest image quality mode (p. 135) | MEMORY VCR |
| FINE | To record still images in the fine image quality mode | ||
| STANDARD | To record still images in the standard image quality mode | ||
| IMAGESIZE | ● 1600 × 1200 | To record still images at 1600 × 1200 size (p. 141) | MEMORY |
| 640 × 480 | To record still images at 640 × 480 size | ||
| MOVIE SET | |||
| MOVIEMODE | ● SUPER FINE | To record moving pictures with super fine image quality (p. 138) | MEMORY VCR |
| FINE | To record moving pictures with fine image quality | ||
| STANDARD | To record moving pictures with standard image quality | ||
| LIGHTMODE | To record moving pictures to be used as an e-mail attachment | ||
| □REMAIN | ● AUTO | To display the remaining capacity of the “Memory Stick” in the following cases: · For five seconds after inserting a “Memory Stick” into your camcorder · When the capacity of the “Memory Stick” is less than one minute after the POWER switch is set to MEMORY · For five seconds after completing recording | MEMORY VCR |
| ON | To always display the remaining capacity of the “Memory Stick” | ||
If you select QUALITY
The number of images you can shoot in the currently selected image quality appears on the LCD screen.
(continued on the following page)
| Icon/item | Mode | Meaning | POWER switch |
| MEMORY SET | |||
| SLIDE SHOW | --- | To play back images in a continuous loop (p. 185) | MEMORY |
| FILE NO. | ● SERIES | To assign numbers to file in sequence even if the "Memory Stick" is changed | MEMORY VCR |
| RESET | To reset the file numbering each time the "Memory Stick" is changed | ||
| DELETE ALL | --- | To delete all the unprotected images (p. 191) | MEMORY |
| FORMAT | ● RETURN | To cancel formatting | MEMORY |
| OK | To format an inserted "Memory Stick" Formatting erases all information on the "Memory Stick"1. Press ↓/↑ to select FORMAT then press EXEC.2. Press ↓/↑ to select OK, then press EXEC.3. After "EXECUTE" appears, press EXEC."FORMATTING" flashes during formatting."COMPLETE" appears when formatting is finished. | ||
Notes on formatting
- The "Memory Stick" supplied with your camcorder has been formatted at factory. Formatting with your camcorder is not required.
-
Do not do any of the following while FORMATTING is displayed:
-
Turn the POWER switch to the other position
-
Operatetobuhtons
-Eject the "Memory Stick" -
You cannot format the "Memory Stick" if the write-protect tab on the "Memory Stick" is set to LOCK.
- Format the "Memory Stick" with your camcorder if "格式FORMAT ERROR" appears.
- The original sample images recorded on the supplied "Memory Stick" will be erased.
- Formatting erases protected image data on the "Memory Stick."
Changing the menu settings
| Icon/item | Mode | Meaning | POWER switch |
| CM SET | |||
| TITLEERASE | — | To erase the title you have superimposed (p. 119) | CAMERA VCR |
| TITLE DSPL | ● ON | To display the title you have superimposed | VCR |
| OFF | Not to display the title | ||
| TAPE TITLE | — | To label a cassette (p. 125) | CAMERA VCR |
| ERASE ALL | — | To erase all the data in cassette memory (p. 127) | CAMERA VCR |
| INFODSPL | ● ON | To display the cassette information of the tape This is displayed for five seconds in the following cases (p. 124):· When inserting a cassette in CAMERA mode· When setting the POWER switch to VCR | CAMERA VCR |
| OFF | To not display the cassette information of the tape. | ||
| TAPE SET | |||
| REMAIN | ● AUTO | To display the remaining tape bar:· For about eight seconds after a cassette is inserted and your camcorder calculates the remaining amount of tape· For about eight seconds after the playback button ▷ is pressed in VCR mode· For about eight seconds after DISPLAY/TOUCH PANEL is pressed to display the screen indicators | CAMERA VCR |
| ON | To always display the remaining tape indicator. | ||
(continued on the following page)
| Icon/item | Mode | Meaning | POWER switch |
| SETUP MENU | |||
| CLOCK SET | —— | To set the date or time (p. 31). | CAMERA MEMORY |
| USB STREAM | ● OFF | To deactivate the USB Streaming function. | CAMERA VCR |
| ON | To activate the USB Streaming function (p. 209). | ||
| LANGUAGE | ● ENGLISH | To display the following information indicators in English: min, STBY, REC, CAPTURE, VOL, END SCH and START | CAMERA MEMORY VCR |
| FRANÇAIS1) | To display the information indicators in French | ||
| ESPÁÑOL1) | To display the information indicators in Spanish | ||
| PORTUGUES1) | To display the information indicators in Portuguese | ||
| DEUTSCH1) | To display the information indicators in German | ||
| ITALIANO1) | To display the information indicators in Italian | ||
| ΕΛΑΗΝΙΚΑ1) | To display the information indicators in Greek | ||
| 中文 [COMP]2) | To display the information indicators in Chinese (traditional) | ||
| 中文 [SIMP]2) | To display the information indicators in Chinese (simplified) | ||
| DEMO MODE | ● ON | To make the demonstration appear | CAMERA |
| OFF | To cancel the demonstration mode | ||
1) European models only
2) Except for European models
Notes on DEMO MODE
- You cannot select DEMO MODE when a cassette or the "Memory Stick" is inserted in your camcorder.
- When using the NightShot, the "NIGHTSHOT" indicator appears on the LCD screen and you cannot select DEMO MODE in the menu settings.
- If you press the touch panel during the demonstration, the demonstration stops for a while, then it starts again after about 10 minutes.
- DEMO MODE is set to STBY (Standby) at the default setting and the demonstration starts about 10 minutes after you have set the POWER switch to CAMERA without a cassette inserted.
To cancel the demonstration, insert a cassette, set the POWER switch to other than CAMERA, or set DEMO MODE to OFF. To set to STBY (Standby) again, leave DEMO MODE at ON in the menu settings, turn the POWER switch to (CHG) OFF, and return the POWER switch to CAMERA.
| Icon/item | Mode | Meaning | POWER switch |
| ETC OTHERS | |||
| DATA CODE (On the Remote Commander) | ● DATE/CAM | When you press DATA CODE on the Remote Commander, the date, time and various settings are displayed during playback (p. 57). | MEMORY VCR |
| DATE | The date and time are displayed during playback. | ||
| AREA SET | --- | To set your area temporarily when using your camcorder in a new location (p. 33) | CAMERA MEMORY |
| SUMMERTIME | ● OFF | To be used when your area is not in summer time | CAMERA MEMORY |
| ON | To be used when your area is in summer time | ||
| BEEP | ● MELODY | To output the melody when you start/stop recording or when an unusual condition occurs on your camcorder | CAMERA MEMORY VCR |
| NORMAL | To output the beep instead of the melody | ||
| OFF | To cancel melody and the beep sound | ||
| COMMANDER | ● ON | To activate the Remote Commander supplied with your camcorder | CAMERA MEMORY VCR |
| OFF | To deactivate the Remote Commander to avoid remote control misoperation caused by other VCR's remote control | ||
| DISPLAY | ● LCD | To show the display on the LCD screen and viewfinder | CAMERA MEMORY VCR |
| V-OUT/LCD | To show the display on the TV screen, LCD screen and viewfinder | ||
| REC LAMP | ● ON | To light up the camera recording lamp at the front of your camcorder | CAMERA MEMORY |
| OFF | To turn the camera recording lamp off so that the subject is not aware of recording | ||
Note
If you press DISPLAY/TOUCH PANEL with DISPLAY set to V-OUT/LCD in the menu settings, the picture from a TV or VCR will not appear on the LCD screen even when your camcorder is connected to the output jacks on the TV or VCR.
When recording a close subject
When REC LAMP is set to ON, the red camera recording lamp on the front of your camcorder may reflect on the subject if it is close. In this case, we recommend you set REC LAMP to OFF.
In more than five minutes after removing the power source
The PROGRAM AE, FLASH LVL, WHT BAL and COMMANDER items return to their default settings. Other menu items are held in memory even when the battery is taken out.
Pysckni
Bb6op yctaHOBOK pexkma no KaKdoI onznn ABJIaETcYCTaHOBKOIO yMOJauHIO.
Onu MeHIO OTJNUaOTcB 3aBnCmOCTN O TNOLOKeHn NpeKlUoTaTeIPOWER.
Ha 3KpaHe KKД OTO6paxaIOTc TOnbKO Te OIcHn, KoTOpbIMN Bbl MoKeTe OIepuPoBaT b DaaHbI MOMeHT BpeMeHn.
BbI He moKeTe peryIinpoBaTb onuIIO FLASH LVL, ecn BHeUHRA BCnblska (pnpO6peTaetcA OTdJIbHO) He COBMeCTMa C yPOBHEM BCnblsKn.
Types of trouble and how to correct trouble
If you run into any problem using your camcorder, use the following table to troubleshoot the problem. If the problem persists, disconnect the power source and contact your Sony dealer. If "C:□□:□□" appears on the LCD screen, the self-diagnosis display function has activated. See page 251.
In the recording mode
| Symptom | Cause and/or Corrective Actions |
| START/STOP does not operate. | ·The POWER switch is not set to CAMERA. →Set it to CAMERA (p. 38). ·The tape has run out. →Rewind the tape or insert a new one (p. 34, 55). ·The write-protect tab is set to expose the red mark. →Use a new cassette or slide the tab (p. 35). ·The tape is stuck to the drum (moisture condensation). →Remove the cassette and leave your camcorder for at least one hour to acclimatise (p. 271). |
| The power goes off. | ·When your camcorder is in the recording standby mode for more than five minutes, your camcorder automatically turns off to save battery power and to prevent battery and tape wear. →Set the POWER switch to (CHG) OFF and then to CAMERA. ·The battery pack is dead or nearly dead. →Insert a fully charged battery pack (p. 26, 27). |
| The image on the viewfinder screen is not clear. | ·The viewfinder lens is not adjusted correctly. →Adjust the viewfinder lens (p. 41). |
| The SteadyShot function does not work. | ·STEADYSHOT is set to OFF in the menu settings. →Set it to ON in the menu settings (p. 229). |
| The autofocusing function does not work. | ·The setting is the manual focus mode. →Set FOCUS to AUTO (p. 88). ·Shooting conditions are not suitable for autofocus. →Adjust to focus manually (p. 88). |
| The picture does not appear in the viewfinder. | ·The LCD panel is open. →Close the LCD panel when you record using the viewfinder (p. 13). |
| A vertical band appears when you shoot a subject such as lights or a candle flame against a dark background. | ·The contrast between the subject and background is too high. This is not a malfunction. |
| A vertical band appears when you shoot a very bright subject. | ·This is not a malfunction. |
| Some tiny white, red, blue or green spots appear on the LCD screen. | ·SLOW SHUTTER, Super NightShot or Colour Slow Shutter mode is activated. This is not a malfunction. |
| An unknown picture is displayed on the LCD screen or in the viewfinder. | If 10 minutes elapse after you set the POWER switch to CAMERA without a cassette inserted, your camcorder automatically starts the demonstration. → Insert a cassette or press the LCD screen. The demonstration stops. You can also cancel DEMO MODE (p. 234) in the menu settings. |
| The picture is recorded in incorrect or unnatural colours. | The NightShot is activated. → Set it off (p. 49). |
| Picture appears too bright, and the subject does not appear on the LCD screen. | The NightShot is activated. → Set it off (p. 49). The backlight function is active. → Set it off (p. 48). |
| The click of the shutter does not sound. | BEEP is set to OFF in the menu settings. → Set it to MELODY or NORMAL (p. 235). |
| A black band appears when recording a TV screen or computer screen. | Set STEADYSHOT to OFF in the menu settings (p. 229). |
(continued on the following page)
In the playback mode
| Symptom | Cause and/or Corrective Actions |
| Playback is not possible. | ·The tape has run out. →Rewind the tape (p. 59). |
| There are horizontal lines on the picture or the playback picture is not clear or does not appear. | ·The video head may be dirty. →Clean the head using the cleaning cassette (optional) (p. 273). |
| No sound or only a low sound is heard when playing back a tape. | ·Volume is turned to minimum. →Turn up the volume (p. 55). |
| The multi-picture search or date search function does not work. | The tape has a blank portion in the beginning of the tape or between record portion. |
| The title search function does not work. | ·There is no title in the tape. →Superimpose the titles (p. 114). ·The tape has a blank portion in the beginning of the tape or between recorded portion. |
| The title is not displayed. | ·TITLE DSPL is set to OFF in the menu settings. →Set it to ON in the menu settings (p. 233). |
| The playback picture freezes for about one second. | ·When playing back a transition of recordings, the playback picture freezes for about one second. This is not a malfunction. |
In the recording and playback modes
| Symptom | Cause and/or Corrective Actions |
| The POWER switch does not turn on. | · The battery pack is not inserted, or is dead or nearly dead. → Insert a charged battery pack (p. 26, 27). · The AC power adaptor is not connected to a wall socket. → Connect the AC power adaptor to a wall socket (p. 30). |
| The battery pack is quickly discharged. | · The temperature of the environment is too low. · The battery pack is not fully charged. → Charge the battery pack fully again (p. 27). · The battery pack is completely dead, and cannot be recharged. → Replace with a new battery pack (p. 26). |
| The battery remaining indicator does not indicate the correct time. | · You have used the battery pack in an extremely hot or cold environment for a long time. · The battery pack is completely dead, and cannot be recharged. → Replace with a new battery pack (p. 26). · The battery is exhausted. → Use a charged battery pack (p. 26, 27). · A deviation has occurred in the remaining time. → Charge the battery pack fully again so that the indication on the battery remaining indicator is correct (p. 27). |
| The power goes off although the battery remaining indicator indicates that the battery pack has enough power to operate. | · A deviation has occurred in the remaining battery time. → Charge the battery pack fully again so that the indication on the battery remaining indicator is correct (p. 27). |
| The cassette cannot be removed from the holder. | · The power source is disconnected. → Connect it firmly (p. 30). · The battery is exhausted. → Use a charged battery pack (p. 26, 27). |
| The □ and ▲ indicators flash and no functions except for cassette ejection work. | · Moisture condensation has occurred. → Remove the cassette and leave your camcorder for at least one hour to acclimatise (p. 271). |
| Remaining tape indicator is not displayed. | · The □ REMAIN is set to AUTO in the menu settings. → Set it to ON to always display the remaining tape indicator (p. 233). |
(continued on the following page)
When operating using the "Memory Stick"
| Symptom | Cause and/or Corrective Actions |
| The “Memory Stick” does not function. | · The POWER switch is not set to MEMORY. → Set it to MEMORY (p. 144). · The “Memory Stick” is not inserted. → Insert a “Memory Stick” (p. 131). |
| Recording does not function. | · The “Memory Stick” has already been recorded to its full capacity. → Delete unnecessary images and record again (p. 189). · The “Memory Stick” formatted incorrectly is inserted. → Format the “Memory Stick” using your camcorder or use another “Memory Stick” (p. 232). · The write-protect tab on the “Memory Stick” is set to LOCK. → Release the lock (p. 129). |
| The image cannot be deleted. | · The image is protected. → Cancel image protection (p. 187). · The write-protect tab on the “Memory Stick” is set to LOCK. → Release the lock (p. 129). |
| You cannot format the “Memory Stick.” | · The write-protect tab on the “Memory Stick” is set to LOCK. → Release the lock (p. 129). |
| Deleting all the images cannot be carried out. | · The write-protect tab on the “Memory Stick” is set to LOCK. → Release the lock (p. 129). |
| You cannot protect the image. | · The write-protect tab on the “Memory Stick” is set to LOCK. → Release the lock (p. 129). · The INDEX screen is not displayed. → Press INDEX to display the index screen then protect the image (p. 187). |
| You cannot write a print mark on the still image. | · The write-protect tab on the “Memory Stick” is set to LOCK. → Release the lock (p. 129). · The INDEX screen is not displayed. → The print marks cannot be written to the single screen (p. 192). · You are trying to write a print mark on a moving picture. → Print marks cannot be written to moving picture (p. 193). |
| You cannot play back images in actual size. | · You may not be able to play back images in actual size when you try to play back images recorded by other equipment. This is not a malfunction. |
| You cannot play back image data. | · Your camcorder cannot play back some images processed with your computer (The file name flashes on the LCD screen). · Your camcorder may not be able to play back the image recorded using other camcorder. |
Others
| Symptom | Cause and/or Corrective Actions |
| A title is not recorded. | ·20 titles have been recorded. → Erase unnecessary title (p. 119). ·The cassette is set to prevent accidental erasure. → Slide the write-protect tab so that red portion is not visible (p. 35). ·The tape has a blank portion in the recorded portion. → Superimpose the title to the recorded position (p. 117). |
| A cassette label is not recorded. | ·The tape is set to prevent accidental erasure. → Slide the write-protect tab so that red portion is not visible (p. 35). |
| The Remote Commander supplied with your camcorder does not work. | ·COMMANDER is set to OFF in the menu settings. → Set it to ON (p. 235). ·Something is blocking the infrared rays. → Remove the obstacle. ·The batteries are inserted in the battery holder with the + - polarities incorrectly matching the + - marks. → Insert the batteries with the correct polarity (p. 291). ·The batteries are dead. → Insert new ones (p. 291). |
| The picture from a TV or VCR does not appear even when your camcorder is connected to the outputs on the TV or VCR. | ·DISPLAY is set to V-OUT/LCD in the menu settings. → Set it to LCD (p. 235). ·VIDEOINPUT is not set correctly in the menu settings. → Set it to the appropriate setting (p. 230). |
| Dubbing cannot be made when using the A/V connecting cable. | ·VIDEOINPUT is not set correctly in the menu settings. → Set it to the appropriate setting. |
| The melody or beep sounds for five seconds. | ·Moisture condensation has occurred. → Remove the cassette and leave your camcorder for at least one hour to acclimatise (p. 271). ·Some troubles have occurred in your camcorder. → Remove the cassette and insert it again, then operate your camcorder. |
| No function works though the power is on. | ·Disconnect the AC power adaptor from a wall socket or take out the battery, then reconnect it in about one minute. Turn the power on. If the functions still do not work, press RESET using a sharp-pointed object. (If you press RESET, all the settings (DCR-IP220E: except the NETWORK mode settings) including the date and time return to the default) (p. 285). |
(continued on the following page)
| Symptom | Cause and/or Corrective Actions |
| While charging the battery pack inserted in your camcorder, the battery CHG lamp does not light up. | • Charging is completed. • The battery pack is not properly inserted. → Insert it properly (p. 26). |
| You cannot charge the battery pack inserted in your camcorder. | • The POWER switch is not set to (CHG) OFF. → Set it to (CHG) OFF. |
| While charging the battery pack inserted in your camcorder, the battery CHG lamp flashes. | • The battery pack is not properly inserted. → Insert it properly (p. 26). • Something is wrong with the battery pack. → Please contact your Sony dealer or local authorised Sony service facility. |
| When you set the POWER switch to VCR or (CHG) OFF, if you move your camcorder, you may hear a clattering sound from inside your camcorder. | • This is because some functions use a linear mechanism. This is not a malfunction. |
| The buttons do not appear on the touch panel. | • DISPLAY/TOUCH PANEL is pressed. → Press the LCD screen lightly. → Press DISPLAY/TOUCH PANEL on your camcorder or DISPLAY on the Remote Commander (p. 57). |
| The buttons on the LCD screen do not work. | → Adjust the LCD screen (CALIBRATION) (p. 275). |
| The indicators appear mirror-reversed in the viewfinder. | • The mirror mode is activated. This is not a malfunction (p. 45). |
| The characters on the TV screen are reversed. | • It occurs if you set DISPLAY to V-OUT/LCD in the menu settings when using mirror mode. This is not a malfunction. |
| Image data cannot be transferred to your computer by the USB connection. | • The USB cable was connected before installation of the USB driver was completed. → Uninstall the incorrect USB driver and reinstall the USB driver (p. 206). • USB STREAM is set to OFF in the menu settings. → Set it to ON (p. 234). |
| A cassette cannot be removed even if the cassette lid is open. | • Moisture condensation has started to condense in your camcorder (p. 271). |
Self-diagnosis display
Your camcorder has a self-diagnosis display function.
This function displays the current condition of your camcorder as a five-digit code (a combination of a letter and figures) on the LCD screen. If a five-digit code is displayed, check the following code chart. The last two digits (indicated by ) will differ depending on the state of your camcorder.
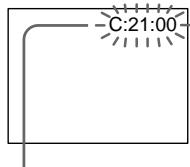
LCD screen or Viewfinder
Self-diagnosis display
C:□□:□□
You can service your camcorder yourself.
E:□□:□□
Contact your Sony dealer or local authorised Sony facility.
| Five-digit display | Cause and/or Corrective Actions |
| C:04:☐☐ | • You are using a battery pack that is not an “InfoLITHIUM” battery pack. → Use an “InfoLITHIUM” battery pack (p. 266). |
| C:21:☐☐ | • Moisture condensation has occurred. → Remove the cassette and leave your camcorder for at least one hour to acclimatisation (p. 271). |
| C:22:☐☐ | • The video heads are dirty. → Clean the heads using the cleaning cassette (optional) (p. 272). |
| C:31:☐☐ | • A malfunction other than the above that you can service has occurred. |
| C:32:☐☐ | • Remove the cassette and insert it again, then operate your camcorder. Do not perform this operation if moisture starts to condense (p. 271). → Disconnect the mains lead of the AC power adaptor or take out the battery pack. After reconnecting the power source, operate your camcorder. |
| E:20:☐☐ | • A malfunction that you cannot service has occurred. |
| E:61:☐☐ | • Contact your Sony dealer or local authorised Sony service facility and inform them of the 5-digit code. example: E:61:10) |
| E:62:☐☐ |
If you are unable to rectify the problem even if you try corrective actions a few times, contact your Sony dealer or local authorised Sony service facility.
Warning indicators and messages
If indicators and messages appear on the LCD screen, check the following:
See the page in parentheses "() for more information.
Warning indicators
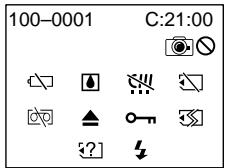
100-0001 Warning indicator as to file Slow flashing:
The file is corrupted.
The file is unreadable.
- You are trying to carry out MEMORY MIX function on a moving picture (p. 160).
C:21:00 Self-diagnosis display (p. 251)
The battery is dead or nearly dead Slow flashing:
- The battery is nearly dead. Depending on operational, environmental or battery conditions the indicator may flash, even if there are approximately five to 10 minutes remaining.
Moisture condensation has occurred* Fast flashing:
- Eject the cassette, turn off your camcorder, and leave it for about one hour with the cassette compartment open (p. 271).
Warning indicator as to micro Cassette Memory*
Slow flashing:
- Eject the cassette, and insert it again. If even then the indicator flashes, the micro Cassette Memory of the cassette may be faulty.
Fast flashing:
- The micro Cassette Memory of your camcorder may be faulty.
Warning indicator as to "Memory Stick" Slow flashing:
- No "Memory Stick" is inserted.
Fast flashing:
- The image cannot be recorded on "Memory Stick."
Warning indicator as to "Memory Stick" formatting*
Fast flashing:
- The "Memory Stick" data is corrupted (p. 128).
- "Memory Stick" is not formatted correctly (p. 232).
? Warning indicator as to incompatible "Memory Stick"
Slow flashing:
An incompatible "Memory Stick" is inserted.
Warning indicator as to tape Slow flashing:
The tape is near the end.
- No cassette is inserted.
- The write-protect tab on the cassette is out (red) (p. 35).
Fast flashing:
The tape has run out.*
Warning indicator as to a cleaning cassette (DCR-IP220E only)
Slow flashing:
- A cleaning cassette is inserted in MEMORY/ NETWORK mode (p. 273).
You need to eject the cassette*
Slow flashing:
- The write-protect tab on the cassette is out (red) (p. 35).
Fast flashing:
- Moisture condensation has occurred (p. 271).
- The tape has run out.
- The self-diagnosis display function is activated (p. 251).
The image is protected*
Slow flashing:
The image is protected (p. 187).
Warning indicator as to the flash Slow flashing:
During charging.
Fast flashing:
The self-diagnosis display function is activated (p. 251).*
- There is something wrong with the flash.
Warning indicator as to recording of still image
Slow image:
-
The still image cannot be recorded on a "Memory Stick" (p. 64).
-
You hear the melody or beep sound.
Warning messages
| • CLOCK SET | Set the date and time (p. 31). |
| • FOR “InfoLITHIUM”BATTERY ONLY | Use an “InfoLITHIUM” battery pack (p. 266). |
| • CLEANING CASSETTE | The video heads are dirty (p. 272). (The × indicator and “CLEANING CASSETTE” message appear one after another on the LCD screen.) |
| • COPY INHIBIT | You tried to record a picture that has a copyright control signal (p. 264).* |
| • FULL | The “Memory Stick” is full (p. 147).* |
| • NO FILE | The write-protect tab on the “Memory Stick” is set to LOCK (p. 129). |
| • NO MEMORY STICK | No image is recorded on the “Memory Stick” (p. 176).* |
| • NO MEMORY STICK | No “Memory Stick” is inserted.* |
| • MEMORY STICK ERROR | The “Memory Stick” data is corrupted (p. 131).* |
| • FORMAT ERROR | The “Memory Stick” is not recognised (p. 232).*Check the format. |
| • DIRECTORY ERROR | There is more than two same directories (p. 175).* |
| • PLAY ERROR | The image is distorted and cannot be played back.* |
| • REC ERROR | Check the input signal, then record again (p. 159, 173).* |
| • TAPE END | The tape has reached the end of the tape.* |
| • NO TAPE | Insert a cassette.* |
| • DELETING | You press PHOTO while deleting data in a “Memory Stick.”* |
| • Formatting | You press PHOTO while formatting a “Memory Stick.”* |
| • NOW CHARGING | Charging flash does not work correctly.* |
| • CLEANING END | The cleaning is complete. Eject the cleaning cassette (p. 273). |
| • CLEANING TAPE END | The cleaning tape has run out. |
| • TITLE FULL | 20 titles have been recorded (p. 116).* |
| • INPUT ERROR | A picture in an incompatible format (such as one recorded with the DV format) is input (p. 113).* |
| • NOT REC | You tried to copy MPEG MOVIE files recorded on a “Memory Stick” to the tape (p. 182). |
| • CHANGE TO “CAM” or “VCR” | A cleaning cassette cannot be used in MEMORY mode (p. 273). |
| • INCOMPATIBLEMEMORY STICK | The “Memory Stick” inserted is not compatible with your camcorder.* |
| • READ-ONLY MEMORY STICK | A read-only “Memory Stick” is inserted.* |
| * You hear the melody or beep sound. | |
| Refer to the Network Function Operating Instructions supplied with your camcorder about warning messages in NETWORK mode. | |
Pycckn
Pa3HOBnIHOCTn HeNCpPaBHOCTeN MeTOblx yCTpaHeHNA
Ecn y Bac Bo3HKnla kakaan-1n6o np6Iema npn nCpObn30BaHNn Baue Bndeokamepbl, BocnoB3ayTecb CneDyoue TaBniuee Jn OTBckHnN uYCTpaHEHn np6IeMbl. Ecn np6IeMa He yCTpaHnETcR,TO cNe dyet OTcoEduHNTb NCTOuHn NITaHn N o6paTbCS B cepBnchbl YeHTP Sony. Ecn na 3KpaHe JKd NoBvntc INHdnkaun "C:□□:□", 3to 3NaHT, YTO cpa6oTaJ aHnkun HnDnKaun CaMODaarHocTkn. CM. cTp. 261.
B pexime 3aipcn
EcnHa 3kpaHe KKIOIaTcHINdkaTOpbI cOooHn, npOBepbTe cneDyUoee:
Cm. ctpaHnuy B kpyrIbIx ckO6kax “()”ДЯн пolyuyeHn 6OJIe e nOДрОБHо INHΦOPMaUHn.
PpeDynpexKaIOUne INHnKKaTOpbl
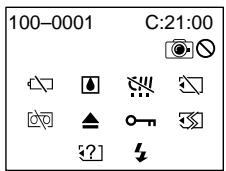
100-0001 Ppeynpekdaoosn HndkaTOp OTHOCTeJIbHO faiJa
MeJenneHoe MInraHne:
-Фаил NOBpeKdEh.
-Фаин He uHTaetca.
- Bы nbItaTeScb BbINOJIHnTb ФУнКCUH
MEMORY MIX Ha ДвИЖушЕмс ИЗБражени
(ctrp. 160).
C:21:00 INHdIkauncamaOuaNarHocTNKu(cTp.261)
BaTapeHbI 6JIOK pa3pJxKeH nJI noTu pa3pJxKeH
MeIeHoe MrgaHne:
BaTapeHbI 6nok NoTuPa3pRJaKeH. B3aBcImOCTn OT pa6oUx ycNoBm, OKpyKaHOSe CpeDbI INJ COCTOHN6BaTapeHOrO 6noka, INdKApOT MoKet MNaTb, DJaCe eCNI 3apraDa octanocb npN6n3nteNbHO Ha PnTb -10 MNHyT.
PpOJ30UJI KOHdEHCaIgBJIarN\*
БыICTpoe MmraHne:
I3BLeKInTe KaCCTe, BbIKLIOuHTe BaUy BeOKePBy UcTAb8e OpIMePHo Ha OdMH Yac COTkpblTbIM KACCEThbIM OTcEKOM (CTp. 271).
PpeynpeKdaOuHnDnKaTOp OTHocntelbHmo micro Cassette Memory (MnPKoaccTeHn parnr)
MeJHeHHoe MmraHne:
-ИЗВЕКИТЕΚACСЕТ,ИВСТАБТЕе chOBA.
EслддампеспэTOROинДИКaTOpбудтМИгАть,micro CassetteMemory
(MИКРОКACСТЕнЯпamЯТь)ΚACСТы можetedБытnotвржdeHa.
- He yctaHOBneHa "Memory Stick".
Быст Poe маганe:
Избрахене He moket 6bIb 3aПиcaHoHa "Memory Stick".
Ппдунрждаюши ИndkaTop OTHoNteJbHObФopMaTupOBaHnA"Memory Stick"
БыICTpoe MURAHHe:
-Данные"Memory Stick"noBpeKdHeHbI(cTp.128).
- "Memory Stick" OToDopMaTIpOBaHaH
- HnpeBaNJIbHo (CTp. 240).
2?] Pnpdynpexkaiou mHdkaTop OTHOCNTeBHO COBmectHMocTn "Memory Stick"
MeJenHoeMraHne:
BCTabIeHa HecOBMeCTmMa "Memory Stick".
IpeDynpexKaIOuMn INHdkaTOp OTHOCTeJIbHO JeHTbl
MeDJIeHHoe MURaHne:
- JeHTa NOUtn DOCTnIgna KOHua.
He BCTaBJeHa KaccTea.
JIeNecTOK 3aunTbI OT 3anCn Ha KaccTe (KpaChbI) BbICTabInen Hapyxy (Ctp. 35).*
Быст Poe міruhaнe:
- JeHtA 3aKoHnIaCb.
品 PpeDynpexKaUOuHmHdNkATOp OTHOCHTeNbHO YnCTaUeKacCtbl (TolbKO MoedeJb DCR-IP220E)
MeDneHHoe MraHHe:
OuHCTInTeIbHaKacCeTa BCTaBJeHa BpeXnMe MEMORY/NETWORK (ctp.273).
Bam Huxho n3Bneby kaccety*
MeDneHHoe MmraHne:
JIeNecToK 3aunTbI OT 3aHnHa KaccTe (KpaChbI) BbICTaBIn HapyKy (CTp. 35).
БыICTpoe MIRaHne:
-ПОНЗОШа конденьcaця Влари (Стр. 271).
- JeHTa 3aKoHnlaCb.
Cpa6oTaJaФyHKuINHdNkaCn camOdaIarHOCTNK (cTp.261).
mI3o6paXeHne 3aunuheo\*
MeJenHeHoe MrgaHne:
- 1306pbaxKeHHe 3aunuHcHo (ctp. 187).
IpeDynpexkdaiouHnHnKaTOp OTHOCHTbHO BCNbIiKu
MeJenHoeMraHne:
-BoBpeM3apRdKn.
Быст Poe маганe:
-ПивебенаВдействафункциИнданцamodmaharoctnkn(ст.261).
- IMeHTcH HeNoJaIK Co BCnBbIKoN.
Ppeynpejkaioi nHdkaTOp OTHOCNTeBHO 3aHcN HeNodBnXHOrO N3o6paeHH
MeDJIeHHoe MmraHne:
- HensoBnKHOe N3O6paXeHne He MoKeT 6bITb 3aIncAo Ha "Memory Stick" (cTp. 64).
*BblcIbIeMeNoIOHJIN3yMmepHbI cnHaJI.
Ppeynpekdaioune coo6eHHa
Additional Information - Usable cassettes
Selecting cassette types
You can use MICROMV cassette only. You cannot use any other 8 mm, Hi8 Hi8, Digital8, WHS VHS, WHSC VHSC, SWHS S-VHS, SWSC S-VHSC, Betamax, DV, or mini DV cassettes.
All of the MICROMV cassettes have micro Cassette Memory.
MICRO MEMO, MICROMV, and MICROMV are trademarks of Sony Corporation.
Playing back an NTSC-recorded tape You can play back tapes recorded in the NTSC-video system on the LCD screen.
Copyright signal
When you play back
If the tape you play back on your camcorder contains copyright signals, you cannot copy it with other equipment connected to your camcorder.
When you record
You cannot record software on your camcorder that contains copyright control signals for copyright protection of software. COPY INHIBIT appears on the LCD screen or on the TV screen if you try to record such software. Your camcorder does not record copyright control signals on the tape when it records.
ИспобьзуемBLEkacceТbl
Bb6op TnOB Kaccet
BbMOKTe HcNOb30BaTb TOJbKO
MmHaTOpHbIe KacceTb MICROMV. Bbl
He MOKTe HcNOb30BaTb HkKaMe Dpyrme
KacceTb, a NMeHHO, KacceTb 8 MM, Hi8 Hi8, Digital8, VHS, VHSC VHSC, SVHS S-VHS, SWHS S-VHSC, Betamax, DV mIn Min mini DV.
Bce KaccTebMICROMV mHeOT micro Cassette Memory (MnKpOKacCEThyIO nAMrTb).
CIMROMVCIMROMV ABJIOTCA ToprobIMN Mapkam KoprnapuSs Sony Corporation.
Bocnpon3BeJeHne JeHT, 3aIncaHHbIX B cnCTeme NTSC
BbMOxTe BOCpON3BOOnTb Ha 3KpaHe KKJIeHTb, 3aIncAnHbE BnDeocnCTeme NTSC.
CunhaaBTOpCKoro npaba
PnB Bocnpo3BeDeHn
EcnI JeHTa, KOTOpyU BbI BOCnpOn3B0dnte Ha BaWei BnDeOkAmpe, CoepKNT CnHaNbl ynpaBHeNIA ABTOPCKIM npabOM, BbI He CMOKeTe cKoPiPoBaTb ee c NOMOJIbO dpyroI anPapaTpybl, noDcoEeHNHeHON K BaWei BnDeOkAmpe.
Pn3ainnC
BbI He CMOKTe 3aHnCaTb nporpaMMHoe
obecneueHHe BaSeB BnDeokamepe, KoTopoe
coepxnt CnHaNbIy npaBnHnA bTOPCKM
npaBOM dJa 3aunTbI ABTOPcKO rpaBa
npoRpaMMHOro obecneueHn.
Ha 3kpane XKd nIi Ha 3kpane TeNebu3opa
noBHTcN HnDnKaua COPY INHIBIT, ecn Bbl
nonbTaTeCb 3aHnCaTb TaKoe nporpaMMHoe
obecneueHne.
Ba7a BnDEOKaMePa He 3aHncbIbAeT CnHaNbI
ynpaBnHn A bTOpCKM npaBOM Ha JeHTy,
KOrDa OHa BbINOJIHRe T3aNNCb.
Notes on the MICROMV cassette
When affixing a label on the MICROMV cassette
Be sure to affix a label only on the location illustrated below [a] so as not to cause malfunction of your camcorder.
After using the MICROMV cassette
Rewind the tape to the beginning, put the cassette in its case, and store it in an upright position.
When the micro Cassette Memory function does not work
Reinsert the cassette.
About the "InfoLITHIUM" battery pack
What is the "InfoLITHIUM" battery pack?
The "InfoLITHIUM" battery pack is a lithium-ion battery pack that has functions for communicating information related to operating conditions between your camcorder. The "InfoLITHIUM" battery pack calculates the power consumption according to the operating conditions of your camcorder, and displays the remaining battery time in minutes.
Charging the battery pack
- Be sure to charge the battery pack before you start using your camcorder.
- We recommend charging the battery pack in an ambient temperature of between 10^ to 30^ (50^ to 86^) until the battery CHG lamp goes off, indicating that the battery pack is fully charged. If you charge the battery outside of this temperature range, you may not be able to efficiently charge the battery pack.
- After charging is completed, either disconnect the cable from the DC IN jack on your camcorder or take out the battery pack.
Effective use of the battery pack
- Battery pack performance decreases in low-temperature surroundings. So, the time that the battery pack can be used is shorter. We recommend that you put the battery pack in your pocket to warm it up, and insert it in your camcorder immediately before you start taking photos. This enables you to use the battery pack longer.
- Frequently using the LCD panel or frequently operating playback, fast-forward or rewind wears out the battery pack faster.
- Be certain to turn the POWER switch to (CHG) OFF when not taking shots or playing back on your camcorder. The battery pack is also consumed when your camcorder is in the standby mode or playback is paused.
- Have spare battery packs handy for two or three times the expected recording time, and make trial recordings before taking the actual recording.
- Do not expose the battery pack to water. The battery pack is not water resistant.
О затыpeйhom блoke "InfoLITHIUM"
Remaining battery time indicator
- If the power goes off although the remaining battery time indicator indicates that the battery pack has enough power to operate, charge the battery pack fully again so that the indication on the remaining battery time indicator is correct. Note, however, that the correct battery indication sometimes will not be restored if it is used in high temperatures for a long time or left in a fully charged state, or the battery pack is frequently used. Regard the remaining battery time indication as the approximate shooting time.
- The 口 mark indicating little remaining battery time sometimes flashes depending on the operating conditions or ambient temperature and environment even if the remaining battery time is about five to 10 minutes.
How to store the battery pack
- If the battery pack is not used for a long time, do the following procedure once per year to maintain proper function.
- Fully charge the battery.
- Discharge on your electronic equipment.
- Take out the battery from the equipment and store it in a dry, cool place.
- To use the battery pack up on your camcorder, leave your camcorder in the recording mode until the power goes off without a cassette inserted.
Battery life
- The battery life is limited. Battery capacity drops little by little as you use it more and more, and as time passes. When the available battery time is shortened considerably, a probable cause is that the battery pack has reached the end of its life. Please buy a new battery pack.
- The battery life varies depending on how it is stored and operating conditions and environment for each battery pack.
HdkaTop BpeMeHn octabweOcA 3apra6bataepenHoro 6loka
- Ecnn nntanhe OTKIIOUaETcR, XOTN INDkaTOpOCTabWeroCByBpeHmN 3apaeHnHO6boka NOKa3bBaet DOCTaTOuHbN DnPa6oTBz3apdN 6bapeHnOHO6boka, 3apdnte6bapeHnBn6IoK NOHOCtBu Eepe pa3, YTObIbOTobpaXeHne INDkaTOpA OCTabWeroCByBpeMeHn 3apraDA 6bapeHnOHO6boka cTANO pABINbHM. 3aMeTBe, TEM He MeHee, YTO ToCHn INDkaCuaIN BpeMeHn 3apraDA 6bapeHnOHO6boka INHOrA He bDeT BOCCTAHABINBA TcS, ECNI OH dInTeNbHOE BpeMn NCIOJb3OBAJCS Prn BBICOKNXTEMpePTypax INIb 6bl OCTabLeH BNOHOCTBO 3apxKeHHOM COCToHNN, INI npn Cactom INIOJIb3OBAHNN 6bapeHnOHO6boka.CunTaTe INDkaCauIO OCTabWeroCBypeMeHN 3apraDA 6bapeHnOHO6boka npin6nNTeNbHBIM BpeMeHEm CbeMKN.
- INHOrda MeTka, yKa3bIbAIOUaHaTo, qTO BpeMeHn 3apraJa 6aTaapeHoro 6Ioka OCTaIOcB MaNo, MraEaT B 3aBcHMOCTn OT UcNOBn 3KcNpYatauINn OkpyKaIOsei TEMpePaTybI n CpeDbI, dJaXe ECnB BpeMeHn 3apraJa 6aTaapeHoro 6Ioka OCTaIOcB npImepHOOTn10MnHyT.
Kak xpaHb6aTapeHbI 6JOK
Ecnn 6aTapeiHbI 6bok He nCnOJIb3yETcA dInTeIbHoe BpeM, npBODiTe CNEduOuSyo npOeUpy OIN Hpa3B rOg DnIPOdEprKaHnHaNDLeXaJero FyHKUHOHropOBaHn6aTapeHoro 6boka.
1.Полноctьюзардпerteбатapesteньшлok.
2. Pazpndte ero ha Bauee 3JIeKtponHno annapatype.
3.IBnEeNtBe 6aTapeHbIb 6nOK n3 annapaTpybI u xpaHnTe erO B cyxOM, npoxJaNDMoCte.
ДлгTOrO,YTo6bI pa3prnTb 6aTapeHbI 6JOK Na BaWei BIndeOkamepe,OCTabBe BaWy BIndeOkamepyB pexmE 3aInc 6e3 BCTabNeHHoKacCeTbI,Noka 3apRd 6aTapeHoro 6JOKa He nCchepnaeTc.
Cpok cnyk6bl 6atapeHoro 6loka
Cpok clyxkbblbatapeHoro 6Ioka orpaHueH. EMKocTb batapeHoro 6Ioka mALo-NOMaLy naaet, no Mepe TOrO, KaK Bblncnol3yeTeero BCE 60lbwe n 60lbwe, a TAkXe CteuHnEM BpemHn. Korda doCTynHoe Bpemr 3apra da 6batapeHoro 6Ioka 3naHTeJIbHO cOKpATNTcB, BO3MOxHO pnuHNO ABJAEcTcTo, YTO cPcK clyxkbblbatapeHoro 6Ioka 3akOHnICN.PnIO6pETne, NoXaanyIcTa, HObblb 6bataepHbN 6Iok.
Cpok cnyk6bl 6batapeHoro 6noka n3MehnEcT B COOTBETCTBmN C TEM, KaK OH XpaHNTcA, a TAKKe B 3aBNCIMOCTN OT YCSIOBNI 3KcPnIyatauN OOKpyXaOeI cpebl dJa kKaJDoR 6batapeHoro 6noka.
The i.LINK (MICROMV Interface) on this unit is an i.LINK-compliant MICROMV interface. This section describes the i.LINK standard and its features.
What is i.LINK?
i.LINK is a digital serial interface for handling digital video, digital audio and other data in two directions between equipment having the i.LINK jack, and for controlling other equipment.
i.LINK-compatible equipment can be connected by a single i.LINK cable. Possible applications are operations and data transactions with various digital AV equipment. When two or more i.LINK-compatible equipment are connected to this unit in a daisy chain, operations and data transactions are possible with not only the equipment that this unit is connected to but also with other devices via the directly connected equipment.
Note, however, that the method of operation sometimes varies according to the characteristics and specifications of the equipment to be connected, and that operations and data transactions are sometimes not possible on some connected equipment.
Note
Normally, only one piece of equipment can be connected to this unit by the i.LINK cable. When connecting this unit to i.LINK-compatible equipment having two or more i.LINK (MICROMV Interface), refer to the operating instructions of the equipment to be connected.
About the name "i.LINK"
i.LINK is a more familiar term for IEEE 1394 data transport bus proposed by Sony, and is a trademark approved by many corporations. IEEE 1394 is an international standard standardised by the Institute of Electrical and Electronics Engineers.
O ctaндарт e i.LINK
Ihe3do i.LINK (uHTepcpeic MICROMV)Ha daHHOM annapaTe RBnEeTcR uHTepcpeiCOM MICROMV, COBmecTumbIM CO cTaHaprTom i.LINK. 3ToT pa3deJ onncbIbae t cTaHapr i.LINK n ero xapaKTepeNCTKn.
YTo Takoe i.LINK?
i.LINK npedctabnaetn3 c6b znpoBoi nocleboaTeIbHbInHTepceic dIy nepeDaunznpoBOB BnDEOCIRHa, znpoBOr aynocirHaJn Dpynx DaHHBX DBYX HanpaBNeHmex Mekdy annapaTpyo, mMeOSei rHe3do i.LINK, nIyIynpaBneHn dpyro annapaTpyo.
i.LINK-COBMecTIma annpaTpya MoKeT 6bItb NOcOeINHeHa eINHCTBHeHHIM Ka6eIem i.LINK. Bo3MOxHbIe pImeHEnHn BkInouaIOT obp6Otky npeJaU daHNbIX c NOMoUbIO pa3NNUHOI uFpBOB ayDINO/BnDeO annpaTpybl. EcnI Dba IuNBolee i.LINK-COBMecTImbIX annpaTa NOcOeINHeHbIK DaHHOMy annpaTy NocJeIOBaTeJbHOI ZeNoCHKO, BO3MOxHbI Opb60TKa INpeJaDaHNbIX He TOnbKO Ha annpaType, K KOToPOI NOcOeINHeH daHNbI annPapAT, Ho TaKke I Ha dpyrNX yCtPoIcTBax ueE3 HapRMyIO NOcOeINHeHnyo annpaTpy. 3aMeTbTe, TEM He MeHee, YTO mToD pa60Tb INOHDA OTNIuaeTcRcIaCHO OcOBeHHOCTjam TEXnueckmX xapaKTeprnCTNKam annpaTpybl, KOTOpYIO HxJHXo NOcOeINHTb, I YTO o6pa60Tk a INpeJa DAHNbIX INHorda HEBO3MOxHbI Ha HeKOTOpBX IOcOeINHeHbIX annpaTax.
Ppmeuahne
O6bIyHO TOJbKO OINH aannapat MOKeT 6bITb NOcEOHNEN K DaHHOMY aannapATy C NOMOuHO Ka6eI.i.LINK. Iprn NOcEOHNEN DaHHORo aannapata K i.LINK-COBMeCTHMoA aannapATye c DByM INI 60OE rHe3dAMn i.LINK (InTepeiCamm MICROMV), o6paauTeCb KpyKOBODCTBY nO 3KcPnPyATAuIN aannapATypbl, KOToPYU HxKHO NOcEOHNHTb.
O Ha3BaHn "i.LINK"
i.LINKBnAETc60Jee y3HaBaEmbIM
onpeJeIeHmEMdIaIHHbI TpaHCnOpTa DaHHbx
IEEE 1394, npEIOKeHbIM Sony, n ABJIeTcra
fnpMeHbIM 3NaKOM,yTBepKJDeHHbIM MHOrIMN
kopnapaunM. IEEE 1394 ABnAEtca
MxJyHapOdbHbIM CtaHdaptOM,
CTaHdaptIN3OBaHbIM IVHCTHTyTOM INHXeHepOB
no 3JNeKTPOTEXHKe n 3JNeKTPOHKe.
i.LINK baud rate
The maximum baud rate of your camcorder is "S400".
i.LINK's maximum baud rate varies according to the equipment. Three maximum baud rates are defined:
S100 (approx. 100Mbps*)
S200 (approx. 200Mbps)
S400 (approx. 400Mbps)
The baud rate is listed under "Specifications" in the operating instructions of each equipment. It is also indicated near the i.LINK (MICROMV Interface) on some equipment.
The maximum baud rate of equipment, except for this unit, on which it is not indicated is "S100".
When units are connected to equipment having a different maximum baud rate, the baud rate sometimes differs from the indicated baud rate.
*What is Mbps?
Mbps stands for megabits per second, or the amount of data that can be sent or received in one second. For example, a baud rate of 100Mbps means that 100 megabits of data can be sent in one second.
i.LINK functions on this unit
For details on how to dub when this unit is connected to other video equipment having DV jacks, see page 107, 112.
This unit can also be connected to other i.LINK (MICROMV Interface) compatible equipment made by Sony (e.g. VAIO series personal computer) other than video equipment.
Before connecting this unit to your computer, make sure that application software supported by this unit is already installed on your computer.
For details on precautions when connecting this unit, also refer to the operating instructions for the equipment to be connected.
Required i.LINK cable
Use the Sony i.LINK 4-pin-to-4-pin cable (during MPEG2 dubbing).
i.LINK and are trademarks.
Скорocъ перауддаHHbIX i.LINKВбодан
MaKcImaJIbHaIckOpOCTbpeepaHnDaHHbIX BaIeBIVideOkAmePbIb60daxcoCTabJIeT“S400" MaKcImaJIbHaIckOpOCTbpeepaHnDaHHbIX i.LINKB60daxpa3JIuHaeTcORnaCHO annapatype. OnpeJeHeblTrnMaKcImaJIbHbIe ckOpocTIpeepaHnDaHHbIXB60dax:
S100 (πριδλ. 100 M6πτ/c*)
S200 (npn6n. 200 M6nT/c)
S400 (npn6n. 400 M6nT/c)
CkopocTb nepaun daHbIX B 60dax yka3aHa B pa3deJe "Texnueckne xapaKtepncTKn" HCTpyKuIN NO kCNpIyatauM KaxdoTO annapata. OHa TaKxe yka3bIbaeTcB6ln3n rheJa iLINK (ntepceca MICROMV) Ha HeKOToPbx annapatax.
MaKcMmaIbHoi CKOpocTbIO nepeaun daHHbIX B 6oJax dIra aannapatOB, Ha KOTOpbIX OHa He yka3aHa, 3a NCKJIouHeHem DaHHoro annpapaTa, AIBnIeTcra "S100".
Ecnn annapaTbI NOcOeHnHOTcK
6obpydoBaHnO cpa3NHyOH MaKcMmaJIbHOI
CKOpocTbIO nepeaCh DaHHbX B 6oDaX, CKOpocTb
peepaDnHaHHbX B 6oDaX HnORda OTnIaeTcR OYka3aHHOckOpocTN peepaCh DaHHbX B 6oDaX.
\*4To TaKoe M6nt/c?
M6t/T c 063NaeAET MeraBNT B cekyHny, nIIN KOniuehCTBO daHHbIX, KOtOpBie MOrY T obItb NocNahIbNO INPiNHATb 3a OdHy cekyHny.
HaNpMpE,CKoPoCTbIpeDaIyDaaHbIXB6OaX 100M6nT/c6o3Haaye,TtO10Mera6nT daHbIXMOrT6bITbIOcnaHb3aOHyCeYHd.
Функции i.LINK Ha 3Tom annapate
Using your camcorder abroad
Using your camcorder abroad
Countries and areas where you can use network functions are restricted. For details, refer to the separate Network Function Operating Instructions (DCR-IP220E only).
You can use your camcorder in any country or area with the AC power adaptor supplied with your camcorder within 100V to 240V AC, 50 / 60Hz .
Your camcorder is a PAL system based camcorder. If you want to view the playback picture on a TV, it must be a PAL system based TV with VIDEO/AUDIO input jack. The following shows TV colour systems used overseas.
PAL system
Australia, Austria, Belgium, China, Czech Republic, Denmark, Finland, Germany, Holland, Hong Kong, Hungary, Italy, Kuwait, Malaysia, New Zealand, Norway, Poland, Portugal, Singapore, Slovak Republic, Spain, Sweden, Switzerland, Thailand, United Kingdom, etc.
PAL-M system
Brazil
PAL-N system
Argentina, Paraguay, Uruguay
NTSC system
Bahama Islands, Bolivia, Canada, Central America, Chile, Colombia, Ecuador, Guyana, Jamaica, Japan, Korea, Mexico, Peru, Surinam, Taiwan, the Philippines, the U.S.A., Venezuela, etc.
SECAM system
Bulgaria, France, Guiana, Iran, Iraq, Monaco, Russia, Ukraine, etc.
Maintenance information and precautions
Moisture condensation
If your camcorder is brought directly from a cold place to a warm place, moisture may condense inside your camcorder, on the surface of the tape, or on the lens. In this condition, the tape may stick to the head drum and be damaged or your camcorder may not operate correctly. If there is moisture inside your camcorder, the beep sounds and the indicator flashes. When the indicator flashes at the same time, the cassette is inserted in your camcorder. If moisture condenses on the lens, the indicator will not appear.
If moisture condensation occurred
None of the functions except cassette ejection will work. Eject the cassette, turn off your camcorder, and leave it for about one hour with the cassette compartment open. Your camcorder can be used again if the indicator does not appear when the power is turned on again.
If moisture starts to condense, your camcorder sometimes cannot detect condensation. If this happens, the cassette is sometimes not ejected for 10 seconds after the cassette lid is opened. This is not a malfunction. Do not close the cassette lid until the cassette is ejected.
Note on moisture condensation
Moisture may condense when you bring your camcorder from a cold place into a warm place (or vice versa) or when you use your camcorder in a hot place as follows:
- You bring your camcorder from a ski slope into a place warmed up by a heating device.
- You bring your camcorder from an air-conditioned car or room into a hot place outside.
- You use your camcorder after a squall or a shower.
- You use your camcorder in a high temperature and humid place.
How to prevent moisture condensation
When you bring your camcorder from a cold place into a warm place, put your camcorder in a plastic bag and tightly seal it. Remove the bag when the air temperature inside the plastic bag has reached the surrounding temperature (after about one hour).
Maintenance information
Cleaning the video head
To ensure normal recording and clear pictures, clean the video head. The video head may be dirty when:
- Mosaic-pattern noise appears on the playback picture.
-Playback pictures do not move. - Playback pictures do not appear.
- The indicator and "CLEANING
CASSETTE" message appear one after another or the × indicator flashes on the LCD screen during recording.
If the above problem, [a] or [b] occurs, clean the video heads with the Sony MGRCLD cleaning cassette (optional). Check the picture and if the above problem persists, repeat cleaning.
[a]
If the video heads gets dirtier, the entire screen becomes blue [b].
The video head
The video head wears out if you use the camcorder for a long time. When use of the cleaning cassette does not make the picture clear, the video head may have worn out. In such cases, you must replace the video head. For details, contact your Sony dealer or local authorised Sony service facility.
Kak npedotBpataNb KOHdeneau BlaIg
Ecni BnIeOKaMepa npinHeceHa n3 xOIoNHO
MeCTa B TeTnloe MeCTo, noLoXKeTe BaUy
BnIeOKaMepy B NOIe3TNHeOBb NpAKETn
HaJeKHO 3akpoTe erO. Y6epiTne pAKET, KOrda
TempepaTypa Bo3Dxa BHyTpIn
NOIe3TNHeOBFO NaKeTa DoCTINHET
TempepaTypbOkpykaIOuEero Bo3Dxa
(Prn6JIIn3NTeJbHoYepe3 ODNH Yac).
HΦopMaζη no yxOу 3a annapaTOM
OuNCTKa BnDeoROJOBKn
ДяобспесеняHopmaльho3a\Pu nUyETKOrO n3O6paXeHnCneDyET nepINOdupeckOnOuNtBvIeOroLOBky.BuIeOroLOBka,BO3MOxHO,3aRp3HeHa,ecnI:
-Ha BOCPON3BOIDNM N3O6paKeHIN NOBJIHO7C TOMEXN TINA M03aIKN.
-Bocnpo3B0Dmblte n3obpaxhen He DBNrAOTc.
-Bocnpou3BOIDmblieH3O6paXeHnHe nOBJIHOCTCA.
-Bo Bpemr 3aIncn INDkaTOp × n COo6eHne "CLEANING CASSETTE" noBJIOTcra Ha 3KpaHe JkD oJHO 3a npYrIM, INI INDkaTOp MmTaet.
B clyae Bo3HKnHOBeHn yKa3aHHbIX BblIe np6bem [a] nIi [b].OuCTIte BnDEoROrOBKn c nmoUbIO uCCTraIe KAcceTb Sony MGRCLD (np6pTaetcAOnDeIbHO).PpOBepTe n3ObpaKeHne I,ecn ONCaHNbIe BblIe np6bEmbl He yctpaHnInCb, NOBTopnte YnCTKy.

[b]
Ecni BnIeOroJIOBKn CtaHyT eUe rpa3Hee, BeCb 3KpaH CtaHET CnHIM [b].
Bundeorolobka
BnDeorOJOBKa n3HocntcA,ecn Bb6ydeTe
NCNoIb3OBA Tb BnDeOKaMepy B TeueHne
dIInTeIbHOro BpeMeHN. EcnPiNcNe
NCNoIb3OBAHnY ChCTaIeKacCeTbI
n3O6paXKeHne He CTaHOBITcR OTeTINBeE,
BO3MOxHO, n3HOcNlAcB BnDeORoJOBKa. B TaKnx
CnyaXn BnDeorOJOBKy Heo6XoDIMO 3aMeHNTb.
3a NoJIyHeHem 60nee noPdo6HOnn HfOpMaun
obpaTnTEcb B cepBnChb IeHTp Sony nnB
MeCTHoe yNOLHOMOueHHoe ppeIpnrTne NO
06CnJxKnBaHnIO n3JeIy Sony.
Using a cleaning cassette
(1) Set the POWER switch to CAMERA or VCR.
(2) Insert the cleaning cassette.
(3) Press OK on the LCD screen. The message "NOW CLEANING" appears.
After the cleaning is finished, the message
"CLEANING END" appears.
(4)Eject the cleaning cassette.
To cancel cleaning
Press CANCEL.
Notes
- When cleaning the video head, do not use any equipment other than the cleaning cassette.
- The cleaning cassette does not work in MEMORY/NETWORK mode.
Cleaning the LCD screen
If fingerprints or dust make the LCD screen dirty, we recommend using a cleaning cloth (supplied) to clean the LCD screen. When you use the LCD Cleaning Kit (optional), do not apply the cleaning liquid directly to the LCD screen. Clean the LCD screen with a cleaning paper moistened with the liquid.
Charging the built-in rechargeable battery
Your camcorder is supplied with a built-in rechargeable battery installed so as to retain the date and time, etc., regardless of the setting of the POWER switch. The built-in rechargeable battery is always charged as long as you are using your camcorder. The battery, however, will get discharged gradually if you do not use your camcorder. It will be completely discharged in about three months if you do not use your camcorder at all. Even if the built-in rechargeable battery is not charged, it will not affect your camcorder operation. To retain the date and time, etc., charge the battery if the battery is discharged.
Charging the built-in rechargeable battery
- Connect your camcorder to a wall socket using the AC power adaptor supplied with your camcorder, and leave your camcorder with the POWER switch turned off for more than 24 hours.
- Or insert the fully charged battery pack in your camcorder, and leave your camcorder with the POWER switch turned off for more than 24 hours.
IcnoJIb3OBaHne YnCTaue KACCetbl
(1)YcTaHOBInTe NepeKJIIOUaTeIb POWER B noJIOKeHne CAMERA nnn VCR.
(2) BctabbTe YnCTaIyU Kaccety.
(3)HaKMMTE KhoNky OK Ha 3kpaHe KKД. ПогВNTсС COO6шЕнE “NOW CLEANING”. ПосLE 3aBepShENIA ONUCTKN PONBNTcC COO6шЕнE l CLEANING END”.
(4)ИЗВЕКINTe YIСТЯЦYO KACCEТY.
ДЛЯ OTMEHBI OYNCTKN.
HaKmTe KhONKy CANCEL.
PpimeyaHn
Пиочstke BnDEOroIobKN He NCNoB3yTe HNKaKeO dpyroe obOpdyoBaHne, KpOme YNCTrauSeKacCtBt.
-ЧИстая касета He pa60taeВ ржимEMEMORY/NETWORK.
OuICTKa 3KpaHa KKd
EcnI OTNeUaTKn NaJIbueB ININ NbIn 3arp3HraOT 3KpaH XXKD,peKomeHdyeTcB BOCNoJb3OBAtbcr YNCTAunm IockyTom (PnIJaRaTeC) dNl OOnCTKn 3KpaHa JKKD, PnIcNOL3OBAHm Habopa dNl OUnCTKn KK(D npNIO6peTaeTcR OTDeNbHO) He HaONCTe YNCTaUHy XnIDKOCTb HENOCpeDCTBeHHo Ha 3KpaH XXKD. OOniuaTe 3KpaH XXKD, YNCTaUeB yMaRo, CMOeHHoB 3TOI XnIDKOCTN.
3apKa BCTpoEHoIpepe3apXaemO6aTaepKu
Baasa Bndeokama epo ochaueha BCTpoehnoi nepe3apjxaemoi 6aTapeikco, yctahOBlenhoI nIraTOO, YTObI IOndepkXnBaTb DaTy, BpEmr I T.IN., BHe 3ABNCIMOCTN OYCTAHOBKN pekeKnUoyateJNA POWER.BCTpoehna npe3apjxmaeMa 6atapeiKa BCerda 3apjxaetcR, KOrDa BbI NcNoJIb3yTe Bauy BnDEOKaMEpy. Ondako, 6aTapeiKa NOCTeHNO pa3prnITcR, ecnBbI He 6yTe NcNoJIb3ObaTb BAsy BnDEOKaMEpy. OHa 6yTe NOINOCtBu pa3prxhe npimepHo Uepe3 TPr Mecra, ecnBbI BOo6e He 6yTe Te NcJIb3ObaTb CaWe BnDEOKaMepor. Jaxe ecnn BCTpoehna npe3apjxaemai 6atapeiKa He 3apjxheA, 3To He NobInreTa Hpa60Tu BnDEOKaMepy. YTObl IOndepkXnBaTb DaTy, BpEMr I T.IN., 3apJnte 6batapeky, ecn OHa pa3prdnilacb.
3apnka BcTpoEHNO nepe3apXaEMo6aTapeKn:
-ПодсоевинITEБауВидаокамepyК
Злелктуческов сети,Инрпьз汞 сетево
адалтетерпесеменогToKa,pinnaragaemblK
Башewидаокамeper,иocstавыТБаш
ВидаокамeperСБыклю悔HHbIMпескючatelem
POWERбОлee,ЧЕн ha24чaca.
- YIIN yCTaHOBNTe NOHOCbTO 3apJXeHHbI batapeHbN 6bKn B Bauy BnDEOKaMEpy, n octaBtBe BaUy BnDEOKaMEpy c BblKJIuOeHHbIM nepeKJIuOaTeJeM POWER 60nee, Yem Ha 24 Yaca.
Removing dust from inside the viewfinder
(1) Open the LCD panel.
(2) Remove the screw with a screwdriver (optional).
(3) Slide the viewfinder about 1.5mm (1/16 in.) to the left and then pull it to remove the eyecup.
YdaJIeHne nbln n3HyTpN BVDOnCKaTeIa
(1)ОТкpoIte паньЖКД.
(2)YdaJIInTe BnHT C NOMOuHO OTBepTKI (Pnpo6peTaetcO TDeJIbHO).
(3)CdbnHbTe BINOckaTeIb npIMepHo Ha 1,5 MM BNeBO,a 3aTEM NOTAHHTe ero, YTO6bl N3BLeCb OKyIap.

(4) Remove dust from inside the eyecup and viewfinder with a commercially available blower.
(5) Reverse the above steps 2 and 3 to attach the eyecup. Then replace the screw.
Caution
Do not remove any other screws. You may remove only the screw to remove the eyecup.
Notes
- Do not drop or bend the eyecup shaft.
- Be careful when handling the eyecup.
He ydaJIaIte HnKaKne DpyrNe BnHTbI. TTo6bI CHaTb OkyIrp, Bam HyxHNo ydaIITb TOnbKO yka3aHHbBnHT.
Примеань.
- He pōnǎrTe n He crɪbərTe Koprnyc Okyjápa.
- Пи образецни с okулгом соблдай Te octopoxkHocTb.
Adjusting the LCD screen (CALIBRATION)
The buttons on the touch panel may not work correctly. If this happens, follow the procedure below.
(1) Set the POWER switch to (CHG) OFF.
(2)Eject the tape from your camcorder, then disconnect any connecting cable from your camcorder.
(3) Close the LCD panel with the LCD screen facing out.
PerynipoBka 3KpaHa XXKd (CALIBRATION)
KhoNnHa ceHcOHO nAHeJIM MOrYT He pa6oTaTb HaIeXaUIM O6pa3OM. EcIn 3To npOn3oIeT, CNeDyIte OINcaHHo HNXe npOceDype.
(1) YctaHOBInTe napeKJIouaTeIb POWER B noJIOKeHne (CHG) OFF.
(2)ИЗВЛЕКИТЕ KACCEТУ C ЛENTОД ИЗ Вашей ВИДЕОКAMеры, a 3aTeM OTCоEДИНITE OТ Вашей ВИДЕОКAMеры BICE COeДИНTEЛьнIBLE KaБЕПИ.
(3)Зakpoite naheJIжД tak,чTo6bl экpan JKKД bIbОрашен hapxу.
DISPLAY/TOUCH PANEL
(4) Set the POWER switch to VCR while pressing DISPLAY/TOUCH PANEL, then keep pressing DISPLAY/TOUCH PANEL for about five seconds.
(5)Follow the procedure below with your finger or the supplied stylus (DCR-IP220E only).
① Touch x at the upper left corner.
② Touch x at the lower right corner.
③ Touch x in the middle of the LCD screen.
(4)Установпейреключateь POWER в положене VCR, уdeckжваянжатои Кногку DISPLAY/TOUCH PANEL, и далец уdeckжваятейнжатои Кногку DISPLAY/TOUCH PANELВ Teчени有很大ерснояпгту секунд.
(5) CnéduyTe OπncaHNoH NHXe pnoceDype, nCnoB3yR Baaw naIeU nII npnlaeraemoe nepo (Tolbko moDeJIb DCR-IP220E).
You can only carry out this operation with the LCD screen in the step 3 position.
PpimeyaHne
Bb CMOKeTe BbINHnTb 3Ty OpeaunTOJbKO C nOmoIbIO 3KpaHa KKД B noLoXeHN IyHKTa 3.
Precautions
Camcorder operation
- Operate your camcorder on 7.2V (battery pack) or 8.4V (AC power adaptor).
- For DC or AC operation, use the accessories recommended in this operating instructions.
- If any solid object or liquid get inside the casing, unplug your camcorder and have it checked by a Sony dealer before operating it any further.
- Avoid rough handling or mechanical shock. Be particularly careful of the lens.
- Keep the POWER switch set to (CHG) OFF when you are not using your camcorder.
- Do not wrap your camcorder with a towel, for example, and operate it. Doing so might cause heat to build up inside.
- Keep your camcorder away from strong magnetic fields or mechanical vibration.
- Do not touch the LCD screen with a sharp object other than the stylus supplied (DCR-IP220E only).
- If your camcorder is used in a cold place, a residual image may appear on the LCD screen. This is not a malfunction.
- While using your camcorder, the back of the LCD screen may heat up. This is not a malfunction.
- Do not use the network function in a medical institution or in an aircraft (DCR-IP220E only).
On handling tapes
- Do not insert anything into the small holes on the rear of the cassette. These holes are used to sense the type and thickness of the tape and if the recording tab is in or out.
- Do not open the tape protect cover or touch the tape.
- Avoid touching or damaging the terminals. To remove dust, clean the terminals with a soft cloth.
Mepblpeoctopoxhoctn
3KcnIyataunBndeokamepbI
- 3KcnpnyatnpyTe Bawy Bndeokamepy npn 7,2 B (6aTaapeHbIb 6JIoK) nnn 8,4 B (ceTeBoi aDanTep nepemehHoro Toka).
- UTo Kacaetc3KcNpyaTaunBnDeokamepbI OT NOCTOARHHORIO ININ NpeMeHNO TOKA, INCNoJIb3yInTe PnHaJnEKeHocTn, peKOMHeNyEMbIE B DaHHO INHCTpyKcUNo 3KcNpyaTaun.
Ecn Kaokn-HbD TBepdb npEdMeNnn Kxdkoctb npana BHytpb Kopnyca, BblKnOHTe Baay BuDeOkamepy N obecneBte ee npobepky B cepBCHom cHtpe Sony nepeed ee daJIbHeuWekcCnpyatauei.
-Избегаийтгрубого образецни видевокамерюл'm Меническх удаюВудьт ecobенho octopoxнblc obkektivbom. - Ecni Baasa Bndeokamepa He nCnoJIb3yeTcra, ycTaHOBInTe nepeKlnOuataIb POWER B noNoXeHne (CHG) OFF.
He 3abopauBaIte Bauy Bndeokamepy, Hnnpmep, BnoTneHue, n He 3KcPnyaTnpyute ee B TAKOM COCToHnn. B npotnbHom cnyae MoKeT npOn3OHTn NOBbUeHne TempepaTpybl BHYTpN BnDeokamepbl.
-ДерхиTe BaSu Wy BnDeokamepy noJaIbWe ot CInIbHbIX MaHnTHbIX NOJIe INJIM MExaHnueckoBn6paun. - He npikacaiTecb K 3kpaHy KKIOcTpbIMn ppeMeTaM, OTNIuHbIMN OT npilraeMOrO nepa (ToIbKO MoJeB DCR-IP220E).
-ПиЗКСПЛУаТaцИn Baшeи BИДeOKaМepыВхОДнOM MeCTe Ha 3KpaHе XXKД можетпЯВЛЯТсЯ OCTaTOчHoe ИЗБраЖeHne.ЗTo He AВЛЯТСЯ HENСРаВнOCtьO.
-ПинэкплуataциВашевидевokamepы 3адясторна ekрараЖКД может HarpeBaTc.3TO HeЯBnEТсЯ HeICnpaBHOCTbO. - He nCnoIb3yIte CeTeByIO yHKnIIO, hXoIaBcB B MeDnIHCKOM yUpeKJdeHm IIN Ha camOJeTe (ToIbKO moJeB DCR-IP220E).
06 obpauehenn c JeHTamn
He BCTabnIe HnHero B MaIeHbKne OTBepCTNa Ha 3aIHei CTOpOHe KacCeTbI.3TN OTBepCTNa IcONb3yOTcRdIg ONpeDeIeHn TINa NTOIuHbI JeHTbI, a TaKxE dJIr ONpeDeIeHn HAIuHn IJN OTCyTCTBn JIeNEcTKa 3aunTbI OT 3aIMCn.
He OTKpbIbAaTe 3aunTHyO KpbIuKy IeHTbI He npKacaiTecb KJeHTe.
- ɪəsərəaɪte npɪkɔchɔbēnɪŋ K KOtʌkTam nɪn
ɪx nobpɛkʌdɛnɪŋ. Ytɒbɪ yɪdaɪntb nbɪnb,
ɪpɒtpɪte KOtɑkʌtɪ bɪ LOCKYOM MʌrKɔj TkaHɪ.
Camcorder care
- Remove the tape, and periodically turn on the power, operate the CAMERA and VCR sections and play back a tape for about three minutes when your camcorder is not to be used for a long time.
- Clean the lens with a soft brush to remove dust. If there are fingerprints on the lens, remove them with a soft cloth.
- Clean your camcorder body with a dry soft cloth, or a soft cloth lightly moistened with a mild detergent solution. Do not use any type of solvent which may damage the finish.
- Do not let sand get into your camcorder. When you use your camcorder on a sandy beach or in a dusty place, protect it from the sand or dust. Sand or dust may cause your camcorder to malfunction, and sometimes this malfunction cannot be repaired.
AC power adaptor
- Unplug the unit from a wall socket when you are not using the unit for a long time. To disconnect the mains lead, pull it out by the plug. Never pull the mains lead itself.
- Do not operate the unit with a damaged lead or if the unit has been dropped or damaged.
- Do not bend the mains lead forcibly, or place a heavy object on it. This will damage the lead and may cause fire or electrical shock.
- Prevent metallic objects from coming into contact with the metal parts of the connecting section. If this happens, a short may occur and the unit may be damaged.
- Always keep metal contacts clean.
- Do not disassemble the unit.
- Do not apply mechanical shock or drop the unit.
- While the unit is in use, particularly during charging, keep it away from AM receivers and video equipment. AM receivers and video equipment disturb AM reception and video operation.
- The unit becomes warm during use. This is not a malfunction.
- Do not place the unit in locations that are: -Extremely hot or cold
Dusty or dirty - Very humid
Vibrating
YxOa 3a BnIeOkamepo
BbHIMaTe KACCETy CJeHTOnI nePNOJUHeCKN BkJIIOuAte NITaHne, nepeKIOuAteTcB NIOJoxEHnCA CAMERA n VCR N BOCpON3BODIne JENTy B TeueHne npImepHO Tpex MmHT, ecn BaSha BUNeOKAMepa He 6yDet NcNoJIb3OBaTbcra DINITeNbHOe BpEM.
OuIaIe ObEeTINB C NOMoIbIO MRAKoN KNCTOUKN DnA ydaJIeHNI bIIIN. EcJI INMeOTCnOTpeTKn NaIbueE Ha ObEeKTInBE, ydaJIInTe IN C NOMOJIbIO MRKO TKAHN.
OuimaTe Kopnyc Bauei BndeokamepbI c NOMOJIbIO CYXON MfKoN TKAHN IJN MfKoN TKAHNI, CJIeKCa CMoueHHo pactBOPOM yMepeHHoro MOUoJero cpeCTBa. He NCNoJIb3yIte KAKIX-NINBO TINOB pactBopnteJeN, KOtOpIbe MOrYT NOBpeNTb OTDeJIky.
He donyckaIte nonaDaHnI necka B BaWb
BnuDeokamepy.Ecnn BblncnoJIb3yeTe
BnuDeokamepyHa ncecaHOM nJIeKe IINB
KaKoM-JIn60 NblbHOM MeCT, npeOxoPaHnIte
ee ot necka nnPi. NpCOK nIIIN PbIb MOryt
npNBeCTKn HeNCnPabHocTn BaWei
BnuDeokamepbl, KOtOPaI INHOrda MoXET 6blTb HeyCTpaHnMoI.
Cetebon aadantep nepemehnHO Toka
- OTCOeINHInTe aannapat OT 3JleKtpnueckoCetn, ecnn OH He IcNOB3yETcI JInTEbHOE BPEM. IJIa OTcoeINHeHnI PpOBd 3JleKtpOniTahnI NOtAHNITE erO 3wTencelbHyU BuNKy. HIKOrda He TAHNITe 3a cam pOBOD.
He 3KcIpyaTpyuTe annapat c nobpeXdHbIM npBOoDM nn Jx B Cnyae, ecnn anappat yanl nn nbl noBpeXdH.
He crnbaiTe npoBOD 3neKTPoNTaHnCnOIO n He cTAbTe Ha Hero TAgKeIbe PpeDMeTb.I.3To NOBpeINT npoBOID mOKeT pINBeCTN K NOXApy IIn NopaxeHnO 3neKTPuYeCKIM TOKOM.
He donyckaTte cOpnKoCHOBeHnA MeTaNlueckxnpEaMeTOB C MeTaNlueckmK KOHTaKTAMn COeINHtEnbHOI pJAcTHNb.I EcJI N 3To CnyHTCn, TO MOKeT npON3OITN KOPOTKe 3AmbKaHne, n AnnapaT MoKeT 6bItb NOBpeXDeH.
CneInte 3a Tem, YTO6bl MeTALNIueCKNe KOHTaKTbI 6blIN NCTbIMN. - He pa3bpaaiTe annapat.
- He noДверраиTe anпарТ MexaHnueckm ydapam n He poHЯTe erO.
-Прии срльзовани annapaTa,OC6eHNO BO BpEm 3apJdkn,Держnte erO noJaIbSe OTe npiemHKnOB AM-paDInObeuaHnru BnDeoanpaTpybl.Y npiemHKnOB AMpAOnBeeuHaHnru BnDeoanpaTpybl HapyuSaetcAM-paDInOpnpmE nФункционпobAoHne BVdeo.
B npocce 3Kcnjnyataun annapat harpeBaetc. 3To He nBnAeTcH enCnpaBHOCTbIO. - He pacnonaraa Te annapat B Mectax: -Upe3MepHo JxapKIN XIN XOJNOHbIX -PiIbNbHbIX ININ Tpr3HbIX -OChEB BlaXhBix
-ПоДВержЕньх ВибрацИN
About care and storage of the lens
- Wipe the surface of the lens clean with a soft cloth in the following instance:
- When there are fingerprints on the lens surface
-In hot or humid locations - When the lens is used in environments such as the seaside
- Store the lens in a well-ventilated location subject to little dirt or dust.
To prevent mold from occurring, periodically perform the above.
We recommend turning on and operating your camcorder about once per month to keep your camcorder in an optimum state for a long time.
Battery pack
- Use only the specified charger or video equipment with the charging function.
- To prevent an accident from a short circuit, do not allow metal objects to come into contact with the battery terminals.
- Keep the battery pack away from fire.
- Never expose the battery pack to temperatures above 60^ (140^) , such as in a car parked in the sun or under direct sunlight.
- Store the battery pack in a cool, dry place.
- Do not expose the battery pack to any mechanical shock.
- Do not disassemble nor modify the battery pack.
- Attach the battery pack to the video equipment securely.
- Charging while some capacity remains does not affect the original battery capacity.
06 yxode 3a obbeKTbOM n o erO xpaHeHH
OuHuaTe NOBepxHocTb OBeKTHBa MArKoTKaHbO B CNeDyUOUX CnyaX:
-ECINHaNoBepxHocTnObbeKTHBaecTb OTneuATNIaIbueB
-BJxNINBnAkhbIXMeCTax
-При Исплььовани объektва Такnx MeCTax, КАМорскoe побержы
XpaHnTe 06bEeKTHB BXopoWIO npOBeTpnaEBaEMOM MeCTe,3aUuIeHHOM OT rpr3N INblIN.
Bo n36bexkHne noRbIeHnI neceHn nepoNDUeCKN BblIOJIHrTe OINCAHHbIe BblIe npOcEdupl.
PekomeHnyeTcBkIIOuATb BaUy BnDeokamepy I NOJIb3OBAtbcra eIO pIMepHO OIN pa3 B MeCau IIN IOndepXaHIN BnDEOKaMepbl B ONTIMaJIbHOM COCTOAHIN B TeueHne DInTeJIbHOro BpeMeHN.
BaTapeHbIb6Jok
- IcnoIb3yIte TOnIbKO peKoMeHdyEmoe 3apJHOe yCTPOIcTBO ININ BnJeOaPapaTypC 3apJHOHФyHKUeN.
-ДлгпрдOTВрашенн HeсчacTHOrO cnyuaHn3-3a KOPOTKOrO 3aMbIkaHn He ДOnyckaIteKOHTaKtA MeTaNJIuYeCKNx PpeMTeOB CKOHTaKtAm6BaTapeHnOro 6NoKa.
XpaHnTe 6aTapeeHbI 6JOK BdaIOn OT OrHa. - HnKorJa He noDbEprAte 6aTapeHbI b6nok BO3dJeCTBnIO TempeaTp CBbIe 60^ Hapnpimep, B npnapkoBaHHOM NOI COJIHcEM aBTOMObIe IIN IOI npRbIM COJHeHbIM CBETOM.
XpaHnTe 6aTaapeHbI 6JIOK B npoxlaHOM, cyxom MeCTe. - He noDBeprAte 6aTapeHbI bLoK BO3DeIcTBnIO KaKnx-Jn6o MExaHnuecknx yIapOB.
- He pa3bnpaTne n He BnDOn3MeHraTe 6aTapeuHbI 6LoK.
- Плотно пркpenпг Te 6atapeHbI 6LoK K Bndeoannapatype.
- 3apnka 6atapeu, y KOTOPoE uEe NMeETcHemHOrO 3apHa, He NOBInaRrTaHa NcXoHyoEMKocTb 6atapeu.
Notes on dry batteries
To avoid possible damage from battery leakage or corrosion, observe the following:
- Be sure to insert the batteries with the + - polarities matched to the + - marks.
- Dry batteries are not rechargeable.
- Do not use a combination of new and old batteries.
- Do not use different types of batteries.
- Current flows from batteries when you are not using them for a long time.
- Do not use leaking batteries.
If batteries are leaking
- Wipe off the liquid in the battery compartment carefully before replacing the batteries.
- If you touch the liquid, wash it off with water.
- If the liquid get into your eyes, wash your eyes with a lot of water and then consult a doctor.
If any problem occurs, unplug your camcorder and contact your nearest Sony dealer.
Video camera recorder
System
Video recording system
2 rotary heads
Helical scanning system
Audio recording system
MPEG1 Audio Layer2
(Fs 48 kHz, stereo)
Video signal
PAL colour, CCIR standards
Usable cassette
MICROMV cassette with the
mark printed
Tape speed
Approx. 5.66mm / s
Recording/playback time
(using cassette MGR60)
1 hour
Fastforward/rewind time (using cassette MGR60)
Approx. 1 min. and 30 seconds
Viewfinder
Electric viewfinder (colour)
Image device
5.0mm (1/3.6 type) CCD
(Charge Coupled Device)
Gross: Approx. 2110000 pixels
Effective (still):
Approx. 1920000 pixels
Effective (moving):
Approx. 1080000 pixels
Lens
Carl Zeiss Vario-Sonnar T*
Combined power zoom lens
Filter diameter 37mm (1 1/2 in.)
10 × (Optical), 120 × (Digital)
Focal length
4.5 - 45mm (3/16-1 13/16 in.)
When converted to a 35mm still camera
CAMERA:
52 - 520mm (21 / 8 - 201 / 2 in.)
MEMORY:
39 - 390mm (1 9 / 16 - 153 / 8 in.)
Colour temperature
AUTO,HOLD,INDOOR
(3 200K), OUTDOOR (5 800K)
Minimum illumination
7 lx (lux) (F 1.8)
0 lx (lux) (in the NightShot mode)*
- Objects unable to be seen due to the dark can be shot with infrared lighting.
Input/Output connectors
Audio/Video input/output
10-pin connector
Input/output auto switch
Video signal: 1 Vp-p, 75 Ω (ohms), unbalanced, sync negative
Luminance signal: 1Vp - p 75
(ohms), unbalanced
Chrominance signal: 0.3Vp - p 75
(ohms), unbalanced
Audio signal: 327mV (at output impedance more than 47k (kilohms))
Input impedance with more than 47k (kilohms)
Output impedance with less than 2.2k (kilohms)
i.LINK (MICROMV Interface)
input/output
4-pin connector S400
LANC jack
Stereo mini-minijack ( 2.5mm)
USB jack
mini-B
Headphone jack
Stereo minijack ( 3.5mm)
LCD screen
Picture
6.2 cm (2.5 type)
Total dot number
211 200 (960× 220)
Wireless communication (DCR-IP220E only)
Communication system
Bluetooth specification Ver.1.1
Maximum communication speed ^1) 2)
Approx. 723 kbps
Maximum output
Bluetooth specification Power Class2
Communication distance
Approx. 10m (33 feet) (Open space, when using a Sony BTA-NW1/
NW1A Modem Adaptor with Bluetooth Function)
Compatible Bluetooth profiles3)
Generic Access Profile
Dial-up Networking Profile
Usable frequency band
2.4 GHz band
(2.400 - 2.4835 GHz)
1) The maximum rate defined by Bluetooth specification Ver.1.1
2) Depends on obstacles between the Bluetooth devices, radio wave conditions, etc.
3) Defined by Bluetooth specification for intended use between the Bluetooth devices
General
Power requirements
7.2 V (battery pack)
8.4 V (AC power adaptor)
Average power consumption (when using the battery pack)
During camera recording using LCD: 4.8 W
Viewfinder: 4.2 W
Operating temperature
0^ to 40^ (32^ to 104^)
Storage temperature
-20^ to +60^ (-4^ to +140^)
Dimensions (approx.)
98× 75.5× 136mm
(37 / 8× 3× 53 / 8 in. (w / h / d)
Mass (approx.)
520 g (1 lb 2 oz)
excluding the battery pack and cassette
630 g (1 lb 6 oz)
including the battery pack,
NP-FF70, cassette MGR60, lens cap and stylus
Supplied accessories
See page 25.
AC power adaptor
Power requirements
100-240VAC,50/60Hz
Power consumption
23 W
Output voltage
DC OUT: 8.4V 1.5 A in the
operating mode
Operating temperature
0^ to 40^ (32^ to 104^)
Storage temperature
-20^ to +60^ (-4^ to +140^)
Dimensions (approx.)
125× 39× 62mm (5× 19 / 16× 21 / 2
in.) (w / h / d) excluding projecting parts
Mass (approx.)
280 g (9.8 oz)
excluding mains lead
"Memory Stick"
Memory
Flash memory
8MB: MSA-8A
Operating voltage
2.7-3.6V
Power consumption
Approx. 45mA in the operating mode
Approx. 130~ A in the standby mode
Dimensions (approx.)
50× 2.8× 21.5mm
(2× 1 / 8× 7 / 8 in.) (w / h / d)
Mass (approx.)
4 g (0.14 oz)
Design and specifications are subject to change without notice.
Battery pack
Maximum output voltage
DC 8.4 V
Output voltage
DC 7.2 V
Capacity
9.6 Wh (1 350 mAh)
Operating temperature
0^ to 40^ (32^ to 104^)
Dimensions (approx.)
40.8 × 24.1 × 49.1 ~mm
(15 / 8× 31 / 32× 115 / 16 in.)
(w/h/d)
Mass (approx.)
90 g (3.2 oz)
Type
Lithium ion
Texhnueckne xapaKTepeNCTnKN
Budekamepa
CnCTema
CnCTema BnDeo3aHnCn
2BpaaioiuecraIIOBkn
CnCTema BUNTOBOO cKaHnpOBaHn
Cnctema aydnno3annc
CnCTema MPEG1 Audio Layer2
(CdBrH yactOtb 48 KU, cTepeo)
BndeocnHn
LBeToBoi CnHnPal, cTaHnApTbI MKKP
IcnoJb3yemaKaCCeta
MHHnataIopHna KaccTea MICROMV
CMETKOH
CKopoctb JIeHTbl
Pn6Jn3.5,66 MM/c
He BKJIOUa 6aTapeHbI bIOK KACCETy
630 g (r)
BKJUOaB 6bAeHbI bK, NPFF70, KacTeY MGR60, KpbIshky oBeKtIbva n nepo
Ppnilaraemble npHnAdJexKHOCTN
CM. ctp. 25.
CeTeBoi aanTep nepemehHoro TOka
Tpe6oBaHnK nntaHHIO
100-240V(B) nepemehnHO TOKa, 50/60T
Iotppe6JIeMa MOUHOCtB 23W(BT)
BbIXoHoe HapxkeHne
DC OUT: 8,4 V (B), 1,5 A pa6o7em pex7mme
PaboyamtemnepaTpya OTo 0^ do 40^
Tempepatypaxaenn OT-20°Cdo+60°C
Pa3mepbI (pnp6n3.)
125× 39× 62mm (MM) ( / / )
He BKJIIOUaY BbICTyIaIOUne YaCTN
Mcca (npn6Jn3.)
280 g (r)
He BKIOUOaI npoBOd
3JIeKtpoNTaHnA
"Memory Stick"
Namrmb
Φn3u-naMaTb
8 M6: MSA-8A
Pa6ooye HapnpxkHeHne
2,7-3,6V(B)
Notpe6nemMOHoctb
Пиблз.45MAВразочem peжime
Пиблз.130 мКВ вржиме Окдан.
Pa3mepbl (npn6bn3.)
50× 2,8× 21,5mm (MM) ( / / )
Mcca (npn6n3.)
4g (r)
KoHCTpykUma nTexnHuceckne xapaKTepeNCTnK MOrTy 6bItb n3MeHeBb 6e3 yBeDomLeHna.
BaTapeiHbI 6JIOK
MaKcImaJIbHoe BbIXoJHoe HapraKeHne
8,4 V (B) NOCTOHHORO TOKA
BbIXoHoe HapXeHne
7,2V(B) noctoHHoro ToKa
EMKOCTb
9,6BT-4(1350MA-4)
Pa6o7a rEmpepaTya
OT 0^ do 40^
Pa3mepbl (npn6bn3.)
40,8× 24,1× 49,1mm (MM) ( / / )
Macca (npn6Jn3.)
90 g (r)
Tun
JIITNTEBO-NOHHbI
Identifying the parts and controls
If you press RESET, all the settings (DCR-IP220E: except the NETWORK mode settings) including the date and time return to the default.
[14] (USB) jack (p. 194)
15 (LANC) jack (blue)
LANC stands for Local Application Control Bus System. The control jack is used for controlling the tape transport of video equipment and other peripherals connected to the video equipment. This jack has the same function as the jack indicated as CONTROL L or REMOTE.
16 (headphones) jack (green)
When you use headphones, the speaker on your camcorder is silent.
17 i.LINK (MICROMV Interface) (p. 107, 112, 159, 173, 268)
The i.LINK (MICROMV Interface) is i.LINK compatible.
9ПepeKJIIOuAteIbLCD BACKLIGHT (cTp.40)
10 Pbyar MEMORY EJECT (ctp. 131)
11 Khonka DISPLAY/TOUCH PANEL (ctp. 57)
12 JAMnoKa DoCTyna "Memory Stick" (cTp. 131)
13 KHONKa RESET
Ecni BbI HaxMeTe KhoNky RESET, BCE yctaHOBKn (MoJeJI BDCR-IP220E: KpOme yctaHOBOK pexIma NETWORK), BKJIouyAЯ dAty I BpeM, BepHyTcK yCTaHOBKaM no yMOJUHaHIO.
14 THe3do (USB) (cTp. 194)
15 THe3do LANC (CnHee)
LANC 03haaet CnCTemy HmHbMeCTHOYnpabHeHn. Ihe3o ynpabHeHn LcNoIb3yeTcra dIy npabHeHnJIeHTOpOTaXbIM MEXAHN3MOMBInDeoanpaatypbI n dpynx nepupeepnHbIXycTpoCTB,IOCoEINHeHbIX KBNdeoanpaatype.DaHHoe Ithe3do IMeETaKyo JeФyHKUIO,Kak INthe3do,06O3HaeeHoe KaK CONTROL Lnn REMOTE.
16 THe3doO (TOnOBHbIe TeJefoHbI) (3eJeHoe)
PnncnoJIb3OBAHmroJIOBhbIX TeJeFOHOB DInHaMVK BaSei BnDeokamepb6yDet OTKnIOUeH.
17Гнeздоi.LINK(uHTepфсmicMICROMV)
(ctp. 107, 112, 159, 173, 268)
THe3oI.LINK (nHTepdEic MICROMV)
RbIaETcI.LINK-COBMeCTnMbIM.
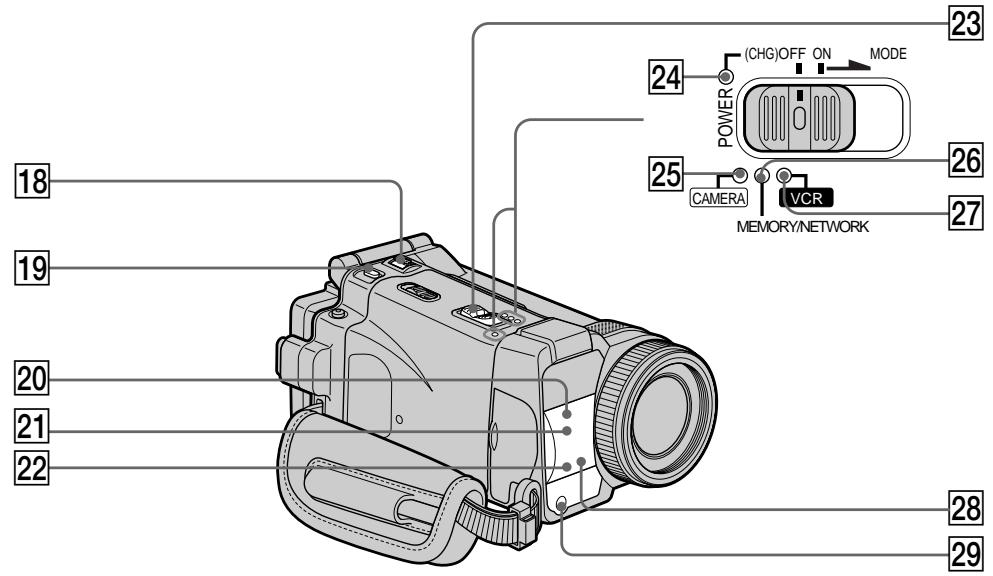
18 ZOOM lever (p. 43)
PHOTO button (p. 63, 144)
20 Infrared rays (NightShot Light) emitter (p. 49)
21 Remote sensor
22 Camera recording lamp (p. 38)
23 POWER switch (p. 12)
CHG lamp (p. 27)
25CAMERA lamp (p. 12)
26 MEMORY/NETWORK lamp (DCR-IP220E) or MEMORY lamp (DCR-IP210E) (p. 12)
27 VCR lamp (p. 12)
28 (Bluetooth) lamp (DCR-IP220E only) (p. 224)
29 HOLEGRAM AF emitter (p. 151)
18 Pbyar ZOOM (ctp. 43)
19 Khonka PHOTO (cTp. 63, 144)
20 N3nyaTeJIb INHΦpaKpaChbIX NyeI (NODCBETKa HOUHOcBemKn) (CTp. 49)
21 DaTnK DnCTaHcNoHHOrO ynpabJIeHnA
22 JIamnoUka 3aHnCn BnDeokamepbI (CTp. 38)
23Переклioчатель POWER (ctp. 12)
24 JIamnoyka CHG (CTp. 27)
25 JIamnoka CAMERA (cTp. 12)
26 Ламочka MEMORY/NETWORK (MOdeJIb DCR-IP220E) Ил ламочka MEMORY (MOdeJIb DCR-IP210E) (cTp. 12)
[27]JAMnoUka VCR (cTp. 12)
28 JIamnoyka (Bluetooth) (TOnbKO MoJeJIb DCR-IP220E) (ctp. 224)
29ИЗлучateль голограмнов abToФокс neuropвkn HOLOGRAM AF (ст. 151)
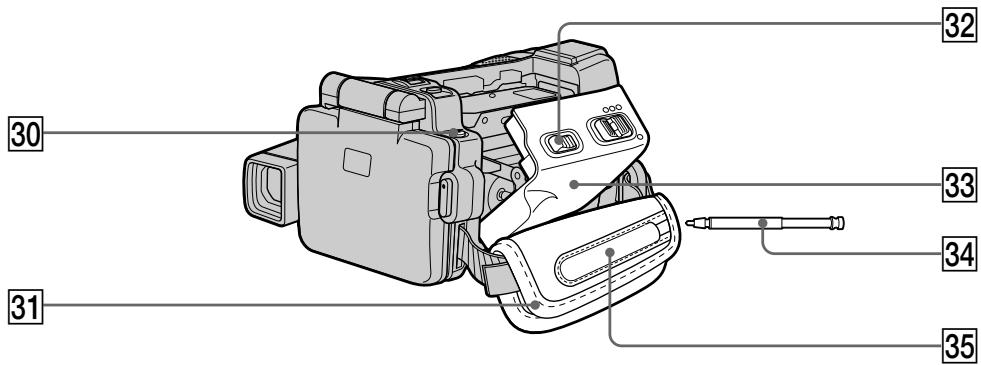
30 (flash) button (p. 65, 149)
31 Grip belt
32 OPEN/△EJECT switch (p. 34)
33 Cassette lid (p. 34)
34Stylus (DCR-IP220E only) (p. 225)
35Stylus holder (DCR-IP220E only) (p. 225)
30 Khonka (BcnbIuKn) (ctp. 65, 149)
31 PemeNb dIЯ 3axBaTa
32Переклочать OPEN/△EJECT (ctp.34)
33 Kpblika kaccethoro oTecka (cTp. 34)
34 Nepo (ToIbKO MoJeJIb DCR-IP220E) (cTp. 225)
35Дерхателпера(TОЛьКо моделDCR-IP220E)(ст. 225)
Fastening the grip belt Fasten the grip belt firmly.
PpKpeJIeHne pemnI dIa3Xbata HaJeXHO pIkpEInTe peMeHb Iyra 3axbata.
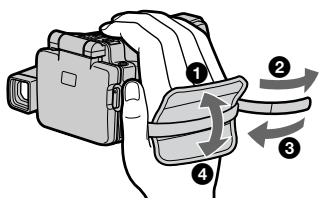
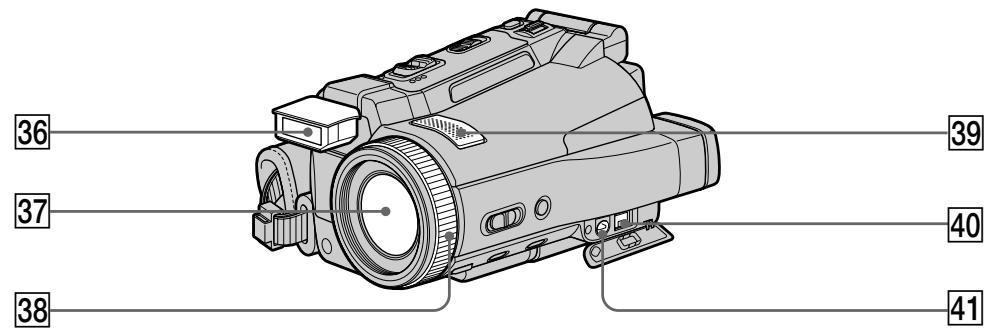
36 Flash (p. 65, 149)
37 Lens
38 Focus ring/Zoom ring (p. 44, 88)
39 Microphone
40 DC IN jack
41 A/V jack (p. 61, 105, 110, 158, 172)
Note on the Carl Zeiss lens
Your camcorder is equipped with a Carl Zeiss lens which can reproduce a fine image.
The lens for your camcorder was developed jointly by Carl Zeiss, in Germany, and Sony Corporation. It adopts the MTF# measurement system for video camera and offers a quality as the Carl Zeiss lens.
The lens for your camcorder is also T^* -coated to suppress unwanted reflection and faithfully reproduce colours.
MTF is an abbreviation of Modulation Transfer Function.
The value number indicates the amount of light of a subject penetrating into the lens.
36 Bcnbbioka (ctp. 65, 149)
37 06bektnb
38 KoIbIcOΦOkycnPoBKN/KoJIbIcO BapNo06BeKTHBa(cTp.44,88)
39 Minkpofoh
40 The DC IN
41 THe3do A/V (ctp. 61, 105, 110, 158, 172)
PpmeaHne 06 oBekTbe KapI Lcic
Bawa Bndeokamaepa ochaeta ObkeTNBOM KapI LeiCC, cnoocbHbIM BOCpOIN3BOJNTb kaeeCTBeHHbIe I3o6paXeHnI.
ObekTINB DnBaWe BnDeokamepbI 6bl pa3pa60Tan CoBMecTHO fnpMOi Kapl LcEcc, FepMaHnI, N KopnpaueeN Sony Corporation. OH BKJIouaET B c68 n3MepntelHyIO CnCTemy MTF# dnn BnDeokamepbI N oBeCneuBAeT KaueCTBO, npncyuee ObekTINBaM KapI LcEcc.
ObektnBaeweBnDeokamepbI mMeet TaKxe T*-NOKpbITne DnI NOdaBHeH NHexeNaTeJIbHOrO OtpaXeHnN TOHOrO BocnpOn3BeDeHnueCBETOB.
MTF - a6bpeBnaTpya cyHKuN nepeDaun MOdYJLauN.
HicnoBoe 3naueHne yka3bIbaET KOINHECTBO OCBeUeHnO6bEkTa, nonaiauioeroB O6bEKeTnB.
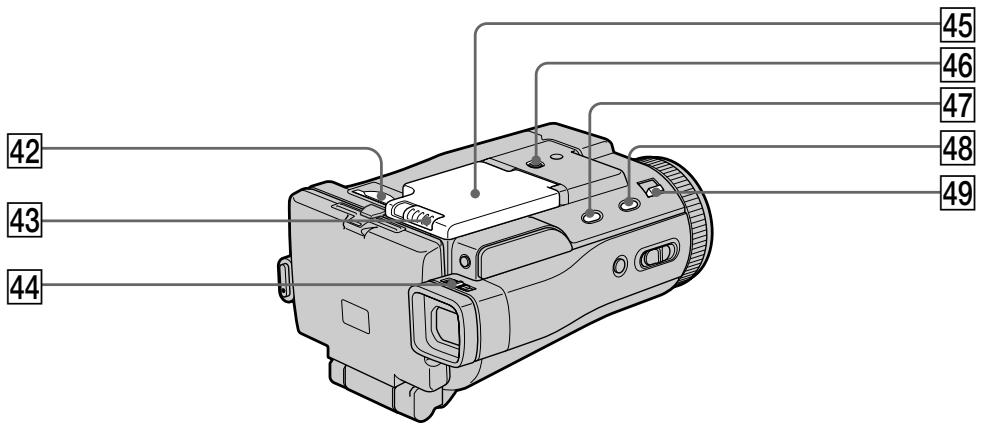
42 "Memory Stick" slot (p. 131)
43 OPEN switch (p. 26)
Viewfinder lens adjustment lever (p. 41)
45 Battery compartment lid
46 Tripod receptacle
Make sure that the length of the tripod screw is less than 5.5mm (7/32 inch). Otherwise, you cannot attach the tripod securely and the screw may damage your camcorder.
47 FADER button (p. 74)
48 SUPER NS/COLOUR SLOW S button (p. 49)
49 NIGHTSHOT/NIGHTFRAMING switch (p. 49, 153)
42 Cnot "Memory Stick" (cTp. 131)
43 PenepeKJIIOUaTeIb OPEN (CTp. 26)
44 Pbyar peryunpoBkn o6bekTnBa BvdoonckaTeIa (cTp. 41)
45 Kpbiika 6aTaapeHoro OTecka
46 THe3doDJIaTpeHorn
Y6eIITecb, YTO dINHa BnHTa TpeHOr MeHee 5,5 MM. B npOTuBHom cIyae, Bbl He CMOXkTe HaJedXHO pNkPenNTb TpeHory, a BnHT MoXET NOBpeIITb BaUy BuJeokamepy.
47 KhoNka FADER (cTp. 74)
48 KhoJa SUPER NS/COLOUR SLOW S (ctp. 49)
49Переклочаль NIGHTSHOT/NIGHTFRAMING (cTp. 49, 153)
Remote Commander
The buttons that have the same name on the Remote Commander as on your camcorder function identically to the buttons on your camcorder.
1 PHOTO button (p. 64, 154)
2 DISPLAY button (p. 57)
3 MEMORY control buttons
4 SEARCH MODE button (p. 102, 103)
5 MULTI SRCH button (p. 98)
6 Transmitter Point toward the remote sensor to control your camcorder after turning on your camcorder.
7 DATA CODE button (p. 57)
8 START/STOP button (p. 38, 167)
9 Power zoom button (p. 43)
Video control buttons (p. 55, 59)
11 / / / EXECUTE buttons
1 Khonka PHOTO (cTp. 64, 154)
2 Khonka DISPLAY (ctp. 57)
3 Khonkn ynpabJIeHnEMORY
4 Khonka SEARCH MODE (ctp. 102, 103)
[5] Khonka MULTI SRCH (cTp. 98)
6 NpepaTuk
HapabBte Ha daTuk INCTaHIOHORO
ynpabJeHHI dIy npabJeHH BaSeI
BndeOkamepoi nocIe BkIoUeHH
BndeOkamepbl.
7 Khonka DATA CODE (ctp. 57)
8 Khonka START/STOP (ctp. 38, 167)
9 KhoNka npuBODHOro BapnoOBeKtNbA (cTp. 43)
10 Khonkn BndeokOHpoJra (ctp. 55, 59)
11 Khonkn / / / / EXECUTE
To prepare the Remote Commander
Insert two R6 (size AA) batteries by matching the + and - polarities on the batteries to the + - marks inside the battery compartment.
ДлnoIodrotOBKn nyIbTa ДиCTAHCUHHOуnpaBJIeHn
BcTaBbTe DBe 6aTapeKn R6 (pa3mepa AA), yTo6bl nonpHocTb + n - Ha 6aTapeKkax coBnana co 3HaKaMn + - BHyTpN OTCeka dJa 6aTapeek.
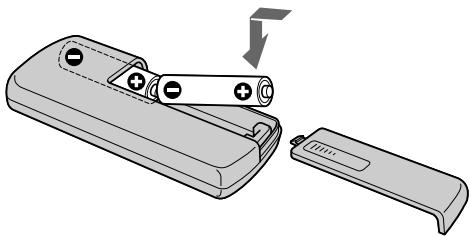
Notes on the Remote Commander
- Point the remote sensor away from strong light sources such as direct sunlight or overhead lighting. Otherwise, the Remote Commander may not function properly.
- Your camcorder works in the commander mode VTR 2. Commander modes 1, 2 and 3 are used to distinguish your camcorder from other Sony VCRs to avoid remote control misoperation. If you use another Sony VCR in the Commander mode VTR 2, we recommend changing the commander mode or covering the sensor of the VCR with black paper.
PpmeaHnO npJIbTe dNCTaHcNoHOrO ynpabJIeHH
HapabnIte DaTchN DInCTaHcNOHORO ynpabNeHbB CTOPOHy OT CNlbhIX nCTOCHNkOB CBeta, KaK HApPmEp, PpMbIe cONHeHbIe LyuN INBepxHceOCBeSeHne. B npOTNBHom CInyae NylbT DInCTaHcNOHORO ynpabNeHbMoKeT He JeDcETBOBaTb HaJnEkaUIM O6pa3OM.
- Baа видаеокамер pa6oTaETВ pexmeme nylbTa dinCTaHcUOHHoro ynpabLeHnRA VTR2. PexkmbI pylbTa dinCTaHcUOHHoro ynpabLeHnRA 1,2и3ncNoB3yOToCДЯОТИЯ BaeI BvduEOKamepbOTdpyrKKBMФрMbI Sony BO n36ExkaHne HnPaBInbHOpa60Tb IDCtAHcUOHHoro ynpabLeHnRA.EcnBblcNoB3yeTe dpyroKBMФрMbI Sony, pa6oTaIOUINBpeXmme nylbTa dinCTaHcUOHHoro ynpabLeHnRA VTR2, peKOMeHNdyTeCraN3MeHnTBpeXmIM nplbTa dinCTaHcUOHHoro ynpabLeHnRA INI 3aKpbITb dinCTaHcUOHHbI daTChK KBM cepHoN 6ymaroi.
Operation indicators
LCD screen and viewfinder
Pa60yne HndnkaTopbI
3KpaH KKD n BnDOnckaTeIb
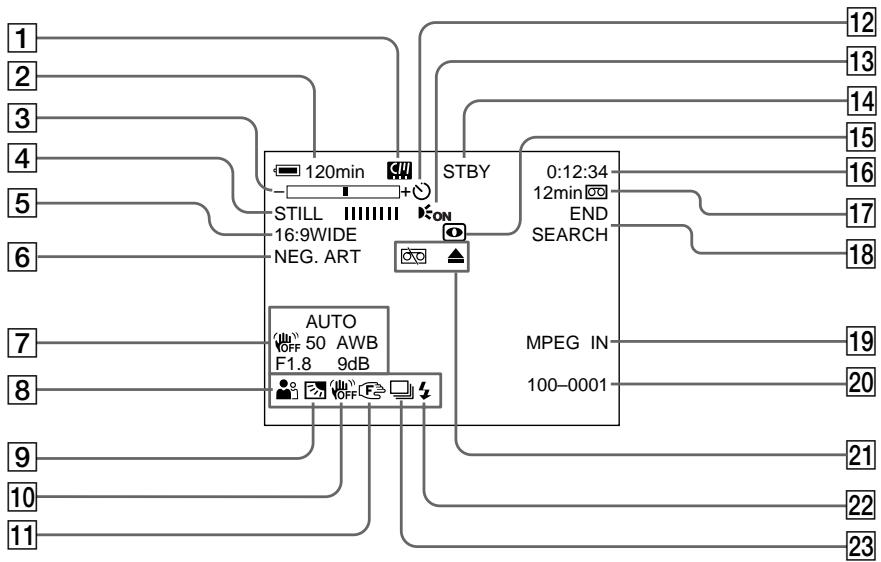
1 micro Cassette Memory (p. 46, 124)
2 Remaining battery time (p. 46, 58)
3 Zoom (p. 43)/Data file name (p. 128)
4 Digital effect (p. 78, 93)/MEMORY MIX (p. 160)/FADER (p. 73)
16:9WIDE (p. 71)
6 Picture effect (p. 76, 91)
7 Data code (p. 57)/Date (p. 46)
8 PROGRAM AE (p. 81)
9 BACK LIGHT (p. 48)
10 SteadyShot off (p. 229)
1 INdkaTop micro Cassette Memory (MnKpokaccetHou nAMrTu) (cTp. 46, 124)
2 INHdNKATOpOCTaBWeOcR BpeMeHn 3apJa6batapeHoro 6Joka (cTp.46,58)
3 INHdNkATOp yBelenueHn (cTp. 43)/ INHdNkATOp mEmn faJna daHHbIX (cTp. 128)
4 INHdNKaTOP UINΦPOBOrO 3ΦΦeKTa (CTp.78,93)/INHdNKaTop MEMORY MIX (CTp.160)/INHdNKaTop FADER (CTp.73)
5 INHdikatop 16:9WIDE (cTp.71)
6 INHdNkaTOp 3ΦΦeKta n3o6paXeHn (cTp.76,91)
7 INHdkaTop KOda DaHHbIX (CTp. 57)/ INHdkaTop DaTbI (CTp. 46)
8Индикатop PROGRAM AE (ctp. 81)
9 INdikKaTop BACK LIGHT (ctp. 48)
10 INHДИКaTOP BbIKIQUeHHoФункци yctOuHBOcBemKn (cTp.237)
11 Manual focus (p. 88)/Expanded focus (p. 89)/Zoom ring (p. 44)
12 Self-timer (p. 52, 68, 154, 169)
13 HOLEGRAM AF (p. 151)
STBY/REC (p. 38)/Video control mode (p. 59)/Image size (p. 141)/Image quality mode (p. 135)/Picture quality mode (p. 138)
15 NIGHTSHOT/SUPER NIGHTSHOT (p. 49)/ COLOUR SLOW SHUTTER (p. 50)/ NIGHTFRAMING (p. 153)
16 Tape counter (p. 46)/Self-diagnosis (p. 251)/ Memory photo (p. 144)
17 Remaining tape (p. 46)/Memory playback (p. 176)
18 END SEARCH (p. 54)
19 MPEG IN (p. 113)
20 Data file name (p. 128)
This indicator appears when the MEMORY MIX functions work./Time (p. 46)
21 Warning (p. 252)
22 Flash (p. 65, 149)
23 Continuous photo recording (p. 146)
11Индикатор рунов Фокс neuropьк (ctp.88)/YdlnHeHoeФokycHoepacCTOHaHne (ctp.89)/KoIbco Bapno06BeKTnBa (ctp.44)
12 ИndikaTop TaMepa cAmO3anycka (cTp. 52, 68, 154, 169)
13 INHdNKaTOp HOLEGRAM AF (cTp. 151)
14 INHДИКaTOP STBY/REC (cTp. 38)/ INHДИKaTOP peKIMa BnDEOKOHrPoJr (cTp.59)/INHДИKaTOP pa3Mepa IN3O6paxeHn (cTp.141)/INHДИKaTOP peKIMa KaueCTBa IN3O6paXeHn (cTp.135)/peKIM KaueCTBa IN3O6paXeHn (cTp.138)
15 INHdNkATOp NIGHTSHOT/HnDnKATOP SUPER NIGHTSHOT (cTp. 49)/INHdNkATOp COLOUR SLOW SHUTTER (cTp. 50)/ INHdNkATOp NIGHTFRAMING (cTp. 153)
16 INHdNKaTOP CHTUKNA JENTbI (ctp. 46)/ INHdNKaTOP CAMOHaarHOCTNKn (ctp. 261)/ INHdNKaTOP FOOTOCBeMKN B NAMrTb (ctp. 144)
17Индikatop octabweecЯentbI(ctp.46)/Индikatop Bocpon3BedeHnI nI naRTn(ctp.176)
18 INdkaTop END SEARCH (cTp. 54)
19ИнданkaTop MPEG IN (cTp. 113)
20 INdikatop ImeHn faaIa daHHbIX (ctp. 128) 3TOT INdikatop NOBJIaETc npn pa6Ote cyHKcN MEMORY MIX./ INdikatop BpeMeHn (ctp. 46)
[21]Предупөжддөшөнддүлары (стр. 262)
22ИндикатOPВиDEOBcMbIshKn(cTp.65,149)
23Индикатор HeпрөрьИВно ФотOCьемки (стр. 146)
A, B
AC power adaptor 27, 30
Adjusting viewfinder 41
Adjusting volume 55
Auto red-eye reduction.....65,149
AUTO SHTR 228
A/V connecting cable 61, 105, 110, 158, 172
BACK LIGHT 48
Battery pack 26
BEEP 235
BOUNCE 73
B&W 76
C,D
CALIBRATION 275
Camera chroma key 160
Carl Zeiss lens 288
Cassette information 124
Cassette memory 124
Charging battery 27
Charging built-in rechargeable battery 273
Cleaning cassette 273
Clock set 31
COLOUR SLOW SHUTTER .... 50
Continuous photo recording 146
Data code 57
DATE SEARCH 103
DEMO MODE 234
Digital effect 78,93
DISPLAY 235
Dubbing a tape 105
E
END SEARCH 54
Expanded focus. 89
EXP BRKTG 146
Exposure 84
F, G, H
Fader 73
FADER 73
Fade in/out 73
Flash 65, 149
FLASH MOTION 78
Flexible Spot Meter 86
FOCUS 88
Focusing manually 88
FORMAT 232
Full charge 27
Grip belt 287
Heads 272
HIGH SPEED 146
HOLOGRAM AF 151
I, J, K, L
i.LINK (MICROMV Interface) 107, 112, 159, 173, 268
Image protection 187
Image quality mode 135
Image size 141
Index screen 177
"InfoLITHIUM" battery ... 29, 266
Infrared rays emitter 49
JPEG 128
Labelling a cassette 125
(LANC) jack 285
LUMINANCE KEY 78
M, N
Manual focus 88
Memory chroma key 160
Memory luminance key 160
MEMORY MIX 160
Memory overlap 160
Memory PB ZOOM 183
Memory photo playback 174
Memory photo recording 144
"Memory Stick" 128
Menu settings 226
micro Cassette Memory .... 23, 264
Mirror mode 45
Moisture condensation 271
MONOTONE 73
MOSAIC 76
M.FADER 73
MPEG 128
MPEG MOVIE recording 167
MULTI-PICTURE SEARCH .... 97
NEG.ART 76
MULTI SCRN 146
NETWORK 224
NIGHTSHOT 49
NIGHTFRAMING 153
O, P, Q
OLD MOVIE 78
Operation indicators 292
PAL system 270
PASTEL 76
Picture effect 76, 91
Picture quality mode 138
Playback pause 59
Playing time 29
Printmark. 192
PROGRAM AE. 81
R
Recording time 28
Remaining battery time indicator 46
Remaining tape indicator 46
Remote Commander 290
Remote sensor 286
RESET 285
S
Self-diagnosis display 251
Self-timer recording 52,68,154,169
SEPIA 76
SHARPNESS 228
Slide show. 185
SLOW SHUTTER 78
SOLARIZE 76
SPOT FOCUS 90
STEADYSHOT 229
STILL 78
Stylus 225
SUPER NIGHTSHOT 49
T, U, V
Tape counter 46
Tape PB ZOOM 95
Telephoto 43
Title 114, 120
TITLE SEARCH 102
Touch panel 36, 132
TRAIL 78
Transition 39
TV colour systems 270
USB jack 194
USB Streaming 209
W,X,Y,Z
Warning indicators 252
White balance 69
Wide-angle 43
Wide mode 71
Write-protect tab 35, 129
Zoom 43
Zoom ring 44
Aлфавиньи уka3aTeь
A, B, B, Γ
ABTomatUHeCKOE yMeHbIeHne 304KkTA KpaChbIX rIa3...65,149
Baanac 6eIoro 69
BaTapeiHbI 6Jok 26
БатAPEньблOK"InfoLITHIUM" 29,266
Bapnoo6beKtNB 43
BVeJeHne/BbIBeJeHne 73
Bocnpo3BeJeHne
ФOTOCHIMKOBИЗпamгТи..174
BpMa BocnpOn3BeDeHnA 29
Bpem3a.. 28
Bcnpbika 69,149
Tolovkn 272
THe3do (LANC) 285
Tne3o USB 194
D,E,X,3
Датунд достанционноуправлени 286
3aIncb no taMepy camo3anycka..52,68,154,169
3aicb MPEG MOVIE 167
3aprka 6aTapeHoro 6Joka ... 27
3apdka BcTPOeHHoJ npe3apjXaemO 6aTapeKn
3aunTa n3o6paXeHn1 187
3epkaJIbHbI pexIM 43
3nak neuatai 192
N, K, N, M
I3nyatelb HnΦpaKpaChbIX nyeI 49
HHeKcbI 3KpaH 177
Индikatop octabweocraBpeMeHn 3apJa 6aTaepHoRo 6noka .46
INHdkaTop ocTabWeeJcJeHTbl 46
INHdkauncaMoDnaHoctnKu 261
HOpMaIaO KaccTe 124
KaccetHa nAMrTb 124
KolbO Bapnoo6beKtNbA ....44
KoI daHHbIX 57
KoHdEHaCaunBlaan 271
JIeNEcTOK 3aunIbO T 3aINcN 35,129
Mapknipobka kaccetbl 125
H,O
HenpepbHbHa oToCbEmka ... 146
ObekTbKapIeic 288
P
Pay3a Bocnpn3BeJeHn 59
IpeezancsJIeHTbl 105
IpeekpbItne namrtn 160
IepexoI 39
Iepo 225
Poka3 cnaIOB 185
Ponna 3apka 27
Ppeynpexkaioune HndikaTOpbl 252
ПильТ ДИСТАнЦОНноупавлени … 290
Pa3Mep n306paXeHnI 141
PerylnpobkBa Bdoonckatena... 41
PerynipobKa rpoMkoctn 55
Pergynpemyoe pTHO
ΦoTOMeTpNI 86
Pexim KaeeTba n3o6paXeHnna 138
PemeHdIa3axBaTa 287
PuyhagokocnpobKa 88
C, T
Cechopnna naneJb. 36, 132
Cetebo aanTp npemehnHoro Toka. 27,30
CnCTema PAL 270
CnCTemblcBETHORo TelenBvndHn.. 270
CoeHInHTeIbHbKabEJIb ayDIO/ BnDeo ... 61, 105, 110, 158, 172
CuetnK JENTbl 46
Tepeoto 43
Tntp 114,120
y-
YdINHeHHoeΦokyCHOe pacCToHnE 88,237
YcTaHOBka YacOB 31
YcTaHOBKe MeHIO 226
ΦeIdep 73
ФokycinpobKa BpyHyu 88
ΦOTOCbEMKa C COXpaHeHnEM B nAMrTn 144
Функциональные Иndикадоры 292
Функцп PB ZOOM lentbl ... 95
Функця PB ZOOM namrTn ... 183
LBeTobar npnpoeKzur BnDeokamepbl 160
LcBeTobar npnpoeKzna namrtn 160
LundpobOoB 3eFfKeT 78,93
Ynctraa kacceta 273
山npoKoyroJbHa cBemKa .... 43
山poko3kpanhblpekm.....71
3Kcno3nua 84
3ΦΦeKT n3o6paXeHnA .... 76, 91
Irkoctha npnpoeKnna narnn 160
A,B,C,D
AUTO SHTR 236
BACK LIGHT 48
BEEP 243
BOUNCE 73
B&W 76
CALIBRATION 275
COLOUR SLOW SHUTTER ... 50
DATE SEARCH 103
DEMO MODE 242
DISPLAY 243
E,F,G,H
END SEARCH 54
EXP BRKTG 146
FADER 73
FLASH MOTION 78
FOCUS 88
FORMAT 240
HIGH SPEED 146
HOLOGRAM AF 151
1-0
i.LINK (uHTepfceMCICROMV) 107,112,159,173,268
JPEG 128
LUMINANCE KEY 78
MEMORY MIX 160
"Memory Stick" 128
M.FADER 73
micro Cassette Memory (MnKpokacceTHa nAMrTb) 23,264
MONOTONE 73
MOSAIC 76
MPEG 128
MULTI-PICTURE SEARCH .... 97
MULTI SCRN 146
NEG.ART 76
NETWORK 224
NIGHTSHOT 49
NIGHTFRAMING 153
OLD MOVIE 78
P-Z
PASTEL 76
PROGRAM AE 81
RESET 285
SEPIA 76
SHARPNESS 236
SLOW SHUTTER 78
SOLARIZE 76
SPOT FOCUS. 90
STEADYSHOT 237
STILL 78
SUPER NIGHTSHOT 49
TITLE SEARCH 102
TRAIL 78
USB Streaming (nToKOBaFФyHKnUr USB) 209
N3roTOBNTeJIb: CoHn KopnpoeiH
Adepoc:6-7-35 Kntaunharaba,
山HaraBa-Ky, Tokno 141-0001, JnOhna
Ctpana-mpon3Bountel:JnoHna
http://www.sony.net/

Printed on 100% recycled paper using VOC (Volatile Organic Compound)-free vegetable oil based ink.
HaneetaHO Ha 6ymare, n3ROTOBHeHHo HA 100% n3 6yMaXhblx OTXoOB,C INCNoJIb3OBAHNem NeaTHOH Kpackn Ha OCHObe paCTnteJbHOrO macna 6e3 npImceen JOC (JeTyuNX oprAHuecknx coeqHeHn).
- Digital Video Camera Recorder MICROMV
- Operating Instructions
- HnctpyKUna NO 3KcnIyatauIN
- WARNING
- N50
- NOTICE ON THE SUPPLIED AC POWER ADAPTOR FOR CUSTOMERS IN THE UNITED KINGDOM
- For the customers in Europe
- Pysckn
- Добpo пожаловать!
- PNEyPPEKDEHNE
- ATTENTION
- Notice
- DCR-IP220E only
- BHIMMAHNE
- PpeynpeKdHne
- Tolbko Дли мода DCR-IP220E
- Tolbko Дд мода DCR-IP210E
- Other uses
- Ipooyne npimehenma
- Getting Started
- Recording - Basics
- Playback - Basics
- Advanced Recording Operations
- AdvancedPlaybackOperations
- Editing
- "Memory Stick" Operations
- Viewing Images Using your Computer
- Using the Network function (DCR-IP220E only)
- Customising Your Camcorder
- Troubleshooting
- Additional Information
- Quick Reference
- OchOBhIe yHKcHn 6
- Bveedene
- - OCHOBhIe Onpaunn 12
- PyKOBoIcTBo nO 6bICTpOMy 3aNycky
- Iopdrotobka K 3Kcnpyaataun
- 3aHcB - OCHOBHbIe NOJIOXeHnA
- Introduction - Basic operations
- How to turn on the power and select the mode
- В级以上 - OCHOBьeОпаци
- KaBbJIIOuHTb NITaHne N BbI6paTb peXIM
- How to open the LCD panel
- 1
- 2
- 3
- Notes
- When you set the LCD screen outdoors in direct sunlight
- Приимechания
- Quick Start Guide - Recording on a tape
- Connecting the mains lead (p. 30)
- Inserting a cassette (p. 34)
- Viewfinder
- Monitoring the playback picture on the LCD screen (p. 55)
- Note
- Inserting a "Memory Stick" (p. 131)
- PykoBoCTBO IO 6bICTpOMy 3aIycKy - 3aIncb Ha JeHTy
- ПодсоeДиненue npOBODa элжКТрОпNTаHЯ (cTp. 30)
- ИсpenьзованецдаHHORO pyKOBOdCTBa
- Note on the MICROMV format
- Note on TV colour systems
- Copyright precautions
- Precautions on camcorder care
- Lens and LCD screen/finder
- MepblnpedocTopoKHOCTn npnyxoJe 3a BndeokamepoJ
- 06beKTHB n 3KpaH KKDvDOnckaTeIb
- Step 1 Preparing the power supply
- Inserting the battery pack
- UcTaHOBka 6aTapeHoro 6Joka
- To take out the battery pack
- PpmeaHne
- Charging the battery pack
- 3apka 6aTapeHoro 6loKa
- After charging the battery pack
- Pocne 3apnK6aTapeHoro 6Ioka
- Пункт 1 ПОДROTOВКИ NGTOUHINKA NITAHNIA
- Приимechаиме
- Charging time/Bpem3apdKn
- Recording time/Bpema 3auncs
- If the power goes off although the battery remaining indicator indicates that the battery pack has enough power to operate
- Recommended charging temperature
- What is "InfoLITHIUM"?
- PpimeyaHne
- Ecnn nntanhe nponaadaet, xotn HndkaTop octabwerooc3apra6batapeHoro 6loka noka3bIbaeT,TO 6batapeHbI 6LOK o6naaet doCTaTOHbIM dny pa60tbi 3aprdom
- PekomehnyeMa TEMnepaTypa 3apAdkn
- Connecting to a wall socket
- A car battery
- IPEIOCTEPEXEHNE
- PpimueaHn
- ABTomo6nIbHbI aKKyMylrTop
- Step 2 Setting the date and time
- Пун=kT 2 YcTaHOBKaДaTbI NВрemeHn
- To return to FN (Function)
- Simple setting of clock by time difference
- To set your local time
- PpocTay yctaHOBKa yaCob no pa3Hnue BO BpeMeHn
- Step 3 Inserting a cassette
- Пун=kТ 3 Yстановka KacceTbl
- To eject a cassette
- ДяиЗВLEЧЕнЯ KACCEТI
- To prevent accidental erasure
- Ppimcaynne
- ДлпpenotBpaueHnCnyaHOrO CTnpaHn
- Note on the label
- Прмочаимеобзкетke
- Step 4 Using the touch panel
- To execute settings
- To cancel settings
- When executing each item
- If an item is not available
- Press FN to display the following buttons:
- ДЯ Bынолпену yctahOBOK
- ДЯ OTMeHbI yCTaHOBOK
- Примеанья
- Pn BbINOJIHeHn KaJdOrO nyHKta
- Ecnn nyHKT He doctynen
- Haxmte KhONky FN dIy oTo6paXeHHa CJeDyUoNx KHOK:
- Recording a picture
- 3a\Pncb n3o6paXeHn
- After recording
- To enable transition
- Recording data
- If you leave your camcorder in the standby mode for five minutes while the cassette is inserted
- The battery life when you record using the LCD screen
- PocJe BbInOpHeHn 3aIncn
- Adjusting the brightness of the LCD screen
- PerynpoBka npKocTn 3KpaHa KKd
- To return to FN
- YctaHOBka nepeKlioyateJLa LCD BACKLIGHT
- Adjusting the viewfinder
- Perynnpovka BuidonckaTeJia
- Viewfinder backlight
- 3aHnnoDcBtKa BIOONCKaTeJIa
- JaXe ecn Bbl OtperyInpyeTe npKoCTb 3aHne nOcBETKn BuOnckatela
- Attaching the supplied lens hood
- PpKpeHne npnlaeMo6JeHdbI obBeKTbBa
- Using the zoom feature -Zoom lever
- IcnoJIb3OBAHneФyHKcHn Hae3da BnDEOKaMepbl
- - Pbyar Bapnoo6bekTnBa
- To zoom greater than 10 ×
- When you shoot close to a subject
- Notes on digital zoom
- Using the zoom feature - Zoom ring
- Set FOCUS to ZOOM.
- Ppncbemke o6beKta c 6n3KoropacctoHHN
- Приимейке
- Shooting with the mirror mode
- CbeMaB 3epKaJIbHOM peXnme
- Picture in the mirror mode
- During recording in the mirror mode
- When you press FN
- I306paXeHne B 3epKaJIbHom pexnme.
- BoBpeM3aHcN B3epKaIbHOM pexHme
- EcJn BbI HaxMeTe KhONKy FN
- Indicators displayed in the recording mode
- HДИКaTOPbl, OTo6paXkaemble BpeXmte 3aInscn
- STBY/REC/ндкатop STBY/REC
- Remaining battery time indicator during recording
- Tape counter
- HnDKaTOp BpeMeHN OCTaBWeOc3apJa 6aTaPeHOro 6Ioka BO BpeM 3aIncn
- CuetukJeHTbI
- DaHHbIe 3aHcN
- CbeMa o6BeKToB c 3aHnei noCDBeTkoI - BACK LIGHT
- During back light function
- Bo Bpempa60bI cyHKcnn 3aAnHe noDCBETK
- Shooting in the dark - NightShot/Super NightShot/ Colour Slow Shutter
- Using NightShot
- Cbemka B TemHote - HocnHa Cbemka/HocnHa cynepcbemka/LBeTHa CbemKa c MeJleHHbIM 3aTBOPOM
- IcnoIb3OBAHne pexmHa HOHcBEmKu
- Using Super NightShot
- IcnoJb3OBAHne peKIma HocHoN cynpceMkn
- Using the NightShot Light
- Using Colour Slow Shutter
- IcnoJIb3OBAHne IOpCBETKn HOyHOJ CbeMKN
- IcnoIb3OBAHne cyHKcHn CBeTHoN CbeMKn C MeJleHHbIM 3aTBOPOM
- While using NightShot, you cannot use the following functions:
- PpmeuHn
- PnHcNoJIb3OBAHnHyHKuH NHOHOBcbEMKn BbI He MoKeTe HcNoJIb3OBA TbCJeDyUoJne FyHKuH:
- Self-timer recording
- 3aInc b no TaMepy caMo3anycKa
- To stop the countdown
- To cancel self-timer recording
- PpimcuaHne
- Checking the recording - END SEARCH
- Bocnpo3BeDeHneJeHTbl
- To stop playback
- Bocnpon3BeDenHe JeHtbl
- To display the screen indicators - Display function
- Using the data code function
- IcnoJIb3OBAHne nylbTa dNCTaHcNoHHoro ynpabLeHn
- To not display various settings
- ДяТOrO,чTo6bI He OTo6paXaJIncb pa3JIuHbIe YcTaHOBKn
- Various settings/ Pa3nHbIe ycTaHOBKn
- Various settings
- When you use the data code function, bars ( ) appear if:
- Data code
- Remaining battery time indicator during playback
- Pa3JIMHbIy yCTaHOBKn
- EcIn BbI nCnOJIb3yeTe fynKcNIO KOA daHHbIX,TO NOBRArTcNOIOcbI (--- --),ecIN:
- KoDaHHbIX
- Hndkatop octabweroocBpeMeHH 3apda 6aTaepenHoro 6Ioka BO BpeMBOcnpoN3BeDeHH
- Various playback modes
- To view a still image (playback pause)
- To fast-forward the tape
- To rewind the tape
- To locate a scene monitoring the picture (picture search)
- To monitor the high-speed picture while fast-forwarding or rewinding the tape (skip scan)
- Pa3nHbIe peXmblBocnpOn3BeDeHnA
- To view the picture at slow speed (slow playback)
- To search the last scene recorded (END SEARCH)
- When the playback pause mode lasts for five minutes
- Bocnpoun3BeDeHne JeHTbI
- ДлпюсмOTpa ИЗбрахенЯ Ha 3aMeДLEнHоI ckOpoCTn (3aMeДLEнHHOE BOCPpON3BedeHne)
- Viewing the recording on TV
- If your TV is already connected to the VCR
- Ecni BaW TeJIeBn3Op yXe npDoceDInHeN K KBM
- If your TV or VCR is a monaural type
- If your TV/VCR has a 21-pin connector (EUROCONNECTOR)
- EcIn Baw TeIeBn3Op oShaueH rHe3dOM S BuJeO
- Дпг OTO6paхени ИнdkaTopOB 3kpHa JKKД Ha 3kpAne TeIeBu3opa
- Recording still images on a "Memory Stick" in CAMERA mode
- Before operation
- "Memory Stick"
- Image size of still images
- When the POWER switch is set to CAMERA
- To record still images on a "Memory Stick" during tape recording
- When you press PHOTO on the Remote Commander to record still images
- To record images with higher quality
- 3aIncb HeNoDBrXhBIX H3o6paXeHn Ha "Memory Stick" BpeKIme CAMERA
- Приимейсан<|im_start|>
- Recording images with the flash
- 3aIncb n3o6paXeHn co BCnbIshKoI
- Приимейань
- 3aIncb HeNoDBrXhBIX H3o6paXeHn Ha "Memory Stick" BpeKIme CAMERA
- 3aHcB no TaMepy camo3anycka
- Ipeed BbINOJIHeHem Oepaunn
- Длг OTMeHbI 3aIncn no TaMepy camo3anycka
- PpimueaHne
- Bo BpemBbIIOJIHeHn 3aInc Ha JeHTy
- Adjusting the white balance manually
- PeruInpoBka 6aHaHca 6eIoro BpyHyIO
- INDOOR
- To return to the automatic white balance mode
- In the AUTO mode
- In the HOLD mode
- PerynipoBka 6aJaanca 6eJoro BpyHyU
- To cancel the wide mode
- Дя BO3Bpata K Индакци FM
- During recording
- BoBpem3aHncn
- Using the fader function
- IcnoJb3OBaHneФункци ФeДера
- MONOTONE
- PpimmeuHne no yHKun BOUNCE
- EcjinpekeKJIouaTeIb POWER ycTaHOBLeH B noJIOXeHne MEMORY
- Using special effects - Picture effect
- IcnoJb3OBaHne CpeunalbHbIX 3ΦΦeKTOB - ΘΦΦeKT n3o6paXKeHnA
- To turn the picture effect function off
- ДЯ BO3Bpata K ИнданFN
- ДЯ OTKЛIOUeHnФункuIN 3ΦΦeKTa n3O6paXeHn
- Pn nCnoB3OBAHnn FyHKuN 3ΦΦeKta n3o6paXeHH Bb He moKeTe nCNoB3OBA Tb cJeDyUoIne FyHKuN:
- EcIn Bbl nobephe TepeKluoyateIb POWERBdpyro neJoxHe
- Using special effects - Digital effect
- STILL
- FLASH (FLASH MOTION)
- LUMI. (LUMINANCE KEY)
- TRAIL
- SLOW SHTR (SLOW SHUTTER)
- OLD MOVIE
- IcnoJb3OBaHne cpeuaJIbHbIX 3ΦΦeKTOB -UnpoBoi 3ΦΦeKT
- IcnoJb3OBAHHe cneuaJIbHbIX 3ΦΦeKTOB -LcnpoBOI 3ΦΦeKT
- To cancel the digital effect
- When you turn the POWER switch to the other position
- When recording in the slow shutter mode
- SPOTLIGHT
- PORTRAIT (Soft portrait)
- SPORTS (Sports lesson)
- BEACH&SKI
- SunSETMOON (Sunset & moon)
- LANDSCAPE
- PORTRAIT (Märkni nopTeHbI peKIM)
- SPORTS (Pexm CnpTbIX COCTaHn)
- SUNSETMOON (Pekim 3axo#a coHua n lyHbI)
- To turn the PROGRAM AE off
- Дя BO3BpaTа KИндикади FN
- Adjusting the exposure manually
- To return to the automatic exposure mode
- Примеане
- Using the spot light-metering mode - Flexible Spot Meter
- IcnoJb3OBAHne pexnMa CBetOBORoΦOTometpnueCKoro PHTA-PeryJnpyEmoe PANTHOΦOTometpn
- Длв BO3ВраТКИнДикалиFN
- ДЯВОЗВРаТВрекIM
- abTomatnuecko3Kcno3n
- Focusing manually
- Pуная Фокусювka
- About expanded focus
- To focus precisely
- Focal distance information
- PuchanФokycnpobka
- HnDnKaun 6yDen H3MeHrTbCnJeDyUoMn 06pa30m:
- HOpMaun OokcHOM paCtOHHn OTo6paXaETcHa 3KpaHe KKDb TeueHne npImepHo Tpex cekyHb CneDyUoXn Clyuayx:
- Using the spot focus mode - Spot Focus
- IcnoJb3OBAHne peKIma PAnTha 0OKycnPOBKn - PAnTHo 0OKycnPOBKn
- To return to the autofocus mode
- Playing back a tape with picture effects
- Bocnpo3BeDeHne JeHtbi C əΦΦeKtAmn n3o6paXkeHnA
- To cancel the picture effect function
- Pictures processed by the picture effect function
- When you turn the POWER switch to the other position or stop playing back
- Приимechanicals
- N3o6paXeHn, 6pa6oTaHHbIe C nOmoBIO cyHKUIM 3ΦΦeKTA N3o6paXeHn
- Ecnn Bbl nobephe Te nepeKlnouateIb POWERB dpyroe noJoxKeHne nn ocTaHOBnTe Bocnpoun3BeJeHne
- Playing back a tape with digital effects
- Bocnpon3BeDeHne JeHTbI C cnΦpOBbIMN ΘΦΦeKtAmn
- Pictures processed by the digital effect function
- N3o6paXeHn, o6pa6oTaHHbIe c nOmoUbO cyHKcMn UΦpOBOrO 3ΦΦeKta
- Ecnn BbI nobepheTe nepeKluoyateIb POWERBdpyroe noloxhenne IIN octaHOBnTE BOCPON3BeHHe
- Enlarging images recorded on tapes - Tape PB ZOOM
- YBéniuheHne 3aPiNcaHHbIXHa JeHTbI n3O6paJxHenn- ΦyHKZnP B ZOOM JeHTbI
- 4
- 2,3
- The PB ZOOM function is automatically cancelled when you operate the following functions:
- Images in the PB ZOOM
- In the PB ZOOM mode
- Edge of the enlarged image
- When FOCUS is set to ZOOM
- Функця PB ZOOM 6удет abTomatueckn OTmeheha, ecIn BblbInonHnte OndHy n3 cJeMyuuxx Функци:
- N3o6paXeHnBpeXnmePBZOOM
- B pexkme PB ZOOM
- KpOMKa yBENHHeHO n3o6paXeHNr
- Ecnn nepeeknoateIb FOCUS yctaHOBNeHa B noJoxHe ZOOM
- Searching for a scene - MULTI-PICTURE SEARCH
- Оъckaне зпиЗода -ФункцЯ MULTIPICTURE SEARCH
- EcIn Bbl XOTnTe 3aMeHnTb MNHaTHOpHoe n3o6paXeHne
- To return to the MULTI SCH screen from playback
- To stop searching
- To end the multi-picture search function
- To end the multi-picture search function from the playback screen
- When controlling your camcorder with the Remote Commander
- If the tape has a blank portion in the beginning of the tape or between recorded portions
- The number of thumbnails stored in one cassette
- EcIn Ha JeHTe IMeETcRe He3aNtcaHHbI yAcTOK B HauaJIe JHeTbI INJIM MeKdY 3aNtcaHHbIMyAcTkAmI
- OTbICKaHne 3n3oJa -ФункцЯ MULTI-PICTURE SEARCH
- Searching the boundaries of recorded tape by title - TITLE SEARCH
- EcIn Ha JeHTe IMeETcRe He3aIncaHHbI yAcTOK B Hauane JeHTbI INn MeKdY 3aIncaHHbIMyAcTkAmn
- Searching a recording by date - DATE SEARCH
- Searching for the date by using cassette memory
- ДлЯ OCTaHOBKINONCKA
- Dubbing a tape
- Using the A/V connecting cable
- Параапсь лeNTы
- IcnoJIb3OBAHnE CoeHNHTeNbHOKa6eJnyDNo/BuDeo
- Peped BbINOJIHeHnEM Opeaun
- When you have finished dubbing a tape
- If your VCR is a monaural type
- If your VCR has an S video jack
- Ipee3aIncb JeHTbl
- Ecnn Bbl 3aKOHnJI npe3anCb IeHTbl
- Ecnn BaW KBM moHooHueckoro Tuna
- EcnnBaawem KBM mmeetc rhe3do S Bndeo
- Using the i.LINK cable
- Icnojb30BaHne ka6eJiaLINK
- Ecnn Bbl 3aKOHnJI npe3anCb JeHTbI
- Recording video or TV programmes
- When using the A/V connecting cable
- Switching the video input jack of the A/V connecting cable
- 3a\Pncb BnDeo nJI TeIeBn3nOHhbIX npOprpamM
- PnncnoJIb3ObaHn coeHHTeIbHOro Ka6eJyauNo/ BndeO
- 1IpeekJIOUeHne BXOHDoro BnDeoRHe3da COeINHtEnbHOrKa6eJaayDNo/BnDeo
- Making a recording
- Co3dHne 3aHncn
- Ipeed BbINOJIHeHEm Opeaun
- Using the Remote Commander
- Ecnn Bbl 3aKOHnIn npe3anncb IeHTbl
- UcnoJIb3OBAHne nIyIbTa dNCTaHcUNOHHorO ynpabNeHnA
- If your TV or VCR has an S video jack
- EcnBaw KBMMOHooHueckoro Tnna
- EcnB Baem TeleBn3ope nKBM nMeetc rHe3do S Bndeo
- When using the i.LINK cable
- PnncnoJb3ObaHnn Ka6eJIaLINK
- IcnoJIb3OBAHnne nylbTa dNCTaHcUHOHHOro ynpabJeHn
- Note on playback pause pictures
- Before recording
- Приимейсаня
- PpmeaHne no n3o6paXeHNrM BO BpeMa npay3bl Bocnpoun3BeDeHHA
- Ipeed BbINOJIHeHnem 3aIncs
- Superimposing a title
- HanoxeHne TnTpa
- Superimposing a title on starting a recording
- Hanoxehne TnTpa Ha hauaNo 3aIncN
- TITLE
- 5-7
- 8
- Title setting
- The number of titles recordable on one cassette
- Tntpbl, haJIOXeHHbI c nOmoIbI BaIeBnDcOkamepbl
- YtobHe OTo6paKaTb TnTp BO BpemBocnpOn3BeDeHn
- Hactpoika Tntpa
- KoJIuYeCTBO THTPOB, KOToPbIe MOryT 6bITb 3aIIncAhI Ha Ondy Kaccety
- Ecnnyx3aHcAno20TnTpOB
- Superimposing a title on a recorded tape
- HaJIOKeHne TnTpHa 3aIncaHHyU JIeHTy
- To use a custom title
- On a blank portion of the tape
- IINcN0b3OBaHHco6CTBeHHoro TnTpa
- Ha He3ancaHHom yactke JeHTbI
- Erasing a title
- CTpapanHe TnTpa
- MENU
- 4,5
- Making your own titles
- Making a title in CAMERA mode
- Co3dahne BaushxCo6CTBHeHHbIX THTPOB
- To change a title you have stored
- To superimpose your own title on tape
- Co3dHne Baunx co6CTBeHHbIX TnTPOB
- Making a title in VCR mode
- Co3dHHe TnTpa BpeXmme VCR
- Дя BO3ВраТКИнДикали FN
- Hn HAnOxHn Ha NENTy BaWero co6CTBeHHoro TnTpa
- The micro Cassette Memory
- The cassette information
- micro Cassette Memory (MнКрokedTHапамгь)
- HΦopmaζη o kaccete
- Recorded areas
- To not display the cassette information
- When " ※ " is flashing
- 3aHncaHHbIe 06JaCTN
- UTo6bI He OTo6paXaTb INHΦopMaζuO o Kaccete
- EcnMnraTeHndkaZna “
- Labelling a cassette
- MapKnpOBka KaccTebl
- To erase the label you have made
- To change the label you have made
- Erasing all the data in micro Cassette Memory
- To cancel deleting
- Стupaне BCex ДаHHbIX micro Cassette Memory (МКрокассгонпamATN)
- Для BOЗВраТа К ИнДиКаци FN
- ДлгOTMeHbI ydaJIeHnA
- PpmeaHne 06 yHkaJIbHOM Homepe ID
- Using a "Memory Stick" - Introduction
- File format
- Typical image data file name
- ИспOLTьзоване "Memory Stick" - Вて deane
- Φopmat φaɪnəb
- Using a "Memory Stick"
- IcnoIb3OBaHne "Memory Stick"
- "Memory Stick" formatted by a computer
- Notes on image data compatibility
- "Memory Stick", OTΦopMaTnpoBaHnaHa nepcoHaJIbHOM KOMNbIOTepe
- Приимechаши NO COBmecTUMOCTN daHHbIX N3O6paKeHnI
- Inserting a "Memory Stick"
- Извileченье "Memory Stick"
- While the "Memory Stick" access lamp is lit or flashing
- EcInI lamnoka doctyna "Memory Stick" roput nJn Muraet
- Ecnn oTo6paXaTeTcHnDnKaTOp "MEMORY STICK ERROR"
- Using a touch panel
- IcnoJb3ObaHne ceHCOPHO naneJn
- Selecting still image quality mode
- Bb6oppekimaKauecTba HeNoDbXHOro 306paXeHn
- 3-5
- Differences in image quality
- Image quality mode indicator
- When you select image quality
- Испобьзовке “Memory Stick” - Вedlyнe
- Setting the moving picture quality mode
- Bb6op pexkma kaecTba DnKxUeOcN 306paXeHnA
- Bit rate
- Selecting the size of still image
- Bb6op pa3mepa HeNoDbNxHoro n3o6paXeHn
- Approximate number of still images you can record on a "Memory Stick"
- Approximate time of moving pictures you can record on a "Memory Stick"
- ПриблзnteьногДиTeьнocтБдвжуцхсгИЗOBpaхжн,KOTopbieBbl moxkeTzeapncatbHa“MemoryStick"
- Recording still images on a "Memory Stick" - Memory photo recording
- 3aIncb HeIOBbIX H3O6paXeHn Ha "Memory Stick" - FOToCbEmKa c COxpaHeHmEBnAMrTn
- Ipeed BbINOJIHeHem Oepaun
- When you press PHOTO on the Remote Commander
- When you press PHOTO lightly in step 2
- When the POWER switch is set to MEMORY
- The number of still images you can record on a "Memory Stick"
- EcJn nepeKJIIOUaTeIb POWER yCTaHOBNeH B noJIOKeHne MEMORY
- Ioka Bby 3aINCbIBaTe HeNoDBNXKHOe n3o6paXeHne
- EcIn Bbl HaxMeTe KhoNky PHOTO ha nyIbTe ductaHOnHOrO ynpabLeHH
- Korda Bbl cnerka haxnmaeTe KhONky PHOTO npB bInOJHHeHN DeIcTBnnyHKTa 2
- DaHHbIe 3aHNCN
- Recording images continuously
- NORMAL [a]
- HIGH SPEED [a]
- EXP BRKTG (Exposure Bracketing)
- MULTI SCRN (Multi Screen) [b]
- HenpepbBna 3aNcB n3o6paXeHn
- PexkmN NORMAL [a]
- Pexim HIGH SPEED [a]
- Pexim EXP BRKTG (cepna 3Kcnozni)
- PexzMMULTISCRN (mylbTu3KpaH) [b]
- If the "Memory Stick" becomes full
- The number of still images in continuous shooting
- When shooting with the self-timer function on the Remote Commander
- Ecπη emKocTb "Memory Stick" 3aNoJIHNTCA
- KolnueCTBO HeNoDBNXHbIX n3O6paXeHn npn HnpepbBHOcBemKe
- Bo Bpem HnpepbBHOJ 3aHNC HeNoDBrXhblx N3o6paKeHn
- Ppi Cbemke C nCnOJIb3OBAHEm FyHKcnn TaMepa cAmO3anycka Nn NpIbTa dNCTaHcUNOHoro ynpabJeHH
- EcIn Bbl octabte Bawy Bndeokamepy Ha nTb nn 60lee MNHyT Nocne OTcoeDHeHn HCTOCHKA NITAHN
- Bcblska He 6ydt cpa6aTbIBaTb, daXe ecn Bbl bIbepeTe onuHO AUTO n aBTOMaTHueckoe yMeHbWeHne 3ΦΦeKta KpacHbIX rna3 (O) BO BpEmra pa6oTbI cJeDyUoNx ΦyHKm:
- Bo Bpemr HepepbBHOJ 3aHNCn 1306paXeHn
- Shooting with an auxiliary light - HONOGRAM AF
- CbeMka co BCnOMoRAteIbHbIMOCBeueHem -ФункцЯ HOLOGRAM AF
- O roJorpamMHO aBToΦOKcnpOBKe HIOLOGRAM AF
- Приимechаня
- Tolorpammna aBtofoKcnpobka HOLOGRAM AF He 6ydtncnyckatb CBet BCJeDyUx npexkmax:
- Using NightFraming
- IcnoJb3OBAHne HocHoY uCTaHOBKn KaJaPa
- Self-timer memory photo recording
- Recording an image from a tape as a still image
- 3a\Pncb n3o6paXeHnCJIeHTbI KaK HeNoDvNxHOrO n3o6paXeHnA
- Ipeep BbINOJIHeHHeM Oepaun
- 3aIncB n306paXeHnC JIeHTbI KaK HeNoDbNxHOrO n306paXeHn
- Recording a still image from other equipment
- 3aIncB HenoDbNxHoro 13o6paXeHnC dpyro annapaTpybl
- Ipeed BbINOJIHHeHEm OIepaun
- UcnOJIb3OBAHnE CoeINHITeIbHOro Ka6eJyaydno/BuJeO
- EcIn B BaWeM TeJeBn3ope nKBM IMeeTc rHe3do S Bvdeo
- IcnoJIb3OBAHne ka6eJiaLINK
- Superimposing a still image in a "Memory Stick" on an image - MEMORY MIX
- HanoXeHne HenoDbxxHoro n3o6paXeHnB“Memory Stick”Ha n3o6paXeHne-ФункцЯ MEMORY MIX
- HaioxHe HeNoBnXHoro n3o6paXeHnB“Memory Stick” Ha n3o6paXeHne-ФункцЯ MEMORY MIX
- Recording a superimposed image to a tape
- 3aɪncb HaIoxeHHoro n3o6paxeHnHa JIeHTy
- Ipeed BbINOJIHeHHeM OIepaun
- To change the still image to be superimposed
- To cancel MEMORY MIX
- Image data modified on your computer or shot with other equipment
- When you select M. OVERLAP
- UTo6bI n3MeHnTb HEnoDnXHHeu n3O6paXeHne dJa HaLoXeHn
- ДЯ OTMeHbI yCTaHOBKIMEMORYMIX
- Примейань
- Ecnn Bbl BbIbepeTe pexm M. OVERLAP
- Recording a superimposed image to a "Memory Stick" as a still image
- 3aInscb HaIoxKeHHoro n3o6paXeHnHa "Memory Stick" KaK HenoDbHXHO r 3o6paXeHnA
- UTo6bI n3MeHnTb HenoDnXHHeu n3o6paXeHne dIra HaIOxKeHnI
- HaIooXeHne HenoDbNxHoro n3o6paXeHnB“Memory Stick” Ha n3o6paXeHne-ФункцЯ MEMORY MIX
- Recording moving pictures on a "Memory Stick" - MPEG MOVIE recording
- 3a\Pncb D\nKxUnxCn3O6paJxHn Ha "Memory Stick" - 3a\Pncb MPEG MOVIE
- Ipeed BbinoJHHeHem Oepaun
- To stop recording
- ДЯ OCTaHOBK 3aHNCN
- Self-timer MPEG MOVIE recording
- 3aInscb MPEG MOVIE no TaMepy camo3anycka
- To cancel the self-timer recording
- Дл оctановки образноро оtcуета
- Recording a picture from a tape as a moving picture
- 3aHnscb n3o6paXeHnCJIeHTbl KaK DnXkyuTeROcHn3o6paXeHn
- Ipeed BbinoJHHeHem Otnepaun
- ДлЯ OCTaHOBKи 3aПСн
- When the "Memory Stick" access lamp is lit or flashing
- Titles which have already been recorded on tapes
- Recording date/time
- 3aIncB n3o6paXeHnC JIeHTbI KaK DnKxUeOcR n3o6paXeHn
- Ecln lamnoka Doctyna "Memory Stick" roput nlin muraet
- TntpbI, yke 3aHncaHHbIe Ha JIeHTax
- 3aHcB daTbI/BpeMeHN
- Recording a moving picture from other equipment
- 3ainncb n3o6paXeHnC JIeHTbI KaK DnBxKyUeOcR n3o6paXeHn
- 3aIncb DvNxUeOcra n3o6paXeHnC dpyro annapaTpybl
- Viewing a still image - Memory photo playback
- To stop memory photo playback
- Playback still images recorded on the "Memory Stick"
- ДлЯ OCTAHOBKN BOCNPOUN3BedeHNA FOTOCHIMKOB N3 NaMRTN
- Примейане
- Bocnpo3BoDmblc HeNoDbNxHbIe n3O6paXeHn, 3aIncahHbIe Ha "Memory Stick"
- File name
- To play back recorded images on a TV screen
- Still image
- Mma
- Дявocиpondибendeязапсаньхи n3o6paxeну Ha ekpahe TelebeN3opa
- HenodBuxKHe u3o6paXeHne
- Screen indicators during still image playback
- DaHHbIe 3aHmci
- Playing back six recorded images at a time (index screen)
- Bocnpo3BeDeHne WecTn 3aHncahHbIX N3O6paXeHn OndHObpemEHNO (HHeKeCHbI eKpaH)
- To return to the normal playback screen (single screen)
- Длг BOЗВраТКИнДикauци FN
- Длво3ВраТКЗКрануОььчногOBocрpon3ВeDEнг(OДиHOCHbIЗKран)
- Danhble n3o6paXeHn, BUNOn3MeHenHbIX C nOMOuB BaWero nepcoHaJIbHOrO KOMNbIOTepa HIN CHATbIX C NOMOuB DpyrO annapaTypbl
- Viewing a moving picture - MPEG MOVIE playback
- To pause MPEG MOVIE playback
- To change the screen size
- Notes on the screen size
- MPEG MOVIE recorded with your camcorder:
- Moving picture
- When no images are recorded on the "Memory Stick"
- PpmeuHnO pa3Mepe 3KpaHa
- Приимechанинe
- MPEG MOVIE, 3aIncaHbI Ha BaSei BnDeokamepe:
- Дявocрpon3BedeHЯ 3aINcAHbIX n3o6paXeHn Ha 3kpaHe TeneBuN3opa
- EcIn Ha "Memory Stick" HeT 3aIncHbIX n3o6paxKeHn
- Screen indicators during moving picture playback
- 3KpaHHbIe INHdNkAToPbI BO BpeMBOcnpOn3BeJeHnI DBNXJuEroOcN3o6paXKeHnI
- Data/Bpema 3anncn
- Copying still images recorded on a "Memory Stick" to a tape
- KoNiPoBaHne HeNoDvXhBIX n3O6paXeHn, 3aIncAHHbIX Ha "Memory Stick", Ha JeHTy
- PpeB BbINOJIHeHEm Opeaun
- To stop copying in the middle
- To start copying using the Remote Commander
- Дя NaHaJana KOnIpOBaHnC nOMoIbIpyIbTa dNCTaHcNoHHOrO ynpabJIeHn
- During copying
- DaHHbIe I3o6paXeHn, BnDOn3MeHeHHbIX Ha BaWeM nepcoHaJIbHOM KOMNbIOTepe HIN CHaTbIX C NOMOsbIO dpyroI annapaTypbl
- Enlarging still images recorded on a "Memory Stick" – Memory PB ZOOM
- YBeHnueHne HEnoDbHXhBIX 306paXeHn, 3aIncaHHbIX Ha "Memory Stick" -ФункцЯ PB ZOOM namrtn
- Ipeed BbInoJIHeHnEM Onpaun
- To cancel the Memory PB ZOOM function
- ДЯ OTMeHbI ΦyHKcN PB ZOOM nAMrTn
- Bocnpo3BeDeHne n3o6paXeHn IO 3aMKHyTOMy zukny -ФункцЯ SLIDE SHOW
- To stop the slide show
- To pause during a slide show
- To start the slide show from a particular image
- Дл OCTaHOBKи NOKa3сlaйдов
- Iy3bI BO BpeMa noka3a cnaIOB
- If you change the "Memory Stick" during operation
- When there are no images on the "Memory Stick"
- Preventing accidental erasure - Image protection
- To cancel image protection
- Предотьразецни слуайHoro ctrupaши - 3ацита n3обрахени
- Deleting images - DELETE
- Deleting selected images
- Ydajenne n3o6paXeHn -ФункцЯ DELETE
- YdaJIeHne BbI6paHHbIX n3o6paXKeHn
- Deleting selected images on the index screen
- YdaJIeHne BbI6paHHbIX n3O6paXKeHn Ha mHndeKCHOM 3KpaHe
- Ipeed BbINOJIHeHHeM OIepaunu
- To cancel deleting an image
- Длв Bo3ВраТКИнДикалTN FN
- ДЯ OTMeHbI ydaJIeHn I3O6paXKeHn
- Deleting all the images
- YdaJIeHne Bcex n3O6paXKeHn
- 3aHnscb 3HaKa NeuATn -ФункцЯ PRINT MARK
- To cancel writing print marks
- Viewing images on your computer - Introduction
- *When connecting to a computer without a USB jack
- \* Pnp noDcoeHHeHn K KomNbIOTepy 6e3 rHe3da USB
- Notes on using your computer
- Software
- Communications with your computer
- Connecting your camcorder to your computer using the i.LINK cable (For Windows users)
- Ppmeuahne
- Recommended computer environment
- PekomeHdoBaHHa KOnΦnrgpaunKOMnbIOTepa
- Connecting your camcorder to your computer using the USB cable (For Windows users)
- When connecting to a computer via the USB jack
- Recommended computer usage environment when connecting via USB cable and viewing tape images on your computer
- OS:
- CPU:
- Application:
- Display:
- Others:
- PoncoeHHeHne BaWei BnDeoKamepbI K Baewemy KomnbIoTepy c nomoubIO Ka6eJI USB (ДлЯ пььзовateJe Windows)
- PeKOMeHdEma KOMNbIOTePna OepaauonHaA Cpea npi IoDCoeDInHeHm Upe3 Ka6eB USB nIpocMOrpe Ha KOMbIOTepe H3O6paXeHm, 3aNtcaHHbIX Ha JeHTy
- OC:
- ZeHTpaJIbHbI npOceccop:
- PnPKlaaHa nporpaMa:
- Akyctnuecka cnTeMa:
- NamrB:
- KecTkniDnck:
- Ducnnei:
- PpOuee:
- Recommended computer usage environment when connecting via USB cable and viewing the "Memory Stick" images on your computer
- Installing the USB driver
- YcTaHOBka dpaBepa USB
- Installing Image Transfer
- YcTaHOBka nporpaMMbI Image Transfer
- Installing_PIXELA ImageMixer
- YcTaHOBka nporpaMMbI_PIXELA ImageMixer
- Making the computer recognise your camcorder
- Viewing images recorded on a tape
- Kak do6ntbcra, cy06b1 KOMnbIOTepepacno3han Bauy Bndeokamepy
- Viewing images recorded on a "Memory Stick"
- ПпocмотгИЗбрахжи,зaнcaHHbIX ha"Memory Stick
- If you cannot install the USB driver
- EcIbI He MoXeTe yCTaHOBnTb IpaBep USB
- Viewing images recorded on a tape on your computer - USB Streaming (For Windows users)
- Capturing images with "PIXELA ImageMixer Ver.1.0 for Sony"
- 3axBaT n3o6paXeHn C pOMOsbIO nporpamMHorO oBecneueHn "PIXELA ImageMixer Ver.1.0 for Sony"
- ПрсмOTР n3o6paXeHn, 3aIncAHbIX NaJIeHTy
- Viewing pictures live from your camcorder
- PpocMToP KINBbIX N3O6paXeHn C Bauei Bndeokamepbl
- Capturing still images
- 3axBaT HeNoDvBxHbIX N3o6paKeHn
- Capturing moving pictures
- 3axBaT DnBxkyuxxCn3o6paXeHn
- If image data cannot be transferred by the USB connection
- If any trouble occurs
- Carry out the following operations after quitting the application:
- When operating the following functions, they do not function for the image to be output, or the image cannot be output
- EcIn DaHHbe H3O6paXeHn He MOryT 6bItb nepeDaHbI Chee3 CoeDInHeHne USB
- Seeing the on-line help (operating instructions) of "PIXELA ImageMixer Ver.1.0 for Sony"
- Note on using your computer
- Viewing images recorded on a "Memory Stick" on your computer (For Windows users)
- ПюсмOTР ИЗOB PaxжENи,ЗАпSCaHHbIX Ha "Memory Stick",Ha BaшeM KOMnBIOtepe (ДЯ пьзOBaTeNei Windows)
- Viewing images without Image Transter
- ПрсмоТР ИЗОБрахени, 3апиcaHHbIX Ha "Memory Stick", Ha Baшем KMньЮтepe (ДЯ польбовateел Windows)
- PpocmTo p3o6paXeHn 6e3 PpeDaun 3o6paXeHn
- Image file storage destinations and image files
- For Windows Me users (The drive recognising your camcorder is [E:].)
- MecTa xpaHeHЯ φaIIOB n3o6paxKeHn I φaJIbI n3o6paxKeHn
- Длг польбизовател Windows Me (Yc tropoicbOM, pacno3naiozum Baу Bndeokamepy, nBJIaTeCn [E:])
- Disconnect the USB cable and remove the "Memory Stick" or set the POWER switch to (CHG) OFF
- Connecting your camcorder to your computer using the USB cable (For Macintosh users)
- Recommended Macintosh environment
- PoiocoeHHeHne BaWei BnDeoKamepbI K Baewemy KomnbIoTepy c nOmoobko6eJI USB (DnIy noIb30BaTeJei Macintosh)
- Viewing images recorded on a "Memory Stick" on your computer (For Macintosh users)
- ПрсмOTР ИЗБрахени,ЗАпSCаHHbIX Ha "Memory Stick",н Вашем KomпьЮтepe (ДЯ пьзOBaTeNei Macintosh)
- Viewing images
- PpocmToP u3o6paXeHn
- ПрсмоТР ИЗОБрахени, 3аИнcaHHbIX Ha "Memory Stick", Ha Baшем КOMпьЮтetime (Дя польбовате Л Macintosh)
- OTcoeHnHTe Ka6eJIb USB nI3BLeKInTe "Memory Stick", nIynycTaHOBnTe nepeKlIoUaTeJIb POWER B noJIoXeHne (CHG) OFF
- Accessing the network
- -ToIbKO MoIeJIb DCR-IP220E
- On trademarks
- About (Bluetooth) lamp
- OToprobbixMapkax
- O JIaMnOuKe Bluetooth
- How to hold your camcorder when operating in NETWORK mode
- Pocne nCnoJIb3OBaHnI nepa
- Changing the menu settings
- BbINOJIHeHne HnDnBnDyAaNbHbIx yCTaHOBOK Ha BaWei BnDeokamepe —
- Изменистановок мени
- OnuM MeH OTo6paXaOTcB B VnE cJeDyUOxN NKTOrpamM:
- English
- Selecting the mode setting of each item is the default setting.
- FLASH LVL
- Notes on the SteadyShot
- If you cancel the SteadyShot
- NTSC PB
- LCD B.L. and VF B.L.
- Notes on formatting
- Notes on DEMO MODE
- When recording a close subject
- In more than five minutes after removing the power source
- Pysckni
- Types of trouble and how to correct trouble
- In the playback mode
- In the recording and playback modes
- Others
- Self-diagnosis display
- Warning indicators and messages
- Warning indicators
- Warning messages
- Pycckn
- Pa3HOBnIHOCTn HeNCpPaBHOCTeN MeTOblx yCTpaHeHNA
- B pexime 3aipcn
- PpeDynpexKaIOUne INHnKKaTOpbl
- 100-0001 Ppeynpekdaoosn HndkaTOp OTHOCTeJIbHO faiJa
- BaTapeHbI 6JIOK pa3pJxKeH nJI noTu pa3pJxKeH
- PpOJ30UJI KOHdEHCaIgBJIarN\*
- PpeynpeKdaOuHnDnKaTOp OTHocntelbHmo micro Cassette Memory (MnPKoaccTeHn parnr)
- Ппдунрждаюши ИndkaTop OTHoNteJbHObФopMaTupOBaHnA"Memory Stick"
- 2?] Pnpdynpexkaiou mHdkaTop OTHOCNTeBHO COBmectHMocTn "Memory Stick"
- IpeDynpexKaIOuMn INHdkaTOp OTHOCTeJIbHO JeHTbl
- 品 PpeDynpexKaUOuHmHdNkATOp OTHOCHTeNbHO YnCTaUeKacCtbl (TolbKO MoedeJb DCR-IP220E)
- Bam Huxho n3Bneby kaccety*
- mI3o6paXeHne 3aunuheo\*
- IpeDynpexkdaiouHnHnKaTOp OTHOCHTbHO BCNbIiKu
- Ppeynpejkaioi nHdkaTOp OTHOCNTeBHO 3aHcN HeNodBnXHOrO N3o6paeHH
- Ppeynpekdaioune coo6eHHa
- Additional Information - Usable cassettes
- Selecting cassette types
- Copyright signal
- When you play back
- When you record
- ИспобьзуемBLEkacceТbl
- Bb6op TnOB Kaccet
- Bocnpon3BeJeHne JeHT, 3aIncaHHbIX B cnCTeme NTSC
- CunhaaBTOpCKoro npaba
- PnB Bocnpo3BeDeHn
- Pn3ainnC
- Notes on the MICROMV cassette
- When affixing a label on the MICROMV cassette
- After using the MICROMV cassette
- When the micro Cassette Memory function does not work
- About the "InfoLITHIUM" battery pack
- What is the "InfoLITHIUM" battery pack?
- Effective use of the battery pack
- О затыpeйhom блoke "InfoLITHIUM"
- Remaining battery time indicator
- How to store the battery pack
- Battery life
- HdkaTop BpeMeHn octabweOcA 3apra6bataepenHoro 6loka
- Kak xpaHb6aTapeHbI 6JOK
- Cpok cnyk6bl 6atapeHoro 6loka
- What is i.LINK?
- About the name "i.LINK"
- O ctaндарт e i.LINK
- YTo Takoe i.LINK?
- O Ha3BaHn "i.LINK"
- i.LINK baud rate
- *What is Mbps?
- i.LINK functions on this unit
- Required i.LINK cable
- Скорocъ перауддаHHbIX i.LINKВбодан
- \*4To TaKoe M6nt/c?
- Функции i.LINK Ha 3Tom annapate
- Using your camcorder abroad
- PAL system
- PAL-M system
- PAL-N system
- NTSC system
- SECAM system
- Maintenance information and precautions
- Moisture condensation
- If moisture condensation occurred
- Note on moisture condensation
- How to prevent moisture condensation
- Maintenance information
- Cleaning the video head
- The video head
- Kak npedotBpataNb KOHdeneau BlaIg
- HΦopMaζη no yxOу 3a annapaTOM
- OuNCTKa BnDeoROJOBKn
- Bundeorolobka
- Using a cleaning cassette
- Cleaning the LCD screen
- Charging the built-in rechargeable battery
- IcnoJIb3OBaHne YnCTaue KACCetbl
- PpimeyaHn
- OuICTKa 3KpaHa KKd
- 3apKa BCTpoEHoIpepe3apXaemO6aTaepKu
- 3apnka BcTpoEHNO nepe3apXaEMo6aTapeKn:
- Removing dust from inside the viewfinder
- YdaJIeHne nbln n3HyTpN BVDOnCKaTeIa
- Caution
- Примеань.
- Adjusting the LCD screen (CALIBRATION)
- PerynipoBka 3KpaHa XXKd (CALIBRATION)
- Precautions
- Camcorder operation
- On handling tapes
- Mepblpeoctopoxhoctn
- 3KcnIyataunBndeokamepbI
- obpauehenn c JeHTamn
- Camcorder care
- AC power adaptor
- YxOa 3a BnIeOkamepo
- Cetebon aadantep nepemehnHO Toka
- About care and storage of the lens
- Battery pack
- yxode 3a obbeKTbOM n o erO xpaHeHH
- BaTapeHbIb6Jok
- Notes on dry batteries
- If batteries are leaking
- Video camera recorder
- System
- Input/Output connectors
- LCD screen
- Wireless communication (DCR-IP220E only)
- General
- Texhnueckne xapaKTepeNCTnKN
- Budekamepa
- CnCTema
- CeTeBoi aanTep nepemehHoro TOka
- BaTapeiHbI 6JIOK
- Identifying the parts and controls
- Note on the Carl Zeiss lens
- PpmeaHne 06 oBekTbe KapI Lcic
- Remote Commander
- To prepare the Remote Commander
- ДлnoIodrotOBKn nyIbTa ДиCTAHCUHHOуnpaBJIeHn
- Notes on the Remote Commander
- PpmeaHnO npJIbTe dNCTaHcNoHOrO ynpabJIeHH
- Operation indicators
- LCD screen and viewfinder
- Pa60yne HndnkaTopbI
- 3KpaH KKD n BnDOnckaTeIb
- A, B
- C,D
- E
- F, G, H
- I, J, K, L
- M, N
- O, P, Q
- R
- S
- T, U, V
- W,X,Y,Z
- Aлфавиньи уka3aTeь
- A, B, B, Γ
- D,E,X,3
- N, K, N, M
- H,O
- P
- C, T
- y-
- A,B,C,D
- E,F,G,H
- 1-0
- P-Z
Brand : SONY
Model : DCR-IP220E
Category : Camcorder