
TKR1WD - Razor TELEFUNKEN - Free user manual and instructions
Find the device manual for free TKR1WD TELEFUNKEN in PDF.
| Brand | Telefunken |
| Model | TKR1WD |
| Product Type | Rechargeable electric shaver with built-in trimmer |
| Number of heads | 3 |
| Power supply | AC adapter 100-240 V ~ 50/60 Hz, output 5 V 1 A |
| Battery type | Built-in rechargeable (non-replaceable) |
| Charging time | Approximately 90 minutes |
| Runtime | Approximately 60 minutes |
| Charge indicator | LCD screen with battery level indicator and red LED light |
| Usage | Dry shaving or with shaving gel |
| Built-in trimmer | Yes, retractable with unlock button |
| Cleaning | Washable under water or thorough dry cleaning with included brush and tweezers |
| Included accessories | Adapter, cleaning brush, blade removal tweezers, storage pouch |
| Safety | Do not use if foil is damaged; turn off device before cleaning |
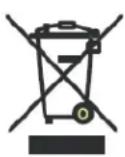
| Recycling | Compliant with WEEE directive; battery must be recycled separately |
| Weight (estimated) | Approximately 200 g |
| Dimensions (estimated) | 6 x 4 x 18 cm |
| Repairability | Spare parts available at pieces-detachees.sogedis.fr |
| Trimmer lubrication | Every 2 months with a drop of sewing machine oil |
| First use | Clean the head and fully charge the battery |
Frequently Asked Questions - TKR1WD TELEFUNKEN
User questions about TKR1WD TELEFUNKEN
0 question about this device. Answer the ones you know or ask your own.
Ask a new question about this device
Download the instructions for your Razor in PDF format for free! Find your manual TKR1WD - TELEFUNKEN and take your electronic device back in hand. On this page are published all the documents necessary for the use of your device. TKR1WD by TELEFUNKEN.
USER MANUAL TKR1WD TELEFUNKEN
natural_image
Line drawing of a handbrush with three circular blades and a central knob (no text or symbols)TKR1WD
INSTRUCTIONS DE SÉCURITÉ
- LIRE IMPÉRATIVEMENT CE MODE D'EMPLOI ET LE CONSERVER AFIN DE POUVOIR LE CONSULTER ULTÉRIEUREMENT. DANS LE CAS OÙ VOUS CÉDEZ CET APPAREIL Á UN TIERS, N'OUBLIEZ PAS DE FOURNIR CETTE NOTICE AVEC L'APPAREIL.
- CET APPAREIL EST DESTINÉ Á ETRE UTILISÉ DANS DES APPLICATIONS DOMESTIQUES ET ANALOGUES TELLES QUE:
○ DES COINS CUISINES RÉSERVÉS AU PERSONNEL DANS DES MAGASINS, BUREAUX ET AUTRES ENVIRONNEMENTS PROFESSIONNELS;
○ DES FERMES;
○ L'UTILISATION PAR LES CLIENTS DES HÔTELS, MOTELS ET AUTRES ENVIRONNEMENTS À CARACTÈRE RÉSIDENTIEL;
○ DES ENVIRONNEMENTS DU TYPE CHAMBRES D'HÔTES.
- TOUTE UTILISATION AUTRE QUE CELLE PRÉVUE POUR CET APPAREIL, PAR EXAMPLE UNE UTILISATION COMMERCIALE, EST INTERDITE. UNE UTILISATION NON CONFORME AU MODE D'EMPLOI DÉGAGERAIT LA MARQUE DE TOUTE RESPONSABILITÉ ET ENTRAÎNERAIT LA PERTE DE LA GARANTIE.
- CET APPAREIL PEUT ÊTRE UTILISÉ PAR DES ENFANTS D'AU MOINS 8 ANS ET PAR DES PERSONNES AYANT DES CAPACITÉS PHYSIQUES, SENSORIELLES OU MENTALES RÉDUITES OU DÉNUÉES D'EXPÉRIENCE OU DE CONNAISSANCE, S'ILS (SI ELLES) SONT CORRECTEMENT SURVEILLÉ(E)S OU SI DES INSTRUCTIONS RELATIVES À L'UTILISATION DE L'APPAREIL EN TOUTE SÉCURITÉ LEUR ONT ÉTÉ DONNÉES ET SI LES RISQUES ENCOURUS ONT ÉTÉ APPRÉHENDÉS. LES ENFANTS NE DOIVENT PAS JOUER AVEC L'APPAREIL. LE NETTOYAGE ET L'ENTRETIEN PAR L'USAGER NE
DOIVENT PAS ÊTRE RÉALISÉS PAR DES ENFANTS SANS SURVEILLANCE.
- TENEZ L'APPAREIL ET SON CORDON HORS DE PORTÉE DES ENFANTS DE MOINS DE 8 ANS.
- L'APPAREIL NE DOIT PAS ÊTRE UTILISÉ S'IL A CHUTÉ, S'IL PRÉSENTE DES DOMMAGES APPARENTS, S'IL FUIT OU PRÉSENTE DES ANOMALIES DE FONCTIONNEMENT.
- SI LE CÂBLE D'ALIMENTATION EST ENDOMMAGÉ, IL DOIT ÊTRE REMPLACÉ PAR LE FABRICANT, SON SERVICE APRÈS-VENTE OU DES PERSONNES COMPÉTENTES DE QUALIFICATION SIMILAIRE AFIN D'ÉVITER TOUT DANGER.
- L'APPAREIL DOIT ETRE UTILISE UNIQUEMENT AVEC L'ALIMENTATION FOURNIE AVEC L'APPAREIL.
- L'APPAREIL DOIT ETRE ALIMENTE UNIQUEMENT SOUS LA TRES BASSE TENSION DE SECURITE CORRESPONDANT AU MARQUAGE DE L'APPAREIL.
- MISE EN GARDE: ENLEVER LA PARTIE TENUE A LA MAIN DU CABLE D'ALIMENTATION AVANT DE LA NETTOYER SOUS L'EAU.
- MISE EN GARDE : NE JAMAIS METTRE LE RASOIR EN CONTACT DE L'EAU LORSQUE CELUI-CI EST RELIE AU SECTEUR.
PEUT ETRE UTILISE DANS LA BIGNOIRE OU LA DOUCHE.
PEUT ETRE NETTOYE SOUS UN ROBINET D'EAU COURANTE.
- EN CE QUI CONCERNE LA FAÇON DE NETTOYER L'APPAREIL, RÉFÉREZ-VOUS AUX CONSIGNES DONNÉES DANS LE CHAPITRE « NETTOYAGE ET ENTRETIEN ».
- EN CE QUI CONCERNE LES MODALITÉS D'INSTALLATION ET DE FONCTIONNEMENT, RÉFÉREZ-VOUS AUX CONSIGNES DONNÉES DANS LE CHAPITRE « MISE EN SERVICE ET UTILISATION ».
MISE EN GARDE
- APRÈS AVOIR DEBALLÉ VOTRE APPAREIL, ASSUREZ-VOUS D'ABORD QU'IL N'A PAS ÉTÉ ABIMÉ. SI VOUS AVEZ UN DOUTE, N'UTILISEZ PAS VOTRE APPAREIL, ET CONSULTEZ UN TECHNICIEN QUALIFIÉ.
- ENLEVEZ BIEN TOUS LES ÉLÉMENTS DE L'EMBALLAGE, ET NE LAISSEZ PAS LES ÉLÉMENTS TELS QUE LES SACS PLASTIQUES, DU POLYSTYRÈNE OU DES ÉLASTIQUES À PORTÉE DES ENFANTS. CES ÉLÉMENTS POURRAIENT ÊTRE DANGEREUX POUR EUX.
- N'UTILISEZ JAMAIS D'ACCESSOIRES OU DE PIÈCES D'UN AUTRE FABRICANT. L'UTILISATION DE CE TYPE D'ACCESSOIRES OU DE PIÈCES ENTRAÎNE L'ANNULATION DE LA GARANTIE.
- DÉBRANCHEZ TOUJOURS LE PRODUIT EN CAS DE LONGUE PÉRIODE SANS UTILISATION.
NORMES DE SÉCURITÉ
CET APPAREIL EST CONFORME AUX DIRECTIVES ET NORMES EN VIGUEURS.
SOMMAIRE
DESCRIPTION....1
MISE EN SERVICE ET UTILISATION....2
natural_image
Diagram of a medical device with a plug and connector, showing an upward arrow (no text or symbols)natural_image
Line drawing of a stylized human figure with abstract circular patterns (no text or symbols)RASAGE
natural_image
Silhouette of a human hand holding a circular object with directional arrows indicating motion or force (no text or symbols)natural_image
Silhouette of a person wearing a smartwatch with a device on their lap (no text or symbols visible)
natural_image
Line drawing of a person's face with a pen, no text or symbols presentnatural_image
Line drawing of a frog wearing a hat and holding a faucet, with splashing water (no text or symbols)natural_image
Line drawing of a hand holding a three-bladed electric shaver with an upward arrow and number 1 (no text or symbols on the diagram itself)
natural_image
Diagram of a device with three circular components and a smartphone, no visible text or symbols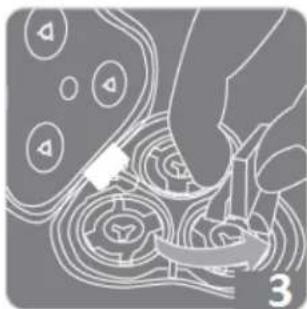
natural_image
Illustration of a hand using a tool to interact with a device, showing no text or symbols present.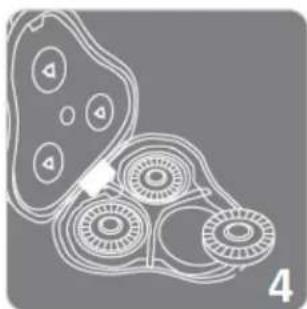
natural_image
Abstract diagram of interconnected circular and ring-like shapes with no visible text or symbols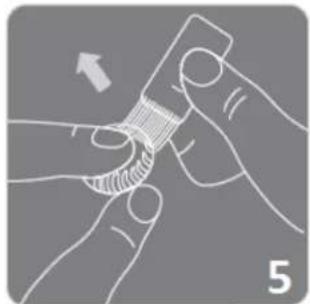
natural_image
Illustration of hands holding a finger with a string, showing a finger movement (no text or symbols)
natural_image
Diagram of a mechanical component with internal structure and motion arrow, no visible text or symbols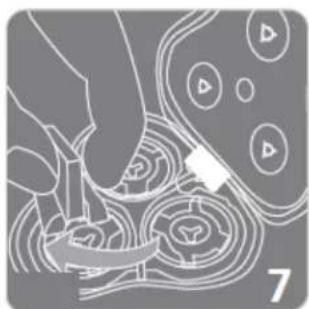
natural_image
Illustration of a hand interacting with a device, showing abstract circular patterns and a white arrow pointing to a component (no text or symbols)
natural_image
Line drawing of a hand holding a three-bladed electric shaver with a downward arrow indicating motion (no text or symbols)NETTOYAGE DE LA TONDEUSE
natural_image
Illustration of a hand holding a device with a tool, accompanied by an inset showing a bottle (no text or symbols present)Vestel France, 17 rue de la Couture – 94563 Rungis CEDEX

natural_image
Line drawing of a handbrush with three circular blades and a central knob (no text or symbols)TKR1WD
SAFETY WARNINGS
- READ CAREFULLY THE INSTRUCTIONS BEFORE INSTALLING AND USING THIS APPLIANCE. IN THE CASE YOU RESELL THIS APPLIANCE, PLEASE MAKE SURE TO PROVIDE THIS INSTRUCTION MANUAL TO YOUR BUYER.
- THIS APPLIANCE IS INTENDED TO BE USED IN HOUSEHOLD AND SIMILAR APPLICATIONS SUCH AS:
○ STAFF KITCHEN AREAS IN SHOPS, OFFICES AND OTHER WORKING ENVIRONMENTS;
○ FARM HOUSES;
○ BY CLIENTS IN HOTELS, MOTELS AND OTHER RESIDENTIAL TYPE OF ENVIRONMENTS;
○ BED AND BREAKFAST TYPE ENVIRONMENTS.
- IT SHOULD NOT BE USED FOR ANY OTHER PURPOSE OR IN ANY OTHER APPLICATION, SUCH AS FOR NON-DOMESTIC USE OR IN A COMMERCIAL ENVIRONMENT. ANY COMMERCIAL USE, INAPPROPRIATE USE OR FAILURE TO COMPLY WITH THE INSTRUCTIONS, THE MANUFACTURER ACCEPTS NO RESPONSIBILITY AND THE GUARANTEE WILL NOT APPLY.
- THE APPLIANCE CAN BE USED BY CHILDREN AGED FROM 8 YEARS AND ABOVE AND PERSONS WITH REDUCED PHYSICAL, SENSORY OR MENTAL CAPABILITIES, OR LACK OF EXPERIENCE AND KNOWLEDGE, UNLESS THEY HAVE BEEN GIVEN SUPERVISION OR INSTRUCTION CONCERNING USE OF THE APPLIANCE IN A SAFE WAY AND UNDERSTAND THE HAZARDS INVOLVED BY A PERSON RESPONSIBLE FOR THEIR SAFETY. CHILDREN SHALL NOT PLAY WITH THE APPLIANCE. CLEANING AND MAINTENANCE SHALL NOT BE MADE BY CHILDREN WITHOUT SUPERVISION.
- KEEP AWAY THIS APPLIANCE AND ITS ELECTRIC PLUG FROM CHILDREN UNDER 8 YEARS OLD.
- THE APPLIANCE MUST NOT BE USED IF IT HAS BEEN DROPPED, IF IT HAS ANY VISIBLE DAMAGE, IF IT LEAKS OR IF IT FUNCTIONS ABNORMALLY IN ANY WAY.
- IF THE SUPPLY CORD IS DAMAGED, IT MUST BE REPLACED BY THE MANUFACTURER, ITS SERVICE AGENT OR SIMILARLY QUALIFIED PERSONS IN ORDER TO AVOID A HAZARD.
- THE APPLIANCE IS ONLY TO BE USED WITH THE POWER SUPPLY UNIT PROVIDED WITH THE APPLIANCE.
- THE APPLIANCE MUST ONLY BE SUPPLIED AT SAFETY EXTRA LOW VOLTAGE CORRESPONDING TO THE MARKING ON THE APPLIANCE.
- WARNING: DETACH THE HAND-HELD PART FROM THE SUPPLY CORD BEFORE CLEANING IT IN WATER.
- WARNING: NEVER PUT THE SHAVER IN CONTACT WITH WATER WHEN IT IS CONNECTED TO THE MAIN.
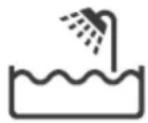
SUITABLE FOR USE IN A BATH OR SHOWER.
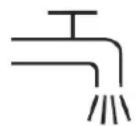
SUITABLE FOR CLEANING UNDER AN OPEN WATER TAP.
- FOR THE DETAILS ON HOW TO CLEAN THE UNIT, PLEASE SEE SECTION « CLEANING AND MAINTENANCE ».
- REGARDING THE INFORMATION ON INSTALLATION AND OPERATING SETTING, THANKS TO REFER TO THE BELOW PARAGRAPH OF THE MANUAL « SET-UP AND USE ».
SAFETY CAUTIONS
- AFTER UNPACKING THE APPLIANCE, MAKE SURE IT IS NOT DAMAGED. IN CASE OF DOUBT, DO NOT USE THE APPLIANCE AND CONTACT YOUR SUPPLIER OR A QUALIFIED TECHNICIAN.
- REMOVE ALL PACKAGING AND DO NOT LEAVE THE PACKAGING MATERIAL SUCH AS PLASTIC BAGS, POLYSTYRENE AND ELASTIC BANDS IN EASY REACH OF CHILDREN AS THEY MAY CAUSE SERIOUS INJURIES.
- THE USE OF ACCESSORY AND ATTACHMENTS NOT RECOMMENDED BY THE MANUFACTURER MAY CAUSE INJURIES.
- ALWAYS UNPLUG THE APPLIANCE IF NOT USING IT FOR A PERIOD OF TIME.
CONFORMITY
THIS APPLIANCE IS CONFORMED TO CURRENT DIRECTIVES AND STANDARDS.
TABLE OF CONTENTS
DESCRIPTION....1
SET-UP AND USE 2
Before rst use....2
Charging your unit before rst use....2
Using your appliance....2
CLEANING AND MAINTENANCE ....3
TECHNICAL INFORMATION 4
ENVIRONMENT AND RECYCLING 5
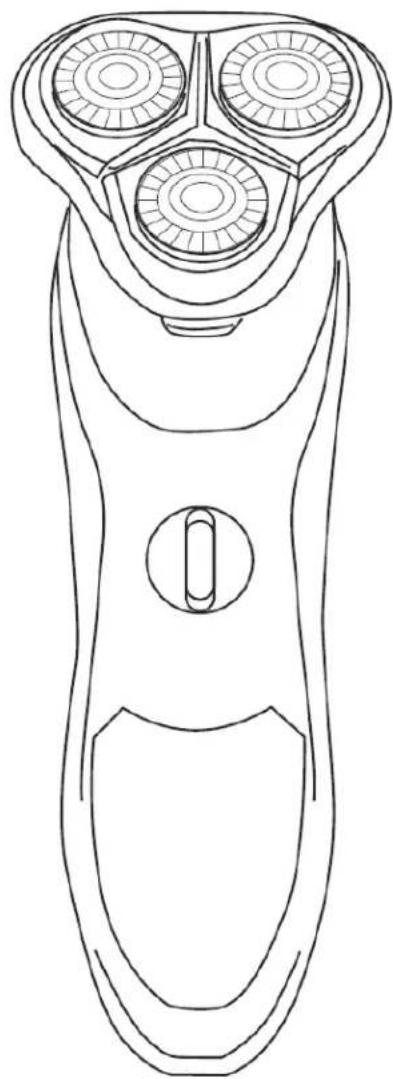
DESCRIPTION
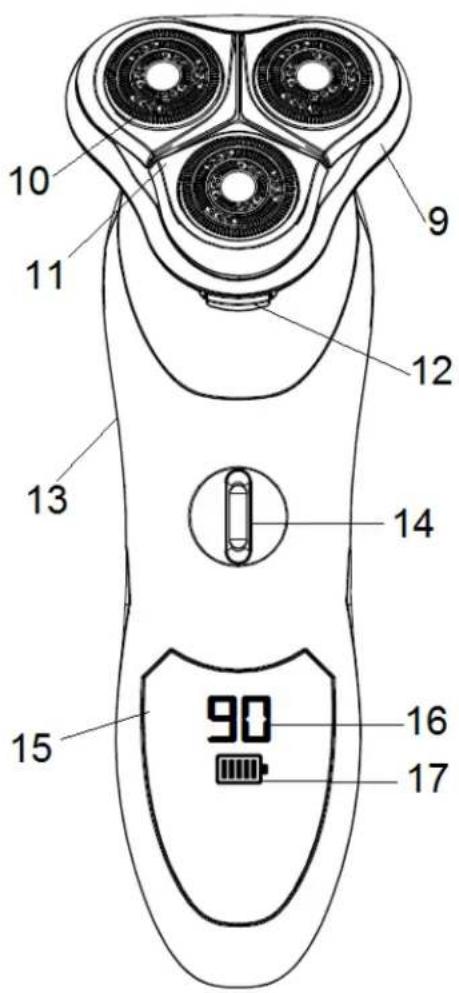

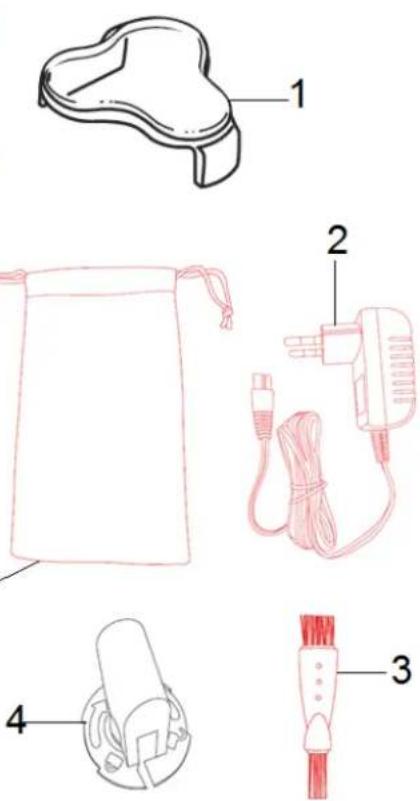
- Cover for protecng the shaver head
- Adaptater
- Cleaning brush
- Tong cuers
- Bag
- Charging pins
- Release buon for the trimmer
-
Trimmer
-
Hair tank
- Cuers
- Head and cuers set
- Release buon of the head and cuers set
- Main body
- ON/OF buon
- LCD display
- Light indicator of baery level charging
- Light indicator for baery charging
SET-UP AND USE
Before rst use
Remove any scker, protective foil or storage cover on the appliance.
Charging your unit before rst use
Ensure to fully charge the new baery before rst use.
natural_image
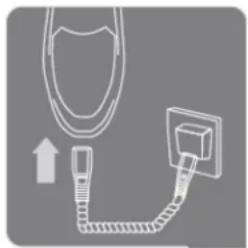
Diagram of a medical or electrical device with a plug and connector, no text or symbols presentConnect your adapter to the connector pins of the shaver. Plug in the adapter to charge the shaver.
The charging me for the rst me is around 90 minutes for a new baery for 60 minutes working me.
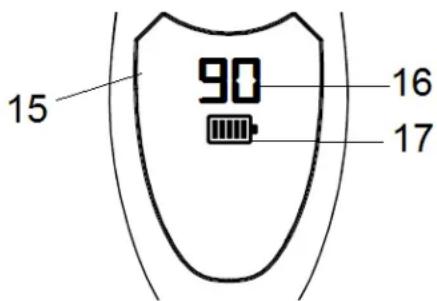
The indicator light for baery charging (17) located on the LCD display (15) will ash red to indicate the unit is charging.
When the baery is fully charged, the light indicator of baery level charging (16) will show "99".
When the baery is 10% full, the light indicator will ash red to indicate the appliance has to be put on charge.
Ensure to disconnect the charging adaptor from the power socket aer you have nished charging. To preserve the life of your baeries, let them run out every 6 months then recharge for 24 hours.
Using your appliance
SHAVING
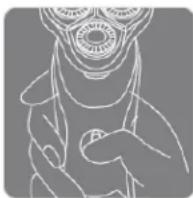
Note: This shaver can be used cord and cordless.
- Make sure your shaver is properly charged.
- Switch the shaver on by pressing the ON/OFF buon.
- Stretch the skin with your free hand so the hairs stand upright.
- Only apply light pressure on the shaving head while shaving (pressing too hard can damage the heads and make them vulnerable to breakage).
- Use short and circular strokes.
Warning: do not shave if the cuer grid is damaged to avoid potenal injuries.
SHAVING WITH SHAVING GEL
- Follow the same instrucons as dry shaving if using shaving gel.
Cauon: Aer use with shaving gel, please rinse the head and cuers under warm water to clean away any excess gel and debris.
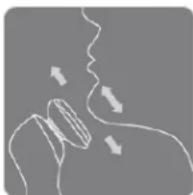
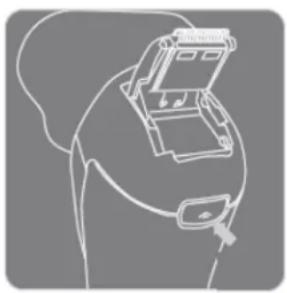
TRIMMING
natural_image
Silhouette of a person wearing a helmet and holding a device (no text or symbols visible)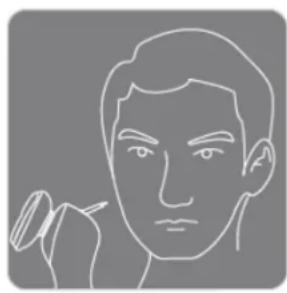
natural_image
Line drawing of a person's face with hand near chin (no text or symbols)- Push the trimmer buon to release the detail trimmer.
- Hold the trimmer at a right angle to your skin.
- Place the trimmer at desired trim line for a quick, easy and professional trim.
- Switch the shaver on by pressing the ON/OFF buon.
- To retract the trimmer, push down until it locks into posion.
CLEANING AND MAINTENANCE
- Unplug the appliance.
- When cleaning, use a so cloth (or sponge) and neutral cleaner on the exterior surfaces of the appliance.
- You can clean your shaver under water or dry cleaning it thoroughly.
- It is recommended to clean your shaver aer each use. It is recommended to thoroughly dry cleaning your shaver once a month for a beer maintenance.
CLEANING UNDER WATER

natural_image
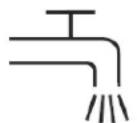
Line drawing of a frog drinking from a faucet (no text or symbols)Switch o your shaver and unplug the adapter cable.
Press on the release buon of the head and cuers set.
Rinse under warm water for one minute.
Shake o carefully to retrieve the remaining water and let the shaver head dry.
Close the shaving head holder when dry.
DRY CLEANING
- Switch o your shaver and unplug the adapter cable. Retrieve the shaver head by pulling it from the top.
- Press on the release buon of the head and cuers set. Use the cleaning brush to clear the hairs from the tank.
- Use the tong cuers by embedding it on the two protruding notches of the plascs rings, then turn an-clockwise to unlock the cuer, plasc ring and the grid.
- Retrieve the cuer, plasc ring and the grid from their locaon.
- Use the cleaning brush to clean the cuer.
- Use the cleaning brush to clean the grid.
- At the end of your cleaning, replace the grid into its locaon, then the cuer and the plasc ring. Ensure each element is well embedded into its locaon. Use the tong cuers by embedding it on the two protruding notches of the plascs rings, then turn clockwise to lock the cuer, plasc ring and the grid.
- Place the shaver head on top of the main body and push down to lock it.
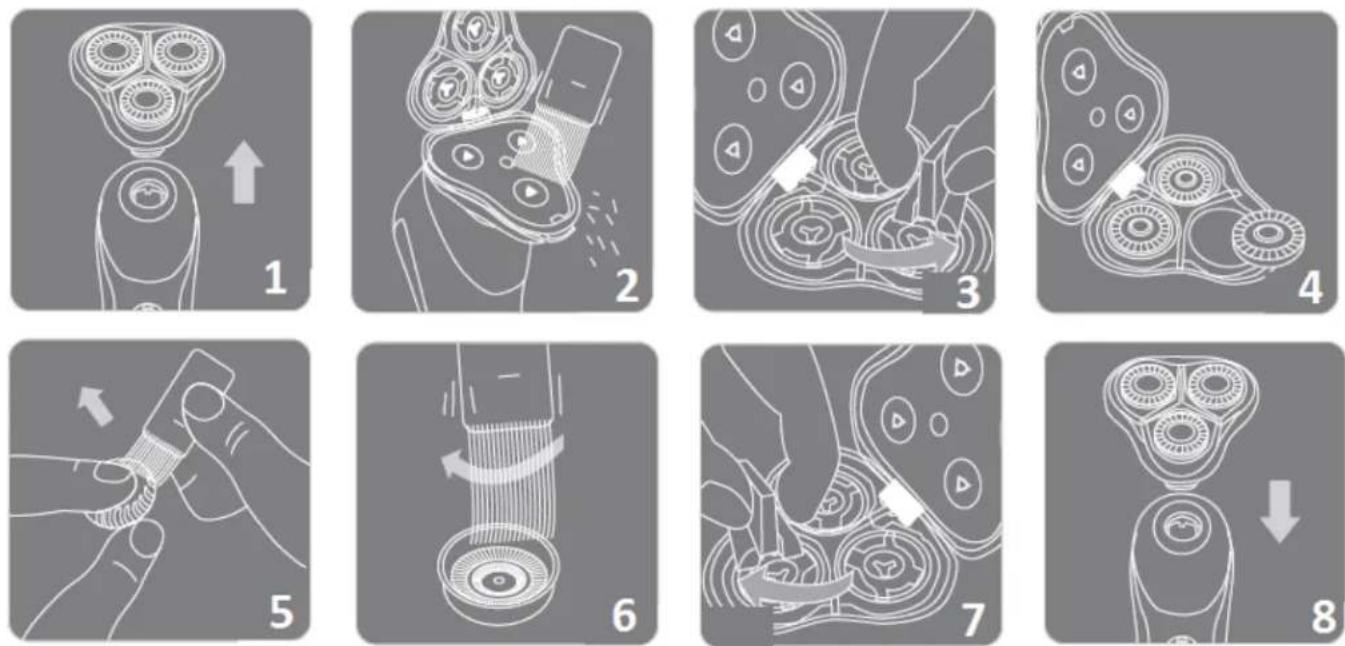
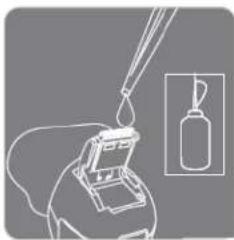
CLEANING TRIMMER
Switch o your shaver and unplug the adapter cable. Press on the trimmer release buon. Rinse the trimmer under warm water for one minute. Shake o carefully to retrieve the remaining water and let the trimmer dry. Close the trimmer when dry.
natural_image
Illustration of a hand holding a small object with a dropper above it, next to a bottle (no text or symbols present)To maintain your trimmer: ensure to lubricate the teeth of the trimmer every two months with a drop of sewing machine oil (not supplied).
WARNING: Do not use any toxic, solvent, industrial or harsh cleaning products to avoid damaging your appliance.
TECHNICAL INFORMATION
| Model | TKR1WD |
| Rated voltage | 100-240V ~ 50/60Hz |
| Voltage | 5V =1000mA |
ENVIRONMENT AND RECYCLING
Disposal of old electrical appliances
The European Directive on Waste Electrical and Electronic Equipment (WEEE) requires that old household electrical appliances must not be disposed of in the normal unsorted municipal waste stream. Old appliances must be collected separately in order to optimize the recovery and recycling of the materials they contain, and reduce the impact on human health and the
environment.
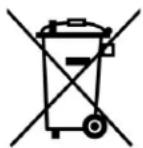
The crossed out “wheeled bin” symbol on the product reminds you of your obligaon, that when you dispose of the appliance, it must be separately collected.
Consumers should contact their local authority or retailer for informaon concerning the correct disposal of their old appliance.
Li
Baery handling
The appliance is supplied with one rechargeable Lithium incorporated into the product which cannot be repaired. Therefore the baery should be removed from the product before disposal of the product. At the end of the baery lifecycle, dispose of or recycle the baery in accordance with local ordinances or regulaons.


Vestel France, 17 rue de la Couture – 94563 Rungis CEDEX

natural_image
Line drawing of a handbrush with three circular blades and a central knob (no text or symbols)TKR1WD
natural_image
Diagram showing a plug inserted into a socket connected to a shield (no text or symbols)natural_image
Line drawing of a stylized human figure with abstract circular patterns (no text or symbols)AFEITADO
natural_image
Silhouette of a human head with abstract arrows indicating motion or pressure direction (no text or symbols)natural_image
Silhouette of a human torso with a medical device attached, no visible text or symbols
natural_image
Line drawing of a person's face with a pen, no text or symbols presentnatural_image
Line drawing of a frog drinking from a faucet (no text or symbols)natural_image
Illustration of a welding torch applying material to a container, with a magnified inset showing the same object (no text or symbols present)ACCUSCHEERAPPARAAT 3 KOPPEN
natural_image
Line drawing of a handbrush with three circular blades and a central knob (no text or symbols)TKR1WD
VEILIGHEIDSINSTRUCTIES
- LEES DEZE GEBRUIKSHANDLEIDING ZORGVULDIG DOOR EN BEWAAR ZE VOOR LATERE RAADPLEGING. WANNEER U DIT APPARAAT AAN DERDEN OVERDRAAGT, MOET DEZE HANDLEIDING BIJ HET APPARAAT WORDEN GEVOEGD.
- DIT APPARAAT IS BESTEMD VOOR HUISHOUDELIJK EN GELIJKAARDIG GEBRUIK ZOALS:
○ DE KEUKENHOEK VOOR HET PERSONEEL IN WINKELS, KANTOREN EN ANDERE WERKOMGEVINGEN;
○ BOERDERIJEN;
○ HOTEL- EN MOTELKAMERS EN ANDERE OMGEVINGEN MET EEN RESIDENTIEEL KARAKTER;
○ GASTENKAMERS EN GELIJKAARDIGE OMGEVINGEN.
- DIT APPARAAT MAG NIET WORDEN GEBRUIKT VOOR ANDERE TOEPASSINGEN DAN WAARVOOR HET BEDOELD IS (BV. COMMERCIEEL GEBRUIK). BIJ GEBRUIK DAT NIET OVEREENSTEMT MET DE GEBRUIKSHANDLEIDING IS HET MERK NIET MEER AANSPRAKELIJK EN VERVALT DE GARANTIE.
- DIT APPARAAT MAG WORDEN GEBRUIKT DOOR KINDEREN VANAF 8 JAAR EN DOOR PERSONEN MET VERMINDERDE LICHAMELIJKE, ZINTUIGLIJKE OF GEESTELIJKE VERMOGENS OF PERSONEN MET EEN GEBREK AAN ERVARING OF KENNIS, OP VOORWAARDE DAT DEZE PERSONEN ONDER TOEZICHT STAAN OF INSTRUCTIES HEBBEN GEKREGEN OVER HET VEILIGE GEBRUIK VAN HET APPARAAT EN DAT ZE DE GEVAREN BIJ HET GEBRUIK ERVAN KENNEN. KINDEREN MOGEN NIET MET HET APPARAAT SPELEN. REINIGING EN ONDERHOUD DOOR DE GEBRUIKER
MOGEN NIET WORDEN TOEVERTROUWD AAN KINDEREN DIE NIET ONDER TOEZICHT STAAN.
• HOUD HET APPARAAT EN HET NETSNOER BUITEN HET BEREIK VAN KINDEREN JONGER DAN 8 JAAR.
- HET APPARAAT MAG NIET WORDEN GEBRUIKT ALS HET IS GEVALLEN, ALS HET ZICHTBARE SCHADE VERTOONT, ALS HET LEKT OF BEDRIJFSSTORINGEN VERTOONT.
- ALS HET NETSNOER BESCHADIGD IS, MOET HET WORDEN VERVANGEN DOOR DE FABRIKANT, ZIJN KLANTENDIENST OF GELIJKAARDIG BEVOEGDE PERSONEN OM ALLE GEVAAR UIT TE SLUITEN.
- HET APPARAAT MOET UITSLUITEND MET DE MEEGELEVERDE VOEDINGSUNIT WORDEN GEBRUIKT.
- HET APPARAAT MAG ALLEEN WORDEN AANGESLOTEN OP DE ZEER LAGE VEILIGHEIDSSPANNING DIE IS VERMELD OP HET APPARAAT.
- WAARSCHUWING: VERWIJDER HET NETSNOER VAN HET APPARAAT ALVORENS DIT ONDER WATER TE REINIGEN.
- WAARSCHUWING: ZET HET SCHEERAPPARAAT MET WATER WANNEER DEZE IS AANGESLOTEN AAN DE MACHT.
natural_image
Simple line drawings of a showerhead spraying water and a faucet spraying liquid (no text or symbols)MAG WORDEN GEBRUIKT IN BAD OF DOUCHE.
MAG WORDEN GEREINIGD ONDER EEN KRAAN MET STROMEND WATER.
- WAT REINIGINGSWIJZE VAN HET APPARAAT BETREFT, ZIE DE INSTRUCTIES IN HET HOOFDSTUK "REINIGING EN ONDERHOUD".
- WAT DE VOORSCHRIFTEN VOOR DE INSTALLATIE EN DE WERKING BETREFT, ZIE DE INSTRUCTIES IN HET HOOFDSTUK "INBEDRIJFSTELLING EN GEBRUIK".
WAARSCHUWING
- VERGEWIS U ERVAN, NADAT U HET APPARAAT HEBT UITGEPAKT, DAT HET NIET BESCHADIGD IS. GEBRUIK HET APPARAAT NIET IN GEVAL VAN TWIJFEL EN RAADPLEEG EEN VAKMAN.
- VERWIJDER ZORGVULDIG ALLE VERPAKKINGSMATERIAAL EN LAAT GEEN ZAKEN ALS PLASTIC ZAKKEN, POLYSTYREEN OF ELASTIEKEN BINNEN HET BEREIK VAN KINDEREN LIGGEN. DIE ZAKEN KUNNEN VOOR HEN GEVAARLIJK ZIJN.
- GEBRUIK NOOIT ACCESSOIRES OF ONDERDELEN VAN EEN ANDERE FABRIKANT. BIJ GEBRUIK VAN ZULKE ACCESSOIRES OF ONDERDELEN VERVALT DE GARANTIE.
- HAAL HET NETSNOER ALTIJD UIT HET STOPCONTACT WANNEER HET APPARAAT LANGDURIG NIET ZAL WORDEN GEBRUIKT.
VEILIGHEIDSNORMEN
DIT APPARAAT VOLDOET AAN DE GELDENDE RICHTLIJNEN EN NORMEN.
INHOUDSOPGAVE
BESCHRIJVING 1
INBEDRIJFSTELLING EN GEBRUIK 2
natural_image
Diagram of a medical device with a plug and connector, no text or symbols presentnatural_image
Line drawing of a stylized human figure with abstract circular patterns (no text or symbols)SCHEREN
natural_image
Silhouette of a human head with abstract markings and directional arrows, no text or symbols presentnatural_image
Silhouette of a human head with a device mounted on the chest (no text or symbols visible)
natural_image
Line drawing of a person's face with a pen, no text or symbols presentnatural_image
Line drawing of a person using a faucet to clean water, with splashes and steam rising (no text or symbols)natural_image
Line drawing of a three-pin electric shaver with an upward arrow indicating motion (no text or symbols)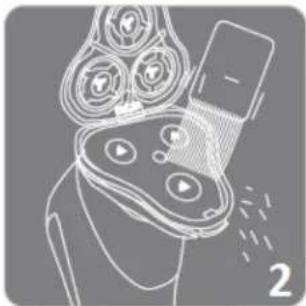
natural_image
Diagram of a device with three circular components and a smartphone, no visible text or symbols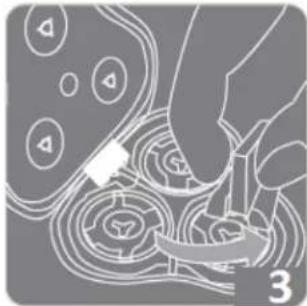
natural_image
Illustration of a hand inserting a device into a device with circular components (no text or symbols)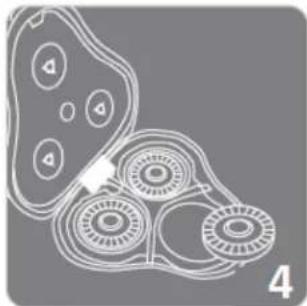
natural_image
Abstract diagram of interconnected circular and ring-like shapes with no visible text or symbols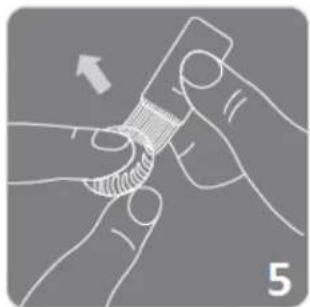
natural_image
Illustration of two hands holding a small object with a curved line, no text or symbols present
natural_image
Diagram of a mechanical component with internal structure and motion arrow (no text or symbols)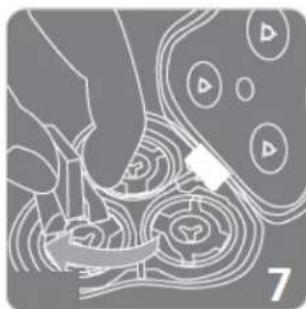
natural_image
Illustration of a hand interacting with a device, showing abstract circuit patterns and a small white component (no text or symbols)
natural_image
Line drawing of a hand holding a three-circular object with a downward arrow and number 8 (no text or symbols on the diagram itself)DE TRIMMER REINIGEN
natural_image
Illustration of a person using a handheld device with a droplet above, next to an inset showing a bottle (no text or symbols present)- INSTRUCTIONS DE SÉCURITÉ
- MISE EN GARDE
- NORMES DE SÉCURITÉ
- SOMMAIRE
- RASAGE
- NETTOYAGE DE LA TONDEUSE
- SAFETY WARNINGS
- SAFETY CAUTIONS
- CONFORMITY
- TABLE OF CONTENTS
- DESCRIPTION
- SET-UP AND USE
- Before rst use
- Charging your unit before rst use
- Using your appliance
- SHAVING
- SHAVING WITH SHAVING GEL
- TRIMMING
- CLEANING AND MAINTENANCE
- CLEANING UNDER WATER
- DRY CLEANING
- CLEANING TRIMMER
- TECHNICAL INFORMATION
- ENVIRONMENT AND RECYCLING
- Disposal of old electrical appliances
- Baery handling
- AFEITADO
- VEILIGHEIDSINSTRUCTIES
- WAARSCHUWING
- VEILIGHEIDSNORMEN
- INHOUDSOPGAVE
- SCHEREN
- DE TRIMMER REINIGEN
Brand : TELEFUNKEN
Model : TKR1WD
Category : Razor