
VCBH5 - Frying Pan TELEFUNKEN - Free user manual and instructions
Find the device manual for free VCBH5 TELEFUNKEN in PDF.

| Brand | Telefunken |
| Model | VCBH5 |
| Product type | Oil-filled radiator |
| Power | 2500 W |
| Supply voltage | AC 230V-240V ~ 50Hz |
| Number of heating elements | 13 |
| Main functions | Precise temperature adjustment, automatic shut-off timer (1-24h), delayed start timer (1-24h), continuous operation, two power levels (high/low) |
| Display | Digital LCD screen |
| Safety switch | Anti-tip switch (shuts off if tipped over) |
| Overheat protection | Yes (automatic shut-off, 30 min cooling) |
| Recommended safety distance | 100 cm from walls, furniture and curtains |
| Cleaning and maintenance | External cleaning every two weeks with a soft cloth and pH-neutral cleaner; low-power vacuum cleaner for interior |
| Recycling | Compliant with WEEE directive 2012/19/EU, do not dispose with household waste |
| Country of manufacture | Imported by Vestel France |
Frequently Asked Questions - VCBH5 TELEFUNKEN
User questions about VCBH5 TELEFUNKEN
0 question about this device. Answer the ones you know or ask your own.
Ask a new question about this device
Download the instructions for your Frying Pan in PDF format for free! Find your manual VCBH5 - TELEFUNKEN and take your electronic device back in hand. On this page are published all the documents necessary for the use of your device. VCBH5 by TELEFUNKEN.
USER MANUAL VCBH5 TELEFUNKEN
natural_image
Black telefunk heater with digital display and control panel, no visible text or symbols on the device itself.
VCBH5
CONSIGNES DE SÉCURITÉ

MISE EN GARDE
- LIRE IMPÉRATIVEMENT CE MODE D'EMPLOI ET LE CONSERVER AFIN DE POUVOIR LE CONSULTER ULTÉRIEUREMENT. DANS LE CAS OÙ VOUS CÉDEZ CET APPAREIL Á UN TIERS, N'OUBLIEZ PAS DE FOURNIR CETTE NOTICE AVEC L'APPAREIL.
- ATTENTION ! LE RADIATEUR NE DOIT ÊTRE MIS EN MARCHE UNIQUEMENT LORSQUE LES ROULETTES SONT BIEN FIXÉES.
- CET APPAREIL EST DESTINÉ Á ÊTRE UTILISÉ DANS DES APPLICATIONS DOMESTIQUE UNIQUEMENT. TOUTE UTILISATION AUTRE QUE CELLE PRÉVUE POUR CET APPAREIL, PAR EXEMPLE UNE UTILISATION COMMERCIALE, EST INTERDITE. UNE UTILISATION NON CONFORME AU MODE D'EMPLOI DÉGAGERAIT LA MARQUE DE TOUTE RESPONSABILITÉ ET ENTRAÎNERAIT LA PERTE DE LA GARANTIE.
- APRÈS AVOIR DÉBALLÉ VOTRE APPAREIL, ASSUREZ-VOUS D'ABORD QU'IL N'A PAS ÉTÉ ABIMÉ. SI VOUS AVEZ UN DOUTE, N'UTILISEZ PAS VOTRE APPAREIL, ET CONSULTEZ UNE PERSONNE COMPÉTENTE.
- N'UTILISEZ JAMAIS D'ACCESSOIRES OU DE PIÈCES D'UN AUTRE FABRICANT. L'UTILISATION DE CE TYPE D'ACCESSOIRES OU DE PIÈCES ENTRAÎNE L'ANNULATION DE LA GARANTIE.
- L'APPAREIL NE DOIT PAS ÊTRE UTILISÉ S'IL A CHUTÉ, S'IL PRÉSENTE DES DOMMAGES APPARENTS, S'IL FUIT OU PRÉSENTE DES ANOMALIES DE FONCTIONNEMENT.
-
DÉBRANCHEZ TOUJOURS LE PRODUIT EN CAS DE LONGUE PÉRIODE SANS UTILISATION.
-
ENLEVEZ BIEN TOUS LES ÉLÉMENTS DE L'EMBALLAGE, ET NE LAISSEZ PAS LES ÉLÉMENTS TELS QUE LES SACS PLASTIQUES, DU POLYSTYRÈNE OU DES ÉLASTIQUES À PORTÉE DES ENFANTS. CES ÉLÉMENTS POURRAIENT ÊTRE DANGEREUX POUR EUX.
- APRÈS DÉBALLAGE DE L'APPAREIL, ASSUREZ-VOUS DE POSER L'APPAREIL SUR UNE SURFACE PLANE ET STABLE NE CRAIGNANT PAS LA CHALEUR. VÉRIFIEZ QUE VOUS LAISSEZ UNE LIBRE CIRCULATION DE L'AIR TOUT AUTOUR DE VOTRE APPAREIL. RESPECTEZ ENTRE L'APPAREIL ET TOUT PLAN MURAL, UNE DISTANCE DE 50CM VERS LE HAUT ET UNE DISTANCE DE 100CM SUR LES COTÉS.
- IL CONVIENT DE MAINTENIR Á DISTANCE LES ENFANTS DE MOINS DE 3 ANS, Á MOINS QU'ILS NE SOIENT SOUS UNE SURVEILLANCE CONTINUE.
- CET APPAREIL PEUT ÊTRE UTILISÉ PAR DES ENFANTS D'AU MOINS 8 ANS ET PAR DES PERSONNES AYANT DES CAPACITÉS PHYSIQUES, SENSORIELLES OU MENTALES RÉDUITES OU DÉNUÉES D'EXPÉRIENCE OU DE CONNAISSANCE, S'ILS (SI ELLES) SONT CORRECTEMENT SURVEILLÉ(E)S OU SI DES INSTRUCTIONS RELATIVES À L'UTILISATION DE L'APPAREIL EN TOUTE SÉCURITÉ LEUR ONT ÉTÉ DONNÉES ET SI LES RISQUES ENCOURUS ONT ÉTÉ APPRÉHENDÉS. LES ENFANTS NE DOIVENT PAS JOUER AVEC L'APPAREIL. LE NETTOYAGE ET L'ENTRETIEN PAR L'USAGER NE DOIVENT PAS ÊTRE RÉALISÉS PAR DES ENFANTS, SAUF S'ILS ONT PLUS DE 8 ANS ET QU'ILS SONT SURVEILLÉS.
- LES ENFANTS ÂGÉS ENTRE 3 ANS ET 8 ANS DOIVENT UNIQUEMENT METTRE L'APPAREIL EN MARCHE OU Á L'ARRÊT, Á CONDITION QUE CE DERNIER AIT ÉTÉ PLACÉ OU INSTALLÉ DANS UNE POSITION NORMALE PRÉVUE ET QUE CES ENFANTS
DISPOSENT D'UNE SURVEILLANCE OU AIENT REÇU DES INSTRUCTIONS QUANT À L'UTILISATION DE L'APPAREIL EN TOUTE SÉCURITÉ ET EN COMPRENNENT BIEN LES DANGERS POTENTIELS. LES ENFANTS ÂGÉS ENTRE 3 ANS ET 8 ANS NE DOIVENT NI BRANCHER, NI RÉGLER NI NETTOYER L'APPAREIL, ET NI RÉALISER L'ENTRETIEN DE L'UTILISATEUR.
- ATTENTION - CERTAINES PARTIES DE CE PRODUIT PEUVENT DEVENIR TRÈS CHAUDES ET PROVOQUER DES BRÛLURES. IL FAUT PRÊTER UNE ATTENTION PARTICULIÈRE EN PRÉSENCE D'ENFANTS ET DE PERSONNES VULNÉRABLES.
- MISE EN GARDE : CET APPAREIL DE CHAUFFAGE N'EST PAS ÉQUIPPÉ D'UN DISPOSITF POUR CONTRÔLER LA TEMPÉRATURE AMBIANTE. NE PAS UTILISER CET APPAREIL DE CHAUFFAGE DANS DES PETITS LOCAUX, LORSQU'ILS SONT OCCUPÉS PAR DES PERSONNES INCAPABLES DE QUITTER LE LOCAL SEULES, Á MOINS QU'UNE SURVEILLANCE CONSTANTE NE SOIT PRÉVUE.
- TENEZ L'APPAREIL ET SON CORDON HORS DE PORTÉE DES ENFANTS DE MOINS DE 8 ANS.
MISE EN GARDE : POUR ÉVITER UNE SURCHAUFFE, NE PAS COUVRIR L'APPAREIL DE CHAUFFAGE.
- CET APPAREIL DE CHAUFFAGE EST REMPLI D'UNE QUANTITÉ PRÉCISE D'HUILE SPÉCIALE. LES RÉPARATIONS NÉCESSITANT L'OUVERTURE DU RÉSERVOIR D'HUILE NE DOIVENT ÊTRE EFFECTUÉES QUE PAR LE FABRICANT OU SON SERVICE APRÈS-VENTE QUI NORMalement DOIT ETRE CONTACTÉ EN CAS DE FUITE D'HUILE.
- LORSQUE L'APPAREIL DE CHAUFFAGE EST MIS AU REBUT, RESPECTER LES RÉGLEMENTATIONS CONCERNANT
L'ÉLIMINATION DE L'HUILE.
- CET APPAREIL DOIT ÊTRE CONNECTÉ Á UNE PRISE RELIÉE Á LA TERRE. NE PAS UTILISER CET APPAREIL DE CHAUFFAGE AVEC UN PROGRAMMATEUR, UNE MINUTERIE, UN SYSTÈME DE COMMANDE Á DISTANCE SÉPARÉ OU TOUT AUTRE DISPOSITIF QUI MET L'APPAREIL DE CHAUFFAGE SOUS TENSION AUTOMATIQUEMENT, CAR IL Y A RISQUE DE FEU SI L'APPAREIL EST RECOUVERT OU PLACÉ DE FAÇON INCORRECTE.
- ATTENTION : AFIN D'ÉVITER TOUT DANGER DÛ AU RÉARMEMENT INTEMPESTIF DU COUPE-CIRCUIT THERMIQUE, CET APPAREIL NE DOIT PAS ÊTRE ALIMENTÉ PAR L'INTERMÉDIAIRE D'UN INTERRUPTEUR EXTERNE, COMME UNE MINUTERIE, OU ÊTRE CONNECTÉ Á UN CIRCUIT QUI EST RÉGULIÈREMENT MIS SOUS TENSION ET HORS TENSION PAR LE FOURNISSEUR D'ÉLECTRICITÉ.
- UN MOYEN DE DÉCONNEXION DU RÉSEAU D'ALIMENTATION AYANT UNE DISTANCE D'OUVERTURE DES CONTACTS DE TOUS LES PÔLES DOIT ÊTRE PRÉVU DANS LA CANALISATION FIXE CONFORMÉMENT AUX RÈGLES D'INSTALLATION.
- L'APPAREIL DE CHAUFFAGE NE DOIT PAS ÊTRE PLACÉ JUSTE EN DESSOUS D'UNE PRISE DE COURANT.
- NE PAS UTILISER CET APPAREIL DE CHAUFFAGE À PROXIMITÉ D'UNE BAIGNOIRE, D'UNE DOUCHE OU D'UNE PISCINE.
- SI LE CÂBLE D'ALIMENTATION EST ENDOMMAGÉ, IL DOIT ÊTRE REMPLACÉ PAR LE FABRICANT, SON SERVICE APRÈS-VENTE OU DES PERSONNES COMPÉTENTES DE QUALIFICATION SIMILAIRE AFIN D'ÉVITER TOUT DANGER.
• VÉRIFIEZ QUE LE VOLTAGE MARQUÉ SUR LA PLAQUE SIGNALÉTIQUE CORRESPOND BIEN Á CELUI DE VOTRE
INSTALLATION. SI CE N'EST PAS LE CAS, N'UTILISEZ PAS VOTRE APPAREIL, ET CONSULTEZ UNE PERSONNE COMPÉTENTE.
• ASSUREZ-VOUS QUE L'INSTALLATION ÉLECTRIQUE EST SUFFISANTE POUR ALIMENTER L'APPAREIL.
- PRENEZ TOUTES LES PRÉCAUTIONS NÉCESSAIRES POUR ÉVITER QU'UNE PERSONNE NE SE PRENNE LES PIEDS DANS LE CÂBLE OU SA RALLONGE.
- AVANT TOUTE OPÉRATION DE NETTOYAGE, DÉBRANCHEZ ET LAISSEZ REFROIDIR L'APPAREIL COMPLÈTEMENT.
- NE JAMAIS PLONGER L'APPAREIL, SON FIL ÉLECTRIQUE ET SA PRISE DE COURANT DANS L'EAU OU AUTRE LIQUIDE.
- NE LE METTEZ PAS SUR D'AUTRES APPAREILS.
- POUR VOTRE SECURITÉ, NOUS VOUS RECOMMANDONS DE NE JAMAIS LAISSER VOTRE APPAREIL DANS UN ENDROIT EXPOSÉ AUX INTEMPÉRIES ET A L’HUMIDITÉ.
- NE LAISSEZ PAS VOTRE APPAREIL BRANCHÉ SANS L'UTILISER.
- IL EST CONSEILLÉ D'EXAMINER RÉGULIÈREMENT LE CÂBLE D'ALIMENTATION POUR DÉCELER TOUT SIGNE DE DÉTÉRIORATION ÉVENTUELLE.
- NE LAISSEZ PAS LE CORDON D'ALIMENTATION PENDRE DE LA TABLE OU DU PLAN DE TRAVAIL SUR LEQUEL LE PRODUIT EST POSÉ.
- NE BRANCHEZ PAS LE PRODUIT ET N'APPUYEZ PAS SUR LES BOUTONS DU PANNEAU DE COMMANDE SI VOS MAINS SONT MOUILLÉES. N'UTILISEZ PAS L'APPAREIL LES PIEDS NUS OU MOUILLÉS.
- AVANT TOUTE OPÉRATION DE NETTOYAGE OU D'ENTRETIEN, DÉBRANCHEZ L'APPAREIL POUR COUPER L'ALIMENTATION ÉLECTRIQUE.
- PENDANT SON FONCTIONNEMENT, ÉVITEZ DE DÉPLACER L'APPAREIL.
- S'IL ARRIVAIT QUE CERTAINES PARTIES DE L'APPAREIL S'ENFLAMMENT ; NE TENTEZ JAMAIS DE LES ÉTEINDRE AVEC DE L'EAU. ÉTOUFFEZ LES FLAMMES AVEC UN LINGE HUMIDE OU UTILISEZ UN EXTINCTEUR EN ORIENTANT LE JET VERS L'APPAREIL DANS LE SENS DU VENT.
- NE RANGEZ PAS DE PRODUITS INFLAMMABLES Á PROXIMITÉ OU SOUS LE MEUBLE OÚ EST RANGÉ L'APPAREIL. NE FAITES PAS FONCTIONNER L'APPAREIL A PROXIMITÉ DE MATÉRIAUX INFLAMMABLES TELS QUE STORES, RIDEAUX, TENTURES, ETC.
- N'INTRODUISEZ RIEN DANS LES GRILLES DE VENTILATION ET NE LES OBSTRUEZ PAS.
- CONCERNANT LES INFORMATIONS DE NETTOYAGE ET D'ENTRETIEN DE L'APPAREIL, RÉFÉREZ-VOUS AUX CONSIGNES CORRESPONDANTES DONNÉES DANS LA SECTION « NETTOYAGE ET ENTRETIEN ».
- CONCERNANT LES INFORMATIONS D'INSTALLATION DES ROUES ET DE CONNEXION ÉLECTRIQUE DE L'APPAREIL, RÉFÉREZ-VOUS AUX CONSIGNES CORRESPONDANTES DONNÉES CI-APRÈS.
NORMES DE SÉCURITÉ
CET APPAREIL A ÉTÉ TESTÉ SUIVANT LES DIRECTIVES EU ET CE EN VIGUEUR CONCERNANT LA BASSE TENSION ET LA COMPATIBILITÉ ÉLECTROMAGNÉTIQUE. IL A ÉTÉ FABRIQUÉ CONFORMÉMENT AUX DERNIÈRES NORMES DE SÉCURITÉ LVD 2014/35/UE, EMC 2014/30/UE, ERP 2009/125/CE, DEEE 2012/19/UE, ROHS 2011/65/UE ET REACH 1907/2006/CE.
SOMMAIRE
DESCRIPTION 1
natural_image
Black telefunkem heater with digital display and control panel (no visible text or symbols on body)
VCBH5
SAFETY ADVICES AND WARNINGS

WARNING
- READ CAREFULLY THE INSTRUCTIONS BEFORE INSTALLING AND USING THIS APPLIANCE. IN THE CASE YOU RESELL THIS APPLIANCE, PLEASE MAKE SURE TO PROVIDE THIS INSTRUCTION MANUAL TO YOUR BUYER.
- WARNING! THIS HEATER CAN ONLY BE USED WHEN THE WHEELS ARE FULLY MOUNTED.
- THIS APPLIANCE IS INTENDED TO BE ONLY USED IN HOUSEHOLD. ANY COMMERCIAL USE, INAPPROPRIATE USE OR FAILURE TO COMPLY WITH THE INSTRUCTIONS, THE MANUFACTURER ACCEPTS NO RESPONSIBILITY AND THE GUARANTEE WILL NOT APPLY.
- AFTER UNPACKING THE APPLIANCE, MAKE SURE IT IS NOT DAMAGED. IN CASE OF DOUBT, DO NOT USE THE APPLIANCE AND CONTACT YOUR SUPPLIER OR A QUALIFIED TECHNICIAN.
- THE USE OF ACCESSORY AND ATTACHMENTS NOT RECOMMENDED BY THE MANUFACTURER MAY CAUSE INJURIES.
- THE APPLIANCE MUST NOT BE USED IF IT HAS BEEN DROPPED, IF IT HAS ANY VISIBLE DAMAGE, IF IT LEAKS OR IF IT FUNCTIONS ABNORMALLY IN ANY WAY.
- ALWAYS UNPLUG THE APPLIANCE IF NOT USING IT FOR A PERIOD OF TIME.
-
REMOVE ALL PACKAGING AND DO NOT LEAVE THE PACKAGING MATERIAL SUCH AS PLASTIC BAGS, POLYSTYRENE AND ELASTIC BANDS IN EASY REACH OF CHILDREN AS THEY MAY CAUSE SERIOUS INJURIES.
-
AFTER UNPACKING YOUR APPLIANCE, MAKE SURE YOU HAVE PUT IT ON A FLAT, STABLE AND HEAT-RESISTANT SURFACE. CHECK YOU HAD LEAVE ENOUGH SPACE BETWEEN YOUR APPLIANCE AND SURROUNDING WALL TO LET THE AIR CIRCULATE AROUND. THERE SHOULD BE AT LEAST 50CM ON THE TOP AND 20CM ON SIDES APART FROM THE APPLIANCE.
- CHILDREN OF LESS THAN 3 YEARS SHOULD BE KEPT AWAY UNLESS CONTINUOUSLY SUPERVISED.
- THE APPLIANCE CAN BE USED BY CHILDREN AGED FROM 8 YEARS AND ABOVE AND PERSONS WITH REDUCED PHYSICAL, SENSORY OR MENTAL CAPABILITIES, OR LACK OF EXPERIENCE AND KNOWLEDGE, UNLESS THEY HAVE BEEN GIVEN SUPERVISION OR INSTRUCTION CONCERNING USE OF THE APPLIANCE IN A SAFE WAY AND UNDERSTAND THE HAZARDS INVOLVED BY A PERSON RESPONSIBLE FOR THEIR SAFETY. CHILDREN SHALL NOT PLAY WITH THE APPLIANCE. CLEANING AND MAINTENANCE SHALL NOT BE MADE BY CHILDREN WITHOUT SUPERVISION.
- CHILDREN AGED FROM 3 YEARS AND LESS THAN 8 YEARS SHALL ONLY SWITCH ON/OFF THE APPLIANCE PROVIDED THAT IT HAS BEEN PLACED OR INSTALLED IN ITS INTENDED NORMAL OPERATING POSITION AND THEY HAVE BEEN GIVEN SUPERVISION OR INSTRUCTION CONCERNING USE OF THE APPLIANCE IN A SAFE WAY AND UNDERSTAND THE HAZARDS INVOLVED. CHILDREN AGED FROM 3 YEARS AND LESS THAN 8 YEARS SHALL NOT PLUG IN, REGULATE AND CLEAN THE APPLIANCE OR PERFORM USER MAINTENANCE.
- CAUTION – SOME PARTS OF THIS PRODUCT CAN BECOME VERY HOT AND CAUSE BURNS. PARTICULAR ATTENTION HAS TO BE
GIVEN WHERE CHILDREN AND VULNERABLE PEOPLE ARE PRESENT.
- WARNING: THIS HEATER IS NOT EQUIPPED WITH DEVICE TO CONTROL THE ROOM TEMPERATURE. DO NOT USE THIS HEATER IN SMALL ROOMS WHEN THEY ARE OCCUPIED BY PERSONS NOT CAPABLE OF LEAVING THE ROOM ON THEIR OWN, UNLESS CONSTANT SUPERVISION IS PROVIDED.
- KEEP AWAY THE APPLIANCE AND ITS POWER CORD FROM CHILDREN LESS THAN 8 YEARS OLD.
WARNING: IN ORDER TO AVOID OVERHEATING, DO NOT COVER THE HEATER.
- THIS HEATER IS FILLED WITH A PRECISE QUANTITY OF SPECIAL OIL. REPAIRS REQUIRING OPENING OF THE OIL TANK SHOULD BE DONE ONLY BY THE MANUFACTURER OR ITS AFTER SALES SERVICE WHO SHOULD BE CONTACTED IN CASE OF OIL LEAKAGE. REGULATIONS REGARDING THE DISPOSAL OF OIL WHEN THE HEATER IS DISCARDED MUST BE RESPECTED.
- THIS APPLIANCE MUST BE EARTHED. DO NOT USE THIS HEATER WITH A PROGRAMMER, TIMER, SEPARATE REMOTE-CONTROL SYSTEM OR ANY OTHER DEVICE THAT SWITCHES THE HEATER AUTOMATICALLY, SINCE A FIRE RISK EXISTS IF THE HEATER IS COVERED OR POSITIONED INCORRECTLY.
- DO NOT USE THIS HEATER IN THE IMMEDIATE SURROUNDINGS OF A BATCH, A SHOWER OR A SWIMMING POOL.
-
THE HEATER MUST NOT BE LOCATED IMMEDIATELY BELOW SOCKET-OUTLET.
-
IF THE SUPPLY CORD IS DAMAGED, IT MUST BE REPLACED BY THE MANUFACTURER, ITS SERVICE AGENT OR SIMILARLY QUALIFIED PERSONS IN ORDER TO AVOID A HAZARD.
- CHECK THAT THE VOLTAGE MARKED ON THE RATING PLATE MATCHES TO YOUR LOCAL SUPPLY. IF NOT THE CASE, DO NOT USE THE APPLIANCE AND SEEK FOR EXPERT ADVICE.
- CHECK THAT YOUR ELECTRICAL INSTALLATION IS SUFFICIENT FOR SUPPLYING THIS APPLIANCE.
- TAKE ALL NECESSARY MEASURE WITH CORDS AND EXTENSIONS TO AVOID ANY INJURIES WHILE IN USE.
- NEVER IMMERSE IN WATER OR ANY OTHER LIQUID THIS APPLIANCE, ITS ELECTRIC PLUG AND CORD.
- ALWAYS UNPLUG THE APPLIANCE AND LET IT COOL DOWN COMPLETELY BEFORE ANY CLEANING OPERATION.
- FOR YOUR OWN SAFETY, WE RECOMMEND YOU NEVER LEAVE THE APPLIANCE IN A PLACE THAT IS EXPOSED TO HUMIDITY OR INCLEMENT WEATHER CONDITION.
• DO NOT PUT THIS APPLIANCE ON TOP OF OTHERS. - NEVER LEAVE APPLIANCE PLUGGED IN WHEN NOT IN USE.
- NEVER MOVE THE APPLIANCE WHEN IN USE.
- THE SUPPLY CORD SHOULD BE REGULARLY EXAMINED FOR SIGNS OF DAMAGE AND THE APPLIANCE IS NOT TO BE USED IF THE CORD IS DAMAGED.
- NEVER PLUG THE APPLIANCE AND TOUCH THE THERMOSTAT WITH WET HANDS. NEVER USE THE APPLIANCE WITH BARE OR WET FEET.
-
NEVER UNPLUG THE APPLIANCE BY PULLING THE POWER CABLE. ALWAYS UNPLUG THE APPLIANCE FROM THE MAIN SOCKET.
-
DO NOT STORE ANY FLAMMABLE PRODUCTS CLOSE TO OR UNDER THE UNIT WHERE YOU PLACED THE APPLIANCE. DO NOT PLACE AND USE THE APPLIANCE CLOSE TO ANY FURNITURE WITH FABRICS, CURTAINS OR DRAPES.
- IN THE CASE OF SOME PARTS OF THE APPLIANCE DURING THE USE CATCH FIRE, DO NOT ATTEMPT TO EXTINGUISH IT WITH WATER. USE A DAMP CLOTH OR A BLANKET TO CHOKE THE FLAMES OR USE AN EXTINGUISHER BY SPRAYING THE FOAMS TOWARDS THE APPLIANCE AND ON THE SAME DIRECTION THAN THE WIND.
- DO NOT PUT ANYTHING INTO THE VENTILATION SLITS, OR OBSTRUCT THEM.
- FOR THE DETAILS ON HOW TO CLEAN SURFACES, PLEASE SEE SECTION “CLEANING AND MAINTENANCE”.
- REGARDING THE INFORMATION FOR INSTALLATION AND OPERATING SETTING, THANKS TO REFER TO THE BELOW PARAGRAPH OF THE MANUAL.
STANDARDS
THIS APPLIANCE IS CONFORMED TO DIRECTIVES LVD 2014/35/EU, EMC 2014/30/EU, ERP 2009/125/EC, DEEE 2012/19/EU, ROHS 2011/65/EU AND REACH 1907/2006/EC.
TABLE OF CONTENTS
DESCRIPTION 1
Product descripon....1
Control panel ....1
SET-UP AND USE 2
Assembly....2
Before rst use....3
Using appliance ....4
CLEANING AND MAINTENANCE....5
TECHNICAL INFORMATION......6
ENVIRONMENT AND RECYCLING....6
DESCRIPTION
Product descripon
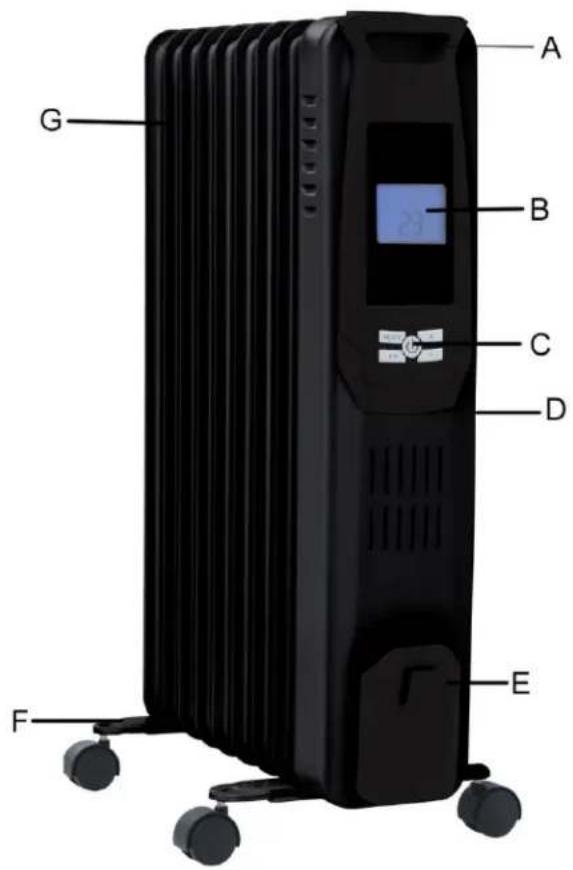
A. Handle
B. LCD display
C. Control panel
D. ON/OFF switch buon
E. Power cord storage
F. Wheels
G. Heang elements
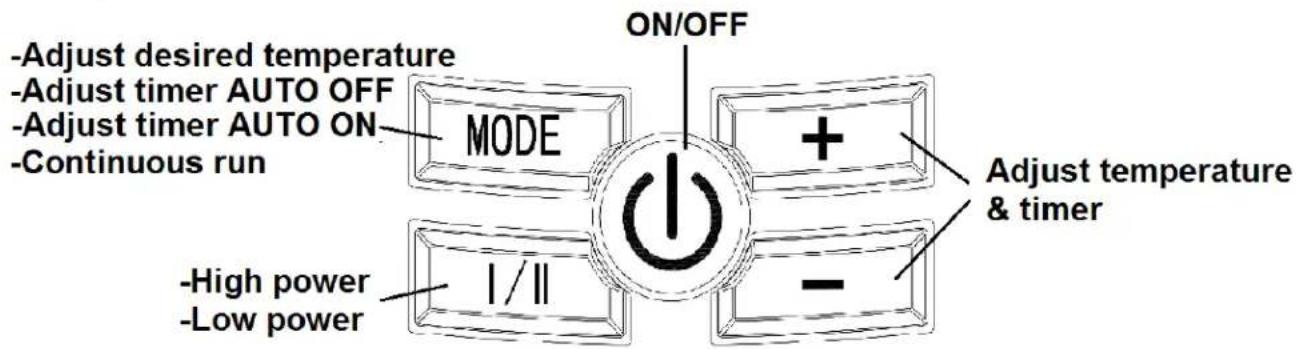
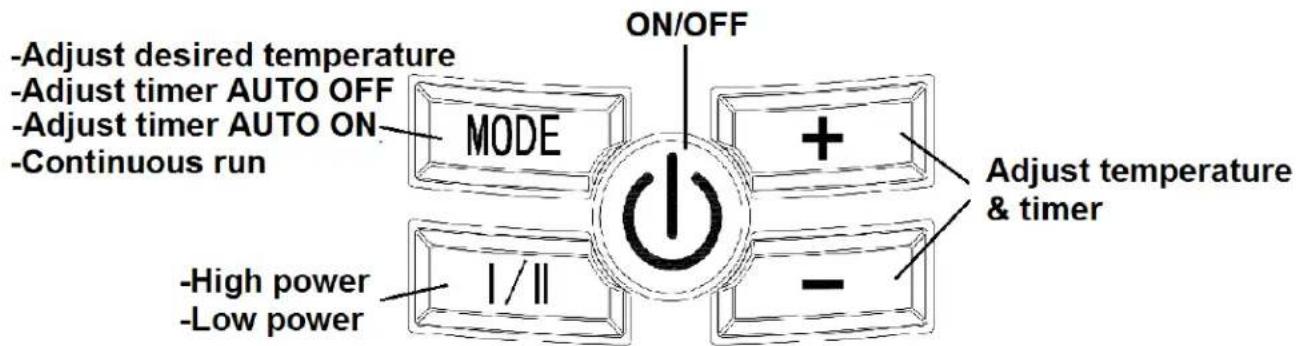
Control panel
SET-UP AND USE
Assembly
Remove the heater and its accessories from its packing. Ensure the heater is not damaged before assembling it. Follow below instrucons that match each drawing to assembly the unit.
-
Turn the heater upside-down and put it on the ground gently.
-
Insert each hook into each wheels metal base support.
-
Place the 1^st wheels metal base support on the le side of the heater between the 1^st and the 2^nd heang element under the power cord storage. Do not choose another locaon as it will act the stability of the oil radiator.
-
Securely fasten the wheels metal base support to the heater by screwing the wing nuts into the bolt.
-
Place the 2^nd wheels metal base support on the right side of the heater between the 12^th and 13^th heang elements.
-
Securely fasten the wheels metal base support to the heater by screwing the wing nuts into the bolt.
-
Turn the radiator upright.
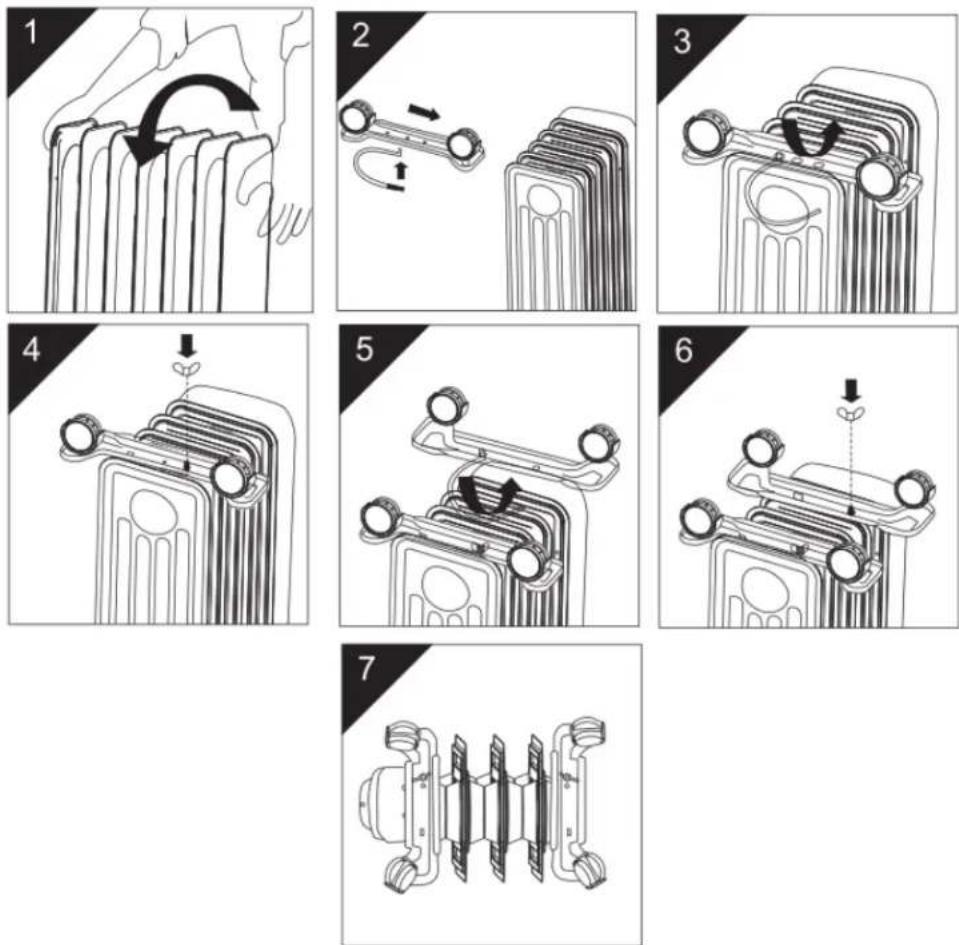
WARNING! ALWAYS CHECK THE WHEELS ARE WELL MOUNTED ON THE HEATER BEFORE STATING TO USE IT.
Before rst use
-
Place your appliance on a at and stable surface. Your heater is equipped with p over switch which will automatically switch it o if not on place on stable surface.
-
Ensure to place the heater at least 100 cm from the walls, furniture and curtains.
-
Plug your appliance into a earth socket.
-
Before the rst use, always heat up the heater to burn the protecve fat and to eliminate smells when you buy new appliances. Follow the steps indicated in the secon « Using your appliance » to switch on the heater.
NOTE: It is normal that strange odor comes out from the unit for the rst use. This will cease aer a short while. Do not forget to air the room during this operaon.
This heater is equipped with Digital Controls that provide the ability to set the temperature to the exact degree desired. To operate, simply follow these instrucons and the control panel:
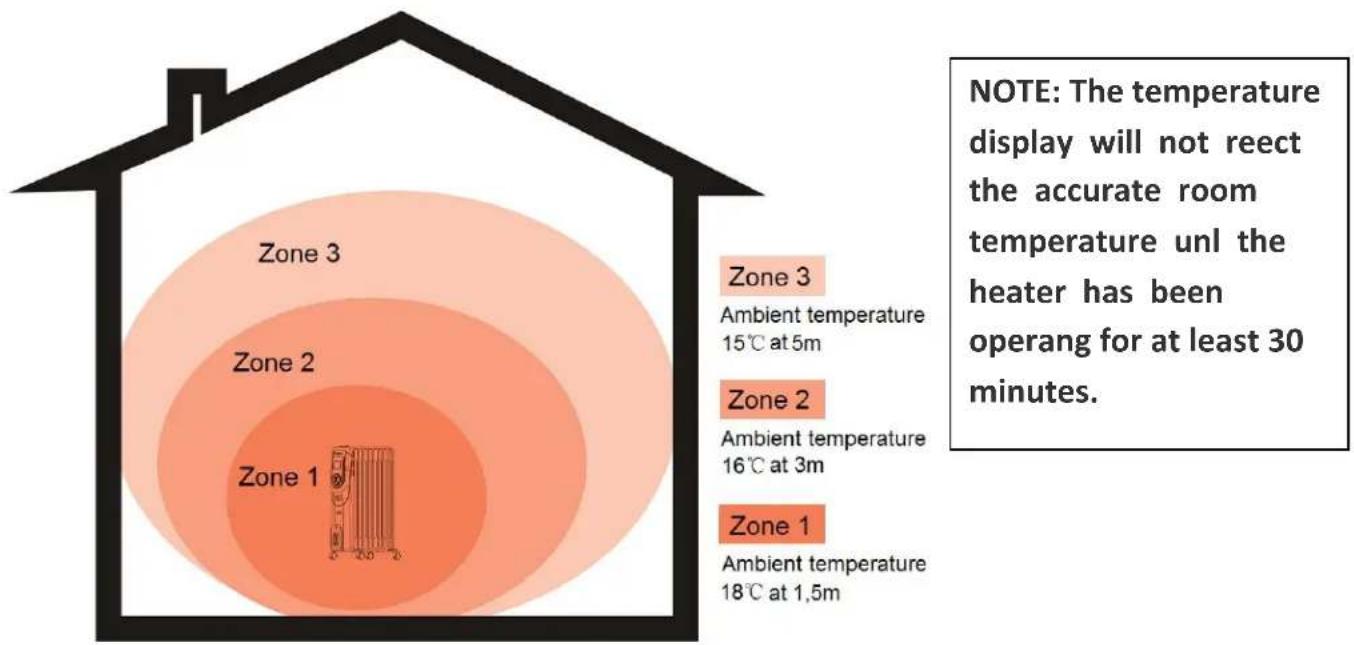
The display shows the temperature of the area around the product (diagrams below). There may be a dience of temperature indicaon, between that of the heang zone and that of the part. This dience is reduced during a connuous operaon of the radiator.
other
| Zone | Ambient Temperature (°C) | |------|--------------------------| | Zone 1 | 18 | | Zone 2 | 16 | | Zone 3 | 15 |Using appliance
- Place the product in an upright posion on a at, steady, stable, heat-resistant surface. Make sure there is nothing ammable or heat sensitive within 1 meter. Operang the product in any other posion could cause a hazard.
- Take out the power cord from its storage, and insert the main plug into a socket. Press the power switch (red color) to posion 1. Always ensure the main cable is fully unwind and outside of the cable storage when the product is in use.
- Press the power buon ( ) to switch on heater at max. power ( ) in connuous run. If let at this seng, the heater will be at max. power connuously.
- Press the buon I/II to switch on lower power ( ) in connuous run. If let at this seng, the heater will be at low power connuously.
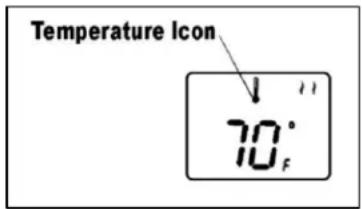
1. Seng the temperature
- Press the MODE buon unl the temperature icon blinks.
- Use the “+” and “-” buon to set the desired temperature.
- The temperature icon will stop blinking and the current ambient temperature will appear aer the desired temperature is set.
- The heater will turn-o shortly aer the room temperature is higher than the desired temperature. The temperature display will blink.
- The heater will turn back on when the room temperature drops below the desired temperature. The temperature display will then stop blinking and keep displaying the room temperature.
Note: The LCD display shows the ambient temperature near the heater, to achieve opmal indoor temperature, it is advisable to increase the target temperature during the rst hour of use of the device, then you can adjusting the temperature.
2. Set the mer in Auto shut o (AUTO OFF)
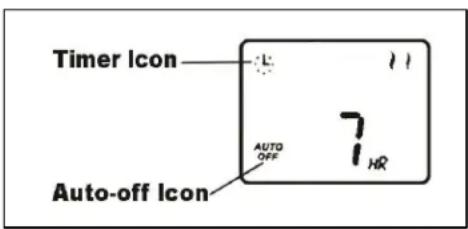
This funcon should only be set if you desire that the heater be automacally shut o aer a certain period of me (1 to 24 hours from the me the funcon is set). Always set the desired temperature prior to seng the Timer so that the heater will shut o at the desired temperature seng.
Press the MODE buon unl the mer icon blinks ( ).
The hour display and Auto O icon will appear.
Use the “+” and “-” buon to set the heater operaon me between 1 and 24 hours. This funcon will acvate once the mer icon stops blinking. The heater will automacally turn-o when me runs out.
3. Set the mer in delay use (AUTO ON)
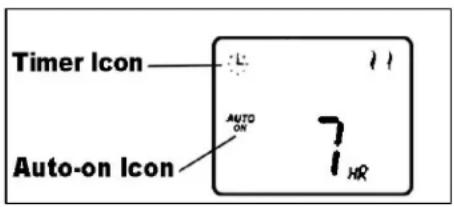
This funcon provides a delayed start opon and should only be set if you desire that the heater be automacally turned ON aer a certain period of me (1 to 24 hours from the me the funcon is set). Always set the desired temperature prior to seng the mer so that the heater will turn on at the desired
temperature seng.
Press the MODE buon unl the mer icon blinks ( ). The hour display and Auto On icon will appear.
Use the “+” and “-” buon to set the heater start me between 1 and 24 hours. This funcon will acvate once the mer icon stops blinking. The heater will automatically turn on when me expires.
4. Set the connuous Run mode
Press the MODE buon unl the connuous run icon " " appears.
When set to connuous run mode, the auto-on/auto-o sengs and the temperature seng will be canceled. In connuous run, the heater will operate to the thermostat maximum temperature seng and display room temperature.
Note: Overheang can be caused by obstrucon to the air intakes on the back of the machine or the grill on the front. If this occurs please disconnect the machine and allow it to cool for 30 minutes. If the heater ceases to funcon, the most likely cause is a blown fuse. Bring it back to the aer sales service.
⚠ WARNING: When not in use, ensure to switch o the heater by pressing on the buon (Red) on 0 (OFF) and unplug the heater from the socket.
CLEANING AND MAINTENANCE
√ The appliance needs only an external regular cleaning, the recommended cleaning frequency is every 2 weeks when used daily.
√ Unplug the heater.
√ Always let the appliance to cool down for at least two hours before starng any cleaning operaon.
√ When cleaning the outer part of the heater, use a dry so cloth (or sponge) or a damped one with neutral cleaner.
√ Do not use a hard brush or any others cleaners to avoid scratching the heater.
√ To clean the accumulated dust inside the heater, use a vacuum cleaner with power at minimal.

WARNING: Do not open the main body for cleaning the inside of the appliance to avoid any injuries or damaging the appliance.
TECHNICAL INFORMATION
| Model | VCBH5 |
| Rated voltage | AC 230V-240V ~ 50Hz |
| Heang elements | 13 |
| Rated power input | 2500W |
ENVIRONMENT AND RECYCLING
Disposal of old electrical appliances
The European Directive 2012/19/EU on Waste Electrical and Electronic Equipment (WEEE) requires that old household electrical appliances must not be disposed of in the normal unsorted municipal waste stream. Old appliances must be collected
separately in order to optimize the recovery and recycling of the materials they contain, and reduce the impact on human health and the environment.
The crossed out “wheeled bin” symbol on the product reminds you of your obligaon, that when you dispose of the appliance, it must be separately collected.
Consumers should contact their local authority or retailer for informaon concerning the correct disposal of their old appliance.


Imported by Vestel France, 17 rue de la Couture – 94563 Rungis CEDEX

- CONSIGNES DE SÉCURITÉ
- MISE EN GARDE
- NORMES DE SÉCURITÉ
- SOMMAIRE
- DESCRIPTION 1
- SAFETY ADVICES AND WARNINGS
- WARNING
- STANDARDS
- TABLE OF CONTENTS
- DESCRIPTION
- Product descripon
- Control panel
- SET-UP AND USE
- Assembly
- Before rst use
- Using appliance
- Seng the temperature
- Set the mer in Auto shut o (AUTO OFF)
- Set the mer in delay use (AUTO ON)
- Set the connuous Run mode
- CLEANING AND MAINTENANCE
- ENVIRONMENT AND RECYCLING
Brand : TELEFUNKEN
Model : VCBH5
Category : Frying Pan