 — Cooker — Mode d'emploi PDF")
HGK 20.B (WH) - Cooker INDESIT - Free user manual and instructions
Find the device manual for free HGK 20.B (WH) INDESIT in PDF.

User questions about HGK 20.B (WH) INDESIT
0 question about this device. Answer the ones you know or ask your own.
Ask a new question about this device
Download the instructions for your Cooker in PDF format for free! Find your manual HGK 20.B (WH) - INDESIT and take your electronic device back in hand. On this page are published all the documents necessary for the use of your device. HGK 20.B (WH) by INDESIT.
USER MANUAL HGK 20.B (WH) INDESIT
Built-in cooker Installation and use
Congratulations on choosing an Indesit appliance, which you will find is dependable and easy to use. We recommend that you read the instructions in this owner's manual carefully before use for the best performance and to extend the life of your appliance, as it will provide you with all the instructions you require to ensure its safe installation, use and maintenance. Always keep this owner's manual close to hand since you may need to refer to it in the future. Thank you.
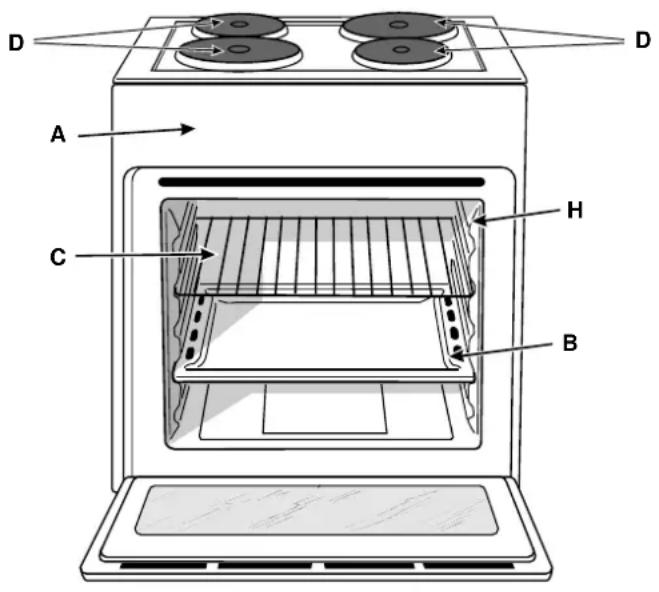
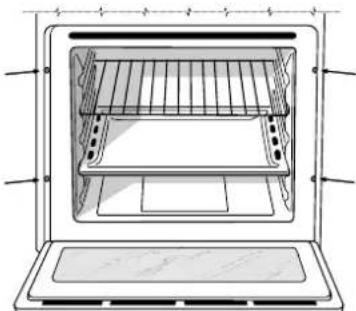
Close-up view
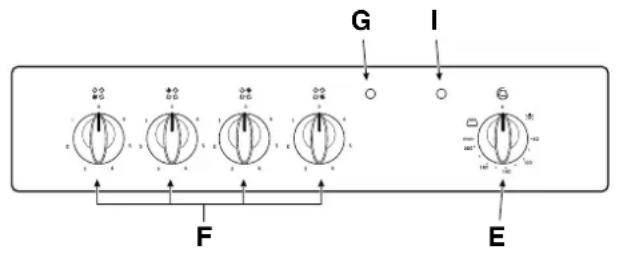
A. Control Panel
B. Dripping Pan or Baking Sheet
C.Oven Rack
D. Electric hotplate
E. Cooking mode selection knob
F.Electric hotplate knobs
G. Electric hotplate indicator light
H. Guides for sliding the racks or dripping pan in and out
I. Oven indicator light (only on certain models) - When lit, it indicates the oven is heating up to the temperature set.
How to use your oven
The various features of this oven are controlled via the knobs and buttons located on the control panel.
Notice: The first time you use your appliance, we recommend that you set the thermostat to the highest setting and leave the oven on for about half an hour with nothing in it, with the oven door shut. Then, open the oven door and let the room air. The odour that is often detected during this initial use is due to the evaporation of substances used to protect the oven during storage and until it is installed.
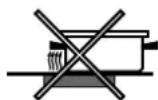
Notice: Place the dripping pan provided on the bottom shelf of the oven to prevent any sauce and/or grease from dripping onto the bottom of the oven only when grilling food or when using the rotisserie (only available on certain models). For all other types of cooking, never use the bottom shelf and never place anything on the bottom of the oven when it is in operation because this could damage the enamel. Always place your cookware (dishes, aluminium foil, etc. etc.) on the grid provided with the appliance inserted especially along the oven guides.
The oven knob (E)
This knob is used not only to select the different oven modes, but also to choose the right cooking temperature from among the temperatures shown on the knob itself (from 60^ to 240^ ) for the food to be cooked in the
oven. When the knob is turned clockwise, the oven light and the top and bottom heating elements will come on. you can choose the most suitable temperature for cooking your food from the range of values below (Convection Mode). To select the temperature, match the desired temperature with the fixed reference mark on the control panel.
The oven will automatically reach the temperature set, and the thermostat, which is controlled by the knob, will keep it constant.
Top Heating Element Position
Set the knob to this position and the oven light and top heating element come on.
The oven light
Set knob "E" to the symbol to turn it on. It lights the oven and stays on when any of the electrical heating elements in the oven come on.
The control knobs for the hob electric hotplates (F)
The cookers can be equipped with standard, rapid and automatic electric hotplates in a variety of combinations (the rapid hotplates can be distinguished from the rest by
the red boss in the centre of the same, and the automatic hotplates by the smaller circular aluminium plate in their centre).
To avoid any heat loss and damage to the hotplates, we advise you to use pans with a flat bottom, whose diameter is no less than that of the hotplate itself.
The table contains the different settings indicated on the knobs and the use for which the hotplates are recommended.
| Setting | Normal or Fast Plate |
| 0 | Off |
| 1 | Cooking vegetables, fish |
| 2 | Cooking potatoes (using steam) soups, chickpeas, beans. |
| 3 | Continuing the cooking of large quantities of food, minestrone |
| 4 | For roasting (average) |
| 5 | For roasting (above average) |
| 6 | For browning and reaching a boil in a short time. |
Before using the hot plates for the first time, you should heat them at maximum temperature for approximately 4 minutes, without any pans. During this initial stage, their protective coating hardens and reaches its maximum resistance.
Electric hotplate indicator light (G)
This light comes on when any of the electrical hotplates on the hob have been turned on.
Using the hob
To get the best from your hob, here are a few helpful tips to keep in mind during cooking or when preparing food.
- Use flat-bottomed pans to ensure the same adhere fully to the cooking zone.
- Use pans whose diameter is sufficient to cover the hotplate fully, so as to guarantee the use of all the available heat.
Make sure the bottom of the pan is always clean and dry, to ensure correct contact and a long life for your hotplates and pans.
How to Keep Your Oven in Shape
Before cleaning your oven, or performing maintenance, disconnect it from the power supply.
To extend the life of your oven, it must be cleaned frequently, keeping in mind that:
- Do not use steam equipment to clean the appliance.
- the enamelled or stainless steel parts should be washed with lukewarm water without using any abrasive powders or corrosive substances which could ruin them; Stainless steel could get stained. If these stains are difficult to remove, use special products available on the market. After cleaning, it is advisable to rinse thoroughly and dry.
- the inside of the oven should preferably be cleaned immediately after use, when it is still warm, with hot water and soap; the soap should be rinsed away and the interior dried thoroughly. Avoid using abrasive detergents (for example cleaning powders, etc...) and abrasive sponges for dishes or acids (such as limescale-remover, etc...) as these could damage the enamel. If the grease spots and dirt are particularly tough to remove, use a special product for oven cleaning, following the instructions provided on the packet.
- if you use your oven for an extended period of time, condensation may form. Dry it using a soft cloth.
- there is a rubber seal surrounding the oven opening which guarantees its perfect functioning. Check the condition of this seal on a regular basis. If necessary, clean it and avoid using abrasive products or objects to do so. Should it become damaged, please contact your nearest After-sales Service Centre. We recommend you avoid using the oven until it has been repaired.
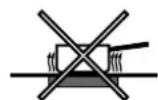
- never line the oven bottom with aluminium foil, as the consequent accumulation of heat could compromise the cooking and even damage the enamel.
- clean the glass door using non-abrasive products or sponges and dry it with a soft cloth.
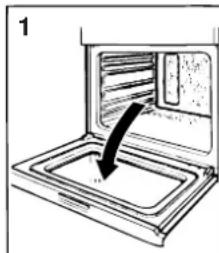
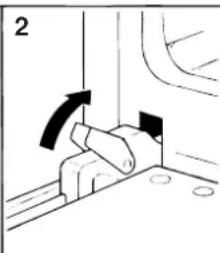
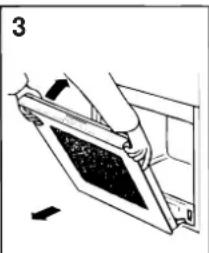
How to remove the oven door
For a more thorough clean, you can remove the oven door. Proceed as follows:
open the door fully;
- lift up and turn the small levers situated on the two hinges;
- grip the door on the two external sides, shut it slowly but not completely;
- pull the door towards you, pulling it out of its seat; Reassemble the door by following the above procedures backwards.
Replacing the Oven Lamp
- Disconnect the oven from the power supply by means of the omnipolar switch used to connect the appliance to the electrical mains; or unplug the appliance if the plug is accessible;
- Remove the glass cover of the lamp-holder;
- Remove the lamp and replace with a lamp resistant to high temperatures (300^) with the following characteristics:
Voltage: 230/240 V
-Wattage 25W
- Type E14
- Replace the glass cover and reconnect the oven to the mains power supply.
Practical Cooking Advice
When cooking in the oven, use only one dripping pan or rack at a time. Select from among the top or bottom rack heights based on whether the dish needs more or less heat from the top.
Preheating
If the oven must be preheated (this is generally the case when cooking leavened foods), we recommend you use the "convection mode" to reach the desired temperature as quickly as possible. When preheating is over, which is indicated by the red light "I" going out, select the required cooking mode.
Cooking Fish and Meat
When cooking white meat, fowl and fish, use temperature settings from 180^ to 200^ .
For red meat that should be well done on the outside while tender and juicy in the inside, it is a good idea to start with a high temperature setting (200^ - 220^) for a short time, then turn the oven down afterwards.
In general, the larger the roast, the lower the temperature setting. Place the meat on the centre of the grid and place the dripping pan beneath it to catch the fat.
Make sure that the grid is inserted so that it is in the centre of the oven. If you would like to increase the amount of heat from below, use the low rack heights. For savoury roasts (especially duck and wild game), dress the meat with lard or bacon on the top.
Baking Cakes
When baking cakes, always preheat the oven and do not open the oven door during baking to prevent the cake from dropping. In general:
Pastry is too dry
Increase the temperature by 10^ and reduce the cooking time.
Pastry dropped
Use less liquid or lower the temperature by 10^
Pastry is too dark on top
Place it on a lower rack, lower the temperature, and increase the cooking time.
Cooked well on the inside but sticky on the outside
Use less liquid, lower the temperature, and increase the cooking time.
The pastry sticks to the pan
Grease the pan well and sprinkle it with a dusting of flour or use greaseproof paper.
Using the Grill
Use the "grill" mode, placing the food under the centre of the grill (situated on the 3rd or 4th rack form the bottom) because only the central part of the top heating element is turned on.
Use the bottom rack (1st from the bottom), placing the dripping pan provided to collect any sauce and/or grease and prevent the same from dripping onto the oven bottom.
When using this mode, we recommend you set the thermostat to the highest setting. However, this does not mean you cannot use lower temperatures, simply by adjusting the thermostat knob to the desired temperature.
Important: always use the grill with the oven door shut. This will allow you both to obtain excellent results and to save on energy (approximately 10% ).
Therefore the best results when using the grill modes are obtained by placing the grid on the lower racks (see cooking table) then, to prevent fat and grease from dripping onto the bottom of the oven and smoke from forming, place a dripping-pan on the 1st oven rack from the bottom.
| Foods Wt. | (Kg) | Cooking position from bottom | Temperature (℃) | Pre-eating time (minutes) | Cooking time (minutes) |
| Paste Lasagne 2.5 3 210 - 75-80Cannelloni 2.5 3 210 - 75-80Oven-baked noodles 2.5 | 3 210 - 75-80 | ||||
| Meat Veal 1.7 3 220 - 85-90Chicken 1.5 3 220 - 110-115Turkey 3.0 3 220-MaxDuck 1.8 3 220 - 120-125Rabbit 2.0 3 220 - 105-110Pork 2.1Lamb 1.8 3 220 - 90-95 | 95-1001.8 3 220 - 120-1252.0 3 220 - 105-1103 220 - 100-1101.8 3 220 - 90-95 | ||||
| Fish Mackerel Dentex 1.5 3Trout baked in paper | 1.1 3210-2301.0 | 210-230-60-653 | 210-230 | - 55-60 | 40-45 |
| Pizza Napolitan pizza 1.0 3 | Max | 15 30-35 | |||
| Tarts Biscuits Meringues Chocolate cake Yeast cakes | 0.5 31.1 31.0 3 2001.0 3 200 | 180 15 30-35180 15 30-3515 45-5015 50-55 |
Note: cooking times are approximate and may vary according to personal taste.
Safety Is A Good Habit To Get Into
To maintain the efficiency and safety of this appliance, we recommend that you do the following:
- only call the Service Centres authorised by the manufacturer
-
always use original spare parts
-
When handling the appliance, we recommend you always use the purpose provided handles recessed into the sides of the oven to prevent harming people or damaging the appliance itself.
-
This appliance is designed for non-professional, household use and its functions must not be changed.
- These instructions are only valid for the countries whose symbols appear on the manual and the serial number plate.
- The electrical system of this appliance can only be used safely when it is correctly connected to an efficient earthing system in compliance with current safety standards.
- When the appliance is in use, the heating elements and some parts of the oven door become extremely hot. Make sure you don't touch them and keep children well away.
The following items are potentially dangerous, and therefore appropriate measures must be taken to prevent children and the disabled from coming into contact with them:
- Controls and the appliance in general;
- Packaging (bags, polystyrene, nails, etc.);
- The appliance itself, immediately after use of the oven or grill due to the heat generated;
- The appliance itself, when no longer in use (potentially dangerous parts must be made safe).
Avoid the following:
- Touching the appliance with wet parts of the body;
- Using the appliance when barefoot;
- Pulling on the appliance or the supply cable to unplug it from the electrical outlet;
- Improper or dangerous operations;
- Obstructing the ventilation or heat dissipation slots;
- Allowing power supply cables of small appliances to come into contact with the hot parts of the appliance;
- Exposing the appliance to atmospheric agents such as rain, or sunlight;
- Using the oven for storage purposes;
-
Using flammable liquids near the appliance;
-
Using adapters, multiple sockets and/or extension leads;
- Attempting to install or repair the appliance without the assistance of qualified personnel.
Qualified personnel must be contacted in the following cases:
- Installation (following the manufacturer's instructions);
- When in doubt about operating the appliance;
- Replacing the electrical socket when it is not compatible with the appliance plug.
Service Centres authorised by the manufacturer must be contacted in the following cases:
- If in doubt about the soundness of the appliance after removing it from its packaging;
- If the power supply cable has been damaged or needs to be replaced;
- If the appliance breaks down or functions poorly; ask for original spare parts.
It is a good idea to do the following:
- Only use the appliance to cook food and nothing else;
- Check the soundness of the appliance after it has been unpacked;
- Disconnect the appliance from the electrical mains if it is not functioning properly and before cleaning or performing maintenance;
- When left unused, unplug the appliance form the electricity mains and turn off the gas tap (if foreseen);
- Use oven gloves to place cookware in the oven or when removing it;
- Always grip the oven door handle in the centre as the extremities of the same may be hot due to any hot air leaks:
- Make sure the knobs are in the "·"/"o" position when the appliance is not in use.
- Cut the power supply cable after disconnecting it from the mains when you decide not to use the appliance any longer.
- The manufacturer may not be held responsible for any damage due to: incorrect installation, improper, incorrect and irrational use.
The appliance must be installed only by a qualified person in compliance with the instructions provided.
The manufacturer declines all responsibility for improper installation which may harm persons and animals and damage property.
Important: The power supply to the appliance must be cut off before any adjustments or maintenance work is done on it.
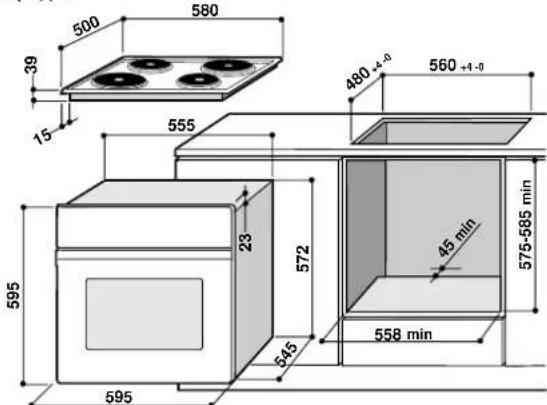
Installation of Built-in Ovens
In order to ensure that the built-in appliance functions properly, the cabinet containing it must be appropriate. The figure below gives the dimensions of the cut-out for installation under the counter or in a wall cabinet unit.
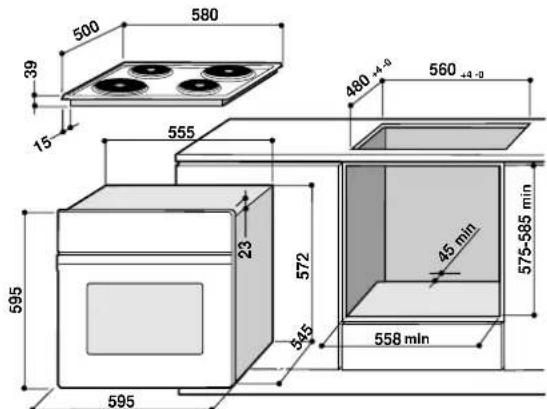
N.B.: Installation in compliance with the consumption declaration
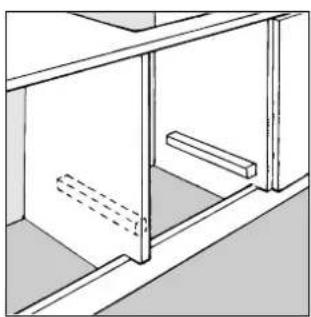
In order to ensure adequate ventilation, the back panel of the cabinet unit must be removed. Installing the oven so that it rests on two strips of wood is preferable. If the oven rests on a continuous, flat surface, there must be an aperture of at least 45 × 560 ~mm .

The panels of the adjacent cabinets must be made of heat-resistant material. In particular, cabinets with a veneer exterior must be assembled with glues which can withstand temperatures of up to 100^ .
In compliance with current safety standards, contact with the electrical parts of the oven must not be possible once it has been installed.
All parts which ensure the safe operation of the appliance must be removable only with the aid of a tool.
To fasten the oven to the cabinet, open the door of the oven and attach it by inserting the 4 wooden screws into the 4 holes located on the perimeter of the frame.

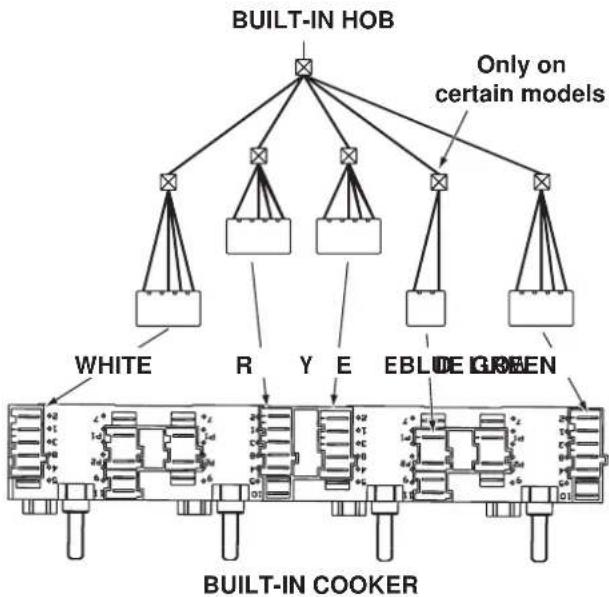
Electrical Connection
The cooker must be connected to the mains electricity supply. The hob is connected to the cooker using a special connector. The cookers are designed to operate on alternating current featuring the supply voltage and frequency indicated on the appliance data plate.
Fitting on a Power Supply Cable
Opening the terminal board:
- Using a screwdriver,prise on the side tabs of the terminal board cover;
- Pull open the cover of the terminal board.

To install the cable, proceed as follows:
- unscrew the wire clamp screw and the contact screws
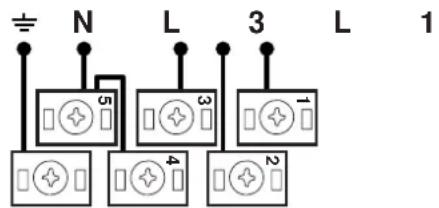
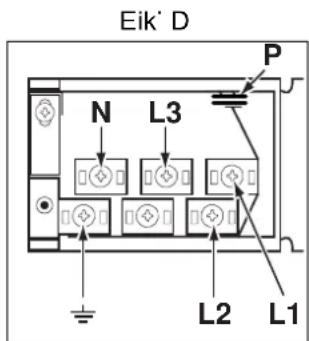
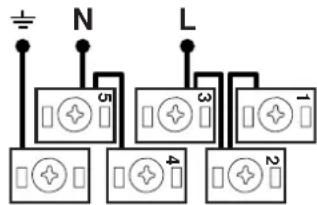
Note: the jumpers are factory-set for a three-phase 400V connection (fig. D).
to make the electrical connections illustrated in fig. F and fig.G, use the two jumpers housed in the box (fig. E - reference "P")
fasten the supply cable in place with the clamp and close the cover of the terminal board.
C
C
O E TIIAOYEaCTOUΦoUPOVou (E)
Eivai n diataqn Tou EITIpeTNI VETMIAOYTNWdiAPoWV
AEIOUPyIWTOU FOUPVOU KAI TNV EITIAOYN TNS
eepuokpaoiaac ynoiuaoc TNS TIeov KAATAANANCS YIA TO
ynoiPOaYNTW UETAGU EKEEVWV TOU AVaPepovTAl OTOV
IDIO TOV EITIAOYEa (UEA60°C KAI 240°C) STPePovTAC
TOV EITIAOYEa DEIGOTPOPA AVABEI TO QwS TOU POVPVOU
KAI TIEVTAL OE AEITOUPYIA TA eepuavTKa OTXeJA ETTAVW
KAI KATW (NAEKPTIKES AVTIOTAOIS) KAI MTOPEITE VA
ETIIeSETE' ATTOIV TNI ANP YKAuta TILWTOU AVaPepovTAl
TTAPAKaTWMV TIAEVKATAAANAN eepuokpaoja Via Ta TTPOCS
PHNOIPOaYNTA AUTO EITITUYXAVETAI KAVoVTAC VA OUMTEOI
ENTIEUnTH EvEIGEN ME T N OTAEPN EVDEIGN ETTI TOU TAI TLO
(Statikos POpvOS).
60·100·140·180·220 Max
| 80 120 | 160 | 200 | 240 |
H TEeioa eepokpaia EITUYXavetai autoata kai δiATnpεiT aTaepn aTO opyavo EλEyXou (TO ΘeepooTAt) TIO UeUθuvetai aTTOvETIAYOYc
EeONETaVwAVrTaOanC
Tpeovotac Tov Etnooyea uXn Tn eon autn avaei To TO oopvou kai Tietai e aeitoupyia n ETTAVW
avTjotaon
To TOU
AVaBcI OTpeovTAC TOV EITIOyEA "E" OTO aUbOAO B:
ΦWTcETAI OoUpvoKai TnapauEvI avuMEvO EVoW EiVAI
OE AEIToupyia eva OTIOIoNTOTe NkTPIKO eepavTIKo
OTOIxEJ TOU oUpvou'
OI EITIAOYEIG EVTOAWV TOWNV NAEKPTIKW V EOTIWTS ETTIAPVEIAC HAYEIPeAtoC(F)
OI KOUZIVEC MTOPEVA EVAEOIAOVECS ME NAEKTPIKES
EOTIEC KAVOVIKES TAXEIES KAUI AUTOATEC OElAFOPOUC
OUVUAOUOS (OI TAXEIEC EOTIEG SIAKPVOTAI ATTO TIG AALAE
ATTO TVTAPOUJA UIAC KOKKIVNS OFPAYIAGC OTOKVTPO)
TIA VA AITPOEUXEIN DIAOTOPA 0EPoNTAC KAI ZNUECSOTIC
EOTIEC EIVA KAIOVA XONAIOTIOIEITE OKEN U E BAnETITTEDN
KAI DIaETPO OXI MIKPOTEPN ATO EKEiVN TNS ETJAcS
STOV TTIVAKA AVAPePOVTAI OAVNIATOIXEC METAGTuW THEOEWV
TWV ETIIAOEVW KAI TNS XpONCS VIA TNV OTIOJA OELOTIECS
TTPOTEJVOVTAI
ATTOPOEUYOVTai OAKoAOUeEVEpyeies
V a ayyizET m oukeun eBpeyEva Hpn Tou oWuatoC
Va Tn XpnoiouoieTe E YUuVa TIOIA
-va TpaBATE N OUKEUn n TO KaWIO TPOPOOooiaç YIA VA TnV aTTOOUVoEOTe aTIO TIV TpiCa peuatoC
aOKOTTEc KAI ETTIKJVUvE EVEPYEIG
va bouwovu Ta avoiuaTa aepioo u n aTobaa Tc 0eepoTnTac
-vaKaatayI To Kaawio Tpooposooiac uikpovnAekptikowv OoKEuW oEepua Hpn nS OoKEunS
- mny TnV aqnvETE EKTEeIeVn OE aTHooaipikoC TTAPAYOVTc (BPOXn' nIo' KTT)
n xpnoTou oopvouw aTIOgNKeUTkoXoou
nXPnON EUΦAekTuvUpyw TTAnov Tns OoKEunS
n Xpnn TpooappuoOTIKw' TOnuTpiζw n/Kai TPOEKTAeWv
- PPOOTaOeIc EYKAToTAOns n ETIOKEUns Xwpi TnV ETEmuON EIiKEUeVou TPooWTIKo
IpETTEOTW08nTOTEVAATTEUVEOTE OE ESIKEUeVO TPOOWTIKo OTICAKoAouEGCTEPITTTwOEIG:
- EYKATaOTaON (OuHpWvA ME TIG OsnYIEc TOU KATAOKeuaOTn)
-0TAV aΦβαλεTE γa T Λ ΛIETOUPYia
avikataoantnTpiacOe TEPITWOn aoumuTOMtac ME TO BuOa nC OUOKUnS
IpeTIEVAaATTEUVEOTcEgouoIOGOTmEvKaVTpa TEXVIKCSUTTOPTnPGNCSOTcAkoAUOEGCTEPITTTWoeIC
av aqipaaaETe via TnV akepaioTnta Tns ouokueuS apou EXEte aqapieoei n ouokueuaia
ZnHa n avtakatotaon Tou Kaawoiu Tpoosooia
OE TEPITTIOWBαβαns n KAKNS λEITOUPYIaC ζNTWVTAC aUθΕVTIKa AVTαλλΑKTIKa
EivaOKoTmioVaekTeAeTeTISaKoAUOeSdIepyaoJeS
HOVTOHnOIO TOW qayNTw v aTTOpeUyovtac aaAEC EVDYIECS
-va ElambdaEETnV aKepaIOTnT aΦou aPaipεOeTe Tn OuaKEUaia
VAATTOOUVDEETIN OUKEUn ATTO NAEKTPIK0 DIKTUO OE TEPITTOWN KAKNS LEIOTUPYiAc KAI TTIV ATO OTIOIAHNTOT EVEPYEIA KAAGAPIOu n OUVTNPONs
6TAV EV XpnoIIOHTOIEiTA' VA aTTOOUVSETE TNOOKeUN aTTO TO nAekTPO idKTUO KAI VA KAEIVETO VKPOUVTOU aepiou (AV TPOBAAETTATI)
VApnoiPoTIOEYaviaYiaToΦoUpvoYiaVaEioaYETe n VAByAcTe OKeun
VA TIAVETE TAVTA N AβN TOU φOUPVOU OTO KεVTPO' δεδομενου ΜT OTo αKpO ΘaMTOPOUσE VA εIVAI TIO Θερμη EαITJAC TS ESδOu Θερμou aepa
VA EAYXETIaVAtA vOI ETIAOYEIC EiVaI OTn OeON "f/o" OAVN OUKEUnEVDXPnOIOTTOIETAI
V a KoBETo Kaawio Tpoosooiaa apou to exTe aTOOUVoei aTo To nAEKTPIKOgKTOO tAV aTTOPOaOizTe VA HxnpoiOTIOHoe TE TIA Tn OUCKEun
O KATAOKEUAOTHS EV MTOpei va eewpnei UTeUGUVOS VIA EVEXOVECS nHcS TPOEPXoEVc aTIO: AavaaOpEvN EYkataOtaon' XpnoEIC aIoVIOTEc' AavaaOeVCaI aOKOTEC
H EYKAOTAOIANTPETIVA TPAVMAOTOINeI OUWVA TIC OSNYIECS TOU KATAOKEUAOTn aTIO TPOOWTIKO ETTAYEAUATIKa EIISKUEMEVO MIA AAVAAOUEVN EYKATAOAON MTOPEi VA TPOSEVNOE ZNIIECS OE TPOOSWA n TPAVATAEVAVI TOW OTIOJW V KATAOKEUAOTns SEV MTPOEi va Ewnpnei UTTEUGVOC
Enpuavko: OTIOaONTOTE ETEBpaon Puaonns ouvtnpnncs KAT TPEITI VA EKTEAETOI ME TOV FOUPVO ATTOOUVDEEHEVO nAKTPIKA
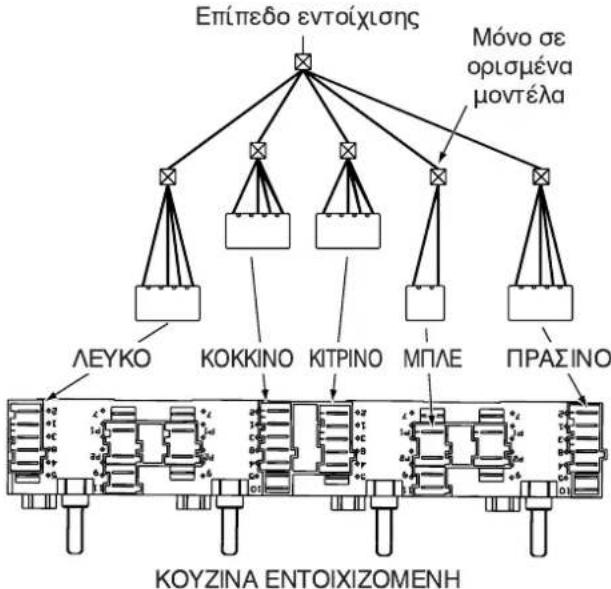
EVKaTaOtaon TwV EVToIxIzOeVW VoPvW
TIA VA DAOPAIOE TEIKAAN AEITOUPYIA TS EVTOXICHEVNS OUOKeUNTS TPETEI TO ETTTIAoVA EXE KATGAAxapAKTIPIOTIKa TIV TTAPAKATU EIKOVA TTAPAOETOVTAI OIAOTAEIS TOU XWPOU TOEITTTAU
IHMEI2H: Eykaataaon yla 6nlambda katavaawv
TIA va 60000000000000000000000000000000000000000000000000000000000000000000000000000000000000000000000000000152345678911234567891123456789112345678911234567891123456789112345678911234567891123456789112345678911234567891


Ta TnV Wv YEITOVIKWTOU FOUPVOU ETTAWTPETEVA
EVaTAYeVA aTO UAKo AVKETKO OTN 0EPOTNTA
EIOTPA'OTNV TEPITTOWN EUVWV ETTAWKATTAAO ai
KOASCTPETEVA AVEXOUV OE 0EPOKpOJA TOV 100C
ZuPwVA uTOUs KAVOMIOUcAoPAeIaC apou EVTOIXOTEJ
n OUKeUN' 0EV TPETEVA uPOTAVTAI EVSEXoeVS ETTAPES
UE Ta NAEKTPIKToxWmuTa
Oa ta Hepn Tou 6iaopaaizouv Tnv TPOOTAOi TpEITeI VA OTEpeWovTai ME TEIO TO TPOTO Tou va mnu TIOpeI VA apaipeEeXwpiT BOnEIA KATIOU EpyAeiou
TIA VA OTEPEOETE TO FOUPV OTO EITTTAO AVOIE TIV TIOPTA TOU FOUPVOU KAI OTEPEOATE VPOVPV SIaEOAU TWV 4 EUVW BIDW OTIC 4 OTIE TOUTBIPOKOVTA OTO TEPIETPIKO TIAQIO
HAEKPTPIKn Ouvgeon
H nEKTPIKn OUVsEON OTO SIKTUO TIPETTEI VA YIVEI OTNV KOUZiva H EITiPavEIA OUVsEETAI OTNV KOUziva DIAeou EVOS KATAANLAAO OUVoEOMOU OIKUzivec Eivai DIAOpopwEvc Via LEITOUPyia ME EvVAaAooEvo PeuMa OE Taon KAI OUXoTNTa TPOpOoOiaC TIOU AVaPepeTaI OTNV TIIAKiDa XapaktnpiOTIKWV
EUVsEonKaawou Tpoopogooja
AVOYUaTtivakjao akpo8EKtov
XpnoiOHToiWvTc eva KAtoaiiKpatnote KoVtpa OTIeupikeys yawooitoe tsou kattakiou Tns TIVAKiag akpoEeKtow
TpaBnEeKai aovieTe To kattkntivakiaac akpo8ekTuV

Tn TcOn Oe AETOUPYiA TOU KAaWsiou EKTEAOTE TcAOKoAUOES EVpEyEG.
Eeipowte n biocai ts bioeTswv Etnaov
Sneiwon: oYeupes civai sieueetnvec aTO
Evooataoia Tn ouvsoen 400 Tpiaoko (EK D).
VIVNVEKTEAEON TOW NAEKTPIKW OUVOEOSWTVV EIK KAI EIK G,XPNOIPOTIOINOTE TIG YQUPECIPO BpiOKoVTai EVTOSS TOU KIBWTOU (EIK -OxETIKO"
OTEPEWTO KAALWIO TPOPOOooTc OTO AVTOAO KAIIT KAALOWIO KAI KAJEOTe TO KATQKI
400V 3N~ H05RR-F 5x2.5 CEI-UNEL 35363
Eik' E 230V 1N\~ H07RN-F 3x4 CEI-UNEL 35364
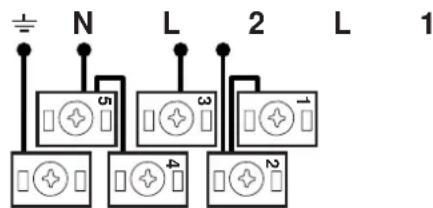
Eik'F 400V2N\~ H05RR-F 4x2.5 CEI-UNEL 35363
Eik G
