
AOES3030WW - Oven AMANA - Free user manual and instructions
Find the device manual for free AOES3030WW AMANA in PDF.

| Product Type | Built-in Oven |
| Brand | Amana |
| Model | AOES3030WW |
| Power Supply | 115/230-120/240 V, 60 Hz, three-wire circuit |
| Overall Dimensions | Width: 75.6 cm (29 3/4 in); Height: 71.8 cm (28 1/4 in); Depth: 67.3 cm (26 1/2 in) (including handle) |
| Cavity Dimensions | Width: 72.4 cm (28 1/2 in); Height: 69.2 cm (27 1/4 in); Depth: 59.7 cm (23 1/2 in) |
| Weight | Approximately 86.4 kg (190 lb) (maximum floor load) |
| Capacity | 6 rack positions, standard oven |
| Main Functions | Bake, Broil, Self-Clean, Timed Bake, Delay Bake, Slo-Cook™ |
| Controls | Electronic controls with digital display, +/– keys, clock, timer, cancel |
| Bake Temperature Range | 77 °C to 288 °C (170 °F to 550 °F) in increments of 3 °C (5 °F) |
| Broil Temperature Range | 77 °C to HI (high temperature) |
| Self-Clean | 2 to 4 hour cycle, automatic door lock, automatic shut-off |
| Safety | Child lock, automatic shut-off after 12 hours, self-diagnostic with F-codes, door lock during self-clean |
| Lighting | 25 W appliance bulb, replaceable |
| Maintenance and Cleaning | Self-Clean; clean broiler pan and racks by hand or in dishwasher; exterior surface with soapy water; do not clean door gasket |
| Spare Parts | Bulb, door gasket, racks, broiler pan – available from Amana after-sales service |
| Repairability | Diagnosis by F-codes; repairs by a qualified technician; after-sales service: 1-800-NAT-LSVC (USA) |
| General Information | UL listed built-in oven; 101-page manual; Asure™ extended service plan available |
Frequently Asked Questions - AOES3030WW AMANA
User questions about AOES3030WW AMANA
0 question about this device. Answer the ones you know or ask your own.
Ask a new question about this device
Download the instructions for your Oven in PDF format for free! Find your manual AOES3030WW - AMANA and take your electronic device back in hand. On this page are published all the documents necessary for the use of your device. AOES3030WW by AMANA.
USER MANUAL AOES3030WW AMANA
Self-Cleaning Built-In Wall Oven Owner's Manual
AOES3030\*
* Additional alphanumeric characters representing other models in series may follow each model number.
English 2
Español 33
Français 67
Please Read Manual Before Operating Wall Oven
Installer
Leave this manual and other literature with consumer for future use.
Consumer
Keep these instructions for future reference. If appliance changes ownership, be sure this manual accompanies Wall Oven.
Contents
Model Identification 3
Asure™ Extended Service Plan 3
Important Safety Information 3
Installation.... 5
Packaging Material 5
Oven Dimensions 5
Oven Location 5
Line Voltage Requirements 5
Connecting Wiring 6
Tilting Control Panel 7
Wall Oven and Cooktop Combination Installation
Specifications
AKED3060 or AKES3060 Downdraft Cooktops
Above AOES3030 Wall Ovens 8
AKED3060 or AKES3060 Downdraft Cooktop
Above AOES3030 Wall Ovens in an Island
Application....9
AK2H36, AK2T36, 36" Electric Cooktop Installed
Above AOES3030 Wall Oven 9
AKGD3060 Gas Downdraft Cooktop Installed
Above AOES3030 Wall Oven in a Standard
Kitchen Cabinet 10
AOES3030 Wall Oven Installed Below
AKGD3060 Gas Downdraft Cooktop In An Island
Installation 11
AKS3020 or AKS3040 cooktop above
AOES3030 Wall Oven 12
AOES3030 Wall Oven Installed in a Cabinet ..... 13
30" Electric Cooktop AK2H30, AK2T30,
AKR3000, AKT3000, CAK2H30, CAK2T30
Installed Above AOES3030 Wall Oven. 14
AOES3030 wall oven stacked installation ..... 14
AOES3030 Wall Ovens Installed Side-by-Side .... 15
Operating Instructions AOES3030 16
Electronic Oven Control 16
Special Oven Control Options 16
Quick Reference Instructions 17
Bake 18
Timed Bake 18
Delayed Bake 18
Broiling 18
Self-Cleaning 19
Delayed Self-Cleaning 19
Dehydration Tips 20
Adjusting Oven Temperature.... 20
Service Tones and Codes 20
Cooking Guide
Oven Rack Placement 21
Pan Placement 21
Broiling Pan 21
Oven Operation 21
Bake 21
Broil 21
Baking Chart 22
Poultry Oven Roasting Chart 22
Beef and Pork Oven Roasting Chart 23
Broiling Chart 23
Slo-Cook™ Instructions and Cooking Guide for
Wall Oven
Slo-Cook™ Programming Instructions 24
Slo-Cook™ Roasting Rack 24
Facts and Hints to Remember 24
Suggested Dish Arrangements 24
Main Dish Recipes....24
Slo-Cook™ Menu Meals 27
Care and Cleaning
Cleaning Oven Parts 30
Removing Oven Door 31
Replacing Oven Door.... 31
Replacing Oven Light 31
Before Calling for Service 32
Problem Solving 32
Common Questions 32
Complete enclosed registration card and promptly return. If registration card is missing, call Consumer Affairs Department at 1-800-843-0304 inside U.S.A.
319-622-5511 outside U.S.A. When contacting Amana, provide product information. Find product information on rating label located behind oven door. Record the following:
Model Number: ____
Manufacturing Number: ____
Serial or S/N Number: ____
Date of purchase: ____
Dealer's name and address:
Keep a copy of sales receipt for future reference or in case warranty service is required. Any questions or to locate an authorized servicer, call 1-800-NAT-LSVC (1-800-628-5782) inside U.S.A. 319-622-5511 outside U.S.A. Warranty service must be performed by an authorized servicer. Amana, also recommends contacting an authorized servicer if service is required after warranty expires.
Asure™ Extended Service Plan
Amana offers long-term service protection for this new wall oven. Asure™ Extended Service Plan is specially designed to supplement Amana's strong warranty. This plan covers parts, labor, and travel charges. Call 1-800-528-2682 for information.

Recognize this symbol as a safety precaution

WARNING
This appliance contains or produces a chemical or chemicals which can cause death or serious illness and which are known to the state of California to cause cancer, birth defects or other reproductive harm. To reduce the risk from substances in the fuel or from fuel combustion make sure this appliance is installed, operated, and maintained according to the instructions in this booklet.
To avoid personal injury, do not sit, stand or lean on oven door.
To avoid risk of electrical shock, personal injury, or death, make sure your oven has been properly grounded and always disconnect it from main power supply before any servicing.
To avoid risk of fire, do not store combustible materials, gasoline or other flammable vapors and liquids near or in the oven.
To avoid burns caused by steam, do not use a wet sponge or cloth to wipe up spills on a hot cooking area.
All Appliances
Proper installation
Be sure your appliance is properly installed and grounded by a qualified technician.
Never use your appliance for warming or heating the room.
Do not leave children alone
Children should not be alone or unattended in the area where the appliance is in use. They should never be allowed to sit or stand on any part of the appliance.
Wear proper apparel
Loose fitting or hanging garments should never be worn while using appliance.
User servicing
Do not repair or replace any part of the appliance unless specifically recommended in this manual. All other servicing should be referred to a qualified technician.
Storage in or on appliance
Flammable materials should not be stored in oven or near surface units.
Do not use water on grease fires
Smother fire or flame, or use dry chemical or foam-type extinguisher.
Use only dry potholders
Moist or damp potholders on hot surfaces may result in burns from steam. Do not let potholder touch elements. Do not use a towel or other bulky cloth.
Do not leave oven unattended
Boilovers can cause smoke and may ignite.
Oven
Use care when opening door
Let hot air or steam escape before removing or replacing food.
Do not heat unopened food containers
Build-up of pressure may cause container to burst and result in injury.
Keep oven vent ducts unobstructed.
Placement of oven racks
Always place oven racks in desired location while oven is cool. If rack is removed while oven is hot, do not let potholder contact hot heating element in oven.
Do not use aluminum foil to line the oven bottom
Aluminum foil can cause fire, damage oven interior, and will seriously affect baking results.
Do not touch interior surfaces of oven during or immediately after use
Do not let clothing or other flammable materials contact elements. Although these surfaces may be dark in color they can still be hot enough to burn.
Use caution when touching oven while in use
Other areas of the oven can become hot enough to cause burns, such as vent openings, window, oven door and oven racks.
Self-Cleaning
Do not clean door gasket
The door gasket is essential for a good seal. Care should be taken not to rub, move, or damage the gasket.
Do not use oven cleaners
No commercial oven cleaner or oven liner protective coating of any kind should be used in or around any part of the liner.
Clean only parts listed in manual.
Before self-cleaning the oven
Remove broiler pan, oven racks, and other utensils.
In Case of Fire
Fires can occur as a result of overcooking or excessive grease. Though a fire is unlikely, if one occurs, proceed as follows.
- If you see smoke from oven, do not open oven door.
- Turn oven control to "OFF".
- As an added precaution, turn off power at main circuit beaker or fuse box.
- Turn on vent to remove smoke.
- Allow food or grease to burn itself out in oven.
- If smoke and fire persist, call fire department.
- If there is any damage to components, call an authorized servicer before using oven.
Packaging Material
Remove protective packing materials from oven. Tape residue can be cleaned with a soft cloth and alcohol.
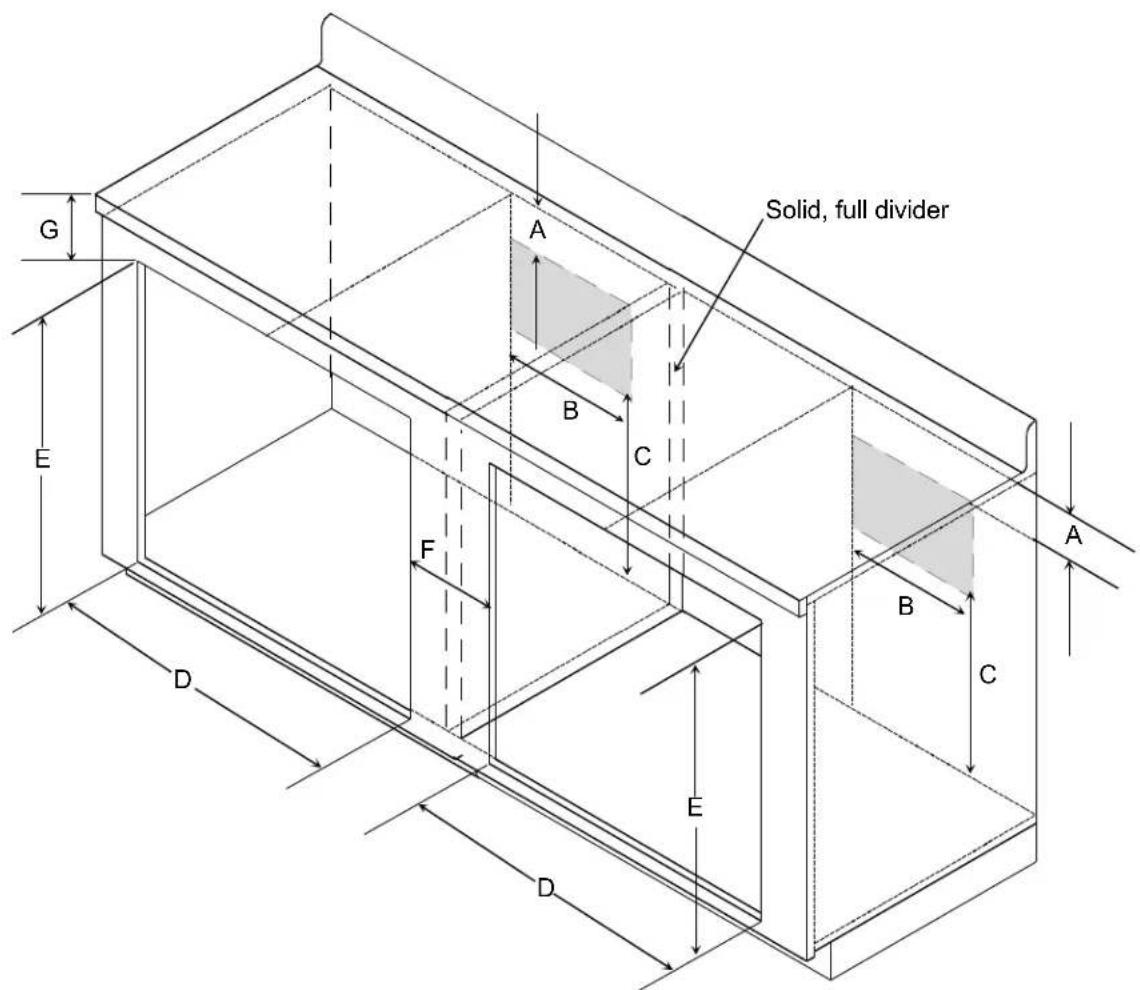
Oven Dimensions
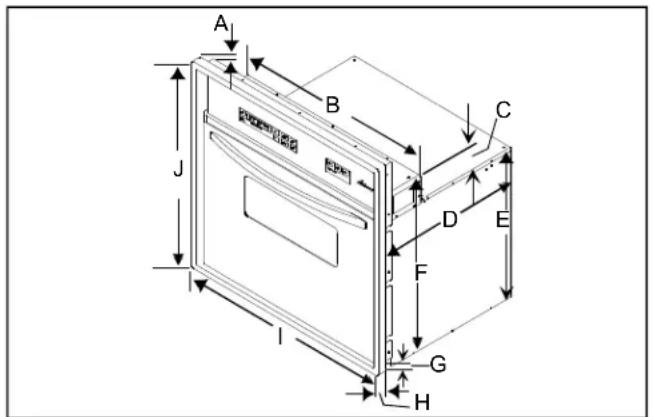
A. 34 " Trim height, top of oven face
B. 28 ^1/_4 " Oven control cover width
C. 3 ^5/8 " Oven control cover height
D. 23 14 " Oven cavity cover depth
E. 23 12 " Rear oven cavity cover height
F. 27" Front oven cavity cover height
G. 12 " Trim height, bottom of oven
H. 1^1/4 " Trim depth
I. 29 34 " Overall oven width
J. 28 14 " Overall oven height
Depth of oven with handle 26 ^1/2 "
Depth without handle 24^1/2
Oven Location
Oven can be installed in wall or in an undercounter kitchen cabinet.
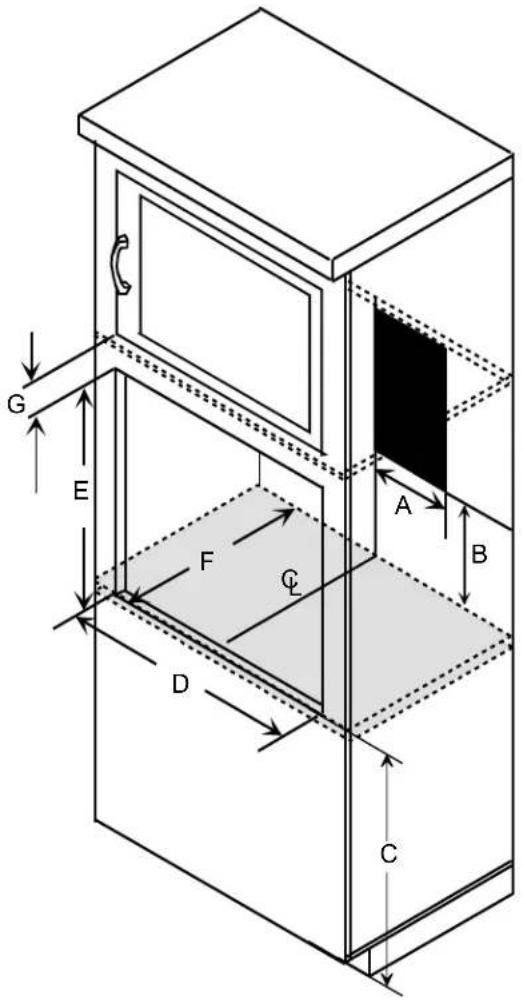
Cutout measures 28^1/2 " wide x 27^1/4 " high. Provide flat bottom for oven to rest on. Bottom must be level and flush with bottom edge of opening, and square to front of cabinet for proper installation. Oven bottom must be able to support 190 pounds.
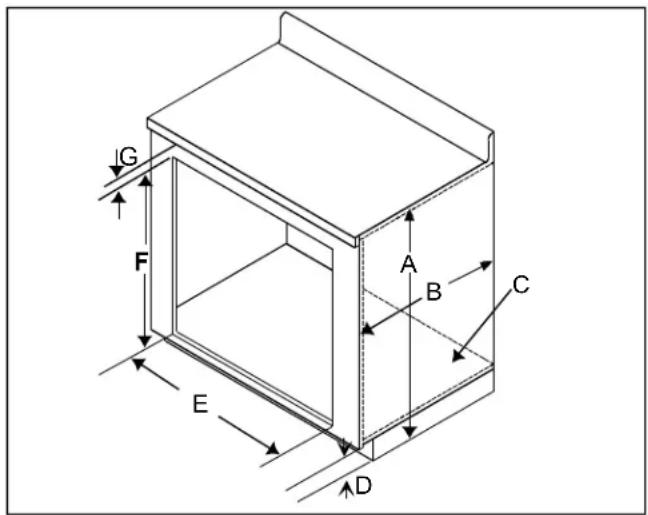
A. 36"
B. 23 12 " minimum
C. Oven installed on this surface for undercounter application.
D. 3^1/2 " from floor
E. 28 ^1/2
F. 27 ^1/_4 "
G. 78 " minimum from bottom of countertop to top of cutout
Line Voltage Requirements
Line voltage must not exceed rated voltage. Line voltage less than rated voltage will result in slow heating. Wiring system must conform to U.L. Standards and National Electrical Code. Installation must conform to all local, municipal and state building codes, and local utility regulations. Oven must be connected only to a supplied circuit as specified on rating plate.
This oven requires 3 wires, 115/230-120/240 volts, 60 Hertz A.C. Unit is equipped with a No. 10 ground wire in conduit. Oven should be fused separately from other appliances. Verify electric power is off from fuse box to junction box until oven is installed and ready to operate.
Junction box should be installed in shaded area as shown and connected to a suitable ground.
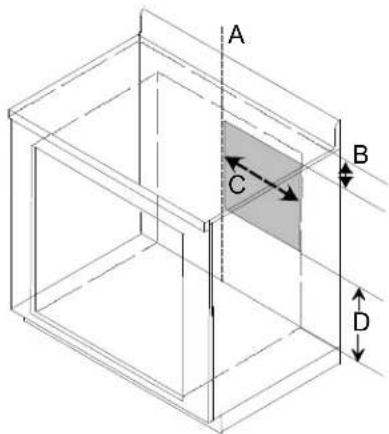
A. Center of wall oven cutout
B. 2 ^1/2 " from bottom of countertop
C. 14 14 " from center of cutout
D. 24" minimum from bottom of cutout
House wiring and fusing must comply with local wiring codes. If no local codes are applicable, wire in accordance with the National Electrical Codes.
Connecting Wiring

WARNING
To avoid risk of personal injury or electrical shock, do not ground through neutral wire if installation is in a mobile home or if local codes do not permit grounding through a neutral.
Improper connection of aluminum house wiring to copper leads can result in property damage, personal injury or fire. Use only connectors designed for joining copper to aluminum and follow manufacturer's recommended procedure closely.
- With oven positioned in front of cabinet opening, connect wire leads extending from conduit to junction box. Verify neutral (white) wire is connected to appropriate terminal. Check local code to see which of the options should be used in grounding unit.
Option 1
Attach oven ground wire (green or bare) to junction box (if grounded) or a suitable ground.
Option 2
Connect oven ground wire (green or bare) to house ground feed wire (green, bare, or white). If grounding through white wire, observe above warning.
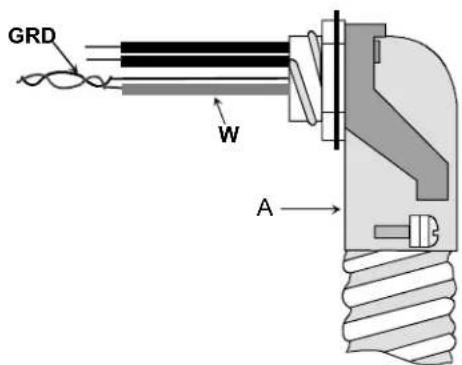
A. Conduit
W. White neutral wire
GRD. Bare ground wire
If oven is used in a mobile home or if local codes do not permit grounding through neutral, open connection and use grounding lead to ground unit in accordance with local codes. Connect neutral lead to branch circuit neutral conductor in usual manner.
- Connect red and black wires to appropriate house electrical wiring.
- Verify wiring by connecting electrical power at fuse box and checking for proper operation of unit.
- Some interior parts are finished with a protective coating of oil. When heated for first time oil will burn off and there will be some odor and smoke.
- Do not block air openings in bottom front of oven when making installation.
- Insert oven into cabinet and check for flush fit to face of cabinet. If necessary screw unit to cabinet using holes in top and bottom of trim and screws provided.
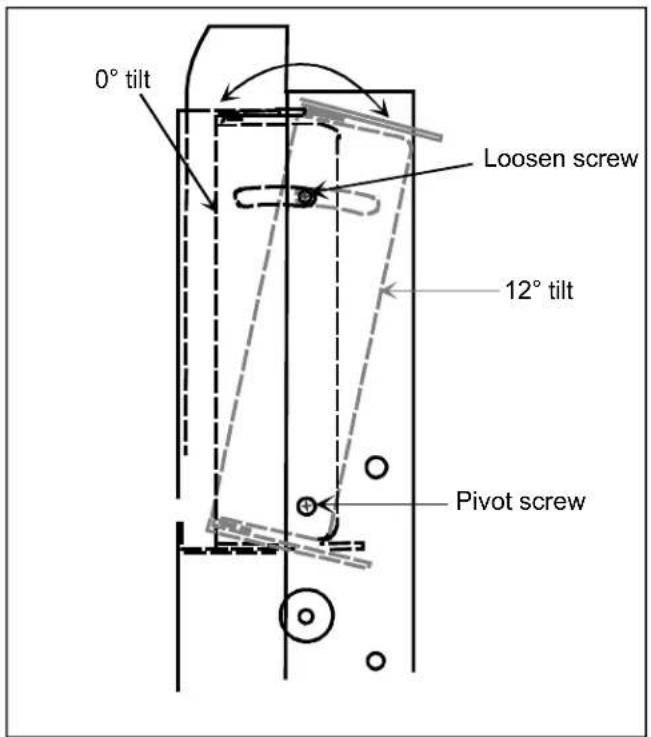
Tilting Control Panel
Control panel can be adjusted to tilt from 0^ to 12^ to make more visible.
- Loosen screws on top and sides of control panel and pivot screw on bottom sides of control panel before installing oven, or with oven partially pulled from opening.
- Adjust control panel to desired angle and retighten screws.
Wall Oven and Cooktop Combination Installation Specifications
IMPORTANT— Save these instructions for local electrical inspector's use.
Installer
Leave these instructions and other literature with consumer for future reference.
Installations specified in these instructions are approved for the AKT3000, AK2T30, AK2T36, AK2H30, AK2H36, AKR3000 cooktops, and AKED3060, AKES3060 downdraft cooktops, above AOCS3040 and AOES3030 Amana wall ovens. Stacked and side-by-side wall oven installation applies to Amana AOES3030 wall ovens only.
For additional individual unit requirements and clearances refer to the installation instructions packaged with the wall oven and cooktop.
All installations specified are for a 36" cabinet height, 23 ^1/2 " minimum depth. Junction box and 10 ^1/8 "x3 ^3/8 " vent location for 10"x3 ^1/4 " vent indicated in black.

WARNING
To avoid property damage or personal injury, information in these installation specifications must be followed exactly.

Listed by Underwriters Laboratories
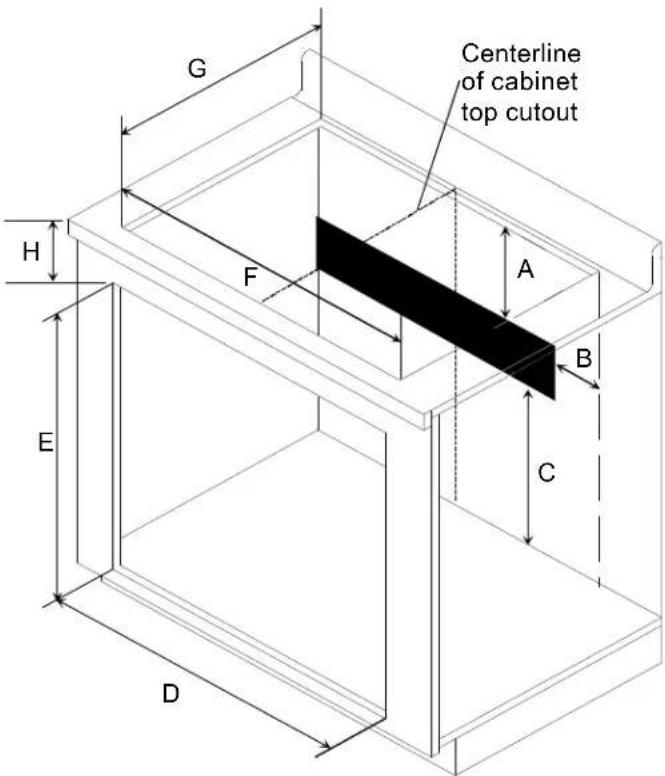
AKED3060 or AKES3060 Downdraft Cooktops Above AOES3030 Wall Ovens
Junction box location and 10^1/8 × 3^3/8 inch vent location indicated in black.

WARNING
To avoid property damage or personal injury, information in these installation specifications must be followed exactly.
A—6" from back of cutout to back edge of vent cutout
B—47/32" from centerline to vent cutout
C—4 ^1/2 " from top of countertop
D—4 ^3 /8" from top of countertop to top of vent cutout
E—20 ^5/8 " cooktop cutout depth
F—28 ^7/8 " cooktop cutout width
G—28 ^1/2 " wall oven cutout width
H—27 ^1/4 " wall oven cutout height
I— 4 ^1/2 " from top of countertop to top of wall oven cutout
©—Centerline of cutout
AKED3060 or AKES3060 Downdraft Cooktop Above AOES3030 Wall Ovens in an Island Application
Illustration shows dimensions for venting behind, and to the left side of the wall oven. Left side venting for wider island applications only. Junction box and 10^1/8 "x3 ^3/8 " vent location for 10"x3 ^1/4 " vent indicated in black. Grey shaded area indicates wall oven floor

WARNING
To avoid property damage or personal injury, information in these installation specifications must be followed exactly.
A—6" Right of centerline
B—4 ^1/2 " From top of countertop
C—24" From bottom of oven cutout to bottom juncntion box location
D—3 ^1/2 " minimum from back wall of island cabinet and back of wall oven
E—28"minimum island depth
F—23 ^1/2 " Bottom of wall oven in cutout
G—28 ^1/2 " wall oven cutout width
H—27 ^1/4 " wall oven cutout height
— 3^1/2 " minimum from side wall of island to side wall of oven
J—6" from back of cooktop cutout to back of vent cutout
K—4 7/32" from centerline to vent cutout
L—28 ^7/8 " cooktop cutout width
M—20 ^5/8 " cooktop cutout depth
N—4 ^1/2 " from top of countertop to top of wall oven cutout
AK2H36, AK2T36, 36" Electric Cooktop Installed Above AOES3030 Wall Oven
Cooktop and wall oven junction box location indicated in black.

WARNING
To avoid property damage or personal injury, information in these installation specifications must be followed exactly.
A—4 ^1/2 " minimum from top of countertop
B— 8" maximum from right side wall of wall oven cutout
C—24" minimum from bottom of cutout
D—28 12 " wall oven cutout width
E— 27 ^1/4 " wall oven cutout height
F— 34 ^1/8 " cooktop cutout width
G—20 ^3 /4" cooktop cutout depth
H—3 ^3/16 " from top of countertop to top of wall oven cutout
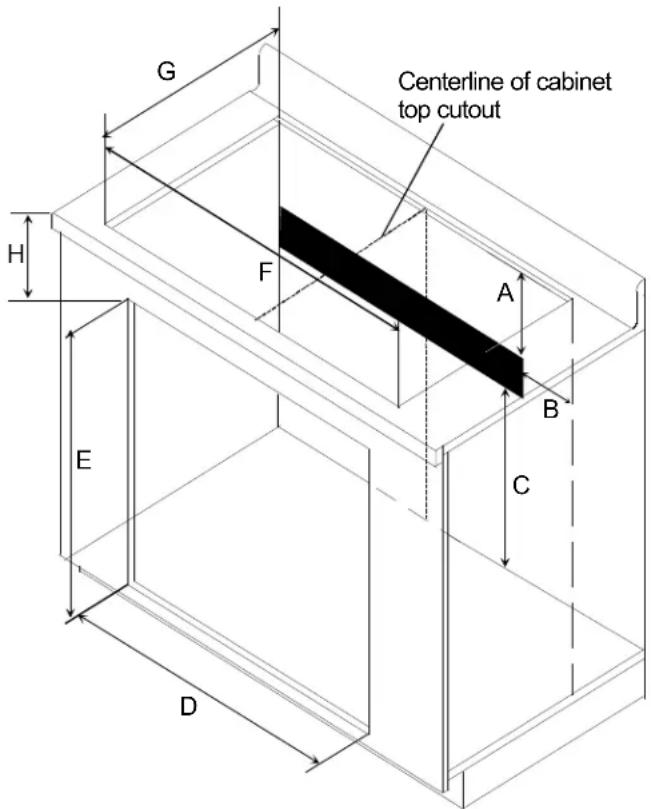
AKGD3060 Gas Downdraft Cooktop Installed Above AOES3030 Wall Oven in a Standard Kitchen Cabinet
10^1/8" × 3^3/8" vent location for 10" by 3^1/4" vent and junction box indicated in grey. Installation specified is for a 36" cabinet height, 23^1/2" minimum depth.

WARNING
To avoid property damage or personal injury, information in these installations must be followed exactly.
A—6" minimum
B—2 ^5 / _8 " right of center line
C—4 ^3 / _8 " between top of countertop and top of duct cutout
D—20 ^5 /8" cutout depth
E—28 ^7/8 " cutout width
F— ^3/_4 " from back of cooktop cutout to center of gas entry into cooktop
G—4 ^3/4 " from right side of cooktop cutout to center of gas entry into cooktop
H—28 ^1/2 " wall oven cutout width
I—27 ^1/4 " wall oven cutout height
J—4 ^1/2 " from top of coutertop to top of wall oven cutout
C—Centerline of cutout
Wall oven and gas cooktop must be installed on separate electrical circuits. Be certain to avoid interference between the wall oven power supply and the gas supply lines.

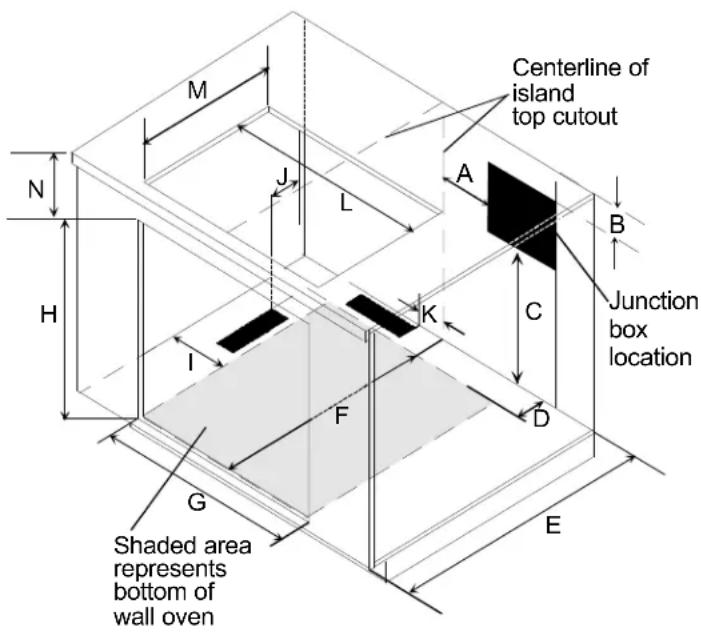
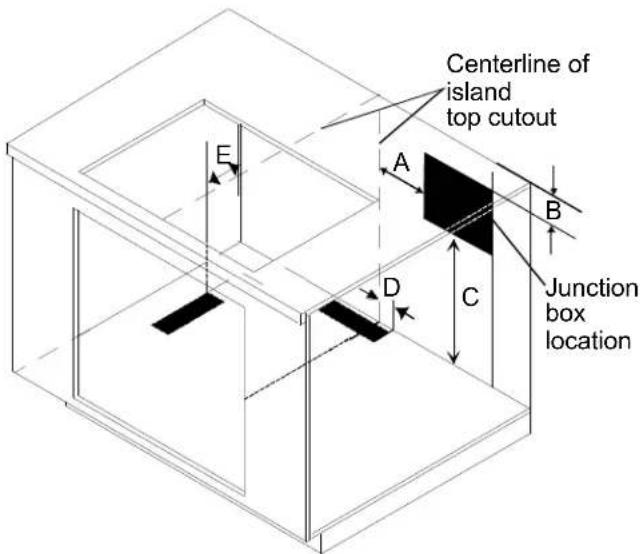
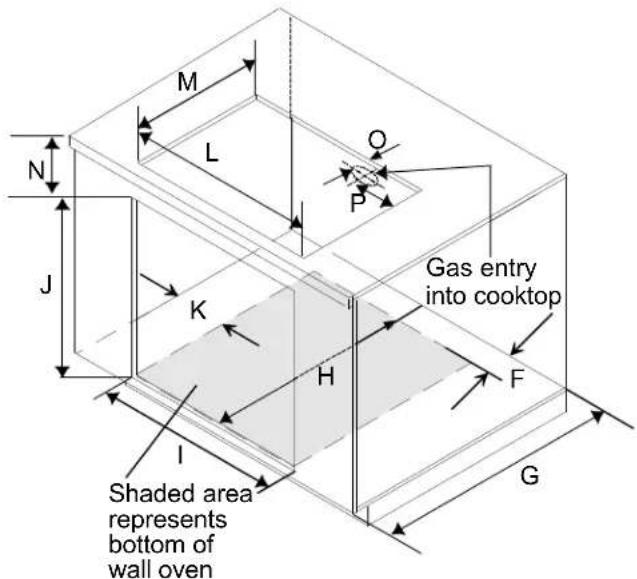
AOES3030 Wall Oven Installed Below AKGD3060 Gas Downdraft Cooktop In An Island Installation
Illustration shows dimensions for venting behind, and to the left side of the wall oven. Left side venting for wider island applications only. Junction box and 10^1/8 "x3 ^3/8 " vent location for 10"x3 ^1/4 " vent indicated in black. Cutout bottom indicated in grey.

WARNING
To avoid property damage or personal injury, information in these installation specifications must be followed exactly.
A—6" right of junction box location
B—4 ^1/2 " from top of countertop
C—24" from floor of cutout
D—2 ^5/8 " right of centerline from right edge of vent
E—6" from back of cooktop cutout to back of vent cutout
F— 3 ^1/2 " minimum from back wall of island cabinet to back wall of wall oven
G—28" minimum island depth
H—23 ^1/2 " bottom of wall oven in cutout
—28 ^1/_2 " wall oven cutout width
J—27 1/4" wall oven cutout height
K—3 ^1/2 " minimum from side wall of island to side wall of wall oven
L—27 ^7 /8" cooktop cutout width
M—20 ^5 /8" cooktop cutout depth
N—4 ^1/2 " from top of countertop to top of wall oven cutout
O— ^3/_4 " from back of cooktop cutout to center of gas entry into cooktop
P—4 ^3/4 " from right of cooktop coutout to center of gas entry into cooktop
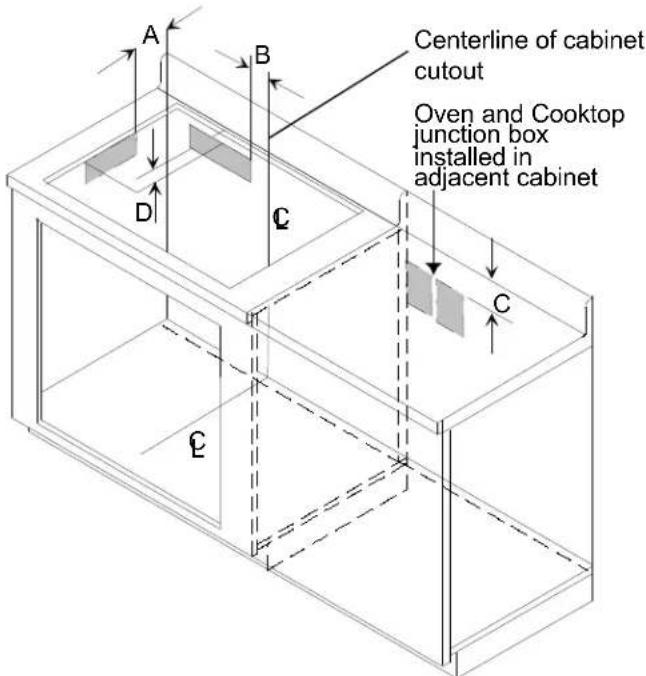
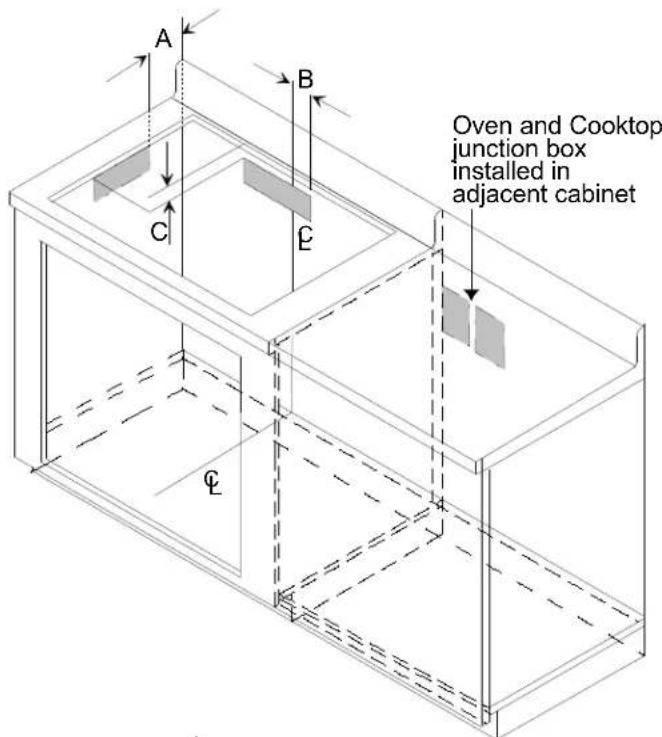
AKS3020 or AKS3040 cooktop above AOES3030 Wall Oven
Gas Supply Location
Locate gas supply so manual shutoff valve is accessible after installation. Electrical junction box and gas supply should be installed in an adjacent cabinet.

WARNING
To avoid property damage or personal injury, information in these installation specifications must be followed exactly.
Installation specified is for a 36" cabinet height, 23^1/2 minimum depth.
A—19 ^3 /16" cooktop coutout depth
B—28 ^1/2 " cooktop cutout width
C—3 ^3 /16" from top of countertop to top of wall oven cutout
D—27 ^1/4 " wall oven cutout height
E—28 ^1/2 " wall oven cutout width
F—Oven and Cooktop junction box installed in adjacent cabinet
G-1 ^3 /4" from back of cooktop cutout to center of gas entry into cooktop
H—2 ^1/8 " from right side of cooktop cutout to center of gas entry into cooktop.
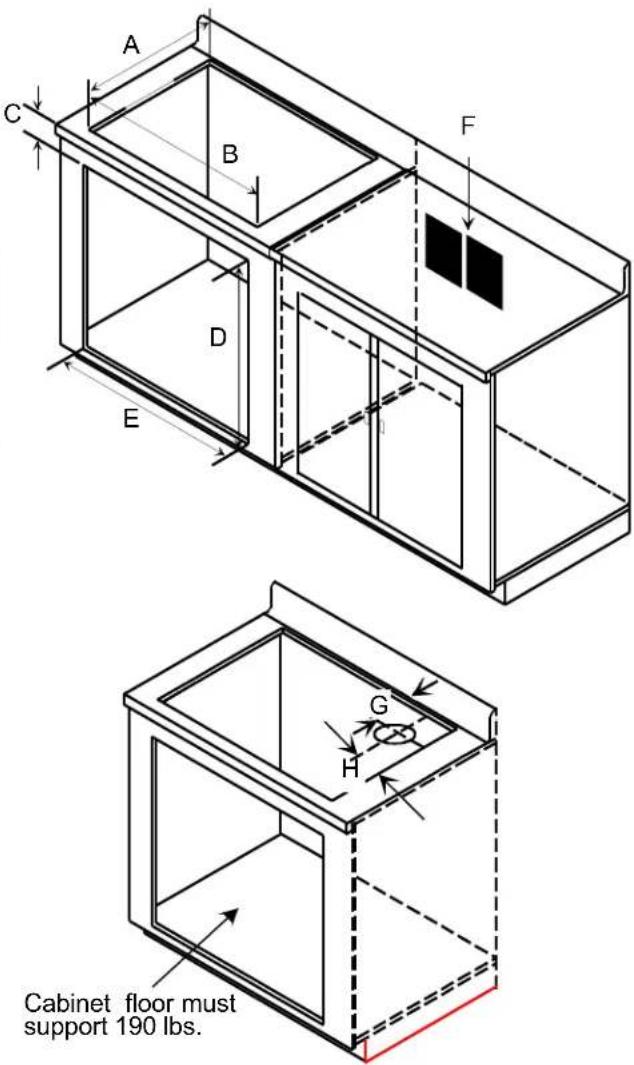
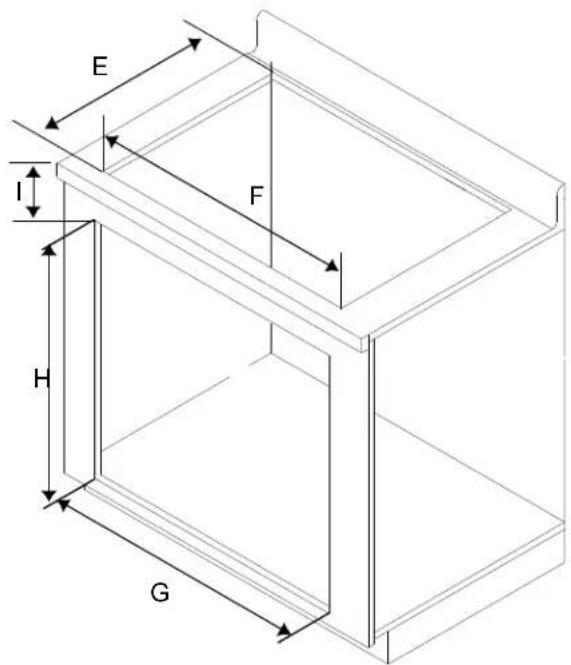
AOES3030 Wall Oven Installed in a Cabinet
Wall oven junction box indicated in black. Cutout floor indicated in grey. Bottom of cutout must be level and flush with bottom edge of opening, and square to front of cabinet for proper installation. Cutout floor must be able to support 190 lbs.

WARNING
To avoid property damage or personal injury, information in these installation specifications must be followed exactly.
A—14 ^1/2 " from center of cutout
B—24" minimum
C—32" minimum recommended height from floor to bottom of cutout
D—28 ^1/2 " wall oven cutout width
E—27 ^1/4 " wall oven cutout height
F—23 ^1/2 " minimum
G—1 ^5/8 " minimum space between wall oven and cabinet above
30" Electric Cooktop AK2H30, AK2T30, AKR3000, AKT3000, CAK2H30, CAK2T30 Installed Above AOES3030 Wall Oven.
Cooktop and wall oven junction box location indicated in black.

WARNING
To avoid property damage or personal injury, information in these installation specifications must be followed exactly.
A—4 ^1/2 "minimum from top of countertop
B—8" maximum from right of wall oven right side wall cutout
C—24" minimum from wall oven cutout floor
D—28 ^1/2 " wall oven cutout width
E—27 ^1/4 " wall oven cutout height
F—28 ^7/8 " cooktop cutout width
G—20 ^3/4 " cooktop cutout depth
H— 3^3/_16 " from top of countertop to top of wall oven cutout
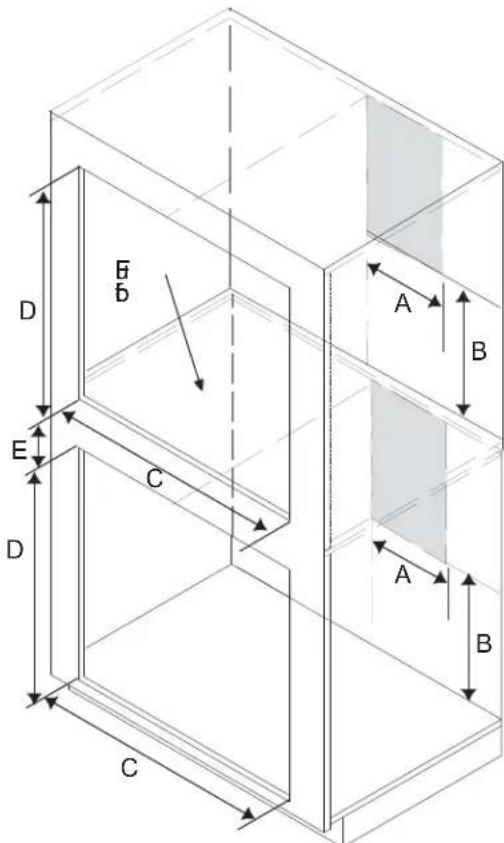
AOES3030 wall oven stacked installation
Wall oven junction box location indicated in grey.

WARNING
To avoid property damage or personal injury, information in these installation specifications must be followed exactly.
A—14 ^1 /4" from center of cutout
B—24" minimum
C—28 ^1/2 " wall oven cutout width
D—27 ^1/4 " wall oven cutout height
E—3" minimum space between wall ovens
AOES3030 Wall Ovens Installed Side-by-Side
Wall oven junction box location indicated in grey.

WARNING
To avoid property damage or personal injury, information in these installation specifications must be followed exactly.
A—2 ^1/2 " minimum from bottom of countertop
B— 14 ^1/8 " maximum from center of cutout
C—24" minimum
D—28 ^1/2 " wall oven cutout width
E— 27 ^1/4 " wall oven cutout height
F— 1^3 / 4 minimum
G— ^7/_8 " minimum from bottom of countertop to top of cutout

Electronic Oven Control
LIGHT— Use to turn light on and off inside oven. Light will automatically turn on when oven door is opened.
TIMER ON/OFF— Use to time any kitchen function or cancel timer.
STOP TIME— Use to set delayed bake and delayed self clean.
CLOCK— Use to set time of day.
OVEN CANCEL— Cancels any cooking or cleaning function.
COOK TIME — Use to set timed or delayed baking.
BAKE— Use to set bake.
BROIL— Use to set broil
CLEAN— Use to set self-clean.
or — Use to select temperature or time.
Special Oven Control Options
Preheat Signal
After setting the oven to cook and selecting a temperature, oven will preheat. When oven reaches set temperature, signal will sound.
End-of-Cycle Signal
When a timed cycle is complete, three long signals will sound. End-of-cycle signal will continue to sound until CANCEL is touched. If TIMER ON/OFF end-of-cycle signal is sounding, touch TIMER ON/OFF.
Child Lockout
This is a safety feature used to prevent children from accidentally programing oven. It disables electronic oven control. Touch and hold BAKE and COOK TIME for 5 seconds. "OFF" will display where the temperature normally appears. To reactivate control, press and hold BAKE and COOK TIME pads for 5 seconds. Child lockout feature must be reset after a power failure.
12-hour Automatic Cancel
This is a safety feature that prevents oven from continuing to operate if it has been left on for over 12 hours. If a cooking function continues longer than 12 hours without any oven control options being touched, this feature turns oven off. Any time an option is touched 12-hour automatic cancel is reset.
Timer Signal
When time elapses, timer beeps 3 times then once every 10 seconds.
Increasing ▲ or ▼ Pad Speed
When setting time and temperature, hold pad to accelerate rate at which numbers increase or decrease.
Self-diagnostic System
Electronic range control has a self-diagnostic system. Self-diagnostic system sounds a series of short, rapid beeps and shows an "F-code" in display when there is a problem.
Quick Reference Instructions
Read "Important Safety Information" before using "Quick Reference Instructions". If there are unanswered questions, refer to detailed sections of this manual.
- Oven cooling fan will come on every time an oven function is selected and may come on during extended oven operation.
- Oven display will blink after disconnection of power or initial start up until clock is reprogrammed.
Setting Clock
-
Press CLOCKpad.
-
Press ▲ or ▽ pad until correct time of day "AM", or "PM" appears in display.
Setting Minute Timer
- Press TIMER ON/OFFpad.
- Press pad until desired amount of time is displayed.
- Timer can be set from 5 seconds to 9 hours and 55 minutes.
- When time elapses timer beeps 3 times then approximately once every 7 seconds.
- Press TIMER ON/OFF to cancel beep for up to 5 minutes, or press TIMER ON/OFF and ▲ or ▼ to return to 0:00.
Canceling Minute Timer
- Press TIMER ON/OFF pad for approximately 5 seconds.
- When canceling minute timer do not press OVEN CANCEL pad. Pressing OVEN CANCEL pad cancels cooking function.
Baking or Broiling
- Press BAKE or BROIL pad.
- Press ▲ or ▽ pad until desired temperature or broiler setting is displayed.
- Oven begins baking or broiling automatically.
Canceling Bake or Broil
Press OVEN CANCEL pad.
Self Cleaning
- Remove oven racks and all utensils from oven. Clean excess spills from oven.
- Press CLEAN pad.
- Press ▲ or ▽ pad to adjust clean time. Clean can be set from 2 to 4 hours. Minimum recommended cleaning time is 3 hours.
- Oven begins cleaning automatically.
Canceling Self-Cleaning Cycle
- Press OVEN CANCEL pad.
- When oven has cooled to a safe temperature, door will unlock.
- When "LOCKED" no longer displays, oven temperature is safe. Do not force door while "LOCKED" displays.
Bake
Open oven door to confirm nothing is stored in oven cavity and set racks to proper height before baking. Preheat before placing food inside oven. Bake element is concealed under the Spillsaver™ oven bottom.
-
Press BAKE pad.
-
Press ▲ or ▼ pad until desired temperature is displayed.
- Temperature begins at 350^ and can be set from 170^ to 550^ in 5^ increments.
- Time of day, temperature, "BAKE", and "ON" display.
- Temperature starts at 100^ and increases in 5^ increments until reaching set temperature. Some minor smoking is normal when using oven for first time. When cook temperature is reached, oven signal sounds.
- Press OVEN CANCEL pad when finished.
- Remove food from oven when cooking time has elapsed. Food left in oven can overcook.
Timed Bake
-
Place food in oven, or preheat oven depending on food item.
-
Press COOK TIME pad.
-
Press ▲ or ▽ pad until desired cook time is displayed. Time can be set up to 11 hours and 50 minutes.
-
Press BAKE pad.
-
Press ▲ or ▽ pad until desired temperature is displayed. Temperature can be set from 170° to 550°F.
- “TIMED”, “BAKE”, will light in display. Oven will begin to bake at preset time and "ON" will light in display. When cooking time has elapsed, end-of-cycle signals 3 times and oven will automatically turn off. End-of-cycle signals every 7 seconds until cancel is pressed.
- To cancel remaining cooking time press OVEN CANCEL pad.
- Food should be removed from oven when cooking time has elapsed. Food left in oven may overcook.
Delayed Bake
- Place food in oven.

Caution
To reduce risk of food poisoning due to bacterial growth and production of toxins, never hold meat, milk, fish or eggs for more than 2 hours before cooking.
-
Press COOK TIME pad.
-
Press ▲ or ▽ pad until desired cooking time appears in display. Time can be set up to 11 hours and 50 minutes.
-
Press STOP TIME pad.
-
Press ▲ or ▼ pad until desired stop time appears in display. Electronic control will calculate start time.
-
Press BAKE pad. 350° will appear in display.
-
Press ▲ or ▽ pad until desired temperature appears in display. Temperature can be set from 170° to 550° F.
- "DELAY", "TIMED", "BAKE", will light in display. Oven will begin to bake at preset time and "ON" will light in display. When cooking time has elapsed, end-of-cycle signals 3 times and oven will automatically turn off. End-of-cycle signals every 7 seconds until OVEN CANCEL pad is pressed.
- When finished press OVEN CANCEL pad.
- To cancel remaining cooking time press OVEN CANCEL pad.
- Food should be removed from oven when cooking time has elapsed. Food left in oven may overcook.
Broiling
- Oven door must be closed while broiling.
- Remove excess fat from meat before broiling. Cut edges of meat to prevent curling.
- Place food on a cold ungreased broiling pan. If pan is hot, food sticks.
- All food should be turned at least one time, except fish. Begin broiling with skin side down.
- Season meat after it has browned.
- Broiling does not require preheating.
- Begin cooking using suggested rack levels. See "Broiling Guide" section to test broiler results. If food is not brown enough, cook on a higher rack position. If food is too brown, cook on a lower rack position.

WARNING
- To avoid risk of fire, do not line broiler grid with foil. Foil may trap grease on top of grid, close to element, causing a fire.
-
Never leave oven unattended while broiling. Overcooking may result in a fire.
-
Center food on broiling grid and pan, place in oven.
- Oven door must be closed while broiling.
- Press BROIL pad.
- "BROIL", and "---" displays.
- Press or until desired setting is displayed. Broil can be set from 170^ F to HI.
- Oven will begin to broil automatically. "ON", "BROIL", and the selected setting will be displayed.
- When finished press OVEN CANCEL pad.
Self-Cleaning

WARNING
To avoid risk of fire, clean excess spills from oven interior.
- A small amount of smoke is normal when cleaning. Excessive smoke may indicate too much food residue has been left in oven or a faulty gasket.
- Clean oven before it gets too dirty. Wipe up large spills before self-cleaning.
- Do not use cleaning cycle if oven light cover is not properly in place.
-
Oven light will not work during clean cycle.
-
Remove oven racks and all cooking utensils from oven. Clean excess spills from oven interior.
- Press CLEANpad.
- Press ▲ or ▼ pad until desired cleaning time is displayed. Clean can be set from 2 to 4 hours. Recommended clean time is 3 hours.
- Oven will begin to clean automatically. "CLEAN", "LOCK", and "ON" will light in display. As oven door locks and unlocks "LOCK" will flash in display. When door is locked, "LOCK" will remain in display. When cleaning cycle has elapsed, oven will automatically turn off. End-of-cycle signal will not sound.

CAUTION
To avoid risk of personal injury, do not touch oven vents or areas around vents during self-cleaning. These areas can become hot enough to cause burns.
To avoid risk of damage to automatic locking system, do not try to force oven door open when "LOCK" is flashing in display.
- When oven has cooled to a safe temperature, "LOCK" will disappear from display and door can be opened. "LOCK" will flash in display while unlocking.
Interrupt Self-Cleaning Cycle
- Press OVEN CANCEL pad.
- When oven has cooled to a safe temperature, door will unlock and can be opened.
Delayed Self-Cleaning
- Remove oven racks and all cooking utensils from oven. Clean excess spills from oven interior.
- Press CLEAN pad.
- Press + or - until desired cleaning time is displayed.
- Press STOP TIME pad.
- Press △ or ▽ until desired stopping time is displayed. A starting time will automatically be calculated based on amount of cleaning time and stop time.
- "DELAY", "CLEAN", and "LOCK" will light in display. As oven door locks and unlocks "LOCK" will flash in display. Oven will begin to clean at preset time and "ON" will light in display. When cycle is complete oven will automatically turn off.

CAUTION
To avoid risk of personal injury, do not touch oven vents or areas around vents during self-cleaning. These areas can become hot enough to cause burns.
To avoid risk of damage to automatic locking system, do not try to force oven door open when "LOCK" is flashing in display.
- When oven has cooled to safe temperature, "LOCK" will disappear from display and door can be opened.
Interrupt Self-Cleaning Cycle
- Press OVEN CANCEL pad.
- When oven has cooled to a safe temperature, "LOCK" will disappear from display and door can be opened.
Dehydration Tips
Fruits
• Always start with fresh fruit.
- Cut fruit in equal pieces approximately ^1/8 " thick. Thinner pieces will dry quicker.
- Fruits need to be dipped into an antioxidant, a color-keeping preservative, or two parts water and one part lemon juice. Treating fruit with an antioxidant will help retain vitamins, color and flavor.
Vegetables
Most vegetables require blanching to inactivate enzymes.
Herbs and Spices
• Herbs and spices dry quickly.
- Check every 30 minutes to avoid over-drying.
- When drying herbs, leaf clusters should be separated from stems.
Adjusting Oven Temperature
Oven temperature has been factory calibrated and tested. In unlikely event that oven consistently overcooks or undercooks food, oven temperature can be adjusted.
- Press BAKE pad.
- Press ⚠️ until an oven temperature greater than 500^ F shows in display.
- Immediately press and hold BAKE pad until "00" appears in display, approximately 5 seconds.
- To decrease oven temperature (for cooler oven), press ∇ until negative numbers appear. Oven can be adjusted from 05° to 35° lower. To avoid over-adjusting oven move temperature -5° each time.
- To increase oven temperature (for a warmer oven) press _+ until positive number appear. Oven can be set from 05^ to 35^ higher. To avoid overadjusting oven, move temperature 5^ each time.
- Press OVEN CANCEL pad. Temperature adjustment will be retained even through a power failure.
Service Tones and Codes
Electronic range control has a self-diagnostic system.
Self-diagnostic system sounds a series of short, rapid beeps and shows an "F-code" in display when there is a problem. When electronic range control signals a problem, follow steps listed below.
- Record "F-code" shown.
• F1—control malfunction.
• F2—high oven temperature.
- F3—open temperature sensor or circuit malfunction.
• F4—shorted temperature sensor or circuit malfunction.
• F7—pad malfunction.
- F9—door lock or lock circuit malfunction.
- FF—door circuit malfunction during clean-cycle.
- "DOOR"—door circuit malfunction or oven door not completely closed.
- Disconnect electrical supply.
- Pressing OVEN CANCEL pad or disconnecting electrical supply may eliminate "F-code". If failure continues, contact an authorized servicer.
- Contact an authorized servicer to check range.
Cooking Guide
Follow these recommendations only as a guide for times and temperature. Times, rack position, and temperatures may vary depending on conditions and food type. For best results, always check food at minimum time. When roasting, choose rack position based on size of food item.
Oven Rack Placement
Position oven rack before turning oven on.
- Pull rack forward to stop position.
- Raise front edge of rack and pull until rack is out of oven.
- Place rack in new rack position.
- Curved edge of rack must be toward rear of oven.
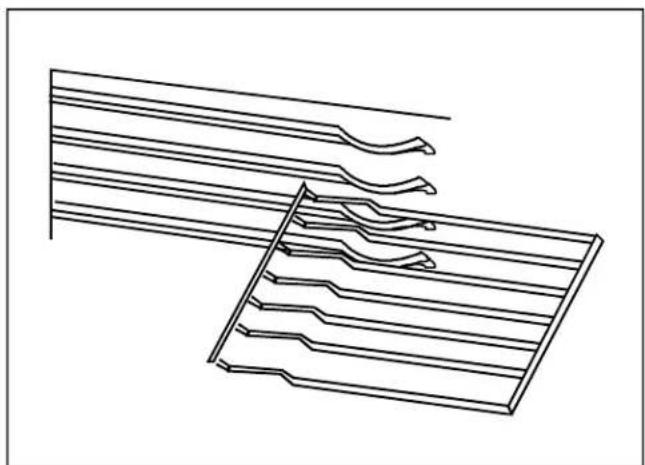
natural_image
Pure technical line drawing of layered structure with wavy and straight lines, no text or symbols presentPan Placement
- Keep pans and cookie sheets 2 inches from oven walls.
- Stagger pans placed on different racks so one is not directly over the other.

natural_image
Two identical rectangular grids with four circular holes, no text or symbols presentBroiling Pan
Oven includes a broiler pan. Foods must be turned at least once during cooking except fish.

natural_image
Line drawing of a rectangular container with vertical fins, placed on a grid-lined rack (no text or symbols)Oven Operation
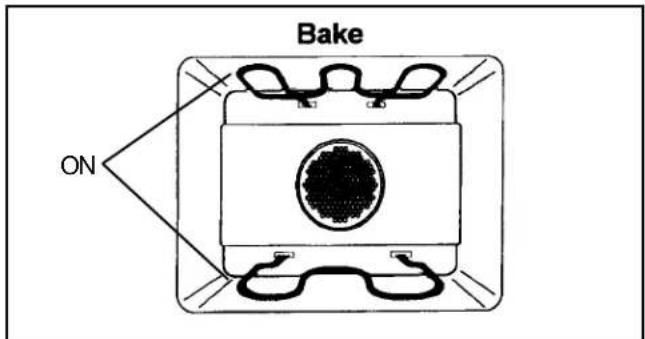
Bake
Top and bottom elements operate during bake. Bake can be used to cook foods which are normally baked. Oven must be preheated.
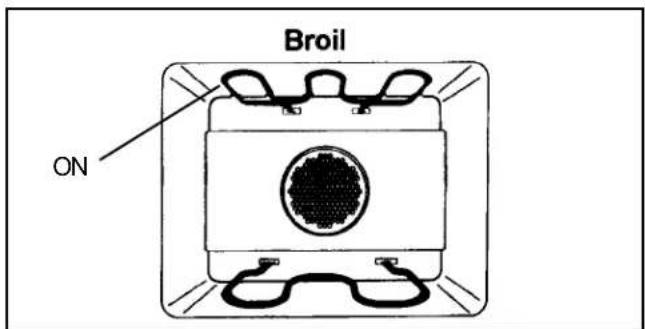
Broil
Top element operates during broil. Broil can be used to cook foods which are normally broiled. Preheating is not required when using broil. All foods should be turned at least once except fish, which does not need to be turned.
Baking Chart
Follow these recommendations only as a guide for times and temperature. Times, rack position, and temperatures may vary depending on conditions and food type. For best results, always check food at minimum time.
| Food Oven temperature | (°Fahrenheit). | Cooking time(Minutes) |
| Yeast Rolls 375 25–30 | ||
| Baking Powder Biscuits 450 10–12 | ||
| Muffins 400 20–25 | ||
| Popovers in Muffin Cup 450 20–25 | ||
| Nut Bread 350 55–65 | ||
| Corn Bread 400 5–30 | ||
| Rolled Cookies 375–400 8–12 | ||
| Drop Cookies 375 8–10 | ||
| Sliced Cookies 350 7–9 | ||
| Brownies 350 30–35 | ||
| Pastry Pie Shells 350 8–10 | ||
| Graham Cracker Pie Shell 350 10–12 | ||
| Berry Pie 425 35–45 | ||
| Apple Pie 425 40–50 | ||
| 8" Layer Cake | 350 35–40 | |
| 9" Layer Cake | 350 30–35 | |
| Cup Cakes | 350 20–25 | |
| Loaf Cakes 350 65–70 | ||
| Angel Food Cake | 350 40–50 |
Poultry Oven Roasting Chart
Follow these recommendations only as a guide for times and temperature. Times, rack position, and temperatures may vary depending on conditions and food type. For best results, always check food at minimum time.
| Food | Oven temperature (°Fahrenheit). | Cooking time (Hours) |
| Whole Chicken (4 lbs to 5 lbs) | 375 | 1 12-1 34 |
| Whole Chicken (Over 5 lbs) | 375 | 1 34-2 |
| Turkey (6 lbs to 8 lbs) | 325 | 3 12-4 |
| Turkey (8 lbs to 12 lbs) 325 | 4-4 12 | |
| Turkey (12 lbs to 16 lbs) | 325 | 5 12 |
| Turkey (16 lbs to 20 lbs) | 325 | 5 12-7 |
| Turkey 20 lbs to 22 lbs) | 325 | 7-8 12 |
| Duck (3 lbs to 5 lbs) | 325 | 1 12-2 |
Beef and Pork Oven Roasting Chart
Follow these recommendations only as a guide for times and temperature. Times, rack position, and temperatures may vary depending on conditions and food type. For best results, always check food at minimum time.
| Food Oven Temperature | (°Fahrenheit) | Cooking time(minutes per pound) |
| Beef Roast (Rare) 325 20–25 | ||
| Beef Roast (Medium) 325 26–30 | ||
| Beef Roast (Well) 325 33–35 | ||
| Rolled Roast (Rare) 325 32–36 | ||
| Rolled Roast (Medium) 325 36–40 | ||
| Rolled Roast (Well) 325 43–45 | ||
| Fresh Whole Ham 325 22–28 | ||
| Pork Loin 325 35–40 | ||
| Pork Shoulder, Butt 325 40–45 | ||
| Pork Picnic Shoulder 325 35–40 | ||
| Mild Cured Ham Picnic, Shoulder 350 30–35 |
Broiling Chart
Follow these recommendations only as a guide for times and temperature. Times, rack position, and temperatures may vary depending on conditions and food type. For best results, always check food at minimum time.
| Food Thickness | (Doneness) | Rack position(1=Highest 6=Lowest) | Cooking time(Minutes) |
| Beef Steak | 1" (med.) | 3 | 14–16 |
| Beef Steak | 1" (well) | 3 | 23 |
| Beef Steak | 112" (med.) | 3 | 23–28 |
| Beef Steak | 112" (well) | 3 | 33 |
| Beef ground | ( 34" to 1") | 4 | 12–17 |
| Fish Fillets and Steaks | 4 | 15–20 | |
| Pork Chops or Steak | 1" | 3 | 15–16 |
| Pork Chops or Steak | 112" 3 | 23–28 | |
| Bacon | 4 | 12–17 | |
| Ham Slice (pre-cooked) | 12" 3 | 20–25 | |
| Ham Slice (pre-cooked) | 1" | 3 | 25–30 |
Slo-Cook™ Instructions and Cooking Guide for Wall Oven
Slo-Cook™ Programming Instructions
Open oven door to confirm nothing is stored in oven cavity and set racks to proper height before slo-cooking. Bake element is concealed under the Spillsaver™ oven bottom.
-
Press BAKE pad.
-
Press ▼ pad until 250^ is displayed.
- Temperature is set in 5^ degree increments.
- Time of day, temperature, "PRE-BAKE", and "ON" display.
- Temperature starts at 170^ and increases in 5^ increments until reaching set temperature. Some minor smoking is normal when using oven for first time. When temperature is reached, oven signal sounds for approximately 1 second.
- Press OVEN CANCEL pad when finished.
- Remove food from oven when cooking time has elapsed. Food left in oven can overcook.
Slo-Cook™ Roasting Rack
Oven includes a Slo-Cook ^™ roasting rack. This rack should be placed in pan or roaster. Slo-Cook ^™ roasting rack elevates food keeping it out of grease and fat.
Facts and Hints to Remember
-
Covered dishes generally cook more evenly and retain moisture.
-
Foods have better flavor cooked at low temperature and are more tender.
-
Meats cooked on low temperature shrink less and are more tender, thus allowing less use of expensive cuts of meat.
-
Food flavors do not mix when cooked in the oven in separate, covered dishes.
-
You have a standard oven cavity for cooking, allowing you six rack positions.
-
You can Slo-Cook ^™ a complete meal in 6 to 10 hours using the same oven-proof glass or stoneware for mixing, cooking, and serving.
-
No preheating of oven necessary.
-
Spices are enhanced when slo-cooked.
-
Liquids do not boil away. Generally there will be more liquid at the end of cooking.
-
Stirring is not necessary. Valuable heat loss will occur when oven door is opened for stirring.
-
Meats may be placed on slo-cook roasting rack to avoid saturation of juices and to obtain better color.
-
It is important not to open door of oven during Slo-Cook ^™ , as heat loss will occur. Heat loss will make a difference in length of cooking time.
-
Time for slo-cooking meat will vary depending on distribution and amount of fat, bone, weight, and shape. With slo-cook you have less shrinkage of meat.
-
Dairy products such as milk, cheese, sour cream and condensed cream soups have a tendency to separate and break down.
-
Fresh vegetables in slo-cooking tend to discolor or turn dark. Discoloration can be avoided by using frozen or blanched vegetables.
Suggested Dish Arrangements
- Determine rack level by dish size and amount of food.
- Covered dishes retain moisture better than uncovered dishes.
- Casserole items with bread or cracker topping should be left uncovered to prevent soggy topping.
- Roast should not be covered so a rich browness can be obtained.
- Wrap food items like baking potatoes and corn on the cob in foil.
- In the Slo-Cook ^™ oven, one-dish items such as a casserole require adding a separate dish with water. This is important as it prevents overcooking of food.
Main Dish Recipes
Beef Stew
8 to 10 hours
2 lbs. Beef (cut into 1½" cubes)
3 Potatoes large
4 Carrots medium
2 Onions medium
12 oz. V-8 Juice
1 teaspoon Worcestershire sauce
1 Clove garlic
1 Bay leaf
1- 12 teaspoon salt
1 teaspoon sugar
12 teaspoon pepper
2 tablespoons Tapioca
Cut beef in 1½" cubes; peel and quarter potatoes; scrap or peel carrots and cut in thick slices or chunks; peel onions and quarter.
Put all ingredients in a deep cooking container or 3 qt. ovenproof casserole dish in order listed.
Mix seasonings with V-8 juice and pour over main ingredients. Stir just enough to mix. Cover and Slo-
Cook ^™ 8 to 10 hours in center of rack at the lowest rack 24 level.
Chili Con Carne
8 to 10 hours
2 lbs. Ground Beef
2 cans (15½ oz.) Red Kidney Beans
1 can (32 oz.) Tomato Juice
1 large onion chopped
1 Clove garlic crushed
1 oz. Chili Powder or season to taste
1 tablespoon Vinegar
In a large skillet add ground beef and brown over medium heat. Separate into small pieces with a fork or spoon.
Drain. Put browned ground beef in large ovenproof container for Slo-Cooking. Add other ingredients and mix well. Cover and Slo-Cook ^™ 8 to 10 hours in center of rack at the lowest rack level.
Beef Pot Roast With Vegetables
8 to 10 hours
3 lbs. Beef Chuck Roast
6 Carrots
4 Potatoes
3 Medium Onions
2-6 oz. cans V-8 Juice
1 teaspoon Worcestershire sauce
1 Clove garlic crushed
1 Bay leaf
1- 12 teaspoon salt
1 teaspoon sugar
12 teaspoon pepper
2 tablespoons Tapioca
Prepare carrots, potatoes, and onions by peeling and cutting into chunks. Put these ingredients in large ovenproof dish.
Add seasonings to the V-8 juice and mix or shake thoroughly (a shaker can be made by using a small jar with a lid). Pour over meat and vegetables. Cover and Slo-Cook™ 8 to 10 hours in center of oven rack at the lowest rack level.
Sausage and Rice Casserole
4 to 5 hours
1 lb. mild Sausage
1 Onion chopped
1 Bell Pepper chopped
1 cup Rice (pre-cooked or quick cooking)
1 jar (4 oz.) Pimento
1 cup grated sharp Cheese
1 can Cream of Chicken Soup
1 can Cream of Mushroom Soup
Break or cut sausage into small pieces and brown in skillet. Drain. Put drained sausage and the other ingredients listed into a large bowl for stirring. After stir-mixing put into a 2 qt. ovenproof casserole dish. Cover and place in center of rack in third rack level from the bottom. On the lowest rack level put a water load of 5 cups cold faucet water in an ovenproof dish. Do not cover water load. Slo-Cook™ 4 to 5 hours.
Cover casserole and place in center of rack in third rack level from the bottom. Add additional water load.
Chicken and Dressing
8 to 10 hours
Chicken
3 to 3½ lbs. Chicken
Salt
Pepper
Vegetable Oil
Paprika
Salt and pepper to taste cavity of chicken. Rub chicken with vegetable oil on the outside and sprinkle with paprika. Place on meat rack breast up in 3 qt. casserole dish. Cover and Slo-Cook™ on second rack level position from the bottom.
Dressing
1 pkg. 8 oz. Herb stuffing mix
12 cup water
14 lb. oleo or butter
1 egg beaten
14 cup chopped celery
14 cup chopped onion
1 jar 2- 12 oz. chopped mushrooms
Heat water and melt butter in hot water. Add herb stuffing mix and the other ingredients. Mix ingredients just enough to blend. Spread evenly in an 8 x 8 x 2 ovenproof dish. Cover with aluminum foil and place beside chicken on the oven rack in second rack level position from the bottom. Do not add additional food to oven. Do not stuff cavity of chicken.
Sherried Chicken and Wild Rice
4 to 5 hours
Sherried Chicken
6 Chicken breast skinned
1 package Onion soup mix
Salt and pepper to taste
1 can 4 oz. sliced mushrooms retain half the liquid
^3/_4 cup Cooking Sherry
Butter or margarine
Line an ovenproof dish with aluminum foil. (Use enough foil so that you will be able to fold foil for making a sealed package). Sprinkle onion soup mix on foil. Place chicken breast on top of the onion soup. Salt and pepper to taste and dot chicken with butter. Pour sherry and sliced mushrooms with liquid over the chicken breast.
Fold foil to make a tightly sealed package so steam will not escape.
Baked Wild Rice
1 cup long grain and wild rice mixed
2½ cups water
3 tablespoons butter
12 teaspoon salt
Put all ingredients in buttered 1½ quart ovenproof dish. Stir. Cover dish with aluminum foil. Slo-Cook™ beside the sherried chicken on the lowest oven rack level.
Chicken Cacciatore
6 to 7 hours
3 lbs. Chicken, cut in pieces
1 Onion, slice thin
1 can 8 oz. Tomato Sauce
1 teaspoon Oregano
1 teaspoon Celery Salt
14 cup White Cooking Wine
2 cloves Garlic, minced
12 teaspoon Basil
12 teaspoon Pepper
1 can 28 oz. Tomatoes
3 tablespoons Vegetable Oil
Heat vegetable oil in skillet, lightly brown chicken pieces. After browning, place chicken pieces in a deep ovenproof dish and arrange onion slices on top. Combine the other ingredients and pour over the chicken and onion slices. Cover and Slo-Cook ^™ 6 to 7 hours on the lowest oven rack level.
Serve over hot buttered spaghetti or noodles.
Italian Spaghetti Sauce
7 to 9 hours
2 lbs. Ground Beef
1 large Onion chopped
4 cloves Garlic, minced
2 cans (4 oz.) sliced Mushrooms with liquid
14 cup chopped Parsley
2 cans (28 oz.) Tomatoes
4 cans (8 oz.) seasoned Tomato Sauce
2 cans (6 oz.) Tomato Paste
1 tablespoon Oregano
2 teaspoons Salt
12 teaspoon Thyme
12 teaspoon Pepper
2 Bay leaves, crumbled
2 cups Water
1 tablespoon sugar added to sauce after cooking.
In a large skillet lightly brown ground beef, onion and garlic. Drain. In a large deep ovenproof casserole dish add mushrooms including liquid and all other ingredients except the sugar. Add sugar after cooking has been completed. Cover and Slo-Cook™ 7 to 9 hours on lowest oven rack level. Serve over spaghetti.
Braised Short Ribs
7 to 9 hours
3 lbs. Beef Short Ribs
12 cup Flour
1 teaspoon Salt
12 teaspoon Pepper
2 tablespoons Vegetable Oil
12 teaspoon Ground Allspice
2 Onions, sliced thin
1 Bay leaf
Mix flour, salt and pepper and coat beef ribs. Heat vegetable oil in skillet and brown flour coated ribs. Place ribs on meat rack in ovenproof dish. Sprinkle ground allspice over short ribs, place sliced onion on ribs and crumble bay leaf over top. Cover and Slo-Cook™ 7 to 9 hours on second oven rack level from the bottom.
Chuck Roast Stroganoff
7 to 8 hours
3 lbs. Chuck Roast
1 tablespoon Vegetable Oil
1 cup hot Water
1 Beef Bouillon cube
12 cup Catsup
1 tablespoon Worcestershire Sauce
4 oz. sliced Mushrooms, drained
1 medium Onion, chopped
1- 12 teaspoons Salt
14 teaspoon Caraway Seed
2 tablespoons Butter or Margarine
2 tablespoons Flour
1 carton 8 oz. Sour Cream
Heat vegetable oil in skillet and brown chuck roast. Dissolve bouillon cube in 1 cup hot water and pour into a deep ovenproof dish. Add other ingredients except butter, flour, and sour cream. Place browned chuck roast in dish with combined ingredients. Cover and Slo-Cook ^™ on lowest oven rack level 7 to 8 hours. After cooking, remove roast from the juices. Keep roast warm.
In a saucepan, melt butter, add flour, and 12 cup juices from the cooked roast. Mix these ingredients until blended. Stir in sour cream. Put these blended ingredients into the remaining juices of the roast. Stir well. Pour this sauce over the cooked chuck roast.
Swedish Meat Balls
3½ to 4 hours
1 cup Milk
1½ cups Bread crumbs
2 lbs. lean Ground Beef
2 eggs, beaten
1 Onion, medium, finely chopped
1 12 teaspoon Salt
^1/_8 teaspoon Allspice
^1/_8 teaspoon Nutmeg
^1/_8 teaspoon Pepper
2 tablespoons Vegetable Oil
^3/_4 teaspoon Dill Seed
1 can 10 ^3 / _4 oz. Beef Broth
If desired add 14 cup chopped mushrooms to broth
Add bread crumbs to milk and let stand 4 minutes.
Combine crumb mixture with meat, eggs, onions, salt, pepper, allspice, and nutmeg. Shape into meat balls.
Heat vegetable oil in skillet and brown meat balls. After browning, place meat balls into an ovenproof dish.
Sprinkle with dill seed. Add beef broth and mushrooms.
Cover and Slo-Cook ^™ 3½ to 4 hours on lowest oven rack level.
Brown Bagged Barbecue Chicken
3½ to 4 hours
3 lbs. Chicken, cut into pieces
1 brown medium size grocery sack or bag
1 tablespoon Vegetable Oil or Shortening
Barbecue Sauce
2 teaspoons Catsup
2 teaspoons White Vinegar
2 teaspoons Butter or Margarine, melted
2 teaspoons Worcestershire sauce
4 teaspoons Water
2 teaspoons Lemon Juice
1 teaspoon prepared Mustard
1 teaspoon Paprika
1 teaspoon Chili Powder
Salt
Pepper To Taste
Salt and pepper chicken pieces to taste. Combine barbecue sauce ingredients for making a sauce. Grease inside of brown grocery bag with vegetable oil or shortening. Dip each chicken piece in the barbecue sauce. Put chicken pieces in bag and squeeze or fold top of bag so ingredients can be held in bag. Place bag of chicken in flat ovenproof dish. Slo-Cook™ 3½ to 4 hours on third oven rack level position from the bottom.
Slo-Cook™ Menu Meals
Chuck Roast, Green Beans, Baked Potatoes
8 to 10 hours
Chuck Roast
3 lb. Beef Chuck Roast
Vegetable Oil small amount cover bottom of skillet
Flour
Salt Season to taste
Pepper
14 cup Water
1 Onion medium
Coat chuck roast with flour that has been seasoned with salt and pepper to taste. Add small amount of cooking oil to skillet. When oil is hot sear each side of roast until desired browning is obtained. Place roast in 1312 × 912 × 212 -inch dish, add 14 cup water. Slice onion over top of roast. Cover. Cook on lowest oven rack level.
Green Beans
1- 12 to 2 lbs. Green Beans
*Frozen or blanched Green Beans retain better color when Slo-Cooked
1 slice Bacon uncooked
12 teaspoon salt
12 cup liquid (water)
Put beans in 2 qt. casserole dish. Add 12 teaspoon salt. Place uncooked bacon slice on top of beans. Add 12 cup water. Cover and Slo-Cook™ on lowest oven rack level.
Baked Potatoes
4 to 6 medium baking potatoes. Pierce each potato one time with knife and wrap each potato tightly in foil. Slo-Cook™ on lowest oven rack level.
Swiss Steak, New Potatoes, Chocolate Chip Brownies
7 to 9 hours
Swiss Steak
2 lbs. Round Steak 34 " thick
1 Onion, large, sliced thin
1 can 15½ oz. Tomatoes
14 teaspoon Salt
^1/_8 teaspoon Pepper
Trim fat on steak. Cut into serving pieces. Place flat in ovenproof dish. Salt and pepper. Arrange thin slices over steak. Pour tomatoes over top. Cover and Slo-Cook™ 7 to 9 hours on lowest oven rack level.
\*New Potatoes
1 pkg. 1 lb. 4 oz. New Frozen Potatoes
*Fresh potatoes Slo-Cooked have a tendency to turn dark.
12 teaspoon Salt
4 tablespoons or 12 stick Butter or Oleo
1 cup Water
Put new frozen potatoes in a 1- 12 qt. dish. Add salt, oleo, and water. Cover and Slo-Cook ^™ on lowest oven rack
27 level. After cooking, garnish with parsley flakes.
Chocolate Chip Brownies
1 Double Fudge Brownie Mix 15½ oz.
14 cup Cooking Oil
1 Egg
2 tablespoons Water
12 cup Chocolate Chips
12 cup chopped Walnuts
Mix first 4 ingredients in small bowl for 2 minutes. Add chocolate chips and nuts. Mix. Pour into buttered and floured 8" x 8" baking dish. Cover with aluminum foil. Slo-Cook™ on top oven rack level.
Barbecued Country Ribs, Baked Beans, Peanut Delight Bars
8 to 10 hours
Barbecued Country Ribs
3 to 4 lbs. Country style or thick cut Spareribs
14 teaspoon Salt
14 teaspoon Pepper
^3/_4 cup Barbecue Sauce
Place ribs on slo-cook roasting rack in 3 quart baking dish. Add salt and pepper. Pour barbecue sauce over meat. Cover. Slo-Cook ^™ on lowest oven rack level.
Baked Beans
1 can 31 oz. Pork and Beans
1 Onion, medium, grated
3 tablespoons Brown Sugar
1 tablespoon prepared Mustard
1 tablespoon Molasses
3 slices Bacon - uncooked
Cut bacon slices in 1-inch pieces. Add all ingredients and stir together well. Slo-Cook ^™ uncovered on lowest oven rack level.
Peanut Delight Bars
1 jar (12 oz.) crunchy Peanut Butter
1 can (15 oz.) sweetened Condensed Milk
2 Eggs
1- 12 teaspoons Vanilla Extract
1 pkg. (13-½ oz.) Graham Cracker Crumbs
1 cup dry roasted or other type whole Peanuts
Combine crunchy peanut butter, condensed milk, eggs, and vanilla. Stir these ingredients with a spoon until smooth.
Blend graham cracker crumbs. Mixture will be stiff. Pat evenly into a greased dish.
Sprinkle peanuts evenly over top. Pat down firmly into dough. Leave uncovered.
Slo-Cook™ on top oven rack level.
After cooking the top may be glazed. Make glaze by mixing together 1 cup confectioners sugar, 2 tablespoons hot water, and 12 teaspoon vanilla extract.
Stuffed Bell Peppers, Squash Supreme Casserole, French Apple Pie
6 to 7 hours
Stuffed Bell Peppers
4 Bell Peppers - medium
1 lb. Ground Beef
1 Egg
12 cup precooked Rice or (quick cooking rice)
1 can 7 oz. whole kernel Corn
1 can 8 oz. Tomato Sauce
1 teaspoon Salt
^1/_8 teaspoon Pepper
Cut bell peppers in half (lengthwise) remove core and seeds. Mix other ingredients together well. Fill each bell pepper half with stuffing and place on slo-cook raosting rack placed inside a dish. Cover and Slo-Cook™ on second oven rack level from the bottom.
Squash Supreme Casserole
2 cups Herb Stuffing
4 cups Yellow Squash (cooked and mashed)
12 cup Carrots (cook whole, cool and grate)
1 carton Sour Cream
2 tablespoons Sautéed Onions in 3 tablespoons Butter or Oleo
1 can Condensed Cream of Chicken Soup
Place 1 cup herb stuffing in a long flat ovenproof dish.
Mix squash, carrots, sour cream, onions, and soup. Pour over herb stuffing. Put another cup of herb stuffing on top as a dressing. Slo-Cook™ uncovered on second oven rack level from the bottom.
French Apple Pie
1 9" frozen Pie Crust
1 can 20 oz. sliced Apples
^3/_4 cup Sugar
14 cup All-Purpose Flour
^3/_4 teaspoon Cinnamon
1 tablespoon Lemon Juice
Topping:
^3/_4 cup unsifted All-Purpose Flour
^1/_3 cup packed Brown Sugar
^1/_3 cup Butter or Oleo
Combine apples, sugar, flour, cinnamon, and lemon juice. Pile into uncooked pastry lined pan.
Combine flour and brown sugar in mixing bowl; cut in butter until crumbly, spoon over apples making sure all apples are covered. Slo-Cook™ on top oven rack position.
Meat Loaf, Corn on the Cob, Green Bean Casserole
6 to 7 hours
Meat Loaf
2 lbs. Hamburger
1 cup Bread Crumbs
1 Egg
14 cup Catsup
14 cup Milk
1 pkg. Onion Soup Mix
1 teaspoon Salt
14 teaspoon Pepper
Combine all ingredients and mix well. Place into an ovenproof oblong loaf pan and Slo-Cook™ uncovered in the center of rack at the lowest oven rack level.
Corn on the Cob
- Fresh corn on the cob has a tendency to turn dark when Slo-Cooked.
- Frozen corn on the cob retains color because of previous blanching process.
Wrap 4 to 6 ears of corn on the cob individually in aluminum foil and place on second oven rack level from the top.
Green Bean Casserole
1 can (16 oz.) French Style Green Beans
1 can (16 oz.) French Style Seasoned Green Beans
1 teaspoon Salt
^1/_8 teaspoon Pepper
1 can 10 ^3 / _4 oz. Condensed Cream of Mushroom Soup
1 can 3 oz. French Fried Onion Rings
Combine all ingredients except onion rings - Stir lightly to mix. Place in 2 quart casserole dish and sprinkle onion rings evenly over the top. Slo-Cook™ uncovered on second oven rack level from the top.
Pork Chops, Mixed Vegetables, Cheese Potatoes
6 to 7 hours
Pork Chops
6 Pork Chops, cut 1" thick
Salt to Taste
Pepper
1 package Shake and Bake or
14 cup Milk
1 cup fine Cracker Crumbs
Salt and pepper pork chops to taste. Coat with Shake and Bake and place on slo-cook roasting rack in ovenproof dish. Cover and Slo-Cook™ 6 to 7 hours.
or
If you choose to coat with cracker crumbs, dip pork chops individually in milk, salt and pepper, and coat with fine cracker crumbs. Place on slo-cook raosting rack in ovenproof dish. Cover and Slo-Cook™ 6 to 7 hours on second oven rack position from the bottom.
Mixed Vegetables
Fresh vegetables Slo-Cooked have a tendency to slightly discolor. Frozen pre-packaged vegetables produce more desirable results.
Place 12 to 16 oz. mixed frozen vegetables in small ovenproof dish, add 12 cup water and 1 teaspoon salt. Cover and Slo-Cook ^TM with other oven load items on third oven rack position from the bottom.
Cheese Potatoes
Frozen new potatoes produce more desirable results.
20 oz. New Frozen Potatoes
12 cup Frozen Chopped Onion
4 oz. Cheese Whiz
Combine ingredients in small ovenproof dish. Cover and Slo-Cook™ with other oven load items on third oven rack position from the bottom.
Cleaning Oven Parts
| Oven Part Cleaning Materials General Directions | |
| Broil elements Do not clean broil element. An | y soil willburn off during cooking. |
| Broiler pan and grid Soap and a nonabrasive plastic scouring pad and water | Drain fat, cool pan and grid slightly. (Do not let soiled pan and grid stand in oven to cool.) Sprinkle with soap. Fill the pan with warm water. Let pan and and grid stand for a few minutes. Wash and scour if necessary. Rinse and dry. Broiler pan and grid may also be cleaned in the dishwasher. |
| Interior oven door outside door gasket | Soap and water Cool before cleaning g. Frequent wiping with mild soap and water will prolong the time between major cleanings. Be sure to rinse thoroughly. For extra dried on soil a mild abrasive can be used. Never use strong abrasives, gritty cleaners, commercial oven cleaners or steel wool. |
| Oven door gasket Do not clean Gaskets should not be cleaned. Care should be taken not to wet or rub the gasket. | |
| Oven racks Soap and water For heavy soil, clean by hand and rinse thoroughly. Remove oven racks for ease in cleaning. | |
| Outside of oven Soap and Water Wash all glass with cloth dampened in soapy water. Rinse and polish with a dry cloth. Do not use cleaning products containing ammonia. | |
Removing Oven Door

CAUTION
To avoid personal injury or property damage, handle oven door with care. Door is heavy and can be damaged if dropped.
Do not place hands in hinge area when door is removed. Hinge can snap closed and pinch your hands.
Door contains tempered glass. If glass is scratched, chipped, impacted or twisted it may break suddenly. If door glass appears damaged it should be replaced immediately.
Oven door can be removed for ease in cleaning large spills.
- Open door to first stop.
- Remove screws in door liner.
- Grasp door firmly on each side and lift upward off hinges. Do not push hinges closed once oven door is removed.
Replacing Oven Door
- Make sure hinges are open to first stop position. If hinges have been accidentally closed, carefully pull them open to first stop. Align door with hinge arms.
- Slide door down and into place. Be sure door is completely down on hinges.
- Replace screws in door liner.
Replacing Oven Light
Protective gloves must be worn when changing light bulb.
- Disconnect electrical supply by turning off power at fuse box.
- Remove oven door.
- Remove light cover by inserting a screwdriver, blade end covered in masking tape, into slot at front of lens cover and prying lens cover downward.
- Unscrew bulb from receptacle.
- Replacement bulbs are available through your local Amana service or parts center.
Problem Solving
Oven Light Is Not Working
- Check bulb for loose fit. Tighten if loose.
- Check for burned out bulb. Replace with 25-watt appliance bulb if burned out.
Oven Not Heating
- Check circuit breaker and power supply connection.
- Confirm oven was programmed correctly.
Self-Clean Cycle Is Not Working
- Confirm door is fully closed.
- Confirm oven is not programmed for delayed self-clean.
Oven Element Cycles On and Off During Use
- Normal operation.
Oven Temperature Is Not Accurate
- Do not measure temperature with regular thermometer. Special equipment is required for accurate calibration.
- Check for blocked air vents.
- Use correct utensils. Aluminum foil can alter oven temperature.
- Adjust oven temperature. See "Adjusting Oven Thermostat Temperature."
Common Questions
Should oven maintain a constant temperature on an oven thermometer?
- To maintain a temperature for baking, the oven cycles on and off. The temperature may vary 20^ to 25^ higher or lower than oven temperature set on the control.
Is there a problem if the oven smokes the first few times it is turned on?
- Some minor smoking is normal when using the oven the first few times.
Should there be an odor or smoke while self-cleaning the oven?
- There may be some smoke and odor during the first few cleaning cycles. If there is excessive smoke or odor, too much soil remains in the bottom of the oven. If the oven smokes excessively, turn off the oven, wait for the oven to cool and wipe away excess soil.
Can timer be used during automatic cooking?
- Timer can be used any time. The timer functions independently from the oven cooking functions. Always cancel the timer using MIN. TIMER ON/CANCEL pad to avoid canceling cooking function.
Índice
A. 36"
B. 23 1/2" mínimo
natural_image
Pure technical line drawing of a structural component with parallel grooves and slats (no text or symbols)natural_image
Simple line drawing of two rectangular grids with four circular holes, no text or symbols present.natural_image
Line drawing of a rectangular container with vertical fins placed on a grid base (no text or symbols)A. 36 po
B. 23 12 po minimum
natural_image
Pure technical line drawing of layered structure with wavy elements, no text or symbols presentPlacement des plats
natural_image
Two identical rectangular grids with four circular holes, no text or symbols presentLèchefrite
natural_image
Line drawing of a rectangular container with vertical fins, placed on a grid base (no text or symbols)natural_image
Diagram of a grill device with a central circular component and four side connectors (no text or symbols)
- Self-Cleaning Built-In Wall Oven Owner's Manual
- AOES3030\*
- Please Read Manual Before Operating Wall Oven
- Installer
- Consumer
- Contents
- Asure™ Extended Service Plan
- Recognize this symbol as a safety precaution
- WARNING
- All Appliances
- Proper installation
- Never use your appliance for warming or heating the room.
- Do not leave children alone
- Wear proper apparel
- User servicing
- Storage in or on appliance
- Do not use water on grease fires
- Use only dry potholders
- Do not leave oven unattended
- Oven
- Use care when opening door
- Do not heat unopened food containers
- Keep oven vent ducts unobstructed.
- Placement of oven racks
- Do not use aluminum foil to line the oven bottom
- Do not touch interior surfaces of oven during or immediately after use
- Use caution when touching oven while in use
- Self-Cleaning
- Do not clean door gasket
- Do not use oven cleaners
- Clean only parts listed in manual.
- Before self-cleaning the oven
- In Case of Fire
- Packaging Material
- Oven Location
- Line Voltage Requirements
- Connecting Wiring
- Option 1
- Option 2
- Tilting Control Panel
- Wall Oven and Cooktop Combination Installation Specifications
- AKED3060 or AKES3060 Downdraft Cooktops Above AOES3030 Wall Ovens
- AKED3060 or AKES3060 Downdraft Cooktop Above AOES3030 Wall Ovens in an Island Application
- AK2H36, AK2T36, 36" Electric Cooktop Installed Above AOES3030 Wall Oven
- AKGD3060 Gas Downdraft Cooktop Installed Above AOES3030 Wall Oven in a Standard Kitchen Cabinet
- AOES3030 Wall Oven Installed Below AKGD3060 Gas Downdraft Cooktop In An Island Installation
- AKS3020 or AKS3040 cooktop above AOES3030 Wall Oven
- Gas Supply Location
- AOES3030 Wall Oven Installed in a Cabinet
- 30" Electric Cooktop AK2H30, AK2T30, AKR3000, AKT3000, CAK2H30, CAK2T30 Installed Above AOES3030 Wall Oven.
- AOES3030 wall oven stacked installation
- AOES3030 Wall Ovens Installed Side-by-Side
- Electronic Oven Control
- Special Oven Control Options
- Preheat Signal
- End-of-Cycle Signal
- Child Lockout
- 12-hour Automatic Cancel
- Timer Signal
- Increasing ▲ or ▼ Pad Speed
- Self-diagnostic System
- Quick Reference Instructions
- Setting Clock
- Setting Minute Timer
- Canceling Minute Timer
- Baking or Broiling
- Canceling Bake or Broil
- Self Cleaning
- Canceling Self-Cleaning Cycle
- Bake
- Timed Bake
- Delayed Bake
- Caution
- Broiling
- Interrupt Self-Cleaning Cycle
- Delayed Self-Cleaning
- Dehydration Tips
- Fruits
- Vegetables
- Herbs and Spices
- Adjusting Oven Temperature
- Service Tones and Codes
- Cooking Guide
- Oven Rack Placement
- Pan Placement
- Broiling Pan
- Oven Operation
- Broil
- Baking Chart
- Poultry Oven Roasting Chart
- Beef and Pork Oven Roasting Chart
- Broiling Chart
- Slo-Cook™ Instructions and Cooking Guide for Wall Oven
- Slo-Cook™ Programming Instructions
- Slo-Cook™ Roasting Rack
- Facts and Hints to Remember
- Suggested Dish Arrangements
- Main Dish Recipes
- Beef Stew
- Chili Con Carne
- Beef Pot Roast With Vegetables
- Sausage and Rice Casserole
- Chicken and Dressing
- Dressing
- Sherried Chicken and Wild Rice
- Sherried Chicken
- Baked Wild Rice
- Chicken Cacciatore
- Italian Spaghetti Sauce
- Braised Short Ribs
- Chuck Roast Stroganoff
- Swedish Meat Balls
- Brown Bagged Barbecue Chicken
- Barbecue Sauce
- Slo-Cook™ Menu Meals
- Chuck Roast, Green Beans, Baked Potatoes
- Chuck Roast
- Green Beans
- Baked Potatoes
- Swiss Steak, New Potatoes, Chocolate Chip Brownies
- Swiss Steak
- \*New Potatoes
- Chocolate Chip Brownies
- Barbecued Country Ribs, Baked Beans, Peanut Delight Bars
- Barbecued Country Ribs
- Baked Beans
- Peanut Delight Bars
- Stuffed Bell Peppers, Squash Supreme Casserole, French Apple Pie
- Stuffed Bell Peppers
- Squash Supreme Casserole
- French Apple Pie
- Topping:
- Meat Loaf, Corn on the Cob, Green Bean Casserole
- Meat Loaf
- Corn on the Cob
- Green Bean Casserole
- Pork Chops, Mixed Vegetables, Cheese Potatoes
- Pork Chops
- or
- Mixed Vegetables
- Cheese Potatoes
- Removing Oven Door
- Replacing Oven Door
- Replacing Oven Light
- Problem Solving
- Common Questions
- Índice
- Placement des plats
- Lèchefrite
Brand : AMANA
Model : AOES3030WW
Category : Oven