USER MANUAL HNCP 2070 I HOOVER
SETTING UP THE REFRIGERATOR COMPARTMENT
COMBI NO FROST MECHANICAL
CONTROL PANEL
(figure 6)
Open the top door of the fridge in order to access the control panel.
SWITCHING THE PRODUCT ON AND OFF
The product is electronically powered by connecting the power cable to the power outlet and remains powered on until cable is removed.
When " - " is displayed on the digital display, it indicates that the product is in stand-by mode, therefore it is connected to the power outlet but it is not functional. To switch the appliance on, press the MODE button. To turn the product back to standby mode, press the MODE button for a few seconds. When the product is in standby mode, any food in your fridge or freezer will not be cooled.
![graph LR A["Mode"] --> B["Block"] B --> C["+"] B --> D["-"]](/content/2026/03/482661/images/29d61ad939c2694bcdfcf5b0c902e621c5dfde550e4bd7169b320cce235447fd.jpg)
(Figure 1)
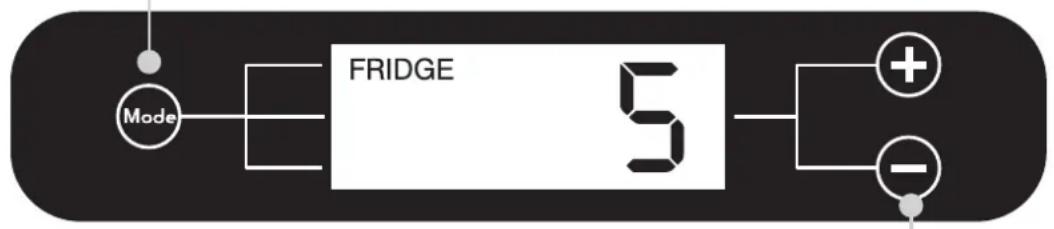
Once the product is switched on, the appliance will set the recommended temperature for the fridge compartment on the display +5°C. For the freezer compartment, the product will automatically set the freezer to the recommended temperature of -18°C.
MODIFYING THE TEMPERATURE OF THE FRIDGE COMPARTMENT
It is possible to modify the temperature by pressing the buttons (+) and (-). The maximum temperature is 7, and the minimum is 1. The manufacturer's recommended temperature is 5.
When the temperature of the fridge compartment is being set, the word FRIDGE flashes. By pressing the button + from 7 to 1 you will find the OFF mode with which it will be possible to switch off the fridge compartment. The display will only show the temperature set for the freezer compartment. In order to reactivate the fridge compartment press the MODE button until the fridge mode stops blinking, at this point it will be possible to change the temperature of the fridge compartment.
MODIFYING THE TEMPERATURE OF THE FREEZER COMPARTMENT
It is possible to switch from Fridge to Freezer mode by pressing the MODE button. The word FREEZER will now be displayed. Subsequently, the recommended temperature -18 will be displayed. It is possible to modify the temperature from -16°C to -22°C.
(Figure 2)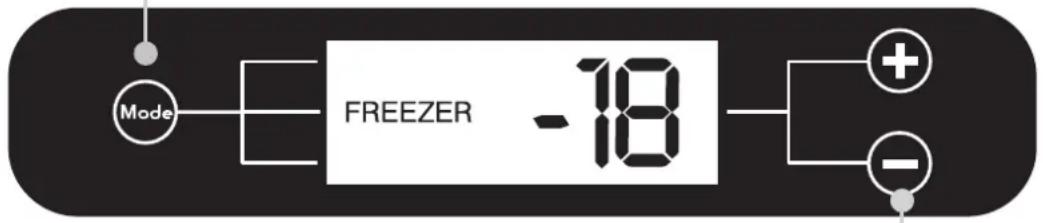
To modify the temperature, press the buttons (+) and (-) until you reach the desired temperature. The display temperatures are only indicative.
The SUPER option can be selected for fast freezing food items. Ideal to use when a large amount of food has been added to your freezer.
Off On
(Figure 3)
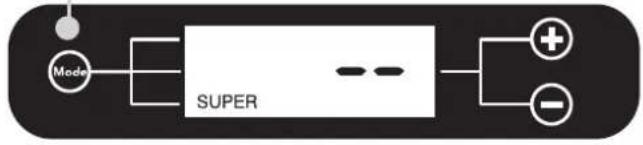
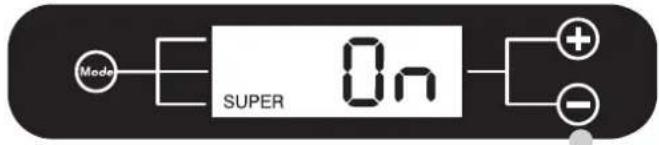
Press the (+) button in order to activate the SUPER function. After 36 hours the product will automatically leave the SUPER function, if you wish to interrupt the SUPER function at anytime press the (-) button. For optimum usage the manufacturer recommends that the super freeze function is activated a few hours before putting the selected food items in the freezer. The rating plate states the maximum quantity of foods that can be frozen, (see figure 6).
FAULTS AND ERRORS
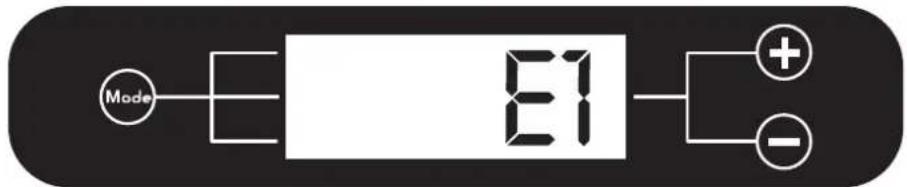
Every error or fault that occurs will be automatically shown on the display which will indicate a number followed by the letter "E" (Error). If this occurs switch the product off and back on again, if the error persists, please contact our service department for assistance.
(Figure 4)
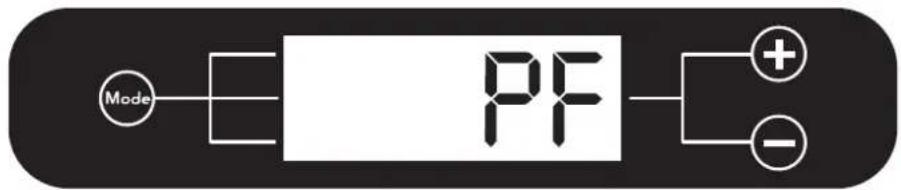
In the event of a power failure the message "PF" (Power Fail) will be shown on the display once power is returned to the machine. In case of a power cut lasting 10-12 hours, check that the food items have remained unchanged. Any food that has been fully or partially defrosted needs to be consumed within 24 hours and NOT refrozen.
(Figure 5)
FROST FREE FRIDGE FREEZER MECHANICAL
CONTROL PANEL
Open the top door of the fridge in order to access the control panel.
Turn on the thermostat dial to switch on the appliance and set the temperature of the freezer compartment and fridge. The recommended settings are 2-3. Turn the thermostat dial to "0" to turn off the appliance.

FREEZING
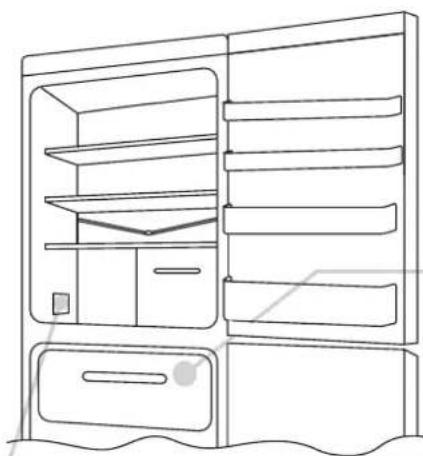
(figure 6)
Place the foods inside the freezer and for normal functioning turn the thermostat to the recommended settings.
The product does not require defrosting because it is equipped with an automatic system that prevents the formation of ice.
N.B. This is the rating plate. If you need to contact our Service Department in the event of faults, remember to give them the information on the plate.
REVERSING THE OPENING OF THE DOORS
In order to reverse the opening of the doors, follow the indications in relation to the insert and hinge type your product is made up of.
Place the appliance on the floor or at a 45-degree angle, as it is necessary to work on the bottom of the appliance.
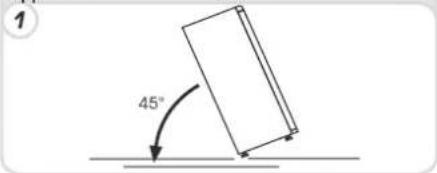
Remove the bottom right hinge by unscrewing the screws, pin and washers, then remove the bottom door.
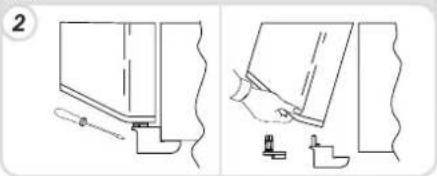
Remove the screws from the central hinge and remove the top door.
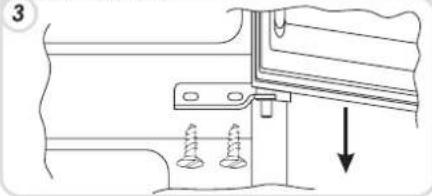
Take off the bottom right-hand hinge by removing the screws, pin and washers, then remove the lower door.
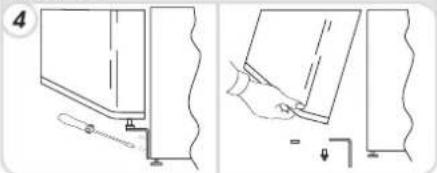
Remove the caps (A) and (B), loosen the screws and partially remove the panel making sure not to damage the rear electric part.
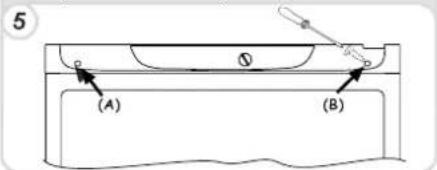
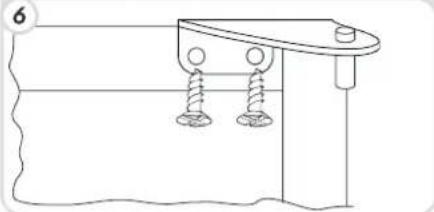
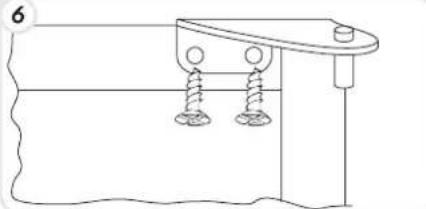
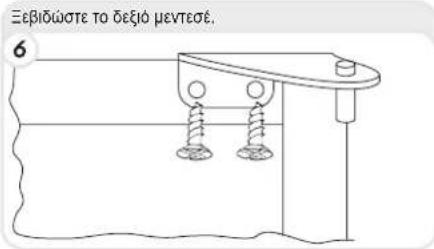
Unscrew the right hinge.
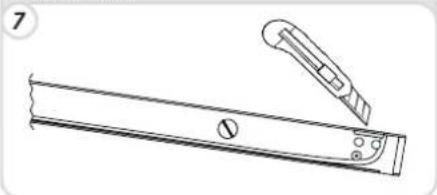
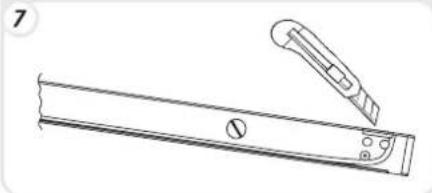
Mark and break the left-hand slot on the panel, in the insert area.
Flip the top left-hand hinge found in the accessories kit.
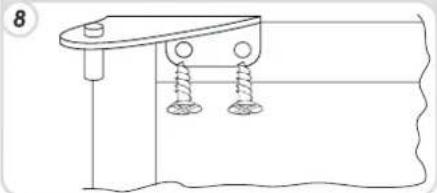
Fit the panel, and secure it with the screws and caps.
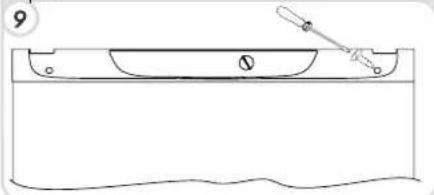
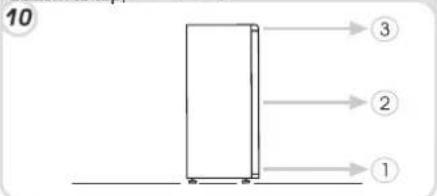
Remount the hinges and doors working from bottom to top, 1→2→3.
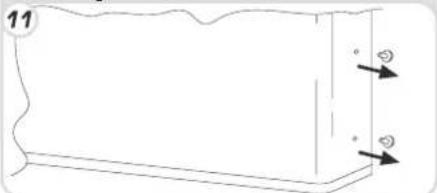
To reverse the handles: remove the outer caps from the right-hand side of the doors.
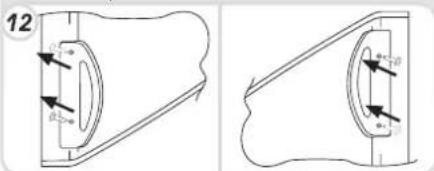
Unscrew the handles from the left-hand side and move them to the right-hand side, then position the outer caps on the left-hand side of the doors.
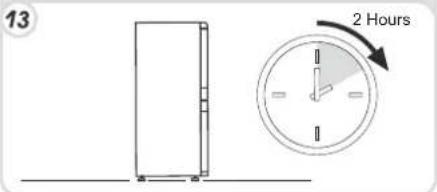
Put the appliance in an upright position and wait two hours before turning it on.
CONTROL PANEL
SETTING THE TEMPERATURE OF THE REFRIGERATOR COMPARTMENT
REFRIGERATOR-FREEZER NO FROST WITHOUT ELECTRONIC DISPLAY
CONTROL PANEL
(Image 6)
(Fig. 5)
FROST-FREE REFRIGERATOR/FREEZER MECHANICAL
SWITCHBOARD
(Fig. 6)
SETTING THE TEMPERATURE OF THE REFRIGERATOR COMPARTMENT
(image 5)
NO FROST REFRIGERATOR/FREEZER - MECHANICAL
CONTROL PANEL
(image 6)
SET THE TEMPERATURE OF THE REFRIGERATOR COMPARTMENT
(figure 6)
Loosen the right hinge.
SET THE REFRIGERATOR TEMPERATURE
NO FROST MECHANICAL REFRIGERATOR/FREEZER
CONTROL PANEL
(Figure 6)
Loosen the refrigerator door lock and place the provided lock on the other side.
4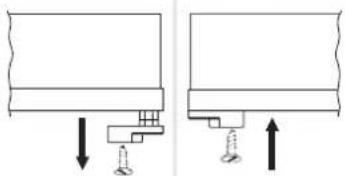
(image 6)
SETTING THE TEMPERATURE ON THE REFRIGERATOR
SETTING THE TEMPERATURE ON THE FREEZER
FROST-FREE REFRIGERATOR-FREEZER WITH REMOTE CONTROL
CONTROL PANEL
(Figure 6)
SETTING THE TEMPERATURE ON THE REFRIGERATOR
The temperature can be changed by pressing the (+) and (-) buttons. The maximum temperature is 7, and the minimum is 1. The manufacturer's recommended temperature is 5.
FROST-FREE MECHANICAL REFRIGERATOR-FREEZER
CONTROL PANEL
Cut out the left hole in the cover where you see the mark.
SETTING THE TEMPERATURE IN THE REFRIGERATOR
MECHANICAL FROST-FREE REFRIGERATOR/FREEZER
CONTROL PANEL
SETTING THE TEMPERATURE OF THE REFRIGERATOR
FROST-FREE MECHANICAL REFRIGERATOR-FREEZER
CONTROL PANEL
(figure 6)
SETTING THE TEMPERATURE OF THE REFRIGERATOR COMPARTMENT
SETTING THE TEMPERATURE OF THE FREEZER COMPARTMENT
COMBINED REFRIGERATOR-FREEZER FROST FREE WITH MECHANICAL CONTROL
CONTROL PANEL
(fig. 6)
SETTING THE TEMPERATURE OF THE REFRIGERATOR COMPARTMENTS
FROST FREE REFRIGERATOR-FREEZER MECHANICAL
CONTROL PANEL
(figure 6)