
ACP950 - Sports camera SALORA - Free user manual and instructions
Find the device manual for free ACP950 SALORA in PDF.
| Product Type | Sportscam |
| Brand | Salora |
| Model | ACP950 |
| Dimensions | 71 x 24 x 43 mm |
| Weight | Approx. 80 g (with battery) |
| Power | Rechargeable 3.7 V lithium battery |
| Maximum video resolution | 4K (3840x2160) at 30 fps |
| Maximum photo resolution | 16 MP (4608x3456) |
| Screens | Main 2.0-inch IPS screen + side 1.3-inch HD screen |
| Memory | Micro SD card up to 64 GB (Class 10 recommended) |
| File formats | JPEG (photo), H.264 MP4 (video) |
| Connectivity | Wi-Fi, USB 2.0 |
| Main features | 4K video recording, photo, slow motion, time-lapse, loop recording, motion detection, remote control, mobile app |
| Water resistance | Waterproof housing included for underwater use |
| Viewing angle | HD wide-angle lens |
| Maintenance and cleaning | Clean with a soft, dry cloth. Avoid solvents. Store in a cool, dry place. |
| Safety | Do not expose to magnetic fields or excessive heat. Disconnect if overheating or smoke. Keep out of reach of children during charging. |
| Spare parts and repairability | Removable battery. Replaceable SD card. For other repairs, contact customer service. |
| General information | Suitable for outdoor activities, home surveillance, and underwater shooting. |
Frequently Asked Questions - ACP950 SALORA
User questions about ACP950 SALORA
0 question about this device. Answer the ones you know or ask your own.
Ask a new question about this device
Download the instructions for your Sports camera in PDF format for free! Find your manual ACP950 - SALORA and take your electronic device back in hand. On this page are published all the documents necessary for the use of your device. ACP950 by SALORA.
USER MANUAL ACP950 SALORA
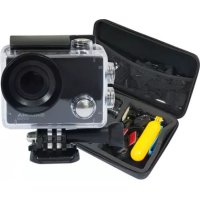
Action camera ACP950
Manual
This is a high end HD sports action camera, equipped with top quality features like digital video recording, photographing, slow motion photographing, video displaying and more functions. Suitable for various purposes: perfect for outdoor activities, as a home security camera, making underwater images and lots more.
Operation precautions:
- This is a high-precision device, do not drop or hit it.
- Do not keep the camera close to objects with strong magnetic fields, such as magnets and motors. Also, avoid exposure to objects that produce strong radio waves.
- Always use name-brands Micro SD cards. No-brand cards don't guarantee a good performance.
- Do not store the Micro SD card in or near a magnetic field, you might lose all the data on the card.
- In case of overheating, smoke or a peculiar smell when you are charging the camera, please disconnect the power immediately and stop charging to avoid the risk of fire.
- When the device is charging, keep it out of reach of children. The power cord may cause accidental suffocation or an electric shock.
- Please keep this device in a cool, dry and dustproof place.
Product Features
The digital camera is supplied with a waterproof casing, which enables you to shoot wonderful underwater images.
Video resolution max. 4K at 30fps
Wide angle HD lens
Super HD 2.0 inch IPS screen + 1.3 inch HD side screen, to display wonderful images and videos.
Removable battery, easy to replace with extended lifespan.
Supports up to 64GB memory cards.
Multiple video recording formats:4K,2.7K,1080P,720P
Various shooting modes: Normal, Timing, Automatic, Motion track, etc.
Various video modes: Normal, Loop, Compact, Slow motion, etc.
Product overview

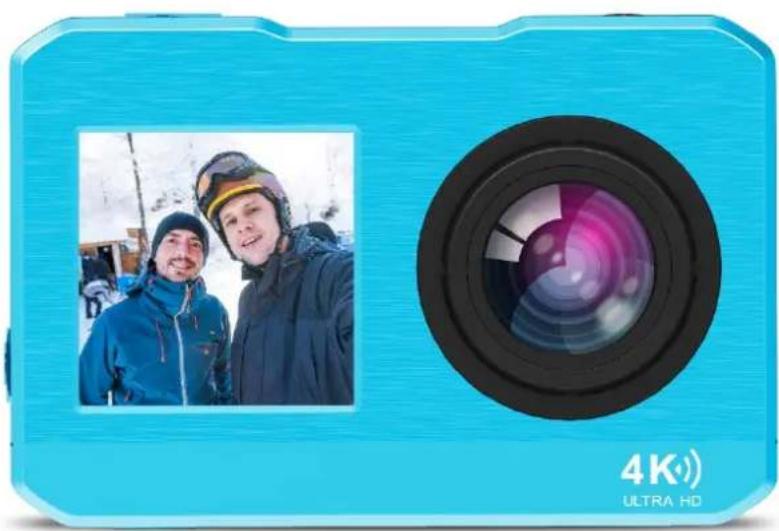
- 1.3 inch HD front screen
- Lens
- 2.0 inch main display
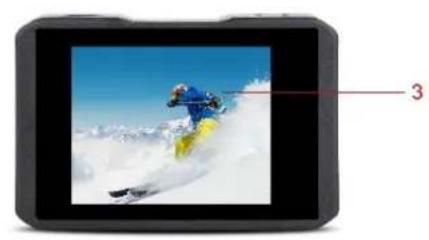
- Power/mode button
5.Shutter button -
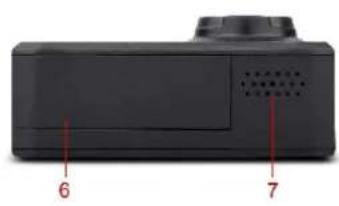
Battery cover
-
Speaker
- Battery compartment
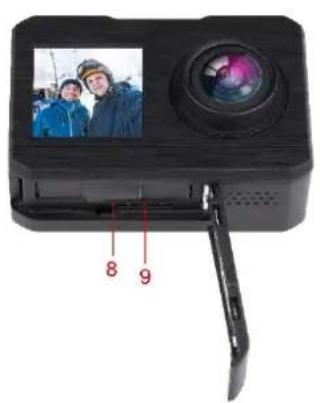
- Micro SD card slot
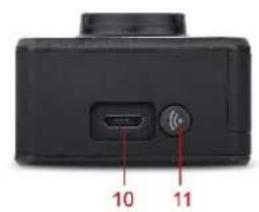
- USB port
- Wi-Fi button
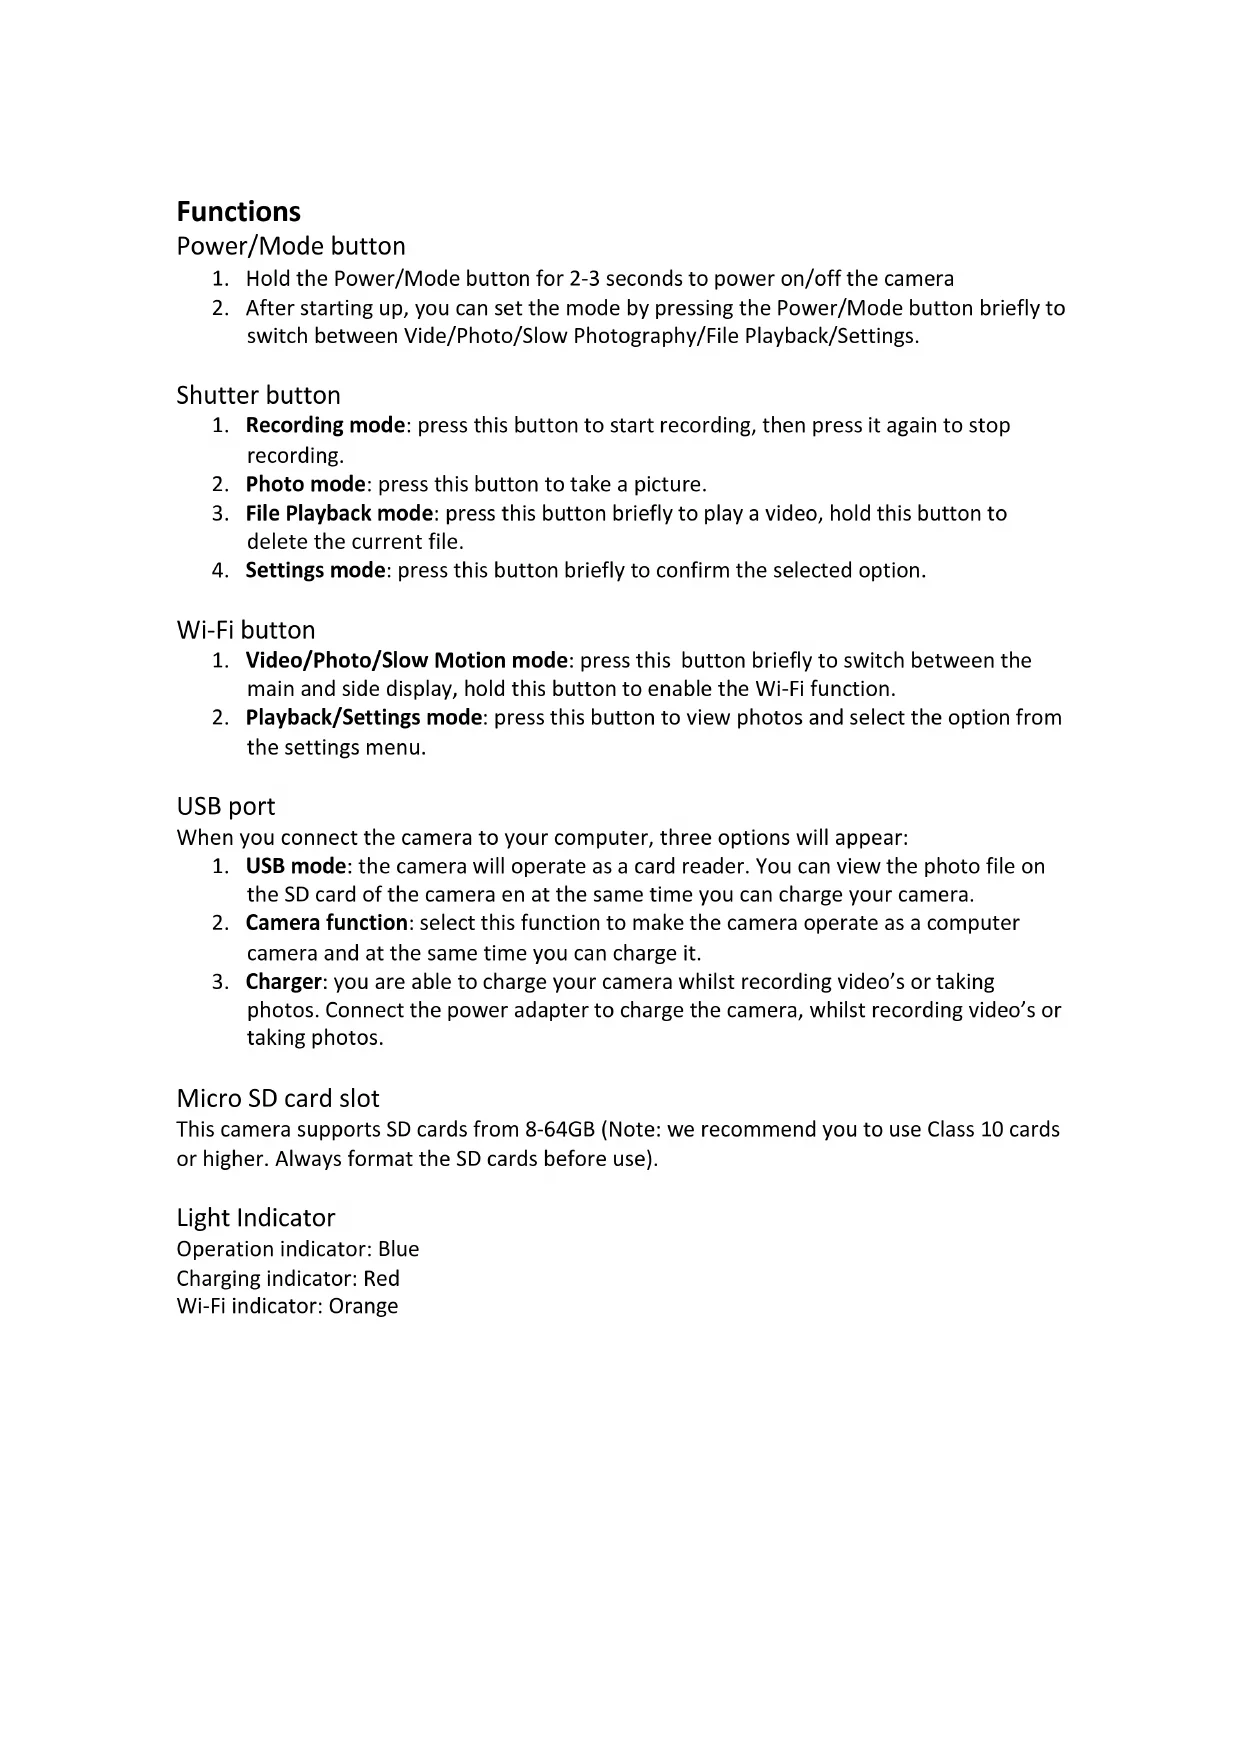
Functions
Power/Mode button
- Hold the Power/Mode button for 2-3 seconds to power on/off the camera
- After starting up, you can set the mode by pressing the Power/Mode button briefly to switch between Vide/Photo/Slow Photography/File Playback/Settings.
Shutter button
- Recording mode: press this button to start recording, then press it again to stop recording.
- Photo mode: press this button to take a picture.
- File Playback mode: press this button briefly to play a video, hold this button to delete the current file.
- Settings mode: press this button briefly to confirm the selected option.
Wi-Fi button
- Video/Photo/Slow Motion mode: press this button briefly to switch between the main and side display, hold this button to enable the Wi-Fi function.
- Playback/Settings mode: press this button to view photos and select the option from the settings menu.
USB port
When you connect the camera to your computer, three options will appear:
- USB mode: the camera will operate as a card reader. You can view the photo file on the SD card of the camera en at the same time you can charge your camera.
- Camera function: select this function to make the camera operate as a computer camera and at the same time you can charge it.
- Charger: you are able to charge your camera whilst recording video's or taking photos. Connect the power adapter to charge the camera, whilst recording video's or taking photos.
Micro SD card slot
This camera supports SD cards from 8-64GB (Note: we recommend you to use Class 10 cards or higher. Always format the SD cards before use).
Light Indicator
Operation indicator: Blue
Charging indicator: Red
Wi-Fi indicator: Orange
1. Main/Side display switch
This camera is equipped with a 1.3 HD front facing display to improve the user's selfie experience. You can switch between the main and side screen.
Switching between the main and side screen:
Video/Photo/Slow Motion mode: press the Wi-Fi button briefly, to switch from the main screen to the side screen, press again to switch back.
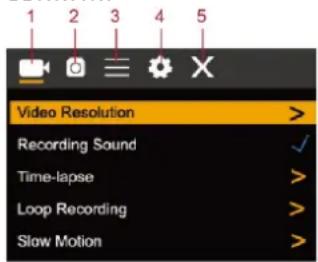
2. Camera Settings
Press the Power/Mode button to go to the setting mode, press the Shutter button to enter the settings menu. Press the Power/Mode button to navigate through the settings options. Press the Wi-Fi button to select the option an press the Shutter button to
confirm.
-
Video mode
-
System settings
-
Photo mode
-
Exit
-
Camera settings
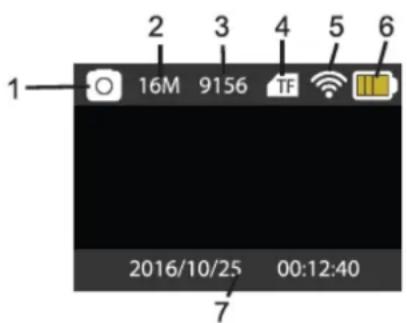
3. Video Mode

-
Video mode
-
Wi-Fi status
-
Current video resolution
-
Power
-
SD card capacity left
-
Date and Time
-
Micro SD status
Normal video
Recording mode: press the shutter button to start recording. At this point the time and date, displayed at the bottom of the screen will change to display the current video duration.
Press the shutter button again to stop recording, the file will be automatically saved.
Loop video
Set up the cycling recording parameter (2/3/5 minutes) in the settings menu of the video mode. Then return to the video mode. The loop sign is displayed at the bottom left of the screen. Press the Shutter button to start de loop recording.
Time-lapse video
Video mode, settings menu, set the recording parameter (0.5, 1, 2, 5, 10, 30 and 60 seconds), then return to the recording mode. The screen displays the time lapse sign at the bottom left of the screen. Press the Shutter button to start the time-lapse recording and press again to stop recording.
Slow motion video
Video mode, settings menu, you can set the slow motion video resolution (1080P60fps, 720P120fps). Return to the video slow motion mode, press the Shutter button and start recording, press again to stop recording.
4. Photo mode
- Photo mode
- Wi-Fi status
- Current photo pixels
- Power
- Number of photos
- Time and Date
- SD card status
Normal photo
Photo mode: press the Shutter button to take a picture, the picture will be automatically saved.
Time delay
Photo mode, settings menu, set the delay timing parameter (3s, 5s, 10s, 20s) and return to the photo mode. The time delay sign will appear at the bottom left of the screen. Press the shutter button, to activate the time delay function. The camera will click and the blue indicator will flash.
(Note: the camera will save the pictures for a certain amount of time. The blue indicator will flash once, when a picture has been save. The blue indicator will light up once the storage
has been completed. You cannot take a picture when the camera is in process of saving the pictures)
Automatic
Photo mode, settings menu, set the automatic photographing parameters (3s, 5s, 10s, 20s), the return to the Photo mode. The automatic photographing sign will appear at the bottom left of the screen. Press the Shutter button to start the countdown. When the countdown has been completed and the picture has been taken, the next countdown will start automatically. Press the Shutter button to stop the automatic function again.
5. Remote control
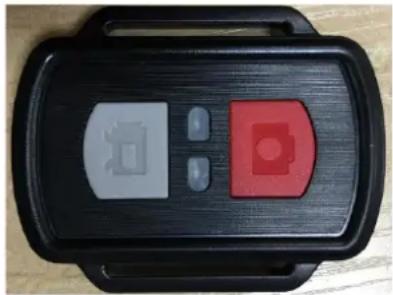
1. Recording button
1.1 Press this button to start recording while the camera is switched on. Press it again to stop recording.
1.2 Hold this button for about 5 seconds to switch the power off. If the Remote Control function, in the Settings menu, is turned on hold this button for about 5 seconds and turn it on again. (When you have replaced the battery, the Remote Power On function cannot be used. You first need to switch on the camera manually before you are able to use the remote control again.)
2. Photo button
1.1 Press this button briefly to take pictures in operating state.
1.2 After you have switched on the camera, hold this button for 5 seconds to switch between the main and the side screen.
6. Wi-Fi- and APP
Download the APP
For android please search "x-sport Pro" on the Google APP store to download and install the application. For iOS please search for "x-sport Pro" to download and install the application in the Apple's App. Store. Or scan the QR codes below by using you mobile phone.

Android

iOS
Wi-Fi
In Video/Photo/Slow Motion mode: Hold the Wi-Fi button to go to the Wi-Fi mode. The camera will enter the Wi-Fi interface and will display the Wi-Fi name: "x10000_XXXX", the Wi-Fi password is: "66666666". Find the name of the corresponding Wi-Fi connection on your mobile phone, establish the Wi-Fi connection.
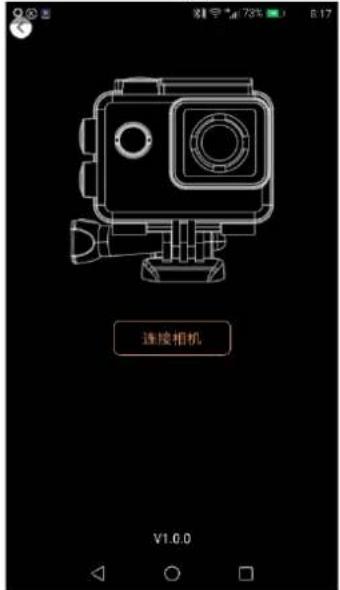
APP
After connecting your mobile phone to your camera, the APP will open and "connect the camera" will appear to enter the APP operation interface.
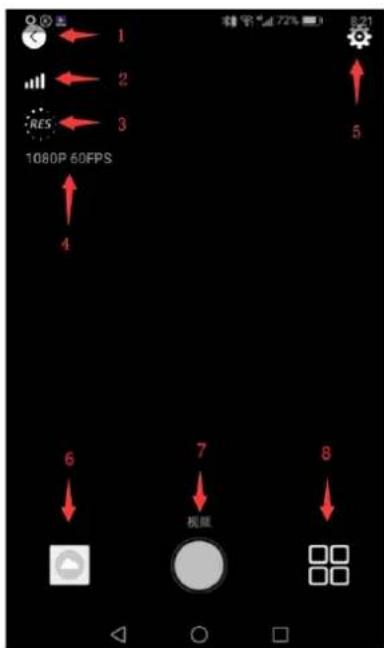
APP operation interface
1.Exit 5. Camera settings
2. Wi-Fi signal strength 6. Media library
3. Resolution settings 7.Shutter button
4.Current resolution 8.Mode
7. Technical Parameters
| Image sensor | SONY 179 |
| Function mode | Video, Photo, Slow Motion, Playback |
| LCD screen | 2.0’ ips high screen + 1.3’ high screen |
| Picture resolution | 16M(4608*3456) 12M(4000*3000), 8M(3264*2448). 5M(2560*1920), 2M(1600*1200) |
| Video resolution | 4K(3840*2160 30fps), 2.7K(30fps), 1080P(1920*1080 30fps), 1080P(1920*1080 60fps) 720P(1280*720 30fps) 720P(1280*720 60fps) 720P(1280*720 120fps) |
| Storage medium | Micro SD Card (Maximum supporting 64GB) |
| File format | JPEG H.264(MP4) |
| USB Port | USB2.0 |
| Power supply | Built-in3.7V rechargeable lithium battery |
| Menu language | English/ Spanish/Deutsch/Francais/Italian/Espanol/Nederlands |
| Power save | 1min/3min/5min/OFF |
| Operation system requirements | Windows XP/ Vista/7/8,Mac 10.8 |
| Dimensions | 71*24*43mm |
Actioncam ACP950
Handbuch


- Action camera ACP950
- Manual
- Operation precautions:
- Product Features
- Product overview
- Functions
- Power/Mode button
- Shutter button
- Wi-Fi button
- USB port
- Micro SD card slot
- Light Indicator
- Main/Side display switch
- Camera Settings
- Video Mode
- Normal video
- Loop video
- Time-lapse video
- Slow motion video
- Photo mode
- Normal photo
- Time delay
- Automatic
- Remote control
- Recording button
- Photo button
- Wi-Fi- and APP
- Download the APP
- Wi-Fi
- APP
- Technical Parameters
- Actioncam ACP950
- Handbuch
Brand : SALORA
Model : ACP950
Category : Sports camera