District L1 - Wristwatch ADIDAS - Free user manual and instructions
Find the device manual for free District L1 ADIDAS in PDF.



| Product Type | Wristwatch |
| Brand | Adidas |
| Model | District L1 |
| Movement | Analog and digital quartz |
| Display | Analog (hands) and digital (LCD screen) |
| Main functions | Time, date, chronograph, alarm, timer, dual time zone, EL backlight |
| Case material | Stainless steel and resin |
| Glass material | Mineral |
| Strap | Silicone or resin (depending on version) |
| Case diameter | 45 mm (approx) |
| Case thickness | 12 mm (approx) |
| Weight | 80 g (approx) |
| Water resistance | 5 ATM (50 meters) - suitable for swimming and showering |
| Power | Button cell battery (type SR626SW or equivalent) |
| Battery life | Approximately 2 years |
| Controls | Crown and push buttons |
| Care and cleaning | Clean with a soft, dry cloth. Avoid chemicals. |
| Safety | Do not operate the crown underwater. Ensure the crown is fully pushed in before any contact with water. |
| Spare parts and repairability | Battery and strap replaceable by a watchmaker. For any repairs, contact an authorized Adidas service center. |
| General information | Manual available in multiple languages at notice-facile.com. 2-year warranty. |
Frequently Asked Questions - District L1 ADIDAS
User questions about District L1 ADIDAS
0 question about this device. Answer the ones you know or ask your own.
Ask a new question about this device
Download the instructions for your Wristwatch in PDF format for free! Find your manual District L1 - ADIDAS and take your electronic device back in hand. On this page are published all the documents necessary for the use of your device. District L1 by ADIDAS.
USER MANUAL District L1 ADIDAS
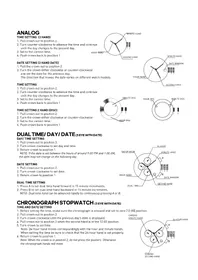
- Pull crown out to position 2.
- Turn counter-clockwise to advance the time and continue until the day changes to the present day.
- Set to the correct time.
- Push crown back to position 1


DATE SETTING (3 HAND DATE)
- Pull the crown out to position 2.
- Turn the crown either clockwise or counter-clockwise and set the date for the previous day. The direction that moves the date varies on different watch models.
TIME SETTING
1.Pull crown out to position 2.
2. Turn counter-clockwise to advance the time and continue until the day changes to the present day.
3. Set to the correct time.
4. Push crown back to position 1

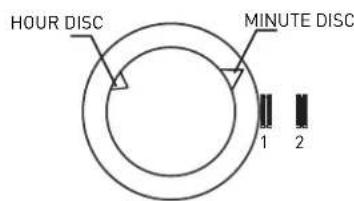
TIME SETTING 2 HAND (DISC)
- Pull crown out to position 2.
- Turn the crown either clockwise or counter-clockwise
- Set to the correct time.
- Push crown back to position 1
DUAL TIME/ DAY/ DATE (3 EYE WITH DATE)
DAY/TIME SETTING
- Pull crown out to position 3.
- Turn crown clockwise to set day and time.
- Return crown to position 1. NOTE: If the date is set between the hours of around 9:00 PM and 1:00 AM, the date may not change on the following day.
DATE SETTING
- Pull crown out to position 2.
- Turn crown clockwise to set date.
- Return crown to position 1.
DUAL TIME SETTING
- Press A to set dual time hand forward in 15 minute increments.
- Press B to set dual time hand backward in 15 minute increments.
NOTE: Dual time hand can be advanced rapidly by continuously pressing A or B.

CHRONOGRAPH STOPWATCH (3 EYE WITH DATE)
TIME AND DATE SETTING
- Before setting the time, make sure the chronograph is stopped and set to zero [12:00] position.
2.Pull crown out to position 2. - Turn crown clockwise until the previous day's date is displayed.
- Pull crown out to position 3 when the second hand is at the 12:00 position.
- Turn crown to set time.
Note: 24-hour hand moves correspondingly with the hour and minute hands. When setting the time be sure to check that the 24-hour hand is set properly.
- Return crown to position 1.
Note: When the crown is in position 2, do not press the pushers. Otherwise the chronograph hands will move.

CHRONOGRAPH
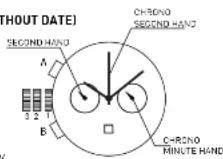
- Press A to start/slop the chronograph.
- Press B to reset to zero.
CHRONOGRAPH ZERO RESET
- If either of the chronograph hands is not at the zero [12:00] position, pull crown out to position 3.
- Press A to move hands clockwise; press B to move hands counter-clockwise.
- Return crown to position 1
CHRONOGRAPH 2 EYE WITH DATE (WITH OR WITHOUT DATE)
TIME AND DATE SETTING
- Before setting the time, make sure the chronograph is stopped
and set to zero [12:00] position.
2.Pull crown out to position 2. - Turn crown clockwise until the previous day's date is displayed.
- Pull crown out to position 3 when the second hand is at the 12:00 position.
Turn crown to set time.
Note: 24-hour hand moves correspondingly with the hour and minute hands.
When setting the time be sure to check that the 24-hour hand is set properly.
& Return grown to position 1
Note: When the crown is in position 2, do not press the pushers. Otherwise the chronograph hands will move.
CHRONOGRAPH
- Press B to start/slop the chronograph.
- Press A for Split time, Press A again to restart
- Press A to reset to zero.
CHRONOGRAPH ZERO RESET
- If either of the chronograph hands is not at the zero (12:00) position, pull crown out to position 3.
- Press A to move hands clockwise; press B to move hands counter-clockwise.
- Return crown to position 1
CALAGARY (QFL769BB/QFL873AC)
NORMAL TIME DISPLAY
- Press A for EL
- Press C to select T1 or T2 format.
- Press D to toggle chime on/off.
TIME/CALENDAR SETTING
- In time mode, press and hold D for 2 seconds to enter time setting; hour will begin flashing.
- Press C to increase selling value. Press D to decrease selling value.
- Press B to enter next setting field
- Setting sequence is hour, minute, second, year month, date,12/24 hr
- Press A to exit setting mode.
CHRONOGRAPH MODE
- Press B to enter chrono mode.
- Press D to select split or lap mode. Split mode will display the full time of all records after
each split. Lap mode will display only the new lap time after each record has been recorded. - Press C to start chrono.
- Press C again to split time.
- Repeat step 4 until desired number of laps have been reached (maximum 10).
- Press D to stop chrono.
- To review, press B to enter recall mode before resetting.
- Press D again to reset chrono

RECALL MODE
- Press C to recall each lap [10 maximum]
- Press D to return to chronog.
ALARM MODE
- Press B to enter alarm mode.
- Press C to toggle alarm on/off.
- Press D to select T1 Alarm 1 or T2 Alarm 2.
ALARM SETTING
- Press and hold D for 2 seconds to enter alarm setting; hour will begin flashing.
- Press C to increase setting value. Press D to decrease setting value.
- Press B to set minutes.
- Press A to exit setting mode
NOTE: Alarm turns on automatically when exiting setting mode.
TIMER MODE
- Press C to start countdown timer.
- Press D to stop countdown timer. Press D again to reset timer.
TIMER SETTING
- Press B to enter timer mode.
- Press and hold D to enter setting mode; hour will begin flashing.
- Press C to increase setting value. Press D to decrease setting value.
- Press B to enter next setting field.
- Setting sequence is hour, minute, second
- Press A to exit setting

PEACHTREE (FL145GB)
NORMAL TIME DISPLAY
- Press A for EL in any mode
- Press C to toggle between Time 1 and Time 2
- Press and hold C to set Time 1 or Time 2 as the default timer.
- Press D to toggle chime on/off.
TIME/CALENDAR SETTING
- In normal time display, press and hold A to enter setting mode; chime will begin flashing.
- Press C to increase setting value. Press D to decrease setting value.
- Press B to set and advance to next setting value.
- Setting sequence is chime, 12/24-hour time, hour, minute, second, year, month, date, Auto EL
- Press A to save data and exit setting mode.
CHRONOGRAPH MODE
- Press B to change to chronograph mode.
- Press C to start chronograph: press D for lap when the chronograph is running.
- Press D to change views while chronograph is running
- Press C to stop chronograph.
NOTE: When running, there is a maximum of 10 laps, afterward last lap will be overwritten each time
additionol tap is recorded.
RECALL MODE
- Press A to recall the memory when the chronograph is stopped.
- Press A to view the next lap.
- Press C or D to exit Recall Mode and go back to chronograph mode.
TIMER MODE
- Press B to change to timer mode.
- Press C to start timer.
- Press C to stop timer. Press D to reset the timer when it is stopped.
TIMER SETTING
- In timer mode, press and hold A to enter setting mode; timer type will begin flashing.
- Press C and D to select count down stop, count down repeat, or count up timer.
- Press B to advance to next setting field.
- Press C to decrease and D to increase.
- Press B to set and advance to next setting value.
- Setting sequence is timer type, hour, minute, second.
- Press A to save data and exit setting mode
NOTE: Alarm will sound at 2 beeps per second, and will beep for 30 seconds after timer reaches zero.
ALARM MODE
- Press B to change to alarm mode.
- Press C to toggle between alarms 1, 2, 3, 4.
-
Press D to enable the alarm; press D again to disable the alarm.
-
Press B to exit alarm mode.
ALARM SETTING
- In alarm mode, press and hold A to enter setting mode, hour will begin flashing.
- Press C to increase; press D to decrease.
- Press B to set and advance to next setting value
- Setting sequence is hour, minute.
- Press A to exit setting mode.
DENVER/CANDY/SYDNEY (UPCR-780A-P07/QUPCR-823A-P03/QUPCR-780A-3-P16)
NORMAL TIME DISPLAY
-
Press A for EL.
-
Press C to select T1 or T2 format.
TIME/CALENDAR SETTING
- In time mode, press and hold D for 2 seconds to enter time.
setting; hour will begin flashing. - Press C to increase setting value
- Press B to enter next setting field
- Setting sequence is hour, minute, day, year, month, date.
- Press D to exit setting mode.
ALARM MODE
- Press B to enter alarm mode.
- Press C to toggle alarm/chime on/off
- Press D to select Home Alarm or T2 Alarm
ALARM SETTING
- Press and hold D for 2 seconds to enter alarm setting; hour will begin flashing
- Press C to increase selling value
- Press B to set minutes.
Press D to exit setting mode.
NOTE: Alarm turns on automatically when exiting setting mode.

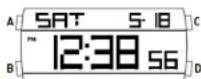
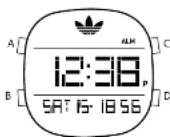
CHRONOGRAPH MODE
- Press Big eni r chron mode.
- Press D to select split or lap mode. Split mode will display the full time of all records after each split.
Lap mode will display only the new lap time after each record has been recorded. - Press C to start chrono.
- Press C again to split limc.
- Repeat step 4 until desired number of laps have been reached (maximum 10).
- Press D to stop chrono.
- To review, press B to enter recall mode before reselling
- Press D again to reset chrono.
RECALL MODE
- Press C to recall each lap [10 maximum]
- Press D to return to chrono.
TIMER MODE
- Press C to start countdown timer.
- Press D to stop countdown timer. Press D again to reset timer.
TIMER SETTING
- Press B to enter timer mode.
- Press and hold D to enter setting mode; hour will begin flashing
- Press C to increase setting
- Press B to enter next setting field.
- Setting sequence is hour, minute, second
- Press D to exit setting mode


Seoul / Curitiba (QFL657)
NORMAL TIME DISPLAY
- Press A to change mode. Mode sequence is normal time,
shrponogreeh, limsr, alarm. - Press B for E.L.
- Press C to flash time zone 2. Press and hold C 2 seconds
to toggle normal time displaytime zone 2. - Press D to toggle key tone an/off.
NOTE: At any point in any setting mode, press B to exit setting mode.
NOTE: in any setting mode, if no pusher is operated for 30 seconds,
all changes will be saved and the setting will automatically return
to normal time
TIME/CALENDAR SETTING
- In normal time display, press and hold B 2 seconds; auto EL
sn/alf will begin flashing. - Press C toggle auto EL on/off.
- Press A to set and advance to next setting value.
- Press C to increase digit; press D to decrease digit. Press and hold C or D for fast increment/decrement.
- Repeat steps 3 and 4 through setting sequence. Setting sequence is: auto EL, chime on/off
12/24 hour format, hour, minute, second, year, month/dale or date/ month formal, month and date. - Press B to exit setting mode.
NOTE: Weekday is automatically updated upon arriving setting mode.
TIME ZONE 2 SETTING
- To sel Tims Zons 2, press and hold C 2 seconds to change in Tims Zang 2.
- Press and hold B 2 seconds; time difference between time zone 1 and time zone 2 will begin flashing.
- Press C to increase value: press D to decrease value. Press and hold C or D for
fast increment/decrement - Press B to exit setting mode.
CHRONOGRAPH MODE
- Press A to change to chronograph mode.
- Press B to recall lap data. Press B to scroll through laps.
- Press C to start/slop the chronograph.
- Press and hold D 2 seconds to reset to zero.
NOTE: Insert chronograph indicolor here will flash in all modes if the chronograph is running.
LAP COUNTING
- Press D while the chronograph is running for lap counting [up to 10 laps].
NOTE: After 8 seconds, display will show total chronograph time in the lower portion of the display; next lap running time will show in upper portion of the display. - Press C to stop chronograph
- Press B when the chronograph is stopped to recall chronograph lap data.
- Press C or D to exit recall mode and return to chronograph.
TIMER MODE
- Press A to change to timer mode.
- Press C to start/stop timer.
- Press D to reset the timer.
NOTE: Alarm will sound for 30 seconds when countdown reaches zero. Press any pusher to silence alarm.
TIMER SETTING
- In timer mode, press and hold B 2 seconds to enter setting mode; timer type will begin flashing.
Press C to select countdown-stop ("CD-STP"), countdown-repeat ("CD-REP"), or countdown-then up timer ("CD-UP"). - Press A to set and advance to next setting value.
- Press C to increase digit, press D to decrease digit. Press and hold C or D for fast increment/decrement.
- Repeat steps 3 and 4 through selling sequence. Setting sequence is: timer type, hour, minute, seconds.
- Press B to exit setting mode.
ALARM MODE
- Press A to change to alarm mode.
- Press C to select alarm 1-4.
- Press D to toggle alarm on/off.
ALARM SETTING
- In alarm mode, press and hold B 2 seconds; hour will begin flashing.
- Press C to increase digit; press D to decrease digit. Press and hold C or D for fast increment/decrement.
- Press A to set and advance minute.
- Repeat step 2.
- Press B to exit setting mode.
NOTE: Alarm will sound for 30 seconds. Press any pusher to silence alarm.
ANALOG
[UPCR-780A-P07/QUPCR-823A-P03/QUPCR-780A-3-P16]
{UPCR-780A-P07/QUPCR-823A-P03/QUPCR-780A-3-P16}
AFFICHAGE NORMAL DE L'HEURE
{UPCR-780A-P07/QUPCR-823A-P03/QUPCR-780A-3-P16}
VISUALIZACION NORMAL DE LA HORA
[UPCR-780A-P07/QUPCR-823A-P03/QUPCR-780A-3-P16]
SCHERMO CON L'ORA STANDARD
{UPCR-780A-P07/QUPCR-823A-P03/QUPCR-780A-3-P16}
VISUALIZACAO NORMAL DA HORA
[UPCR-780A-P07/QUPCR-823A-P03/QUPCR-780A-3-P16]
OTOBPAXEHNE ObbyHOro BPEMEHN
- Haxmte KhoNky A JEA EL.
- HaxmTe KhoNky C nIy Bb6opa foMpTa T1 nnT2.
YCTAHOBKA BPEMEHN
- HaxoJcB bpeKmE BpeMeHn, HaxMnte n ydepKnBaTe KhoNky D B TeueHne 2 cekyH, UTObI BoHTn B peKm ycTaHOBKn; uO3HaauOpune Yacbl, HaHyT MrraTb.
- HaxmTe KhoNky C, yTo6bIyBEnuHTb 3HaueHne ycTaHOBKn.
- Haxmte KhoNky B, yTo6bI nepeuTn K cJeDyUoEmy npaMeTpY ycTaHOBKn.
- NocJeIOBATEbHOCTb yCTaHOBKN - Yac, MHyTa, DeHb, RoD, MeCra, DaTa.
- Haxmte KhoNky D IaI BbIXOa n3 peXnMa yCTaHOBKn.
PEXKIM BUDINJIbHnKA
- HaxmTe KhoNky B Dny BxOda B pexM 6yDnIbHnKa.
- HaxmTe KhoNky C nIy BkIIOHeHry/BbIKIOHeHry 6byINbHNka/3ByKOBOrO cnHaHa.
- HaxmTe KhoNky D nIy Bbl6pa domaaHero 6yDnJIbHnKa nn 6yDnJIbHnKa T2.
YCTAHOBKA BydNJIbHnKA
- Haxmte u ydepunBaTe KhoNky D TeueHne 2 cekyH, YTo6bl BoTn B pexm ycTaHOBKn 6yDnIbHnka; Cnpbl, o03HaayIoune Yacbl, HauHyT MmraTb.
- Haxmnte KhoNky C, yTo6bIyBEnuHTb 3HaueHne ycTaHOBKn.
- Haxmte KhoNky B, yTo6bl yCtHaOBuTb MHyTbI.
- HaxmTe KhoNky Dnla BbIXoJa n3 peXIma yctahOBKn.
{UPCR-780A-P07/QUPCR-823A-P03/QUPCR-780A-3-P16}
正常时间显示
{UPCR-780A-P07/QUPCR-823A-P03/QUPCR-780A-3-P16}
通常时刻一卜
{UPCR-780A-P07/QUPCR-823A-P03/QUPCR-780A-3-P16}
五圣山阿五
- EL(前日告白福社)到自A
2.C将T10N T2F
#

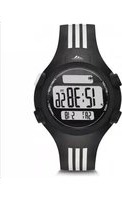

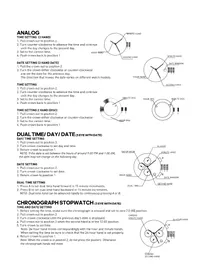
- DATE SETTING (3 HAND DATE)
- TIME SETTING
- TIME SETTING 2 HAND (DISC)
- DUAL TIME/ DAY/ DATE (3 EYE WITH DATE)
- DAY/TIME SETTING
- DATE SETTING
- DUAL TIME SETTING
- CHRONOGRAPH STOPWATCH (3 EYE WITH DATE)
- TIME AND DATE SETTING
- CHRONOGRAPH
- CHRONOGRAPH ZERO RESET
- CHRONOGRAPH 2 EYE WITH DATE (WITH OR WITHOUT DATE)
- CALAGARY (QFL769BB/QFL873AC)
- NORMAL TIME DISPLAY
- TIME/CALENDAR SETTING
- CHRONOGRAPH MODE
- RECALL MODE
- ALARM MODE
- ALARM SETTING
- TIMER MODE
- TIMER SETTING
- PEACHTREE (FL145GB)
- DENVER/CANDY/SYDNEY (UPCR-780A-P07/QUPCR-823A-P03/QUPCR-780A-3-P16)
- Seoul / Curitiba (QFL657)
- TIME ZONE 2 SETTING
- LAP COUNTING
- ANALOG
- AFFICHAGE NORMAL DE L'HEURE
- VISUALIZACION NORMAL DE LA HORA
- SCHERMO CON L'ORA STANDARD
- VISUALIZACAO NORMAL DA HORA
- OTOBPAXEHNE ObbyHOro BPEMEHN
- YCTAHOBKA BPEMEHN
- PEXKIM BUDINJIbHnKA
- YCTAHOBKA BydNJIbHnKA
- 正常时间显示
- 通常时刻一卜
- 五圣山阿五
- #
Brand : ADIDAS
Model : District L1
Category : Wristwatch