210683 - Lighting Prilux - Free user manual and instructions
Find the device manual for free 210683 Prilux in PDF.

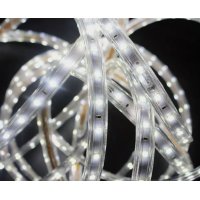
| Product type | Flexible LED light string (FLEXLIGHT LED) |
| Brand | Prilux |
| Model | 210683 |
| Supply voltage | 220-240 V |
| Usage | Indoor and outdoor (with precautions) |
| Moisture protection | Connectors sealed with silicone; outdoor IPX4 plug recommended |
| Included accessories | Power cable (210713), end cap (210737), splice (210744), L connector (210751), fixing clip (210768) |
| Cut possibility | Yes, at the indicated cut marks |
| Connection | Male/female connectors; max power to respect (see manual) |
| Cable material | PVC (UV protection recommended) |
| Recommended protection rating (outdoor) | IPX4 for the plug; 30 mA differential switch |
| Maintenance | Check connections and sealing before each use |
| Repairability | Cut and connection possible with connectors and heat shrink tubing |
| Warranty | Void if installation not compliant with REBT (Spanish standard) |
| Warning | Do not use coiled; avoid heat sources; do not immerse |
Frequently Asked Questions - 210683 Prilux
User questions about 210683 Prilux
0 question about this device. Answer the ones you know or ask your own.
Ask a new question about this device
Download the instructions for your Lighting in PDF format for free! Find your manual 210683 - Prilux and take your electronic device back in hand. On this page are published all the documents necessary for the use of your device. 210683 by Prilux.
USER MANUAL 210683 Prilux
| 210713 Power cable (Included) |
| 210737 End cap |
| 210744 Junction |
| 210751 Conductor L |
| 210768 Attachment clip |
WARNING
BEFORE STARING THE INSTALLATION OF THIS PRODUCT, PLEASE READ ATTENTIVELY THE INSTRUCTIONS AND KEEP THEM IN A SAFE PLACE.
THE INSTALLATION SHOULD BE PERFORMED BY QUALIFIED PERSONNEL.
THE IMPROPER HANDLING OF THE COMPONENTS OR THE PRODUCT COULD DAMMAGE THE CORRECT FUNCTION OF THIS DEVICE THUS CANCELLING THE WARRANTY OF THE PRODUCER
THE WARRANTY OF THE PRODUCER IS CANCELED IF THE INSTALLATION IS NOT PERFORMED FOLLOWING THE INDICATED IN REBT 2002.
THE APPLICATION ITC BT09-4 OF THE REBT IS MANDATORY (INSTALLATION OF OVERVOLTAGE PROTECTORS OF IN LINES AND RECEIVERS) FOR INDUSTRY INSTALLATIONS AND PUBLIC LIGHTING. THE WARRANTY DOES NOT COVER DAMMAGES PRODUCED BY OVERVOLTAGE ON RECEIVERS WITHOUT OVERVOLTAGE PROTECTORS.
THE APPLICATION OF ITC BT19 (INTERIOR OR RECEIVING INSTALLATIONS.GENERAL PRESCRIPIONS) IS MANDATORY.
THE APPLICATION OF ITC BT34 (INSTALLATIONS FOR SPECIAL PURPOSES. FAIRS AND STANDS) IS MANDATORY.
MAINTENANCE OF THE PRODUCT
ALL PRILUX CHRISTMAS LIGHTING MOTIF, NEED A MAINTENANCE BEFORE BEING USED, IT MEANS TO CHECK ALL THE CONNECTIONS (INcluded THE END CAP) IN ORDER TO BE SURE THAT THE MATERIAL HAS THE PERFECT TIGHTNESS.
SUMMARY
FLEXLIGHT LED is a new series of product for a professional design. You can decorate both indoors and outdoors from the buildings, highlighting something, surroundings from a specified place, making a kind of symbol or lighting windows, entrances, stairs, trailers, cars, etc. It all depends on the imagination of each one.
WARNING: Avoid making inappropriate installations as well these ones which are damaged, and please, we invite you to read carefully the following instructions manual to do a safe installation.
The product is supplied with power cable and end cap. The rest of accessories are sold separately, for instance, heat shrink tubes, flanges, cable conduit, etc
CAUTIONS
- No use this product in contact with water or with wet hands.
- Never place or use this product close to heat sources (for instance: heating).
- No connect this product while it remains rolled, it might set fire.
- Use only this product with enough ventilation and refrigeration.
If you use this product outdoors, you must use as electrical outlet a IPX4 tigh-base.
If you use this product outdoors, you must always use a Power Failure Protection Switch (FI-30mA) between the Power Supplier (220-240V) and the product. - Protect all the cables against potential damages.
The lamps are not exchangable. - Under no circumstances should you beat this product with a hammer, if it might damage the lamps.
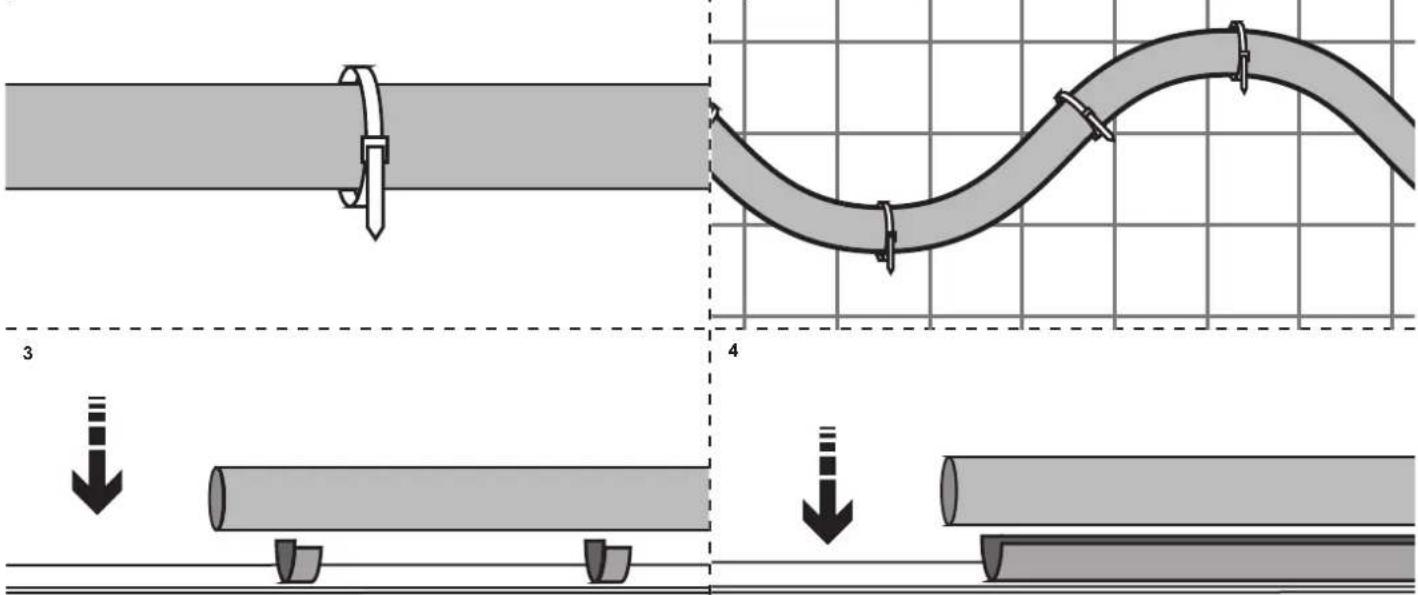
- If the product is mounted to hang freely, it must be adjusted to a steel cable and be connected to it every 10cm .
If the luminous thread is going to use in permanent installations, you have
to take into account that it will lose progressively performance in white and blue colors after many continuous hours.
CONNECTION TO THE POWER SUPPLIER
-
Do not connect the luminous thread to the power supplier until the installation or the modification has been completed.
-
Do not connect the luminous thread to the power supplier until the end cap has been fixed with security to the edge of the luminous thread.
- Do not connect the garland to the power supplier while it is in its package, unless the package has a decorative meaning.
- Make sure that the power supplier has not a higher voltage than the luminous thread.
- It is recommended to use plug/adapter with fuse in order to avoid any damages from overload.
CONNECTION
- Only can be connect between them those luminous thread with the same voltage.
- When it is going to make connections between pieces from the luminous thread, o the luminous thread with the power cord, make sure that both parts keep the narrowest as possible.
- The connector pins and the copper wire of the luminous thread.
The male and female connector.
The length of the luminous thread has not to overcome the maximum power load (Look the chart with the parametres) - It is recommended to seal all the connectors with neutral adhesive silicone in order to avoid the entry of moisture in the luminous thread.
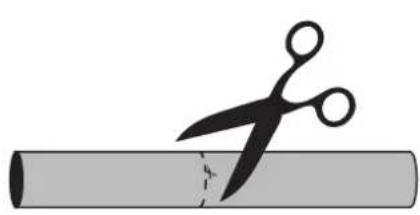
THE CUT
Cut the luminous thread exclusively along the crops marks.
- To avoid possible short-circuits, make sure that the copper wire is cut clearly.
USE
- Warn the luminous thread by connecting it to the network before giving shape to the design. Unplug it while you are applying the shape desired.
- Do not use the metal cable, which can be conductive, to tie the luminous thread.
Make sure that the luminous thread does not make contact with any flammable material or that can be melting. - Ensure that there is an appropriate ventilation around the luminous thread, do not cover or install the luminous thread in an enclosed area.
- Do not dip the luminous thread under the water.
- Once the installation is planned, it is recommended that qualified staff check it out.
- Throw away the product in the right place to do so.
YOUR LED LUMINOUS THREAD WORKS BETTER IF:
- Do not expose it directly to sunlight. UV radiation destroys the PVC coverage of your luminous thread.
- If it is operated with supply of stable flow, changes in the voltage damage or shorten the useful life.
- It is used in a neutral chemical environment. Strong acids, alkaline, radioactive, etc Damage the PVC coverage.
INSTRUCTIONS FOR ITS USE.
THE CUT OF THE LUMINOUS THREAD
- Cut only the cable along the crops marks indicated.
- To avoid possible short-circuits, make sure that the cut of the cables has been done cleanly. Bend the luminous thread from the left to the right and, after that, cut the copper cable which edges.
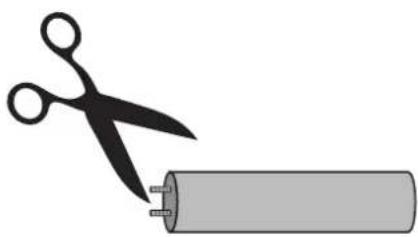
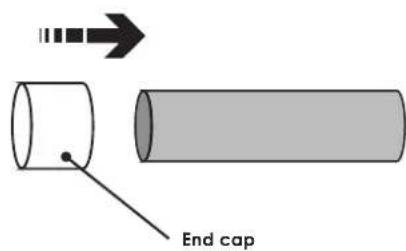
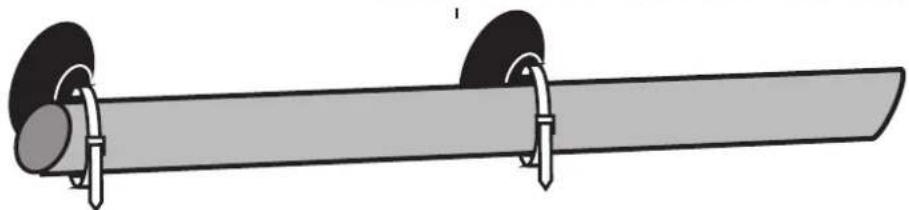
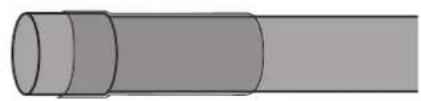
- Cover the end of the luminous thread with a end cap which is included, seal it with silicone, tie it with a flange (no included) for its totally insulation. The other extreme of the luminous thread can be linked by a power cable (included), which has been also sealed to get the perfect tightness.
123
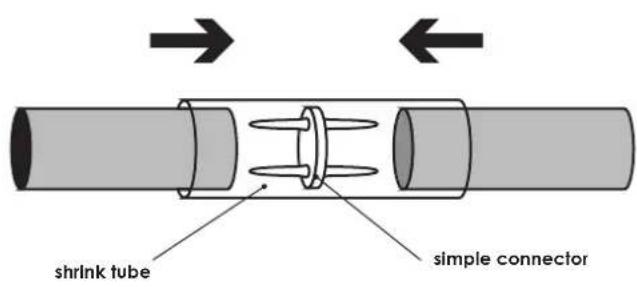
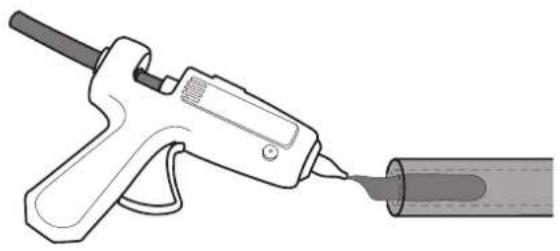
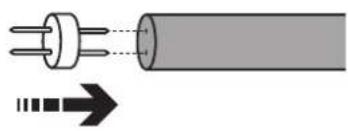
- Cut a 7cm section from the heat shrink tube, at least, and place it in one of the thread.
-
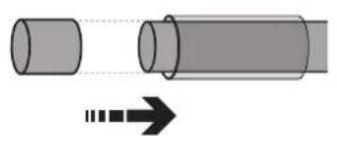
Enter the pins of the simple connector inside the cable of the luminous thread.
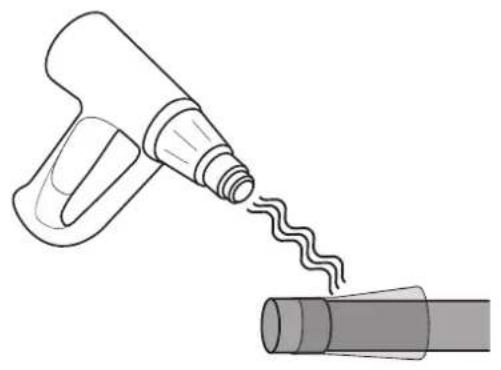
-
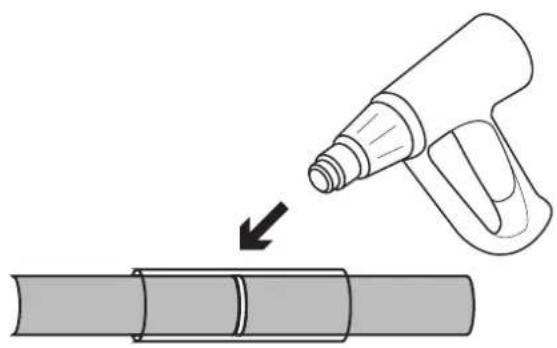
Centre the heat shrink tube with the simple connector and apply heat until it remains completely sealed.
HOW TO CONNECT THE POWER CABLE
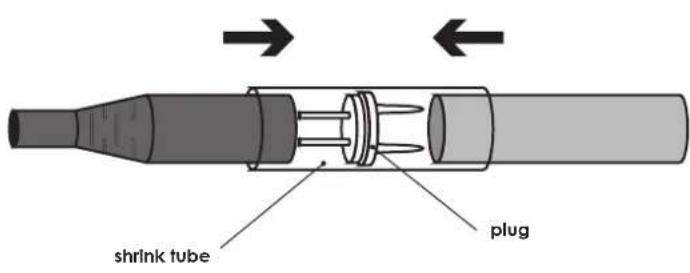
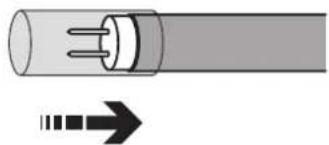
- Make sure that the luminous thread, which is going to be manipulated, is not connected to any power supplier.
- Enter the connector with the pin male in the luminous thread in its right position.
-
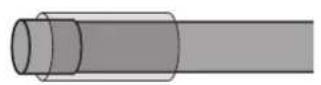
Place the heat shrink tube over the luminous thread.
-
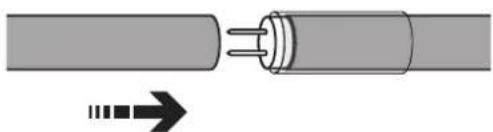
Enter the other luminous thread in the connector, Make sure that the connector has fixed in the right position inside the luminous thread.
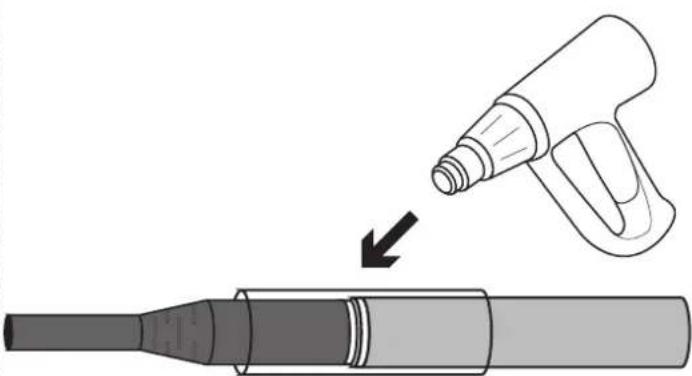
- Once both of there are right fixed, apply some heat if you had used a shrink tube with silicone.
- The connectors and the joints cope with a limit of pressure.
INSTALLATION (ACCESSORIES NO INCLUDED):
1. FLANGE
- Manufacture the mould with the iron cable or bar according to its design.
- Use the flanges to secure the luminous thread inside the cable.
- It is perfect for Artwork and lighting of buildings.
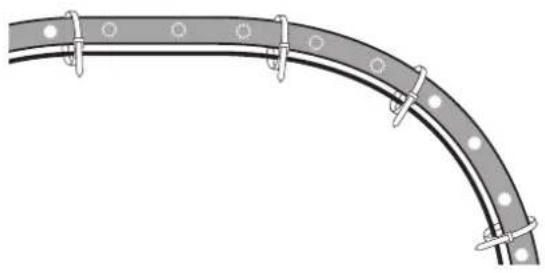
2. STEEL MESH
- Firstly make the design in its current size on paper.
- Place the steel mesh over the design, fix the luminous thread on the mesh with flanges according to its drawing.
It is perfect for Artwork.
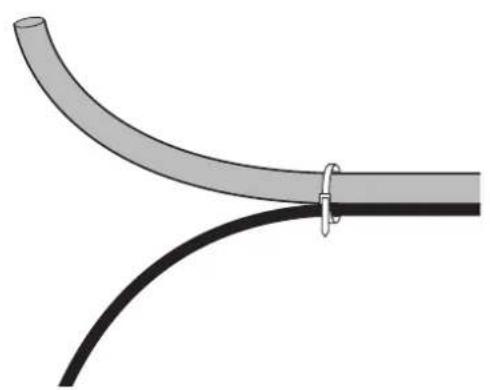
3. FIXING CLIP
- Set the fixing clip with ropes in wooden surfaces, with glue or double-face adhesive tape, according to its design.
To make square or rectangular figures, use the appropriate fixing clip and set it with ropes.
- You can use it on wood surfaces, metal, etc. It is perfect for great lighting projects.
4. CABLE CONDUIT
- Set the cable conduit on a glass surface with the double-face cap or tie it on wood surfaces.
- Push the luminous thread in the conduit.
It is perfect for right-line decoration.
5.SUCTION PADS
Fix the suction pads on the glass surface or metal with glue.
- Use the flanges to fix the luminous thread to the suction pad.
It is suitable to glass or metal surfaces.
1
5
1
Locate the section to repair.
Cut a piece of new wire and seal the ends with silicone.
2
4
3
Insert a new connector metal entering through wire pin inside the holes of the internal wires.
Enter a shrink in the wire's side for its subsequent sealing.
WARNING!
MAKE SURE THAT THE POLARITY AND THE POWER DIRECTION ARE CORRECT.
6
5
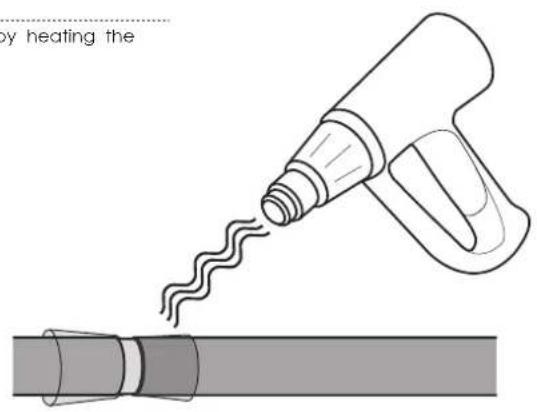
Proceed to join the two ends of the wire through the connector.
Introduce the shrink on the joint of the wo wire's sections.
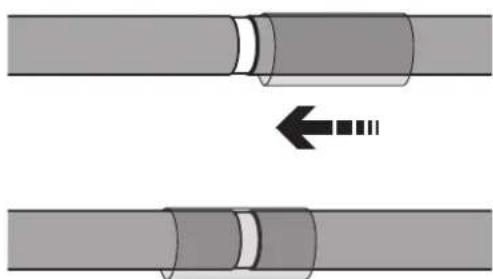
Seal the seam by heating the shrinkable.
7/8

9/10/11
Repit this process at the ends of every sections to be replaced.
12
Set the new sections to the metallic structure.
ACCESSIONS
INSTALLATION (ACCESSIONS NON INCLUS):
- MOYEUX
Sceller le joint enchauffant le psy.