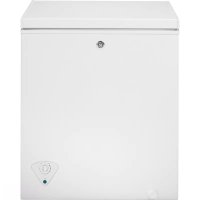
FUF21DLRWW - Freezer GE - Free user manual and instructions
Find the device manual for free FUF21DLRWW GE in PDF.

User questions about FUF21DLRWW GE
0 question about this device. Answer the ones you know or ask your own.
Ask a new question about this device
Download the instructions for your Freezer in PDF format for free! Find your manual FUF21DLRWW - GE and take your electronic device back in hand. On this page are published all the documents necessary for the use of your device. FUF21DLRWW by GE.
USER MANUAL FUF21DLRWW GE
SAFETY INFORMATION 3
USING THE FREEZER
Temperature Control 5
Features 7
CARE AND CLEANING 9
INSTALLATION INSTRUCTIONS
Installing the Freezer 12
TROUBLESHOOTING TIPS 13
WARRANTY 15
CONSUMER SUPPORT 16
OWNER'S MANUAL AND INSTALLATION INSTRUCTIONS
Upright-No-Frost Models: FUF14, FUF17, FUF21
ENGLISH/FRANÇAIS/ ESPÁÑOL
Write the model and serial numbers here:
Model #
Serial #
Find these numbers on a label on the top inner case liner of the unit toward the front.
THANK YOU FOR MAKING GE APPLIANCES A PART OF YOUR HOME.
Whether you grew up with GE Appliances, or this is your first, we're happy to have you in the family.
We take pride in the craftsmanship, innovation and design that goes into every GE Appliances product, and we think you will too. Among other things, registration of your appliance ensures that we can deliver important product information and warranty details when you need them.
Register your GE appliance now online. Helpful websites and phone numbers are available in the Consumer Support section of this Owner's Manual. You may also mail in the pre-printed registration card included in the packing material.

GE APPLIANCES
IMPORTANT SAFETY INFORMATION READ ALL INSTRUCTIONS BEFORE USING THE APPLIANCE
WARNING
To reduce the risk of fire, explosion, electric shock, or injury when using your upright freezer follow these basic safety precautions:
This freezer must be properly installed and located in accordance with the Installation Instructions before it is used.
Replace all parts and panels before operating.
- Do not store or use gasoline or other flammable vapors and liquids in the vicinity of this or any other appliance.
Because of potential safety hazards under certain conditions, we strongly recommend against the use of an extension cord. However, if you must use an extension cord, it is absolutely necessary that it be a UL-listed (in the United States) or a CSA certified (in Canada), 3-wire grounding type appliance extension cord having a grounding type plug and outlet and that the electrical rating of the cord be 15 amperes (minimum) and 120 volts.
- To prevent suffocation and entrapment hazards to children, remove the doors from any freezer before disposing of it or discontinuing its use.
-
Do not allow children to climb, stand or hang on the door handles or the shelves in the freezer. They could seriously injure themselves.
Unplug the freezer : -
To disconnect power to the freezer. It cannot be turned off by any setting on the control panel.
- To clean, replace a burned out light bulb, or make repairs.
NOTE: Repairs must be performed by a qualified Service Professional.
STATE OF CALIFORNIA PROPOSITION 65 WARNINGS:
WARNING
This product contains one or more chemicals known to the State of California to cause cancer and birth defects or other reproductive harm.
CAUTION
To reduce the risk of injury when using your freezer, follow these basic safety precautions.
- Do not clean glass shelves or covers with warm water when they are cold. Glass shelves and covers may break if exposed to sudden temperature changes or impact, such as bumping or dropping. Tempered glass is designed to shatter into many small pieces if it breaks.
-
Keep fingers out of the "pinch point" areas; clearances between the doors and between the doors and cabinet are necessarily small. Be careful closing doors when children are in the area.
-
Do not touch the cold surfaces in the freezer compartment when hands are damp or wet, skin may stick to these extremely cold surfaces.
- Do not refreeze frozen foods which have thawed completely.
INSTALLATION
WARNING

PLOSION HAZARD
Keep flammable materials and vapors, such as gasoline, away from freezer. Failure to do so can result in fire, explosion, or death.
READ AND SAVE THESE INSTRUCTIONS
IMPORTANT SAFETY INFORMATION READ ALL INSTRUCTIONS BEFORE USING THE APPLIANCE
CONNECTING ELECTRICITY
WARNING

ELECTRICAL SHOCK HAZARDS
Plug into a grounded 3-prong outlet
Do not remove the ground prong
Do not use an adapter
Failure to follow these instructions can result in death, fire, or electrical shock.
Do not, under any circumstances, cut or remove the third (ground) prong from the power cord. For personal safety, this appliance must be properly grounded.
The power cord of this appliance is equipped with a 3-prong (grounding) plug which mates with a standard 3-prong (grounding) wall outlet to minimize the possibility of electric shock hazard from this appliance.
Have the wall outlet and circuit checked by a qualified electrician to make sure the outlet is properly grounded.
Where a standard 2-prong wall outlet is encountered, it is your personal responsibility and obligation to have it replaced with a properly grounded 3-prong wall outlet. Do not use an adapter.
The freezer should always be plugged into its own individual electrical outlet which has a voltage rating that matches the rating plate.
A 115 Volt AC, 60Hz 15-or 20-amp fused, grounded electrical supply is required. This provides the best performance and also prevents overloading house wiring circuits which could cause a fire hazard from overheated wires.
Never unplug your freezer by pulling on the power cord. Always grip plug firmly and pull straight out from the outlet.
Repair or replace immediately all power cords that have become frayed or otherwise damaged. Do not use a cord that shows cracks or abrasion damage along its length or at either end.
When moving the freezer away from the wall, be careful not to roll over or damage the power cord.
PROPER DISPOSAL OF YOUR OLD APPLIANCE
WARNING
SUFFOCATION AND CHILD ENTRAPMENT HAZARD
Remove freezer doors prior to disposal. Failure to do so can result in child entrapment which can lead to death or brain damage.
IMPORTANT: Child entrapment and suffocation are not problems of the past. Junked or abandoned appliances are still dangerous even if they will sit for "just a few days." If you are getting rid of your old appliance, please follow the instructions below to help prevent accidents.
Before You Throw Away Your Old Freezer:
Take off the doors.
- Leave the shelves in place so that children may not easily climb inside.
Refrigerants
All refrigeration products contain refrigerants, which under federal law must be removed prior to product disposal. If you are getting rid of an old refrigeration product, check with the company handling the disposal about what to do.
READ AND SAVE THESE INSTRUCTIONS
For safe food storage, allow 4 hours for the freezer to cool down completely. The freezer will run continuously for the first several hours. Foods that are already frozen may be placed in the freezer after the first few hours of operation. Unfrozen food should NOT be placed in the freezer until it has operated for 4 hours. Allow several hours after each one-step adjustment for the freezer temperature to stabilize.
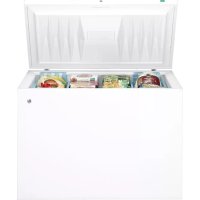
When loading the freezer, freeze only 3 pounds of fresh food per cubic foot of space at a time. Distribute packages evenly throughout the freezer. It is not necessary to turn the control knob to a colder setting while freezing food.
Starting the Freezer with Electronic Control
- If desired, clean the inside of the freezer with a mild solution of baking soda and water (see Care and Cleaning).
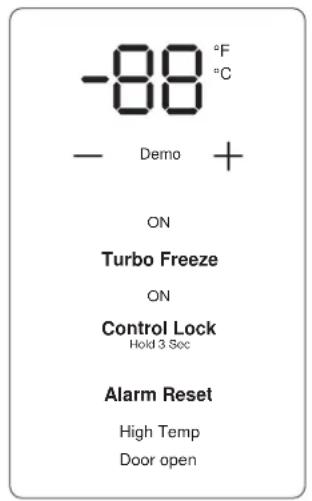
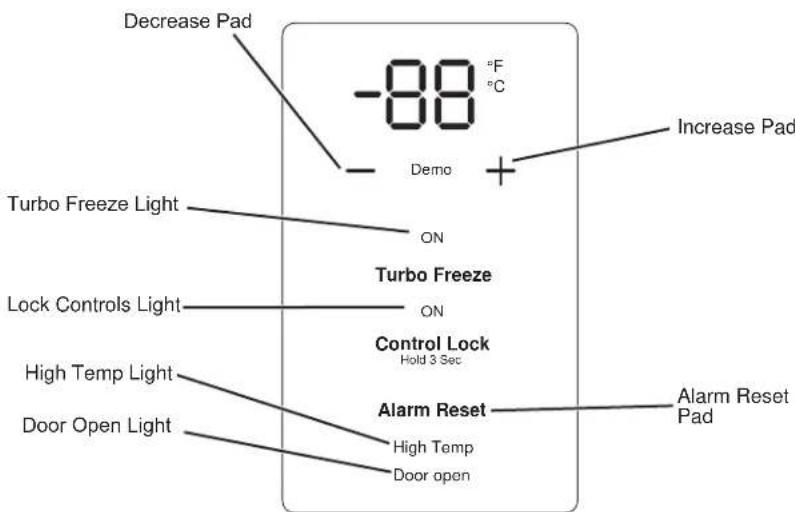
- Connect cord to power outlet. The 7-segement display will come on and flash with the default setting temperature of 0^ , and the "High Temp" Alarm will be displayed on the electronic temperature control with an audible warning. Pressing "Alarm Reset" on the control will silence the alarm, and stop the flashing, but the "High Temp" LED will stay on until your freezer reaches a safe storage temperature.
- Press " - " or "+" to reach desired temperature.
- Press "+" and "-" buttons at the same time for 3 seconds to switch the display temperature unit between ^ F and ^ C .
- Allow freezer to operate for at least four hours before placing food inside.
This electronic temperature control is located on the front of the freezer door. The temperature is factory-preset to provide satisfactory food storage temperatures. To adjust the temperature setting, press - to decrease temperatures and + to increase temperatures. Allow several hours for the temperature to stabilize between adjustments.
High Temp Alarm
This electronic control has a high temperature alarm feature. An alarm will sound if the freezer temperature is high. To silence the alarm, press Alarm Reset on the control panel.
The High Temp will continue to be displayed on the control panel until set temperature has been restored. The alarm will sound again if the temperature is not restored and remains high in six hours.
Turbo Freeze
To enable Turbo Freeze, press Turbo Freeze until Turbo Freeze ON light turns on. The unit will be in "Turbo Freeze" mode for 8 hours and the ON light for Turbo Freeze will stay illuminated. After the 8 hours is completed, Turbo Freeze turns off automatically. The ON light will be off to show that Turbo Freeze is off. To exit Turbo Freeze before the 8 hour automatic shutoff, press Turbo Freeze until ON light for Turbo Freeze is off.
Control Lock
To lock the controls, press Control Lock and hold for 3 seconds until the ON light for Control Lock turns on.
To unlock, press and hold Control Lock for 3 seconds. The ON light for Control Lock turns off and the control panel will be unlocked. Control setting cannot be changed when the control is locked.
Power Fail
If a power outage has caused the internal temperature to be high, the high temp alarm will sound and the temperature display will flash. Pressing Alarm Reset on the control will silence the alarm and stop the flashing, but High Temp LED will stay on until your freezer reaches a safe storage temperature.
If the internal temperature has been restored before you press Alarm Reset, the sound alarm will stop on its own, and the High Temp LED will go off automatically. The temperature display will continue flashing to remind you that a power outage has occurred. Press Alarm Reset to stop the flashing.
Door Open Alarm
If your door has been left open for more than 2 minutes, the control panel will display Door Open and will sound an alarm until the door has been closed or Door Open is pressed on the control panel. If Door Open has been pressed but the door has not been closed, Door Open will continue to be displayed on the control panel until the door has been closed. If 10 minutes after Door Open has been pressed, the door is still open, the door open alarm will sound again.
C or F Setting
To change between C^ or F^ press and hold the - and + pads at the same time for 3 seconds.
Control Dormant
The control settings are displayed at normal condition. Press and hold Control Lock and Turbo Freeze for 3 seconds. The electric control will enter into Dormant Mode and will not show the control settings. The control settings will be displayed for 30 seconds if one of the buttons on the control is pressed or the door is opened while in Dormant Mode. Press and hold Control Lock and Turbo Freeze for 3 seconds again will disable Dormant Mode.
Features
Key-Ejecting Lock
The key for the spring-loaded lock is automatically ejected-key will not remain in lock in either the open or closed position.
Keep the key out of reach of children and away from the freezer.
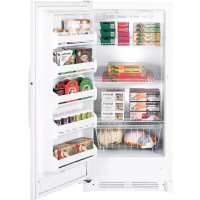
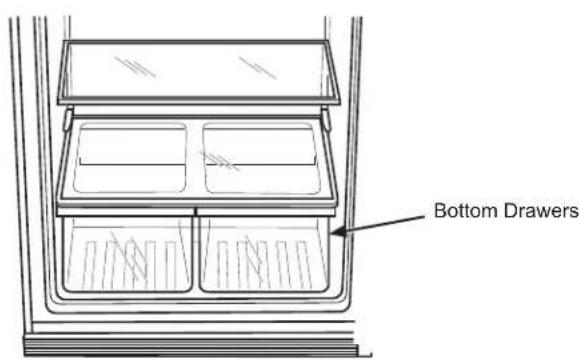
Drawers (on some models)
The drawers provide separate storage spaces for items that are difficult to store on shelves. To remove the drawers, pull out and lift up.

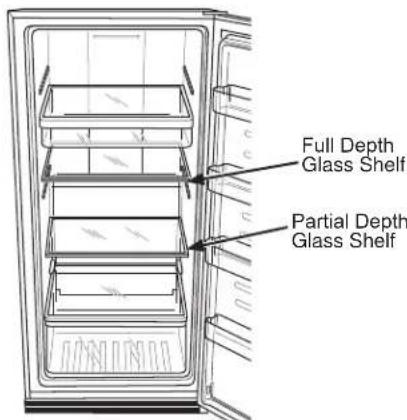
Adjustable Glass Shelves
The glass shelves are adjustable, some are full depth and the others are partial depth.
The full depth glass shelf shall be installed to a higher position where the unit is deeper; and the partial depth glass shelve shall be installed to a lower position where the unit is shallower.
Features
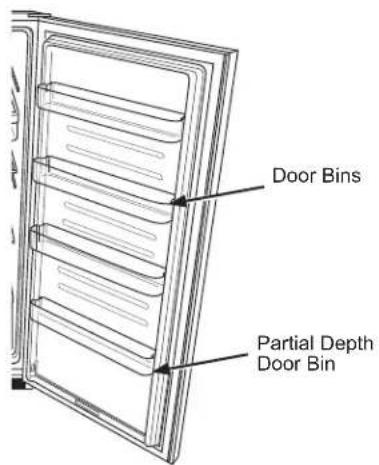
Clear Door Bins
There are 3 full depth door bins and one partial depth door bin on the unit. The partial depth door bin should always be installed at the bottom.
Cleaning the Inside
To help prevent odors, leave an open box of baking soda in the freezer.
Unplug the freezer before cleaning. If this is not practical, wring excess moisture out of sponge or cloth when cleaning around switches, lights or controls. Use warm water and baking soda solution--about a tablespoon (15 ml) of baking soda to a quart (1 liter) of water. This both cleans and neutralizes odors. Thoroughly rinse and wipe dry.
CAUTION
Do not clean glass shelves with warm
water when they are cold. Glass shelves may break if exposed to sudden temperature changes or impact such as bumping or dropping. Tempered glass is designed to shatter into many small pieces if it breaks.
Do not wash any plastic freezer parts in the dishwasher.
Do not clean with any products containing detergent, bleach or ammonia. They may damage the freezer.
After cleaning the door gaskets, apply a thin layer of petroleum jelly to the door gaskets at the hinge side.
This helps keep the gaskets from sticking and bending out of shape.
Cleaning the Outside
Door Handles and Trim. Clean with a cloth dampened with soapy water. Dry with a soft cloth.
Keep the outside clean. Wipe with a clean cloth lightly dampened with kitchen appliance wax or mild liquid dish detergent. Dry and polish with a clean, soft cloth. Do not wipe the freezer with a soiled dish cloth or wet towel. These may leave a residue that can erode the paint. Do not use scouring pads, powdered cleaners, bleach or cleaners containing bleach because these products can scratch and weaken the paint finish.
No Defrosting
You never have to defrost your new No-Frost freezer. It has been pre-set at the factory to defrost itself automatically.
During defrosting, a slight noise may be noticed if the door is opened while the freezer is in the automatic defrosting cycle.
Care and Cleaning
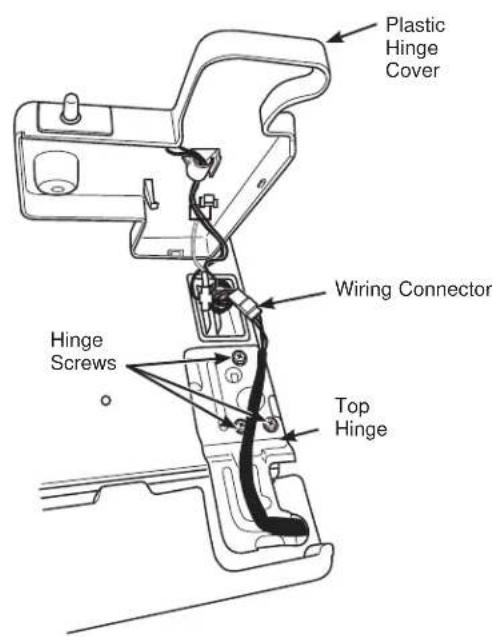
To Remove the Freezer Door
- Remove the plastic hinge cover by removing one screw, disconnect the wiring connector and remove the ambient thermistor from the hinge cover, and then lifting it off.
- Remove the screws holding the hinge to the top of the cabinet using a Phillips screwdriver or 5/16" socket driver. Be carefully not to damage the wiring nearby.
- Remove the top hinge from the cabinet and lift the door up and off the lower hinge pin. Set the door aside.
- Remove the screws from the bottom hinge.
To replace the doors, reverse the order of the above instructions.
NOTICE: It is very important that all hinge screws are securely tightened to ensure a secure assembly and prevent hinge slippage. Do not overtighten the hinge screws. Tighten them until they are just snug, and then turn them another one-half turn.
NOTE: The door swing is not reversible.
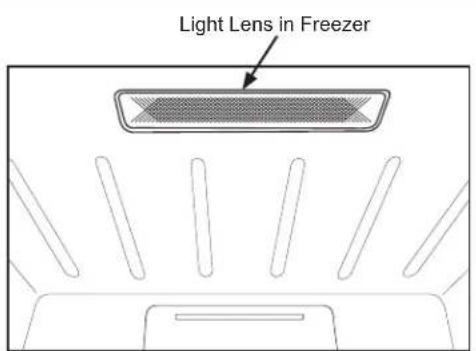
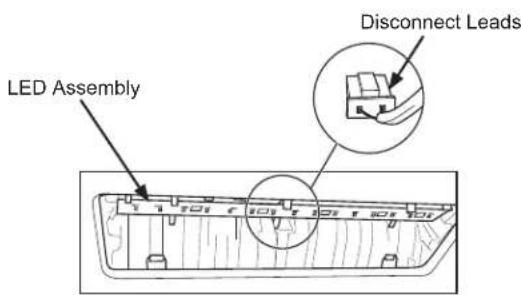
Replacing the LED Light
The LED light is located behind a light lens in the ceiling of the Freezer section.
To replace the LED light:
- Remove the top shelf (if necessary).
- Gently push the three snap-in tabs at the front of the lens, release the lens from the liner, and pull to remove.
- Remove the LED assembly from the mounting tabs.
- Gently pull the leads out and disconnect from the unit.
- Replace with new LED assembly and slide assembly back into mounting tabs.
- Replace the light lens by sliding the tabs at the back of the lens into the slots and push up on the lens until the tabs at the front of the lens snap into place.
To order the LED assembly, please call GE Appliances at 800.GE.CARES (800.492.2737) during normal business hours.
Care and Cleaning
In Case of Extended Power Failure
- Keep freezer door closed. Your freezer will keep food frozen for 24 hours provided warm air is not admitted.
If freezer is out of operation for 24 hours or more, add dry ice. Leave ice in large pieces. Add more ice as required.
CAUTION
freezing of the hands—gloves or other protection is recommended.
If dry ice is not available, move food to a frozen food locker temporarily—until power is restored.
Preparing to Move
Disconnect the power cord plug from the wall outlet. Remove foods and clean the freezer.
Secure all loose items such as baskets and shelves by taping them securely in place to prevent damage.
Be sure freezer stays in upright position during actual moving and during transportation. The freezer must be secured during transportation to prevent movement. Protect outside of freezer with blanket.
Preparing for Vacation
To maintain freezer in operation during vacations, be sure your house power is not turned off. For sure protection of freezer contents, you may want to ask a neighbor to check the power supply and freezer operation every 48 hours.
For extended vacations or absences, you may prefer to move your frozen foods to a storage locker temporarily. If your freezer is to be left empty, disconnect power cord
plug from wall outlet. To prevent formation of odors, place open box of baking soda in freezer and leave freezer door open.
When the freezer is not operating, it can be left in an unheated house or room without damage to cabinet or mechanism.
Save Money/Save Energy
The freezer should be located in the coolest area of the room, away from heat-producing appliances or heating ducts, and out of direct sunlight.
- Let hot foods cool to room temperature before placing in the freezer. Overloading the freezer forces the compressor to run longer. Foods that freeze too slowly may lose quality or spoil.

- Be sure to wrap foods properly, and wipe containers dry before placing them in the freezer. This cuts down on frost buildup inside the freezer.
- Organize and label food to reduce door openings and extended searches. Remove as many items as needed at one time, and close the door as soon as possible.
Installing the Freezer
Freezer Location
Your freezer should be conveniently located for day-to-day use in a dry, well-ventilated room.
Do not install the freezer where the temperature will go below 0^ or above 110^ , because it will not maintain proper temperatures.
Be sure to install your freezer on a floor strong enough to support it when it is fully loaded.
Clearances
On all models, allow 3" (76 mm) on top, back and sides for proper air circulation.
Adjustable Legs
Legs at the front corners of the freezer should be set so the freezer is firmly positioned on the floor, and the front is raised just enough so the door closes easily when opened about halfway.
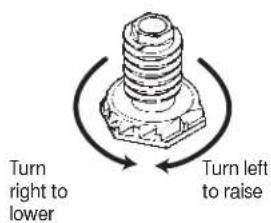
Level Freezer
Use a carpenter's level to level the freezer from back to front. Adjust the plastic leveling feet in front 1/2 bubble higher so the door closes easily when left open.
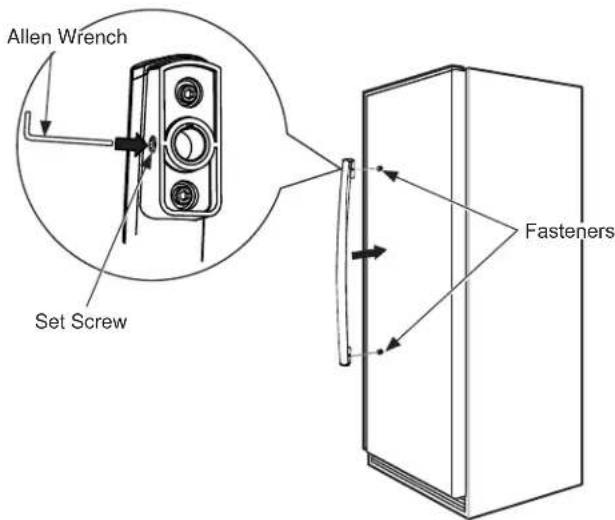
Door Handle
Shape of handle may vary on your model.
- Align the handle with fasteners.
- Push the handle over fasteners until it touches the door.
- Use the allen wrench to turn set screw clockwise to fasten the handle to the door.
Unit Loading
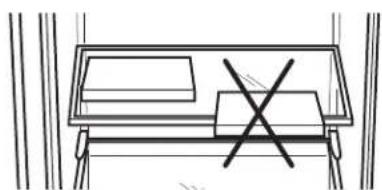
NOTICE: To allow the door to close and seal properly, DO NOT let food packages extend past the front of the shelves.
Troubleshooting Tips... Before you call for service
Save time and money! Review the charts on the following pages first and you may not need to call for service.
| Problem Possible Causes What to Do | ||
| Freezer does not operate Freezer is unplugged. Push the plug completely into the outlet. | ||
| The fuse is blown/circuit breaker is tripped. | Replace fuse or reset the breaker. | |
| "Demo" LED light is on and Freezer is in Demo mode. | Please press "Alarm Reset" first, and then press the "+" and "+" immediately while holding "Control Lock" at the same time for 5 seconds and release. "Demo" LED light will be off. | |
| Freezer starts/stops too frequently | Door left open. Check to see if package is holding door open. | |
| Too frequent or too long door openings. | Open the door less often. | |
| Temperature control set too cold. See Temperature Control. | ||
| Freezer operates too long D | Door left open. Check to see if package is holding door open. | |
| Too frequent or too long door openings. | Open the door less often. | |
| Temperature control set too cold. See Temperature Control. | ||
| Inadequate air circulation space around cabinet. | See Installing the Freezer. | |
| Room or outside weather is hot. It's normal for the freezer to work harder under these conditions. | ||
| Freezer has been disconnected recently for a period of time. | It takes 4 hours for the freezer to cool down completely. | |
| Large amounts of warm or hot food have been stored recently. | Warm food will cause the freezer to run more until the desired temperature is reached | |
| Noisy operation or cabinet vibrates | Floor may be weak, causing freezer to vibrate when compressor is on. | Check to make sure freezer is located on solid floor and adjust leveling legs as needed. |
| Cabinet is not positioned solidly on floor. | Adjust legs. See Installing the Freezer. Or use shims for uneven floor. | |
| Freezer is touching the wall. | Level freezer or move slightly. See Level Freezer. | |
| Freezer temperature too warm | Door left open. Check to see if package is holding door open. | |
| Too frequent or too long door openings. | Open the door less often. | |
| Temperature control is set too warm. | Turn control to a colder setting. Allow several hours for the temperature to stabilize. | |
| Large amounts of water or hot food may have been stored recently. | Wait until the freezer has had a chance to reach its selected temperature. | |
| Freezer has been disconnected recently. | Freezer requires 4 hours to cool down completely. | |
| Foods defrosting High temp | alarm is on and temperature display is flashing. | Power outage may have caused high internal temperature. |
| Freezer is unplugged. Push the plug completely into the outlet. | ||
| The fuse is blown/circuit breaker is tripped. | Replace fuse or reset the breaker. | |
| Door left open. Check to see if package is holding door open. | ||
| Too frequent or too long door openings. | Open the door less often. | |
| Freezer temperature too cold | Temperature control set too cold. | See About the operation of your freezer. |
Troubleshooting Tips... Before you call for service
| Problem Possible Causes What to Do | ||
| Moisture forms on outside of cabinet | Not unusual during periods of high humidity. | Wipe surface dry. |
| Door may not be seating properly, causing cold air from inside the freezer to meet warm moist air from the outside. | See Preparing to install the freezer. | |
| Interior light does not work No power at outlet. Replace fuse or reset the breaker. | ||
| Freezer is unplugged. Push the plug completely into the outlet. | ||
| LED light burned out. Replace the LED. | ||
| Door won't fully close by itself | Legs need adjusting. | See Preparing to install the freezer. |
| Package holding door open. Move package to a different location. | ||
| Slow starting time after being off | Built-in overload protection. | This is normal after being off. |
| Excessive frost buildup Door left open | Open. Check to see if package is holding door open. | |
| Too frequent or too long door openings. | Open the door less often. | |
| Not unusual during periods of high humidity. | Wipe surface dry. | |
| Freezer external surface temperature is warm | The external freezer walls can be as much as 30°F warmer than room temperature. | This is normal while the compressor works to transfer heat from inside the freezer cabinet. |
| Louder sound levels whenever freezer is on | Modern freezers have increased storage capacity and more stable temperatures. They require a high-efficiency compressor. | This is normal. When the surrounding noise level is low, you might hear the compressor running while it cools the interior. |
| Higher sound levels when compressor comes on | Freezer operates at higher pressures during the start of the ON cycle. | This is normal. Sound will level off or disappear as freezer continues to run. |
| Popping or cracking sound when compressor comes on | Metal parts undergo expansion and contraction, as in hot water pipes. | This is normal. Sound will level off or disappear as freezer continues to run. |
| Bubbling or gurgling sound, like boiling water | Refrigerant (used to cool freezer) is circulating throughout the system. | This is normal. |
| Moisture forms on inside freezer walls | Weather is hot and humid, which increases internal rate of frost buildup. | This is normal. |
| Door may not be seating properly. | See Preparing to install the freezer. | |
| Door is kept open too long, or is opened too frequently. | Open the door less often. | |
| Odors in freezer | Interior needs to be cleaned. | Clean interior with sponge, warm water and baking soda. |
| Foods with strong odors are in the freezer. | Cover the food tightly. | |
Normal Operating Characteristics
A warm cabinet exterior as the refrigeration system transfers heat from the inside to the outside through the exterior cabinet walls.
The sound of the high-efficiency compressor motor.
The sound of water dripping as it melts from the evaporator and escapes to the drain pan during defrost cycle.
The sound of the fan circulating air within the interior of the cabinet providing a consistent temperature throughout.
GE Appliances Freezer Warranty
GEAppliances.com
All warranty service is provided by our Factory Service Centers, or an authorized Customer Care® technician. To schedule service online, visit us at www.geappliances.com, or call GE Appliances at 800.GE.CARES (800.432.2737). Please have your serial number and your model number available when calling for service. In Canada, call 800.661.1616.
For the Period of: GE Appliances Will Replace
| One Year From the date of the original purchase | Any part of the freezer which fails due to a defect in materials or workmanship. During the limited one-year warranty, GE Appliances will also provide, free of charge, all labor and related service to replace the defective part. |
What GE Appliances Will Not Cover:
Service trips to your home to teach you how to use the product.
- Improper installation, delivery or maintenance.
Failure of the product if it is abused, misused, or used for other than the intended purpose or used commercially.
Loss of food due to spoilage.
Damage caused after delivery.
- Replacement of house fuses or resetting of circuit breakers.
- Damage to the product caused by accident, fire, floods or acts of God.
- Incidental or consequential damage caused by possible defects with this appliance.
Product not accessible to provide required service.
EXCLUSION OF IMPLIED WARRANTYES
Your sole and exclusive remedy is product repair as provided in this Limited Warranty. Any implied warranties, including the implied warranties of merchantability or fitness for a particular purpose, are limited to one year or the shortest period allowed by law.
For US Customers: This warranty is extended to the original purchaser and any succeeding owner for products purchased for home use within the USA. If the product is located in an area where service by a GE Appliances Authorized Servicer is not available, you may be responsible for a trip charge or you may be required to bring the product to an Authorized GE Appliances Service location for service. In Alaska, the warranty excludes the cost of shipping or service calls to your home.
Some states do not allow the exclusion or limitation of incidental or consequential damages. This warranty gives you specific legal rights, and you may also have other rights which vary from state to state. To know what your legal rights are, consult your local or state consumer affairs office or your state's Attorney General.
Warrantor: GE Appliances
For Customers in Canada: This warranty is extended to the original purchaser and any succeeding owner for products purchased in Canada for home use within Canada. In-home warrant service will be provided in areas where it is available and deemed reasonable by Mabe to provide.
Warrantor Canada: MC Commercial, Burlington, Ontario, L7R 5B6
Consumer Support
GE Appliances Website
Have a question or need assistance with your appliance? Try the GE Appliances Website 24 hours a day, any day of the year! You can also shop for more great GE Appliances products and take advantage of all our on-line support services designed for your convenience. In the US: GEAppliances.com In Canada: GEAppliances.ca
Register Your Appliance
Register your new appliance on-line at your convenience! Timely product registration will allow for enhanced communication and prompt service under the terms of your warranty, should the need arise. You may also mail in the pre-printed registration card included in the packing material.
In the US: GEAppliances.com/register
In Canada: Prodsupport.mabe.ca/crm/Products/ProductRegistration.aspx
Schedule Service
Expert GE Appliances repair service is only one step away from your door. Get on-line and schedule your service at your convenience any day of the year. In the US: GEAppliances.com/ge/service-and-support/service.htm or call 800.432.2737 during normal business hours.
In Canada: GEAppliances.ca/en/support/service-request or call 800.561.3344
Extended Warranties
Purchase a GE Appliances extended warranty and learn about special discounts that are available while your warranty is still in effect. You can purchase it on-line anytime. GE Appliances Services will still be there after your warranty expires. In the US: GEAppliances.com/ge/service-and-support/shop-for-extended-service-plans.htm or call 800.626.2224 during normal business hours.
In Canada: GEAppliances.ca/en/support/purchase-extended-warranty or call 800.290.9029
Parts and Accessories
Individuals qualifed to service their own appliances can have parts or accessories sent directly to their homes (VISA, MasterCard and Discover cards are accepted). Order on-line today 24 hours every day. In the US: GEApplianceparts.com or by phone at 877.959.8688 during normal business hours.
Instructions contained in this manual cover procedures to be performed by any user. Other servicing generally should be referred to qualified service personnel. Caution must be exercised, since improper servicing may cause unsafe operation.
Customers in Canada should consult the yellow pages for the nearest Mabe service center, visit our website at GEAppliances.ca/en/products/parts-filters-accessories or call 800.661.1616.
Contact Us
If you are not satisfied with the service you receive from GE Appliances, contact us on our Website with all the details including your phone number, or write to:
In the US: General Manager, Customer Relations | GE Appliances, Appliance Park | Louisville, KY 40225
GEAppliances.com/ge/service-and-support/contact.htm
In Canada: Director, Consumer Relations, Mabe Canada Inc. | Suite 310, 1 Factory Lane | Moncton, N.B. E1C 9M3
GEAppliances.ca/en/contact-us
INFORMATION DE SECURITE...3
UTILISATION DU CONGÉLATEUR
Garant Canada : MC Commercial, Burlington, Ontario, L7R 5B6
Au Canada: Prodsupport.mabe.ca/crm/Products/ProductRegistration.aspx
Au Canada: GEAppliances.ca/en/support/service-request ou composez le 800.561.3344
Prolongation de garantie
Au Canada: GEAppliances.ca/en/support/purchase-extended-warranty ou composez le 800.290.9029
GEAppliances.com/ge/service-and-support/contact.htm
Au Canada : Director, Consumer Relations, Mabe Canada Inc. | Suite 310, 1 Factory Lane | Moncton, N.B. E1C 9M3 GEAppliances.ca/en/contact-us
FREEZERS VERTICALES
SOLUTIONAR PROBLEMAS...13
GARANTIA 15
SERVICIO AL CONSUMIDOR...16
MANUAL DEL
PROPIETARIO
E INSTALLACION
Warrantor: GE Appliances
GEAppliances.com/ge/service-and-support/contact.htm