PerfectCare Compact GC7842 - Iron PHILIPS - Free user manual and instructions
Find the device manual for free PerfectCare Compact GC7842 PHILIPS in PDF.
Download the instructions for your Iron in PDF format for free! Find your manual PerfectCare Compact GC7842 - PHILIPS and take your electronic device back in hand. On this page are published all the documents necessary for the use of your device. PerfectCare Compact GC7842 by PHILIPS.
USER MANUAL PerfectCare Compact GC7842 PHILIPS
PHILIPS and the Philips Shield Emblem are registered trademarks of Koninklijke Philips N.V. and are used under license. This product has been manufactured by and is sold under the responsibility of Versuni Holding B.V., and Versuni Holding B.V. is the warrantor in relation to this product. 2023 © Versuni Holding B.V. 6420.010.0198.2 (12/07/2023) >75% recycled paper >75% papier recyclé
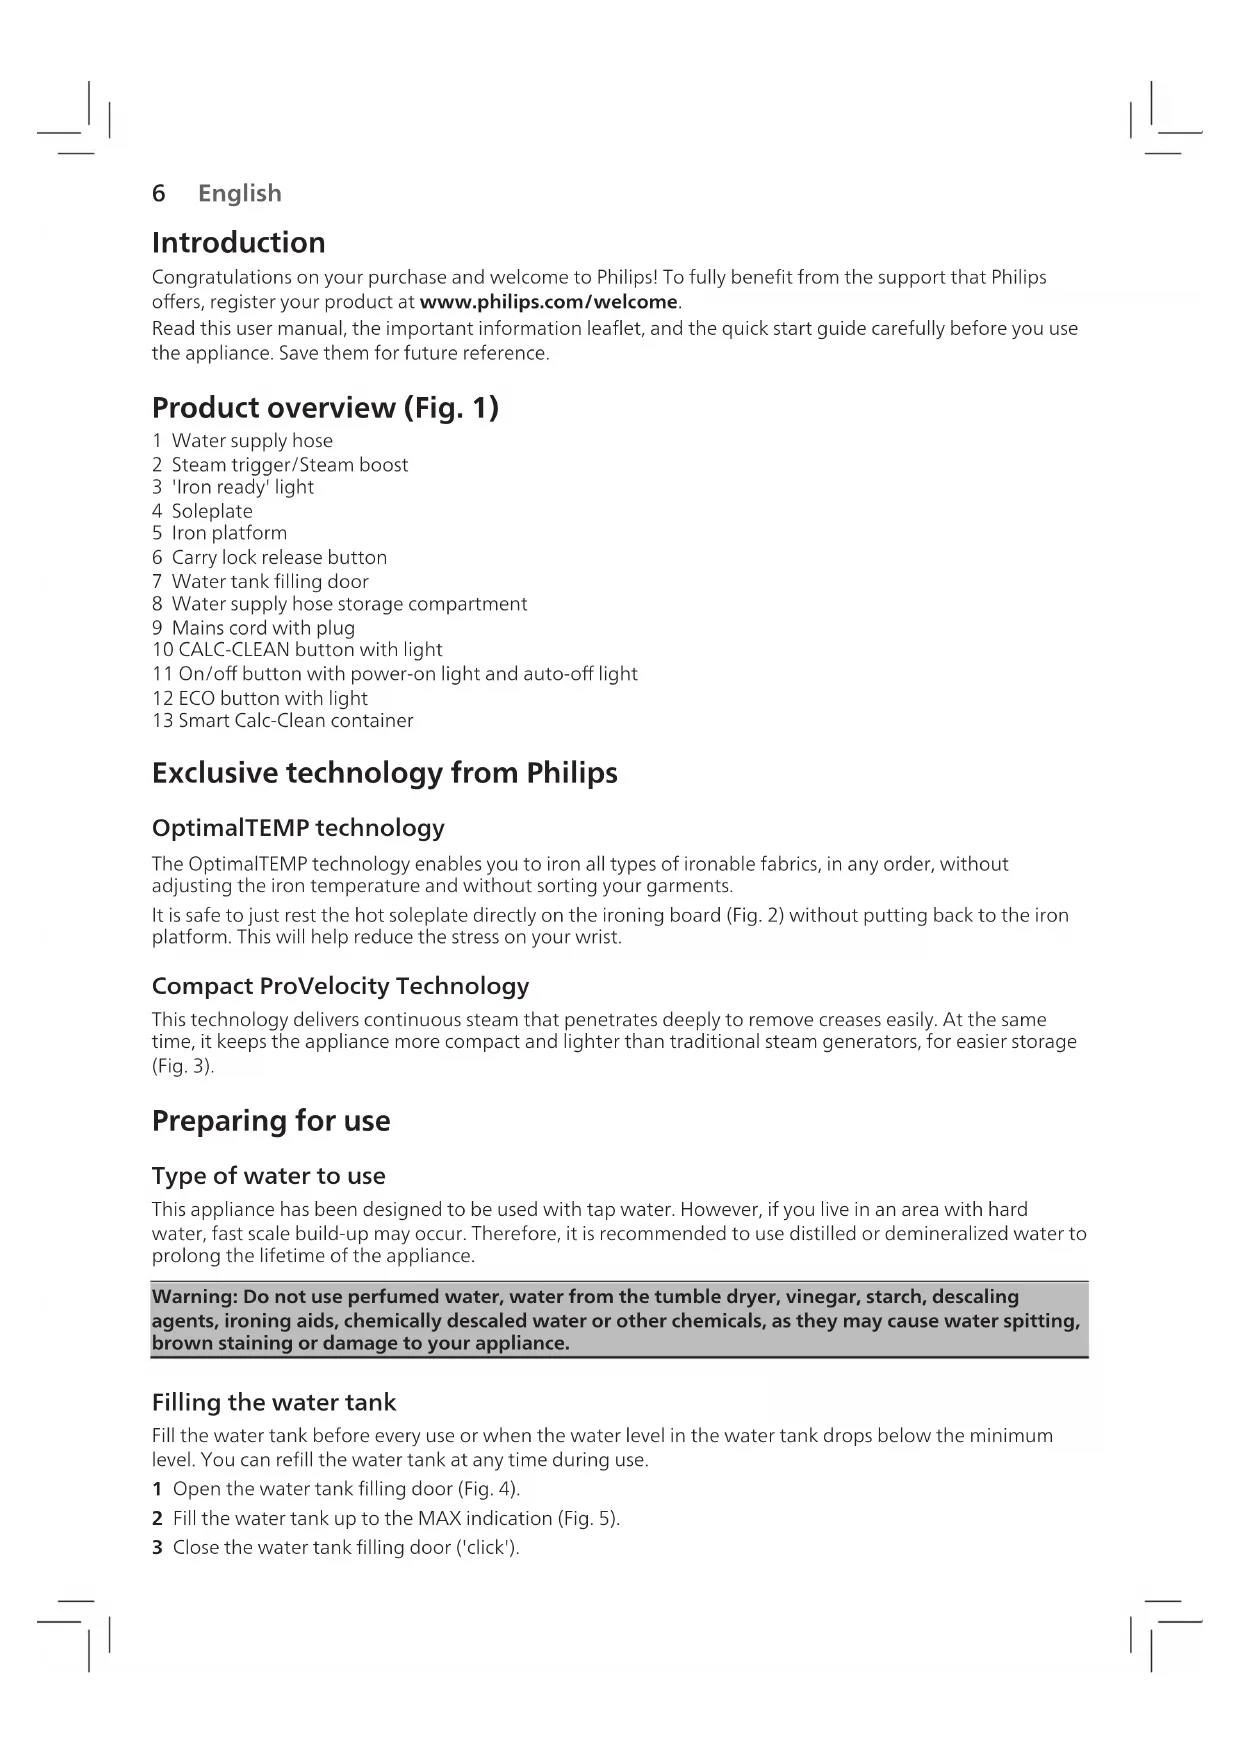
Introduction Congratulations on your purchase and welcome to Philips! To fully benet from the support that Philips oers, register your product at www.philips.com/welcome. Read this user manual, the important information leaet, and the quick start guide carefully before you use the appliance. Save them for future reference. Product overview (Fig. 1) 1 Water supply hose 2 Steam trigger/Steam boost 3 'Iron ready' light 4 Soleplate 5 Iron platform 6 Carry lock release button 7 Water tank lling door 8 Water supply hose storage compartment 9 Mains cord with plug 10 CALC-CLEAN button with light 11 On/o button with power-on light and auto-o light 12 ECO button with light 13 Smart Calc-Clean container Exclusive technology from Philips OptimalTEMP technology The OptimalTEMP technology enables you to iron all types of ironable fabrics, in any order, without adjusting the iron temperature and without sorting your garments. It is safe to just rest the hot soleplate directly on the ironing board (Fig. 2) without putting back to the iron platform. This will help reduce the stress on your wrist. Compact ProVelocity Technology This technology delivers continuous steam that penetrates deeply to remove creases easily. At the same time, it keeps the appliance more compact and lighter than traditional steam generators, for easier storage (Fig. 3). Preparing for use Type of water to use This appliance has been designed to be used with tap water. However, if you live in an area with hard water, fast scale build-up may occur. Therefore, it is recommended to use distilled or demineralized water to prolong the lifetime of the appliance.
Warning: Do not use perfumed water, water from the tumble dryer, vinegar, starch, descaling
agents, ironing aids, chemically descaled water or other chemicals, as they may cause water spitting, brown staining or damage to your appliance. Filling the water tank Fill the water tank before every use or when the water level in the water tank drops below the minimum level. You can rell the water tank at any time during use. 1 Open the water tank lling door (Fig. 4). 2 Fill the water tank up to the MAX indication (Fig. 5). 3 Close the water tank lling door ('click'). English7 Using the appliance Ironable fabrics Do not iron non-ironable fabrics. - Fabrics with these symbols (Fig. 6) are ironable, for example linen, cotton, polyester, silk, wool, viscose and rayon. - Fabrics with this symbol (Fig. 7) are not ironable. These fabrics include synthetic fabrics such as Spandex or elastane, Spandex-mixed fabrics and polyolens (e.g. polypropylene). Prints on garments are not ironable either. Ironing 1 Place the steam generator on a stable and even surface. Note: In order to ensure safe ironing we recommend to always place the base on a stable ironing board. 2 Make sure that there is enough water in the water tank. 3 Put the mains plug in an earthed wall socket and press the on/o button to switch on the steam generator.Wait until the 'iron ready' light lights up continuously (Fig. 8). This takes approx. 2 minutes. 4 Remove the water supply hose from the water supply hose storage compartment. 5 Press the carry lock release button to unlock the iron from the iron platform (Fig. 9). 6 Press and hold the steam trigger to start ironing (Fig. 10). 7 For best ironing results, after ironing with steam, perform the last strokes without steam.
Warning: Never direct steam at people.
Note: When you use the appliance for the rst time, it may take 30 seconds for steam to come out of the appliance. Note: The pump is activated each time you press the steam trigger. It produces subtle rattling sound, which is normal. When there is no water in the water tank, the pump sound is louder. Fill up the water tank with water when the water level drops below the minimum level. For more powerful steam, you can use the TURBO steam mode, which is safe on all ironable fabrics. For fabrics such as cotton, jeans and linen, you are recommended to use the TURBO steam mode. 1 Press and hold the on/o button for 2 seconds until the light turns white. 2 To deactivate the TURBO mode, press and hold the on/o button for 2 seconds again until the light turns blue. Steam boost function Use the steam boost function to remove stubborn creases. 1 Press the steam trigger twice quickly (Fig. 11). Vertical ironing
Warning: Hot steam is emitted from the iron. Never attempt to remove wrinkles from a garment
while someone is wearing it (Fig. 12). Do not apply steam near your or someone else's hand. You can use the steam iron in vertical position to remove wrinkles from hanging fabrics. 1 Hold the iron in vertical position, press the steam trigger and touch the garment lightly with the soleplate and move the iron up and down (Fig. 13). English8 Safe rest Resting the iron while rearranging your garment While rearranging your garment, you can rest the iron either on the iron platform or horizontally on the ironing board (Fig.2). The OptimalTEMP technology ensures the soleplate will not damage the ironing board cover. Energy saving Eco mode By using the ECO mode (reduced amount of steam), you can save energy without compromising on the ironing result. 1 To activate the ECO mode, press the ECO button (Fig. 14). The green ECO light goes on. 2 To deactivate the ECO mode, press the ECO button again. The green ECO light goes out. Safety auto-o mode (specic types only) - To save energy, the appliance switches o automatically when it has not been used for 5 minutes. The auto-o light in the on/o button starts to ash. - To activate the appliance again, press the on/o button. The appliance then starts to heat up again.
Warning: Never leave the appliance unattended when it is connected to the mains. Always unplug
the appliance after use. Cleaning and maintenance Smart Calc-Clean System Your appliance has been designed with a Smart Calc-Clean system to ensure that descaling and cleaning is done regularly. This helps to maintain a strong steam performance and prevents dirt and stains coming out of the soleplate over time. To ensure that the cleaning process is performed, the steam generator gives regular reminders. Sound and light Calc-Clean reminder After 1 to 3 months of use, the Calc-Clean light starts ashing and the appliance starts beeping to indicate that you have to perform the Calc-Clean process (Fig. 15). Besides that, a second defense step to protect the steam generator from scale is integrated: the steam function gets disabled if descaling is not done (Fig. 16). After descaling is done, the steam function will be restored. This takes place regardless of the type of water used. Note: The Calc-Clean process can be performed at any time, even when the sound and light reminder is not activated yet. Performing the Calc-Clean process with the Calc-Clean container
Warning: Do not leave the appliance unattended during the Calc-Clean process.
Caution: Always perform the Calc-Clean process with the Calc-Clean container. Do not interrupt the process by lifting the iron up from the Calc-Clean container, as hot water and steam will come out of the soleplate. 1 Fill up the water tank halfway (Fig. 17). Note: Make sure that the appliance is plugged in and switched ON during the Calc-Clean process. English9 2 Place the Calc-Clean container on the ironing board or any other even, stable surface (Fig. 18). 3 Place the iron stably on the Calc-Clean container (Fig. 19). 4 Press and hold the CALC-CLEAN button for 2 seconds until you hear short beeps (Fig. 20). Note: The Calc-Clean container has been designed to collect scale particles and hot water during the Calc-Clean process. It is perfectly safe to rest the iron on this container during the entire process. 5 During the Calc-Clean process, you hear short beeps and a pumping sound (Fig. 21). 6 Wait approximately 2 minutes for the appliance to complete the process (Fig. 22). When the Calc-Clean process is completed, the iron stops beeping and the CALC-CLEAN light stops ashing. 7 Wipe the iron with a piece of cloth and put it back on the base station (Fig. 23). Caution: The iron is hot. 8 As the Calc-Clean container becomes hot during the Calc-Clean process, wait approx. 5 minutes before you touch it. Then carry the Calc-Clean container to the sink, empty it and store it for future use (Fig. 24). 9 If necessary, you can repeat steps 1 to 8. Make sure that you empty the Calc-Clean container before you start the Calc-Clean process. Note: During the Calc-Clean process, clean water may come out of the soleplate if no scale has accumulated inside the iron. This is normal. For more information on how to carry out the Calc-Clean process, refer to the videos in this link: http://www.philips.com/descaling-iron. Cleaning the soleplate To properly maintain your appliance, clean it regularly. 1 Clean the appliance with a moist cloth. 2 To easily and eectively remove stains, let the soleplate heat up and move the iron over a moist cloth (Fig. 25). Tip: Clean the soleplate regularly to ensure smooth gliding. Storage 1 Switch o the steam generator and unplug it. 2 Pour the water out of the water tank into the sink (Fig. 26). 3 Fold the water supply hose. Wind the water supply hose inside the water supply hose storage compartment and secure it inside the storage hook (Fig. 27). 4 Fold the mains cord and fasten it with the Velcro strip (Fig. 28). 5 Push the carry lock release button to lock the iron onto the iron platform (Fig. 29). 6 You can carry the appliance with one hand by the handle of the iron when the iron is locked on the iron platform (Fig.30). Troubleshooting This chapter summarizes the most common problems you could encounter with the appliance. If you are unable to solve the problem with the information below, visit www.philips.com/support for a list of frequently asked questions or contact the Consumer Care Center in your country. Problem Possible cause Solution The iron does not produce any steam. There is not enough water in the water tank. Fill the water tank beyond the MIN indication. Press and hold the steam trigger until steam comes out. It may take up to 30 seconds until steam comes out. English10 Problem Possible cause Solution You did not press the steam trigger. Press and hold the steam trigger until steam comes out. The steam function has been disabled until you have performed the Calc-Clean process. Perform the Calc-Clean process to restore the steam function. (see chapter ' Cleaning and maintenance') At the start of your ironing session, the steam trigger has not been pressed long enough. Press and hold the steam trigger until steam comes out. It may take up to 30 seconds until steam comes out. The light of the CALC- CLEAN button ashes and the appliance beeps. This is the Calc-Clean reminder. Perform the Calc-Clean after the Calc-Clean reminder is given (see chapter 'Cleaning and maintenance'). No steam comes out of the soleplate, the light of the CALC-CLEAN button ashes and the appliance beeps. You have not done or have not completed the Calc-Clean process. Perform the Calc-Clean process to enable the steam function again (see chapter 'Cleaning and maintenance'). The appliance has switched o. The safety auto-o function is activated automatically when the appliance has not been used for more than 5 minutes. To activate the appliance again, press the on/ o button. The appliance then starts to heat up again. The appliance produces a loud pumping sound. The water tank is empty. Fill the water tank with water and press the steam trigger until the pumping sound becomes softer and steam comes out of the soleplate. Water droplets come out of the soleplate. After the Calc-Clean process remaining water may drip out of the soleplate. Wipe the soleplate dry with a piece of cloth. If the Calc-Clean light still ashes and the appliance still beeps, perform the Calc- Clean process (see chapter 'Cleaning and maintenance'). The Calc-Clean process has not been completed. You have to perform the Calc-Clean process again (see chapter 'Cleaning and maintenance'). Steam condenses into water in the hose when you use steam for the rst time or have not used it for a long time. This is normal. Hold the iron away from the garment and press the steam trigger.Wait until steam instead of water comes out of the soleplate. Dirty water and impurities come out of the soleplate. Impurities or chemicals present in the water have deposited in the steam vents and/or soleplate. Perform the Calc-Clean process regularly (see chapter 'Cleaning and maintenance'). Water ushes out of the soleplate. You have accidentally started the Calc-Clean process (see chapter 'Cleaning and maintenance'). Switch o the appliance. Then switch it back on again. Let the iron heat up until the 'iron ready' light lights up steadily. The Calc-Clean process does not start. You have not pressed the CALC-CLEAN button for 2seconds until the appliance started beeping. See chapter 'Cleaning and maintenance'. English11 Problem Possible cause Solution The iron leaves a shine or an imprint on the garment. The surface to be ironed was uneven, for instance because you were ironing over a seam or a fold in the garment. PerfectCare is safe on all garments. The shine or imprint is not permanent and will come o if you wash the garment.Avoid ironing over seams or folds or you can place a cotton cloth over the area to be ironed to avoid imprints. There was not enough felt in the ironing board cover. Put an extra layer of felt material under the ironing board cover. The ironing board cover becomes wet, or there are water droplets on the oor/garment. Steam has condensed on the ironing board cover after a long ironing session. Replace the ironing board cover if the foam or felt material has worn out. You can also add an extra layer of felt material under the ironing board cover to prevent condensation on the ironing board. You have an ironing board that is not designed to cope with the high steam rate of the appliance. Put an extra layer of felt material under the ironing board cover to prevent condensation on the ironing board. English12 Introduction Félicitations pour votre achat et bienvenue dans l'univers Philips! Pour proter pleinement de l'assistance oerte par Philips, enregistrez votre produit à l'adresse suivante: www.philips.com/welcome. Lisez attentivement ce mode d'emploi, la brochure «Informations importantes» et le guide de démarrage rapide avant d'utiliser l'appareil. Conservez ces documents pour toute consultation ultérieure. Présentation du produit (Fig.1) 1 Tuyau d'alimentation en eau 2 Gâchette vapeur/Eet pressing 3 Voyant «Fer prêt» 4 Semelle 5 Support du fer à repasser 6 Bouton de déverrouillage du fer 7 Couvercle de remplissage du réservoir d'eau 8 Compartiment de rangement du tuyau d'alimentation en eau 9 Cordon d'alimentation avec che secteur 10 Bouton CALC-CLEAN avec voyant 11 Bouton marche/arrêt avec voyant d'alimentation et voyant d'arrêt automatique 12 Bouton ECO avec voyant 13 Réservoir anticalcaire intelligent Technologie exclusive de Philips Technologie OptimalTEMP La technologie OptimalTEMP vous permet de repasser tous les types de tissus repassables, dans l'ordre que vous souhaitez, sans avoir à régler la température du fer ni à trier vos vêtements. Vous pouvez poser en toute sécurité la semelle chaude directement sur la planche à repasser (Fig. 2) sans la remettre sur son support. Cela aide à réduire les tensions au niveau de votre poignet. Technologie Compact ProVelocity Cette technologie produit une vapeur continue qui pénètre en profondeur dans les tissus pour éliminer facilement les faux plis. De plus, les appareils équipés de cette technologie sont plus compacts et légers que les centrales vapeur traditionnelles et se rangent plus facilement. Avant utilisation Type d'eau à utiliser Cet appareil a été conçu pour une utilisation avec de l'eau du robinet. Si vous habitez dans une région où l'eau est très calcaire, des dépôts se formeront rapidement. Il est dès lors recommandé d'utiliser de l'eau distillée ou déminéralisée an de prolonger la durée de vie de l'appareil.
.(27 4 .(28 5 .(29 6 .(30