
OCEATV4ZSE - Cooker OCEANIC - Free user manual and instructions
Find the device manual for free OCEATV4ZSE OCEANIC in PDF.
| Product type | Ceramic glass hob |
| Brand | Oceanic |
| Model | OCEATV4ZSE |
| Number of cooking zones | 4 radiant zones |
| Product dimensions (WxDxH) | 590 x 520 x 52 mm |
| Recess dimensions (WxD) | 560 x 490 mm |
| Supply voltage | 220-240 V~ |
| Installed electric power | 5490 - 6533 W |
| Energy consumption of the hob | 206 Wh/kg |
| Cooking zone diameters | Zone 1 & 3: 18.5 cm Zone 2 & 4: 15.5 cm |
| Power per zone | Zones 1 & 3: max 1800 W Zones 2 & 4: max 1200 W |
| Control type | Touch controls |
| Main functions | Programmable timer (up to 99 min), control lock, automatic shut-off, residual heat indicator |
| Safety | Child lock, automatic shut-off in case of overheating, heat-resistant ceramic glass surface |
| Maintenance and cleaning | Use a specific ceramic glass cleaner, scraper for burnt residues |
| Installation | By a qualified technician, requires a heat-resistant worktop (min. thickness 5 cm), safety distance 760 mm above |
| Warranty | Standard warranty (excluding wear parts and damage due to improper use) |
Frequently Asked Questions - OCEATV4ZSE OCEANIC
User questions about OCEATV4ZSE OCEANIC
0 question about this device. Answer the ones you know or ask your own.
Ask a new question about this device
Download the instructions for your Cooker in PDF format for free! Find your manual OCEATV4ZSE - OCEANIC and take your electronic device back in hand. On this page are published all the documents necessary for the use of your device. OCEATV4ZSE by OCEANIC.
USER MANUAL OCEATV4ZSE OCEANIC
OCEATV4ZSE
oceanic
AVERTISSEMENTS ET CONSEILS DE SECURITE IMPORTANTS
- EN (translated from the original)
natural_image
Three identical cooking pots with crossed-out X marks, no text or symbols presentnatural_image
Four identical cooking pots with crossed-out X marks, shown in sequence (no text or symbols)II. SPECIFICATIONS TECHNIQUES
| L (mm) | W (mm) | H (mm) | D(mm) | A (mm) | B (mm) | X (mm) |
| 590 | 520 | 52 | 48 | 560 | 490 | 50 mini |
natural_image
Simple line drawing of a mechanical component inside a circular frame (no text or symbols)| A | B | C | D |
| Vis | Support | Trou de vis | Base |
natural_image
Simple line drawing of a hand with a circular head and index finger (no text or symbols)natural_image
Line drawing of a cooking pot on a stand (no text or symbols)natural_image
Simple line drawing of a hand with a circular mark on the index finger (no text or symbols)natural_image
Simple line drawing of a hand pointing upward with a circular icon on the index finger (no text or symbols)
Avertissement ! Attention aux surfaces chaudes
Protection anti-surchauffe
chemical
Simple molecular structure diagram showing a positively charged atom bonded to two negatively charged atomsGuide de cuisine

IMPORTANT WARNINGS AND SAFETY INSTRUCTIONS
We encourage you to read this user guide carefully and completely before installing and using your device.
- CAUTION: Accessible parts of the appliance are heated at high temperature during use. Be careful never to touch the heating elements. Children under 8 years old must be kept at a distance or remain under permanent surveillance.
- This device may be used by children 8 years of age or older, and those with reduced physical, sensory or mental capabilities, or lack of experience or knowledge, if properly supervised, if instructed to the device was safely used and the risks were apprehended. Never let a child play with the device. Cleaning or maintenance operations should not
be performed by a child without supervision.
- CAUTION: It can be dangerous to leave grease or oil unattended on a cooktop as this can cause a fire. DO NOT try to extinguish a fire with water. Turn off the appliance and then cover the flames, for example with a fireproof lid or blanket.
- CAUTION: Risk of fire: Never store any object on the hob.
- CAUTION: If the surface is cracked, turn off the power to prevent electric shock.
- Do not attempt to clean the cooktop with a steam cleaner.
- The device is not designed to be used with an external timer or a separate remote control system.
- CAUTION: Use only cooktop safety devices designed by the cooktop manufacturer and / or integrated into the appliance and / or indicated by
the manufacturer in the operating instructions as appropriate for the appliance. apparatus. The use of inappropriate cooktop safety guards may cause accidents.
- If the power cable is damaged, it must be replaced by the manufacturer, its after-sales service or a person of equivalent qualification, in order to avoid any danger.
- Never put any object or combustible material on this device.
- Make this information available to the person responsible for the installation of the device, this could help to reduce your installation costs.
- For safety reasons, the appliance must be installed in accordance with the instructions in the operating instructions.
- The device must be installed and grounded correctly by a qualified person.
- Disconnection means must be provided in the fixed piping in accordance with the installation rules to ensure complete shutdown of the power supply.
- Improper installation of the unit may invalidate the warranty and void the claim rights.
- No objects or utensils should be left on the appliance.
- Never use this table to heat or heat the room.
- After use, always switch off the plates and the table as indicated in the operating instructions (ie with the control buttons).
- Never allow children to play with the appliance or sit, climb or climb on the appliance.
- Objects of interest to children should not be stored in cupboards above the plates. A child may be seriously injured while riding on the cooktop.
- Under no circumstances should you attempt to repair or replace any part of the appliance (unless otherwise specified in the operating instructions). Any other repair work must be performed by a qualified technician.
- Do not attempt to clean the cooktop with a steam cleaner.
- No heavy objects should fall or be placed on the cooktop.
- Do not stand on the hob.
- Do not use utensils with uneven edges, and do not drag utensils to the induction glass surface as this may scratch the surface.
- Do not use scouring pads or other abrasive cleaners to clean your cooktop, as they may scratch the induction glass.
- For instructions on fixed installation, refer to the Installation section of the manual.
Risk of electric shock
- Disconnect the device before performing any work or maintenance operation.
- It is essential and mandatory that the appliance is properly grounded.
- Any changes to the electrical system may only be made by a qualified electrician.
- Failure to do so may result in electric shock or fatal electrocution.
Cutoff risk
- Be careful: the edges of the panels are very sharp.
- Failure to do so could result in injury or cuts.
Operation and maintenance
Risk of electric shock
- Do not use a broken cooktop or cracked. If the surface of a plate is
broken or cracked, immediately turn off the power (by turning off the power plug) and consult a qualified technician.
- Turn off the table (by turning off the plug) before cleaning or maintenance.
- Failure to do so may result in electric shock or fatal electrocution.
Risk associated with hot surfaces
- During use, accessible parts of this appliance are heated to a temperature high enough to cause burns.
- No part of the body, clothing or any object (other than the proper cookware) should come into contact with the glass surface until it has cooled down.
- Metal objects such as knives, forks, spoons and lids should not be placed on the hotplate as they may become hot.
• Children must stay away.
- Pan handles can also be heated at high temperatures. Make sure that the pot handles never protrude above another lighted cooktop. Handles must be out of reach of children.
- Failure to do so may cause severe burns.
For installation, handling, cleaning and disposal of the device, refer to the following chapters of the User's Guide.
CE
Information on the meaning of the conformity marking
The CE marking indicates that the product meets the main requirements of European Directives 2014/35 / EC (Low Voltage), 2014/30 / EC (Electromagnetic Accounting), 2011/65 / EU (Reduction of the use of certain hazardous substances in EEE).
SUMMARY
Important warnings and safety instructions
35
Summary 43
I. Product description 44
II. Technical specifications 46
III. Installation 48
IV. Use of the cooktop 52
V. Cleaning and maintenance 60
VI. Faults and solutions 62
VII. Warranty 63
VIII. Disposal 64
This user guide is available in the following languages:
- FR (original version)
- EN (translated from the original)
Any other translation would be a translation of the original version.
This user guide, any modifications or any new version, is available on our website.
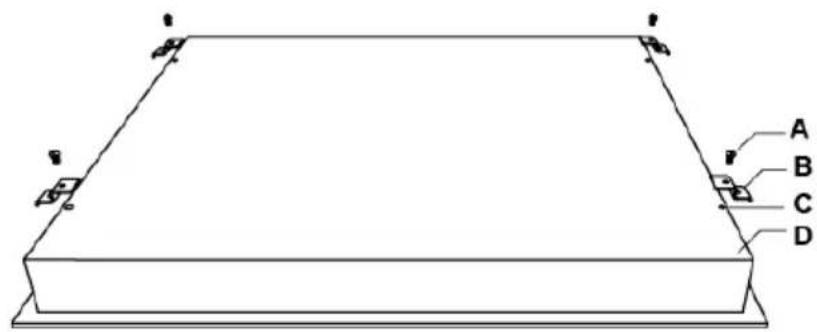
I. PRODUCT DESCRIPTION
View from above
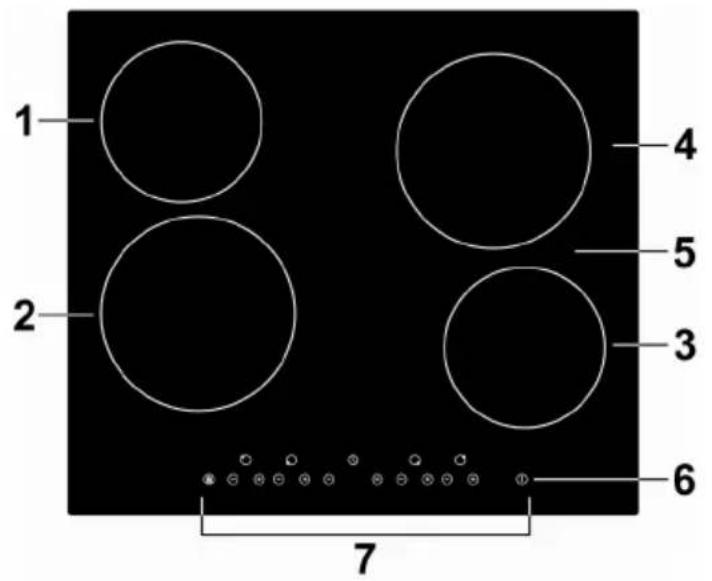
- Plate max. 1200 W
- Plate max. 1800 W
- Plate max. 1200 W
- Plate max. 1800 W
- Glass plate
- On / Off button
- Control panel
Control panel
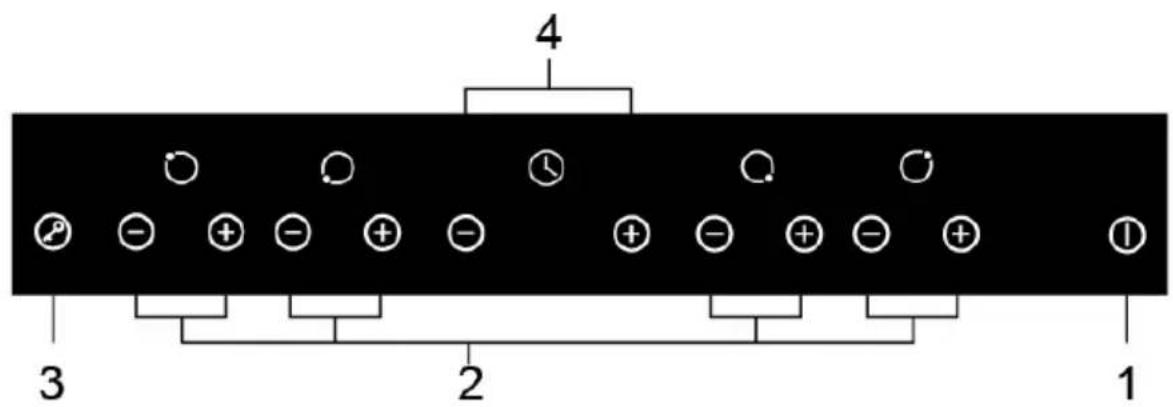
- On / Off button
- Power adjustment buttons
- Locking orders
- Timer setting buttons
Product Information
This ceramic hob is controlled by a microcomputer and can adapt to different types of cooking thanks to its resistance heating and adjustable cooking power; it is a product of choice for any modern family.
This ceramic hob has a custom design and is focused on the needs of the customer. With its safe and reliable operation, it has all the assets in hand to make your daily life both simpler and more enjoyable.
Unpacking the device and scrapping the packaging
Remove all packing material around the appliance and the protective elements inside the appliance compartments.
- Cartonboard and sheets of paper are recyclable. They must be thrown in the collection bins provided for this purpose.
• The materials bearing the symbol △ are recyclable:
PE <= polyethylene; > PS <= polystyrene; > PE <= polypropylene; This means that they can be recycled by depositors in appropriate collection containers.
- other packaging elements (adhesive, fasteners, etc.) must be disposed of with household waste.
For more information: www.quefairedemesdechets.fr
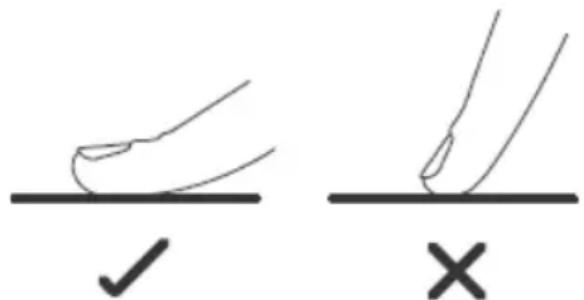
Touch controls
- The buttons are tactile, so you do not need to exert any pressure.
- Touch the buttons with the fingertips, not the tip.
- You will hear a beep each time a key is pressed.
- Buttons should always be kept clean and dry; no object (eg cloth, utensil) should cover them. Even a film of water is enough to make the keys very difficult to operate.
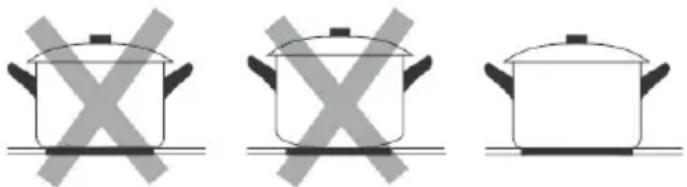
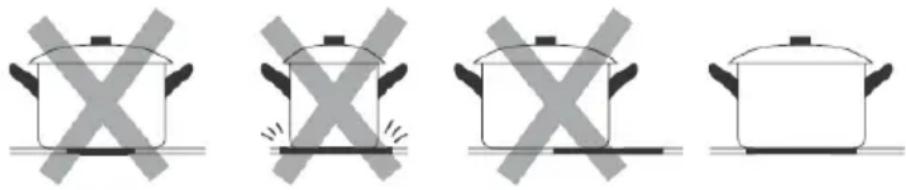
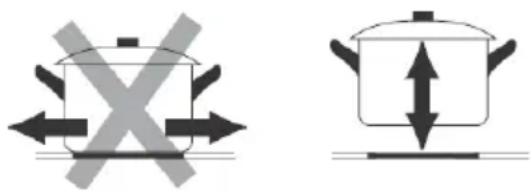
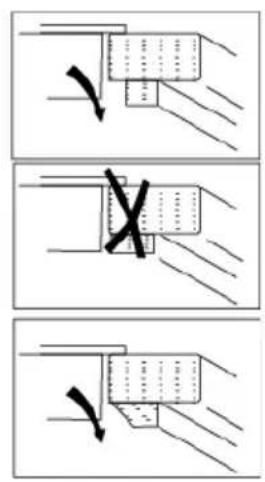
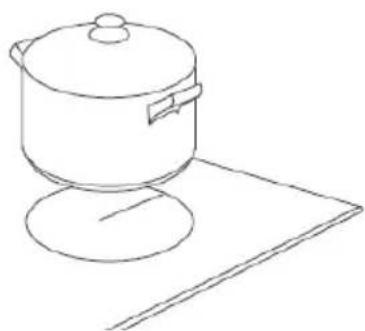
What utensils to use
Do not use utensils with serrated edges or curved bottom.
natural_image
Three identical cooking pots with crossed-out X symbols, no text or labels presentThe base of the utensil should be smooth, lay flat on the glass and be the same size as the plate. Always place the utensil in the center of the plate.
natural_image
Four identical cooking pots with crossed-out X marks, shown in different orientations (no text or symbols)Always remove the utensils from the plates by lifting them, never sliding them on them, otherwise they could scratch the glass.
II. TECHNICAL SPECIFICATIONS
| Reference | OCEATV4ZSE |
| Model | YL-CF6002 |
| Hotplates | 4 plaques |
| Supply voltage | 220-240V~ |
| Installed electrical power | 5490-6533W |
| Product Dimensions LxW×H (mm) | 590X520X52 |
| Dimensions of the location AxB (mm) | 560X490 |
The weight and dimensions are approximate. Due to ongoing improvements to our products, specifications and designs are subject to change without notice.
Information about electric hobs
| Symbol | Value | Unit | |
| Model identification OCEATV4ZSE | |||
| Plate type Vitrocéramique | |||
| Number of zones and / or cooking areas | 4 | ||
| Heating technology (induction zones and hobs, conventional cooking zones, electric hobs) | Zones de cuisson radiante | ||
| For circular cooking zones or areas: diameter of the useful area per electric cooking zone, rounded to the nearest 5 mm | ∅ | Zone 1 : 18,5Zone 2 : 15,5Zone 3 : 18,5Zone 4 : 15,5 | cm |
| For non-circular areas or cooking areas: diameter of the useful area per zone or electric cooking area, rounded to the nearest 5 mm | LW | -- | cm |
| Energy consumption by zone or cooking area, calculated per kg | ECelectriccooking | Zone 1 : 209Zone 2 : 209Zone 3 : 198Zone 4 : 207 | Wh/kg |
| Energy consumption of the hob, calculated per kg | ECelectricplate | 206 Wh/kg |
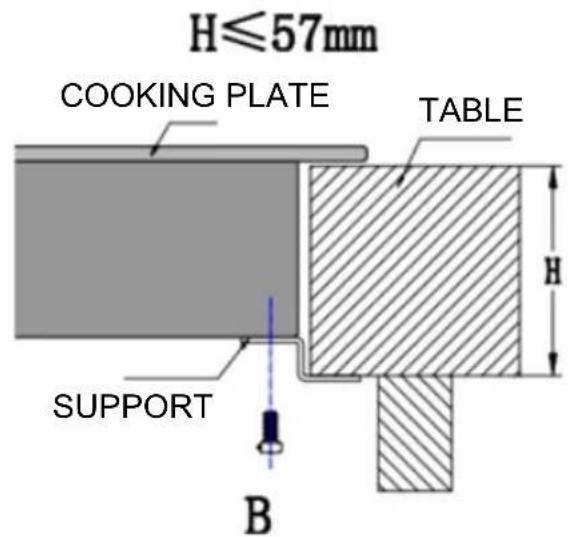
VII. INSTALLATION
Choosing an installation location
Cut out the work surface (refer to the dimensions shown in the illustration).
For installation and use, a gap of 50mm minimum must be placed around the hole.
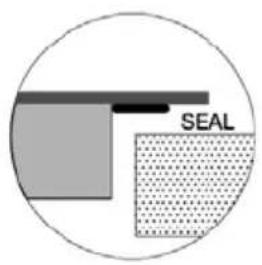
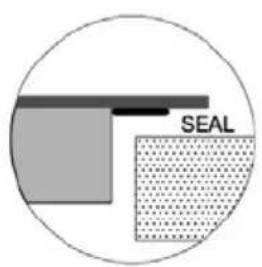
The worktop must be at least 5 cm thick. The worktop must be made of a heat-resistant material, otherwise the thermal radiation of the table may cause considerable deformation. See below:
SEAL = JOINT
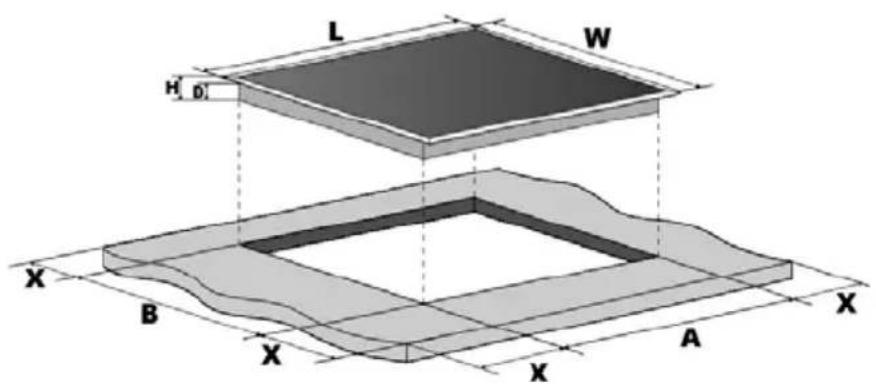
| L (mm) | W (mm) | H (mm) | D(mm) | A (mm) | B (mm) | X (mm) |
| 590 | 520 | 52 | 48 | 560 | 490 | 50 mini |
In any case, ensure that your cooktop is sufficiently well ventilated and that the air inlet and outlet are not blocked. Make sure the table is in good condition. See below.

Note: The safety distance between the induction hob and the cupboards above is at least 760 mm.

Before installing the mounting brackets
Place the device on a smooth, stable surface (use the packaging). Do not press any command buttons that stick out of the table.
Attach the table to the worktop by screwing 4 brackets under it after installation (see illustration).
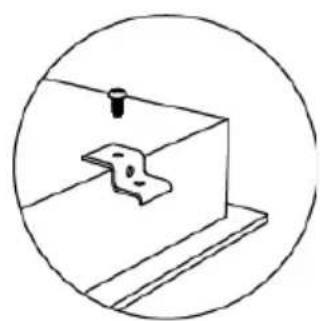
natural_image
Simple line drawing of a mechanical component inside a circular frame (no text or symbols)| A | B | C | D |
| Screw | Support | Screw hole | Base |
Adjust the position of the supports to the dimensions of the worktop.

Warning
This ceramic cooktop must be installed by a qualified technician or professional. Our professionals are at your service. Do not try to do this work yourself.
This cooktop must not be installed on a cooling device, dishwasher or tumble dryer.
This cooktop must be installed in such a way as to optimize the thermal radiation, and therefore the smooth operation of the table.
The wall and induction heated surface above the worktop must be heat resistant.
For safety reasons, the adhesive and the interlayer must be heat resistant.
Do not use a steam cleaner to clean your appliance.
Connecting the hob
The connection to the power supply must be carried out in compliance with the standards in force, or with a unipole circuit breaker. The connection procedure is shown below.
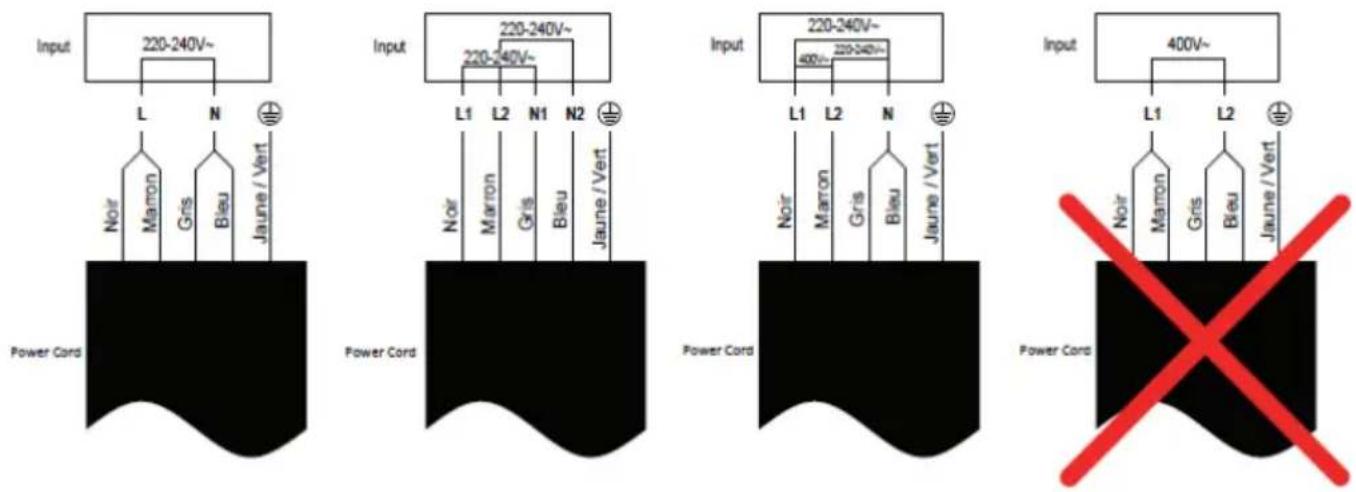
If the cable is damaged and needs to be changed, this can only be done by a service technician with the proper tools for safety reasons.
If the unit is directly connected to the mains supply, an omnipolar circuit breaker must be installed, with a gap of at least 3mm between the contacts.
The installer must ensure that the electrical connections are correct and comply with safety regulations.
The cable should not be bent or compressed.
The cable must be checked regularly and may only be changed by a qualified professional.
III. USE OF THE COOKTOP
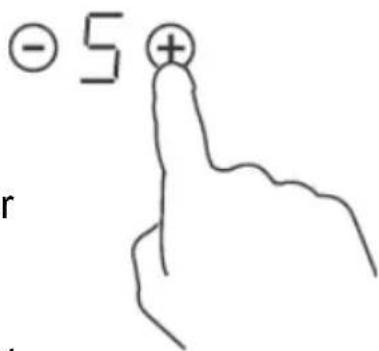
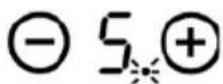
To start cooking
- When the unit is turned on, a beep sounds and all lights come on for 1 second before turning off, indicating that the hob is in standby mode.
- Press the on / off button Ⓐ; all screens indicate "-".

natural_image
Simple line drawing of a hand with a circular head and index finger (no text or symbols)- P ut a suitable cookware on the cooktop to use.
- The underside of the cookware and the surface of the cooktop must be clean and dry.
natural_image
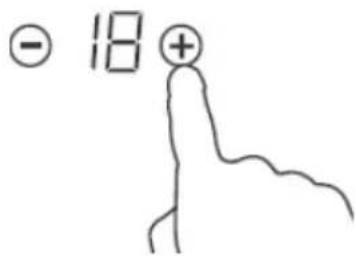
Line drawing of a cooking pot on a stand (no text or symbols)- Set the cooking temperature using the buttons
(-⊕), then adjust the cooking power with the same buttons.
- If you still have not selected a heat setting after 1 minute, the table will turn off automatically. You will then have to start again at step 1.
- You can change the temperature setting at any time during cooking.
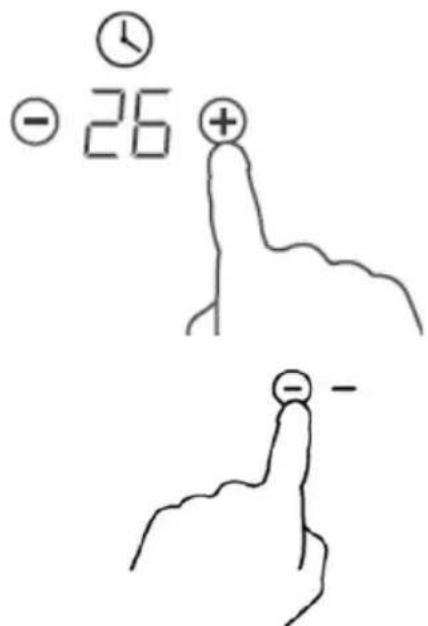
After cooking
1a. Turn off the plate by returning the temperature to "0" with the key ☑.

natural_image
Simple line drawing of a hand with a circular mark and a minus sign, no text or symbols present1b. Turn off the entire table by pressing the power button.

natural_image
Simple line drawing of a hand pointing upward with a circular icon on the index finger (no text or symbols)
Warning ! Attention to hot surfaces
- Watch out for hot surfaces.
"H" is displayed if the plate is still too hot to touch. It disappears from the screen when the surface has sufficiently cooled down. Thanks to it, you can save energy, by using the residual heat of the plate to heat other utensils.

Locking buttons
- You have the possibility to lock the buttons to prevent any risk of unexpected start (ex: child accidentally lighting one of the plates).
- When the lock is on, all buttons are inoperable except the power button.
To lock the buttons
Press the lock key. The timer displays "Lo".
To unlock the buttons
- Turn on the table.
- Keep the lock button pressed for a few seconds.
- You can now use the table.

When the table is locked, all commands are disabled except the power button; so you can always turn off the table in case of emergency, but you will need to unlock the table before any other use.
Overheating protection
This hob is equipped with a sensor that controls the internal temperature. If too high a temperature is detected, the table stops automatically.
Residual heat indicator
When a plate has been used for a long time, a certain amount of residual heat remains. The letter "H" on the screen indicates that you should not touch the plate in question.
Automatic extinction
Another safety feature of this table is the auto power off function. This feature activates whenever you forget to turn off one of the plates. The default timeouts are shown in the table below:
| Power level | 1 | 2 | 3 | 4 | 5 | 6 | 7 | 8 | 9 | ||||
| Default run time (hours) | 8 | 8 | 8 | 4 | 4 | 4 | 2 | 2 | 2 |
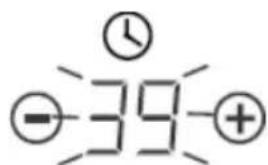
Timer
The timer can be used in two different ways:
- You can use it as a minute beep. In this case, the timer does not turn off the plates when the time has elapsed.
- You can program it to turn off one of the plates after the time has elapsed.
• The timer can be set up to 99 minutes maximum.
Using the timer as a minute beep
If no cooking plate is chosen
- Turn on the table.
Note: You can use the timer as a minute beep even without using one of the hotplates.
-
Press the ☐ r ⓣ button on the timer; the timer digits flash.
-
T he duration of the timer is set using the keys

Tip:
A short press on or ☑ or allows respectively decrease or increase the duration of 1 minute.
Long press or allows respectively decrease or increase the duration of 10 minutes respectively.
If the cooking time exceeds 99 minutes, the timer automatically returns to 0 minutes.
-
When the timer is set, the countdown starts immediately. The display shows the remaining time and the timer flashes for 5 seconds.
-
When the countdown is complete, the buzzer sounds for 30 seconds and the timer indicates "-".

Using the timer to turn off a hob
- Press the or ⏻ or Ⓕ button on the hob for which you want to set the timer.

- The duration of the timer is set using the keys: Tip:
A short press on ⏚ or allows respectively to decrease or increase the duration of 1 minute respectively.
A long press on ⏻ ou ⚠ decreases or increases the duration of 10 minutes respectively.
If the cooking time exceeds 99 minutes, the timer automatically returns to 0 minutes.
-
Press the timer button (-) ; the display successively displays "00" then "-".
-
When the timer is set, the countdown starts immediately. The display shows the remaining time and the timer flashes for 5 seconds.
NOTE: A red dot is illuminated next to the temperature indicator of the selected plate.
- When the time has elapsed, the plate in question automatically turns off.
NOTE: If you want to change the duration after the timer is set, repeat the procedure from step 1.


Cooking guide

Be careful when preparing fried foods: oil and grease heat very quickly, especially if you use the PowerBoost function. At very high temperatures, oil and grease may ignite and may cause a fire hazard.
Cooking tips
- When food comes to a boil, lower the temperature.
- Cooking with a lid helps to retain heat and thus reduce cooking time and save energy.
- Minimize the amount of grease and liquid to reduce cooking times.
- Start cooking at a high temperature, then turn it down once the food has been heated evenly.
Simmer, cook rice
- Simmering is cooking below the boiling point, around 85°C, when bubbles only occasionally rise to the surface of the cooking liquid. This method allows you to make delicious soups and very tender stews, because the flavors can develop without the food being overcooked. Egg-based and flour-thickened sauces should also cook below boiling point.
- Some tasks, such as cooking rice by absorption, may require a higher temperature than the lowest, to ensure even cooking in the recommended cooking time.
Grab a steak
For juicy and tasty steaks:
- Leave the meat at room temperature for about 20 minutes before cooking.
- Heat a heavy-bottomed pan.
- Brush steaks on both sides with oil. Put a few drops of oil in the hot pan, then gently put the meat on it.
- Turn the steak only once during cooking. The exact cooking time depends on the thickness of the steaks and the desired degree of cooking. The time can vary from 2 to 8 minutes per side. Squeeze the steak to see if it's cooked; then it is firm, the more it is cooked.
- Place the steak on a hot plate and let it sit for a few minutes so that it is soft when you serve.
Sauté
- Choose a large stove or a flat wok compatible with the ceramic tables.
- Prepare all the ingredients and utensils you will need. This cooking mode is fast. If you want to cook large quantities of food in this way, proceed in small batches.
- Preheat the pan briefly and add two tablespoons of oil.
- Cook meat first, then set aside and keep warm.
- Sauté the vegetables. When they are hot and still crispy, lower the temperature of the plate then put the meat and add your sauce.
- Gently stir the ingredients to ensure even cooking.
- Serve immediately.
Temperature adjustment
The settings below are for reference only. The exact setting will depend on several factors: type of cookware, amount of food to cook.
Test the table to determine which setting is best for you.
| Temperature adjustment | Suitable for |
| 1 - 2 | Heat small amounts of food gentlyMelt chocolate, butter and all foods that quickly attachSimmerHeat slowly |
| 3 - 4 | Warm upSimmer quicklyCook rice |
| 5 - 6 | Pancakes |
| 7 - 8 | FryCook pasta |
| 9 | SautéGrillBring the soup to a boilBring water to a boil |
IV. CLEANING AND MAINTENANCE

Warning: Before cleaning, unplug the appliance.
| What? How? Important! | ||
| Daily defilement of glass (fingerprints, marks, stains left by unsweetened foods) | 1. Turn off the hob.2. Apply a cooktop product while the glass is still hot (but not hot!).3. Rinse and wipe with a clean cloth or Sopalin.4. Put the hob back on. | ·When the table is off, the 'hot surface' indicator disappears but the plate may still be hot! Be very careful.·Hard / abrasive cleaners and scouring pads (including some nylon pads) may leave scratches on the glass. Always refer to the label to determine if the product / scouring pad is suitable or not.·Never leave cleaner residue on the table: it will stain the glass. |
| Overflows, melted food stains or hardened sugar on the glass. | These stains must be removed immediately using a stove spatula, palette knife or scraper for glass ceramic hobs; watch out for hot surfaces1. Turn off the hob (by turning off the power).2. Hold the blade or utensil at a 30 ° angle and push the stain or residue to a cool part of the cooktop.3. Clean stain or residue with a cloth or Sopalin.4. Follow steps 2 to 4 in the 'Daily Glass Soaking' section above. | · Stains or residues of molten or sweet foods should be removed as soon as possible. If you let them attach or cool on the glass, they can become very difficult to remove, or even damage the glass permanently.· Cut Hazard: When the blade guard is retracted, the blade is as sharp as a razor. Handle with extreme caution and always keep out of reach of children. |
| Residue on the control buttons | 1. Turn off the hob.2. Blot.3. Wipe the control panel with a clean, damp sponge (or cloth).4. Dry the board completely with Sopalin.5. Turn the hob back on. | · When there is liquid on the controls, they may be inoperative or the table may sound and go out on its own. Wipe the control panel well before turning on the table again. |
V. FAULTS AND SOLUTIONS
| Faults | Possible causes | Solutions |
| The device does not turn on. | No food. | Check that the device is connected and turned on. |
| The control buttons are inoperative. | The keys are locked. | There may have been a power outage in your home or neighborhood. If the problem persists after all checks have been made, call a qualified technician. |
| The keys are difficult to use. | This may be due to a thin film of water on the keys, or the fact that you press with your fingertips. | Unlock the keys. See section 'Using the hob' for more details. |
| The glass is scratched. | Cookware with irregular edges was used. | Make sure the keys stay dry and always press with the fingertip. |
| Some utensils make crackling or crackling noises. | An abrasive pad or an unsuitable cleaning product was used. | Use flat-bottom and smooth utensils See section 'What utensils to use'. |
Do not try to disassemble the device yourself, you could damage the table and put yourself in danger.
VI. WARRANTY
The warranty does not cover the wear parts of the product, nor the problems or damage resulting from:
(1) surface deterioration due to normal wear and tear of the product;
(2) defects or deterioration due to contact with liquids and corrosion caused by rust or the presence of insects;
(3) any incident, abuse, misuse, alteration, disassembly or unauthorized repair
(4) improper maintenance, improper use concerning the product or connection to an incorrect voltage;
(5) any use of accessories not supplied or not approved by the manufacturer.
The guarantee will be cancelled if the nameplate and / or serial number of the product are removed.
VIII. DISPOSAL
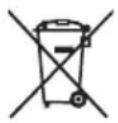
- This appliance carries the selective sorting symbol for waste electrical and electronic equipment (WEEE).
- This means that this product must be supported by a selective collection system in accordance with the EU Directive 2012/19 / EU so that it can either be dismantled or recycled, thus reducing the impact on the environment
- For more information, you can contact your local (town hall) or regional administration.
- Electronic products that have not been sorted are potentially dangerous for the environment due to the presence of hazardous substances.
- Under no circumstances should you throw this unit on public roads.
- When this device reaches the end of its useful life, you must deposit it in a selective collection center so that it is destroyed and / or recycled.
oceanic
OCEATV4ZSE_Oct-2018_v1
www.oceanic.eu
CE


- oceanic
- AVERTISSEMENTS ET CONSEILS DE SECURITE IMPORTANTS
- SPECIFICATIONS TECHNIQUES
- Avertissement ! Attention aux surfaces chaudes
- Protection anti-surchauffe
- Guide de cuisine
- IMPORTANT WARNINGS AND SAFETY INSTRUCTIONS
- We encourage you to read this user guide carefully and completely before installing and using your device.
- Risk of electric shock
- Cutoff risk
- Operation and maintenance
- Risk associated with hot surfaces
- SUMMARY
- PRODUCT DESCRIPTION
- Product Information
- Unpacking the device and scrapping the packaging
- Touch controls
- What utensils to use
- TECHNICAL SPECIFICATIONS
- INSTALLATION
- Choosing an installation location
- Before installing the mounting brackets
- Warning
- Connecting the hob
- USE OF THE COOKTOP
- To start cooking
- After cooking
- Warning ! Attention to hot surfaces
- Locking buttons
- To unlock the buttons
- Overheating protection
- Residual heat indicator
- Automatic extinction
- Timer
- Using the timer as a minute beep
- Using the timer to turn off a hob
- Cooking guide
- Cooking tips
- Simmer, cook rice
- Grab a steak
- Sauté
- Temperature adjustment
- CLEANING AND MAINTENANCE
- FAULTS AND SOLUTIONS
- WARRANTY
- DISPOSAL
Brand : OCEANIC
Model : OCEATV4ZSE
Category : Cooker