
DPF074V1SLDB6 - Fridge DANBY - Free user manual and instructions
Find the device manual for free DPF074V1SLDB6 DANBY in PDF.

| Product Type | Partial Frost Free Refrigerator |
| Brand | Danby |
| Model | DPF074V1SLDB6 |
| Compartments | Freezer and Refrigerator |
| Temperature Adjustment | Thermostat with settings from 1 (warmest) to 5 (coldest); 3 recommended for everyday use, 5 for freezing |
| Ambient Operating Temperature | 16°C to 32°C |
| Defrost | Automatic in refrigerator; manual in freezer (defrost when frost reaches 3-5 mm) |
| Interior Light | Replaceable bulb, max 15 W |
| Installation | Clearance required: 5 cm sides, 10 cm top, 7.5 cm back; rest 6 hours before plugging in after transport |
| Leveling | Adjustable feet (turn counterclockwise to lower, clockwise to raise) |
| Power Supply | 120 V ~ 60 Hz (see rating plate for confirmation) |
| Safety | Grounding required; do not use extension cord; do not damage refrigerant circuit; keep ventilation openings clear |
| Cleaning | Use a soft cloth with baking soda solution (1 tbsp per 1 L water) or mild detergent; do not use ammonia or alcohol |
| Warranty | Limited 12 months for functional parts; 2-month extension offered with online registration |
| Spare Parts | Replacement bulb (15W); removable shelves; ice cube tray |
| Environment | Do not dispose in household waste; recycle at appropriate collection point |
| Additional Information | Manual available in multiple languages; technical support via www.danby.com or 1-800-263-2629 |
Frequently Asked Questions - DPF074V1SLDB6 DANBY
User questions about DPF074V1SLDB6 DANBY
0 question about this device. Answer the ones you know or ask your own.
Ask a new question about this device
Download the instructions for your Fridge in PDF format for free! Find your manual DPF074V1SLDB6 - DANBY and take your electronic device back in hand. On this page are published all the documents necessary for the use of your device. DPF074V1SLDB6 by DANBY.
USER MANUAL DPF074V1SLDB6 DANBY
DPF074V1WDB-6
DPF074V1SLDB-6
Welcome to the Danby family.
We are proud of our quality products and we believe in dependable service. We suggest that you read this owner's manual before plugging in your new appliance as it contains important operation information, safety information, troubleshooting, and maintenance tips to ensure the reliability and longevity of your appliance.
You are entitled to the warranty coverage as described in the owner's manual provided with your new appliance.
- Please write down your appliance information below. You must keep the original proof of purchase receipt to validate and receive warranty services.
- Register your product online and receive a FREE 2 MONTH WARRANTY EXTENSION after fi lling out a product survey, at www.danby.com/support/product-registration/
Model Number:
Serial Number:
Date of Purchase:
Need Help?
- Read your Owner's Manual for installation help, troubleshooting, and maintenance assistance.
- Visit www.Danby.com to access self-service tools, FAQs and much more by searching your model number in the search bar.
- For the Quickest Customer Service, please fill out the web form at www.danby.com/ support. Your submission will go directly to an expert on your particular appliance. Our average response times are between 20 minutes and 2 hours, during EST business hours.
- Call 1-800-263-2629 - please note that during peak hours, hold times can exceed one hour.

Important Safety Information READ AND FOLLOW ALL SAFETY INSTRUCTIONS
SAFETY REQUIREMENTS
DANGER: Risk of fire or explosion. Flammable refrigerant used. Do not puncture refrigerant tubing.
- Do not use mechanical devices to defrost refrigerator.
- Ensure that servicing is done by factory authorized service personnel, to minimize product damage or safety issues.
- If the power supply cord is damaged, it must be replaced by the manufacturer, its service agent or similar qualified person in order to avoid hazard.
- Consult repair manual or owner's guide before attempting to service this product. All safety precautions must be followed.
- Dispose of properly in accordance with federal or local regulations.
- Follow handling instructions carefully.
- Do not store explosive substances such as aerosol cans with a flammable propellant in this appliance.
WARNING: Keep ventilation openings, in the appliance enclosure or in the built-in structure, clear of obstruction.
WARNING: Do not use mechanical devices or other means to accelerate the defrosting process, other than those recommended by the manufacturer.
WARNING: Do not damage the refrigerant circuit.
WARNING: Do not use electrical appliances inside the food storage compartments of the appliance, unless they are of the type recommended by the manufacturer.
CAUTION: Children should be supervised to ensure that they do not play with the appliance.
DANGER: Risk of child entrapment. Before throwing away an old appliance:
- Remove the door or lid.
- Leave shelves in place so that children may not easily climb inside.
DANGER: Do not add a lock to the door or lid. This can cause child entrapment and harm.
SAFETY REQUIREMENTS
This appliance is not intended for use by persons (including children) whose physical, sensory or mental capabilities may be different or reduced, or who lack experience or knowledge, unless such persons receive supervision or training to operate the appliance by a person responsible for their safety.
This appliance is intended to be used in household and similar applications such as:
Staff kitchen areas in shops, offi ces and other working environments;
- Farm houses and by clients in hotels, motels and other residential type environments;
- Bed and breakfast type environments;
- Catering and similar non-retail applications.
GROUNDING INSTRUCTIONS
This appliance must be grounded. Grounding reduces the risk of electrical shock by providing an escape wire for the electrical current.
This appliance has a cord that has a grounding wire with a 3-prong plug. The power cord must be plugged into an outlet that is properly grounded. If the outlet is a 2-prong wall outlet, it must be replaced with a properly grounded 3-prong wall outlet. The serial rating plate indicates the voltage and frequency the appliance is designed for.
WARNING - Improper use of the grounding plug can result in a risk of electric shock.
Consult a qualified electrician or service agent if the grounding instructions are not completely understood, or if doubt exists as to whether the appliance is properly grounded.
Do not connect your appliance to extension cords or together with another appliance in the same wall outlet. Do not splice the power cord.
Do not under any circumstances cut or remove the third ground prong from the power cord. Do not use extension cords or ungrounded (two prongs) adapters.
SAVE THESE INSTRUCTIONS!
OPERATING INSTRUCTIONS
LOCATION
- Two people should be used when moving the appliance.
- Remove interior and exterior packaging prior to installation. Wipe the outside of the appliance with a soft, dry cloth and the inside with a lukewarm wet cloth.
- Place the appliance on a floor that is strong enough to support it when it is fully loaded.
- Do not place the appliance in direct sunlight or near sources of heat, such as a stove or heater, as this can increase electrical consumption. Extreme cold ambient temperatures may also cause the appliance to perform improperly.
- Do not use the appliance near water, for example in a wet basement or near a sink.
- This appliance is intended for household use only. It is not designed for outside installation, including anywhere that is not temperature controlled (garages, porches, vehicles, etc.).
- Before connecting the appliance to a power source, let it stand upright for approximately 6 hours. This will reduce the possibility of a malfunction in the cooling system from handling during transportation.
- This appliance is only intended for free-standing installation. It is not intended to be built into a cabinet or counter without following the minimum air circulation requirements.
- Minimum air circulation requirement: Allow 5 cm (2 inches) of space on both sides of the appliance. Allow 10 cm (4 inches) of space on the top of the appliance. Allow 7.5 cm (3 inches) of space between the back of the appliance and the wall.
- WARNING - Placing this appliance into any enclosed location with a door or without the minimal amount of air space described above will Void YOUR WARRANTY, increase energy usage, and reduce this appliance's performance and lifespan.
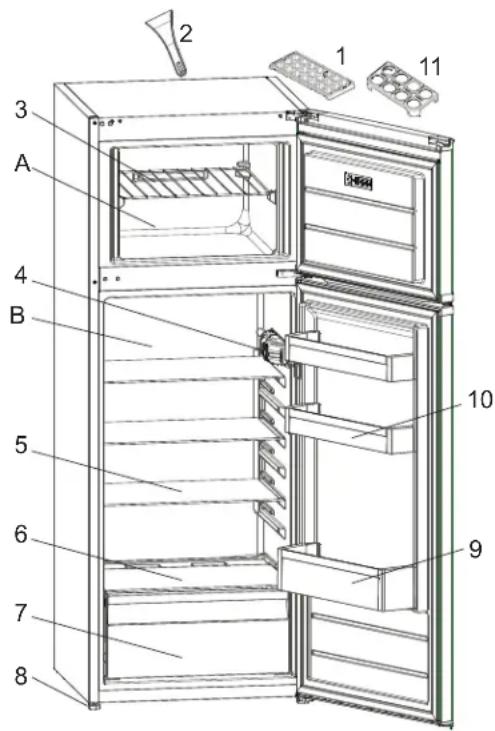
FEATURES
A. Freezer compartment
B. Refrigerator compartment
- Ice cube tray
- Plastic ice scraper
- Freezer shelf
- Thermostat box
- Refrigerator shelves
- Crisper cover
- Crisper
- Leveling feet
- Bottle shelf
- Door shelves
11.Egg tray
LEVELING INSTRUCTIONS
There is an adjustable leg on the bottom of the appliance that can be turned up or down to ensure that the appliance is level.
- Turn the leveling leg counter-clockwise as far as it will go, until the top of the foot is touching the bottom of the cabinet.
- Slowly turn the leveling leg clockwise until the appliance is level.
OPERATING INSTRUCTIONS
TEMPERATURE CONTROL
The refrigerator control panel is located on the side of the refrigerator compartment.
- Light cover
- Thermostat knob
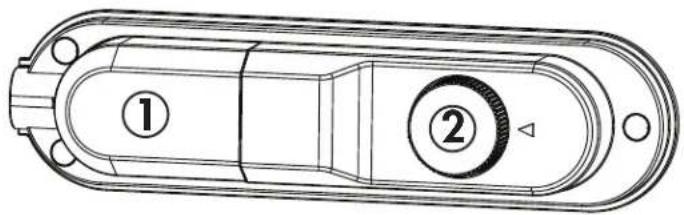
- Lower numbers indicate warmer temperature settings.
- Higher numbers indicate colder temperature settings.
The recommended setting for regular daily use is 3.
The recommended setting for freezing fresh food is 5. - Actual temperature inside the appliance can vary based on ambient operating temperature, how often the door is opened and how much fresh food has been recently added.
- This appliance is intended to be used in ambient temperatures between 16 - 32^ (60 - 90^) . It is not recommended to operate this appliance in ambient temperatures below 10^ (50^) .
- When turning the appliance on for the first time, allow it to run empty with the door closed for a full 24 hours before adding any fresh food.
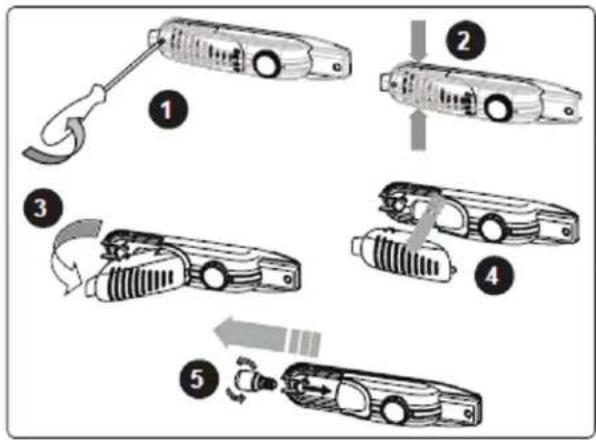
LIGHT REPLACEMENT
- Unplug the appliance .Remove the screw from the light cover.
- Press the hooks on the light cover.
- Open the light cover.
- Remove the light cover.
- Remove the light bulb and replace with one of not more than 15W. Reverse the steps to replace the light cover. Wait 5 minutes before plugging the appliance back in.
IMPORTANT NOTE
The freezer door may be difficult to open immediately after closing it. This is normal and is due to the pressure difference between the cold interior of the freezer and the warm air that has just entered the freezer when the lid was opened. The pressure will equalize within a few minutes.
If the lid is especially difficult to open, wait 5 minutes to allow the pressure to equalize and then try again.
CARE & MAINTENANCE
CLEANING
Ensure the appliance is unplugged before cleaning.
To clean the inside of the appliance, use a soft cloth and a solution of a tablespoon of baking soda to one quart of water or a mild soap solution or some mild detergent.
- Wash removable shelves in a mild detergent solution, then dry and wipe with a soft cloth.
- Clean the outside with a soft, damp cloth and some mild detergent.
- It is important to keep the area clean where the door seals against the cabinet. Clean this area with a soapy cloth. Rinse with a damp cloth and let dry.
Note: Do not use cleaners containing ammonia or alcohol on the appliance. Ammonia or alcohol can damage the appearance of the appliance. Never use any commercial or abrasive cleaners or sharp objects on any part of the appliance.
POWER FAILURE
Most power failures are corrected within a few hours and should not affect the temperature of your appliance if you minimize the number of times the door is opened. If the power is going to be off for a longer period of time, take the proper steps to protect your contents.
Note: Wait 3 to 5 minutes before attempting to restart the refrigerator if operation has been interrupted.
VACATION
- Short vacations: Leave the appliance operating during vacations of less than three weeks.
- Long vacations: If the appliance will not be used for several months, remove all items and turn off the appliance. Clean and dry the interior thoroughly. To prevent odor and mold growth, leave the door open slightly, blocking it open if necessary.
DEFROSTING INSTRUCTIONS
There is no need to defrost the refrigerator compartment as any ice build up on the back wall will be defrosted automatically. Defrost water from the refrigerator compartment is channeled into a drip tray above the compressor. Heat transfer from the compressor causes the water to evaporate.
The freezer compartment should be defrosted any time the frost reaches 3 - 5mm (1/4 in) thick. To defrost the freezer compartment, unplug the appliance and remove all frozen contents. Leave the freezer door open to allow the frost to melt. Discard the melted water and leave the door open until the interior of the freezer is dry.
Remember to protect your floors during the defrosting process by putting towels or a pan under the appliance in case of leaking.
Important: Never use sharp or pointed instruments to remove ice. The freezer compartment contains refrigerated gas lines. If these lines are accidentally pierced it will render the refrigerator inoperable and void the manufacturer's warranty. Do not allow the refrigerator to continue operation if the freezer compartment is pierced.
MOVING
- Remove all contents.
- Turn the adjustable legs up to avoid damage.
- Tape the door shut.
- Be sure the appliance stays in the upright position during transportation. Protect the outside of the appliance with a blanket.
- If the appliance is placed on its back or side during transportation, upon reaching the destination, allow it to remain upright for 6 hours before plugging in to avoid damage to internal components.
DISPOSAL
This appliance may not be treated as regular household waste, it should be taken to the appropriate waste collection point for recycling of electrical components. For information on local waste collection points, contact your local waste removal agency or government office.
FREQUENTLY ASKED QUESTIONS
What are the standard wattage and amps used?
This information can be found on the rating plate located on the back of the cabinet.
How much does it cost to run the freezer?
Reference the energy card attached to the front of the appliance or go to www.danby.com and visit the corresponding product page to find a copy of the energy card.
Can I use an extension cord?
No, an extension cord may not be used.
I am having trouble opening the door; why?
The refrigerator door may be difficult to open immediately after closing it. This is normal and is due to the pressure difference between the cold interior of the refrigerator and the warm air that has just entered the refrigerator when it was opened. The pressure will equalize within a few minutes.
I had my fridge on its side to bring it home. Do I have to let it sit? And for how long?
Yes, please allow it to sit upright for 6 hours before plugging it in.
The refrigerator smells like new plastic. How do I make it go away?
It is common for new appliances to have a slight plastic smell. Ensure that you have removed all packing material from the fridge. Clean the inside of the cabinet by following the cleaning instructions included in the owner's manual. Once completed, place an open box of baking soda in the refrigerator to absorb any remaining odour.
How do I set the temperature?
This varies based on model:
- If your thermostat dial has a graduated blue line, the thinner part of the line indicates warmer temperatures and the thicker part of the line indicates colder temperatures
- If your thermostat dial has dots, the smaller dots indicate warmer temperatures and the larger dots indicate colder temperatures
- If your thermostat dial has numbers, the smaller numbers indicate warmer temperatures and the larger numbers indicate colder temperatures
TROUBLESHOOTING
No power
- A fuse may be blown or the circuit breaker tripped
- Plug not fully inserted into the wall outlet
Internal temperature not cold enough
- Temperature setting is too warm
- The door is not shut properly or opened excessively
- Recently added a large quantity of warm food to the cabinet
- Close proximity to heat source or direct sunlight
- Ambient temperature or humidity is very high
Refrigerator runs continuously
- Temperature setting is too cold
- The door is not shut properly or opened excessively
- Recently added a large quantity of warm food to the cabinet
- Close proximity to heat source or direct sunlight
- Ambient temperature or humidity is very high
Refrigerator makes a gurgling noise when operating
- This noise is completely normal. The refrigerant inside the appliance will make a gurgling noise as it changes from a liquid to a gas and back again.
LIMITED "IN HOME" WARRANTY
This quality product is warranted to be free from manufacturer's defects in material and workmanship, provided that the unit is used under the normal operating conditions intended by the manufacturer.
This warranty is available only to the person to whom the unit was originally sold by Danby Products Limited (Canada) or Danby Products Inc. (U.S.A.) (hereafter "Danby") or by an authorized distributor of Danby, and is non-transferable.
TERMS OF WARRANTY
Plastic parts are warranted for thirty (30) days from the date of purchase, with no extensions provided.
First 12 months During the first twelve (12) months, any functional parts of this product found to be defective, will be repaired or replaced, at warrantor's option, at no charge to the original purchaser.
To obtain service Contact the dealer where the unit was purchased, or contact the nearest authorized Danby service depot, where service must be performed by a qualified service technician. If service is performed on the unit by anyone other than an authorized service depot, all obligations of Danby under this warranty shall be void.
Boundaries of Danby reserves the right to limit the boundaries of "In Home Service" to the proximity of an authorized service depot. Any appliance requiring service outside the limited boundaries of "In Home Service", will be the consumer's responsibility to transport at their own expense to the original point of purchase or a service depot for repair. If the appliance is installed in a location that is 100 kilometers (62 miles) or more from the nearest service center, it must be delivered to the nearest authorized Danby Service Depot by the purchaser.
Transportation charges to and from the service location are not protected by this warranty and are the responsibility of the purchaser.
Nothing within this warranty shall imply that Danby will be responsible or liable for any spoilage or damage to food or other contents of this appliance, whether due to any defect of the appliance, or its use, whether proper or improper.
EXCLUSIONS
Save as herein provided, by Danby, there are no other warranties, conditions, representations or guarantees, express or implied, made or intended by Danby or its authorized distributors and all other warranties, conditions, representations or guarantees, including any warranties, conditions, representations or guarantees under any Sale of Goods Act or like legislation or statute is hereby expressly excluded. Save as herein provided, Danby shall not be responsible for any damages to persons or property, including the unit itself, howsoever caused or any consequential damages arising from the malfunction of the unit and by the purchase of the unit, the purchaser does hereby agree to indemnify and hold harmless Danby from any claim for damages to persons or property caused by the unit.
GENERAL PROVISIONS
No warranty or insurance herein contained or set out shall apply when damage or repair is caused by any of the following:
1) Power failure.
2) Damage in transit or when moving the appliance.
3) Improper power supply such as low voltage, defective house wiring or inadequate fuses.
4) Accident, alteration, abuse or misuse of the appliance such as inadequate air circulation in the room or abnormal operating conditions (ie. extremely high or low room temperature).
5) Use for commercial or industrial purposes (i.e. If the appliance is not installed in a domestic residence).
6) Fire, water damage, theft, war, riot, hostility, acts of God such as hurricanes, floods etc.
7) Service calls resulting in customer education.
8) Improper Installation (ie. Building-in of a free standing appliance or using an appliance outdoors that is not approved for outdoor application, including but not limited to: garages, patios, porches or anywhere that is not properly insulated or climate controlled).
Proof of purchase date will be required for warranty claims; retain bills of sale. In the event that warranty service is required, present the proof of purchase to our authorized service depot.
Warranty Service In Home
Danby Products Limited
PO Box 1778, Guelph, Ontario, Canada N1H 6Z9
Telephone: [519] 837-0920 FAX: [519] 837-0449
1-800-263-2629 04/17
Danby Products Inc.
PO Box 669, Findlay, Ohio, U.S.A. 45840
Telephone: (419) 425-8627 FAX: (419) 425-8629
QUESTIONS FREQUEMENT POSÉES
Danby Products Limited
PO Box 1778, Guelph, Ontario, Canada N1H 6Z9
Telephone: (519) 837-0920 Télécopieur: (519) 837-0449
1-800-263-2629
02/18
Danby Products Inc.
PO Box 669, Findlay, Ohio, U.S.A. 45840
Telephone: (419) 425-8627 Telecopier: (419) 425-8629
Danby Products Limited
PO Box 1778, Guelph, Ontario, Canada N1H 6Z9
Telephone: [519] 837-0920 FAX: [519] 837-0449
1-800-263-2629
04/17
DanbyProductsInc.
PO Box 669, Findlay, Ohio, U.S.A. 45840
Telephone: (419) 425-8627 FAX: (419) 425-8629
NOTES / REMARQUES / NOTAS :
NOTES / REMARQUES / NOTAS :
Danby Products Limited, Guelph, ON, Canada N1H 6Z9 Danby Products Inc., Findlay, Ohio, USA 45840
Trademarks of Danby Products Limited and/or its subsidiaries
Marques de commerce de Danby Products Limited et / ou de ses filiales
* Marcas commerciales de Danby Products Limited y / o sus subsidiaries