
MSACPC3 - Computer accessory SONY - Free user manual and instructions
Find the device manual for free MSACPC3 SONY in PDF.
| Product Type | PC Card Memory Stick Adapter |
| Model | MSAC-PC3 |
| Brand | Sony |
| Interface | PCMCIA ATA 16-bit (Type II PC Card) |
| Dimensions (L x H x D) | 54 x 5.0 x 85.6 mm (2 1/4 x 2 x 3 3/8 in) |
| Weight | Approx. 30 g (1.06 oz) without Memory Stick |
| Operating Voltage | DC 3.3 V / 5.0 V |
| Power Consumption | Max. 90 mA DC |
| Operating Temperature | 0°C to 60°C (32°F to 140°F) |
| Operating Humidity | 20% to 80% (non-condensing) |
| Compatible Memory Stick Types | Standard Memory Stick, Memory Stick PRO (up to 4 GB), Memory Stick Duo (with adapter) |
| Supported Operating Systems (Windows) | Windows 98/98SE, Windows Me, Windows 2000 Professional, Windows XP Home/Professional, Windows CE |
| Supported Operating Systems (Mac) | Mac OS 8.5 to 9.2.2, Mac OS X v10.1.2 to 10.2.2 |
| Main Functions | Read and write data to Memory Stick from a computer via PC Card slot |
| Maintenance and Cleaning | Clean connectors with a dry cloth; avoid dust, moisture, and shocks |
| Safety Precautions | Do not remove the Memory Stick or adapter during access (light on); unlock the LOCK switch before writing |
| Supplied Accessories | PC Card Memory Stick Adapter, storage case, instruction manual |
| Repairability / Spare Parts | One-year warranty; contact the dealer or Sony in case of defects |
| General Information | Not MagicGate compatible; format via Memory Stick Formatter (downloadable) |
Frequently Asked Questions - MSACPC3 SONY
User questions about MSACPC3 SONY
0 question about this device. Answer the ones you know or ask your own.
Ask a new question about this device
Download the instructions for your Computer accessory in PDF format for free! Find your manual MSACPC3 - SONY and take your electronic device back in hand. On this page are published all the documents necessary for the use of your device. MSACPC3 by SONY.
USER MANUAL MSACPC3 SONY
Memory Stick PC Card Adaptor
Operating Instructions US
Mode d'emploi____FR
MSAC-PC3

MEMORY STICK TM
English
Before operating the unit, please read this instructions thoroughly, and retain it for future reference.
For the customers in U.S.A.
THIS DEVICE COMPLIES WITH PART 15 OF THE FCC RULES. OPERATION IS SUBJECT TO THE FOLLOWING TWO
CONDITIONS:
(1) THIS DEVICE MAY NOT CAUSE HARMFUL INTERFERENCE, AND
(2) THIS DEVICE MUST ACCEPT ANY INTERFERENCE RECEIVED, INCLUDING INTERFERENCE THAT MAY CAUSE UNDESIRED OPERATION.
CAUTION
You are cautioned that any changes or modifications not expressly approved in this manual could void your authority to operate this equipment.
Note:
This equipment has been tested and found to comply with the limits for a Class B digital device, pursuant to Part 15 of the FCC Rules. These limits are designed to provide reasonable protection against harmful interference in a residential installation. This equipment generates, uses, and can radiate radio frequency energy and, if not installed and used in accordance with the instructions, may cause harmful interference to radio communications. However, there is no guarantee that interference will not occur in a particular installation. If this equipment does cause harmful interference to radio or television reception, which can be determined by turning the equipment off and on, the user is encouraged to try to correct the interference by one or more of the following measures:
- Reorient or relocate the receiving antenna.
- Increase the separation between the equipment and receiver.
- Connect the equipment into an outlet on a circuit different from that to which the receiver is connected.
- Consult the dealer or an experienced radio/TV technician for help.
For the customers in Canada
This Class B digital apparatus complies with Canadian ICES-003.
Documentation©2002 Sony Corporation
- "Memory Stick", "MagicGate Memory Stick", "Memory Stick PRO", "Memory Stick Duo", "MagicGate", and are trademarks of Sony Corporation.
- Microsoft, and Windows are registered trademarks of Microsoft Corporation in the United States and/or other countries.
• Macintosh and MacOS are registered trademarks of Apple Computer, Inc. in the United States and/or other countries. - All other company names and product names mentioned here may be the trademarks or registered trademarks of their respective companies.
The symbols for ^TM and ^ are omitted in these instructions.
Table of contents
Before You Begin
On "Memory Stick" 5
Required system construction 7
Checking the supplied accessories 8
Parts identification 8
How to Use (When Using Windows)
Connecting this unit to your computer 9
Confirming that connections are completed 12
When the Removable Disk is not displayed 17
Copying image data recorded on "Memory Stick" to your computer ..... 21
Disconnecting this unit from your computer 22
How to Use (When Using Macintosh)
Connectiong this unit to your computer 24
Disconnecting this unit from your computer 24
Other Information
Formatting (initialization) of "Memory Stick" 25
Precautions for use of "Memory Stick" 26
Precautions for use of "Memory Stick Duo" 28
Troubleshooting 29
Specifications 31
LIMITED WARRANTY 32
On "Memory Stick"
What is "Memory Stick"?
"Memory Stick" is a new-generation IC storage media that is ultra-small and lightweight and has far greater storage capacity than floppy disks. It can be used not only for transferring data between "Memory Stick" compatible products, but also as a removable, external storage media for storing data.
"Memory Stick" is available in standard size and a smaller size called "Memory Stick Duo." When "Memory Stick Duo" is inserted into a Memory Stick Duo Adaptor, the size becomes the same as the standard-sized "Memory Stick" to allow use with products that are compatible with the standard-sized "Memory Stick."
"Memory Stick" types that can be used with this unit
Three types of “Memory Stick” are available to suit your needs.
"Memory Stick PRO"
This type of "Memory Stick" can only be used with products that are compatible with "Memory Stick PRO," and the media features built-in copyright-protection technology ("MagicGate"). (MSAC-PC3 is not compatible with "MagicGate", however, you can use "Memory Stick PRO" just like a "Memory Stick" to record of all kinds of data with the exception of data requiring copyright-protection technology.)
"Memory Stick"
A “Memory Stick” that allows recording of all kinds of data with the exception of data requiring copyright-protection technology (“MagicGate”).
"MagicGate Memory Stick"
This is a “Memory Stick” featuring built-in copyright protection technology (“MagicGate”). (MSAC-PC3 is not compatible with “MagicGate”, however, you can use this unit just like a “Memory Stick” to record of all kinds of data with the exception of data requiring copyright-protection technology.)
On "Memory Stick" (continued)
What is "MagicGate"?
"MagicGate" is a copyright protection technology that operates when it is provided in both the "Memory Stick" and the product in which the media is used. A "Do you comply with "MagicGate"?" authentication takes place between devices equipped with "MagicGate", and the "Memory Stick." Data encryption takes places after the authentication. This unit is not equipped with "MagicGate", so it can not record or playback the data which needs "MagicGate".
Required system construction
Recommended Windows environment
OS: Microsoft Windows 98/Windows 98Second Edition (Windows 98SE)/Windows Millennium Edition (Windows Me)/Windows 2000 Professional (Windows 2000)/Windows XP Home Edition/XP Professional (Windows XP)
Microsoft Windows CE/1.0/2.0/2.11/3.0
* The operating systems mentioned above must be installed on the computer when shipped from the factory.
* Operation is not guaranteed for upgraded operating systems even if they are among those mentioned above.
PC Card Slot which is compatible with PC Card Type II as standard equipment.
Recommended Macintosh environment
OS: Mac OS 8.5\~9.2.2/X (v10.1.2\~10.2.2)
* The operating systems mentioned above must be installed on the computer when shipped from the factory.
* Operation is not guaranteed for upgraded operating systems even if they are among those mentioned above.
PC Card Slot which is compatible with PC Card Type II as standard equipment.
Note
Operation is not guaranteed for all computers even if they comply with the recommended environments.
Checking the supplied accessories
• Memory Stick PC Card Adaptor (1)
• Specified Storage Case (1)
- Operating Instructions (1)
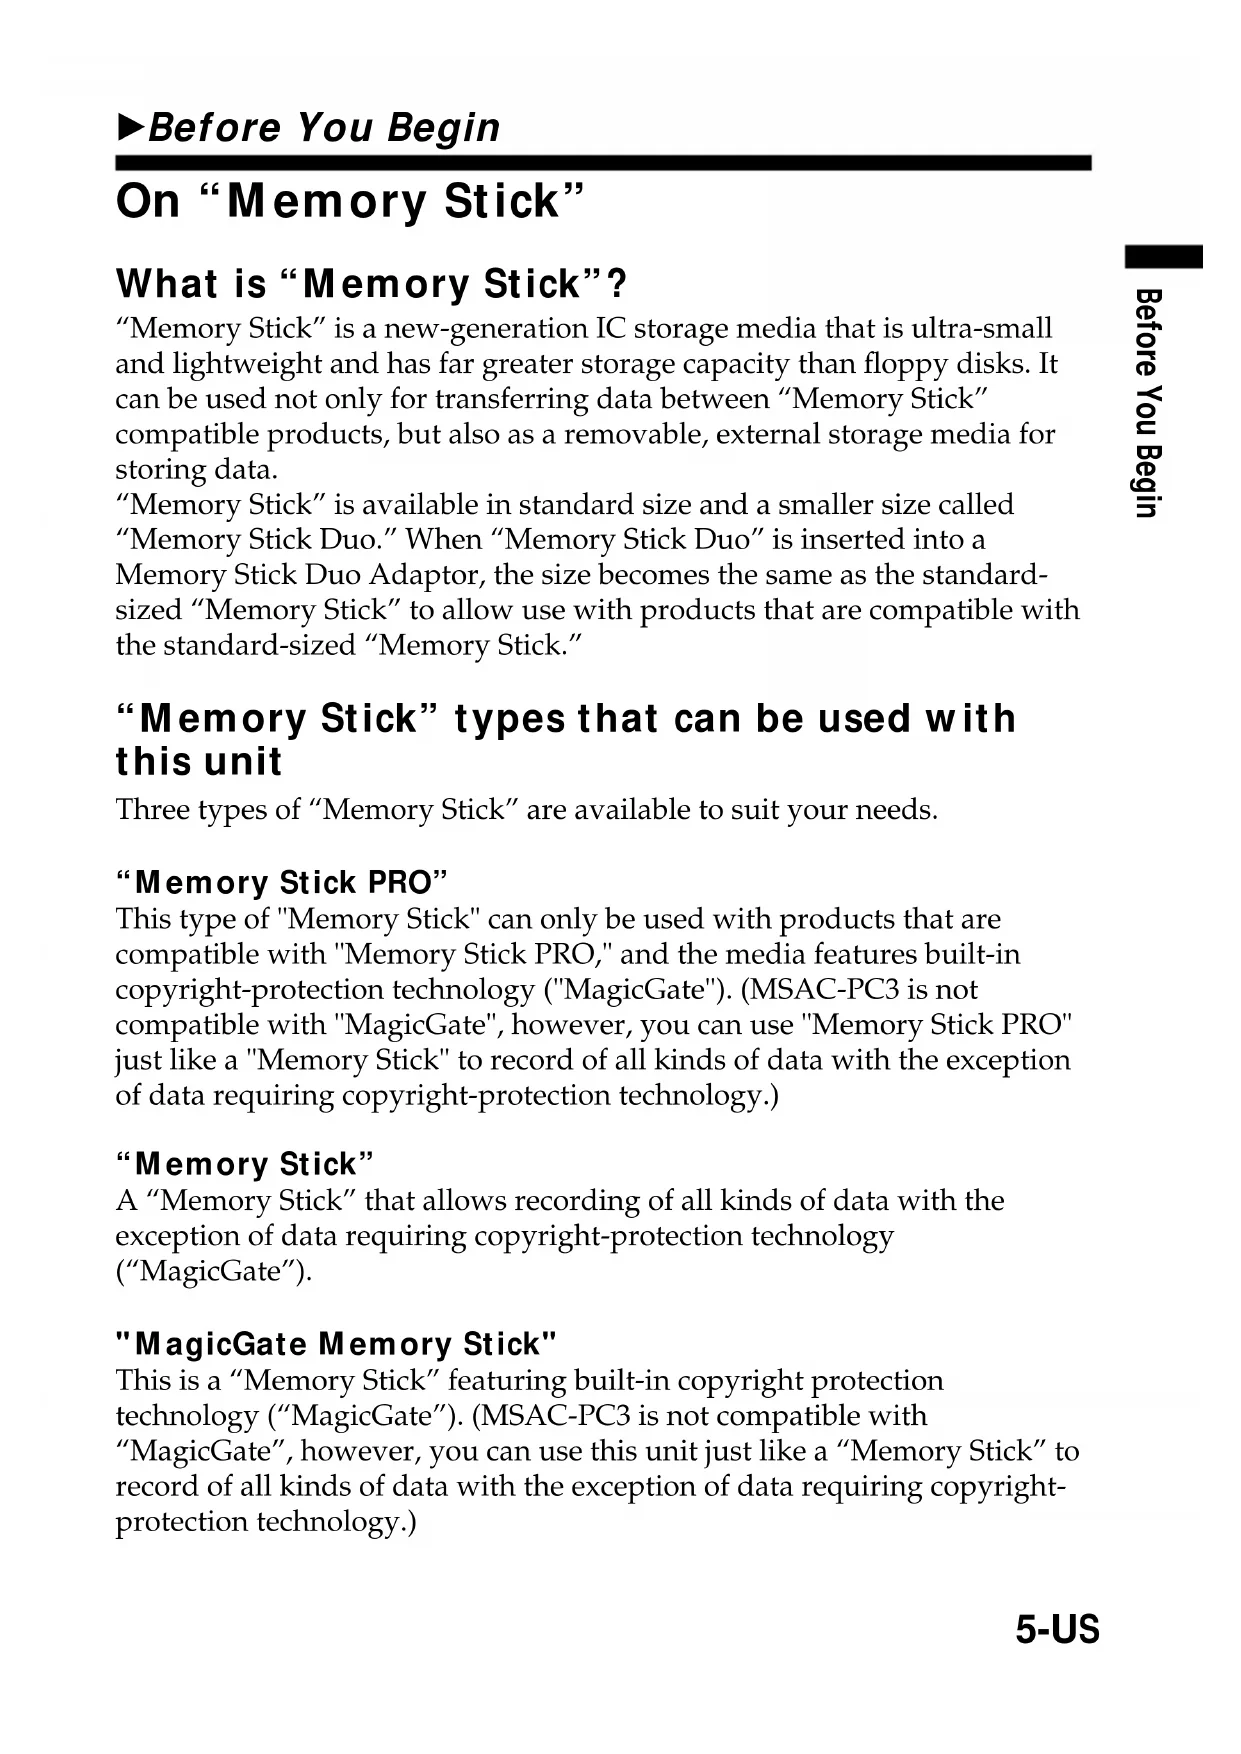
Parts identification
Note
The access lamp lights while the “Memory Stick” is being accessed. Never remove the “Memory Stick,” turn off the computer, or remove the PC card adaptor, while the access lamp is on. The data on the “Memory Stick” might be destroyed.
Connecting this unit to your computer
1 Turn on your computer, and start up Windows.
2 Insert the PC Card Adaptor with a "Memory Stick" attached to your computer firmly.
Recommended ways for connecting
The operation of this unit has been confirmed when connected to the computer in either of the following ways.
When installing the PC Card Adaptor with "Memory Stick" attached into the PC Card Slot on your computer
Note
- Make sure that the "Memory Stick" is positioned correctly when inserting.
- The place of the PC card slot on the computer differ with the computers.
- Not all operations are guaranteed on all computers running under the recommended environment.
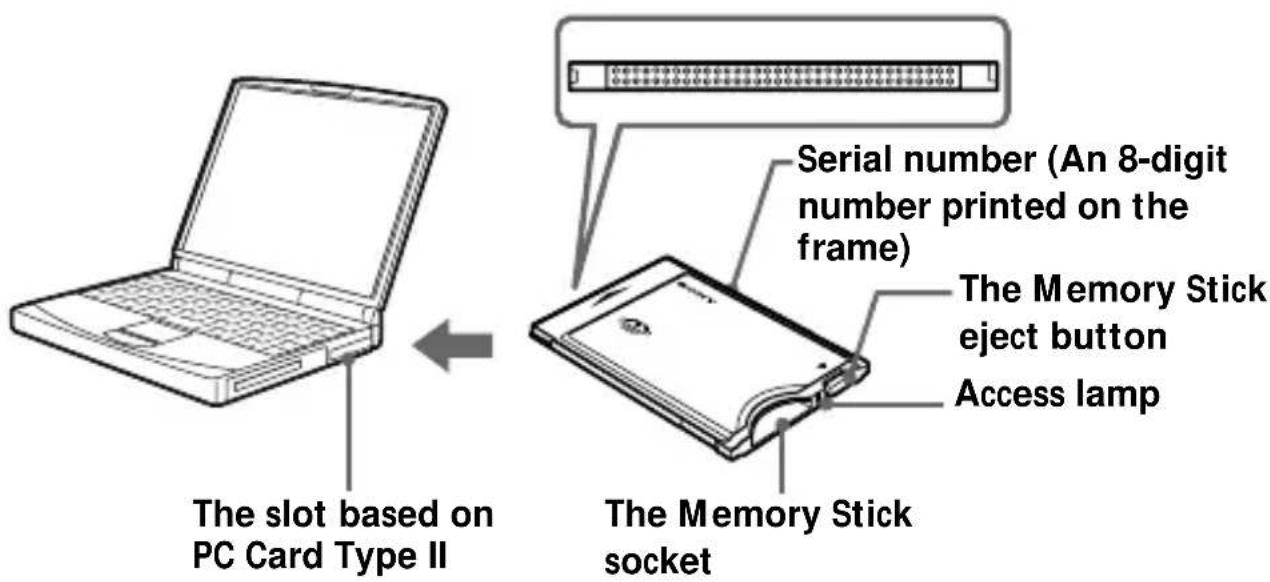
3 Open the additional hardware wizard and begin driver installation.
Depending on your operating system, driver installation may start automatically, or the wizard may not start up.
Follow the instructions on the screen and click on the [Next] button to carry out driver installation.
Connecting this unit to your computer (Continued)
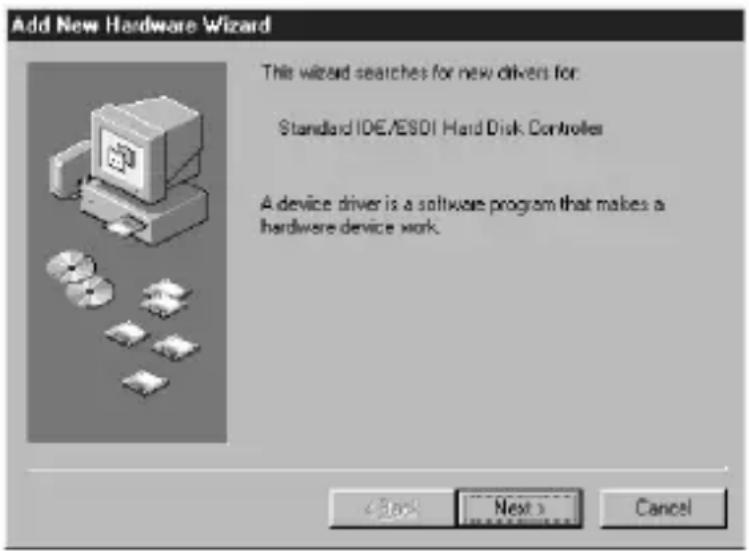
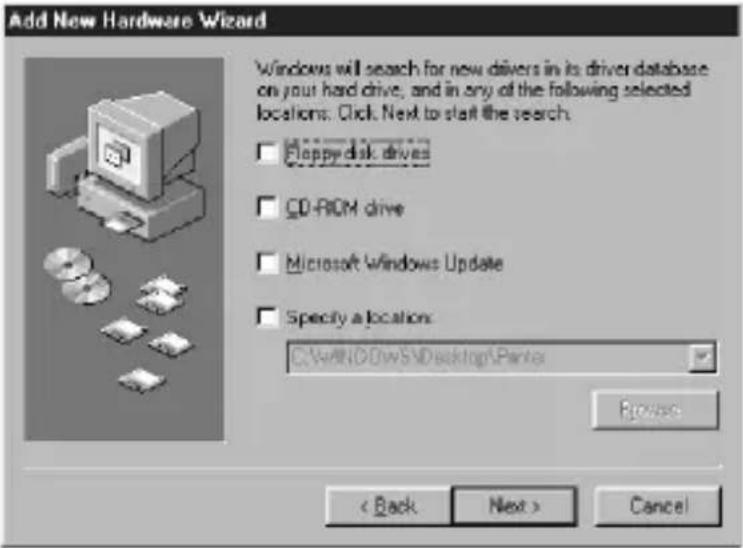
4 Select "Search for the best driver for your device [Recommended]" and click on [Next].
5 Do not check anything. Click on [Next].
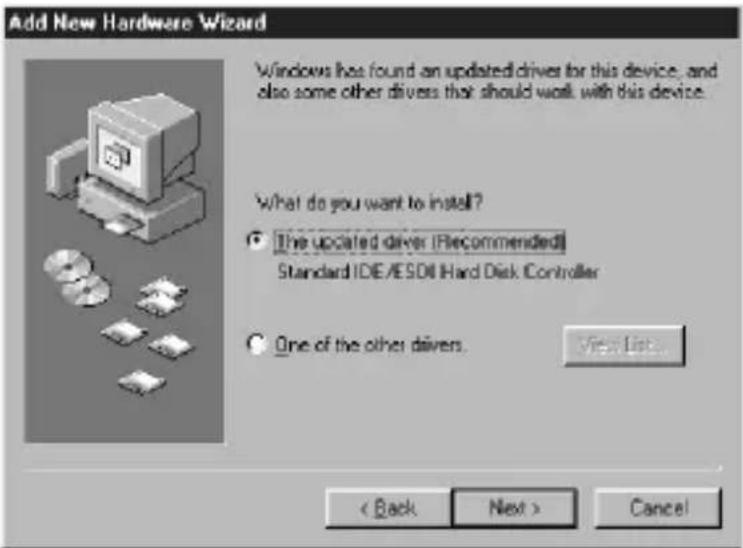
6 Select "The updated driver [Recommended] Standard IDE/ESDI Hard Disk Controller".
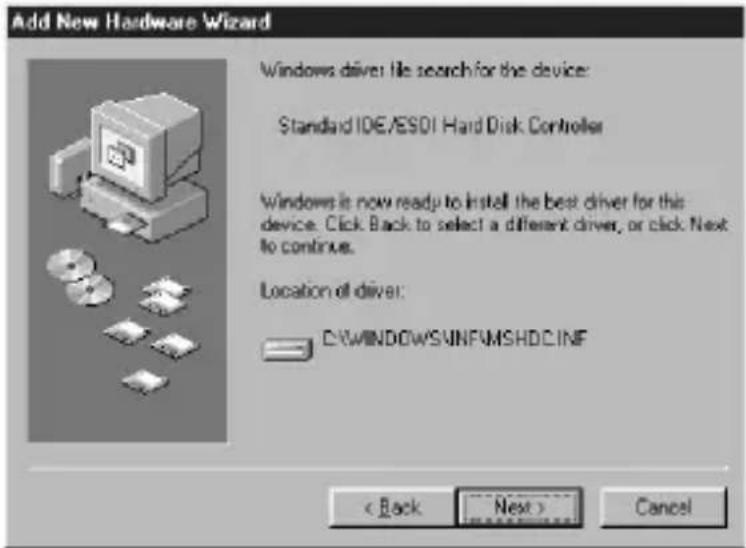
7 Follow the instructions on the screen and click on [Next].
8 Click on the [Finish] button. Driver installation is now complete.
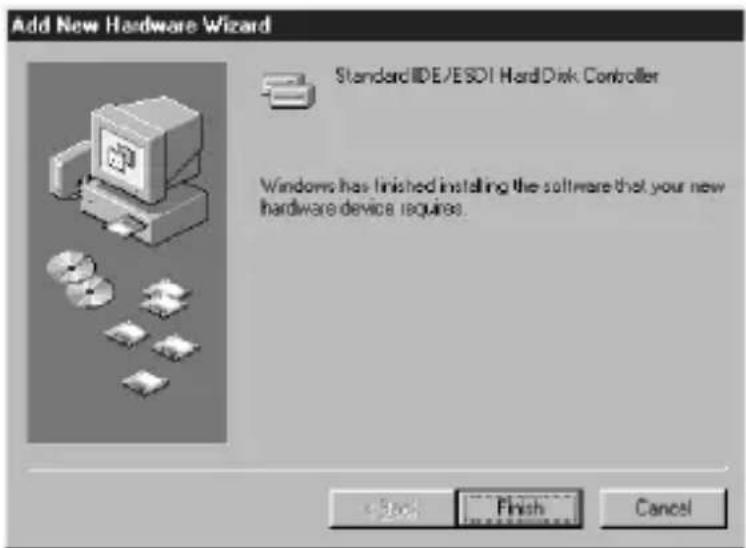
You can now use the unit.
Note
Start up the additional hardware wizard when you first use this unit, and when you first use a "Memory Stick" with a different capacity.
Confirming that connections are completed
1 Open the "My Computer" folder.
①Double-click "My Computer".
②The "My Computer" folders appear.
2 Confirm that the newly recognized "Sony MemoryStick (F:) " icon is shown.
This “Sony MemoryStick (F:)” icon indicates this unit connected to the computer. Depending on the computer used, the drive letter (F:) may be different.
The connection is completed when the "Sony MemoryStick (F:) " icon is shown.
It may take a little while before the "Sony MemoryStick (F:) " icon appears.
Note
- If the “Sony MemoryStick (F:)” icon is not shown, the Device driver may not be installed correctly. Perform the procedures described on page 17.
- "Sony MemoryStick (F:)” may be displayed as “Removable Disk (F:)” and icons may differ depending on the type of OS and the “Memory Stick” you are using.
- When using another “Removable Disk,” plural “Removable Disk” icons appears.
- The “Memory Stick” may be recognized as “Local Disk (F:)” depending on the “Memory Stick” you are using, though this will cause no problems in terms of use. When using Windows 98/Windows 98SE/Windows Me, please refer to “When Using Windows 98/Windows 98SE/Windows Me” described on the next page and change disk settings from “Local Disk” to “Removable Disk”. This will cause no problems in terms of use, but settings cannot be changed to “Removable Disk” when the “Memory Stick” is recognized as a “Local Disk” in Windows 2000/Windows XP. In this case, unlocking the LOCK switch when using the “Memory Stick” is recommended (Page 26).
- When Using Windows 98/Windows 98SE/Windows Me -
When first using the unit, it will appear in the "My Computer" folder as a "Local Disk" and not as a "Removable Disk". There are no problems in terms of use when it is used like this, though a blue screen may appear when it is used with the LOCK switch in the locked position and a warning may appear. In this event, use of the "Memory Stick" with the disk drive settings changed from "Local Disk" to "Removable Disk" as shown below is recommended.
1 Insert the unit with the “Memory Stick” inserted into your computer and install drivers (Page 9). When drivers are already installed, insert the unit with the “Memory Stick” inserted into your computer and perform operations according to the following steps.
2 After installation is complete, write down the drive letter assigned to the "Memory Stick". You can check the drive letter by opening "My Computer" from the desktop.
3 Open the "Control Panel" from the [Settings] in the [Start] menu.
4 Double-click [System].
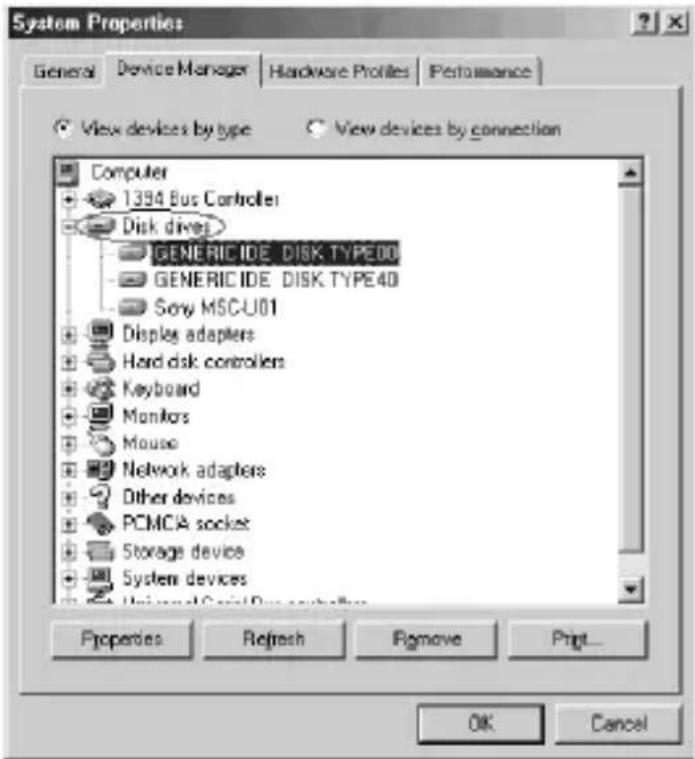
5 Select the [Device Manager] tab from "System Properties" and double-click [Disk drives].
Confirming that connections are completed (Continued)
6 Search for the drive assigned to the unit in [GENERIC IDE DISK TYPE XX] (XX is a 2-digit number or a “=” sign and a single-digit number). Search for the drive in question as follows.
①Select the first [GENERIC IDE DISK TYPE XX] (in this example, [GENERIC IDE DISK TYPE 00]), and click [Properties].
②After opening the "Properties" window, click the [Settings] tab.
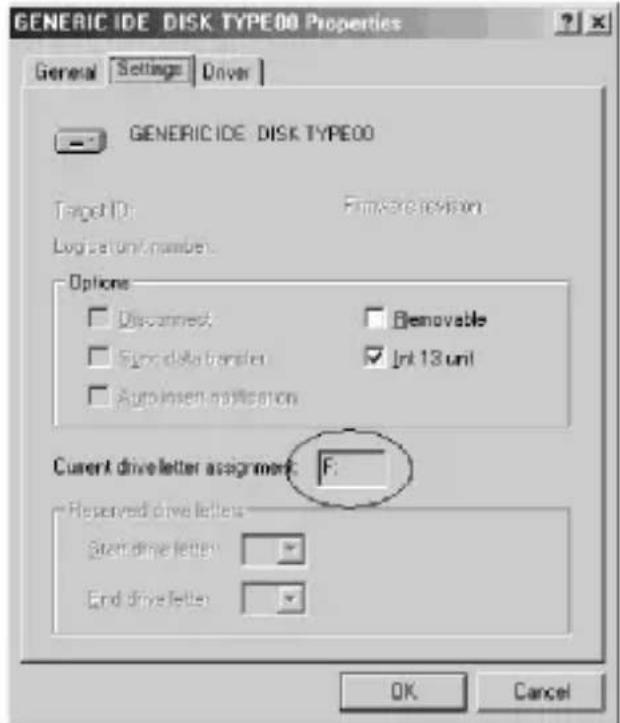
③Check the text box for the “Current drive letter assignment”, if the drive letter assigned to the unit is the same, then the selected device drive is the drive assigned to the unit. If the drive letters are different, click [Cancel], close the properties screen, select the next [GENERIC IDE DISK TYPE XX] (in this example, [GENERIC IDE DISK TYPE 40]), and check it by following the same steps.
④Keep repeating these steps until you find the drive assigned to the unit.
7 After you have checked the drive assigned to the unit, check "Removable" in the settings screen and remove the check from "Int 13 unit".
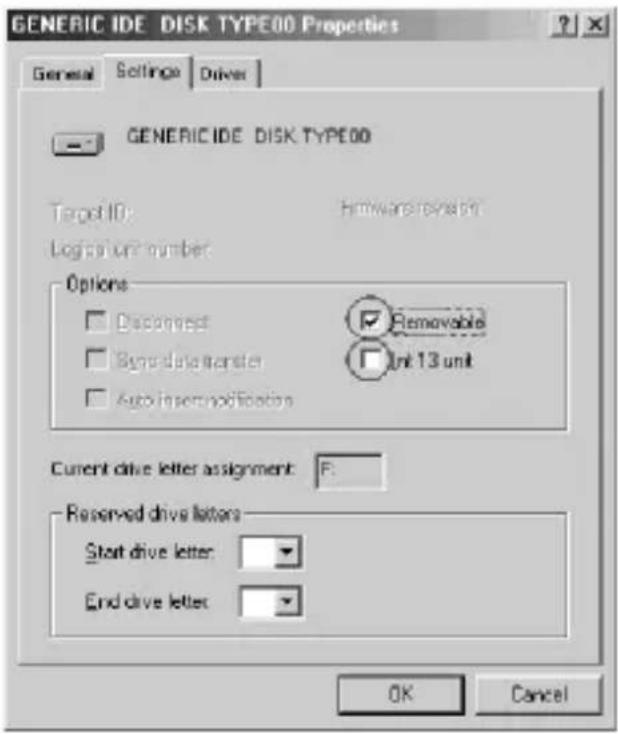
8 Click [OK] and close the properties screen.
9 Click [OK] and close the system properties screen.
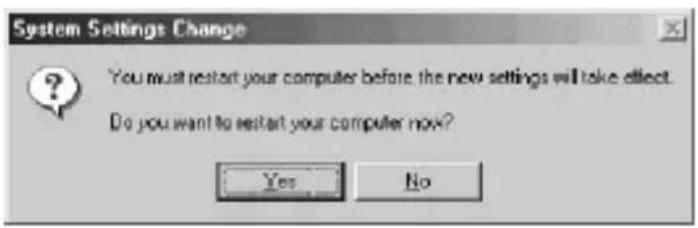
10 The following message for you to restart your computer will be displayed, so click [Yes] and restart your computer.
Confirming that connections are completed (Continued)
11 After restarting your computer, open “My Computer” and check to see if the drive assigned to the unit has been changed to “Removable Disk (X:)” (X is the drive letter assigned to the unit). If the drive has not been changed, settings are not reflected, so change settings again starting at step 3 above.

Note
- The drive assigned to the unit and the drive number (the XX portion in [GENERIC IDE DISK TYPE XX]) may differ when you restart your computer.
- When first using a "Memory Stick" of a different capacity with this unit, settings must be changed in the same manner after driver installation is complete.
When the Removable Disk is not indicated
A separate Device driver may already have been installed. Connect this unit to your computer, insert a “Memory Stick” into the unit and then perform the following procedure.
- When using Windows 2000/Windows XP -
1 Display the "System Properties" screen.
Double-click the "System" icon in the "Control Panel."
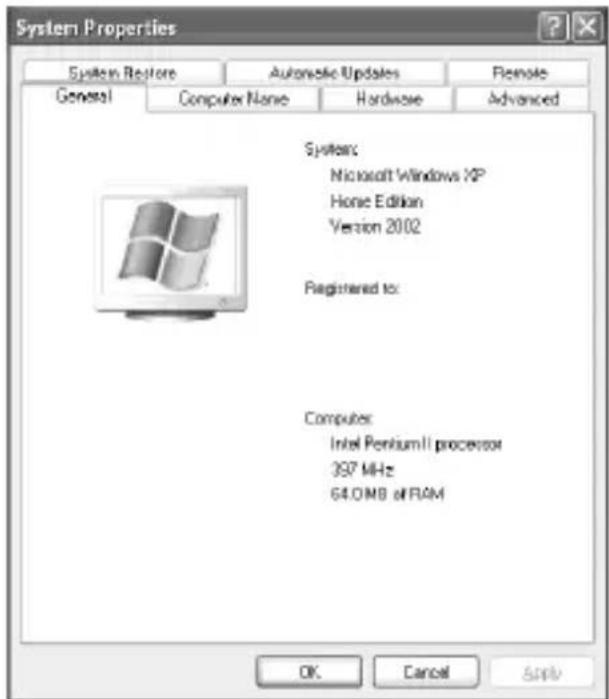
The "System Properties" screen appears.
When the Removable Disk is not indicated (Continued)
2 Check if the Device driver has already been installed.
![System Properties System Restore Automatic Updates Remote General Computer Name Hardware Advanced Add Hardware Wizard The Add Hardware Wizard helps you install hardware. Add Hardware Wizard Device Manager The Device Manager lets all the hardware devices installed on your computer. Use the Device Manager to change the properties of any device. Driver Signing Device Manager Hardware Profiles Hardware Profiles provide a way for you to set up and store different hardware configurations. Hardware Profiles OK Cancel Apply ①Click the [Hardware] tab on the "System Properties" screen. ②Click [Device Manager]. The "Device Manager" screen appears. ③Click [View]. ④Click [Devices by type] ⑤Check whether [! SONY-Memory Stick] preceded by the "!" symbol is shown. Device Manager File Action Help Devices by type Devices by connection Resources by type Resources by connection Show hidden devices Customize... IDE ATA/ATAPT controllers Infrared devices Keyboards Mice and other pointing devices Modems Maniters Network adapters Other devices Sony Memory Stick PCMCIA adapters Parts (COM & LPT) Processors Sound, video and game controllers Storage volumes System devices Displays devices by hardware type.](/content/2026/03/478512/images/db3514ad5e9c53f5ec755adf9a767a7c9ac88fcd997459e911bcd977e3bc99a0.jpg)
3 Delete the driver if installed.
If you use the procedure described in Step 2 and confirm that [! SONY-Memory Stick] is shown under in the “Devices by type” display, a separate device driver has already been installed.
Use the following procedure to delete this driver.
Do not delete other devices than [! SONY-Memory Stick].
①Right-click on [! SONY-Memory Stick].
②Click on [Remove]. The “Confirm Device Removal” screen appears.
③Click the [OK] button. The device is removed.
④Restart your computer after disconnecting this unit from the computer.
Install the Device driver again by performing the procedure from "Connecting this unit to your computer" described on page 9.
Note
- If you delete other devices than [! SONY-Memory Stick] your computer may no longer operate normally.
- The computer recognize the "Memory Stick" with different capacity as the different divece.
- [! Sony-Memory Stick] may be displayed as the following depending on the type of OS and the “Memory Stick” you are using.
[!Sony Memory Stick] [!Standard IDE/ESDI Hard Disk Controller] [!PCMCIA IDE/ATAPI Controller]
When the Removable Disk is not indicated (Continued)
- When using Windows 98/Windows 98SE/Windows Me -
1 Display the "System Properties" screen.
Double-click the "System" icon in the "Control Panel."
2 Check if the Device driver has already been installed.
①Click the [Device Manager] tab on the "System Properties" screen.
②Check whether [! SONY-Memory Stick] preceded by the “!” symbol is shown.
Note
[! Sony-Memory Stick] may be displayed as the following depending on the type of OS and the “Memory Stick” you are using.
[!Sony Memory Stick]
[!Standard IDE/ESDI Hard Disk Controller]
[!PCMCIA IDE/ATAPI Controller]
3 Delete the driver if installed.
If you use the procedure described in Step 2 and find that [! Sony-Memory Stick] is shown, a separate device driver has already been installed.
Use the following procedure to delete this driver.
Do not delete other devices than [! Sony-Memory Stick].
①Click on [! Sony-Memory Stick].
②Click on [Remove]. The "Confirm Device Removal" screen appears.
③Click the [OK] button. The device is removed.
④Close the "System Properties" screen.
⑤Restart your computer after disconnecting this unit from the computer.
Install the Device driver again by performing the procedure from "Connecting this unit to your computer" described on page 9.
Note
- If you delete other devices than [! Sony-Memory Stick] your computer may no longer operate normally.
- The computer recognize the "Memory Stick" with different capacity as the different device.
Copying image data recorded on "Memory Stick" to your computer
If you remove this unit from your computer, the computer will no longer be able to recognize this unit and the image data stored on the “Memory Stick” can no longer be viewed on the computer. If you copy the image data stored on the “Memory Stick” to your computer, the image data can be displayed and processed on your computer even if this unit is not connected to your computer.
For details on how to copy image data to the computer, refer to the operating instructions of your computer.
Note
For details on how to disconnect this unit from your computer, refer to "Disconnecting this unit from your computer" described on page 22. Sony does not accept liability for damage to this unit and the "Memory Stick", or damage of the data.
Disconnecting this unit from your computer
After copying of the image data is completed, perform the procedure described below before removing the “Memory Stick” from this unit and removing this unit from the computer.
The screens shown in Windows XP are used in the following explanations. The screens may differ slightly with the type of OS used.
1 Click the “Unplug or Eject Hardware” icon in the task tray in the lower right corner of the screen.
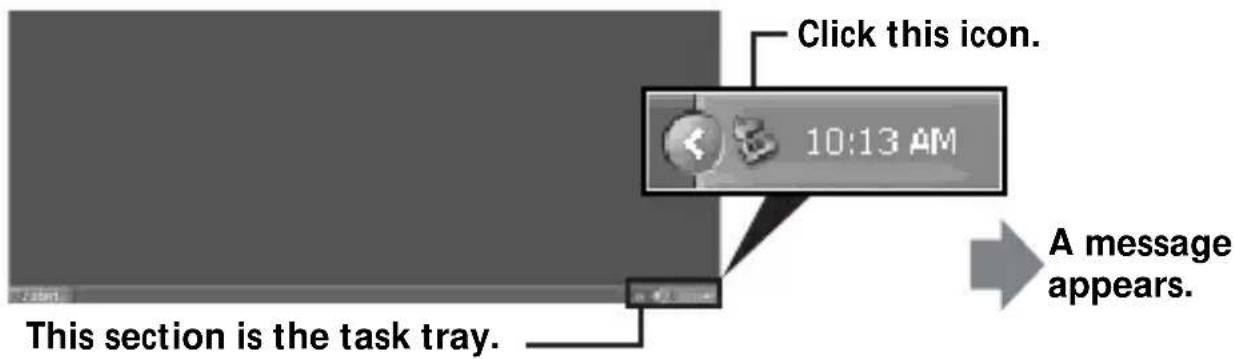
2 Click "Safely remove Sony Memory Stick-Drive (F:)".
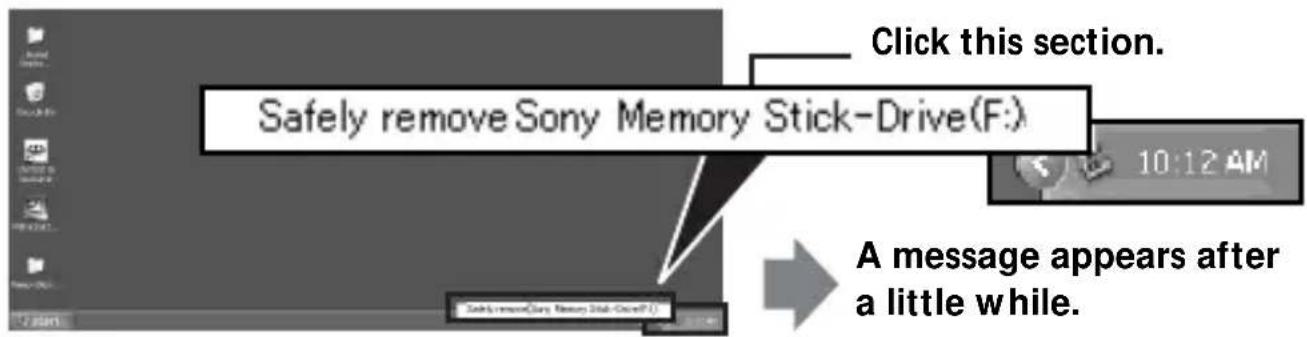
* The drive letter “(F:), etc.” differs with the computer used.
Note
The drive letter may be displayed as one of the following depending on the OS and "Memory Stick" you are using.
[Sony-Memory Stick Drive (F:)]
[Standard IDE/ESDI Hard Disk Controller Drive (F:)]
[PCMCIA IDE/ATAPI Controller (F:)]
22-US
3 "Sony Memory Stick can be removed safely" will be displayed.
At this point, data is safe even if the unit is unplugged from the computer.
*The display may differ depending on the OS you are using.
4 Remove this unit from the computer by pressing the eject button on the PC Card Slot.
Note
Do not remove the “Memory Stick” from the unit while the access lamp is flashing or “Memory Stick” data may be corrupted.
Connecting this unit to your computer and installing drivers
It can be used with OS standard device drivers.
Perform operations according to the following steps.
1 Turn on the power to your computer and start up the MacOS.
2 Firmly insert the unit with the “Memory Stick” attached until it reaches the back of your computer’s PC card slot.
For connection of the unit to your computer, refer to page 9.
3 Driver installation will start automatically and drivers will be installed on your computer.
4 When driver installation is complete, a Memory Stick icon will be displayed on your desktop and you can use the unit.
Disconnecting this unit from your computer
1 Close the software using this product.
2 Make sure that the unit's access lamp is not lit.
3 Move the Memory Stick icon to the [Trash].
When the Memory Stick icon is selected, choose "Uninstall" in the [Special] menu at the top left of the screen.
4 Remove the unit from your computer.
Note
Do not remove the “Memory Stick” from the unit while the access lamp is flashing or “Memory Stick” data may be corrupted.
Formatting (initialization) of “Memory Stick”
This deletes all the data recorded on a “Memory Stick.” When formatting on this unit, be sure to use the supplied “Memory Stick Formatter” software program, following the procedures outlined below. Operation on a Handycam or other “Memory Stick” compatible products is not guaranteed for a “Memory Stick” formatted on a computer without the use of the “Memory Stick Formatter” software program.
You can download the "Memory Stick Formatter" at the following Web Site.
http://www.sony.net/memorystick/supporte
For the details on how to use the “Memory Stick Formatter”, refer to the manual supplied with the “Memory Stick Formatter.”
Note
If you format a “Memory Stick” that contains recorded data, the already recorded data will be deleted. Be careful not to inadvertently delete important data.
1 Insert a "Memory Stick" into this unit, and install to your computer.
2 Start "Memory Stick Formatter."
3 After confirming that the drive is selected on which the "Memory Stick" is recognized to have been mounted, click [Start formatting]. Formatting begins.
Note
Do not remove this unit from the computer while formatting the “Memory Stick”. The data on the “Memory Stick” may be damaged.
Precautions for use of “Memory Stick”
LOCK (write-protect) switch
When the “Memory Stick” is used with the LOCK switch in the locked position, a blue screen and warning may appear. Unlocking the LOCK switch when using the “Memory Stick” is recommended.
![[LOCK]](/content/2026/03/478512/images/dd460ff2f99650f90cc3122875173c17a271e8fdc2321c5c9b3c35cc8c94f0b1.jpg)
In addition, copying or writing to the “Memory Stick”, deleting data, or formatting the “Memory Stick” with the LOCK switch in the locked position may cause writing and other operations to appear as if they have been performed when they have actually not been performed.
Do not write to the "Memory Stick" with the LOCK switch in the locked position.
Data read/write speed
The data read/write speed differs with the “Memory Stick” media and product combination that you are using.
Capacity of “Memory Stick PRO” that can be used with this unit (when using Windows)
Any “Memory Stick PRO” with a capacity of up to 4GB can be used with this unit. A “Memory Stick PRO” with a memory larger than 4GB will not operate properly if inserted.
Only use a "Memory Stick PRO" with a capacity of 4GB or less.
There is no capacity limit when using a Macintosh computer.
- Never remove the "Memory Stick" while the access lamp is on (while data is being read/written).
• Data may be corrupted in the following cases.
- If the "Memory Stick" is removed or the power to this unit is turned off while the access lamp is on (while data is being read/written)
- When used in a location subject to static electricity or electrical noise
• Always backup important data. Sony does not accept liability for it, even if data is lost.
- We cannot accept responsibility in the event that data is lost or damaged and the unit is damaged, while using this unit.
- Data copyright protected by "MagicGate" can only be used with a "MagicGate Memory Stick." (This unit is not compatible with "MagicGate".)
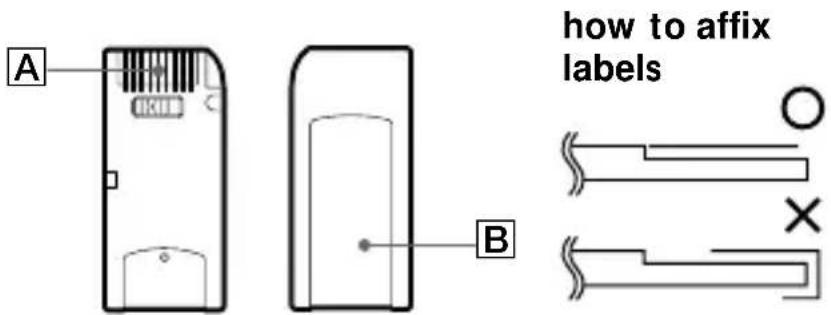
- Do not touch the connector section A with fingers or metallic objects.
- Do not affix any label other than those specially provided on the label space .
- When affixing labels, affix these at the designated positions. Labels should not protrude from the edges of the "Memory Stick."
- When transporting or storing a "Memory Stick," place it in the supplied storage case.
- Do not bend, drop or subject the "Memory Stick" to strong impacts.
- Do not attempt to disassemble or modify the "Memory Stick."
- Do not wet with water.
- Avoid use and storage in the following locations.
- In a car where the temperature may become very high or in other hot locations
- Location subject to direct sunlight
- Location with high humidity or where corrosive substances are present.
Precautions for use of “Memory Stick Duo”
- When using “Memory Stick Duo” with this unit, make sure the “Memory Stick Duo” has been inserted into the Memory Stick Duo Adaptor before starting to use.
- Confirm that the “Memory Stick” is positioned correctly before inserting for use.
- Do not insert the Memory Stick Duo Adaptor into “Memory Stick” compatible products when no “Memory Stick Duo” is inserted into the Memory Stick Duo Adaptor.
If used in these ways, malfunctions may occur.
Troubleshooting
| Symptom | Cause/Solution |
| The [Removable Disk] icon is not displayed. | Not connected correctly.→Connect correctly. (Page 9)The Device driver is not installed.Install the Device driver in the right way. (Page 9)"Memory Stick" is not inserted.→Insert a "Memory Stick." |
| The access lamp blinks when a "Memory Stick" is inserted. | Foreign matter adhering to the connector section of the "Memory Stick."→Check whether dust or dirt is adhering to the connector section of the "Memory Stick."Remove any foreign matter and insert the "Memory Stick" again. |
| Reading data on the "Memory Stick", writing data to the "Memory Stick", and copying may cause a blue screen and warning to appear. | The "Memory Stick" is write-protected.→Unlock the LOCK switch (Page 26).The "Memory Stick" is set as a "Local Disk" (When Using Windows 98/Windows 98SE/Windows Me).→Change the drive settings for the "Memory Stick" to "Removable Disk" (Page 13). |
| Writing data to or deleting data from the "Memory Stick" may appear to be taking place, but the data on the "Memory Stick" has not been changed. | The "Memory Stick" is write-protected.→Unlock the LOCK switch (Page 26).→Do not write to the "Memory Stick" with the LOCK switch in the locked position.The "Memory Stick" is set as a "Local Disk" (When Using Windows 98/Windows 98SE/Windows Me).→Change the drive settings for the "Memory Stick" to "Removable Disk" (Page 13). |
Troubleshooting (Continued)
| Symptom | Cause/Solution |
| The “Memory Stick” cannot be ejected from the Memory Stick PC Card adaptor. | ·The eject button is pushed into the PC card.→Hold the “Memory Stick” between your fingers and pull it out.→The Memory Stick PC card adaptor is not damaged.You can continue to use it, after removing the “Memory Stick”.→It may happen if you insert the “Memory Stick” in this unit while pressing the panel part of this unit strongly. Do not press it when you insert the “Memory Stick” in. |
Specifications
Memory Stick PC Card Adaptor
Interface: PCMCIA ATA 16bit (PC Card Type II)
Operating voltage DC 3.3 V/5.0 V
Power consumption Max. 90 mA DC
External dimensions
Approx. 54 · 5.0 · 85.6 mm
Mass Approx. 30 g (1.06 oz)(not including
"Memory Stick")
Operating conditions Temperature 0^ C to 60^ C ( 32^ F to 140^ F)
(no condensation)
Humidity 20% to 80%
(no condensation)
Design and specifications are subject to change without notice.
If you have any questions/comments related to this product, please visit our Customer Support website at http://www.sony.net/memorystick/supporte
LIMITED WARRANTY
If this product should prove defective in workmanship or material during the period of 1 year from the date of original purchase at retail, the same will be replaced by either the Seller, or Sony Electronics, Inc. or Sony of Canada, Ltd.
SUCH REPLACEMENT SHALL BE THE SOLE REMEDY OF THE CONSUMER, AND THERE SHALL BE NO LIABILITY ON THE PART OF THE MANUFACTURER, DISTRIBUTOR OR SELLER FOR ANY LOSS OR DAMAGE, DIRECT OR CONSEQUENTIAL, ARISING OUT OR THE USE OF, OR INABILITY TO USE, THIS PRODUCT.
Some states of the United States do not allow the exclusion of incidental or consequential damages, so the above exclusion may not apply to you.
This warranty gives you specific legal rights and you may also have other rights which vary from state to state in the United States, Puerto Rico or from province to province in Canada.
In the United States, contact: Sony Electronics Inc.,
Sony Building, 680 Kinderkamack Road, Oradell, New Jersey 07649.
In Canada, contact: Sony of Canada Ltd.,
115 Gordon Baker Road, Toronto, Ontario, M2H 3R6 CANADA.
Français
"MagicGate Memory Stick"
4 Sélectionnez "Search for the best driver for your device [Recommended]" et cliquez sur [Next].
![Add New Hardware Wizard What do you want Windows to do? ● [Search for the best driver for your device [Recommended]] ● Display a list of all the drivers in a specific locations, so you can select the driver you want. < Back Next > Cancel](/content/2026/03/478512/images/e53a098aabbdd985a936d0ebb57e6cd5cb09a84631a14bd1b804a3b6dff8e88c.jpg)
6 Sélectionnez "The updated driver [Recommended] Standard IDE/ESDI Hard Disk Controller".
![Add New Hardware Wizard Windows has found an updated driver for this device, and also some other drivers that should work with this device. What do you want to install? ● The updated driver [Recommended] Standard IDE/ESDI Hard Disk Controller ○ One of the other drivers. View List... < Back Next > Cancel](/content/2026/03/478512/images/e5ee31042f97d80cfd2a2e221f9d9d78089a2436efba31fd6dc846376e7aa5e1.jpg)
12-FR
Remarque
[Sony-MemoryStick Drive (F:)]
[Standard IDE/ESDI Hard Disk Controller Drive (F:)]
[PCMCIA IDE/ATAPI Controller (F:)]