
DBS 3748 - Iron CLATRONIC - Free user manual and instructions
Find the device manual for free DBS 3748 CLATRONIC in PDF.

| Product type | Steam iron with steam station |
| Brand | Clatronic |
| Model | DBS 3748 |
| Power supply | 220-240 V ~, 50 Hz |
| Rated power | 3000 W |
| Water tank capacity | 1.0 liter |
| Net weight | Approximately 3 kg |
| Protection class | I |
| Functions | Steam ironing, vertical steam, temperature and steam quantity adjustment |
| Temperature adjustment type | Rotary control with symbols (synthetic, silk, wool, cotton, linen) |
| Adjustable steam quantity | Yes, from MIN to MAX |
| Steam burst trigger | Yes |
| Indicator lights | Temperature and steam (heating) |
| Automatic shut-off | Not specified |
| Soleplate type | Not specified (estimate: stainless steel or ceramic) |
| Care and cleaning | Use only distilled water; clean the soleplate with a slightly damp cloth; do not immerse |
| Safety | Hot surface (caution burns); unplug before filling; do not leave unattended |
| Spare parts / Repairability | Removable water tank; repair only by authorized technician |
| Included accessories | Base station, iron, water tank, connecting hose |
| Warranty | Not specified |
Frequently Asked Questions - DBS 3748 CLATRONIC
User questions about DBS 3748 CLATRONIC
0 question about this device. Answer the ones you know or ask your own.
Ask a new question about this device
Download the instructions for your Iron in PDF format for free! Find your manual DBS 3748 - CLATRONIC and take your electronic device back in hand. On this page are published all the documents necessary for the use of your device. DBS 3748 by CLATRONIC.
USER MANUAL DBS 3748 CLATRONIC
natural_image
Exterior view of a modern office building (no signage)CE
Thank you for choosing our product. We hope you will enjoy using the appliance.
Symbols in this Instruction Manual
Important information for your safety is specially marked. It is essential to comply with these instructions in order to avoid accidents and prevent damage to the appliance:

WARNING:
This warns you of dangers to your health and indicates possible injury risks.

CAUTION:
This refers to possible hazards to the appliance or other objects.

NOTE:
This highlights tips and information.
Contents
Overview of the Components....3
General Notes......38
Special Safety Precautions for this Appliance....38
Intended Use 40
Overview of the Components/Scope of Delivery......40
Notes for Use....40
Unpacking 40
Electrical Connection 40
Power Requirements 40
Turn On and Off 40
Temperature Control on the Iron....41
Amount of Steam 41
Water Tank 41
Water 41
Operation 41
Before Initial Use....41
Ironing without Steam 41
Steam Ironing....41
Vertical Steam Function 42
How Can I Replenish the Water During Operation?.....42
When You Have Finished 42
Cleaning 42
Troubleshooting....43
Technical Data....43
Disposal 43
Meaning of the "Dustbin" Symbol 43
General Notes
Read the operating instructions carefully before putting the appliance into operation and keep the instructions including the warranty, the receipt and, if possible, the box with the internal packing. If you give this appliance to other people, please also pass on the operating instructions.
- The appliance is designed exclusively for private use and for the envisaged purpose. This appliance is not fit for commercial use.
- Do not use it outdoors. Keep it away from sources of heat, direct sunlight, humidity (never dip it into any liquid) and sharp edges. Do not use the appliance with wet hands. If the appliance is humid or wet, unplug it immediately.
- When cleaning or putting it away, switch off the appliance and always pull out the plug from the socket (pull the plug itself, not the lead) if the appliance is not being used and remove the attached accessories.
- The appliance and the mains lead have to be checked regularly for signs of damage. If damage is found the appliance must not be used.
- Use only original spare parts.
- In order to ensure your children's safety, please keep all packaging (plastic bags, boxes, polystyrene etc.) out of their reach.

WARNING:
Do not allow small children to play with the plastic foil.
There is a danger of suffocation!
Special Safety Precautions for this Appliance
You will find the following symbol with warning character on the appliance:
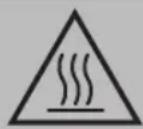
WARNING: Hot Surface!
Danger of Burns!
The temperature of accessible surfaces can be very hot during and after operation.

WARNING:
- The sole plate of the iron quickly becomes hot and needs time to cool down. Do not touch it!
- When not in use the iron should be stored in the storage space! Do not place it vertically onto any other surface. There is the risk that the iron will slip.
- Choose a secure surface for the stand! The surface must be level and stable. Check the surface again for stability.
- The iron must be used and rested on a stable, heat-resistant surface.
- Before filling the water tank remove the mains lead.
- The iron must not be left unsupervised while it is connected to the mains.
- Do not use the iron if it was dropped, has visible damages or leaks.
- Do not repair the appliance by yourself. Always contact an authorized technician. If the supply cord is damaged, it must be replaced by the manufacturer, its service agent or similarly qualified persons in order to avoid a hazard.
- While the iron is switched on and while it cools down, the iron and its connection cable must be outside the reach of children younger than 8 years.
- This appliance can be used by children aged from 8 years and above and persons with reduced physical, sensory or mental capabilities or lack of experience and knowledge if they have been given supervision or instruction concerning use of the appliance in a safe way and understand the hazards involved.
• Children shall not play with the appliance.

WARNING:
- Cleaning and user maintenance shall not be performed by children.

CAUTION: Limescale build-up on the appliance!
- Use only distilled water! If you do not comply with this important note, it may result in a defective appliance.
- An appliance that is defective due to build-up of limescale shall not be covered by the free warranty.

CAUTION:
This appliance is not designed to be immersed in water during cleaning. Please follow the instructions that we have included for you in the chapter on “Cleaning”.
- The tank should only be filled up to the maximum mark. Do not overfill! Max. water capacity: 1 litre.
- Do not bend the connecting hose!
Intended Use
This appliance is intended for ironing of clothing and textiles.
It is intended for use in households.
Any other use shall be considered as not intended use and can lead to material damage or even personal injury.
Overview of the Components / Scope of Delivery
1 Steam button
2 Temperature control
3 Handle
4 Connecting tube
5 "Temperature" control lamp
6 On / Off switch
7 Indicator light "steam"
8 Steam flow controller
9 Base
10 Iron rest
11 Water tank
12 Water tank recess
Notes for Use
Unpacking
Remove any protective foils and stickers from the soleplate.
Electrical Connection
Make sure that the iron voltage (see name plate) and the line voltage match.
Power Requirements
The station has a total maximum wattage of 3000 W. With this connected load a separate supply line protected by a 16 A household circuit breaker is recommended.

CAUTION: Overload!
- If you use extension leads, these should have a cable cross-section of at least 1.5 ~mm^2 .
- Do not use any multiple sockets, as this appliance is too powerful.
Turn On and Off
The indicator light (5) also serves as a marker for the temperature setting.
Turn on: Ensure that the temperature control is in the "0" position. Connect the mains plug to a properly installed safety socket. Set the on / off switch to "I" to turn the appliance on. Select the desired temperature and wait until the indicator light (5) goes out. Then the appliance is ready for steam ironing.
Turn off: Turn the temperature control to "0" and set the on / off switch to "O". Disconnect the mains plug from the socket.
Temperature Control on the Iron
The symbols on the control correspond to the following settings:
• (synthetics, silk) low temperature
•• (rayon, wool) medium temperature
•••(cotton, linen) high temperature
- Observe the ironing instructions on the clothes label.
- Turn woolen clothes inside out to avoid shiny spots on the fabric due to steam ironing. In addition, lay a thin cotton cloth onto the fabric.
- Select a low temperature setting for fabrics with additional surface treatment and iron them inside out.

NOTE:
The iron heats up faster than it cools down. Start ironing with the lowest temperature setting.
Amount of Steam
The desired steam level can be adjusted with the steam flow controller. Choose between "MIN" and "MAX".
Water Tank
- The water tank has a recessed grip on the bottom so that it can be removed.
- The "MAX" marking is located at the filling hole. Do not fill the tank above this mark. The tank volume is 1.0 litre.
- Slide the tank back into the base and press it firmly into place.
Water

CAUTION: Limescale build-up on the Appliance!
- Use only distilled water! If you do not comply with this important note, it may result in a defective appliance
- An appliance that is defective due to build-up of limescale shall not be covered by the free warranty.
Do not fill battery water, water from the clothes dryer and water containing additives (such as starch, perfume, softener or other chemicals) into the water reservoir.
This could damage the iron due to residues forming in the steam chamber. These residues may cause impurities to the fabric when dropping out of the holes in the soleplate.
Operation
Before Initial Use
- Clean the ironing base with a slightly damp cloth.
- In order to remove all residues before initial use, please pass the iron a few times over an old clean cloth.
Ironing without Steam

NOTE:
Sort out the garments according to their ironing temperatures.
- Place the iron on the rest.
- Set the steam flow controller to the "OFF" position.
- Connect the base station to a socket with earthing contact.
- Set the on/off switch to "I" to turn the appliance on.
- Adjust the temperature on the temperature control. If you have sensitive items to iron, please begin with the lowest temperature.

NOTE:
The control lamp (5) on the iron indicates the heating process. As soon as this goes out, the operating temperature is reached. You can now begin ironing.
Steam Ironing

WARNING:
The iron expels a large quantity of hot steam. Danger of burns!

CAUTION:
When using the steam iron please ensure that the water tank is always filled to the required level.

CAUTION: Initial Use:
Please proceed as follows:
- Remove the water tank by grasping the water tank recess.
- Fill the water tank with distilled water. Fill the water tank to the maximal marking only. Do not overfill!
- Slide the water tank back into the base.
- Connect the base station to a socket with earthing contact.
- Set the on/off switch to "I" to turn the appliance on.
- Set the required temperature in the range “●●” to “●●●”. The control lamp (5) on the iron lights up.
- Wait until the sole plate has heated up. If the temperature has been reached, the control lamp (5) goes out.
- The indicator light (7) at the base displays the heating process. As soon as this goes out, you can begin steam ironing.

CAUTION: Initial Use:
- Turn the steam flow controller to "MAX". Now press the steam button ⏻ for at least 20 seconds or until the steam begins to discharge from the iron soleplate. This time is needed for the steam to reach the iron. A slightly louder noise of the pump is normal with this.

CAUTION:
- A high temperature is needed to iron with steam.
- If the temperature is too low, the iron soleplate does not become hot enough to evaporate the water. Thereby water will be able to discharge from the iron soleplate when you keep the steam button pressed.
- Set the temperature control at least to the “●●” symbol.
- Adjust the amount of steam to the temperature of the iron with the steam flow controller.
- The soleplate might cool down after continuously long steam ironing. Thus it is possible that water escapes out of the soleplate. This is not a malfunction of the appliance. Reduce the steam level with the steam flow controller. Or you can wait until the iron soleplate has heated up again before pressing the steam button 🤨 again.
Vertical Steam Function
The vertical steam function allows a constant burst of steam in a vertical direction. This function can be used to remove creases from hanging clothes or from curtains.

WARNING:
Do not direct the steam at any persons. Danger of burns!
Hang the washing on a hanger. Guide the iron closely over the material as specified by the material.
How Can I Replenish the Water During Operation?
Refill with water before the tank is completely empty. A loud noise of the pump during operation indicates that the water level is too low.
- Place the iron on the rest.
- Set the temperature control to "MIN".
- Turn the appliance off by setting the on/off switch to "O".
- Remove the mains plug from the socket.
- Pull the water tank out of the base.
- Fill the water tank only with distilled water. Fill the water tank to the maximal marking only. Do not overfill!
- Put the water tank back into position.
- Put the power plug into the socket.
- Set the on/off switch to "I" to turn the appliance on.
- You can now continue ironing.
When You Have Finished
- Turn the appliance off by setting the on/off switch to "O".
- Allow the appliance to cool down before you put it away.
Cleaning

WARNING:
• Always remove the mains lead before cleaning!
- Wait until the appliance has cooled down completely!
- Under no circumstances should you immerse the appliance in water for cleaning purposes. Otherwise this might result in an electric shock or fire.

CAUTION:
- Do not use a wire brush or any abrasive items.
- Do not use any acidic or abrasive detergents.
- Clean the casing with a slightly damp cloth.
- Clean the sole plate and the rest with a slightly damp cloth.
- Any residual water can remain in the water tank, but should be poured out if it has been in the tank for a prolonged period.
Troubleshooting
| Fault Possible Cause Remedy | ||
| Appliance does not work. Faulty | mains socket. Try another socket. | |
| The appliance suddenly stops working during operation. | Is the electric circuit overloaded? Check the house fuse. | |
| No steam is generated. The water tank has not been installed correctly. | Firmly push the water tank into the base. | |
| Water leaks from the soleplate. | The temperature is set too low. Select a temperature between “●●” and “●●●”. | |
| Loud noises during steam operation. | The tank is empty. Check the tank. | Fill tank with water. |
| Initial start-up or after long periods of disuse. | These noises of the pump are normal. | |
Technical Data
Model: DBS 3748
Power supply: 220 - 240 V\~, 50 Hz
Power consumption: 3000 W
Protection class:....I
Maximum filling quantity of the water tank: 1.0 litre
Net weight: .... approx. 3 kg
The right to make technical and design modifications in the course of continuous product development remains reserved.
This appliance has been tested according to all relevant current CE guidelines, such as electromagnetic compatibility and low voltage directives, and is manufactured according to the latest safety regulations.
Disposal
Meaning of the "Dustbin" Symbol
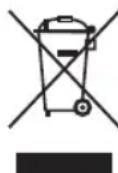
Protect our environment: do not dispose of electrical equipment in the domestic waste.
Please return any electrical equipment that you will no longer use to the collection points provided for their disposal.
This helps avoid the potential effects of incorrect disposal on the environment and human health.
This will contribute to the recycling and other forms of re-utilisation of electrical and electronic equipment.
Information concerning where the equipment can be disposed of can be obtained from your local authority.
Instrukcja obsługi
CTC Clatronic Sp. z o.o
Ul. Brzeska 1
45-960 Opole