
DE4024P1 - Tumble drier Fisher & Paykel - Free user manual and instructions
Find the device manual for free DE4024P1 Fisher & Paykel in PDF.

| Product Type | Front-loading condenser dryer |
| Model | DE4024P1 |
| Brand | Fisher & Paykel |
| Maximum Capacity | 8.0 kg (dry weight) |
| Height | 845 mm (33 1/4 in) |
| Width | 595 mm (23 7/16 in) |
| Depth (door closed) | 640 mm (25 1/4 in) |
| Depth (door open) | 1067 mm (42 in) |
| Power Supply | 120/240 V, 30 A (power cord not supplied) |
| Drying Cycles | Cottons, Everyday, Heavy, Bulky, Sanitize, Permanent Press, Delicate, Sheets, Freshen, Rack Dry, Time Dry, Air Dry, Sports |
| Drying Options | Dryness level (5 levels), temperature (high/medium/low/no heat), wrinkle free (2h or 24h), buzzer, key lock, delay start (5 min to 12 h) |
| Moisture Sensing System | Auto drying sensors |
| Water Drainage | Water tank (to empty) or drain hose to a drain |
| Drying Rack Included | Yes, for flat drying of delicate items |
| Interior Light | Drum light (not user-replaceable) |
| Regular Maintenance | Clean lint filter after each cycle, empty water tank after each cycle, monthly condenser cleaning |
| Safety | Grounding required, key lock, automatic stop when door open or tank full, error codes displayed |
| Limited Warranty | 2 years parts and labor (US and Canada) |
| Country of Manufacture | Not specified, brand based in New Zealand |
Frequently Asked Questions - DE4024P1 Fisher & Paykel
User questions about DE4024P1 Fisher & Paykel
0 question about this device. Answer the ones you know or ask your own.
Ask a new question about this device
Download the instructions for your Tumble drier in PDF format for free! Find your manual DE4024P1 - Fisher & Paykel and take your electronic device back in hand. On this page are published all the documents necessary for the use of your device. DE4024P1 by Fisher & Paykel.
USER MANUAL DE4024P1 Fisher & Paykel
INSTALLATION INSTRUCTIONS
USERGUIDE
INSTRUCTIONS D'INSTALLATION
GUIDE D'UTILISATION
Safety and warnings 4
Installation instructions 6
Getting started 18
Drying cycles 20
Drying cycle options 21
Sorting and loading 24
Caring for your dryer 26
Before you call for service 28
Fault codes 29
Troubleshooting
Limited warranty 35
30
IMPORTANT!
SAVE THESE INSTRUCTIONS
The models shown in this User guide may not be available in all markets and are subject to change at any time. For current details about model and specification availability in your country, please go to our website www.fisherpaykel.com or contact your local Fisher & Paykel dealer.
Registration
Register your product with us so we can provide you with the best service possible.
To register your product visit our website: www.fisherpaykel.com
Welcome to your new condenser dryer
Thank you for purchasing a Fisher & Paykel clothes dryer. Your new dryer gives you the convenience of tumble drying and your clothes the advantage of not being subjected to the harsh overdrying effects of the sun. Your clothes will feel softer, retain their shape better and require less ironing.
At Fisher & Paykel we aim to provide innovative products that are simple to use, ergonomic, energy efficient and kind to the environment. Thousands of tons of laundry and 75 years of laundry experience have been programmed into your dryer to help give you the best possible performance.
Your dryer has the benefit of not needing to be vented outside, instead it condenses the moisture from the clothes and collects this in a water tank, or can pump it directly into a drain.
This dryer has been specifically designed to complement our front loading Fisher & Paykel WashSmart™ and FabricSmart™ washers. We are proud of this dryer and trust it will serve you well for many years.
Your condensing dryer has numerous cycles and options so you can perform every drying task (including flat drying) with ease, allowing you to spend less time in the laundry. With the ability to automatically sense when your clothes are dry, your dryer is more efficient, making it kinder on your wallet and the environment.
Please take the time to read these instructions carefully before you begin using your dryer. Following the advice in this User guide will ensure you get the performance you expect from your dryer and that you get the best possible results. Keep these instructions for future reference and pass them on with your dryer, if it changes hands.
We hope you enjoy your new dryer. We have certainly enjoyed designing it for you.
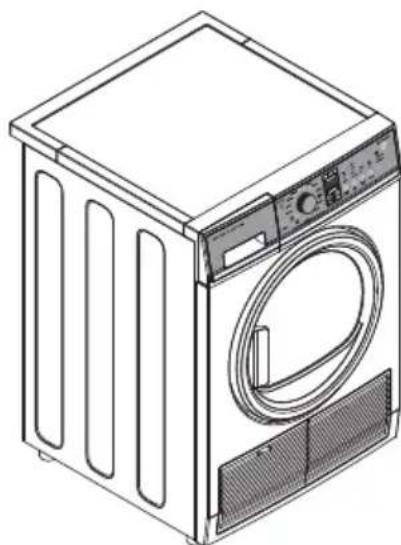
Condenser clothes dryer
Read all instructions before using the appliance.
WARNING!

Electric Shock Hazard
Follow the safety precautions outlined in this User guide. Failure to do so can result in death or electric shock.
IMPORTANT SAFETY INSTRUCTIONS
WARNING!
To reduce the risk of fire, explosion, electric shock, or injury to persons when using your appliance, follow basic precautions, including the following:
- Read all instructions before using the appliance.
- This dryer, when installed, must be electrically grounded in accordance with local codes, or in the absence of local codes, with the National Electrical Code, ANSI/NFPA 70, or the Canadian Electrical Code, CSA C22.1.
- DO NOT dry articles that have been previously cleaned in, washed in, soaked in, or spotted with gasoline, dry-cleaning solvents, or other flammable or explosive substances, as they give off vapors that could ignite or explode.
- DO NOT place items exposed to cooking oils in your dryer. Items contaminated with cooking oils may contribute to a chemical reaction that could cause a load to catch fire. To reduce the risk of fire due to contaminated loads, the final part of the tumble dryer cycle occurs without heat (cool down period). Avoid stopping a tumble dryer before the end of the drying cycle unless all items are quickly removed and spread out so that the heat is dissipated.
- DO NOT allow children to play on or in this appliance. Close supervision of children is necessary when this appliance is used near children.
- Before the appliance is removed from service or discarded, remove the door to the drying compartment.
DO NOT reach into the appliance if the drum is moving.
DO NOT install or store this appliance where it will be exposed to the weather.
DO NOT tamper with controls. - DO NOT repair or replace any part of this appliance or attempt any servicing unless specifically recommended in the user-maintenance instructions or in published user-repair instructions that you understand and have the skills to carry out.
DO NOT use fabric softeners or products to eliminate static unless recommended by the manufacturer of the fabric softener or product.
DO NOT dry articles containing foam rubber or similarly textured rubber-like materials.
Clean lint screen before or after each load.
DO NOT operate the dryer without the lint filter and condenser in place. - DO NOT store combustible materials, gasoline or other flammable liquids near the dryer. Keep area around the air intake vent on the front of the dryer and adjacent surrounding areas free from the accumulation of lint, dust and dirt.
-
The interior of the appliance should be cleaned periodically by qualified service personnel.
-
Unplug the appliance or turn off the circuit breaker before servicing. Pressing the 'POWER' or button DOES NOT disconnect power.
- DO NOT operate this appliance if it is damaged, malfunctioning, partially disassembled, or has missing or broken parts, including a damaged cord or plug.
- DO NOT spray any type of aerosol into, on or near dryer at any time. DO NOT use any type of spray cleaner when cleaning dryer interior. Hazardous fumes or electrical shock could occur.
- See 'Electrical connection information for electric dryers' located in the Installation Instructions for grounding instructions.
Before you begin
Read these instructions completely and carefully.
IMPORTANT!
Save these instructions for local electrical inspector's use.
IMPORTANT!
Observe all governing codes and ordinances.
Install the clothes dryer according to the manufacturer's instructions and local codes.
Note to Installer - Be sure to leave these instructions with the Consumer.
Note to Consumer - Keep these instructions for future reference.
Clothes dryer installation must be performed by a properly trained installer.
Before the old dryer is removed from service or discarded, remove the dryer door.
Service information and the wiring diagram are located in the control console.
- Do not allow children on or in the appliance. Close supervision of children is necessary when the appliance is used near children.
- Proper installation is the responsibility of the installer.
Product failure due to improper installation is not covered under the limited warranty.
- Install the dryer where the temperature is above 50^ ( 10^ ) for satisfactory operation of the dryer control system.
WARNING!

Fire Hazard
- Clothes dryer installation must be performed by a properly trained installer.
Install the clothes dryer according to these instructions and local codes. - DO NOT install or store this appliance in any location where it could be exposed to water or weather.
- To reduce the risk of severe injury or death, follow all installation instructions.
- Save these instructions. (Installers: Be sure to leave these instructions with the customer.)
If you are planning to stack the washer and dryer, order a Stacking Kit separately for this dryer.
Unpacking your dryer
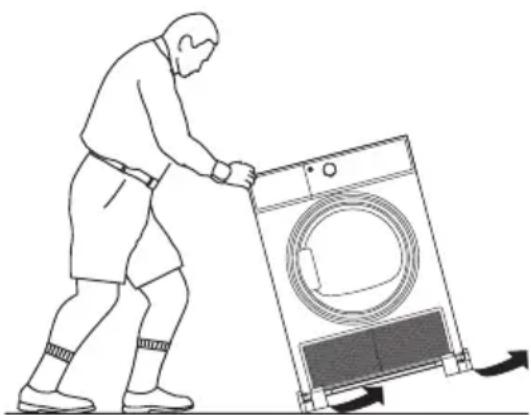
Tilt the dryer sideways and remove the foam shipping pads by pulling at the sides and breaking them away from the dryer legs. Be sure to remove all of the foam pieces from around the legs.
Remove and retain the bag containing the literature.
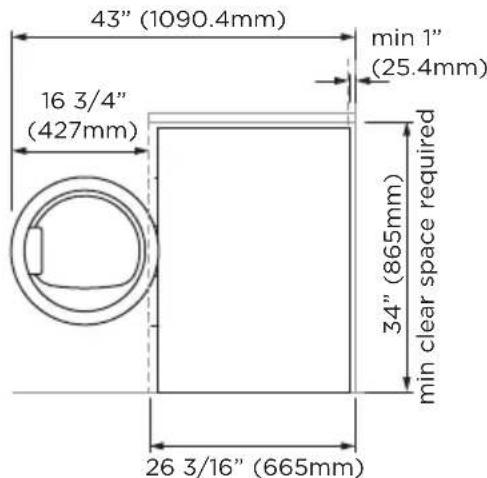
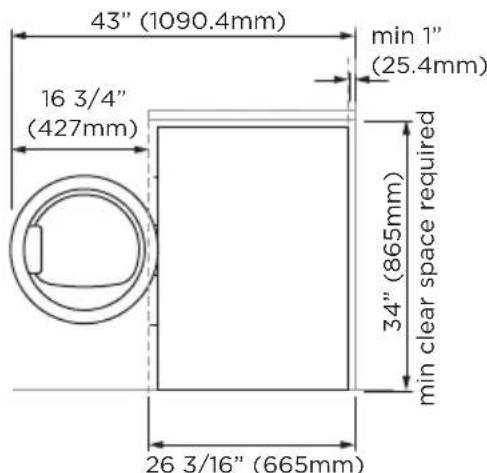
Product dimensions
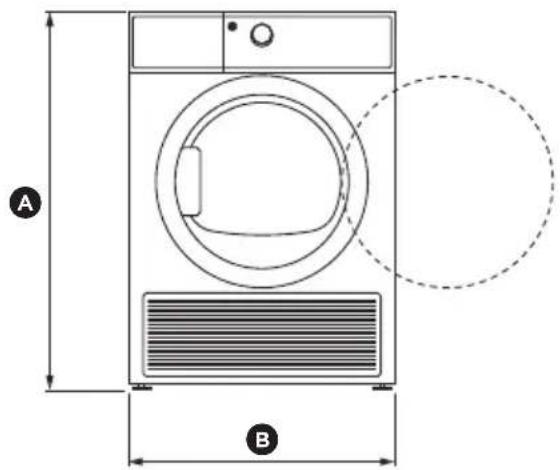
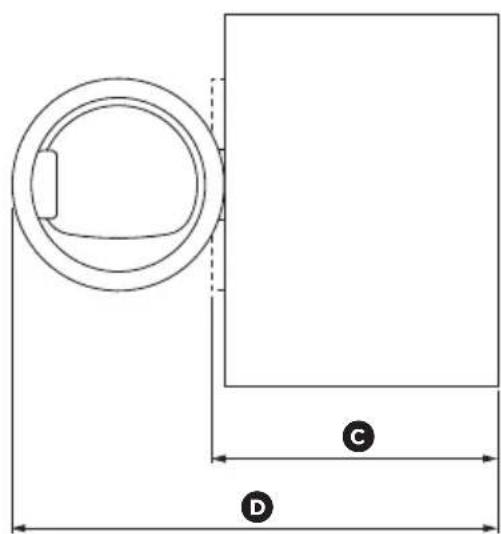
DE4024P
PRODUCT DIMENSIONS inches (mm)
Overall height of product ^ 喜 331/4" (845)
Overall width of product 23 7/16" (595)
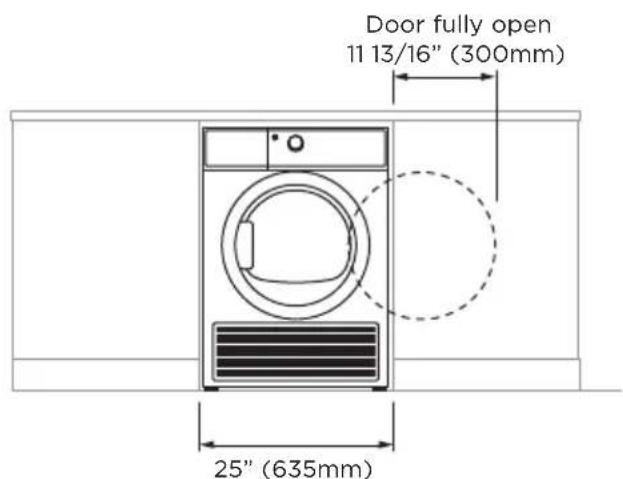
Overall depth of product (including dial and door when closed)
Depth to door open 42" (1067)
MAXIMUM CAPACITY+ kg
8.0
*Note:
With leveling legs retracted: 331 / 4'' (84.5cm). With leveling legs fully extended: 335 / 8'' (85.4cm). Stacked: 661 / 2'' (168.9cm).
† Capacity refers to the maximum dry weight of items the machine can dry at any one time. Note: some cycles have a lower maximum capacity (see the 'Drying cycles' section).
Electrical connection dimensions
Power cords
Fisher & Paykel Appliances strongly recommends the use of factory specified parts. Select the power cord to fit your installation requirements.
Requirements for alcove or closet installation
WARNING!
Explosion Hazard
- Keep flammable materials and vapors, such as gasoline, away from dryer.
- Place dryer at least 18" (46cm) above the floor for a garage installation.
-
Failure to do so can result in death, explosion, or fire.
-
Minimum clearance between dryer cabinet and adjacent walls or other surfaces is: 3/4 (20mm) sides, front, and top 1" (25.4mm) rear
- Consideration must be given to provide adequate clearance for installation and service.
- Closet doors must be louvered or otherwise ventilated and have at least 60 square inches (387cm^2) of open area. If the closet contains both a washer and a dryer, doors must contain a minimum of 120 square inches (774cm^2) of open area.
Minimum clearance other than alcove or closet installation
- Minimum clearance to combustible surfaces and for air opening are: 3/4'' (20mm) sides and top 1'' (25.4mm) rear
- Consideration must be given to provide adequate clearance for installation and service.
Mobile or manufactured home installation
- Installation MUST conform to the MANUFACTURED HOME CONSTRUCTION AND SAFETY STANDARD, TITLE 24, PART 3280 or STANDARD FOR MOBILE HOMES CAN/CSA-Z240 MH, or, when such standards are not applicable, with AMERICAN NATIONAL STANDARD FOR MOBILE HOME, ANSI/NFPA NO. 501B.
- Provide an opening with a free area of at least 25 square inches (161cm²) for introduction of outside air into the dryer room.
See the sections for electrical connection information.
Bathroom or bedroom installation
The installation must conform with local codes or, in the absence of local codes, with the NATIONAL ELECTRICAL CODE, ANSI/NFPA NO. 70 (for electric dryers).
Undercounter installation
If an undercover installation is desired:
- No special dryer installation kit is required.
- If the dryer is installed alone, a minimum of 60 square inches (387cm^2) of open area is required. If a washer and dryer are installed together, a minimum of 120 square inches (774cm^2) of open area is required.
Dryer installed alone
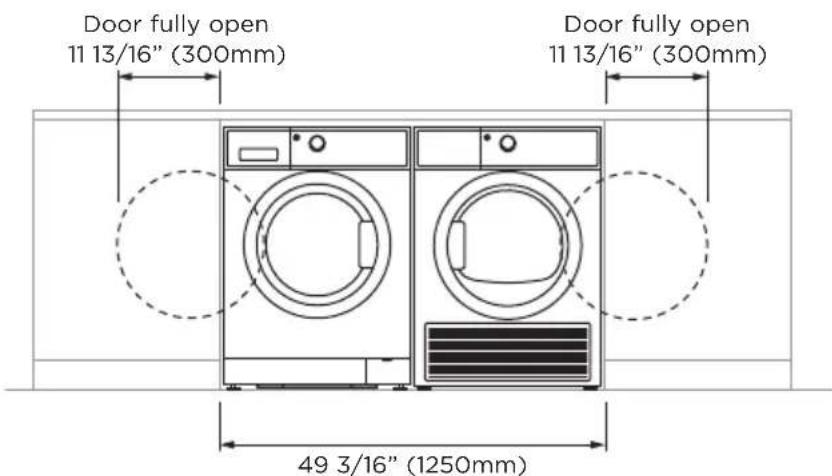
Washer and dryer installed together
INSTALLATION INSTRUCTIONS
Connecting an electric dryer
Tools you will need:
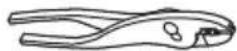
Slip-joint pliers Phillips Level


screwdriver

Flat-bladescrewdriver
Materials you will need:
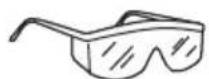
"Safety glasses Gloves 3/4" Strain relief
(UL recognized)
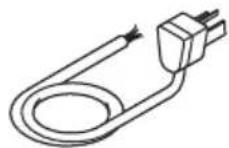
Dryer power cord kit (not provided with dryer)
UL rated 120/240V, 30A with 3 or 4 prongs. Identify the plug type as per the house receptacle before purchasing line cord. Stacking installations may require a power cord up to 6 feet (1.8m) in length.

Before making the electrical connection, turn off the circuit breaker(s) or remove the dryer's circuit fuse(s) at the electrical box. Be sure the dryer cord is unplugged from the wall.
IMPORTANT! Never leave the access cover off the terminal block.
Electrical connection information for electric dryers
For electrical connections using a power cord:
WARNING!

Fire Hazard
- Use a new UL-listed 240V 30 amp dryer power supply cord with closed ring terminals or spade terminals with upturned ends.
Use a UL-listed strain relief. - Disconnect power before making electrical connections.
- Connect neutral wire (white or center wire) to center terminal.
- Ground wire (green or bare wire) must be connected to green ground connector.
- Connect remaining two supply wires to remaining two terminals.
- Securely tighten all electrical connections.
- Replace the terminal block cover.
- Failure to do so can result in death, fire or electrical shock.
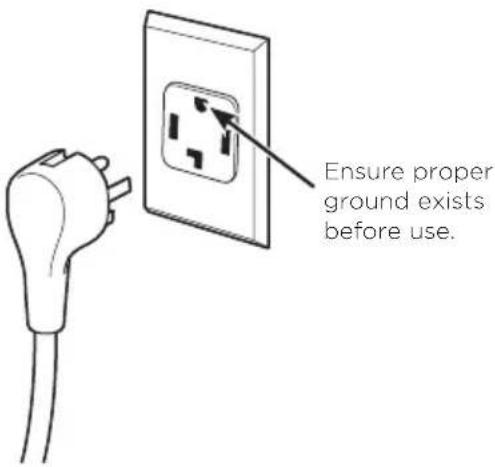
Grounding instructions
For a grounded, cord-connected dryer:
This dryer must be grounded. In the event of a malfunction or breakdown, grounding will reduce the risk of electric shock by providing a path of least resistance for electric current. This dryer uses a cord having an equipment-grounding conductor and a grounding plug. The plug must be plugged into an appropriate outlet that is properly installed and grounded in accordance with all local codes and ordinances.
WARNING!
Improper connection of the equipment-grounding conductor can result in a risk of electric shock. Check with a qualified electrician, or service representative or personnel, if you are in doubt as to whether the appliance is properly grounded. DO NOT modify the plug on the power supply cord. If it will not fit the outlet, have a proper outlet installed by a qualified electrician.
SAVE THESE INSTRUCTIONS
Electrical connection information for electric dryers
For direct wire connections:
WARNING!

Fire Hazard
- Use 10 gauge copper wire.
Use a UL-listed strain relief. - Disconnect power before making electrical connections.
- Connect neutral wire (white or center wire) to center terminal.
- Ground wire (green or bare wire) must be connected to green ground connector.
- Connect remaining two supply wires to remaining two terminals.
- Securely tighten all electrical connections.
- Replace the terminal block cover.
- Failure to do so can result in death, fire or electrical shock.
Grounding instructions
For a permanently connected dryer:
This dryer must be connected to a grounded metal, permanent wiring system, or an equipment-grounding conductor must be run with the circuit conductors and connected to the equipment-grounding terminal on the appliance.
WARNING!
Improper connection of the equipment-grounding conductor can result in a risk of electric shock. Check with a qualified electrician, or service representative or personnel, if you are in doubt as to whether the appliance is properly grounded.
SAVE THESE INSTRUCTIONS
Connecting dryer using 4-wire connection (must be used for mobile home installation)
Note: since January 1, 1996, the National Electrical Code requires that new constructions use a 4-wire connection to an electric dryer. A 4-wire cord must also be used where local codes do not permit grounding through the neutral. 3-wire connection is NOT for use on new construction.
4 #10 AWG minimum copper conductors or 120/240V 30A power supply cord kit marked for use with dryers and provided with closed loop or spade terminals with upturned ends (not supplied)
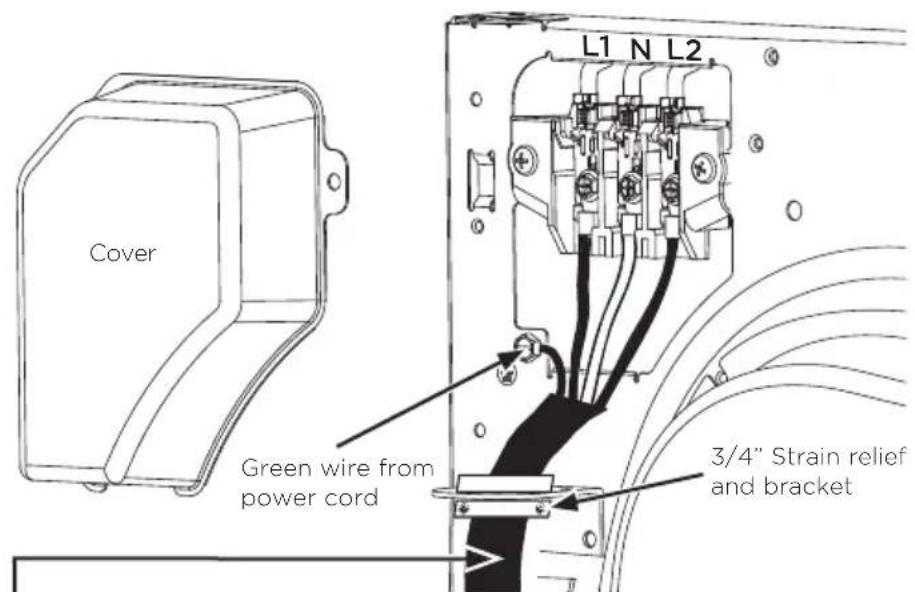
① Turn off the circuit breaker(s) (30 amp) or remove the dryer's circuit fuse at the electrical box.
② Be sure the dryer cord is unplugged from the wall receptacle.
③ Remove the power cord cover located at the upper back.
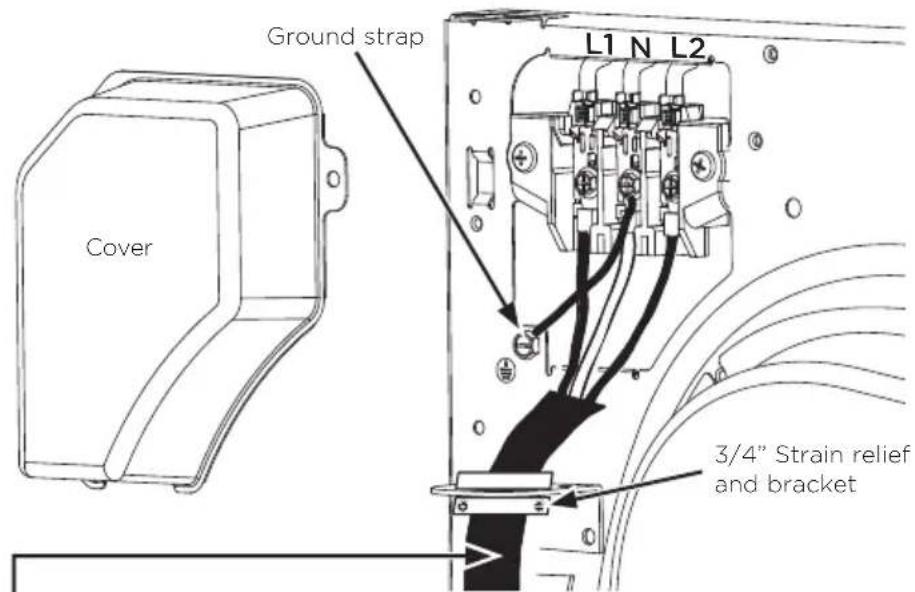
④ Remove green ground screw and retain for use in Step⑦. Remove center screw (marked N) in terminal block. Remove and discard ground strap.
⑤ Install 3/4 in. UL-recognized strain relief to power cord entry hole. Bring power cord through strain relief and bracket.
⑥ Connect power cord as follows:
A. Connect the 2 hot lines to the outer screws of the terminal block (marked L1 and L2).
B. Connect the neutral (white) line to the center of the terminal block (marked N).
⑦ Attach ground wire of power cord with the green ground screw (hole above strain relief bracket). Tighten all terminal block screws (3) securely.
(8) Properly secure power cord to strain relief and bracket.
(9) Reinstall the cover.
IMPORTANT!
Never leave the cover off of the terminal block.
Connecting dryer using 3-wire connection
If required, by local code, install external ground (not provided) to grounded metal, cold water pipe, or other established ground determined by a qualified electrician.
3 #10 AWG minimum copper conductors or 120/240V 30A power supply cord kit marked for use with dryers and provided with closed loop or spade terminals with upturned ends (not supplied)
3-wire connection
Not for use in Canada.
DO NOT use for Mobile Home Installations.
- NOT for use on new construction.
- NOT for use on recreational vehicles.
- NOT for use in areas where local codes prohibit grounding through the neutral conduction.
① Turn off the circuit breaker(s) (30 amp) or remove the dryer's circuit fuse at the electrical box.
② Be sure the driver cord is unplugged from the wall receptacle.
3 Remove the power cord cover located at the upper back.
④ Install 3/4 in. UL-recognized strain relief to power cord entry hole. Bring power cord through strain relief and bracket.
⑤ Connect power cord as follows:
A. Connect the 2 hot lines to the outer screws of the terminal block (marked L1 and L2).
B. Connect the neutral (white) line to the center of the terminal block (marked N).
⑥ Be sure ground strap is connected to green ground screw on cabinet rear. Tighten all terminal block screws (3) securely.
⑦ Properly secure power cord to strain relief and bracket.
(8) Reinstall the cover.
IMPORTANT!
Never leave the cover off of the terminal block.
Connecting the drain hose
Draining water without using the water tank
You can use the dryer without using the water tank by following the procedures below.
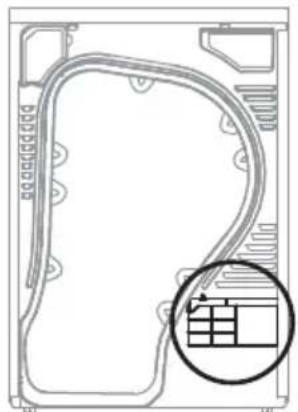
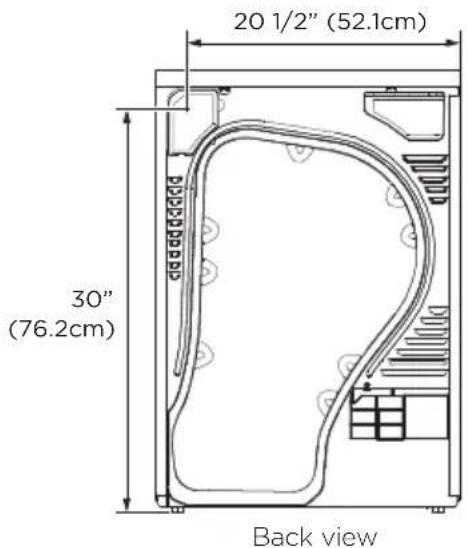
Back view
To connect the drain hose:
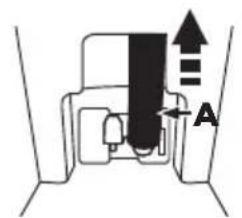
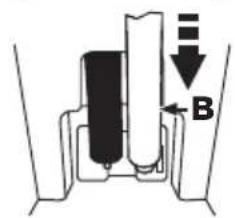
① Disconnect the drain hose A.
② Connect the drain hose A to the other hole.
③ Connect accessory hose B (long drain hose) adjacent to hose A.
- When connecting hose B, take care that the height of the hose does not exceed 58" (147cm).
After connecting the drain hose, you can now directly drain the condensed water to a standpipe or washstand.

Over the edge of a wash basin: The drain hose must be placed lower than 58^ (147cm). To keep the drain hose spout bent, use the plastic hose guide as supplied with the washer. Secure the guide to the wall with a hook or to the tap with a piece of string to prevent the drain hose from moving.
⑤ Assemble the drain hose and the hose guide and fix them with the cable-tie.
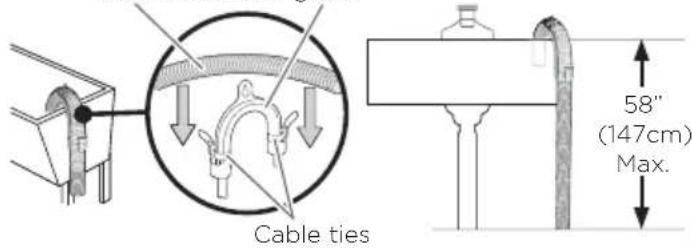
Drain hose Hose guide
Do not push the drain hose in the standpipe any further than 4" (10cm). Pushing the drain hose further in the standpipe can cause leaking.

INSTALLATION INSTRUCTIONS
Final setup
① Level the dryer
Stand the dryer upright near the final location and adjust the four leveling legs at the corners to ensure that the dryer is level from side to side and front to rear.
Levelling the feet
② Plug dryer in
Note: stacking installations may require a power cord up to 6 feet (1.8m) in length.
③ Dryer startup
Press the 'POWER' button.
Note: if the dryer has been exposed to temperatures below freezing for an extended period of time, allow it to warm up before pressing 'POWER'. Otherwise, the display will not come on.
The dryer is now ready for use.
Completing the installation
Installation test cycle
IMPORTANT!
Ensure the installation test cycle is completed before you dry any items in your dryer. This is to check that your dryer is installed correctly and that it is functioning properly prior to use.
① Turn your dryer on by pressing the 'POWER' button.
② Select the 'Time Dry' (30 mins) cycle. Ensure the drum is empty and the door is closed (you will hear it click shut).
③ Touch the button. The drum will start rotating.
- Observe the machine for any problems.
- The dryer will beep and display any faults on the screen if there are any problems. Refer to pages 28 and 29.
(4) At the completion of the cycle open the door and check that there is warmth inside the dryer. This indicates the dryer is operating normally.
IMPORTANT!
If there are any problems, you must address these before proceeding with normal use. The dryer will automatically turn off at the end of the cycle if there are no problems.
Before you start, it is a good idea to go through the following checklist:
① Has the packaging been removed?
② Is the machine correctly levelled, and the cabinet corners clear of the floor and walls?
③ Are the water tank, condenser and lint filter correctly in place?
④ Has the power cord been connected to an appropriate power supply and the power turned on?
⑤ Have you performed the installation test cycle?
If external draining is preferred, is the drain hose attached to the correct outlet and hooked into a standpipe or tub?
WARNING!
To reduce the risk of fire, electric shock, or injury to persons, read the IMPORTANT SAFETY INSTRUCTIONS before operating this appliance.
- Check the lint filter is clean and the water tank is empty before every load. Ensure both are replaced correctly before using your dryer.
- Sort and load items into the dryer drum, ensuring no items are in the way of the door. Close the door (you will hear it click shut).
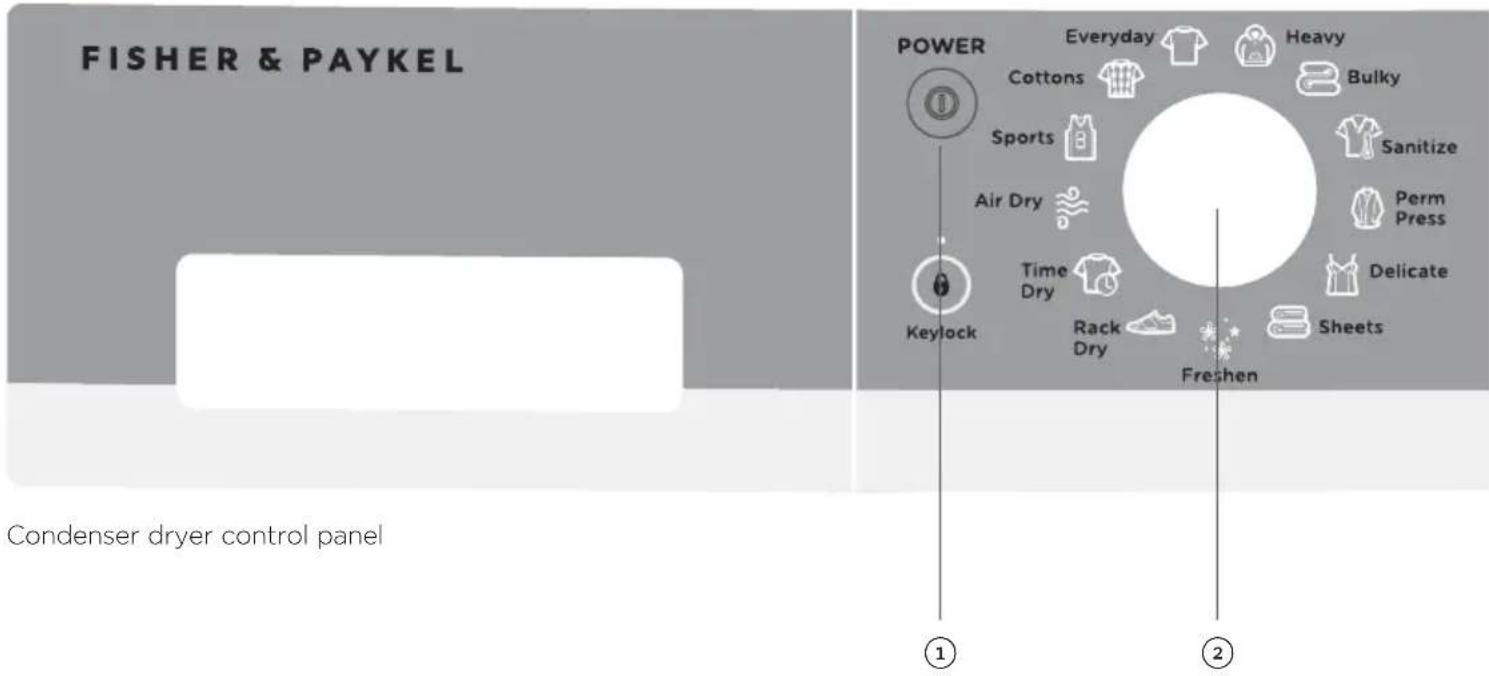
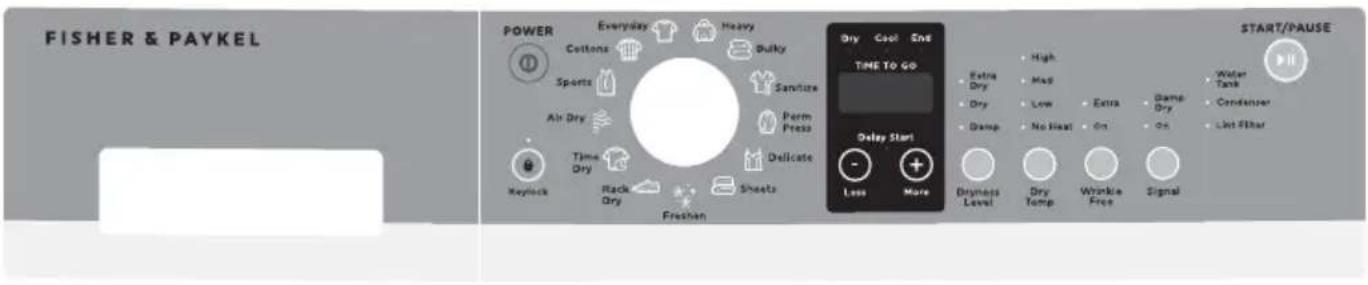
① Press 'POWER' to activate your dryer.
② Your dryer will default to the 'Everyday' cycle. Select your desired drying cycle by turning the SmartTouch™ Control Dial.
③ Select your preferred drying options, using the SmartTouch™ buttons on the right hand side of the panel (if you wish to select options different from the default options for the cycle).
④ Touch the button to start the cycle.
If you make an invalid selection the dryer will beep to alert you.
- When the cycle finishes, your dryer will beep and then turn off automatically. If the 'Wrinkle Free' option has been selected the machine will rotate the drum periodically blowing cool air into the drum to help minimize wrinkling and creasing of your load.
If you wish to stop your dryer at any point during a cycle simply touch Ito pause the cycle, then open the door.
- If you wish to cancel a cycle or select a different option once a drying cycle has started, touch the button then select the new cycle or option. Touch restart the dryer with the new cycle and/or settings.
IMPORTANT!
- If you wish to stop the dryer before the cycle has finished you MUST remove the clothes IMMEDIATELY and spread them out to cool. DO NOT leave the clothes in the dryer or bunched up in a clothes basket. Take extreme care as the drum and the load items may be extremely hot.
- Failure to follow the advice in this guide may result in damage to your garments and your expectations of drying performance may not be met.
Your dryer has a number of drying cycles to suit your laundry needs. Selecting the most appropriate cycle for each particular load will help ensure you get the best result.
| CYCLE DESIGNED FOR DESCRIPTION | MAX. LOAD SIZE (KG) | ||
| Cottons Cottons and most linens. A high heat cycle for cottons and linens. | 8 | ||
| Everyday Mixed loads consisting of cottons and polyester blends. Casual wear. | A cycle for rapid drying of everyday clothing. 8 | ||
| Heavy Heavy durable garments, eg work sweatshirts/jerseys and jeans. | A longer, high heat cycle for heavy fabrics and denim. 8 | ||
| Bulky Large coats, bed spreads, mattress covers, sleeping bags, blankets, comforters, jackets, small rugs, and similar large and bulky items. | A medium heat cycle for the special care of bulky items. | 4 | |
| Sanitize Bed linen, tea towels, socks. A high heat cycle for reducing certain types of bacteria by 99.6%, including: Staphylococcus aureus and Pseudomonas aeruginosa. The antibacterial process occurs when high heat is used during a portion of this drying cycle. | 8 | ||
| Permanent Press | Business shirts and clothing that creases easily. | A short, medium heat cycle with the ‘Wrinkle Free’ option selected for easily creasable items. | 4 |
| Delicate Lingerie and special-care fabrics. | A shorter, cooler cycle for carefully drying delicate and heat sensitive fabrics. | 4 | |
| Sheets Sheets, pillowcases and duvet/doona covers. | High heat cycle with reversing, to improve the movement of large items such as sheets and duvet/doona covers and help reduce tangling. | 4 | |
| Freshen Items that have been in storage or have not been worn/used for some time. | A short cycle with a burst of heat followed by cool air to help de-wrinkle and refresh items. | 1 - 3 items | |
| Rack Dry Drying delicate items without tumbling. | Use drying rack accessory. Place items flat on the drying rack such as wool sweaters and delicate fabrics. Dry with low heat. | 1 - 2 items | |
| Time Dry Drying items for a selected period of time. | A cycle with user selectable 30 - 150 minute drying times. | 8 | |
| Air Dry Drying items for a specific time period, without heat. | 40 minute cycle with no heat. | 8 | |
| Sports | Sports items, eg running gear. | A low heat cycle designed for the special care of sports items. | 4 |
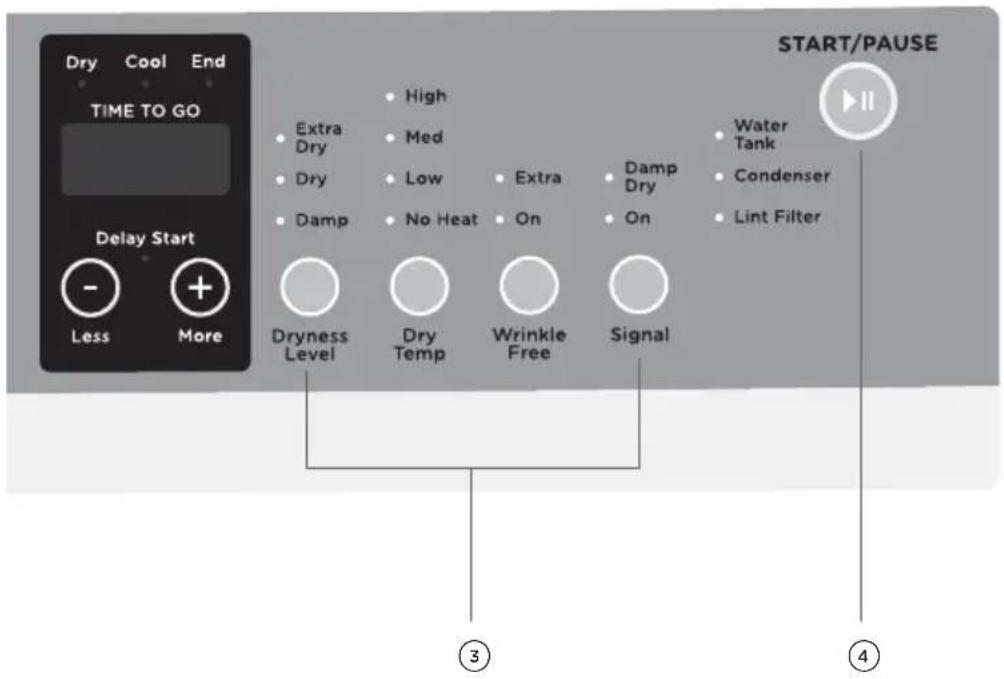
All drying cycles default to the recommended options for that cycle based on the average expected load size to be dried using that cycle. You can vary the options (eg 'Dryness Level', 'Dry Temp') to create your desired cycle. Note: some options are not available on some cycles for clothes care reasons, or because the option is not appropriate for the cycle.
To change a drying option or options you have selected after a cycle has started, touch and select your new setting, then touch again to resume the cycle with the new setting or settings.
Note: some options may not be available for selection under certain conditions and after particular stages of the drying cycle have passed.
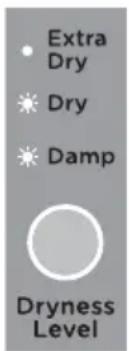
Dryness Level
Your dryer takes the guess work out of choosing drying times by sensing the dryness of the load. When your dryer senses that the clothes have dried to the dryness level you have selected, the dryer will automatically finish the cycle.
The dryer has five dryness levels from 'Damp' through to 'Extra Dry'. Choose the dryness level to suit your load depending on how dry you wish for your clothes to be. If you find the load is not dry enough, select the next dryness level up. The higher the level, the longer the drying time and the drier your clothes will become.
Note: two lights are used to show some dryness levels. For example, to achieve the Damp Dry setting both the 'Dry' and the 'Damp' lights will be illuminated.
Airing/Cool down (Cool)
When the dryer has sensed that the load is dry it will automatically go into a cool down period. This will be a minimum of 5 minutes and could be longer depending on the conditions in the laundry room.
Dry Temp
There are four drying temperatures you can choose from:
High: For regular to heavy cottons.
Medium: For synthetics, some blends and items labeled Permanent Press.
- Low: For delicates, synthetics and items labeled Tumble Dry Low.
- No Heat: This option may only be used with 'Air Dry' and 'Time Dry', in which items are tumbled without heat.
Touch the 'Dry Temp' button until the light next to your desired drying temperature is illuminated.
Dryness levels

Cool down mode

Dry temp
Wrinkle Free
If you wish to minimize wrinkling, select one of the 'Wrinkle Free' options. At the end of the cycle, the drum will rotate periodically and cool air will be circulated through the load to minimize wrinkling and creasing. This is particularly useful if you cannot remove the items immediately after the cycle ends. There are two wrinkle free options:
'On' provides 'Wrinkle Free' operation for 2 hours.
'Extra' provides 'Wrinkle Free' operation for 24 hours.
If you wish to stop the dryer at any stage during the 'Wrinkle Free' stage of the cycle, simply touch You can then open the dryer door and remove your items. Press 'POWER' to stop the cycle and turn the dryer off.
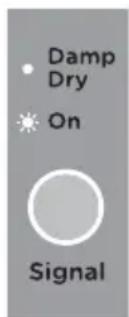
Signal
The 'Signal' option automatically defaults to 'On' for all cycles. This means a series of beeps will sound at the end of a cycle, to alert you that the dryer has finished. You can turn the 'Signal' off by touching the 'Signal' button twice (no lights will then be illuminated).
When you select a dryness level above damp/dry and wish your dryer to alert you to remove items once your load reaches the damp/dry stage, touch the 'Signal' button once to select 'Damp Dry'. Ensure 'On' is also selected. When your load reaches the damp/dry stage, the dryer will beep to alert you to remove your items, then continue drying until the remaining load reaches the dryness level you selected.
Indicators
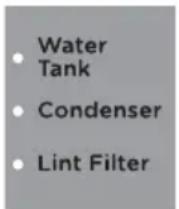
There are a number of indicators to alert you when you need to attend to your dryer, either to clean the lint filter, empty the water tank or to clean the condenser (refer to the 'Caring for your dryer' section).
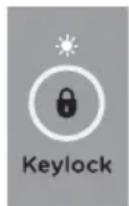
Keylock
This option enables you to deactivate the buttons on the display panel, except for the 'POWER' and buttons. This option helps prevent accidental button presses.
To turn Keylock mode ON or OFF, at any time when the dryer is powered on:
Touch and hold the button for 2 seconds.
Note: when activated, the light above the button is illuminated.
If Keylock mode is activated and the machine is powered off:
- To turn your dryer on, press the 'POWER' button, then touch and hold the button for 2 seconds to turn Keylock off. Select your drying cycle, any options and then touch to start the cycle.

Wrinkle free option
Signal options
Indicators
Keylock mode
Delay Start
The 'Delay Start' option enables you to delay the start of the drying cycle from between 5 minutes and 12 hours. Times you can select are 5 min, 15 min, 30 min, 1 hour, then hourly up to 12 hours. This can be useful to time your drying to finish when you arrive home from work, or to start when power rates are lower.
To programme a 'Delay Start', simply touch the 'More' button to increase the delay time and 'Less' button to decrease the time or to turn 'Delay Start' off. Touch to confirm your selection and start the countdown. Once the 'Delay Start' has been started, the time will count down on the digital display in one minute increments, the 'Delay Start' light will flash and the light will stop flashing and turn on solid.
Note: if you hold the 'More' button down, the time displayed on the screen will increase after every half a second (more convenient than touching the button repetitively). To remove a 'Delay Start' time once it is counting down, simply touch then touch the 'Less' button to decrease the time to zero. Touch start the cycle immediately.
IMPORTANT!
We suggest that you avoid using 'Delay Start' for damp, non-colorfast items as this may cause dye run to occur.
Customizing dryer cycles
After using your dryer a few times you may discover there are some drying options you prefer for some cycles.
You can programme your dryer to remember the drying options you prefer for each drying cycle. For instance, you may want to set the 'Perm Press' cycle to a lower drying temperature or set the 'Everyday' cycle so it automatically has the 'Wrinkle Free' option selected.
To customize a cycle:
① Press 'POWER' to turn the machine on.
② Turn the dial to select the cycle you wish to customize.
③ Touch and hold any of the drying options buttons for 3 seconds. The lights will flash on and off to indicate that the machine is in cycle adjustment mode.
④ Select the drying options you prefer by touching the relevant option button.
⑤ Touch to save the selected settings. The dryer will then beep to indicate your customized cycle has been saved.
Factory reset
You can reset your dryer to the default settings it left the factory with:
① Turn the dial to select the 'Freshen' cycle.
② Touch and hold the 'Delay Start', 'More' +, the 'Delay Start', 'Less' and 'Signal' buttons together for three seconds.
3 Your dryer will now be reset to the default settings.
Always follow fabric manufacturer's care label when laundering.
Fabric care labels
Below are fabric care label "symbols" that affect the clothing you will be laundering.
DRY LABELS
| Tumble dry | Dry Normal Permanent Press/wrinkle resistant | Gentle/ delicate | Do not tumble dry | Do not dry (used with do not wash) |
| Heat setting | High Medium Low No heat/air | |||
| Special instructions | Line dry/ hang to dry | Drip dry Dry flat In the shade |
Sorting and loading hints
WARNING!
| WARNING! | |
| Fire Hazard ·Keep flammable materials and vapors, such as gasoline, away from dryer. ·DO NOT dry anything that has ever had anything flammable on it (even after washing). ·No washer can completely remove oil. ·DO NOT dry anything that has ever had any type of oil on it (including cooking oils). ·Items containing foam, rubber, or plastic must be dried on a clothesline. ·Failure to do so can result in death, explosion, or fire. | |
- As a general rule, if clothes are sorted properly for the washer, they are sorted properly for the dryer. Try also to sort items according to size. For example, do not dry a sheet with socks or other small items.
- Do not add fabric softener sheets once the load has become warm, they may cause fabric softener stains.
- Do not overload. This wastes energy and causes wrinkling.
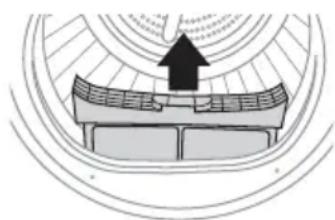
Drying rack
A handy drying rack may be used for drying delicate items such as washable sweaters. Place items flat on the drying rack. Dry with low heat.
A drying rack is installed in your dryer when it leaves the factory. To remove it, tilt the top of the rack towards you to detach the legs from the slots in the lint filter, and gently remove from the drum. Do the reverse to reinstall it.

Note:
- The drying rack is designed for use with the 'Rack Dry' cycle. Use with sensor cycles may result in damp items or extended cycle times.
- Do not use this drying rack when there are other clothes in the dryer that are not placed on the rack.
Cleaning your dryer
Cleaning the control panel and outer surfaces of the dryer
Use a soft damp cloth to wipe all surfaces, then wipe dry. Avoid using chemical or scouring cleaners, as these will damage the paint and plastic surfaces of your dryer.
Cleaning the inside of your dryer
It is important that you occasionally clean the inside of your dryer. If the drum has any residual dirt or lint stuck to it, remove this and wipe it clean with a damp cloth. Do not leave any metal objects in the drum, as these may cause rust.
Cleaning the lint filter
- Lint is generally formed during wearing and washing. Fibres (ie lint) released from the clothes during the drying cycle are collected in the lint filter.
It is important to clean the lint filter after every load, as the lint produced in the drying process can become a fire hazard if it is allowed to accumulate in or around your dryer.
The lint filter is located in the door opening (at the bottom). - There is a warning light that will flash at the beginning of every cycle to remind you to clean the filter. The warning light will also flash on and off during the cycle if the filter becomes blocked. The filter should be cleaned as soon as the 'Lint Filter' light starts flashing. Lint becomes a fire hazard if left to build up, and will reduce the efficiency of your dryer.
To clean the filter:
① Open the dryer door.
② Remove the lint filter by pulling it up and out of the filter slot. Open it out and wipe the surface clean with your hand.
③ Close the lint filter and place it back in the opening. Ensure the filter is fitted correctly back in place before operating the dryer.
Have a qualified technician vacuum the lint from the dryer once a year.
Lint filter
Drum lamp
Note: the drum light is not consumer replaceable. If this light should ever stop working, call for service.
When the door is opened, the drum light automatically turns on and remains on for two minutes. When the door is closed, the drum light will remain on for 30 seconds.
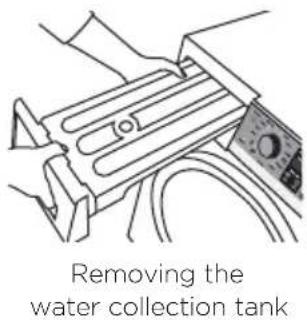
Emptying the water collection tank
During the drying cycle steam condenses into water and is collected in the water tank, located at the top left of the dryer. It is important to empty the water tank after every load.
There is an indicator light that will illuminate when the water tank needs emptying. A user warning will also be displayed on the screen (refer to the 'Before you call for service' section). If the water tank becomes full during operation, the dryer will go into 'Cool' mode for several minutes, then pause and beep to alert you. Empty the tank and touch to resume the cycle.
Note: you do not need to empty the water tank if you have set up the drain hose to drain the water automatically (refer to 'Installation instructions' page 15).
To empty the water tank:
1 Remove the water tank by holding onto the handle and pulling outwards gently to remove it. Hold tank with both hands and ensure that you keep the tank level when it is being removed to prevent the water collected from spilling.
Pour the water down the sink or into a bucket, and then put the tank back in place.

IMPORTANT!
- Do not use the water collected in the water tank for drinking or food processing.
- Never run the dryer without the water tank in place.
- If the water tank becomes full, the tumble dryer will pause drying and will sound an alarm. You must empty the water tank before the dryer can continue drying. Empty the tank, replace it back in the housing then touch to resume the cycle.
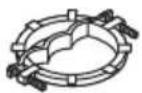
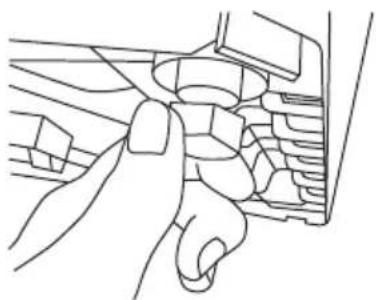
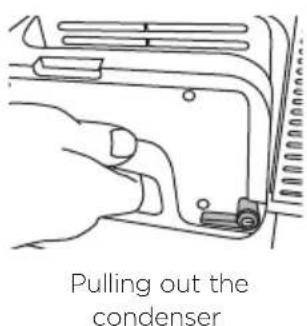
Cleaning the condenser
If the 'Condenser' indicator light starts to flash this indicates that the condenser needs to be cleaned. The condenser should be cleaned once a month. The light illuminates when you first turn the machine on, then turns off once the button has been touched.
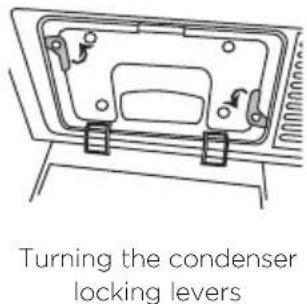
To clean the condenser:
① Open the condenser cover.
② Turn the two condenser lock levers 90 degrees then pull out the condenser.
③ Clean the condenser with pressurized water and wait until the water drains.
④ Replace the condenser.
⑤ Turn the two condenser lock levers to lock the condenser back in place again. Make sure that these locks are engaged securely.
Close the condenser cover.
User warnings
Your dryer is capable of diagnosing a number of its own problems. It will sound a continuous series of beeps and display a code when it has a problem that you can correct yourself. All control panel lights will turn off and a code will be displayed to inform you what the problem is. To stop the beeps sounding, press any button on the control panel. Do not try to continue your drying cycle once you stop the noise, you must address the problem the dryer is alerting you to.
Check this chart before you call for service.
| PROBLEM DISPLAYED AS WHAT TO DO | ||
| Keylock is activated. | KEY LOC | Touch and hold the button for 2 seconds to deactivate the Keylock. |
| The lint filter is blocked and needs to be emptied. | L Int CLn | Empty the lint filter and then replace it. |
| Check the lint filter is not damaged. | ||
| Check there is nothing else stuck in the lint filter holder which may be blocking the air flow. | ||
| Check the lint filter is in place correctly in your dryer. | ||
| The water tank is full and needs to be emptied. | H20 FULL | Check if the water tank is full. |
| Empty the water tank. | ||
| If using the drain hose, check whether the water tank or drain hose is blocked. | ||
| Check the drain hose is still attached at the back of the machine, and is not kinked or squashed. | ||
| The condenser needs to be cleaned. | CLn cond | Clean the condenser (refer to the ‘Caring for your dryer’ section). Ensure the condenser unit has been placed or replaced correctly into your dryer. |
| The door is not closed. | door OPEN | Close the door fully and touch ➔ ➔ |
| Try opening and closing the door again. | ||
| Reposition the load, make sure the load is correctly in the drum and that protruding items are not stopping the door from closing. | ||
Once you have addressed the issue the user warning was alerting you to, try using your dryer as per usual.
If the symptom persists, call your properly trained installer.
When a continuous series of beeps is sounded, all the lights turn off on the control panel and a number appears on the display, a fault has occurred. The dryer will
automatically enter this mode if a fault occurs. The fault code will be displayed as Err followed by a number on the digital display. To stop the beeps, touch any button then perform the following steps:
① Turn your machine off at the power point.
② Wait one minute and turn it back on.
③ Check your machine is installed correctly (refer to the 'Installation instructions' section).
④ Remove your dryer load and retry.
⑤ Perform a 'Time Dry' cycle, eg 'Time Dry' (30 mins).
(6) If the fault re-occurs repeat steps 1 and 2.
If the machine still will not work you will be required to call a properly trained installer to arrange service (refer to the 'Limited warranty' section). Record the fault code number displayed and the serial number of your dryer (located on the inside of the door below the glass) before calling. The fault code will indicate to the service technician what the problem could potentially be.
If a fault code is being displayed, you can still turn your dryer off by pressing 'POWER'.
The following is a list of problems you may encounter when using this appliance and some suggestions that may help to correct the problem. If you still have problems, please contact a properly trained installer.
| PROBLEM POSSIBLE CAUSES WHAT TO DO | |
| Dryer shakes or makes noise. | Some shaking/noise is normal. Move dryer to an even floor space, or adjust leveling legs as necessary until even. |
| Dryer may be sitting unevenly. | |
| Clothes take too long to dry. | Improper sorting. Separate heavy items from lightweight items (generally, a well-sorted washer load is a well-sorted dryer load). |
| Large loads of heavy fabrics (like beach towels). Large, heavy fabrics contain more moisture and take longer to dry. Separate large, heavy fabrics into smaller loads to speed up drying time. | |
| Non-venting dryer. Condensing dryers usually take longer to dry than a vented dryer. | |
| Controls improperly set. Match control settings to the load you are drying. | |
| Lint filter is full. Clean the lint filter before every load. | |
| Blown fuses or tripped circuit breaker. Replace fuses or reset circuit breakers. Since most dryers use 2 fuses/breakers, make sure both are operating. | |
| Overloading/combining loads. Do not put more than one washer load in the dryer at a time. | |
| Underloading. If you are drying only one or two items, add a few items to ensure proper tumbling. | |
| PROBLEM POSSIBLE | CAUSES WHAT TO DO | |
| The 'Dry' dryness level was chosen but load is still damp. | Load consists of a mixture of heavy and light fabrics. | When combining heavy and light fabrics in a load, choose a higher dryness level. |
| Lint filter, condenser, and/or air intake vent located on the front of the dryer is blocked. | Inspect and clean lint filter, condenser, and/or air intake vent located on the front of the dryer. | |
| Dryness sensors are dirty. Clean the sensors with a moist cloth. These are the metal ribs located in the drum behind the lint filter. | ||
| Control buttons not responding. | Controls accidentally put in service mode. | Press▶II. |
| Controls accidentally put in 'Keylock' mode. | Hold the ➤ button for 3 seconds to unlock the dryer. | |
| Controls performed an incorrect operation. | Check the building's fuse/circuit breaker box and replace fuse or reset breaker. Note: electric dryers use two fuses or breakers. | |
| Dryer doesn't start. | Control panel is "asleep". This is normal. Press 'POWER' to activate the control panel. | |
| Dryer is unplugged. Make sure the dryer plug is pushed completely into the outlet. | ||
| Fuse is blown/circuit breaker is tripped. | Check the building's fuse/circuit breaker box and replace fuse or reset breaker. Note: electric dryers use two fuses or breakers. | |
| Dryer was accidentally paused when starting 'Delay Start'. | If the light on the ➤ button is flashing, the dryer is paused. Press ➤ to restart the countdown. | |
| Water tank is full. If the 'Water Tank' light is on, you must empty the water tank before the dryer will start. Refer to the 'Caring for your dryer' section for instructions on emptying the water tank. | ||
| No numbers displayed during cycle, only lights. | Dryer is continuously monitoring the amount of moisture in the clothes. | This is normal. When the dryer senses a low level of moisture in the load, the dryer will display the dry time remaining. |
| ‘TIME TO GO’ jumped to a lower number. | The estimated time may change when a smaller load than usual is being dried. | This is normal. |
| Cannot make a selection and the dryer beeps twice. | The dryness level, temperature, or option that you are trying to select is incompatible with the chosen dry cycle. | This is normal. |
| Dryer is running but 00 is displayed in ‘TIME TO GO’. | The ‘Wrinkle Free’, ‘Extra’ option was chosen. | This is normal. During extended tumbling, the time remaining is not displayed. |
| Int cln Clean lint filter (message). | ‘POWER’ button was activated. | Press ➔ll to begin a dry cycle and the message will disappear. |
| Dryer doesn’t heat. | Fuse is blown/circuit breaker is tripped; the dryer may tumble but not heat. | Check the building’s fuse/circuit breaker box and replace both fuses or reset both breakers. Your dryer may tumble if only one fuse is blown or one breaker tripped. |
| Inconsistent drying times. | Type of load and drying conditions. | The load size, types of fabric, wetness of clothes and the condition of the lint filter, condenser, and/or air intake vent located on the front of the dryer will affect drying times. |
| Excess debris has collected in the condenser preventing proper airflow. | Refer to the ‘Caring for your dryer’ section. | |
| Glow at the rear of the drum. | Heaters behind the drum. This is normal. Under certain drying conditions and room ambient lighting, the glow of the heaters may be visible at the rear of the drum. | |
| Clothes are still wet and dryer shut off after a short time. | The door was opened mid-cycle. The load was then removed from the dryer and a new load put in without selecting a new cycle. | A dry cycle must be reselected each time a new load is put in. |
| Small load. When drying 3 items or less, choose 'Time Dry'. | ||
| Load was already dry except for collars and waistbands | Choose 'Time Dry' to dry damp collars and waistbands. In the future, when drying a load with collars and waistbands, choose a higher dryness level. | |
| Dryer is not level. Move dryer to an even floor space or adjust leveling legs as necessary until even. | ||
| Clothes are wrinkled. | Overdrying. Select a shorter drying time. | |
| Remove items while they still hold a slight amount of moisture. Select a lower dryness setting. | ||
| Letting items sit in dryer after cycle ends. | Remove items when cycle ends and fold or hang immediately, or use the 'Wrinkle Free', 'Extra' option. | |
| Overloading. Separate large loads into smaller ones. | ||
| Clothes shrink. Some fabrics will naturally shrink when washed. Others can be safely washed, but will shrink in the dryer. | To avoid shrinkage, follow garment care labels exactly. | |
| Some items may be pressed back into shape after drying. | ||
| If you are concerned about shrinkage in a particular item, do not machine wash or tumble dry it. | ||
| Greasy spots on clothes. | Improper use of fabric softener. | Follow directions on fabric softener package. |
| Drying dirty items with clean ones. | Use your dryer to dry only clean items. Dirty items can stain clean items and the dryer. | |
| Clothes were not completely clean. | Sometimes stains which cannot be seen when the clothes are wet appear after drying. Use proper washing procedures before drying. | |
| Lint on clothes. Lint | filter is full. Clean lint screen before each load. | |
| Improper sorting. Sort lint producers (like chenille) from lint collectors (like corduroy). | ||
| Static electricity can attract lint. | See suggestions in this section under 'Static occurs'. | |
| Overloading. Separate large loads into smaller ones. | ||
| Paper, tissue, etc, left in pockets. | Empty all pockets before laundering clothes. | |
| Static occurs. No fabric softener was used. Try a recommended fabric softener. | ||
| Overdrying. Try a recommended fabric softener. | ||
| Adjust setting to a lower dryness level. | ||
| Synthetics, permanent press and blends can cause static. | Try a recommended fabric softener. | |
| Collars and waistbands still wet at end of cycle. | The dryness monitor senses that the body of the clothes is dry. | Choose 'Time Dry' to dry damp collars and waistbands. In the future, when drying a load with collars and waistbands, choose a higher dryness level. |
| Slight variation in metallic color. | This is normal. Due to the metallic properties of paint used for this unique product, slight variations of color may occur due to viewing angles and lighting conditions. | |
| Dryer continues to tumble. | 'Wrinkle Free', 'Extra' was selected. | Ensure 'Wrinkle Free', 'Extra' option is not selected. |
When you purchase any new at retail Fisher & Paykel product for personal or consumer use you automatically receive a two year limited warranty covering parts and labor for servicing within the United States & Canada. If there is no authorized Fisher & Paykel service center in your area you may be responsible for any trip charges or transportation costs.
If the product has been purchased as open box, factory refurbished or previously returned from an authorized reseller you automatically, but only, receive a one year limited warranty for non-cosmetic parts.
Products located in Canada for which a consumer seeks warranty repairs in Canada must have been purchased in Canada due to regulatory compliance requirements. Products located in Canada that were purchased in the United States must be returned or taken to the United States for warranty repairs at the consumer's cost.
If the product is installed in a motor vehicle, boat or similar mobile facility, you must bring the vehicle, boat or mobile facility containing the product to the service shop at your expense or pay the service technician's travel to the location of the product.
Fisher & Paykel undertakes to:
Repair without cost to the owner, either for material or labor, any part of the product which is found to be defective by Fisher & Paykel, provided the original serial number appears unmarked on the product.
In Alaska, you must pay to ship the product to the service shop or for the service technician's travel to your home. If the product is installed in a motor vehicle, boat or similar mobile facility, you must bring it to the service shop at your expense or pay for the service technician's travel to the location of the product. If we are unable to repair a defective part of the product after a reasonable number of attempts, at our option we may replace the part or the product, or we may provide you a full refund of the purchase price of the product (not including installation or other charges). This warranty extends to the original purchaser and the first subsequent owner of the product for products purchased for ordinary single-family home use. All service under this limited warranty shall be provided by Fisher & Paykel or its Authorized Service Agent during normal business hours.
How long does this limited warranty last?
Our liability under this limited warranty expires TWO YEARS from the date of purchase of the product by the original purchaser for products purchased new at retail. For products purchased open box, factory refurbished or previously returned from an authorized reseller the limited warranty expires ONE YEAR from the date of purchase.
Our liability under any implied warranties, including the implied warranty of merchantability (an unwritten warranty that the product is fit for ordinary use) also expires TWO YEARS (or such longer period as required by applicable law) from the date of purchase of the product by the first consumer and first subsequent owner. Some states do not allow limitations on how long an implied warranty lasts, so this limit on implied warranties may not apply to you
This limited warranty does not cover:
Service calls that are not related to any defect in the product. The cost of a service call will be charged if the problem is not found to be a defect of the product. For example:
① Correcting faulty installation of the product.
② Instructing you how to use the product.
③ Replacing house fuses, resetting circuit breakers, correcting house wiring or plumbing, or replacing light bulbs.
④ Correcting fault(s) caused by the user.
⑤ Changing the set-up of the product.
Unauthorized modifications of the product.
⑦ Noise or vibration that is considered normal, for example, drain/fan sounds or user warning beeps.
⑧ Correcting damage caused by pests, for example, rats, cockroaches, etc.
Defects caused by factors other than:
① Normal domestic use; or
② Use in accordance with the product's User guide.
Defects to the product caused by accident, neglect, misuse, fire, flood or 'act of God'.
The cost of repairs carried out by non-authorized repairers or the cost of correcting such unauthorized repairs.
⑥ Travel fees and associated charges incurred when the product is installed in a location with limited or restricted access (eg airplane flights, ferry charges, isolated geographic areas).
Normal recommended maintenance as set out in the product's User guide.
If you have an installation problem contact your dealer or installer. You are responsible for providing adequate electrical, exhausting and other connection facilities.
We may not be responsible for consequential or incidental damages (the cost of repairing or replacing other property damaged if the product is defective or any of your expenses caused if the product is defective). Some States do not allow the exclusion or limitation of incidental or consequential damages, so the above limitation or exclusion may not apply to you.
How to get service
Please read your User guide. If you then have any questions about operating the product, need the name of your local Fisher & Paykel Authorized Service Agent, or believe the product is defective and wish service under this limited warranty, please contact your dealer or call us at:
USA and Canada
TOLL FREE 1.888.9.FNP.USA (1.888.936.7872)
or use the link at: www.fisherpaykel.com/locator/servicer/
You may be required to provide reasonable proof of the date of purchase of the product before the product will be serviced under this limited warranty.
Commercial use
If you are using the product in a commercial setting (any use other than a single family dwelling), we agree to repair or replace, without cost to you for parts only, any defective parts, the serial number of which appears on the product. Our liability for these repairs expires ONE YEAR from the date of original purchase.
At our option we may replace the part or the product, or we may provide you a full refund of the purchase price of the product (not including installation or other charges). All service under this limited warranty shall be provided by Fisher & Paykel or its Authorized Service Agent during normal business hours.
No other warranties
This limited warranty is the complete and exclusive agreement between you and Fisher & Paykel regarding any defect in the product. None of our employees (or our Authorized Service Agents) are authorized to make any addition or modification to this limited warranty.
Warrantor: Fisher & Paykel Appliances, Inc.
If you need further help concerning this limited warranty, please call us at above number, or write to:
Fisher & Paykel Appliances, Inc.
695 Town Center Drive, Suite 180
Costa Mesa
CA 92626
This limited warranty gives you specific legal rights, and you may also have other rights which vary from state to state.
Complete and keep for safe reference:
Model
Serial No.
Purchase Date
Purchaser
Dealer
City
State
Zip
Country
Introduction 43
Fisher & Paykel Appliances, Inc.
695 Town Center Drive, Suite 180
Costa Mesa
CA 92626
Fisher & Paykel Appliances 2017. All rights reserved.
The product specifications in this booklet apply to the specific products and models described at the date of issue. Under our policy of continuous product improvement, these specifications may change at any time. You should therefore check with your Dealer to ensure this booklet correctly describes the product currently available.