WOGL9050CN - Basket ELECTROLUX - Free user manual and instructions
Find the device manual for free WOGL9050CN ELECTROLUX in PDF.
| Features | Details |
|---|---|
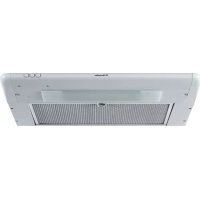
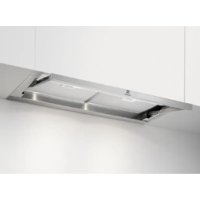
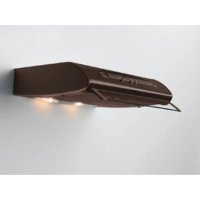
| Type of hood | Decorative hood |
| Dimensions (W x D x H) | 90 cm x 50 cm x 70 cm |
| Maximum air flow | 700 m��/h |
| Power levels | 3 levels + intensive mode |
| Grease filter | Dishwasher-safe metal filters |
| Lighting | LED, 2 lamps |
| Additional features | Recirculation and extraction mode, remote control |
| Installation | Wall-mounted installation |
| Energy consumption | Energy class A |
| Weight | 15 kg |
| Warranty | 2 years |
Frequently Asked Questions - WOGL9050CN ELECTROLUX
Download the instructions for your Basket in PDF format for free! Find your manual WOGL9050CN - ELECTROLUX and take your electronic device back in hand. On this page are published all the documents necessary for the use of your device. WOGL9050CN by ELECTROLUX.
USER MANUAL WOGL9050CN ELECTROLUX
WE’RE THINKING OF YOU
Thank you for purchasing an Electrolux appliance. You’ve chosen a product that brings with it decades of professional experience and innovation. Ingenious and stylish, it has been designed with you in mind. So whenever you use it, you can be safe in the knowledge that you’ll get great results every time. Welcome to Electrolux
ACCESSORIES AND CONSUMABLES
In the Electrolux webshop, you’ll nd everything you need to keep all your Electrolux appliances looking spotless and working perfectly. Along with a wide range of accessories designed and built to the high quality standards you would expect, from specialist cookware to cutlery baskets, from bottle holders to delicate laundry bags… Visit the webshop at: www.electrolux.com/shop ENVIRONMENT CONCERNS Recycle the materials with the symbol Put the packaging in applicable containers to recycle it. Help protect the environment and human health and to recycle waste of electricaland electronic appliances. Do not dispose appliances marked with the symbol with the household waste. Return the product to your local recycling facility orcontact your municipal ofce.
CUSTOMER CARE AND SERVICE
We recommend the use of original spare parts. When contacting Service, ensure that you have the following data available The information can be found on the rating plate. Model ___________________________ PNC ____________________________ Serial Number ____________________4 www.electrolux.com
- The Instructions for Use apply to several versions of this ap- pliance. Accordingly, you may nd descriptions of individual features that do not apply to your specic appliance.
- The manufacturer will not be held liable for any damages resulting from incorrect or improper installation.
- The minimum safety distance between the cooker top and the extractor hood is 650 mm (some models can be installed at a lower height, please refer to the paragraphs on working dimensions and installation).
- Check that the mains voltage corresponds to that indicated on the rating plate xed to the inside of the hood.
- For Class I appliances, check that the domestic power sup- ply guarantees adequate earthing. Connect the extrac- tor to the exhaust ue through a pipe of minimum diameter 120 mm. The route of the ue must be as short as possible.
- Do not connect the extractor hood to exhaust ducts carry- ing combustion fumes (boil- ers, replaces, etc.).
- If the extractor is used in con- junction with non-electrical appliances (e.g. gas burn- ing appliances), a sufcient degree of aeration must be guaranteed in the room in order to prevent the backow of exhaust gas. The kitchen must have an opening com- municating directly with the open air in order to guarantee the entry of clean air. When the cooker hood is used in conjunction with appliances supplied with energy other than electric, the negative pressure in the room must not exceed 0,04 mbar to prevent fumes being drawn back into the room by the cooker hood.
- In the event of damage to the power cable, it must be replaced by the manufacturer or by the technical service de- partment, in order to prevent any risks.
- If the instructions for installa- tion for the gas hob specify a greater distance specied above, this has to be taken into account. Regulations concerning the discharge of air have to be fullled.
- Use only screws and small parts in support of the hood.
Warning: Failure to install the
screws or xing device in ac- cordance with these instruc- tions may result in electrical hazards.
- Connect the hood to the mains through a two-pole switch having a contact gap of at least 3 mm.5 ENGLISH
- The extractor hood has been designed exclusively for domestic use to eliminate kitchen smells.
- Never use the hood for pur- poses other than for which it has been designed.
- Never leave high naked ames under the hood when it is in operation.
- Adjust the ame intensity to direct it onto the bottom of the pan only, making sure that it does not engulf the sides.
- Deep fat fryers must be con- tinuously monitored during use: overheated oil can burst into ames.
- Do not ambè under the range hood; risk of re.
- This appliance can be used by children aged from 8 years and above and persons with reduced physical, sensory or mental capabilities or lack of experience and knowledge if they have been given supervi- sion or instruction concerning use of the appliance in a safe way and understand the haz- ards involved. Children shall not play with the appliance. Cleaning and user mainte- nance shall not be made by children without supervision.
- “CAUTION: Accessible parts may become hot when used with cooking appliances.”
- Switch off or unplug the ap- pliance from the mains sup- ply before carrying out any maintenance work.
- Clean and/or replace the Fil- ters after the specied time period (Fire hazard). - The Activated charcoal lter is not washable and cannot be regenerated, and must be replaced approximately every 4 months of operation, or more frequently for par- ticularly heavy usage (W). A long life lter, washable and reusable, can be used, as an accessory, for some models
- The Grease lters must be cleaned every 2 months of operation, or more frequent- ly for particularly heavy us- age, and can be washed in a dishwasher (Z).
A B C D E F G H I Button Function Display A Brief pressure: Activates/Deactivates the button pad functions. All the buttons light up white. If the motor is ON, it turns the motor off and leaves the button pad functions active. If the motor is OFF, the button pad remains active for 1 minute.
Pressed for 3 Seconds: Activates/Deactivates the button pad lock. For example to allow cleaning of the Glass without activating any functions. Active: All the buttons ash. Inactive: Buttons remain lit for 1 minute. B Activates speed one. The button turns from white to red. C Activates speed two. The button turns from white to red. D Activates speed three. The button turns from white to red. E Activates Intensive 1 speed for 5 minutes. At the end of this time the system will automatically return to the speed set before. It is disabled by changing speed or pressing button A. The button turns from white to red. Press and hold for approximately 3 seconds to En- able / Disable the Activated Charcoal Filter alarm. H ashes 5 times. F Activates BREEZE speed for 60 minutes. At the end of this time the motor switches off. It is disabled by changing speed or pressing button A. The button turns from white to red. G Filter alarm button. This button is normal off. It is only displayed when the lter alarm is triggered. The alarm can be reset by pressing and holding this button for approximately 3 seconds. Button H xed (30 seconds): indicates the need to wash the metal grease lters. The alarm is triggered after the Hood has been in operation for 40 working hours. Button H ashing (30 seconds): indicates the need to change the activated charcoal lters, and also to wash the metal grease lters. The alarm is triggered after the Hood has been in operation for 160 working hours. H H2H indicator button. This button is normally off. It is only displayed when the hob is connected to the Hood. The button turns red. I Turns the lighting system on and off at maximum intensity.
- For replacement contact tech- nical support (“To purchase contact technical support”).7 GERMAN