
FA5 841 P IX HA - Oven HOTPOINT - Free user manual and instructions
Find the device manual for free FA5 841 P IX HA HOTPOINT in PDF.
| Product type | Built-in oven |
| Brand | Hotpoint |
| Model | FA5 841 P IX HA |
| Category | Oven |
| Power supply | 220-240 V / 50-60 Hz |
| Rated power | 3.0 kW (adjustable to 2.9 kW) |
| Dimensions (W x H x D) | 595 x 595 x 550 mm (approximate) |
| Oven volume | Approx 70 L (estimation) |
| Number of cooking functions | 11 |
| Cooking functions | Conventional, Fan Forced, Maxi Cooking, Pizza, Grill, Turbogrill, Dough Proving, Eco Fan Forced, Auto Bread, Auto Pastries |
| Cleaning | Self-cleaning by pyrolysis (Pyro) |
| Safety | Automatic door locking during pyrolysis |
| Control panel | Rotary knobs, digital display, adjustment keys |
| Interior light | Yes, separate control |
| Timer | Yes, adjustable (max 23h59) |
| Programming | Cooking duration, delayed start, end of cooking |
| Sliding shelves | Yes, removable with shelf supports |
| Power adjustment | Hi mode (3 kW) or Lo mode (2.9 kW) |
| Number of cooking levels | Up to 3 simultaneously (Fan Forced) |
| Included accessories | Wire grill, drip tray, baking tray |
Frequently Asked Questions - FA5 841 P IX HA HOTPOINT
User questions about FA5 841 P IX HA HOTPOINT
0 question about this device. Answer the ones you know or ask your own.
Ask a new question about this device
Download the instructions for your Oven in PDF format for free! Find your manual FA5 841 P IX HA - HOTPOINT and take your electronic device back in hand. On this page are published all the documents necessary for the use of your device. FA5 841 P IX HA by HOTPOINT.
USER MANUAL FA5 841 P IX HA HOTPOINT
THANK YOU FOR BUYING A HOTPOINT-ARISTON PRODUCT
In order to receive a more complete assistance, please register your product on www.hotpoint.eu/register

Before using the appliance carefully read the Safety Instruction.
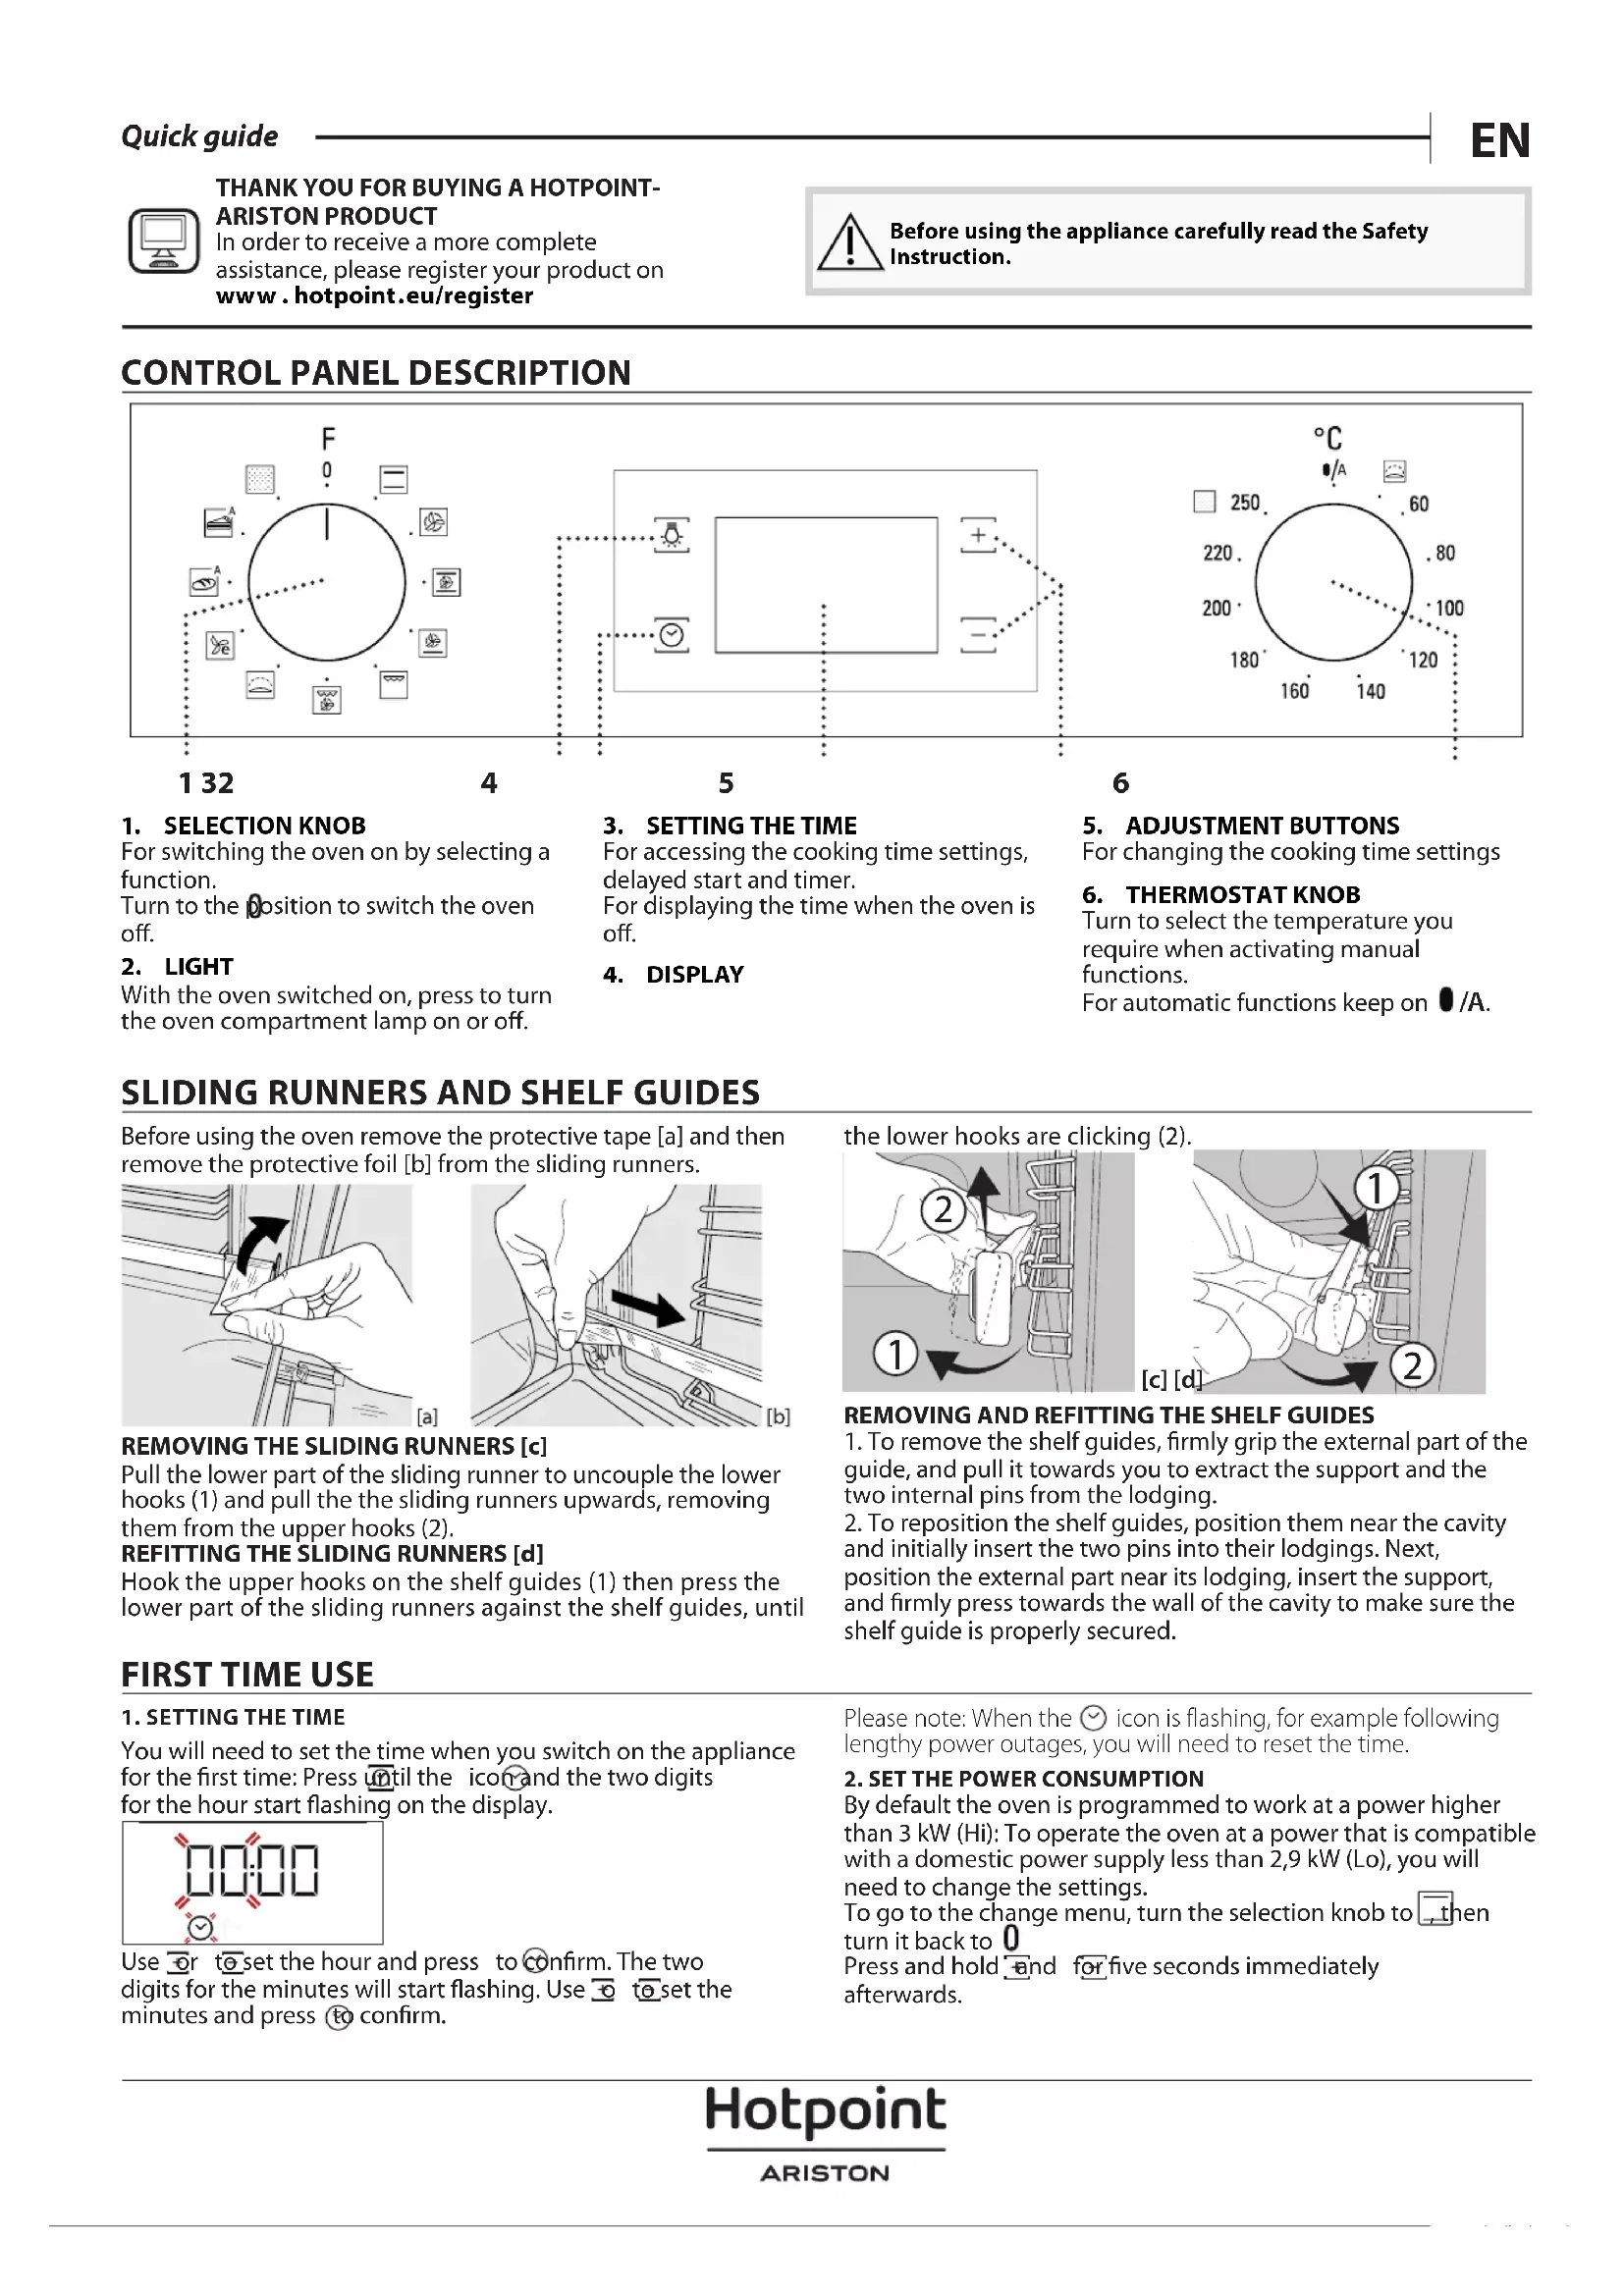
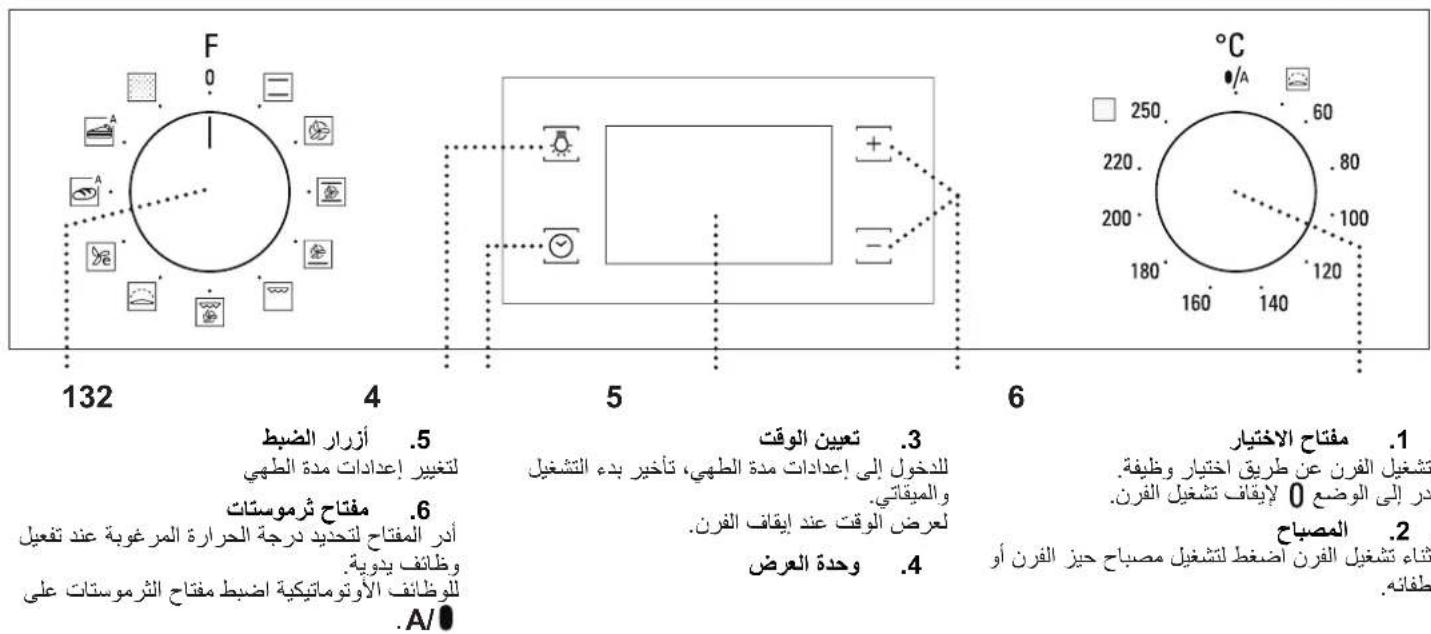
CONTROL PANEL DESCRIPTION
1. SELECTION KNOB
For switching the oven on by selecting a function.
Turn to the position to switch the oven off.
2. LIGHT
With the oven switched on, press to turn the oven compartment lamp on or off.
3. SETTING THE TIME
For accessing the cooking time settings, delayed start and timer.
For displaying the time when the oven is off.
4. DISPLAY
5. ADJUSTMENT BUTTONS
For changing the cooking time settings
6. THERMOSTAT KNOB
Turn to select the temperature you require when activating manual functions.
For automatic functions keep on 0/A.
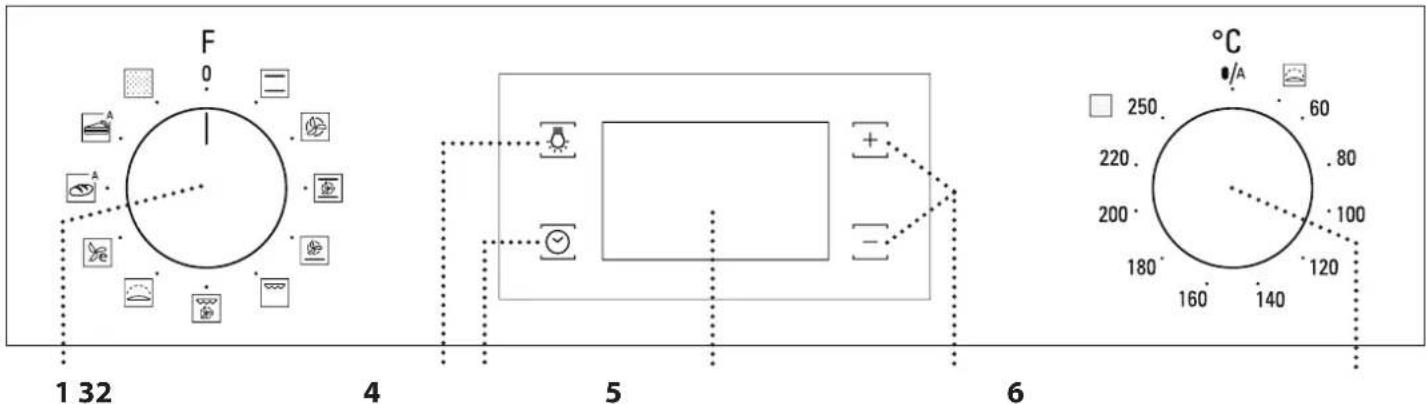
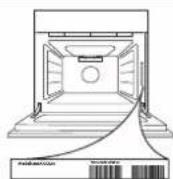
SLIDING RUNNERS AND SHELF GUIDES
Before using the oven remove the protective tape [a] and then remove the protective foil [b] from the sliding runners.
natural_image
Two technical diagrams showing hand positioning of a mechanical component, labeled (a) and (b), with no visible text or symbols.REMOVING THE SLIDING RUNNERS [c]
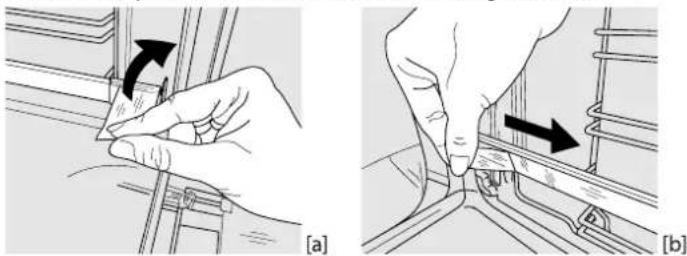
Pull the lower part of the sliding runner to uncouple the lower hooks (1) and pull the the sliding runners upwards, removing them from the upper hooks (2).
REFITTING THE SLIDING RUNNERS [d]
Hook the upper hooks on the shelf guides (1) then press the lower part of the sliding runners against the shelf guides, until
the lower hooks are clicking (2).
![HOTPOINT FA5 841 P IX HA - REFITTING THE SLIDING RUNNERS [d] - 1](/content/2026/03/475248/images/e756842d38b9736d065871a014a071eda0732d1ef344f93e4cc22c16a7626273.jpg)
text_image
Diagram illustrating two mechanical assembly steps labeled ① and ②, with arrows indicating rotation or movement.REMOVING AND REFITTING THE SHELF GUIDES
- To remove the shelf guides, firmly grip the external part of the guide, and pull it towards you to extract the support and the two internal pins from the lodging.
- To reposition the shelf guides, position them near the cavity and initially insert the two pins into their lodgings. Next, position the external part near its lodging, insert the support, and firmly press towards the wall of the cavity to make sure the shelf guide is properly secured.
FIRST TIME USE
1. SETTING THE TIME
You will need to set the time when you switch on the appliance for the first time: Press until the icon and the two digits for the hour start flashing on the display.
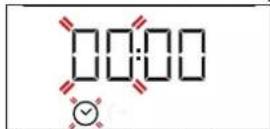
Use or to set the hour and press to confirm. The two digits for the minutes will start flashing. Use to set the minutes and press to confirm.
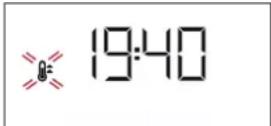
Please note: When the ⬤ icon is flashing, for example following lengthy power outages, you will need to reset the time.
2. SET THE POWER CONSUMPTION
By default the oven is programmed to work at a power higher than 3 kW (Hi): To operate the oven at a power that is compatible with a domestic power supply less than 2,9 kW (Lo), you will need to change the settings.
To go to the change menu, turn the selection knob to , then turn it back to 0
Press and hold and for five seconds immediately afterwards.

Use to change the setting, then press and hold for least two seconds to confirm.
FUNCTIONS & DAILY USE

CONVENTIONAL
For cooking any kind of dish on one shelf only.

FORCED AIR
For cooking different foods that require the same cooking temperature on several shelves (maximum three) at the same time. This function can be used to cook different foods without odours being transferred from one food to another.

MAXI COOKING
For cooking large joints of meat (above 2.5 kg). We recommend turning the meat over during cooking to ensure that both sides brown evenly. We also recommend basting the joint every so often to prevent it from drying out excessively.

PIZZA
For baking different types and sizes of pizza and bread. It is a good idea to swap the position of the baking trays halfway through cooking.

GRILL
For grilling steaks, kebabs and sausages, cooking vegetables au gratin or toasting bread. When grilling meat, we recommend using a Baking tray to collect the cooking juices: position the pan on any of the levels below the wire shelf and add 500 ml of drinking water.
1. SELECT A FUNCTION
To select a function, turn the selection knob to the symbol for the function you require: the display will light up and an audible signal will sound.
2. ACTIVATE A FUNCTION
To start the function you have selected, turn the thermostat knob to set the temperature you require.
To interrupt the function at any time, switch off the oven, turn the selection knob and the thermostat knob to 0.
Please note: During cooking you can change the function by turning the selection knob or adjust the temperature by turning the thermostat knob.
The function will not start if the thermostat knob is on 0 °C. You can set the cooking time, cooking end time (only if you set a cooking time) and a timer.
AUTOMATIC
To start the automatic function you have selected ("Bread" or "Pastry"), keep the thermostat knob at the position for automatic functions (O/A).
To finish cooking, turn the selection knob to position .0
Please note: You can set the cooking end time and timer.
RISING
To start the "Rising" function, turn the thermostat knob to the relevant symbol; if the oven is set to a different temperature, the function will not start.
3. HEAT THE OVEN
A new oven may release odors that have been left behind during manufacturing: this is completely normal. Before starting to cook food, we therefore recommend heating the oven with it empty in order to remove any possible odors.
Remove any protective cardboard or transparent film from the oven and remove any accessories from inside it.
Heat the oven to 250 °C for about one hour. The oven must be empty during this time.
Please note: It is advisable to air the room after using the appliance for the first time.

TURBO GRILL
For roasting large joints of meat (legs, roast beef, chicken).
We recommend using a Baking tray to collect the cooking juices: position the pan on any of the levels below the wire shelf and add 500 ml of drinking water.

RISING
For helping sweet or savoury dough to rise effectively. Turn thermostat knob to the icon to activate this function.

ECO FORCED AIR
For cooking roasts and stuffed roasting joints on a single Food is prevented from drying out excessively by gentle, nittent air circulation. When this ECO function is in use, the will remain switched off during cooking but can be switched again by pressing

BREAD AUTO
This function automatically selects the ideal temperature soaking time for bread. For best results, carefully follow the e. Activate the function when the oven is cold.

PASTRY AUTO
This function automatically selects the ideal temperature baking time for cakes. Activate the function when the oven d.

AUTOMATIC OVEN CLEANING - PYRO
For eliminating cooking spatters using a cycle at very high erature.
Please note: You can set the cooking time, cooking end time (only if you set a cooking time) and a timer.
3. PREHEATING AND RESIDUAL HEAT
Once the function starts, an audible signal and a flashing icon on the display indicate that the preheating phase has been activated. At the end of this phase, an audible signal and the fixed icon on the display will indicate that the oven has reached the set temperature: at this point, place the food inside and proceed with cooking.
Please note: Placing the food in the oven before preheating has finished may have an adverse effect on the final cooking result.
After cooking and with the function deactivated, the icon may continue to remain visible on the display even after the cooling fan has switched off to indicate that there is residual heat in the compartment.
Please note: The time after which the icon switches off varies because it depends on a series of factors such as ambient temperature and function used. In any case, the product should be considered to be off when the pointer on the selection knob is at "0".
4. PROGRAMMING COOKING
You will need to select a function before you can start programming cooking.
DURATION
Keep pressing 🤨 until the Icon and "00:00" start flashing on the display.

Use for to set the cooking time you require, then press to confirm.

Activate the function by turning the thermostat knob to the temperature you require: an audible signal will sound and the display will indicate that cooking is complete.
Notes: To cancel the cooking time you have set, keep pressing √ until the icon starts flashing on the display, then use to reset the cooking time to "00:00". This cooking time includes a preheating phase.
PROGRAMMING THE END COOKING TIME/DELAYED START After a cooking time has been set, starting the function can be delayed by programming its end time: press 🔒 until the ON and the current time start flashing on the display.
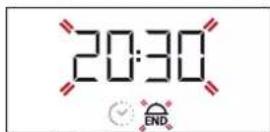
Use or to set the time you want cooking to end and press to confirm.
Activate the function by turning the thermostat knob to the temperature you require: the function will remain paused until it starts automatically after the period of time that has been calculated in order for cooking to finish at the time you have set. Notes: To cancel the setting, switch the oven off by turning the selection knob to the 0 position.
Notes: Delay to start functionality is not available for Grill and Turbo Grill functions.
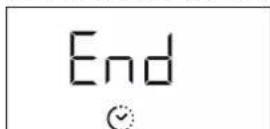
END OF COOKING
An audible signal will sound and the display will indicate that the function has finished.
COOKING TABLE
Turn the selection knob to select a different function or to position "0" to switch the oven off.
Please note: If the timer is active, the display will show "END" alternately with the remaining time.
5. SETTING THE TIMER
This option does not interrupt or program cooking but allows you to use the display as a timer, either during while a function is active or when the oven is off. Keep pressing ☺ until the 📣 on and "00:00" start flashing on the display.
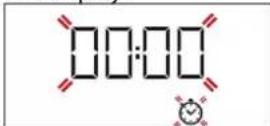
Use or to set the time you require and press to confirm. An audible signal will sound once the timer has finished counting down the selected time.
Notes: To cancel the timer, keep pressing ☑ until the ☑ on starts flashing, then use to reset the time to "00:00".
6. AUTOMATIC CLEANING FUNCTION - PYRO
Do not touch the oven during the Pyro cycle.
Keep children and animals away from the oven during and after (until the room has finished airing) running the Pyro cycle.
Remove all accessories - including shelf guides - from the oven before activating the function. If the oven is installed below a hob, make sure that all the burners or electric hotplates are switched off while running the self cleaning cycle. For optimum cleaning results, remove excessive residuals inside the cavity and clean the inner door glass before using the pyrolytic function. We recommend only running the Pyro function if the appliance contains heavy soiling or gives off bad odors during cooking.
To activate the automatic cleaning function, turn the selection knob and the thermostat knob to the icon. The function will be activated automatically, the door locked and the light inside the oven switched off: The display will show the time remaining to the end, alternating with "PYRO".
Once the cycle has been completed, the door remains locked until the temperature inside the oven has returned to a safe level. Air the room during and after running the Pyro cycle.
| RECIPE FUNCTION PREHEAT | TEMPERATURE(°C) | DURATION(MIN) | LEVEL AND ACCESSORIES | ||
| Leavened cakes | Yes 170 30 - 50 | 2 | |||
| Yes 160 30 - 50 | 2 | ||||
| Yes 160 40 - 60 | 4 1 | ||||
| Biscuits/tartlets | Yes 160 25 - 35 | 3 | |||
| Yes 160 25 - 35 | 3 | ||||
| Yes 150 35 - 45 | 4 2 | ||||
| Pizza / Focaccia | Yes | 190 - 250 | 15 - 50 | 1/2 | |
| Yes | 190 - 250 | 20 - 50 | 4 2 | ||
| Lasagne / baked pasta / cannelloni / flans | Yes | 190 - 200 | 45 - 65 | 2 | |
| Lamb / veal / beef /pork 1 kg Yes 190 - 200 80 - 110 | 3 | |||
| Chicken/rabbit/duck 1 kg Yes 200 - 230 50 - 100 | 2 | |||
| Baked fish/en papillote 0,5 kg (fillets, whole) | — | Yes 170 - 190 30 - 45 | 2 | |
| Toasted bread 5' 250 2 - 6 | 5 | |||
| Roast potatoes | Yes 200 - 210 | 35 - 55 ** | 3 |
** Turn food two thirds of the way through cooking (if necessary). The level is indicated on the wall of the cooking compartment. The time indicated does not include the preheating phase: we recommend placing the food in the oven and setting the cooking time only after the required temperature has been reached.
Download the complete Use and Care Guide from docs.hotpoint.eu for the table of tested recipes, compiled for the certification authorities in accordance with the standard IEC 60350-1.
| ACCESSORIES | |||||
| Wire shelf | Baking dish or cake tin on the wire shelf | Baking tray/Drip tray or Baking dish on the wire shelf | Drip tray / Baking tray | Drip tray / Baking tray with 200 ml of water |
TROUBLESHOOTING
| Problem | Possible cause | Solution |
| The oven does not work. | Power cut.Disconnection from the mains. | Check for the presence of mains electrical power and whether the oven is connected to the electricity supply.Turn off the oven and restart it to see if the fault persists. |
| The display shows the letter “F” followed by a number. | Software problem. | Contact you nearest After-sales Service Centre and state the letter or number that follows the letter “F”. |
Download the complete Use and Care Guide from docs.hotpoint.eu for more informations about your product

Policies, standard documentation and additional product information can be found by:
- Visiting our website docs.hotpoint.eu
- Using QR Code
• Alternatively, contact our After-sales Service (See phone number in the warranty booklet). When contacting our After-sales Service, please state the codes provided on your product's identification plate.

MERCI D'AVOIR ACHETÉ UN PRODUIT HOTPOINT-ARISTON
natural_image
Illustration of a hand holding a small object with an arrow indicating direction (no text or symbols present)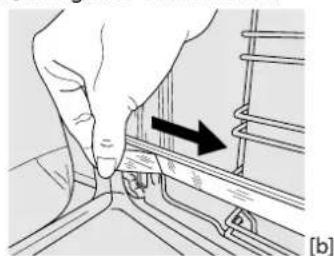
natural_image
Hand pressing a component on a mechanical component, showing a black arrow indicating direction (no text or symbols present)ENLÈVEMENT DES PATINS COULISSANTS [c]
text_image
Diagram showing hand positioning a component with numbered steps and directional arrows indicating movement![HOTPOINT FA5 841 P IX HA - ENLÈVEMENT DES PATINS COULISSANTS [c] - 1](/content/2026/03/475248/images/68bb097bc7901c9d9cf263c39ff24ac4e59b8cf0bcaf8bb23077fd9235f5e85c.jpg)
text_image
① ② [c] [d]ENLEVER ET REPLACER LES SUPPORTS DE GRILLE
natural_image
Illustration of a hand holding a small object with an arrow indicating rotation (no text or symbols present)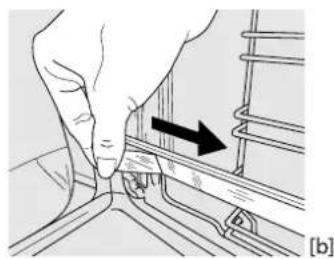
natural_image
Hand pressing a button on a rail track with an arrow indicating direction (no text or symbols)text_image
Diagram illustrating hand positioning and movement of a mechanical component, labeled with numbered parts and directional arrows.SMONTAGGIO E RIMONTAGGIO DELLE GRIGLIE LATERALI
natural_image
Illustration of a hand holding a small object with an arrow indicating direction (no text or symbols present)
natural_image
Hand pressing a button on a rail track with an arrow indicating direction (no text or symbols)EXTRAER LAS GUÍAS DESLIZANTES [c]
text_image
Technical diagram showing two-step assembly steps of a mechanical component, labeled with arrows and numbered parts.CÓMO EXTRAER Y VOLVER A COLOCAR LAS GUÍAS PARA ESTANTES
www.hotpoint.eu/register

natural_image
Illustration of a hand holding a small object with an arrow indicating direction (no text or symbols present)
natural_image
Hand pressing a button on a rail track with an arrow indicating direction (no text or symbols)text_image
Technical diagram showing two-step assembly steps of a mechanical component, labeled with arrows and numbered parts.RETIRAR E REPOR AS GUIAS DE NÍVEL
www . hotpoint . eu/register

الموقع
وصف لوحة التحكم
أزرار الضبط
text_image
Diagram showing a hand pressing a component with numbered callouts indicating step 1 and step 2.
text_image
[c][d] ① ②natural_image
Hand holding a small object with an arrow indicating rotation (no text or symbols present)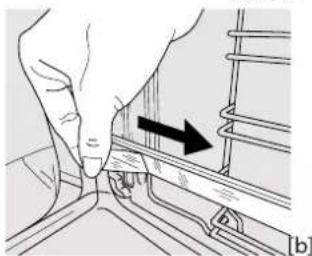
natural_image
Illustration of a hand pressing down on a mechanical component with an arrow indicating motion (no text or symbols)•does, hotpoint, eu •QR

400011618880