USER MANUAL CSRE9JKE1 PANASONIC
Operating Instructions Air Conditioner
Indoor Unit Outdoor Unit
CS-RE9JKE-1 CU-RE9JKE-1
CS-RE12JKE-1 CU-RE12JKE-1
CS-RE15JKE-1 CU-RE15JKE-1

ENGLISH 2~7
Before operating the unit, read these operating instructions thoroughly and keep them for future reference.
FRANÇAIS 8~13
© Panasonic Home Appliances Air-Conditioning (Guangzhou) Co., Ltd. 2009. Unauthorized copying and distribution is a violation of law.
Thank you for purchasing Panasonic Air Conditioner
TABLE OF CONTENTS
SAFETY PRECAUTIONS
2~3
REMOTE CONTROL
4~5
INDOOR UNIT
6
TROUBLESHOOTING
7
INFORMATION
56~61
PRODUCT SPECIFICATION
62
QUICK GUIDE
BACK COVER
NOTE
The illustrations in this manual are for explanation purposes only and may differ from the actual unit. They are subject to change without notice for future improvement.
SAFETY PRECAUTIONS
To prevent personal injury, injury to others, or property damage, please comply with the following.
Incorrect operation due to failure to follow instructions may cause harm or damage, the seriousness of which is classified as below:
OF CONTENTS

WARNING warns of death or serious injury.

This sign warns of injury or damage to CAUTION.
The instructions to be followed are classified by the following symbols:
| This symbol denotes an action that is PROHIBITED. |
| These symbols denote an actions that is COMPULSORY. |
| WARNING |
| INDOOR UNIT AND OUTDOOR UNIT |
| This appliance is not intended for use by persons (including children) with reduced physical, sensory or mental capabilities, or lack of experience and knowledge, unless they have been given supervision or instruction concerning use of the appliance by a person responsible for their safety. Children should be supervised to ensure that they do not play with the appliance. |
| Please consult authorized dealer or specialist to repair, install, remove and reinstall the unit. Improper installation and handling will cause leakage, electric shock or fire. |
| Do not install the unit in a potentially explosive or flammable atmosphere. Failure to do so could result in fire accident. |
| Do not insert your fingers or other objects into the air conditioner indoor or outdoor unit, rotating parts may cause injury. |
| Do not touch the outdoor unit during lightning, it may cause electric shock. |
| REMOTE CONTROL |
| Do not allow infants and small children to play with the remote control to prevent them from accidentally swallowing the batteries. |
| WARNING |
| POWER SUPPLY |
| Do not use modified cord, joint cord, extension cord or unspecified cord to prevent overheat and fire. |
| Do not share the same power outlet with other equipment to prevent overheat and fire. |
| Do not operate with wet hands to prevent electric shock. |
| If the supply cord is damage, it must be replaced by the manufacturer, its service agent or similarly qualified persons in order to avoid a hazard. |
| Strongly recommended to be installed with Earth Leakage Circuit Breaker (ELCB) or Residual Current Device (RCD) to prevent electric shock or fire. |
| This equipment must be earthed to prevent electrical shock or fire. |
| In case of emergency or abnormal conditions (burnt smell, etc), turn off the power supply, and please consult authorized dealer.Prevent electric shock by switch off the power supply when:- Before cleaning or servicing.- Extended non-use.- Abnormally strong lightning activity. |
NOTICE: This model is not suitable for 24 hours nonstop operation in heating mode below -5°C. When the outdoor temperature is below -5°C and you use this model out of the above conditions, the outdoor unit might freeze up and stop operation for protection control.
- DBT: Dry bulb temperature
- WBT: Wet bulb temperature


Do not use rechargeable (Ni-Cd) batteries. It may damage the remote control.
Remove the batteries if the unit is not going to be used for a long period of time. New batteries of the same type must be inserted following the polarity stated to prevent malfunction of the remote control. Remove the batteries if the unit is not going to be used for a long period of time. New batteries of the same type must be inserted following the polarity stated to prevent malfunction of the remote control.
REMOTE
CAUTION
INDOOR UNIT AND OUTDOOR UNIT REMOTE CONTROL
| Do not wash the indoor unit with water, benzene, thinner or scouring powder. |
| Do not use for other purpose such as preservation of food. |
| Do not use any combustible equipment in front of the airflow outlet to avoid propagate fire. |
| Do not expose directly to cold air for a long period. |
| Do not sit or step on the unit, you may fall down accidentally. |
| Do not touch the sharp aluminium fin, sharp parts may cause injury. |
| Do not switch ON the indoor when waxing the floor. After waxing, aerate the room properly before operating the unit. |
| Do not install the unit in oily and smoky areas. |
| Ensure drainage pipe is connected properly. Otherwise, leakage may occur. |
| Aerate the room regularly. |
| After long period of use, make sure the installation rack is not deteriorate to prevent the unit falls down. |
| Operation condition | INDoor | Outdoor |
| *DBT *WBT *DBT *WBT | |
| COOLING | Maximum 32 23 43 26 | | |
| Minimum 16 11 16 11 | | |
| HEATING | Maximum 30 - 24 18 | | |
| Minimum 16 - -5 -6 | | |

Do not use rechargeable (Ni-Cd) batteries. It may damage the remote control.
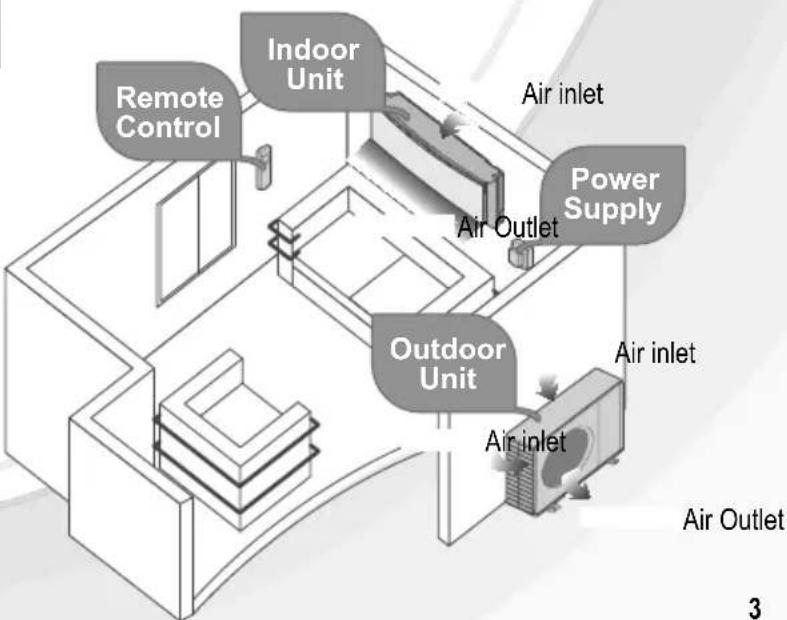
Air Outlet
REMOTE CONTROL
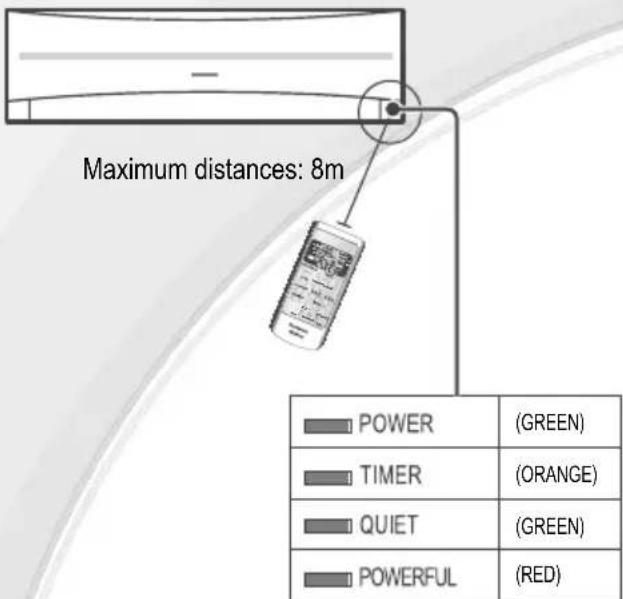
Press the remote control's but
1
TO TURN ON OR OFF THE UNIT

POWER
- Please be aware of the OFF indication on the remote control display to prevent the unit from starting/stopping improperly.
2
TO SET TEMPERATURE
- For heat, cool and dry modes, the range of temperature for selection is 16°C to 30°C.
- Operating the unit within the recommended temperature could induce energy saving.
HEAT mode: 20°C to 24°C.
COOL mode: 26°C to 28°C.
DRY mode: 1°C to 2°C lower than room temperature.
3
- During operation mode selection the power indicator blinks.
- Unit selects operation mode every 10 minutes according to temperature setting and room temperature.
HEAT mode - To enjoy warm air
- In heat mode, it may take a while for the unit to warm up. The POWER indicator blinks during preheating.
COOL mode - To enjoy cool air
- Use curtains to screen off sunlight and outdoor heat to reduce power consumption during cool mode.
DRY mode - To dehumidify the environment
- Unit operates at low fan speed to give a gentle cooling operation.
4
TO SELECT FAN SPEED (5 OPTIONS)
FAN SPEED

- For AUTO, the indoor fan speed is automatically adjusted according to the operation mode.
5
TO ADJUST AIRFLOW DIRECTION (5 OPTIONS)
AIR SWING

- Keeps the room ventilated.
- In COOL/DRY mode, if AUTO is set, the louver swing up/down automatically.
- In HEAT mode, if AUTO is set, the horizontal louver is fixed at a predetermined position.
6
TO SWITCH AMONG POWERFUL, QUIET AND NORMAL OPERATION MODE
POWERFUL: TO ACHIEVE TEMPERATURE QUICKLY
- This setting enables the desired set temperature to be reached quickly.
QUIET: TO ENJOY QUIET ENVIRONMENT
- This setting provides a quiet environment by reducing the airflow noise.
- POWERFUL and QUIET operations cannot be activated at the same time.
7
PRESS TO RESTORE THE REMOTE CONTROL'S DEFAULT SETTING
8
NOT USED IN NORMAL OPERATIONS
Remote Control display
TO SET THE TIMER TO SET THE TIME ON AND OFF TIMER (12-HOUR TIMER SETTING)
- When you want the air conditioner to turn ON or OFF automatically.
DELAY OFF-TIMER
For example, to stop the air conditioner 5 hours later.
1. To select the Delay OFF-TIMER, press the button once. 2. Press the button to select the delay hour. - The OFF-TIMER can only be set while the air-conditioner is in operation.
DELAY ON-TIMER
For example, to start the air conditioner 2 hours later.
1. To select the Delay ON-TIMER, press the button once.

2. Press the button to select the delay hour. - The ON-TIMER can only be set while the air-conditioner is not in operation.
DELAY OFF AND ON TIMER
For example, to stop the air conditioner 3 hours later and start 4 hours later.
1. To select the Delay OFF and ON Timer, press the button twice repeatedly. 2. Press the button to select the delay hour for OFF Timer. 3. Press the button to select the delay hour for ON Timer. - This mode of timer can only be set while the air-conditioner is in operation.
For example, to start the air conditioner 7 hours later and stop 10 hours later.
1. To select the Delay ON and OFF Timer, press the button twice repeatedly. 2. Press the button to select the delay hour for ON Timer. 3. Press the button to select delay hour for OFF Timer. - This mode of timer can only be set while the air-conditioner is not in operation.
TO CONFIRM THE TIMER SETTING
Press the button once to activate the timer operation which will start when the set time is reached.
TO CANCEL THE TIMER SETTING
Press the SET/CANCEL button again to cancel the timer operation.
- The timer indicator of the indoor unit will light up during the timer operation.
- When ON Timer is set, the unit may start earlier before the actual set time in order to achieve the desired temperature on time.
- If you press the operation button during the timer setting operation, the timer setting will be cancelled.
- If the timer is cancelled manually or due to a power failure, you can restore the timer again by repeating the steps above (once power is resumed).

- Switch off the power supply before cleaning.
- Do not touch the aluminium fin, sharp parts may cause injury.
WASHING INSTRUCTIONS
- Do not use benzene, thinner or scouring powder.
- Use only soap (pH7) or neutral household detergent.
- Do not use water hotter than 40°C.
HINT
To ensure optimal performance of the unit, cleaning maintenance must be carried out at regular intervals. NOTE: If a chemical cloth is used to wipe the unit, follow the instructions for the cloth.
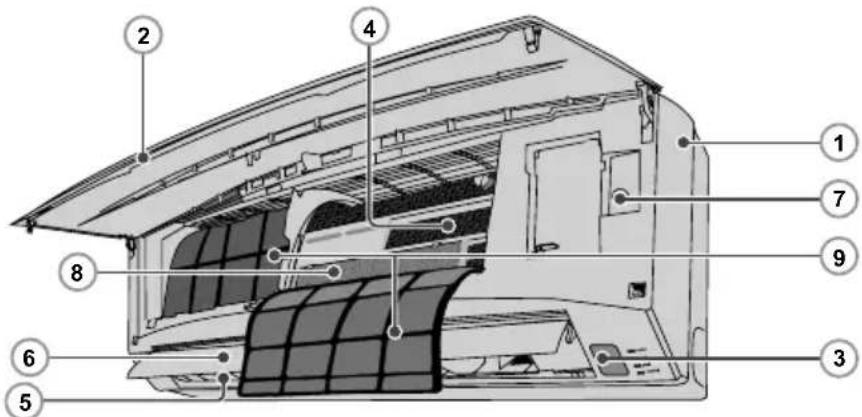
1 INDOOR UNIT
- Wipe the unit gently with a soft, dry cloth.
2 FRONT PANEL
Remove Front Panel
- Raise and pull to remove the front panel.
- Wash gently and dry.
Close Front Panel
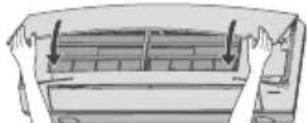
- Press down both ends of the front panel to close it securely.
3 RECEIVER
4 ALUMINIUM FIN
5 HORIZONTAL AIRFLOW DIRECTION LOUVER
WARNING
Be careful not to insert your fingers into the unit to avoid injuring by cross-flow fan.
6 VERTICAL AIRFLOW DIRECTION LOUVER
- Use when remote control is misplaced or malfunction.
| Action Mode | |
| Press once. Auto | |
| Press and hold until 1 beep is heard, then release. | Cooling |
| Press and hold until you hear double beep sound, then release. | Heating |
| Press the button to turn off. |
8 SUPER ALLERU-BUSTER FILTER

Vacuum the super alleru-buster filter.
Vacuum the filter whenever necessary. - Replace the filter every 10 years or replace any damaged filter.
9 AIR FILTERS
- Clean the filters regularly.
- Wash/rinse the filters gently with water to avoid damage to the filter surface.
- Dry the filters thoroughly under the shade, away from fire or direct sunlight.
- Replace any damage filter.
TROUBLESHOOTING
The following symptoms do not indicate malfunction.
| SYMPTOM SYMPTOM CAI | CAUSE |
| Mist emerges from indoor unit. ▶ · Condensation effect due to cooling process. | |
| Water flowing sound during operation. ▶ · Refrigerant flow inside the unit. | |
| The room has a peculiar odour. ▶ This may due to damp smell emitted by the wall, carpet, furniture or clothing. | |
| Indoor fan stops occasionally during automatic fan speed setting. ▶ This helps to remove the surrounding odours. | |
| Operation is delayed a few minutes after restart. ▶ The delay is a protection to the unit's compressor. | |
| Outdoor unit emits water/steam. ▶ Condensation or evaporation occurs on pipes. | |
| The unit operates automatically when power is resumed after a power failure. ▶ It is the Auto Restart function of the unit. Operation will be restarted automatically under the previous operation mode and air flow direction when power is resumed as the operation is not stopped by remote control. To cancel the Auto Restart Control, please contact with authorized distributor. | |
| Indoor fan stops occasionally during heating operation. ▶ To avoid unintended cooling effect. | |
| Power indicator blinks before the unit is switched on. ▶ This is a preliminary step in preparation for the operation when the ON timer has been set. | |
| Cracking sound during operation. ▶ Changes of temperature cause the expansion/contraction of the unit. | |
Check the following before calling for servicing.
| SYMPTOM | CHECK |
| Heating/Cooling operation is not working efficiently. | • Set the temperature correctly.
• Close all doors and windows.
• Clean or replace the filters.
• Clear any obstruction at the air inlet and air outlet vents. |
| Noisy during operation. | • Check if the unit has been installed at an incline.
• Close the front panel properly. |
| Remote control does not work.
(Display is dim or transmission signal is weak.) | • Insert the batteries correctly.
• Replace weak batteries. |
| The unit does not work. | • Check if the circuit breaker is tripped.
• Check if timers have been set. |
| The unit does not receive the signal from the remote control. | • Make sure the receiver not obstructed.
• Certain fluorescent lights may interfere with signal transmitter. Please consult authorized dealer. |
The unit stops and the timer indicator blinks.
Use remote control to retrieve error code.

4 Turn the unit off and reveal the error code to authorized dealer.
Note:
- For certain errors, you may restart the unit with limited operation with 4 beeps during operation starts.
PRODUCT FEATURES
62
QUICK GUIDE
BACK COVER
REMARK
INDOOR UNIT AND OUTDOOR UNIT

PROGRAM THE DELAYED START
For example, to automatically turn on the appliance within two hours.
Remove the front panel
PROHIBITED.


These symbols indicate
actions that are
mandatory.

WARNINGS
Mentioned above
| YpeIbT He e npEJa3HaueH 3a n3PON3BaHe ot Xopa (BKN.
deça) c HamaIeH NΦI3UeCKN, ceTINBHN IINI NCNXUHNI
npOblEMn IINI HЯMaIc CbOTBeTHNIA ONIT I N03HaHNY,
DOKaTo He sbDaT INCTpyKTIpaHNI IINI HabJIIODaBAHNI
ot YOBek, OTROBOpEN 3a 6e3OpacHocCTTa, 3a HauHNa Ha
n3PON3BaHe Ha ypeA. HabJIIODaBAIte DeCuTa, 3a da ce
yBepIte, ye He cn ngparr T c ypeA. |
| MOnJ IoobpHete Ce KbM OTOpI3IpaHdINIpbIiN
cNeuJIaIMCT 3a peMOHT, MOHTaX IINI NOBTOpeH MOHTaX HA
MoUyA. HEnpABVIIHInTe MOHTaX I NpOTpe6a Ie pIunHrT
TeU, TOKOB udap IINI noXap. |
| He MOHTpaIte MoUyA B NOMEseHnC I NOTEuIaJIHNO
eKcnNo3IBHn IINI 3aIaJIIMa aTMocΦepa. B IpoTINBeH
cLuyaM MoXe Da ce CTINHe Do NoXap. |
| He IbXaIte IpbCTIte Cn IINI dpyIg ObekTI BbB
BbTpReIHHN IINI BbHShN MaOdyN Ha KJIIMaTIka,
BbRrTaIHTe Ce Chactn MOrat Da IpeDI3BVkAT
HapAHBaHnI. |
| He DOKOCBaIte BbHShN MaOdyN IIO BpeMe Ha
IpbMOTeBvUHb 6bpy, TOBa MOpE da IOBeE de IO TOKOB
ydap. |
REMOTE CONTROL
| He no3BOJRABaIte Ha 6e6eta mAnKn Deca Da nIgpaIc
ДиCTaHцIOHOTO ynpaBneHne, 3a Ду nI ppeIda3nIte OT
СNYaIHO NOrJIbUaH e H a6aTePnIte. |
| ЕLEKТРО3AXPAHBAHE |
| He n3ллгьаве модифицран
кабел, сбьрьан кабел,
удьлжITEл лима Heyka3azah
кабел, за назбогнete
празрахалу и пожар. |
| He n3ллгьаве_edи и сьш контакт задно с
друг консуатор, за назбогнete празрахалу
и пожар. |
| He n3ллгьаве с мokрни рьcke, за назбогнete
ТOKOB у dap. |
| Ако зхрахвашият кабел e nobpeдан, тол Тра-
да sbde подмени OT поизвodпenteя, Неровя
сервиемен arentл лима пообно Кваллфицрани
лима с цel ду се назбогнete onachocst. |
| Силно пегорьчтелно e ду се мontира
Заменейен abTomatчesen пекьсвач (ELCB)
лима устрийстю 3a димореццmaлна 3aцита
(RCD), за назбогнete TOKOB у dap лима пожар. |
| Тoba оборубсану Травьда e заду Замен, за ду
се пedingотравати TOKOB у dap лима пожар. |
| При с pineши с pineан лима Небочайни условя
(Mири体育场 на История и д.) Источу:
Зхрахваши.To и се консулираjete с
OTOPINIPAN ДИльр.
Изberгете TOKOB у dap, като Источу:
Зхрахваши.To, KORATO:
- П pineши поисвахе лима обс neurop支线.
- ПordьлжITEлени песто.
- Небочиюс сима грьмOTEVИЧА.akТИВHOCCT. |
WORK AREA WORK AREA
Use this machine in suitable temperature conditions
| TemnepaTpya (°C) | В заkeesюпомешиени | Ha оTKрито |
| *DBT | WBT *DBT | *WBT | |
| OXIIAXДАНЕ | Мakсимуm | 32 23 | 43 26 | | |
| Минимуm | 16 11 | 16 11 | | |
| OTОПLEHINЕ | Мakсимуm | 30 | - | 24 | 18 |
| Минимуm | 16 | - | -5 | -6 |
CAUTION: This machine has not passed a 24-hour continuous operation test at temperatures below -5°C. When the ambient temperature is below -5°C, and the machine is used outdoors, the unit may freeze and stop working. Use with caution.
- DBT: Dry bulb temperature (temperature without humidity)
- WBT: Wet bulb temperature (temperature with humidity)

REMOTE CONTROL


Do not use rechargeable (Ni-Cd) batteries. They may damage the remote control. Remove the batteries if they will not be used for an extended period. New batteries must be installed with correct polarity to prevent malfunction of the remote control.
Charging the battery
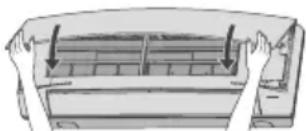
Handle the device carefully to close it properly.
3 BLOWER
4 ALUMINUM RIB
HORIZONTAL VENTILATION OPENING 5 FOR AIRFLOW

Be careful not to poke your fingers into the device for removing the plug from the fan for the pressure flow.
6 VERTICAL VENTILATION OPENING FOR AIRFLOW
Do not adjust manually.
7 BUTTON AUTO OFF/ON
- Press it when the remote control is lost or damaged.
| Демства Ржим | |
| Нат再说е Ведьж. АВТOMATЧЕн | |
| Нат再说е и зашихte,does to be a 1 сигнал "бий",след което руншete. | Охлajданe |
| Нат再说е и зашихte,does to be ДBOEEN 3BYKOB сигнал ,бий"и поспe от再说е. | Отоляванe |
| Нат再说е бутона,за дa ИЗКПЮЧИte урEDA. |
FILTER FOR SUPER CLEANER ALERT

Clean the filter with a vacuum cleaner.
- Clean with a vacuum cleaner, if necessary. - Replace the filter every 10 years. Replace damaged filters.
9 AIR INLET FILTER
Clean the filter regularly. Carefully clean/replace the filters with water to avoid damaging their surface. Carefully dry the filters in a dry place, away from fire and direct sunlight. - Replace damaged filters.
TROUBLESHOOTING
Follow the symptoms and work through the table. They do not indicate a malfunction.
Symptom
Air is drawn from the outside part of the appliance.
Sound of water flowing during operation.
The appliance is tilted or leaning.
The external fan switches on and off from time to time during automatic speed adjustment.
The operation is forgotten or interrupted before the end of the program.
The external part is dripping water/steam.
The appliance switches on automatically after a power failure to restore the previous setting.
The external fan switches on and off from time to time during heating.
The filter indicator lights up before the appliance is switched on.
Noise during operation.
- Condensation during the cooling process.
- Cooling liquid leaks from the appliance.
- Place the device away from walls, doors, furniture, or other objects. This helps to avoid external interference.
The connection is used to protect the compressor of the device.
This is the "automatic restart" function of the device. The operation resumes automatically in the previous mode and direction of the airflow, unless it was stopped by the remote control. To disable the "automatic restart" function, contact your authorized distributor. Be careful to avoid any potential danger. This is a preliminary step in preparation for work, when the timers are set. Temperature changes may lead to expansion or contraction of the device.
Check the safety devices, and contact an authorized service center if necessary.
SYMPTOM
The device operates efficiently in heating/cooling mode.
Noise during operation.
Remote control operation.
(The signal is emitted or the transmitted signal is weak.)
The device does not operate.
The device does not receive a signal from the remote control.
CHECK
Set the correct temperature. Close all windows and doors. - Clean or replace the filter. - Clean the inlet and outlet vents. - Check that the device is not installed at an incline. - Close the front panel correctly. - Install the batteries correctly. Replace the exhausted batteries. - Check that the automatic circuit breaker is not tripped. - Check that the timer is set correctly. - Ensure there is no power outage. Fluorescent lights may cause interference when the signal is transmitted. Contact your authorized dealer.
The device stops working and the timer indicator is lit.
Use the remote control to obtain the error code.
1
Press for 3 seconds.

Press until you hear a beep, after which the device will beep for an error.
Press for 5 seconds for a quick check.
Note:
When the device is first powered on, it will beep with a "Bn" sound to indicate it is ready for operation.
4
Disconnect the module and show the error code on the display.
PRODUCT SPECIFICATIONS 62
SNELLE GIDS A
NOTE

These symbols on the products, packaging, and/or accompanying documents mean that used electrical and electronic products and batteries should not be mixed with general household waste.
For proper treatment, recovery and recycling of old products and used batteries, please take them to applicable collection points, in accordance with your national legislation and the Directives 2002/96/EC and 2006/66/EC.
By disposing of these products and batteries correctly, you will help to save valuable resources and prevent any potential
negative effects on human health and the environment which could otherwise arise from inappropriate waste handling.
For more information about collection and recycling of old products and batteries, please contact your local municipality, your waste disposal service or the point of sale where you purchased the items.
Penalties may be applicable for incorrect disposal of this waste, in accordance with national legislation.

For business users in the European Union
If you wish to discard electrical and electronic equipment, please contact your dealer or supplier for further information.
These symbols are only valid in the European Union. If you wish to discard these items, please contact your local authorities or dealer and ask for the correct method of disposal.
Note for the battery symbol (bottom two symbol examples):
This symbol might be used in combination with a chemical symbol. In this case it complies with the requirement set by the Directive for the chemical involved.
- Checking of remote control batteries.
- No obstruction at air inlet and air outlet vents.
- Use Auto OFF/ON button to select Cooling/Heating operation, after 15 minutes of operation, it is normal to have the following temperature difference between air inlet and air outlet vents: Cooling: ≥8°C Heating: ≥14°C
FOR EXTENDED NON-USE
- Activate Heat mode for 2~3 hours to remove moisture left in the internal parts thoroughly to prevent mould growth.
- Turn off the power supply.
- Remove the remote control batteries.
NON-SERVICEABLE CRITERIA
TURN OFF POWER SUPPLY then please consult authorized dealer under the following conditions:
Abnormal noise during operation. Water/foreign particles have entered the remote control. Water leaks from Indoor unit. - Circuit breaker switches off frequently. - Power cord becomes unnaturally warm. - Switches or buttons are not functioning properly. - The timer indicator blinks and the unit cannot be operated.
ANNUAL INSPECTION AFTER A PROLONGED PERIOD OF NON-USE
INSPECTION AFTER PROLONGED PERIOD OF NON-USE
- Check the batteries of the remote control.
- Check the air inlet and outlet vents for blockages.
- Use the Auto OFF/ON button to select the cooling/heating mode. It is normal that after 15 minutes of operation, there is a temperature difference between the inlet and outlet air:
Cooling: ≥ 8°C
Heating: ≥ 14°C
AFTER PROLONGED PERIOD OF NON-USE
- Activate the heating mode for 2-3 hours to remove any residual moisture inside the internal parts and to prevent the accumulation of dust.
- Turn off the power supply.
- Remove the batteries from the remote control.
Check the filter, which is located at the air inlet in the following cases:
- Unusual sound during operation. Water/air may have entered the control unit.
- Water leakage from the unit. - Check the drain hose. Ensure the drain is not clogged. The power cable may be damaged. The remote control batteries may not be working properly.
- The timer indicator and the device do not work.
- Standard piping length: 7.5 m (Includes Indoor Unit piping length).
| Translations | Deutsch | François | Greek | Italian | Nederland | Portuguese | Russian | Spanish | Bulgarian | Turkish | Arabic | Swedish | Norwegian | Ukrainian | |
| Product Specification | Produktspazifikation | Cachidikas u. prud | PteRyanskyi, pykrik | prodotti del prodotto | productenmarkan | Especifiques do proto | Tatavchenka kraspeneck | Especilacion de produits | Caucau | Kunststoffe | Gesundheit | Produkte spolitizierter | Produkte spezifikativer | Teoryx kapokreptern | |
| Model Indoor Unit | Model | Modèle | Moveni | Modelllo | Modelo | Modelo | Modell | Modell | Modelo | Bulgaria yugoslavia | Model | Model | Model | Model | |
| Outdoor Unit | Immergerl
Aussengrät | Unite interne
Unite estanche | Eurupon zuokul
Elutropion zuokul | Implante interne
Implante estanche | Elemento interior
Elemento exterior | Elemento exterior | Elemento exterior | Equipo interior
Equipo exterior | Equipo interior
Equipo exterior | Bulgaria yugoslavia
Bulgaria yugoslavia | Equto | ig Unite
Digi Unite | Innendarsenhet
Utermushenet | Innendarsenhet
Utermushenet | Modell
Brytpiastny 6nok
30eHNsik 6nok |
| Power / Current | Stromversorgung | Alimentation | Tapoxh
peμatoc | Corrente | Stroom | Potência | Hanteknade
πητाअ | Corrente | Enctrepneche
Saxpenshe | Güç / Akim | | Effekt/ström | Effekt/ström | Tepoxych/ stryp | |
| Refrigerant | Kütentät | Réfrigerant | ψuktkó μεco | Refrigerante | Koelminder | Refrigerante | Ökologické sticht | Refrigerante | Oxnačka dme | Sogutucu | | Keldmedium | Kjelalemiddel | Xenodopareht | |
| Cooling Capacity | Kunthleitung | Capacité réfrigeratie | Irkovotni
ψgnc | Refrigerazione | Cooling Capacity | Capacidade de refrescimento | Mocean'tb
oxlukşende | Potencia
trigora | Oxnačka dme
Kanaustet | Sogutma
Kapasitesi | | Kytkapacitet | Kjolekapasitet | Tepoxych
ha oxenodoxen | |
| Heating Capacity | Heitleitung | Capacità chaudiage | Irkovotni
δερμavon | Riscaldamento | Verwarming Capacity | Capacidade de aquecimento | Mocean'tb
harpea | Potencia
calclación | 3aerobau
Kanaustet | Italma
Kapasitesi | | Liprimergskopax | Varmokapacet | Tepoxych
ha obiripahnn | |
| Noise Level
Conditions
Tim Distance
Max. cooling
Sound power level | Lampegel
Bedingungen
1m Abstand
Max. Kölnung
Schädlingskapgel | Niveau de bruit
Condition
Distance 1 m
Redundancy max.
Neueu de paxarato sone | Então do bruit
Zukovsk
Anatorjon 1 ptou
May, lvy
Traddamenter max.
Bocupou | Livelto di rumore
Conditioni
Distanza di 1 m
Rahidamento max.
Livelto rurone | Lawaipieiler
Voorwaiden
1m abstand
Max. Kooling
Gekidrivau | Nivel do barulho
Condizioni
Distancia de 1 m
Arefecimento max.
Nivel de alimentação
tenora | Yorozhenb liyuMa
UdoFenfli
Hullužin'lt'lv
Rafinamento max.
Nivel de potenza
d'oro | Nivel sonoro
Condizioni
1 m de distanza
Rafinamento max.
Nivel de potenza
d'oro | Huafo ha liyuMa
Yonosan
1m pasontro
Max. soluzma
Sas savyasi | Ses sevlyesi
Kegular
1m Uzadik
Max. soluzma
Sas savyasi | | Butleriva
Viktor
1 m avstand
Max. kylming
Ludefektivna | Stayniva
Viklar
1 m avstand
Max. kylming
Ludefektivna | Pienihuy
Woyne
Bürgschaft 1 m
Maxx. oxondepennen
Pienihuy potyphosit
Saxy | |
| Air Circulation | Luftzirkulation | Ventilation | Kukopopia
aqua | Circulation aria | Luchtcirculation | Circulation do ar | Lidnyuichnaya
Bolskya | Circulation de aire | Bádyusha
dipuytsa | Hava Devri | | Luftflöde | Luftstromming | Lidnyuichnaya
nodelprn | |
| Product weight | Produktgewicht | Peids ou produit | Bago; Tou
pipoiwatoc | Peso prodotto | Produktgewicht | Peso do producto | Bec npodyska | Peso del producto | Temo ha npodyska | Ürdn agidigi | | Produktans vikt | Produktats vekt | Maca supeby | |
| Dimensions | Abmessungen | Dimensión | Δidctaon | Misure | Atmetingen | Dimensões | Passagems | Medidas | Passagems | Ebadar | | Makt | Mai | Gamma | |
QUICK GUIDE/GUIDE RAPIDE/GUIA RAPIDA/GUIDA RAPIDA/GUIA RAPIDO/QUICK REFERENCE/QUICK GUIDE/QUICK GUIDE/QUICK GUIDE
Remote Control Preparation · Préparation De La Télécommande · Preparación Del Mando A Distancia · Telecomando: Operazioni Preliminari · Preparação Do Controlo Remoto · Preparation of the Remote Control · Preparation of the Remote Control · Vorbereitung der Fernbedienung · Afstandsbediening Voorbereiding

Pull out · Retirez · Quite · Estrarre · Retire · Remove · Pull out · Nach unten ziehen · Verwijderen 2 Insert AAA or R03 batteries (can be used ~1 year) Placez des piles AAA ou R03 (valables environ 1 an) · Inserte pilas AAA o R03 (puede ser uso ~1 año) Inserire batterie AAA o R03 (può essere utilizzato per circa 1 anno) Introduza pilhas AAA ou R03 (pode ser utilizado ~1 ano) · Insert AAA or R03 batteries (can be used ~1 year) · Insert AAA or R03 batteries (can be used ~1 year) Batterien des Typs AAA oder R03 einlegen (Betriebsdauer etwa ein Jahr) Plaats AAA of R03 batterijen (kunnen ongeveer 1 jaar gebruikt worden) 3 Close the cover · Fermez le couvercle · Cierre la tapa · Chiudere il coperchio · Feche a tampa · Close the cover · Close the cover · Batteriefach schließen · Sluit de klep
1 MODE

Select the desired mode.
Start/stop the operation.
Select the desired temperature.
Pursuant to at the directive 2004/108/EC, article 9(2) Panasonic Testing Centre
Panasonic Service Europe, a division of
Panasonic Marketing Europe GmbH
Winsberging 15, 22525 Hamburg, F.R. Germany