
Gracia Rossa - Food Processor Klarstein - Free user manual and instructions
Find the device manual for free Gracia Rossa Klarstein in PDF.

| Brand | Klarstein |
| Model | Gracia Rossa |
| Product Type | Food Processor |
| Article Numbers | 1006253, 10006252, 10022087, 10022088 |
| Power Supply | 230 V ~ 50 Hz |
| Power Consumption | 1000 W |
| Mixing Bowl Capacity | 5 liters (max. 2 kg of dough) |
| Dimensions (L x H x D) | 36 x 33 x 23 cm |
| Weight | 8 kg |
| Included Accessories | Mixing bowl, lid, flat beater, whisk, dough hook |
| Speeds | 0 (stop), 1 to 7, MAX |
| Main Functions | Mix, knead, whisk, whip egg whites, prepare milkshakes and cocktails |
| Cleaning | Mixing bowl dishwasher safe; accessories hand wash with hot water and dish soap; exterior housing with damp cloth |
| Safety | Protective cover, unlock button, automatic stop not specified |
| Compliance | EU Directives 2014/30/EU, 2014/35/EU, 2011/65/EU |
| Recycling | Do not dispose with household waste, follow local guidelines |
Frequently Asked Questions - Gracia Rossa Klarstein
User questions about Gracia Rossa Klarstein
0 question about this device. Answer the ones you know or ask your own.
Ask a new question about this device
Download the instructions for your Food Processor in PDF format for free! Find your manual Gracia Rossa - Klarstein and take your electronic device back in hand. On this page are published all the documents necessary for the use of your device. Gracia Rossa by Klarstein.
USER MANUAL Gracia Rossa Klarstein
INHALTSVERZEICHNIS
BEDIENUNG
natural_image
Symbol of a trash bin crossed with a diagonal line, no text or numbers presentCongratulations on purchasing this equipment. Please read this manual carefully and take care of the following hints to avoid damages. Any failure caused by ignoring the items and cautions mentioned in the instruction manual is not covered by our warranty and any liability. Scan the QR code to get access to the latest user manual and other information about the product:

CONTENT
Safety Instructions 10
Product Description and Accessory 11
Operation 12
Application Examples 13
Cleaning and Care 13
Hints on Disposal 14
Declaration of conformity 14
TECHNICAL DATA
| Item number | 1006253, 10006252, 10022087, 10022088 |
| Power supply 230 V ~ 50 Hz | |
| Power consumption 1000 W | |
| Capacity mixing bowl 5 litres (max 2 kg dough) | |
| Dimensions (WxHxD) 36 x 33 x 23 cm | |
| Wight 8 kg |
SAFETY INSTRUCTIONS
- Make sure that the voltage shown on the rating plate corresponds with that of the mains supply. The rating plate can be found on the bottom of the motor block.
- The motor must always be switching off before the stand mixer is connected with the mains supply.
- To avoid electric shocks, do not use this device in the vicinity of water. Do not immerse the mains lead in water or other liquid.
- If the supply cord is damaged, it must be replaced by the manufacturer or its service agent or a similarly qualified person in order to avoid a hazard.
- Do not kink or clamp the mains lead. To avoid any risk of stumbling, do not allow the mains lead to hang over the edge of a table or a counter.
- This device should not be set up in close proximity to a naked flame, easily flammable materials (curtains, textiles, etc.), a radiator, an oven or some other heat source.
- Before use, place the device on a horizontal and flat surface.
- This appliance is not intended for use by persons (including children) with reduced physical, sensory, or men-tal capacities, or lack of experience and knowledge, unless they have been given supervision or instruction concerning use of the appliance by a person responsible for their safety.
• Children should be supervised to ensure that they do not play with the appliance.
- Place this device as close as possible to the power source so that you can disconnect the plug quickly and easily.
- If is recommended to check regularly the supply cord for any sign of possible deterioration, and the appliance should not be used if the cable is damaged.
- Do not use outdoors. Only suitable for use indoors.
- The device should only be used for its intended purpose.
- This is not a toy! Keep away from children. The device should be used and stored out of the reach of children.
- Careful supervision is required when the device is used by or in the vicinity of children.
- Never operate empty and without supervision. During use, do not touch moving parts with your fingers.
- Please note that when passing the device on to a third party, the operating instructions must be included.
- Use only original accessories.
- Unplug the appliance when not in use or before cleaning.
- Switch off the appliance and disconnect from supply before changing accessories or approaching parts which move in use.
- Do not attempt to repair the device yourself, since you will be exposed to hazardous live components or other hazards by opening and removing the covers. Repairs should only be carried out in a qualified workshop.
- The appliance is not intended to be operated by means of an external timer or a separate remote-control system.
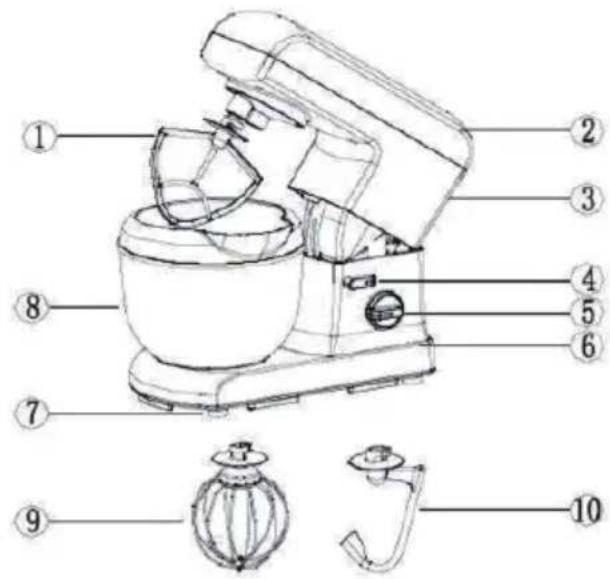
PRODUCT DESCRIPTION AND ACCESSORY
1 Mixer blade
2 Large cover
3 Upper main body
4 Shaft knob
5 Rotary knob
6 Lower main body
7 Foot
8 Mixing bowl
9 Eggs beater
10 Dough blade
OPERATION
All parts of the stand mixer are to be thoroughly cleaned before being used for the first time. Take out the re-quired length of cable from the cable tidy on the base of the mixer and connect the device to the mains supply.
Commissioning
-
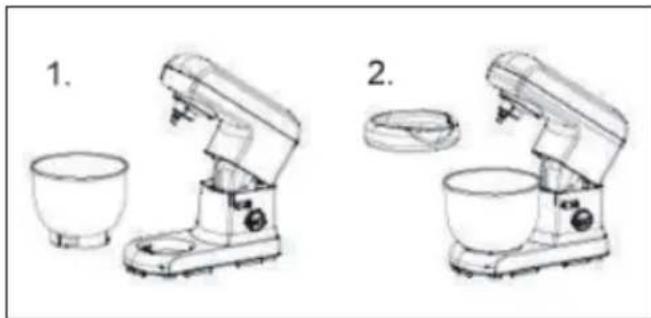
Mix the food ingredients thoroughly in accordance with the detail in the recipe; then open the upper main body (3) using the Shaft Knob (4).
-
Place the Mixing bowl (8) on the device and tune the Mixing bowl unit in anticlockwise direction unit it is fixed and the cover of bowl is fixed on the bowl
- Fix the Mixer blade (1) or the Eggs beater (9) or the Dough blade (10) on the blade connector and rotate the particular attachment clockwise vntil it engages firmly. Turn the Shaft knob (4) in the direction of the arrow and press the upper main body (3) down- wards with one hand.
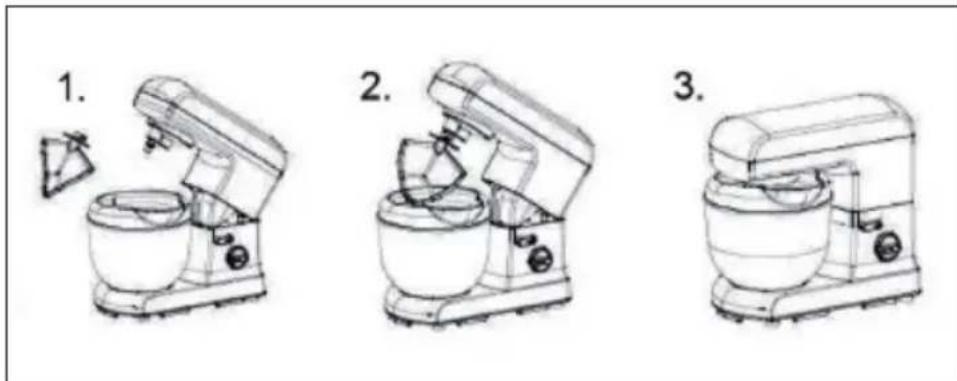
-
Insert the power plug in the power socket and Rotary knob (5) to set the operating switch to the desired position (1-MAX) for longer usage.
-
Turn the operating Rotary knob (5) in the „0“ setting.
-
Lift up the upper main body (3) by turning the Shaft Knob (4) clockwise.
-
You can now remove the Mixing bowl (8) from the device.
APPLICATION EXAMPLES
To mix or knead dough
- Maximum quantity of flour is 785 g and quantity of water is 570 g.
- From speed 1 for mix 20 second, and speed 2 for mix 20 second, afterwards speed 3 for about 3 minutes.
- When filling the agitator kettle, please ensure that the maximum quality is not exceeded.
- The dough beater or mixer beater should be used.
Mixing shakes, eoeklails or other liquids
- Mix the ingredients according to the available recipe, from speed 1 to 7 for about 3 minutes.
- Do not exceed the maximum quantity for the agitator kettle.
- The mixer beater should be used.
Whipping egg whites or er eam
- Switch on speed 7 to speed MAX, whip the egg whites without stopping for about 5 minutes, according to the size of the eggs, until stiff. Maximum quantity 12 eggs.
- For whipped cream, whip 250 ml fresh cream at speed 5 to 9 for about 3 minutes.
- When filling the Mixing bowl with fresh milk, cream or other ingredients, please ensure that the maximum quality is not exceeded. The egg beater should be used.
CLEANING AND CARE
- Before cleaning, please ensure that the Switch knob is at the „OFF“ position and that the plug has been disconnected from the socket.
• After use allow the device to cool down before you start to clean it. - To clean the exterior of the device, use a moist cloth and a mild detergent. To clean the device, never sub- merge it in water.
- The Dough blade and Mixer blade are not dishwasher safe. The accessories can be cleaned in warm water and washing-up liquid.
- The mixing bowl and Egg whisk are dishwasher safe. The bowl can also be cleaned with warm water and washing-up liquid. Do not use any abrasive detergents.
HINTS ON DISPOSAL
natural_image
Symbol of a trash bin crossed with a diagonal line, no text or numbers presentAccording to the European waste regulation 2012/19/EU this symbol on the product or on its packaging indicates that this product may not be treated as household waste. Instead it should be taken to the appropriate collection point for the recycling of electrical and electronic equipment. By ensuring this product is disposed of correctly, you will help prevent potential negative consequences for the environment and human health, which could otherwise be caused by inappropriate waste handling of this product. For more detailed information about recycling of this product, please contact your local council or your household waste disposal service.
DECLARATION OF CONFORMITY

Producer:
Chal-Tec GmbH, Wallstraße 16, 10179 Berlin, Germany.
This product is conform to the following European Directives:
2014/30/EU (EMC)
2014/35/EU (LVD)
2011/65/EU (RoHS)
Estimado cliente,
ÍNDICE
MANEJO
natural_image
Symbol of a trash bin crossed with a diagonal line, no text or numbers presentSOMMAIRE
UTILISATION
natural_image
Symbol of a trash bin crossed with a diagonal line, no text or numbers presentDÉCLARATION DE CONFORMITÉ

Fabricant :
Chal-Tec GmbH, Wallstraße 16, 10179 Berlin, Allemagne.