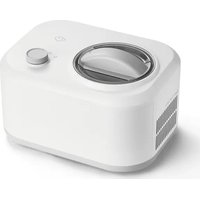
Elisa - Ice machine Springlane - Free user manual and instructions
Find the device manual for free Elisa Springlane in PDF.
Frequently Asked Questions - Elisa Springlane
User questions about Elisa Springlane
0 question about this device. Answer the ones you know or ask your own.
Ask a new question about this device
Download the instructions for your Ice machine in PDF format for free! Find your manual Elisa - Springlane and take your electronic device back in hand. On this page are published all the documents necessary for the use of your device. Elisa by Springlane.
USER MANUAL Elisa Springlane
natural_image
Line drawing of a rectangular electronic device with a circular top and ventilation slots (no text or symbols)Elisa
Cleaning and care 31
Trouble shooting 31
Customer service 34
Disposal/Environmental
protection 35
text_image
Technical diagram of a microwave oven with numbered parts labeled 1 to 5Important safety information
Please read this manual carefully before using the appliance for the first time and keep it for future reference.
- Warning — Keep ventilation openings, in the appliance enclosure or in the built-in structure, clear of obstruction. For optimal ventilation, allow space of approx. 8 cm to other objects, furniture, or walls.
- Warning — Do not use mechanical devices or other means to accelerate the defrosting process, other than those recommended by the manufacturer.
- Warning — Do not damage the refrigerant circuit.
- Warning — Do not use electrical appliances inside the food storage compartments of the appliance, unless they are of the type recommended by the manufacturer.
-
Warning: When positioning the appliance, ensure the supply cord is not trapped or damaged.
-
Warning: Do not locate multiple portable socket-outlets or portable power supplies at the rear of the appliance.
Intended use
The 2-in-1 ice cream machine and yogurt maker Elisa can agitate and cool liquid foods as well as produce yogurt and ice cream.
Symbols

This symbol warns of hazards that can damage
the appliance or cause injury.

This symbol warns of an electric shock that may be caused by a defective appliance or by improper handling. This product may only be opened for necessary service work by an authorised technician.

This symbol warns of flammable substances.
Avoid open flames and sources of ignition and ensure that the room in which the unit is located is well ventilated.
Safety information

Do not store explosive substances such as aerosol containers with flammable propellant gas in this appliance.

Do not submerge the appliance in water or any other liquid. Protect the power cable, plug, and mains adaptor from moisture.

Do not put your hand into the appliance during operation – this may lead to injury! Make sure that the appliance is never tilted more than 45^ , as this could damage the compressor.

After unpacking, leave the appliance in its final position for at least 2 hours. The cooling agent inside the appliance must first sink to the bottom, as the compressor could otherwise be damaged. The manufacturer will assume no liability in the event of incorrect assembly, improper or incorrect use, or repairs carried out by unauthorised third parties.

Warning: Risk of fire!
The cooling circuit
contains the cooling agent isobutane (R600a). Although it is a natural, environmentally-friendly gas, it is also flammable. Make sure that the cooling circuit is not damaged during transport or while setting up the appliance.
The cooling agent (R600a) is flammable.
If the cooling circuit is damaged:
- Keep away from open flames and ignition sources.
• Thoroughly ventilate the room in which the appliance is located.
- Do not continue using the appliance.
- If the supply cord is damaged, it must be replaced by the manufacturer, its service agent or similarly qualified persons in order to avoid a hazard.
• After unpacking the appliance, check that it is in perfect condition and has not sustained any damage that could impair its functional safety. Should you notice any defects or if the appliance has fallen on the floor,
do not attempt to use it, but call our customer service.
- Improper repairs can lead to hazards for the user and the warranty may be deemed void. If individual parts are damaged, they must be replaced by the manufacturer, an authorized specialist company, or a similarly qualified person.
- The 2-in-1 ice cream machine and yogurt maker Elisa can agitate and cool liquid foods as well as produce yogurt and ice cream. Do not place any other food items inside.
- Store the appliance out of the reach of children.
- This appliance can be used by children aged from 8 years and above and persons with reduced physical, sensory or mental capabilities or lack of experience and knowledge if they have been given supervision or instruction concerning use of the appliance in a safe way and understand the hazards involved. Children shall not play with the appliance. Cleaning and user maintenance shall not be made by children without supervision.
• Children aged from 3 to 8 years
are allowed to load and unload refrigerating appliances.
- Position the appliance on a clean and level surface.
- The appliance is only intended for use in the household or other similar uses such as
• in kitchenettes in shops, offices, or other workplaces,
- on farms,
• for use by guests in accommodation establishments (hotels, motels) private guest houses, or holiday homes.
- Fill the ice cream container to a maximum of 2/3 to prevent overflow. Do not fill above the indicated maximum level.
- Use the appliance only after proper assembly.
- The appliance may only be used with original accessories.
- Connect the appliance only to alternating current as indicated on the type plate. Connect the mains plug only to an earthed socket.
- Uncoil the power cable completely before use.
- Disconnect the mains plug as soon as you have finished using the appliance. Do not pull the power cable itself, as it could cause damage.
- Switch off the machine before plugging in or unplugging it.
- The appliance must not be operated with an external timer or a separate remote-control system.
• Always disconnect the mains plug after use, before cleaning, or in the event of possible malfunctions during operation.
- Do not submerge the appliance in water or any other liquid. Protect the power cable and plug from moisture.
- The appliance is not dishwasher safe. The agitator arm, the stainless steel ice cream container and the transparent cover may be cleaned in the dishwasher.
- Avoid using the on/off switch too often, as it might damage the compressor. Allow for at least 5 minutes to pass between switching the appliance on and off.
- Never place or use the appliance and power cable on or near a hot surface.
- The cable must not hang over the edge of the work surface.
- Do not use the appliance outdoors.
- Ensure that the appliance's ventilation slots are not blocked at any time.
- Do not put objects or your hand in the appliance while it is in operation.
- Never insert body parts or metallic objects into ventilation slots, there is a risk of injury.
- Do not store explosive substances such as aerosol containers with flammable propellant gas in this appliance.
Before using the appliance for the first time
- Remove all parts related to packaging and transport safety. Make sure that these parts are also kept away from children – they pose a risk of suffocation!
- Before initial operation and after prolonged periods of non-use, Elisa should be cleaned. When doing so, please make sure to note our instructions on cleaning and care.
- Place the appliance on a level and dry surface.
• After unpacking, leave the appliance in its final location for at least 2 hours.
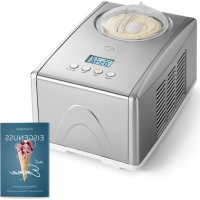
Tecnical data
Cooling power: 220 W
Heating power: 22.8 W
Voltage/Frequency:
220-240 V AC, 50-60 Hz
Capacity: 2 litres
Max. filling capacity: 1.3 liter
Dimensions (LxWxH):
28.2 × 42.2 × 27.2 cm
Weight: 12.1 kg
Material: stainless steel (casing, ice bucket), plastic
Features: fully automatic, self-cooling compressor, removable stainless steel ice cream container, stirring insert, transparent lid with filler cap, digital control panel, ice cream programme
with 3 stirring-speed levels, yoghurt programme, post-cooling function for finished ice cream and yoghurt, timer, non-slip feet
Accessories: measuring cup and spatula, instruction manual, recipe booklet
Subject to changes and errors with regards to features, technology, colours and design.
Purpose of use: The compressor-operated Elisa ice cream machine is suitable for the production of ice cream and yoghurt. Do not use the machine for other foods.
Using Elisa
Product description
Appliance

text_image
Technical diagram of a microwave oven with labeled parts including vent, lid, and base-
Lid with filling hole
-
Machine body
-
Stirring insert
-
LCD display
-
Stainless steel ice cream container
Display

text_image
1 2 3 4 5 Speed °C h min Ready! Cooling Heating Keeping cool 6 7 8 9 10 11- Ice cream programme
- Yoghurt programme
- Stirring speed setting
- Pre-cool function
- Stirring speed display
-
Time and temperature display
-
Status display
- Sound on/off display
- Arrow keys
- Start/Stop
- Power
Turning on the machine
- Plug the device plug into a power outlet. The power icon appears in the lower right corner of the display.
- Press and hold to turn on the machine.
- Press and hold the power icon to turn off the machine at any time.
Preparing the ice cream
- Prepare the ice cream mixture according to the recipe. Ice cream mixtures that have to be heated
beforehand should be prepared the day before so that the mixture has enough time to cool down.
- Cool the ice cream mixture until it reaches refrigerator temperature.
- Insert the ice cream container into the corresponding space in the machine body. Make sure that the wings at the top edge of the ice cream container fit into the matching slots in the machine.
-
Place the stirring insert upright onto the shaft at the bottom of the ice cream container.
-
Add chilled ingredients into the removable ice cream container. Be careful not to exceed the maximum capacity. The ice cream container should be at least 1/3 full, maximum 2/3 full, as the ice cream mixture expands during the freezing process.
-
Place the lid on the ice cream container and turn it counterclockwise until it locks into place.
-
Select ice cream programme.
-
You can use the corresponding button to set the speed of the stirring arm; 3 levels are available. Select the desired level by pressing the button several times.
-
The machine is pre-programmed to 45 minutes. We recommend this setting for ice cream mixtures that have been properly chilled ahead of time. Adjust the time as you wish using the arrow keys. Hold down the arrow keys to change the time in 10-minute increments. You can adjust the duration of the programme at any time using the arrow keys.
-
Now press the "Start/Stop" button to start the programme. The status "Cooling" will appear in the display. You can cancel the programme at any time by pressing the ice cream cone icon.
-
During the programme, the remaining time and current cooling
-
temperature are alternately shown on the display. When making ice cream, the temperature is usually between -12 and -20 °C, depending on environmental factors.
- The ice cream is ready when it has a creamy consistency resembling a very thick milkshake. If the machine has stopped on its own, the motor protection feature has kicked in and the ice cream has already set. When the set time has expired, the machine will make the acoustic signal you previously selected. If the machine is on mute, there will be no beep. The display flashes and shows "Ready!".
- Now remove the ice cream. If the container is not removed within 10 minutes, the post-cooling function will begin automatically. To be able to form scoops, we recommend freezing the ice cream for approx. 60 minutes in a suitable container in the freezer.
Pre-cool function
The ice cream programme allows you to select the pre-cool function. Pre-cooling mode brings the machine and the coolant - and thus the ice cream container used - to the right temperature for making ice cream. You can use this mode to make the ice cream mixture ready for freezing a little faster. The pre-cool function lasts 5 minutes.
- Select the pre-cool function.
- Press Start/Stop. The pre-cool function will now start. The machine displays "Cooling". The stirring arm does not rotate in this mode; only the compressor is active.
- You can cancel pre-cooling mode at any time by pressing the pre-cool button again.
- An acoustic signal sounds when pre-cooling mode has finished. Now add the ice cream mixture and confirm with the "Start/Stop" button.
Post-cooling function
The post-cooling function keeps your ice cream cold if it is not immediately removed. The post-cooling programme automatically starts 10 minutes after the ice cream programme has finished. The machine stirs only occasionally so that the ice cream does not turn solid. You can pause post-cool mode by pressing the "Start/Stop" button. Note that the compressor will continue to run to protect it from being switched on and off too frequently. Remove the ice cream as soon as possible.
Adjustment of stirring speed
You can use the corresponding button to adjust the stirring speed of the ice cream machine. The speed determines how much air is worked under the ice and the fineness of the ice crystals formed. The highest setting yields the ariest ice cream with the finest ice crystals. This setting is particularly suitable for milk-based ice cream, which is particularly good at retaining the air that has been worked in to the mixture. The slowest setting is particularly suitable for sorbet, which retains little air due to the ingredients used. Try out different possibilities and prepare your ice cream the way you like it.
Tips for perfect ice cream
- Self-made ice cream tastes best when fresh. It does not contain any preservatives and should therefore be eaten immediately, if possible.
• Always use very fresh eggs for your ice cream.
• Always use fully ripe fruits for fruit ice cream and only add them at the end of the preparation time through the opening in the lid. - Only puree fruit just prior to preparation and add any fruit pieces only towards the end of the cycle.
• Instead of sugar, you can also use honey or syrup as sweeteners. - The colder the ice cream mass is before beginning with the preparation, the shorter the preparation time.
• Alcohol lengthens the freezing time.
Use ingredients containing alcohol sparingly and add these only at the end of the freezing time.
- For storage, do not use the device's ice cream bowl but rather move the ice cream to a suitable container with a lid. You can prevent the formation of ice crystals by ensuring that your container contains as little air as possible or by storing it upside down – this way, the crystals gather on the lid and not on the ice cream.
- You can achieve optimal results by filling at least 1/3 of the ice cream container. Fill the container to the max. mark to prevent overflowing. The ice cream expands during the freezing process.
- Please note: The ice cream mass always tastes overly sweet before freezing. However, if you taste the frozen ice cream later on, it will taste perfect.
- Consume the ice cream within a week and never refreeze thawed or defrosted ice cream.
Preparing yoghurt
Please also note the instructions for the production of yogurt in the recipe booklet included with delivery.
-
Prepare the yoghurt mixture according to the instructions.
-
Add the yoghurt mixture to the removable ice cream container. There is no minimum fill level here; fill the container up to a maximum of 2 cm below the edge.
-
Insert the container without the stirring arm into the corresponding space in the machine body. Make sure that the wings at the top edge of the ice cream container fit into the matching slots in the machine.
-
Place the lid on the ice cream container and turn it counterclockwise until it locks into place.
-
Select the yoghurt programme.
-
The machine is pre-programmed for 8 hours. Adjust the time as you wish in 30-minute increments - from 4 to 24 hours - using the arrow keys. Hold down the arrow keys to change the time to one-hour increments. You can adjust the duration of the programme at any time using the arrow keys.
-
Now press the "Start/Stop" button to start the programme. The status "Heating" appears in the display. You can cancel the programme at any time by pressing the yoghurt cup icon. Note: The yoghurt programme runs almost silently; the mass must not be moved or stirred during preparation.
-
During the programme, the remaining time and current preparation temperature are alternately shown on the display. When making yoghurt, the temperature is usually between 38 and 42 °C, depending on environmental factors.
- The yoghurt is ready when the mass has thickened. Note that yoghurt becomes firmer after it cools. When the set time has expired, the machine will make the acoustic signal you previously selected. If the machine is on mute, there will be no beep. The display flashes and shows "Ready!". Now you can flavour the mass according to your wishes. The yoghurt should be refrigerated in a clean container as soon as possible to prevent it from going sour. The yoghurt will continue to mature in the fridge for the next few days, but very slowly.
- If the yoghurt is not removed within 10 minutes, the automatic post-cooling function will start.
Ice cream and yogurt removal
- Ice cream and yogurt are ready when the display shows "00:00". Before removing the product, switch the appliance off using the ON/OFF button and unplug it from the socket.
- Remove the transparent lid.
- Take the container out of the appliance and carefully pull the mixer out of the ice cream. If the ice cream container is frozen slightly and cannot easily be lifted out of the recess in the housing, wait for a few minutes and try removing it again.
- Fill ice cream and yogurt into suitable containers. Refrain from using sharp or pointed objects, but rather use a plastic or wooden spoon, to avoid damaging the ice container. We recommend silicone dough scrapers.
- If you are finished making ice cream, switch off the appliance with the power button and disconnect the plug.
Motor protection function
If the ice cream mass becomes harder, the motor can get jammed. The motor protection function makes sure that the mixing motor automatically stops at a hard ice cream consistency to avoid motor damage.
Cleaning and care
Before cleaning, always switch off the appliance, remove the plug from the socket and allow the appliance to cool down.
- Never clean the device with or under running water or any other liquid. Especially the motor and the compressor may not come into contact with water.
- Do not use any scratching or abrasive detergents.
-
The stainless steel ice cream container is dishwasher safe. All other removable parts may be put in the dishwasher.
-
Clean all plastic parts on the top shelf of a dishwasher and use a programme with at most 60 °C to keep them from losing their shape. Make sure that the plastic part is not jammed.
- Wipe down the compressor housing with a moist cloth.
- Dry off all parts with a soft cloth before assembling them. Before using the ice cream machine again, all parts should be thoroughly cleaned and dried off.
- The ice cream scoop should be washed by hand.
Trouble shooting
If the device does not work properly, please check the following steps:
- Check if the manual was followed precisely and correctly.
- Check the following table for possible reasons.
- Check if all fuses are working.
Error codes
| Error code | problem solution |
| E 4 | The motor has overheated. |
| E 5 | The temperature sensor has a fault. |
Issues with the appliance
| problem solution | |
| The ice cream doesn't freeze. | Make sure the compressor is working.Contact customer service for repair. |
| The stirring rod freezes. | The motor protection function has been activated.Remove the container, transfer your ice cream to another container, and let the machine stand for at least 30 minutes. Reduce the stirring duration next time. |
| The ice cream has frozen into a hard edge on the outside but remains soft on the inside. | |
| The 2nd batch of ice cream freezes unevenly and the motor protection function activates itself, the agitator no longer rotates. | Let your machine rest for at least 30 minutes before filling it with the next batch of ice cream. |
| The ice cream is too hard when it comes out of the freezer. | Home-made ice cream without additives and thickeners will naturally become very hard in the freezer. If your ice cream has been in the freezer for a while, you should allow it to thaw in the fridge or at room temperature for approx. 10-30 minutes. |
| I paused and restarted the ice cream programme.The compressor suddenly stopped working. | To protect the compressor from being switched on and off too frequently, the compressor will take a few minutes to turn back on if there is an interruption. |
| The ice cream is too runny. | You should generally freeze fruit ice cream or sorbet a little bit longer. To do so, fill the ice cream into a suitable and airtight container and allow it to freeze in the freezer for at least an additional 30 minutes. |
| Make sure that your ice cream mass is no warmer than room temperature when filling and never fill the machine with hot ice cream mass. Optimal results are obtained at a temperature of approx. 6–8 °C. | |
| The yogurt is too runny. | Extend the mixing time. Please note: The longer yoghurt stirs, the more sour and bitter it can become. You shouldn't leave yoghurt in the machine for more than 14 hours.The milk became too hot during preparation and the bacteria died. Start again. |
| The yogurt is too sour. | The fat content of the milk was too low. Yoghurt from whole milk tastes less sour than yoghurt from semi-skimmed milk.The yoghurt was stirred or stored too long. Yoghurt continues to ferment, even when it's stored in the fridge. Consume your yoghurt when its still fresh if possible |
| The yogurt is too grainy. | If you made yoghurt using powder, the powder was not stirred evenly enough into the milk. Try to stir through your yoghurt with a hand mixer and let it stir for another 2–3 hours. |
If you have any other issues with your Elisa, please contact our customer service. Do not try to repair the machine yourself.
Customer service
In principle, our products have a legal warranty duty of 2 years. Further claims can only be processed in conjunction with a proof of purchase. Wearing parts exclude any warranty claims, when usual abrasion has occurred. The durability is determined by the respective handling and use of the products and is thus variable.
For questions concerning handling and functionality of our products, please contact our customer service:
Tel. +49 (0) 5424 - 80944-0
Email: info@kronenburg-handel.de
Disposal/Environmental protection
Our products are manufactured with high quality standards and designed for long-lasting
durability. Regular maintenance and care help extend their lifespan. If the device is defective and cannot be repaired, it must not be disposed of with regular household waste. You must take the device to a designated recycling facility for electrical or electronic equipment. By properly disposing of and recycling the device, you make an important contribution to protecting our environment.
Hereby, Kronenburg Handel GmbH declares that the product complies with the essential CE requirements as of the date of issuance. The complete Declaration of Conformity can be viewed at www.springlane.de/pages/ce.