
10032993 - Pan Klarstein - Free user manual and instructions
Find the device manual for free 10032993 Klarstein in PDF.
| Product type | Electric radiator |
| Brand | Klarstein |
| Model | 10032993 |
| Nominal heat output | 1.266 kW |
| Maximum continuous power | 1.266 kW |
| Electrical supply | 230 V ~ 50 Hz |
| Standby auxiliary consumption | 0.000 W |
| Temperature control | Mechanical thermostat |
| Frost protection mode | Yes |
| Installation | Attachment of included feet |
| Cleaning | Vacuum for grill, damp cloth for surface |
| Safety instructions | Do not cover, keep away from children, do not use in small rooms without supervision |
| Recycling | Comply with WEEE directive 2012/19/EU |
| Country of origin | Germany (manufacturer) |
| Warranty | See manufacturer's terms |
| Included accessories | Feet (2x), Screws (4x) |
| Type of heat control | Manual with thermostat |
| Overheat protection | Yes (do not cover) |
Frequently Asked Questions - 10032993 Klarstein
User questions about 10032993 Klarstein
0 question about this device. Answer the ones you know or ask your own.
Ask a new question about this device
Download the instructions for your Pan in PDF format for free! Find your manual 10032993 - Klarstein and take your electronic device back in hand. On this page are published all the documents necessary for the use of your device. 10032993 by Klarstein.
USER MANUAL 10032993 Klarstein
Note: This product is only suitable for well insulated spaces or occasional use.
Congratulations on purchasing this equipment. Please read this manual carefully and take care of the following hints to avoid damages. Any failure caused by ignoring the mentioned items and cautions mentioned in the instruction manual are not covered by our warranty and any liability.
CONTENT
Product Data Sheet 11
safety Instructions 12
Product Description 13
Control Panel 14
Installation 14
Operation 15
Care and Cleaning 16
Hints on Disposal 16
TECHNICAL DATA
| Item number 1003022, 10032992, 1008 | 82993 |
| Power supply 230 V ~ 50 Hz | |
| Power consumption 1300 W |
DECLARATION OF CONFORMITY

Producer:
Chal-Tec GmbH, Wallstraße 16, 10179 Berlin, Germany.
This product is conform to the following European Directives:
2014/30/EU (EMC)
2014/35/EU (LVD)
2011/65/EU (RoHS)
2009/125/EC (ErP)
PRODUCT DATA SHEET
| Model identifier(s): 10032022 | ||||||
| Item Symbol Value Unit Item Unit | ||||||
| Heat output Type of heat input, for electric storage local space | heaters only | |||||
| Nominal heat output P | nom | 1.266 | kW manual | heat charge control, with integrated thermostat | N/A | |
| Minimum heat output (indicative) | Pmin | N/A kW manual heat | charge control with room and/or outdoor temperature feedback | N/A | ||
| Maximum continuous heat output | Pmax,c | 1.266 | kW electronic | heat charge control with room and/or outdoor temperature feedback | N/A | |
| Auxiliary electricity consumption | fan assisted heat output N/A | |||||
| At nominal heat output (fan motor) | elmax | N/A kW | Type of heat output/room temperature control | |||
| At minimum heat output (fan motor) | elmin | N/A kW single stage | heat output and no room temperature control | no | ||
| In standby mode el | SB | 0.000 W | Two or more | manual stages, no room temperature control | no | |
| with mechanic thermostat room temperature control | yes | |||||
| with electronic room temperature control | no | |||||
| electronic room temperature control plus day timer | no | |||||
| electronic room temperature control plus week timer | no | |||||
| Other control options (multiple selections possible) | ||||||
| room temperature control, with presence detection | no | |||||
| room temperature control, with open window detection | no | |||||
| with distance control option | no | |||||
| with adaptive start control no | ||||||
| with working time limitation | no | |||||
| with black bulb sensor | no | |||||
| Contact details | Chal-Tec GmbH, Wallstraße 16, 10179, Berlin, Germany | |||||
SAFETYINSTRUCTIONS
- Don't do any modification to the Heater.
Children of less than 3 years should be kept away unless continuously supervised. - This appliance can be used by children aged from 8 years and above and persons with reduced physical, sensory or mental capabilities or lack of experience and knowledge if they have been given supervision or instruction concerning use of the appliance in a safe way and understand the hazards involved. Children shall not play with the appliance. Cleaning and user maintenance shall not be made by children without supervision.
CAUTION
Risk of burns! Some parts of this product can become very hot and cause burns. Particular attention has to be given where children and vulnerable people are present.
Children should be supervised to ensure that they do not play with the appliance.
- Do not use this heater in the immediate surroundings of a bath, a shower or a swimming pool.
- In order to avoid overheating, do not cover the heater.
- The Heater must not be located immediate below a socket outlet.
- This Heater has hot and arcing or sparking parts inside. Please do not place combustible or chemical items near the Heater.
- This Heater is not equipped with a device to control the room temperature. Do not use this heater in small rooms. When they are occupied by persons not capable of leaving the room on their own, unless constant supervision is provided
- To avoid over-heating since a fire risk exists, do not cover the Heater.
- To avoid burns, do not touch the hot surfaces of the heater when it is in use.
- Do not use the Heater in outdoors.
- Do not insert or allow foreign objects to enter any ventilation or exhaust opening as this may cause an electric shock or fire, or damage the Heater.
- Always unplug the Heater when not in use. To disconnect the Heater, remove the plug from the electrical outlet.
- Connect the Heater to properly grounded outlets only.
- Never use a damaged cord or plug. If the supply cord is damaged, must be replaced by the manufacturer, an affiliate agent or a qualified person in order to avoid hazard.
- The total ampere ratings of the equipment plugged in should not exceed the ampere rating of the cord if you are using an extension cord.
- Do not run cord under carpet and do not cover cord with throw rugs, runners, or the like. Place the cord away from traffic area and where it will not be tripped over.
- Use this Heater only as described in this manual.
- In order to avoid hazard due to inadvertent resetting of the thermal cut-out, this appliance must not be supplied through an external switching device, such as a timer, or connected to a circuit that is regularly switched on and off by the utility.
- Only qualified service representative should perform repairing and maintenance services.
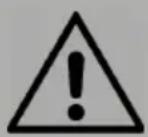
PRODUCT DESCRIPTION
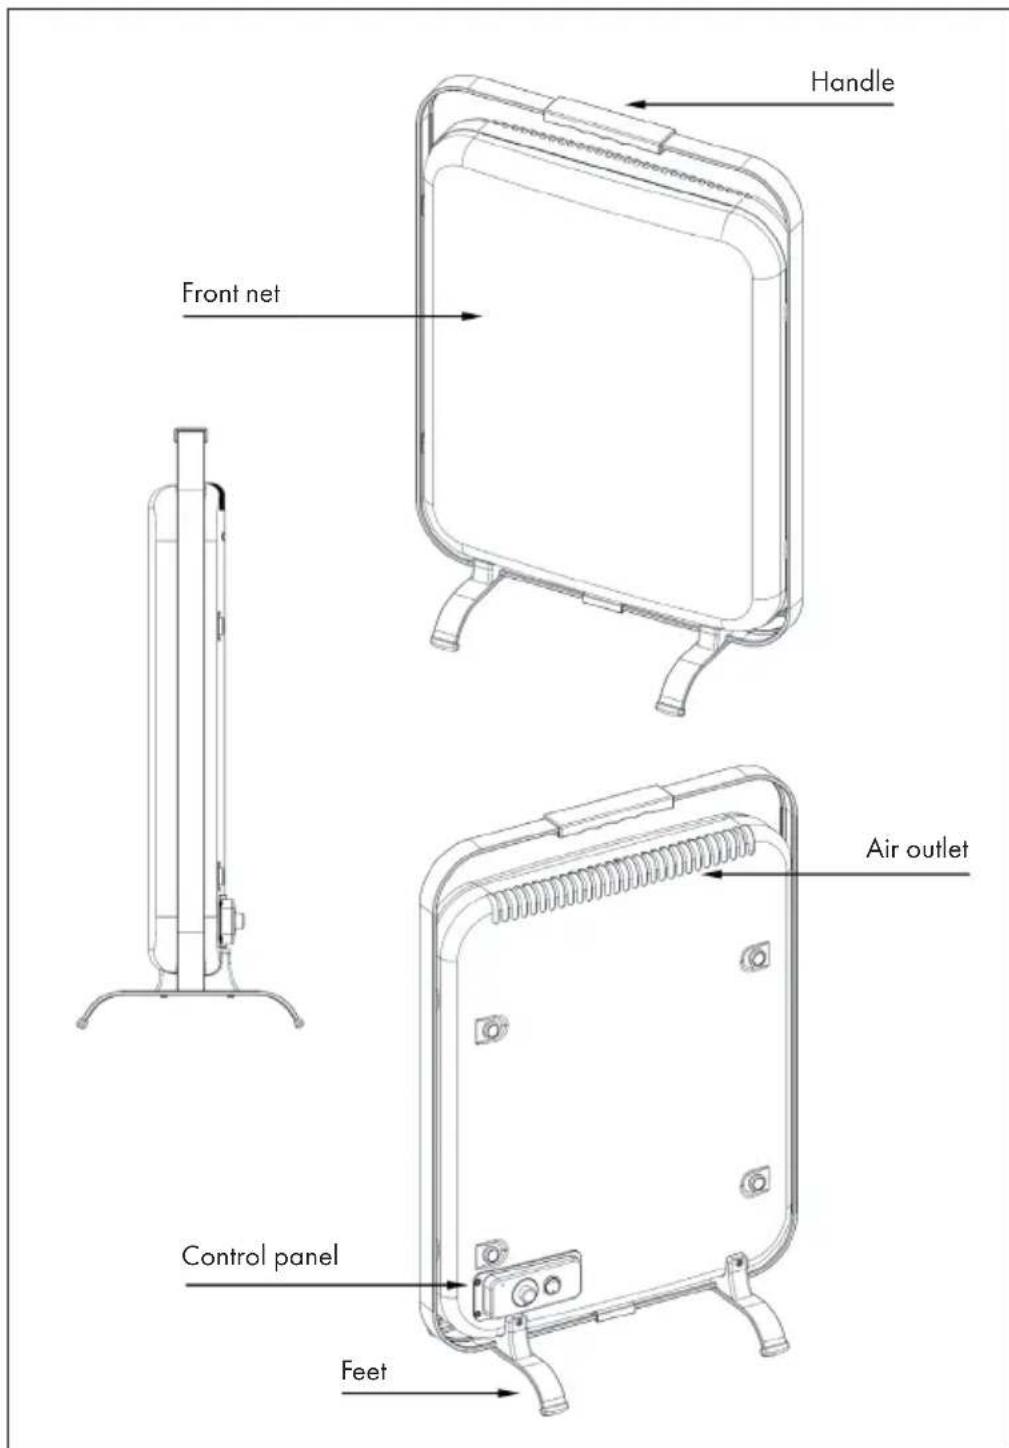
CONTROL PANEL
1 Heating indicator light
2 Temperature control knob
3 MIN position
4 Comfortable zone
5 Power switch
6 MAX position
7 Anti-Frost position
INSTALLATION
Carefully unpack the components and check that no damage occurred during transportation. If any damage is apparent or any component is missing, please contact the dealer immediately.
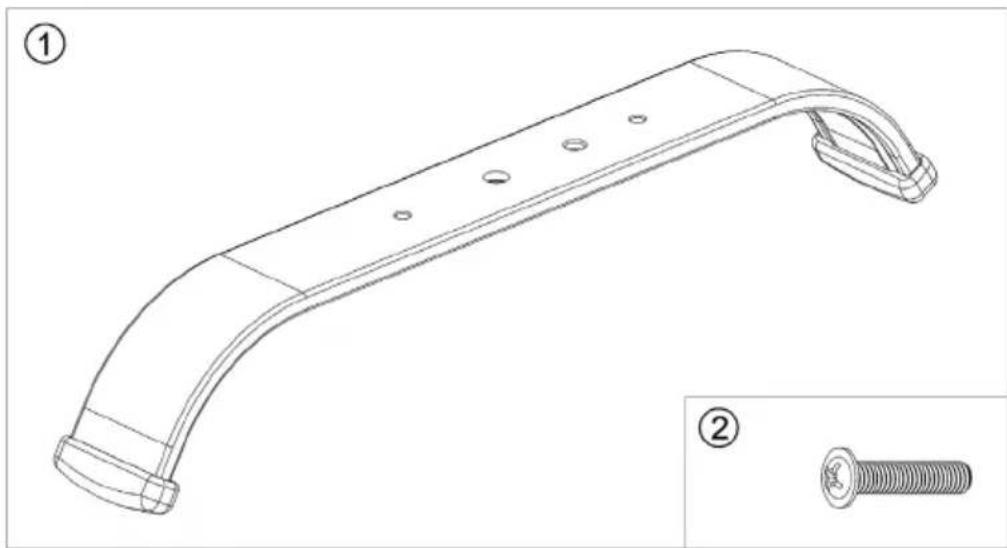
Installation Kit
1 Feet (2x)
2 Screw (4x)
Installation
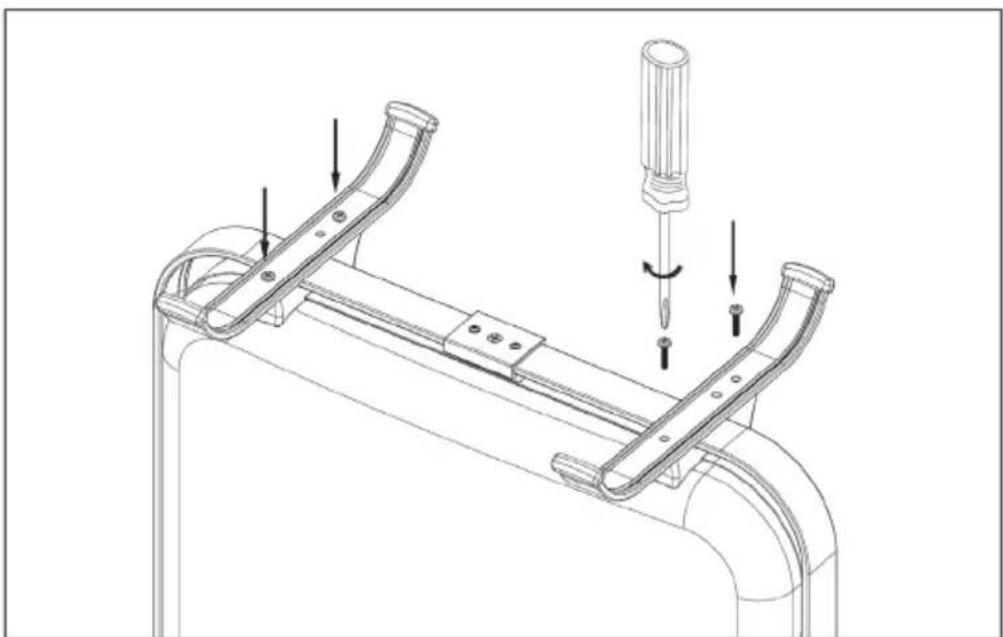
Fix two feet on the bottom of the heater by screws.
OPERATION
1 Ensure that the Temperature Control Knob is at "Max" position. Also, make sure the power switch is at "OFF" position. Plug the power cord into a suitable electrical outlet.
2. Switch "ON" the heater.
3 Then adjust the temperature control knob to set the room temperature. According to the personal needs, you can turn the temperature control knob in a clockwise or anti-clockwise direction to increase or decrease the room temperature.
4 When the room temperature reaches the pre-set temperature the power will cut out and the heating indicators light will be "OFF" at the same time. The power will resume when the room temperature drops at least 3^ lower than the pre-set temperature.
5 Anti-Frost mode: It will keep the surrounding temperature above freezing point to avoid the pipe breakage by ice.
CARE AND CLEANING
NOTE: Turn off the unit, and unplug it from the wall outlet before maintenance or cleaning to avoid electric shock.
- Do not immerse the power cord and plug or the heater into water or other liquid.
- Do not pour water or other liquid over the heater.
- Use a vacuum cleaner to remove dust and lint from the metal grid of the heater.
- Wipe the heater with a dry cloth to remove dust and a damp cloth (not wet) to clean the stains.
- Do not use detergents, abrasive cleaning powder or polish of any kind on the body of the heater, as these can damage the finish.
- Store the heater in a cool dry place when not in use. To prevent dust and dirt getting into the heater, use the original box to repack the unit.
HINTS ON DISPOSAL
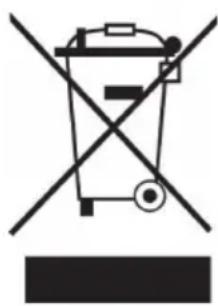
According to the European waste regulation 2012/19/EU this symbol on the product or on its packaging indicates that this product may not be treated as household waste. Instead it should be taken to the appropriate collection point for the recycling of electrical and electronic equipment. By ensuring this product is disposed of correctly, you will help prevent potential negative consequences for the environment and human health, which could otherwise be caused by inappropriate waste handling of this product. For more detailed information about recycling of this product, please contact your local council or your household waste disposal service.
Estimado cliente:
FICHE DE DONNÉES PRODUIT


Brand : Klarstein
Model : 10032993
Category : Pan