
MZ-R90 - MiniDisc Player SONY - Free user manual and instructions
Find the device manual for free MZ-R90 SONY in PDF.
| Product type | Portable MiniDisc player/recorder |
| Brand | Sony |
| Model | MZ-R90 |
| Dimensions (MZ-R90) | 78.9 × 17.3 × 72.0 mm (W×H×D) |
| Dimensions (MZ-R91) | 78.9 × 18.0 × 72.0 mm |
| Weight (MZ-R90, bare) | 105 g |
| Weight (MZ-R90, with NH-14WM battery) | 148 g |
| Weight (MZ-R91, bare) | 110 g |
| Weight (MZ-R91, with NH-14WM battery) | 153 g |
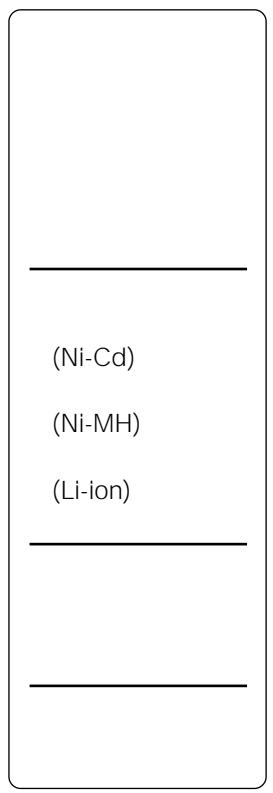
| Power supply | AC 100-240V power adapter, rechargeable Ni-MH NH-14WM battery, AA LR6(SG) batteries |
| Battery life (NH-14WM battery) | Recording: approx. 6.5 h; Playback: approx. 12 h |
| Battery life (AA LR6 alkaline battery) | Recording: approx. 4 h; Playback: approx. 16.5 h |
| Battery life (combined battery + battery) | Recording: approx. 14.5 h; Playback: approx. 29 h |
| Shock-proof memory | Up to 40 seconds of optical read errors |
| Frequency response | 20 – 20,000 Hz ±3 dB |
| Inputs | Line IN (optical), MIC (Plug-in Power), DC IN 3V |
| Outputs | O/LINE OUT jack (headphone/line) |
| Output power (headphone) | 5 mW + 5 mW into 16 Ω |
| Recording formats | Stereo and mono (ATRAC) |
| Remote control | LCD remote control with editing functions |
| Main functions | Digital/analog recording, sync recording, CD text copy, track editing (name, move, erase, divide/combine), phrase bank, time stamping |
| Maintenance | Clean with a soft, dry cloth. Do not use solvents. |
| Spare parts / repairability | AC power adapter, NH-14WM battery, BC-9HM charger, optical/line cables, RM-MZE1 remote control, ECM microphones. Repairs should be performed by a Sony authorized technician. |
| General information | Manual available as PDF download. User questions via the website. |
Frequently Asked Questions - MZ-R90 SONY
User questions about MZ-R90 SONY
0 question about this device. Answer the ones you know or ask your own.
Ask a new question about this device
Download the instructions for your MiniDisc Player in PDF format for free! Find your manual MZ-R90 - SONY and take your electronic device back in hand. On this page are published all the documents necessary for the use of your device. MZ-R90 by SONY.
USER MANUAL MZ-R90 SONY
/Operating Instructions


MZ-R90
MZ-R91

68
1 AC
AC
警告
注意


禁止

分解禁止

接触禁止

FLADGOMON トもはく
警告 注意 6
10
12
2
15
16
··
17
18
18
.19
20
22
CD
23
25
25
26
-AVLS 27
27
28
LINE OUT 29

30
30
31
32
32
33
37

40
41
41
41

42
Operating Instructions
44
46
47
49
50
52
54
Operating Instructions 57

禁止


禁止
AC
100V


強制

接触禁止
AC

禁止
注意
AC


接触禁止


禁止
MD CD DAT

禁止
AC

禁止
AC

禁止

MZ-R90 MZ-R91 2
MZ-R90
2
50
MZ-R90
MZ-R91
O/LINE OUT
O/LINE OUT
AUDIO OUT
HeadPhone
LINE OUT
LINE OUT
HeadPhone
HeadPhone
O/LINE OUT
AUDIO OUT
1
AUDIO OUT
2
HeadPhone
LINE OUT
3
LINE OUT
AUDIO OUT
LINE OUT
VOL+/-
HeadPhone
.
O/LINE OUT
AUDIO OUT
HeadPhone
16
MD MD
53
1
①
RK-G129
CD
RK-G136
2
① OPEN
2
3
AC
10
5
Data Save TOC Edit
①REC REC
TOC Edit
② CD
END SEARCH REC
REC
1)
2) TOC Edit
1)
2)
28
53

19
O/LINE OUT
TOC Edit
AC
VOL /
1
40
① AC
② O/LINE OUT
2
① OPEN
(2)
3
VOL + / -
1 AUDIO
OUT
LINE OUT
2 HeadPhone
3


.
.
AC
2
CD
LINE IN 2
16
LINE IN 10
| LINE IN | ||
| LINE OUT | ||
| 16 | 10 | |
| CD | ||
| · | ·2 | |
| ·2 | · | |
| · | ||
| ( ) 32 | ( ) 32 | |
| REC | 19 | |
| 19 | ||
| CD MD | CD MD | |
CD
CD MD
BSCS
(

DAT
CD CD
10 CD MD
3
CD


3
SYNCHROREC

18
13
13
1 SYNCHRO RECON
2REC
SYNC
SYNC
2
1
- MIC PLUG IN POWER
ECM-717
ECM-MS907 ECM-MS957
MIC (PLUG IN POWER)
1
REC
10
(OPTICAL)
LINE IN
1
REC
2
REC MODE
3
MonoREC
Stereo
REC
4 II
5
OFF
ON
5

-12dB
OVER
1
REC
2
5
6 II
RecVolume
3
ManualREC
Auto REC
4

56
1 2
DISPLAY
| A | B1) | C2) |
| LapTime | 1 | 3 |
| RecRemain | 2 | 3 |
| Clock | 3 | 3 |
1) 2)
| A | B1) | C2) |
| LapTime | 1 | 4 |
| RecRemain | 2 | 4 |
| AllRemain | 3 | 4 |
| Clock | 4 | 4 |
1) 2)
3
| A | B | |
| 1) | 1) | |
| 1) | ||
O/LINE OUT LINEOUT AUDIOOUT
1 AUDIO
OUT 2 LINE OUT

1
EDIT

Name
1
2

Erase
Erase OK?
PushENTER
TMARK
TOC Edit
TOC Edit
TOC Edit
3
1
31

1
EDIT

Name
2

Erase
AllErase?
PushENTER
TMARK
3
TOC Edit
BLANKDISC
1
TMARK
MARK ON
TMARK
LINE IN

2 00:00 MARK 2
3 TMARK MARK OFF

2 1
C 2
1

Name
1
2 Move 003

3
MV003
002
MV003
TMARK
4
1 DISPLAY 2
Name 1
2 Move
3 003 003
4
003 002 DISPLAY 2
5
200 1 1700 800
1 EDIT 2 Name 3
4
1
2

Name
3
4
4 6
VOL /-

1


END SEARCH/VOL
END SEARCH/VOL -
T MARK
1)
37
5
4
TMARK
6
2
1

Name
2·

Name
3
4
6
TMARK
1)
VOL /-


2
←→
DISPLAY 2
PLAYMODE
1
2 DISPLAY 2

Name
3
4
38

2
DISPLAY
6 2
1
2 DISPLAY 2

Name
DISPLAY
2
3
4
35
4
.
A Z
.
09
.
1 DISPLAY 2
1 3
2.

Name
2
•


Name
3 35 4 6

200

3
3 Erase!
1
EMPTY
4 T MARK
1 VOL +/− 1
2 1
3 2 Entry!
1 EDIT
2 BankErase VOL+/- 1 2
EDIT
1 DISPLAY 2 1 +/− VOL
2 1
Name Bank
3 2
Entry!
2 II
3
1 MD
Name
Name
2
3
Erase!
EMPTY
4 DISPLAY 2

NH-14WM
3
1
Charging

3 CHARGE
3
CHARGE
4 AC
1 AC
2
CHARGE
AC
1)
1
/
| 2) | ||
| NH-14WM | 6.5 | 12 |
| LR6(SG)1 | 4 | 16.5 |
| NH-14WM | 14.5 | 29 |
| LR6(SG)1 | ||
1)
2)
1

LOW
BATT
2
AC
AC
EIAJ
AC

.
•
.
(

Ni-MH
TEL: 03-3434-0261
: http://www.baj.or.jp
(28) LOW BATT (40 41
MEM OVER
NO COPY (SCMS) (LINE IN)
NO DISC
NO SIGNAL LINE IN
| P/B ONLY | ( ) | |||
| PROTECTED | ||||
| SORRY | Ω/LINE OUT | AUDIO | OUT | Ω/LINE |
| OUT | LINE OUT | HeadPhone | 9 | |
| 14 | ||||
| 1 | - | |||
| CD | ||||
| II | T | |||
| MARK | ||||
| TEMP OVER | ||||
| TR FULL | 254 | 254 | ||
| TrPROTECT | ) | ( | ||
| EDITING | ||||
| MENU | ||||
| LINE OUT | Ω/LINE OUT | AUDIO | OUT | Ω/LINE |
| OUT | LINE OUT | HeadPhone | 9 | |
| VOL +/- | 14 | |||
| NO TEXT | CD | |||
| EMPTY | ||||
| BANK FULL | 600 | |||
8
( )
1
20 20,000Hz± 3dB
0.35 1.38mV
69 194mV
(
GaAlAs
$$ = 7 9 0 \mathrm {n m} $$
160 (MDW-80)
80 (MDW-80)
148 (MDW-74)
74 (MDW-74)
400rpm 1800rpm(CLV)
(ACIRC)
44.1kHz
32kHz/44.1kHz/48kHz
(ATRAC)
EFM
2
1
O/LINE OUT
5mW + 5mW
16Ω
LINE OUT
194mV
10kΩ
LINE OUT
NH-14WM( )
31( )
(41
MZ-R90
$$ 7 8. 9 \times 1 7. 3 \times 7 2. 0 \mathrm {m m} $$
MZ-R91
$$ 7 8. 9 \times 1 8. 0 \times 7 2. 0 \mathrm {m m} $$
(/ 1
MZ-R90
105g
148g(
NH-14WM
MZ-R91
110g
153g(
NH-14WM
AC
(1)
(1)
(1)
3
(1)
(1)
(1)
(1)
(1)
(1)
O/LINE OUT
NH-14WM
BC-9HM
POC-5/10/15AB
POC-5/10/15B
L 7 POC-DA12SP
(
(X2) RK-G129
RK-G136
CD
RK-TXT1
CPA-8
DCC-E230
RM-MZE1
ECM-717 ECM
MS907 ECM-MS957
MDR-D77/D55
MDR-E888SP
SRS-Z500/Z750/
Z1000
( )ES
MD MD-4CPMN/V
MD MD-4SCPL/N
MD MZP-1
64mm
(MD)
(CD)
ATRAC(Adaptive TRansform Acoustic Coding) CD
(BS :32kHz, DAT:48kHz MD (44.1kHz)
TOC EDIT
TOC Table Of Contents
MD
CD
2
TOC
TOC Edit
CD -0:03
0:00
MD
SCMS
CD MD
LINE IN
1 /CHARGE 11
13 30 40
2 17 25
REC 21
4 DC IN 3V 10
12 40
5 9182533
6 Ω/LINE OUT 9 12
23 29
MIC (PLUG IN POWER)
18
8 LINE IN (OPTICAL)
10 16
HOLD 28
10 11 13 38
11 13
22 34 37
T MARK 30
13REC 11
14 40
15 VOL/ 13 34
16 OPEN 10 12
17 END SEARCH 1134
18 1
11 13 32 34 37
19 SYNCHRO REC ON/OFF
17
1
17 25
9
40
2
10 REMAIN
20 27
3
4
25
11 REC DATE
27
5
17
12
20 27
6
7
11
13 19
8
26
14 22
12
1
5
HOLD
28
2
3
4


Operating Instructions
Welcome!
Welcome to the world of the MiniDisc! Here are some of the capabilities and features you'll discover with the new MiniDisc Recorder.
- Recording MD Walkman in an ultracompact body — Almost as small as a playback-only MD Walkman; easy to carry in your pocket or bag.
- Ultra-light body (MZ-R90) — Magnesium lid for extra lightness.
- Ultra-compact body (MZ-R91) — Fashionable design and colors.
- Low power consumption design — Less drain and longer service life for the rechargeable battery.
- 9-letter, backlit LCD remote control with editing capabilities — You can now label tracks and discs, change track sequence, etc., with the easy-to-operate stick remote controller.
- Simultaneous labeling feature — No more waiting for the recording to end; you can label tracks and discs while the MD is being recorded.
- Phrase bank function — Phrases that you often use in track or disc names can be stored in the recorder's memory and retrieved whenever you need them.
- Copying CD Text - If you use a CD text connecting cord (not supplied) to connect a Joint Text-compatible portable CD player to the recorder, CD text data (such as track and disc names) on the CD that is compatible to CD-TEXT display will be recorded automatically during recording.
- Shock-resistant memory — Offsets up to 40 seconds of optical read errors.
- High-fidelity recording — Low-noise, low-distortion, high-fidelity recording through the optical digital input jack.
-
Digital synchro-recording — When recording from a digital equipment with optical output, the recorder automatically starts and pauses recording in sync with operation on the digital source.
-
Digital REC level control.
- Long recording with monaural sound — You can record up to 160 minutes (when using 80 minutes recordable MD) on a disc using monaural recording.
- Date and time stamp function — The built-in clock automatically records the date and time whenever you make a recording.
- Digital AGC (Auto Gain Control) — Automatic recording level adjustment without sacrificing superb digital sound.
This manual is for models MZ-R90 and MZ-R91
The MZ-R90 appears in the instructions for illustration purposes. Though they differ in appearance, the models share the same functions and are operated in the same way.
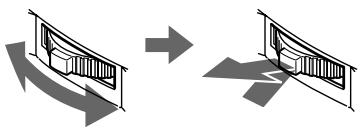
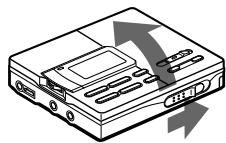
How to use the jog lever
The jog lever can be used to perform various operations during playback, recording, and editing, as well as when the recorder is stopped. Flip the jog lever to select an item in the display. Then press the jog lever to enter your selection.
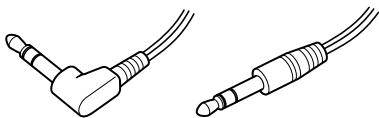
About the LINE OUT jack on the recorder.
The parameter ("AUDIO OUT") for the / LINE OUT jack must be set to "HeadPhone" if you want to connect headphones other than the supplied set, or to "LINE OUT" if you want to connect another component to the recorder through a line cable. There is no need to make this when using the supplied headphones with remote control since it is done automatically.
To set the "AUDIO OUT" parameter for the / LINE OUT jack, do the following procedure:
1 Press the jog lever, flip until "AUDIO OUT" flashes in the display, and then press the lever again.
2 Flip the jog lever until "HeadPhone" or "LINE OUT" flashes in the display.
3 Press the jog lever when the item you want to select is flashing.
Notes
- When the "AUDIO OUT" parameter is set to "LINE OUT", the VOL +/- buttons and the Mega Bass function become inoperative. To make them operative, set the "AUDIO OUT" parameter to "HeadPhone".
- The "AUDIO OUT" parameter is automatically set to "HeadPhone" when you turn off the power.
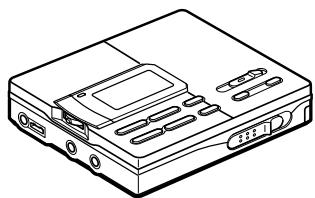
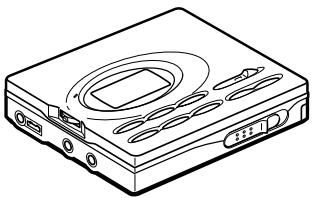
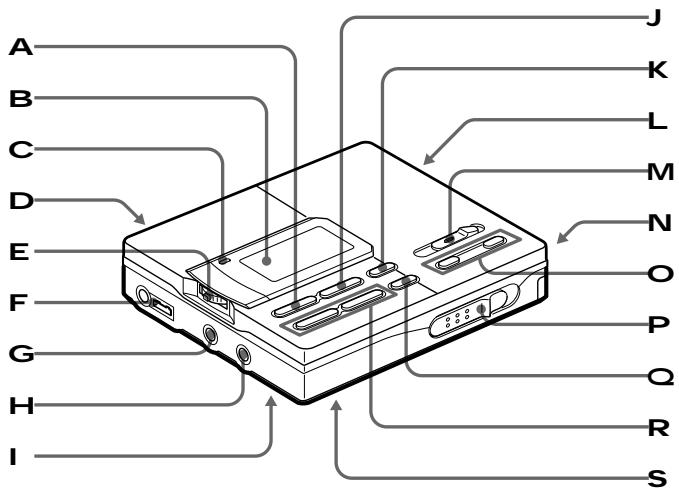
Looking at the controls
The numbers are keyed to the illustrations in the Japanese text (pages 54 to 56).
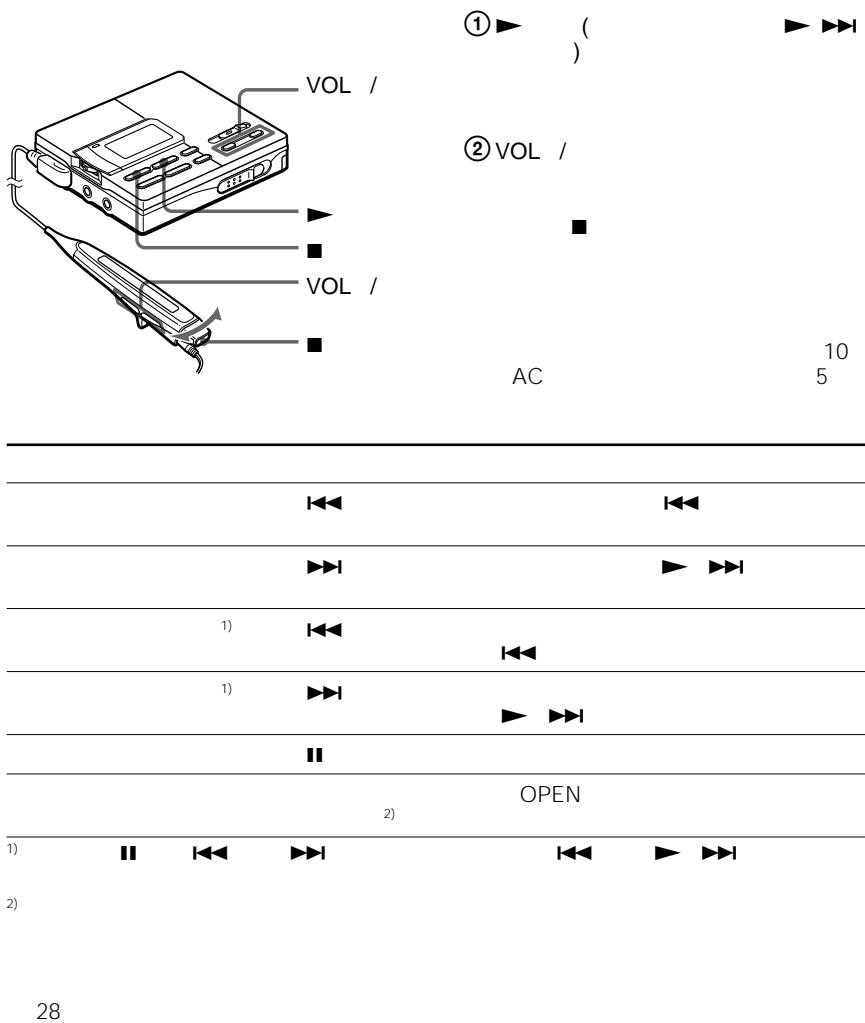
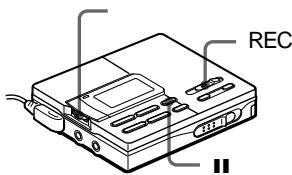
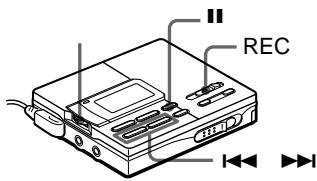
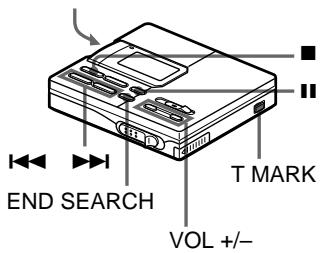
The recorder
1 (stop) /CHARGE button
2 Display window
3 REC indicator
4 DC IN 3V jack
5 Jog lever
6 LINE OUT (headphones/line out) jack
MIC (PLUG IN POWER) jack
8 LINE IN (OPTICAL) jack
HOLD switch Slide to lock the controls of the recorder.
10 play) button
11 (pause) button
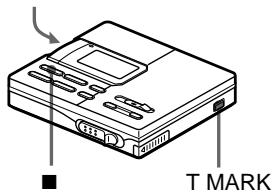
12 T MARK (track mark) button
REC (record) switch
14 Battery compartment
15 VOL (volume) + / - buttons
16 OPEN switch
17 END SEARCH button
18 I/ (search/AMS) buttons
19 SYNCHRO REC (synchro-recording) ON/OFF switch
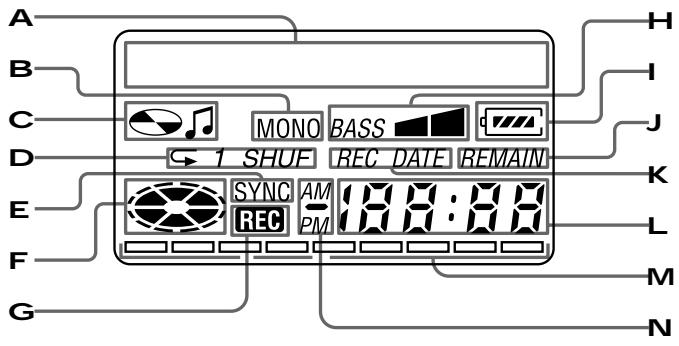
The display window of the recorder
1 Character information display Displays the disc and track name*, date, error messages, track numbers, etc.
- Disc and track names appear only with MDs that have been electronically labeled.
2 MONO(monaural) indication
3 Disc name/track name indications Appears when labeling disc or track respectively.
4 Play mode indication Shows the play mode of the MD.
(all repeat): All tracks play repeatedly.
1(single repeat): One track plays repeatedly.
SHUF(shuffle repeat): Tracks will be repeated in random order.
SYNC (synchro-recording) indication Lights up while synchro-recording.
6 Disc indication
Shows that the disc is rotating for recording, playing or editing an MD.
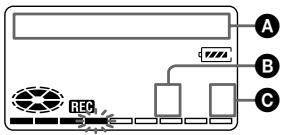
7 REC indication
Lights up while recording. Flashes when standing by for recording.
8 Mega bass indication
9 Battery indication
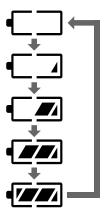
Shows approximate battery condition. While charging the rechargeable battery, this indication shows the charging condition.
10 REMAIN (remaining time/tracks) indication
Lights up along with the remaining time of the track, remaining time of the MD, or remaining number of tracks.
11 REC DATE (recorded/current date) indication
Lights up along with the date and time the MD was recorded. When only "DATE" lights up, the current date and time are displayed.
Time display
Shows the elapsed time of the track being recorded or played.
13 Level meter
Shows the level of the MD being played or recorded.
14 AM/PM indication
Lights up along with the time indication in the 12-hour system.
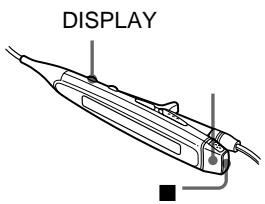
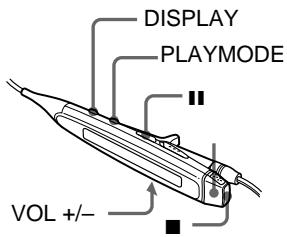
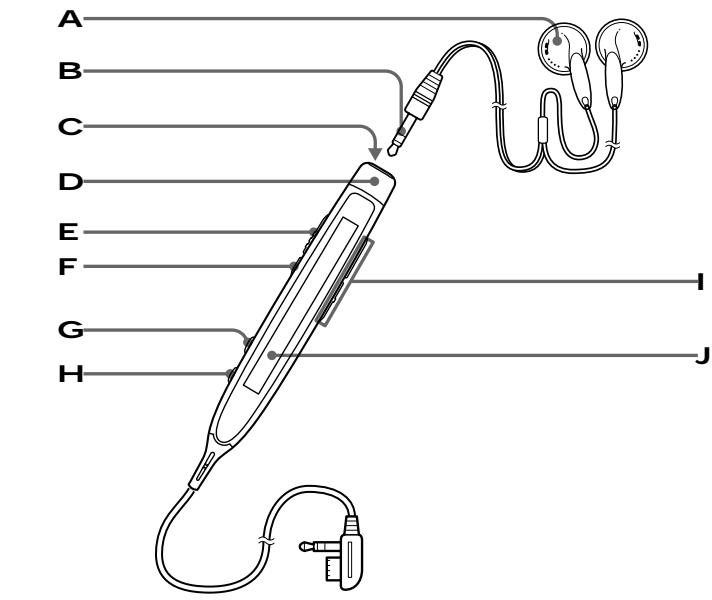
The headphones with a remote control
1 Headphones
Can be replaced with optional headphones.
2 Stereo mini plug
3 (stop) button
4 Control
To play, press the control toward
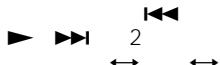
· during stop. Press the control towards · during play to search the beginning of the succeeding track; hold in this position to fast-forward. Press towards during play to search the beginning of the preceding track; hold in this position to rewind.
5 HOLD switch
Slide to lock the controls of the remote control.
[6] (pause) button
7 PLAY MODE button
8 DISPLAY button
9 VOL (volume) + /- buttons
When the AVLS is set to on, you cannot increase the volume to the maximum. To increase the volume above the limited level, set the AVLS to off using the jog lever.
10 Display window
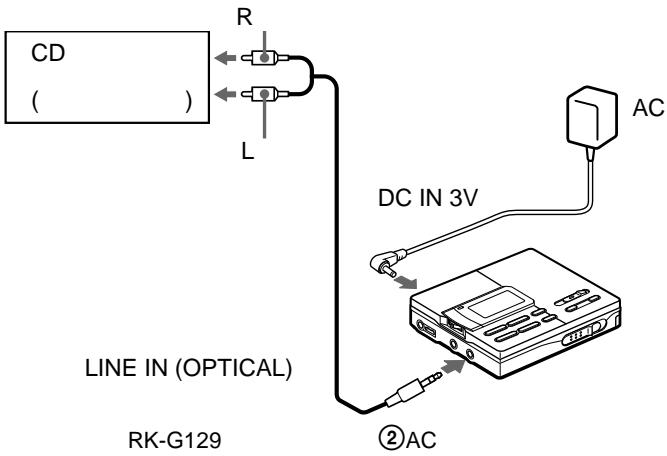
Recording an MD right away!
See the illustrations in the Japanese text (pages 10 and 11).
Use a line cable (not supplied) to hook up an analog source. The sound will be sent from the connected equipment as analog signal but will be recorded digitally on the disc. If you want to record programs from digital equipments or a microphone, see "Various ways of recording."
Premastered MDs cannot be recorded over.
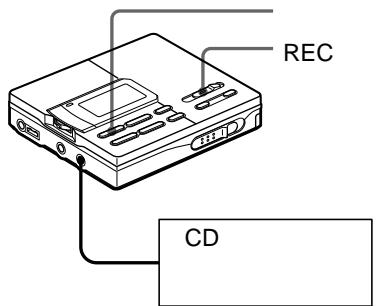
1 Make connections. (Insert the cables firmly and completely into the appropriate jacks.)
① Connect the LINE IN (OPTICAL) jack of recorder to the LINE OUT R(red)/L (white) jacks of the source with a line cable. The recorder switches to analog input automatically.
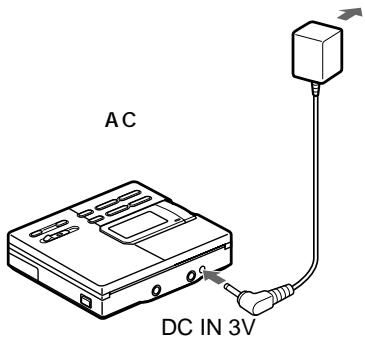
② Connect the DC IN 3V jack of the recorder to a wall outlet with the supplied AC power adaptor.
When the recorder has different sound sources connected at the same time, the recorder switches to the digital, microphone, or analog input in this order of priority.
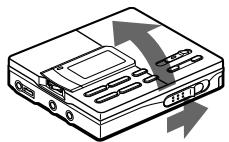
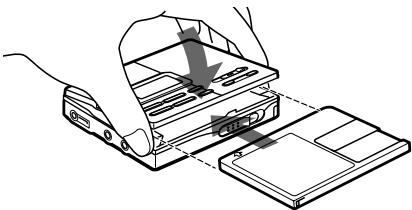
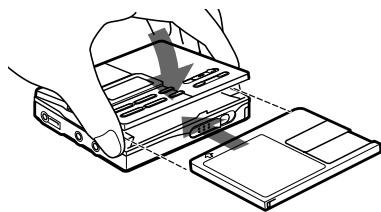
2 Insert a recordable MD.
① Slide OPEN to open the lid.
② Insert a recordable MD with the label side facing up, and press the lid down to close.
3 Select recording start point.
If you want to add a recording to the end of the previous recording, press END SEARCH.
(If you want to start recording from the beginning, skip this step).
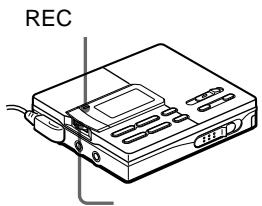
4 Start recording.
① Slide REC to the right.
"REC" lights up and recording starts.
② Play the sound source.
The level of the recorded sound is adjusted automatically.
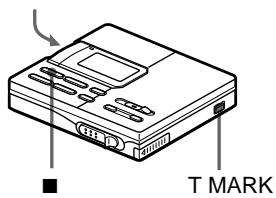
To stop recording, press ■.
After you press, the recorder will automatically turn off in about 10 seconds (when using batteries) or about 5 minutes (when using AC power adaptor).
Notes
- Do not move or jog the recorder or disconnect the power source while the "Data Save" or "TOC Edit" indication is flashing in the display.
- The lid does not open until "TOC Edit" disappears in the display.
| To | Press |
| Record over partway through the previous recording | ▶, ➔ or ⇌ to find the start point of recording and press ■ to stop. Then slide the REC switch. |
| Pause | ■.1) Press ■ again to resume recording. |
| Remove the MD | ■, then slide OPEN to open the lid.2) |
1) A new track mark is added at the point where you pressed I again to resume recording while pausing, and the recording will be marked with the new track number when you resume recording.
2) Once you open the lid, the point to start recording will change to the beginning of the first track. When recording on a recorded MD, check the point to start recording on the display.
If the recording does not start
- Make sure the MD is not record-protected.
- Make sure the recorder is not locked.
- Premastered MDs cannot be recorded over.
Note
If the power supply is disrupted (i.e. the battery is removed or becomes exhausted or the AC power adaptor is disconnected) during a recording or editing operation, or while "TOC Edit" appears in the display, then it will not be possible to open the lid until power is restored.
Playing an MD right away!
See the illustrations in the Japanese text (pages 12 and 13).
If you want to use the rechargeable battery, be sure to recharge them before playing (see page 72).
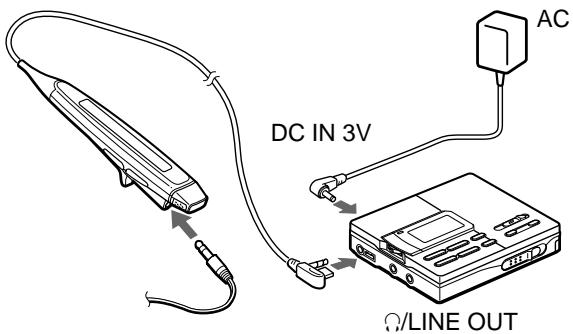
1 Make connections. (Insert the cables firmly and completely into the appropriate jacks.)
① Connect the remote control-equipped headphones (supplied) to the / LINE OUT jack.
② Connect the DC IN 3V jack of the recorder to a wall outlet with the supplied AC power adaptor.
2 Insert an MD.
① Slide OPEN to open the lid.
② Insert an MD with the label side facing up, and press the lid down to close.
3 Start playing.
① Press (Press the control towards · on the remote control).
A short beep sounds in the headphones.
② Press VOL + / - to adjust the volume.
To stop play, press
| To | Do this (Beeps in the headphones) |
| Find the beginning of the current track | Press once. Press the control towards on the remote control. (Three short beeps) |
| Find the beginning of the next track | Press once. Press the control towards on the remote control. (Two short beeps) |
| Go backwards while playing1) | Keep pressing. Keep pressing the control towards on the remote control. |
| Go forward while playing1) | Keep pressing ➔. Keep pressing the control towards ➔•▶ on the remote control. |
| Pause | Press ■. (Continuous short beeps) Press ■ again to resume play. |
| Remove the MD | Press ■, then slide OPEN to open the lid.2) |
1) To go backwards or forward quickly without listening, press and hold down or (keep pressing the control on the remote control).
2) Once you open the lid, the point to start play will change to the beginning of the first track.
If the playback does not start
Make sure the recorder is not locked. If it is locked, slide the HOLD switch in the opposite direction of the arrow.
When using optional headphones
- Use headphones with a stereo miniplug. You cannot use headphones with a micro-plug.
- The VOL + / - buttons and the Mega Bass function may become inoperative. In this case, do the procedure below.
1 Press the jog lever, flip until "AUDIO OUT" flashes in the display, and then press the lever again. "LINE OUT" flashes in the display.
2 Flip the jog lever until "HeadPhone" appears in the display.
3 Press the jog lever again.
Notes
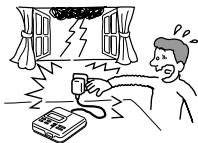
- The sound may skip during playback when the recorder is exposed to continuous vibration, such as while jogging.
- If the power supply is disrupted (i.e. the battery is removed or becomes exhausted or the AC power adaptor is disconnected) when the recorder is operating, the lid will not open until the power is restored.
Various ways of recording
Connecting digital (optical) and analog (line) inputs
The recorder selects digital or analog input according to how the sound source is hooked up.
| Input Difference | Digital (optical) input | Analog (line) input |
| Connectable source | Equipment with an digital (optical) output jack | Equipment with an analog (line) output jack |
| Usable cord | Optical cable (with an optical or an optical-mini plug) | Line cable (with 2 phono plugs or a stereo-mini plug) |
| Signal from the source | Digital | Analog Even when a digital source (such as a CD) is connected, the signal sent to the recorder is analog. |
| Recorded track numbers | Marked (copied) automatically •at the same positions as the source. •after more than 2 seconds of silence1). •when recording is paused. | Marked •after more than 2 seconds of silence. •when recording is paused. You can erase unnecessary marks after recording. |
| Recorded sound level | Same as the source. You can also adjust it manually (Digital REC level control). | Adjusted auto-matically. You can also adjust it manually. |
1) When recording a CD or an MD, track numbers are automatically marked in the order of the original disc.
Recording with digital(optical) input (optical cable required)
See the illustration in Japanese text (page 16.
Connect to a digital source using an optical cable (POC-5B or POC-5AB, not supplied) to make digital recordings. Digital recording is possible even from digital equipment with different sampling rates, such as a DAT deck or a BS tuner, using the built-in sampling rate converter.
1 Connect the LINE IN (OPTICAL) jack of the recorder to the optical digital output jack of the source with an optical cable (not supplied). The recorder switches to digital input automatically.
2 Connect the power source. To use on AC power, see "Recording an MD right away!". To use on other power sources, see pages 72 and 73.
3 Insert a recordable MD. Slide OPEN to open the lid, insert a recordable MD, and close the lid.
4 Press and slide REC to the right. "REC" lights up and recording starts.
5 Play the sound source.
To stop recording, press ■.
Notes
- You can make a digital recording only from an optical type output.
- When recording from a portable CD player, play it on AC power and disable the anti-skip function (such as ESP*).
- Digital output may be disabled on some portable CD players when the player is not run on AC power.
- Electronic Shock Protection
- Electronic Shock Protection
Synchro-recording from a digital source
See the illustration in Japanese text (page 17).
You can easily dub a digital source on an MD by using the SYNCHRO REC switch. Before synchro-recording, be sure to make digital connection and insert a recordable MD. Note that track marks are automatically marked at the same positions as the source.
1 Slide the SYNCHRO REC switch to ON.
"SYNC" lights up in the display.
2 Slide REC to the right.
"REC" lights up in the displ
The recorder starts recording when you start playing the source player.
To stop recording, press ■.
Notes
- Do not switch SYNCHRO REC after step 2. Recording may not be made properly.
- When recording in monaural, follow steps 1 to 3 of "Recording in monaural for double the normal recording time" (page 63), and then do steps of synchro-recording.
- Even when there is no recorded sound on the sound source, there may be cases when recording does not pause automatically during synchro-recording due to the noise level emitted from the sound source.
- If a silent portion is encountered for 2 seconds or more during synchro-recording, a new track mark is automatically added at the point where the silent portion ends.
- Synchro-recording cannot be done if the connecting cord is not an optical cable, or if the cable is connected to the MIC (PLUG IN POWER) jack.
- You cannot adjust the recording level manually during synchro-recording.
Recording from a microphone
See the illustration in the Japanese text (page 18).
Connect a microphone to the MIC (PLUG IN POWER) jack. Use a stereo microphone (ECM-717, ECM-MS907, ECM-MS957, etc., not supplied).
1 Insert a recordable MD.
Slide OPEN to open the lid, insert a recordable MD, and close the lid.
2 Slide REC to the right.
"REC" lights up and recording starts.
To stop recording, press
Notes
- You cannot record through the microphone while an optical cable is connected to the LINE IN (OPTICAL) jack. The recorder automatically switches input in the following order: optical input, microphone input, and analog input.
- The microphone may pick up the operating sound of the recorder itself. Use the microphone away from the recorder in such cases.
Recording in monaural for double the normal recording time of an MD
See the illustration in the Japanese text (page 18).
For longer recordings, choose to record in monaural. The recording time becomes double the normal.
1 While pressing, slide REC to the right. The recorder stands by for recording.
2 Press the jog lever, flip until "REC MODE" flashes in the display, and then press the lever again.
3 Flip the jog lever until "Mono REC" flashes in the display, and then press the lever. To switch back to stereo recording again, press the lever while "Stereo REC" flashes in the display in this step.
4 Press again to start recording.
5 Start the sound source.
To stop recording, press
The recorder switches back to stereo recording when you record next time.
Notes
- If you record in monaural from a stereo source, the sounds from left and right will be mixed.
- You cannot record in monaural if SYNCHRO REC is slid to ON. If you are recording digital input, make sure to slide SYNCHRO REC to OFF before you begin recording.
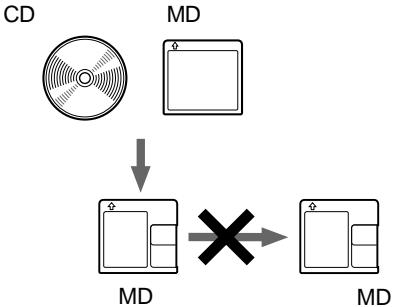
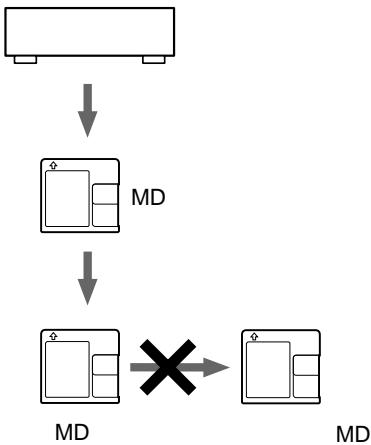
- The MDs recorded in monaural can be played back only with an MD player/ recorder that has the monaural playing function.
- Sound recorded through digital (optical) input can be monitored in stereo through headphones, etc.
Adjusting the recording level (Manual recording)
See the illustration in the Japanese text (page19).
When you record with an analog (line) input, the sound level is adjusted automatically. If necessary, you can set the level manually.
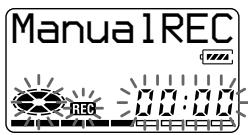
1 While holding down I, slide REC to the right. The recorder stands by for recording.
2 Press the jog lever, flip until "RecVolume" flashes in the display, and then press the lever again.
3 Flip the jog lever until "ManualREC" flashes in the display, and then press the lever. To switch back to the automatic level adjustment, press the lever while "Auto REC" flashes in the display.
4 Play the program source.
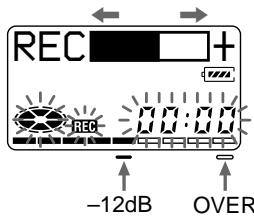
5 While observing the level meter in the display, adjust the recording level by flipping the lever or pressing 1(+) or | (-) .
Set the level so that the level meter reaches around -12dB mark beneath the display window. If the sound is too high, lower the recording level until the level meter just barely reaches the (OVER) mark beneath the display window. Recording does not start in this step. If your source is an externally connected component, be sure to cue the source to the beginning of the material to be recorded before you start playback.
6 Press again to start recording.
To stop recording, press ■.
Notes
- The recording level cannot be adjusted while recording is in progress. If you want to adjust the recording level after you have started the recording, press I to pause the recorder. Then do the procedure from step 5.
- You cannot adjust the recording level manually during synchro-recording.
Setting the clock to stamp the recorded time
See the illustrations in the Japanese text (page 22).
To stamp the date and time on the MD when you record, you need to set the clock.
1 Connect the supplied AC power adaptor.
2 Press the jog lever while no disc is inserted or the recorder is stopped.
3 Flip the jog lever until "CLOCK SET" flashes in the display, and then press the lever. The digits of the year flash.
4 Change the current year by flipping the jog lever and press to enter. The digit of the month flashes.
5 Repeat steps 4 to enter the current month, date, hour, and minute. When you press the jog lever to enter the minute, the clock starts operating.
If you make a mistake while setting the clock
Press , and repeat the steps above. Press the jog lever to locate the digit to be changed.
To display the time in the 24-hour system
Press while setting the clock. To change the clock to the 12-hour system, press again.
Charging the built-in battery for the clock
After setting the clock, leave the recorder connected to the AC power for about 2 hours to charge the built-in battery for the clock. Once charged, the built-in battery will last for about a month without being connected to any of the power sources. The recorder will automatically charge the built-in battery while operating on AC power, a rechargeable battery or dry batteries.
Copying CD text information while recording (Joint Text)
CD text connecting cable, CD that support CD-TEXT, and CD player that support Joint Text required.
See the illustration in the Japanese text (page 23)
By connecting the recorder to a Sony portable CD player that supports Joint Text (the CD text copying function) (D-E01), you can copy track and disc names automatically during recording. In addition to the CD text connecting cable (RK-TXT1), make sure to connect the recorder to the portable CD player with an optical cable.
1 Slide REC to the right to start recording on the recorder, and start playing the CD in the portable CD player.
"SYNC", "REC" and " ±b " lights up in the display.
"CD TEXT" appears for a few seconds, then "001 TEXT?" and "PushENTER" alternate in the display.
"NO TEXT" appears at this time if no track name information exists in the CD. In this case, the track name will not be copied.
2 Press the jog lever.
Track name scrolls, and then the track name and "PushENTER" alternate in the display.
3 Press the jog lever.
Track name scrolls in the display while the name is copied.
4 Follow steps 2 and 3 to copy each new track name that appears.
5 Press on the recorder at the point you want to stop recording.
" lights up, and then "000 TEXT" and "PushENTER" alternate in the display.
If you don't want to copy the disc name information, press again. The disc name is not copied and the operation ends.
"NO TEXT" appears at this time if no disc name information exists in the CD. In this case, the operation ends without copying the disc name.
6 Press the jog lever.
Disc name scrolls, and then disc name and "PushENTER" alternate in the display.
7 Press the jog lever.
"TOC Edit" flashes.
Afterwards, the disc name scrolls in the display.
Notes
- If you copy disc name information to a disc with a previously recorded disc name, the old disc name will be overwritten with the new one.
- When the CD text copying function is on, various settings and editing functions cannot be accessed with the jog lever.
- The CD text copying function (joint text) can only be used with component (D-E01) with the joint text logo.
- The CD text copying function can only be used with CDs and component (D-E01). The CD text copying function can only be used with CDs that support CD-TEXT.
- The RK-TXT1 CD text connecting cable is designed for exclusive use with this recorder and Sony portable CD player (D-E01). Do not use a connecting cable of another make to copy CD text information.
- The remote becomes inoperative when the CD text connecting cable (RK-TXT1) is connected to the recorder.
- Stopping or pausing playback on the CD player automatically causes recording on the recorder to pause. A new track mark is automatically added when you resume recording.
- The track name of the track currently played will not be recorded if you stop or pause CD playback in the middle of the copying process on the recorder.
Various ways of playback
Playing tracks repeatedly
See the illustrations in the Japanese text (page 25).
1 While the recorder is playing an MD or stopped, press the jog lever, flip until "PLAY MODE" flashes in the display, and then press the lever again.
2 Flip the jog lever to select the play mode, and then press the lever. Each time you flip the lever, the play mode changes and when you press the lever to select, indication appears in the display as follows.
"No Repeat/(none)" All the tracks are played once.
"AllRepeat/ All the tracks are played repeatedly.
1 Repeat/1 A single track is played repeatedly.
"Shuffle/SHUF" After currently selected track finishes playing, the remaining tracks are played repeatedly in random order.
Connecting to a stereo system (LINE OUT)
See the illustration in Japanese text (page 29).
Connect the /LINE OUT jack of the recorder to the LINE IN jacks of an amplifier or a tape player with a line cable (not supplied).
The output is analog. The recorder plays the MD digitally and sends analog signals to the connected equipment.
When connecting a line cable to the O/LINE OUT jack
When connecting a line cable (not supplied), be sure to set the "AUDIO OUT" parameter for the / LINE OUT jack.
1 Press the jog lever, flip until "AUDIO OUT" flashes in the display, and then press the lever again.
2 Flip the lever until "LINE OUT" flashes in the display, and then press the lever again.
Notes
- If the "AUDIO OUT" parameter for the / LINE OUT jack is set to "LINE OUT", VOL + / - or DIGITAL MEGA BASS will not function.
- The "AUDIO OUT" parameter for the / LINE OUT jack cannot be set to "LINE OUT" when the supplied remote control is connected.
- When you turn off the power, the "AUDIO OUT" parameter for the / LINE OUT jack automatically switches to "HeadPhone".
Editing recorded tracks
You can edit your recordings. Premastered MDs cannot be edited.
Notes on editing
- Do not move or jog the recorder while "TOC Edit"* is flashing in the display.
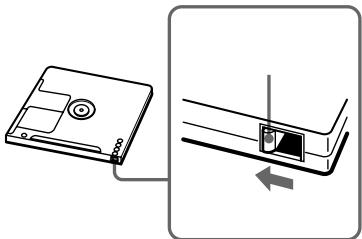
- You cannot edit tracks on an MD that is record -protected. Before editing tracks, close the tab on the side of the MD.
- If you perform an editing operation while playing, be sure not to turn the power off until "TOC Edit" disappears in the display.
-
The lid does not open until "TOC Edit" disappears in the display after editing.
-
TOC = Table of Contents
Erasing a track
See the illustration in the Japanese text (page 30).
You can quickly erase a recorded track. Note that once a recording has been erased, you cannot retrieve it.
1 While playing the track you want to erase, press the jog lever so that "EDIT" flashes in the display, then press the lever again.
" : Name " flashes in the display, and the recorder plays the selected track repeatedly.
2 Flip the jog lever until " : Erase" flashes in the display, and then press the lever.
"Erase OK?" and "PushENTER" appear alternately in the display. To cancel erasing, press or TMARK.
3 Press the jog lever again.
The track is erased and the next track starts to play. All the tracks after the one erased are automatically renumbered.
To erase a part of a track
Add track marks at the beginning and the end of the part you want to erase, then erase the part.
Erasing a whole disc
See the illustration in the Japanese text (page 31).
You can quickly erase all the tracks and data of the MD at the same time. Note that once a recording has been erased, you cannot retrieve it.
1 While the recorder is stopped, press the jog lever so that "EDIT" flashes in the display, and then press the lever again.
“:Name” flashes in the display.
2 Flip the jog lever until "Erase" flashes in the display, and then press the lever.
"AllErase?" and "PushENTER" appear alternately in the display.
To cancel erasing, press or T MARK.
3 Press the jog lever again.
"TOC Edit" flashes in the display, and all the tracks will be erased.
When erasing is complete,
"BLANKDISC" appears in the display.
Adding a track mark
See the illustration in the Japanese text (page 31).
You can insert a track mark into a track.
1 While the recorder is playing or pausing an MD, press T MARK on the recorder at the point you want to mark.
"MARK ON" appears in the display, and the track mark is added.
To add track marks while recording (except while synchro-recording)
Press T MARK at the point you want to add a track mark.
Erasing a track mark
See the illustrations in the Japanese text (page 32).
When you record with analog (line) input, unnecessary track marks may be recorded where recording level is low. You can erase a track mark to combine the tracks before and after the track mark.
1 While playing the track with the track mark you want to erase, press to pause.
2 Find the track mark by pressing slightly. "00:00" flashes in the display.
3 Press the T MARK to erase the mark. "MARK OFF" appears in the display. The track mark is erased and the two tracks are combined. The number of the newly combined track will be that of the first track and the succeeding tracks will be renumbered.
Moving recorded tracks
See the illustrations in the Japanese text (page 32).
You can change the order of the recorded tracks.
On the recorder
1 While playing the track you want to move, press the jog lever so that "EDIT" flashes in the display, and then press the lever again. " : Name" flashes in the display and the recorder plays the selected track repeatedly.
2 Flip the jog lever until "Move" flashes in the display, and then press the lever.
3 Flip the jog lever to select the destination track number. To cancel moving, press or T MARK.
4 Press the jog lever again. The track moves to the selected destination track.
On the remote control
1 Press DISPLAY for 2 seconds or longer while playing the track you want to move.
" : Name " flashes in the display and the recorder plays the selected track repeatedly.
2 Press the control towards or towards repeatedly until "Move" appears in the display.
3 Press ■.
4 Press the control towards or towards repeatedly to select the destination track number.
5 Press again. The selected track moves just before the destination track.
Labeling recordings
See the illustration in the Japanese text (page 33).
You can name tracks during playback, discs during stop, and both during recording. Each name can be as long as 200 letters.
Each disc can hold up to 1700 alphanumeric letters or 800 katakana characters during playback or stop.
Labeling on the recorder Labeling a disc during stop
1 Insert a disc.
To label a disc that is already in the recorder, press ■ to stop.
2 Press the jog lever so that "EDIT" flashes in the display, and then press the lever again.
“:Name”flashes in the display.
3 Press the jog lever again.
4 Flip the jog lever to select a letter and press the lever to enter.
The selected letter stops flashing and the cursor moves to the next input position.
Press to switch between katakana, the alphabet, symbols/numbers, and phrases (if phrases are stored in the phrase bank).
Press VOL + / - to move the cursor to left or right.
Press when inputting alphabet, symbol or numbers to change the letter to the one before/next one. Press to go back.
Press END SEARCH together with VOL + to insert a blank space to type in a new letter.
Press END SEARCH together with VOL - to delete a letter and move back all following letters to the left.
Press or T MARK to cancel labeling.
5 Repeat step 4 and enter all characters of the label name.
6 Press down the jog lever for 2 seconds or more.
The track or disc is labeled.
Labeling a track during playback
1 Insert a disc and play the track you want to label.
2 Press the jog lever so that "EDIT" flashes in the display, and then press the lever again.
:Name" flashes in the display.
3 Press the jog lever again.
4 Follow steps 4 to 6 of "Labeling a disc during stop" above.
Labeling a track or a disc during recording
1 While recording, press the jog lever so that "EDIT" flashes in the display, and then press the lever again.
“ :Name”flashes in the display.
2 To label a track, press the jog lever again.
To label a disc, flip the lever until " : Name" flashes in the display, and then press the lever.
3 Follow steps 4 to 6 of "Labeling a disc during stop" above.
Note
When the recording is stopped while labeling a track or a disc during recording, or when the playback moves on to the next track while labeling a track during playback, the input at that point is entered automatically.
Labeling on the remote control
See the illustration in the Japanese text (page 35)
Labeling a disc during stop
1 Insert a disc.
To label a disc that is already in the recorder, press ■ to stop.
2 Press DISPLAY for 2 seconds or longer.
“:Name” flashes in the display.
3 Press ■.
The disc is ready to be labeled.
4 Press the control towards or towards repeatedly to select a letter and press to enter.
The selected letter stops flashing and the cursor moves to the next input position.
Press to switch between katakana, the alphabet, symbols/numbers, and phrases (if phrases are stored in the phrase bank).
Press VOL + / - to move the cursor to left or right.
Press the control towards when inputting alphabet, symbol or numbers to change the letter to the one before/next one. Press towards to go back.
Press DISPLAY to insert a blank space to type in a new letter.
Press DISPLAY for 2 seconds or more to cancel labeling.
Press PLAY MODE to delete a letter and move back all following letters to the left.
5 Repeat step 4 and enter all characters of the label name.
6 Keep pressing for 2 seconds or longer.
The track or disc is labeled.
Labeling a track during playback
1 Insert a disc and play the track you want to label.
2 Press DISPLAY for 2 seconds or longer.
“ :Name” flashes in the display.
3 Press ■.
The disc is ready to be labeled.
4 Follow steps 4 to 6 of "Labeling a disc during stop" above.
Labeling a track or a disc during recording
1 Press DISPLAY for 2 seconds or longer during recording.
: Name" flashes in the display.
2 To label a track, press ■.
To label a disc, press the control towards or towards
until “ :Name” flashes in the display, then press ■.
3 Follow steps 4 to 6 of "Labeling a disc during stop" above.
To cancel labeling, press DISPLAY for 2 seconds or more.
Note
When the recording is stopped while labeling a track or a disc during recording, or when the playback moves on to the next track while labeling a track during playback, the input at that point is entered automatically.
Relabeling recordings
Follow the steps corresponding to the labeling method until the disc or track is ready to be labeled. Enter a new character over the one you want to change, then press the jog lever (keep pressing for 2 seconds or more on the remote control).
Storing phrases frequently used in labeling (Phrase Bank)
See the illustration in the Japanese text (page 37)
Phrases that you often use in track or disc labeling can be stored in the recorder's memory. Approximately 40 phrases of about 10 characters each (with a total character count of about 600) can be stored in the phrase bank. The actual number will depend on the length of each phrases.
On the recorder
Storing phrases while labeling a track or disc
1 Do the procedure "Labeling recordings" (page 68) to enter a phrase.
2 After entering the phrase, press for 2 seconds or more.
"Entry!" appears in the display and the cursor flashes after the phrase you just stored. You can then continue with labeling operation.
Storing phrases using the EDIT menu
1 Press the jog lever so that "EDIT" flashes in the display, and then press the lever again.
2 Flip the jog lever until "Name Bank" flashes in the display, and then press the jog lever.
3 Enter the phrase you want to store, and then press the jog lever for 2 seconds or more. "Entry" appears in the display and the phrase is stored.
Retrieving phrases stored in the phrase bank
You can retrieve a phrase stored in the phrase bank anytime you want to use it in a track or disc name.
Searching for a phrase by displaying the stored phrase one by one
1 Do the procedure "Labeling recordings" (page 68) until " :Name" or " :Name" flashes in the display. Then press the jog lever.
2 Press I repeatedly until the first phrase stored in the phrase bank appears in the display.
3 Flip the jog lever or press / repeatedly. Flipping the jog lever or pressing the buttons causes the phrases stored in the phrase bank to appear one by one in sequential order. If you press 1 at this time, the first phrase stored in the phrase bank retrieved.
4 Press the jog lever while the phrase you want is shown in the display. The cursor flashes after the phrase you just retrieved. You can then continue with labeling operation.
Searching for a phrase by its first letter
1 When labeling a track or disc, use VOL + / - to move the cursor to the letter which the desired phrase begins with.
2 Press to search.
The phrase for that letter appears in the display. If there are two or more phrases that start with that letter, press to see the next phrase.
3 Press the jog lever while the phrase you want is shown in the display. The cursor flashes after the phrase you just retrieved. You can then continue with labeling operation.
Erasing phrases
You can erase phrases from the phrase bank while the recorder is stopped. You can also erase phrases when the recorder is empty.
1 Press the jog lever so that "EDIT" appears, and then press the lever again.
2 Flip the jog lever until "BankErase" appears, and then press the lever.
3 Flip the jog lever until the phrase you want to erase appears, and then press the lever. "Erase!" appears and the phrase is erased. If no phrase is stored in the phrase bank, "EMPTY" appears in the display.
To cancel the operation, press or T MARK
On the remote control
Storing phrases while labeling
1 Do the procedure "Labeling on the remote control" in "Labeling recordings" (page 69) to enter a phrase.
2 After entering the phrase, press I for 2 seconds or more. "Entry!" appears in the display and the cursor flashes after the phrase you just stored. You can then continue with labeling operation.
Storing phrases using the EDIT menu
1 Press DISPLAY for 2 seconds or more.
2 Press the control towards | | | | | | or towards | | · repeatedly until "Name Bank" flashes in the display, and then press.
3 Enter the phrase you want to store, then press for 2 seconds or more. "Entry" appears in the display and the phrase is stored.
Retrieving phrases stored in the phrase bank
Searching for a phrase by displaying the stored phrase one by one
1 Do the procedure "Labeling on the remote control" in "Labeling recordings" (page 69) until " :Name" or " :Name" appears in the display. Then press ■.
2 Press I repeatedly until the first phrase stored in the phrase bank appears in the display.
3 Press the control towards 1 or towards repeatedly. Pressing the control towards 1 or towards causes the phrases stored in the phrase bank to appear one by one. If you press at this time, the first phrase stored in the phrase bank retrieved.
4 Press while the phrase you want is shown in the display. The cursor flashes after the phrase you just retrieved. You can then continue with labeling operation.
Searching by the first letter of a phrase
1 When labeling a track or disc, use VOL + / - to move the cursor to the letter which the desired phrase begins with.
2 Press to search. The phrase for that letter appears in the display. If there are two or more phrases that start with that letter, press to see the next phrase.
3 Press while the phrase you want is shown in the display. The cursor flashes after the phrase you just retrieved. You can then continue with labeling operation.
Erasing phrases
1 Press DISPLAY for 2 seconds or more.
2 Press the control towards or towards repeatedly until "BankErase" appears in the display, and then press.
3 Press the control towards 14 or towards 14 · 14 repeatedly until the phrase you want to erase appears, and then press. "Erase!" appears in the display and the phrase is erased. If there is no phrase stored in the phrase bank, "EMPTY" appears in the display.
To cancel the operation, press DISPLAY for 2 seconds or more.
Power sources
You can use the recorder on ...
house current.
- a nickel metal hydride rechargeable battery (supplied).
- dry battery (not supplied).
It is preferable to use the recorder on house current when recording for a long time.
Charging a nickel metal hydride rechargeable battery
See the illustrations in the Japanese text (page 40).
Before using the supplied nickel metal hydride rechargeable battery for the first time, you must charge it.
1 Connect the supplied AC power adaptor.
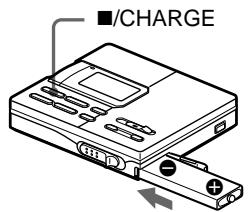
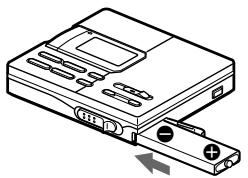
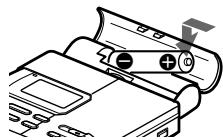
2 Insert the NH-14WM into the recorder and close the lid.
3 Press /CHARGE. "Charging" flashes, appears in the display, and charging starts. When charging is completed, battery indication disappears. A completely discharged battery takes about 3 hours to charge fully.
Using on a nickel metal hydride rechargeable battery
See the illustration in the Japanese text (page 41).
Be sure the rechargeable battery is fully charged.
1 Insert the fully charged nickel metal hydride rechargeable battery with correct polarity.
Using on a dry battery
See the illustration in the Japanese text (page 41).
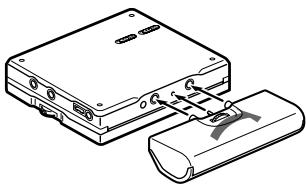
Use the battery case.
1 Attach the supplied battery case.
2 Insert the dry battery with correct polarity.
Notes
Stop operation before replacing the battery.
Battery life
| Batteries | Recording | Playback |
| NH-14WM nickel metal hydride rechargeable battery | Approx. 6.5 hours | Approx. 12 hours |
| R6(size AA) Sony alkaline dry battery LR6(SG) | Approx. 4 hours | Approx. 16.5 hours |
| NH-14WM +LR6(SG) | Approx. 14.5 hours | Approx. 29 hours |
When to replace the batteries
When the dry batteries or rechargeable battery are weak, flashing or "LOW BATT" appears in the display. Replace the dry battery or charge the rechargeable battery.
The battery level indicator is approximate.
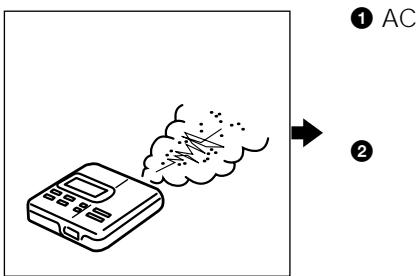
Notes on dry batteries
Incorrect battery usage may lead to leakage of battery fluid or bursting batteries. To prevent such accidents, observe the following precautions:
- Insert the + and - poles of the batteries correctly.
- Do not try to recharge the batteries.
- When the recorder is not be used for a long time, be sure to remove the batteries.
- If a battery leak should develop, carefully and thoroughly wipe away battery fluid from the battery compartment before inserting new ones.
Additional information
Messages
If the recorder cannot carry out an operation, error messages may flash in the display window as follows.
BLANK DISC:
You tried to play an MD with no recording on it.
DISC ERR:
The recorder cannot read the MD (it is scratched or dirty). Reinsert the MD. If the same message still appears, replace the MD.
DISC FULL :
There is no more space to record on the MD (less than 12 seconds available).
Data Save:
The MD player is recording information (sounds) from the memory to the disk.
Wait until this process is completed. Do not expose the player to any physical shock, nor disrupt power supply.
TOC Edit :
The MD player is recording information (track start and end position) from the memory to the disk. Wait until this process is completed. Do not expose the player to physical shock, nor disrupt power supply.
BUSY:
You tried to operate the recorder while it was accessing the recorded data. Wait until the message goes out (in rare cases, it may take about 2 - 3 minutes).
NAME FULL :
You tried to enter more than 200 letters to label a single track or disc.
You tried to enter a total of more than 1700 letters for track or disc names during playback or stop.
Hi DC in :
The power supply is higher than required. Use the recommended power sources.
HOLD:
You tried to operate the recorder with the HOLD switch slid in the direction of the arrow. Slide back the switch.
LOW BATT:
The rechargeable battery or dry batteries are weak. Charge the rechargeable battery or replace the dry batteries.
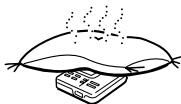
MEMOVER:
You started recording with the recorder receiving continuous vibration. Put the recorder on the stable place and start recording again.
NO COPY:
You tried to make a copy from a disc that is protected by the Serial Copy Management System. You cannot make copies from a digitally connected source which was itself recorded using the digital connection. Use the analog connection instead.
NO DISC :
You tried to play or record with no disc in the recorder.
NO SIGNAL :
The recorder could not detect digital input signals. Make sure that the source is connected firmly. If the message appears while recording, press to end recording.
P/B ONLY:
You tried to record or edit on a premastered MD (P/B stands for playback).
PROTECTED :
You tried to record or edit on an MD with its tab in the record-protect position.
SORRY:
You tired to set DIGITAL MEGA BASS while the "AUDIO OUT" parameter is set to "LINE OUT." Use the jog lever to set the "AUDIO OUT" parameter to "HeadPhone."
You tried to erase a track mark while playing the MD or at the beginning of the first track.
You tried to erase a track mark to combine tracks the recorder cannot combine*.
You tried to press I or T MARK while synchro-recording or the joint text function is active.
- If you have recorded or erased many times on the same MD, the data of a single track may be scattered throughout the MD. When the data is scattered in groups of less than 12 seconds long, the recorder will not be able to combine the tracks.
TEMPOVER:
Heat has built up in the recorder. Wait until the recorder cools down.
TR FULL:
You tried to record more than 254 tracks.
TrPROTECT :
You tried to record over or edit a track which has been protected from being recorded over*.
- Track-protected MiniDiscs — Some MD recorders will let you protect individual tracks from being recorded over. This recorder, however, does not offer this feature.
EDITING
You pressed a key on the recorder while editing on the remote control, or vice versa.
LINE OUT
You pressed VOL + / - while the "AUDIO OUT" parameter is set to "LINE OUT." Use the jog lever to set the "AUDIO OUT" parameter to "HeadPhone."
NO TEXT
You tried to use the CD text copying function to copy a track or disc name from a CD that has no text data.
EMPTY
You tried to erase data in the phrase bank but no data have been recorded.
BANK FULL
The phrase bank is almost full and cannot store the phrase you tried to enter. Delete some phrases from the phrase bank, and then reenter the new phrase.
MZ-R90/R91
048 794 5194
9
5
1
MZ-R90/R91

http://www.world.sony.com/
Sony online