
MZ-R5ST - MiniDisc Player SONY - Free user manual and instructions
Find the device manual for free MZ-R5ST SONY in PDF.

| Product type | MiniDisc player/recorder station |
| Brand | Sony |
| Model | MZ-R5ST |
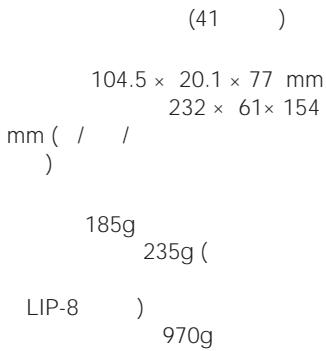
| Dimensions (recorder) | 104.5 × 20.1 × 77 mm |
| Dimensions (station) | 232 × 61 × 154 mm |
| Weight (recorder with LIP-8 battery) | 185 g |
| Weight (station) | 970 g |
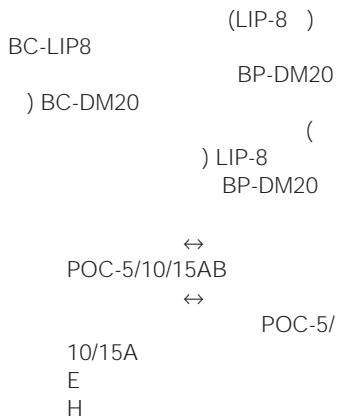
| Power supply | AC power adapter 100 V, 50/60 Hz; rechargeable lithium-ion battery LIP-8; LR6 (AA) dry batteries × 2; nickel-metal hydride rechargeable battery BP-DM20 |
| Battery life (recording) | Approx. 3.5 h (LIP-8), 4.5 h (LR6), 4.5 h (BP-DM20), 8 h (LIP-8 + LR6), 8 h (LIP-8 + BP-DM20) |
| Battery life (playback) | Approx. 5.5 h (LIP-8), 9 h (LR6), 6.5 h (BP-DM20), 16 h (LIP-8 + LR6), 13 h (LIP-8 + BP-DM20) |
| Recording functions | Digital/analog recording, synchro-recording, Time Machine Recording, monaural recording (up to 148 min), manual level adjustment |
| Playback functions | Normal playback, repeat (one/track, random), programmed playback (up to 20 tracks), direct selection via remote control |
| Editing functions | Track/disc erase, track mark insert/delete, track move, labeling (up to 200 characters per title, 1700 per disc), undo (UNDO) |
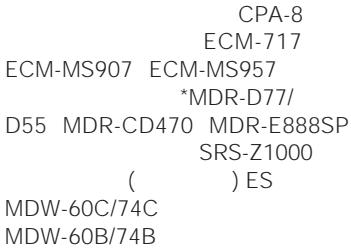
| Connectivity | Optical digital input (OPT1, OPT2), optical digital output, analog input/output (RCA), active speaker output, headphones (stereo mini-jack), microphone (mini-jack with Plug-in Power) |
| Frequency response | 20 - 20,000 Hz (±3 dB recording, ±0.5 dB playback) |
| Signal-to-noise ratio (playback) | 96 dB (EIAJ) |
| Signal-to-noise ratio (recording) | 92 dB |
| Laser | GaAlAs, λ = 780 nm |
| Maintenance | Clean with a soft, dry cloth; do not use solvents or abrasive products |
| Safety | Use only the supplied AC adapter; do not expose to humidity or extreme temperatures; do not open the housing |
| Included accessories | AC adapter, LIP-8 battery, card remote control (with CR2025 battery), headphones with remote control, battery case, connection cables |
Frequently Asked Questions - MZ-R5ST SONY
User questions about MZ-R5ST SONY
0 question about this device. Answer the ones you know or ask your own.
Ask a new question about this device
Download the instructions for your MiniDisc Player in PDF format for free! Find your manual MZ-R5ST - SONY and take your electronic device back in hand. On this page are published all the documents necessary for the use of your device. MZ-R5ST by SONY.
USER MANUAL MZ-R5ST SONY
/Operating Instructions


MZ-R5ST
scatter
| Label | X | Y | |---|---|---| | MD | 0.25 | 0.85 | | Z1000 MD | 0.35 | 0.95 | | SRS- | 0.45 | 0.75 | | BS | 0.65 | 0.05 | | DAT | 0.75 | 0.05 | | 148 | 0.85 | 0.05 | | MD WALKMAN | 0.95 | 0.05 | | 🇨️ | 1.05 | 0.05 | | UNDO ( ) | 1.15 | 0.05 | | Tel.03-5353-0336 | 1.25 | 0.05 |

6 9
1 1
AC


6

natural_image
Solid dark gray image with no visible content, text, or symbols.10
( ) 12
14

natural_image
Solid gray image with no visible content, text, or symbols.16
2 17
18
19
...... 20
21
22

natural_image
Solid gray image with no visible content, text, or symbols.24
24
24
( )......25
26
DIGITAL MEGA BASS 26
-AVLS 27
27

natural_image
Blank gray image with no visible content, text, or symbols29
ERASE 29
1 29
29
TRACK MARK ON 30
TRACK MARK OFF 31
MOVE 32
TITLE 32
(UNDO)...... 34
35
35
-CD 37
37
37
- ...... 38
38
38
39
39
39
/ 41
...... 41
42
43
...... 46
47
49
50
52
54
Operating Instructions
Operating Instructions 62


AC
AC
natural_image
Simple line drawing of a device emitting smoke or vapor above it (no text or symbols)

natural_image
Illustration of a person with headphones and musical notes, expressing discomfort (no text or symbols)


AC
natural_image
Cartoon illustration of a person running away from a large book with stars, no text or symbols present
AC

(Ni-Cd)
(Ni-MH)
(Li-ion)


AC
CD
(37)
1
2
3
natural_image
Line drawing of a hand inserting a device into an electronic device (no text or symbols visible)→
natural_image
Line drawing of a hand inserting a device into an electronic device (no text or symbols visible)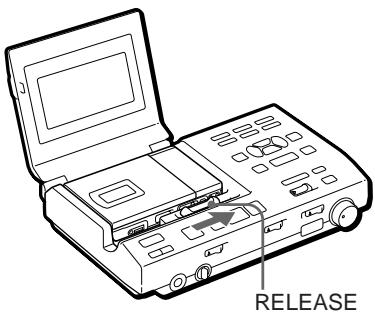
RELEASE
(22)
CD
CD
AC
(ESP )
$$ (\quad) $$
(10
)
37
20
19
1

natural_image
Illustration of a hand inserting a device into a laptop (no text or symbols visible)2
INPUT
DIGITAL IN OPT 1 OPT 1
DIGITAL IN OPT 2 OPT 2
3
END SEARCH
( )
4
① REC
REC
② CD
TOC EDIT
( )
1)
▶ ▶
REC
◀◀
OPEN
3)
POWER
1) 1
2)
3)

(53) SCMS NO COPY
(53
HEADPHONES
Ω/REMOTE
5
POWER

(39)
1
2
① OPEN
②
natural_image
Illustration of hands inserting a device into a device with arrows indicating process (no text or symbols)3


1)
2)
35
24

( )

natural_image
Completely dark image with no visible content, text, or symbols.3 REC
4
CD


• 2
18
3
SYNCHRO REC
1 2
1 INPUT
OPT2
OPT1
2 SYNCHRO REC
ON
SYNC
2
4
TIME
MACHINE REC
2
2
FM

2
2
1"
REC
2
3
6)
(20

1
REC
2 MODE
MONO Monaural REC
3
20
6
4
5


OFF
ON
ECM-
717 ECM-MS907 ECM-MS957
1 MIC SENS
HIGH
LOW
2
REC
(10)
natural_image
Line drawing of a portable electronic device with labeled ports (no text or symbols beyond labels)1 2
REC
2
3


4
4


MIC SENS
6
REC LEVEL
12 ( dB)
)
(37

REC
REC
LEVEL
(ANALOG)
7"
REC LEVEL
1
2 INPUT
ANALOG
3
END SEARCH
4
REC
5
1 DISPLAY
A
B
A
B
*

natural_image
Line drawing of a rectangular electronic device with labeled 'DISPLAY' component (no other text or symbols)1 DISPLAY
A
B
A
B
*
1 DISPLAY

1 CLOCK SET
A
B
2
↑
↓
→
A
B
3


TITLE/ENTER
0
CLOCK SET
24
DISPLAY
12
2

natural_image
Completely dark image with no visible content, text, or symbols.
**
11
POWER
ACTIVE SP LEVEL
Z1000
(38) MD
SRS-

LEVEL


OPEN
**
POWER
ACTIVE SP LEVEL /
1
other
| Category | Value | |---|---| | 10 | 0/10 | | 11 | >10 | | 10 | 1 | | 0/10 | 1 | | 100 | >10 | | 1 | 10 | | 1 | 2 |
SELECT
ERASE/ DELETE
20
1 PLAY MODE PROGRAM
2
20
ERASE/DELETE
1 MODE PROGRAM
2 SELECT
3 2
4 ▶

DIGITAL MEGA BASS
1 3
1 MODE PLAY MODE
1 DIGITAL MEGA BASS
1 2
1 2 2
| REPEAT | |
| 1 | REPEAT1 |
| SHUF | REPEATSHUFFLE |
MODE (
PLAY MODE)
REPEAT
U
-AVLS
1 AVLS
LIMIT
AVLS
1
DISPLAY
natural_image
Line drawing of a portable electronic device with labeled 'DISPLAY' (no other text or symbols)1 DISPLAY

1 DISPLAY

A B
A B

**
2
ENTER
TITLE/
1
- TOC EDIT
30
ERASE
1
1
ERASE/
DELETE
1
Erase OK? Push Enter
1
ERASE/DELETE REC
Enter
All Erase OK? Push
2
TITLE/ENTER
TOC EDIT
BLANK DISC
2 TITLE/ENTER Track Mark ON
TRACK MARK ON
T MARK
1
TRACK MARK
T MARK
TRACK MARK
1
T MARK
TRACK MARK
TRACK MARK
Rehearsal Track Mark ON
OK? Push Enter
4
0.06
8
TRACK MARK OFF
3
TRACK MARK
Rehearsal Track Mark
OFF OK? Push Enter
4
2
00:00
4 TITLE/ENTER
Track Mark OFF

T
MARK
T MARK

2 1
MOVE
:C 2
flowchart
graph TD
    A["A"] --> B["B"]
    B --> C["C"]
    C --> D["D"]
    C --> E["2"]
    E --> F["1"]
1
MOVE/INSERT
Move
No.003 No.003 OK? Push Enter
2

natural_image
Pure directional arrows and a black square on white background (no text or symbols)3
TITLE/ENTER
TITLE
200 1 / 1700 800
1
2 TITLE/ENTER
3
SELECT
CAPS
INPUT
POSITION /
SELECT
MOVE/INSERT
ERASE/
DELETE
4
3
5
TITLE/ENTER

SELECT
•
A Z
•
0 9
•
1 2
TITLE/ENTER

UNDO
- REC
MD
•
5
• AC
1 UNDO
| 1 | Erase Undo OK? | |
| 1 | MD | All Erase Undo OK? |
| Track Mark ON Undo OK? | ||
| Track Mark OFF Undo OK? | ||
| Move Undo OK? | ||
| Disc Name Undo OK? | ||
| Track Name Undo OK? |
2 TITLE/ENTER
TOC EDIT
MD


UNDO

HOLD
HOLD

1
AC
2

3 TIMER
PLAY
REC
PLAY
4
| 3 | ||
| MODE | 2 | |
| Stereo MODE | Monaural |
| TOC(TOC) | 52 | |
| ) | AC10 | |
| 1 | 1 |
CD
DAT
BS
INPUT
OPT2
OPT1
DAT
CD
CD
DIGITAL IN OPT1 OPT2
INPUT
ANALOG
(20)
LINE (ANALOG) IN
flowchart
graph TD
    A["LINEARAL LOG"] --> B["OUT"]
    B --> C["OPTICAL OUT"]
    C --> D["MOD IN"]
    C --> E["MOD OUT"]
    D --> F["OUT1"]
    D --> G["OUT2"]
    E --> H["OPTICAL"]
    F --> I["CLOCK SET"]
    G --> J["DIGITAL OUT (OPTICAL)"]
    H --> K["POC-10A"]
    H --> L["POC-10AB"]
    K --> M["MD DAT"]
    L --> N["MD"]
flowchart
graph TD
    A["SRS-Z1000"] --> B["ACTIVE SP OUT"]
    B --> C["LINE (ANALOG) OUT"]
    C --> D["R( )"]
    C --> E["L( )"]
    C --> F["RK-C310GS"]
    D --> G["↓"]
    E --> G
    F --> G
LIP-8
LIP-8
...
3 2
BP-DM20
1
2
LIP-8
natural_image
Line drawing of a portable electronic device with a USB cable inserted (no text or symbols)3
flowchart
graph TD
    A["Input"] --> B["Display"]
    B --> C{Signal}
    C --> D["Output"]
    style A fill:#f9f,stroke:#333
    style D fill:#bbf,stroke:#333

ON OFF
2
natural_image
Line drawing of a car air conditioner unit with handle and control panel (no text or symbols)LIP-8
CHARGE
80%
2
3
LIP-8
1
OPEN
natural_image
Diagram of a device rear panel with ventilation slots and a control switch (no text or symbols)OPEN
1
natural_image
Diagram of a device with a button and indicator lights, no text or symbols present2
natural_image
Diagram of a car interior showing battery and charging mechanism (no text or labels)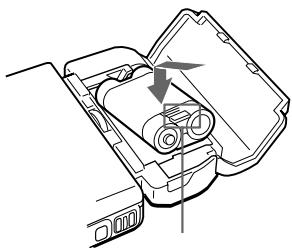
natural_image
Diagram of a car interior showing airflow or traffic flow direction (no text or symbols)| 3.5 | 5.5 | |
| LIP-8 | ||
| 4.5 | 9 | |
| LR6 (SG) 2 | ||
| 4.5 | 6.5 | |
| BP-DM20 | ||
| 8 | 16 | |
| LIP-8 | ||
| LR6 (SG) 2 | ||
| 8 | 13 | |
| LIP-8 | ||
| BP-DM20 | ||
| * | ||
| ** | ||
| Lo | ||
| BATT |
AC
AC
EIAJ
AC

natural_image
Illustration of two hands holding a computer with a 'X' symbol crossed out (no text or labels)•
•
)
•
•
•
| ( HOLD ) | HOLD (35) | |||
| (☐) | LoBATT | (39 40 41) | 2 | |
| + (41) | ||||
| OPEN | ||||
| ( ) | ( ) | (19) | ||
| Ω /REMOTE | ||||
| AVLS (27) | NORMAL | |||
| AC | DC IN 9V | |||
| ( ) | (10 11) | |||
| AC | (39) | |||
| (37 38) | ||||
| INPUT | INPUT 37 | |||
| ( ) | (20) | |||
| CD | CD | |||
| ( NO DIGITAL SIGNAL ) | ||||
| CD | CD | |||
| (ESP ) | ||||
| ( ) | ||||
| ( DISPLAY 2 ) | DISPLAY | 2 | ||
| ( ) | ||
| DISC ( BLANK ) | ||
| 12 303 | ||
| ( DISC ERR ) | DISC ERR | |
| MODE ( PLAY MODE) (26) | ||
| 1 | ( ) | |
1
( PROTECTED DISC SAVED )
( P/B ONLY )
(DISC FULL^12 FULL )


VOL / (LEVEL)
(22)
--y--m--d
2
(23
)
DAT
| )TRACK FULL | |||||
| (60) | 74 | 254 | |||
| 1 | |||||
| 254 | 1 | ||||
| ( ) | ( ) | 12 | |||
| 12 | |||||
| 2 | |||||
| (60) | 74) | 2 | 2 | ||
| 2 | |||||
| 6 | |||||
| ( ) | ||
| BLANK DISC(BLANK) | ( ) | |
| CONNECTIONERROR ( ) | ||
| DISC ERROR(ERROR) | ( ) | DISC ERROR |
| DISC FULL(FULL) | ( ) | 12 |
| EDIT BUSY(BUSY) | 2 3 | |
| (LoBATT) | (39 41 ) | |
| MEMORYOVER (MEMORY) | ||
| NAME FULL ( ) | 200 | |
| 11700 | ||
| NO DIGITAL SIGNAL ( ) | ||
| NO DISC (NoDISC) | ||
| P/B ONLY (PbONLY) | ( ) | |
| PROTECTED DISC(SAVED) | ||
| PROTECTED TRACK (TrPROT) | ( ) | |
| SCMS NO COPY ( ) | (SCMS) | (LINE) (37 ) |
| SORRY (SORRY) | 1 | |
| TEMPERATURE OVER (TEMP) | ||
| TRACK FULL (TrFULL) | 254 | 254 |
1
8
( )
( )
GaAlAs = 780nm
148 (MDW-74)
74 (MDW-74)
400rpm 900rpm (CLV)
(ACIRC)
44.1kHz
(ATRAC)
EFM
2
1
20 20,000 Hz± 3dB
MIC (PLUG IN POWER)
0.22
0.78mV
Ω/REMOTE
5mW+5mW
16
5 20,000 Hz± 0.5dB
S/N (EIAJ*)
96dB
92dB
LINE (ANALOG) IN
500mV
DIGITAL IN OPT1, OPT2
660nm
LINE (ANALOG) OUT
500mV
10k
ACTIVE SP OUT
500mV
4.7k
DIGITAL OUT
-17dBm
660nm
ΩHEADPHONES
5mW+5mW
16
32kHz/44.1kHz/48kHz
44.1kHz
* EIAJ ( )
natural_image
Two types of electrical connectors: a left-angle connector and a right-angle connector, shown without any text or symbols.64mm
(MD)
(CD)
ATRAC (Adaptive TRansform Acoustic Coding) CD
(BS :32kHz, DAT:
48kHz )
MD
(44.1kHz)
TOC EDIT
TOC Table Of Contents
MD
CD
2
TOC
TOC EDIT
CD -0:03
0:00
MD
(SCMS)
flowchart
graph TD
    A["CD\nMD"] --> B["MD"]
    B --> C["MD"]
    style B stroke:#000,stroke-width:2px
    note right of B
        ×
    end

natural_image
Diagram of a compact floppy disk with a circular inset showing a close-up of its internal structure (no text or symbols)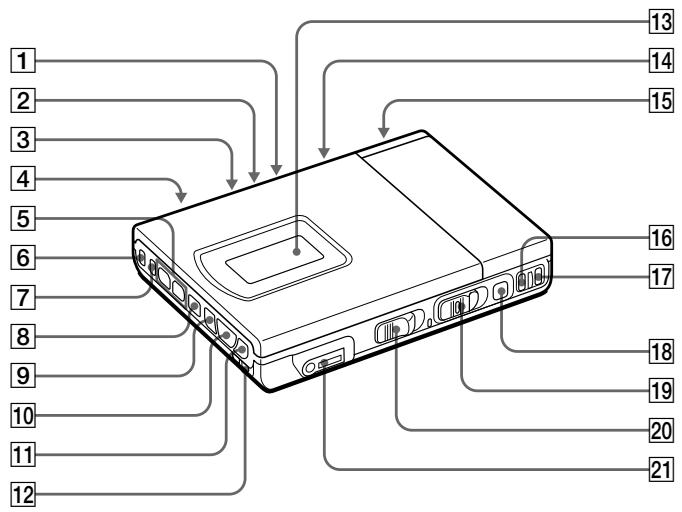
1 MIC SENS 19
2 DIGITAL MEGA BASS
26
3 AVLS 27
4 MIC (PLUG IN POWER)
19
5 VOL 15
6 MODE 18 26
7 DISPLAY 21 28
8 ■ 13 15
9 13 15
10 ▶ 13 15
11 13 15
12 HOLD 35
13 (21 28 55)
14 CLOCK SET 23
15 39
16 END SEARCH 13
17 T MARK 30 31
18 13 15
19 REC 13 19
20 OPEN 14
21 Ⓞ/REMOTE

1
7 MONO (18)
2 (40 41)
8 26
3
9
4 REC DATE 21 28
10 HOLD 35
DATE
5 REMAIN 21 28
11 AVLS 27
6 21 28
12
1 ERASE/DELETE 29 32
② MODE 18 26
3 MOVE/INSERT 32
4 DISPLAY 21 27
5 PUSH OPEN (10)
6 (21 27 58)
7 ▶ 13 24
8 OPEN•RELEASE 11 12
9 ■ ( ) 13 24
10 POWER
11 ACTIVE SP LEVEL / 24
12 HEADPHONES
13 LEVEL 24
14 TIMER (35)
15 13 24
16 13 24
17 TRACK MARK 30 31
18 UNDO (34)
19 INPUT POSITION / 32
20 32
21 TITLE/ENTER 32
22 SELECT 32
23 CAPS 32
24 END SEARCH 13
25 TIME MACHINE REC (17)
26 13 24
27 REC 13
28 REC LEVEL (ANALOG) 19
29 INPUT 12 37
30 SYNCHRO REC (16)
1 OPEN ( 40
2 CHARGE 40
3 40
4 ACTIVE SP OUT (38)
5 DC IN 9V 39
6 CLOCK SET 22
7 DIGITAL OUT (OPTICAL)
38
8 DIGITAL IN (OPT1 OPT2)
37
9 LINE (ANALOG) OUT 38
10 LINE (ANALOG) IN 37
1 21 27 7
8
2 MONO (18)
9
3 40 41
4 0% 50% 100% 5 SYNC (16) 25 26 6
10
1
2
3
4
■() (15)
5
HOLD 35
6 15
7 PLAY MODE (26)
8 DISPLAY (22 28)
9 VOL
10 TRACK MARK (30)
11 (22 28 60)
1
22 28
4
2
5
40 41
3
6
26
1 (24)
2 ▶ ( ) (24)
3 ◀◀ ( ) (24)
4 ▶▶▶( ) (24)
5 Ⅱ() (24)
6 ■ ( ) (24)
7
8 POWER (24)
9 PLAY MODE (26)
10 ACTIVE SP LEVEL / (24)
11 (61)
CR2025 ( )
5m
natural_image
Diagram of a screwdriver inserted into a mechanical component with a plus symbol, showing motion arrows (no text or labels)1
2
⊕
CR2025
⊕ ⊖
Operating Instructions
Welcome!
Welcome to the world of the MiniDisc! Here are some of the capabilities and features you'll discover with the new MiniDisc Recorder.
- The MiniDisc station system — Use the recorder either by itself or attached to the station dock. To record digitally or edit labels, use the recorder attached to the station for enhanced features and connectivity. To playback MDs or record from the microphone, use the recorder detached from the station for portability.
- Optical digital IN/OUT jack — Since the signal is transmitted in digital form, you can get high quality recordings.
- Sampling rate converter — This circuit enables you to record programs from digital equipment using other sampling rates, such as a BS tuner or DAT deck.
- Variety of recording options
— Long recording with monaural recording (up to 148 minutes).
— Time Machine recording enables you to record from the top of a song even if you pressed the button after you heard the beginning of the song.
— Connect to an audio-timer to record when you are not home. - Easy editing with the large LCD panel and the editing buttons
— Supports "katakana" characters.
— Title samples (42 words and phrases).
— UNDO function lets you undo an editing operation. - Programmed playback — Play any set of tracks in the order of your choice.
- Card remote commander — Operate the station from a distance. Direct Track Selection available.
- Output jack for active speakers — Connect to the active speakers SRS-Z1000 (not supplied), etc. to enjoy powerful MD playback at your desktop.
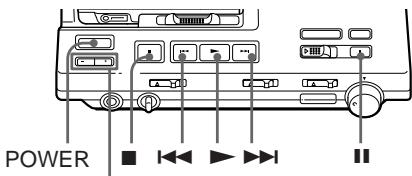
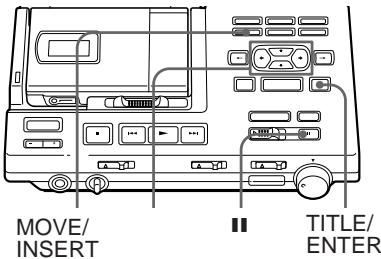
Looking at the controls
The numbers are keyed to the illustrations in the Japanese text (pages 54 to 61).
The recorder
1 MIC SENS (Mic sensitivity)
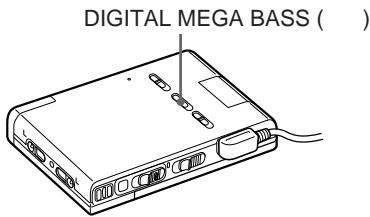
2 DIGITAL MEGA BASS switch Select to emphasize bass sound.
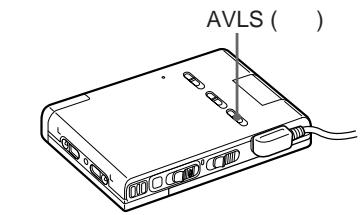
3 AVLS (Automatic Volume Limiter System) switch
Slide to LIMIT to limit the maximum volume.
4 MIC (PLUG IN POWER) jack
5 VOL (volume) -/+ buttons
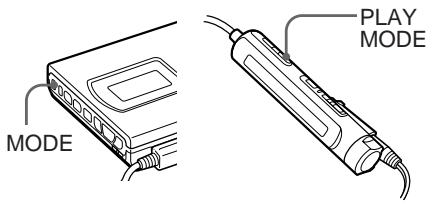
6 MODE button
Each time you press here while playing an MD, the recorder plays the MD in a different play mode: normal play, all repeat, single repeat, or shuffle repeat. Press here while recording to select monaural recording.
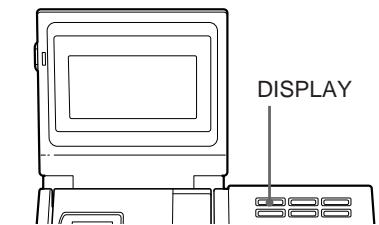
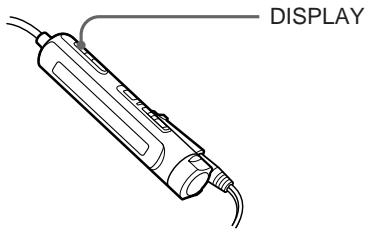
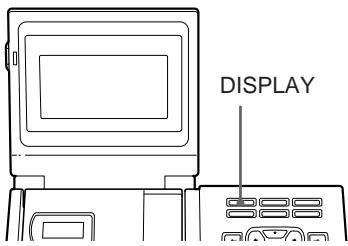
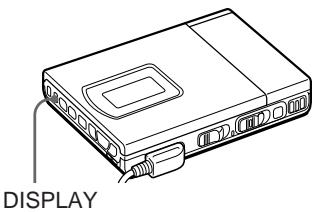
7 DISPLAY button
Press to display the current play mode, the remaining time of the current track, the remaining time of the disc, or the recording date and time.
8 ■ (stop) button
9 ◀◀◀ (rewind/AMS) button
10 ▶ (play) button
11 ▶▶▶ (fast forward/AMS) button
12 HOLD switch
Slide to lock the controls of the recorder.
13 Display window
14 CLOCK SET button (at the bottom)
15 Battery compartment
16 END SEARCH button
17 T MARK button
18 II (pause) button
19 REC switch
20 OPEN switch
21 Ⓞ/REMOTE (headphones/remote)
jack
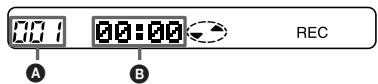
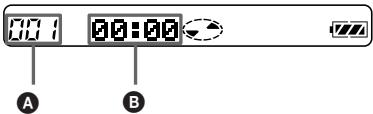
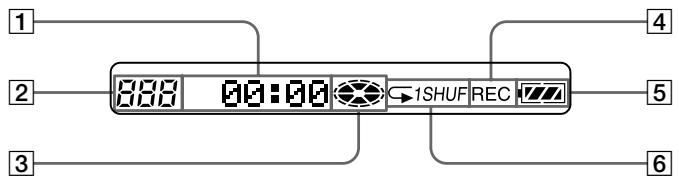
The display window of the recorder
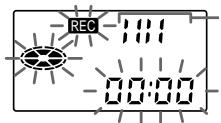
1 REC indication
Lights up while recording. When flashing, the recorder is in record standby mode.
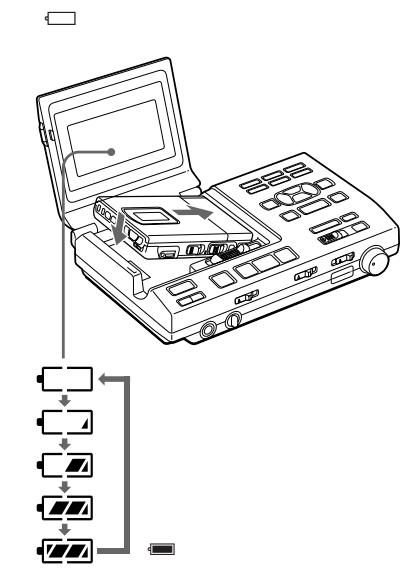
2 Battery indication
Shows battery condition. Lights up when a rechargeable battery is inserted. While charging the rechargeable battery, this indication shows the charging condition.
3 Disc indication
Shows that the disc is rotating for recording, playing or editing an MD.
4 REC DATE (recorded/current date) indication
Lights up along with the date and time the MD was recorded. When only "DATE" lights up, the current date and time are displayed.
5 REMAIN (remaining time/tracks) indication
Lights up along with the remaining number of tracks, remaining time of the track, or remaining time of the MD.
6 AM/PM indication
Lights up along with the time indication in the 12-hour system.
7 MONO (Monaural) indication
8 Play mode indication
Shows the play mode of the MD.
(all repeat): All tracks play repeatedly.
1(single repeat): One track plays repeatedly.
SHUF(shuffle repeat): Tracks will be repeated in random order.
9 Track number indication
Shows the track number playing currently.
10 HOLD indication
Lights up when the HOLD switch is set on.
11 AVLS indication
Lights up when the AVLS switch is set on.
12 Time display
Shows the recorded time, current time, elapsed time of the track being played and the remaining time of the track or the disc.
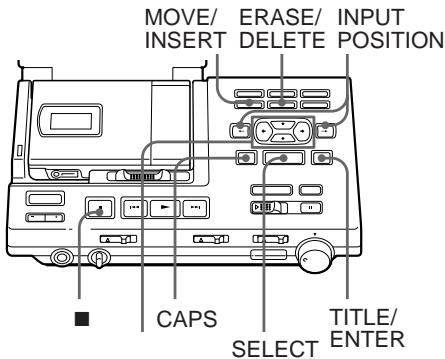
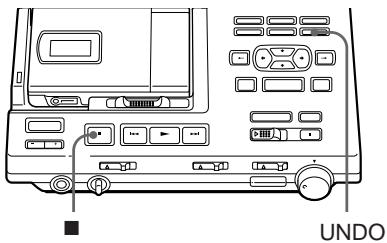
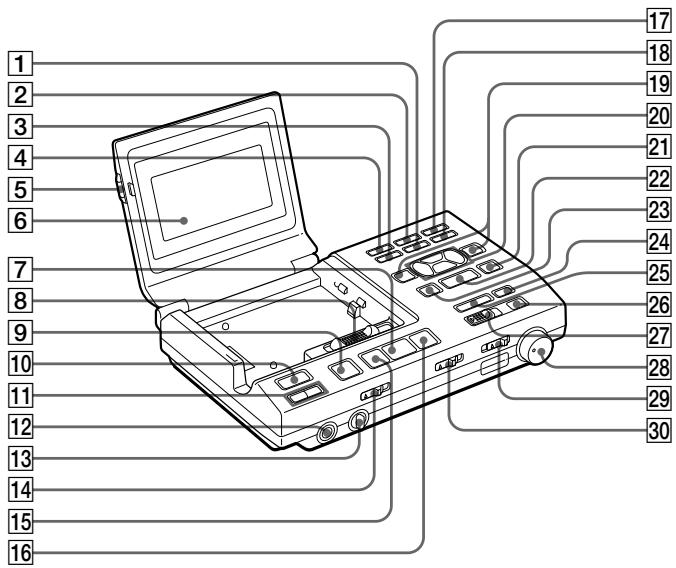
Front panel of the Station
1 ERASE/DELETE button
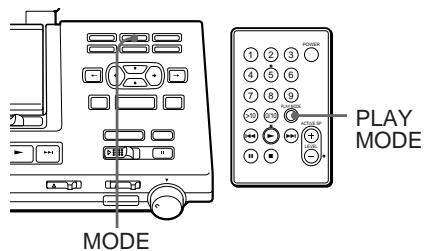
2 MODE button
3 MOVE/INSERT button
4 DISPLAY button
5 PUSH OPEN button
6 Display window
7 ▶ (play) button
8 OPEN•RELEASE switch
9 ■ (stop) button
10 POWER switch
11 ACTIVE SP LEVEL -/+ buttons
12 Ⓞ HEADPHONES jack for stereo plug
13 LEVEL dial
Adjusts the volume of headphones connected to the ⓄHEADPHONES jack on the station, not the recorder.
14 TIMER switch
15 ◀◀ (rewind/AMS) button
16 ▶▶▶ (fast forward/AMS) button
17 TRACK MARK button
18 UNDO button
19 INPUT POSITION / (position) buttons
20 Cursor buttons
21 TITLE/ENTER button
22 SELECT button
23 CAPS button
24 END SEARCH button
25 TIME MACHINE REC button
26 II (pause) button
27 REC switch
28 REC LEVEL (ANALOG) control
29 INPUT switch
30 SYNCHRO REC switch
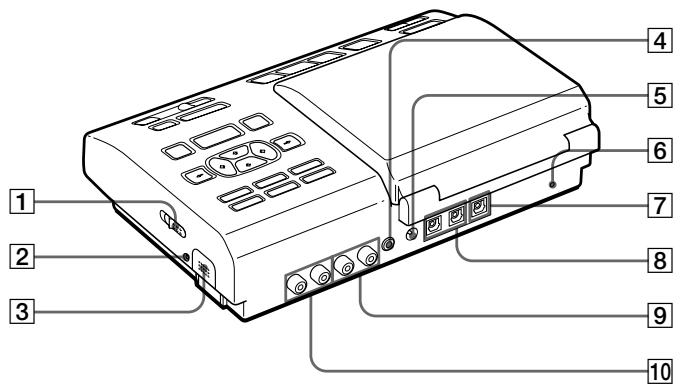
Back panel of the Station
1 OPEN (open the lid) switch
2 CHARGE lamp
Lights up while charging the rechargeable battery on the station.
3 Rechargeable battery compartment
4 ACTIVE SP OUT jack
5 DC IN 9V jack
6 CLOCK SET button
7 DIGITAL OUT (OPTICAL) jack
8 DIGITAL IN (OPT1, OPT2) jack
9 LINE (ANALOG) OUT jack
10 LINE (ANALOG) IN jack
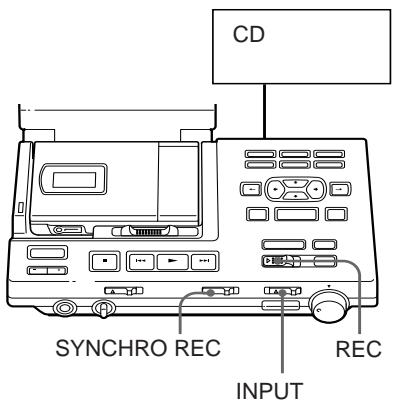
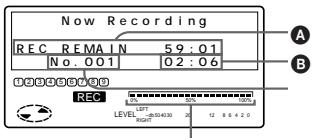
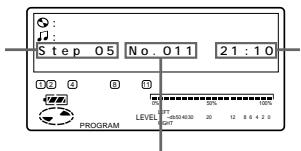
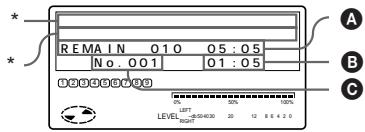
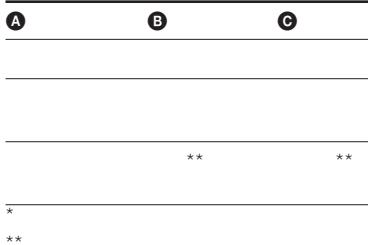
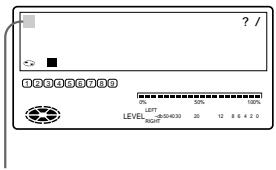
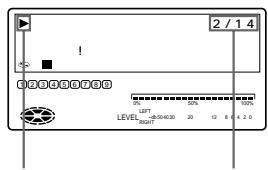
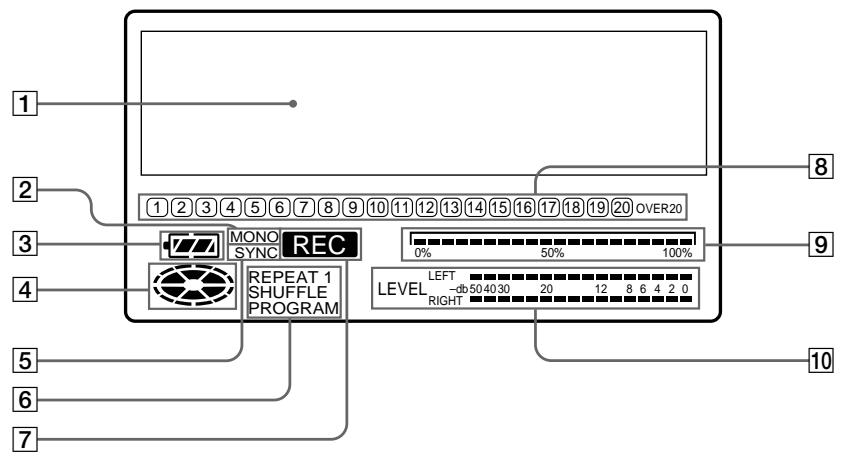
The display window of the station
1 Character information display Displays the disc and track names ^ , date, error messages, track numbers, etc. ^ Disc and track names appear only with MDs that have been electronically labeled.
2 MONO (monaural) indication
3 Battery indication Shows battery condition. Lights up when a rechargeable battery is inserted. While charging the rechargeable battery, this indication shows the charging condition.
4 Disc indication Shows that the disc is rotating for recording, playing or editing an MD.
5 SYNC (synchronized recording) indication Lights up while synchro-recording.
6 Play mode indication Shows the play mode of the MD. REPEAT (all repeat): All tracks play repeatedly.
REPEAT 1(single repeat): One track plays repeatedly.
REPEAT SHUFFLE (shuffle repeat): Tracks will be repeated in random order.
PROGRAM (program play): Lights up when programming for program play or executing program play.
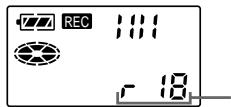
7 REC (record) indication Lights up while recording. When flashing, the recorder is in record standby mode.
8 Music calendar Displays the number of tracks recorded in MD, remaining tracks during shuffle play.
9 Position pointer Shows the current location on the MD. The point under recording or playing flashes. The recorded position lights up.
10 Peak level meter Shows the volume of the MD being played or recorded.
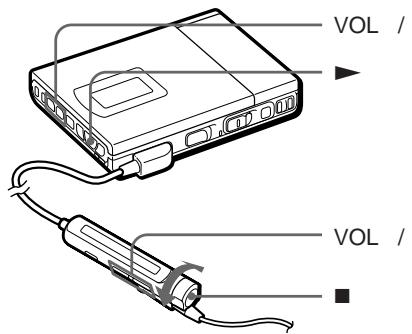
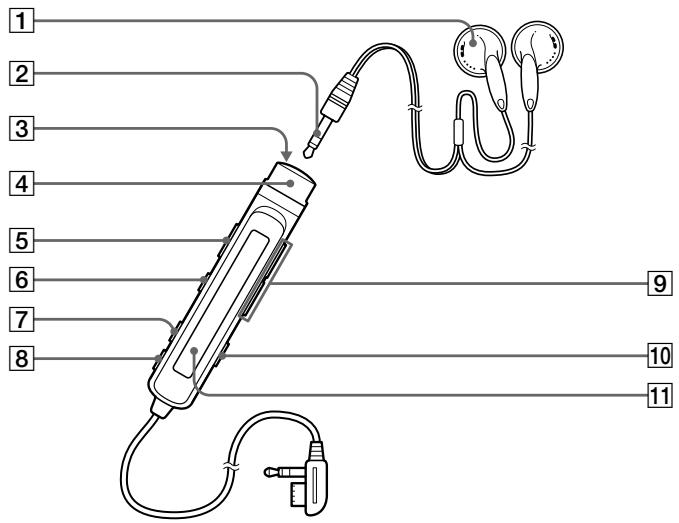
The headphones with a remote control
1 Headphones
Can be replaced with optional headphones.
2 Stereo mini plug
3 ■ (stop) button
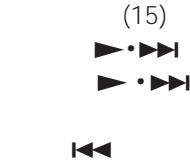
4 Control
To play, turn to ▶▶▶▶ during stop.
Turn to ▶▶▶▶ during play to search the beginning of the succeeding track; hold in this position to fast-forward.
Turn to ◀◀ during play to search the beginning of the preceding track; hold in this position to rewind.
5 HOLD switch
Slide to lock the controls of the remote control.
6 Ⅱ (pause) button
7 PLAY MODE button
8 DISPLAY button
9 VOL (volume) -/+ buttons
10 TRACK MARK button
11 Display window
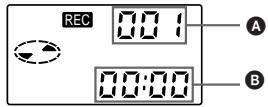
The display window of the remote control
1 Character information display
Displays the disc and track names,
date, elapsed time, etc.
2 Track number indication
Shows the track number of the track being recorded or played.
3 Disc indication
Shows that the disc is rotating for recording, playing or editing an MD.
4 REC (record) indication
Lights up while recording. When flashing, the recorder is in record standby mode.
5 Battery indication
Shows battery condition. While charging the rechargeable battery, this indication shows the charging condition.
6 Play mode indication
Shows the play mode of the MD.
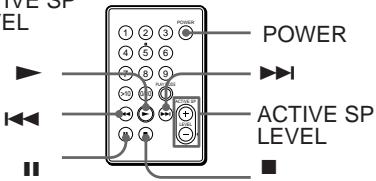
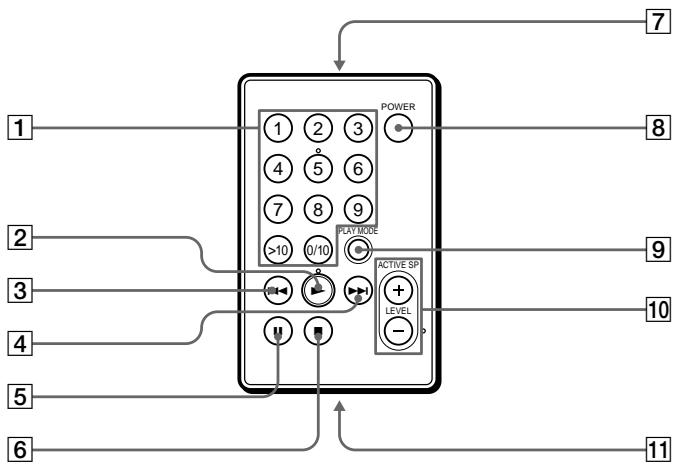
Card remote commander
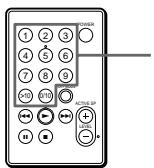
1 Number keys
2 ▶ (play) button
3 ◀◀◀ (rewind/AMS) button
4 ▶▶▶ (fast forward/AMS) button
5 II (pause) button
6 ■ (stop) button
7 Transmitter
Direct it toward the receiver on the station.
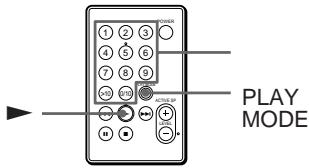
8 POWER switch
9 PLAY MODE button
10 ACTIVE SP (active speaker) LEVEL +/- buttons
11 Battery compartment
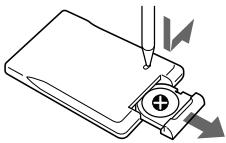
Replacing the lithium ion battery When the battery becomes weak, the working distance of the remote commander becomes shorter. Replace the battery with a new CR2025 lithium ion battery (not supplied).
① Insert a pointed object to the slot. Slide and hold it as shown in the illustration and pull out the battery tray.
② Insert a CR2025 lithium ion battery (not supplied) with the (+) side facing up.
Insert with correct polarity, or the remote commander will not work.
▶MD recording
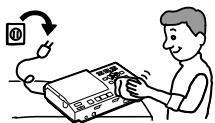
Setting up the station system
See the illustrations in the Japanese text (pages 10 and 11).
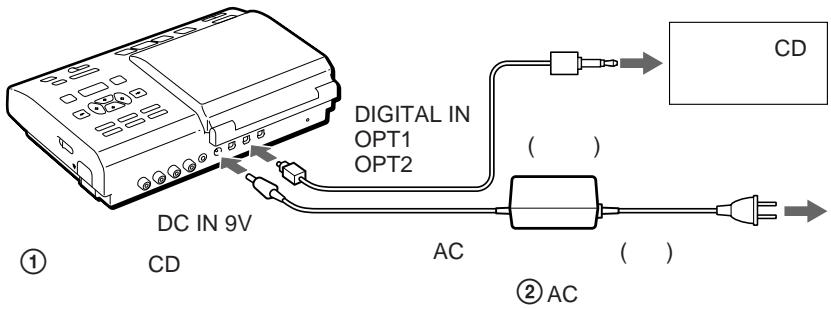
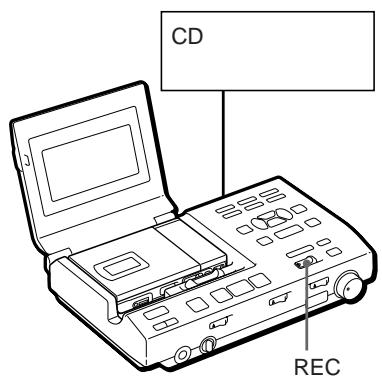
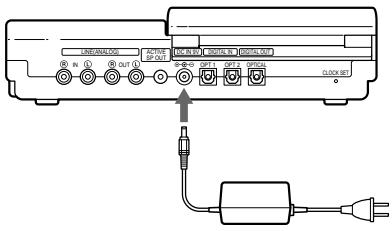
Connect other equipment to the station, then plug in the AC power cord. The explanation here is for recording from a portable CD player through digital input. To connect for other ways of recording, see "Hooking up", (page 75).
1 Connect.
① Connect the portable CD player to the MD station.
② Connect the AC power adaptor to the MD station.
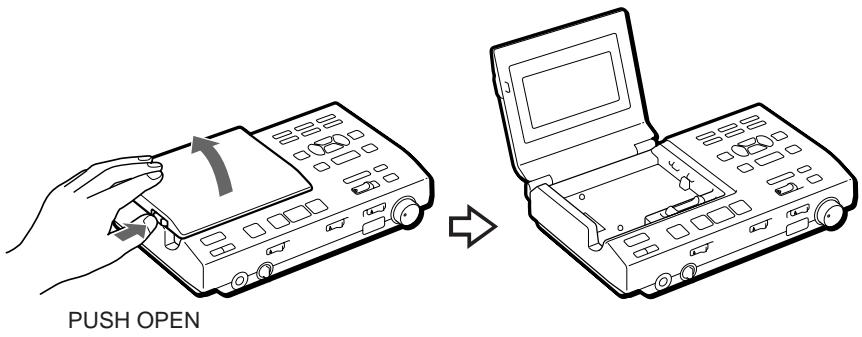
2 Open the lid.
① Press PUSH OPEN and open the lid.
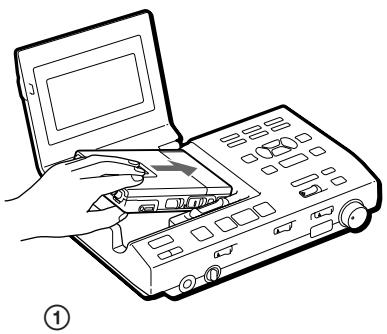
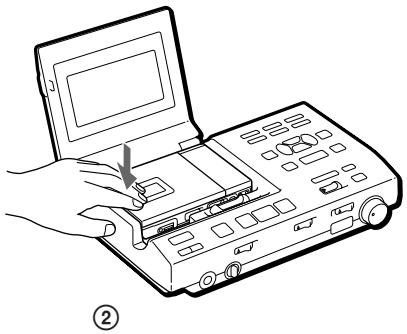
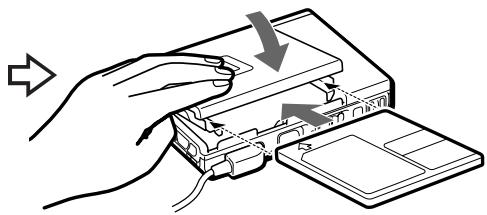
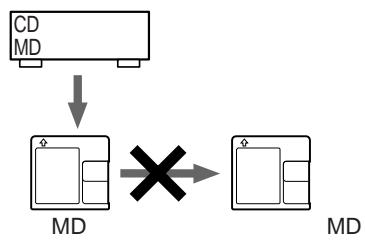
3 Attach the recorder to the station.
① Place the right side of the recorder first.
② Push down the left side until it clicks.
The display will light up on the station if the recorder is attached correctly.
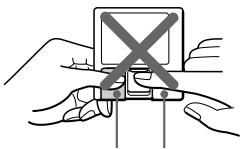
To detach the recorder from the station
Slide RELEASE fully to the right during stop.
Note
- Set the clock to record the recorded date and time (see page 69).
- Play the portable CD player on AC power.
- Make sure that the anti-skip function (such as ESP) is turned off on the portable CD player.
Recording an MD right away!
See the illustrations in the Japanese text (pages 12 and 13).
The explanation here is for recording through digital input. If you want to record through analog input, see "Recording through analog input", (page 69).
If you want to record programs from MIC (PLUG IN POWER) jack of the recorder, see “Recording from a microphone” (page 68).
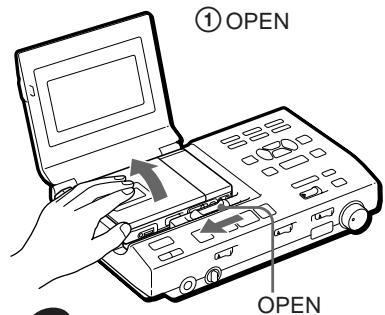
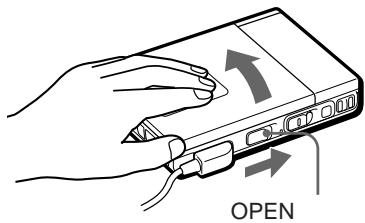
1 Insert a recordable MD.
① Slide the OPEN switch and open the lid.
② Insert a recordable MD with the label side facing up and press the lid down to close.
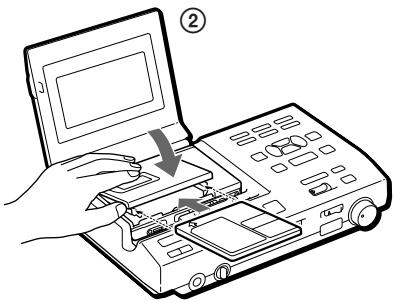
2 Select the input source.
Set INPUT switch to the connected input; OPT1 or OPT2.
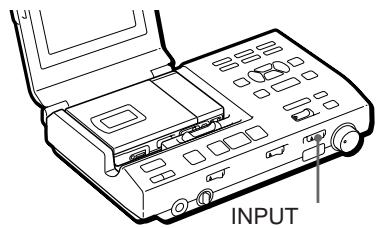
3 Select the point to start recording.
If you want to record form the end of the previous recording, press END SEARCH. (If you want to start recording from the beginning, skip this step).
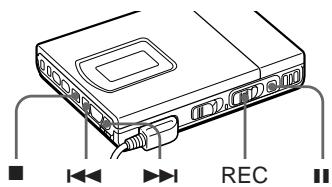
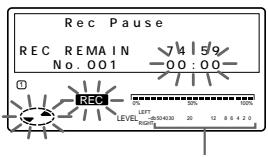
4 Start recording.
① Press and slide the REC switch to the right.
“REC” lights up and recording starts.
② Play the sound source.
To stop recording, press ■.
Do not move or jog the recorder or disconnect the power source while the “TOC EDIT” indication is flashing in the display.
| To | Press |
| Pause | II^1) Press II again to resume recording. |
| Record partway through the previous recording ^2) | ▶, ▶▶ or ◀◀ to find the start point of recording and press ■ to stop. Then slide the REC switch. |
| Remove the MD | ■, then slide the OPEN switch and open the lid. ^3) |
| Turn power off | POWER |
1) A track mark is added at the point where you press ■; thus the remainder of the track will be counted as a new track.
^2) If you start a new recording partway from a previous recording, the previous recording will be overwritten (erased) by the new one.
3) Once you open the lid, the point to start recording will change to the beginning of the first track. Check the point to start recording on the display.
If the recording does not start
- Make sure the MD is not record-protected. If the tab at the side of the MD is open, slide it back so the tab is visible.
- You cannot record on a premastered MD.
▶MD playing
Playing an MD right away!
See the illustrations in the Japanese text (pages 14 and 15).
The explanation here is for playing MDs on the recorder when it is detached from the station.
Before playing, make sure the rechargeable battery is fully charged. To charge battery or to run the recorder on other power sources, see “Power Sources”, (page 77).
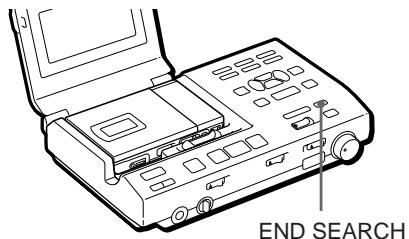
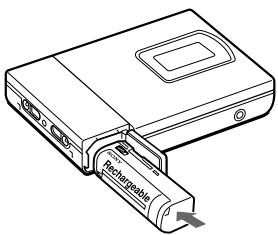
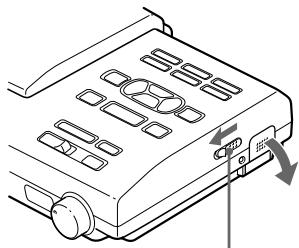
1 Insert the rechargeable battery.
2 Insert an MD.
① Slide the OPEN switch and open the lid.
② Insert an MD with the label side facing up, and press the lid down to close.
3 Start playing.
① Press▶ (Turn the control to ▶•▶▶ on the remote control). A short beep sounds in the headphones.
② Press the VOL (volume) -/+ buttons to adjust the volume. The volume will be shown in the display.
To stop play, press ■.
A long beep sounds in the headphones.
| To | Press (Beeps in the headphones) |
| Pause | ■ (Continuous short beeps)Press ■ again to resume play. |
| Find the beginning of the current track | ◀◀ once (Turn the control to ◀◀◀ on the remote control)(Three short beeps) |
| Find the beginning of the next track | ▶◀▶ once (Turn the control to ▶▶●▶▶▶▶▶▶▶▶▶▶▶▶▶▶▶▶▶▶▶▶▶▶▶▶▶▶▶▶▶▶▶▶▶▶▶▶▶▶▶▶▶▶▶▶▶▶▶▶▶▶▶▶▶▶▶▶▶▶▶▶▶▶▶▶▶▶▶▶▶▶▶▶▶▶▶▶▶▶▶▶▶▶▶▶▶▶▶▶▶▶▶▶▶▶▶▶▶▶▶▶▲▶▶▶▶▶▶▶▶▶▶▶▶▶▶▶▶▶▶▶▶▶▶▶▶▶▶▶▶▶▶▶▶▶▶▶▶▶▶▶▶▶▶▶▶▶▶▶▶▶▶▶▶▶▶▶▶▶▶▶▶▶▶▶▶▶▶▶▶▶▶▶▶▶▶▶▶▶▶▶▶▶▶▶▶▶▶▶▶▶▶▶▶▶▶▶▶▶▶▶> |
| Go backwards while playing1) | keep pressing ◀◀◀(Turn and hold the control to ◀◀◀ on the remote control) |
| Go forward while playing1) | keep pressing ▶▶▶▶(Turn and hold the control to ▶▶●▶▶▶▶▶▶▶▶▶▶▶▶▶▶▶▶▶▶▶▶▶▶▶▶▶▶▶▶▶▶▶▶▶▶▶▶▶▶▶▶▶▶▶▶▶▶▶▶▶▶▶▶▶▶▶▶▶▶▶▶▶▶▶▶▶▶▶▶▶▶▶▶▶▶▶▶▶▶▶▶▶▶▶▶▶▶▶▶▶▶▶▶> |
| Remove the MD | ■, then slide the OPEN switch and open the lid.2) |
1) To go backwards or forward quickly without listening, press and keep pressing or ▶▶.
2) Once you open the lid, the point to start play will change to the beginning of the first track.
If the playback does not start
Make sure the recorder is not locked. If it is locked, slide the HOLD switch in the opposite direction of the arrow.
To play with the recorder attached to the station
See "Playing an MD on the station" (page 70).
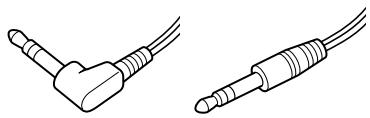
When using optional headphones
Use only headphones with stereo mini plugs. You cannot use headphones with micro plugs.
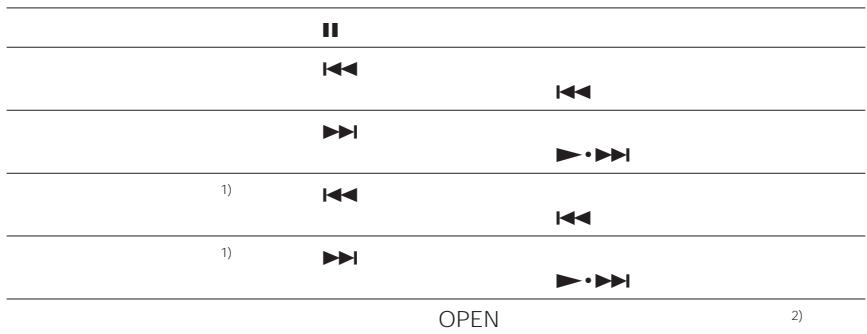
▶ Various ways of recording
To start/stop recording in sync with the source player (Synchro-recording)
See the illustrations in the Japanese text (page 16).
You can easily make digital recordings of a digital source on an MD.
Before synchro-recording, make connections to the digital source with a digital cable, and insert a recordable MD.
1 Set INPUT switch to "OPT1" or "OPT2".
Set it to match the input jack connected to the source.
2 Slide SYNCHRO REC to ON. "SYNC" appears in the display.
3 Press and slide REC to the right. The recorder stands by for recording.
4 Play the source sound. The recorder starts recording when it receives the playing sound.
To stop recording, press ■.
Tips
- You cannot pause manually during synchro-recording.
- When there is no sound from the player for more than 3 seconds during synchro-recording, the recorder goes into the standby mode automatically. When the sound comes from the player again, the recorder resumes synchro-recording. If the recorder is kept in the standby mode for 5 minutes or longer, the recorder stops automatically.
Note
- Do not switch SYNCHRO REC after step 2. Recording may not be done properly.
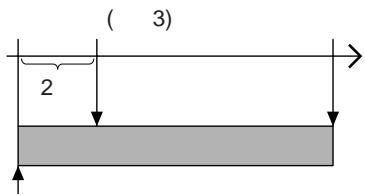
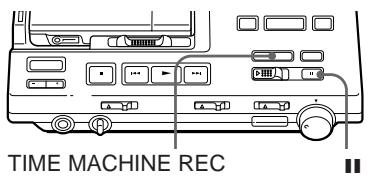
Starting recording going back 2 seconds (Time Machine recording)
See the illustrations in the Japanese text (page 17).
The recorder stores sound input in its memory during record standby. When you start Time Machine recording, the sound is recalled from the memory and the recorder starts recording the sound from 2 seconds before.
This is convenient, for example, if you do not want to miss the beginning of a track when recording from a BS or a FM program.
1 While holding down Ⅲ, press and slide REC to the right.
The recorder stands by for recording.
2 Play the sound source.
The recorder will start storing the sound input.
3 If you want to record through analog input, adjust the recording level (follow step 6 in "Recording through analog input", page 69).
4 Press TIME MACHINE REC to start recording.
The recorder will go back 2 seconds and start recording.
To stop recording, press ■.
Note
If you have taken less than 2 seconds between steps 2 and 3, then the time the recorder will go back will also be less than 2 seconds.
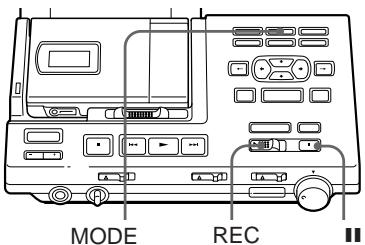
Recording in monaural for double the normal recording time
See the illustrations in the Japanese text (page 18).
Before recording, make connections to the sound source and the power source, and insert a recordable MD. You can operate in the same way on the station as on the recorder.
1 While pressing Ⅲ, press and slide the REC switch to the right.
The recorder stands by for recording.
2 Press the MODE button. "MONO" or "Monaural REC" appears in the display, and the recorder switches to monaural recording.
3 If you want to record through analog input on the station, adjust the recording level (play the source and follow step 6 in "Recording through analog input", page 69).
4 Press Ⅱ again to start recording.
5 Play the sound source.
Tips
- The recorder switches back to stereo recording when you press ■ to stop recording.
- If you record a stereo source in monaural, the sounds from left and right will be mixed.
• The MDs recorded in monaural can be played back only with an MD player/recorder that has the monaural playing function.
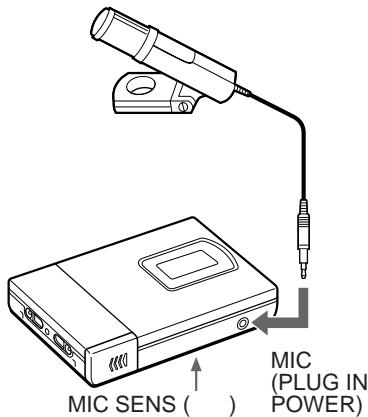
Recording from a microphone
See the illustration in the Japanese text (page 19).
Connect a microphone to the MIC (PLUG IN POWER) jack. Use a stereo microphone ECM-717, ECM-MS907 or ECM-MS957, etc., not supplied). The recording level is adjusted automatically, though you can adjust manually as well.
1 Select the input level with the MIC SENS (Mic sensitivity) switch. Usually, set it to HIGH. When you record loud sound such as a live concert, set it to LOW.
2 Insert a recordable MD.
Slide the OPEN switch to open the lid, insert a recordable MD, and close the lid.
3 Press and slide the REC switch to the right.
“REC” lights up and recording starts.
Note
You cannot record from a microphone when the recorder is attached to the station.
To adjust the recording level manually
1 While holding down Ⅲ, press and hold REC to the right for more than 2 seconds.
The recorder stands by for recording.
2 Play the source.
3 Observe the level meter in the display and adjust the recording level by pressing ▶▶▶ (+) or ◀◀◀ (-). Set the level so that the meter shows 4 bars at average input level.
4 Press Ⅱ again to start recording.
Tip
The recorder switches back to automatic control when you press ■ to stop recording.
Note
Adjust recording level while the recorder is in standby mode. You cannot adjust it while recording.
Recording through analog input (Analog recording)
See the illustrations in the Japanese text (page 20).
When recording from a radio or a record, connect analogically (page 75) and record as follows. Be sure to adjust recording level manually.
1 Insert a recordable MD.
2 Set INPUT to ANALOG.
3 Select the point to start recording. If you want to record form the end of the previous recording, press END SEARCH.
4 While holding down Ⅲ, press and slide REC to the right.
5 Play the source.
6 Observe the level meter in the display and adjust the recording level with REC LEVEL. Set the level to around 12 (-12dB) at average input level.
7 Press Ⅱ again to start recording.
Note
Note that REC LEVEL is effective even during recording; adjusting it will change recording level.
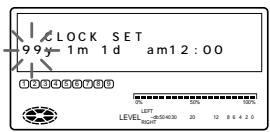
Setting the clock to stamp the recorded time
See the illustrations in the Japanese text (page 22).
To stamp the date and time on the MD when you record, you need to set the clock. You can set the clock either from the detached recorder, or from the station when the recorder is attached.
1 Press CLOCK SET button at the rear of the station with a pointed object. The digits of the year flash.
2 Enter the current year by pressing or .
To change the digits rapidly, keep
pressing or .
3 Press to enter. The digit of the month flashes.
4 Repeat steps 2 and 3 to enter the current month, date, hour, and minute. After you press TITLE/ENTER to set the minutes, the clock starts operating.
If you made a mistake while setting the clock
Press ■ button and repeat the steps above. Press → to locate necessary digits to be changed.
To set the clock on the recorder
The procedure is the same as in setting the clock on the station. Press CLOCK SET at the bottom of the recorder so that the digit of the year flashes. Change the number with ◄◀◀ or ▶▶▶, and enter with ▶. When you press ▶ to enter the minute, the clock starts operating. If you attach the recorder to the station after you have set the clock on the recorder, the clock on the station will be synchronized automatically.
To display the time in the 24-hour system
Press the DISPLAY button while setting the clock. To change the clock to the 12-hour system, press DISPLAY again.
Charging the built-in battery for the clock
When you are using the recorder for the first time or after a long period of disuse, charge the built-in battery for the clock.
After setting the clock, leave the recorder attached to the station for about 2 hours to charge the built-in battery. Once charged, the built-in battery will last for about a month without being connected to any of the power sources. The recorder will automatically charge the built-in battery while operating on the station, a rechargeable battery or dry batteries.
▶ Various ways of playback
Playing an MD on the station
See the illustrations in the Japanese text (page 24).
| To | Operation |
| Play | Press ▶ |
| Adjust the volume of the headphones connected to the station | Turn LEVEL on the station |
| Pause | Press ||Press || again to resume play. |
| Find the beginning of the current track | Press ◀◀ once |
| Find the beginning of the next track | Press ▶▶ once |
| Go backwards while playing1) | Keep pressing ◀◀ |
| Go forward while playing1) | Keep pressing ▶▶ |
| To | Operation |
| Remove the MD | Press ■ and open the lid.2) |
| Turn power off | Press POWER |
1) To go backwards or forward quickly without listening, press ▪ and keep pressing ◀◀ or ▶▶.
2) Once you open the lid, the point to start play will change to the beginning of the first track.
Note
The power turns off automatically when you leave the station for 5 minutes in the stop mode. Press POWER or ▶ to turn the power on again.
Playing back with active speakers
You can enjoy MD playback on active speakers such as SRS-Z1000 (not supplied) by connecting it to the station (page 76).
Operate with the buttons on the station or from the card remote commander.
To adjust volume
Press ACTIVE SP LEVEL -/+ on the station or the card remote commander.
Choosing a track from the commander (Direct Selection)
See the illustration in the Japanese text, (page 24).
You can select a track directly by pressing the track number on the card remote commander.
1 Press the track number of the track of your choice.
The recorder will play the selected track.
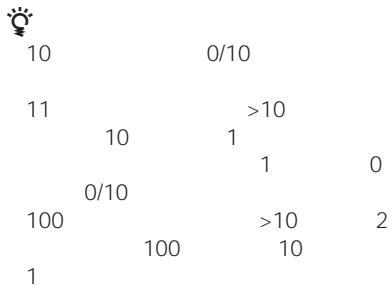
Tips
- To select track number 10, press 0/10.
- To select a track number larger than 10, first press >10 , then press the number for the tens digit and then the units digit. Press 0/10 if the units digit is zero.
- To select a track number larger than 100, first press >10 twice, then press the number for the hundreds digit, tens digit, and the units digit.
Playing selected tracks in the order of your choice (Program Play)
See the illustrations in the Japanese text, (page 25).
Select up to 20 tracks and play them in the order of your choice.
1 Press PLAY MODE repeatedly until "PROGRAM" lights up in the display.
2 Press the number key for the track number of your choice in the order to be played.
The tracks are programmed in sequence. You can program up to 20 tracks.
To cancel a track, press ERASE/DELETE on the station.
3 Press ▶.
The recorder will play the tracks in the programmed order.
To display the track order
Press SELECT on the station before playing back. With each press, the track number will be displayed in the order programmed.
To change the program
Press ERASE/DELETE on the station before playback to cancel the last track, or press ■ to cancel all tracks. Then, repeat from step 2.
To program from the station
1 Press MODE repeatedly until "PROGRAM" lights up in the display.
2 Select the track number of your choice with the cursor buttons and press SELECT.
3 Repeat step 2 and select tracks in the order to be played.
4 Press ▶.
Note
The program will be erased if you press ■, remove the disc, detach the recorder from the station, record, or edit.
Playing tracks repeatedly
See the illustrations in the Japanese text (page 26).
Press MODE (PLAY MODE on the remote control) repeatedly during playback until the play mode indication of your choice appears in the display.
| Recorder/Remote control | Station | Play mode |
| “ ” | REPEAT | All the tracks are played repeatedly.(all repeat) |
| “ 1” | REPEAT 1 | A single track is played repeatedly.(single repeat) |
| “ SHUF” | REPEAT SHUFFLE | All the tracks are played repeatedly in random order.(shuffle repeat) |
▶Editing recorded tracks
You can edit your recordings. Premastered MDs cannot be edited.
Notes
- When you press ■ after erasing track marks, "TOC EDIT" flashes for about a second. Do not move or jog the recorder or disconnect the power source while the indication is flashing.
- You cannot erase track marks on an MD with the tab open for protection. Before erasing track marks, close the tab at the side of the MD.
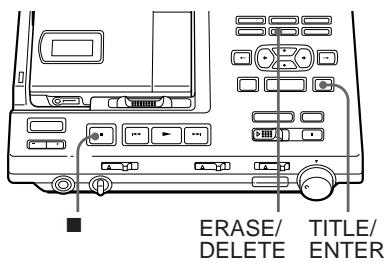
Erasing a track (ERASE)
See the illustration in the Japanese text (page 29).
You can erase a recorded track. Make sure of the track you are erasing.
1 Play the track you want to erase.
2 Press the ERASE/DELETE button while playing the track.
"Erase OK?" and "Push Enter" appear in the display, and the recorder plays the selected track repeatedly. Check the track number in the display. To cancel erasing, press ■.
3 Press the TITLE/ENTER button again to erase the track.
The track is erased from the MD and the remaining tracks are renumbered. The recorder starts to play the succeeding track.
To erase a part of a track
Add track marks at the beginning and the end of the part you want to erase, then erase the part.
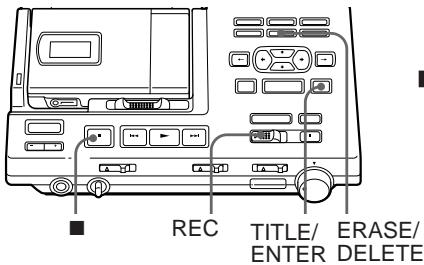
Erasing a whole disc
See the illustration in the Japanese text (page 29).
You can erase all the tracks on a disc at a time. Be sure to check the contents of the disc you want to erase.
1 Press ■ to stop.
2 While pressing the ERASE/DELETE button, slide the REC switch to the right.
“All Erase OK?” and “Push Enter” appear in the display.
Make sure it is the right disc to be erased.
To cancel erasing, press ■.
3 Press the TITLE/ENTER button.
"TOC EDIT" flashes in the display.
When erasing is complete, “BLANK DISC” appears.
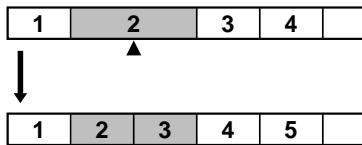
Insert a track mark (TRACK MARK ON)
See the illustrations in the Japanese text (page 30).
You can insert a track mark into a track.
1 While playing or pausing an MD, press TRACK MARK on the station at the point you want to add a mark.
"Rehearsal" will light up and "Track Mark ON OK?" and "Push Enter" will appear. A four second segment will be played repeatedly. Press the cursor buttons to adjust the point to be mark. It can be moved forward or backwards up to eight seconds, in 0.06 second steps.
To cancel erasing, press ■.
2 Press TITLE/ENTER.
"Track Mark ON" will be displayed. A track mark is added and the portion after the mark will be counted as a new track.
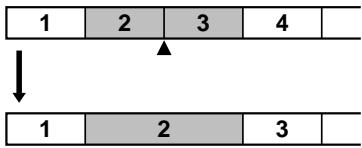
To insert a track mark on the recorder
Press T MARK during playback or pause at the point you want to add a mark. The track mark will be added where you pressed the button.
You can insert the track number while recording.
Press TRACK MARK button while recording.
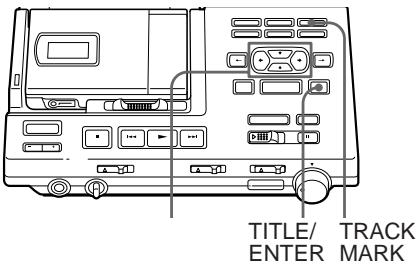
Erasing a track mark (TRACK MARK OFF)
See the illustrations in the Japanese text (page 31).
When you record with analog (line) input, unnecessary track marks may be recorded where the recording level is low. You can erase a track mark to combine the tracks before and after the track mark.
1 While playing the track with the track mark you want to erase, press Ⅱ to pause.
2 Find the track mark you want to erase by pressing ◀◀ slightly.
"00:00" flashes in the display.
3 Press the TRACK MARK button.
"Rehearsal" will light up and "Track Mark OFF OK?" and "Push Enter" will appear. A four second segment will be played repeatedly.
To cancel erasing, press ■.
4 Press TITLE/ENTER.
"Track Mark OFF" will be displayed. The track mark is erased and the two tracks are combined. The number of the newly combined track will be that of the first track. The succeeding tracks will be renumbered.
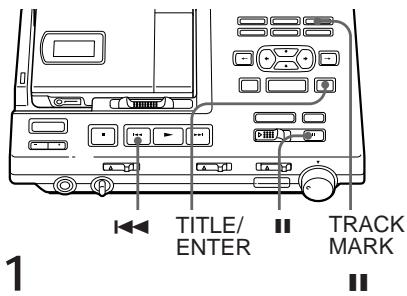
To erase a track mark on the recorder
Press ◀◀◀ or ▶▶◀ slightly during pause to find the track mark you want to erase and press T MARK.
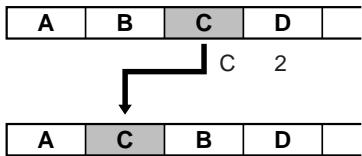
Moving recorded tracks (MOVE)
See the illustration in the Japanese text (page 32).
You can change the order of the recorded tracks.
1 While playing or pausing the track you want move, press MOVE/INSERT. For the example above, "Move No.003 → No.003" and "OK? Push Enter" appear on the display.
2 Press the cursor buttons to select the new track position.
← or ↓ moves the track number down.
↑ or → moves the track number up. To cancel moving, press ■.
3 Press TITLE/ENTER.
The track moves to the position before the designated track.
Labeling recordings (TITLE)
See the illustration in the Japanese text (page 32).
You can label the MDs and tracks you recorded with letters, numbers, and marks. Each label can be made up of up to 200 characters, and each MD can include up to about 1700 characters.
1 To label a track, play the track you want to label.
To label an MD, insert the recordable MD you want to label. If an MD is already inserted, press ■ to stop.
2 Press the TITLE/ENTER button on the recorder. A set of characters appears on the display. To select a different set of characters, press the CAPS button to change the display. Each time you press this button the display changes in the order of katakana characters, English letters, symbols and numbers, and title samples.
3 Press the cursor buttons to select a character.
The cursor buttons move the cursor up/down or right/left.
The INPUT POSITION button moves the cursor right or left.
Press the SELECT button to finalize your selection.
Press the MOVE/INSERT button for a space.
Press the ERASE/DELETE button to delete a character.
Press ■ to stop labeling.
* When you use Katakana, press
↑/↓ to change the display as follows:

4 Repeat step 3 until you have entered all the characters for the label.
5 Press the TITLE/ENTER button to finish labeling.
To cancel labeling
Press ■.
To use the title samples
There are 42 samples available for the disc name or message.
Press ←/→to change the pages.
Press ↑/↓ to move the cursor (>) up or down.
Press the SELECT to enter the title samples.
Cancelling the last editing operation (UNDO)
See the illustration in the Japanese text (page 34).
You can undo the last perfomed editing operation and return to the previous status. However, you cannot undo an editing operation if you have done any of the following afterwards:
- slide the REC switch
• turn off the power or remove the MD - remove the recorder from the station
- leave both the recorder and the station unoperated for more than 5 minutes
- remove the AC power adaptor from the wall outlet
1 Press UNDO during stop.
The following messages will appear according to the last performed editing operation.
| Editing operation | Message |
| Erase a track | "Erase Undo OK?" |
| Erase all tracks | "All Erase Undo OK?" |
| Insert a track mark | "Track Mark ON Undo OK?" |
| Erase a track mark | "Track Mark OFF Undo OK?" |
| Move a track | "Move Undo OK?" |
| Name a disc | "Disc Name Undo OK?" |
| Name a track | "Track Name Undo OK?" |
2 Press TITLE/ENTER.
"TOC EDIT" will appear for a few seconds and the MD will return to the previous status.
To cancel UNDO
Press ■.
Note
Once you have undone an editing operation, you cannot undo this undoing process itself to restore the original editing operation.
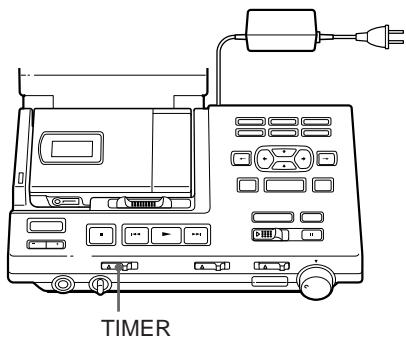
Recording/playing with a timer
See the illustration in the Japanese text (page 35).
You can start recording or playback at a preset time using an audio-timer (optional).
1 Plug in the AC power adaptor of the station to the audio-timer (optional).
2 Adjust recording level manually and press ■ if recording through analog input (steps 4 to 6 of "Recording through analog input", page 69).
3 Set TIMER to "REC" or "PLAY".
To start recording at the preset time: select "REC"
Recording will start automatically after the part that is already recorded in the MD.
To start playback at the preset time: select "PLAY"
4 Set the time on the audio-timer and turn the power off.
The power of the audio-timer will turn on automatically at the preset time, which will then turn on the station.
Notes
- To record monaurally using an audio-timer, press MODE for 2 seconds or more after step 3. The timer recording preferences will be displayed. If the recording mode is in "Stereo", press MODE so that it changes to "Monaural".
- If you are using the station for the first time or using the station after a long period of disuse, be sure to charge the built-in backup battery of the station. The recorder uses this backup battery when it writes TOC information after the timed recording is complete and the power is turned off. To charge the built-in battery, connect the AC power adaptor to the station. Full charging takes about 10 hours. The battery will last for about a week; do not set the timer to start recording in more than a week.
▶Hooking up
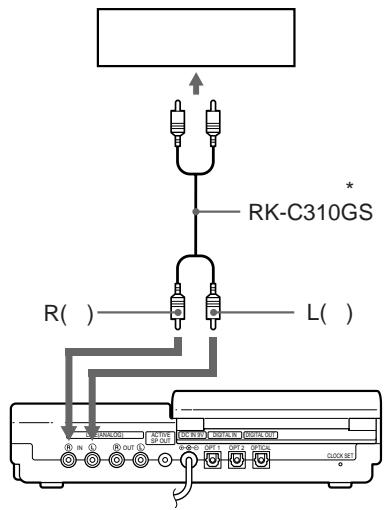
Setup for digital recording on the station
DIGITAL IN OPT1 or OPT2 (digital optical input) jack
Setup for analog recording on the station
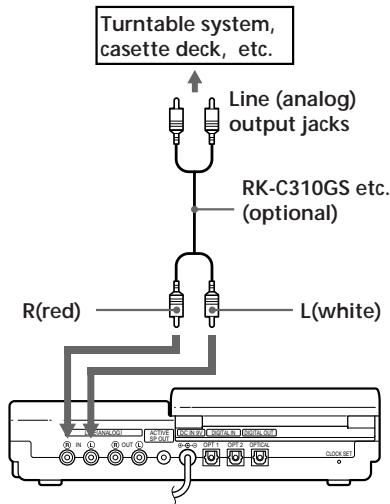
LINE (ANALOG) IN jacks
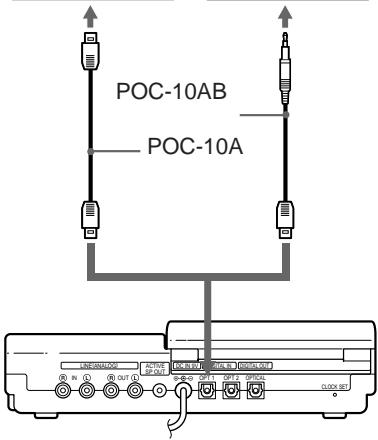
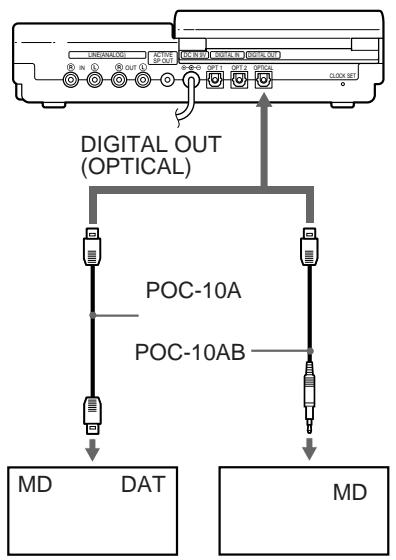
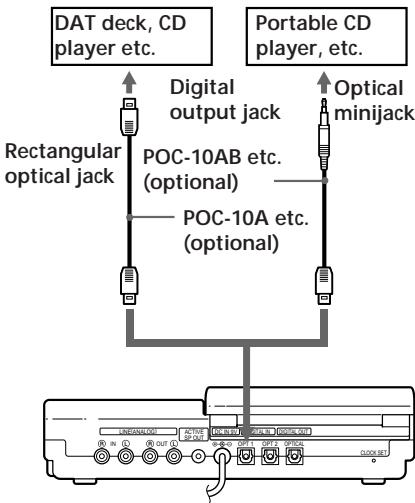
Setup for digital output from the station
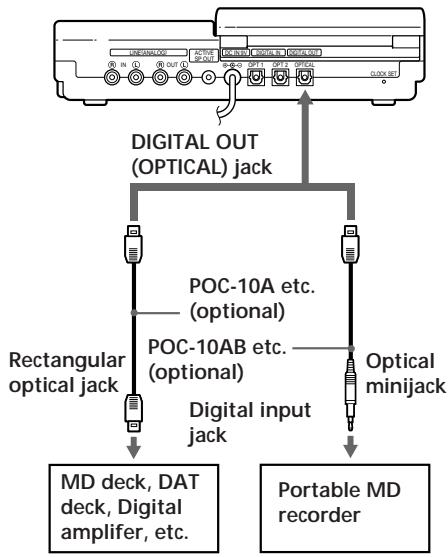
flowchart
graph TD
    A["Device"] --> B["Digital OUT (OPTICAL) jack"]
    B --> C["Rectangular optical jack"]
    B --> D["POC-10A etc. (optional)"]
    B --> E["POC-10AB etc. (optional)"]
    B --> F["Optical minijack"]
    C --> G["MD deck, DAT deck, Digital amplifier, etc."]
    D --> H["Portable MD recorder"]
    E --> H
    F --> H
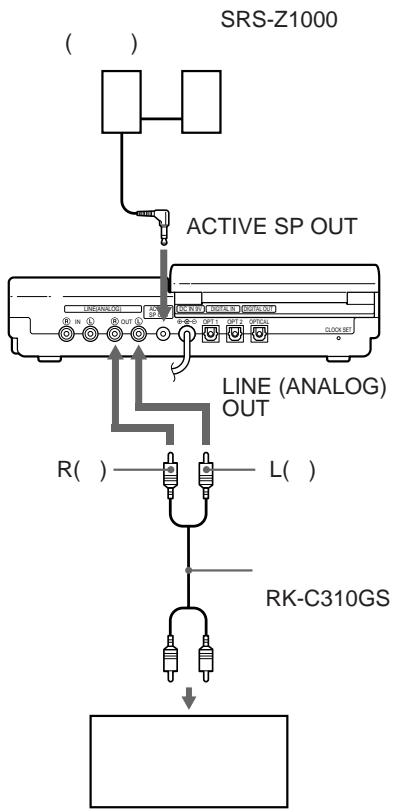
Setup for analog output from the station
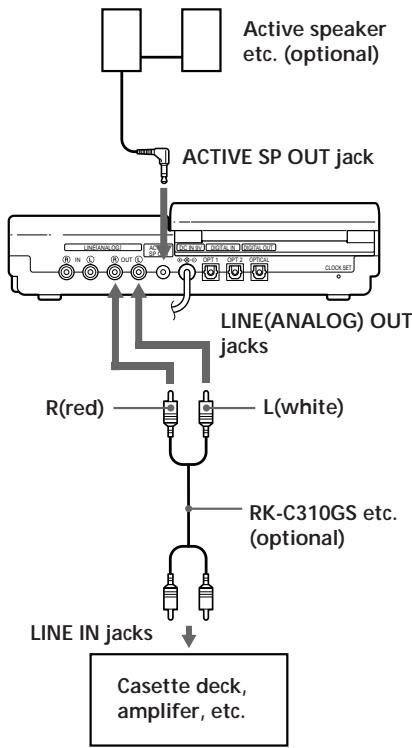
flowchart
graph TD
    A["Active speaker etc. (optional)"] --> B["ACTIVE SP OUT jack"]
    B --> C["LING(ANALOG) OUT jacks"]
    C --> D["R(red)"]
    C --> E["L(white)"]
    C --> F["RK-C310GS etc. (optional)"]
    F --> G["LINE IN jacks"]
    G --> H["Casette deck, amplifier, etc."]
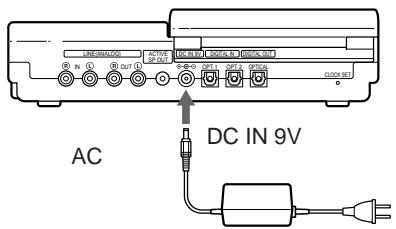
Using the Station on house current
See the illustration in the Japanese text (pate 39).
Connect the supplied AC power adaptor to the DC IN 9V jack on the station and to the wall outlet.
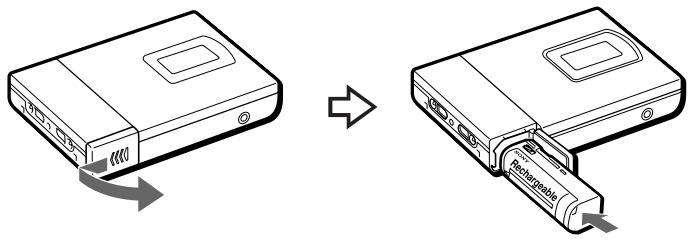
Using the recorder on a lithium ion rechargeable battery
See the illustrations in the Japanese text (page 39).
You can charge the LIP-8 lithium ion rechargeable battery (supplied) on the recorder.
1 Connect the station to an electrical outlet.
2 Insert the LIP-8 to the recorder and close the lid.
3 Attach the recorder to the station. The battery will charge whether the power is on or off.
Full charging take about 3 hours.
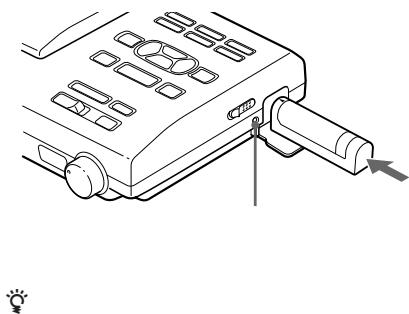
To charge the battery with the recorder detached
1 Slide the OPEN switch at the side of the station to open the lid.
2 Insert the battery and close the lid. When charging is completed, the CHARGE lamp goes out.
Using the recorder on dry batteries/nickel metal hydride rechargeable battery
See the illustrations in the Japanese text (page 41).
Before using a nickel metal hydride rechargeable battery, you must charge it.
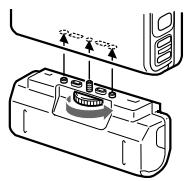
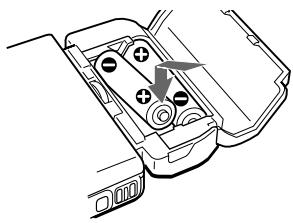
1 Attach the supplied battery case.
2 Insert two LR6 (size AA) dry batteries or a nickel metal hydride rechargeable battery.
Note
You cannot charge the nickel metal hydride rechargeable battery on this recorder. Use only the recommended battery charger (not supplied).
Battery life
| Batteries | Recording | Playback |
| LIP-8 lithium ion rechargeable battery | Approx. 3.5 hours | Approx. 5.5 hours |
| R6(size AA) Sony alkaline dry batteries LR6(SG) x 2 | Approx. 4.5 hours | Approx. 9 hours |
| BP-DM20 nickel metal hydride rechargeable battery | Approx. 4.5 hours | Approx. 6.5 hours |
| LIP-8 +LR6(SG) x 2 | Approx. 8 hours | Approx. 16 hours |
| LIP-8 +BP-DM20 | Approx. 8 hours | Approx. 13 hours |
When to replace the batteries
When the dry batteries or rechargeable battery are weak, ☐ flashes in the display of the recorder and "LoBATT" appears in the display of the remote control. Replace the dry batteries or charge the rechargeable battery.
▶Additional information
Error messages
If the recorder cannot carry out an operation, error messages may flash in the display window as follows. The words in parentheses are the messages that appear on the display window of the headphone's remote control.
BLANK DISC (BLANK):
You tried to play or edit an MD with no recording on it.
CONNECTION ERROR (−):
The recorder is not attached to the station correctly.
DISC ERROR (ERROR):
The recorder cannot read the MD (it is scratched or dirty). Reinsert the MD. If the same message still appears, replace the MD.
DISC FULL (FULL):
There is no more space on the MD (less than 12 seconds available).
EDIT BUSY (BUSY):
You tried to operate the recorder while it was accessing the recorded data. Wait until the message goes out (in rare cases, it may take 2-3 minutes).
- (LoBATT):
The rechargeable battery or dry batteries are weak. Charge the rechargeable battery or replace the dry batteries.
MEMORY OVER (MEMORY):
You tried to record when there is no indication in the display, with the recorder placed where it receives continuous vibration. Put the recorder on a stable place, and start recording again.
NAME FULL (-)
You tried to enter more than 200 characters for a track or disc name, or the total characters entered in the MD exceeded the limit (about 1700). Enter the characters within the limit.
NO DIGITAL SIGNAL (-):
The recorder could not detect digital input signals. Make sure that the source is connected firmly.
NO DISC (NoDISC):
You tried to play or record with no disc in the recorder.
P/B ONLY (PbONLY):
You tried to record or edit on a premastered MD (P/B means playback).
PROTECTED DISC (SAVED):
You tried to record or edit on an MD with its tab in the record-protect position.
PROTECTED TRACK (TrPROT):
You tried to record over or edit a track which has been protected from being recorded over. ^1)
SCMS NO COPY (-):
You tried to make a copy from a disc that is protected by the Serial Copy Management System. You cannot make copies from a digitally connected source which was itself recorded using a digital connection. Use the analog connection instead.
SORRY (SORRY):
You tried to erase a track mark while playing the MD or at the beginning of the first track.
You tried to erase a track mark to combine tracks the recorder cannot combine. ^2)
TEMPERATURE OVER (TEMP):
Heat has built up in the recorder. Wait until the recorder cools down.
TRACK FULL (TrFULL):
There is no more space for new data on the MD you are editing. Erase unnecessary tracks.
1) Track-protected MiniDiscs — Some MD recorders will let you protect individual tracks from being recorded over. This recorder, however, does not offer this feature.
2) If you have recorded or erased many times on the same MD, the data of a single track may be scattered throughout the MD.
When the data is scattered in groups of less than 12 seconds long, the recorder will not be able to combine the tracks.