
HCA62844WH - Range hood BEKO - Free user manual and instructions
Find the device manual for free HCA62844WH BEKO in PDF.
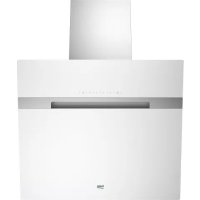



| Product Type | Wall-mounted cooker hood |
| Brand | Beko |
| Model | HCA62844WH |
| Width (cm) | 60 |
| Minimum installation height (gas) | 50 cm |
| Minimum installation height (electric) | 45 cm |
| Exhaust duct diameter | 120 mm or 150 mm |
| Power supply | 220-240 V, 50/60 Hz |
| Number of speeds | 4 (including an intensive speed) |
| Lighting | LED bulb with 5 brightness levels |
| Grease filter | Washable metal filter (dishwasher safe) |
| Charcoal filter | Circular charcoal filter, replace every 4 months |
| Filter saturation alarm | Yes (grease and charcoal filter) |
| Control panel | Touch with LED indicators |
| Cleaning | Soft cloth and mild detergent; do not use alcohol or abrasives |
| Safety | Automatic shutdown in case of overheating, mandatory grounding |
| Approximate weight (kg) | 10 |
Frequently Asked Questions - HCA62844WH BEKO
User questions about HCA62844WH BEKO
0 question about this device. Answer the ones you know or ask your own.
Ask a new question about this device
Download the instructions for your Range hood in PDF format for free! Find your manual HCA62844WH - BEKO and take your electronic device back in hand. On this page are published all the documents necessary for the use of your device. HCA62844WH by BEKO.
USER MANUAL HCA62844WH BEKO
Please read this manual first!
Dear Customers!
Thank you for preferring a Beko product. We hope that you get the best results from your product which has been manufactured with high quality and state-of-the-art technology. Therefore, please read this entire user manual and all other accompanying documents carefully before using the product and keep it as a reference for future use. If you handover the product to someone else, give the user manual as well. Follow all warnings and information in the user manual.
Remember that this user manual is also applicable for several other models. Differences between the models are explicitly described in the manual.
Meanings of the Symbols
Following symbols are used in the various section of this manual:

Important information and useful hints about usage.

WARNING: Warnings for dangerous situations concerning the safety of life and property.
Warning for electric shock.
Warning for hot surfaces.

This product has been manufactured in environmental friendly modern plants without giving any harm to the nature.
ENGLISH 5-18
DEUTSCH 19-36
БЪЛГАРСКИ 37-54
ČESKY 55-70
DUTCH 71-88
ESTONIAN 89-104
FRENCH 105-122
CROATIAN 123-138
ITALIAN 139-155
LITHUANIAN 156-172
POLISH 173-189
PORTUGUESE 190-207
RUSSIAN 208-226
SLOVAK 227-242
1 Important safety and environmental instructions 5-8
1.1 General safety 5 1.1.1 Electrical safety 5 1.1.2 Product safety 6 1.1.3 Children's safety 7 1.2 Intended use 7 1.3 Compliance with WEEE Directive and disposing of the waste product 8 Compliance with RoHS Directive: 8 1.4 Package information 8
2 Technical specifications of your appliance 9
3 Installing your appliance 10-13
3.1 Power connection 10 3.2 Installation 10 3.2.1 Before you start installation: 10 3.2.2 Preparation for the Assembly of the Hood onto the Wall 11 3.2.3 Assembling the hood flue 12 3.2.4 Assembly of the Hood onto the Wall 13
4 Operating your appliance 16
4.1 Operation 16 4.2 Control with levels 16 4.3 Grease filter alarm 16 4.4 Charcoal filter alarm 16 4.5 Energy efficient usage: 16
5 Cleaning and maintenance 17-18
5.1 Cleaning 17 5.2 Cleaning the glass panel 17 5.3 Charcoal filter (filtered models only) 17 Circular charcoal filter. 17 5.4 Grease filter 17 5.5 Cleaning 18 5.6 Replacing the lamps 18
Important safety and environmental instructions
This section contains safety instructions that will help protect from risk of personal injury or property damage. Failure to follow these instructions invalidates the granted warranty.
1.1 General safety
- Always have the installation and repairing procedures carried out by the Authorized Service Agent. Manufacturing firm shall not be held responsible for damages that may be caused by unauthorized persons.
- This appliance is not intended for use by persons (including children) with reduced physical, sensory or mental capabilities, or lack of experience and knowledge. Children should be supervised to ensure that they do not play with the appliance.
1.1.1 Electrical safety
Always unplug the appliance from the mains supply during installation, maintenance, cleaning and repair operations.
- If the power cable is faulty, it should be replaced by a qualified person certified by the manufacturer, after-sales service or similar (preferably an electrician) or a person described by the importer.
- Operating voltage is 220 to 240 volts.
- If the appliance has a failure, it should not be operated unless it is repaired by the Authorized Service Agent. There is the risk of electric shock!
- Do not route power cable close to hobs. Otherwise power cable may cause fire since it melts down easily.
- Never plug the hood before installation is completed. In order to obtain the best performance, external conductor must not be longer than 4 m. It must not contain more than 2 perpendicular (90°) angles and its diameter must be min. φ120 mm.
- Disconnect the appliance from mains before any intervention to the internal parts of the appliance.
- Use the appliance with a grounded outlet only.
1
Important safety and environmental instructions
1.1.2 Product safety
- You can use a pipe with a diameter of 120 mm or 150 mm on the flue connection of the hood.
- Do not make connections to the flues connected with stoves, exhaust shafts or flues with rising flames. Observe the rules set by authorities on the discharge of exhaust air.
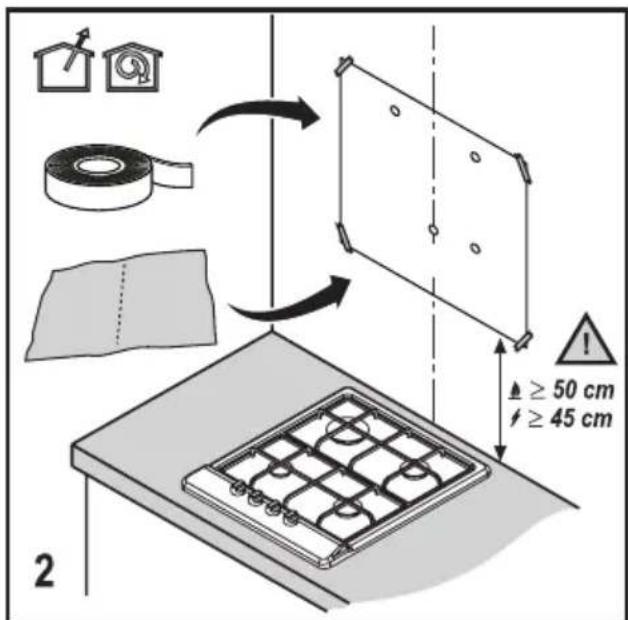
- The height between the lower surface of the hood and upper surface of the stove/oven should not be less than 50 cm for gas hobs and 45 cm for electric hobs.
- Do not operate the hood without aluminum filters and do not remove the filters while it is operated.
- Never touch the hood's lamps after they are operated for a long time. Hot lamps may burn your hand.
- Avoid large flames beneath the product. Otherwise, particles on the oil filter may ignite and lead to a fire.
- Turn on the hobs after placing pans or pots on them. Otherwise, rising heat may deform certain parts of your product.
- Turn off the hobs before taking away pans or pots.
- Avoid inflammable materials under the hood.
- Oil may ignite while frying foods. Therefore, be careful about cloths and curtains.
- Never leave the cooker unattended when frying foods; otherwise hot oil may cause fire.
- There is the risk of fire if your hood is not cleaned in the specified periods.
- Be extremely careful and wear gloves when cleaning the hood.
- We advise you to operate the appliance a few minutes before starting to cook in order to increase the suction power. Thus, you shall have a continuous and stable suction power when the vapors arise.
- Operate your hood for 15 minutes more after the end of cooking or frying in order to remove the smell and cooking vapor in the kitchen.
- When the hood is in use, especially together with gas cookers, make sure that the environment is ventilated with clean air.
Important safety and environmental instructions
- Pay attention not to connect the appliance to the flues used by non-electrical devices. (E.g.: Heater flue).
- Simultaneous and smooth operation of the hood and another device that require air is only possible when a low pressure of 4 Pa (0.04 mbar) is reached, and thus the reabsorption of the gas is avoided. This can only be achieved by means of air coming from uncovered openings (door, window, ventilation openings or other technical measures). Pay utmost attention to provide sufficient air flow. A flue that provides air ingress/egress is not enough for this purpose.
1.1.3 Children's safety
- Packaging materials are dangerous to children. Keep packaging materials in a safe place out of reach of children.
- Electrical appliances are dangerous to children. Keep children away from the product. Do not allow children play with the appliance.
- This appliance can be used by the children who are at the age of 8 or over and by the people who have limited physical, sensory or mental capacity or who do not have knowledge and experience, as long as they are supervised with regard to safe use of the product or they are instructed accordingly and understand the risks of using the product. Children should not play with the appliance.
- CAUTION: Accessible parts may heat up when used with a cooking device.
1.2 Intended use
- This appliance is intended for domestic use. It is not suitable for commercial use and it must not be used out of its intended use.
- The manufacturer shall not be liable for any damage caused by improper use or handling. Service life of your appliance is 10 years. This is the period required for availability of spare parts for proper functioning of the product.
- WARNING: Failure to fix the screws in concordance with the instructions provided in the manual may lead to electrical hazards.
1
Important safety and environmental instructions
1.3 Compliance with WEEE Directive and disposing of the waste product
This product complies with EU WEEE Directive (2012/19/EU). This product bears a classification symbol for waste electrical and electronic equipment (WEEE).
This product has been manufactured with high quality parts and materials which can be reused and are suitable for recycling. Do not dispose of the waste product with normal domestic and other wastes at the end of its service life. Take it to the collection center for the recycling of electrical and electronic equipment. Please consult your local authorities to learn about these collection centers.
Compliance with RoHS Directive:
The product you have purchased complies with EU RoHS Directive (2011/65/EU). It does not contain harmful and prohibited materials specified in the Directive.
1.4 Package information

Package of the product is made of recyclable materials in accordance with our National Legislation. Do not dispose of
the packaging materials together with the domestic or other wastes. Take them to the packaging material collection points designated by the local authorities.
2 Technical specifications of your appliance
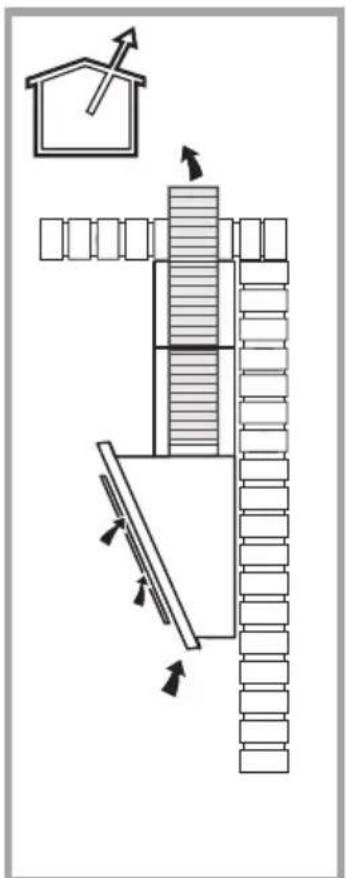
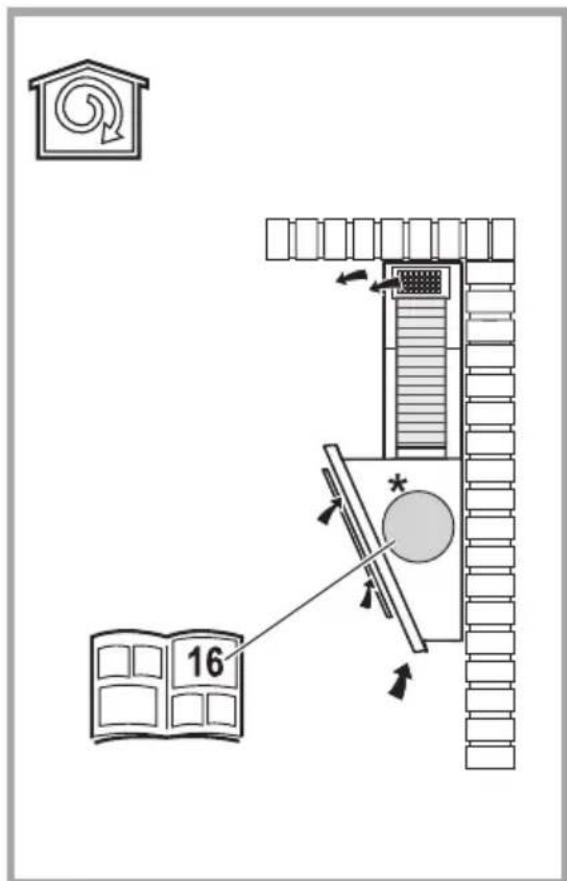

Usage with charcoal filterUsage with flue
Markings on the product or the values stated in other documents supplied with the product are values obtained under laboratory conditions as per relevant standards. These values may vary depending on operational and environmental conditions of the product.
B Installing your appliance
Please consult the nearest Authorized Service Agent for the installation of the hood.
*Preparation of location and electrical installation for the product is under customer's responsibility.

WARNING: Remove the protective film (if any) on the hood and flue surface after the installation.
The height between the lower surface of the hood and the upper surface of a hob should not be less than 50 cm for gas hobs and 45 cm for electric hobs.
Have a qualified electrician make the electrical connection.
Install your product so that you can reach the power connection (plug, outlet) easily after installation.
Dimensions are given in mm.
3.1. Power connection
- Main power supply should comply with the values indicated on the plate inside the hood. Connect the hood to an outlet in compliance with current regulations by means of a plug and place it within an accessible area. After installation, if the device doesn't have a plug (direct mains supply connection) or the plug is out of reach, use a double-pole switch in line with standards that enables disconnection of the main plug under circumstances related to overcurrent category III.

WARNING: Before reconnecting the hood to the main power source and checking if it functions correctly, ensure that the main power cable is connected properly.
- The hood is equipped with a special power cable. Contact an Authorised Service Agent if the power cable is damaged.
3.2. Installation
3.2.1 Before you start installation:
- Check that the product purchased has appropriate sizes for the installation location.
- Remove the active charcoal (*) filter if supplied (see also relative paragraph). That/those will only be installed if you want to use the hood as a filtered model.
- Check if any other material (such as screw package (*), warranty card (*), etc.) is delivered in the hood and if available, remove them and keep elsewhere.
- If possible, remove freestanding or sliding hob and pull it aside in order to reach rear wall / ceiling easily. If not possible, cover the bench, hob or oven with a thick protective cloth in order to secure them against damage and dirt. Select a flat surface to install the appliance. Cover the surface with a protective cloth and place all awning hood parts and hardware in it.
- Besides, check if a plug is available on the assembly area of the hood (besides, on the accessible area after assembling the hood) and check if connecting the hood to the outside (only for the model with aspiration) is possible.
- Finish all required operations related to the wall (e.g., plugging in the power plug and/or opening a hole for the discharge hose).
Wide dowels are available to allow for fixing the hood on a variety of wall/ceiling types. Additionally, conformity of the material to the wall/ceiling type should be confirmed by a qualified technician. The wall/ceiling should be able to sustain the hood. Do not assemble the appliance on tile, plaster, or silicon surfaces. Assemble it only onto a wall.
If a panel and/or side wall and/or furniture exist, check that there is sufficient space for assembly of the hood and that the control panel is easily accessible.
3 Installing your appliance
3.2.2 Preparation for the Assembly of the Hood onto the Wall
Information required for the preparation of the installation place for your hood is given below. 1. Mark the surface where the assembly template is going to be hung. (Figure 1)
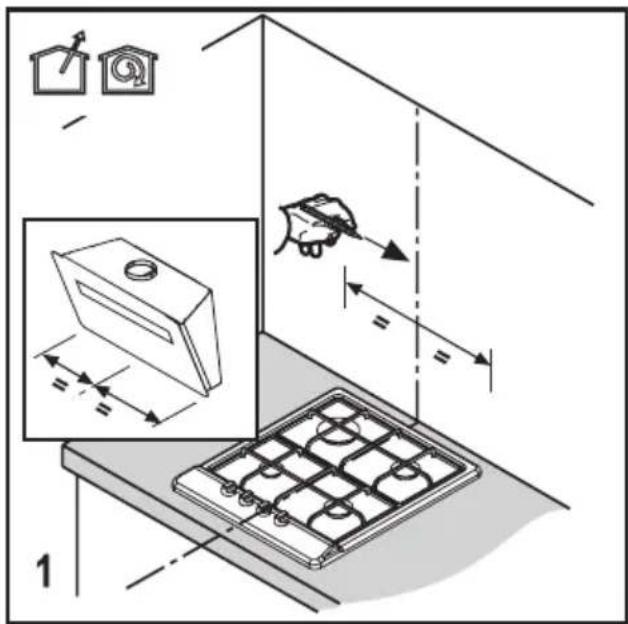
- Affix the assembly template onto the installation place of the hood. (Figure 2)
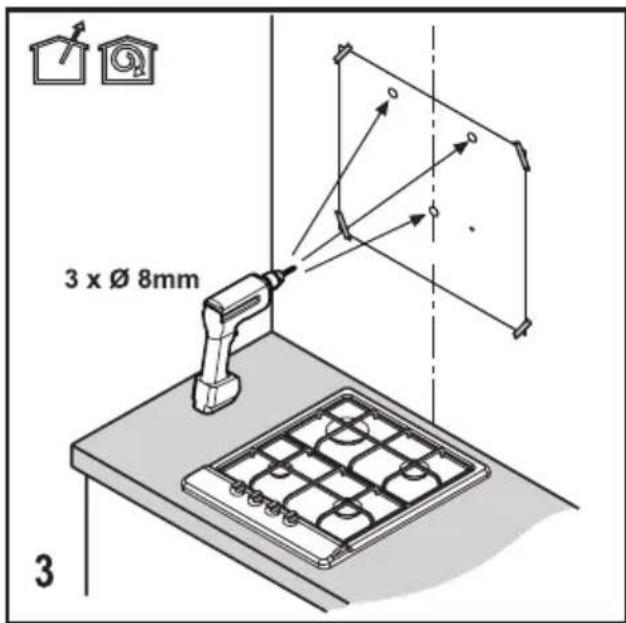
- Drill a hole with an 8 mm bit on the marked points. (Figure 3)
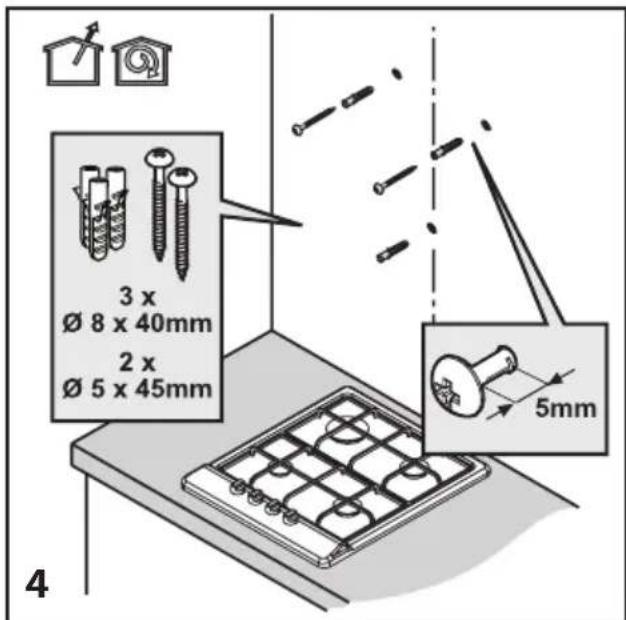
- Hammer 3 pieces of 8 x 40 mm dowels into the drilled holes. Screw 2 pieces of 5 x 45 mm hanging screws into the dowels hammered above. There must be a gap of 5 mm between the screw head and the wall. (Figure 4)
3.2.3 Assembling the hood flue
Drill holes on the marked points with an 8 mm bit in order to attach the flue plate. Hammer 2 pieces of 8 x 40 mm dowels into the drilled holes. Screw 2 pieces of 5 x 45 mm hanging screws into the dowels hammered.
(Figure 5)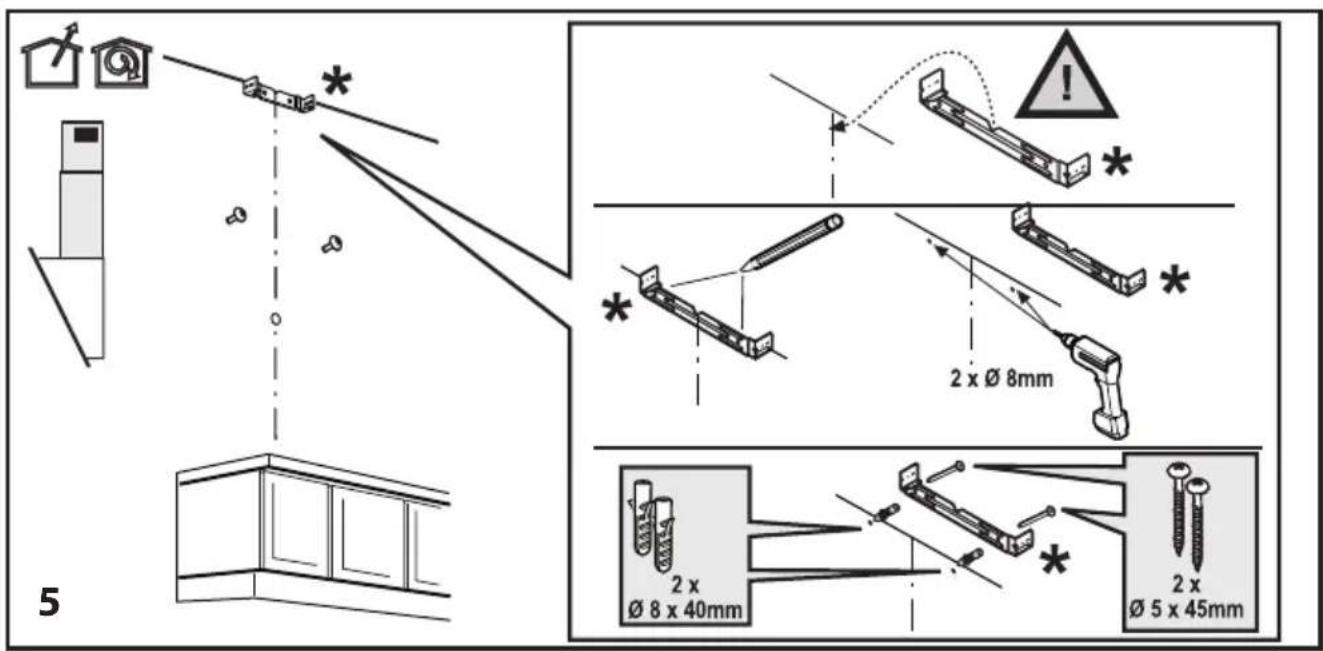
3 Installing your appliance
3.2.4 Assembly of the Hood onto the Wall
- Remove the front panel to attach the hood onto the wall. (Figure 7)
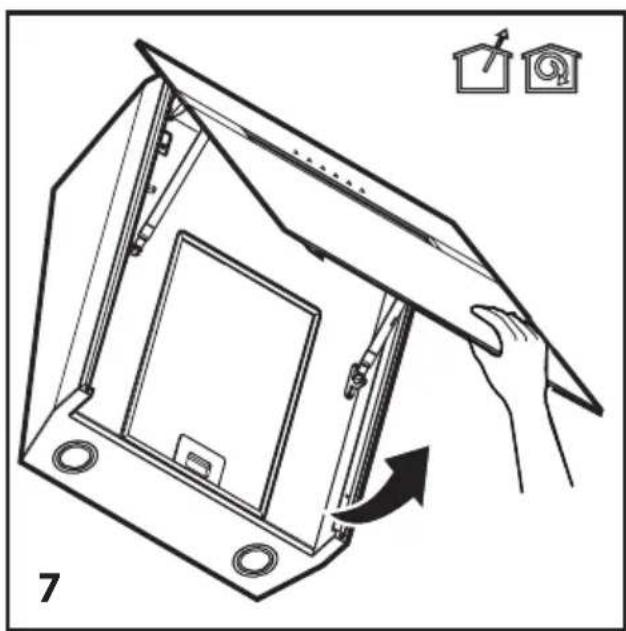
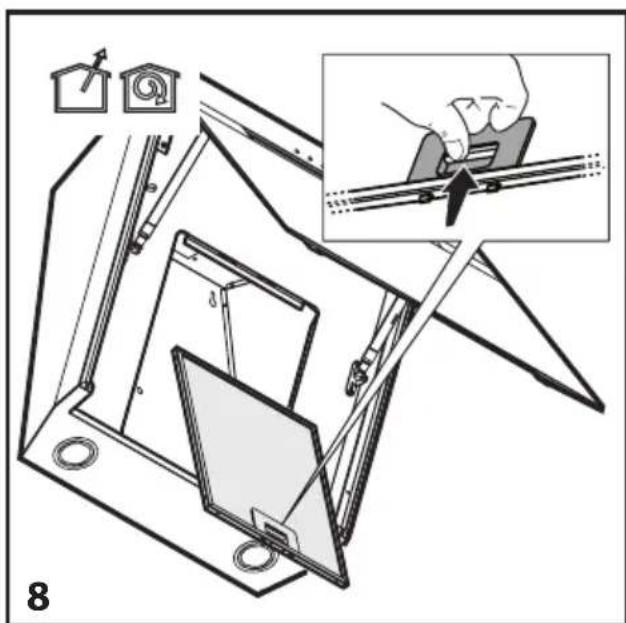
- Remove the filters. (Figure 8)
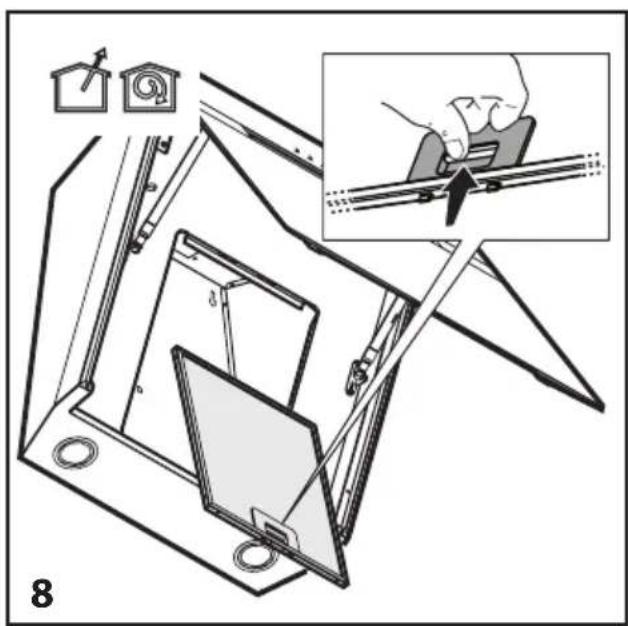
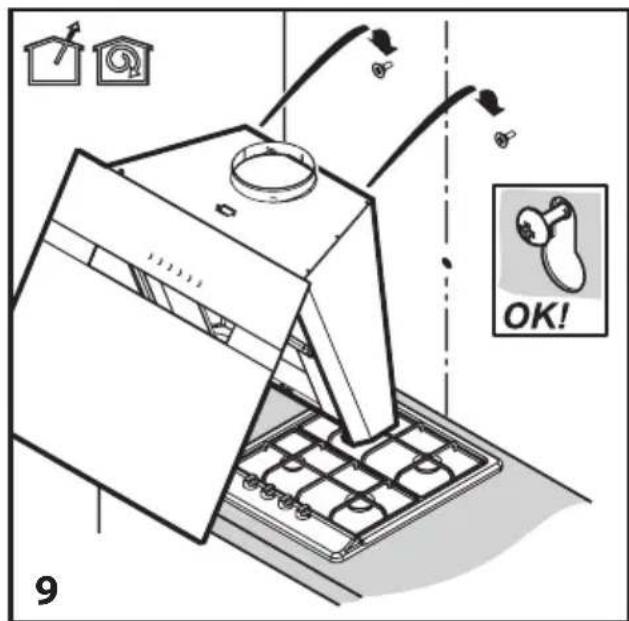
- Place the hood so that the screws align with the screw heads. (Figure 9)
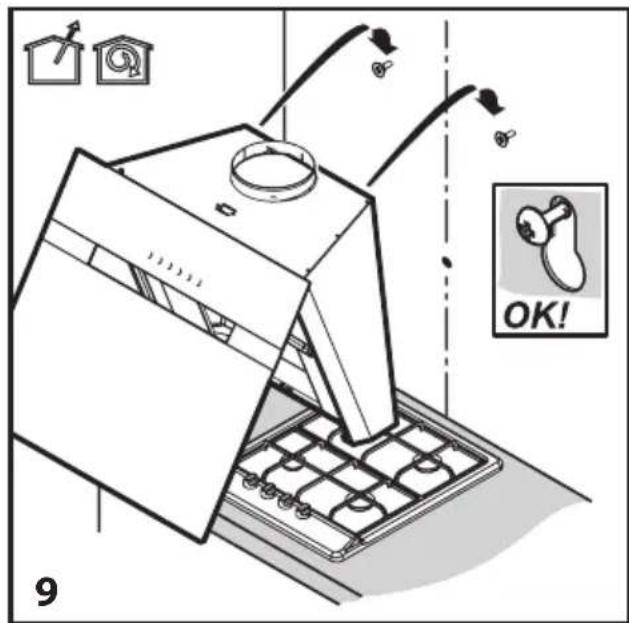
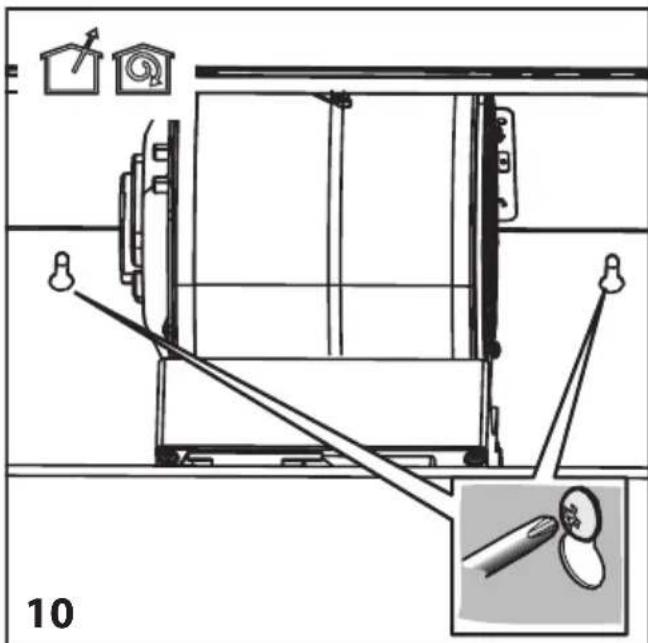
- Tighten the screws to secure the hood. (Figure 10)
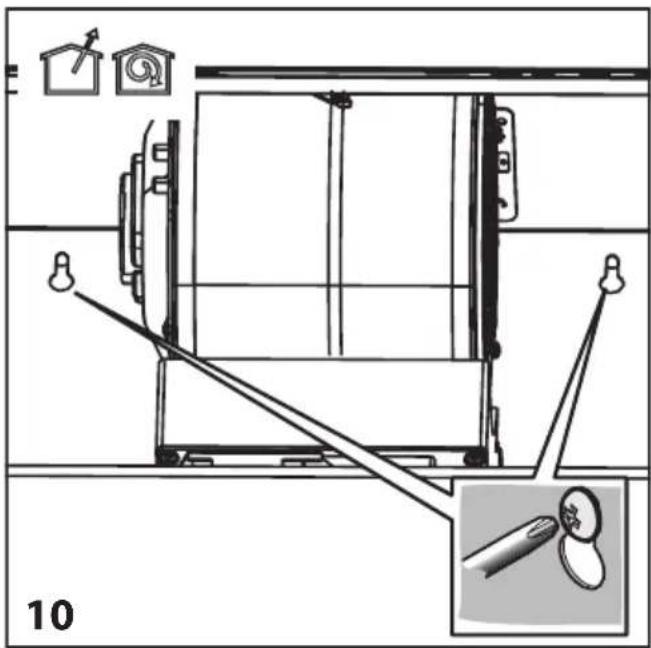
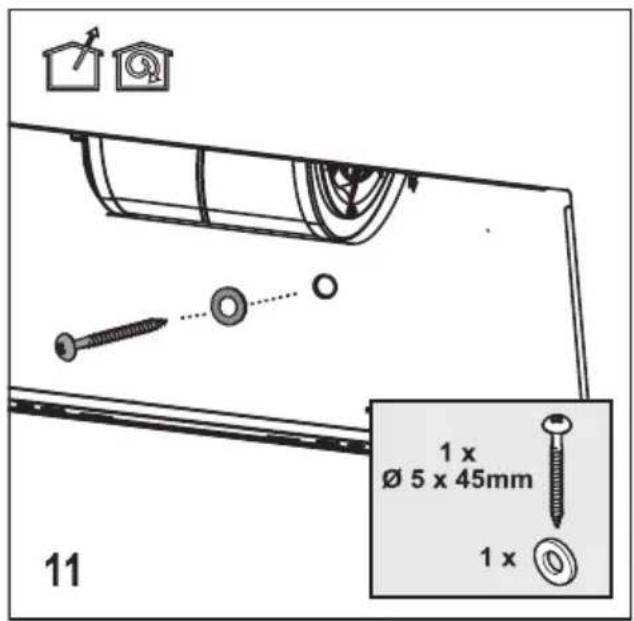
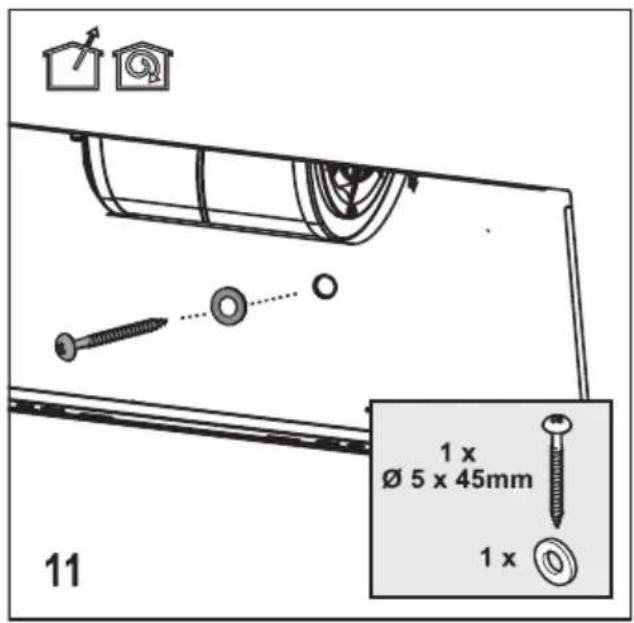
- To secure the hood, use washers and tighten with 0.5 x 45 screws. (Figure 11)
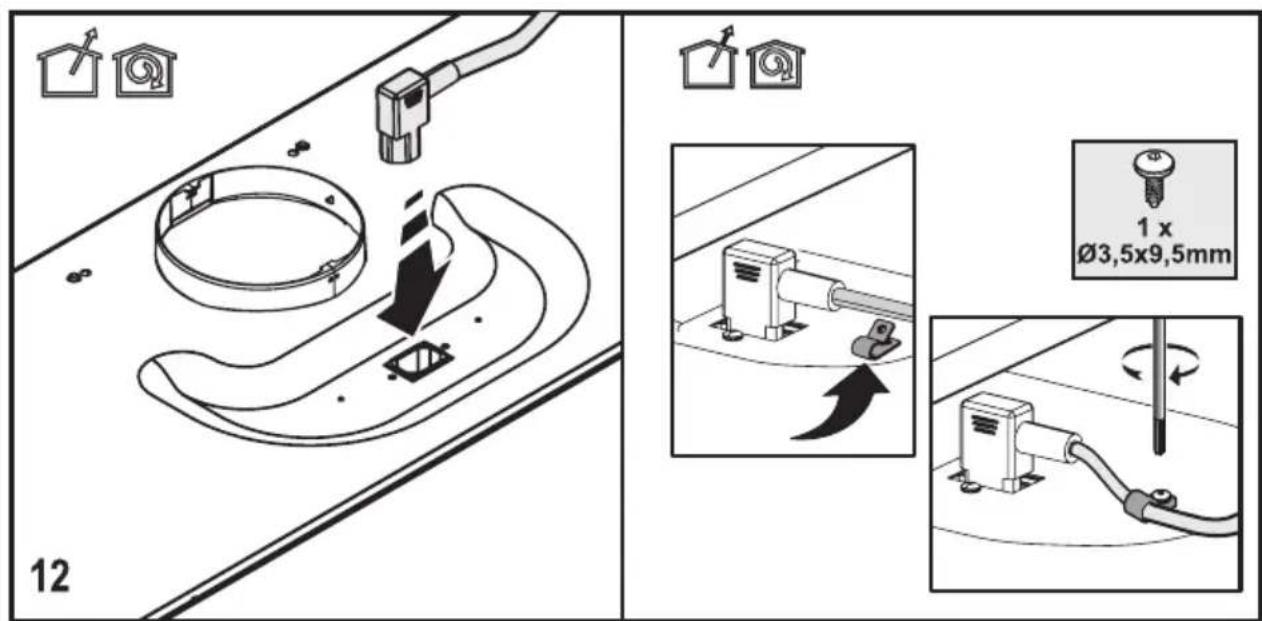
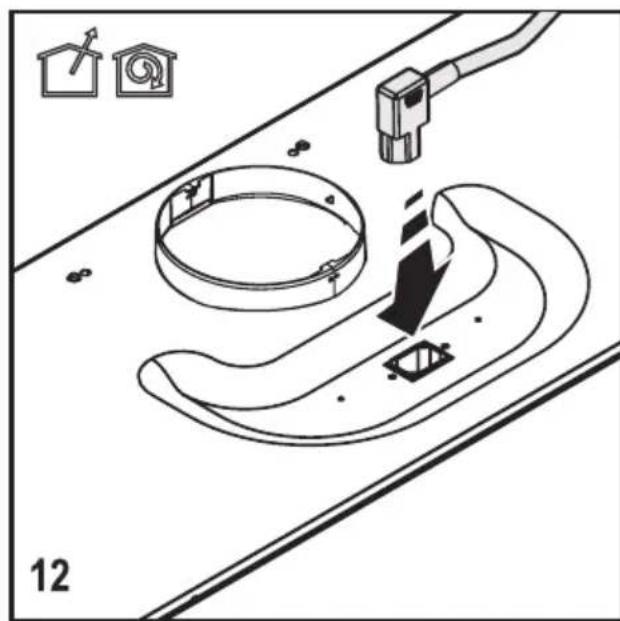
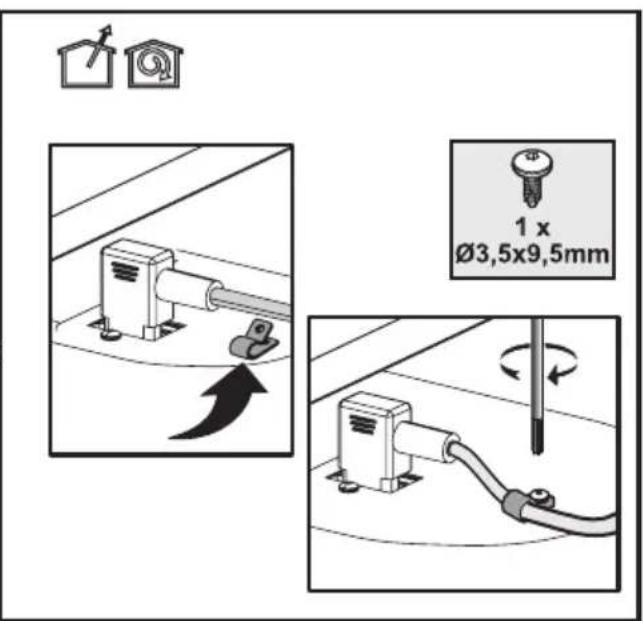
- Plug in the power cable. Use a 3.5 x 9.5 screw to secure the cable. (Figure 12)
Installing your appliance
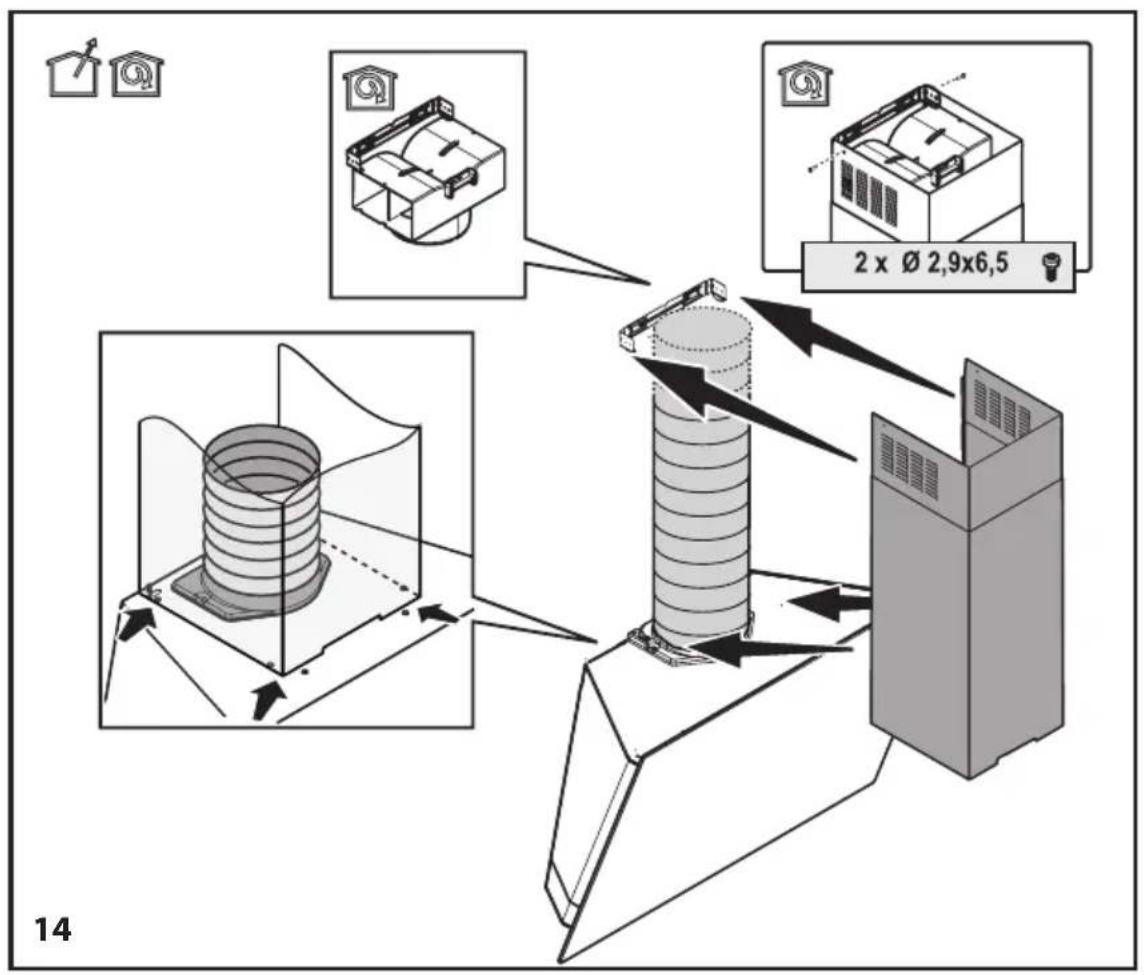
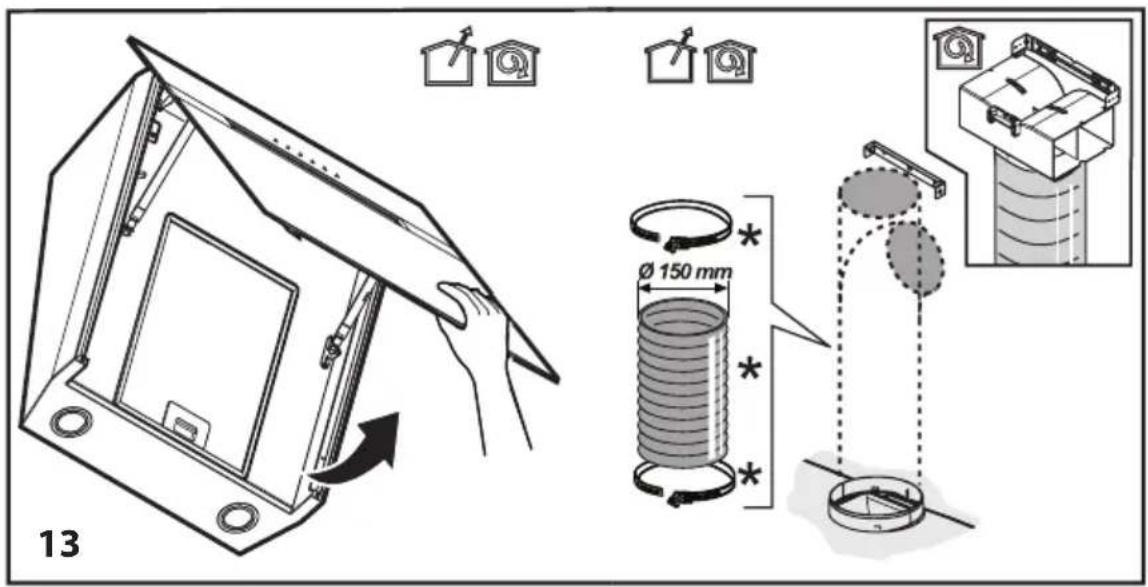
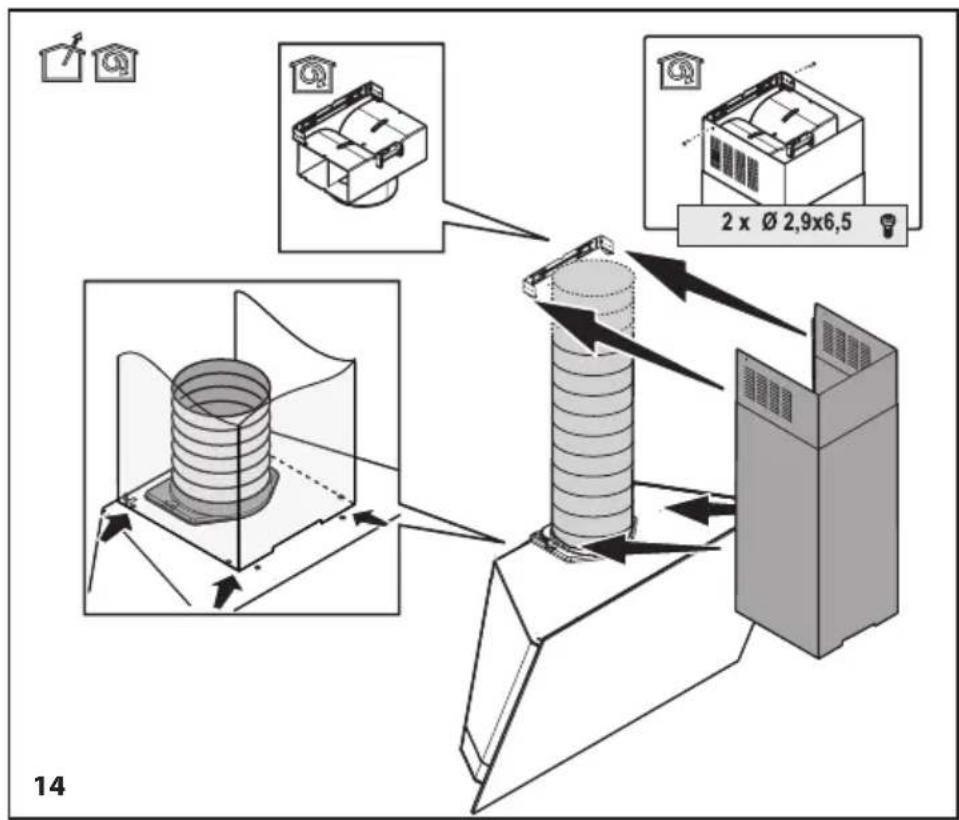
- Connect the flue according to the figures.
Figures 13, 14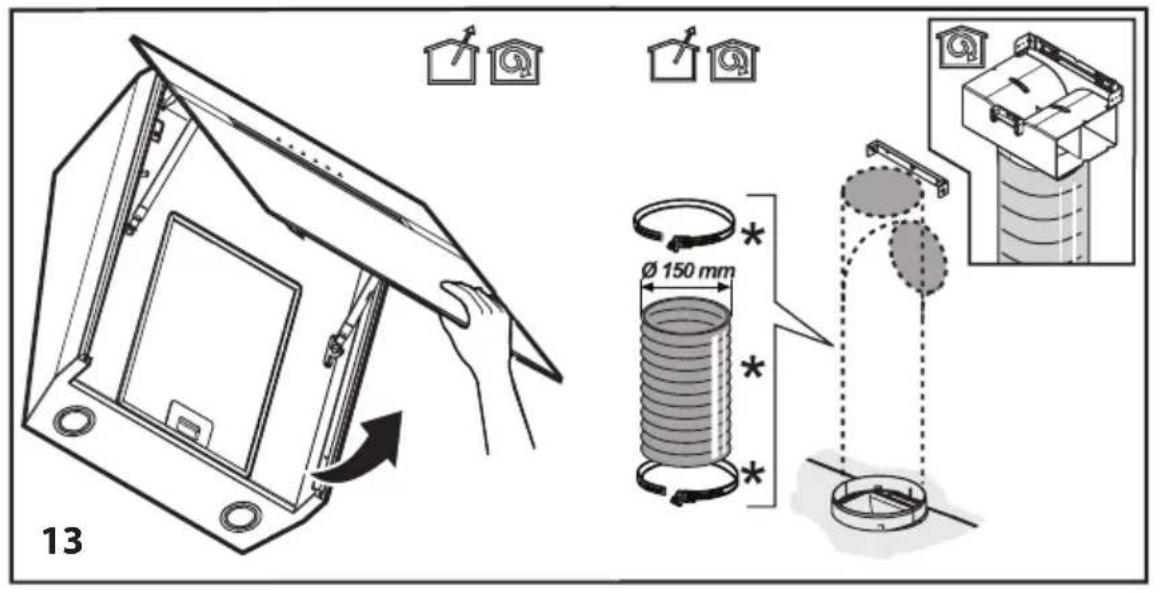
4 Operating your appliance
4.1 Operation
- Use high suction power if excessive vapor is formed in the kitchen. It is recommended that the hob hood suction unit is turned on 5 minutes before beginning cooking and is left in operation during and for 15 minutes after cooking.
4.2 Control with levels
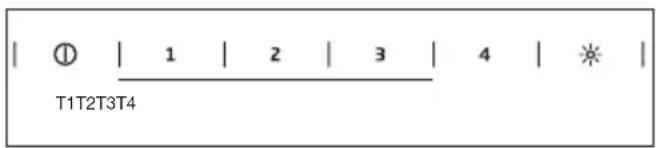
T1. On/Off key. If the appliance is OFF, turns on the appliance. If the appliance is at any speed level, turns it OFF. T2. Operates the appliance in speed levels 1, 2, and 3.
Operates the appliance in speed level 1. LED 1 lights.
Operates the appliance in speed level 2. LED 2 lights.
Operates the appliance at speed level 3. LED 3 lights up.
T3. Operates the appliance at speed level 4 for 5 minutes. While the appliance is in operation at any level (1, 2, 3), if this key is pressed, the current speed LED will become steady and speed level 4 LED will flash. At the end of 5 minutes, speed level 4 LED will switch off and the product will exit max speed mode. If speed level 4 key is pressed before 5 minutes are over, the product exits max speed mode. T4. Lamp On/Off key. Briefly press this key to turn the lamp ON/OFF. Press and hold for more than 1 second to select one of the 5 brightness levels.
4.3 Grease filter alarm
Flashing of LED 1 warns the user to clean the metal filter. When this alarm is given, it is time to clean the grease filter. Press and hold the ON/OFF key for 3 seconds to reset the warning while the product is in operation. LED 1 will stop flashing.
4.4 Charcoal filter alarm
The product is delivered with the charcoal filter alarm deactivated. Press and hold keys 1 and 2 for 3 seconds to activate the charcoal filter cleaning warning while the product is OFF. First LED 1 and then LED 1 and 2 light up and indicate that the warning is activated. Press and hold keys 1 and 2 for 3 seconds to deactivate the warning while the product is OFF. First LED 1 and 2 then LED 1 light up and indicate that the warning is deactivated.
Flashing of LED 2 warns the user to clean the charcoal filter. Press and hold the ON/OFF key for 3 seconds to reset the warning while the product is in operation.

If both metal and charcoal filter warnings are activated simultaneously, resetting should be performed separately for each warning.
4.5 Energy efficient usage:
- When operating the hood, adjust the speed level according to the odour and vapour intensity in order to prevent unnecessary power consumption.
- Use low speeds in normal conditions (1-2), and high speeds (3-4) when smell and vapors are intensified.
- Lamps on the hood are intended for illuminating the cooking zone. Using them to illuminate the ambient/kitchen will result in unnecessary power consumption and inadequate illumination.
5 Cleaning and maintenance
5.1 Cleaning
- Prior to cleaning and maintenance, unplug the appliance or turn the main switch off or loosen/switch off the fuse that supplies the hood.
- The hood should be cleaned regularly, both internally and externally, at least as often as you perform maintenance on the grease filters.
- Clean the hood using a clean cloth dampened with a mixture of warm water and neutral liquid detergent.
- Do not use abrasive products. DO NOT USE ALCOHOL!

WARNING: Failure to follow the basic cleaning instructions for the hood and to replace the filters may cause fire.
- For this reason, we recommend that you follow the instructions mentioned above.
- The manufacturer cannot be held responsible for motor and fire damage caused by inappropriate maintenance or failure to follow the safety recommendations mentioned above.
5.2 Cleaning the glass panel
- The glass panel and suction surfaces should be cleaned at the same intervals as the grease filters.
- Clean with a damp cloth and a neutral liquid detergent.
- Avoid using abrasive products. DO NOT CLEAN WITH ALCOHOL!
5.3 Charcoal filter (filtered models only)
- After a long period of use, the charcoal filter may become saturated depending on the type of cooking and whether the oil filter is cleaned regularly.
- In any case, the cartridge should be replaced at least every four months (or when the filter fullness indicator system indicates that the filter should be replaced, if available in the model). (Figure 16)
- Charcoal filter cannot be washed and reused.
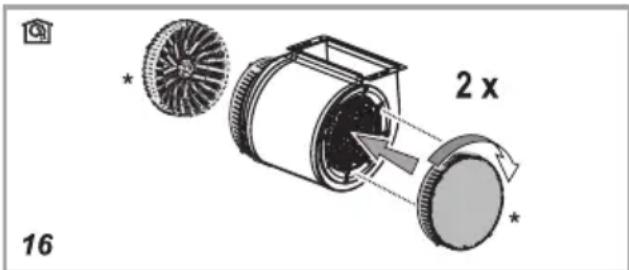
Circular charcoal filter
- Place one filter next to the protection cages of motor propeller, then turn the part clockwise.
- For disassembly, turn the part counterclockwise.
5.4 Grease filter
- Retains grease particles caused by cooking procedure.
- Grease filter should be cleaned monthly (or filter fullness indicator system - if available in purchased model - indicates when it is time) using acid-free detergent by hand or in a dishwasher with low temperature and short program.
- When washed in a dishwasher, color of grease filter may fade slightly, but this does not affect its filtering capacity.
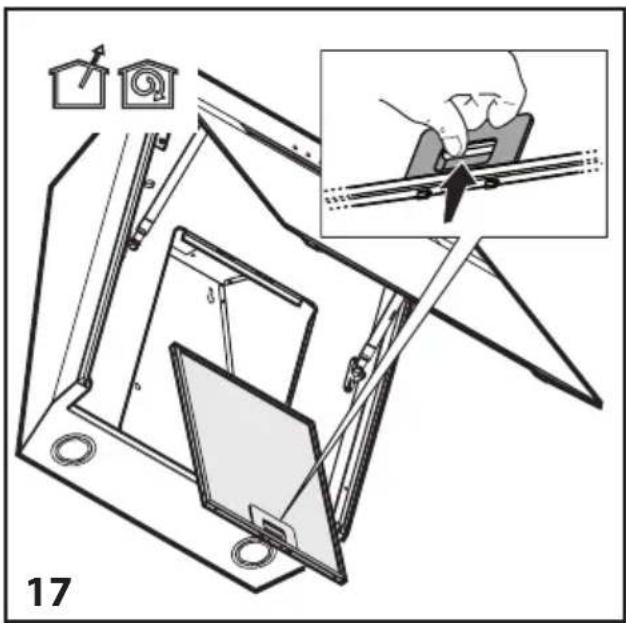
- Pull spring release lever in order to remove grease filter. (Figure 17)
5 Cleaning and maintenance
5.5 Cleaning
Particularly do not neglect to clean your hood immediately after you have made frying. - Use a soft cloth soaked with liquid detergent to clean the outer surface of your hood. - Never use abrasive or scratching materials for cleaning. - You may use the cleaning agents commercially available for persistent grease etc. by following the warnings on the product. In order not the scratch the brushed steel body, wipe in the same direction with the bush trace. - Do not use cleaning agents containing hydrochloric acid, bleach or abrasive powders in order to maintain the surface quality of your product. Use a cloth dampened in soapy water or special stainless steel cleaning spray for stainless steel surfaces. Remove the protective foil on the appliance.

Caution: You may cause a fire if you do not follow the instructions on the cleaning and replacement of the filters of your hood.

If you need to transport the appliance:
Keep the original packaging of the appliance. Transport the appliance with its original package, and follow the transport markings on the original package.
If you do not have the original package:
- Do not put heavy objects on the hood.
- Protect the outer surface from impacts.
- Pack the product so that it would not be damaged during transport.
5.6 Replacing the lamps

WARNING: Prior to touching the light bulbs, ensure that they are cooled down.

Contact Authorized Service Agent for lamp replacement.
4.4 Activating the filter change alarm
The product is delivered with the filter change alarm deactivated. Press and hold buttons 1 and 2 for 3 seconds to activate the filter change alarm when the product is switched off. The light first illuminates indicator 1, and then 1 and 2, to show that the alarm is activated. Press and hold buttons 1 and 2 for 3 seconds to deactivate the alarm when the product is switched off. The light first illuminates indicators 1 and 2, and then 1, to show that the alarm is deactivated.
Illumination of indicator 2 warns the user to change the filter. Press and hold the button for on/off for 3 seconds to reset the warning while the product is operating.

If the metal filter change and filter change warnings are activated simultaneously, resetting must be done separately for each warning.
4.5 Energy efficient use
- While the hood is operating, adjust the speed level according to the intensity of the cooking fumes and vapors, to prevent unnecessary energy consumption.
- Use low speeds (1-2) under normal conditions and high speeds (3-4) when there is high intensity of cooking fumes and vapors.
- The hood lamps are intended for illuminating the cooking zone. Using them for general kitchen lighting will lead to unnecessary energy consumption and inadequate illumination.
5.1 Cleaning
- Before cleaning or maintenance, disconnect the appliance from the power supply by unplugging it or switching off the circuit breaker.
- The absorber must be cleaned regularly (at every cleaning and maintenance of the oil filter) from the outside and inside. Clean the absorber using a cloth dampened with warm water and neutral liquid detergent. Do not use abrasive products. DO NOT USE ALCOHOL.

WARNING: Failure to follow the basic instructions for cleaning the absorber and not replacing the filters may cause a fire.
- We recommend that you follow the instructions below.
- The manufacturer is not responsible for damage or fire caused by improper use, incorrect installation, or failure to follow the safety instructions above.
4.4 Electrical connections
Electrical connections must be made by a qualified electrician.
The appliance must be installed so that the plug can be easily disconnected from the power supply (socket, outlet).
Dimensions are given in mm.
- Remove the filters. (Figure 8)
- Place the hood so that the screw heads align with the corresponding marks. (Figure 9)
- Tighten the screws to fix the hood. (Figure 10)
3 Installation of the appliance
5. For the hood installation, use wall plugs and screws 5x45. (Figure 11)
6. Connect the cable. Use screw 3.5x9.5 to secure the cable. (Figure 12)
3. Installation of the device
7. Connect the smoke exhaust as shown in the figures. (Figures 13, 14)
4.1. Screen resolution
- PLEASE READ THIS MANUAL FIRST
- DEAR CUSTOMERS
- MEANINGS OF THE SYMBOLS
- IMPORTANT SAFETY AND ENVIRONMENTAL INSTRUCTIONS
- TECHNICAL SPECIFICATIONS OF YOUR APPLIANCE
- INSTALLING YOUR APPLIANCE
- OPERATING YOUR APPLIANCE
- CLEANING AND MAINTENANCE
- GENERAL SAFETY
- ELECTRICAL SAFETY
- PRODUCT SAFETY
- CHILDREN'S SAFETY
- INTENDED USE
- COMPLIANCE WITH WEEE DIRECTIVE AND DISPOSING OF THE WASTE PRODUCT
- COMPLIANCE WITH ROHS DIRECTIVE
- PACKAGE INFORMATION
- B INSTALLING YOUR APPLIANCE
- POWER CONNECTION
- INSTALLATION
- BEFORE YOU START INSTALLATION
- PREPARATION FOR THE ASSEMBLY OF THE HOOD ONTO THE WALL
- ASSEMBLING THE HOOD FLUE
- ASSEMBLY OF THE HOOD ONTO THE WALL
- OPERATION
- CONTROL WITH LEVELS
- GREASE FILTER ALARM
- CHARCOAL FILTER ALARM
- ENERGY EFFICIENT USAGE
- CLEANING
- CLEANING THE GLASS PANEL
- CHARCOAL FILTER (FILTERED MODELS ONLY)
- CIRCULAR CHARCOAL FILTER
- GREASE FILTER
- IF YOU NEED TO TRANSPORT THE APPLIANCE
- IF YOU DO NOT HAVE THE ORIGINAL PACKAGE
- REPLACING THE LAMPS
- ACTIVATING THE FILTER CHANGE ALARM
- ENERGY EFFICIENT USE
- ELECTRICAL CONNECTIONS
- INSTALLATION OF THE APPLIANCE
- INSTALLATION OF THE DEVICE
- SCREEN RESOLUTION
Brand : BEKO
Model : HCA62844WH
Category : Range hood