
BIC3 IKPIX2 - Cooker PKM - Free user manual and instructions
Find the device manual for free BIC3 IKPIX2 PKM in PDF.
| Product type | Built-in cooker with oven and ceramic hob |
| Brand | PKM |
| Model | BIC3 IKPIX2 |
| Oven installation dimensions (H x W) | 59.5 x 59.5 cm |
| Hob installation dimensions (H x W) | 3.8 x 58.0 cm |
| Gross / net weight | 41 kg / 36 kg |
| Power supply | 400V 3N~ 50Hz (three-phase) or 230V single-phase with bridges; max power 7.85 kW |
| Number of cooking zones | 4 (2x145 mm 1 kW, 2x180 mm 1.5/2 kW) |
| Oven type | Electric, conventional convection (top, bottom, top+bottom) |
| Net oven capacity | 55 litres |
| Oven functions | Top heating, bottom heating, combined; interior lighting |
| Oven temperature range | 50 °C to 250 °C |
| Door type | Black glass, removable for cleaning |
| Interior lighting | Bulb 25W, 230V, E14 base, resistant to 300 °C |
| Cleaning and maintenance | Clean with a soft cloth and mild detergent; do not use steam cleaner; remove the door for cleaning |
| Safety | Safety lock for the door; emergency stop via circuit breaker; detailed safety instructions |
| Spare parts and repairability | Use only original parts; replaceable bulb; door and glass hob removable possible |
| General information | Household use only; do not install near a refrigerator; minimum distance of 76 cm above |
| Conventional energy consumption | 0.74 kWh |
Frequently Asked Questions - BIC3 IKPIX2 PKM
User questions about BIC3 IKPIX2 PKM
0 question about this device. Answer the ones you know or ask your own.
Ask a new question about this device
Download the instructions for your Cooker in PDF format for free! Find your manual BIC3 IKPIX2 - PKM and take your electronic device back in hand. On this page are published all the documents necessary for the use of your device. BIC3 IKPIX2 by PKM.
USER MANUAL BIC3 IKPIX2 PKM
L1 = R,L2 = S,L3 = T
Dear customer! We would like to thank you for purchasing a product from our wide range of domestic appliances. Read the complete instruction manual before you operate the appliance for the first time. Retain this instruction manual in a safe place for future reference. If you transfer the appliance to a third party, also hand over this instruction manual.
Index
- Safety instructions.. 25
2.Installation 29
2.1 Unpacking and positioning 29
2.2 Installation/hob 29
2.3 Installation/oven 30
2.4 Electrical connection 31
- Main components 34
- Operation 34
4.1 Before the first use 34
4.2 Control panel 35
4.3 Hob. 35
4.4Oven 36
4.5 Helpful hints 37
4.6 How to save energy 37
- Cleaning and maintenance 38
5.1 Replacing of the illuminant 39
5.2 Removing of the door 39
5.3 Removing of the glass panel 40
5.4Trouble shooting. 40
- Technical data 41
7.Waste management. 41
8.Guarantee conditions. 42
EU - Declaration of Conformity
The products, which are described in this instruction manual, comply with the harmonized regulations.
The relevant documents can be requested from the final retailer by the competent authorities.
The figures in this instruction manual may differ in some details from the current design of your appliance. Nevertheless follow the instructions in such a case. Delivery without content.
Any modifications, which do not influence the functions of the appliance, shall remain reserved by the manufacturer. Please dispose of the packing with respect to your current local and municipal regulations.
The appliance you have purchased may be an enhanced version of the unit this manual was printed for. Nevertheless, the functions and operating conditions are identical. This manual is therefore still valid. Technical modifications as well as misprints shall remain reserved.
1. Safety instructions
Read the safety instructions carefully before you operate the appliance for the first time. All information included in those pages serve for the protection of the operator. If you ignore the safety instructions, you will endanger your health and life.
DANGER! indicates a hazardous situation which, if ignored, will result in death or serious injury.
WARNING! indicates a hazardous situation which, if ignored, could result in death or serious injury.
CAUTION! indicates a hazardous situation which, if not avoided, may result in minor or moderate injury.
NOTICE! indicates possible damage to the appliance.
Store this manual in a safe place so you can use it whenever it is needed. Strictly observe the instructions to avoid damage to persons and property.
Check the technical periphery of the appliance! Do all wires and connections to the appliance work properly? Or are they time-worn and do not match the technical requirements of the appliance? A check-up of existing and newly-made connections must be done by an authorized professional. All connections and energy-leading components (incl. wires inside a wall) must be checked by a
qualified professional. All modifications to the electrical mains to enable the installation of the appliance must be performed by a qualified professional.
The appliance is intended for private use only.
The appliance is intended for cooking in a private household only.
The appliance is intended for indoor-use only.
The appliance is not intended to be operated for commercial purposes, during camping and in public transport.
Operate the appliance in accordance with its intended use only.
Do not allow anybody who is not familiar with this instruction manual to operate the appliance.
This appliance may be operated by children aged from 8 years and above as well as by persons with reduced physical, sensory and mental capabilities or lack of experience and knowledge if they are supervised or have been instructed concerning the safe use of the appliance and do comprehend the hazards involved. Children must not play with the appliance. Cleaning and user-maintenance must not be carried out by children unless they are supervised.
DANGER!
- The appliance must be connected to the mains by a qualified professional, who is familiar with and adheres to the local requirements and supplementary regulations of your electricity supplier
- All electrical work must be carried out by a qualified professional. Do not modify the energy supply. The connection must be carried out in accordance with the current local and legal regulations
- Do not connect the appliance to the mains if the appliance itself or the power cord or the plug are visibly damaged.
- Never try to repair the appliance yourself. If the appliance does not operate properly, please contact the aftersales service. Original spare parts should be used only.
- When the power cord is damaged, it must be replaced by the manufacturer or an authorized aftersales service or a qualified professional only.
WARNING!
- Disconnect the appliance from the mains before you clean or maintain it.
- The appliance must always be grounded and protected corresponding to the requirements of your local energy supplier. The main current circuit must be equipped with a safety shut-down device.
- All modifications to the electrical mains to enable the installation of the appliance must be performed by a qualified professional.
- In case of an event caused by a technical malfunction, disconnect the appliance from the mains. Report the malfunction to your service centre so it can be
repaired.
- If the cooking zones are cracked or damaged in any way, switch off the appliance immediately and disconnect it from the mains (fuse box). Risk of electric shock.
- Do not carry out any modifications to your appliance.
- Do not repair the appliance yourself. Repairs carried out by unauthorized persons can cause serious damage. Always contact the nearest service centre. Only original spare-parts should be used for repairs.
- Unattended cooking with fat or oil can be dangerous and may result in fire. NEVER try to extinguish a fire with water, but switch off the appliance and then cover flame e.g. with a lid or a fire blanket
- The room the appliance is installed in must be dry and well-ventilated. When the appliance is installed, an easy access to all control elements is required.
- The veneering of cabinets has to be fixed with a heat-resistant glue, that is able to withstand a temperature of 100^ .
- Adjacent furniture or housing and all materials used for installation must be able to resist a temperature of min. 85^ above the ambient temperature of the room the appliance is installed in during operation.
- Do not install the appliance in rooms or at areas which contain flammable substances as petrol, gas or paint. This warning also refers to the vapour these substances relcase.
- Cooker-hoods should be installed according to their manufacturers' instructions.
- Do not heat your rooms or dry your washing by use of the appliance.
- Do not install the appliance near to curtains or upholstered furniture. RISK OF FIRE!
- Do not store any objects in the oven. RISK OF FIRE!
- Household equipment and connection leads must not touch the hot oven or the hob as the insulation material is usually not heat-resistant.
- Never use a steam cleaner to clean the appliance. The steam will cause serious damage to the electric components of the appliance. Risk of electrical shock!
- The accessible parts of the oven become hot during operation, so keep children away from the operating appliance. Touching the appliance while it is operating can cause serious burns.
- Children must not play with the appliance. Always supervise children if they are near the appliance.
- Only use hob guards designed by the manufacturer of the cooking appliance or indicated by the manufacturer of the appliance in the instructions for use as suitable or hob guards incorporated in the appliance. The use of inappropriate guards can cause accidents.
CAUTION!
-
The appliance becomes hot while operating. Do not touch the hot components inside the oven.
-
Do not use any aggressive, abrasive and acid detergents or sharp-edged items to clean the door of the oven. Otherwise you may scratch the surface and damage the glass.
- Do not put any cookware or backing trays directly on the base inside the oven. Do not cover the base inside the oven with aluminium foil.
- The hob should be clean at every time. Soiled cooking zones do not transfer the heat correctly.
- Protect the hob against corrosion.
- Switch off soiled cooking zones.
- Switch off the complete hob if any damage or malfunction occurs.
- Do not leave pans with prepared dishes based on fats and oils unattended on a operating cooking zone; hot fat can spontaneously catch fire.
- Keep the door of the oven always closed if you use one of the oven-functions.
- Do not put any cookware directly on the base inside the oven. Use the trays.
- The interior parts of the oven become extremely hot. Do not touch any parts inside the oven if you handle your cookware.
- Be careful if you open the door. Do not get in contact with the hot parts of the oven or the steam, which will escape the oven.
- Always use oven-gloves.
- This appliance complies with the current European safety legislation. We do wish to emphasize that this compliance does not negate the fact that the surfaces of the appliance will become hot while operating and will retain and emit heat even if it has stopped operating.
NOTICE
- When you move the appliance, hold it at its base and lift it carefully. Keep the appliance in an upright position.
- Never use the door for moving the appliance as you will damage the hinges.
- The appliance must be transported and installed by at least two persons.
- When you unpack the appliance, you should take note of the position of every part of the interior accessories in case you have to repack and transport it at a later point of time.
- Do not operate the appliance unless all components are installed properly.
- Do not stand or lean on the base, the drawers, the doors etc of the appliance.
- The air vents of the appliance or its built-in structure (if the appliance is suitable for being built-in) must be completely open, unblocked and free of any kind of dirt.
- Do not put any cookware with a weight of more than 25kg on the hob.
- Do not put any heavy items onto the open door of the oven. Do not put any cookware with a weight of more than 15kg on the door of the oven. Do not lean against the open door of the oven as you will damage the hinges.
2.1 Unpacking and positioning
- Unpack the appliance carefully. Dispos of the packaging as described in chapter waste management.
- Completely remove the transport-protection. Be very careful and do not use any aggressive or abrasive detergents to remove residuals of the transport-protection.
- Check that the appliance and the power cord are not visible damaged.
- Do not install the appliance in a place where it may come in contact with water or rain; otherwise the insulation of the electrical system will be damaged.
- Install the appliance on a level, dry and solid floor. Check the correct installation with a bubble level.
- The nameplate is situated inside the appliance or at the back.
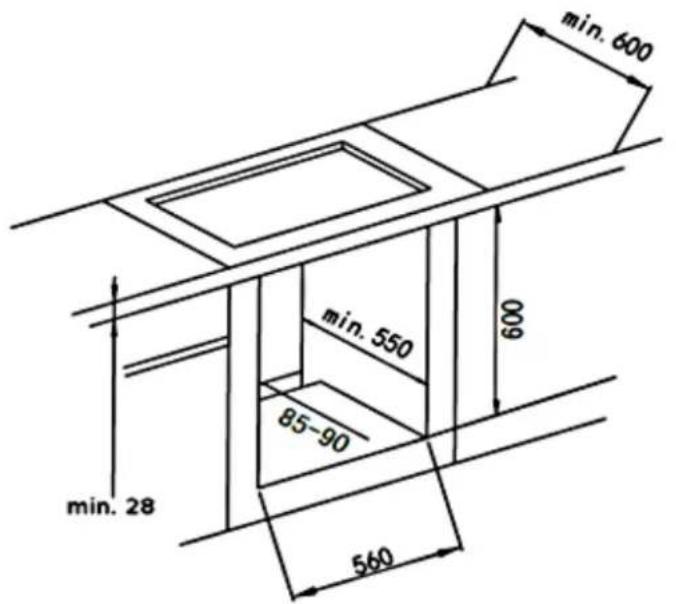
2.2 Installation/hob
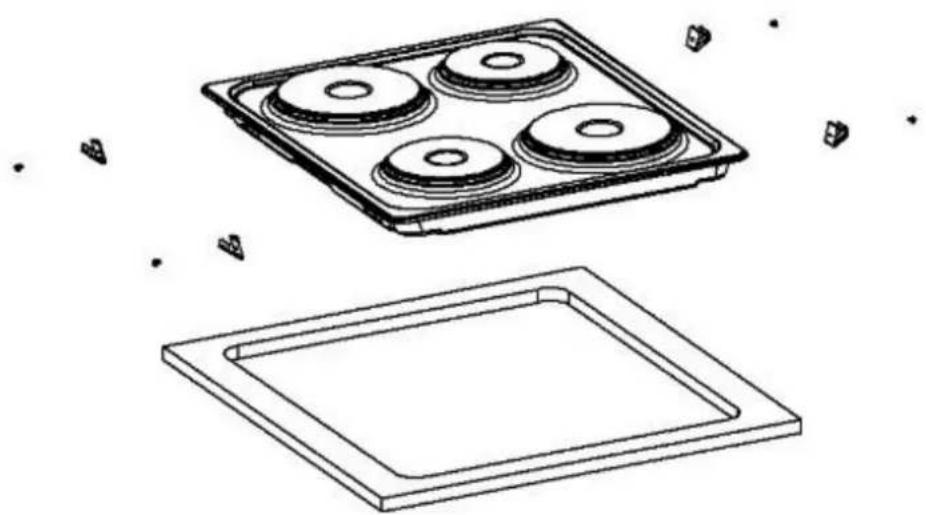
Make an installation-opening with the dimensions given on the drawing below).
Fix the supplied scaling tape on the corresponding place of the hob.
Check the seal for perfect fit and overall cover. Insert the electric hob in the opening and align it correctly.
Using a standard screwdriver, tighten the tension clamps evenly starting at the centre and moving diagonal, until the built-in rim is tight on the worktop.
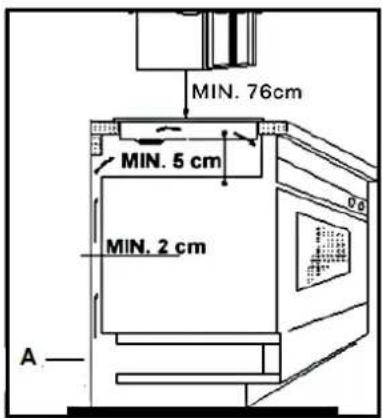
The hob must be vented properly. Air inlet and air outlet must not be blocked.
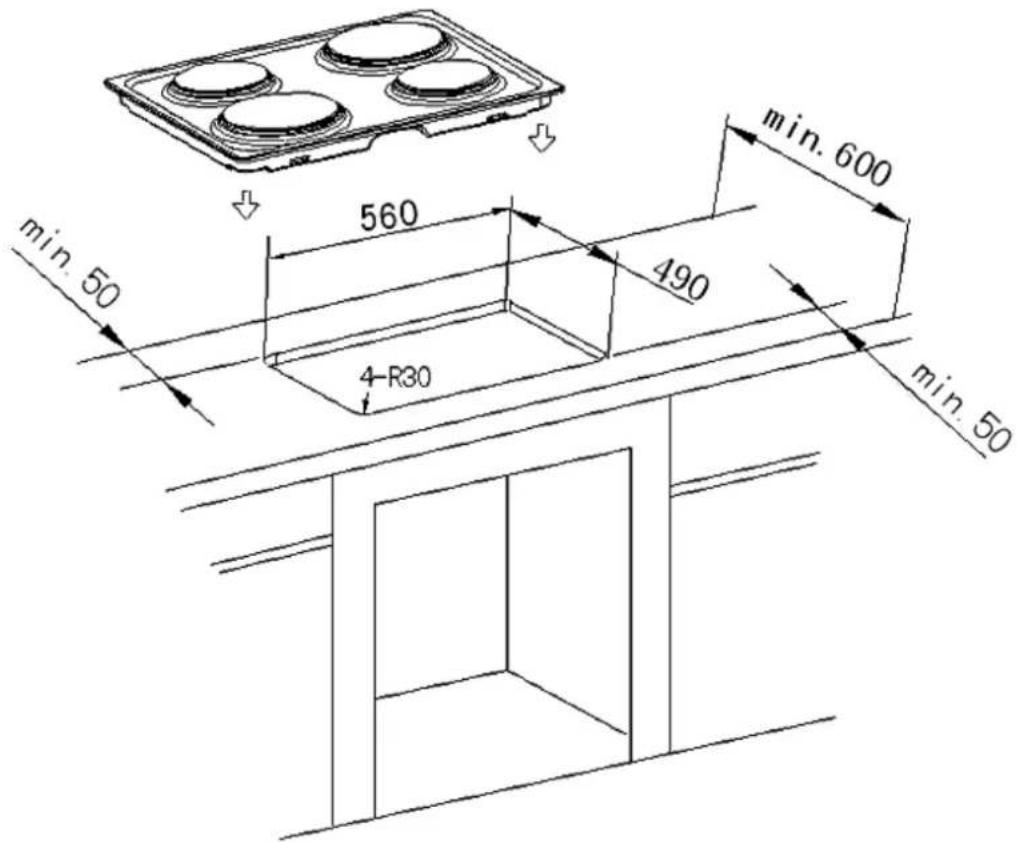
Min. safety distance between hob and a cupboard above = 76cm
A: Air inlet
2.3 Installation/oven
DANGER!
The appliance must be connected to the mains by a qualified professional, who is familiar with and adheres to the local requirements and supplementary regulations of your electricity supplier.
All electrical work must be carried out by a qualified professional. Do not modify the energy supply. The connection must be carried out in
accordance with the current local and legal regulations
-
Turn off the energy supply (fuse box).
-
Provide an opening meeting the dimensions on the drawing below.
-
Place the hob in the built-in opening.
-
Place the oven near the built-in opening.
-
Connect the oven to the mains.
-
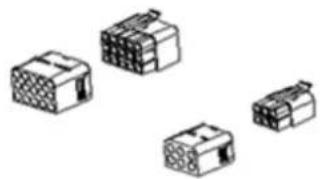
Partially insert the oven into the opening and connect the oven to the hob. The connectors at the end of the group of wires coming out of the hob should be inserted into the appropriate sockets of the control panel of the oven according to their colour, i.e. a black connector should be inserted into a socket marked with the same colour.
-
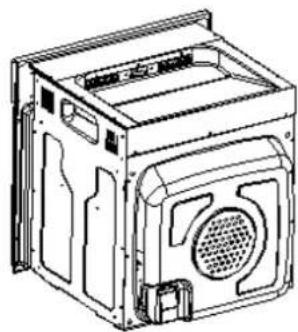
Complete the installation of the appliance and fix the oven with 4 screws (fig. 2, right side).
2.4 Electrical connection
Instructions for the installer (qualified professional)
The cooker is manufactured to work with three-phase alternating current (400V3N 50Hz) . Remember that the connection wire should match the connection type and the power rating of the cooker. The connection cable must be secured in a strain-relief clamp. The ground wire must be connected to the marked clamp of the terminal. The electric supply of the appliance must be equipped with an emergency switch with a distance between the contacts of at least 3mm which disconnects the entire appliance from the mains in a case of
emergency. Read the information on the rating label and the connection diagram before connecting the appliance to the mains.
- When the socket is not accessible for the user or a fixed electrical connection of the appliance is required, an all-pole disconnecting device must be incorporated during installation. Disconnecting devices are switches with a contact opening distance of at least 3mm . These include LS-switches, fuses and protectors (EN 30335).

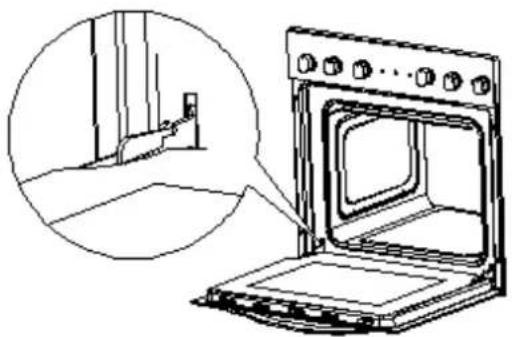
Move a screwdriver (1) slightly downwards (2) to open the box.

Connection diagram

Voltage heating elements 230V. Any kind of connection: the safety wire must be connected to the PE terminal.
1 For 230V earthed one-phase connection, bridges connect 1-2-3 terminals and 4-5 terminals Protective ground to
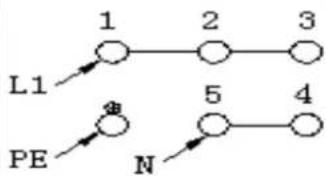
Recommended type of connection lead.
H05VV-F3G4
2 For 400 / 230V earthed two-phase connection, bridges connect 2-3 terminals and 4-5 terminals
Protective ground to
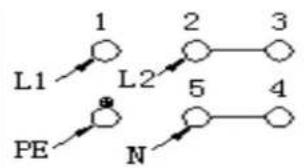
H05VV-F4G2,5
3 For 400-230V earthed three-phase connection, bridges connect 4-5 terminals, phases in succession 1,2 and 3, Neutral to 4-5
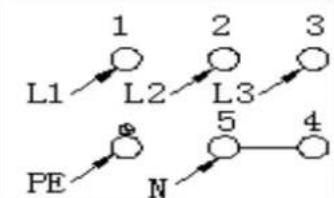
H05VV-F5G1,5
Protective ground to L1=R, L2=S, L3=T
N = Earth
PE= earth wire terminal
- Check that the technical data of your energy supply meet the values on the nameplate.
- Your domestic circuit must be equipped with an automatic circuit brcaker.
- Do not attempt to repair the appliance yourself. Repairs carried out by unauthorized persons can cause serious damage. Always contact the nearest service centre. Original spare parts should be used only..

Electrical connection - hob
The hop works with a voltage of 230V AC. The electrical connection gets the power from the oven. Carry out the connection properly and as described on the drawing below.
Hob
Oven
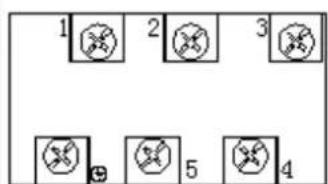
3. Main components
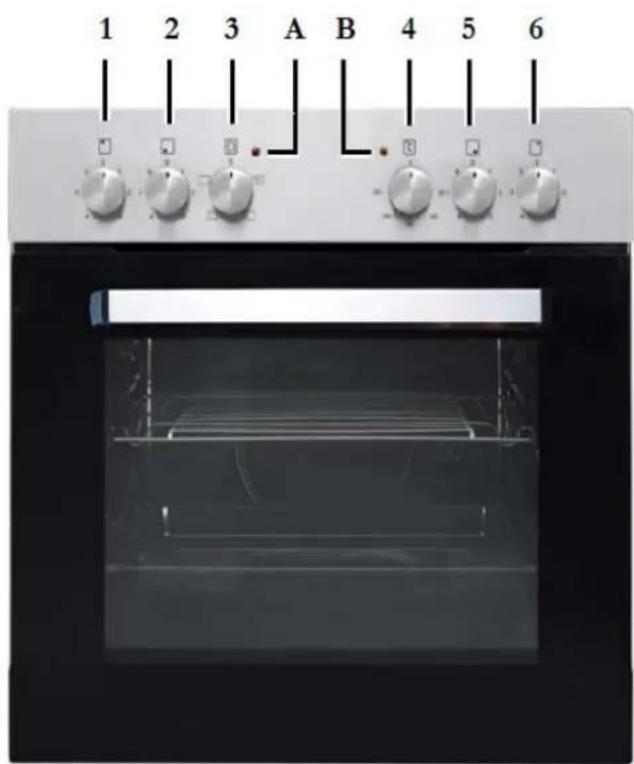

1 Rotary knob cooking zone - rear left
7 0145 mm; 1000W
2 Rotary knob cooking zone - front left
8 180mm;1500W
3 Rotary knob oven/ function control
9 180mm;2000W
4 Rotary knob oven /temperature control
10 145mm;1000W
5 Rotary knob cooking zone /front right
6 Rotary knob cooking zone - rear right
A Control light hob-red
B Control light oven- orange
4. Operation
4.1 Before the first use
- Remove all packaging material.
- Clean the oven inside from all protective agents.
- Take out the supplied accessories and clean them with warm water and washing-up liquid.
-
Switch on the room ventilation or open a window.
-
Let the oven operate (250^) for 30 minutes. Now a little bit of smoke and odour may be generated for approx. 15 minutes. This is normal. They are generated by the substance, that protects your appliance against damage caused by the shipment from the manufacturer's works.
-
NOTICE! Clean the oven with warm water and washing-up liquid only.
4.2 Control panel

A
B
C
D
E
F
| A | rear left cooking zone control knob | turn clockwise or anticlockwise to turn on the hob. |
| B | front left cooking zone control knob | turn clockwise or anticlockwise to turn on the hob. |
| C | oven function selection knob | choose your desired function to cook |
| D | control of the oven-temperature | can be adjusted from 50°C to 250°C |
| E | front right cooking zone control knob | turn clockwise or anticlockwise to turn on the hob. |
| F | rear right cooking zone control knob | turn clockwise or anticlockwise to turn on the hob. |
4.3 Hob
Put a cookware directly onto a cooking zone. Turn the corresponding knob clockwise or anticlockwise to switch on the hob.
Turn the knob to position O/OFF/AUS to stop cooking.
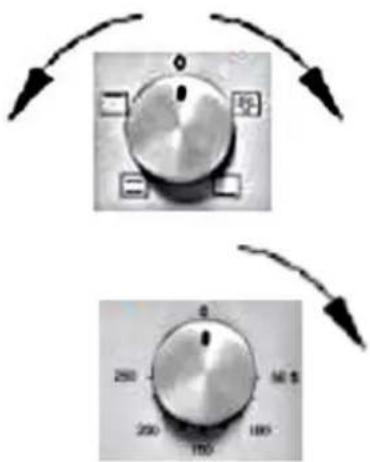
4.4 Oven
The oven can be warmed up using the bottom and top heaters. The operation of the oven is controlled by the oven function knob .To set function you should turn the knob to the desired position.
To select a temperature, use the temperature regulator knob to set the desired temperature. You can set the temperature within a range of 50- 250^
The oven can be switched off by setting both of these knobs to position "0".
A signal light (orange) indicates that the oven is operating.
The orange light indicates that the oven is heating.
If the orange light goes off the oven has reached the temperature you preset.
If a recipe recommends to place dishes in a warmed-up oven, this should be not done before the orange light has gone off for the first time.
While the oven is operating, the orange light will go off and on temporarily to maintain the preset temperature.
The orange light indicates that the oven is operating. The orange light is also on, when the interior light of the oven is switched on.

Functions of the oven

interior light
switches separately on the interior light of the oven, e.g. for cleaning the oven inside.

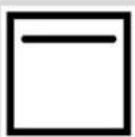
top heat on
switches on the top heater of the oven, e.g. for final backing from above.
bottom heat on
switches on the bottom heater of the oven, e.g. for final backing from the bottom.
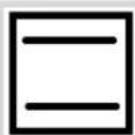
top heat and bottom heat on
allows the oven to be heated conventionally.
4.5 Helpful hints
We recommend to use the supplied baking tray provided with your appliance.
It is also possible to bake in cake tins and trays bought somewhere else. For baking it is better to use black trays which conduct heat better and shorten the baking time.
Shapes and trays with bright or shiny surfaces are not recommended when using the conventional heating method (top and bottom heaters). The use of such tins can result in under-cooking the base of cakes.
Before you take a cake out of the oven, check that it is ready using a wooden stick (when the cake is ready the stick should come out dry and clean after having been inserted in the cake).
When switching off the oven leave the cake inside for about 5 minutes.
Cook meat with a weight of more than 1kg in the oven. Cook smaller pieces of food on the hob.
Use oven-proof cookware only. Check that their handles also are oven-proof.
When you cook meat on a grillage, insert a drip tray with a small amount of water in the oven (minimum rack hight).
Turn over meat at least once.
Never pour cold water on the meat.
4.6 How to save energy
Use proper cookware for cooking. Cookware with thick, flat bases can save up to 1/3 of electric energy. Remember to cover your cookware if possible; otherwise you will use four times as much energy!
Match the size of the cookware to the surface of the heating plate.
A cookware should never be smaller than a heating plate.
Ensure that the heating plates and the cookware are clean.
Soils prevent heat-transfer. Repeatedly burnt-on spillages can often be removed by products, which will damage the environment, only.
Do not uncover the cookware too often (a watched pot-content will never boil!).
Do not open the oven door unnecessarily often.
Switch off the oven in good time and make use of the residual heat.
For long cooking times, switch off the heating zones 5 to 10 minutes before you will finish cooking. This saves up to 20% of energy.
Only use the oven when cooking larger dishes.
Meat of up to 1kg can be cooked more economically in a pan on the hob.
Make use of the residual heat of the oven.
If the cooking time takes longer than 40 minutes switch off the oven 10 minutes before.
Make sure the oven door is closed properly.
Heat can escape through spillages on the door seals. Clean up any spillages immediately.
Do not install the cooker near of refrigerators/freezers. Otherwise the energy consumption increases unnecessarily.
5. Cleaning and maintenance
WARNING!
Switch off the appliance and let it cool down before cleaning. Disconnect the appliance from the mains before maintenance.
Hob
Clean the hob after use.
Clean the black hotplates with a commercially available detergent for hotplates.
Remove residuals on the hotplates with a soft cloth.
Do not wash or scrub the hotplates.
Clean the fastening rings of the hotplates with washing-up liquid or a mild detergent. Dry them carefully.
Clean the stainless steel surround of the hob with a suitable commercially available detergent for stainless steel.
Model variation white/black: Do not clean the white or black parts of the appliance with a detergent for stainless steel. Only use a mild detergent and a soft cloth.
Detergent
Do not use any abrasive detergents! Do not use any organic detergents!
Do not use essential oils!
Never use solvents.
Oven
Clean the oven after use.
Switch on the internal light while cleaning.
Clean the interior with warm water and a little bit of washing-liquid. Use a sponge or a soft cloth. Never use abrasive or aggressive detergents.
Dry after cleaning.
Clean the outside of the oven with warm soapy water. Use a sponge or a soft cloth. Never use abrasive or aggressive detergents.
If you use a special oven-detergent, check that the detergent is suitable for your appliance (instructions on the packaging of the detergent).
Any damage that is caused to the appliance by a cleaning product will not be fixed free of charge, even if the guarantee period of the appliance is still valid.
Never use a steam cleaner.
Oven-door
Clean the door very carefully. Do not use any abrasive detergents; otherwise you may damage or brake the glass. Use wash-up liquid and warm water.
5.1 Replacing of the illuminant
-
unscrew and wash the lamp cover and wipe it dry.
-
unscrew the light bulb from the socket, replace the bulb. Choose a high temperature bulb (300^) with the following parameters:
Voltage230V
Power 25W
Thread E14.
- Do not use any other type of bulb.
- Screw the bulb in, Check its proper position in the ceramic socket.
- Replace the lamp cover.
According to the EU regulation No. 244/2009, your appliance is classified as a household appliance in accordance with the ecodesign requirements for non-directional household lamps. This means that bulbs, which are used in household appliances, must not be used to illuminate domestic establishments.
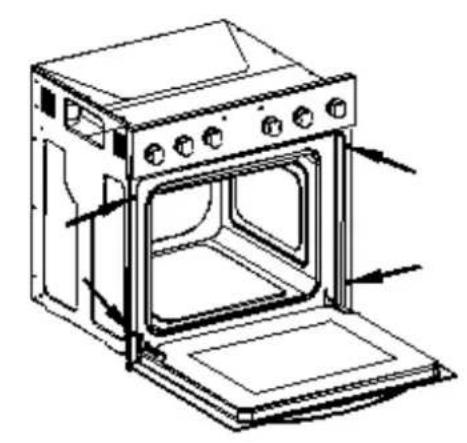
5.2 Removing of the door
- Open the door and push the safety catch upwards.
- Close the door slightly.
- Lift the door and pull it towards your direction.
- To reassemble proceed in reverse order.
- Check that the groove of the hinge bracket is positioned properly in its guide.
- After reassembling the door close the safety catch carefully.
- If the safety catch is not closed properly you will damage the hinges when closing the door.
5.3 Removing of the glass panel
- Unscrew and unfasten the bracket latch that is in the corner at the top of the door.
- Take out the glass from the second blocking mechanism and remove it.

- After cleaning, insert and block the glass panel.
- Screw in the blocking mechanism...
5.4 Trouble shooting
Periodical controls:
- Carry out periodic inspections of the control elements and cooking units of the cooker. After the guarantee has expired you should provide a technical inspection of the cooker carried out at a service centre at least once every two years.
- All malfunctions should be repaired immediately.
Emergency measures:
- Switch off the entire appliance.
- Disconnect the appliance from the mains (fuse box of your household power supply).
- Contact your aftersales service.
Check the schedule below before you contact your aftersales service.
MALFUNCTION POSSIBLE CAUSES MEASURES
Appliance does not work at all.
The appliance is not supplied with energy.
Check the relevant fuse in the fuse box of your household power supply.
Internal light does not work.
The illuminant is loose or damaged.
Tighten or replace the illuminant.
6. Technical data
| Type | Built-in oven & Hob | |
| Energy rating | A | |
| Power rating | max. 7.85 kw | |
| Energy consumption when conventionally used | 0.74 kw/h | |
| Hotplates | 4. incl.1 speed hotplate | |
| Power hotplates | 2*145mm a 1kw | 2*180mm 1.5/2 kw |
| Oven incl. 3 functions | Top heat; bottom heat; top-/bottom heat | |
| Cooling of housing | ✓ | |
| Door | Black glass | |
| Net oven volume | 55 litres | |
| Installation dim. oven H/W/D cm | 59.50 | 59.50 |
| Installation dim. hob H/W/D cm | 3,80 | 58.00 |
| Weight gross / net | 41 kg | 36 kg |
7. Waste management
- While unpacking, the packaging materials (polythene bags, polystyrene pieces, etc.) should be kept away from children. CHOKING HAZARD!
- Old and unused appliances must be send for disposal to the responsible recycling centre. Never expose to open flames.
- Before you dispose of an old appliance, render it inoperative. Unplug the appliance and cut off the entire power cord. Dispose of the power cord and the plug immediately. Remove the door completely so children are not able to get into the appliance as this endangers their lives!
- Disposc of any paper and cardboard into the corresponding containers.
- Dispose of any plastics into the corresponding containers.
- If suitable containers are not available at your residential area, dispose of these materials at a suitable municipal collection point for waste-recycling.
- Receive more detailed information from your retailer or your municipal facilities.


Materials marked with this symbol are Please contact your local authorities to recyclable. receive further information.
for large electric appliances; PKM GmbH & Co. KG, Neuer Wall 2, 47441 Moers
This appliance includes a 24-month guarantee for the consumer given by the manufacturer, dated from the day of purchase, referring to its flawless material-components and its faultless fabrication.
The consumer is accredited with both the dues of the guarantee given by the manufacturer and the vendor's guarantees. These are not restricted to the manufacturer's guarantee.
Any guarantee claim has to be made immediately after the detection and within
24 months after the delivery to the first ultimate vende.
The guarantee does not establish any entitlement to withdraw from the purchase contract or for a price reduction. Replaced components or exchanged appliances demise to us as our property.
The guarantee claim does not cover:
- fragile components as plastic, glass or bulbs;
- minor modifications of the PKM-products concerning their authorized condition if they do not influence the utility value of the product;
- damage caused by handling errors or false operation;
- damage caused by aggressive environmental conditions, chemicals, detergents;
- damage caused by non-professional installation and haulage;
- damage caused by non common household use;
- damages which have been caused outside the appliance by a PKM-product unless a liability is forced by legal regulations.
The validity of the guarantee will be terminated if:
- the prescriptions of the installation and operation of the appliance are not observed.
- the appliance is repaired by a non-professional.
- the appliance is damaged by the vendor, the installer or a third party.
- the installation or the start-up is performed inappropriately.
- the maintenance is inadequately or incorrectly performed.
- the appliance is not used for its intended purpose.
- the appliance is damaged by force majeur or natural disasters, including, but with not being limited to fires or explosions.
The guarantee claims neither extend the guarantee period nor initiate a new guarantee period.
The geographical scope of the guarantee is limited with respect to appliances, which are purchased and used in Germany, Austria, Belgium, Luxembourg and the Netherlands.
2.3 Installation/four
DANGER!
L1 = R,L2 = S,L3 = T
N = Terre
Aftersales service information on the leaflet inside this instruction manual.
Subject to alterations