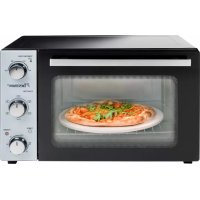
AOV31PS - Oven BESTRON - Free user manual and instructions
Find the device manual for free AOV31PS BESTRON in PDF.


| Brand | BESTRON |
| Model | AOV31PS |
| Product type | Oven with grill |
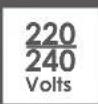
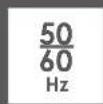
| Power supply | 220-240 V ~ 50/60 Hz |
| Cooking functions | Convection, top/bottom heat, grill, rotisserie, hot air |
| Included accessories | Baking tray, grill rack, rotisserie spit, pizza stone, removal handles |
| Interior light | Yes |
| Timer | Yes, with automatic shut-off and audible signal |
| Number of shelf positions | Multiple heights (a, b, c) |
| Maximum temperature | 230 °C (estimated from recipes) |
| Pizza stone material | Unglazed porous stone |
| Safety | Automatic shut-off, hot glass door, minimum clearance 10 cm sides and 30 cm above |
| Cleaning | Baking tray, grill rack, rotisserie spit washable in soapy water; pizza stone not washable, wipe dry |
| Warranty | 60 months (5 years) from purchase date |
| After-sales service | www.bestron.com/service |
| Repairability | Do not repair yourself, entrust to a qualified professional |
| Use by children | From 8 years under supervision |
| Environmental instructions | Do not dispose of with household waste, recycle at a waste disposal facility |
Frequently Asked Questions - AOV31PS BESTRON
User questions about AOV31PS BESTRON
0 question about this device. Answer the ones you know or ask your own.
Ask a new question about this device
Download the instructions for your Oven in PDF format for free! Find your manual AOV31PS - BESTRON and take your electronic device back in hand. On this page are published all the documents necessary for the use of your device. AOV31PS by BESTRON.
USER MANUAL AOV31PS BESTRON
natural_image
Black and white photo of a Bestron® oven with a food item inside, showing temperature, function, timer, and power controls (no readable text beyond branding)

AOV31PS INSTRUCTION MANUAL
DE
Bedienungsanleitung
FR
Mode d'emploi
NL
Handleiding
EN
Instruction manual
IT
R. Neyman Quality control
natural_image
Line drawing of a hand inserting a small component into a microwave oven (no text or symbols)natural_image
Line drawing of a hand inserting a rack into a microwave oven (no text or symbols)natural_image
Line drawing of a microwave oven with open lid and internal compartments, showing heat transfer arrows (no text or symbols)DÉCLARATION DE CONFORMITÉ CE
natural_image
Line drawing of a hand inserting or removing a microwave oven into a tray (no text or symbols)ATTENTION:
natural_image
Line drawing of a hand inserting a tray into a microwave oven (no text or symbols)natural_image
Line drawing of a microwave oven with open lid and internal compartments, showing heat transfer arrows (no text or symbols)NETTOYAGE ET ENTRETIEN
WAT U MOET WETEN OVER DIT APPARAAT
R. Neyman
Quality control
WERKING - Algemeen
natural_image
Line drawing of a hand inserting a small object into a microwave oven (no text or symbols)WERKING - Grillen
natural_image
Line drawing of a hand inserting a small into a microwave oven with a rack inside (no text or symbols)natural_image
Line drawing of an open safety cabinet with internal components and a cylindrical device (no text or symbols)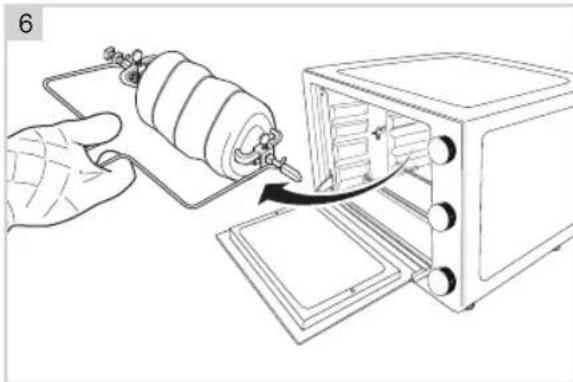
natural_image
Illustration of a hand using a coiled spring to install or install an open oven (no text or symbols present)WAT U MOET WETEN VOORDAT U DE PIZZASTEEN GAAT GEBRUIKEN:
natural_image
Line drawing of a microwave oven with open lid, cooling rack, and open door (no text or symbols)REINIGING EN ONDERHOUD
Congratulations with the purchase of this Bestron product. These instructions tell you how the product works and how to use it. Read the instructions carefully before you start using the appliance. Only use the appliance in the manner described in the instructions. Keep these instructions in a safe place for future reference.
Defects:
If the appliance is defective, do not try to repair it yourself. Always have a qualified mechanic carry out any repairs.
Children:
- This appliance may be used by children over the age of 8 years old and persons with reduced physical, sensory or mental capabilities or lack of experience and know-how, but only if supervised or if they have been instructed on how to use the appliance safely and are aware of its potential dangers.
• Children are not allowed to clean and maintain the appliance, except if they are over the age of 8 years old and supervised. - Keep the appliance and the cable out of reach of children under the age of 8 years old.
- Keep an eye on children to ensure that they do not play with the appliance.
WHAT YOU SHOULD KNOW ABOUT ELECTRICAL APPLIANCES
- Check that the mains voltage corresponds with that shown on the rating plate of an electrical appliance before you use it.
- Check that the socket to which you connect the electrical appliance is earthed.
• Always install electrical appliances on a stable and level surface where it cannot fall over.
• Certain parts of an electrical appliance may become warm or sometimes hot. Do not touch them as you may burn yourself.
• Make sure your hands are dry when you touch an electrical appliance, a cord or a plug. -
Electrical appliances must be able to lose their heat to avoid fire hazards. Therefore, make sure that the appliance has sufficient clearance around it and that it does not come into contact with flammable materials. Electrical appliances must never be covered.
-
Make sure that electrical appliances, cords or plugs do not come into contact with water.
Never immerse electrical appliances, cords or plugs in water or any other liquid. - Do not touch electrical appliances if they have fallen in the water. Immediately pull the plug out of the socket. Stop using the appliance.
• Make sure that electrical appliances, cords and plugs do not come into contact with heat sources, such as a hot hob or open fire. - Never let cords hang over the edge of the sink, a worktop or a table.
• Always remove plug from the socket when you are not using the electrical appliance. - Remove the plug from the socket by pulling the plug itself and not the cord.
- Regularly check if the cord of the electrical appliance is not damaged. Do not use the electrical appliance if the cord shows signs of damage. If the cord is damaged, it should be replaced by the manufacturer, a technical service provider or a person with an equivalent qualification, to avoid any danger.
- The appliance may not be switched on with the aid of an external time switch, or by a separate system with remote control.
WHAT YOU SHOULD KNOW ABOUT THIS APPLIANCE
- Be careful when using the appliance outdoors.
- Never use the appliance in damp or wet locations.
- Thoroughly clean the appliance after use (see Cleaning and Maintenance).
• Make sure there is sufficient free space around the appliance (at least 10cm), as well as above the appliance (at least 30cm). - The oven's glass door becomes hot during use. Therefore, always use the handle to open and close the door.
• Use the removal tool to remove the baking tray, the grille or the roasting spit from the hot oven. - Allow the pizza stone to cool completely before removing it from the oven.
- Do not place the following items on top of the appliance: cardboard, plastic, paper, candles or flammable objects.
- Do not place heavy objects on the oven door when it is open.
- Carefully remove the baking tray when it contains hot juices or fat.
- Avoid water coming into contact with the oven door during or shortly after use. This may cause the glass to break.
- Do not place the appliance near a gas ring or another heat source, nor immediately next to an electrical fan. They may have a negative effect on the appliance's Temperature control.
•Always use oven gloves
ENVIRONMENT
- Dispose of packaging material such as plastic and cardboard boxes in the designated containers.
Do not dispose of this product as normal domestic waste at the end of its life, but hand it in at a collection point for the reuse of electric and electronic equipment. Look for the symbol on the product, the user instructions or the packaging showing the type of waste.
- The materials can be used as indicated. By helping us reuse and process the materials or otherwise recycle the old equipment, you will be making an important contribution towards the protection of the environment.
- Your municipality can tell you where to find the designated waste collection point in your neighbourhood.
CE DECLARATION OF CONFORMITY
This product conforms to the requirements of the following European Directives on safety:
• EMC Directive
- Low Voltage Directive
• RoHS Directive
2014/30/EU
2011/65/EU
R. Neyman
Quality control
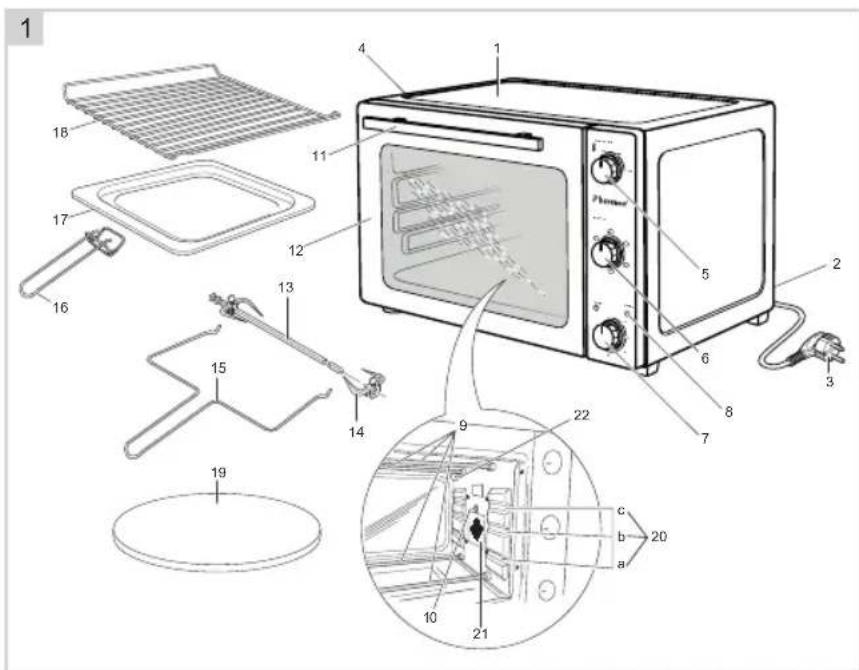
OPERATION - General
The grill-oven is only intended for domestic use, not for professional use.
- Housing
- Spacer
- Power cord and plug
- Ventilation slots
- Temperature setting
- Function setting
- Time setting
- On/Off indicator light
- Heating elements
- Roasting spit drive sleeve
- Door handle
- Door
- Roasting spit
- Roasting spit clamp
- Roasting spit removal tool
- Bakingtray/grille removal tool
- Baking tray
- Grille
- Pizza stone
- Grid heights
- Fan
- Interior lighting
OPERATION - Before first use
- Remove the packaging.
- Clean all the accessories to remove any residue that may be left from the manufacturing process (see "Cleaning and maintenance"). Dry them thoroughly.
- Turn on the top and bottom heating elements for 15 minutes at the highest Temperature with the door open. This will remove any packaging odour from the appliance.
ATTENTION:
- The appliance may emit a little smoke and a characteristic smell when you switch it on for the first time. This is normal and will stop on its own. Make sure the appliance has sufficient ventilation.
OPERATION - Grill
You can use the grill fot food that must be heated, not fried and is large enough not to fall through the grill. The grill can also be used when you want to grill with both top and bottom heat.
OPERATION - Baking tray
The baking tray is used for fine food that really needs to be fried. The heat from the bottom element causes the baking tray to heat up witch will provide cooked food.
OPERATION - Convection function
The fan in the back of the oven blows hot air into the oven. This is used to heat the dishes. You can use several levels at the same time, thus saving energy. Because of the intensiv heat you can select a temperature of 20 °C lower then indicated in the conventional recepy. The hot air system is highly suitable for baking cakes, cookies and apple tarts. You can bake on multiple levels simultaneously if desired, in which case the tins should be aligned directly under one another. Baking sheets with cookies should be positioned on the second and third levels.
It is not necessary to preheat the oven. In certain cases, however, you may achieve a better result if the oven is preheated, for example, for meat that must be cooked medium rare (pink on the inside with a red core) or when baking a cake or pizza.
| Potato Dish Scale or grid at height | b 220 degrees Top/bottom 30 min | ||
| Oven Fries Scale at height b 200 | degrees Top/bottom 10 min | ||
| Chicken | Scale at height a Rotisserie chicken | 200 degrees Top 60 min | |
| Pizza (ready-to-eat) Pizza stone 2 | 30 degrees Top/bottom 7 min | ||
| Pizza (with homemade dough) Pizza stone 200 degrees Top/bottom 20 min | |||
| Pasties Scale at height a 200 degrees Top 40 min | |||
| Apple pie | Grid at height b | 230 degrees Top/bottom 25 min | |
| Cake | Grid at height a or b | 200 degrees | Top 40 min |
| Cookies | Scale at height b 170 degrees Top 20 min | ||
Some baking times for the most common baking dishes.
Please note that these times are approximations and may vary depending on quantity, quality and personal preference. If baking instructions are noted on the food's packaging we advise you to follow these in order to get the best results.
OPERATION - Baking
- Open the oven door (12).
- Place the baking tray (17) with the food at the desired height in the grooves in the oven.
- Close the oven door.
- Use the temperature setting (5) to set the required temperature.
- Rotate the function setting (6) to the setting ☐.
- Use the timer setting (7) to set the baking time. The amount of time required depends on the type and quantity of food. The On/Off indicator (8) will be lit.
-
Bake the food until it is cooked. The oven will turn itself off automatically and a sound signal will be heard once the baking time has elapsed. The On/Off indicator light will go out.
-
Wear oven gloves.
- Open the oven door. Take care! The door is hot.
- Use the removal tool to remove the baking tray from the oven.
- Close the oven door.
- Remove the food from the baking tray (17) and put it on a plate. Take care! The food is hot.
13 Once you have finished, rotate the function setting to ☐ and remove the plug (3) from the plug socket.
ATTENTION:
- If the food is ready but the baking time has not yet elapsed, you can turn off the oven by rotating the function setting to ☑The timer will continue, but the oven will no longer be heated.

natural_image
Line drawing of a hand inserting a small component into a microwave oven (no text or symbols)OPERATION - Grilling
You can use the grill function to give fish, poultry and oven dishes a golden brown crust.
- Open the oven door (12).
- Place the baking tray (13) in the bottom groove in the oven. The baking tray will collect any juice and fat whilst grilling and prevent the juice and fat from getting on the bottom heating element (19 a, b, c).
- Place the grille with the food in the middle or top grooves in the oven.
- Leave the oven door slightly open so as to allow the air to circulate.
- Use the temperature setting (5) to set the required Temperature.
- Rotate the function setting (6) to the setting
- Use the timer setting (7) to set the grilling time. The amount of time required depends on the type and quantity of food. The On/Off indicator (8) will be lit.
- Grill the food until it is cooked. The oven will turn itself off automatically and a sound signal will be heard once the grilling time has elapsed. The On/Off indicator light will go out.
- Wear oven gloves.
- Open the oven door. Take care! The door is hot.
- Use the removal tool to remove the grille with the food from the oven.
- Remove the food from the grille and put it on a plate. Take care! The food is hot.
- Use the removal tool to remove the baking tray from the oven. Take care! Any juice and fat on the baking tray will be hot!
- Close the oven door.
- Once you have finished grilling, rotate the function setting to ☐ and remove the plug from the plug socket.
ATTENTION:
- If the food is ready but the grilling time has not yet elapsed, you can turn off the grill by rotating the function setting to 📄. The timer will continue, but the grill will no longer be turned on.
OPERATION - Using the roasting spit
You can use the roasting spit (13) to roast meat and poultry to a nice, even brown colour.
-
Open the oven door.
-
Place the baking tray in the bottom groove in the oven. The baking tray will collect any juice and fat whilst roasting and prevent it from getting on the bottom heating element.
-
Remove the clamp (14) from the round end of the roasting spit.
-
Spike the meat or poultry to be roasted on the round end of the roasting spit. Make sure the roasting spit is inserted through the middle of the meat or poultry.
-
Use the clamps to secure the meat or poultry to the roasting spit.
-
Place the roasting spit with the meat or poultry in the oven. Insert the round end of the roasting spit into the drive sleeve (10). Place the straight end of the roasting spit on the support.
-
Leave the oven door slightly open so as to allow the air to circulate.
-
Use the temperature setting to set the required Temperature.
-
Rotate the function setting to the setting ☑When using the roasting spit we advise you to use only the top heat, because the bottom heat elements are covered by the baking tray which catches grease and therefore it has no effect.
-
Use the timer setting to set the roasting time. The amount of time required depends on the type and quantity of food. The On/Off indicator will be lit.
-
Roast the meat or poultry until it is cooked. The oven will turn itself off automatically and a sound signal will be heard once the roasting time has elapsed. The On/Off indicator light will go out.
-
Wear oven gloves.
-
Open the oven door. Take care! The door is hot.
-
Use the removal tool to remove the roasting spit with the meat or poultry and place it on a plate.
-
Close the oven door.
-
Remove the clamp from the round end of the roasting spit and remove the meat or poultry from the roasting spit. Take care! The roasting spit and the meat or poultry are hot.
-
Use the removal tool to remove the baking tray from the oven. Take care! Any juice and fat on the baking tray will be hot!
-
Once you have finished, rotate the function setting to and remove the plug from the plug socket.
ATTENTION:
• Make sure the meat or poultry does not touch the top heating element when turning.
- If the meat or poultry is ready but the roasting time has not yet elapsed, you can turn off the oven by rotating the function setting to 🧑The timer will continue, but the oven will no longer be heated.
WHAT YOU NEED TO KNOW BEFORE YOU START USING THE PIZZA STONE:
• The pizza stone is porous, unglazed and fragile.
• The pizza stone must be gradually heated, otherwise it will crack.
• The pizza stone must cool gradually, otherwise it will crack.
- If the stone is stored in a cold place, allow it to reach room temperature before use.
- Never take the pizza stone out of a hot oven. Also not with oven gloves on or with the removal handle. The take-out handle will damage the stone and oven gloves cannot protect your hands from the heat of the stone
- The stone will become increasingly dark due to use. This is how it should be and does not need to be cleaned. Never use soapy water or a dishwasher. You can optionally use a putty knife to remove visible dirt. Then rinse with lukewarm water and let it dry before you use the stone again.
OPERATION - Using the pizza stone
With the pizza stone you can bake crispy pizzas in an authentic way.
- Open the oven door. (12)
- Place the grid on the bottom position and place the pizza stone (19) on the grid.
- Close the oven door.
- Set the desired temperature with the temperature setting (5).
- Turn the function setting (6) to the position.
- Allow the oven and pizza stone to preheat until the set temperature is reached.
- Open the oven door. Careful! The door is hot.
- Pick up the pizza with, for example, 2 spatulas and place it on the pizza stone. Then pull the spatulas out of the pizza and close the oven door.
- Set the desired baking time with the time setting (7). The on / off indicator light (8) comes on.
- Bake the pizza until it is done. At the end of the baking time, an audible signal is heard and the oven switches off automatically. The on / off indicator light goes out.
- Open the oven door. Careful! The door is hot.
- Place the spatulas under the pizza and place the pizza on a plate.
- When you have finished baking, turn the function setting to the position and remove the plug (3) from the wall socket.
- Allow the pizza stone to cool thoroughly before taking it out of the oven and storing it.
CLEANING AND MAINTENANCE
Clean the appliance every time after use.
- Remove the plug from the wall socket and allow the appliance to cool down completely.
- Use warm water with a small amount of washing-up liquid to clean the baking tray, the grille, the roasting spit and the removal tool. Rinse the items with plenty of water and dry them thoroughly.
- The stone cannot be washed in the dishwasher and does not need to be cleaned. You can optionally use a putty knife to remove visible dirt. Then rinse with lukewarm water and let it dry
- Use a damp cloth to clean the interior and exterior of the oven and the door. Dry them thoroughly.
- Place all the items back in the oven and store the oven
ATTENTION:
• Make sure the plug has been removed from the plug socket before cleaning the appliance.
- Never use corrosive or scouring cleaning agents or sharp objects (such as knives or hard brushes) to clean the appliance.
WARRANTY CONDITIONS
Bestron offers a 60-month warranty on this equipment against defects resulting from manufacturing and/or material errors, subject to the following conditions.
- No labour or material costs will be charged during this warranty period.
- Any repairs carried out under the warranty will not extend the warranty period.
- Faulty parts, or in the event of exchange, the faulty equipment itself, will automatically become the property of Bestron.
- The warranty is valid for the first buyer only and is non-transferable.
- The warranty is not valid for damage caused by:
- Accidents
- Improper use
- Wear and tear
- Neglect
- Faulty installation
- Connection to a different mains voltage than indicated on the type plate
• Unauthorised changes
• Repairs carried out by unqualified third parties - Use in violation with the applicable statutory, technical or safety standards
-
Careless transport without suitable packaging or other protection
-
Warranty cannot be claimed:
-
For damage during transport
-
If the serial number of the appliance is removed or changed
-
Items excluded from warranty are:
-
Cords
- Lamps
- Glass parts
- The warranty does not entitle the purchaser to compensation for any damage other than replacement or repair of the faulty parts. Bestron cannot in any event be held liable for any indirect or consequential losses caused by or in relation to the equipment it has provided.
- Claims under a warranty may only be submitted to your (online) retailer or directly to the Bestron Service Department. Never send items without being asked to. We may refuse the parcel and you will be liable for the costs. Contact us first and we tell you how the appliance should be packaged and sent. Each claim under a warranty must be accompanied by the relevant receipt.
SERVICE
If an unexpected problem occurs, please contact the BESTRON service department: www.bestron.com/service
COMPLIMENTI!
natural_image
Line drawing of a hand inserting or removing a microwave oven into a tray (no text or symbols)ATTENZIONE:
natural_image
Line drawing of a hand inserting a component into a microwave oven (no text or symbols)ATTENZIONE:
natural_image
Line drawing of an open safety cabinet with a cylindrical device inserted, showing internal components and wiring (no text or symbols)
natural_image
Line drawing of a hand using a coiled spring to install or install an open oven (no text or symbols present)COSA DEVI SAPERE PRIMA DI INIZIARE A USARE LA PIETRA PER PIZZA:
natural_image
Line drawing of a microwave oven with open lid, cooling rack, and open door (no text or symbols)R. Neyman
Control de calidad
natural_image
Line drawing of a hand inserting or removing a microwave oven into a rack (no text or symbols)ATENCIÓN:
natural_image
Line drawing of a hand inserting a rack into a microwave oven (no text or symbols)ATENCIÓN:
natural_image
Line drawing of an open safety cabinet with a cylindrical device inserted, showing internal components and wiring (no text or symbols)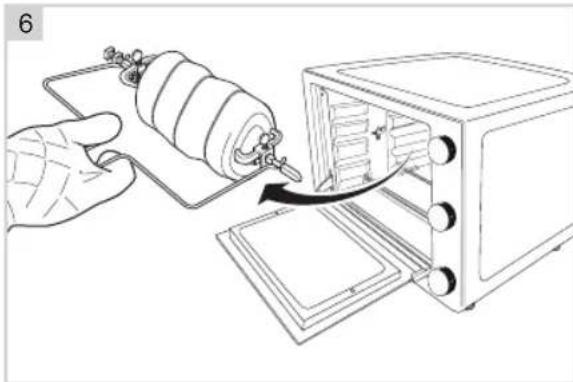
natural_image
Line drawing of a hand using a coiled spring to install or install an open oven (no text or symbols present)LO QUE NECESITA SABER ANTES DE COMENZAR A USAR LA PIEDRA PARA PIZZA:
natural_image
Line drawing of a microwave oven with internal compartments and a circular lid, showing internal structure and airflow direction (no text or symbols)LIMPIEZA Y MANTENIMIENTO
NEED HELP? CHAT WITH US! WHATSAPP CUSTOMER SERVICE

BESTRON.COM/WHATSAPP

- AOV31PS INSTRUCTION MANUAL
- DÉCLARATION DE CONFORMITÉ CE
- ATTENTION:
- NETTOYAGE ET ENTRETIEN
- WAT U MOET WETEN OVER DIT APPARAAT
- WERKING - Algemeen
- WERKING - Grillen
- WAT U MOET WETEN VOORDAT U DE PIZZASTEEN GAAT GEBRUIKEN:
- REINIGING EN ONDERHOUD
- Defects:
- Children:
- WHAT YOU SHOULD KNOW ABOUT ELECTRICAL APPLIANCES
- WHAT YOU SHOULD KNOW ABOUT THIS APPLIANCE
- ENVIRONMENT
- CE DECLARATION OF CONFORMITY
- OPERATION - General
- OPERATION - Before first use
- OPERATION - Grill
- OPERATION - Baking tray
- OPERATION - Convection function
- OPERATION - Baking
- OPERATION - Grilling
- OPERATION - Using the roasting spit
- WHAT YOU NEED TO KNOW BEFORE YOU START USING THE PIZZA STONE:
- OPERATION - Using the pizza stone
- CLEANING AND MAINTENANCE
- WARRANTY CONDITIONS
- SERVICE
- COMPLIMENTI!
- ATTENZIONE:
- COSA DEVI SAPERE PRIMA DI INIZIARE A USARE LA PIETRA PER PIZZA:
- ATENCIÓN:
- LO QUE NECESITA SABER ANTES DE COMENZAR A USAR LA PIEDRA PARA PIZZA:
- LIMPIEZA Y MANTENIMIENTO
Brand : BESTRON
Model : AOV31PS
Category : Oven