
PHVR6 OH5V2 IN - Oven PRIVILEG - Free user manual and instructions
Find the device manual for free PHVR6 OH5V2 IN PRIVILEG in PDF.
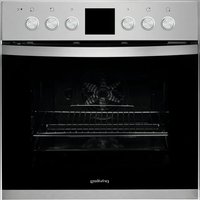
| Brand | PRIVILEG |
| Model | PHVR6 OH5V2 IN |
| Product type | Built-in electric oven |
| Color | Stainless steel (estimated) |
| Number of functions | 8 (Lighting, Natural convection, Hydrocleaning, Forced convection, Grill, Gratin, Defrosting, Stop) |
| Maximum temperature | 250 °C |
| Power supply | 230 V / 50-60 Hz |
| Bulb type | Incandescent 25-40W 230V E-14 T300°C or Halogen 20-40W 230V G9 T300°C |
| Special function | Hydrocleaning (low temperature steam cleaning) |
| Special function | Accelerated defrosting |
| Special function | Forced convection for uniform cooking on 2 levels |
| Cooking levels | 4 (grid supports) |
| Supplied accessories | Metal grid, drip tray (depending on model) |
| Control type | Retractable rotary knobs + touch controls |
| Display | Digital screen with cooking programming and timer |
| Door opening | Removable for cleaning |
| Cleaning | Do not use steam cleaner, microfibre cloth, neutral detergent; Hydroclean function |
| Safety | Disconnect before maintenance; do not touch hot surfaces; door safety locks |
| Spare parts available | Bulb, grid, drip tray, grid supports |
| After-sales service | Indicated in the warranty booklet |
| Documentation | User and maintenance guide downloadable at docs.whirlpool.eu |
Frequently Asked Questions - PHVR6 OH5V2 IN PRIVILEG
User questions about PHVR6 OH5V2 IN PRIVILEG
0 question about this device. Answer the ones you know or ask your own.
Ask a new question about this device
Download the instructions for your Oven in PDF format for free! Find your manual PHVR6 OH5V2 IN - PRIVILEG and take your electronic device back in hand. On this page are published all the documents necessary for the use of your device. PHVR6 OH5V2 IN by PRIVILEG.
USER MANUAL PHVR6 OH5V2 IN PRIVILEG
BEDIENKNOPFE DES KOCHFELDS
A. Kochfeld vorne links.
B. Kochfeld hinten links.
C. Kochfeld hinten rechts.
D. Kochfeld vorne rechts.
You can download the Safety Instructions and the Use and Care Guide by visiting our website docs.whirlpool.eu and following the instructions on the back of this booklet.

Before using the appliance carefully read the Health and Safety guide.
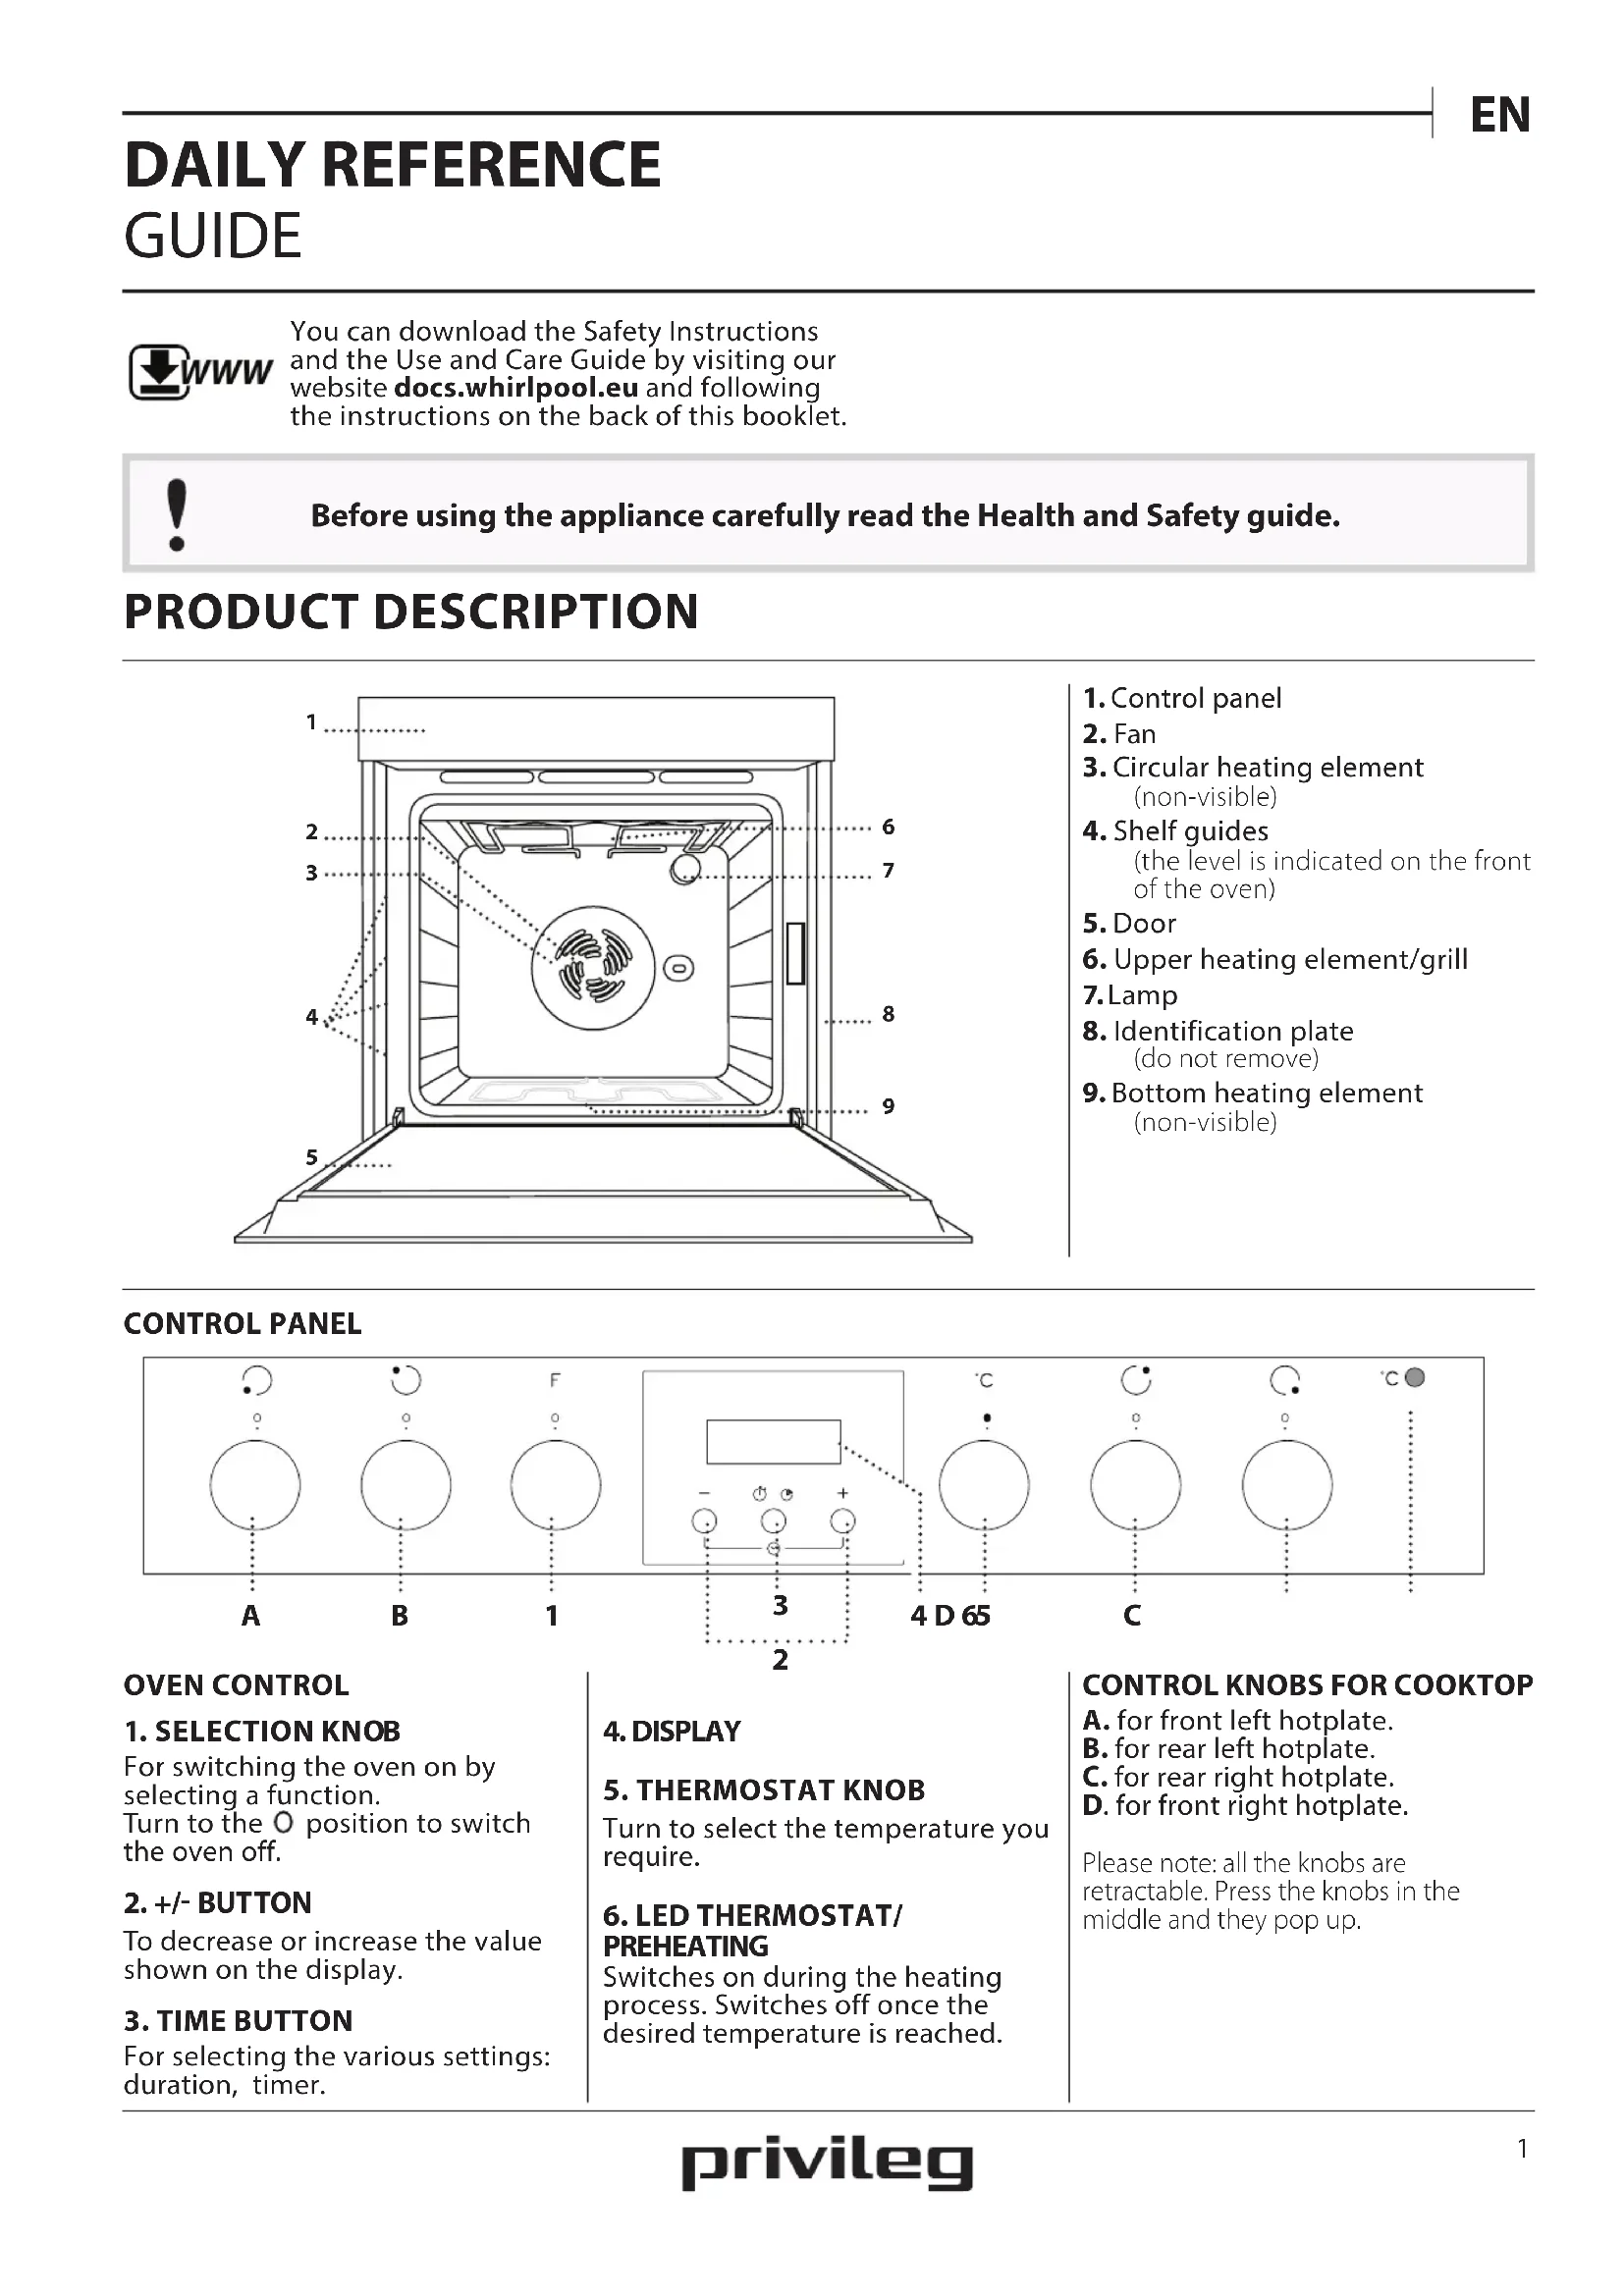
PRODUCT DESCRIPTION
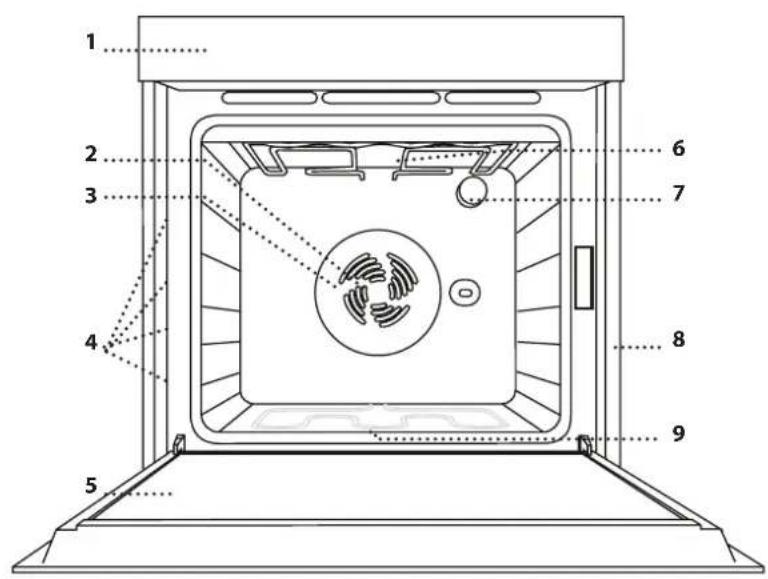
- Control panel
2.Fan - Circular heating element (non-visible)
- Shelf guides (the level is indicated on the front of the oven)
- Door
- Upper heating element/grill
7.Lamp - Identification plate (do not remove)
- Bottom heating element (non-visible)
CONTROL PANEL
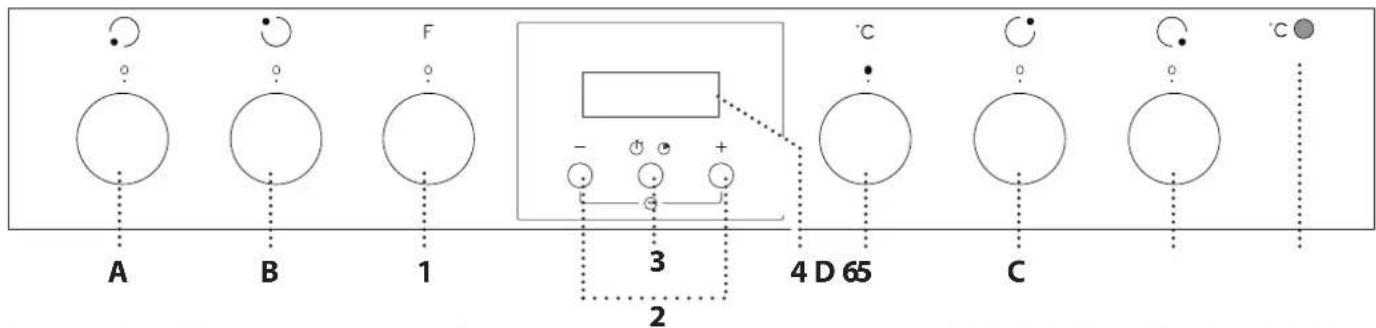
OVEN CONTROL
1. SELECTION KNOB
For switching the oven on by selecting a function.
Turn to the O position to switch the oven off.
2. +/- BUTTON
To decrease or increase the value shown on the display.
3. TIME BUTTON
For selecting the various settings: duration, timer.
4. DISPLAY
5. THERMOSTAT KNOB
Turn to select the temperature you require.
6. LED THERMOSTAT/ PREHEATING
Switches on during the heating process. Switches off once the desired temperature is reached.
CONTROL KNOBS FOR COOKTOP
A. for front left hotplate.
B. for rear left hotplate.
C. for rear right hotplate.
D. for front right hotplate.
Please note: all the knobs are retractable. Press the knobs in the middle and they pop up.
The number and the type of accessories may vary depending on which model is purchased.
Other accessories that are not supplied can be purchased separately from the After-sales Service.
INSERTING THE WIRE SHELF AND OTHER ACCESSORIES
Insert the wire shelf horizontally by sliding it across the shelf guides, making sure that the side with the raised edge is facing upwards.
Other accessories, such as the drip tray and the baking tray, are inserted horizontally in the same way as the wire shelf.
REMOVING AND REFITTING THE SHELF GUIDES
-
To remove the shelf guides, remove the fixing screws (if present) on both sides with the aid of a coin of a tool. Lift the guides up and pull the lower parts out of their seatings: The shelf guides can now be removed.
-
To refit the shelf guides, first fit them back into their upper seating. Keeping them held up, slide them into the cooking compartment, then lower them into position in the lower seating. Refit the fixing screws.
FUNCTIONS

Download the Use and Care Guide from docs.whirlpool.eu for more information

OFF
For switching off the oven.

LIGHT
To switch the oven light on/off.

CONVENTIONAL
For cooking any kind of dish on one shelf.

HYDROCLEANING
To eliminate the dirt created by cooking by means of a low temperature cycle. The action of the steam released during this special low-temperature cleaning cycle allows dirt and food residues to be removed with ease. Pour 200ml of drinking water on the bottom of the oven and use the function for 35^ at 90^ Activate the function when the oven is cold and let it cool down for 15^ once the cycle ends.

CONVECTION BAKE
For cooking meat and pies with liquid filling (savoury or sweet) on a single shelf, and pizzas on one or two shelves. This function delivers an even, golden, crisp top and base. When cooking on two levels, switch the position of the dishes halfway through cooking to cook food more evenly.

GRILL
For grilling steaks, kebabs and sausages, cooking vegetables au gratin or toasting bread. When grilling meat, we recommend using a tray to collect the cooking juices: Position the pan on any of the levels below the wire shelf and add 500ml of drinking water.

GRATIN
For roasting large joints of meat (legs, roast beef, chicken). We recommend using a tray to collect the cooking juices: Position the pan on any of the levels below the wire shelf and add 500ml of drinking water. The turnspit (if provided) can be used with this function.

DEFROSTING
To speed up defrosting of food.
USING THE APPLIANCE FOR THE FIRST TIME
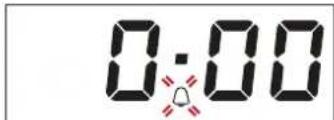
1. SETTING THE TIME
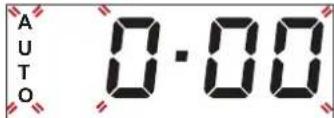
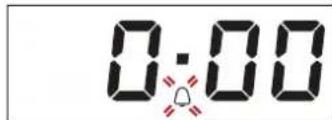
You will need to set the time when you switch on the appliance for the first time: "AUTO" and "0.00" flash on the display.
To set the time of day, press buttons—and at the same time: Set the time of day using the + and - buttons.
Please note: To change the time of the day afterwards for example following lengthy power outages, you will need to reset the time.
2. SETTING THE TONE
Having selected the desired time value, press the time button: The display shows "ton 1".
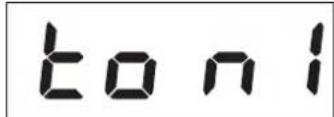
To select the desired tone, press button-, then press the time button to confirm.
3. HEAT THE OVEN
A new oven may release odours that have been left behind during manufacturing: this is completely normal. Before starting to cook food, we therefore recommend heating the oven with it empty in order to remove any possible odours.
Remove any protective cardboard or transparent film from the oven and remove any accessories from inside it. Heat the oven to 250^ for about one hour, preferably using the "Convection Bake" function. The oven must be empty during this time.
Follow the instructions for setting the function correctly.
Please note: It is advisable to air the room after using the appliance for the first time.
DAILYUSE
1. SELECT A FUNCTION
To select a function, turn the selection knob to the symbol for the function you require.
2. ACTIVATE A FUNCTION
To start the function you have selected, turn the thermostat knob to set the temperature you require.
To interrupt the function at any time, switch off the oven, turn the selection knob and the thermostat knob to O and
3. PREHEATING
Once the function has been activated, the LED thermostat will switch on signalling that the preheating process has begun.
At the end of this process, the LED thermostat switches off indicating that the oven has reached the set temperature: at this point, place the food inside and proceed with cooking.
Please note: Placing the food in the oven before preheating has finished may have an adverse effect on the final cooking result.
. PROGRAMMING COOKING
After selecting and activating the function, it is possible to set the duration.

DURATION
Press the time button: the symbol flashes.
Press the time button again: the display shows DUR and AUTO flashes.
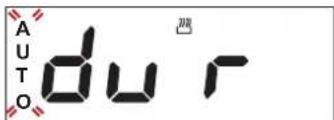
Set the duration using the buttons + and -After a few seconds, the display shows the time of the day while AUTO remain lit, confirming the setting.
To view the remaining cooking duration press the time button for at least 2 seconds.
To change it, if necessary, press it again a second time, using + and - buttons to modify the duration.
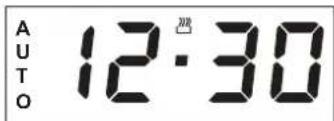
At the end of cooking, the symbol switches off, an alarm sounds while AUTO flashes on the display.
A 13.20 UT O
Press any button to deactivate the alarm. Return the function knob and thermostat knob to O and then press the time button for at least 2 seconds to switch off the oven.

SETTING THE TIMER
This option does not interrupt or activate cooking but allows you to use the display as a timer, both while a function is active and when the oven is off. To activate the timer, long press the time button: the symbol flashes on the display.
Use the and buttons to set the desired duration: the countdown begins after a few seconds.
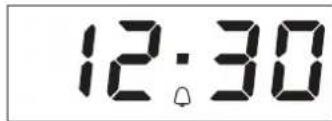
The display shows the time of the day and the remains lit, confirming the timer has been set.
Please note: To view the countdown and change it if necessary, press the time button 2 seconds again.
COOKTOP OPERATION
(see the instructions supplied with the cooktop).
Turn the control knob of the relevant hotplate clockwise to the desired power setting.
The oven control panel features 4 adjustable knobs for cooktop operation. The cooktop control knobs are marked with a numerical scale corresponding to different power settings, and a series of function symbols.

GENTLEHEAT
To allow dough to rise, to soften butter taken from the fridge, to keep baby bottles or food warm, also for making yoghurt, melting chocolate, etc. This function is only available when the residual heat indicator is on. For this function, make sure the residual heat indicator of the desired hotplate is on. Turn the knob to . To deselect the function, change the position of the knob.
HEAT MAINTENANCE
To maintain a constant temperature of 60^ until the end of cooking. To select this function, turn the knob to 15.
FAST BOIL This func
This function is used to bring water to the boil rapidly and remains on for a preset time. At the end of the preset time, the cooktop automatically returns to the maximum power setting. This function can be selected even during cooking. Important: before selecting this function, make sure the pot is positioned on the selected hotplate in order to avoid any damage to the cooktop surface. The stated performance values for this function are those guaranteed for all glass ceramic cooktops. For this function, place the pot on the selected hotplate and turn the knob to To deselect, change the position of the knob.
MULTIZONE This is availa
This is available on the front left and rear left hotplates. This extends the heating area of the cooktop in order to allow the use of large, oval or rectangular pots or cooking receptacles. To select this function: turn the knob to and wait until the residual heat indicator for the hotplate begins to flash. To switch on the triple zone function (if available), wait until the LED begins flashing quickly. Select the power setting required by turning the knob anticlockwise. The residual heat indicator remains on to indicate that the cooktop is in use. To deselect, turn the knob to by turning the knob anticlockwise.
Please note: The multizone function can only be switched on for the double and triple hotplates of the cooktop.
COOKING TABLE
| RECIPE FUNCTION PREHEAT | TEMPERATURE (°C) | DURATION (MIN) | LEVEL AND ACCESSORIES | ||
| Leavened cakes | ─ | Yes 160 - 180 35 - 55 | 2 | ||
| ─ | Yes 150 - 170 30 - 90 * | 3 1 | |||
| Filled cake (cheese cake, strudel, fruit pie) | ─ | Yes 150 - 190 30 - 85 | 2 | ||
| ─ | Yes 150 - 190 35 - 90 * | 3 1 | |||
| Biscuits/tartlets | ─ | Yes 170 - 180 15 - 40 | 3 | ||
| ─ | Yes 150 - 175 20 - 45 * | 3 1 | |||
| Choux buns | ─ | Yes 180 30 - 40 | 3 | ||
| ─ | Yes 170 - 190 35 - 45 * | 3 1 | |||
| Meringues | ─ | Yes | 90 | 120 - 130 | 3 |
| ─ | Yes | 90 | 130 - 150 * | 3 1 | |
| Bread/Pizza/Focaccia | ─ | Yes 190 - 250 15 - 50 | 2 | ||
| ─ | Yes 190 - 250 25 - 45 * | 3 1 | |||
| Frozen pizza | ─ | Yes 250 | 10 - 15 | 2 | |
| ─ | Yes 250 | 10 - 20 * | 3 1 | ||
| Savoury pies (vegetable pie,quiche) | ─ | Yes 175 - 200 40 - 50 | 2 | ||
| ─ | Yes 180 - 190 40 - 55 * | 3 1 | |||
| Vols-au-vents/puff pastry crackers | ─ | Yes | 180 - 200 | 20 - 30 | 3 |
| ─ | Yes 180 - 190 20 - 40 * | 3 1 | |||
| Lasagne/baked pasta/canneloni/flans | ─ | Yes | 190 - 200 40 - 65 | 2 | |
| Lamb/veal/beef/pork 1 kg | ─ | Yes | 190 - 200 | 90 - 110 | 2 |
| Chicken/rabbit/duck 1 kg | ─ | Yes | 190 - 200 | 65 - 85 | 2 |
| Turkey/goose 3 kg | ─ | Yes | 190 - 200 | 140 - 180 | 1 / 2 |
| Baked fish/en papillote (fillets, whole) | ─ | Yes | 180 - 200 40 - 60 | 2 | |
| Stuffed vegetables (tomatoes, courgettes, aubergines) | ─ | Yes 175 - 200 50 - 60 | 2 | ||
| Toast | ─ | Yes | 200 | 2 - 5 | 4 |
| Fish fillets/steaks | ─ | Yes | 200 | 30 - 40 ** | 4 3 |
| FUNCTIONS | Conventional | Grill | Gratin | Convection Bake |
| ACCESSIONS | Wire shelf | Cake tin on wire shelf | Drip tray / Baking tray or cake tin on wire shelf | Drip tray / Baking tray or Drip tray with 500 ml of water |
| RECIPE FUNCTION PREHEAT | TEMPERATURE (°C) | DURATION (MIN) | LEVEL AND ACCESSORIES | ||
| Sausages/kebabs/spare ribs/hamburgers | Yes 200 | 30 - 50 ** | 4 3 | ||
| Roast chicken 1-1.3 kg | - | 200 | 55 - 70 ** | 2 1 | |
| Roast beef rare 1 kg | - | 200 | 35 - 50 *** | 2 | |
| Leg of lamb/shanks - 200 60 - 90 *** | 2 | ||||
| Roast potatoes - 200 45 - 55 *** | 2 | ||||
| Vegetable gratin | - | 200 | 20 - 30 | 2 | |
| Lasagna & meat | Yes | 200 | 50 - 100 **** | 3 1 | |
| Meat & potatoes | Yes | 200 | 45 - 100 **** | 3 1 | |
| Fish & vegetables | Yes | 180 | 30 - 50 **** | 3 1 |
- Switch levels halfway through cooking.
Turn food halfway through cooking.
Turn food two thirds of the way through cooking (if necessary).
*** Estimated length of time: dishes can be removed from the oven at different times depending on personal preference.
Download the Use and Care Guide by visiting the website docs.whirlpool.eu to consult the table of tested recipes filled out for the assessment institutes in accordance with the IEC 60350 - 1 standard.
| FUNCTIONS | Conventional | Grill | Gratin | Convection Bake |
| ACCESSIONS | Wire shelf | Cake tin on wire shelf | Drip tray / Baking tray or cake tin on wire shelf | Drip tray / Baking tray or cake tin on wire shelf |
CLEANING AND MAINTENANCE

Download the Use and Care Guide from docs.whirlpool.eu for more information
Make sure that the oven has cooled down before carrying out any maintenance or cleaning.
Do not use steam cleaners.
Do not use wire wool, abrasive scourers or abrasive/corrosive cleaning agents, as these could damage the surfaces of the appliance.
Wear protective gloves.
The oven must be disconnected from the mains before carrying out any kind of maintenance work.
EXTERIOR SURFACES
- Clean the surfaces with a damp microfibre cloth. If they are very dirty, add a few drops of pH-neutral detergent. Finish off with a dry cloth.
- Do not use corrosive or abrasive detergents. If any of these products inadvertently comes into contact with the surfaces of the appliance, clean immediately with a damp microfibre cloth.
INTERIOR SURFACES
After every use, leave the oven to cool and then clean it, preferably while it is still warm, to remove any deposits or stains caused by food residues. To
dry any condensation that has formed as a result of cooking foods with a high water content, leave the oven to cool completely and then wipe it with a cloth or sponge.
- Clean the glass in the door with a suitable liquid detergent.
- The oven door can be removed to facilitate cleaning.
ACCESSIONS
Soak the accessories in a washing-up liquid solution after use, handling them with oven gloves if they are still hot. Food residues can be removed using a washing-up brush or a sponge.
REPLACING THE LAMP
- Disconnect the oven from the power supply.
- Unscrew the cover from the light, replace the bulb and screw the cover back on the light.
- Reconnect the oven to the power supply.
Please note: Only use 25-40W/230V type E-14, T300°C incandescent lamps, or 20-40W/230 V type G9, T300°C halogen lamps. The bulb used in the product is specifically designed for domestic appliances and is not suitable for general room lighting within the home (EC Regulation 244/2009). Light bulbs are available from our After-sales Service.
- If using halogen bulbs, do not handle them with your bare hands as your fingerprints could cause damage. Do not use the oven until the light cover has been refitted.
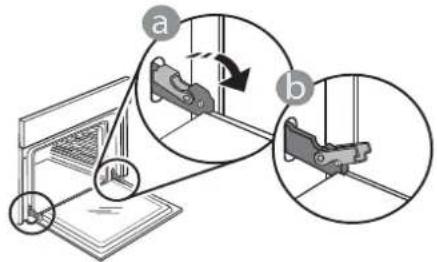
REMOVING AND REFITTING THE DOOR
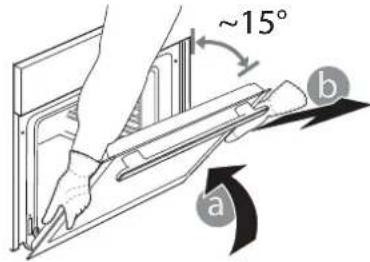
- To remove the door, open it fully and lower the catches until they are in the unlock position.
- Close the door as much as you can.
Take a firm hold of the door with both hands - do not hold it by the handle.
Simply remove the doo by continuing to close it while pulling it upwards at the same time until it is released from its seating. Put the door to one side, resting it on a soft surface.
-
Refit the door by moving it towards the oven, aligning the hooks of the hinges with their seating and securing the upper part onto its seating.
-
Lower the door and then open it fully. Lower the catches into their original position: Make sure that you lower them down completely
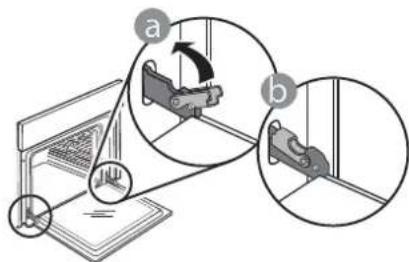
Apply gentle pressure to check that the catches are in the correct position.
- Try closing the door and check to make sure that it lines up with the control panel. If it does not, repeat the steps above: The door could become damaged if it does not work properly..
HOW TO READ THE COOKING TABLE
The table lists the best function, accessories and level to use to cook various different types of food. Cooking times start from the moment food is placed in the oven, excluding preheating (where required). Cooking temperatures and times are approximate and depend on the amount of food and the type of accessory used. Use the lowest recommended settings to begin with and, if the food is not cooked enough, then switch to higher settings. Use the accessories supplied and preferably dark-coloured metal cake tins and baking plates. You can also use Pyrex or stoneware pans and accessories, but bear in mind that cooking times will be slightly longer.
COOKING DIFFERENT FOODS AT THE SAME TIME
Using the "Forced Air" function, you can cook different foods which require the same cooking temperature at the same time (for example: fish and vegetables), using different shelves. Remove the food which requires a shorter cooking time and leave the food which requires a longer cooking time in the oven.
TROUBLESHOOTING

Download the Use and Care Guide from docs.whirlpool.eu for more information
| Problem Possible cause Solution | ||
| The oven does not work. | Power cut. Disconnection from the mains. | Check for the presence of mains electrical power and whether the oven is connected to the electricity supply. Turn off the oven and restart it to see if the fault persists. |
| The display shows the letter “F” followed by a number. | Software problem. Contact you | nearest Client After-sales Service Centre and state the number following the letter “F”. |
PRODUCT FICHE
The product fiche with energy data of this appliance can be downloaded from the website docs.whirlpool.eu
HOW TO OBTAIN THE USE AND CARE GUIDE
Download the Use and Care Guide from our website docs.whirlpool.eu (you can use this QR Code), specifying the product's commercial code.
Alternatively, contact our Client After-sales Service.


CONTACTING OUR AFTER-SALES SERVICE
You can find our contact details in the warranty manual. When
contacting our Client After-sales Service, please state the codes provided on your product's identification plate.

400011603915/B
GUIDE D'UTILISATION QUOTIDIENNE

| FONCTIONS | Convection naturelle | Grill | Gratin | Convection forcee |
| FONCTIONS | Convection naturelle | Grill | Gratin | Convection forcee |
CÓMOPONERSE EN CONTACTO CON NUESTROSERVICIO POSTVENTA

m = 311
Mod. xxxxxx
Ind.C. xxxxxx
SN: XXXXXXXXXX
Download the complete instruction manual on http://docs.Privilege.eu or call the phone number shown on the warranty booklet.
Before using the appliance, read these safety instructions. Keep them nearby for future reference.
These instructions and the appliance itself provide important safety warnings, to be observed at all times. The manufacturer declines any liability for failure to observe these safety instructions, for inappropriate use of the appliance or incorrect setting of controls.
WARNING: If the hob surface is cracked, do not use the appliance - risk of electric shock.
WARNING: Danger of fire: Do not store items on the cooking surfaces.
CAUTION: The cooking process has to be supervised. A short cooking process has to be supervised continuously.
WARNING: Unattended cooking on a hob with fat or oil can be dangerous - risk of fire. NEVER try to extinguish a fire with water: instead, switch off the appliance and then cover flame e.g. with a lid or a fire blanket.
Do not use the hob as a work surface or support. Keep clothes or other flammable materials away from the appliance, until all the components have cooled down completely - risk of fire.
Very young children (0-3 years) should be kept away from the appliance. Young children (3-8 years) should be kept away from the appliance unless continuously supervised. Children from 8 years old and above and persons with reduced physical, sensory or mental capabilities or lack of experience and knowledge can use this appliance only if they are supervised or have been given instructions on safe use and understand the hazards involved. Children must not play with the appliance. Cleaning and user maintenance must not be carried out by children without supervision.
WARNING: The appliance and its accessible parts become hot during use. Care should be taken to avoid touching heating elements. Children less than 8 years of age shall be kept away unless continuously supervised.
The food must not be left in or on the product for more than one hour before or after cooking.
PERMITTED USE
CAUTION: the appliance is not intended to be operated by means of an external switching device, such as a timer, or separate remote controlled system.
This appliance is intended to be used in household and similar applications such as: staff kitchen areas in shops, offices and other working environments; farm houses; by clients in hotels, motels, bed & breakfast and other residential environments.
No other use is permitted (e.g. heating rooms).
This appliance is not for professional use. Do not use the appliance outdoors.
INSTALLATION
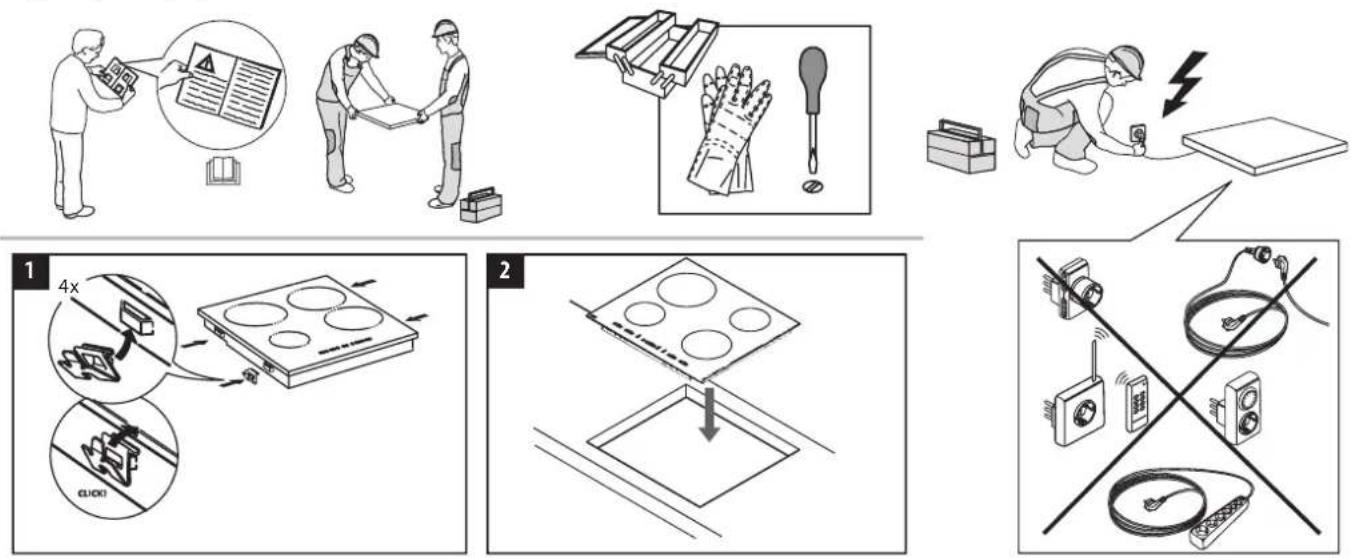
The appliance must be handled and installed by two or more persons - risk of injury. Use protective gloves to unpack and install - risk of cuts.
Installation, including water supply (if any), electrical connections and repairs must be carried out by a qualified technician. Don't repair or replace any part of the appliance unless specifically stated in the user manual. Keep children away from the installation site. After unpacking the appliance, make sure that it has not been damaged during transport. In the event of problems, contact the dealer or your nearest After-sales Service. Once installed, packaging waste (plastic, styrofoam parts etc.) must be stored out of reach of children - risk of suffocation. The appliance must be disconnected from the power supply before any installation operation - risk of electric shock. During installation, make sure the appliance does not damage the power cable - risk of fire or electric shock. Only activate the appliance when the installation has been completed.
Carry out all cabinet cutting operations before fitting the appliance and remove all wood chips and sawdust.
If the appliance is not installed above an oven, a separator panel (not included) must be installed in the compartment under the appliance.
ELECTRICALWARNINGS
It must be possible to disconnect the appliance from the power supply by unplugging it if plug is accessible, or by a multi-pole switch installed upstream of the socket in accordance with the wiring rules and the appliance must be earthed in conformity with national electrical safety standards.
Do not use extension leads, multiple sockets or adapters. The electrical components must not be accessible to the user after installation. Do not use the appliance when you are wet or barefoot. Do not operate this appliance if it has a damaged power cable or plug, if it is not working properly, or if it has been damaged or dropped.
Installation using a power cable plug is not allowed unless the product is already equipped with the one provided by the Manufacturer.
If the supply cord is damaged, it must be replaced with an identical one by the manufacturer, its service agent or similarly qualified persons in order to avoid a hazard - risk of electric shock.
CLEANING AND MAINTENANCE
WARNING: Ensure that the appliance is switched off and disconnected from the power supply before performing any maintenance operation; never use steam cleaning equipment - risk of electric shock.
Do not use abrasive or corrosive products, chlorine-based cleaners or pan scourers.
DISPOSAL OF PACKAGING MATERIALS
The packaging material is 100% recyclable and is marked with the recycle symbol.
The various parts of the packaging must therefore be disposed of responsibly and in full compliance with local authority regulations governing waste disposal.
DISPOSAL OF HOUSEHOLD APPLIANCES
This appliance is manufactured with recyclable or reusable materials. Dispos of it in accordance with local waste disposal regulations. For further information on the treatment, recovery and recycling of household electrical appliances, contact your local authority, the collection service for household waste or the store where you purchased the appliance. This appliance is marked in compliance with European Directive 2012/19/EU, Waste Electrical and Electronic Equipment (WEEE) and with the Waste Electrical and Electronic Equipment regulations 2013 (as amended).
By ensuring this product is disposed of correctly, you will help prevent negative consequences for the environment and human health.
The symbol on the product or on the accompanying documentation indicates that it should not be treated as domestic waste but must be taken to an appropriate collection center for the recycling of electrical and electronic equipment.
ENERGY SAVING TIPS
Make the most of your hot plate's residual heat by switching it off a few minutes before you finish cooking.
The base of your pot or pan should cover the hot plate completely; a container that is smaller than the hot plate will cause energy to be wasted.
Cover your pots and pans with tight-fitting lids while cooking and use as little water as possible. Cooking with the lid off will greatly increase energy consumption.
Use only flat-bottomed pots and pans.
DECLARATION OF CONFORMITY
This appliance meets Ecodesign requirements of European Regulation 66/2014 and The Ecodesign for Energy-Related Products and Energy Information (Amendment) (EU Exit) Regulations 2019 in compliance with the European standard EN 60350-2.
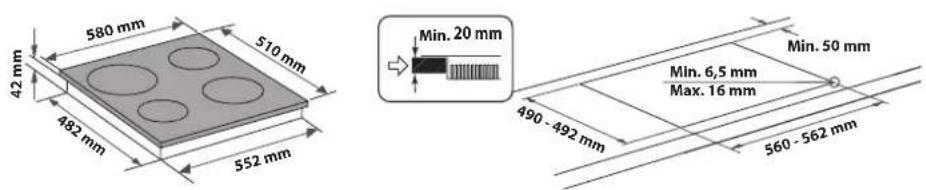
The cooktop must be set into a worktop at least 20mm deep.
- There must be nothing between the cooktop and the oven (cross rails, brackets, etc.).
- For built-in dimensions and installation, see the picture in this paragraph.
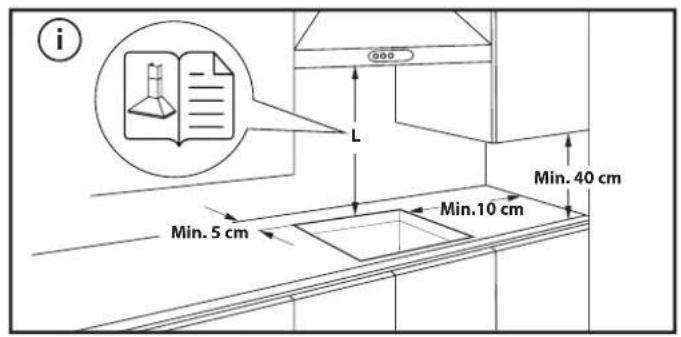
A minimum distance must be maintained between the hob and the hood above it. Please refer to the user manual of the hood for more information.
Apply the supplied gasket to the cooktop (unless it has already been fitted), after having cleaned its surface.
- Do not install the cooktop near a dishwasher or washing machine, so that the electronic circuits do not come into contact with steam or moisture, which could damage them.
If an oven is installed beneath the cooktop, make sure that it is equipped with a cooling system. If the temperature of the electronic circuits exceeds the maximum permitted temperature, the cooktop will switch off automatically; in this case, wait for a few minutes until the internal temperature of the electronic circuits reaches a tolerable level, at which point it will be possible to switch the hob on again.
PLACING THE HOB
After the electrical connection (see the chapter "Electrical connection"). Position each fixing clips on the dedicated slots on the hob's lateral sides as shown in the picture. Then push the hob inside the cut-out and check that the glass is flat and parallel to the worktop. The fixing clips are designed for every type of worktop material (wood, marble, etc.).
DIMENSIONS AND DISTANCES TO BE MAINTAINED
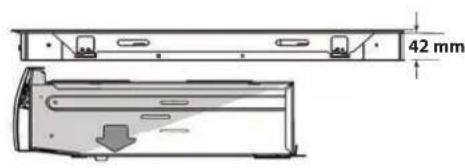
REMOVING THE HOB:
To remove the hob, first, disconnect it from the electric supply. It is strongly recommended to free the underneath part from the oven, drawer, separator, or other. It allows the technician to access the lower part of the hob to unfasten the four clips with a screwdriver, lift the hob and remove it, avoiding any worktop damage.

THANK YOU FOR BUYING A PRIVILEG PRODUCT
In order to receive a more complete assistance, please register your product on www privileg.registerappliance.com.

Before using the appliance carefully read the Safety Instruction.
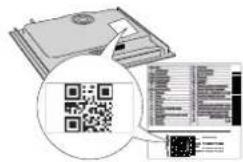
PLEASE SCAN THE QR CODE ON YOUR APPLIANCE IN ORDER TO REACH MORE INFORMATION
PRODUCT DESCRIPTION

1.Radiant cooking zone 180mm
2. Radiant oval dual cooking zone 145x250 mm
3. Radiant cooking zone 145 mm
4. Radiant dual cooking zone 120/210 mm
5. Residual heat indicator lamps
FIRST TIME USE
Before use, remove:
adhesives stuck on the hob;
cardboard guards and protective plastic film;
- check whether the hob has been damaged during transport. If in doubt, contact the After Sales Service.
DAILY USE
SWITCHING THE HOB ON/OFF
The cooktop control knobs are on the control panel on the oven.
To use the hob turn the knob(s) clockwise and position it (them) on the required power setting or symbol (each number/symbol corresponds to a different power setting/function).
To switch off the hob return the knob(s) to position "0".
The hob is fitted with residual heat indicators. These light up when the cooking zones reach temperatures that could cause burns. These indicators
remains alight after the cooking zones are switched off, and turn off only when the zones are no longer hot enough to be dangerous.
Cooktop functions are explained in the separate oven "Product Description Sheet".
IMPORTANT: To avoid a permanent damage the hob:
- do not use pots with bottoms that are not flat;
- do not use metal pots with enamelled bottom.
CLEANING AND MAINTENANCE
Disconnect the appliance from the power supply.
- Do not use steam cleaning equipment.
- Do not use abrasive sponges or scouring pads as they may damage the glass.
-
After each use, clean the hob (when it is cool) to remove any deposits and stains from food residue.
-
Sugar or foods with a high sugar content can damage the hob and must be immediately removed.
Salt, sugar and sand could scratch the glass surface. - Use a soft cloth, absorbent kitchen paper or a specific hob cleaner (follow the Manufacturer's instructions).
- Spills of liquid in the cooking zones can cause the pots to move or vibrate.
After cleaning the hob, dry thoroughly.
TROUBLESHOOTING
If the hob will not operate correctly, before calling the After-Sales Service, refer to the Troubleshooting Guide to determine the problem.
Read and follow the instructions given in the section "Daily use".
- Check that the electricity supply has not been shut off.
- Turn the hob off and on again, to make sure that the problem has been solved.
- Make sure that the knob is not turned to "0".
- Turn the multi-pole switch to "Off" for a few minutes and then turn it back to "On".
- The hob will not switch off: disconnect the hob immediately from the power supply.
If after the above checks the fault still occurs, get in touch with the nearest After Sales Service.
AFTER-SALES SERVICE
To receive complete assistance, please register your product on www. privilege.registerer-appliance.com.
BEFORE CALLING THE AFTER-SALES SERVICE:
- See if you can solve the problem by yourself with the help of the TROUBLESHOOTING suggestions.
- Switch the appliance off and back on again to see if the fault persists.
IF AFTER THE ABOVE CHECKS THE FAULT STILL OCCURS, GET IN TOUCH WITH THE NEAREST AFTER-SALES SERVICE.
When contacting our Client After sales service, always specify:
a brief description of the fault;
the type and exact model of the appliance;

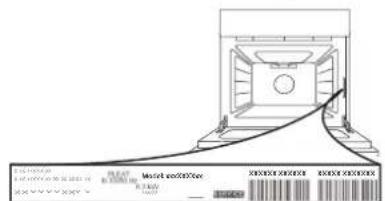
- the serial number (number after the word SN on the rating plate located under the appliance). The serial number is also indicated in the documentation;
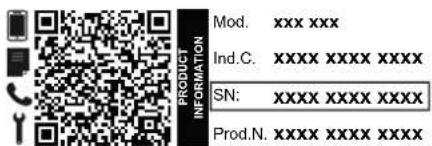
- your full address;
- your telephone number.
If any repairs are required, please contact an authorized after-sales service (to guarantee that original spare parts will be used and repairs carried out correctly).
Policies, standard documentation and additional product information can be found by:
- Using QR code in your appliance;
- Visiting our website docs.Privilege.eu;
- Alternatively, contact our After-sales Service (See phone number in the warranty booklet). When contacting our After-sales Service, please state the codes provided on your product's identification plate.


- BEDIENKNOPFE DES KOCHFELDS
- PRODUCT DESCRIPTION
- CONTROL PANEL
- OVEN CONTROL
- SELECTION KNOB
- +/- BUTTON
- TIME BUTTON
- DISPLAY
- THERMOSTAT KNOB
- LED THERMOSTAT/ PREHEATING
- CONTROL KNOBS FOR COOKTOP
- INSERTING THE WIRE SHELF AND OTHER ACCESSORIES
- REMOVING AND REFITTING THE SHELF GUIDES
- FUNCTIONS
- CONVENTIONAL
- HYDROCLEANING
- CONVECTION BAKE
- USING THE APPLIANCE FOR THE FIRST TIME
- SETTING THE TIME
- SETTING THE TONE
- HEAT THE OVEN
- DAILYUSE
- SELECT A FUNCTION
- ACTIVATE A FUNCTION
- PREHEATING
- PROGRAMMING COOKING
- A 13.20 UT O
- SETTING THE TIMER
- COOKTOP OPERATION
- GENTLEHEAT
- HEAT MAINTENANCE
- FAST BOIL This func
- MULTIZONE This is availa
- COOKING TABLE
- CLEANING AND MAINTENANCE
- EXTERIOR SURFACES
- INTERIOR SURFACES
- ACCESSIONS
- REPLACING THE LAMP
- REMOVING AND REFITTING THE DOOR
- HOW TO READ THE COOKING TABLE
- COOKING DIFFERENT FOODS AT THE SAME TIME
- TROUBLESHOOTING
- PRODUCT FICHE
- HOW TO OBTAIN THE USE AND CARE GUIDE
- CONTACTING OUR AFTER-SALES SERVICE
- GUIDE D'UTILISATION QUOTIDIENNE
- CÓMOPONERSE EN CONTACTO CON NUESTROSERVICIO POSTVENTA
- PERMITTED USE
- INSTALLATION
- ELECTRICALWARNINGS
- DISPOSAL OF PACKAGING MATERIALS
- DISPOSAL OF HOUSEHOLD APPLIANCES
- ENERGY SAVING TIPS
- Use only flat-bottomed pots and pans.
- DECLARATION OF CONFORMITY
- PLACING THE HOB
- DIMENSIONS AND DISTANCES TO BE MAINTAINED
- REMOVING THE HOB:
- THANK YOU FOR BUYING A PRIVILEG PRODUCT
- PLEASE SCAN THE QR CODE ON YOUR APPLIANCE IN ORDER TO REACH MORE INFORMATION
- FIRST TIME USE
- DAILY USE
- SWITCHING THE HOB ON/OFF
- Disconnect the appliance from the power supply.
- AFTER-SALES SERVICE
- BEFORE CALLING THE AFTER-SALES SERVICE:
- IF AFTER THE ABOVE CHECKS THE FAULT STILL OCCURS, GET IN TOUCH WITH THE NEAREST AFTER-SALES SERVICE.
Brand : PRIVILEG
Model : PHVR6 OH5V2 IN
Category : Oven