IAN 288724 - Air bed Meradiso - Free user manual and instructions
Find the device manual for free IAN 288724 Meradiso in PDF.
| Product type | Double air bed |
| Brand | Meradiso |
| Model | IAN 288724 |
| Mattress dimensions | approx. 195 × 81 × 25 cm (L x W x H) |
| Pillow dimensions | approx. 62 × 34 × 12 cm (L x W x H) |
| Maximum load per mattress | 140 kg |
| Rated air pressure | 0.38 PSI (0.026 bar) |
| Delivery contents | 2 air mattresses, 2 pillows, 2 screw valves, 2 purge tubes, 2 patches, 1 calibration ruler, 1 carry bag, instructions |
| Intended use | Private use, leisure, camping |
| Safety instructions | Do not use in water, keep away from heat sources, do not exceed max load |
| Inflation | With manual foot pump or double-action pump, do not use compressor |
| Mattress joining | Adjustable straps for side-by-side or stacked arrangement |
| Air deflation | Via purge tubes or opening the valve |
| Repair | Patches included, do not inflate for 24 hours after repair |
| Care and cleaning | Clean water or soapy water, do not machine wash |
| Warranty | 3 years, Belgium service: 070 270 171 |
| Spare parts | Available at www.delta-sport.com |
| Date of manufacture | 2017 |
Frequently Asked Questions - IAN 288724 Meradiso
User questions about IAN 288724 Meradiso
0 question about this device. Answer the ones you know or ask your own.
Ask a new question about this device
Download the instructions for your Air bed in PDF format for free! Find your manual IAN 288724 - Meradiso and take your electronic device back in hand. On this page are published all the documents necessary for the use of your device. IAN 288724 by Meradiso.
USER MANUAL IAN 288724 Meradiso
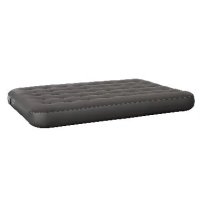
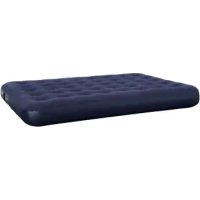
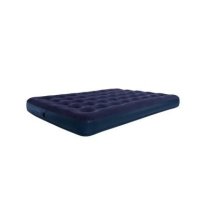
COMFORT DOUBLE AIR BED
GB IE NI
COMFORT DOUBLE AIR BED
Instructions for use
FR BE
SET DE 2 MATELAS GONFLABLES
Included in delivery / Parts description 6
Technical data 6
Intended use 6
Safety information 6-7
Assembling the screw-on valves 7
Inflating the item 7
Attaching the air beds 7
Deflating 7
Repair 8
Maintenance and storage 8
Disposal 8
3-year warranty 8
FR BE
With your purchase you have decided on a high-quality product. Get to know the product before you start to use it.
Carefully read the following instructions for use.
Use the product only as described and only for the given areas of application. Keep these instructions safe. When passing the product on to a third party, always make sure that the documentation is included.
Included in delivery / Parts description (Fig. A)
1 x Air bed with adjustable buckles (1)
1 x Air bed with non-adjustable buckles (2)
2 × Pillows (3)
1 x Carry bag (4)
2 × Screw-on valve (5)
1 x Ruler (6)
2× Venting tubes (7)
2× Repair patches (8)
1 x Instructions for use
Technical data
Dimensions per air bed approx. 195 × 81 × 25cm (L x W x H)
Dimensions per pillow: approx. 62 × 34 × 12cm (L x W x H)

Maximum load per air bed: 140kg
Design air pressure: 0.38 PSI (0.026 bar)

Date of manufacture (month/year):
2017
Intended use
This item is designed for a maximum user weight of 140kg per air bed, and is exclusively for personal use for camping and leisure. This product is not a flotation device, water toy, or item of winter sports equipment.
Safety information
Warning!
Risk of suffocation for children! Do not allow children to play unattended with the packaging material or item.
Risk of injury
- Please use the item exclusively for the purpose for which it was intended.
The item may only be used by persons familiar with the safety information. - Never use the item close to an open flame or oven, and keep away from sources of heat.
- The item must not be used in the water or for swimming! It will not remain on the surface, nor is it suitable as a flotation device. Salt and chlorinated water may damage the surface of the item.
- Please observe the maximum load of 140kg per air bed. Exceeding the weight limit may cause damage to the item as well as impair its function.
- Please inspect the item for damage or wear and tear each time before you use it. The item is only to be used in perfect condition! Do not use the item in the event of visible or presumed damage.
- Discontinue use if the item can no longer hold air.
- Do not over-inflate, otherwise the item may burst.
- Please make sure that only competent persons use this item.
- Warning: Using the item outdoors and/or as a watercraft is hazardous.
Avoiding material damage
- Avoid contact with sharp, hot, pointed, or dangerous objects.
- Do not use the item in water and ensure that the flocked surface does not become wet.
- Only use the valves with suitable pump adapters, otherwise there may be damage to the valves.
-
This item reacts strongly to cold and heat. Do not use the item if the surrounding temperature drops below 15^ or rises above 40^ . Otherwise this may lead to damage.
-
Make sure the valves are closed tightly after inflating.
Assembling the screw-on valves (Fig. B)
Each air bed (1) (2) is equipped with a threaded hole for the valves (5).
- Pull the ring of the valve over the threaded hole so that it fits firmly in the groove.
- Turn the valve firmly into the threaded hole in a clockwise direction.
Inflating the item
The item should be inflated by an adult.
CAUTION!
- To inflate the item, please use a commercially available foot pump or double stroke piston pump with corresponding pump adapter.
- Do not use compressors or compressed air bottles to inflate the item. Doing so may lead to damage.
- Stop pumping when resistance increases and the seams become stretched. Otherwise the material may rip.
Note: We recommend leaving the inflated item to air for a few days before using for the first time. Remove the item from its carry bag (4) and unfold.
Note: For the valve on the pillow, you will need a pump with a nozzle adapter (Ø approx. 8.5mm) (Fig. F).
For the air bed valve (1) (2), you will need a pump with a nozzle adapter, with a radius of approx. 17.5mm (Fig. C).
Inflating the air bed
- Turn the screw cap of the valve (5a) in an anticlockwise direction (Fig. C).
- Inflate the air bed with the appropriate pump (Fig. C).
- Hold the ruler (6) next to the measuring mark. You will have reached nominal pressure when the length of the ruler matches the length of the measuring mark (Fig. D).
- After reaching the nominal pressure, screw the valve (5) in a clockwise direction (Fig. E).
Inflating the pillow and attaching it to the air bed
- Open the valve (3b) (Fig. G).
- Inflate the pillow (3) (Fig. F).
- Close the valve (Fig. G) and sink the valve, applying light pressure (Fig. H).
- To attach the pillow to the air bed, pull the fastening holes (3a) of the pillow over the fastening straps (1b) of the air bed (Fig. K).
Note: Only attach the pillow to an inflated air bed.
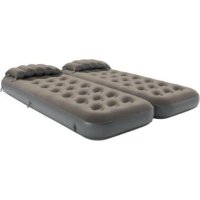
Attaching the air beds
The two air beds can be fastened together either next to one another or on top of one another (Fig. K) (Fig. L). There are buckles on each side of the air bed (1a), which are then attached to the buckles (2a) of the other air bed.
Attaching side by side (Fig. K)
- Place the air beds next to one another so that the pillows are placed beside one another and facing the same direction.
- Fasten the buckles, as shown in the diagram.
Attaching one on top of the other (Fig. L)
- Remove the pillow from one of the air beds.
- Place the air bed with the pillow onto the air bed without a pillow, and buckle the two air beds together as shown in the diagram.
Deflating
Pillow
- Pull out the valve (Fig. H).
- Open the valve (3b) and gently press the valve stem (3c) together so that the air can escape (Fig. G). Alternatively, push the venting tube (7) into the valve stem (3c) in order to let the air escape quickly (Fig. J).
Air bed
Turn the valve (5) out of the threaded hole of the air bed (1) (2) in an anti-clockwise direction (Fig. 1).
Repair
Small leaks or holes can be repaired with the repair patches supplied.
Important! After repairing the item, do not inflate for approximately 24 hours! Do not use the patches on the seams.
- Deflate the item fully.
Clean the area around the leak thoroughly. The area must be dry and free of grease. - Cut out a piece of the repair material large enough that its edges extend approximately 1.3cm over the damaged area.
- Round off the corners of the patch.
- Remove the patch from its paper, place it on the damaged area, and press down firmly.
Maintenance and storage

Always store the item clean and dry.
- The item should only be rolled up in dry condition, and the valve should remain closed during storage.
- Do not expose the item to extreme weather conditions such as extreme temperatures, wind, and rain.
- Clean only using water or soapy water; never with harsh detergents.
- The item is not suitable for cleaning in the washing machine.
Disposal
Dispose of the article and the packaging materials in accordance with current local regulations.
Packaging materials such as foil bags are not suitable to be given to children. Keep the packaging materials out of the reach of children.
3-year warranty
The product was produced with great care and under constant supervision. You receive a three-year warranty for this product from the date of purchase. Please retain your receipt.
The warranty applies only to material and workmanship and does not apply to misuse or improper handling. Your statutory rights, especially the warranty rights, are not affected by this warranty.
With regard to complaints, please contact the following service hotline or contact us by e-mail.
Our service employees will advise as to the subsequent procedure as quickly as possible.
We will be personally available to discuss the situation with you.
Any repairs under the warranty, statutory guarantees or through goodwill do not extend the warranty period. This also applies to replaced and repaired parts.
Repairs after the warranty are subject to a charge.
IAN:288724
GB Service Great Britain
Tel.: 08715000720
(£0.10/Min.)
E-Mail: deltasport@lidl.co.uk
IE Service Ireland
NI Tel.: 1890 930 034
(0,08 EUR/Min., (peak))
(0,06 EUR/Min., (off peak))
E-Mail: deltasport@lidl.ie
You can also find spare parts for your product at:
www.delta-sport.com, category Service - Lidl Spare Parts Service