Regal M2 80ED - Binoculars CELESTRON - Free user manual and instructions
Find the device manual for free Regal M2 80ED CELESTRON in PDF.

| Product Type | Spotting scope |
| Brand | Celestron |
| Model | Regal M2 80ED |
| Objective diameter | 80 mm |
| Eyepiece included | Zoom eyepiece (variable magnification) |
| Focusing system | Dual focusing: coarse and fine |
| Tripod mount rotation | 360° with locking screw |
| Sunshade | Retractable with integrated sight |
| Sealing | Waterproof and filled with dry nitrogen (anti-fog) |
| Digiscoping compatibility | Yes, with T-adapter and/or universal adapter (optional) |
| Tripod mounting | Rotating mount with 1/4-20 screw |
| Eyecup | Rotating (up for non-glasses wearers, down for glasses wearers) |
| Maintenance | Clean lenses with soft brush or optical cloth; store in dry place |
| Safety | Never look directly at the sun |
| Warranty | Celestron limited lifetime warranty (for original owner) |
| Weight | Approximately 1.5 kg (without tripod) |
| Dimensions (approx.) | Length: approximately 350 mm |
| Spare parts / repairability | Optional 1.25-inch eyepieces; Celestron customer service for repairs |
| General information | Use from age 14; design and specifications subject to change |
Frequently Asked Questions - Regal M2 80ED CELESTRON
User questions about Regal M2 80ED CELESTRON
0 question about this device. Answer the ones you know or ask your own.
Ask a new question about this device
Download the instructions for your Binoculars in PDF format for free! Find your manual Regal M2 80ED - CELESTRON and take your electronic device back in hand. On this page are published all the documents necessary for the use of your device. Regal M2 80ED by CELESTRON.
USER MANUAL Regal M2 80ED CELESTRON
natural_image
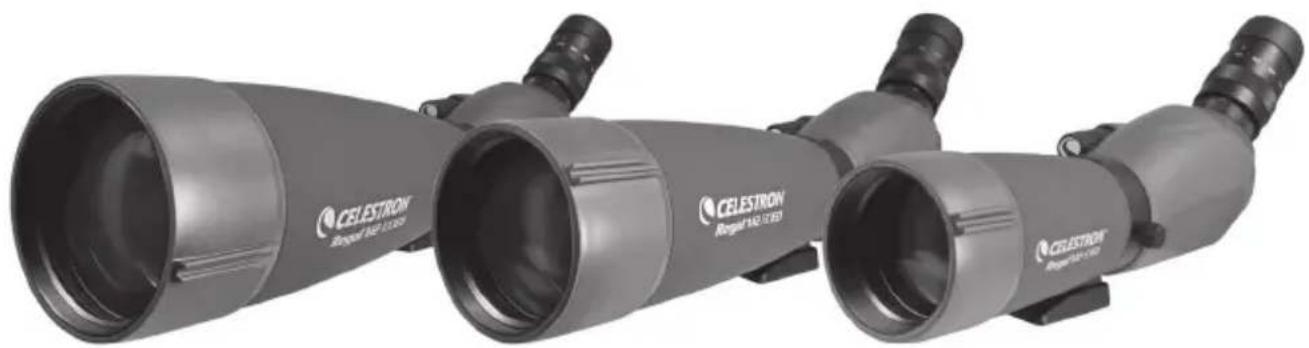
Exterior view of two CELESTRON regional optical instruments (no text or symbols visible on body)Thank you for purchasing a Celestron Regal M2 spotting scope. We trust that this spotting scope will provide you with years of enjoyment and faithful service. Please read the instructions carefully before using your spotting scope to ensure proper use and care.
text_image
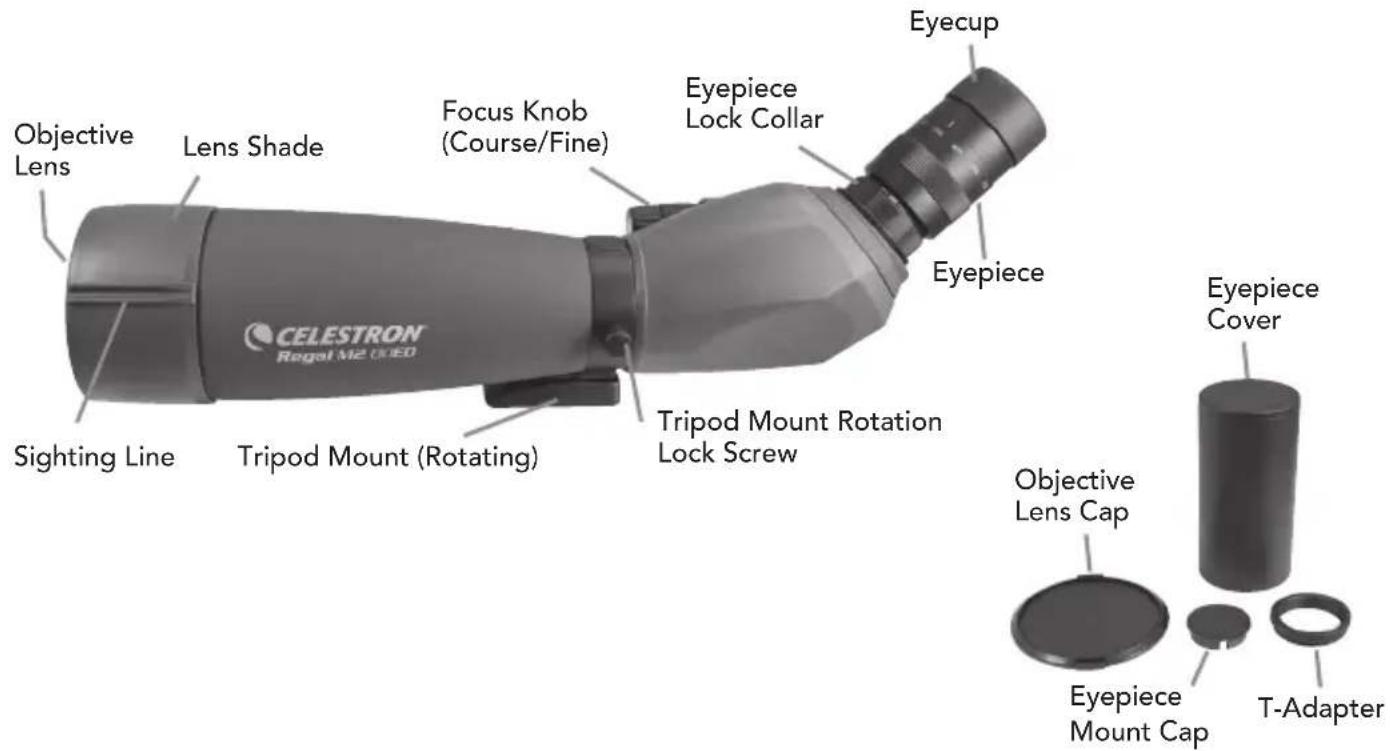
Objective Lens Lens Shade Focus Knob (Course/Fine) Eyepiece Lock Collar Eyecup Sighting Line Tripod Mount (Rotating) Tripod Mount Rotation Lock Screw Eyepiece Cover Objective Lens Cap Eyepiece Mount Cap T-Adapter
WARNING
Never look at the Sun while using your spotting scope. Looking at the Sun can cause permanent eye damage.
BEFORE USE
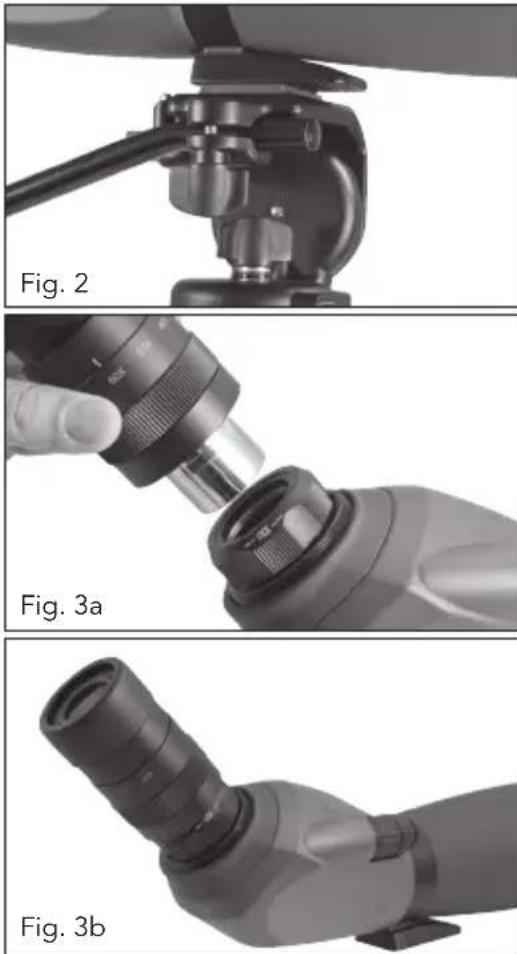
Attach your spotting scope to a sturdy tripod before viewing as the size and power of the spotting scope requires a solid tripod for stability to achieve clear, sharp images (Fig. 2).
ATTACHING THE EYEPIECE
A zoom eyepiece is included with the Regal M2 spotting scope. To attach the eyepiece to the spotting scope, turn the eyepiece lock collar counterclockwise until it is loose and remove the eyepiece mount cover. Make sure that the protective lens cap is removed from the eyepiece and slide it into the eyepiece mount (Fig. 3a). When the eyepiece is fully seated turn the lock collar clockwise to secure the eyepiece and hold it in place (Fig 3b). Do not attempt to attach or remove the eyepiece without first loosening the lock collar as it can cause damage to the eyepiece and/or the spotting scope.
EYECUP ADJUSTMENT
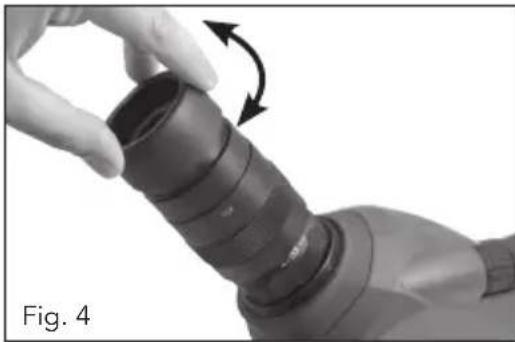
The included zoom eyepiece of the Regal M2 features a twist-up eyecup to accommodate both eyeglass and non-eyeglass wearers (Fig. 4). If you do not wear eyeglasses, twist the eyecup counterclockwise until it reaches the up position. If you wear eyeglasses, make sure that the eyecup is in the down position to obtain the maximum field of view. The eyecup can be set at positions between fully up and down which may suit some users better.
CHANGING THE MAGNIFICATION
To change the magnification of the zoom eyepiece simply rotate the eyepiece in the counterclockwise direction to increase the magnification and clockwise to decrease the magnification (Fig 5). When changing magnification the scope will need to be refocused. The largest field of view and brightest images will always be at the lowest magnification.
FOCUSING
To ensure a crisp, sharp image the spotting scope must be focused. The Regal M2 features a dual focus system that includes a course and a fine focus (Fig. 6). To focus the spotting scope, slowly rotate the course focus knob until the image in the eyepiece is clear and sharp. For fine
natural_image
Close-up of a hand holding a cylindrical mechanical component with a curved arrow indicating rotation (no text or symbols)
natural_image
Close-up of hands holding a black cylindrical object with an arrow indicating rotation (no text or symbols)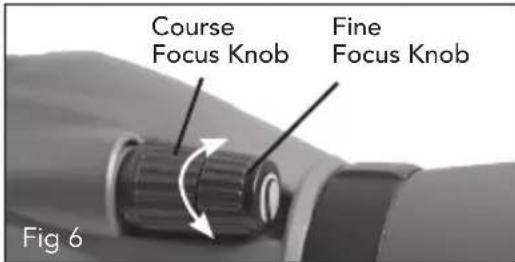
text_image
Course Focus Knob Fine Focus Knob Fig 6adjustment slowly rotate the fine focus knob (located in front of the course focus knob) until the image in the eyepiece is clear and sharp. When the focus knob will not rotate any further, turn the wheel in the opposite direction.
ROTATING TRIPOD MOUNT
The Regal M2 features a rotating tripod mount that rotates a full 360° and allows the eyepiece to be set in any viewing position. To change the position of the eyepiece, loosen the lock screw located on the tripod mount and turn the scope to the desired position (Fig 7a, 7b). Tighten the lock screw and view through the eyepiece.
LENS SHADE AND SIGHTING GUIDE
The lens shade of the Regal M2 will slide away from the body to protect the lens from exposure to rain or to keep unwanted glare from entering the spotting scope and degrading your image. A sighting guide is molded into the lens shade rubber to aid in locating your subject and bringing it into the field of view (Fig. 8). The location of the sighting guide can be changed by simply rotating the lens shade.

text_image
lock Screw Fig. 7a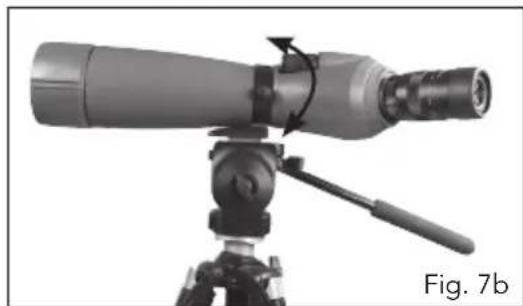
natural_image
Technical illustration of a telescope mounted on a tripod, showing optical path and component (no text or symbols)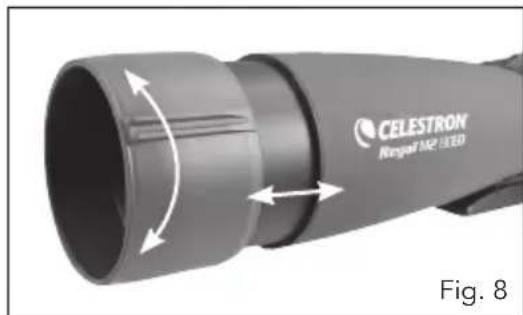
natural_image
Close-up of a CELESTRON Rangal M2 3.3D device with bidirectional arrow indicating rotation (no text or symbols on the device itself)OPTIONAL EYEPIECES
The Regal M2 Series spotting scopes were designed to use optional 1.25" eyepieces. Celestron offers a wide selection of 1.25" eyepieces for use on your spotting scope to achieve higher magnifications, wider fields of view, etc.
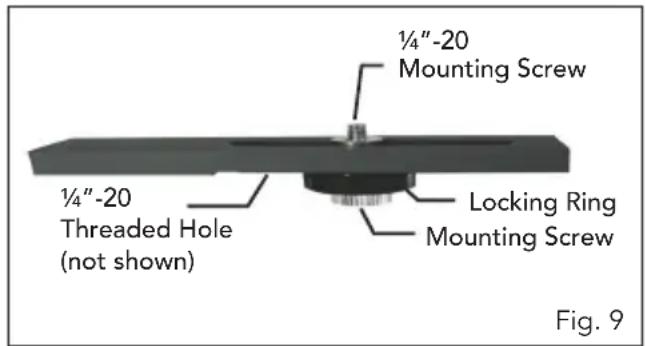
BALANCE PLATE (FOR THE 100 MM MODEL)
The Regal M2 100 mm spotting scope comes with a balance plate to properly balance the spotting scope when attached to a tripod (Fig. 9). To use the balance plate, mount it to the tripod's 14'' -20 mounting screw using the 14'' -20 threaded hole located on the bottom of the plate. Attach the spotting scope to the balance plate using the 14'' -20 mounting screw located on the top of the plate and thread it into the spotting scope as far as it will go. Slide the spotting scope along the slotted portion of the plate until the spotting scope is balanced on the tripod. Tighten the locking ring to hold the spotting scope in the desired position.
text_image
1/4"-20 Mounting Screw 1/4"-20 Threaded Hole (not shown) Locking Ring Mounting Screw Fig. 9DIGISCOPING
The Regal M2 spotting scopes can be used for digiscoping with SLR cameras and point-and-shoot digital cameras. Please note that not all cameras are compatible for digiscoping and in some cameras vignetting (a circular image surrounded by black) will occur. Point-and-shoot cameras with an optical zoom of 3x or 4x tend to be the most compatible with the least amount of vignetting. Most photographs will be the sharpest and brightest when using the lowest magnification on the zoom eyepiece.
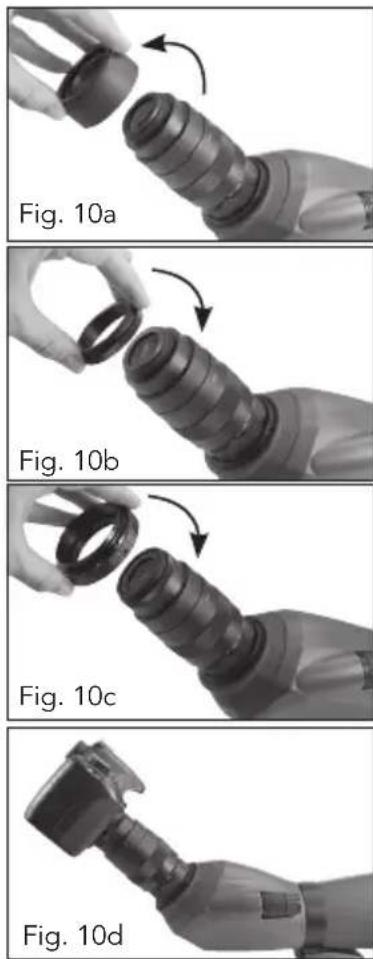
SLR PHOTOGRAPHY
To use an SLR camera and your spotting scope for photography, you will shoot through the zoom eyepiece while it is attached to the spotting scope. To prevent damage to the spotting scope, eyepiece or camera make sure the eyepiece lock collar is secure during each stage of the setup.
- Remove the eyecup from the zoom eyepiece. With the eyecup down, rotate it counterclockwise to remove it from the eyepiece. This will expose the threads under the eyecup (Fig. 10a).
- Thread the included T-adapter ring to the threads exposed on the eyepiece in step one above (Fig. 10b).
- Thread an optional T-ring for your make and model of camera onto the T-adapter ring (Fig. 10c)
- Attach your SLR camera body to the T-ring (Fig. 10d).
The Regal M2 spotting scopes have fixed apertures and as a result fixed f/ratios. To achieve the proper exposure for your photographs you need to set the shutter speed accordingly. Most cameras offer through-the-lens metering which will let you know if your picture is under or overexposed. Consult your camera manual for specific information on metering, changing shutter speeds and other settings.
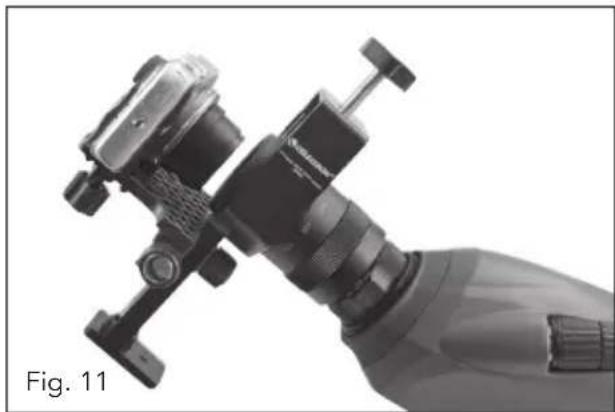
POINT-AND-SHOOT PHOTOGRAPHY
A variety of point-and-shoot cameras can be used to digiscope with the Regal M2 spotting scopes utilizing the Universal Camera Adapter (#93626) offered by Celestron (Fig. 11). This adapter attaches to the spotting scope's eyepiece and allows the camera lens to be centered behind the eyepiece. Please note that not all cameras are compatible with this adapter as there is not enough adjustment to center the lens behind the eyepiece when the position of the lens is low in the camera body or when the camera does not have adequate height.
natural_image
Close-up of a mechanical device with attached bracket and lever mechanism (no visible text or symbols)WATERPROOF / FOGPROOF
The Regal M2 Series spotting scopes are waterproof and filled with dry nitrogen gas to prevent the housing from fogging internally.
CARE AND STORAGE
Your Celestron spotting scope will provide you years of dependable service if it is cared for and stored properly.
- Protect the spotting scope from impact and do not force any of the moving parts beyond their limits.
- Protect the optics of your spotting scope by putting on all lens caps when not in use.
- Store your spotting scope in a cool, dry place whenever possible.
-
When storing for an extended period of time, place the spotting scope in a plastic bag or airtight container with a desiccant.
-
Do not leave the spotting scope in a car on a hot/sunny day or near anything that generates heat as this may cause damage.
-
Clean any dust, dirt or water that may get on the spotting scope or inside moving parts as soon as possible to prevent any unforeseen damage.
CLEANING
Proper lens cleaning is essential to maintaining the optical integrity of your spotting scope. Dirty lenses diminish the amount of light transmitted through the spotting scope and your overall viewing experience.
-
Remove any dust on the lenses with a soft lens brush or can of pressurized air.
-
Remove any fingerprints, stains or smudges from the lens surface with a soft, clean lens cloth or lens tissue by rubbing in a circular motion. Start in the middle of the lens and work your way to the edges. Breathe lightly on the lens to provide moisture if needed.
-
For a more thorough cleaning we recommend the use of a lens/optics cleaning kit available at most photo or optical shops. Follow the directions supplied with the cleaning kit for best results.
SERVICE AND REPAIR
If warranty problems arise or repairs are necessary, contact the Celestron customer service department if you live in the United States or Canada. If you live outside of these countries, please contact the dealer you purchased your spotting scope from or the Celestron distributor in your country. A list of our distributors can be found on our website.
WARRANTY
Your spotting scope is covered under the Celestron Limited Lifetime Warranty. Celestron warrants the spotting scope to be free from defects in materials and workmanship for the spotting scope's usable lifetime to the original owner. Celestron will repair or replace the spotting scope which, upon inspection by Celestron, is found to be defective in materials or workmanship and within the definitions of the limits described below.
This warranty does not cover products that have been subject to abuse, misuse, physically damaged, altered, or had unauthorized repairs or modifications. This warranty does not cover defects due to normal wear and tear and other conditions.
This warranty is valid to U.S.A. and Canadian customers who have purchased their spotting scope from an authorized Celestron dealer in the U.S.A. or Canada. For products purchased outside of the U.S.A. or Canada please contact your local Celestron Distributor or authorized Dealer for applicable warranty information. Additional warranty information and eligibility details can be found on the Celestron website.
Celestron spotting scopes are designed and intended for those 14 years of age and older. Product design and specifications are subject to change without prior notification.
For complete specifications and product information: www.celestron.com • ©2013 Celestron • All rights reserved 2835 Columbia Street • Torrance, CA 90503 U.S.A. Telephone: 800.421.9649 • Printed in China 0113
CELESTRON

CELESTRON
Regal™M2
tÉleScope D'oBSerVation
MoDe D'eMploi
natural_image
Exterior view of a CELESTRON satellite telescope (no signage or text beyond branding)natural_image
Close-up of a hand holding a cylindrical mechanical component with an arrow indicating rotation (no text or symbols)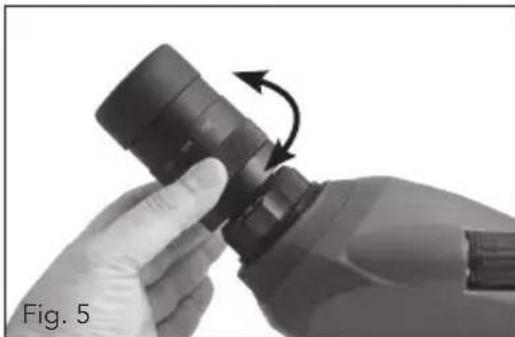
natural_image
Close-up of hands holding a black plastic bottle with an arrow indicating rotation (no text or symbols)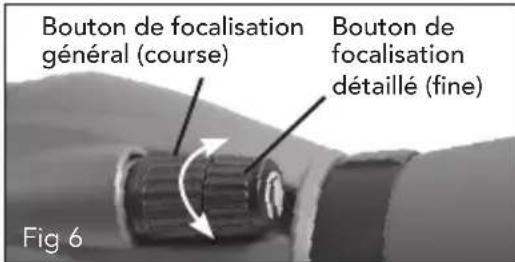
natural_image
Technical illustration of a telescope mounted on a tripod, showing optical components and a labeled view (Fig. 7b)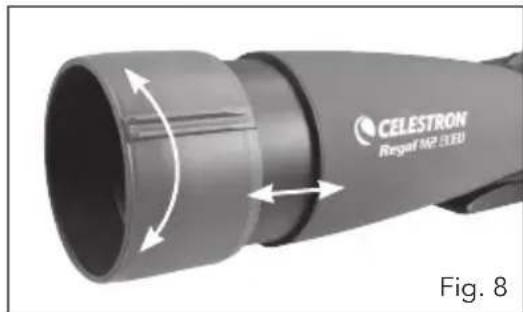
natural_image
Close-up of a CELESTRON Regal MP 3.80 handheld device with bidirectional arrow indicating rotation (no text or symbols on the device itself)OCULAIRES FACULTATIFS
PHOTOGRAPHIE AVEC APPAREIL PHOTO REFLEX (SLR)
PHOTOGRAPHIE AVEC APPAREIL PHOTO COMPACT (POINT-AND-SHOOT)
natural_image
Close-up of a handheld device with attached mechanical components, labeled 'Fig. 11' (no other text or symbols visible)ÉTANCHE/ANTIBUÉE
natural_image
Exterior view of CELESTRON Longel 160 X-250 optical lens (no text or symbols on body)natural_image
Close-up of a hand holding a cylindrical mechanical component with a curved arrow indicating rotation (no text or symbols)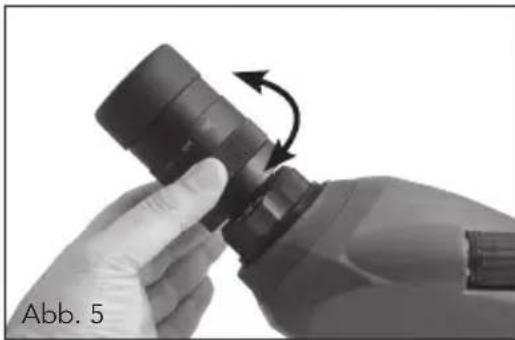
natural_image
Close-up of hands assembling a mechanical component with directional arrows indicating rotation (no text or symbols)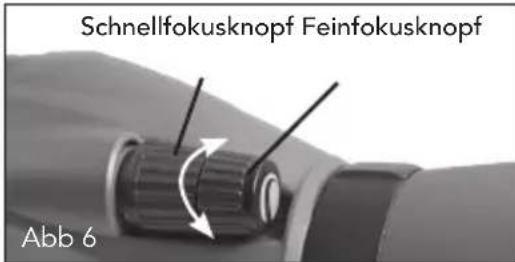
text_image
Schnellfokusknopf Feinfokusknopf Abb 6natural_image
Close-up of a precision optical instrument mounted on a tripod, showing lens and adjustment mechanism (no text or symbols visible)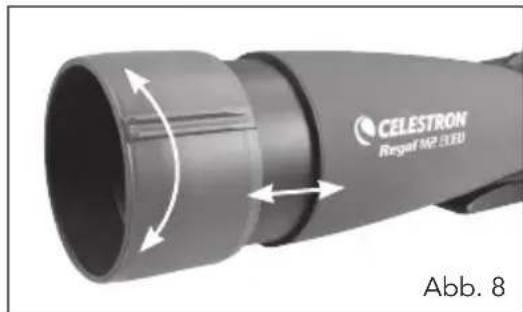
natural_image
Close-up of a CELESTRON Regal MP 3.80 optical lens with bidirectional arrow indicating rotation (no text or symbols on the lens itself)OPTIONALE OKULARE
natural_image
Close-up of a robotic hand holding a black mechanical component with a curved arrow indicating rotation (no text or symbols)
natural_image
Close-up of a hand holding a cylindrical object with an arrow indicating rotation (no text or symbols visible)
natural_image
Close-up of a mechanical component with a hand holding a cylindrical part, showing a curved arrow indicating rotation (no text or symbols visible)
natural_image
Close-up of a handheld electric welding torch (no visible text or symbols)EINFACHE FOTOGRAFIE
natural_image
Close-up of a handheld mechanical device with attached bracket and handle (no visible text or symbols)natural_image
Exterior view of two CELESTRON satellite communication system designs (no text or symbols visible on the device itself)natural_image
Mechanical assembly diagram showing a mounted device with cable and housing (no text or symbols)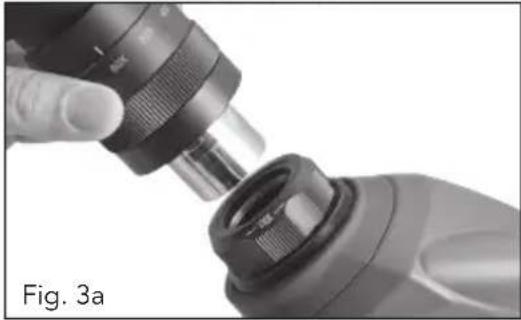
natural_image
Close-up of a hand using a mechanical tool to adjust a component, labeled Fig. 3a (no text or symbols on the diagram itself)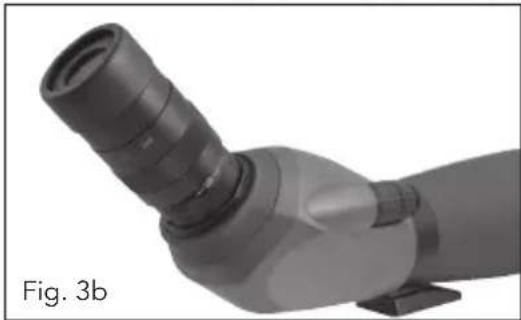
natural_image
3D rendered mechanical component with curved and straight sections, labeled Fig. 3b (no text or symbols on the object itself)AJUSTE DE LA ALMOHADILLA
natural_image
Close-up of a hand holding a cylindrical mechanical component with a curved arrow indicating rotation (no text or symbols)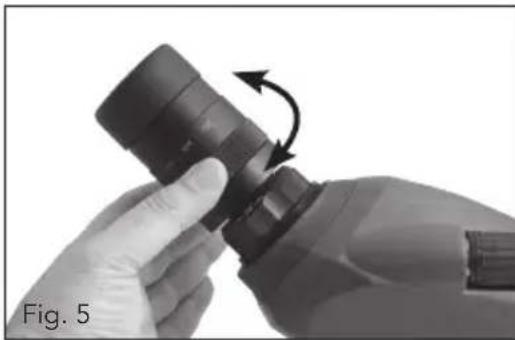
natural_image
Close-up of hands holding a black cylindrical object with an arrow indicating rotation (no text or symbols)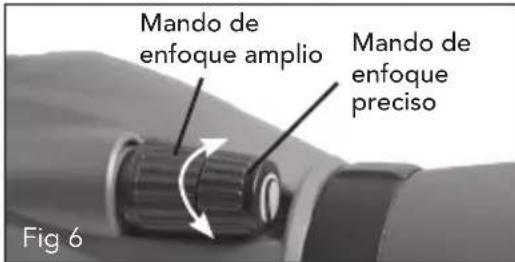
text_image
Mando de enfoque amplio Mando de enfoque preciso Fig 6natural_image
Diagram of a telescope mounted on a tripod, showing optical path and component (no text or symbols)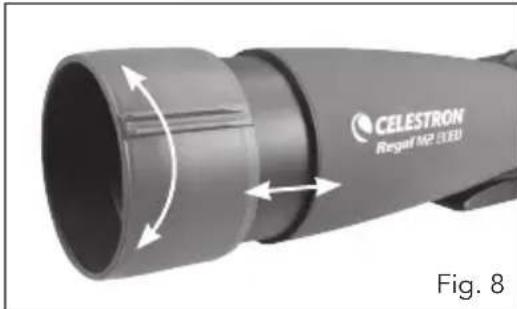
natural_image
Close-up of a CELESTRON Regal MP 3.3D device with bidirectional arrow indicating rotation (no text or symbols on the device itself)OCULARES OPCIONALES
natural_image
Close-up of a handheld mechanical device with attached lever and connector (no visible text or symbols)natural_image
Exterior view of a CELESTRON flight range optical system (no signage or text beyond branding)natural_image
Close-up of a hand holding a cylindrical mechanical component with an arrow indicating rotation (no text or symbols)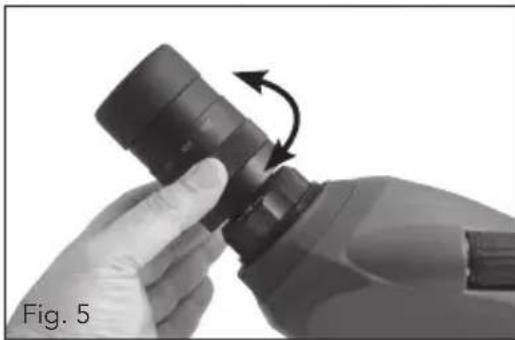
natural_image
Close-up of hands holding a cylindrical object with an arrow indicating rotation (no text or symbols)
natural_image
Diagram of a telescope mounted on a tripod, showing optical path and component (no text or symbols)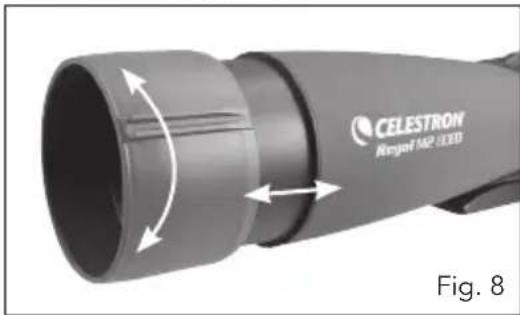
natural_image
Close-up of a CELESTRON Rexpof MP 3.00D device with directional arrows indicating motion (no text or symbols on the device itself)OCULARI OPZIONALI
natural_image
Close-up of a robotic hand holding a black mechanical component with a curved arrow indicating rotation (no text or symbols)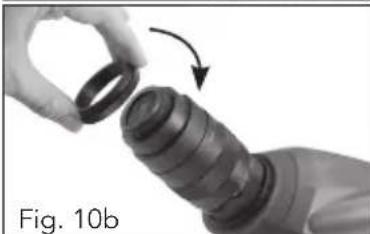
natural_image
Close-up of a hand holding a cylindrical mechanical component with an arrow indicating rotation (no text or symbols)
natural_image
Close-up of a hand holding a black mechanical component with an arrow indicating rotation (no text or symbols visible)