
STHT77366 - Rangefinder STANLEY - Free user manual and instructions
Find the device manual for free STHT77366 STANLEY in PDF.
| Product Type | Connected Laser Distance Measurer (Smart Measure Pro) |
| Brand | Stanley |
| Model | STHT77366 |
| Range | 1.8 m - 150 m (6 ft - 492 ft) |
| Laser Class | 1 (IEC 60825-1:2014) |
| Laser Wavelength | 895-905 nm |
| Power Supply | Built-in lithium-ion battery 3.7 V, 300 mAh |
| Battery Life | Approximately 5 hours of continuous use |
| Charging Time | Less than 4 hours |
| Dimensions | 86 mm x 67 mm x 45 mm (3.4 x 2.6 x 1.8 in) |
| Weight | 100 g (3.21 oz) |
| Operating Temperature | -10 to 50 °C (14 to 122 °F) |
| Storage Temperature | -20 to 60 °C (-4 to 140 °F) |
| Connectivity | Bluetooth Smart (v4.0 Low Energy) |
| Compatibility | iOS 8.0+, Android v4.4+; adjustable clip 45-80 mm |
| Main Functions | Distance, height, width, area, length measurement via photo; PDF, JPG, cloud sharing |
| Auto Power Off | 3 minutes after Bluetooth connectivity loss |
| Warranty | 1 year (parts and labor), 30-day satisfaction guarantee |
| Maintenance and Cleaning | Do not wet; clean with soft dry cloth; avoid extreme temperatures |
| Safety | Class 1 laser; do not stare directly; do not modify; use in accordance with manual |
| Spare Parts and Repairability | No user-serviceable parts (non-removable battery); recycle at end of life |
| General Information | FCC, IC compliant; power 5 V DC, 0.35 A; micro USB charging |
Frequently Asked Questions - STHT77366 STANLEY
User questions about STHT77366 STANLEY
0 question about this device. Answer the ones you know or ask your own.
Ask a new question about this device
Download the instructions for your Rangefinder in PDF format for free! Find your manual STHT77366 - STANLEY and take your electronic device back in hand. On this page are published all the documents necessary for the use of your device. STHT77366 by STANLEY.
USER MANUAL STHT77366 STANLEY
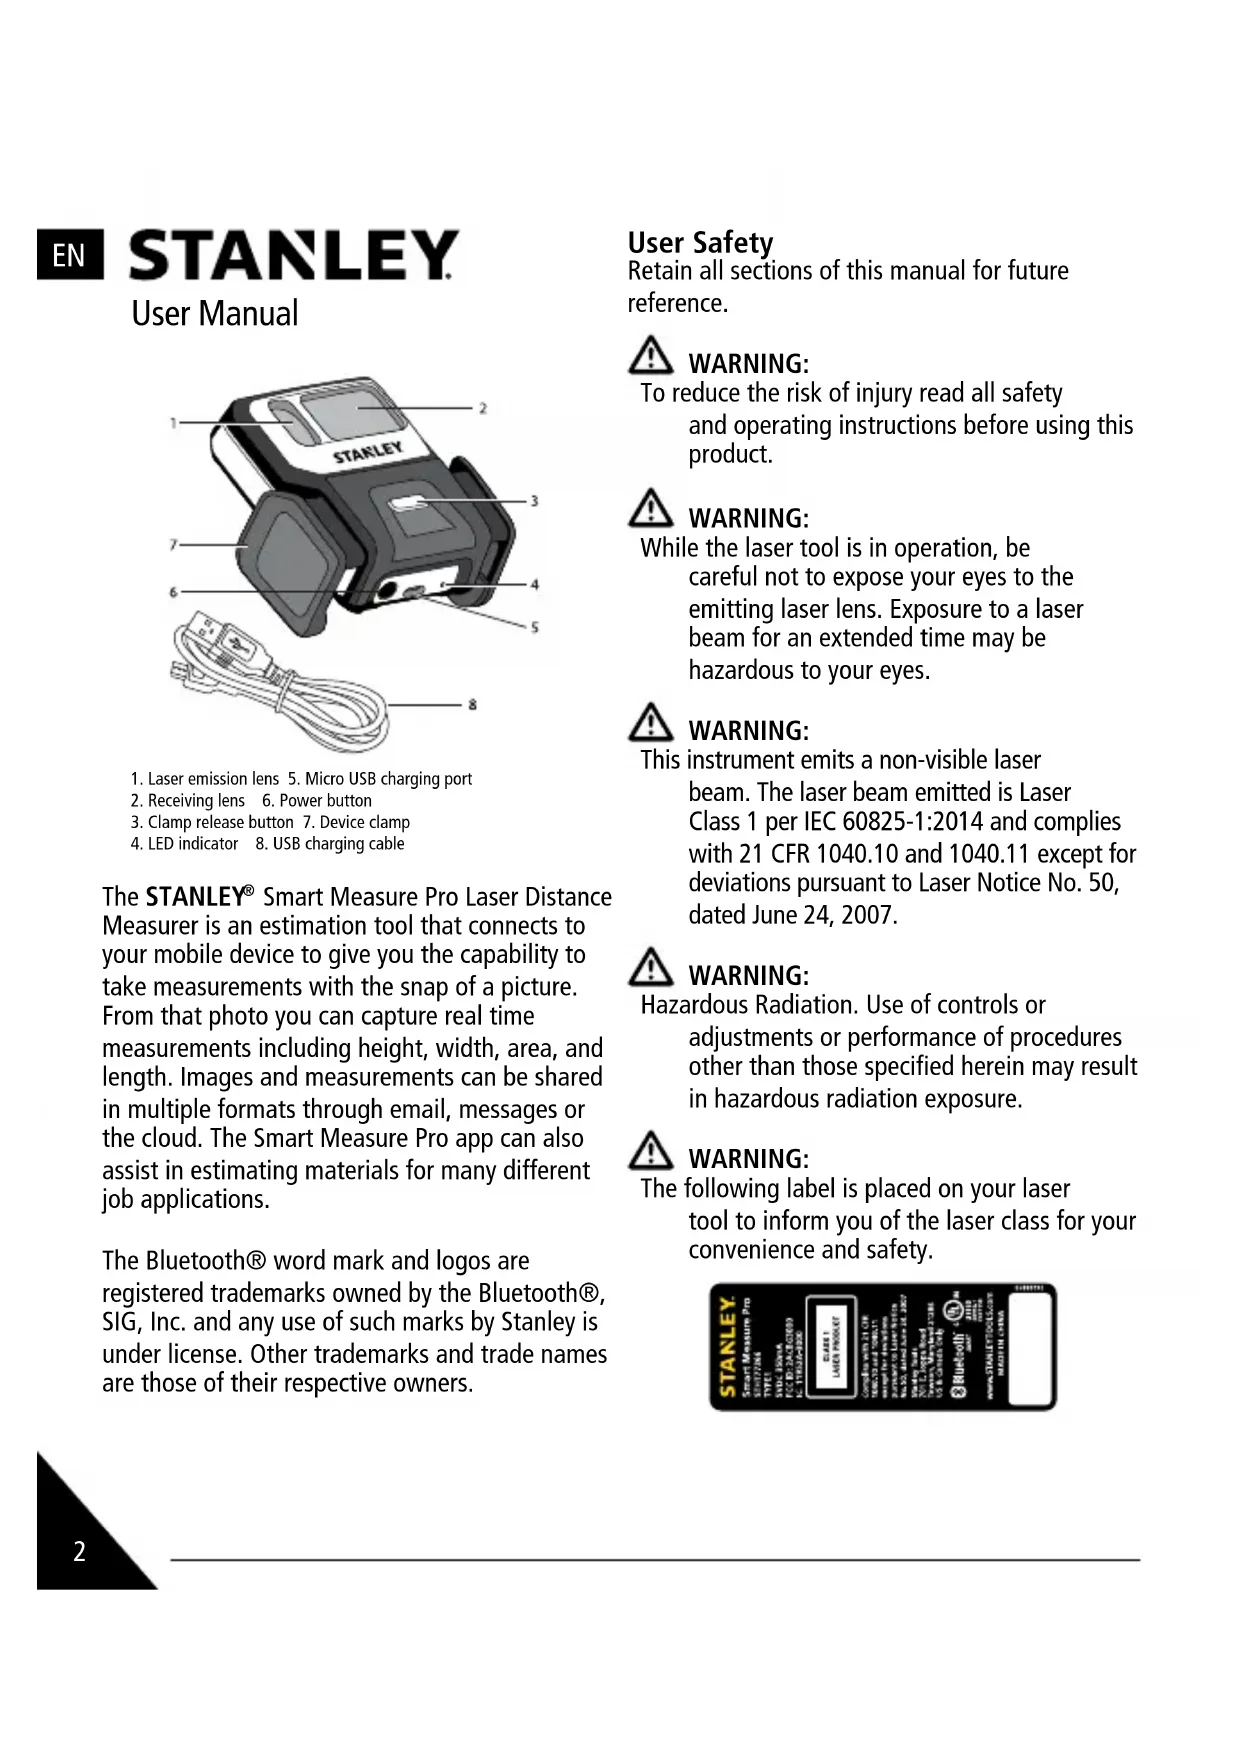
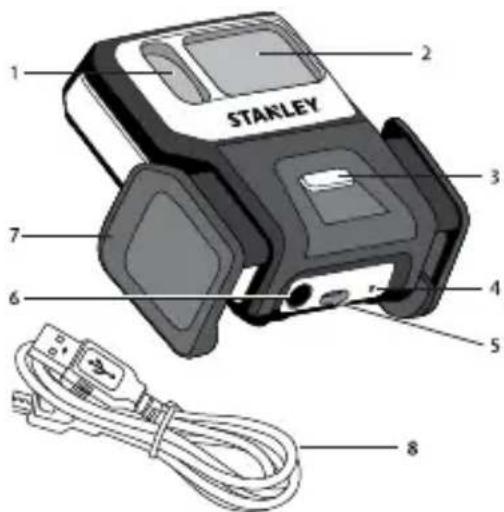
- Laser emission lens 5. Micro USB charging port
- Receiving lens 6. Power button
- Clamp release button 7. Device clamp
- LED indicator 8. USB charging cable
The STANLEY® Smart Measure Pro Laser Distance Measurer is an estimation tool that connects to your mobile device to give you the capability to take measurements with the snap of a picture. From that photo you can capture real time measurements including height, width, area, and length. Images and measurements can be shared in multiple formats through email, messages or the cloud. The Smart Measure Pro app can also assist in estimating materials for many different job applications.
The Bluetooth® word mark and logos are registered trademarks owned by the Bluetooth®, SIG, Inc. and any use of such marks by Stanley is under license. Other trademarks and trade names are those of their respective owners.
User Safety
Retain all sections of this manual for future reference.

WARNING:
To reduce the risk of injury read all safety and operating instructions before using this product.

WARNING:
While the laser tool is in operation, be careful not to expose your eyes to the emitting laser lens. Exposure to a laser beam for an extended time may be hazardous to your eyes.

WARNING:
This instrument emits a non-visible laser beam. The laser beam emitted is Laser Class 1 per IEC 60825-1:2014 and complies with 21 CFR 1040.10 and 1040.11 except for deviations pursuant to Laser Notice No. 50, dated June 24, 2007.

WARNING:
Hazardous Radiation. Use of controls or adjustments or performance of procedures other than those specified herein may result in hazardous radiation exposure.

WARNING:
The following label is placed on your laser tool to inform you of the laser class for your convenience and safety.
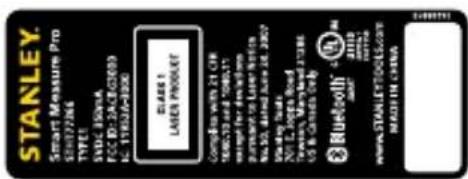
DO NOT remove any warning label(s) on the housing.
This instrument must only be used for tasks as outlined in the Product Manual.
ALWAYS make sure that any bystanders in the vicinity of use are made aware of the dangers of looking directly into the laser beam.
DO NOT use in combination with other optical instruments. Do not modify the laser tool, make adjustments or use in other applications than those described herein.
DO NOT look into the beam lens with optical aids, such as magnifiers, binoculars or telescopes.
DO NOT stare into the laser beam lens.
DO NOT operate the laser tool if damaged or broken.
DO NOT direct the laser tool at other persons.
DO NOT set the instrument at eye level whenever possible.
ALWAYS turn the laser tool OFF when not in use. Leaving the laser tool ON increases the risk of someone inadvertently staring into the laser beam.
DO NOT operate the laser tool in combustible areas such as in the presence of flammable liquids, gases or dust.
DO NOT disassemble the laser tool. There are no user serviceable parts inside. Disassembling the laser will void all warranties on the product. Do not modify the product in any way. Modifying the laser tool may result in hazardous laser radiation exposure.
DO NOT use this instrument in areas where a risk of explosion is present.
DO NOT direct laser beam towards aircraft or moving vehicles.
Battery Safety
DO NOT splash or immerse in water or other liquids.
DO NOT store or use in locations where the temperature may reach or exceed 40.5^ (105^) (such as outside sheds or metal buildings in summer). For best life store in a cool, dry location.
Risk of Fire or Explosion:
- DO NOT incinerate even if severely damaged or completely worn out. The battery can explode in a fire. Toxic fumes and materials are created when lithium ion batteries are burned.
- NEVER attempt to open for any reason. If the housing is cracked or damaged, do not charge.
- Battery liquid may be flammable if exposed to spark or flame.
Risk of Skin or Respiratory Irritation:
- If battery contents come into contact with the skin, immediately wash area with mild soap and water.
- Contents of opened battery may cause respiratory irritation. Provide fresh air. If symptoms persist, seek medical attention.
- If battery liquid gets into the eye, rinse water over the open eye for 15 minutes or until irritation ceases. If medical attention is needed, the battery electrolyte is composed of liquid organic carbonates and lithium salts.
DO NOT crush, drop or damage. Do not use if it has received a sharp blow, been dropped, run over or damaged in any way (e.g. pierced with a nail, hit with a hammer, stepped on).
Damaged devices should be recycled.
DO NOT charge the battery pack in an air temperature below +40^ (+4.5^) , or above +105^ (+40.5^) . Longest life and best
EN STANLEY
User Manual
performance can be obtained if the battery pack is charged when the air temperature is between 65^ - 75^ (18^ and 24^)
Never use any charger or cable that is damaged, as it may present a risk of fire, explosion, leakage, or other hazard.
FCC Information
Smart Measure Pro
Model:STHT77366
Bluetooth Information
FCC ID: 2ACBG3000
IC ID: 11952A-3000
FCC Compliance
This device complies with Part 15 of the FCC
Rules. Operation is subject to the following two conditions: (1) This device may not cause harmful interference, and (2) this device must accept any interference received, including interference that may cause undesired operation
FCC Statement
WARNING: Changes or modification to this unit not expressly approved by party responsible for compliance could void the user's authority to operate the equipment. Note: This equipment has been tested and found to comply with the limits for a Class B digital device, pursuant to part 15 of the FCC rules. These limits are designed to provide reasonable protection against harmful interference in a residential installation. This equipment generates, uses and can radiate radio frequency energy and, if not installed and used in accordance with the instructions, may cause harmful interference to radio communications.
However, there is no guarantee that interference will not occur in a particular installation. If this equipment does cause harmful interference to radio or television reception, which can be determined by turning the equipment off and on, the user is encouraged to try to correct the interference by one or more of the following measures:
- Reorient or relocate the receiving antenna
- Increase the separation between the equipment and the receiver
- Connect the equipment into an outlet on a circuit different from that to which the receiver is connected
- Consult the dealer or an experienced radio/TV technician for help
Canada, Industry Canada (IC) Notices Class B digital circuitry of this device complies with Canadian ICES-003. This device complies with Industry Canada license-exempt RSS standard(s). Operation is subject to the following two conditions:
- This device may not cause interference.
- This device must accept any interference, including interference that may cause undesired operation of the device.
Under Industry Canada regulations, the radio transmitter(s) in this device may only operate using an antenna of a type and maximum (or lesser) gain approved for the transmitter by
Industry Canada. To reduce potential radio interference to other users, the antenna type and its gain should be so chosen that the equivalent isotropically radiated power (e.i.r.p.) is not more than that necessary for successful communication.
This equipment complies with FCC/IC radiation exposure limits set forth for an uncontrolled environment and meets the FCC radio frequency (RF) Exposure Guidelines in Supplement C to OET65 and RSS-102 of the IC radio frequency (RF) Exposure rules. This equipment has very low levels of RF energy that are deemed to comply without testing of specific absorption ratio (SAR).
This product is intended to be powered by a UL Listed power supply; output rated 5 Vdc, 0.35 A. The laser product complies with the requirements set forth in UN Manual ST/SG/AC.10/11/Rev.5/ part III, Subsection 38.3. Shipping of Li Ion battery powered products is regulated therefore you should consult with your carrier prior to shipping Li Ion Battery powered product.
End of Life
DO NOT dispose of this product with household waste.
PLEASE RECYCLE in line with local provisions for the collection and disposal of electrical and electronic waste.
Declaration of Conformity
This product conforms with IEC60825:2014.
Maintenance and Care
DO NOT allow to get wet. Damage to internal circuits may result. Laser tool is not waterproof. DO NOT leave laser tool in direct sunlight or expose it to high temperatures. The housing and some internal parts are polymeric materials and may become deformed at high temperatures. DO NOT store the laser tool in a cold environment. Moisture may form on interior parts when warming up. This moisture could fog up laser windows and / or cause corrosion of internal circuit boards.
NOTE: When working in dusty locations, some dirt may collect on the laser window. Remove any moisture or dirt with a soft, dry cloth.
DO NOT use aggressive cleaning agents or solvents.
Charging Your Smart Measure Pro
Your Smart Measure Pro has an internal, non-removable, rechargeable battery. Do not attempt to remove the battery from the device as you may damage the device. To charge the unit, connect the USB charging cable into the micro USB charging port on the unit and then plug it in to an appropriate USB port. Longest life and best performance can be obtained if the battery pack is charged when the air temperature is between 18^ and 24^ (65^ - 75^) . DO NOT charge the battery pack in an air temperature below +4.5^ (+40^) , or above +40.5^ (+105^) . This is important and will prevent serious damage to the battery pack. NOTE: While the unit is charging, the LED indicator will flash green. When charging is complete, the LED indicator will be solid green. The Bluetooth® device will fully recharge in 4 hours or less.
EN STANLEY
User Manual
Supported Devices
Stanley Smart Measure Pro currently supports the following:
Apple iOS iOS 8.0 or later
Google Android v4.4 or later
*Must support Bluetooth Smart (v.4 - low energy)
For list of compatible devices, visit: www.stanleysmartmeasurepro.com
*The clamp included with your Smart Measure Pro will fit on any device that is between 45mm and 80mm wide (inclusive of any case that may be on the device).
Smart Measure Pro Functionality
The Smart Measure Pro app contains core measurement functionality. As the Smart Measure Pro app evolves, each app update will introduce additional features and capabilities.
Smart Measure Pro has the following functionality:
Range
6ft-492ft (1.8m-150m)
Output
PDF, JPG,Smart Measure Pro File
Share Options
Email, Message, Cloud Storage
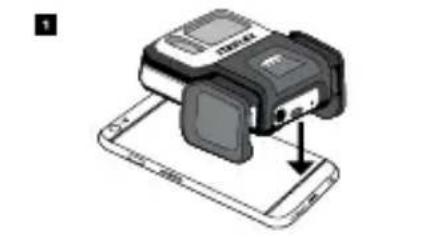
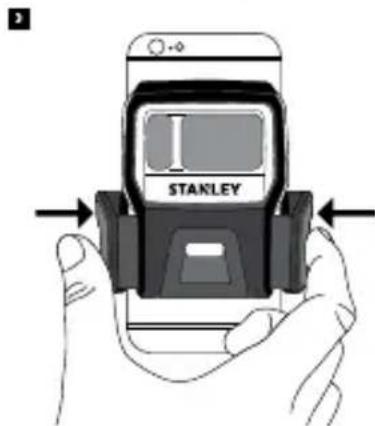
Mounting Your Smart Measure Pro
-
Centrally place Smart Measure Pro on the back of your device, as close to the camera as possible.
-
Ensure that Smart Measure Pro does not obstruct the view from your camera or flash.
-
Firmly squeeze the clamp mechanism onto your device.
- To verify, start your device's camera app and validate the correct placement.
- To remove your Smart Measure Pro, press the clamp release button. The clamp will automatically open and release your device. We recommend compressing the clamp arms when your Smart Measure Pro is not in use.
NOTE: Ensure that your Smart Measure Pro is mounted securely to your device before taking measurements, it should not move or rock. Smart Measure Pro should sit flat against the back of your device and align squarely with the camera of your device.
Installing Your Smart Measure Pro App
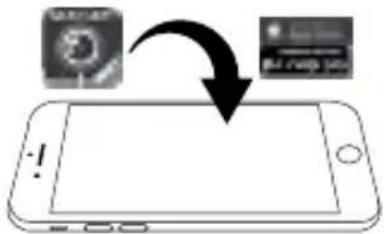
- The Smart Measure Pro app is available for download from the App Store or Google Play.
- On your device, launch the App Store or Google Play.
- Within the search box, search for Stanley Smart Measure Pro.
- Follow the instructions to download and install the app on your device.
- Once installed, the Smart Measure Pro app icon will appear on your device's screen.
- Proceed to Pairing Your Smart Measure Pro to get started.
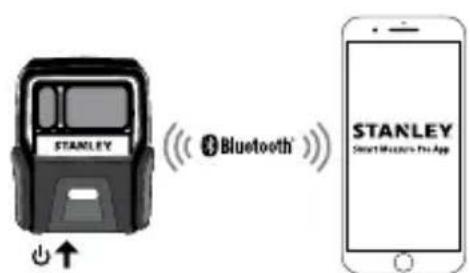
Pairing Your Smart Measure Pro
NOTE:
The LED indicator shows the status of your Smart Measure Pro:

Blue flashing: Smart Measure Pro discoverable over Bluetooth
Blue on: Smart Measure Pro connected to device

Green flashing: Smart Measure Pro charging
Green on: Smart Measure Pro fully charged
-
Off: Power off
-
Turn on Bluetooth on your device.
-
On your Smart Measure Pro, press the Power button.
-
The LED indicator flashes blue indicating that the Smart Measure Pro is discoverable over Bluetooth.
-
If the LED indicator remains off, Smart Measure Pro may need charging.
-
On your device, tap on the Smart Measure Pro app to launch it. The main menu should appear after the app starts.
-
Tap the NO DEVICE CONNECTED button. The app will display any nearby Smart Measure Pro units available for pairing. If no unit appears, ensure that the Smart Measure Pro unit's LED indicator is flashing blue (see Step 2).
-
When your Smart Measure Pro unit appears, tap on it to pair it with your device. This step is necessary the first time you use Smart Measure Pro. For subsequent uses, your Smart Measure Pro will automatically be paired with your device.
Centering the Smart Measure Pro Laser
Before using your Smart Measure Pro, you need to ensure that the laser is aligned with the camera on your device. The Smart Measure Pro
EN STANLEY
User Manual
app contains a detailed instruction tutorial on this procedure under SETTINGS: Align Laser.
-
In the Smart Measure Pro app, tap on SETTINGS, then tap Align Laser.
-
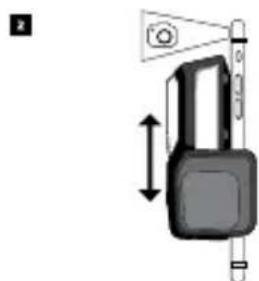
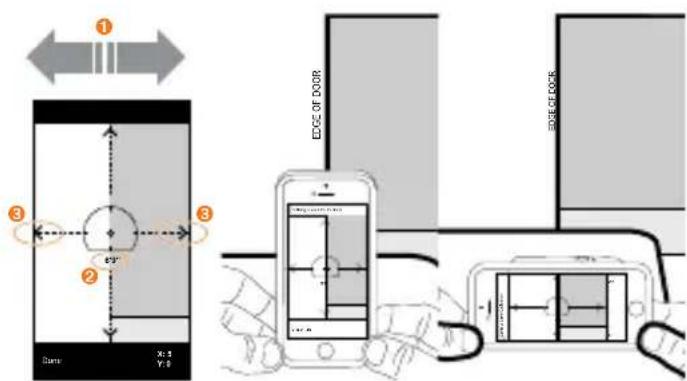
Rest your device on top of a flat, hard surface, such as a table top. Then hold your device vertically and aim it towards two objects that are at different distances, for example the edge of a doorway. Ensure that the closest object has a vertical edge.
-
The distance between the two objects should be at least 15 feet (5 meters).
-
You can use the vertical edge of an open door and the wall of the room behind it.
-
Slowly turn your device to pass the crosshair across the vertical edge 1 and check that the distance measurement 2 changes when the crosshair in the center of the screen moves on and off the vertical edge.
- If the measurement changes at the point where the crosshair moves on and off the vertical edge, your laser is correctly aligned. If this does not happen at the correct point, tap on the left and right black arrows 3 to adjust to the correct point.
- Turn your device horizontally and aiming at the same two objects, repeat steps 3 and 4 to align the laser horizontally.
To save the alignment, tap Done.
Note: While on the SETTINGS screen, you can select your preferred units of measure.
Return to the main menu by tapping the Back button.
Measuring With Your Smart Measure Pro
Measurements taken with your Smart Measure Pro should be used for estimating purposes.
Because these measurements are reliant on user input, it is recommended you become familiar with the measurement process and practice the technique prior to using the measurements obtained with your device.
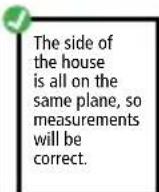
To measure accurately with your Smart Measure Pro, you need to ensure that:
- Your target is a flat surface and you intend to measure on that plane.
- Your target is or has a rectangular shape on it (to assist with image alignment).
- Your laser (indicated by the cross-hair on the screen) is pointed at your target. The crosshair should be on a solid surface and not a window or other reflective surface.
- You are as square to the target as possible. Please reference the following target distance and positioning guide when taking a Smart Measure Pro photo.
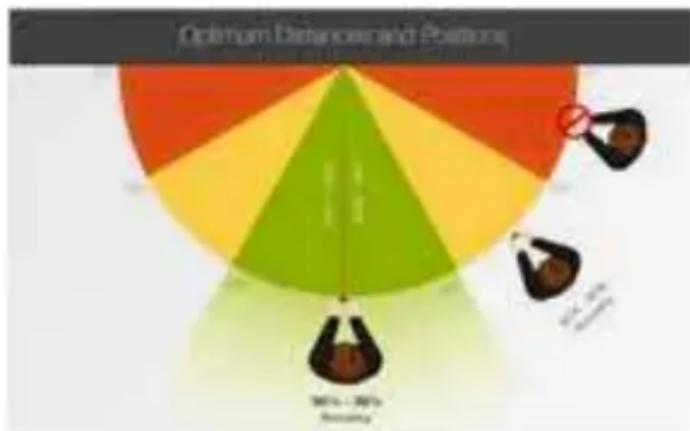
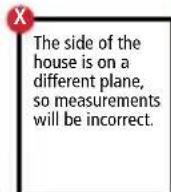
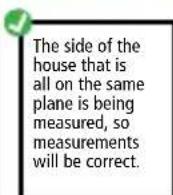
You cannot measure an object or objects that are on different planes. Below are some examples:


The side of the house and the roof are on different planes, so measurements will be incorrect.
Taking a Photo of the Object to Measure
-
Point your device at the object you wish to measure, ensuring that the crosshair is on the target.
-
The whole object must be on the same surface or plane as explained above.
- Ensure the crosshair is on a solid surface and not on a window or hole or reflective surface.
-
Use the zoom slider so you can better view the crosshair location on your target, or when you are positioned at a distance from your target.
Make sure you are as square as possible with the target. -
Tap the Capture button on the screen to take a picture.
- Tap on the small preview image to display the photo you have just taken to enter measurement mode (also referred to as Edit mode).
Aligning to the Object
Before you can measure an object, you need to set the image's perspective by outlining a large rectangle on the surface of your target. This identifies the angle from which your photo was taken. Your target must be or must contain a rectangular shape so that the object can be
aligned. For example, you can use the bricks of a large wall to create an alignment rectangle.
- In the Alignment screen, a rectangular shape will appear over your target.
- Drag the corners of the rectangular shape to align them to the extreme corners of the rectangle on your object.
Here you are only aligning to the surface or plane of your object. After alignment is complete, measurements can be taken.
- Use the popup zoom window to help you align the center of each circle precisely to the corners of your object.
- You may also use your fingers to Pinch & Zoom on the photo to better view the object.
After setting the alignment, tap Next.
Measuring the Area of the Object
Once you have aligned your image to the object, you can measure the area of your object.
- While on the Area tab, you can tap and drag to create rectangular measurements. Drag each corner of the rectangle to precisely match the area you wish to measure.
- Use the popup zoom window to help you align the center of each circle precisely to the corners of the area.
- You can add more anchor points (white circles) by selecting + (Add) and then tapping anywhere on the line of the shape. Drag the new anchor point to create a polygon.
- The measurements of your object will display on the screen.
EN STANLEY
User Manual
Cutting Out a Section of Your Object
You can create polygons that are removed from the main area measurement. For example, you may want to measure the surface area of a wall without including the area of windows or doors.
- While on the Area tab, select Cutout.
- Drag your finger in the general area you would like to add a cutout, a rectangular shape appears.
-
Drag the circles of the rectangular shape to align them to the section of the object you want to cut out.
-
Use the popup zoom window to help you align the center of each circle precisely to the corners of the cutout area.
- You can add more anchor points (white circles) by selecting + (Add) and tapping lightly anywhere on the line of the shape.
- The screen will display the new area measurement excluding the cutout section.
- To add another cutout, tap Cutout again then tap and drag to create another rectangle.
Measuring a Length
- While in measurement mode, tap Length at the top of the screen.
- Tap + (Add), then tap the screen and drag to create a line.
-
Drag the end of the line to the edge of the object you want to measure. Then drag the other end of the line to the other edge of the object.
-
Use the zoom window to help you align the line precisely to the edges of your object.
- The length of your object will display on the screen.
- To add another segment to a line, select + (Add) and drag from an existing anchor.
Saving Your Measurements
At the top of the screen, tap Save.
- Alternatively, tap the X to exit Edit mode and discard or save your changes.
Gallery Options
You can view a gallery of the photos you have taken with the Smart Measure Pro app and perform various functions on the photos.
- In the main menu, tap the GALLERY button. A gallery of your photos appears.
-
Tap on the photo you want to view or edit.
-
To add or modify measurements on the photo, tap Edit and follow the standard measuring procedure.
To delete the photo, tap
To share your photo with measurements, tap - To view orientation and location details of the photo, tap Details.
- To use the calculator tool for estimating purposes, tap Calculator.
Specifications
| Range 6ft-492ft (1.8m-150m) | |
| Laser Class 1 | |
| Laser Wavelength 895-905nm | |
| Auto Power Switch-Off 3 minutes (after no Bluetooth Connectivity) | |
| Battery Type Integral Li-ion, 3.7V 300mAh | |
| Battery Life AVG 5 Hrs of continuous use | |
| Dimension 3.4in x 2.6in x 1.8in (86mm x 67mm x 45mm) | |
| Weight 3.21oz / 100g | |
| Storage Temperature Range -4 °F – 140 °F (-20 °C – 60 °C) | |
| Operating Temperature Range 14 °F – 122 °F (-10 °C – 50 °C) | |
Warranty
STANLEY warrants this product for a period of (1) year against deficiencies in material and workmanship. This LIMITED WARRANTY does not cover products that are improperly used, abused, altered or repaired. Please call 866-786-5924 for more information or return instructions. Unless otherwise noted, STANLEY will repair without cost, any STANLEY product found to be defective, including parts and labor charges, or at STANLEY's option, will replace such tools or refund the purchase price, less the amount for depreciation, in exchange for the defective tool. THIS LIMITED WARRANTY EXCULES ALL INCIDENTAL OR CONSEQUENTIAL DAMAGES. Some states do not allow the exclusion or limitation of incidental or consequential damages, so these limitations may not apply to you. This LIMITED LIFETIME WARRANTY gives you specific legal rights that may vary from state to state. In addition to the warranty, STANLEY Lasers are covered by: 30-Day Money Back Guarantee. If you are not completely satisfied with the performance of your STANLEY Laser for any reason, you can return it within 30 days from the date of purchase with a receipt for a full refund.
IMPORTANT NOTE: The customer is responsible for the correct use and care of the instrument. Moreover, the customer is completely responsible for periodically checking the accuracy of the laser unit, and therefore for the calibration of the instrument.
Calibration and care are not covered by warranty.
STANLEY
Manual del Nombre
© 2015 STANLEY Tools
701 East Joppa Road
Towson, Maryland 21286
www.STANLEYTOOLS.com
79003493
OCTOBER 2015

- User Safety
- WARNING:
- Battery Safety
- Risk of Fire or Explosion:
- Risk of Skin or Respiratory Irritation:
- EN STANLEY
- User Manual
- End of Life
- Maintenance and Care
- Charging Your Smart Measure Pro
- Supported Devices
- Smart Measure Pro Functionality
- Mounting Your Smart Measure Pro
- Installing Your Smart Measure Pro App
- Pairing Your Smart Measure Pro
- NOTE:
- Centering the Smart Measure Pro Laser
- Measuring With Your Smart Measure Pro
- Taking a Photo of the Object to Measure
- Aligning to the Object
- Measuring the Area of the Object
- Cutting Out a Section of Your Object
- Measuring a Length
- Saving Your Measurements
- Gallery Options
- Warranty
- STANLEY
- Manual del Nombre
Brand : STANLEY
Model : STHT77366
Category : Rangefinder