
XS Trackball G845400 - Keyboard Cherry - Free user manual and instructions
Find the device manual for free XS Trackball G845400 Cherry in PDF.

| Product Type | Keyboard with integrated trackball |
| Brand | Cherry |
| Model | XS Trackball G845400 |
| Connection | USB 2.0 (compatible with 1.1) or PS/2 via adapter (depending on version) |
| Power Supply | 4 to 5.25 V DC, typical consumption 25 mA (G84-52xx) / 45 mA (G84-54xx/-55xx) |
| Operating Temperature | 0 °C to +60 °C (G84-52xx/-55xx), 0 °C to +50 °C (G84-54xx) |
| Storage Temperature | -20 °C to +60 °C |
| Cutout Dimensions (top mounting) | 369.05 ± 0.3 mm x 135.75 ± 0.3 mm |
| Cutout Dimensions (bottom mounting) | 369.95 ± 0.2 mm x 134.65 ± 0.2 mm |
| Integrated Numeric Keypad | Yes, activated via Fn key or Pad level |
| Key Programming | CHERRY Tools software (Designer), downloadable from support.cherry.de |
| Maintenance | Lint-free cloth, water, and mild detergent. Do not use alcohol or acids |
| Trackball Cleaning | Remove the ball by turning counterclockwise; clean the optical sensor with a cotton swab |
| Safety | Follow ergonomic guidelines to avoid RSI (repetitive strain injuries) |
| Accessories | WetEx® flexible covers optional |
| Repairability | Repair by manufacturer or authorized body; no spare parts specified |
| Warranty | Manufacturer warranty according to conditions; any modification voids warranty |
Frequently Asked Questions - XS Trackball G845400 Cherry
User questions about XS Trackball G845400 Cherry
0 question about this device. Answer the ones you know or ask your own.
Ask a new question about this device
Download the instructions for your Keyboard in PDF format for free! Find your manual XS Trackball G845400 - Cherry and take your electronic device back in hand. On this page are published all the documents necessary for the use of your device. XS Trackball G845400 by Cherry.
USER MANUAL XS Trackball G845400 Cherry
natural_image
Black-and-white photo of a standard computer keyboard with visible keys and port labels (no readable text or symbols beyond standard font)G84-5200
Bedienungsanleitung
Instruction Manual
Mode d'emploi
1 Connecting the keyboard
Depending on the design, you can connect the keyboard to the system with a PS/2 or USB connection.
1.1 Connecting the keyboard to the USB port
1 Connect the USB plug to any USB connection on your system. You can also use the USB connection of a device that is connected to the system.
2 Follow the instructions on the screen.
1.2 Connecting the keyboard to the PS/2 port
1 Turn off the system.
2 Plug the supplied USB PS/2 adapter into the keyboard's USB cable, if required.
3 Connect the PS/2 plug to the corresponding socket in the system.
4 Turn the system on again.
2 Using the integrated numeric keypad (Models G84-54xx/-55xx)
Due to the keyboard's space-saving design, the numeric keypad has been placed in the area of the main keys. For example, the functions "4", "5", "6" and "/" are assigned to the keys U, I, O and P (identified by a frame).
2.1 Special key Fn
If Num Lock is switched on (LED fon), the integrated numeric pad of the keyboard is consciously not yet active. The numeric pad will be active not until the Fn button is pressed and hold down.
Example: Fn + O = "6"
Pressing the Fn and O in that order and holding them down together causes screen output "6".
Fn in combination with other keys switches functions, each marked with a frame.
2.2 Function level Pad
For longer numeric entries, repeat the steps above to activate Num Lock (LED on) and use the key combination Fn + F12 to turn on the function level Pad (LED on).
With function Pad on, the integrated numeric keypad is permanently active.
The O key is permanently assigned the function "6", for example.
When Num Lock is not active (LED off) and you switch on the function Pad (LED on), the integrated numeric pad operates as a cursor control.
3 Change key assignment
Programming is performed via the CHERRY Tools software. The configuration is stored as a software macro in a file on the computer.

Latest software version on the internet
The software is subject to constant development. The latest version is available on the Internet under: http://support.cherry.de
➢ Install the software CHERRY Tools. You can configure all the functions of the keyboard via the Designer included in the software.
Operation instructions are included in the direct help for the CHERRY Tools software. It offers you information where you need it and can be called up with F1.
4 Securing the keyboard

Dimensions
A diagram with the dimensions of the keyboard and the position of the screw domes can be found on the final pages of the Technical Data information.
4.1 Fitting dimensions
The keyboard can be fitted from above or below.
Cut-out measurements when fitting from above (cut-out version B):
369.05 ±0.3 mm × 135.75 ±0.3 mm.
Cut-out measurements when fitting from below (cut-out version A):
369.95 ±0.2 mm × 134.65 ±0.2 mm.
4.2 Mounting
The casing base contains three screw caps for additional securing. Use screws with a wood/plastic thread and a thread diameter of 2 mm.
When selecting the screw length, ensure that the screw does not protrude into the screw cap by more than 7.7 mm.
5 Installing the mounting feet
Slide both supplied mounting feet into the receiving slots in the base of the casing until locked in.
To remove, press and hold the tab and then pull the foot away towards the rear.
6 Maintenance and servicing
The keyboard is maintenance-free. For cleaning, use a lint-free cloth that has been moistened with water and a mild detergent (e.g. dishwashing liquid). Do not allow liquid to enter the keyboard.
Do not remove the key caps. The use of aggressive liquids such as alcohol or acids can damage the keyboard.
Trackball: Clean the ball at regular intervals. Remove the ball by gently pressing the cover of the trackball and turning counterclockwise. Clean the optical sensor (the transparent lens located under the ball) carefully, e.g. using a cotton wool earbud.
7 Accessories
A flexible protective keyboard membrane (WetEx®) to protect the keyboard against dust, liquids and dirt is available for purchase.
8 RSI syndrome

RSI syndrome
RSI stands for "Repetitive Strain Injury". RSI results from small, continually repeated movements.
Typical symptoms are discomfort in the fingers or neck. For further information see: www.cherry.de/english/service/servicedownload_rsi.htm
1 Set up your workspace for maximum ergonomic benefit.
2 Position the keyboard in such a way that your upper arms and wrists are on either side of your body and are stretched out.
3 Take several short breaks, with stretching exercises if necessary.
4 Change the position of your body often.
9 Disposal
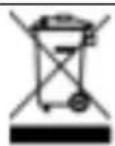
Dispose of the old unit via a collecting point for electronic scrap or via your dealer.
10 Contact
ZF Friedrichshafen AG
Electronic Systems
Cherrystraße
91275 Auerbach
Germany
www.cherry.de
E-mail: info@cherry.de
Telephone:
Sales: +49 (0) 180 5 243779* (0180 5 CHERRY*)
Technical support: +49 (0) 180 5 919108*
(*14 euro cent/min. from German landlines, prices may vary for calls made from mobile networks.)
Please have the following information on hand when contacting technical support:
- Item and serial no. of the product
• Name and manufacturer of your system - Operating system and, if applicable, installed service pack version
11 General advice
CHERRY, a brand of ZF Friedrichshafen AG, continuously optimizes its products as new technologies are developed. For this reason we reserve the right to make technical alterations. The evaluation of product reliability and the definition of the product's technical performance are carried out according to our own requirements in order to meet internationally recognized regulations and standards. Requirements in addition to these can be met through mutual cooperation. Improper usage, handling, storage and external influences could lead to faults and defects during use.
We do not accept warranty for defects caused by alterations to our product by the user and shall not be held liable for unauthorized modifications. All repairs must be made by us or an officially appointed organization or person.
Possible compensation claims against ZF Friedrichshafen AG or its nominated officers – whatever the legal justification including physical or stress related injuries – are excluded. Exceptions to this exist in the case of intent or gross negligence on the part of ZF Friedrichshafen AG, infringements of Product Liability Law or in cases of injury, bodily harm or risk to health. These operating instructions only apply to the accompanying product.
Full details can be obtained from your distributor or direct from us.
Mode d'emploi

1 錢盤連接
Technical Specifications
Technische Daten
Anschluss G84-52xx:
USB 2.0 (1.1 kompatibel)
Technical specifications
Connection G84-52xx:
USB 2.0 (1.1 compatible)
or PS/2 via adapter
G84-54xx/-55xx:
USB 2.0 (1.1 compatible)
or 2 x PS/2
Power supply 4 to 5.25 V/DC
Current input G84-52xx: typ. 25 mA
G84-54xx/-55xx:
typ. 45 mA
Storage temperature -20^ to +60^
Operating temperature G84-52xx/-55xx:
0 °C to +60 °C
G84-54xx:
0 °C to +50 °C
Connector assignment
| Position | USB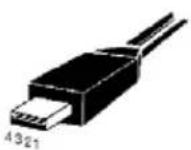 | PS/2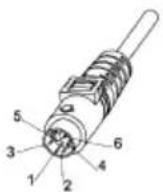 |
| 1 | +5 V | DATA |
| 2 | -DATA | - |
| 3 | +DATA | GND |
| 4 | GND | +5 V |
| 5 | - | CLOCK |
| 6 | - | - |
1 Höhenmaße / Height / Cotes de hauteur / Размеры / 副
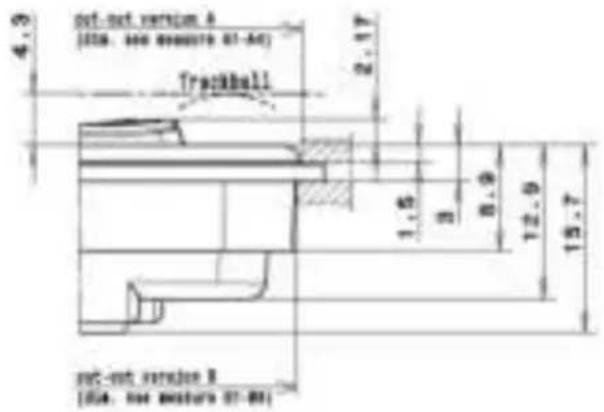
Alle Maße in Millimetern / All measurements in millimeters / Toutes cotes en millimètres / Все размеры в миллиметрах / 測量單位均為公釐
2 Abmessungen und Lage der Schraubdome / Dimensions and position of the screw caps / Dimensions et position des dômes filetés / Размеры и расположение резьбовых гнезд / 尺寸和螺栓的壁帽

Alle Maße in Millimetern / All measurements in millimeters / Toutes cotes en millimètres / Все размеры в миллиметрах. / 測影図色均感多音
Certifications
Federal Communications Commission (FCC) Radio Frequency Interference Statement
Information to the user: This equipment has been tested and found to comply with the limits for Class B digital device, pursuant to Part 15 of the FCC Rules. These limits are designed to provide reasonable protection against harmful interference in a residential installation. This equipment generates, uses and can radiate radio frequency energy and, if not installed and used in accordance with the instructions, may cause harmful interference to radio communications. However, there is no guarantee that interference will not occur in a particular installation. If this equipment does cause harmful interference to radio or television reception, which can be determined by turning the equipment off and on, the user is encouraged to try to correct the interference by one or more of the following measures:
- Reorientate or relocate the receiving antenna.
- Increase the separation between the equipment and receiver.
- Connect the equipment into an outlet on a circuit different from that to which the receiver is connected.
- Consult the dealer or an experienced radio/TV technician for help.
Caution: Any changes or modifications not expressly approved by the party responsible for compliance could void the user's authority to operate the equipment.
VCCI Statement
For use with Listed Personal Computers only!

- Connecting the keyboard
- Connecting the keyboard to the USB port
- Connecting the keyboard to the PS/2 port
- Using the integrated numeric keypad (Models G84-54xx/-55xx)
- Special key Fn
- Function level Pad
- Change key assignment
- Latest software version on the internet
- Securing the keyboard
- Dimensions
- Fitting dimensions
- Mounting
- Installing the mounting feet
- Maintenance and servicing
- Accessories
- RSI syndrome
- RSI syndrome
- Disposal
- Contact
- General advice
- Mode d'emploi
- 錢盤連接
- Technical Specifications
- Technische Daten
- Connector assignment
- Certifications
- Federal Communications Commission (FCC) Radio Frequency Interference Statement
- VCCI Statement
Brand : Cherry
Model : XS Trackball G845400
Category : Keyboard