
OSR1300 - Outdoor sound alarm Home8 - Free user manual and instructions
Find the device manual for free OSR1300 Home8 in PDF.

| Type of product | Outdoor sound alarm |
| Brand | Home8 |
| Model | OSR1300 |
| Power supply | Mains with integrated backup battery |
| Backup battery | Integrated lithium (remove plastic tab before use) |
| Built-in siren | Yes, adjustable volume (high, low, mute) |
| Alarm duration | 30 seconds, 2 minutes or 5 minutes (adjustable via jumper) |
| Tamper switch | Yes, anti-tamper |
| Communication protocol | Wireless (Security Shuttle) with QR code |
| Wireless range | Up to 30 cm to 3 meters for pairing |
| Arm/disarm indicator | Yes (audible or visual prompt) |
| Installation | Wall-mounted, outdoor, elevated |
| Humidity | Weather-resistant (outdoor) |
| Maintenance and cleaning | Clean with a soft, dry cloth |
| Security | Anti-tamper protection, backup battery in case of power outage |
| General information | 2-year warranty, made in China |
Frequently Asked Questions - OSR1300 Home8
User questions about OSR1300 Home8
0 question about this device. Answer the ones you know or ask your own.
Ask a new question about this device
Download the instructions for your Outdoor sound alarm in PDF format for free! Find your manual OSR1300 - Home8 and take your electronic device back in hand. On this page are published all the documents necessary for the use of your device. OSR1300 by Home8.
USER MANUAL OSR1300 Home8
1x Power Adapter Mounting Accessories
Broadband internet connection, iOS or Android phone and home router required.
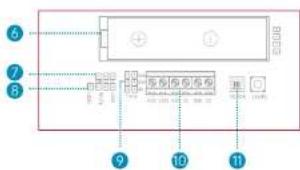
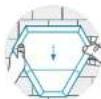
Diagram of PCB Board
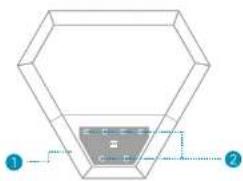
1.Status/Alarm Strobe Lens
2.SirenLED
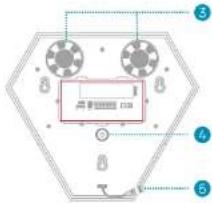
- Built-in Siren
i. Tamper Switch - Adapter Interface
- Backup Battery
-
Arm / Disarm prompt on/off Jumper
B. Siren Volume Jumper -
Siren Time Jumper
10.Wired Block - On/Off Switch
Jumper Setup
| Arm/Disarm Prompt | On (as default) | Off | ||
| Siren Alarming Duration | 30s (as default) | 2 mins | 6 mins | |
| 5min 2min 10min | 5min 2min 10min | 5min 2min 10min | ||
| Siren Volume | High Volume (as default) | Mute | Low Volume | |
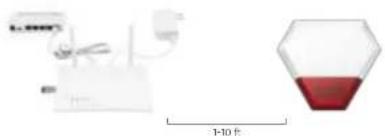
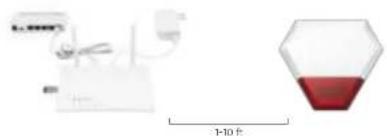
Step 1: Assemble your device and accessories
- Unpack your device and accessories.
-
Pair the device with the Security Shuttle within 1-10 feet to make sure the connection is working well.
-
Plug the Siren into power outlet.
Step 2: Add a device
- Open the app, tap on the menu button "三" and select "Device Management".
- Press the add button "+" next to Sensor
- Follow the app instructions to scan the QR code located on the device.
Note: If the scan is Incomplete, you will be asked to enter the serial number (SN) of the device.
Step 3: Mount your device
Before you mount your device, see if it's within Security Shuttle's range.
- Take your device to the room you want to use it in.
- Tap on the Emergency button in the main screen of the app to send an emergency notification.
If your External Siren sounds, it's within range, you can mount the siren.
Your Siren comes with a backup battery pre-installed. Please pull and remove the plastic strip when you want to use the battery, such as when power cutage.
Installation
Choose a suitable position on an external wall, as high as possible, where the siren can be easily seen and out of easy reach of any potential vendal.
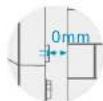
Make sure the Tamper Switch can be fully depressed against the wall.
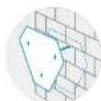
2 Using the mounting template provided.
3 Drill in the three places indicated.
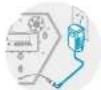
Plug the Siren into power outlet.
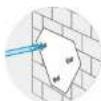
Mount the siren to the wall and make sure it is well positioned.
Jumper 1
10.Wired Block
11.
nann Jumper
| Arm/Disarm Prompt | ida (dua) | 5n | ||
| 30s (dua) | 2duch | 5duch | ||
Huaui: 1.
- unolnsuouo
- Sunuinsuae Security Shuttle nuu1 1-10 Wa nauuunaaanrnnnnaaannrul
3.
Jumout 2: Jaiusnucu
- 1
- nnnn(+)nnnnnnnnnnnnnnnn (Sensor List)
3.aunuOR Tnuaaunnaananaaunauwaa
nannnnn nnnnnn nnne nnnnnnnnnnnnnnnnnnnnnnnnnnnnnnnnnnnnnnnnnnnnnnnnnnnnnnnnnnnnnnnnnnnnnnnnnnnnnnnnnnnnnnnnnnnnnnnnnnn
JUANUW3: ANOANJIN
mouuunnauanannnnnnnnnnnnnnnnnnnnnnnnnnnnnnnnnnnnnnnnnnnnnnnnnnnnnnnnnnnnnnnnnnnnnnnnnnnnnnnnnnnnnnnnnnnnnnnnnnnnnnnnnnnnnnnnnnnnnnnnnnnnnnnnnnnnnnnn
1.
Are your devices listed in your app?
If you're having trouble installing your devices, see if they're listed in your app:
- Navigate to Device Management to see if all your devices are listed.
- Tap + next to the device category and follow the on-screen instructions to add any missing devices.
Are your devices communicating with Security Shuttle?
- If your devices don't connect to Security Shuttle, they might be too far away. Take them to a location that's closer to Security Shuttle and try again.
- If they do connect, you'll know the range of your device and where to install a range extender.
- Alternatively, you can move Security Shuttle closer to your device.
- If your devices still don't communicate with Security Shuttle, even when they're in the same room, navigate to > Device Management > + on the app to add your devices again.