
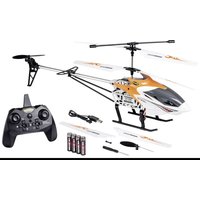
Race Shark Nano - Remote control toy Carson - Free user manual and instructions
Find the device manual for free Race Shark Nano Carson in PDF.
| Product type | Radio-controlled toy (remote-controlled boat) |
| Brand | Carson |
| Model | Race Shark Nano |
| Category | Radio-controlled toy |
| Approximate dimensions | 25-30 cm in length |
| Approximate weight | 250 g |
| Boat power supply | Batteries or rechargeable battery (not included, type specified in the manual) |
| Remote control power supply | AA batteries (not included) |
| Main functions | Propeller propulsion, radio remote control steering, forward/backward |
| Usage | Fresh water only, do not use in salt water |
| Recommended age | From 3 years (with adult supervision) |
| Safety precautions | Do not put fingers in the propeller, remove used batteries, do not use in strong wind or waves |
| Maintenance and cleaning | Drain completely after use, dry thoroughly, remove batteries if storing for a long time |
| Warranty | 24 months, covers manufacturing defects (excluding abuse, normal wear) |
| Spare parts | Available from the manufacturer or authorized dealer |
| Repairability | Repairs by an authorized center recommended |
| Certifications | Compliant with European directive 2014/53/EU |
| Symbols | Recycling pictogram (do not dispose of in household waste) |
| Manual available in | French, German, English (free online download) |
Frequently Asked Questions - Race Shark Nano Carson
User questions about Race Shark Nano Carson
0 question about this device. Answer the ones you know or ask your own.
Ask a new question about this device
Download the instructions for your Remote control toy in PDF format for free! Find your manual Race Shark Nano - Carson and take your electronic device back in hand. On this page are published all the documents necessary for the use of your device. Race Shark Nano by Carson.
USER MANUAL Race Shark Nano Carson
Speed Shark Nano Race Shark Nano
RADIO CONTROLLED BOAT
Achtung - Attention - Attention
Attenzione - Atencion - Pas op 02
Before using your product for the first time or ordering any spare parts, check that your manual is fully up-to-date. This manual contains the technical appendices, important instructions for correct start-up and use and product information, all fully up-to
date before going to press. The contents of this manual and the technical data of the product can change without prior notice.
For the latest version of your manual, see: www.carson-modelsport.com
FR//Remarque importante
We congratulate you for buying this CARSON product, which is designed and manufactured using state of the art technology.
According to our policy of continued development and product improvement we reserve the right to make changes in specifications regarding equipment, material and design at any time without notice.
Specifications or designs of the actual product may vary from those shown in this manual or on the box.
The manual forms part of this product. Should you ignore the operating and safety instructions, the warranty will be void.
Keep this guide for future reference.
Limited Warranty
This product is warranted by CARSON against manufacturing defects in materials and workmanship under normal use for 24 months from the date of purchase from authorised franchisees and dealers. In the event of a product defect during the warranty period, return the product along with your receipt as proof of purchase to any CARSON store.
CARSON will, at its option, unless otherwise provided by law:
(a) Correct the defect by repairing the product without charging for parts and labour;
(b) Replace the product with one of the same or similar design.
All replacement parts and products, and products on which a refund is made, become the property of CARSON. New or reconditioned parts and products may be used in the performance of warranty services.
Repaired or replaced parts and products are warranted for the remainder of the original warranty period. You will be charged for repair or replacement of the product made after the expiration of the warranty period.
The Warranty does not cover:
- Damage or failure caused by or attributable to acts of God, abuse, accident, misuse, improper or abnormal usage, failure to follow instructions, improper installation or maintenance, alteration, lightning or other incidence of excess voltage or current;
- Damage caused by losing control of your model;
- Any repairs other than those provided by a CARSON authorised service facility;
- Consumables such as fuses or batteries;
- Cosmetic damage;
- Transportation, shipping or insurance costs; or
- Costs of product removal, installation, set-up service adjustment or reinstallation;
- Any changes to plugs and cables, open the housing and damage the sticker.
This warranty gives you specific legal rights, and you may also have other rights which may vary according to the country of purchase.
Declaration of conformity
TAMIYA-CARSON Modellbau GmbH & Co. KG hereby declares that the radio equipment type 500108023/500108024 conforms to Directive 2014/53/EU. The complete text for the EU declaration of conformity is available at the following Internet address.
The explanation of the symbol on the product, packaging or instructions: Electronic devices are valuable products and should not be disposed of with the household waste when they reach the end of their service life! Help us to protect the environment and respect our resources by delivering this appliance to the relevant recycling point.
We wish you a lots of fun using your CARSON product!
Before use, read this manual carefully!
SAFETY PRECAUTIONS (KEEP IN A SAFE PLACE!)
1. WARNING! Not suitable for children under 3
years. There is a risk of suffocation if small parts are swallowed! Please keep these instructions for possible correspondence. Right reserved to change colours and make technical changes. Help from adults is required to remove the transport protection.
- For hygiene reasons we recommend that the toy is fully emptied and dried after use. Toy must only be operated in water when fully assembled, and in accordance with the instructions!
- Use only the specified batteries! Insert the batteries so that the positive and negative poles are correctly positioned! Do not throw used batteries in the domestic rubbish - take them to a collection point or dispose of them at a hazardous waste depot. Remove empty (flat) batteries from the toy. Do not attempt
to charge non-rechargeable batteries. Rechargeable batteries must be removed from the toy before charging. Rechargeable batteries may only be charged by adults. Do not use different types of battery, and do not insert new and used batteries at the same time. Do not short-circuit the crosspieces. Do not mix old and new batteries. Do not mix alkaline, standard (carbon-zinc) and rechargeable batteries.
- Do not operate the toy in strong winds, waves or in a strong current.
- Please note that the steering of the toy is limited when the battery is discharged.
- WARNING! Do not touch the ship's propeller while in motion!
- Boat will not function until it is placed in the water.
- Not suitable for use in salt water!
TECHNICAL DATA
- Model with 2.4 GHz RC system (max. transmitter power 10mW )
- Transmitter operating voltage: 3 V
Function:
- Move forwards/backwards/left/right
SCOPE OF DELIVERY
- RC model
- Remote Control
-
2x1.5VAA batteries
-
Charger (in the transmitter)
- Operating Instructions
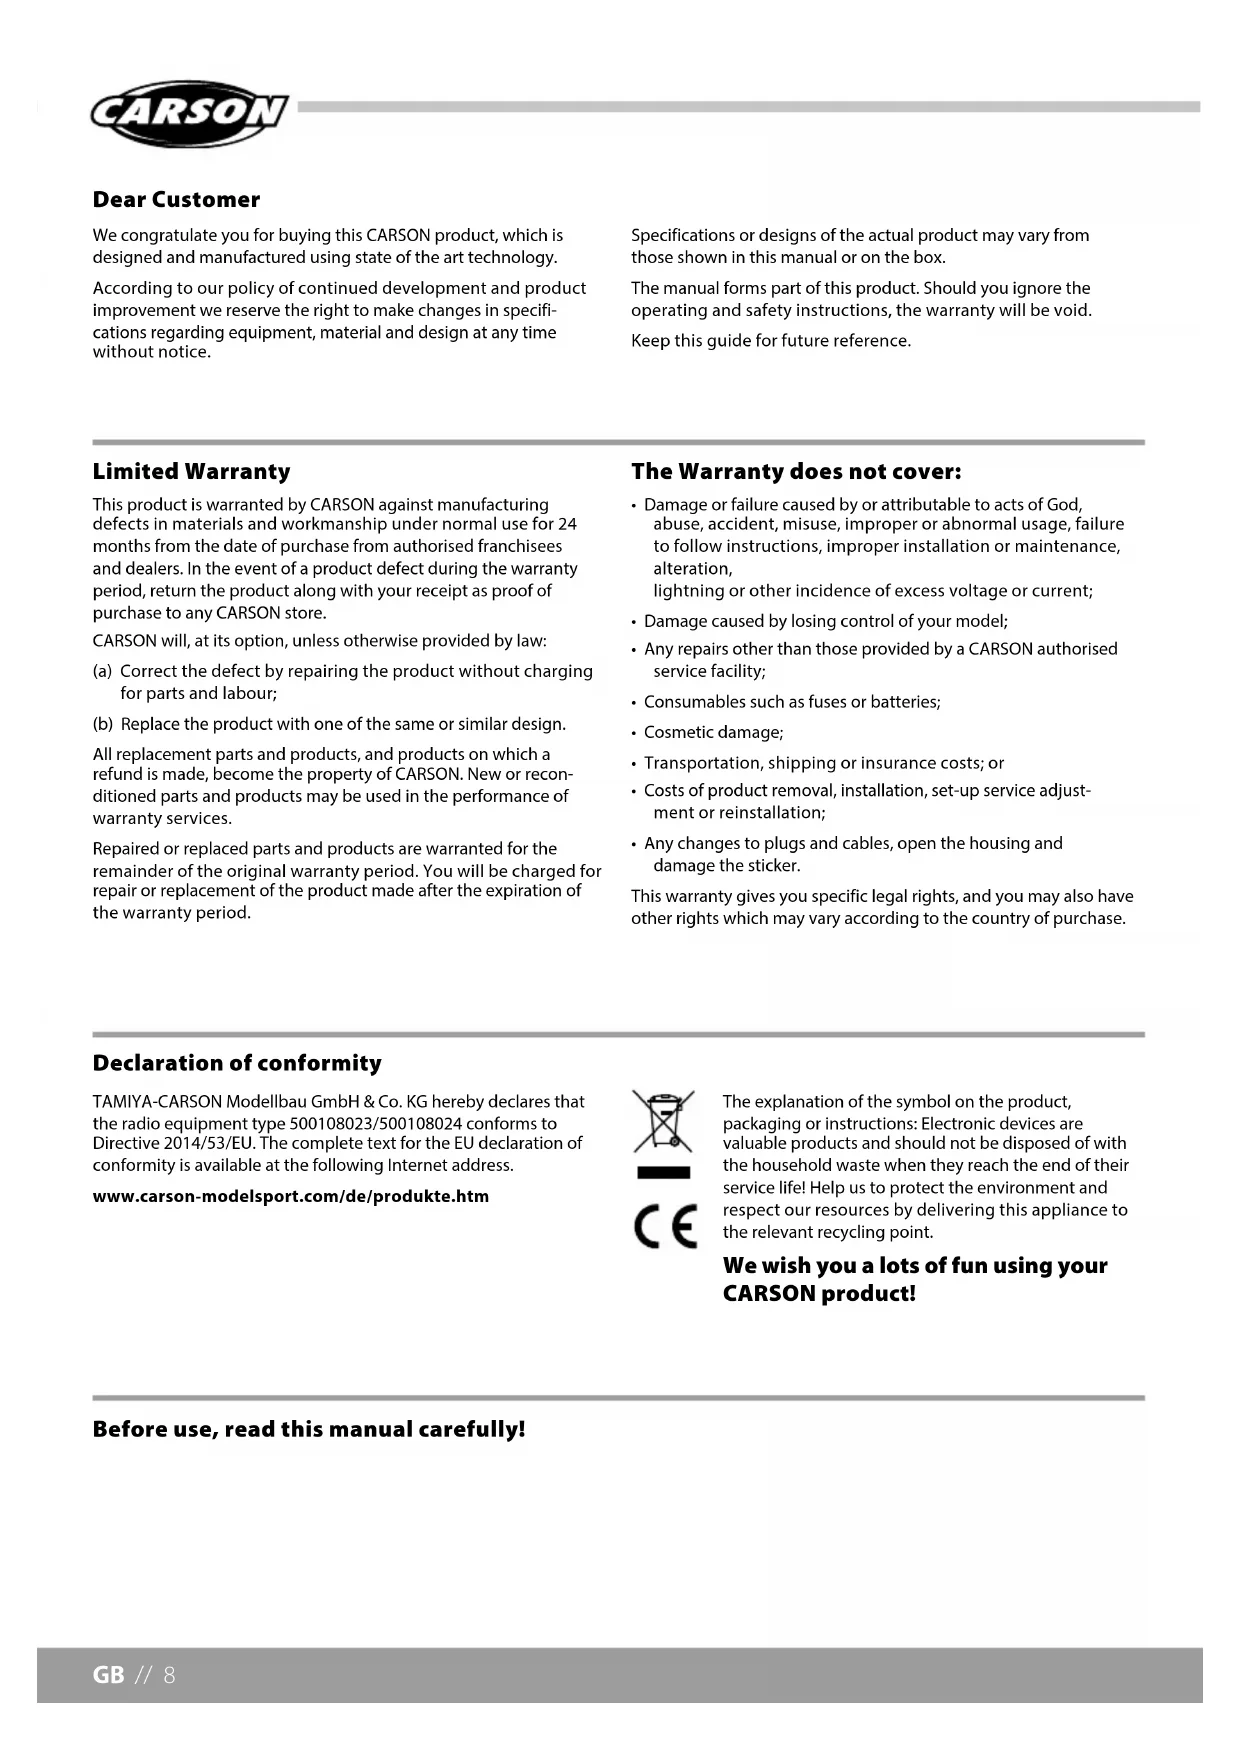
PREPARATION

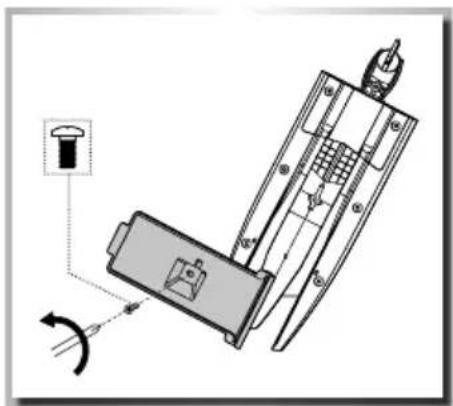
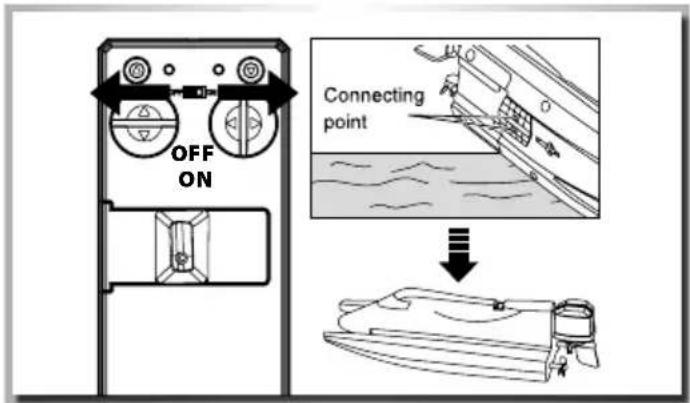
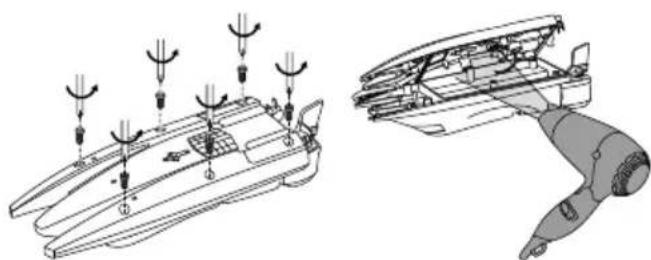
Open transparent cover. Push model to the left out of the radio control.
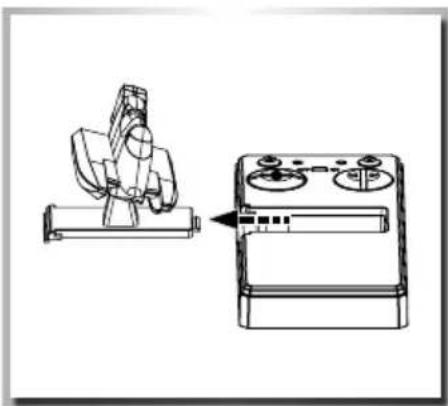
Remove screw with a cross-head screwdriver
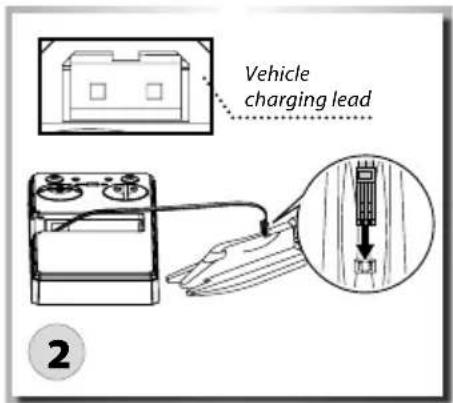
CHARGING THE BATTERY
Charging via the transmitter
- Switch the RC unit to "ON"
- Open the charging slot in the middle of the RC unit
- Connect the charging cable to the charging socket on the boat (make sure the plug is correctly fitted)
While charging, the green status LED will light - green LED goes out - charging is complete (charging time 10-12 min.)
INSTALLING THE TRANSMITTER BATTERIES
- Turn to open the battery compartment out there the attached screw counterclockwise with a screwdriver.
- Insert a fresh battery according to the polarity of prefabricated into the battery compartment.
- Close the battery compartment cover and turn the screw clockwise again prudently.
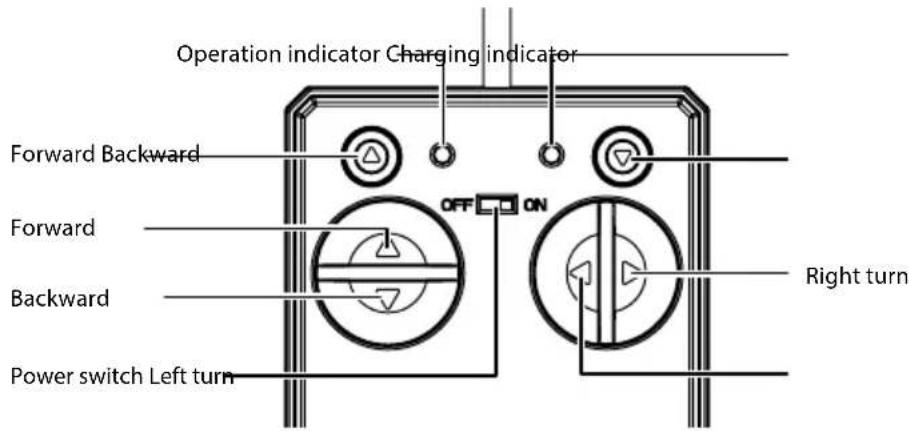
- Slide the switch on the rear panel to "ON". Lighting up a LED light indicates that the batteries are inserted correctly.
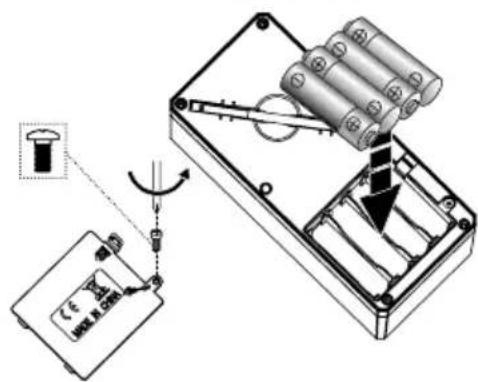
Caution !!!
When delivered, the batteries are already in the remote control.
Please remove the protection paper strip only!!!
READY TO START
- Switch on RC unit (red status LED flashes)
Important: The boat is not yet ready for use!!
- Place the boat in the water (red status LED goes out)
The model boat is nopw ready to go (safety circuit !!! - both contacts must be in the water).
To avoid losing control: ALWAYS move the control lever S-L-O-W-L-Y!
- Actuate function buttons (control commands) to select the desired direction of travel.
the selected commands are indicated by the red status LED.\$
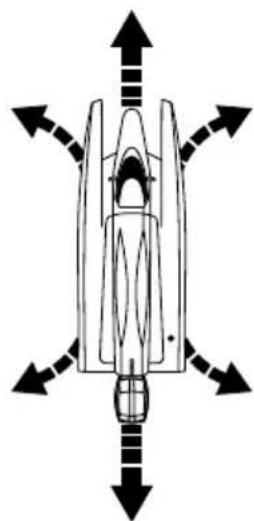
DIRECTIONAL GUIDE
Straight ahead travel and the speed of the boat can be changed by means of the mechanical setting of the rudder.

TIPS AND TRICKS
If, as the result of an unforeseeable manoeuvre, water should enter the hull of the boat, this can be very simply removed. To do this, the screws on the underside of the boat must be undone (the number can differ from model to model). Remove the water and dry the electronics with a hair dryer.
CAUTIONS WHEN OPERATING THE RC MODEL
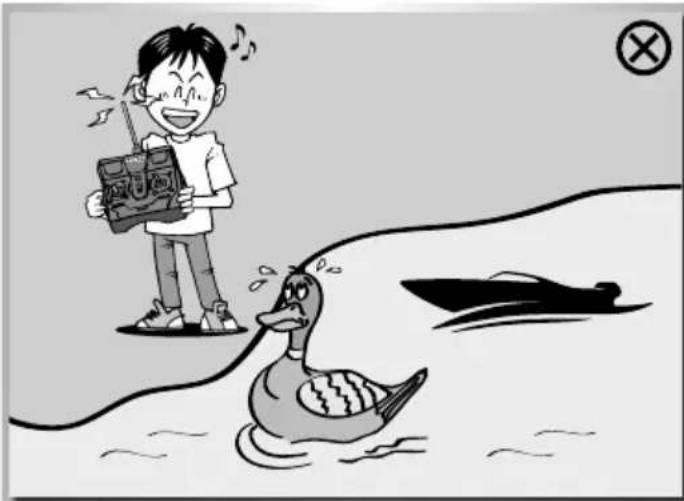
- Never run the model in crowded areas, near or toward people or animals, to prevent property damage and/or personal injury.
- Never run the model on grassland. Twining grass may hinder axle rotation and may cause motor heat buildup.
- Never run your model in flowing waters.
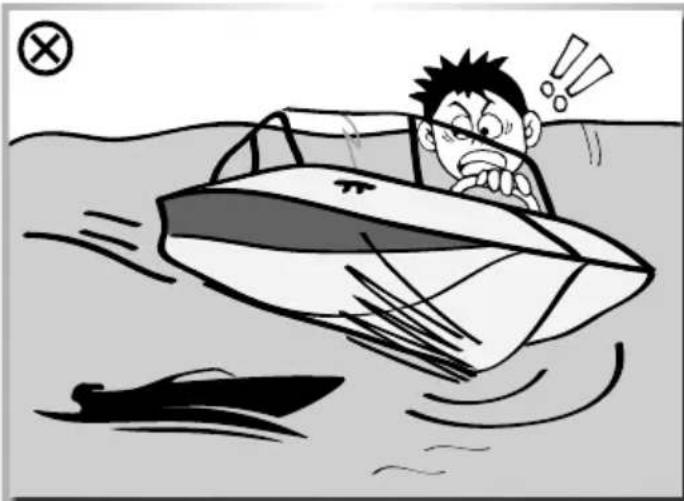
- Never run the model on public waterstreets, as it could endanger the traffic.
TROUBLESHOOTING
| Problem Cause Remedy | ||
| Model does not move Model has no contact with the water Make model into the water | ||
| Weak or no battery in the model Insert fully charged battery | ||
| The overheat cut-out has stopped the model due to overheating | Switch off the receiver. Allow the RC model to cool down for approximately 30 minutes | |
| No control Weak rechargeable battery/battery in transmitter or model | Insert fully charged battery or new battery | |
| The brushless motor suddenly stops during normal operation. | The receiver is being affected by interference. | Change location and start operation in another area. |
| The functions of the speed controller have been stopped by the integrated safety shut-off for low battery voltage or overheating. | Replace the driving battery with a fully charged battery or wait until the electronics have cooled down. | |
Cher client
- Speed Shark Nano Race Shark Nano
- RADIO CONTROLLED BOAT
- FR//Remarque importante
- Limited Warranty
- The Warranty does not cover:
- Declaration of conformity
- Before use, read this manual carefully!
- SAFETY PRECAUTIONS (KEEP IN A SAFE PLACE!)
- WARNING! Not suitable for children under 3
- TECHNICAL DATA
- SCOPE OF DELIVERY
- PREPARATION
- CHARGING THE BATTERY
- Charging via the transmitter
- INSTALLING THE TRANSMITTER BATTERIES
- Caution !!!
- READY TO START
- Important: The boat is not yet ready for use!!
- DIRECTIONAL GUIDE
- TIPS AND TRICKS
- CAUTIONS WHEN OPERATING THE RC MODEL
- TROUBLESHOOTING
- Cher client
Brand : Carson
Model : Race Shark Nano
Category : Remote control toy