
IKI7831 - Cooker INVENTUM - Free user manual and instructions
Find the device manual for free IKI7831 INVENTUM in PDF.

User questions about IKI7831 INVENTUM
0 question about this device. Answer the ones you know or ask your own.
Ask a new question about this device
Download the instructions for your Cooker in PDF format for free! Find your manual IKI7831 - INVENTUM and take your electronic device back in hand. On this page are published all the documents necessary for the use of your device. IKI7831 by INVENTUM.
USER MANUAL IKI7831 INVENTUM
text_image
INVENTUM H I J O I - S P 0- Safety instructions page 20
- Appliance description page 23
- Before first use page 24
- Operation of the appliance page 24
- Cookware for induction page 28
- Cleaning & maintenance page 28
- Installation instructions page 29
- Problems & solutions page 32
- Product fiche page 33
General terms and conditions of service and warranty page 66
Deutsch
natural_image
Simple line drawing of a four-cylinder plate with arrows indicating direction, no text or symbols presentRESTWARMTE INDICATIE
1 safety instructions
- Please read these instructions before operating the appliance and retain for future use.
- The appliance is intended solely for domestic use within the home. The hob is only to be used for the preparation of food. The appliance is not designed for heating rooms.
- WARNING: this appliance and the accessible parts will

become hot during use. Do not touch hot parts. Keep children younger than 8 away from the appliance unless they are under continuous supervision.
- This appliance can be used by children aged 8 years and over, as well as by people with reduced physical, sensory or mental capabilities or lack or experience and knowledge, provided they are supervised and instructed in the safe use of the appliance and understand the hazards involved.
• Children must not play with the appliance. - Cleaning and maintenance shall not be made by children.
- Do not keep objects that children might find interesting in cupboards above or behind the appliance.
- The cooking zones heat up during use and stay hot for a while afterwards. Keep young children away from the hob during and immediately after cooking.
- The manufacturer cannot be held liable for any damage resulting from failure to follow the safety instructions and warnings.
- Never open the casing of the appliance.
- Do not warm closed tins on the hob. There will be a build-up of pressure that will cause tins to explode. You might get injured or scalded.
• WARNING: danger of fire: never leave anything unsupervised on the hob. - WARNING: cooking with fat or oil on a hob without supervision can be dangerous and can lead to fire. NEVER try to extinguish a fire with water. Instead, switch the appliance off and then cover the flames with for example a lid or a fire blanket.
-
The appliance should not be placed or used outdoors.
-
Do not use the appliance as a worktop. The appliance may accidentally be switched on or still be hot or catch fire.
- Never cover the appliance with a cloth or something similar. If the appliance is still hot or is switched on, there is a risk of fire.
- Never use a pressure cleaner or steam cleaner to clean the hob.
- Do not use the appliance in temperatures below 5^ .
- When you use the hob for the first time you will notice a “new smell”. Don’t worry, this is normal. If the kitchen is well ventilated, the smell will soon disappear.
• ⚠ WARNING: in case of hotplate glass breakage:
- shut immediately off any electrical heating element and isolate the appliance from the power supply;
- do not touch the appliance surface;
- do not use the appliance.
- If a drawer underneath the appliance is permitted, without an intermediate bottom, this should not be used to store highly flammable objects/ materials. Ensure that there is adequate clearance of a few centimetres between the bottom of the hob and the contents of any drawers.
- The appliance is not intended to be operated by means of an external timer or separate remote control system.
- Do not place metal objects such as knives, forks, spoons and lids on the surface of the hob, they may become hot.
- As soon as you remove the pan from the hob, the cooking process will stop automatically. Get into the habit of switching off the cooking zone or hob manually to avoid unintentionally switching on the appliance. After use, switch off the hob element using the controls and don’t rely only on the pan detector.
- The ceramic top is extremely strong, but not unbreakable. For example, a spice jar or sharp utensil falling on it could cause it to break.
- WARNING: if the surface is cracked, switch off the appliance to reduce the risk of electric shock.
- Remember that if the hob is used on a high setting the heating time will be very short. Do not leave the hob unattended if you are using a zone on a high setting.
- When the induction hob is in use, keep objects that are sensitive to magnetic fields (credit cards, bank cards, discs, watches and similar items) away from the hob. We advise anyone with a pacemaker to consult their cardiologist first.
- This appliance should only be connected by a registered installer.
- Faulty parts may only be replaced by original parts meet safety requirements.
- Damage caused by incorrect connection, incorrect fitting, or incorrect use is not covered by the warranty.
- If the connecting cable is damaged, it may only be replaced by the manufacturer, the manufacturer's service organisation or equivalently qualified persons, in order to avoid dangerous situations.
- The electrical connection must comply with national and local regulations.
- The wall plug socket and plug should always be accessible.
- The connection cable must hang freely and should not be fed through a drawer.
- The worktop into which the hob is fitted, should be flat.
- The walls and the worktop surrounding the appliance must be heat resistant up to at least 85°C. Even though the appliance itself does not get hot, the heat of a hot pan could discolour or deform the wall.
- Legislation requires that all electrical and electronic equipment must be collected for reuse and recycling. Electrical and electronic equipment marked with the symbol indicating separate collection of such equipment must be returned to a municipal waste collection point.
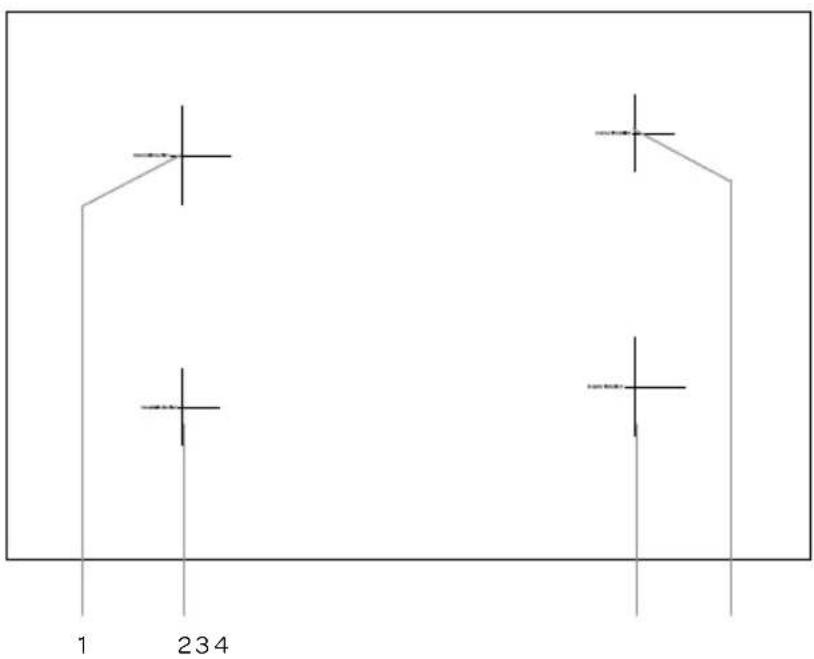
2 appliance description
text_image
1 234Hob
- Cooking zone rear left (∅ 210 mm)
- Cooking zone front left (∅ 160 mm)
- Cooking zone front right (∅ 210 mm)
- Cooking zone rear right (∅ 160 mm)
text_image
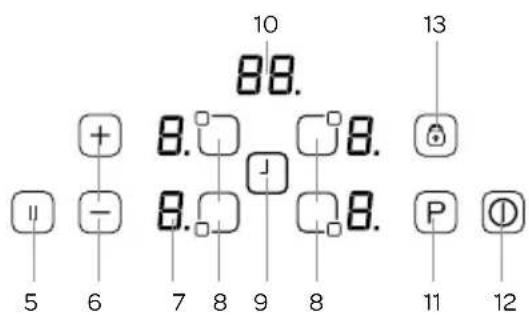
10 88. 13 + 8. 8. 6 - 8. 8. 9 8 P 12 5 6 7 8 9 8 11Control panel
- Pause key
- Heat setting keys+ and - /
- Heat setting/residual heat display
- Cooking zone key
- Timer key
- Display timer
- Boost key
- On/off key
- Keylock
3 before first use
Before you use the appliance for the first time, please do as follows: Carefully unpack the appliance and remove all the packaging material. Keep the material (plastic bags and cardboard) out of reach of children. Check the appliance after unpacking for any damage, possible from transportation. Clean the glass with a damp cloth. Check that the voltage in your home corresponds with the voltage printed on the bottom of the appliance and plug it in a socket. Follow the installation instructions in chapter 7 for installing the hob.
4 operation of the appliance
Use only suitable cookware on the induction hob.
After the mains voltage is applied all displays can light up for a moment. After that, the hob is in stand-by mode and is ready for use.
The hob is controlled with electronic sensors which are operated by touching the related keys. Each sensor activation is followed by a sound signal.
SWITCHING THE APPLIANCE ON
Switch the hob on by touching the ON/OFF key for a few seconds. The displays of the cooking zones all show [0.] and the dots blink. If there is no cooking zone selected within 20 seconds, the hob will automatically shut off.
SWITCHING THE APPLIANCE OFF
Switch the hob off at any time by touching the ON/OFF key for a few seconds.
The ON/OFF key always has priority in the switch off function.
SWITCHING ON A COOKING ZONE
Press on the key of the cooking zone you wish to use. There is a static dot indication on the selected cooking zone display and the dots on the other displays turn off.
Place the pan on the cooking zone. Select the heat setting by using the increase heat setting key + or the decrease heat setting key -.
To get food quickly to the boil, select the desired heat setting and touch the P key to activate the Boost function.
BOOST FUNCTION P
The Boost function gives extra power and can be activated for each cooking zone. A cooking zone must be selected, the heat setting set on the desired setting and the P key (Boost) must be pressed. The Boost function is activated when a P appears in the display of the selected cooking zone.
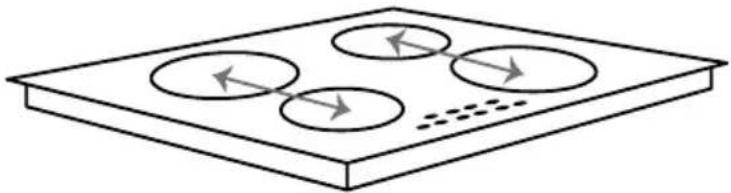
natural_image
Simple line drawing of a four-cylinder plate with arrows indicating direction, no text or symbols presentWhen using the Boost function the maximum available power will be divided between two cooking zones which work as a pair.
It is possible that the maximum available power for these two cooking zones together is exceeded. In that case the power of the second cooking zone will be decreased automatically. The necessary power reduction is shown by blinking of the corresponding cooking zone display. The display will blink for 3 seconds and during that time further adaptations of the settings are allowed before the power is automatically reduced.
The duration of the Boost function depends on the selected heat setting of the corresponding cooking zone.
| Setting + Boost Boost function automatically shuts off after Setting + Boost Boost function automatically shut off after | |||
| Setting 1 + P 1 minute Setting 6 + P 6 minutes | |||
| Setting 2 + P 2 minutes Setting 7 + P 7 minutes | |||
| Setting 3 + P 3 minutes Setting 8 + P 8 minutes | |||
| Setting 4 + P 4 minutes Setting 9 + P 9 minutes | |||
| Setting 5 + P 5 minutes -- | |||
SWITCHING A COOKING ZONE OFF
Select the cooking zone you want to switch off by pressing the corresponding key. Touch the - key to decrease the heat setting to [0]. By pressing the keys + and - simultaneously, the setting turns directly to [0].
If the cooking zone is hot, the displays show an [H] instead of [O].
POWER MANAGEMENT
Thanks to the power management function, the user can set the maximum power of the hob if needed and power limit is never exceeded.
How it works
If total power exceeds the adjusted limit, the power management function decreases the last selected hob zone power limit automatically, then the display flashes and buzzer signal sounds. The power level of other cooking zones remain the same.
After energizing the hob, default power limit (32A) occurs on the display for 4-5 seconds as shown figure A.
A.

text_image
88. + A. 3. □ - 8. 2. P ①4 different power limits are available (13A, 15A, 16A, 32A).
| Power limit Required cable size Power | ||
| 13 A min. 3G1,5mm | ^2 | 2900 watt |
| 15 A min. 3G1,5mm | ^2 | 3500 watt |
| 16 A min. 3G1,5mm | ^2 | 3600 watt |
| 32 A min. 3G2,5mm | ^2 | 7400 watt |
Setting the power limit;
IMPORTANT: If another power limit is chosen than the default power limit, electrical network (cable, plug, fuse, etc.) must be checked and changed if needed by a qualified technician according to local regulations.
After energizing the hob, in the first 60 seconds it is possible to set the required power limit by following steps:
- First you will see the default setting on the display. (Figure A)
- After this disappear turn on the hob by on/off key Ⓓ.
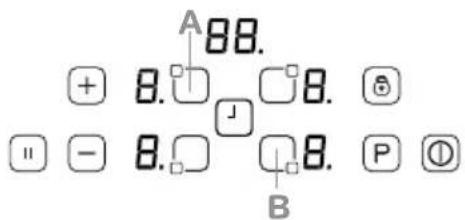
- Touch the 'A' and 'B' keys at the same time for 2-3 seconds. Then default power limit will appear again.
- Select the power limit by pressing the '+' or '-' buttons.
- Then press 'A' and 'B' buttons at the same time for 2-3 seconds to set the selected limit. Now the hob is ready to use with new power limit setting.
text_image
A 88. + 8. □ □ 8. □ - 8. □ □ 8. P Ⓧ BThis setting is possible at any time and is maintained until the next change
SWITCHING OFF ALL COOKING ZONES AT ONCE
To switch off all cooking zones at once, press the ON/OFF key. The displays which are still hot an [H] appears.
RESIDUAL HEAT DISPLAY
The residual heat display shows the glass is still too hot to touch around the cooking zone.
After switching off the cooking zone, the corresponding display shows [H]. As soon as the temperature has decreased enough the [H] indication will disappear.
PAUSE FUNCTION
When pause is activated, it reduces the power of all cooking zones which are being used at that moment. As soon as pause is deactivated, all cooking zones automatically switch back to the original heat settings.
- When the pause function is not deactivated, the hob will switch off after 30 minutes.
- Press the pause key [8] to activate the pause function. The power of the activated cooking zones will be decreased and [11] is visible in the displays.
- Press the pause key again to deactive the pause function. [II] disappears and the cooking zones switch back to the original heat settings.
SAFETY SWITCH OFF
Each cooking zone will automatically be switched off after a defined maximum operation time if the heat setting is not modified.
The maximum operation time depends on the selected temperature level.
| Heat setting Safety switch off after: | |
| 1 - 26 hours | |
| 3 - 45 hours | |
| 54 hours | |
| 6 - 9 12 hours | |
CHILD LOCK
The child lock prevents an unintentional use of the hob. After switching on the control, the child lock function can be activated.
Do not select a cooking zone. To activate the child lock, press simultaneously the + and - keys and then the + key again. [L] appears in the displays and indicates the controls can't be changed. If a cooking zone is still hot, [L] and [H] will be displayed in alternation.
The hob will remain locked until it gets unlocked, even if the control has been switched off and on.
To deactivate the child lock, first switch on the hob. Press simultaneously the + and - keys and then the - key again. [L] disappears in the displays and the hob will be switched off.
KEY LOCK
The key lock function is for blocking and setting the hob in a save mode during use. Setting a higher heat setting or other alterations are not possible. It is only possible to switch the appliance off.
The key lock is activated when the key lock key is pressed for 2 seconds. This activation is confirmed by a sound signal. The indicator for the key lock lights up and the controls are blocked.
TIMER FUNCTION
The timer function can be used in two ways: minute minder timer and cooking zone timer.
Minute minder timer
The minute minder timer can be operated without active cooking zones. Switch the hob on and press the TIMER key. The display shows 00. Set the desired time with the + and - keys. The range of the minute minder timer is between 0 to 99 minutes. If there are no controls touched in 10 seconds, the minute minder time will be set and the dot will disappear. The time runs down according to the setting.
When the time is over, a signal sounds and the timer display blinks. The sound signal will stop automatically after 30 seconds or by operating any key.
To change the timer, press the TIMER key again and change the time with the + and - key.
Cooking zone timer
The cooking zone timer is connected to a cooking zone and can be set separately for each cooking zone. In contrast to the minute minder timer the cooking zone timer switches off the cooking zone when the set time runs out.
- Switch on the hob and activate a cooking zone.
- Set the heat setting with the + and - key.
- Press on the TIMER key 📁. The display shows ⒸThe timer will now function as a minute minder timer.
- Press the TIMER key 📁 again until the corresponding LED blinks to activate the cooking zone timer. Around the timer display there a four LED's. They indicate for which cooking zone, the cooking zone timer is set.
- Set the desired time with the + and - key.
- 10 seconds after the last control touch, the display will show the time of the cooking zone which runs out first (in case of programming more than one cooking zone).
To set an extra cooking zone timer, do as follows:
- Activate another cooking zone.
- Set the heat setting with the + and - key.
- Press on the TIMER key. The timer will now function as a minute minder timer.
- Press the TIMER key again until the corresponding LED blinks to activate the cooking zone timer.
- Set the desired time with the + and - key.
- 10 seconds after the last control touch, the display will show the time of the cooking zone which runs out first (in case of programming more than one cooking zone).
When the selected time has runs down, a signal sounds and the timer display shows [00]. The programmed cooking zone will be switched off and [H] appears in the display if the cooking zone is hot.
The sound signal will stop automatically after 30 seconds or by operating any key.
SOUND SIGNAL
When the hob is in operation, the following activities will be signalled by means of a sound signal:
• normal key activation with a short sound signal
• continuous operation of keys over a longer period of time (10 seconds) with a longer, intermittent sound signal.
DISPLAY INDICATION
| Indication on the display Description | |
| E | An error has occurred. Check the notification according to the table in chapter 8. |
| H | Residual heat indication: the cooking zone is still hot. |
| L | The child lock is activated. |
| F | Fault. There is something placed on the controls or the cookware is not suitable or too small. |
| U | Place a pan on the active cooking zone or switch it off. |
5 cookware for induction
Cookware which has been used on other hobs, such as a gas hob, are no longer suitable for use on an induction hob.
Therefore purchase before the first use new cookware if you do not have suitable pans.
- Use thick, flat smooth bottomed cookware that are the same diameter as the cooking zone. This will help reduce cooking times.
• Cookware made of steel, enamelled steel, cast iron and stainless steel will give the best results. - Check the indications of the manufacturer whether the pan is suitable for use on an induction hob.
- Cookware made of enamelled steel or aluminium or copper bottoms can cause a metallic residue to remain on the hob. If left, this becomes difficult to remove. Clean the hob after every use.
- Cookware is suitable for induction when a magnet sticks to the bottom of the cookware.
- Cookware must be placed centrally on the cooking zone.
- When using certain pans, you may get various noises from the pans, this is due to the design of the pans and does not effect the performance or safety of the hob.
text_image
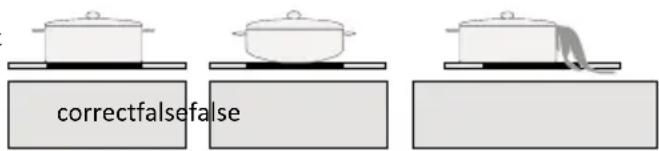
correctfalsefalseENERGY SAVING
- Induction cooking zones adapt automatically to the size of the cookware bottom up to a certain limit. However the magnetic part of the cookware bottom must have a minimum diameter depending upon the size of the cooking zone.
- Place the cookware on the cooking zone before it is switched on. If it is switched on before placing any cookware, the cooking zone will not operate.
• Always use a lid to reduce cooking time. - Decrease the heat setting when a liquid comes to the boil.
- Minimise the amount of liquid or fat to reduce cooking times.
- Select the correct heat setting for the several cooking options.
The following table is an indication for the several cooking options.
| Settings Use for: | |
| 0 cooking zone off | |
| 1 - 3 keep warm | |
| 4 - 5 gentle simmering, slow warming | |
| 6 - 7 reheating and rapid simmering | |
| 8 boiling, saute and searing | |
| 9 maximum heat | |
| P Boost function |
6 cleaning & maintenance
Make sure all the cooking zones are cooled down before cleaning the hob and lock the hob with the child lock.
- Do not use abrasive pads, corrosive cleaners, aerosol cleaners or sharp objects to clean the surface of the hob which are not intended for this purpose.
- Clean the surface daily with a damp cloth and a mild detergent, such as washing-up liquid. Dry thoroughly with kitchen paper or a clean cloth.
- Spilt food can be removed by soaking the spot with a damp cloth and some washing-up liquid or a special scraper.
Attention: the glass scraper has a razor, therefore, it must be kept away from children.
Use a special cleaner for ceramic/induction hobs for difficult stains. Attention: follow the instructions on the product.
7 installation instructions
- The safety during use can only be guaranteed when the hob is installed correctly and according to the regulations. The installer is responsible for any damage caused by a faulty installation.
- The electrical connection must be made by a qualified electricien. This person is aware of the national and local regulations the installation must comply with.
- The appliance falls under protection class I and can only be used in combination with a grounding conductor connection. The manufacturer accepts no responsibility for any malfunction or damage caused by incorrect electrical installations.
- The appliance must be connected to a fixed installation and the means of disconnecting it from the fixed installation must be installed according to the installation instructions.
- The induction hobs may only be installed over a drawer, ovens with forced ventilation from the same brand and dishwashers from
the same brand. Refrigerators, unventilated ovens and washing machines may not be installed beneath the hob. - The connection cable must hang freely. Do not tie the power cable or pass it along sharp edges. If there is an oven installed below, pass the cable along the rear corners of the oven to the connection box. It must be positioned so that it does not touch any of the hot parts of the hob or the oven.
- The connection point, the wall socket and/or plug must always be accessible.
- The worktop into which the hob is fitted should be flat. Follow the instructions of the manufacturer of the worktop.
- Damage caused by incorrect connection, incorrect use or incorrect fitting is not covered by the guarantee.
- Attention: any change to the appliance's interior, including fitting and changing the power cable, must only be performed by a qualified electricien.
SPACE AROUND THE HOB
Sufficient clearance around the hob is essential for a safe use of the hob. Check that there is sufficient clearance.
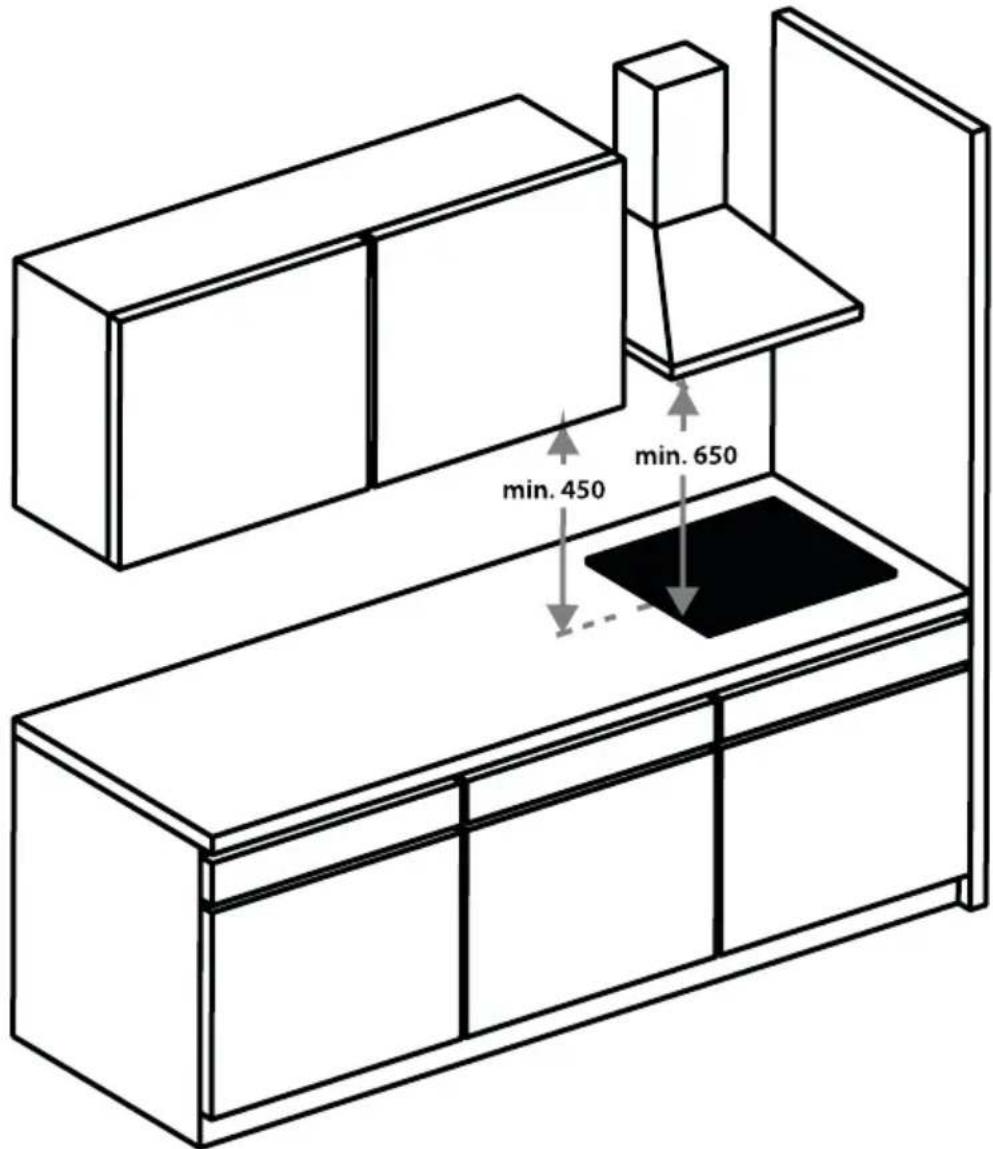
INSTALLATION DIMENSIONS
In the drawings below, all the dimensions are displayed in mm.
text_image
780 520 56 min. 50 750 490 min. 50VENTILATION
The electronics in the hob need to cool. The hob will automatically switch off if there is insufficient air circulation and the hob will overheat. There are ventilation openings on the underside of the appliance. It must be possible for cool air to be drawn in through these openings. There are outlet openings to the front of the appliance.
Ventilation occurs through the plinth and the back of the cupboard. Saw out the ventilation openings (min. 100cm^2 ). Air supply through the plinth is superflous if, together with an opening at the back of the cupboard, there's an opening somewhere else through which air can be drawn in.
Ensure that there is sufficient air circulation.
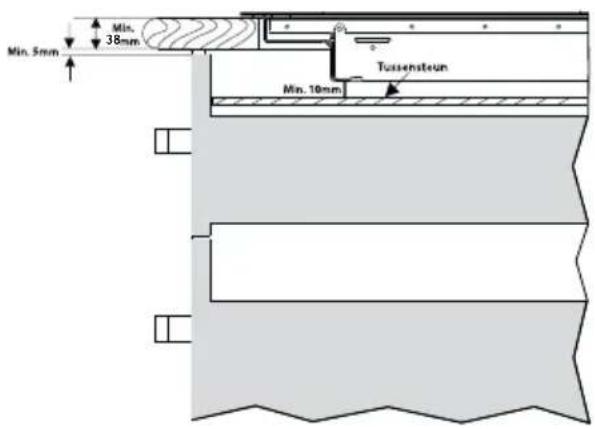
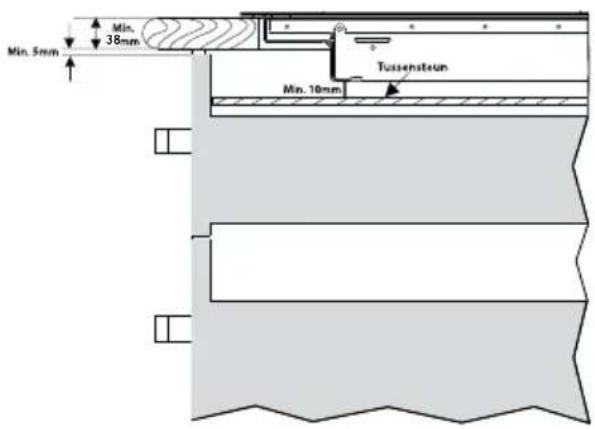
- Make a ventilation opening to the front of the kitchen unit at least the width of the hob and to a minimum height of 5 mm if the hob is built-in above a drawer or plank.
- Ensure there is a minimum height of 10 mm between the oven, the drawer or separator and the hob.
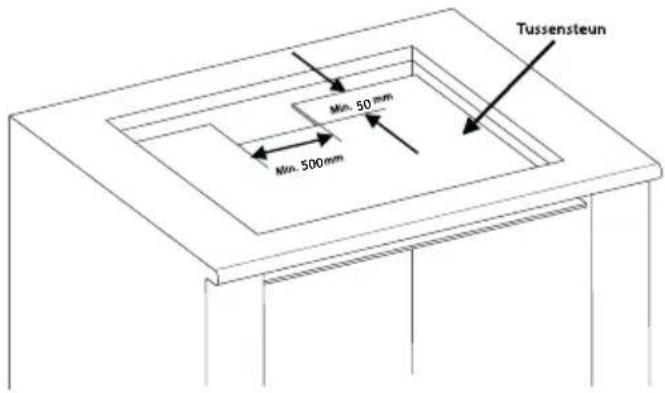
Metal objects can become hot because of the ventilation. If this occurs, we advise to use a separator. This can be a wooden panel.
• Attention: when fitting the hob above an oven or a drawer the thickness of the worktop must be at least 38 mm. - Ensure the crossbar does not impede the airflow. Plane or saw the crossbar [C] diagonally if necessary.
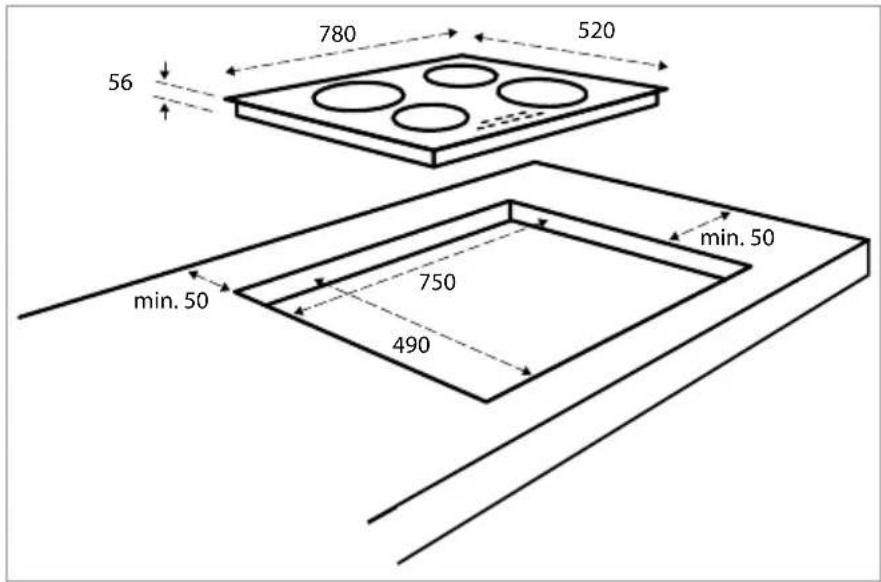
Fitting above an oven - A Fitting above a drawer - B

text_image
A Min. 20mm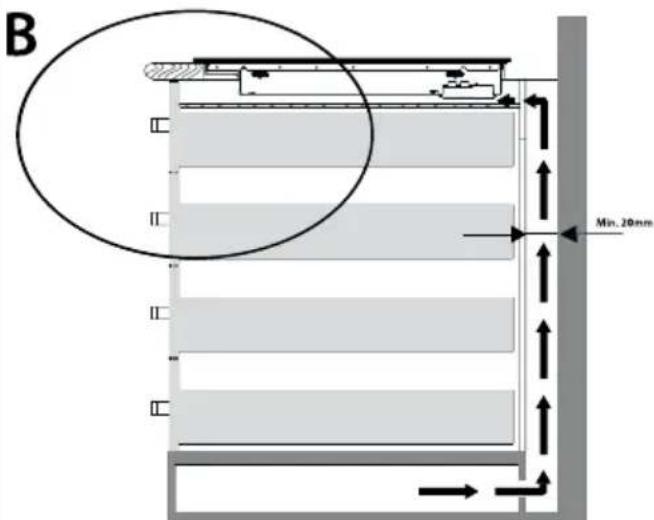
text_image
B Min. 20mm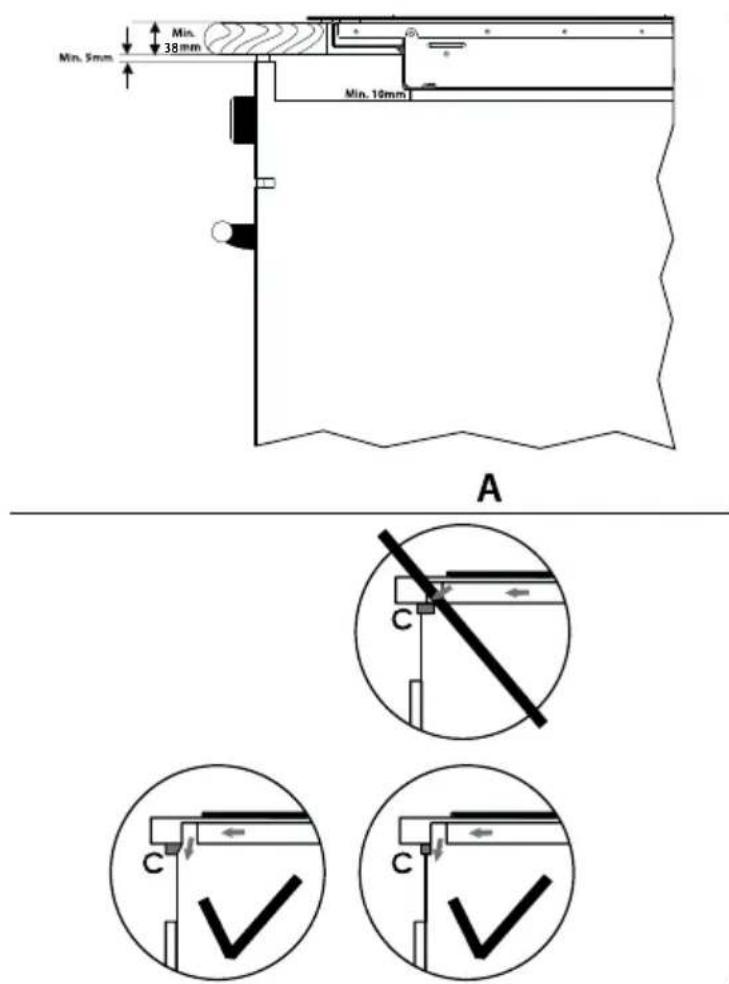
text_image
Min. 5mm Min. 38mm Tussensteun Min. 10mmB
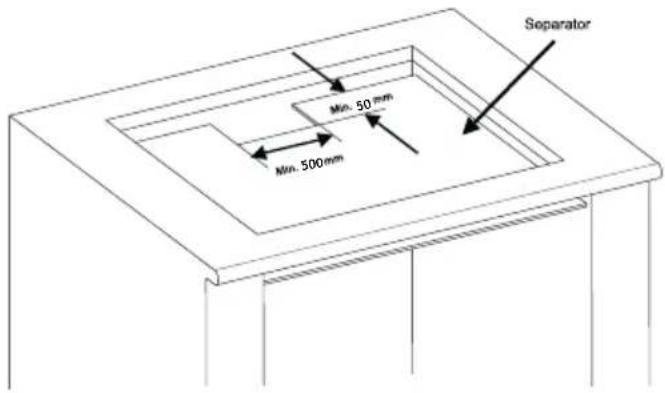
text_image
Min. 500mm Min. 50 mm SeparatorCONNECTING THE HOB TO THE ELECTRICAL SYSTEM
- The hob is supplied with a connection cable, but without a plug and, in accordance with connection diagram A1, it is set by default for 2 x 1 phase (230VDC). The hob uses a so-called 5-pole Perilex plug (not included). In the meter cupboard, the groups must each be protected with a 16 Ampere fuse at least.
- The hob can also be connected in accordance with connection diagram A2 or A3. This may only be performed by a certified installer.
-
The socket for connecting to the electrical system must be provided with an earthing pen and may not be located above the hob. The socket for connecting to the electrical system must also be accessible for the user after placement of the hob.
• Before connecting the hob, check that: -
the fuse and electrical system are suitable for the load of the hob,
- the electrical system is equipped with an efficient earthing system that meets the current standards and regulations.
- the socket is easily accessible.
connection cableconnection block
connection cableconnection

text_image
A1 3 L₂ N₁ 4 2 N₂ 5 1 L₁ PE 5x 1,5mm² 220V 2L+2N - 5x 1,5mm² 230V 2L+2N - 5x 1,5mm² 240V 2L+2N - 2 x 230V 2L+2N-16A L1 L2 N2 N1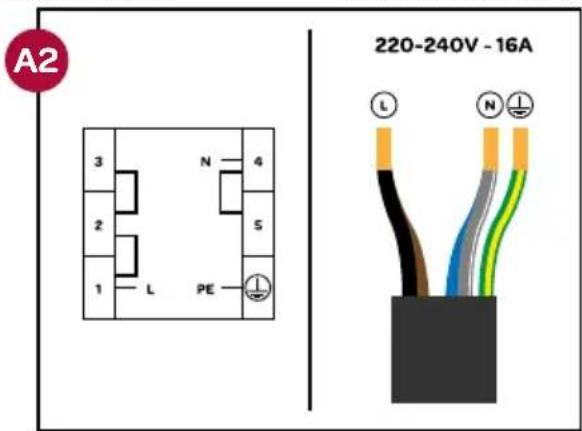
text_image
A2 220-240V - 16ATHE FITTING OF THE APPLIANCE
- Check that the cabinet and the cut-out meet the dimension and ventilation requirements.
- Remove the chips from the cutting job in the opening of the worktop and treat the saw ends of wooden or synthetic worktops with sealing varnish if necessary, to prevent moisture causing the worktop to swell.
- Lay the hob upside down on the worktop.
- Fit the connecting cable to the appliance in compliance with requirements.
- Remove the protective layer from the sealing tape and apply the tape on the edge of the glass plate. Make sure to apply the tape to the glass and not on the metal part. Do not stick the tape around the corners, but cut 4 separate pieces to seal the corners well. Attention: any damage that occurs when not applying the tape has consequences for the warranty.
- Fit the supplied mounting brackets on the appliance.
- Turn the hob over and lay it in the recess.
- Connect the appliance to the mains. The appliance is ready for use.
- Check that it works properly. If the appliance has been wrongly connected either a bleep will sound or an error code will appear on the displays.
REMOVING THE HOB
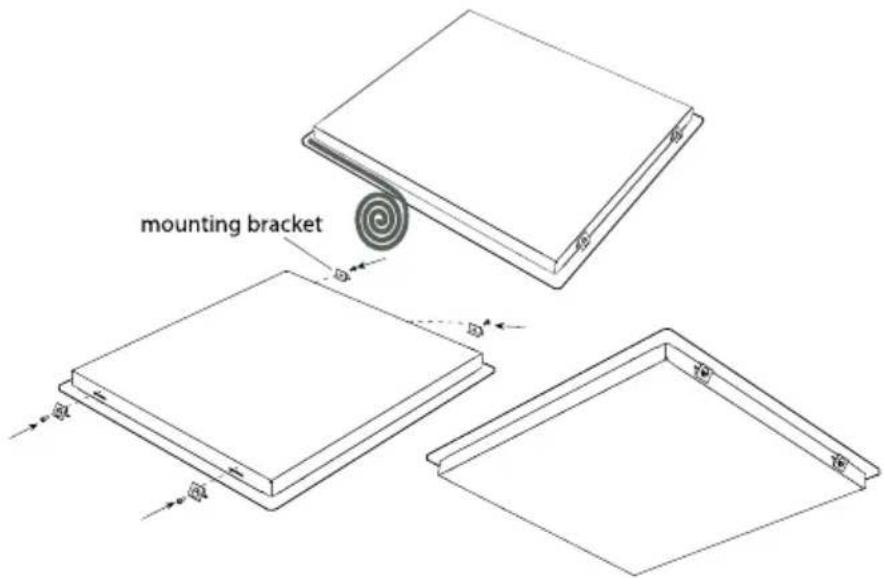
text_image
mounting bracketDisconnect the hob from the mains. Remove the hob by pushing it upwards from the bottom. Attention! Beware of damage to the appliance! Do not try to remove it from the top.
8 problems & solutions
If there is an error, an error code will be shown at the displays.
| Error code Cause Solution | ||
| E1 Cooling fan is disabled. Contact the service department of Inventum. | ||
| E3 Supply voltage is too high. | Have the installation checked by a qualified electricien. | |
| E4 | Supply frequency is different from the rated values (50Hz). | Have the installation checked by a qualified electricien. |
| E5 The hop is overheated. | Switch the appliance off and let the cooking zones cool down. | |
| E6 Control defect. Contact the service department of Inventum. | ||
| E7 Coil temperature sensor is defect. Contact the service department of Inventum. | ||
| E8 | Cooler temperature sensor is defect. | Contact the service department of Inventum. |
| E9 Calibration error. Contact the service department of Inventum. | ||
| Manufacturer INVENTUM | |
| Model IKI7831 | |
| Type of appliance induction hob | |
| Number of cooking zones 4 | |
| Heating technology induction | |
| Diameter per cooking zone [cm] (front left) ∅ 16 | |
| Diameter per cooking zone [cm] (rear right) ∅ 16 | |
| Diameter per cooking zone [cm] (rear left) ∅ 21 | |
| Diameter per cooking zone [cm] (front right) ∅ 21 | |
| Diamter per cooking zone [cm] (middle) | |
| Energy consumption per cooking zone [Wh/kg] (front left) 182 | |
| Energy consumption per cooking zone [Wh/kg] (rear right) 182 | |
| Energy consumption per cooking zone [Wh/kg] (rear left) 182 | |
| Energy consumption per cooking zone [Wh/kg] (front right) 182 | |
| Energy consumption per cooking zone [Wh/kg] (middle) | |
| Energy consumption of the appliance [kg] 182 | |
| Residual heat indicator | per cooking zone |
| On/off key | ● |
| Power on - indicator | ● |
| Timer | ● |
| Execution | |
| Material | glass |
| Control | touch keys |
| Displays | LED |
| Technical specifications | |
| Dimensions (wxdxh) in mm | 780 x 520 x 56 |
| Nett weight in kg | 11,5 |
| Power consumption [W] | 7400 |
| Rated voltage [V] / frequency [Hz] | 220-230V |
Remark: on the rating label - which can be found at the bottom of the appliance - you will find the technical specifications of the appliance.
natural_image
Simple line drawing of a four-cylinder electrical component with arrows indicating direction (no text or symbols)text_image
A Mn 20mm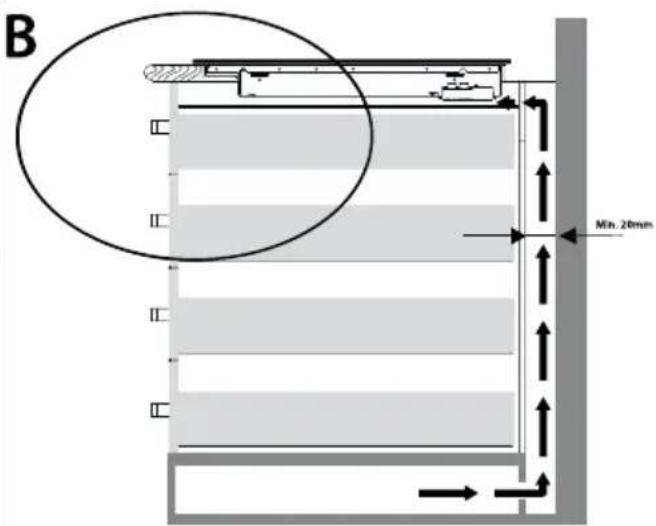
text_image
B Min. 20mm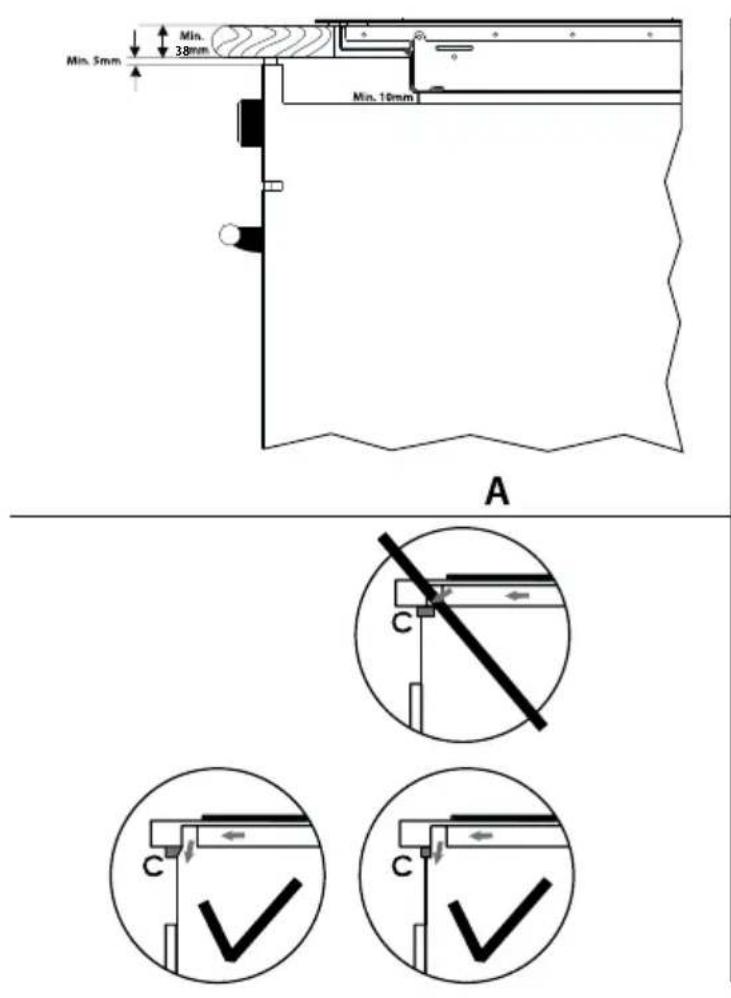
text_image
Min. 5mm Min. 38mm Tussensteun Min. 10mmB
text_image
Tussensteun Min. 50 mm Min. 500 mmnatural_image
Simple line drawing of a four-cylinder electrical component with arrows indicating direction (no text or symbols)general terms and conditions of service and warranty
We do not need to remind you of the importance of service. After all, we develop our products to a standard so that you can enjoy them for many years, without any concerns. If, nevertheless, there is a problem, we believe you are entitled to a solution straight away. Hence our products come with an exchange service, on top of the rights and claims you are entitled to by law. By exchanging a product or part, we save you time, effort and costs.
2-year full manufacturer's warranty
- Customers enjoy a 2-year full manufacturer's warranty on all Inventum products. Within this period, a faulty product or part will always be exchanged for a new model, free of charge. In order to claim under the 2-year full manufacturer's warranty, you can either return the product to the shop you bought it from or contact the Inventum costumer service department via the form at www.inventum.eu/service-aanvraag.
- The 2-year warranty period starts from the date the product is bought.
- In order to claim under the warranty, you must produce a copy of the original receipt.
- The warranty applies only to normal domestic use of Inventum products within the Netherlands.
5-year Inventum warranty
- Inventum offers a 5-year warranty on most large domestic appliances and a selection of small domestic appliances. This 5-year Inventum warranty consists of a 2-year full manufacturer's warranty, extended by a further 3-year warranty. The only thing you need to do to qualify for the 3-year extended warranty is to register the product within 45 days of purchase. You can read more about registering the product in the following paragraph.
- In accordance with the 5-year Inventum warranty provisions, a faulty product or part will always be exchanged for a new model during the first 2 years under the warranty. During the 3rd to 5th year under the warranty, you will only pay the costs of exchange. The current costs of exchange are listed at www.inventum.eu/omruilkosten.
- In order to claim under the 5-year Inventum warranty, you can either return the product to the shop you bought it from or contact the Inventum costumer service department via the form at www.inventum.eu/service-aanvraag.
- The 5-year warranty period starts from the date the product is bought.
- In order to claim under the warranty, you must produce a copy of the original receipt.
- The warranty applies only to normal domestic use of Inventum products within the Netherlands.
Product registration
- The 3-year extended warranty is easy to obtain, free of charge, by registering the product within 45 days of purchase, via the website www.inventum.eu/garantie-registratie. If you did not register the product within 45 days of purchase, you can still do so up to 2 years after the purchase date. However, there will be a charge. The one-off registration charge is € 89 for each separate product. Registration is possible only for products that are subject to the 5-year Inventum warranty. Whether the product qualifies for the 5-year Inventum warranty is stated in the product user manual and in the product information sheet, on Inventum's website.
- The warranty period always starts from the date the product is bought. If the product is registered for the extended warranty at a later date, the warranty period still starts from the original date of purchase.
- The 3-year extended warranty can only be applied for if you are in the possession of a copy of the original receipt and the Inventum 5-year warranty certificate.
Large domestic appliances
- Breakdowns or faults in large domestic appliances (separate and built-in white goods) can be registered via the form at www.inventum.eu/service-aanvraag, by calling the Inventum costumer service department or in the store where you bought the device. The telephone number of the costumer service department can be found at www.inventum.eu.
- In the event of breakdowns or faults in large domestic appliances, Inventum will have the option to have a service engineer inspect the faulty device onsite at the customer in the Netherlands and to carry out repairs, there and then. The Inventum customer service department can also decide to have the device exchanged.
- If you suffer a breakdown or fault in a large domestic appliance during the first 2 years from the date of purchase, Inventum will not charge any costs for the exchange, call-out or for parts and labour.
- If you registered the product as described before at www.inventum.eu/garantie-registratie and you subsequently report a breakdown of a large domestic appliance in the 3rd to 5th year of the date of purchase, the 5-year Inventum warranty applies and the device will be repaired or exchanged, free of charge. In the event of a repair or exchange of the device, you only pay the costs of exchange. The current costs of exchange are listed at www.inventum.eu/omruilkosten. If you did not register the product, the 3-year extended warranty does not apply.
- When reporting a breakdown or fault, a service engineer will contact the customer within 1 working day in order to make an appointment. When the report is made in a weekend or during a public holiday, this will be the next working day.
- If you report a breakdown or fault via the form at www.inventum.eu/service-aanvraag, you will be kept informed of the progress via mobile messages and e-mail.
-
The warranty period starts from the date the product is bought.
-
In order to claim under the warranty, you must produce a copy of the original receipt and the Inventum 5-year warranty certificate.
- The warranty applies only to normal domestic use of Inventum products within the Netherlands.
Breakdowns or faults outside the warranty period
- Breakdowns or faults in small or large domestic appliances outside the warranty period, can be reported to the costumer services department via the form at www.inventum.eu/service-aanvraag or by calling the costumer services department.
- The costumer services department may ask you to send the product for inspection or repair. The costs of dispatch will be at your expense.
- The inspection to establish whether repair is possible involves a charge. You need to grant your permission for this, in advance.
- In the event of a large domestic appliance, Inventum, at your request, can send out a service engineer. In that case, you will be charged the call-out costs, as well as parts and labour.
- In the event of an instruction to repair, the repair costs must be paid in advance. In the event of a repair by a service engineer, the costs of the repair must be settled with the engineer onsite, preferably by means of PIN payment.
Warranty exclusions
- The following is excluded from the aforesaid warranties:
• normal wear and tear;
- improper use or misuse;
• insufficient maintenance;
- failure to comply with the operating and maintenance instructions;
- unprofessional installation or repairs by third parties or the customer himself;
• non-original parts used by the customer;
- use for commercial or business purposes;
- removal of the serial number and/or rating label.
-
In addition, the warranty does not apply to normal consumer goods, such as:
-
dough hooks, baking tins, (carbon) filters, etc.;
- batteries, bulbs, carbon filters, fat filters etc.;
• external connection cables; -
glass accessories and glass parts such as oven doors;
• and similar items. -
Transport damage not caused by Inventum is also excluded. Therefore, inspect your new device before starting to use it. If you detect any damage, you must report this to the store where you purchased the product within 5 working days, or to the Inventum customer service department via the form at www.inventum.eu/service-aanvraag. If transport damage is not reported within this period, Inventum does not accept any liability in this respect.
-
The following are excluded from warranty and/or replacement: faults, loss of and damage to the device as a result of an event that is normally insured under the home contents insurance.
Important to know
- The replacement or repair of a faulty product, or a part thereof, does not lead to an extension of the original warranty period.
- Parts that have been replaced, packaging material and exchanged devices are taken back by the service engineer and become the property of Inventum.
- If a complaint is unfounded, all costs arising from it will be at the customer's expense.
- Following expiry of the warranty period, all costs of repair or replacement, including administration costs, dispatch and call-out charges, will be charged to the customer.
- Inventum cannot be held liable for damage as a result of devices built in incorrectly.
- Inventum cannot be held liable for damage caused by external events, unless this liability arises from mandatory statutory provisions.
- These warranty and service provisions are governed by Dutch law. Disputes will be settled exclusively by the competent Dutch court.
twitter.com/inventum1908
facebook.com/inventum1908
youtube.com/inventum1908


