
Rebel 34 Pet - Vacuum Cleaner DIRT DEVIL - Free user manual and instructions
Find the device manual for free Rebel 34 Pet DIRT DEVIL in PDF.
| Device type | Bagless canister vacuum cleaner |
| Model | Rebel 34 Pet (DD2424) |
| Power | 700 W |
| Voltage | 220-240 V ~, 50/60 Hz |
| Dust bin capacity | 1.8 L |
| Weight | 4.5 kg |
| Power cord length | 6 m |
| Motor protection filter | Washable dual filter |
| Exhaust air filter | Lamellar filter (cleanable with a brush) |
| Carpet and rug brush | Included (deep cleaning) |
| Switchable brush | Yes (hard floors/carpets) |
| Telescopic tube | Yes, adjustable |
| Secondary air regulator | Yes, on the handle |
| Cord rewinder | Yes, automatic |
| Included accessories | 3-in-1 crevice tool, carpet nozzle |
| Usage | Household use only |
Frequently Asked Questions - Rebel 34 Pet DIRT DEVIL
User questions about Rebel 34 Pet DIRT DEVIL
0 question about this device. Answer the ones you know or ask your own.
Ask a new question about this device
Download the instructions for your Vacuum Cleaner in PDF format for free! Find your manual Rebel 34 Pet - DIRT DEVIL and take your electronic device back in hand. On this page are published all the documents necessary for the use of your device. Rebel 34 Pet by DIRT DEVIL.
USER MANUAL Rebel 34 Pet DIRT DEVIL
natural_image
Line drawing of a vacuum cleaner with threaded shaft and hose (no text or symbols)EN Instruction Manual | Bagless cylinder vacuum cleaner | 13
natural_image
Diagram showing folded panels with arrows indicating direction (no text or symbols)International Services
DE
Royal Appliance International GmbH
Abt. Kundenservice
Jagenbergstraße 19
41468 Neuss
DEUTSCHLAND

de@dirtdevil-service.eu
www.dirtdevil.de

0049 (0) 180 - 501 50 50*

0049 (0) 2131 - 60906095
AT

at@dirtdevil-service.eu
0043 - 720 -88 49 54**
CH

ch@dirtdevil-service.eu
0041 - 31 -52 80 557**
BE

be@dirtdevil-service.eu
0032 - 2 -80 85 065**
LU

lu@dirtdevil-service.eu
00352 - 2 -08 80 506**
FR

fr@dirtdevil-service.eu
0033 - 9 - 75 18 30 17**
ES

es@dirtdevil-service.eu
0034-91-1982787**
IT

it@dirtdevil-service.eu
0039 - 06 - 94 80 16 18**
PT

pt@dirtdevil-service.eu
00351 - 21 - 11 41 327**
NL

nl@dirtdevil-service.eu
0031 - 20 - 80 85 408**
PL

pl@dirtdevil-service.eu
0048 - 22 - 39 70 223**
CZ

cz@dirtdevil-service.eu
00420 - 2 - 46 01 95 41**
HU

hu@dirtdevil-service.eu
0036 - 1 - 84 80 686**
TR

tr@dirtdevil-service.eu
0090 - 85 03 90 1980**
FI

fi@dirtdevil-service.eu
00358 - 9 - 42 45 04 12**
SE

se@dirtdevil-service.eu
0046 - 84 46 82 150**
DK

dk@dirtdevil-service.eu
0045 - 78 - 77 44 95**
SK

sk@dirtdevil-service.eu
0042 - 12 32 78 45 49**
NO

no@dirtdevil-service.eu
0047 - 21 99 94 89**
GR

gr@dirtdevil-service.eu
0030-2-11 19 81 203**
RO

ro@dirtdevil-service.eu
0040 - 31 63 03 651**
BG

bg@dirtdevil-service.eu
00359 - 2 - 49 25 116**
HR

hr@dirtdevil-service.eu
00385 - 1 - 6666 441**
LT

li@dirtdevil-service.eu
00370 - 52 14 17 98**
LV

lv@dirtdevil-service.eu
00371 - 66 09 04 70**
EE

ee@dirtdevil-service.eu
00372 - 88 01 167**
SI

si@dirtdevil-service.eu
00386 - 18 88 80 74**
DE
** Charges for calls from abroad depend on the current charges imposed by the respective foreign telephone company and the respective rates.
AT, CH
natural_image
Diagram of a vacuum cleaner with a downward arrow indicating motion (no text or symbols)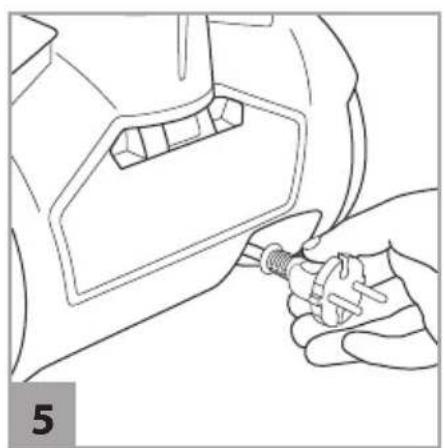
natural_image
Line drawing of a hand using a tool to adjust or install a mechanical component (no text or symbols visible)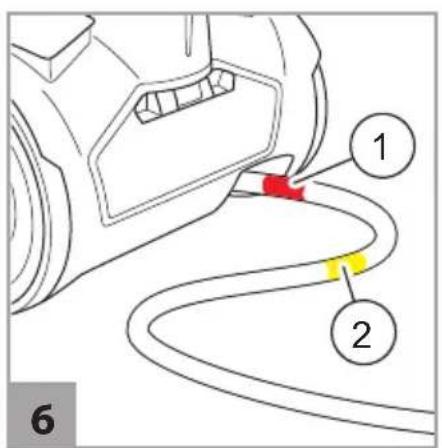
natural_image
Technical line drawing of a mechanical component with a circular badge and numbered label (8), no readable text or symbols beyond the number.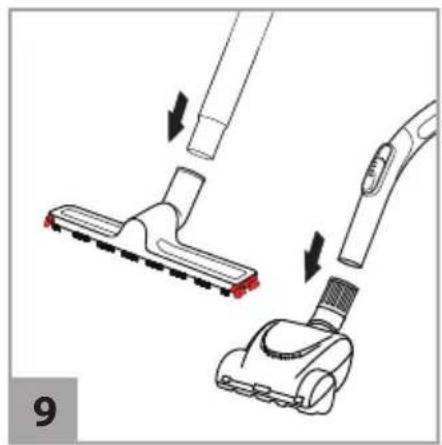
natural_image
Illustration of a vacuum cleaner being inserted into a rack, showing step-by-step assembly (no text or symbols)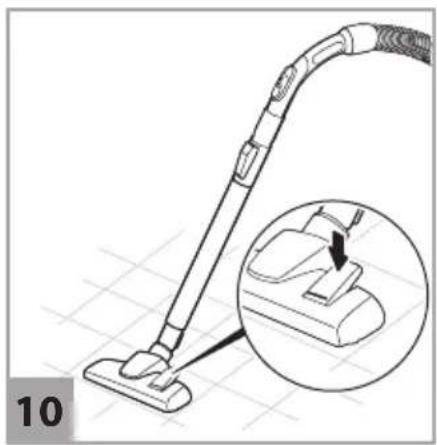
natural_image
Line drawing of a vacuum cleaner with an inset showing the insertion step (no text or symbols)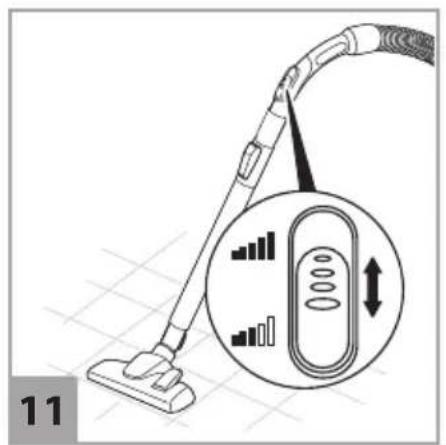
natural_image
Technical line drawing of a mechanical component with a black arrow indicating a process or movement (no text or symbols present)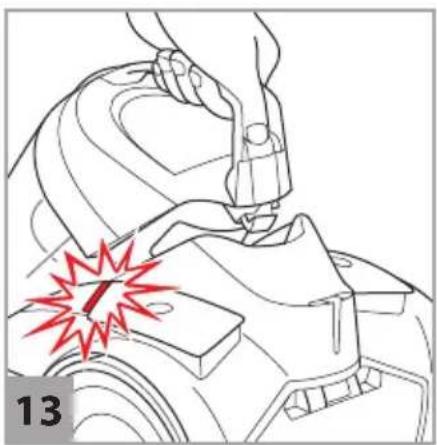
natural_image
Line drawing of a person using a tool on a vehicle, with a red starburst symbol highlighting the issue (no text or symbols present)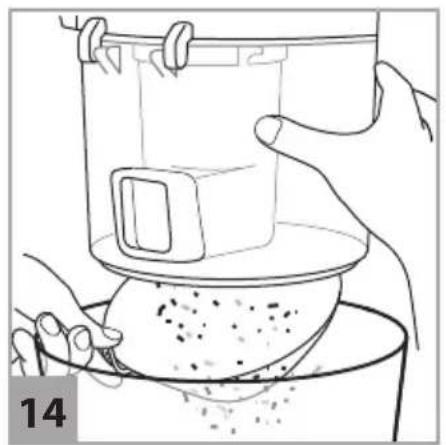
natural_image
Line drawing of hands pouring liquid from a container into a bowl (no text or symbols)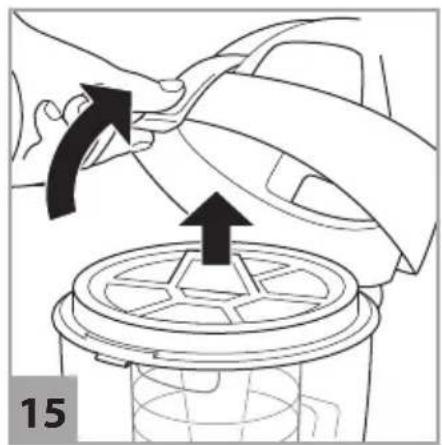
natural_image
Diagram showing a hand removing a car into a trash bin with an arrow indicating the process (no text or symbols present)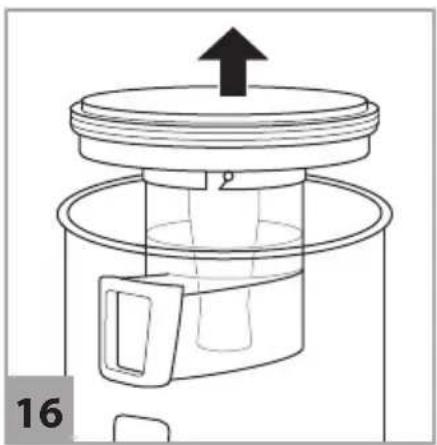
natural_image
Line drawing of a mechanical device with an upward arrow and label '16' (no text or symbols on the diagram itself)
natural_image
Diagram of a mechanical component with a piston and housing, showing a directional arrow (no text or symbols)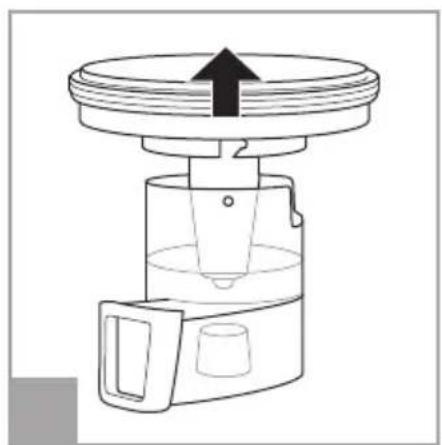
natural_image
Technical line drawing of a mechanical component with an upward arrow indicating motion (no text or symbols)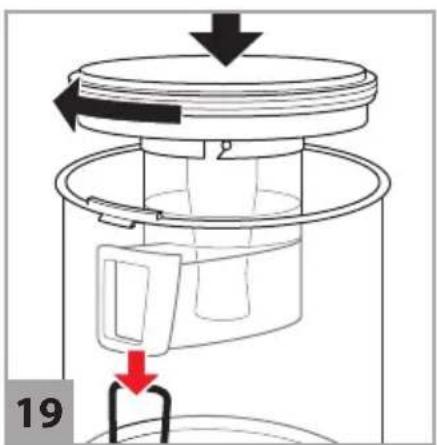
natural_image
Diagram of hands assembling a mechanical component with red arrows indicating motion (no text or symbols)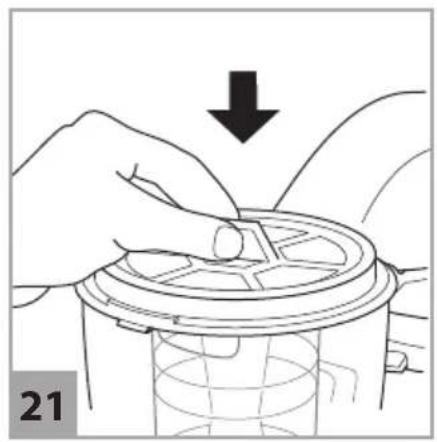
natural_image
Illustration of hands using a mechanical device to adjust a lid (no text or symbols visible)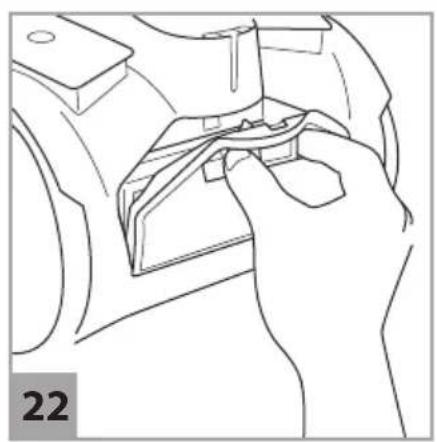
natural_image
Line drawing of a hand holding a mechanical component, no text or symbols present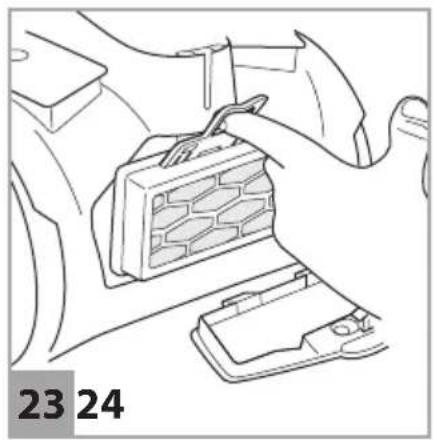
natural_image
Line drawing of a car interior showing a handle and seatbelt device (no text or symbols)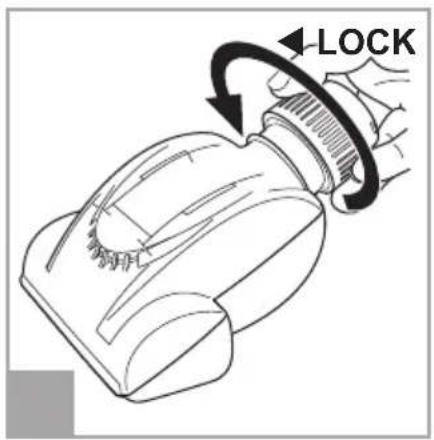
natural_image
Technical line drawing of a mechanical assembly with an arrow indicating rotational motion (no text or symbols)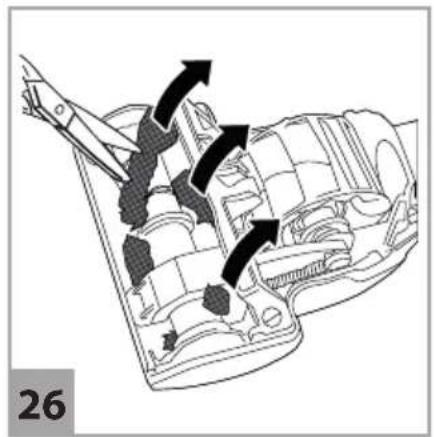
natural_image
Diagram of engine cylinder components with arrows indicating flow direction (no text or symbols)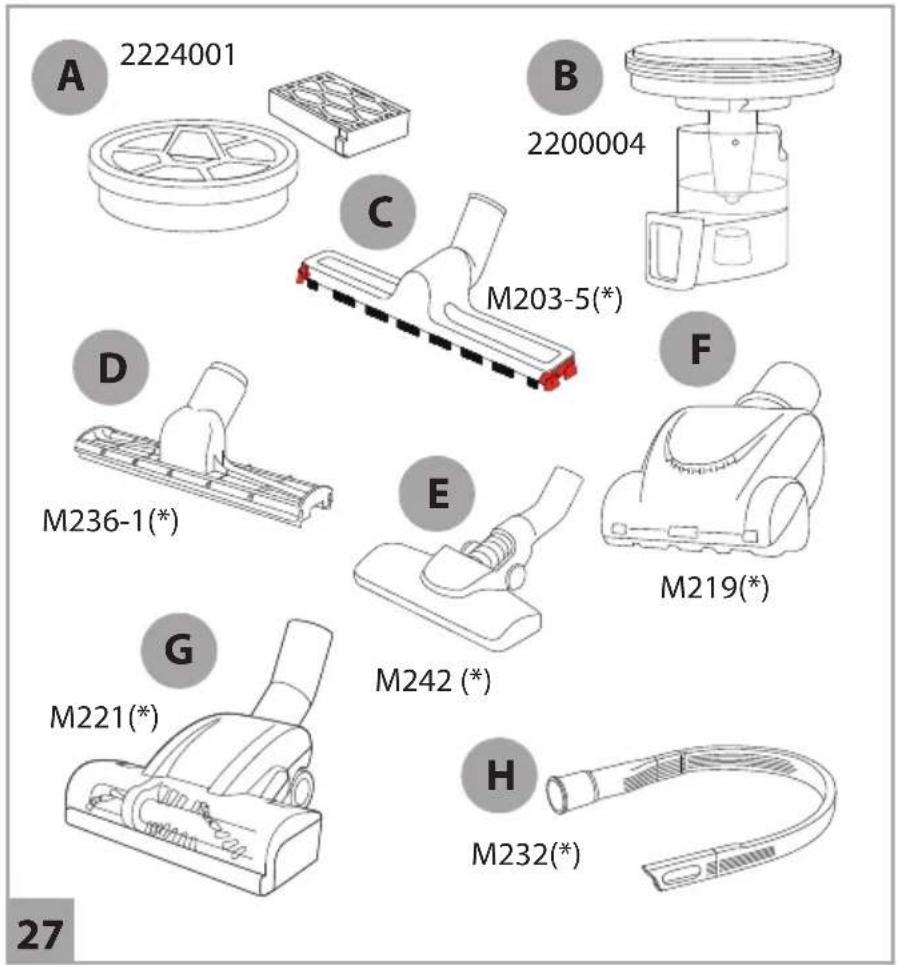
Vielen Dank!
We are pleased that you decided to purchase a Dirt Devil product. We hope you enjoy using your appliance and we would like to thank you for your purchase.
You will find further information on your product in this operating manual and at our website www.dirtdevil.de. To contact our service team, refer to the contact details on page 2.
Technical data
| Type of appliance: Bagless cylinder vacuum cleaner | |
| Model name,model: | DD2424, DD2424 (0–9) |
| Voltage: 220–240 V ~, 50/60 Hz | |
| Power: 700 W | |
| Dust bin: approx. 1,8 l | |
| Weight: approx. 4,5 kg | |
| Connection cord length: | approx. 6 m |
Environmental protection and disposal
Do not dispose of the appliance with the domestic waste.

Warranty
If you have purchased the appliance as a consumer within the European Union, the respective national legislation implemented as per EU Directive 2011/83/EU applies as the minimum warranty standard. In non-EU countries the minimum warranty requirements in the respective country apply. This does not apply to batteries or rechargeable batteries which have become faulty or have a reduced service life as a result of normal wear or improper handling.
SAFETY INSTRUCTIONS
About the operating manual
Read this operating manual completely before using the appliance. Keep the operating manual for reference. If you pass the appliance on to third parties, it must be accompanied with the operating manual. Failure to adhere to this operating manual can lead to serious injuries or damage to the appliance. We assume no liability for damage caused as a result of failure to adhere to this operating manual.
Important information not included in this chapter is indicated as follows:

WARNING!
Warns of health hazards and identifies possible risks of injury.

CAUTION!
Indicates possible dangers to the appliance or other objects.
NOTE
Highlights tips and information.
You can also download this operating manual at any time from out website:
www.dirtdevil.de
Concerning certain groups of persons
These appliances can be used by children of 8 years and persons with impaired physical, sensory or mental abilities, or insufficient experience or knowledge, providing they are supervised or have been instructed in the proper use of the appliance and understand the risks involved.
■ Children must not perform cleaning or user maintenance tasks without supervision. Children must not play with the appliance.
- Packing material ad small parts must not be used as toys. There is risk of asphyxiation.
Children under the age of 8 years old should be kept away from the appliance and the connection cord whilst the appliance is switched on, plugged in at the socket or cooling down.
Information on the power supply
The appliance is operated with electrical current. Thus there is always risk of electrical shock.
You must therefore observe the following:
- Never immerse the appliance in water or other liquids.
If you want to pull the connection cord out of the socket, always pull directly on the plug. Never pull on the connection cord.
■ Ensure that the connection cord is not bent, pinched, rolled over and that it does not come into contact with heat sources.
■ Always check the connection cord for possible damage before using the appliance. Do not use a connection cord with a damaged cord or plug.
Before cleaning or performing maintenance on the appliance, ensure that the appliance is switched off and that the connection cord is not connected.
Information on the brush roller
The brush roller in turbo nozzles rotates at hight speed. This poses various hazards to people, animals and objects:
If the appliance is faulty
If the appliance or the connection cord are damaged, they will need to be replaced by the manufacturer, the manufacturer's customer service department or a similarly qualified person in order to prevent hazards.
- Hand over a faulty appliance to an authorised dealer or send it to the Dirt Devil customer service department for repairs, >“International Services” on page 2.
■ Never use a faulty appliance or a faulty connection cord.
- Never vacuum clean people, animals or Information on proper use
plants. Keep parts of the body and items of clothing away from the moving parts and openings on the appliance when it is in operation. They may otherwise be drawn in and may cause injuries.
This appliance is intended for domestic use only. It is not suitable for industrial or commercial use. Only use the appliance for cleaning lightly soiled, dry hard floors, carpets or upholstered furniture. Any other use
Before you detach or attach, open or clés considered improper use and is prohibited. an the floor nozzle, switch off the appliance.
- Do not run over cords, cables etc. as there is a risk of them becoming tangled in the brush roller and may become damaged.
- Keep the rotating brush roller away from all delicate surfaces. This may otherwise cause damage. Comply with the care and cleaning instructions provided by the manufacturer.
Also keep the rotating brush roller away from curtains, long tassels and the like. The objects may otherwise become drawn in and damaged.
The following in particular is prohibited:
Vacuuming:
— People, animals, plants or items of clothing on the body
→ High risk of injury!
- Hot ash, burning cigarettes, matches and highly flammable substances
→ Risk of fire!
— Water and other liquids
→ Risk of short circuit!
- Toner (for laser printers, copying machines, etc.)
→ Risk of fire and explosion!
Use
– in the vicinity of explosive or highly flammable substances
→ Risk of fire and explosion!
- outdoors
→ Risk of damage due to rain and dirt!
- of non-original accessories
→ Impairment of appliance safety!
Carrying out repairs yourself
→ Risk of injury and loss of entitlement to free replacement!
Concerning disposal
■ After its service life, dispose of the appliance in an environmentally friendly manner, as described,
“Environmental protection and disposal” on page 13.
Preparatory work
Getting to know the appliance
Fig. 1: ① Dust bin cover release; ② dust bin; ③ hose release; ④ dust bin cover; ⑤ dust bin handle; ⑥ dust bin release; ⑦ cord rewind button;
⑧ parking bracket; ⑨ exhaust filter cover; ⑩ connection cord; ⑪ ON/OFF button; ⑫ suction hose with accessory bracket; ⑬ handle; ⑭ bypass vent;
⑮ telescopic tube; ⑯ suction hose port; ⑰ telescopic tube release catch; ⑱ switchable floor nozzle;
⑲ carpet nozzle; ⑳ 3-in-1 combi nozzle
Accessories (optional):
Ⓐ parquet nozzle; Ⓑ mini turbo nozzle
Unpacking and assembling
① Check that the unpackaged contents are complete. If you notice any transport damage or if anything is missing, contact your dealer immediately. ② Connect suction hose and appliance (Fig. 2).
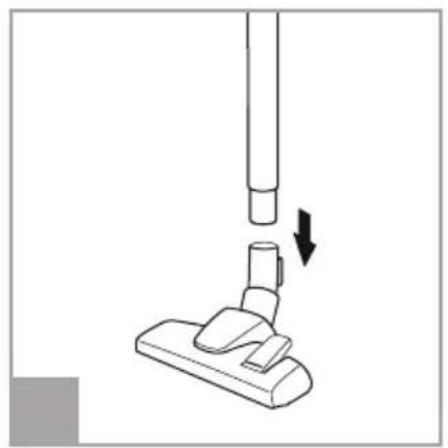
3 Connect the suction hose with the telescopic tube and adjust the length of the telescopic tube (Fig. 3).
4 Connect telescopic tube and switchable floor nozzle (Fig. 4). 5 Ensure that the bypass vent (Fig. 1/14) is completely closed.
Using the accessories

CAUTION!
For hard floors, only use the switchable floor nozzle (Fig. 1 /18) with the brush (Fig. 10) extended, as the hard floor may otherwise become damaged.

CAUTION!
If using the turbo nozzle (Fig. 1 / B), make sure that the surface can withstand the rotating brush without becoming damaged.
NOTE:
The carpet nozzle (Fig. 1 /19) is a nozzle developed specially for carpets and cleans deep down. As a result of its design it may adhere firmly to the carpet. This adhesion can be reduced using the bypass vent (Fig. 1 /14).
Do not use the carpet nozzle for hard floors as the hard floors will otherwise become damaged.
NOTE:
You can also use the suction nozzles without the telescopic tube as necessary. To do so, connect the required accessories directly to the handle (Fig. 9).
① Connect the required accessory to the handle or the telescopic tube (Fig. 9). ② Make sure that the accessory is securely connected. → The appliance can be connected.
Connecting the appliance

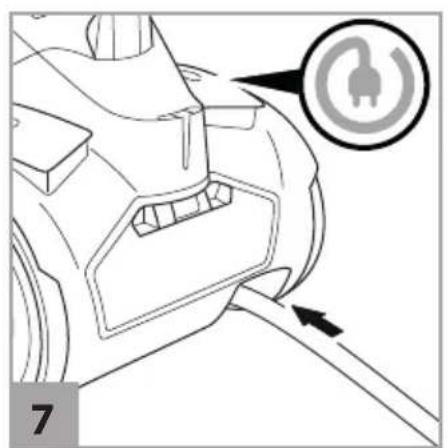
CAUTION!
If the red marking is visible (Fig. 6 /①), retract the connection cord by pressing the cord rewind button to pull in the cord up to the yellow mark (Fig. 6 /②) (Fig. 7). Otherwise, the connection cord might be damaged.
① Pull the cable out of the appliance (Fig. 5).
2 Insert the plug into a mains socket.
Vacuum cleaning
Flexible vacuum-cleaning
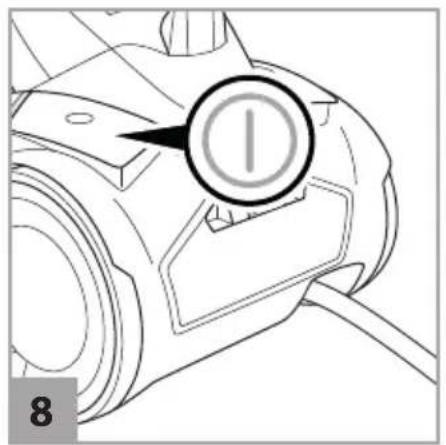
① Connect the required accessories >"Using the accessories" on page 16.② Connect the appliance >"Connecting the appliance" on page 18.③ To switch on the appliance, press the ON/OFF button (Fig. 8). → The appliance vacuums at full suction power.
④ To reduce the suction power, open the bypass vent as required >"Regulating the suction power" on page 17. ⑤ To switch off the appliance, press the ON/OFF button again (Fig. 8). → The appliance switches off. ⑥ Close the bypass vent (Fig. 1/14) so that the appliance operates with full suction power when vacuum-cleaning the next time.
Regulating the suction power
① To reduce the suction power, slide the bypass vent open (Fig. 11). ② To increase the suction power, slide the bypass vent closed again (Fig. 11).
Storing the appliance
NOTE:
If necessary, use the holding clip on the suction hose (Fig. 1/12) to attach accessories.
① Switch off the appliance and pull the plug from the socket. ② Push the cord rewind button (Fig. 1/7) until the cord has been fully rewound (Fig. 7).
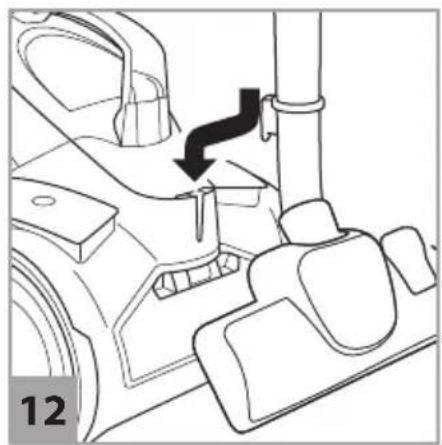
3 Hang the telescopic floor nozzle or parquet nozzle (connected to the telescopic tube or handle) in the parking bracket (Fig. 1/8) (Fig. 12).
Maintaining the appliance
Emptying the dust bin
① Switch off the appliance and pull the plug from the socket. ② Press the dust bin release catch (Fig. 1/6) and remove the dust bin from its console in the appliance (Fig. 13). ③ Place dust bin closely above a waste bin and release the dust bin (Fig. 14). ④ Dispose of the contents of the dust bin in a waste bin. Gently tap out the dust bin to remove any soiling. ⑤ Close the emptied dust bin. ⑥ Re-insert the dust bin into its console in the appliance so that you feel it click into place.
Cleaning the separator and filter
NOTE:
The appliance, the separator and the pre-motor filter should be cleaned regularly in order to maintain the suction power. Empty and clean the dust bin at the latest when the cleaning/emptying display lights up (Fig. 13).
① Remove the dust bin from the appliance, >"Emptying the dust bin" on page 18. ② Push the upper dust bin cover release (Fig. 1 /①). ③ Remove the pre-motor filter (Fig. 15). ④ Remove the separator, together with the separator cover, from the dust bin (Fig. 16). ⑤ Release the separator cover (Fig. 17).
6 Remove the cover from the separator (Fig.18).
⑦ Remove the separator and dispose of the content in a waste bin. ⑧ Rinse the pre-motor filter and the separator out thoroughly under running water.
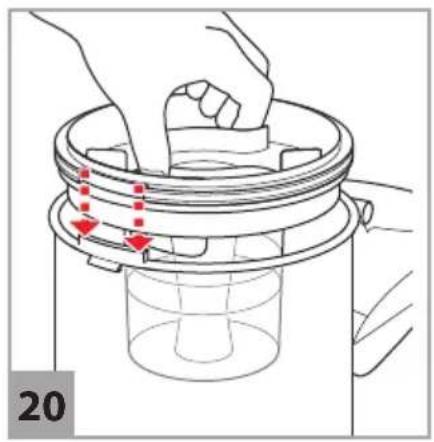
9 Leave the cleaned parts to dry completely for at least 24 h. 10 Insert the separator cover into the separator (Fig. 19). 11 Insert the separator, together with the separator cover, into the dust bin (Fig. 20). 12 Place the pre-motor filter on the dust bin (Fig. 21).
13 Close the dust bin cover. 14 Re-insert the dust bin into its console on the appliance body. You must be able to feel the dust bin click into place.
Cleaning the exhaust filter

CAUTION!
The fine fins on the exhaust filter are sensitive. Never clean the fins with water and only ever use soft brushes for cleaning.
NOTE:
Replace any damaged, very heavily soiled, discoloured or deformed exhaust filters with new ones.
① Press the key to release the exhaust filter cover and flip the exhaust filter cover away towards the rear (Fig. 22). ② Remove the exhaust filter by pulling on the catch (Fig. 23). ③ Carefully tap out the exhaust filter. ④ Carefully clean the exhaust filter with a soft brush. ⑤ Re-insert the exhaust filter into its console on the appliance (Fig. 23). ⑥ Insert the exhaust filter cover into its bottom opening first, and then flip it up so that you hear and feel it click into place.
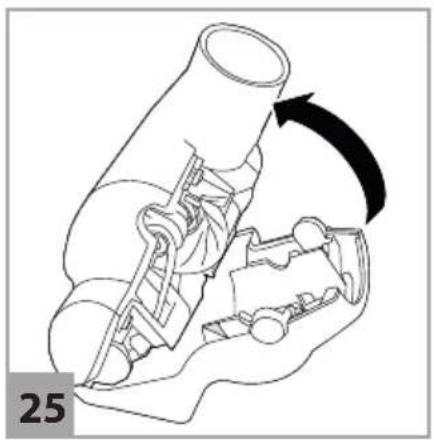
Cleaning the mini turbo nozzle
1 Disconnect the mini turbo nozzle from the handle or the telescopic tube. 2 Turn the retaining ring anti-clockwise (Fig. 24). 3 Carefully open up the appliance top of the mini turbo nozzle (Fig. 25). 4 Thoroughly clean the brush by hand. In case of stubborn soiling, carefully use tweezers or scissors (Fig. 26). 5 Place the appliance top on the 4 tabs on the appliance bottom and then carefully close the appliance top. 6 Turn the retaining ring clockwise.
Accessories
- Filter set (1 dual pre-motor filter, 1 exhaust filter) – 2224001 (Fig. 27/A)
- Filter unit (filter screen, filter cup) – 2200004 (Fig. 27/B)
- 1 parquet brush – M203-5 (Fig. 27 /C)(*)
- 1 mini turbo brush "Fellino" – M219 (Fig.27 /F)(*)
- 1 midi turbo brush – M221 (Fig. 27 /G)(*)
- 1 long flexible crevice nozzle – M232 (Fig.27/H)(*)
- 1 hard floor nozzle – M236-1 (Fig.27/D)(*)
- 1 carpet nozzle – M242 (Fig. 27 /D)(*)
(*) optional
Troubleshooting
Before you contact our customer service department or send the appliance to the Dirt Devil customer service department, you will find a lot of additional information in the service area of our website which will help you solve problems.
Switch off the appliance before you start trouble-shooting. Never use a faulty appliance.
Merci beaucoup !
*Indicative annual energy consumption (kWh per year), based on 50 cleaning processes. The actual annual energy consumption depends on how the appliance is used. The data is based on the Delegated Regulation (EU) No. 665/2013 of the commission of 3rd May 2013 which supplements Directive 2010/30/EU. All the methods which are not described in more detail in these instructions have been implemented based on DIN EN 60312-1:2014. Date: April 2018
Information on the energy label
This universal vacuum cleaner achieves the declared energy efficiency class and the specified cleaning class on carpet with the supplied carpet floor nozzle (Abb. 1/19). The cleaning class on hard floor with joints and crevices is achieved with the supplied floor nozzle when the switch is set to "hard floor" (Fig. 10).
FR
- International Services
- DE
- AT
- CH
- BE
- LU
- FR
- ES
- IT
- PT
- NL
- PL
- CZ
- HU
- TR
- FI
- SE
- DK
- SK
- NO
- GR
- RO
- BG
- HR
- LT
- LV
- EE
- SI
- AT, CH
- Vielen Dank!
- Environmental protection and disposal
- Warranty
- SAFETY INSTRUCTIONS
- About the operating manual
- WARNING!
- CAUTION!
- NOTE
- Concerning certain groups of persons
- Information on the power supply
- Information on the brush roller
- If the appliance is faulty
- The following in particular is prohibited:
- Concerning disposal
- Preparatory work
- Getting to know the appliance
- Unpacking and assembling
- Using the accessories
- NOTE:
- Connecting the appliance
- Vacuum cleaning
- Flexible vacuum-cleaning
- Regulating the suction power
- Storing the appliance
- Maintaining the appliance
- Emptying the dust bin
- Cleaning the separator and filter
- Cleaning the exhaust filter
- Cleaning the mini turbo nozzle
- Accessories
- Troubleshooting
- Merci beaucoup !
- Information on the energy label
Brand : DIRT DEVIL
Model : Rebel 34 Pet
Category : Vacuum Cleaner