KXHNS107 - Smart Home PANASONIC - Free user manual and instructions
Find the device manual for free KXHNS107 PANASONIC in PDF.

User questions about KXHNS107 PANASONIC
0 question about this device. Answer the ones you know or ask your own.
Ask a new question about this device
Download the instructions for your Smart Home in PDF format for free! Find your manual KXHNS107 - PANASONIC and take your electronic device back in hand. On this page are published all the documents necessary for the use of your device. KXHNS107 by PANASONIC.
USER MANUAL KXHNS107 PANASONIC
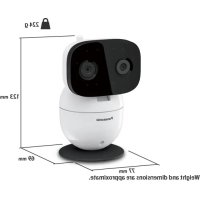
Model No. KX-HNS107C
natural_image
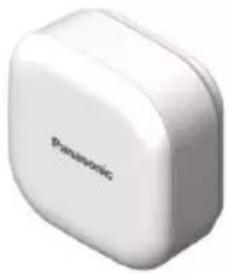
White Panasonic electronic device with rounded edges (no visible text or symbols on body)Thank you for purchasing a Panasonic product.
This document explains how to install the sensor properly.
For details about how to use the system, refer to the User's Guide (page 16).
Please read this document before using the unit and save it for future reference.
For assistance, please visit our Support page:
www.panasonic.ca/english/support
In order to use this device:
- Download the latest version of the [Home Network] app.
- Update your hub to the latest firmware version(version 7.00 or later).
For more information, refer to the User's Guide (page 16).
Printed in China
Table of Contents
Introduction
Accessory information ....3
Important Information
About this system ....4
For your safety 4
Important safety instructions .....5
For best performance ......6
Other information ......6
Setup
Part names and functions .....8
LED indicator 8
Setup overview 9
Inserting the battery .....9
Registering the sensor .....10
Information about sensor
features 11
Confirming the usage area .....12
Mounting the sensor .....13
Appendix
Features available when using the
[Home Network] app ......16
Accessing the User's Guide ....16
Specifications ......17
Industry Canada Notices and
other information ....17
Warranty 18
Accessory information
Supplied accessories
| No. | Accessory item/Part number Quantity | |
| 1 | Battery*1 | 1 |
| 2 | Mounting adaptor*2 | 1 |
| 3 | Mounting screws (20 mm (25/32 inches)) 2 | |
| 4 | Double-sided mounting tapes 2 |
*1 When replacing the battery, see "Power source" of "Specifications", page 17 for battery information.
*2 The mounting adaptor is attached to the product at the time of shipment.
①
②

Other information
- Design and specifications are subject to change without notice.
- The illustrations in these instructions may vary slightly from the actual product.
Trademarks
- iPhone and iPad are trademarks of Apple Inc., registered in the U.S. and other countries.
- Android is a trademark of Google Inc.
- Microsoft, Windows, and Internet Explorer are either registered trademarks or trademarks of Microsoft Corporation in the United States and/or other countries.
- All other trademarks identified herein are the property of their respective owners.
Important Information
About this system
- This system is an auxiliary system; it is not designed to provide complete protection from property loss. Panasonic will not be held responsible in the event that property loss occurs while this system is in operation.
- The system's wireless features are subject to interference, therefore functionality in all situations cannot be guaranteed. Panasonic will not be held responsible for injury or damage to property that occurs in the event of wireless communication error or failure.
For your safety
To prevent severe injury and loss of property, read this section carefully before using the product to ensure proper and safe operation of your product.

WARNING
Power connection
- Do not connect non-specified devices.
Installation
• Install this product in accordance with the provided instructions.
- To prevent the risk of fire or electrical shock, do not expose the product to rain or any type of moisture.
- Do not place or use this product near automatically controlled
devices such as fire alarms. Radio waves emitted from this product may cause such devices to malfunction resulting in an accident.
- Install the product only on a vertical surface. Do not install the product on a ceiling, as the product may fall, resulting in damage or injury.
- Keep small parts (screws, etc.) out of the reach of children. There is a risk of swallowing. In the event they are swallowed, seek medical advice immediately.
- Panasonic will not be held responsible for damage or injury caused by improper connection, installation, or usage.
Operating safeguards
- Do not disassemble the product.
Medical
- Consult the manufacturer of any personal medical devices, such as pacemakers or hearing aids, to determine if they are adequately shielded from external RF (radio frequency) energy. DECT features operate between 1.92 GHz and 1.93 GHz with a peak transmission power of 115 mW.
- Do not use the product in health care facilities if any regulations posted in the area instruct you not to do so. Hospitals or health care facilities may be using equipment that could be sensitive to external RF energy.
CR Lithium battery
- Do not recharge, disassemble, remodel, heat or throw it into fire.
Important Information
- Do not touch the terminals⊕ and ⊖ with metal objects.
- Risk of explosion if battery is replaced by an incorrect type. Dispose of used battery according to local regulations.
- If any electrolyte should come into contact with your hands or clothes, wash it off thoroughly with water.
- If any electrolyte should come into contact with your eyes, never rub your eyes. Rinse your eyes thoroughly with water, and then consult a doctor.

CAUTION
Installation and location
- Do not mount the product on plywood less than 25 mm (1 inch) thick.
CR Lithium battery
- Use only the battery noted on page 3.
- Insert the battery correctly.
- Do not leave the battery in an automobile exposed to direct sunlight for a long period of time with the doors and windows closed.
- Remove the battery if you do not use the product for a long period of time. Keep it in a cool, dark area.
- Do not replace a battery with wet hands.
- Keep out of the reach of small children. There is a risk of swallowing. If the battery is swallowed, seek medical attention immediately.
- Remove the battery if it becomes unusable. There is a risk of leakage, overheating, and rupture. Do not
attempt to use a battery if it is leaking.
- Exercise care when handling the battery. Do not allow conductive materials such as rings, bracelets, or keys to touch the battery, otherwise a short circuit may cause the battery and/or the conductive material to overheat and cause burns.
- Do not intentionally pour water on the battery or allow it to get wet. There is a risk of fire and smoke. If the battery becomes wet, remove it immediately and contact an authorized service centre.
- The battery should be used correctly, otherwise the product may be damaged due to battery leakage.
- Do not charge, short-circuit, disassemble, or heat the battery.
- Do not dispose of batteries in a fire.
Important safety instructions
When using your product, basic safety precautions should always be followed to reduce the risk of fire, electric shock, and injury to persons, including the following:
- Do not use this product near water for example, near a bathtub, washbowl, kitchen sink, or laundry tub, in a wet basement or near a swimming pool.
- Use only the batteries indicated in this document. Do not dispose of batteries in a fire. They may explode. Check with local codes for possible special disposal instructions.
SAVE THESE INSTRUCTIONS
For assistance, visit www.panasonic.ca/english/support
Important Information
For best performance
Hub location/avoiding noise
The hub and other compatible Panasonic devices use radio waves to communicate with each other.
- For maximum coverage and noise-free communications, place your hub:
- at a convenient, high, and central location with no obstructions between the product and hub in an indoor environment.
– away from electronic appliances such as TVs, radios, personal computers, wireless devices, or other phones.
– facing away from radio frequency transmitters, such as external antennas of mobile phone cell stations. (Avoid putting the hub on a bay window or near a window.) - If the reception for a hub location is not satisfactory, move the hub to another location for better reception.
Environment
- Keep the product away from electrical noise generating devices, such as fluorescent lamps and motors.
- Do not place heavy objects on top of the product.
- The product should be kept away from heat sources such as heaters, kitchen stoves, etc. It should not be placed in rooms where the temperature is less than -20 °C (-4 °F) or greater than 50 °C (122 °F). Damp basements should also be avoided.
- Operating the product near electrical appliances may cause interference. Move away from the electrical appliances.
Other information
CAUTION: Risk of explosion if battery is replaced by an incorrect type. Dispose of used batteries according to the instructions.
Routine care
- Wipe the outer surface of the product with a soft moist cloth.
- Do not use any cleaning products that contain alcohol, polish powder, powder soap, benzine, thinner, wax, petroleum, or boiling water. Also do not spray the product with insecticide, glass cleaner, or hair spray. This may cause a change in color or quality of the product.
Information on Disposal in other Countries outside the European Union
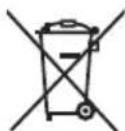
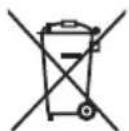
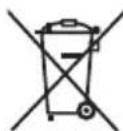

Cd
These symbols are only valid in the European Union. If you wish to discard these items, please contact your local authorities or dealer and ask for the correct method of disposal.
Important Information
Note for the battery removal procedure
Refer to "Inserting the battery" on page 9.
Setup
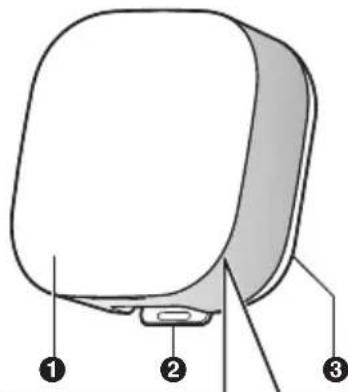
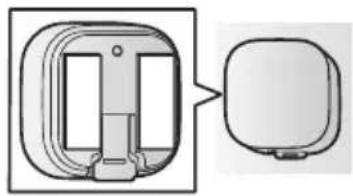
Part names and functions
text_image
Diagram of a device component with numbered parts labeled 1, 2, and 3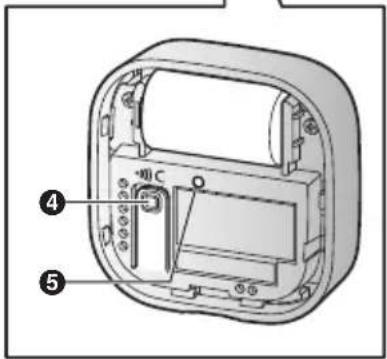
text_image
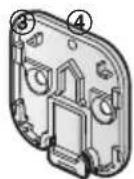
Technical diagram of a device casing with labeled components and numbered parts1 Front cover
② Mounting adaptor release lever
3 Mounting adaptor
④ [•]C]
Used to confirm the status of the sensor or register the sensor to the hub.
⑤ LED indicator
LED indicator
You can press [▶]C and check the LED indicator to confirm the sensor's status. After confirming the sensor's status, we recommend turning the LED indicator off by pressing [▶]C again as soon as possible, otherwise battery life may be reduced.
| Indicator Status | |
| Green, lit Door | or is closed |
| Red, lit Door | is open |
| Red, blinking | Sensor is out of range of the hub |
| Green, blinking slowly | Registration mode (You pressed and held [●●)C]) |
| Off No battery power | |
Note:
- The LED indicator does not indicate sensor status if the sensor has not been registered (page 10).
Setup overview
1 Initial setup
Make sure you can access the system using your mobile device. For details, refer to the System Setup Guide included with your hub.
2 Insert the battery
The sensor is battery powered.
3 Registration
Required only if the sensor was purchased separately (i.e., not as part of a bundle).
4 Confirm the installation area
Read the information in this document to confirm that the desired installation area is suitable to proper operation.
5 Installation
Install the sensor in the desired location.
Inserting the battery
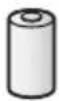
- Use ONLY a CR2 Lithium battery.
- Confirm the polarities (+, +).
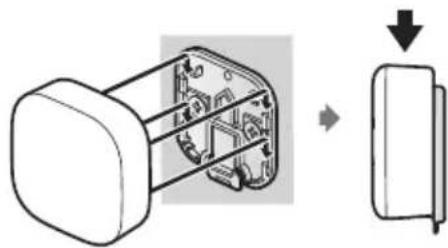
1 R remove the front cover.
- Lift from the indented area (①) and remove the cover (②).
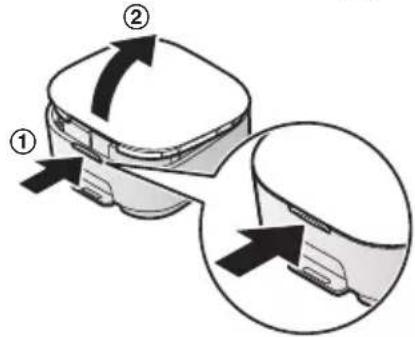
text_image
Diagram showing a device with labeled parts and directional arrows indicating movement or assembly.2 | nsert the battery.
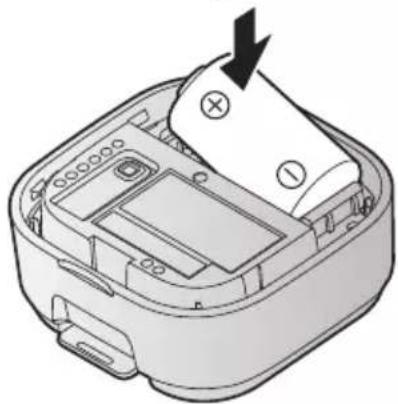
natural_image
3D diagram of a device casing with a paper roll and a black arrow indicating direction (no text or symbols)3 A ttach the front cover.
Setup
Replacing the battery
Use this procedure when replacing the battery after installation.
1 Remove the sensor from the mounting adaptor by pressing the release lever, sliding the sensor up and lifting it away from the mounting adaptor.
2 Remove the front cover.
3 Replace the battery with a new one.
4 Attach the front cover.
5 Attach the sensor to the mounting adaptor.
- The sensor will click into place when it is secured.
- Make sure the "UP" marks on the back of the sensor and the inside of the mounting adaptor point in the same direction.
Registering the sensor
This procedure is not required for devices that were included as part of a bundle.
Before you can use the sensor, it must be registered to the hub. If you purchased devices separately (i.e., not as part of a bundle), you must register each device to the hub.
You can register each device by using the registration buttons or the [Home Network] app.
Using registration buttons
1 Hub:
Press and hold [●]OTHER DEVICE) until the LED indicator blinks slowly in green.
2 Sensor:
Remove the front cover, and then press and hold [●●●C] until the LED indicator blinks slowly in green (page 8).
- When registration is complete, the hub sounds one long beep.
Note:
- To cancel without registering the sensor, press [●●●] on the hub and on the sensor again.
- If registration fails, the hub sounds several short beeps.
Using the app
When you register the sensor by using the [Home Network] app, you can assign it a name and location. For more information, refer to the User's Guide (page 16).
Information about sensor features
The garage door sensor utilizes an accelerometer to detect its orientation. Please read the following information before deciding where to install the garage door sensor.
Note:
- The sensor is not designed to be used in situations that require high reliability. We do not recommend use of the sensor in these situations.
- Panasonic takes no responsibility for any injury or damage caused by the use of the garage door sensor.
Compatible garage doors
Vertical section-type
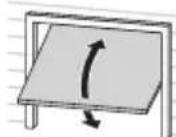
Swing-up type
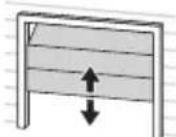
How an open door is detected
The sensor is installed by mounting it to the interior-side of your garage door. It should be mounted in such a way that it is perpendicular to the ground when the garage door is closed, and is tilted when the garage door is opened. When the garage door has opened far enough to tilt the sensor beyond the detection threshold (page 17), the sensor is triggered.
Note:
- The sensor is not triggered if the door is opened slightly.
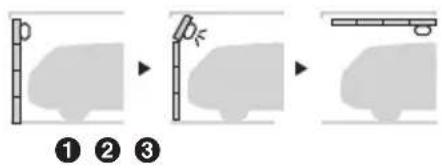
Vertical section-type
flowchart
graph LR
    A["Step 1: Height measurement"] --> B["Step 2: Vertical height measurement"]
    B --> C["Step 3: Final measurement"]
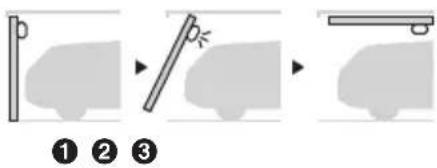
Swing-up type
text_image
Diagram illustrating three-step mechanical or electrical process steps with labeled components and directional arrows① Door closed
② As door opens, sensor is triggered
3 Door fully open
Setup
Confirming the usage area
Wireless communication range
The wireless communication range of each device in the system from the hub is approximately 50 m (160 feet) indoors and approximately 300 m (1,000 feet) outdoors. Wireless communication may be unreliable when the following obstacles are located between the hub and other devices.
• Metal doors or screens
- Walls containing aluminum-sheet insulation
- Walls made of concrete or corrugated iron
• Double-pane glass windows
- Multiple walls
- When using each device on separate floors or in different buildings
Note:
- You can check the sensor's communication status by pressing [→]C]. If the LED indicator is lit in green or red, the sensor is communicating properly with the hub. If the LED indicator blinks in red, it is out of range of the hub.
Usage area cautions
Using the sensor in the following areas may cause deformation, malfunction, or operational failure.
- In direct sunlight
- Areas exposed to grease or steam, such as kitchens
• Near fire or heating devices
- Near magnetic fields (such as near microwaves and magnets)
- Areas subject to extreme temperature changes, such as next to air conditioners
- Near devices that emit strong radio waves, such as mobile phones
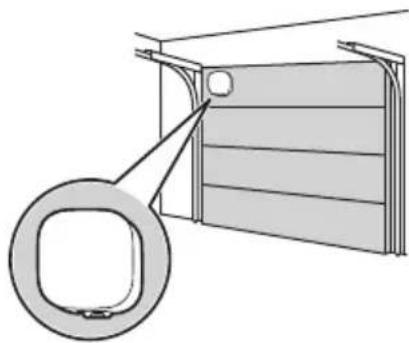
Mounting the sensor
In most cases, you can mount the sensor to the garage door using double-sided tape. In some cases, such as when mounting the sensor to a wooden surface, you can use screws.
Installation precautions
- Observe the following to avoid the risk of falling, which could cause injury or damage to property.
- Mount the sensor on a stable surface where the sensor will be adequately supported.
- Do not mount the sensor on plywood less than 25.4 mm (1 inch) thick.
- Install the sensor on the inside of the garage door.
- Mount the sensor near the top of the garage door. Additionally, we recommend mounting the sensor near the left or right edge of the garage door, so that the sensor is not directly above the car when the garage door is open.
natural_image
Diagram of a door frame with a magnified inset showing the handle (no text or symbols)Securing with double-sided tape
Important:
- Make sure the surfaces of the mounting adaptor and the installation area of the garage door are clean and dry before applying double-sided tape. Take particular care to remove any oil or grime that has accumulated on the garage door.
- Install the sensor on a smooth area of the garage door. Ideally there should be no pits or grooves deeper than 0.5 mm (0.02 inches).
- Once you have used the double-sided tape, do not reuse it.
- When mounting the sensor in cold temperatures, observe the following to ensure optimal adhesion.
- Affix the double-sided tape to the mounting adaptor indoors, when the tape and the adaptor are at room temperature.
- Use a hair dryer or other low-heat emitting device to warm the installation surface of the garage door immediately prior to adhesion, otherwise adhesion may be poor and the sensor may fall.
Setup
1 M ake sure that the front cover and the mounting adaptor are firmly attached to the sensor.
2 Affix the double-sided tape to the mounting adaptor.
- Make sure the tape covers the screw holes on the mounting adaptor.
natural_image
Diagram showing a device with two internal components and a separate rounded component (no text or symbols)3 A ttach the sensor to the inside of the garage door.
- Make sure the mounting adaptor release lever is facing down when the garage door is closed.
- Press firmly to ensure solid adhesion to the installation surface.
Removing when secured with double-sided tape
1 Tie a piece of thread to two sticks, screwdrivers, etc.
2 Pull the thread tight and use it to cut the double-sided tape, and then remove any excess tape (①).

natural_image
Illustration of two hands holding test probes with a device on top (no text or symbols)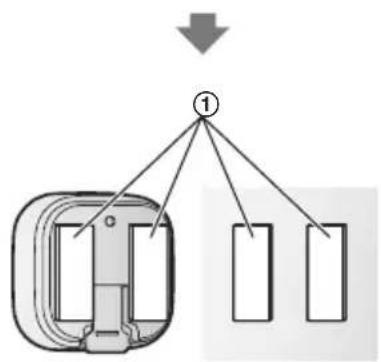
flowchart
graph TD
    A["Device with ①"] --> B["Block 1"]
    A --> C["Block 2"]
Setup
Securing with screws
Important:
- Make sure the screws are shorter than the thickness of the installation surface.
1 Remove the sensor from the mounting adaptor by pressing the release lever (①), sliding the sensor up and lifting it away from the mounting adaptor (②).

text_image
Diagram showing finger pressing a button with two arrows indicating upward movement, labeled ① and ②.2 Use the screws to attach the mounting adaptor to the inside of the garage door.
- Make sure the "UP" mark on the mounting adaptor points upwards when the garage door is closed.
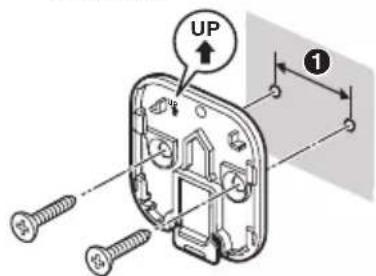
text_image
UP ①① 25.4 mm (1 inch)
3 A ttach the sensor to the mounting adaptor.
natural_image
Diagram showing a mechanical component with internal structure and a separate view of a housing (no text or symbols)- The sensor will click into place when it is secured.
- Make sure the "UP" marks on the back of the sensor and the inside of the mounting adaptor point in the same direction.
Appendix
Features available when using the [Home Network] app
Some of the sensor's features that are available when using the [Home
Network] app are listed below. For more information, refer to the User's Guide (page 16).
- Alarm system
You can use the app to receive notifications when the garage door is opened or left open, arm and disarm the alarm system, confirm the current status of the sensor, and view a log of previous events.
- Sensor integration
You can configure the sensor to trigger other system events, such as camera recording, turning on an electric device (such as a lamp), etc. (Appropriate device required.)
- Telephone alert
You can configure the system to call a preprogrammed phone number when the sensor is triggered.
Accessing the User's Guide
The User's Guide is a collection of online documentation that helps you get the most out of the [Home Network] app.
1 iPhone/iPad
Tap : the app's home screen.
Android™ devices
Tap : or press your mobile device's menu button in the app's home screen.
2 Tap [User's Guide].
Note:
- Microsoft® Windows® Internet Explorer® 8 and earlier versions are not supported.
- Android 4.1 or later versions are recommended.
- You can also access the User's Guide at the web page listed below.

www.panasonic.net/pcc/support/tel/homenetwork/manual/
Specifications
- Standards DECT (Digital Enhanced Cordless Telecommunications)
- Frequency range DECT: 1.92 GHz – 1.93 GHz
- RF transmission power
DECT: 115 mW (max.)
● Power source Lithium battery CR2 (CR15H270) (1 × 3.0 V, 850 mAh) - Battery life
Up to 18 months (when the sensor is triggered 5 times a day and the surrounding temperature is approx. 25 °C (77 °F))
• Detection method 3-axis accelerometer - Operating conditions -20 °C – 50 °C (-4 °F – 122 °F)
- Detection threshold When opening the door: Approx. 26° When closing the door: Approx. 20°
- Dimensions (height × width × depth) 50 mm × 50 mm × 24 mm (1 31/32 inches × 1 31/32 inches × 15/16 inches) with the mounting adaptor attached
- Mass (weight) Approx. 30.3 g (1.07 ounces), excluding the battery, with the mounting adaptor attached
Industry Canada Notices and other information
NOTICE:
This device complies with Industry Canada licence-exempt RSS standard(s). Operation is subject to the following two conditions: (1) this device may not cause interference, and (2) this device must accept any interference, including interference that may cause undesired operation of the device.
RF Exposure Warning:
- This product complies with IC radiation exposure limits set forth for an uncontrolled environment.
- To comply with IC RF exposure requirements, the hub must be installed and operated 20 cm (8 inches) or more between product and all person's body.
- This product may not be collocated or operated in conjunction with any other antenna or transmitter.
Warranty
Panasonic Canada Inc.
5770 Ambler Drive, Mississauga, Ontario L4W 2T3
PANASONIC PRODUCT - LIMITED WARRANTY
EXCHANGE PROGRAM
Panasonic Canada Inc. warrants this product to be free from defects in material and workmanship under normal use and for a period as stated below from the date of original purchase agrees to, at its option either (a) repair your product with new or refurbished parts, (b) replace it with a new or a refurbished equivalent value product, or (c) refund your purchase price. The decision to repair, replace or refund will be made by Panasonic Canada Inc.
Home Network System Products – One (1) year microSD card (Included model only) – One (1) year
This warranty is given only to the original purchaser, or the person for whom it was purchased as a gift, of a Panasonic brand product mentioned above sold by an authorized Panasonic dealer in Canada and purchased and used in Canada, which product was not sold “as is”, and which product was delivered to you in new condition in the original packaging.
IN ORDER TO BE ELIGIBLE TO RECEIVE WARRANTY SERVICE HEREUNDER, A PURCHASE RECEIPT OR OTHER PROOF OF DATE OF ORIGINAL PURCHASE, SHOWING AMOUNT PAID AND PLACE OF PURCHASE IS REQUIRED
LIMITATIONS AND EXCLUSIONS
This warranty ONLY COVERS failures due to defects in materials or workmanship, and DOES NOT COVER normal wear and tear or cosmetic damage. The warranty ALSO DOES NOT COVER damages which occurred in shipment, or failures which are caused by products not supplied by Panasonic Canada Inc., or failures which result from accidents, misuse, abuse, neglect, mishandling, misapplication, alteration, faulty installation, set-up adjustments, misadjustment of consumer controls, improper maintenance, improper batteries, power line surge, lightning damage, modification, introduction of sand, humidity or liquids, commercial use such as hotel, office, restaurant, or other business or rental use of the product, or service by anyone other than a Authorized Servicer, or damage that is attributable to acts of God.
Dry cell batteries are also excluded from coverage under this warranty. Rechargeable batteries are warranted for ninety (90) days from date of original purchase.
THIS EXPRESS, LIMITED WARRANTY IS IN LIEU OF ALL OTHER WARRANTIES, EXPRESS OR IMPLIED, INCLUDING ANY IMPLIED WARRANTIES OF MERCHANTABILITY AND FITNESS FOR A PARTICULAR PURPOSE. IN NO EVENT WILL PANASONIC CANADA INC. BE LIABLE FOR ANY SPECIAL, INDIRECT OR CONSEQUENTIAL DAMAGES RESULTING FROM THE USE OF THIS PRODUCT OR ARISING OUT OF ANY BREACH OF ANY EXPRESS OR IMPLIED WARRANTY. (As examples, this warranty excludes damages for lost time, travel to and from the Authorized Servicer, loss of or damage to media or images, data or other memory or recorded content. This list of items is not exhaustive, but for illustration only.)
Appendix
In certain instances, some jurisdictions do not allow the exclusion or limitation of incidental or consequential damages, or the exclusion of implied warranties, so the above limitations and exclusions may not be applicable. This warranty gives you specific legal rights and you may have other rights which vary depending on your province or territory.
CONTACT INFORMATION
For product information and operation assistance, please visit our Support page:
www.panasonic.ca/english/support
For defective product exchange within the warranty period, please contact the original dealer.
For your future reference
We recommend keeping a record of the following information to assist with any repair under warranty.
Serial No. Date of purchase
(found inside the sensor)
Name and address of dealer
Attach your purchase receipt here.
Panasonic Canada Inc.
5770 Ambler Drive, Mississauga, Ontario L4W 2T3
© Panasonic System Networks Co., Ltd. 2016
Panasonic®
text_image
Diagram of a device with labeled parts: 1, 2, and 3 pointing to a component.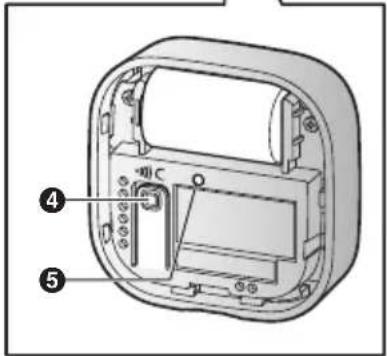
text_image
Technical diagram of a device casing with labeled components, showing internal structure and mounting points.1 Protecteur avant
text_image
Diagram showing two views of a device with numbered annotations indicating directional changes.natural_image
Diagram of a device casing with internal components and a black arrow indicating action (no text or symbols)flowchart
graph LR
    A["Initial View"] --> B["Projection"]
    B --> C["Final Projection"]
1 2 3
text_image
Diagram illustrating a mechanical or optical setup with labeled components and directional arrows indicating motion or transformation.1 2 3
natural_image
Diagram of a door frame with a magnified inset showing the handle (no text or symbols)natural_image
Diagram showing a device with two internal components and a separate rounded component (no text or symbols)natural_image
Illustration of two hands holding test probes with wires connecting a device (no text or symbols)
flowchart
graph TD
    A["Device with ①"] --> B["Block 1"]
    A --> C["Block 2"]
    A --> D["Block 3"]
Configuration
text_image
Diagram showing finger pressing a button with numbered arrows indicating movement or force directionnatural_image
Diagram showing a mechanical component with internal structure and a separate view of a housing (no text or symbols)Panasonic Canada Inc.
5770 Ambler Drive, Mississauga, Ontario L4W 2T3
PRODUIT PANASONIC - GARANTIE LIMITÉE
PROGRAMME DE REMPLACEMENT
Panasonic Canada Inc.
5770 Ambler Drive, Mississauga, Ontario L4W 2T3
© Panasonic System Networks Co., Ltd. 2016
HNS1070_(fr|fr)_0212_ver.012.pdf 20 2016/02/12 11:49:34