SLR75 - Data Storage Tandberg Data - Free user manual and instructions
Find the device manual for free SLR75 Tandberg Data in PDF.
| Product type | SLR (Scalable Linear Recording) Magnetic Tape Drive |
| Native capacity | 38 GB |
| Compressed capacity (2:1) | 75 GB |
| Native transfer rate | 300 MB/min |
| Compressed transfer rate | 600 MB/min |
| Compressed hourly throughput | 36.0 GB/h |
| Interface | SCSI (Wide/Narrow, LVD/SE) |
| Hardware compression | ALDC (Adaptive Lossless Data Compression) |
| Media type | SLRtape75 (length 1150 feet) |
| Media compatibility | Reads and writes on SLRtape60, SLRtape50, SLRtape40, SLRtape7 ; read-only on SLRtape100 and SLRtape140 |
| Form factor (internal) | 5.25-inch bay (half-height) |
| Power supply (internal) | Standard power connector (4-pin) |
| Cleaning frequency | Every 100 hours of use or when the orange LED is steady |
| LED indicators | 3 LEDs: green (status), orange (clean needed), blinking (error) |
| SCSI configuration | Adjustable SCSI ID via jumpers (internal) or thumbwheel (external), active LVD/SE termination |
| Supported operating systems | Windows NT 4.0, Windows 2000, Novell NetWare, SCO Open Server, Solaris, Mac OS, AIX, HP-UX, Linux |
| Included backup software | ARCserveIT (Workgroup/Advanced/Enterprise), Backup Exec, Legato NetWorker |
| Kit contents (internal) | Drive, internal SCSI cable, data cartridge (1 or 5), cleaning cartridge, software, manual, warranty card |
Frequently Asked Questions - SLR75 Tandberg Data
User questions about SLR75 Tandberg Data
0 question about this device. Answer the ones you know or ask your own.
Ask a new question about this device
Download the instructions for your Data Storage in PDF format for free! Find your manual SLR75 - Tandberg Data and take your electronic device back in hand. On this page are published all the documents necessary for the use of your device. SLR75 by Tandberg Data.
USER MANUAL SLR75 Tandberg Data
Installation and User's Guide
PC-BACKUP-SYSTEME
9084 43 15 65 Tandberg SLR Product Line - SLR5 4.0/8.0GB Product
Verification Reports
9033 43 01 37 Tandberg SLR Product Line - SLR4 (TDC 4220) Product
Verification Reports
9031 43 04 44 Tandberg SLR7,SLR24,SLR40,SLR50,SLR60,SLR75
SLR100 and SLR140 Reference Manual
9063 43 07 43 Tandberg SLR7, SLR24, SLR40, SLR50, SLR60, SLR75
SLR100 and SLR140 - SCSI Interface Functional
Specifications
9100 43 17 88 Tandberg SLR50 (MLR3) PVR Manual
9144 43 21 67 Tandberg SLR100, SLR60 and SLR40
PVR Manual - Internal
9148 43 22 23 Tandberg SLR24-100 PVR Manual - External
9149 43 22 22 Tandberg SLR2-5 PVR Manual - External
9156 42 22 46 Tandberg SLR24 and SLR50 PVR Manual - Internal (VU2000)
9162 43 23 17 Tandberg SLR7 PVR Manual - Internal
Please Note
This publication may describe designs for which patents are granted or pending. By publishing this information, Tandberg Data ASA conveys no license under any patent or any other rights.
Every effort has been made to avoid errors in text and diagrams. However, Tandberg Data ASA assumes no responsibility for any errors, which may appear in this publication.
It is the policy of Tandberg Data ASA to improve products as new techniques and components become available. Tandberg Data ASA therefore reserves the right to change specifications at any time.
We would appreciate any comments on this publication.
Tape Drive Naming Convention 5
Tape Drive Capacity 5
Tape Drive Performance 6
Media Specifications 6
Tape Format Compatibility 6
Data Compression 7
Tape Drive Installation 9
SCSI Controller Board Installation 9
SCSI Configuration 11
External SLR2 - SLR140: 12
SCSI-bus Termination - Internal Tape Drives 13
SCSI-bus Termination - External Tape Drives 15
Mounting the Internal Tape Drive 15
Mounting a Tabletop Tape Drive 19
Tape Drive Operation 21
How to Rewind a Data Cartridge 23
Software Installation 27
Windows NT 29
SCSI Host Adapter 29
Tape Driver 29
Windows NT 4.0 Tape Driver Installation 29
Backup Applications 31
Computer Associates ARCserveIT for Windows NT 32
Veritas Software Server CD-ROM 35
Legato Networker for Windows NT 39
Windows 2000 41
SCSI Host Adapter 41
Tape Driver 41
Windows 2000 Tape Driver Installation 41
Backup Applications 43
Novell NetWare 45
Host Adapter 45
Backup Applications 45
Veritas Software Server CD-ROM 49
Windows 95 51
Host Adapter 51
Backup Applications 51
Veritas Software Desktop CDROM 52
Windows 98 Windows 98 ^2nd Edition 53
Host Adapter 53
Backup Applications 53
Veritas Software Desktop CD-ROM 54
SCO Open Server Release 5 55
Host Adapter 55
Backup Applications 57
SCO UnixWare 59
Host Adapter 59
Backup Applications 59
Sunsoft Solaris 61
Tape Drive Installation 61
Backup Applications 62
Apple Macintosh 65
Backup Applications 65
IBM RS/6000 67
Tape Drive Installation 67
Backup Applications 68
HPIUX 71
Tape Drive 71
Backup Applications 72
Linux 73
SCSI Host Adapter 73
Backup Applications 74
Tape Drive Utility Disk 77
Troubleshooting 79
Hardware Checking 79
Software Checking 79
Verifying Recent Changes 80
Correcting Intermittent Failures 80
Software Troubleshooting 80
Appendix 81
Regulatory Compliance Notices 81
Glossary of Terms 83
Introduction
Congratulations on your new Tandberg Data SLR tape storage solution!
Total customer satisfaction is of the most importance to Tandberg Data. We guarantee that this product left our premises defect free. If you are not satisfied the quality of this product, please contact your distributor, dealer or the nearest Tandberg Data office to have your problem resolved quickly.
If you need technical support or have any problem with your SLR tape storage solution, phone, fax and addresses can be found on the back cover of this manual, ask for Customer Services.
Tandberg Data ASA is a leading global supplier of advanced, tape-based information data storage products for the professional market. The company offers a wide range of products and solutions for data protection and other user applications within data storage management.
Tandberg Data supplies Travan NS^TM , SLR^TM and DLT^TM branded tape drives and tape storage solutions to the world's leading OEMs and through a worldwide channel sales network.
On the following pages, before the installation guide starts, there is some brief information about the Tandberg Data SLR tape storage solutions. Also listed is what is included with the Tandberg Data product you have purchased.
All documentation referred to in this Product Line installation guide, is available as a downloadable PDF file from the Tandberg Data web site:
www.tandberg.com
Tandberg Data
This Page Intentionally Left Blank
Solution Contents
Please Check the Package Contents before Beginning the Installation!
For the Internal Solution:
- Internal Tandberg SLR tape drive (SLR2-140)
- Internal SCSI cable (with removable LVD/SE terminator for Tandberg SLR24, SLR7, SLR40, SLR50, SLR60, SLR75, SLR100 and SLR140)
- Data cartridge (1 or 5 depending on type of kit/solution)
- Cleaning cartridge (Tandberg SLR5, SLR24, SLR7, SLR40, SLR50, SLR60, SLR75, SLR100 and SLR140)
-Application software
•Installation and User's Guide
• Warranty Card
For the Tabletop Solution:
- Tabletop Tandberg SLR tape drive with power cord
- External LVD/SE SCSI terminator (Tandberg SLR24, SLR7, SLR40, SLR50, SLR60, SLR75, SLR100 and SLR140)
•External SCSI cable - Data cartridge (1 or 5 depending on type of kit/solution)
- Cleaning cartridge (Tandberg SLR24, SLR7, SLR40, SLR50, SLR60, SLR75, SLR100 and SLR140)
-Application software
•Installation and User's Guide
• Warranty Card
NOTE: See also our website: www.tandberg.com.
Tandberg Data
This Page Intentionally Left Blank
Information
Tape Drive Naming Convention
The following table gives the equivalence between the original tape drive name and their associated SLR naming.
| Tandberg SLR Name Convention Previous Tape Drive Name | |
| Tandberg SLR2 Tandberg TDC 3820 | |
| Tandberg SLR3 Tandberg TDC 4120 | |
| Tandberg SLR4 Tandberg TDC 4220 | |
| Tandberg SLR4-DC Tandberg TDC 4222 | |
| Tandberg SLR5 NA | |
| Tandberg SLR24 Tandberg SLR6 | |
| Tandberg SLR7 NA | |
| Tandberg SLR40 NA | |
| Tandberg SLR50 Tandberg MLR3 | |
| Tandberg SLR60 NA | |
| Tandberg SLR75 NA | |
| Tandberg SLR100 NA | |
| Tandberg SLR140 NA | |
Tape Drive Capacity
| Tandberg Data Tape Drive Model Capacity | ||
| Tandberg SLR2 | (TDC 3820) | 525 MB |
| Tandberg SLR3 | (TDC 4120) | 1.2GB |
| Tandberg SLR4 | (TDC 4220) | 2.5GB |
| Tandberg SLR4-DC | (TDC 4222) | 2.5GB/5.0*GB |
| Tandberg SLR5 | (SLR5 4/8 GB) | 4.0GB/8.0*GB |
| Tandberg SLR24 | (SLR6 12/24 GB) | 12GB/24*GB |
| Tandberg SLR7 20 GB/40GB* | ||
| Tandberg SLR40 20GB/40*GB | ||
| Tandberg SLR50 | (MLR3 25/50 GB) | 25GB/50*GB |
| Tandberg SLR60 30GB/60*GB | ||
| Tandberg SLR75 38 GB/75*GB | ||
| Tandberg SLR100 50GB/100*GB | ||
| Tandberg SLR140 70GB/140*GB | ||
* Using 2:1 Hardware Compression
Tape Drive Performance
| Tandberg Data Tape Drive Model Per Minute Per Hour | ||
| Tandberg SLR2 525MB (TDC 3820) | 12 MB/min 720 MB | |
| Tandberg SLR3 1.2GB (TDC 4120) | 18 MB/min 1.08 GB | |
| Tandberg SLR4 2.5GB (TDC 4220) | 18 MB/min 1.08 GB | |
| Tandberg SLR4-DC 5GB (TDC 4222) | 18/36* MB/min 2.16 GB | |
| Tandberg SLR5 (SLR5 4/8 GB) | 24/48* MB/min 2.88 GB | |
| Tandberg SLR24 (SLR6 12/24 GB) | 72/144* MB/min 8.64 GB | |
| Tandberg SLR7 180/360* MB/min 21.6 GB | ||
| Tandberg SLR40 180/360* MB/min 21.6 GB | ||
| Tandberg SLR50 (MLR3 25/50 GB) | 120/240* MB/min 14.4 GB | |
| Tandberg SLR60 240/480* MB/min 28.8 GB | ||
| Tandberg SLR75 240/480* MB/min 28.8 GB | ||
| Tandberg SLR100 300/600* MB/min 36.0 GB | ||
| Tandberg SLR140 360/720* MB/min 43.2 GB | ||
* Using 2:1 Hardware Compression
Media Specifications
| Media Type | Length (feet) | Native Capacity (MB) |
| DC 6250 or equivalent 1020 250 | ||
| DC 6525 or equivalent 1020 525 | ||
| MAGNUS 1.2 or equivalent 950 1200 | ||
| MAGNUS 2.5 or equivalent 1200 2500 | ||
| SLR5 8GB * 1500 4000 | ||
| SLRtape24 24 GB * | 1130 | 12 000 |
| SLRtape7 40 GB* | 1545 | 20 000 |
| SLRtape40 40 GB* | 600 | 20 000 |
| SLRtape50 50 GB * | 1515 | 25 000 |
| SLRtape60 60 GB* | 900 | 30 000 |
| SLRtape75 75 GB* | 1150 | 38 000 |
| SLRtape100 100 GB* | 1500 | 50 000 |
| SLRtape140 140 GB* | 1670 | 70 000 |
* Using 2:1 Hardware Compression
Tape Format Compatibility
| Tape NativeDrive | Media Type | Tape Drive Compatibility | ||||||||||||
| SLR140 | SLR100 | SLR75 | SLR60 | SLR50 | SLR40 | SLR7 | SLR32 | SLR24 | SLR5 | SLR4 | SLR3 | SLR2 | ||
| SLR140 | SLRtape140 | R/W | ||||||||||||
| SLR100 | SLRtape100 | R | R/W | |||||||||||
| SLR75 | R | R/W | R/W | |||||||||||
| SLR60 | SLRtape60 | R | R/W | R/W | R/W | |||||||||
| SLR50 | SLRtape50 | R | R/W | R/W | R/W | R/W | ||||||||
| SLR40 | SLRtape40 | R | R/W | R/W | R/W | - | R/W | |||||||
| SLR7 | SLRTape7 | R | R^* | R | R^* | - | R^* | R/W | ||||||
| SLR32 | SLR32,MLR1-26GB,Accuscribe 13GB | R | R | R | R/W | R | - | R/W | ||||||
| SLR24 | SLRtape24 | R | R | R | R/W | R | - | R/W | R/W | |||||
| SLR5 | SLR5 | R | R | R | R | R | R/W | R | R/W | |||||
| SLR4 | Magnus 2.5,Magnus 2.0,DC 92xx, QD 92xx | R | R | R | R/W | R | RW | R/W | ||||||
| SLR3 | Magnus 1.2,Magnus 1.0,DC 91xx, QD 91xx | R/W | R/W | R/W | ||||||||||
| SLR2 | DC6525, DC6320 | R/W | R/W | R/W | R/W | |||||||||
| SLR1 | DC6250, DC6150 | R/W | R/W | R/W | ||||||||||
R à Read only
R/W à Read and Write compatible
*SLR7 read capability available in F/W 04.30 or greater
Data Compression
Data Compression is a way to increase capacity on a storage device. Compression ratios are normally specified to be 2:1, meaning that it is possible to store twice as much data on the tape as normal without data compression. However, the compression rate is depending on the type of data, e.g. ordinary text files can be compressed in a much higher rate than program files.
There are two ways to compress data, hardware compression and software compression. The storage device very often does hardware compression, and software compression means that the program is compressing the data before it is sent to the storage device. Hardware compression is much more efficient, and works much faster than software compression.
The Tandberg Data SLR4-DC, SLR5, SLR24, SLR7, SLR40, SLR50, SLR60, SLR75, SLR100 and SLR140 use ALDC Hardware compression to compress data. This feature is enabled per default but the user may turn off data compression through the application software or specific Software Tools. (Please refer to the Tandberg SCSI tools chapter at the end of this manual for more information).
Tandberg Data
This Page Intentionally Left Blank
Tape Drive Installation
SCSI Controller Board Installation
All Tandberg Data SLR tape drives uses a SCSI interface to the host system.
Before any SCSI device can be installed it is necessary to have a SCSI controller board installed. Please pay attention to the following points.
- Make sure your computer is turn off before proceeding to the installation.
- If you computer is equipped with an onboard SCSI controller, before proceeding with the installation, you must first locate the SCSI connector on the computer motherboard.
- Refer to the documentation provided with your computer to find out where this connector is located.
- If multiple SCSI connectors are available, you can choose any of them, except if your computer documentation mentions something different.
- When done, firmly connect the SCSI connector to the Mainboard connector and refer to the section Mounting the Tape Drive to install your internal SLR.
- If your PC/Server needs a separate SCSI controller, you need to make sure it is properly installed before connecting your SLR tape drive.
Tandberg Data
- You will also need a software driver from the SCSI controller vendor to activate the SCSI Controller. Please make sure you have the latest software driver for your SCSI controller loaded, and that the SCSI controller board is properly installed. Software drivers can be downloaded from the vendors' web site. Refer to the README file for installation.
Please refer to the PC/Server documentation for further information on how to install additional boards in the PC/Server. Or ask your local dealer for assistance.
SCSI Configuration
SCSI-ID Selection
Internal SLR2® SLR5:

text_image
Jumper Block/Jumper Block/Bloc de Cavalliers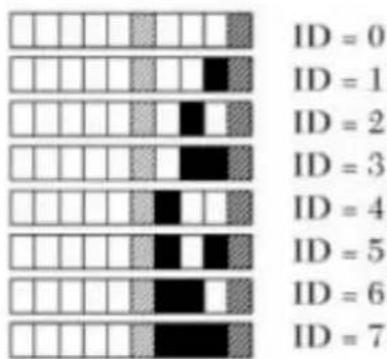
text_image
ID = 0 ID = 1 ID = 2 ID = 3 ID = 4 ID = 5 ID = 6 ID = 7
text_image
Jumper Block/Jumper Block/Bloc de Cavaliers
text_image
ID = 0 ID = 1 ID = 2 ID = 3 ID = 4 ID = 5 ID = 6 ID = 7 ID = 8 ID = 9 ID = 10 ID = 11 ID = 12 ID = 13 ID = 14 ID = 15All devices on a SCSI-bus need their own unique identification, called SCSI-ID. If a SCSI-ID conflict exists, some of the SCSI devices will not be recognized by your system. In many systems it is common to use the SCSI-bus for the hard-drive and CD-ROM, as well as the tape drive. Remember that the SCSI Controller uses SCSI-ID 7.
If the tape drive is the only device on the SCSI - bus, you do not need to do anything. The tape drive will be recognized automatically. (All Tandberg Data tape drives are delivered with SCSI-ID 2 as default.)
If the tape drive is going to share the SCSI-bus with other devices, check the SCSI-ID numbers used by the other devices, then set the drive's SCSI-ID to a number that is not being used by any of the other devices (remember the SCSI host adapter uses ID 7).
The SCSI-ID is often set by “jumpers” where you can “read out” which SCSI-ID the device has been set up for. All SCSI device ID's are displayed on the screen during system startup.
Tandberg Data
SCSI-ID Selection
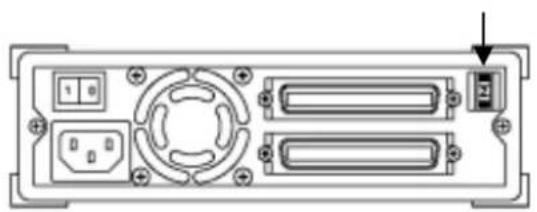
External SLR2® SLR140:
For the external tabletops, you will find the SCSI-ID setting thumb-wheel switch on the rear end of the unit box:
natural_image
Back panel diagram of a computer interface with ports and indicators (no text or symbols)
natural_image
Back panel diagram of a device showing ports, connectors, and a central hub (no text or labels)SCSI-bus Termination - Internal Tape Drives
Termination in General
A SCSI-bus is susceptible to interference, such as noise from electrical motors and other electromagnetic devices. Also due to the speed of the data on the SCSI-bus, it is of outmost importance to terminate the SCSI-bus properly. “Termination” is used to define the ends of the SCSI-bus.
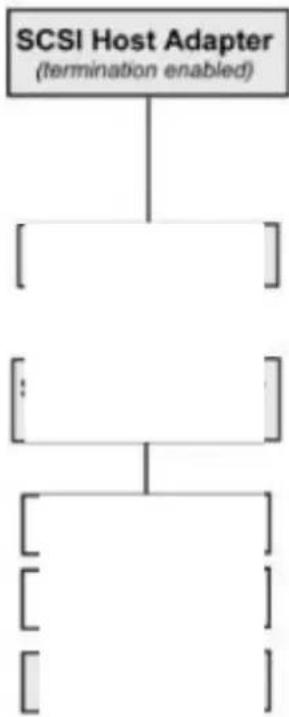
Tandberg SLR2 ^® SLR5
Will your new tape drive be the last or only SCSI device on a SCSI cable?
flowchart
graph TD
    A["SCSI Host Adapter\n(termination enabled)"] --> B["[---"]]]
    B --> C["[---"]]]
    C --> D["[---"]]]
    D --> E["[---"]]]
SCSI termination where the tape drive is the last or only SCSI device.
SCSI termination in a system with three internal SCSI devices.
- If your drive will be the last device on the SCSI cable or the only device on the cable, as shown to the left, make sure that the SCSI termination packs are installed in the drive (Factory default).
- If your tape drive will be in the middle of a SCSI chain, as shown to the left, you must disable SCSI termination on the drive. To disable SCSI termination on the tape drive, remove the termination resistor packs from the drive (see figure on the following page). Make sure that the last SCSI device on the cable has termination enabled.
Tandberg Data
The Tandberg SLR2 ^ SLR5 drives have 3 passive termination resistor packages that can be removed or installed inside the drive.
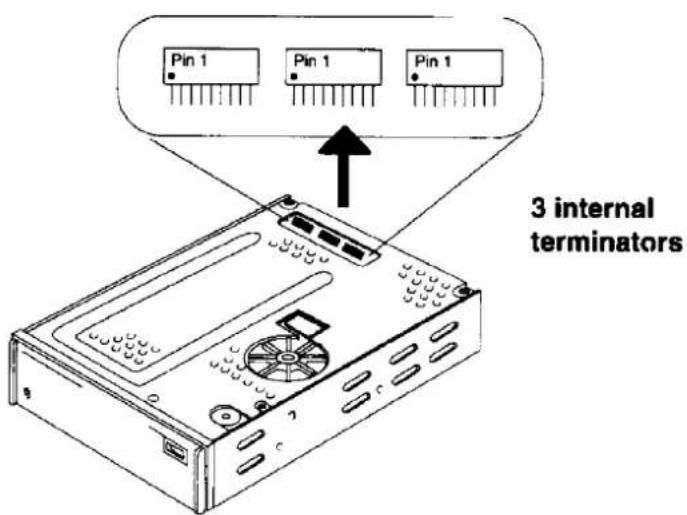
text_image
Pin 1 Pin 1 Pin 1 3 internal terminatorsTandberg SLR24, SLR7, SLR40, SLR50, SLR60 SLR75, SLR100 and SLR140
The Tandberg SLR24, SLR7, SLR40, SLR50, SLR60, SLR75, SLR100 and SLR140 tape drives are supplied with no internal drive termination capability. To comply with PC99 specifications, TD supplies an internal SCSI cable with a removable active terminator to facilitate termination requirements in internal applications.
SCSI-bus Termination - External Tape Drives
If the Tape drive is the only device on the external SCSI-bus, it must be terminated using the external SCSI termination provided with the solution. See figure:
SCSI Host
Adapter
SLR Tape Drive (Must
be terminated)
If other external device(s) is/are present, the Tandberg SLR tape drive can be installed in any position on the SCSI-bus, the SLR tape drive must be terminated if installed at the end of the SCSI-bus. See figure:
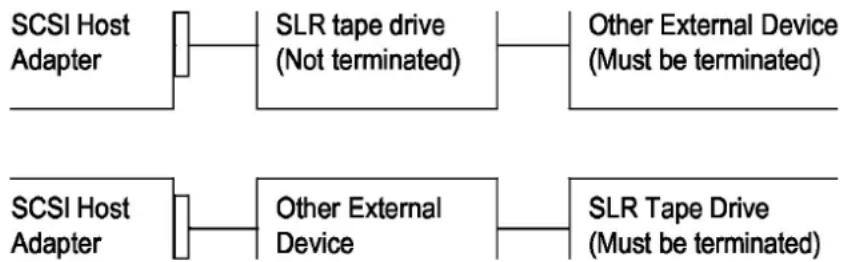
flowchart
graph LR
    A["SCSI Host Adapter"] --> B["SLR tape drive (Not terminated)"]
    B --> C["Other External Device (Must be terminated)"]
    D["SCSI Host Adapter"] --> E["Other External Device"]
    E --> F["SLR Tape Drive (Must be terminated)"]
Mounting the Internal Tape Drive
Wide/Narrow Configuration
All SLR internal tape drives can be connected either to a 16 bit Wide SCSI or an 8-bit Narrow SCSI host adapter. SLR25 is provided with an internal cable with a narrow connector. SLR7-140 internal tape drives are supplied with a WIDE connector. If you plan to use SLR2-5 with a WIDE SCSI host adapter you will need a Narrow SCSI host adapter Narrow to WIDE converter for the internal cable supplied with your SLR2-5 tape storage solution. If you plan to use SLR7-140 with a narrow SCSI host adapter you will need a Wide to Narrow converter.
Tandberg Data
More detailed information regarding these converters and connecting 8 bit narrow SCSI peripherals to 16 bit wide SCSI host adapter and 16 bit WIDE SCSI peripherals to 8 bit narrow host adapters as well as purchasing these converters, can be found at the following website.
www.adaptec.com/products/solutions/cables.html
NOTE:
When mounting a Tandberg SLR24, SLR7, SLR40, SLR50, SLR60, SLR75, SLR100 or SLR140 tape drive on an 8-bit SCSI host adapter, using the Wide/Narrow converter, check that the WIDE Negotiation feature is disabled from the SCSI host adapter Bios. Refer to the SCSI adapter manual for more information.
Internal Tape Drive Installation
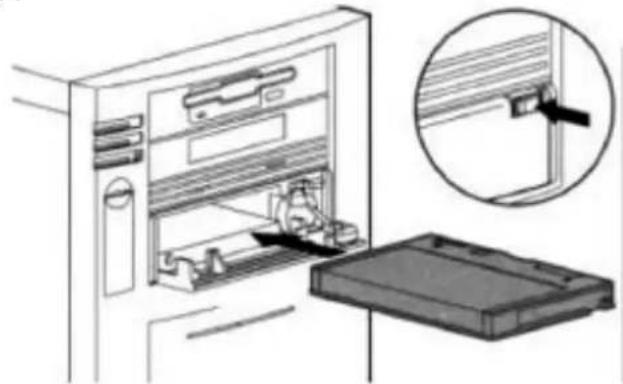
1) Internal installation of the drive requires that there is a free 5.25-inch bay with an open front in your computer system. Obtain access to the removable media bay (refer to the documentation supplied with your system for more information on accessing the removable media bay).
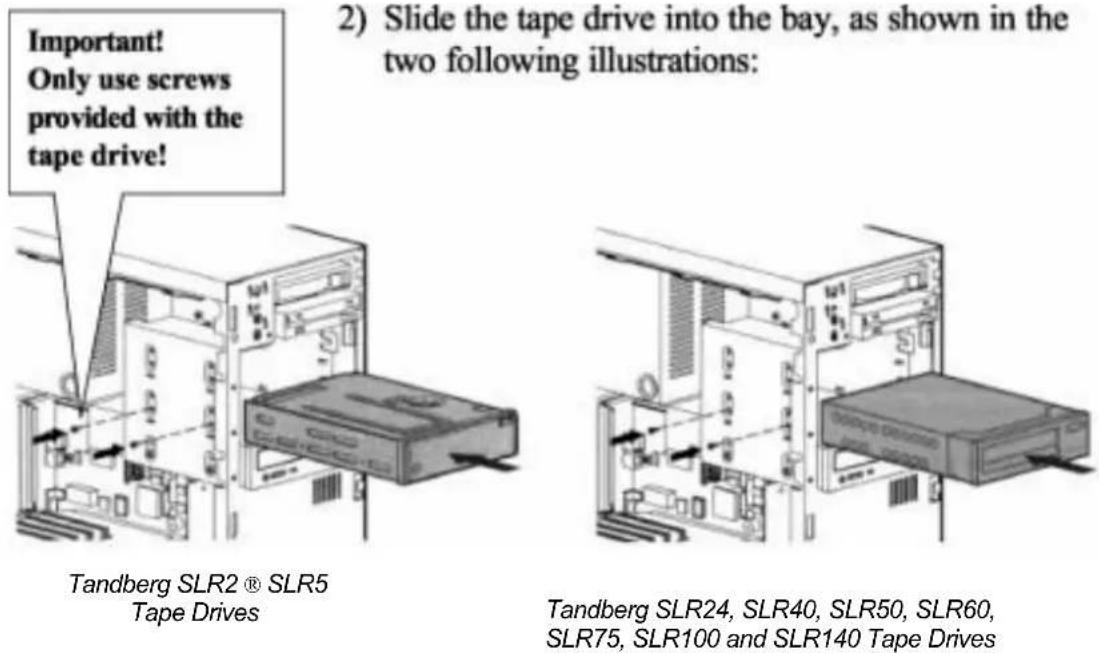
2) Slide the tape drive into the bay, as shown in the two following illustrations:
NOTE: A mounting kit may be necessary for mounting the tape drive into the bay. Please refer to www.tandberg.com > SUPPORT > SLR Support > Hardware Compatibility for more information on obtaining the kit.
3) Secure the tape drive to the bay (use only the screws supplied with the tape drive) 4) Connect the power cable and the SCSI signal cable (and eventually the SCSI converter), as shown below:

natural_image
Illustration of a computer monitor with cable inserted into a drive (no text or symbols)Tandberg SLR2® SLR5 Tape Drives

natural_image
Diagram of a computer tower connected to a cable via a connector (no text or symbols visible)Tandberg SLR24, SLR7, SLR40, SLR50, SLR60, SLR75, SLR100 and SLR140 Tape Drives
Tandberg Data
Mounting Rail Installation Instructions Tandberg SLR5 Drives for
IBM Netfinity 5000, 5500, 5600 and 7000 Series
text_image
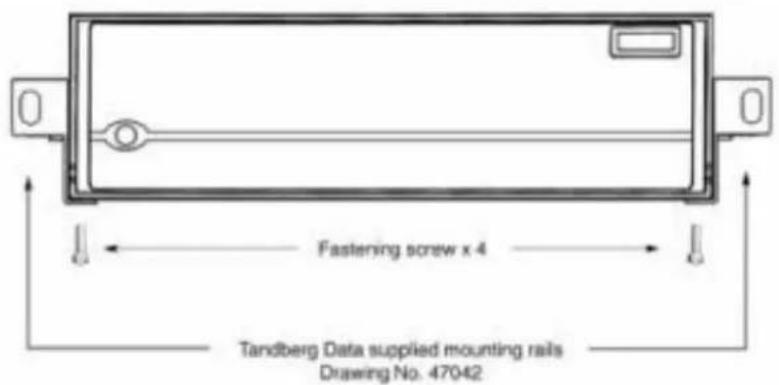
Fastening screw x 4 Tandberg Data supplied mounting rails Drawing No. 47042SLR5 Netfinity Kit ordering no.: P/N 432126
Including:
- 2 x mounting rails - left hand and right hand side - 4 x screws
- 1 x Installation Instructions
Tandberg SLR24, SLR7, SLR40, SLR50, SLR60, SLR75, SLR100 and SLR140 Drives for IBM Netfinity 5000 and 7000 Series (xSeries)

natural_image
Pure electrical circuit lines without any symbols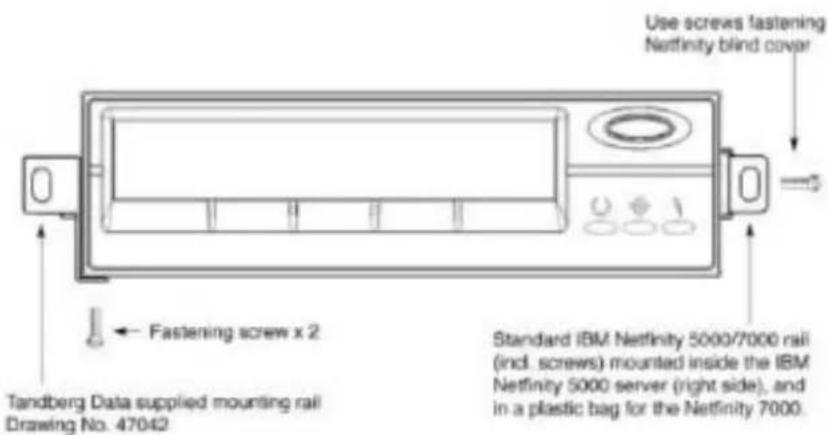
text_image
Use screws fastening Netfinity blind cover ← Fastening screw x 2 Tandberg Data supplied mounting rail Drawing No. 47042 Standard IBM Netfinity 5000/7000 rail (incl. screws) mounted inside the IBM Netfinity 5000 server (right side), and in a plastic bag for the Netfinity 7000.Netfinity Kit ordering no.: P/N 431950
Including:
- 1 x mounting rail
- 2 x screws
- 1 x Installation Instructions
Mounting a Tabletop Tape Drive
Wide/Narrow Configuration
All SLR external tabletop tape drives can be connected either to a 16 bit Wide SCSI or an 8-bit Narrow SCSI host adapter. SLR2-5 is provided with an external cable with a narrow connector. SLR7-140 tape drives are supplied with a WIDE external connector. If you plan to use SLR2-5 with a WIDE SCSI host adapter you will need a Narrow SCSI host adapter Narrow to WIDE converter for the external cable supplied with your SLR2-5 tape storage solution. If you plan to use SLR7-140 with a narrow SCSI host adapter you will need a Wide ®Narrow converter. More detailed information regarding these converters and connecting 8 bit narrow SCSI peripherals to 16 bit wide SCSI host adapter and 16 bit WIDE SCSI peripherals to 8 bit narrow host adapters as well as purchasing these converters, can be found at the following website.
www.adaptec.com/products/solutions/cables.html
External Tape Drive Installation
After the SCSI controller board has been installed and is working properly, the tape drive can be installed. Before starting, make sure the power Is turn off.
NOTE:
Do not apply or insert power cord until all connections have been made.
Tandberg DataTandberg Data
Please carefully read the Information about the SCSI-ID conflicts and SCSI termination paragraph on pages 11-14. To install a tabletop tape drive, simply connect the tape drive to your PC/Server with the enclosed SCSI cable to any of the two available SCSI connectors. Remember to place the termination on the free connector on the back of the tape drive, and to select a unique SCSI-ID.

text_image
Diagram of an electronic device rear panel with labeled ports and connectors, showing directional arrows indicating movement or orientation.
natural_image
Back panel diagram showing electronic components with arrows indicating direction (no text or labels)Connect it then to the power outlet.
When you power up the system for the first time, and check that all your SCSI devices are visible for the SCSI controller board.
Tape Drive Operation
Loading a Data Cartridge Tandberg SLR2 ® SLR5
1) Press the Eject button (see detail upper right for button location).
2) Ensure that the data cartridge is correctly oriented (see left for tape
natural_image
Diagram of an open refrigerator with internal compartments and a close-up view of the door handle (no text or symbols)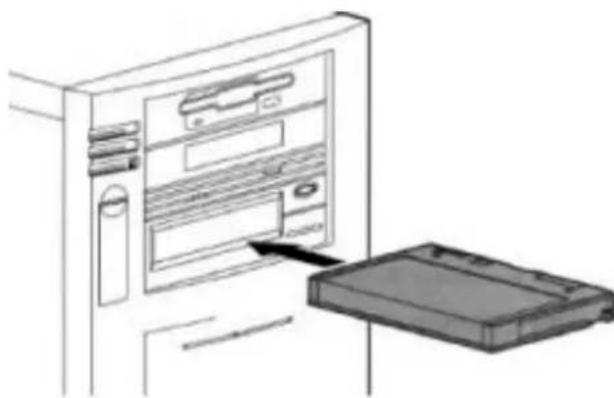
natural_image
Line drawing of a computer tower with an open storage tray and internal compartments (no text or symbols)orientation).
3) Push the data cartridge Into the drive until you hear a click that indicates that the data cartridge is locked in place.
Tandberg SLR24, SLR7, SLR40, SLR50, SLR60, SLR75, SLR100 and SLR140
1) Ensure that the data cartridge is correctly oriented (see left for tape orientation).
2) Push the data cartridge into the drive slowly until it is taken in by the tape drive automatically.
Unloading a Data Cartridge
Tandberg SLR2®
SLR5
text_image
Eject button1) Wait for any tape activity to finish.
2) Press the Eject button (see left for button location).
3) When the front of the tape drive opens, remove the data cartridge.
4) Manually close the front of the tape drive.
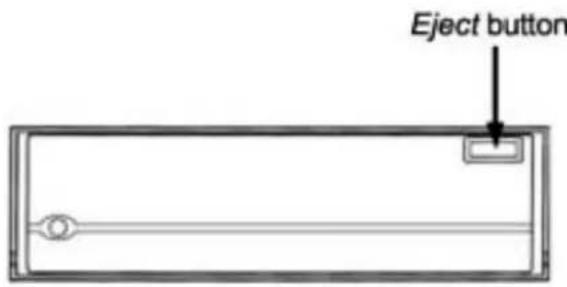
Tandberg SLR24, SLR7, SLR40, SLR50, SLR60, SLR75, SLR100 and SLR140
Eject button

natural_image
Front view of a rectangular appliance with a circular button and control buttons (no text or symbols visible)1) Wait for any tape activity to finish.
2) Press the Eject button (see left for button location).
3) The data cartridge will be ejected automatically.
Handling a Data Cartridge
To improve data reliability and data cartridge lifetime, please respect the following:
- Do not drop data cartridges
- Make sure the air around the tape drive and the data cartridge storage area is clean
- Before using any data cartridge, expose it to the actual operating environment for at least four hours
-Replace worn or excessively noisy data cartridges
Storing Data Cartridges
The best practice to store a data cartridge is to rewind it to the beginning of tape before storing it in its protective case.
How to Rewind a Data Cartridge
Tandberg SLR7 ® SLR140
The SLR7-140 drives automatically perform this operation when the Eject button is pressed.
Tandberg SLR2® SLR5
Unix System Command
Using the system command, a rewind operation has to be performed using the MT command. (Refer to the MT documentation for details)
Unix System/PC System Using Backup Application
To make sure the tape is at Beginning Of Tape, a retention command has to be executed, prior to ejecting the tape.
When this operation is completed:
Eject the tape from the drive and then store it in its protective case.
Storage Condition
Avoid high temperature (>25C/77F) and high humidity (>50 % RH)
Store the data cartridge in a cool and dry environment.
Do not store the data cartridge near devices with strong magnetic fields, such as computer monitors, TV sets, or loudspeakers.
Conditioning
Prior to use, the data cartridge should be adapted to the operating environment for a time at least equal to the period it has been out of the operating environment (up to a maximum of 8 hours).
Retentioning Condition
A Retention MUST be performed in any of the following cases:
- First use of brand new data cartridge.
- After prolonged operation over a limited tape length, meaning excessive start/stop operations.
- When the cartridge has been exposed to a decrease/increase in temperature of 16^ (30°F)
- When the cartridge has been dropped.
- The occurrence of excessive soft write errors, excessive soft read errors (also named ECC error by some backup applications).
Cleaning
Before use, please make sure that the cleaning cartridge is stored for 24 hours in the temperature and humidity of the environment in which it will be used.
Recommended Cleaning Intervals
In general, the tape drive should be cleaned after 50 hours of tape movement for SLR2-5, and every 100 hours for SLR7 - 140.
A weekly cleaning routine is highly recommended, as well as cleaning the tape drive immediately after using a brand new tape cartridge.
NOTE: If your product is the Tandberg SLR24, SLR7, SLR40, SLR50, SLR60, SLR75, SLR100 or SLR140, cleaning is required when the rightmost front LED being illuminated a steady AMBER color.
Cleaning Procedure
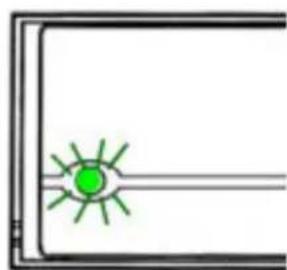
1) Load the cleaning cartridge into the SLR tape drive.
2) The cleaning process will begin automatically. This is indicated by the front LEDs on the product as follows:
Tandberg SLR2® SLR5
- Flashing GREEN front panel LED.
3) Wait for all LED activity to finish and manually eject the data cartridge from the tape drive (around 30 seconds).
Tandberg SLR7 ® SLR140
- Leftmost LED OFF, center GREEN LED flashing, rightmost LED steady AMBER.
3) The cartridge will be ejected when cleaning has completed (around 3 minutes).
natural_image
Simple diagram with a green sunburst symbol inside a rectangular frame (no text or labels)
natural_image
Simple line drawing of a kitchen appliance with a circular sink and a green indicator light (no text or symbols)Cleaning Cartridge replacement
The SLR cleaning cartridge has to be replaced when:
Tandberg SLR2® SLR5

natural_image
Pure electrical circuit lines without any symbols- Steady GREEN front panel LED (for SLR2, SLR3, SLR4, and SLR4DC).
- Steady AMBER front panel LED (for SLR5).
Tandberg SLR24, SLR7, SLR40, SLR50, SLR60, SLR75, SLR100 and SLR140
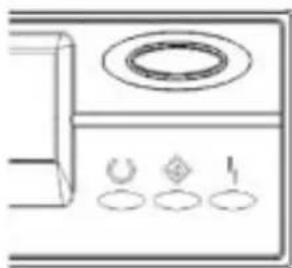
natural_image
Simple line drawing of a kitchen appliance with a circular top and three buttons below (no text or symbols)- No LED activity and tape is automatically ejected.
Front Panel LED Indicators
Tandberg SLR2 ® SLR5
There is one LED (Light Emitting Diode) for the Tandberg SLR2, SLR3, SLR4, SLR4-DC and SLR5 indicating the following tape drive status:
| LED State | Meaning |
| OFF No activity / no cartridge loaded | |
| Steady GREEN No activity / cartridge loaded | |
| Blinking GREEN Tape drive activity | |
| Steady AMBER | Media or hardware error |
| Steady GREEN | Cleaning cartridge exhausted - cleaning cartridge must be changed (SLR2--> SLR4) |
| Steady AMBER | Cleaning cartridge exhausted - cleaning cartridge must be changed (SLR5) |
| Steady RED Fatal error * | |
* Contact Tandberg Data Customer Services
Tandberg SLR24, SLR7, SLR40, SLR50, SLR60, SLR75, SLR100 and SLR140
There are three LEDs for the Tandberg SLR24, SLR7, SLR40, SLR50, SLR60, SLR75, SLR100 and SLR140 indicating the following tape drive status:
| LED State | Meaning | |
| Green Amber | ||
| Blinking OFF | OFF Power | up self test/Diagnostic Activity |
| OFF OFF | OFF No activity / no cartridge | loaded |
| OFF OFF ON | Cartridge not loaded/Cleaning required | |
| ON OFF OFF | No activity / cartridge | loaded |
| ON Blinking | OFF Tape drive activity | |
| ON OFF ON | Tape Loaded/Cleaning required | |
| ON Blinking | ON | Tape Activity/Cleaning required |
| OFF OFF Blinking | Unrecoverable | Drive Failure* |
| Blinking Blinking | Blinking | Fatal Error * |
* Contact Tandberg Data Customer Services
Software Installation
This chapter contains information for installing SLR Tape Drives in the following operating system environments:
- Windows NT 4.X (Server/Workstation) 0 -
Windows 2000
- Novell NetWare 4.X/5.0 -
Windows 95 - Windows 98
- Windows 98 Second Edition -
SCO Open Server Release 5 -
SCO UnixWare Version 7.X -
Sunsoft Solaris 2.x, 7.0
- Apple Macintosh System 7 and higher -
IBM AIX Version 4.x - HP UX Version
10.20/11.0 - Linux
Tandberg Data
This Page Intentionally Left Blank
Windows NT
SCSI Host Adapter
Windows NT includes a driver for most SCSI host adapters. If you cannot find the appropriate driver, please refer to the installation guide provided with the SCSI host adapter or contact your computer supplier.
Tape Driver
Windows NT 4.0 includes a tape driver that supports the SLR2, SLR3, SLR4, and SLR4DC for all versions of Windows NT and Service Pack.
SLR5 support is provided by Service Pack 6A. (Available from www.microsoft.com).
The SLR24, SLR7, SLR40, SLR50, SLR60, SLR75, SLR100 and SLR140 require an additional tape driver that is available from the Tandberg website at www.tandberg.com.
Windows NT 4.0 Tape Driver Installation
1) Double-click on the "Tape Devices" icon from the Control Panel.
NT will detect automatically which Tandberg SLR tape drive is installed on the system and prompts you to install the driver.
Tandberg SLR2, SLR3, SLR4, SLR4-DC and SLR5 Installation
2) Select “Tandberg 3660, 3820, 4120, 4220, 4222”.
3) Select OK and follow the instruction on the screen.
Tandberg Data
Tandberg SLR24, SLR7, SLR40, SLR50, SLR60, SLR75, SLR100 and SLR140 Installation
2) Click on Have a Disk.
3) Insert a disk in drive A when requested to so:
4) Select Tandberg Data SLR2-140 driver.
5) Select Install and follow the instruction on the screen.
During the copy process, you may receive the following warning:
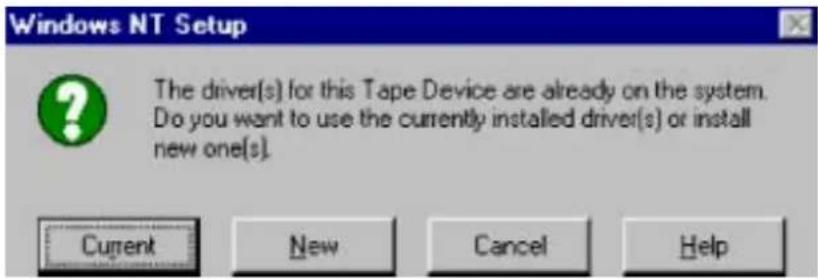
text_image
Windows NT Setup The driver(s) for this Tape Device are already on the system. Do you want to use the currently installed driver(s) or install new one(s). Current New Cancel HelpAlways choose New
This will replace the existing tape driver with the latest version that supports the Tandberg SLR tape drive you are using.
Backup Applications
NT Embedded Application
The NT Backup application (NTBackup) is included in the Windows NT 4.0 Operating System.
Installation
Before running the application, make sure the tape driver for your SLR tape drive is properly installed. Please refer to the tape driver installation on page 29.
To start the application:
- Click on START.
- Click on Programs.
- Click on Administrative tools.
- Select Backup.
NOTE:
For any questions related to the use of this application or its installation, please refer the Microsoft NT documentation
Computer Associates ARCserve/T for Windows NT
ARCserveIT is one of the market leaders for NT backup software. It is sold in three different versions: ARCserveIT Workgroup Edition, ARCserveIT Advanced Edition and ARCserveIT Enterprise Edition.
ARCserveIT Workgroup Edition
Primarily designed for small to midsize organizations and single-server installations, CA's Workgroup Edition for NT enable users to reap the benefits of powerful technology at a price point and level of functionality that fits their needs.
Features
• Autoloader support included
- Parallel Streaming
- Automated media management
- Unlimited Windows 3.1x, Windows 95/98, Windows NT workstation client support
ARCserveIT Advanced Edition
Created to meet the distinct IT needs of most midsize organizations, ARCserveIT Advanced Edition combine industry-proven technology and ease-of-use with advanced features and scalability to deliver a new breed of solutions. Advanced Edition provide centralized management of IT solutions, support for multi-servers (with unlimited clients), and scalability for dynamic environments.
ARCserveIT Enterprise Edition
Designed for mid- to large-size organizations, CA's Enterprise Edition products offer virtually unlimited scalability and cross-platform interoperability for large heterogeneous environments. Flexible licensing makes Enterprise Edition solutions an ideal choice for the larger users. Tandberg Data bundles products with ARCserveIT Work Group and Advanced Edition.
Installation
1) Insert the Server CD-ROM. 2)
Open My Computer.
3) Double-click on the CD-ROM icon.
4) A Browser automatically appears.
5) Select the version ARCserveIT for Windows NT you want to Install
or
6) Click on the install icon.
7) Follow the instructions on the screen.
NOTE:
For any questions related to this application or its installation, please refer to the online documentation included on the CD-ROM.
Veritas Backup Exec for Windows NT Workstation
- Veritas Backup Exec is comprehensive, easy to use 32-bit data protection for Windows NT Workstations 4.0. Built in device detection automates setup and the simple push of a button launches backups or restores. It reliably protects NetWare data, including Bindery and Trustee Information as well as guarantees consistent and reliable unattended backups with advanced Scheduling and the AutoProtect feature.
- Veritas Backup Exec uses its own tape driver so that the Windows NT tape driver does not need to be installed.
Installation
1) Insert the Desktop CD-ROM.
2) Open My Computer.
3) Double-click on the CD-ROM icon.
4) A Browser will automatically appear.
5) Select Backup Exec for Windows NT Workstation.
6) Click on the install icon.
7) Follow the instructions on the screen.
NOTE: For any questions related to this application or its installation, please refer to the online documentation provided on the Veritas Software CD-ROM.
Veritas Software Server CD-ROM
Backup Exec for Windows NT
Veritas Backup Exec for Windows NT Single/-Enterprise Edition
Backup Exec is one of the market leaders for NT backup software.
It is sold in two different versions: Single Server and Multi Server.
Backup Exec's powerful suite of management tools provides the functionality you demand, while its feature rich design makes local and remote backup completely hassle-free.
Tape Driver Installation
Before running the application, make sure the tape driver for your SLR tape drive is properly installed.
1) Select "Control Panel" from the "Settings" menu.
2) Double click on the "Tape Devices" icon. Choose the "Drivers" tab.
3) Make a note of the type of drivers currently installed. For each of the tape drivers you want to update, sequentially select each driver and click "Remove" to remove the driver from list. If you are initially adding new drivers, please skip this step.
4) Select "Add..." from the "Drivers" tab.
5) Select the "Have Disk..." button.
6) Enter the drive/path to the directory where the desired "oemsetup.inf" file is stored on disk. (
7) Select "OK" in the "Install From Disk" window.
8) Select one of the options in the "Choose the driver you want to install, and then click OK." list in the "Install Driver" window; i.e., select the description of the set of tape drives that you want load a device driver for.
Tandberg Data
9) Select "OK" in the "Install Driver" window.
10) If the option appears, then select "New" in the "Windows NT Setup" dialog; then enter the samedrive/path that was entered in step #6 above.
IMPORTANT!
Always select "New" if it appears – do NOT select "Current"
11) If you wish to install other tape device drivers, select "No" in the "System Settings Change - Do you want to restart your computer now?" window and repeat steps 4 to 10. After all the needed device drivers have been installed, select "Yes" in this window to shutdown and restart Windows NT. This will activate the changes made.
Software Installation
1) Insert the Server CD-ROM.
2) Open My Computer.
3) Double-click on the CD-ROM icon.
4) A Browser automatically appears.
5) Select Backup Exec for Windows NT.
6) Click on the install icon.
7) Follow the instructions on the screen.
NOTE: For any questions related to this application or its installation, please refer to the online documentation included on the CD-ROM.
Veritas Backup Exec Small Business Server Suite
Veritas Backup Exec Small Business Server Suite for Windows NT is a complete data protection solution designed specifically for Microsoft Small Business Server for Windows NT. Through transparent integration into the administration console, Backup Exec provides an easy-to-use application supporting virus protection, backup, restore, and disaster recovery.
Tape Driver Installation
Before running the application, make sure the tape driver for your SLR tape drive is properly installed.
1) Select "Control Panel" from the "Settings" menu.
2) Double click on the "Tape Devices" icon. Choose the "Drivers" tab.
3) Make a note of the type of drivers currently installed. For each of the tape drivers you want to update, sequentially select each driver and click "Remove" to remove the driver from list. If you are initially adding new drivers, please skip this step.
4) Select "Add..." from the "Drivers" tab.
5) Select the "Have Disk..." button.
6) Enter the drive/path to the directory where the desired "oemsetup.inf" file is stored on disk. (
7) Select "OK" in the "Install From Disk" window.
8) Select one of the options in the "Choose the driver you want to install, and then click OK." list in the "Install Driver" window; i.e., select the description of the set of tape drives that you want load a device driver for.
9) Select "OK" in the "Install Driver" window.
10) If the option appears, then select "New" in the "Windows NT Setup" dialog; then enter the same drive/path that was entered in step #6 above.
IMPORTANT!
Always select "New" if it appears – do NOT select "Current"
Tandberg Data
11) If you wish to install other tape device drivers, select "No" in the "System Settings Change - Do you want to restart your computer now?" window and repeat steps 4 to 10. After all the needed device drivers have been installed, select "Yes" in this window to shutdown and restart Windows NT. This will activate the changes made.
Software Installation
Insert the Server CD-ROM.
Open My Computer.
Double-click on the CD-ROM icon.
A Browser automatically appears.
Select Backup Exec for Windows NT Small Business
Server Suite.
Click on the install icon.
Follow the instructions on the screen.
NOTE:
For any questions related to this application or its installation, please refer to the online documentation included on the CD-ROM.
Legato Networker for Windows NT
All released SLR tape drives from SLR7 and up are certified with Legato Networker Version 5.5 and higher.
- Legato Networker is a highly reliable, enterprise-strength storage management solution for distributed networks. Networker is highly scalable and delivers superior manageability, availability and performance. Legato Networker provides built-in support for client connections and includes client software to protect systems with the same operating system as the server.
Installation
Before running the application, make sure the tape driver for your SLR tape drive is properly installed. Please refer to the tape driver installation on page 29.
1) Insert the Server CD-ROM.
2) Open My Computer.
3) Double-click on the CD-ROM icon.
4) Double-click on the SETUP.EXE file.
5) Follow the instructions on the screen
NOTE: For any questions related to this application or its installation, please refer to the online documentation included on the Legato CD-ROM.
Tandberg Data
This Page Intentionally Left Blank
Windows 2000
SCSI Host Adapter
Windows 2000 includes a driver for most SCSI host adapters. If you cannot find the appropriate driver, please refer to the installation guide provided with the SCSI host adapter or contact your computer supplier.
Tape Driver
Windows 2000 includes a tape driver that supports the SLR2, SLR3, SLR4, and SLR4DC for all versions of Windows 2000 and Service Pack.
The SLR24, SLR7, SLR40, SLR50, SLR60, SLR75, SLR100 and SLR140 require an additional tape driver that is available from the Tandberg website at www.tandberg.com.
Windows 2000 Tape Driver Installation
1) Right click on My Computer.
2) Select Manage, you should see the tape drive under "Other deices" with a "?".

text_image
Computer Management System Time Computer Management (Local) Systems Tools Direct Volumes System Information Performance Logs and Alerts Shared Powers System Manager System Systems and Groups Storage Disk Management Disk Disruptments Logos Drivers Systemable Storage Services and Applications OSAOC Computer Disk drives Designer adapters DUAL/CCB-ROPS/Stack Phage and controllers Phage, Disk drives Switchbooks File and other pointing devices Network adapters Other devices TAWRENTAL TCP/CCB Sequential Device Porto (OPR SLRT) SCB and RABS controllers Sound, buttons and audio controllers Socket adapter Universal Serial line controllersTandberg Data
3) Select the device, right click and properties.

text_image
System Management (Local) System Tools Start Menu End Menu and Settings Accessories: log and files Database Editors Database Manager Local tools and https Server Data Management Data Exchange/Server Userset Services Transposable Settings Services and Applications Test Data To Documents To Devices Name Parameters COMPUTS Computer Sub Devices Hyper-Objectors MISCELLATION Devices Hyper Disk Controlers Hyper Disk Drivers Diagnostics Mini and other pinning devices Hardware Microsoft Objectors Other Devices SUPPORTS by AT-PCB Map Forb20015.471 PCB and PAST toolfiles Single video and game control Software DevOps Advanced SocialBus controls Systems: Not Applicable System Management Design [ Style ] SUMMERATE SLAT PCB Management Devices Personality: Other Devices Methodcode: Unknown Location: For Number 3, Target ID: 10/9/1 Device title: The device is the device recommended. Scale.dlt * To choose this device to the device, clock format/dash Save Out Book Design size: Use Full Device (Product) OK Cancel4) Select the appropriate driver location.

text_image
Update Server Wizard Wizard Update Server Files where do you want to switch to access to drive this? Search on drive file by the following software version: F-\ADD\METH2.3\LNT 10.0.1\Devonet\Windows The mixed selection for reliable drives is to use the database or your computer within each of the existing software, which contains only a key option. To find this research, then find it to save any much long or much longer disk or 12.90% less than the large disk or 12.90% shorter drive. Optional support functions: Play disk drive E:\METH2 drive Send a linker Microsoft Windows Update Next Show Cancel Add Remove Help5) Follow the instructions on the screen.
Backup Applications
Windows 2000 Embedded Application
The Backup application is included in the Windows 2000 Operating System.
Installation
Before running the application, make sure the tape driver for your SLR tape drive is properly installed. Please refer to the tape driver installation on page 47.
To start the application:
- Click on START.
- Click on Programs.
- Click on Accessories.
- Click on System tools.
- Select Backup.
Please see Windows NT section for other backup applications.
Tandberg Data
This Page Intentionally Left Blank
Novell NetWare
Host Adapter
Novell NetWare includes the necessary drivers for most SCSI host adapters.
If the appropriate driver cannot be found, please refer to the installation guide provided with the SCSI host adapter.
Most of the Backup applications on Novell NetWare require the use of the Advanced SCSI Programming Interface (ASPI). The ASPI driver (ASPITRAN.LNM on Novell 4.1x and NWASPI.CDM on Novell 4.x and 5) is part of the Operating System and is normally automatically installed when the SCSI board is setup on your system.
If you have any problem to install the SCSI host adapter or install the ASPI compatible driver on this operating system, please refer to the installation guide provided with the SCSI host adapter.
Backup Applications
NetWare Embedded Backup Applet on Novell 4.1x
Installation
On the Server console, type:
LOAD TAPEDAI
SCAN FOR NEW DEVICES*
LIST DEVICES (The SLR appears on screen.)
LOAD TSA410**
LOAD SBACKUP
* When this command is executed, you may see the following warning:
PEBA-NW411:scan for new devices
11-09-98 3:17:35 pm: TAPEDAI-4.14-0
TAPEDAI.DSK: [TANDBERG SLR6] is not officially supported.
Device will be treated as generic device. USE AT OWN RISK!
PEBA-NW411:
Please ignore this warning; Tandberg Data has certified the SLR tape drives and test reports are available upon request.
** Novell 4.10 and IntranetWare 4.11 only.
NetWare Embedded Backup Applet on Novell 4.2 and 5
- Novell Sbackup (SBCON for Novell 5) provides simple Backup and Restore operations.
- This application requires a specific driver to be loaded. (See next paragraph: Installation)
Installation
On the Server console, type:
NWTAPE.CDM
LOAD TSA500
QMAN NEW*
LOAD SBCON (SBACKUP for Novell 4.2)
* The NEW option is only requested the first time you run this command. This will create a default queue that will be used by the Backup applet.
NOTE:
For any questions related to this application or its installation, please refer to the online documentation included on the CD-ROM.
Computer Associates ARCserveIT for NetWare 6.61
Computer Associates ARCserveIT for NetWare:
ARCserve/T Single Server for NetWare
Primarily designed for small to midsize organizations and single-server installations, CA's Single Server for NetWare products enable users to reap the benefits of powerful technology at a price point and level of functionality that fits their needs.
Features
1) Backup Unlimited DOS, OS2, Windows 3.X, Windows 95/98 workstations.
2) Support for Novell Netware 3.x, 4.x, 5.x 3)
Parallel Streaming
4) Automated media management
ARCserveIT Enterprise Edition for Netware - A Solution for Multiple Servers
Designed for mid- to large-size organizations, CA's Enterprise Edition products offer virtually unlimited scalability and cross-platform interoperability for large heterogeneous environments. Flexible licensing makes Enterprise Edition solutions an ideal choice for the larger users.
Tandberg Data
Tandberg Data bundles products with ARCserveIT Single Server and Enterprise Edition.
For proper installation, ARCserveIT requires a workstation (Windows 9x/NT) connected to the Novell Server.
1) Insert the ARCserve IT CD-ROM.
2) Open My Computer.
3) Double-click on the CD-ROM icon
4) A Browser will automatically appear.
5) Select ARCserve IT for NetWare.
6) Click on the install icon.
7) Follow the instructions on the screen.
NOTE:
For any questions related to this application or its installation, please refer to the online documentation provided on the ARCserveIT CD-ROM.
Veritas Software Server CD-ROM
Backup Exec for NetWare
Backup Exec is one of the market leaders for NT backup software.
It is sold in two different versions: Single Server and Multi Servers.
VERITAS Backup Exec for NetWare provides the latest backup and restore technology for quickly, reliably and simply protecting server data. Complete NDS support provides powerful data protection for large and small businesses alike.
NOTES:
- When Backup Exec for NetWare is installed on Novell 4.1X, both versions 7.5 and 8.0 can be installed.
- When Backup Exec is installed on Novell 5, only version 8.0 can be installed.
- Backup Exec version 8.5 is required for compatibility with Novell 5.1.
Installation
Server based installation
Please insert the Installation CD-ROM into the Server's CD-ROM drive and type at the server console prompt:
CD MOUNT VERITAS
LOAD VERITAS:NETWARE/BEINSTL
Follow the instructions on the screen.
Workstation based installation
Please insert the installation CD-ROM into the workstation CD-ROM drive and perform the following steps:
à Under Windows NT, Windows 95, Windows 98, Windows 98 Second Edition
1) Open My Computer.
2) Double-click on the CD-ROM icon
3) A Browser will automatically appear.
4) Select Backup Exec for NetWare.
5) Click on the install icon.
6) Follow the instructions on the screen.
1) Open the Windows File Manager.
2) Click on the drive letter assigned to the CD-ROM.
3) Double-click on the "setup.exe" file.
4) A Browser will automatically appear.
5) Select Backup Exec for NetWare.
6) Click on the install icon.
7) Follow the instructions on the screen.
NOTE:
For any questions related to this application or its installation, please refer to the online documentation provided on the Veritas Software CD-ROM.
Windows 95
Host Adapter
Windows 95 includes a driver for most SCSI host adapters. Since most host adapters support Plug-And-Play functionality, the SCSI interface will be automatically detected after its installation and the necessary driver(s) copied to the hard disk.
If the host adapter is not automatically detected, please refer to the installation guide provided with the SCSI host adapter.
Windows 95 Embedded Backup Applet
Windows 95 embedded backup Applet does not contain any drivers that support SCSI tape drives.
Backup Applications
Since the Windows 95 embedded backup applet does not include any tape driver that supports SCSI Tape drives, a third party application is needed to use any of the SLR tape drives. (For example Veritas Backup Exec for Windows 95/98)
The tape driver is provided by the backup application. For this reason, after installing your SLR tape drive, it will appear as "unknown device" by the Windows 95 Device Manager. Please ignore this information and proceed with the backup software installation.
Veritas Software Desktop CDROM
Veritas Backup Exec for Windows 95/98
- Veritas Backup Exec for Windows 95/98 provides a powerful feature-set with the easiest-to-use interface for reliable, automated Windows 95/98 data protection. Integrated Emergency Recovery feature rebuilds your entire system without reinstalling the operating system or the backup software. Selectively locate files with the File Find feature for specific data restores.
- Veritas Backup Exec uses a System tape driver that is copied to your hard disk during the installation process. This will allow Windows 95/98 to recognize your SLR tape drive.
Installation
1) Insert the Desktop CD-ROM.
2) Open My Computer.
3) Double-click on the CD-ROM icon.
4) A Browser will automatically appear.
5) Select Backup Exec for Windows 95/98.
6) Click on the install icon.
7) Follow the instructions on the screen.
NOTE:
For any questions related to this application or its installation, please refer to the online documentation provided on the Veritas Software CD-ROM.
Windows 98 Windows 98 ^2nd Edition
Host Adapter
Windows 98 and Windows 98 Second Edition include a driver for most SCSI host adapters. Since most SCSI host adapters support Plug-And-Play functionality, The SCSI interface it will be automatically detected after its installation and the necessary driver(s) copied to the hard disk.
If the host adapter is not automatically detected, please refer to the installation guide or the Read-Me file provided with the SCSI board.
Backup Applications
Windows 98 Embedded Backup Applet
- This application provides complete protection for your data, including automatic backup operation. (Scheduled Operation)
- A Backup Wizard helps you performing all operations you want to do with the SLR tape drive.
- The embedded backup applet supports Tandberg SLR2, SLR3, SLR4, SLR4DC and SLR5 tape drives. For SLR24 and SLR50, tape drives, Veritas Backup Exec for Windows 95/98 is required. (SLR7, SLR40, SLR60, SLR75, SLR100 and SLR140 may work but are not qualified by Tandberg Data)
Installation
To start the Backup application:
1) Click on START.
2) Click on Programs.
3) Click on Accessories.
4) Click on System Tools.
5) Select Backup.
Veritas Software Desktop CD-ROM Veritas Backup Exec for Windows 95/98
- Veritas Backup Exec provides a powerful feature-set with an easy to-use interface for reliable, automated data protection. Integrated Emergency Recovery feature rebuilds your entire system without reinstalling the operating system or the backup software. Selectively locate files with the File Find feature for specific data restores.
- Veritas Backup Exec uses a System tape driver that is copied to your hard disk during the installation process. This will allow Backup Exec to recognize your SLR Tape drive.
Installation
1) Insert the Desktop CD-ROM.
2) Open My Computer.
3) Double-click on the CD-ROM icon.
4) A Browser will automatically appear.
5) Select Backup Exec for Windows 95/98.
6) Click on the install icon.
7) Follow the instructions on the screen.
NOTE:
This version of the application is fully compatible with Windows 98 Second Edition.
SCO Open Server Release 5 Host Adapter
SCO OS includes a driver for most SCSI host adapters.
If you can't find the appropriate driver, please refer to the installation guide provided with the SCSI host adapter.
SLR Tape Drive Compatibility Chart
Please see www.tandberg.com Software Compatibility for the most current information
| SCO OS 5Release 5.0.4 | SCO OS 5Release 5.0.5 | |
| SLR2 | SCO certifiedTandberg certified | SCO certifiedTandberg certified |
| SLR3 | SCO certifiedTandberg certified | SCO certifiedTandberg certified |
| SLR4 | SCO certifiedTandberg certified | SCO certifiedTandberg certified |
| SLR4DC | SCO certifiedTandberg certified | SCO certifiedTandberg certified |
| SLR5 | SCO certifiedTandberg certified | SCO certifiedTandberg certified |
| SLR24 | SCO certifiedTandberg certified | SCO certifiedTandberg certified |
| SLR40 | Tandberg certified SCO certified | Tandberg certified |
| SLR50 | SCO certifiedTandberg certified | SCO certifiedTandberg certified |
| SLR60 | Tandberg Certified SCO certified | Tandberg certified |
| SLR75 | Tandberg certified Tandberg certified | |
| SLR100 | Tandberg certified SCO certified | Tandberg certified |
| SLR140 | Tandberg certified Tandberg certified | |
Installation
1) Login as root.
2) Type the following command: MKDEV TAPE.
3) Select Install a SCSI Tape Drive.
4) Enter the prefix of the SCSI host adapter that supports this device.
(Typing h gives you a list of the supported SCSI host adapter).
5) Which SCSI host adapter supports this device?
(If only one SCSI host adapter in installed select 0. If two SCSI host adapter of the same type are installed, select 1).
6) What is the target ID for this device? (2 is the Tandberg default SCSI-ID)
7) What is the LUN of this device?
(Must be set to 0).
8) Update the SCSI Configuration?
(Check first that the table on the screen is conformed to the Tape Drive configuration).
NOTES:
- The Kernel has to be rebuilt to reflect the new Hardware configuration, and a reboot is mandatory before you can use your SLR tape drive. - For any questions related to this operating system or its embedded Backup applet, please refer to the documentation provided on the SCO OS CD-ROM.
Backup Applications
SCO Open Server System Commands
TAR, CPIO and DD allow simple backup, verify or restore operations to be performed.
2 different device drivers can be used:
- A Non Rewind device driver (used to perform append Backup)
- A Rewind device driver (used only to perform overwrite backup)
For a complete explanation on how to use the system commands, please refer to the SCO Open Server documentation, or the online help. (MAN command).
Tar command examples:
tar cvf/dev/rStp0 /etc will perform the backup of the /etc directory
tar tvf/dev/rStp0 will read the data on the tape
tar xvf /dev/rStp0 will restore the data from the tape to the current directory tree
SCO Open Server Backup Manager
Installation
SCO Open Server Graphic Interface 1) Click on System Administration.
2) Double-click on Backup Manager.
SCO Open Server Console 1) Login
as Root.
2) Type SCOADMIN.
3) Select Backup Manager.
ARCserve Open Lite for SCO Open Server
- Embedded with SCO Open Server Release 5, ARCserve Open Lite offers simple, comprehensive Backup and Restore for your SCO System.
- The full-featured version of ARCserve Open provides advanced backup and restore Services, including support for NetWare Server and Windows 95/98 client.
- The SLR2, SLR3 and SLR4 are supported.
NOTE: ARCserve Open Full-featured version is required for the support of the SLR5, SLR24, SLR7, SLR40, SLR50, SLR60, SLR75, SLR100 and SLR140 products. Please refer to the Computer Associates Compatibility Guide at www.cai.com and Tandberg Compatibility Guide at www.tandberg.com for more information.
Installation
The installation of ARCserve Open Lite is included in the SCO Open Server Setup.
If it was not selected during the O/S setup, you can use the Software Manager to install it.
SCO OS Graphic Interface
1) Double-click on Software Manager. 2)
Select Software, then Install New.
3) Follow the instructions on the screen.
SCO OS Console
1) Login as Root.
2) Type SCOADMIN.
3) Select Software Manager, then Software and Install New.
4) Follow the instructions on the screen.
NOTE: For any questions related to this application or its installation, please refer to the online documentation provided on the SCO CD-ROM.
SCO UnixWare
Host Adapter
SCO UnixWare includes a driver for most SCSI host adapters. If the appropriate driver cannot be found, please refer to the installation guide provided with the SCSI host adapter.
Installation
1) Install the SLR Tape Drive. 2)
Turn On the PC.
3) During the boot process, SCO UnixWare automatically detects the SLR and install the correct tape driver.
NOTE:
For any questions related to this operating system or its embedded Backup applet, please refer to the documentation provided on the SCO CD-ROM.
Backup Applications
SCO UnixWare System Command
TAR, CPIO and DD allow simple backup, Verify or Restore operation to be performed.
2 different device drivers can be used:
- A Non Rewind device driver (used to perform append Backup)
- A Rewind device driver (used only to perform overwrite backup)
For a complete explanation on how to use the system commands, please refer to the SCO UnixWare documentation, or the online help. (MAN command).
Tar command examples:
tar cvf /dev/rmt/c0s0 /etc will perform the backup of the /etc directory
tar tvf/dev/rmt/c0s0 will read the data on the tape
tar xvf /dev/rmt/c0s0 will restore the data from the tape to the current directory tree
SCO UnixWare ARCserveIT
- Embedded with SCO UnixWare 7, Computer Associates ARCserveIT Enterprise Edition offers complete and comprehensive Backup and Restore for your SCO System.
- The SLR5, SLR24, SLR7, SLR40, SLR50, SLR60, SLR75, SLR100 and SLR140 are supported. Please refer to the latest compatibility information from our web site at www.tandberg.com.
Installation
The installation of ARCserveIT is included in the SCO UnixWare setup.
If it was not selected during the O/S setup, you must use the Software Management to install it.
SCO UnixWare Graphic Interface 1)
Double-click on SCO Admin.
2) Select Software Management.
3) Select application Installer.
4) Follow the instructions on the screen.
SCO UnixWare Console
1) Login as Root.
2) Type SCOADMIN.
3) Select Software Management.
4) Select application Installer.
5) Follow the instructions on the screen.
NOTE: For any questions related to this application or its installation, please refer to the online documentation provided on the SCO UnixWare CD-ROM.
Sunsoft Solaris
Tape Drive Installation
1) Install the SLR Tape Drive.
2) Turn on the SUN workstation or server.
3) Use Boot -r.
This will reconfigure the /devices directory for the SLR to work properly on the machine.
For improved performance using the SLR24, SLR7, SLR40, SLR50, SLR60, SLR75, SLR100 and SLR140, a specific system file can be modified:
/kernel/drv/st.conf
ST.CONF File entries for Tandberg SLR24, SLR7, SLR40, SLR50, SLR60, SLR75, SLR100 and SLR140:
"TANDBERGSLR6", "Tandberg SLR24", "TANDBERG", "TANDBERGMLR3", "Tandberg SLR50", "TANDBERG", "TANDBERGSLR7", "Tandberg SLR7", "TANDBERG", "TANDBERGSLR40", "Tandberg SLR40", "TANDBERG", "TANDBERGSLR60", "Tandberg SLR60", "TANDBERG", "TANDBERGSLR75", "Tandberg SLR60", "TANDBERG", "TANDBERGSLR100", "Tandberg SLR100", "TANDBERG", "TANDBERGSLR140", "Tandberg SLR140", "TANDBERG",
TANDBERG = 1,0x37,0,0x963b,1,0,0;
NOTE: Updated configuration file (ST.CONF) can be downloaded from the Tandberg WEB at www.tandberg.com. Please refer to the Readme provided with the file for more information on the installation process.
Backup Applications
Sun System Command
TAR, CPIO and DD allows simple backup, verify or restore operations to be performed.
2 different device drivers can be used:
- A Non Rewind device driver (used to perform append Backup)
- A Rewind device driver (used only to perform overwrite backup)
Tar command examples:
tar cvf /dev/rmt/0 /etc will perform the backup of the /etc directory
tar tvf /dev/rmt/0 will read the data on the tape
tar xvf /dev/rmt/0 will restore the data from the tape to the current directory tree.
For a complete explanation on how to use the system commands, please refer to the Sun documentation, or the online help. (MAN command).
Legato NetWorker for Solaris
All SLR tape drives (from SLR7 to SLR140) are certified with Legato Networker Version 5.5 and higher.
- Legato Networker is a highly reliable, enterprise-strength storage management solution for distributed networks. Networker is highly scalable and delivers superior manageability, availability and performance. Legato Networker provides built-in support for client connections and includes client software to protect systems with the same operating system as the server.
Installation
Before running the application, make sure the tape driver for your SLR tape drive is properly installed. Please refer to the tape driver installation on page 61.
1) Login as root.
2) Locate the Solaris directory on the installation CD.
3) Set the PATH environment for the user root to the location where NetWorker executables reside.
4) Enter "pkgadd -d ./" to install NetWorker.
5) Follow the instructions on the screen
Please refer to the Installation documentation provided on the Legato CD-ROM for additional information.
This Page Intentionally Left Blank
Apple Macintosh
Backup Applications
Dantz Retrospect
Dantz Retrospect offers the following features:
- Automatic Setup with EasyScript Uses answers to a few simple questions to create backup scripts that run automatically with multiple sources, destinations, file selection criteria, and schedules.
• Fully Automated Backups
Launches automatically to run unattended backups on any schedule (daily, weekly, etc.).
- One-step Restore
Restore an entire hard disk in a single step even after multiple incremental backups. Or, restore any part of your hard disk exactly the way it was after any backup session.
- Disaster Recovery
Emergency bootable CD aids in disaster recovery in the event of complete hard drive failure.
Note: SLR 2-5 tape drives are supported in the native version. For the Tandberg SLR24, SLR40, SLR50, SLR60, SLR75, SLR100 and SLR140 an Advanced Driver Kit is required, available from Dantz. (www.dantz.com)
Retrospect Installation
1) Insert Disk 1 (or the Retrospect CDROM depending on the version you purchased).
2) Double click on the Install icon.
3) Follow the instructions on the screen.
NOTE:
For any questions related to this application or its installation, please refer to the online documentation provided with the application.
This Page Intentionally Left Blank
IBM RS/6000/pSeries
Tape Drive Installation
To install any of the SLR tape drives on IBM AIX, the Smit utility must be used.
1) Be sure the SCSI-ID of the tape drive is not used in the SCSI Sub-System.
2) Install the SLR tape drive.
3) Login as root.
4) Run smit devices.
5) Select Install/Configure Devices Added after IPL.
6) Follow the instructions on the screen.
For improved performance on SLR24, SLR7, SLR40, SLR50, SLR60, SLR75, SLR100 and SLR140, the default block size should be set to 0.
1) Run smit devices.
2) Select Change/Show characteristics of a tape drive.
3) Select the tape driver you want to modify.
4) Set the BLOCK size to 0.
Backup Applications
IBM AIX System Command
TAR, CPIO and DD allow simple backup, Verify or Restore operation to be performed.
2 different device drivers can be used:
- A Non Rewind device driver (used to perform append Backup)
- A Rewind device driver (used only to perform overwrite backup)
Please refer to the IBM AIX documentation for more information.
Tar command examples:
tar cvf /dev/rmt0 /etc will perform the backup of the /etc directory
tar tvf /dev/rmt0 will read the data on the tape tar xvf /dev/rmt0 will restore the data from the tape to the current directory tree
IBM AIX Storage Manager
Installation
This application is part of the operating system.
1) Open the System Administrator Window.
2) Double-click on Storage Manager.
3) The list of the available tape device(s) appears on the screen.
4) Follow the instructions on the screen to continue.
NOTE: For any questions related to this application or its installation, please refer to the IBM online documentation.
Legato Networker for AIX
Tandberg SLR24, SLR7, SLR40, SLR50, SLR60, SLR75, SLR100 and SLR140 tape drives are certified with Legato Networker Version 5.5 and higher.
- Legato NetWorker is a highly reliable, enterprise-strength storage management solution for distributed networks. NetWorker is highly scalable and delivers superior manageability, availability and performance. Legato NetWorker provides built-in support for client connections and includes client software to protect systems with the same operating system as the server.
- Legato Networker uses the AIX system tape driver. Please refer to page 57 for installation.
Installation
The installation is depending on the version of the AIX operating system. Please refer to the Installation documentation provided on the Legato CD-ROM.
NOTE: For any questions related to this application or its installation, please refer to the online documentation included on the CD-ROM.
Quadratec Time Navigator for AIX
Time Navigator is the professional Enterprise-wide Backup and Archival solution.
Time Navigator is a software that backs up automatically and archives data. It also provides safe data restoration on several locations whose backup requirements and constraints are identical.
Installation
Please refer to the Installation documentation provided for instructions and additional information.
Arkeia Backup Software for AIX
Arkeia is a software that backs up and archives data. It has a simple interface, but very powerful features.
Installation
Please refer to the Installation documentation provided for instructions and additional information.
HP/UX
Tape Drive
- When the HP Server or workstation is equipped with GSC Bus Architecture, the HPUX System tape driver can be used by all backup applications.
NOTE:
A patch must be downloaded on the Tandberg WEB for this environment. Please refer to the Readme file provided with the patch for more information.
- When the HP Server or Workstation is equipped with PB Bus Architecture (Precision Bus), a tape driver is available on the Tandberg WEB at www.tandberg.com. Please refer to the Installation Procedure provided with the driver for more information.
Tape Drive Installation (GSC-bus Only)
To install the SLR tape drives, the SAM utility must be used.
1) Login as root.
2) Run SAM.
3) Select Peripheral Devices.
4) Select Action/Add.
The SLR will be automatically detected and the necessary drivers installed.
Backup Applications
HP/UX System Command
TAR, CPIO and dd allows simple backup, verify or restore operations to be performed.
2 different device drivers can be used:
- A Non Rewind device driver (used to perform append Backup)
- A Rewind device driver (used only to perform overwrite backup)
Tar command examples:
tar cvf /dev/rmt0 /etc will perform the backup of the /etc directory
tar tvf /dev/rmt0 will read the data on the tape tar xvf /dev/rmt0 will restore the data from the tape to the current directory tree
For a complete explanation on how to use the system commands, please refer to the HPUX documentation, or the online help. (MAN command).
Linux
SCSI Host Adapter
Linux contains a driver for most SCSI host adapters.
If the driver cannot be found, please refer to the documentation provided with the SCSI host adapter.
Tape Drive Installation
1) Install the SLR Tape Drive. 2)
Turn On the PC.
3) During the boot process, Linux automatically detects the SLR and install the correct tape driver.
NOTE:
For any questions related to this operating system or its embedded backup applet, please refer to the documentation provided on the Linux CDROM.
Backup Applications
Linux System Command
TAR, CPIO and DD allows simple backup, verify or restore operations to be performed.
2 different device drivers can be used:
- A Non Rewind device driver (used to perform append Backup)
- A Rewind device driver (used only to perform overwrite backup)
Tar command examples:
tar cvf /dev/st0 /etc will perform the backup of the /etc directory
tar tvf /dev/st0 will read the data on the tape
tar xvf /dev/st0 will restore the data from the tape to the current directory tree
For a complete explanation on how to use the system commands, please refer to the Linux documentation, or the online help. (MAN command).
Legato Networker for Linux
Tandberg SLR24, SLR7, SLR40, SLR50, SLR60, SLR75, SLR100 and SLR140 tape drives are certified with Legato Networker Version 5.5 and higher.
- Legato NetWorker is a highly reliable, enterprise-strength storage management solution for distributed networks. NetWorker is highly scalable and delivers superior manageability, availability and performance. Legato NetWorker provides built-in support for client connections and includes client software to protect systems with the same operating system as the server.
- Legato Networker uses the Linux system tape driver. Please refer to page 70 for installation.
Installation
1) Insert the NetWorker installation CD-ROM.
2) Open the Linux Console.
3) Locate the Linux directory on the installation CD.
4) Type “./NWInstall” to install NetWorker.
5) Follow the instructions on the screen.
Please refer to the Installation documentation provided on the Legato CD-ROM for additional information.
Quadratic Time Navigator for Linux
Time Navigator is the professional Enterprise-wide Backup and Archival solution.
Time Navigator is a software that backs up automatically and archives data. It also provides safe data restoration on several locations whose backup requirements and constraints are identical.
Installation
Please refer to the Installation documentation provided for instructions and additional information.
Computer Associates ARCServelT for Linux
ARCServeIT is the professional Enterprise-wide Backup and Archival solution in one package.
Installation
Please refer to the Installation documentation provided for instructions and additional information.
EST Inc. BRU Pro for Linux
BRU PRO is a software that backs up automatically and archives data. It also provides safe data restoration on several locations whose backup requirements and constraints are identical.
Installation
Please refer to the Installation documentation provided for instructions and additional information.
Arkeia Backup Software for Linux
Arkeia is a software that backs up and archives data. It has a simple interface, but very powerful features.
Installation
Please refer to the Installation documentation provided for instructions and additional information.
Tape Drive Utility Disk
Provided with each Tandberg SLR tape drive kit and solution, the Tandberg Tape Drive Utility Disk/Resource CD offers the following utilities:
- Tandberg Tape Drive Optimizer
This utility is used for tuning the SLR performance on SLR24 and SLR50 only.
SLR7, SLR40, SLR60, SLR75, SLR100 and SLR140 have an "Auto-sensing" transfer rate and will automatically adjust to optimize performance on most systems.
A Dos, Windows 95/98 (Second Edition included) and Windows NT version is included.
-FlashIt
This utility is used for updating the SLR firmware.
A Dos, Windows 95/98 (Second Edition included) and Windows NT version is included. For SLR7, 40, SLR60, SLR75, SLR100, SLR140, an updated version is available on the Tandberg WEB at www.tandberg.com.
- Tandberg Tape Drive Viewer
This utility gives detailed information on the SLR configuration. A Windows 95/98(Second Edition Included) and Windows NT version is included.
NOTE: For any information regarding this utility disk or its installation, please refer to the README file available on the disk.
This Page Intentionally Left Blank
Troubleshooting
In case of problems with operation of your SLR tape drive and before contacting the Customer Services Group, please be sure to check the following:
Hardware Checking
- Check that the system recognizes the tape drive during the boot process.
- Check that the SCSI host adapter recognizes the tape drive during its initialization.
- Did you check the tape drive Front Panel LED status?
- Check that the tape drive has been configured correctly.
- Check that the SCSI-ID of the drive is not conflicting on the SCSI-bus.
- Check that the power cable is inserted correctly.
- Check that the SCSI cable connections are made correctly.
Software Checking
- Check that the operating system does not report a problem during the boot.
- Check that the correct Tape Device Driver has been installed properly.
- Check that the driver for the SCSI host adapter is present and loaded properly.
- Check that the Backup software does not report an error message when loading.
- Reinstall the Backup Software and check that the SLR is recognized.
Verifying Recent Changes
If the SLR has been installed previously and operating correctly but is now incurring a problem, verify any recent changes to the system to ensure that these changes are not causing the problem. Try the following:
1) If the system configuration has changed, remove the change to see if it affected the tape drive.
2) If an operating system corrective patch has been installed, remove it to see if it affected the tape drive.
3) If a SCSI device has been added, check for SCSI-ID conflicts.
4) If a SCSI device has been added, check if the SCSI termination has been properly set.
Correcting Intermittent Failures
If the SLR fails intermittently:
1) Clean the tape drive.
2) Check the SCSI termination on the SCSI Bus.
If the problem occurs in the middle of an operation:
1) Try with a different data cartridge.
2) If the error occurs when the software scans for the files to be backed-up, please operate a SCANDISK operation to check the state of the File Systems(s) and hard disk.
If the error occurs always on the same file or directory:
1) Try to remove the file or directory from the Backup operation to see if that corrects the problem.
2) Try with a different data cartridge.
Software Troubleshooting
A complete Software Troubleshooting Guide is available on the Tandberg WEB at the following URL: www.tandberg.com.
Appendix Regulatory Compliance Notices
Manufacturer Declaration of Conformity:
This is to certify that the SLR ^™ Tape Backup Systems: Internal
SLR ^TM models:

Tandberg SLRx Internal Tape Drive Tandberg SLRxx Internal Tape Drive EC Certificate of Conformity Tandberg SLRxxx
Intern
al Tape Drive
External SLR ^TM models:
Tandberg SLRx Ext. External Tape Solution Tandberg SLRxx Ext. External Tape Solution Tandberg SLRxxx Ext. External Tape Solution
Comply with the provisions of the Directive of the Council of the European Communities on the approximation of the laws of the Member States relating to electromagnetic compatibility (EMC Directive 89/336/EEC of 3. May 1989). These products also comply with the Low Voltage Directive (73/23/EEC of 19. February 1973).
This declaration of conformity of the European Communities is the result of an examination carried out by the Quality Assurance Department of Tandberg Data ASA in accordance with European Standards EN 50081-1 and 50082-1, as laid down in Article 10 of the Directive. The SLRx™ Tape Backup System complies with the limits for Class B computing device pursuant to subpart B of Part 15 of the FCC Rules. Only equipment complying with Class B limits may be attached to this backup system.
Operation with non-complying equipment is likely to result in interference to radio and TV reception.
The SLRx ^™ Tape Backup System complies with the Safety Standards: EN 60950, UL 1950, CSA 950 and TÜV 60950.
This Page Intentionally Left Blank
Glossary of Terms
Active Termination
Enhanced SCSI termination that provides better stability and noise immunity of the electrical signals on the SCSI-bus lines.
ALDC
Adaptive Lossless Data Compression. The hardware data compression method used with SLR4DC, 5, 24, 7, 40, 50, 60, 75, 100 and 140 tape drives.
Append When data is written after previously recorded data, as opposed to overwriting the previously recorded data.
ASPI
Advanced SCSI Programming Interface. Standard SCSI software that acts as a liaison between host adapters and SCSI device drivers. ASPI enables host adapters and device drivers to share a single SCSI hardware interface.
Auto sensing
SLR feature that allow detection of the best transfer rate to use for optimizing performance on the SCSI-bus.
BOT
Designated by a specific hole pattern on quarter Beginning of Tape inch data cartridge media.
Data Compression
There are two ways to compress data on tape. Through the software data compression feature for the SLR2, SLR3 and SLR4 or using hardware data compression on the SLR4-DC, SLR5, SLR24, SLR40, SLR50, SLR60, SLR75, SLR100 and SLR140.
Device Driver A software program that enables a computer to communicate with peripheral devices such as a hard disk or tape drives. Each type of device needs a different device driver. Device drivers are stored on a computer's hard disk and are typically loaded into memory at boot time.
EEPROM Electrically Erasable Programmable Read Only. An integrated circuit typically used to store configuration information. GUI Graphical User Interface. Software which interacts with the user.
ID See SCSI-ID.
LVD LVD stands for Low Voltage Differential.
LVD provides better stability and noise immunity of the electrical signals on the SCSI-bus lines. LVD also allows longer SCSI Bus length.
Overwrite A method of recording over data previously written on tape without performing a erase operation before.
PNP
A hardware and software mechanism that provides Plug-and-Play an automatic way for the system to self-configure system resources such as I/O ports, IRQ, and DMA channels between PNP cards and other devices in the system.
RWW Read While Write: All Tandberg Tape drive automatically and internally read the data just being written to the tape to avoid writing to bad block.
SCAM
A SCSI protocol that assigns automatically SCSISCSI IDs to SCAM capable devices such as the SLR Tape Drives when you boot the system. Configured AutoMagically
SCSI-ID A unique identifier assigned to SCSI devices that enables them to communicate with a computer when they are attached to a host adapter via the SCSI-bus. Each SCSI host adapter Board has eight available SCSI-IDs with numbers 0 through 7 (or 0 through 15 for Wide SCSI adapters). Usually the host adapter itself is assigned SCSI-ID 7.
SLR ^TM
Scaleable Linear Recording.
Ultra/Ultra2
16 bit WIDE SCSI/LVD interface used with SLR7,
24, 40, 50, 60, 75, 100 and 140 tape drives.
SLR ^TM is a registered trademark of Tandberg Data.
Veritas Software, Veritas Backup, Veritas Backup Exec are trademarks of Veritas Software Inc. in the United States. Computer
Associates, ARCserveIT are trademarks of Computer Associates Inc. in the United States.
Windows NT, Windows 95, Windows 98, MS-DOS, Windows are registered trademarks of Microsoft Corporation in the United States.
Novell NetWare is a registered trademark of Novell Inc.
All other trademarks are registered marks of their respective owners.
This Page Intentionally Left Blank
TANDBERG SLR
PC-BACKUP-SYSTEME
| Tandberg SLR 9048 43 05 08 Tandberg SLR Product Line Reference Manual | |
| 6028 42 26 86 Tandberg SLR Product Line Maintenance Manual | |
| 6047 42 30 42 Tandberg SLR Product Line SCSI-2 Interface Functional Specifications | |
| 9084 43 15 65 | Tandberg SLR Product Line - SLR5 4.0/8.0GB Product Verification Reports |
| 9033 43 01 37 | Tandberg SLR Product Line - SLR4 (TDC 4220) Product Verification Reports |
| 9031 43 04 44 | Tandberg SLR7, SLR24, SLR40, SLR50, SLR60 |
| 9063 43 07 43 | SLR75, SLR00 and SLR140 Reference Manual Tandberg SLR7, SLR24, SLR40, SLR50, SLR60 SLR75, SLR00 and SLR140 - SCSI Interface Functional Specifications |
| 9100 43 17 88 | Tandberg SLR50 (MLR3) PVR Manual |
| 9144 43 21 67 Tandberg SLR100, SLR60 and SLR40 PVR Manual - Internal | |
| 9148 43 22 23 | Tandberg SLR24-100 PVR Manual - External |
| 9149 43 22 22 Tandberg SLR2-5 PVR Manual - External | |
| 9156 42 22 46 Tandberg SLR24 and SLR50 PVR Manual - Internal (VU2000) | |
| 9162 43 23 17 Tandberg SLR7 PVR Manual - Internal | |
Hinweis:
text_image
Jumper Block/Jumper Block/Bloc de Cavities ID = 0 ID = 1 ID = 2 ID = 3 ID = 4 ID = 5 ID = 6 ID = 7Interne SLR7 ® SLR140:

text_image
Jumper Block/Jumper Block/Bloc de Cavaliers ID = 0 ID = 1 ID = 2 ID = 3 ID = 4 ID = 5 ID = 6 ID = 7 ID = 8 ID = 9 ID = 10 ID = 11 ID = 12 ID = 13 ID = 14 ID = 15natural_image
Front view of a computer rack unit with indicator lights and ports (no text or symbols)SLR7-140
SCSI-ID Thumb-wheel Switch
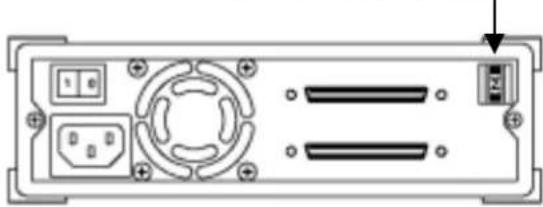
natural_image
Front view of a device rear panel with buttons, ports, and indicator lights (no text or symbols)Tandberg SLR24, SLR7, SLR40, SLR50, SLR60, SLR75, SLR100, SLR140
www.adaptec.com/products/solutions/cables.html
natural_image
Technical diagram of a computer tower with internal components and drive unit (no text or labels visible)Tandberg SLR24. SLR7. SLR40. SLR50.
SLR60, SLR75, SLR100, SLR140 Laufwerk e
HINWEIS
natural_image
Diagram of a computer monitor with cable inserted into a drive (no text or symbols visible)Tandberg SLR2 ^® SLR5 Laufwerke

natural_image
Diagram of a computer tower with cable and connector, no text or symbols presentTandberg SLR24, SLR40, SLR50, SLR60, SLR75, SLR100, SLR140 Laufwerke
text_image
Fastening screw x 4 Tandberg Data supplied mounting rails Drawing No. 47042text_image
Use screws fastening Netfinity blind cover ← Fastening screw x 2 Tandberg Data supplied mounting rail Drawing No. 47042 Standard IBM Netfinity 5000/7000 rail (incl. screws) mounted inside the IBM Netfinity 5000 server (right side), and in a plastic bag for the Netfinity 7000.www.adaptec.com/products/solutions/cables.html
natural_image
Illustration of an open refrigerator with a close-up view showing internal components (no text or symbols)SLR60, SLR75, SLR100, SLR140

natural_image
Line drawing of a computer tower with an open drive and a paper box inserted (no text or symbols)Tandberg SLR24, SLR7, SLR40, SLR50,
Tandberg SLR24, SLR7, SLR40, SLR50, SLR60, SLR75, SLR100, SLR140
beendet ist.
(Retension Condition)
natural_image
Simple diagram with a green starburst and horizontal line, no text or symbols presentnatural_image
Simple line drawing of a kitchen appliance with a bowl, a ring, and a green indicator light (no text or symbols)natural_image
Simple diagram with a green circle and horizontal line inside a square frame (no text or symbols)natural_image
Simple line drawing of a kitchen appliance with a circular top and three side buttons (no text or symbols)Tandberg SLR24, SLR7, SLR40, SLR50, SLR60, SLR75, SLR100 und SLR140
Tandberg SLR24, SLR7, SLR40, SLR50, SLR60, SLR75, SLR100, SLR140
text_image
Windows NT Setup The driver(s) for this Tape Device are already on the system. Do you want to use the currently installed driver(s) or install new one(s). Current New Cancel HelpARCserveIT Workgroup Edition
text_image
Computer Management File Edit View Help System Tools System Information Performance Loop and Methods Shareholders Disk Management Local Users and Settings Storage Disk Management Disk Infrastructure Logical Driver Automotive Storage Services and Applications C:\WINDOWS\ST-MCS Sequential Devices Duty (COM SLIFT) DCB and FHD controllers Sound, video and image controllers System devices Username and file controllerstext_image
Engine Active Driver: Drive Wizard Active Drive Files Where to use Start Windows to access the drive file? Close to drive file for the following hardware drives: C:\WIN\WIN\1.047.2023 Sequential Drive The progress is driven by available drives in all other databases in your computer within the existing optional drive modules that are available. To maintain this drive, then it may be automatically replacing disk or 12.0GHz drive, except for having disk or 12.0 GHz drive, which can be replaced by a drive. Content must be done: - Copy drive drive - EDA drive drive - Update drive drive - Microsoft Windows Display + Start Cancel ShowPEBA-NW411:scan for new devices
11-09-98 3:17:35 pm: TAPEDAI-4.14-0
TAPEDAI.DSK: [TANDBERG SLR6] is not officially supported.
Device will be treated as generic device. USE AT OWN RISK!
PEBA-NW411:
TANDBERG = 1,0x37,0,0x963b,1,0,0;
HINWEIS:
IBM AIX-Storage-Manager
Installation
SLR ^TM Scaleable Linear Recording.
| Tandberg SLR | 9048 43 05 08 | Tandberg SLR Product Line Reference Manual | |
| 6028 42 26 8 | € | Tandberg SLR Product Line Maintenance Manual | |
| 6047 | 42 30 42 | Tandberg SLR Product Line SCSI-2 Interface Functional Specifications | |
| 9084 43 15 65 | Tandberg SLR Product Line - SLR5 4.0/8.0GB Product Verification Reports | ||
| 9003 | 43 01 37 | Tandberg SLR Product Line - SLR4 (TDC 4220) Product Verification Reports | |
| 9051 43 04 44 | Tandberg SLR7, SLR24, SLR40, SLR50, SLR60, SLR75, SLR100 and SLR140 Reference Manual | ||
| 9063 | 43 07 48 | Tandberg SLR7, SLR24, SLR40, SLR50, SLR60, SLR75, SLR100 and SLR140 - SCSI Interface Functional Specifications | |
| 9100 | 43 17 88 | Tandberg SLR50 (MLR3) PVR Manual | |
| 9144 43 21 6 | 7 | Tandberg SLR100, SLR60 and SLR40 PVR Manual - Internal | |
| 9148 43 22 2 | 3 | Tandberg SLR24-100 PVR Manual - External | |
| 9149 | 43 22 22 | Tandberg SLR2-5 PVR Manual - External | |
| 915 € | 42 22 46 | Tandberg SLR24 and SLR50 PVR Manual - Internal (VU2000) | |
| 9162 43 23 1 | 7 | Tandberg SLR7 PVR Manual - Internal |
text_image
Grid pattern with alternating black and white squares, some shaded, arranged in vertical columnsID = 0 ID = 1 ID = 2 ID = 3 ID = 4 ID = 5 ID = 6 ID = 7
natural_image
Back panel diagram of a computer drive or server unit with ports, connectors, and an arrow pointing to a component (no text or symbols present)natural_image
Back panel diagram showing electronic device ports and connectors (no text or labels)Configuration large/étroite
www.adaptec.com/products/solutions/cables.html
REMARQUE :
natural_image
Diagram of a computer monitor with cable inserted into the case (no text or symbols)natural_image
Diagram of a computer tower connected to a cable via a connector (no text or symbols visible)Lecteurs Tandberg SLR24, SLR7, SLR40, SLR50, SLR60, SLR100
Configuration large/étroite
www.adaptec.com/products/solutions/cables.html
natural_image
Illustration of a refrigerator with an open drawer and a close-up inset showing the door handle (no text or symbols)Tandberg SLR24, SLR7, SLR40, SLR50, SLR60, SLR75, SLR100, SLR140
natural_image
Illustration of a computer tower with an open storage tray and a file slot, no text or symbols present.text_image
Bout on EJECTTandberg SLR24, SLR7, SLR40, SLR50, SLR60, SLR75, SLR100, SLR140
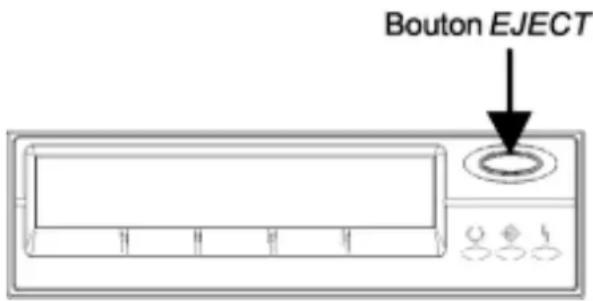
text_image
Bouton EJECTnatural_image
Simple diagram with a green starburst symbol inside a rectangular frame (no text or labels)natural_image
Simple diagram of a device with a circular top, two white ovals below, and a green and orange lightbulb on the bottom (no text or symbols)natural_image
Simple line drawing of a rectangular frame with a green circular element at the center (no text or symbols)natural_image
Simple line drawing of a kitchen appliance with a circular top and three side buttons (no text or symbols)Tandberg SLR24, SLR7, SLR40, SLR50, SLR60, SLR75, SLR100, SLR100
text_image
Windows NT Setup The driver(s) for this Tape Device are already on the system. Do you want to use the currently installed driver(s) or install new one(s). Current New Cancel HelpApplication NT incluse
ARCserveIT Workgroup Edition
text_image
Computer Management Back menu View Time Computer Management (Local) Systems Tools Credit Viewer System Performance Performance Log and HMI Shareholders Central Managers Local Users and Groups Storage Disk Management Disk Data Generator Logic Drivers Removable Storage Services and Applications Outperform Computer Disk drives Display adapters Data2-ADACs Photo drive controllers Photo drive devices Instruments File and other virtual devices Phrases Network adapters Other devices TAWBRENE TCP/SCB Sequential Device Center(COR-SORT) SCB and FANDB controllers Sound, video and power controllers System drivers Unboxed local file controllersTandberg Data
PEBA-NW411:scan for new devices
11-09-98 3:17:35 pm: TAPEDAI-4.14-0
TAPEDAI.DSK: [TANDBERG SLR6] is not officially supported.
Device will be treated as generic device. USE AT OWN RISK!
PEBA-NW411:
TANDBERG = 1,0x37,0,0x963b,1,0,0;
IBM AIX Storage Manager Installation
ASPI Advanced SCSI Programming Interface.
SCSI Configured AutoMatically.
| Tandberg SLR | 9048 43 05 08 Tandberg SLR Product Line Reference Manual6028 42 26 86 Tandberg SLR Product Line Maintenance6047 42 30 42 Tandberg SLR Product Line SCSI-2 Interface Functional Specifications |
| Tandberg SLR Product Line - SLR5 | |
| 9084 43 15 65 4.0/8.0GB Product Verification Reports | |
| Tandberg SLR Product Line - SLR4 (TDC 4220) Product Verification Reports | |
| Tandberg SLR24, SLR40, SLR7, SLR50, SLR60, SLR75, SLR100 and SLR140 Reference Manual | |
| Tandberg SLR24, SLR40, SLR7, SLR50, SLR60, SLR75, SLR100 and SLR140 SCSI Interface Functional Specifications | |
| Tandberg SLR50 (MLR3) PVR Manual | |
| 9144 43 21 67 Tandberg SLR100, SLR60 and SLR40 PVR Manual - InternalTandberg SLR24-100 PVR Manual - External | |
| 9149 43 22 22 Tandberg SLR2-5 PVR Manual - External | |
| 9156 42 22 46 Tandberg SLR24 and SLR50 PVR Manual - (VU2000) Internal | |
| 9162 43 23 17 Tandberg SLR7 PVR Manual - Internal |
text_image
Diagram showing a device with labeled components and an upward arrow indicating direction or movement.Jumper Block/Bloc de Cavaliers/ Bloque de Jumpers
text_image
Grid pattern with alternating white and black squares, some shaded, likely representing a binary or encoded data visualization.ID = 0 ID = 1 ID = 2 ID = 3 ID = 4 ID = 5 ID = 6
natural_image
Pure electrical circuit lines without any symbolsJumper Block/Bloc de Cavaliers/ Bloque de Jumpers
natural_image
Back panel diagram of a computer drive or chassis with ports and connectors (no text or symbols)
natural_image
Back panel diagram showing electronic components including a rotary knob, buttons, and a switch (no text or labels)www.adaptec.com/products/solutions/cables.html
natural_image
Diagram of a computer setup showing an open drive and internal components (no text or labels visible)
natural_image
Technical diagram of an internal computer setup with drive, tower, and monitor components (no text or labels visible)Lectores Tandberg SLR2® SLR5
Lectores Tandberg SLR24, SLR40, SLR7, SLR50, SLR60, SLR75, SLR100 y SLR100
natural_image
Diagram of a computer monitor with cable inserted into the drive (no text or symbols visible)Lectores Tandberg SLR2® SLR5
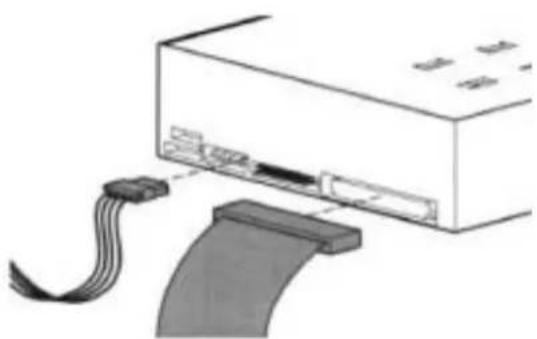
natural_image
Diagram of a computer tower with cable and connector, no text or symbols presentLectoresTandberg SLR24, SLR40, SLR7, SLR50, SLR60, SLR75, SLR100 y SLR140
NOTA:
www.adaptec.com/products/solutions/cables.html
natural_image
Back panel diagram of an electronic device showing ports, connectors, and a central hub (no text or labels)
natural_image
Diagram of a device rear panel with labeled ports and connectors (no text or symbols)Conectar seguidamente la toma de corriente.
natural_image
Illustration of a refrigerator with an open door and a close-up inset showing the door handle (no text or symbols)natural_image
Line drawing of a computer tower with an open drive base and a monitor on the wall (no text or symbols)natural_image
Simple diagram with a green sun-like symbol inside a rectangular frame, no text or labels present.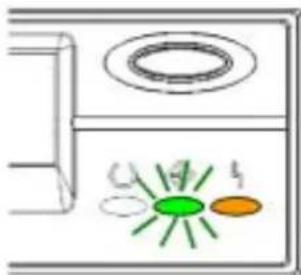
text_image
Diagram showing a device with labeled components and colored indicators, including green and orange circles.
natural_image
Pure electrical circuit lines without any symbols
natural_image
Simple line drawing of a rectangular container with a circular top and three small circular symbols below (no text or labels)LED del panel frontal Lectores Tandberg SLR2 ® SLR5
text_image
Windows NT Setup The driver(s) for this Tape Device are already on the system. Do you want to use the currently installed driver(s) or install new one(s). Current New Cancel HelpARCserveIT Workgroup Edition
text_image
Computer Management Name: Computer Management (Local) Systems Tools Direct Views System Information Performance Logs and Markets Shared Puffers Local Features Local Items and Settings Storage Data Management Data Disadvantages Logical Drivers Reversible Storage Services and Applications CREATE Computer Disk drives Display adapters DCT/DCB/DCB drive Phage and controllers Phage disk drives Switchers File and other pointing devices Hardware Network adapters Other devices TAKEEN1: SET/DCB Sequential Devices FPGA COM BOOT DCB and PRAD (Modules) Sound, audio and plane controllers Custom devices Universal local file controllersTandberg Data
text_image
Computer Management (Sound) Surface Tools Project Options System Information Performance log and data Physical Environment Diagnostics Local Tools and Web Storage User Management User Data Storage Connected Devices New file and Application Computer Sub-Drive Highway options MCCDCAM (Drive) Highway disk functions Hyper disk functions Networks Mini and other printing devices Networks Network options Plan device SAPPROGIC (SAPPROGIC)... Forka (COPA) (FPT) RCD and MACD software Single file and gear control Turkish Devens Advanced Format tool files SAPPROGIC (SAPPROGIC) - Supercritical Software - System 4 - Store Sub-Drive (SAPPROGIC) - Supercritical Software Description: Write Document Interconnection: Retina Location: Not Refer to Page 2.1 (2014) Device info: This drive is also an recommended .Data List To adopt the drive to this device, click PersonalIcon Printed Drive Device page: Use the Web icon OK Canceltext_image
My Computer My Computer My Computer Management (Com) My Tools My Start Menu My Start Menu My Start Menu to Windows My Start Menu to Windows My Start Menu to Windows My Start Menu to Windows My Start Menu to Windows My Start Menu to Windows My Start Menu to Windows My Start Menu to Windows My Start Menu to Windows My Start Menu to Windows My Start Menu to Windows My Start Menu to Windows My Start Menu to Windows My Start Menu to Windows My Start Menu to Windows My Start Menu to Windows My Start Menu to Windows My Start menu to Windows My Start menu to Windows My Start menu to Windows My Start menu to Windows My Start menu to Windows My Start menu to Windows My Start menu to Windows My Start menu to Windows My Start menu to Windows My Start menu to Windows My Start menu to Windows My Start menu to Windows My Start menu to Windows My Start menu to Windows My Start menu to Windows My Start menu to Windows My Start menu to Windows Mncl or other waiting devices Mncl or other waiting devices Mncl or other waiting devices Mncl or other waiting devices Mncl or other waiting devices Mncl or other waiting devices Mncl or other waiting devices Mncl or other waiting devices Mncl or other waiting devices Mncl or other waiting devices Mncl or other waiting devices Mncl or other waiting devices Mncl or other waiting devices Mn1 or other waiting devices Mn2 or other waiting devices Mn3 or other waiting devices Mn4 or other waiting devices Mn5 or other waiting devices Mn6 or other waiting devices Mn7 or other waiting devices Mn8 or other waiting devices Mn9 or other waiting devices Mn10 or other waiting devices Mn11 or other waiting devices Mn12 or other waiting devices Mn13 or other waiting devices Mn14 or other waiting devices Mn15 or other waiting devices Mn16 or other waiting devices Mn17 or other waiting devices Mn18 or other waiting devices Mn19 or other waiting devices Mn20 or other waiting devices Mn21 or other waiting devices Mn22 or other waiting devices Mn23 or other waiting devices Mn24 or other waiting devices Mn25 or other waiting devices Mn26 or other waiting devices Mn27 or other waiting devices Mn28 or other waiting devices Mn29 or other waiting devices Mn30 or other waiting devices Mn31 or other waiting devices Mn32 or other waiting devices Mn33 or other waiting devices Mn34 or other waiting devices Mn35 or other waiting devices Mn36 or other waiting devices Mn37 or other waiting devices Mn38 or other waiting devices Mn39 or other waiting devices Mn40 or other waiting devices Mn41 or other waiting devices Mn42 or other waiting devices Mn43 or other waiting devices Mn44 or other waiting devices Mn45 or other waiting devices Mn46 or other waiting devices Mn47 or other waiting devices Mn48 or other waiting devices Mn49 or other waiting devices Mn50 or other waiting devices Mn51 or other waiting devices Mn52 or other waiting devices Mn53 or other waiting devices Mn54 or other waiting devices Mn55 or other waiting devices Mn56 or other waiting devices Mn57 or other waiting devices Mn58 or other waiting devices Mn59 or other waiting devices Mn60 or other waiting devices Mn61 or other waiting devices Mn62 or other waiting devices Mn63 or other waiting devices Mn64 or other waiting devices Mn65 or other waiting devices Mn66 or other waiting devices Mn67 or other waiting devices Mn68 or other waiting devices Mn69 or other waiting devices Mn70 or other waiting devices Mn71 or other waiting devices Mn72 or other waiting devices Mn73 or other waiting devices Mn74 or other waiting devices Mn75 or other waiting devices Mn76 or other waiting devices Mn77 or other waiting devices Mn78 or other waiting devices Mn79 or other waiting devices Mn80 or other waiting devices Mn81 or other waiting devices Mn82 or other waiting devices Mn83 or other waiting devices Mn84 or other waiting devices Mn85 or other waiting devices Mn86 or other waiting devices Mn87 or other waiting devices Mn88 or other waiting devices Mn89 or other waiting devices Mn90 or other waiting devices Mn91 or other waiting devices Mn92 or other waiting devices Mn93 or other waiting devices Mn94 or other waiting devices Mn95 or other waiting devices Mn96 or other waiting devices Mn97 or other waiting devices Mn98 or other waiting devices Mn99 or other waiting devicestext_image
PEBA-NW411:scan for new devices
11-09-98 3:17:35 pm: TAPEDAI-4.14-0
TAPEDAI.DSK: [TANDBERG SLR6] is not officially supported.
Device will be treated as generic device. USE AT OWN RISK!
PEBA-NW411:
TANDBERG = 1,0x37,0,0x963b,1,0,0;