BAS 6 - Docking station Imperial - Free user manual and instructions
Find the device manual for free BAS 6 Imperial in PDF.
| Product Type | Bluetooth Docking Station / Bluetooth Speaker with Solar Charger |
| Brand | Imperial |
| Model | BAS 6 |
| Dimensions (L x W x H) | 200 mm x 85 mm x 82 mm |
| Weight | Approximately 0.5 kg (estimated) |
| Power Supply | Li-ion battery 7.4 V / 2500 mAh; charging via USB 5 V/1 A or solar panel 5.5 V/200 mA |
| Output Power | 2 x 8 W |
| Bluetooth Version | 4.1 |
| Bluetooth Range | Up to 10 m |
| Supported Audio Formats | MP3, WMA, WAV, FLAC |
| External Storage | Micro SD card up to 128 GB (FAT32) |
| Main Functions | Bluetooth playback, SD card, AUX (3.5 mm jack), hands-free kit, TWS, USB charger (power bank), solar panel |
| Battery Life | Approximately 10 hours at medium volume |
| Charging Time (USB) | Approximately 5 hours |
| Care and Cleaning | Clean with a dry cloth only |
| Safety | Do not expose to water or moisture; do not open the casing; use only the provided charger |
| Spare Parts and Repairability | Spare parts available from the manufacturer; repair by qualified personnel |
| General Information | Bluetooth docking station with integrated solar panel; can be used as a USB power bank |
Frequently Asked Questions - BAS 6 Imperial
User questions about BAS 6 Imperial
0 question about this device. Answer the ones you know or ask your own.
Ask a new question about this device
Download the instructions for your Docking station in PDF format for free! Find your manual BAS 6 - Imperial and take your electronic device back in hand. On this page are published all the documents necessary for the use of your device. BAS 6 by Imperial.
USER MANUAL BAS 6 Imperial
Thank you for choosing the IMPERIAL BAS 6.
With this Bluetooth speaker, you can wirelessly play back music files from your smartphone or play music files on a Micro SD card.
If you are using the IMPERIAL BAS 6 for the first time, please read these instructions carefully and keep them for future reference. Only by following the instructions can you optimally enjoy the full functionality of the device. This operation manual will help you with the
intended
- safe
- beneficial
E use of the device
We assume that the operator of the IMPERIAL BAS 6 has general working knowledge of entertainment electronics.
Any person who
- assemblies
- connects
- operates
- cleans
disposes of
this device must have acknowledged the entire content of this operation manual. Always keep this operation manual close to the device.
2. SAFETY INFORMATION
- In the event of a malfunction, disconnect the speaker from the USB power source.
- Do not expose the device to rain or other moisture.
- Never open the casing.
- Only connect the device to a correctly installed power outlet via a charger.
- Unplug the external power adaptor from the outlet if you are not using the device for an extended period of time. Only pull at the power adapter, not the cord.
- In the event of a thunderstorm, unplug the power adaptor of the device from the outlet.
- If foreign bodies or liquids enter the device, immediately disconnect it from the USB power source. Have the device inspected by qualified technical staff before putting it into operation again.
- Please note that the power source is easily accessible.
- Do not bend or squeeze any cable connections.
- If the power cord is damaged, you will need to have the device repaired by technical staff before using it again.
- Do not allow children to use the device unsupervised.
- Always leave maintenance work to qualified technical staff. Otherwise, you will put yourself and others at risk.
- In the event of a malfunction, disconnect the device from the power source.
- Replacement parts must be purchased directly from the manufacturer.
- Modifications to the device will result in the expiry of the manufacturer's liability.
- Remove the protective foils.
- Clean this device only with a dry cloth.
Risk of Distraction
Using the device can affect your concentration in certain situations. (e.g., when driving a vehicle, participating in road traffic, or operating machinery).
Please enquire about the legal provisions that restrict or prohibit the use of headphones.
Please do not use the device if it restricts the ability to hear other environmental sounds.
2. SAFETY INFORMATION
Risk of Hearing Damage
Listening to music or other audio content, especially via headphones, can result in hearing damage. Please check the volume level before inserting the earplugs into your ears.
Charging the Device
Only use the charger cable included in the delivery scope to charge the device, and charge the device only via a USB connection.
Protection against HF Energy
The device generates an electromagnetic field.
It complies with the limit values for protection against HF energy.
Please pay attention to instructions in your environment that prohibit or restrict the operation of electronic devices. This can be the case in hospitals, at petrol stations and tank facilities, or at airports, for example.
If respective warnings are present, please switch the device off immediately.
The components contained in the device generate electromagnetic energy and magnetic fields. These can affect medical devices such as pacemakers or defibrillators. Therefore, please keep a safe and adequate distance between medical devices and the radio.
If you have reason to assume that the radio is interfering with a medical device, please switch the radio off immediately.
Small Parts
Please keep the radio out of the reach of small children, as some parts could cause suffocation if accidentally swallowed.
Operating Temperature
Please operate the device only within a temperature range of
0^ C to 35^ C . Please do not expose the radio to extreme temperature fluctuations or humidity
Please check the delivery scope for completeness before initial operation.
The following components are included in the delivery scope:
- BAS 6
- USB charger cable
- Operation manual
- Wrist strap
- 3.5 mm audio cable

1

4
2
5

3

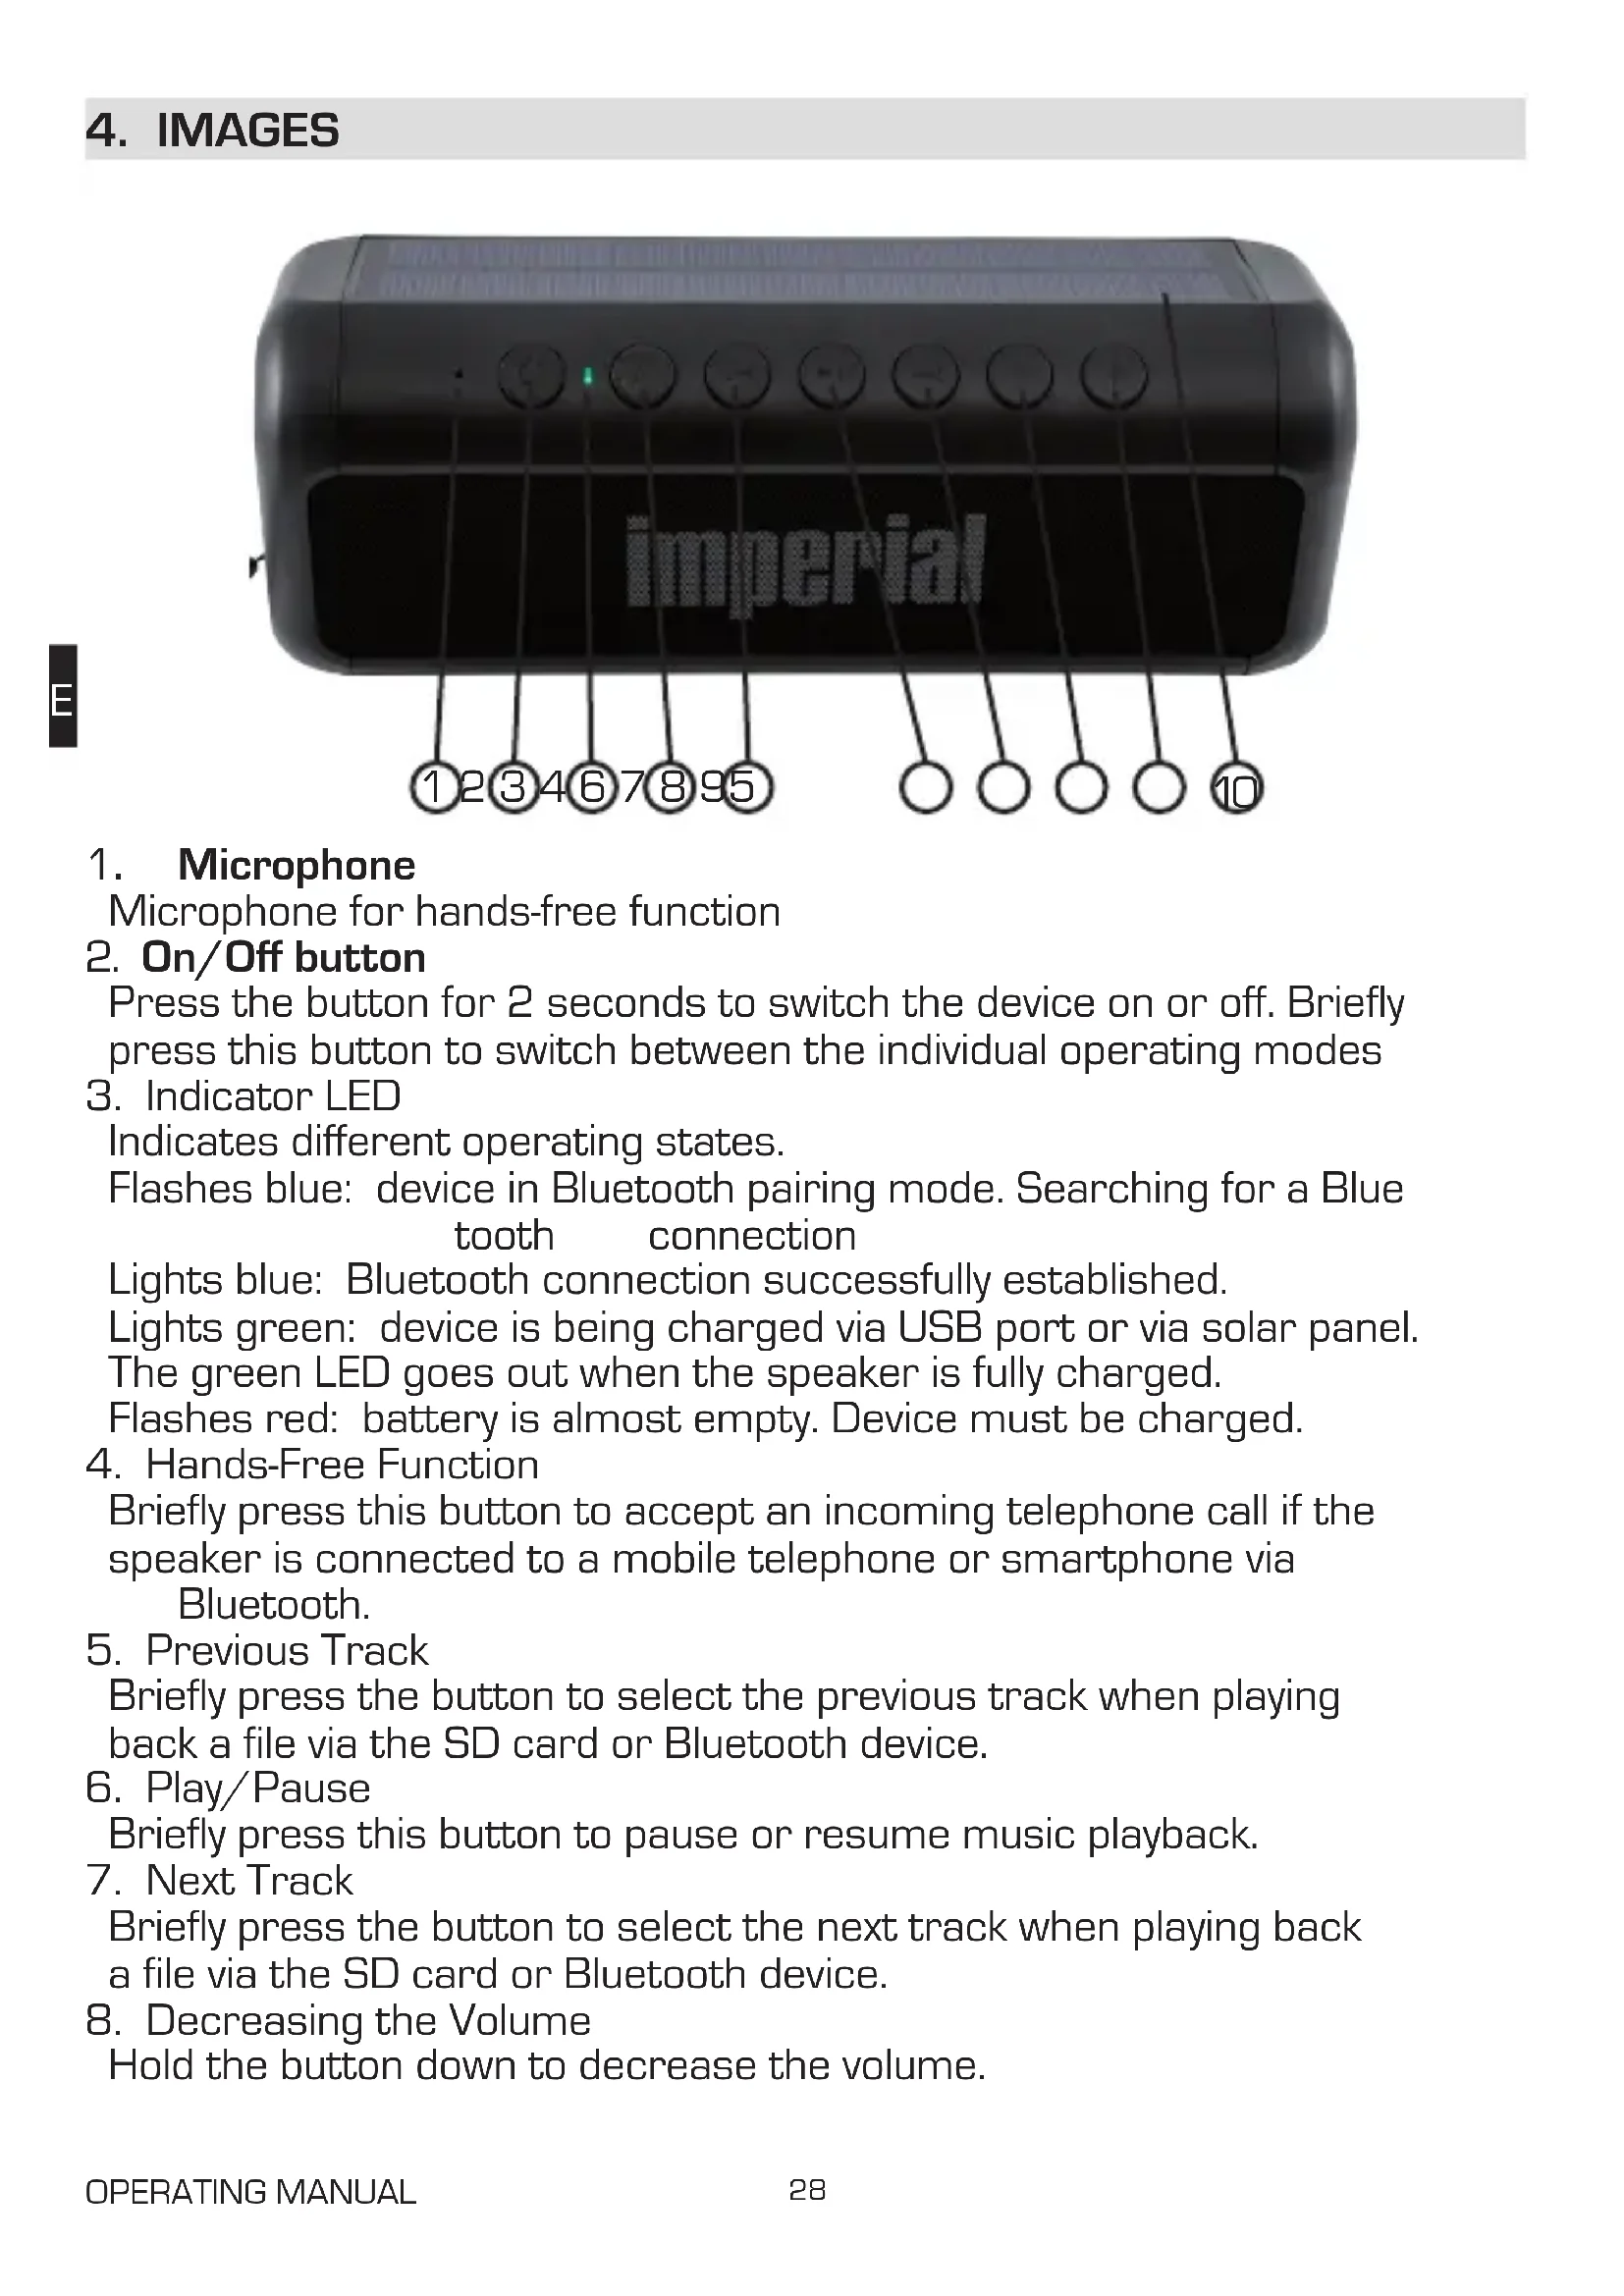
4. IMAGES

1. Microphone
Microphone for hands-free function
2. On/Off button
Press the button for 2 seconds to switch the device on or off. Briefly press this button to switch between the individual operating modes
3. Indicator LED
Indicates different operating states.
Flashes blue: device in Bluetooth pairing mode. Searching for a Blue tooth connection
Lights blue: Bluetooth connection successfully established.
Lights green: device is being charged via USB port or via solar panel.
The green LED goes out when the speaker is fully charged.
Flashes red: battery is almost empty. Device must be charged.
4. Hands-Free Function
Briefly press this button to accept an incoming telephone call if the speaker is connected to a mobile telephone or smartphone via Bluetooth.
5. Previous Track
Briefly press the button to select the previous track when playing back a file via the SD card or Bluetooth device.
6. Play/Pause
Briefly press this button to pause or resume music playback.
7. Next Track
Briefly press the button to select the next track when playing back a file via the SD card or Bluetooth device.
8. Decreasing the Volume
Hold the button down to decrease the volume.
4. IMAGES
- Increasing the Volume
Hold the button down to increase the volume.
- SOLAR PANEL
Solar panel for independent power supply.
When daylight is sufficient, the battery of the speaker can be charged via the solar panel.
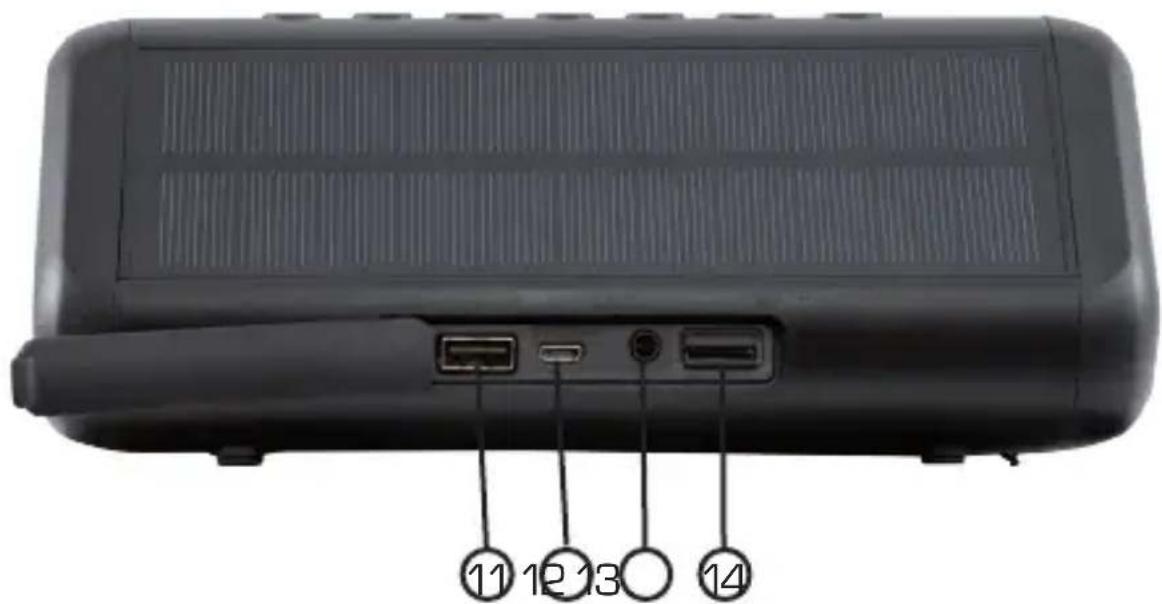
- USB Connection / Power Bank Function
Connect a USB charger cable here to charge your smartphone, tablet, or other USB device via the speaker.
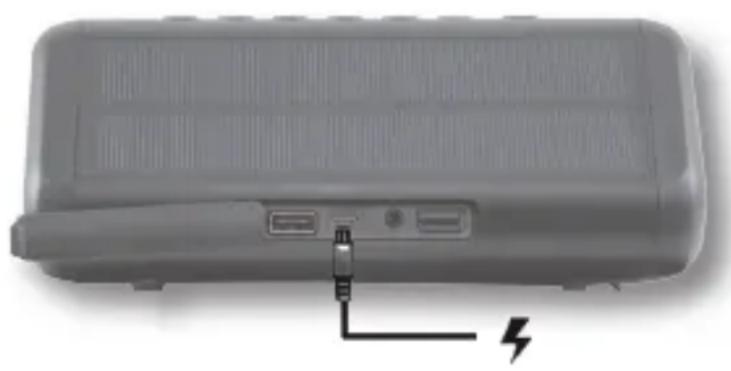
- Micro USB Port
Connect the cable included in the delivery scope via this connector to charge the radio via a USB power source. Via the USB port, you can also access the data of the inserted SD card.
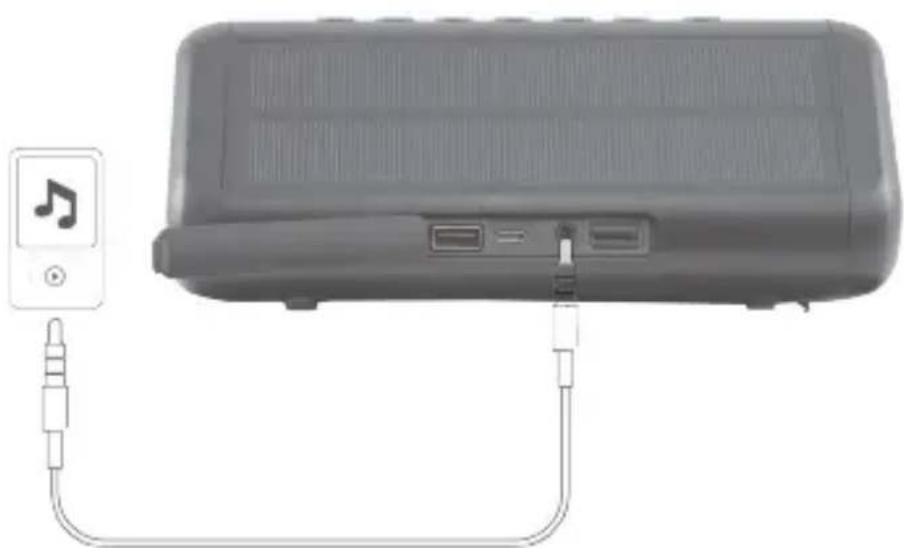
- AUX IN 3.5 mm
Connect an external audio source here, such as an MP3 player, smart phone, or tablet, with the 3.5 mm AUX jack cable.
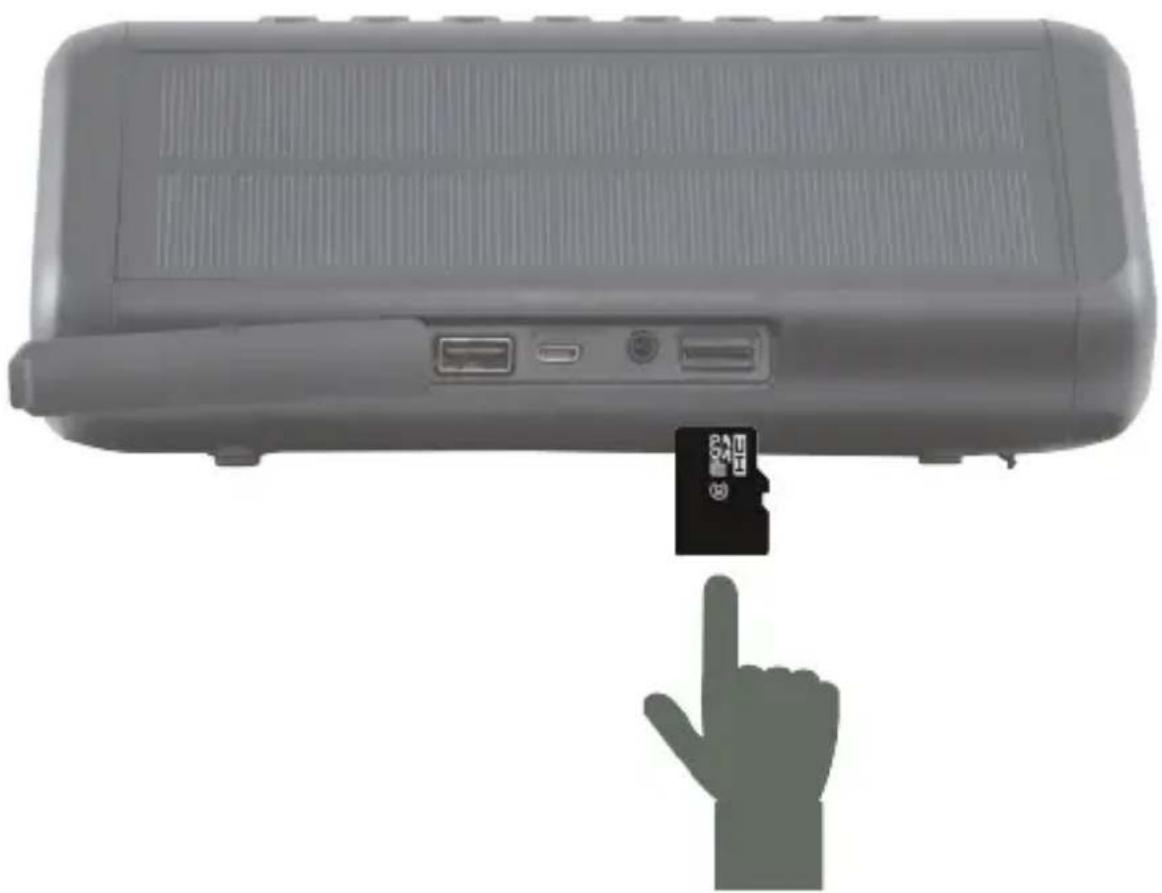
- Micro SD Card Slot.
Insert a Micro SD card here to play music from it.
Charging the Device
Before initial operation, we recommend charging the device for approx. 2 hours.
Connect the device with the USB charger cable included in the delivery scope to a USB power supply, e.g., to a PC, to a USB charger, or to a notebook.
Once the power supply is established, the charging process will start.
5. OPERATION
5.1. Switching [the Speaker] On / Off
Hold the ON/OFF switch (2) down for approx. 2 seconds.
The device will switch on. A brief tone will sound.
![Imperial BAS 6 - Switching [the Speaker] On / Off - 1](/content/2026/03/451477/images/1da477b68baafbdfc794409fdf0883110ddbeca6ea9be61895baae9adeb373c0.jpg)
![Imperial BAS 6 - Switching [the Speaker] On / Off - 2](/content/2026/03/451477/images/51ef8c3336072c5ee1898113168e6d003fd2109a1ba52ecbfa48baa5365a876a.jpg)
The indicator LED (3) will start to flash.
The device will be in Bluetooth mode and will search for available Bluetooth devices.
To switch off the device, hold the ON/OFF switch (2) down again for approx. 2 seconds.
5.2. Establishing a Bluetooth Connection
To establish a Bluetooth connection with a Bluetooth-enabled device, please proceed as follows:
Switch the BAS 6 on via the ON/OFF switch [3].
The blue indicator LED will flash.
Open the Bluetooth settings on your tablet or smartphone and start a search for Bluetooth devices.
After the search has been completed, please select the device IMPERIAL
BAS 6 from the list and establish a connection.
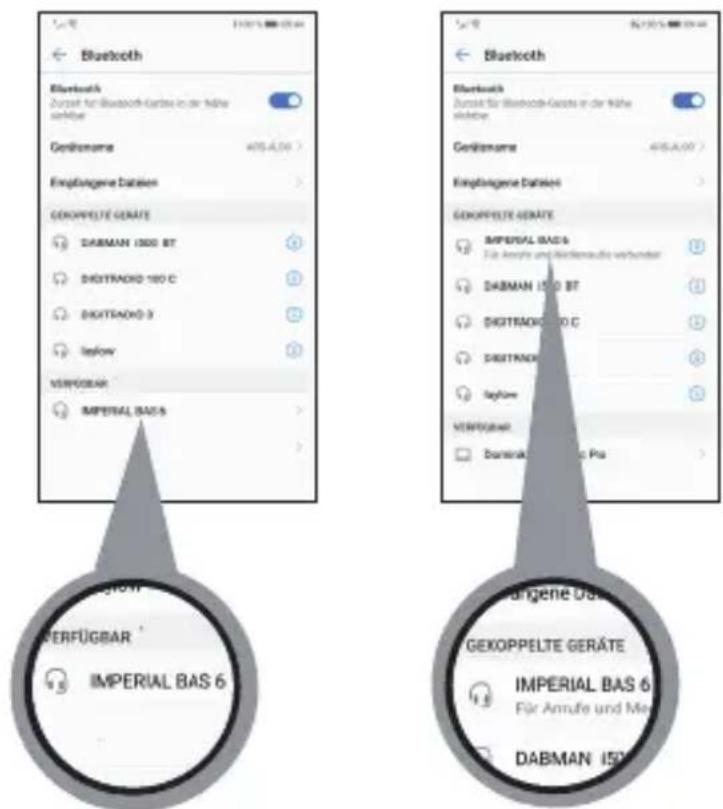
If a password prompt appears on your tablet or smartphone, please enter the password 0000.
After you have established the connection, the indicator LED will permanently light blue. You can now play music files from your smartphone or tablet via the speaker.
The next time the speaker is switched on, it will automatically connect to the tablet or smartphone last connected. A new search is only required if you would like to pair the speaker with another device.
Note:
The device automatically switches off after 10 minutes if no Bluetooth connection was established during this time.
5.3. Changing the Volume Level
In addition to a Bluetooth connection, you can also play music from an SD card in the device.
Insert an SD card into the SD card slot.

The speaker will automatically start to play back the music files stored on the SD card.
Briefly press the button [7] to select the next track.
Hold the button [9] + down to increase the volume.
Briefly press the button [5] to select the previous track.
Hold the button [8] - down to decrease the volume.
5.5. Hands-Free Telephone
You can use the speaker as a hands-free device for your smartphone, if the smartphone is paired with the speaker via Bluetooth.
If during music playback via Bluetooth, a telephone call occurs, you can accept it via the loudspeaker. Press the button [4] to accept the call.
Press the button [4] again to end the call.
5.6.AUX Mode
You can connect any audio playback device with an analogue audio output with a 3.5 mm jack socket.
[e.g., MP3 player, smartphone, tablet, PC, etc.]
Switch on the BAS 6.
Connect your playback device to the 3.5 mm jack audio cable included in the delivery scope and connect it via the AUX jack of the speaker.
Start the music playback on your connected device. Hold the button [9] down to increase the volume. Hold the button [8] down to decrease the volume.
Note:
The music is controlled in the AUX operation via the connected device. Functions such as title selection cannot be made via the loudspeaker in this mode but must be made on the connected device.
5.7. Charging the Device
If the indicator LED (3) on the speaker flashes red, the internal battery is depleted and should be charged.
Via USB
To charge the speaker, connect the device with the USB cable included in the delivery scope to a USB charger or another USB power source.
It is recommended to use a 5 V/1 A USB charger. Switch off the device via the button [2].
Once a voltage source is connected, the charging process for the internal battery will start. The indicator LED will permanently light green.

Via Solar Panel
The speaker can also be charged via the built-in solar panel.
This allows you to charge the device independently of a power source using sunlight or another light source.
Switch off the device via the button [2] and point the solar panel towards the incoming sunlight or another strong light source.
If there is sufficient light, the indicator LED will permanently light green.
If the light intensity is insufficient for charging, the LED will flash green in rapid succession. In this case, change the position of the radio to increase the incidence of light on the solar panel in order to achieve an ideal charging result.
5.8. Using the Device as a USB Power Bank
You can use the speaker as a USB power band.
To do this, connect a device that you would like to charge via the USB port (11).
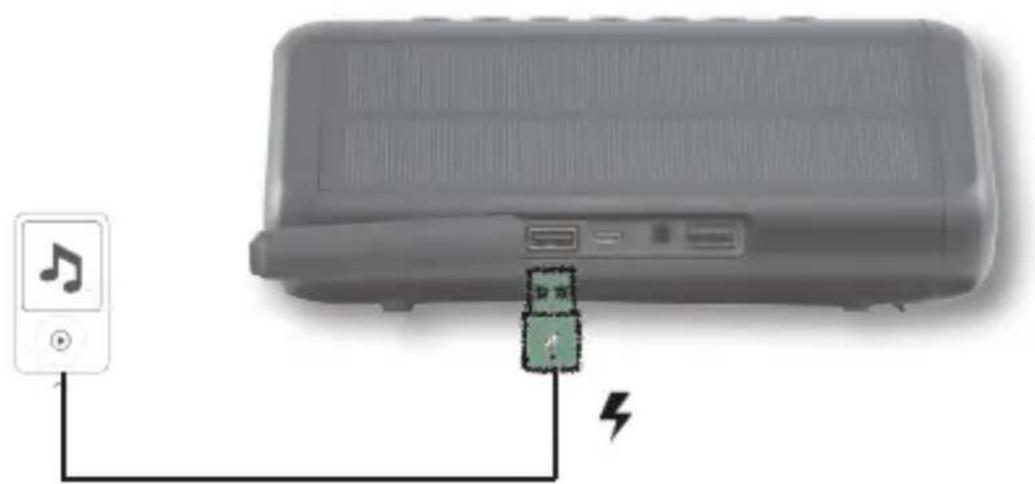
Switch on the device via the button (2)
The charging process will begin.
5.9. TWS
TWS stands for true wireless stereo
[wireless playback of true stereo sounds].
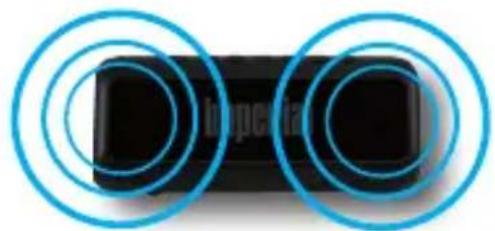
In TWS mode, the BAS 6 can connect wirelessly to a second BAS 6 via Bluetooth, with one speaker taking over the right and the other the left audio channel of a stereo system. This creates, via two paired speakers, a true, synchronous, wireless stereo sound with first-class sound quality.
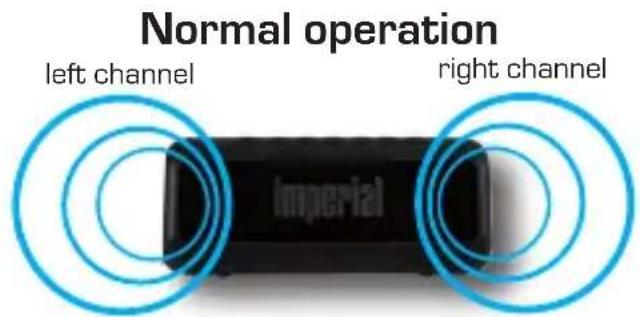
left channel
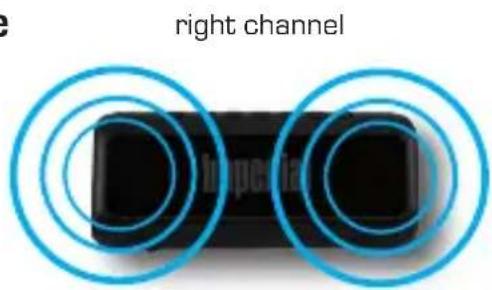
TWS Mode
To run TWS mode, you need 2 BAS 6 speakers.
Switch on both speakers via the button [2]
Press the button [4] on both devices at the same time.
An acoustic signal will indicate the connection of the two devices.
6. TECHNICAL DATA
| System | |
| Output power | 2 x 8 W |
| Bluetooth version | 4.1 |
| SD memory card | Maximum 128 GB |
| Power supply | 7.4 Volt 2500 mA Li-ion battery |
| Frequency range | 100Hz- 20KHz |
| USB specifications | USB 2.0 / USB 1.1 compatible |
| Solar panel | 5.5 volts 200 mA |
| Charging time | At DC 5 volts 1 A approx. 5 hours |
| Operating time | At medium volume level approx. 10 hours |
| File formats | MP3, WMA, WAV, FLAC |
| Dimensions | 200mm x 85mm x 82mm |
| Operating temperature | 0°C - 40°C |
7. TROUBLESHOOTING
| Symptom | Possible Cause and Remedy |
| No sound at a Bluetooth connection | Paired Bluetooth device not switched on. Volume set too low Increase the volume on the BAS 6. Restart the BAS 6. |
| No Bluetooth pairing to a Bluetooth device possible | Pairing mode not active on the device to be con- nected. Make sure that the device to be connected is in pair- ing mode. Only then is it possible to establish a pairing with the BAS 6. Distance between both devices too large Reduce the distance between the two devices and carry out another Bluetooth scan. |
| Disconnection or dropout of mu- sic playback via Bluetooth | Distance between tablet/smartphone and speaker too large. Decrease the distance of the devices. Tip: the distance should not exceed 10 m. |
| SD card is not recognized. | Formatting of the card might be wrong. Please format the SD card in FAT 32. Music file format might not be supported. Please make sure that the music files are stored in the follow- ing file types on the SD card: MP3, WVMV, WAV, FLAC |
| No sound at the Bluetooth play- back | Volume level on BAS 6 is too low. Please increase the volume. Briefly press the On/Off button if needed. |
| Switching on the BAS 6 not possible | Battery completely exhausted. Please connect the speaker to a USB power source to start the charging process. |
8. DISPOSAL INFORMATION
The packaging of your device consists entirely of recyclable materials. Please return these to the „dual system," sorted accordingly. At the end of its service life, this product may not be disposed of as normal household waste but must be disposed of at a recycling collection point for electric and electronic equipment.
The symbol on the product, instruction manual, or the packaging indicates this.
The materials are recyclable according to their labelling. The reuse, material recycling, and other forms of recycling of old equipment are an important contribution toward protecting our environment. Please ask your municipal administration about the relevant disposal centre. Please ensure that electronic waste and empty batteries are disposed of properly, not disposed of as household waste.

9. SERVICE AND SUPPORT
Dear Customer
Thank you for choosing a product from our company. Our product meets the legal requirements and was manufactured subject to continuous quality control. The technical data correspond to the current status at the time of printing. Subject to change.
The warranty period for the BAS 6 meets the legal provisions at the time of purchase.
We also offer our telephone
HOTLINE service with professional help.
At our service centre, professional technicians are available to answer your questions.
Here, you can ask any questions you have regarding IMPERIAL products and receive tips for locating a possible error cause.
Our technicians are available Monday - Friday 8:00 am to 4:45 pm at the following telephone number:
02676/9520101
or by email at: service@telestar.de
If the service hotline is unable to help you, send your BAS 6, preferably in its original packaging but at least packed securely for transport, to the following address:
TELESTAR - DIGITAL GmbH
Service Centre
Am Weiher 14 (Industriegebiet [Industrial Area])
56766 Ulmen
10. CE INFORMATION
Your device bears the CE marking and complies with all relevant EU standards.
TELESTAR DIGITAL GmbH hereby declares that the device
IMPERIAL BAS6 is in compliance with the essential requirements and other relevant provisions.
The Declaration of Conformity for this product is available at:
8. INDICATIONS D'ELIMINATION
Chere cliente, cher client,
Please note that all technical data or any described functions are subject to change without notice.
Copy and reproduction only with authorization of the publisher
TELESTAR Digital GmbH is not responsible for printing errors.
Correct as at: January 2019